

GE JGBS80BELBB, JGBS80DEM, JGBS80SEMSS, JGBS80SELSS, JGBS80DEMBB Owner's Manual & Installation Instructions
...Page 1

Safety Instructions . . . . . .2–7
Operating Instructions
Aluminum Foil . . . . . . . . . . . . . . . .15
Burners . . . . . . . . . . . . . . . . . . . . . .8, 9
Clock . . . . . . . . . . . . . . . . . . . . . . . . .19
Griddle . . . . . . . . . . . . . . . . . . . .10, 11
Oven . . . . . . . . . . . . . . . . . . . . .12–17
Baking and Roasting . . . . . . . . .15
Broiling . . . . . . . . . . . . . . . . . .16, 17
Broiling Guide . . . . . . . . . . . . . . .17
Clock and Timer . . . . . . . . . . . . .19
Light . . . . . . . . . . . . . . . . . . . . . . . .14
Oven Control . . . . . . . . . . . . . . . .12
Power Outage . . . . . . . . . . . . . . .14
Preheating . . . . . . . . . . . . . . . . . .15
Thermostat Adjustment . . . . . .18
Vent . . . . . . . . . . . . . . . . . . . . . . . . .14
Care and Cleaning
Broiler Compartment . . . . . . . . .27
Broiler Drawer . . . . . . . . . . . . . . . .27
Burner Assemblies . . . . . . . .23, 24
Burner Grates . . . . . . . . . . . . . . . .25
Control Panel and Knobs . . . . . .28
Cooktop Surface . . . . . . . . . . . . . .25
Griddle . . . . . . . . . . . . . . . . . . . . . . .22
Lift-off Oven Door . . . . . . . . . . . . .26
Oven Bottom . . . . . . . . . . . . . . . . .26
Oven Interior . . . . . . . . . . . . . . . . .28
Oven Light Replacement . . . . . .27
Oven Vents . . . . . . . . . . . . . . . . . . .28
Shelves . . . . . . . . . . . . . . . . . . . . . . .27
Stainless Steel Surfaces . . . . . . .25
Installation
Instructions . . . . . . . . . . . .29–41
Air Adjustment . . . . . . . . . . . . . . . .40
Anti-Tip Device . . . . . . . . . . . .33, 41
Assembling
Surface Burners . . . . . . . . . . . . . .38
Checking Burner Ignition . . . . . .39
Connecting the Range
to Gas . . . . . . . . . . . . . . . . . . . .34–36
Dimensions and
Clearances . . . . . . . . . . . . . . . . . . .32
Electrical Connections . . . . .37, 38
Leveling the Range . . . . . . . . . . .40
Location . . . . . . . . . . . . . . . . . . . . . .33
LP . . . . . . . . . . . . . . . . . . . . . . . . . . . .41
Model and Serial Number
Location . . . . . . . . . . . . . . . . . . . . . .33
Troubleshooting Tips . .42, 43
Accessories . . . . . . . . . . . . . . . .44
Consumer Support
Consumer
Support . . . . . . . . . . . . . .Back Cover
Product Registration . . . . . . .45, 46
Warranty . . . . . . . . . . . . . . . . . . . . .47
183D5580P217 49-85133 05-07 JR
JGBS80
Owner’s Manual
& Installation
Instructions
ge.com
Write the model and serial
numbers here:
Model #________________________
Serial # ________________________
You can find them on a label on the
front of the range behind the kick
panel or broiler compartment.
Ranges
Non-Self-Cleaning Gas
Page 2
Operating Instructions
Safety Instructions
Installation
Instructions
Troubleshooting TipsConsumer Support
2
IMPORTANT SAFETY INFORMATION.
READ ALL INSTRUCTIONS BEFORE USING.
— Do not store or use gasoline or other
flammable vapors and liquids in the
vicinity of this or any other appliance.
—
WHAT TO DO IF YOU
SMELL GAS
■ Do not try to light any appliance.
■ Do not touch any electrical switch;
do not use any phone in your
building.
■ Immediately call your gas supplier
from a neighbor’s phone. Follow the
gas supplier’s instructions.
■ If you cannot reach your gas supplier,
call the fire department.
— Installation and service must be
performed by a qualified installer,
service agency or the gas supplier.
WARNING: If the information
in this manual is not followed exactly,
a fire or explosion may result causing
property damage, personal injury
or death.
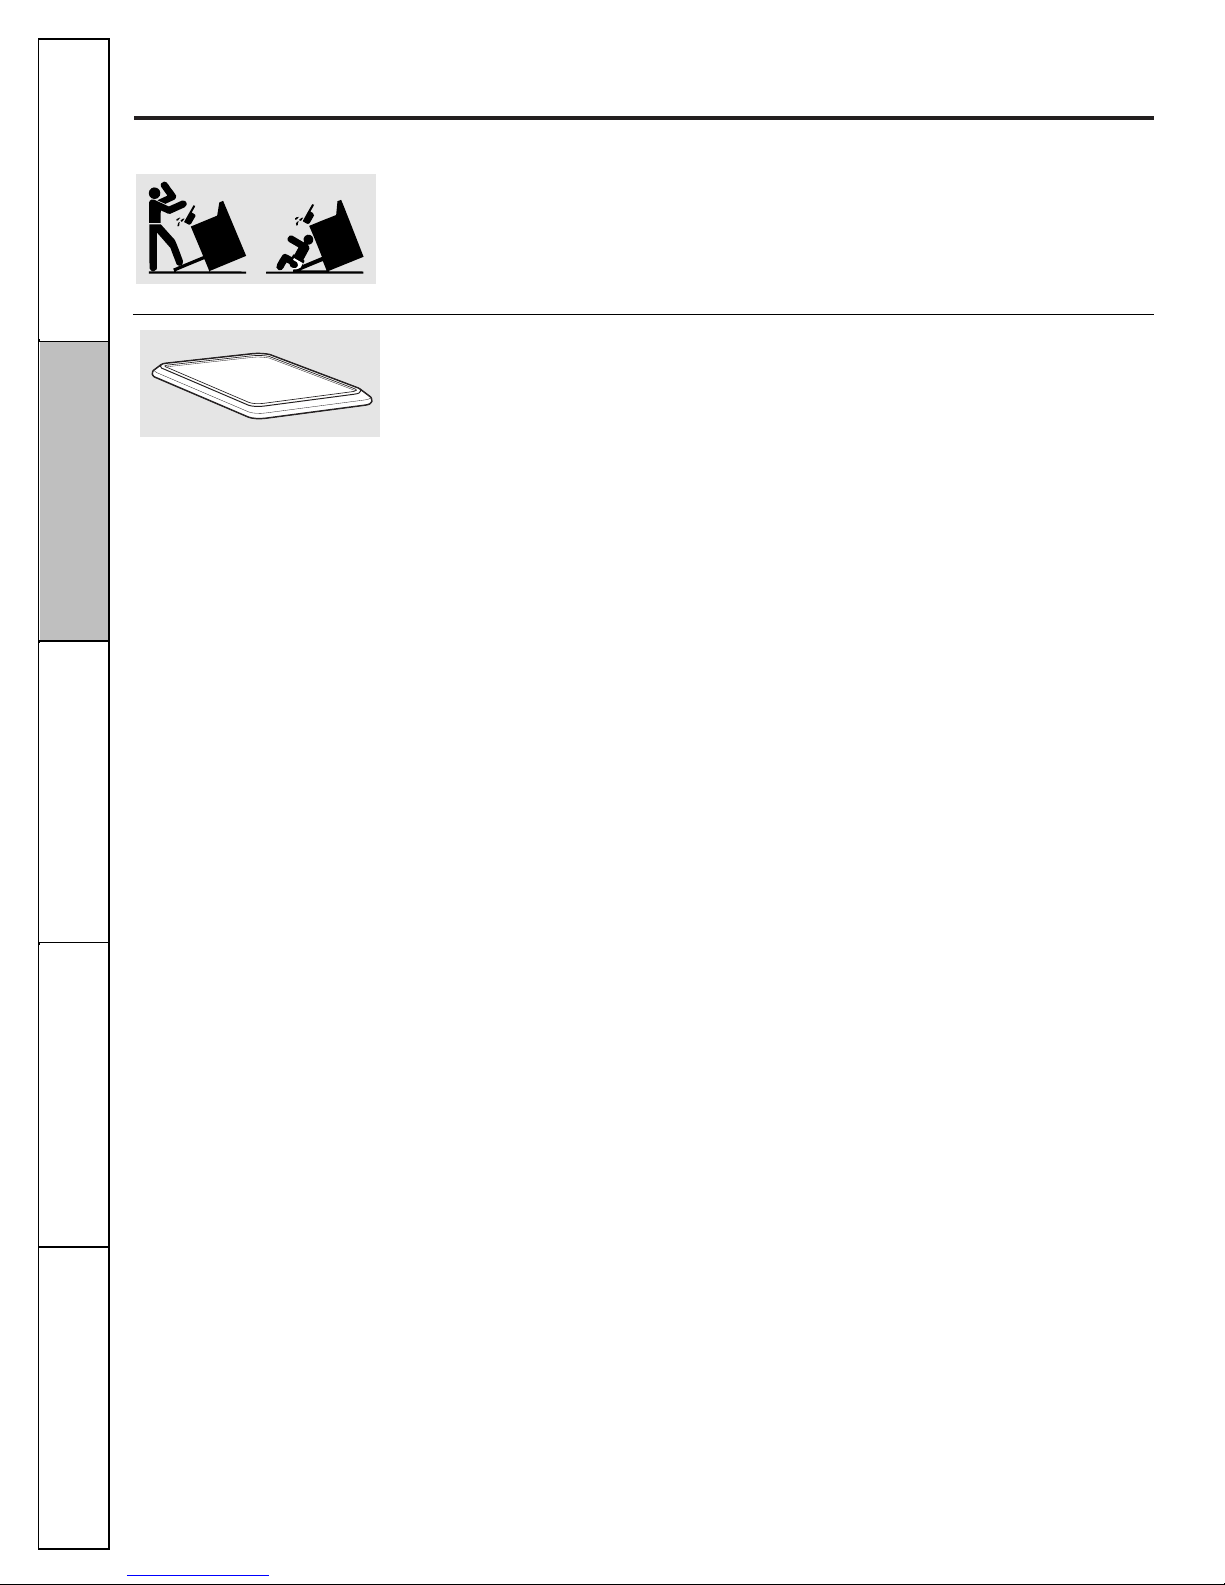
WARNING!
ANTI-TIP DEVICE
■ ALL RANGES CAN TIP
■ INJURY TO PERSONS
COULD RESULT
■ INSTALL ANTI-TIP
DEVICES PACKED WITH
RANGE
■ SEE INSTALLATION
INSTRUCTIONS
WARNING!
For your safety, the information in this manual must be followed to minimize the risk of fire or
explosion, electric shock, or to prevent property damage, personal injury, or loss of life.
All ranges can tip and injury could result.
To prevent accidental tipping of the range, attach it to the wall by installing the Anti-Tip device supplied.
If the Anti-Tip device supplied with the range does not fit this application, use the universal Anti-Tip
device WB2X7909.
To check if the device is installed and engaged properly, carefully tip the range forward. The Anti-Tip
device should engage and prevent the range from tipping over.
If you pull the range out from the wall for any reason, make sure the device is properly engaged
when you push the range back against the wall. If it is not , there is a possible risk of the range tipping
over and causing injury if you or a child stand, sit or lean on an open door.
Please refer to the Anti-Tip device information in this manual. Failure to take this precaution could
result in tipping of the range and injury.
ANTI-TIP DEVICE
®
Page 3
Consumer SupportOperating InstructionsSafety Instructions
Installation
Instructions
Troubleshooting Tips
3
ge.com
WARNING!
Have the installer show you the location of the range gas shut-off valve and how to shut it off
if necessary.
■ Have your range installed and properly
grounded by a qualified installer, in
accordance with the Installation Instructions.
Any adjustment and service should be
performed only by qualified gas range
installers or service technicians.
■ Do not attempt to repair or replace any
part of your range unless it is specifically
recommended in this manual. All other service
should be referred to a qualified technician.
■ Plug your range into a 120-volt grounded
outlet only. Do not remove the round
grounding prong from the plug. If in doubt
about the grounding of the home electrical
system, it is your personal responsibility and
obligation to have an ungrounded outlet
replaced with a properly grounded,
three-prong outlet in accordance with
the National Electrical Code. Do not use
an extension cord with this appliance.
SAFETY PRECAUTIONS
IMPORTANT SAFETY NOTICE
The California Safe Drinking Water and Toxic Enforcement Act requires the Governor of California to
publish a list of substances known to the state to cause birth defects or other reproductive harm, and
requires businesses to warn customers of potential exposure to such substances.
Gas appliances can cause minor exposure to four of these substances, namely benzene, carbon
monoxide, formaldehyde and soot, caused primarily by the incomplete combustion of natural gas or
LP fuels. Properly adjusted burners, indicated by a bluish rather than a yellow flame, will minimize
incomplete combustion. Exposure to these substances can be minimized by venting with an open
window or using a ventilation fan or hood.
Page 4
■ Locate the range out of kitchen traffic path
and out of drafty locations to prevent poor air
circulation.
■ Be sure all packaging materials are removed
from the range before operating it to prevent
fire or smoke damage should the packaging
material ignite.
■ Be sure your range is correctly adjusted by
a qualified service technician or installer for
the type of gas (natural or LP) that is to be
used. Your range can be converted for use
with either type of gas. See the Installation
of the range section.
■
WARNING: These adjustments must
be made by a qualified service technician
in accordance with the manufacturer’s
instructions and all codes and requirements of
the authority having jurisdiction. Failure
to follow these instructions could result in
serious injury or property damage. The
qualified agency performing this work
assumes responsibility for the conversion.
■ After prolonged use of a range, high floor
temperatures may result and many floor
coverings will not withstand this kind of use.
Never install the range over vinyl tile or
linoleum that cannot withstand such type
of use. Never install it directly over interior
kitchen carpeting.
■ Do not leave children alone or unattended
where a range is hot or in operation. They
could be seriously burned.
■ Do not allow anyone to climb, stand or hang
on the oven door, broiler compartment or
cooktop. They could damage the range and
even tip it over, causing severe personal injury.
■
CAUTION: Items of interest to children
should not be stored in cabinets above a
range or on the backsplash of a range—
children climbing on the range to reach items
could be seriously injured.
■ Clean only parts listed in this Owner’s Manual.
■ Never wear loose fitting or hanging garments
while using the appliance. Be careful when
reaching for items stored in cabinets over the
range. Flammable material could be ignited if
brought in contact with flame or hot oven
surfaces and may cause severe burns.
■ Do not store flammable materials in an oven,
a range broiler, behind the kick panel or near
a cooktop.
■ Do not store or use combustible materials,
gasoline or other flammable vapors and
liquids in the vicinity of this or any other
appliance.
■ Do not let cooking grease or other flammable
materials accumulate in or near the range.
■ Do not use water on grease fires. Never pick
up a flaming pan. Turn the controls off.
Smother a flaming pan on a surface burner
by covering the pan completely with a wellfitting lid, cookie sheet or flat tray. Use a
multi-purpose dry chemical or foam-type
fire extinguisher.
■ Flaming grease outside a pan can be put
out by covering it with baking soda or,
if available, by using a multi-purpose dry
chemical or foam-type fire extinguisher.
■ Flame in the oven can be smothered
completely by closing the oven door and
turning the control to off or by using a multipurpose dry chemical or foam-type
fire extinguisher.
■ Let the burner grates and other surfaces cool
before touching them or leaving them where
children can reach them.
■ Never block the vents (air openings) of the
range. They provide the air inlet and outlet
that are necessary for the range to operate
properly with correct combustion. Air openings
are located at the rear of the cooktop, at the
top and bottom of the oven door, and at the
bottom of the range under the broiler
compartment or kick panel.
■ Large scratches or impacts to glass doors can
lead to broken or shattered glass.
SAFETY PRECAUTIONS
Operating Instructions
4
Safety Instructions
Installation
Instructions
Troubleshooting TipsConsumer Support
IMPORTANT SAFETY INFORMATION.
READ ALL INSTRUCTIONS BEFORE USING.
WARNING:
NEVER use this
appliance as a space heater to heat or
warm the room. Doing so may result
in carbon monoxide poisoning and
overheating of the oven.
Page 5

5
Consumer SupportOperating InstructionsSafety Instructions
Installation
Instructions
Troubleshooting Tips
ge.com
■ Do not use the oven for a storage area.
Items stored in the oven can ignite.
■ Keep the oven free from grease buildup.
■ Place the oven shelves in the desired position
while the oven is cool.
■ Pulling out the shelf to the stop-lock is a
convenience in lifting heavy foods. It is also
a precaution against burns from touching hot
surfaces of the door or oven walls. The lowest
position is not designed to slide.
■ Do not heat unopened food containers.
Pressure could build up and the container
could burst, causing an injury.
■ Do not use aluminum foil anywhere in the
oven except as described in this manual.
Misuse could result in a fire hazard or damage
to the range.
■ When using cooking or roasting bags in the
oven, follow the manufacturer’s directions.
■ Do not use your oven to dry newspapers.
If overheated, they can catch fire.
■ Use only glass cookware that is recommended
for use in gas ovens.
■ Always remove any broiler pan from the range
as soon as you finish broiling. Grease left in the
pan can catch fire if oven is used without
removing the grease from the broiler pan.
■ When broiling, if meat is too close to the flame,
the fat may ignite. Trim excess fat to prevent
excessive flare-ups.
■ Make sure a broiler pan is in place correctly to
reduce the possibility of grease fires.
■ If you should have a grease fire in the broiler
pan, turn off the oven control, and keep
the broiler compartment and oven door closed
to contain fire until it burns out .
■ For safety and proper cooking performance,
always bake and broil with the oven door
closed.
Stand away from the range when opening the door of a hot oven. The hot air and steam that escape
can cause burns to hands, face and eyes.
OVEN
COOK MEAT AND POULTRY THOROUGHLY…
Cook meat and poultry thoroughly—meat to at least an INTERNAL temperature of 160°F and poultry to
at least an INTERNAL temperature of 180°F. Cooking to these temperatures usually protects against
foodborne illness.
WARNING: NEVER cover
any slots, holes or passages in the oven
bottom or cover an entire shelf with
materials such as aluminum foil. Doing
so blocks air flow through the oven and
may cause carbon monoxide poisoning.
Aluminum foil linings may also trap
heat, causing a fire hazard.
Page 6
Operating Instructions
6
Safety Instructions
Installation
Instructions
Troubleshooting TipsConsumer Support
IMPORTANT SAFETY INFORMATION.
READ ALL INSTRUCTIONS BEFORE USING.
SURFACE BURNERS
Use proper pan size—avoid pans that are unstable or easily tipped. Select cookware having flat
bottoms large enough to cover burner grates. To avoid spillovers, make sure cookware is large enough
to contain the food properly. This will both save cleaning time and prevent hazardous accumulations of
food, since heavy spattering or spillovers left on range can ignite. Use pans with handles that can be
easily grasped and remain cool.
■ Always use the Lite position when igniting the
top burners and make sure the burners have
ignited.
■ Never leave the surface burners unattended at
high flame settings. Boilovers cause smoking
and greasy spillovers that may catch on fire.
■ Adjust the top burner flame size so it
does not extend beyond the edge of the
cookware. Excessive flame is hazardous.
■ Use only dry pot holders—moist or damp pot
holders on hot surfaces may result in burns
from steam. Do not let pot holders come near
open flames when lifting cookware. Do not
use a towel or other bulky cloth in place of
a pot holder.
■ When using glass cookware, make sure it
is designed for top-of-range cooking.
■ To minimize the possibility of burns, ignition
of flammable materials and spillage, turn
cookware handles toward the side or back of
the range without extending over adjacent
burners.
■ Carefully watch foods being fried at a high
flame setting.
■ Always heat fat slowly, and watch as it heats.
■ Do not leave any items on the cooktop. The
hot air from the vent may ignite flammable
items and will increase pressure in closed
containers, which may cause them to burst.
■ If a combination of oils or fats will be used in
frying, stir together before heating or as fats
melt slowly.
■ Use a deep fat thermometer whenever
possible to prevent overheating fat beyond the
smoking point.
■ Use the least possible amount of fat for
effective shallow or deep-fat frying. Filling the
pan too full of fat can cause spillovers when
food is added.
■ Do not flame foods on the cooktop. If you do
flame foods under the hood, turn the fan on.
■ Do not use a wok on the cooking surface
if the wok has a round metal ring that is
placed over the burner grate to support
the wok. This ring acts as a heat trap, which
may damage the burner grate and burner
head. Also, it may cause the burner to work
improperly. This may cause a carbon
monoxide level above that allowed by current
standards, resulting in a health hazard.
WARNING!
Page 7
READ AND FOLLOW THIS SAFETY INFORMATION CAREFULLY.
SAVE THESE INSTRUCTIONS
7
Consumer SupportOperating InstructionsSafety Instructions
Installation
Instructions
Troubleshooting Tips
ge.com
■ Do not use aluminum foil to line the griddle.
Misuse could result in a fire hazard.
■ Never leave the kitchen while using the griddle.
■ Foods for frying should be as dry as possible.
Frost on frozen foods or moisture on fresh
foods can cause hot fat to bubble up and over
the sides of the pan.
■ Never try to move a pan of hot fat, especially
a deep fat fryer. Wait until the fat is cool.
■ Do not leave plastic items on the cooktop—
they may melt if left too close to the vent.
■ Keep all plastics away from the surface
burners.
■ To avoid the possibility of a burn, always be
certain that the controls for all burners are at
the Off position and all grates and the griddle
are cool before attempting to remove them.
■ If range is located near a window, do not hang
long curtains that could blow over the surface
burners and create a fire hazard.
■ If you smell gas, turn off the gas to the range
and call a qualified service technician. Never
use an open flame to locate a leak.
■ Always turn the surface burner controls off
before removing cookware or the griddle.
■ Do not lift the cooktop. Lifting the cooktop can
lead to damage and improper operation of the
range.
■ Do not place or store items that can melt or
catch fire on the grates, even when the
cooktop is not being used.
■ Keep range clean and free of accumulations of
grease or spillovers, which may ignite.
Page 8
Operating Instructions
8
Safety Instructions
Installation
Instructions
Troubleshooting TipsConsumer Support
Throughout this manual, features and appearance may vary from your model.
How to Light a Gas Surface Burner
Make sure all the surface burners are placed
in their respective positions.
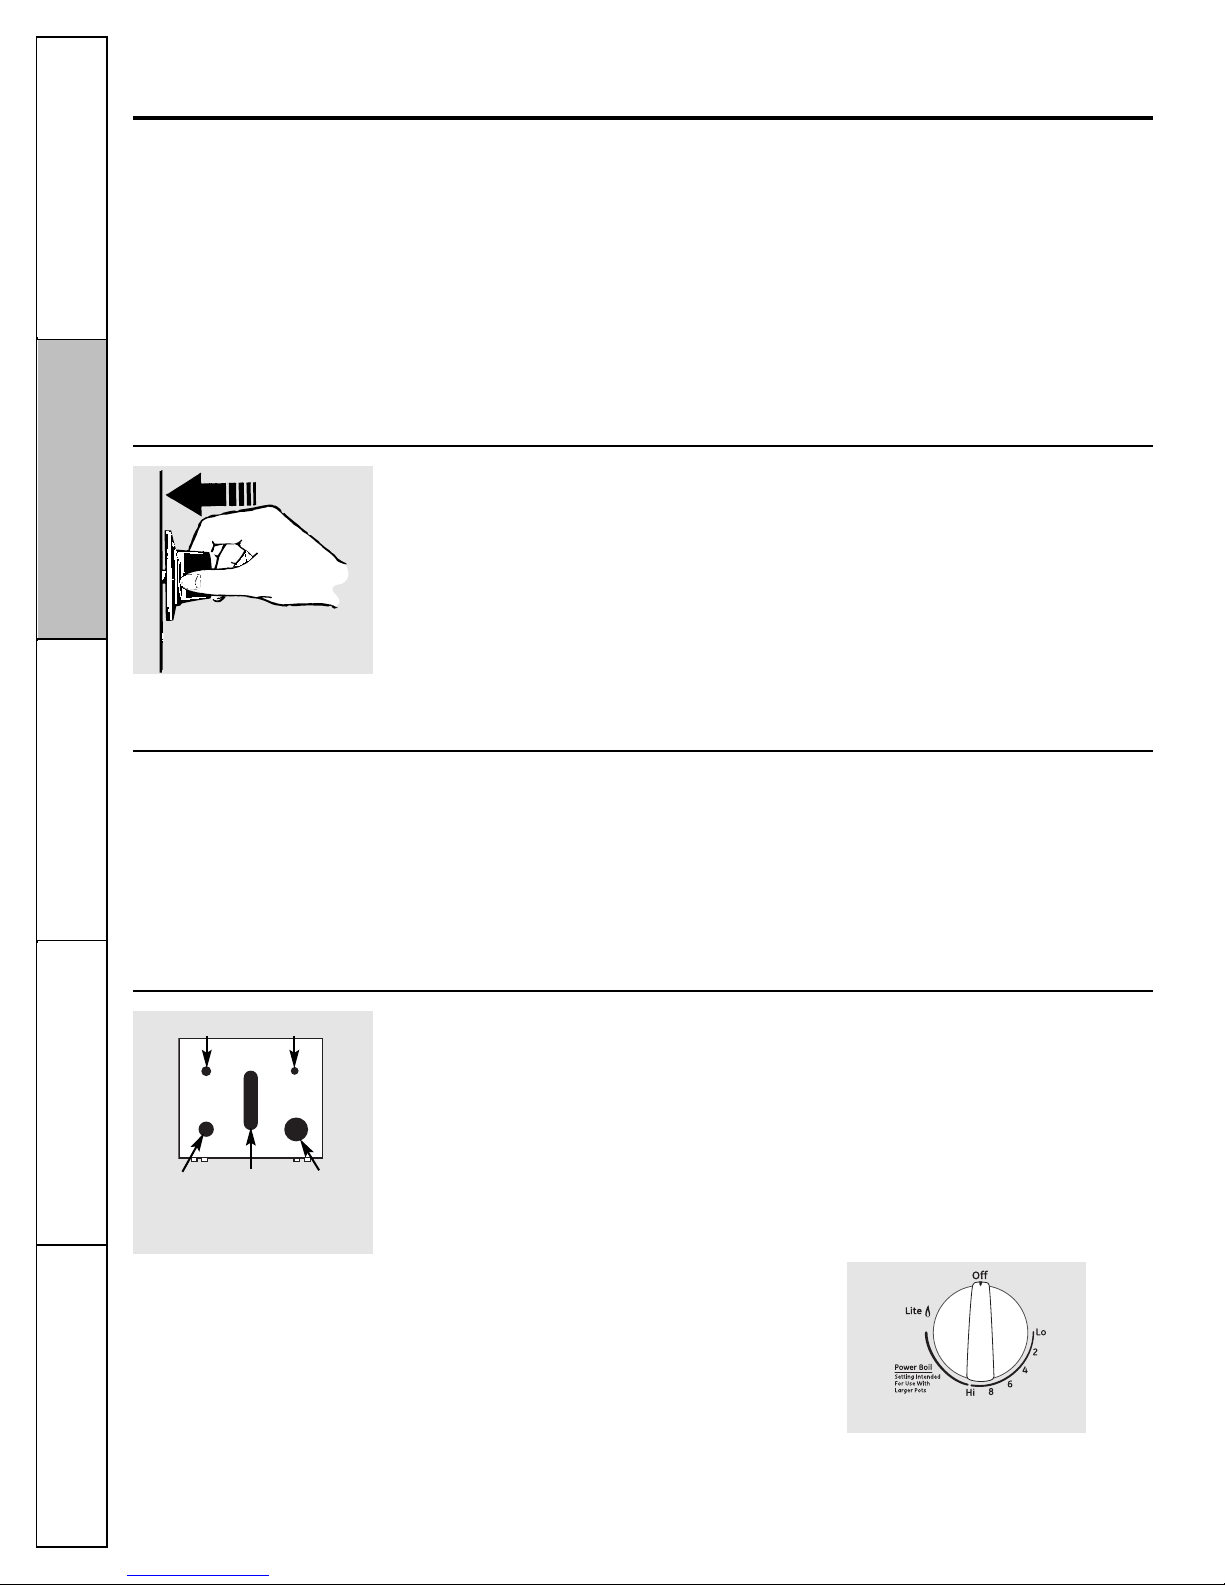
Push the control knob in and turn it to the
Lite position.
You will hear a little clicking noise—the sound
of the electric spark igniting the burner.
Turn the knob to adjust the flame size. If the
knob stays at Lite, it will continue to click.
When one burner is turned to Lite, all the
burners spark. Do not attempt to disassemble
or clean around any burner while another
burner is on. An electric shock may result,
which could cause you to knock over hot
cookware.
Push the control knob in and turn it
to the LITE position.
Using the gas surface burners.
Before Lighting a Gas Burner After Lighting a Gas Burner
■ Make sure all burners are in place.
■ Make sure all grates (and the center
griddle, if it is going to be used) on the
range are properly placed before using any
burner.
■ Do not operate the burner for an extended
period of time without cookware on the
grate. The finish on the grate may chip
without cookware to absorb the heat.
■ Be sure the burners, griddle and grates are
cool before you place your hand, a pot
holder, cleaning cloths or other materials
on them.
Surface Burner Controls
Knobs that turn the surface burners on and
off are marked as to which burners they
control. The two knobs on the left control the
left front and left rear burners. The two knobs
on the right control the right front and right
rear burners. The center left knob controls the
center oval burner.
Medium Small
Large Extra
Large
Sealed Gas Burners
Your gas range cooktop has five sealed
gas burners. They offer convenience,
cleanability and flexibility to be used
in a wide range of cooking applications.
The smallest burner in the right rear position
is the simmer burner. This burner can be
turned down to a very low simmer setting. It
provides precise cooking performance for
delicate foods such as sauces or foods that
require low heat for a long cooking time.
The medium (left rear) and large (left front)
burners are the primary burners
for most cooking. These general-purpose
burners can be turned down from Hi to Lo to
suit a wide range of cooking needs.
The extra large burner (right front) is the
maximum output burner. Like the other four
burners, it can be turned down from Hi to Lo
for a wide range of cooking applications;
however, this burner is designed to quickly
bring large amounts of liquid to a boil. It has
a special Power Boil™setting designed to be
used with cookware 10 inches or larger in
diameter.
The center oval burner (on some models) is
for large pots/pans or for use with the griddle.
Center
(oval)
(on some
models)
Extra-large burner only
Page 9
In case of a power failure, you can light
the gas surface burners on your range with a
match. Hold a lit match to the burner, then
push in and turn the control knob to the Lite
position. Use extreme caution when lighting
burners this way.
Surface burners in use when an electrical
power failure occurs will continue to operate
normally.
9
ge.com
Use a flat-bottomed wok.
Top-of-Range Cookware
Aluminum: Medium-weight cookware is
recommended because it heats quickly
and evenly. Most foods brown evenly in an
aluminum skillet. Use saucepans with tightfitting lids when cooking with minimum
amounts of water.
Cast-Iron: If heated slowly, most skillets will
give satisfactory results.
Enamelware: Under some conditions, the
enamel of some cookware may melt. Follow
cookware manufacturer’s recommendations
for cooking methods.
Glass: There are two types of glass
cookware—those for oven use only and those
for top-of-range cooking (saucepans, coffee
and teapots). Glass conducts heat very
slowly.
Heatproof Glass Ceramic: Can be used for
either surface or oven cooking. It conducts
heat very slowly and cools very slowly. Check
cookware manufacturer’s directions to be
sure it can be used on gas ranges.
Stainless Steel: This metal alone has poor
heating properties and is usually combined
with copper, aluminum or other metals for
improved heat distribution. Combination
metal skillets usually work satisfactorily if
they are used with medium heat as the
manufacturer recommends.
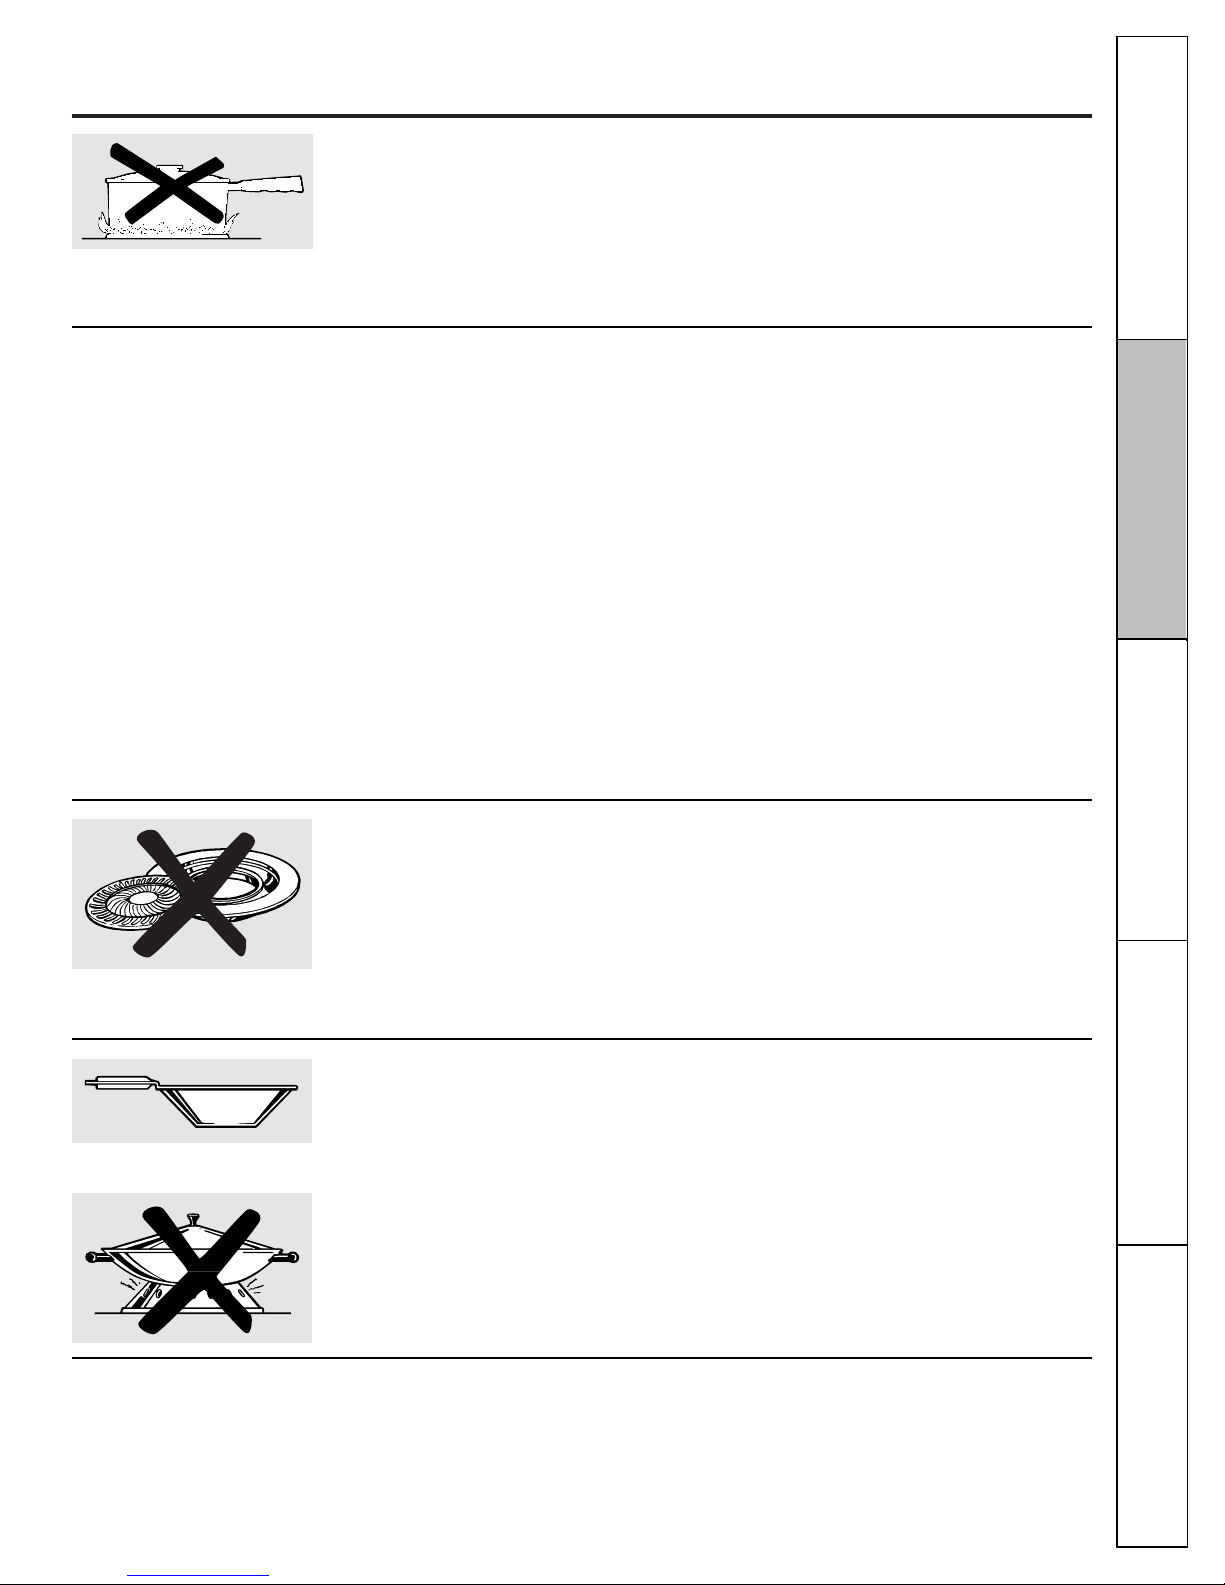
Stove Top Grills
Do not use stove top grills on your sealed gas
burners. If you use the stove top grill on the
sealed gas burner, it will cause incomplete
combustion and can result in exposure to
carbon monoxide levels above allowable
standards.
This can be hazardous to your health.
Wok This Way
We recommend that you use a 14 ″ or smaller
flat-bottomed wok. Make sure the wok bottom
sits flat on the grate. They are available at
your local retail store.
Only a flat-bottomed wok should be used.
Do not use a flat-bottomed wok on a support
ring. Placing the ring over the burner or grate
may cause the burner to work improperly,
resulting in carbon monoxide levels above
allowable standards. This could be dangerous
to your health.
In Case of Power Failure
How to Select Flame Size
For safe handling of cookware, never let the
flames extend up the sides of the cookware.
Watch the flame, not the knob, as you reduce
heat. When fast heating is desired, the flame
size on a gas burner should match the
cookware you are using.
Flames larger than the bottom of the
cookware will not result in faster heating
of the cookware and could be hazardous.
Use only large oval pots/pans, round
pots/pans 12″ or greater in diameter or
the griddle on the center burner.
Consumer SupportOperating InstructionsSafety Instructions
Installation
Instructions
Troubleshooting Tips
Page 10
Operating Instructions
Safety Instructions
Installation
Instructions
Troubleshooting TipsConsumer Support
10
Your non-stick coated griddle provides
an extra-large cooking surface for meats,
pancakes or other food usually prepared
in a frying pan or skillet.
NOTE: Your griddle will discolor over time as it
becomes seasoned with use.
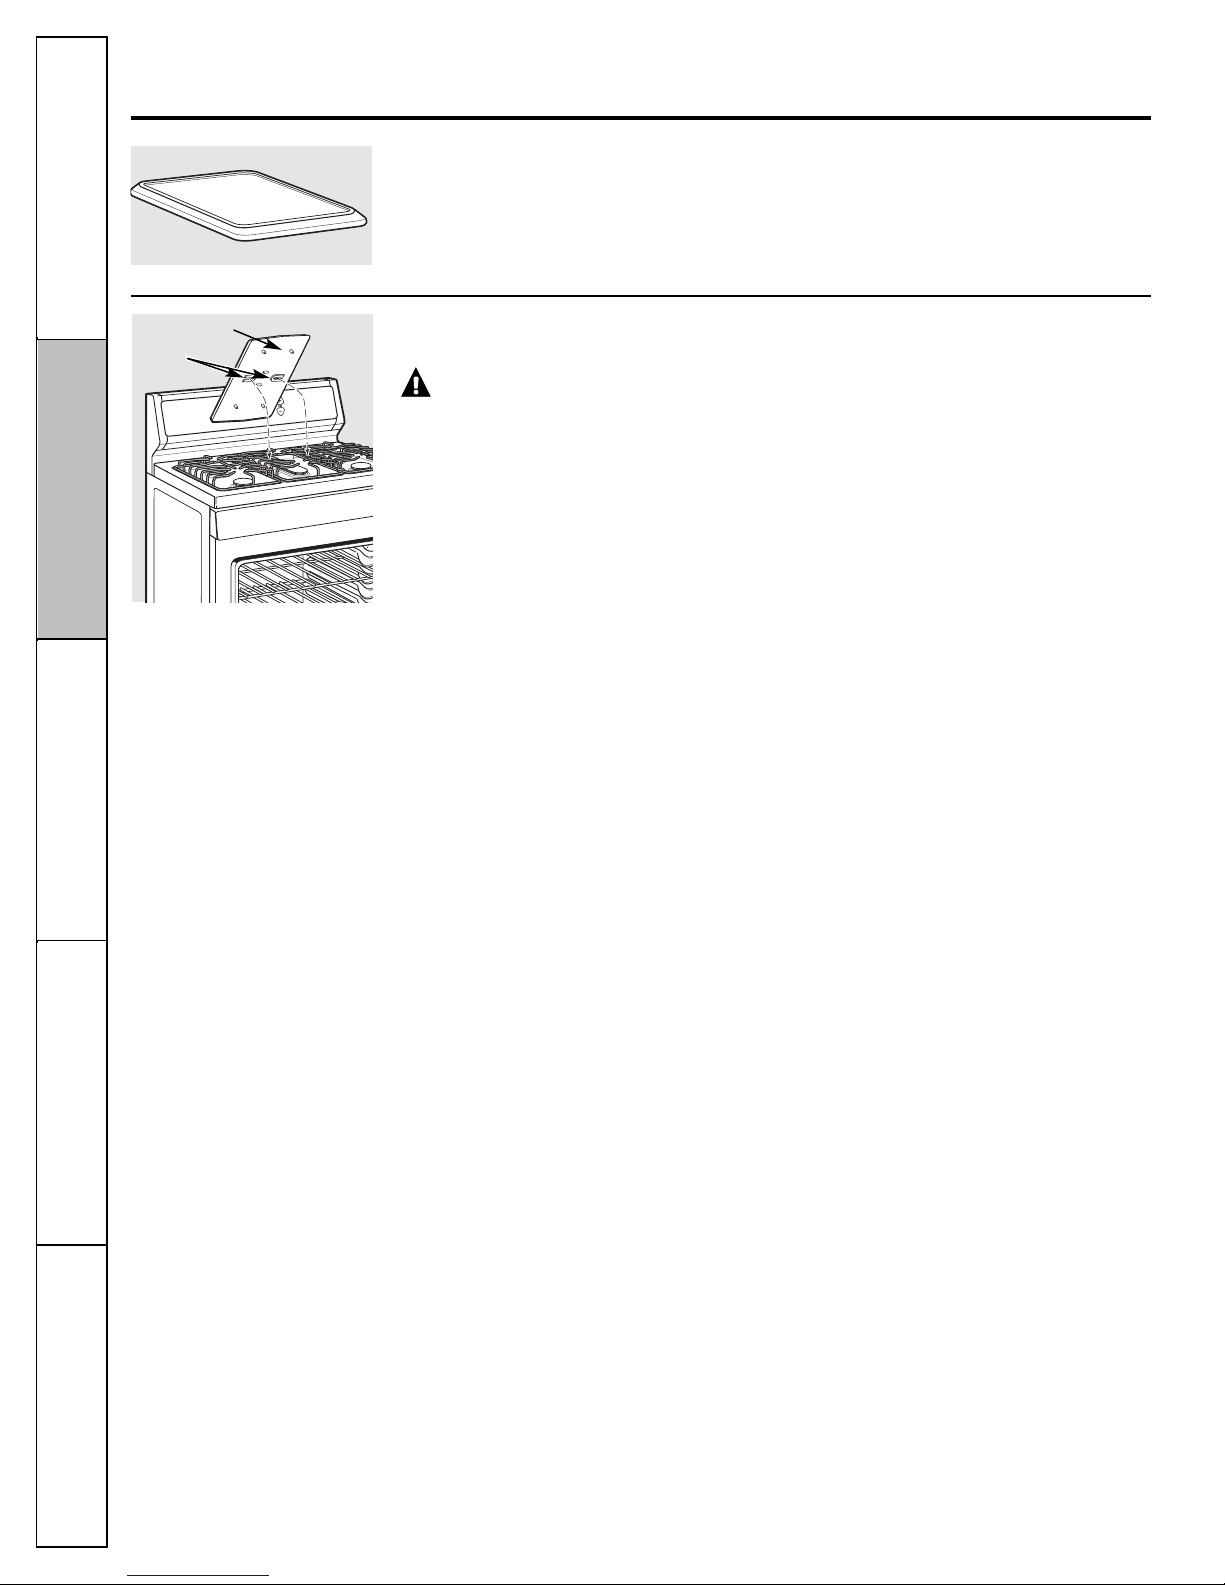
How to Insert the Griddle
Place the “U” locks onto the center
fingers on the center grate.
Using the griddle.
CAUTION:Place and remove
the griddle only when all grates and
griddle are cool and all surface units are
turned OFF.
The griddle can only be used with the center
burner and must be locked into place on the
center grate.
Place the “U” locks on the underside of
the griddle over the center fingers of the
center grate.
Move the griddle back-and-forth to make
sure it is locked in place
.
“U” locks
Underside of griddle
Page 11
11
Most griddled foods require cooking
on a preheated surface. Preheat griddle
according to the guide below, then switch to
the desired cook setting.
IMPORTANT NOTES:
■ Avoid cooking extremely greasy foods and
be careful of grease spill-over while cooking.
■ Do not use oil on the griddle for extended
lengths of time. Permanent staining and/or
craze lines on the surface could result.
■ Do not cook milk products (such as french
toast) on the griddle. Permanent staining
and/or craze lines on the surface could
result.
■ Never place or store any items on the
griddle, even when it is not in use. The
griddle can become heated when using the
surrounding burners.
■ Do not overheat the griddle. Leaving the
griddle burner on at Hi for an extended
amount of time without food can damage
the non-stick coating.
Using the Griddle
Type of Food Preheat Maximum Quantity
Conditions Recommended
Warming none 7 stacked
Tortillas
Pancakes 7 (MED-HI) 6
3 minutes
Hamburgers Medium for 4 – flattened out
5 minutes
Fried Eggs Medium for 4
5 minutes
Bacon High for 4
5 minutes
Breakfast None–no oil 13
Sausage Links
Hot Sandwiches High for 6 4
(such as minutes then
Grilled Cheese) Medium for
4 minutes
Consumer SupportOperating InstructionsSafety Instructions
Installation
Instructions
Troubleshooting Tips
ge.com
Page 12
12
Operating Instructions
Safety Instructions
Installation
Instructions
Troubleshooting Tips
Consumer Support
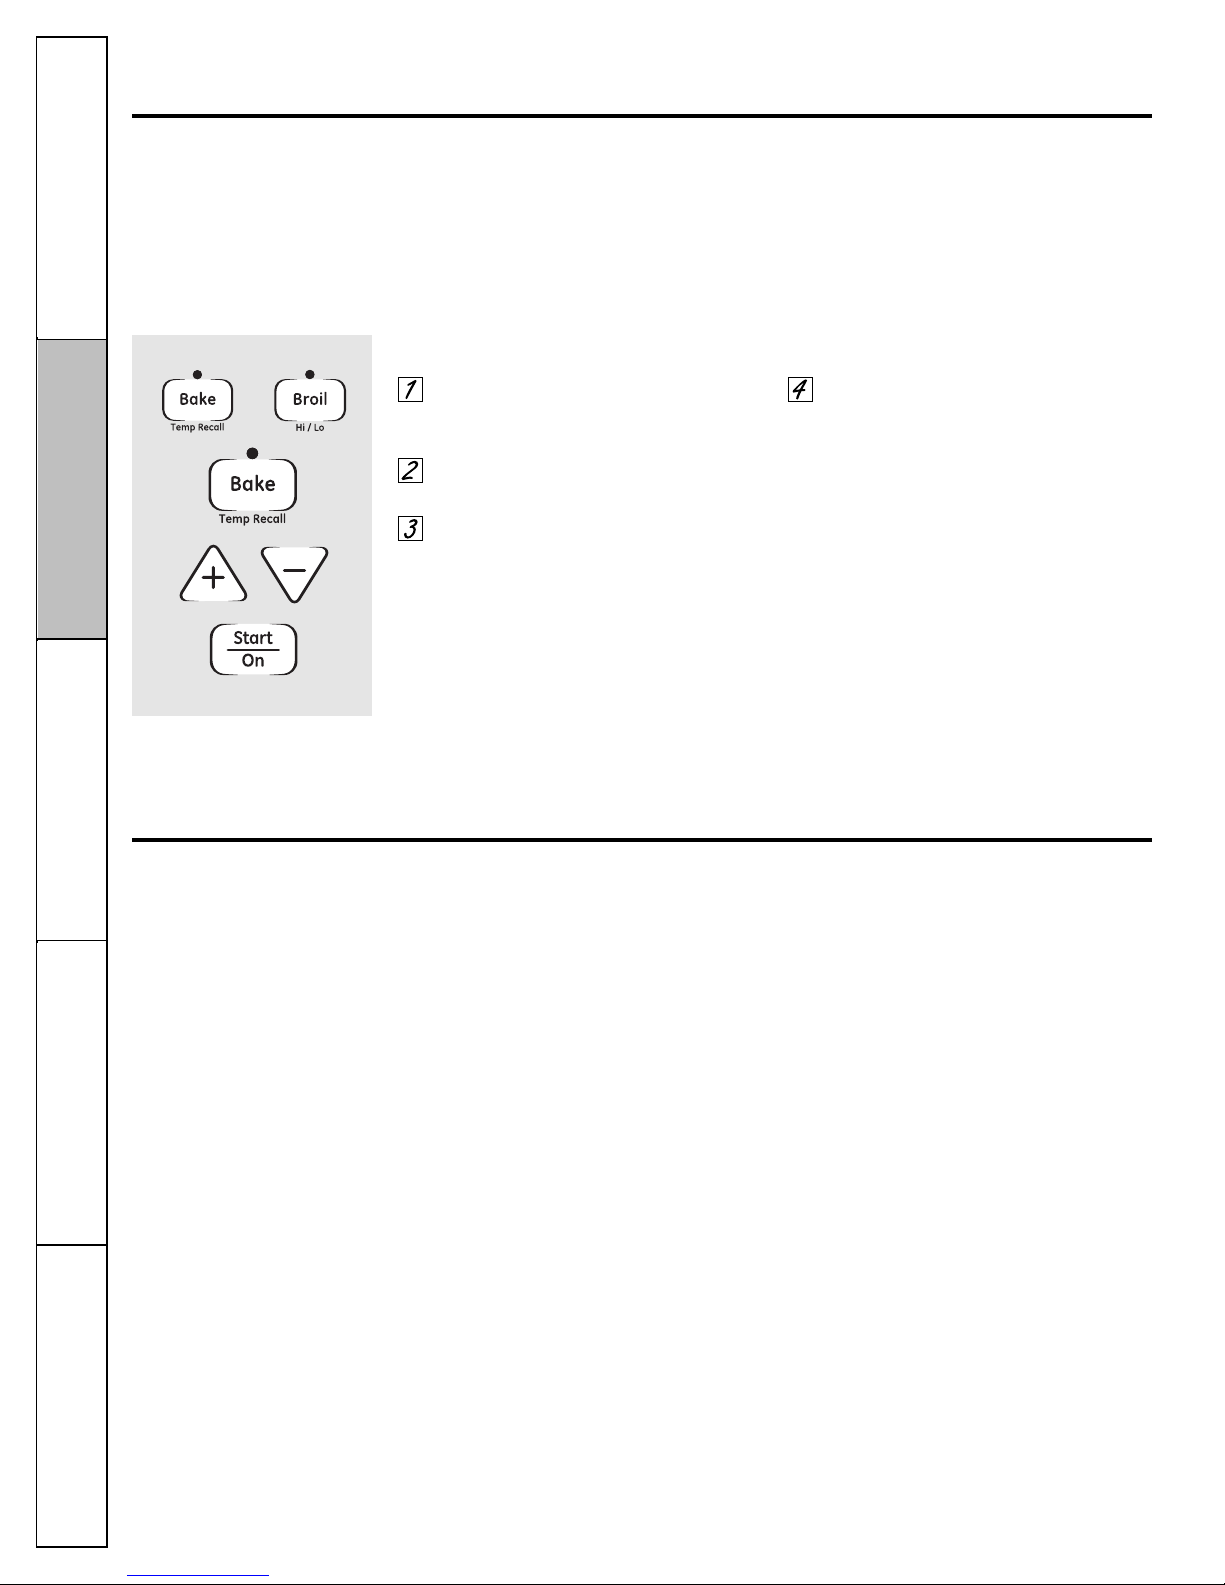
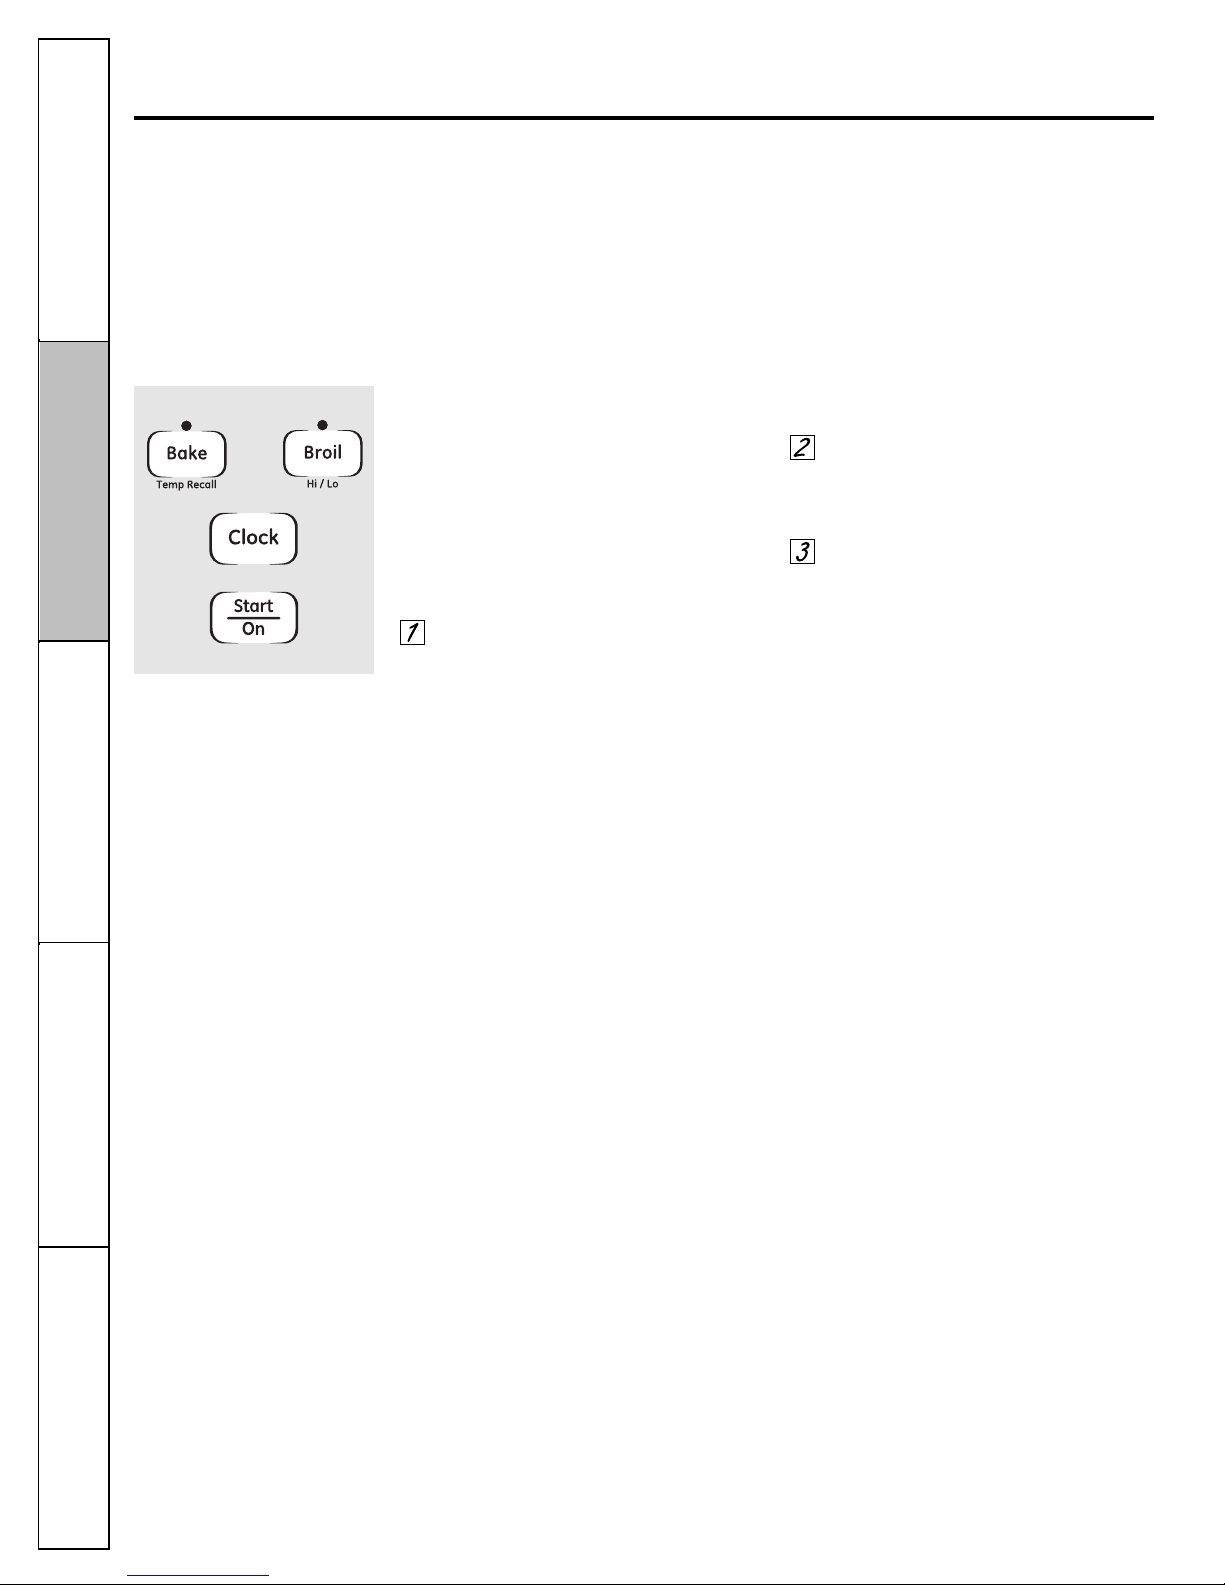
Bake/Temp Recall Pad
Touch this pad to select the bake function.
Bake Light
Flashes while in edit mode—you can change the
oven temperature at this point. Glows when the
oven is in bake mode.
Start/On Pad
Must be touched to start any cooking function.
Display
Shows the time of day, oven temperature,
whether the oven is in the bake or broil mode
and the times set for the timer. The display will
show PRE while preheating. When the oven
reaches the selected temperature, the oven
control will beep and the display will show the
oven temperature.
If “F– and a number or letter” flash in the display and
the oven control signals, this indicates a function error
code.
The time of day will flash in the display when there has
been a power outage. Reset the clock.
Touch the Clear/Off pad. Allow the oven to cool for
one hour. Put the oven back into operation. If the
function error code repeats, disconnect the power to
the range and call for service.
Kitchen Timer On/Off Pad
Touch this pad to select the timer feature. Then
press the + and – pads to adjust the timer.
Kitchen Timer Light
Flashes while in edit mode—you can change the
set time at this point. Glows when the timer has
been activated. Flashes again when the time has
run out until the control is reset.
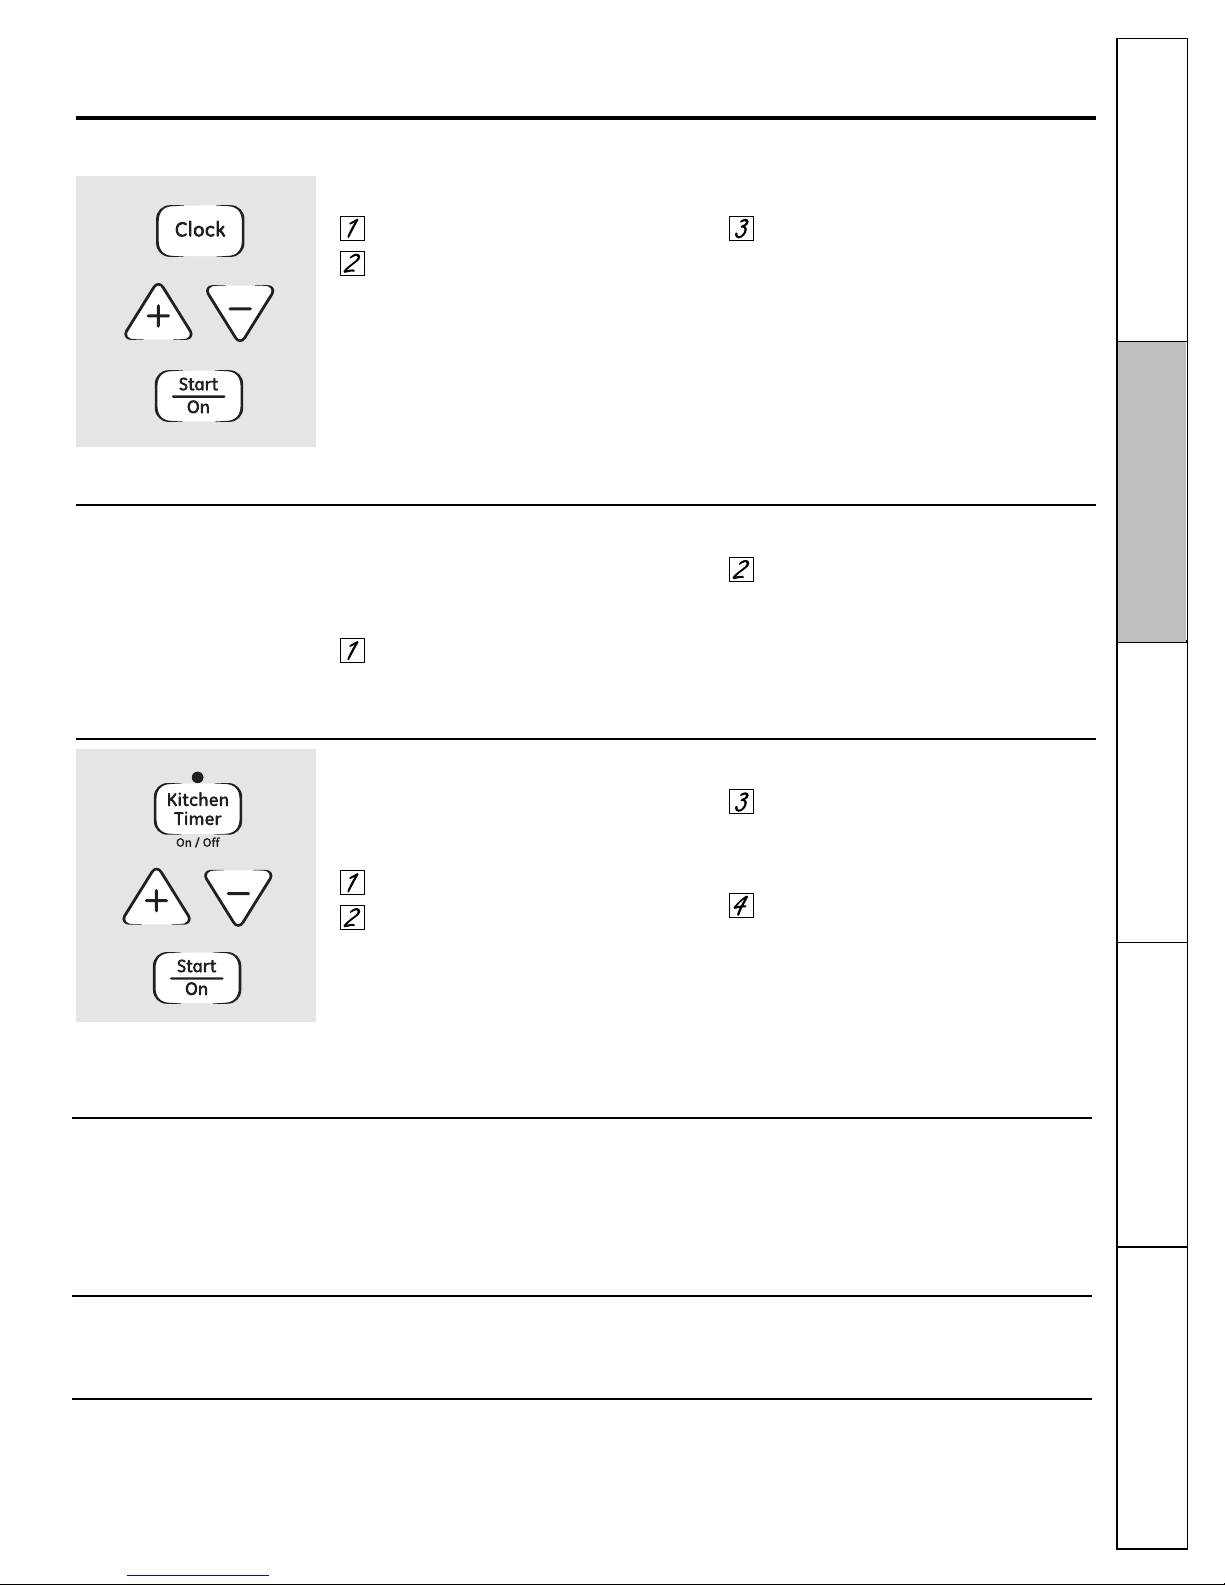
Clock Pad
To set the clock, press this pad twice and then
press the + and – pads. The time of day will
flash in the display when the oven is first
turned on.
Oven Light Pad
Touch this pad to turn the oven light on or off.
– Pad
Short taps to this pad will decrease the time or
temperature by small amounts. Touch and hold
the pad to decrease the time or temperature by
larger amounts.
+ Pad
Short taps to this pad will increase the time or
temperature by small amounts. Touch and hold
the pad to increase the time or temperature by
larger amounts.
Throughout this manual, features and appearance may vary from your model.
Using the oven controls.
Oven Control, Clock and Timer Features and Settings
(on some models)
Page 13
13
Consumer SupportOperating InstructionsSafety Instructions
Installation
Instructions
Troubleshooting Tips
ge.com
Clear/Off Pad
Touch this pad to cancel ALL oven operations
except the clock and timer.
Broil Hi/Lo Pad
Touch this pad to select the broil function.
Broil Light
Flashes while in edit mode—you can switch from
Hi to Lo Broil at this point. Glows when the oven
is in broil mode.
Indicator Lights (on some pads)
Edit mode lasts several seconds after the last
pad press.
Oven Control, Clock and Timer Features and Settings (on some models)
Page 14
Operating Instructions
Safety Instructions
Installation
Instructions
Troubleshooting TipsConsumer Support
14
To avoid possible burns, place the shelves in the desired position before you turn the oven on.
Oven Vent
Your oven is vented through ducts at the rear
of the range. Do not block these ducts when
cooking in the oven—it is important that the
flow of hot air from the oven and fresh air
to the oven burner be uninterrupted. Avoid
touching the vent openings or nearby
surfaces during oven or broiler operation—
they may become hot.
■ Handles of pots and pans on the cooktop
may become hot if left too close to the vent.
■ Do not leave plastic or flammable items on
the cooktop—they may melt or ignite if left
too close to the vent.
■ Do not leave closed containers on the
cooktop. The pressure in closed containers
may increase, which may cause them to
burst.
■ Metal items will become very hot if they are
left on the cooktop, and could cause burns.
Plastic items on the cooktop may
melt if left too close to the vent.
Vent appearance and location vary.
Using the oven.
Before you begin…
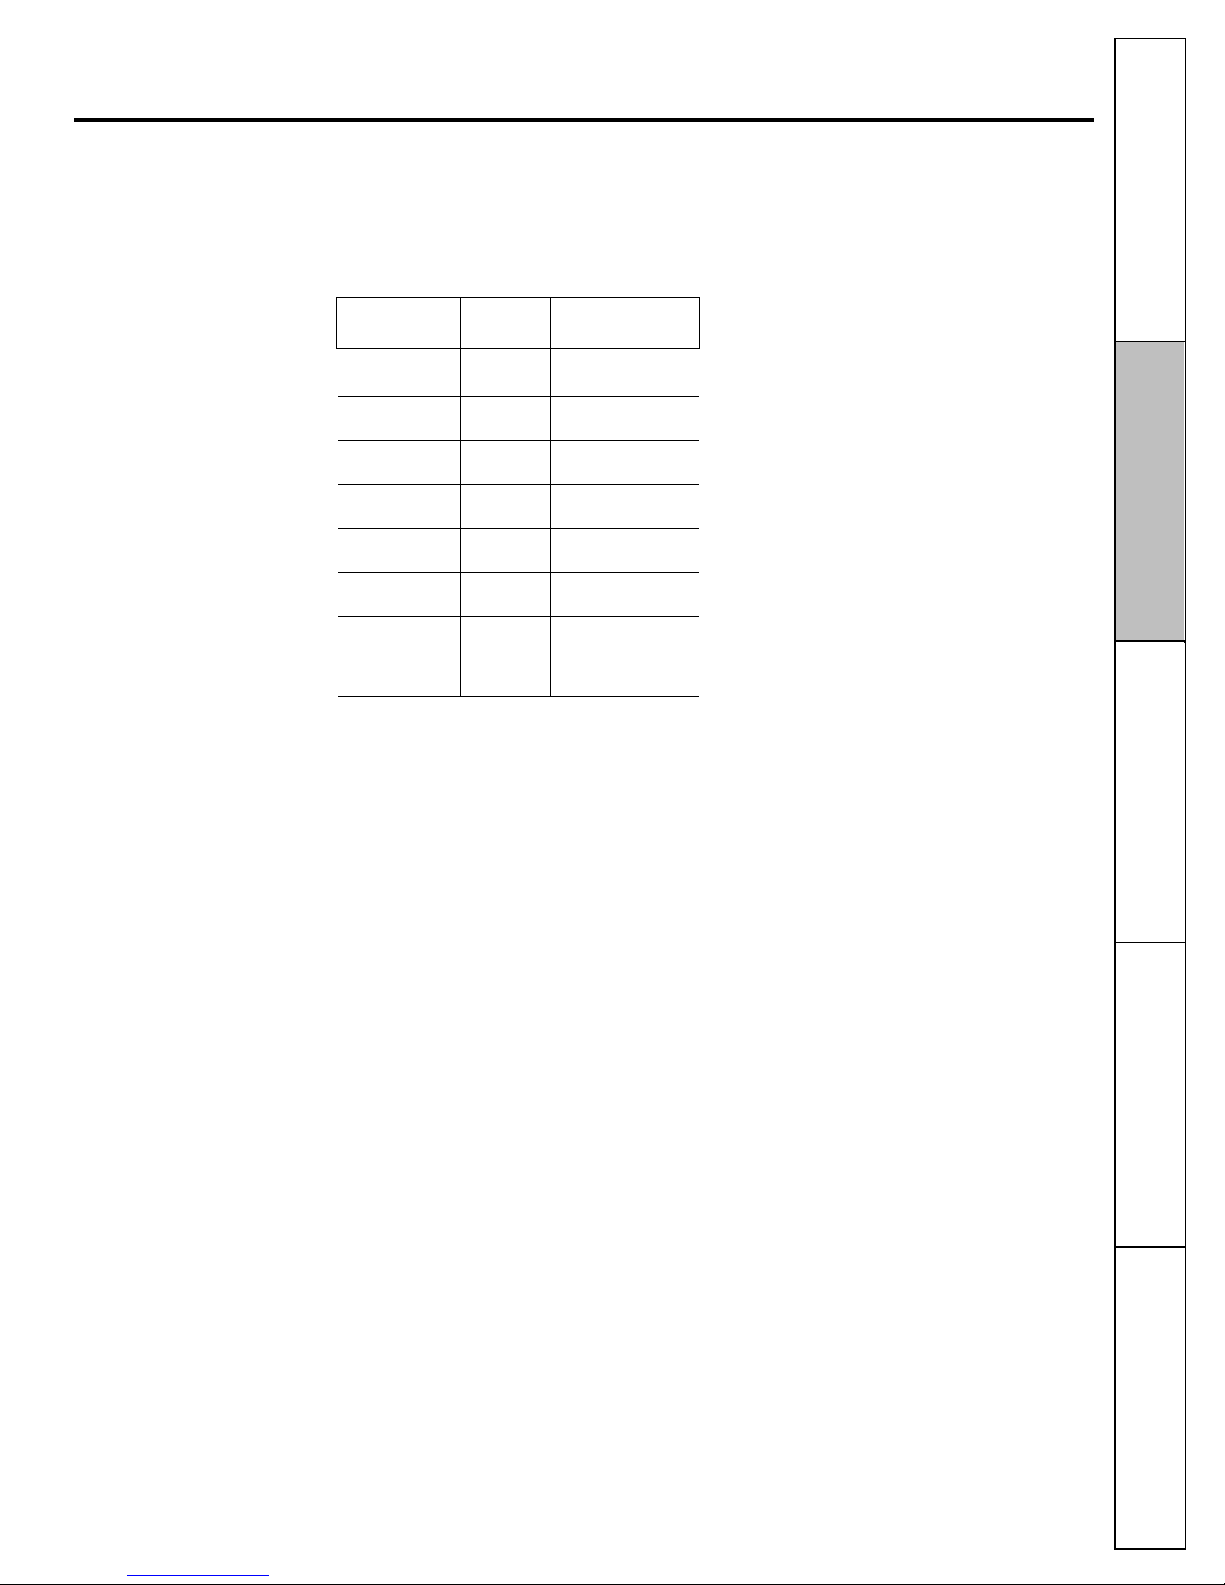
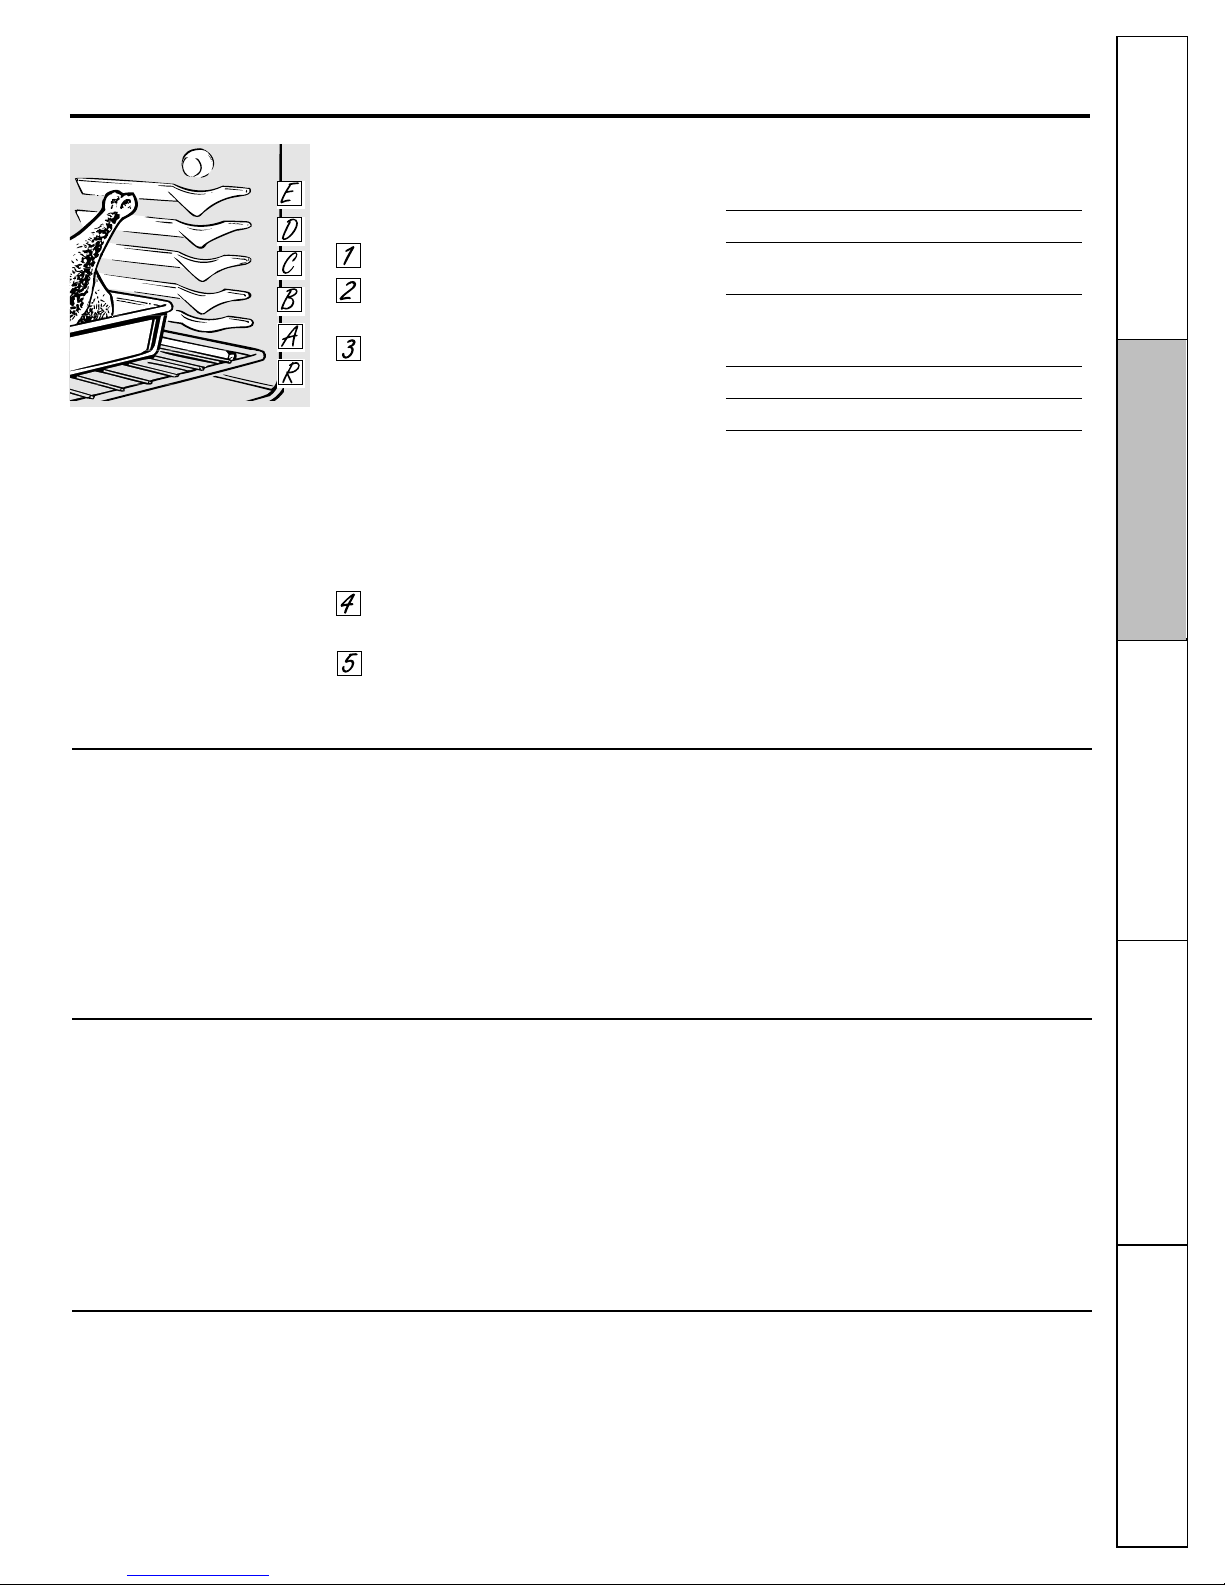
The shelves have stop-locks, so that when
placed correctly on the shelf supports
(A through E), they will stop before coming
completely out, and will not tilt.
When placing and removing cookware,
pull the shelf out to the bump on the
shelf support.
To remove a shelf, pull it toward you, tilt the
front end up and pull it out.
To replace, place the end of the shelf
(stop-locks) on the support, tilt up the
front and push the shelf in.
NOTE: The shelf is not designed to slide out at
the special low shelf (R) position.
The oven has 5 shelf positions.
It also has a special low shelf
position (R) for extra large items,
such as a large turkey.
Power Outage
CAUTION: Do not make any
attempt to operate the electric ignition oven
during an electrical power failure.
The oven or broiler cannot be lit during
a power failure. Gas will not flow unless
the glow bar is hot.
If the oven is in use when a power failure
occurs, the oven burner shuts off and cannot
be re-lit until power is restored. This is
because the flow of gas is automatically
stopped and will not resume when power
is restored until the glow bar has reached
operating temperature.
Oven Light
Touch the Oven Light pad on the upper
control panel to turn the light on or off.
Page 15
Consumer Support
Installation
Instructions
Troubleshooting Tips
Operating Instructions
Safety Instructions
15
Preheating and Pan Placement
Preheat the oven if the recipe calls for it.
To preheat, set the oven at the correct
temperature. Preheating is necessary for
good results when baking cakes, cookies,
pastry and breads.
For ovens without a preheat indicator light or
tone, preheat 10 minutes.
Baking results will be better if baking pans are
centered in the oven as much as possible.
Pans should not touch each other or the walls
of the oven. If you need to use two shelves,
stagger the pans so one is not directly above
the other, and leave approximately 11⁄2″
between pans, from the front, back and sides
of the wall.
ge.com
How to Set the Oven for Baking or Roasting
Your oven is not designed for open-door
cooking.
Touch the Bake pad.
Touch the + or – pads until the desired
temperature is displayed.
Touch the Start/On pad.
The oven will start automatically. The display
will show PRE while preheating. When the
oven reaches the selected temperature, the
oven control will beep several times and the
display will show the oven temperature.
To change the oven temperature during Bake
cycle, touch the Bake pad and then the + or –
pads to get the new temperature.
Check food for doneness at minimum
time on recipe. Cook longer if necessary.
Touch the Clear/Off pad when baking is
finished and then remove the food from
the oven.
Type of Food Shelf Position
Frozen pies (on cookie sheet) B or C
Angel food cake, B
bundt or pound cakes
Biscuits, muffins, brownies, C
cookies, cupcakes,
layer cakes, pies
Casseroles B or C
Roasting R or A
Oven Moisture
As your oven heats up, the temperature
change of the air in the oven may cause
water droplets to form on the door glass.
These droplets are harmless and will
evaporate as the oven continues to heat up.
The oven has a special low shelf (R)
position just above the oven
bottom. Use it when extra cooking
space is needed, for example, when
cooking a large turkey. The shelf is
not designed to slide out at this
position.
Aluminum Foil
Do not use aluminum foil on the bottom of
the oven.
Never entirely cover a shelf with aluminum
foil. This will disturb the heat circulation and
result in poor baking.
A smaller sheet of foil may be used to catch a
spillover by placing it on a lower shelf several
inches below the food.
Page 16
Operating Instructions
Safety Instructions
Installation
Instructions
Troubleshooting TipsConsumer Support
16
Using the oven.
Broiling
Broiling is cooking food by direct heat from
above the food. Most fish and tender cuts of
meat can be broiled. Follow these directions
to keep spattering and smoking to a
minimum.
Your range has a compartment below the
oven for broiling.
Both the oven and broiler compartment
doors must be CLOSED during broiling.
Turn most foods once during cooking (the
exception is thin fillets of fish; oil one side,
place that side down on broiler grid and cook
without turning until done). Time foods for
about one-half the total cooking time, turn
food, then continue to cook to preferred
doneness.
You can change the distance of the food
from the heat source by positioning a
broiler pan and grid on one of three shelf
positions in the broiler compartment—A
(bottom of broiler compartment), B
(middle) and C (top).
Preheating the broiler or oven is not
necessary and can produce poor results.
If meat has fat or gristle around the edge,
cut vertical slashes through both about
2″ apart. If desired, the fat may be
trimmed, leaving a layer about 1/8″ thick.
Arrange the food on the grid and position
the broiler pan on the appropriate shelf in
the oven or broiling compartment.
Placing food closer to the flame
increases exterior browning of the food,
but also increases spattering and the
possibility of fats and meat juices
igniting.
Close the oven and broiler compartment
door.
Touch the Broil Hi/Lo pad once for
Hi Broil.
To change to Lo Broil, touch the
Broil Hi/Lo pad again.
Use Lo Broil to cook foods such as
poultry or thick cuts of meat thoroughly
without over-browning them.
Touch the Start/On pad.
When broiling is finished, touch the
Clear/Off pad.
Remove the broiler pan from the broiler
compartment and serve the food
immediately. Leave the pan outside the
range to cool.
Page 17
17
Consumer Support
Installation
Instructions
Troubleshooting Tips
Operating Instructions
Safety Instructions
ge.com
The size, weight, thickness,
starting temperature and
your preference of doneness
will affect broiling times. This
guide is based on meats at
refrigerator temperature.
†The U.S. Department of Agriculture
says “Rare beef is popular, but you
should know that cooking it to only
140°F means some food poisoning
organisms may survive.” (Source:
Safe Food Book, Y
our Kitchen
Guide
, USDA Rev. June 1985.)
Broiling Guide
The oven and broiler compartment doors
must be closed during broiling.
■ Always use a broiler pan and grid. It is
designed to minimize smoking and
spattering by trapping juices in the
shielded lower part of the pan.
■ For steaks and chops, slash fat evenly
around the outside edges of the meat. To
slash, cut crosswise through the outer fat
surface just to the edge of the meat. Use
tongs to turn the meat over to prevent
piercing the meat and losing juices.
■ If desired, marinate meats or chicken
before broiling. Or brush with barbecue
sauce last 5 to 10 minutes only.
■ When arranging the food on the pan, do
not let fatty edges hang over the sides
because dripping fat could soil the oven.
■ The broiler compartment does not need to
be preheated. However, for very thin foods,
or to increase browning, preheat if desired.
■ Frozen steaks can be broiled by positioning
the shelf at the next lowest shelf position
and increasing the cooking time given in
this guide 11⁄2 times per side.
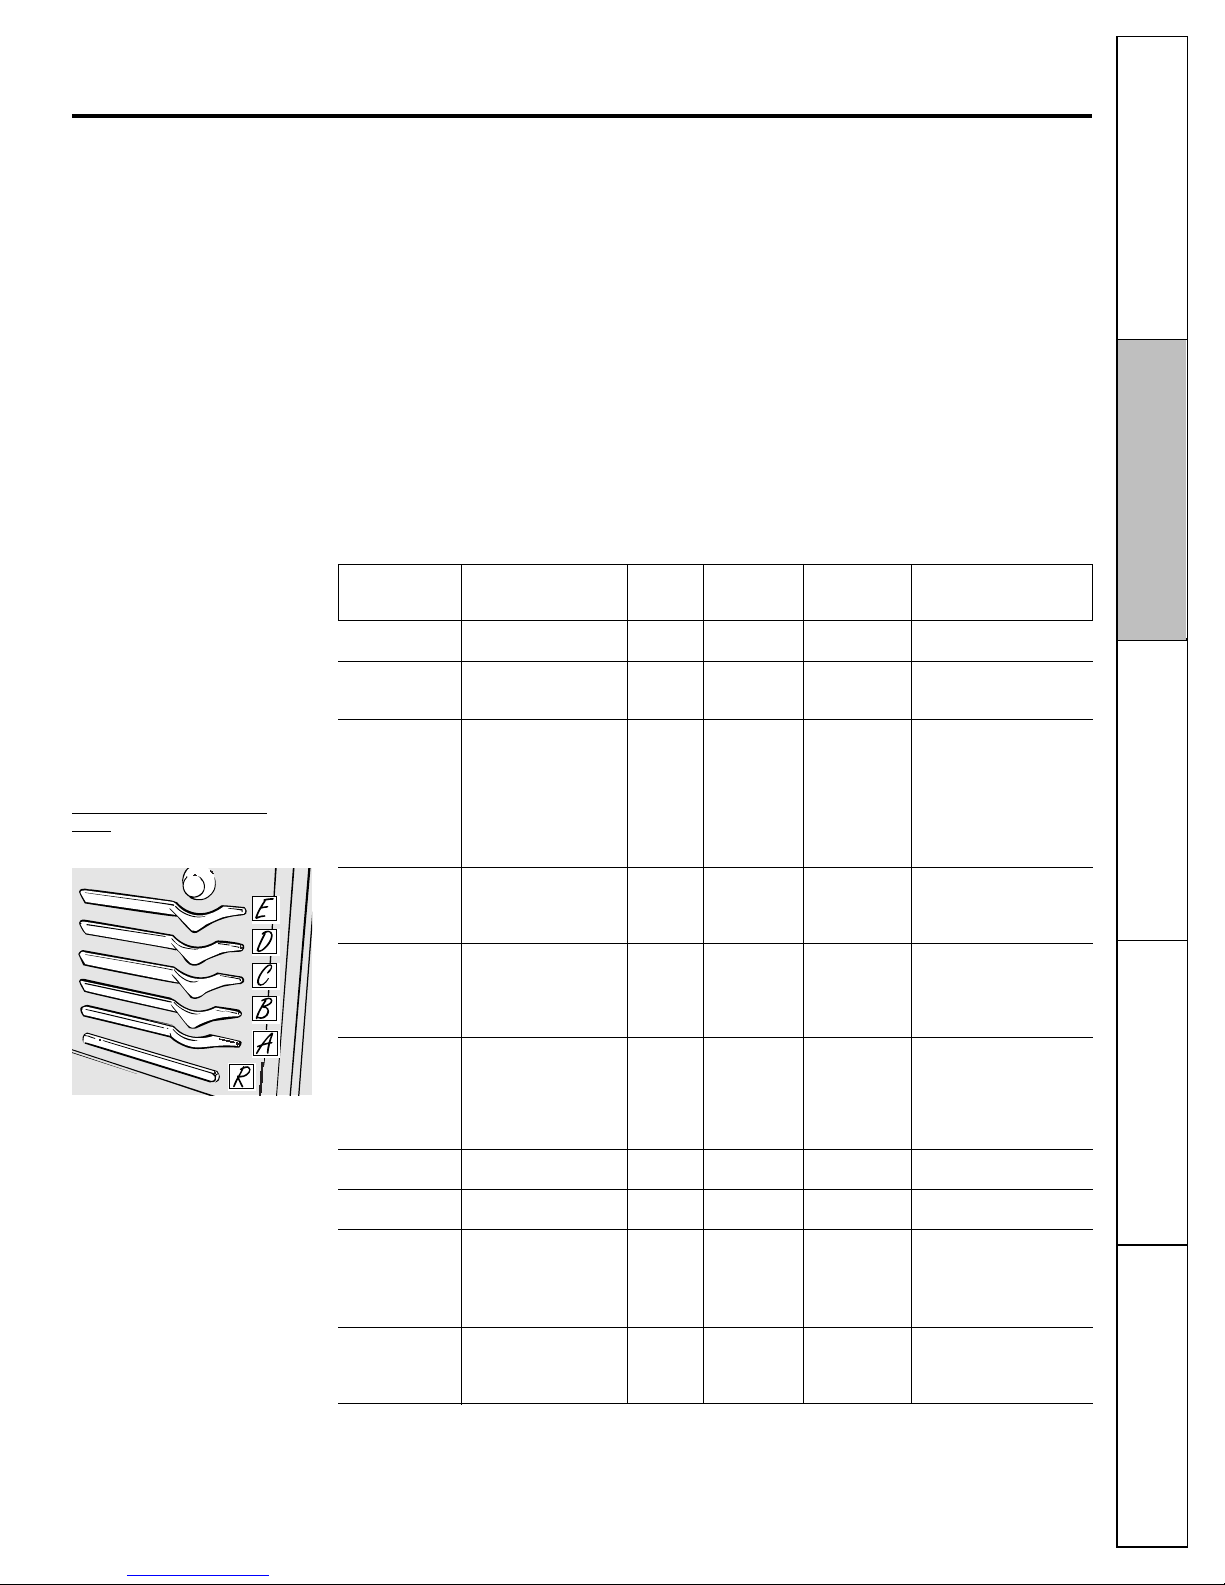
The oven has 5 shelf positions.
*See illustration for description of shelf positions.
Quantity and/ Shelf* First Side Second Side
Food or Thickness Position Time (min.) Time (min.) Comments
Bacon 1/2 lb. C 4 3 Arrange in single layer.
(about 8 thin slices)
Ground Beef 1 lb. (4 patties) C 10 7–10 Space evenly. Up to
Well Done 1/2 to 3/4″ thick 8 patties take about
the same time.
Beef Steaks
Rare
†
1″ thick C 9 7 Steaks less than 1″ thick
Medium 1 to 11⁄2
lbs. C 12 5–6 cook thro ugh before
Well Done B 13 8–9 browning. Pan frying is
recommended.
Rare
†
11⁄2″ thick C 10 6–7 Slash fat.
Medium 2 to 21⁄2
lbs. C 12–15 10–12
Well Done B 25 16–18
Chicken 1 whole B 30–35 15 Brush each side with
2 to 21⁄2 lbs., melted butter. Broil
split lengthwise skin-side-down first.
4 bone-in breasts B 25–30 10–15
Lobster Tails 2–4 A 13–16 Do not Cut through back of
6 to 8 oz. each turn shell. Spread open. Brush
over. with melted butter before
broiling and after half
of broiling time.
Fish Fillets 1 lb. fillets C 5 5 Handle and turn very
1/4 to 1/2″ thick carefully. Brush with
lemon butter before
and during cooking, if
desired. Preheat broiler
to increase browning.
Ham Slices 1″ thick B 8 8
(precooked) 1/2″ thick B 6 6
Pork Chops 2 (1/2″ thick) B 10 4–5 Slash fat.
Well Done 2 (1″ thick) about 1 lb. B 13 9–12
Lamb Chops
Medium 2 (1″ thick) about B 8 4–7 Slash fat.
Well Done 10 to 12 oz. B 10 10
Medium 2 (11⁄2″ thick) B 10 4–6
Well Done about 1 lb. B 17 12–14
Wieners
Similar Precooked
1 lb. pkg. (10) C 6 1–2 If desired, split sausages
Sausages, in half lengthwise; cut
Bratwurst into 5- to 6-inch pieces.
Page 18
Operating Instructions
Safety Instructions
Installation
Instructions
Troubleshooting TipsConsumer Support
18
Adjust the oven thermostat—Do it yourself!
You may find that your new oven cooks differently than the one it replaced. Use your new oven for a few weeks to
become more familiar with it. If you still think your new oven is too hot or too cold, you can adjust the thermostat
yourself.
Do not use thermometers, such as those found in grocery stores, to check the temperature setting of your oven.
These thermometers may vary 20–40 degrees.
NOTE: This adjustment will not affect the broiling temperature.
Most recipes for baking have been developed using high-fat products such as butter or margarine (80% fat). If you
decrease the fat, the recipe may not give the same results as with a higher-fat product.
Recipe failure can result if cakes, pies, pastries, cookies or candies are made with low-fat spreads. The lower the fat
content of a spread product, the more noticeable these differences become.
Federal standards require products labeled “margarine” to contain at least 80% fat by weight. Low-fat spreads, on the
other hand, contain less fat and more water. The high moisture content of these spreads affects the texture and flavor
of baked goods. For best results with your old favorite recipes, use margarine, butter or stick spreads containing at least
70% vegetable oil.
The type of margarine will affect baking performance!
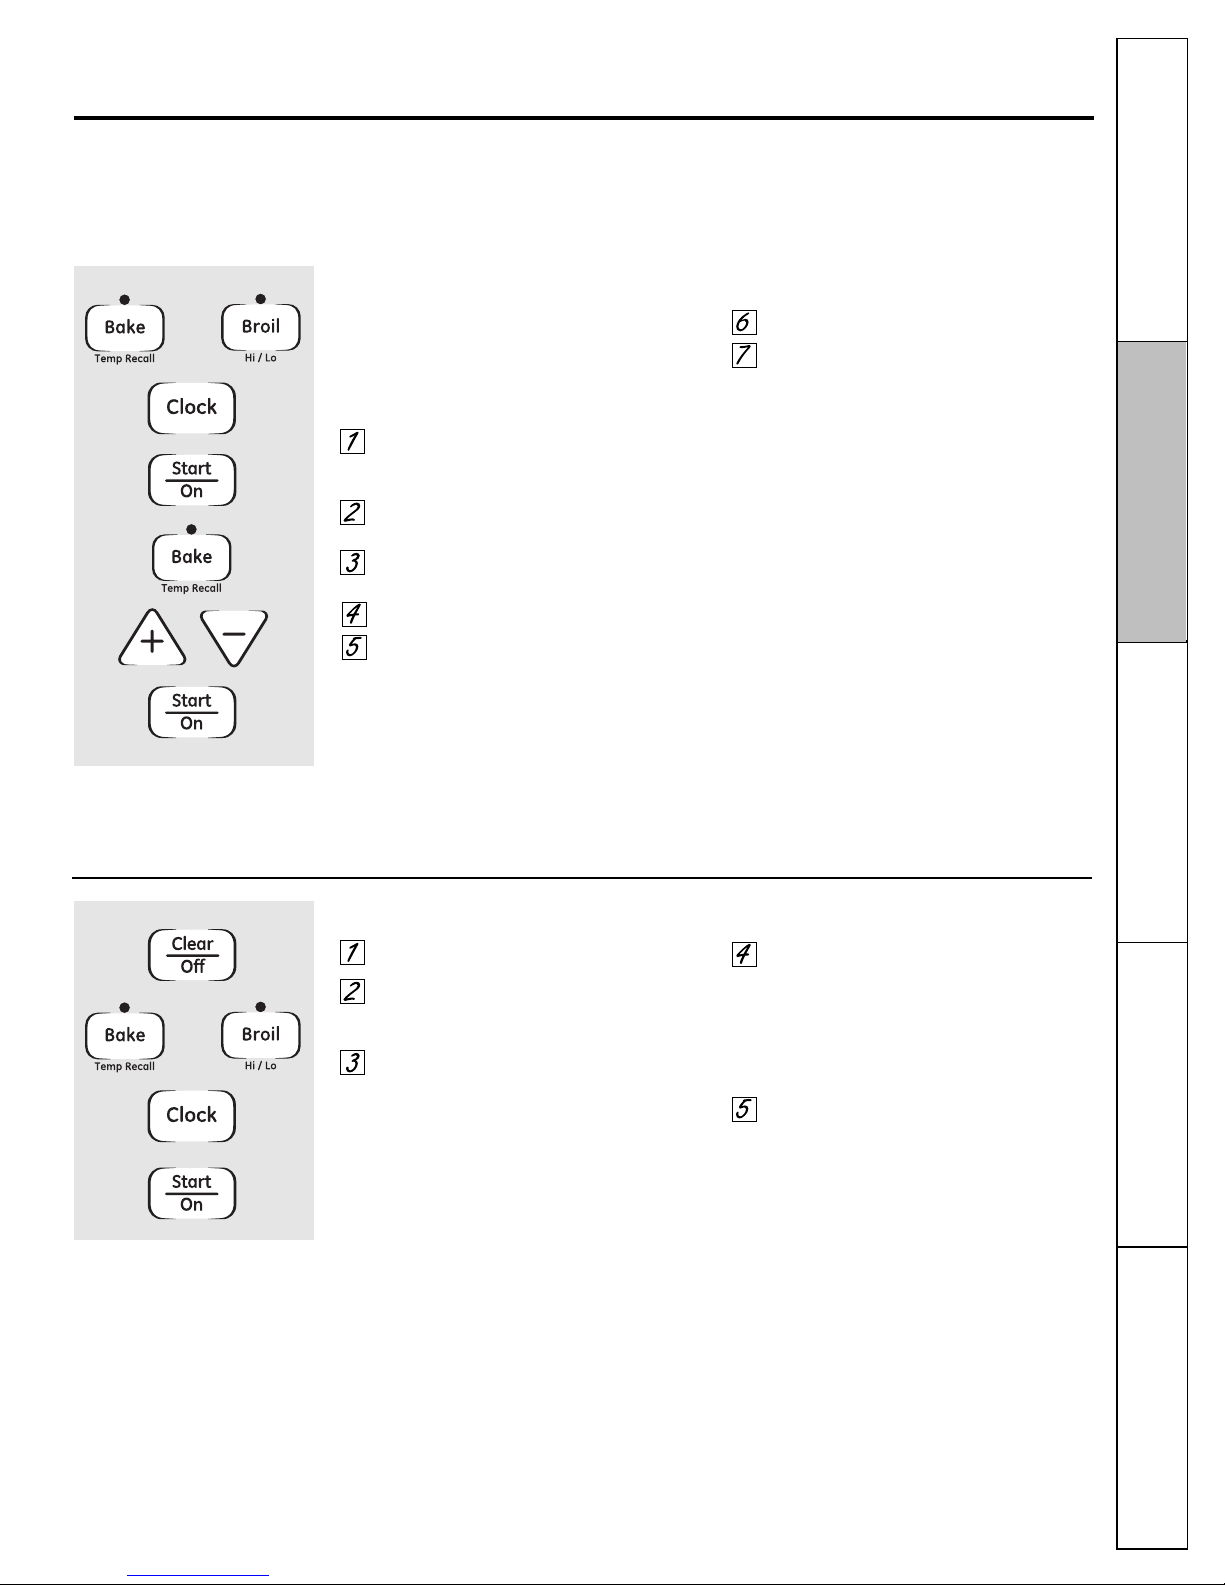
To Adjust the Thermostat
Touch the Bake and Broil Hi/Lo pads at
the same time for 2 seconds until the
display shows SF.
Touch the Bake pad. A two digit number
shows in the display.
The oven temperature can be adjusted
up to (+) 35°F hotter or (–) 35°F cooler.
Touch the + pad to increase the
temperature in 1 degree increments.
Touch the – pad to decrease the
temperature in 1 degree increments.
When you have made the adjustment,
touch the Start/On pad to go back to
the time of day display. Use your oven
as you would normally.
NOTE: This adjustment will not affect broiling
temperatures. It will be retained in memory
after a power failure.
Page 19
If a flashing time is in the display, you have
experienced a power failure. Reset the clock.
To reset the clock, touch the Clock pad. Enter
the correct time of day by touching the + or –
pads. Touch the Start/On pad.
19
Consumer Support
Installation
Instructions
Troubleshooting Tips
Operating Instructions
Safety Instructions
Not all features are on all models.
To Set the Timer
The timer does not control oven operations.
The maximum setting on the timer is 9 hours
and 59 minutes.
Touch the Kitchen Timer On/Off pad.
Touch the + or – pads until the amount
of time you want shows in the display.
The maximum time that can be entered
in minutes is 59. Times more than
59 minutes should be changed to
hours and minutes.
If you make a mistake, touch the Kitchen
Timer On/Off pad and begin again.
Touch the Start/On pad. The time will
start counting down, although the
display does not change until one
minute has passed.
When the timer reaches :00, the control
will beep 3 times followed by one beep
every 6 seconds until the Kitchen Timer
On/Off pad is touched.
The timer is a minute timer only.
The Clear/Off pad does not affect
the timer.
Using the clock and timer.
ge.com
To Set the Clock
Touch the Clock pad twice.
Touch the + or – pads.
If the + or – pads are not touched within one
minute after you touch the Clock pad, the
display reverts to the original setting. If this
happens, touch the Clock pad twice and
reenter the time of day.
Touch the Start/On pad until the time of
day shows in the display. This enters the
time and starts the clock.
To check the time of day when the display is
showing other information, simply touch the
Clock pad. The time of day shows until
another pad is touched.
Make sure the clock is set to the
correct time of day.
To Turn Off the Clock Display
If you have several clocks in your kitchen,
you may wish to turn off the time of day
clock display on your range.
Touch the Clock pad once to turn off the
time of day display. Although you will
not be able to see it, the clock maintains
the correct time of day.
Touch the Clock pad twice to recall the
clock display.
To Reset the Timer
If the display is still showing the time
remaining, you may change it by touching
the Kitchen Timer On/Off pad, then touch the
+ or – pads until the time you want appears
in the display.
If the remaining time is not in the display
(clock is in the display), recall the remaining
time by touching the Kitchen Timer On/Off
pad and then touching the + or – pads to
enter the new time you want.
To Cancel the Timer
Touch the Kitchen Timer On/Off pad twice.
Power Outage
Page 20
20
Operating Instructions
Safety Instructions
Installation
Instructions
Troubleshooting Tips
Consumer Support
Your new touch pad control has additional features that you may choose to use. The following are the features and
how you may activate them.
The special feature modes can only be activated while the display is showing the time of day. They remain in the
control’s memory until the steps are repeated.
When the display shows your choice, touch the Start/On pad. The special features will remain in memory after
a power failure.
NOTE: The Sabbath feature and the Thermostat Adjustment feature are also Special Features, but they are addressed
separately in their own sections.
Special features of your oven control.
12 Hour Shut-Off
With this feature, should you forget and leave
the oven on, the control will automatically turn
off the oven after 12 hours during baking
functions or after 3 hours during a broil
function.
If you wish to turn OFF this feature, follow the
steps below.
Touch the Bake and Broil Hi/Lo pads at
the same time for 3 seconds until the
display shows SF.
Touch the Clock pad. The display will
show On (12 hour shut-off). Touch the
Clock pad repeatedly until the display
shows Off (no shut-off).
Touch the Start/On pad to activate the
no shut-off and leave the control set in
this special features mode.
Page 21
21
Consumer Support
Installation
Instructions
Troubleshooting TipsOperating InstructionsSafety Instructions
The Sabbath feature can be used for baking/roasting only. It cannot be used for broiling.
NOTE: The oven light comes on automatically (on some models) when the door is opened and goes off when the
door is closed. The bulb may be removed. See the Oven Light Replacement section. On models with a light switch
on the control panel, the oven light may be turned on and left on.
Using the Sabbath Feature.
(on some models)
(Designed for use on the Jewish Sabbath and Holidays)
ge.com
How to Set for Regular Baking/Roasting
NOTE: To understand how the oven control works,
practice using regular baking (non-Sabbath) before
entering Sabbath mode.
Make sure the clock shows the correct time of day
and the oven is off.
Touch and hold both the Bake and
Broil Hi/Lo pads, at the same time,
until the display shows SF.
Tap the Clock pad until SAb appears in
the display.
Touch the Start/On pad and ⊃ will appear
in the display.
Touch the Bake pad. No signal will be given.
The preset starting temperature will
automatically be set to 350°. Tap the +
or – pads to increase or decrease the
temperature in 25° increments. The
temperature can be set between 170° and
550°. No signal or temperature will be given.
Touch the Start/On pad.
After a random delay period of
approximately 30 seconds to 1 minute, ⊃
will appear in the display indicating that the
oven is
baking/roasting.
If ⊃ doesn’t appear
in the display, start again at Step 4.
To adjust the oven temperature, touch the Bake
pad and tap the + or – pads to increase or
decrease the temperature in 25° increments.
Touch the Start/On pad.
NOTE: The Clear/Off pad is active during the
Sabbath feature.
⊃
⊃
When the display shows ⊃ the
oven is set in Sabbath. When the
display shows ⊃ the oven is
baking/roasting.
⊃
How to Exit the Sabbath Feature
Touch the Clear/Off pad.
If the oven is cooking, wait for a random
delay period of approximately 30 seconds to
1 minute, until only ⊃ is in the display.
Touch and hold both the Bake and
Broil Hi/Lo pads, at the same time,
until the display shows SF.
Tap the Clock pad until On or Off appears in
the display. On indicates that the oven will
automatically turn off after 12 hours. Off
indicates that the oven will not automatically
turn off. See the Special Features section for
an explanation of the 12 Hour Shut-Off
feature.
Touch the Start/On pad.
NOTE: If a power outage occurred while the oven
was in Sabbath, the oven will automatically turn off
and stay off even when the power returns. The
oven control must be reset.
Page 22
22
Care and cleaning of the range.
Be sure electrical power is off and all surfaces are cool before cleaning any part of the range.
If your range is removed for cleaning, servicing or any reason, be sure the anti-tip
device is re-engaged properly when the range is replaced. Failure to take this
precaution could result in tipping of the range and cause injury.
Griddle
NOTES:
■ The griddle is to be used on the center
burner grate only.
■ Do not clean the griddle in a dishwasher.
Thoroughly clean the griddle of grease and
food particles, using a square-edged spatula,
while it is still hot.
Wipe the griddle with a dry, heavy, coarse
cloth to remove any remaining residue and
food particles.
Wash with hot soapy water, rinse and dry.
Once the griddle has cooled, rub the surface
lightly with vegetable oil. Do not use corn oil
or cooking sprays as they get sticky.
If the griddle is cleaned with anything other
than a dry, heavy, coarse cloth, it will need to
be reseasoned.
Never flood the hot griddle with cold water.
This could cause the griddle to crack or warp.
As the griddle is used and seasoned, it may
change color over time.
Griddle Precautions:
■ If something has spilled under the griddle, it
should be cleaned up as soon as possible to
prevent “baked on” food soil.
■ Do not allow grease to accumulate under
the griddle as it can be a fire hazard. Clean
under the griddle as soon as it is cool. Clean
with hot soapy water.
Operating Instructions
Safety Instructions
Installation
Instructions
Troubleshooting Tips
Consumer Support
Page 23
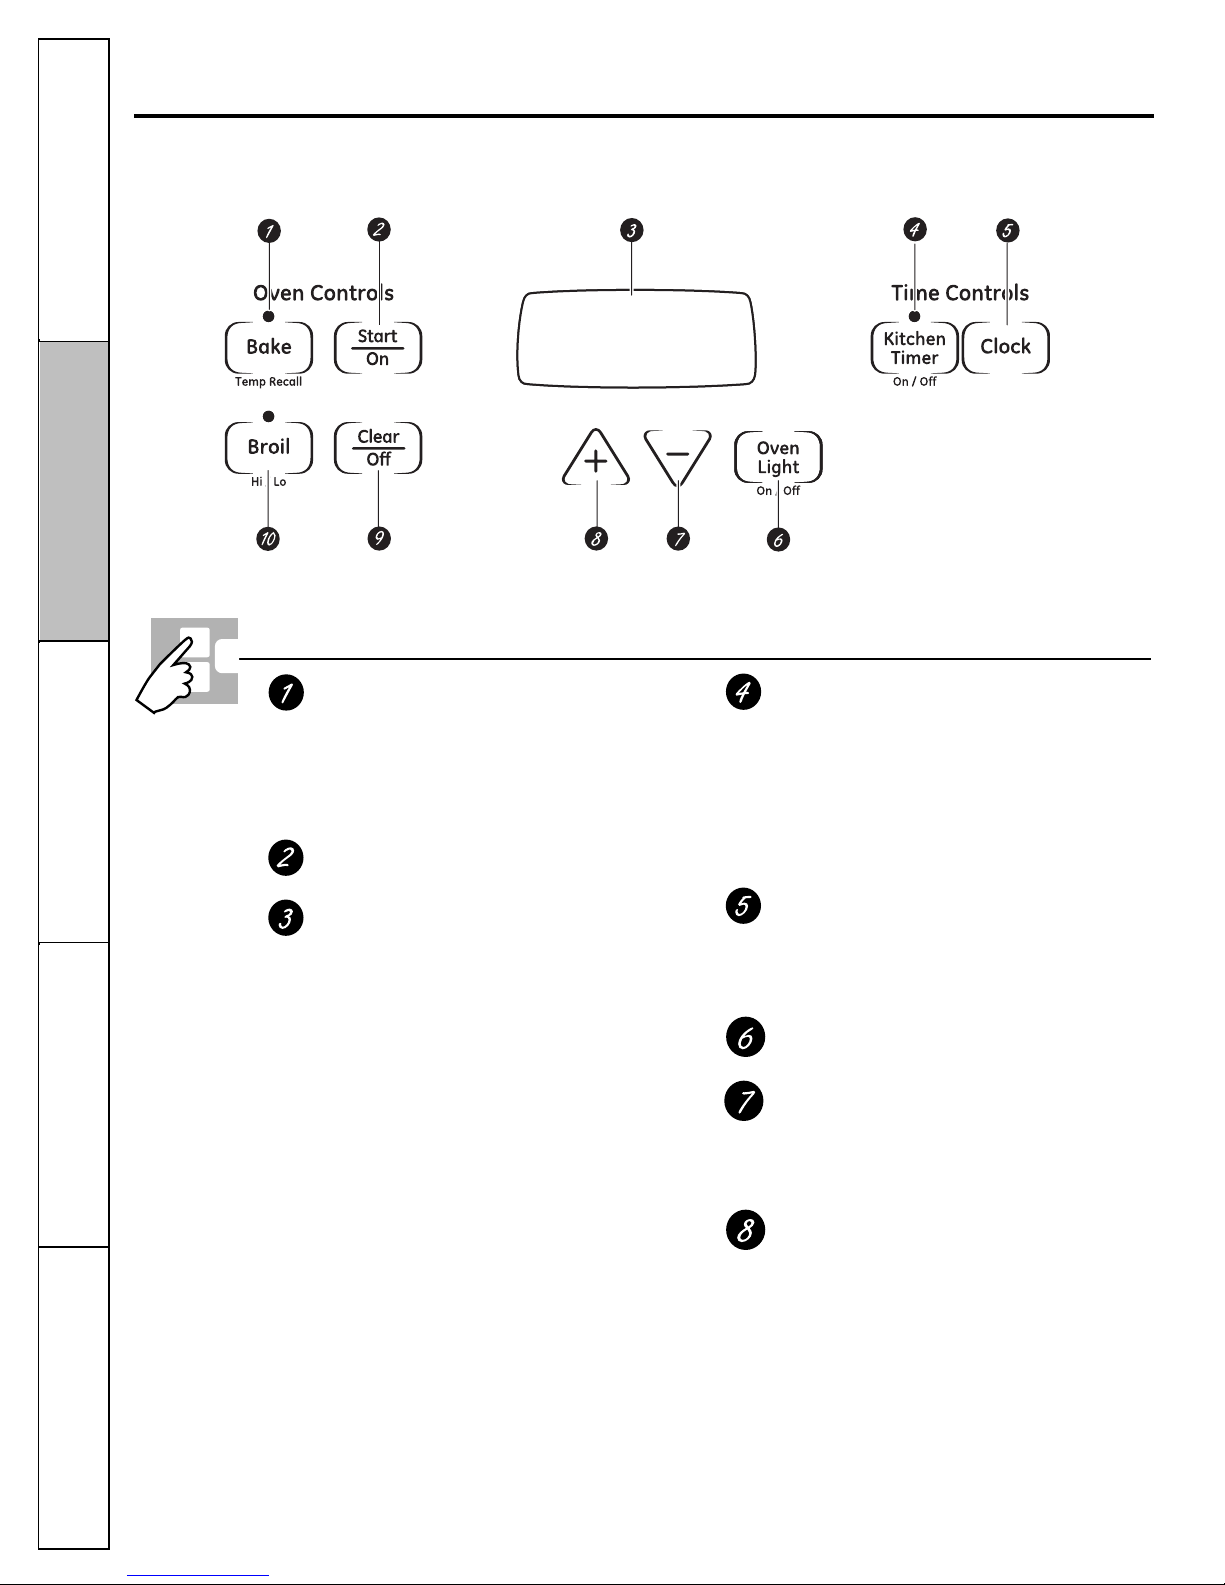
The electrode of the spark igniter is
exposed when the burner head is
removed. When one burner is turned to
Lite, all the burners spark. Do not
attempt to disassemble or clean
around any burner while another
burner is on. An electric shock may
result, which could cause you to knock
over hot cookware.
23
ge.com
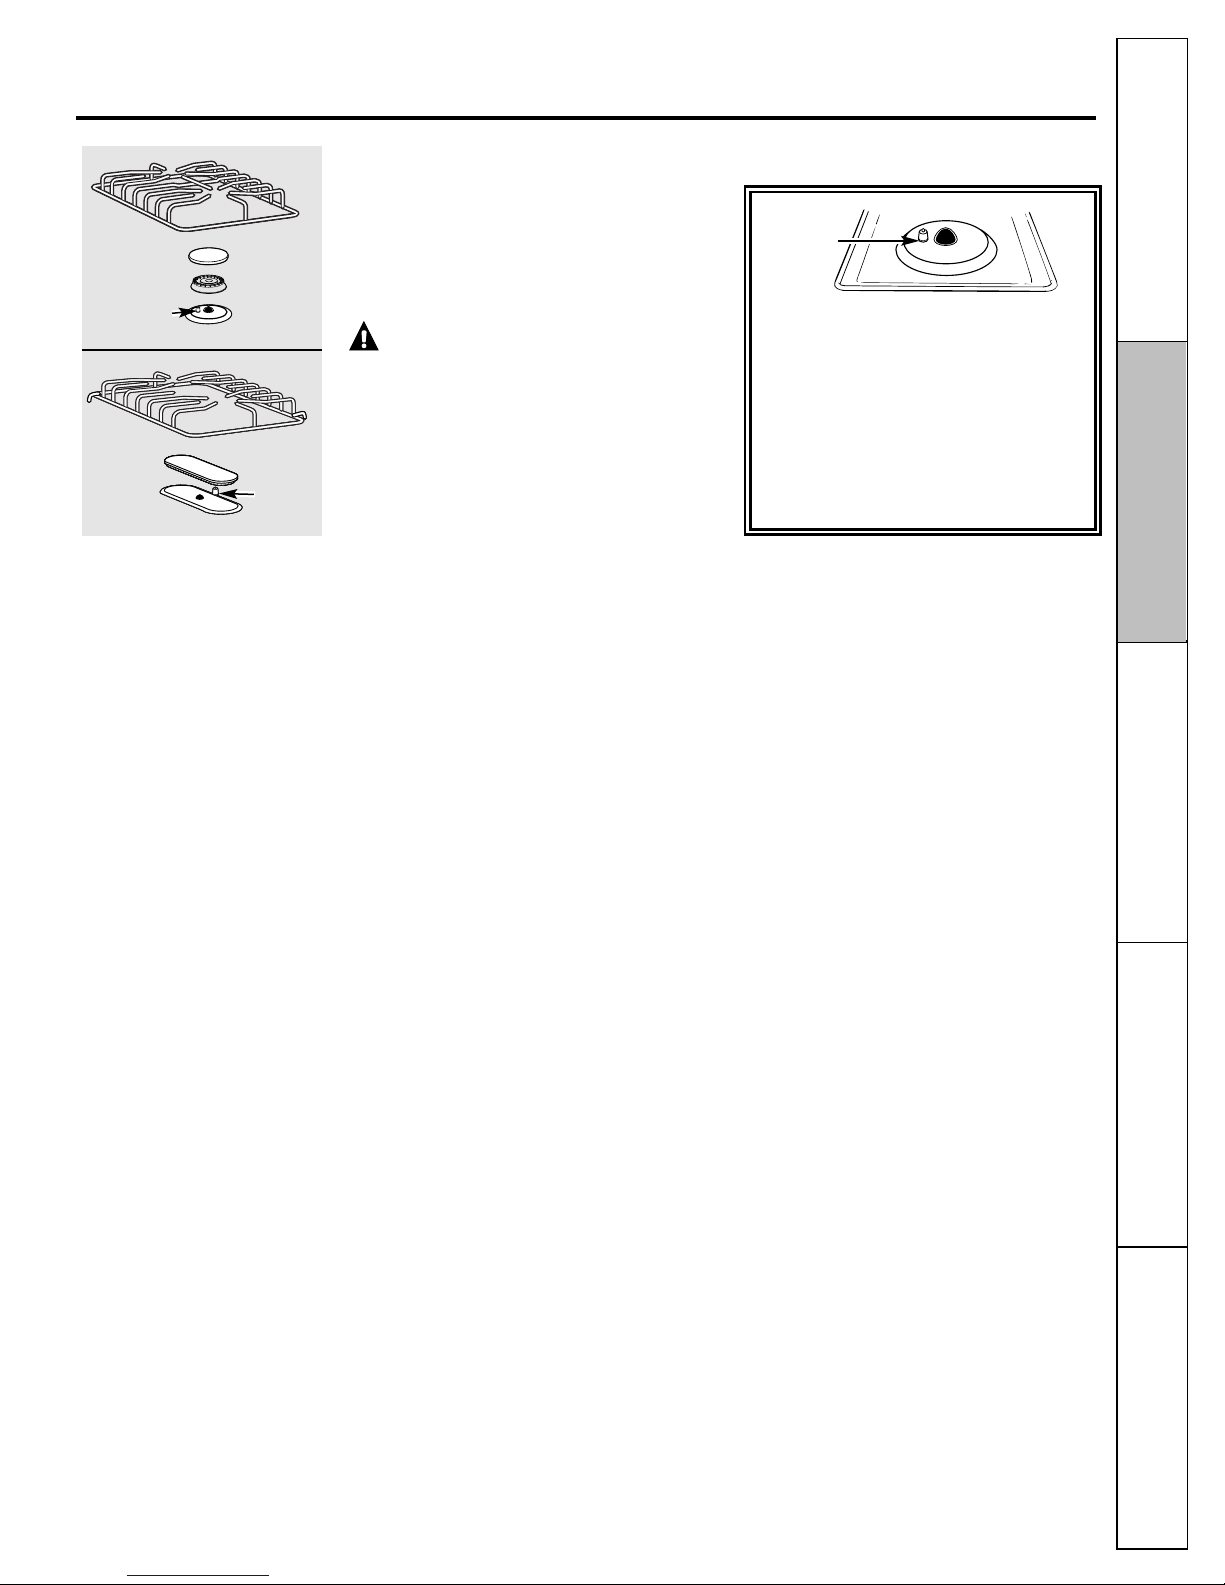
Burner Assemblies
Turn all controls OFF before removing the
burner parts.
The burner grates, caps, burner heads and
griddle can be lifted off, making them easy to
clean. The electrodes are not removable.
CAUTION: Do not operate the
cooktop without all burner parts and grates
in place.
Burner cap
Burner head
Side
Grate
Electrode
Burner
head
and cap
assembly
Center
Grate
Electrode
Consumer Support
Installation
Instructions
Troubleshooting TipsOperating InstructionsSafety Instructions
Electrode
Page 24
24
Operating Instructions
Safety Instructions
Installation
Instructions
Troubleshooting Tips
Consumer Support
Burner Caps and Heads
Burner caps
Lift off when cool. Wash burner caps in hot,
soapy water and rinse with clean water. You
may scour with a plastic scouring pad to
remove burned-on food particles.
Burner heads
For proper ignition, make sure the small hole
in the section that fits over the electrode is
kept open. A sewing needle or wire twist-tie
works well to unclog it.
The slits in the burner heads must be kept
clean at all times for an even, unhampered
flame.
Clogged or dirty burner ports or electrodes will
not allow the burner to operate properly.
Any spill on or around an electrode must be
carefully cleaned. Take care to not hit an
electrode with anything hard or it could
be damaged.
You should clean the burner caps and
burner heads routinely, especially after bad
spillovers, which could clog the openings
in the burner heads. Lift off when cool.
To remove burned-on food, soak the burner
heads in a solution of mild liquid detergent
and hot water for 20–30 minutes. For more
stubborn stains, use a toothbrush.
NOTE: Do not use steel wool or scouring
powders to clean the burners.
After cleaning
Before putting the burner caps and heads
back, shake out excess water and then dry
them thoroughly by setting in a warm oven
for 30 minutes.
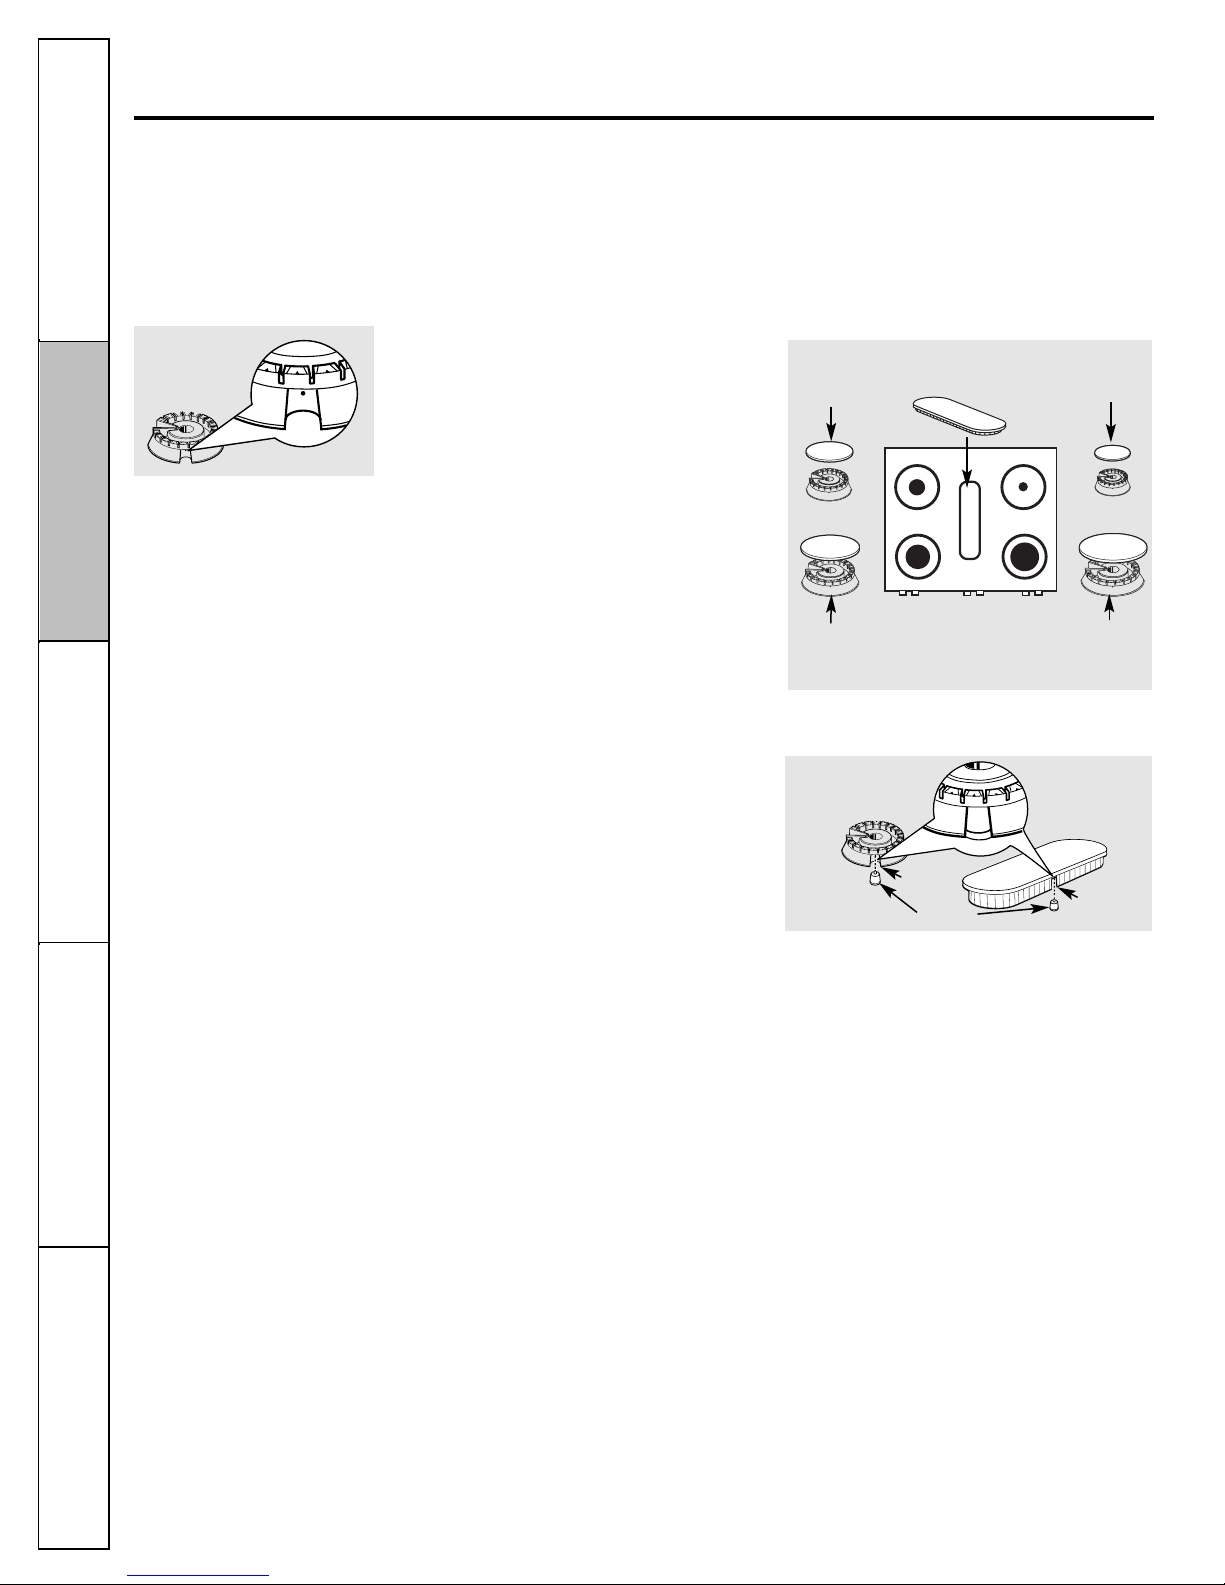
Replacement
Replace the burner heads and caps. Make
sure that the heads and caps are replaced in
the correct location. There is one oval (center)
head and cap assembly and four side heads
and caps.
Make sure the slot in the burner head is
positioned over the electrode.
Make sure that the heads and caps are
replaced in the correct locations.
Medium
burner head
and cap
Front of range
Large burner
head and
cap
Small burner
head and
cap
Extra large
burner head
and cap
Use a sewing needle or twist-tie
to unclog the small hole in the
burner head.
Oval head and cap
assembly
Slot
Electrode
Slot
Care and cleaning of the range.
Page 25
25
ge.com
Consumer Support
Operating Instructions
Safety Instructions
Installation
Instructions
Troubleshooting Tips
Burner Grates
Lift out when cool. First remove the center
grate and then the side grates. Grates should
be washed regularly and, of course, after
spillovers. Wash them in hot, soapy water
and rinse with clean water. After cleaning, dry
them thoroughly by putting them in a warm
oven for a few minutes. Don’t put the grates
back on the range while they are wet. When
replacing the grates, be sure they are
positioned securely over the burners.
Do not operate a burner for an extended
period of time without cookware on the
grate. The finish on the grate may chip
without cookware to absorb the heat.
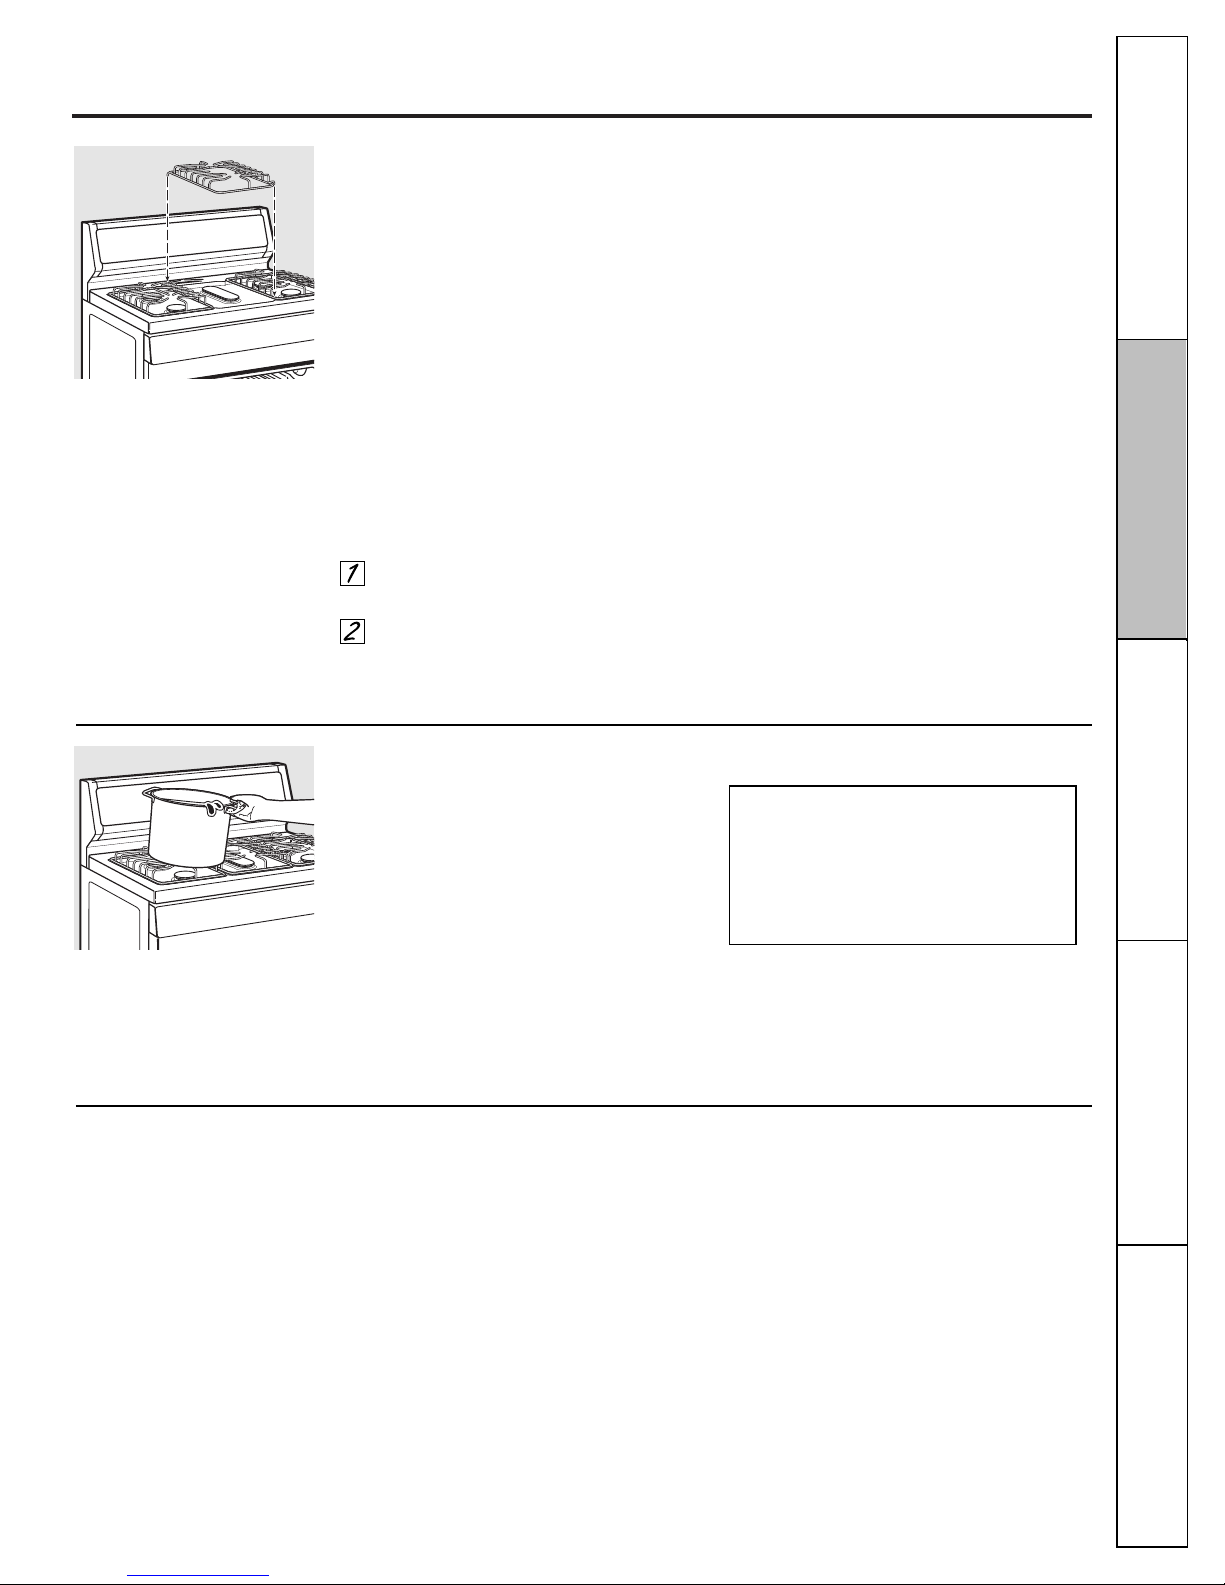
To replace the grates:
Place the side grates in position on the
cooktop.
Place the center grate on the cooktop,
making sure the locking feet hook over
the side grates.
To get rid of burned-on food, place the grates
in a covered container. Add 1/4 cup ammonia
and let them soak several hours or overnight.
Wash, rinse well and dry.
Although they are durable, the grates
will gradually lose their shine, regardless
of the best care you can give them. This
is due to their continual exposure to high
temperatures. You will notice this sooner
with lighter color grates.
Cooktop Surface
To avoid damaging the porcelain enamel
surface of the cooktop and to prevent it
from becoming dull, clean up spills right
away. Foods with a lot of acid (tomatoes,
sauerkraut, fruit juices, etc.) or foods with
high sugar content could cause a dull spot
if allowed to set.
When the surface has cooled, wash and
rinse. For other spills such as fat spatterings,
etc., wash with soap and water once the
surface has cooled. Then rinse and polish
with a dry cloth.
NOTE: Do not lift the cooktop. Lifting the
cooktop can lead to damage and improper
operation of the range.
NOTE: Do not store flammable materials
in an oven or near the cooktop. Do not
store or use combustible materials,
gasoline or other flammable vapors and
liquids in the vicinity of this or any other
appliance.
Stainless Steel Surfaces (on some models)
Do not use a steel wool pad; it will scratch
the surface.
To clean the stainless steel surface, use
warm sudsy water or a stainless steel
cleaner or polish. Always wipe the surface in
the direction of the grain. Follow the cleaner
instructions for cleaning the stainless steel
surface.
To inquire about purchasing stainless steel
appliance cleaner or polish, or to find the
location of a dealer nearest you, please call
our toll-free number:
National Parts Center 800.626.2002
ge.com
Page 26

Lift-Off Oven Door
The oven door is removable, but it is heavy.
You may need help removing and replacing
the door.
To remove the door, open it a few inches to
the special stop position that will hold the
door open. Grasp firmly on each side and lift
the door straight up and off the hinges.
NOTE: Be careful not to place hands between
the hinge and the oven door frame as the
hinge could snap back and pinch fingers.
To replace the door, make sure the hinges
are in the special stop position. Position the
slots in the bottom of the door squarely over
the hinges. Then lower the door slowly and
evenly over both hinges at the same time. If
the hinges snap back against the oven frame,
pull them back out.
To clean the inside of the door:
■ Do not allow excess water to run into any
holes or slots in the door.
■ The area outside the gasket can be
cleaned with a soap-filled steel wool or
plastic pad.
To clean the outside of the door:
■ Use soap and water to thoroughly clean
the top, sides and front of the oven door.
Rinse well. You may also use a glass
cleaner to clean the glass on the outside
of the door.
■ Spillage of marinades, fruit juices, tomato
sauces and basting materials containing
acids may cause discoloration and should
be wiped up immediately. When the
surface is cool, clean and rinse.
■ Do not use oven cleaners, cleansing
powders or harsh abrasives on the
outside of the door.
Oven Bottom
The oven bottom has a porcelain enamel
finish. To make cleaning easier, protect the
oven bottom from excessive spillovers by
placing a cookie sheet on the shelf below the
shelf you are cooking on. This is particularly
important when baking a fruit pie or other
foods with a high acid content. Hot fruit
fillings or other foods that are highly acidic
(such as tomatoes, sauerkraut and sauces
with vinegar or lemon juice) may cause
pitting and damage to the porcelain enamel
surface and should be wiped up immediately.
We don’t recommend using aluminum foil on
the oven bottom. It can affect air flow if the
holes are blocked and it can concentrate heat
at the bottom of the oven, resulting in poor
baking performance.
To clean up spillovers, use soap and water, an
abrasive cleaner or soap-filled steel-wool pad.
Rinse well to remove any soap.
Lift the door straight up and off
the hinges.
The gasket is designed with a gap
at the bottom to allow for proper
air circulation.
Do not rub or clean the door
gasket— it has an extremely low
resistance to abrasion.
If you notice the gasket becoming
worn, frayed or damaged in any
way or if it has become displaced
on the door, you should have it
replaced.
Operating Instructions
Safety Instructions
Installation
Instructions
Troubleshooting TipsConsumer Support
Care and cleaning of the range.
26
Page 27
27
ge.com
Consumer SupportOperating InstructionsSafety Instructions
Installation
Instructions
Troubleshooting Tips
Broiler Compartment
When the broiler compartment is cool,
remove any grid and pan. Clean the broiler
compartment with hot soapy water. Rinse
thoroughly with a damp cloth and dry.
Oven Shelves
Clean the shelves with an abrasive cleanser
or scouring pad. After cleaning, rinse the
shelves with clean water and dry with a
clean cloth.
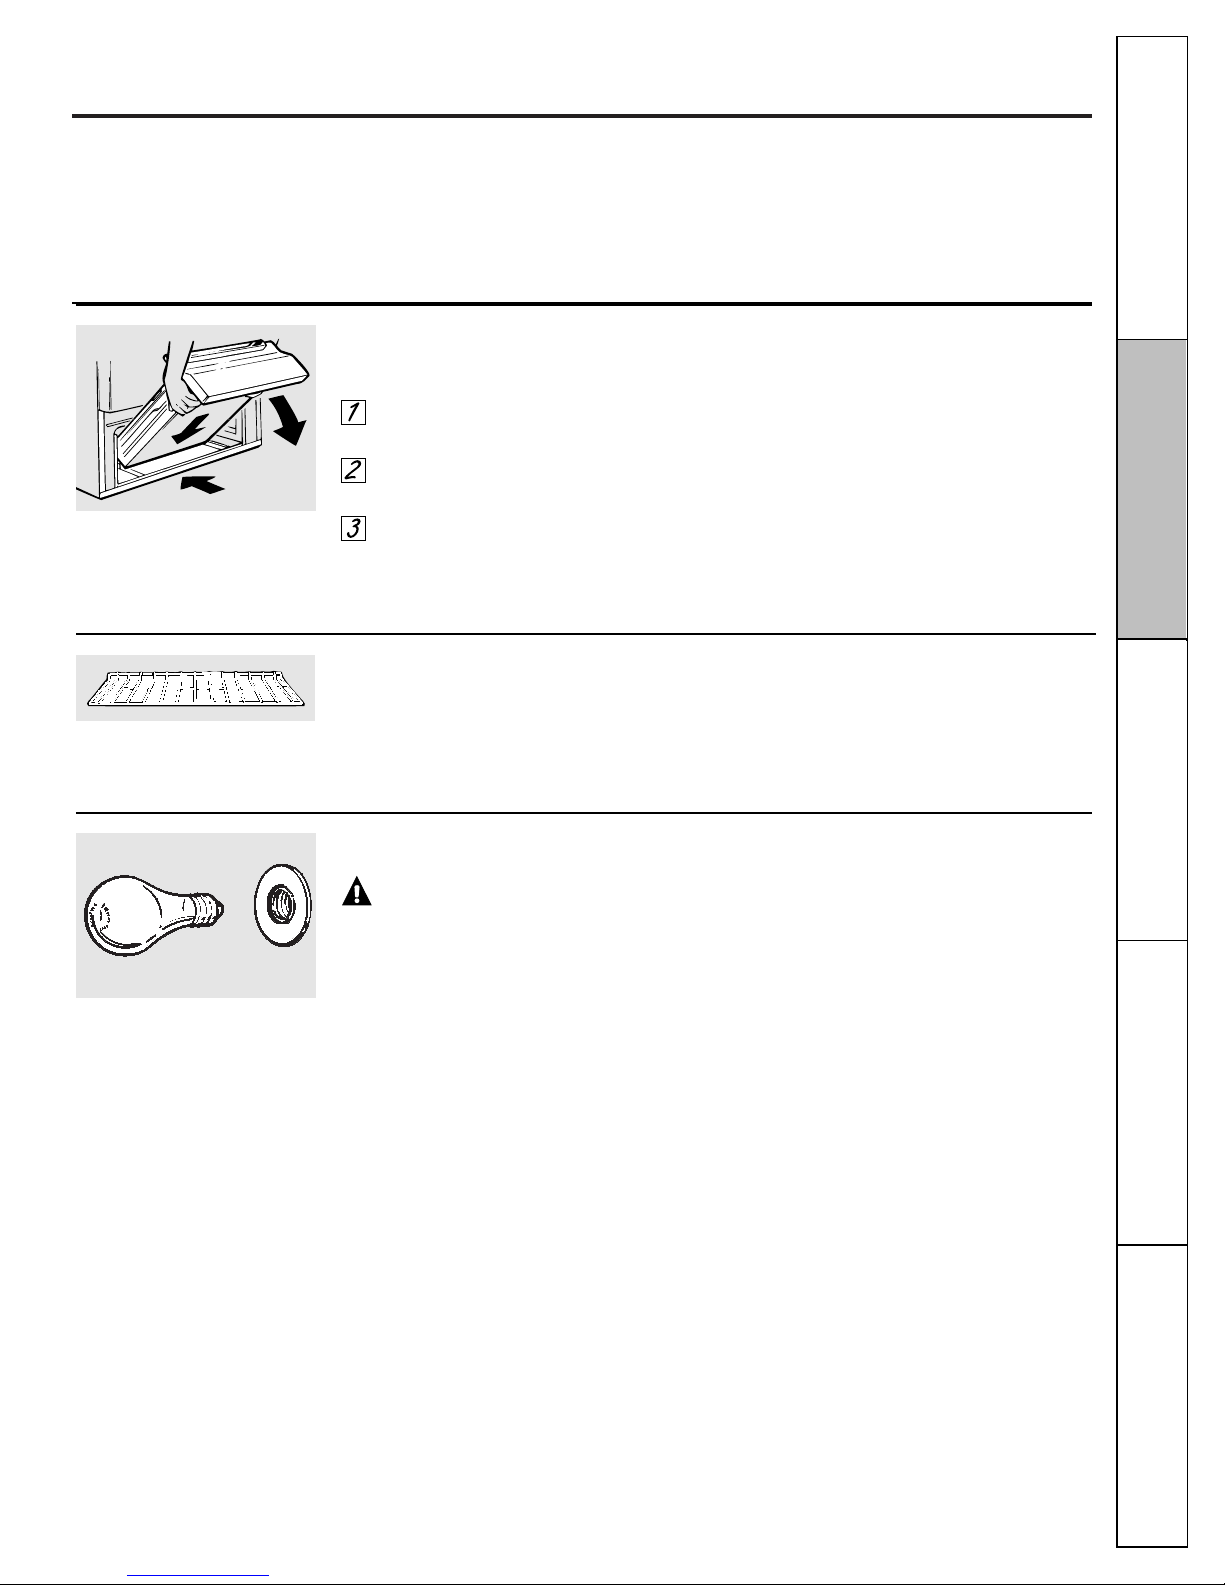
Oven Light Replacement
CAUTION: Before replacing your
oven light bulb, disconnect the electrical
power to the range at the main fuse or circuit
breaker panel. Do not touch a hot light bulb
with wet hands or a wet cloth. Be sure to let
the bulb cool completely and use a dry cloth.
The light bulb is located in the upper left
corner (may vary) of the oven. Replace the
bulb with a 40-watt appliance bulb only.
Removable Broiler Drawer
To remove:
When the broiler is cool, remove the grid
and pan.
Pull the broiler drawer out until it stops,
then push it back in about one inch.
Grasp the handle, lift and pull the broiler
drawer out. Clean the broiler drawer with
hot soapy water.
To replace:
Hold the broiler drawer in the raised position
as you slide it partway into the range. Then
lower the drawer and push it completely
closed.
Page 28

Oven Air Vents
Never block the vents (air openings) of the
range. They provide the air inlet and outlet
that are necessary for the range to operate
properly with correct combustion.
Air openings are located at the rear of the
cooktop, at the top and bottom of the oven
door, and at the bottom of the range, under
kick panel or broiler compartment (depending
on the model).
Lower Control Panel (Front Manifold Panel) and Knobs
It’s a good idea to wipe the control panel after
each use of the oven. Use a damp cloth to
clean or rinse. For cleaning, use mild soap
and water or a 50/50 solution of vinegar and
water. For rinsing, use clean water. Polish dry
with a soft cloth.
Do not use abrasive cleansers, strong liquid
cleaners, plastic scouring pads or oven
cleaners on the control panel—they will
damage the finish.
Do not bend knobs by pulling them up or
down or by hanging a towel or other such
loads. This can damage the gas valve shaft.
The control knobs may be removed for easier
cleaning.
Make sure the knobs are in the Off positions
and pull them straight off the stems for
cleaning.
The knobs can be cleaned in a dishwasher
or they may also be washed with soap and
water. Make sure the insides of the knobs are
dry before replacing.
Replace the knobs in the Off position to
ensure proper placement.
Metal parts can be cleaned with soap and
water. Do not use steel wool, abrasives,
ammonia, acids or commercial oven
cleaners. Dry with a soft cloth.
Vent appearance and location vary.
Pull the knob straight off the stem.
Porcelain Oven Interior
With proper care, the porcelain enamel
interior will retain its attractive finish for many
years.
Soap and water will normally do the job.
Heavy spattering or spillovers may require
cleaning with a mild abrasive cleanser.
Soap-filled scouring pads may also be used.
Do not allow food spills with a high sugar or
acid content (such as tomatoes, sauerkraut,
fruit juices or pie filling) to remain on the
surface. They may cause dull spots even
after cleaning.
Household ammonia may make the cleaning
job easier. Place 1/2 cup ammonia in a
shallow glass pan and leave in a cold oven
overnight. The ammonia fumes will help
loosen the burned-on grease and food.
When necessary, you may use a commercial
oven cleaner. Follow the package directions.
Cautions about using spray-on oven
cleaners:
■ Be careful where the oven cleaner is
sprayed.
■ Do not spray oven cleaner on the electrical
controls and switches (on some models)
because it could cause a short circuit and
result in sparking or fire.
■ Do not allow a film from the cleaner to
remain on the temperature sensing bulb—
it could cause the oven to heat improperly.
(The bulb is located at the rear of the oven.)
Carefully wipe the bulb clean after each
oven cleaning, being careful not to move the
bulb as a change in its position could affect
how the oven bakes.
■ Do not spray any oven cleaner on the
outside oven door, handles or any exterior
surface of the oven, cabinet or painted
surfaces. The cleaner can damage these
surfaces.
Operating Instructions
Safety Instructions
Installation
Instructions
Troubleshooting TipsConsumer Support
28
Care and cleaning of the range.
Page 29
Installation
Range
Instructions
If you have questions, call 800.GE.CARES or visit our Website at: ge.com
BEFORE YOU BEGIN
Read these instructions completely and carefully.
Installation of this range must conform with
local codes, or in the absence of local codes,
with the National Fuel Gas Code, ANSI
Z223.1/NFPA.54, latest edition. This range has
been design-certified by CSA International
according to ANSI Z21.1, latest edition and
Canadian Gas Association according to
CAN/CGA-1.1 latest edition.
As with any appliance using gas and generating
heat, there are certain safety precautions you
should follow. You will find these precautions in the
Important Safety Information section in the front
of this manual. Read them carefully.
29
In the Commonwealth of
Massachusetts:
• This product must be installed by a licensed plumber
or gas fitter.
• When using ball-type gas shut-off valves, they shall
be the T-handle type.
• A flexible gas connector, when used, must not
exceed 3 feet.
•
IMPORTANT – Save these instructions for
local electrical inspector’s use.
•
IMPORTANT – Observe all governing codes
and ordinances.
• Note to Installer – Be sure to leave these
instructions with the Consumer.
• Note to Consumer – Keep these instructions for
future reference.
• Note – This appliance must be properly grounded.
• Servicer – The electrical diagram is in an envelope
attached to the back of the range.
• Skill level – Installation of this appliance requires
basic mechanical skills.
• Proper installation is the responsibility of the
installer.
• Product failure due to improper installation is not
covered under the Warranty.
Page 30

MATERIALS YOU MAY NEED
• Gas line shut-off valve
• Pipe joint sealant or UL-approved pipe thread tape
with Teflon* that resists action of natural and LP
gases
• Flexible metal appliance connector (1/2 ″ I.D.)
A 5-foot length is recommended for ease of
installation but other lengths are acceptable. Never
use an old connector when installing a new range.
• Flare union adapter for connection to gas supply
line (3/4 ″ or 1/2 ″ NPT x 1/2 ″ I.D.)
• Flare union adapter for connection to pressure
regulator on range (1/2 ″ NPT x 1/2 ″ I.D.)
• Liquid leak detector or soapy water.
• Lag bolt or 1/2″ O.D. sleeve anchor (for concrete
floors only).
*Teflon: Registered trademark of DuPont
FOR YOUR SAFETY
Do not store or use combustible materials, gasoline
or other flammable vapors and liquids in the
vicinity of this or any other appliance.
If you smell gas:
Open windows.
Don’t touch electrical switches.
Extinguish any open flame.
Immediately call your gas supplier.
TOOLS YOU WILL NEED
Flat-blade screwdriver
Pipe wrenches (2)
(one for backup)
Phillips screwdriver
Open-end or
adjustable wrench
Pencil and ruler
Level
PART INCLUDED
Anti-tip bracket kit
30
Installation Instructions
Drill, awl or nail
Page 31

Installation Instructions
WARNING!
INSTALLATION SAFETY
INSTRUCTIONS
Read these instructions completely and carefully.
Improper installation, adjustment, alteration,
service or maintenance can cause injury or
property damage. Refer to this manual. For
assistance or additional information, consult a
qualified installer, service agency, manufacturer
(dealer) or the gas supplier.
Never reuse old flexible connectors. The use of old
flexible connectors can cause gas leaks and personal
injury. Always use NEW flexible connectors when
installing a gas appliance.
IMPORTANT – Remove all packing material
and literature from oven before connecting gas and
electrical supply to range.
CAUTION – Do not attempt to operate the
oven of this range during a power failure (Electric
Ignition models only).
• Have your range installed by a qualified installer.
• Your range must be electrically grounded in
accordance with local codes or, in the absence of
local codes, in accordance with the National
Electrical Code (ANSI/NFPA 70, latest edition). See
Electrical Connections in this section.
• Before installing your range on linoleum or any
other synthetic floor covering, make sure the floor
covering can withstand 180°F without shrinking,
warping or discoloring. Do not install the range over
carpeting unless a sheet of 1/4″ thick plywood or
similar insulator is placed between the range and
carpeting.
• Make sure the wall coverings around the range can
withstand heat generated by the range up to 200°F
.
• Avoid placing cabinets above the range. To reduce
the hazard caused by reaching over the open
flames of operating burners, install a ventilation
hood over the range that projects forward at least
5″ beyond the front of the cabinets.
• The ventilating hood must be constructed of sheet
metal not less than 0.0122″ thick. Install above the
cooktop with a clearance of not less than 1/4″
between the hood and the underside of the
combustible material or metal cabinet. The hood
must be at least as wide as the appliance and
centered over the appliance. Clearance between the
cooking surface and the ventilation hood surface
MUST NEVER BE LESS THAN 24 INCHES.
EXCEPTION: Installation of a listed microwave oven
or cooking appliance over the cooktop shall conform
to the installation instructions packed with that
appliance.
• If cabinets are placed above the range, allow a
minimum clearance of 30″ between the cooking
surface and the bottom of unprotected cabinets.
• If a 30″ clearance between cooking surface and
overhead combustible material or metal cabinets
cannot be maintained, protect the underside of the
cabinets above the cooktop with not less than 1/4″
insulating millboard covered with sheet metal not
less than 0.0122″ thick. Clearance between the
cooking surface and protected cabinets MUST
NEVER BE LESS THAN 24 INCHES.
• The vertical distance from the plane of the cooking
surface to the bottom of adjacent overhead cabinets
extending closer than 1″ to the plane of the range
sides must not be less than 18″. (See the Dimensions
and Clearances illustration in this section.)
•
CAUTION – Items of interest to children
should not be stored in cabinets above a range or
on the backsplash of a range—children climbing on
the range to reach items could be seriously injured.
31
Page 32

Installation Instructions
DIMENSIONS AND CLEARANCES
Provide adequate clearances between the range and adjacent combustible surfaces. These dimensions must be met for
safe use of your range. The location of the electrical outlet and pipe opening (see Gas Pipe and Electric Outlet Locations) may
be adjusted to meet specific requirements.
The range may be placed with 0″ clearance (flush) at the back wall.
32
To cabinets
below cooktop
and at the
range back
30”
30”
2”
Minimum
13”
To wall on either side
Maximum
depth for
cabinets above
countertops
Front edge
of the range
side panel
forward from
cabinet
18”
0”
1/4”
Minimum
to cabinets
on either
side of the
range
36”
273/4” to 281/2”
Depth with door closed (includes door handle)
Depth varies depending on model.
See specifications sheet for your model.
30”
361/4” ± 1/4”
Depth with door open:
463/8” (glass door)
475/8” (porcelain door)
Height
473/8”
Page 33

33
Installation Instructions
WARNING!
ANTI-TIP DEVICE
All ranges can tip and injury could result.
To prevent accidental tipping of the range,
attach an approved Anti-Tip device to the
wall. (See Installing the Anti-Tip Device in this
section.) To check if the device is installed and
engaged properly, carefully tip the range
forward. The Anti-Tip device should engage
and prevent the range from tipping over.
If you pull the range out from the wall for
any reason, make sure the Anti-Tip device
is engaged when you push the range back
against the wall.
■ For your safety, never use your range for warming
or heating the room. Your oven and cooktop are not
designed to heat your kitchen. Top burners should
not be operated without cookware on the grate. Such
abuse could result in fire and damage to your range
and will void your warranty.
■ Do not store or use combustible materials, gasoline
or other flammable vapors and liquids in the vicinity
of this or any other appliance. Explosions or fires
could result.
■ Do not use oven for a storage area. Items stored in
the oven can ignite.
■ Do not let cooking grease or other flammable
materials accumulate in or near the range.
LOCATION
Do not locate the range where it may be subject to
strong drafts. Any openings in the floor or wall behind
the range should be sealed. Make sure the openings
around the base of the range that supply fresh air for
combustion and ventilation are not obstructed by
carpeting or woodwork.
Your range, like many other household items, is heavy and
can settle into soft floor coverings such as cushioned vinyl
or carpeting. Use care when moving the range on this type
of flooring. It is recommended that the following simple and
inexpensive instructions be followed to protect your floor.
The range should be installed on a sheet of plywood (or
similar material). When the floor covering ends at the front
of the range, the area that the range will rest on should be
built up with plywood to the same level or higher than the
floor covering.
This will allow the range to be moved for cleaning or
servicing. Also, make sure your floor covering will withstand
180°F. (See the Installation Safety Instructions section.)
Make sure the wall coverings around your range can
withstand the heat generated (up to 200°F) by the range.
(See the Installation Safety Instructions section.)
IMPORTANT!
Remove all tape and packaging. Make sure the burners
are properly seated and level.
Lift up the cooktop (on models with standard twin
burners) and remove any packing material under it.
Take the accessory pack out of the oven and/or drawer.
Check to be sure that no range parts have come loose
during shipping.
MODEL AND SERIAL NUMBER LOCATION
Depending on your range, you’ll find the model and serial
numbers on a label on the front frame of the range, behind
the kick panel or broiler compartment.
Page 34

34
Installation Instructions
PROVIDE ADEQUATE GAS SUPPLY
Your range is designed to operate at a pressure of
4″ or 5″ (depending on model) of water column on
natural gas or, if designed for LP gas (propane or
butane), 10″ of water column.
Make sure you are supplying your range with the type
of gas for which it is designed.
This range is convertible for use on natural or propane
gas. If you decide to use this range on LP gas,
conversion must be made by a qualified LP installer
before attempting to operate the range on that gas.
For proper operation, the pressure of natural gas
supplied to the regulator must be between 5″ and
13″ of water column.
For LP gas, the pressure supplied must be between
10″ and 13″ of water column.
When checking for proper operation of the regulator,
the inlet pressure must be at least 1″ greater than the
operating (manifold) pressure as given above.
The pressure regulator located at the inlet of the range
manifold must remain in the supply line regardless of
whether natural or LP gas is being used.
A flexible metal appliance connector used to connect
the range to the gas supply line should have an I.D. of
1/2″ and be 5 feet in length for ease of installation.
1
CONNECT THE RANGE TO GAS
Shut off the main gas supply valve before
disconnecting the old range and leave it off until the
new hookup has been completed. Don’t forget to
relight the pilot on other gas appliances when you
turn the gas back on.
Because hard piping restricts movement of the range,
the use of a CSA International-certified flexible metal
appliance connector is recommended unless local
codes require a hard-piped connection.
Never use an old connector when installing a new
range. If the hard piping method is used, you must
carefully align the pipe; the range cannot be moved
after the connection is made.
To prevent gas leaks, put pipe joint compound on, or
wrap pipe thread tape with Teflon* around, all male
(external) pipe threads.
Install a manual gas line shut-off valve in the gas
line in an easily accessed location outside of the
range. Make sure everyone operating the range
knows where and how to shut off the gas supply
to the range.
Install male 1/2″ flare union adapter to the 1/2″
NPT internal thread at inlet of regulator. Use a
backup wrench on the regulator fitting to avoid
damage.
Install male 1/2″ or 3/4″ flare union adapter to the
NPT internal thread of the manual shut-off valve,
taking care to back-up the shut-off valve to keep
it from turning.
Connect flexible metal appliance connector to the
adapter on the range. Position range to permit
connection at the shut-off valve.
When all connections have been made, make
sure all range controls are in the off position and
turn on the main gas supply valve. Use a liquid
leak detector at all joints and connections to
check for leaks in the system.
When using test pressures greater than 1/2 psig to
pressure test the gas supply system of the residence,
disconnect the range and individual shut-off valve
from the gas supply piping. When using test pressures
of 1/2 psig or less to test the gas supply system,
simply isolate the range from the gas supply system
by closing the individual shut-off valve.
*Teflon: Registered trademark of DuPont
E
D
C
B
A
2
WARNING:
DO NOT USE A FLAME TO
CHECK FOR GAS LEAKS.
Page 35

Installation Instructions
35
GAS PIPE AND ELECTRICAL OUTLET LOCATIONS
This area allows for flush range
installation with through-the-wall
connection of pipe stub/shut-off
valve and rear wall 120V outlet.
This area allows for flush range installation
with through-the-floor connection of pipe
stub/shut-off valve.
Shortest connection from
hard pipe stub location to
range hookup.
Page 36

36
Installation Instructions
FLEXIBLE CONNECTOR HOOKUP OPTION
RIGID PIPE HOOKUP OPTIONS
Pressure
regulator
Gas Flow into Range
Flex connector
(6 feet maximum)
Adapter
Installer: Inform the
consumer of the
location of the gas
shut-off valve.
1/2 ″ or 3/4″
Gas pipe
Adapter
Gas shut-off
valve
Pressure
regulator
45° Elbow
Nipple
Union
90° Elbow
Black iron
pipe
Union
Nipple
Gas shut-off
valve
1/2″ or 3/4″
Gas pipe
Installer: Inform the
consumer of the
location of the gas
shut-off valve.
Gas shutoff valve
1/2 ″ or 3/4″
Gas pipe
Pressure
regulator
Nipple
90° Elbow
90° Elbow
Adapter
Adapter
90° Elbow
Quick connect
or union
Installer: Inform the
consumer of the
location of the gas
shut-off valve.
Alternate Hookup
Nipple
Nipple
90° Elbow
Gas Flow into Range
Gas Flow into Range
Page 37

37
Installation Instructions
ELECTRICAL CONNECTIONS
Electrical Requirements
120-volt, 60 Hertz, properly grounded branch circuit
protected by a 15-amp or 20-amp circuit breaker or time
delay fuse.
Extension Cord Cautions
Because of potential safety hazards associated with certain
conditions, we strongly recommend against the use of an
extension cord. However, if you still elect to use an extension
cord, it is absolutely necessary that it be a UL-listed, 3-wire
grounding-type appliance extension cord and that the
current carrying rating of the cord in amperes be equivalent
to, or greater than, the branch circuit rating.
Grounding
IMPORTANT—(Please read carefully)
FOR PERSONAL SAFETY, THIS APPLIANCE MUST BE
PROPERLY GROUNDED.
The power cord of this appliance is equipped with a 3-prong
(grounding) plug which mates with a standard three-prong
grounding wall receptacle to minimize the possibility of
electric shock hazard from this appliance.
The customer should have the wall receptacle and circuit
checked by a qualified electrician to make sure the
receptacle is properly grounded.
Where a standard two-prong wall receptacle is
encountered, it is the personal responsibility and obligation
of the customer to have it replaced with a properly
grounded three-prong wall receptacle.
DO NOT, UNDER ANY CIRCUMSTANCES, CUT OR REMOVE
THE THIRD (GROUND) PRONG FROM THE POWER CORD.
A word about GFCI’s – GFCI’s are not required or
recommended for gas range receptacles.
Ground Fault Circuit Interrupters (GFCI’s) are devices that
sense leakage of current in a circuit and automatically
switch off power when a threshold leakage level is detected.
These devices must be manually reset by the consumer.
The National Electrical Code requires the use of GFCI’s in
kitchen receptacles installed to serve countertop surfaces.
Performance of the range will not be affected if operated on
a GFCI-protected circuit but occasional nuisance tripping of
the GFCI breaker is possible.
3
ELECTRICAL CONNECTIONS (CONT.)
Usage Situations where Appliance Power Cord
will be Disconnected Infrequently.
An adapter may be used only on a 15-amp circuit.
Do not use an adapter on a 20-amp circuit. Where
local codes permit, a TEMPORARY CONNECTION
may be made to a properly grounded two-prong wall
receptacle by the use of a UL-listed adapter, available
at most hardware stores. The larger slot in the adapter
must be aligned with the larger slot in the wall
receptacle to provide proper polarity in the connection
of the power cord.
When disconnecting the power cord from the adapter,
always hold the adapter with one hand. If this is not
done, the adapter ground terminal is very likely to
break with repeated use. Should this happen, DO NOT
USE the appliance until a proper ground has again
been established.
A
3
Preferred Method
Ensure proper ground
exists before use
Temporary Method
Ensure proper ground
and firm connection
before use
Align large prongs/slots
CAUTION: Attaching the adapter ground
terminal to the wall receptacle cover screw does
not ground the appliance unless the cover screw is
metal, and not insulated, and the wall receptacle is
grounded through the house wiring. The customer
should have the circuit checked by a qualified
electrician to make sure the receptacle is properly
grounded.
Page 38

ASSEMBLE SURFACE BURNERS
CAUTION: Do not operate the burner without
all burner parts in place.
Assemble the side burners as shown.
A
5
ASSEMBLE SURFACE BURNERS (CONT.)
Assemble the center burner. Make sure that the locking
feet on the center grate hook over the side grates.
Replace the burner heads and caps. Make sure that the
heads and caps are replaced in the correct location.
There is one oval (center) head and cap assembly and
four side heads and caps.
Make sure the slot in the burner head is positioned over
the electrode.
Make sure that the heads and caps are replaced in the
correct locations.
C
B
5
Installation Instructions
ELECTRICAL CONNECTIONS
(CONT.)
Usage Situations where Appliance Power Cord will be
Disconnected Frequently.
Do not use an adapter plug in these situations because
disconnecting of the power cord places undue strain on the
adapter and leads to eventual failure of the adapter ground
terminal. The customer should have the 2-prong wall
receptacle replaced with a three-prong (grounding)
receptacle by a qualified electrician before using the
appliance.
The installation of appliances designed for mobile home
installation must conform with the Manufactured Home
Construction and Safety Standard, Title 24 CFR, Part
3280 (formerly the Federal Standard for Mobile Home
Construction and Safety, Title 24, HUD, Part 280) or,
when such standard is not applicable, the Standard
for Manufactured Home Installations, latest edition
(Manufactured Home Sites, Communities and Set-Ups),
ANSI A225.1, latest edition, or with local codes.
Electric Disconnect
• Locate disconnect plug on the range back.
• Pinch sides of connector and pull out of range back.
B
3
SEAL THE OPENINGS
Seal any openings in the wall behind the range
and in the floor under the range when hookups are
completed.
4
Burner cap
Burner head
Side
Grate
Electrode
Burner head
and cap
assembly
Center Grate
Electrode
Locking
Foot
Locking
Foot
Medium burner
head and cap
Front of range
Large burner
head and cap
Small burner
head and cap
Extra large
burner head
and cap
Oval head and cap
assembly
Slot
Electrode
Slot
38
Page 39

39
CHECK IGNITION OF SURFACE
BURNERS
Operation of all cooktop and oven burners should be
checked after the range and gas supply lines have
been carefully checked for leaks.
Electric Ignition Models
Select a top burner knob and simultaneously push
in and turn to Lite position. You will hear a clicking
sound indicating proper operation of the spark
module. Once the air has been purged from the
supply lines, burners should light within 4 seconds.
After burner lights, rotate knob out of the Lite position.
Try each burner in succession until all burners have
been checked.
Quality of Flames
The combustion quality of burner flames needs to be
determined visually.
If burner flames look like (A), call for service. Normal
burner flames should look like (B) or (C), depending
on the type of gas you use.
With LP gas, some yellow tipping on outer cones is
normal.
(C) Soft blue flames—
Normal for natural
gas
(B) Yellow tips on
outer cones—Normal
for LP gas
(A) Yellow flames—
Call for service
6
CHECK IGNITION OF OVEN BURNER
The oven is designed to operate quietly and
automatically. To operate the oven, set the oven
control to a setting above 200°F. After 30–90 seconds,
the oven burner will ignite and burn until the set
temperature is reached. The oven burner will continue
to cycle on and off as necessary to maintain the
oven at the temperature indicated by the Oven
Control knob.
Electric ignition models require electrical power to
operate. In case of a power outage, the oven burners
on these models cannot be lit manually with a match.
Gas will not flow unless the glow bar is hot.
If the oven is in use when a power outage occurs, the
burner will shut off and cannot be re-lit until power
is restored.
7
Installation Instructions
Page 40

40
LEVELING THE RANGE
Install the oven shelves in the oven and position the
range where it will be installed.
Check for levelness by placing a spirit level or a cup,
partially filled with water, on one of the oven shelves. If
using a spirit level, take two readings—with the level
placed diagonally first in one direction and then the
other.
Remove the kick panel or open the broiler
compartment. See the Care and cleaning of the range
section. The front leveling legs can be adjusted from the
bottom and the rear legs can be adjusted from the top
or the bottom.
Use an open-end or adjustable wrench to adjust the
leveling legs until the range is level.
After the range is level, slide the range away from the
wall so that the Anti-Tip device can be installed.
E
D
C
B
A
9
Installation Instructions
ADJUST BROIL AND OVEN BURNER
AIR ADJUSTMENT SHUTTERS IF
NECESSARY
(CONT.)
On some models, remove the metal shield at the rear
of the cavity. The air adjustment shutter is behind this
shield.
To adjust the flow of air to the burner, loosen the
Phillips-head screw and rotate the shutter to allow
more or less air into the burner tube.
8
Leg
leveler
Lower
range
Raise
range
(on some models)
Raise
range
Lower
range
(on some models)
ADJUST BROIL AND OVEN BURNER
AIR ADJUSTMENT SHUTTERS IF
NECESSARY
To determine if the oven/broiler burner flames are
burning properly, first remove the oven bottom.
To remove the oven bottom:
Remove screws holding down rear of oven
bottom.
Grasp oven bottom at finger slots on each side.
Lift rear of oven bottom enough to clear the lip
of range frame, then pull out.
With the oven bottom removed, properly
adjusted flames should have approximately 1″
blue cones and, if range is supplied with natural
gas, should burn with no yellow tipping. (With
most LP gas, small yellow tips at the end of
outer cones are normal.) Flames should not lift
off burner ports. If lifting is observed, gradually
reduce air shutter opening until flames are
stabilized.
The shutter for the oven burner is near the back
wall of the oven and behind the kick panel or
broiler compartment (depending on the model).
Remove the panel or open the broiler. See the
Care and cleaning of the range
section.
C
B
A
8
Oven bottom
Loosen
Air adjustment shutter
Metal shield
(on some models)
Page 41

Installation Instructions
INSTALLING THE ANTI-TIP DEVICE
Mark the wall where the RIGHT EDGE of the
range is to be located. Be sure to allow for the
countertop overhang if you intend to install the
range next to cabinets.
Locate the outside edge of the device 2
1
⁄8 ″
toward the center of the range from the marked
edge of the range.
Using the device as a template, mark the position
of the hole for the screw.
For wood construction, drill a pilot hole at an
angle of 20 degrees from the horizontal. A nail or
awl may be used if a drill is not available.
Mount the Anti-Tip device with the screw provided.
For cement or concrete construction, you will need
a 1/4″ x 1
1
⁄2″ lag bolt and a 1/2″ O.D. sleeve anchor,
which are not provided. Drill the recommended size
hole for the hardware.
D
C
B
A
10
INSTALLING THE ANTI-TIP DEVICE
(CONT.)
Install the sleeve anchor into the drilled hole and then
install the lag bolt through the device. The bolt must
be properly tightened as recommended for the
hardware.
Slide the range against the wall, and check for
proper installation by grasping the front edge of
the cooktop and carefully attempting to tilt the
range forward.
E
10
WHEN ALL HOOKUPS ARE COMPLETED
Make sure all controls are left in the off position.
Make sure the flow of combustion and ventilation
air to the range is unobstructed.
WARNING!
• Range must be secured with an approved Anti-Tip
device.
• Unless properly installed, the range could be tipped
by you or a child standing, sitting or leaning on an
open door.
• After installing the Anti-Tip device, verify that it is
in place by carefully attempting to tilt the range
forward.
• This range has been designed to meet all
recognized industry tip standards for all normal
conditions.
• The use of this device does not preclude tipping
of the range when not properly installed.
• If the Anti-Tip device supplied with the range does
not fit this application, use the universal Anti-Tip
device WB2X7909.
Anti-Tip
device
Slotted head
screw
Wallplate
Approx.
20°
2
1
/8”
Marked edge of range
CONVERTING TO LP GAS (or converting back
to natural gas from LP)
This range leaves the factory set for use with
natural gas. If you want to convert to LP gas, the
conversion must be performed by a qualified LP gas
installer.
The conversion instructions and LP orifices can be
found attached to the range next to the pressure
regulator.
Keep these instructions and the orifices in case you
want to convert back to natural gas.
Back of range
Wallboard
Wood screw
Anti-Tip
device
41
Page 42

Before you call for service…
Troubleshooting Tips
Save time and money! Review the charts on the following
pages first and you may not need to call for service.
Problem Possible Causes What To Do
Top burners do not light Plug on range is not completely • Make sure electrical plug is plugged into a live, properly
or do not burn evenly inserted in the electrical outlet. grounded outlet.
Burner hole or slits on the side • Remove the burner heads and caps and clean them
of the burner may be clogged. with a sewing needle or twist-tie. Make sure you do not
enlarge the holes. Check and clean the electrode area for
burned-on food or grease.
Improper burner assembly. • Make sure the burner parts are installed correctly.
See the Care and cleaning of the range section.
Burner flames very Improper air to gas ratio. • If range is connected to LP gas, contact the person who
large or yellow installed your range or made the conversion.
Clock does Plug on range is not completely • Make sure electrical plug is plugged into a live, properly
not work inserted in the electrical outlet. grounded outlet .
A fuse in your home may be • Replace the fuse or reset the circuit breaker.
blown or the circuit breaker
tripped.
Oven controls improperly set. • See the Using the oven section.
Surface burners light The oven gas shut-off valve • To check the oven gas shut-off valve, remove the broiler
but oven does not may have accidentally been drawer or kick panel (see the Care and cleaning of the
moved during cleaning or range section) and look for the gas shut-off lever at the
moving. back of the range.
Display goes blank A fuse in your home may be • Replace the fuse or reset the circuit breaker.
blown or the circuit
breaker tripped.
The clock is turned off so that it • See the Using the clock and timer section.
does not show in the display.
Display flashes Power failure. • Reset the clock.
Unable to get the Oven control pads were • The Bake and Broil Hi/Lo pads must be touched at
display to show “SF” not touched properly. the same time and held for 3 seconds.
Lever is
shown closed.
PULL TO OPEN.
42
Operating Instructions
Safety Instructions
Installation
Instructions
Troubleshooting Tips
Consumer Support
Page 43

Consumer SupportOperating InstructionsSafety Instructions
Installation
Instructions
Troubleshooting Tips
43
Problem Possible Causes What To Do
Food does not bake Oven controls improperly set. • See the Using the oven section.
or roast properly
Shelf position is incorrect. • See the Using the oven section.
Incorrect cookware or cookware • See the Using the oven section.
of improper size being used.
Oven thermostat needs • See the Adjust the oven thermostat—Do it yourself! section.
adjustment.
Clock not set correctly. • See the To set the clock section.
Aluminum foil used improperly • See the Using the oven section.
in the oven.
Oven bottom not securely • See the Installation of the range section.
seated in position.
Food does not Oven controls improperly set. • See the Using the oven section.
broil properly
Oven door and/or broiler • See the Broiling section.
compartment not closed.
Improper shelf position • See the Broiling Guide.
being used.
Food being cooked in a hot pan. • For best results, use a pan designed for broiling.
Make sure it is cool.
Cookware not suited for broiling. • For best results, use a pan designed for broiling.
Oven bottom not securely • See the Installation of the range section.
seated in position.
Oven temperature Oven thermostat • See the Adjust the oven thermostat—Do it yourself! section.
too hot or too cold needs adjustment.
Oven light does not work Light bulb is loose or defective. • Tighten or replace the bulb.
Plug on range is not completely • Make sure electrical plug is plugged into a live, properly
inserted in the electrical outlet. grounded outlet.
“Crackling” or This is the sound of the • This is normal.
“popping” sound metal heating and cooling
during cooking.
Rainbow effect in the This is caused by the heat • This is normal.
oven window (on some treatment applied to the oven
models) window.
Power outage, Power outage or surge. • Reset the clock.
clock flashes
Strong odor An odor from the insulation • This is temporary.
around the inside of the oven
is normal for the first few times
the oven is used.
Improper air to gas ratio. • Adjust oven burner air shutter.
ge.com
Troubleshooting Tips
Page 44

Operating Instructions
Safety Instructions
Installation
Instructions
Troubleshooting TipsConsumer Support
44
Accessories.
Looking For Something More?
You can find these accessories and many more at ge.com (U.S.) or
www.GEAppliances.ca (Canada), or call 800.626.2002 (U.S.) or 888.261.3055 (Canada)
(during normal business hours). Have your model number ready.
Visit ge.com (U.S.) or www.GEAppliances.ca (Canada) for more information.
Grates
Broiler Pan
Light Bulbs Knobs
Stainless Steel Cleaner
Surface Burner Caps
Oven Racks
Page 45

General Electric Company
Warranty Registration Department
P.O. Box 32150
Louisville, KY 40232-2150
GE Service Protection Plus
™
GE, a name recognized worldwide for quality and dependability, offers you
Service Protection Plus
™
—comprehensive protection on all your appliances—
No Matter What Brand!
Benefits Include:
• Backed by GE
• All brands covered
• Unlimited service calls
• All parts and labor costs included
• No out-of-pocket expenses
• No hidden deductibles
• One 800 number to call
You will be completely satisfied with our service protection or you may request your money back
on the remaining value of your contract. No questions asked. It’s that simple.
Protect your refrigerator, dishwasher, washer and dryer, range, TV, VCR and much more—any brand!
Plus there’s no extra charge for emergency service and low monthly financing is available. Even icemaker
coverage and food spoilage protection is offered. You can rest easy, knowing that all your valuable household
products are protected against expensive repairs.
Place your confidence in GE and call us in the U.S. toll-free at 800.626.2224
for more information.
*All brands covered, up to 20 years old, in the continental U.S.
We’ll Cover Any Appliance.
Anywhere. Anytime.*
Please place in envelope and mail to:
✁
Cut here
45
Page 46

46
Consumer Product Ownership Registration
Important
Mail
Today!
First
Name
Mr. ■■ Ms. ■■ Mrs. ■■ Miss ■■
Street
Address
City
State
Date Placed
In Use
Month
Day
Year
Zip
Code
Apt. #
Last
Name
Phone
Number
_
_
Consumer Product Ownership Registration
Dear Customer:
Thank you for purchasing our product and thank you for placing your confidence in us.
We are proud to have you as a customer!
Follow these three steps to protect your new appliance investment:
Important: If you did not get a registration card with your
product, detach and return the form below to
ensure that your product is registered, or register
online at ge.com.
1
23
Model Number Serial Number
✁
Cut here
Complete and mail
your Consumer
Product Ownership
Registration today.
Have the peace of
mind of knowing we
can contact you in
the
unlikely event of
a
safety modification.
After mailing the
registration below,
store this document
in a safe place. It
contains information
you will need should
you require service.
Our service number is
800.GE.CARES
(800.432.2737).
Read your Owner’s
Manual carefully.
It will help you
operate your new
appliance properly.
Model Number Serial Number
E-mail Address*
* Please provide your e-mail address to receive, via e-mail, discounts, special offers and other
important communications from GE Appliances (GEA).
■■ Check here if you do not want to receive communications from GEA’s carefully selected
partners.
FAILURE TO COMPLETE AND RETURN THIS CARD DOES NOT DIMINISH YOUR
WARRANTY RIGHTS.
For information about GEA’s privacy and data usage policy, go to ge.com and click on “Privacy
Policy” or call 800.626.2224.
GE Consumer & Industrial
Appliances
General Electric Company
Louisville, KY 40225
ge.com
Page 47

47
Consumer SupportOperating InstructionsSafety Instructions
Installation
Instructions
Troubleshooting Tips
■ Service trips to your home to teach you how to use
the product.
■ Improper installation, delivery or maintenance.
■ Failure of the product if it is abused, misused,
or used for other than the intended purpose or
used commercially.
■ Replacement of house fuses or resetting of circuit
breakers.
■ Damage to the product caused by accident , fire, floods
or acts of God.
■ Incidental or consequential damage caused by possible
defects with this appliance.
■ Damage caused after delivery.
■ Product not accessible to provide required service.
What GE Will Not Cover:
This warranty is extended to the original purchaser and any succeeding owner for products purchased for
home use within the USA. If the product is located in an area where service by a GE Authorized Servicer is
not available, you may be responsible for a trip charge or you may be required to bring the product to an
Authorized GE Service Location for service. In Alaska, the warranty excludes the cost of shipping or service
calls to your home.
Some states do not allow the exclusion or limitation of incidental or consequential damages. This warranty
gives you specific legal rights, and you may also have other rights which vary from state to state. To know
what your legal rights are, consult your local or state consumer affairs office or your state’s Attorney General.
Warrantor: General Electric Company. Louisville, KY 40225
For The Period Of: GE Will Replace:
One Year Any part of the range which fails due to a defect in materials or workmanship. During this
From the date of the limited one-year warranty, GE will also provide, free of charge, all labor and in-home service to
original purchase replace the defective part.
GE Gas Range Warranty. ge.com
All warranty service provided by our Factory Service Centers,
or an authorized Customer Care
®
technician. To schedule
service, on-line, 24 hours a day, visit us at ge.com, or call
800.GE.CARES (800.432.2737). Please have serial and model
numbers available when calling for service.
Staple your receipt here.
Proof of the original purchase
date is needed to obtain service
under the warranty.
EXCLUSION OF CMPLIED WARRANTIES—Your sole and exclusive remedy is product repair as
provided in this Limited Warranty. Any implied warranties, including the implied warranties of
merchantability or fitness for a particular purpose, are limited to one year or the shortest period
allowed by law.
Page 48

Printed in Mexico
This book is printed on recycled paper.
GE Appliances Website ge.com
Have a question or need assistance with your appliance? Try the GE Appliances Website 24 hours a day,
any day of the year! For greater convenience and faster service, you can now download Owner’s Manuals,
order parts or even schedule service on-line.
Schedule Service ge.com
Expert GE repair service is only one step away from your door. Get on-line and schedule your service at your
convenience 24 hours any day of the year! Or call 800.GE.CARES (800.432.2737) during normal business hours.
Real Life Design Studio ge.com
GE supports the Universal Design concept—products, services and environments that can be used by people of
all ages, sizes and capabilities. We recognize the need to design for a wide range of physical and mental abilities
and impairments. For details of GE’s Universal Design applications, including kitchen design ideas for people with
disabilities, check out our Website today. For the hearing impaired, please call 800.TDD.GEAC (800.833.4322).
Extended Warranties ge.com
Purchase a GE extended warranty and learn about special discounts that are available while your warranty
is still in effect. You can purchase it on-line anytime, or call 800.626.2224 during normal business hours.
GE Consumer Home Services will still be there after your warranty expires.
Parts and Accessories ge.com
Individuals qualified to service their own appliances can have parts or accessories sent directly to their homes
(VISA, MasterCard and Discover cards are accepted). Order on-line today, 24 hours every day or by phone at
800.626.2002 during normal business hours.
Instructions contained in this manual cover procedures to be performed by any user. Other servicing
generally should be referred to qualified service personnel. Caution must be exercised, since improper
servicing may cause unsafe operation.
Contact Us ge.com
If you are not satisfied with the service you receive from GE, contact us on our Website with all the details
including your phone number, or write to: General Manager, Customer Relations, GE Appliances, Appliance Park,
Louisville, KY 40225.
Register Your Appliance ge.com
Register your new appliance on-line—at your convenience! Timely product registration will allow for
enhanced communication and prompt service under the terms of your warranty, should the need arise.
You may also mail in the pre-printed registration card included in the packing material.
Consumer Support.
Page 49

Instrucciones de
seguridad . . . . . . . . . . . . . . . . . .2–7
Instrucciones de operación
Horno . . . . . . . . . . . . . . . . . . . . . .13–18
Ajuste del termostato . . . . . . . . .18
Asado a la parrilla,
Guía para asar . . . . . . . . . . . .16, 17
Control del horno . . . . . . . . . . . . .12
Cortes de energía . . . . . . . . . . . . .14
Horneado y asar . . . . . . . . . . . . .15
Luz del horno . . . . . . . . . . . . . . . . .14
Precalentamiento . . . . . . . . . . . . .15
Reloj y cronómetro . . . . . . . . . . .19
Ventilación . . . . . . . . . . . . . . . . . . .14
Papel aluminio . . . . . . . . . . . . . . . . .15
Plancha para asar . . . . . . . . . .10, 11
Quemadores a gas . . . . . . . . . . .8, 9
Reloj . . . . . . . . . . . . . . . . . . . . . . . . . . .19
Cuidado y limpieza
Cajón del asador
desmontable . . . . . . . . . . . . . . . . . .27
Compartimiento para asar . . . . .27
Conductos de ventilación
del horno . . . . . . . . . . . . . . . . . . . . . .28
Ensambladuras del
quemador . . . . . . . . . . . . . . . . .23, 24
Estantes . . . . . . . . . . . . . . . . . . . . . . .27
Fondo del horno . . . . . . . . . . . . . . .26
Interior porcelana
del horno . . . . . . . . . . . . . . . . . . . . . .28
Panel de control y perillas . . . . . .28
Plancha para asar . . . . . . . . . . . . .22
Puerta del horno
de levantar . . . . . . . . . . . . . . . . . . . .26
Reemplazo de la luz
del horno . . . . . . . . . . . . . . . . . . . . . .27
Rejillas . . . . . . . . . . . . . . . . . . . . . . . . .25
Superficies de
acero inoxidable . . . . . . . . . . . . . . .25
Superficie de la estufa . . . . . . . . .25
Instrucciones de
instalación . . . . . . . . . . . . . .29–41
Ajuste del aire . . . . . . . . . . . . . . . . . .40
Coloque los quemadores
de la superficie . . . . . . . . . . . . . . . .38
Conecte la estufa al gas . . . .34–36
Conexiones eléctricas . . . . . .37, 38
Dimensiones y tolerancias . . . . .32
Dispositivo
anti-volcadura . . . . . . . . . . . . .33, 41
Localización . . . . . . . . . . . . . . . . . . .33
Localización modelo
y número de serie . . . . . . . . . . . . .33
LP . . . . . . . . . . . . . . . . . . . . . . . . . . . . .41
Nivelación . . . . . . . . . . . . . . . . . . . . .40
Revisar ignición de
quemadores . . . . . . . . . . . . . . . . . . .39
Solucionar problemas .42–44
Accesorios . . . . . . . . . . . . . . . . . .45
Soporte al consumidor
Garantía . . . . . . . . . . . . . . . . . . . . . . .47
Soporte al consumidor . . . . . . . . .48
Estufasa Gas
183D5580P217 49-85133 05-07 JR
JGBS80
Manual del
propietario e
instrucciones
de instalación
ge.com
Escriba el modelo y los números de
serie en este espacio:
Modelo No:____________________
Serie No: ______________________
Usted puede encontrarlos en una
etiqueta en el frente de la estufa
detrás del panel inferior o en el
compartimiento para asar.
No Limpieza Automática
Page 50

ADVERTENCIA!
DISPOSITIVO
ANTI-VOLCADURA
Operación
Seguridad
Instrucciones de
instalación
Solucionar problemasSoporte al consumidor
2
INSTRUCCIONES IMPORTANTES DE SEGURIDAD.
Lea todas las instrucciones antes de usar este aparato.
— No almacene ni use gasolina u otros
vapores y líquidos inflamables cerca
de éste o de cualquier otro aparato.
—
QUE HACER SI PERCIBE
OLOR A GAS:
■ No trate de encender ningún aparato.
■ No toque ningún interruptor eléctrico;
no use ningún teléfono en su edificio.
■ Inmediatamente llame a su proveedor
de gas desde el teléfono de un vecino.
Siga las instrucciones del proveedor
de gas.
■ Si no puede encontrar a su proveedor
de gas, llame al departamento de
bomberos.
— Un instalador calificado, la agencia de
servicios o el proveedor de gas debe
realizar la instalación y el servicio.
ADVERTENCIA: Si no se sigue
exactamente la información de este
manual, puede ocurrir un incendio o
una explosión que cause daños a la
propiedad, lesiones personales o la
muerte.
■
TODAS LAS ESTUFAS SE
PUEDEN VOLTEAR
■
LAS PERSONAS PODRÍAN
RESULTAR HERIDAS
■
INSTALE LOS
DISPOSITIVOS ANTIVOLCADURA INCLUIDOS
CON LA ESTUFA PARA
EVITAR QUE SE VOLTEE
■
CONSULTE LAS
INSTRUCCIONES
DE INSTALACIÓN
ADVERTENCIA!
Por su seguridad, la información contenida en este manual debe seguirse para minimizar el riesgo de incendio,
explosión, descarga eléctrica, o para evitar daños a la propiedad, lesiones personales o pérdida de vida.
Todas las estufas se pueden voltear y puede causar lesiones.
Para prevenir que la estufa se voltee por accidente, péguela a la pared instalando el dispositivo
anti-volcadura suministrado.
Si el dispositivo Antivolcaduras proporcionado con la estufa no se ajusta a esta aplicación, use el
dispositivo Antivolcaduras WB2X7909.
Para revisar si el dispositivo se instaló y enganchó correctamente, de forma cuidadosa voltee la estufa
hacia delante. El dispositivo anti-volcadura debe enganchar e impedir que la estufa se voltee.
Si hala la estufa lejos de la pared por cualquier razón, asegúrese de que el dispositivo esté
enganchado correctamente cuando empuje la estufa de nuevo contra la pared. Si no es así, existe un
posible riesgo de que la estufa se voltee y cause algún daño si usted o un niño se para, se sienta o se
apoya en una puerta abierta.
Sírvase consultar la información sobre el dispositivo anti-volcadura en este manual. No tomar esta
precaución podría resultar en una posible volcadura de la estufa y lesiones.
DISPOSITIVO ANTI-VOLCADURA
®
Page 51

Soporte al consumidorOperaciónSeguridad
Instrucciones de
instalación
Solucionar problemas
3
ge.com
ADVERTENCIA!
Pida al instalador que le muestre la localización de la válvula de cierre del gas hacia la estufa y que le
indique cómo cerrarla si es necesario.
■
Haga que un instalador calificado le instale su
estufa y la conecte a tierra correctamente, de
acuerdo con las instrucciones de instalación.
Sólo un instalador de estufas a gas o técnicos
de servicio calificados deben realizar cualquier
ajuste y servicio.
■
No intente reparar o reemplazar ninguna
parte de su estufa a menos que se
recomiende específicamente en este manual.
Todos los otros servicios se deben consultar
con un técnico calificado.
■
Conecte su estufa sólo en un tomacorriente
con conexión a tierra de 120 voltios. No retire
la pata redonda de conexión a tierra del
enchufe. Si hay alguna duda sobre la conexión
a tierra del sistema eléctrico de la casa, es su
responsabilidad personal reemplazar el
tomacorriente por uno con conexión a tierra,
de tres patas de acuerdo con el Código
Eléctrico Nacional. No utilice un cable de
extensión con este aparato.
PRECAUCIONES DE SEGURIDAD
AVISO IMPORTANTE DE SEGURIDAD
La ley de Tóxicos y Agua Potable Segura de California exige al gobernador de California publicar una
lista de las sustancias conocidas en el estado que causen cáncer, defectos de nacimiento u otros daños
y exige a las empresas que alerten a los clientes sobre la exposición potencial a dichas sustancias.
Los aparatos de gas pueden causar una exposición menor a cuatro de estas sustancias, a saber;
benceno, monóxido de carbono, formaldehído y hollín, causadas principalmente por la combustión
incompleta de gas natural o combustibles licuados de petróleo (LP). Los quemadores correctamente
ajustados, que se identifican por el color azuloso de la llama en vez del color amarillo, minimizarán la
combustión incompleta. Se puede minimizar la exposición a estas sustancias ventilando con una
ventana abierta o usando un ventilador o una campana.
Page 52

■ Coloque la estufa fuera de la zona de tráfico de
la cocina y alejada de sitios con corrientes de
aire para evitar una circulación de aire deficiente.
■ Asegúrese de retirar todos los materiales de
empaque de la estufa antes de operarla para
evitar daños por incendio o humo si se inflamara
el material de empaque.
■ Asegúrese de que un instalador o técnico de
servicio calificado ajuste correctamente su estufa
según el tipo de gas (natural o licuado de
petróleo [LP]) que se vaya a usar. Se puede
convertir su estufa para cualquiera de los
dos tipos de gas. Consulte las instrucciones
de instalación.
■
ADVERTENCIA: Un instalador o
técnico de servicio calificado debe realizar estos
ajustes según las instrucciones del fabricante y
todos los códigos y requisitos de la autoridad que
tenga jurisdicción. No seguir estas instrucciones
pueden resultar en lesiones serias o daños a la
propiedad. La agencia calificada que realiza este
trabajo asume la responsabilidad de la
conversión.
■ Después de un uso prolongado de la estufa,
el piso puede alcanzar altas temperaturas y
muchos materiales no resisten este tipo de uso.
Nunca instale la estufa en tabletas de vinilo o
linóleo que no pueden resistir este tipo de uso.
Nunca la instale directamente sobre la alfombra
interior de la cocina.
■ No deje a niños solos o sin atención donde una
estufa esté operando o esté caliente. Podrían
quemarse seriamente.
■ No permita que nadie se suba, se pare o se
cuelgue de la puerta, del compartimiento para
asar a la parrilla o de la superficie de la estufa.
Podrían dañar la estufa e incluso voltearla,
causando heridas personales severas.
■
PRECAUCION: No se deben guardar
articulos de interés para los niños en los
gabinetes que están encima de una estufa o en
la parte posterior de la estufa. Los niños que se
suban a la estufa paraalcanzar artículos podrían
resultar heridos.
■ Sólo limpie las partes que se presentan en este
manual de proprietario.
■ Nunca use prendas sueltas o colgantes mientras
use la estufa. Tenga cuidado al alcanzar artículos
almacenados en gabinetes sobre la estufa. Se
pueden encender los materiales inflamables si
entran en contacto con la llama o con las
superficies calientes del horno, causando
quemaduras severas.
■ No almacene materiales inflamables en el horno,
parrilla de la estufa, detrás del panel inferior o
cerca de la superficie de la estufa.
■ No guarde o use materiales combustibles,
gasolina u otros vapores y líquidos inflamables
cerca de éste o de cualquier otro aparato.
■ No deje que la grasa ni otros materiales
inflamables se acumulen en la estufa o
cerca de ésta.
■ No use agua para apagar el fuego producido por
las grasas. Nunca levante una sartén que esté
en llamas. Apague los controles. Sofoque el fuego
de la sartén sobre una unidad de la superficie
cubriéndola completamente con una tapa que
ajuste bien, una lata plana o de galletas. Use un
químico para secar de uso múltiple o un extintor
de fuego tipo espuma.
Se pueden extinguir las llamas producto de la
grasa por fuera de una sartén cubriéndolas con
bicarbonato de soda o, si está disponible, usando
un químico para secar de uso múltiple o un
extintor de fuego tipo espuma.
Se puede sofocar completamente la llama en el
horno cerrando la puerta de éste y apagando los
controles o usando un químico para secar de
uso múltiple o un extintor de fuego tipo espuma.
■ Deje que las rejillas del quemador y otras
superficies se enfríen antes de tocarlas o dejarlas
donde los niños las puedan tocar.
■ Nunca bloquee los conductos de ventilación
(aberturas de aire) de la estufa. Estos permiten la
entrada y salida del aire que la estufa necesita
para operar apropiadamente con la combustión
correcta. Las aberturas de aire se localizan en la
parte trasera de la parte superior de la estufa, en
la parte superior e inferior de la puerta del horno
y en la parte inferior de la estufa debajo del
compartimiento de la parrilla o del panel inferior.
■ Fisuras grandes o impactos en las puertas de
cristal pueden llevar a que el cristal se rompa o
se vuelva añicos.
PRECAUCIONES DE SEGURIDAD
Operación
4
Seguridad
Instrucciones de
instalación
Solucionar problemasSoporte al consumidor
INSTRUCCIONES IMPORTANTES DE SEGURIDAD.
Lea todas las instrucciones antes de usar este aparato.
ADVERTENCIA:
NUNCA
use este electrodoméstico como calefactor
para calentar la habitación. Hacerlo podría
provocar envenenamiento por monóxido
de carbono y el sobrecalentamiento del
horno.
Page 53

5
Soporte al consumidorOperaciónSeguridad
Instrucciones de
instalación
Solucionar problemas
ge.com
■ No use el horno como área de
almacenamiento. Los artículos almacenados
en el horno se pueden prender.
■
Mantenga el horno libre de acumulación
de grasa.
■
Coloque los estantes del horno en la posición
deseada mientras el horno está frío.
■
Es conveniente sacar el estante superior hasta
la posición de freno cuando se levanten
alimentos pesados. También es una
precaución contra quemaduras por tocar
superficies calientes de la puerta o de las
paredes del horno. La posición más baja no
está diseñada para deslizarse.
■
No caliente recipientes de comida sin abrir. La
presión puede aumentar y el recipiente puede
reventar, causando posibles lesiones.
■ No use papel de aluminio en ninguna parte del
horno excepto cuando lo indique este manual.
Su uso indebido puede resultar en peligro de
incendio o en daño para la estufa.
■ Cuando use bolsas para cocinar u hornear,
siga las instrucciones del fabricante.
■
No use el horno para secar periódicos. Si se
sobrecalientan, éstos podrían incendiarse.
■
Sólo use batería de cocina de vidrio que esté
recomendada para el uso en hornos de gas.
■
Siempre retire una bandeja para asar de la
estufa tan pronto como termine de asar. La
grasa de la bandeja puede incendiarse si se
usa el horno sin retirar la grasa de la bandeja
para asar.
■
Al asar, si la carne está muy cerca de la llama,
la grasa se puede prender. Corte el exceso de
grasa para prevenir llamaradas excesivas.
■
Asegúrese de que una bandeja para asar esté
colocada correctamente para reducir la
posibilidad de fuego causado por la grasa.
■
Si se produce fuego por la grasa en la bandeja
para asar, apague el control del horno y
mantenga el compartimiento para asar y la
puerta del horno cerrados para retener el
fuego hasta que se apague.
■
Por su seguridad y para lograr una cocción
eficiente, siempre hornee y ase sus alimentos
con la puerta cerrada.
Aléjese de la estufa cuando abra la puerta del horno caliente. El aire caliente y el vapor que salen
pueden causar quemaduras en las manos, rostro y ojos.
HORNO
COCINE LA CARNE Y EL POLLO COMPLETAMENTE
Cocine la carne y el pollo completamente. Cocine la carne por lo menos a una temperatura INTERNA
de 160° F y el pollo a una temperatura INTERNA de 180° F. Normalmente, cocinar a estas
temperaturas protege contra intoxicaciones por consumo de alimentos.
ADVERTENCIA: NUNCA
cubra ninguna ranura, hueco ni pasadizo de
la parte inferior del horno ni cubra
todo el estante con elementos tales como
papel de aluminio. Si lo hace, bloqueará el
flujo de aire a través del horno y podría
provocar envenenamiento por monóxido de
carbono. El revestimiento del papel de
aluminio podría también atrapar el calor,
provocando fuego.
Page 54

Operación
6
Seguridad
Instrucciones de
instalación
Solucionar problemasSoporte al consumidor
INSTRUCCIONES IMPORTANTES DE SEGURIDAD
Lea todas las instrucciones antes de usar este aparato.
QUEMADORES
Use la sartén de tamaño apropiado – evite usar sartenes que no sean estables o que se puedan
voltear fácilmente. Seleccione sartenes de cocina que tengan el fondo lo suficientemente plano como
para cubrir las rejillas. Para evitar derrames, cerciórese de que la sartén es lo suficientemente grande
como para contener la comida de manera apropiada. Esto le ayudará tanto a conservar la superficie
limpia como a evitar peligros de acumulación de alimentos, los que al quemarse se podrían incendiar
si son dejados sobre los quemadores. Use sartenes con manijas que se puedan agarrar fácilmente y
que permanezcan frías.
■ Siempre use la posición Lite cuando encienda
los quemadores superiores y asegúrese de
que los quemadores se prendan.
■
Nunca deje los quemadores de la superficie
sin atender a niveles de llama alta. Hervir
algo excesivamente produce humo y los
derramamientos de grasa pueden encenderse
con las llamas.
■
Ajuste el tamaño de la llama del quemador
superior de manera que no se salga más allá
del borde del recipiente. Una llama excesiva
es peligrosa.
■
Sólo use guantes agarradores de ollas que
estén secos. Los guantes agarradores de
ollas que estén húmedos o mojados sobre
superficies calientes pueden causar
quemaduras por el vapor. No deje los guantes
agarradores de ollas cerca de las llamas
cuando levante las ollas. No use una toalla ni
otro trapo abultado en vez de un guante
agarrador de ollas.
■
Cuando se encuentre usando sartenes de
cocina de vidrio, cerciórese de que estén
diseñadas para ser usadas en estufas de
quemadores de superficie.
■
Para minimizar la posibilidad de quemaduras,
el incendio de materiales inflamables y los
derramamientos, gire los mangos de las ollas
hacia el lado o hacia atrás de la estufa sin que
se extiendan a los otros quemadores.
■
Observe cuidadosamente los alimentos al freír
con una llama alta.
■
Siempre caliente la grasa lentamente, y
observe a medida que se calienta.
■ No deje ningún artículo en la superficie
de la estufa. El aire caliente de la rejilla de
ventilación puede encender los artículos
inflamables e incrementará la presión en
envases cerrados, lo que puede causar que
se revienten.
■
Si va a usar una combinación de aceites
o grasas para freír, mézclelas antes de
calentarlas o a medida que se derritan
lentamente.
■
Cuando sea posible, use un termómetro para
introducir en la grasa, para evitar que la grasa
se queme.
■
Use la menor cantidad posible de grasa para
una fritura eficaz con poca o mucha grasa.
Llenar la sartén con demasiada grasa puede
causar derramamientos cuando se agreguen
los alimentos.
■
No queme alimentos sobre la estufa.
Si quema alimentos bajo la campana,
encienda el ventilador.
■
No use una sartén tipo wok en los
quemadores de superficie si ésta tiene un
anillo metálico redondo que se coloca sobre la
rejilla del quemador como apoyo. Este anillo
actúa como una trampa de calor, que puede
dañar la rejilla y la cabeza del quemador.
También puede hacer que el quemador
funcione incorrectamente. Esto puede causar
niveles de monóxido de carbono por encima
del permitido por los estándares actuales, lo
que puede ser peligroso para la salud.
ADVERTENCIA!
Page 55

FAVOR DE LEER Y SEGUIR CUIDADOSAMENTE LAS
PRECAUCIONES DE SEGURIDAD.
GUARDE ESTAS INSTRUCCIONES
7
Soporte al consumidorOperaciónSeguridad
Instrucciones de
instalación
Solucionar problemas
ge.com
■
No use papel de aluminio para forrar la
plancha. Si se utiliza mal podría causar un
peligro de incendio.
■
Nunca se aleje de la cocina mientras esté
usando la plancha para asar.
■
Los alimentos para freír deben estar lo más
secos posible. El hielo de los alimentos
congelados o la humedad de los alimentos
frescos puede causar que la grasa caliente
burbujee hacia arriba y hacia los lados de
la sartén.
■
Nunca intente mover una sartén con grasa
caliente, especialmente si se trata de una olla
para freír. Espere hasta que la grasa se enfríe.
■
No deje artículos de plástico en la superficie de
la estufa. Se pueden derretir si los deja muy
cerca de la rejilla de ventilación.
■
Mantenga los objetos de plástico lejos de los
quemadores.
■
Para evitar la posibilidad de una quemadura,
siempre asegúrese de que los controles de
todos los quemadores estén en la posición de
apagado (Off) y todas las rejillas y la plancha
estén frías antes de intentar retirarlas.
■
Si la estufa se encuentra cerca de una
ventana, no cuelgue cortinas largas que
puedan caer sobre los quemadores y crear un
peligro de incendio.
■
Si percibe un olor a gas, apague el gas que
va hacia la estufa y llame a un técnico de
servicio calificado. Nunca use una llama
abierta para localizar un escape.
■
Siempre gire los quemadores de la estufa a la
posición de apagado (Off) antes de retirar la
olla o sartén.
■
No levante la superficie de la estufa. Levantar
la superficie de la estufa puede causar daños
y una operación inapropiada de la estufa.
■
No coloque o almacene artículos que se
puedan derretir o incendiar en las rejillas,
aún cuando la estufa no se esté usando.
■
Mantenga la estufa limpia y libre de
acumulaciones de grasa o de derrames, que
se puedan prender.
Page 56

Cómo cocinar en el quemador a gas.
Operación
8
Seguridad
Instrucciones de
instalación
Solucionar problemasSoporte al consumidor
En todo de este manual, las características y el aspecto se puede varían de su modelo.
Cómo encender el quemador de superficie de gas
Cerciórese de que los quemadores de superficie
están colocados en sus posiciones respectivas.
Presione la perilla de control y gírela hasta la
posición Lite.
Escuchará un pequeño chasquido—el sonido de la
chispa eléctrica encendiendo el quemador.
Dé vuelta a la perilla para ajustar el tamaño de la
llama. Si la perilla permanece en la posición Lite,
continuará chasqueando.
Cuando se gira un quemador hacia la posición
Lite, todos los quemadores chispean. No intente
desmontar o limpiar alrededor de ningún
quemador mientras otro esté encendido. Puede
provocar una descarga eléctrica que lo podría tirar
encima de las ollas calientes.
Presione la perilla de control y
gírela hasta la posición LITE.
■ Cerciórese de que todos los quemadores están
en su lugar.
■
Asegúrese de que todas las rejillas (y la plancha
para asar central, si se va a usar) estén
colocados apropiadamente en su lugar sobre la
estufa antes de usar cualquier quemador.
■
No opere un quemador por un período de
tiempo prolongado sin colocar una olla o sartén
en la rejilla. El acabado de la rejilla se puede
dañar sin una olla o sartén para que absorba
el calor.
■
Asegúrese de que los quemadores, la plancha y
las rejillas estén fríos antes de poner una mano,
un guante agarrador de ollas, paños limpios u
otros materiales sobre ellos.
Controles de los quemadores de la superficie
Las perillas que apagan y encienden los
quemadores de la estufa están marcadas de
acuerdo al quemador que controlan. Las dos
perillas de la izquierda controlan el quemador
delantero izquierdo y el quemador trasero
izquierdo. Las dos perillas de la derecha controlan
el quemador delantero derecho y el quemador
trasero derecho. La perilla central izquierda
controla el quemador ovalado central.
Mediano Pequeño
Grande Extra
Grande
Quemadores a gas sellados
Su cocina de gas tiene cinco quemadores sellados.
Brindan conveniencia, fácil limpieza y flexibilidad
para ser utilizados en una amplia gama de
aplicaciones de cocción.
El quemador más pequeño localizado detrás a
la derecha, es el quemador de fuego lento. Se
puede bajar la intensidad de este quemador a una
graduación muy baja de fuego lento. Brinda
desempeño de cocción preciso para alimentos
delicados tales como salsas y alimentos que
requieren bajo grado de calor para un tiempo de
cocción prolongado.
Los quemadores mediano (detrás a la izquierda) y
grande (frente a la izquierda) son los quemadores
principales para la mayoría de las tareas de
cocción. La intensidad de estos quemadores
multipropósito se pueden regular de alta (Hi) a
baja (Lo) para adaptarse a una amplia gama de
necesidades de cocción.
El quemador extra grande (frontal derecho) es
el quemador de máxima intensidad. Al igual
que los otros cuatro, puede regularse de
Hi
(alta) a Lo(baja) para adaptarse a una gran
gama de necesidades de cocción; sin
embargo, este quemador está diseñado
para llevar a hervor rápidamente grandes
cantidades de líquido. Cuenta con la
configuración especial Power Boil™diseñada
para ser utilizada con utensilios de cocina de
10 pulgadas de diámetro o más.
El quemador central ovalado (en algunos
modelos) es ideal para cacerolas y sartenes
grandes o puede utilizarse con la plancha.
Central
(ovalado)
(en algunos
modelos)
Quemador extra
grande
solamente
Antes de encender un quemador
a gas
Después de encender un quemador
a gas
Page 57

9
ge.com
Use una sartén wok con fondo
plano.
Batería de cocina para la estufa
Aluminio: Se recomienda una batería de cocina de
peso mediano ya que se calienta rápidamente y
de manera uniforme. La mayoría de los alimentos
se doran uniformemente en una sartén de
aluminio. Use cacerolas con tapas que se ajusten
perfectamente al cocinar y use una cantidad
mínima de agua.
Hierro fundido: Si se calienta lentamente, la
mayoría de las sartenes dará resultados
satisfactorios.
Batería de cocina esmaltada: Bajo algunas
condiciones, se puede derretir el esmalte de
ciertas ollas o sartenes. Siga las recomendaciones
del fabricante de la batería de cocina para los
métodos de cocción.
Vidrio: Existen dos tipos de recipientes de vidrio
para cocinar—aquellos para usar sólo en el horno
y los que se usan en la superficie de la estufa
(cacerolas, cafeteras y teteras). El vidrio conduce el
calor muy lentamente.
Cerámica de vidrio a prueba de calor: Se puede
usar ya sea en la superficie de la estufa o en el
horno. Conduce el calor muy lentamente y
también se enfría muy lentamente. Revise las
instrucciones del fabricante de la batería de cocina
para asegurarse de que se pueden usar en estufas
de gas.
Acero inoxidable: Este metal por sí solo tiene
propiedades caloríficas deficientes y
normalmente se combina con cobre, aluminio
u otros metales para una mejor distribución del
calor. Normalmente, las sartenes de metales
combinados funcionan satisfactoriamente si
se usan con calor a nivel medio como lo
recomiendan los fabricantes.
Parrillas para la superficie de la estufa
No use parrillas para la superficie de la estufa
sobre los quemadores de gas. Si utiliza la parrilla
para la superficie de la estufa en los quemadores
de gas, no hay combustión completa y puede
causar exposición a niveles de monóxido de
carbón por encima de lo permitido por los
estándares actuales.
Esto puede ser peligroso para la salud.
Use la sartén tipo wok de esta manera
Recomendamos que use una sartén wok de 14” o
menor con fondo plano. Cerciórese de que el fondo
de la wok se sienta de forma plana en la rejilla.
Estas se encuentran en cualquier tienda minorista
local.
Se debe usar solamente una sartén wok con
fondo plano.
No use una sartén wok con fondo plano sobre un
anillo de soporte. Colocar el anillo sobre la rejilla
del quemador puede provocar que el quemador
funcione incorrectamente, lo que puede resultar
en niveles de monóxido de carbono que
sobrepasan los estándares actuales permitidos.
Esto puede ser peligroso para la salud.
En caso de interrupción en el fluido eléctrico
En caso de interrupción en el fluido eléctrico,
puede encender los quemadores de la superficie
con un fósforo. Acerque el fósforo encendido
al quemador, luego gire la perilla a la posición Lite.
Tenga extremo cuidado al encender los
quemadores de esta manera.
Los quemadores de la estufa que estén en uso
cuando ocurre una interrupción en el fluido
eléctrico continuarán funcionando normalmente.
Cómo elegir el tamaño de la llama
Para el manejo correcto de sartenes de cocina,
nunca permita que las llamas se extiendan a los
lados de las sartenes.
Fíjese en las llamas, no en la manija, cuando
reduzca las llamas. Cuando desee calentar con
rapidez, las llamas deben ir acorde con el tamaño
de la sartén que se está usando.
Las llamas mayores que el fondo de la sartén no
resultan en un calentamiento más rápido y podría
ser peligroso.
Solamente use ollas/cacerolas ovales grandes,
ollas/cacerolas redondas de 12″ (30 cms) o
de un diámetro mayor o la plancha en el
quemador central.
Soporte al consumidorOperaciónSeguridad
Instrucciones de
instalación
Solucionar problemas
Page 58

Operación
Seguridad
Instrucciones de
instalación
Solucionar problemasSoporte al consumidor
10
La plancha para asar sin adherencia le
ofrece una superficie de gran tamaño para
cocinar carnes, pancakes u otro tipo de
alimento que normalmente se prepara en
sartenes o cacerolas.
NOTA: Su plancha para asar perderá el color
con el tiempo a medida que se usa.
Cómo insertar la plancha para asar
Coloque los seguros en forma de U
sobre las barras centrales de la
rejilla central.
Plancha para asar.
PRECAUCIÓN:Coloque y
retire la plancha únicamente cuando todas
las rejillas y la misma plancha estén frías y
todas las unidades de la superficie de la
estufa estén apagadas (OFF).
Sólo se puede usar la plancha con el
quemador central y se debe ajustar
firmemente en la rejilla central.
Coloque los seguros en forma de U en
la parte inferior de la plancha sobre las
barras centrales de la rejilla central.
Mueva la plancha hacia atrás y hacia
delante para cerciorarse de que está
firme.
Seguros en
forma de U
Parte inferior de la plancha
Page 59

11
Soporte al consumidorOperaciónSeguridad
Instrucciones de
instalación
Solucionar problemas
La mayoría de los alimentos a la plancha
necesitan una superficie precalentada.
Precaliente la plancha de acuerdo con la
siguiente guía, luego cambie al nivel de
cocción deseado.
NOTAS IMPORTANTES:
■ Evite cocinar alimentos muy grasosos y
tenga cuidado que la grasa no salpique
mientras cocina.
■ No use aceite en la plancha por períodos
prolongados. La superficie se puede
manchar de forma permanente y/o
podría resultar en líneas agrietadas.
■ No cocine productos con leche (como
tostadas a la francesa) en la plancha. La
superficie se puede manchar de forma
permanente y/o podría resultar en líneas
agrietadas.
■ Nunca coloque o almacene ningún
artículo sobre la plancha, incluso si no
está en uso. La plancha se podría
calentar al usar los quemadores vecinos.
■ No sobrecaliente la plancha. Dejar el
quemador de la plancha en la posición
HI (alto) por un período de tiempo
prolongado sin alimentos podría dañar
la capa antiadherente.
Cómo usar la plancha
Condiciones Máxima
Tipo de de cantidad
alimento
precalentamiento recomendada
Calentar Ninguno 7 apiladas
tortillas
Pancakes
7 (MED-HI)
6
3 minutos
Hamburguesas
Medio por 4 – aplanadas
5 minutos
Huevos fritos Medio por 4
5 minutos
Tocineta Alto por 4
o bacon 5 minutos
Salchichas Ninguno– 13
para el sin aceite
desayuno
Sándwiches Alto por 6 4
calientes minutos, luego
(como un medio por
sándwich de 4 minutos
queso a la
plancha)
Plancha para asar. ge.com
Page 60

12
Operación
Seguridad
Instrucciones de
instalación
Solucionar problemasSoporte al consumidor
Botón Bake/Temp Recall
(Horneado/Temperatura)
Presione este botón para seleccionar la función
de horneado.
Luz Bake (Hornear)
Parpadea en modo de edición, es decir que
puede cambiar la temperatura del horno en este
momento. Permanece encendida en modo de
horneado.
Botón Start/On (Iniciar/Encendido)
Debe presionar este botón para iniciar cualquier
función de cocción.
Pantalla
Muestra la hora, la temperatura del horno, si el
horno está en modo de horneado o de parrilla
y las horas establecidas para el temporizador.
La pantalla mostrará PRE durante el
precalentamiento. Una vez que el horno alcance
la temperatura seleccionada, el control del
horno emitirá un pitido y la pantalla mostrará
la temperatura del horno.
Si una ”F– y un número o letra” parpadean en la
pantalla y las señales de control del horno, esto indica
un código de error de la función.
La hora del día parpadeará en la pantalla cuando se
haya producido un corte en el suministro eléctrico.
Reinicie el reloj.
Presione el botón Clear/Off (Borrar/Apagar). Permita
que el horno se enfríe durante una hora. Ponga el
horno nuevamente en operación. Si el código de error
de la función se repite, desconecte la corriente de la
cocina y comuníquese con el servicio de
mantenimiento.
Botón Kitchen Timer On/Off (Temporizador
de cocina On/Off)
Presione este botón para seleccionar la
característica del temporizador. Luego presione
los botones + y – para ajustar el temporizador.
Luz del Kitchen Timer (Temporizador
de cocina)
P
arpadea en modo de edición, es decir que
puede establecer el tiempo en este momento.
Permanece encendida cuando se activa el
temporizador. Vuelve a parpadear cuando se
haya agotado el tiempo hasta que se restablezca
el control.
Botón Clock (Reloj)
Para configurar el reloj, presione este botón dos
veces y luego presione los botones + y –. La
hora del día parpadeará en la pantalla cuando
el horno se encienda por primera vez.
Botón Oven Light (Luz del horno)
Presione este botón para encender o apagar la
luz del horno.
– Botón
Si presiona este botón con golpecitos suaves, la
hora o la temperatura disminuirán ligeramente.
Presione este botón y manténgalo presionado
para disminuir la hora o la temperatura en
mayor medida.
+ Botón
Si presiona este botón con golpecitos suaves, la
hora o la temperatura disminuirán ligeramente.
Presione este botón y manténgalo presionado
para disminuir la hora o la temperatura en
mayor medida.
A lo largo de este manual, las características y apariencia pueden ser diferentes a las de su modelo.
Uso de los controles del horno.
Control del horno, características y configuraciones del reloj
(Clock) y del temporizador (Timer)
(en algunos modelos)
Page 61

13
Soporte al consumidorOperaciónSeguridad
Instrucciones de
instalación
Solucionar problemas
ge.com
Botón Clear/Off (Cancelar/Apagado)
Presione este botón para cancelar TODAS las
operaciones del horno, excepto el reloj y el
temporizador.
Botón Broil Hi/Lo (Parrilla Alto/Bajo)
Presione este botón para seleccionar la función
de asar a la parrilla.
Luz de la parrilla
P
arpadea en modo de edición, es decir que
puede cambiar de Asar a la parrilla Hi (Alto) a Lo
Broil (Bajo) en este momento. Permanece
encendida en modo de parrilla.
Luces indicadoras (en algunos botones)
El modo de Edit (edición) dura algunos segundos
después de haber presionado el último botón.
Control del horno, características y configuraciones del reloj
(Clock) y del temporizador (Timer)
(en algunos modelos)
Page 62

Operación
Seguridad
Instrucciones de
instalación
Solucionar problemasSoporte al consumidor
14
Para prevenir posibles quemaduras, coloque los estantes en la posición deseada antes de encender el horno.
Ventilación del horno
Su horno es ventilado a través de conductos
en la parte posterior de la estufa. No bloquee
estos conductos cuando se encuentre
cocinando en el horno – es importante que el
flujo de aire caliente desde el horno y de aire
fresco hacia el quemador del horno estén
libres de interrupciones. Evite tocar las
aberturas de la ventilación o las superficies
próximas durante la operación de cocción
del horno—podrían estar bastante calientes.
■ Las manijas de las ollas y las cacerolas
en la estufa podrían calentarse si de dejan
próximo a la abertura de ventilación.
■ No deje artículos plásticos o inflamables
sobre la estufa—se podrían derretir o
incendiar si se dejan próximo a la abertura
de ventilación.
■ No deje recipientes cerrados sobre la estufa.
La presión en recipientes cerrados podría
acumularse y podrían explotar.
■ Artículos metálicos se podrían calentar
mucho si se dejan sobre la estufa y podrían
causar quemaduras.
Artículos plásticos en la estufa
podrían derretirse si se dejan
demasiado cerca de la ventilación.
La apariencia y la localización de la
ventilación varía.
Cómo usar el horno.
Antes de comenzar…
Los estantes tienen cierres de tope,
de forma tal que cuando se encuentren
colocados correctamente en los soportes de
los estantes (de A a E), se detendrán antes de
salir completamente y no se inclinarán.
Cuando se encuentre colocando o
removiendo sartenes, tire del estante hacia
afuera hasta la protuberancia en el apoyo
del estante.
Para remover un estante, tírelo hacia usted,
incline el frente hacia arriba y tire de él hacia
afuera.
Para reemplazar, coloque el extremo del
estante (topes de cierre) en el apoyo, incline
el frente y empuje del estante hacia adentro.
NOTA: Este estante no está diseñado para
deslizarse hacia afuera en la posición (R) del
estante inferior especial.
El horno tiene 5 posiciones.
También tiene una posición de
estante inferior especial (R) para
artículos muy grandes, como un
pavo grande.
Cortes de energía
PRECAUCIÓN: No intente
operar el horno con el encendido eléctrico
durante un corte de energía.
No es posible encender el horno ni el asador
durante un corte de energía. El gas no fluirá
a menos que la barra de encendido esté
caliente.
Si el horno está en uso cuando ocurre un
corte de energía, el quemador del horno se
apagará y no se puede volver a encender
hasta que se restablezca el suministro de
energía. Esto se debe a que se interrumpe
automáticamente el flujo de gas y no
continuará cuando se restablezca la energía
sino hasta que la barra de encendido vuelva
a alcanzar la temperatura de operación.
Luz del horno
Presione el botón Oven Light (Luz del horno)
situado en el panel de control superior para
encender o apagar la luz.
Page 63

Soporte al consumidor
Instrucciones de
instalación
Solucionar problemas
Operación
Seguridad
15
Precalentamiento y ubicación de la sartén
Precaliente el horno si la receta así lo indica.
Para precalentar, coloque el horno en la
temperatura correcta. El precalentamiento es
necesario para obtener buenos resultados
cuando hornee tortas, dulces, pastelitos
y panes.
Para hornos sin la luz indicadora o tono de
precalentamiento, precaliente por 10 minutos.
Los resultados del horneado son mejores si
las sartenes de hornear están centradas en el
horno tanto como sea posible. Las sartenes
no se deben tocar entre sí ni deben tocar las
paredes del horno. Si necesita usar dos
estantes, coloque las sartenes de forma que
una no quede inmediatamente encima de la
otra, y deje aproximadamente 11/2″ entre
cada sartén, desde el frente, desde atrás y
desde los costados.
ge.com
Cómo ajustar el horno para hornear o para asar
Su horno no está diseñado para hornear con
las puertas abiertas.
Presione el botón Bake.
Presione los botones + o – hasta que
aparezca la temperatura deseada.
Presione el botón Start/On.
El horno se encenderá automáticamente. La
pantalla mostrará PRE durante el
precalentamiento. Una vez que el horno
alcance la temperatura seleccionada, el
control del horno emitirá varios pitidos y la
pantalla mostrará la temperatura del horno.
Para cambiar la temperatura del horno
durante el ciclo de Horneado, presione el
botón Bake y luego los botones + o - hasta
alcanzar la nueva temperatura.
Revise los alimentos para el punto de
cocción al mínimo tiempo en la receta.
Cocine durante más tiempo si es
necesario.
Presione el botón Clear/Off cuando
termine de hornear y luego saque la
comida del horno.
Posición del
Tipo de comida estante
Pasteles congelados B o C
(en bandeja de dulces)
Torta de ángel y pasteles B
Panecillos, molletes, bizcochos C
de chocolate y nueces, magdalenas,
tortas de capas, pasteles
Cacerolas B o C
Asados R o A
Envoltura de aluminio
No use papel de aluminio en el fondo
del horno.
Nunca cubra por completo un estante con
papel de aluminio. Esto obstruirá la
circulación del calor y obtendrá un asado
deficiente.
Puede utilizarse una pequeña hoja de papel
aluminio para atrapar derrames colocándola
en uno de los estantes inferiores varias
pulgadas por debajo del alimento.
Humedad del horno
A medida que su horno se calienta, el cambio
de temperatura del aire en el horno puede
causar que se formen gotitas de agua en
el cristal de la puerta. Estas gotitas son
inofensivas y se evaporan a medida que
el horno se calienta.
El horno tiene una posición de
estante inferior especial (R) casi
inmediatamente encima del fondo
del horno. Úsela cuando necesite
espacio adicional para cocinar, por
ejemplo cuando cocina un pavo
grande. El estante no está diseñado
para deslizarse hacia afuera en
esta posición.
Page 64

Operación
Seguridad
Instrucciones de
instalación
Solucionar problemasSoporte al consumidor
16
Cómo usar el horno.
Asado a la parrilla
Asar a la parrilla es cocinar alimentos con el
calor directamente encima de los alimentos.
Se puede asar la mayoría de los tipos
pescados y los cortes de carne. Siga estas
instrucciones para llevar al mínimo las
salpicaduras y las humaredas.
Su estufa tiene un compartimiento debajo del
horno para asar a la parrilla.
Se deben CERRAR durante el asado a la
parrilla tanto la puerta del horno como
la del compartimiento para asar a la
parrilla.
Voltee la mayoría de los alimentos una vez
durante la cocción (la excepción son los
filetes delgados de pescado; engrase un lado,
coloque ese lado hacia abajo en la parrilla
para asar y cocine sin voltearlo hasta que
esté listo). A la mitad del tiempo estimado de
cocción, voltee el alimento y luego continúe
cocinando hasta la cocción deseada.
Puede cambiar la distancia del alimento
de la fuente de calor colocando la
bandeja y la rejilla para asar en una de
las tres posiciones para el estante en el
compartimiento para asar a la parrilla: A
(fondo del compartimiento para asar a la
parrilla), B (medio) y C (alto).
No es necesario precalentar el asador
o el horno, ya que podría ofrecer
resultados deficientes.
Si la carne tiene grasa o cartílago en el
borde, corte tajos verticales a través de
los mismos a una distancia de 2″. Si se
desea, se puede cortar la grasa, dejando
una capa de 1/8″ (3 mm) de espesor.
Coloque los alimentos en la rejilla y
coloque la bandeja para asar en el
estante apropiado del horno o del
compartimiento para asar. Colocar
el alimento más cerca de la llama
aumenta el dorado exterior del alimento,
pero también aumenta el salpicado y la
posibilidad de que las grasas y los jugos
de la carne se prendan.
Cierre la puerta del horno y del
compartimiento para asar a la parrilla.
Presione el botón Broil Hi/Lo una vez
para asar a la parrilla Hi Broil (Alto).
Para cambiar a Lo Broil, presione el
botón Broil Hi/Lo nuevamente.
Utilice Lo Broil para cocinar alimentos
como ave o cortes gruesos de carne
completamente sin dorarlos demasiado.
Presione el botón Start/On.
Cuando el asado a la parrilla esté
terminado, presione el botón Clear/Off.
Retire la bandeja para asar a la parrilla
del compartimiento y sirva los alimentos
inmediatamente. Deje el recipiente por
fuera de la estufa para que se enfríe.
Page 65

Soporte al consumidor
Instrucciones de
instalación
Solucionar problemas
Operación
Seguridad
ge.com
El tamaño, peso, grueso,
temperatura inicial y su
preferencia sobre el punto
de cocción de los alimentos
afectarán los tiempos de
cocción. Esta guía está
basada en carnes a
temperatura de refrigerador.
†El Departamento de Agricultura de
EE.UU. dice que: “La carne a poco
cocer (poco hecha) es popular, pero
usted debe saber que cocinarla a
solamente 140° F significa que
algunos organismos venenosos
podrían sobrevivir.” (Fuente: Safe
Food Book, Your Kitchen Guide,
USDA. Rev. Junio 1985.)
Guía para asar a la parrilla
Se deben cerrar las puertas del horno y del
compartimiento para asar a la parrilla durante
el proceso de asado.
■ Siempre use la bandeja y rejilla para asar que viene
con la estufa, las cuales están diseñadas para
minimizar el humo y las salpicaduras atrapando
los jugos en la parte baja de la bandeja.
■ Para filetes y chuletas, corte la grasa que
normalmente está en los bordes de la carne. Para
cortar, hágalo transversalmente a través de la
superficie externa de grasa hasta el borde de la
carne. Use pinzas para voltear la carne para evitar
cortar la carne y perder los jugos.
■ Si desea, marine las carnes o el pollo antes de
asarlos a la parrilla, o úntelos con salsa BBQ en los
últimos 5 a 10 minutos únicamente.
■ Cuando organice los alimentos en la bandeja, no
deje que los bordes grasosos cuelguen de los lados
ya que la grasa que cae puede ensuciar el horno.
■ El compartimiento para asar a la parrilla no
necesita precalentamiento. Sin embargo, para
alimentos muy delgados, o para incrementar el
nivel de dorado, precaliente si lo desea.
■ Los filetes congelados se pueden asar a la parrilla
colocando el estante en la siguiente posición más
baja e incrementando el tiempo de cocción
indicado en esta guía 11/2 veces por cada lado.
El horno tiene 5 posiciones.
Cantidad y/o Posición Primer lado Segundo lado
Alimento grosor del estante* minutos minutos Comentarios
Tocineta
1
⁄2 libra C 4 3 Coloque en una sola capa.
(unas 8 tiras delgadas)
Carne molida 1 libra (4 croquetas) C 10 7–10
Distribuya de manera
(bien asada)
1
⁄2
a
3
⁄4
de pulg. de
uniforme. Hasta 8 croquetas
espesor
toman el mismo tiempo.
Filetes de carne
Poco cocido
†
1 pulgada de espesor C 9 7 Los filetes de menos de
Medio (1 a 11⁄2
libras) C 12 5–6 1 pulgada de espesor se
Bien cocido B 13 8–9 cocinan por completo
antes de dorarse.
Recomendamos freír en
el sartén. Corte la grasa.
Poco cocido
†
11⁄2 pulg. de espesor C 10 6–7
Medio (2 a 21⁄2 libras) C 12–15 10–12
Bien cocido B 25 16–18
Pollo 1 completo B 30–35 15 Unte cada lado con
(2 a 21⁄2 libras), dividido mantequilla derretida.
longitudinalmente Ase primero con la piel
Cuatro pechugas con hueso
B 25–30 10–15 hacia abajo.
Colas de langosta
2 a 4 A 13–16 No voltee.
Corte a través de la parte posterior
(6 a 8 onzas
del
caparazón, ábralo. Unte con
cada uno)
mantequilla
derretida antes de
asar y después de la mitad del
tiempo de cocción.
Pescado Filetes de 1 libra C 5 5
Manipule y voltee con cuidado. Unte
1
/4 a 1/2 de pulgada
con mantequilla de limón antes y
de espesor
durante la cocción, si lo desea.
Precaliente el asador para
aumentar el dorado.
Rodajas de jamón1 pulg. de espesor B 8 8
(precocido)
1
/2 pulg. de espesor B 6 6
Chuletas de cerdo
2 (1/2 pulgada) B 10 4–5 Corte la grasa.
Bien asadas
2 (1 pulgada de espesor),
B 13 9–12
1 libra aproximadamente
Chuletas de cordero
Medio 2 (1 pulgada) B 8 4–7 Corte la grasa.
Bien cocido 10 a 12 onzas B 10 10
Medio 2 (11⁄2 pulgadas), B 10 4–6
Bien cocido
1 libra aproximadamente
B 17 12–14
Salchichas tipo
Igual a las salchichas
1 paquete de 1 libra (10)
C 6 1–2
Si desea, parta las salchichas
precocidas,
por la mitad, longitudinalmente;
bratwrurst
corte en piezas de 5 a 6
pulgadas.
*Ver la ilustración para la descripción de las posiciones de los estantes.
17
Page 66

Operación
Seguridad
Instrucciones de
instalación
Solucionar problemasSoporte al consumidor
18
Ajuste del termostato del horno—¡hágalo usted mismo!
Usted se podrá dar cuenta de que su horno nuevo cocina diferente que el que usted reemplazó. Use su horno nuevo
por unas semanas para familiarizarse con él. Si aún así usted todavía piensa que su horno nuevo es demasiado
caliente o demasiado frío, usted puede ajustar el termostato usted mismo.
No use termómetros, como esos que se venden en tiendas de aprovisionamiento para inspeccionar la temperatura de
su horno. Estos termómetros podrían variar de 20 a 40 grados.
NOTA: Este ajuste no afectará la temperatura de asado a la parrilla.
La mayoría de las recetas para horneado se han desarrollado usando productos de alto contenido en grasa como
mantequilla o margarina (80% de grasa). Si disminuye la grasa, es posible que la receta no tenga los mismos
resultados que con un producto de mayor contenido de grasa.
Las recetas pueden fallar si las tortas, pasteles, galletas o dulces se preparan con productos bajos en grasa. Mientras
menor sea el contenido de grasa de un producto tipo mantequilla, más se notarán estas diferencias.
Los estándares federales exigen que los productos marcados como margarinas, contengan por lo menos un 80% de grasa por
peso. Por otra parte, los productos tipo mantequilla bajos en grasa contienen menos grasa y más agua. El alto contenido de
humedad de estos productos afecta la textura y el sabor de los alimentos horneados. Para mejores resultados con sus viejas
recetas favoritas, use margarina, mantequilla u otros productos que contengan por lo menos un 70% de aceite vegetal.
El tipo de margarina afecta el desempeño del horneado!
Para ajustar el termostato
Presione los botones Bake y Broil Hi/Lo
al mismo tiempo durante 2 segundos
hasta que la pantalla muestre SF.
Presione el botón Bake. En la pantalla se
muestra un número de dos dígitos.
La temperatura del horno puede
ajustarse hasta (+) 35° F más caliente o
(-) 35° F más fría. Presione el botón +
para aumentar la temperatura de a
1 grado.
Presione el botón + para aumentar la
temperatura de a 1 grado.
Cuando haya realizado el ajuste,
presione el botón Start/On para volver a
la pantalla de la hora del día. Utilice su
horno como lo haría normalmente.
NOTA: este ajuste no afecta las temperaturas
de asado a la parrilla. El ajuste se almacenará
en la memoria después de una falla eléctrica.
Page 67

19
Utilización del reloj y cronómetro. ge.com
Si parpadea la hora en la pantalla, se ha
producido una falla eléctrica. Reinicie el reloj.
Para reiniciar el reloj, presione el botón Clock.
Ingrese la hora correcta del día presionando
los botones + o –. Presione el botón
Start/On.
No todas las características están disponibles en todos los modelos.
Para ajustar el temporizador
El temporizador no controla las operaciones
del horno. La configuración máxima en el
temporizador es de 9 horas y 59 minutos.
Presione el botón Kitchen Timer On/Off.
Presione los botones + o - hasta que la
cantidad de tiempo que desea aparezca
en la pantalla. El tiempo máximo que
puede ingresarse en minutos es de 59.
Los tiempos de cocción mayores a 59
minutos deben cambiarse a horas y
minutos.
Si comete un error, presione el botón Kitchen
Timer On/Off y comience nuevamente.
Presione el botón Start/On. El tiempo
comienza la cuenta regresiva, aunque la
pantalla no cambia hasta que haya
pasado un minuto.
Cuando el temporizador alcance :00, el
control pitará 3 veces seguidas por un
pitido cada 6 segundos hasta que se
presione el botón Kitchen Timer On/Off.
El temporizador es únicamente un
temporizador de minutos.
El botón Clear/Off no afecta al
temporizador.
Para ajustar el reloj
Presione el botón Clock dos veces.
Presione los botones + o –.
Si no presiona los botones + o - dentro del
minuto de haber presionado el botón Clock,
la pantalla vuelve a la configuración inicial.
Si esto ocurre, presione el botón Clock dos
veces, y vuelva a ingresar la hora del día.
Presione el botón Start/On hasta que
en la pantalla aparezca la hora del día.
Al hacerlo, ingresará la hora e iniciará
el reloj.
Para ver la hora cuando la pantalla muestra
otra información, sólo presione el botón
Clock. Muestra la hora hasta que se presiona
otro botón.
Asegúrese que el reloj se ajuste con
la hora correcta del día.
Para apagar la pantalla del reloj
Si tiene varios relojes en su cocina, puede
anular la pantalla del reloj con la hora de
su cocina.
Presione el botón Clock una vez para
apagar la pantalla que muestra la hora
del día. Aunque ya no podrá verlo, el
reloj mantiene la hora del día correcta.
Presione el botón Clock dos veces para
que vuelva a mostrar la hora.
Para reiniciar el temporizador
Si la pantalla todavía está mostrando el
tiempo restante, puede cambiarla
presionando el botón Kitchen Timer On/Off,
luego presione los botones + o - hasta que en
la pantalla aparezca el tiempo que desea.
Si el tiempo restante no está en la pantalla
(en la pantalla está el reloj), recuerde el
tiempo restante presionando el botón
Kitchen Timer On/Off y luego presionando
los botones + o - hasta ingresar el nuevo
tiempo que desea.
Para cancelar el temporizador
Presione el botón Kitchen Timer On/Off
dos veces.
Corte en el suministro eléctrico
Soporte al consumidor
Instrucciones de
instalación
Solucionar problemas
OperaciónSeguridad
Page 68

20
Operación
Seguridad
Instrucciones de
instalación
Solucionar problemasSoporte al consumidor
Su nuevo control con botones sensibles tiene características adicionales que puede elegir utilizar. A continuación se
describen las características y cómo puede activarlas.
Los modos de característica especial sólo pueden activarse mientras la pantalla esté mostrando la hora del día. Dichos
modos permanecen en la memoria del control hasta que los pasos sean repetidos.
Cuando la pantalla muestre su elección, presione el botón Start/On. Las características especiales permanecerán en la
memoria después de una falla eléctrica.
NOTA: la característica Sabbath y la característica Ajuste del termostato también son características especiales, pero
se describen en forma separada en sus secciones correspondientes.
Características especiales de los controles de su horno.
Apagado después de 12 horas
Con esta característica, si se olvida y deja el
horno encendido, el control apagará el horno
después de 12 horas automáticamente
durante las funciones de horneado o después
de 3 horas durante una función de asado a la
parrilla.
Si desea desactivar esta función, siga los
pasos a continuación.
Presione los botones Bake y Broil Hi/Lo
al mismo tiempo durante 3 segundos
hasta que la pantalla muestre SF.
Presione el botón Clock. La pantalla
mostrará On (apagado después de 12
horas). Presione el botón Clock varias
veces hasta que la pantalla muestre Off
(no apagado).
Presione el botón Start/On para
establecer el modo "no apagado" y dejar
la configuración del control en este
modo de característica especial.
Page 69

21
Soporte al consumidor
Instrucciones de
instalación
Solucionar problemasOperaciónSeguridad
La característica Sabbath puede utilizarse únicamente para horneado/asado. No puede utilizarse para asado a la parrilla.
NOTA: la luz del horno se enciende automáticamente (en algunos modelos) cuando la puerta es abierta y se apaga
cuando la puerta es cerrada. Se puede quitar la bombilla. Consulte la sección Reemplazo de la luz del horno. En los
modelos con un interruptor de luz en el panel de control, la luz del horno puede encenderse y dejarse encendida.
Uso de la característica Sabbath.
(en algunos modelos)
(Diseñada para utilizarse en el Sabbath judío y días festivos)
ge.com
Cómo configurar el horneado/asado regular
NOTA: para entender cómo funciona el control del
horno, practique usando el horneado normal (no en
funcionamiento para Sabbath) antes de ingresar en
el modo de funcionamiento para Sabbath.
Asegúrese que el reloj muestre la hora correcta del
día y que el horno esté apagado.
Presione y sostenga los botones Bake y
Broil Hi/Lo, al mismo tiempo, hasta que la
pantalla muestre SF.
Presione suavemente el botón Clock hasta
que aparezca SAb en la pantalla.
Presione el botón Start/On y aparecerá ⊃ en
la pantalla.
Presione el botón Bake. No se dará ninguna
señal.
La temperatura de inicio preconfigurada
se configurará automáticamente en 350°.
Presione suavemente los botones + o – para
aumentar o disminuir la temperatura en
incrementos de 25°. La temperatura puede
configurarse entre 170° y 550°. No se dará
ninguna señal o temperatura.
Presione el botón Start/On.
Después de un periodo aleatorio de espera
de aproximadamente 30 segundos a 1
minuto, ⊃ aparecerá en la pantalla
indicando que el horno está
horneando/asando. Si ⊃ no aparece en la
pantalla, comience de nuevo en el Paso 4
Para ajustar la temperatura del horno, presione el
botón Bake y presione suavemente los botones +
o – para aumentar o disminuir la temperatura en
incrementos de 25°. Presione el botón Start/On.
NOTA: el botón Clear/Off está activo durante la
característica Sabbath.
⊃
⊃
Cuando la pantalla muestra ⊃ el
horno está configurado en Sabbath.
Cuando la pantalla muestra ⊃ el
horno está horneando/asando.
⊃
Cómo salir de la característica Sabbath
Presione el botón Clear/Off.
Si el horno está cocinando, espere durante
un periodo aleatorio de aproximadamente
30 segundos a 1 minuto, hasta que sólo
aparezca ⊃ en la pantalla.
Presione y sostenga los botones Bake y
Broil Hi/Lo, al mismo tiempo, hasta que la
pantalla muestre SF.
Presione suavemente el botón Clock hasta
que aparezca On u Off en la pantalla.
On indica que el horno se apagará
automáticamente después de 12 horas.
Off indica que el horno no se apagará
automáticamente. Consulte la sección
Características especiales para obtener
detalles sobre la característica Apagado
después de 12 horas.
Presione el botón Start/On.
NOTA: si se produjo un corte en el suministro
eléctrico mientras el horno estaba en Sabbath,
el horno se apagará automáticamente y
permanecerá apagado aunque el suministro
eléctrico regrese. El control del horno debe ser
reiniciado.
Page 70

22
Cuidado y limpieza.
Cerciórese de que el suministro eléctrico esté desconectado y que todas las superficies estén frías antes de
limpiar cualquier parte de la estufa.
Si su estufa es removido para ser limpiado, servicio o por cualquier otra razón,
cerciórese de que el dispositivo Antivolcaduras es reemplazado. No tomar esta
precaución podría resultar en que la estufa se incline demasiado, lo que podría
causar lesiones.
Plancha para asar
NOTAS:
■ La plancha para asar se debe usar
únicamente en la rejilla del quemador
central.
■ No limpie la plancha en el lavaplatos
automático.
Limpie a fondo la grasa de la plancha y
las partículas de alimentos, usando una
espátula de borde cuadrado, mientras
todavía está caliente.
Limpie la plancha con un paño seco y grueso
para retirar cualquier residuo y partículas de
comida restantes.
Lave con agua caliente jabonosa, enjuague
y seque.
Una vez la plancha esté fría, frote la superficie
ligeramente con aceite vegetal. No use aceite
de maíz o atomizadores para cocinar ya que
estos son pegajosos.
Si se limpia la plancha con algo diferente
a un paño seco y grueso, será necesario
volverlo a curar.
Nunca sumerja la plancha caliente en agua
fría. Esto puede causar que la plancha se raje
o se pandee.
A medida que se usa, la plancha puede
cambiar de color con el tiempo.
Precauciones con la plancha:
■ Si algo se derrama debajo de la plancha, se
debe limpiar tan pronto como sea posible
para evitar que se pegue con el uso de la
estufa.
■ No deje que la grasa se acumule debajo de
la plancha ya que puede haber peligro de
incendio. Limpie debajo de la plancha tan
pronto como se enfríe. Limpie con agua
caliente y jabón.
Operación
Seguridad
Instrucciones de
instalación
Solucionar problemasSoporte al consumidor
Page 71

23
ge.com
Ensambladuras del quemador
Apague todos los controles en la posición
OFF antes de remover las partes del
quemador.
Las rejillas del quemador, las tapas, las
cabezas y plancha del quemador pueden ser
extraídas levantándolas, haciendo que su
limpieza sea fácil. Los electrodos no son
removibles.
PRECAUCIÓN: No opere
la estufa sin todas las partes del quemador y
las rejillas en su lugar.
Cabeza del
quemador
Rejilla
lateral
Electrodo
Ensambladura
de la cabeza y
tapa del quemador
Rejilla
central
Electrodo
Soporte al consumidorOperaciónSeguridad
Instrucciones de
instalación
Solucionar problemas
Cuando se gira un quemador hacia la
posición Lite, todos los quemadores
chispean. No intente desmontar o
limpiar alrededor de ningún quemador
mientras otro esté encendido. Puede
provocar una descarga eléctrica que
lo podría tirar encima de las ollas
calientes.
Electrodo
Tapa del
quemador
Page 72

Operación
Seguridad
Instrucciones de
instalación
Solucionar problemasSoporte al consumidor
24
Cuidado y limpieza.
Tapas y cabezas del quemador
Tapas del quemador
Levántela cuando esté fría. Lave las tapas del
quemador con agua de jabón caliente y
enjuáguela con agua limpia. Usted la puede
restregar con un restregador para remover
las partículas de comidas quemadas que se
le hayan adherido.
Cabezas del quemador
Para lograr una ignición apropiada,
cerciórese de que el agujero pequeño en
la sección que se ajusta al electrodo está
abierto. Una aguja de coser o un alfiler
funcionan bien para mantenerlo abierto.
Las hendiduras en las cabezas del quemador
deben mantenerse limpias en todo momento
para lograr llamas uniformes y eficientes.
Agujeros o electrodos atascados o con
suciedad no le permiten al quemador operar
apropiadamente.
Cualquier derrame sobre o alrededor del
electrodo debe ser limpiado cuidadosamente.
Tenga cuidado de no golpear el electrodo con
algún objeto duro, lo que podría dañarlo.
Usted debe limpiar las tapas y las cabezas
del quemador de manera rutinaria,
especialmente después de derrames serios,
lo que podrían obstruir las cabezas del
quemador. Levántelo y límpielo cuando
esté frío.
Para remover comida que se haya quemado
y que se encuentre encima, sumerja las
cabezas del quemador en una solución
de agua con un detergente suave y agua
caliente por 20 ó 30 minutos. Para manchas
más difíciles de retirar, use un cepillo dental.
NOTA: No use un estropajo de acero o un
restregador demasiado duro para limpiar los
quemadores.
Después de limpiar
Antes de poner las tapas y las cabezas del
quemador de regreso en su lugar, sacuda
el agua que haya quedado sobre ellos y
séquelas totalmente colocándolas en el
horno en caliente por 30 minutes.
Reemplazo
Reemplace las cabezas y las tapas del
quemador. Cerciórese de que las cabezas y
las tapas del quemador sean reemplazadas
en la posición correcta. Existe una
ensambladura de la cabeza y tapa oval
(centro) y cuatro de las cabezas y las
tapas laterales.
Cerciórese de que la ranura en la cabeza del
quemador está colocada sobre el electrodo.
Asegúrese de reemplazar las cabezas y las
tapas en los lugares correctos.
Use una aguja de coser o un alfiler
para retirar cualquier obstrucción
en el agujerito en la cabeza del
quemador.
Ranura
Electrodo
Ranura
Cabeza y tapa
de quemador
mediano
Frente de
la estufa
Cabeza y tapa
de quemador
grande
Cabeza y tapa
de quemador
pequeña
Cabeza y tapa
de quemador
extra grande
Ensambladura
de la cabeza
y tapa oval
Page 73

ge.com
25
Rejillas de los quemadores
Levántelas cuando estén frías. Primero retire
la rejilla central y después las rejillas laterales.
Las rejillas se deben lavar con frecuencia y
siempre después de derrames. Lávelas en
agua caliente y jabonosa y enjuague con
agua clara. Después de limpiar, séquelas
completamente colocándolas en el horno
caliente por unos minutos. No coloque las
rejillas nuevamente en la estufa mientras
estén húmedas. Cuando reemplace las
rejillas, asegúrese de colocarlas firmemente
sobre los quemadores.
No opere un quemador por un período de
tiempo prolongado sin una olla o sartén
sobre la rejilla. El acabado de la rejilla se
puede rajar si no hay una olla o sartén que
absorba el calor.
Para reemplazar las rejillas:
Coloque las rejillas laterales en su
posición sobre la superficie de la estufa.
Coloque la rejilla central en la superficie
de la estufa, asegurándose de que las
patas de bloqueo se enganchen sobre
las rejillas laterales.
Para deshacerse de alimentos quemados,
coloque las rejillas en un envase cubierto.
Agregue 1/4 de taza de amoniaco y déjelo
por varias horas o toda la noche. Lávelo,
enjuáguelo y séquelo.
Aunque son duraderas, las rejillas
gradualmente pierden su brillo, sin importar
el cuidado que se les dé. Esto se debe a su
continua exposición a altas temperaturas.
Se dará cuenta de esto con rejillas de color
más claro.
Superficie de la estufa
Para evitar daños en el esmalte de porcelana
de la superficie de la estufa y para prevenir
que pierda el brillo, limpie los derramamientos
inmediatamente. Los alimentos con mucho
ácido (tomates, chucrut, jugos de fruta, etc.)
o con alto contenido de azúcar pueden
causar una mancha pálida si se dejan
demasiado tiempo.
Cuando la superficie se enfríe, lave y
enjuague. Para otros derramamientos como
salpicaduras de grasa, etc., lave con agua y
jabón una vez se enfríe la superficie de la
estufa. Luego enjuague y brille con un
paño seco.
NOTA: No levante la superficie de la estufa.
Levantar la superficie de la estufa puede
causar daños y una operación inapropiada de
la estufa.
NOTA: No almacene materiales
inflamables en el horno o cerca de la
superficie de la estufa. No almacene o
use materiales combustibles, gasolina
u otros vapores y líquidos inflamables
en los alrededores de éste o de
cualquier aparato.
Superficies de acero inoxidable (en algunos modelos)
No utilice almohadillas de lana de acero ya
que rayará la superficie.
Para limpiar la superficie de acero inoxidable,
utilice agua jabonosa o u limpiador o
pomada para acero inoxidable. Siempre
limpie la superficie en la dirección del grano.
Siga las instrucciones del producto limpiador
al limpiar la superficie de acero inoxidable.
Si tiene preguntas sobre la compra de
un limpiador o pomada limpiadora de
electrodomésticos de acero inoxidable, o
para averiguar la dirección del distribuidor
más cercano, por favor llame al siguiente
número telefónico gratuito:
Centro nacional de piezas 800.626.2002
ge.com
Soporte al consumidor
Operación
Seguridad
Instrucciones de
instalación
Solucionar problemas
Page 74

Cuidado y limpieza.
Puerta del horno de levantar
La puerta del horno es desmontable, sin
embargo es pesada. Posiblemente necesite
ayuda para quitar y reemplazar la puerta.
Para retirar la puerta, ábrala unas cuantas
pulgadas hasta la posición de freno especial
que mantiene la puerta abierta. Tómela
firmemente de cada lado y levante la puerta
hacia arriba y hacia fuera de las bisagras.
NOTA: Tenga cuidado de no colocar las manos
entre la bisagra y el marco de la puerta del
horno ya que la bisagra se puede escapar
y le atraparía los dedos.
Para reemplazar la puerta, cerciórese de
que las bisagras estén en la posición de freno
especial. Coloque las ranuras de la parte
inferior de la puerta justamente sobre las
bisagras. Luego baje la puerta lenta y
uniformemente sobre ambas bisagras al
mismo tiempo. Si las bisagras se escapan
del marco del horno, ábralas nuevamente.
Para limpiar el interior de la puerta:
■ No permita que agua excesiva corra hacia
los agujeros o las ranuras en la puerta.
■ El área afuera de la junta puede limpiarse
con una esponja de acero con detergente
o con una almohadilla plástica.
Para limpiar el exterior de la puerta:
■ Use agua y jabón para limpiar
completamente la parte superior, los lados
y el frente de la puerta del horno. Enjuague
bien. También puede usar un limpiador de
vidrios para limpiar el vidrio por fuera de la
puerta.
■ Los derramamientos de platos marinados,
jugos de frutas, salsas de tomate y líquidos
para cocinar que contengan ácidos
posiblemente causen decoloración y se
deben limpiar inmediatamente. Cuando la
superficie este fría, limpie y enjuague.
■ No use limpiadores para hornos,
limpiadores en polvo o abrasivos fuertes en
la parte exterior de la puerta.
Fondo del horno
El fondo del horno tiene un acabado en
esmalte de porcelana. Para limpiar más
fácilmente, proteja el fondo del horno de
derramamientos excesivos colocando una
lata de galletas en el estante debajo del que
está usando para cocinar. Esto es
particularmente importante cuando hornea
un pastel de frutas u otros alimentos con alto
contenido de ácido. Los rellenos de fruta
caliente o de otros alimentos altamente
ácidos (como tomates, chucrut y salsas con
vinagre o jugo de limón) pueden causar
marcas y dañar la superficie del esmalte
de porcelana, por tanto se debe limpiar
inmediatamente.
No recomendamos el uso de papel de
aluminio en el fondo del horno. Puede afectar
el flujo de aire si se bloquean los orificios y se
puede concentrar el calor en el fondo del
horno, dando como resultado un desempeño
inadecuado al hornear.
Para limpiar derrames, use jabón y agua, un
limpiador abrasivo o una esponja de acero
con detergente. Enjuague bien para remover
el detergente.
Levante la puerta directamente hacia
arriba y extráigala de las bisagras.
La junta está diseñada con una franja
en el fondo para permitir que ocurra
una circulación del aire apropiada.
No restriegue o limpie la junta de la
puerta—tiene una tolerancia
extremadamente baja a la abrasión.
Si usted nota que la junta de la puerta
se está desgastando, o que se está
deshilachando o dañándose o que de
alguna forma se está saliendo de su
lugar, usted debe reemplazarla.
26
Operación
Seguridad
Instrucciones de
instalación
Solucionar problemasSoporte al consumidor
Page 75

27
ge.com
Compartimiento para asar a la parrilla
Cuando el compartimiento para asar a la
parrilla esté frío, retire la rejilla y la bandeja.
Limpie el compartimiento con agua jabonosa
caliente. Enjuague completamente con un
paño húmedo y seque.
Estantes del horno
Limpie los estantes con un limpiador abrasivo
o una almohadilla de restregar. Después de
limpiar, enjuague los estantes con agua clara
y seque con un paño limpio.
Reemplazo de la luz del horno
PRECAUCIÓN: Antes
de reemplazar la bombilla de su horno,
desconecte el suministro eléctrico hacia la
estufa en el fusible principal o en el panel
de circuitos de interruptores. No toque la
bombilla cuando está caliente con sus manos
húmedas o con un trapo húmedo. Cerciórese
de permitir que la bombilla se enfríe
completamente y use un trapo seco para
retirarla.
La bombilla está localizada en la esquina
superior izquierda (podría variar) del horno.
Reemplace la bombilla con una bombilla
para electrodomésticos de 40 vatios
solamente.
Cajón del asador desmontable
Para desmontar:
Cuando se ha enfriado el asador, quite
la rejilla y bandeja.
Jale el cajón del asador hacia afuera
hasta que se detenga, luego vuelva a
empujarlo hacia adentro cerca de una
pulgada.
Agarre la manija, levante y jale el cajón
del asador hacia afuera. Limpie el cajón
del asador con agua jabonosa caliente.
Para volver a colocar:
Sostenga el cajón del asador en la posición
levantada mientras desliza una porción del
mismo hacia la estufa. Luego baje el cajón y
empújelo hasta que cierre completamente.
Soporte al consumidor
Operación
Seguridad
Instrucciones de
instalación
Solucionar problemas
Page 76

Cuidado y limpieza.
Conductos de ventilación del horno
Nunca obstruya los conductos (aberturas de
aire) de la estufa. Éstos permiten la entrada y
salida de aire que se necesita para que la
estufa funcione correctamente con la
combustión adecuada.
Las aberturas de aire se localizan en la
parte posterior de la superficie de la estufa,
en la parte superior e inferior de la puerta
del horno y en la parte inferior de la
estufa debajo del panel inferior o del
compartimiento del asador (dependiendo
del modelo).
Panel de control inferior (Panel del múltiple frontal) y las perillas
Es buena idea limpiar el panel frontal cada
vez que se use el horno. Use un trapo
húmedo para limpiarlo o para enjuagarlo.
Para la limpieza, use un jabón suave y agua
con una solución de agua y vinagre en una
proporción de 50/50. Para enjuagarlo, use
agua limpia solamente. Púlalo con un trapo
suave.
No use limpiadores abrasivos, limpiadores
líquidos fuertes, almohadillas de restregar
plásticas o limpiadores de horno para limpiar
el panel de control—dañarán el acabado.
No doble las perillas tirando de ellas hacia
abajo o hacia arriba, ni cuelgue objetos como
toallas u otras cosas sobre las perillas. Esto
puede dañar el eje de la válvula de gas.
Las perillas de control pueden quitarse
para limpiarse.
Para limpiar las perillas, cerciórese de que
estén en la posición de apagado (Off). Hale
cada perilla hacia fuera del vástago.
Limpie las perillas en el lavaplatos o lave las
perillas en agua y jabón. Antes de que
reemplazo, cerciórese de que los interiores
de las perillas estén secos.
Cuando reemplace las perillas, revise
que estén en la posición de apagado (Off)
para garantizar la colocación correcta.
Se pueden limpiar las partes metálicas con
agua y jabón. No use esponjillas metálicas,
abrasivos, amoniaco, ácidos o limpiadores de
horno comerciales. Seque con un paño suave.
El aspecto y ubicación de los
conductos de ventilación puede variar.
Tire de la perilla directamente hacia
afuera extrelléndola del vástago.
Interior de porcelana del horno
Con el cuidado correcto, el interior de
esmalte de porcelana conservará su
acabado atractivo por muchos años.
Agua y jabón normalmente es suficiente.
Las salpicaduras o derrames pesados
posiblemente necesiten limpieza con un
limpiador abrasivo suave. También se pueden
usar esponjillas con jabón. No permita que
derramamientos de comida con alto
contenido de azúcar o de ácido (como
tomates, chucrut, jugos de frutas o rellenos
de pasteles) permanezcan sobre la superficie.
Pueden dejar manchas pálidas aún después
de limpiar.
El amoniaco casero puede facilitar el trabajo
de limpieza. Vierta 1⁄
2 taza de amoniaco en un
recipiente de vidrio poco profundo y déjelo
dentro del horno frío toda la noche. El
amoniaco despedido ayuda a ablandar la
grasa y la comida pegada.
Cuando sea necesario, puede usar un
limpiador de hornos comercial. Siga las
instrucciones del empaque.
Precauciones sobre cómo usar
limpiadores de atomizador para
hornos:
■ Tenga cuidado al esparcir el limpiador
de hornos.
■ No esparza el limpiador en los controles
eléctricos o en los interruptores (en algunos
modelos) ya que podría causar un corto
circuito y provocar chispas o fuego.
■ No deje que una película del limpiador
permanezca en la bombilla de detección de
la temperatura, podría causar que el horno
calentara incorrectamente. (La bombilla se
encuentra en la parte posterior del horno).
Limpie con cuidado la bombilla después de
cada limpieza del horno, tenga cuidado de
no mover la bombilla ya que un cambio en
su posición puede afectar la capacidad
para hornear.
■ No esparza ningún limpiador de horno
sobre la puerta exterior del horno, mangos
o cualquier superficie exterior del horno,
gabinete o superficies pintadas. El limpiador
puede dañar estas superficies.
28
Operación
Seguridad
Instrucciones de
instalación
Solucionar problemasSoporte al consumidor
Page 77

Instrucciones
Estufa
de instalación
¿Preguntas? Llame al 800.GE.CARES (800.432.2737) o bien Visite nuestra página Web: ge.com
ANTES DE COMENZAR
Lea estas instrucciones completa y cuidadosamente.
La instalación de esta estufa debe conformarse a los
códigos locales, o en la ausencia de códigos locales,
con el National Fuel Gas Code (Código Nacional de
Combustibles de Gas) ANSI Z223.1/NFPA.54, en su
última edición. Esta estufa ha sido diseñada-certificada
por CSA International conforme con ANSI Z21.1, en su
edición más reciente y la Canadian Gas Association
(Asociación de gas canadiense) de acuerdo con
CAN/CGA-1.1 en su edición más reciente.
Al igual que cualquier aparato que use gas y genere
calor, existen ciertas precauciones que debe seguir.
Encontrará estas precauciones en la sección
Instrucciones importantes de seguridad en la parte
inicial de este manual. Léalas cuidadosamente.
29
•
IMPORTANTE –Guarde estas instrucciones para
ser usadas por el inspector eléctrico local.
•
IMPORTANTE –Observe todos los códigos y
ordenanzas aplicables.
• Nota al instalador – Cerciórese de dejar estas
instrucciones con el Consumidor.
• Nota al consumidor – Guarde estas instrucciones para
referencia futura.
• Nota – Este electrodoméstico debe estar conectado a
tierra de manera apropiada.
• Técnico de servicio – El diagrama eléctrico se encuentra
en un sobre pegado a la parte posterior de la estufa.
• Nivel de conocimiento – La instalación de este
electrodoméstico requiere habilidades básicas mecánicas.
• La instalación apropiada es la responsabilidad del
instalador.
• Si este producto falla por una instalación inapropiada, la
Garantía no cubrirá este producto.
En el Estado de Massachusetts:
• Este producto lo debe instalar un plomero
con licencia o un instalador de gas.
• Al usar válvulas de cierre de gas de tipo esfera,
no deben ser del tipo de manija en T.
• Un conector de gas flexible, cuando se utilice,
no debe superar los 3 pies.
Page 78

HERRAMIENTAS QUE USTED NECESITARÁ
POR SU SEGURIDAD
No almacene o use materiales combustibles,
gasolina u otros vapores o líquidos en la cercanía
de este o de otro aparato.
Si percibe un olor a gas:
Abra las ventanas.
No toque los interruptores eléctricos.
Apague cualquier llama abierta.
Llame de inmediato a su proveedor de gas.
MATERIALES QUE PUEDE NECESITAR
• Válvula de cierre del suministro de gas
• Sellante para acoplamiento de tuberías o cinta de Teflón*
aprobada por UL para tuberías que resista la acción de
gas natural y LP
• Conector metálico flexible para aparatos (1/2″ diámetro
interno). Se recomienda una longitud de 5 pies (1.50 ms)
para una fácil instalación, aunque se aceptan otras
longitudes. Nunca use un conector viejo cuando instale
una estufa nueva.
• Adaptador abocinado para acoplamiento a la línea de
suministro de gas (3/4″ ó 1/2″ NPT x 1/2″ diámetro
interno)
• Adaptador abocinado para acoplamiento al regulador de
presión de la estufa (1/2″ NPT x 1/2″ diámetro interno)
• Detector de fuga de líquido o agua jabonosa.
• Tornillo de retraso o ancla de manga de 1/2″ O.D. (para
pisos de concreto solamente).
*Teflon: Marca registrada de DuPont
Destornillador plano
Llaves de tubos (2)
(una de repuesto)
Destornillador Phillips
Llave ajustable o abierta
Lápiz y regla
Nivel
30
Instrucciones de instalación
Taladro, punzón o clavo
PARTE INCLUIDA
Page 79

Instrucciones de instalación
ADVERTENCIA!
INSTRUCCIONES DE
SEGURIDAD DE INSTALACIÓN!
Lea estas instrucciones completa y
cuidadosamente.
La instalación, ajuste, alteración, servicio o
mantenimiento incorrectos puede causar lesiones o
daños a la propiedad. Consulte este manual. Para
asistencia o información adicional, consulte a un
instalador calificado, agencia de servicio, fabricante
(distribuidor) o proveedor de gas.
Nunca vuelva a usar los conectores flexibles
anteriores. El uso de estos conectores podría causar
escapes de gas y lesiones personales. Siempre use
conectores flexibles NUEVOS cuando instale un
aparato de gas.
IMPORTANTE –Retire todo el material de
empaque y los manuales del horno antes de conectar
el gas y el fluido eléctrico a la estufa.
PRECAUCIÓN –No intente operar el
horno de esta estufa durante una interrupción en el
fluido eléctrico (los modelos con ignición eléctrica
solamente).
• Solicite la instalación de la estufa a un instalador
calificado.
• La estufa debe estar conectada a tierra de acuerdo
con los códigos locales o, en la ausencia de códigos
locales, con el Código nacional de electricidad
(ANSI/NFPA 70, última edición). Consulte la sección
Conexiones eléctricas.
• Antes de instalar la estufa en linóleo o en cualquier
otro piso sintético, asegúrese de que el acabado del
piso pueda resistir 180° F sin contraerse, pandearse
o decolorarse. No instale la estufa sobre alfombra a
menos que se coloque una hoja de plywood de 1/4″
de espesor o un aislante similar entre la estufa y
la alfombra.
• Asegúrese de que los acabados de las paredes
alrededor de la estufa puedan soportar hasta 200° F,
producto del calor generado por la estufa.
• Evite colocar gabinetes encima de la estufa. Para
reducir el peligro de quemarse al intentar alcanzar
algo sobre la llama que producen los quemadores,
instale una campana de ventilación sobre la estufa
que se proyecte hacia delante al menos 5″ (13 cm)
más allá del frente de los gabinetes.
• La campana de ventilación se debe construir de
lámina metálica no menor a 0.0122″ (0.3 mm) de
espesor. Instale por encima de la superficie de la
estufa con un espacio de no menos de 1/4″ (6 cm)
entre la campana y el costado inferior del material
combustible o del gabinete metálico. La campana
debe ser por lo menos tan ancha como el aparato
y centrada sobre el aparato. El espacio entre la
superficie de la estufa y la superficie de la campana
de ventilación NUNCA DEBE SER MENOR DE 24″
(61 cm).
EXCEPCIÓN: La instalación de un horno
microondas o de un aparato para cocinar sobre
la superficie de la estufa debe cumplir con las
instrucciones de instalación que vienen con
ese aparato.
• Si se instalan gabinetes encima de la estufa, deje
un espacio mínimo de 30″ (76 cm) entre la superficie
de la estufa y la parte inferior de los gabinetes
desprotegidos.
• Si no se puede dejar un espacio de 30″ (76 cm) entre
la superficie de la estufa y el material combustible o
los gabinetes metálicos superiores, proteja la parte
inferior de los gabinetes que están encima de la
estufa con papel aislante de por lo menos 1/4″
(6 mm) cubierto con latón de no menos de 0.0122″
(0.3 mm) de espesor. El espacio entre la superficie de
la estufa y los gabinetes protegidos NUNCA DEBE
SER MENOR DE 24″ (61 cm).
• La distancia vertical desde el plano de la superficie
de la estufa a la parte baja de los gabinetes
adyacentes superiores que están más cerca de 1″
(25 mm) de los lados de la estufa no debe ser menor
de 18″ (46 cm). (Consulte la ilustración sobre
Dimensiones y espacios de esta sección.)
•
PRECAUCIÓN – No se deben
guardar artículos de interés para los niños en los
gabinetes que están encima de la estufa o en el
salpicadero posterior de ésta. Los niños que se
suban a la estufa para alcanzar artículos se pueden
lesionar seriamente.
31
Page 80

DIMENSIONES Y TOLERANCIAS
Proporcione tolerancias adecuadas entre la estufa y las superficies adyacentes de combustible.
Estas dimensiones deben cumplirse para el uso seguro de la estufa. La localización del tomacorriente eléctrico y
la abertura de la tubería (ver Localización de la tubería de gas y tomacorriente eléctrico) podría ser ajustado
para cumplir con requerimientos específicos.
La estufa puede colocarse con una tolerancia de 0″ en la pared posterior.
32
Instrucciones de instalación
Para los gabinetes
debajo de la superficie
de estufa y en la parte
trasera de la estufa
30” (76.2 cm)
30” (76.2 cm)
2”
(5 cm)
Mínima
13”
de distancia hasta la pared
Profundidad
máxima para
los gabinetes
encima de la
superficie de
cocción
Borde
delantero del
panel lateral
de la estufa
hacia
adelante
desde el
gabinete
18”
(45.7 cm)
0”
(0 cm)
1/4”
(6 mm)
Márgenes de
distancia
mínima para
los gabinetes
a ambos lados
de la estufa
36”
(91.5 cm)
273/4” (70.5 cm)–281/2” (72.4 cm)
Profundidad mínima – máxima con la puerta cerrada
(incluye la manija de la puerta):
La profundidad varía dependiendo
del modelo. Consulte la hoja de
especificaciones para su modelo.
30”
(76.2 cm)
361/4” (92.1 cm)
± 1/4” (6 mm)
Profundidad con la
puerta abierta:
463/
8
” (117.8 cm)
(puerta de vidrio)
475/
8” (123 cm)
(puerta de porcelana)
Altura
473/8”
(120.3 cm)
(33 cm)
Page 81

Instrucciones de instalación
ADVERTENCIA!
DISPOSITIVO
ANTI-VOLCADURA
Todas las estufas se pueden voltear y
puede causar lesiones.
Para prevenir que la estufa se voltee
por accidente, péguela a la pared
instalando el dispositivo anti-volcadura
suministrado. (Consulte en esta sección
Cómo instalar el dispositivo antivolcadura.) Para revisar si el dispositivo
se instaló y enganchó correctamente,
de forma cuidadosa voltee la estufa
hacia delante. El dispositivo antivolcadura debe enganchar e impedir
que la estufa se voltee.
Si hala la estufa lejos de la pared por
cualquier razón, asegúrese de que
el dispositivo esté enganchado
correctamente cuando empuje la
estufa de nuevo contra la pared.
• Por su seguridad, nunca use la estufa para calentar
la cocina. Ni el horno ni la superficie de la estufa se
diseñaron para calentar la cocina. Los quemadores
de la superficie no deben funcionar sin un recipiente
de cocina sobre las parrillas. Tal abuso puede
desencadenar un incendio y dañar su estufa, al
mismo tiempo que invalidaría su garantía.
• No almacene o use materiales combustibles,
gasolina u otros vapores y líquidos inflamables en
los alrededores de éste o de cualquier aparato.
Podrían resultar explosiones o incendios.
• No use el horno como área de almacenamiento.
Los artículos almacenados en el horno se
pueden prender.
• No deje que la grasa ni otros materiales inflamables
se acumulen en la estufa o cerca de ésta.
LOCALIZACIÓN
No instale la estufa donde esté sujeta a corrientes
fuertes. Se debe sellar cualquier abertura en el piso
o en la pared detrás de la estufa. Asegúrese de que
las aberturas alrededor de la base de la estufa
que suministran aire fresco para combustión y
ventilación no estén obstruidas por alfombras
o cualquier tipo de carpintería.
La estufa, como muchos otros electrodomésticos,
es pesada y se puede instalar en acabados de piso
suaves como vinilo acolchado o alfombra. Tenga
cuidado cuando mueva la estufa en este tipo de pisos.
Se recomienda seguir las siguientes recomendaciones
que son simples y económicas para proteger su piso.
La estufa se debe instalar en una hoja de plywood (o
material similar). Cuando el acabado del piso termina
al frente de la estufa, el área donde la estufa va a
estar instalada se debe cubrir con el plywood al
mismo nivel o más alto que el acabado del piso.
Esto permitirá que pueda mover la estufa para
limpieza y mantenimiento. También asegúrese de que
el acabado del piso resista 180° F. (Consulte la sección
Instrucciones importantes de seguridad en las
instrucciones de instalación.)
Asegúrese de que los acabados de las paredes
alrededor de la estufa puedan resistir el calor
generado (hasta 200° F) por la estufa. (Consulte la
sección Instrucciones de seguridad de instalación.)
IMPORTANTE!
Retire todas las cintas y el empaque.
Saque el paquete de accesorios del horno.
Revise que no se haya soltado ninguna parte
durante el envío.
33
LOCALIZACIÓN MODELO Y NÚMERO
DE SERIE
Dependiendo de la estufa, encontrará los números
del modelo y serie en una etiqueta en el marco
frontal de la estufa, detrás del panel inferior o
compartimiento para asar a la parrilla.
Page 82

34
Instrucciones de instalación
CONECTE EL SUMINISTRO
DE GAS ADECUADO
Su estufa está diseñada para operar a
una presión de 4″ (10 cm) o de 5″ (13 cm)
(dependiendo del modelo) de columna de agua
sobre gas natural o bien, si se diseño para gas LP
(propano o butano), 10″ (25 cm) de columna de
agua.
Asegúrese de suministrar el tipo de gas para el cual
está diseñada.
Esta estufa se puede convertir para el uso con gas
natural o propano. Si decide usar esta estufa con
gas LP, un instalador calificado de gas LP debe
realizar la conexión antes de intentar operar la
estufa con ese tipo de gas.
Para una correcta operación, la presión del
suministro de gas natural al regulador debe ser
entre 5″ (13 cm) y 13″ (33 cm) de columna de agua.
Para gas LP, la presión suministrada debe ser entre
10″ (25 cm) y 13″ (33 cm) de columna de agua.
Al revisar la operación correcta del regulador, la
presión entrante debe ser al menos 1″ (25 mm)
mayor que la presión de operación (colector)
señalada anteriormente.
El regulador de presión localizado en el colector
de admisión de la estufa debe permanecer en la
tubería de abastecimiento sin importar el tipo de
gas que se utilice.
El conector flexible metálico de aparatos
usado para conectar la estufa a la tubería de
abastecimiento de gas debe tener un diámetro
interno de 1/2″ (13 mm) y 5 pies (1.50 m) de
longitud para una fácil instalación.
1
CONECTE LA ESTUFA AL GAS (cont.)
Nunca use un conector viejo cuando instale una nueva
estufa. Si se usa el método de tubería rígida debe alinear
la tubería cuidadosamente, la estufa no se puede mover
sino hasta que se realice la conexión.
Para evitar filtraciones de gas, use un compuesto para
acoplar tuberías o envuelva cinta de Teflón* para roscas
de tubería alrededor de todas las roscas macho
(externas) de la tubería.
Instale una válvula de cierre manual a la tubería de gas
en un sitio de fácil acceso y que esté fuera de la estufa.
Asegúrese de que todo aquel que opere la estufa
conozca dónde y cómo se cierra el suministro de gas
a la estufa.
Instale un adaptador macho abocinado de 1/2″ de
acoplamiento a la rosca interna NPT de 1/2″ en la
entrada del regulador. Use una llave de repuesto
para el accesorio del regulador con el fin de evitar
algún daño.
Instale un adaptador macho abocinado de 1/2″ ó 3/4″
de acoplamiento a la rosca interna NPT de la válvula
manual de cierre, teniendo cuidado de proteger la
válvula de cierre para que no gire.
Una el conector metálico flexible de aparatos al
adaptador de la estufa. Coloque la estufa de manera
que se facilite la conexión de la válvula de cierre.
Cuando se hayan realizado todas las conexiones,
asegúrese de que todos los controles de la estufa estén
en la posición de apagado (off) y abra la válvula
principal de suministro de gas. Use un detector de
escapes de líquido en todas los acoplamientos y
conexiones para verificar que no haya escapes en
el sistema.
Cuando se usan presiones de prueba mayores a 1/2 psig
para la prueba de presión del sistema de suministro de
gas de la residencia, desconecte la estufa y la válvula de
cierre individual de la tubería de suministro de gas.
Cuando se usan presiones de prueba de 1/2 psig o
inferiores para verificar el sistema de suministro de gas,
simplemente aísle la estufa del sistema de suministro de
gas cerrando la válvula de cierre individual.
*Teflon: Marca registrada de DuPont
E
D
C
B
A
2
ADVERTENCIA:
NO USE UNA LLAMA
PARA VERIFICAR SI EXISTEN ESCAPES DE GAS.
CONECTE LA ESTUFA AL GAS
Cierre la válvula principal del suministro de gas
antes de desconectar la estufa vieja y déjela
cerrada hasta que se complete la nueva
conexión. No olvide volver a encender el piloto
en otros aparatos a gas cuando vuelva a abril
la válvula del gas.
Debido a que la tubería rígida restringe los
movimientos de la estufa, se recomienda el uso
de un conector metálico flexible para aparatos
certificado por CSA International, a menos que
los códigos locales exijan la conexión con
tubería rígida.
2
Page 83

Instrucciones de instalación
35
LOCALIZACIONES DE LA TUBERÍA DE GAS Y DEL TOMACORRIENTE ELÉCTRICO
Esta área permite una instalación
ajustada de la estufa con conexión
directa por la pared de la válvula de
cierre de la tubería y el tomacorriente
de 120 V de la pared posterior.
Esta área permite una instalación
ajustada de la estufa con conexión
directa por el piso de la válvula de
cierre de la tubería.
Conexión más corta desde
el cabo de la tubería rígida
hacia la conexión a la estufa.
Page 84

OPCIÓN DE CONECTOR FLEXIBLE
OPCIONES DE CONEXIONES
A LA TUBERÍA RÍGIDA
Regulador
de presión
Codo
de 45°
Boquilla
Unión
Codo de
90°
Tubería de
hierro
negro
Unión
Boquilla
Instalador: Informe al
consumidor sobre la
localización de la válvula
de cierre del gas.
Válvula
de cierre
del gas
Tubería de
gas de 1/2″
o 3/4″
El gas fluye hacia la estufa
36
Instrucciones de instalación
Regulador
de presión
Conector flexible
(máximo 6 pies
[1,80 m])
Adaptador
Instalador: Informe al
consumidor sobre la
localización de la válvula
de cierre del gas.
Tubería de gas de
1/2 ″ o 3/4″
Adaptador
Válvula de
cierre del gas
Válvula de
cierre del gas
Tubería de gas
de 1/2″ o 3/4″
Regulador
de presión
Boquilla
Codo de 90°
Codo
de 90°
Adaptador
Adaptador
Codo de 90°
Unión
Instalador: Informe al
consumidor sobre la
localización de la válvula
de cierre del gas.
Conexión alterna
Boquilla
Boquilla
Codo
de 90°
El gas fluye hacia la estufa
El gas fluye hacia la estufa
Page 85

37
Instrucciones de instalación
CONEXIONES ELÉCTRICAS
Requisitos eléctricos
Un circuito derivado de 120 voltios, 60 Hertz, protegido por
un disyuntor de circuitos de 15 ó 20 amperios o un fusible
con retraso.
Precauciones con los cables de extensión
Debido a riesgos potenciales de seguridad relacionados
con ciertas condiciones, no recomendamos el uso de un
cable de extensión. Sin embargo, si es indispensable que
use un cable de extensión, es absolutamente necesario
que esté sea aprobado por UL, un cable de extensión para
aparatos con conexión a tierra de tres alambres y que la
calificación de transmisión de corriente del cable en
amperios sea equivalente o mayor a la calificación del
disyuntor de circuitos.
Conexión a tierra
IMPORTANTE—(Lea cuidadosamente)
POR SEGURIDAD PERSONAL, ESTE APARATO SE DEBE
CONECTAR A TIERRA CORRECTAMENTE.
El cable eléctrico de este aparato está equipado con un
enchufe de tres patas (con conexión a tierra) que se
acopla a un receptáculo de pared estándar de tres patas
con conexión a tierra para minimizar la posibilidad de una
descarga eléctrica de este aparato.
El cliente es responsable por revisar el receptáculo de
pared y el circuito por parte de un electricista calificado
para cerciorarse de que el receptáculo cuenta con la
conexión a tierra apropiada.
Cuando se encuentre un receptáculo de pared de dos
patas, es responsabilidad y obligación personal del
cliente reemplazarlo por un receptáculo de tres patas
correctamente conectado a tierra.
BAJO NINGUNA CIRCUNSTANCIA, CORTE O RETIRE
LA TERCERA PATA (CONEXIÓN A TIERRA) DEL CABLE
ELÉCTRICO.
Un mensaje sobre los interruptores de circuitos para
fallas (GFCI, por sus iniciales en inglés). Los GFCI no son
necesarios o recomendados para receptáculos de estufas
de gas.
Los interruptores de circuitos para fallas (GFCI) son
dispositivos que perciben la fuga de corriente en un circuito y
automáticamente apagan la corriente cuando detectan una
falla. Estos dispositivos deben ser reiniciados manualmente
por el consumidor. El Código Eléctrico Nacional exige el uso
de GFCI en receptáculos de cocina instalados para servir en
superficies de mesones. El desempeño de la estufa no se
verá afectado si se opera con un circuito protegido por GFCI
pero es posible experimentar a menudo desconexiones
molestas del disyuntor GFCI.
3
CONEXIONES ELÉCTRICAS (CONT.)
Situaciones de uso en las cuales el cable eléctrico del
aparato se desconecta con poca frecuencia.
Se puede usar un adaptador únicamente en un circuito
de 15 amperios. No use un adaptador en un circuito de
20 amperios. Donde lo permitan los códigos locales, se
puede realizar una CONEXIÓN TEMPORAL para conectar
a tierra correctamente un receptáculo de pared de dos
patas para usar un adaptador aprobado por UL,
disponible en la mayoría de las tiendas. La ranura más
grande en el adaptador debe alinearse con la ranura
más grande en el receptáculo para ofrecer la polaridad
apropiada en la conexión del cable eléctrico.
Al desconectar el cable eléctrico del adaptador, siempre
sostenga el adaptador con una mano. Si no hace esto,
es posible que el terminal con conexión a tierra del
adaptador se rompa con el uso. Si esto ocurriera, NO
USE este aparato hasta que se haya establecido una
correcta conexión a tierra.
Situaciones de uso en las cuales el cable eléctrico del
aparato se desconecta frecuentemente.
En estas situaciones no use un enchufe adaptador ya
que desconectar el cable eléctrico exige un esfuerzo
indebido al adaptador y lo lleva a una falla del terminal
de conexión a tierra del adaptador en cualquier
momento. El cliente debe reemplazar el receptáculo de
pared de dos patas con uno de tres patas (con conexión
a tierra) con la ayuda de un electricista calificado antes
de usar el aparato.
B
A
3
Método
preferido
Cerciórese de que existe
una conexión a tierra
apropiada antes del uso
Método temporal
Asegure una conexión
firme y conexión a
tierra correctamente
antes del uso
Alinee las
patas/ranuras
PRECAUCIÓN:
Unir el terminal de
conexión a tierra del adaptador al tornillo de la tapa del
receptáculo de la pared no logra la conexión a tierra a
menos que el tornillo sea de metal, y no esté aislado y el
receptáculo de la pared esté conectado a tierra a través
del cableado de la casa. El cliente debe hacer que un
electricista calificado revise el circuito para cerciorarse de
que el receptáculo está correctamente conectado a tierra.
Page 86

COLOQUE LOS QUEMADORES DE LA
SUPERFICIE
(CONT.)
Reemplace las cabezas y las tapas del quemador.
Cerciórese de que las cabezas y las tapas del
quemador sean reemplazadas en la posición correcta.
Existe una ensambladura de la cabeza y tapa oval
(centro) y cuatro de las cabezas y las tapas laterales.
Cerciórese de que la ranura en la cabeza del
quemador está colocada sobre el electrodo.
Asegúrese de reemplazar las cabezas y las tapas en
los lugares correctos.
C
5
COLOQUE LOS QUEMADORES DE
LA SUPERFICIE
PRECAUCIÓN:
No opere el quemador sin
antes colocar todas las partes.
Arme los quemadores laterales como se muestra.
Arme el quemador central. Cerciórese de que las patas
de bloqueo en la rejilla central se enganchen en las
rejillas laterales.
B
A
5
Instrucciones de instalación
CONEXIONES ELÉCTRICAS (CONT.)
La instalación de los aparatos diseñados para instalación
móvil en el hogar deben cumplir los Estándares de
Seguridad y Construcción para el Hogar, Título 24 CFR,
Sección 3280 (anteriormente Estándar Federal para
Construcciones Móviles y Seguridad de los Hogares,
Título 24, HUD, Sección 280) o bien, cuando dicho
estándar no corresponde, el Estándar para Instalaciones
de Hogares Fabricados, última edición (Hogares
Fabricados, Comunidades e Instalaciones), ANSI A225.1,
última edición, o bien a los códigos locales.
Desconexión eléctrica
• Ubique el enchufe de
conexión en la parte
posterior de la estufa.
• Presione los lados del
conector y hale hacia
fuera de la estufa.
3
SELLE LAS ABERTURAS
Selle cualquier abertura en la pared detrás de la estufa y
en el piso debajo de la estufa cuando termine las
conexiones.
4
Ranura
Electrodo
Ranura
Tapa del quemador
Cabeza del quemador
Rejilla
lateral
Electrodo
Ensamble de la
cabeza y tapa
del quemador
Rejilla central
Electrodo
Patas de
bloqueo
Patas de
bloqueo
Cabeza y tapa
de quemador
mediano
Frente de la estufa
Cabeza y
tapa de
quemador
grande
Cabeza y tapa
de quemador
pequeña
Cabeza y tapa de
quemador extra
grande
Ensambladura de la
cabeza y tapa oval
38
Page 87

39
REVISAR IGNICIÓN DE QUEMADORES
DE LA SUPERFICIE
Se debe revisar la operación de los quemadores de
la estufa y del horno después de que la estufa y las
líneas de suministro de gas se hayan inspeccionado
cuidadosamente en busca de fugas.
Modelos con ignición eléctrica
Seleccione una perilla de un quemador de la
superficie y simultáneamente presione y gire hacia
la posición LITE. Escuchará un chasquido indicando
la operación correcta del módulo de la chispa. Una
vez que el aire se haya purgado de las líneas de
suministro, los quemadores se deben encender
en 4 segundos. Después de que el quemador se
encienda, rote la perilla fuera de la posición de LITE.
Ensaye cada quemador en orden hasta haber
revisado todos los quemadores.
Calidad de la llama
La calidad de la combustión de las llamas del
quemador se debe determinar visualmente.
Si la llama del quemador tiene el aspecto (A),
llame a solicitar un servicio. La llama normal
del quemador debe tener el aspecto (B) o (C),
dependiendo del tipo de gas que use.
Con gas licuado de petróleo (LP), es normal ver
ciertas puntas amarillas en los conos exteriores.
(C) Llamas suaves
azules—Normal para
gas natural
(B) Puntas amarillas en
los conos exteriores—
Normal para gas licuado
de petróleo (LP)
(A) Llamas
amarillas—Llame a
solicitar un servicio
6
REVISE LA IGNICIÓN DEL
QUEMADOR DEL HORNO
El horno está diseñado para operar silenciosa y
automáticamente. Para operar el horno, configure el
control del horno a una posición por encima de 200°
F. Después de 30–90 segundos, el quemador del
horno se prende y quema hasta que se alcance la
temperatura establecida. El quemador del horno
continúa el ciclo de encendido y apagado según
sea necesario para mantener el horno a la
temperatura indicada por la perilla OVEN CONTROL.
Los modelos con ignición eléctrica requieren
corriente eléctrica para operar. El horno no se
puede prender durante una interrupción en el
suministro eléctrico. El gas no fluye a menos que
la barra de encendido esté caliente.
Si el horno está en uso cuando ocurre una
interrupción del suministro eléctrico, el quemador
se apaga y no se puede volver a encender hasta
tanto no se reestablezca el suministro eléctrico.
7
Instrucciones de instalación
Page 88

NIVELACIÓN DE LA ESTUFA
Instale los estantes del horno y coloque la estufa donde se
vaya a instalar
.
Revise la nivelación colocando un nivelador o una taza,
parcialmente llena de agua, en uno de los estantes del
horno. Si usa un nivelador, tome dos lecturas—con el
nivelador colocado diagonalmente primero en una
dirección y luego en la otra.
Retire el panel inferior o abra el compartimiento del
asador. Consulte la sección Cuidado y limpieza. Las patas
delanteras niveladoras se puede ajustar desde la parte
inferior y las patas traseras se pueden ajustar desde arriba
o abajo.
Use una llave abierta o ajustable para ajustar las patas
niveladoras hasta que la estufa esté nivelada.
Después de nivelar la estufa, deslice la estufa hacia fuera
de la pared de manera que pueda instalar el dispositivo
anti-volcadura.
E
D
C
B
A
9
40
Instrucciones de instalación
AJUSTE EL DISPOSITIVO DE AJUSTE
DE AIRE DEL QUEMADOR DEL
HORNO/ASADOR SI ES NECESARIO
(CONT.)
Retire el protector metálico (en algunos modelos) en la
parte trasera de la cavidad. El dispositivo de ajuste del
aire está detrás de este protector.
Para ajustar el flujo del aire hacia el quemador, afloje el
tornillo de estrella y rote el dispositivo para permitir más
o menos aire hacia el tubo del quemador.
8
Nivelador de
las patas
Bajar
estufa
Levantar
estufa
(en algunos modelos)
Levantar
estufa
Bajar
estufa
(en algunos modelos)
AJUSTE EL DISPOSITIVO DE AJUSTE
DE AIRE DEL QUEMADOR DEL
HORNO/ASADOR SI ES NECESARIO
Para determinar si las llamas del quemador del
horno/asador se están quemando correctamente,
primero retire el fondo del horno.
Para retirar el fondo del horno:
Retire los tornillos que sostienen la parte trasera
del fondo del horno.
Tome el fondo del horno por las ranuras para los
dedos en cada costado.
Levante la parte trasera del fondo del horno lo
suficiente para despejar el borde de la estructura
del horno, luego hale.
Una vez haya retirado el fondo del horno, las
llamas correctamente ajustadas deben tener conos
azules aproximadamente de 1” y, si la estufa usa
gas natural, debe quemarse sin puntas amarillas.
(Con la mayoría de gases propanos, las pequeñas
puntas amarillas al final de los conos exteriores son
normales.) Las llamas no deben levantar lumbreras
de los quemadores. Si se observan lumbreras,
reduzca gradualmente la abertura del dispositivo
del aire hasta que la llama se estabilice.
El dispositivo de apagado del quemador del horno
está cerca de la pared trasera del horno y detrás
del panel inferior o compartimiento del asador
(dependiendo del modelo). Retire el panel o abra el
asador Consulte la sección Cuidado y limpieza.
C
B
A
8
Fondo
del horno
Aflojar
Dispositivo de ajuste
de aire
Protector metálico
(en algunos modelos)
Page 89

Instrucciones de instalación
CÓMO INSTALAR EL DISPOSITIVO
ANTI-VOLCADURA
Marque la pared donde se vaya a ubicar el BORDE
DERECHO de la estufa. Cerciórese de dejar el espacio
de la saliente del mesón si pretende instalar la estufa
al lado de los gabinetes.
Ubique el borde exterior del dispositivo 2
1
⁄8″ hacia
el centro de la estufa desde el borde marcado de
la estufa.
Usando el dispositivo como plantilla, marque la
posición del orificio para el tornillo.
Para construcción en madera, perfore un orificio piloto
a un ángulo de 20 grados desde la horizontal. Puede
usar un clavo o punzón si no tiene un taladro
disponible.
Instale el dispositivo anti-volcadura con el tornillo
suministrado.
Para construcciones de concreto, usted necesitará cuatro
pernos tipo “lag” de
1
/4″ x 11/2″ y el ancla de tipo manga DE
de
1
/2″ (que no se proveen). Haga los hoyos del tamaño
recomendado para las anclas sobre el concreto en el
centro de las posiciones premarcadas sobre el piso y
la pared.
D
C
B
A
10
CÓMO INSTALAR EL DISPOSITIVO ANTIVOLCADURA
(CONT.)
Instale el ancla de tipo manga dentro del hoyo y
luego instale el perno a través del perno. No apriete
demasiado el perno.
Deslice la estufa contra la pared y verifique la
instalación correcta tomando el borde delantero
de la estufa y cuidadosamente intentando
inclinar la estufa hacia delante.
E
10
CUANDO TODA LA INSTALACIÓN
ESTÉ COMPLETA:
Cerciórese de que todos los controles estén en la
posición de apagado. Cerciórese de que el flujo de
combustión y aire de ventilación hacia la estufa
no esté obstruido
.
ADVERTENCIA!
• La estufa se debe asegurar con un dispositivo antivolcadura aprobado.
• A menos que se instale correctamente, la estufa podría
voltearse por acción suya o de un niño que se pare, se
siente o se recueste sobre la puerta abierta del horno.
• Después de instalar el dispositivo anti-volcadura,
verifique que esté en su lugar intentando
cuidadosamente halar la estufa hacia delante.
• Ésta estufa está diseñada para cumplir con todos los
estándares reconocidos de la industria para todas las
condiciones normales.
• El uso de este dispositivo no impide la volcadura de la
estufa cuando no se instale correctamente.
• Si el dispositivo anti-volcadura suministrado con la
estufa no se ajusta a esta aplicación, use el dispositivo
anti-volcadura universal WB2X7909.
Dispositivo antivolcadura
Tornillo con
ranura en la
cabeza
Carrera de la pared
Aproximadamente
20°
2
1
/8”
(5,4 cm)
Borde marcado
de la estufa
CÓMO CONVERTIR A GAS LÍQUIDO
DE PETRÓLEO LP
(o convertir de
nuevo a gas natural)
Esta estufa sale de la fábrica lista para usarse
con gas natural. Si desea convertirla a gas líquido
de petróleo (LP), la conversión la debe realizar un
instalador de gas LP calificado.
Las instrucciones para la conversión y los orificios
de gas líquido de petróleo se encuentran anexos a
la estufa al lado del regulador de presión.
Conserve estas instrucciones y los orificios en caso
que desee convertir de nuevo a gas natural.
Parte posterior
de la estufa
Placa de la pared
Tornillo para madera
Dispositivo
antivolcadura
41
Page 90

Antes de llamar para solicitar servicio…
Solucionar problemas
¡Ahorre dinero y tiempo! Revise la siguiente tabla primero
y quizás no tenga que llamar para solicitar servicio.
Problema Causas posibles Qué hacer
Los quemadores superiores
El enchufe en la estufa no • Cerciórese de que el enchufe eléctrico esté enchufado
no se encienden o no está insertado totalmente en el en un tomacorriente vivo que esté conectado a tierra
queman uniformemente tomacorriente eléctrico. apropiadamente.
El agujero del quemador o •
Remueva las cabezas y las tapas del quemador y límpielas
las hendiduras en el lado del con una aguja o con un alfiler. Cerciórese de no
quemador podría estar obstruida. ensanchar el tamaño del agujero. Inspeccione y limpie el
área del electrodo en busca de grasa o comida quemada.
Ensamblado del quemador • Cerciórese de que las partes del quemador están
inapropiado. instaladas correctamente. También ver la sección de
Cuidado y limpieza de la estufa.
Las llamas del quemador
Proporción de gas y aire • Si la estufa está conectada a gas LP, póngase en
son muy grandes y
inapropiada. contacto con la persona que instaló la estufa o que hizo
amarillas
la conversión.
El reloj no funciona El enchufe en la estufa no está • Cerciórese de que el enchufe eléctrico esté enchufado
insertado totalmente en el en un tomacorriente vivo que esté conectado a tierra
tomacorriente eléctrico. apropiadamente.
El fusible de su casa podría • Reemplace el fusible o reajuste el interruptor de circuito.
haberse quemado o el interruptor
de circuito pudo haberse volado.
Los controles del horno no están • Ver la sección de Cómo usar el horno.
conectados apropiadamente.
Los quemadores de la La válvula de cierre de gas del • Para revisar la válvula de cierre de gas del horno,
superficie se encienden horno podría haberse movido quite el cajón del asador o panel inferior (consulte
pero el horno no accidentalmente durante la sección de Cuidado y limpieza de la estufa)y
la limpieza o traslado. localice el accionador de cierre de gas en la parte
posterior de la estufa.
La pantalla se pone S
e ha fundido un fusible en su hogar
• Reemplace el fusible o reajuste el cortacircuitos.
en blanco o bien el cortacircuitos no está
funcionando correctamente.
El reloj se ha apagado de modo • Consulte la sección Utilización del reloj y cronómetro.
que no aparece en la pantalla.
La pantalla parpadea Falla eléctrica. • Reinicie el reloj.
Imposible lograr que la Los botones de control del horno • Debe presionar los botones Bake y Broil Hi/Lo al mismo
pantalla muestre “SF” horno no se presionaron tiempo y mantenerlos presionados durante 3 segundos.
correctamente.
Se muestra el
accionador en
posición cerrada.
JALE PARA ABRIR.
Operación
Seguridad
Instrucciones de
instalación
Solucionar problemasSoporte al consumidor
42
Page 91

ge.com
43
Solucionar problemas
Problema Causas posibles Qué hacer
Los alimentos no se Los controles del horno no están • Ver la sección de Cómo usar el horno.
hornean o asan conectados apropiadamente.
apropiadamente
La posición del estante es • Ver la sección de Cómo usar el horno.
incorrecta.
Las sartenes incorrectas o tamaño • Ver la sección de Cómo usar el horno.
inapropiado de las sartenes siendo
usados.
El termostato del horno necesita • Ver la sección de Cómo ajustar el termostato del horno –
ser ajustado. Hágalo usted mismo.
El reloj no está ajustado • Ver la sección Para configurar el reloj.
apropiadamente.
Papel aluminio siendo usado • Ver la sección de Cuidado y limpieza de la estufa.
incorrectamente en el horno.
El fondo del horno no está • Ver la sección de Instalación de la estufa.
asentado en su posición con
seguridad.
Los alimentos no se asan Los controles del horno no están • Ver la sección Cómo usar el horno.
apropiadamente ajustados apropiadamente.
La puerta y/o el compartimiento • Ver la sección de Asado.
del asador no están cerrados.
Posición del estante siendo usada • Ver la Guía para asar a la parrilla.
es inapropiada.
La comida siendo cocinada está • Para obtener mejores resultados, utilice una fuente
siendo cocinada en una sartén diseñada para asar a la parrilla. Asegúrese de que
caliente. esté fría.
La sartén de cocina no es • Para obtener mejores resultados, utilice una fuente
apropiada para asar. diseñada para asar a la parrilla.
El fondo del horno no está • Ver la sección de la Instalación de la estufa.
asentado en su posición
adecuadamente.
Soporte al consumidor
Operación
Seguridad
Instrucciones de
instalación
Solucionar problemas
Page 92

44
Antes de llamar para solicitar servicio…
Problema Causas posibles Qué hacer
La temperatura del horno El termostato del horno necesita •
Ver la sección de
Cómo ajustar el termostato del horno –
es demasiado caliente o ser ajustado. Hágalo usted mismo.
demasiado fría
La luz del horno no funciona
La bombilla está floja o defectuosa. • Apriete la bombilla o reemplácela.
El enchufe en la estufa no está • Cerciórese de que el enchufe eléctrico esté enchufado
insertado totalmente en el en un tomacorriente vivo que esté conectado a tierra
tomacorriente eléctrico. apropiadamente.
Sonido de “crujido” o Este es el sonido del • Esto es normal.
“reventado” calentamiento del metal o del
enfriamiento durante la cocción.
Efecto arco iris en la Esto es causado por el tratamiento • Esto es normal.
ventana del horno (en de calor aplicado a la ventana del
algunos modelos) horno.
Interrupción del suministro Ocurrió una interrupción el • Reajuste el reloj.
eléctrico, el reloj parpadea suministro eléctrico.
Olor fuerte Un olor del aislante alrededor del • Este pasará con el tiempo.
interior del horno es normal las
primeras veces que el horno se use.
Proporción de gas y aire • Ajuste el dispositivo de ajuste de aire del quemador.
inapropiada.
Operación
Seguridad
Instrucciones de
instalación
Solucionar problemasSoporte al consumidor
Page 93

45
Soporte al consumidorOperaciónSeguridad
Instrucciones de
instalación
Solucionar problemas
Accesorios. ge.com
¿Buscando algo?
Usted puede encontrar estas y muchas partes más en ge.com o por teléfono
al 800.626.2002 (durante horas de trabajo normales). Tenga su número de
modelo listo.
Visite ge.com para más información.
Bombillas Perillas
Rejillas
Asadera
Limpiador de acero inoxidable
Cabezales de quemadores
de superficie
Parrillas del horno
Page 94

46
Operación
Seguridad
Instrucciones de
instalación
Solucionar problemasSoporte al consumidor
Notas.
Page 95

47
Soporte al consumidorOperaciónSeguridad
Instrucciones de
instalación
Solucionar problemas
Garantía de GE para su estufa a gas. ge.com
■ Viajes de servicio a su casa para mostrarle cómo
funciona el equipo.
■ Instalación, entrega o mantenimiento inapropriada.
■ Fallo del producto resultante de modificaciones al
producto o debido a uso incorrecto incluyendo no
proporcionar mantenimiento razonable y necesario.
■ Reemplazo de fusibles de la casa o reajuste del sistema
de circuitos.
■ Daño al producto causado por accidentes, incendios,
inundaciones o actos de la naturaleza de fuerza mayor.
■ Daños incidentales o consecuenciales causados por
defectos posibles con este aparato.
■ Daños causados después de la entrega.
■ Producto no accesible para facilitar el servicio requerido.
Lo que no está cubierto por GE:
Todos los servicios de garantía los proporcionan nuestros
Centros de Reparación de Fábrica o nuestros técnicos Customer
Care
®
autorizados. Para concertar una cita de reparación,
en línea, 24 horas al día, visítenos en ge.com, o llame al
800.GE.CARES (800.432.2737). Cuando llame para solicitar
servicio, por favor tenga a mano el número de serie y el número
de modelo.
Peque aquí su recibo.
Se requiere facilitar prueba
de la fecha de compra original
para obtener un servicio
bajo la garantía.
Por el período de: GE reemplazará:
Un año Cualquier parte de la estufa a gas que falle debido a defectos en los materiales o en
A partir de la fecha la fabricación. Durante este garantía limitada de un año, GE también proporcioná, sin costo
de la compra original alguno, toda la mano de obra y los servicios internos para reemplazar partes defectuosas.
Esta garantía se extiende al comprador original y cualquier comprador posterior de productos comprados para uso
residencial dentro de los Estados Unidos. Si el producto está situado en un área que no dispone de servicio por parte
de un proveedor de servicio autorizado de GE, podría tener que hacerse cargo de los costes de envío o bien podría
solicitársele que lleve el producto a una centro de servicio de GE autorizado para realizar la reparación. En Alaska,
la garantía excluye el costo de envío o las visitas de servicio a su casa.
Algunos estados no permiten la exclusión o las limitaciones de daños incidentales o consecuenciales. Esta garantía
da derechos legales específicos, y usted podría tener otros derechos que variarán de estado a estado. Para saber
cuáles son sus derechos legales, consulte a la oficina de asuntos del consumidor local o la oficina del Prucurador
(Attorney General) en su localidad.
Garante: General Electric Company. Louisville, KY 40225
EXCLUSIÓN DE GARANTÍAS IMPLÍCITAS—Su único y exclusivo derecho es la reparación del producto,
tal y como se indica en esta Garantía limitada. Cualquier garantía implícita, incluyendo las garantías
implícitas de comerciabilidad o adecuación para un fin determinado, están limitadas a un año o el
período de tiempo más breve permitido por la ley.
Page 96

Impreso en México
Este libro está impreso en papel reciclado.
Soporte al consumidor.
Página Web de GE Appliances
ge.com
¿Tiene alguna pregunta sobre su electrodoméstico? ¡Pruebe la página Web de GE Appliances 24 horas al día,
cualquier día del año! Para mayor conveniencia y servicio más rápido, ya puede descargar los Manuales de los
Propietarios, pedir piezas o incluso hacer una cita en línea para que vengan a realizar una reparación.
Solicite una reparación ge.com
El servicio de expertos GE está a tan sólo un paso de su puerta. ¡Entre en línea y solicite su reparación cuando
le venga bien 24 horas al día cualquier día del año! O llame al 800.GE.CARES (800.432.2737) durante horas
normales de oficina.
Real Life Design Studio (Estudio de diseño para la vida real)
ge.com
GE apoya el concepto de Diseño Universal—productos, servicios y ambientes que pueden usar gente de todas
las edades, tamaños y capacidades. Reconocemos la necesidad de diseñar para una gran gama de habilidades
y dificultades físicas y mentales. Para más detalles cobre las aplicaciones de GE Diseño Universal, incluyendo
ideas de diseño para la cocina para personas con discapacidades, mire nuestra página Web hoy mismo. Para
personas con dificultades auditivas, favor de llamar al 800.TDD.GEAC (800.833.4322).
Garantías ampliadas ge.com
Compre una garantía ampliada y obtenga detalles sobre descuentos especiales disponibles mientras su garantía
está aún activa. Puede comprarla en línea en cualquier momento, o llamar al 800.626.2224 durante horas
normales de oficina. GE Consumer Home Services estará aún ahí cuando su garantía termine.
Piezas y accesorios ge.com
Aquellos individuos con la calificación necesaria para reparar sus propios electrodomésticos pueden pedir que
se les manden las piezas o accesorios directamente a sus hogares (aceptamos las tarjetas VISA, MasterCard y
Discover). Haga su pedido en línea hoy, 24 horas cada día o llamar por teléfono al 800.626.2002 durante horas
normales de oficina.
Las instrucciones descritas en este manual cubren los procedimientos a seguir por cualquier usuario.
Cualquier otra reparación debería, por regla general, referirse a personal calificado autorizado. Debe
ejercerse precaución ya que las reparaciones incorrectas pueden causar condiciones de funcionamiento
inseguras.
Póngase en contacto con nosotros ge.com
Si no está satisfecho con el servicio que recibe de GE, póngase en contacto con nosotros en nuestra página
Web indicando todos los detalles así como su número de teléfono o escríbanos a:
General Manager, Customer Relations
GE Appliances, Appliance Park
Louisville, KY 40225
Registre su electrodoméstico ge.com
¡Registre su nuevo electrodoméstico en línea—cuando usted prefiera! El registrar su producto a tiempo le
proporcionará, si surgiera la necesidad, una mejor comunicación y un servicio más rápido bajo los términos de
su garantía. También puede enviar su tarjeta de registro pre-impresa que se incluye en el material de embalaje.
 Loading...