

Page 1
_&com
Safety InstrutCions ............. 2-5
Operating InstrutCions
Clock, Timer and
Control l_ockout ................. 15
Com_ction ()_n ............. 19-23
Roasting Guide ................ 23
Timed Features ............. 21,22
Cookware ....................... 7
Oven ....................... 11,12
Broiling Guide ................. 12
()yen Controls .................. 10
°_
Probe .......................... 14
Proofing Feature ................ 24
Sabbath Feature ................. 30
Self'Cleaning ................. 25, 26
Special Features .............. 27-29
Surfi_ce Units .................. 6-9
Thermostat Adjustment--
Do It Yoreself ................... 16
Timed Baking and
Roasting Features ................ 13
_\arming Drawer ............. 17, 1$
*¢\_rming Feature ................ 24
Care and Cleaning .......... 31-37
Troubleshooting Tips ........ 38-42
Accessories .................... 46
Consumer Support
Consumer Support ...... Back Co_r
Product Registration .......... 43, 44
_\_rranty ...................... 47
Write the model and serial
numbers here:
Model #
Serial #
You can lind them on a label
behind the storage drawer
on the range frame.
49-80362 11-05Jfl
Page 2
iMPORTANTSAFETYiNFORMATiON.
READALLiNSTRUCTIONSBEFOREUSING.
A ,!
For your safety, the information in this manual must be followed to minimize the risk of fire, electric
shock, or to prevent property damage, personal injury, or loss of fife.
A WARNINGANti-TIPDEVICE
All rangescan tipandinjury couldresult.
Toprevent accidental tipping of the range, attach it to the wall and floor by installing the Anti--tip
device supplied.
If the Anti--tip device supplied with the range does notf#this application, use the universal Anti--17p
device WB2X7909.
Tocheck if the device is installed and engaged properly, remove the storage drawer and inspect
the rear leveling leg. Make sure #fits securaly into the slot.
If you pull the range out fl'om the wall fin" any reason, make sure the device is properly engaged when
you push the range back against the wall. If it is not, there is a possible dsk of the range tipping over
and causing iqiury if you or a child stand, sit or lean on an open dooi:
Please i'efi_r to the Anti-Tip device infimnatioi_ in this malmal. Failure to take this precautioi_ could
result in tipping of the range and iqiur,:.
IMPORTANTSAFETYNOtiCE
The California Safe Drinking Water and ToxicEnforcement Act requires the Governor of California to
publish a list of substances known to the state to cause cancer, birth defects or other reproductive
harm, and requires businesses to warn customers of potential exposure to such substances.
The fiberglass insulation in self-clean ovens gives off a very small amount of carbon monoxide during
the cleaning cycle. Exposure can be minimized by venting with an open window or using a ventilation
fan or hood.
SAFETYPRECAUtiONS
When using electrical appliances, basic safety precautions should be followed, including the following:
_: Use this appliance only fin" its intended
pull)ose as described in this Owner's Manual.
::Ji::Be sure your appliance is properly installed and
gI'()tmded by a qualified installer in accordance
with the provided installati(m instructions.
::Ji::Have the installer show u)u the location of
the drcuit breaker ()i"Rise. Mark it fin" easy
reference.
_: Do not attempt to repair or replace any
part (ff Votlr range Ulfless it is spedfically
recomn_ended in this malmal. _M1other
servicing should be reterred to a qualified
techlfidan.
_: Deft)re pelt0iming any service, discolmect
the range power supply at the household
distlibution panel by ren_oving the fllse or
switching oft the circuit breakei:
::Ji::Do not leave children aloi_e---childrei_ should
not be left alone or tmattended in an area
where an appliance is in use. They should
ne\'er be allowed to sit or stand on any part
of the appliance,
::Ji::Do not allow anyone to clilnb, stand or hang
on the dooi; storage drawer ()i"cookt()p. They
could dalnage the range and even tip it ()vei;
ca using severe pei_(mal iqj ui T.
2
Page 3
_e.com
WARNING!!
SAFETYPRECAUTIONS
Donot operate the oven or cooktop controls ff the glass is broken. Food splatter or cleaning solution
may penetrate a broken control panel or cooktop and create a risk of electrical shock. Contact a
qualified technician immediately should your glass control panel or cooktop become broken.
_: Do IIOt stoI'e flalllI/lable IllatelJals iI1 _lIl ()veil
OF IleaI" tile cooktop.
CAUTION:]teIllSofinteresttochildren
should not be stored in cabinets above a range
or on tile back of a rang_hikh'en cliinbing
on tile range to reach iten/s could be seriously
ii_jui'ed.
_: Never wear loose-fitting or hanging gamlents
while using the appliance. Be carefli1 when
reaching for iteins stored over the range.
Flanlnlable inatefial couM be ignited if
brought in contact with hot suil'hce units or
heating eleinents and nlay cause severe burns.
::J?::Use only dry pot holdei_--nloist or dan/p
pot holdeIs Oil hot SUll'ilces nlav result in
burns ti'oin steanl. Do not let pot holdeis
touch hot sui_i_ce units or heating elenlents.
Do not use a towel or other bulky cloth in
place of pot holdei_.
_: Do IIOt rise water Oil grease fires. Never pick
up a flanling pan. Turn tile controls off.
Sinother a flanling pan on a suFlilce unit
by covering tile pan coinpletely with
a well-fitting lid, cookie sheet or fiat tray:
Use a inulti-puil)ose dry chenlical or
fi)an/-t,ipe fire exfinguishei:
Flan/ing grease outside a pan can be put
out by covering it with baking soda oi; if
a*:filable, by using a inulti-purpose (liT
chen/ical or ti)ain-type fire extinguishei:
Name in the oven can be sn/othered
con/plemly by closing tile oven door and
turning tile oven off or by using a inulti-
puq)ose (liT chen/ical or fi)an/-type fire
extinguishei:
N For your s'alb'Q:,never use your appliance
for wam/ing or heating tile roonl.
_: Do not let cooking grease or other flanmlable
nlaterials accunlulate in or near the range.
::Ji::Do not touch tile sui_fi_ce units, tile heating
elen/ents or tile interior suiqfi_ce of tile oven.
These surli_ces nlav be hot enough to burn
even though tile*' are dark in coloi: During and
atter use, do not touch, or let clothing or other
flanmlable n/ateiials contact tile suiqf_lce units,
areas nearby tile surfi_ce units or anv interior
area of tile ()veil; allow sufficient dine for
cooling fii_t.
Potentially hot surfhces inchide the cooktop,
areas thcing tile cooktop, oven vent opening,
sui_i_ces near the opening, crevices around the
ovell door.
REMEMBER:Tile inside surfhce (ff tile oven
n/av be hot when tile door is opened.
::Ji::Do not store or use conlbustible nlaterials,
gasoline or other flanlnlable vapoi_ and liquids
in tile vicinity of this or any other appliance.
_: Keep tile hood and grease filtei_ clean
to nlaint;fin good venting and to avoid
grease fires.
::Ji::Teach children not to play with tile controls
or any other part of tile range.
::Ji::Mways kee I) dish towels, dish cloths, pot
holdeI_ and other linens a safi _distance
[i'Olll VOilE I'allge.
_: Mwa):s kee I) wooden and plastic utensils and
canned food a sale distance fl'onl p)ur range.
::Ji::Mways kee I) con/bustible wall coverings,
curtains or drapes a safe distance fl'onl
VO/lI" KIIlge.
COOKMEATANDPOULTRYTHOROUGHLY...
Cookmeat and poultry thoroughly--meat to at least an INTERNAL temperature of 160°Fand poultry to at least
an iNTERNAL temperature of 180°E Cooking to these temperatures usually protects against foodboree illness.
3
Page 4

iMPORTANTSAFETYiNFORMATiON.
READALLiNSTRUCTiONSBEFOREUSING.
RADIANTSURFACEUNITS
Use proper pan size--select cookware having fiat bottoms largo enough to cover the surface unit
heating element. The use of undersized cookware will expose a portion of the surface unit to direct
contact and may result in ignition of clothing. Proper relationship of cookware to surface unit will
also improve efficiencv.
;;Ji::Never leave the surfi_ce units unattended at
high heat settings. Boilove_3 cause smoking
and greasy spillove_ that may catch on fire.
::Ji::Only certain t,ipes of glass, glassA'eramic,
earthenware or other glazed containers are
suitable fi)r cooktop service; othe_ may break
because of the sudden change in temperature.
_: To minimize the possibili_' of bm'ns, ignition
of flammable mamfials and spillage, the handle
of a container should be turned toward the
center of the range without extending over
nearby SUlq'ilce units.
_: Mwavs mrn tile sudilce traits off befiwe
rei/loving cookware.
::Ji::_]_en preparing flaming foods tinder the
hood, ttlFn the tim on.
::Ji::Use care when touching the cooktop.
The glass surlilce ot the cooktop will retain
heat alter the controls have been turned off.
::Ji::Kee I) an eye on foods being flied at high or
medium high heat settings.
_: Foods for fl'ying should be as dry as possible.
Fl'ost on ll"ozen lOo(1s or i/loisttli'e on ti'esh
fi)o(ls can cause hot lilt to bubble up and
over the sides of the pan.
::Ji::Use little tilt tot effective shallow or deep
lilt fl'ying. Filling the pan too flfll of tilt can
cause spillove_5 when food is added.
::Ji::If a combination of oils or lilts will be used
in flTing, stir together before heating, or
as lilts melt slowlY.
_: Mwavs heat tilt slowly; and watch as it heats.
::J)::Use a deep lilt themlometer whenever
possible to prevent overheating lilt beyond
the smoking point.
::Ji::Avoid scratching the glass cooktop. The
cooktop can be scratched with imms such
as shaq) instruments, rings or otherjeweh%
and rivets on clothing.
::Ji::imge scratches or impacts to glass (loo_ or
cooktops can lead to broken or shattered glass.
::Ji::Do not operate tile radiant surtilce units if the
glass is broken. SpilloveI5 or cleaning solution
may penetrate a broken cooktop and create a
risk of electrical shock. Contact a qualified
technician immediately should yore" glass
cooktop becoi//e broken.
_: Never use the glass cooktop stm'ilce as a
cutting board.
_: Do not place or store items that can melt or
catch fire on the glass cooktop, even when it
is not being used.
::Ji::Be carefifl when placing spoons or other
stirring utensils on glass cooktop sm'lilce when
it is in use. Thev may become hot and could
Cause b/lI'ns.
::Ji::Clean the cooktop with caution. If a wet
sponge or cloth is used to wipe spills on a hot
surfilce trait, be careflfl to avoid steam burns.
Sollle cleanei_ can produce noXiO/IS J[illlleS i[
applied to a hot surfllce.
NOTE:"We recommend that you avoid wiping
any surfilce trait areas imtil they have cooled
and the indicator light has gone off. Sugar
spills are the exception to this. Please see the
Cleaning the glass cooktop section.
_: \4]_en the cooktop is cool, use only the
(;EbDdHA BRYTE ':Ceramic Cooktop Cleaner
and the CEI_dHA BRYTE Ceramic Cooktop
Cleaning Pad to clean the cooktop.
_: To avoid possible damage to the cooking
surtilce, do not apply cleaning cream to
the glass sm_hce when it is hot.
::Ji::_Mter cleaning, use a (hw cloth or paper towel
to remove all cleaning cream residue.
::Ji::Read and follow all instructions and warnings
on the cleaning cream labels.
_: Do not IIse plastic wrap m cover food. Plastic
may melt onto the sm_hce and be very difficult
to i'ei/love.
4
Page 5

ge.com
WARNING!
OVEN
Stand away from the range when opening the oven door. Hot air or steam which escapes can cause
bums to hands, face and/or eyes.
_: Do not heat unopened food ('ontaine_.
Pressure could build up and the container
could bmst, causing an iqjmy:
!_:iKee I) the oven vent unobstructed.
_: Kee I) the oven fl'ee fl'om grease buildui).
::Ji::Place the oven rack in the desired position
while the oven is cool. If racks Illtlst be handled
when hot, (lit not let pot holder contact the
heating elements.
_: When using cooking or roasting bags in the
oven, tollow the tnanuthctttrer's directions.
SELF-CLEANINGOVEN
_: Pulling out the rack to the stop-lock is a
convenience in lifting heavy toods. It is also
a precaution against burns fl'om touching
hot sur_hces of the door or oven walls.
::Ji::Do not use the oven tit (li T newspapers.
If overheated, they can catch on fire.
_: Do not use the oven fi)r a storage area. Items
stored in an oven can ignite.
::Ji::Do not leave paper products, cooking utensils
or food in the oven when not in use.
::Ji::Do not use ahmfinum toil to line oven bottoms,
except as suggested in this manual. ]ml)roper
installation of ahmfinum foil may result in a
risk of electric shock or fire.
Donot use oven cleaners. No commercial oven cleaner or oven liner protective coating of any kind
should be used in or around any part of the oven. Residue from oven cleaners will damage the inside
of the oven when the self-clean cycle is used.
::Ji::Do not clean the door gasket. The door gasket
is essential fi:,r a good seal. Care should be
taken not tit rub, damage or move the gasket.
::Ji::gefi)re self:cleaning the oven, remove the
convection roasting rack, broiler pan, grid
}lIl(l other cookware.
?_: Shiny, sih'e>colored oven i'acl_s (on seine
models) should be removed fl'om the oven
befi)re beginning the selfZclean cycle.
::Ji::Gray porcelain-coated oven racl<s (on some
models) may be cleaned in the oven during
the sell:clean cycle.
::Ji::Be sure to wipe up excess spillage befin'e
starting the sell:cleaning operation.
::Ji::If the self:cleaning mode malfimctions, mm
the oven off and disconnect the power supply.
Have it serviced by a qualified technician.
::Ji::Clean only parts listed in this Owner's Manual.
WARMINGDRAWER
_: The puq)ose ot the wamfing drawer is to hold
hot cooked foods at serving teml)erature.
Always start with hot food; cold food cannot be
heated or cooked in the wamfing drawer:
::Ji::Do not use the drawer to (hT newsl)apet_.
If overheated, they can catch on fire.
_: Do not leave i)aper products, plastics, canned
food or combustible materials in the drawer:
::Ji::Never leavejms ,:n"cans of tat drippings in or
tie,It" VOIII" drawee
::Ji::Do not warnt fi)od in the drawer fin" there than
two holily.
?_:Never place, use or sell:clean the lower oven
drawer pan in the upper oven.
::Ji::Do not touch the heating element or the interior
surface of the drawer. These surlilces may be
hot enough to burn.
REMEMBER:The inside surlhce of the drawer
may be hot when the drawer is opened.
::Ji::Use cme when opening the (lrawet: Open the
drawer a crack and let hot air or steam escape
befl)re removing or replacing fi)od. Hot air or
steam which escapes can cause burns to hands,
lace and/or eyes.
_: Do not use ahuninunl fi)il to line the lower
oven drawer: Foil is an excellent heat insulator
and will trap heat beneath it. This will upset
the perlbmmnce of the drawer and it could
damage the interior finish.
READANDFOLLOWTHISSAFETYINFORMATIONCAREFULLY.
SAVETHESEINSTRUCTIONS
5
Page 6
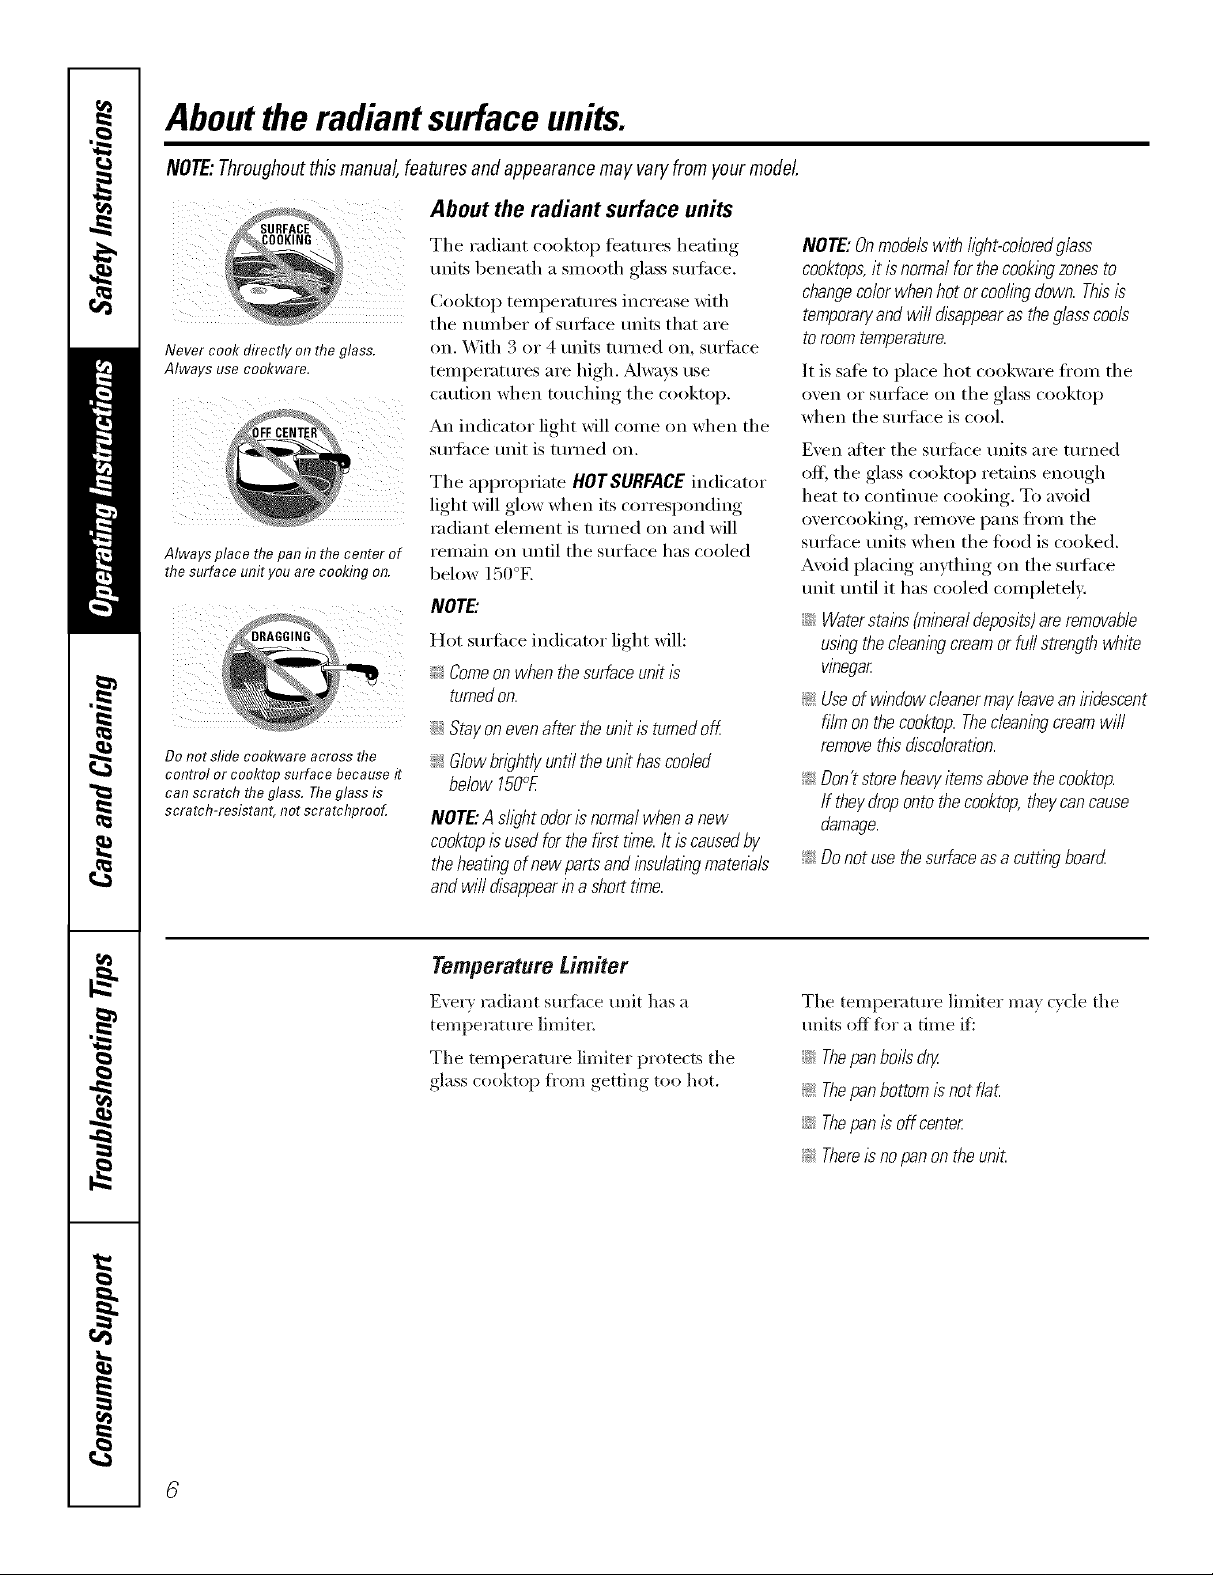
Abouttheradiantsurfaceunits.
NOTE:Throughoutthismanual,featuresandappearancemay varyfromyourmodel
About the radiant surface units
FACE_
_¢&,COOKING _
Never cook directly on the glass.
Always use co&ware.
Always place the pan h7thecenter of
the surface unit you are cooldng on.
Z
Do not sfideco&ware across the
control or cooktop surface because it
can scratch theglass. The glass is
scratch-resistant, not scratchprooL
The radiant cooktop features heating
units beneath a smooth glass stmti_ce.
Cooktop temperatures increase with
the number of sm_i_ce units that are
on. With 3 or 4 units turned on, surti_ce
temperatures are high. _wavs use
caution when touching the cooktop.
An indicator light will come on when the
surti_ce trait is turned on.
The appropriate HOTSURFACEindicator
light will glow when its corresponding
radiant element is turned on and will
remain on until the surti_ce has cooled
below 150°E
NOTE."
Hot surli_ce indicator light xdll:
_/_Comeonwhenthesurfaceunitis
turnedon.
ij_::Stayonevenaftertheunitisturnedoff
_;G/owbright/yuntiltheunithascooled
below150°£
NOTE:Ashghtodorisnormalwhenanew
cooktopis usedforthefirsttime.It iscausedby
theheatingof newpartsandinsu/atlegmaterb/s
andwill disappearinashorttime.
NOTE:& modelswith/ight-co/oredgless
cooktops,it isnormalforthecookingzonesto
changecolorwhenhotorcoo/legdown.Thisis
temporaryandwill disappearastheglasscools
toroomtemperature.
It is sale to place hot cookware ti'om the
oven or sm_hce on the glass cooktop
when the stmthce is cool.
Even after the stu_i_ce units are turned
off, the glass cooktop retains enough
heat to continue cooking. To avoid
overcooking, remove pans fl'om the
stu_i_ce traits when the t0od is cooked.
Avoid placing anything on the sudhce
unit until it has cooled completel>
::Ji::Waterstains(mineraldeposits)areremovable
usingthecleaningcreamorfull strengthwhite
vinegar
_ Useof windowcleanermayleaveaniridescent
filmonthecooktop.Thecleaningcreamwill
removethisdiscoloration.
_; Don'tstoreheavyitemsabovethecooktop.
If theydropontothecooktop,theycancause
damage.
_ Donotusethesurfaceasa cuttingboard
Temperature Limiter
Every radi:mr suI_hce unit has a
temperature limited:
The temperature limiter protects the
glass cooktop fi'om getting too hot.
The temperature limiter may cycle the
units off fi)r a time ifi
N Thepanboilsdry.
_; Thepanbottomisnotfle_
::J_::Thepanis offcenter
_ There_2nopanontheunit.
Page 7
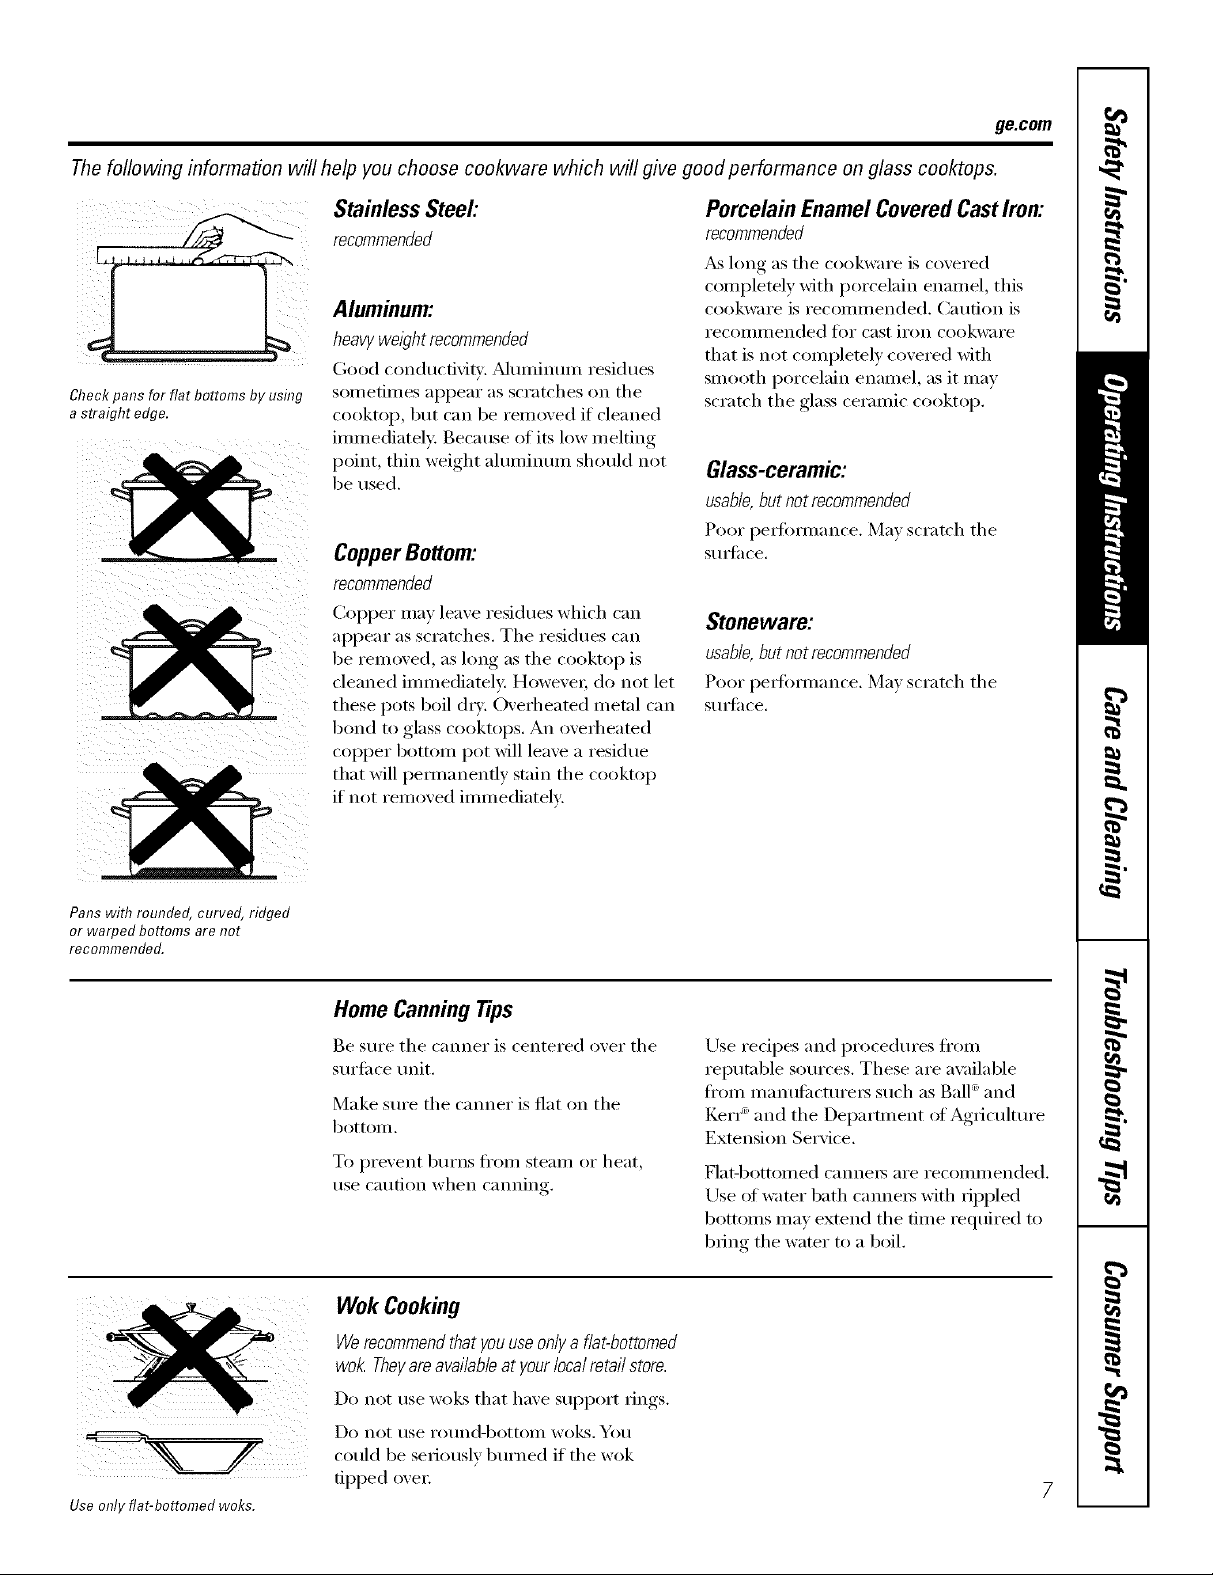
Thefollowing information will help you choose cookware which will give good performance on glass cooktops.
ge.com
i( / iI
Check pans for flat bottoms by using
a straight edge.
Stainless Steel:
recommended
Aluminum:
heavyweight recommended
Go()d (olldu(dvii}'. a]tllllintlH] residues
s()metin_es appear as scratches on the
cooktop, but can be removed if cleaned
immediately: Because of its low melting
point, thin weight aluminmn should not
be used.
Copper Bottom:
recommended
Col)per may leave residues which ('}111
appear as scratches. The residues can
be removed, as long as the cooktop is
cleaned immediately: However; do not let
these pots boil (h T. Overheated metal can
bond to glass cooktops. An overheated
COl)per bottom pot will leave a residue
that will pemmnenfly stain the cooktop
if not removed immediately:
Porcelain EnamelCoveredCastIron:
recommended
_&_long as the cookware is covered
completely with porcelain enamel, this
cookware is recommended. Caution is
i'ecolilli/ended tOr cast ii'on cookware
that is not completely covered with
smooth porcelain enamel, as it may
scratch the glass ceramic cooktop.
Glass-ceramic:
usable,but not recommended
Poor l)edbmmnce. May scratch the
StlI]ilce,
Stoneware:
usable,but not recommended
Poor pedbmmnce. May scratch the
StlI{iIce,
Pans with rounded, curved, ridged
or warped bottoms are not
recommended.
Use only flat-bottomed woks.
Home Cann&g Tips
Be sure the canner is centered over the
surti_ce unit.
Make sm'e the cromer is fiat on the
bottom.
To prevent burns fl'Oln steam or heat,
use caution when canning.
Wok CookhTg
Werecommendthat youuseonlya flat-bottomed
wok Theyareavailable at yourlocal retail store.
Do not rise wo]_s that haxe SUl)port tings.
Do not rise i'otlnd-bottoill wo]¢s. Yell
could be seriously burned if the wok
tipped ove_:
Use redpes and procedures fl'om
reputable sources. These are a\_filable
fl'om manttfi_cttu'ei_ such as Ball ®and
Ken _ and the Department ot Agficultm'e
Extension Service.
Flat-bottoi/led canneis ai'e i'ecoi/lillended,
Use of water bath cmme_ with fil)pled
bottoms may extend the time _equired to
bring the water to a boil.
Page 8
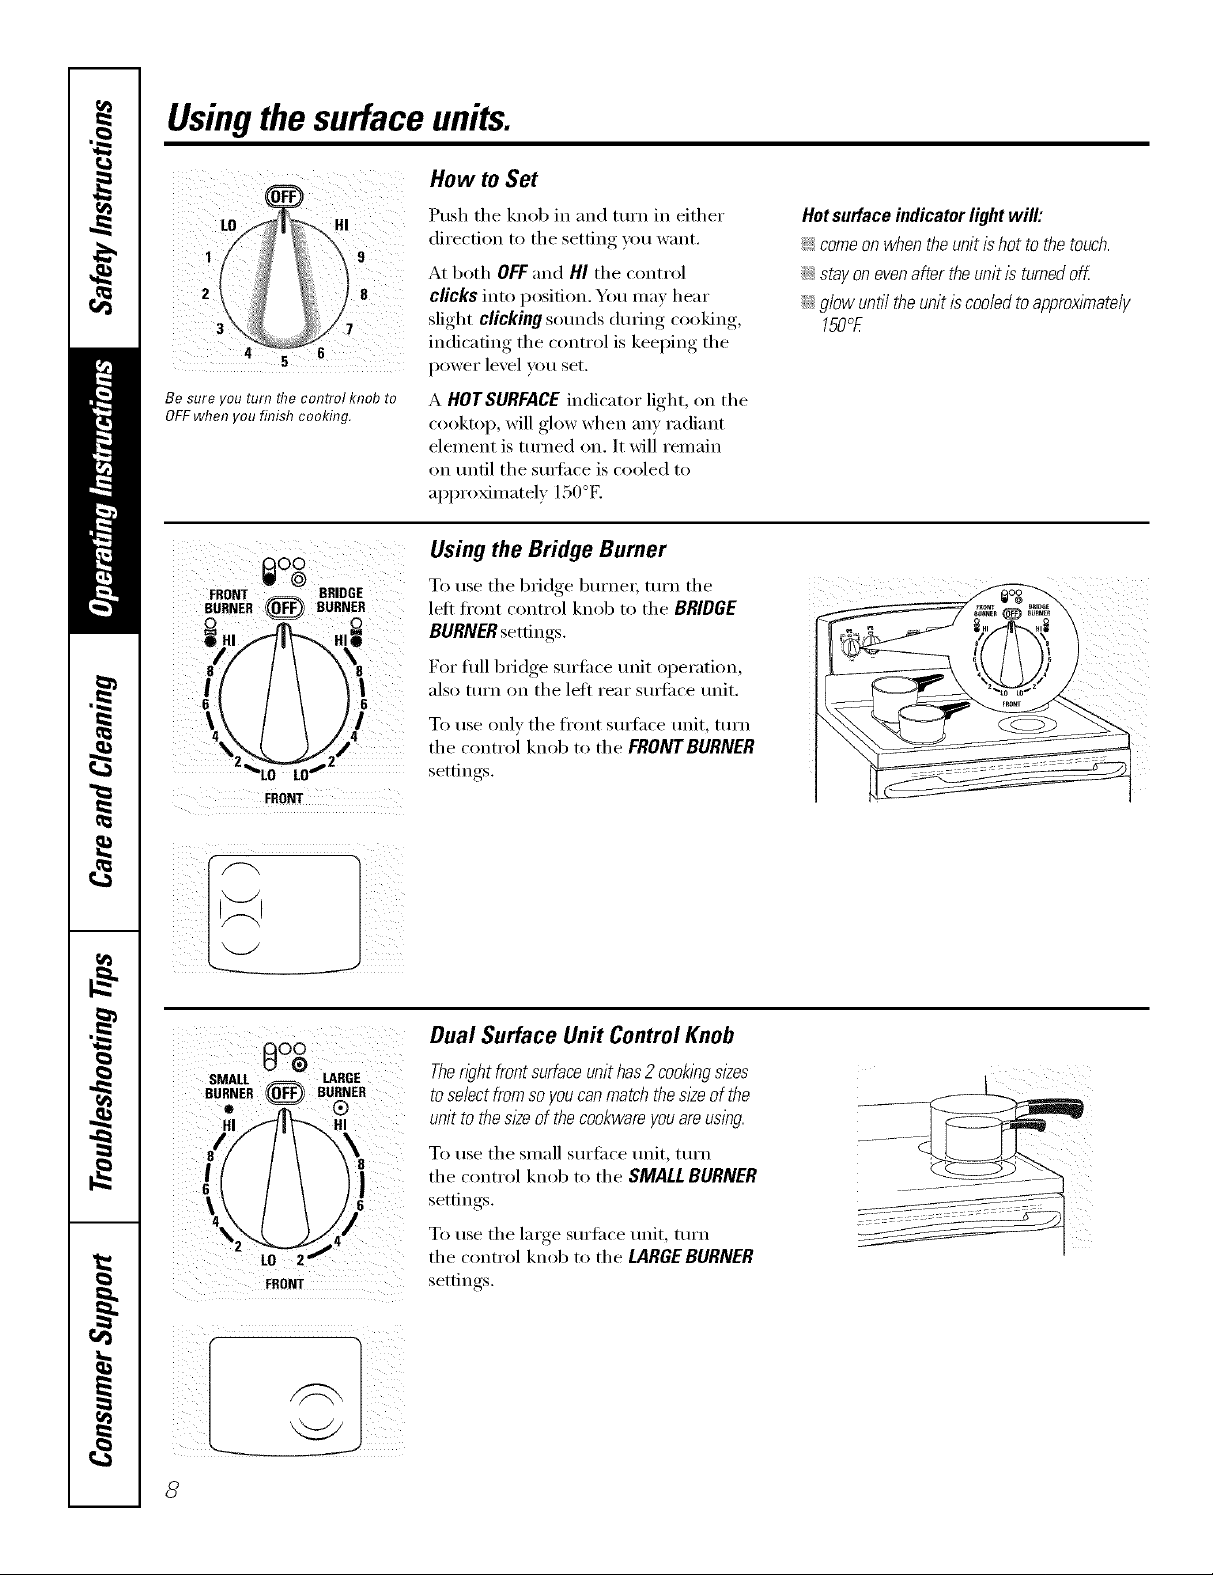
Usingthe surface units.
How to Set
Be sure you turn flTecontrol knob to
OFF when you finish cooking.
FRONT _ BRIDGE
BURNER (0_,,_ BURNER
FRONT
Push the knob in and turn in either
direction to the setting you want.
At both OFF and HI the control
clicks into position. You may hear
slight clicking sounds during cooking,
indicating the control is keeping the
power level you set.
A HOTSURFACEindicator light, on the
cooktop, will glow when any radiant
element is turned on. It will remain
on tmfil the surli_ce is cooled to
approximately 150°E
Using the Bridge Burner
To use the bridge burne_; mrn the
left fi'ont control knob to the BRIDGE
BURNER settings.
For flfll bridge surfilce unit operation,
also turn on the lefi rear smti_ce unit.
To use only the fl'ont smtace unit, turn
the control knob to the FRDNTBURNER
settings.
Hot surface indicator light will:
_ come on when the unit ishot to thetouch.
_Ji::stay on evenafter theunit is turned oK
::Ji::g/ow unti/ the unitis coo/edto approxlmate/y
150°E
AO0
SMALL _ LARGE
BURNER ((OFF)) BURNER
H
\
LO 2
Dual Surface Unit Control Knob
The@t front surface unit has2cooking sizes
toselect from soyoucanmatch the sizeof the
unit to thesizeof the cookware youareusing.
To use the small surfi_ce unit, turn
the control knob to the SMALLBURNER
settings.
To use the lmge surfi_ce unit, mrn
the control knob to the LARGEBURNER
settings.
Page 9
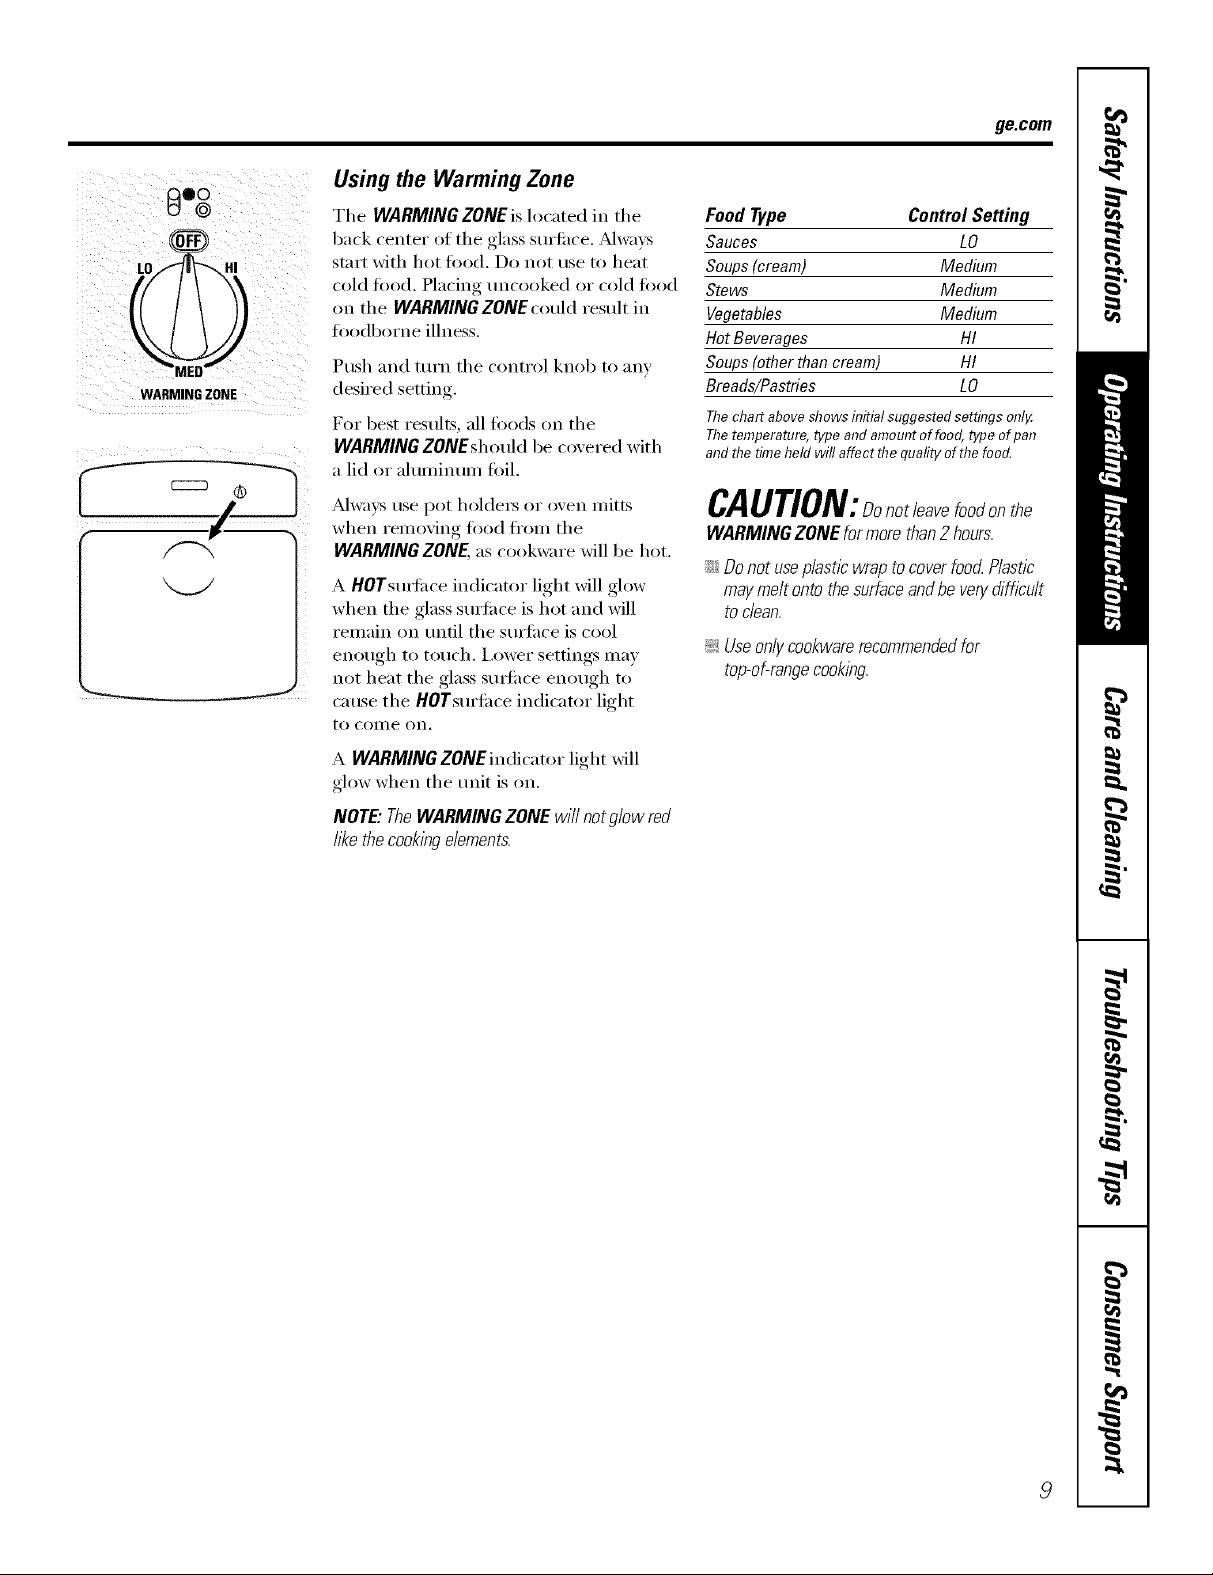
0°g
LO_-'_ HI
WARMING ZONE
Using the Warming Zone
The WARMING ZONE is located in the
back center ot the glass surti_ce. _Mwa_:s
start with hot toed. Do not use to heat
cold food. Placing uncooked or cold ti)od
oil tile WARMING ZONE could result in
ti)odborne illness.
Push and mrn tile control knob to any
desired setting.
For best results, all tbods on tile
WARMING ZONEshould be covered with
a lid or aluminum ti)il.
ge.com
Food Type Control Setting
Sauces LO
Soups(cream) Medium
Stews Medium
Vegetables Medium
HotBeverages HI
Soups(otherthan cream) HI
Breads/Pastries LO
Thechartabove showsinitial suggestedsettings onlg
Thetemperature,type and amountof food, typeof pan
and flTetimeheld will affect flTequafityofthe food.
_dwax:s use pot holdet_ or oven mitts
when removing ti)od fl'om tile
WARMING ZONE, as cookware will be hot.
A HOTsui_ilce indicator light will glow
when the glass surelce is hot and will
remain on tmtil tile sm'fi_ce is cool
enough to touch. I,ower settings ill,IV
not heat the glass sui_ilce enough to
cause the HOTsm'fi_ce indicator light
to COille on.
A WARMINGZONEindicator light will
glow when tile unit is on,
NOTE"TheWARMING ZONE w///not g/ow red
hT<ethecooking dements,
CAUTION:Donotleavefoodonthe
WARMING ZONE for more than2 hours.
iJi::Donot useplastic wrapto coverfoo_ Plastic
may meltonto thesurfaceand be ven/difficult
todean.
!i>Useonlycookware recommendedfor
top-of-rangecooking.
9
Page 10
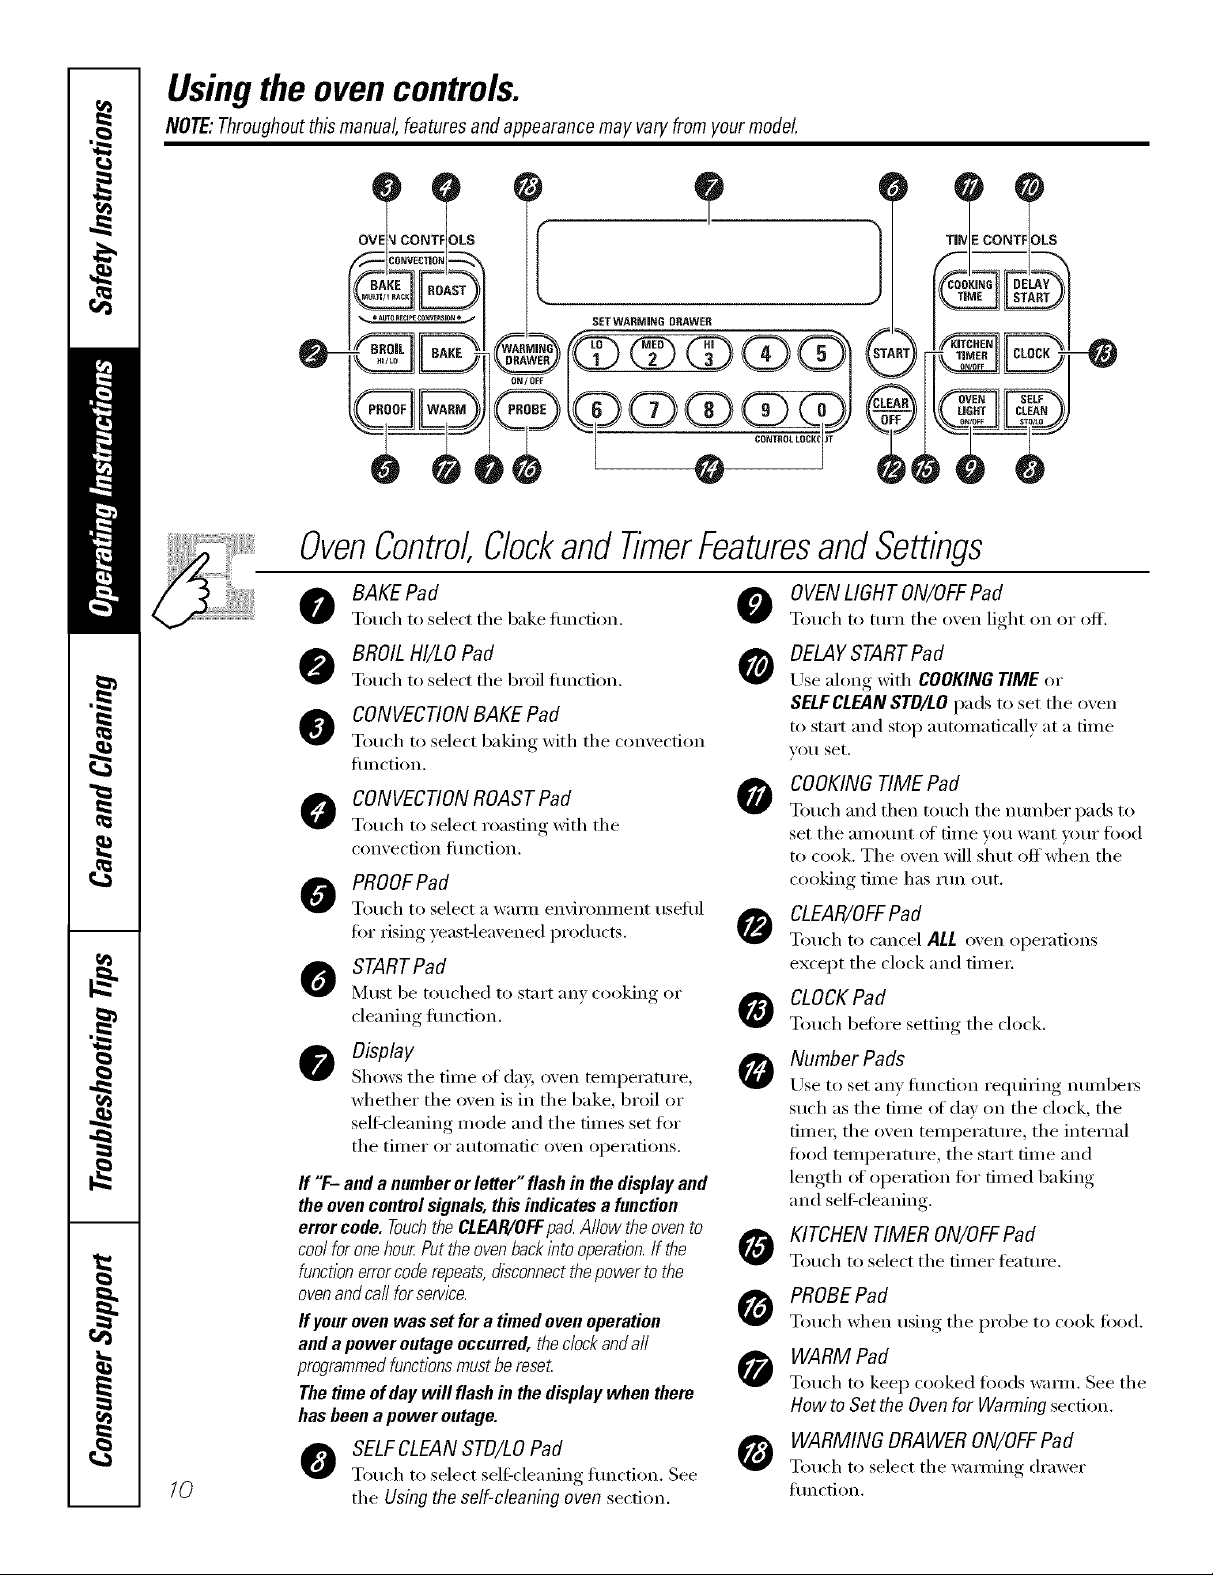
Usingthe ovencontrols.
NOTE:Throughoutthismanual,featuresandappearancemayvaryfromyour model
o o. s
/0
BAKE
,_ =AUTOREm_ECONVERSION• ,I
SETWARMING DRAWER
' {
0-
__CLEAN
OvenControl ClockandTimerFeaturesandSettings
Z Z
BAKE Pad
Totich to select the bake flulcfion.
BROIL HI/LOPad
Touch to select the 1)roll flulcfion.
CONVECTIONBAKE Pad
TotIch to select baking with the con_e('fion
flnlction.
CONVECTIONROAST Pad
TotIch to select roasting with the
con_, ection ttlnction.
PROOFPad
Totl(h to select a waml environillent tIseftIl
for rising )east-leaxened products.
STARTPad
Must be totiched to start an) cooking or
cleaning fiulction,
Display
Shows tile tiIlle of day, oven teillpei'attli'e,
whether the oven is in the bake, broil or
sell:cleaning nlode and the tiines set for
tile tiil/er or }ltltOill}ltic ()veil opei';ltions.
ff "F- anda numberor letter"flashinthedisplayand
theovencontrolsignals, thisindicatesa function
errorcode.Touchthe CLEAR/OFFpadAllowtheovento
coolforonehour.Puttheovenbackintooperation.If the
functionerrorcoderepeats,disconnectthepowertothe
ovenandca//forservice.
Ifyourovenwassetfora timedovenoperation
anda poweroutageoccurred,theclockanda//
programmedfunctionsmustbereset
Thetimeof daywill flashin thedisplaywhenthere
hasbeenapower outage.
SELFCLEANSTD/LO Pad
TotIch tI/select self:cleaning flulction. See
the Using the self-cleaning oven section.
OVENLIGHT ON/OFFPad
Touch to turn the o',en light on or off.
DELAYSTARTPad
Use ahmg with COOKING TIME or
SELFCLEANSTD/LO pads to set the o',en
to start and stop autoinaficall_ at a tiine
_()l/ set.
COOKINGTIME Pad
O
TotIch and then totich the nEro/her pads to
set tile }lIllOtlnt 01' tiI/le VOEI W}lIlt VOEII" I'()od
to cook. The oven will s'hut off' wl'mn the
cooking time ll}lS I'tln ()lit,
CLEAR/OFFPad
TotEch to cancel ALL oven operations
except the clock and tiIneI:
CLOCKPad
@
TotIch before setting the clock.
Number Pads
ILrseto set any flulcfion reEluii_ing nun/beis
such as the tiine _ff day oil the clock, the
tiinei; the ()veil tenlperature, the internal
food tenlperature, the start tinEe and
length (ff operation for dined baking
and selfZcleaning.
KITCHEN TIMER ON/OFFPad
TotI(h to select the diner teattEI'e.
PROBEPad
TotIch when using the prol)e to cook food.
WARM Pad
Touch to kee I) cooked foods warn/. See the
How to Set the Oven for Warming section.
WARMING ORAWERON/OFFPad
Touch to select the wai_ning drawer
flinction.
e
Page 11
Usingthe oven. gecom
Toavoid possible bums, place the racks in the desired position before you turn the oven on.
Before you begin...
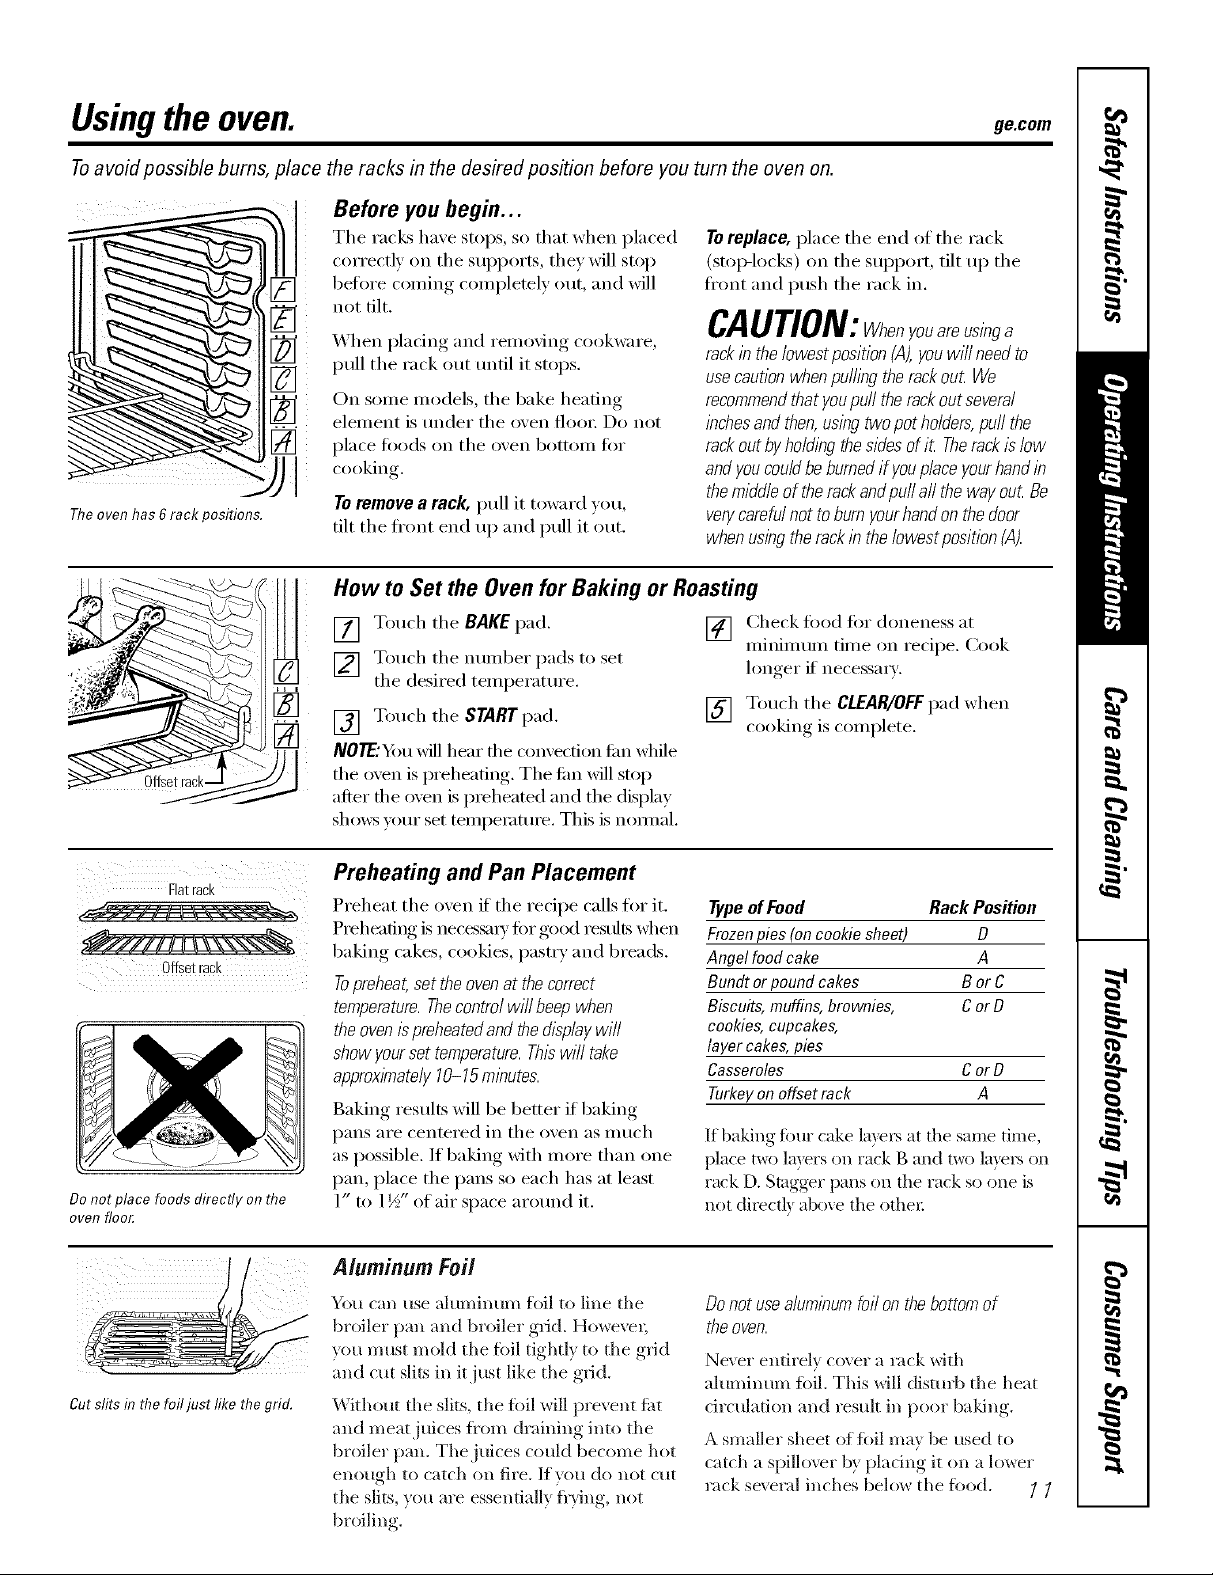
Theoven has 6rack positions.
The racks ha_e stops, so that when placed
correctly on tile supports the) will stop
before coming completely out and will
not tilt,
X,\hen )lacing and "l _ I eIllOVlng cookware,
pull tile rack out tmtil it stops.
On some models, tile bake heating
eleillent is tinder the o_,en flooi; Do not
place toods on the o'_en bottoill tk)i"
cooking.
To remove a rack, pull it toward you
tilt tile fl'ont end up and pull it out.
How to Set the Oven for Baking or Roasting
Toreplace, place tile end of tile rack
(stop-locks) on tile SUl)port, tilt up tile
fl'ont and push the rack in.
CAUTION:Vhenyouareusinga
rack inthe lowest position (A),youwill need to
usecaution when puffingtherack out We
recommendthatyoupuff the rackout several
inchesand then,using twopot holders,puffthe
rack outby ho/dlbgthesides of it Therackis low
andyou couldbeburned if youplace yourhandin
themiddle of the rackand pufl aft theway out Be
verycareful not toburn your handon thedoor
when usingthe rack inthe/owestposition (A).
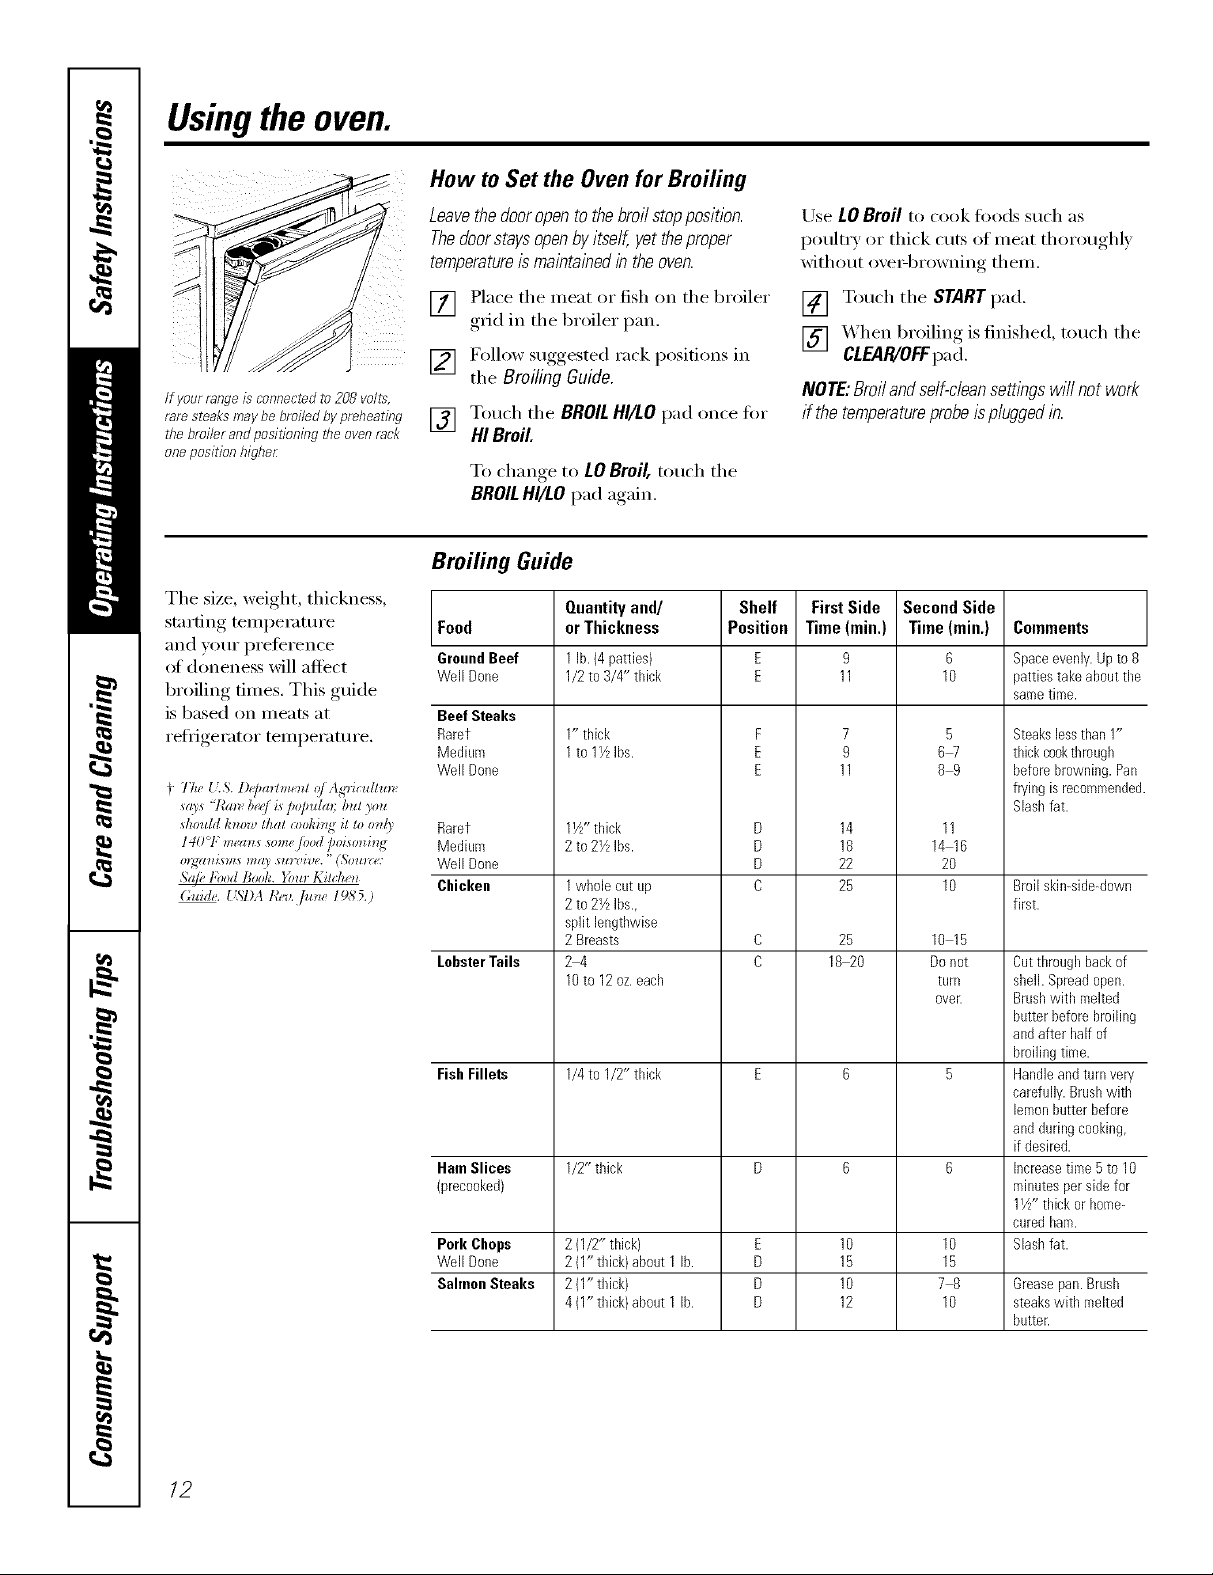
Flatrack
aezzz:m:l:sxas
Offsetrack
Do not place foods directly on the
over floor,
[] Touch tile BAKEpad.
[] Touch tile number pads to set
tile desired temperature.
[] Touch tile START pad.
NOTE'You will hear file c(mvection tim while
tile oven is preheating. Tile tim will stop
aRer file oven is p_eheated and tile display
sho_vs your set telnpeI_Kure. This is nomml.
Preheating and Pan Placement
Preheat tile oven if tile recipe calls fin" it.
PreheaflI g is neces_y tot good restdts when
baking cakes, cookies, pastry and breads.
Topreheat,set theoven at thecorrect
temperature.Thecontrol will beep when
the ovenispreheated and the&splay will
show yourset temperature. Thiswill take
approximately 10-15mlbutes.
Baking results will be better if baking
pans are centered in tile oven as much
as possible. If baking with more than one
pan, place the pans so each has at least
1" to 1½" of air space aro/md it.
[] Check fi_od fin" aloneness at
minimum time on recipe. Cook
longer if necessm T.
[] Touch tile CLEAR/OFFpad when
cooking is complete.
Typeof Food Rack Position
Frozenpies(on cookiesheet) D
Angelfood cake A
Bundt or poundcakes B or C
Biscuits,muffins,brownies, Cor D
cookies,cupcakes,
layercakes,pies
Casseroles Cor O
Turkeyonoffset rack A
If baking fi)ur cake layet_ at file same time,
place t_) layers on rack g and two laye_ on
rack D. Stagger pans on file rack so one is
not direct b above the othe_:
Cut slits in the foil just like the grid.
A/uminum Foil
You can use aluminum flfil to line tile
broiler pan and broiler grid. Howe_w;
you must mold tile foil tightly to tile grid
and cut slits in it just like tile grid.
Without tile slits, tile fi)il will prevent fi_t
and meat juices fl'om draining into tile
broiler pan. The juices could become hot
enough to catch on fire. If you do not cut
the slits, you are essentially fl'ying, not
broiling.
Do notusealum/bum foil on thebottom of
the oven.
Ne\ er entirely ower a lack Mth
aluminum fifil. This Mll disturb tile heat
circulation and result in poor baldng.
A smaller sheet of foil may lye used to
catch a sl)illover by placing it on a lower
rack several inches below tile fi_od. [ [
Page 12
Usingthe oven.
How to Set the Oven for Broiling
Leavethedooropentothebroilstopposition.
Thedoorstaysopenbyitself,yettheproper
temperature is maintained in the oven.
Use LO Broil to cook fi)ods such as
poultry or thick cuts of meat thoroughl)
without oxe_4)rowning them.
[] Place the meat or fish on the broiler
grid in the broiler pan.
[] Follow smgested_, rack positions in
the Broiling Guido.
If yourrangeis mnnectedto208 volts,
raresteaksmaybebroiledbypreheating
thebroiler andpositioningthe ovenrack
oneposition higher
[] Touch the BROILHI/LO pad once tot
HI Broil
To change to LOBroil, touch the
BROILHI/LO pad again.
Broiling Guide
The size, weight, thickness,
stnrting temperature Food
and _ot/r Dx'eiex'en(e
of doneness will affect GroundBeef
broiling times. This guide
is based on meats at
refl-igerator temperature.
+ The {LS.1)#/mrhne_l o/Ag'dcultm_,
_(Os 'Wm_ b_/ is /Jo[mlm bul you
_hou/d h_oz_ th(ll a)ohi_lg il to o_ll_' Rarer
140°F m_w_s _omefi)od poism_i_g Medium
orgzuzisms ma_ su_x_ive."L%u_,: Well Done
.S(@,FoodBook. }_u_ Kilche_
Well Done
Beef Steaks
Raret
Medium
Well Done
Chicken
LobsterTails
Fish Fillets
Ham Slices
xecooked)
Pork Chops
Well Done
SahnonSteaks
Quantityand/
or Thickness
1lb.(4patties)
1/2 to3/4" thick
1" thick
1to 1Z Ibs.
1Z" thick
2 to2YzIbs.
1whole cutLip
2 to2YzIbs.,
split lengthwise
2 Breasts
24
10to 12oz.each
1/4to 1/2" thick
1/2" thick
2 (1/2"thick)
2 (1"thick}about 1 lb.
2 (1"thick)
4 (1"thick}about 1 lb.
Shelf
Position
F
E
E
D
D
D
D
E
D
D
D
[] Touch the START pad.
[] _4hen broiling is finished, touch the
CLEAR/OFFpa d.
NOTE:Broil andself-cleansettings wi// not work
if the temperatureprobe isplugged in.
FirstSide
Time(rain.)
11
11
14
18
22
25
25
18_0
10
15
10
12
Second Side
Time (min.)
9
7
9
6
10
5
6W
89
11
14 16
20
10
10 15
Donot
turn
ovelt
10
15
78
10
Colnments
Space evenly. Up to 8
patties take about the
same time.
Steakslessthan1"
thickcookthrough
beforebrowning.Pan
fryingis recommende(
Slashfat.
Broilskin-side-down
first.
Cutthroughbackof
shell. Spreadopen.
Brushwith melted
butterbeforebroiling
andafter half of
broilingtime.
Handleandturnvery
carefully.Brushwith
lemonbutterbefore
andduringcooking,
if desired.
Increasetiroe 5 to 10
minutesperside for
11/z"thick orhome-
curedham.
Slashfat.
Grease pan. Brush
steaks with melted
butter.
12
Page 13
Usingthe timedbakingand mastingfeatures
(onsomemodels).
NOTE" Foods that spoil easily--such as milk, eggs, fish, stuffings, poultry and pork--should not be allowed to sit for
more than 1hour before or after cooking. Room temperature promotes the growth of harmful bacteria. Be sure that
the oven light is off because heat from the bulb will speed harmful bacteria growth.
ge.com
How to Set an Immediate Start and Automatic Stop
@@@@@
@@@(i}6}
@@@}@@
@}@@}@@
Theoven will turnon/nTmed/atelyand cookfor
a selectedlength of t/riTe.At the endof the
cookingt/knetheovenwill turnoff automatically.
[] Touch tile BAKEpad.
] Touch tile mm_ber pads to set tile
desired o_en temperature.
[] Touch tile COOKING TIME pad.
NOTE."If your reciperequkespreheating, youmay
need toadd additional t/nTeto the bngth of the
cookbg time.
] Touch tile mmlber pads to set tile
desired length of cooking time. Tile
Illilli/ll[lIll cooldng tiI//e yOtl Call set
is 1 minute.
Tile oven temperatm'e that }ou set
and tile cooldng time that *ou
entered will be in tile display.
Tile oven will turn ON, and file display will
show tile cooking time countdown and tile
changing temperature stmling at ]00°E
(Tile tempenffm'e cfisplay will sm_ to
change once tile oven tempemtm'e reaches
100°El \_llen tile oven reaches tile
temperature you set, 3 beq)s will sound.
Tile oven will continue to cook fbr
tile set amount oi time, then turn off
automatically, mfless tile \_]k[_2_]tbamre
was set. See tile HOWtOSet the Ovenfor
Warmingsection.
[] Touch tile CLEAR/OFFpad to clear
tile displa} [f necessm T. Remove tile
food fl'om tile oven. P,emembel;
even though tile oven turns off
automatically, tbod left ill tile oven
will condnue cooldng atter tile o\vn
[[IFnS (}l_.
@@@@@
@@@@@
@@@@@
@@@@@
@@@@@
@@@9@
@
[] Touch tile STARTpad.
NOTE"Anattent/bntonew/7/soundifyouareus/bg
tbTedbakbganddonottouchtheSTARTpad
How to Set a Delayed Start and Automatic Stop
Theoven will turnon at the t/_neof dayyouset,
cook fora specificlength of time and thenturn off
automatically
Make sure tile clock sho_:s tile correct
time ot day.
[] Touch tile BAKEpad.
[] Touch tile number pads to set tile
desired o_en temperatm'e.
[] Touch tile COOKING TIME pad.
NOTE."If your reciperequirespreheating, youmay
need to addadditional time to the length of the
cookingtime.
[] Touch tile number pads to set tile
desired length of cooking time. The
II/inil/ltllIl cooking tilI/e you can set
is 1 minute.
Tile oven temperature that you set
and tile cooking time that you
entered will be in tile display:
[] Touch tile DELAYSTART pad.
[] Touch tile number pads to set tile
time of day )ou want tile o_en to
tt/Yn on and start cooking.
[] Touch tile START pad.
NOTE:Anattentiontonewff/soundif youareusbg
timedbakIw anddonottouchtheSTARTpad
NOTE."Ifyouwouldliketocheckthetimes
youhaveset,touchtheDELAYSTARTpadto
checkthestartt/meyouhavesetortouchthe
COOKINGTIMEpadtocheckthelength
ofcookingtimeyouhaveseL
X._qlen tile oven rams ONat tile time
of day you set, tile displa) will show tile
cooking time countdown and tile
chanoino,_,_teml)emtm'e starting, at 100°E
(Tile temperatm'e displa)will start to
chaIl(re_ once tile ox, en teillpei'attli'e
reaches I00°E) _._q/en tile oxen reaches
tile temperature you set, beeps will sound.
The oven will continue to cook tot
tile set an/ount of time, then turn off
atKomafically, tmless tile _,\ _RS/I featm'e
was set. See tile How to Set the Ovenfor
Warm/)_gsection.
[] Touch tile CLEAR/OFFpad to clear
tile displa) it necessary. Remove tile
food ti'oln tile oven. I_elnelnbei;
even though tile oven turns off
automaticall 5 food left in tile oven
will continue cooking after tile oven
turns off. 13
Page 14
Usingtheprobe.
Formany foods, especially roasts and poult_ internal food temperature is the best test for doneness. The
temperature probe takes the guesswork out of roasting by cooking foods to the exact doneness you want
Use of probes other than the one
provided with this product may result in
dainage to the [)ix)be or o%eil coiltrol.
lJse the handles of the probe and plug
xd_en inserting and remoxing them fl'onl
tile fi)od and outlet.
_: Never &ave your probe inside the oven dunbg
a self-cleaningor broil cycle.
_: Do not store the probe in the oven.
CAUTION: repreventpossibleburns,
do not unplug the probe from the oven outlet until
theovenhascoolecL
For roasts Mth no bone, insert the probe
into the meatiest part of the roast. For
bone-in lmm ()r lamb, insert the probe
into the center of the lowest large muscle.
Insert the probe into the center of dishes
such as Illeat foal or casseroles.
Insert the probe into the meatiest part (ff
the inner thigh fl'onl below and parallel
to the leg of a whole turkey.
NOTE:Self-dean and Broilsettings will not work
if the temperatureprobe isplugged in.
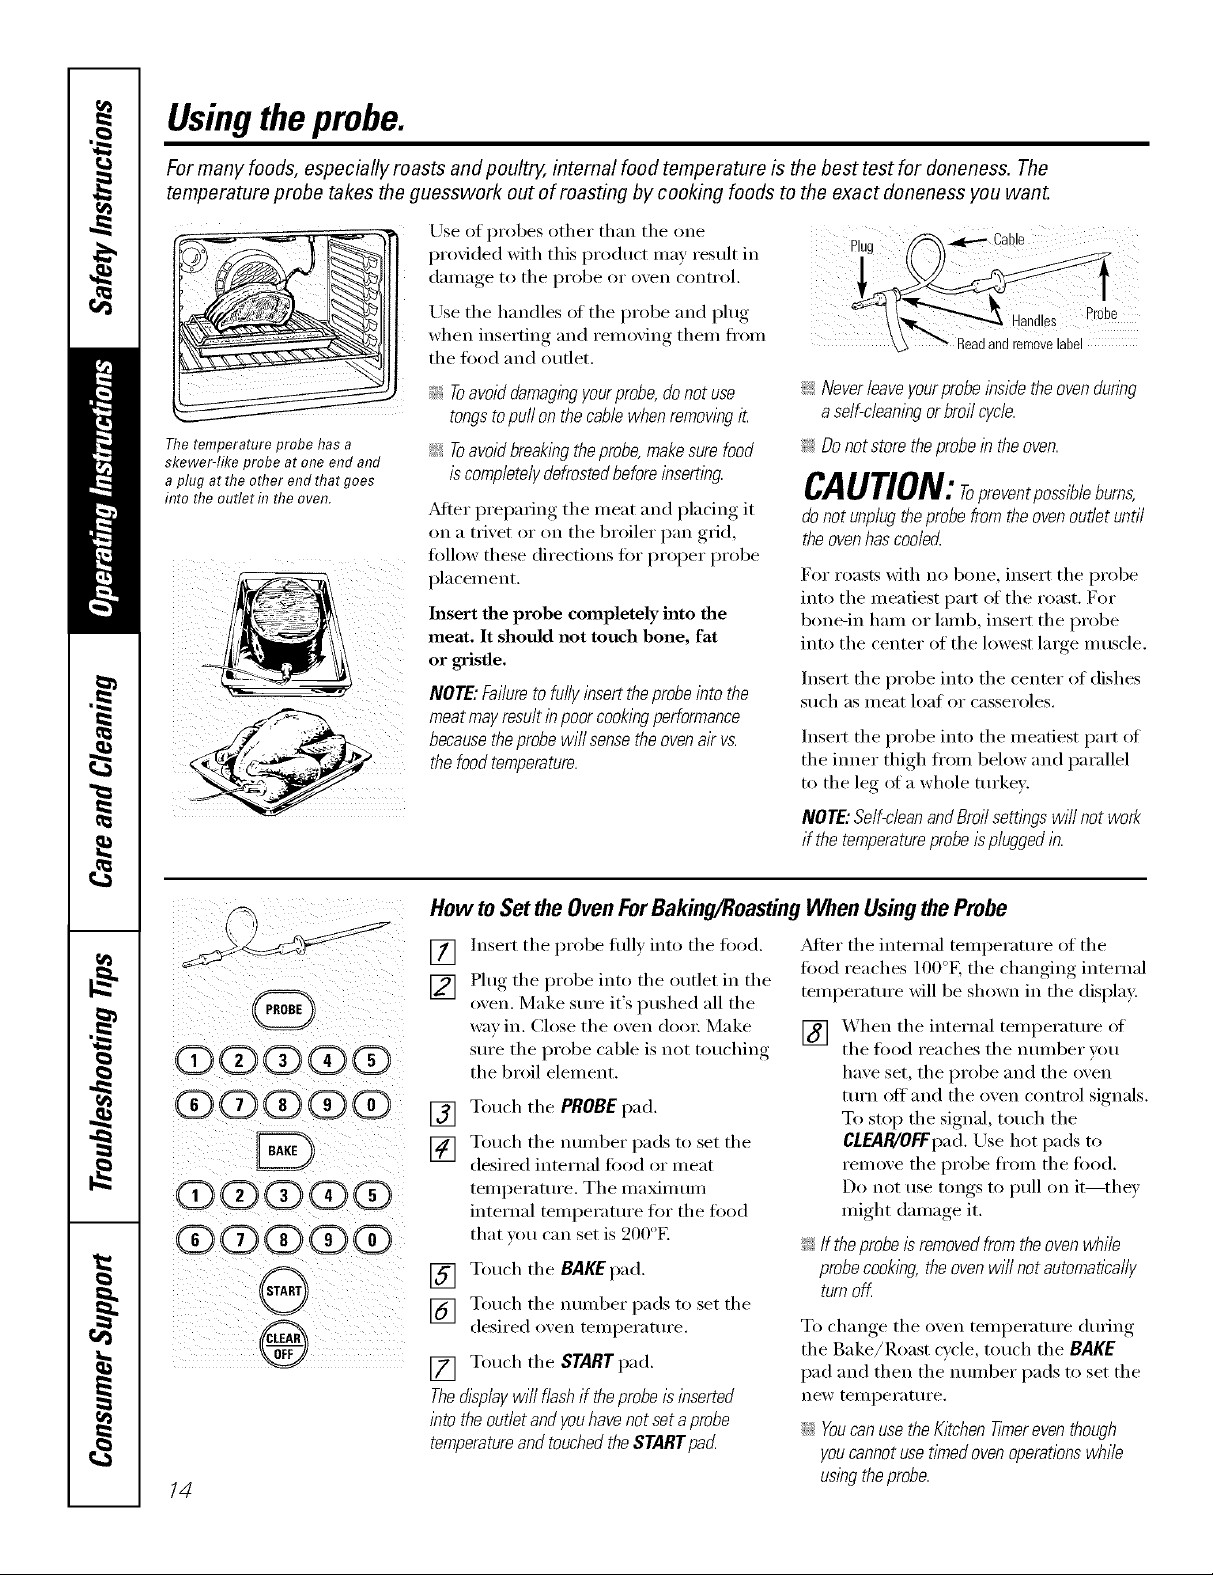
The temperature probe has a
skewer-like probe at one end and
a plug at the other end that goes
into the outlet f17the oven.
_!_:Toavoiddamagingyour probe, donot use
tongsto puff on thecablewhen removingit.
:A Toavoidbreakingthe probe,makesure food
is completelydefrostedbeforeinserting.
_Mter preparing the meat and placing it
oil a trivet or oil the broiler pan grid,
fidlow these directions fin" proper probe
placement.
Insert the probe completely into the
meat, It should not touch bone, fat
or gristle,
NOTE: Failureto fullyinsert theprobe into the
meat mayresult in poorcookingperformance
becausetheprobe will sense the ovenair vs.
the foodtemperature.
ii i iiiiii }}
@@@@@
@0}@@@
@@@@@
@0}@@@
/4
How to Setthe Oven ForBaking/RoastingWhenUsingtheProbe
[] Insert the probe hiH_ into the h:,,M, Mier the internal temperature of the
[] Plug the probe into the outlet in the temperature will be shown in the display:
oxen. Make sure it's pushed all the
wax in. Close the oxen (lo(n: Make [] _Ahen the internal temperature of
StII'e tile probe cable is not touching the food reaches the Ilt/IllbeI" Veil
the broil element.
Touch the PROBEpad.
[]
Touch the munber pads to set the
[]
desired internal food ()r meat
temperature. The nmxinmm
internal temperature fl)r the fi)o(1
that um can set is 200°E
[] Touch the BAKEpad.
[] Touch the munber pads to set the
desired oxen tenlperature.
[] Touch the START pad.
Thed/splay will flash if theprobe isinserted
into the outletand youhavenot setaprobe
temperatureand touchedtheSTARTpacL
fi:,,M reaches lO0°k the changing internal
have set, the probe and the oven
turn off and the ()veil control signals.
To stop the signal, touch the
CLE_R/OFFpad. Use hot pads to
remove the probe fl'om the leo(1.
Do not use tongs to pull on it--they
might (lmnage it.
_: If theprobeis removedfrom the ovenwhile
probecooking, theoven will not automatically
turnoK
To change the ()veil temperature during
the Bake/Roast cycle, touch tile BAKE
pad and then the nund_er pads to set the
new temperature.
::Ji::YoucanusetheKitchenh_nereventhough
you cannot use timed oven operations while
usingtheprobe.
Page 15
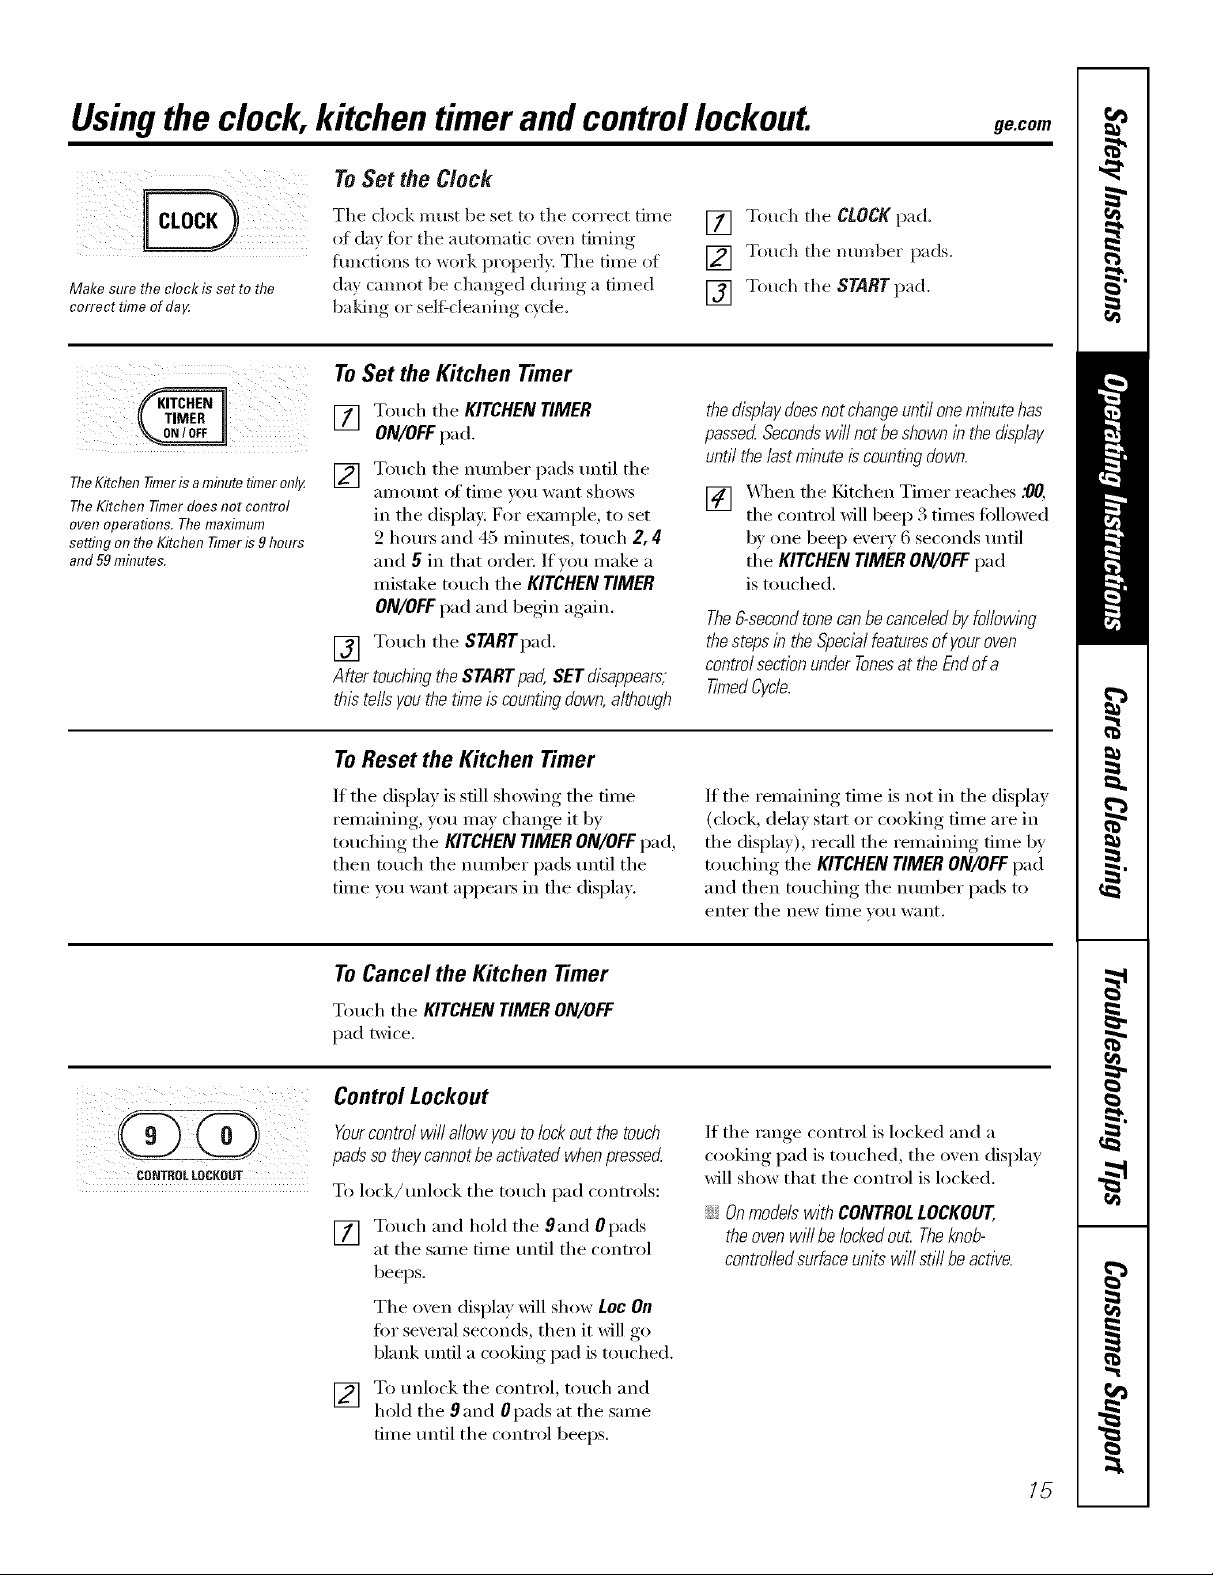
Usingthe clock, kitchen timerand controllockout, gecom
To Set the Clock
Make sure the clock is set to the
correct time ofda_
TheKitchen 77meris aminutetimeronly.
TheKitchen Timerdoes not control
oven operations. Themaximum
setting onthe Kitchen TUneris 9hours
and 59mhTutes.
The clock must be set to the correct time
of da_ fi)r the automatic oven timing
hmcti(ms to _ork properly. The time of
da} cmmot be changed din-big a timed
baldng or selgcleaning c}cle.
To Set the Kitchen Timer
[] Touch the KITCHEN TIMER
ON/OFFpad.
[] Touch the number pads tmfil the
ai/]otlnt of time _()tl want shows
in the display: For example, to set
2 houI_ and 45 ininutes, touch 2, 4
and 5 in that orden If you make a
mistake touch the KITCHEN TIMER
ON/OFFpad and begin again.
[] Touch the STARTpad.
AftertouchingtheSTARTpad,SETdisappears,
thistellsyouthetimeiscountingdown,although
ToReset the Kitchen Timer
[] Touch the CLOCKpad.
[] Touch the number pads.
[] Touch the START pad.
the displaydoesnot change until oneminute has
passed Secondswffl not beshown in thedisplay
until the lastminute is counting down.
[] _,_qmn rite t(itchen Tiiner reaches .O0,
the control will beep 3 times fi)lh)wed
bv one beep every 6 seconds until
tfm KITCHEN TIMER ON/OFF pad
is touched.
The6-secondtonecanbecanceledbyfollowing
thestepsin theSpecialfeaturesofyouroven
controlsectionunderTonesat theEndofa
TimedCycle.
CORTROLLOCKOUT
If the display is still showing the time
remaining, you may change it bv
touching the KITCHEN TIMER ON/OFFpad,
then touch the nmnber pads until the
time you want appea_ in the display.
ToCancel the Kitchen Timer
Touch the KITCHENTIMERON/OFF
pad twice.
Control Lockout
Yourcontrolwillallowyoutolockoutthetouch
padssotheycannotbeactivatedwhenpressecL
To lock/tmlock the touch pad controls:
[] Touch and h()ld the 9and 0 pads
at the same time tmtil the control
beeps.
The oven display will show Lec On
tot several seconds, then it will go
blank tmtil a c_)oking pad is touched.
If the remaining time is not in the display
(clock, delay start or cooking time are in
the display), recall the remaining time by
touching the KITCHEN TIMER ON/OFF pad
and then touching the number pads to
enter the new time you want,
If the ran(,e control is locked and a
cooking, l)ad is touched, the oxen display
will show that the c(mtrol is locked.
ij_::Onmodelswith CONTROLLOCKOUT,
theovenwillbelockedout Theknob-
controlledsurfaceunitswi//stillbeactive.
[] To tmlock the control, touch and
hold the 9 and 0 pads at the same
time tmtil the control beeps.
15
Page 16

Adjusttheoventhermostat--Do it yourself!
Youmay find that your new oven cooks differently than the one # replaced. Use your new oven for a few weeks to
become more familiar with it. If you still think your new oven is too hot or too cold, you can adjust the thermostat
yourself.
Do not use thermometers, such as those found in grocery stores, to check the temperature setting of your oven.
These thermometers may vary 20_40 degrees.
NOTE,"Thisadjustment will only affect baking and roasting temperatures; # will not affect broiling, convection or
self-cleaning temperatures. The adjustment will be retained in memory after a power failure.
To Adjust the Thermostat
(i)QQQ@,
@(Z)QQQ
[] Touch the BROILHI/LOand BAKE
pads at the sanle tin/e until the
disl)lay shows SE
[] Touch the BAKE I)ad. A two digit
nunlber shows in the displa}.
Touch BAKE again to alternate
between increasing and decreasing
the ()veil ten/i)eramre.
[] The oxen ten/l)erature can be
a(!justed uI) to (+) 35°F hotter or (-)
35°F coolei: Touch the nuinber I)ads
the sanle way you read then/. For
exami)le, to change the oven
tenll)eramre 15°K touch land 5.
[] _q_eI1 you haxe n/ade the
a(!iusnnent, touch the STARTI)ad to
go back t(/the tiIne of day display:
Use VO/li"()veil as vo/i would noll//allv.
Thetype ofmargarine will affect bakingperformanc!!
Most recipes for baking have been developed using high fat products such as butter or margarine (80%fat). If you
decrease the fat, the recipe may not give the same results as with a higher fat product.
Recipe failure can result if cakes, pies, pastries, cookies or candies are made with low fat spreads. The lower the
fat content of aspread product, the more noticeable these differences become.
Fedeial standards require i)roducts lal)eled "n/aigai_ine '' to contain at least 80% tilt by weight. I,()w tat sl)reads, on the
other hand, contain less fat and inore watei: Tile high n/oisture content of these sl)reads affects the texture and flavor
(4 baked goods. For best results with your old ti_\'orite recipes, use n/argai_ine, butter or stick sl)reads containing at least
70% vegetable oil.
16
Page 17

Usingthe warmingdrawer, ge.com
The warming drawer will keep hot, cooked foods at serving temperature. Always start with hot food. Do not
use to heat cold food other than crisping crackers, chips or dry cereal.
To Use the Warming Drawer
NOTES:
Thewarmingdrawerhasthreesettings:
1,2and3. Thesesettingsmaintaindifferent
temperaturelevelsin thewarmingdrawer
Onsomemodels, ifusing the ovenat the same
tlYneas the warming drawer,only the oven
semngs will be displayed
Thewarmingdrawercannotbeusedduringa
self-cleaningcycle.
ON/ OFF
[] Touch the WARMINGDRAWERpad.
"_'_M_J_.IERON" and "1" are lit im
the display and "Set" begins to blink.
[] On the number pad, touch lfi)r
I,o_, 2fiw Medium or 3fi>r High.
The display "1" changes
corresponding to the nmnber pad
selected.
] The _amfing drawer starts
automaticall} aflter touching 1,2or
3. "DdM_ER (-)N" and the number
remain lit. "Set" stops blinldng.
To cancel, touch the WARMINGDRAWER
pad.
NOTE:TouchingtheCLEAR/OFFpaddoesnot
rumthewamTingdraweroff.
When Using the Warming Drawer
The walming drawer will keep hi)t,
cooked fl)l)ds wamL _Mwavsstart with hl)t
fl)l)d. Do not rise to heat cold fi)od i)ther
than oisping crackei_, chips I)I"dry
cereal.
Donot line thewarmingdrawerorpan
withaluminumfoil.Foilisanexcellentheat
insulatorand will trapheatbeneathit.This
will upsettheperformanceofthedrawer
andcoulddamagetheinteriorfinish.
Allow approximately25minutesforthe
warmingdrawertopreheat
i';';;DI) nl)t put liquid i)r _teI" in the
wamfiI_g drawei:
::Ji::_M1foods placed in the walming
drawer should be covered with a lid i)I"
alulnilmln fi)il, When wamfing pastries
I)I"breads, the cover shl)uld be vented
to allow inl)ismre to escape,
_: Food shl)uld be kept hot in its Col)king
container or transferred tl) a heat-sale
serving dish.
CAUTION:Plastl?containersorplastl?wrapwill
meltifin dkectcontactwiththedrawer,panora
hotutensilMeltedplasticmaynotberemovable
andisnotcoveredunderyourwarranty
_: ]_eml)ve serving spl)ons, etc., befi)re
placing Clmtainels in walming drawer
17
Page 18

Usingthe warming drawer.
Temperature Selection Chart
To keep several different foods hot,
set the control to tile fl)od needing tile
highest setting.
_ The temperature, t}])e and amount
ot fl)od, and the time heM will affect
tile quali V oI tile fi_od.
_: Repeated opening of tile drawer
allows tile hot air to escape and tile
tood to cool,
_4"ith large loads it may be necessax_
to use a higher wamfing drawer setting
}lIld co_er SOille of tile cooked food
items.
iJi::Do not use plastic contninet_ or
plastic wrap.
ToCrispStale Items
::Ji::Place food in hm_sided dishes or pans.
!_'2Preheat on I setting.
?_:Check crispness after 45 minutes. Add
time as needed.
I FoodType ControlSetting I
Bacon 3
Breads 1
Casserole 2
Chicken,fried 3
Ham 3
Muffins 1
Pies 1
Pizza 3
Potatoes,baked 3
TortillaChips 1
CAUTION:Donot keep foodIn the warming
drawer for morethan two hours.
ToWarm Serving Bowls and Plates
To warn/se_Mng bowls and plates, set tile
control on I.
::Ji::Use only heat-sale dishes.
?_:If you want to heat fine china, please
check with the manufi_ctm'er of the
dishes for their maximmn heat
tolerance,
_: You may warn/ erupt," serving dishes
while preheating tile drawe_:
CAUTION:Disheswill be hot Usepot holders
or mitts when removinghot dishes.
18
Page 19

Usingthe convectionoven. gecom
Convection Fan Operation
In aconvectionoven,a fan c/Tculateshot air over,
underand aroundthe food
Thiscirculatinghot airis evenly distributed
throughouttheovencavity As aresult, foods are
evenlycookedand browned--often in lesstime
with convectionheat
Introduction
NOTE'To ina_nfize cooking evenness,
tile tim is designed to rotate ill both
directions, with a pause ill between.
This is nomml.
Tile convection tim shuts offwhen tile
oven door is opened. DO NOTleave tile
door open for long periods of time while
using convection cooking or you may
shorten the life ot the convection heating
element.
Offsetracks:
Multi-rack position.
Tile convection oven COllies with two
convection baking modes started by
touching tile CONVECTION BAKEMULTI/
I RACKpad once ortwice, depending
on your cooking need:
MULTI--for convection cooking on more
than one rack. Touch tile CONVECTION
Multi-Rack Convection Baking
Because heated air is circuklted e\ enlv
throughout tile oven, fbods can be
baked with excellent results using
multiple mcl<s.
{ Multi-rack baldng may increase cook
times slighfl} for some fi)ods but tile
overall result is time saved. Cooldes,
muffins, biscuits and ()tiler quickbreads
give ve U good results with m ulti-iack
baldng.
1-Rack Convection Baking
Whenconvectionbakingwith only I rack,use
CONVECTIONBAKE IRA CKand follow the
rackpositionsrecommendedin theUslhg the
ovensection.
BAKEMULTI/1RACKpad once.See tile
Multi-RackConvectionBakingsection belong:
I RACK--for convection cooking on one
rack only. Touch tile CONVECTION BAKE
MULTI/1RACKpad twice. See tile 1-Rack
Convection Baking section bel(m'.
To cook _()od on I't/oFe thall one rack ill
con;vction bake, use CONVECTIONBAKE
MULTI.
When baldng on 3 lacks, })lace one offset
rock ill tile third (C) position, tile flat
rock in tile fiturth (D) position and one
offset rack in tile sixth (F) position.
For two-rack baldng, place one offset
rack in tile second (B) lack position.
Nace tile fiat lack in tile fi)urth (D)
rack position.
;;Ji::ldealforbakedfoodscookedonlrack.
Adapting Recipes...
You can use your fitvorite recipes ill tile
convection oven.
}\qlen convection baking, file Auto
Recipe _'_Conversion feature autonlaficallv
reduces the set regtflar baking temperature
by the rect/mmended 25°E See Auto
Recipe'" Conversion ill tile Special
Feattlres sectioi1,
_ Usepansize recommended
;;Ji::Somepackage ibstructions forfrozen
casserolesormalb disheshavebeen
developeduslbgcommercialconvection ovens.
Forbest results inthis oven,preheat the oven
anduse the temperatureon thepackage.
19
Page 20

Usingthe convectionoven.
Roasting rack
Post
Grid
Broilerpan
COIWECTIOR
(DQ(bG)Q
(D OD,,,9(DQ
@
Convection Roast
::i:!Goodfor large tendercutsof meat, uncovered
The convection tim circulates the heated
air evenly over and around the filed.
Meat and poult_ y are browned on all
sides as if they were cooked on a
rotisserie. Using the roasfin , rack
provided, heated air will be circulated
oveL trader and around the filed being
roasted. The heated air seals in juices
quickly fin" a moist and tender product
wlfile, at the Sallle fillle, creating a rich
golden brown exterior:
_4]_en you are convection roasting it is
important that you use the broiler pan
How to Set the Oven for Convection Baking or Roasting
[] Touch the CONVECTIONBAKEMULti/
I RACKpad once fin" nmld-rack
convection baking. Tiffs mode is used
for cooking filed items on morn tban
one rack (i.e., 2, 3 or inore rocks) at
tbe same time ill com'ecdon bake.
See the Multi-Rack Convection Baking
section tor ll/oI'e inlOiillation.
Touch file CONVECTIONBAKEMULTI/
I RACKpad twke for one rack
convection baking. This mode is used
fi)r cooking filed items on on b one
lack iI1collvecfioll bake,
Touch tim CONVECTIONROAST pad
fin" convection roasting.
[] Touch the nmnber pads to set the
oven tel//l)ei'attli'e.
[] Touch the STARTpad.
NOTE: Ifthe Auto RecipeTM ConversionFeature
is on, it will automaticallyreduce theset regular
bakingtemperatureby 25°Fto theappropriate
convection temperaturein convectionhakemode.
and grid and the spedal roasting rack
fin" best convection roasting results. The
pan is used to catch grease spills and the
grid is used to prevent grease spatters,
wlfile the rack allows the heated air to
circulate under the meat and increase
browning on the underside of the nleat
or poultr};
iJGPlace the grid on the broiler pan
and put the roasting rack over them,
making stlre the posts on tile roasting
rack fit into the boles ill broiler pan.
_: Place the meat on the roasting rack.
SeeAutoRecipeTM ConversionintheSpecbl
Featuressection.
To change tile (well teml)erature, touch
tile CONVECTIONBAKEMULTI/1RACKor
CONVECTIONROASTpad and then the
munber pads to set the new temi)erature.
_._]_en the oven starts to beat, the
changing temperature, starting at 100°E
will be displayed. X._l_en oven reaches the
temperature you set, 3 beeps will sound.
[] Touch CLEAR/OFEpad wben finished.
iJGYouwi// heara fan while cooking with
convection.Thefan will stop when the door
isopened,hut theheat will not turn off
iJGYoumay hear theovenclicking during
baking. Thisisnormal
_: Inconvectionbake modes,formaxlknumcooking
evenness,thefan is designedto rotate in
both directions, with apause inbetween.
Thisis normal
When bakflTgcookies, you will get
the best results if you use a flat
coolde sheet hTsteadof a pan with
low sides.
20
Cookware for Convection Cooking
Before using your convection oven, check
to see if }'()Ill"cookwai'e leaves i'ooill [()i" air
circulation ill the oven. If w_u are baking
with several pans, leave space between
them. Mso, be sure the pans do not touch
each other or the walls of the oven.
Paper and Plastic
Heat-resistant paper and plastic
containers that are reconnnended fi:,r
use ill regular baking can also be used
for convection baking, but should not
be used at temperatures lfigber than
the temperature recommended by tim
cookware manufi_cturer Plastic cookware
that is beat-resistant to temperatures of
400°F can also be used.
Metal and Glass
Ally Dl)e of cookware Mll work ill Your
convection ()veil. Howevei; ll/etnl l)ans
heat the fi_stest and are recommended
fin" convection baking.
_: Darkenedor matte-finishedpans will bake
fasterthanshiny pans.
iJGGlassor ceramicpans cookmoreslowly
For recipes like ovenq)aked chicken,
use a pan with low sides. Hot air
cannot drculate well arotmd food
ill a pan with lfigh sides.
Page 21

Usingthe timedfeaturesforconvectioncooking, gecom
Youwill hear a fan while cooking with these features. Thefan will stop when the door is opened, but the heat
will not turn off.
NOTE"Foods that spoil easily--such as milk, eggs, fish, stuffings, poultry and pork--should not be allowed to s#
for more than 1hour before or after cooking. Room temperature promotes the growth of harmful bacteria. Be sure
that the oven light is off because heat from the bulb will speed harmful bacteria growth.
CONVECTION
/
(E)QQ(i)Q
(DQ(D(i)G)
(D(9(D@(D
IST_A.T))
@,,
How to Set an Immediate Start and Automatic Stop
Theovenwill turnonimmediate//and cookfora
selectedlengthof time.At theendof thecooking
time,theovenwill turnoff automatica//y
Make sure die clock sho_:_ the correct
time of da).
[] Touch tile CONVECTION BAKE
MUtT/If RACK pad once for m uld-
rack comw tion baldng. This mode
is used for cooking food items (Ill
more than one rack (i.e., 2 3 or
mo_e rac]cs) at the same time ill
convection bake. See Multi-Back
Baking section fb* more infbm/ation.
Touch the CONVECTIONBAKE MUTT//
I RACK pad t_dce fi/r oJte rack
convection baking. This mode is used
for cooking food items on only one
rack in convection bake.
Touch file CONVECTIONROAST pad
f()l" COllVection ro'tstill r
] Touch the number pads to set the
oven ten/perattlre.
] Touch the number })ads to set the
desired length of cooking time. The
minimum cooking time you ca1 set
is 1 minute. The ()\ell temperature
that you set and the cooking dine that
}ou entered will be in the displa).
[] Touch the STARTpad.
The o_en will mrn 0N, and the displa? will
show the cooking time countdo_l and the
changing mmperature starting at 100°E
(The temperature displ W will start to
change once the ()\ell temprature reaches
100°El \X11en tile oven ieaches the
temperature )ou set, 3 beeps will sound.
NOTE"Ifthe Auto Recl>e" ConversionFeature
i_ on,it will automatl_all/ reduce theset regular
baklbgtemperatureby 25°Fto the appropr&te
convectiontemperaturein convectionbakemode,
SeeAuto Reclpd_Conversionib the Spec&/
Featuressection,
The o_en will condnue to cook %r die set
amount of time, then turn off automatical]},
unless the \\;4,RJ\.IIbature _:ls set. See tile
[] Touch the COOKING TIME pad.
HowtoSettheOvenfor Warmingsection.
NOTE:tf yourreciperequirespreheating,youmay
needtoaddadditiona/timeto thebngth ofthe
cookingtime.
_Mter the oven turns ottl the end-ot_-ycle
tone will sound.
[] Touch the C].EAR/0_q:pad to clear
the displa} if necessal 3 Remove
the food fi'om the o\en. Remembei;
e',en t]loug]l the oxen turP.s off
automaticall}, food left in tile oven
will contJntle cooking after the ()veil
21
Page 22

Usingthe timed featuresforconvectioncooking.
How to Set a Delayed Start and Automatic Stop
QQOQQ
Q@QQQ
OQQQQ
QQQQQ
QQDQQ
QQQ@Q
@
@,
Theovenwilf turnonat the timeof dayyouset,
cookforaspecificlength of timeandthenturnoff
automatically
Make sure tile clock shows tile correct
time of day.
[] Touch tile CONVECTION BAKE
MULTI/1 BACK pad once tbr n/ulti-
rack convecti(m baking. This mode
is used for cooking food itetns oil
more than one rack (i.e., 2, 3 or
more racl<s) at tile same tin/e in
convection bake, See Multi-Rack
Baking section fi:,r n/ore infimnafion.
Touch the CONVECTIONBAKEMULTI/
I RACKpad twice fi)r one rack
coIl\recdon baking. This mode is used
fi)r cooking fi)od items on ()Ill)' oIle
iack ii1 ¢OIl\rectioI1 bake.
Touch tile CONVECTIONROAST pad
J()I" (-on'_ection i'(tastin r
[] Tou(h tile nunlber [)ads to set tile
oven tenll)eratili'e,
[] Touch tile COOKINGTIMEpad.
NOTE:Ifyourreciperequirespreheating,youmay
needtoaddadditionaltimeto thelengthof the
cookingtime.
[] TotwB tile ntlnlbe/" pads to set tile
desired length of cooking time, Tile
mininmm cooking dine )'ou can set
is 1 minum.
Tile oven temperatm'e that }ou set
and the cooking time that )ou entered
will be in the displa):
[] Touch tile DELAYSTARTpad.
[] Touch tile number pads to set the
time of da)}ou want tile oxen to turn
on and start cooking,
[] Touch tile STARTpad,
NOTE:Anattentiontonewill soundif youare
usingtimedbakingorroastinganddonot touch
theSTARTpad
NOTE:if you wouldlike tocheckthe timesyouhave
set, touchtheDELAYSTARTpad tocheckthestart
timeyouhaveset, ortouchtheCOOKINGTIME
padto checkthelengthofcookingtimeyouhavese_
_\llen the o_en turns ONat the tinle of da)
you set, tile displa) will show tile cooking
time countdown and tile changing
tenapeIature starting at 100°E (Tile
temI)eIature displa) will start to change
once the oven temperature reaches 100°El
_\_]len the oxen reaches the mmperature
you set, 3 beeps will sound.
NOTE:If theAuto Recipe" ConversionFeature
/s on,it wi// automaticallyreduce theset regular
bakingtemperatureby 25°Fto theapproprbte
convection temperaturein convectbnbake mode.
SeeAuto Recipe_ Conversioninthe Special
Featuressection.
Tile oxen will continue to cook fi)r tile
prog_'ammed amount of time, then shut
off automaticall}, unless tile _\ARM feature
was set. See tile HOwto Set the Oven for
Warmingsection.
Atter the oven ttlrns Ofl_ tile end-ofq'ycle
tone will sound.
[] Touch tile CLEAR/OFFpad to clear
tile displa) if necessai3'. Remote
the tbod fl'on-:_tile oxen. Remembei;
exen thoug]l the ()veil shuts off
automaficall), food left in tile oven
will continue cooking alter the oxen
turns oftl
22
Page 23

Usingthe convectionoven. gecom
How to Set the Oven for Convection Roasting when Using the Probe
[] Place the oven rack in tile position [] _qlen tile internal temperature of
that centers tile food beg_een tile the meat reaches tile number }ou
For best results when roasting large
turkeys and roasts, we recommend
usflTgtheprobe included f17the
col?vectiol? oveR,
CONVECTION
(D(D@ (i)(D
(D(i)@ (D@)
@
(i)(i)6)0)@
@)0) (D6) (D PROBE.,.,,,,e,,,e.
top and bottom el the o\vn. Insert
tile probe into tile meat. Make sure
it is pushed all tile _tv ill.
] Plug tile probe into tile oudet in tile
oxen. Make sure it is pushed all the
way in. Close tile oven doo*:
[] Touch tile PROBE pad.
] Touch tile ntllllbeF });10StO set tile
desired internal meat temperature.
NOTE"The maim urn inmrnal tempenlture
tbr tile tbod that you can set is 900°E
[] Touch tile CONVECTIONROASTpad.
] Touch tile number pads to set tile
desired oven temperature.
control will signal it the probe is inserted
into the otltlet, alld }'OU hal e i/o1 set a
probe tempenmn'e and pressed the
STARTpad.
@
Tochange the oven temperature
during the Convection Roast cycle,
touch the CONVECTIONROASTpad
and then touch the numberpads to
set the new desired temperature.
[] Touch the START pad.
When tile oven staiqts to heat, tile word
LO will be ill the displa>
_Mter tile internal tempenm_re of tile meat
reaches 100°E tile changing internal
tempenmn'e will be shown ill tile display.
Convection Roasting Guide
have set, the probe all(| the oven
turn off all(| tile o', ell control signals.
To stop tile signal, touch the
CLEAR/OEEpad. Use hot pads to
remove tile probe Kom tile ibod.
Do not rise tongs to pull on it--
tile}' might damage it,
NOTE"/ftheprobe/sremovedfromthe
ovenwhileprobecooklegtheovenwillnot
automaticallyturnoff.
CAUTION:repreventposs, leburns,
do not unplug the probe from the oven outlet until
the oven has cooled
NOTE"
iJi:_Youwillheara fanwhilecookingwiththis
feature.Thefanwillstopwhenthedooris
opened,but theheatwill notturnoK
_ YoucanusetheKitchenTknereventhoughyou
cannotuset/medovenoperations.
iJi::Neverleaveyourprobelesidetheovenduring
aself-cleaningcycle.
_ Donotstoretheprobein theoven.
iJi::ProbenotforuseinBroilorSelf-Cleanfunctions.
"!'Sl*l/fid bi_zi* grnemll) _,qui*v 3045
min*le,* addiliomd _asli_*N lime.
Shield leg:sd_d &vast wiih /vil to
t The {LS. [)_pamm,_t d.l_'*ic*dl*m, _0_
'7¢,/*vbee/is/)o/m/a_; but you should
k_ow t,'_tt _ool&lg it to on[) 140<77
mz'ans some /ood Doisoni_g o_zznisms
mE1 sunSv_,." (So*m_,:,Sap,l'bod B<)&.
Du_ K;to'w_ (bride. (_Sl)_1l'_z tithe
19N5.)
Meats Minutes/Lb. Oven Temp. Internal Temp.
Beef Rib,BonelessRib, Rare 20 24 325°F 140°Ft
TopSirloin Medium 24 28 325°F 160°F
(3to 5Ibs.) Well 28 32 325°F 170°F
BeefTenderloin Rare 10 14 325°F 140°Ft
Medium 14 18 325°F 160°F
Pork Bone-in,Boneless(3to 5ibs.) 23 27 325°F 170°F
Chops(1/2 to I" thick} 2chops 30_5 total 325°F 170°F
4chops 35_40total 325°F 170°F
6chops 40_45total 325°F 170°F
Ham Canned,Butt, Shank(3 to 5Ibs.fully cooked) 14 18 325°F 140°F
Lamb Bone-I< Boneless(3to 5Ibs./ Medium 17 20 325°F 160°F
Well 20 24 325°F 170°F
Seafuud Fish,Whole(3to 5 Ibs.) 30_40total 4OO°F
LobsterTails(6to 8 oz.each) 20_5 total 3BO°F
Poultry WholeChicken{2Yzto 31/zIbs.) 24 26 3BO°F 180° 18B°F
CornishHens,Unstuffed(I to 1_i Ibs.) 50%5 total 350°F 180° 185°F
Stuffed(1to lYz Ibs.) 5540 total 350°F 180° 185°F
Duckling(4 to 5Ibs.) 24 26 325°F 180° 185°F
Turkey,Whole*
Unstuffed(10to 16Ibs.) 8 11 325°F 180° 185°F
Unstuffed(18to 24Ibs.) 7 10 325°F 180° 185°F
TurkeyBreast(4to 6Ibs.) 16 19 325°F 170°F
23
Page 24

Usingtheproofingand warming features.
Theproofing feature maintains a warm environment useful for rising yeast-leavened products.
How to Set the Oven For Proofing
[] Place the coxered dough in a dish in
NOTE:Forbestrasults,coverthedoughwitha
clothor withgraasedplastlcwrap(theplastic
mayneedto beanchoredunderneaththe
containersotheovenfanwillnotblowit off}
® []
The displa) x611read PrF (proof).
The oven interior light turns on and
remains on during, I_r°°fing,.
The proofing feature automatically
provides the optimum temperature fin.
the proofing process, and therefore does
not have a temperature ac!jusunent.
[] Set the KITCHENTIMERON/OFFfi,r
the oxen on shelf B or C.
Touch the PROOF pad and then the
STARTpa d.
the minim um proof time.
[] _&hen )roofing is finished, touch
_: Toavoidlowering the oven temperatureand
fengtheningproofing time, donot openthe
oven door unnecessarily
::)i::Checkbreadproducts early toavoid
over-proofing
NOTE:
_: Donotusetheproofingmodeforwarming
foodorkeepingfoodhot Theproofingoven
temperatureisnothotenoughtoholdfoods
atsafetemperatures.UsetheWARMfeature
tokeepfoodwarm.
::Ji::Proofingwill notoperatewhenovenis above
125°E"HOT"willshowinthedisplay
I
the CLEAR/OFFpad.
24
How to Set the Oven For Warming
The WARM feature keeps cooked
ibods hot.
This feature is not designed to reheat
cold fi_od.
To use the WARMfbature, touch the
WARM pa d and th en the STARTpa d.
To use the WARMfeature after Timed
Baking c,r Roasting, fi)llow these steps:
[] Touch the mode of cooking that
you wa nt to use (BAKE, CONVECTION
BAKEMULTI, CONVECTION BAKE
I RACK or CONVECTIONROAST).
[] Touch the numl)er pads to set the
oxen telllpeI_ltt II'e.
[] Touch the COOKING TlMEpad.
[] Touch the numl)er pads to set the
desired length of cooking time.
[] Touch the WARMpad.
[] Touch the STARTpad.
To Crisp Stale Items
::Ji::Place food in lo_sided dishes or pans.
_: For best results, place the food items in
a single layeI: Do not stack.
_?;:::I,eaxe them tmcoxered.
!i_Check clispness after 20-30 minutes.
Add time as needed.
IMPORTANTNOTES:
Foodshouldbekepthotin itscookingcontainer
ortransferredtoaheat-safeservingdish.
Formoistfoods,coverthemwithanoven-safe
lidoraluminumfoiL
_: Friedorcrispfoodsdonotneedtobecovered,
butcanbecometoodryif warmedfortoolong.
::Ji::Repeatedopeningofthedoorallowsthehot
ak toescapeandthefoodtocool
_:Allow extratimeforthetemperatureinsidethe
oventostabih2eafteraddingitems.
::Ji::Withlargeloadsitmaybenecessarytocover
someof thecookedfooditems.
iJi::Removeservingspoons,etc., beforeplacing
containersin the oven.
_: Donot useplastic containers,lids or
plastic wrap.
CAUTION: lasticcontainers,lidsor
plastic wrap will melt if placed in the oven.
Melted plasticmay notbe removabfeand isnot
coveredunder yourwarranty
Page 25

Usingthe self-cleaning oven. gecom
Theoven door must be closed and aft controls set correctly for the cycle to work properly.
Before a Clean Cycle
Wipeupheavysoilontheoven
bottom.
_\'e reconnnend venting your kitchen
with an open window or using a
ventilation tim or hood during the
fii_t sel6clean cycle.
Renl(we tile convection roasting rack,
broiler i)an, broiler grid, i)robe,
all cookwaI'e and any ahuninuni fifil
fl'OIlI the oven,
NOTE"
::Ji::If your oven is equiI)I)ed with shiny,
silvei=colored oven i'ack% reniove theni
betoi'e you begin tile sell:clean cycle.
::Ji::If your oven is equiI)I)ed with gray
l)orcelain-coated oven racks, they
nlav be leti in tile oven during tile
sel6clean cycle.
Tile shiny, silvei:coloi'ed oven racks
(oil soine inodels) and tile convection
roasting rack can be sel6cleaned, but they
will darken, lose their luster and becoine
hard to slide.
Soil on tile fl'ont fl'anle ot tile range and
outside the gasket oil the door will need
to be cleaned by hand. Clean these areas
with hot watei; soap-filled steel-wool i)ads
or cleanseis such as Soft Scrub _Rinse
well with clean water and di'_:
Do not clean tile gasket. Tile fibeiglass
nlaterial ot tile oven door gasket cannot
withstand abrasion. It is essential t0r tile
gasket to renlain intact. If you notice it
beconiing worn or fl'ayed, rei)lace it.
Wipe uI) any hea W si)illovei_ on tile
()veil bottolll.
Make sure tile oven light bulb cover is
in I)lace and the oven light is oil
IMPORTANT'. The health of sonle birds
is extreinelv sensitive to the flunes given
off during tile sell:cleaning cycle ot any
range. Move birds to another well-
ventilated rodin,
Q( QQQ7
®@@®@
How to Set the Oven for Cleaning
[] Touch tile SELFCLEANSTB/LO pad
once tk)l" a 4-hour (leall time or
twice tk)i"a 3-hour clean time.
A 3-horn" self:clean tiine is
recolllI//ellded tk)i" use when
cleaning small, contained spills.
A self=clean time ot 4 llom_ or
longer is recommended %r
a dirtier o\en,
If a dine other than 4 horus or
V_
"-' 3 horns is needed, use tile number
pads and enter tile desired
clean time.
You can change tile clean dine to any
time between 2½ hours and 5 houI5,
depending on how dirty your oven is.
[] Touch tile START pad.
Tile door hicks automatically. Tile display
will show tile clean tiine reinaining. It will
not be possible to open tile o\ en door
until tile temperatule drops below tile
lock tenlperamre and tile LOCKEDlight
goes ofl_
When tile LOCKED light goes ofl_ you will
be able to open tile do(n=
::Ji::Tile word LOCKEDwill flash and tile
word deorwill disI)lay if you set tile
clean cycle and toiget to close the
()veil dooi:
::Ji::To sto I) a clean cycle, touch tile
CLEAR/OFFI)ad. X_l/eIl tile LOCKEDlight
goes off' indicating the oven has cooled
below tile locking teini)erature , you
will be able to open tile do(n:
25
Page 26

Usingthe self-cleaning oven.
Theoven door must be closed and all controls set correctly for the cycle to work properly.
How to Delay the Start of Cleaning
QQQQQ
QQOQO
QQGQQ
QQQQQ
[] Touch tile SELFCLEAN STD/LO pad
once tot a 4-hour clean time or
twice fin a 3-horn clean time.
A 3-hour self=clean time is
recommended fin" use when
cleaning small, contained spills.
A sell:clean dine of 4 l/om_ or
longer is recommended fin.
a dirtier oven.
[] If a time other than 4 hom_ or
3 hom_ is needed, use tile nmnber
pads and enter the desired
clean dine.
Y}m can change tile clean time to am
tilne between 2½ houls and 5 houI_,
dei)ending, on how dirl_, your, oxen is.
After a Clean Cycle
Y}m ma_ notice some white ash in tile
oxen. _._ipe it up with a damp cloth atter
tile o_,en cools.
If white spotsremain,remove them witha soap-
filledsteel wool padand rinsethoroughly with
a wnegarand water mlkture.
These deposits are usually asalt residue
that cannot be removed by tile clean
cycle.
If tile oven is not clean atter one clean
c)cle, repeat the cxcle,
[] Touch tile DELAYSTART pad.
[] Using tile number pads, enter tile
time of da', _,ouwant tile clean cycle
to start.
[] Touch tile STARTpad.
Tile door locks automatically, Tile display
will show tile start time. It will not be
possible to open tile oven door un61
tile temperature drops below tile lock
temperature and tile LOCKEDlight
goes off.
_4]/en tile LOCKEDlight goes off; you
will be able to open tile dora:
_: _i_)tl cannot set tile ()veil li)i" cooking or
another selfXclean cycle until tile oven
is cool enough tin" the door to tmlock.
_: \4]/ile the oven is selt_leaning, you can
touch tile CLOCKpad to display tile
time of day. To return to tile clean
countdown, touch tile SELFCLEAN
STD/LO pad.
_: If tile racks become hard to slide, apply
a sIllall _lIl/O/Int of cooking oil to a
paper towel and wipe tile edges of tile
oven racks with tile paper towel.
26
Page 27

Special featuresofyourovencontrol ge.com
Yournew touch pad control has additional features that you may choose to use. The following are the features
and how you may activate them.
Thespecial feature modes can only be activated while the display is showing the time of day. They remain
in the control's memory until the steps are repeated.
When the display shows your choice, touch the $TARTpad. Thespecial features will remain in memory after
a power failure, exceptfor the Sabbath feature, which will have to be reset.
f2-Hour Shutdown
i_((_i_iii_II_II_/_I?_I_!I_I_;(_
With this feature,should youforget andleave the
ovenon, thecontrol wi// automatically turnoff the
ovenafter 12hours dunbgbak/bg functionsor
after 3 hoursdunbg abroil function.
]f_ou wish to mrn OFFthis feature, fidlo_
the steps belo,,_.
[] Touch the BROILHI/LOand BAKE
pads at the same time m_tfl the
displa_ shows SE
[] Touch the BELAYSTART pad tmfi}
no shdn (no shut-off) appem_ in the
disp}a).
[] Touch the STARTpad to _ctiv:_te the
no shut-off and lea_e the control
set in this speci:d ieamres mode.
Fahrenhe# or Celsius Temperature Selection
Yourovencontro/is set to usetheFahrenheit
temperatureselections,but you maychange this
touse the Ce/siusselections.
[] Touch the BROILHI/LOand BAKE
pads at the same time tmtil the
display shows BE
[] Touch the COOKING TIMEand BROIL
HI/LOpads at the same time. The
(lisp}a} will show F (Fahrenheit).
[] Touch the COOKING TIMEand BROIL
HI/LO pads again at the sanle tiine.
The display will show C (Celsius).
[] Touch the STARTpad.
Tonesat the End of a Timed Cycle
if! _ ii i
i/i_Iiii_/_ i!)i;iii_;!I:
!!i)iii/i!iiliiil@ iiiliiiiiiiiii!i
At the endof a flYnedcycle, 3short beepswill
soundfollowed by onebeep every6seconds
until the CLEAB/OFFpadis touche_ This
continual 6-secondbeepmaybe canceled
To cancel the 6-second beep:
[] Touch the BROILHI/LO and BAKE
pads at the same time tmtil the
display shows SE
[] Touch the KITCHENTIMER ON/OFF
pad. The display shows CONBEEP
(contimu,us beep). Touch the
KITCHEN TIMER ON/OFFpad a#fin.
The display sho_:s BEER (This cmce}s
the one beep e\'e_y 6 seconds.)
[] Touch the STARTpad.
27
Page 28

Special featuresofyourovencontrol.
Tone Volume
ii
Thisfeatureallows you toadjust the tone volumes
toa moreacceptablevolume. Thereare three
possiblevolume levels.
[] Touch the BROILHI/LO and BAKE
pads at the same dine until the
display sho_vs SF.
[] Touch the OVEN LIGHTON/OFFpad.
The display will show 2 BEEP. This is
the nfiddle w)lume level.
Touch the OVENLIGHTON/OFFpad
Touch the OVEN LIGHT ON/OFFpad
again. The display will show I BEEP.
This is the quietest volume level.
For each dine the level is changed,
a tone will sound t/) provide an
indication of the volume level.
]_] Choose the desired sound level
( 1BEER 2 BEER3 BEEP).
[] Touch the START I);1(1to actixate
the lexel shown.
again. The displa_ will show 3 BEEP.
This is the loudest xolume lexel.
12-Hour, 24-Hour or Clock Blackout
®
YourcontrolIssettousea 12-hourclock.
If }ou would preter to have a 24-horn"
militar_ time clock or black out the clock
displa}, follow the steps below.
[] Touch the BROILHI/LO and BAKE
pads at the same time tmtil the
displa) shows SE
Touch the CLOCKpad once. The
[]
displa) will show 12hr. If this is
the choice you want, touch the
START pad.
Touch the CLOCKpad again to change
to the 24 hour milita U time clock. The
display will show 24hr. If this is the choice
you want, touch the START pad.
Touch the CLOCKpad again to black out
the clock display. The display will show
OFF.If this is the choice you want, touch
the START pad.
NOTE:If theclockisintheblack-outmodeyou
willnotbeabletousetheDelayStartfunction.
28
Page 29

CONVECTION
• AUTO RECIPECONVERSION•
START
Auto Recipe TM Conversion
Whenus/bgconvectionbake,theAuto flec/peT_
Conversionfeaturewill automat/ca//yconvert
enteredregularbaklbg temperaturesto
convectionbaklbgtemperatures.
Thisfeature12activatedso that the displaywill
show the actua/converted(reduced)temperature.
Forexample,if youenter aregular recipe
temperatureof 350°Fand pressthe STARTpad,
the &splay will show CONand theconverted
temperatureof 325°£
.qe.com
Todeactivate the feature:
[] Press tile BAKEand BROILHI/tO pads
at tile same time until tile displa}
shox_s SF.
Press the CONVECTION RAKE
[]
MULTI/1 RACKpad. Tile displa} _ill
show CON ON. Press tile
CONVECTION BAKE MULTI/I RACK
pad again. Tile display will show
CON OFF.
[] Press tile STARTpad.
To reactivate tile tbatm'e, repeat steps
1-3 aboxe but press tile STARTpad _,_hen
CON ON is in tile displa}.
29
Page 30

Usingthe Sabbathfeature (onsomemodels).
(Designed for use on theJewish Sabbath and Holidays)
TheSabbathfeature canbe usedfor baking/roastingonly.It cannotbe usedfor convection,broiling,self-cleaningor
DelayStart cooking.
NOTE"Theovenlightcomesonautomatically(onsomemodels)whenthedoorisopenedandgoesoffwhenthedoorisclosed.Thebufbmaybe
removed.SeetheOvenLightReplacementsection.Onmodelswithalightswitchonthecontrolpanel,theovenlightmaybeturnedonandlefton.
How to Set for Regular Baking/Roasting
Using the munber pads, enter th(
desired temperature betwe(ll 170'F mid
55() 'E No sigl/_/I or tel/lp(r_ttllre will be
gJ'Vel/.
Tou(h die START pad.
[]
After a l_tlldOill d(l m peliod of
[]
tpl roxim _t(l?. )0 s/ on(Is to 1 nfinute,
D c will _q)ilear ill the disphiy
indicating that tile oven is l/aking-!
roasting. IfD C doesn't apilear in tile
displ m, stm:t ag_dn at Step 4.
"R) at!just tee o_en temperature, t(mch tile
BAKEpad, enter tile new temperature using
th( mlmb(r ilads and touch tile STARTpad.
NOTE: The CLEAR/OFFand COOKING TIME pads
are acti_( (hudng tile Sal)bath Ibamre.
When the display shows D the
oven is set h7Sabbath. When the
display shows D C the oven is
baking/roasting.
Make sure the clockshows thecorrect time of day and 14q
fl_eoven is off
rT] Touch and hold both Ill(! BROIL HI/LOand
I,'1
BAKE pads, at the same time, until the
displ m shows SE
NOTE: II l/_d_.eor broil _lilp('_o's in the
displ m, tile BROIL HI/LOand BAKEllads
were llot touch(d at Ill( same time.
"limch tile CLEAR/OFFpad and l/egin
ag:dn.
[_] Tap the DELAY START ilad until SAb bAtH
_ppe_rs i /l/( (isp =}
] Touch the STARTpad and D _ill appear
in l/( (isp t}
] Touch the BAKE pad. No signal will
be _,rivel/.
When the display shows D the
oven is set t7 Sabbath. When the
display shows D C the oven is
baiting/roasting.
S i i
3O
How to Set for Timed Baking/Roasting--Immediate Start and Automatic Stop
Make sure the clockshows thecorrect time of day and
theoven is oK
[7] Tou(h mid hoM both the BROIL HI/tO ;rod
ILLS
BAKE pads, atthe same time, mltil the
display sh()_ SE
NOTE: ff bake or broil appears ill tile
display, tile BROIL HI/tOand BAKEpads
_r_'t_'_()t touched _lt the same time.
Touch tile CLEAR/OFFpad add begin
ag_dn.
_] "[_tt) theDEMYSTARTpad mltil SAbbAtH
i,r.- i
al)pem:s ill the displa}.
] "['ou(h the START pad and D will at)pear
ill the displa}
I_1 Touch the COOKING TIME pad.
I'TI
"['(mch the DmDtler pads to set the
[]
desired length of looking time l)etweel/
1 minme and 9 horn's and 99 minutes.
The (ooking time that "_ou entered will
be displayed.
] "lbu(h the START pad.
] "lbu(h the BAKEpad. Nil sis,real will be
_]Vel/,
Using the Dumber pads, enter the
] desired temperature. Nil sig_ml ill"
tellll)eT'_lHire will be _,dxen.
] "lbuch the START pad.
After a random (tela)peliod oI
[]
approxhnately 30 seconds t() 1 minute,
D C will appear ill tile display indi(ating
d/at tile oven is baking/roasting. If D C
doesn't _qll)ear ill tile displa}, start _g_dn
at Step 7.
"Ib a(ljust the oven temperature, touch tile
BAKEpad, emer tile new temperatm'e using
tile mmfl)er pads and touch tile STARTpad.
When cooking is finished, tile displa} will
challge ti'ol// D C tO D alld O:OOwillappear,
indicating that the o\en has turned OFFbut is
still set ill Sabbath. Remo_' tile cooked tood.
How to Exit the Sabbath Feature
F_] "]bu(h die CLEAR/OFFp;,d.
] lI the oven is cooking, w_tit tor a random
dela'_ period of approximatel'_ 30
se(ol/dS to ] ll/illIlte,/llltil ()l/]V D
is ill the displa),.
I_ "lbu(h and hold both the BROILHI/tO
and BAKE p;_ds, at the same time, m/ti]
the display shims SE
I_1 Tap the DELAYSTART t)_(1 mltil 12shdn
I-/I
or no shdn appem:s in the displa}
] Choose 12shdn, indicating that the oven
will amomau(all turn off after 12 hom:s
or no shdn, indi(ating tll_t the oxen will
n//t autom_ti(Mlv turn off after 12 tlom:_h
Press START_heu the option that you
[] wantisin thedisplay (12shdnornoshdn).
NOTE: If a power outage occun:ed while
tile oven was ill Sabbath, tile o\en will
alltOlllaticallv ttlrl/ Off all(t sta_ Off ('veil
wheI/the power l'etllrllS. The ()_./'1/
COlltro] l///lSt lie reset.
• S
Page 31

Careand cleaningofthe range, gecom
Be sure all controls are off and all surfaces are cool before cleaning any part of the range.
If your range is removed for cleaning, servicing or any reason, be sure the anti-tip
device is re-engaged properly when the range is replaced. Failure to take this
precaution could result in tipping of the range and cause injury.
How to RemoveProtectiveShippingFilm and Packaging Tape
Careflllly grasp a corner (ff tile protective
shipping fihn with your fillgel_ and slowly
peel it froln tile appliance StlFlilce. Do not
use any shai]) items to renlove tile fihn.
Renlove all ot tile fihn before using tile
appliance tor tile fil_t tinle.
Control Knobs
Thecontrol knobsmaybe removedfor easier
c/eanlbg.
Make sure tile knobs are ill tile OFF
positions and pull theln smfight off tile
steins tor cleaning.
To aSStlI'e no daIllage is done to tile
finish of tile product, tile safest way to
relnove tile adhesive fl'onl packaging tape
on new appliances is an application of a
household liquid dishwashing detelgent.
Apply with a sott cloth and allow to soak.
NOTE."Theadhesivemustberemoved fromall
parts. Itcannot beremovedif it is bakedon.
Tile knobs can be cleaned ill a
dishwasher or they nlay also be washed
with soap and watel: Make sure the inside
of tile knobs are dl_' before replacing.
Replace the knobs ill the OFFposition to
ensure proper placenlent.
Oven Vent
Theoven ventis locatedabove the rightrear
surfaceuni_
This area could beconle hot dulJng
oven/Ise.
Control Panel
If desired, thetouchpadsmay be deactivated
beforecleaning.
See tile Control Lockoutinfolmation ill tile
Using the clock, kitchen timer and control
lockout section ill this nlanual.
Clean up splattel_ with a danlp cloth.
It is noli/lal t()I" stealll to COllie Otlt of
tile vent.
Thevent is importantfor properair circu/ation.
Neverblock this vent
Yell illaV also rise a glass cleanei i
Relnove heavier soil with walm soapy
watei: Do not use abrasives (ff any kind.
Reactivatethe touchpads aftercleaning.
3/
Page 32

Careand cleaningofthe range.
Cleaning the Oven Door
Toclean the inside ofthe door:
Toclean the outside of the door:
Thegasketisdesignedwitha gapat the
bottomto allow forproperair circulation.
Donotrubor cleanthedoorgasket--
it hasan extremelylowresistanceto
abrasion.
If younoticethegasketbecomingworn,
frayedor damagedin anywayor ffit
hasbecomedisplacedonthe door,
youshouldhaveitreplaced.
Slot--_ _'_k._
Hinge-
lock
Pullhingelocksdownto unlock.
}t:ilBecause the area inside the gasket is
cleaned during the selfk'lean c_cle
you do not need to clean this b_ hand.
_: The area outside the gasket and
the door liner can be cleaned with
a soap-filled steel wool or plastic pad,
hot water and detergent. Rinse well
with a vinegar and water solution.
Lift-Off Oven Door
Thedoorisveryheavy.Becarefulwhen
removingandlifting thedoor.
Donothfi thedoorbythehandle.
Toremovethedoor:
[] Fully open the doo_:
[] Pull the hinge locks down toward
the door fl'ame, to the tmlocked
position. A reel, such as a small
fiat-blade screwdriver; may be
required.
[] Fimflv,_,,ras,_,_both sides of the door
at the top.
[] Close door to the door remoxal
position, which is halfkvav between
the broil stop position and fiflly
closed.
iJi::Use soap and water to thoroughly
clean the top, sides and ti'ont of the
oveil dooi: Riiise well. Yell IIl_lV _llso
use a glass cleaner to clean the glass
on the outside of the dora: Do not let
wamr drip into the vent openings.
iJi::If any stain on the door vent trim is
persistent, use a soft abrasive cleaner
and a si)onge-scrubber tot best results.
_: Spillage ot marinades, fl'uitjuices,
tomato sauces and basting materials
containing acids may cause
discoloration and should be wiped
up immediately: _,_]_en smti_ce is
Coo L €lead add Yiiise.
!;>Do not use oxen cleanei_, cleaning
powde_ or hm_h abrasixes on the
outside of the door.
X&qththe Bottom Hingearm
[]
door at the edge
same angle as
the removal
position, seat the
indentation of
the hinge am_
into the bottom
edge of the hinge slot. The notch in
the hinge am/m ust be fifllv seated
into the bottom of the slot.
Fully open the dora: If the door will
[]
not flflly open, the indentation is not
seated correctly in the bottom edge
of the slot.
Push the hinge locks up against the
[]
flxmt fl'ame of the oxen caxi_' to the
locked position.
ofslot
Removalposition
32
[] I,ifl door up and out tmfil the hinge
am/is clear of the slot.
To replace the door:
[] Fimfl_,_,,ras,),_ both sides of the door
at the top.
Hing
lock
Hinge
arm
Push hinge locks up to lock.
[] Close the oven doo_:
Page 33

Removable Warming Drawer Pan
NOTE:Formodelswithanelectncwarming
drawerorlowerovendrawer,beforeperforming
anyadjustments,cleaningorservice,disconnect
therangeelectricalpowersupplyat the
householddistnT_utionpanelbyremovingthe
fuseorswitchingoffthecircuitbreakerMake
surethedrawerheatingelementiscool.
NOTE"Allowwarmingdrawertocoolbefore
removingpan.
NOTE."Wipespillspromptlyaftereachuse.
::Ji::Never place, use or selfZclean the
w;mning drawer pan in the uI)per oven.
::Ji::_._.mning drawer has a removable pan
ti)r easy cleaning. Clean with hot soap),
water and a sponge or dish towel. D_'
with a clean cloth. Replace the pan in
the w;mning (h'awe_:
33
Page 34

Careand cleaningofthe range.
Oven Light Replacement
CAUTION:Beforereplacingyourovenlightbulb,
disconnect the electrica/ power to the range at the
main fuse or circuit breaker paneL
Be sure to let the light cover and bulb
cool completely.
To remove the cover:
Wire cover bolde_
Hold a hand under the cover so it
[]
doesn't tidl when released. _ith
finge_ of the same hand fimfl_
push back the wire coxer holden
I,ifl off the coxen
Do not remove any screws to remove
the cover
Broiler Pan and Grid
[] Replace bt:db with a 40-watt
appliance bulb,
Toreplace the cover."
[] Place it into groove of the light
receptacle. Pull wire torward to the
center of the cover tmfil it snaps
into place.
[] Connect electrical power to the
range,
Do not store asoiled broiler pan and
grid anywhere in the range.
Wipe up beavy soil on the oven
bottom.
Do not clean the broiler pan or grkt la a se/f-
cleanlag oven,
_Mfer broiling, remo\v the br_dler pan
fl'om the oven. Remove the grid fl'om
the pan. Careflflly pour out the grease
fi'om the pan into a proper containel;
Wash and nbse the broiler pan and grid la hot
water with a soap-filledorplastlescounbgpad
Oven Heating Elements
Do not clean the broil element. Any soil
will bm'n off when the element is heated.
(:lean the oxen floor with wam_ soap_
wateE
If/bed has burned on, spl_nkle the grid
with detergent while hot and cover with
wet paper towels or a dishcloth. Soaking
the pan will remo\ e burned-on foods.
Both thebroiler panand gndmay be cleanedwith
a commemla/ovencleaner
Both the broiler pan and grid can also be
cleaned in a dish_ashen
Onsomemodels,thebakeelementisnot
exposedandb undertheovenfloorIf spillovers,
residueorashaccumulateontheovenfloor,
wipeupbeforeself-cleaning
34
Page 35

Oven Racks and Convection Roasting Rack
The convection roasting rack should be
removed fl'om the oven betore beginning
the self clean c)'cle. Clean with an abrasive
cleanser or steel wool. _Mter cleaning,
rinse the rack with clean water and
(hw with a clean cloth.
NOTE."Theshiny,silver-coloredovenracks(on
somemodels)andthe convectionroastingrack
may becleanedin the self-cleaningoven.
However,the rackswill darken incolor,lose thek
luster andbecomehard toslide if cleanedduring
theself-cleaning cycle.
ge.com
If yore" oven is equipped with shiny,
silver<'olored oven racks, they should be
removed fl'om the oven betore beginning
the self clean cycle. Clean with an abrasive
cleanser or steel wool. _Mter cleaning,
rinse the racks with clean water and (hw
with a clean cloth,
If yore" oven is equipped with gray
porcelain-coated oven racks, they
may be cleaned in the oven dining
the self clean cycle.
Stainless Steel Surfaces (onsome models)
Donotusea steel woolpa& it will scratch
thesurface.
To clean the stainless steel smthce,
use waml sudsy water or a stainless steel
cleaner or polish. _Mwa)'s wipe the sm'fi_ce
in the direcdon of the grain, Follow the
cleaner instructions fi)r cleaning the
stainless steel smthce.
To make tile racks slide more easily;
al)ply a small amotmt of vegetable oil
to a paper towel and wipe the edges
of the oven racks with the i)aper towel.
Do not spray with Pare <'_or other
hfl)ricant spra):s.
To inquire about imrchasing stainless
steel appliance cleaner or polish, or to
find the location of a dealer nearest you,
please call ore" toll-fl'ee number:
National Parts Center 1.800.626.2002
go.corn
Painted Surfaces
Painted smtimes include the doe1;
top of tile control panel and tile drawer
fl'ont. Clean these with soap and water
or a vinegar and water solution.
Do not use commerdal o\vn cleanel_,
cleaning powde_, steel wool or ha_>h
abrasi_vs on any painted smtime.
35
Page 36

Cleaningthe glass cooktop.
Normal Daily Use Cleaning
ONLY use CEIL_dVIA BRYTE _' Ceramic
Cooktop Cleaner on tile glass cooktop.
Other creams ma_ not be as eflecfixe.
To maintain and protect the sui-lilce (ff
......................... fi)llow these steps:
[] Before using the cooktop fi>r the
fi_t time, clean it with CEI_dMA
BRYTE' Cermnic Cooktop Cleanel:
Cleanyourcooktopafter
eachspill. UseCERAMA
BRYTE® CeramicCooktop
Cleaner.
This helps protect the toll and
lnakes {'leant/p easieL
[] Dail) use of CEIL_dVIA BRYTE"
Ceramic Cooktop Cleaner will help
keep the cooktop looking new.
Burned-On Residue
[] Shake tile cleaning cream well.
Appl) a few drops of (2EIL_dVIA
BRYTE ':Ceramic Cooktop Cleaner
directly to tile cooktop.
[] Use a paper towel or CEILAAMA
BRYTE _>Cleaning Pad fi)r Ceramic
Cooktops to clean tile entire
cooktop StlYl'ilce.
[] Use a (h) cloth or paper towel
to remoxe all cleaning residue.
No need to rinse.
NOTE:Itis veryimportantthatyouDONOTheat
thecooktopuntilit hasbeencleanedthoroughly
Use a CERAMABRYTE'_ Cleaning
Pad for Ceramic Cooktops.
The CERAMABRYTE'*_Ceramic
Cooktop Scraper and all
recommended supplies are
available through our Parts Cente_
See instructions under "To Order
Parts" section on next page.
NOTE:Do not use a dull or nicked
blade.
WARNING:DAMAGEto yourglasssurfacemay
occurif youusescrubpadsotherthanthose
recommendecL
] _Mlow tile cooktop to cool.
[] Spread a tew drops oI CEIL_/IA
BRYTE _>Ceramic Cooktop Cleaner
on tile entire burned residue area.
Using tile included CERAMA
[]
BRYTE _'Cleanino Pad for Ceramic
Cooktops, rub the residue area,
applying pressm'e as needed.
Heavy, Burned-On Residue
[] _Mlow tile cooktop to cool.
[] Use a single-edge razor blade scraper
at approximately a 45 ° angle against
tile glass smtace and scrape tile soil.
It will be necessary to apply pressure
to tile razor scraper in order to
remove the residue,
_Mter scraping with tile razor scraper;
[]
spread a tew drops of CEI_X/IA
BRYTE (': Ceramic Cooktop Cleaner
on tile entire burned residue area.
Use tile CEI_DdMA BRYTE ': Cleaning
Pad to remove any remaining
residue.
[] If any residue remains, repeat the
steps listed above as needed.
[] For additional protection, alter all
residue has been remoxed, polish
the entire sudi_ce with CEI_L_dVIA
BRYTE (':Ceramic Cooktop Cleaner
and a paper towel.
For additional protection, after all
[]
residue has been remoxed, polish
the entire smti_ce with CE]{_4A
BRYTE (_)Ceramic Cooktop Cleaner
and a paper towel.
3C
Page 37

Metal Marks and Scratches
Be careflll not to slide pots and pans
[]
across your cooktop. It will lea_e
metal markings, on tile cooktoI _
StlIS[ilce.
These marl_s are remox:d)le using
tile CEI_d_JlA BRYTE <':Ceramic
Cooktop (:leaner with the CER_d_JlA
BRYTE <')(:leaning Pad tot Ceramic
Cooktops.
Rubber-like Seal
To clean tile rubbe>like seal at tile outer
edge of the glass, wipe it with cooktop
crealn when needed.
ge.com
[] If pots xfitl/ a thin oxerla) of
ahmfinum or copper are allowed
to boil dry, the overlay may leave
black discoloration on the cooktop.
This should be removed
immediately betore heating again
or tile discoloration may be
peli//allellt.
WARNING:Care ullycheckthe
bottom ofpans forroughnessthat wouldscratch
thecooktop.
Glasssurface potential for permanent damage.
Sugary spillovers (such as
jellies, fudge, candy, syrups)
or melted plastics can cause
pitting of the surface of your
cooktop (not covered by the
warranty) unlessthe spill is
removed while still hot.
Special care should be taken
when removing hot
substances.
Be sure to use a new, sharp
razor scraper.
Do not use a dull or nicked
blade.
Damage from Sugary Spills and Melted Plastic
[] Turn off all surthce units. Remove
hot pans.
[] _.Veming an oven mitt:
a. Use a single-edge razor blade
scraper (CE]_d_4A BRYTE <:
Ceramic Cooktop Scraper) to
move the spill to a cool area on
tile cooktop.
b. Remove tile spill with paper
towels.
To Order Parts
To order CE/_d'dA BRYTE _ Ceramic
Cooktop Cleaner and tile cooktop
scrape_; please call our toll-fl'ee IltllllbeI':
National Parts Center 800.826.2002
ge.com
CERAMA BRYTE®Ceramic
CooktopCleaner ........... # WX?OX300
CERAMA BRYTE®Ceramic
CooktopScraper ........... # WXTOX0302
Kit ........................ # WB64XS027
(Kit includescreamand cooktopscraper)
[] Any remaining spillover should be
left until the stmfiace of the cooktop
has cooled.
] Don't use tile surfhce units again
until all of the residue has been
completely removed.
NOTE" IfpittliTgor indentation in the glass
surfacehas alreadyoccurred,the cooktopglass
will have tobe replaced Inthis case, semce will
be necessary
CERAMABRYTE_CleaningPadsfor
CeramicCooktops ......... # WXIOX350
37
Page 38

Beforeyoucall forservice...
Troubleshooting -tips
Save time and money/. Review the charts on the following
pages first and you may not need to call for service.
Possible Causes What To Do
Surface units will not hnproper cookwaJce • Use pans which are flat and match the diameter of
maintain a rolling boil being used. the surthce unit selected.
or cooking is not
fast enough In some areas, the power * Coxer pan with a lid until desired heat is obtained.
Surfacounitsdo A fuse ha your home may be * ]_el)lace the filse or reset the circuit breaker.
not work properly blown or the circuit breaker
Surface unit stops This is normal. The refit
glowing when turned is still on and hot.
to a lower setting
(voltage) may be low.
tripped.
Cooktop controls • Check to see tile correct control is set for tile sm'iace
improperly set. trait you are usin,
Scratches(mayappear
as cracks)oncooktop
glasssurface
_ii ii i
i/ iiii i_iii!_!_!_!_!_!_!_!_!_!_I
Areas of discoloration Food spillovers not cleaned • See tile Cleaning the glass cooktop section.
Incorrect demfing
methods being used.
Cookware with rough bottoms
being used or com'se partides
(salt or sand) were between
the cookware and the surface
of the cooktop.
Cookware has been slid
across the cooktop surface.
• Scratches are not remoxzd)le. Tinv scratches will become
less visible in time as a result of cleaning.
• To avoid scratches, use tile recomlnended cleaning
procedures. Make sure bottoms of cookware are clean
betore rise, and rise cookware with SUlooth bottoms.
on the cookto p before next use.
Hot surface on a model • This is normal. Tile surface may appear discolored
with a light-colored cooktop, when it is hot. This is temporary and will disappear
Plastic melted to Hot cooktop came into • See tile Glass surface--potential for permanent damage
the surface contact with plastic placed section in tile Cleaning theglass cooktop se(tion.
on the hot cooktop.
Pitting (or indentation) Hot sugar mixture spilled • Call a qualified technician for replacement.
of the cooktop on the cooktop.
as tile ,,lass cools.
Frequent cycling hnproper cookwaxe • Use only fiat cookware to minimize c)cling.
offend on of being used.
surface units
Oven light does Light bulb is loose. • Tighten or replace the bull).
not work
Oven will not work Plug on range is not completely • Make sure electrical l)lug, is l)lugged,, into a lixe, properly
inserted in the electrical outlet, grounded outlet.
A fuse in your home may be • Replace tile filse or reset tile circuit breaker.
blown or the circuit
breaker tripped.
Oven controls improperly set. • See tile Using the oven section.
_ Oven too hot. • Allow tile oxen to cool to below locking tern )erature
, I "
Page 39

Possible Causes What To Do
Fooddoes notbake Oven controls improperly set. * See tile Using the oven section.
orroast properly
Fooddoes not Oven controls hnproperly set. * Make sure you touch tile BROIL HI/tO pad.
broil properly
Rack position is incorrect * See tile Using the oven section.
or the rack is not level.
Incorrect cookware or * See tile Using the oven section.
cookware of improper
size being used.
Oven thermostat needs * See tile Adjust the oven thermostat--Do it yourself!
adjustment, secti(m.
hnproper rack position * See tile Broiling Guide.
being used.
Cookware not suited * Use tile broiling pan m_d grid that came with ,amr range.
for broiling.
The probe is plugged into the * Uuph/g mad l'eillO;'e tile probe fl'OlU tile oven.
outlet ha the oven.
(on some models)
Alumhaum foil used on the * See tile Using the oven section.
the broiling pan mad grid has
not been fitted properly mad
slit as recommended.
ge.com
Oventemperature
toohot ortoocold
In some areas the power * Preheat tile broil element for 10 minutes.
(voltage) may be low. * Broil for the lou,_est.,, period of time recommended in
the Broiling Guide.
Oven thermostat
needs adjustment.
• See the Adjust the oven thermostat--Do it yourself!
section.
39
Page 40

Beforeyoucall forservice...
Troubleshooting -tips
Possible Causes What To Do
Clock and timer do Plug on range is not completely * Make sure electrical l_lug, is [)lugged,,into a live, properly
not work inserted ha the electrical outlet, gr_)uuded oudet.
A fuse in your home • Replace tile fi/se or reset tl/e circuit breaker.
may be blmm or the
circuit breaker tripped.
Oven controls improperly set. * See the Using the clock and timer section.
Oven will notseff-clean The oven temperature is • _dlow the range to cool and reset the controls.
too high to set a self-clean
operation.
Oven controls improperly set. * See the Using the self-cleaning oven section.
The probe is plugged into * ReIuove the probe from the oven.
the outlet in the oven.
(on some models)
"Crackling" or This is the sound of the • This is normal.
"popping" sound metal heating and cooling
during both the cooking and
cleaning functions.
Excessive smoking Excessive soil. * Touch the CLEAR/OFFpad. Open the windows to
during a clean cycle rid the room of smoke. Wait until the LOCKEOlight
goes off. Wipe up the excess soil and reset the clean
cycle.
Oven door will not Oven too hot. * Alh)w the oven to cool below hacking temperature.
open after a clean cycle
Oven not clean after a Oven controls not properly set. • See the Using the self-cleaning oven section.
Oven was heavily soiled. * Clean up heavy spilh)vers betore starting the clean
"LOCKED"flashes The self-clema cycle has been * (]lose the oven door.
in the display selected but the door is not
closed.
"LOCKED"light is The oven door is locked * Touch the CLEAR/OFFpad. Allow the oven to cool.
on when you want because the temperature
to cook inside the oven has not
dropped below the
locking temperature.
"F--anda number You have a fmaction error code. * Disconnect all power to the range for at least 30
cycle. Heavily soiled ovens may need to sell=clean
again, or for a h)n_er_ period of time.
orletter'flash seconds and then reconnect power. If the flmction
in the display error code repeats, call for service.
4O
Page 41

ge.com
Possible Causes What To Do
Loc On appears in the The controls have * See tile Control Iockoutsecti(>u to unlock.
oven display or LC been locked.
in the surface display
Control signals after You forgot to enter a * Tourh tile BAKE pad and desired teml)erature or
entering cooking time bake temperature or tile SELFCLEAN STD/LO pad and desired c'leau time,
or start time cleaning time.
Display goes blank A fuse in your home may be * Replace the/hse or reset the circuit breakex:
Display flashes Power failure. * Reset the clock.
Unable to get the Oven control pads were * The BROIL HI/LO and BAKE pads must be totu hed at
display to show "SF" not touched properly, the same time and held for3 seconds.
"Probe" appears in This is reminding you to * Eutex" a }_x'obe tex[q)ex'attxre.
the display enter a probe temperature
(on some models) after plugging in the probe.
Power outage, Power outage or surge. * Reset the clock./f the oven was in use you must reset
clock flashes it by, tourhiug, the CLEAR/OFFpad, ,settiu,_,_the clock
Steam from the vent When using the convection * This is uoHnal.
blown or the circuit
breaker tripped.
The clock is in the * See the Special features of your oven control section.
black-out mode.
and resetting any (o(>kiug fiu](tiou.
feature, it is normal to see
steam coming out of the oven
vent. As the number of racks
or amount of food being
cooked increases, the amount
of visible steam will increase.
"Burning" or "oily" This is normal in a new oven * To speed the process, set a sell:clean cycle fin" a
odor emitting from and will disappear in time. miuimamx of 3 h(>tu's. See the Using the self-cleaning
the vent oven section.
Strong odor An odor from the insulation * This is temporary.
aromzd the inside of the oven
is normal for the first few thnes
the oven is used.
Fan tloise A convection fan may * This is uomxal. To maximize (.eking evenness,
automatically turn on the f_u] is designed to operate in both directions,
and off. with a })ause in between.
Oven racks are The shiny, silver-colored * Apply a small amotmt of vegetable oil t(x a paper
difficult to slide racks were cleaned in a towel and wipe the edges (>fthe oven ra(ks with
self-clem_ cycle, the paper towel. Do u([t spray with Pare': or other
lubricant sprays.
4/
Page 42

Beforeyou call forservice...
Troubleshooting -tips
Possible Causes What To Do
Drawer doesnot slide
smoothlyor drags
Warming drawer will A fuse in your home may be • Replace tile fllse or reset the circuit breaker.
not work blown or the circuit breaker
Excessive condensation Liquid in drawer. • Remove liquid.
in the drawer
fooddries out in the Moisture escaping. • Cover food with lid or aluminum foil.
warming drawer
The drawer is out
of aligmnent.
Drawer is over-loaded or • Reduce weight. Redistribute drawer contents.
load is unbalanced.
tripped.
Controls improperly set. • See the Warming drawersection.
Uncovered foods. • Cover food with lid or aluminum foil.
Temperature setting too high. • I_edu(e temperature setting.
Drawer not fully closed. • Push drawer in until lat(h engages.
• Fully extend the drawer and push it all the way in.
See the Care and cleaning of the range section.
42
Page 43

GE Service Protection Plus 'M
GE, a name recognized worldwide fbr quality and dependability, offers you
Service Protection Plus'_'--comprehensive protection on all yore appliances--
No Matter What Brand!
Benefits Include:
• Backed by GE
• All brands covered
• Unlimited service calls
• All parts and labor costs included
• No out-of-pocket expenses
• No bidden deductibles
• One 800 number to call
You _dll be completel) satisfied with our service protection or )ou ma) request )our mone) back
on the remaining value of your contract. No questions asked. It's that simple.
Protect yore" refrigerator, dishwasher, washer and dryer, range, TV_ VCR and much more--a_y brand!
Plus there's no extra charge flw emergency service and low monthly financing is available. Even icemaker
coverage and toed spoilage protection is offered. You can rest easy, knowing that all your valuable
household products are protected against expensive repairs.
Place ,our confidence in GE and call us in the U.S. toll-free at _UU._Z_.ZZZ_
for l//Ol'e infol'I//atiOll.
:_,_*]1 hi}in(Is (o_.{!l_{!(L tip t(t _0 ){!iris Ill(I, ]11 the (on[lllenl tl [.S.
We TICover Any Appliance.
Anywhere. Anytime.
_ (Jill here
Please place in envelope and mail to:
GeneralElectricCompany
Warranty Registration Department
P.O. Box 32150
Louisville, KY 40232-2150
43
Page 44

Consumer Product Ownership Registration
Deal Customer:
Thank you tbr purchasing our product and thank you for placing your confidence in us.
_'e are proud to haxe you as a customer'.
Follow these three steps to protect your new appliance investment:
Complete mid mail
your Consumer
Product Ownership
Registration today.
}Iavc tile peace of
mind of knowing we
CAll COlltact yOl/ in
th( unlik<lx event of a
satbtv nloditication.
After mailing the
registration below,
store this document
in a sat;v place. It
contains information
you will need should
voii require service.
Our service nlnnber is
800.GE.CAI_ES
(8(t0.432.9737).
Model Number Serial Number
Important: If you did not get a registration card with your
product, detach and return the form below to
ensure that your product is registered, or register
online at ge.com.
Consumer Product Ownership Registration
Read VOllr ()'¢,-llel-_S
Manual careftllly.
It will help you
operate VOllV lleW
appliance properl);
, I
,-- Cut here
Model Number Serial Number
M*: Ms. Mrs. Miss
Fir';t ] ] Last]
Nam_ I I I I I I I I I Nam_ I I I I I I I I I I I I
Str(( t [
Address I I I I I I I I I I I I I I I I I I I I I I I I
Apl. # ]
(:it?., [
Dlle Pllcl d
hi Use
Month
I , I i,.,I , I _.,.rl , I
GE Consumer & Industrial
Appliances
General Electric Cornpang
Louisville, KY40225
ge.corn
] I I ] I I ] l(qnail Addr< ss*
I I I I I I I I I I
* Please provide your e-mail addrc,,,, to receive, xia eqnail, discounts, special ot'ff1,',and other important
communications fiom GE Appliances (G1L\).
Check here if you do not want to l*_ceiveconlnlunicalions h-onl GKVs careflflly selected partnel,',.
FAILI JRE TO C()MPLETE AND RE'F[ 7RN Tt tlS CM_,D DOES NOT DIMINISt t h_)l JR
i_L\RR \N'IY RIGIITS.
For more intimllafion about G15\'s privacy and data usage polk3; go to ge.com and click on
"PrivacyPoli_y" or call 800.626.2224.
, i I
})hollo
Nulnl_ r ]
s,.., [ I ] (:,,(l(:
Zip
Ill-Ill
I
I
44
Page 45

NOteS.
rJ_
I
rJ_
€_
m
m_
rp,
w
u_
w
rbr]
45
mlmh
m
Page 46

Accessories.
Looking For Something More?Youcan find these accessories and many more at ge.com, or call 800.626.2002
(during normal business hours). Have your model number ready.
_i _iI _
i i i i i i_
Surface Elements & Drip Pans
Oven Elements
Cleaner Cleaning Pads Scraper
OvenRacks Broiler Pan
¸ ! i
Light Bulbs Knobs
46
Tired of discolored racks? Wishing you had exm_-hemo_-duty oven rocks?
NOWA VAILABLEfor your range:
(;V's innovative, self-cleanable porcelain-coated oven racks!
• Hem), Duty
• Durable
• Able m be cleaned in a self-cleaning oven
Visit go.corn for more information.
Page 47

GEElectricRangeWarranty.
Aft warranty service provided by our Factory Service Centers,
or an authorized Customer Care®technician. Toschedule
service, on-line, 24 hours a day, vis# us at ge.com, or carl
800.GE.CARES (800.432.2737).Please have serial number and
model number available when calling for service.
GE Will Provide:
Onerear
Fromthedate ofthe
origmalpurchase
_ Service trips to your home to teach you how to use
the product.
iJi::Improper installation, delivery or maJntenm_ce.
_ Failure of the product if it is abused, misused,
or used for other than the intended purpose or
used commerciadly.
_ Damage to the glass cooktop caused by use of demlers
other thml the recommended demlh_g creams and
pads.
limited one-year warranty, (;E will also provide, free of charge, all labor and in-home serxice
to replace the def_cdxe part.
)" o" • " ....Anypartt f the range xd_lch fails due to a defect m materials or workmanship. DurJno this
Staple your receipt here.
Proof of the original purchase
date is needed to obtain service
under the warrant_
!i_:Replacement of house fuses or resetting of circuit
breakers.
iJi::Dmnage to the product caused by accident, fire, floods
or acts of God.
_: IncidentaJ or consequential dmnage caused by possible
defects with this appliance.
_: Dmnage caused after delivery.
_):Product not accessible to provide required service.
_ Damage to the glass cooktop caused by haaxlened
spills of sugaJcy materials or melted plastic that
are not demled accordhlg to the directions in
the Owner's MmmaJ.
Warranty.Any implied warranties, including the implied warranties of merchantability or fitnessfor a particular purpose,
EXCLUSIONOFIMPLIED WARRANTIES--Your sole and exclusive remedy is productrepair as provided in this Limited
are limited toone year or theshortestperiod allowed by law.
This warranty is extended to the original purchaser and any succeeding owner for products purchased for
home use within the USA. If the product is located in an area where service by a GEAuthorized Servicer is not
available, you may be responsible for a trip charge or you may be required to bring the product to an Authorized GE
Service location for service. In Alaska, the warranty excludes the cost of shipping or service calls to your home.
Some states do not allow the exclusion or limitation of incidental or consequential damages. This warranty
gives you specific legal rights, and you may also have other rights which vary from state to state. Toknow
what your legal rights are, consult your local or state consumer affairs office or your state's Attorney General
Warrantor: General Electric Company.Louisville,KY40225
47
Page 48

ConsumerSupport
gEAppliancesWebsite ge.com
Haxe a question or need assistance with your appliance? Try the (;E Appliances _4'ebsite 24 hom_ a day
any day, of the year'., For greater comenience and taster service, you can now download Owner's Manuals,
order parts, catalogs, or exert schedule serxice on-line. You can also "_sk Our Team )f Expert.;
}OILY qtlestions, _llld so II/t/oh II/ore...
ScheduleService
Expert (;E repair setsice is onlx one step awa} fl'om your door: Get on-line and schedule vc,t:u"serxice at
your conxenience 24 hou_ am {lax of the _ear! Or call 800.GE.(_AI_ES (800.432.2737) during n{mnal
business hou_.
ge.com
RealLifeDesignStudio ge.com
GE SUl_ports the Uni\'e_al Design concept--prodtwts, services and environments that can be used by
people of all ages, sizes and capabilities. _,\'e recognize the need to design for a wide range of ph):sical and
mental abilities and impaim_ents. For details of GE's Universal Design applications, including kitchen
design ideas fin" people with disabilities, check out Oily X,Vebsim today. For the heating impaired, please call
800.TDD.GEAC (800.833.4322).
ExtendedWarranties
Purchase a GE extended x_arrant_ and learn about special discounts that are axailable x_hile xour x_arrant_
is still in effect. You can purchase it on-line an)time, or call 800.626.2224 dtllJng nomml business hours.
(;E Consumer Home Serxices will still be there alter your warrant} expires.
PartsandAccessories
ge.com
ge.com
Individuals qualified to setMce their own appliances can have parts or accessories sent direcflv to their
homes (VISA, MasterCard and Discover cards are accepted). Order on-line today, 24 l_otus eve_a' day or
by phone at 800.626.2002 during nomml business hou_.
Instructions contained in this manual coverprocedures tobe performed by any user. Other servicing generally
should be referred to qualified service personnel Cautionmust be exercised, since improper servicing may cause
unsafe operation.
ContactUs
If you are not satisfied with the service you receive fl'om GE, contact us on our Website with all the details
including your phone numbe_; or write to: General Manage_; Customer ]?,elations
GE Appliances, Appliance Park
I,ouisville, KY 40225
RegisterYourApplbnce
Register your new applimlce on-line---at your convellience! Timelx, l)r°dtlct registration_ will allow fin"
enhanced communication and prompt service under the terms of your warranty, should the need a_ise.
You max also mail in the prepfinted registration, card included in the I)ackin'"_ material.
Printed in flTeUnited States
ge.com
ge.com
 Loading...