

GE JB910SL1SS, JB910SK1SS, JB910KK1CC, JB910BK1BB, JB910TK1WW Owner’s Manual

www.6EApp#ances.com
Saf_ ImWuc_ions ............. 2-:_
Operating Imtructi ons
c,j
°_
Clock, Timer a_d
Control Lockout ................. 15
Comvcdon OxvI_ ............. 19-23
RoasfiI_g Guide ................ 23
Timed Features ............. 21, 22
Cook_;_we ....................... 7
Oven ....................... tl, 12
Broiling Guide ................. 12
O_en Comcols .................. 10
Probe .......................... l 4
ProoiiI_g Feature ................ 24
Sabbath Feature ................. a0
Self=Cleaning ................. 25, 26
Special Features .............. 27-29
Smfsce ( _nits .................. 6-9
Thermostat Ac_justme_ t--
Do It 3ohmself ................... 16
Timed Baking and
Roasfi ng Features ................ 13
W_wming Drawer . ............ [ 7, 18
_A_rming Feature ................ 24
o
Care and Cleaning .....
.......... o[-o/
Troubleshooting Tips ........ 38-42
Accessories . ................... 45
Co--met Support
Consumer St_ppo_t ...... ga(k Cosec
Product Registratkm .......... 43, 44
_A_-,ramv . ..................... 47
Write the model and serial
numbers here:
Model #
Serial #
You can lind them on alabel
behind the storage drawer
on the range fl'ame.
49-80286-1 05-05JR
READALL/IVSTRUCTIOtV$BEFOREUSING.
For your safety, Ne information in this manual must be followed to minimize the risk of fire, electric
shock, or to prevent propen"y damage, personal injury, or loss of/if&
WARNINGANTI-TIPDEVICE
All rangescan tipand injury could result.
Topre vent accidental tipping of the range, attach it to the wall and floor by installing the Anti--tip
device supplied.
If the Anti--tip device supplied with the range does not fit this application, use the universal Anti--tip
device WB2X7909.
Tocheck ff the device is installed and engaged properly, remove the storage drawer and inspect
the rear leveling leg. Make sure #fits securaly into the slot.
Ifyou pull the range out ti'om the wall for any reason, make sure the device is properly engaged when
you push the range back against the wall. ]f it is not, there is a possible risk of the range tipping over
and causing iqjm y if you or a child stand, sit or lean on an open door
Please relier to the Anti-Tip device infimnation in this manual. Failure to take this precaution could
result in tipping of the range and iqim>
IMPORTANTSAFETYNOtiCE
The California Safe Drinking Water and ToxicEnforcement Act requires the Governor of California to
publish alist of substances known to the state to cause cancer, birth defects or other reproductive
harm, and requires businesses to warn customers of potential exposure to such substances.
The fiberglass insulation in self-clean ovens gives off a very small amount of carbon monoxide during
the cleaning cycle. Exposure can be minimized by venting with an open window or using a ventilation
fan orhood.
SAFETYPRECAUtiONS
When using electrical appliances, basic safety precautions should be followed, including the following:
Use this appliance only fi)r its intended
propose as described in this Owner's Manual.
Be sure your appliance is properly installed and
grounded by a qualified installer in accordance
with the provided installati(m instructions.
Have the installer show u)u the location of
the drcuit breaker ()r fllse. Mark it for easy
reference.
Do not attempt to repair or replace any
part of x_mr range unless it is specifically
recommended in this manual. M1 other
servicing should be referred to a qualified
technidan,
Befi)re perfimning ai V se_Mce, disconnect
the range power supply at the household
distribution panel by removing the fllse or
switching off the circuit breaker:
Do not leave children alone---children should
not be left alone or unattended in an area
where an appliance is in use. They should
never be allowed to sit or stand on any part
of the appliance.
Do not allow anyone to climb, stand or hang
on the doo_; storage drawer or cooktop. They
could damage the range and even tip it ove_;
ca using severe personal iDju U.
2
wv_v.GEApp#ances,com
WARNING!
SAFETYPRECAUTIONS
Donot operate the oven or cooktop controls if the glass is broken. Food splatter or cleaning solution
may penetrate a broken control panel or cooktop and create arisk of electrical shock. Contact a
qualified technician immediately should your glass control panel or cooktop become broken.
; D() IlOt stoI'e flalllI/lable IllatellalS ill _lIl ()veil
OI" IleaI" tile cooktop.
CAUTION:lteIns o' intei'est to childI'en
should not be stored in cabinets above a range
or on tile back of a range--<hildren climbing
on tile range to reach items could be seriously
iqiured.
Never wear loose-fitting or hanging gam_ents
while using tile appliance. Be careflfl when
reaching for items stored over tile range.
Flammable material could be ignited if
brought in contact with hot sm_hce milts or
heating elements and may cause severe burns.
Use only (hT pot holde_--moist or damp
pot holde_ on hot surli_('es may result in
burns fl'om steam. Do not let pot holde_
touch hot SUll'ilce milts or heating elements.
Do not use a towel or other bulky cloth in
place of pot holde_.
Do not use water on grease fires. Never pick
up a flaming pan. Tm'n tile controls off'.
Smother a flaming pan on a surfi_ce trait
by covering tile pan completely with
a well-fitting lid, cookie sheet or fiat tray:
Use a multi-puq)ose dry chemical or
fi)am-type fire exfinguishei:
Flaming grease outside a pan can be put
out by covering it with baking soda or; if
a*:filable, by using a multi-puq)ose (hy
chemical or ti)am-type fire extinguishe_:
Name in tile oven can be smothered
complemly by closing the oven door and
turning tile oven off or by using a multi-
pml)ose (hy chemical or fi)am-type fire
extinguisher:
For your s'alb'_:, never use your appliance
tot wamfing or heating tile room.
Do not let cooking grease or other flammable
materials accmmflate in or near the range.
Do not touch tile surfi_ce milts, tile heating
elements or tile interior sm_i_ce of tile oven.
These surli_ces may be hot enough to burn
even though tile*' are dark in colin: Dining and
alter rise, (lo Hot to/lch, or let clothing or other
flammable materials contact tile s/m'hce units,
areas nearby tile surfi_ce milts or anv interior
area of tile oven; allow sufficient time for
cooling fi_t.
Potentially hot smthces include the cooktop,
areas fl_dng the cooktop, oven vent opening,
smti_ces near the opening, crevices aro/md the
ovell dooi:
REMEMBER:Tile inside surfhce ot tile oven
may be hot when tile door is opened.
Do not store or use combustible materials,
gasoline or other flammable vapo_ and liquids
in tile vicinity of this or any other appliance.
Keep tile hood and grease filte_ clean
to maint;fin good venting and to avoid
grease fires.
Teach children not to play with tile controls
or any other part of tile range.
_Mways kee I) dish towels, dish cloths, pot
holde_ and other linens a safi _distance
[i'Olil VO/lI" I'allge.
Always kee I) wooden and plastic utensils and
canned food a sale distance fl'oln your range.
Mways keep combustible wall coverings,
cm'tains or drapes a sate distance fl'om
VO/II" KIIlge.
COOKMEATANDPOULTRYTHOROUGHLY...
Cookmeat and poultry thoroughly--meat to at least an INTERNAL temperature of 160°F and poultry to at least
an INTERNAL temperature of 180°E Cooking to these temperatures usually protects against foodbome illness.
3

READALLINSTRUCTIONSBEFOREU$1N&
RADIANTSURFACEUNITS
Use proper pan size--select cookware having fiat bottoms large enough to cover the surface unit
heating element. The use of undersized cookware will expose a portion of _hesurface unit to direct
contact and may result in i)nifion of clothing, Proper relationship of cookware to surface unit will
also improve efficiency.
Never leave the surfi_ce units unattended at
high heat settings. Boilove_3 cause smoking
and greasy spillove_3 that may catch on fire.
Only certain types of glass, glassA'eramic,
earthenware or other glazed containe_3 are
suitable for cooktop service; othe_ may break
because of the sudden change in temperature.
To minimize the possibili_' of bm'ns, ignition
of flammable mamfials and spillage, the handle
of a container should be turned toward the
center of the range without extending over
nearby sm_i_ce milts.
Mwavs turn the sudi_ce units off before
i'ei/loving cookware.
X4]/ell preparing flaming foods tinder the
hood, ttli'n the lira on.
Use care when touching the cooktop.
The glass sui_ilce of the cooktop will retain
heat after the controls haxe been turned off.
Keep an eye on foods being flie(1 at high or
medium high heat settings.
Foods fiw fl'ying should be as ch_' as possible.
_l'ost on ll"ozen lOo(|s or illoisttli'e on fi'esh
fi)ods can cause hot fi_t to bubble up and
over the sides ot the pan.
Use little ti_t tot effective shallow or deep
ti_t fl'ying. Filling the pan too flfll of ti_t can
cause spillove_ when tood is added.
If a combination of oils or fats will be used
in flTing, stir together before heating, or
as ti_ts melt slowly.
Mwavs heat ti_t slowly; and watch as it heats.
Use a deep ti_t them_ometer whenever
possible to prevent overheating ti_t beyond
the smoking point.
Avoid scratching the glass cooktop. The
cooktop can be scratched with imms such
as shaq) instruments, rings or otherjeweh>
and rivets on clothing.
i_uge scratches or impacts to glass (loo_ or
cooktops can lead to broken or shattered glass.
Do not operate the radiant sm'ti_ce milts if the
glass is broken. Spillove_ or cleaning solution
may penetrate a broken cooktop and create a
risk of electrical shock. Contact a qualified
technician immediately should yore" glass
cooktop becoi//e broken.
Never use the glass cooktop SUltilce as a
cutting board.
; Do not place or store items that can melt or
catch fire on the glass cooktop, even when it
is not being used.
Be carefifl when placing spoons or other
sorting utensils on glass cooktop sm'li_ce when
it is in use. Thev may become hot and could
C;l//se b//I'ns,
Clean the cooktop with caution. If a wet
sponge or cloth is used to wipe spills on a hot
sm'fi_ce trait, be careflfl to avoid steam burns.
Solile cleanei_ can pi'o(hlce nOXiOUS tillIleS i[
applied to a hot surfl_ce.
NOTE:"We recommend that you avoid wiping
any sm'fi_ce trait areas tmtil they have cooled
and the indicator light has gone off. Sugar
spills are the exception to this. Please see the
Cleaning the glass cooktop section.
\_l_en the cooktop is cool, use only the
(;EI_dMA BRYTE ':Ceramic Cooktop Cleaner
and the CEIL_dMA BRYTE Ceramic Cooktop
Cleaning Pad to clean the cooktop.
To avoid possible damage to the cooking
sm'fi_ce, do not apply cleaning cream to
the glass smtace when it is hot.
_Mter cleaning, use a (hw cloth or paper towel
to remove all cleaning cream residue.
Read and ti)llow all instructions and warnings
on the cleaning cream labels.
Do not use plastic wrap m cover rood. Plastic
may melt onto the smthce and be very difficult
to i'ei/love.
4
www.GEAppliances.com
WARNING!
OVEN
Stand away from the range when opening the oven door. Hot air or steam which escapes can cause
bums to hands, face and/or eyes.
Do not heat unopened food containet_.
Pressm'e could build up and the container
could bmst, causing an iqjmy:
Kee I) the oven vent imobstructed.
Kee I) the oven fl'ee from grease buildui).
Place the oven rack in the desired position
while the oven is cool. If racks tlltlst be handled
when hot, (lit not let pot holder contact the
heating elements.
\_]/en using cooking or roasting bags in the
oven, tollow the tnanttfilctttrer's directions.
SELF-CLEANINGOVEN
Pulling out the rack to the stoi>lock is a
convenience in lifting heavy t0ods. It is also
a precaution against bm'ns fl'om touching
hot sudhces of the door or oven walls.
Do not use the oven tit (hT ne_vspapets.
If overheated, they can catch on fire.
Do not rise the oven lk)t" a stot'age at'ea, ]tetIlS
stored in an oven can ignite.
Do not leave paper products, cooking utensils
or toed in the oven when not in use.
Do not use almninmn f0il to line oven bottoms,
except as suggested in this manual. ]mi)roper
installation of aluminum f0il may result in a
risk of electric shock or rite.
Donot use oven cleaners. No commerc&l oven cleaner or oven liner protective coating of any kind
should be used in or around any part of the oven. Residue from oven cleaners will damage the inside
of the oven when the self-clean cycle is used.
Do not clean the door gasket. The door gasket
is essential fin" a good seal. Care should be
taken not tit rub, damage or move the gasket.
Betore self:cleaning the oven, remove the
convection roasting rack, broiler pan, grid
and other cookware.
Shiny, sih'e>colored oven rack,; (Oll some
models) should be removed fl'om the oven
betore beginning the selfk'lean cycle,
Gray porcelain-coated oven racks (on some
models) may be cleaned in the oven during
the sel6clean cycle.
Be sm'e to Mpe up excess spillage betore
starting the sel6cleaning operation.
If the self:cleaning mode malflmctions, turn
the oven off and discom_ect the power supl)ly.
Have it serviced by a qualified technician.
Clean only parts listed in this Owner's Manual.
WARMINGDRAWER
The pml)ose ot the wamfing drawer is to hold
hot cooked foods at serving temperatm'e.
Mwavs start with hot food; cold food cmmot be
heated or cooked in the wamting drawer:
Do not ttse the drawer to (h T newspapet_.
If overheated, they can catch on fire.
Do not leave paper products, plastics, cmmed
food or combustible materials in the drawer:
Never leave jars or cans of flit drippings in or
near your drawer
Do not warnt fi_od in the drawer fin" nlore than
two hottt_.
Never place, use or self:clean the lower oven
drawer pan in the ul)per oven.
Do nottouch the heating element or the interior
surface of the drawer. These surtilces may be
hot enough to bm'n.
REMEMBER: The inside sm_hce of the drawer
may be hot when the drawer is opened.
Use care when opening the drawer: Open the
drawer a crack and let hot air or steam escape
beli)re removing or replacing fi)od. Hot air or
steam which escapes can cause bm'ns to hands,
elce and/or eyes.
Do not use ahtnlinutn f0il to line the lower
oven drawer: Foil is an excellent heat insulator
and will trap heat beneath it. This will upset
the pedbmmnce of the drawer and it could
damage the interior finish.
READANDFOLLOWTHISSAFETYINFORMATIONCAREFULLY.
SAVETHESEINSTRUCTIONS
5
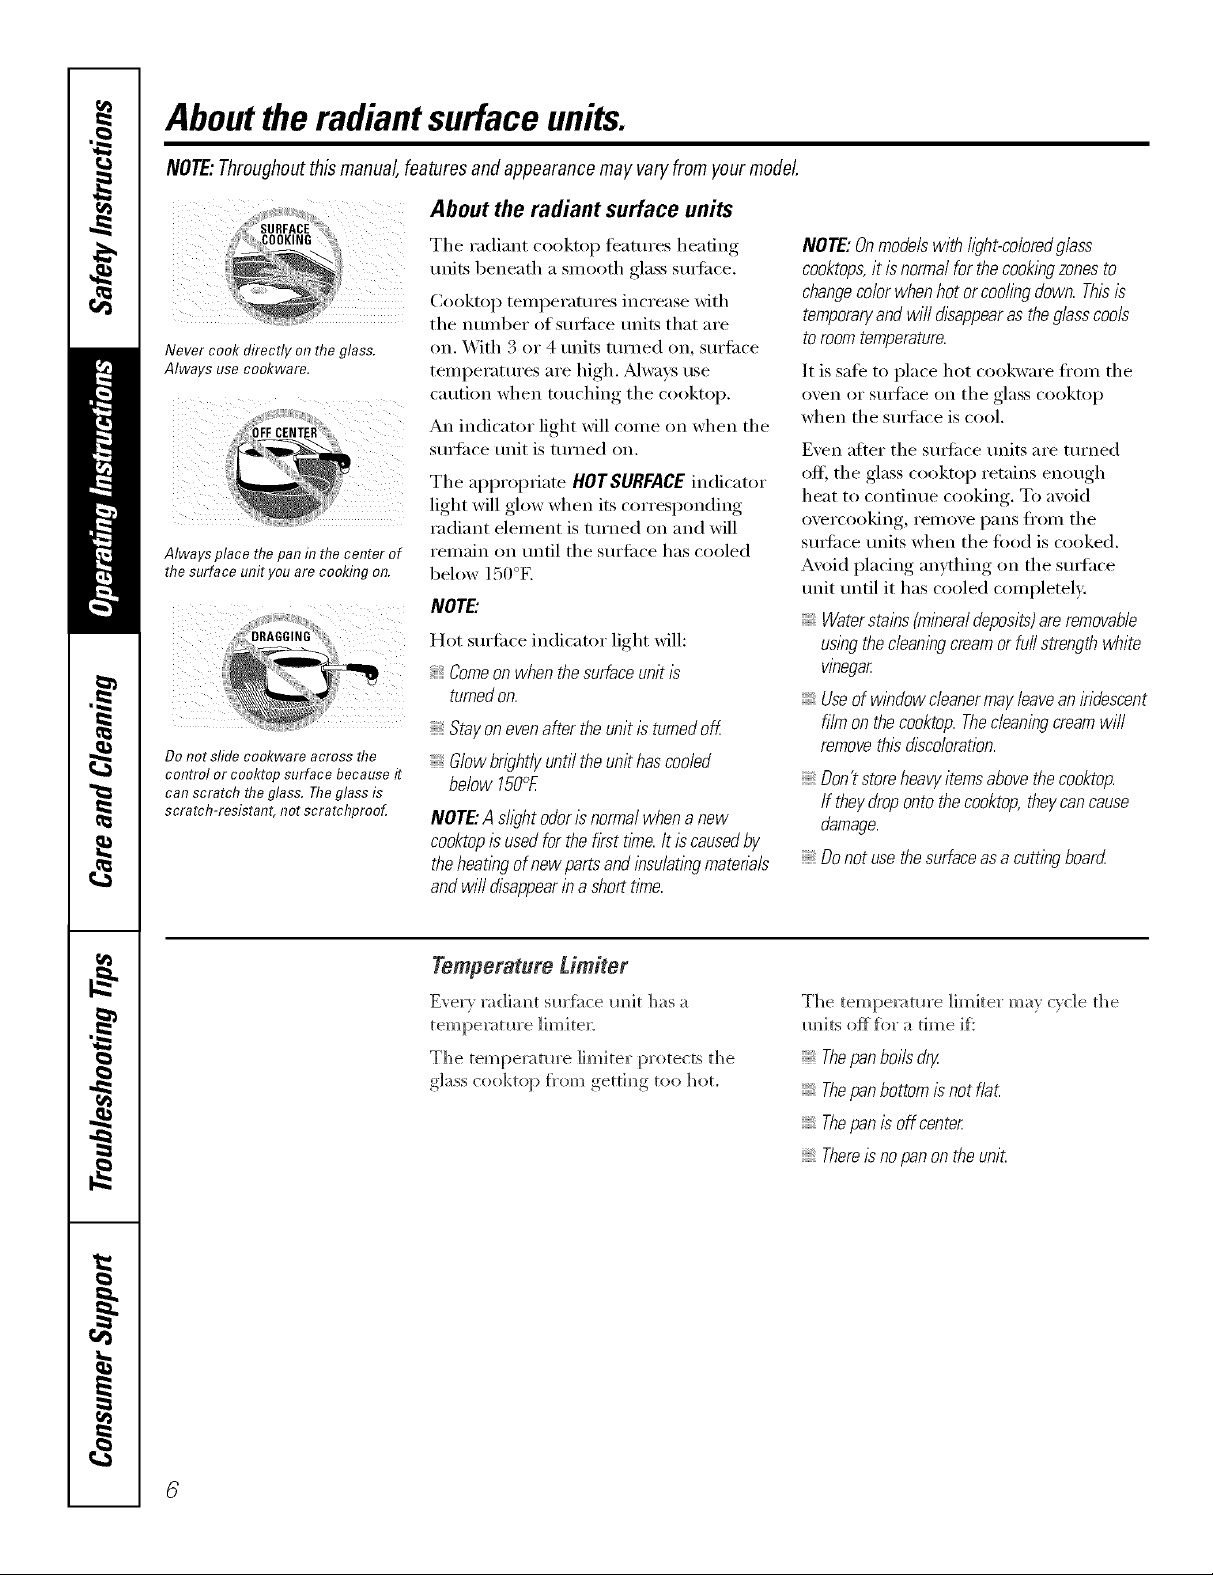
Abouttheradiantsurfaceunits.
NOTE:Throughoutthismanual,featuresandappearancemay varyfromyour model
About the radiant surface units
,_iii¸ _iiii,
i , iiii'
Never cook directly on the glass.
Always use co&ware.
iii(i ii,iii ¸::
Always place thepan h7the center of
the surface unit you are cooking on.
Do not sfide cookware across the
control or cooktopsurface because it
can scratch theglass. Theglass is
scratch-resistant, not scratchprooL
The radiant cooktop features heating
units beneath a smooth glass surti_ce.
Cooktop temperatures increase with
the nun/ber of SUll'ilce units that are
on. With 3 or 4 units turned on, surtilce
temperatures are high. Mwavs tlse
caution when touching the cooktop.
An indicator light will come on when the
surti_ce unit is turned on.
The appropriate HOTSURFACE indicator
light will glow when its corresponding
radiant element is turned on and will
remain on until the surti_ce has cooled
below 150°E
NOTE."
Hot surii_ce indicator light will:
Comeon when thesurface unit is
turnedon.
Stay oneven after theunit is turned oK
Glow brightly until theunit has cooled
below 150°£
NOTE."AshghtodorIsnormalwhenanew
cooktopisusedforthe firsttime.Itis causedby
theheatlbgofnewpartsandinsu/atlbgmatena/s
andwi//disappearina shorttime.
NOTE:On models with/ighbcoloredg/ass
cooktops,it is normalfor thecook/bgzonesto
changecolor whenhot or coding down. Thisis
temporaryand wi// disappearas the glasscools
to roomtemperature.
It is safe to place hot cookware ti'om the
oven or surthce on the glass cooktop
when the surthce is cool.
Even after the surti_ce units are turned
off, the glass cooktop retains enough
heat to continue cooking. To avoid
ovei'cooking, i'ei/love l)[lns ][i'oi/l the
surli_ce units when the tood is cooked.
Avoid placing anything on the surthce
unit until it has cooled compleml>
Waterstains (mineraldeposits)are removable
uslbg thecleaning cream orfu// strength white
vinegar
Useof window cleanermay leavean iridescent
film on thecooktop. Thecleaning creamwi//
removethis discoloration.
Don'tstoreheavyitemsabovethecooktop.
If theydropontothecooktop,theycancause
damage.
Donotusethesurfaceasa cuttingboard
Temperature timber
Ever_ mdiam_t sm'fi_ce m_it has a
The tempe_;_ture ]imiter protects the
glass cooktop }_'omgettim_gtoo hot,
The tempe_:m*re ]hinter may c}c]e the
m_its offfl_r a time iP
Thepan boils dry.
Thepan bottom is not fiat
Thepan is off center
There/sno panon theunit.
vvwvv.GEAppliances.com
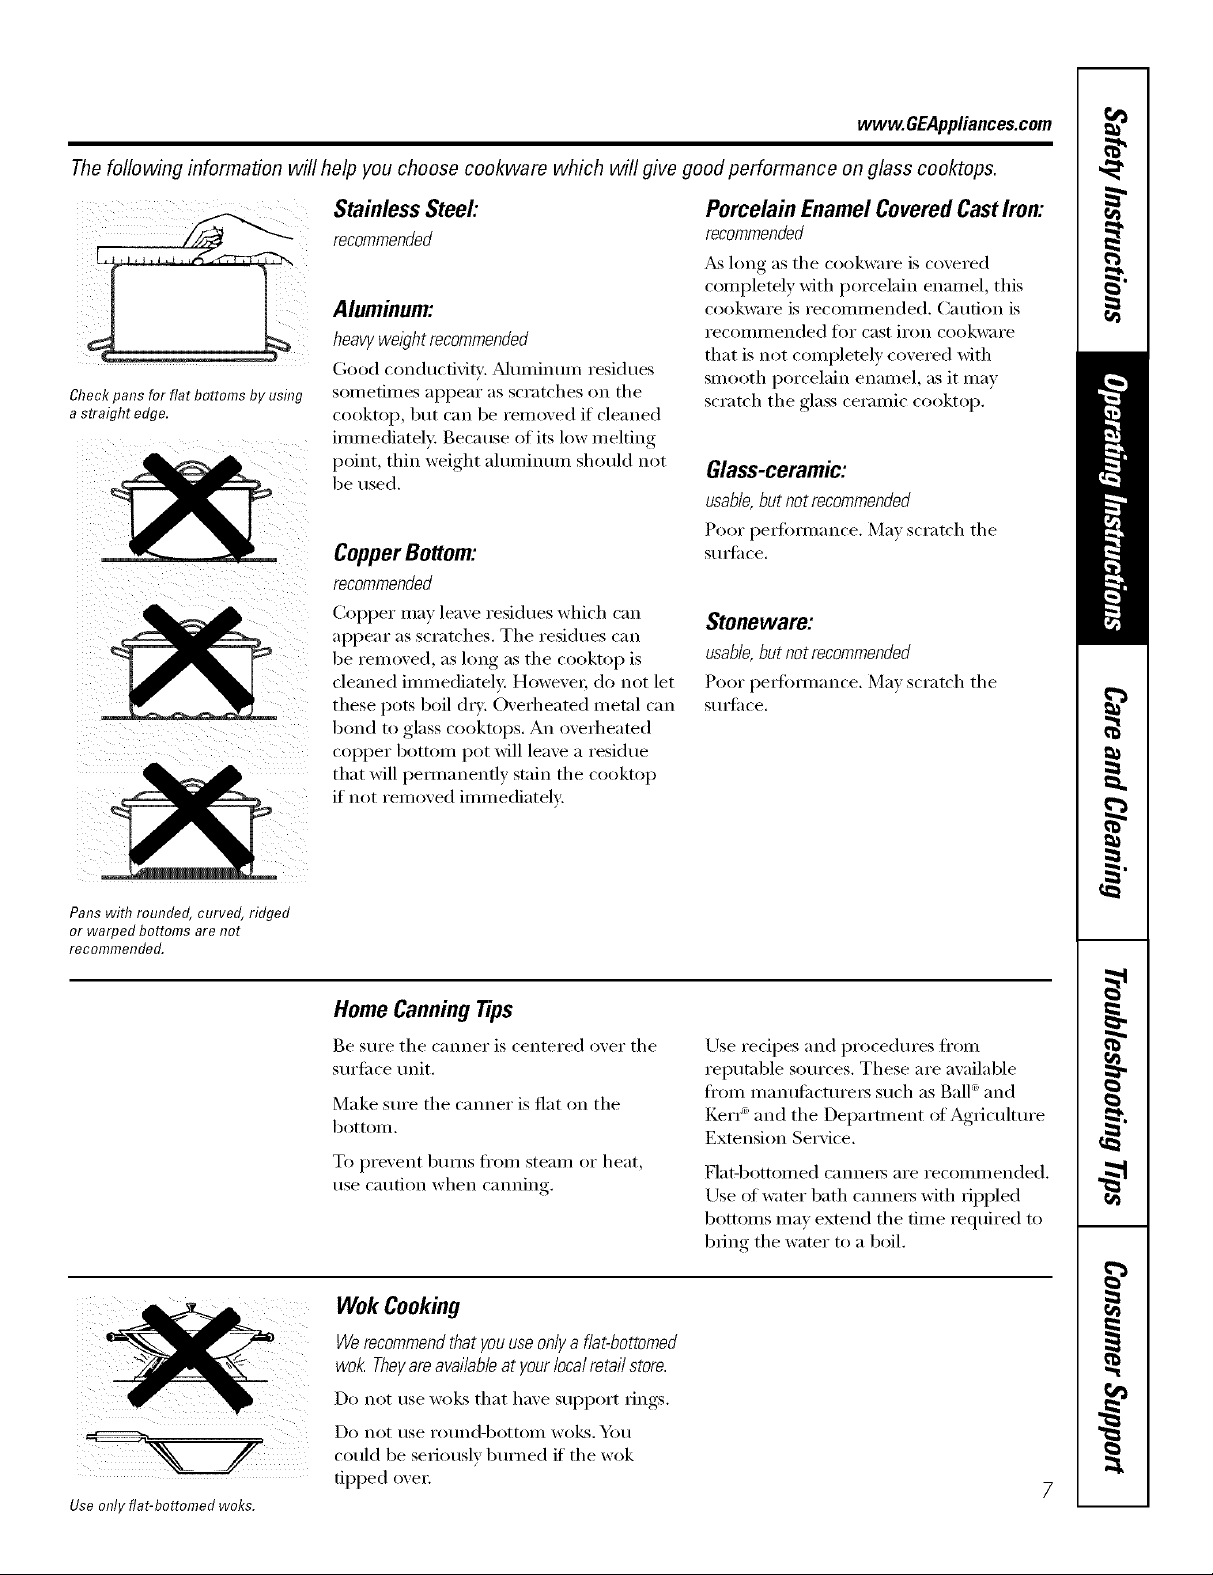
Thefollowing information will help you choose cookware which will give good performance on glass cooktops.
Check pans for flat bottoms by using
a straight edge.
Stainless Steel:
recommended
Aluminum:
heavy weight recommended
(;ood conducfidty. Muminun/residues
sometimes appear as scratches on the
cooktop, but can be removed if cleaned
immediately: Because of its low melting
point, thin weight aluminum should not
be used.
CopperBottom:
recommended
CoI_per may leave residues which can
appear as scratches. The residues can
be removed, as long as the cooktop is
cleaned immediately: However; do not let
these pots boil (h T. (-)verheated metal can
bond to glass cooktops. An overheated
COl)per bottom pot will leave a residue
that will pemmnenfly stain the cooktop
if not removed immediately:
Porcelain EnamelCoveredCastIron:
recommended
_&_long as the (-ookware is covered
completely with porcelain enamel, this
cookware is recommended. Caution is
recolillilended for cast iron cookware
that is not completely covered with
smooth porceMn enamel, as it may
scratch the glass ceramic cooktop.
Glass-ceramic:
usable, but not recommended
Poor pe_l'bmmnce. Mm scratch the
StllS[il ce.
Stoneware:
usable, but not recommended
Poor perlimnance. Max scratch the
StllS[il ce.
Pans with rounded, curved, ridged
or warped bottoms are not
recommended.
Use only flat-bottomed woks.
Home CanningTips
Be sure the canner is centered over the
surti_ce unit.
Make sure the canner is fiat on the
bottom.
To prevent burns fl'Oln steam or heat,
use caution when canning.
Wok Cooking
Werecommendthatyouuseonlya flat-bottomed
wok.Theyareavailableat yourlocalretailstore.
[)0 not rise wells that have SUl)port rings.
Do not rise i'otlnd-bottoill wells. _)tl
could be seriously burned if the wok
tipped oxei:
Use redpes and procedm'es from
reputable sources. These are available
fl'om inanufilcturei3 such as Ball ®and
KeI'I_ and the Department of Agriculture
Extension Service.
Flat-bottoi/led CallllelS ai'e recollllllended,
Use _ff wamr bath canne_ with rippled
bottoms may extend the time required to
bring the water to a boil.
Usingthe surfaceunits.
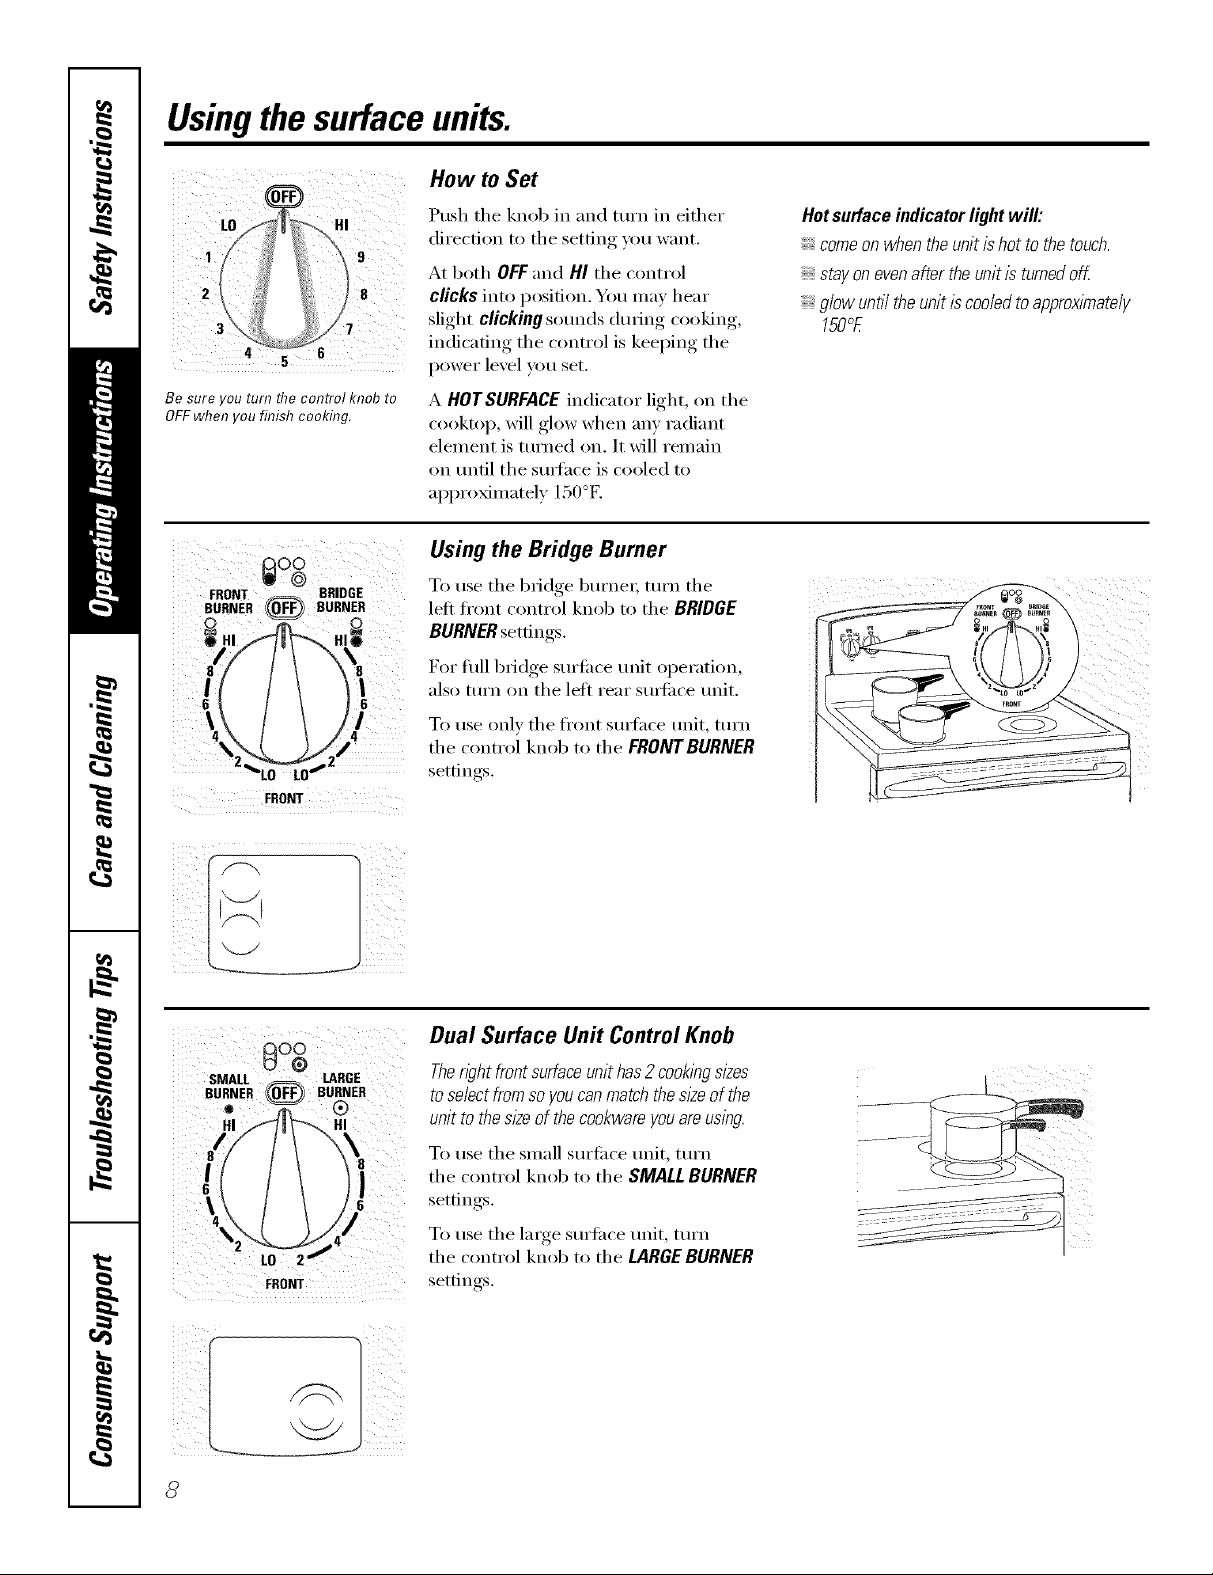
How to Set
LOLu_ HI Push, the, knob in and, _-turnin either
i // _ dn'ectlon to the setting you want.
2 _ _ _8 clicks into position. You max hear
Be sure you turn flTecontrol knob to
OFFwhen youfinish cooking.
_}_ 9 At both OFFand HI the control
/ sli ,ht clicking sounds during co,,kin ,,
indicating the control is keeping the
power lexel you set.
A HOTSURFACE indicator light, on the
cooktop, will glow when any radiant
element is turned on. It will remain
on tmfil the surthce is cooled to
approximately 150°E
Using the Bridge Burner
FRONT - - BR DGE
BURNER (_ BURNER
0 0
6
!
To use the bridge burnex; turn the
left fi'ont control knob to the BRIDGE
BURNER settings.
For flfll bridge sm'li_ce refit operation,
also turn on the left rear sm_i_ce unit.
To use only the fl'ont surlace unit, turn
the control knob to the FRON7"BURNER
settings.
Hot surface indicator light will:
comeon when theunit ishot to the touch.
stay on evenafter theunit is turned oK
g/ow unti/ the unit is coo/edto approxlmate/y
150°E
FRONT
Dual Surface Unit Control Knob
Thewht front surface unit has2cookingsizes
toselect from soyou canmatch thesl2eof the
unit to thesl2e of the cookwareyouare using.
8
To use the small sm'fi_ce refit, tm'n
the control knob to the SMALL BURNER
settin ,s
To use the lmge surfi_ce unit, tm'n
the control knob to the LARGEBURNER
settings.
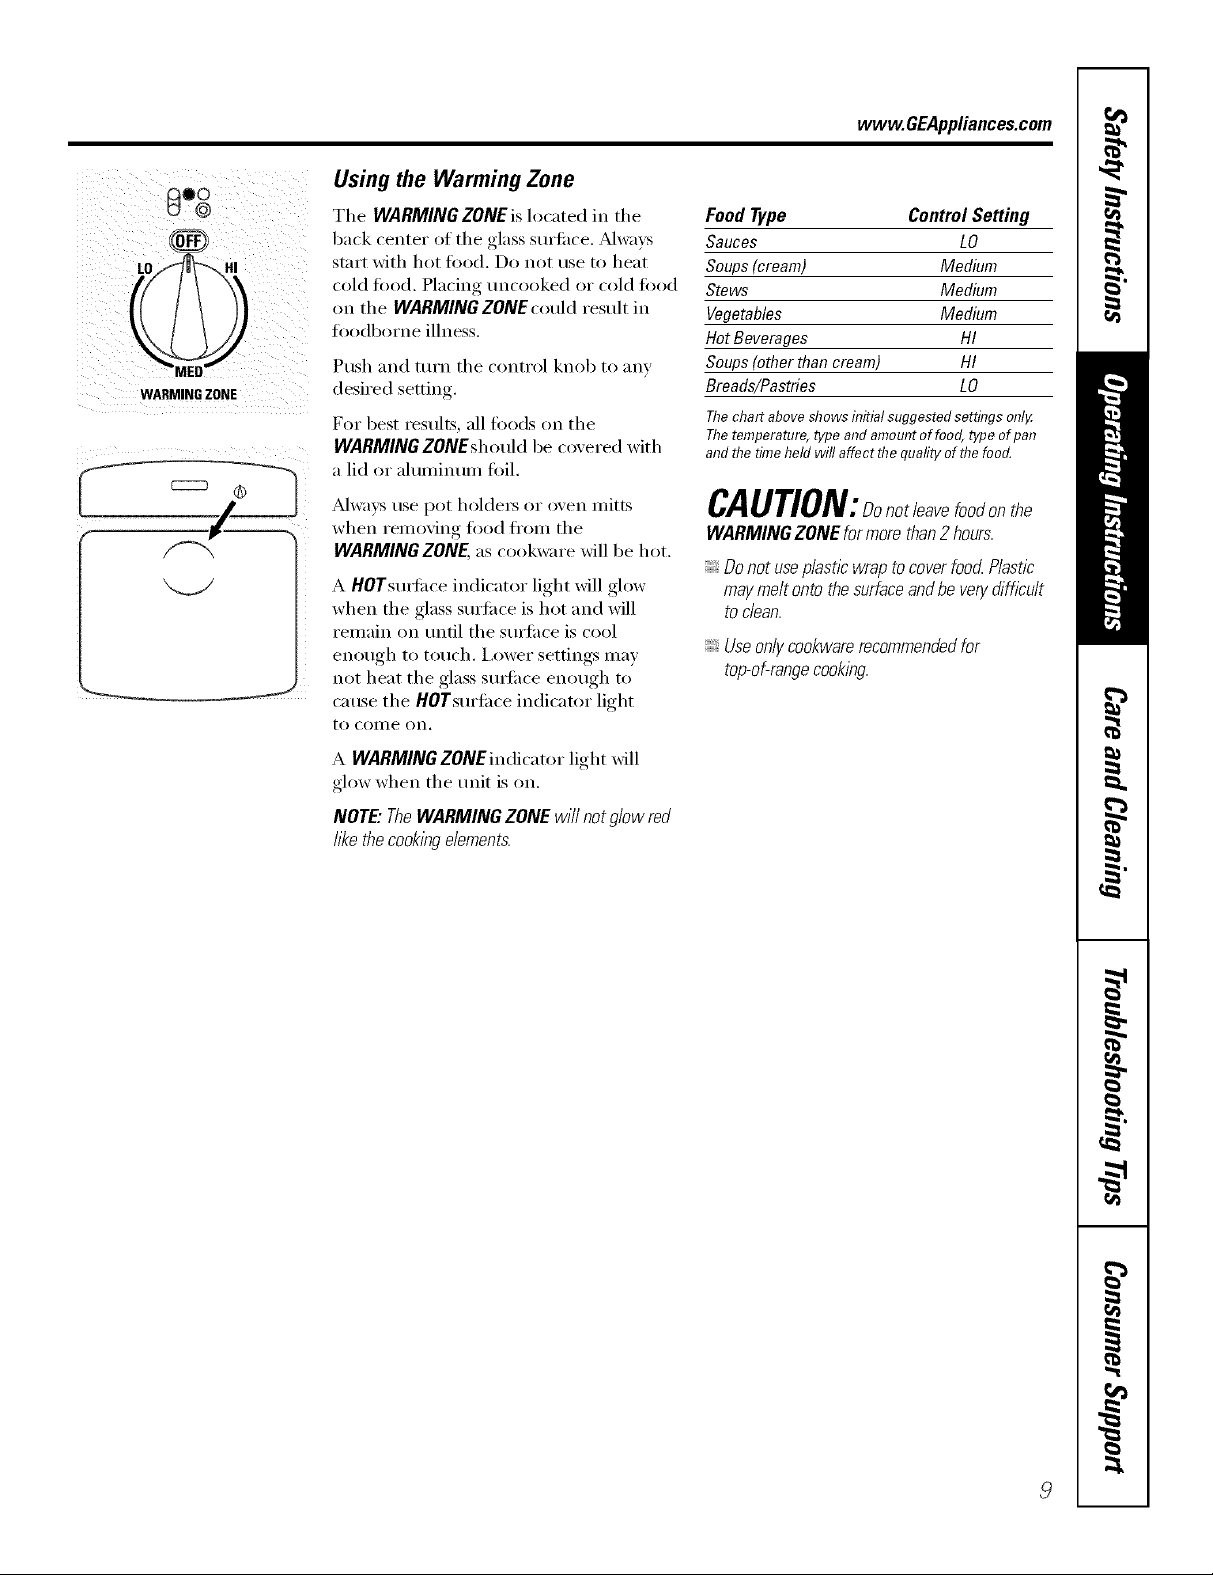
8"8
WARMING ZONE
Using the Warming Zone
The WARMING ZONE is located in the
back center ot the glass surti_ce. _Mwa_:s
stnrt with hot toed. Do not use to heat
cold toed. Placing uncooked or cold toed
on tile WARMING ZONE could result in
toodborne illness.
Push and mrn the control knob to any
desired setting.
For best restflts, all tbods on tile
WARMING ZONEshould be covered with
a lid or almninmn foil.
vvww.GEAppliances.com
Food Type Control Setting
Sauces LO
Soups(cream) Medium
Stews Medium
Vegetables Medium
HotBeverages HI
Soups(other than cream) HI
Breads/Pastries LO
Thechart above showsinitial suggestedsettings only
Thetemperature,type and amountof food,type ofpan
and flTetimeheld will affect flTequafity offlTefood.
Alwa_s use pot holdet_ or oven mitts
when removing fi)od fl'om tile
WARMING ZONE, as cookware will be hot.
A HOTsurtime indicator light will glow
when the glass sm'fi_ce is hot and will
remain on tmtil tile sm'fi_ce is cool
eno/lgh to [o/ich. I,oweI" settings Ill}IV
not heat the glass Stlrlilce enough to
cause tile HOTsm'e_ce indicator light
1o COille on.
A WARMINGZONEindicator light will
glow when tile unit is on,
NOTE"TheWARMING ZONE wi// not glow red
/17(ethecooking elements.
CAUTION:Donotleavefoodonthe
WARMING ZONE formore than2 hours.
Donot useplastic wrap to coverfood Plastic
may melt onto thesurfaceand be verydifficult
todean.
Useonlycookwarerecommendedfor
top-of-rangecooking.
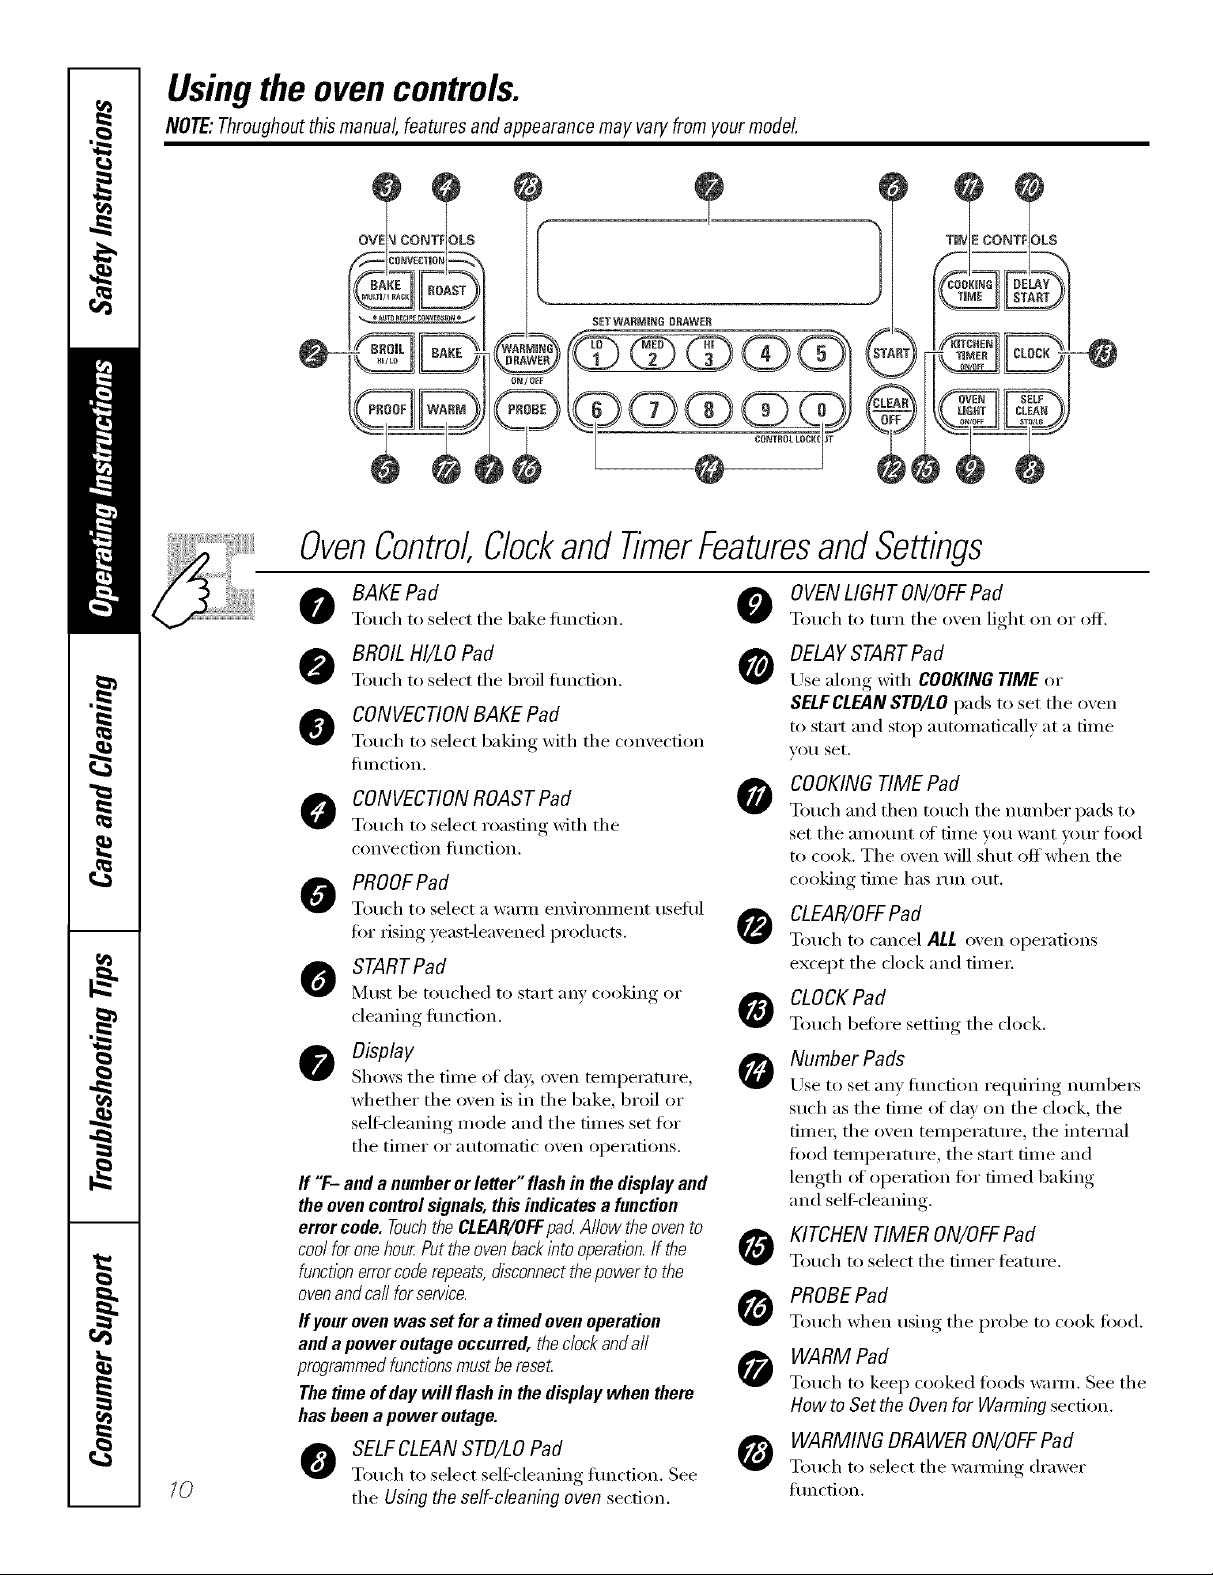
Usingthe ovencontrols.
NOTE:Throughoutthismanual,features andappearancemayvary fromyour model
10
o oo s
BAKE
SETWARMmNGDRAWER
T OON S
@
@
OvenControlClockandTimerFeaturesandSettings
BAKE Pad
Touch to select the bake flmcfion.
BROIL HI/LO Pad
Touch to select tile broil flmcfion.
CONVECTIONBAKE Pad
Touch to select baking with tile comecfion
flmction.
O CONVECTIONROAST Pad
Touch to select roasting with tile
con_, ection tilnction.
PROOFPad
To/l(h to select a tV}lII/l environillent tlselill
for rising )east-leaxened products.
STARTPad
]¥hlst be to/iched to stnIt _lIly cooking oI"
cleaning fimction.
Display
Shows tile tiIlle Of day, oven teillpei'attli'e,
whether tile oven is in tile bake, broil or
sel6cleaning mode and tile times set tot
tile tiil/er or }IUtOIII}ItiC oven opei'ations.
ff "/:- anda numberor letter"flashinthedisplayand
theovencontrolsignals,thisindicatesafunction
error code.TouchtheCLEAR/OFFpa_Allow theovento
coolforonehourPuttheovenbackintooperation.Ifthe
functionerrorcoderepeats,disconnectthepowertothe
ovenandca//forservice.
Ifyourovenwassetfora timedovenoperation
anda poweroutageoccurred,thedockanda//
programmedfunctionsmustbereset
Thetimeof daywill flashin thedisplaywhenthere
hasbeenapower outage.
SELFCLEANSTD/LOPad
Touch to select self:cleaning function. See
tile Using the self-cleaning oven section.
OVENLIGHT ON/OFFPad
Touch to mrn tile o',en light on or off.
DELAYSTARTPad
Use along with COOKING TIME or
SELFCLEANSTD/LO pads to set tile o_en
to start and stop automaticall_ at a time
_O/I set.
COOKINGTIME Pad
O
Touch and then touch tile munber pads to
set tile }lIllO/lnt of tiI/le veil w}lnt VO/li" t()()d
to cook. Tile oven will s'hut off wflen tile
cooking time has I'tln ()/It.
CLEAR/OFFPad
Touch to cancel ALL oven operations
except tile clock and time_:
CLOCKPad
0
Touch before setting tile clock.
Number Pads
ILrseto set any flmcfion requiring numbers
such as tile time of day on tile clock, tile
time_; tile oven temperatm'e, tile internal
food temperature, tile start time and
length _ffoperation for timed baking
and self:cleaning.
KITCHEN TIMER ON/OFFPad
Touch to select tile timer teattlre.
PROBEPad
Touch when using tile probe to cook food.
WARM Pad
Touch to keep cooked foods wamL See tile
How to Set the Ovenfor Warming section.
WARMING DRAWERON/OFFPad
Touch to select tile wamfing drawer
flmction.
@
Usingthe oven. www.GEAppliances.com
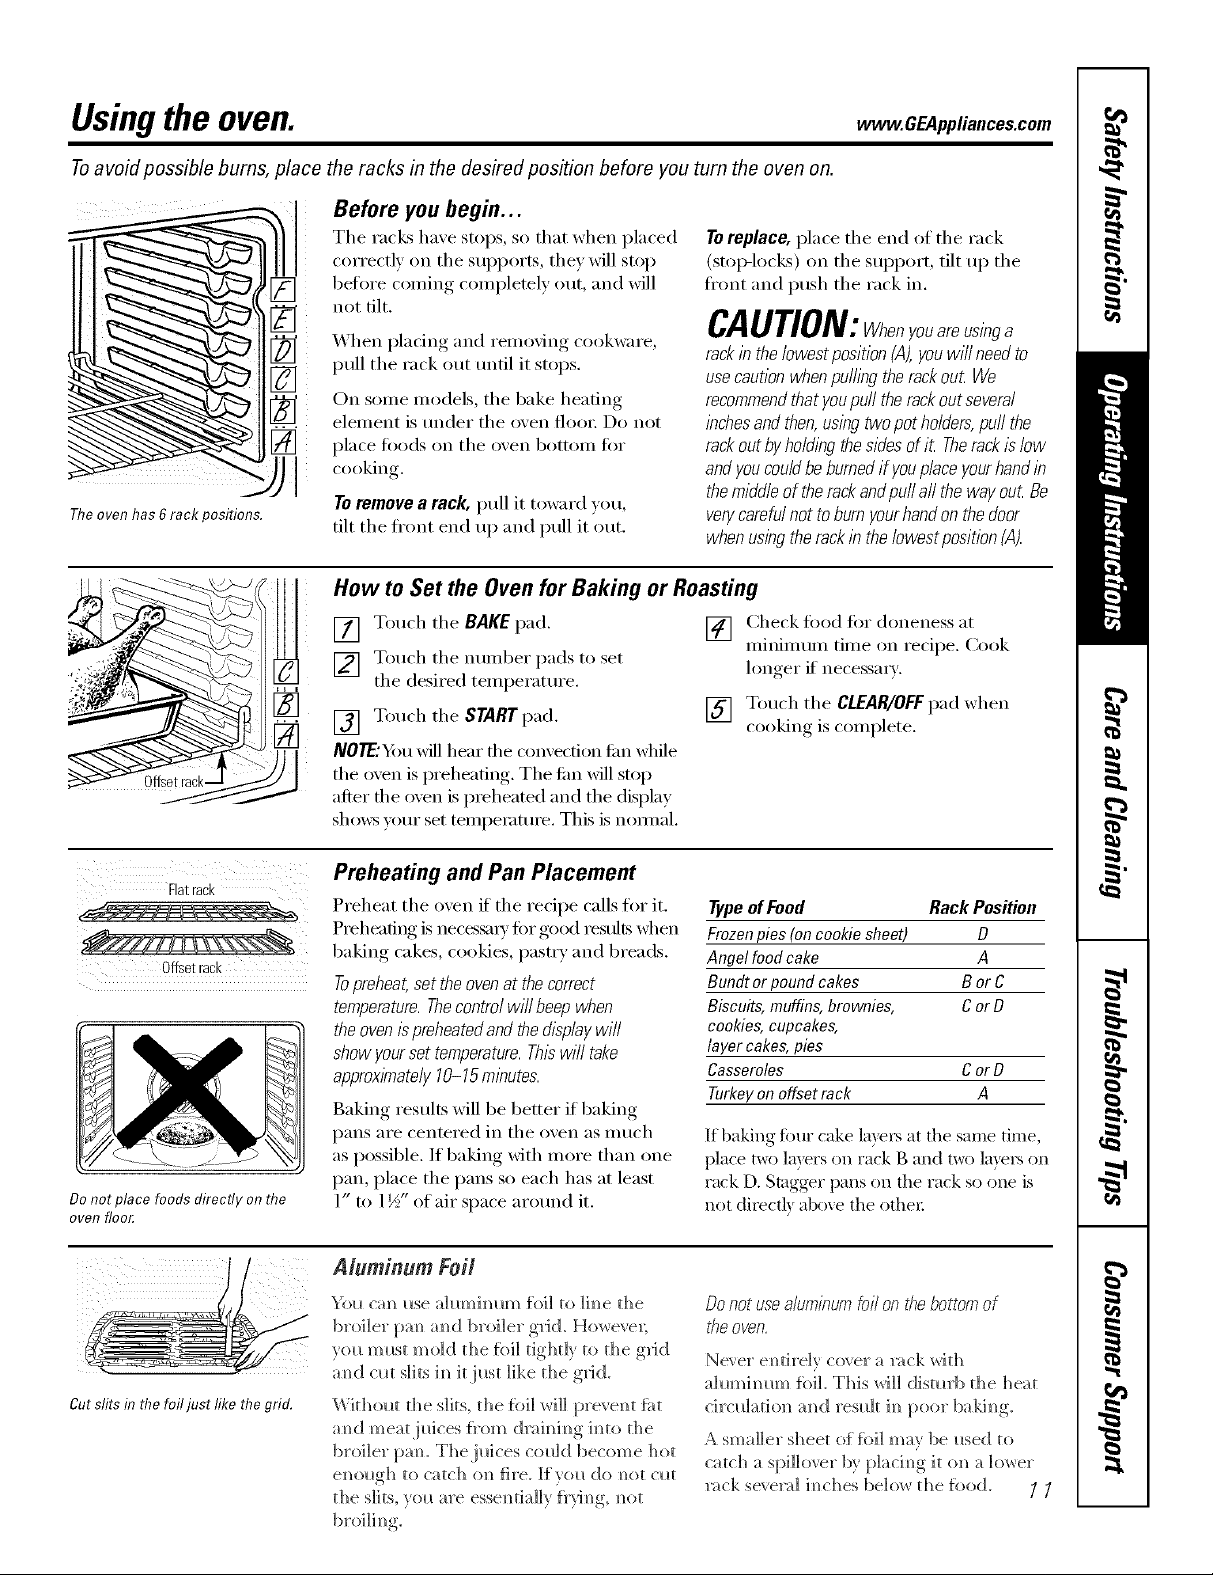
Toavoid possible bums, place the racks in the desired position before you turn the oven on.
Before you begin...
_) place ti
Theoven has 6rack positions.
Tile racks have stops, so that when placed
correctly on the supports, they will stop
betin'e coming completely out, and will
not tilt.
_'\ hen l
When placing and removing cookware,
pull th(
pull the rack out until it stops.
Oil SOil
On some models, tile bake heating
elelllen
element is under tile oven flooi: Do not
place toods on tile oven bottOlll tk)i"
cooking.
To remove a rack, pull it toward you
tilt tile fl'ont end up and pull it out.
How to Set the Oven for Baking or Roasting
Toreplace, place tile end of tile rack
(stop-loci<s) on tile support, tilt iiI) tile
fl'ont and push the rack ill.
CAUTION:Whenyouareusinga
rack in thelowest position (A),youwill need to
usecaution when puffing therack out We
recommendthat youpuff the rackout several
inchesand then,using two pot holders,puff the
rack out byho/dbg thesides of it Therackis low
andyoucould beburned if youplace yourhandb
themiddle of the rackand pufl aft the way out Be
verycareful not toburn yourhandon the door
when usingthe rack in the/owestposition (A).
Flatrack
-
OIIsetrack
Do not place foods directly on the
ogol7 floor,
[] Touch tile BAKEpad.
[] Touch tile number pads to set
the desired temperature.
[] Touch tile STARTpad.
NOTE"d)u will hear tile c{m\'ection tim while
the oven is preheating. The tim will stop
alter file oven is pieheated and tile display
sho_vs your set temperature. This is nomml.
Preheating and Pan Placement
Preheat tile oven if tile recipe calls for it.
Preheafin g is neces_u'v fin"good restfltswhen,,
baking cakes, cookies, pastry and breads.
Topreheat,set theoven at the correct
temperature.Thecontrol will beep when
the ovenispreheated andthe &splay will
show yourset temperature. Thiswill take
approximately 10-15mlbutes.
Baking results will be better if baking
pans are centered ill tile oven as much
as possible. If baking with more than one
pan, place the pans so each has at least
1" to 1½" of air space around it.
[] Check fi)od fin" doneness at
nfininmm time on recipe. Cook
longer if necessmT.
[] Touch tile CLEAR/OFFpad when
cooking is complete.
Type of Food Rack Position
Frozen pies (on cookie sheet) D
Angel food cake A
Bundt or pound cakes B or C
Biscuits, muffins, brownies, C or D
cookies, cupcakes,
layer cakes, pies
Casseroles C or O
Turkey on offset rack A
If baking ti)ur cake la)'eIs at file same time,
place t_) layers on rack B and two layei:s on
rack D. Stagger pans on file rack so one is
not direct]) above tile OflleI:
Cut slits in the foil just like the grid.
Aluminum Foil
You cm_ I*se a]umimm_ }bi] to ]h_e t]_e
broiler pam_ amid broiler gri(L Ho_eve_;
vol_ m I_st m old the fbi] tightly to the grid
amid cm slits im_it just like the g_Jd.
Witholat the slits, the {bi] wi]] prevel_t {i_t
m_d meatjlfices {_'om dmh_im_g h_to the
broiler pare The.jlfices coldd become hot
em_o_*gh to catch ol_ fire. I{ vo_ do _ot o*t
the are esse_tia]]y fi'}_g, _ot
Do not use a/uminum foi/ on the bottom of
the oven.
Ne_ er e_tire]v cover a _ck with
ah*mhmm %1]. This _rH]] distmb the heat
cirodatiol_ ;rod res_dt 1_ poor baki_g
A smaller sheet of fb]] may be used to
catch a sI)iliover by piach_g it on a ]o*_er
l:_ck se', el:d i_ches be]o_v the %od. I I

Usingthe oven.
How to Set the Oven for Broiling
Leavethedooropentothebroilstopposition.
Thedoorstaysopenbyitself,yettheproper
temperature is maintained in the oven.
Use LO Broil to cook fi)ods such as
poultry or thick cuts of meat thoroughly
without oxe_q)rowning them.
[] Place tile meat or fish on tile broiler
grid in tile broiler pan.
[] Follow suggested rack positions in
tile Broiling Guide.
If yourrangeis connectedto208volts,
raresteaksmaybebroiled bypreheating
thebroiler andpositioning theovenrack
oneposition higher
[] Touch tile BROILHI/LO pad once for
HI Broil
To change to LOBroil, touch tile
BROILHI/LO pad again,
Broiling Guide
Tile size, weight, thickness,
stnrting temperature Food
and _ O/lI" i)i'eiei'en(e
of doneness will affect GroundBeef
broiling dines. This guide
is based on meats at
refi-igerator temperature.
+ T/m {LS.1)#/mrhne_l o/Ag'dcultm_,
_a_s "l_m_bee/is po[mhn bul you
_hou/d hm)w th(ll a)ohi_lgil to o_d_' Rarer
140°F m_w_s somefi)od poismzi_g Medium
orgzmisms m(l_ sur_ive." (,%u_,: WeT[Done
,S(@,Food Boot_. };)u_ Kilche*_
Well Done
Beef Steaks
Rarer
Medium
Well Done
Chicken
LobsterTails
Fish Fillets
Ham Slices
xecooked)
Pork Chops
Well Done
SahnonSteaks
Quantityand/
or Thickness
1lb.(4 patties)
1/2 to3/4" thick
1" thick
1to 1VzIbs.
1Vz"thick
2 to 27zIbs.
1whole cut Lip
2 to 2VzIbs.,
split lengthwise
2 Breasts
24
10to 12oz.each
1/4to 1/2" thick
1/2" thick
2 (1/2" thick)
2 (1" thick/about 1 lb.
2 (1" thick)
4 (1" thick)about 1 lb.
Shelf
Position
F
E
E
D
D
D
D
E
D
D
D
[] Touch tile START pad.
[] _'_hen broiling is finished, touch tile
CLEAR/OFFpa d.
NOTE:Broil andself-cleansettings wi// not work
if the temperatureprobeisplugged in.
FirstSide
Time(rain.)
11
11
14
18
22
25
25
18_0
10
15
10
12
Second Side
Time (min.)
9
7
9
6
10
5
6W
89
11
14 16
20
10
10 15
Donot
turn
ovelt
10
15
78
10
C01nments
Space evenly. Up to 8
patties take about the
same time.
Steakslessthan1"
thickcookthrough
beforebrowning.Pan
fryingis recommende(
Slashfat.
Broilskin-side-down
first.
Cutthroughbackof
shell. Spreadopen.
Brushwith melted
butterbefore broiling
andafter halfof
broilingtime.
Handleandturnvery
carefully.Brushwith
lemonbutterbefore
andduringcooking,
if desired.
Increasetime 5 to 10
minutespersidefor
11//'thick orhome-
curedham.
Slashfat.
Grease pan. Brush
steaks with melted
butter.
12
Usingthe timedbakingand mastingfeatures. .GEA..lia.ces.com
NOTE" Foods that spoil easily--such as milk, eggs, fish, stuffings, poultry and pork--should not be allowed to sit for
more than 1hour before or after cooking. Room temperature promotes the growth of harmful bacteria. Be sure that
the oven light is off because heat from the bulb will speed harmful bacteria growth.
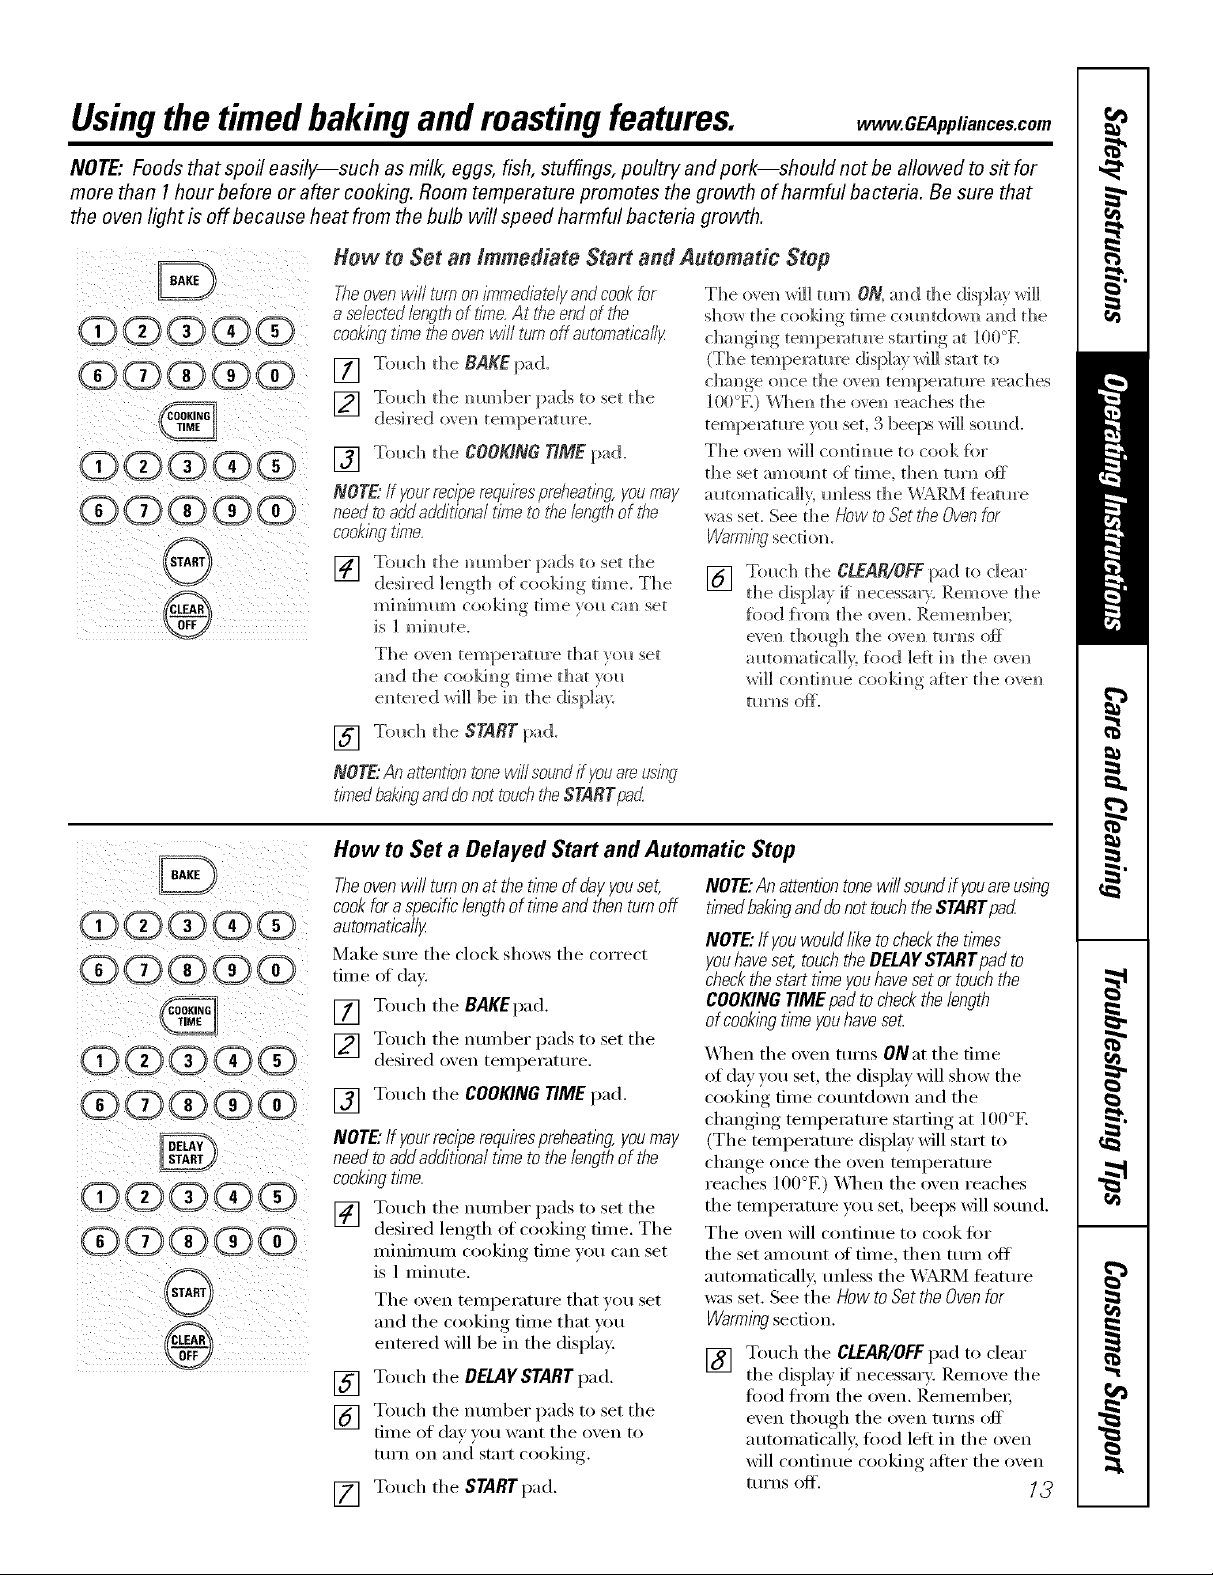
Hew te Set an Immediate Start and Automatic Step
Theovenwil/ turnon/#/mediaidyandcookfor
a se/ected/engiflof tT#/eAt tDeendofthe
cookingtimetheovenwill turnoff automat/cafy
[] Touch the BAKEpad.
] Touch
desired ()``'el/ tempe):_ture.
Q @@ @ ® [] COOK,NGT,ME,).d
NOTE"If yourre,c//_ere,quirespreheatbg,youmay
@ @ @ @ @ needmaddadditionaltimetotilelengtt/oftile
cooking tDTe.
@ [] >,c.t.e t. et./e
desi red ] el/gth of cooki m/g ti me. The
Ill ] I/] Ill I lll/ C( )o ](i I/<_ 1] Ill e }o I l Ca I/ se [
is 1 mhmte.
The ()','el/ [el//peYiKllre [hilt veil set
amid the cookh/g time that _ou
em/tered will lie ira/the disph U.
[] Touch the STARTpad.
NOTE,,"An attentiontone will samd if youam using
timedba@/ganddonot touchtile STARTpad
How to Set a Delayed Start and Automatic Stop
The oxen will mm ON, and the displ_/y will
sh(n_ the cookh/g dee Colll/td(ml/ al_(;[ tile
cham/gim/g temperature smrtim/g at 100°E
(The tempemnlre display will smut to
change once the o_ el/ temperature l'eaches
l O0 °K) Wh el/th e o',en reach es the
temperature yell set, 3 beeps will som/d.
The o_en _ri]] contimle to cook for
the set amoral) of time, then turn of{
automatically, unless the _\_kl{M featm'e
was set. See the How to Set Ne Over/for
VVarm/R()secti on.
[] Touch tile CLEAR/OFFpad to dear
the displa)if" m/ecessar};. Ren]ove the
%od {_'om the !)',em Rein em be_;
e_ el/ though the o_en tluus of_
automatically, fi)od left hi the ()',el/
_rH]l cominue cookil/g alter tile ovel/
[lll3)S Oft.
@@@@@
@@@@@
@@@@@
@@@@@
Theovenwill turnonatthetimeofdayyouset,
cookforaspecificiengthoftimeandthenturnoff
automatically
Make stlI'e tile clock shmvs tile coFi'ect
time oI day.
[] Touch the BAKEpad.
[] Touch the nulnl)er pads to set the
desired ))``eli tenlperature.
[] Touch the COOKINGTIMEpad.
NOTE."If yourreciperequirespreheat/bg,youmay
needtoaddadditionaltimetothelengthofthe
cookingtime
[] Touch the nunlber pads to set the
desired length of cooking tilne. The
II/iIliIIltlIIl cookiIlg tiII/e yell caIl set
is 1 lninute.
The oven tenlperature that you set
and tile cooking tilne that you
entered will be in the display:
[] Touch the DELAY START pad.
[] Touch the nunlber pads to set the
)line of day }ou want the ))``eli to
[tlI'II Oil }lIld start cookiilg.
[] Touch the STARTpad.
NOTE"Anattentiontonewff/soundif youareusbg
timedbak/w anddonottouchtheSTARTpad
NOTE"Ifyouwouldliketocheckthetimes
youhaveset,touchtheDELAYSTARTpadto
checkthestartt/meyouhavesetortouchthe
COOKINGTIMEpadtocheckthelength
ofcookingtimeyouhaveset
_AqlelI the ()``,eli turns ONat the )line
of day }ou set, the displa} will show the
Cl)oking tinle countdown and the
chanoino_ _ telni)elatul'e starting< at 100°E
(The tenlperature (lispla} will start to
challOea ()lice tile ()``eli teillpei'attli'e
reaches 100°E) _Aq_elI the ))``eli reaches
the tenlperature you set, beeps will sound.
The oven will continue to cook for
the set alnount of tilne, then turn off
a utonlafically, unless the _,\ _RM featul'e
was set. See the Howto SettheOvenfor
Warming sect.ion.
[] Touch the CLEAR/OFFpad to clear
tile displa} ff necessarx: Relnove the
ti)od ti'oln the oven. l_elnelnbel;
even though the oven turns off
autolnaticall> food left in the oven
will continue cooking after the oven
turns off. 13
Usingtheprobe.
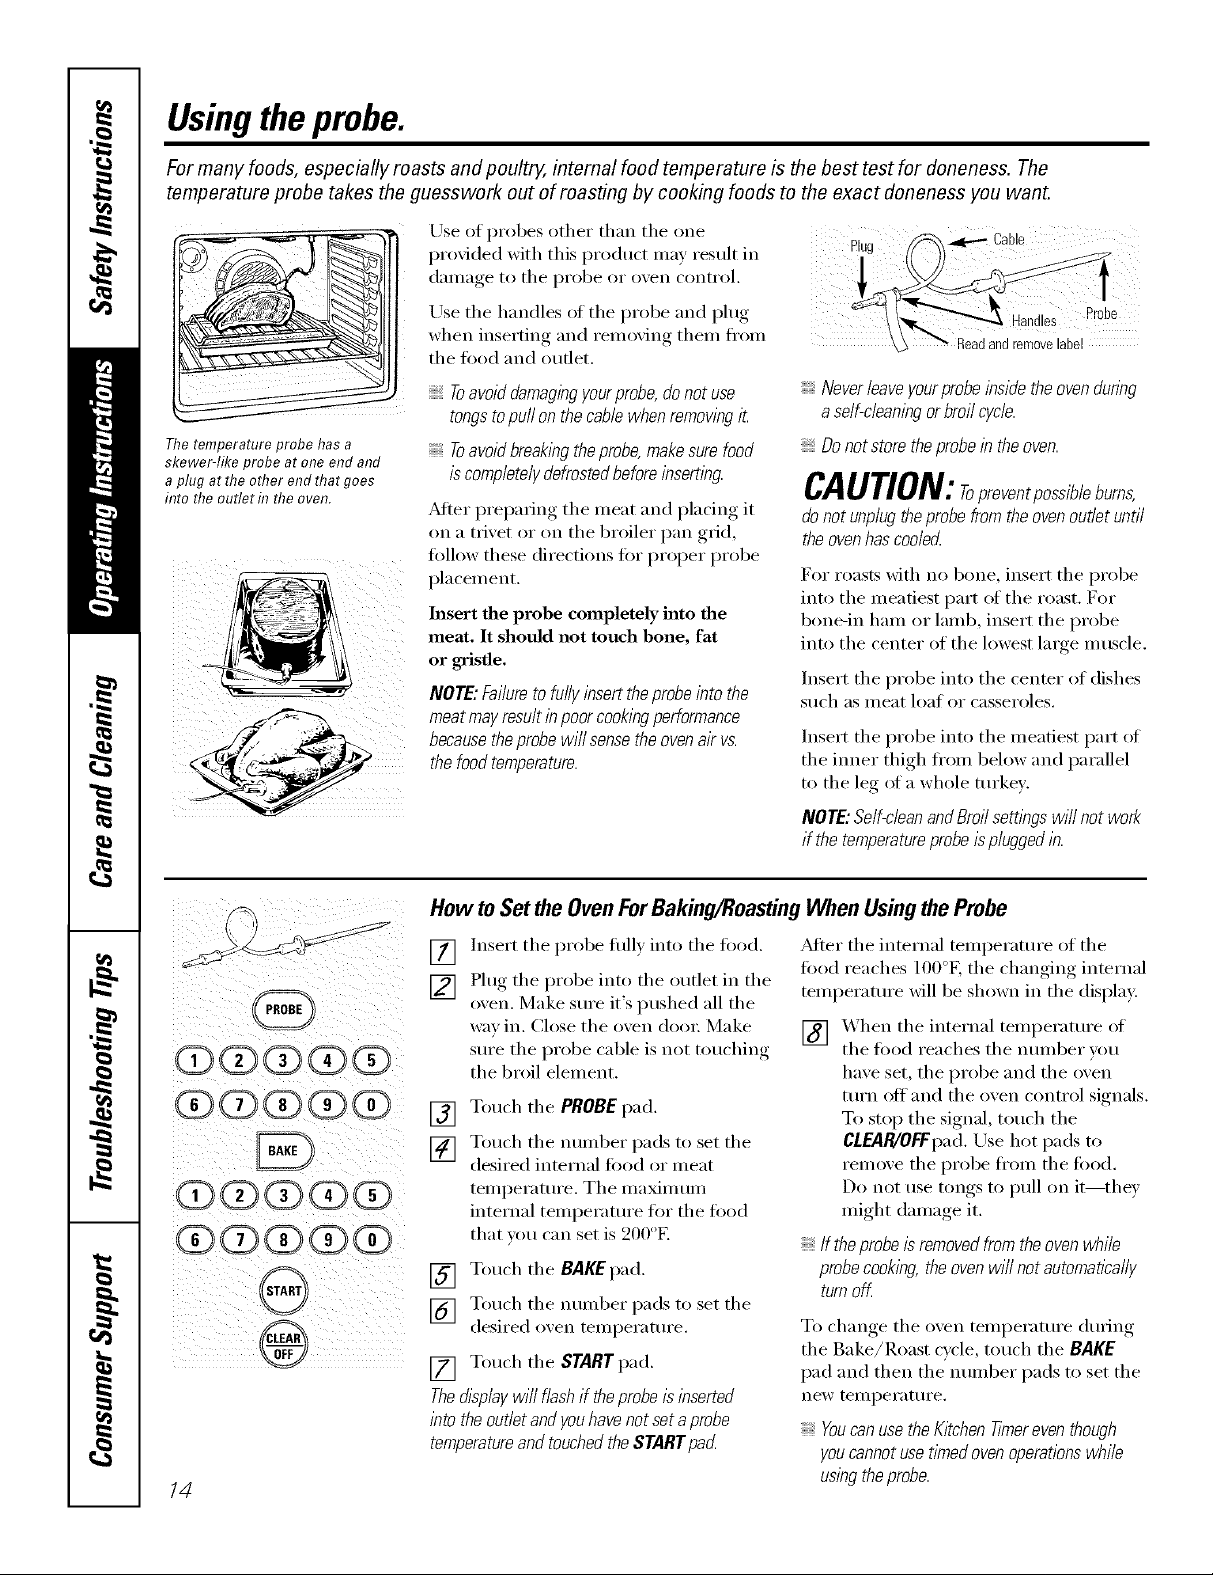
Formany foods, especially roasts and poult_ internal food temperature is the best test for doneness. The
temperature probe takes the guesswork out of roasting by cooking foods to the exact doneness you want.
I_)se of probes other than the one
provided with this product may result in
Riy:¸ C !,e/
i_:i!_i_ _iiii_
__move label
Neverleaveyourprobeinsidetheovendunbg
aself-cleaningorbroilcycle.
Donotstoretheprobeintheoven.
CAUTION: ropreventpossibleburns,
do not unplug the probe from the oven outlet until
the oven has cooled
For roasts Mth no bone, insert the probe
into the meatiest part of the roast. For
bone-in ham or lamb, insert the probe
into the center of the lowest large muscle.
Insert the probe into the center of dishes
Stlch as IIleat l()at or casseroles.
Insert the ptx)be into the meatiest part of
the inner thigh fl'om below and parallel
to the leg of a whole tin'key.
NOTE:Self-dean andBroilsettings will not work
if the temperatureprobeisplugged in.
The temperature probe has a
skewer-like probe at one end and
a plug at the other end that goes
into the ouflet fl7the oven.
dai/lage to the pi'obe or oxeil coiltrol.
Use the handles of the probe and plug
xdmn inserting and rem(Mng them fl'om
the fl)od and outlet.
Toavoiddamagingyourprobe,donotuse
tongs to pullon the cable when removing i_
Toavoid break/bg the probe, make sure food
is completely defrosted before insert/bg.
_dier preparing the meat and placing it
on a trivet or on the broiler pan grid,
fi)llow these directions fi)r proper probe
placement.
Insert the probe completely into the
meat, It should not touch bone, fat
or gristle.
NOTE:Failuretofullyinserttheprobeintothe
meatmayresultinpoorcookingperformance
becausetheprobewi//sensetheovenair vs.
thefoodtemperature.
@@@@@
@@@@@
Q@@@@
@@@@@
14
How to Set the Oven ForBaking/Roasting When Using the Probe
Insert the probe flfllv into the fi)od.
[]
Plug the probe into the outlet in the
[]
oxen. Make sm'e it's pushed all the
way in. Close the oven dora: Make
sm'e tile probe cable is not touching
the broil element.
Touch the PROBEpad.
[]
Touch the number pads to set the
[]
desired internal fi)od or meat
temperature. The maximum
internal temperatm'e fl)r the food
that you can set is 200°E
[] Touch the BAKEpad.
[] Touch the number pads to set the
desired oxen temperatm'e.
[] Touch the START pad.
Thedisplay wi// f/ash if theprobe isinserted
into the outletand youhavenot seta probe
temperatureand touchedthe STARTpacL
_Mter the internal temperatm'e of the
ti)()(1 reaches lO0°K the changing internal
temperature will be shown in the display:
[] _._hen the internal temperatm'e of
the food reaches the nmnber you
have set, the probe and the oven
turn off and the oven control signals.
To stop the signal, touch the
CLEAR/OFFpad. Use hot pads to
remove the probe ti'om the too(1.
Do not use tongs to pull on it--they
might damage it.
If theprobe is removedfrom theoven while
probecooking,the ovenwill not automaflbally
turnoff.
To change the oven temperatm'e dining
the Bake/Roast cycle, touch tile BAKE
pad and then the nmnber pads to set the
new temperatm'e.
Youcan usethe Kitchen Tknereventhough
youcannotuse timed oven operationswhile
usingthe probe.

Usingthe clock,kitchen timerand controllockout. CEa..,ia.cescom
To Set the Clock
Make sure the clock is set to the
correct time ofda_
TheKitchen 77merisamhTutetimeronly.
TheKitchen Timer does not control
oven operations. Themaximum
setting onthe Kitchen T#neris 9hours
and 59mhTutes.
The clock midst be set to the co_'rect time
of dav ]" [h e a I 0It }1]_ a [i c o','e]_ ti m i m_
_m_ctio_s to work properly. The time of
day cam_ot 1)e cham_ged C[m_wg a timed
bakim)g or se]fXc]eam)im)g c_c]e.
ToSet the Kitchen Timer
[] Touch tile KITCHENTIMER
ON/OFFpad,
[] Touch tile number pads until tile
ai/lotlnt of time )ou want shows
in tile display: For example, to set
2 houI_ and 45 ininutes, touch 2, 4
and 5 in that ordex: If you make a
mistake touch the KITCHEN TIMER
ON/OFFpad and begin again.
[] Touch tile STARTpad.
AftertouchingtheSTARTpad,SETdisappears,
thistellsyouthetimeiscountingdown,although
ToReset the Kitchen Timer
[] Tol_c]) the CLOCK pad.
[] Tol_c]) the mm_l)e_" pads.
[] Tol_h the START pad.
the displaydoesnot change until oneminute has
passed Secondswill not beshown inthe display
until thelastminute is counting down.
[] _q/ell file Kitchen Tilner reaches .00,
tile control will beep 3 times fi)llowed
bv one beep every 6 seconds until
tl;e KITCHEN TIMER ON/OFF pad
is touched.
The6-secondtonecanbecanceledbyfollowing
thestepsin theSpecialfeaturesofyouroven
controlsectionunderTonesat theEndofa
TimedCycle.
CONTROLLOCROLff
If tile display is st.ill showing tile time
remaining, you may change it bv
touching tile KITCHEN TIMER ON/OFFpad,
then touch tile number pads tmtil tile
time you want appem_ in tile display,
ToCancel the Kitchen Timer
Touch tile KITCHENTIMERON/OFF
pad twice.
Control Lockout
Yourcontrolwillallowyoutolockout thetouch
padssotheycannotbeactivatedwhenpressecL
To lock/unh)ck tile touch pad controls:
[] Touch and hold the 9and 0 pads
at tile same time until tile control
beeps.
The oven display will show Lec On
tot several seconds, then it will go
blank until a c_)oking pad is touched.
If tile remaining time is not in tile display
(clock, delay start or cooking time are in
tile display), recall tile remaining time by
touching tile KITCHEN TIMER ON/OFFpad
and then touching tile number pads to
enter the new time you want.
If the ranoe control is locked and a
cooking, l)ad is touched, tile oxen display
will show that the control is locked,
Onmodelswith CONTROLLOCKOUT,
theovenwillbelockedout Theknob-
controlledsurfaceunitswillstillbeactive.
[] To tmlock the control, touch and
hold tile 9 and Opads at the salne
time tmtil tile control beeps.
15
 Loading...