

GE JB910TK4WW, JB910TK3WW, JB910TK2WW, JB910SL2SS, JB910KK4CC Owner’s Manual
...
_&com
Safety InstrutCions ............. 2-5
Operating InstrutCions
Clock, Timer and
Control l_ockout ................. 15
Com_ction ()_n ............. 19-23
Roasting Guide ................ 23
Timed Features ............. 21,22
Cookware ....................... 7
Oven ....................... 11,12
Broiling Guide ................. 12
()yen Controls .................. 10
°_
Probe .......................... 14
Proofing Feature ................ 24
Sabbath Feature ................. 30
Self'Cleaning ................. 25, 26
Special Features .............. 27-29
Surfi_ce Units .................. 6-9
Thermostat Adjustment--
Do It Yoreself ................... 16
Timed Baking and
Roasting Features ................ 13
_\arming Drawer ............. 17, 1$
*¢\_rming Feature ................ 24
Care and Cleaning .......... 31-37
Troubleshooting Tips ........ 38-42
Accessories .................... 46
Consumer Support
Consumer Support ...... Back Co_r
Product Registration .......... 43, 44
_\_rranty ...................... 47
Write the model and serial
numbers here:
Model #
Serial #
You can lind them on a label
behind the storage drawer
on the range frame.
49-80362 11-05Jfl
iMPORTANTSAFETYiNFORMATiON.
READALLiNSTRUCTIONSBEFOREUSING.
A ,!
For your safety, the information in this manual must be followed to minimize the risk of fire, electric
shock, or to prevent property damage, personal injury, or loss of fife.
A WARNINGANti-TIPDEVICE
All rangescan tipandinjury couldresult.
Toprevent accidental tipping of the range, attach it to the wall and floor by installing the Anti--tip
device supplied.
If the Anti--tip device supplied with the range does notf#this application, use the universal Anti--17p
device WB2X7909.
Tocheck if the device is installed and engaged properly, remove the storage drawer and inspect
the rear leveling leg. Make sure #fits securaly into the slot.
If you pull the range out fl'om the wall fin" any reason, make sure the device is properly engaged when
you push the range back against the wall. If it is not, there is a possible dsk of the range tipping over
and causing iqiury if you or a child stand, sit or lean on an open dooi:
Please i'efi_r to the Anti-Tip device infimnatioi_ in this malmal. Failure to take this precautioi_ could
result in tipping of the range and iqiur,:.
IMPORTANTSAFETYNOtiCE
The California Safe Drinking Water and ToxicEnforcement Act requires the Governor of California to
publish a list of substances known to the state to cause cancer, birth defects or other reproductive
harm, and requires businesses to warn customers of potential exposure to such substances.
The fiberglass insulation in self-clean ovens gives off a very small amount of carbon monoxide during
the cleaning cycle. Exposure can be minimized by venting with an open window or using a ventilation
fan or hood.
SAFETYPRECAUtiONS
When using electrical appliances, basic safety precautions should be followed, including the following:
_: Use this appliance only fin" its intended
pull)ose as described in this Owner's Manual.
::Ji::Be sure your appliance is properly installed and
gI'()tmded by a qualified installer in accordance
with the provided installati(m instructions.
::Ji::Have the installer show u)u the location of
the drcuit breaker ()i"Rise. Mark it fin" easy
reference.
_: Do not attempt to repair or replace any
part (ff Votlr range Ulfless it is spedfically
recomn_ended in this malmal. _M1other
servicing should be reterred to a qualified
techlfidan.
_: Deft)re pelt0iming any service, discolmect
the range power supply at the household
distlibution panel by ren_oving the fllse or
switching oft the circuit breakei:
::Ji::Do not leave children aloi_e---childrei_ should
not be left alone or tmattended in an area
where an appliance is in use. They should
ne\'er be allowed to sit or stand on any part
of the appliance,
::Ji::Do not allow anyone to clilnb, stand or hang
on the dooi; storage drawer ()i"cookt()p. They
could dalnage the range and even tip it ()vei;
ca using severe pei_(mal iqj ui T.
2
_e.com
WARNING!!
SAFETYPRECAUTIONS
Donot operate the oven or cooktop controls ff the glass is broken. Food splatter or cleaning solution
may penetrate a broken control panel or cooktop and create a risk of electrical shock. Contact a
qualified technician immediately should your glass control panel or cooktop become broken.
_: Do IIOt stoI'e flalllI/lable IllatelJals iI1 _lIl ()veil
OF IleaI" tile cooktop.
CAUTION:]teIllSofinteresttochildren
should not be stored in cabinets above a range
or on tile back of a rang_hikh'en cliinbing
on tile range to reach iten/s could be seriously
ii_jui'ed.
_: Never wear loose-fitting or hanging gamlents
while using the appliance. Be carefli1 when
reaching for iteins stored over the range.
Flanlnlable inatefial couM be ignited if
brought in contact with hot suil'hce units or
heating eleinents and nlay cause severe burns.
::J?::Use only dry pot holdei_--nloist or dan/p
pot holdeIs Oil hot SUll'ilces nlav result in
burns ti'oin steanl. Do not let pot holdeis
touch hot sui_i_ce units or heating elenlents.
Do not use a towel or other bulky cloth in
place of pot holdei_.
_: Do IIOt rise water Oil grease fires. Never pick
up a flanling pan. Turn tile controls off.
Sinother a flanling pan on a suFlilce unit
by covering tile pan coinpletely with
a well-fitting lid, cookie sheet or fiat tray:
Use a inulti-puil)ose dry chenlical or
fi)an/-t,ipe fire exfinguishei:
Flan/ing grease outside a pan can be put
out by covering it with baking soda oi; if
a*:filable, by using a inulti-purpose (liT
chen/ical or ti)ain-type fire extinguishei:
Name in the oven can be sn/othered
con/plemly by closing tile oven door and
turning tile oven off or by using a inulti-
puq)ose (liT chen/ical or fi)an/-type fire
extinguishei:
N For your s'alb'Q:,never use your appliance
for wam/ing or heating tile roonl.
_: Do not let cooking grease or other flanmlable
nlaterials accunlulate in or near the range.
::Ji::Do not touch tile sui_fi_ce units, tile heating
elen/ents or tile interior suiqfi_ce of tile oven.
These surli_ces nlav be hot enough to burn
even though tile*' are dark in coloi: During and
atter use, do not touch, or let clothing or other
flanmlable n/ateiials contact tile suiqf_lce units,
areas nearby tile surfi_ce units or anv interior
area of tile ()veil; allow sufficient dine for
cooling fii_t.
Potentially hot surfhces inchide the cooktop,
areas thcing tile cooktop, oven vent opening,
sui_i_ces near the opening, crevices around the
ovell door.
REMEMBER:Tile inside surfhce (ff tile oven
n/av be hot when tile door is opened.
::Ji::Do not store or use conlbustible nlaterials,
gasoline or other flanlnlable vapoi_ and liquids
in tile vicinity of this or any other appliance.
_: Keep tile hood and grease filtei_ clean
to nlaint;fin good venting and to avoid
grease fires.
::Ji::Teach children not to play with tile controls
or any other part of tile range.
::Ji::Mways kee I) dish towels, dish cloths, pot
holdeI_ and other linens a safi _distance
[i'Olll VOilE I'allge.
_: Mwa):s kee I) wooden and plastic utensils and
canned food a sale distance fl'onl p)ur range.
::Ji::Mways kee I) con/bustible wall coverings,
curtains or drapes a safe distance fl'onl
VO/lI" KIIlge.
COOKMEATANDPOULTRYTHOROUGHLY...
Cookmeat and poultry thoroughly--meat to at least an INTERNAL temperature of 160°Fand poultry to at least
an iNTERNAL temperature of 180°E Cooking to these temperatures usually protects against foodboree illness.
3

iMPORTANTSAFETYiNFORMATiON.
READALLiNSTRUCTiONSBEFOREUSING.
RADIANTSURFACEUNITS
Use proper pan size--select cookware having fiat bottoms largo enough to cover the surface unit
heating element. The use of undersized cookware will expose a portion of the surface unit to direct
contact and may result in ignition of clothing. Proper relationship of cookware to surface unit will
also improve efficiencv.
;;Ji::Never leave the surfi_ce units unattended at
high heat settings. Boilove_3 cause smoking
and greasy spillove_ that may catch on fire.
::Ji::Only certain t,ipes of glass, glassA'eramic,
earthenware or other glazed containers are
suitable fi)r cooktop service; othe_ may break
because of the sudden change in temperature.
_: To minimize the possibili_' of bm'ns, ignition
of flammable mamfials and spillage, the handle
of a container should be turned toward the
center of the range without extending over
nearby SUlq'ilce units.
_: Mwavs mrn tile sudilce traits off befiwe
rei/loving cookware.
::Ji::_]_en preparing flaming foods tinder the
hood, ttlFn the tim on.
::Ji::Use care when touching the cooktop.
The glass surlilce ot the cooktop will retain
heat alter the controls have been turned off.
::Ji::Kee I) an eye on foods being flied at high or
medium high heat settings.
_: Foods for fl'ying should be as dry as possible.
Fl'ost on ll"ozen lOo(1s or i/loisttli'e on ti'esh
fi)o(ls can cause hot lilt to bubble up and
over the sides of the pan.
::Ji::Use little tilt tot effective shallow or deep
lilt fl'ying. Filling the pan too flfll of tilt can
cause spillove_5 when food is added.
::Ji::If a combination of oils or lilts will be used
in flTing, stir together before heating, or
as lilts melt slowlY.
_: Mwavs heat tilt slowly; and watch as it heats.
::J)::Use a deep lilt themlometer whenever
possible to prevent overheating lilt beyond
the smoking point.
::Ji::Avoid scratching the glass cooktop. The
cooktop can be scratched with imms such
as shaq) instruments, rings or otherjeweh%
and rivets on clothing.
::Ji::imge scratches or impacts to glass (loo_ or
cooktops can lead to broken or shattered glass.
::Ji::Do not operate tile radiant surtilce units if the
glass is broken. SpilloveI5 or cleaning solution
may penetrate a broken cooktop and create a
risk of electrical shock. Contact a qualified
technician immediately should yore" glass
cooktop becoi//e broken.
_: Never use the glass cooktop stm'ilce as a
cutting board.
_: Do not place or store items that can melt or
catch fire on the glass cooktop, even when it
is not being used.
::Ji::Be carefifl when placing spoons or other
stirring utensils on glass cooktop sm'lilce when
it is in use. Thev may become hot and could
Cause b/lI'ns.
::Ji::Clean the cooktop with caution. If a wet
sponge or cloth is used to wipe spills on a hot
surfilce trait, be careflfl to avoid steam burns.
Sollle cleanei_ can produce noXiO/IS J[illlleS i[
applied to a hot surfllce.
NOTE:"We recommend that you avoid wiping
any surfilce trait areas imtil they have cooled
and the indicator light has gone off. Sugar
spills are the exception to this. Please see the
Cleaning the glass cooktop section.
_: \4]_en the cooktop is cool, use only the
(;EbDdHA BRYTE ':Ceramic Cooktop Cleaner
and the CEI_dHA BRYTE Ceramic Cooktop
Cleaning Pad to clean the cooktop.
_: To avoid possible damage to the cooking
surtilce, do not apply cleaning cream to
the glass sm_hce when it is hot.
::Ji::_Mter cleaning, use a (hw cloth or paper towel
to remove all cleaning cream residue.
::Ji::Read and follow all instructions and warnings
on the cleaning cream labels.
_: Do not IIse plastic wrap m cover food. Plastic
may melt onto the sm_hce and be very difficult
to i'ei/love.
4

ge.com
WARNING!
OVEN
Stand away from the range when opening the oven door. Hot air or steam which escapes can cause
bums to hands, face and/or eyes.
_: Do not heat unopened food ('ontaine_.
Pressure could build up and the container
could bmst, causing an iqjmy:
!_:iKee I) the oven vent unobstructed.
_: Kee I) the oven fl'ee fl'om grease buildui).
::Ji::Place the oven rack in the desired position
while the oven is cool. If racks Illtlst be handled
when hot, (lit not let pot holder contact the
heating elements.
_: When using cooking or roasting bags in the
oven, tollow the tnanuthctttrer's directions.
SELF-CLEANINGOVEN
_: Pulling out the rack to the stop-lock is a
convenience in lifting heavy toods. It is also
a precaution against burns fl'om touching
hot sur_hces of the door or oven walls.
::Ji::Do not use the oven tit (li T newspapers.
If overheated, they can catch on fire.
_: Do not use the oven fi)r a storage area. Items
stored in an oven can ignite.
::Ji::Do not leave paper products, cooking utensils
or food in the oven when not in use.
::Ji::Do not use ahmfinum toil to line oven bottoms,
except as suggested in this manual. ]ml)roper
installation of ahmfinum foil may result in a
risk of electric shock or fire.
Donot use oven cleaners. No commercial oven cleaner or oven liner protective coating of any kind
should be used in or around any part of the oven. Residue from oven cleaners will damage the inside
of the oven when the self-clean cycle is used.
::Ji::Do not clean the door gasket. The door gasket
is essential fi:,r a good seal. Care should be
taken not tit rub, damage or move the gasket.
::Ji::gefi)re self:cleaning the oven, remove the
convection roasting rack, broiler pan, grid
}lIl(l other cookware.
?_: Shiny, sih'e>colored oven i'acl_s (on seine
models) should be removed fl'om the oven
befi)re beginning the selfZclean cycle.
::Ji::Gray porcelain-coated oven racl<s (on some
models) may be cleaned in the oven during
the sell:clean cycle.
::Ji::Be sure to wipe up excess spillage befin'e
starting the sell:cleaning operation.
::Ji::If the self:cleaning mode malfimctions, mm
the oven off and disconnect the power supply.
Have it serviced by a qualified technician.
::Ji::Clean only parts listed in this Owner's Manual.
WARMINGDRAWER
_: The puq)ose ot the wamfing drawer is to hold
hot cooked foods at serving teml)erature.
Always start with hot food; cold food cannot be
heated or cooked in the wamfing drawer:
::Ji::Do not use the drawer to (hT newsl)apet_.
If overheated, they can catch on fire.
_: Do not leave i)aper products, plastics, canned
food or combustible materials in the drawer:
::Ji::Never leavejms ,:n"cans of tat drippings in or
tie,It" VOIII" drawee
::Ji::Do not warnt fi)od in the drawer fin" there than
two holily.
?_:Never place, use or sell:clean the lower oven
drawer pan in the upper oven.
::Ji::Do not touch the heating element or the interior
surface of the drawer. These surlilces may be
hot enough to burn.
REMEMBER:The inside surlhce of the drawer
may be hot when the drawer is opened.
::Ji::Use cme when opening the (lrawet: Open the
drawer a crack and let hot air or steam escape
befl)re removing or replacing fi)od. Hot air or
steam which escapes can cause burns to hands,
lace and/or eyes.
_: Do not use ahuninunl fi)il to line the lower
oven drawer: Foil is an excellent heat insulator
and will trap heat beneath it. This will upset
the perlbmmnce of the drawer and it could
damage the interior finish.
READANDFOLLOWTHISSAFETYINFORMATIONCAREFULLY.
SAVETHESEINSTRUCTIONS
5
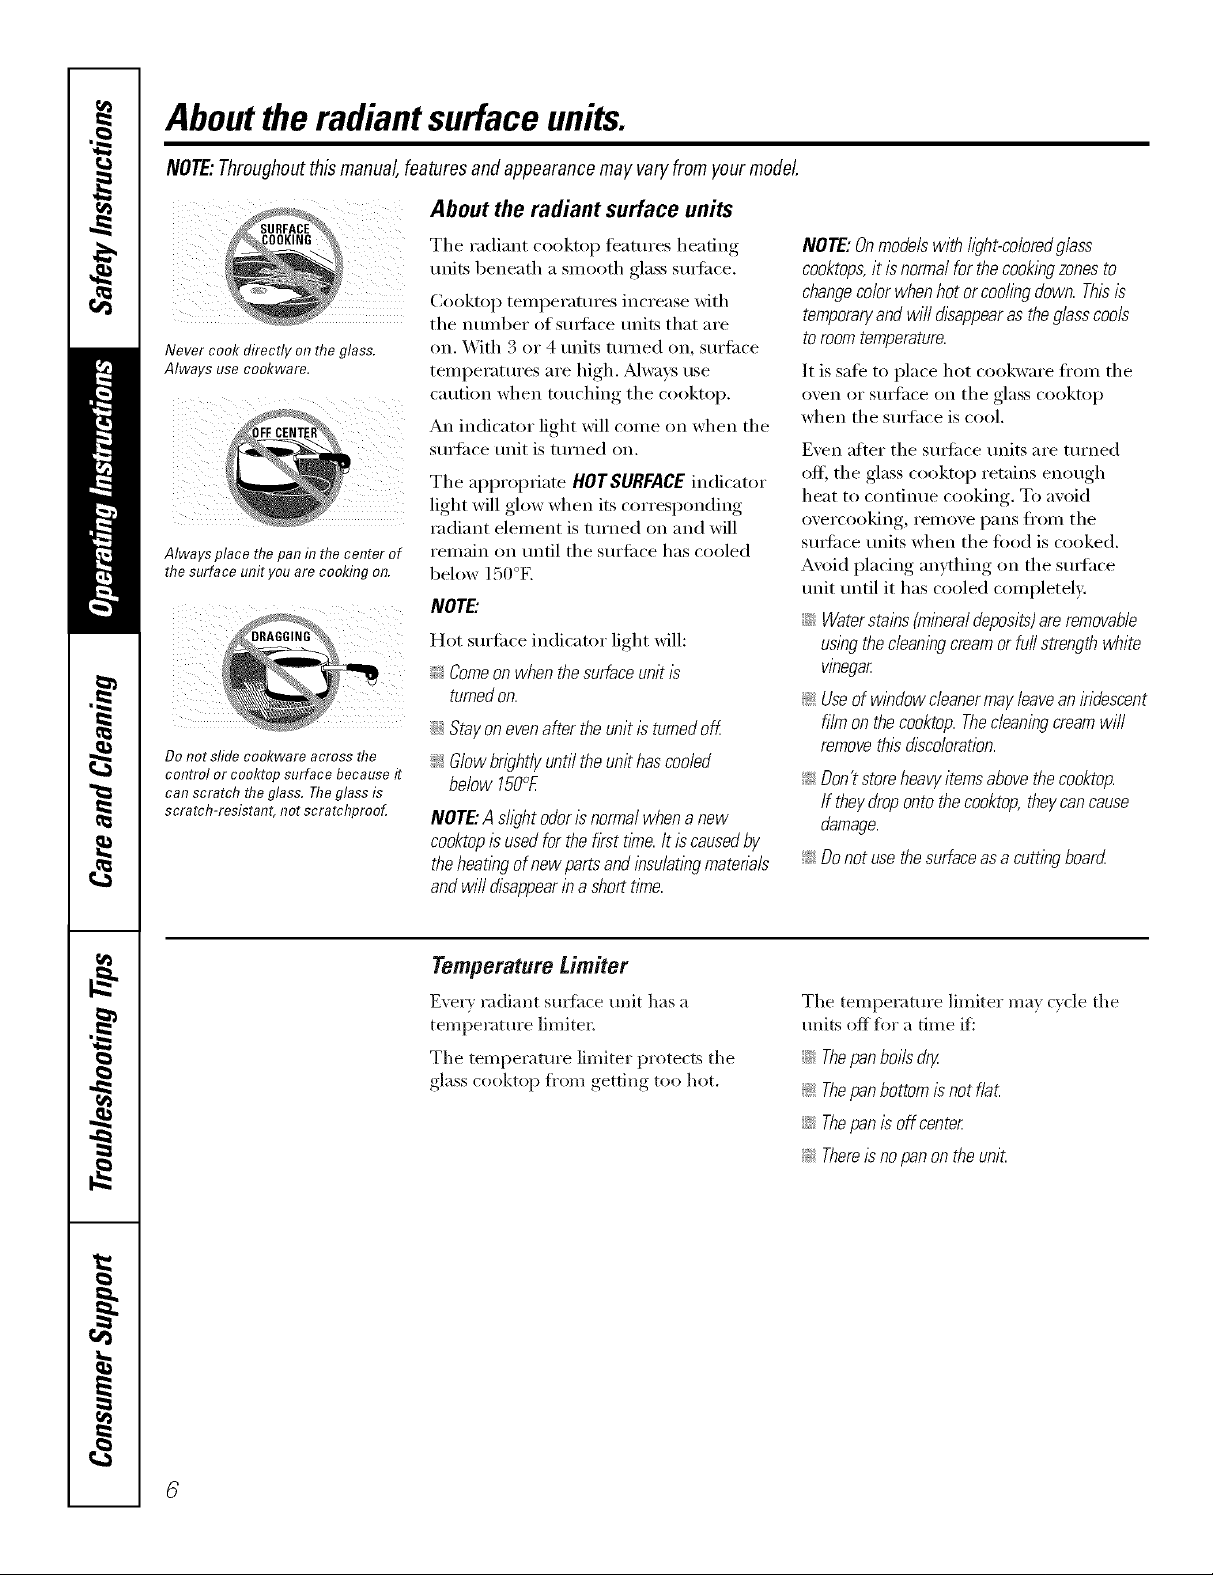
Abouttheradiantsurfaceunits.
NOTE:Throughoutthismanual,featuresandappearancemay varyfromyourmodel
About the radiant surface units
FACE_
_¢&,COOKING _
Never cook directly on the glass.
Always use co&ware.
Always place the pan h7thecenter of
the surface unit you are cooldng on.
Z
Do not sfideco&ware across the
control or cooktop surface because it
can scratch theglass. The glass is
scratch-resistant, not scratchprooL
The radiant cooktop features heating
units beneath a smooth glass stmti_ce.
Cooktop temperatures increase with
the number of sm_i_ce units that are
on. With 3 or 4 units turned on, surti_ce
temperatures are high. _wavs use
caution when touching the cooktop.
An indicator light will come on when the
surti_ce trait is turned on.
The appropriate HOTSURFACEindicator
light will glow when its corresponding
radiant element is turned on and will
remain on until the surti_ce has cooled
below 150°E
NOTE."
Hot surli_ce indicator light xdll:
_/_Comeonwhenthesurfaceunitis
turnedon.
ij_::Stayonevenaftertheunitisturnedoff
_;G/owbright/yuntiltheunithascooled
below150°£
NOTE:Ashghtodorisnormalwhenanew
cooktopis usedforthefirsttime.It iscausedby
theheatingof newpartsandinsu/atlegmaterb/s
andwill disappearinashorttime.
NOTE:& modelswith/ight-co/oredgless
cooktops,it isnormalforthecookingzonesto
changecolorwhenhotorcoo/legdown.Thisis
temporaryandwill disappearastheglasscools
toroomtemperature.
It is sale to place hot cookware ti'om the
oven or sm_hce on the glass cooktop
when the stmthce is cool.
Even after the stu_i_ce units are turned
off, the glass cooktop retains enough
heat to continue cooking. To avoid
overcooking, remove pans fl'om the
stu_i_ce traits when the t0od is cooked.
Avoid placing anything on the sudhce
unit until it has cooled completel>
::Ji::Waterstains(mineraldeposits)areremovable
usingthecleaningcreamorfull strengthwhite
vinegar
_ Useof windowcleanermayleaveaniridescent
filmonthecooktop.Thecleaningcreamwill
removethisdiscoloration.
_; Don'tstoreheavyitemsabovethecooktop.
If theydropontothecooktop,theycancause
damage.
_ Donotusethesurfaceasa cuttingboard
Temperature Limiter
Every radi:mr suI_hce unit has a
temperature limited:
The temperature limiter protects the
glass cooktop fi'om getting too hot.
The temperature limiter may cycle the
units off fi)r a time ifi
N Thepanboilsdry.
_; Thepanbottomisnotfle_
::J_::Thepanis offcenter
_ There_2nopanontheunit.
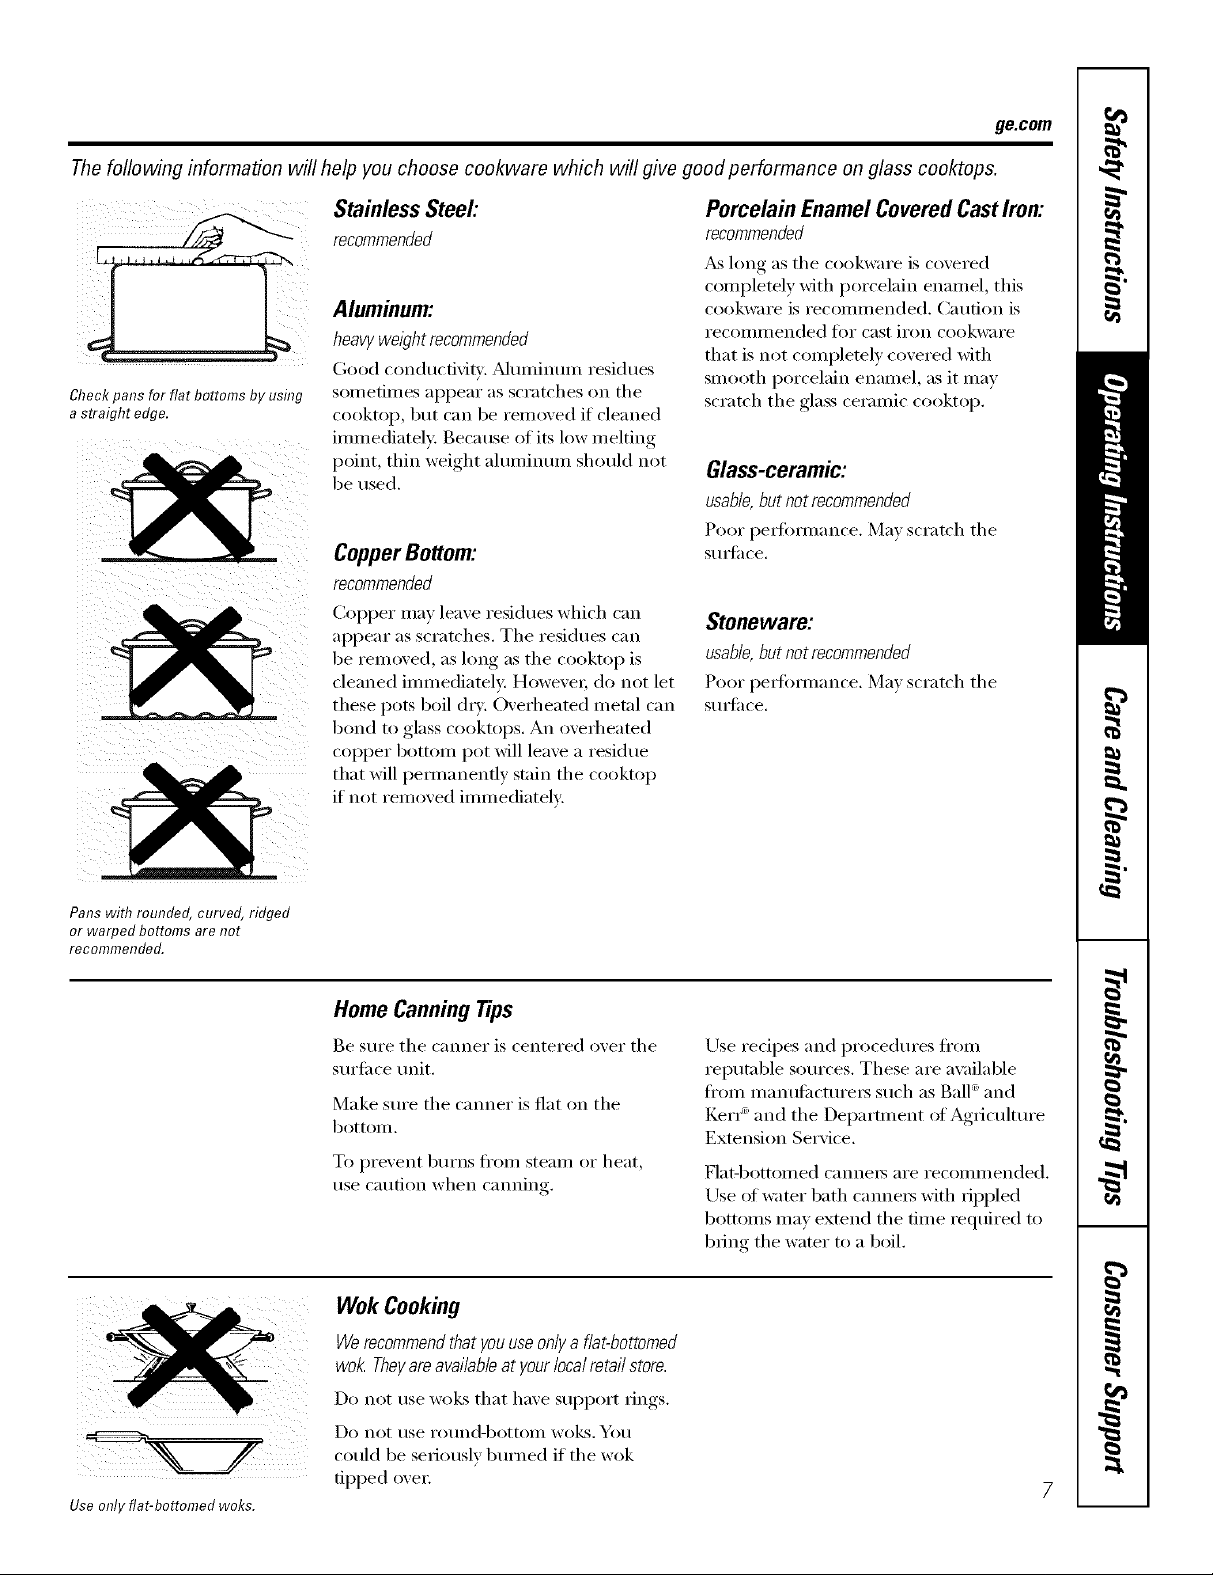
Thefollowing information will help you choose cookware which will give good performance on glass cooktops.
ge.com
i( / iI
Check pans for flat bottoms by using
a straight edge.
Stainless Steel:
recommended
Aluminum:
heavyweight recommended
Go()d (olldu(dvii}'. a]tllllintlH] residues
s()metin_es appear as scratches on the
cooktop, but can be removed if cleaned
immediately: Because of its low melting
point, thin weight aluminmn should not
be used.
Copper Bottom:
recommended
Col)per may leave residues which ('}111
appear as scratches. The residues can
be removed, as long as the cooktop is
cleaned immediately: However; do not let
these pots boil (h T. Overheated metal can
bond to glass cooktops. An overheated
COl)per bottom pot will leave a residue
that will pemmnenfly stain the cooktop
if not removed immediately:
Porcelain EnamelCoveredCastIron:
recommended
_&_long as the cookware is covered
completely with porcelain enamel, this
cookware is recommended. Caution is
i'ecolilli/ended tOr cast ii'on cookware
that is not completely covered with
smooth porcelain enamel, as it may
scratch the glass ceramic cooktop.
Glass-ceramic:
usable,but not recommended
Poor l)edbmmnce. May scratch the
StlI]ilce,
Stoneware:
usable,but not recommended
Poor pedbmmnce. May scratch the
StlI{iIce,
Pans with rounded, curved, ridged
or warped bottoms are not
recommended.
Use only flat-bottomed woks.
Home Cann&g Tips
Be sure the canner is centered over the
surti_ce unit.
Make sm'e the cromer is fiat on the
bottom.
To prevent burns fl'Oln steam or heat,
use caution when canning.
Wok CookhTg
Werecommendthat youuseonlya flat-bottomed
wok Theyareavailable at yourlocal retail store.
Do not rise wo]_s that haxe SUl)port tings.
Do not rise i'otlnd-bottoill wo]¢s. Yell
could be seriously burned if the wok
tipped ove_:
Use redpes and procedures fl'om
reputable sources. These are a\_filable
fl'om manttfi_cttu'ei_ such as Ball ®and
Ken _ and the Department ot Agficultm'e
Extension Service.
Flat-bottoi/led canneis ai'e i'ecoi/lillended,
Use of water bath cmme_ with fil)pled
bottoms may extend the time _equired to
bring the water to a boil.
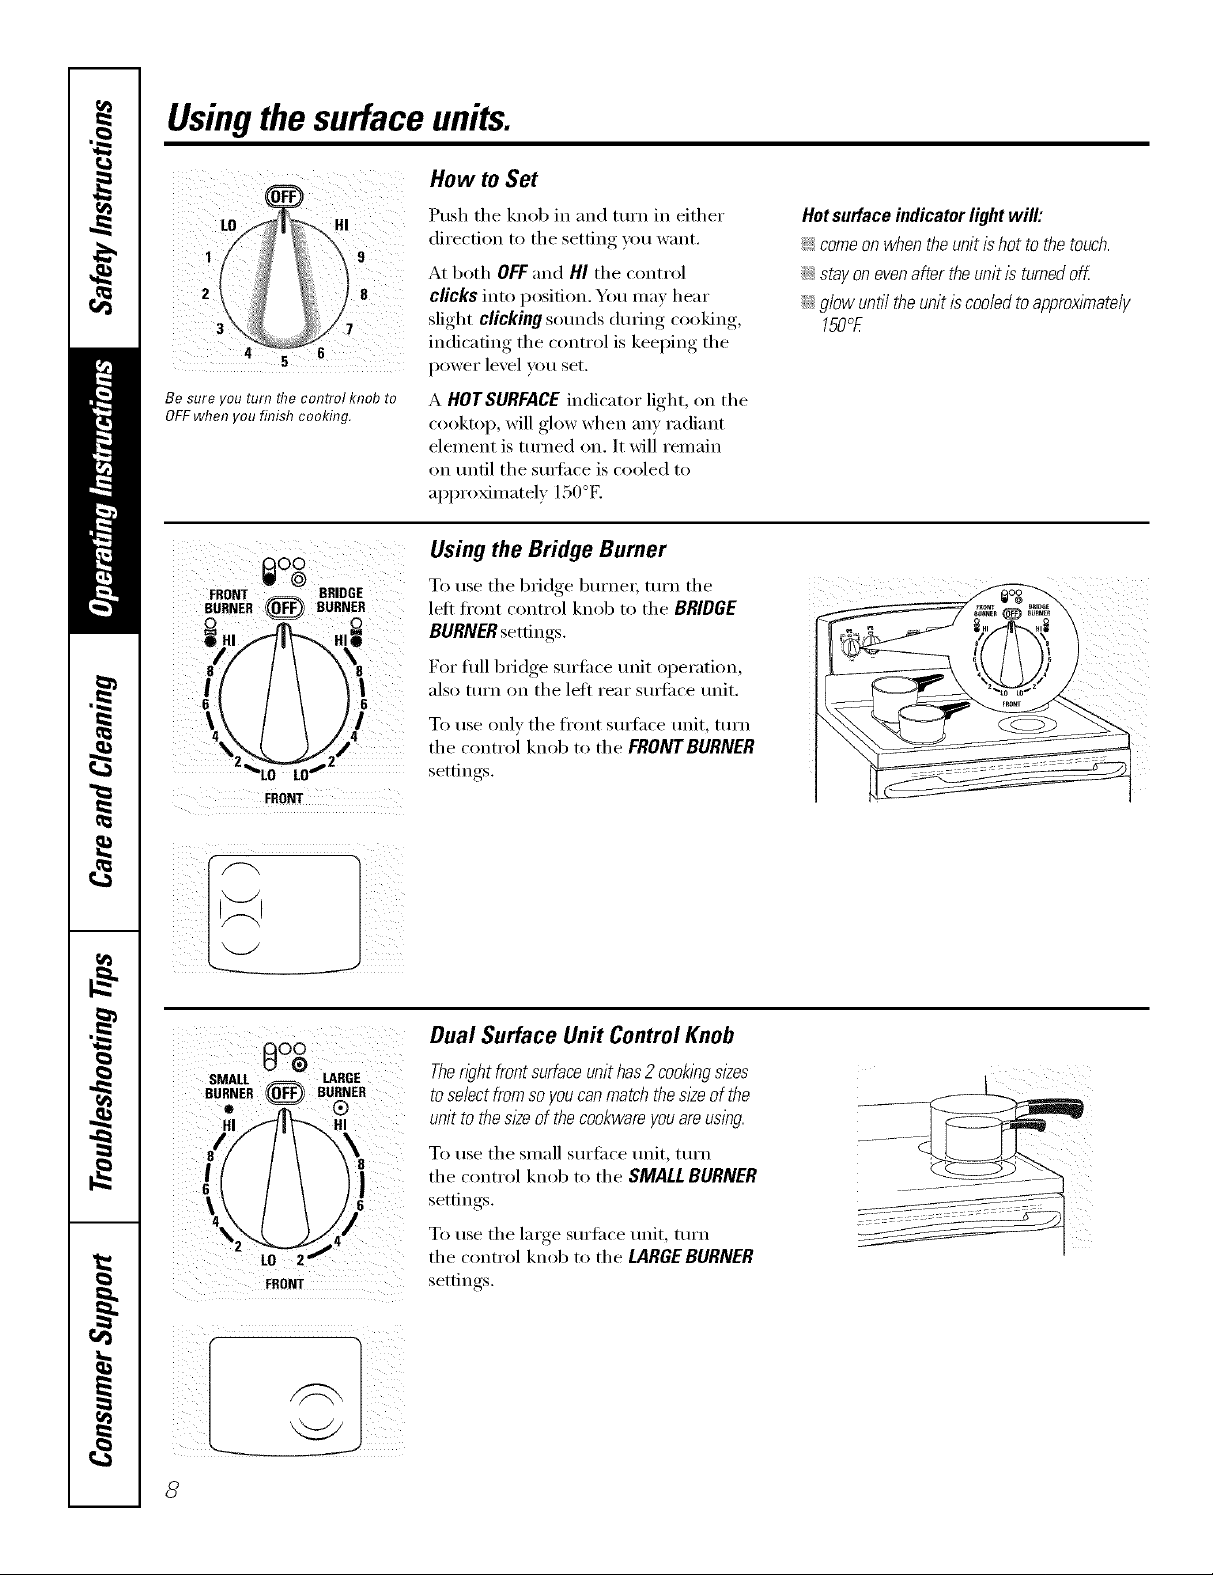
Usingthe surface units.
How to Set
Be sure you turn flTecontrol knob to
OFF when you finish cooking.
FRONT _ BRIDGE
BURNER (0_,,_ BURNER
FRONT
Push the knob in and turn in either
direction to the setting you want.
At both OFF and HI the control
clicks into position. You may hear
slight clicking sounds during cooking,
indicating the control is keeping the
power level you set.
A HOTSURFACEindicator light, on the
cooktop, will glow when any radiant
element is turned on. It will remain
on tmfil the surli_ce is cooled to
approximately 150°E
Using the Bridge Burner
To use the bridge burne_; mrn the
left fi'ont control knob to the BRIDGE
BURNER settings.
For flfll bridge surfilce unit operation,
also turn on the lefi rear smti_ce unit.
To use only the fl'ont smtace unit, turn
the control knob to the FRDNTBURNER
settings.
Hot surface indicator light will:
_ come on when the unit ishot to thetouch.
_Ji::stay on evenafter theunit is turned oK
::Ji::g/ow unti/ the unitis coo/edto approxlmate/y
150°E
AO0
SMALL _ LARGE
BURNER ((OFF)) BURNER
H
\
LO 2
Dual Surface Unit Control Knob
The@t front surface unit has2cooking sizes
toselect from soyoucanmatch the sizeof the
unit to thesizeof the cookware youareusing.
To use the small surfi_ce unit, turn
the control knob to the SMALLBURNER
settings.
To use the lmge surfi_ce unit, mrn
the control knob to the LARGEBURNER
settings.
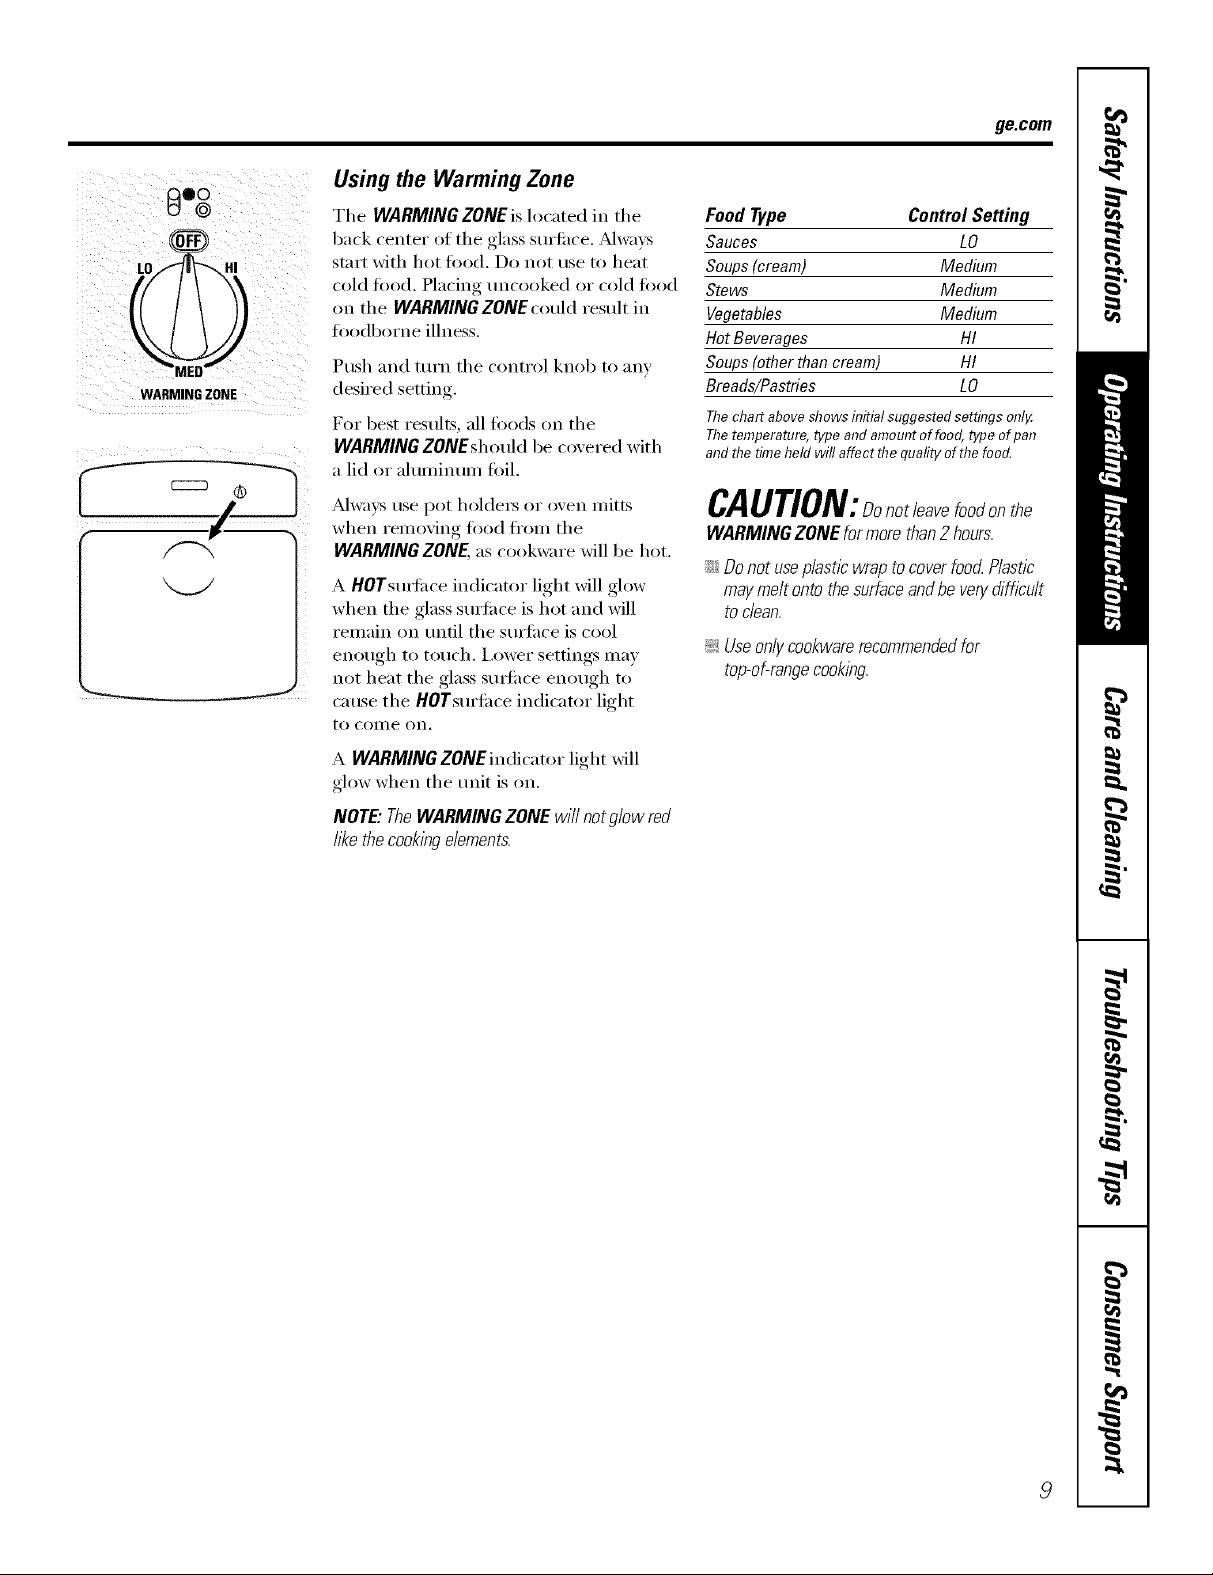
0°g
LO_-'_ HI
WARMING ZONE
Using the Warming Zone
The WARMING ZONE is located in the
back center ot the glass surti_ce. _Mwa_:s
start with hot toed. Do not use to heat
cold food. Placing uncooked or cold ti)od
oil tile WARMING ZONE could result in
ti)odborne illness.
Push and mrn tile control knob to any
desired setting.
For best results, all tbods on tile
WARMING ZONEshould be covered with
a lid or aluminum ti)il.
ge.com
Food Type Control Setting
Sauces LO
Soups(cream) Medium
Stews Medium
Vegetables Medium
HotBeverages HI
Soups(otherthan cream) HI
Breads/Pastries LO
Thechartabove showsinitial suggestedsettings onlg
Thetemperature,type and amountof food, typeof pan
and flTetimeheld will affect flTequafityofthe food.
_dwax:s use pot holdet_ or oven mitts
when removing ti)od fl'om tile
WARMING ZONE, as cookware will be hot.
A HOTsui_ilce indicator light will glow
when the glass surelce is hot and will
remain on tmtil tile sm'fi_ce is cool
enough to touch. I,ower settings ill,IV
not heat the glass sui_ilce enough to
cause the HOTsm'fi_ce indicator light
to COille on.
A WARMINGZONEindicator light will
glow when tile unit is on,
NOTE"TheWARMING ZONE w///not g/ow red
hT<ethecooking dements,
CAUTION:Donotleavefoodonthe
WARMING ZONE for more than2 hours.
iJi::Donot useplastic wrapto coverfoo_ Plastic
may meltonto thesurfaceand be ven/difficult
todean.
!i>Useonlycookware recommendedfor
top-of-rangecooking.
9
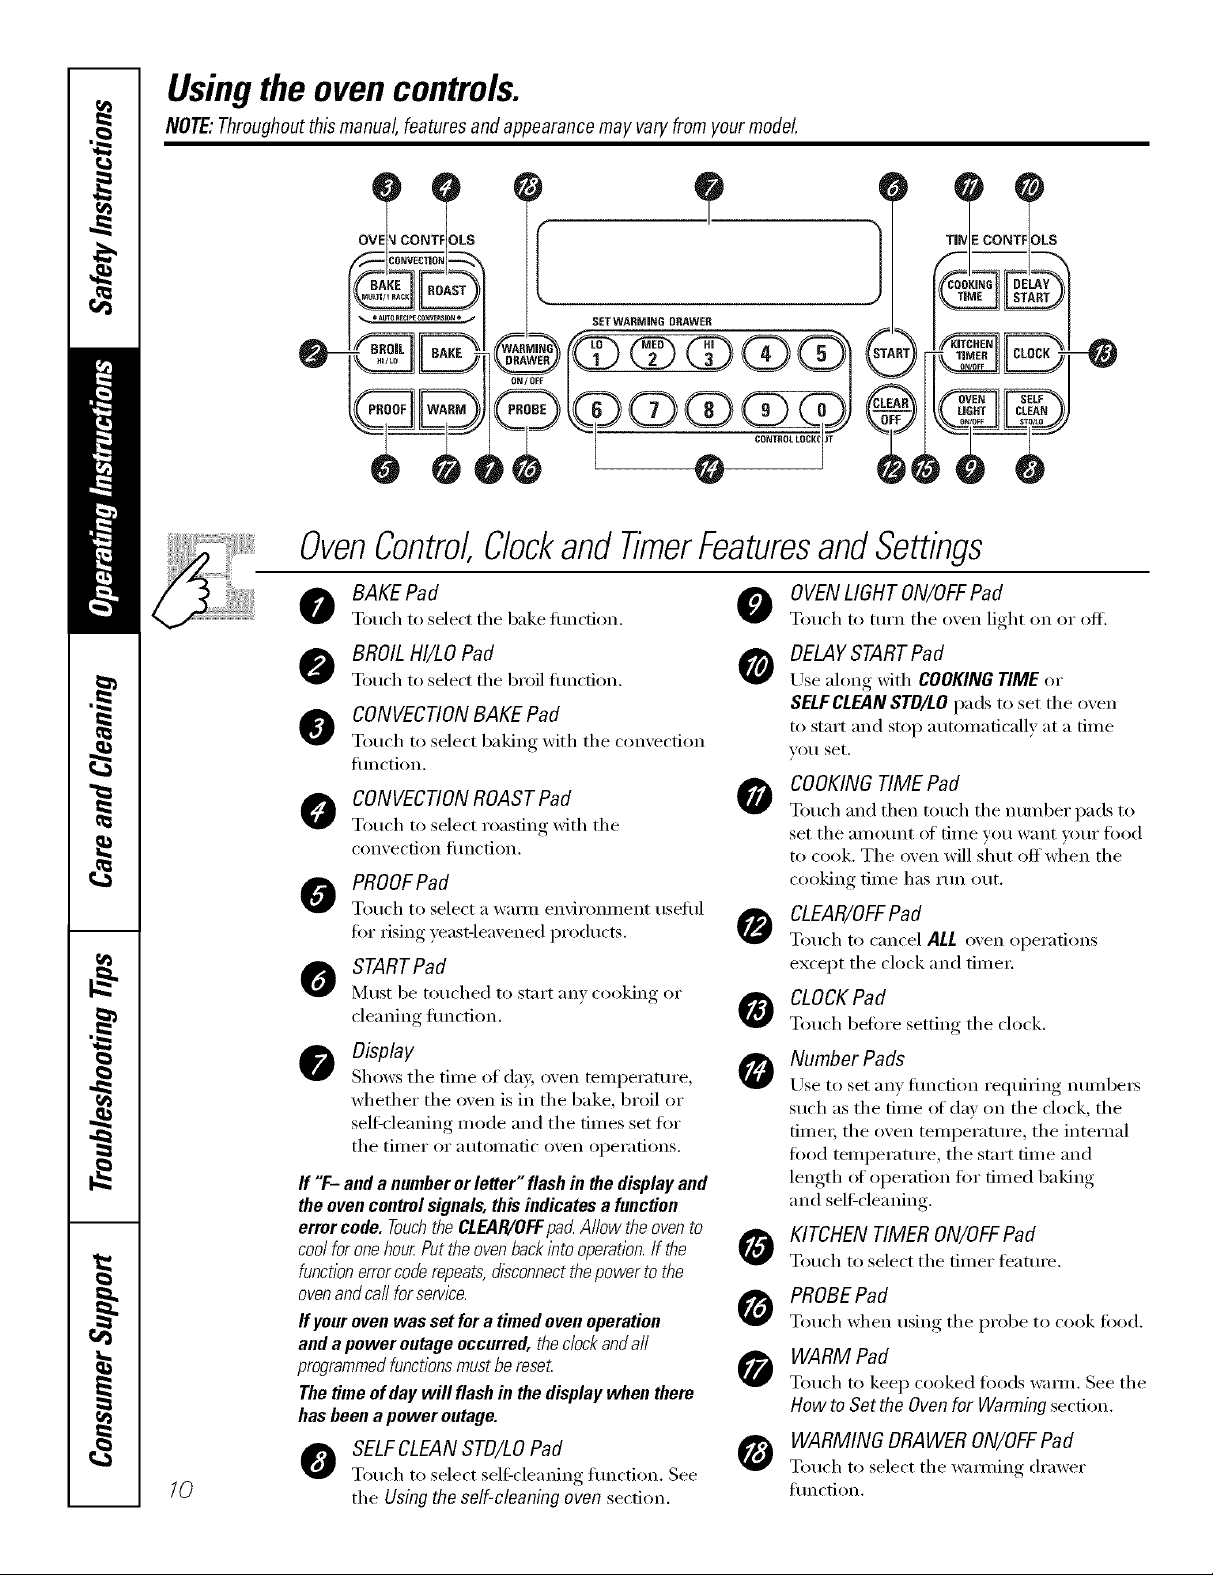
Usingthe ovencontrols.
NOTE:Throughoutthismanual,featuresandappearancemayvaryfromyour model
o o. s
/0
BAKE
,_ =AUTOREm_ECONVERSION• ,I
SETWARMING DRAWER
' {
0-
__CLEAN
OvenControl ClockandTimerFeaturesandSettings
Z Z
BAKE Pad
Totich to select the bake flulcfion.
BROIL HI/LOPad
Touch to select the 1)roll flulcfion.
CONVECTIONBAKE Pad
TotIch to select baking with the con_e('fion
flnlction.
CONVECTIONROAST Pad
TotIch to select roasting with the
con_, ection ttlnction.
PROOFPad
Totl(h to select a waml environillent tIseftIl
for rising )east-leaxened products.
STARTPad
Must be totiched to start an) cooking or
cleaning fiulction,
Display
Shows tile tiIlle of day, oven teillpei'attli'e,
whether the oven is in the bake, broil or
sell:cleaning nlode and the tiines set for
tile tiil/er or }ltltOill}ltic ()veil opei';ltions.
ff "F- anda numberor letter"flashinthedisplayand
theovencontrolsignals, thisindicatesa function
errorcode.Touchthe CLEAR/OFFpadAllowtheovento
coolforonehour.Puttheovenbackintooperation.If the
functionerrorcoderepeats,disconnectthepowertothe
ovenandca//forservice.
Ifyourovenwassetfora timedovenoperation
anda poweroutageoccurred,theclockanda//
programmedfunctionsmustbereset
Thetimeof daywill flashin thedisplaywhenthere
hasbeenapower outage.
SELFCLEANSTD/LO Pad
TotIch tI/select self:cleaning flulction. See
the Using the self-cleaning oven section.
OVENLIGHT ON/OFFPad
Touch to turn the o',en light on or off.
DELAYSTARTPad
Use ahmg with COOKING TIME or
SELFCLEANSTD/LO pads to set the o',en
to start and stop autoinaficall_ at a tiine
_()l/ set.
COOKINGTIME Pad
O
TotIch and then totich the nEro/her pads to
set tile }lIllOtlnt 01' tiI/le VOEI W}lIlt VOEII" I'()od
to cook. The oven will s'hut off' wl'mn the
cooking time ll}lS I'tln ()lit,
CLEAR/OFFPad
TotEch to cancel ALL oven operations
except the clock and tiIneI:
CLOCKPad
@
TotIch before setting the clock.
Number Pads
ILrseto set any flulcfion reEluii_ing nun/beis
such as the tiine _ff day oil the clock, the
tiinei; the ()veil tenlperature, the internal
food tenlperature, the start tinEe and
length (ff operation for dined baking
and selfZcleaning.
KITCHEN TIMER ON/OFFPad
TotI(h to select the diner teattEI'e.
PROBEPad
TotIch when using the prol)e to cook food.
WARM Pad
Touch to kee I) cooked foods warn/. See the
How to Set the Oven for Warming section.
WARMING ORAWERON/OFFPad
Touch to select the wai_ning drawer
flinction.
e
Usingthe oven. gecom
Toavoid possible bums, place the racks in the desired position before you turn the oven on.
Before you begin...
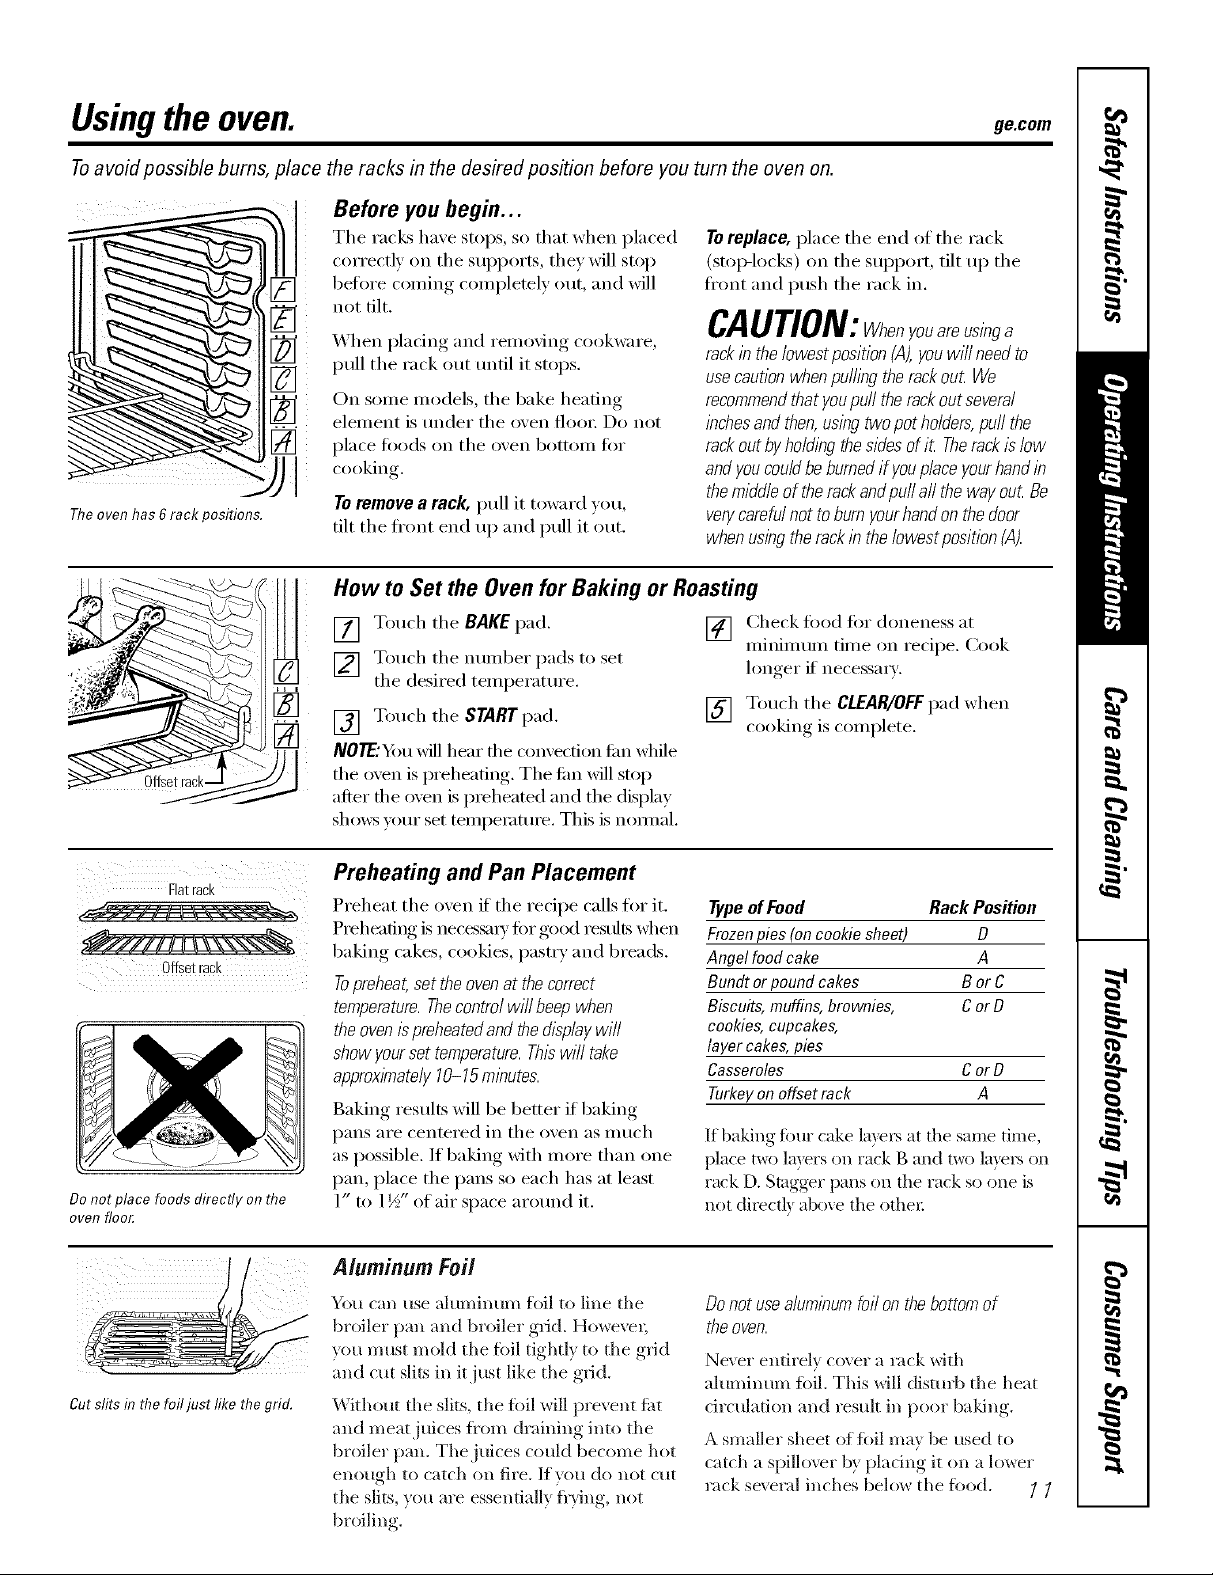
Theoven has 6rack positions.
The racks ha_e stops, so that when placed
correctly on tile supports the) will stop
before coming completely out and will
not tilt,
X,\hen )lacing and "l _ I eIllOVlng cookware,
pull tile rack out tmtil it stops.
On some models, tile bake heating
eleillent is tinder the o_,en flooi; Do not
place toods on the o'_en bottoill tk)i"
cooking.
To remove a rack, pull it toward you
tilt tile fl'ont end up and pull it out.
How to Set the Oven for Baking or Roasting
Toreplace, place tile end of tile rack
(stop-locks) on tile SUl)port, tilt up tile
fl'ont and push the rack in.
CAUTION:Vhenyouareusinga
rack inthe lowest position (A),youwill need to
usecaution when puffingtherack out We
recommendthatyoupuff the rackout several
inchesand then,using twopot holders,puffthe
rack outby ho/dlbgthesides of it Therackis low
andyou couldbeburned if youplace yourhandin
themiddle of the rackand pufl aft theway out Be
verycareful not toburn your handon thedoor
when usingthe rack inthe/owestposition (A).
Flatrack
aezzz:m:l:sxas
Offsetrack
Do not place foods directly on the
over floor,
[] Touch tile BAKEpad.
[] Touch tile number pads to set
tile desired temperature.
[] Touch tile START pad.
NOTE'You will hear file c(mvection tim while
tile oven is preheating. Tile tim will stop
aRer file oven is p_eheated and tile display
sho_vs your set telnpeI_Kure. This is nomml.
Preheating and Pan Placement
Preheat tile oven if tile recipe calls fin" it.
PreheaflI g is neces_y tot good restdts when
baking cakes, cookies, pastry and breads.
Topreheat,set theoven at thecorrect
temperature.Thecontrol will beep when
the ovenispreheated and the&splay will
show yourset temperature. Thiswill take
approximately 10-15mlbutes.
Baking results will be better if baking
pans are centered in tile oven as much
as possible. If baking with more than one
pan, place the pans so each has at least
1" to 1½" of air space aro/md it.
[] Check fi_od fin" aloneness at
minimum time on recipe. Cook
longer if necessm T.
[] Touch tile CLEAR/OFFpad when
cooking is complete.
Typeof Food Rack Position
Frozenpies(on cookiesheet) D
Angelfood cake A
Bundt or poundcakes B or C
Biscuits,muffins,brownies, Cor D
cookies,cupcakes,
layercakes,pies
Casseroles Cor O
Turkeyonoffset rack A
If baking fi)ur cake layet_ at file same time,
place t_) layers on rack g and two laye_ on
rack D. Stagger pans on file rack so one is
not direct b above the othe_:
Cut slits in the foil just like the grid.
A/uminum Foil
You can use aluminum flfil to line tile
broiler pan and broiler grid. Howe_w;
you must mold tile foil tightly to tile grid
and cut slits in it just like tile grid.
Without tile slits, tile fi)il will prevent fi_t
and meat juices fl'om draining into tile
broiler pan. The juices could become hot
enough to catch on fire. If you do not cut
the slits, you are essentially fl'ying, not
broiling.
Do notusealum/bum foil on thebottom of
the oven.
Ne\ er entirely ower a lack Mth
aluminum fifil. This Mll disturb tile heat
circulation and result in poor baldng.
A smaller sheet of foil may lye used to
catch a sl)illover by placing it on a lower
rack several inches below tile fi_od. [ [
Usingthe oven.
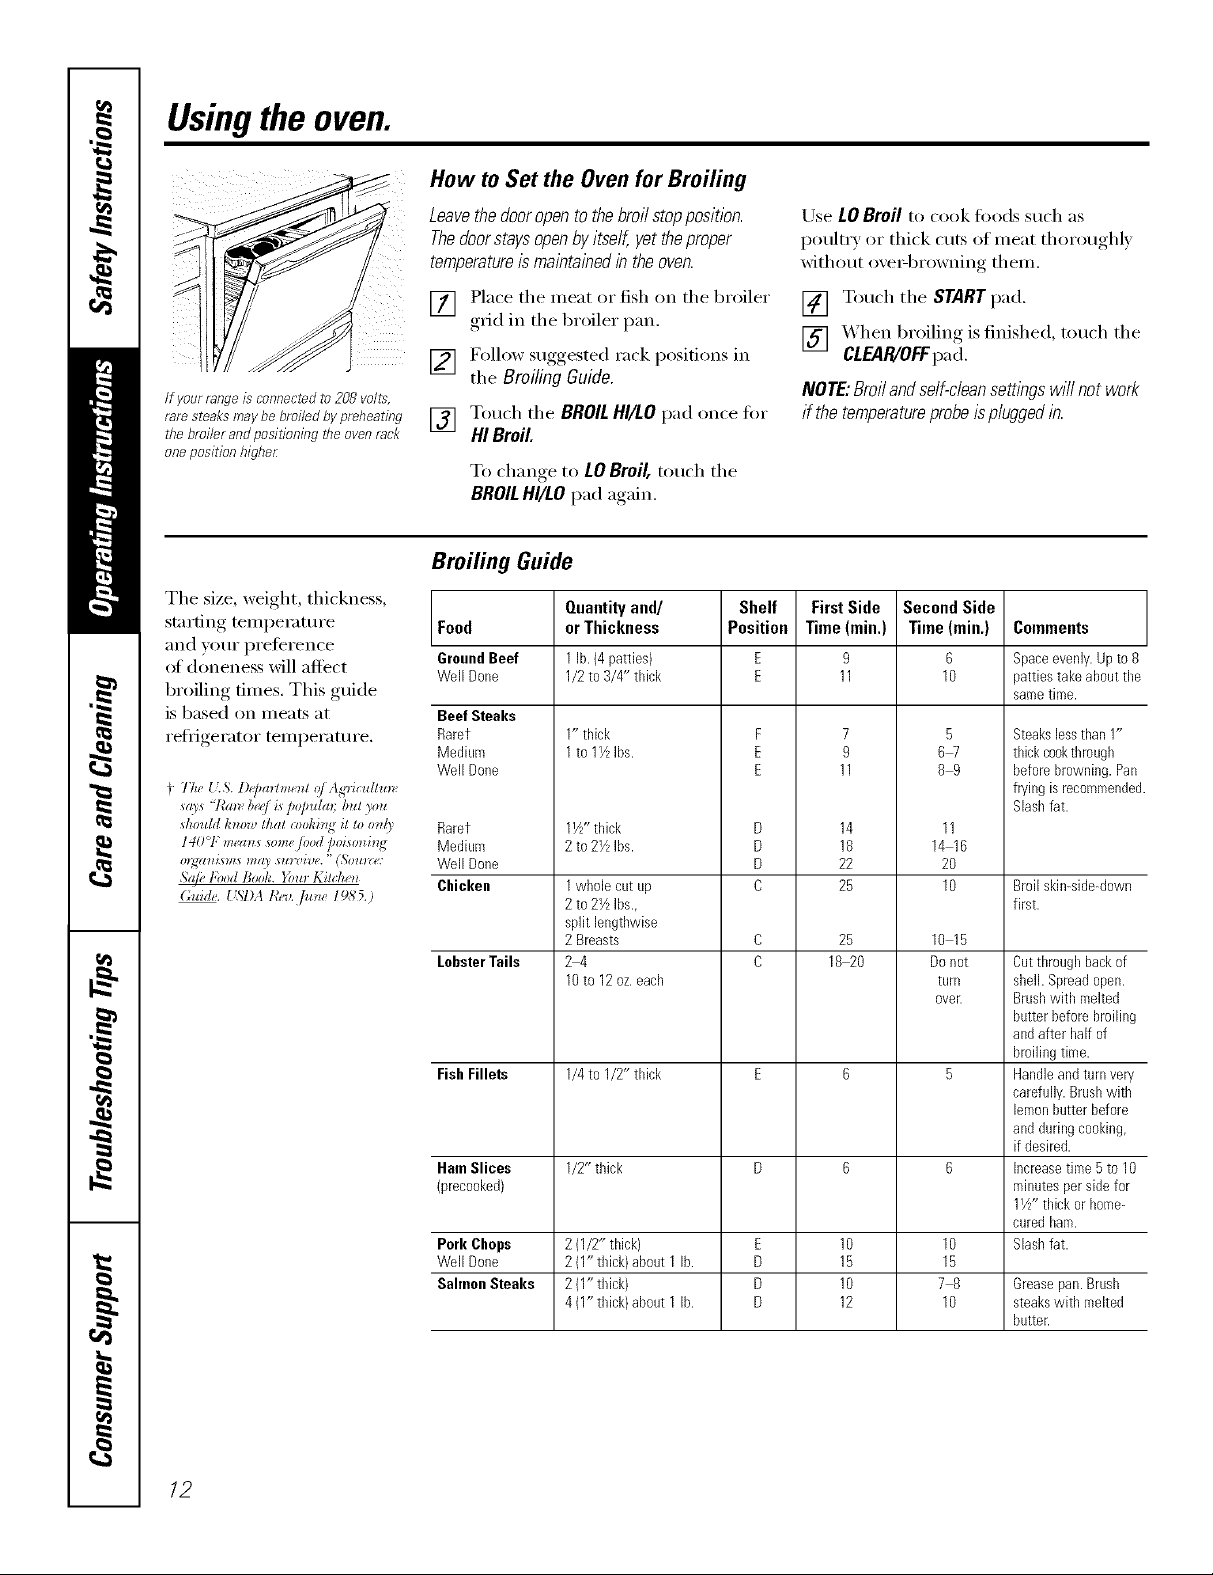
How to Set the Oven for Broiling
Leavethedooropentothebroilstopposition.
Thedoorstaysopenbyitself,yettheproper
temperature is maintained in the oven.
Use LO Broil to cook fi)ods such as
poultry or thick cuts of meat thoroughl)
without oxe_4)rowning them.
[] Place the meat or fish on the broiler
grid in the broiler pan.
[] Follow smgested_, rack positions in
the Broiling Guido.
If yourrangeis mnnectedto208 volts,
raresteaksmaybebroiledbypreheating
thebroiler andpositioningthe ovenrack
oneposition higher
[] Touch the BROILHI/LO pad once tot
HI Broil
To change to LOBroil, touch the
BROILHI/LO pad again.
Broiling Guide
The size, weight, thickness,
stnrting temperature Food
and _ot/r Dx'eiex'en(e
of doneness will affect GroundBeef
broiling times. This guide
is based on meats at
refl-igerator temperature.
+ The {LS.1)#/mrhne_l o/Ag'dcultm_,
_(Os 'Wm_ b_/ is /Jo[mlm bul you
_hou/d h_oz_ th(ll a)ohi_lg il to o_ll_' Rarer
140°F m_w_s _omefi)od poism_i_g Medium
orgzuzisms ma_ su_x_ive."L%u_,: Well Done
.S(@,FoodBook. }_u_ Kilche_
Well Done
Beef Steaks
Raret
Medium
Well Done
Chicken
LobsterTails
Fish Fillets
Ham Slices
xecooked)
Pork Chops
Well Done
SahnonSteaks
Quantityand/
or Thickness
1lb.(4patties)
1/2 to3/4" thick
1" thick
1to 1Z Ibs.
1Z" thick
2 to2YzIbs.
1whole cutLip
2 to2YzIbs.,
split lengthwise
2 Breasts
24
10to 12oz.each
1/4to 1/2" thick
1/2" thick
2 (1/2"thick)
2 (1"thick}about 1 lb.
2 (1"thick)
4 (1"thick}about 1 lb.
Shelf
Position
F
E
E
D
D
D
D
E
D
D
D
[] Touch the START pad.
[] _4hen broiling is finished, touch the
CLEAR/OFFpa d.
NOTE:Broil andself-cleansettings wi// not work
if the temperatureprobe isplugged in.
FirstSide
Time(rain.)
11
11
14
18
22
25
25
18_0
10
15
10
12
Second Side
Time (min.)
9
7
9
6
10
5
6W
89
11
14 16
20
10
10 15
Donot
turn
ovelt
10
15
78
10
Colnments
Space evenly. Up to 8
patties take about the
same time.
Steakslessthan1"
thickcookthrough
beforebrowning.Pan
fryingis recommende(
Slashfat.
Broilskin-side-down
first.
Cutthroughbackof
shell. Spreadopen.
Brushwith melted
butterbeforebroiling
andafter half of
broilingtime.
Handleandturnvery
carefully.Brushwith
lemonbutterbefore
andduringcooking,
if desired.
Increasetiroe 5 to 10
minutesperside for
11/z"thick orhome-
curedham.
Slashfat.
Grease pan. Brush
steaks with melted
butter.
12
Usingthe timedbakingand mastingfeatures
(onsomemodels).
NOTE" Foods that spoil easily--such as milk, eggs, fish, stuffings, poultry and pork--should not be allowed to sit for
more than 1hour before or after cooking. Room temperature promotes the growth of harmful bacteria. Be sure that
the oven light is off because heat from the bulb will speed harmful bacteria growth.
ge.com
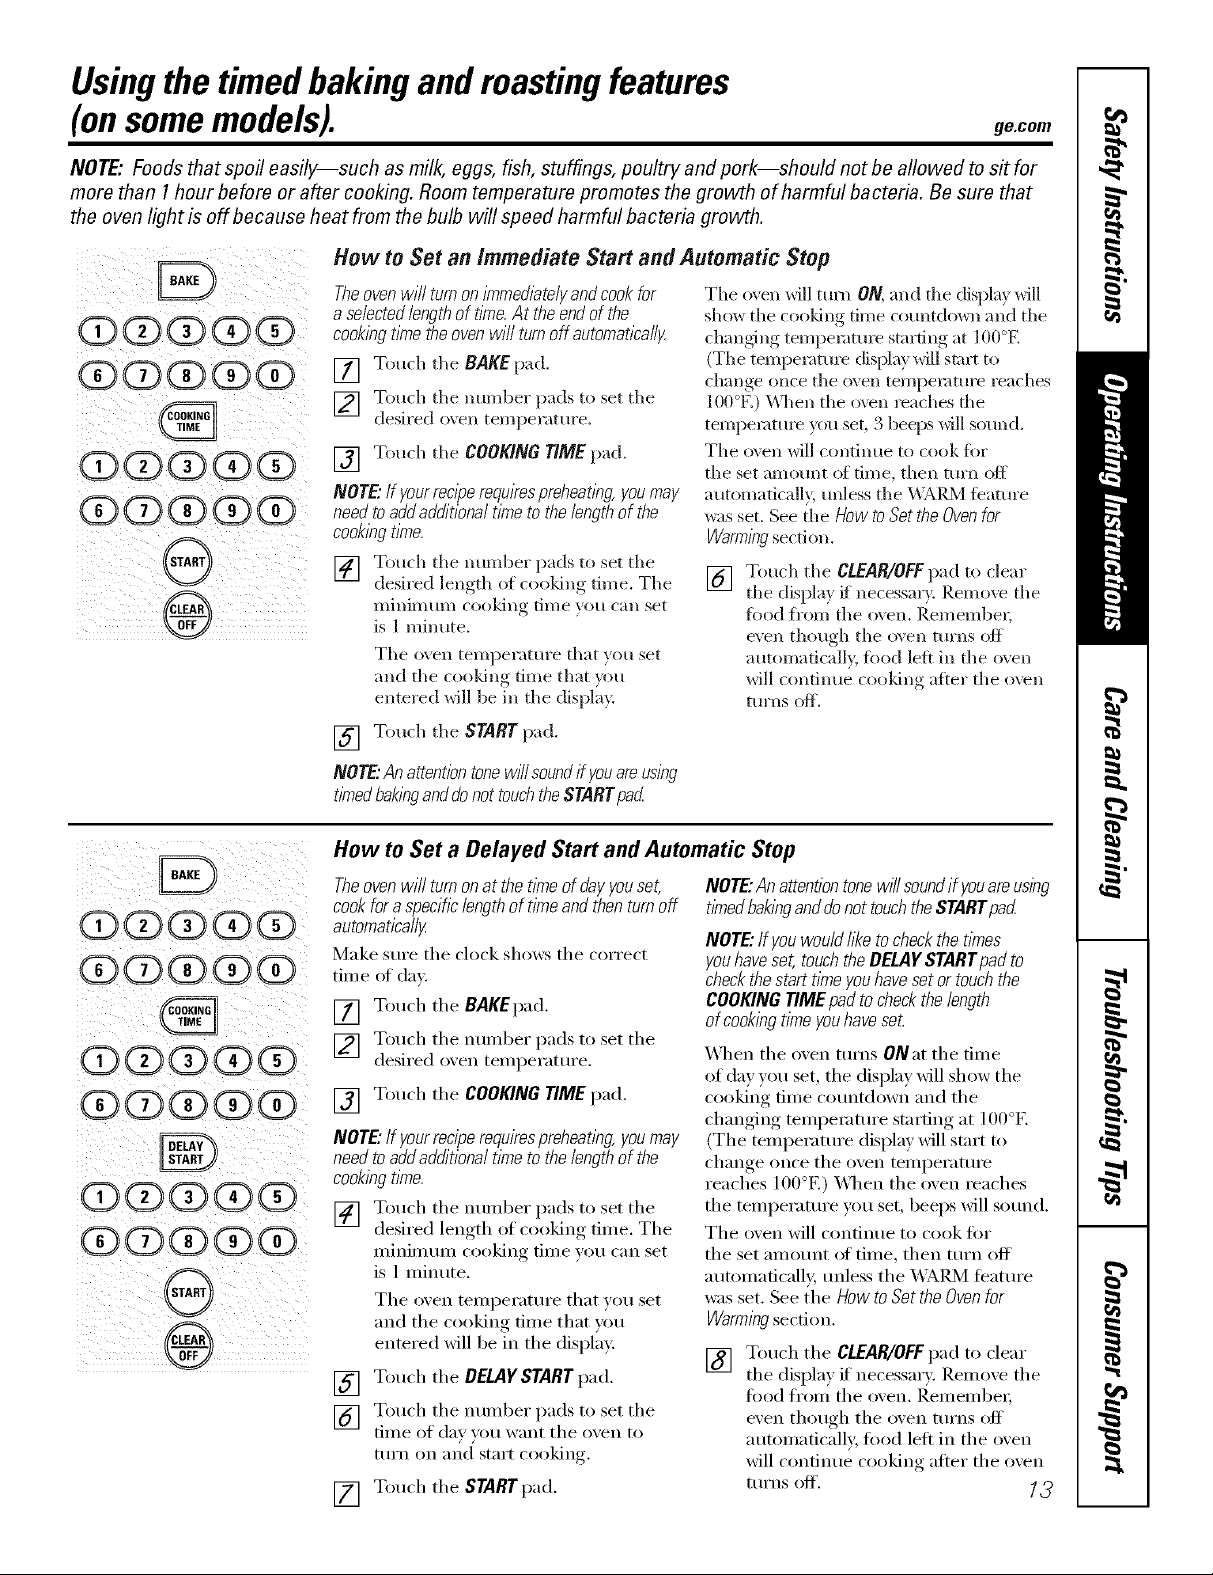
How to Set an Immediate Start and Automatic Stop
@@@@@
@@@(i}6}
@@@}@@
@}@@}@@
Theoven will turnon/nTmed/atelyand cookfor
a selectedlength of t/riTe.At the endof the
cookingt/knetheovenwill turnoff automatically.
[] Touch tile BAKEpad.
] Touch tile mm_ber pads to set tile
desired o_en temperature.
[] Touch tile COOKING TIME pad.
NOTE."If your reciperequkespreheating, youmay
need toadd additional t/nTeto the bngth of the
cookbg time.
] Touch tile mmlber pads to set tile
desired length of cooking time. Tile
Illilli/ll[lIll cooldng tiI//e yOtl Call set
is 1 minute.
Tile oven temperatm'e that }ou set
and tile cooldng time that *ou
entered will be in tile display.
Tile oven will turn ON, and file display will
show tile cooking time countdown and tile
changing temperature stmling at ]00°E
(Tile tempenffm'e cfisplay will sm_ to
change once tile oven tempemtm'e reaches
100°El \_llen tile oven reaches tile
temperature you set, 3 beq)s will sound.
Tile oven will continue to cook fbr
tile set amount oi time, then turn off
automatically, mfless tile \_]k[_2_]tbamre
was set. See tile HOWtOSet the Ovenfor
Warmingsection.
[] Touch tile CLEAR/OFFpad to clear
tile displa} [f necessm T. Remove tile
food fl'om tile oven. P,emembel;
even though tile oven turns off
automatically, tbod left ill tile oven
will condnue cooldng atter tile o\vn
[[IFnS (}l_.
@@@@@
@@@@@
@@@@@
@@@@@
@@@@@
@@@9@
@
[] Touch tile STARTpad.
NOTE"Anattent/bntonew/7/soundifyouareus/bg
tbTedbakbganddonottouchtheSTARTpad
How to Set a Delayed Start and Automatic Stop
Theoven will turnon at the t/_neof dayyouset,
cook fora specificlength of time and thenturn off
automatically
Make sure tile clock sho_:s tile correct
time ot day.
[] Touch tile BAKEpad.
[] Touch tile number pads to set tile
desired o_en temperatm'e.
[] Touch tile COOKING TIME pad.
NOTE."If your reciperequirespreheating, youmay
need to addadditional time to the length of the
cookingtime.
[] Touch tile number pads to set tile
desired length of cooking time. The
II/inil/ltllIl cooking tilI/e you can set
is 1 minute.
Tile oven temperature that you set
and tile cooking time that you
entered will be in tile display:
[] Touch tile DELAYSTART pad.
[] Touch tile number pads to set tile
time of day )ou want tile o_en to
tt/Yn on and start cooking.
[] Touch tile START pad.
NOTE:Anattentiontonewff/soundif youareusbg
timedbakIw anddonottouchtheSTARTpad
NOTE."Ifyouwouldliketocheckthetimes
youhaveset,touchtheDELAYSTARTpadto
checkthestartt/meyouhavesetortouchthe
COOKINGTIMEpadtocheckthelength
ofcookingtimeyouhaveseL
X._qlen tile oven rams ONat tile time
of day you set, tile displa) will show tile
cooking time countdown and tile
chanoino,_,_teml)emtm'e starting, at 100°E
(Tile temperatm'e displa)will start to
chaIl(re_ once tile ox, en teillpei'attli'e
reaches I00°E) _._q/en tile oxen reaches
tile temperature you set, beeps will sound.
The oven will continue to cook tot
tile set an/ount of time, then turn off
atKomafically, tmless tile _,\ _RS/I featm'e
was set. See tile How to Set the Ovenfor
Warm/)_gsection.
[] Touch tile CLEAR/OFFpad to clear
tile displa) it necessary. Remove tile
food ti'oln tile oven. I_elnelnbei;
even though tile oven turns off
automaticall 5 food left in tile oven
will continue cooking after tile oven
turns off. 13
Usingtheprobe.
Formany foods, especially roasts and poult_ internal food temperature is the best test for doneness. The
temperature probe takes the guesswork out of roasting by cooking foods to the exact doneness you want
Use of probes other than the one
provided with this product may result in
dainage to the [)ix)be or o%eil coiltrol.
lJse the handles of the probe and plug
xd_en inserting and remoxing them fl'onl
tile fi)od and outlet.
_: Never &ave your probe inside the oven dunbg
a self-cleaningor broil cycle.
_: Do not store the probe in the oven.
CAUTION: repreventpossibleburns,
do not unplug the probe from the oven outlet until
theovenhascoolecL
For roasts Mth no bone, insert the probe
into the meatiest part of the roast. For
bone-in lmm ()r lamb, insert the probe
into the center of the lowest large muscle.
Insert the probe into the center of dishes
such as Illeat foal or casseroles.
Insert the probe into the meatiest part (ff
the inner thigh fl'onl below and parallel
to the leg of a whole turkey.
NOTE:Self-dean and Broilsettings will not work
if the temperatureprobe isplugged in.
The temperature probe has a
skewer-like probe at one end and
a plug at the other end that goes
into the outlet f17the oven.
_!_:Toavoiddamagingyour probe, donot use
tongsto puff on thecablewhen removingit.
:A Toavoidbreakingthe probe,makesure food
is completelydefrostedbeforeinserting.
_Mter preparing the meat and placing it
oil a trivet or oil the broiler pan grid,
fidlow these directions fin" proper probe
placement.
Insert the probe completely into the
meat, It should not touch bone, fat
or gristle,
NOTE: Failureto fullyinsert theprobe into the
meat mayresult in poorcookingperformance
becausetheprobe will sense the ovenair vs.
the foodtemperature.
ii i iiiiii }}
@@@@@
@0}@@@
@@@@@
@0}@@@
/4
How to Setthe Oven ForBaking/RoastingWhenUsingtheProbe
[] Insert the probe hiH_ into the h:,,M, Mier the internal temperature of the
[] Plug the probe into the outlet in the temperature will be shown in the display:
oxen. Make sure it's pushed all the
wax in. Close the oxen (lo(n: Make [] _Ahen the internal temperature of
StII'e tile probe cable is not touching the food reaches the Ilt/IllbeI" Veil
the broil element.
Touch the PROBEpad.
[]
Touch the munber pads to set the
[]
desired internal food ()r meat
temperature. The nmxinmm
internal temperature fl)r the fi)o(1
that um can set is 200°E
[] Touch the BAKEpad.
[] Touch the munber pads to set the
desired oxen tenlperature.
[] Touch the START pad.
Thed/splay will flash if theprobe isinserted
into the outletand youhavenot setaprobe
temperatureand touchedtheSTARTpacL
fi:,,M reaches lO0°k the changing internal
have set, the probe and the oven
turn off and the ()veil control signals.
To stop the signal, touch the
CLE_R/OFFpad. Use hot pads to
remove the probe fl'om the leo(1.
Do not use tongs to pull on it--they
might (lmnage it.
_: If theprobeis removedfrom the ovenwhile
probecooking, theoven will not automatically
turnoK
To change the ()veil temperature during
the Bake/Roast cycle, touch tile BAKE
pad and then the nund_er pads to set the
new temperature.
::Ji::YoucanusetheKitchenh_nereventhough
you cannot use timed oven operations while
usingtheprobe.
Usingthe clock, kitchen timerand controllockout, gecom
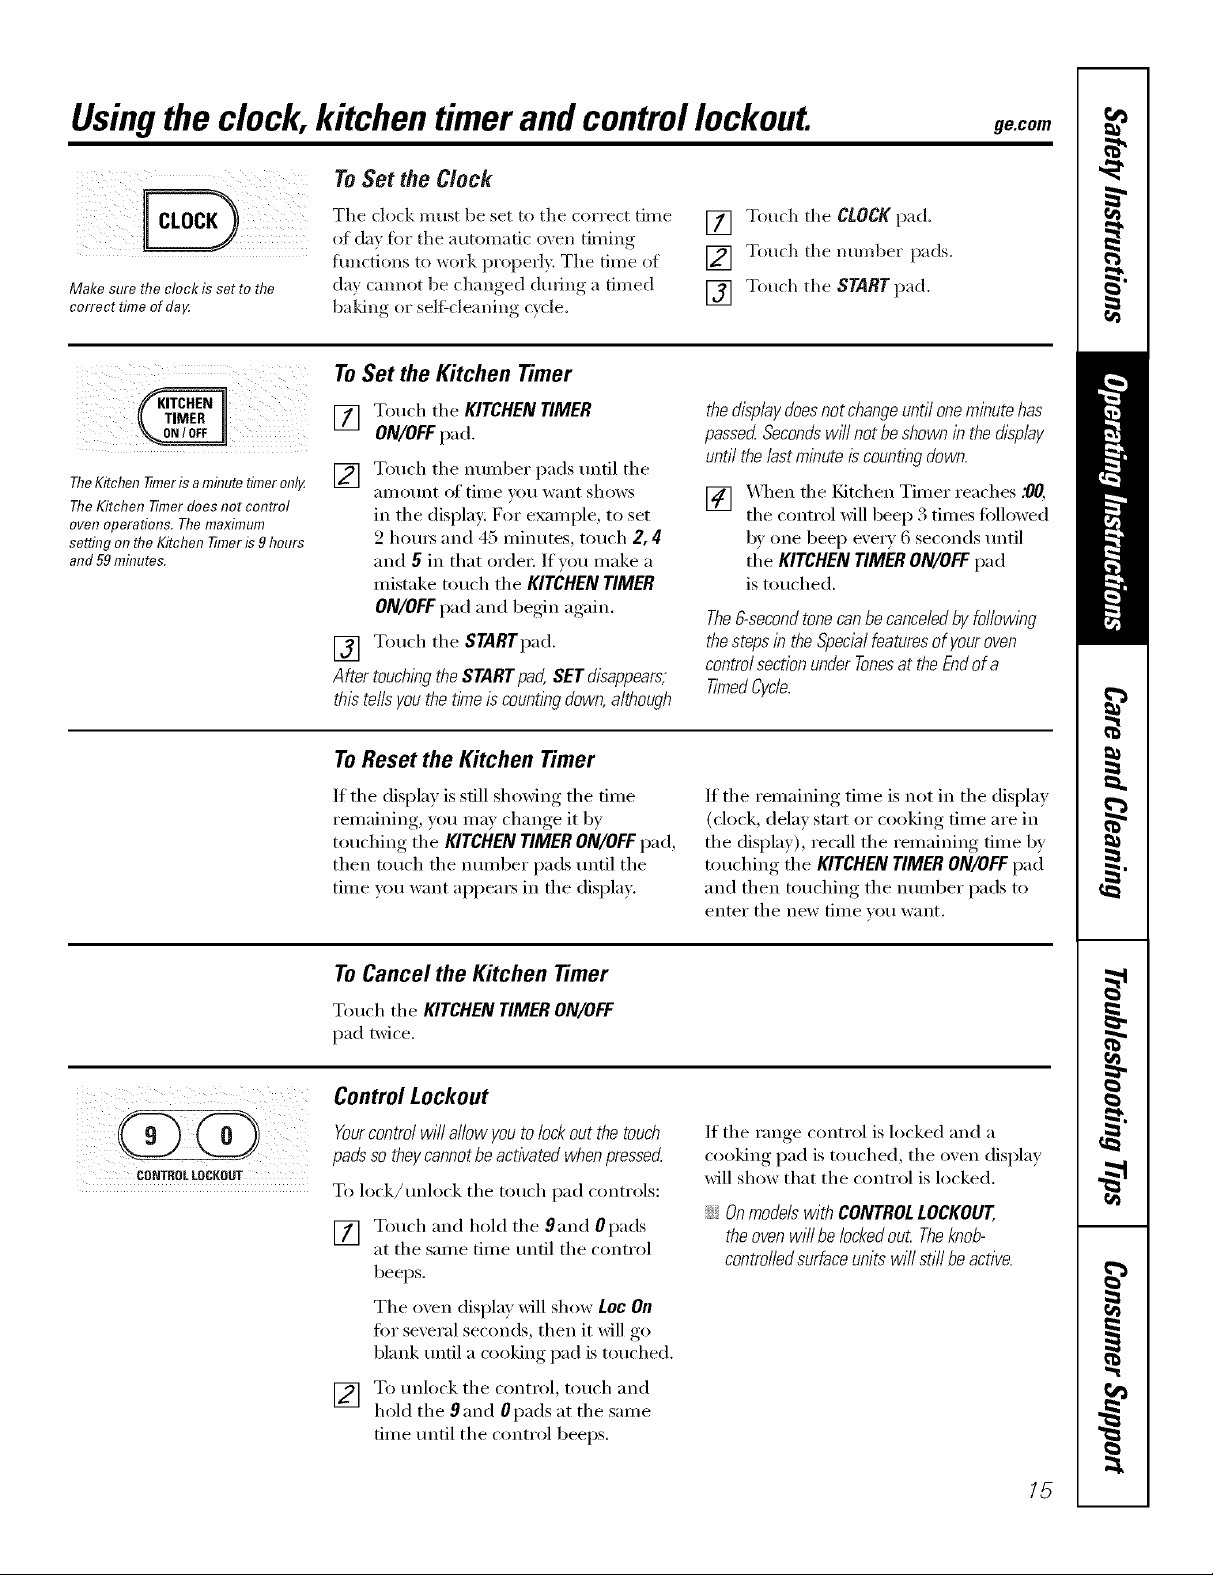
To Set the Clock
Make sure the clock is set to the
correct time ofda_
TheKitchen 77meris aminutetimeronly.
TheKitchen Timerdoes not control
oven operations. Themaximum
setting onthe Kitchen TUneris 9hours
and 59mhTutes.
The clock must be set to the correct time
of da_ fi)r the automatic oven timing
hmcti(ms to _ork properly. The time of
da} cmmot be changed din-big a timed
baldng or selgcleaning c}cle.
To Set the Kitchen Timer
[] Touch the KITCHEN TIMER
ON/OFFpad.
[] Touch the number pads tmfil the
ai/]otlnt of time _()tl want shows
in the display: For example, to set
2 houI_ and 45 ininutes, touch 2, 4
and 5 in that orden If you make a
mistake touch the KITCHEN TIMER
ON/OFFpad and begin again.
[] Touch the STARTpad.
AftertouchingtheSTARTpad,SETdisappears,
thistellsyouthetimeiscountingdown,although
ToReset the Kitchen Timer
[] Touch the CLOCKpad.
[] Touch the number pads.
[] Touch the START pad.
the displaydoesnot change until oneminute has
passed Secondswffl not beshown in thedisplay
until the lastminute is counting down.
[] _,_qmn rite t(itchen Tiiner reaches .O0,
the control will beep 3 times fi)lh)wed
bv one beep every 6 seconds until
tfm KITCHEN TIMER ON/OFF pad
is touched.
The6-secondtonecanbecanceledbyfollowing
thestepsin theSpecialfeaturesofyouroven
controlsectionunderTonesat theEndofa
TimedCycle.
CORTROLLOCKOUT
If the display is still showing the time
remaining, you may change it bv
touching the KITCHEN TIMER ON/OFFpad,
then touch the nmnber pads until the
time you want appea_ in the display.
ToCancel the Kitchen Timer
Touch the KITCHENTIMERON/OFF
pad twice.
Control Lockout
Yourcontrolwillallowyoutolockoutthetouch
padssotheycannotbeactivatedwhenpressecL
To lock/tmlock the touch pad controls:
[] Touch and h()ld the 9and 0 pads
at the same time tmtil the control
beeps.
The oven display will show Lec On
tot several seconds, then it will go
blank tmtil a c_)oking pad is touched.
If the remaining time is not in the display
(clock, delay start or cooking time are in
the display), recall the remaining time by
touching the KITCHEN TIMER ON/OFF pad
and then touching the number pads to
enter the new time you want,
If the ran(,e control is locked and a
cooking, l)ad is touched, the oxen display
will show that the c(mtrol is locked.
ij_::Onmodelswith CONTROLLOCKOUT,
theovenwillbelockedout Theknob-
controlledsurfaceunitswi//stillbeactive.
[] To tmlock the control, touch and
hold the 9 and 0 pads at the same
time tmtil the control beeps.
15
 Loading...