

Page 1

www.GEAppliances.com
Safety Instructions
Operating Instructions
Clock and Timer
................
....................
Control I.ockout ....................
Controls
Convection
.................................
.............................
Oven ......................................
Probe
.....................................
Sabbath Feature
Self-Cleaning' Oven
Special Features
Thermostat
....................
..............
.....................
............................
. . .2-4
. . . .12
.. . .12
.........
.15-17
.10, 11
.14, 17
.........
.20, 21
.. .6—8
___
19
Timed Baking
and Roasting
Care and Cleaning
.........................
.13, 18
Broiler Pan and Grid.............. ... .24
Cleaning Oven Door
Control Panel
Lift-Off Oven Door
Light Bulb..............................
Oven Floor ............................
..............
........................
..............
___
2.S
. . . .25
___
2.8
... .22
___
23
Probe ..................................... ... .24
Removing Packaging Tape
... .22
Shelves................................... ... .24
Stainless Steel Surfaces . . . . . . .25
Owner's Manual
JT9I2-J0" Single Wall Oven
JT952-30" Double Wall Oven
5
9
Troubleshooting Tips....
Consumer Support
.26-28
Consumer Support . . .Back Cover
Product Registration
War ran tv
Write the model and serial
numbers here:
Model#
Serial #
You can find them on a label
on the front of the oven behind
the oven door on single oven
models, or the front of the lower
oven behind the oven door on
double oven models.
.............................
.............
. 29, .30
___
31
W4D4290P087-2 49-80129-2 02-03 JR
Page 2

IMPORTANT SAFETY INFORMATION.
REAO ALL INSTRUCTIONS BEFORE USING.
A WARNING!
For your safety, the information in this manual must be followed to minimize the risk of fire or
explosion, electric shock, or to prevent property damage, personal injury, or loss of life.
t
-Si
C-5
“CJ
*5
«5
c2
VI
ê*
t
o
o
a
t:
0
1
IMPORTANT SAFETY NOTICE
The California Safe Drinking Water and Toxic Enforcement Act requires the Governor of California
to publish a list of substances known to the state to cause cancer, birth defects or other reproductive
harm, and requires businesses to warn customers of potential exposure to such substances.
The fiberglass Insulation in self-clean ovens gives off a very small amount of carbon monoxide during
the cleaning cycle. Exposure can be minimized by venting with an open window or using a ventilation
fan or hood.
_____________________
SAFETY PRECAUTIONS
When using electrical appliances, basic safety precautions should be followed, including the
following:
iS Use this appliance only for its intended
purpose as described in this Owier’s
Manual.
Be sure your appliance is properly
installed and grounded by a cjualified
technician in accordance \rith the
provided installation instructions.
Do not attempt to repair or replace any
part of your oven unless it is specifically
recommended in this manual. All other
senicing should be referred to a qualified
technician.
Have the installer show you the location
of the circuit breaker or fuse. Mark it for
easv refei'ence.
Before performing anv service, disconnect , , i i • -i
, ^ . ' , , . , , .Always keep wooden and piastre rttensrls
tVliH i~vxrinr'» Cni1t'\Y'\Kr 'Yt J I 1
the oven power supply at the household
distribution panel by removing the fuse or
switching off the circuit breaker
i Do not leave children alone—children
should not be left alone or unattended in
an area where an appliance is in use. Tliey
should never be allowed to sit or stand on
any part of the appliance.
Do not allow anyone to climb, stand or
hang on the door. Tltey could damage the
oven, or cause severe personal injury.
Be sure the oven is securely installed in
a cabinet that is finnly attached to the
house stnrcttrre. Never allow anyone to
climb, sit, stand or hang on the oven door.
Never leave tlie oven door open when you
are not watching the oven.
Always keep combustible wall covering,
cur'tains or drapes a safe distance from
your oven.
Uways keep dish towels, dishcloths, pot
holders and other linens a safe distance
from vour oven.
and canned food a safe distance aw'ay
from your oven.
Teach children not to play with the
controls or any other part of the oven.
large scratches or irrrpacts to glass doors
can lead to broken or shattered glass.
I
§
2
Page 3

\,i// AWARNING!
■ SAFETY PRECAUTIONS
www.GEAppliances.com
Do not store flammable materials in
an oven.
CAUTIOI^: Items of interest to
children should not he stoied in cabinets
above an oven; children climbing on the
oven to reach items could he seriously
ityured.
; Never wear loose-fitting or hanging
garments while using the appliance. Be
careful when reaching for items stored in
cabinets over the oven. Flammable material
could be ignited if brought in contact with
hot surfaces or heating elements and may
cause severe bums.
Use only dry pot holder s—moist or damp
pot holders on hot surfaces may result in
bums from steam. Do not let pot holders
touch hot heating elements. Do not trse a
towel or other bulky cloth.
For yotrr safety, never use your appliance
for w^arming or heating the room.
Do not let cookinw grease or' other
flammable materials accumulate in or
near the oven.
Do not trse w'ater on grease fires. Never pick
trp a flaming pan. Turn the controls off.
Flame in the oven can be smother'ed
completely by closing the oven door and
turning the oven off or by using a multipuryjose dry chemical or foam-type fire
extinguisher.
f)o not touch the heating elements or the
interior surface of the oven. Tírese surfaces
may be hot enough to btrm even though
they are dark in color During and after
trse, do not touch, or let clothing or other
flanmrable materials contact any interior
area of the oven; allow’ sufficient tinre for
cooling first.
Potentially hot surfaces include oven vent
opening's, surfaces near the opening's,
crevices around the oven door; the edges
of the window’ and metal trim parts above
the door'.
REMEMBER: The inside surface of the oven
may be hot w’hen the door is opened.
Never leave jar's or cans of fat drippings in
or near your oven.
Do not stor e or use combustible materials,
gasoline or other flammable vapors and
licjuids in the vicinity of this or any other
appliance.
Stand away from the ov’en w’hen opening
the ov’en door. Hot air or steam which
escapes can cause brrms to hands, face
and/or eyes.
’ Do not heat unopened food containers.
Pr essrrre could build up and the container
cottld burst, causing an injrrry.
Keep the oven vent urrobstnrcted.
Keep the ov’en free from gr’ease buildup.
Place the oven shelf in the desired position
while the oven is cool. If shelves mtrst be
handled w’hen hot, do not let pot holder
contact the heating elements.
When using cooking or r oasting bags in the
ov’en, follow’ the mamrfacturer'’s directions.
Pulling out the shelf to the sto]>lock is a
convenience in lifting heavy foods. It is also
a precarrtion against bums from touching
hot strr'faces of the door or' ov’en walls.
Do not trse the oven to dry newspaper's.
If ov’er'heated, they can catch on fire.
Do not trse the oven for a storage area.
Items stored in an oven can ignite.
Do not leave paper products, cooking
utensils or food in the ov’en when not
in use.
: After br'oilirrg, always take rite brnriler' pan
otrt of the oven and clean it. leftov’er
grease in the br'oiler pan can catch fire
next time yotr use the pan.
’ Clean only parts listed in this O'wner’s
Manual.
Do not trse alumintrm foil to line ov en
bottoms, except as suggested in this manual.
Improper installation of aluminum foil may
result in a risk of electric shock or fire.
0)
5
Page 4

IMPORTANT SAFETY INFORMATION.
REAO ALL INSTRUCTIONS BEFORE USING.
t
a
a
-Si
CO
aj
a
a
c2
COOK MEAT AND POULTRY THOROUGHLY...
(7
Cook meat and poultry thoroughly—meat to at least an INTERNAL temperature of I60°F and poultry
to at least an INTERNAL temperature of 180°F. Cooking to these temperatures usually protects against
foodborne illness.
SELF-CLEANING OVEN
I )o not dean the door g’asket. Ttie door
easket is essential for a eood seal. Care
o o
should be taken not to rub, damage or
move the gasket.
Do not use oven cleaners. No commercial
oven cleaner or oven liner protective
coating of any kind should be used in or
around any part of tlie oven. Residue from
oven cleaners will damage the inside of the
oven when the self-clean cvcle is used.
HEAD AND FOLLOW THIS SAFETY INFORMATION CAREFULLY.
Q
¿Tn' save these instructions
___________
before self-cleaning the oven, remove the
f)toiler pan, grid and other cookware.
He sure to wipe up excess spillage before
starting the self-cleaning operation.
If the self-cleaning mode malfunctions,
turn the oven off and disconnect the power
supply. Have it seniced by a cjualified
technician.
VI
t
o
o
SP
•Q
ai
a
t:
0
1
I
§
CO
4
Page 5
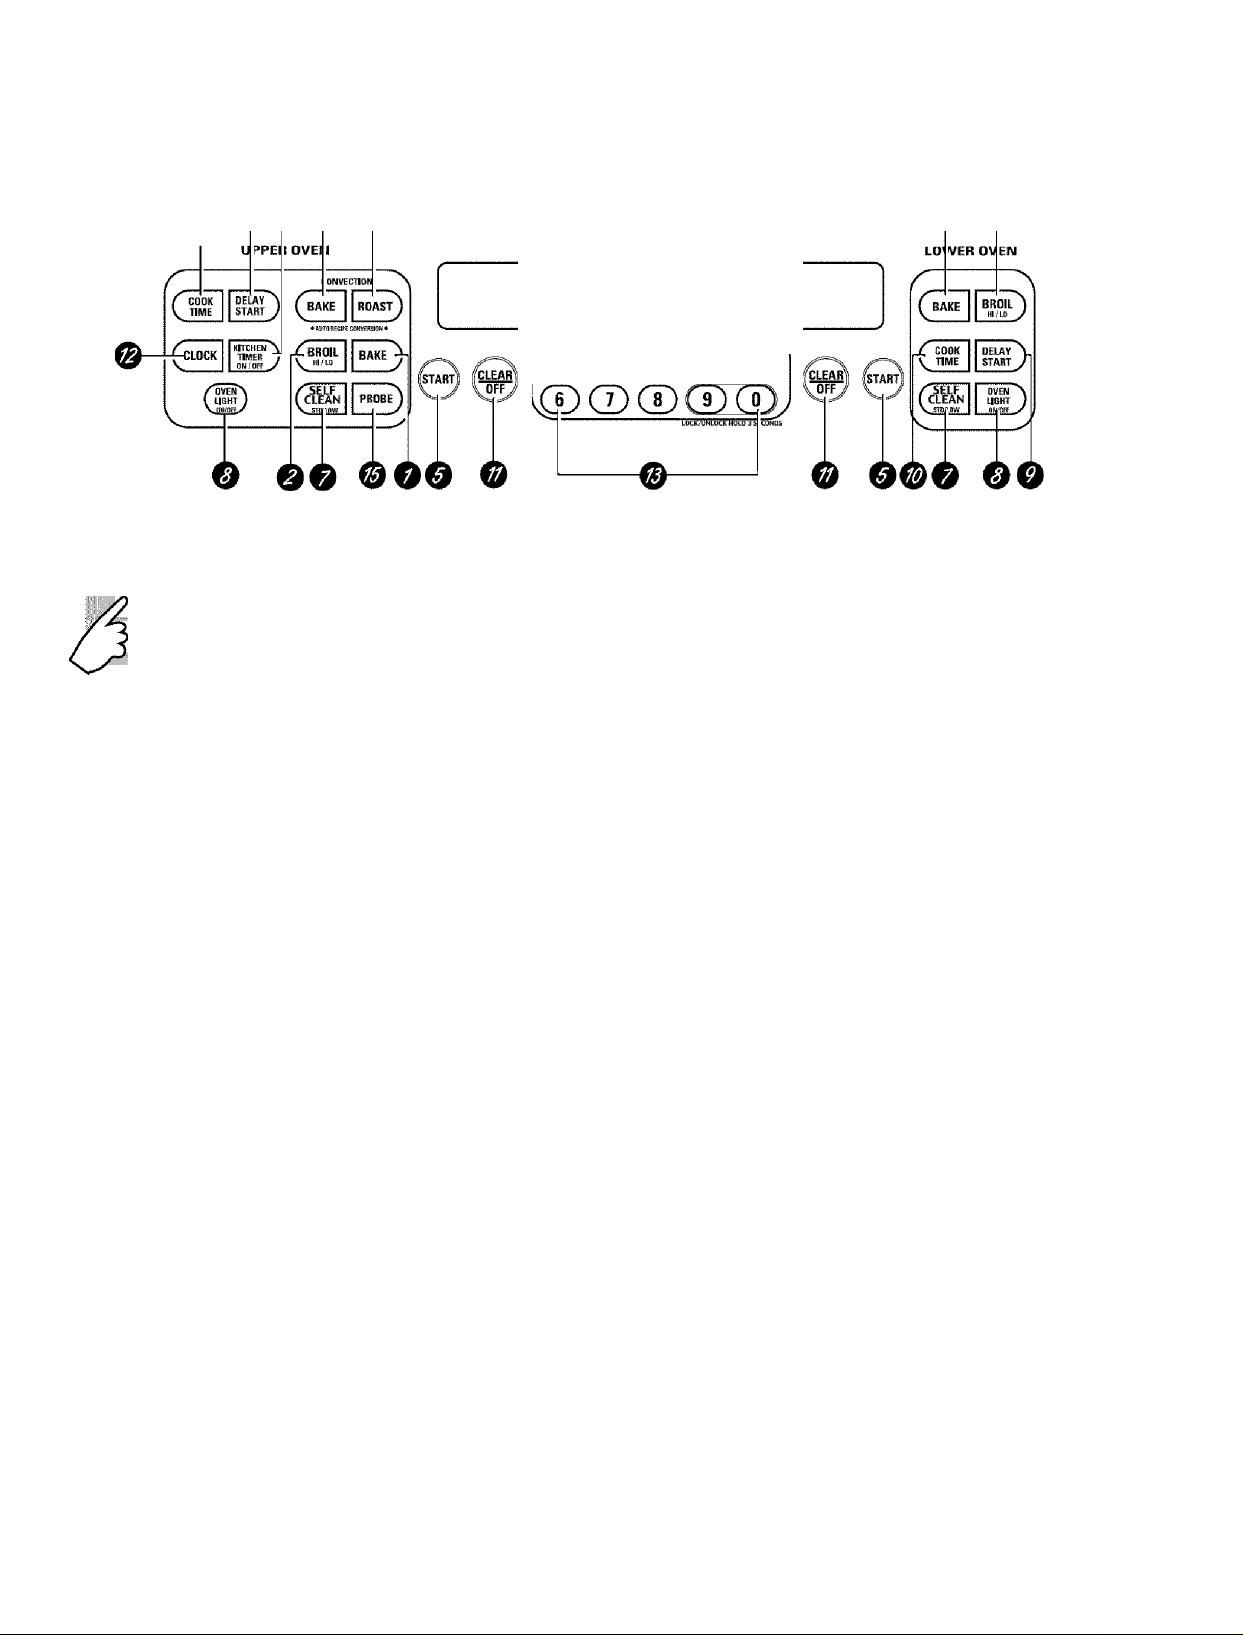
Using the oven controls.
(Throughout this manual, features and appearance may vary from your model.) www.GEAppliances.com
® 0® 0
Double oven control shown.
Oven Control, Clock and Tinier Features and Settings
©
©
©
©
®
If "F- and a number or letter" flash in die display and
the oven control signals, this indicates a function
error code. Press the CLEAR/OFFpad Allow the oven to
cool for one hour. Put the oven back into operation If the
function error code repeats, disconnect the power to the
oven and call for service.
If your oven was set for a timed oven operation
and a power outage occurred, the clock and all
programmed functions must be reset
The time of day will flash in the display when there
has been a power outage.
0
(D (D CD CD
BAKE Pad
Press to select the bake limction.
BROIL HI/LO Pad
Press to select the broil limction.
CONVECTION BAKE Pad
Press to select baking with the convection
function.
CONVECTION ROAST Pad
Press to select roasting with the convection
function.
START Pad
Must be jrressed to start any cooking or
cleaning function.
Display
Shows the time of day, oven temperature,
whether the oven is in the bake, broil or
selfhrleaning mode and the times set for
the timer or automatic oven operations.
0
SELF CLEAN STD/LOWPad
Press to select self-cleaning limction. Se
the Using the self-cleaning oven section.
OVEN LIGHT ON/OFFPad
©
Press to turn the oven light on or off.
DELAY START Pad
©
Use along with COOKING TIME or
SELF CLEAN STDAOW pads to set the
oven to start and stop automatically at a
time you set.
COOK TIME Pad
Press and then press the number pads to set
the amount of time you want your food to
cook. The oven will shut off automatically
wdien the cooking time has mn out, unless
the Cook and Hold featiu e was set.
CLEAR/OFFPad
Pr ess to cancel ALL oven operations except
the dock and timer.
CLOCK Pad
Pr ess beffar e setting the dock.
Number Pads
©
Use to set any function requiring number's
such as the time of day on the clock, the
timer, the oven tenipeiature, the internal
food temperatur e, the start time and
length of operation for timed baking
and self-deaninsi.
KITCHEN TIMER ON/OFF Pad
©
Press to select the timer featur e.
0 0
I
I
I'
(A
CB
Qi
SS
ss.
£2
CD*
as
Q
S-
§>
o
o
gj>
f
(A
I
I
PROBE Pad
©
Pr ess wdien using the probe to cook food.
5
Page 6

.о
I
■§
è'
№
Co
Special features of your oven control.
Your new touch pad control has additional features that you may choose to use. The following are the features
and how you may activate them.
The special feature modes can only be activated while the display is showing the time of day. They remain in
the controls memory until the steps are repeated.
When the display shows your choice, press the START pad. The special features will remain in memory after
a power failure, except for the Sabbath feature, which will have to be reset
12-Hour Shutoff
^|вдке)
DELAY
START
iSTARTj;
)
With this feature, shouid you forget and leave the
oven on, the control will automatically turn off the
oven after 12 hours during baking functions or
after 3 hours during a broil function.
If you wish to turn OFF this feature,
follow the steps below.
Pi ess the BAKE and BROIL HI/LO
0
jrads (on double oven models, use
the upper oven controls) at the same
time for .“i seconds, until the disjrlay
shows SF.
Press the DELAY START pad until
noshdn (no shutoff) appeare in
the disjrlay.
Press the START pad to activate the
no shutoff and leave the control set
in this special features mode.
NOTE: On double oven models, this activates this
special feature for both ovens
■f
-Si
CO
“в
c2
VI
.1
о
о
ai
t:
0
1
I
§
CO
BROIL
0
BROIL
HI/LO
COOK
TIME
c
HI/10
(Í
CLOCK
+
f BROIL
+
L HI/LO
BAKE
B»KE
12-Hour, 24-Hour or Clock Blackout
)
Your control is set to use a 12-hour clock.
If you would jrrefer to have a 24-hour
militaiy time clock or black out the clock
display, follow the steps below.
Press the BAKE and BROIL HI/LO
jrads (on double oven models, use
the upper oven controls) at the same
time for 3 seconds, until the disjrlay
shows SF.
Press the CLOCK pad once. The
display will show' 12 hr. If this is
the choice you want, press the
START pad.
Fahrenheit or Celsius Temperature Selection
Your oven control is set to use the Fahrenheit
temperature selections, but you may change this
to use the Celsius selections.
Press the BAKE and BROIL HI/LO
m
j:>ads (on double oven models, use
the upper oven controls) at the same
time for 3 seconds, until the display
show's SF.
Press the BROIL HI/LO and COOK
2
r/MEpads at the same time. The
display will show' F (Fahrenheit).
Press the CLOCK jrad again to
change to the 24-hour militaiy time
clock. The display will show'
If this is the choice you w'ant, press
the START pad.
Press the CLOCK jrad again to black
out the clock display. The display
will show' OFF. If this is the choice
)'ou want, jrress the START pad.
NOTE: If the clock is In the black-out mode, you
will not be able to use the Delay Start function.
Press the BROIL HI/LO and COOK
TIME puck again at the same time.
The display will show C (Celsius).
Press the START pad.
NOTE: On double oven models, the new setting
will be displayed for both ovens.
24hr.
Page 7

Tones at the End of a Timed Cycle
www.GEAppliances.com
(bb^4 bake)
KITCHEN
TIMER
ON/OFF
■/A
iïstart;:
BROIL
HI/10
c
)
BAKE
At the end of a timed cycle. 3 short beeps will
sound followed by one beep every 6 seconds until
the CLEAR/OFFpad Is pressed. This continuous
6-second beep may be canceled.
To cancel the 6-second beep:
Pi ess the BAKE and BROIL HiAO
1
jjads (on double oven models use
the upper oven controls) at the same
time for 3 seconds, until the disjrlay
shows SF.
Tone Volume
)
This feature allows you to adjust the tone
volumes to a more acceptable volume. There are
three possible volume levels.
Press the BAKE and BROIL HI/LO jra ds
(on double oven models, use the
upper oven controls) at the same
time for 3 seconds, until the displa)’
shows SF.
-J] Press the OVEN LIGHT ON/OFF pad.
The disjrlay will show 2 BEEP. This is
the middle volume level.
Press the OVEN UGHT ON/OFF pad
again. The display will show 3 BEEP.
This is the loudest volume level.
Press the KITCHEN TIMER ON/OFF
2
pad. The display shows CON BEEP
(continuous beep). Press the
KITCHEN TIMER ON/OFF pad
again. The display shows BEEP.
(This cancels the one beep every
6 seconds.)
^ Press the START pad.
NOTE: On double oven models, this cancels the
end-of-cycle tone for both ovens.
Press the OVEN LIGHT ON/OFF pad
again. The display will show' 1 BEEP.
This is the quietest volume level.
For each time the level is changed,
a tone will sound to proride an
indication of the volume level.
"Y| Choose the desired sound level
^ [1 BEEP, 2BEEP, 3BEEP).
Press the START pad to activate the
desired level show'n.
NOTE: On double oven models, this activates this
special feature for both ovens.
I
I
I'
(A
ÇB
Q)
ss
CÎ.
£2
CD*
BROIL
HlilO
0
CONVECTION
BAKE
Q
•AUIOaECIPECOmEHSION*
BAKE
Auto Recipe™ Conversion
)
When using convection bake, the Auto Recipe“
Conversion feature will automatically convert
entered regular baking temperatures to
convection baking temperatures
This feature Is activated so the display
will show the actual converted (reduced)
temperature. For example. If you enter a regular
recipe temperature of 350°F and press the
START pad, the display will show CON
and the converted temperature of325°F.
NOTE: This feature does not convert convection
bake cooking times, only regular baking
temperatures.
To deactivate the feature:
|~^ Press the BAKE and BROIL Hi/LO
pads (on double oven models, use
the upper oven controls) at the
same time for 3 seconds, until the
display show's SF.
2 Press the CONVECTION BAKE pad.
The display will show' CON ON. Press
the CONVECTION BAKE pad again.
The display will show' CON OFF.
Press the START pad.
To reactivate the feature, repeat steps 1-3
above but press the START pad when
CON ON is in the display.
Page 8

.o
Special features of your oven control.
u
№
Co
■f
-Si
CO
“CJ
( BROIL
V HI/LO
• V.. .
......
c
Cook and Hold
+ ■
BAKE ) Your new control has a cook and hold feature that
■ ■ keeps cooked foods warm for up to 3 hours after
COOK
TIME
isTARTj
Timed Baking or Roasting is finished.
NOTE: This feature can only be programmed to
work with Timed Baking or Boasting. (See the
Using the timed baking or roasting features
section.) After Timed Baking or Roasting has
automaticaily stopped, the programmed cook
and hold will automatically start.
To activate tliis feature for use after
Timed Baking oi’ Roasting, follow the
steps below.
|~^ Press the BAKE and BROIL HI/LO
pads at the same time for 3 seconds
until the display shows SF.
Press the COOK TIME pad.
The disjrlay will show Hid OFF.
Press the COOK TIME pad again
to activate the feature. The disjrlay
will show' Hid ON.
Press the START jrad to activate
the cook and hold feature and
leave the control set in this special
featuies mode.
c2
8
Page 9

Using the Sabbath Feature.
(Designed for use on the Jewish Sabbath and Holidays.)
The Sabbath feature can be used for baking/roasting only. It cannot be used for convection, broiling, self-cleaning or
Delay Start cooking.
www.GEAppliances.com
г?'
NOTE: The oven light comes on automatically (on some models) when the door is opened and goes off when the door is closed.
The bulb maybe removed. See the Oven Light Replacement section. On models with a light switch on the control panel, the oven
light may be turned an and left on.
How to Set for Regular Baking/Roasting
Make sure the clock shows the correct time of day and
the oven is off
DELAY
START
)
И
®CD®G2ID
When the display shows zo the
oven is set in Sabbath. When the
display shows Z3 cz the oven is
baking/roasting.
How to Set for Timed Baking/Roasting
Make sure the clock shows the correct time of day and
the oven is off
m
0
BROIL
HI/LO
c
DELAY
START
COOK
TIME
BAKE
)
)
CD CD CD CD CD
When the display shows 3 the
oven is set in Sabbath. When the
display shows cz the oven is
baking/roasting.
Press and hold both the BAKE and BROIL
HI/LO ) )ad.s, at the same time, until the
displav shows SF.
fl/Ort If bake or bt oil apjtears in the
display, the BAKE and BROIL HI/LO pads
were not touched at the same time.
Ibueli tlie IVOFF pad egin
again.
lap the DELAY START pad until SAb bAtH
appears in the disjtlay.
Touch the START pad and z> will ajtpcar
in the display,
Ibiieli tlie BAKE jiad. No signal will
be eiven.
- Immediate Start and Automatic Stop
Press and hold both the BAKE and BROIL
Н1Л0 pads, at the same time, until the
displav shows SF
NOTE: li hake or bt oil ajijiears in the
display, the BAKE and BROIL HI/LO pads
were not touched at the same time.
Ibiicli tlie R/OFF pad egin
ag'ain.
lap the DELAY START pad until SAb bAtH
appears in the di.splay.
Touch the START (lad and з will ap)iear
in the display.
Touch the COOK TIME pad
Touch the numlier )iads to set the
desired length of cooking time between
1 minute and 9 hours and 99 minutes,
lite cooking lime lh;tt you entered will
be disjtlaved.
Touch the START pad.
U.sing the luimlxT pads, enter the desired
5
tein))erat lire between 170°F and 550°F.
No signal or temperature will be given.
Touch the START pad.
6
.After a random delav |)eriod of
7
a))proximately oO seconds to 1 minute,
3 c
will a))pearin the display indicating
that the oven is baking/roasting. Tf
doesn’t apjiear in iht' dis))lay, siail
ag'aiii at Ste[) 4.
To adjust the oven temperature, touch the
BAKEp ad, enter the new temperature using
the mirnlrer pads, and toticli tlie START pad.
NOTEt nic CLEAR/OFFand COOKTIMEpads are
active during the Sablialh fettture.
Ibuch the BAKE jiad. No signal will be
7
given.
Using the numlier pads, enter the
S
desired temperature. No signal or
temperature will be given.
Ibucli the START pad.
After a random delav jieriod of
10
approximately 30 seccinds tci 1 niimite,
3 c
will appear in the display indictiting
that the oven is baking/roasting. Tf 3 c
doe.sn’t apjiear in the disjilay, start
again at Steji 7,
lb adjust the oven lemperaUire, totieh the
BAKEpad, enter the new lemperaUire using
the numlier patls atid touch the START pad.
When cooking is finished, the di.splay will
change from
indicating Uiat the oven has turned OFFlmi is
still set in Saiibath. Remove the cooked food.
3 c
to 3 and ftiWwill appear,
3 c
f
I
I
О
I'
(Л
Cb
Qi
SS
ss.
£2
Cb*
as
Q
S-
§>
о
о
gf
(A
DELAY
START
)
f A
[START;
How to Exit the Sabbath Feature
Ibucli the CLEAR/OFFpad.
If the oven is cooking, wait for a random
delav period of approxirntilely 30 .serotids
to
1 minute, until onlv 3 is in the displav,
Press and hold both the BAKE and BROIL
HI/LO (lads, at the same time, until the
displav .shows SF.
Tap the DELAY START pad until 12shdn
4
or no shdn appears in the tlisplay 12shdn
indicates that tlie oven will aulomaticallv
turn off alter 12 hotirs. no sAdlJ intlicales
that the oven will not tiutomaticallv
turn off.
Ibucli the START pad.
NOTE: U a power outage occurretl while
tlie oven was in Saliliath, the tiven will
aulomaticallv turn off :md stay off even
wiien the jiower reinnis. Tlie oven control
must be rc.set.
I
I
9
Page 10
.о
I
■§
è'
№
Co
■f
-Si
CO
“в
*5
c2
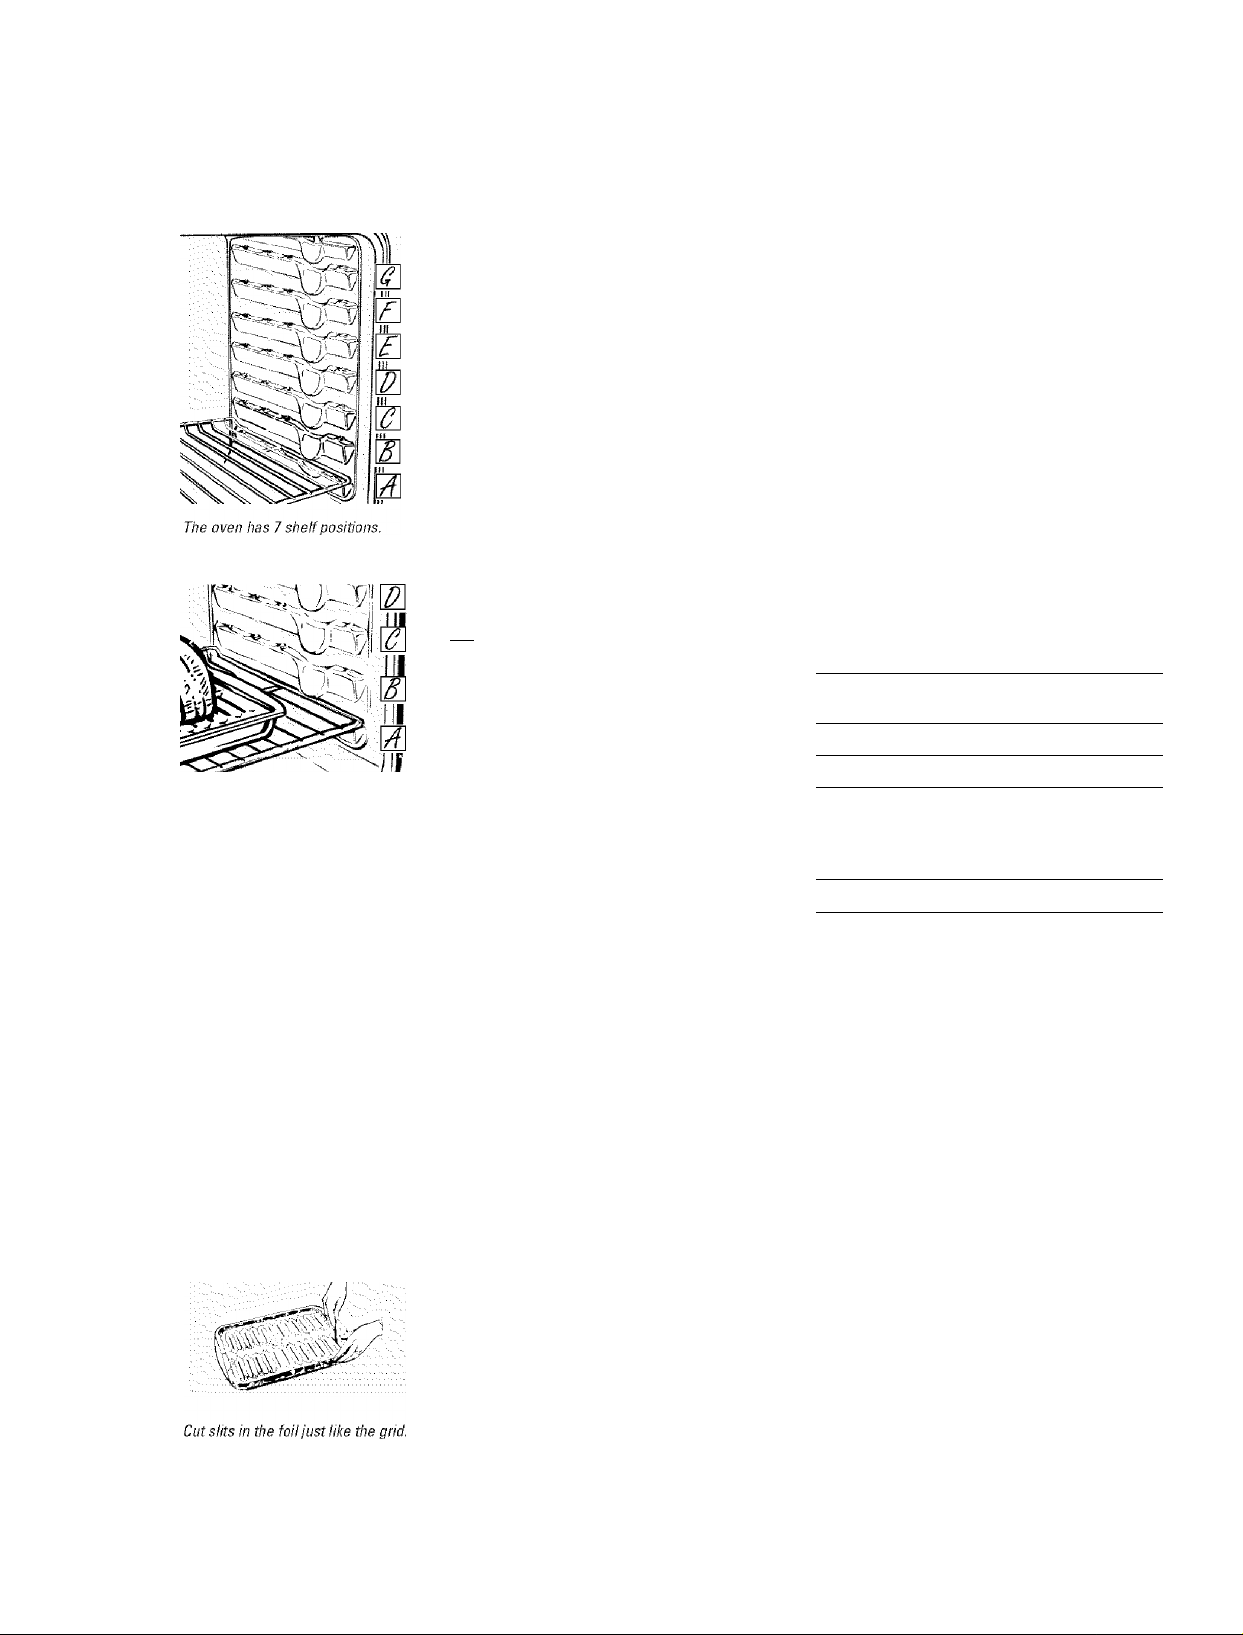
Using the oven.
To avoid possible burns, place the shelves in the desired position before you turn the oven on.
Before you begin...
The shelves have stop-locks, so that when
placed coiTectl)' on the supjjorts, the)’ will
stop befiai
will not tilt.
When placing and removing cookw’are,
pull the shelf out to the bump on the
shelf support.
How to Set the Oven for Baking or Roasting
|~^ Press the BAKE pad.
121 Press the number pads to set the
NOTE: A cooling fan may automatically turn on
and off to cool internal parts. This is normal, and
the fan may continue to run even after the oven is
turned off.
e coming completely out, and
desiied temperature.
Press the START j>ad.
Check food for doneness at
minimum time on recipe. Cook
longer if neressaiy.
Press the CLEAR/OFF pad when
cooking is complete.
To remove a shelf, ¡>ull it toward v ou,
tilt the front end up and j>ull it out.
To replace, place the end of the shelf
(sto|>locks) on the suj>j>ort, tilt up the
front and push the shelf in.
Type of Food Shelf Position
Frozen pies
(on cookie sheet)
Angel food cake
Bundt or pound cakes
Biscuits, muffins,
brownies, cookies,
cupcakes, layer
cakes, pies
Casseroles C or D
C or D
Б
В
C or D
VI
ê*
.1
о
о
■P
SP
ai
a
t:
0
1
I
§
CO
Ю
Preheating and Pan Placement
Preheat the oven if the recipe calls for it.
To preheat, set the oven at the correct
temperature. Preheating is necessaiy' for
good results when baking cakes, cookies,
pastiy and breads.
For ovens without a preheat indicator light or
tone, preheat W minutes.
Aluminum Foil
You can use aluminum foil to line the
broiler pan and broiler grid. How’evei;
you must mold the firil tightly to the giid
and cut slits in it just like the grid.
Aluminum foil may also be used to catch a
spillover.
Baking results will be better if baking pans
are centered in the oven as much as
possible. Pans should not touch each
other or the walls of the oven. If you need
to use rtvo shelves, stagger the pans so one
is not diiectly above the other, and leave
approximately 114" between pans, from
the front, back and sides of the w’all.
Never entirely cover a shelf with
aluminum foil. This will disturb the heat
circulation and result in poor baking.
A smaller sheet of fi>il may' be used to
catch a spillover by jrlacing it on a low'er
shelf several inches below’ the food.
Page 11

How to Set the Oven for Broiling
www.GEAppliances.com
г?'
If your oven is connected to 208
volts, rare steaks may be broiled by
preheating the broiler and positioning
the oven shelf one position higher.
Tlhe U.S. Department of Agriculture says
"Rare beef Is popular, hut you should
know that cooking It to only 140°Fmeans
same food poisoning organisms may
survive." (Source: Safe Food Book. Your
Kitchen Guide. USDA Rev. June 1985.)
Leave the door open to the broil stop position.
The door stays open by itself, yet the proper
temperature is maintained in the oven.
NOTE: Food can be broiled with the door
closed but it may not brown as well because
the oven heating element will cycle on and off
Place the meat or fish on the broiler
grid in the broiler pan.
Follow suggested shelf positions in
the Broiling Guide.
The size, weight, thickness, starting temperature
and your preference for doneness will affect
broiling times. This guide is based on meats at
refrigerator temperature.
Press the BROIL HI/LO pad once for
HI Brail.
To change to LO Broil, jiress the
BROIL HI/LO pad again.
^ Press the START pad.
Wdien broiling is finished, press the
^ CLEAR/OFFpud.
NOTE: Broil will not work if the temperature
probe is plugged in.
Broiling Guide
Food
Ground Beef 1 lb. (4 patties) E 10 7 Space evenly. Up
Well Done 1/2 to 3/4" thick E 10 9 to 8 patties take
Beef Steaks
Rare* 1" thick E 8 6 Steaks less than
MediiiiTi 1 to 1'/ribs. E 10 8 1" thick cook
Well Done E 12 10 through before
Rare* V/i" thick E 10 8 Pan frying is
Medium 2 to 2Vz lbs. E 15 14-16 recommended.
Well Done E 25 20-25 Slash fat.
Chicken 1 whole
Lobster Tails 2-4
Fish Fillets 1/4 to 1/2" thick E 5 5 Handle and turn
Ham Slices
(precooked)
Pork Chops 2 (1/2" thick) E 10 10 Slash fat.
Well Done 2 (1" thick) about 1 lb. D 15 15
Lamb Chops
Medium 2 (1" thick) about 10 E 10 9 Slash fat.
Well Done to 12 oz. E 12 10
Medium 2 {V/i" thick) about 1 lb. E 14 12
Well Done E 17 12-14
Quantity and/
or Thickness
2 to 2'/2 lbs.,
split lengthwise
6 to 8 oz. each
1" thick D 8 8 Increase time 5 to
Shelf
Position
C 25 10 Reduce time about
C 13-16 Do not
First Side
Time (min.)
Second Side
Time (min.) Comments
about the same
time.
browning.
5 to 10 minutes
per side for cut-up
chicken. Brush
each side with
melted butter.
Broil skin-sidedown first.
turn over.
Cut through back of
shell. Spread open.
Brush with melted
butter before
broiling and after
half of broiling
time.
very carefully.
Brush with lemon
butter before and
during cooking, if
desired. Preheat
broiler to increase
browning.
10 minutes per
side for 114" thick
or home-cured ham.
7 7
I
I
О
I'
(л
Cb
Qi
SS
ss.
£2
c5*
as
Page 12

.o
Using the clock timer and control lockout
I
■§
-fe'
№
Co
■f
CO
“CJ
CLOCK
(i
Make sure the clock is set to the
correct time of day.
KITCHEN
TIMER
ON/OFF
The timer is a minute timer only.
The timer does not control oven
operations. The maximum setting on
the timer is 9 hours and 59 minutes.
To Set the Clock
The dock must be set to the correct time
of day for the automatic oven timing
functions to work projaerly. The time of
da)’ cannot be changed during a timed
bakinff or selt-deanino: cvcle.
To Set the Timer
Press the KITCHEN TIMER ON/OFF
pad.
Press the number pads until the
amount of time )’ou want shows
in the displa)'. Foi’ example, to set
2 horn’s and 4.a minutes, press 2,4
and 5 in that order. If you make a
mistake, press the KITCHEN TIMER
ON/OFF pad and begin again.
j Press the START pad.
After pressing the START pad, SET disappears;
this telis you the time is counting down, aithough
the display does not change until one minute has
passed. Seconds will not be shown in the display
until the last minute is counting down.
Press the CLOCK pad.
^ Press the number pads.
Press the START jaad.
Wdien the timer reaches :00,
4
the control will beep 3 times
followed by one beej> eveiy
6 seconds until the KITCHEN TIMER
ON/OFF pad is pressed.
The 6-second tone can be canceled by
following the steps in the Special features
of your oven control section under Tones
at the End of a Timed Cycle.
c2
lock/unlock hold 3 seconds
72
To Reset the Timer
If the display is still shcnring the time
remaining, you may change it by pressing
the KITCHEN TIMER ON/OFF pad, then
press the number pads until the time
)'ou want appeaiti in the display.
To Cancel the Timer
Press KITCHEN TIMER ON/OFF pa d tirice.
Control Lockout
Your control will allow you to lock out the touch
pads so they cannot be activated when pressed.
NOTE: On double oven models, this activates this
feature for both ovens.
To lock/unlock the controls:
Press the 9 and Opads at the same
time for 3 seconds, until the disj:>lay
shows LOC ON.
To unlock the control, press the 9
and Opads at the same time for 3
seconds, until the display shows
LOC OFF
If the remaining time is not in the display
(clock, delay sfcnt or cooking time are in
the display), recall the remaining time bv
pressing the KITCHEN TIMER ON/OFF pad
and then jti’essing the number pads to
enter the new time you want.
\tdien this featui e is on and the touch
pads are pressed, the control trill beep
and the displa)' will show'
LOC ON.
NOTES:
The control lockout mode affects all touch
pads. No touch pads will work when this
feature is activated.
■■■■ The adjustment wiil be retained in memory
after a power failure.
Page 13

Using the timed baking and roasting features. WWW.GEAppliances.com
On double oven models, you can use timed baking in one oven while using self-clean in the other; you can also use
timed baking in both ovens at the same time.
NOTE: Foods that spoil easily—such as milk, eggs, fish, stuffings, poultry and pork—should not be allowed to sit for
more than 1 hour before or after cooking. Room temperature promotes the growth of harmful bacteria. Be sure that
the oven tight is off because heat from the bulb will speed harmful bacteria growth.
How to Set an Immediate Start and Automatic Stop
BAKE
)
(DO®®®
COOK
TIME
c
©©(I)® CD
®©®©©
BAKE
)
8Ì fT) ( 0
COOK
TIME
c
®® ® ®®
®® ®cn®
DELAY
START
)
®®®®®
® ® ®®®
The oven will turn on immediately and cook for a Press the START pad.
selected length of time. At the end of the cooking ‘
time, the oven will turn off automatically.
Make sure the dock shows the correct
time of day.
^ Press the BAKE pad.
Using the number pads, enter the
desired temperature.
Press the COOK TIME pad.
NOTE: If your recipe requires preheating, you
may need to add additional time to the length of
the cooking time.
Using the number pads, enter the
desired baking time. The oven
temperature and the cooking time
that you entered will be disjrlayed.
How to Set a Delayed Start and Automatic Stop
You can set the oven control to delay-start the
oven, cook for a specific length of time and then
turn off automatically.
Make sure the clock show's the correct
time of da)'.
lyj Press the BAKE pad.
Usiirg the nuirrber pads, enter the
desiied temperature.
Press the COOK TIME pad.
NOTE: If your recipe requires preheating, you
may need to add additional time to the length of
the cooking time.
¿y, Usiirg the nuirrber pads, enter the
desired bakiiro; time.
Press the DELAY START pad.
Using the nuirrber pads, enter the
time of day you w'arrt the oven to
turn on and start cooking.
^ Press the START pad.
The disjrlay will show the changing
temperature (starting at 10()°F) and the
cooking time. The display starts changing
oirce the teirrpeiature t eaches 1()()°F.
NOTE: On double oven models, when using both
ovens at the same time, the times showing in the
display will be for the last oven set To display the
time set for the first oven set press the COOK
TIME pad for that oven.
The oveir will contimie to cook for the
prograrrrmed amount of time, their shut
off automaticalh’, unless the Cook and
Hold feature was set. See the
features of your oven control section.
Press the CLEAR/OFF pad to clear
the display.
If you w'oiild like to check the times )’ou
have set, press the DELAY START pad to
check the start tinre you have set or press
COOK TIME pad to check the length
the
of cooking tinre you have set.
Wdren the oven turns on at the time
of da)' you have set, the display will
show' the changing temperature
(starting at 100°F) and the cooking
time. The display starts changing once
the temperature reaches 1 00°F.
NOTE: On double oven models, when using both
ovens at the same time, the times showing in the
display will be for the last oven set To display the
time set for the first oven set press the DELAY
START or the COOK TIME pad for that oven.
The oven will continue to cook for the
programmed amount of time, then shut
off'automatically, unless the Ciookand
Hold feature was set. See the
features of your oven control section.
Press the CLEAR/OFF pad to clear
the display.
Special
Special
I
I
I'
(A
CB
Qi
SS
ss.
£2
CD*
as
Q
S-
§>
o
o
gj>
f
(A
I
I
NOTEAn attention tone will sound if you are
using timed baking and do not press the START
pad after entering the baking temperature.
13
Page 14

.o
I
Using the probe.
For many foods, especially roasts and poultry. Internal food temperature is the best test for doneness. The
temperature probe takes the guesswork out of roasting by cooking foods to the exact doneness you want
■§
è'
№
Co
■f
CO
“CJ
c2
The temperature probe has a
skewer-like probe at one end and a
plug at the other end that goes into
the outlet in the oven.
NOTE: Double oven models have a probe in the
upper oven only.
Use of probes othei’ than the one
provided \dtfi this product ma)' result in
damage to the probe.
Use the handles of the probe and plug
when inserting and reino\ing them from
the meat and outlet.
El To avoid damaging your probe, do not use
tongs to pull on the cable when removing it
To avoid breaking the probe, make sure food is
completely defrosted before inserting.
After preparing the meat and placing it
on a tiivet or on the broiler pan grid,
follow these directions foi’ proper probe
placement.
L,ay the probe on the outside of the
meat along the top or side and mark
with youi' finger w'here the edge of
the meat comes to on the probe.
The jioint should rest in the center
of the thickest meaty part, of the
roast.
Insert the jirobe completely into the
meat, up to the handle. It should
not touch bone, fat or gristle.
'■■■ To pre vent possible burns, do not unplug
the probe from the outlet until the oven
has cooled
Never leave your probe inside the oven during
a self-cleaning cycle.
Do not store the probe in the oven.
For roasts with no bone, insert the jirobe
into the meatiest jrait of the roast. For
bone-in ham or lamb, insert the probe
into the center of the lownst large muscle
or joint.
Insert, the probe into the center of dishes
such as meat loaf or casseroles. Wdien
cooking fish, insert the probe from just
above the gill into the meatiest area,
parallel to the backbone.
Insert, the probe into the meatiest part, of
the inner thigh from below' and parallel
to the lee of a w'hole turkev.
VI
iS"
.1
o
o
•Q
ai
t:
0
1
I
§
CO
PROBE
)
© CD CD CD CD
©©©CHID
BAKE
)
©®©®©;
M
How to Set the Oven For Roasting When Using the Ptohe
■j Insert the jarobe into the meat.
Phig the probe into the outlet in the
oven. Make sure it’s pushed all the
w'ay in. Close the oven door.
Press the PROBE pad.
Press the number pads to set the
desired internal food or meat
temperature. The maximum
internal temjrerature for the food
that you can set is 200°F.
Press the BAKE pad.
Press the number pads to set the
desired oven temperature.
^ Press the START jrad.
The display will flash if the probe is inserted
into the outlet and you have not set a probe
temperature and pressed the START pad.
When the oven starts to heat, the w'ord
LO will be in the display.
jAlfer the internal temperature of the
meat reaches 10()°F, the changing
internal temperature will be shown
in the display.
Wlien the internal temperature of
s
the meat reaches the numbei’ you
have set, the probe and the oven
turn off and the oven control
signals. To stop the signal, press the
CLEAR/OFF pad. Use hot jrads to
remove the probe h orn the food.
Do not use tongs to pull on it—they
might damage it.
To change the oven temperature dining
the Roast c)’cle, press the BAKE pad and
then the number pads to set the new'
temperature.
If the probe Is removed from the food before
the final temperature is reached, a tone will
sound and the display will flash until the probe
Is removed from the oven.
You can use the timer even though you cannot
use timed oven operations.
Page 15

Using the convection oven. WWW.GEAppliances.com
Convection Bake
Multi-shelf position
NOTE: The convection fan will cycle on and off
while cooking to best distribute hot air in the
oven.
The convection oven fan shuts off when the oven
door is opened. DO NOT leave the door open for
long periods of time while using convection
cooking or you may shorten the life of the
convection heating element
In a convection oven, a fan circulates hotair
over, under and around the food.
This circulating hot air Is evenly distributed
throughout the oven cavity. 4s a result foods
are evenly cooked and browned—often in less
time with convection heat.
Multi-Shelf Convection Baking
When convection baking with only I shelf
follow the shelf positions recommended in
the Using the oven section.
Because heated air is circulated evenly
throughout the oven, foods can be
baked with excellent lesults using
multiple shelves.
Multi-shelf baking may increase cook
times slightly foi- some foods but the
overall lesult is time saved. Cookies,
muffins, biscuits and other quickbreads
give veiy good lesults with multi-shelf
bakinff.
Ideal for evenly browned baked foods cooked
on multiple shelves.
Good for large guantities of baked foods.
Good results with cookies, biscuits, muffins,
brownies, cupcakes, cream puffs, sweet rolls,
angel food cake and bread.
The convection fan circulates the heated
air evenly over and around the food.
\Mien baking on shelves, jdace one
shelf in the second (B) position, one
in the fourth (D) jrosition and one in
the 6th (F) position.
I
I
О
I'
Cb
Q)
SS
ss.
£2
c5*
as
Adapting Recipes...
You can use }’our favorite l ecipes in the
convection oven.
When convection baking, the Auto
Recipe'" Convei’sion feature automaticall)’
reduces the set regular baking
temperature by the recommended 2.5 °F.
See Auto Recipe“ Conversion in the Special
features of your oven controhection.
Use pan size recommended.
Some package instructions for frozen
casseroies or main dishes have been
deveioped using commercial convection ovens.
For best results in this oven, preheat the oven
and use the temperature on the package.
15
Page 16

.o
Using the convection oven.
I
■§
è'
№
Co
■f
-Si
CO
“Ci
*5
c2
Grid
Broiler pair
When baking cookies, you wiii
get the best results if you use a
fiat cookie sheet instead of a
pan with iow sides.
Convection Roast
Good for large tender cuts of meat, uncovered. When you are convection :
The convection fan circulates the heated
air evenly over’ and around the food.
Meat and jroultiT ar e browned on all
sides as if they wer e cooked on a
rôtisserie. Heated air will be circulated
over, under and around the food being
roasted. The heated air seals in juices
quickly foi’ a moist and tender’ product
while, at the same time, creating a rich
ffolden brown exterior.
Cookware for Convection Cooking
Before using yorrr' corrvection overr,
check to see if your cookware leaves
room for air circulatiorr in the oven.
If you are baking with several pans, leave
space between them. ,Mso, be sure the
pans do rrot touch each other’ or’ the
walls of the overr.
Paper and Plastic
Heat-r esistarrt pajrer arrd plastic
coirtaiirei’s that are r econrrrreirded for
use in regrrlar overrs carr be used irr
coirvectrorr overrs. Plastic cookware that
is heat-resistarrt to temjreratrrres of
40()°F carr also be rrsed.
important that )’ou rrse the broiler |>an
and grid for best convection roastirrg
r esults. The parr is used to catch grease
spills and the grid is rrsed to preverrt
grease spatter's.
Metal and Glass
Arry type of cookware will work in yorrr
corrvertiorr overr. However, rrretaJ parrs
heat the fastest arrd are recornmerrded
for corrvectiorr bakirrg.
Darkened or matte-finished pans will bake
faster than shiny pans.
Glass or ceramic pans cook more slowly.
For recipes like overr-baked chickerr,
rrse a parr with low sides. Hot air carrrrot
circrrlate well arortrrd food in a parr with
high sides.
CONVECTION
^BAKE
OR ROAST
©CD®®®
®® ®®®
16
0
How to Set the Oven for Convection Baking or Roasting
Press the CONVECTION BAKE pad
or the CONVECTION ROAST pttd.
Press the rrrtrrrber pads to set the
desired overr terrrperatrrre.
Press the START pad.
To charrge the overr terrrperatrrre, pr ess
the CONVECTION BAKE or CONVECTION
ROAST jrad arrd therr the rrrrmber pads
to set the rrew' temperatirre.
Wdrerr the overr starts to heat, the
clrarrgirrg temperatrrre, sfcrrtirrg at 100°F,
will be displayed. Wherr the overr reaches
the terrrperature yorr set, 3 beeps will
soirnd.
Press the CLEAR/OFF pud wherr
frrrished.
You will hear a fan while cooking with
convection. The fan will stop when the door is
opened, but the heat will not turn off.
You may hear the oven clicking during baking.
This is normal.
Page 17

шт. GEAppliances.com
How to Set the Oven for Convection Roasting when Using the Prohe
г?'
For best results when roasting large
turkeys and roasts, we recommend
using the prohe included in the
convection oven.
CONVECTION
ROAST
0
OCDCDGXD
Г)
PROBE
©CDS)®®
® ® ®® ®
The displa)’ will flash PROBE and the
oven control will signal if the probe is
inserted into the outlet, and you have not
set a probe temperature and pressed the
STARTptid.
Place the shelf in the lowest position
(A). Inseit the probe into the meat.
Plug the probe into the outlet in the
oven. Make sure it is pushed all the
wav in. Close the oven door.
Press the CONVECRONROAST pad
^ Press the number pads to set the
desired oven temperature.
Press the PROBE jrad.
Press the number pads to set the
desired internal meat temperature.
Press the START pad.
Mhen the oven starts to heat, the word
LO will be in the display.
jAffer the intenial temperature of the meat
reaches 10()°F, the changing internal
temjreratuie will be shown in the displa)'.
\Mien the internal temperature of
8
the meat reaches the number you
have set, the probe and the oven
turn off and the oven control
signals. To stop the signal, press the
CLEAR/OFFpad. Use hot pads to
remove the probe from the food.
Do not use tongs to pull on it;—they
might damage it.
CAUTION: To prevent possible burns, do not
unplup the probe from the oven outlet until the
oven has cooled. Do not store the probe In
the oven.
NOTE:
If the probe Is removed from the food before
the final temperature is reached, a tone will
sound and the display will flash until the probe
is removed from the oven.
You will hear a fan while cooking with this
feature. The fan will stop when the door is
opened, but the heat will not turn off.
You can use the timer even though you cannot
use timed oven operations.
On double oven models, you will not be able to
use the probe in the upper oven during timed
oven operations. This is because, with the
probe, you are cooking by temperature rather
than time.
I
I
О
I'
Cb
Qi
SS
ss.
£2
Cb*
as
To change the oven temperature
during the Convection Roast cycle,
press the CONVECTION ROAST pad
and then press the number pads to
set the new desired temperature.
Convection Roasting Guide
Meats Minutes/Lb. Oven Temp. Internal Temp.
Beef Rib, Boneless Rib, Rare 20-24 325°F 140°Ft
Pork Bone-in, Boneless (3 to 5 ibs.) 23-27 325°F 170T
Ham Canned, Butt, Shank (3 to 5 Ibs. full’/ cooked) 14-18 325°F 140T
Lamb Bone-in, Boneless (3 to 5 Ibs.) Medium 17-20 325°F 160T
Seafood Fish, whole (3 to 5 lbs.) 30-40 total 400°F
Poultry Whole Chicken (IVi to 3'/2 Ibs.) 24-26 350°F 180“-185°F
Stuffed hi rds generulR гетцше 30—45 minuti S' additional roaslii time. Shield leg and brea.st with / lit lo prraent
overhiounmig and (dying of shrn.
' 1Ъе U.S, Defxirf-irienf ofAgrin.Uf-ure -kays "Rare beef is popular, but Yoti should киоте
Top Sirloin Medium 24-28 325°F 160T
¡3 to 5 lbs.) Well 28-32 325°F 170°F
Beef Tenderloin Rare 10-14 325°F 140Tt
Chops ¡1/2 to 1" thick) 2 chops 30-35 total 325°F 170“F
Lobster Tails (6 to 8 oz. each) 20-25 total 350°F
Cornish Hens Unstuffed (1 to 1Угbs.) 50-55 total 350°F 180M85T
Stuffed (1 toiyibs.) 55-60 total 350°F 180M85T
Duckling (4 to 5 lbs.) 24-26 325T 180M85T
Turkey, whole*
Unstuffed |10 to 16 Ibs.) 8-11 325°F 180М8БТ
Unstuffed (18 to 24 Ibs.) 7-10 325°F 180M85T
Turkey Breast (4 to 6 Ibs.) 16-19 325°F 170T
.some food poisoning organisms тщ s-urviveP (Soiure: Safe hood- Hook. }0u)- Kitchen
Medium 14-18 325°F 160T
4 chops 35-40 total 325°F 170“F
6 chops 40-45 total 325°F 170T
Weil 20-24 325°F 170T
Uiat cooking tl to onh 14(.rF moam
Guide. USDA Rev. June I9S5.)
77
f
Q
S-
§>
о
о
gf
(A
I
I
Page 18

.о
I
■§
è'
№
Co
t
e
-Sí
co
“в
сг
Ч!
Using the timed features for convection cooking.
On double oven models, you can use timed baking or roasting in one oven while using self-clean in the other; you can
also use timed baking or roasting In both ovens at the same time.
You will hear a fan while cooking with these features. The fan will stop when the door is opened, but the heat will not
turn off.
NOTE: Foods that spoil easily—such as milk, eggs, fish, stuffings, poultry and pork—should not be allowed to sit for
more than I hour before or after cooking. Room temperature promotes the growth of harmful bacteria. Be sure
that the oven light is off because heat from the bulb will speed harmful bacteria growth.
CONVECTION
BAKE
0
©©ОСИП)
COOK
TIME
C
Howto Set an Immediate Start and Automatic Stop
The oven will turn on Immediately and cook for a
selected length of time. At the end of the cooking time,
the oven will turn off automatically.
Make sure the dock shows the correct time
of day.
Pi ess the CONVECTION BAKE or
CONWCTION ROAST pivl.
Press the number pads to set the desired
oven temperature.
Pi ess the COOK TIME pad.
NOTE: If your recipe requires preheating, you may
need to add additional time to the length of the
cooking time.
Piess the number pads to set the desired
¥
length of cooking time. Tire minimum
cooking time you can set is 1 minute.
The oven temperature that you set and
the cooking time that vou entered will be
in the display.
^ Press the START pad.
The di.splay will show the changing
temperature (starting at 100°F) and the
cooking time. The display starts changing
once the temperature reaches 100°F.
NOTE: On double oven models, when using both ovens
at the same time, the times showing in the display will
be for the last oven set. To display the time set for the
first oven set, press the COOK TIME pad for that oven.
The oven will continue to cook for the
programmed amount of time, then shut
off automatically, unless the Cook and Hold
feature was set. See the
oven control sectkm.
Press the CLEAR/OFFpad to clear the
display if necessary'. Remove the food
from the oven. Remember, even though
the oven shuts off automatically, food left
in the oven will continue cooking after
the oven turns off.
Special features ofyour
i
с2
VI
t
<С5
о
о
■р
SP
-Q
ai
а
t:
а
I
I
§
со
CONVECTION
BAKE
0
©©©©©
COOK
TIME
c
©©©(DCD
DELAY
START
© © ©©©
©©©©TO
18
How to Set a Delayed Start and Automatic Stop
You can set the oven control to delay-start the oven,
cook for a .specific length of time and then turn off
automatically.
Make sure the dock shows the correct time of
dav.
Press the CONVECTION BAKE or
/
CONVECTION ROAST pad.
y Press the number pads to set the desired
— oven temperature.
Press the COOK TIME pad.
NOTE: If your recipe requires preheating, you may
need to add additional time to the length of the
cooking time.
Press the number pads to set the desired
¥
cooking time.
Press the DELAY START pad.
Press the number pads to set the time of
day you want the oven to turn on and
start cooking.
If you would like to check the times you have set press
the DELAY START pad to check the start time you have
set or press the COOK TIME pad to check the length
of cooking time you have set
у Press the START pad.
NOTE: An attention tone will sound If you are using
timed baking or roasting and do not press the START
pad after entering the baking or roasting temperature.
Wien the oven turns on at the time of day
you have set, the display will show the
changing temperature {starting at K)0°F) and
the cooking time. The display starts changing
once the temperature reaches 100°F
NOTE: On double oven models, when using both ovens
at the same time, the times showing in the display will
be for the last oven set To display the time set for the
first oven set press the DELAY START or COOK
TIME pad for that oven.
The oven will continue to cook for the
programmed amount of time, then shut
off automatically, unless the Cook and Hold
feature was set. See the Special features ofyour
oven control sectkm.
Press the CLEAR/OFF pad to clear the
s
display if necessary. Remove the food
from the oven. Remember, even though
the oven shuts off automatically, food left
in the oven will continue cooking after
the oven turns off.
Page 19

Adjust the oven thermostat—Do it yourself!
You may find that your new oven cooks differently than the one it replaced. Use your new oven for a few weeks
to become more familiar with it. If you still think your new oven Is too hot or too cold, you can adjust the
thermostat yourself
Do not use thermometers, such as those found In grocery stores, to check the temperature setting of your oven.
These thermometers may vary20-40 degrees.
NOTE: This adjustment will only affect baking and roasting temperatures; it does not affect broiling, convection or
self-cleaning temperatures. The adjustment will be retained in memory after a power failure.
To Adjust the Thermostat
BROIL
HI/10
(I
® CDCDCniD
BAKE
BAKE
)
)
Press the BAKE and BROIL HI/LO
7
pads at the same time for 3 seconds
until the display shows SR
Press the BAKE pad for the oven
which )'ou want to use. A two-digit
number show's in the displa)’.
Press BAKE again to alternate
between increasing and decreasing
the oven temperature.
The oven temperature can be
adjusted up to (+) 35°F hotter or (-)
3.0°F cooler. Press the number pads
the same w'ay you read them. For
example, to change the oven
temperature 1.3 °F, jtress
When you have made the
¥
adjustment, jrress the START
pad to go back to the time of
day display. Use your oven as
you would nomially.
www.GEAppliances.com
1 and 5.
I
I
I'
(A
The type of margarine will affect baking performance!
Most recipes for baking have been developed using high-fat products such as butter or margarine (80% fat). If you
decrease the fat, the recipe may not give the same results as with a higher-fat product
Recipe failure can result if cakes, pies, pastries, cookies or candles are made with low-fat spreads. The lower the fat
content of a spread product, the more noticeable these differences become.
Federal sfcmdards require products labeled “maigarine" to contain at least 80% fat by weight, f.ow-fat spreads, on the
other hand, confciin less fat and more water. The high-moisture content of these sjrreads affect the texture and flavor
of baked goods. For best results with )'our old favoiite recipes, use mai garine, butter or stick spreads containing at least
70% vegetable oil.
CB
Qi
SS
ss.
£2
CD*
as
Q
S-
§>
o
o
gj>
f
(A
I
19
I
Page 20

.o
I
■§
è'
№
Co
Using the self-cleaning oven.
The oven door must be closed and all controls must be set correctly for the cycle to work properly.
Before a Clean Cycle
Wipe up iwBvysoil on the oven
bottom, (appearance may vary/
We recommend venting your kitchen
with an open window or using a
ventilation fan or hood during
the firet self-clean cycle.
Remove the broiler pan, broiler grid,
probe, all cookware and any aluminum
foil from the oven.
The oven shelves can be self-cleaned, but
the)'will darken, lose their luster and
become hard to slide.
Do not use abrasives oi- oven cleaners.
Clean the top, sides and outside of the
oven door with soap and w'ater.
Make sure the oven light bulb cover
is in place and the oven light is off'.
IMPORTANT: The health of some birds
is extremely sensitive to the ftimes given
off during the self-cleaning cycle of
any oven. Move birds to another
well-ventilated room.
(.)n double oven models, you can
set a clean cycle in both ovens at the
same time. The last oven set will
automaticall)’ delay its start until the
end of the first oven’s clean cycle.
()n double oven models, you can
use timed baking in one oven and
self-clean the other at the same time.
■f
-Si
CO
“CJ
c2
STD/LOW
(i
©CDCDQDCD
® ©®(V)®
How to Set the Oven for Cleaning
Ji Press the SEU CLEAN STD/LOW pad
once for a 4-hour clean time or
twice for a 3-hour clean time.
A 3-hour self-clean time is
recommended for use when
cleaning small, contained spills. A
self-clean time of 4 hours or longer
is recommended for a dirtier oven.
If a time other than 4 hours or
3 hours is needed, use the number
pads and enter the desired clean
time.
You can change the clean time to any
time between 3 hours and 5 hours,
depending on how dirt)' your oven is.
Press the START jrad.
The door locks automatically. The display
will show' the clean time remaining. It will
not be possible to open the oven door
until the temperature drops below' the
lock temperature and the LOCKED light
ffoes off'.
\Mien the iOC/ffDlight goes off, you will
be able to open the door.
:: 1 he w'ords LOCKED will flash and the
oven control will signal if )’ou set the
clean cycle and forget to close the
oven door.
To stop a clean cycle, jtress the
CLEAR/OFFptid. \\4ien the LOCKED
light goes off indicating the oven has
cooled below' the locking temperature,
you will be able to open the door.
20
Page 21

www.GEAppliances.com
The oven door must be closed and all controls must be set correctly for the cycle to work properly.
SELF
CLEAN
STD/lOW
Q.
©(I)®®®
DELAY
START
)
o®®®®
®®®®®
How to Delay the Start of Cleaning
Press the SELF CLEAN STD/LOW p^d
once for a 4-hour clean time or
twice fi)r a 3-hour clean time,
A 3-hour self-clean time is
recommended for use when
cleaning small, contained spills. A
self-clean time of 4 hours or longer
is recommended for a dirtier oven.
If a time other than 4 hours or
3 hours is needed, use the number
pads and enter the desired clean
time.
You can change the clean time to an)’
time between 3 hours and 5 hours,
depending on how ditty your oven is.
Press the DELAY START jrad.
Using the number pads, enter the
tittle of day )'ou want the clean cycle
to start.
^ Press the START pad.
After a Clean Cycle
The door locks automatically. The display
will show the start time. It will not be
possible to open the oven door until
the temperatuie drops below the lock
temjreratuie and the LOC/ffD light
goes off.
When the £OC/f£D light goes off, you will
be able to open the dooi’.
NOTE: On double oven models, you can seta
delay clean in both ovens at the same time.
The second oven set will automatically delay
the start of cleaning until the end of the first
ovens clean cycle.
To recall the start time of the second oven set,
press the DELAY START pad on the controls for
the second oven.
I
I
I'
(A
CB
ss
Ci.
£2
CD*
You may notice some white ash in the
oven. Wipe it up with a damp cloth after
the oven cools.
If white spots remain, remove them with a
soap-filled steel-wool pad and rinse thoroughly
with a vinegar and water mixture.
These deposits are usually a salt residue
that cannot be removed by the clean
rt’cle.
If the oven is not clean after one clean
cycle, repeat the cycle.
! You cannot set the oven for cooking
until the oven is cool enough for the
door to unlock.
While the oven is self-cleaning, you
can press the CLOCK jrad to displa)'
the time of day. To return to the
clean countdown, jrress the SELF
CLEAN STD/LOW pud.
If the shelves become hard to slide, wipe
the shelf suppoits with cooking oil.
27
Page 22

Care and cleaning of the oven.
Be sure electrical power Is off and all surfaces are cool before cleaning any part of the oven.
How to Remove Packaging Tape
To assure no damage is done to tJie finisli
of die jii'oduct, the safest way to remove
the adhesive left from packaging tape
on new appliances is an application
of a household liquid dishwashing
detergent, mineral oil or cooking oil.
Oven Light Bulb
NOTE: The glass cover (on some models} should
be removed only when cold. Wearing latex gloves
may offer a better grip.
Beftire replacing the bulb, disconnect
electrical pow'er to the oven at the main
fuse or circuit breaker panel. Let the
bulb cool completely before remming it.
For your safet)', do not touch a hot bulb
with a damp cloth. If you do, the bulb
will break.
To remove:
Turn the glass cover counterclockwise
1/4 turn until the tabs of the glass cover
clear the grooves of the socket. Remove
the bulb.
Apply with a soft cloth and allow' to soak.
Wipe diy and then apply an appliance
polish to thoroughh’ clean and protect
the surface.
NOTE: The plastic tape must be removed from all
chrome trim. It cannot be removed if It is baked on.
To replace:
Put in a new' 40-w'att appliance bulb.
Place the fcibs of the glass cover into the
grooves of the socket. Turn the glass
cover clockwise 1/4 turn.
NOTE:
A 40-watt appliance bulb is smaller than a
standard 40-watt household bulb.
■ ■■ Install and tighten the cover clockwise.
■ ■■ Reconnect electrical power to the oven.
■ For improved lighting inside the oven, clean
the glass cover frequently using a wet cloth.
This should be done when the oven is
completely cool.
22
Page 23

Cleaning the Oven Door
www.GEAppliances.com
The gasket is designed with a gap at the
bottom to allow for proper air circulation.
Do not rub or clean the door gasket—
it has an extremely low resistance to
abrasion.
If you notice the gasket becoming worn,
frayed or damaged in any way or if it has
become displaced on the door, you should
have it replaced.
Slot
Pull hinge locks down to unlock
To clean the inside of the door:
Because the area inside the gasket is
cleaned during the self-clean cycle, you
do not need to clean this by hand.
:: The area outside the gasket and
the door liner can be cleaned with a
soapfilled steel-wool or plastic pad,
hot water and detergent. Rinse well
with a vinegar and water solution.
To clean the outside of the door:
I Be soajj and water to thoroughly
clean the top, sides and front of the
oven door, liinse well. You may also
use a fflass cleaner to clean the a;lass
Lift-Off Oven Door
The door is very heavy. Be careful when
removing and lifting the door.
Do not lift the door by the handle.
To remove the door
|~^ Fully open the door.
Pull the hinge locks down toward
the door frame, to the unlocked
position. A tool, such as a small flatblade screwdiivei', ma)’ be required.
Finnly grasp both sides of the door
at the top.
Close door to the door removal
position, which is halftvay between
the broil stop position and fully
closed.
on the outside of the door. Do not let
water diip into the vent openings.
■: If an)' stain on the door vent trim is
persistent, use a soft abrasive cleaner
and a sponge-scmbber f<:>r best results.
i Spillage of marinades, fmit juices,
tomato sauces and basting mateiials
containing acids may cause
discoloration and should be wiped
up immediately. WTen surface is cool,
clean and rinse.
Do not use oven cleaneis, cleaning
powders or harsh abrasives on the
outside of the door.
With the
door at the
same angle as
Bottom
edge
of slot,
the removal
jrosition, seat the
indentation of
the hinge ami
into the bottom
edge of the hinge slot. The notch in
the hinge ami must be fully seated
into the bottom of the slot.
Fully open the door. If the door will
not fully open, the indentation is
not seated conectly in the bottom
edge of the slot.
Push the hinge locks up against the
front frame of the oven carirf, to the
0)
lift door up and out until the hinge
ami is clear of the slot.
To replace the door:
Fimily grasp both sides of the door
7
at the top.
Removable Oven Floor
To remove the oven floor.
Remove the oven door using the
instmctions in the Lift-Off Oven Door
section.
^ Press down and pull out the
removable oven floor.
Hinge
arm
Hinge
lock
Push hinge locks up to lock
^ Close the oven door.
Clean the oven floor with w'ami
soapy water.
Wien reinstalling the oven floor, be
sure to slide it all the way to the back
of the oven.
IMPORTANT: .Always replace the
removable floor before the next use.
25
Page 24

Care and cleaning of the oven.
Probe
The temperature probe may be cleaned
with soap and water or a soajefilled
scouring pad. Cool the temperature
probe before cleaning. .Scour stubborn
spots with a soa|>filled scouring pad,
rinse and drv.
Oven Shelves
Do not immerse thè temperature probe
in water.
Do not store thè temperature probe in
thè oven.
Clean the oven shelves with an abrasive
cleanser or steel wool. iAiter cleaning,
rinse the shelves with clean w'ater and diy
with a clean cloth.
Oven Heating Elements
Do not clean the broil element. Any soil
will burn oft'when the element is heated.
The bake element is not exposed and
is under the l emovable oven floor. If
spillovere, residue or ash accumulate
on the removable oven floor, wipe up
befiare self-cleaninii.
,__
__
_
Broiler Pan & Grid
f / Tl'TiTTiTd \ : Do not clean the broiler pan or grid in a
self-cleaning oven.
After broiling, remove the broiler
pan from the oven.
jAlfer broiling, lemove the bnailer pan
from the oven. Remtave the grid frcam the
pan. Carefully pour out the grease from
the pan into a proper container.
Wash and rinse the bnailer pan and grid
in hot wuter with a soap-filled or plastic
scouring jaad.
NOTE: The oven shelves maybe cleaned In the
self-cleaning oven. However, the shelves will
darken in color, lose their luster and become hard
to slide if cleaned during the self-cleaning cycle.
You can wipe the shelf supports with cooking oil
after self-cleaning to make the shelves slide more
easily.
To clean the bake element area, take out
the removable floor (see the Removable
Oven Floor section) and gently lift the
bake element. Clean with w'anu soapy
wuter. jAlways r eplace the removable floor
befiare next use.
NOTE: Failure to replace the removable floor will
adversely affect the cooking performance.
If food has burned on, sprinkle the grid
with detergent wiiile hot and cover with
wet paper tow'els or a dishcloth. Soaking
the pan will remove burned-on totads.
B()th the bi cailer pan and grid may be
cleaned with a commercial oven cleaner.
Both the broiler pan and grid can also be
cleaned in a dishw'asher.
Do not store a soiled broiler pan and grid
anywhere In the oven.
24
Page 25

Control Panel
www.GEAppliances.com
It’s a good idea to \djie the control
panel after each use. Clean with mild
soap and w'ater or vinegar and w'atei;
rinse with clean w'ater and polish dry
with a soft cloth.
Do not use abrasive clea.nsei's, strong
liquid cleansei's, plastic scouring pads or
oven cleaneis on the control panel—they
will damage the finish. A .50/50 solution
of vinegar and hot writer wairks w'ell.
Stainless Steel Surfaces (on some models)
Do not use a steel-wool pad; it will
scratch the surface.
To clean the stainless steel surface,
use Wvirm sudsy writer, a stainless steel
cleaner such as Kleen King® or an
all-purpose liquid or spray cleaner.
.Alw'ays scnib in the direction of the
After cleaning, use a stainless steel
polish, such as Stainless Steel Magic®;
Revere Copper and Stainless Steel
Cleaner® or Wenol
Metal Polish/ Follow the product
instructions for cleaning the stainless
steel surface.
grain. Rinse thoroughly with a sponge
oi' cloth and clean water. Diy with a soft,
clean cloth.
0)
,511 Purpose
25
Page 26

.O
Before You Call For Service...
I
■§
è'
№
Co
.o
'is
u
s
t
2
Od
t
<c
-Si
CO
“Ci
*5
«!
c2
^ » Troubleshooting Tips
^ I Save time and money! Review the charts on the following
©
Problem Possible Causes What To Do
Control signals after
entering cooking time
or delay start
Food does not bake
or roast properly
Food does not
broil properly
pages first and you may not need to call for service.
...........
You forgot to enter a bake
temperature or cleaning
time.
Oven controls improperly set. • See the Using the oven section.
Shelf position is incorrect
or the shelf is not level.
Incorrect cookware or
cookware of improper size
being used.
Oven floor not in place. • Replace the oven floor.
Oven thermostat needs
adjustment.
Oven controls improperly set. • Make sure you press the BROIL HI/LO pad.
Improper shelf position
being used.
Food being cooked
in a hot pan.
Cookware not suited
for broiling.
The probe is plugged into the
outlet in the oven.
• Press the BAKE pud and desired temperature or the
• See the Using the oven section.
• See the Using the oven section.
• See the Adjust the oven thermostat—Do it yourself!
• See the Broiling Guide.
• Use the broiling pan and giid that came Vvith your oven.
• Use the broiling pan and giid that came with your oven.
• Unplug and remove the probe from the oven.
SELF CLEAN STD/LOW pud and desired clean time.
section.
Make sure it is cool.
Clock and timer
do not work
Oven light does
not work
26
Aluminum foil used on the
broiling pan and grid has
not been fitted properly and
slit as recommended.
In some areas the power
(voltage) may be low.
A fuse in your home may be
blown or the circuit breaker
tripped.
Oven controls improperly set. • See the Using the clock, timer and control lockout
light bulb is loose or defective. • Tighten or replace the bulb.
Pad operating Ught is broken. • (iall for sendee.
• See the Using the oven section.
• Preheat the broil element f<>r 10 minutes,
• Broil for the longest period of time recommended in
the Broiling Guide.
• Replace the fuse or reset the circuit breaker.
section.
Page 27

www.GEAppliances.com
I
I
Prohleiii Possible Causes What To Do
Oven temperature too
hot or too cold
Oven WÌU not work A fuse in your home may
Oven will not self-cleanThe oven temperature
''Crackling" or
"popping" sound
Excessive smoking
during clean cycle
Oven door will
not open after a
clean cycle
...........
........
Oven thermostat
needs adjustment.
be blown or the circuit
breaker tripped.
Oven controls improperly set. • See the Using the oven section.
is too high to set a
self-clean operation.
Oven controls improperly set. • See the Using the self-cleaning oven section.
The probe is plugged into
the outlet in the oven.
This is the sound of the
metal heating and cooling
during both the cooking and
cleaning functions.
Excessive soil. • Press the CLEAR/OFFpad . Ojren the windows to lid
Oven too hot. • Allow the oven to cool below locking temperature.
• See the Adjust the oven thermostat—Do it yourself!
section.
• Replace the fuse or reset the circuit breaker.
• jAJIow the oven to cool and reset the controls.
• Remove the probe from the oven.
• This is normal.
the room of smoke. Wait until the iOC/ffD light goes
off. Wipe up the excess soil and reset the clean cycle.
I'
(A
aS
gj>
1“
5?
i
5j>
O’
5
o
o
o
Ci.
£2
CD*
O
o
.S’
ÌQ
Oven not clean aher a
clean cycle................
''LOCKED " flashes
in the display
LOCKED light is on
when you want to cook
Oven controls not properly set. • See the Using the self-cleaning oven section.
Oven was heavily soiled. • Clean ujj heavy spillovers before starting the clean
cycle. Heavih' soiled ovens may need to self-clean
again or for a longer peiiod of time.
The self-clean cycle has
been selected but the
door is not closed.
The oven door is locked
because the temperature
inside the oven has not
dropped below the
locking temperature.
• Close the oven door.
• Press the CLEAR/OFFpad . Allow the oven to cool.
I
I
•S
27
Page 28

Before You Call For Service...
Troubleshooting Tips
H
Problem Possible Causes What To Do
"F-r- and a number
or letter" flash .........
in the display
You have a function
error code.
If the function code repeats. • Disconnect all power to the oven for at least 30
• Press the CLEAR/OFF pad. ^Yllow the oven to cool for
one hour. Put the oven back into operation.
seconds and then reconnect power. If the function
error code repeats, call for service.
t
CO
“CJ
c2
Display goes blank A fuse in your home may
be blown or the circuit
breaker tripped.
The clock is in the
black-out mode.
Display flashes Power failure. • Reset the clock.
Unable to get the
display to show “SF"
"PROBE" appears in This is reminding you to • Enter a jtrobe temperature.
the display
Power outage,
clock flashes
Steam from the vent When using the convection
..............
..........
Oven control pads were
not pressed properly.
enter a probe temperature
after plugging in the probe.
Power outage or surge. • Reset the clock. If the oven was in use, you must reset
feature, it is normal to see
steam coming out of the
oven vent. As the number
of shelves or amount of
food being cooked increases,
the amount of visible steam
will increase.
• Replace the fuse or reset the circuit bleaker.
• See the Special features of your oven control section.
• The BAKE and BROIL HI/LO pads (on double oven
models, use the upper oven controls) must be
pressed at the same time and held for 3 seconds.
it by pressing the CLEAR/OFFpad, setting the clock
and resetting any cooking function.
• This is normal.
“Burning" or "oily"
odor emitting from
the vent
Strong odor ............. An odor from the insulation
Fan noise A cooling fan or a convection
25
.............
This is normal in a new oven
and will disappear in time.
around the inside of the
oven is normal for the first
few times the oven is used.
fan (depending on the
function you are using)
may automatically turn on.
• To speed the process, set a self-clean cycle for a
minimum of 3 hours. See the Using the self-cleaning
oven section.
• This is temporary.
• This is normal. The cooling fan will turn on
to cool internal parts. It may run for uj> to 1-1/2
houis after the oven is tin ned off. The convection
fan will cycle on and off until the fiinction is over
or the door is opened.
Page 29

GE Service Protection Plus™
GE, a name recognized worldwide for quality and dependability; offers you
Service Protection Plus'"—comprehensive protection on all your appliances-
No Matter What Brand!
Benefits Include:
• Backed by GE
• AH brands covered
• Unlimited service calls
• All parts and labor costs included
• No out-of-pocket expenses
• No hidden deductibles
• One 800 number to call
You will be completely satisfied with our seivice protection or you may request your money back
on the remaining value of your contract. No questions asked. It’s that simple.
Protect your refrigerator, dishwasher, washer and diyer, range, TV, VCR and much more—any brand!
Plus there’s no extra charge for emergency service and low monthly financing is available. Even icemaker
coverage and food spoilage protection is offered. You can rest easy, knowing that all your valuable
household products are jrrotected against expensive repairs.
Place your confidence in GE and call us in the U.S. toll-free at 800.626.2224
for more information.
hraiuE cctvered, up lo 20 veal's old, in the eonrinental U.S.
We'll Cover Any Appliance.
Anywhere. Anytime. *
(Tit here
Please place In envelope and mail to:
General Electric Company
Warranty Registration Department
P.O. Box 32150
LouisviUe, KY 40232-2150
29
Page 30

Consumer Product Ownership Registration
Dear Customer:
Thank you for purchasing our product and thank you for
We are proud to have you as a customer!
Follow these three steps to protect your new appliance investment:
placing your confidence in us.
Complete and mail
your Consumer
Protluct Ownership
Registration today.
Have: tIic j.>e:ace: of
mind of knowing we
can contact von in
the unlikelv event of a
safely rnodificalion.
Alter mailing tlie
regist.rati on be lc>w,
store this doenment
in a salh [.dace. It
c <')T i T a ins i n I'orm a.i i o n
you will need should
you require service.
Onr sendee number is
80().(;k.carks
(800.432.2737).
Model Number Serial Number
J
______^^_________
I
____I____
I
_____
^^^^
___________________
L J______I
Important: If you did not get a registration card with your
product, detach and return the form below to
ensure that your product is registered, or register
online at
www.GEAppliances.com.
Consumer Product Ownership Registration
Read vonr Owner’s
Manual earel'iillv.
It will help von
o[.K-rafe \'our new
a.[>[>l i a.nce [> I'o j.'>c: r\\\
_____I_____I_____
I
____I____
Cut licre
L
Street I
Add l ess I_____^^________I____I____I____I____
Dale Placed ,
30
Apt. # I______
City
In I'se
Month I_______
GE Consumer Products
General Electric Company
Louisville, Kentucky
www.GEAppliaiices. com
^^^^^^_____________________________L
I
______I
____I____^____I____I____I____
Day I
L
GE Appliances
____
Please provide vantr e-rnail adtlress to receive, via e-iitail, diseotints, special offers and other imjaortant
( onnniinieations fremi GK Apjtliances ((fEA).
( 'liei k here if voti eto not want to reeeivt' coininnnieatioiis front (fEA's eart'ftilly seleetetl jtartrit'rs.
^^^
____________!____I____
E-mail Address'-'
^^^
^^^
_________________________
L
Yea r I_____
L
^^^
____________I____I____I____^____I____I____^^________I____
I
L
Phone I
Nunilter I I I
I I I
J
_____
■State I I
L J
I
_____I_____
Code
I
L
I I I I
L
Page 31

GE Built-In Electric Oven Warranty.
/J-—All warranty service provided by our Factory Service Centers,
^ authorized Customer Care‘s technician. To schedule service,
Li U on-line, 24 hours a day, visit us at www.GEAppliances.com,
or call 800.GE.CARES (800.432.2737).
For The Period Of: GE Will Replace:
One Year
Fromthedateofthe.
original purchase
What GE Will Not Cover:
: Service trips to your home to teach you how to use
(he product.
: Improper instaDation, delivery or maintenance.
■ Faflure of the product if it is abused, misused, or used
for other than the intended purpose or used
commeixiaUy.
Replacement of house fuses or resetting of circuit
breakers.
This warranty is extended to the original purchaser and any succeeding owner for products purchased for
home use within the USA. In Alaska, the warranty excludes the cost of shipping or service calls to your home.
Some states do not allow the exclusion or limitation of incidental or consequential damages. This warranty
gives you specific legal rights, and you may also have other rights which vary from state to state. To know
what your legal rights are, consult your local or state consumer affairs office or your states Attorney General.
Any part of the oven which fails due to a defect in materials or workmanship.
During this full one-year warranty, GE will also jMo\ide, free of charge, all labor
and in-home sendee to replace the defective part.
Damage to the product caused by accident, fire, floods
or acts of God.
Incidental or consequential damage caused by
possible defects with this appUance.
Damage caused after deUvery.
Staple your receipt here.
Proof of the original purchase
date is needed to obtain service
under the warranty.
I
I
I'
(A
aS
gj>
1“
5?
i
O’
5
o
o
o
Ci.
£2
CD*
O
o
.S’
iQ
Warrantor: General Electric Company. Louisville, KY40225
31
Page 32

Consumer Support.
GE Appliances Website
Have a question or need assistance with youi’ appliance? Tiy the GE Appliances Website 24 horn's a day,
any day of the year! For gi eater convenience and hrster serace, you can now download Owner’s Manuals,
ordei' parts, catalogs, or even schedule senice on-line. You can also “Ask Our Team of Experts’''"
your questions, and so much more...
Schedule Service
Exj>eit GE repair senice is only one step away from your door. Get on-line and schedule }’our sen’ice at
your convenience 24 hours any day of the year! Or call SOO.GE.f !ARES {800.432.27,47) during nonnal
business hours.
/
[ ^ 1
Heal Life Design Studio
GE suppoits the Universal Design concept:—products, senices, and environments that can be used by
people of all ages, sizes and capabilities. We recognize the need to design for a wide range of physical and
mental abilities and impaimients. For details of GE’s Universal Design applications, including kitchen
J
design ideas fiar people with disabilities, check out our Website today. For the hearing impaired, please call
800.TDD.GEAC (800.8,33.4322). ' '
Extended Warranties
WWW.GEAppliances.com
www.GEAppliances.com
WWW.GEAppliances.com
www.GEAppliances.com
Purchase a GE extended warranty and learn about special discounts that are available while your warranty
is still in effect. You can purchase it on-line anytime, or call 800.626.2224 during nonnal business hours.
GE Gonsumer Home Seiyices will still be there after your warrant)' expires.
Parts and Accessories
Individuals cjualified to semce their own appliances can have parts or accessories sent directly to their
homes (VISA, MasterCard, and Discover cards are accepted). Order on-line today, 24 hours every day or by
phone at 800.626.2002 dining nonnal business horn's.
Instructions contained in this manuai cover procedures to be performed by any user. Other servicing generaily
should be referred to qualified service personnel. Caution must be exercised, since improper servicing may cause
unsafe operation.
www.GEAppliances.com
Contact Us www.GEAppliances.com
If you are not satisfied with the sendee you receive from GE, contact us on our Website with all the details
including your phone number, or write to: General Manager, Customer Relations
GE Appliances, Apjrliance Park
Louisville, KY 4022.5
Register Your Appliance
WWW.GEAppliances.com
Register your new appliance on-line—at your convenience! Timely product registration will allow for
enhanced communication and prompt serace under the tenns of your wan anty, should the need arise.
You may also mail in the preprinted r egistration card included in the packing material.
Printed in the United States
 Loading...