

Page 1
wvvw.GEAppliances.com
Safety Instruotions .......... 2-7
0
"m
Operating Instruotions
Baking or Roasting ........... ] ]
Broiling, Broiling Guide ....... ] 2
Clock and Timer . ............ ] 3
Control Lockout ............. ] 3
Convection ............... ] 6-20
Cookware .................... 9
Oven ................... ] 0-28
Probe ...................... ] 5
Proofing ................... 21
Sabbath Feature .............. 28
Self-Cleaning ............. 23, 24
Special Feaulres ........... 25-27
Surface Burners ............ 8, 9
Thermostat ................. 22
Timed Baking ,%Roasting ...... 14
_'arming ................... 21
Care and Cleaning
Broiler Pan and Grid ......... 31
Burner Assembly ............ 29
Burner Grates and
Center Grate ................ 30
Control Panel ............... 33
Glass Cooktop ............ 34, 35
Heating Elements ............ 33
Knobs ..................... 29
I,ift-Off Door . .............. 32
I,ight Bulbs ................. 30
Oven Floor ................. 33
Packaging Tape .............. 29
Racks ...................... 31
Storage Drawer .............. 31
Surfaces ................. 32, 33
Vent ...................... 33
Troubleshooting Tips ..... 36-40
Accessories ................... 45
Consumer Support
Consumer Support .... Back Cover
Product Registration ....... 41,42
_'arranty for Customers
in Canada .................. 47
Warranty for Customers
in the U.S.A ................. 46
www.geappfiances.ca
Write the model and serial
numbers here:
Model #
'Serial #
You can lind them on a label
behind the open oven door
on the lower left corner of
the range fl'ame.
<
164D4290P324-1 49-80168-! 09-04 JR
Page 2
IMPORTANTSAFETYINFORMATION.
READALLINSTRUCTIONSBEFOREUSING.
WARNING!
ANTI-TIPDEVICE
, ALLRANGESCAN TIP
INJURY TOPERSONS
COULDRESULT
INSTALLAN_ tiP
DEVICESPACKEDWITH
RANGE
SEEINSTALLATION
INSTRUCtiONS
A WARNING:If the information
in this manual is not followed exactly,
a fire or explosion may result causing
property damage, personal injury
or death.
-- Do not store or use gasoline or other
flammable vapors and liquids in the
vicinity of this or any other appliance.
- WHATTODOIF YOU
SMELLGAS
Do not try to light any appliance.
Do not touch any electrical switch;
do not use any phone in your building.
Immediately call your gas supplier
from a neighbor's phone. Follow the
gas supplier's instructions.
If you cannot reach your gas supplier,
call the fire department.
-- Installation and service must be
performed by a qualified installer,
service agency or the gas supplier.
GAS-FIRED
2
LISTED
Page 3
www.GEAppliances.com
WARNING!
Foryour safe_, the information in this manual must be followed to minimize the risk of fire or
explosion, electric shock, or to prevent property damage, personal injury, or loss of life.
ANti-TIPDEVICE
All ranges can tip and injury could result.
Toprevent accidental tipping of the range, attach it to the wall or floor by installing the Anti--tip device
supplied.
If the Anti--tip device supplied with the range does not fit this application, use the universal Anti--tip
device WB2X7909.
Tocheck if the device is installed and engaged properly, remove the storage drawer and inspect the
rear leveling leg. Make sure #fits securely into the slot.
It'VOtl p/til tile range Otlt from tile wall for ally' reason, make sure tile device is properly
engv_ged when you push tile rang_ back agvdnst tile wall. lt'it is not, there is a possible iisk of
tile rang> tipping oxer and causing il_juW if you or a child stand, sit or lean on all open door
Please refer to tile Anti-Tip device information ill this manual. Failure to take tills piecaufion
could result ill tipping of tile rang> and il)jury.
IMPORTANTSAFETYNOtiCE
The California Safe Drinking Water and ToxicEnforcement Act requires the Governor of California to
publish a list of substances known to the state to cause birth defects or other reproductive harm, and
requires businesses to warn customers of potential exposure to such substances.
Gasappliances can cause minor exposure to four of these substances, namely benzene, carbon
monoxide, formaldehyde and soot, caused primarily by the incomplete combustion of natural gas or
LP fuels. Properly adjusted burners, indicated by a bluish rather than a yellow flame, will minimize
incomplete combustion. Exposure to these substances can be minimized by venting with an open
window or using a ventilation fan or hood.
The fiberglass insulation in self-clean ovens gives off a very small amount of carbon monoxide during
the cleaning cycle. Exposure can be minimized by venting with an open window or using a ventilation
fan or hood.
3
Page 4
IMPORTANTSAFETYINFORMATION.
READALLINSTRUCTIONSBEFOREUSING.
WARNING!
SAFETYPRECAUTIONS
When using electrical appliances, basic safety precautions should be followed, including the
following:
Use tiffs appliance only for its intended Do not leme children alone or unattended
purpose as described in this Owner's wheie a range is hot or in operation. They
Manual. could be seriously burned.
Be sure your appliance is properly installed
and grounded by a qualified technician in
accordance with the provided installation
instructions.
Before perforating any service, disconnect
the range power supply at the household
disuibufion panel by removing the fllse or
switching off the circuit breaken
Hme the installer show you the location of
the circuit breaker or fl_se. Mark it for easy
reference.
Do not leme children alone--<hildren
should not be left alone or unattended in
an area where an appliance is in use. They
should nexer be allowed to sit or stand on
any part of the appliance.
Haxe the installer show van the location
of the range gas shut.offxahe and how to
shut it off if necessary.
Hate your range installed and properly
grounded by a qualified installel, in
accordance with the Installa6on
Instrucuons. Any adjusunent and service
should be perfot_ned only by qualified gas
range installers or seiwice mchnicians.
i,ocate rite range ant of kitchen traffic path
and out of drafty locations to piexent poor
air circulation.
Be sure all packaging materials are
remoxed flom the range before operating
it to pre\ent fire or smoke damage should
the packag{ng material ignite.
Do not attempt to repair or replace any
part of your range unless it is specifically
recommended in this manual. All other
service should be refe_Ted to a qualified
technician,
Be sure your range is con_ecfly adjusmd
1)ya qualified setMce mchnician or installer
for the type of gas (natural or i,P) that is
to be used. Your range can be comermd
for use with either type of gas. See the
Installation Instructions packed with
the range.
WARNING:theseadjustments
must be made by a qualified service
technician in accordance with the
manufacturer's instructions and aft codes
and requirements of the authority having
jurisdiction. Failure to follow these
instructions could result in serious injury or
property damage. The qualified agency
performing this work assumes
responsibility for the conversion.
Kee I) the hood and grease fihers clean to
maintain good xenting and to mold grease
fires.
Teach children not to play with the
controls or any other part of the range.
Always kee I) dish towels, dish clofl_s, pot
holders and other linens a safe distance
from your range.
4
Page 5
vvww.GEAppl_nce_com
Always kee I) wooden and plastic umnsils
and canned food a safe distance flora your
rang>.
Always kee I) combustible wall coxetings,
curtains or drapes a safe distance flom
your rang_.
Do not clean the rang_ wifll flammable or
_oladle cleaning fluids.
Mter prolonged use of a range, high floor
mmperamres may result and ma W floor
cox_rings will not withstand this kind of
use. Nex_r install the rang_ oxer vinyl file
or linoleum that cannot withstand such
type of use. Nexer install it directly oxer
interior kitchen carpeting.
Avoid scratching the glass cooktop with
shaq) instrmnents, or wifll tings and oilier
jeweh>
Do not allow anyone to climb, stand or
hang on rim ox>n door, storag_ drawer or
cooktop. They could damag> the rang>
and even tip it o_>l; causing sin>re
personal injm>
CAUTION:Itemsinteresttochildren
shou/dnotbe storedincabinetsabovea rangeor
on tbebacksplashofa range--children climbing
on therangetoreachitems couldbe seriouslg
injured.
material could be ig_ited if brought in
contact wifll flame or hot oven surfi_ces
and may cause sex,re bums.
Do not store flammable mamfials in an
oven, a rang> storag_ drawer or near a
cooktop.
Do not store or use combnsfible mamrials,
gasoline or other flammable vapors and
liquids in the vicinity of this or any other
appliance.
Do not let cooking grease or other
flammable mamrials accumulate in or
near the rang_.
Do not use wamr on grease fires. Nexer
pick up a flaming pan. Turn the controls
off'. Smother a flaming pan on a snrthce
burner by covering the pan complemly
wifl/a well-fitting lid, cookie sheet or fiat
tray. Use a muldq)m])ose dU chemical or
tbam-type fire extinguisher
Flaming grease outside a pan can be put
out by covering it with baking soda or,
if available, by using a muldq)m])ose drT
chemical or foam-type fire exdnguishen
Flame in die oven can be smothered
completely 1)yclosing die oven door and
mining d_e control to off or by using a
nmlfi-purpose dry chemical or foam-type
rite extinguishen
WARNING:NEVERusethis
appliance as a space heater to heat or
warm fl_e room. Doing so m W result
in carbon monoxide poisoning and
oveflleafing of the cookmp or ox>n.
For your safew, nmer use your appliance
for warming or heating the room.
Larg> scratches or impacts to glass doors
can lead to broken or shattered glass.
Do not clean file rang_ when the appliance
is in use.
Nexer wear loose-fitting or hanging
g'annents while using tim appliance.
Be careflfl when reaching for imms stored
ira cabinets over the rang_. Flammable
Let flae burner grams and other surfaces
cool before touching them or leaving
them where children can _each them.
Ne_er block the _ents (air opening:s) of
file range. They provide flae air inlet and
outlet flint are necessmw• fbr the range to
operate properly with conect combustion.
Air openings are locamd at the rear of the
cooktop, at the top and bottom of file
oven door, and at the bottom of the rang>
under the storag_ drawer or kick panel.
Do not lift the cooktop. Lifting the
cooktop can lead to damag_ and improper
operation of the rang>.
5
Page 6
IMPORTANTSAFETYINFORMATION.
READALLINSTRUCTIONSBEFOREUSING.
WARNING!
SURFACEBURNERS
Useproperpansize--avoid pansthat are unstableor easilytipped.Selectcookwarehavingflat bottomslarge
enoughto coverburnergrates.Toavoidspillovers,makesurecookwareis largeenoughto containthefood
properly, Thiswillbothsave cleaningtimeandprevent hazardousaccumulationsoffood,sinceheaw spattering
or spilloverslefton rangecan ignite.Usepanswith handlesthatcanbe easilygraspedandremaincooL
Always use d_e tire position when igniting
the top 1)urners and make sure the 1)urners
hme ig_dted.
Never lem_e the surface 1)urners unattended
at high flame settings. Boiloxers cause
smoking and greasy spilloxers that may
catch on fire.
Adjust the top 1)urner flame size so it does
not exmnd 1)eyond the edge of the cookware.
Excessive flame is hazardous.
Use only dry pot holders--moist or damp pot
holders on hot surPaces m W resuh in 1)urns
flom smam. Do not let pot holders come
near open flames when lifting cookware. Do
not use a towel or other 1)ulky cloth in place
of a pot holder:
;, X&hen using glass cookware, make sure it
is desig_ed for top<_f-v,mge cooking.
To minimize dm possibili b, of 1)urns, ignition
of flammable materials and spillage, mm
cookware handles toward the side or back of
the range without extending over adjacent
1)tlI'IleI's.
Do not use a wok on dm cooking sur£1ce
if the wok has a round metal ring that is
placed o\'er the burner gram m support the
wok. This ring acts as a heat u'ap, which mW
damage the 1)urner gram and N_rner head.
Also, it m W cm_se the 1)urner m work
improperly. This may came a cad)on
monoxide le\>l abo\e that allowed 1)ycurrent
standards, resulting in a heahh hazard.
Foods for flying should be as dry as possible.
Frost on flozen foods or moisture on flesh
foods can cause hot Pat to 1)ul)l)le up and over
the sides of the pan.
Nexer u}, to move a pan of hot Pat especially
a deep _lt flTer. X&hituntil the flit is cool.
Do not leme plastic items on tim cooktop--
they may meh if left too close to the vent.
J J
Kee I) all plastics mvay flom the surPace
1)tlI'Ile I'S.
To moid the possibility of a 1)urn ahvavs be
certain that the conuols for all 1)urners are
at the ORc position and all grates are cool
1)efore attempting to remove them.
Careflflly watch foods 1)eing flied at a high
flame setting.
Ahvays heat fat slowly and watch as it heats.
ff a coml)ination of oils or _lts will be used
in flTing, stir together 1)efore heating or
as flits meh slowh,
Use a deep flit thermometer whenever
possible to prevent oxeflmating Pat 1)eyond
the smoking point.
Do not operate the 1)urner wifl_out all 1)urner
parts in place.
[ 7se the least possible amount of flit for
efl>cdxe shallow or deep-_lt fl3,ing. Filling the
pan too fifll of_lt can cause spillovers when
food is added.
X_qmn preparing flaming foods under dm
6
hood, turn the _m on.
If _ange is located near a window, do not
hang long curtains that could blow over the
surface 1)umers and create a fire hazard.
If you smell gas, turn off the g_ls to the range
and call a qualified service technician. Nmer
use an open flame to locate a leak.
Ahvays turn the stHJ_ce burner conuols off
1)efore removing cookware.
Do not lea\'e any imms on tim cooktop. The
hot air flom the \ent may ignim flammable
items and will increase pressure in closed
containers, which may cm_se them to 1)urst.
Page 7
www.GEAppliances.com
COOKMEATANDPOULTRYTHOROUGHLY...
Cookmeatandpoultrythoroughly--meattoatleastanINTERNALtemperatureof 160°Fandpoultrytoatleastan
INTERNALtemperatureof 180°ECookingtothesetemperaturesusuallypmtectsagainstfoodbomeillness.
a, WARNING!
OVEN
Standaway fromthe rangewhenopeningthe ovendoor.Hotair orsteamwhich escapes cancauseburnsto
hands,face and/oreyes.
Do not heat unopened fbod containers.
Pressure could build up and the container
could bmst, causing an inju U.
Keep the oven _ent unobstructed.
KeeI) the oven flee from grease buildup.
iii}iiii_
Place the oven tack in the desired position
while the oven is cool. If tacks must be handled
when hot, do not let pot holder contact the
heating elements.
} _hen using cooking oi roasting bags in the
oven, follow the manufilcturer's directions.
Pulling out the t'ack to the stop-lock is a
convenience in lifting hear) fbods. It is also a
precaution against burns flom touching hot
surfaces of the door or oven walls.
iii}iiii
Do not use the oven to dU newspapers.
If overheated, the) can catch on fire.
iii}iiii
Do not use the oven for a stot'age area. Items
stored in an oven can ignite.
Do not leave paper products, cooking utensils
or fbod in the oven when not in use.
.4,WARNING:NEWRcovet
slots, holes or passages in the oven bottom
or cover an entire t'ack with materials such
as ahllninuln foil. Doing so bloc_ air flow
through the oven and may cause carbon
monoxide poisoning. Ahllninuln fbil linings
may also uap heat, causing a fire hazard.
Do not use aluminum foil to line oven bottoms,
except as suggested in this manual, hnproper
installation of aluminum fbil ma) resuh in a risk
of electric shock or fire.
iii}iiii
Make sure the broiler pan is in place conectl)
to reduce the possibilit) of grease fires.
iii}iiii
If)ou should have a grease fire in the broiler
pan, press the C/.EAR/0FFpadand kee I) the
oven door closed to contain fire until it
l)tlI'IlS out.
SELF-CLEANINGOVEN
Donotuse ovencleaners.No commercialovencleaneror oven linerprotectivecoatingof anykindshouldbe
usedin or aroundanypart of the oven.Residuefrom oven cleanerswill damagetheinsideofthe ovenwhenthe
self-cleancycleis used.
} Do not clean the door gasket. The door gasket
is essential for a good seal. Care should be
taken not to rub, damage or move the gasket.
} Be%re selgcleaning the oven, remove
the iac "_,broiler pan, grid and other cookware.
} Be sure to xdpe up excess spillage be%re
starting the self cleaning opet'ation.
} If the self cleaning mode malflmctions, turn the
oven off and disconnect the power supply. Have
it serviced b)a qualified technician.
} Clean only parts listed in this Owner's Manual.
READANDFOLLOWTHISSAFETYINFORMATIONCAREFULLY.
SAVETHESEINSTRUCTIONS 7
Page 8

Usingthegas surfaceburners.
Throughout this manual, features and appearance may vary from your model.
How to Light a Gas Surface Burner
\
Push the control knob in and turn it
to the LITEposifion.
Push the control knob in and turn it to
tile LITE l)osition.
You will hear a little clicking noise---
tile sound of tile electric soark i,mifin,_
the burnel:
Mter the flame lights, mrn the knob to
ac!iust the flmne size, If the knob stays at
£1TE, it will continue to click,
Sealed Gas Burners
When one burner is turned to LITE,all
the burne_ spark. Do not attempt to
disassemble or clean around any burner
while another burner is on. An electric
shock may result, which could cause you
to knock ()vet" hot cookware.
The smaller burner (right rear position)
will give the best simmer results fl)r
delicate fi)ods, Stlch as satlces or fi)ods
which need to cook over low heat tot a
long time. It can be turned down to a ve_'
low setting.
How to Select Flame Size
For safe handling of cookware, never let the flames
extend up the sides of the cookware.
_'m'h the flame, not the knob, as you
reduce heat. The flame size on a gas
burner should match the cookware
VOII aI'e rising.
In Case of Power Failure
In case ot a power tifilure, you can light
the gas surli_ce burne_ on your range
with a match. Hold a lit match to the
burner, then push in and turn the control
knob to the LifEposition. Use extreme
caution when lighting burnexs this way.
The largest burners are higher powered
than the othe_ and will bring liquids to
a boil quicke_:
An) flame larger than the bottom of the
cookware is wasted and (mix serx es to heat
the handle.
Stu_i_ce burners in use when an electrical
power fifilure occm_ will COllfillt/e to
operate noHnallv.,
Before Lighting a Gas Burner
Make sure all grates on the range are in
place heft)re using any burne_:
After Lighting a Gas Burner
Do not operate the burner for an
extended period of time without
cookware on the grate. The finish on
the grate may chip without cookware
to absorb the heat.
Be sure the 1)urnet5 and grates are
cool heft)re you place your hand,
a pot holder; cleaning cloths or
other materials on them.
8
Page 9
Top-of-Range Cookware
www.GEAppliances.com
Aluminum: Medium-weight cookware is
recommended because it heats quickly
and evenly: Most fi)ods brown evenly in
an ahmlinum skillet. Use saucepans with
tight-fitting lids when cooking with
IllinillltlI// alllO/ints ot watei;
Cast-Iron: If heated slowly, most skillets
will give satisti_ctmy results.
Enamelware: Under some conditions,
tile enalllel Of SOllle (ookware Ill}IV
Illelt. Follow cookware Ill_lnDtilCttlI'eI"S
recommendations fl)r cooking methods.
Glass'. There are two t)pes of glass
cookware--those tot oven use only
and those fin" tOl>OtZrange cooking
(saucepans, coffee and teapots).
Glass conducts heat very slowly.
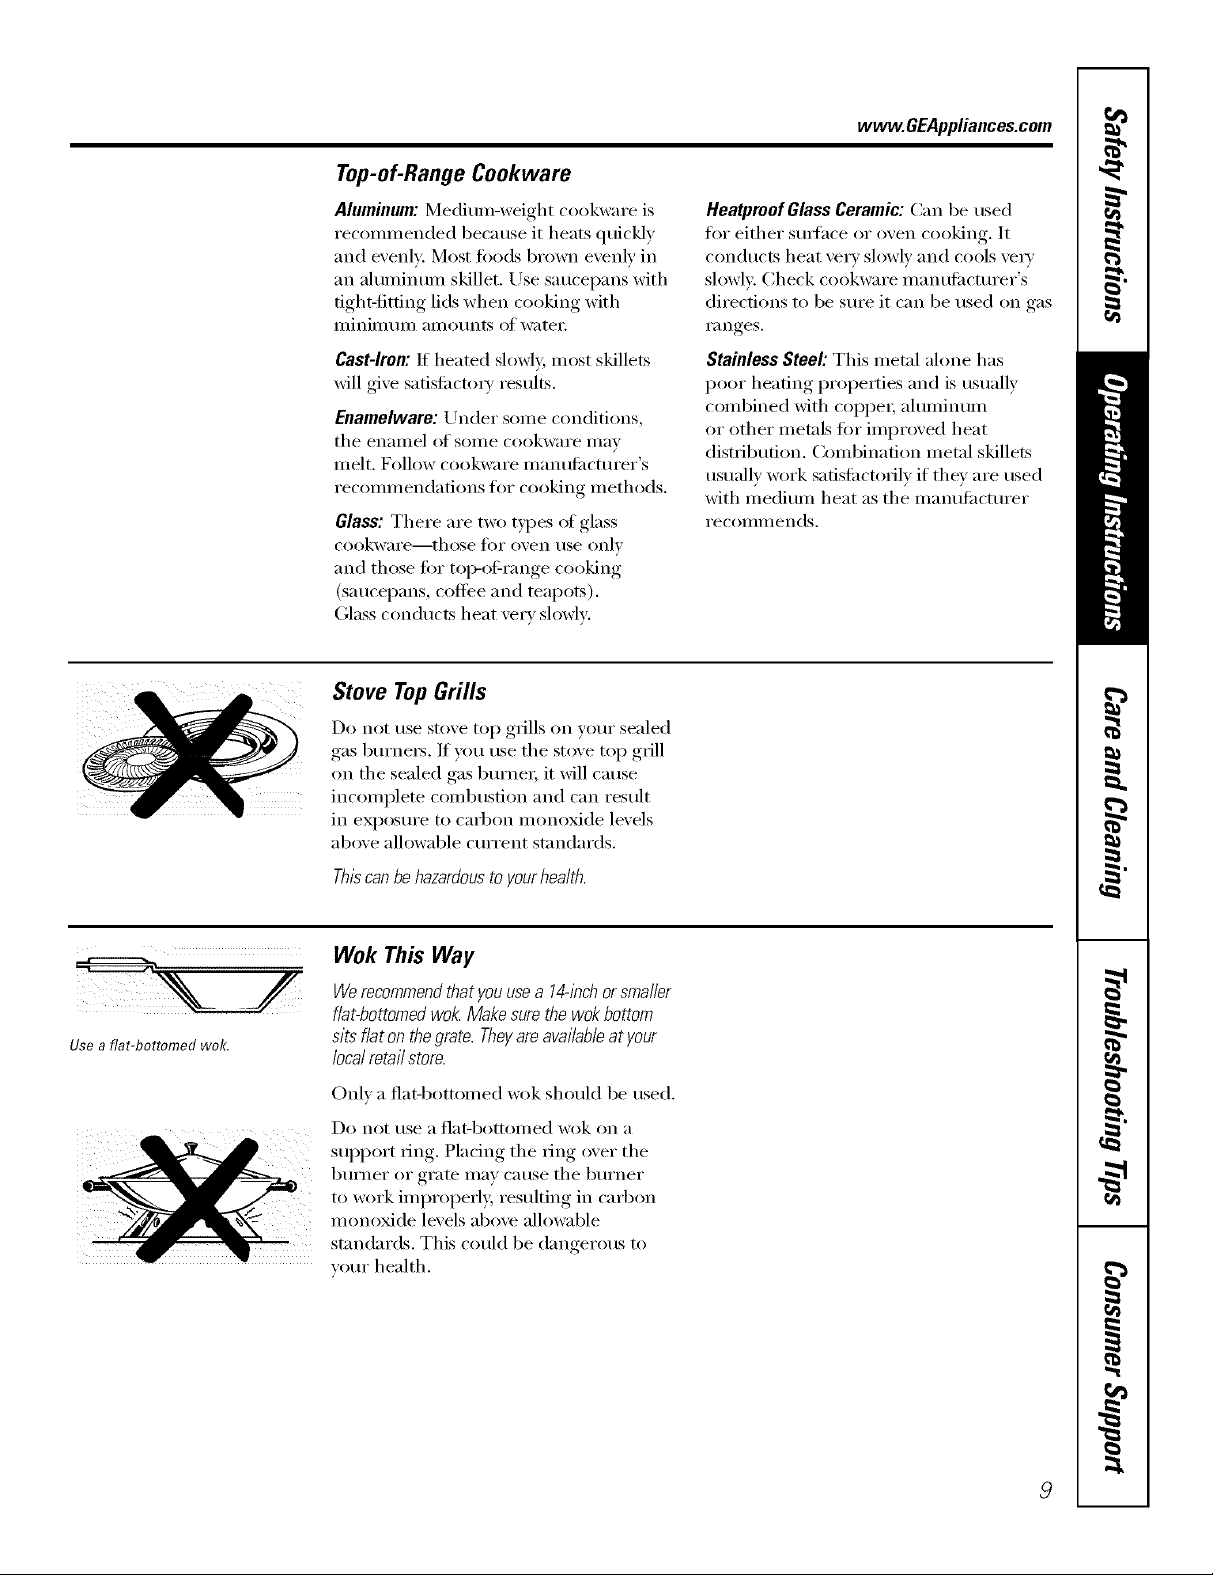
Stove TopGrills
Do not use stove top grills on your sealed
gas burnex_. If you use tile stove top grill
on tile sealed gas burnex; it will cause
incomplete combustion and can result
in eN)osure to carbon inonoxide levels
above allowable current standards.
Heatproof Glass Ceramic: Can be used
tor either SUltace or oven cooking. It
con(hlctS heat very sh)wlv and cools velw
slowl> Check cooi¢ware inanufilcturer's
directions to be sure it can be used on gas
ranges.
Stainless Steel: This metal alone has
poor heating properties and is usually
combined with coppe_; ahmfinum
or other metals fin" improved heat
distribution. Combination metal skillets
usually work safisfi_ctofilv if they are used
with medium heat as the manufi_ctm'er
i'ecOlillilends,
Use a fiat-bottomed wok.
t
Thbcanbehazardousto yourhealth.
Wok This Way
Werecommendthatyouusea 14-inchorsmaller
flat-bottomedwok.Makesurethewokbottom
sitsflatonthegrate.Theyareavailableatyour
localretailstore.
OnE a fiat-bottomed wok should be used.
Do not use a fiat-bottomed wok on a
support ring. Placing tile IJng over tile
b/lI'neI" OF grate may Catlse tile b/iYnei"
to work improped> resulting in carbon
monoxide levels above allowable
standards. This could be dangerous to
veto" health.
9
Page 10

Usingthe ovencontrols.
(Throughout this manual, features and appearance may vary from your model.)
Features and appearance may var_A
OvenControlClockand TimerFeaturesandSettings
--0
BAKEPad
Touch to select the bake fimction.
BROILHI/LOPad
Touch to select tile broil fimcdon. Touch once for 0
high broil and twice for low broil.
CONVECTIONBAKEPad
Touch to select baking with tile con_ection O
flmction. Touch once ior multi-rack com'ection
baking and twice for 1-rack comection baking.
CONVECTIONROASTPad
Touch to select roasting _ith tile (omection
fimction.
PROOFPad
Totlch to select a "w;:|J_l/en'_,ironn/ent t|selill tot
rising., yeast-leavened,..... [)roducts..
STARTPad
Mtlst be touched to start any cooking or
cleaning fimction.
Display
Sho_:_ tile time of da}, o_en temperature,
\_hether the o_en is ill the bake, broil or
selfkleaning mode and the times set for the
timer or automatic o_en operations.
ff "F-andanumberorletter"flashinthedisplayandthe
ovencontrolsignals,thisindicatesa functionerrorcode.
TouchtheCLEAR/OFFpad.AIIowtheoventocoolforonehour
Puttheovenbackintooperation.Ifthefunctionerrorcoderepeats,
disconnectthepowertotheovenandcallforservice.
Ifyourovenwassetforatimedovenoperationanda
poweroutageoccurred,theclockandallprogrammed
functionsmustbereset.
Thetimeofdaywill flashin thedisplaywhentherehas
beenapower outage.
0VENLIGHTON/OFFPad
Touch to turn tile men light on or off.
DELAYSTARTPad
Use along with COOKTIMEor SELFCLEAN
LO/STOpads to set tile ()\'ell to start and stop
automaticallt at a time you set.
COOKTIMEPad
Touch and then touch the ntmflx_r pads to set
the _ll//OIlI/t of time YOU wail[ vot/r food to cook.
Tile o',en will shut offwhen the cooking time
has YtlIl out.
CLEAR/OFFPad
Touch to cancel ALL ()\'ell operations except tile
clock, timer and control lockout.
CLOCKPad
0
Touch befbl_ setting the clock.
Number Pads
Else to set any thn(fion reqtfiring ntm-lbel_
such as tile time of(lay on tile clock, die fimel;
tile oven tempemtm'e, the internal food
tempemtm'e, the start time and length of
operation ibr timed baking and self cleaning.
KITCHENTIMERON/OFFPad
_)u(h to select the timer teatul_.
PROBEPad
0
Touch \_hen using tile probe to cook ti)o(t.
WARMPad
Touch to keep cooked the(is _mn. See tile
Howto Sot the Ovenfor Wormingsection.
CONTROLLOCKOUT
@
Tile control lockout is 9 and 0. Touch and hold
tile gand 0pads at tile same time tor 24seconds.
10
SELFCLEANLO/STDPad
Touch to select selfcleaning fimction. See tile
Usingthe self-cleaningoven section.
Page 11
Usingthe oven. vvww.GEAppliances.com
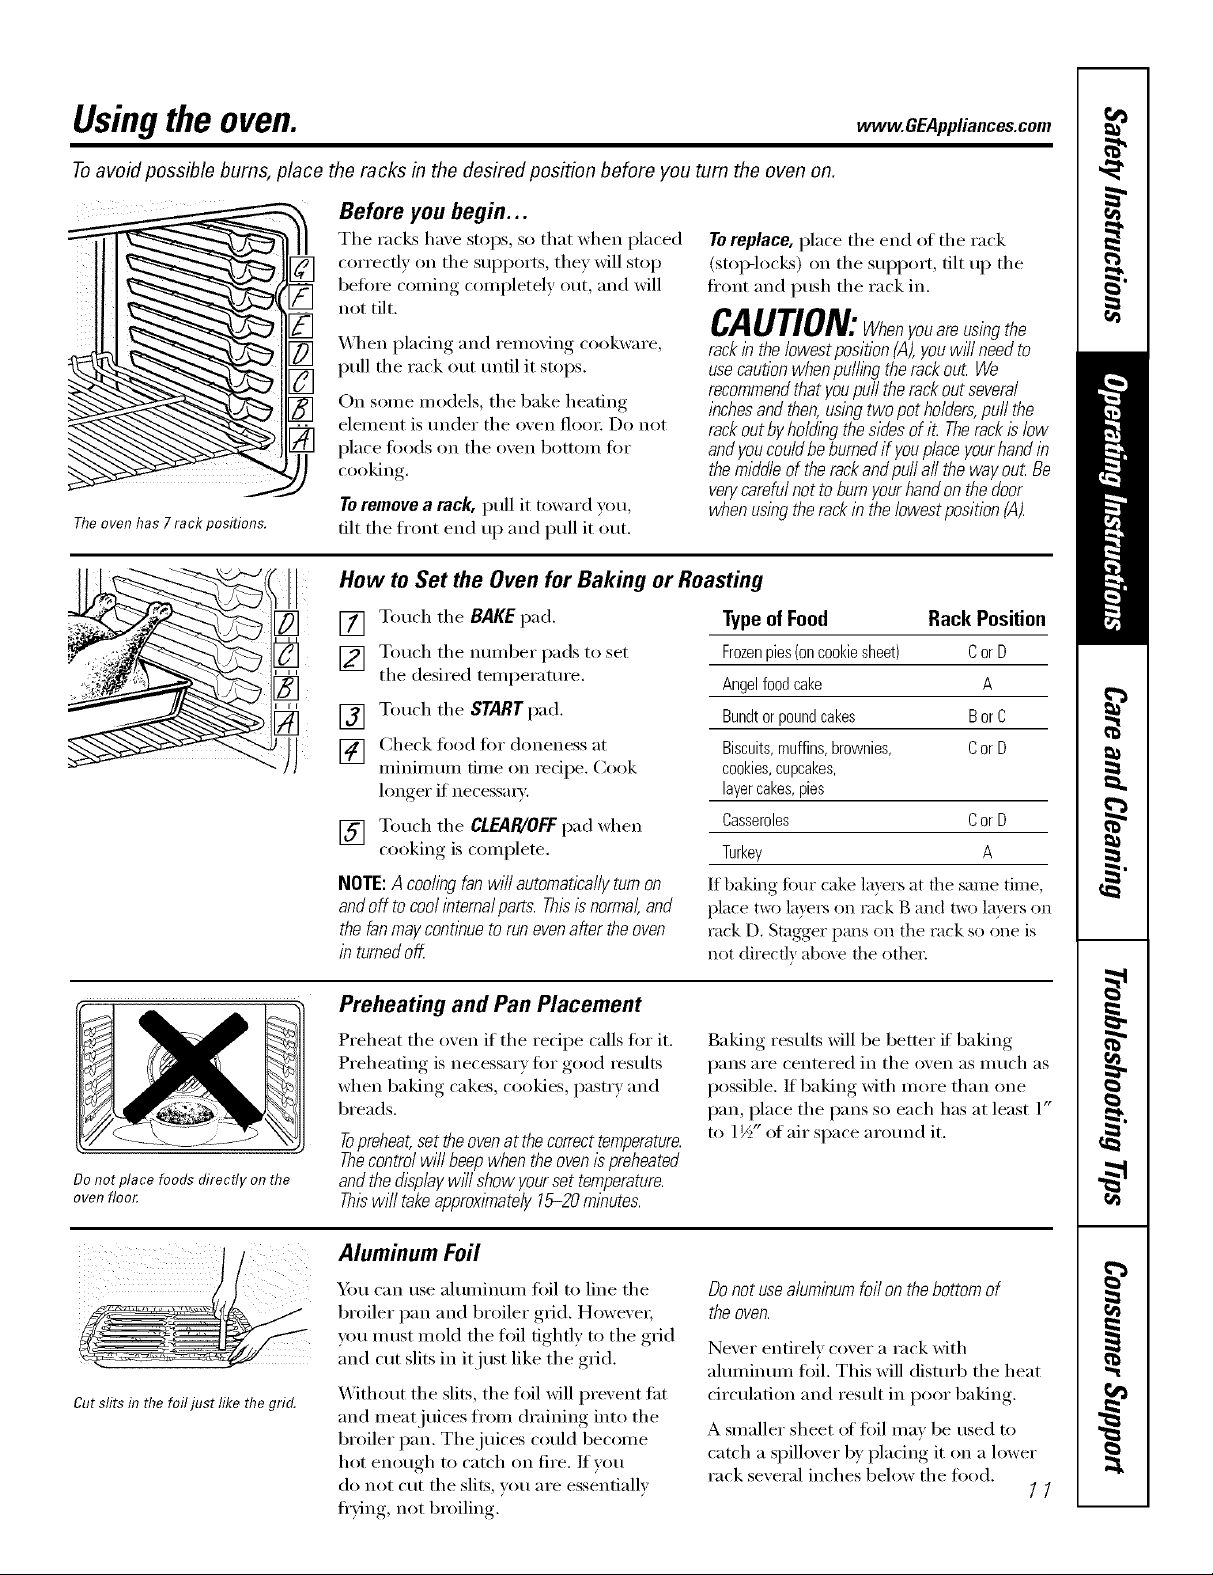
Toavoid possible bums, place the racks in the desired position before you turn the oven on.
Before you begin...
The racks haxe stops, so that when placed
[] ,.He(tl,,,.tiles.pp(.tts,tile,willst.p
before coming completely out and will
Toreplace, place tile end of tile rack
(stop-locl_s) on tile support, tilt up tile
ti'ont and push tile rack in.
..ttilt
_._q/en I)lacing, and remoxin,,_ cookware,
pull tile rack out tmtil it stops.
_]_ On some models, tile bake heating
eleiilent is ttnder tile o_,en I']ooi: Do not
place toods on tile o_,en bottoilt t()i"
C( )eking,
Toremove a rack, pull it toward you,
Theoven has 7rack positions, tilt tile I_I'ont end ttp and pull it o/tt.
How to Set the Oven for Baking or Roasting
[] Touch tile BAKE pad.
[] Touch tile nmnl)er pads to set
tile desired temperature.
[] Touch tile STARTpad.
[] Check food for doneness at
mininmn_ time (m recipe. Co()k
longer if necessm T.
[] mottch tile CLEAR/OFFpad when
cooking, is comi)lete.
NOTE:A coolingfanwill automaticallyturnon
andoff tocoolinternalparts.Thisisnormal,and
thefanmaycontinuetorunevenaftertheoven
inturnedoff
CAUTION:Whenyouarausingthe
rackin the lowest position (A),youw/Tlneedto
usecautionwhenpulling the rackou_ We
recommendthat youpuff the rackout several
inchesandthen,using two pot holders,puff the
rackoutby ho/ding the sidesof iL Therackis low
andyou couldbe burnedif youplace yourhand in
the middle of therackandpu// a// the way ou_ Be
verycarafu/not to burnyourhandon the door
when using therack in the/owestposition (A).
TypeofFood Rack Position
Frozenpies(oncookiesheet) CorD
Angelfoodcake A
Bundtorpoundcakes BorC
Biscuits,muffins,brownies, CorD
cookies,cupcakes,
layercakes,pies
Casseroles CorD
Turkey A
If baking fi)ur cake layers at file same time,
place t_) layet_ on tack B and two layers on
tack D. Stagger iimls on the tack so ()tie is
not direct]} abo_e the other;
Donotplacefoodsdirectlyonthe
ovenfleet
Cut slits in the foil just like the grid.
Preheating and Pan Placement
Preheat tile oven if tile recipe calls for it.
Preheating is necessary t0r good results
when baking cakes, cookies, pastry and
breads.
Topreheat,set theovenat the correcttemperature.
Thecontrol will beepwhen the oven/s preheated
andthe display w#l show yourset temperature.
Thiswill take approximately15-20 minutes.
Aluminum Foil
Ym can use almninmn fifil m line tile
broiler pan and broiler grid. However;
you must mold tile foil tightly to tile grid
and cut slits in it just like tile grid.
Without tile slits, tile foil will prevent fat
and meat juices fl'om draining into tile
broiler pan. The juices could become
hot enough to catch on fire. If volt
do not cut tile slits, you are essemiallv
fl'_ing, not broiling.
Baking results Mll be better if baking
pans are centered in tile oven as much as
possible. If baking with more than one
pan, place tile pans so each has at least 1"
to 1½" of air space around it.
Donotusealuminumfoil onthebottomof
theoven.
Never entirely cover a rack with
almninmn fifil. This will disturb tile heat
circulation and result in poor baking.
A smaller sheet of fi)il may be used to
catch a spillover by placing it on a lower
rack several inches below the fi)od,
//
Page 12
Usingthe oven.
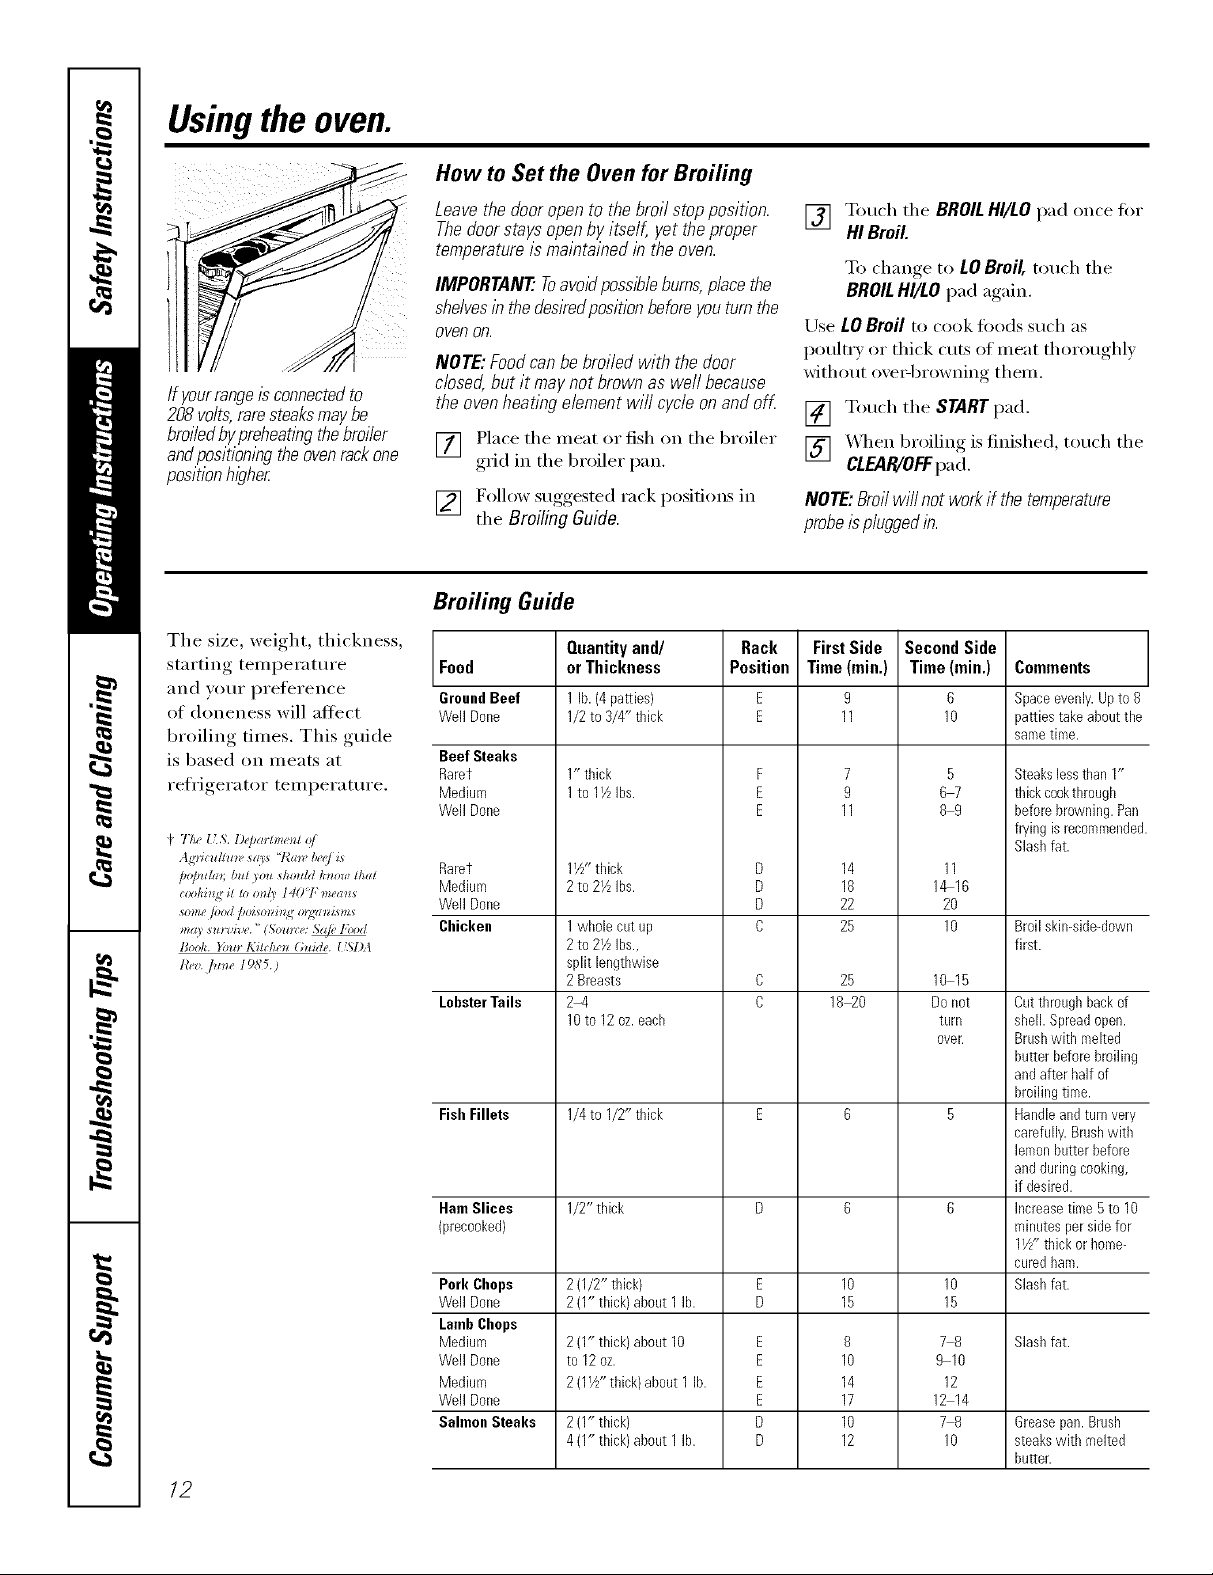
How to Set the Oven for Broiling
Leavethedooropento thebroil stopposition.
Thedoorstaysopenby itself, yet theproper
temperature is maintained in the oven.
IMPORTANT'. Toavolcl possib/e burns, place the
shelves in the desired position before you turn the
oven oR.
NOTE:Foodcanbebroiledwith thedoor
If yourrange is connectedto
208 volts,raresteaksmay be
broiled bypreheating thebroiler
andpositionl)_gtheoven rackone
positionhigher
dosed, but it may not brown as well because
the oven heating element wifl cycle on and off.
[] Place the meat or fish on the broiler
grid in the broiler pan.
[] Follow suggested rack positions in
the Broiling Guide.
Broiling Guide
The size, weight, thickness,
starting temperature Food
and yotlr preference GroundBeef
of doneness will altect Well Done
broiling times. This guide
is based on meats at Beef Steaks
reli'igera tot temperature. Medium
4 TIw { S. l)@a_lm_l o/
D@_llat; &*l )oz* *ho*zld k_ow lh_zl
:_M6_g il lo o_d3 140<12mem**
ma), su:'_:iv(,." (.So_:_:(,:S(_(, l'_,_>d
Boot:. };n_ Kih:he_ Gttide. (iSI}_
l'eza ]m_e 19?,'5.)
Raret
Well Done
Rarer
Medium
Well Done
Chicken
LobsterTails
Fish Fillets
Ham Slices
{precooked}
Pork Chops
Well Done
LambChops
Medium
Well Done
Medium
Well Done
SalmonSteaks
12
Quantityand/
orThickness
1 lb.(4patties}
1/2to 3/4" thick
1" thick
1to 11/LIbs.
17/' thick
2to 27zIbs.
1whole cut up
2to 27_Ibs.,
split lengthwise
2Breasts
2-4
10to 12oz.each
1/4to I/2" thick
1/2" thick
2(1/2" thick}
2(1" thick)about 1 lb.
2{1" thick)about 10
to 12oz.
1
2(1_" thick) about 1 lb.
2(1" thick)
4(1" thick)about 1 lb.
Rack
Position
F
E
E
D
D
D
C
E
E
E
E
D
D
[] Touch the BROIL HI/LO pad once for
HI Broil
To change to LO Broil, touch the
BROILHI/LO pad again.
Use LOBroil to cook foods such as
poultry or thick cuts of meat thoroughly
without ove_q)rowning them.
[] Touch the START pad.
[] XAq_enbroiling is finished, touch the
CLEAR/OFFpad.
NOTE:Broil wi// not work if the temperature
probeis plugged in.
FirstSide
Time(min,)
9
11
7
9
11
14
18
22
25
25
18 20
10
15
8
10
14
17
10
12
Second Side
Time (rain.)
6
10
5
67
89
11
1_16
20
10
10 15
Do not
turll
oveE
10
15
78
9 10
12
12 14
78
10
Comments
Space evenly. Up to 8
patties take about the
same time.
Steakslessthan 1"
thickcookthrough
beforebrowning.Pan
fryingisrecommended.
Slashfat.
Broilskin-side-down
first.
Cutthroughbackof
shell.Spreadopen.
Brushwith melted
butterbeforebroiling
andafter half of
broilingtime.
Handleandturnvery
carefully.Brushwith
lemonbutterbefore
andduring cooking,
if desired.
Increasetime 5to 10
minutespersidefor
11//'thickor home-
curedham.
Slashfat.
Slashfat.
Grease pan. Brush
steaks witl_ melted
butter.
Page 13
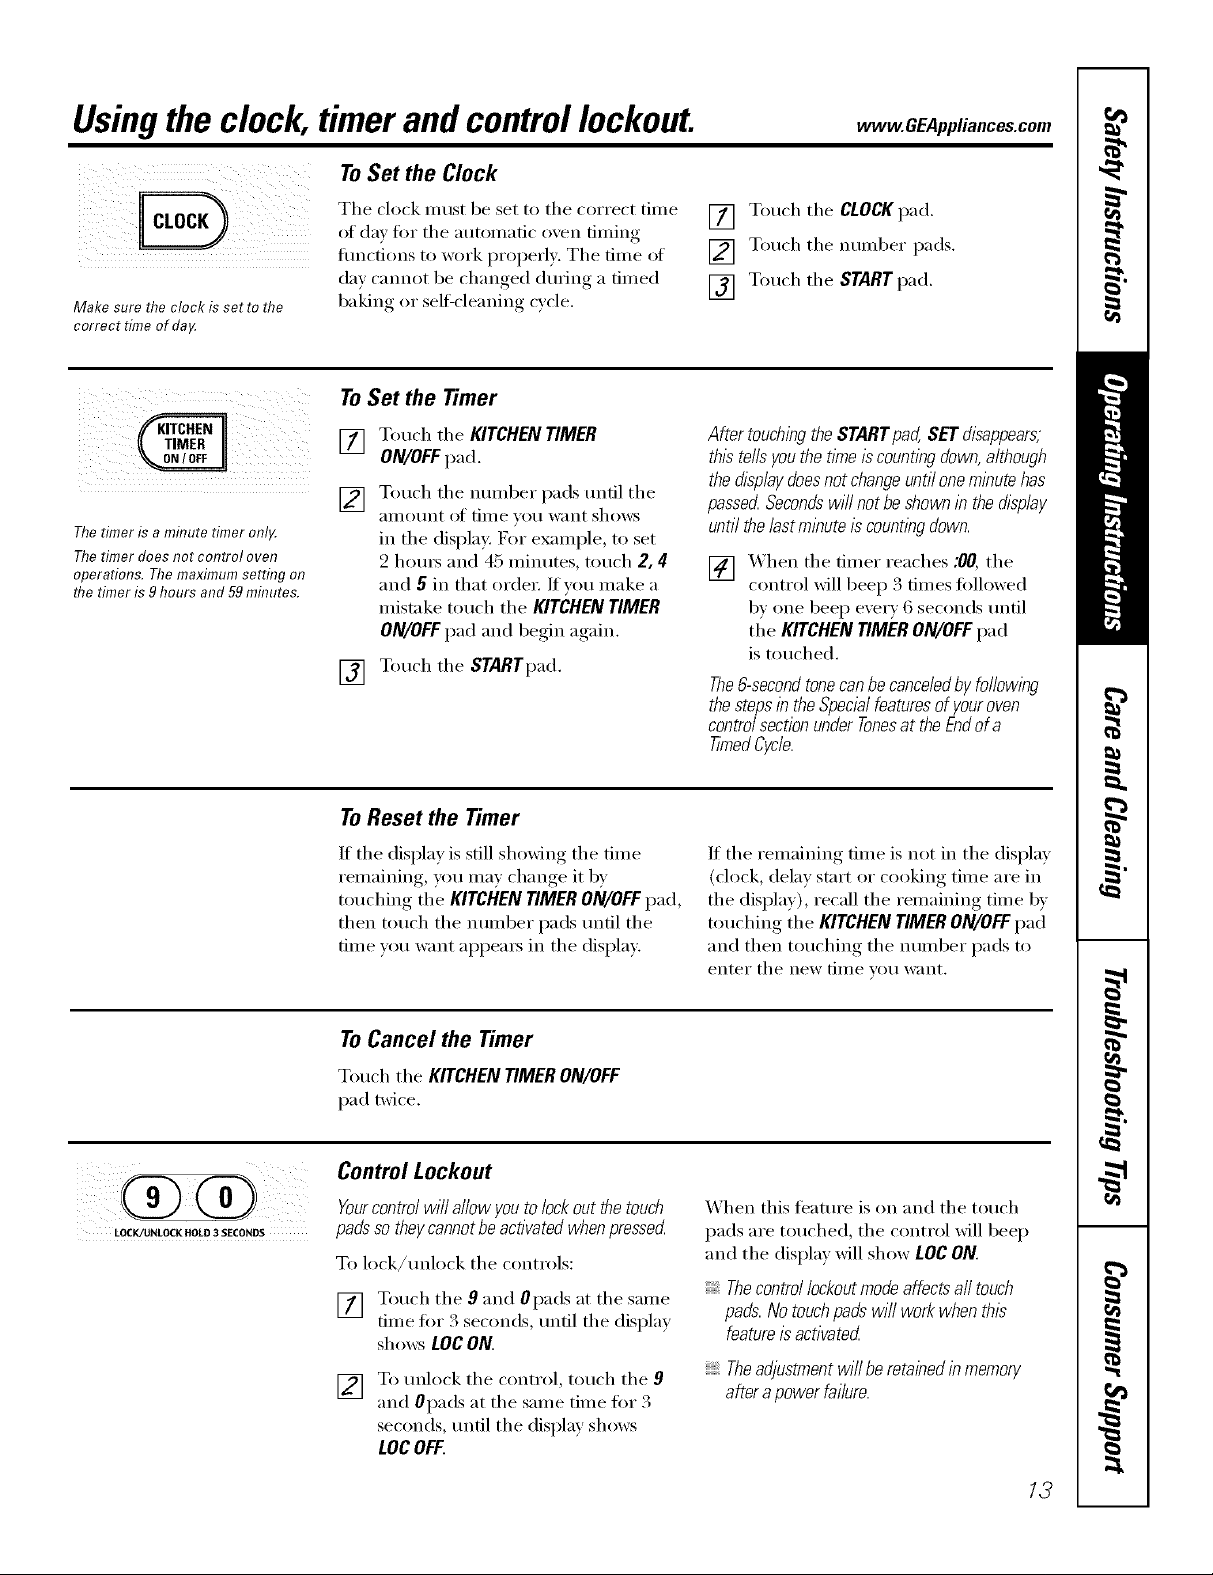
Usingthe clock, timerandcontrol lockout, vvvvw.GEAppliances.com
ToSet the Clock
Make sure the clock is set to the
correct time of da,¢
Thetimer is a mhTutetimer onl_¢
Thetimer does not control oven
operations. The maximum setting on
the timer is 9 hours and 59mhTutes.
The clock must be set to the correct time
of day fin" the autonmfic oven tinting
flmctions to work i)roperly. The time ot
day cannot be changed during a timed
baking or self=cleaning cycle,
ToSet the Timer
Touch the KITCHEN TIMER
ON/OFFpad.
Touch the nmnber pads tmfil the
[]
_liilOtlnt of time yell W_lIlt shows
in the displa): For example, to set
2 hom_ and 45 minutes, much 2, 4[
and 5 in that order: If wm make a
mistnke touch the KITCHEN TIMER
ON/OFF pad and begin again.
Touch the STARTpad.
[]
[] Touch the CLOCK pad.
[] Touch the number pads.
[] Touch the START pad.
AftertouchingtheSTARTpad, SETdisappears,
thistellsyouthetl_neiscountingdown,although
thedisplaydoesnotchangeuntiloneminutehas
passedSecondswi//notbeshownin thedisplay
untilthe/astmlnuteiscountingdown.
[] _'_ hen tile timer reaches :00, tile
control will beep 3 times fi_llowed
by one beep eveI T 6 seconds until
the KITCHENTIMERON/OFFpad
is touched.
The6-secondtonecanbecance/edbyfo//owlbg
thestepsin theSpecialfeaturesofyouroven
controlsectionunderTonesat theEndeta
TimedCycle.
LOCK/UNLOCK HOLD 3 SECONDS
To Reset the Timer
If tile display is still showing tile time
remaining, you may change it by
touching the KITCHEN TIMER ON/OFFpad,
then touch tile number pads tmtil tile
time w)u want appea_ in tile display.
ToCancel the Timer
Touch the KITCHENTIMERON/OFF
pad twice.
Control Lockout
Yourcontrolwill allowyoutolockoutthetouch
padssotheycannotbeactivatedwhenpressed
To lo(k/tmlock tile controls:
[] Touch tile 9 and Opads at tile same
time fin 3 seconds, tmtil tile displa)
sho_:sLOCON.
[] To unlock tile control, touch tile 9
and 0pads at tile same time fin" 3
seconds, until the display shows
LOCOFF.
If tile remaining time is not in tile display
(clock, delay stnrt or cooking time are in
the display), recall the remaining time by
touching tile KITCHEN TIMER ON/OFFpad
and then touching tile nmnber pads to
enter tile new tiille veil iV_lilt,
When this teatm'e is on and tile touch
pads are touched, tile control will beep
and tile display will show LOC ON.
Thecontrol/ockoutmode affects a// touch
pads.No touchpads wi// work when this
featureis activated
Theadjustment will be retained in memory
after apower fai/ure.
13
Page 14
Usingthe timedbakingand masting features.
NOTE" Foodsthat spoil easily--such as milk, eggs, fish, stuffings, poultry and pork--should not be allowed to sit for
more than 1hour before or after cooking. Room temperature promotes the growth of harmful bacteria. Be sure that
the oven light is off because heat from the bulb will speed harmful bacteria growth.
How to Set an Immediate Start and Automatic Stop
Theoven will turn on immediatelyandcook for
aselected length of tlYne.At the end of the
cookingtime the ovenwi// turnoff automatica//y
[] Touch the BAKEpad.
[] Using the nulnber pads, enter the
desired telni)erature.
[] Touch the COOKTIMEpad.
NOTE:If yourreciperequkespreheatingyou
mayneedtoaddadditionaltimetothelengthof
thecookingrime.
[] Using the number pads, enter the
desired baking time. The oxen
temi)erature and the cooking dine
that you entered will be displa) ed.
[] Touch the STARTpad.
The display will show the changing
temperature (starting at 100°F) and the
cooking time. The display starts changing
once the temperature reaches 100°E
The oven will continue to cook for the
programmed amount of time, then shut
offautomafically, unless the WARM or
tile Cook and Hold teatm'e was set.
Depending on your model, see the How
to Set the Oven for Warmingsection or the
Special features of your oven control section.
Tou{'h the CLEAR/OFFpad to {'lear the
displa.v:
OQ (Z
OQ (E
OOCOC
O
,®
How to Set a Delayed Start and Automatic Stop
Youcanset the oven control to delay-start the
oven,cookfora specifc length of time and then
turnoff automatically
Make sm'e the clock shows the correct
time of day:
[] Touch the BAKEpad.
[] Using the number pads, enter the
desired temperature.
[] Touch the COOK TIME pad.
NOTE:If yourreciperequkespreheatingyou
mayneedtoaddadditionaltimetothelengthof
thecookingrime.
[] Using the number pads, enter the
desired baking time.
[] Touch the DELAYSTART pad.
[] Using tile number pads, enter the
time of {la))ou want the oxen to
ttlI'n on and start cooking,
[] Touch the STARTpad.
If you would like to check tile times you
have set, touch the DELAYSTARTpad to
check the start time you have set or touch
the COOK TIME pad to check the length
of cooking time you have set.
X&hen the oven turns on at the time of
da) you haxe set, the displa)will show the
changin,,, ., temperature (startino. ., at 100°F)
and the cooking iUne. The displa)starts
changing once the temperature reaches
I{}{}(>F.
The oven will continue to cook fi)r the
programmed amount of time, then shut
off automatically, tmless the _._;M_M or
the Cook and Hold teatme was set.
Depending on your model, see the How to
Set the Ovenfor Warmingsection or tile
Special featuresof yourovencontro/secfion,
Touch the CLEAR/OFFpad to {'lear the
display:
14
NOTE:An attention tone wi// sound if youare
using tl_nedbakinganddo not touch the START
padafter entering the baking temperature.
Page 15
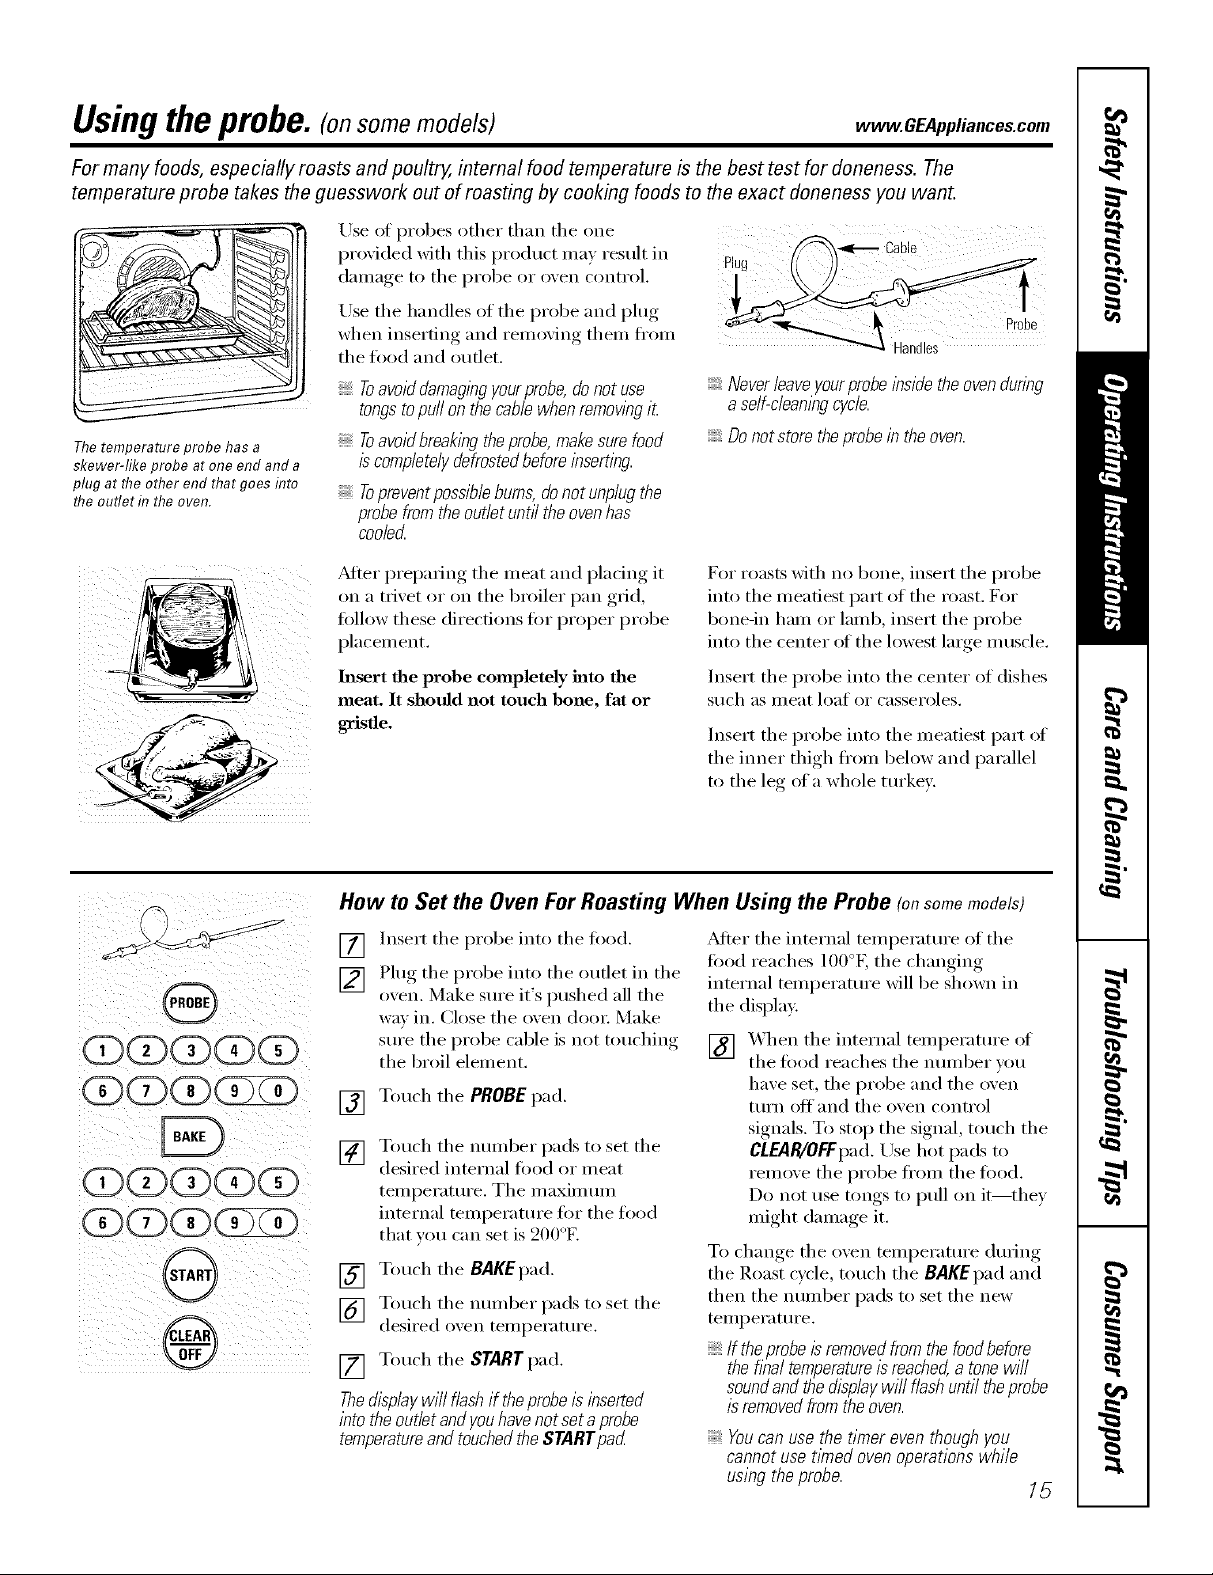
Using the probe. (onsome models) www.GEAppliances.com
For many foods, especially roasts and poultry, internal food temperature is the best test for doneness. The
temperature probe takes the guesswork out of roasting by cooking foods to the exact doneness you want.
Use of probes other than the one
proxided with this product ma) result in
dalila(re_ to tile probe or oxen control.
Thetemperature probe has a
skewer-like probe at one end and a
plug at the other end that goes into
the outlet h7the oven.
Use the handles of the probe and plug
when inserting and remoxim, them fl'om
the fi)od and outlet.
Toavoiddamag/bgyourprobe,donotuse
tongstopuffonthecamewhenremov/bgiL
Toavoidbreakingtheprobe,makesurefood
iscompletelydefrostedbeforeinserting.
_Topreventpossibleburns,donotunplugthe
probefromtheoutletuntfftheovenhas
cooled
_Mter preparing the meat and placing it
oil a trivet or on the broiler pan grid,
tOllow these directions for proper probe
placement,
Insert the probe completely into the
meat. It should not touch bone, fat or
gristle.
!!ugi/(( I!)il/ "
Neverleave yourprobe/bside the ovenduring
a self-cleambgcycle.
Donotstore the probe in the oven.
For Ixmsts Mth no bone, insert the probe
into the meatiest part of the roast. For
bone-in ham or lamb, insert the probe
into the center of the l_m'est lmge muscle.
Inseit the probe into the center of dishes
StIch _lS II/eat loaf c,r casseroles.
Insert the probe into the meatiest part of
the inner thigh fl'om below and parallel
to the leg era whole turkey.
O
(D(Z)(Z)(?)(5)
(D(Z)C(Z)C
(D(Z)(g)(Zi2D
O
@
How to Set the Oven For Roasting When Using the Probe (onsomemodels)
Insert the probe into the fi)od.
[]
Plug the probe into the outlet in the
[]
oven. Make sure it's pushed all the
way in. Close the oven dora: Make
sure the probe cable is not touching
the broil element.
[] Touch the PROBEpad.
Touch the munber pads to set the
[]
desired internal fi)od or meat
temperature. Tile maxinlunl
internal temperature for the food
that votI can set is 200°E
[] Touch the BAKEpad.
[] Touch the nmnber pads to set the
desired oxen temperature.
[] Touch the STARTpad.
Thedisplaywill flashif theprobe/sinserted
intotheoutlatandyouhavenotsetaprobe
temperatureandtouchedtheSTARTpad
_Mter the internal temperature of the
toed reaches 100°K the changing
internal Wmperamre will be shown in
the display,
X&q_entile internal temperature of
[]
the food reaches the nmnber xou
have set, the probe and the oven
ttlYn offand the oven control
signals. To stop the signal, touch the
CLEAR/OFFpad. Use hot pads to
remove the probe fl'om the t0od.
Do not use tongs to pull oil it--thev
might damage it.
To change the oven Wmperamre during
the Roast cycle, touch the BAKE pad and
then tile munber pads to set the new
temperature.
If theprobe isremovedfrom the food before
the f/hal temperatureisreached,a tonewill
soundand the displaywill flash until theprobe
isremoved from the oven.
Youcan use the timer even though you
cannot use timed oven operations while
using the probe.
15
Page 16

Usingthe convectionoven.
ConvectionFan
In a convection oven, a fan circulates hot air
over, under andaround the food
This circulating hot ak is evenly distributed
throughout the oven cavity.As a result, foods
are evenly cooked and browned--often in less
time with convection heat
1-Rack Convection Baking
Tile convection tim ciivulates tile heated
air evenly over and around tile fi)od
using tile bake and broil eleinents.
WhenconvectionbakingwithonlyI rack,
useCONVECTIONBAKE1RACKor
CONVECTIONBAKE(depen&bgonmodel)and
forbestresultsplacetherackonshelfCorDat
thecenteroftheoven.CooktlYnesmaydecrease,
sofoodshouldbecheckedearllarthanpackage
directionstomakesurethatit doesnotovercook.
NOTE:The convection tim will cycle on
and off while cooking to best distribute
hot air in the oven.
Tile convection oven lilil shtltS off when
tile oven door is opened. DO NOTleave
tile door open for long periods of dine
while using convection cooking or you
nlav shoi_Len tile life of tile convection
heating eleinent.
Idealforevenlybrownedbakedfoodscooked
on I rackandforlargefoods.Additionally,
sometimesawbgsmaybenoticed
Goodresultswithcookies,biscuits,muffbs,
brownies,cupcakes,creampuffs,sweetrolls,
angelfoodcakeandbreac_
Multi-rack position.
Multi-Rack Convection Baking
Because heated air is circulated evenly
throughout tile oven, fi)ods can be
baked with excellent results using
inultil)le racks.
Tile anlount of tinie required fiIr
Inulfi-Iack baking nlay increase slightly
fi)r solne fi)ods, but overall tinie is saved
be(atlse two to three tiilles as Illucl/J[ood
is cooked at once. Cookies, nIuflins,
biscuits, and other quick breads give
good results with nmlti-iack baking.
Adapting Recipes...
Y)u can use your fm:oiite recipes in tile
convection ()veil.
$\qleil convection baking, tile Auto
Recipe '_ Conversion featm'e automatically
reduces the set regular baking
temperature by the recoimnended 25°E
See Auto Recipe'" Conversion in tile
Special Features section.
To cook fi)od Oil IlIOI'e than one rack in
convection bake,/ise CONVECTIONBAKE
MULTI or CONVECTIONBAKE (depending
on nlodel).
_'_]lell baking oil 3 racks, place one
Iack in tile second (B) position, one
in tile fourth (D) position and one in
tile sixth (F) position. If pans will not
fit, use rack positions B, D and F
Usepansizerecommended
Somepackageinstructionsfor frozen
casserolesormain disheshavebeen
developedusing commercialconvection ovens.
Forbest results in this oven,preheat the oven
andusethe temperatureon thepackage.
16
Page 17

vvww.GEAppliances.com
Boastingrack
Grid
Broilerpan
When baking cookies, you will
get the best results ff you use a
flat cookie sheet instead of a
pan with low side&
Convection Roast
Goodfor large tendercuts of meat, uncovered
The convection tim circulates tim heated
air evenly over and around tim food.
Meat and poultI T are browned on all
sides as if tile)' were cooked on a
rotisserie. Lrsing the roasting rack
provided, heated air will be drculated
ovei; under and ar(iund the filed being
roasted. The heated air seals in juices
quickly for a moist and milder product
while, at the sanle tiine, creating a rich
golden brown exteiioi:
_,_l_ei1w)u are convection roasting it is
inil)ortant that you rise the broiler pan
Cookware for Convection Cooking
gefi)re using your convection oven,
check to see if your cookware leaves
rooin fi)r air d_'culafion in tim ()veil.
If you are baking with several pans, leave
silence between tbenl. Mso, be sure the
pans do not touch each other or the
walls ot the ()veil.
Paper and Plastic
Heat-resistant paper and plastic
containei_ that are reconlInended for
use in regular baking can also be used
for convection baking, but should not
be used at teinl)eratuies higher than
the teinl)erature reconlnlended by the
cookware ii/antt[ilCtui'ei: Plastic cookware
that is beat-resistant to teInl)eratures oI
400°F can also be used.
and grid and the spedal roasting rack fl)I"
best convection roasting results. The pan
is used to catch grease spills and the grid
is used to i)revent grease spattei_, while
the rack alh)ws the heated air m circulate
under the nleat and increase browning
Oil the undei_ide of the nleat or poultry:
Place the oven rack in the position
that centei_ the food between the top
and bottoill ()t the ()veil.
Place tim grid (In the broiler I)an
and put the roasting rack over thenl,
nlaking sure the posts Oil the roasting
rack fit into tim boles in broiler pan.
Place the nieat on the roasting rack.
Metal and Glass
Any type of cookwai'e will work in your
convection oven, Howevei; Illetal liens
heat the fi_stest and are reconinlended
for convection baking.
Darkenedor matte-finishedpanswill bake
faster thanshinypans.
Glassor ceramlcpanscookmores/ow/jz
For recipes like ovenq)aked chicken,
use a pan with h)w sides. Hot air cannot
dIvulate well around food in a pan with
high sides.
CONVECTION
caepending onmoaeJ
(D(Z)(Z)(Z)C
How toSet the Oven for Convection Baking or Roasting
Touch the CONVECTION BAKE
[]
MULTI/1 RACK pad once
(CONVECTION BAKEMULTI mode)
ti)r nI ulti-rack convection baking.
Tiffs nIode is used fi)r cooking food
iteIns on inoi'e than one rack (i.e., 2,
3 or nlore racks) at the same time in
convection bake. See Multi-Rack
Baking section for inore
intoii/lation.
T()uch tile CONVECTIONBAKEMULTI/
I RACK pad twice (CONVECTIONBAKE
I RACKinode) Ii)i" one rack
COilVeCtk)nbaking. This Inode is used
fi)I"cooking fbod iteIns on (>Ill) one
rack in convection bake.
NOTE: On seine Inodels, there is ()Ill)'
a CONVECTION BAKEpad which
_)i'ks fbr both one-rock and nmlti-
rack convection baking.
Touch the CONVECTIONROAST pad
fi)r convection roasting.
[] Touch the nuinl)er pads to set the
desired oxen tenil)erature.
[] Touch the STARTpad.
To change tile oven tenil)erature, touch
tile CONVECTION BAKEMULTI/1 RACK,
CONVECTION BAKE (depending on
nlodel) or CONVECTION ROASTpad and
then the nunlber pads to set the new
teinl)erature.
When the oven starts to beat, the
changing teinl)erature, starting at 100°K
will be displayed. When oven reaches the
teinl)erature you set, 3 beeps will sound.
[] Touch CLEAR/OFFpad when
finished.
Youwillheara fanwhilecookingwith
convection.Thefanwillstopwhenthedoor if
opened,buttheheatwillnotturnoK
Youmayheartheovencrickingdunbg
baking.Thisisnormal 17
Page 18

Usingthe timedfeaturesforconvectioncooking.
Youwill hear a fan while cooking with these features. The fan will stop when the door is opened, butthe heat
will not turn off.
NOTE:Foods that spoil easily--such as milk, eggs, fish, stuffings, poultry and pork--should not be aflowed to
s# for more than 1hour before or after cooking. Room temperature promotes the growth of harmful bacteria.
Be sure that the oven light is off because heat from the bulb will speed harmful bacteria growth.
CONVECTIOI_
•dependingonmoaet
00 (Z}Z
00eGG
How to Set an Immediate Start and Automatic Stop
Theovenwilf turnon immediate/)/andcookfor a
selectedlengthof time.At theendof thecooking
time,theovenwill turnoffautomatically
Make stlre the clock sho_,_:sthe correct time
of da)'.
[] Touch the CONVECTIONBAKE
MULTI/1 RACK pad once
(CONVECTION BAKEMULTI mode)
for m ulti-rack c(mve(tion baking.
Tiffs mode is used for cooking ti)od
items (m more than (me rack (i.e., 2,
3 or more racLs) at the same dine ill
convection bake. See Multi-Rack
Baking section tor more inlbmlation.
Touch the CONVECTIONBAKEMULTI/
I RACKpad twice (CONVECTIONBAKE
I RACKmode) fi>r one rack
c()m'ection baking. This mode is used
fi)r cooking food items on onl) one
lack ill convection bake.
NOTE:On some models, there is onl)
a CONVECTION BAKEpad which
works for both one-rack and m ulti-
rack convection baking.
Touch the CONVECTIONROAST pad
tor convection roasting.
[] Touch the number pads to set the
desired oxen temperatm'e.
[] Touch tile COOKTIME pad.
NOTE:ffyourreciperequirespreheating,youmay
needtoaddaflflfiona/timeto thelengthof the
cookingtime.
[] Touch the number pads to set tile
desired length of cooking time. The
mininmna cooking dine you call set
is 1 minute. Tile oven tempeIatm'e
that you set and the cooking time that
?<m enmred will be ill the display.
[] Touch tile STARTpad.
The displa) will show the changing
mmperature (starting at 100°F) and the
cooking dine. The displa) starts changing
once the temperature reaches 100°E
The oxen will continue to cook ti)r the
progTammed amount of time, then shut
offautomatically, unless the WARM or
the Cook and Hold feature was set.
Depending on your model, see the How to
Set the Ovenfor Warmingsection or the
Specialfeaturesof yourovencontrolsection.
[] Touch tile CLEAR/OFFpadto clear
the displa) if necessaD'. Remo_e
the ti)od fl'onl tile ()_en, P.emembeI;
even thotlgh the oven ttlrns Off
autonaafically, fi)od left ill tile oven
will continue cooking afier the oxen
turns ale
18
Page 19

How to Set a Delayed Start and Automatic Stop
vvww.GEAppliances.com
(dependin_onmodel)
ODGQ00
)
i OD(D
oR
Youcansettheovencontroltodelay-starttheoven,
cookfora specificlengthof timeandthenturnoff
automatically
Make sure die clock sho_s file correct time
of day.
[] Touch the CONVECTIONBAKE
MULTI/I RACK pad once
(CONVECTION BAKEMULTI mode)
for multi-rack convection baking.
This mode is used for cooking food
items on more than one rack (i.e., 2,
3 or more racks) at the same time in
convection bake. See Multi-Rack
Baking section for more inlimnafion.
To uch tile CONVECTIONBAKEMULTI/
I RACKpad mke (CONVECTIONBAKE
I RACKmode) Ii)r one rack
('OIl\re('tioIl baking. This mode is used
fi)r cooking fi)od items on on b one
rack in convection bake.
NOTE:On some models, there is on b
a CONVECTIONBAKEpad which
works tor both one-rack and m ulti-
rack convecdon baking.
Touch tile CONVECT/ON ROAST pad
Jor convection roasting.
] Touch tile nmnber pads to set tile
desired oven temperatm'e.
[] Touch the COOKTIMEpad.
NOTE:Ifyourreciperequkespreheating,youmay
needtoadd additbnaltime tothe lengthof the
cookingtime.
[] Touch tile nmnber pads to set tile
desired cooking trine.
[] Touch tile DELAYSTARTpad.
[] Touch the number pads to set the
time of da} }ou want tile oxen to ttlrn
on and start cooking.
ffyouwouldliketo&eckthetimesyouhaveset,
touchtheDELAYSTARTpadtocheckthestarttime
youhaveset,ortouchtheCOOKTIMEpadto
checkthelengthofcookingtimeyouhaveset.
[] Touch tile STARTpad.
NOTE"An attentiontonewill sound ff youare
usingtimedbakingorroastinganddonot touch
the STARTpadafter enteringthebakingor
roastingtemperature.
V_llen tile oxen turns on at the dine
of de)you hme set, the displa)will
show tile changing temperature
(smrdng at 100°F) and the cooking time.
Tile displa) starts changing once the
tempemtm'e reaches 100°E
The oven will continue to cook for the
programmed amount of time, then shut
off automadcall}, unless the WARM or the
Cook and Hold t_'ature was set.
Depending on yore" model, see the How to
Set the Oven for Warming section or tile
Special featuresof yourovencontrolsecd(>n.
[] Touch tile CLEAR/OFFpad to clear
the displa} if necessai3: Relno_e
the fi)od fi'om the oven. Remember;
e\_n t]lotlg]l tile ()\el1 shuts off
automaticalb; food left in tile oven
will confintle cooking after tile oxen
ttlFnS Ott_
19
Page 20

Usingthe convectionoven.
How to Set the Oven for Convection Roasting when Using the Probe
For best results when roasting large
turkeys and roasts, we recommend
using the probe flTcluded t7 the
convection oven.
CONVECTION
Tochange the oven temperature
during the Convection Roast cycle,
touch the CONVECTIONROASTpad
and then touch the number pads to
set the new desired temperature.
The display will flash PROBEand the
oven control will signal if the probe is
inserted into the outlet, and you have not
set a probe temperature and pressed the
STARTpad.
Place the oxen rack in the position
[]
that cente_ the fi)od between the
top and bottom of the oxen, Insert
the probe into the meat.
Plug the probe into the outlet in the
[]
oxen. Make sm'e it is pushed all the
wa_ in. Close the o;en (loo_:
[] Touch the CONVECTIONROAST pad.
[] Touch the number pads to set the
desired oxen temperature.
[] Touch the PROBE pad.
[] Touch the number pads to set the
desired internal meat temperatm'e.
[] Touch the START pad.
X&q_enthe oxen starts to heat, the word
tO will be in the display.
,Mter the internal temperatm'e of the meat
reaches 100°E the changing internal
temperatm'e will be shown in the display.
Convection Roasting Guide
[] X._q_en the internal temperatm'e of
the meat reaches the nmnber xou
have set, the probe and the oven
ttlFn oil and the oven control
signals. To stop the signal, touch the
CLEAR/OFFpad. Use hot pads to
remove the probe fl'om the tood.
Do not use tongs to pull on it--they
might damage it.
CAUTION:Topreventposs, leburns,
donotunplugtheprobefromtheovenoutletuntil
the oven has coolecL Do not store the probe/b
the oven.
NOTE:
If theprobe isremovedfrom the foodbefore
the f/hal temperature/s reached,a tone will
soundandthe display will flash until the probe
is removedfrom the oven.
Youwi// hear a fan while cookingwith this
feature. Thefan will stop.,when the dooris
opened,but the heat will not turnoK
Youcanuse thekitchen t/knereventhough you
cannotuse timed ovenoperations.
20
Meats Minutes/Lb. Oven Temp. Internal Temp.
Beef Rib,BonelessRib, Rare 20 24 325°F 140°Ft
TopSirloin Medium 2&28 325°F 160°F
(3to RIbs.) Well 28 32 325°F 170%
BeefTenderloin Rare 10 14 32R°F 140°Ft
Medium 1&18 32R°F 160%
Perk Bonedn,Boneless(3to 5 Ibs.) 23 27 32R°F 170%
Chops(1/2to 1" thick) 2 chops 30_5 total 32R°F 170°F
4 chops 35-40 total 32R°F 170°F
6 chops 40-45 total 325°F 170%
Ham Canned,Butt, Shank(3to 5 Ibs.fully cooked} 1_18 325°F 140%
Lamb Bonedn,Boneless(3to 5 Ibs.) Medium 17 20 325°F 160°F
Well 20 24 325°F 170%
Seafood Fish,Whole(3 to 5 Ihs.) 30-40 total 400°F
LobsterTails(0 to 8 oz.each) 20_5 total 350°F
Poultry WholeChicken(2_4to 31/zIhs.} 2_26 350°F 180° 185°F
CornishHens,Unstuffed(1to 11/LIhs.) 50 55 total 350°F 180° 185°F
Stuffed(1to 11/LIhs.) 5R 60total 350°F 180° 185°F
Duckling(4to 5 Ibs.) 2_26 325°F 180° 185°F
Turkey,Whole*
Unstuffed(lOto 16 Ihs.) 8 11 32R°F 180° 185°F
Unstuffed(18to 24 Ibs.) 7 10 32R°F 180° 185°F
TurkeyBreast(4to 6 Ibs.) 16 19 32R°F 170%
Slu//ed bsds gv_em/{) _,qui_v 3t)-45 minules addilim*al *l)asli_ lime. Shidd h'y:sa_ d b*_,asl aft/h/vii 1opn,'_,e_ l
i)'leH)lownin,< and d_yi_*,go/ slli_*.
4 Th* {X i)(Jm_lmenl o/Ag_'ic*zllun, *(zy*"l'a*l, two/L* po/m/a*; but you should h_zoa_1hal (:o&i_g il to m_{y I40<I2memos
some /ood t_oiso_ i_ly,ol:e,_z_g_m_m<0 _u_'_i-i,_,."(%_m_,: ,Sa/elbod Book. }bu_ Kilche_ Guide. [ SI)A lCe_. flz_*e 19,'_'5.)
Page 21

Usingtheproofingand warmingfeatures. CEApplia,cescem
Theproofing feature maintains a warm environment useful for rising yeast-leavened products.
How to Set the Oven For Proofing (onsomemodels)
0
®
[] Place tile coxered dough in a dish in
tile oxen on shelf B or C.
NOTE:Forbestrasults,coverthedoughwitha
clothorwithgraasedplasticwrap(theplastic
mayneedtobeanchoredunderneaththe
containersotheovenfanwill notblowit off).
[] Touch tile PROOF pad and then tile
STARTpad.
Tile display will read PrF (proof).
Tile oven interior light ttlrns on and
remains on during proofing.
Tile proofing teatuI'e automatically
provides tile optimum tempemtm'e fin.
tile proofing process, and therefore does
not have a temperature ac!iustment.
[] Set tile KITCHENTIMERON/OFFfi,r
tile minim um proof time.
How to Set the Oven For Warming (onsomemodels)
Tile WARMleattlx'e keeps cooked Check (IJspness af[er 20-30 illintltes.
foods hot. Add time as needed.
[] X&hen proofing is finished, touch
tile CLEAR/OFFpad.
Toavoid lowering theoven temperature
andlengtheningproofing tlYne,donot
openthe ovendoor unnecessarily
Checkbraadproductsearly to avoid
over-proofing
NOTE:
Donotusetheproofingmodeforwarming
foodorkeepingfoodho_Theproofingoven
temperatureisnothotenoughtoholdfoods
atsafetemperatures.UsetheWARMorthe
CookandHoldfeatura(dependingonmodel)to
keepfoodwarm.
Proofingwill notoperatewhenovenisabove
125°£"HOT"will showin thedisplay
This teatm'e is not designed to reheat
cold food.
To use tile WARMfeamre, touch tile
WARMpad and then tile STARTpad.
To use tile WARMfeature after Timed
Baking or Roasting, follow these steps:
[] Touch tile mode of cooking that
wm want to use (BAKE, CONVEC770N
BAKEMULTI, CONVECTIONBAKE
I RACKer CONVEC770NROAST).
[] Touch tile number pads to set tile
oven teI//pei'attli'e.
[] Touch tile coogrfMEpad.
[] Touch tile ntlil/ber pads to set tile
desired length of cooking time.
[] Touch tile WARMpad.
[] Touch tile STARTpad.
To Crisp Stale Items
Place fi_o(l in lo_:si(led dishes or pans.
For best results, place tile food items in
a single layer: Do not stack.
i,eave them uncovered.
IMPORTANTNOTES:
Foodshouldbekepthotin itscooking
containeror transferredtoaheat-safe
servingdish.
Formoistfoods,coverthemwithanoven-safe
lid oraluminumfoil.
Friedorcrispfoodsdonotneedtobecovered,
butcanbecometoodryif warmedfortoolong.
Repeatedopeningofthedoorallowsthehot
ak toescapeandthefoodtocool.
AllowextratlYneforthetemperatureinsidethe
oventostabilReafteraddingitems.
Withlargeloadsit maybenecessarytocover
someofthecookedfooditems.
Removeservingspoons,etc.,beforeplacing
containersintheoven.
Donotuseplasticcontainers,hdsorplasflc
wrap.
CAUTION: lasticcontainers,lids
orplasticwrapwill meltifplacedin theoven.
Meltedplastlcmaynotberemovableandis
notcoveredunderyourwarranty
21
Page 22

Adjust the oven thermostat--Do it yourself!
Youmay find that your new oven cooks differently than the one it replaced. Use your new oven for a few weeks to
become more familiar with it. If you still think your new oven is too hot or too cold, you can adjust the thermostat
yourself.
Donot use thermometers, such as those found in grocery stores, to check the temperature setting of your oven.
These thermometers may vary 20_40 degrees.
NOTE,"This adjustment will only affect baking and roasting temperatures; it will not affect broiling, convection or
self-cleaning temperatures. The adjustment will be retained in memory after apower failure.
ToAdjust the Thermostat
[] The o;en tenil)erature can be
a(!iusted uI) to (+) 35°F hotter or (-)
35°F coolei: Touch the nuinber i)ads
the same way you read theni. For
exaini)le, to change the oven
tenll)erature 15°K touch I and 5.
[] _hen you have nlade tile
a(!justnlent, touch the STARTi)ad to
glt 1)ack tlI the tiIne el day display:
[Jse VOtli" ()veil _lS Veil would
noi]/l_lllvl
C)(DC)(Z)dE)
(DdZ)(Z)(SEE)
®
[] Touch the BROILHI/LO and BAKE
I)ads at the sanle tin/e fin 3 see(rods
until the disl)lay sh()_:s SF.
[] Touch the BAKE I)ad. A two digit
nuinber shows in the disi)la}:
Touch BAKEagain to alternate
between increasing and decreasing
the oven tenii)ei_mire.
Thetype ofmargarine will affect bakingperformance!
Most recipes for baking have been developed us&g high-fat products such as butter or margarine (80% fat). If you
decrease the fat, the recipe may not give the same results as with a higher-fat product.
Recipe failure can result if cakes, pies, pastries, cookies or candies are made with low-fat spreads. Thelower the fat
content of a spread product, the more noticeable these differences become.
Federal standards require i)roducts lal)eled "inaigai_ine '' to contain at least 80% lilt by weight, ixmqht sl)reads, Oil the
other hand, contain less tilt and inore watei: Tile high nloismre content of these sl)reads affects the texture and flavor
of baked goods. For best results with u)ur old filvoIite redpes, use inaigai_ine, butter or stick sl)reads containing at least
70% vegetable oil.
22
Page 23

Usingthe self-cleaning oven. OEA..li..cesoom
The oven door must be closed and all controls set correctly for the cycle to work properly.
Before a Clean Cycle
Wipe up heavy soil on flTeoven
bottom.
(DCDCDCD@
@(DCD
O
We recommend venting your kitchen
with an open window or using a
ventilation tim or hood dining tile
fi_st self=clean cycle.
Remoxe tile racks, broiler pan, broiler
grid, probe, all cookware and am
ahuninun/foil fl'om tile oxen.
Tile oxen racks can be self-cleaned, but
they will darken, lose their luster and
become hard to slide.
Soil on tile fl'ont fl'ame of tile range and
outside the gasket on the door will need
to be cleaned bv hand. Clean these areas
with hot water; soap-filled or plastic
scom_ing pads or cleanse_ such as
Soft Scrub<! Rinse well with clean water
and dry:
How to Set the Oven for Cleaning
[] Touch tile SELFCLEANLO/STD pad
once _0I" a 4-hotli" clean tiine or
twice fin a 3-horn clean time.
A 3-horn self-clean time is
i'ecoi/lillended lk)r t/se when
cleaning small, contained spills. A
sellklean time of 4 hom_ or hmger
is recommended fin" a dirtier oxen.
V2] If a time other than 3 houi_ or
4 hotli'S is needed, tlse tile ntllllbeI"
pads and enter the desired clean
tim e,
Yo/I can chan_*e tile clean tilne to _lliV
fiIne between 3 houi_ and :5houI_,
dei)ending, on how dirt_, yore" oven is.
Do not clean tile gasket. Tile fiberglass
material ot the oven door gasket cmmot
withstand abrasion. It is essential fin" the
gasket to remain intact. If you notice it
becoming worn or fl'ayed, replace it.
_._]l)e up any hear)' spillove_ on tile oven
bottom.
Make sm'e tile oven light bulb cover is in
place and the oven light is off.
IMPORTANT'.Tile health of some birds
is extremely sensitive to the flmms given
off dtwing tile self cleaning cycle of any
range. Move birds to another well-
ventilated room.
When tile LOCKEDlight goes off', you will
be able to open tile dora:
Tile word LOCKEDwill flash and tile
oven control will signal if you set tile
dean cycle and fin'get to dose tile oven
dooi:
To stop a clean cycle, touch tile
CLEAB/OFFpad. X,_]/en the LOCKEDlight
goes off indicating the oven has cooled
below tile locking temperature, you
will be able to open tile (loo_:
[] Touch tile STARE pad.
Tile door locks automatically. Tile display
will show the clean time remaining, It will
not be possible to open tile oven door
tmtil tile mmperatm'e drops below tile
lock temperature and tile LOCKEDlight
goes off.
23
Page 24

Usingthe self-cleaning oven.
The oven door must be closed and all controls must be set correctly for the cycle to work properly.
How to Delay the Start of Cleaning
The door locks autoniaticallv: The
display will show the stair tinie. It will
not be possible to open the oven door
until the tenlperature drops below the
lock tenlperamre and the LOCKEDlight
goes off.
_,_]_eIl the LOCKEDlight goes off; you will
be able to open the door.
(D(Z)(?)(3)C
(3)OD(Z)(3 )
(D(Z)(E)(3)(3)
(DOD(X)(3EE)
[] Touch the SELF CLEAN LO/STD pad
once fiIr a 4-hour clean time or
twice foi a 3-houI clean tinle.
A 3-hour selfk'lean tiine is
i'ecoilli/i ended fi)r rise when
cleaning snmlL contained spills. A
sel6clean dine of 4 houi_ or lonoei"
is i'econnnended for a dirtier oxen.
[_] ]fa tiIne other than 3 houI_ or
4 houI_ is needed, use the nunlber
pads and enter the desired clean
time.
You can change the clean tiine to any
tiIne between _ houi_ and 5 houi_,
del)ending, on how dirt_, your oxen is.
[] Touch the DELAYSTART pad.
[] Using tile nunlber pads, enter the
dine of dm you want the clean cycle
to staI't,
[] Touch the START pad.
After a Clean Cycle
Y)u nlav notice sonle white ash in the
oven. Wipe it up with a daInp cloth after
the ()veil cools,
If whitespotsremain,removethemwitha soap-
filledorplasticscounngpadandrinsethoroughly
witha wnegarandwatermixture.
These deposits are usually a salt resi(hle
that cannot be renioved by the clean
cycle.
If the oven is not clean after one clean
c)'cle, repeat the cvcle.
Y})u cannot set the oxen fin" cooking
until the oxen is cool enough fin" the
door to tlnlock.
X,_]file the oven is self:cleaning, you can
touch tile CLOCKpad to display the
dine of day. To return to the clean
countdown, touch the SELFCLEAN
LO/STD I);1(1.
If the racks becoine hard to slide, apply
a snlall anlount (ff cooking oil to a
paper towel and wipe the edges _ff the
oven racks with the paper towel.
24
Page 25

Special featuresof yourovencontrol, vvvvw.GEAppliances.com
Yournew touch pad control has additional features that you may choose to use. The following are the features
and how you may activate them.
Thespecial feature modes can only be activated while the display is showing the time of day. They remain
in the control's memory until the steps are repeated.
When the display shows your choice, touch the STARTpad. The special features will remain in memory after
a power failure, except for the Sabbath feature, which will have to be reset.
i i ii
With_isfeatura,shouldyouforgetandleavethe[]
ovenovenafteron,the12c°ntr°lhoursdur,bgwillautomat,tallybakingfunctionsturno_orthe
after 3hours duringa broil function.
....wi_h_o_.,.OFF_hi_,_._.,e,,..ow[]
the steps below.
[] Touch the BROILHf/LO'and BAKE
pads at the same time for 3 seconds
until the display shows SF
Touch the DELAYSTART pad Imfil
noshdn(no shut-oft) appeax_ in the
display.
Touch the START pad to acti\:_te the
no shut-off and leave the control
set in this special features mode.
Fahrenheit or Celsius Temperature Selection
Yourovencontrolisset to use the Fahrenheit
temperatureselectionsbutyoumay changethis
to use the Celsiusselections.
[] Touch the BROIL HI/LOand BAKE
pads at the sanle time fi)r 3 seconds
until the display shows SF
Touch the COOKTIMEand BROIL
[]
display will show F (Fahrenheit).
Touch the COOKTIMEand BROIL
[]
The displa) will show C (Celsius).
[] Touch the START pad.
Tonesat the End of a Timed Cycle
At the end of a tlYnedcycle,3 shortbeeps will
soundfollowed by onebeep every 6seconds
until the CLEAR/OFFpad is touched This
continual 6-secondbeepmaybe canceled
To cancel the 6-second beep:
[] Touch the BROIL HI/LO "and BAKE
pads at the same time f'o_ 3 seconds
until the displa} shows SF.
Touch the KITCHEN TIMER ON/OFF
[]
pad. The display shows CON BEEP
KITCHEN TIMER ON/OFF pad
again. The display shows BEEP.
every 6 seconds.)
Touch the STARTpad.
[]
HI/LOpads at the same time. The
HI/LO pads again at the same time.
(continuous beep). Touch the
(This cancels the one beep
25
Page 26

Special featuresof yourovencontrol.
Tone Volume
i 'iii < i ill ! <i) ?;
ii iii@ iii ! i
®
Thisfeatureallows you toadjust the tone
volumesto a more acceptable volume.Thereare
threepossiblevolumeleveb.
[] Touch the BROIL HI/tO and BAKE
pads at the sanle time foi 3 seconds,
until tile display shows SF.
Touch the OVEN LIGHTON/OFFpad.
[]
The displa)will show 2BEEP.This is
the high _olume lmel.
Touch the OVEN LIGHT ON/OFFpad
again. The display will show 3BEEP.
This is tile hmdest _olume level.
12-Hour, 24-Hour or Clock Blackout
Yourcontrol is set to usea 12-hourdock.
If you would prefer to have a 24-hour
military time clock or black ()/it tile clock
displa> follow tile steps below.
[] Touch the BROIL HI!tOand BAKE
pads at tile same time fin" 3 seconds
tmtil the display shows SF.
[] Touch tile CLOCKpad once. Tile
display will show 12hr. If this is
tile choice you want, touch tile
START pad.
Touch the OVENLIGHT ON/OFFpad
again. The display will show I BEEP.
This is the quietest volume level.
For each fiIne tile level is changed,
a tone will sound to provide an
indication ot tile volume level.
Choose the desired sound le'_el
[]
(1 BEEP,2 BEEP,3BEEP).
Touch tile START pad to actixate tile
[]
lexel shown.
Touch tile CLOCKpad again to change
to the 24 hour milimx_, time clock. The
display will show 24hr. If this is the choice
you want, touch tile START pad.
Touch tile CLOCKpad again to black out
the clock display: The display will show
OFF.If this is the choice you want, touch
tile START pad.
NOTE:If the clock Is inthe black-outmode you
wi// not be abletouse the Delay Start function.
26
Page 27

CONVECTION
(dependingonmoae
0
Using Auto Recipe TM Conversion
Whenusingconvectionbake,theAuto Recipe_
Conversionfeaturewill automaticallyconvert
enteredregularbaklbg temperaturesto
convectionbaklbgtemperatures.
Thedisplaywill show the actual converted
(reduced)temperature.Forexample, if you entera
regularrecipe temperatureof350°Fand touch the
STARTpad, thedisplaywill show CON
andthe convertedtemperatureof 325c_E
NOTE" Thisfeatureonly convertscooking
temperatures,not cooking times.
vvww.GEAppliances.com
Toturn offthis feature:
Touch the BROILHI/LOand BAKE
[]
pads at the same time fo_ 3 seconds
tmtil the display shows SF.
Touch the CONVECTIONBAKEor
[]
CONVECTION BAKE MULTI/1 RACK
pad (depending (>n m(>del). The
display will show CON ON. Touch the
CONVECTION BAKE (>r CONVECTION
BAKEMULTI/1 RACKpa d again. Th e
display will sh(_w CONOFF.
[] Touch the START pad.
To tm'n on this teature, repeat steps 1-3
abo_e but touch the STARTpad when
CON ON is in the display.
27
Page 28

Usingthe SabbathFeature.
(Designed for use on the Jewish Sabbath and Holidays.) (Onsomemodels)
TheSabbathfeaturecan be usedfor baking/roastingonly It cannot be usedfor convection,broiling, self-cleaningor
DelayStartcooking.
NOTE:Theovenlightcomesonautomatically(onsomemodels)whenthedoorisopenedandgoesoffwhenthedoorisclosed.Thebulbmaybe
removed.SeeflTeOvenLightReplacementsection.Onmodelswithalightswitchonthecontrolpanel,theovenlightmaybeturnedonandlefton.
How to Set for Regular Baking/Roasting
Llsing the 1retailer pads, enter tim
(tesired tellll)el'Ht/lre 1)et'_#reel/ ] 70+F and
550°F. No sig_ml or wmt)eratm:e will l)e
_lVel I.
"[kmch the STARTt)ad.
[]
,\tier a randon/delay t)eriod of
[]
al)l)roximatel _ 30 secon(Is to 1 mimlte,
D C will al)l)ear in the disl)lay
indi(ating that the oven is baking!
roasting. If D C doesn't al)l)ear in the
(list)lay, start again at Sie l) 4.
"Ib a(!iust tile o\en temt)eramre, touch the
BAKEt)ad, enter the new temperature using
the mmlber t)ads and touch tile STARTpad.
NOTE:TheCLEAR/OFFandCOOKTIMEt)adswill
flmction (h_ring tile Sabbath t('atm'e.
OD(D(i) (D
When the display shows D the
oven is set in Sabbath. Whenthe
display shows D C the oven is
bakflTg/roasfing.
Make surethe clockshows the correct time of day and F_]
theoven is off
I_] Tou(h and hold both the BROIL HI/LO and
Ill
BAKE pads, at the same time, m_til the
disl)lm/shows SE
NOTE:It t)_&e or broil al)l)emrs in th('
(list)Ira/, the BROIL HI/tOand BAKE t)ads
were not touched at the stone Hme.
"Ibuch tile CLEAR/OFFpad and 1)egJn
again.
I_] "lal) the DELAYSTART t)ad m_til SAb bAtH
i¢.-i
_q)l)ears ill the disl)lm;.
] "Ibu(h the STARTpad and D will at)t)ear
in the (list)la _.
] "lbu(h the BAKE pad. No sig_lal will
be _,4",'en.
When the display shows D the
oven is set fl7Sabbath. When the
display shows D C the oven is
bakflTg/roasting.
How to Set for Timed Baking/Roasting -
Makesuretheclockshowsthecorrecttimeofdayand
theovenisoff,
f_] "lbu(h and hold both the BROIL HI/LO and
BAKE t);,(ts, at the same time, m_til the
disl)lm/shows SE
NOTE:I1 t)_&e or t)roil al)l)emrs in the
disl)lay, the BROIL HI/tOand BAKE1)ads
were not touched at the stone time.
"Ibuch tile CLEAR/OEEI)ad and begin
again.
r_] "lhl) the DELAYSTART t)ad/mtil SAb bAtH
_q)l)ears ill the disl)lm,
] +Ibu(h the START pad and D will al)t)ear
in the (lisl)la _.
[_1 +lbu(h the COOK TIME pad.
171
"Ibu(h the numl>er 1)ads to set the
[]
desired length ot (ooking time t)etvqeell
1 mint=re mM 9 hotu:s mM 99 mint=tes.
The cooking thne that yr()t] elm_red will
1)e dist)layed.
How to Exit the Sabbath Feature
Immediate Start and Automatic Stop
] "[ou(h the STARTpad.
] "['ouch the BAKE t)ad. No sign+d will 1)e
] Llsing the nunll)er t)_(Is, eiJ,ter the
desired tenq)erature. No sigl_d or
tenq)erattlre will 1)e g,ri'_ell.
] "['ou(h the START pad.
,\tier a random delay t)eriod of
[]
approximatel) 30 se(onds to 1 minute,
D G will appear in the (tispl_} indicating
that the oven is baking/roasdng. If D C
doesn't appear in the disl)lm!, start ag_dn
at Step 7.
To a(!iust the o\en temperature, touch tile
BAKEt)ad, enter the new tenq)emture using
the number t)ads and touch the START1)ad.
When cooking is tinishe(I, th( disl)lm! will
change/i:om D C to D and 0:_0will appear
indicating dtat the oven has turned OFFbut is
still set in Sabbath. P,emove the cooked/k)o(t.
5 i¸¸i;:
28 []
Touch the CLEAR/OFFt)ad.
[]
If the oven is cooking, wait for a nmdom
[]
delay t)eriod of _q)tm)ximately 30
seconds to 1 minute, m_til only D
is in the displ m.
Touch and hold beth the BROIL HI/tO
and BAKE 1)ads, atthe same time, until
the display shows SE
"[:at) the DELAYSTART t)ad until 12shdn
or no shdn _q)l)ears in the disl)lay.
] Choose 12shdn, in(ti(ating that the oxen
will m_tomaticalh' ttlnJ, off aRer 12 ham's
or no shdn, indicating that the oxen will
not auton/ati( alh' turn off after 12 hours.
] "lbuch the STARTt)ad when the ot)tion
that xou vvr_llltis in the (tist)la } (12shdn or
no shdn).
NOTE:II ;, I)OW(T OUtag'C o((urred uhile
tile o\en was in Sal)t)ath, the o_en will
a/ltOl/lati('_d]V t tlrll Off aI/d slav off 1'\el/
whell the t)ower rettlrl/S. The OVell
('ontrol lilllSt be reset.
Page 29

Careand cleaningoftherange. CEappliancescom
Be sure aft controls are off and all surfaces are cool before cleaning any part of the range.
If your range is removed for cleaning, servicing or any reason, be sure the anti-tip
device is reengaged propefly when the range is replaced. Failure to take this
precaution could result in tipping of the range and cause injury.
How toRemovePackaging Tape
To assure no dmnage is done to the finish
of the product, the satest way to remove
the adhesive left fl'om packaging tape
and cooktop labels on new appliances
is an application of a household liquid
dishwashing detergent, mineral oil or
cooking oil.
Control Knobs
Thecontrolknobsmayberemovedfor easier
cleaning.
getore removing the knobs fin.
cleaning, please note that the knobs are
in the OFFposition. When replacing the
Apply _dth a soft clofl_ and allow to soak.
X._ipe(liT and then apply an appliance
polish to thoroughly clean and protect
the surti_ce.
NOTE: Theadhesivemust be removedfrom a//
parts, it cannotbe removedif it is bakedon.
knobs, check the OFFposition to insure
proper placement.
Wash the knobs in soap and water or a
vinegar and hot water solution but do
not soak.
Grate
t Burnercad
Burnerneed
Electro0e
CAUTION:DO NOT OPERATETHE
BURNERWlTHOUTALL BURNER
PARTSIN PLACE
Burnerbase
Burner Assembly
The burner assemblies should be washed
regularly and, of coui_e, alter spillovei_.
Turnall controlsoff beforeremowngburnerparts.
The burner grates, burner heads and
btII'neI" C}ll)S C}lIl be i'ei//oved li)i" easv
cleaning.
The electrode (ff the spark ignitor is
eN)osed beyond the StlYlilce of the
burner base. \._]/en cleaning the cooktop,
be carefld not to snag the electrode _ff
the spark igniter with your cleaning
cloth. Damage to the igniter could occm:
Toavoid snagging a cloth on thespark
igniter, leave the burner heads inplace
when cleaning the cooktop.
Be careful not to push in any cooktop
controls while cleaning the cooktop.
A slight electrical shock might result
which could cause you to knock over
hot cookware.
Wash burner parts with an allI)uq)ose
non-abi_lsive cleaner _lIl(1 W_IIII/ wateI:
Soak stubborn soil. Dry them with a
cloth--do not reassemble while wet.
To reassemble, replace the burner head
fiist, then the burner cap and finally the
burner grate. Be sure the pins in the
burner head are properly located in the
btlrner base holes.
29
Page 30

Careand cleaningoftherange.
BurnerGratesand CenterGrate
Porcelain eimmel burner grates and the
vent grille should be washed regularly
and, of com_e, after spillove_.
_hsh them in hot, soapy water and
rinse with clean water: You may also use
abrasive cleane_ and scotwing pads to
clean burner grates and the vent grille.
D_' tile grams and grille with a cloth--
don't put them back on tile cooktop wet.
To get rid of btlFned-on food, place tile
grates and grille in a covered containe_:
Add l/4 cup ammonia and let them soak
several houI_ or overnight. Wash, rinse
well and (h_'.
_Mthough they're durable, tile grates
and grille will gradually lose their shine,
regardless at the best care you can give
them. This is due to their continual
exposm'e to high temperatures.
Do not operate a burner fin" an extended
period of time without cookware on tile
grate. Tile finish on tile grate ma) chip
without cookware to absorb tile heat.
_fter cleaning, replace tile center grille
fi_t. Replace the side grates so that the
notches lock over tile tabs on tile center
grate. Make sm'e the grates are positioned
securely over tile burne_ and that tile}'
are stable and level.
Rubber Grate Feet
For stability, your cooktop has rubber
teet on the burner grates. If am' of these
rubber teet should become damaged or
lost, replace them immediately.
To order replacement robber gram feet,
please call our toll-fl'ee immber:
National Parts
Center ............... 800.626.2002(U.S.)
888.261.3055(Canada)
Rubber Grate Feet ....... #WBO2TI0101
Receptacle.
, ,%
i i i i
i i
....
i
, , ,
Glasscover
3O
, ,i i i
Socket
Oven Light Bulbs
NOTE,"Theglass cover should be
removed only when cold. Wearing latex
gloves may offer a better grip.
CAUTION.Beforereplacingyour
oven light bulb, disconnect the electrical
power to the oven at the main fuse or
circuit breaker panel
Be StlI'e to let tile light co_,er and bulb
cool completely.
For yam" salbt_ do not touch a hot bulb
with bare hands or a damp cloth.
Toremove:
[] Turn tile glass co_er
counterclockwise 1/4 mrn until tile
tabs of tile glass co_er clear tile
grooxes of the socket.
[] Using gloxes or a dry cloth, relnoxe
tile bulb b) Imllin("_ it straight out.
Toreplace:
[] Use a new 130-\olt halogen bulb,
not t() exceed 50 watts.
[] Using gloxes or a dry cloth remoxe
tile bulb fl'om its packaging. Do not
touch the bulb with bare finge_s.
/
%ceDtacle
use g 0ves
Or Cl0[Ir
[] Push the bulb straight into the
receptacle all the way.
[] Place the tabs of the glass cover into
the grooves of tile socket. Turn the
glass cover clockwise 1/4 mrn to
engage.
For improved lighting inside
the oven, clean the glass cover
fl'equenfly using a wet cloth. This
should be done when the oven is
c(m_pletely co()l.
] Reconnect electrical power 1o
the ovel].
Page 31

Broiler Pan and Grid
www.GEAppliances.com
Do not store asoiled broiler pan
and grid anywhere in flTerange.
il Stepguide
Roastingrack
Do not dean the broilerpanor grid in a
self-cleaningoven.
Adter broiling, remove the broiler pan
fl'om the oven. Remove the grid fl'on_ the
pan. Careflllly pour out the grease fl'om
the pan into a proper contnine_:
Washand rinse the broi/er pan andgrid in hot
water with a soap-filledor p/asticscouringpad
If fi}od has bm'ned on, sprinkle the grid
with detergent while hot and cover with
wet paper towels or a dishcloth. Soaking
the pan will remove bm'ned-on fi)ods.
Boththe broilerpanand grid may be cleanedwith
a commercialovencleaner
Both the broiler pan and grid can also be
{'leaned in a dishwasher:
Storage Drawer Removal
To remove the drawer:
[] Ptfll the drawer out tmtil it stops.
[] Lift the front of the drawer tmtil the
stops clear the guides,
[] Remoxe the {h'awe_:
Toreplace the drawer:
[] Place the drawer rails on the guides.
[] Push the drawer back tmtil it stops.
[] Lift the front of the drawer and
[] i,ower the fl'ont of the drawer and
Oven Racks andConvec#on Roas#ng Rack
Clean the oven racks and the convection
roasting rack with an abrasive cleanser or
steel wool. Mter cleaning, rinse the racks
with clean water and dry with a clean
cloth,
NOTE: Theoven racks and convection roasting
rack may be cleaned in the self-cleaning oven.
However, the oven racks wi// darken in color,
lose their luster and becomehard to slide if
cleaned during the self-cleaning cycle.
To make the oven racks slide more easily,
apply a small amotmt of cooking oil to a
paper towel and wipe the edges of the
oven racks with the paper towel.
push back tmfil the stops clear the
guides,
push back {mdl it closes,
71
Page 32

Careand cleaning oftherange.
Cleaning the Oven Door
To clean the inside of the door:
_: Because tile area inside tile gasket is
cleaned during tile self,'lean c_cle _ou
do not need to clean this by hand.
Thegasketis designedwithagapatthe
bottomto allowforproperaircirculation.
Donotrub or cleanthe door gasket--
it hasanextremelylowresistanceto
abrasion.
Ifyou noticethe gasketbecomingworn,
frayed ordamagedinanyway or ifit has
becomedisplacedon the door,you should
haveit replaced.
Tile area outside tile gasket and
tile door liner can be cleaned with a
soap-filled or plastic scouting pad,
hot water and detergent, Rinse well
with a vinegar and water solution.
To clean the outside of the door:
Use soap and water to thoroughly
clean tile rap, sides and fl'ont of tile
oveil dooi: ]_diise well. _J_)/I Ill[IV also
use a glass cleaner to clean the glass
Lift-Off Oven Door
on the outside ot the door: Do not let
water drip into the vent openings.
If any stain on the door vent trim is
persistent, use a soft abrasive cleaner
and a sponge-scrubber tot best results.
Spillage oI marinades, fl'uitj uices,
tomato sauces and basting materials
containing acids may cause
discoloration and should be wiped
up immediately. _4]/en sm'ti_ce is cool,
clean and rinse.
Do IlOt t/se o_,ell cleallei3, cleallillg
powde_ or ha_h abrasixes on tile
outside of tile doo_:
SI0t
Hinge10ck
Pull hinge locks down to unlock.
Removalposition
Thedoorisveryheavy.Becarefulwhen
removingandlifting thedoor.
Donotliftthedoorbythehandle.
Toremovethe door."
Fully open tile dora:
[]
Pull tile hinge locks down toward
[]
the door fi'ame, to the tmlocked
position, A tool, such as a small
flat-blade screwdrixe_; may be
required.
Firefly _*ras,) both sides of tile door
[]
at the top.
Close door to tile door removal
[]
position, which is half Win between
tile broil stop position m_d flflly
closed,
[] I,ifl door up and out tmfil tile hinge
am_ is clear of the slot.
Toreplacethe door:
[] Fimflv,_oras,),t both sides of tile door
at tile top.
X¥ith tile Bottom Hingearm
[]
door at tile edge
same angle as 0fslot
tile remowd
position, seat the
indentation of
the hinge am_
into tile bottom
edge of the hinge
slot. The notch in the hinge am/
must be flfllv seated into tile bottom
of tile slot.
Fully open tile d(:,(:,r.If tile do(:,r will
[]
not flflly open, tile indentation is
not seated correctly in the bottom
edge _ffthe slot.
Push the hinge locks up against tile
[]
front fl'ame of tile oxen cavity to tile
locked position.
Hing
Pushhingelocksup tolock.
F_q Close the oven dora:
\
32
Painted Surfaces
Painted sm'fi_ces include tile top and
sides of tile doo_; top of tile control panel
and the drawer fl'ont. Clean these with
soap and water or a vinegar and water
solution.
Do Ilot rise COll/illeFcial o_,ell cleallers,
cleaning powde_, steel wool or ha_h
abrasixes on an) painted sm'li_ce.
Page 33

Stainless Steel Surfaces
www.GEAppliances.com
Do not use a steel-wool pad; it will
scratch the surface.
Shake bottle well.
[]
Place a small amount of CEIL_dMA
[]
BRYTE _:'Stainless Steel Appliance
Cleaner on a damp cloth or damp
paper towel.
Clean a small area (approximatel,_
[]
8" x 8%,, rubbino_ with tile grain of
the stainless steel if applicable.
Dr} and buff with a clean, dry paper
[]
towel or soft cloth.
[] Repeat as necessary:
NOTE."If a mineral oil-based stainless steel
appliance cleaner has been used heft)re
to clean tile appliance, wash tile sm_h('e
with dishwashing liquid and water prior
to using the CEIL_d'dA BRYTE ')Stainless
Oven Vent
Theoven ventis abovethe lefts/de of the door
This area could become hot dining
oxen rise.
Steel Appliance Cleaner; _dter washing
the smtace with dishwashing liquid
and _,_,;IteI;/lse a genei'o/is _lillo/lnt Oil
(;Elmira BRYTE '_Stainless Steel
Appliance Cleaner to clean the
appliance.
To Order
To order CEILa2dA BRYTE (_:'Stainless
Steel Appliance Cleane_; please call ore"
toll-free nlllllbei':
NationalParts
Center ............ 800.626.2002(U.S.)
888.261.3055(Canada)
www.GEAppliances.com(U.S.)
www.geappliances.ca (Canada)
CERAMABRYTEc_
StainlessSteel Appliance
Cleaner .................... _ PMIOX311
It is nOll//al t()I" stealll to COIlle o/It of
tile vent.
Thevent is/Ynportantforproper air circu/ation.
Neverblock thisvena
Press down and pull out.
Control Panel
Ifdesked, the touchpads may be turnedoff
beforecieaning.
See tile Control Lockoutsection.
Clean up splatte_ with a damp cloth.
Oven Heating Elements
Do not clean tile broil element. Am soil
will b//rn off' when the elelnent is heated.
Clean tile oxen floor with wam_ soapy
watei:
RemovableOvenFloor
Toremove the oven floorfor easier
cleaning:
[] Remo_e tile o_en door using tile
instructions in tile Lift-Off Oven Door
section.
[] Press down and pull out tile
I'ell/OX Ible o'_en J]ooi:
_i_)tl II/ay also use a glass cleanei:
Remove heavier soil with waxm soapy
water. Do not use abrasives of any kind.
Turnonthe touchpadsafter cleanlbg.
On somemode/s, thebakedement is not
exposedand isunder the oven floor If spillovers,
residueorashaccumu/ateon theoven floor,wipe
up beforeself-cieaning.
V_ Clean tile oven floor with wam_
soap} wateE
[] X_q/en reinstalling tile oven fleet; be
sure to slide it all the wax to the back
of the o'_ en.
IMPORTANT'._Mways replace tile
reilloxable floor bel0re tile next rise.
33
Page 34

Cleaningtheglass cooktop.
Control Lockout
Begin b) locking the cooktop; see the
LOCK/UNLOCK ltOEO 3 SECONDS
Cleanyour cooktopafter
eachspill. UseCERAMA
BRYTE®CeramicCooktop
Cleaner.
Centre/Lockoutsection.
Normal Daily Use Cleaning
ONLY use (_EIL_d_JlABRYTE _)Ceran]i{'
Cookto I) Cleaner on the glass cooktoi).
Other creams max not be as eflbctixe.
To maintain and protect the sm_i_ce of
yore" glass cooktop, tollow these steps:
[] gefin'e using the cooktop fin" the
fi_t time, clean it with CEIL_dMA
BRYTE '_Ceramic Cooktop Cleane_:
This helps protect the top and
makes cleanup easier:
[] Dail) use of CEI_/]A BRYTE <_>
Ceramic Cooktop Cleaner will help
kee I) the cooktop looking ne_:
[] Remo',e the bm'ner grates and xent
grille.
[] Shake the cleaning cream well.
Apply a few drops of CEIL_d_L_
BRYTE _ Ceramic Cooktop Cleaner
directly to the cooktop.
[] Use a p_}per towel or CEI_L_dVIA
BRYTE _-Cleaning Pad tot Ceramic
Cooktops to clean the entire
cooktop StlFJ[ilce.
[] Use a dry cloth or paper towel to
remove all cleaning residue. No
need to rinse.
NOTE: It is very important that you DO NOT
heat the cooktop unfi/ it has been cieaned
thorough/>
Use a CERAMABRYTE_ Cleaning
Pad for Ceramic Cooktops or a
Scotch-Brite _ Multi-Purpose No
Scratch blue scrub pad.
The CERAMABRYTE_ Ceramic
Cooktop Scraper and all
recommended supplies are
available llTrough our Parts Cente_
See instnmtions under "To Order
Parts" section onnext page.
NOTE:Donot use a dull or
nicked blade.
Burned-On Residue
WARNING:DAMAGEto yourg/asssurface
mayoccurif you usescrubpadsotherthanthe
pad inciudedwith yourcooktop.
[] Allow the cooktop to cool.
[] Remove the bm'ner grates and xent
grille.
[] Spread a few drops of CEIL&MA
BRYTE _>Ceramic Cooktop Cleane_
on the entire bm'ned residue area.
[] Using the included (2El_d'dA
BRYTE _:'Cleaning Pad fin" Ceramic
Heavy, Burned-On Residue
[] Allow the cooktop to cool.
[] Remo',e the bm'ner grates and xent
grille.
[] Use a single-edge razor blade
scraper at approximately a 45 °
angle against the glass surtace
and scrape the soil. It will be
necessary to apply pressm'e to the
I'_lZOI" scraper in order to i'ei//ove
the residue.
Cooktops, Hfl) the residue area,
applying pressm'e as needed.
If any residue remains, repeat the
[]
steps listed above as needed.
For additional protection, atter all
[]
residue has been remoxed, polish
the entire surtace with CEI_dVIA
BRYTE ': Ceramic Cooktop Cleaner
and a paper towel.
Cooktop (3eaner on the entire
bm'ned residue area. Use the
CEIL_dVIA BRYTE : Cleaning Pad to
remove any relnaining residue.
For additional protection,
[]
atter all residue has been
removed, polish the entire
sm'lace with CEIL_dVIA BRYTE':
Ceramic Cooktop Cleaner and a
paper towel.
34
[] After scraping with the razor
scraper, spread a few drops of
CEIL_dVlA BRYTE _>Ceramic
Page 35

Glasssurface--potential for permanent damage, www.GEAppliances.com
Sugary spillovers (such as
jellies, fudge, candy,syrups)
or melted plastics can cause
pitting of the surface of your
cool(top(not covered by the
warranty) unless the spill is
removed while still hot.
Special care should be taken
when removing hot substances.
Be sure to use a new, sharp
razorscraper.
Donot use a dull or nicked
blade.
Damage from Sugary Spills and Melted Plastic
[] Turn off all surli_ce units and, _th
}lIl o_,en Illitt, I'eIl/O_,e hot l)}lns lind
grates.
[] _.Vearing an oven mitt:
a. Use a single-edge razor blade
scraper (CEI_d_4A BRYTE '_
Ceramic Cooktop Scraper) to
move the spill to a cool area on
the cooktop.
b. Remove the spill with
paper towels.
To Order Parts
To order CEI_d_4A BRYTE '_Ceramic
Cooktop Cleaner and the cooktop
scrape_; please call am" toll-ti'ee ntlll/beI':
National Parts
Center .............. 800.626.2002(U.S.)
888.261.3055(Canada)
CERAMA BRYTE®Ceramic
Cool(topCleaner ........... _ WXTOX300
CERAMA BRYTE_ Ceramic
Cool(topScraper ........... # WXTOX030£
Kit ........................ # WB64XSO£7
(KitIncludescream and cooktopscraper)
CERAMA BRYTP_ Cleaning Pads for
Ceramic Cooktops ......... # WXIOX350
[] An) x'emaining spillo_er should be
left until the smti_ce of the cooktop
has cooled.
] Don't use the surIhce units again
until all of the residue has been
completely removed.
NOTE:Ifpittl)_gor indentation in the glass
surface hasalready occurred,thecooktopglass
will haveto be replaced In thb case,servicewill
be necessarg
35
Page 36

Beforeyoucall for service...
Troubleshooting -tips
Save time and money! Review the charts on the following
pages first and you may not need to call for service.
Possible Causes
Burners have yellow or The combustion quality of
yellow-tippedflames bmaler flames needs to be
determhled visuaJly.
What ToDo
• Use the ill ustrafions beh)w to detemfine if vour burner
flaines are nomml. If burner flaules look like ,4. call fin"
service. No_mal 1)urner flames shotfld look like B or C,
depending on the t},l)e of gas you use. With I,P gas, some
yellow tipping on tilter cones is noi_nal.
A-Yellow flames B-Yellow tips C-Softblue flames
Carlfor service onoutercones Normal for natural
Normalfor LPgas gas
Control knobs Nalob isn't pushed down. • To turn from the OFF l)ositiou, lmsh the knob in and
will not turn then ttu'u.
Burners do Plug on range is not • Make sure electrical l)lug, ix l)lugged,, into a live, l)roperly
not light completely inserted in the grotmded outlet.
electrical outlet.
Gas supply not comlected • See the lustnllatiou/ustrttcfious that (mue with your
or turned on. I';lU re
A fuse ill your home may be • Replace the fl/se or reset the circuit breakel:
blown or the circuit breaker
tripped.
Burner parts not replaced • See the Careandcleaningof therange section.
correctly,
Control tockoutfeature •/f LOC 0Nappears in the display, the oven control ix
is activated locked. Ttu'u this feature tit to use the oven. See the
Control Lockout section.
Tickingsoundofspark Control knob is still • Ttlru the knob ()lit of the LITEposition to the desired
igniterpersistsafter in the LITEposition, setfiu
burnerlights • Turn the burner oft and relight./f ticking ix still
l)reseut, call fi)r service.
Burner flames very hnproper air to gas ratio. •/f range ix connected to LP gas, check :111steps
large or yellow in the Installation Instructions that came with
VOI/I" l';lIl re
Oven light does Light bulb is loose or defective. • Tighten or replace the lmlb.
not work
Oven will not work Plug on range is not completely • Make sure electrical l)lug, ix l)lugged,, into a live, l)roperly
3_ Oven controls improperly set. • See the Using the oven section.
Switch operating • Call fin" service.
light is broken.
haserted ill the eleclricaJ outlet, grounded outlet.
A fuse ill your home may • Rel)lace the fl/se or reset the circuit breaker:
be blown or the circuit
breaker tripped.
Page 37

www.GEAppliances.com
Fooddoes not bake
or roastproperly
Possible Causes
Oven controls hnproperly set.
Rack position is incorrect
What To Do
• See the Using the oven section.
• See the Using the oven section.
or the rack is not level.
Incorrect cookware or • See tile Using the oven section.
cookware of improper
size being used.
Oven thermostat needs • See tile Adjust the oven thermostat - Do it yourself[
adjustment, section.
Food does not Oven controls improperly set. • Make sure VOt/touch the BROIL HI/LOpad.
broil properly
hnproper rack position • See tile Broiling Guide.
being used.
Cookware not suited • Use tile broiling }_;m ;rod grid that came with your range.
for broiling.
The probe is plugged into the • Uu.})lug, and relllOVe tire probe from tire oveu.
outlet ha the oven.
(on some models)
Almnhamn foil used on the • See tire Using the oven section.
the broiling pan mad grid has
not been fitted properly mad
slit as recommended.
In some areas the power • Preheat tire broil element for 10 minutes.
(voltage) may be low.
• Broil for tire longest period of time recommended in
tire Broiling Guide.
Oven temperature Oven thermostat • See tire Adjust the oven thermostat - Do it yourself[
too hot or too cold needs adjustment, section.
Oven dooris crooked The door is out of position. • Because the oven door ix removable, it soiuetimes
gets out of position dttriug installation. Remove and
replace tire oven door. See tire Lift-Off Oven Door
sectiou.
Storage drawer Rear drawer support is • Repositiou tire drawer. See the Storage Drawer
is crooked on top of the guide rail. Removaliustructious in the Care and cleaning of your
range section.
Storage drawer Power cord may be • I_.el)ositiou tire drawer and power cord. See the
won't close obstructing drawer Storage Drawer Removal iustructi_)us in tire Care and
in the lower back cleaning of your range section.
of the range.
Rear drawer support is
on top of the guide rail.
• Reposition the drawer. See the Storage Drawer
Removalinstructions in the Care and cleaning of
your range section.
37
Page 38

Beforeyoucall for service...
Troubleshooting tips
Possible Causes What To Do
Clock and timer do Plug on range is not completely * Make sure electrical I/lug, is Illugged,, into a live, properly
not work inserted in the electrical oudet, grounded outlet.
A fuse in your home * Replace tile fl/se or reset tile circuit breakel:
may be blown or the
circuit breaker tripped.
Oven controls improperly set. * See the Using the clock and timer section.
Oven will not self-clean The oven temperature is * _Mh>wthe range to cool and reset the controls.
too high to set a self-clemz
operation.
Oven controls improperly set. * See the Using the self-cleaning oven section.
The probe is plugged into * Remove the Ilrobe fi'om the oven.
the outlet in the oven.
(on some models)
"Crackling" or This is the sound of the * This is normal.
"popping" sound metal heating and cooling
during both the cooking and
clemfing functions.
Excessive smoking Excessive soil. * Touch the CLEAR/OFFpad. Open the windows to
during a clean cycle rid the room of smoke. Wait tmtil the LOCKEDlight
goes oil. Wipe up tile excess soil and reset the clean
cvcle.
Oven door will not Oven too hot. * Allow the oven to cool below locking tern/erature
open after a clean cycle
Ovennot clean after a Oven controls not properly set. * See the Using the self-cleaning oven secti_>n.
clean cycle Oven was heavily soiled. * Cle;m up heavy sl/illovers bei(>re starting the clean
cycle. Heavily soiled ovens may need to sell:clean
again or fin" a h>n,_er_ period of time.
"LOCKED"flashes The self-cleml cycle has been * Close tile oven door.
in the display selected but the door is not
closed.
"LOCKED"light is The oven door is locked * Touch the CLEAR/OFFpad. Alh>w the oven to cool.
on when you want because the temperature
to COOk inside the oven has not
dropped below the
locking temperature.
"F--and a number You have a function error code. * Touch the CLEAR/OFFpad. Put the oven back into
orletter" flash _>perafion.
in the display
If the function code repeats. * Disconnect all power to tile range for at least 30
seconds and then reconnect power. If tile flmction
err(>r code repeats, call for serxice.
38
Page 39

www.GEAppliances.com
Possih/eCaose
Control signals after You forgot to enter a
entering cooking time bake temperature or
or start time cleaning time.
Display goes blank A fuse in your home may be • Replace tile fl/se or reset tile circuit breaker:
blown or the circuit
breaker tripped.
The clock is in the • See the Special features of your oven control section.
black-out mode.
Display flashes Power failure. • Reset the clock.
Unable to get the Oven control pads were • The BROIL HI/LO and BAKE pads must be touched at
displayto show "SF" not touched properly, the same time and held fo_ 3 seconds.
"Probe" appears in This is reminding you to • Enter a probe teml_eratm'e.
the display enter a probe temperature
(onsome models) after plugging in the probe.
Power outage, Power outage or surge. • Reset the clock. ]f the oven was in use you must reset
clock flashes it by touching the CLEAR/OFFpad, setting the dock
Steam from the vent When using the convection • This is normal.
feature, it is normal to see
steam coming out of the oven
vent. As the number of racks
or amount of food being
cooked increases, the amount
of visible stemn will increase.
What To Do
• Touch the BAKE pad and desired temperature or
the SELF CLEAN LO/STD pad and desired clean time.
and resetting any cooking fiuactiou.
"Burning" or "oily"
odoremittingfrom
the vent
Strongodor
Fan noise
This is normal in a new oven • To speed the process, set a self-clean cycle for a
and will disappem" in time. u]inimum of 3 hours. See the Using the self-cleaning
An odor from the insulation • This is temporai T.
around the inside of the oven
is normal for the first few times
the oven is used.
A cooling fan or a convection
fan (depending on the
function you are using) may
automatically turn on mad off.
oxei] se('tioi],
• This is normal. The cooling tim will tm'n off and on
to cool internal parts. It may run after the oven is
tin'ned OFF, The convection fan will cycle on and off.
until the flu]ction is over or the door is opened.
39
Page 40

Beforeyoucall for service...
Troubleshooting tips
Possible Causes What ToDo
Scratches(mayappear
as cracks)oncooktop
glasssurface
Incorrect clem_hlg
methods being used.
Cookware with rough bottoms
being used or coarse particles
(salt or sand) were between
the cookware mid the surface
of the cooktop.
Cookware has been slid
across the cooktop surface.
Areas ofdiscoloration Food spillovers not cleaned • See the Cleaning the glass cooktop section.
on the glass cooktop before next use.
surface
Hot surface on a model • This is normal. Tile surtace ma) appear discolored
with a light-colored cooktop, when it is hot. This is temporary and will disappear
• Scratches are not remo_al)le. Tim scratches will
beconm less _isible in time as a result of cleaning.
• To axoid scratches, use tile recommended cleaning
i)rocedures. Make s/Ire bottoIns of cookware are clean
betore rise, and t/se cookware with slnooth bottoins.
as the glass cools.
Plastic melted Hot cooktop came into
to the glass cooktop contact with plastic placed
surface on the hot cooktop.
Htting (or indentation)Hot sugar mixture spilled
of the cooktop on the cooktop.
• See the Glass surface- potential for permanent
damage section in tile Cleaning the glass cooktop
surface section.
• Call a qualified technician for replacement.
4O
Page 41

GE Service Protection Plus 'M
GE, a name recognized worldwide %r quality and dependability, oflers y'ou
Service Protection Plus'_'--comprehensive protection on all y'our appliances--
No Matter What Brand!
Benefits Include:
• Backed by GE
• All brmads covered
• Unlimited service calls
• All parts mad labor costs included
• No out-of-pocket expenses
• No hidden deductibles
• One 800 number to call
You will be completely satisfied with our service protection or you ma} request your inone} back
on the remaining value of 3our contract. No questions asked. It's that simple.
Protect yore" refrigerat(m dishwasher; washer and dryer; range, TV, VCR and much more--rely brand!
Plus there's no extra charge tot einergency ser;'ice and low inonthly financing is available. Even icelnaker
coverage and t()od spoilage protection is ottered. You can rest eas> knowing that all y(mr valuable
household products are protected against expensive repairs.
Place your confidence in (;E and (all us in the IU.S. toll-free at _tllt,_Z_,ZZZ_
foY UlOI'e inloi'u/ation.
"*Allbrands coxered, up to 2(} years old. in the contin< nlal I_.S.
We71CoverAnyAppliance.
Anywhere. Anytime.*
_.. (.:_."._22.............
Please place in envelope and mail to:
General Electric Company
Warranty Registration Department
EO. Box 32150
Louisville, KY 40232-2150
41
Page 42

Consumer Product Ownership Registration
Dear Customer:
Thank you for purchasing our product and thank you for placing your confidence in us.
_A/eare proud to ha_e you as a customer!
Follow these three steps to protect your new appliance investment:
Important: If you did not get a registration card with your
................................................................................................... _,.-- (MI 11_1-_
Consumer Product Ownership Registration
Complete and mail
your Consumer
Product Ownership
Registration today.
ttaw' the peace ot
mind of knowing wc
C_lll COlltact VOI/ ill
the tmlikely event era
satb B modificalion.
Aiter mailing the
registration below,
store this docmnent
ill a sati' place. It
contains inl)mnation
you will need should
you require service.
Our selwice number is
800.GE.CARES
(8t)0.432.2737).
Model Number Serial Number
, , , , , I I , , , , , , , I
product, detach and return the form below to
ensure that your product is registered, or register
online at www.GEAppliances.com.
Read your Owner's
Malmal careihllv.
It will help you
operat( your lle'*_
appliance properly.
Model Number Serial Number
Ms. M*>,. Mix',
Firsl I I Lasl]
Name I I I I I I I I I Nain(! I I I I I I I I I I I I
Addr( ss I I I I I I I I I I I I I I I I I I I I I I I I
Apt. # I i I
<;i,vI I I
l )ale Placed
hi Use 111
Monlh
0
GE Consumer Products
General Electric Company
Louisville, Kentucky
ZI 2 wwvcGEApplianceswom
I I I I I I EqnailAddress*
Y:!ar I I I Phon(
* Please l)rovide your e-mail addrc',,, to receive, xia e-mail, discounts, special ot"t_1"_and other important
communications fl-om GE Appliances (GK\).
Check hero ifw)u do not want to receive communicalions h-ore (;EA's carctiflly selected partnel'_.
GEAppliances
FAIL/RE TO COMPI.ETE AND RE'I'[ rRN Tt tlS C,_(I) DOES NOT DIMINISt th_)l JR
W.\RI_ \NTY RIGt tTS.
For more inflmnation about Gl_\'s privacy and data usage poll(?; go to _a_a_.(;1L\pl)liances.com and
click on 'Privacy Poli_y" or call 800.626.2224.
Nunll)(!r I , I
I ] Code I I I I
Zip I
I-I,, I-I , , ,
I
I
I
Page 43

Notes.
I
_L
==
m.
w
m
w
m
43
Page 44

m
Notes.
,0
r _
m
z=
m
I
44
Page 45

Accessories.
Looking For Something More?
You can find these accessories and many more at www.GEAppliances.com (U.S.) or
www.geappliances.ca (Canada), or call 800.626.2002 (U.S.) or 888.261.3055 (Canada)
(during normal business hours). Have your model number ready.
¸¸¸¸¸¸¸¸7¸¸¸¸¸¸¸¸¸¸¸ < ; <j ( </ !)<[ i<
7!_)i!!iI iilJ_!i__i_ij_ii_i_)_il)_jiiii((
Grates Surface Burner Heads & Caps
OvenRacks Broiler Pan Cleaner
Light Bulbs Knobs
Tired of discolored rocks? Wishing you had extm-heaxT-duty oven racks?
NOW AVAILABLEfor your range:
GE's innovative, self-cleanable porcelain-coamd oven racks!
• Hem T Dul)_
• Durable
• Able to be cleaned in a self-cleaning oven
Visit www.GEAppliances.com (U.S.) or www.geappliances.ca (Canada)
fin more information.
45
Page 46

GEDual FuelRange Warranty.(Forc,stomersintheUnitedStates)
Aft warranty service provided by our Factory Service Centers,
or an authorized Customer Care® technician. Toschedule service,
on-line, 24 hours a day, vis# us at www.GEAppliances.com, or
carl 800.GE.CARES(800.432.2737).
GE Will Replace:
OneYear
Fromthe dateof the
originalpurchase
Service trips to your home to teach you how to use
the product.
Improper installation, delivery or maintenance.
Failure of the product if it is abused, misused,
or used for other than the intended purpose or
used commerciaJly.
Replacement of house fuses or resetting of circuit
breakers.
Any part of the range which t_dls due to a (letect in materials or worlu//anship. During this
full one-year warranty, GE will also provide, free of charge, all labor and in-home service to
replace the de/bctive part.
Staple your receipt here.
Proof of the original purchase
date is needed to obtain service
under the warrant_
Damage to the product caused by accident, fire, floods
or acts of God.
h_cidentaJ or consequential damage caused by possible
defects with this applimlce.
Damage caused after delivery.
This warranty is extended to the original purchaser and any succeeding owner for products purchased for
home use within the USA. In Alaska, the warranty excludes the cost of shipping or service calls to your home.
Some states do not allow the exclusion or limitation of incidental or consequential damages. This warranty
gives you specific legal rights, and you may also have other rights which vary from state to state. To know
what your legal rights are, consult your local or state consumer affairs office or your state's Attorney General.
Warrantor:General Electric Company.Louisville,KY 40225
46
Page 47

GEDual Fuel Range Warranty.(Forc.stomersinCanada)
All warranty service provided by our Factory Service Centers
or an authorized Customer Care®technician. For service,
call 1.800.361.3400.
Camco Will Replace:
Anypatt of the range which fifils due to a defect in materials or workmanship, During this
Fromthedateof the
originalpurchase
Service trips to your home to teach you how to use
the product.
hnproper h_staJlation, delivery or maintenance.
Failure of the product if it is abused, misused,
or used for other than the intended purpose or
used commerciaJly.
Replacement of house fuses or resetth_g of circuit
breakers.
full one-year warranty, (;amco will also provide, free of charge, all labor and in-home service to
replace the defective part,
Staple your receipt here.
Proof of the original purchase
date is needed to obtain service
under the warrant_
Dmnage to the product caused by accident, fire, floods
or acts of God.
h_cidentaJ or consequentiaJ dmnage caused by possible
defects with this applimlce.
Dmnage caused after delivery.
I WARRANTOR IS NOT RESPONSIBLE FOR CONSEQUENTIAI, DAMAGES. ]
I Warrantor: CAMCO INC. I
47
Page 48

ConsumerSupport.
GEAppliancesWebsite ,,,thet._.8.:www.GEAppliances.com
Have a question or need assistance with your appliance? Try the GE Appliances Website 24 hotu_ a day,
any day of the year! For greater convenience and faster selMce, you can now download Owner's Manuals,
order parts, catalogs, or even schedule service on-line. You can also "_sk Our Team of EN)erts'"" your questions,
and so much more... In Cmmda: www.geapplimaces.ca
ScheduleService .,theu.s.:www.GEAppliances.com
Expert (;E repair se_Mce is onl_ one step away fi'om your (loo_: Get on-line and schedule your service at ,,our
comenience 24 hom_ any day of the }ear! Or call 800.GE.CARES (800.432.2737) during nom,al business hom_.
In Cmmda, call 1.800.361.3400
RealLifeDesignStudio ,, theu.s.:www.GEAppliances.com
GE supports the Uni\'e_al Design concei)t--products, services and environments that can be used by people of all
ages, sizes and capabilities. _,\'e recognize the need to design fin" a wide range of ph}:sica, and mental abilities and
impaimmnts. For details of GE's Universal Design applications, including kitchen design ideas fin" people with
disabilities, check out our XA'ebsite today For the heating impaired, please call 800.TDD.GEAC (800.833.4322).
In Cmmda, contact: Manage_; (_onsulner Relations, Camco, Inc.
Suite 310, 1 Facto_' i.ane
Moncton, N.B. E1 C 9M3
ExtendedWarranties ,,thet._.s.:www.GEAppliances.com
Purchase a (;E extended x_arranb' and learn about special discounts that are a_ailable x_hile your _arrantv is still
in eflbct. Y)m can purchase it on-line anytime or call 800.626.2224 (huing nom_al business hours. (;E Consumer
Home Services will still be there after your warrant) expires. In Canada, call 1.888.261.2133
PartsandAccessories ,,,thet._.s.:www.GEAppliances.com
Individuals qualified to sexMce their own appliances can have parts or accessodes sent directly to their homes
(VISA, MasterCard and Discover cards are accepted). Order on-line today, 24 horus every day or b v phone at
800.626.2002 dtuing nom,al business hours.
Instructions contained in this manual cover procedures tobe performed by any user. Other servicing generally should be
referred to qualified service personnel Cautionmust be exercised, since improper servicing may cause unsafe operation.
Custome_ in Cmmda should consult the yellow pages fin" the nearest Cameo service center; or call 1.888.261.3055.
ContactUs _,,theu.s.:www.GEAppliances.com
If'you are not satisfied with the service you receive from GE, contact us on our _A'ebsite with all the details
including your phone numbe_; or w_ite to: General Manage_; Customer ]?.elations
GE Appliances, Appliance Park
i,ouisville, KY 40225
In Cmmda: www.geapplimaces.ca, or w_im to: Directo_; Consumer Relations, Camco, Inc.
Suite 310, 1 Factory i.ane
Moncton, N.B. E 1 C 9M3
RegisterYourApplbnce ,,,theu.s.:www.GEAppliances.com
Register your new applimace on-lhae-at your convmfience! Timel) product registration will allow ,for enhanced
communication and prompt serxice under the temps of xour warranb _,should the need a_ise. You may also mail
in the pre-pfinted registration card included in the packing material, ha Cmmda: www.geappfimaces.ca
Printed in flTeUnited States
 Loading...