

Page 1
Models: JVM1540
JNM1541
HVM1540
Spacemaker Microwave Oven
Owner'sManual
H
[]
[]
Helpful Information
C_ye
2
5
If SomethingGoes Wrong
[]
Write the model and serial nmnbers here:
Model#
Serial#
I:illd/h¢_bt • mmtbers o11:-tl:d),t:l illside/]w oven.
ge.com
MFL31918501
49-40528
08-06 JR
Page 2
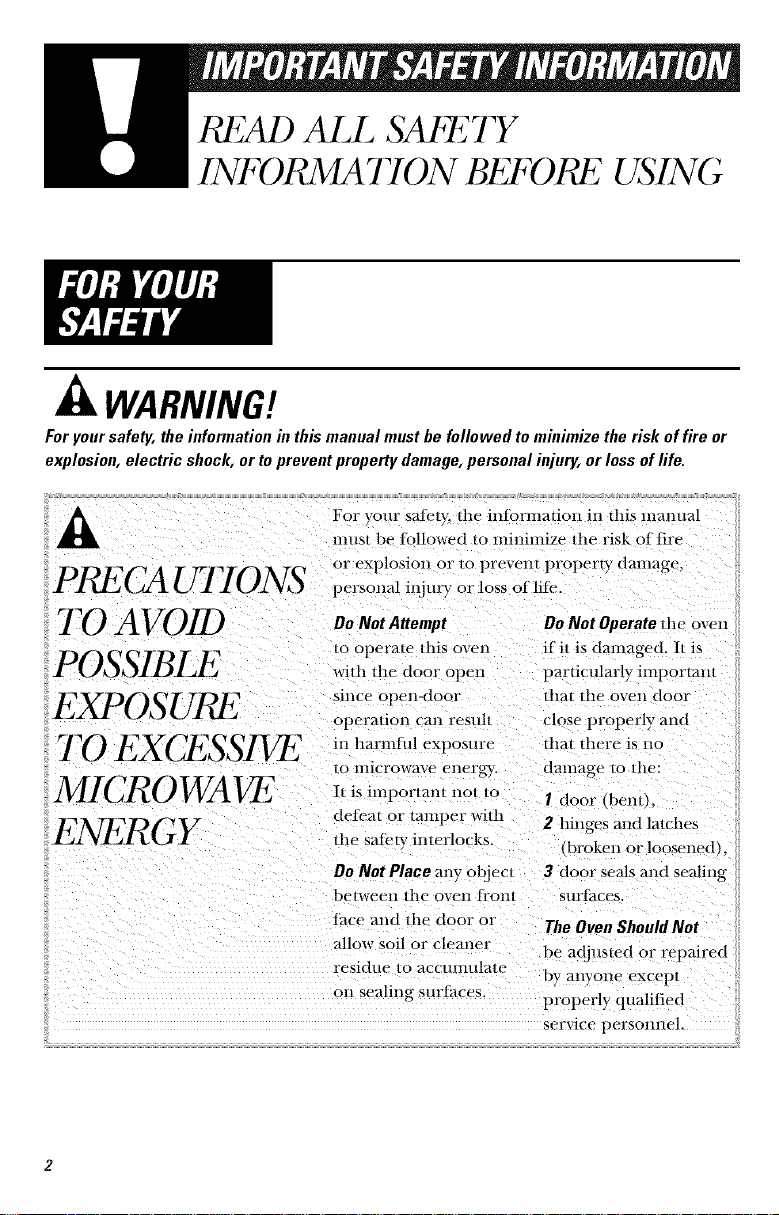
READ ALL SAA_2TY
INFORMATION BEFORE USING
,_ WARNING!
Foryoursafety,theinformationinthis manualmustbe followed tominimizetherisk offire or
explosion, electric shock,or toprevent property damage,personal injury,or loss of life.
For your safiqy, die intbrma|iolt ill this manual
lnus/be tollowed to mininlize /he risk of fire
or explosion or/o prevem property damage,
Pt_CAUIYONS persollal_l_>.orlosso,li*_
Do Not Attempt DoNot Operate1tie oven
/o operate /his oven ifil is damaged. 1/is
with lhe door open particularly importan/
_ince opell-door that tile OVell door
operauon call resul/ close properly and
TO EXCESSIVE i,l_l_,rmr_,lexposuretlla,,llereisllO
lo illicrowave ellergw, dalllage to tile:
MICROWA_ It is impor,anl no, to ' door (ben,).
ENERGY ,hesali_'y interlocks.
deti_a_ or tmnper with 2 hiJlges and lmches
,broken or loosened _.
DoNot Place rely objec_ 3 door seals and sealing
between lhe oven [i'Oll/ surthces
tace and tile door or The OvenShouldNot
allow soil or eleaneI be adjusted or repaired
residue to accumulaw by allVOlle excepl
on sealing sur[aces
properly qualified
servlce persolllle].
Page 3
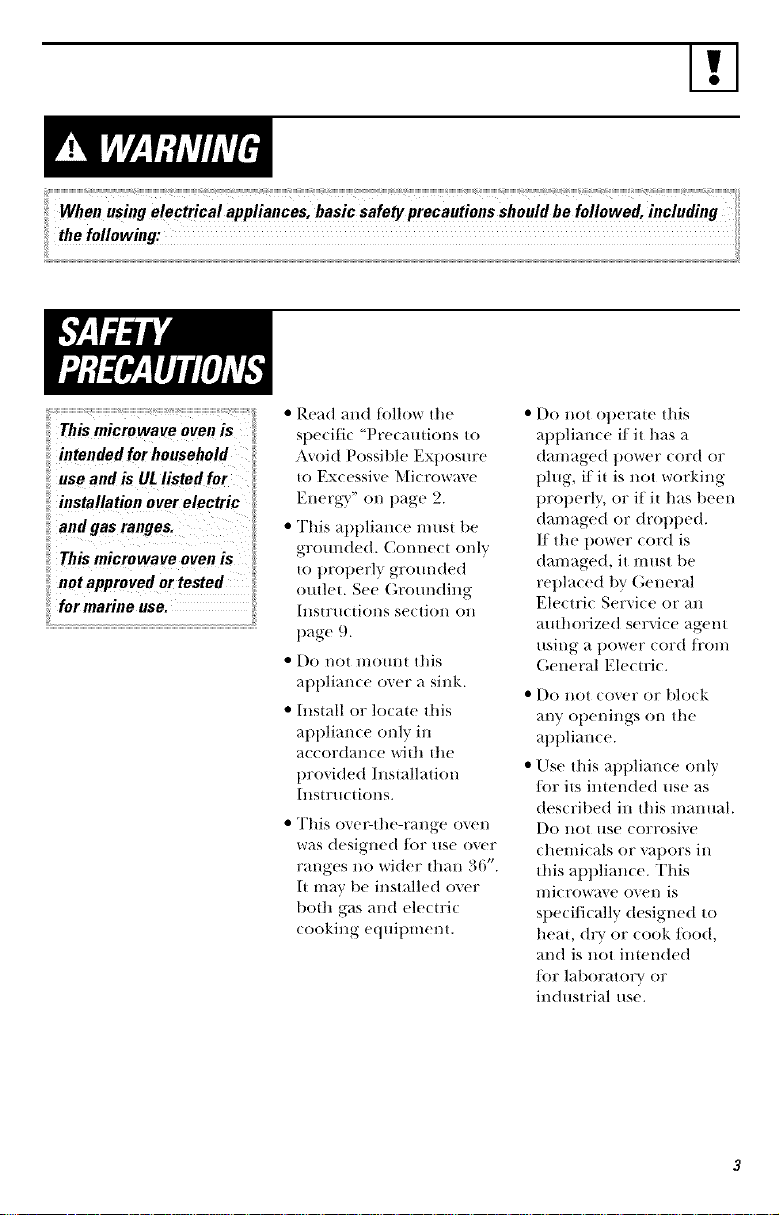
I'.1
This microwave oven is
intended for household
use and is IlL listed for
installation over electric
and gas ranges.
This microwave oven is
not approved or tested
for marine use,
• Read and tollow the
specific "Precautions to
A\oid Possible Exl)osure
to Excessive Microwave
Energy" on 1)_ge 2.
• This _lppliml(e must be
groml(le(t. C(mnect only
to properly gr(mnded
outlet. See Grom_ding
Instru( tions section on
[)_ge 9.
• I)o not m(mm this
_q)l)liam e o_er _ sink.
• Install or lo(_w this
_q)l)lian(e only in
_l(-cor(tan(e with the
provided Installation
hlstrtl( tions+
• This o_et:the-range oven
was designed/or use over
ranges no wider dmn 36".
It may be installed over
both gas mid ele(tri(
cooking e(luit)ment.
• I)o not ot)eraw this
al)l)liance if it has a
damaged power cord or
plug, if it is not working
t)rol)erly, or if it has t)een
damaged or drot)ped.
If the power cord is
damaged, it must lie
replaced t)v General
Electric Service or an
m_thorize(t service agent
using a power cord/i'om
General Electric.
• I)o not cover or block
any openings on the
at)t)liame.
• Llse this at)t)liance only
/or its linen(led use as
described in this mmmal.
[)O not IISe corrosive
chemicals or vapors in
this appliance. This
microwave oven is
sl)eci/ically designed to
heat, dry or cook/oo(t,
and is not intended
/()r laboratory or
industrial use.
Page 4
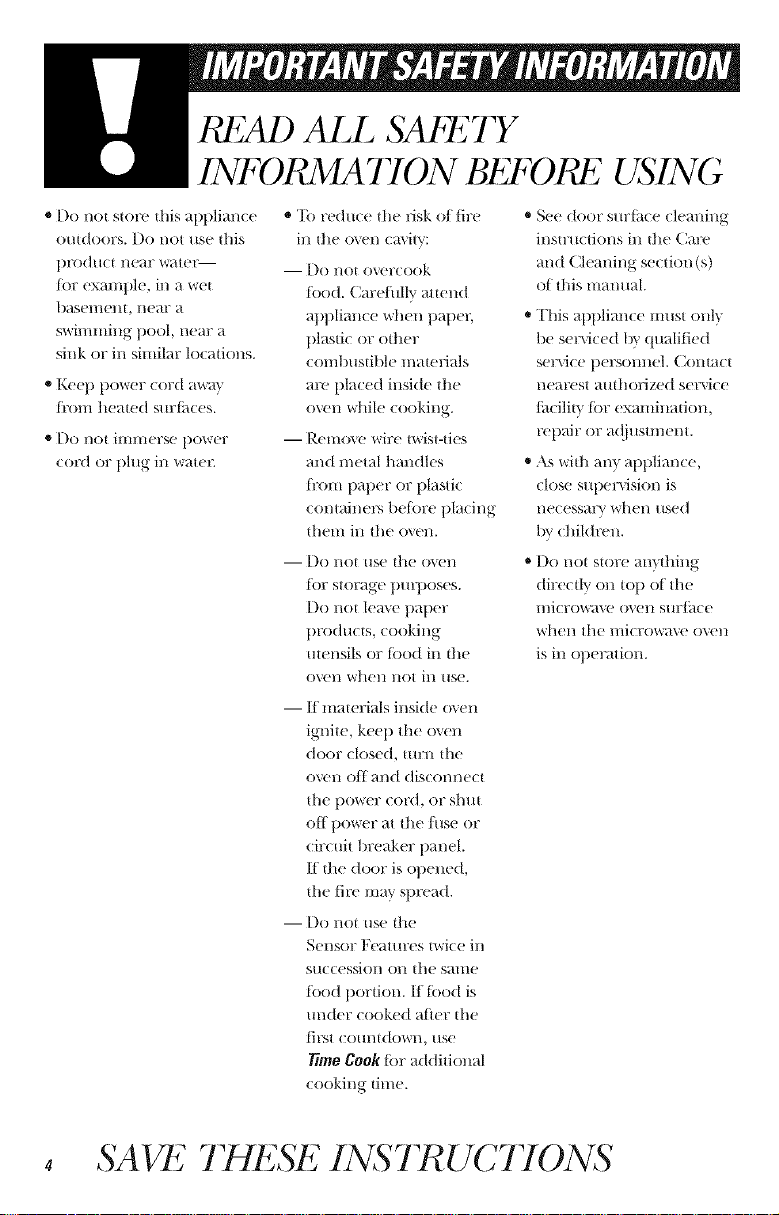
READ ALL SAPETY
INFORMATION BEFORE USIN(;
®Do not store this appliance
outdoors. Do not/lse this
llFodHc[ Ileal; watel_
tot examllle, ill a wet
[)aS( l/lell[, near a
swin/ining pool, near a
sink or in similar locations.
o Keep power cord awm
fl_onl heated surli_ces.
®Do not iinmerse power
COlXlor l)l/lg in watel_
* 'Ib reduce tile risk of fire
in file oven cmi|v:
-- Do not overcook
lood. Careiullv attend
appliance when llape C
plastic or other
conlbustible matelJals
are placed inside tile
oven _llile cooking.
-- R('Ino_e _ire twist-ties
and metal hmldles
li'OIl/ i)_qler or plasti(
c()i/taii/ers belore placing
them ill tile oxen.
-- Do not use file o_en
tor storage p/n'llOSeS.
Do not lem e paper
lllz)ducts, cooking
ulensils or lood in tile
ovell Wllell llOt ill use.
-- If inate rials inside o_en
ignite, keep tile oxen
door closed, turn tile
OVCll Oil and disconne€t
tile t)ower cord, or sh/H
off llower at tile Ihse or
circuit breaker panel.
If tile door is opened,
tile thx' may spread.
-- Do not use tile
SeI/SOl; Fe;HIll'l'S Iwi(e iI/
smeession on tile skulle
lood portion. If t;.)od is
under cooked after tile
first (:ountdown, use
7_meCook/i)r additional
cooking time.
®See door surli_ce cleaning
inso uctions ill file Care
and Cleaning section (s)
of this nlan/lal.
®This apllliance must only
be se r\ice d by q/lalified
set\ice tlersonnel. Contact
nearest authorized se r_ice
litcilil}/ill; examination,
l>tlair or a/!j/lstn/ent.
®.ks with any appliance,
close s/qlervision is
neeessar\, when used
1)v !:hildren.
* Do not store anyflling
directly on tot) of tile
l/liCl'ow_lve O\ell S/ll;]ilce
whei/tile l/liCrOWm'e ()veil
is in operation.
SAVE THESE INSTR UC770NS
Page 5

SPECIAL NOTT2S ABOUF MICRO WAVING
I'.1
Arcing is the microwave
term lot sparks ill the
oven. Arcing is caused by:
• The metal shelf (if
included) not installed
(orrectly so it touches the
microwave wall.
• The te]//l)elTatllre probe
(if included) in the
lilicrowave t)tlt 110[
inserted in the tood.
• Metal or foil tou(hing
the side oI the ovel/.
• I)<) not pop popcorn in
your microwave oven
imless in a special
microwave popcorn
accessory or unless you
use popcorn labeled tor
use in microwave o_ens.
• So1//e ])yodllctS sIIcl/ as
whole eggs and sealed
containers tor example,
closed jars--are al)le to
explode and should not
be heated in this
lIlicrowa_' ovel/. Sllch/Ise
of the microwave ovel/
could resuh in h_iury.
• 1)1) not boil eggs in a
IlIiCI'OWi-I_,_' OVCI/, PF('SSIlF('
will build ut) inside egg
yolk and will cause it to
bin\st, t)ossibly resulting
ill iHj IIFV.
• Foil not molded to tood
(upturned edges act like
_tl/[elll/_tS).
• Metal, such as twist-ties,
poultry pins or gold-
rinnned dishes, in the
microwave.
• Recycled paper towels
containing small metal
pieces being used in the
microwave.
• Operating the microwave
witl't Ho tood iHside/or
more than a mimne or
tWO IIIi'IV C_HISC (]_tl//i-lge
to the oven and could
start a life. It ill(]?eases
the t'teat aromld the
magnetron and (an
shorten the lilt of
the o_eH.
• Foods with mlbroken
OtlteF "skill" s/Ich as
potatoes, hot dogs,
S_I/IS_Igcs, IOIlI_tI()US,
apples, chicken livers
and other git)h'ts, and
egg yolks should be
pierced to allow steam
to escape dm:ing
cooking.
Page 6
SPECIAL NOTT2S ABOUF MICRO WAVING
SAFETYFACT
SUPERHEATED WATER
Liquids, such as water,
coffee or tea, are able to
be overheated beyond
the boiling pohlt without
appearing to be hoi/ing.
Visible bubbling or boiling
when the container is
removed from the microwave
oven is not always present.
THIS COULD RESULT
IN VERY HOT LIQUIDS
SUDDENLY BOILING OVER
WHEN THE CONTAINER IS
DISTURBED OR A SPOON
OR OTHER UTENSIL IS
INSERTED INTO THE LIQUID.
To red u(e the risk ol ill jut?.
tO i)ersons:
-- Do not overheat the
liquid.
-- Stir tile liquid both
belore and halli_av
through heating it.
-- Do not use straight-
sided containers with
narrow necks.
-- Al_er h_ ating, allow file
container to stand ii/
tile l/licrow_{\( o'_en l()r
a short time belore
rel/ioving tile contai]le]2
-- IJse extrel/le (:are when
inserting a si/oon or
other/ltensil into tile
contain_ r.
* Axoid heating 1lab}. Iood
in glass jars, e_('n with tile
lid oil Make sure all
inlimt Io(/(1 is thoro/lghlv
(ook_ (t. Stir Iood to
(listritmt_ the ll('_tt evenl}.
Be car(tiff to 1)rev(nt
scalding when warlning
lormula or breast milk.
The container Ill_t_'tbel
cooler than tile milk realN
is. Alwm:s test tile milk
belbr_ li_(lii/g the 1)abe..
o Don_t (teli'ost li'ozen
beverages ill narrow-
n_eked bottles (especially
carbonated beverages}.
Even if tile container is
op(ne(t, l)ress/lre Call
b//ild up. "Ellis call cause
the c()ntainer to burst,
l)ossibly r( s/llting in
iiI jur}.
* Hot li)o(ls and steanl
call ca/lse burns. Be
carefill when opening
allY coi/taillers of hot
tood, inchlding pot;)corn
b_tgs, looking tlcmIhes
and boxes. To prev_ nt
l)ossible il_jm:}, (lire(t
stean/ awa V li:on/ hands
and I?me.
® Do 1lot overcook
potatoes. Thev could
d(hvdrate and catch
lira, causing danlage
to VO/lr ()Veil.
®Cook meat and i)ouhr}
thoro/lghl}--meat to
at least all 1NTERNAI_
temilerature of 160°F
and l)oultrv to at least all
INTERNAI __el/ll)_ ratm:e
of 180°E Cooking to
these tenltleratm:es
/lsuall V protects against
Ioodborne illn_ ss.
Page 7

m.
Make sure all cook_are
used in your microwave
oven is suitable tor
n/icrowaving. Most glass
casseroles, cooking dishes,
l//eastll?il/g ClltIS , Cllstard
cups, potter} or china
dinnerware which does not
have metallic u:im or glaze
with a metallic sheen can
be/lsed. Sortie cook_are
is labeled "suitable tor
microwm'ing."
How to test for a microwave
safe dish
• I|vou are not s/Ire il
a dish ixlnicrowa,e-sali'.
ux(+ tt_ix test: Place il tt_(
ovel| l)ol]l the dish ",,(n
;-ire leSllll_t _111(| _1 _l_tss
ulea.suriug cut)/il|ed with
1 cut) (.ffw;tter--xet the
measuril/g CUll either
in or next to the dish.
Microwave 30-45 see(rods
at high. /f the dish heats,
it shouht not tie tlsed lot
lllicrowuvillg.
If the dish remains cool
and (rely the water in the
CUll heats, then the dish
is microwa_ e-sati'.
• If VO/l /lse a l//eat
thermometer while
cooking, make sm:e it is
sat('/()r/Ise ill lilicrowave
()VeilS.
• Do not use recycled
paper t/roducts. Recycled
paper towels, napkins
aild waxed tlaper Call
contaill metal flecks
which may cause arcing
or ignite. Paper products
contaiifing nylon or
mhm filaments should
be avoided, as they may
also ignite.
• Sol//e styro/()al// tr_lvs
(like those that meat is
tiackaged on) time a thin
stritl of metal embedded
in the bottom. When
micro_s_ed, the metal can
l)urn the floor of the ovell
or ignite a patier towel.
• Do not use the microwa\e
to dr} newstlatiers.
• Not all t>lastic wrap
is suitable/ill: use in
microwave ovens.
Check the package
tor tlrotier use.
• Patler towels, waxed
tlat/er and t/lastic wrap
can tie used to (over
dishes in order to retain
moisture and lIrevem
spattering. Be sure to
veto plastic wrat> so
steal// can escalle.
• Cookware lilav becolile
hot because of heat
transti'rred/i'om the
heated/ood. Pot holders
may be needed to handle
the cookware.
• "Boilable" cooking
t)ouches and tightly
closed plastic bags should
be slit, tlierced or _emed
as directed tiy tlackage.
If they are not, tllasti(
could burst durillg or
immediately atter
cooking, l)ossitily restflting
in ii_jur}. Also, tllastic
storage containers should
be at least partially
m/covered 1)ecause they
/orm a tight seal+ When
cooking with COlmUners
tightly covered with
t>lastic wrap, remove
covering carefllllv and
direct steal// aw_lv Ji'ol//
hands and {hce.
Page 8
SPECIAL N07 2S ABOUF MICRO WAVING
o Use Ibil only as directed ill
this man/_d. When using
loll in the iIli(rowa_e
oven, keep the li/il at least
1" awm from the sides of
the o_en.
The ]kli/will operate
autoulaticallv raider
certain (onditions (see
Automatic Fan tbamre).
"E_k( care to t/revent tile
starting and spreading of
accidental (ooking lires
while tile x(nt lml is in use.
®Clean tile und(rside of
tile i//icrow_t\ e olien.
Do not allow grease
to build ut) on tile
ulicrowa_e or tile
thn lilter.
* Plastic rookware Plastic
cookwar_ designed lor
ulicrow_ cooking is v_l'?
us(fill, lint should 1)( used
ear(flfll}. E_en nlicrowu_e-
sate l)lastic nlay not be as
tolerant of o_ ercooking
conditions _s are gl_lss or
ceruulic materials _md
UlUy solien or chin: if
subject(d to short l_eriods
of o_ ercooking, hi longer
exl/osures to o_ercooking,
tile lood and cookware
could ignite.
* Ill tile exent of a grease
fire on tile s/n:lhce units
below tile l/licrowave
ov(n, smother a flaming
lla]l Oll tile s/lrl_lce tlnit
b} co_ering tile pan
eonlpletely with a lid, a
cookie sheet or a fiat tra_,.
* Use care when cleaning
tile v(nt thn fiher.
Corrosive cleaning
agents, su(h as h.e-based
o,,(n cleuners, l/l_t}
damage the lilter.
Follow these guidelines:
I Use microwm e-sate
plastics onk. and use
thenl in StlJCt ronlt/liance
with the cookware
l/lan/ll_lrtllrer_s
r( COI//Illei/d ati OilS.
2 Do not illicrowave (l//l)l},'
contaiHers.
3 Do not permit chikh:en
to/lse plastic cookwalx
without comlllete
Still( rvision.
®When pr(paring
]laming loods raider
the illi( rowa_e, tllril tile
vellt th]l Oll.
®N(ver lem:e s/lrlkice units
t)eneath VO/lr microwave
oven unatlended at high
heat settings. Boilovers
cause smoking and greas}
spillovers that nl m ignite
and spread if the
l/licrow_t\( V(llt thn is
ollerating. "Ib ininimize
a/ltoI/lati( l;_11 oil(ration,
use ad(quate sized
cook*_are and use high
heat on surlhee tlnits
only whell n(eessar}.
Page 9
I'.1
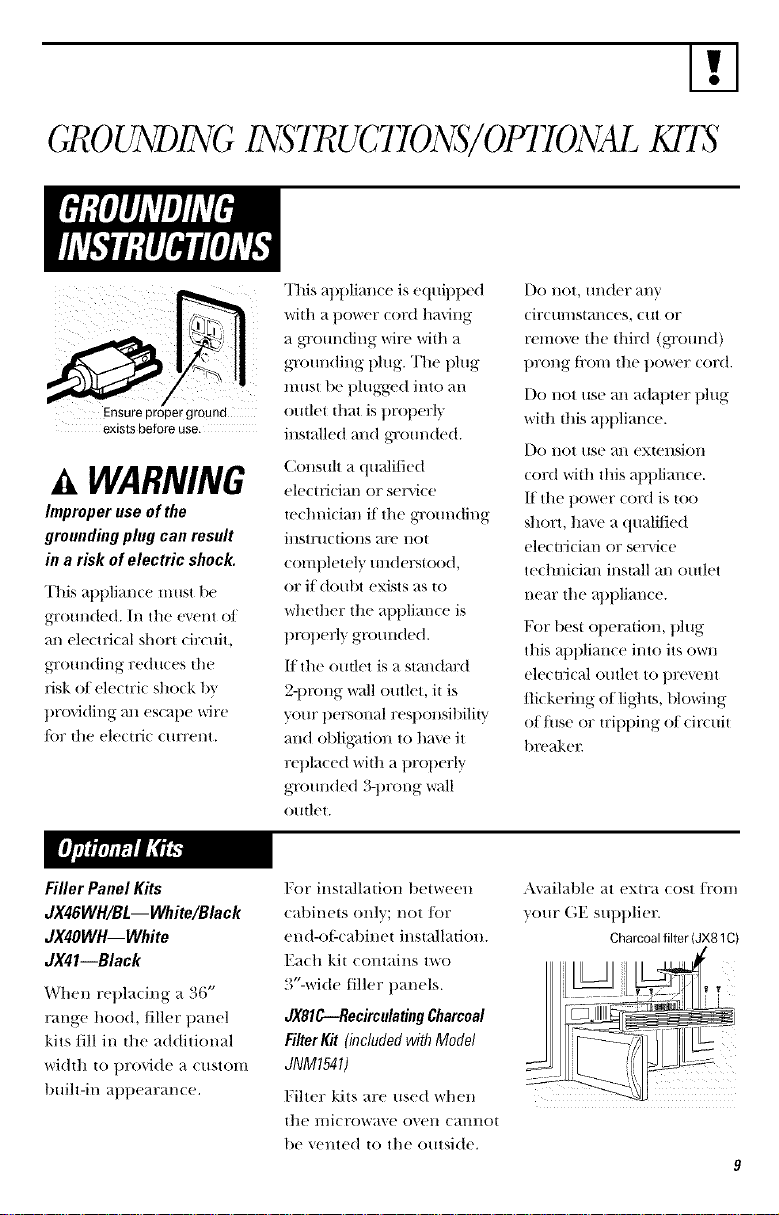
GR0 UNDING INSTR{7(;770NS/ OfflTONAI KFIS
Ensure proper ground
exists before use.
A WARNING
hnproper use of the
grounding plug can result
in a risk of electric shock.
This appliance Inust be
g-rom/de(t. Ill tile event of
an electlJcal short circuit,
gTounding reduces tile
risk of elecirie shock 1)_
t)roviding all escape wire
/_)r the electric current.
This appliance is e(tuiplled
with a t)ower cord having
a gTom/(ting _,ire with a
grounding plug. The l)lug
must be t)lugged into an
ouilei that is t)rotlerl}
installed and g_xmn(ted.
Consuh a qualified
ele(u'i(-ian or service
te(hni(ian if tile gTom/ding
instrucdons are not
eomt)letely undersiood,
or if doubt exists as to
wheiher the appliance is
tlrot)efly grounded.
I/the ouilet is a standard
2-llrong wall outlet, it is
your personal resllonsibilip_
and oblig_don to have it
ret)la(ed wifll a t)rollerly
grounded 3-t)rong wall
omlei.
[)O not, iin(teF _ll/V
CilTe/ll//stan(es, Ctl[ OF
remove the {hird (grom/(t)
t)rong tix)m the t)ower cord.
Do not use an adat)ter plug
with ihis atltlliance.
Do not use an exiension
cord with this appliance.
If the power cord is too
short, ha\ e a qualNed
ele(Ui(ian or ser_i(e
te(lmi(ian install an outlet
near tile al)tllian(e.
For best ollet_don, plug
this al)lllimwe into its ()_r_
elecilJcal outlet to t)revent
flickering of lights, blowing
offilse or u:itltling of cir(uit
breaker.
Filler Panel Kits
JX46WH/BL--White/Black
dX4OWH--White
JX41--Black
When ret,la(ing a 36"
range hood,/iller panel
kits fill in the additional
wi(hh t() t)rovide a custom
built-in al)l)earance.
For installation between
cabinets only; not/i)r
end-el:cabinet installation.
Each kit contains t,,*,o
3"-wide filler t)anels.
axsIC--Recircolating Charcoal
FilterKit (included with Model
JNM1541)
Filter kits are /lse(t whell
the microwave oven cannot
be vented to tile outside.
Axailable at extra cost/i'om
your GE supplier.
Page 10
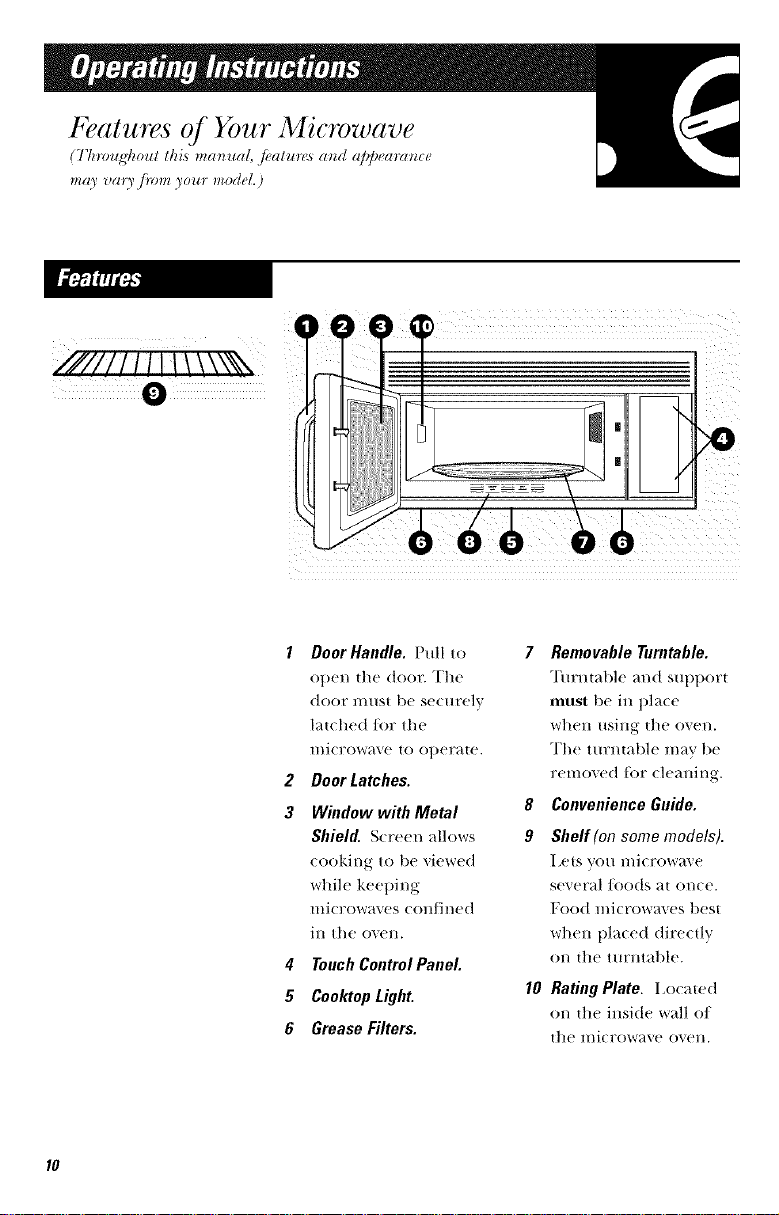
/il/ll//1i t \\\\N --[7
1 Door Handle. Pull to
op('n th(' (too_ The
door must bc secur('lv
latched/i)r the
microwave to operate.
2 Door Latches.
3 Window with Metal
Shield. Scre('n allows
cooking to be viewed
while keeping
IIIi(TOW_tVeS confined
ilJ, the o_en.
# Touch Control Panel.
5 Cooktop Light.
6 Grease Filters.
7 Removable Turntable.
Turntable and supt)()rt
must bc in t)la(c
when using the o_en.
The turntable it)w,; 1)e
removed ti)r cleaMng.
8 Convenience Guide.
9 Shelf(on some models).
I,(,isyou l//i( l-()w_l_+(,
several/i)ods at once.
Food l//i(Fowa_es best
when pla(ed directly
on the turntable.
10 Rating Plate. I,ocat('d
on tl't(' inside WC++]IO/
the mi(rowave o_en.
Page 11
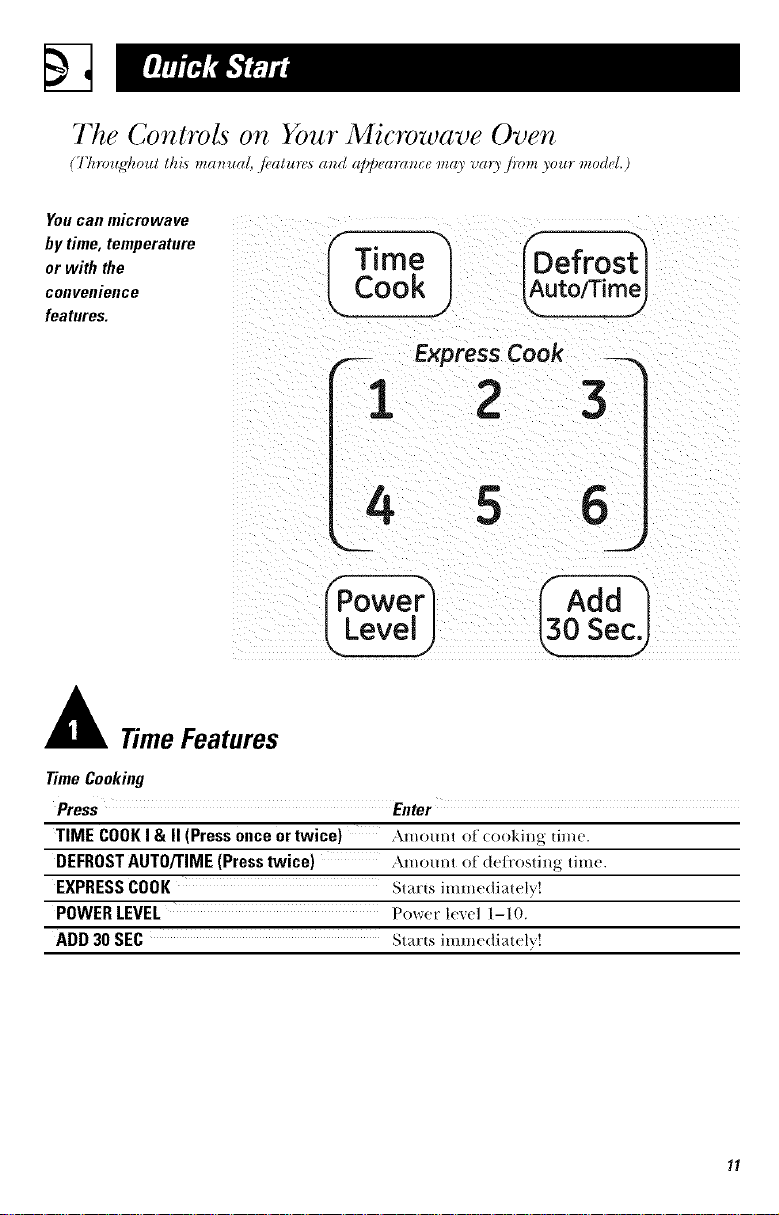
The Controls on Your Microwave Oven
(Tlnvug]_ou/ thL_ma_n_a/,f_alur_'._m_d a]_]_earm_c_ma) vm3 ji_mz 3our model.)
You can microwave
bytime, temperature ( Ti "
or with the m_
convenience LCoo k
features.
Defros
Auto/TimeJ
Express Cook --_
1 2 3
4 5
J
J
TimeFeatures
TimeCooking
Press Enter
TIME COOKI & II (Press once ortwice) Amount o[' cooki.g dm_'.
DEFROSTAUTO/TIME(Presstwice) Amount ol d('/i'osting tim('.
EXPRESSCOOK Starts immediately!
POWERLEVEL Power lev('l 1-10.
ADD 30 SEC Starts imm_,diat_,lv!
Page 12
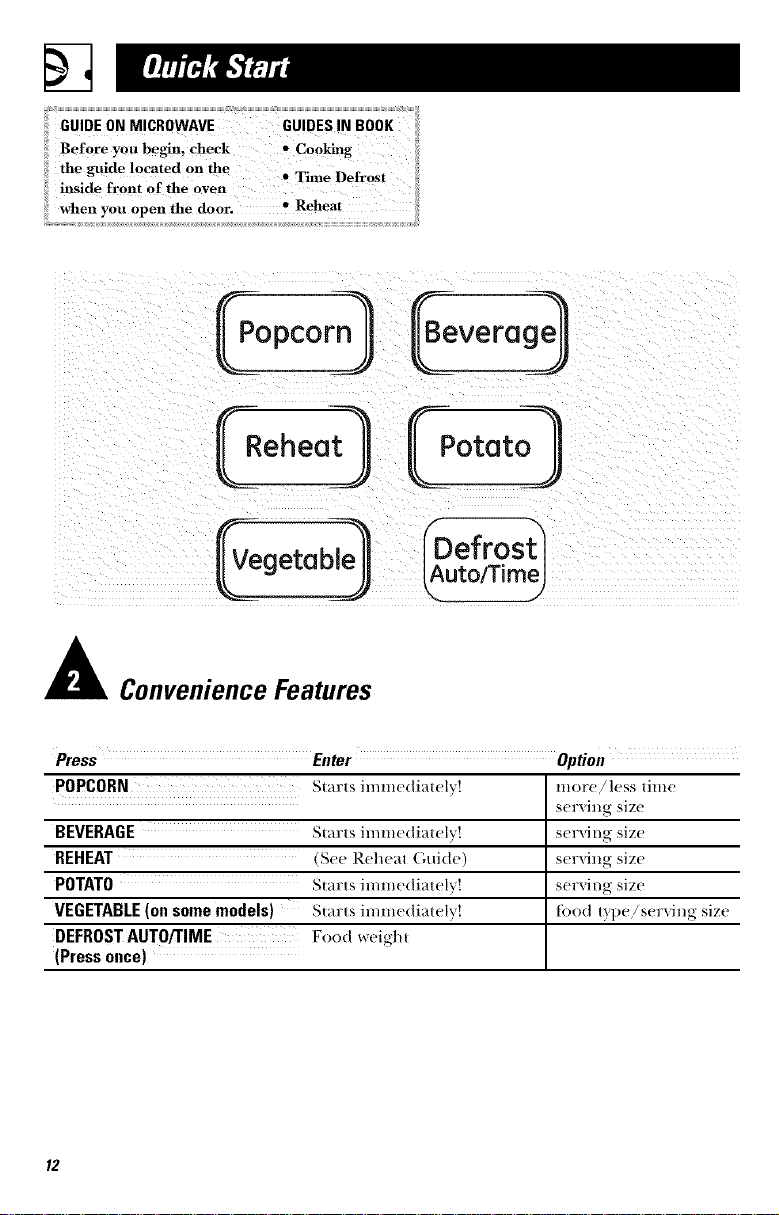
@_Beverage
Potato
ConvenienceFeatures
Press Enter Option
POPCORN Starts immediateb;! more,/h'ss time
Serlill_ size
BEVERAGE Starts immediately! serving size
REHEAT (See Reheat (;uide) serving size
POTATO Starts mmle(hatel"" _,' serxing size
VEGETABLE (on some models) Starts immediately! tood tH)e!serxing size
DEFROST AUTO/TIME Food weight
(Press once)
Page 13

torQ
k_P0use_3
time t-br TIME COOK,
TIME DEFROST or
EXPRESS C()OK. The
power leve! may a!so be
changed dmJ!(g ti(ne
co tl!ltdow(l.
3 PressPOWERLEVEL
# Select desiredpowe_
\hriable liower levels add
flexibility to microwave
cooking. The liower levels
on the iilicl?owave ()Veil
('all be col//t)aFed to the
sm:/hce units on a range.
IIigh (power level 10) or
lull power is the thstest way
to cook and gixes you
level gives you microwave
energ} a certain liercent of
I() 'e(lll;llizC" OF tl°;ll/Slel °
heal Io dw inside ol lh(
1oo(I.\u exam] fie oI dds
is shown wid* power level
3 the dell'ost c' (le. ]
l/llCFOwave el/eF0-_ did l/el
c+(-leoil the oulside ol the
[i)od WOl|Id (ook belore
dw inside \_asde|i'os|(_d.
[ [eFe _lFe SOll/e ex_ll/ ])]es
O] /lses 1()1 _ various l)()\_re] °
h'_ els:
the time. Power level 7 is
microwave em'rgy 70% of
the time. Power level 3 is
energy 30% of die time.
A high setting (10) will
cook t_lsler but toed may
need more fl:equent
stirring, rotating or tm:ning
over. Most cooking will be
PowerLevel BestUses
High 10 Fish. bacon.
v(,g-clables.
boiling liquids.
Med-High 7 G(,ntle
cooking ol
In_'_kl [ alld
poubry;
baMng
done on /[igh (power lexel casseroles
10). A lower settiug will and reheating.
cook l/lOre evel/1V ;ll/d need Medium 5 Slow cooking
less slitting or rol;Hiug of and tenderizing
tile toed. such as slews
SO/lie ](7ods l/lay tKlve tilts of meal.
belief /I;I_OF, teXttlFe OF tow2or3 Defrosting
a])t)earmlce if one of Ill('
lower seltil/gs is /lsed. Use
a lower ]lower level w]|el/
cookiug leeds that ha_e a
teudenQ 1(7 boil o\el: such Warm I
as scallol)ed iIolatoes.
Rest periods (when the
H_icr()w;_e ellergv cycles
and less lender
wtlhoul
cooking:
simmerinal
delicate sauces.
Keeping food
W;l l'nl _Nil tloIlt
ovL'l'cookillg2
softenmg
bl/llCl-.
(7tt) give linle/or the/ood
Page 14

Time Features
7 8 9
0
D_SPLAY
useJ
ilii3 Changepower leve, "i
ii if you don'twant futt
Time Cook I
Allows }'o/1 to Hli('l'O_%lve
tor any time uI) to 99
nlin/ltes and 9(.) s(conds.
Pow(r level 10 (High)
is automatically set, l)Ht
yo/* m m chang( it tot
illore /lexibilit}.
_,k)u ma}. open the door
d m:ing Time Cook to
che(k the Iood. (;los( the
door and press ST\RT
to FeSHI/Ie cooking.
Time Cook//
I,ets yo/l chang-( i)ower
kvels automatically during
cooking. }tere's how to
do it:
I Press TIME C()()K.
2 Emer lhe tits1 cook time.
3 Change the power level
if you don't want full
power. (Press P()WER
I,EVEI. Select a desir( d
power lexel 1-10.)
4 Press TIME COOK
again.
5 Enter the second (ook
time.
6 Change the power l(vel
if yoH (lon't want full
power. (Press P()WER
I J_VEI. Select a l)ower
level 1-10.)
7 Press ST, kR'E
,\( lhe end ()I Tim( (_ook l.
"['il/le (]oo1( II (()H]IIS doxwl/.
Page 15

Cooking Guide for Time Cook I & 11
NOTE:Usepower level High(10)unlessotherwise noted.
Vegetable Amount Time Comments
Asparagus
(fresl! spears ) 1 lb.
(li'ozen Spears) 10-oz. package
Beans
(li'csh green) ] lb. (ut in half
(fiozen green) 10-oz. pa(kage
(li'ozen lima) lO-oz, pa(kage
Beets
(Ii'esh, whole)1 btm(h
Broccoli
(fresh ct;tt) 1 t)tlllch
(1V_ to 17_, lbs.)
(fresh spears) 1 bunch
(frozen, 1 O-oz. package
c!!opped)
(li'ozen spears)
1 O-oz. package
6 to 9 rain.,
Med-I tigh (7)
5 m 7 min.
9 to 1 1 min.
6 to 8 rain.
6 to 8 ++trim
17 to 21 rain. In 2-qt. casserole, place 1/2 cup water.
7 to 10 l_+)in.
9 to 13 min.
5 to 7 l_+)in.
5 to 7 min.
In 1K,-qt. oblong glass baking dish,
plaxe 1/4 (tq) +v+r;+lter.
In 1-qt. (asserole.
In 1t/>qt, casserole, place 1/2 (u l) water.
In 1-qt. (asserole, pla(e 2 tablespoons
W;4t eF.
In 1-qt. (asserole, pla(e 1/4 (up water.
In 2-qt. casserole, place 1/2 cup water.
In 2-qt. oblong glass baking dish, place
1/4 cup water.
In 1-qt. casserole.
In 1-qt. casserole, place 3 tablespoons
water.
(fresh)
(wedges)
Carrots
1 medimn head
(about 2 lbs.)
(li'es!l, sliced ) 1 lb.
(li'ozen) 1O-oz. package
Cauliflower
(tlowerets) I me(titan head
(fresh, v,i!o!e ) ] l/teditllll head
(frozen) ] O-oz. pa( kage
8 to 11 min.
7 to 10 min.
7 to 9 mim
5 to 7 min.
9 to 14 min.
10 to 17 min.
5 to 7 min.
In 1V_,-or 2-qt. (asserole, place 1/4 (up
W_lt er.
In 2- or 3-qt. (ass(rok, pla(( 1/4 (up
W_lt er.
In 1 K,-qt. casserole, place 1/4 cup water.
In 1-qt. (asserole, plaxe 2 tablespoons
water.
In 2-qt. casserole, place 1/2 cup water.
In 2-qt. (asserole, pla(e 1/2 (tq> VQltel_.
In 1-qt. (asserole, pla(e 2 tablespoons
W_lt er.
Page 16

Cooking Guide for 1Tree Cook I & II
Coru
di'ozen kernel, ] O-oz. t)a(kage 5 to 7 rain. In l-qt. (asserole. t)la(e 2 tab|esl)oon.s
Corn on the cob
(Ii'esh 1 to 5 ears
1] rOZell }
3 to 4 rain.
)er e_ll?
5 to 6 rain.
3 to 4 rain.
)er e_ll7
Mixed
vegetables
tt_ozen_
] O-oz. package
5 to 7 nlin.
Peas
(ti'esh. shelled) 2 lbs. unshelled
(fi'ozen_ ] O-oz. package
9 to 12 rain.
5 to 7 rain.
Potatoes
(fi'esh. cubed. 4 t)olmoe.s
9 to 12 rain.
white, +_to 8 oz. each
(ti'esh. whole. ] +_t(> 8 oz.)
3 to 4 rain.
sweel or while,
Spinach
(Ii'esh) ]0 to 16 oz.
(fi'ozeIL 10-oz. t)ackage
5 to 7 nlin.
5 to 7 nlin.
chopped
and leal J
Squash
,2i'('sh. Stlllllller ] lb. sliced
5 to 7 nlin.
alld vello_v
_Willler. acorll ] to _ s(ltl_l.sl/
8toll nlin.
but|ernuE i qabottt 1 ]t). each)
W_ler.
h/2-qt, oblong glass baking dish, t)lace
corn. If corn is in husk, use no water;
if corn has been husked, add 1/4 cup
water. Rearrange after half of time.
Place in 2-qt. oblong glass baking dish.
Cover with vetoed t)lastic wrat).
Rearrange atter half of time.
h/ 1-qt. casserole, t)lace 3 tablest)oons
water.
h/ 1-qt. casserole, t)lace 1/4 cup water.
h/ 1-qt. casserole, t)lace 2 tablesl)oons
water.
Peel and cut into 1 inch cubes. Place
in 2-qt. casserole with 1/2 cup water.
Stir atter half of time.
Pierce with cooking tork. Place in
center of tile ()Veil. I el stalld .'_ l//ill/l|es.
hi 2-qt. casserole, place washed st)inach.
h/ 1-qt. casserole, place 3 tablesl)oons
water.
hi 1½-(t t. casserole, place 1/4 cut) water.
Cut in half and ren/ove fibrous
membranes. In 2-qt. oblong glass
baking dish, l)la(e squash (m-side-
down. ]hrn cm-side-u t) alter 4 n/inures.
Page 17

Time Features
[456j
7 8 9
0
DISPLAY
1 Press DEFROST
AUTO/TIME twice.
2 Enter defrosting time,
3 Press START.
4 Turnfood over when
the oven signals.
5 Press START
(Auto Defrost explained
in the section on
Convenience Features.)
Allows you {o deti'ost/or the
length of time you select.
See the Defl:osting Guide
tor suggesmd times.
Power level 3 is
automatically set, but
you may change this tor
more {lexibilitv. You may
de/i'ost small items more
quickly [g r_dsing tile t)ower
h'\ el alter entering tile time.
I/owevel; they will need
more {i'equent attemion
than usual.
Power level 7 cuts tile tot_fl
defl:osting time in _d)out
hal/:, t)ower level 10 cuts the
total time to apt)roximately
1/3. Rotate or stir tood
/i'e(t uemly.
At one half of selected
de/i:osting time, the oven
signals TUI).N. At this time,
turn/ood over and break
apart or rearrallge t)ie( es
/or more even de/i:osting.
Shield any waml areas with
small pieces of toil.
A dull {hmnping noise ma}
be heard dining defl:os{ing.
This somJ, d is _J,ornlal when
tile o\en is not ot)erating at
I/igh power:
Defrosting Tips
• Foods/i'ozen in t)at)er or
plastic (an t)e delix)sted in
the package. Tightly closed
t)ackages shouM be slit,
t)ierced or vetoed AVI]_;R
t_)od has partially
(/eli'osted. Plastic storage
contaJnel?s shouM be at
least partially uncovered.
• Family-size, 1)_X'l)ackaged
{]'()zen dinllel'.s (_tl/be
delix)smd and microwa_'d.
lithe tood is in a/oil
container, tl;al/sl(T it
to a microwa_,-sat;v dish.
• Foods that spoil easil}, such
as milk, eggs, fish, stuffings,
t)ouhr} and pork, shouM
not be allowed to sit out
tor more than (me hour
after de/i'osting. Room
temt)erat ure t)lx)motes
the growth of harm{ul
b_.eteria.
• Igor more (,_,_J, (leffos{i_J,g
of larger toods, such as
beeL lamb and _'al roasts,
use Auto Deli'os{.
• Be sure large meats are
COml)letely (teffosmd
be/6_x' cooking.
• When deli'osted, ff)od
should be (ool but
soliened in all areas. If still
slightly icy. return to the
microwa_a' _('_'_rbfiefl}, or
let it stand a/(w_' mimnes.
Page 18

Defrosting Guide
Breads,Cakes
Bread,bunsor rolls _l piece)
Sweetrolls approx. 12 oz..
Fishand Seafood
Fillets, frozen_1lb._
Shelffish,smallpieces (1 lb.
Fruit
Plastic pouch--1 to 2
(lO-oz. package)
Meat
Bacon (1 lb.)
Franks (l lb.t
Groundmeat I lb.,
Roast:beef,lamb,veal,pork
Steaks, chops and cutlets
Poultry
Chicken, broiler-fryer
cutup (2½ lo 3 lbs.
Chicken,whole
_21/_)to 3 lbs.
Cornish hen
Turkey breast (4 lo 6 lbs.,
18 z z z z z z z z z z z z z z z z z
5 to 7 min.
_) to 7 n|il|.
12 to 16 min.
per lb
5 io 7 min.
per lb
15 1o 19 min.
17 1() 21 min.
7 to ] _ //lil/.
per lb
Place block in casserole. Tm:n over and
break u t) after tlalf tile time.
Place unotlened tlaekage in oven.
I_et stand 5 nlinutes after defl:osting.
Place unotlened package in oven.
Microwave just until/i'mlks can be
sel)arawd, let stand 5 minutes,
if necessary, tO conll)lete defl:osting.
"Ihrn meat over after tlalf tile time.
Use power level 1.
Place unwralllled meat in cooking disll.
Turn over after half tile time and shield
warm areas with/oil. When tinished,
set)arate pieces and let stall(t to eomtllete
de/i'osting.
Place wrapped chicken in dish. Unwra l)
and turn o_er a/let half tlle time. When
tinislled, sel)arate pieces and n/icrowa\ e
2-4 minutes more, if necessary. I_et stand
to finish (tet_:osting.
Place wrapped ( hicken in dish. AJler tlalf
tile time, /lnwra t) and tllrn ellicken over.
Sllield warn/areas witll loll. Nnisll
de/i'osting. If necessary, run cold water in
the cavity until git)lets call t)e removed.
Place unwralllled hen in the oven tlreast-
side-up. Turn over after tlalf the time.
Run cool water in tile cavity m/til gJt/lets
Call be relilOVe(I,
Place unwrat)lled breast in (lisll breast-
side-down. After tlalf the time, tm:n over
mid shield warm areas widl/oil. Finisll
deli'osting. I,et stand 1-2 hours in
refi'igerator to (on/t)lew (te/i'osting.
Page 19

Time Features
This is a quick way to set
cooking time for 1-6 minutes.
Press one of tile Exl)ress
Cook t)ads (fi'om 1 u) 6)
J_)r ] to 6 minutes of
(()()king at t)ow('r hwel l 0.
For eXaml)le , t)ress the
2 pad t_)r 2 mim_tes of
cooking time.
Fou can use this feature
two waits:
• It will add 30 seconds to
the time counting down
each time the t)ad is
pressed.
The 1)ower level can
be changed as lime is
( OHllting (town. PlTess
POWER I ,EVEI, and
enter 1-10.
•/t can t)e used as a qui(k
way to set 30 seconds of
( ooking time.
Page 20
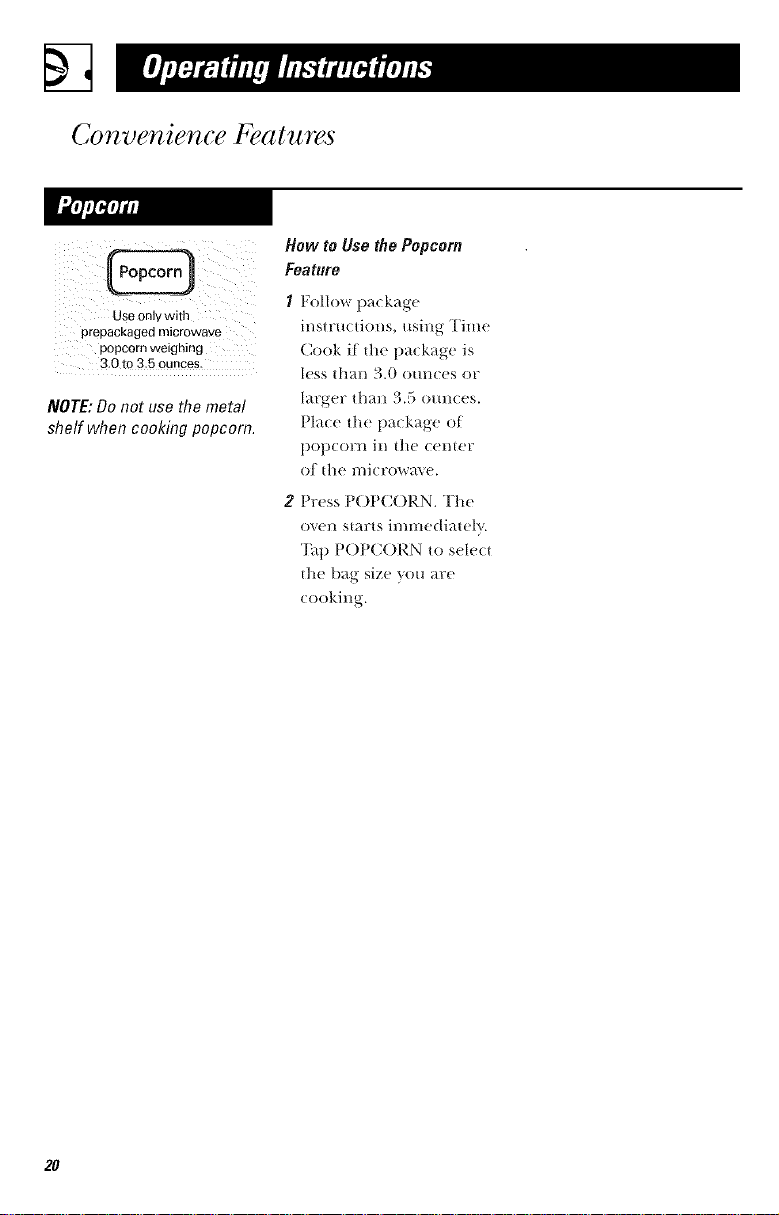
Convenience Features
How to Use the Popcorn
Feature
Use only with
prepackaged microwave
popcorn weighing
3.0to 3,5 ounces,
NOTE:Do not use the metal
shelf when cooking popcorn.
Follow package
instructions, using Time
Cook if th( i)ack_lge is
less than 3.0 ounces or
larger than 3.5 omlces.
Place th_ package of
[)Ol)COrll in tlle center
of the l//icrowH\ e.
2 Press POPCORN. The
o'_(n starts immediatelv.
'I'_q) P()PCORN to select
the bag size you arc
cooking.
2O
Page 21

Convenience Features
i__iiii_iii i ii / ii ii iiii_!_i_!_
2 ¸ ¸¸¸¸3
2 3
_SStar_
L2°"_°J
NOTE: Do not use the metal
shelf when using the Reheat
feature.
Reheat Guide
The Beverage/cature heats
servings of any beverage.
Press BEVI_21),L+\(;E.The
ovell Stitrls il//IIlediatel%.
Onsome models, the serving
size is automaticalh' set at
1, but can 1)e changed b}
pressing 2 or 3 right alter
t)ressing BEVEIL\GE.
The Reheat/bamre reheats
servings of many previously
cooked loads.
/ Press l¢iI tI_2\T.
2 Select tiled t_])e 1-6 ti)r
one serving (see P,eheat
Guide below). ()n some
models, tile ovell starts
immediately.
Drhlks heated with the
Beverage feature lllay be
very hot. Remove the
container with care.
3 ()n some models, press
S'IART
4 Press 2 or 3 to change the
serx ing size.
NOTE:Theserving size may
be changedor addedafter
the ovenstarts, Press
nmeberpat/2 or3. Onsome
models,theserving size
forfood type6 cannotbe
changed.
I Pasta (_oxer with lid or xemed plastic vvrr_++t).
2 Meats Coxer with lid or xemed plasti(wrat).
3Veggies (_ox er with lid or xented t)lasti( wra p .
4 Beverages Works best with wi(le l//oHth mug--do not (oxer.
5 Sauces Coxer with lid or xemed t)lasti( wrap.
6 Plate of leftovers Coxer with xemed t)lasti( wrap.
21
Page 22

Convenience Features
The Potato t_'attll'e cooks
Press PO'E\TO once fi)r
one t)otato, twice lot two
potatoes, thFee tl,Iles t()F
three pOt_ttoes _tn(I t(),lr
tinles ]or ]()tl]? pot_ttoes.
The oven will start
immediately after
P()'E\T() is pressed.
l'he \'ege,al)h'/bat rex'
ntltom_flic_dlv sets the
cooking lil/,es _{//d t)ower
f- ExpressCook .._
1 2 3
I(+vels to cook flx'sh, {]'ozelJ,
OF C_ll/lle(| vegetables.
I Press X_X;EE\BI.E.
4 5 6
g Selecl/ood ,ype 1-3
7 8 9
3 Enter weighl iu ounces
0
_tSPLA¥
4 The oxeu SIaFls
(Model HVMI540 only)
"Select \'eggie lype 1-3"
will be displayed.
(see chmq belo,,Q.
(see chmq below).
au,omalicallv.
FoodCode
22
Food
1
2
3
( ',amled
Frozell
Fresh
I
Weight
4-20 oz.
4-20 oz.
4-16 oz.
Page 23

Convenience Features
F ExpressCook
1 2 3
4 5 6
7 8 9
0
DISPLAY
1 Press DEFROST
AUTO/TIME once.
r the Conversion
Guide at right, enter
food weight. For
example, press pads 1
and 2 for 1.2 pounds
(1 pound, 3 ounces).
3 Press START.
(Time Defrost is
explained in the time
Features section.) +
The I)e/i'ost AutofI'ime
tbature gives you two ways
to defl:ost/i'ozen/k)o(ts.
Press DEFROST
AUT()!TIME once ti)r
Auto l)el_:ost or twice/i)r
Time De/i'ost.
Use Auto Del_'ost/_)r meat,
t)ouhvy and fish. Use Tin/e
De/i'ost ti)r most other
fi'ozen/i)o(ts.
Auto I)efl:ost automati(allv
sets the (teli'osting times
and l)ower levels to give
even del_:osting results ti)r
meats, l)oultry and tish
weighing u I) to six t)om/ds.
There is a handy guide
located on the inside fi'ont
ot the ovell.
Guide
Conversion Guide
If"the weight Ot fbod is
stated in pounds and
ot!nces_ tile Ot!IlCeS lnttst
be converted to tenths
(A) ofa potmd.
Weight of Enter Food
Foodin Weight
Ounces (tenths of
a pound)
1-2 .1
3 .2
4-5 .3
6-7 ' 14
8 .5
9-10 .6
11 ' 17
12-13 ' 18
14-15 .9
• Rel//ox, e l/lear i]?Olll
pa(kage and t)la(e (m
1hi( rowax e-sat)! dish.
• "I\vice during de/i'ost,
the oven signals TURN.
At each TURN signal,
ttlrll the t()od over.
Remove de/i'osted meat
or shield warm areas with
small t)ieces of ti)il.
• Alter del+'osting, most
meats lleed to stall(t
l/lil/tltes to COml)lete
(tel_'osting. I+arge roasts
should stand ti)r al>out
30 minutes.
23
Page 24

Other Features Your Model May Have
']k/remind you that vo/l
hme Iood in tile ov(l], the
o_en will displ m "F()()D IS
REAI)'_" or "END" and
beep once a ininute until
VO/I either open the oven
door or 1)r_ss CI EAR!()FE
Press to enter tile lil//e of
day or to check the time
of dm while n/icrowaving.
I Press CL(ICK.
2 Enter time of day.
3 ()n some models, select
!4 s 6j
AM or PM.
4 Press STkRT or CI_()CK.
7 8 9
24
0
DISPLA_
SCROLL SPEED
Page 25

Other Features Your Model May Have ___
(On some models)
The scroll sl)eed of the
display can be d/m/ged.
SCROLLSPIEEO
I)ress and hold the AM!PM
t)ad about 3 seconds to
bring up tile dist)la }.
Select 1-5/or slow to
tilsl scroll speed.
DISPLAY
r-- ExpressCook
1 2 3
4 5 6
7 8 9
0
DISPtAY
To turn the (lock display
off, t)ress and hold 0 tor
al)om tllree se(ollds.
Deh_v Start allows s_)u to
set the lIlicr()W_l_e tO del_ls
cooking ut ) to 24 hours.
I Press DEI AY S'I'AR]_
2 Enter the time you want
{he oven to start. (Be
sm:e the microwave clock
shows tile correc{thlle
of da}.)
3 On solne models, sele(t
AM or PM.
"[b redisplay the do(k,
ret)e_tt.
4 Select any con/t)ination
of I)eti'ost Amo!Time
or Time Cook I & II.
5 Press S'I;_\RT.
The Delay Start dine will
be displa}'ed. The oven will
auton/adcallv start at the
delased time.
The time of din,' mas be
displmed by t)ressing
CI ,()CK.
SCROLL SPEED
25
Page 26
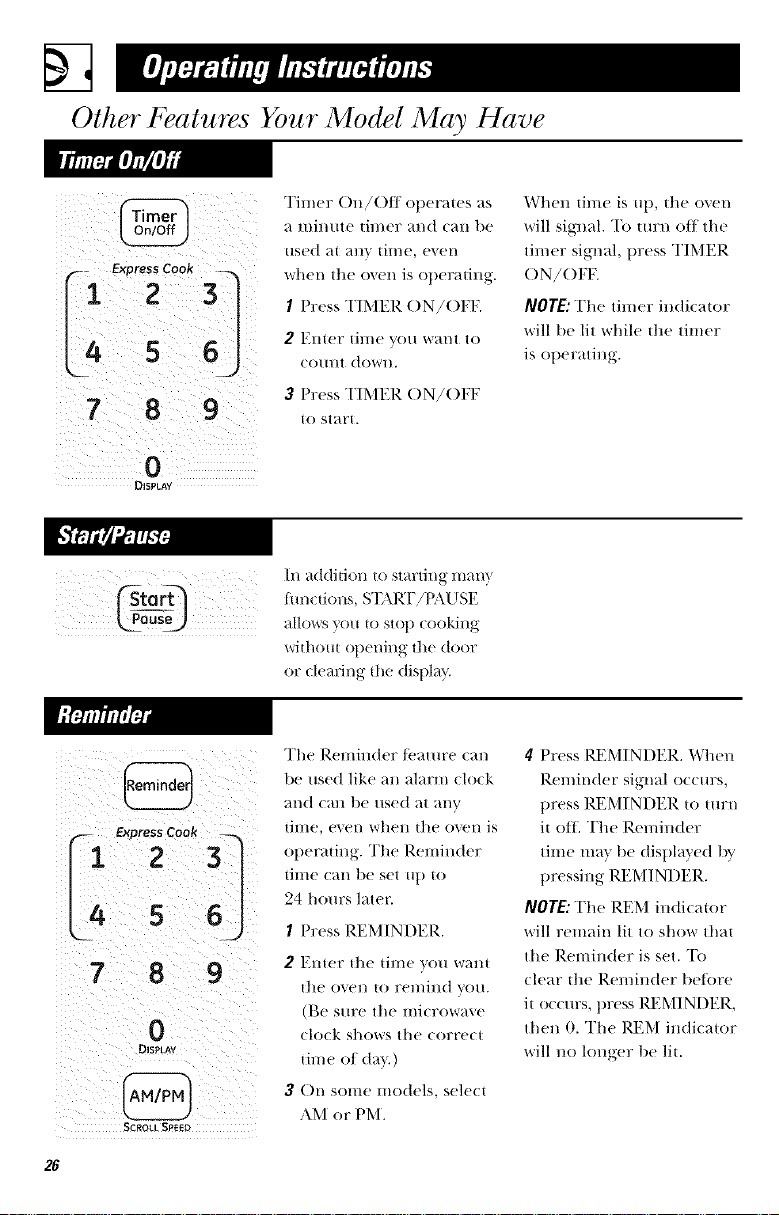
Other Features Your Model May Have
Timer ()n!Off operams as
a mimne timer and can lye
used at any time, even
when the oven is operating.
I Press TIMER ()N/()FE
2 E1J,ter [in/e VO/l want to
cotmt down.
7 8 9
DISPLAY
3 Press TIMER ()N!()FI "
to start.
In addition t+.>starting man}
_tort-"I .,,. rio.s,s'l;u_r,/l'_XvsE
_ou$_ tllows }'O/ O Sop cooking
_ithout opening the door
or clearing the disl)la }.
The Reminder/_'ature can
@
4 5 6J
7 8 g
0
DISPLAY
SCROLL SPEED
be used like an alarm clock
and c_t+llbe/lse(t at _t+I/V
tilIle, even whell the ()_+tq/ is
operating. The Reminder
time cm/lye set up to
24 hom:s later.
I Press REMINDER.
2 Tilter the time VO[l Wallt
the o_en to remind you.
(Be sure the microwave
clock shows the correct
time of da}.)
3 ()n sonle models, select
AM or PM.
When time is Ul), the oven
will signal. To tm:n off the
timer signal, press TIMER
()N!()FF.
NOTE:The timer indicator
will be lit while the timer
is operating.
4 Press REMINDER. When
Reminder signal occm:s,
press I/EMINDER to tm:n
it oIE The Reminder
time ma_ l>e displayed l>y
pressing I),EMI N DER.
NOTE: The I),EM indicator
will remain lit to show that
the Reminder is set. "Ik)
clear the Reminder beti)re
it occurs, press REMINDER,
then 0. The REM indicator
will no longer lye lit.
26
Page 27

Other Features Your Model May Have ___
_'l_Otl lIl;4V lo(k the (Olltrol
(deo;) t,+,-el,ot,re.e,.{he
koffJ ,,,i,,_ow_,,e_',,,,, bein_
a( ddentall'_ started or
used b'_ children.
For best cooking results,
lea'_e the turntable o11.
It can be turned off for
large dishes. Press
TURNT\BI +E to turn
the turntal)le on or off.
])ress tO tilrn the SillT{_l(e
light on or oil'.
To lock or mflock the
controls, press and hold
CI,IL\R/OFF/i)r about
3 seconds. When the
control panel is locked, "I 7
or "I ()C" will be displayed
to the extreme right.
Solnetinles the turntable
cml become too hot to
touch. Be c_u:etul touching
the turntable during and
a/ier cooking.
()n some models, there is
a night light option.
Press SLIRFA(_E I_IGItT
once/i)r bright light, rwlce
/i)r the night light or tl_ee
times to turn the light off.
27
Page 28

Other Features Your Model May Have
is off, )o ula_ operale lhe
_el/1 t_il/:
I Press tile Vent Fail pad
once tot high lira slier d.
2 Press tile Vent Fan pad a
second tin/e lot low Iml
slier d.
3 Press tile Vent Fan pad
a third time to tm:n tile
l_m off.
Whei/tile l/licrow>t\ e
is on, tile _tllt Ira/ will
a/ltOl/laticallv tilFn on at
low tml spt ed, stay on while
the microwave is operating
and autoulaticallv tm:n off
alier tile nlicrowme goes
off if tile Vent Fan pad is
not pressed.
WIlell tile ii/icl'owave ()veil
is Oil VO/I l/l_l}' also:
I Press tilt V_nt Fan pad
once lor high Ihn speed.
2 Press tile Vent Fan pad a
second tin/e tot low lhn
spt ed.
3 Press tilt Vent Fan pad
a third tinle to stt the lml
to turn off autonladcallv
alier tile ulicrowave
goes oil
If the vent Iml is still
operating alier the
l/licrow_t\e goes olE t/rt ss
the Xi'nt Fan pad until it
t IIF1 IS 0]]_
NOTE: The vent fan camlot
be turned off while the
microwave is operating,
28
Page 29

Other Features Your Model May Have
How toUse theShelf
WhenMicrowaring
If//I I //I I \ \\ \_\
_'Make sure tile shelf is
positioned properly
inside /he microwave
to preven/damag e no
die oven fi'om arcing.
• [)o not rise a
lnlcrowave browning
dish on dm shelf
The shelf could
overheal.
• Do llO[ rise lhe OVl'n
with/he shelI oll tile
IlIICrOWHVe [1OO15 This
could damage /lie
llllCrOwaVe,
• Use poJ holders when
handling lhe shelt _
it ma_ be ho|.
• Do not use the shelf
when cooking
popcorn.
]?ood IIli( Fowa'_es best
"when plated on the
HllT1Hable or Oil the shel["
ill tlle |()_vel _ position.
NOTE: Only use the shelf
when reheating on more than
one level Do not store the
shelf inside the oven cavity.
For best results
Use the loweF shelf
S[IppOI'[S wllell tookhlg Olle
olth)ng or oxersiz_ d dish.
Uneven results
Shelf and Reheating
Switch places alter 1/2 time,
" To reheat on 2 levels
or
Switchplacesalter ]/2 time,
• To reheat 2 dishes on the
lower level:
1 Muhiply reheat lime
2 S\vitch places al_er 1/2
tit(: time.
Switch places twice
• To reheat on 3 levels
(on some models)
1 Double the reheating
time.
2-levelreheatin9
rise the upper shelf
supports for t'_vo-lexe|
cooking.
2 S\vitch places t_vice arid
give the dishes a 1/2 turn
during reheating. (Place
dense |oods, or those
that require a longer
cook time, on the
upller shelf/irst.) 29
Page 30

Microwave Terms
Term Definition
Arcing
g
Covering Co'_ers hol(t ill II/OiSttll?e, ;tllow tor more exert heating and red u(e
Shielding In a regular o',cn, "_ou shield (hicken l>reasts or baked foods to
Standing Time V_;llell xou cook with regular oxens, too(ts su(h as roasts or (akes
Venting After (oxering a dish with plastic wrap, you xent the plastic wFap by
Arcing is the llliCrowa_,e term for sparks in the oxen. Arcing is
( _ttlS(!(t 1)_:
• the metal shclI being installed in(orre( tly and toudling the
illi( rowa_,e wails.
• metal or foil touching the side off the oxen.
• ti)il that is not molded to food (upturned edges +let like
antemms).
• metal such as twist ties, potdtry pins, gold-rimmed dishes.
• rcQ,'(led paper towels (ontaining small metal pic(es.
cooking time. Venting plastic VvT}t_pOF covering with wax paper
prexent oxcr-browning. When l//i(?rovqa'Villg, yo/l /IS(! small strips
of ti>il to shield thin parts, such as the tips of Wil/gS +llld legs on
p(mltvy, whi(h would (ook before larger parts.
are allowed to stand to finish (ooking or to set. Standing time is
espcci_dly important in l//i(l:()_r_l'_(! (()(>king. Note that a l//icrow_t'_(_d
(ake is llOt ])l_'t((?(t on a (ooling ra(k+
HI1;llil/g ])_l(k ()1/(' ( Ol'll(_l _ so (?K(('SS SICkl]// (_tl/ (_S( _tp(L
3O
Page 31

Care and Cleaning
An occasional thorough
wiping with a solution of
baking soda _md _mter
NOTE:Be certainthepower
is offbeforecleaning any
part ofthis oven.
keeps the inside/i'esh.
z
Walls, Floor, Inside Window,
Metal and Plastic Parts on
the Door
_oH/e spatters (_lll be
relilove(t with a paper
towel, others may require
_1(l_ml l) ch)th. Remove
greasy sl)_mers wi[h a sIIdsv
ch)th, then rinse with a
damp cloth. Do not use
abrasive cleaners or sharp
tltensils Oll ovell walls.
Never use a eolllnlereial
oven cleaner on rely part
of your microwave.
Temperature Probe
(if included)
Clean immediately after
Removable Turntable and
Turntable Support
To prevent breakage,
do Dot place die turntable
into water just alter
cooking. "_'_lsl_ it carefully
in warm, sudsy water or
in die dishwasher. The
tm:mable and support
can be broken if drol)l)ed.
UemembeL do llOt operate
the oven withom die
turntable and stli)i)ort
in place.
Shelf (if included)
Clean with mild soap and
water or in tlle dishwasher.
Do not clean in a
self-cleaning oven.
using. To clean, wipe with
a sudsy ch)th, dlen rub
lightly widl a ])lastic
so(raring ball if necessary.
Rinse and dry. The l)robe
can also be washed in the
dishwasher.
31
Page 32

%
Care and Cleaning
We recommend against
using cleaners with
ammonia or alcohol,
as they can damage
the appearance of the
microwave oven. ff you
choose to use a common
household cleaner, first
apply the cleaner directly
to a clean cloth, then
wipe the soiled area.
Case
Clean the omside of tlle
microwave with a sudsy
cloth. Rillse and then dry.
Wipe the window clean
with a dam t) cloth.
Control Panel
Wipe with a dam 1) cloth.
I)ry thoroughl}. Do not
use cleaning sprays, large
am(rams of soap and water,
abrasives or sharp ok!jeers
Ol/die panel--dley ('all
damage it. Some paper
towels call also scratch
die comrol panel.
Door Panel
Belore cleaning die t)'ont
door 1)anel, make sure you
know what t}])e of panel
you hme. Re/('r to the
eighth digit of the model
mHnber. "S" is stainless
steel, "(;" is (',ral)hite, "I/'
is CleanSteel and "B", "W"
or "C" are plastic colors.
Stainless Steel
blea(h or t)ro(lH(ts
(ontaining (hlorine on
Stainless Steel tinishes.
CleanSteel or Graphite
[Is(' a (lean, soil light and
lightly dampened clodl,
then dry thoroughly. Do
not use _[)t)li_mce w_x,
polish, ble_lch or 1)rodu(ts
(ontaining m_y (hemi(M
agem on the CleanSteel
or (;ral)hite sm:/i_ees.
Plastic Color Panels
Use a clean, sell lightly
(tampeHed cloth, then dry
thoroughly.
Door Seal
It's important to kee t) die
area clean \dlere the door
st'_ds ag_finst the mi(row_we.
Use only mild, non-abrasive
(h'tergelltS al)l)lied with a
clean sponge or so/t cloth.
Rinse well.
Bottom
The stainless steel 1)anel
can be cleaned with
Stainless Steel Magic or a
similar product using a
clean, so/t cloth. Apl)ly
stainless cleaner caretullv
t(/a\oid the surroml(ting
plastic parts. Do Hot use
32
applian( e wax, t)olish,
Clean (Ill the gr('_se and
dtlst OI/ the bottOlll o/lell.
Use a solution of warm
water and (h'tergem.
Page 33

LightBub t placeme t
watt incandescent bulb
(30-watt--WB36X10198/
40-watt--WB36X10003),
available from your
GE Supplier.
watt incandescent bulb
(30-watt--WBZaXI0198/ ,:
40-watt--WBZaX10003),
available fromyour
GESupplier.
1 "Ib ret/lace the bulb(s),
first disconnect the t)ower
at the main fi_se or circuit
breaker l/anel or pull
tl/e plug.
2 Remove the screw t_'om
light cover and lower
tile cowm
! ¸
REMOVE SCREW
1 "Ib replace the oven liglm
first discom]ect the power
at tile main fl_se or circuit
breaker panel or pull
the plug.
2 Remove tile top gillie t)_
taking out the 4 s( I_(_x_rs
lhat hold it iH t/la( e.
REMOVE SCREWS
3 Be sure the bulb(s) to be
replaced are cool before
removing. Aller breaking
the adhesive seal, remove
the bull) kw gently turning.
4 Replace the screw.
Colmect electrical power
to the owm.
3 Push tab back and lift
light housing. Replace
the bulb and press the
light housing back imo
place.
i i i i
4 Replace the top grille
and 4 screws. Com]ect
electrical power to
the ()Veil.
33
Page 34
%
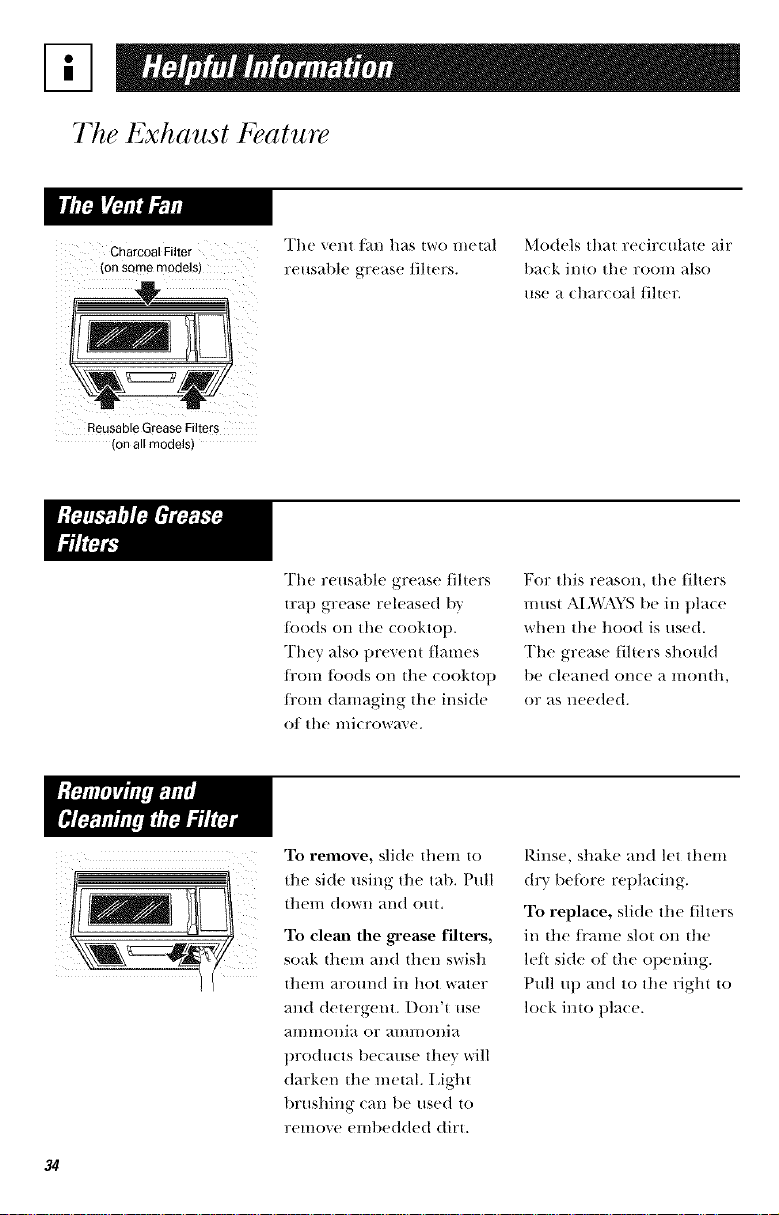
The Exhaust Feature
Cha-coal Filter
ion some models)
Reusable Grease Filters
(on all models)
The ",ent t_m has two metal Models that re/irculate air
r( usat)le grease filters. 1)a(k into the room also
use a dlar(oal fiher.
The reusable grease filters
)rap grease released l_5'
{oods on the cooktol).
They also t)revem flames
fi'om too(Is on tlle cookto t)
t]'om damaging the inside
of the microwave.
For this reason, tile filters
must AI.W,\YS be in place
when the hood is used.
The grease filters should
be cleaned once a momh,
or as needed.
To relnove, slide thelil |0
the side using the tal>. Pull
tllem down and out.
To clean the ,_'ease filters,
soak fllem and fllen swish
[tlel// aroltnd ill hot water
and detergent. Don't use
ammonia or ammonia
prod mrs because they will
darken file metal. I.ight
brushing can be used to
remove eml)e(Ided dirt.
34
Rinse, shake and let them
(t1"),'betore replacing.
To replace, slide the filters
in the/i'ame slot on the
lett side of the opening.
Pull ut) and to the right to
lock into t)la( e.
Page 35
A]
must be replaced. Order
PartNo.WBOZX10776 i_
froth your GE supplier.
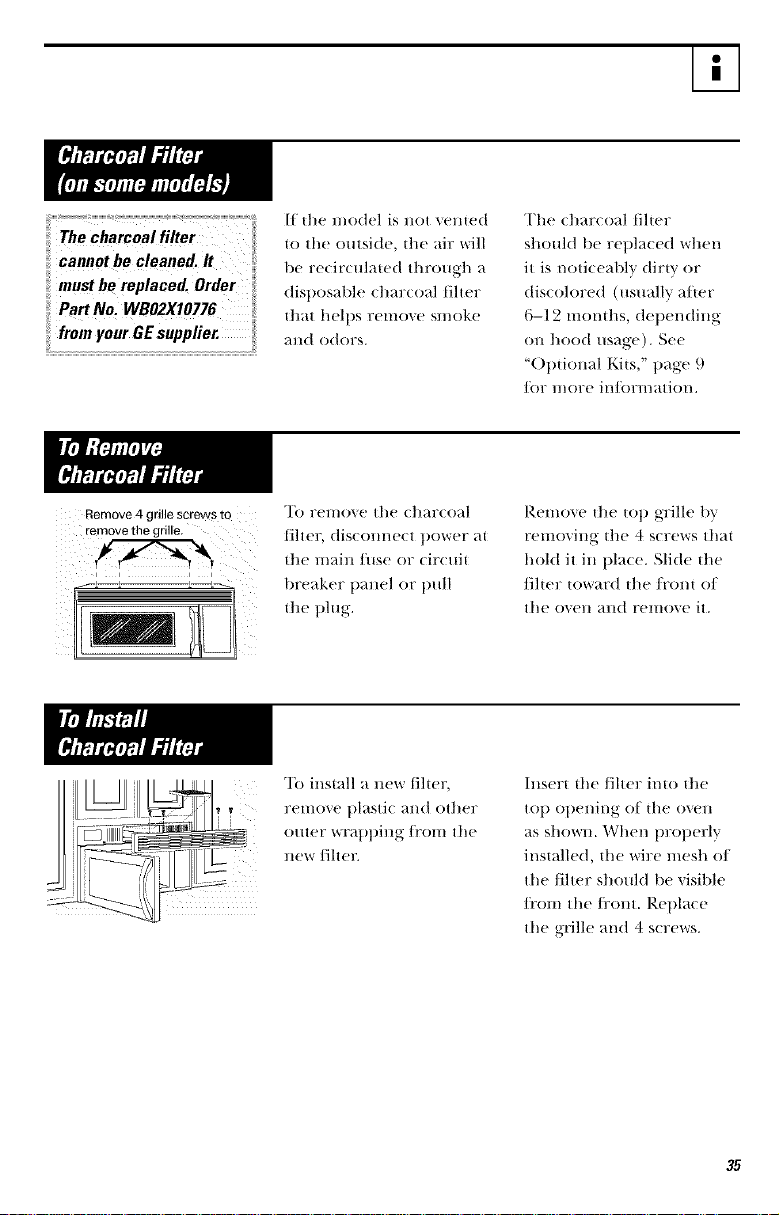
Remove 4 grille screws to
remove the grille.
If the model is not vented
to the outside, the air will
be recirculated through a
disposable charcoal filter
that helps remove smoke
+11 l(t o(tors.
To remove the charcoal
fiher, (lisconne(t power at
the main fiise or cir(uit
breaker t)mlel or pull
the plug.
To install a _(_r filter,
relilove t)lasti( and other
outer _*,rat)t)ing ti'om the
new filter.
The charcoal filter
should be replaced when
it is noticeabh' dirty or
discolored (usllally atTer
6-12 months, depending
on hood us_ige). See
"()ptiomil Kits," p_ige 9
/i)r more in/ormation.
Remove the top grille bv
removing the 4 screws that
hold it in pla(e. Slide the
/ilter tow_t_rd the/i'ont o/
the oveD ;-nJ,(t remove it.
IHsert the fiher into the
top opening of the oven
_lS showll. When properly
installed, the wire mesh of
tl/e filter should be visil)le
/i'om tl/e/i'ont. Replace
the grille and 4 screws.
35
Page 36

Before You Call For Service
Problem PossibleCause Whatto Do
Oven will not
start
A fuse in your home
may be blown or the
circuit breaker tripped.
Power surge.
Plug not fully inserted
into wall outlet.
Door not securely closed.
Floor of the oven is
warm, even when
the oven has not
been used
The cooktop light is
located below the oven
floor. When the light
is on, the heat it
produces may make the
oven floor get warm.
"LOC" appears The conwol has been
on display locked.
Vent fan will not The vent fro1
turn off automatically turns on
to cool hlternal parts
Mille the microwave
is on.
"BAD PROBE" The probe has not been
appears On display completely inserted into
the oven wall outlet.
The probe is defective.
"PLEASEINSERT Probe has been
PROBE" appears forgotten or not
on display inserted properly.
"SENSOR ERROR" When ushlg a Sensor
appears on display feature, the door was
couldopenedbe beforedetected,steam
Steam was not detected
in maxhntun mnotmt
of time.
36
• Replace tuse or reset circuit l>reaker.
• Unplug the IlIicrow_ive ovell, then plug
it l>a(k in.
• Make sm:e the 3-1)tong plug on the
oxen is tully inserted into wall outlet.
• ()t)ell the (toor and close seem:ely.
• This is nl)rmal.
• Press and hold CI]L_\R/OFF tot
abom 3 seconds to mflock tile coHtrol.
• The vent tbn (i4ll]l()| be [Hrl/e(I oil
while the microwave is ol)era6ng.
Tlfis is normal. Wait h)r tile microwave
to turn off mid tile tml will tidier go
off mltl)mati( ally or you will need to
turn it off l>} pressing die Vent Fan
pad after the mi( rowave is oil
hlseri |tie t)r/)l)e t)rol)erly in|o the
ovell wrall ()/ltlet.
• Ret)lace the t)robe.
• Insert the 1)rol>e 1)rot)erly into die
()xel/ wall ()H[leL
I)1) llOt /)t)en (toor /l]ltil ste_llll is
sel/se(1 _llld til//e is StlOWrl/ C/)Hlltil/g
down on disl)lay.
[lse Time Cook t() heat for more time.
Page 37

Before You Call For Service
• MOiSHIrE oil the ()VEIl
door and walls while
cooking. Wipe tile
moistm'e off with a paper
towel or soft cloth.
• MoisturE betwe(m thE
()VEIl (IooF panels when
cooking certain h)ods.
Moisture should dissipate
shortly aftEr cooking is
finished.
• StEam or vapor escalling
l/'()l/l aro/llld the dooL
• Light reflection ar(mnd
door or ottter case.
• [)immi_lg OVEn light and
changE in the blower
somM at powEr levels
other than high.
• Dull thmnping s(mnd
while oven is operating.
• The VEnt tal_ operating
while the microwm e is
operating. The wmt/aI_
will not go off nor call it
be tin:ned off m_til the
li/icrowa_e is of'].
• TV-radio imErlhrence
miglu lie noticed while
/lSillg the l//iCFowa\ e.
Similar to the imer[i:rence
caused 1)_ other small
appliallces, i_ does not
indicate a problem with
the microwa\ e. Plug _l_e
microwave into a difJerent
Electrical circuit, move the
radio or TV as thr m\ _'>r
]17()I/1 the l/li(Towa_e as
possible or check the
position and sigmd of
the TViradio antetma.
37
Page 38

WeTlBe
ge.com
ge.com
800.GE.CARES
ge.com
800.TDD.GEAC
(800.432.2737)
(800.833.4322)
Itave a question or
need assistance with
your appliance? "I'r_ the
(;E Appliances Website
24 hours a day. ally day
of the veal:!
Expert GE repair service
is only one step away
/i'om your door. (;et
on-line and schedule
your service at your
(onvelliellce ,2_1hours
any dm of die veal:!
GE sut)t)orts the Universal
I)esign COlWept--tm)d mts,
services and environmems
that can be used by t)eot)le
of all ages, sizes and
cal)at)ilities. \_i' recognize
the need to design for
a wide range of physical
and n/ental abilities and
illl])airl//el/tS.
For greater COllVel/iel/ce
alld/b.ster service, yo/l Call
now download ()wner's
M_.l/llals, order paris or
evell sche(hlle service
on-line.
()r call 800.(;E.CAI¢2S
(800.432.2737) d roping
normal business homPs.
For details of GE's
Llniversal Design
al)l)li(ations, in_ hi(ling
kiwhel_ design ideas/or
people with disabiliues,
check om our Wet)siw
today. For tile hearing
impaired, please call
800.TDI).G1L+\C
(800.833.4322).
ge.com
38
800.626.2224
Purchase a GE extended
warramv all(I learH at)out
special discomus ttlat
are available while your
warramv is still ill e/lc(t.
"1()/1 Call t)/lrchase it
on-line anytime, or call
800.626.2224 d m:ing
llOrl/lal bllsilless hollrs.
GE Consmner t tome
Servi(es will still be dlere
alter your warranty expires.
Page 39

m
ge.com
ge.com
800.626.2002
Individuals qualified
to service their own
appliances can have
parts or accessories sent
directly to their home.
(VIS\, MasterCard and
Discover cards are
ac(el)ted.)
()rder on-line todaT',
24 hom:s every da} or
by t)hone at 800.626.2002
during normal business
ho/lrs.
Register your new
appliance on-line--
at your convenience!
Timely l)ro(luct registration
will allow {or enhanced
COUllIl/lnication alld
t)rol/ll)t service tinder the
terms of y(mr warrant_',
should the need arise.
You mm also mail in the
t)re-l)rint ed registration
card inchl(led in the
packing material.
Instructions contahled
in this manual cover
procedures to be
performed by rely user.
Other servicing generally
should be referred
to qualified service
personnel. Caution
must be exercised, since
improper servicing may
cause unsafe operation.
39
Page 40

S/aplesa/c_5_l!p or ca_cdh, d du, ck lu'n,. Pmo o ori._q_al
[_un'hase daie i_ _teeded goobiain service under warra_tly.
LIMFI_3) ONE-Yb_ WARBAN77(
J_'or one ve_li' [l?()ll/ (J_tt( O[ ()II_Jl/al ])Hr(h_P;e,
GE will r_pl_u e anypartin the mitrowax_ o_tn
that Jitils due lo a & fix't in tn:m'rials or
x_orlsmanship. I)mJl_g ibis limited one-year warrat@,
(;E will proxqd_,fiz, e of charge, all labor and rdal_ d
serxi( e cosls to/_'place the defi:ctiw part.
:/:/ ,
Xll _arranw serfiee _ill be prodded b} ottr ,%ctory
Ser\ice Ceilt( l'S or 1)} otlr authorized (/BtOluer
Care _ serdcers dudug normal aorkiug hours.
Should your applianc_ need ser_Jce, dm'ing
warmnl} p(riod or be}ond, call 801).(;1LC.\RES
(800.4322737).
Please ha\e serial and mod(I tmmbers axailabl(
\d_en calling/i)r serdce.
• Service trips to your home to teach you how m
use the product.
• hnproper installation, delivery or maintenance.
If you have an installation problem, contact your
dealer or installer. You are responsible for
providing adequate electrical, exhausting and
other com_ecting facilities.
• Product not accessible to provide required
service.
• Replacement of house fuses or resetting of
circuit breakers.
• Replacement of the cooktop light bulbs.
• Failure of the product or damage to
the product if it is abused, nffsused (for
example, cavity" arcing from wire rack or
metal/foil), or used for other than the intended
purpose or used commercially.
• Damage to product caused by"accident, fire,
floods or acts of God.
• Incidental or consequential danmge caused
by possible defects with tiffs appliance.
• Damage caused after delivery'.
EXCLUSIONOFIMPLIEDWARRANtiES--Yoursole andexclusiveremedyisproduct
repairasprovided in thisLimitedWarranty.Anyimpliedwarranties,includingtheimplied
warrantiesofmerchantability orfitnessforaparticular purpose,arelimitedtooneyearor
theshortestperiodallowedbylaw.
This waw.-ulty is extended to tile original purchaser and an}"succeeding owner tbr products purch>tsed fi)r home
use _ithin the USA. If the product i.slocated ha an m'ea where se_a'ice by a GE Authorized Seia'icer is nor m ailable.
voa may be responsible tbr a tfip chaig'e or you ma} be requked to bring the product to _,nAudlorized GE Service
Location tbr sela'ice. In Alaska, the wan_anty excludes the service calls to your home.
Sonle states do not allo_ the exclusion or fimitation of incidental or coh_,_quential dalnagra, so the abo\e
limitation or exclusion may not apply to you. This wammty giws you specitic leg_alfights, and you ma} also have
other rights _hich x_,_3, ti'om stare to state. To know whm your leg.d fights are m your state, cons_lll your locM Ol
statte consumer al_)irs office or )'our state's Attorney General.
WmTarttor: General Eledrie Company. Louisoille, KY 40225
Printed ill Chi£a
 Loading...