

GE GXCFI5HWW, GXCF15HWW, GXCF25HWW Owner's Manual
ge.com
Tri-Temperature Water Dispenser
Safety Instruetions ..................... 2, 3
U,s_ng the Water Dispenser
Child Sateguard ......................... 5
Features and Parts List .................... 4
Loading the Dispenser .................... 4
Specifications ........................... 8
Care and Cleaning ..................... 5-8
7)*oubleshooting Tips ................... 8, 9
Consu,n_" Suppo,_
Consumer Support .............. Back Cover
_A_u'_mtv ...................... Back Cover
Franqais
Infinnnations en matikre de s&.uritd ...... 1O, 11
Utilisation du distributeur d'eau
Cm_lct6ristiques et liste de pibre ........... 12
Cm_lct6ristiques techniques ............... 16
Chm}4ement du distributeur .............. 12
Sauvegarde pour la protection
des enfimts ............................ 13
Entretien et neltoyage ................. 13-16
Conseils de d@annage ................ 16, 17
Soutien du eonsommateur
G;mlntie .............................. 18
Soutien du consommateur ................ 18
Espa_ol
Inftnnnad6n de seg_widad ............. 19, 20
Cdmo utilizar el dispensador de agua
Cdmo cm_4ar el dispensador .............. 21
Espedfirariones ........................ 25
Lism de partes y caracterfsticas ............ 21
Seguro conml nifios ..................... 22
Cuidado y limpieza .................. 22-25
Soludonar p'oblemas . ................ 25, 26
Servicio d consumidor
(;m_mtfa .............................. 27
Servirio al consunfidor ................... 27
GXCFI5HWW* Floor Modal
GXCF25H WW Chiller Modal
Distributeur d'eau
trois tempdratures
La section fran_aise commence a la page 10
Dispensador de agua
de tres temperaturas
La seccion en espaOel empieza en la pagina 19
*ENERGY STAR ® quahfied product.
As an ENERGY STAR¢'_pmme_; (;E
has determined that this woduct
meets the ENERGY STAR_°guidelines
for energy effidency.
215C1002P036 49-50174 12-05 5R
iMPORTANTSAFETYiNFORMATiON.
READALLiNSTRUCtiONSBEFOREUSING.
WARNING!
Use this appliance only for its intended purpose as described in this Owner's Manual.
SAFETYPRECAUTIONS
When using electrical appliances, basic safety precautions should be followed, including the following:
_J<;This water dispenser must be properly installed
and located in accordance with these instructions
befiwe it is used.
i)::Do not allow children to climb, stand or hang on
the outside of the dispense_; or on the shelves inside
the storage cabinet (on some models). They could
ill) the dispenser over and damage it and seriously
ioj ure themselves.
:_;_Do not store or use gasoline or other flammable
\:q)o_ and liquids in tile vicinity of this or any
other appliance.
::_ UnI)lug the water dispenser heft)re cleaning or
making repah_.
NOTE: GE does not support any servicing of the
dispenser. We strongly recommend that you do not
attempt to service the dispenser yourself
}_'_Wipe up any water spills immediately alter loading
or unloading water bottles.
i):: Children should be supervised by a parent when
using this product.
WARNING:Do.ot_e.,*bwater,',at
microbiologicaJly unsafe or of tuflmown quality.
CAUtiON: The dispenser heats water to a
temperature of approximately 194°F (90°C). Water
temperatures above 125°F (52°C) cm_ cause severe
burns or death from scalding. Children, the disabled
mad the elderly are at highest risk of being scalded.
NOtiCE:Thisproduct__,te,,dedsole,_"or
use in chilling cmmed mid boxed beverages, m_d
packaged nonperishables.
!:/_Do uot use this dispenser to dispense an)_hing
other than water.
{_:i:Do not I)lug in tile power cord or turn on tile power
switches when tile water dispenser is erupt'.
PROPERINSTALLATIONANDLOCATION
::_;Allow at least 1" (2.5 cm) of space between tile
back of tile water dispenser and tile wall to allow
for proper air circulation.
i)::Do not install the water dispenser where tile
temperature will go bellow 50°F (10°C) or
above 100°F (38°(:),
:_/_Install tile water dispenser on a level floor strong
enough to suI)port it when flfllv loaded. Do not
install where it will be subject to direct sunlight,
heat or uloisttu'e.
GROUNDINGINSTRUCTIONS
WARNING:I,,_ro_or.soo_thogro,,di,g_l,gca.ros.lti,orisko_oloctricshock.
This appliance must be grounded. In tile event of
an electrical short circuit, grounding reduces tile
risk of electric shock.
This appliance is equipped Mth a power cord having
a gro/mding wire with a gro/mding plug. Tile plug
must be plugged into an outlet that is properly
installed and gro/mded.
Consult a qualified electrician if tile gro/mding
instructions are not completely understood, or
if doubt exists as to whether the appliance is
properly gro/mded.
If tile outlet is a standard 2-prong wall outlet,
it is yore" personal responsibility and obligation
to have it replaced with a properly gro/mded
3-prong wall outlet.
Do not tinder }liiV cii'C/lillSt}lnces c/lt or i'elllOVe tile
third (ground) prong ti'om tile power cord.
Do not use an adapter plug with this appliance.
Do not use an extension cord with this appliance.
If tile power cord is too short, have a qualified
electrician install an outlet near tile appliance.
For best operation, plug tile appliance into its own
electrical outlet on a dedicamd circuit to prevent
flickering of lights, bh_wing of filse or tripping of
circuit breaker:
PROPERDISPOSALOFTHEWATERDISPENSER
RefrigerantDisposal
Ymr old water dispenser may have used a regulated
refl_igerant in its cooling system. These refiJgerants
are belie;'ed to ham/stratospheric ozone. If you are
throwing away yore" old dispense_; make sm'e tile
refl_igerant is removed and recovered for proper
disposal bv an EPA-certNed technician. If w_u
intentionally release this reli_igerant, you can be
subject to fines and iinprisonnlent under provisions
of enviromnental legislation.
READANDFOLLOWTHISSAFETYINFORMATIONCAREFULLY.
SAVETHESEINSTRUCTIONS
3
Using the water dispenser.
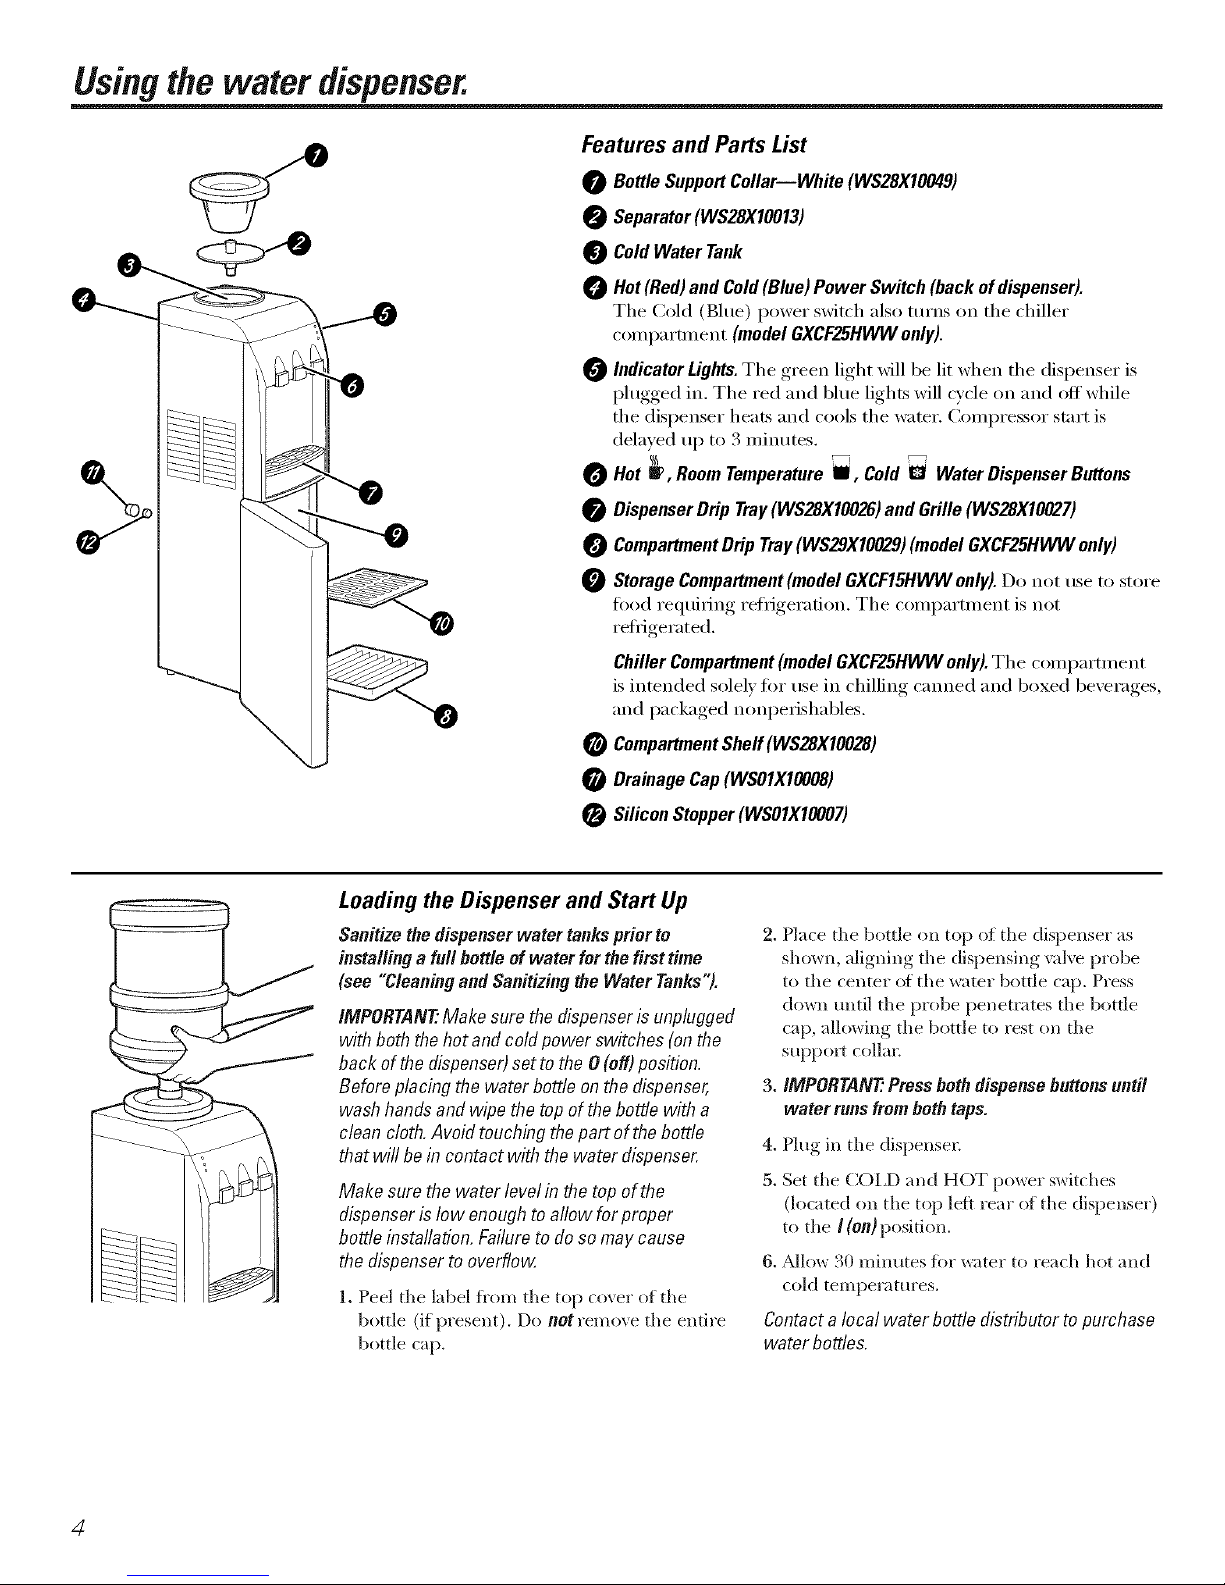
Features and Parts List
0 BottleSupportCollar--White (WS28X10049)
Separator(WS28X10013)
ColdWaterTank
Hot(Red)and Cold(Blue)PowerSwitch(backofdispenser).
Tile Cold (Blue) power switch also turns on tile chiller
c()mpartn_ent (modelGXCF25HWWonly).
IndicatorLights.The green light will be lit when the dispenser is
plugged in. The red and blue lights will o'cle on and off while
the dispenser heats and cools the water. Compressor start is
delayed up to 3 minutes,
Hot _ ,RoomTemperaturei, Cold U WaterDispenserButtons
DispenserDrip Tray(WS28X10026)andGrille(WS28X10027)
CompartmentDripTray(WS29X10029)(modelGXCF25HWWonly)
StorageCompartment(modelGXCF15HWWonly).Do not useto store
food requiring refrigeration. The compartment is not
reflJgerated.
ChillerCompartment(modelGXCF25HWWonly).The compartment
is intended solely fin" use in chilling canned and boxed beverages,
and packaged nonperishables.
CompartmentShelf(WS28X100281
DrainageCap(WSOlXIO008)
0 SiliconStopper(WSOIXIO007)
Loading the Dispenser and Start Up
Sanitizethedispenserwater tankspriorto
installing afullbottle ofwaterforthefirsttime
(see "CleaningandSanitizingtheWaterTanks").
IMPORTANT'.Makesurethe dispenserisunplugged
with boththehotand coldpower switches (onthe
back ofthe dispenser)setto the O(off)position.
Beforeplacing the waterbottleonthe dispenser,
washhandsand wipethe topofthebottle with a
cleancloth.Avoidtouchingthepart of thebottle
that will beincontact with thewater dispense_
Make surethe water level in the topof the
dispenserislow enoughto allow forproper
bottle installation.Failureto do somaycause
thedispensertooverflow,
1. Peel tile label fl'om tile top cover of the
bottle (if present). Do not rem(>ve the entire
bottle cap.
2. Place tile bottle on top of the dispenser as
showll, aligning tile dispensing x:dve probe
to the center (ff the water bottle cap. Press
down mltil tile probe penetrates tile bottle
cap, allowing tile bottle t(> rest (>n tile
support collar:
3. IMPORTANT'.Press both dispense buttons until
water runs from both taps.
4. Plug ill tile dispensel:
5. Set the COI,D and HOT power switches
(located on tile top leit rear oI tile dispenser)
to the I (on) position.
6. _Mlow 30 minutes fiw water to reach hot and
cold temperatures.
Contact a local water bottle distributor to purchase
water bottles.
4
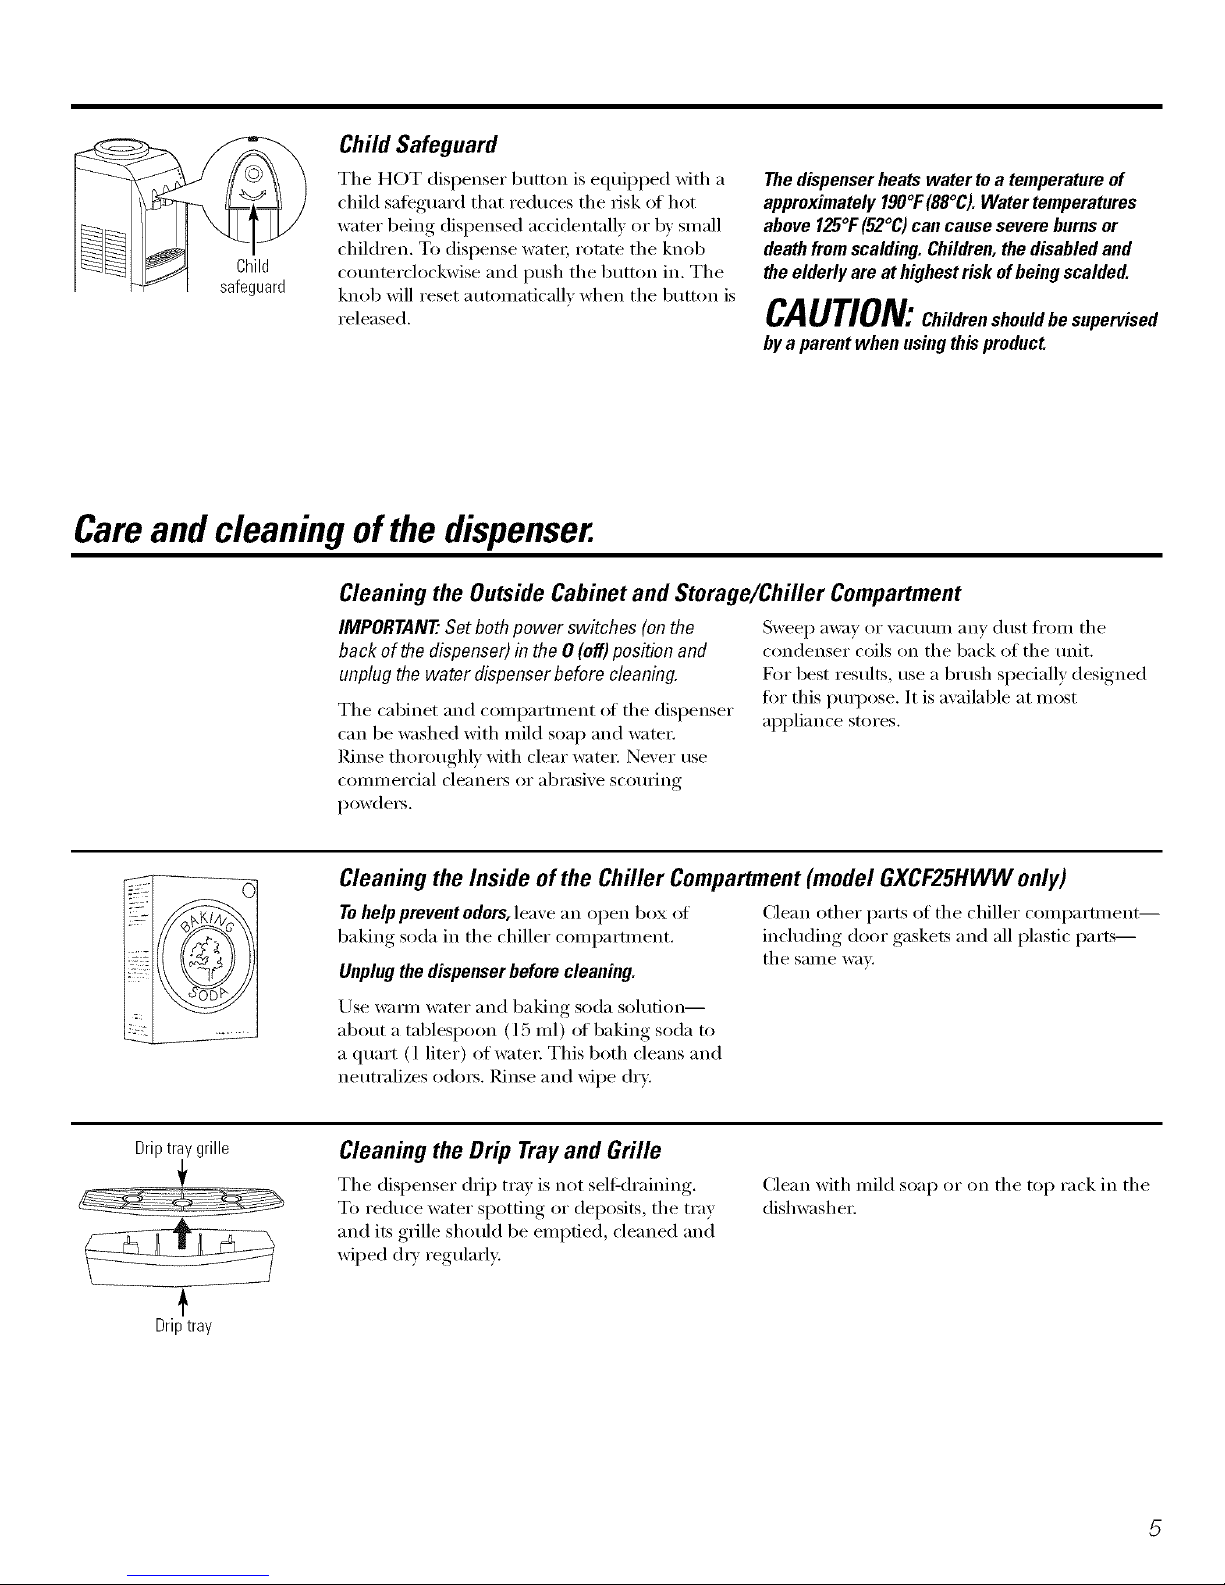
Child
safeguard
Child Safeguard
Tile HOT dispenser button is equipped with a
child saii_guard that reduces tile risk of hot
water being dispensed accidentally or by small
children. To dispense water; rotate tile knob
co/mmrclockwise and push tile button in. Tile
knob will reset automatically when tile button is
released.
The dispenser heats water to a temperature of
approximately 190°1:(88°C).Water temperatures
above 125°1:(52°C) can cause severe burns or
death from scalding. Children, the disabled and
the elderly are at highest risk ofbeing scalded.
CAUTION:Childrenshouldbesupe ised
by a parent when using this product
Careand cleaningofthe dispenser.
Cleaning the Outside Cabinet and Storage/Chiller Compartment
IMPORTANT'.Set both power switches (on the
back of the dispenser) in the 0 (off) position and
unplug the water dispenser before cleaning.
The cabinet and compartment _ff tile dispenser
can be washed with mild soap and water:
Rinse thoroughly with clear water: Never rise
COlllll/ei'cial cleaners or abrasive SCO/IFing
powders.
Sweep _l_V;ly oi V_lC/l[lill _liiV dust ][i'Oill tile
condenser coils on tile back of tile unit.
For best results, use a brush specially designed
tot this puq)ose. It is available at most
appliance stores.
Cleaning the Inside of the Chiller Compartment (model GXCF25HWW only)
Tohelp prevent odors, leave an open box ot Clean other parts of tile chiller compartment--
baking soda in tile chiller compartment, including door gaskets and all plastic parts--
tile Sallle W;l_i
Unplugthe dispenser before cleaning.
Use warm water and baking soda solution--
about a tablespoon (l 5 ml) of baking soda to
a quart (1 liter) of water: This both cleans and
neutralizes odors. Rinse and wipe dry.
Driptray grille
Driptray
Cleaning the Drip Tray and Grille
Tile dispenser drip tray is not sel6draining.
To reduce water spotting or deposits, tile tray
and its grille should be emptied, cleaned and
wiped (hT regularly:
Clean with mild soap or on tile top rack in tile
dishwasher:
Careand cleaningofthe dispenser.
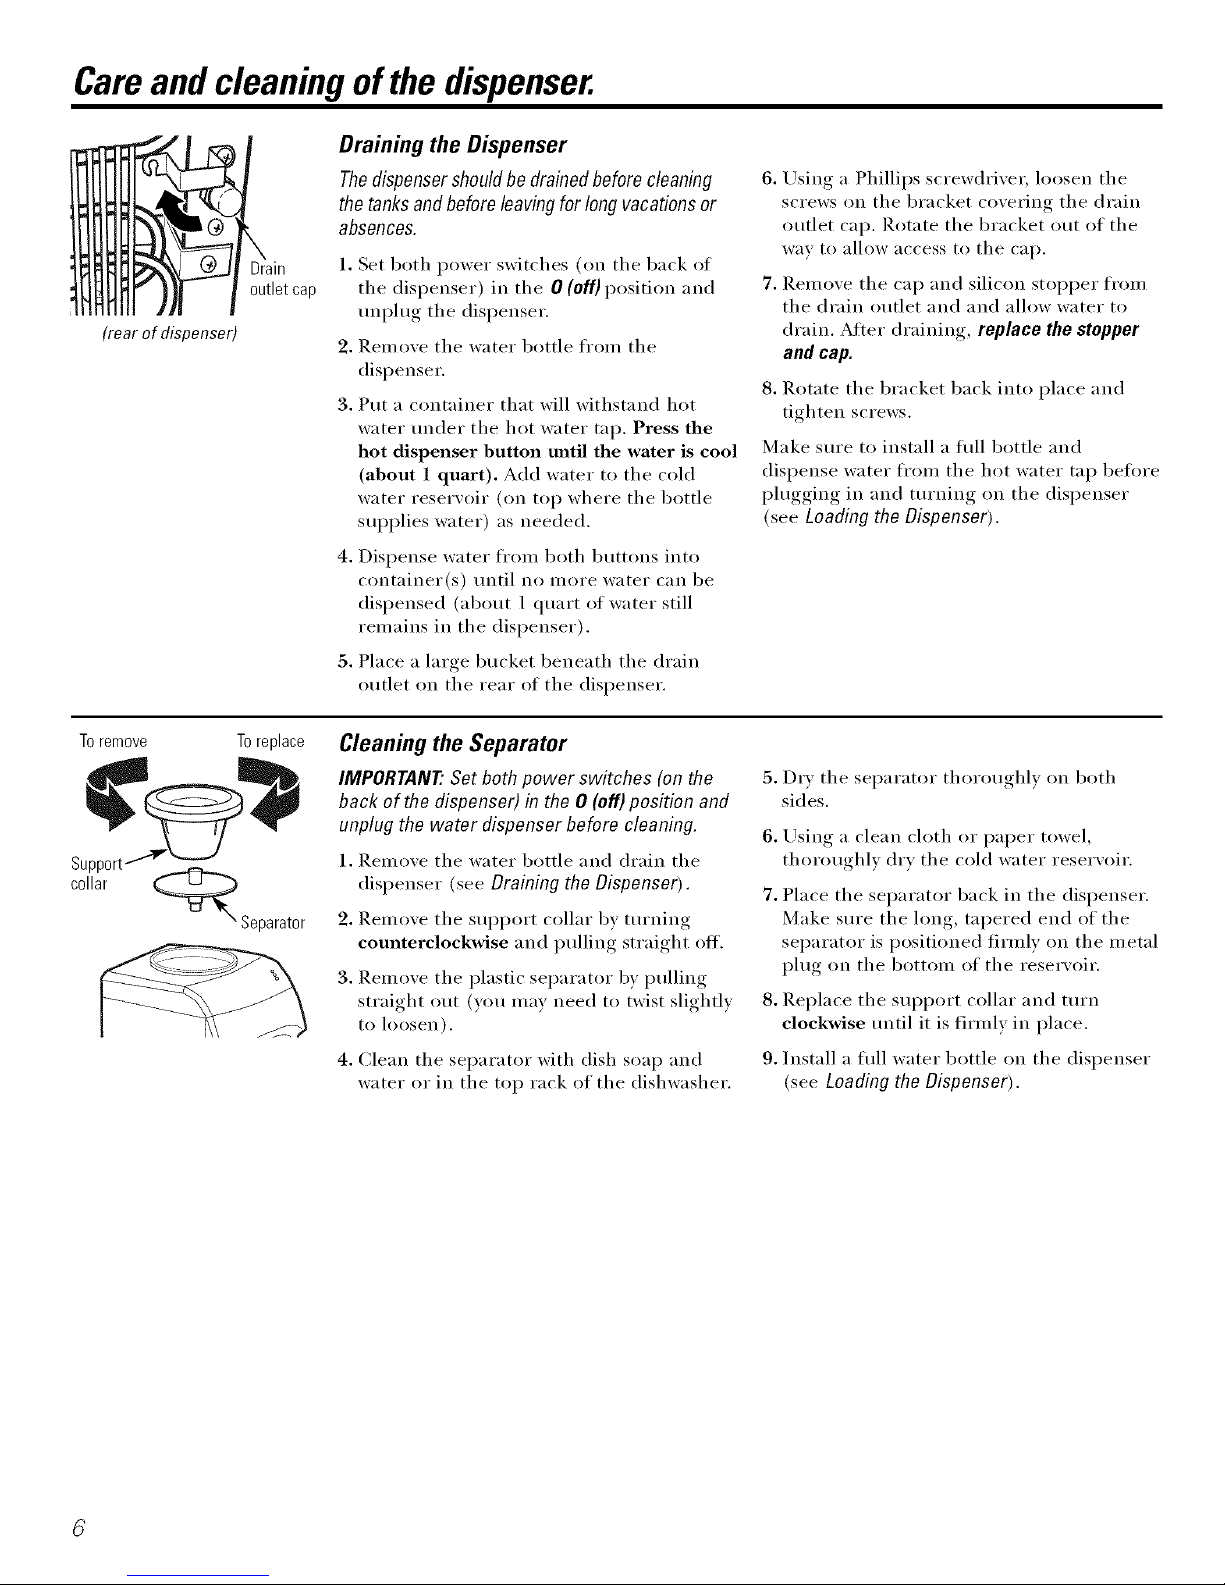
(rear of dispenser)
Drain
outlet cap
Draining the Dispenser
Thedispensershouldbe drainedbeforecleaning
the tanksand beforeleavingfor long vacationsor
absences.
1. Set both power switches (oil tile back of
tile dispenser) in tile 0 (off)position and
unplug tile dispenser.
2. Remove tile water bottle fl'om tile
dispenser.
3. Put a container that will withstand hot
water under tile hot water tap. Press the
hot dispenser button until the water is cool
(about 1 quart). Add water to the cold
water reservoir (on top where the bottle
sui)plies water) as needed.
4. Dispense water fl'om both buttons into
container(s) until no more water can be
dispensed (about 1 quart of water still
remains in tile dispenser).
5. Place a large bucket beneath the drain
outlet on tile rear of tile dispenser.
6. Using a Phillips screwdriver; loosen tile
screws on the bracket covering the drain
outlet cap. Rotate tile bracket out of tile
way to allow access to tile cap.
7. Remove tile cap and silicon Stol)per fl'om
tile drain outlet and and allow water to
drain. After draining, replace the stopper
and cap.
8. Rotate tile bracket back into place and
tighten screws.
Make sure to install a flfll bottle and
dispense water fl'om tile hot water tap beflwe
I)lugging in and turning on tile dispenser
(see Loading the Dispenser).
Toremove
Support
collar
To replace
N Separator
Cleaning the Separator
IMPORTANT'. Set both power switches (on the
back of the dispenser) in the 0 (oft) position and
unplug the water dispenser before cleaning.
1. Remove tile water bottle and drain tile
dispenser (see Draining the Dispenser).
2. Remove tile support collar by turning
counterclockwise and pulling straight ott.
3. Remove tile plastic separator by pulling
straight out (you may need to twist slightly
to loosen).
4. Clean tile separator with dish soap and
water or in the top rack of the dishwasher.
5. D_w tile separator thoroughly on both
sides.
6. Using a clean cloth or paper towel,
thoroughly dry tile cold water reservoir.
7. Place tile separator back in tile dispenser.
Make sure tile long, tapered end of tile
separator is positioned firmly on tile metal
plug on tile bottom of tile reservoir.
8. Replace the sui)port collar and turn
clockwise until it is firmly in place.
9. Install a hill water bottle on the dispenser
(see Loading the Dispenser).
Sanitizing and Cleaning the Water Tanks
IMPORTANT. Periodically the water dispenser
tanks must be sanitized to prevent unpleasant
tastes in the water and cleaned to remove mineral
deposits that can impair flow
ToSanitize:
1. Beto_e deaning, set both power
switches (on tile back of tile
dispenser) in tile 0 (Off)posit.ion OFF
and unplug the water dispenser, position
NOTE: Forfirst t/?ne/hsta//atioask))
steps 2-4.
2. Empty tile _lter bottle, then remove it fl'om
tile dispenser.
3. Drain tile water tanks (see Draining the
Dispenser).
4. Reinstall the silicon stopper and drain cap (see
Draining the Dispenser).
5. BO NOTABB BLEACH FIRST ORBIRECTLYTO
THEB/SPENSER. Concentratedbleach may
damage plastic.
Add 1/2 teaspoon (2.5 ml) ot ordinm)' 6.0%
ma_mum househoM bleach to a 2 quart
(9 liter) pitcher filled with tap watel;
6. Pour tile solution in tile opening at tile top
(ff tile dispensel;
7. Repeat steps 5 and 6 until tile dispenser is fldl.
8. Press tile hot and cold dispenser buttons until
tile water just begins to flow fl'om tile taps.
9. Mlow to sit fl_ 15-20 minutes.
10. Rinse out the bleach solution:
-- Drain tile water tanL_ into a large bucket
(see Draining the Dispenser).
-- l_,];lke stlre that tile silicon stopper is
N0rinstalled.
-- IMPORTANT'.Remove the separetar and
wipe out the cold water reservoir (see
Cleaning the Separator).
-- Clean, then Ieinstall tile separator and
collar (see Cleaning the Separator).
-- Pore" appro_mately 1 gallon (4 qumqts or
4 litel_) of fl'esh m}:)_ffer into tile top
and allow to drain into tile bucket.
-- Flush with an additional 1 gallon (4
quarts or 4 litel_) of flesh tap water and
allow to drain into tile bucket.
11. Reinstall the silicon stopper and drain cap
(see Draining the Dispenser).
12. Install a fi'esh water bottle (see Loading the
Dispenser).
13. Dispense I quart(1 liter) of water frem each
tap and taste to make sure tile bleach
solution is completely removed.
If you continue to taste the chlorine from the
bleach solution, repeat steps 10-13 until the taste
is gone.
14. Plug in tile dispense_: Then turn
on tile hot and cold power s'_dtches
(on tile back of tile dispenser). ON
position
ToRemove Mineral Deposits:
Mix 2 quarts (2liters) of water with two quarts
of vinegar ORmix 1gallon of water (4 liters)
with 16ounces (454g) of citric acid crystals.
Bleach does not remove mineral deposits. Do
this in place of step 5 when removing mineral
deposits.
Defrosting (model GXCF25HWW only)
Defrost whenever froston the wall of the chiller
compartmentbecomesexcessive.Never usea sharp
or metallic instrument toremove frostas it may
damage the liner. Werecommendusingaplastic
scraper Donot useanyelectrical devicein defrostlhg
yourchiller compartment
Todefrost:
!i( Remove items ti'om tile compartment.
_: Tm'n tile Cold (Blue) Power switch to off and
tmplug tile dispense_:
_Ji::Put several towels in tile bottom of tile
COlllpartli/ent to collect water.
Deli'osfing usually takes a few hom_. To defl'ost
fi_ste_; keep tile door open.
After defrosting:
::Ji::Remove tile wet towels and wipe up am'
remaining water:
!i( Wipe tile compartment with a (h_' cloth.
_: Plug in the unit and turn on the Cold (Blue)
power switch. Retm'n items to tile unit.
7
Careand cleaningofthe dispenser.
Preparing for Vacation
For long vacations or absences, set both power
switches (on the back of the dispenser) to the
0 (off) position.
1. Unplug the water dispensei:
2. Relnove the water bottle.
3. Drain the _;_ter tanks (see Draining the
Dispenser).
4. Dry the separator thoroughly on both the
top and bottom (see Cleaning the Separator).
5. I,eave the door of the chiller compartment
open,
After returning from vacation, make sure to sanitize
the water tanks before using the dispenser (see
Cleaning and Sanitizing the Water Tank).
Specifications
Chilling Rate: approx. 0.5 gallons (2 htex,_)
per hour
Heating Rate: approx. 0.8 gallons (3 [items)
per hour
Troubleshootingtips.
Capacity: 3 or 5 ga[hm bottle
Power Consumption: Heating: 480 watts max.
Coo[ing: 125 watts max.
Possible Causes What To Do
Water haspoor taste Separator needs clemth_g. "See Cleaning the Separator
or odor
Unit needs to be sanitized, * See Cleaning and Sanitizing the Water Tanks.
Water not hot enough Dispenser is unplugged. * Push t[w plug c_)mp[ete[y into the outlet.
or coldenough The fuse is blown/circtfit * Replace house fl/se or reset the house circuit breakeI:
breaker is tripped. */f too many items are [)[ugged,, into a sing[e, circuit, move some
items to a different circuit.
All the water in the water tmfl¢ * \_'ait 31) minutes fi>r water to heat or coo[.
has been used.
Temperature lhniter tripped. * Set the hot and co[d power switc[ws (on the back of the
dispenser) to the 0 (off) position. Wait five minutes; t[wn
set the switches to the I (on)position. \_fit 30 minutes fin.
w;itel" to heat or coo[.
Water dispenser does not I?hnply water bottle. *I_ep[ace with a new bottle of ware1:
work--No water flow
Mineral deposits clogging tmaks. • See Care and Cleaning.
Cold water button Chiller door has been left open. • C[ose c[fi[[er door.
does not dispense
( "_r " " (
Ice buildup blocking water flow. • Turn off co[d power switch >verm_ht ,rod thp back m in
the morning.
Waterdispenserleaks Crack or pin hole in bottle. * Replace with a new bottle of watel:
from the outside
Compressordoes notstart Normal Operation--Compressor * Wait t0r up to 3 minutes lox the compxesso_ to start.
when coldpower switch/ start is delayed by up to 3 minutes
blue light is on to prolong the compressor life.
Bottle feels warm Water system overfilled. Water * Dispense enid water until air is re[eased into the bottle.
is boiling in the hot tank and
bubbling up into the bottle.
Particles floating Water has high mineral content. • Fit]([ a water source with [ower hardness.
in water
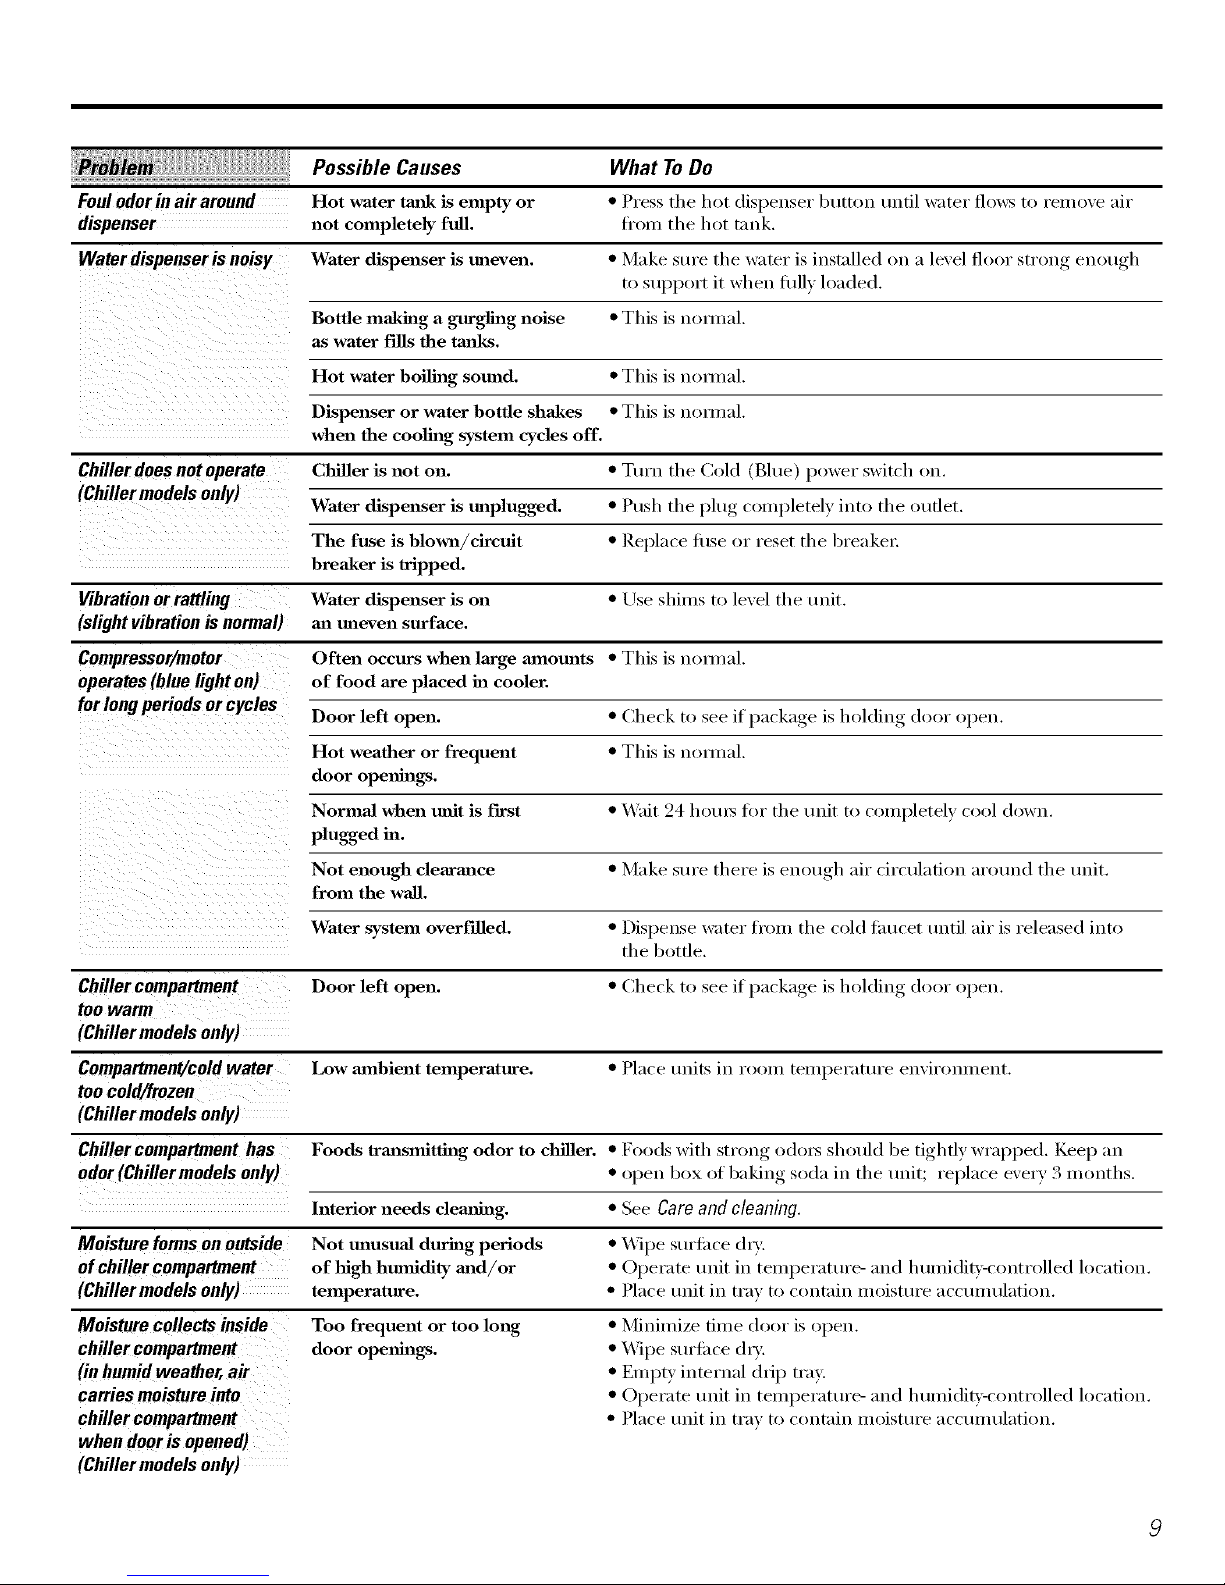
PossibleCauses WhatToDo
Foulodorinairaround Hot water ta_lk is empty or * Press the hot dispenser bumm until water flows to remo_e air
dispenser not completely full. fl'om the hot tank.
Water dispenser is noisy Water dispenser is uneven. * Make sure the water is installed on a lexel floor strong enough
t() supp()rt it when fifth loaded.
Bottle makhlLg a gurgling noise * This is nomml.
as water f'flls the taalks.
Hot water boiling soma& * This is nomml.
Dispenser or water bottle shakes * This is nmmal.
when the cooling system cycles off.
Chiller does not operate Chiller is not on. * Turn the Cold (Blue) power switch on.
(Chiller models only)
Water dispenser is unplugged. * Push the I)lu"_ completely, into the outlet.
The fuse is blown/circuit * ]_eplace filse or reset the breakei:
breaker is tripped.
Vibration orrattling Water dispenser is on * Use shims to level the unit.
(slight vibration is normal) an uneven surface.
Compressor/motor Often occurs when large axnomlts * This is noY///al.
operates (blue light on) of food are placed in cooler.
forlongperiodsorcYc!es Door left open. * Check to see if I)ackage, is holding door open.
Hot weather or frequent * This is nomml.
door opmfings.
Normal when refit is first • _,%fit 24 houlS fin" the Ulfit to completely cool down.
plugged in.
Not enough clearmlce * Make sm'e there is enom, h_ air circulation arotmd the refit.
from the wall.
Water system overfilled. * Dispense water from the cold lancet tmtil air is released into
the bottle.
Chiller compartment Door left open. • Check to see I ,-,if )acka_*e is holding door open.
too warm
(Chiller models only)
Compartment/cold water Low ambient temperature. * Place units in room temperatm'e emironment.
too cold/frozen
(Chiller models only)
Chiller compartment has Foods trmzsmitthzg odor to chiller. * Foods with strong odoi_ should be tightly wrapped. Keep an
odor (Chiller models only) • oi)en box of baking, soda in the refit; replace e\'er_ 3 months.
• See Care and cleaning.
• Wipe sm'li_ce dry:
• Operate refit in temperatm'e- and humidity-controlled location.
• Place refit in tra_ to contain moistm'e accmn ulation.
Moistureformsonoutside
ofchillercompartment
(Chillermodels only)
Moisturecollectsinside
chillercompartment
(inbumidweather,air
carriesmoisture into
cbillercompartmeM
whendoorisopened)
(Chillermodelsonly)
Interior needs demfing.
Not mmsuaJ during periods
of high humidity mid/or
temperature.
Too frequent or too long
door opmfings.
• Minimize time door is open.
• X,_]pe sm'ti_ce (hy:
• Empty internal drip tray.
• Operate refit in temperatm'e- and humidity-controlled location.
• Place refit in tray to contain moistm'e accmn ulation.
 Loading...