

Page 1
ge, com
Hot & Cold Water Dispenser
Safety Instructions . ................... 2, 3
Using the Water Dispenser
Child Safeguard .......................... 5
Features and Parts i,ist .................... 4
i,oading the Dispenser . ................... 4
Specifications ............................ 8
Care aml Cleaning ...................... 5-8
Troubleshooting Tips .................... 8, 9
Consumer Support
(_onsulner Support ............... Back (_over
Warranty ....................... Back Cover
Fran_'ais
lnformations en matibre de s&'urit_ ...... ]O, ] ]
Utilisation du distributeur d'eau
Caract6ristiques et liste de pibces ........... ] 2
(;aract6ristiques techniques ............... ] 6
(_hargement du distributeur . ............. 12
Sauvegarde pour la protection des enfimts . . .13
Entretien et nettoyage ................. 13-16
Conseils de dEpannage ................. 16, 17
Soutien au consommateur
Garantie .............................. ] 8
So/Itiell atl COllSOll/ll/atetlI" . ............... ]8
GX(J:2OKWW*/GX(J:2OKBB* (hiller model
GXCCO ID* courttez'top model
GXCFOSD* Jloor model
(;X CI;2()I_/ ( ;X CIg2OFII B chiller model
Distributeur d'eau
chaude ou froide
La section frangaise commence h la page 10
Dispensador de agua
caliente & frfa
Espa_ol
lnformaci6n de seguridad .............. 19, 20
C6mo utilizar el dispensador de agua
C6mo cargar el dispensador . .............. 21
Especificaciones ......................... 25
i,ista de partes y caracterfsticas ............. 21
Seguro contra niflos ..................... 29
Cuidado y limpieza ................... 29-25
Solueionar problemas ................. 25, 26
Apoyo al consumidor
Garantia ............................... 27
Apoyo al consmnidor . ................... 27
Laseccion en espa_ol empieza en la pagina 19
*ENERGY STAR_' qualified produ(t.
As an ENERGYSTAR<':partneL (;E
has detemfined that this product
meets the ENERGYSTAR<':guidelines
215C1002P038 49-50222 02-07JR
©
tot energy eflidenc):
Page 2
iMPORTANTSAFETYiNFORMATiON.
READALLiNSTRUCtiONSBEFOREUSING.
WARNING!
Usethisappliance onlyfor itsintended purpose as describedin thisOwner'sManual
SAFETYPRECAUTIONS
Whenusingelectrical appliances,basicsafetyprecautions shouldbe followed,includingthe following."
_:This "wa|er dispenser must be t)roperly inslalled
and lo(aled in a((ordan(e wiih Ihese insu'u( lions
t)eti)l'(_ i! is us(_d.
::_'_1)o not allow children to climb, stand or hang
on tile outside of tile dist)enseJ; or on the shelves
inside the storage cabinet (on some models).
I'h() could tip the dispenser O_t('_"and damag('
it and seriously ii!jure themselves.
i):?Do not store or use gasoline or other flammat)le
vapors _md liquids in the vi(init) of this or ally
other appliance.
::_':Unplug the water dispenser beli/re cleaning or
making ret)airs.
NOTE: GEdoes not support any servicing of the
dispense_ We strongly recommend that you do not
attempt to service the dispenser yourself.
::U_Do not rise this dispenser to dispense _mything
other than water.
i_:Wipe up any water spills immediatel} after loading
i):?C_fildren should be supervised by a parent when
::CAUtiON:The dispenser beats water
Water temperatures above 125°F (52°C) era1 cause
or unloading water boules.
using this product.
WARNING:Do uot use with water that is
microbinlogically unsafe or of unknown quality.
to a temperature of approxhnately 194°F (90°C).
severe bunls or death from scalding. Clfildren,
the disabled mad the elderly are at highest risk
of beh_ scalded.
NOTICE:'_+,s product is intended solely for
use in cllillit_g cmmed mid boxed beverages, and
packaged nouperishables.
_+l)o not t)lug ill the l)OV_'eF(ord ()r turn on die
t)(/wel" S'Wi|( lies when |he _va|er dispenser is en/t)l )
PROPERINSTALLATIONANDLOCATION
_;_\llo\v at least 1" (2.5 cm) of space/)et\veen the
back of ttle water dispenser and the wall to allow
li/r t)roper air circulation.
::_'_Do not install the water dispenser where the
temperature will go below 50°F (10°C) or
above 100+F (38°(;).
::_':Install the water dispenser on a lcv('l floor or
counter str(mg enough to support it when fldly
loaded. Do not install where it will be subject to
direct stmlight, heat or moisture.
Page 3
GROUNDINGINSTRUCTIONS
WARNING:Improper use of the grounding plug can result in a risk of electric shock.
This apl_liance lllUSl be grounded. Ill die _r_l_l _ a_
ekx Iri(al shorl (irctlil, gr/nlnding reduo:_s II/_:_risk of
ele< Iri( sho(k.
This appliance is equipped with a power cord Ill,ring
a grounding wire witl/a grom/ding phlg. The phlg
must be plugged into an outlet that is properl?
installed and grounded.
Consuh a qualified electrician if the grounding
instr/tctions are not completely understood, or if
doubt exists as to whether the appliance is properly
grounded.
If the outlet is a standard 2-prong wall outlet, it is
your personal responsibili F and obligation to have
it replaced with a t/roperl} grounded 3-prong
wall outlet.
Do 110[ tinder ally circIIIIISI21nc('s CII[ or relllO\_* IN('
third (ground) prong ti'om the power cord.
Do not use an adapter plug with this appliance.
Do not use an extension cord with this appliame.
If the power cord is u_/) short, have a qualified
electrician install all omlet near the appliance.
For best operation, plug the appliance into its own
electrical otttlet on a dedicated circuit to prevent
flickering of lights, l/lowing of fllse, or tripping of
circuit breakel:
PROPERDISPOSALOFTHEWATERDISPENSER
Refrigerant Disposal
rcli'igeran_ in its (ooling s) sWm. These reli_gcrmlts
are t/elieved to harm stratospheric ozone. If'y)u are
tllrowing aw_l), your old dispenser make sure the
reti'igerant is removed and recovered tbr proper
disposal t V an l{E\-certilied re<hnician. If you
intentionally release this reli'igerant, you Call be
sul!iect to lines and imprisonnlent under provisions
of environmental legislation.
READANDFOLLOWTHISSAFETYINFORMATIONCAREFULLY.
SAVETHESEINSTRUCTIONS
3
Page 4
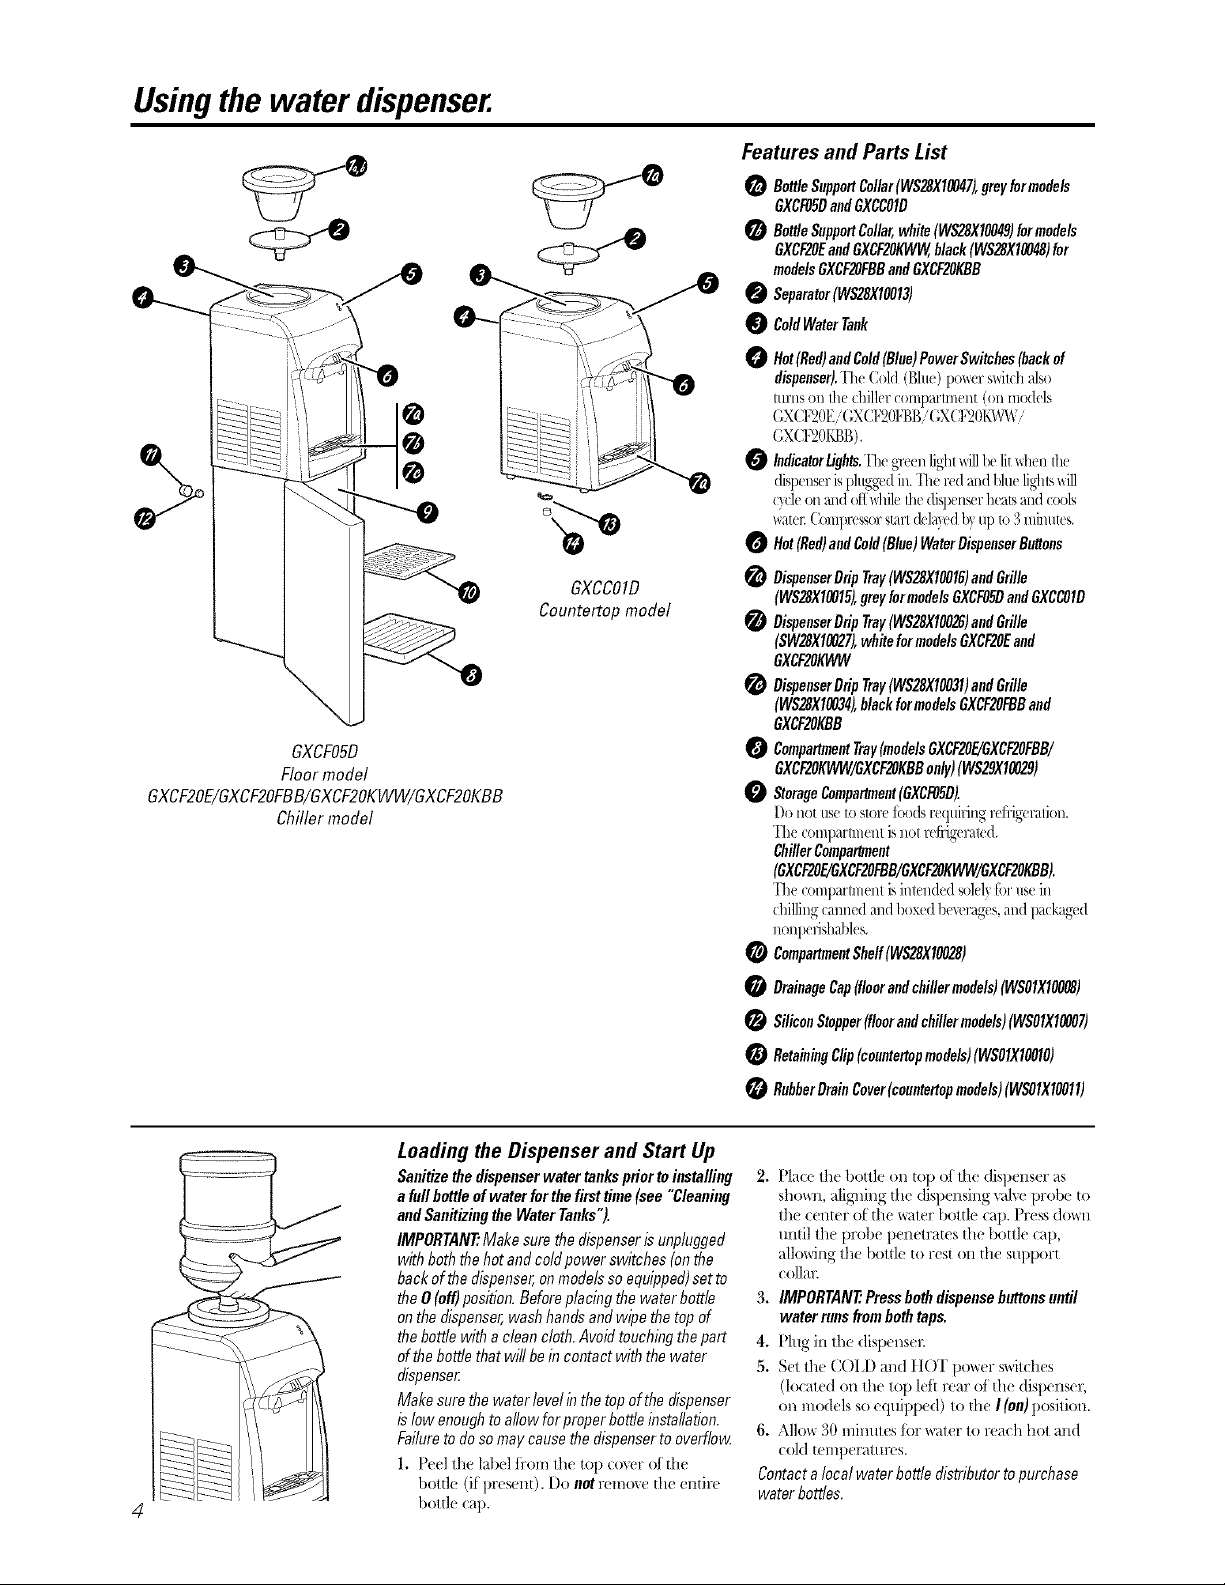
Usingthe water dispenser.
GXCFOSD
Floor model
GXCF2OE/GXCF2OFBB/GXCF2OKWW/GXCF2OKBB
Chiller model
GXCCOID
Countertop model
Features and Parts List
BottleSupportCollar(WS28XlO047),greyformodels
GXCFOSDandGXCCO1D
BottleSupportCollar,white(WS28X10049)formodels
GXCF20EandGXCF2OKWW,black(WS28XlO048)for
modelsGXCF2OFBBandGXCF2OKBB
Separator(WS28XlO013)
0 ColdWaterTank
Hot(Red)andCold(Blue)PowerSwitches(backof
dispenser),Th(, Cold (B]m,) pol_er ,',ldtchalso
turnson thedriller (:ompartment (on models
GXCF2OE/ CXCF2OFN_/ GXCF2OI(W__/'
CXCI:201_I_I_),
IndicatorLights.The greenlight_411be lit _4/enI1_e
dispenserisl/luggedin."fh_ l_'d and lllne ligNs 1411
_?xleon and t_[lI_l/il_Ihc disF'ns_'r heats and _ools
water: Compressor start dela)ed b_ up to 3 minut_s,
Hot(Red)andCold(Blue)WaterDispenserButtons
DispenserDrip Tray(WS28XIO016)andGrille
(WS28XlO015),greyformodelsGXCFOSDandGXCCO1D
DispenserDrip Tray(WS2.SXlO026)andGrille
(SW28XlO027),whiteformodelsGXCF20Eand
GXCF20KI44,V
DispenserDrip Tray(WS2.SXlO031)andGrille
(WS28XIO034),blackformodelsGXCF2OFBBand
GXCF2OKBB
CmnpartmentTrayOnodelsGXCF2OF./GXCF2OFBB/
GXCF2OKWW/GXCF2OKBBonly)(WS29XlO029)
StorageCmnpartment(GXCFOSD).
Do not u,,_'t_:>st_/x_toads requiring _Ii'ig_'radon,
The compartment isnot refi'iT/rated,
ChillerCmnpartment
(GXCP2ff/GXCF20_B/GXCF_KWW/GXCP_KBB),
The comparm/ent isinl_nded sold? lilt use in
chilling canned and boxed bexcrag_'s, and packag_'d
nonpel'ishables,
CmnpartmentShelf(WS28XIO028)
DrainageCap(f/oorandchi//ermode/s)(WSO1XIO008)
SiliconStopper(floorandchillermodels)(WSO1XIO007)
RetainingClip(countertopmodels)(WSO1XIO010)
RubberDrainCover(countertopmodels)(WSO1X10011)
Leading the Dispenser and Start Up
Sanitizethe dispenserwatertanksprior toinstalling
a fullbottleofwaterfor the firsttime (see "Cleaning
andSanitizing the Water Tanks").
IMPORTANT"Make sure the dispenser is unplugged
with both the hot and coldpower switches (on the
back of the dispenser,onmodels so equipped)set to
the 0 (off)position. Before placing the water bottle
on the dispenser, wash hands and wipe the top of
the bottle with a clean cloth. Avoid touching the part
of the bottle that wil! be in contact with the water
dispense£
Make sure the water level in the top ofthe dispenser
is low enough to allow for proper bottle installation.
Failure to do so may cause the dispenser to overflo_z
l. Peel tilt' label tiom the top _over of the
bottle (if l/resent). Do not remox e the entire
l/ottle call.
2. ['lace tile bottle on t()p oflhe dispenser as
sho/_l, aligning the dispensing _d_e probe to
tile center of tile _ater bottle cap. Press doun
/mdl the probe penetrates the bottle cap,
allowing the horde to rest on the stq_port
eollal;
3. IMPORTANT."Pressbothdispensebuttonsuntil
water runsfrom bothtaps.
4. Plug ill the dispense_:
5. Set the COl l) and ItOT po_wr s_itdles
(located on the top leI_ rear of the dispenser,
on models so equil/ped) to the I (on) position.
6. Allow 30 minutes/or w_ter to reach hot and
cold telllperattlres.
Contacta localwater bottle distributor topurchase
water bottles.
Page 5
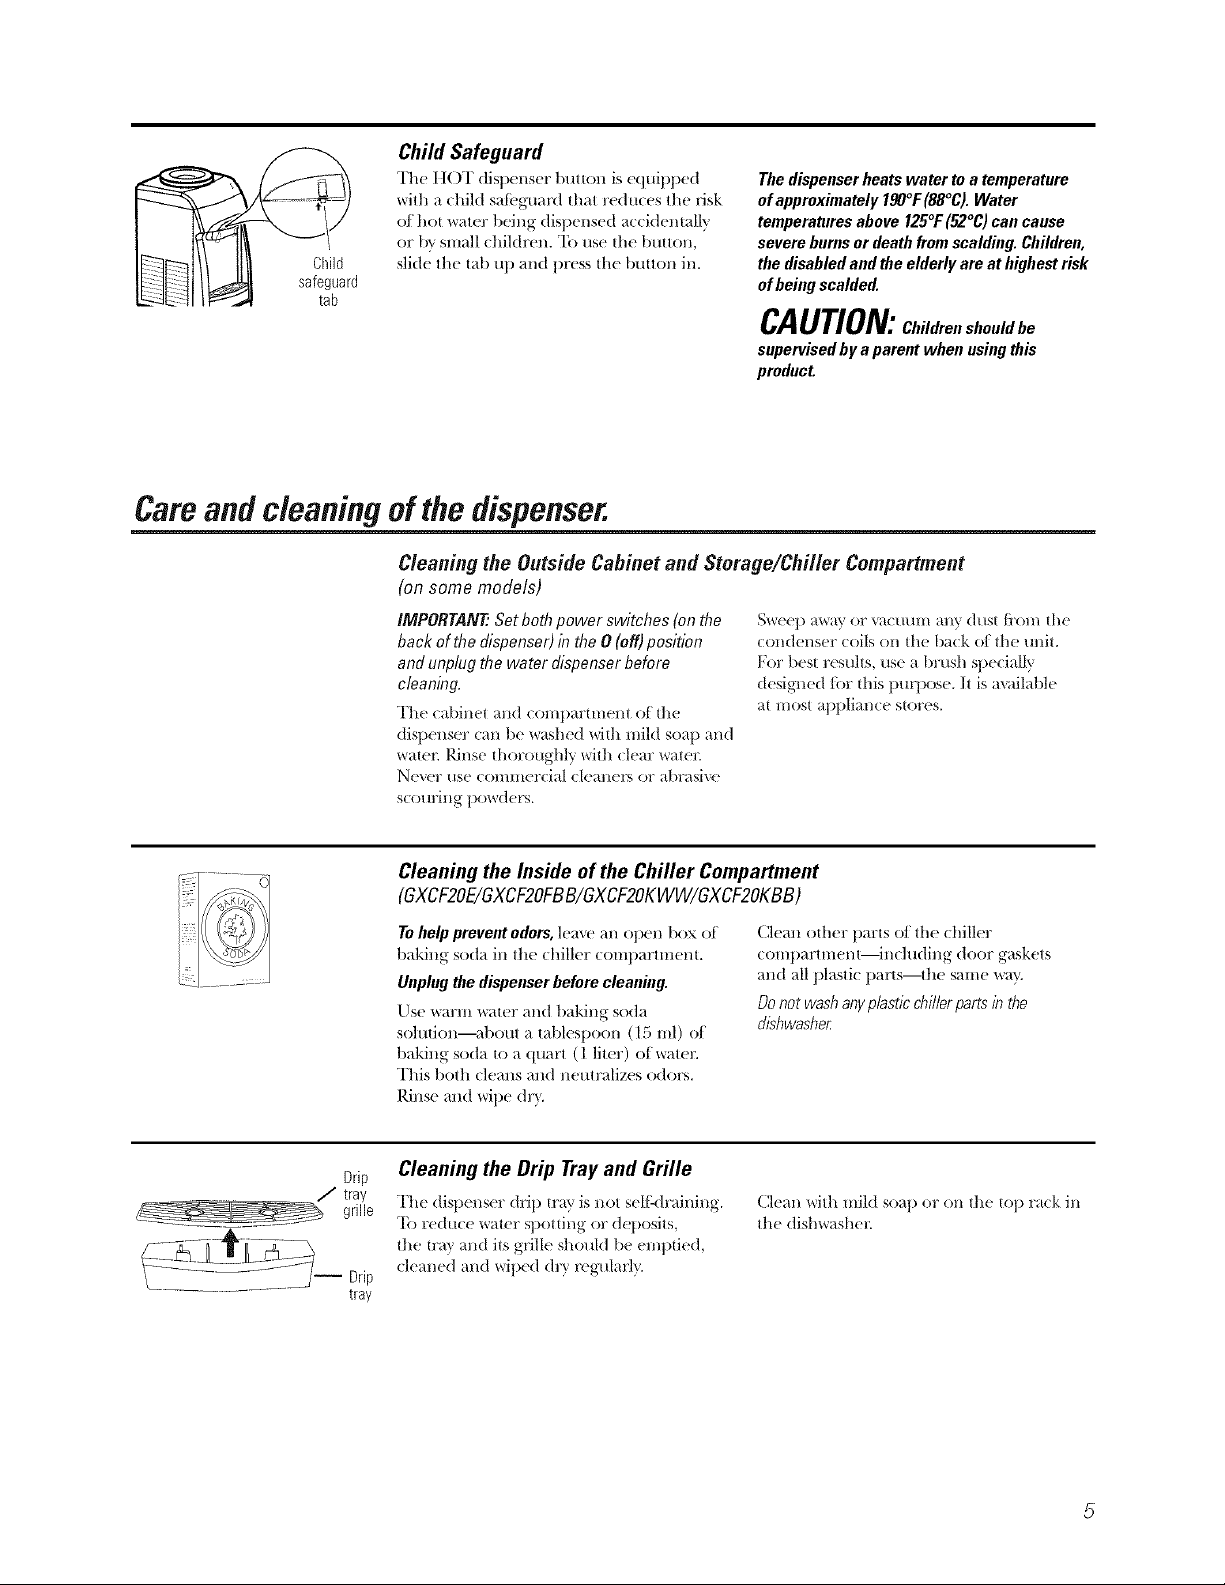
Child Safeguard
The t tOT disl_'nser t)t_t to_l is c'q tlit)l_ed
with a child sat_'guar(1 that redtlces the risk
of hot water being dispensed accidentally
or b_ small children. "lb t_se the bt_tton,
slide the tab tip and press the btltton in.
d
Careand cleaningofthe dispenser.
Cleaning the Outside Cabinet and Sterage/Chi//er Cempartment
(on some models)
/MPORTANT: Set both power switches (on the
back of the dispenser) in the 0 (off) position
and unplug the water dispenser before
cleaning.
The cal)in_ 1 _md (omI)_trtm('l_t _l th('
disi)ens_ r can 1)e washed with mild soap and
water. I_i/se thoro_lghly with (lear water.
Ne\('r rise col/li/leFcial cleallel's or al)rasi'_'('
scollring p__,wders.
The dispenser heats water to a temperature
of approximately 190°1:(88°C). Water
temperatures above 125°1:(52°C) can cause
severe burns or death from scalding. Children,
the disabled and the elderly are at highest risk
of being scalded.
CAUTION:Children should be
supervised by a parent when using this
product.
condei/ser coils on th_ 1)a(k of the m_it.
I:<_r1)es_ results, tls_ a br_lsh speciallp'
desigJled liar this i)t_]_os_. 11 is a\zdlat)l_
at most api)lianc_ stores.
Cleaning the Inside of the Chiller Compartment
(GXCF2OE/GXCF2OFBB/GXCF2OKWW/GXCF2OKBB)
Tohelp prevent odors, le_\_' an open box of
baki_g soda in the chiller compartment.
Unplug the dispenser before cleaning.
soh_tio_--zd)ot_t a tablespoon (15 ml) of
baki_g soda to a qt_art (1 liter) of water,
This both cleans and net_tralizes odors.
Rinse and wipe dr}.
Cleaning the Drip Tray and Grille
Drip
The disi)_'_s_'r dri I) tr_' is _ot s('llktr_ini_g.
traygrille
"1}_redllce water spotting or dei)osits,
the tr;_y and its grille sho_Id 1)e emptied,
(leaned and wiped dry r_'g_lafly.
tray
Clean other parts of the chiller
comt)artmenl including door gaskets
and all plasti( parts--lhe same w_y,
Do not wash aog plastic chiller parts in the
dishwasher
Cleai/with mild soap or on the top rack in
the dishwasher.
Page 6
Careandcleaningof thedispenser.
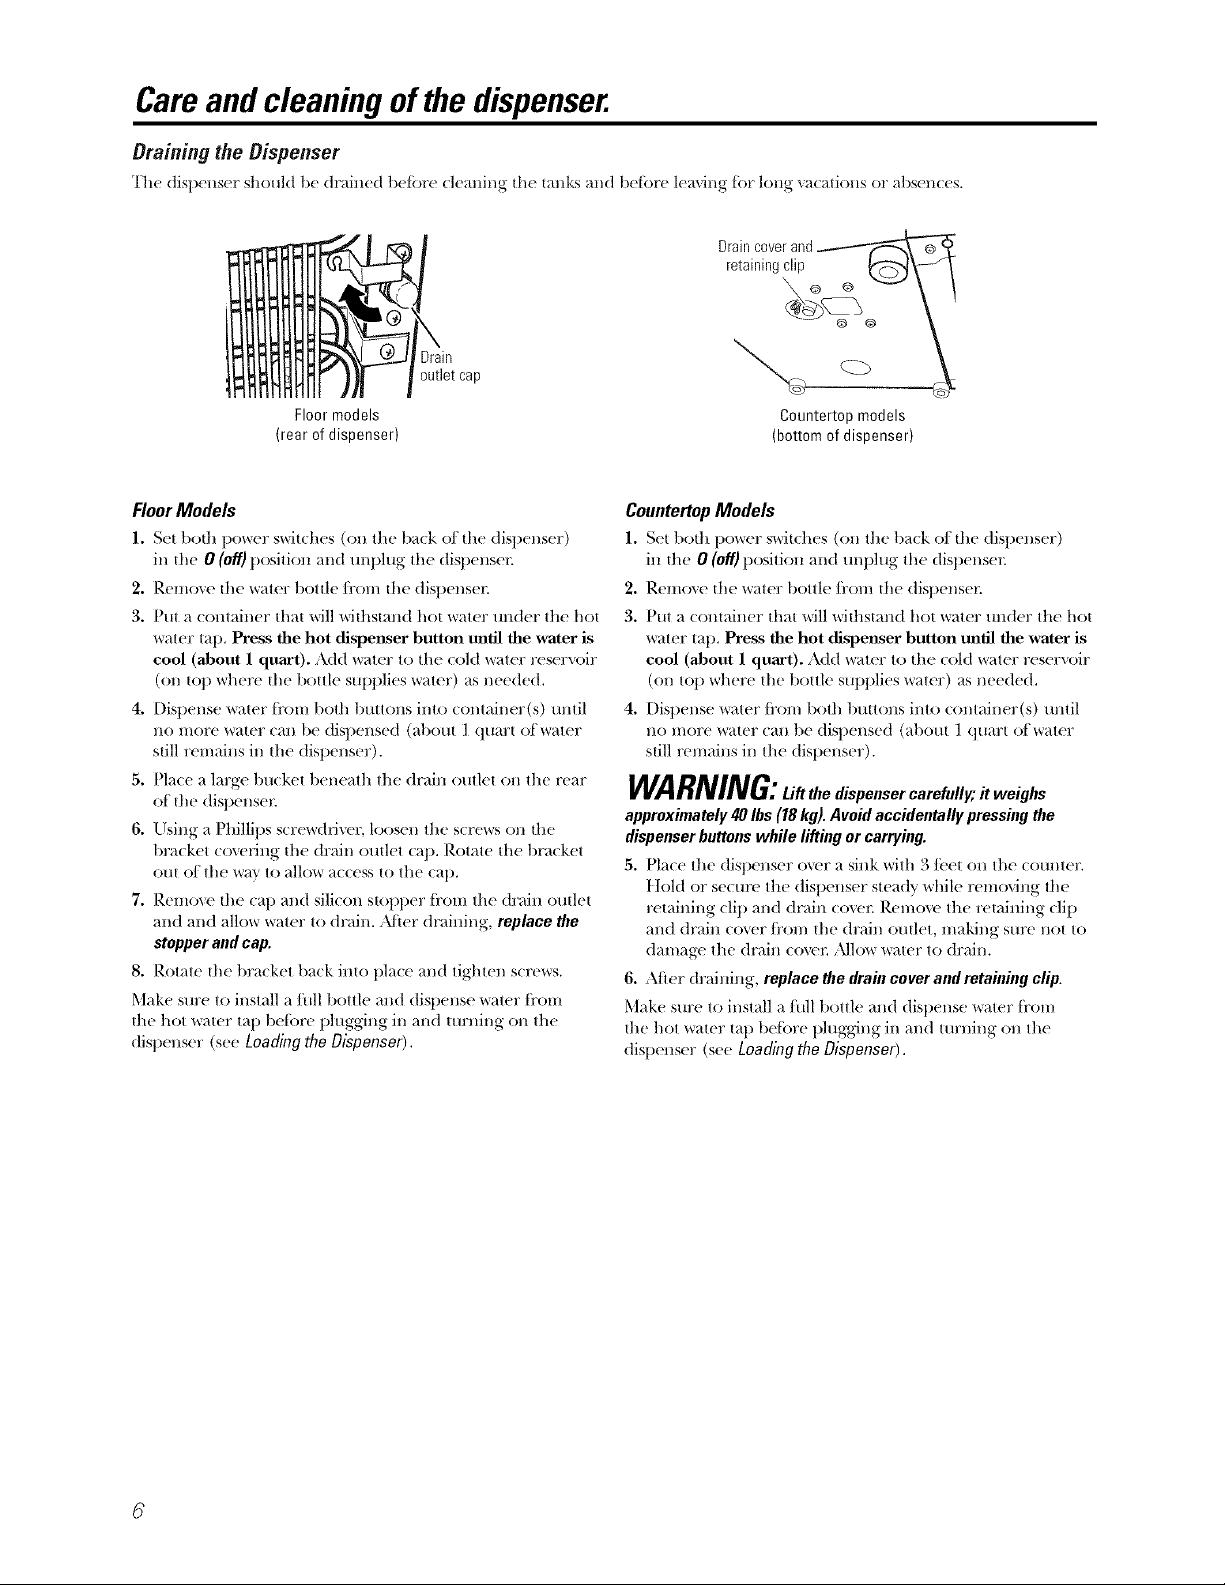
Draining the Dispenser
"l]_e dislx'ns('r should 17( drain(d b(liTrc cleaning the bulks ai/d 1)('tiTI'(' l('aving lor long xa(ations or abs('n(es.
Drain
outlet cap
Floor models
(rear of dispenser)
FloorModels
1. Sol both t)ow('r switches ((311the back of the dispenser)
in the 0 (Off)position and unplug the dispense::
2. Remove the water bottle fi'om the dispense::
3. Put a (ontainer that will withstand hot water uuder the hot
water tap, Press the hot dispel_er button tmdl the water is
cool (about 1 quart). Add water to the cold water reserx_)ir
(/)i/top where the bottle supplies water) as needed,
4. Dispense water ti'om both t)uttons into container(s) until
i11) more water can be dispensed (about 1 quart of water
still remains in the dispenser).
5. Place a large 1)u(ket beneath the drain outlet on the rear
of the dispense::
6. Using a Phillips scruwd:Jvcr loosen the screws on the
bracket co\_'lJng the drain outlet (ap, Rotate the bracket
out of the way to allow access to the cap,
7. Ilemovc the cap and silicon su)pper ti'om the drain oudet
and and allow water to drain. )d_er draining, replace the
stopper and cap.
8. Rotate the bracket back into place and tighten s(rews.
Make sure to install a litll bottle and dispense water ti'om
the hot water tap beti)re phlgging in and turning on the
dispenser (see Loading the Dispenser).
Countertop models
(bottom of dispenser)
CountertopModels
1. Set both t)ow('r switches (Oil the back (/1 the dispenser)
in the 0 (off) position and unplug the dispense::
2. Remove the water bottle/i'om the dispenser.
3. Put a (ontainer tl/at will withstand hot water tluder the hot
water tap, Press tim hot dispel_er button until tim water is
cool (about 1 quart). Add water to the cold water reserx_)ir
(/)i/top where the bottle supplies water) as needed,
4. Dispense water ti'om both buttons into container(s) until
i11)more water can be dispensed (about 1 quart of water
still remains in the dispenser).
WARNING:,i ,hedispe.sercore oOv,"i,weighs
approximately 40Ibs (18 kg). Avoid accidentally pressing the
dispenser buttons while lifting or carrying.
5. Place the dispcnsur ()v('r _1sink with 3 lk'_'l 1)I1the counter.
t t/)1(t or sect::'(' the dispenser steady while remo_4ng the
retaining clip and drain (ove:: ]{(':n()v(' the retaining clip
and drain cover fl'om tile drain outlet, making sure not to
damagu the drain cover, )dlow water to drain.
6. Afler draining, replace the drain cover and retaining clip.
Make sure to install a lhll bottle and dist)ense _,\'_lt('rti'oI:l
the hot water tap bolero plugging in and turning (7:1 the
dispenser (see Loading the Dispenser),
6
Page 7
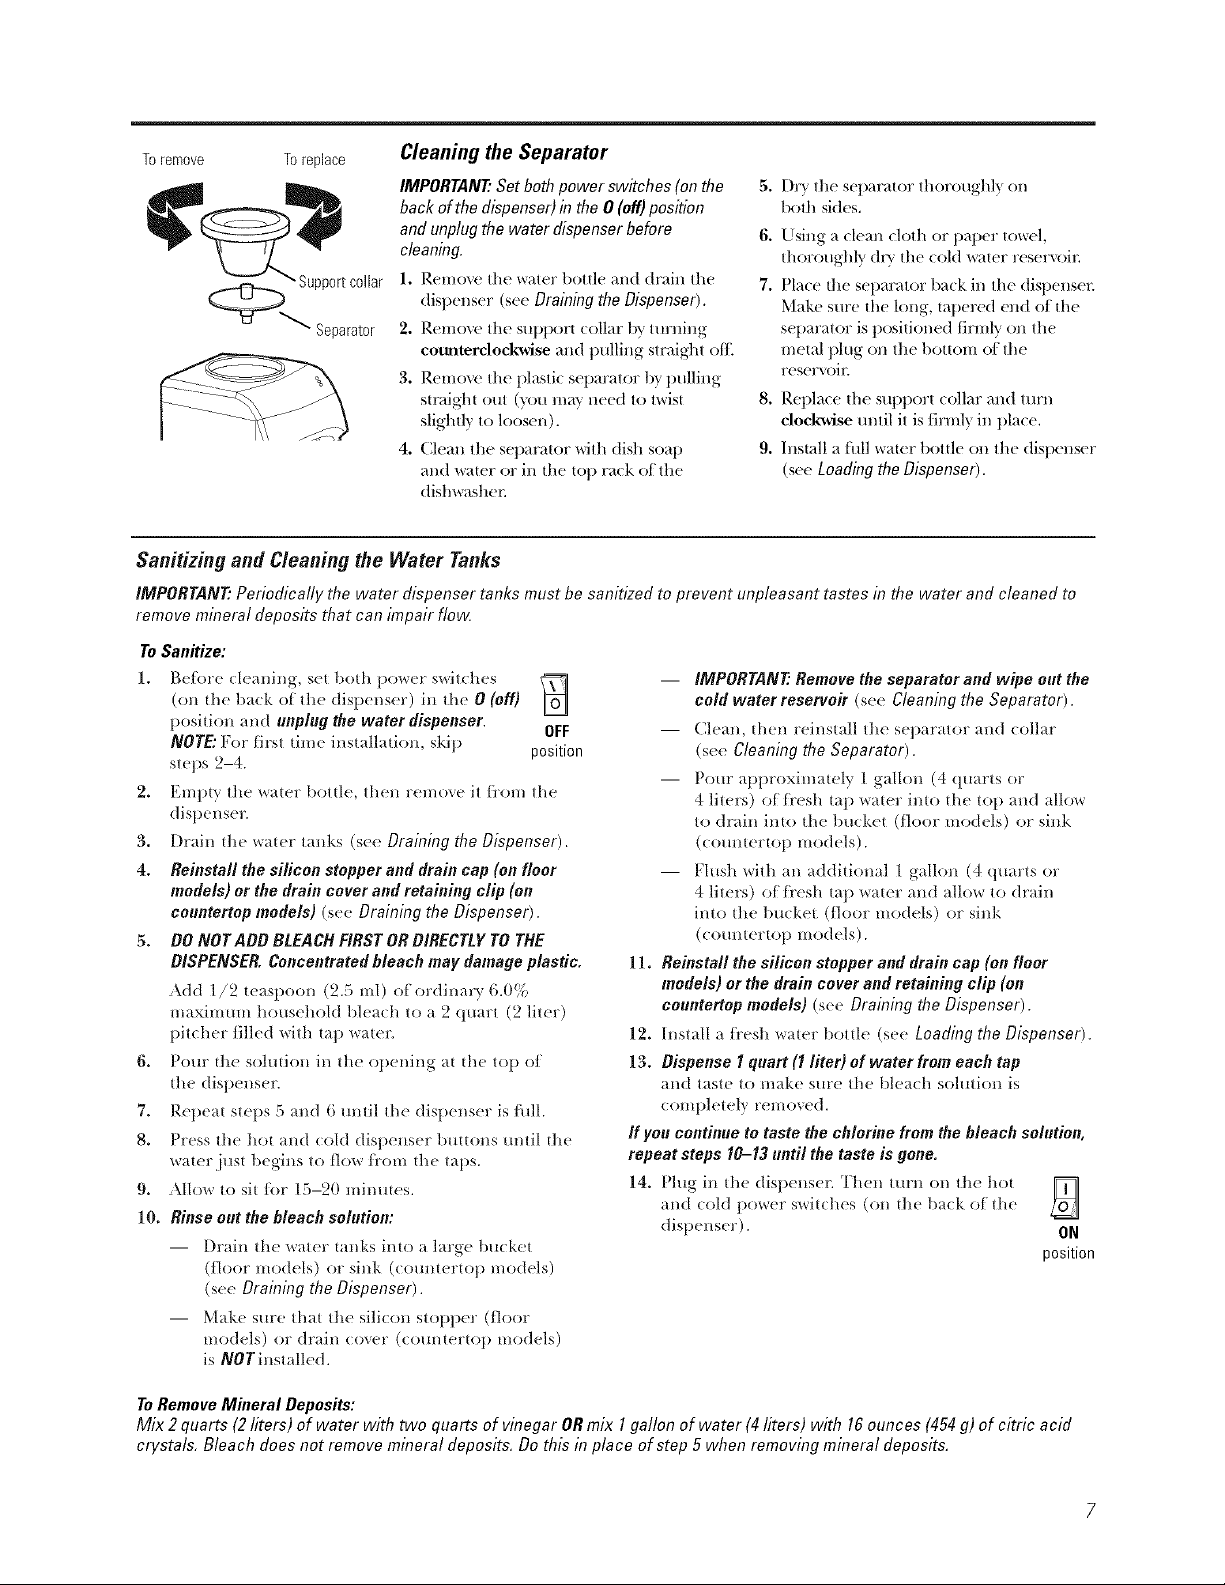
Toremove Toreplace
_ Supportcollar
Separator
Cleaning the Separator
IMPORTANT: Set both power switches (on the
back of the dispenser) in the 0 (off) position
and unplug the water dispenser before
cleaning.
1. ReIIlO\r( |he _r_l_ _"t_l]_ _t drain the
dist)enser (see Draining the Dispenser).
2. I_elIlo\re |he supporl collar 1)} turning
com_terclockwise and pulling straight DiE
3. Remove tile plastic separator t)y pulling
straight out (}u)u Ina} need to |\vis[
slightly to loosen).
4. Clean the separator Mtb dish soap
and water or ill the top rack of the
dishwasher,
5. Dry the separator tllorougbly on
both sides.
6. Using a clean clottl or paper towel,
thoroughly dry the cold water reserv()il:
7. Place the separator back ill the (list)easel:
Make sure the long, mt)ered end of the
set)arator is positioned tirml} on the
metal plug on tlle botlonl of tile
r('s('rvoil:
8. Retllace the SOl)port collar and turn
clock'wise (mtil it is firmly ill t)lace,
9. Install a flfll water bottle on the dispenser
(see Loading the Dispenser).
Sanitizing and Cleaning the Water Tanks
IMPORTANT"Periodicallythewater dispensertanksmustbesanitizedtopreventunpleasanttastesinthewaterand cleanedto
removemineralde)ositsthat canimpairflow
ToSanitize:
1. B(f()re cleanii/g, sei bolh l)o_ver swilcb(!s
(on lhe back of dw disi)enser ) ill Ihe O (off)
i)osidon aI/d enpIeg the water dispenser. OFF
NOTE: For firsl lira( inslal]ali(m, skip position
steps 2-4.
2. Empb, tile waI(r l/otde, then remov( it l]'om tile
disi)enser.
3. Drain tb( water tanks (see Draining No Dispenser).
4. Reinstall the silicon stopper and drain cap (on floor
models) or the drain cover and retaining clip (on
coentertop models) (see Draining the Dispenser).
5. DO NOT ADD BLEACH FIRST OR DIRECTLY TO THE
DISPENSER. Concentrated hleach may damage plastic.
Add 1/2 te_tspoon (2.5 ml) ofordiimry 6.0%
//laXillllllll household blea(h to a 2 (llmrt (2 liter)
I)itch(r filled with tap water.
6. Pour tile solution ill tim opening at th( top of
tb( dispenser.
7. Repeat steps 5 and 6 imtil tile dispenser is fllll.
8. Press tile hot and cold dispenser butIons imtil the
water jllst begins to flow/i'om the tai)s.
9. Allow to sit/i/r 15-20 n/inures.
10. Rinse pet the bleach soletiom
-- Drain the \\rHl('r tanks into a l_u'gc bll(k('t
(floor models) or sink (count(rto t) models)
(see Draining the Dispenser).
-- ]X,'/_ke sm'e that the silicon stopper (/lear
models) or drain cov(r (colmtertop models)
is NOT installed.
U
-- IMPORTANT? Remove the separator and wipe oct the
cold water reserve# (see Cleaning the Separator).
-- (]lean, then rcinst_lll tb(' SCl/arator _md collar
(see Cleaning the Separator).
-- Pore- N)t)roxim_mqy 1 gallon (4 qlmrts or
4 lilers) ofli'csh tap \*,r}lt{'rinto the top _md allow
to drain in[o tile bucket (floor rood(Is) or sink
((ounterto I) models).
-- Fh/sb with all additional 1 gallon (4 qmu'ts or
4 liters) ofli'esh tap water and allow to drain
lille the buckel (floor models) or sink
((ountertop models).
11. Reinstall the silicon stopper and drain cap (on floor
models) or the drain cover and retaining clip (on
coentettop models) (s(( Draining the Dispenser).
12. install a/i'(sh \\rater berth' (see Loading the Dispenser).
13. Dispense 1 quart (1 fiter) of water from each tap
and taste to m_&e sm'c the l/lc_tch solmion is
complelely removed.
If Foe continue to taste the chlorine from the bleach soletion,
repeat steps 10-13 enti] the taste is gone.
14. Phlg ill Ill( dispenser. Then Illrn Oil |tl( tl()| [_
and cold l)()wer s_xiI(ll(?s (Oil Ill(! ba(k of Ihe
disI)ens( r)" ON
position
To Remove Mineral Deposits:
Mix 2 quarts (2 liters) of water with two quarts of vinegar OR mix I gallon of water (4 liters) with 16 ounces (454 g) of citric acid
crystals, Bleach does not remove mineral deposits, Do this in place of step 5 when removing mineral deposits,
Page 8
Careand cleaningofthe dispenser.
Defrosting (GXCF2OE/GXCF2OFBB/GXCF2OKWW/GXCF2OKBBChiller Model)
Defrost whenever frost on the waft of the dff//er compartment becomes After defrosting:
excessive.Never use a sharp or metMlio instrument to remove frost
as # may damage the liner We recornmeed using a plastic scraper
Donot use aey ebctrical dev/ce /e defrosbTg yourchiller compartroeet
To defrost:
iJi:Remove iwms ti'oul tilt' (()mparmient.
Yi::'Ihrn tile (:/)1(t (ghle) Power switch to offand [lilt)big
tile dispenser.
iJi:Put several towels in the bottou] of the compartment
to collect watch
[)eh'osfi])g ttsually takt's a tow hours. To defl'ost Ii_sten
kee t ) the door opel).
Preparing for Vacation
For long vacations or abseI]( ('s, s('t both l)OWt'r s_itch(s
(on tile back of tile dispenser) to tile 0 (off) position.
1. Llnplug tile water dispens_ n
2. Remoxe tile ++*afterbottle.
3. Drain tl/e water tanks (see Draining the Dispenser).
Yi::Rem_\x' the wet towels and wipe up any remaining water.
>:Wipe the c()mparm]ent with a dr_ cloth.
;(::Plug in tile unit and turn on tile Cold (Blue) power switch.
Return items to the HI}it.
4. DIT the separator thoroughly on both tile toil and bouom
(see CleaningtheSeparator).
5. l,eave tile door of tile (hiller (ompartment open
(on som_ models).
After retumMgfrom vacation,makesure to sanitizethe water tanks
beforeusingthedispenser(see CleaningandSanitizingthe WaterTank).
Specifications
Chilling Rate: al)prox. 0.5 gallons (2 hter:) per holtr
Heating Rate: aI)prox. 0.8 gallons (3 liters) per holtr
Capacity: 3 or 5 gallon bottle
Power Consumption: } ]eati]]g: @0 "\V_IIISIIlaX,
Cooling: 125 _satts max.
Troubleshootingtips.
PossibleCauses What ToDo
Water has poor taste Separator needs cleaning. • See Cleaning the Separator
or odor
Water not hot enough Dispe_er is mlplugged. • PtlsIt lit(' t l lg- (oil| t le el)' tit o lit(' outlet.
or cold enough The fuse is blown/circuit " Replace house ftlse or reset lhe }reliNe circuit 1)reaker.
Water dispenser does Empty water bottle. • Replace with a ]/t'\_ rbottle t)f I&rate]:
not work - No water flow
Cold water button Chiller door has been left open. • Close chiller (loot:
does not dispense
Water dispenser leaks Crack or pin hole in bottle. " Replace with a }lOW bottle of ware}:
from the outside
Compressor does not start Normal Operation--Compressor • \Vail tor up to 3 miJmtes fi>r the COml)ressor lo start.
when coldpower switch/ start is delayed by up m 3 minutes
blue light is on to prolong the compressor life.
Bottle feels warm Water system overfilled. • Dispense ('/)1(1 wawr until air is released into the berth'.
¸¸¸¸¸¸¸¸¸¸¸¸
Unit needs to be sanitized. • See Cleaning and Sanitizing the Water Tanks.
breaker is tripped. "If too man) ileum are t)lugged i/]to a single circuit, move
some iwms loa dilIcrenl circuil.
MI the water in tim water tank "Wait 30 n|imfles Ior water lo heat or cool.
has been used.
Temperature limiter tripped. • Set the hot and coht power switches (Ira the back of the
dispenser) to the 0 (off)position. Wail live minuws: then
set the switches to the I (0o) position. Wait 30 minutes tbr
wate/" to }teat or cool.
Mineral deposits clogging tmalcs. "See Care and Cleaning.
Ice buildup blockix_ water flow. "Turn oItcohl power swiwh overnight and/lip back (m in
the )nor)ring.
Water is boiling in the hot tmxk
mad bubblhg up into the bottle.
Page 9
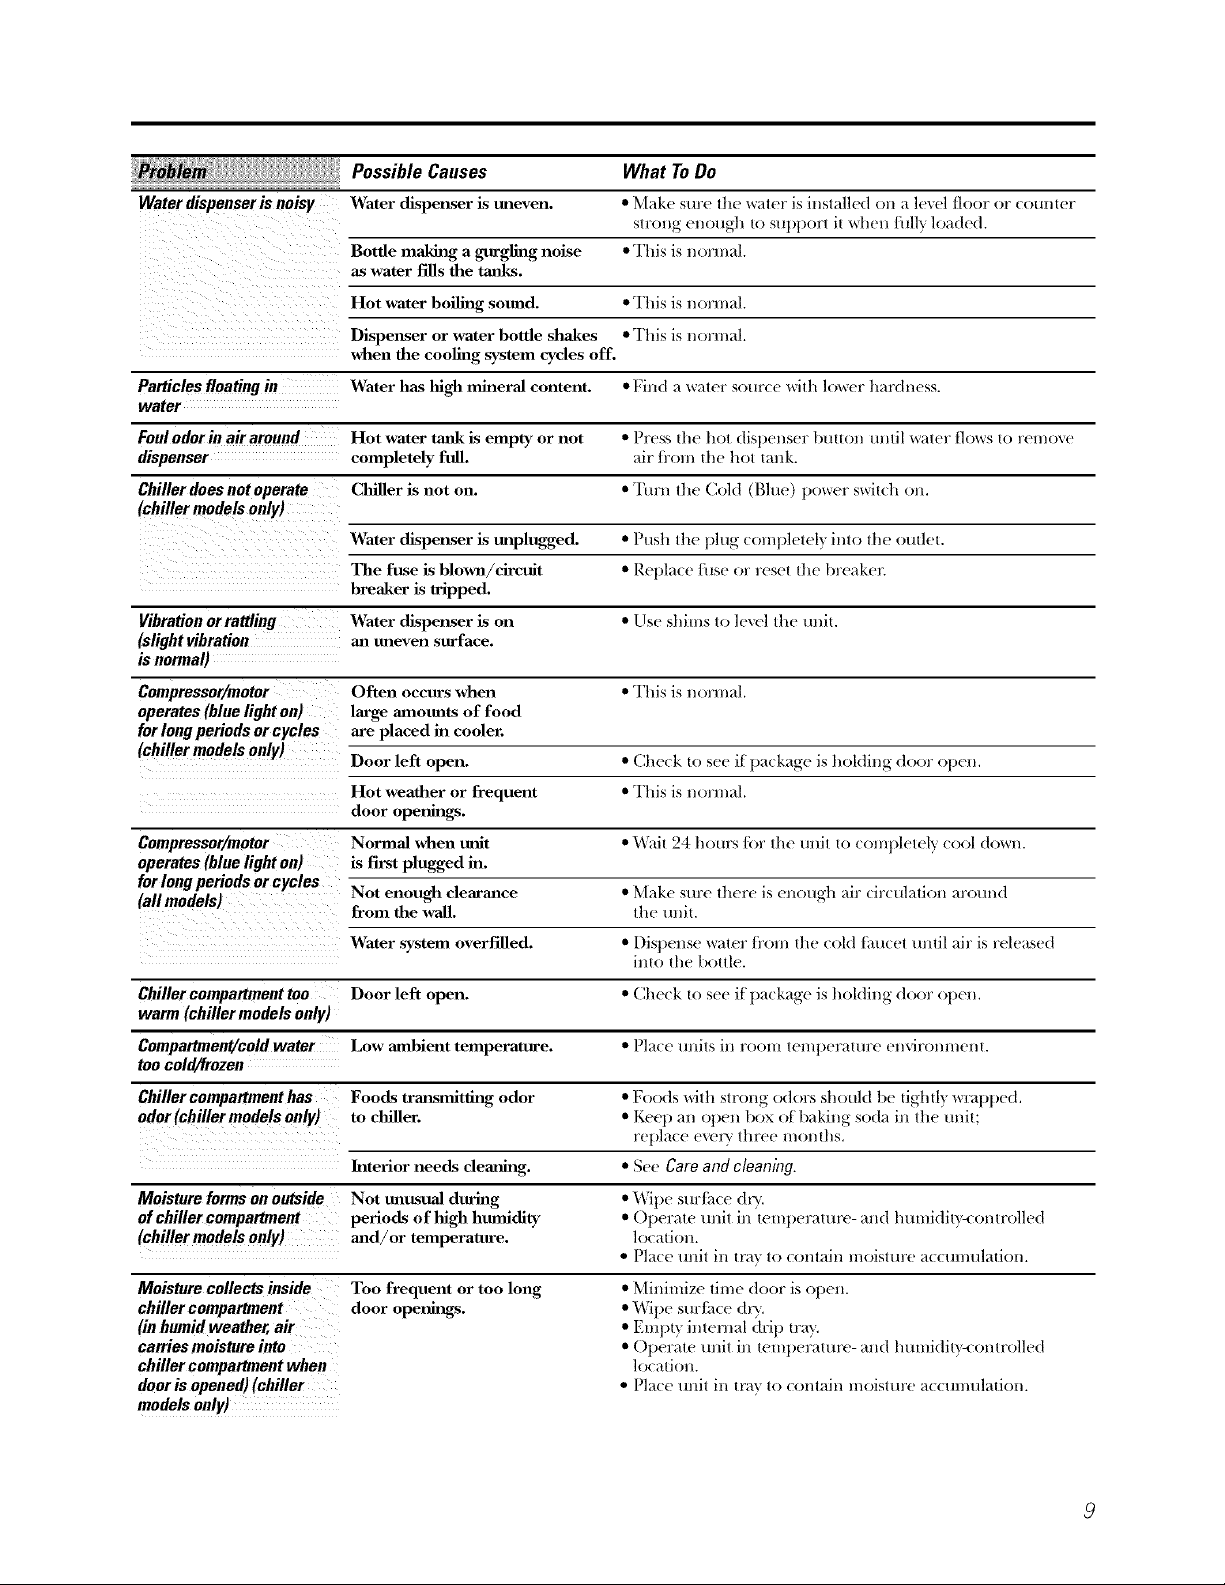
PossibleCauses What ToDo
slrong enough to SUl)porl it \vllcll fulb ](reded.
Bottle making, a gurgling noise • This is normM.
as water fills the tmflcs.
Hot water boiling sound. • This is non nN.
Dispenser or water bottle shakes • This is non n_d.
when the cooling system cycles off.
Particles floating in Water has lfigh mineral content. • Fiud a \%r_llel"source _Jll/]owcr hardness.
water
Foulodor in air around Hot water tmlk is empty or not _ /)_(x_ _ ]](x _()_ (ti_)(Xl/_(x]_ l)_[ [ ()_/ _]Jlli_ _r_ 1 (xr _]()_r_ _ () /'(xllJ()_r( x
dispenser completely full. air/]'om the hol lmlk.
Chillerdoes notoperate Clfiller is not on. • _]'t_J_] lit( _ ( 44()1(t (}_]t](') })()_r('l" S*l%ri|t--][ Oil,
(chiller models only)
Water dispenser is tmplugged. • Puslt_ l]le j)lug, colnj)hqel\, ilHo lhe oulltq.
The fuse is blown/circttit • Rel)lacc lust or reset the breakcl:
breaker is tripped.
Vibration orrattling Water dispenser is on • Ust +shil//s lo ]('xr(_l1][(' tll/il.
(slight vibration ma uneven surface.
is normal)
Compressor,/motor Often occurs when • This is n(n'mM.
operates (blue light on) large anmmtts of food
for long periods or cycles are placed in cooler.
(chiller models only) Door left open. • Check In see i_t)_,-kage is holding door open,
Hot weather or frequent • This is n(n'mM.
door opetfit_s.
Compressor/motor Normal Maen refit • V(;dl 24 hours tbr lhe mill to c(mq)lclel? cool doxArl/.
operates (blue light on) is first plugged in.
for long periods or cycles
(allmodels) Not enottgh clearmace • _/[ak( + slit'(" 1]leFt' ix e/lOtlg]t air circtll_llJoll arotll/d
from the wall. lhc ill/it.
Water system overfilled. • l)is})ense \vzll('r ll'()ll/ |lit' c()ld J_tHt-c1 tmlil air ix released
i/llo lilt" 1)ollle.
Chiller compartment too Door left open. • (iheck In see i[ t);. kage is holding door open,
warm (chiller models only)
Compartment/coldwater Low ambient telnperature. • P]_we IlllilS ill l'()()t/| lell/j)crtlHire (q/virol/li/tq/|.
too cold/frozen
Chiller compartment has Foods transmitling odor • Foods _ilh slrollg odors should t)c lighll} wrat)l)t+d,
odor (chiller models only) to driller. • Kee t) m/open box ofl)aking soda ill l]/c unit:
rcl)lace t+ver_ l]tl't't' ll/oI/lhs,
Interior needs demliug. • St'(" Care and cleaning.
Moisture forms on outside Not unusual during • V(ilw surt_(-e dry,
of chiller compartment periods of high humidity • ()t)eralc Hllil ill leml)tT;_lure- ;uld huluidil}_-onlrolh+d
(chiller models only) mad/ur temperature, loc;_lioiL
• Pl_*ce tlllil ill Ira} lo (-Ol/121il/ II/oisHlr(' _l(-(-tll/ltll;l|iOl/.
Moisture collects inside
chiller compartment
(in humid weather, air
carries moisture into
chiller compartment when
door is opened) (chiller
models only)
Too frequent or too long
door opetfit_gs.
• Minimize time door is open.
• Wipe surlime dr>
• Emp|) interned drip rely.
• Operate mlit in temt)cramru- and humidil}-controllcd
location.
• Place ullJt ill tra} to contain moisture a(cumulatJon.
Page 10

INFORMAT/ONSIMPORTANTESENMATIEREBES£-CURIT_'.
L/SEZTOUTESLESINSTRUCTIONSAVANTB'UT/L/SERCETAPPARE/L
AVERTISSEMENT!
N'utilisezcot appareil qu'aux finspr#vuesdansle Manuel du propribtaire.
PflECAUflONSDESdLCUfllTE
Ouandvousutilisez unappareilblectrombnager,vousdevezsuiwe desprecautions enmatibre desbcurit#,
en particufier los suivantes:
_: _;()tlS dev(z bien inslaller e! pla( er (( dislril)tlletlr
d'eatl, COIl['OrlIl('lIle]l| _1 ces illSl£/lclions, _l\r_tll| de
l'udliseL
i:?_Ne permeuezjamais _ des enthnts de grimpe_;
de se tenir ou de se pendre _'_l'extdrJeur du
distributeur ou sttrles dtag("res qui se wotlven[ _'{
l'int('rieur de l'armoire de rangement (sur certains
mo(h"les). Ils peuvem renverser le distrJbuteur et
l'endommager ou se blesser s('rJeusemem.
:!2,Ne rangezjamais ou n'utilisez jamais d'essence ou
d'autre liquide ou vapeur inflammable _'_proximit('
de ce distrJbttteur ou de [Otlt amre appareil
('lectrom('nager.
:;;Ddbranchez vo[re distrJbuteur d'eau avtli/[ de le
nemver ou de le rdpare_:
NOTE: GEn'est on favour d'aucune r@aration ou
entretien pour le distributeur.Nous vous
recommandons fortement de nepas essayer d'assurer
vous-m#melosr@arations ouI'entretien de votre
distributeur,
:)'_Les enfmlts doivent _tre surveill6s par tm parent
quand ils ufilisent ce produit.
_"AVERTISSEMENT:N'ufilisezjamais
d'eau qui ne soit pas microbiolo_quemeut sable
ou qui soit de qualit6 h_comme.
_:_A7-1"ENTION:_ disa'ibuteurr6chauffe
l'eau a une temp_ratttre d'environ 90 °C (194 °F).
L'eau a tree temperature sup6rieure a 52 °C
(125 °F) peut occasioxmer des brfilures s_v_res
ou la mort par _bouillmltage. Les enfmlts, les
persormes handicap6es et les persomaes fig6es
courent le plus grand risque d'etre 6bouillmlt_s.
Ce produit ne doit &tre udlis6 que
pour refroidir des boissons en bore ou en paquet
et des aliments non-p6_rissables emball6s.
i: N'ulilisezjamais ce dislribuleur pour dislribuer
atl|£e chose qtle de l'eau.
_:i_?Ne IIle[[ez t)as le COllll//tlta[('t W de i//arche en
position de marche ou ne branchez pas le cordon
d'alimentation qttand le distributettr est vide.
:!:;Essuyez route ('clat)oussure (l'eatt im111('diatelnent
aprg's a',_)ir chargd ou ddchargd les bouteilles
d'eau.
BONNEINSTALLATIONETBONENTflET./EN
ii,!I aissez au moins 2,5 cm (1 po) d'espace libre
entre l'arric',re du distribmeur d'eau el le tour
pour permettre une bonne drculation d'ail;
i:_ N'installezjamais le distrJt)uteur d'eau darts un
emplacement oi_ la temp('rature peut des( endre
au-dessous de 10 °C (50 OF) ou monter au-dessus
de 38 °C (100 OF).
_ ]nstallez le distritmteur d'eau sur 11i/plancher ott
comptoir sttltisamment lort pour le porter quand
il est comph"tement plein. Ne l'installezjamais
darts ttn enlplacenlent ott il peut &tre c\x])os('
dire(tement au soleil, _ la chaleur ou _'_l'humidit(',
10
Page 11

INSTRUCTIONSDEMISEALA TERRE
AVERTISSEMENT: Une ma.voise utifisation de/a fiche triphas#e peut occasionner
une secousse #lectrique.
Cel appareil ('leclrom('nager doil _'qre mis 5 la terr_.
En (as de (:ourl (ir(:uil dle(lrique, la raise _'_la lerre
r('duil le risque de se(ousse (,le(:lrique.
Cet appareil dlectromdnager est mmfi dhm cordon
d'alhnentation muni d'un til de raise fi la terre _v(,c
une tiche triphas(¢e. I _a liche doit _"tre branchde
darts role prise murale qui est bien installde et
raise _'_la terre.
Consuhez un ('lectricien qualifid si vous ne
comprenez pas bien les instru(tions de raise _'lla
terre ou si vous ne s_vez pas si votre appareil est
bien mis _'_la terre.
Si la prise murale est une prise normale biphas(:e,
vous (_qes responsable et vous _"tes obligd de la
remplacer par une prise triphas('e 1)ien raise
_'_la terre.
N( (oupez ou n'( nle'_rezjanlais la lroisibme bro(he
(raise _'_la lerre) du (or(hm d'alimenlali(m.
N'milisez pas une fiche d'adaplali(m a\rec ce|
appareil.
N'utilisez pas de rallonge dlectrique _\'ec cet
appareil. Si le cordon d'alimemadon est trop court,
demandez _'_un ('lectricien qualili(' d'installer une
prise murale prg's de votre appareil.
Pour un meilleur ffmctiom_ement, branchez cet
appareil dlectr()m('nager fi sa propre prise 61ectrique
pour (,viter tome lmni_'re qui clignote, risible qui
saute ou disioncteur qui bascule.
BONNEMISEAUREBUTDUDISTRIBUTEURD'EAU
Disposition du refrigerant
Votre an(ien distrilmteur d'eau pent (omenir
un r('li'ig(_rant r('glementaire dans son s}stbme de
reli'oidissemem. Ces r('trig(:rants sont jug& nocils
pour l'ozone stratosph('riqtle. Si vous d('barrassez
de votre ancien distributem', assurez-_ous que
le r(qi'ig(:rant soit enlex (' el r(:cup('r(: par tLi_
technicien certit](' par I'I£E\. Si vous lib('rez
intentiomlellement ce r('li'ig(:rant, vous pouvez
_"tre s(mmis aux contraventions el fi
l'emprisonnement sous provisions
des lois sur l'environnement.
LISEZETSUIVEZSOIGNEUSEMENTCESMESURESDESECURITE.
CONSERVEZCESINSTRUCTIONS
77
Page 12

Utilisationdudistributeurd'eau.
0
GXCFOSD
(ModUle sur pied)
GXCF2OE/GXCF2OFBB/GXCF2OKWW/GXCF2OKBB
'ModUle refroidisseur)
Caracteristiques et liste de pieces
Collierdesoutiendebouteille(WS2gX10047),gdspourlesmodeles
GXCFOSDetGXCCOID
Collierdesoutiendeboutei//e,blanc(WSZgX10049)pour/esmode/us
GXCF20EetGXCF2Oh'WW,noir{WS28X10048)pour/esmodules
GXCF2OFBBetGXCF2OKBB
0 S@arateur(WS28X10013)
Reservoird'eaufroide
0
Commutateursdemarcheeauchaude(rouge)eteaufroide(b/eu)
(arderedudistdbuteur),L( commutateurdemarcheCold(bleu)
i/let atb,si en l//al€lR • le col//paHJl//ent ictloklJs,Setly (stir inod_les
(;XCI_20Ei(;XCI_2t}FBBi(;XCF201d.U,W/(;XCI_2()I_{B).
0
Voyantslumineaux,Le\_}:mtvc_ts'allnmequandledisuibutcurest
blanch(_.Ie x_wantiot/ge etleu_vantbleus'alhll//el/let s'dtdgl/ent
quandledJstfibumurid(hatlflk•ou]elioiditl'eau, 1_ddl//allltf{ed/l
col//plt-sscur(:stietald(_dul'antune I)(_l]odepotB;u/talleljusqu'a 3
I/)JI//Itt'N
0
Boutonsdodistributiond'eauchaudo(rouge)etfroido(bleu)
P/ateaudecondeusationdudistdbuteur{WS2gXIOOlg)etgd//e
{WS2gXIO015),gdspour/esmodulesGXCFOSDetGXCCOID
P/ateaudecondensatioududistdbuteur(WS2gXIOO2g)etgd//e
(WS2gXIO027),blancpour/esmode/esGXCF20EetGXCF20/(WW
Plateaudecondensationdudistdbuteur{WS28X10031)etgrille
(WS2gX10034),noirpour/esmodulesGXCF2OFBBetGXCF2OKBB
Plateaudecompattiment(GXCF2OFJGXCF2OFBB/GXCF2OI(WW/
GXCF2OKBBseu/ement){WS29X10029)
Compattimentderaugement(GXCFOSD),N'utilisezjalnais
ce (:olnpartil//el/t pour langer des aliments qtti doi\t_m
elIe ittflJgt}l_S. Ce c01//pallil/lel/t n'est pasI(t[iJg_lde.
CompaNmeutrefroidisseur
{GXCF2OE_XCF2OFBB/GXCF2OI(WW/GXCF2OKBB).Cecompallimem
ne dolt _:trcutilis_(lUt•pour i e[roidirdesbois,sonsenboite ouen
paquel el des a]ilnenlsnon-pdfissablesemba]l&,
Etagereducompattiment{ws2gxIoo2g)
G
G
Capuchondedrainage(mode/esurpiedetrefroidisseur){WSOIXIO008)
0
Bouchoneusilicone(modulesurpiedetrefroidisseur){WSOIXIO007)
G
Bridederetenue(modeledecomptoir)(WSOIXIO01O)
@
Couverc/ededraineucaoutchouc(modeledecomptoir){WSOIXIO01I)
12
Chargement du distributeur
O#sinfectez le r#servoird'eau avantde/'emplir pour
lapremi#re fois (consultez"Nettoya.qe et d#sinfection
desr#servoirsd'eau").
IMPORTANT: Assurez-vous qoe/e distriboteor soit
d#branch# et qoe les deox commotateurs de marche
(eao chaude et eao froide, _ /'arri#re do distriboteor,
pour les mod#les qoi en sont dot#s) soient enposition
0 (art#t) avant de le chargeK Avant de le charger,
esswez le haot dela bouteille avec untinge propre et
lavez-vous /es mains. Evitezde toucher/a pattie de/a
boutei//e qoi sera en contact avec/e distributeor d'eao.
Assurez-vous que /e niveao de I'eao en haot do
distriboteor soit su_samment has pour permettre one
bonne installation de/a boutei//e.Si vous nele faites
pas, VOHSrisqoez de provoqoer on d#bordement do
distriboteoK
L Pclez l'dtiq/lcttc (/u cotIvt'ycl(" situd ('II h2tll[ (It"
1_bouteille(s'il y _ lieu). Ne retirez pas tout le
capnchon (/e l_ bouteille.
2. Pl_(ez la I)outeille en haul du (]istrillutem-
(omme l'indi(lue la figure, en aliguant la sonde
(111robinet (]iStlJbt!tt'lll" all (elltI'( (111 bI)ll(holl
(le 1_ bouteille d'eau. Pressez vers le basjus(ll£a
ceque la sonde pdn,Strc dins le/)ouchon de la
l)outeille, en pennettam ¢51_bouteille de
reposer Sill" le (ol (hi SOlltiell.
3. IMPORTANT: Appuyez sur les doux bo.tons du
distributeurjusqu'# co quede Yea. conic des
deux robinets.
4. Brml(hcz le (/istl-illuwul:
5. Mettcz les (Olnlnlltatelll-S (/e olaf( h(FROll) et
CIiAUD (situds fi l'arri,Sr(, (In cgt6 supdrieur
g:m(he du disu-i//tlteln, pour les lno(/?qes qui
en soot (Iotds) en position ! (marcho}.
6. Atmndez 30 minutes que l'eau meigne 1_
telnpdramre (hm[de et la telnpdlvmlre hoide.
Appoloz tin distribotoor local poor achotor vos
booteilles d'eao.
Page 13

Sauvegarde pour la protection des enfants
Le bouton du distdl)ut_ ur CtL\[ D est mtmi
qtl'tlIle SallVlJgal(/e polll It sc;(lllJr( _ des elllitllrS
qui rdduit le risque (le dist*ibtltion tc(i(lentelle
d'eml thmde par dejeunes enlants. Pour uriliser
Commutateurde
sauvegardepourla
_rotectiondes enfants
(e l)()/ItO11,tbites glisser le ( Oll)ll]l]ta[ellY Vt'ls le
ham et appuyez sur le 1)outon.
Entretienet nettoyagedudistributeur.
Nettoyage de I'exterieur de I'armoire et de rangement du compartiment
refroidisseur (surcertains modO/es)
IMPORTANT: Mettez los deux commutateurs de
marche (_ I'arribre flu flistributeur) en position 0
(arr_t) et d_branchez le distributeur d'eau avant
de lenettoye_
'_'1 )11S l)Otlvez Iletto_eF l'aYii]oiI'(' 1'1
le conlpartiment du (listril)uteur axec de l'eml
savotllletlse. Rill(Tez l/ie[l ave( (1( l'eall ptlre.
N'utilisezjamais de nettcgant (ommer(ial ou
de poudre a rdcurer abrasive.
Le distrihuteurreeha_fe /'eaua une temperaturo
d'enviroe88 °C (190°F).L'eaua role tomperature
superiouroa 52 °C(125 °F)peut occasiotmerdes
br_/uresou desblessuresserieusos par
ebouillantage. Lesenfants, lospersennes
haedieapees ot los persoenos_qees eoerent
le pl,s lerisque d_tro ebeuillaetes.
PTTENTION:Losoefants doivont
Otresurvei//es par ml parentquaed i/s uti/iseet ee
produit.
Enhwez 111poussi?-re du serpentin (111
(ond(nsat_ ur 5 l arfi?_tc d( l'app troll 5 laide
(l'tllle l)rosse Oll (l'tln Isl)italellt; PoQr (!l)t_:llir
les rdsultats les meilleurs, utilisez tm_ bross_
Sl)d(ial( merit (oncue 5 (ette lin. X.%us11
trouverez (]tns 11tplupart des m tg:lsins
d'apparcils dle( tromdn 1gets.
--_2. ............
"" Tiroirde
condensation
Nettoyage de I'interieur du compartiment refroidisseur
(GXCF2OE/GXCF2OFBB/GXCF2OKWW/GXCF2OKBB)
Pouraider a empOeherles odeurs,laissez tree
boite de t)icarl/onate de soude ouw:rre dins le
(ompalqiment refl'oi(lisset m
DObranehezle distributeuravantde nettoyer.
[ tilisez tlllt' solution d'em ti_"(le et de
bicarbonale (le sou(le-environ une (uiller fl
soupe (15 ml) de t/i(arl/onate de s()u(le par litre
d'eall, (](tie sohltioll nettoie totlt etl ilelltl'dlisallt
les odetlrS. Uillcez (r eSStlyeZ (ompl("tl:lllellt.
Grille
Tim# de condensation et grille
Ix' tiroir dc (ondensation (lu (listril)utetu nc
se vide pls mtomatiquement. Pour rdduire los
taches dues 5 l'eml ou 5 des ddp&ts, vous devez
vi(let; n_ tto?vr (t sd(her rdguli_rement le tiroir
et la grill(.
Nettox(z de ]a lll£qlle lllatli(_Yt ' los t11tFeS parties
du (oml)artiment t_ [roklissem; y (ompds les
joints (t les pi_x:es etl matin're plastique.
Nenettoyezaucunepibcede refro/d/sseurer?mat/bre
plastiqueclanslamachine_laverla vaisselle
Nem)vcz 5 l_eall l(_g('I'ellleIl[ sa'_( )lltlel/se (111
(lalls la (la}_.:tte StlpdlJ(llYt de votr( l]la(hille
fi lav_r la vaisselle.
13
Page 14

Entretienetnettoyagedudistributeur.
Vidange du distributeur
VOltS (]evt z vi(ler le (listlJbllt( llr aVallt (]e ttettoyeI- ]es l-dselvoirs et tvall[ (l( _ VOtlS abst_llt( f pOllF (]e lOll_llt_s Va(_lll(es ell ulle loll_tle (hlF_e.
Couvercle
dedrain et
bridede
retenue
Capuchon
desortie
Modgles sur pied
(arri_re du distributeur)
ModMessurpied
l. Metlcz les intcrrul)teurs (le mar(he (fi 1arri_:re (lu (lisrril)utetu-)
en position 0 (arrOt)et (Idl)ranchez le distrit)tttem d'em.
2. Enlevez la l)o)tteille d'eau dtt (]istlJbUt( Ul_
3, Mettez le CO)It( i)aIl[ qui r(:( tWl'_l l'emt cha)lde SOILS le rol)ittet
d'emt chaude. Appuyez sur le bouton du distributeur d'eau
ehaude jusqu'a ee que l'eau soit fraiche (environ 1 litre). Ajoumz
de l'eau at, rdsetw<)ir d')au li-<)i(]e (ca hint de 15ell la bouteille
limrni_ l'em) si ndcessaire.
4. Appuyez sur l(s deux t)ouEons (hi distnbureur et laissez couler
l'eau.jusqu'_'t c) qu'il n'y air plus (l'eau qui coule (environ I litn
d'eau demeure dtns 1((]istril)tttettr).
5. Placez tttt gcand seau s<)ttsIt set, i) de vidange simde 5 l'arri_:re
(l)) (/istrilmteur.
6. _\ l'aide (Fun rom'nevis Phillips, desserrez les vis du support
qui couvr( le capuchon d( sortie de vidang(. Faites tourner
le suppotls complbtem( nt pour axoir acc_-s au capuchon.
7. Enlev(z le capuchon et le bouchon de silicone d( la sortie de
vidange et p) rmetmz 5 l'eau de s'dcoulet; Aprbs la vidangc,
remettezonplace le bouehonet le eapuchon.
8. Faites tourner le support ;din de le r) nteme )n pla(e et
FesselTeZ ]es vis.
Assmez-v<)us d'installer une bouteille pleine et de [itire co)tier
l'eatt (1)) n)binet (]'eau (ha)lde tVal)t (1( l)ratl(her et (]e renlettre
en mart h¢ le distril)uteur (volt Chorgomont du distributour).
\,
Mod_les de comptoir
(bas du distributeur)
ModMesdecompto#
1. Metlcz les intcrtul)teurs (Ie mar(he (fi l'arri_:re (lu distril)tttettr)
en position 0 (arrOt)et ddl)ran(hez le distritmtettr d'(m.
2. Enlevez la bouteille )l'eau )lit )listfibttr_ ut:
3. Meuez le co)ltel)atH qui F(X tWI'_I l'eml challde sous le Iot)illet
d'emt chaude. Appuyez sur le bouton du distributeur d'eau
chaude j_u'a ce que l'eau soit fraiche (environ 1 litre). Ajoumz
de l'eau at, rdsetw<)ir d'eau li-<)i(]e(ca hint )le l't ell la l)oumille
limrnit l'em) si ndcessaire.
4. Appuyez sur l(s deux bouEons (lit distdb)treur et laissez couler
l'e m.jusq)t'5 ce qu'il n'y air plus (l'eau qui coule (environ I litr)
d'eatt demeure dtns le (listril)tttettr).
AVERT/SSEMENT:,eolevezledi. ib.,e.r
aveeprecautions; il pese environ 18kg (40Ibs),E:vitezde presser
accideatellemeatstir les boutensdudistributeurquand vousle seulevez
oule transportez.
5. Placez le distrilmtetu- sur un d'<ier avec 3 pieds sur le (omptoit_
"I_mez bien ou l)loquez lc (]istlJb)ttt'ttr dill q))'il soit iltln)obile
qtlal)d VO)tS el)ltwez la bri)l( )l( r( tel))l( er le (o)lver(le de
vidange, l_l)l('vcz la bride de retenue er le couver(l( de vidange
de la sortie )le vidang(, ell re)is assurallt de l)e pas ( l)(1OllllllageI"
le (:omercle de vidange. Permetrez fi l')au d( s'dcoul)m
6. Aprbs la vidange, remettez ea plaee le couvercle de vidaage et la
bridede retenue.
Assmez-v<)us d'installer une bouteille pleine et de taire coul( r
l'eatt (1)) n)binet (]'eau (])a)lde tVal)t (]e l)ratl(her et de relllettre
en mart h¢ le distril)uteur (volt Chorgomont du distributour).
14
Page 15

Enlevement Remiseenplace
soutien
debouteille
_ S@arateur
Nettoyage du separateur
IMPORTANT: Mettez losdeux commutateurs de
marche (_ I'arribre flu flistributeur) en position 0
(art#t) et dbbranchez le distributeur d'eau avant
tout nettoyage.
1. Enlt_ez la boutcille d'em et videz le
distfibuteur (consuhez, Vidagedudistributeur).
2. 12_II](vez ]e tolliet d( SOllli(l] ell IOllI'l]_tH[
da_ns le sens oppos(_ h celui des aiguilles
d'une nlontre el (ll [it_tl]l droll.
3. Enlevez le sdparatt'tlr etl matin-re plastitluC
e11 til',tt][ droit (VOUS _/V(Z p(ut-£-trc l)esoil]
de tordre ldg_-rement pour flOg]g(r).
4. Nt ttoyez le sdpat'ateur avec de l'em
saYol]t]eltse s_tvOtll]( use ott (l_t[is le
5. Faites bien s{:cher le haut et le has flu
sdp trateur.
6. A 1'dtl( (]'un lingo propre ou (l'tm essuit_
tout, sdchez le rdsetaoir d'eau hoide fi lend.
7. l--)cm(ttez le sdpat_tteur en place (]ans le
distribut_ m; Assm_t:7-vous title l'extrdmi_
allongde et amincie flu s(_parateur soi_ insdrde
lermemen/dans la prise mdtallique strode en
has flu rdservoil;
8. 1--'1metlez en place le collier tie soutit n et
Iourn(z dans le sens des aiguines d'une
monlrejusqu'fi ce qu'il soit bien fixd en place.
9. l-.)cln(tlez en place la bou[(ille d'eau
(conslthez Chargement du distributeur).
lave-vaisselle, sur le panier stq)drieuc
O#sinfectien et ne#oFage des r#servoirs d'eau
IMPORTANT: Vousdevez d#sinfecter p#riodiquement les r#servoirs du distributeur d'eau pour emp#cher route accumulation de
d#p6ts min#raux qui peuvent changer le go5t et le d#bit de I'eau,
Pour desinfecter :
l* A'_]I]I (te (t(_sil]fe( let _, ln(Hez les dtttx t Olnllllll_tteut_s
tit tom-(he (5 l'arH_:-r( till dislribuleur) en l)osilion
0 (arrOt)el dObranehezle distributeurd'eau,
NOTE:Pour la premi_-rt installation, saulez lts Position
drapes 2-4. ARR[:T
2. Vidtz la bouteillt (l'emh lmis retirez-la tit=distribttmtu:
3. Videz lts rdservoirs d'eau (volt Vidoge du distributeur).
4. Remettezen place la bouehonde silicone etla eapuehon dedrain
(modMessur pied), oule eouverelede drain etla bride deretenue
(modMesde eomptoir)(voir _dage du distributeur).
5. N'AJOUTEZPASL'EAUDEJAVELENPREMIEROU DIRECTEMENT
DANSLE DISTRIBUTEUR.L'eaude dave/eoneentree risque
d'endommagerle plastique.
\k'rs(z 1/2 cuiller 5 thd (2,5 ml) d'(au dt Javel domcstique
(t on(entnttion 6,0 % maximum) dans tree truthe tie 2 litrcs
remplie tl'eau tht r(_l)inet.
6. \i:rs(z la solution dans l'om(Tmre strode sur le (lesstts (hi
tlistfibttteuc
7. Rdpdt(z lts dtapes 5 et 6jusqu'5 ce (lU( le distributeur sol[ plein.
8. Appuyez sur les bout(ms tie distril)ution d'eau (htutlt et lioide
jusqu'5 (e qu( l'(au (oule ties deux robinets.
9. Laiss(z la solution agir pond m[ 15 5 20 rain(ires.
10. Rincagede la solutiond'eau de dave/:
--_'i([('Z 1( (oIlt( lilt des r(_s( rvoi['s (1 e_tLt ([HITS 1tit gt'dt]d se_tLt
(motEde sur pied) ou dvier (motEde de comptoir) (voir
Vidagedu distributour).
--A',surez-vous que le bert(hen en silicone (mod_Hes sur pied)
ou le (ouver(le (le drain (mod_dt s tie (omptoir) ne soit PAS
en plate.
-- IMPORTANT: Enlavezla separateuret nettoyezle reserve# d'eau
froide (voir Nettoyage du s_parateur).
-- Netto}ez, pttis r( mett_z (n place ]e sdp m_teur et le t:ollier de
souden (voir Nettoyago du s#paratour).
--\i-rsez approximativement 1 gallon (4 litres) d'eau du
r(_binet dans l'ouverttn_c du dessus, puts laisser l'(au
s'dcouler dans le seau (mod_de sur pied) ou drier (moth'de
tie comptoir).
--\i-rsez un mme gallon (4 litres) d'tau du robinet (]tns
l'ouverture (ht d( ssus, puts laisser l'eau s'dcouler dans le sere
(mod_-le sttr pied) ou drier (mod_de tie comptoir).
11. Remettezen place le bouehondesilicone et la eapuehonde drain
(modMessur pied), ou le eouverelade drain etla bride de retenue
(modMesde eomptoir)(v(fir Vidagedu distributeur).
12. Mettez cn place tree l)otueille d'eau h_dche (voir Chargement du
distributeur).
13. Laissez#coMer I litre d'eauh travers ebaquereblaet et gofitez-}
aiin tlt verifier que la solution tl'emt deJ wel a tomplbtement
dtd dvatude.
SiI'eaugoOtetoujoursla oh/are dela solution dealt de Javel, repetez
lesetapes 10h 13jusqu'ane plus pereevoir ee geM.
14. bI'_ltl(hez l( tlisllJbllt(Ul; M(ilez l(s COlIllllU[2ttellt'S
tie marcht eall chattt]( el (au l]-oitle (5 l'arri_!re flu
dislribuleur) en posilion I (marehe). Position
MARCHE
Pour enlever les dopOts minoraux :
M#langez 2/itres d'eau avec deux fitres de vinaigre; OU mOlangez 4 litres d'eau avec 454 grammes de cristaux d'acide citrique. L'eau de
Javel n'enlbve pas les dOpOtsminOraux. Appliquez cette procOdure _ I'Otape 5 Iorsque vous voulez enlever les dOpOtsminOraux.
15
Page 16

Entretienetnettoyagedudistributeur.
O#givrage (modOlerefroidisseur GXCF2OE/GXCF2OFBB/GXCF2OKWW/GXCF2OKBB)
Degivrezchaquefoisquele givresurlapard ducernpartb_entrefroidL_seur
devientexcessiveN'utilisezjamais d'instrumentaiguis#oum#tallique
pour enleverle givre, car vous risquezd'endommagerles oonduites.
Neusveusrecernrnandunsd'utiliserun gratteir enmatiereplastique N'utilisez
jsf;qais Ufl appareildlectriquepourdwivrer lecernpartimentrefreidisseur
Pour degivrer:
i_ Enlmez les aliments du (Oml)mlim( nt.
N Mettez le COl]li]lttt2ttellr de march( Cold (bleu) en position OFF
tarrY't) et ddbran(hez le distfibuteut;
ii: Mettez plusieurs serviettes (n |)as (h_ compaxliment, pour
recueillir l'eau.
Le ddgivrage prend gdndrak merit quelques h( ures. Pour ddgivrer
plus rapid( merit, 1fissez 11porte or/voile.
Pr#paratien au depart en vacanees
_/laIld VOtlS paltez t'iI va(all( t,s ell _, Oils _l|)Selltt=z ])endailt
longtcmps, lnetlt'z los deux ( olnmlltat('tlrs (1( mar(h( (fi l _,rfi?'re
du distfibuteur) en position 0 (arrOt).
1. D(q)ranchez lt"(/istril)uteur (/'cau.
2. Enl(_vz la bouteille d'eau.
3. Vi(lez les rdsep,oirs (/'eau (voir Vldage du distributeur).
Apres avoir degivre :
i_)Enle'v( z les s(*xiett_ s mouilldes et (ssu'_ z (omplbtement toute
(:all restante.
i_i:Essuyez le compartiment avcc tm linge sec.
ii: Branch(z l'appareil et mettez le colllllltttatel/r d( marche Cold
(blet 0 en position ON (mar(he). Rem(ttez les _liments dins
l'app _reil.
4. Ffites bien sdcher l( haut et le has du sdpa_'ateur (writ Nergoyage
du s_parateur).
5. laissez la porte du compartiment refloidisseur Ollvtqte (Sill
( ertains mod?qes).
Deretour de vacances, assurez-vous de d4sinfecter los r4servoirs d'eau
avant d'utitiser le distributeur (voir Nettoyage et dOsinfection des
rOservoirsd'eau).
Caract#ristiques techniques
Tauxde refroidissement: environ 2 litres (0,5 gallons) par hem('
raox de r#ohauClemeut: environ 3 litres (0,S Kallons) par heure
Capacit# :l)outeille de 15 OH2(1litres (3 ou 5 gallons)
CoBsommatiende courant: Rd(haulleln_ nt : 4S0 watts lntx.
Rehoidissemem : 125 watts max.
Conseilsde depannage.
Causepossible Quebite
L'eaua unmauvabgo_t Des_parateur d0it _tre nett0y& * Ctmsulle;' NetteyageNettoyagedu s@arateur.
_uunemauvaiseodeur
L'eaun'estpas Dedistributeurn'estpasbranch,. • Pouswzconlpl("temcn/la tithedanslaprisemurale.
suffisammentchaude
oufroide Defttsible a saut(}ou • Remplacez le titsible de lainai',lm ou reln',ntchel le di>iou(leur de la utaison.
te dis_ributeurd'eaune Laboutdlle d'eau est vide. • Reuq)laceNa par une m _u\clle bl_uteil/e d'cau.
nefonctionnepas- L'eau
necoulepas Desd*}p&sde min_rat_x * (ionsuhezEntretienetnettoyage.
L'eaunecoulepas@and vous Laporte du reffoidisseur d'eau est ouverte. • |"('m/ezla p*,r/c du re6'oidisseur d'eau.
appuyezsurleboutond'eaufroide
fa bouteille estchaude De s?st{'me d'eau est trop plein. • Dispensez tit' l'eau fi'oidejusqu'5 te que Fair es/_vlfit hd
to dis*ributeurd'eau 11y a tm troud'(?pingleou • R('mplacez pal' une nouwlle bou/eille d'eau.
code_ I'exterieur une fente dans labouteille.
Dedistributeur dolt 6Ired&infect& * (i*,nsuhezNettoyageet d#sinfectiondesr#servoirsd'eau.
le disjoncteur a bascul& • Sim _p d'artMes st_tl/branch& sue le t//_l/le circuit, enlexez qt/elqtlcs
m'/itles pour les braneher a un (irtuil difldwn/.
Toute Feau des r(}servoirs a _}ti• utilis6e. • Atteudez 30 minutes que l'cau w r&'hault(' ousc rc¢(_idisw.
Delinfiteur de temperature ' Me/fez les ('Otl/ll/tllB/et/r_d'eau chaude el d'eau fi'(fide (_'_l'arfi&'e du
s'est dbdeneh& dish'ibuteur) en pt)si/i0n 0 (arrOt).kuendez 5 I//itltfles, pois t//el/ez It's
tonmultamurs eu posi/ion /(marche).A/teudcz 30 minu/es que ]'eau
se reh'oidissc ou se rtlt ]/atl[]e.
bout]lent les ri_servoirs.
De la glaee emp_?ehel'eau de passer. • D(:bt'and_ez le (_nnnlulaleur du refmidisseur pendant la nuit e!
_vl)ranrhez-le le marie.
L'eau bout dans le r(}servoir d'eau dans labouteille.
chaude et bouillonne dans la bouteille.
16
Page 17

Causepossible Quefaire
.....[ecompresseurned_matrepas Opi_rafion normaJe--Le d_marrage du , Pa& ntezjusqu'_'t 3 Jninul_ s p(mr perm_ ur_ au (ompr(ss(ur & d_marn t;
lursquele vuyantbleu de compresseur est retard_ durant tree p_rinde
I_ntermpteurd'eaufruide pouvant afterjusqu'_t 3 minutes a£m de
est allumO prolonger la dur_e de vie du compre_eur.
Le distributeurd'eau Le distributetw d'eau • \,',surez-s_msque le disu'ibuteur d'eau soil bien ixtstal16sur un planchx r
faitdu bruit n'est pas bien _tniveau, horiz(mul suflisamull nt {brt pour le soull nir quand il _st plein.
I,a bouteil/e far un glou-glou * Ce bluil _sl nornlal,
qt_ld I'eau remplit les r_servoirs.
Son d'eau chaude qui bout. * Ce bluit _sl nornlal,
Le distributeur ou la bouteille * (Zsl n(wmal.
d'eau vibre lorsque le sTst_me de
refroidissement termine son cycle.
ParticulesquifluttentdansI'eau L'eau confient beaucoup de min_rat_x. * 'fi'omez une sourcx d'eaxl moins dure,
Unemauvaise udeurdans Le r_servoir d'eau chaude est vide . _ppuyez sur II l)ouhm de distribution d'eau daaude jusqu'_'t ceque
rair autuurdu distributeur ou pas compl_tement plein, l'<m coule pour &er l'air dun ser_oir d'eaxl ( haxlde.
Le cumpartimentrefruidisseur L'appareil n'est pas en marche. . MeUlz ]e coumlutateur d( marx:h( Cold (hi(u) (n posidon
nefunctiunnppas ()N (marllhe).
(moaetesrelrulalsseurs
seulement) Le distfibuteor d'eau n'est pas bnmch& . t)oussez ]a fidte (ouq)ll"temx nt dans la pris(,
Le fttsible a saut_/le disjoncteur a bascul& •
/Isepruduit des vibrations Le distfibuteor d'eau se trouve sur • L lilis_z&s (aks pore" l)i_n m(Ure l'appardl _'_l'horiz(mtale.
uuunbruitdecrecelle une sorface in,gale.
(desvibratiunslegeres
suntnunnales)
Le compresseur/muteur Cela se pro&fit souvent quand de gra:ades • C(sl nornml,
fonctiunne(la lumiere bleue qtmntit_s d'aliments sont plac_es dans
marche)pendantdesperiudes le compartiment refroidissetm
uu des cycleslongs (mudeles I,a porte est rest_e ouverte. • \ssur( z-sousqu'ml paquet ne bloq u( ])as la ti rnlx ulr( de la porte,
avec cumpartimentrefruidisseur L'eau est chaude ou votts ouvrez • C'esl n(wma].
uniquement) souvent la porte.
Le cumpresseurhnuteur C'est normal quand vous venez de • \Uen& z 24 hx ures que l'appan il soil (ouq)l("lenl( m r_ fi'oidi.
functiunne(lalumierebleue bvancher l'appareil.
marche)pendantdesp_riudes L'appareil n'est pas plae_ • \,',sur_z-_ousqu'il ? air suflisamul( m de circulalion d'air a_m_tu'(k
uudescycleslungs(tuuts stfffisamment loin du mtm l'apparx il.
mudeIes)
te cumpartimentrefruidisseur Laporte est rest_e ouverte. • \ssur( z-_ous qu'un paquet ne bloqu( pas la th'mx um & la porte.
esttrupchaud(mudeles
refruidisseursseu/ement)
Cumpartimengeaufruide Temp_ratore ambiante basse. • Pla(ez l'appan il dam tm _nviroml_nlx nt ot'_la temp_ ramre anlbianl_ _sl
trupfruide/gel ntlrnlak .
Le compartimentrefruidisseur Les aliments tra:asmettent de 1odeur
a des odeurs (mudeles au compartiment refroidisseur.
refruidisseursseulement)
Ilsefurmedel_umidit_ Ce n'est pas m_ormaJ pendm_tdes
I'ext_rieur(mudeles p_rindes de haute temperature et/ou
refruidisseursseulement) haute humiditY.
1/sefurmedeI'humidit_
I'int_rieurducompartiment
refruidisseur(@andilfait
humide,l'airtranspurtede
rhumiditedanslecompartiment
refruidisseur@andvuus
uuvrez/aporte)(mude/es
refruidisseursseulement)
Le sTst_me d'eau est trop plein. • l)isp_ nsez de ]'lau dx robinel fl'oidjusqu'_'x(e qul l'air _sl rll_, h6
dartsla bouteill(,
• Vousdewz bien empaqueterlesalimenls qui ont desodeurs[orles.
• Conservezuneboi'teo/n_!rttde bicarl)onatede soude darts
l'appareil;rempla(ez-latousles troisulois.
Vous devez nettoyer l'int_rieur.
• Consultez,,Coinsetnettoyage,
• E#uwz bieu la s/u'tilce.
• Faitts[i)netionnerl'appareil dartsdesemplacementot'_la
temp&ature et l'huutidild sont conu'61&s.
• Haez l'appm>ildam un platemlpour x,_cueillirl'a(cuululafiond'huulidin;.
Vousouvrezla porte trop
fr_quemmentoutrop Iongtemps.
• Dintinuezle lempsd'ou_aTturedela porte.
• Essmezbieu la surtale.
• Vid& le plateaude condensationinlt_rktn:
• Faiteslimetionnerl'appareil dartsdesemplacemeul offla
temp&ature et l'htmtidilOsoutcontrg_l(;es.
• Placezl'appa_vildarts unplateau pllur recueillirl'attum ulatJon
d'hunlidil_:.
17
Page 18

Soutien au consommateur.
Site/nternetgEApp/iances www.electromenagersge.ca
_X(!Z _,tIIIS Ililt? question OU besoin d'aide contenmnt xolre ai)pareil €}leclronl('nager? Essayez It siw
ill|erllt 111_!(;l_ Applianct s, 24 heures par join; 3(;5 jours par an. Pour plus de confort tl de rapidil6
VO[IS pO[lVt!Z i/lali/|t!nai/| "}' exlraire ]es I/I}[II[ltT1S d'ulilisa|ion, el l/l{"l/l(? COl/llllalld( y (lt!s pi_"c(?s.
StudiodeDesignpourla VraieVie www.electromenaqersge.ca
(;It agil at'tivcnlt'nt ill Jil,,t'ur du t oncoi)t tie I)csign lJni,,t rs(,l-----<]es produits, services ct t nvJronnt iiR'nts
(lid peuvci_t 01re utilis('s par des i)ersonnes tie tout age, faille et cai)atit('. Nous recommissons le besoin
de concevoir des prothfits adapt('s a m_ grand hombre tie handicaps physiques et mt ntaux. Pour obtenir
des delails sur les api)licafi(ms du Dt sig-n Universel tie GE, (lui comprei_d des id&s d'agencemt nt tie
cuisii_e pour des i)ersolmes handicap('t s, cons_fltez d_.s fi pr('sem notre site imernet. Pore" les persomles
mal-('ntendai_tes, mtrti d'aI)pder le numero : 800.TDD.(;EAC (800.833.4322).
Pibceset accessoires
I,es personnes t)eu_ent recevoir directement fi la maison des i)ibces ties carles _I.N_.\, MasterCard ou
Discox(,r SOllt act ept('es). Comlllandez ell ligne fi tout moment, 24 heures i)arjour ou par tdldi)hone
all i/tllllel'o 800.(;26.2002, aux l_tats-UlfiS, l)endant les horaires de bm'eau habimels. An Calmda,
appelez au numero 800.(;(;3.(;0(;0.
Les directives stipulOes dans le present manuel comportent des procedures que n'importe quel utilisateur
peat effectuer. GE n'est en favour d'aucune reparation ou entretien pour le distributeur. Nous vous
recommandons fortement de ne pas essayer d'assurer vous-m&ne les reparations ouI'entretien de votre
distributeur.
ontsctez nous www.electromenagersqe.ca
Si xous n'01t s l)as sadstidt thl S_ r'At e Ai)res _( illt} (ion[ _,OllS_r_z bdn('I_ci(' de (;E, tonmtlez i/oils Sill"
IIO|l't? Sil(_ tTll fournissanl |ous les details, y conli)ris volre illlt/lt?l'O tit! 1('16I)}lont , (111eci'ivt z au :
Managt r, (Mslomer Relations, (;E Appliances, Ai)i)liai_ce Park, I,ouls,dlle, K_ 402_ ).
GARANTIE LIMITl_E D'UNE ANNl_E
• @a,(,mvw/. grnanfi_,?
--'Ibut ddthut de matdriel ou de main (['ocuvic du produit.
-- l.cs bout_ illcs (['cml.
-- Los ({('placclll_ Ills _'1v()tlt_ domicile pour vous cn',t igllcr ((lllll/lcnt
utiliscr k produit.
--Ullt2 installatioll, rt lllibt Oll cn[Fcti< 11 incorl't etc.
--[Jilt pannt du produit causdc par un abus (l'utili_ltion. unc
mauvaisc utilisation, tout_ modification, exploitation commcr(iale
ou role utili_aion du p_oduit darts m_ I)ut non prdvu.
--'lout p_oduit qui (st utilisd cn dehors d'tm(: rdsid(nct ou d'un
I)urca/i.
-- Ix" remplacenl(nt des thsibles ou (ks di@mctcurs de la rdsidcnce.
--Utili,_tion (k ce p_oduit l()rsque l'tau est microbiologiqut m_ nt
imptm ou dc qualit(" inconnue.
--I)ommagc au produit si urns l'utiliscz pour distribut r alltrc chose
qlle (It l't atL
--'Ibut domlnag_ (:au_d au produit ])at accident, inct ndit. inondation
(Ill aCtC ([c Dit 11.
-- qbut s_ rvict au pro(luit.
-- Tom dommage fortuit ou indirect CmLS_ par des d6fauts 6ventuels
de cet appareil, son installation ou les r6pm-ations effectu6es.
Garant : General Electric Company,Louisville,KY 40225.
18
www. electromenagersge,ca
• . • 9_
• @_dl*.,_st:la d.*;_,de la,g_nam/*.ap_;*:}_d_ag?
-- Um anndc.
• ():mm*'**tdoiQ:'/ahe ma _;dm:/atio_*?
-- F.alIlCIlcx It pFo(hlit au lllagasill oi'iVOtlS l'avcz a(ll_ R: ave( llIW
(•X(•IIll31_liFt (IC l_l "Plt2tlVt (I'll( h_it'_ 1_ii( ilnit(" llCtlvc oil iClilis( a if(ill
s_ra Iournk. Cctte garantit < xclut Itsfi'aisd'<xpddition du produit _'_
VOtl'C dOI/licilc.
EXCLUSIONDE GARANTIESIMPLICITES--Votre seal et unique
recoursest I_change du produitselon les dispositionsde cette
Garantie limiMe. Toutesles garanties implicites, incluant les
garanties de commercialiM et d'adequation a un usage
specifique, sent limitees a une annee ou a la periode la plus
courte autorisee par la legislation.
Cetie gm-mitie couvre l'achetetxr orighial et mm propri6taire sltbs&luent des
prodttits achet6s h des finis r6sidentielles ou de bureau h l'int6deur des Etats-
Unls. En Alaska, cette gat_tntie exclm le coi!! d'exp6dition ou les appels de
service/t votre lnaison Otl burea_l.
Cer tahis l_tats ne pennettent pas l'exchtsion ou la restriction des donmiages
accessoires ou cons6cufifs. Cei*e gm-arltie votts donne des droits jurldlqtms
parficuliers, mais voos pouvez 6galement avoir d'autres droits qtfi varient
d'Eta!/t Etat. Petit connaiia'e yes drolts juridlques, collstfltez le btlrealt de
protection dtl consolrmlalet tr de votre localitY, de votre Etat ou le proc_tretlr
g6n.q-al de votre EtaI.
Con_clez notts sill" ge.coln, OU appelez le nttl116ix_ sal_s frais 800.952.5039
atLx Etats-Uxfis. A_t Canada, contactez [zeus sin" x_¢.eleciTonlenag'ersge.ca,
ou appelez le ntma6ro sans frais 866.777.7627.
Page 19

/NFORMAC/ONESBESEGUR/DAB/MPORTANTES.
LEATODASIAS /NSTRUCC/ONESANTESBEIJSAR.
iADVERTENCIA!
Use esteaparatosolamente con elpropdsito para elcual fue fabricado deacuerdo a como sedescribe en
este Manual del Propietario.
PRECAUCIONESDESEGURIDAD
Cuando use aparatos, usted debe tomar ciertas precauciones de seguridad, incluyendo las siguientes:
i,:Eslc dJspensador dc agtla dcl)c scr instalado ii,! I Jlllt)ie (tlal(ttlJcr dcrrall/c de agua
apropiadamentc y localizado de acuerdo coil inmedialaulcnte despuds de haber llenado
estas instrucciones ames de ser usado, o x_(cia(to t/olellas de agua,
::_':No permita que los nifios se trepen, paren o
cuelguen de la parle externa del dispensado/;
(7 en lOS estantes ell el interior dcl gabinetc
de almacenan/iento (ell algtmos modelos). Esto
podrfa hacer que el dispensador se vohee y se
dafie o cause lesiones serias a los niflos.
!_;_No almacene o use gasolina ni olros vapores
o lfquidos inflamables prdxJmo a este u otro
aparato.
i);?Desconecte el dispensador de agua amcs de
limpiarlo o hacerle cualquier reparacidn.
NOTA: GE no proporciona servicio para el dispensador,
Recomendamos que no intente proporcionar servicio
al dispensador usted mismo,
i,>No use este dispensador de agtta para disl)ensm"
nillg-tlna olra cosa qtle no sea agua.
:: No conccl( cl (ablc el('(lri(o ni a(cione los
intcrrul)lor(s el& tri(os (uan(lo el disl)ensador
_:_Los nh_os deben ser supervisados por uno de los
padres cuimdo se disponga a usar esm producto.
ADVERTEIVClA:_o._eco._a _.e
sea nlicrobiologicamente hlsegura o de calidad
desconocida.
PRECAUCION:E,dispensador
calienta agua atma temperatura de
aproxhnadamente 90 °C (194 °F). FAagua a
temperaturas mayores de 52 °C (125 °F) puede
ca(tsar quemaduras severas y hasta la muerte
debido a las quemaduras. Los nh_os, las personas
con h_capaddades flsicas y los andmms fienen tm
riesgo mayor de sufrir quemaduras.
AVlSO:Este producto lJene la illtendoll
de ser usado solamente en bebidas enlatadas
refrigeradas y en bebidas en cajas, ademfis de
productos shl expiracion empacados.
INSTALACIONAPROPIADAYLOCALIZACION
!_;:t)ennita t)or 1(7menos 2,5 cm (1 t)ulg.) de cspacio
enm' la parle posterior del dispcnsador de agua y
la pared, para permitir que el aire circule.
i);?No instale el dispensador de agua donde la
temperamra est(' por deb@) de 10 °C (50 "F)
o por encima de 38 °C (100 "F).
i:i_)]nstale el dispensador de agua en un piso o
cncimcra nivclado lo sufi(icntcmente rcsislente
para resisdr su peso cuando est(' totalnlente lleno,
No instalc dondc est(' suicto a la hlz dirc(ta del sol,
calor o humedad.
19
Page 20

INFORMACIONESDESEGURIDADIMPORTANTES.
LEATODASLASINSTRUCCIONESANTESDEUSAR.
INSTflUCCIONESPAflACONEX/ONA TIEflflA
ADVERTENCIA:E]._o inapropiado de un enchufe que no est_ conectado a tierra
apropiadamente podda resultar en riesgos de descargas el_ctricas.
Este aparato debe estar conectado a derra. E_:, el
taso tie que ocm*a m:, corto circuito, la coi,:.:,xidn
a tierra reduce el desg-o tie descarga el&tdca.
Este aparato est_i equipado con un cable el&trico
que dene un enctmlc que cuenta con un cable para
sert onectado a derra, E1 enchulb debe estar
conectado a un enchulb que est( _ instalado
apropiadamente y que est,: conectado a tierra,
Consulte a un electricista caliticado si usted no
entiende las instrucciones de conexidn a tierra, o si
existe alguna duda de si el aparato est_i conet tado
apropiadamente a tierra,
Si el enctmtc es uno est_indar de dos claviias,es su
responsabilidad personal y obligacidn hacer que sea
reemplazado ton un enchulb de 3 clax_jas con
(onexidn a tierra.
B@> ninguna drt unsmncia (orte o ['_l_[]_r_ la
ler( er claviia (lad(! (oi:,exidiJ, a lierra) del tabl(_
el& lri(:o.
No utilizar un adat)tador con este aparato,
No utilizar un (able de extensidn con este aparato,
Si el cable eldctri(o del aparato es muy (()rio, haga
que un electricista calilicado instale un
Io///aco/TJe/lle cerca del aparato,
Para obtener una m@)r operacidn, enclmtb este
aparato en su tomacorriente propio para evitar que
las luces parpadeen, que se queme un fltsible o que
se dispare un interruptor de circuito.
COMOEI/MINARSUDISPENSADOflDEAGUA
DEFOflMAAPflOPIAOA
Deshacerse del refrigerante
Su antiguo dist_cnsador dc agua tmcde habcr
usado un reli'igerante regulado en su sistema
de enl?'iamiento, Estos ret?'igerantes son noci_>s
para el ozono estratost[¢rico, Si se deshace del
antiguo dispensador asegfirese de que se
deshaga del ret_'igerante correctamente por un
t6cnico certit_cado E[_\. Si se libera a propdsito
el ret_'igerante tmede estar st!jeto alas muhas y
al encarcelamiento b@) las estipulaciones de la
legislacidn ambiental.
20
LEAYSIGACUIDADOSAMENTELAINFORMACIONDESEGURIDAD.
CONSERVEESTASINSTRUCCIONES
Page 21

Comoutilizarel dispensadordeagua.
GXCCO1D
Modelo de encimera
GXCFOSD
Modelo de piso
GXCF2OE/GXCF2OFBB/GXCF2OKWW/GXCF2OKBB
Modelo con enfriador
Lista de partes y caracteristicas
0 Collardeapoyodelabotella(WS28XlO047),grisparamodelos
GXCFOSDyGXCCO1D
Collarde apoyodelabotella,blanco(WS28XIO049)paramodelos
GXCF20EyGXCF2OKWW,,negro(WS28XIO049)paramode/os
GXCF2OFBBy GXCF2OKBB
0 Separador(WS28XlO013)
Tanquedeaguafria
O InterruptoresparaaguaFria(azul)yCaliente(rojo)(enlaparte
posteriordeldispensador),E1intemq)tor de poten(ia (old (fi'io)
(azul) tmnbi(;n ,:!nciendeel compartinliento lil'o (en mode]os
CX(IF20E,"(;"_(YEOI"BB/ CXCI_(}I_,BAV,,'CX(]_01_BB).
_Luces indicadoras.I.a]uzverde ('qar_ encendidacuando el
dispensador esld {one{t2_d().I,as hues lz!ja) azul hark] un cMo
de encelldkh) apagad(} mienm, sel dispensador calienla o
{'nti'_ael agua. El ini(io de] compresor st'fitdilalado pot hasta
3 minut(}s.
BotonesparasuministraraguaCaliente(rojo)yFria(azul)
Bandejadegoteodispensadora(WS28X10016)yParrilla
(WS28X10015),grisparamode/osGXCFOSDyGXCCO1D
Bandejadegoteodispensadora(WS28X10026)yParrilla
(WS28X10027),blancoparamodelosGXCF20EyGXCF20/(WW
Bandejadegoteodispensadora(WS28X10031)yParrilla
(WS28X10034),negroparamode/osGXCF2OFBByGXCF2OKBB
Bandejadecompattimiento(GXCF20UGXCF20FBB/GXCF20K[44_/
GXCF2OKBBso/mnente)(WS29X10029)
Compartimientodea/macenmniento(GXCFOSD).N(>uli]iee
[}a/'a allI]a(eIlar alilt]e/llos q/le re{]tlieral] reti'igerad6n.
E1COlllp31'[JIni{}II[() I/O es till I"ehJ_e/'d{]OI2
Compartimientofrio
(GXCF2OUGXCF2OFBB/GXCF2OKWW/GXCF2OKBB).
E1{ompartimi( nto tiene la imenci6n exdtlsi_ de ser usa&) en
bebklas eIl]alada_,refi'ig_!ra&s ) en bebidas en (@Ls,atleHl(tslit'
p/_)(hlcI{}S Si]] exlkaci6n en]pa( ados.
Estantedecompattimiento(WS28XIO028)
Tapadedrenaje(modelosdepisoyconenfriador)(WSO1XIO008)
0 Tap6ndesi/iconaOnode/osdepisoyconenfriador)(WSO1XIO007)
Ganchoretenedor(mode/osdeencimera)(WSO1XIO010)
TapadedrenajedecauchoOnode/osdeencimera)(WSO1XIO011)
Comocargar el dispensador
Besinfectelostanqeesdeageade/dispensadorantesde
eargareldispensadorla primeravez(vet "Comolimpiary
desinfectarlosfanqeesdeagea").
IMPORTANT£"CerciSresedequeeldispensadorest_
desconectadoconambosinterruptoresdeaguafda Yde
aguacaliente(enla parteposteriordeldispensador,en
modelosquedispongande estacaracteristica)enla
posiciSn0 (apaqado).Antesde colocarla botelladeagua
eneldispensador,I&ese lasmanesy limpielaparte
superiordela botellaconunpatiolimpio.Evitetocarla
partedela botellaque estateencontactoconel
dispensadordeagua.
Cerci&esedeque el niveldel aguaenlaparte superiordel
dispensadoresIo suficientementebajaparapermitirque
la botellapuedaserinstaladaapropiadamente.Nohacerlo
podriacausarquehayaun derrameeneldispensado_
1. Pele la etiquem de la cubierta superior de la
botella (si (lisp(me tie ella). NO_emueva toda la
mpa (It la botella.
2. (2oloque la botella encilna del dispensador, mly
(OHIO Se llll]eslla. Alinee la SOl>(la(/e la v[flvulade
dispensaci6n con el centro de la tapa de la bo_ella
(le agua. P_esione hacia ab@) hasm que la sonda
peneue en la mpa de la botella, perlnitiendo que
la botella se coloque sobre la ab_aza(le_a de apcwo.
3. IMPORTANTE"Presioneamhoshotonesde
dispensaeionhastaquesalgaageaperamhosgrifos.
4. l_211cllut( el (lislx'nsador.
5. (2oh>(luelosilm'HuptoresdeaguaFR_)'
CALIENTE (ubi{a(h)s en la palE('superio)
iz(luierda (letr_is del dispcnsa(Iol; en lno(/eh>s que
dispongan dc csla cara(tel%tica) ell la poski6n
I (eneendido).
6. D@, que trans_urran30 lninutos para que el agua
ak an(e lastelnperaturas (aliente y fifa.
P6ngaseoncontactocon undistribuiflordebotellas
deaguaIocalparacomprar/asbotellas.
21
Page 22

Comoutilizarel dispensadorde agua.
Seguro contra ni#os
El |)otdn (',kl ]ENTE del disi)ensador est5
equii)ado con i11/seguro (ontra nifios que
reduce el riesgo de que tm nifio suministre
agua (alienle accidentahn(nte. Para usar el
botdn, deslice el interrupter hacia arriba y
presidn( Io.
El dispensador calienta agua a una
temperatura de aproximadamente 88 °C
(190 °F).El agua a temperaturas mayores de
Cuidadoy limpiezadel dispensador.
Comolimpiar el gabinete exterior y el compartimiento frio de
almacenamiento (onalgunos modelos)
IMPORTANTE: Coloque ambos interruptores
el#ctricos (en la parte posterior del
dispensador) en la posiciSn 0 (apagado) y
desconecte el dispensador de agua antes
de limpia_
E1 gabinete y el compartimiento del
dispensador t)ueden ser lavar con jabdn
StlaVt' V agua. I .avc' bien con agua limt)ia.
Nunca use limt)iadores comerciales o t)oh_s
t)ulidores abrasives.
52 °C(125 °F)puede causar quemaduras
severas yhasta la muerte debido a/as
quemaduras. Los ni_os, /as personas con
incapacidades fisicas y los ancianos tienen
un riesgo mayor de sufrir quemaduras.
f
PRECAUCION:tus,,i osdebe,
set supervisados per unu de los padres cuando
se disponga a usar este producto.
Pase un patio o limt)ie con una aspiradora
cualquier t)olv() de las bovinas del
condensador en la t)arte t)osterior de la
unidad. Para m_jores resultados, use un
cepillo est)ecialmeme diseflado t)ara este
t)r()pdsit(). Estos est_in dist)onibles en la
ma}orfa de las tiendas de aparatos.
Parrilla
/
Come limpiar el interior del compartimiento frio
(GXCF2OE/GXCF2OFBB/GXCF2OKWW/GXCF2OKBB)
Para ayudar a evitar olores, d(je una c_!ja
abierta de bicarbonate de soda en el
comt)artimiento ti'fo.
Desconecteeldispensadorantesde limpiar.
Use una solucidn de agua tibia y
bicarbonate de soda: alrededor de una
cucharada (15 ml) de bicarbonate de soda
y un cuarto (1 litro) de agua. Esto limt)ia
y neumlliza los ol(m's. Eniuague y limpie
]lasta secan
I Jmpie otras t)artes del coml)artimiento |i'fo,
inclu} endo los empaques de la t)uerta y
todas las t)artes t)lfisti(as de la misma |i)rma.
No lave eieguea parte plbstica &l eefriador ee la
lavadora&p/atos.
Comolimpiar la bandeja de goteo y parrilla
I,a bandeja de goteo del dispensador i/o
drena automdticamente. Para reducir el
goteo de agua, la ban&ja y su parrilla
deben ser vaciadas, liml)iadas y secadas
de manera regular:
I Jmi)ie con unjabdn suave' o en el estante
sul)erior de un lavaplatos.
22
Page 23

C6mo drenar el dispensador
El dispcnsa(lor d('bcrfa sur druna(lo ant('s (h' lhnpiar los tan(tues y antes (h' salir a una vacacion('s largas o aus('ncias.
Tapade
drenajey _\ ® _.
retenedor I('_ \--s \
Tapade salida
de drenaje
Modelos de piso
(parte posterior
del dispensador)
Model0s de encimera
(fondo del dispensador)
MMelos depiso
1. Coloqtle allll)os iIlttTr/ll)tort's ('l&tricos (,,!n ]a part(' posterior
del disper_sador) en la posicidn 0 {apagado}y desconecte el
dispel_sador de agua.
'2. Retire la botella de agua del disi)ensadol:
3. Coloque un (ontenedor que resista agua calien(e deb@odel
grito de agua calien_e. Presione el bot6n dispensador de agua
caliente hasta que el agua se enfrie (cerca de tm cuarto).
Agregue agua al depdsito de agua ti'fa (en la parte de arriba
don(le la botella sunlinisIra el agua) segfin sea necesario.
4. Dispense agua de ambos botones en el contenedor(es) hasta
que no se dispense mils agua (cerca de un cuarto de agua
permane(:e mdavfa en el dispensador).
5. Coloque una cub,,!ta grande de])@) de la salida de dren_je en
la parte posterior del dispensador.
6. Usando tm destorrfillador de estrella, afloje los tornillos en el
soporte que cubre la tapa de salida del drem!je. Rote el
soporte hasta qlm est,: flmm del camino pare permitir el filcil
acceso hacia la tapa.
7. Retire la mpay el tapdn de silicona de la salida de drem!je y
permil;, que el agua se drene. Despu& del dren_je, reemplace
el tapony la tapa.
8. Rote cl soporW de nu('vo en su lugar y apriete los tornillos.
Cer( idrese de instalar una 1)otella ( ompleta y dispense agua desde
el grito de agua caliente antes de (onectar y encender el
disper_sador (_('r Como cargar o[ disponsador).
Modelosdeencimera
1. Coloque ambos intt'rruptort's ('l&tri('os (en la pmte posterior
del disper_sador) en la posi( idn 0 (apagado)y des( one(re el
dispensador de agua.
2. Retire la botella de agua del disi)ensadol:
3. Coloqtl(: till corl[(:lledoF qlm resista agua caliente (leb_jo del
grito de agua (aliente. Presione el bot6n dispensador de agua
caliente hasta que el agua se enfrle (cerca de ml cuarto).
Agregue agua al depdsito de agua fl;a (en la parte de arriba
donde la botella suministra el agua) segtin sea necesario.
4. Disl)ense agua de ambos botones en el contenedor(es) hasta
que no se dispense mils agua (cer(a de un cuarto de agua
permanece m(lavfa en el dispensador).
ADVERTENCIA:Levante el dispensador cuidadosamente,
Pesa aproximadamente 40 libras o 18 Riles. Evitepresionar los botones
del dispensador accidentalmente mientras selevanta o se carga.
5. Coloque cl disp('nsador sobre el laxaplatos ((m !/pies en la
en( imera. Sostenga y asegure el dispensador firmemente
mientras retira el gancho retenedor y la tapa de dren_!ie.
Redre el gancho retenedor y la mpa de (lren_je de la salida de
(]ten,tie, cerciorfindose de no dafiar la tapa de (]ren_je.
Permim que el agua se drene.
6. Despu& de (]renar; reemplace la tapa de drenaje y el gancho
retenedor.
C('r( idr('s(' de instalar tma bott'lla ( omt:)lem ) disp('nse agua desde
el grito de agua ( aliente alltes (]c (onettm-y en(ender el
dispensador (_('r C6mo cargar o! disponsador).
Comolimpiar el separador
Pararemover Parareemplazar IMPORTANTE:Co/oqueambosinterruptores
dispensador) on la posici6n 0 (apagado) y
desconecte el dispensador de agua antes
_ _--mt_ d e,ectHcos (en ,a parte posterior de,
de la b0tella el (tispensador (ver C&no drenar el
Separador 2. Relllu(va el collar de soporle g{rail(lo ell
de limpiarlo.
e8poyo 1. R(?IIItI(?_Gt]a bol( lla de agtla y (]I'(!II(?
dispensador).
senddo contrario a las agujas del reloj y
drando de ('1 dire(tamente ha(ia aflmra,
3. Remu('xa el set)arador t)lfistico drando
hacia afimra (es posible que tenga que
doblarlo lig(Tamente para aflojarlo).
4. I Jmpie el separador (on un jabdn de
platos y agua o en la band(ja sut)erior
del lavat)latos,
_°
Se(lUe el separador completamenm tanto
en la parte sut)erior como en la t)arte
inlbrior,
6. Con un patio limpio o toalla de papel,
seque completamente el tan(tue de
agua ti'_a.
7. Colo(tue el separador ()Ira v(,z en el
dispensado_: (:ercidrese de que el
extremo largo, afilado del set)arador se
colo(lue lirmemei_te en el tat)tin
metfilico en el limdo del tan(tue.
8. Reemplace el collar de soporte y g-ire
en sentido de las agujas del rdoj basra
quedar/irmememe colocado en SUlug al:
9. Reempla(e la botella de agua (vcr &5too
cargar el dispensador).
23
Page 24

Cuidadoy limpiezadel dispensador.
Come desinfectar y /impiar los tanques de agua
/MPORTANTE: Peritdicamente se deben desinfectar los tanques dispensadores de agua para evitar sabores desagradables en el
agua Y/impiar para retirar los deptsitos de minerales que puedan obstacu/izar el fluiD.
Para desinfectar:
]. ,\I/|(!S de limpiar, coh_qut ambos
inlermpmrcs eldclricos (in la parle poslerior
del dispensador) 1_i1la posici6n O (apagado) P0sici0n
?' desconecte el dispensador de agoa apagad0
Nota: Para lu insmlaci6n per primcra vcz,
ignore los pasos 2-4.
2. I)t'socup<' la b(m.lla tit' agua, lut'go rclfrcla (h'l
dispensador.
3. Drent los tanqt/es de agua (vet Ctmo drenar el
dispensador).
4. Voelve a insta/ar el tapon de silicona y la tapa de drenaje
(en los modelos de piso) o/a tapa de drenaje y e/ gancho
retenedor (on los modelos de enchnera) 6cr CSmo
drenar e/dispensador).
5. NO AGREGUE BLANQUEADOR PRIMERO O
DIRECTAMENTE EN EL DISPENSADOR El blanqueador
concentrado poede da#ar el pl_stico.
Agreg-t,tc 1/2 (ucharad;i (2,5 ml) (h' blai/qucador
tomfin casero al 6% tome mtximo, a imajarra de
dos ( uarlos (2 litros) llena con agua de la lla_e.
6. Vit rta la soh/cidn en la abermra en la partt s_q)erior
del disi)ei_sador.
7. Rtpim los pasos 5 y 6 hasm (lue el dispensador est6
lleno.
8. Presione los botones del disi)ensador para agua J?'fa
v caliente hasta que tl agna emi)it cea fllfir de las
[]
ilaws.
9. Permita tltm se asiente i)or 15-20 minutes.
10. Enjoagoe la soloci6n de blanqoeador:
-- Drcnt los tan(ttl('s de agtla ('n Ilna (/l|)('ta grandc
(modelo de piso) o lavaplatos (modelo de
encimera) (vet Cbmo drenar e/ dispensador).
-- Cercidrt se de (the el tai)dn tie silicona (tI/ los
modtlos de piso) o la tapa de tlrem_it (el/los
modelos de encimera) NO est_'n instalados.
-- IMPORTANTE: Retire el separador y limpie el tanqoe
de agua fria (_r('_" Ctmo limpiar el separador).
-- [ Jmpit, hlego vuelw'l a instalar el separador y
el collar (vet C6mo fimpior el separador).
-- _erta ai)roximadamente 1 galdn (4 cuartos
o 4 litros) tit agua/i'esca de la llaw' en la parte
superior y l)ermi_a (lt_e se drone hacia la (Id)tla
(modelo de I)iso) o lavaplatos (modelo de
encimera).
-- Enjuagne con 1 galdn (4 cuartos o 4 li[ros)
adkional de aglm li'esca de la lla_e y permita
que se drone hacia la c_fl)eta (modelo de piso)
o laxaplalos (modelo de encimera).
11. Voelve a instalar el tapon de silicona g la tapa de drenaje
(on los modelos de piso) o la tapa de drenaje y el gancho
retenedor (on los modelos de enchnera) (wr CSmo
drenar e/dispensador).
12. ]nstMe Ima botella d,_' ag-mt l}'es(a (vet Ctmo cargar
el dispensador).
13. Dispense 1 cuarto (1 IJtro) de agoa de cada Ravey
pru('bela para (crciorarsc dc qm' la soluci6n
blanqueadora est_i COlnplelamei_te eliminada.
Si continua el saber a clare de la soluciSn blanqueadora,
repita los pasos del 10 al 13 basra que el saber desaparezca.
14. (',onetlt el disi)ensador, l,uego, encicnda I_
lOS inlt!l'l'llI)|OFt!S dr! agtla f/'ia }' aglla calicnw
(t_I/ ]}t parW I)Oswrior dcl disi)cnsador ) .
a
PosiciOn
encendid0
Para retirar los depositos de minerales:
Mezcle 2 cuartos (2 litros) de agua con dos cuartos de vinagre O BIEN un galtn de agua (4 Iitros) con 16 onzas (454 g)
de cristales de #cido c{trico, E! blanqueador no retira los deptsitos minerales, Haga esto en vez del paso 5 al retirar los
deptsitos minerales,
Come descongelar (GXCF2OE/GXCF2OFBB/GXCF2OKWW/GXCF2OKBBModelo con enfriador)
Descoogeb cada vezque el hblo eo la pared del cornpartirnieoto
eofr]ador so vuelva excesiva. Nonca otilice on instromente con
file o metalico para retirar el hielo ya que poede dafiar el
revestimiento. Recorneodarnose/use do unraspador p/bstico. No use
ningbo aparato e/bctrico para descooge/ar e/compartirnieoto enfriador
Para descongelar:
_i::Rcdrc los artfculos th'l comt)artimh'nto,
_(::(;ire el h_terrutm_r el('ctri( o Cold (aztd) a la posicidn de
apagado y des( onecte el dispensado_:
_i::Coloque _;,rias toallas al tbndo del compardmiento para
recoger agua.
I,a descongelacidn per lo general toma tmas t)ocas horas,
Para dest ongelar imls rfipidameme, mantenga la puerta
abierta.
Despues de descongelar:
iJi:Rctiru l_,s to;,llas m(_jadas y limpic cualquicr agua rcst_,nW.
ij?:I,impie el compardmiento con un patio seeD,
ij?:Conecte la tmidad y encienda el inten'uptor eldctrico en
Cold (azul). Regrese los artfculos a la unidad.
24
Page 25

Preparandose para las vacaciones
Para _;l(aci(m_ s _xWnsas o mls_ ncias, (ol(_(lUe los dos
imerrni)tores ddclricos (en la i)arte posterior del
disi)ensador) (n la posicidn 0 (apagaffo).
1. Des(onecte _I smninistrador de agna.
2. Rem_lev:t la botella de ag_m.
3. Drone los tanqncs de agua 6vr C6mo dronarold]sponsador).
4. Seque el separador (ompletameme tanto en la I)art_
superior (omo _n la parle in/brior (_er C6mo limpiar el
separador) .
5. D@ la pn('rt_t del enIi'iador abierta (on algtmos modelos).
Despu6s de regresar de vacaciones, cerciSrese de desinfectar los
tanques de agua antes de usar el dispensador (ver CSmo /impiar y
desinfectar el tanque de agua).
Especificaciones
Ri#no de enfriamiento: Ai)rox. 0,5 galones (2 Ira- _s) pot hora
Ritmo de calentamiento: Aprox. 0,8 galones (3 lilros) i)or hora
Capacidad: golella de 3 6 5 galones
Consume e/bctrico: En ( alemamienm: 480 xafios mfiximo
Ell ell['YiHIIliell|O2 125 V_II]OS i/l_iXil/lO
Solucionar problemas.
Posibles causas Que hacer
El agua tiene un sabor E1 separador necesita ser lhnpiado. ,,Vcr Cdmo limpiar el separado_
desagradable o un
mal olor E! dispel_ador de agua debe ser "Vcr C6mo limpiar y desinfectar los tanques de agua.
El agua no esta F_ dispensador de agua " Empuje cl enchulb complelamcnle cn cl lomacorrienw,
suficientemente estfi deseoneetado.
caliente o fria El fusible o el interruptor de • Reenq)l_,('e el tiMble o re@tsW el inlerrul)tor de cil'cuilo,
El dispensador de agua Botella de agua vaeia. • Reenq)l_,ce con una bowll;, de ;,gu;, nucva.
no funciona- No hay
flujodeagua Depdsitosmineralespuedenestar •Vcrla seccidnsol/re Cuidadoylimpieza.
Elboton de agua fria Se dej6 abierta la puerta del enfriador. • Cicrrc 1;, t)ucrla dcl eufi'iador.
no dispensa
gldispensadorde agua Hay un agrietamiento o tul • Reempl;,('e con una l)otcllt_ de ;_gtl_ lttl(Wa.
tiene una fuga desde a,_ljerito ell la botella.
el exterior
EIcompresornocomienza Operaddn normal E1inido del • Espere hasm 3 mitlutos par;_ (tue cl (-onq)r('sor confienc('.
cuando la luz azul del compresor es dilatado por hasta
interruptor de frio esM 3 minutos para prolol_ar la vida
encendida del compresor.
Labotellasesiente E1 sistema se sobreUeno. • Dispense ;,gut,/i'f;, hasla (tuc el aire sea li])(T;,d(_ ]u,('ia
caliente E1 agua estfi hirviendo en el la boWll;,.
El dispensadorde agua E1 dispensador de ,agua no estfi • Ccrci6r('s(' de (lue el dispensador esl;i inslalw.to en
hace mucho ruido apoyado de mmlera plmm. tm piso pl;,no } nivelado lo suJi(-ielllcnl('nlc {iterle t)ara
deshffectado.
circuito se quemo o se dispar6. • Si denmsiados arlfculos eslfin cnclm[hdos cn un cir('uito
t]nico, _I_[l('xr;{algunos arlf('ulos a un (-ir(-uih) (lilbrcnl(',
Toda el agua en el tanque •Espcre ?)0 mi/lulos para que el agtl;_ sc c;,licnle o
de agua ha sido usada, se cnlrfe.
E1 limitador de temperatura • Coloque los inwrruplores de agua c_,lienw } t_'i_
se dispar6. (on la pal'W p(_swri(," (hq dispens_,dol') cn l_, posici6n
0 (apagado), Espere 5 Iltitlttlos, ('ll|Oll('es ajusle los
imerruplor('s en la p(_si(-i6n I (encendido). Esp(w(-
30 minulos pal';{ (tuc cl ;{gtla st" (';dieuw o se euti'fc,
obstruyendo los tm_ques.
Hay tm bloqueo de hielo evitmldo • l)uranle la no(-]w, aj)_lgtlc el inlerrttpl(_r energ('lico
que el agua fluya, dc agua l]'_ } cncidndalo OIl';l \'cz CtI Ill t//_ll-titIKl.
tanque caliente y haciendo
burbujas en la botella.
SOp(/I'IIIF Nil })CSO (-tlHtldo eslll lola|ttWltle ]]etlo,
La botella estfi baciendo ruidos • Eslo es tlortttal.
de borboteo mienlras el agua
Uena los tmlques.
Solfido de agua hirviendo. • Eslo es normal.
E1 dispensador o la botella de • Eslo es normal.
agua se agitml cuando el sistema
de enfriamiento se apaga.
25
Page 26

Solucionarproblemas.
_i Posibles causas
Particulas flotando en E1 agua tiene tm alto contexfido
el agua de mhzerales.
Un Mot acre ell el ake FJ tanque de agua caliente • Pr('sion( _(q ])otdn dc dispcns_,lor cali(_mc hasm (Ill<` c|
alrededordeldispensador estfi vac_o, o no lleno agua |luya t)ara remoxcr (-1air(" (t('| mn(tuc (alicnw,
completemente.
El enfriadorno opera E1 enfTiador no esta encendido. • Co|o(itt(' (-1i/stcrrul)tor cl('('tri(-o es/la t)osJci(3ss(k- Cold
(modelos con enfriador (azu|).
unicamente)
Vibracion o tamborileo FJ dispensador de agua estfi • [)sc rull('n( _ |)al'a IIj\rcI;(s" 1_1uni(lad.
(una vibraci6n ligera colocado en tma superficie
es normal) no mfiforme.
El compresor/motor opera A menudo ocurre cumldo se • Eslo ('s norm_d.
(luz azul encendida) pot colocml grmldes cm_tidades
periodos o ciclos extensos de alimentos en el enfriador.
(rood•los con enfriador
(micamente)
El compresor/motor opera Es normal cumado la unidad • Esl)ere 24 h(nas para qu(" la tin|dad sc cJdi'fc t)or ('oml)l(qo,
(luz azul encendida) por se conecta por primera vez.
periodoso ciclosextensos No hay suficiente distancia • Ccr(idr(-sc dc (its( ` hay_ stdi(icnte (ir(ul_,i(;n d(" _dre
(todos modelosj de la pared, ah'cd('d(n" (t(" la unJdad.
E1 dispensador de agua esta_ • })l'('sios/(" ('l CIS(-]/IS['( _ ('(,ql/lIltq_ll/|(qsl(" CS/ C| |(,ql/il('(,qTi(qsl(L
desconectado.
E1 fusible/interruptor de • R(_('ml)la((" cl ti_sil)lu o VU('I\r_I_1iJfi('iar ('1 inwl'rUl)lor.
circuitos se sah6.
La puerta se dejo abierta. • Re\_sc t)m_a xcr si algfin p_,tucte csl_i obslruy('nd(_ la puerto.
Clhna cfilido o la puerta se abre • Eslo (-s normal.
retry a menudo.
FJ sistema se sobrellen6. • l)ispcnse _gu_ fi4_ hasla (its(` (q airc sea lit)cr_,h_ h_,ia
Oue hacer
• I_[SI( tS(!lslr(! tsss_t _tS(?lSl(! (1(? _tgtlkl (ois SlS(?SSOS" (]tll'(?z_l.
la bolella.
Compattimiento frio La puerta se dejo abierta. • Revise t)ma vcr si algfin pa(tu(q(" csl5 obslruy('lsd(s la t>uerla.
demasiado caliente
(modelos con enfriador
unicmnente)
Compartimiento/ Temperatura de ambiente baja. • (;o|o(tu(' |as us/ida(l('s CiS |it |CI/i])('I';IIII/_I aml)i('lslal.
El agua frio esta muy fria/
congelada
Olor en compartimiento frio Los alimentos trmasmiten tm olor • Los alJm('nl(,s con oh,res ti_erl('s se d('l)('n s('llar t]I'I//(_SSlCISl(",
(modelos con enfriador al enfriador. • Mmm'nga (ma (@_ abicrm de bicarl)onalo de soda cn la
#nicamente) tin|dad; r('('mp|_, c (ada m's meses,
E1 biter|or necesita limpieza. • Co,suhc la scc(idn Cuidado ylimpieza.
Se fonna hmnedad al No es extrafio durante periodos • [ .im])ie |a Stl})(q'|/('J(" ]/;ISI_I S('(';l/'|21.
exteriordel cmnpartimiento de aha humedad y/o temperatura. • ( )t)ere la Ira|dad cn Ima ui)icacidn ( o s c n t ('r i n_a y
frio (modelos con enfriador humcd;.t ( ontrol_d_s.
#nicamente) * (k)h_(lU(, la tmidad cn la |)m/d@_ t)ara rewner ]a
La humedad se acmnula
al interior (ell climas
h#medos, el aim transporta
humedad al compartimiento
frio cuando la puerta
se abre) Onodelos con
enfriador unicmnente)
Abrir la puerta con mucha
frecuenda o por mucho fiempo.
a(umuia('i(3n de humcdad.
• P,cd uzca las v('ces que se abre la puerta.
• I Jmpie la sul)eriicie hasta secarla.
• k]_cie la ban(hja de goteo interna.
• Ot)ere la unidad en una ubicacidn (on teml)eramra y
|ram•dad (ontroladas.
• Coloque la tin|dad en la band(ja t)ara retener la
acumulacJdn de humedad.
2_
Page 27

Servicioal consumidor.
P ginaWebdeGEAppliances e.com
{']['i( lit' algllI/a l)regunta sobre su elcctrodonl('stit o? iPrllebe la i)_igilla _.*_k'l) de (;E Apl)lJant cs 24 hol'aS a]
tlfa, cltalqui_ r dfa del aflo'. Para mayor conveniencia y serx icio m_is r_ipido, ya puede descargar los
Manuales de los Propi_ lafios, o hasta ordenar partes _n lfilea.
RealLifeDesignStudio(Estudodedisefioparalavidareal) ge.com
(',E apoya cl corn cpto dc Disc[to Univcrsal--prodll('Ios, scrvicios y anlbicntcs qll(' pucden Ilsar g-_ IllC d(
todas las edades, tamaflos y capa_ idades. Reconocemos la necesidad de disefiar para mm g-ran galna de
habilidades y difi(lfllades gskas y mentales. Para mils delalles (obre las aplicadones de GE Diseflo
Universal, in( luyendo ideas de dis_ rio para la cocina para personas con discapacidades, mire nuestra
pfigina Pd'b hoy' mismo. Para personas con di/icuhades audidx as,/iaor de llamar al 800.TDD.GEAC
(800.833.4322).
Piezasyaccesorios De.corn
[ndividuos imeden solicitar que se les (}i/_l(}ii partes a sus casas (aceptamos las tmjetas \qS.\, MasterCard
y Dis(ow'r). }]aga su pedido en lfnea hoy'. 24 horas cada (lia o llamar pot tel('lono, en los I{I{UU, al
800.626.2002 dm'ame horas normales de olicina. Ell Canada, llame al 800.663.6060.
Las instmcciones doscdtas on oste manual cubron los procodimiontosa soguir pot cuMquiorusuario. GE no
proporcionasorvicio para o/ disponsador. Rocomondamos que no intento proporcionarsorvicio a/ disponsador
ustod mismo.
P6ngaseencontactoconnosotros go.corn
Si m_ cst;i satis|_ d_o (on el servkio qlu' rcd|)v & GE, p&lgasc en (onta(to (on nosotros _n lmcsti'a p;igina
_\k'|) indicando todos los delalles asf cored s/l n(tillero de t(l('lbno o escrfl)anos a:
(;en(ral Manage1, Cl_stomer Relations
(;E Appliances, Appliance Park
I,ouisville, KY 40225
GARANTIA LIMITADA POR UN A!_O
• i @a: czd,_, ,,_la -am_t;a ?
-- (Malqttk r delccto d< taibrka <n los mat< rialcs o la manutactura
dtl ploducto.
• Jdm _no I:_dm"_,_la,g_*anlia?
-- Las bott llas de agua.
--Vi@s a stl caNi para cnst flarlc cdmo u_u el producto.
-- lnstalacidn o t lmcga inapropiada, o mantt nimit nto imp_opio.
-- Fallas dcl produclo si hay al)uso, real uso. o uso papa otros
prol)(_sitos (lilt los ])FOptlt Stos. o 11%o [)al'a fines COlllt l'cialt s.
-- Los pl'o([/ictlls qlle son [l%ldl)$ lilt l'a de till al]/l}icntc rt sidcncial o
dt oil( ina.
-- Rt _lnplazo de los fl_sibk s dt la <asa o el lca!j/Islt de los
intcrruplort s de circuito.
--Uso de cstc producto dondc el agua tstfi microl)ioldgicamcntc
inst gura o dc calidad dt sconocida.
--I)al_lO al pl'o(ltlch) Si ts [INldO para disl)cnsar otla (]o%1 qtlc 11o
sea a_t la.
--I)aflos causados al p_oducto dcbido a accidt nt< s. inct ndio.
intllldaciollcs o aCiDS de la llat/iralcza.
-- Cualquicr st rvicio al produclo.
-- Danos secundarios o por conseotencia cansados por posibles
defecms on el producm, su instalacidn o reparacidn.
• ;])olgltd_llo:1('I:@o([('s/:z_/sd("[a(Ym@_a?
-- Lll _lflO.
• i(.'Smo h_(gv {a wc/_,nad(m d(./a .gam_Ka?
--D<vudlwda al minorista a quicn k comprd el producto con
una copia dt "P_oot ot Pm-chaa'(prucba de compra). Sc k
pl'opol(iollaF_i llna llnida(I llt/t va reacolldiciollada. Esta garalltfa
( xclllvC (l (osto at (:ll%ll) dcl ])l'odIIctO a domi(ilio.
EXCLUSIONDEGARANTiAS IMPLiCITAS--Su 6nico yexclusivo
derecho es el cambio del producto,tal y como se indica en
esta Garantia limitada. Cualquiergarantia implicit& incluyendo /as
garantias implicitas de comerciabilidad o adecuaci6n para un fin
determinado, esMn limitadas a un afio o el periodo detiempo mas
brevepermitido pot la ley,
Esta garm_tia se exliende al comprador odghml y cualquier comprador
posterior de productos comprados para uso residencial o en ha oflchla
den_o de Estados Unidos. En Alaska, ha gm'm_tla excluye el costo de
envio o las visitas de servicio a su casa u ofichm.
Algatnos estados no permiten ha exchasi6n o las finfitaciones de
danos incidentales o consecuenciales. Esta gm'm_tia da derechos legales
espe¢iflcos, y usled podria lener o_os derechos qtte vm-im'fin de estado
a estado. Para saber cthhles son stts derechos legales, constdle a ha oficlna
de astmtos del consunfidor local o ha ofichm dd Altomey General en su
localidad.
P6ngase ell contacto con nosotros ell ge.com,
o llame sin cm'go a1800.952.5039, o 866.777.7627 en Canada.
I
Garante:GeneralElectric Company,Louisville,lot 40225.
27
Page 28

ConsumerSupport.
GEAppliancesWebsite e.com
I taxe a queslion or n(ed assistante with ?'or 11"al)i_liance? Try die GE Appliances X_d_sifi' 24 he rs / d _?',
in,v (l t,v /If lit ,_( /r }?or grealer conveni(?llC(! alld faster service, _ou can I_()_ r download ()_rl_'S Manuals
()/" ev(?i/ ()l'(lt!l" I)ar|s on-Jill(.
RealLifeDesignStudio Do.corn
GE supports tile lJniv(rsal Design cent ept--producls, services and (mironments that can l)( used by people of
all ages, siz(s and i apabiliti(s. _$i. recognize tile ne(d to design/era wide range of physical and mental abilities
and ilnpairlnents. For details of GE's Universal Design applications, including kitchen design ideas lor p(ople
widl disabilities, (lleck DO1 o111"$_k'bsite today. For tile hearing impaired, please call 800.'I"1)[).(;1,2 \C
(800.833.4322).
Parts and AccessoFies go.corn
Indivi(hlals (an ha_c parts s(nt directl? to their homes (\]SA, MasterCard and Discover cards are accepted).
Order on-line ted m, 24 hem's every flay or by phone, in th( LI.S., at 800.626.2002 dm4ng normal busin(ss
hours. 71i/Canada, call 800.663.6060.
Instructions contained in this manual cover prooedores to he performed by any user. GEdoes not support any servioing
of the dispenser. We strongly recommend that you do not altempt to service the dispenser yourself.
Contact Us ge.com
If you are not satis/icd _dth the servk'c you receiw'/i'om (;E, (onta(t us 1)i/()llr Website _ith all the details
including your I)hon( nmnber, or write to: (;en(ral Managel; Customer Relations
LIMITED I-YEAR WARRANTY
* I4q_a/do(:sthis ,,m*rm(vr(yv(,_?
-- Any dclcct ill lnatelials or wol knlanshi]) ill tile lllalltl[_cttll'ed ploduct.
-- _':ltel" bottles.
-- Sc Irice tlips to VOtlI" hollle to t<ach you how to Use tile ])l'OdtlCt.
-- Inlplopcr installation, d< livery el lnail_tenal_ce.
-- Failure ot tile product it it is el)used, misused, altered, used
connnercially or used tol other than tile int( ndcd ])t/rl>ose.
-- Products that are used outside a residential or oItice cnvilolnncnt.
-- Rcplacenl(l_t ot house tilses el icsctting ot circuit I)lcakels.
-- Use el this ])rodtlct where watt_ r is nlicrobioh)gically tlllsalc or ot
tlllklli)Wll qualil?:
-- Dmnage to the product it used to dispense anything other than x_atel.
-- Damage to th_ ]>ro(hlct caused b _,accidt nt. file. floods el acts ot God.
--.\ny service to the product.
-- hzcldenlal or consequential dmnage catk_ed by possible defects MIh
this appliance, its h]stallatlon or repair.
GE Appliances, Appliance Park
I ,ouisxille, KY 40225
* l:*J_ho,_ hmg-af!_'_ the, ot{qrhlal/mwhasg,?
--Olle (1) y_al:
* How do ] wal.'_,a/l*(Itgglt_l_([aim?
-- Returli to the ivtailer tioln which it _as pul chased, ahmg _itll a copy
ot the "Plx>of_1Ptnx:hts¢.' Anew or reconditiolmd lnlit willbe
pier\It d. I'his _sarraleXexcludes the test ot shil)pilig the product to
VO[/I" honle.
EXCLUSIONOFIMPLIED WARRANTIES--Your sole and
exclusive remedyis product exchange as provided in this
Limited Warranty.Any implied warranties, including
the implied warranties of merehantability or fitness for a
particular purpose, are limited to one year or the shortest
period allowed by law,
This wan'amy is extended _o 1he original purchaser and any stmceeding
o_vner for products purchased for home or office use widih_ die USA.
In Alaska, tim warrmlly excludes 1he cost of shipph_g or service m your
hollae or office.
Some states do not allow Ihe exdtt_ion or limitation of hicidentM or
consequential {lamages. This warranty gives you specific legal rights, and
you Inay also have other rights, which vary from state to slate. To know
what your legal rights are, constflt your local or state consumer affairs
office or your stale's Attorney General.
Contact tts at ge.com, or call ell-free at 800.952.5039 hi the U.S., or
866.777.7627 hi Gmmda.
Warrantor:General Electric Company,Louisville,KY 40225.
Printed in China
 Loading...