

GE GXCF03EWWR Owner's Manual
Cold and
Room Temperature
Water Dispenser
Safely Instructions ............. 9, 3
Us'it_g the Water Dispenser
Assembling the Base .............. 4
Features and Parts i,ist ............ 4
i,oading the Dispenser . ........... 4
Specifications .................... 6
Care and Cleaning ............ 5, 6
7Youbleshooting Tips ............ 6
Consumer Support
Warranty ...................... 12
Espafiol
Informaci6n de se_uridad ...... 7, 8
Como utilizar el dispensador
de agua
Cdmo cargar el dispensador . ....... 9
Cdmo ensemblar la base ........... 9
Especificaciones ................. 11
i,ista de partes y camcteristicas ...... 9
Cuidado y limpieza .......... 1o, 11
Solucionar problemas ........ 11-12
Servicio al consumidor
Ganmtfa ....................... 12
GX(FO3EWWR
REMANUFACTU RED
Dispensador de agua fffa
y de temperatura ambiente
La secciOn en espafiol empieza en la pagina 7
49-50188 12-05Jfl
iMPORTANTSAFETYiNFORMATION.
READALLiNSTRUCTiONSBEFOREUSING.
WARNING!
Use this appliance only for its intended purpose as described in this Owner's Manual
SAFETYPRECAUTIONS
When using electrical appliances, basic safety precautions should be followed, including the following:
;_ This water dispenser must be t)roperly installed
;-uld ](/(ated ill _'t((()l'd_'tll(( with these illS|l II(|iOllS
t)(fbr( it is used.
k_?I)(/not allow children t(/climb, stall(! or hang
(m ttl( outside of the dispenseL or on the sh( lves
inside th( storage +abinet (on sore(rood(Is).
They (ould tip dl( dist)( riser over and damag(
it and s( riously injure dl( mselves.
_?I)o not st(m or use g_lsoline or other tlammable
wqx)l_ and liquids ill the vi(inity of this or any
(/dl( r applian( e.
i¢_1Jnt)lug dl( water dispens( r bef(lre (leaning or
making r( pairs.
NOTE: GEdoes not support any servicing of the
dispenser, We strongly recommend that you do not
attempt to service the dispenser yourself.
;Do not us( this dispenser t(/ dispense anydling
oth(r than `,vHtel2
;_1)o not plug ill tile t)(/`,`,x_rcord or turn on th(
power _vitdles when the `,`,_tterdisp( riser is ( reply.
_ Wit)e up ally `,`,_tter spills immediately afi(r loading
or unloading `,`,_t(t" boul( s.
WARNING:Do.or.sewith water that is
miclx/biolog_cally unsalk' or of unknown qualit)t
,;: CAUTION:ChiMren should be supervised
1)y a t)ar( nt wh(n using dfis t)rodu(t.
PROPERINSTALLATIONANDLOCATION
_kllow at least 1" (2.5 cm) of spac( b(mx'en die
ba(k of the `,`,_lt(r disp( riser and the wall t() allow
for prop( r air dr'(ulati(m.
i_!::Do not install th( water dispenser wh(re the
t( mt)erat'ure ,,,,'illgo b,. low 50°F (l 0°C) el"
ahoy( IO0°F (38°C).
Install the x`,vlter dist)( riser on a lev(l floor or
(ounter strong ( hough to sul)port it wh(n fully
load(d. I)o not install where it `,`,'illbe sut{i( (t to
dirt (t sunlight, h(at or moismrt.
GROUNDINGINSTRUCtiONS
WARNING-Improper useof the grounding plug can result in a risk of electric shock.
This at)t)liance must be groun<l(d. In dl( event (>fan
ele( tri(al short (ir(uit, grounding redu(( s dw risk of
ele( tri( sho( k.
This appliance is equit)t)ed wfih a t)ox_x_rcord having
+1grounding wire wfih a grounding phlg. Th( plug
tnust be t)lugg( d imo +m oml(t ttlat is t)rot)erly
installed and grounded.
Consuh a qualifi( d el( +tri(ian if:the grounding
instru+ dons art n()t +otnt)letely und( t_tood, or if
doubt exists as to whedl( r dw at)t)lian+ c is t)rot)( tin
ground( d.
If d_( outl( t is _1standard 2-t)rong x_dl outleL it is
)'our t)( rson_d rest)onsibilfiy and oblig:_tion to hay(
it ret)l_i(ed with _i t)rot)( rly grounded 3-t)rong
xx_dlouth't.
I)o not under any circumstances cm or remove t[_(
third (groin:M) t)rol:lg fl'Oln dl( t)ow(r (ord.
I)o not us( an adat)t( r [)lug with this _q)l)li_m((.
I)o not us( an extension (ord with this at)t)lian(e.
If dl( t)owt r (ord is too short, have a qualified
el(+tri+i_m install all outlet n(_u" the _q)t)li_m+(.
For b(st opet+_fion, plug ttle +q)t)lian+ e into fis own
el( +tri+al outlet on a (ledi+at_ (I +ir+ufi to t)r+v+nt
fli( k( ring of lights, blowing of tils( or trit)t)ing of
(ir(uit br(ak( t:
PROPERDISPOSALOFTHEWATERDISPENSER
RefrigerantDisposal
xf_()llr o|(| _A21|(,I" dist)( ns(T IIIHV ]IHV(' us(d _t I'('_ul_t( (|
reflJge_mt in its cooling system. These r( fi'igerants
_li'e believed to hm'm st_tost)h( ri( ozone. If you art
dwowing ax_¢,' your old dist)( nse_, make sure d_(
reflJg(,_mt is removed and r((over(d for t)i'ot)( r
dist)osal by an EPA-(erfified te(hni(ian. If you
intention_dly tel(as( this r( flJg('r_mt, )x)u (an be
subject to fines and illlt)lJSOnlllent un(|( r t)rovisions
of enviromnemal legislation.
READAND FOLLOWTHISSAFETYINFORMAtiONCAREFULLY.
SAVETHESEINSTRUCTIONS
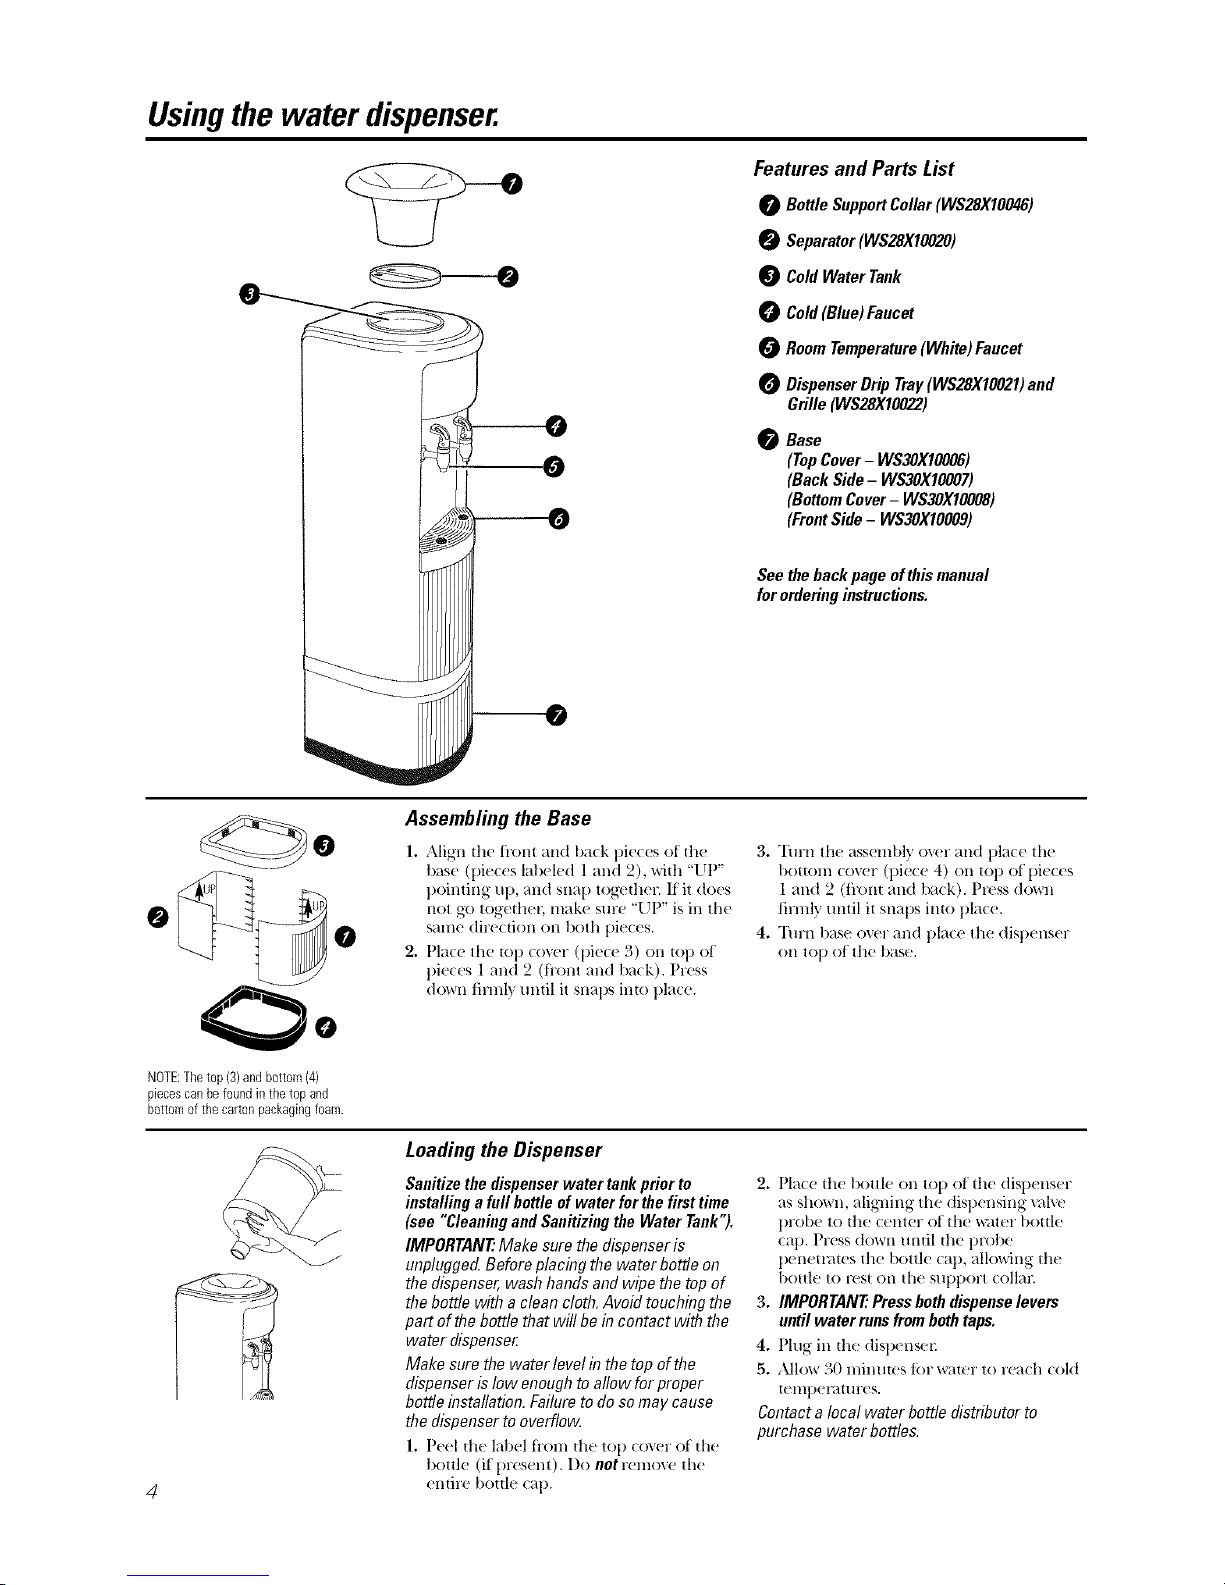
Using the water dispenser.
Features and Parts List
0 Bottle Support Collar (WS28X10046)
0 Separator (WS28X10020)
Cold Water Tank
Cold (Blue) Faucet
Room Temperature (White) Faucet
O Dispenser Drip Tray(WS28X10021) and
Grille (WS28X10022)
Base
(Top Cover- WS30X10006)
(Back Side- WS30X10007)
(Bottom Cover- WS30X10008)
(Front Side - WS30X10009)
See the back page of this manual
for orderinginstructions.
@
Assembling the Base
1. Align the front and back pieces of th+
base (pi,. c,. s lab,. led 1 and 2), vdth "lIP "
pointing up, and snap tog_ dlei: If it does
not go togeth_ t, lIlak+. Slli'e "UP" is in the
salIle dir_ ction on both pk ces.
2. Place the top cover (piec_ 3) on top of
pieces 1 and 2 (fi'ont and back). Press
down tirmly mltil it snails into plac(.
3. "Ihrn tht asseinbly ovtr and place tht
bottom cover (piece 4) on top of ilk ces
1 and 2 (front and b;,ck). Prtss down
firmly until it snaps into plact.
4. Turn bast over and plact the dispenser
on top of tile bast.
NOTE:The top (3)andbottom (4)
piecescat+be found io the top and
bottom of the carton packagingfoam.
4
Loading the Dispenser
Sanitize the dispenser water tank prior to
&stalling a furl bottle of water for the first time
(see "Cleaning and Sanitizing the Water Tank").
IMPORTANT: Make sure the dispenser is
unplugged. Before plac&g the water bottle on
the dispenser, wash hands and wipe the top of
the bottle with a clean cloth. Avoid touching the
part of the bottle that will be in contact with the
water dispenser
Make sure the water level & the top of the
dispenser is low enough to allow for proper
bottle hTstallation. Failure to do so may cause
the dispenser to overflow
1. Petl till' Ldlel from tilt toil cover of tht
bottle (if [n'esent). I)o not remove tht
entire bottk call.
2. Place tilt bottle on tot/of the dist/t riser
as showll, aliglfing the (tispensing v_llvt
[lI'()lle tO tilt Ct [lteI" of tht _flt l" bottk
cat/. Press down until the protx
[lenettatt s tht bottle cat/, allowing tht
bottk to rest on tilt Sll[ll/OPt collar.
3. IMPORTANT: Press both dispense levers
until water runs from both taps.
4. Ph N in tilt dispt riser:
5. Allow 30 minutt s t_)r wattr to reach cold
telnllet_mH'es.
Contact a local water bottle distributor to
purchase water bottlosJ
 Loading...