

GE GTDL210GDWW, GTDL210EDWW, GTDP490GDWS, GTDP280GDWW, GTDS560EFWS Owner's Manual
...
GEAppliances.com
Safety Instructions ........ 2–4
Operating Instructions
Control Panel ................. 5, 6
Control Settings .................. 7
Features ......................... 8
Loading and Using
the Dryer ....................10–11
Reversing the Door ............... 9
Venting the Dryer ...............11
Troubleshooting Tips . . . 12, 13
Consumer Support
Consumer Support .............. 16
Warranty ....................... 15
Owner’s Manual
Printed in Mexico
Dryers
Write the model and serial
numbers here:
Model # ________________
Serial # _________________
You can find them on a label
on the front of the dryer behind the
door.
234D1581P003 49-90450 02-12 GE

IMPORTANT SAFETY INFORMATION.
READ ALL INSTRUCTIONS BEFORE USING.
WARNING!
For your safety, the information in this manual must be followed to minimize the risk of
fire or explosion, electric shock, or to prevent property damage, personal injury, or death.
Do not store or use gasoline or other
flammable vapors and liquids in the
vicinity of this or any other appliance.
WHAT TO DO IF YOU SMELL GAS:
1
Do not try to light a match, or cigarette,
or turn on any gas or electrical
appliance.
2
Do not touch any electrical switch;
do not use any phone in your building.
3
Clear the room, building or area of all
Operating Instructions Safety InstructionsTroubleshooting Tips
California Safe Drinking Water and Toxic Enforcement Act
This act requires the governor of California to publish a list of substances known to the state to cause cancer,
birth defects or other reproductive harm and requires businesses to warn customers of potential exposure to
such substances.
Gas appliances can cause minor exposure to four of these substances, namely benzene, carbon monoxide,
formaldehyde and soot, caused primarily by the incomplete combustion of natural gas or LP fuels.
Properly adjusted dryers will minimize incomplete combustion. Exposure to these substances can be minimized
further by properly venting the dryer to the outdoors.
Installation and service must be
performed by a qualified installer,
service agency or the gas supplier.
occupants.
4
Immediately call your gas supplier from
a neighbor’s phone. Follow the gas
supplier’s instructions carefully.
5
If you cannot reach your gas supplier,
call the fire department.
PROPER INSTALLATION
This dryer must be properly installed and located in accordance with the Installation
Instructions before it is used. If you did not receive an Installation Instructions sheet, you can
receive one by visiting GEAppliances.com or by calling 800.GE.CARES (800.432.2737).
Properly ground dryer to conform with all
governing codes and ordinances. Follow details
in Installation Instructions.
Install or store where it will not be exposed to
temperatures below freezing or exposed to the
weather, which could cause permanent damage
and invalidate the warranty.
Connect to a properly rated, protected and sized
power supply circuit to avoid electrical overload.
Remove all sharp packing items and dispose of
all shipping materials properly.
Remove the colored protective tape from the
control panel.
Consumer Support
2
Exhaust/Ducting
All dryers MUST be exhausted to the outside to
1
prevent large amounts of moisture and lint from
being blown into the room.
Use only rigid metal 4ļ diameter ductwork inside
2
the dryer cabinet and use only rigid metal 4ļ
diameter or UL approved transition ducting
between the dryer and the home duct. USE OF
PLASTIC OR OTHER COMBUSTIBLE DUCTWORK
CAN CAUSE A FIRE. PUNCTURED DUCTWORK
CAN CAUSE A FIRE IF IT COLLAPSES OR
BECOMES OTHERWISE RESTRICTED IN USE OR
DURING INSTALLATION.
For complete details, follow the Installation
Instructions.

IMPORTANT SAFETY INFORMATION.
READ ALL INSTRUCTIONS BEFORE USING. GEAppliances.com
WARNING!
YOUR LAUNDRY AREA
Keep the area underneath and around your
appliances free of combustible materials,
(lint, paper, rags, etc.), gasoline, chemicals and
other flammable vapors and liquids.
Keep the floor around your appliances clean
and dry to reduce the possibility of slipping.
Close supervision is necessary if this appliance is
used by or near children. Do not allow children to
play on, with or inside this or any other appliance.
WHEN USING YOUR DRYER
Never reach into the dryer while the drum is
moving. Before loading, unloading or adding
clothes, wait until the drum has completely
stopped.
Keep all laundry aids (such as detergents,
bleaches, etc.) out of the reach of children,
preferably in a locked cabinet. Observe all
warnings on container labels to avoid injury.
Never climb on or stand on the dryer top.
Keep the area around the exhaust opening
and adjacent surrounding areas free from the
accumulation of lint, dust and dirt.
Do not obstruct the flow of ventilating air. Do not
stack or place laundry or throw rugs against the
front or back of the dryer.
The laundry process can reduce the flame
retardancy of fabrics. To avoid such a result,
carefully follow the garment manufacturer’s
care instructions.
Safety Instructions
Clean the lint filter before each load to prevent lint
accumulation inside the dryer or in the room. DO
NOT OPERATE THE DRYER WITHOUT THE LINT
FILTER IN PLACE.
Do not wash or dry articles that have been
cleaned in, washed in, soaked in or spotted
with combustible or explosive substances (such as
wax, oil, paint, gasoline, degreasers, dry-cleaning
solvents, kerosene, etc.). These substances give
off vapors that may ignite or explode. Do not add
these substances to the wash water. Do not use
or place these substances around your washer
or dryer during operation.
Do not place items exposed to cooking oils in
your dryer. Items contaminated with cooking oils
may contribute to a chemical reaction that could
cause a clothes load to catch fire.
Any article on which you have used a cleaning
solvent or that contains flammable materials
(such as cleaning cloths, mops, towels used in
beauty salons, restaurants or barber shops, etc.)
must not be placed in or near the dryer until
solvents or flammable materials have been
removed. There are many highly flammable items
used in homes such as acetone, denatured alcohol,
gasoline, kerosene, some household cleaners,
some spot removers, turpentines, waxes, wax
removers and products containing petroleum
distillates.
Do not dry articles containing rubber, plastic
or similar materials such as padded bras, tennis
shoes, galoshes, bath mats, rugs, bibs, baby pants,
plastic bags, pillows, etc. that may melt or burn.
Some rubber materials, when heated, can under
certain circumstances produce fire by spontaneous
combustion.
Do not store plastic, paper or clothing that may
burn or melt on top of the dryer during operation.
Garments labeled “Dry Away from Heat” or “Do Not
Tumble Dry” (such as life jackets containing Kapok)
must not be put in your dryer.
Do not dry fiberglass articles in your dryer.
Skin irritation could result from the remaining
particles that may be picked up by clothing
during subsequent dryer uses.
To minimize the possibility of electric shock, unplug
this appliance from the power supply or disconnect
the dryer at the household distribution panel by
removing the fuse or switching off the circuit
breaker before attempting any maintenance or
cleaning (except the removal and cleaning of the
lint filter). NOTE: Turning the Cycle Selector knob
to an off position or pressing PAUSE does NOT
disconnect the appliance from the power supply.
Consumer SupportTroubleshooting TipsOperating Instructions
3
IMPORTANT SAFETY INFORMATION.
READ ALL INSTRUCTIONS BEFORE USING.
WARNING!
WHEN USING YOUR DRYER (cont.)
Never attempt to operate this appliance if it is
damaged, malfunctioning, partially disassembled,
or has missing or broken parts, including a
damaged cord or plug.
The interior of the machine and the exhaust duct
connection inside the dryer should be cleaned at
least once a year by a qualified technician. See the
Loading and Using the Dryer section.
If yours is a gas dryer, it is equipped with an
automatic electric ignition and does not have
a pilot light. DO NOT ATTEMPT TO LIGHT WITH
A MATCH. Burns may result from having your hand
in the vicinity of the burner when the automatic
ignition turns on.
You may wish to soften your laundered fabrics
or reduce the static electricity in them by using
a dryer-applied fabric softener or an anti-static
conditioner. We recommend you use either a
fabric softener in the wash cycle, according to
the manufacturer’s instructions for those products,
or try a dryer-added product for which the
manufacturer gives written assurance on the
package that their product can be safely used
in your dryer. Service or performance problems
caused by use of these products are the
responsibility of the manufacturers of those
products and are not covered under the
warranty to this appliance.
Do not spray any type of aerosol into, on, or near
dryer at any time. Do not use any type of spray
cleaner when cleaning dryer interior. Hazardous
fumes or electrical shock could occur.
Operating Instructions Safety InstructionsConsumer Support Troubleshooting Tips
WHEN NOT USING YOUR DRYER
Grasp the plug firmly when disconnecting this
appliance to avoid damage to the cord while
pulling. Place the cord away from traffic areas
so it will not be stepped on, tripped over or
subjected to damage.
Do not attempt to repair or replace any part of
this appliance or attempt any servicing unless
specifically recommended in this Owner’s Manual
or in published user-repair instructions that you
understand and have the skills to carry out.
READ AND FOLLOW THIS SAFETY INFORMATION CAREFULLY.
SAVE THESE INSTRUCTIONS
Before discarding a dryer, or removing it from
service, remove the dryer door to prevent children
from hiding inside.
Do not tamper with controls.
4
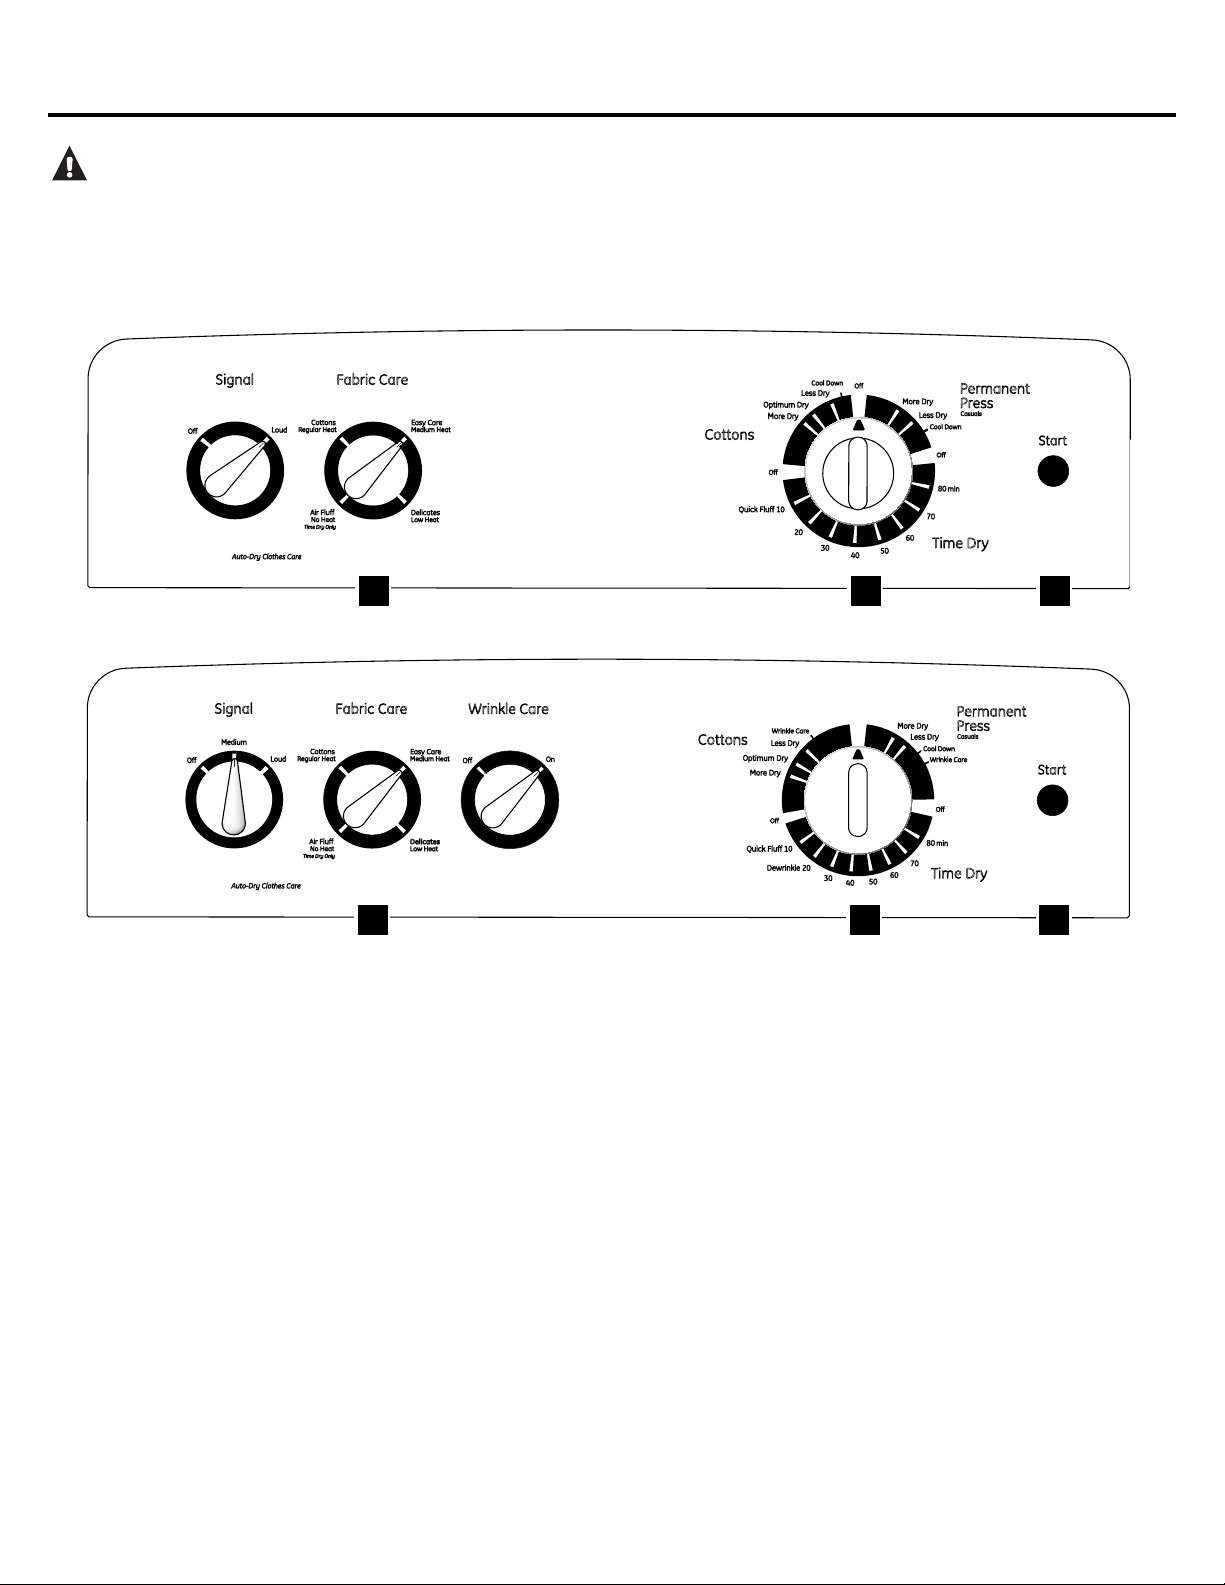
About the dryer control panel.
WARNING!
To reduce the risk of fire, electric shock, or injury to persons, read the IMPORTANT SAFETY INSTRUCTIONS before
operating this appliance.
Throughout this manual, features and appearance may vary from your model.
GEAppliances.com
Signal
Off
Loud
A
u
t
o-
D
r
y Clothes Ca
R
egular Heat
Time
r
e
Cot
Air Fluff
No Heat
D
t
ons
r
y Only
F
abric Ca
r
e
Easy Ca
Medium Heat
Delica
t
es
Low Heat
Cool Down
Off
Less
D
r
y
D
r
y
Mo
r
e D
r
y
2
3
3
1
G
D
0
4
1
3
8
2
0
8
1
P
D
T
Off
G
/
X
D
T
G
2
.
2
V
3
E
4
R
D
1
8
5
1
0
6
0
P
20
30
50
40
r
e
Cot
t
ons
Quick Fluff 10
Optimum
P
r
e
D
Less D
r
y
r
y
Cool Dow
Off
8
0
min
70
Time D
ermanent
P
r
ess
Casuals
n
r
y
S
ta
r
t
Mo
60
21 3
Signal
Medium
Off
Loud
A
u
t
o-
D
r
y Clothes Ca
R
egular Heat
Time
r
e
Cot
Air Fluff
No Heat
D
t
ons
r
y Only
F
abric Ca
r
e
Easy Ca
Medium Heat
Delica
t
es
Low Heat
r
e
Wrinkle Ca
Off
r
e
t
ons
Optimum
Mo
r
e D
Quick Fluff 10
Dewrinkle 20
Wrinkle Ca
Less
D
r
r
y
Off
D
r
y
On
Cot
Off
r
e
y
0
8
2
P
D
T
G
2
30
Mo
2
3
3
G
1
0
D
1
4
3
3
2
1
3
.
4
V
D
E
R
1
5
1
3
6
0
P
0
60
50
40
r
e D
Less D
70
r
y
r
y
Cool Down
Wrinkle Ca
Off
8
0
min
Time D
P
ermanent
P
r
ess
Casuals
r
e
r
y
S
ta
r
t
21 3
NOTE: Drying times will vary according to the type of heat used (Electric, Natural or LP gas), size of load,
types of fabrics, wetness of clothes and condition of exhaust ducts.
5

About the dryer control panel.
Throughout this manual, features and appearance may vary from your model.
Signal
Medium
Off
Loud
A
u
t
o-
D
r
y Clothes Ca
R
egular Heat
Time
r
e
Cot
Air Fluff
No Heat
D
t
ons
r
y Only
F
abric Ca
r
e
Easy Ca
Medium Heat
Delica
t
es
Low Heat
r
e
Wrinkle Ca
Off
r
e
t
ons
Optimum
Mo
r
e D
Off
Quick Fluff 10
Dewrinkle 20
Wrinkle Ca
Less
D
r
y
r
y
D
On
Cot
Off
r
e
r
y
2
3
3
G
1
0
D
1
4
3
3
2
0
8
2
P
D
T
G
2
1
3
.
4
V
D
E
R
1
5
1
3
6
0
P
0
30
60
50
40
P
r
e
Less D
70
D
r
y
r
y
Cool Down
Wrinkle Ca
8
0
Time D
Minutes
P
Off
Heavy Duty
ermanent
r
ess
Casuals
r
e
r
y
S
ta
r
t
Mo
21 3
P
Signal
Medium
Off
Loud
S
e
R
egular Heat
Time
n
s
o
r
Cot
Air Fluff
No Heat
D
D
r
t
ons
r
y Only
™
y
Clothes Ca
F
abric Ca
r
e
r
e
Easy Ca
Medium Heat
Delica
t
es
Low Heat
r
e
Wrinkle Ca
Off
r
e
Cot
t
ons
Optimum
Mo
r
Quick Fluff 10
Dewrinkle 20
Time D
Minu
t
es
Wrinkle Ca
Less D
D
r
e D
r
y
Off
r
On
Sensor
Off
Mo
r
e
r
y
y
30
40
50
60
y
70
r
e D
r
y
Less D
r
Cool Down
Wrinkle Ca
80 Heavy Duty
ermanent
P
r
Casuals
y
Off
Mo
r
Less D
Wrinkle Ca
ess
r
e
e D
r
r
r
y
y
e
Delica
S
ta
r
t
t
es
21 3
NOTE: Drying times will vary according to the type of heat used (Electric, Natural or LP gas),
size of load, types of fabrics, wetness of clothes and condition of exhaust ducts.
6

About the control settings.
IMPORTANT: Clean the lint filter each time you use the dryer.
Fabric Care/Temperature (Not all features are on all models)
1
Cottons For regular to heavy cottons.
Reg. Heat
Easy Care For synthetics, blends, delicates and items labeled permanent press.
Med. Heat
DELICATES On some models. For delicates, synthetics and items labeled tumble dry low.
Low Heat
Air Fluff For fluffing items without heat. Use the Time Dry cycle.
No Heat
Automatic cycles automatically determine fabric dryness. Select Less Dry if you want your clothes slightly
damp at the end of the drying cycle. Select More Dry if you want them to feel drier.
Timed cycles run for a selected time.
Drying Cycles (Not all features are on all models)
2
Cottons For cottons and most linens. For most loads, select Optimum Dry (on some models).
Permanent For wrinkle-free, permanent press and delicate items, and knits.
Press/Casuals
GEAppliances.com
Delicates For delicate items, special-care fabrics and knits.
Time Dry Set the Cycle Selector at the desired drying time.
Dewrinkle For removing wrinkles from items that are clean and dry or that are very lightly damp.
Quick Fluff For freshening or fluffing up already dry clothing, fabrics, linens and pillows. Use with
Air Fluff No Heat. Provides 10 minutes of no heat tumbling.
Start³ Close the dryer door. Select Start. Opening the door during operation will stop the dryer.
3
To restart the dryer, close the door and select Start to complete the cycle.
Color Logic (on some models)
Select the correct Fabric Care setting.
Match the particular color below the words
with the same color on the Cycle Dial.
Example: Drying a load of clothing labeled
permanent press.
Choose the
1
this load it would be the Easy Care
HEAT (which is a particular color).
Turn the Cycle Dial to the area that has
2
the same color as the
you have chosen³for this load it would be
the
Easy Care Automatic.
Fabric Care setting
Fabric Care setting
³for
Med.
Consumer SupportTroubleshooting TipsOperating InstructionsSafety Instructions
7

About the dryer features.
Wrinkle Care
Off
Signal
Medium
Off
On
Loud
Wrinkle Care Option (on some models)
Use this option to minimize the wrinkles
in clothes. It provides approximately
15 minutes of no-heat tumbling after
the clothes are dry.
This option can only be used with the Cottons
and Easy Care cycles.
Cycle Signal Option (on some models)
This signal will sound just before the end
of the cycle to remind you to remove the
clothes. On some models, the signal sound
level cannot be adjusted.
If you selected the Wrinkle Care option, the
signal will sound at the end of the drying
time and will sound several times during the
Wrinkle Care cycle. This will remind you that
it is time to remove the clothes.
If you are using the Cycle Signal knob
and you select the Wrinkle Care option,
a signal will sound at the end of the drying
time and several times during the Wrinkle
CARE cycle. This will remind you that it is time
to remove the clothes.
If Wrinkle Care is not on, the dryer
will stop once the timer reaches the
Wrinkle Care mark on the cycle dial.
NOTE:
Remove garments promptly at the sound
of the signal. Place clothes on hangers so
wrinkles won’t set in.
Use the Cycle Signal especially when
drying fabrics like polyester knits and
permanent press. These fabrics should
be removed so wrinkles won’t set in.
Operating Instructions Safety InstructionsConsumer Support Troubleshooting Tips
Automatic Cycle Signal (on some models)
At the end of each cycle, there is
approximately 15 minutes of no-heat
tumbling after the laundry is dry.
Drum Lamp (on some models)
Before replacing the light bulb, be sure to
unplug the dryer power cord or disconnect
the dryer at the household distribution panel
by removing the fuse or switching off the
circuit breaker. Reach above dryer
from inside the drum. Remove the
replace with the same size bulb.
opening
bulb and
Drying Rack (on some models)
A handy drying rack may be used for drying
delicate items such as washable sweaters.
Hook the rack over the lint filter so the rack
extends into the dryer drum.
A reminder signal will sound periodically
during this time to remind you to remove
the laundry.
NOTE:
The drying rack must be used with the
Time Dry cycle.
Do not use this drying rack when there
are other clothes in the dryer.
Stainless Steel Drum
The stainless steel used to make the dryer
drum provides the highest reliability available
in a GE dryer. If the dryer drum should be
scratched or dented during normal use,
(on some models)
the drum will not rust or corrode. These
surface blemishes will not affect the function
or durability of the drum.
8
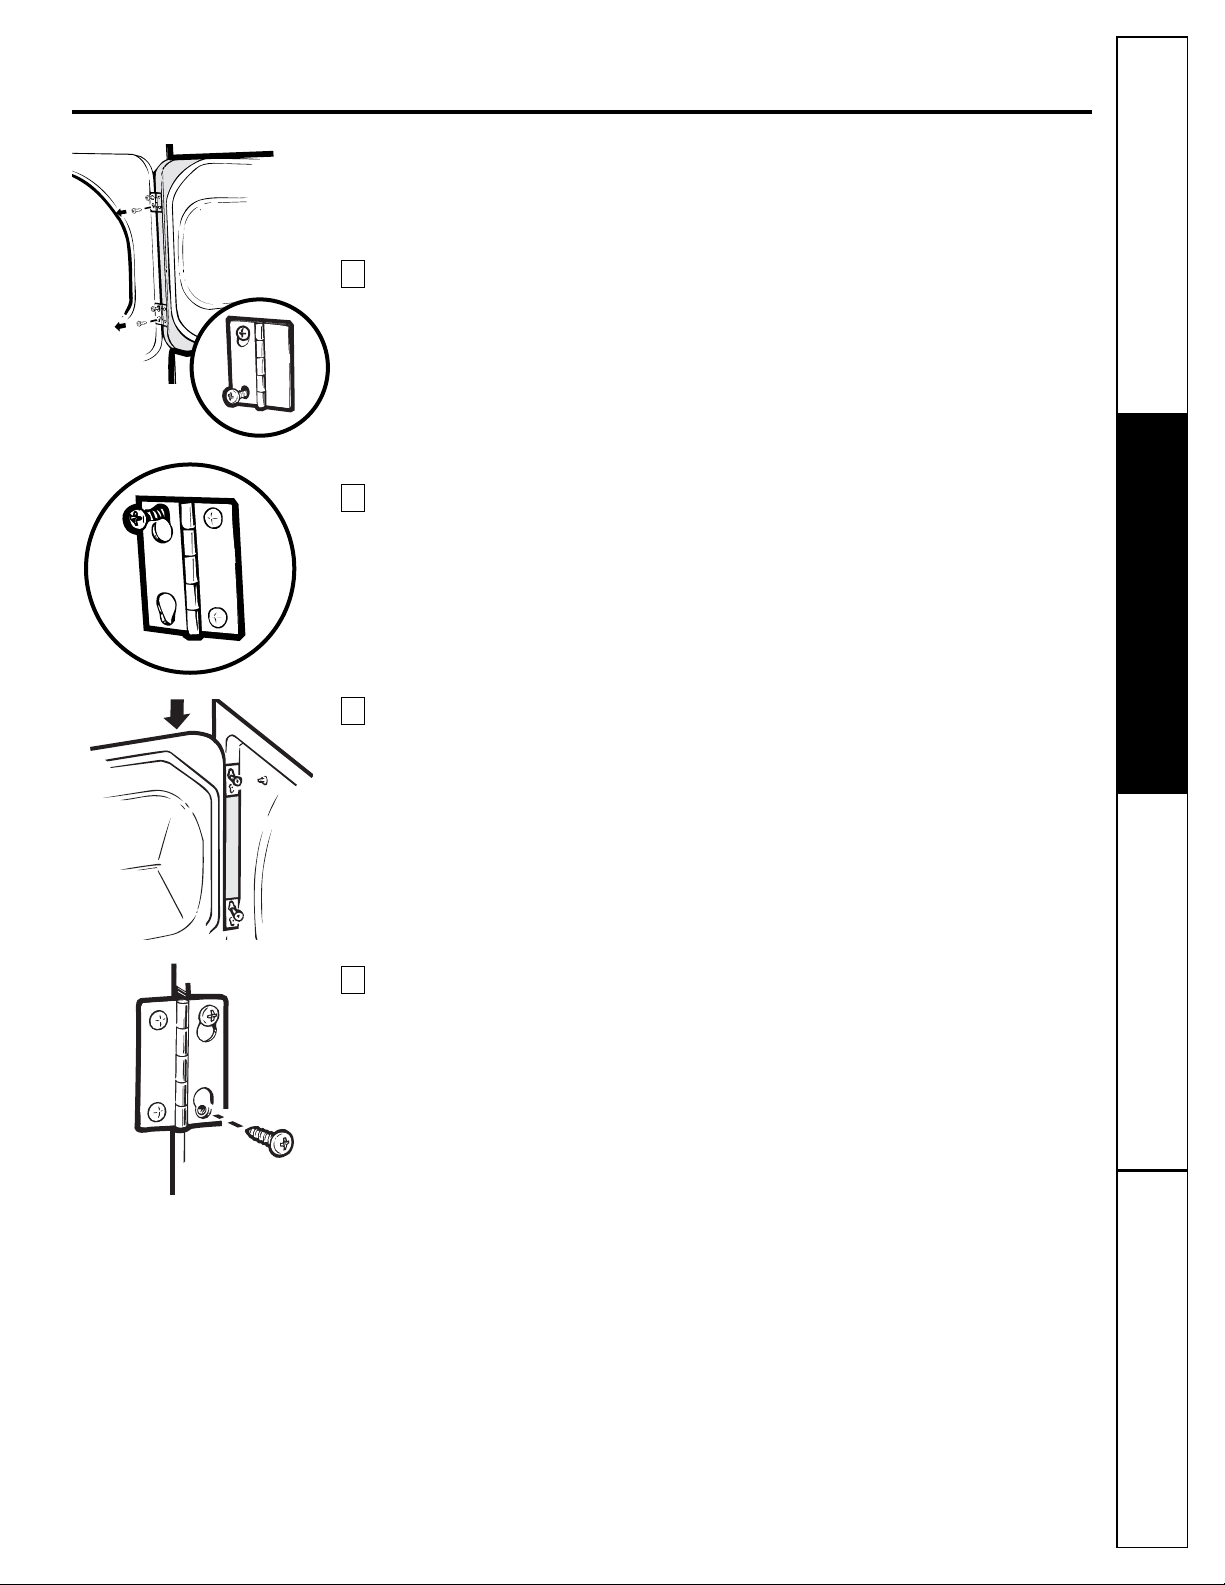
About reversing the door.
Reversing the Door
Tools needed:
Standard #2 Tape-tipped
Phillips screwdriver putty knife
Open the door and remove the filler plugs opposite the hinges. With the door completely
1
open, remove the bottom screw from each hinge on the dryer face. Insert these screws
about half way into the TOP holes, for each hinge, on the opposite side (where you
removed the filler plugs). Apply firm pressure to get the screw started in new holes.
Loosen top screw from each hinge on the dryer face half way. With one hand holding the
2
top of the door and the other hand holding the bottom, remove the door from the dryer
by lifting it UP and OUT.
GEAppliances.com
Rotate the door 180°. Insert it on the opposite side of the opening by moving the door
3
IN and DOWN until the top hinge and the bottom hinge are resting on the top screws
inserted in step 1.
Remove the remaining screws from the side of the opening from which the door
4
was removed. With these screws, secure each hinge at the bottom. Tighten the
two top screws of each hinge. Reinsert the plastic plugs on the side from which
the door was removed.
Consumer SupportTroubleshooting TipsOperating InstructionsSafety Instructions
9
Loading and using the dryer.
Always follow the fabric manufacturer’s care label when laundering.
Sorting and Loading Hints
As a general rule, if clothes are sorted properly for the
washer, they are sorted properly for the dryer.
Do not add fabric softener sheets once the load has
become warm. They may cause fabric softener stains.
Bounce® Fabric Conditioner Dryer Sheets have been
approved for use in all GE Dryers when used in
accordance with the manufacturer’s instructions.
Care and Cleaning of the Dryer
The Exterior: Wipe or dust any spills or washing
compounds with a damp cloth. Dryer control
panel and finishes may be damaged by some laundry
pretreatment soil and stain remover products. Apply
these products away from the dryer. The fabric may
then be washed and dried normally. Damage to your
dryer caused by these products is not covered by
your warranty.
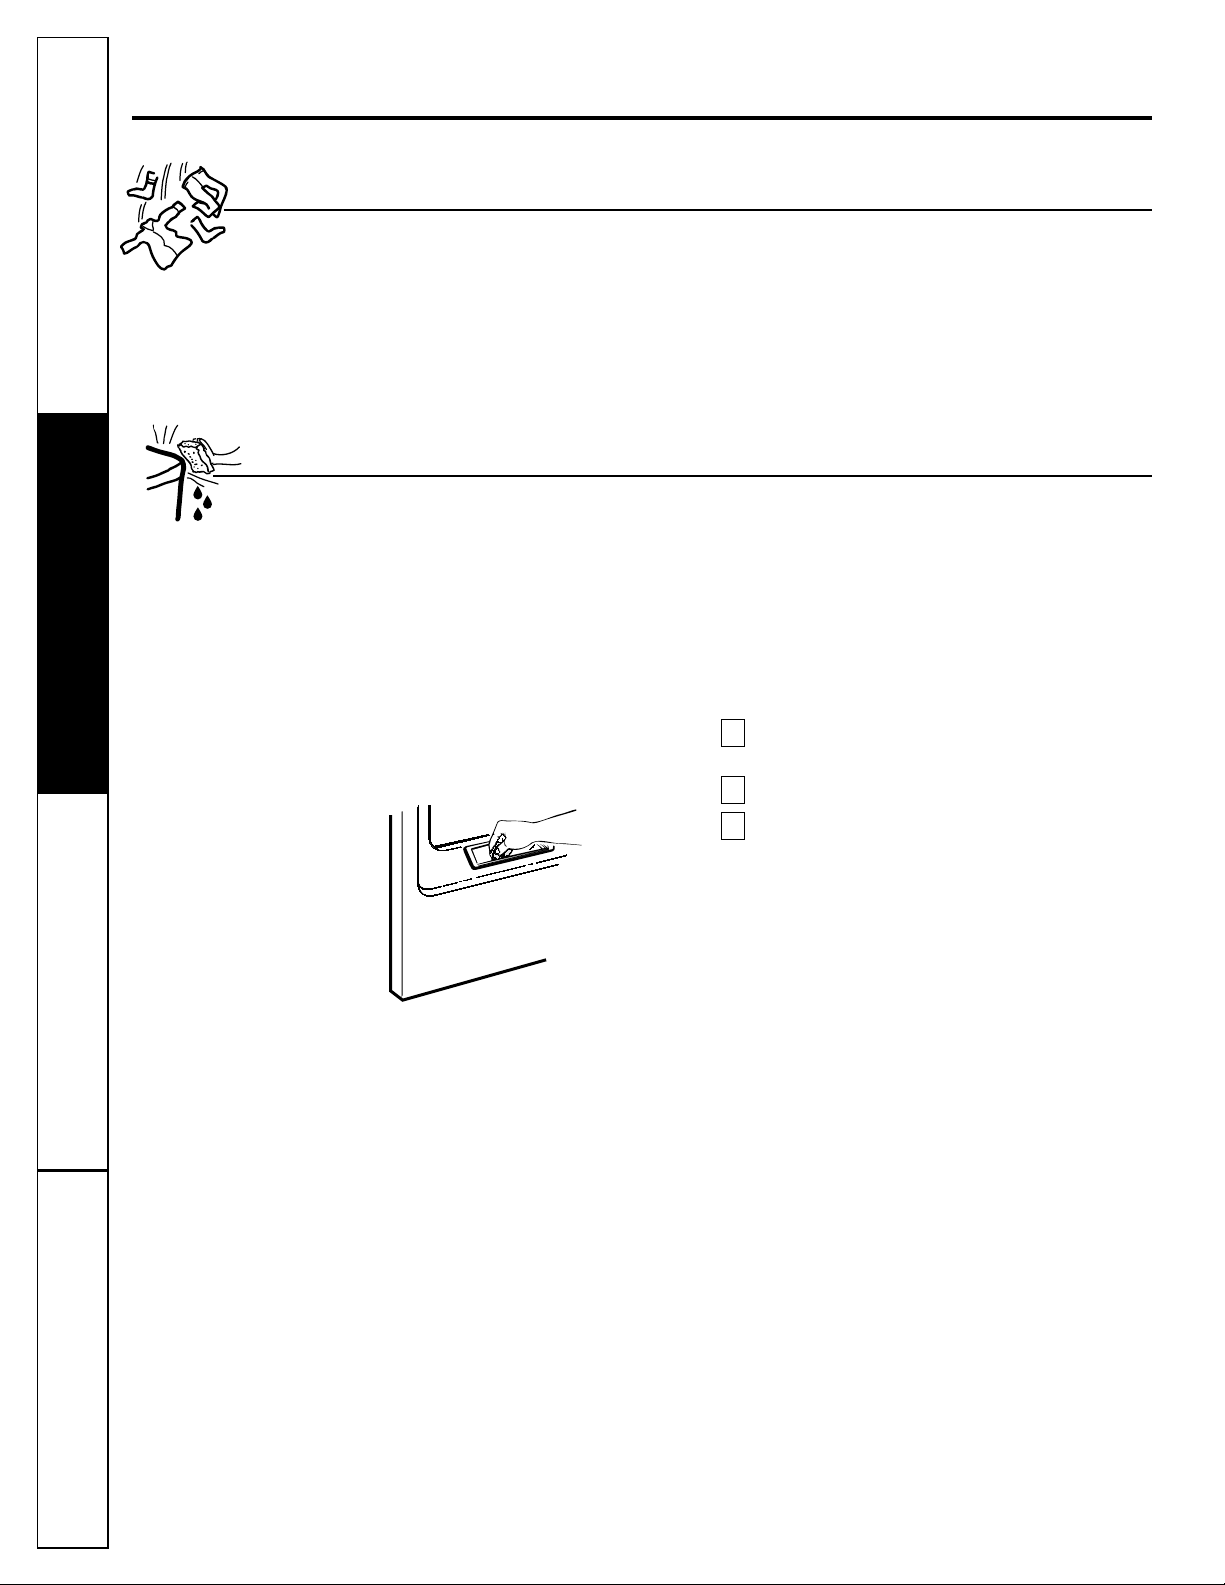
The Lint Filter: Clean the lint filter before each
use. Moisten your fingers and reach into the filter
Operating Instructions Safety InstructionsConsumer Support Troubleshooting Tips
opening. Run your fingers
qualified
once a year.
across the filter. Have a
technician vacuum the lint from the dryer
Do not overload. This wastes energy and causes
wrinkling.
Do not dry the following items: fiberglass items,
woolens, rubber-coated items, plastics, items with
plastic trim and foam-filled items.
Stainless Steel: To clean stainless steel surfaces,
use a damp cloth with a mild, non-abrasive cleaner
suitable for stainless steel surfaces. Remove the
cleaner residue, and then dry with a clean cloth.
The Exhaust Duct: Inspect and clean the exhaust
ducting at least once a year to prevent clogging.
A partially clogged exhaust can lengthen the
drying time.
Follow these steps:
Turn off electrical supply by disconnecting the
1
plug from the wall socket.
Disconnect the duct from the dryer.
2
Vacuum the duct with the hose attachment and
3
reconnect the duct.
The Exhaust Hood: Check from the outside that the
flaps of the hood move freely when operating. Make
sure that there is not wildlife (birds, insects, etc.) nesting
inside the duct or hood.
10
 Loading...