

Page 1
GEAppliances.com
Safety Instructions ........ 2-s
Operating Instructions
Appliance Communication ...... 11
Features ......................... 8
Loading and Using the Dryer ...... 9
Operating Instructions ......... 4-7
Reversing the Door ........... 12, 1B
Venting the Dryer ............... 11
Troubleshooting Tips... 14-16
Consumer Support
Consumer Support .............. 18
Parts and Accessories ........ 3, 18
Warranty ....................... 17
ovF
ENERGYSTAR
As an ENERGY STAR ® partner,
GE hasdeterminedthatthis
product meetstheENERGYSTAR®
guidelinesforenergyefficiency.
Write the model and serial
number here:
Model #
Serial #
You can find them on a label
on the front of the dryer
behind the door.
234D2028PO07
49-90540 02-15 GE PrintedinMexico
Page 2
IMPORTANT SAFETY INFORMATION.
READ ALL INSTRUCTIONS BEFORE USING.
,_ This is the safety alert symbol. This symbol alerts to potential hazards that can kill or hurt and others.
All safety messages will follow the safety alert symbol and the word "DANGER","WARNING", or "CAUTION".These
words are defined as:
Indicates a hazardous situation which, if not avoided, will result in death or serious injury.
Indicates a hazardous situation which, if not avoided, could result indeath or seriousinjury.
_ Indicates hazardous situation which, if not avoided, could result inminor moderate
a or
you you you
injury.
IMPORTANT SAFETYINSTRUCTIONS
Toreduce the risk of fire, explosion, electric shock,or injury to persons when usingyour appliance, follow
basic precautions,including the following:
[] Readall instructionsbeforeusingtheappliance.
[] DO NOTdry articles that have been previously cleaned in, washed in, soaked in or spotted with gasoline, dry-cleaning
solvents, or other flammable or explosive substances, us they give off vapors that could ignite or explode.
[] DO NOTplace items exposed to cooking oils in your dryer. Items contaminated with cooking oils may contribute to u
chemical reaction that could cause u loud to catch fire.
[] DO NOTallow children to play on or in this appliance. Close supervision of children is necessary when this appliance
isused near children. Before the appliance is removed from service or discarded, remove the door to the drying
compartment.
[] DO NOTreach into the appliance if the drum is moving.
[] DO NOTinstall or store this appliance where it will be exposed to the weather.
[] DO NOTtamper with controls, repair or replace any part of this appliance or attempt any servicing unless specifically
recommended in the user maintenance instructions or in published user repair instructions that you understand and
have the skills to carry out.
[] DO NOTuse fabric softeners or products to eliminate static unless recommended by the manufacturer of the fabric
softener or product.
[] DONOTuseheat to dry articles containing foam rubber or similarly textured rubber-like materials.
[] Clean lint screen before or after each load. DONOToperate the dryer without the lint filter in place.
[] Donot store combustible materials, gasoline or other flammable liquids near the dryer. Keep area around the exhaust
opening and adjacent surrounding areas free from the accumulation of lint, dust and dirt. Keep dryer area clear and free
from items that would obstruct the flow of combustion and ventilation air.
[] The interior of the appliance and exhaust duct should be cleaned periodically by qualified service personnel.
[] Unplug the appliance or turn off the circuit breaker before servicing. Pressingthe Poweror Start/Pause button DOESNOT
disconnect power.
[] DO NOToperate this appliance if it isdamaged, malfunctioning, partially disassembled,or hasmissing or broken parts,
including a damaged cord or plug.
[] DO NOTspray anytype of aerosol into,on or near dryerat any time. Do not useany type of spray cleanerwhen cleaning dryer
interior. Hazardous fumes or electrical shock could occur.
[] See "Electrical Connection" located in the Installation Instructions for grounding instructions.
SAVETHESE INSTRUCTIONS
2
Page 3
GEAppliances.com
ADDITIONAL GAS DRYERWARNINGS
Foryour safety, the information in this manual must befollowed to minimize the risk of fire or explosion
or to prevent damage, personalinjury, or death.
- DONOTstore orusegasoline or other flammable vapors and liquidsin the vicinity of this or any other appliance.
- WHATTODOIFYOUSHELLGAS:
• DONOTtry to light any appliance.
• DONOTtouch any electrical switch; DONOTuse any phonein your building.
• Clearthe room, building, or area of any occupants.
• Immediately callyour gas supplier from a neighboCsphone.Followthe gas supplieCsinstructions.
• Ifyou cannot reachyour gas supplier, cellthe fire department.
- Installation and service must be performed bya qualified installer, service agency, or the gassupplier.
Stateof CaliforniaProposition65 Warnings:
TheCaliforniaSafeDrinkingWater andToxic EnforcementAct requiresthe governor of Californiato publish a list of substances
known to the state to cause cancer,birth defects or other reproductive harm and requiresbusinessesto warn of potential exposure
to such substances.
Thisproduct contains one or more chemicals known to the Stateof Californiato causecancer,birth defects or
other reproductive harm.
Gasappliances can cause low-levelexposureto some of thesesubstances,including benzene,carbon monoxide, formaldehyde and
soot,caused primarily bythe incomplete combustion of natural gas or LPfuels. Exposureto these substancescan be minimizedby
properlyventing the dryer to the outdoors.
PROPERINSTALLATION
This dryer must be properly installed and located in accordance with the Installation Instructions before it is used.
If you did not receive an Installation Instructions, you can receive one by visiting GEAppliances.com or by calling
800.GE.CARES (800.432.2737).
[] Properlyground dryerto conform with all governing codes
and ordinances. Followdetails in Installation Instructions.
[] Install or store where it will not beexposed to temperatures
below freezing or exposedto the weather.
[] Connect to a properly rated, protected and sizedpower
supply circuit to avoid electrical overload.
[] Removeall sharp packing items and disposeof allshipping
materials properly.
[] Removethe colored protective tape from the control panel.
[] Donot obstruct the flow of ventilating air. Do not stack or
place laundry or throw rugsagainst the front or back of the
dryer.
Steam Water Hoses:
GEstrongly recommends the use of factory specified parts.
A list of factory hoses availablefor purchase arelisted
below.These hosesare manufactured and tested to meet
GEspecifications.
GEstrongly recommends the use of new water supply
hoses.Hoses degrade overtime and needto be replaced
every 5 years to reducethe risk of hosefailures andwater
damage.
Ports and Accessories
Order on-lineat GEApplianceparts.com today, 24 hours a
dayor byphoneat 800.626.2002duringnormalbusinesshours.
Part Number
WE25M53
OR
WE1H847
WE1H849
PH14X10056
WX14X10007
Exhaust/Ducting:
r_AII dryers MUSTbe exhausted to theoutside to prevent
large amounts of moisture and lintfrom being blown into
the room.
_] se only rigid metal 4" diameter ductwork inside the dryer
cabinet and use only rigid metal 4" diameter or UL
approved transition ducting between the dryer and the
home duct. USE OF PLASTIC OR OTHER COMBUSTIBLE
DUCTWORK CAN CAUSE A FIRE. PUNCTURED DUCTWORK
CAN CAUSE A FIRE IF IT COLLAPSES OR BECONES
OTHERWISE RESTRICTED IN USE ORDURING
INSTALLATION.
For complete details, follow the Installation Instructions.
Accessory
CompleteKit(hoses,Y-adapter
washers)(included)
Longhoseand
Y-adapter
Dryerdooropeningventbrush
(notincluded)
LintEaterTMdryerrotary tubebrush
(notincluded)
SAVETHESE INSTRUCTIONS
Page 4
Operating instructions
A WARNING!
To reduce the risk of fire, electric shock, or injury to persons, read the IMPORTANTSAFETYINSTRUCTIONSbefore
operating this appliance.
Explosion Hazard
Keep flammable materials and vapors, such as gasoline,
away from dryer.
DONOTdry anything that has ever had anything flammable
on it (even after washing).
Failure to do so can result in death, explosion, or fire.
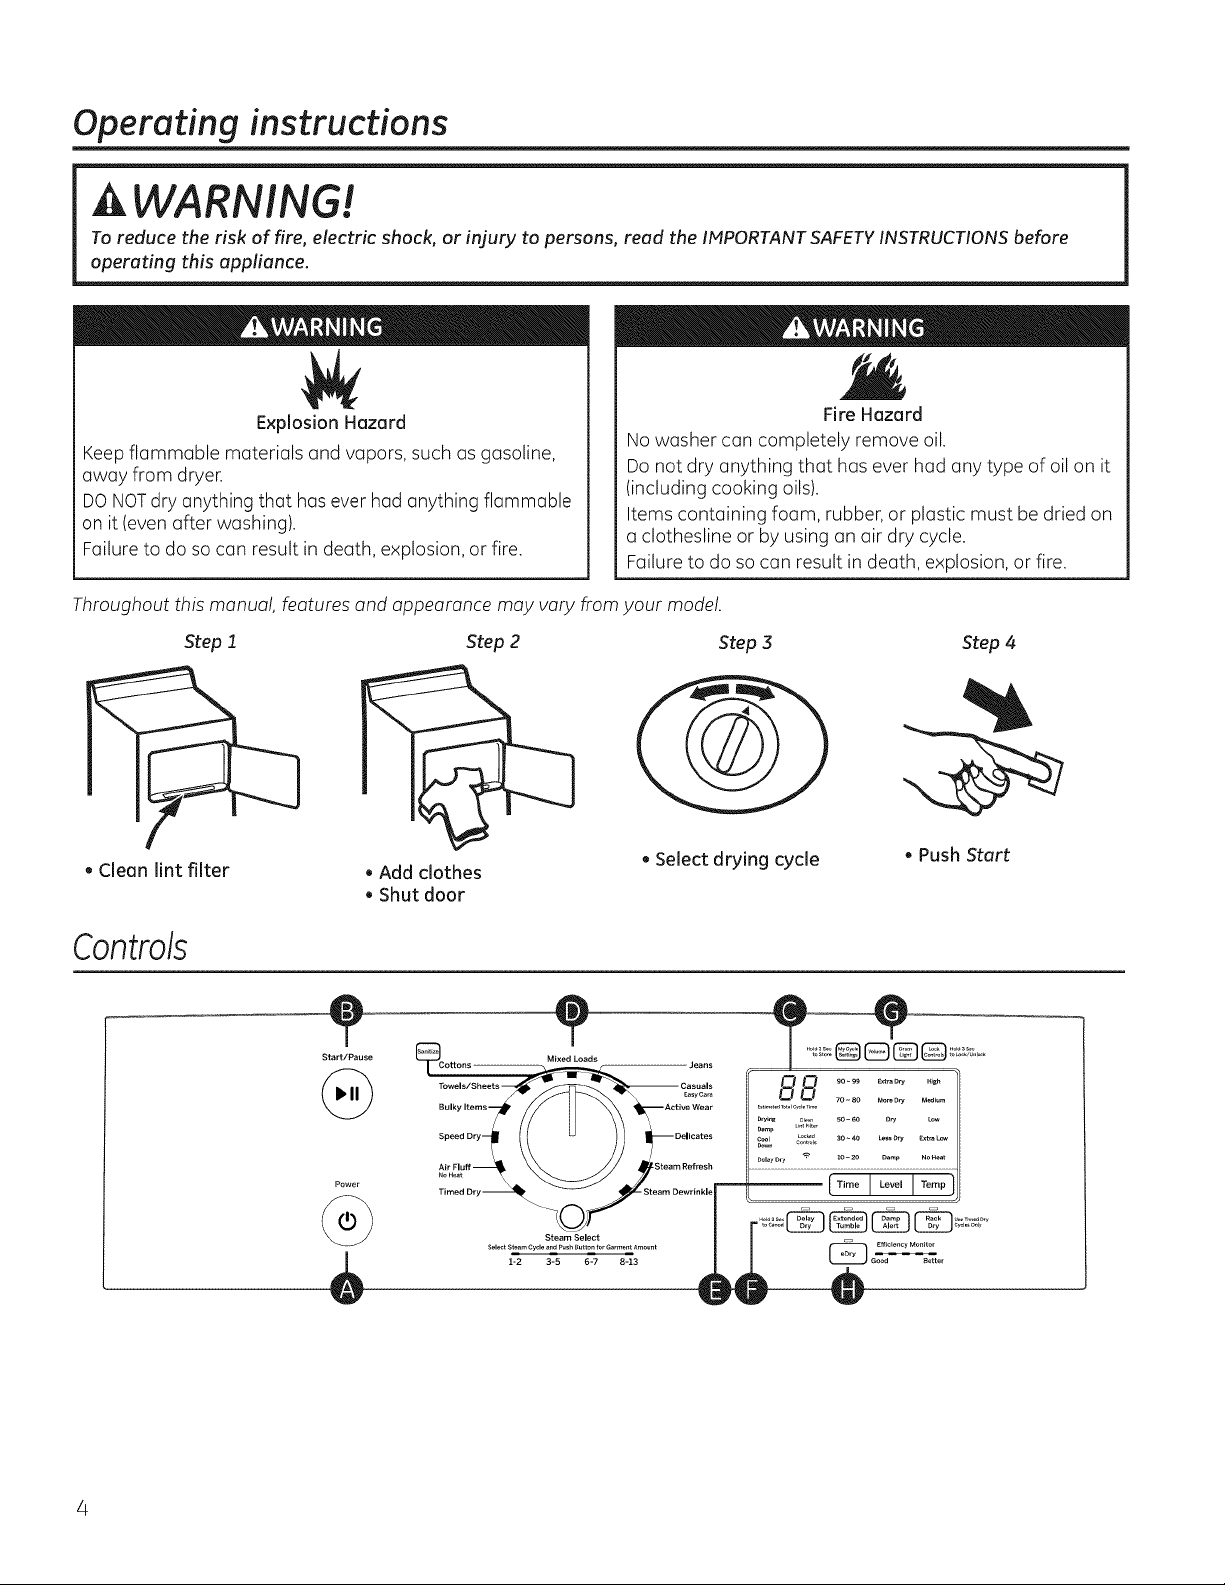
Throughout this manual, features and appearance may vary from your model.
Step I
, Clean lint filter
, Add clothes
, Shutdoor
Step 2
No washer can completely remove oil.
Do not dry anything that has ever had any type of oil on it
(including cooking oils).
Items containing foam, rubber, or plastic must be dried on
a clothesline or by using an air dry cycle.
Failure to do so can result in death, explosion, or fire.
. Select drying cycle
Controls
Step 3
Fire Hazard
Step4
* Push Start
e
Start/Pause
Page 5
GEAppliances.com
Power
Press to "wake up" the display. Ifthe display is active, press to put the dryer into idle mode.
NOTE'. Pressing Power does not disconnect the appliance from the power supply.
Start and Pause
Press Start to begin the cycle. NOTE:The door must be closed for the dryer to start the cycle. Pressing Pause will pause the
cycle,the Start will blinkand "PAUSE"will scrollacrossthe LCD.
Tocontinue the cycle, pressStart again.To stop the cycle,hold the button for 5 seconds.
Display and Status Lights
Thedisplay shows the approximate time remaining until the endof the cycle.
In addition, this display will, "scroll" the dryer status:
• PAUSE The message "PAUSE"will scroll across the display when the dryer's cycle ispaused. Thecycle may be
re-started by pressing the Start button.
• door Themessage"door" will be displayedwhen the door isopened during the dryer'scycle,
• CYCLE Themessage"CYCLE"will be displayed when the clothesare dry and the dryer isrecommending a
preferred cyclefor the next load (seeCleunSpeakTM section).
• dELAY Themessage"dELAY' will bedisplayed when the DelayedDry is initiated. Itwill be replaced with the
estimated time when cyclestarts.
Cycle status lights
Showswhether the dryer isin the DRYING,DAMP,or COOLDOWN cycle.
Feature status lights indicate:
Delay Dry A delay dry time isset,
Locked Controls The dryer controls are locked - will blinkonce if you press any button orturn the cycle knob.
Clean Lint Filter Light will stay on for 15 seconds after the cyclestops.
- Dryerisconnectedto the network and con communicate with a connected smortphone device.
Page 6
Operating instructions
Drying Cycles-Sensor cycles automatically determine fabric dryness.
Timed cycles run for the selected time.
Timed Dry Setthe CycleSelectorat the desired drying time.
Air Fluff/ Forfreshening orfluffing up already dry clothing, fabric, linensand pillows. Usewith No Heat.
No Heat Provides10 minutes of no-heat tumbling.
SpeedDry Forsmallloadsthat areneededin a hurry,such assport or school uniforms.Canalsobe usedifthe
previouscycleleftsome itemsdamp, such as collarsor waistbands.NOTE:On some models,the time
remaining inthe cyclewill show counting down inthe display.
Bulky Items Forlarge coats,bed spreads,mattress covers, sleepingbags and similar large/bulky items such as
blankets, comforters,jackets, and smallrugs.
Towels/Sheets* Formost towels and linens.
Cottons* Forcottons and most linens.Note: ENERGYSTAR®models are tested on Cottons with default settings.
Mixed For loads consistingof cottons and poly-blends.
Loads*
Jeans* Forjeans.
Casuals/ For wrinkle-free, permanent press, delicate items and knits.
EasyCare *
Active Wear
Delicates
Steam Refresh
Steam Dewrinkle Forusewith larger loadsthan Steam Refresh.Idealfor loadsleft inthe dryer for an extended time.
Steam Select TheSteamSelect button isused in conjunction with Steam Refresh and Steam Dewrinkle. Asyou
Steam Cycle Notes:
• Important - The temperature setting must be set to HIGHand water must be turned on before running the steam cycles.
• The Extended Tumble option will be turned on.
• Afterthe steam cycle,the unit willbeep (ifVolume is on) and display "00".
• Donot use a steam cyclewith items such as wool, leather,silk,lingerie,foamproducts or electricblankets.
• Donot use steam cycleson new clothes without first washing.
• Steam cyclesare not intended foruse with towels.
Sanitize This option reduces certain types of bacteria by 99.9%, including: Staphylococcus aureus, Pseudomonas
•Cycles available with Sanitize option.
Forsports and exercisewear.
Fordelicate items,special-care fabrics and knits.
Forslightly wrinkled dry garments. Significantlyreduces wrinkles.
NOTE:A singleextremely light fabric item may need to havean additional item included in
the Steam Refreshcycle to achieve optimum results.
pressthe button, it defines how many articles are in the dryer and adjusts the steam and cool down
times accordingly.
aeruginosa and Klebsiella pneumoniae. The anti-bacterial process occurs when high heat is used
during a portion of the drying cycle.
NOTE: Do not use this cycle on delicate fabrics.
Settings
Individual settings for Timed Dry cycle minutes (Time), dryness level (Level), and temperature (Temp) can be set from
the minimum (lowest in column) to maximum (highest in column). In general, the higher up the column, the more
energy will be used.
Time - Selection only for Timed cycles.
Each"setting"allowsyou to specifya lower(1tap) or an upper(2taps)time working yourway from a
minimum 10 minute to a maximum 99minute dry time (10,20,30,40.... 80,90,99,10...)
Dryness Level - Selection only used for Sensor cycles. Timed cycles run for the selected time.
Extra Dry Usefor heavy-dutyfabrics or itemsthat shouldbevery dry,such astowels.
More Dry Usefor heavy-duty or mixed type fabrics.
Dry Usefor a normal dryness levelsuitable for most loads.This isthe preferred cycle for energy savings.
Less Dry Usefor lighter fabrics.
Damp For leaving items partiallydamp.
6
Page 7
GEAppliances.com
Temperature
High
Medium
Low
Extra Low
No Heat
Forregular to heavy cottons.
NOTE: Steam Dewrinkle and Steam Refresh require the Hightemperature setting.
Forsynthetics,blends,delicates and items labeled permanent press.
Fordelicates,synthetics and items labeledtumble dry low.
Fordelicates,synthetics and items labeledtumble dry low.
Forfluffing itemswithout heat. Foruse only with the Timed Dry cycles.
Options
Delay Dry
Asthe Delay Dry button is repeatedly pressed,the delay time setsto from 1 to 9 hours, and backto clear(0).After selecting
the delay time, pressStart and the delaytime will count down the time remaining until the cycle starts.
If the Delay Dry button is pressedfor 3 seconds, itclears (regardlessof the delay time) or terminates a delaying cycle.
Extended Tumble
Usethis option to minimize the wrinkles inclothes. Itprovides I hour of no-heat tumbling after the clothes are dry.Ifyou are
using the cycle Volume and you selectthe Extended Tumble option,a signalwill sound at the end ofthe drying time and
every 5 minutes during the Extended Tumble cycle.This will remind youthat it is time to remove the clothes.
Damp Alert
Thisoption causesthe dryer to beepwhen clothes have dried to a dump level.Removeitems that you wish to hang dry.The
Dump Alert will only beepwhen thisoption is selected(but the drycyclewillkeeprunning).Removingclothesand hangingthem
when they aredamp, can reduce the need to iron someitems. The light beside the button will be lit when Damp Alert is on.
Rack Dry
RackDry isonlyallowedfor timed cycles(TimedDry & Air Fluff).The light turns off if cycle knob isturnedto a non-timed cycle.
My Cycle Settings
Asthe cycle selector knob isturned, the Time (Timed Dry),Level (Dryness Level),and Tamp (Temperature) settings
change to automatic pre-set default settings. If you desire a different setting, press the appropriate button(s). Then
press and hold the My Cycle Settings button for 3 seconds. The button light will turn on and the dryer will save these
settings for that knob selection. In the future, when you turn the selector knob to that cycle, your settings will be
automatically recalled.
Totemporarily (for this load) return to the pre-set default settings, depress the My Cycle Settings button for 1/2
second. The button light will turn off and the options will change back to these defaults. To make these default settings
permanent, hold the My Cycle Settings button again for 3 seconds to make them your preferred settings (the button
light will turn back on).NOTE:Volume level cannot be set for My Cycle Settings.
Volume
Usethe Volume button to change the volume of the end of cycle andcontrol signals. Pressthe button until you reach the
desiredvolume (Iow-med-high) or off.The clothes should beremoved when the beeper goes off sowrinkles do not set in.
NOTE:
. Removegarments promptly at the sound ofsignal. Placeclotheson hangers so wrinkleswill not set in.
. Usethe Volume especiallywhen drying fabrics likepolyester,knits and permanent press.Thesefabrics should be removed
sowrinkles will not set in.
Drum Light
Thedrum light will go on ifthe Drum Light button is pushed orthe door isopened. It will stay on untilthe door isshut orthe
Drum Light or Power button ispushed.
Lock Controls
Youcan lockthe controls to prevent any selectionsfrom being made. Or you can lockthe controls after you havestarted a
cycle.Childrencannot accidentally start the dryer by touching buttons with this option selected.
To lock the dryer controls, pressand hold theLock Controls button for :3seconds.The control lock iconwill lightup when locked.
To unlock the dryer controls, pressand hold the Lock Controls button for :3seconds.
NOTE:The Power button can stillbe used when the machine is locked.
eDry
Available for Bulky Items, Towels/Sheets, Cottons, Mixed Loads, Jeans, Casuals/Easy Care, Active Wear, and Delicates.
When the eDry button is pressed, cycle settings change to reduce the total energy consumption of the selected sensor cycle.
NOTE:Cycletimes will change when eDry isselected.The eDry option will default to on for Cottons. For optimal energy
savings, turn eDry on. For optimal drying times, turn eDry off. NOTE:Energy savings will vary across loads and cycles.
TheEfficiency Monitor lights display the relative energy useof your selected cycle andoptions.They are provided as an
energy guide and range from Good(1 light)to Better (5lights).Cycle(time),dryness level,temperature, and additional tumble
options can increase or decreaseyour energy efficiency.Somespecial cycles will not provide a display. 7
Page 8
About the dryer features.
Sensor Dry
Time Dry
Steam Cycle
Two back legs on the
rear wall angled ledge
This feature is activated in all but the Timed
(Timed Dry & Air Fluff} and Steam (Steam
Refresh &Steam Dewrinkle) cycles.
The Sensor Dry provides greater drying
accuracy than standard machines, resulting
in shorter dry times and better clothes care.
As the clothes tumble, they touch a moisture
sensor. The sensor will stop the heating cycle
as soon as the clothes have reached the
selected dryness.
This feature is activated in Timed Dry & Air
Fluff cycles. The time (!0, 20, 30,40.... 80, 90,
99) isspecified via the Time button.
This feature is activated in Steam Refresh &
Steam Oewrinkle cycles. UseSTEANselect to
indicate the number articles.
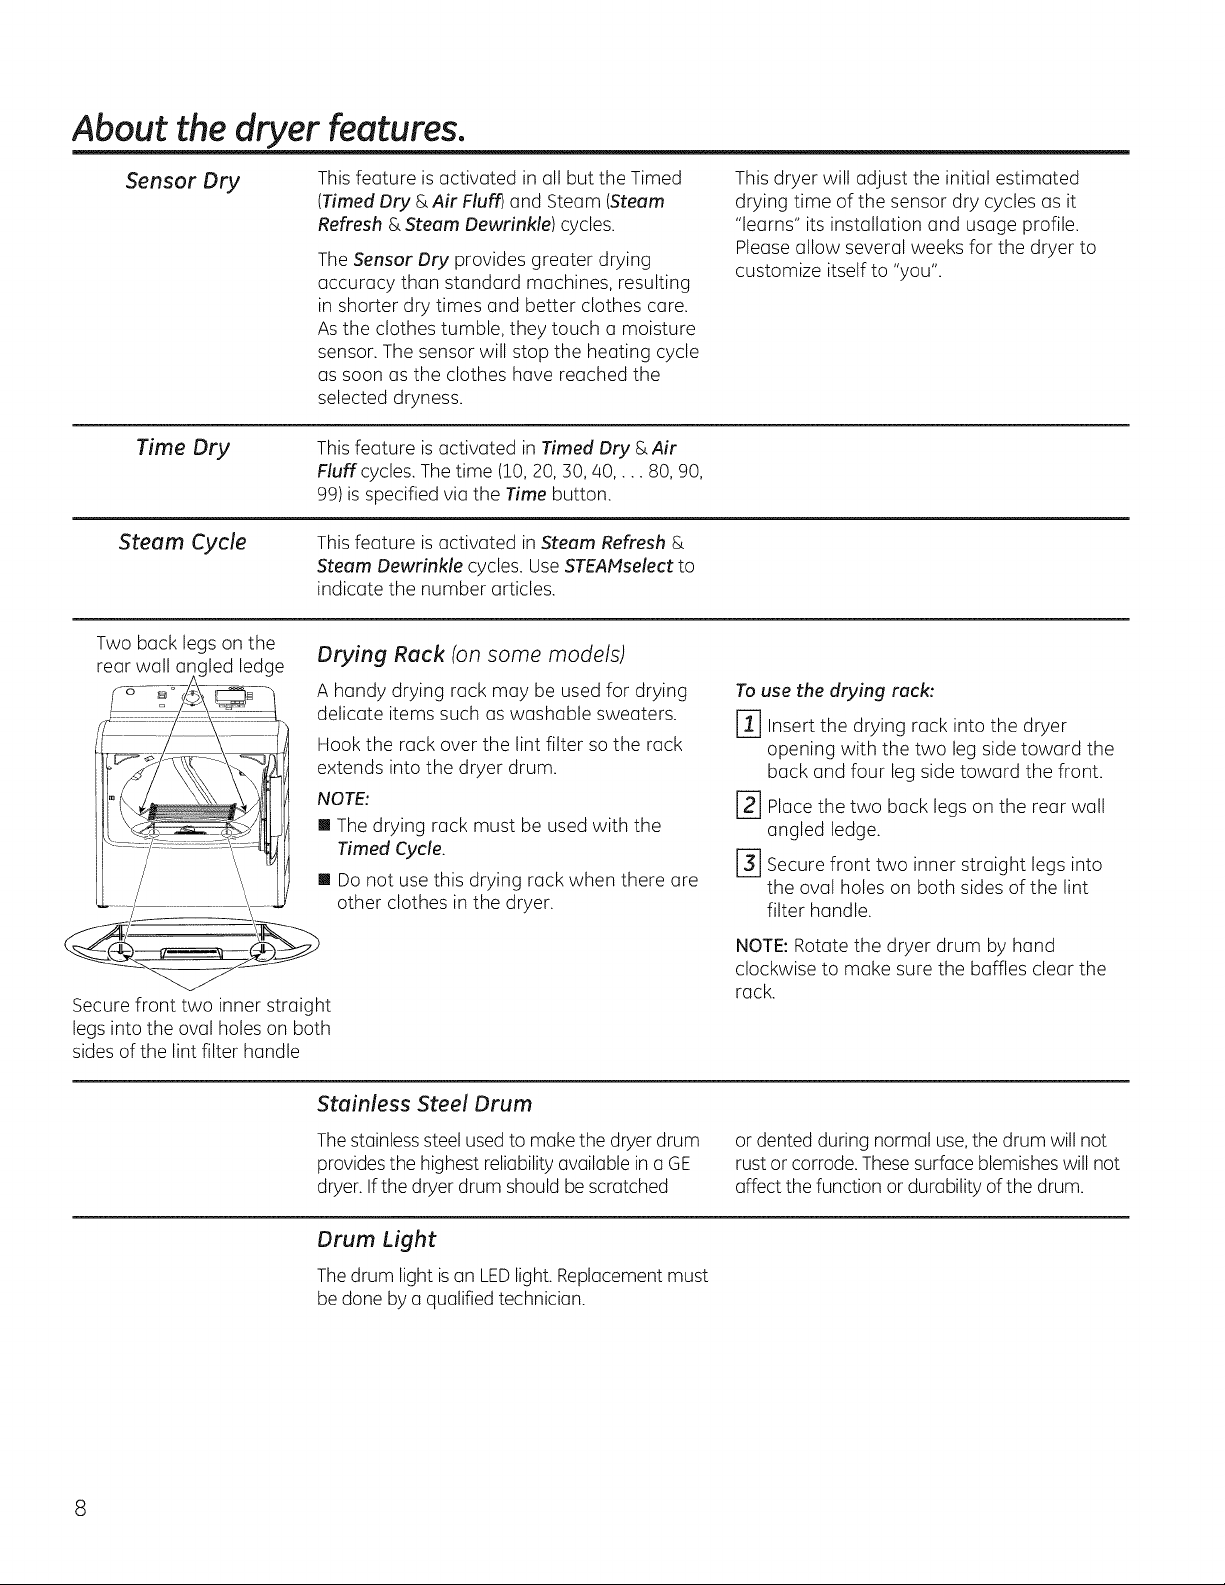
Drying Rack (on some models)
A handy drying rack may be used for drying
delicate items such as washable sweaters.
Hook the rack over the lint filter so the rack
extends into the dryer drum.
NOTE:
[] The drying rack must be used with the
Timed Cycle.
[] Do not use this drying rack when there are
other clothes in the dryer.
This dryer will adjust the initial estimated
drying time of the sensor dry cycles as it
"learns" its installation and usage profile.
Pleaseallow several weeks for the dryer to
customize itself to "you".
To use the drying rack:
-]-] Insert the drying rack into the dryer
opening with the two leg side toward the
back and four leg side toward the front.
-2-]Place the two back legs on the rear wall
angled ledge.
[-_ Secure front two inner straight legs into
the oval holes on both sides of the lint
filter handle.
Secure front two inner straight
legs into the oval holes on both
sides of the lint filter handle
8
Stainless Steel Drum
Thestainlesssteel usedto make the dryer drum
provides the highest reliability available ina GE
dryer. Ifthe dryer drum shouldbe scratched
Drum Light
Thedrum light isan LEDlight. Replacement must
be doneby a qualified technician.
NOTE:Rotate the dryer drum by hand
clockwise to make sure the baffles clear the
rack.
or dented during normal use,the drum will not
rust orcorrode. Thesesurface blemisheswill not
affect the function or durability of the drum.
Page 9
About loadingand using the dryer, GEAppliances.com
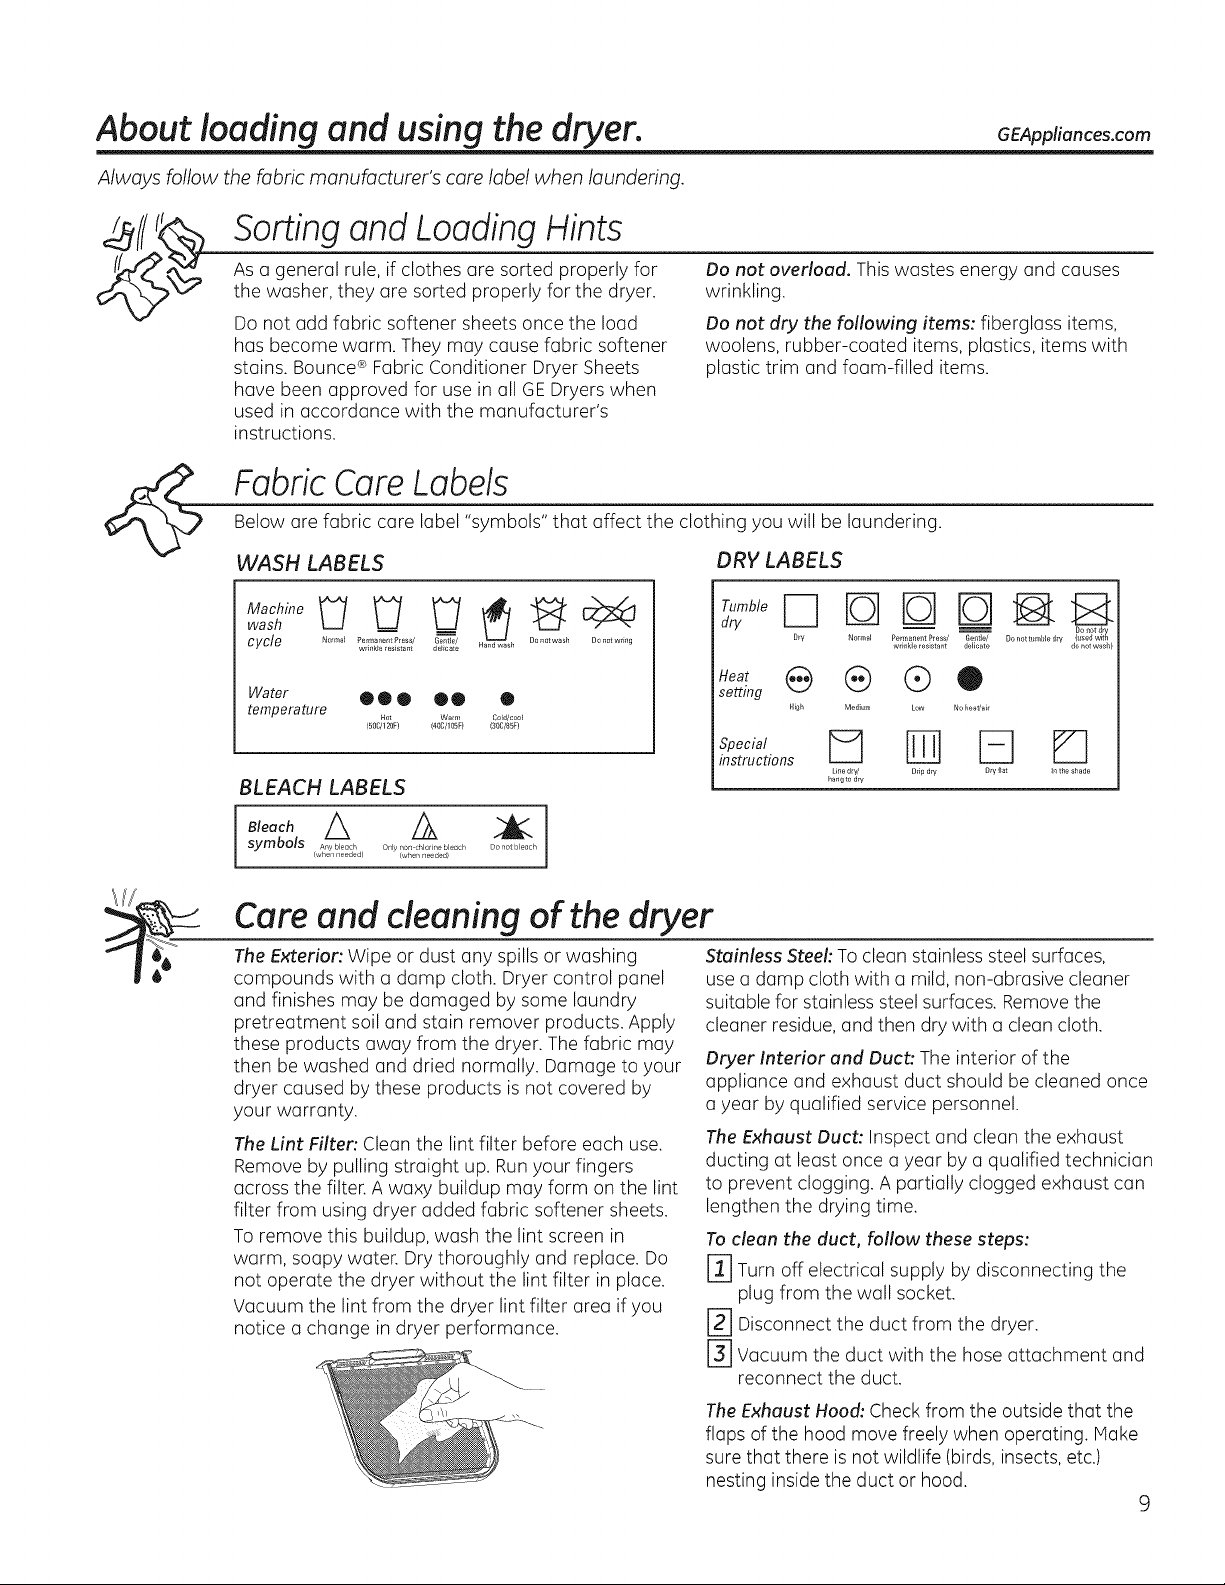
Always follow the fabric manufacturer's care label when laundering.
Sortingand Loading Hints
As a general rule, if clothes are sorted properly for
the washer, they are sorted properly for the dryer.
Do not add fabric softener sheets once the load
has become warm. They may cause fabric softener
stains. Bounce®Fabric Conditioner Dryer Sheets
Do not overload. This wastes energy and causes
wrinkling.
Do not dry the following items: fiberglass items,
woolens, rubber-coated items, plastics, items with
plastic trim and foam-filled items.
have been approved for use in all GEDryers when
used in accordance with the manufacturer's
instructions.
FabricCareLabels
Below are fabric care label "symbols" that affect the clothing you will be laundering.
WASH LABELS DRY LABELS
wash __ __
cycle l_ormal Permanent Press] Genteel/ Do not wash Do not wring
Water 00 • OQ •
temperature
wrinkle resistant deffcate an wash
Hot Warm Cotd/coo_
150C/120F} 140C/105F} (30C/BSF}
BLEACH LABELS
.l°oc.A A i
symbols [vA_,eYrbneeoe,__d} ..... r[]oiiech IrOer_r_leeb}...................
dry
.eat ® ® ®
setting
Special
instructions
O Ib-IIb---]
Dry Non_ml Permanent P_ess/ Ge_t]e/
High Medium Low No heat/ak
Une dry]
hang to dry
wrinkle _esistant delicate
Drip dry Dry fiat In the shade
do not wash
Care and cleaning of the dryer
The Exterior'. Wipe or dust any spills or washing
compounds with a damp cloth. Dryer control panel
and finishes may be damaged by some laundry
pretreatment soil and stain remover products. Apply
these products away from the dryer. The fabric may
then be washed and dried normally. Damage to your
dryer caused by these products is not covered by
your warranty.
The Lint Filter'. Clean the lint filter before each use.
Remove by pulling straight up. Runyour fingers
across the filter. A waxy buildup may form on the lint
filter from using dryer added fabric softener sheets.
To remove this buildup, wash the lint screen in
warm, soapy water. Dry thoroughly and replace. Do
not operate the dryer without the lint filter in place.
Vacuum the lint from the dryer lint filter area if you
notice a change in dryer performance.
Stainless Steel: To clean stainless steel surfaces,
usea damp cloth with a mild, non-abrasive cleaner
suitable for stainless steel surfaces. Remove the
cleaner residue, and then dry with a clean cloth.
Dryer Interior and Duct: The interior of the
appliance and exhaust duct should be cleaned once
a year by qualified service personnel.
The Exhaust Duct: Inspect and clean the exhaust
ducting at least once a year by a qualified technician
to prevent clogging. A partially clogged exhaust can
lengthen the drying time.
Toclean the duct, follow these steps:
[-_ Turn off electrical supply by disconnecting the
plug from the wall socket.
[_ Disconnect the duct from the dryer.
[-.._]Vacuum the duct with the hose attachment and
reconnect the duct.
TheExhaust Hood: Check from the outside that the
flaps of the hood move freely when operating. Hake
sure that there is not wildlife (birds, insects, etc.)
nesting inside the duct or hood.
9
Page 10
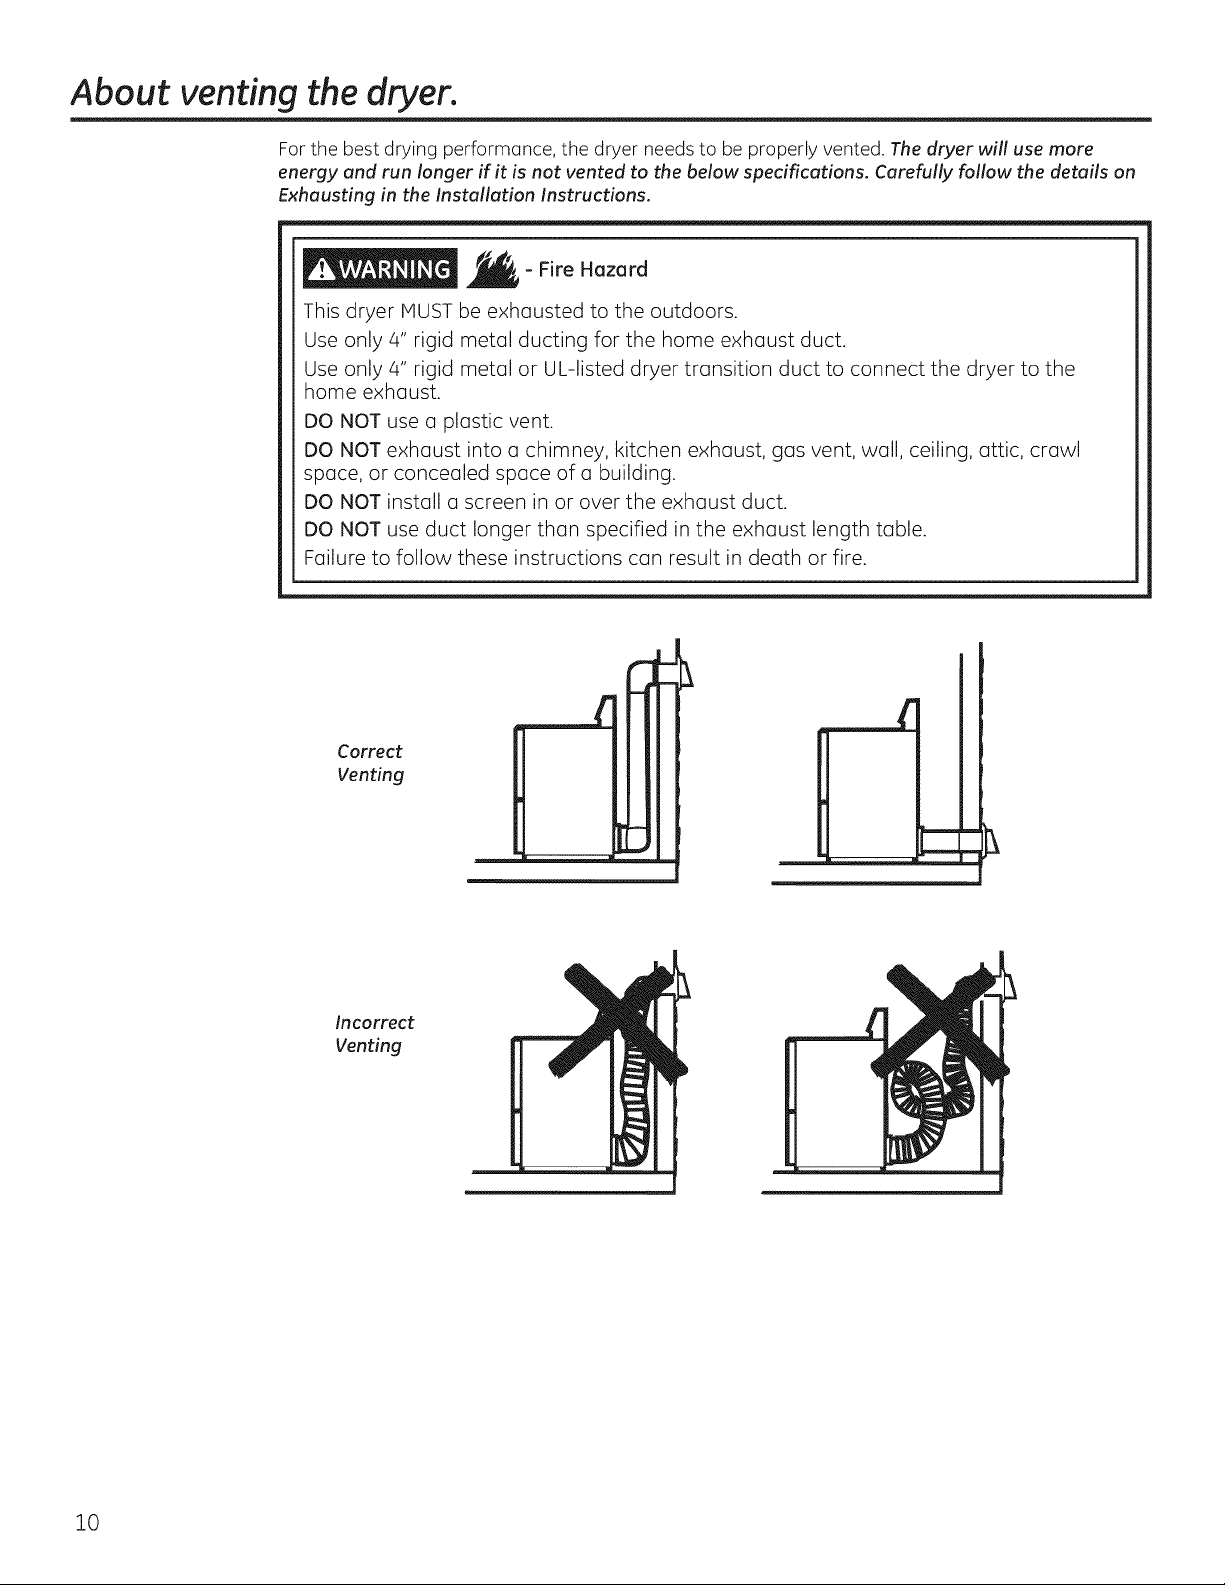
About venting the dryer.
For the best drying performance, the dryer needs to be properly vented. The dryer will use more
energy end run longer if it is not vented to the below specifications. Carefully follow the details on
Exhausting in the Installation Instructions.
This dryer MUST be exhausted to the outdoors.
Use only/4" rigid metal ducting for the home exhaust duct.
Use only 4" rigid metal or UL-listed dryer transition duct to connect the dryer to the
home exhaust.
DO NOT use a plastic vent.
DO NOT exhaust into a chimney, kitchen exhaust, gas vent, wall, ceiling, attic, crawl
space, or concealed space of a building.
DO NOT install a screen in or over the exhaust duct.
DO NOT use duct longer than specified in the exhaust length table.
Failure to follow these instructions can result in death or fire.
- Fire Hazard
Correct
Venting
Incorrect
Venting
10
Page 11
About Appliance Communication. GEAppliances.com
CleanSpeak TM
This dryer can communicate with a compatible
washer (one whose Owner's Manual contains a
CleanSpeakTMdescription)via WiFi Connect.
WiFi Connect (for customers in the United States)
Your dryer is GE WiFi Connect Enabled. A WiFi
communciation card is built into the product
allowing it to communicate with your smartphone
for remote monitoring, control and notifications.
Thisdevicecomplies with Part!5 of the FCCRules.Operationissubjectto thefollowing two conditions:
!. Thisdevicemay not causeharmful interference,and
2.Thisdevicemust acceptany interference received,including interferencethat maycause undesiredoperation.
Thisequipment has beentested and found to comply with the limits for aClassB digital device,pursuant to Part
!5 of the FCCRules.Theselimits are designedto provide reasonable protection against harmful interference
in a residentialinstallation. Thisequipment generates usesand can radiate radio frequencyenergyand,if not
installed and usedin accordancewith the instructions,may causeharmful interference to radiocommunications.
However,there is no guarantee that interferencewill not occur in a particular installation.If this equipment does
causeharmful interferenceto radio or television reception,which can bedetermined byturning the equipment
off and on,the userisencouraged to tryto correct theinterferencebyone or more of the following measures:
, Reorient or relocate the receivingantenna.
Increasetheseparation betweenthe equipment andreceiver.
Connectthe equipment into an outlet on a circuit different from that to which the receiverisconnected.
Consultthe dealer or an experiencedradio/television technicianfor help.
Labelling: Changesor modificationsto thisunit not expresslyapproved bythe manufacturer could void the
user'sauthority to operate the equipment.
At the end of the wash cycle,the washer sends a
signal to the dryer to indicated a preferred dry cycle.
When the dryer becomes idle("End"display times out
- or-the door isopened) "CYCLE"will scroll acrossits
cycle time display,its current cycle knob setting LED
will be lit, and (ifdifferent) a second recommended
cycle LEDwill blink.If "CYCLE"times out, pressing
Power will refresh it and the LEDs.If the dryer cycle
knob isturned, the solid LEDwill move accordingly.
Pressingthe dryer Start will initiate the cycleknob
setting (solidLED)andturn off the recommended
(blinking LED)ifa different cycleis started.
Pleasevisit www.GEAppliances.com/connect to
learn more about connected appliance features,
to learn what connected appliance app's will work
with your smartphone.
WiFi Connectivity: Forassistance with the appliance
or the ConnectPlus network connectivity, please
call 800-GE-CARES.
11
Page 12

About reversing the door.
Reversing the Door
Tools needed:
[] Standard #2 Phillips screwdriver
[] Tape-tipped putty knife
[] Small flat blade screwdriver
Beforeyou Start
Unplugthe dryerfrom itselectricaloutlet.
rl] open the door approximately 170degrees. With a putty
knife, remove the 4 plastic covers located along the left
side of the front panel and set them aside.
Plastic Cover (41
r_ Loosen the bottom 2 right side hinge screws. Remove the
door and place it on a protected flat surface to avoid any
damage. Remove both the Blind Plate and the Strike
Plate and install them in opposite positions.
Blind plate
Strike p ,---
r_ Remove the 4 door hinge screws, 4 edge screws, and 8
inside screws. Lift the inner door upwards using a flat
blade screwdriver.
Inside screws
/
r_ Remove the bottom screw from each hinge (right side)
and partially insert them into the top left side hinge
holes.
NOTE:All 4 front panel hinge screws will now be in the top
hinge holes- 2 on the left and 2 on the right.
f
Edge
I :
Door hinge Insidd screws
screws
screws
Outerdoor _'%_
12
Page 13

GEAppliances.com
r_ Remove and swap the 2 cover caps and door handle
from the outer door:
A. Squeeze the tabs on the inside of the door handle
clips. Pushclips through the outer door.
B.Squeeze the tabs on the inside of the cover caps. Push
caps through the outer door.
¢\,
Cover caps i
C. Push the door handle clips into the openings on the
opposite side of the outer door making sure you flip
the handle so it curves to the inside.
Door handle
Door
handle
clip
J6]With the cover caps and door handle in place, mount the
inner door back into the outer door with the screws
removed in step 4. Make sure you mount the hinges on
the side opposite the handle.
Insidescrews
Door
hinge
screws
I
E_ escrews
screws
Handle
[_] Haunt the assembled door on the 2 upper left side hinge
screws installed in step 2. Movethe hinge screws
loosened in step 3 into the lower left side screw holes
and firmly tighten all 4 screws.
Door
D. Push the cover caps into the openings on the outer
door where the handle was removed.
Inside of door
Cover cap
. Ij _Door handle clip
Door handle
@
[_] Install the 4 plastic caps removed in step 1 into the/4
right side front panel holes.
NOTE:To return the door to the original setup, follow these
instructions, swapping "left" and "right".
When you finish
Plugthe dryer back into its electricaloutlet.
Z3
Page 14

Before you call for service...
gave time and money! Review the charts on the following pages,
or visit GEAppliances.com. You may not need to call for service.
Troubleshooting Tips
Problem Possible Causes What To Do
Dryer doesnt start Dryer is unplugged • Makesure the dryer plug is pushedcompletely into the outlet.
House Fuseis blown/circuit , Checkthe house fuse/circuit breaker box and replacefuse or
breaker istripped resetbreaker.NOTE:Most electricdryers usetwo fuses/breakers.
Dryer fuse blown , The single (Gas)or one of the two (Electric)fuses in the rear of
the backsplash blew becausethe house circuit protection didn't
work. Havea qualifiedtechnician checkfor power at outlet.
Dryer doesnt heat House Fuseis blown/circuit . Checkthe house fuse/circuit breaker box and replace
breaker istripped; the dryer both fusesor resetboth breakers.Your dryer may tumble
may tumble but not heat ifonly one fuse isblown or one breaker is tripped.
Gasservice is off • Makesure gas shutoff at dryer and main shutoff are fully open.
Noheat temperature selected . Select another heat setting.
Dryer shakes or Someshaking/noise is normal. . Movedryer to an evenfloor space, or adjust leveling legs
makes noise Dryer may be sitting unevenly as necessary until even.
Greasy spats an clothes Improper use of fabric softener • Followdirections on fabric softener package.
Drying dirty items . Useyour dryer to dry only clean items. Dirty items can
with clean ones stain clean items and the dryer.
Clothes were not . Sometimesstains which cannot be seenwhen the clothes
completely clean arewet appear after drying. Useproper washing procedures
beforedrying.
Lint on clothes Lint filter is full , Clean lint screen before each load.
Improper sorting , Sort lint producers (likechenille)from lint collectors
(likecorduroy).
Static electricity can attract lint • Seesuggestions inthis sectionunder Static occurs.
Overloading • Separate large loadsinto smaller ones.
Paper, tissue, etc., left in pockets , Empty all pockets before laundering clothes.
Static occurs Nofabric softener was used . Trya fabric softener.
, Bounce®FabricConditioner DryerSheetshave been
approved for usein all GEDryers when used in accordance
with the manufacturer's instructions.
Over-drying
Synthetics, permanent press ,
and blends can cause static
Try a fabric softener.
e
Adjust setting to LessDry or Damp.
Try a fabric softener.
Inconsistent Typeof heat . Automatic drying times will vary according to the type of heat
drying times used(electric,natural or LPgas),sizeof load, types of fabrics,
TheDry dryness level Load consists of a mixture . When combining heavy and light fabrics in a load,
was chosen but load is of heavy and light fabrics choose Mare Dry ifyou are usinga sensorcycle.
still damp
14 Exhaust system is blocked , Inspectand clean exhaust system.
wetness of clothes and condition of exhaust ducts.
Page 15

GEAppliances.com
Problem Possible Causes What To Do
Clothes take too long Improper sorting , Separateheavy items from lightweight items (generally,
to dry a well-sorted washer load isa well-sorted dryer load).
Large loads of heavy fabrics . Large,heavy fabrics contain more moisture andtake
(like beach towels} longer to dry. Separatelarge,heavy fabrics into smaller
loadsto speeddrying time.
Controls improperly set • Hatch control settings tothe load you are drying.
eDry option ison . For optimal drying times, turn eDry off.
. For optimal energy savings, turn eDry on.
Lint filter is full
Improper or obstructed
ducting
e
Cleanlint filter before every load.
e
Checkinstallation instructions for proper ducting/venting.
e
Make sure ducting isclean, free of kinksand unobstructed.
e
Checkto see if outsidewall damper operates easily.
e
Checkthe Installation Instructionsto make surethe
dryerventing is correct.
Blown fuses or tripped . Replacefuses or reset circuit breakers.Electricdryers
circuit breaker use 2 fuses/breakers, make sure both are operating.
Overloading/combining loads . Do not put more than onewasher load inthe dryer at
u time.
Under-loading . Ifyou are drying only one or two items,add afew items
to ensure proper tumbling.
Clothes are wrinkled Over-drying . Selecta shorter drying time.
. Remove items while they still hold a slightamount of
moisture. Selecta LessDry or Damp Dry setting.
Letting items sit in dryer . Removeitemswhen cycle ends andfold or hang
after cycle ends immediately.
Overloading . Separatelarge loads into smaller ones.
Clothes shrink Somefabrics will naturally shrink . To avoid shrinkage, follow garment care labelsexactly.
when washed. Others can be . Some items may be pressedback into shape after drying.
safely washed, but will shrink
in the dryer . Ifyou are concerned about shrinkage ina particular
item,do not machine wash ortumble dry it
Water seen on inside of
door and top of lint filter
Steam condenses on these
surfaces
. Thisis normal.
when opening door after
steam cycle
Small areas on clothes are
damp after steam cycle
Steam condenses on inner drum
If using the Steam Dewrinkle cycle, manually reduce
the cycle time or select fewer number of garments with
Steam Select. If using the Steam Refresh cycle, add
more garments to the load.
Collars and waistbands
still wet at end of cycle
Slight variation
in metallic color
The dryness monitor senses
that the body of the clothes
isdry
This is normal
. ChooseSpeedDry or Timed Dry to dry damp collars
and waistbands. In the future, when drying a load with
collars and waistbands, choose More Dry.
. Due to the metallic properties of paint usedfor this unique
product, slight variations of color may occur due to viewing
anglesand lighting conditions.
15
Page 16

Before you call for service...
Problem Possible Causes What To Do
Small amount of water Inadequate load sizefor steam . If using the Steam Dewrinkle cycle, manually reduce time
on floor in front of dryer cycle selected, excesssteam or select fewer number of garments with Steam Select.
condenses inside cabinet and Ifusing theSteam Refreshcycle, add more garments to
leaks out the load.
Water on floor in back Loosewater hose connection to . Tighten connection.
of dryer valve
Hose missing rubber washer at . Install rubber washer provided with hose.
connection with valve
Water drips from door Steam condenses on inner door . This is normal.
when opened after
a Steam Cycle
Cannot see steam at Steam released at different . This is normal.
beginning of cycle time in cycle
Cannot see steam at any The steam nozzle might be . Cull800.GE.CARES to order nozzle replacement kit WE25M71
time during the cycle clogged with debris from your or to request a service technician to replace this for you.
water supply
Garments still wrinkled Too many garments . Load fewer garments; manually increase time.
after steam cycle
Garments are wet after Lint filter not cleon . Clean lintfilter
Steam cycle
Load is children/infant garments . Use the Steam Refresh cycle.
No numbers displayed Dryer is continuously . This is normal. When the dryer senses a low level of
during cycle, only lights monitoring the amount of moisture inthe load, the dryer willdisplay the dry time
moisture in the clothes remaining.
Time Remaining The estimated time may change . This isnormal.
jumped to a when a smaller load than usual
lower number is drying
Dryer is running but The Extended Tumble option/ . This is normal. During Extended Tumble option/Steam Refresh
000 is displayed in Steam Refresh cycle was cycle, the time remaining is not displayed. The extended
Time Remaining chosen tumble option lusts approximately 60 minutes.
Clothes are still wet The door was opened mid-cycle. . A dry cycle must be re-selected each time a new load
and dryer shuts off The load was then removed from is put in.
after a short time the dryer and a new load put in
without selecting a new cycle
Small load • When drying 3 items or less,chooseSpeedDry or Timed Dry.
Load was already dry except . ChooseSpeedDry or Timed Dry to dry damp collars
for collars and waistbands andwaistbands. In the future, when drying a load with
collars and waistbands, choose More Dry.
Dryer is not level . love dryer to an even floor space or adjust levelinglegs
as necessaryuntil even.
Dryer turns off Very small load (suchas one item). Usethe Timed Dry cycle option, selectthe desireddry time.
is not activating the dry sensor
16
Page 17

GE Dryer Warranty.
All warranty support provided by our Factory Service Centers,
or an authorized Customer Care®technician. To schedule service,
on-line, 24 hours a day, visit us at GEAppliances.com or call
800.GECARES (800.432.2737). Please have serial number and
model number available when calling for service.
Servicing your appliance may require the use of the onboard data port for diagnostics. This gives a GE
Factory Service technician the ability to quickly diagnose any issues with your appliance and helps GE
improve its products by providing GE with information on your appliance. If you do not want your appliance
data to be sent to GE, please advise your technician NOT to submit the data to GE at the time of service.
For The Period Of: GE Will Replace:
One Year
From the date of the
original purchase
Any pert of the dryer which failsdue to a defect in materials or workmanship. During this
limited one:veer warrantv, GEwill also provide,free of charge, all labor and related servicecosts
to replacethe defective part.
Stapleyour receipt here.
Proof of the original purchase
date is needed to obtain
support under the warranty.
What GE Will Not Coven
[] Service trips to your home to teach you how to use []
the product.
[] Improper installation, delivery or maintenance. []
[] Failure of the product if it is abused, misused, or used for []
other than the intended purpose or used commercially. []
[] Replacement of house fuses or resetting of circuit
breakers.
[] Damage to the product causedby accident, fire, floods or
acts of God.
Incidental or consequential damage caused by possible
defects with this appliance.
Damage caused after delivery.
Product not accessible to provide required service.
Defects or damage due to operation in freezing
temperatures.
Products which are not defective or broken, or which are
working as described in the Owner's Manual.
EXCLUSION OF IMPLIED WARRANTIES--Your sole and exclusive remedy is product repair as provided in this Limited
Warranty. Any implied warranties, including the implied warranties of merchantability or fitness for a particular purpose,
are limited to one year or the shortest period allowed by law.
This warranty is extended to the original purchaser and any succeeding owner for products purchased for home use within the USA. If
the product is located in an area where service by a GEAuthorized Servicer is not available, you may be responsible for a tripcharge or
you may be required to bring the product to an Authorized GEService location for service. InAlaska, the warranty excludes the cost of
shipping or service calls to your home.
Some states do not allow the exclusion or limitation of incidental or consequential damages. This warranty gives you specific legal
rights, and you may also have other rights which vary from state to state. To know what your legal rights are, consult your local or
state consumer affairs office oryour state's Attorney General.
Warrantor: General Electric Company. Louisville, KY 40225
17
Page 18

Consumer Support.
GEAppliances Website GEAppliances.com
Have a question or need assistancewith your appliance?Try the GEAppliances Website 24 hours a day,
any day of the year! Forgreater convenience and faster service,you can now download Owner'sHanuals,
order partsor even scheduleservice on-line.
ScheduleService
ExpertGErepair service is only onestep away from your door. Get on-line and scheduleyour serviceat your
convenience 24 hours any day of the year! Or call 800.GE.CARES(800./432.2737)during normal business
hours.
GEAppliances.com
Real Life Design Studio GEAppliances,com
GEsupports the UniversalDesignconcept-products, servicesand environments that can be usedby
people of allages, sizesand capabilities.We recognize the need to designfor a wide range of physical and
mental abilitiesand impairments. Fordetails of GE'sUniversalDesignapplications, including kitchen design
ideasfor people with disabilities,check out our Website today. Forthe hearing impaired,pleasecall 800.TDD.
GEAC(800.833.4322).
ExtendedWarranties
Purchasea GEextended warranty and learnabout special discounts that are available while your warranty
isstill in effect.You can purchase it on-line anytime, or call 800.626.2224during normal businesshours.
GEConsumer Home Serviceswill stillbe there after your warranty expires.
PartsandAccessories
Individualsqualified to servicetheir own appliances can have parts or accessories sent directly to their homes
(VISA,HasterCardand Discovercards are accepted).Order on-line today, 24 hours everyday or by phone
at 800.626.2002during normal businesshours.
GEAppliances.com
GEAppl ianceparts.com
18
Instructions contained in this manual coverprocedures to be performed by any user.Other servicing
generallyshould be referred to qualified service personnel.Caution must be exercised,since improper
servicingmay cause unsafe operation.
Contact Us
Ifyou are not satisfied with the serviceyou receive from GE,contact us on our Websitewith all the details
includingyour phone number, or write to: GeneralManager,Customer Relations
GEAppliances,Appliance Park
Louisville,KY40225
GEAppliances.com
RegisterYourAppliance GEAppliances.com
Registeryour new appliance on-line--at your convenience! Timely product registration will allow for
enhanced communication and prompt service under the terms of your warranty, should the need arise.
You may also mail in the pre-printed registration card included inthe packing material.
Page 19

GEAppliances.com
Instrucciones
de seguridad ............... 2-3
Instrucciones de operaci6n
comunicaci6n del
Electrodom6stico ............... 11
C6mo cambiar el sentido
de apertura de la puerta ..... 12, 13
C6mo cargar y usar la secadora .. 9
Funciones de lasecadora ........ 8
Instrucciones de uso ........... 4-7
Ventilaci6n de la secadora....... ll
Consejos para la soluci6n
de problemas ............ 14-1e
Soporte al consumidor
Garantia ...................... 17
Piezas y accesorios ............ 3, 18
Soporte al consumidor .......... 18
ENERGYSTAR
Como socio de Energy Star®,GE
ha confirmado que este producto
cumple las directrices de Energy
Star®relativas al rendimiento
energ@ico.
Escriba el n(_mero de modelo
y de serie aquh
No. de modelo
No. de serie
bajo la puerta
Puede encontrarlos _
de la lavadora.
234D2028PO07
49-90540 02-25 GE ImpresoenMexico
Page 20

INFORMACiON DESEGURIDADIMPORTANT&
LEATODAS LASINSTRUCCIONESANTESDE USAR.
,t_ Estees el s[mbolo de alerta de seguridad. El mismo alerta sobre potenciales riesgos que lepueden producir lamuerte
o lesiones tanto a usted como a otras personas. Todos los mensajes de seguridad estarcin a continuaci6n del s[mbolo
de alerta de seguridad y con la palabra "PELIGRO","ADVERTENCIA"o "PRECAUCION".Estaspalabras se definen como:
Indica una situaci6n de riesgo que, si no seevita, producir_ la muerte o lesionesgraves.
Indica una situaci6n de riesgo que, si no seevita, podrio producir la muerte o lesionesgraves.
Indica una situaci6n de riesgo que, si no seevita, podrio resultar en lesionesmenores omoderadas.
INSTRUCCIONESIMPORTANTES DESEGURIDAD
Para reducir el riesgode incendio,explosi6n,descargas el@ctricaso lesiones sobre laspersonas al usar su
electrodom@stico,siga las precauciones b6sicas,incluyendo Io siguiente:
[] Leatodas las instruccionesantesde usaresteelectrodom@stico.
[] NO seque prendas queen forma previa hayan sido secadas,lavadas, penetradas o manchadas con gasolina, solventes de
limpieza en seco,u otras sustancias inflamables o explosivas,ya que despiden vapores quese podrfan encender oexplotar.
[] NO coloque prendas expuestasa aceites de cocci6n en su secadora. Las prendas contaminadas con aceitesde cocci6n
podr6n contribuir a una reacci6n quimica que podrfa hacer que una carga deropa se prenda fuego.
[] NO permita que los ninosjueguen sobre o dentro deeste electrodom6stico. Cuando el electrodom6stico se usecerca de
ninos,set6 necesario supervisarlos de cerca. Antes de queeste electrodom6stico quede fuera de usoo sedescarte, retire la
puerta del compartimiento de secado.
[] NO introduzca lasmanos en la secadora cuando eltambor se encuentre en movimiento.
[] NO instale ni guarde este electrodom@sticodonde quedeexpuesto a losfactores climdticos.
[] NO manipule indebidamente los controles, reparar ni reemplazar cualquier parte del electrodom@stico o realizar cualquier
otro trabajo t@cnico,a menos que esto sea especfficamente recomendado en las instrucciones de mantenimiento
del usuario o en instrucciones publicadas sobre reparaciones del usuario, que entienda y para las cuales posea las
destrezas necesarias.
[] NO utilice suavizantes de tela ni productos para eliminar la est6tica, a menos que esto sea recomendado pot elfabricante del
suavizante de tela u otro producto.
[] NOutilicecalorpara secarartfculosquecontengan gomaespumao materialesdegoma contextura similar.
[] Limpie la rejilla para pelusas antes o despu@sde cada carga. NOutilicela secadorasiel filtro de pelusasno seencuentra
colocado.
[] No guarde materiales combustibles, gasolina u otros Ifquidos inflamables cerca de la secadora. Evite laacumulaci6n
de pelusa, polvo o tierra alrededor del @reade la apertura de ventilaci6n y @reasadyacentes. IVlantenga el @reade la
secadora despejada y libre de objetos que puedan obstruir el flujo del aire de la ventilaci6n y combusti6n.
[] La parte interior del electrodom@sticoy el conducto deventilaci6n se deber6n limpiar peri6dicamente pot personal calificado
del servicio t@cnico.
[] Desenchufe el electrodom@sticoo apague el disyuntor antes de realizar el servicio t@cnico.Presionarel bot6n Power
(Encendido)o Stort/Pouse (Inicio/Pausa)NOdesconecta el encendido.
[] NO utilice este electrodom@sticosi se encuentra da_ado, funcionando mal, parcialmente desensamblado, osi tiene partes
faltantes o rotas, incluyendo un cable oenchufe da_ado.
[] NOrode ning0n tipo de aerosol dentro, sobre ni cerca de la secadora en ning0n momento. Nouse ning0n tipo de limpiador
en espray para limpiar el interior de lasecadora. Sepodr6n producir vapores o unadescarga el@ctrica.
[] Para acceder alas instruccionesde conexi6n a tierra, lea los "Conexi6nEl@ctrica"ubicados en las Instruccionesde Instalaci6n.
GUARDE ESTAS INSTRUCCIONES
2
Page 21

GEAppliances.com
ADVERTENCIASADICIONALES SABRE LA SECADORAA GAS
Parasu seguridad, siga lasinstrucciones de este manual afin de minimizar riesgos de incendio o
explosi6n,o para evitar da_os, lesiones personales o la muerte.
- NO guarde ni use gasolina u otros vapores y liquidos inflamables cerca de @steni de otros electrodom_sticos.
- QUEDEBE HACERSIHUELEGAS:
• NO intente iluminar ning0n electrodom_stico.
• NO toque ning0n interruptor el_ctrico; NO use tel@fonos en su edificio.
• Haga que se retiren los ocupantes de la sala, edificio o (_rea.
• De inmediato flame a su proveedor de gas desde el tel_fono de un vecino. - Siga las instrucciones del proveedor de gas.
• Si no se puede comunicar con su proveedor de gas, flame al departamento de bomberos.
- La instalaci6n y las reparaciones deber_n ser realizadas par un instalador calificado, agencia de servicios o el proveedor de gas.
Advertencias de la Proposici4n 65 del Estado de California:
Lo Leysabre Agua Potable Inocua y Tratamiento de ResiduosT6xicos de California (California Safe Drinking Water and
Toxic Enforcement Act) solicita al Gobernador de California que publique una lista de sustancias que el estado reconoce
que producen c6ncer, defectos de nacimiento u otros dahos reproductivos y solicita alas empresas que adviertan sabre la
posible exposici6n a tales sustancias.
Este producto contiene uno o m6s qu[micos que el Estado de California entiende que producen cdncer,
defectos en el nacimiento u otros dahos reproductivos.
Loselectrodom6sticos a gas puedan causar una exposici6n de bajo nivela algunas de estas sustancias, incluyendo benceno,
mon6xido de carbono, formaldehido y hall[n,ocasionado principalmente par lacombusti6n incompleta de gas natural o
combustiblesde LRLaexposici6na estassustanciaspuede set minimizada ventilando correctamente la secadora hacia elexterior.
INSTALACIONADECUADA
Esta secadora se deberd instalar y ubicar de acuerdo con las Instrucciones de Instalaci6n antes de ser usada.
Si no recibi6 las Instrucciones de Instalaci6n, podrd acceder a las mismas ingresando a GEAppliances.com o
Ilamando al 800.GE.CARES (800.432.2737).
[] Conecte a tierra la secadora siguiendo todos los
c6digos y ordenanzas legales. Siga losdetalles en las
instrucciones de instalaci6n.
[] Instale o guarde enun lugar donde no quede expuesta a
temperaturas bajo cero ni a losfactores clim@ticos.
[] Conecte a un circuito de corriente el6ctrica adecuadamente
calificado, protegido y medido afin de evitar una sobrecarga
el6ctrica.
[] Retiredel embalaje todos losartkulos cortantes y descarte
todos los materiales deenv[o de la forma correcta.
[] Retirela cinta de color protectora del panelde control.
[] Noobstruya el flujo delaire de ventilaci6n. No apileni
coloque ropa suciani arroje tapetes contra elfrente o la
parte trasera de la secadora.
Manguera de Vapory Agua:
GE recomienda enf6ticamente el usa de piezas
espedficas de f6brica. A continuaci6n figura una lista
de mangueras de fabricas que podr6 adquirir. Dichas
mangueras son fabricadas y probadas de modo que se
cubran las especificaciones de GE.
GErecomienda enf6ticamente el usa denuevas
mangueras desuministro de agua.Con el paso del tiempo,
lasmangueras se degradas y deben serreemplazadas
cada 5 arias, a fin de reducir el riesgo de fallas sabre las
mismas y dahos con elagua.
Piezasy Accesorios
Ordene hay a trav6sde Interneten GEAppliancesparts.com,
las 24 horas del dia o en forma telef6nica Ilamando al
800.626.2002, durante el horario comercial habitual.
Ndmero de Pieza Accesorio
WE251v153 KitCompleto(mangueras,lavadoracon
o
WEIM847
WEIM849
PMI4XIOO55
WX1/4X10007 CepillocontuberfagiratoriaLintEaterTn(no
Escape/Conducto:
IT] Lassecadoras DEBERANcontar con un escape hacia el
exterior afin de evitar que grandes cantidades de
humedad y pelusa sean sopladosen la sala.
[Z] Uses61oconductos de metal r[gido de a/'de di6metro
dentro del gabinete de la secadora y use s61otuber[as de
transici6n de metal r[gidode z_"de di6metro o aprobadas
par UL,entre lasecadora y el conducto hogareSo.ELUSO
DEUN CONDUCTODEPLASTICOU OTROMATERIAL
COMBUSTIBLEPUEDEOCASIONARUN INCENDIO.SI UN
CONDUCTOPRESENTAUNACORTADURA,ESTOPODR,_
OCASIONARUNINCENDIOSICOLAPSA0 DEALGUN
MODO QUEDARESTRINGIDODURANTESUUSO0
DURANTELAINSTALACION.
Paramds detalles,sigalosInstruccionesde Instalaci6n.
adaptadorenV)(incluido)
Mangueralargay
Y-adaptador
Cepillodeventilaci6ndela aberturadela
puertade lasecadora(noincluido)
incluido)
GUARDE ESTASINSTRUCCIONES
Page 22

Instrucciones de uso
AiADVERTENCIA!
Para reducir el riesgo de incendios, descargas el_ctricas o heridas, lea los INSTRUCCIONESIMPORTANTESDE
SEGURIDADantes de utilizar este electrodom_stico.
Riesgo de Explosi6n
Hantenga cualquier materialy vapores inflamables,tales coma
gasolina,alejadosde la secadora.
NOseque nada que alguna vez hayatenido algainflamable en
6ste (inclusoluego de lavar).
Sino secumple con esto,sepodr6 producir una e×plosi6n,
incendioo lamuerte
Esposible qua los funciones y apariencias varien con relaci6n a su modelo a Io largo del manuall.
Step 1 Step 2 Step 3
. Filtro para la . Agregue ropa . Seleccione el ciclo de
limpieza de pelusa . Cierre la puerto secado
Ninguna lavadora puede eliminar el aceite par completo.
No seque nada que alguna vez haya tenido algOn tipo de
aceite (incluyendo aceites de cocina).
Lasprendascon gomaespuma, goma, o plcistico deberen ser
secadasenuntendedero outilizandounciclodesecadoconaire.
Sino se cumple con esto, se podr4 producir una explosi6n,
incendio o lamuerte.
Riesgo de Incendio
Controles
Start/Pause
_( Mixed Loads
Jeans
Step 4
. Presione START
(iniciar)
Power
[Time I Level I Temp )
6
Power (Encendefl
Presione para "activar" la pantalla. Sila pantalla est6 activa, presione para que la secadora quede en el modo inactivo.
NOTA: Presionar Power (Encendido) no desconecta el electrodom6stico del suministro de corriente.
Start and Pause (Inicio y Pausa)
PresioneStart (Inicio)para comenzar el ciclo.NOTA:Lapuerto se deber@cerrar para que lasecadora comience el ciclo.
PresionarPause(Pausa)pausar@elciclo,la luzdeStart (Inicio)titilar@y "PAUSE'(Pausa)se visualizar@atrav6s de la pantalla de LCD.
Paracontinuar con el ciclo,presione la tecla Start (Iniciar)nuevamente. Para detener el ciclo,mantenga presionada la tecla
durante 3 segundos
Display and Status Lights (Pantalla y los Luces de Status (Estatusl) (analgunosmodelos)
Lapantalla muestra eltiempo restante aproximado hasta elfinal del ciclo.
Adem6s, esta pantalla "mastrar6" elestado de la secadora:
• PAUSE ElMensaje "PAUSE"(Pausa)se mostrar6 en la pantalla cuando elciclo dela secadora sea pausado. Elciclo
• door Elmensaje "door" (puerto)aparecer6 cuando la puerto seabra durante elciclo dela secadora.
CYCLE Elmensaje "CYCLE"Ciclo)aparecer@cuando la ropa est6 seca y la secadora est6 recomendando un
• dELAY Elmensaje "dELAY"(Retraso)aparecer6 cuando se inicie el ciclo Delay Dry (Secadocon Retraso).Ser6
4
podr6 ser reiniciado presionando la tecla Start(Iniciar).
ciclo preferido para a siguiente carga (lea la seccibn CleanSpeak'").
reemplazado par eltiempo estimado cuando el ciclo se inicie.
Page 23

GEAppliances.com
Luces de estado del ciclo
iVluestrasila secadora seencuentra en el ciclo DRYING(Secodo),DAMP(Humedecer),o COOLDOWN (Enfrior).
Los luces de la funci6n de as(ado indican qua:
Delay Dry (Secado con retardo) - Elconfigur6 un tiempo de secado con retraso.
Locked Controls (Lavadoraest5bloqueada)- Titilor_unovezsipresionocuolquierbot6no giroperillode ciclo.
Clean Lint Filter LGluzde Filtro de Limpieza dePelusas permanecerc_encendida durante 15 segundos una vez que el
ciclo sedetenga.
- LGsecudoru esta conectudu u lu red y se puede comunicur con un dispositivo de tel6fono inteligente conectudo.
Ciclos de Secado - Los ciclos del sensor determinon de formo outomdtico cudn seco estd Io telo.
Los ciclos par tiempo funcionon duronte uno contidod de tiempo seleccionodo.
TimedDry ConfigureCycle Selector(Selectorde Ciclo)duronte eltiempo de secadoque desee.
(Secadopar Tiempo)
Air Fluff Para refrescary quitar pelusas de prendas, telas,prendas blancas y almohadas ya secas.Usecon No
(Pelusas Aire)/ Heat (SinColor).Brinda 10minutos de giro sin calor.
No Heat (Sin Calod
SpeedDry Parapequehascantidadesnecesariasen un apuro,tales coma prendasdeportivaso uniformesescalates.
(SecadoR6pido) Tambi6nsepuede usar sien el ciclo previoquedaron algunas prendas hOmedas,tales coma cuelloso
pretinas.NOTA:Enalgunosmodelos,el tiempo restantedel ciclomostrar6 la cuenta regresivaen lapantalla.
Bulky Items Paraabrigos grandes, prendas de cama, cubiertas de colchones, balsasde dormir y artfculos
(PrendasGruesas) grandes/gruesos similares tales coma mantas, edredones,fundas y tapetes pequehos.
Towels/Sheets* Parala mayor[a de lastoallas y prendas blancas.
(ToallaslS6banas)
Cottons (Algadones) Paraalgodones y la mayorfa de los prendas blancas.Losmodelos ENERGYSTAR®son evaluados
con la funci6n Cottons (Algodones) con las configuraciones par omisi6n.
MixedLoads Paracargas con algodonesy telas combinadas.
(Combinadas)
Jeans (Vaqueros)* ParaVaqueros.
Casual/EasyCare* Paraprendas sinarrugas, planchado permanente, prendasdelicadasy tejidos.
(Casual/cuidadof6cil)
Active Wear Para ropa deportiva y de ejercitaci6n.
(Ropa Informal)
Delicates Para prendasdelicadas,telas y tejidos querequieren cuidado especial.
(Delicadas)
Steam Refresh Paraprendas secasapenas arrugadas. Reducelos arrugas defarina significativa.
(Refrescaral Vapor) NOTA:Unasolo prenda de tela extremadamente liviana necesitarc_que se incluyauna prenda
adicional en el ciclo Steam Refresh (RefrescorolVapor)para obtener resultados 6ptimos.
Steam Dewrinkle Para usacon cargos mc_spesadas que Steam Refresh(Refrescorol Vapor).Ideal para cargos que
(Desarrugaral Vapor)fuerondejadas en la secadora par un per[adode tiempo extendido.
Steam Select El bot6n Steam Select se usa junto con las funciones Steam Refresh (Refrescor con Vapor) y Steam
Dewrinkle (Desarrugor con Vapor). AI presionar el bot6n, se define c6mo quedan muchas prendos
dentro de la secadora y c6mo se ajusta el vapor y los tiempos de enfriados de forma consecuente.
No(as sabre el Ciclo al Vapor:
• Importante - La configuraci6n de temperatura se deber6 configurar en HIGH(Alto) y se deber6 abrir el agua antes de activar
el cic/o Steam Refresh IRet_rescar al Vapor).
• La opci6n Extended Tumble (GiroExtendido) se activard.
• Luego de/cido Steam Dewrinkle (Desarrugar a/Vapor),/a secadora emitird un pitido (sise se/ecciona Volume (Vo/umen))y se exhibird
"00".
• No useun ciclo al vapor conprendas de lana, cuero,seda,/encerfa,productos de gomaespuma o mantas e/_ctricas.
• No usecido ol vapor con ropo nuevo sin un Iovodo previo.
• No se recomiendoel usa de toollos en los cidos ol vapor.
Sanitize
(Sanitize)
Estaopci6n reduce ciertos tipos de bacterias en un 99.9%, incluyendo: staphylococcus aureus,
pseudomonas aeruginosa y klebsiellapneumoniae. Elprocesoantibacteriano ocurre cuando se utiliza
un alto nivel de calor durante una parte del ciclo de secado.
NOTA:No use esteciclo con telas delicadas.
*Ciclosdisponiblescon la opci6n Sanitize (Desinfectado).
Page 24

Instrucciones de uso
Configuraciones
Configuraciones individuales para el ciclo Timed Dry ISecado par Tiempo) de minutos (Time),Nivel de Secado (Level),y
temperatura (Temp)se pueden configurar clesde el minima (inferior en la columna) al maxima (superior en la columna).
Engeneral, cuanto m_s arriba en la columna, m_s energia se usara.
Time (Tiempo) - Selecci6n s61opara ciclo par Tiempo.
Cada"configuraci6n" lepermite especificaruntiempo inferior(! toque) o superior(2toques)trabajando
desdeun minima de !0 minutos hasta un maxima de99 minutos de tiempo de secado(!0, 20,30,40,...80,
90,99, i0...)
Dryness Level (Nivel de Secado) - Selecci6n usada 0nicamente para ciclos del Sensor. Losciclos par tiempo
funcionan durante una cantidad de tiempo seleccionada.
Extra Dry (Extra Seco) Seusacon telaso prendaspesadasque deberfanestar muy secas,tales coma toallas.
MoreDry (M6sSeco) Seusacon tipos de telas pesadaso combinadas.
Dry (SecoJ Seusaen el nivel de secado normal,adecuado para la mayoria de las cargas. _stees el ciclo
preferidopara ahorrar energia.
LessDry (MenosSeco) Seusa con telas m@slivianas.
Damp (Hbmedo) Paradejar las prendasparcialmente h0medas.
Temperatura
High (Alia) Paraalgodonesde regular a pesados.
NOTA:Steam Dewrinkle (Desarrugaral Vapor)y Steam Refresh (Refmscaral Vapor)requieren la
configuraci6n de temperatura High(Alta).
Medium (Medial Pararopas sint6ticas,combinadas, delicadasy prendascon etiqueta deplanchado permanente.
Low (Baja) Para prendas delicadas, sint6ticas y con etiqueta para secado en la secadora a nivel bajo.
ExtraLow(ExtraBaja_ Paraprendasdelicadas,sinteticasy con etiqueta para secado en lasecadora a nivelbajo.
No Heat (SinCalofl Paraprendascon pelusasincalor.Parausa 0nicamente con los ciclosTimed Dry (Secadopar Tiempo).
Opciones
Delay Dry (SecadoRetrasadoJ
A medida que sepresiona elbot6n Delay Dry (SecadoRetrasado)deforma repetida, el tiempo de retraso seconfigura de i a
9 horas,y vuelve a cero (0).Luego de seleccionar eltiempo de demora, presioneStart (Iniciar)y eltiempo de demora harc_la
cuenta regresivahasta que el ciclo comience.
Siel bot6n Delay Dry (SecadoRetrasado)es presionado durante 3 segundos, vuelve a cero (sinimportar el tiempo de retraso)
o finaliza un ciclode retraso.
Extended Tumble (Secado Extendido)
Useesta opci6n para minimizar lasarrugas en laropa. Brinda i hora de girosin calor una vezque laropa estc_seca.Siestc_
usando el ciclo Volume (Volumen)y seleccion6la opci6n Extended Tumble(SecadoExCendido),sonarc_una sehal al final del
tiempo de secado y cada 5 minutos durante el ciclo ExtendedTumble (SecadoExtendido).Estole recordarc_quees hora de
retirar la ropa.
Damp Alert (Alerta de HumedadJ
Estaopci6n hace que la secadora emita un pitido cuando la ropase sec6 hasta unnivel de humedad. Retirelas prendasque
deseacolgar para que sesequen. Damp Alert (Alertade Humedad)s61osonarc_cuando esta opci6n seaseleccionada (pero
el ciclo de secado continuar6 en funcionamiento). Retirarla ropay colgarla cuando estc_hOmedapuede reducir la necesidad
de planchar algunas prendas.La luzjunto a la tecla seencenderc_cuando la funci6n Damp Alert (Alertade Humedad)est6
activada.
Rack Dry (Secado en Estante)
RackDry (Secadoen Estante)s61oesautorizado para los ciclospor Tiempo (TimeDry (Secadopot Tiempo)yAir Fluff (Pelusas
Aim)).Laslucesseapagan sila perillaciclo es girada a un cicloque noes por tiempo.
6
Page 25

GEAppliances.com
My Cycle Settings (Mis Configuraciones de Ciclos)
Amedida que la perilla del selector de ciclo es girada, las configuraciones de Nivel (Nivel de Secado), Tamp
(Temperature) y Tiempo (Secado par Tiempo) cambian a configuraciones autom6ticas preconfiguradas par omisi6n.
Si desea una configuraci6n diferente, presione la tecla(s) apropiada. Luego mantenga presionado el bot6n My Cycle
Settings (lis Configurociones de Ciclos) durante 3 segundos. LGluz del bot6n se encender6 y la lavadora guarder6
estas configuraciones para esa selecci6n de perilla. En el futuro, al girar la perilla del selector a ese ciclo, sus
configuraciones ser6n reactivadas de farina autom6tica.
Para regresar temporalmente (para esta carga) alas configuraciones preconfiguradas par omisi6n, presione el bot6n
My Cycle Settings (lis Configurociones de Ciclos) durante 1/2segundo. La luz del bot6n se apagar6 y las opciones
regresar6n a aquellas par omisi6n. Para hacer que estas configuraciones par omisi6n sean permanentes, mantenga
presionado el bot6n MVCycle Settings (lis Configurociones de Ciclos) nuevamente durante 3 segundos para que sean
sus configuraciones preferidas (las luces se volver6n a encender).
NOTA: Elnivel de Volume (volumen) no se puede configurar para My Cycle Settings (Nis Configuraciones de Ciclos).
Volume (Volumen)
Use el bot6n Volume _/olumen) para cambiar el volumen de la serial del fin del ciclo y las seriales del control. Presione el
bot6n hasta que alcance el volumen deseado (bajo, media, alto) o se apague. La ropa deber[a ser retirada cuando el pitido se
apague, de modo que las arrugas no se asienten.
NOTA:
. Retirelos prendas de forma r6pida alescuchar el sonido de la serial.Coloque la rope en perchas,de modo que lasarrugas
no seasienten.
Use la funci6n Volume (Volumen)especialmenteal secartelas tales coma poli6ster,tejidosy planchado permanente. Estas
telas se deber[anretirar, de modo que lasarrugas no seasienten.
Drum Light (Luz del Tambor)
La luz del tambor se encender6 si el bot6n Drum Light (Luzdel Tambor) es presionado ola puerta es abierta. Permanecer6
encendida hasta que la puerta sea cerrada o el bot6n Drum Light (Luz del Tambor) o Power (Encendido) sean presionados.
Lock Controls (Controles de Bloquead
Puede bloquear loscontroles para evitar que se haga cualquier selecci6n.O puede bloquear los controles luegode haber
iniciado un ciclo.Los nirios nopueden iniciar de forma accidental la secadora presionando lasteclas cuando esta opci6n haya
sidoseleccionada.
Pare bloquear los controles la secadom, mantenga presionado el bot6n Lock Controls (Controles de Bloquead durante 3
segundos. El[cono de bloqueo del control se encender6 cuando est6 bloqueado.
Peru desbloquear los controles la secadom, mantenga presionado el bot6n Lock Controls (Controles de Bloquear) durante
3 segundos.
NOTA:Elbot6n Power (Encendido) aOn podrd set usado cuando la mdquina estd bloqueada.
eDry
Disponible para Bulky Items (PrendasGruesas),Towels/Sheets(Toallas/Sdbanas),Cottons(PrendasdeAlgod6n),Nixed Loads
(Combinadas),Jeans(Vaqueros),Casuals/EasyCare(RopeCasual/Cuidadofdlcil), Active Wear(RopaDeportiva),y Delicates
(Delicadas)Cuando se presionala tecla eDry,lasconfiguraciones del ciclo cambian a fin de reducir el consumo de energ[a
total del ciclo del sensor seleccionado.NOTA:Lostiempos del ciclocambiordn cuando seseleccioneeDry. Lo opci6n eOry
har6 que seactive la funci6n Cottons (Algodones)par omisi6n.Pare un ahorro de energ[a 6ptimo, active eDry. Pareobtener
tiempos de secado 6ptimos, apague eDry. NOTA: Losahorros de energ[avariar6n de acuerdo alas cargas y ciclos.
La luz del Efficiency Nonitor muestra la energ[a relativa usada para el ciclo y opcionesseleccionadas.Eliasson utilizadas coma
una guiade energ[a y elrango esde Buena(! luz)a Mejor(5luces).Elciclo (Tiempo),nivel de secado,temperatura y opciones
adicionales de rotaci6n puedenincrementar o disminuir laeficienciade energ[a.Algunosciclosespecialesno mostraran luzde
advertencia.
Page 26

Funciones de lu secudoru.
Sensor Dry
_ecado por Sensor
Time Dry
(Secado pot Tiempo)
Steam Cycle
(Ciclo con Vapor)
Coloque las dos patas
traseras sobre la parte
saliente en @ngulode la
pared trasera
Asegure las dos patas rectas
de la parte frontal interna en
los agujeros ovales a ambos
lados de la manUadel filtro de
pelusas
Esta funci6n es activada en todos los ciclos
excepto en el ciclo por Tiempo (Timed Dry
(Secadopot Tiempo)y Air Fluff (PelusasAire))y
Steam (Steam Refresh (Refrescarcon Vapor)y
Steam Dewrinkle (Desarrugar con Vapor)).
ElSensor Dry brinda mayor exactitud de
secado que las unidades convencionales,
permitiendo menores plazos de secado
y mejor mantenimiento de las prendas.
Hientras giran las prendas, entran en
contacto con un sensor de humedad.
Esta funci6n es activada en los ciclos Timed
Dry (Secado pot Tiempo) y Air Fluff (Pelusas
Aire).Eltiempo (!0, 20, 30, 40,...80,90, 99)es
especificado a trav6s del bot6n Time (Tiempo).
Estafunci6n es activada en los ciclos Steam
Refresh (Refrescarcon Vapor) y Steam
Oewrinkle (Desarrugar con Vapor).Use
STEAMselect para indicar el n0mero de
prendas.
Rejilla de secado (an algunos modelos)
La rejilla de secado se puede usar para secar
articulos delicados tales como su6teres
lavables.
Enganche el estante en el filtro de pelusas,
de modo que el estante se extienda sobre el
tambor de la secadora
NOTA:
[] La rejilla de secado se debe usar con
el CICLODESECADOCRONOMETRADO.
[] No use esta rejilla cuando est6 secando
otra ropa en la secadora.
Elsensor detendr@el ciclo de calentamiento
tan pronto como se hayan alcanzado la
sequedad seleccionada.
Su secadora it@ajustando eltiempo de
secado inicial estimado mientras "aprende"
sus h@bitosde uso particulares. Despu6s
de varias semanas la secadora quedar@
totalmente personalizada a sus hdbitos de
USO.
Pure user el estunte de secudo:
rl] Inserte el estante de secado en la
abertura de la secadora con el lado de las
dos patas hacia la parte trasera y el lado
de las cuatro patas hacia el frente
[]
Coloque las dos patas traseras sobre la
parte saliente en c_ngulode la pared
trasera.
Asegure las dos patas rectas de la parte
frontal interna en los agujeros ovales a
ambos lados de la manUa del filtro de
pelusas.
NOTA: Gire el tambor de la secadora de forma
manual en direcci6n de las agujas del reloj,
para asegurar que las placas despejen el
estante.
El tambor giratorio de acero inoxidable fenalgunos modelos)
Elacero inoxidable usado para construir el tambor no se oxidar@ ni se corroer@.
el tambor giratorio de lasecadora proporciona Estasmarcas en la superficie no afectarc_nel
la alta confiabilidad en una secadora GE.Si funcionamiento o la durabilidad del tambor
el tambor giratorio de la secadora Ilegara a giratorio.
rayarse o a abollarse durante el uso normal,
Drum Light (Luz del TamboR
LGluz del tambor es una luz LED.Su reemplazo
8
debe set realizado por un t6cnico calificado
Page 27

C6mocargar y usar la secadora. GEAppliances.com
Siempre siga las instrucciones del fabricante de la ropa cuando lave.
Ideaspara laclasificaci6ny cargadelaropa
\I/
Como regla general, sila ropa es clasificada
apropiadamente para la lavadora, estar4 clasificada
apropiadamente para la secadora.
No agregue toallitas suavizantes una vez la ropa
se haya calentado. Estopodria causar que la ropa
semanche. Lastoallitas suavizantes acondicionadoras
Bounce®se han aprobado para usarse con todas las
No sobrecargue. Esto desperdicia energia y causa
arrugas.
No seque los siguientes articulos: articulos
de fibra de vidrio, prendas de lana que no sean
lavables, articulos con recubrimientos de goma,
pl6sticos, articulos con bordes plasticos o rellenos
de espuma.
secadoras GEde acuerdo con las instrucciones del
fabricante.
Losetiquetas delcuidado dela tela
Aqui puede ver "s[mbolos" de etiquetas para indicar el cuidado de las telas.
ETIQUETAS DE LAVADO
lavado en __ __
mfiquina Normal Plar,chadop ........... re/ Suave_} Nolave N........
Temperatura 000 00 •
del agua
reslstente a arrugas delicado Lavar a marco
Calien_e Tibia Fda/resca
iso.c/120.F 140.C1105.F 130.C185.F
ETIQUETAS DE LA LEJ[A
=,=bo,os,,eA A
b,anqueador Cuo_quio_b_ooquoodorS_ob_ooquoodor=o=_oroNou,ob_ooquoodo_
(cuande se necesita) (cuando se necesita] especiales Cuelgue Pa ra secer
ETIQUETAS DE SECADO
Tumble F--1 _-] to-1 ro_ _ _
dry / ..... d,_
Secodo Ory/Sec° NormaE PermanentPress/ Gentle/ Oonottumbledry/ [usedwith
congiro Resistenteaarrugas Gentl/ c°ngir° N°s_artN°k]var)
,e= @®(3®
setting /
Temperatura High/'Alto Medklm/'Mediana Low/'Baia No heaVa[r /
de secado
Special _ _-_ [-i-1_
• Line dry/ Dripdry/ Dry fldt / In the shode/
Instrucclones hangtodry/ Ropa que no se arruga E_end_Jo En Ea sombre
instructions /
wrinkleresistdnt/ delicate/ Nousesecddo donotwosh)/
SincaloriCen aire
Cuidado lira leza de la secadora
6
_6 El exterior: P6sele un trapo y elimine el polvo El acero inoxidable: Para limpiar las superficies
o cualquier derrame de productos de lavanderia
con un trapo hOmedo. Losproductos de tratamiento
para quitar mugre y manchas podrian da_ar
el panel de control de la secadora y afectar su
apariencia, Aplique estos productos a cierta
distancia de la secadora. Luego las telas podr6n
lavarse y secarse normalmente. Los dahos causados
a la secadora por estos productos no est6n
cubiertos bajo su garantia.
Elfiltro de pelusa: Limpie elfiltro de pelusa antes de
cada uso. Retireel mismo presionando hacia arriba.
Paselos dedos por el filtro. Esposibleque seforme una
acumulaci6n de cera enel filtro de pelusasdebido al
usode suavizantes detela agregados a la secadora.
Para eliminar dicha acumulaci6n, lave la rejilla
para atrapar pelusascon agua tibia yjab6n. Seque
totalmente y realice el reemplazo. No utilice la secadora
sinel filtro de pelusasy la rejillaen suscorrespondientes
lugares.
Siobserva un cambio en
el funcionamiento de la
secadora,aspire la pelusa
del 6rea del filtro de
pelusasde lasecadora.
de acero inoxidable, use un trapo hOmedo con
un limpiador suave, no abrasivo apropiado para
superficies de acero inoxidable. Remueva el residuo
del limpiador y luego seque con un trapo limpio.
Interior y conducto de la secadora: Un t6cnico
calificado debe limpiar la parte interna del aparato y
del conducto de salida una vez por aho.
El ducto de escape: Inspeccione y limpie el ducto de
escape por Io menos una vez al a_o para evitar los
obstrucciones, Un escape parcialmente taponado
puede prolongar el plazo de secado.
Siga estos pasos:
rl1 Apague el suministro el6ctrico desconectando el
enchufe de la pared.
r21 Desconecte el conducto de la secadora.
r_ Aspire el conducto con la conexi6n
de manguera y vuelva a conectarlo.
La salida de escape: Inspeccionedel exterior que las
aletas dela salida de escape semueven libremente
durante la operaci6n. Aseg0resede que ning0n animal
(p6jaros,insectos,etc.)haya hecho su nido en el interior
del conducto o en la salida de escape. 9
Page 28

Ventilaci6n de la secadora.
Par(] obtener el mejor desempeho, I(] secadora debe estar ventil(]da (]decu(]damente, La secadora utilizar_
m(_s energfa y funcionar_ m_s tiempo si no se ventila siguiendo las especificaciones indicadas m_s
abajo. Siga cuidadosamente los detalles en la secci6n de Escape en las Instrucciones de instalaci6n.
_ #_,- Riesgo de incendio
Esta secadora DEBE tener una ventilaci6n al exterior.
Use s61o un conducto de metal rigido de 4" para la ventilaci6n de salida dom6stico.
Use s61o un conducto de transici6n de la secadora de metal rigido de 4" o de la lista de
UL para conectar la secadora a la salida del hogar.
NO use una ventilaci6n del pldstico.
NO use la salida de una chimenea, la salida de la cocina, ventilaci6n de gas, pared, cielo
raso, dtico, espacio de rastreo, o espacio escondido de una edificaci6n.
NO instale una pantalla en o sobre el conducto de salida.
NO use un conducto m_s largo que aqu61 especificado en la tabla de Iongitud de salida.
Si no se siguen estas instrucciones se podr6 producir la muerte o un incendio.
Ventilaci6n
correcta
Ventilaci6n
incorrecta
10
Page 29

Acerca de lu Comunicaci6n del Electrodom stico. G pU once com
CleanSpeak TM
Estasecadora puedetener comunicaci6n con
una lavadora compatible (una cuyo Manual
del Propietario cuente con una descripci6n de
CleunSpeok T')a trav6s de WiFi Connect (Conexian
WiFi).
WiFi Connect (Conexi6n WiFi) (Para clientes en Estados Unidos)
Su secadora es Compatible con GE WiFi Connect. Para aprender mc_ssobre las funciones del
Una tarjeta de comunicaci6n incorporada en el electrodom6stico conectado y para saber qu6
producto permite la comunicaci6n del mismo con aplicaciones del electrodom6stico conectado
su tel6fono inteligente para un monitoreo remoto, funcionarc_n con sutel6fono inteligente, visite
control y recepci6n de notificaciones, www.GEAppliances.com/connect.
Este dispositivo cumple con la Parte !5 de la Normativa de la FCC.Su funcionamiento estd sujeto alas dos
condiciones siguientes:
!. Este dispositivo no causa interferencias perjudiciales, y
2. Este dispositivo debe aceptar cualquier interferencia recibida, incluidas las interferencias que puedan
provocar un funcionamiento no deseado. Este equipo foe probado y cumple con los Ifmites establecidos para
un dispositivo digital de clase B, segOn la parte !5 de la Normativa de la FCC.Estos Ifmites fuemn disehados
para brindar una protecci6n razonable contra interferencias nocivas en una instalaci6n residencial. Este
equipo genera, usa y puede emitir energia de radiofrecuencia y, si no se instala y utiliza de acuerdo con las
instrucciones, puede ocasionar interferencias perjudiciales sobre las comunicaciones radiales. Sin embargo,
no se garantiza que no se presenten interferencias en una instalaci6n en particular. Si el equipo provoca
interferencias perjudiciales para la recepci6n de radio o televisi6n, Io cual puede comprobar encendiendo
y apagando el equipo, se aconseja al usuario que intente corregir la interferencia a travds de una de las
siguientes medidas:
. Reoriente o reubique la antena receptora.
. Aumente la separaci6n entre el equipo y el receptor.
. Conecte el equipo a un tomacorriente de un circuito diferente al tomacorriente al cual se encuentra
conectado el receptor.
. Para solicitar ayuda, consulte al proveedor minorista o a un tdcnico experimentado de radio/TV.
Etiqueto: Las modificaciones sobre esta unidad no apmbadas expresamente pot parte del fabricante
podHan anular la autoridad del usuario para utilizar el equipo.
AI finalizar el ciclo de lavado, la lavadora envia
una seBal a la secadora para indicar un ciclo de
secado preferido. Cuando la secadora deja de
funcionar (aparece "End" en la pantalla - o - se abre
la puerta)"CYCLE" (Ciclo)aparecerc_en la pantalla
de este ciclo, el LEDde configuraci6n de la perilla
del ciclo actual se encenderc_,y (sies diferente)
un segundo LED del ciclo recomendado titilar&
Si finaliza el tiempo de "CYCLE"(Ciclo),presionar
Power (Encendido) reiniciarc__ste y las luces LED.
Si la perilla del ciclo de secado es girada, el LED
s61idose moverc_de forma consecuente. Presionar
el bot6n Start (Iniciad de la secadora iniciarc_la
configuraci6n de la perilla de ciclo (LEDs61ido)y
apagarc_el recomendado (LEDtitilante) si un ciclo
diferente es iniciado.
Conectividad WiFi: Para recibir asistencia en
relaci6n al electrodom6stico o la conectividad de
red deConnectPlus, comun[quese a1800-GE-CARES.
11
Page 30

C6mo cambiar el sentido de apertura de la puerta.
Inversi6n de la Puerta
Herramientas que necesitar6:
[] Destomillado Phillips NO2Estdndar
[] Espdtula con la punta cubierta con cinta
[] Destomillador de punta plana pequeha
Antes de Comenzar
Desenchufelasecadoradeltomacorriente.
rl1Abra la puerta aproximadamente 170 grados. Con una
esp6tula,retire las4 tapas de plcisticoubicadas a Iolargo del
lado izquierdodel panelfrontal y deje lasmismasa uncostado.
Tapa de pl6stico (4)
r_ Afloje los 2 tornillos de la bisagra inferior derecha. Retire
la puerta y coloque la misma sobre una superficie plana
protegida a fin de evitar cualquier daho. Retire la Placa
Ciegay la Placa de Refuerzo e instale las mismas en
posiciones opuestas.
Placa
Placa
r41 Retire los 4 tornillos de las bisagras de la puerta, los 4
tornillos de los extremos, y los 8 tonillos interiores.
Levante la puerta interna hacia arriba usando un
destornillador de punta plana.
frontal -
r_ Retire el tornillo inferior de cada bisagra (lado derecho) e
inserte parcialmente en los agujeros de las bisagras del
lado superior izquierdo.
NOTA: Los 4 tornillos de la bisagra del panel frontal estaran
ahora en los agujeros de la bisagra superior - 2 sobre la
izquierda y 2 sobre la derecha.
II
!!
)
Tornillos internos
Tornillos
de los
e×tremos
Tornillos de Tornillos intemos
12eSibaisagras A
12
II
Page 31

GEAppliances.com
r-5--jRetire y cambie las 2 tapas protectoras y la manUade la
puerta externa:
A. Apriete las leng0etas de la parte interna de los
ganchos de la manUade la puerta. Presione los
ganchos a trav6s de la puerta externa.
B.Apriete las leng0etas de la parte interna de las tapas
protectoras. Presione las tapas a trav6s de la puerta
externa.
I
Tapesprotectores r_/ f'S'_'_ V dele
__ Manija de puerta
la puerta
C. Presione los ganchos de la manUa de la puerta en las
aberturas sobre el lado opuesto de la puerta externa,
asegur6ndose de voltear la manUade modo que se
curve hacia la parte interna.
D. Presione las tapes protectoras en las aberturas de
la puerta externa donde se encontraba instalada la
manija.
[] Con las tapas protectoras y la manija de la puerta
colocada, vuelva a montar la puerta interna en la puerta
externa con los tornillos retirados en el paso 4.
Aseg0rese de montar las bisagras sobre el lado opuesto
a la manUa.
Tornillos internos
Tornillos de lillos
los e×tremos internos
_] iVlonte la puerta sobre los 2 tornillos superiores del lado
o
izquierdo, instalados en el paso 2. iVlueva los tornillos de
,Manija
la bisagra aflojados en el paso 3 hacia los agujeros
inferiores del lado izquierdo y apriete firmemente los
cuatro tornillos.
Puerta
Tornillos de
las bisagras
de la puerta
Interior de la puerta
dela manija dela puerta
Tape protectora _
de la puerta
r811nstale las cuatro tapas de pl6stico retiradas en el paso 1
en los 4 agujeros del panel frontal derecho.
NOTA: Para regresar la puerta a la configuraci6n original,
siga estas instrucciones, cambiando entre la "izquierda" y la
"derecha".
AI finalizar
Vuelva a enchufar la secadora
en la salida el_ctrica. [-_
13
Page 32

Antes de llamar para solicitar servicio...
iAhorre tiempo y dinero! Consulte primero las tablas de las p@inas siguientes
Consejos para la soluci6n de problemas
o visite GEAppliances.com y quizds no necesite Ilamar al servicio.
Problema Posible causa Qu6 hacer
La secadora no funciona Lasecadora , AsegOrese de que el enchufe est6 completamente colocado
Lo secadora no calienta ElFusible Hogarefio se quem6/ , Revise la caja de fusibles/disyuntores y reemplace ambos
La secadora tiembla o Un poco de temblor/ruido , Coloque la secadora en un lugar con piso nivelado, o ajuste
produce ruido es normal. La secadora podria las patas niveladoras segOn sea necesario hasta que
Manchas de grasa Usa inapropiado de suavizador • Siga las direcciones en el envase del suavizador de telas.
en la ropa de telas
Pelusa en las prendas Elfiltro de pelusa est6 Ileno • Limpie el filtro antes de cada carga.
Ocurre est6tica Nose utiliz6 ning0n tipo , Intente utilizarun suavizador de telas.
Plazas de secado TOo de calor . Losplazas de secadoautom6tico pueden variar segOn
incansistentes el tipo de calor utilizado (el6ctrico,gas natural o LP),
Seha seleccianada Lacarga consiste de . Cuandocombinetelaspesadascon livianasenunacarga,
el nivel de secadoDry una combinaci6n de telas escojaMoreDry (Mdsseco).
(Seca)pero la carga at]n pesadasy livianas
seencuentra hSmeda Elsistemade escape est6tapado . Inspeccioney limpieelsistemade escape.
14
est6 desenchufada en el tomacorriente.
ElFusible Hogarefio se quem6/ , Revise la caja de fusibles/disyuntores y reemplace
disyuntor desconectado el fusible o reconecte el disyuntor. NOTA: La mayor[a
de las secadoras el6ctricas usan dos fusibles/disyuntores.
Elfusible de la secadora , Elfusible simple (Gas)o uno de los dos fusibles (EI6ctricos) en la
se quem6 partetrasera del tablero se quemaron debidoa que la protecci6n
del circuito hogareflo nofuncion6. Solicitea un t6cnico calificado
que controle el encendido del tomacorriente.
disyuntor desconectado; es fusibles y reconecte ambos disyuntores. Es posible que la
posible que la secadora gire secadora gire si 0nicamente un fusible se ha quemado
sin calentar o un solo disyuntor ha saltado.
Seha cortado el suministro , AsegOreseque la v61vulade cierre en la secadora y
de gas la v61vulamaestra est6completamente abierta.
Nose ha seleccionado . Seleccioneotro nivelde calor.
la temperatura
estar disnivelada est6 nivelada.
Secado de articulos sudos , Utilicesu secadora para secar 0nicamente articulos limpios.
con limpios Losarticulos sucios pueden manchar los articulos limpios
y la secadora.
Las prendas no est6n , Algunas manchas que no se pueden ver cuando las prendas
completamente limpias est6n mojadas aparecen despu6s del secado. Utilice
procedimientos apropiados de lavado antes del secado.
Clasitlcaci6n incorrecta , Clasifiquelas prendas que producen pelusa (coma felpilla)
de lasprendas quejuntan pelusa (coma la pana).
Loelectricidad estatica puede • Consulte lassugerenciasen estasecci6n bajo Ocurre estatica.
atraer pelusa
Sobrecarga • Separe las cargas mc_sgrandes en menor tamaho.
Papel,servilletas, etc., quedan . Vacietodos los bolsillosantes delavar la ropa.
dentro de los bolsillos de la ropa
, Bounce®FabricConditioner DryerSheetsha sido aprobado
para serusado con todas lasSecadoras GEy cuando
se usende acuerdo con lasinstrucciones del fabricante.
Sobresecado , Intente utilizarun suavizador de telas.
, Programe el ajuste a Less Dry (MenosSeco)o Damp
(HOmedo).
Articulos sint6ticos, planchado , Intente utilizar un suavizador de telas.
permanente y combinaciones
pueden causar est6tica
tamaho de la carga, tipos detelas, humedad de
laropa y lacondici6nde losconductos de escape.
Page 33

Antes de llamar para solicitar servicio... GEAppliances.com
Q,
Problema Posible causa Qu_ hacer
Secar las prendas toma Clasificad6n incorrecta . Separelas prendas pesadasde laslivianas (generalmente
demasiado tiempo una carga de lavado bien clasificada esuna carga de
secado bien clasificada).
Cargas grandes de telas pesadas . Lastelas grandes y pesadas contienen m6s humedad y toman
(como toallas de playa) m6s tiempo para secar.Separelas telas grandes y pesadasen
cargas de menor tamaho para agilizarel plazo de secado.
Loscontroles no est6n • Corresponde los a]ustes de control a la carga que estc_
programados correctamente secando.
La opci6n eDry est@activada . Para obtener tiempos de secado 6ptimos, apague eDry.
Para obtener ahorros de energia 6ptimos, active eDry.
ElfiJtro de pelusa est6 Ileno • Limpieel filtro de pelusa antes de cada carga.
Conductos inadecuados . Reviselas instrucciones de instalaci6n para sistemas
u obstruidos de conductos/ventilaci6n correctos.
Aseg6rese de que losconductos est6n limpios,libres
de puntos de agarre y no est6n obstruidos.
Reviseobservando que elregulador de pared exterior est6
funcionando confacilidad.
Reviselas Instrucciones de instalaci6n para asegurar que
el sistema de ventilaci6n de la secadora es correcto.
Fusiblesquemados/disyuntor . Reemplacelosfusibleso reconecte los disyuntores.
desconectado Secadorasel6ctricas utilizan 2 fusibles/disyuntores,
aseg0rese de que ambos funcionen.
Sobrecarga/combinaci6n . No coloque m6s de una carga de la lavadora en
de cargas la secadora al mismo tiempo.
Pocacantidad de carga . Siestc_secando solouna odos prendas,a_ada varias
para asegurar un giro apropiado.
Las prendas est6n Sobresecado . Seleccioneun plazo desecado mc_sbreve.
arrugadas _ Retirelas prendas mientras estc_nhQmedas.Programe
el ajuste a LessDry (MenosSeco)o Damp Dry (Secado
HOmedo).
Lasprendas permanecen en . Retirelas prendas cuandofinaliza elcicloy doble o
la secadora despu@sque ha cu61guelasinmediatamente.
terminado el ciclo
Sobrecarga . Separelas cargas mas grandes en mas pequehas.
Las prendas se encogen Algunas telas seencogen . Para evitar encoger las prendas, siga lasinstrucciones
de manera natural cuando de las etiquetas exactamente.
Se ve agua dentro de la
puerta y sobre el filtro de
pelusa cuando se abre la
puerta despu6s del ciclo
de vapor
Areas pequeflas en
prendas muestran
humedad
se lavan. Otras pueden lavarse
sin problemas, pero se encoger6n forma original despu6s de secarlas.
en la secadora
Elvapor se condensa . Estoes normal.
la puerta interna.
Interior del tambor con humedad
despu6s del ciclo devapor
. Algunas prendas pueden plancharsenuevamente a su
. Sitiene dudas sobre siuna prenda en particular encogerci,
no lalavea mciquinani lasequecon giro.
. Siesta utilizando el ciclo Steam Dewrinkle, manualmente las
reduzca el tiempo del ciclo o seleccione un n6mero inferior de
prendas con Steam Select (Selecci6n con Vapor). Siesta
Steam Refresh (Renovaci6npot vapor),agregar prendas a la
carga. 15
Page 34

Antes de llamar para solicitar servicio...
Problema Posible causa Qu6 hacer
Loscuellasy pretinas a4n Elmonitor de sequedaddetecta • EscojaSpeedDry(SecadoRdpido)oTimedDry(Secadopar Tiempo)
seencuentranh4medos queetcuerpode losprendas parasecardejandohOmedosloscuellosy pretinas.Enelfuturo,cuando
al final delcido est6seco sequeunacargoconcuellosy pretinas,escojaMoreDry (MdsSeco).
Pequefla variaci6n del Estoes normal. . Debido a las propiedades metc_licasde la pintura utilizada
color metdlica, con este producto 0nico,pueden ocurrir peque_asvariaciones
de colordebido8ngulosdevisualizaci6nycondicionesdeiluminaci6n.
Hay una pequefia cantidad Tomato de cargo inadecuado
de agua sabre elpiso
frente a la secadara.
Hay agua en elpisa en la Laconexi6n de manguera . Ajuste la conexi6n.
porte trasera de la de agua a la vdlvula se
secadara encuentra floja.
Caeagua de la puerto Elvapor se condensa en . Estoesnormal.
cuanda se la abre despuds la puerto interna.
de un cicla de vapor.
Na puede versevapor al Elvapor se libera en un _ Estoesnormal.
camienza del cicla momenta diferente en el ciclo.
No seve vapor en La boquilla de vapor puede estar • Llame al800.GE.CARESpara solicitar el kit de reemplazode
ning_n momenta bloqueada con suciedad boquilla WE25171 o para solicitar un tdcnico que Ioreemplace
durante el cicla proveniente del suministro deagua par usted.
Losprendas siguen Demasiadas prendas. . Carguemenos prendas;incremente eltiempo manualmente.
arrugadas despuds de
cicla devapor
Prendas mojadas o Filtro de pelusa no esta limpio . Limpiar elfiltro de pelusa
h4medas, despuds del
cicla Steam (vapor) Losprendas de lacargo son . Utilizarel ciclo de Steam Refresh (Refrescaral Vapor).
ropa infantil
No aparecen n_meras en Lasecadora monitorea _ Estoes normal. Cuando la secadora detecta un nivel
la pantalla durante el cicla, constantemente la cantidad bajode humedad enla carga, lasecadora mostrara
s61aluces de humedad en la ropa eltiempo restante de secado.
El tiempa restante Eltiempo estimado podria . Estoesnormal.
ha saltada a un nF_mera cambiar si secauna cargo
inferior menor a la normal
La secadora se encuentra
funcionando, pero el tiempo
restante muestra 000
Las prendas a_n
se encuentran h_medas
y la secadora se apaga
despu6s de un tiempo corto
La secadara se apaga Una cargo muy peque_a (conpar
16
para el ciclo de vapor seleccionado, reduzca manualmente el tiempo del ciclo o seleccione un
el vapor excedente se condensa
dentro del gabinete y se escapa.
La manguera no cuenta con la . Instalela arandela de goma provista con la manguera.
arandela de goma en la
conexi6n con la vdlvula.
Se ha escogido la opci6n Extend . Estoes normal. Durante elsecado prolongado no se muestra el,
Tumble (SecadoExtendido)/Steam tiempo restante. La opci6n de secado prolongado tarda 60
Refresh (Refrescar al Vapor) minutos aproximadamente.
Seabri6 la puerto a la mitad del . Sedebe volver a seleccionarun ciclode secado cada vez
ciclo. Luego se procedio a retirar que se coloca una carga nueva.
la cargo de la secadora y se coloc6
una cargo nueva sin seleccionar
un ciclo nuevo
Cargo peque_a
Lacargo ya se encontraba seca a
excepd6n de los cuellos y pretinas
Lasecadora no est8 nivelada
ejemplo una prenda) no activa el
sensor de secado
• Si va a utilizar el ciclo Steam Dewrinkle (Estirarpar vapor),
n0mero inferior de prendas con Steam Select (Selecci6n
con Vapor). Siva a utilizar el ciclo Steam Refresh (Refrescar
al Vapor), agregue mas prendas a la carga.
, Cuandoseque3o menosprendas,escojaSpeedDry (Secado
Rdpido)o TimedDry (Secadopor Tiempo).
• EscojaSpeedDry (SecadoRdpido)o Timed Dry (Secadopor
Tiempo)para secarloscuellos y pretinas que estdn hOmedos.
Enelfuturo, al seca unacarga que contenga cuellosy pretinas,
escoja Nare Dry (MdsSeco).
. Muevala secadoraa un 6rea con pisoniveladoo ajuste lasparas
niveladorascomo seanecesariohasta que se encuentre nivelada.
Use la opci6n del ciclo Timed Dry (Secado pot Tiempo);
seleccione el tiempo de secado deseado.
Page 35

Garantia de la secadora GE. GEAppliances.com
Todos los servicios de garantia se offecen a travds de nuestros
centros de asistencia t@cnica o un t@cnico autorizado de Customer
Care ®.Pare programar servicio de asistencia tdcnica, en linea y
los 24 hares, visite la pdgina GEAppliunces.com o llama al
800.GE.CARES(1.800.432.2737). Cuando llama pare solicitor servicio,
Engrape el recibo aquL
Senecesita el comprobante
con la fecha de compra original
pare que la garantfa cubra
los servicios.
par favor tango a mane el nOmero de serie y el nOmero de modelo.
Pare realizer el servicio tGcnico de su dectrodomGstico se podr(7 requefir el usa de dabs dd puerto de abordaje pare su
diagn6stico. Esto da al tGcnico del Servicio de F6brica de GE la habilidad de diagnosticar de farina r(_pida cualquier problema
con su electrodomGstico, y de ayudar a GE a mejorar sus productos al bfindarle a GEla informaciGn sabre su electrodomGstico.
Si no desea qua los dates de su electrodomGstico seen enviados a GE, solicitamos qua le indique a su tGcnico NO entregar los
dabs a GE en el momenta del servicio.
Par el periodo de: GE reemplazar6:
Unu_o
Dela fechade la
compm original
Cualquierparte de lasecadoru quefulle debido udefectos en los materiales oen lafabricaci6n.
Durunte esta gurantiu limitudu deun a_o, GEtambiGn proporcionarc_,sin costa elguno, todG
IGmane deobm y servicios relGcionGdoscon el reemplGzode IGspGrtesdefectuosGs.
Lo qua no est_ cubierto:
[] Viejes del personal de servicio a su case pare enseffarle
c6mo user su producto.
[] InstalaciGn, entrega o mantenimiento inapropiada.
[] Fallas del producto si es maltratado, mal usado, o usado
para un propGsito diferente del que se cre6 o si es usado
para uses comerciales.
[] Cembio de losfusibles de sucase o reajuste del circuito de
interruptores.
[] Defies imprevistos resultantes causados per posibles
defectos con este electrodom_stico.
[] Dal_os causados despu_s del envio.
[] Producto no accesible pare facilitar el servicio requerido.
[] Defectos o danes causados per la operaci6n en
temperatures bajo cero C.
[] Productos que no est_n defectuosos o daffados o que
funcionan segOn la descripci6n del Manual del usuario.
[] Da_os el pmducto causados per accidentes, incendios,
inundaciones o actos de la naturaleza.
EXCLUSIGN DE GARANT[AS IMPL[CITAS--Su _nico y exclusive derecho es lu reperuciGn del producto, tu! y coma
se indicu en estu Guruntiu limitudu. Cuulquier guruntiu implicita, incluyendo lus guruntius implicitus de comerciubilidud
o udecuuci6n peru un fin determinedo, est_n limitedes u un erie o el periodo de tiempo m_s breve permitido par le lay.
Esta garanffa se extiende al comprador original y a cualquier propietario subsecuente pare productos comprados pare usa
dom_stico dentro EstadosUnidos.Si el producto estd situado en un drea qua no dispone de servicio par porte de unproveedor
de servicio autorizado de GE,podrfa tenet qua hacerse cargo de los castes de envfo o bienpodrfa solicitdrsele qua Ileve el
producto a un centre de servicio de GEautorizado pare realizer la reparaciGn. EnAlaska,la gamntfa excluye
el costa de envfo o los visitas de servicio a su case.
Algunos estados no permiten la exclusiGn o limitaciGn de dahos imprevistos. Esta garanda le dasus derechos legales
espedficos, yes posible qua usted tango otros detaches legales qua varian de estado a estado. Pare informarse de cudles son
sus detaches legales, consulte a su oficina de asuntos del consumidor local o estatal o pGngase en contacto con
la Oficina de su Procurador General.
Garante: General Electric Company. Louisville, KY 40225
17
Page 36

Soportea!consumidor.
Pdgina Webde GEAppliances GEAppliances.com
LTienealguna pregunta sabre suelectrodom6stico? iPruebela p6gina Web de GEAppliances24 horas al dfa,
cualquier d[a del aho! Paramayor convenienciay servicio m6s r6pido, ya puede descargar los IVlanualesde los
Propietarios,pedir piezas o incluso hacer una cita en I[neapara quevengan a realizaruna reparaci6n.
Solicite una reparaci6n GEAppliances.com
Elserviciode expertosGEestc_a tan s61oun pasode su puerta, iEntre en I[neay solicitesu reparaci6n cuando
le venga bien 24 horas al dia cualquier dia del aBo! O llama a1800.GE.CARES(800.432.2737)durante horas
normales deoficina.
RealLifeDesignStudio(Estudiodedisehoparalavidareal)GEAppliances.com
GEapoya el concepto de DiseBoUniversal-productos, serviciosy ambientes qua pueden usar gente de todas
lasedades, tamaBos y capacidades. Reconocemosla necesidadde diseBarpara una gran gama dehabilidades
y dificultades fisicasy mentales. Param6s detallessabre lasaplicaciones de GEDiseBoUniversal,incluyendo
ideas de diseBopara lacocina para personas con discapacidades, mirenuestra pc_ginaWeb hay mismo. Para
personas con dificultades auditivas, favor de Ilamar al 800.TDD.GEAC(800.833.4322).
Garantias ampliadas GEAppliances.com
Compre unagarantfa ampliada yobtenga detalles sabre descuentos especialesdisponibles mientras su
garant[a est6 aOnactiva. Puedecomprarla en I[neaen cualquier momenta, o Ilamar a1800.626.2224durante
horas normales deoficina. GEConsumer Home Servicesestar6 a0n ah[ cuando su garant[a termine.
Piezas y accesorios GEApplianceparts.com
Aquellos individuos con la calificaci6n necesaria para reparar sus propios electrodom@sticos pueden pedir que
seles manden las piezas o accesorios directamente a sus hogares (aceptamos las tarjetas VISA,MasterCard
y Discover). Haga su pedido en linea hoy, 24 horas cada dia o Ilamar por tel6fono a1800.626.2002 durante
horas normales de oficina.
Las instrucciones descritas en este manual cubren los procedimientos a seguir par cualquier usuario.
Cualquier otra reparaci6n debeda, pot regla general, referirse a personal calificado autorizado. Debe ejercerse
precauci6n ya que las reparaciones incorrectas pueden causar condiciones de funcionamiento inseguras.
P6ngaseen contacto con nosotros GEAppliances.com
Sino est@satisfecho con el servicio que recibe de GE,p6ngase en contacto con nosotros en nuestra pagina Web
indicando todos los detalles as[ como su n0mero de tel6fono o escr[banos a:
General Manager, Customer Relations
GEAppliances,Appliance Park
Louisville,KY40225
18
Registre su electrodomdstico GEAppliances.com
iRegistre su nuevo electrodom_stico en linea-cuando usted prefiera! Elregistrar su producto a tiempo le
proporcionar6, si surgiera la necesidad, una mejor comunicaci6n y un servicio mas r@pidobajo los t@minos de
su garant[a, mambi6n puede enviar su tarjeta de registro pre-impresa que se incluye en el material de embalaje.
 Loading...