

Page 1
®
r ge
Safety Instructions ........... 2,s
For Australia and New Zealand ..... 34
Operating Instructions
Automatic Icemaker ............... 15
Care and Cleaning ............. 17, 18
Crispers and Pans ................. 14
CustomCool'". .................... 7, 8
Freezer Compartment ............. 13
Ice and Water Dispenser ....... 16, 17
Refrigerator Doors .................. 9
Replacing the Light Bulbs .......... 19
Shelves and Bins ............... 10-12
Temperature Controls ............. 4-6
TurboCooF" ......................... 6
Water Filter ......................... 9
Side-bg-Side
Models 21, 23, 25,27 and 29
Installation Instructions
For Australia and
New Zealand ................... 35-37
Preparing to Install
the Refrigerator ................ 25-27
Removing and Replacing Doors ..... 24
Trim Kits and Panels ............ 20-23
Water Line Installation ......... 28, 29
Troubleshooting Tips ...... s1-33
NormalOperatingSounds.......... 30
Write the model and serial numbers here:
Model #
Serial #
Find these numbers on a label inside
the refrigerator compartment at the
top on the right.
200D2600P058 49-60565-1 02-09 JR
Page 2
IMPORTANT SAFETY INFORMATION.
READ ALL INSTRUCTIONS BEFORE USING.
WARNING!
Use this appliance only for its intended purpose as described in this Owner's Manual.
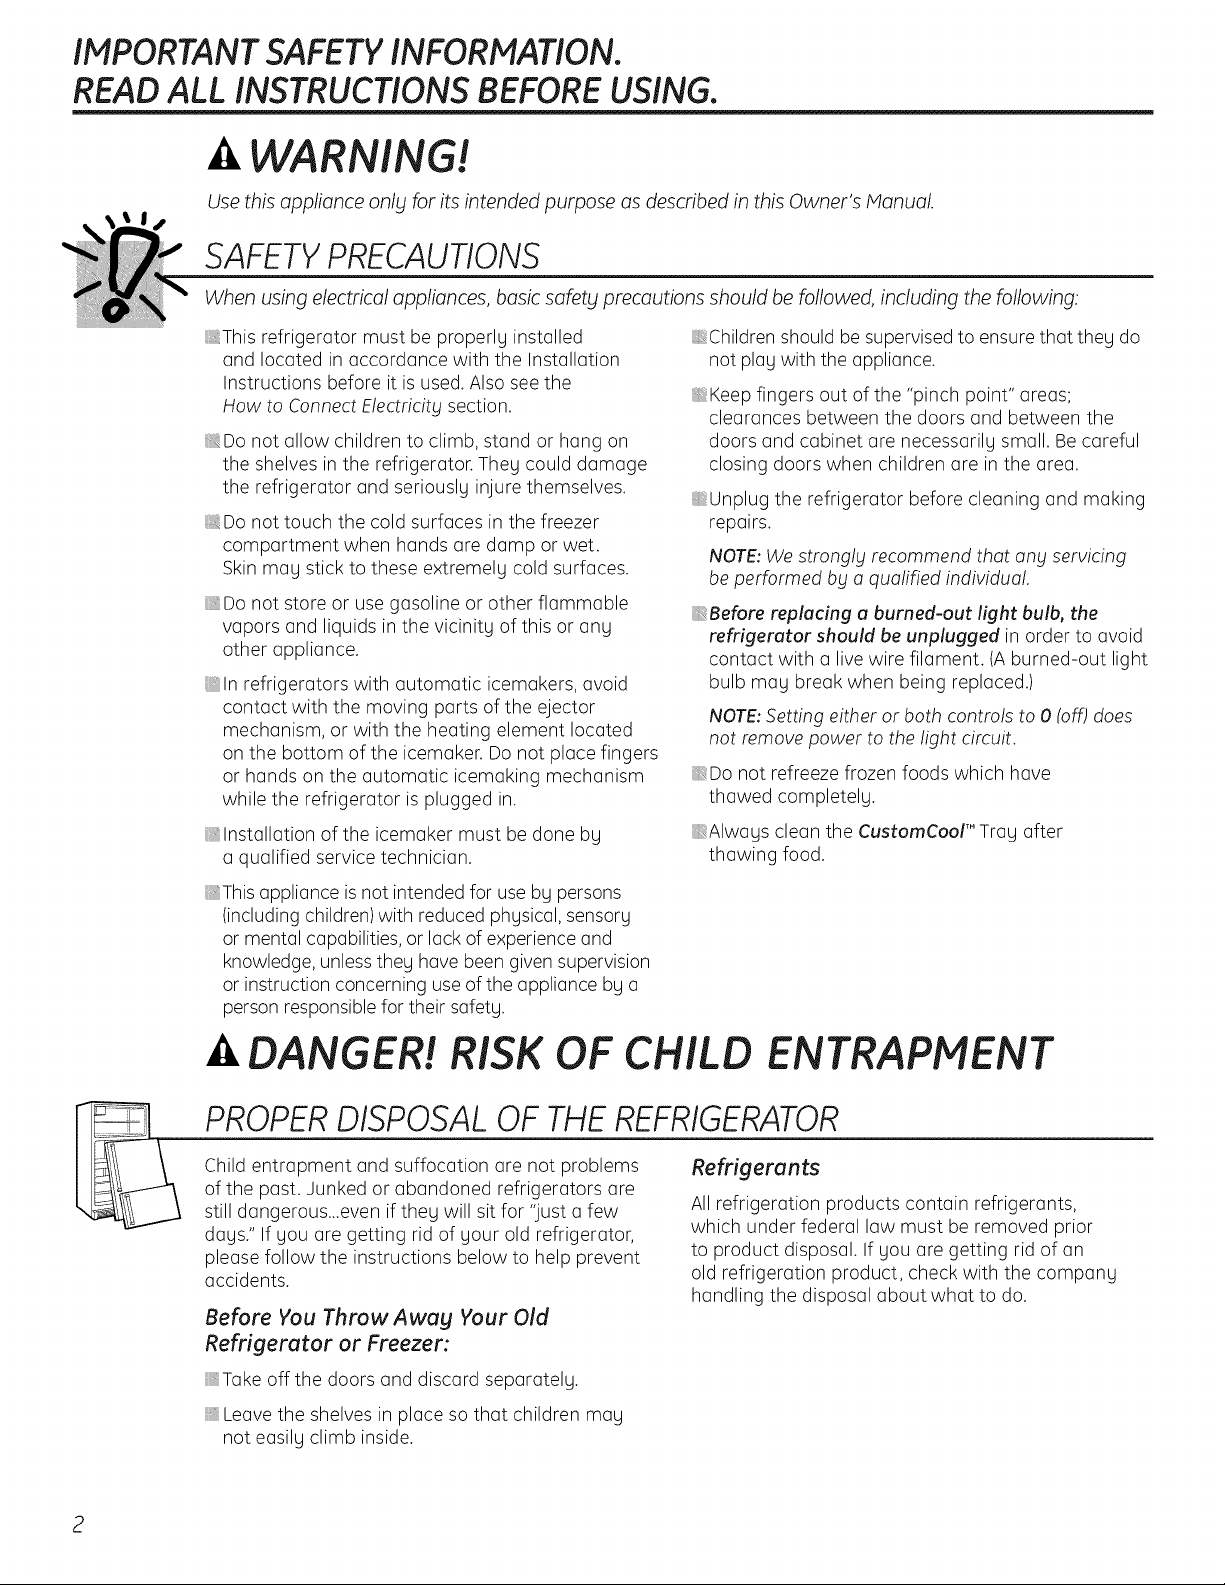
SAFETYPRECAUTIONS
When using electrical appliances, basic safety _recautions should be followed, including the following:
_,This refrigerator must be properly installed
and located in accordance with the Installation
Instructions before it is used. Also seethe
How to Connect Electricity section.
_,Do not allow children to climb, stand or hang on
the shelves in the refrigerator. They could damage
the refrigerator and seriously injure themselves.
_,Do not touch the cold surfaces in the freezer
compartment when hands are damp or wet.
Skin may stick to these extremely cold surfaces.
_,Do not store or use gasoline or other flammable
vapors and liquids in the vicinity of this or any
other appliance.
In refrigerators with automatic icemakers, avoid
contact with the moving parts of the ejector
mechanism, or with the heating element located
on the bottom of the icemaker. Do not place fingers
or hands on the automatic icemaking mechanism
while the refrigerator is plugged in.
_, Installation of the icemaker must be done by
a qualified service technician.
_,This appliance isnot intended for use by persons
(including children) with reduced physical, sensory
or mental capabilities, or lack of experience and
knowledge, unlessthey have beengiven supervision
or instruction concerning use of the appliance by a
person responsiblefor their safety.
_,Children should be supervised to ensure that they do
not play with the appliance.
_,Keep fingers out of the "pinch point" areas;
clearances between the doors and between the
doors and cabinet are necessarily small. Be careful
closing doors when children are in the area.
_,Unplug the refrigerator before cleaning and making
repairs.
NOTE:We strongly recommend that any servicing
be performed by a qualified individual.
_Before replacing a burned-out light bulb, the
refrigerator should be unplugged in order to avoid
contact with a live wire filament. (A burned-out light
bulb may break when being replaced.)
NOTE:Setting either or both controls to 0 (off) does
not remove power to the light circuit.
_,Do not refreeze frozen foods which have
thawed completely.
_,Always clean the CustomCool'" Tray after
thawing food.
DANGER!
RISK OF CHILD ENTRAPMENT
PROPERDISPOSAL OF THE REFRIGERATOR
Child entrapment and suffocation are not problems
of the past. Junked or abandoned refrigerators are
still dangerous...even if they will sit for "just a few
days." If you are getting rid of your old refrigerator,
please follow the instructions below to help prevent
accidents.
Before You Throw Away Your Old
Refrigerator or Freezer:
Take off the doors and discard separately.
Leavethe shelves in place so that children may
not easily climb inside.
2
Refrigerants
All refrigeration products contain refrigerants,
which under federal law must be removed prior
to product disposal. If you are getting rid of an
old refrigeration product, check with the company
handling the disposal about what to do.
Page 3
WARNING!
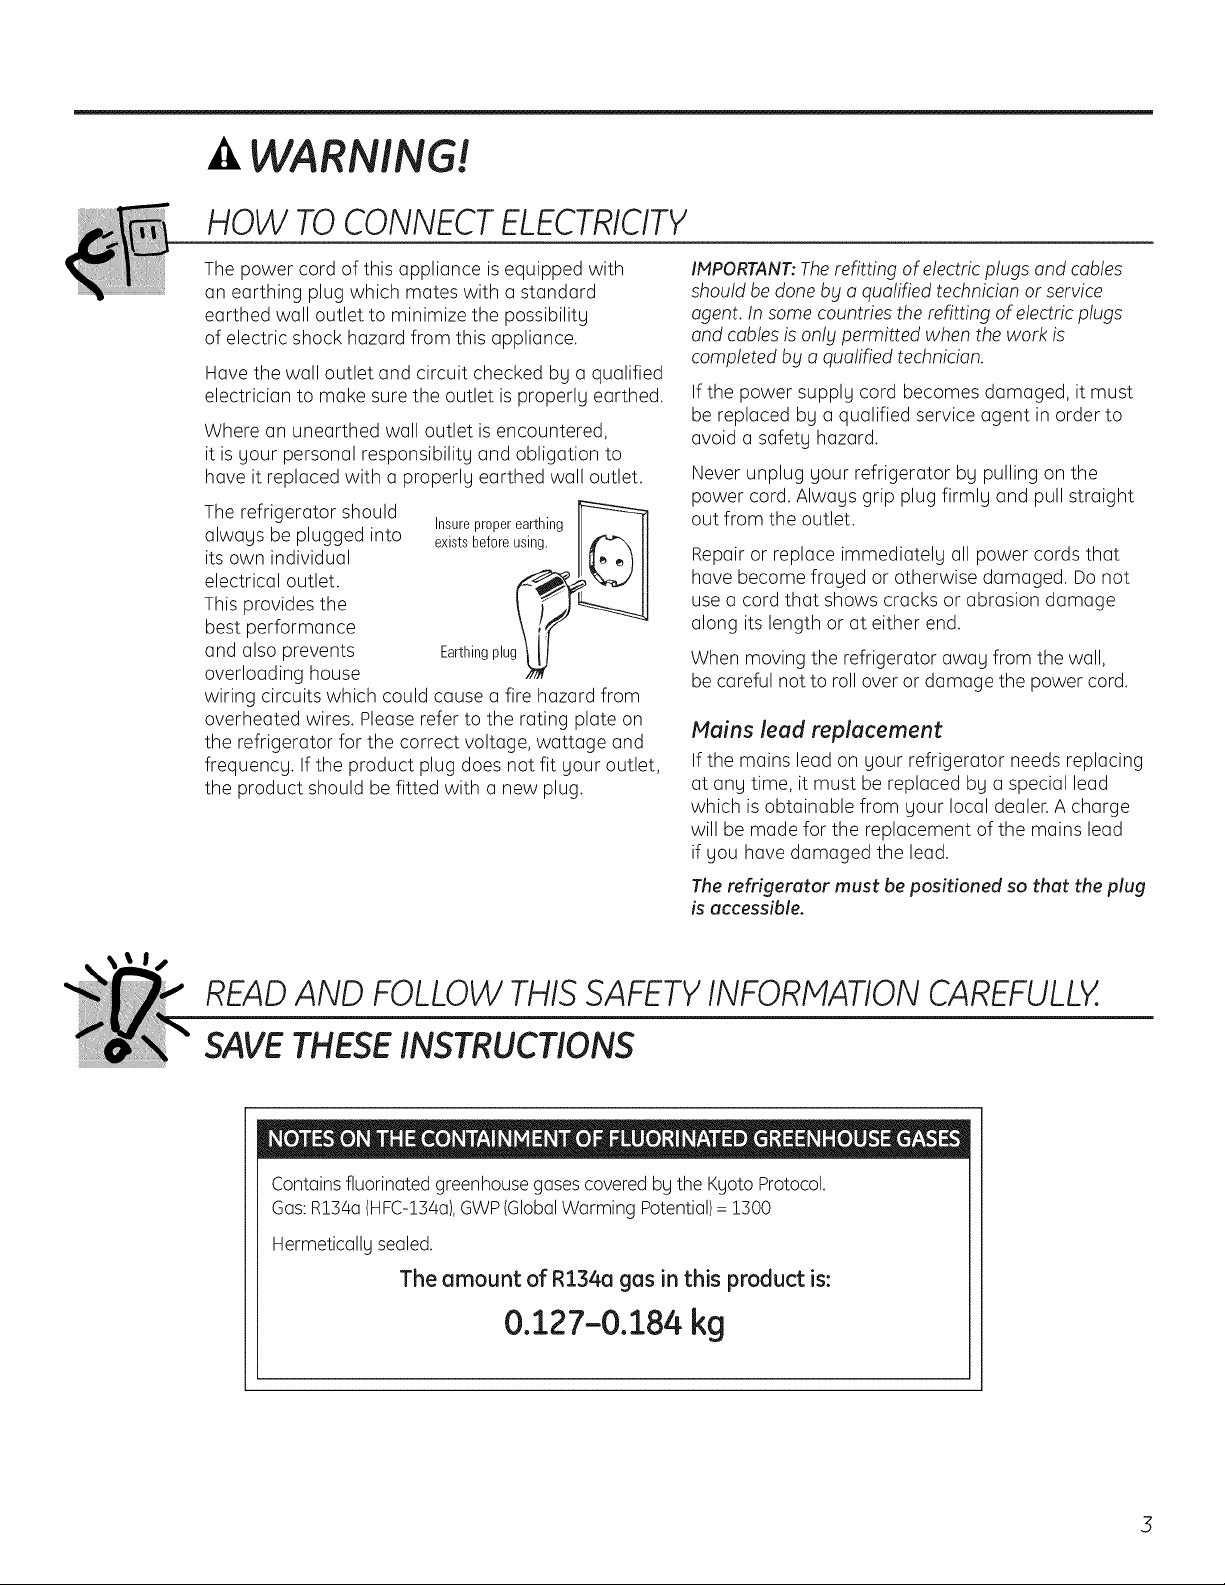
HOW TOCONNECTELECTRICITY
The power cord of this appliance is equipped with
an earthing plug which mates with a standard
earthed wall outlet to minimize the possibility
of electric shock hazard from this appliance.
Have the wall outlet and circuit checked by a qualified
electrician to make sure the outlet is properly earthed.
Where an unearthed wall outlet is encountered,
it is your personal responsibility and obligation to
have it replaced with a properly earthed wall outlet.
The refrigerator should
always be plugged into
its own individual
electrical outlet.
This provides the
best performance
and also prevents
overloading house
wiring circuits which could cause a fire hazard from
overheated wires. Please refer to the rating plate on
the refrigerator for the correct voltage, wattage and
frequency. If the product plug does not fit your outlet,
the product should be fitted with a new plug.
Insureproperearthing
existsbeforeusing. ]_Xl
Earthingplug_
IMPORTANT:Therefitting of electric plugs and cables
should bedone bbta qualified technician orservice
agent. In some countries the refitting of electric plugs
and cables is on!g permitted when the work is
completed bg a qualified technician.
If the power supply cord becomes damaged, it must
be replaced by a qualified service agent in order to
avoid a safety hazard.
Never unplug your refrigerator by pulling on the
power cord. Always grip plug firmly and pull straight
out from the outlet.
Repair or replace immediately all power cords that
have become frayed or otherwise damaged. Do not
use a cord that shows cracks or abrasion damage
along its length or at either end.
When moving the refrigerator away from the wall,
be careful not to roll over or damage the power cord.
Mains lead replacement
If the mains lead on your refrigerator needs replacing
at any time, it must be replaced by a special lead
which is obtainable from your local dealer. A charge
will be made for the replacement of the mains lead
if you have damaged the lead.
The refrigerator must be positioned so that the plug
is accessible.
READAND FOLLOWTHISSAFETYINFORMATIONCAREFULLY.
SAVETHESEINSTRUCTIONS
Containsfluorinated greenhousegases covered by the Kyoto Protocol.
Gas:R154a(HFC-154a),GWP(GlobalWarming Potential)= 1500
Hermetically sealed.
The amount of R134a gas in this product is:
0.127-0.184 kg
3
Page 4

About the temperature controls - Profile Models. ge.com
Not all features are on all models. Your controls will look like one of the following:
y........................................................................................._, F _ ..................................\
i i
i ................]
Non-LCD models Non-LCD models LCD models
NOTE:Therefrigeratorh shippedwithprotectivefilmcoveringthetemperaturecontrols.If thisfilmwasnot
removedduringinstallation,removeitnow.
J
I
Thetemperaturecontrolsorepresetinthefoctor_lat37°F(3°C)
fortherefrigeratorcompartmentandO°FM8°C)forthefreezer
compartment.Allow24hoursforthetemperaturetostabilize
tothepresetrecommendedsettings.
Refrigeratortemperaturescanbeadjustedbetween34°Fand46°F
(2°Cto8°C),andthefreezertemperaturescanbeadjustedbetween
-6°Fand+8°F(-22°Cto -13°C).
Tochange the Refrigerator temperature:
LCDModels:
Access By: Home> Refrigerator
Activate By: Usingthe arrows to selectthe desired
temperature Youmust pressENTERto set the new
temperature
Tochange the Freezer temperature:
Access By: Home> Freezer
Activate By: Usingthe arrows to selectthe desired
temperature Youmust pressENTERto set the new
temperature
Oncethe desired temperature has been set, the displauwill
return to the HOMEscreen and show the set temperatures
underneath the actual temperature display for several
seconds.Severaladjustments may be required. Eachtime you
adjust the controls,allow 24 hours for the refrigerator to reach
the temperature you have set.
Non-LCD Models:
To change the temperature, press and releasethe FREEZER
TEMP/FRIDGETEMPpad.The SETlight will come on and
the displag will show the set temperature. To change the
temperature, tap either the vor ^ pad until the desired
temperature isdisplaged.
Oncethe desired temperature has been set, the temperature
displagwill return to the actual refrigerator and freezer
temperatures after 5seconds.Severaladjustments mag be
required. Eachtime gou adjust the controls, allow 24 hours
for the refrigerator to reach the temperature gou haveset.
Thetemperaturecontrolscandispla9 boththeSETtemperature
aswellastheactualtemperatureintherefrigeratorandfreezer.
Theactualtemperaturemayvarystightl_tfromtheSETtemperature
basedon usageandoperatingenvironment.
Turning the cooling system off:
LCDmodels:TurningthecoolingsystemOFFstopscoolingin both
thefreezerandrefrigeratorcompartments,but doesnotshutoff
electricalpowertotherefrigerator.
LCDModels:
AccessBy: Home > Options > Information and Settings >
CoolingSystem Off
Toturn the cooling system back on,pressthe touch screen
and pressthe ONbutton.
Activate By: PressingENTER.
Non-LCD Models:
Pressand releasethe FREEZERTEMP/FRIDGETEMPpad.
Press^ to set freezer temperature to 5.Thedisplaywill
show OFF.To turn the unit back on, pressthe FREEZER
TEMP/FRIDGETEMPpad. PressV to set the freezer and
refrigerator temperatures to the preset points of O°F(-18°C)
for the freezer and 57°F(5°C)for the refrigerator.
When the unit isturned back on, itwill take upto 24hours
to stabilize.
LCD Models: Units
TheLCDmodels are shipped from the factory with default
settings of Englishunits.
Tochange to Metric units, select:
Home>Options>Information and Settings>Settings>Units
Metric/English>Hetric.
Tochange back to Englishunits repeat the above steps and
select Englishat the final step.
NOTE:Thehelp screen has default setting for USand Canada
customers. If you need replacement parts, contact your local
distributor.
Page 5

About the temperature controls - GE,Monogram Models.
The unit will have one of the temperature controls shown below:
Internal Temperature r
Controls
External Set Point
Controls (0-9)
GE Models
_°'deO $e,P_int. CC°]deo
Adjust Temperature
0 is Off/5 is Normal / 9 is Coldest
The temperature controls are preset in the factors at 5 for both the refrigerator and
freezer compartments.
To adjust the set point temperature, press the WARMER or COLDER button on either the
Freezer or Refrigerator side. The set point light will come on. Press WARMER or COLDER
until the desired setting is reached.
Several adjustments may be required. Each time you adjust controls, allow 2z4 hours
after each adjustment for the refrigerator to reach the setting you have selected.
Setting either or both controls to 0 stops cooling in both the freezer and refrigerator
compartments, but does not shut off electrical power to the refrigerator.
Control settings will vary based on personal preferences, usage and operating
conditions and may require more then one adjustment.
NOTE: The refrigerator is shipped with protective film covering the temperature controls.
If this film was not removed during installation, remove it now.
Ambient temperature limits
This refrigerator is designed to operate in ambient temperatures
specified by its Temperature Class,which is marked on the rating plate.
Temperature Sgmbol Ambient Temperature
Class Maximum Minimum
Extended-
Temperate
Temperate
Subtropical
Tropical
SN
N
ST
T
52°C
52°C
58°C
45 °C
!O°C
!6°C
!6°C
!6°C
NOTE:Internal temperature may be affected by such factors as the location of the refrigerator,
ambient temperature and frequency of door openings. Adjust temperature controls as required
to compensate for these factors.
Page 6

About SetFeatures.
This pad isusedto selectthe following
featu res:TurboCool,Quick Ice,Door Alarm
through all of the available features and then
About TurboCooU"
TurboCool
!6
when putting awag warm leftovers.It can also
to approximatelg 34°F(1°C),then it will cgcle
the refrigerator compartment will return
to the original setting.
and Water Filter.
PressingSETFEATURESrepeatedlg will cgcle
How it Works
TurboCoolTM rapidlg coolsthe refrigerator
compartment in order to more quicklg
coolfoods. UseTurboCoolwhen adding
a large amount offood to the refrigerator
compartment, putting awag foods after theg
have been sitting out at room temperature or
be used ifthe refrigerator has been without
power for an extended period.
Onceactivated, the compressor will turn
on immediatelg and the fans will cgcle on
and off at high speed as neededfor eight
hours.Thecompressor will continue to run
until the refrigerator compartment cools
on and off to maintain this setting. After
8 hours, or ifTurboCool ispressedagain,
exit the mode.If no keg is pressed,the mode
will exit and return to displagingfeatures
currentlg set.
How to Use
LCDModels:
Access By: Home> Options> Refrigerator
Options > TurboCool
Activate By: PressingON.
Deactivate By: PressingOFF.
Non-LCD Models:
PressSETFEATURES.The refrigerator
temperature displag will show TurbaCaal
and/or TC.PressON/OFF.
Internal Control Models:
PressTurboCaol.The TurboCool indicator
light will come on. After TurboCoolis complete,
the TurboCool indicator light will go out.
After TurboCool iscomplete, the refrigerator
compartment will return to the original setting.
NOTES:
Therefrigerator temperature cannot be changed
during TurboCool.
Thefreezertemperature is not affected during
TurboCool.
About
CiimateKeeper2. TM (on some models)
How it Works
TheCfimateKeeper2TM isthe industrg's
most advanced refrigeration sgstem,
deliveringoptimum temperature and
humiditg performance to keepfood garden
fresh longer and reduce freezer burn,while
maintaining efficiencg.
TheClimateKeeper2 sgstem features two
evaporators-one for the refrigerator and
one for the freezer.
This providestwo separate cooling sgstems,
and separates the airflow between the fresh
food andfreezercompartments during normal
coolingoperations.*
This ensuresthat the humiditg levelsin
the freshfood compartment are significantlg
higher than ina conventional sgstem,** allowing
fresh produce and other unsealedfoods to retain
their moisture content and freshnesslonger.
Moisturesensitivefoods such as fresh fruit,
Whenopening the refrigerator door during
TurboCool,the fans wi!!continueto runif theg
havecgcled on.
salads,rice,etc.,can now be stored on open
shelveswithout excessivemoisture loss.Dueto
the higher humiditg inthe refrigerator,gou mag
on occasion experience fog or small amounts of
moisture in the refrigerator compartment. This is
normal and mag come and go asdifferent food
loadsand environmental conditions change.
Wipe drg with a paper towel if desired.
The separateairflow sgstem minimizesthe mixing
of air between thetwo compartments, which
reducesfresh food odor transfer to improve
the taste of ice.
The ClimateKeeper2 sgstem also reduces
the number of defrosting cgcles in the freezer
evaporator,therebg reducing freezer burn.
*Freezerair isused in the CustomCool feature.
**Testingshows a higherleve!of humidity in
the FreshFoodsection in ClimateKeeper2
refrigeratorsversus conventionalunits.
Page 7
About: CustomCooL'"(on somemodels)
LCDModels Only
ExpressThaw TM
ExpressChillTM
ii i iii
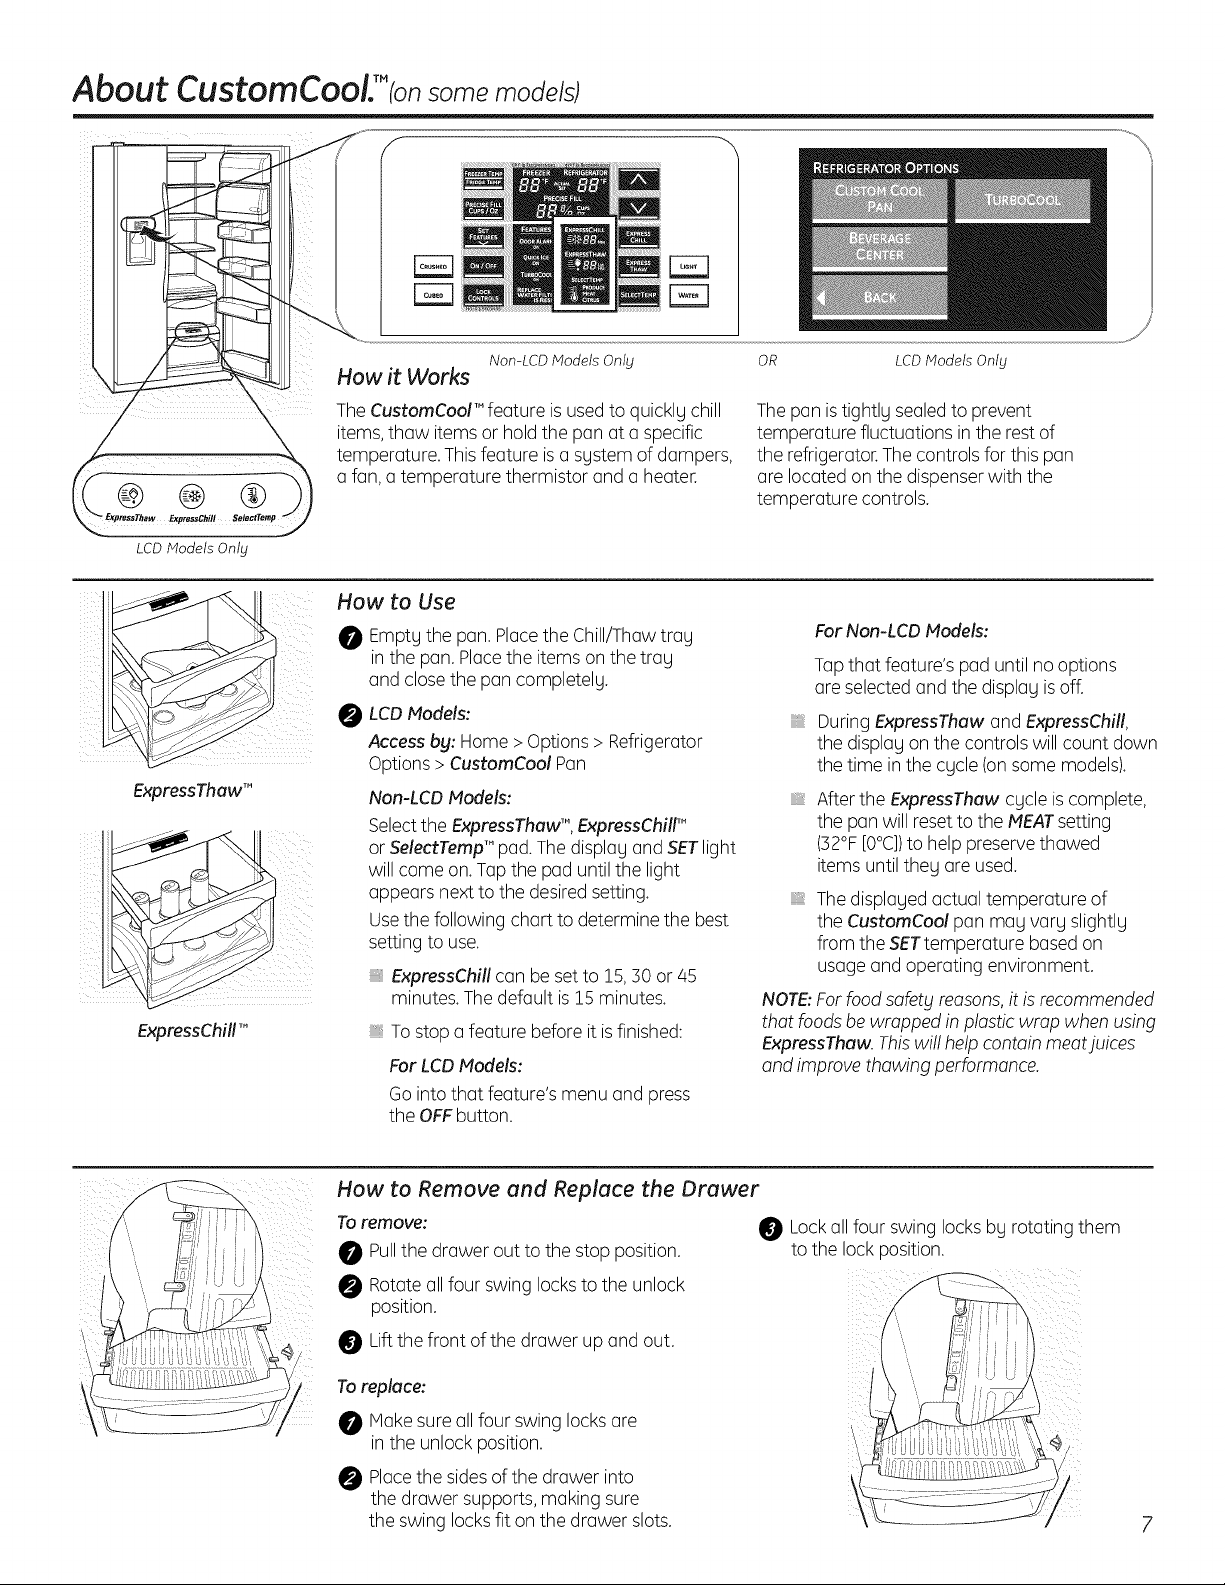
How it Works
Non-LCD Models Only
TheCustomCool'" feature is usedto quickly chill
items,thaw items or holdthe pan at a specific
temperature. Thisfeature isa system of dampers,
a fan, a temperature thermistor and a heater.
How to Use
0 Emptgthe pan. Placethe Chill/Thaw trag
Inthe pan.Placethe items on the trag
and closethe pan completely.
0 LCDModels:
Access by: Home> Options > Refrigerator
Options > CustomCool Pan
Non-LCD Models:
Selectthe ExpressThaw'",ExpressChilF
or SelectTemp'" pad. Thedisplag and SETlight
will come on. Tapthe pad until the light
appears next to the desired setting.
Usethe following chart to determine the best
setting to use.
ExpressChill can be set to !5, 50 or/45
minutes.Thedefault is!5 minutes.
Tostop afeature before it is finished:
For LCDModels:
Go into that feature's menu and press
the OFFbutton.
OR LCD Models Only
Thepan istightly sealedto prevent
temperature fluctuations in the rest of
the refrigerator.The controls for this pan
are located on the dispenserwith the
temperature controls.
For Non-LCD Models:
Tapthat feature's pad until no options
are selectedand the displag isoff.
During ExpressThaw and ExpressChill,
the displag on the controls will count down
the time in the cgcle(onsome models).
After the ExpressThaw cgcle is complete,
the pan will reset to the MEATsetting
(52°F[O°C])to help preservethawed
items until theg areused.
Thedisplaged actual temperature of
the CustomCool pan mag varg slightlg
from the SETtemperature basedon
usage and operating environment.
NOTE:Forfood safety reasons,it isrecommended
thor foods be wrapped in p!ostic wrap when using
ExpressThaw. Thiswi!! help contoin meotjuices
ond improve thowing performance.
How to Remove and Replace the Drawer
Toremove:
Pullthe drawer out to the stop position.
Rotateallfour swing locksto the unlock
position.
Liftthe front of the drawer up and out.
Toreplace:
Makesure all four swing locksare
in the unlock position.
Placethe sidesof the drawer into
the drawer supports,making sure
the swing locks fit onthe drawer slots.
Lockall four swing locksbg rotating them
to the lockposition.
Page 8
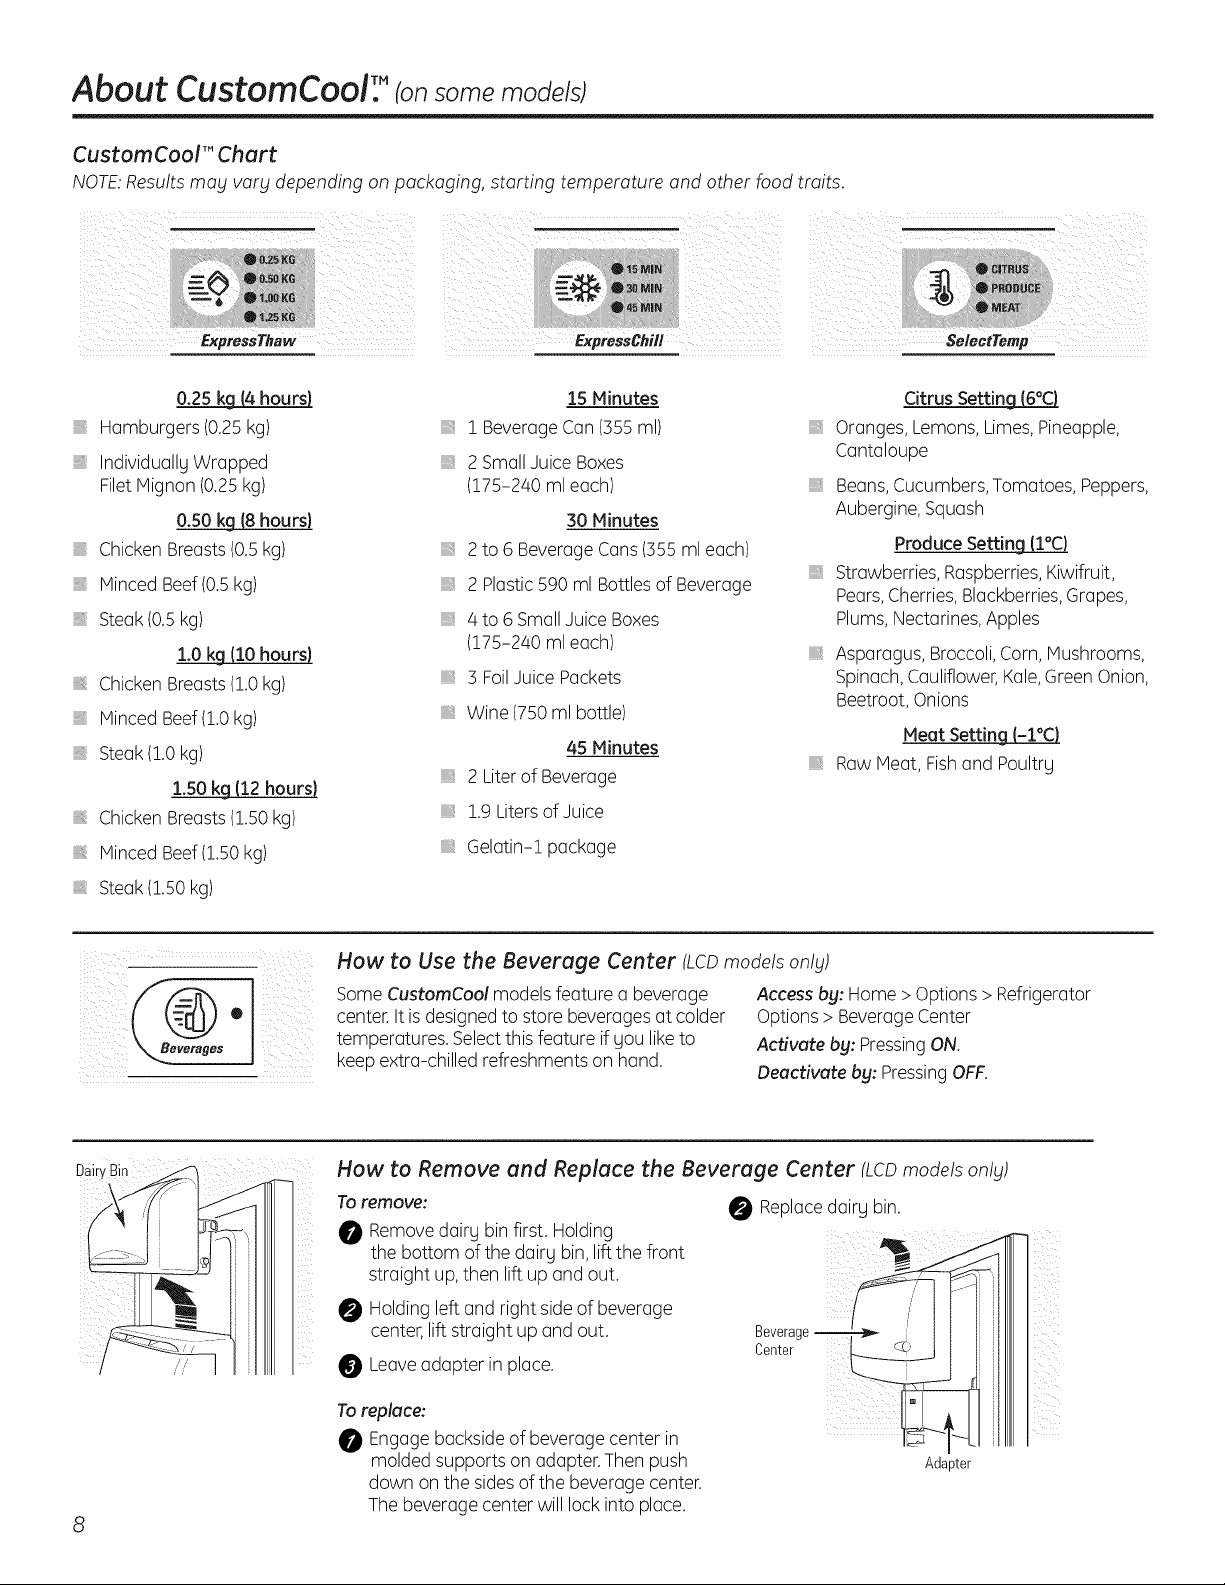
About CustomCoolY tonsome models)
CustomCool'" Chert
NOTE:Resultsmag vorg depending on packaging, starting temperature and other food traits.
o.2sk_
Hamburgers (0.25kg)
IndividuallyWrapped
FiletMignon (0.25kg)
0.50 kg (8 hours)
Chicken Breasts(0.5kg)
Minced Beef(0.5kg)
Steak (0.5kg)
1.0kg (10 hours)
Chicken Breasts(!.0 kg)
Minced Beef(1.0kg)
Steak (!.0 kg)
l.SOkg112hours)
Chicken Breasts(1.50kg)
Minced Beef(!.50 kg)
Steak (!.50 kg)
15 Minutes
1 BeverageCan(355ml)
2 SmallJuice Boxes
(175-240 mleach)
30 Minutes
2to 6 BeverageCans(355ml each)
2 Plastic590ml Bottlesof Beverage
,, 4 to 6SmallJuice Boxes
(175-240 mleach)
3 FoilJuice Packets
,, Wine (750 ml bottle)
45 Minutes
2 Literof Beverage
1.9Litersof Juice
Gelatin-! package
How to Use the Beverage Center (LCDmodels only)
SomeCustomCool models feature a beverage
center.It isdesignedto store beverages at colder
temperatures. Selectthis feature if you liketo
keepextra-chilled refreshments on hand.
,, Strawberries, Raspberries,Kiwifruit,
Access bg: Home > Options > Refrigerator
Options > Beverage Center
Activate bg: Pressing ON.
Deactivate bg: Pressing OFF.
Citrus Settin_
Oranges, Lemons,Limes,Pineapple,
Cantaloupe
Beans,Cucumbers,Tomatoes, Peppers,
Aubergine,Squash
Produce Setting (l°C)
Pears,Cherries,Blackberries,Grapes,
Plums,Nectarines,Apples
Asparagus, Broccoli,Corn,Mushrooms,
Spinach,Cauliflower,Kale,GreenOnion,
Beetroot,Onions
Meat Settin_
Raw Meat, Fishand Poultry
DakyBin
How to Remove end Replace the Beverage Center (LCDmodels onlg)
To remove:
0 Removedairy bin first. Holding
the bottom of the dairy bin,lift the front
straight up,then lift up and out.
i
// /'
0 Holdingleft and right sideof beverage
center,lift straight upand out.
Leaveadapter in place.
To replace:
_! Engagebackside of beverage center in
molded supports onadapter.Then push
down onthe sidesof the beverage center.
Thebeverage center will lockinto place.
Replacedairy bin,
Beverage I itll I
Center ] itll I
]i_ ill I
Adz ,ter
Page 9

About the water filter.
l
II
RESETWATERFILTER
HOLD3 SECS
,L
Place the top of the cartridge up
inside the cartridge holder and
slowly turn it to the right.
Water Filter Cartridge
Thewater filtercartridge islocated inthe back upper
rightcorneroftherefrigeratorcompartment.
When to Replace the Filter
LCDModels:
Apop-up screen will appear on the LCDscreen
to remind gou to replace the water filter. Youcan
check the status ofthe water filter manuallU.
Access By: Home > Options > DispenserOptions >
ResetWater Filter
Non-LCD Models/External Controls:
Thereisa replacementindicatorlightforthewater
filtercartridgeonthedispenser.Thislightwillturn
orangeto tellgouthat Uouneedto replace
thefiltersoon.
Thefiltercartridgeshouldbereplacedwhenthe
replacementindicatorlightturnsredor iftheflow
ofwaterto thedispenseror icemakerdecreases.
Removing the Filter Cartridge
Ifgou are replacing the cartridge,first remove the old
one bg slowlgturning itto the left.Do not pulldown on
the cartridge. Asmall amount ofwater mag dripdown.
/nsta//ing the Filter Cartridge
0 Thereisanadapterattachedto thetop
ofthe newfiltercartridge.
Theadaptermustberemovedbeforeinstalling
thecartridge.Toremovethe adapter,turn itto
theleftabout1//4turn.
0 Fillthereplacementcartridgewithwater
fromthetap to allowforbetterflowfrom
thedispenserimmediatelgafterinstallation.
Lineupthe arrowonthecartridgeand
@
thecartridgeholder.Placethetopof thenew
cartridgeupinsidetheholder.Do notpush
it upintothe holder.
Slowlgturnit tothe rightuntilthefiltercartridge
O
stops.DONOTOVERTIGHTEN.As£touturn
thecartridge,it willautomaticallUraiseitselfinto
position.Thecartridgewillrotateabout 1/2turn.
Runwater from the dispenserfor 5minutes
to clear the sustem and prevent sputtering.
O LCDModels:
PressFILTERREPLACEDbutton to confirm
replacement.
Non-LCD Models:
Pressthe SETFEATURESpad until REPLACE
WATERFILTERislit. Pressand hold the ON/OFF
pad far 5 seconds. WATERFILTERISRESETwill
show in the window.
NOTE:Anewlyinstalledwaterfiltercartridgemay
cause water tospurt fromthe dispenser.
Filter Bypass Plug
Youmust usethefilterbgpassplugwhena
replacementfiltercartridgeisnot available.
Thedispenserandtheicemakerwill notoperate
withoutthefilterorfilter bupassplug.
Replacement Filters:
Toorderadditional filter cartridges,contactyour
localdistributor.
About the refrigerator doors.
Refrigerator Doors
The refrigerator doors mag feel different than
the ones gou are usedto. Thespecialdoor
opening/closing feature makes surethe doors
close all the wag and are securelusealed.
When opening and closingthe door you will
notice a stop position.Ifthe door is opened
past this stop point,the doorwill remain open
to allow you to load and unload food more easily.
When the door is only partially open,it will
automatically close.
The resistance you feel atthe stop position will
be reduced as the door isloaded with food.
When the door is onlg partiallg
open it will automaticallg close.
Begond this stop the door will
stag open.
Page 10

About the shelves and bins.
Not all features are on all models.
Refrigerator Door Bins and Freezer Door Tilt-Out Bins
Refrigerator bin
Freezer tilt-out bin
Bottle
retainer
Large Bins
The larger refrigerator door bins and freezer
tilt-out door bins are adjustable.
Toremove: Lift the front of the bin straight up,
then lift up and out.
Toreplace or relocate: Engagethe back side
of the bin in the molded supports of the door.
Then push down on the front of the bin.
Binwill lock in place.
Small Bins
Toremove: Lift the front of the bin straight up
then out.
Toreplace: Positionthe binabove the
rectangular molded supports on the door.
Then slidethe bin down onto the support
to lockit in place.
Bottle Retainer
The bottle retainers are adjustable and keep tall
itemsfrom tipping over.
Toremove: Lift the front of the retainer straight
up,then lift it up.
Toreplace or relocate: Engagethe back
of the bottle retainer in the molded supports
on the door.Thenpush down onthe front
of the bottle retainer.
Thesnugger helps prevent tipping, spillingor
slidingof small items stored on the door shelf.
Placea finger on either sideof the snugger
near the rear and move it back and forth
to fit your needs.
10
Page 11

ii; i:iiiiii¸i! i
Presstab and pull shelf
forward to remove
Slide-Out Spillproof Shelf
The slide-out spillproof shelf allows you to reach
items stored behind others.The special edges
are designedto help prevent spillsfrom dripping
ii ili i!i
to lower shelves.
Toremove:
Slidethe shelfout until it reachesthe stop,
then pressdown onthe tab and slidethe shelf
straight out.
Toreplece or relocute:
Linethe shelfup with the supports and slideit
into place.Theshelf can be repositioned when
the door is at 90°or more.To repositionthe shelf,
slidethe shelf past the stops and angle
downward. Slideshelfdown to the desired
QuickSpece T"Shelf
This shelf splitsin half and slides under itself
for storage of tall items on the shelf below.
This shelf can be removedand replaced or
relocatedjust likeSlide-OutSpillproof Shelves.
position,line up with the supports and slide
into place.
Make sure _jou push the shelves a!! the wag
back in before gou close the door.
On some models,this shelf can not be used
in the lowest position.
Removable Beverage Rack
The beverage rack isdesignedto hold
a bottle on its side.It can be attached
to any slide-outshelf.
Door Beverage Reck Ion some models)
This rack holds up to 5 cans.
The rack hangs from the sidesof the
dairy bin.
Toremove:
Empty the wine/beverage rack.
Holdingthe bottom of the dairy bin,
lift the front straight up,then lift up
and out.
Toinstull:
0 Lineup the large part of the slotson
the top of the rack with the tabs under
the shelf.
Thenslide the rack back to lock it
in place.
Torepluce:
Reattachthe rackto the sidesof the bin.
Engagethe backsideof the bin in the
molded supports on the door.Then push
down on the front of the bin.The bin will
lock into place.
Todetach the rackfrom the dairy bin,
@
pull the rack's sidewires out of the holes
on each side ofthe dairy bin.
11
Page 12

About the shelves and bins.
Not all features are on all models.
Divide[
iii ii
i i
!_i_i_iiii__i
;¸¸¸:i : :: / j i
Deep Freezer Baskets
Toremove, push the basket all the wag to the
back of the freezer.Liftup until the back pinsare
disengaged. Liftthe entire basket up and pull out.
The divider can be used to organize food
packages. For large packages, simply fold
down the divider.
Hake sure you push the baskets a!!the wag
back in before Souclose the door.
Freezer Baskets
To remove, slide outto the stop position, liftthe
front past the stop position and slide out.
Hake sure you push the baskets a!!the way
back in before Souclose the door.
Slide-Out Freezer Shelves
To remove, slide out to the stop position, liftthe
front past the stop position and slide out.
WARNING: Poor performance may occur
if freezer baskets are not used. Storage of
items in the freezer without using baskets
mag result in poor temperature performance
due to restrictions of air flow within the
freezer compartment.
WARNING: Poor performance may occur
if freezer baskets are not used. Storage of
items in the freezer without using baskets
mog result in poor temperature performance
due to restrictions of air flow within the
freezer compartment.
Hake sure gou push the shelves a!! the way
back in before Sou close the door.
12
Fixed Freezer Shelves
Thereare two tgpes offixed freezer shelves.
Toremove this type of shelf:
Lift the shelf up at the left side.
Bring the shelf out.
Toremove this type of shelfi
Lift up the left sideof the shelfandslide it
left into the center ofthe shelfsupports.
Rotatethe right sideof the shelfup and
out of the shelfsupports.
Page 13

About the freezer compartment.
Loading the Freezer Compartment
Load so that at least 15 mm of space remains
clear between stacks of packages and 15 mm
to 25 mm of space between the top of ang
stack and any shelf or basket above it.
Packages mag hang over the front of shelves
but must remain 15 mm from doors.
Foodto be frozen must not be placed
in direct contact with food in storage.
If food is to be frozen everg dag, it mag
be necessarg to reduce the quantitg to
be frozen.
If a quantitg of food needs to be frozen,
set the freezer control to its coldest setting.
After the food is frozen, reset the freezer
control to its initial position.
Food is most quicklg frozen on the middle
three shelves of the freezer compartment
and most slowlg in the freezer door shelves.
Do not store commerciallg quick-frozen
food longer than the time recommended
bg the food manufacturers.
If the power to the appliance is shut off
for an extended time or if the refrigerating
sgstem fails, do not open the doors unless
absolutelg necessarg. When it is necessarg,
close them as quicklg as possible so the
frozen food will stag frozen as long as
possible.
,,The freezer door storage shelves marked
with a two-star label are onlg appropriate
for the storage of previouslg frozen food.
Effervescent drinks should not be stored
in the freezer compartment.
Freezer Performance
This Refrigerator/Freezer has an overall "Four Star" _ rating.
Freezer performance is classified bg star ratings defined bg ISO15502 STANDARDAND
SUMMARYBELOW:
CODE
®
FREEZING-LOAD TEMR
(FOODTEMPERATURE)
Below -ro°C.
Below -12°C.
Below -18°C.
13
Page 14

About the crispers and pans.
Not all features are on all models.
Fruit and Vegetable Crispers
Excesswater that mag accumulate inthe bottom
of the drawers should be wiped drg.
On some models the bottom drawer has
a cover that slides back asthe drawer isopened.
Thisallows full accessto the drawer.Asthe
drawer isclosed,the coverwill slide forward
into itsoriginal position.
HUMIIDNTYCONTROL
Adjustable Humidity Crispers
Slidethe control all the wag to the J
(high)setting to provide high humiditg
recommended for mostvegetables.
Convertible Meet Pun
The convertible meat pan has its own cold air
duct to allow a stream of coldair from the freezer
compartment to flow to the pan.
Thevariable temperature control regulates
the air flow from the Climate Keeper.TM
About crisper removal.
Not all features are on all models.
Crisper Removal
Thetop crispers can easilg be removed bg pulling
the drawer straight out and lifting the drawer
up and over the stop location.
If the door preventsgou from taking out the
drawers,first trg to remove the door bins.
If this doesnot offer enough clearance,the
refrigerator will need to berolled forward until
the door opens enough to slidethe drawers out.
In some cases,when gou roll the refrigerator out,
gou will need to move the refrigerator to the left
or right as gou roll it out.
Slidethe control all the wag to the _ (low)
setting to provide lower humidity levels
recommended for most fruits.
Setthe control to the _ (coldest)setting
to store fresh meats.
Setthe control to Q_ (cold)to convert
the pan to normal refrigerator temperature
and provide extra vegetable storage space.
Thecold air duct is turned off.Variable settings
between these extremes can be selected.
Toreplace the bottom crisper:
Makesure all four swing locksare
in the unlock position.
Placethe sides of the drawer into the drawer
supports, making surethe swing locksfit
on the drawer slots.
Lockall four swing locks bg rotating them
to the lock position.
14
Toremove the bottom crisper:
0 Pullthe drawer out to the stopposition.
0 Rotateall four swinglocksto the unlock
position.
0 Liftthe front of the drawer up and out.
Page 15

About the automatic icemaker.
A newlg-installed refrigerator may take 12 to 24 hours to begin making ice.
Power
switch
Icemaker
Automatic Icemaker
The icemakerwill produce sevencubes
per cycle-approximately 100-!30 cubes
in a 24-hour period, depending onfreezer
compartment temperature, room temperature,
number of door openings and other use
conditions.
Toaccess the icemaker: Pullthe shelf above
Green, the icedrawer straight out. Always be sure
PowerLight _rArm to replacethe shelf.
If the refrigerator isoperated before the water
.... connection ismade to the icemaker,set the
power switch inthe O position.
When the refrigerator has been connected
to the water supply, set the power switch
to the I position.
Youwill hear a buzzingsound each time
the icemakerfillswith water.
Theicemaker willfillwith water when it cools
to - 10°C.Anewly-installedrefrigeratormay take
12to 2/4hoursto begin making icecubes.
Pull the upper freezer shelf straight
out to access the icemaker. Always
be sure to replace the shelf The
shelf can be used for storage.
Throw away the first few batches of ice to allow
the water line to clear.
Besure nothing interfereswith the sweep
of the feelerarm.
-& WARNING:Connectto potable
water supply only. Installation of the icemaker
must be done bg a qualified service technician.
Special note about ClimateKeeper2 T"dispenser
models:
Dispenser models have a tilt-out ice bin.
The bin can be tilted out asshown in
the illustrations, and it will hold itself up while
you take ice out or turn the icemaker power
switch on and off. Besure to put the bin back
in place before closing the door.
_To restoreyour icelevelfrom an empty bucket
stage,the following stepsare recommended:
O 12 hours after the first batch of icehasfallen
intothe bin,dispense 3 to 4 cubes.
O After an additional 6hours,dispense3 to/4
cubes again.
These stepswill restore your ice level
in the shortest amount of time.
On dispenser models with a tilt-out ice bin, to
access ice or reach the power switch:
When the bin fills to the levelof the feelerarm,
the icemaker will stop producing ice. It isnormal
for severalcubes to bejoined together.If ice is
not usedfrequently, old ice cubes will become
cloudy,taste stale and shrink.
If icecubesget stuckin the icemaker,the green
power lightwill blink.Tocorrect this, set the
power switch to O and remove the cubes.
Setthe power switch to I to restart the icemaker.
After the icemaker hasbeenturned onagain,
there will bea delay of about/45 minutes before
the icemaker resumes operation.
NOTE:Inhomes with !ower-than-avemge water
pressure,gou mag hear the icemaker cgcle
multiple times when making onebatch of ice.
Ice Storage Drawer
Toaccess ice, pull the drawer forward.
Toremove:
Setthe icemaker power switch to the O(off]
position.Pullthe drawer straight out and
then lift past the stop position.
Toreplace:
When replacing the drawer, be sureto press
ii
itfirmly into place. If it does not go all the way
back,remove it and rotate the drive mechanism
1//4turn. Then pushthe drawer back again.
o Lift the bin, then pull it forward until the bin stops.
o ower the bin to access ice or reach the power
switch.
NOTE: In order to take full advantage of the tilt-out ice bin,
onlg store items on the shelf below the ice bin that are no
taller than the lowest point on the bin.
Drive
Mechanism
15
Page 16

About the ice and water dispenser, tonsome models)
To Use the Dispenser
............ ,,,.
SpillShelf
SelectCUBED,CRUSHEDorWATER.
Pressthe glassgentlgagainstthetop
ofthe dispensercradle.
Thespillshelfisnot self-draining.Toreducewater
spotting,the shelfanditsgrilleshouldbecleaned
regularlg.
Ifnowaterisdispensedwhentherefrigeratorisfirst
installed,therema_tbeairinthewaterlines_tstem.
Pressthe dispenserarmforat leasttwominutesto
removetrappedairfromthewaterlineandtofill the
watersystem.Toflushoutimpuritiesin thewaterline,
throwawaitthefirstsixglassfulsofwater.
CAUTION:Neverputfingersoranyotherobjectsinto
theicecrusherdischargeopening.
Locking the Dispenser
PresstheLOCKorLOCK
toIockthedispenserandcontrol
panelTounlock,pressandhold
CONTROLS pad for5 seconds
the pad again for 5seconds.
LOCKCONTROL
HOLD3 SECS
DispenserLight
Door Alarm
!O0_RA)L)A)R! than3minutes.Thealarmwill
LCDModels:
Access By: Home > Options > Information and Settings
>Settings > Door Alarm
Access By: PressingON.
Deactivate By: PressingOFF.
Non-LCDModels:
Pressthe SETFEATURESpadonceandDOORALARM
willblink.PressON/OFFandthe dooralarmwillbeset
andtheiconwillturn solid.PressON/OFFagaintoturn
thealarmoff.
TheLIGHTpadturnsthe night
, _ light inthedispenseronandoff.
Thelightalsocomeson whenthe
d spensercradlepressedOn
somemodels,ifthislightburns
LIGHT out, itshouldbereplacedwitha
6watt 12Vmaximumbulb.
UseDoorAlarmtosoundif
eitherdoorisopenformore
stoponcethedoorisclosed.
ForLCDmodels,apopupscreen
willappear.Thealarmcan be
silencedbUtouchingtheLCD
screen.
Quick Ice
Whengouneedtospeedupice
• production,usetheQuickIce
_ feature.Whilethisfeatureis
turnedon,thefreezerfanruns
QUICK ICE thefeatureisturnedOFF.During
theintegratedicefeaturesgstemrequireatFIRSTUSE
at leasthalfan8oz.glassof iceto bedispensedeverU
6to 12hours.Thiswillhelptheicemakerfillthebucket
properlUsothatdispensingisbetter.
continuouslUfor48hours,oruntil
thisperiod,iceproductionwill
increaseupto/40%.Hodelswith
Howto Use
LCDModels:
Accessby: Home>Options> FreezerOptions>
QuickIce
Activateby: PressingON.
Deactivateby:PressingOFF.
Non-LCDModels:
Pressthe SETFEATURESpadtwiceand QUICKICEwill
blink.PressON/OFFtoturnthe featureon,thenagain
to turnit off.
J6
Page 17

Precise Fill (on some models)
Thiswaterdispenserisequippedwitha featurecalled
"precisefill;'Thisfeatureallowsyouto chooseaprecise
amountofwater(cupsorounces)thatyouwouldlike
dispensed.Pintsand LitersarealsoavailableforLCD
models.
LCDModels
Access By: Home > Options > DispenserOptions >
PreciseFill> SetAmount
Activate By: Usingthe arrow buttons to select
the desired amount. PressMOREUNITSto select
between CUPS,OUNCES,PINTSor LITERS.
Non-LCDNodels
0 PressthePRECISEFILLCUPS/OZpad.TheWATER
padwilllightandtheCRUSHEDand CUBEDice
padswillturnoff.Thelastunitusedwillbe
displaged.
PressthePRECISEFILLpadagainto toggle
betweencupsandounces.
Ifyou selectedOUNCES,pressthe A or V padto
selectthenumberof ouncesyouwould liketohave
dispensedbetween2-99ounces.Thedefaultis
8 ounces.
Important Facts About Your Dispenser
, Donot add icefrom traus or bagsto the storage
drawer.It maUnot crushor dispensewell.
Avoidoverfillingglasswithiceand useof narrow
glasses.Backed-upice canjam the chute or
causethe door in the chuteto freezeshut.
If iceisblockingthe chute,pokeit through
with a woodenspoon.
, Beveragesandfoods shouldnot bequick-chilled
inthe icestoragedrawer.Cans,bottlesor food
packagesinthe storagedrawer maUcause
the icemakeror augertojam.
Ifyou selectedCUPS,presstheA or V padto select
theamountyouwouldliketo havedispensed.They
aredisplauedas0.25,0.3&0.5,0.66and0.75,withthe
highestamountbeing9.75cups.Thedefaultis 1cup.
Forliters,theamountsaredisplauedas0.05to 2.25
inincrementsof 0.05.
Pressthecupagainstthecradleandwaterwill
begindispensing.ItwillautomaticallUstopwhen
theamountsethasbeendispensed.Thedisplay
willshowthe amountofwaterdispensed,beep,
thenresetafter5seconds.
NOTE:Donot leavethedispenserunattendedwhen
waterisbeingdispensed.
If youwouldliketo stopdispensingwater
beforethespecifiedamounthasbeendispensed,
just removethecupfromthecradle.ThedisplaU
willshowthe amountthat hasbeendispensed
for5seconds.Ifthecupswitchispressedagain
withinthat time,thedispenserwillcontinueup
tothe setamount.Ifnot,thedisplaUwillreturn
tothe setamount.
, Tokeepdispensedice from missingthe glass,
putthe glasscloseto,but nottouching,
the dispenseropening.
, Somecrushedice may be dispensedeven
though you selectedCUBED.Thishappens
occasionallywhenafew cubesaccidentallU
getdirectedto the crusher.
, Aftercrushedice isdispensed,somewater maU
dripfrom the chute.
, Sometimesasmall moundof snowwill form on
the door in the icechute.Thisconditionisnormal
and usuallyoccurswhen Uouhavedispensed
crushedicerepeatedlU.Thesnowwill eventuallU
evaporate.
Care and cleaning of the refrigerator.
Cleaning the Outside
Thedispenserdrip area,beneaththegrille,shouldbe
wipeddry.Waterleftinthisareamayleavedeposits.
Removethedepositsby addingundilutedvinegarto
Dispenser drip area.
thewell.Soakuntilthedepositsdisappearor become
looseenoughtorinseaway.
Thedispensercradle.Beforecleaning,lockthe
dispenserbg pressingandholdingthe LOCKor LOCK
CONTROLSpadfor 5 seconds.Cleanwithwarmwater
and bakingsodasolution-abouta tablespoon(15ml)
of bakingsodato aquart (1liter)ofwater.Rinse
thoroughlyandwipedry.
Thedoorhandlesandtrim. Cleanwitha cloth
dampenedwithsoapywater.Drywitha softcloth.
Thestainlesssteelpanelsanddoor handles
(onsomemodels)canbecleanedwith a commercially
availablestainlesssteelcleaner.Aspray-onstainless
steelcleanerworksbest.
Donot useappliancewaxorpolishonthe stainless
steel.
Keepthe outsideclean.Wipewithacleanclothlightly
dampenedwithkitchenappliancewaxor mildliquid
dishdetergent.Dryandpolishwitha clean,softcloth.
Donot wipethe refrigeratorwith a soileddish
clothor wet towel.Thesemabtleavea residue
that canerodethepaint. Donotusescouringpads,
powderedcleaners,bleachor cleanerscontaining
bleachbecausetheseproductsconscratch and
weakenthepoint finish. "17
Page 18

Care and cleaning of the refrigerator.
Cleaning the Inside
Tohelp prevent odors, leave an open box
of baking soda in the fresh food and freezer
compartments.
Unplug the refrigerator before cleaning.
If this is not practical, wring excessmoisture out
of sponge or cloth when cleaning around
switches, lights or controls.
Usewarm water and baking sodasolution-
about atablespoon (15ml) of baking soda
to aquart (1liter)of water.This both cleans
and neutralizes odors. Rinseand wipe drg.
Behind the Refrigerator
Becareful when moving the refrigerator away
from the wall. Alltupes of floor coverings can be
damaged, particularly cushioned coveringsand
those with embossedsurfaces.
Useof ang cleaning solution other than that
which is recommended, especiallg those that
contain petroleum distillates, can crack or
damage the interior of the refrigerator.
Avoid cleaning cold glass shelves with hot
water because the extreme temperature
difference mag cause them to break. Handle
glass shelves careful!_j.Bumping tempered
glass can cause it to shatter.
Do not wash an_j plastic refrigerator parts
in the dishwasher.
Thechi!!/thaw trag is dishwasher safe.
When pushing the refrigerator back, make sure
you don't rol! over the power cord or icemaker
supplg line.
Pullthe refrigerator straight out and return
it to position by pushing it straight in. Moving
the refrigerator in a side direction may result
in damage to the floor covering or refrigerator.
Preparing for Vacation
Forlong vacationsor absences,remove food
and unplug the refrigerator.Cleanthe interior
with a baking soda solution of 15 ml of baking
soda to I liter of water. Leavethe doors open.
Setthe icemaker power switch to the 0 position
and shut offthe water supply to the refrigerator.
Preparing to Move
Secureall looseitems such as shelvesand
drawers by taping them securely in place
to preventdamage.
When using a hand truck to move
the refrigerator,do not restthe front or back
of the refrigerator against the hand truck.
This could damage the refrigerator. Handle
only from the sidesof the refrigerator.
If the temperature can drop belowfreezing,
have a qualified servicer drain the water supply
system to preventseriousproperty damage
due to flooding.
if8
Be sure the refrigerator stags in an upright
position during moving.
Page 19

Replacing the light bulbs.
Setting the controls to 0 (off) does not remove power to the light circuit.
Yourlight shield willlook like Refrigerator Compartment--Upper Light
one of the following:
OR
Pocket
Unplug the refrigerator.
0
Thebulbs are located at the top of
@
the compartment, insidethe light shield.
On some models,a screw at the front of
the light shieldwill haveto be removed.
On other models,the screw islocated in the
pocket locatedat the back of the light shield.
Toremove the light shield,on some models,
@
press in on the tabs on the sides of the shield
and slide forward and out. Onother models,
just slidethe shieldforward and out.
After replacing the bulb with an appliance
@
bulb of the same or lower wattage, replace
the light shieldand screws (onsome models).
When replacingthe light shield,make sure
that the tabs at the back of the shield fit
intothe slotsat the backof the light shield
housing.
0 Plugthe refrigerator back in.
Refrigerator Compartment--Lower Light
This fight is located above the top drawer.
Unplugthe refrigerator.
Removethe convertible meat drawer control
knob bgpullingstraight out.
Liftthe light shield up and pull it out.
Freezer Compartment
Unplugthe refrigerator.
Removethe shelfjust above the light shield.
(Theshelf will be easierto removeif it is
emptied first.) On some models,a screw
at the top of the light shieldwill need to
be removed.
Toremove the light shield,press in
on the sides,and lift up and out.
Dispenser
After replacing the bulb with an appliance
bulb of the same or lower wattage, replace
the shieldand the knob.
Plug the refrigerator back in.
Replace the bulb with an appliance bulb
@
of the same or lower wattage, and reinstall
the light shield. When reinstalling the light
shield, make sure the top tabs snap
securelg into place. Replace the screw
(on some models).
Reinstall the shelf and plug the refrigerator
back in.
Unplugthe refrigerator.
Thebulb islocated onthe dispenser under
the control panel.Removethe light bulb
bg turning it counterclockwise.
Replace the bulb with a bulb of the same
size and wattage.
Plug the refrigerator back in.
19
Page 20

Trim kits and decorator panels.
For Built-In Stgle models
Read these instructions completely and carefullg.
Before You Begin
Some models are equipped with trim kits that allow you to install door panels.
Panels less then 6 mm thick
When installingwood pQnelslessthQn6 mm thick,gODneed to creQtea filler pQnel,such as 3 mm cQrdboQrd,thQt
will fit between the face of the door and the wood pQnel.Ifyou ore installing the pre-cut decorator pQnels,pre-cut
filler pQnelsare included in the kit.The combined thickness of the decorator or wood pQneland the filler pQnelshould
be 6 mm.
Panels6mmthickorless
6mmmax
19 mm or Raised Panel
A raised pQneldesign screwed or glued to a 6 mm thick bQcking,ora 19 mm routed boQrdcan be used.
The raisedportion ofthe pQnelmust be fabricated to permit cleQrancesof at leQst5.1cm from the hQndle
sidefor fingertip cleQrance.
PQnelsthicker thQn6mm, up to 19mm max,will require thQt the outer 8 mm of pQnelperimeter be no thicker
thQn6 mm.
Weightlimitations for custom panels:
RefrigeratorDoor 17 kg max.
FreezerDoor !5 kg max.
Panelsthickerthan6 rnrn
6 mmThick
Racking
J
5.1cm
Clearance
6 mmmax
19mm
HandleSide
Appearance
Panel
19mm
Refrigerator
Door
20
Page 21

Dimensions for Custom Wood Panels
Freezer Panel
Without Dispenser
Cut Cut
out .-_ _-3 mm out --_
t t
8 mm 8 mm
170.9cm
FRONT
36.8cm -_
Freezer Panel
With Dispenser Refrigerator Panel
t_-3 mm
i
i
3mm--_
, I.
|
|
-[
46.4cm
1
170.9cm
FRONT
36.8cm-_,
86.4cm
1
FRONT
49.5cm
Cut
out
t
8 mm
Theareas at the top of the panelsneed to be cut out of the panels.
21
Page 22

Inserting the door panels.
Read these instructions completely and carefully.
0 Insert the Freezer Panel and Refrigerator Panel.
Carefully pushthe freezer panel in until it slidesinto the If your model hasa dispenser,this step only applies
slot behind the door handle. Pushthe filler panel (required to the refrigerator paneland top freezer panel.
with some door panels)in behind the decorator panel.
Repeatfor refrigerator panel.
0 Insert the Bottom Freezer Panel (on dispenser models).
Carefully pushthe panel inuntil it slidesinto the slot
behind the door handle.Pushthe filler panel (required
with some door panels)in behind the decorator panel.
Attach the Top Trim on the Freezer and Refrigerator Doors.
TheTopTrim can be found insidethe refrigerator of each door.Hand tighten only. Makesure that the top
compartment, of each panelfits snugly behindthe lipof the Top Trim.
With a T-20Torxdriver,attach the TopTrim,using
two screws on each Top Trim piece,to the top
SideTrim
Cut-Out
SideTrim
22
Page 23

Install the Side Trim.
O
Thesepieces are tucked insidethe refrigerator
door handle.
Do not remove the protective film on the outside
of the SideTrim until the Side Trimis insto!led.
Fitthe bottom of the SideTrim under the Bottom Trim
as illustrated.
opTrim
Holdthe SideTrim against the front face of the decorator
panelsand fit the SideTrim underthe Top Trim.Make
surethe SideTrimisfitted correctlg and that gou
are satisfied with the appearance of all the parts.
23
Page 24

Removing and replacing the doors.
When installing or moving the refrigerator, the doors mag need to be removed in order to fit the refrigerator through
a doorwa_t.
Removing the Doors
Make sure the doors are closed and the refrigerator
is unplugged.
Disconnect water fine and wiring harness.
0
Near the lower hinge on the freezer side, push in on
the collars at each end of the coupling, and pull the water
linetubing from the coupling.Also,disconnect wiring
harness.Pullthe water line and the harnessthrough
the lower rail.
Remove the hinge covers and the hinges.
0
In order to access the hinges, the hinge covers need to
be removed. Removethe cover bggrasping it on the sides,
near the backof the cover.Pushback onthe cover and
lift up at the back,then the front.
NOTE:DONOTusea screwdriver to remove the cover.BE
CAREFULnot to breakthe rear retaining tab on the hinge
cover.Removethe hingesusinga TorxT-20.
0 Removethe doors.
Carefullyrotate the door to 90°Guiding the disconnected
water lineand wiring harness,liftthe door straight up.
NOTE:Notrifting the door straight up mag damage
the bottom hinge.Placedoorson aprotectedsurface.
NOTE:Becarefu! not to pinch the water tubing and the wire
harnessat the bottom of the door.
NOTE:Donot allow the connector to contactthe floor.
Hard contact can damage the connector.See"Replacing
the Doors."
Replacing the Doors
0 Placedoors on bottom hinges.
With the door at 90° lower the door straight down onto
the bottom hinge.Carefullg closethe door.
NOTE:Not lowering the door straight down onto the bottom
hinge may damage the hinge.
NOTE:Donot a!!owthe connectorto contactthe floor.
Hard contact can damage the connector.
Replace top hinges and hinge covers.
0
Reinstallthe top hinges usingaTorxT-20. Replacethe hinge
covers.If the doors are not level,adjust the bottom right
hinge with a 7/!6" open endedwrench.
Reconnect water line and wiring harness.
@
Insertwater tubing back into coupling, making surethe
tubing ispushed far enough into the coupling so that you
no longer seethe mark on the tubing. Reconnectthe wiring
harness.
Door
HingePin
Connector
24
0 Turn on the water supplg and plug the refrigerator back in.
Page 25

I stallti
structi
I
efrigerator
Models 21,23,25,27 & 29
BEFORE YOU BEGIN
Read these instructions completelg and carefullg.
. IMPORTANT - Sovetheseinstructions
for local inspector's use.
" IMPORTANT - Observe all governing
codes and ordinances.
, Note to Installer - Be sure to leave these
instructions with the Consumer.
, Note to Consumer - Keepthese instructions
for future reference.
Skill level - Installation of this appliance requires
basic mechanical skills.
Completion time - Refrigerator Installation
15 minutes.
, Proper installation isthe responsibility of the installer.
, Product failure due to improper installation is not
covered under the Warranty.
WATER SUPPLY TO THE ICEMAKER
{ON SOMEMODELS}
If the refrigerator has an icemaker, it will have
to be connected to a cold water line. An approved
water supply kit is available at extra cost from your
local distributor.
Maximum permissible inlet water pressure-8.2 bars.
Minimum permissible inlet water pressure-2.8 bars.
Installation of the icemaker must be done bg a qualified
service technician.
CLEARANCES
Allow the following clearances for ease of installation,
proper air circulation and plumbing and electrical
connections:
• Sides 4 mm 4 mm
• Top 25 mm 25 mm
• Back 13 mm 25 mm
DIMENSIONS
A* 1733mm 1733mm 1733mm 1733mm 1733mm
B 908mm 908 mm 908 mm 908 mm 908 mm
C** 912mm 879 mm 879 mm 738mm 738mm
D 1261mm 1271mm 1271mm l156mm l156mm
E 1273mm 1255mm 1247mm 1232mm 1214mm
F 1051mm 1093mm 1099mm 989mm 986mm
G 1386mm 1381mm 1381mm 1361mm 1355mm
H 1140mm 1150mm 1149mm 1023mm 994 mm
*Height does not include hinge.
**Depth includes handle.
21' and 23' 25', 27' and 29'
29 27 25 23 21
I--i!:
II----. D
I !
T
F
REFRIGERATOR LOCATION
• Do not install the refrigerator where the temperature
will go below 16°Cbecause it will not run often enough
to maintain proper temperatures.
• Do not install the refrigerator where the temperature
will go above 37°C because it will not perform properly.
• Install it on a floor strong enough to support it fully
loaded.
25
I L
--B--
!
i 11T_H
II II II l) I
I
L
i"'" l,_,,,,,,,
Page 26

Installation Instructions
ROLLERS
The rollers have 3purposes:
mRollersadjust sothe door closeseasily when opened
about halfway. [Raisethe frontabout 5/8" (16mm)
from the floor.]
mRollersadjust sothe refrigerator is firmly positioned
on the floor and doesnot wobble.
mRollersallow you to move the refrigerator away from
the wall for cleaning.
Finalleveling adjustments should be made after
the refrigerator has been installed.
Toadjust the rollers on 25', 27' and 29' models:
mTurn the roller
adjusting screws
clockwise to raise
the refrigerator,
counterclockwise to
lower it. Usea 3/8"
hex socket or wrench,
or an adjustable
wrench. Roller adjusting screw
To adjust the rollers on 21' and 23' models:
0 Removethe base grille by opening the doors, removing
the screws at each end,and pullingit straight out.
Turnthe front roller
0
adjusting screws
clockwise to raise
the refrigerator,
counterclockwise to
lower it. Usea 3/8"
hex socket or wrench,
or an adjustable
wrench.
Roller adjusting screws
DOOR ALIGNMENT
After leveling,make surethat the refrigerator door is1/!6"
higher than the freezer door.
To align the doors, adjust the refrigerator door.
Usinga 7/16" socket wrench,turn the dooradjusting
screw to the right to raise the door,to the left to lower
it. (Anylon plug, imbedded in the threads of the pin,
prevents the pin from turning unlessa wrench is used.)
0 After one ortwo turns ofthe wrench, open and close
the refrigerator door and check the alignment at
the top of the doors.
Refrigeratordoor
_ needsto be raised.
Toremovethebasegrille,
openthedoors,remove
thescrewateachendof
thebasegrilleandthen
pullthegrillestraightout.
7/16"SocketWrench]
Thesemodels also have rear adjustable rollersso you
@
can align the refrigerator with your kitchencabinets.
Usea long-handled 5/!6" socket wrench to turn the
screws for the rear rollers-clockwise to raise the
refrigerator,counterclockwise to lower it.
Replacethe base grille.
26
Page 27

Installation Instructions
DIMENSIONS AND SPECIFICATIONS
(for Built-ln Stgle models)
oo
178.4cm
o
_, 91.4cm"_-
61cm
61cm
Water Electrical
T
L19 mmAirspace
13mmGap+6mm
(WallPlates)
63.5cm
Countertop
JL
27
Page 28

Installation Instructions
INSTALLING THE WATER LINE
BEFORE YOU BEGIN
The water line installation is not warranted by the
refrigerator or icemaker manufacturer. Follow these
recommendations carefully to minimize the risk of
expensive water damage.
Water hammer (water banging in the pipes)in house
plumbing can cause damage to refrigerator parts and
lead to water leakage or flooding. Call a qualified
plumber to correct water hammer before installing
the water supply line to the refrigerator.
To prevent burns and product damage, do not hook
up the water line to the hot water line.
If you use your refrigerator before connecting
the water line, make sure the icemaker power
switch is in the 0 loft} position.
Do not install the icemaker tubing in areas where
temperatures fall below freezing.
When using any electrical device (such as a power drill)
during installation, be sure the device is insulated or
wired in a manner to prevent the hazard of electric
shock.
All installations must be in accordance with local
plumbing code requirements.
Installation of the icemaker must be done bg
a qualified service technician.
_I_ WAR N I N G ! Connect to potable water
supply only.
CONNECT THE TUBING TO THE
REFRIGERATOR {CONT.}
Somemodelshavethe refrigerator connection at the end
of tubing located outsidethe compressorcompartment
accesscover.Onother models,the compressor
compartment accesscovermust be removedin order
to accessthe refrigerator connectionat the water valve.
_e
On models usingthe
refrigeration connection
at the water valve, remove
the plasticflexible cap.
Placethe compression nut and ferrule (sleeve)onto
the end of the tubing asshown.
Insertthe end of the tubing into the water valve
connection asfar aspossible.While holdingthe tubing,
tighten the fitting.
Fastenthe tubing intothe clamp providedto hold it in
a vertical position.Youmay needto pry open the clamp.
One of the illustrations below will look like
the connection on your icemaker.
©
i-£] CONNECT THE TUBING TO THE
REFRIGERATOR
NOTES:
• Before making the connection to the refrigerator,
be sure the refrigerator power cord is not plugged
into the wall outlet.
• We recommend installing a water filter if your
water supply has sand or particles that could clog
the screen of the refrigerator's water valve. Install
it inthe water line near the refrigerator.
28
Tubing
Clamp
Typical
Compression
Nut
Ferrule
(sleeve)
TubingClamp
Typical
CompressionNut
Ferrule
(sleeve)
RefrigeratorConnection
Reattach the access cover.
_. Tubing
Refrigerator
Connection
Tubing
Page 29

Installation Instructions
i-_ TURN THE WATER ON AND PLUG IN
THE REFRIGERATOR
Arrange the coil of tubing so that it does not vibrate
against the back of the refrigerator or against the
wall. Pushthe refrigerator back to the wall.
[_] START THE ICEMAKER
Setthe icemaker power switch to the ! position. The
icemaker will not begin to operate until it reaches its
operating temperature of -9°C or below. It will then
begin operation automatically if the icemaker power
switch is in the ! _osition.
switchj
NOTE:In lower water pressure conditions, the water
valve may turn on up to 5 times to deliver enough
water to the icemaker.
29
Page 30

Normal operating sounds.
Newer refrigerators sound different from older refrigerators.
Modem refrigerators have more features and use newer
technology.
Do gou hear what i hear? These sounds are normal.
HUMMM.,, WHIB!
-- WHOOSH,..
m The new high efficiency compressor may run faster
and longer than your old refrigerator and you may
hear a high-pitched hum or pulsating sound while
it is operating.
m Sometimes the refrigerator runsfor an extended period,
especiallywhen the doors are openedfrequently. This
means that the Frost Guard'" feature is working to
prevent freezer burn and improve food preservation.
m Youmay hear a whooshing sound when the doors close.
Thisisdueto pressureequalizing within the refrigerator.
CLICKS, POPS,
CRACKS and CHIRPS
m You may hear cracking or popping sounds when
the refrigerator is first plugged in. This happens as
the refrigerator cools to the correct temperature.
m Electronic dampers click open and closed to provide
optimal cooling and energy savings.
m The compressor may cause a clicking or chirping
sound when attempting to restart (this could take
up to 5 minutes).
m The electronic control board may cause a clicking
sound when relays activate to control refrigerator
components.
m Expansion and contraction of cooling coils during and
after defrost can cause a cracking or popping sound.
m On models with an icemaker, after an icemaking
cycle, you may hear the ice cubes dropping into
the ice bucket.
m You may hear the fans spinning at high speeds.
This happens when the refrigerator is first plugged
in, when the doors are opened frequently or when
a large amount of food is added to the refrigerator
or freezer compartments. The fans are helping to
maintain the correct temperatures.
m If either door is open for over 3 minutes, you may hear
the fans come on in order to cool the light bulbs.
m The fans change speeds in order to provide optimal
cooling and energy savings.
m You may hear the fan running after selecting one
of the CustomCool'" settings.
WATER SDUMDS
6
m The flow of refrigerant through the freezer cooling coils
may make a gurgling noise like boiling water.
m Water dropping on the defrost heater can cause
a sizzling, popping or buzzing sound during the
defrost cycle.
m A water dripping noise may occur during the defrost
cycle as ice melts from the evaporator and flows into
the drain pan.
m Closing the door may cause a gurgling sound due to
pressure equalization.
30
Page 31

Before gou call for service...
Troubleshooting Tips
Save time and moneg! Review the charts on the following
pages first and gou mag not need to call for service.
Possible Causes What To Do
Refrigerator does not Refrigerator in defrost cgcle. • Wait about 30 minutes for defrost cgcle to end.
operate Either or both controls set • Setthe controls to a temperature setting.
to O(off).
Refrigerator is unplugged. • Pushthe plug completely into the outlet.
The fuse is blown/circuit • Replacefuse or reset the breaker.
breaker is tripped.
The refrigerator is in • Unplug the refrigerator and plug it back in.
showroom mode.
Vibration or rattling Rollers need adjusting. • See Rollers.
(slight vibration
is normal)
Motor operates for long Normal when refrigerator • Wait 24 hoursfor the refrigerator to completelg
periods orcgcles on is first plugged in. cool down.
and offfrequentlg. Often occurs when large • This is normal.
(Modern refrigerators amounts of food are
with more storage placed in refrigerator.
space and a larger
freezer require more Door left open. • Checkto see ifpackage is holding door open.
operating time. Theg Hot weather or frequent • Thisis normal.
start and stop door openings.
often to maintain
eventemperaturesJ Temperature controls set • SeeAbout the controls.
at the coldest setting.
Refrigerator or freezer Temperature control not set • See About the controls.
compartment too warm cold enough.
Warm weather or frequent • Set the temperature control one step colder.
door openings. See About the controls.
Door left open. • Check to see ifpackage is holding door open.
Frost or ice crgstals Door left open. • Check to see ifpackage is holding door open.
on frozen food
(frost within package
is normal) door openings.
Divider between Automatic energg saver • Thishelps prevent condensation on the outside.
refrigerator and freezer sgstem circulates werm
compartments liquid around front edge
feels warm of freezer compartment.
Automatic icemaker Icemaker power switch • Set the power switch to the on position.
doesnot work is in the off position.
Too frequent or too long
Water supplg turned off or • SeeInstalling the water line.
not connected.
Freezer compartment too warm. • Wait 24 hoursfor the refrigerator to completelg cool down.
Piled up cubes in the storage • Levelcubes bg hand.
bin cause the icemaker
to shut off.
Ice cubes stuck in icemaker.
(Green power light on
icemaker blinking}.
• Turn off the icemaker,remove cubesand turn the
icemaker back on.
51
Page 32

Before gou call for service...
Possible Causes What To Do
Frequent "buzzing" Icemaker power switch is in the • Set the power switch to the off position. Keepingit in the on
sound on position, but the water supplg position will damage the water valve.
to the refrigerator has not been
connected.
Ice cubes have Ice storage bin needs cleaning. • Empty and wash bin. Discard old cubes.
odor/taste Foodtransmitting odor/taste • Wrap foods well.
to ice cubes.
Interior of refrigerator • SeeCareand cleaning.
needs cleaning.
Small or hollow cubes Water filter clogged. • Replacefilter cartridge with new cartridge or with plug.
Slowice cube freezing Door left open. • Checkto see ifpackage is holding door open.
Temperature control not set • SeeAbout the controls.
cold enough.
Cubedispenser does Icemaker turned off or • Turn on icemaker or water supply.
not work water supply turned off.
Ice cubes are frozen to • Removecubes.
icemaker feeler arm.
Irregular iceclumps in • Breakup with fingertip pressureand discard
storage container, remaining clumps.
• Freezermay be too warm. Adjust the freezercontrol to a colder
setting, one positionat a time, until clumps do not form.
Dispenser is LOCKED. • Pressand hold the LOCKCONTROLpad for ] seconds.
Waterhas poor Water dispenser has not been • Dispensewater until all water in system isreplenished.
taste/odor used for a long time.
Water in first glass Normal when refrigerator • Wait 24 hoursfor the refrigerator to completely
is warm is first installed, cool down.
Water dispenser has not been • Dispensewater until all water in system isreplenished.
used for a long time.
Water system has been drained. • Allow severalhours for replenishedsupply to chill.
Water dispenser does Water supply line turned • See Installing the water line.
not work off or not connected.
Water filter clogged. • Replacefilter cartridge or remove filter and install plug.
Air may be trapped in • Pressthe dispenser arm for at least two minutes.
the water system.
Dispenser is LOCKED. • Pressand hold the LOCKCONTROLpad for ] seconds.
Water spurting from Newly-installed filter cartridge. • Runwater from the dispenserfor ] minutes (about
dispenser six liters).
Water is not dispensed Water in reservoir is • Call for service.
but icemaker is working frozen.
Refrigerator control setting • Setto awarmer setting.
is too cold.
No water or ice cube Supply line or shutoff • Call a plumber.
production valve is clogged.
Water filter clogged. • Replacefilter cartridge or remove filter and install plug.
Dispenser is LOCKED. • Pressand hold the LOCKCONTROLpad for ] seconds.
52
Page 33

Possible Causes What To Do
CUBEDICEwas selected Last settingwas • A few cubeswere left inthe crusher from the previous
but CRUSHEDICE CRUSHEDICE. setting. Thisis normal.
was dispensed
Orange glow in Defrost heater ison. +Thisis normal.
the freezer
Refrigerator has odor Foods transmitting +Foodswith strong odors should be tightlg wrapped.
odor to refrigerator. +Keepan open box of baking soda in the refrigerator;
replaceeverg three months.
Interior needs cleaning. +SeeCore and cleaning.
Door not closing properly Door gasket on hinge side +Apply paraffin waxto the face of the gasket.
sticking or folding over.
A door bin is hitting a shelf +Hove the door bin up one position.
inside the refrigerator.
Moisture forms on Not unusual during +Wipe surface dry.
outside of refrigerator periods of high humiditg.
Moisture collects inside
#n humid weather, air
carries moisture into
refrigerator when doors
are openedl
Interior light does
not work
Too frequent or too
long door openings.
No power at outlet. + Replacefuse or resetthe breaker.
Light bulb burned out. +SeeRap!acingthelight bulbs.
Wateron kitchen floor or Cubesjammed in chute. + Pokeice through with a wooden spoon.
on bottom of freezer
Hot air from bottom
of refrigerator
Refrigerator never Adaptive defrost keeps +Thisis normal.The refrigerator will cgcle off after the
shuts off but the compressorrunning during door remains closedfor 2 hours.
temperatures are OK door openings.
Refrigerator beeping Door open. +Close door.
Food isn't thawing/chilling Packaging. • Increase time or re-package in plastic.
Actual temperature not Unit just plugged in. +Allow2/4 hours for sgstem to stabilize.
equal to Settemperature too +Allow 2/4hoursfor sgstemto stabilize.
Select Tamp feature's--- Refrigerator compartment
not working temperature control is set
Normal air flow cooling motor.
In the refrigeration process, it is
normal that heat be expelled in the
area under the refrigerator. Some
floor coverings are sensitive and will
discolor at these normal and safe
temperatures.
Wrong weight selected. +Select a larger weight.
Item with high fat content. +Select a larger weight.
Not using Chill/Thaw trag. + Place items on trag and allow space in between items for
WarmD°°ropenfoodforaddedlong.torefrigerator. +Allow 24 hoursfor sgstemto stabilize.
Defrost cgde is in process. +Allow 24 hours for sgstem to stabilize.
at warmest setting.
better air flow.
+Thisis normal. In order to minimizeenergg usage,the
Select Tamp feature isdisabledwhen the refrigerator
temperature control is set at the warmest setting.
55
Page 34

Special Safety Instructions for Australia and New Zealand.
(in addition to other information in Owner's Manual)
IMPORTANTSAFETYINSTRUCTIONS
To reduce the risk of personal injury or damage to property, follow basic safety precautions when using this
refrigerator, including the following:
When using any Electrical Product, basic precautions should always be followed, including the following:
READ THESE INSTRUCTIONS CAREFULLY BEFORE
USING THE REFRIGERATOR. KEEP THE INSTRUCTIONS
HANDY FOR FUTURE REFERENCE.
_IMPORTANT: Alwags operate the refrigerator
from a power source of the same Voltage,
Frequencg and Rating as indicated on the
refrigerator identification plate. Operate the
refrigerator from an Earthed (Grounded) 3 pin power
outlet fullg accessible when the refrigerator is
located in its normal operating position.
_Close supervision is necessarg when ang electrical
product is used bg or operated near children or
infirm persons; goung children should be supervised
to ensure that theg do not plag with the refrigerator.
_IMPORTANT: Do not operate the refrigerator with
a damaged Supplg cord or Plug. If it is damaged it
must be replaced bg the manufacturer, distributor
or its service agent or a similarlg qualified person in
order to avoid a hazard. Special tools are required to
replace the Supplg flexible cord.
WARNING: Avoidtheuseofextension
cords. If it is necessaru to use an extension cord,
prior to its use,make sure the extension cord is safe
to use,capable of handling the electrical load of the
product (refer to Product identification plate) and
has been checked and tested bu uour electricitu
supplier or a qualified technician.
To avoid becoming entangled in the cord, never
lag it through or along a walkwag or thoroughfare.
_Do not allow the cord to hang over the edge of
a bench top where it mag be grabbed bg children
or become entangled with the user.
54
Page 35

Installing the Water Line
For Australian and New Zealand installation, read these instructions completely and carefully.
Before You Begin
,:IMPORTANT: Government legislation and Codes
in most States and Territories of Australia
require installation by a licensed plumber.
The installation must conform to Australian
Standard AS3500.! Water supply.
_Water hammer (water bonging in the pipes)
in house plumbing con cause damage to the
refrigerator ports and lead to water leakage
or flooding. Call a qualified plumber to correct
water hammer before installing the water supply
line to the refrigerator.
Shut Off the Main Water Supply
For models fitted with an icemaker, a water supply
kit (containing flexible tubing and fittings)is supplied
with the refrigerator.
The water pressure must be between 138 and
827 kPoon models without o water filter fitted
and between 275 and 827 kPa on models with
a water filter fitted.
Turn Offthe water and open a low tap to drain
the water from the pipe.
Complying with the plumbing codes, install a suitable
branch fitting (not supplied) to the cold water supply.
Extend the branch to a suitable location adjacent
to the refrigerator when it is located in its operating
position. Terminate the branch with a shutoff valve
(not supplied).
IMPORTANT:The shut-off valve should be accessible
(such as in an adjacent cupboard, as close to the wall
as possible)when the refrigerator is in its normal
operating position.
,:To prevent burns and refrigerator damage, do not
hook up the water line to the hot water line.
If you use your refrigerator before connecting the
water line, make sure the icemaker power switch
is set to the O position.
Do not install the icemaker tubing inareas where
the temperatures fall below freezing.
If your water supply pressure is higher than 690 kPa
during the day (ifso, it may reach higher levels
at night), install a suitable Pressure limiting valve
(not supplied), after the shut-off valve, making sure
the "flow arrows" on the body of the device face
the same direction as the water flow.
If necessary, assemble a suitable fitting (not supplied)
to the up-stream end of the shutoff valve (or pressure
limiting valve) for attachment of the fitting supplied
with the water supply kit.
NOTE:PTFEtape should be used for a water tight seal
when assembling all the above fittings.
Donot turn the water supply On at this time.
55
Page 36

Special Installation Instructions for Australia and NewZealand.
Installing the Water Line(cont.)
Connecting the Tubing to the Shutoff Valve
Attach the fitting with the male thread supplied with
the water supply kit to the shutoff valve (or pressure
limiting valve, if fitted), and tighten.
NOTE:PTFEtape should be used for a water tight
seal when assembling all the above fittings.
Route the tubing through a hole drilled in the side
of the cupboard as close to the wall as possible.
Make sure there issufficient length of tubing
[approximately 2/40 cm coiled into 5 turns of
approximately 25 cm] to allow the refrigerator
to move out from the wa!! after installation.
Connecting the Tubing to the Refrigerator
Before making the connection to the refrigerator, be
sure the power is turned OFFand the power cord is
disconnected from the Power Outlet.
If your refrigerator does not include a water filter,
we recommend installing one in the water line
near the refrigerator if your water supply has sand
or particles that could clog the screen of the
refrigerator's water valve.
Remove the refrigerator access cover.
Insert and push the end of the tubing into the fitting
as far as possible.
With the free end of the tubing located in a suitable
container, turn the main water supply
On and flush out the tubing until the water is clear.
Turn Off the shutoff valve after approximately 1 litre
of water has been flushed through the tubing.
Attach the fitting with the female thread supplied
with the water supply kit to the water valve and
tighten.
Insert and push the end of the tubing into the fitting
as far as possible.
Fasten the tubing into the clamp provided to hold
it in position. You may need to pry open the clamp.
Remove the plastic flexible cap from the water valve
(refrigerator connection).
56
Page 37

Turn the Water On
Turn the water On at the shutoff valve.
Tighten any connection that leaks.
Replace the access cover and tighten all screws
(on some models).
Plug In the Refrigerator
Plug in the refrigerator to the Power Outlet
and turn On.
IMPORTANT:Always operate the Refrigerator from
a power source of the same Voltage, Frequency and
Rating as indicated on the Refrigerator Identification
Plate. Operate the Refrigerator from an Earthed
(Grounded) 5 Pin Power Outlet fully accessible when
the refrigerator is located in its normal operating
position.
Arrange the coil of tubing so that it does not
vibrate against the back of the refrigerator or
against the wall.
Start the Icemaker
Set the icemaker power switch to the I position.
The icemaker will not begin to operate until it reaches
its operating temperature of -9°¢ or below. It will
then begin operation automatically if the icemaker
power switch is in the I position.
NOTE:In lower water pressure conditions, the water
valve may turn on up to 5 times to make sure enough
water reaches the icemaker.
Pushthe refrigerator back to the wall, making sure
the power cord and the water line tubing are not
trapped, entangled or squashed bu the refrigerator
(including the wheels) or wall.
57
Page 38

Notes.
58
 Loading...