

Page 1
I stollation
I structi
White Pedestal: GFXP1308FWW
Red Pedestal: GFXP1308FRR
Metallic Carbon Pedestal: GFXP1308FMC
For Washer Models:
GFWS2500, GFWS2505, GFWS2600, GFWS2605,
GHWS3600, GHWS3605, GFWS3700 and GFWS3705
Pedestal
Instructions en fran_ais : ................ 5
Instrucciones en espaSol: ............... 9
BEFORE YOU BEGIN
Readthese instructions completely and carefully.
• IMPORTANT- Savetheseinstructionsforlocal
inspector's use.
• IMPORTANT- Observeoilgoverning codesand
ordinances.
• Note to Consumer - Keepthese instructions for future
reference.
• Completion time - 1 to 2 hours
• Proper installation isthe responsibility of the installer.
• Product failure due to improper installation is not
covered under the Warranty.
A CAUTION - Due to the size and weight
of these products, and to reduce the risk of
personal injury or damage to the product, TWO
PEOPLEARE REQUIRED FOR PROPERINSTALLATION.
° Seewasher and dryer Owner's IVlanual& Installation
Instructions for additional installation requirements and
guidelines.
For Dryer Models:
GFDS250, GFDS255, GFDS260, GFDS265, GHDS360,
GHDS365, GFDS370 and GFDS375
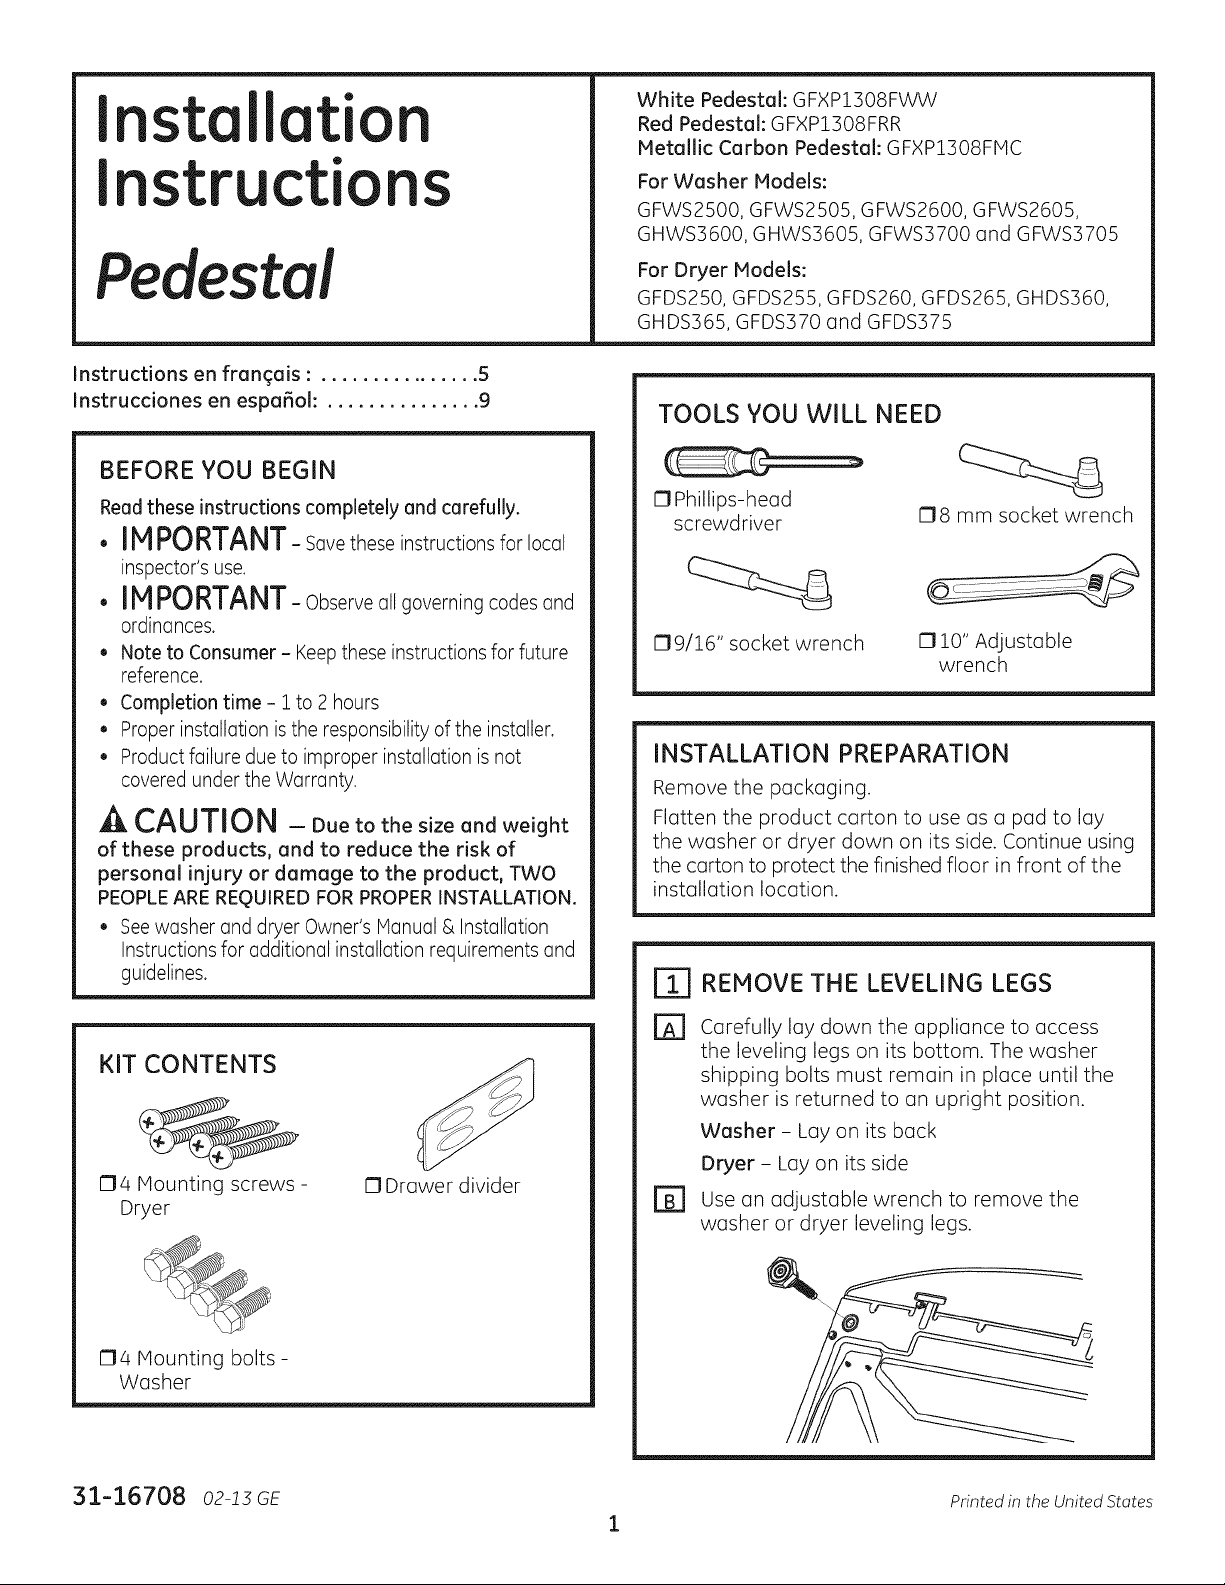
TOOLS YOU WILL NEED
17Phillips-head
screwdriver
C19/16" socket wrench C] 10" Adjustable
08 mm socket wrench
wrench
INSTALLATION PREPARATION
Remove the packaging.
Flatten the product carton to use as a pad to lay
the washer or dryer down on its side. Continue using
the carton to protect the finished floor in front of the
installation location.
| REMOVE THE LEVELING LEGS
KIT CONTENTS
04 Mounting screws -
Dryer
04 Mounting bolts-
Washer
31-16708 oz-!3 GE
[] Carefully lay down the appliance to access
the leveling legs on its bottom. The washer
shipping bolts must remain in place until the
washer is returned to an upright position.
Washer - Lay on its back
Dryer - Lay on its side
17Drawer divider
r_ use an adjustable wrench to remove the
washer or dryer leveling legs.
Printed in the United States
Page 2
Installation Instructions
PREPARE THE PEDESTAL
Pull the drawer
out as far as it
will go.
Removescrews
[]
from drawer
slides. Slide
drawer out of
the base and
set aside.
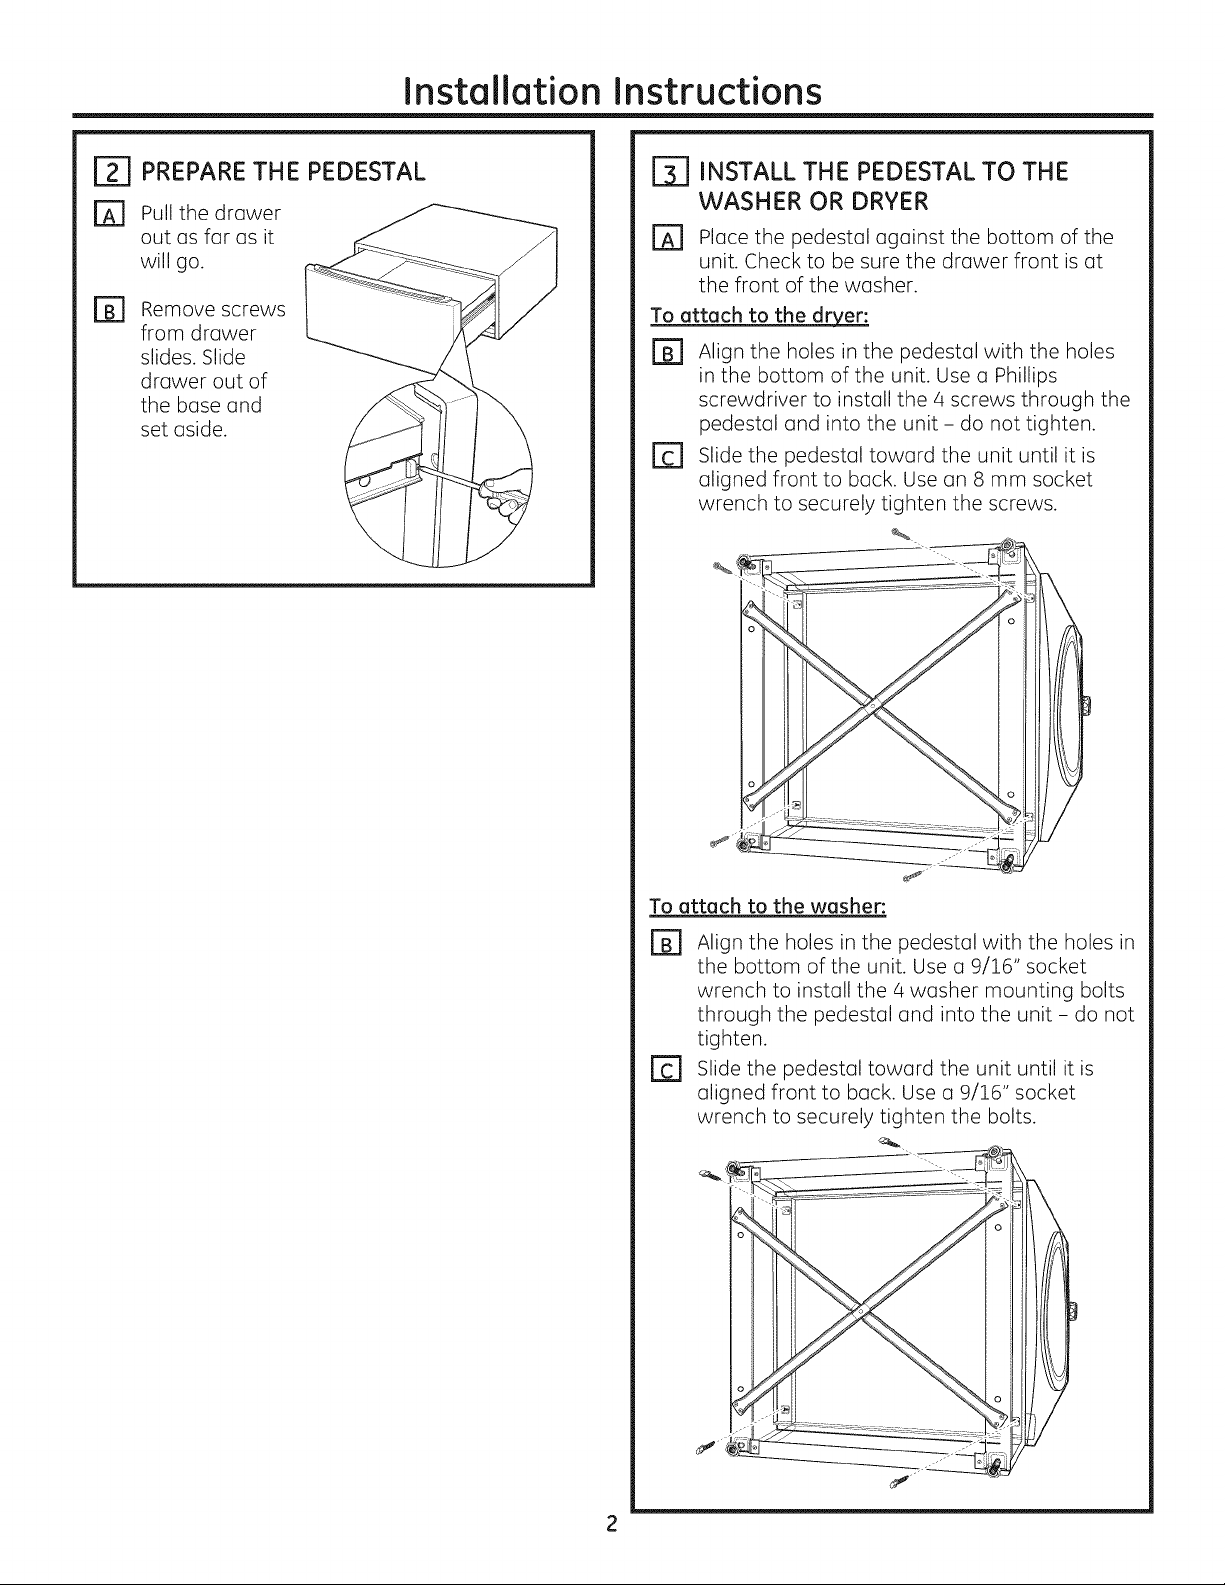
ITI INSTALL THE PEDESTAL TO THE
WASHER OR DRYER
r_ place the pedestal against the bottom of the
unit. Check to be sure the drawer front is at
the front of the washer.
To ottoch to the dry_."
Align the holes in the pedestal with the holes
in the bottom of the unit. Use a Phillips
screwdriver to install the 4 screws through the
pedestal and into the unit - do not tighten.
r_ Slide the pedestal toward the unit until it is
aligned front to back. Use an 8 mm socket
wrench to securely tighten the screws.
To ottoch to the wosher:
r_ Align the holes in the pedestal with the holes in
the bottom of the unit. Use a 9/16" socket
wrench to install the 4 washer mounting bolts
through the pedestal and into the unit - do not
tighten.
[] Slide the pedestal toward the unit until it is
aligned front to back. Use a 9/16" socket
wrench to securely tighten the bolts.
2
Page 3
Installation Instructions
I_] LEVEL THE WASHER OR DRYER
r_ stand the washer or dryer upright. Move it
close to its final location.
r_ Make sure that the washer or dryer is level by
placing a level on top. Check side to side and
front to back.
B]
Use an open /
ended wrench to
adjust the legs in
and out. Tighten
the lock nut
against the
bottom of the
pedestal.
NOTE: To minimize vibration, the locking nuts must
be tight.
/
./
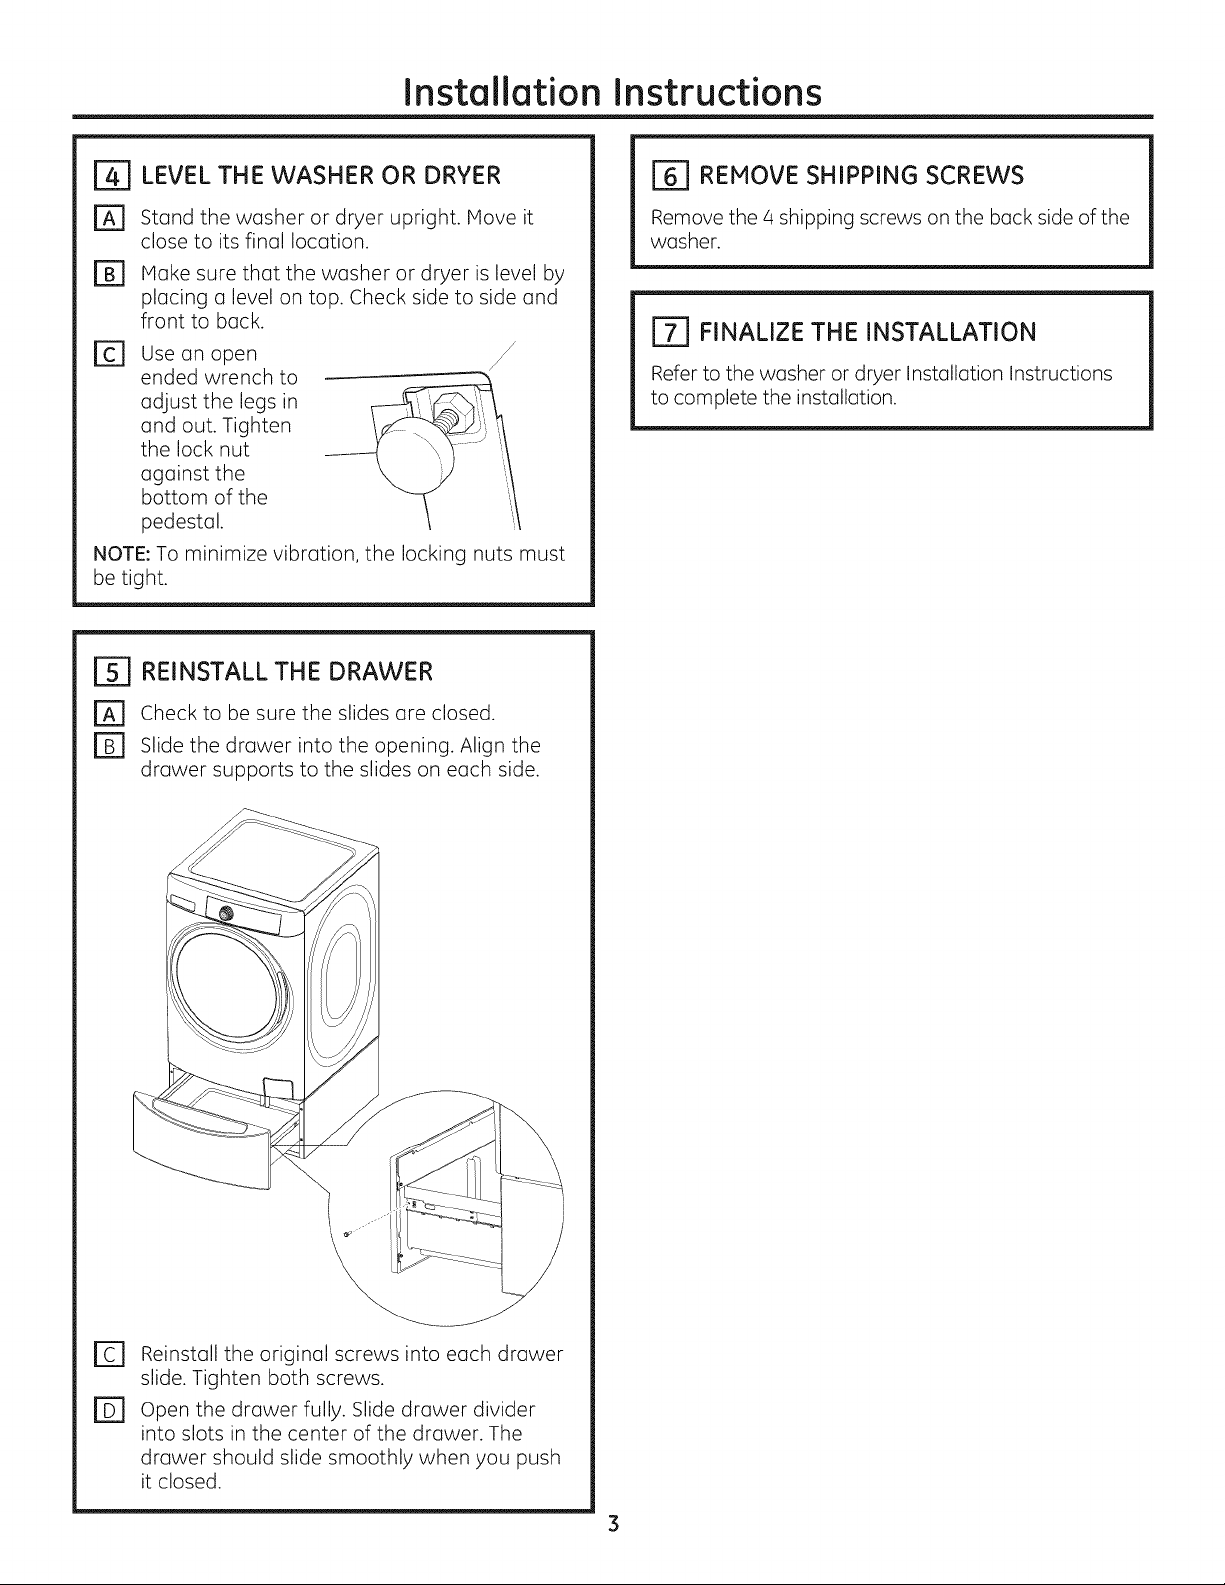
[_] REINSTALL THE DRAWER
r_ Check to be sure the slides are closed.
r_ Slide the drawer into the opening. Align the
drawer supports to the slides on each side.
[_] REMOVE SHIPPING SCREWS
Remove the 4 shipping screws on the back side of the
washer.
r_1 FINALIZETHE INSTALLATION
Refertothewasher or dryerInstallationInstructions
tocomplete theinstallation.
r_ Reinstall the original screws into each drawer
slide. Tighten both screws.
r_ open the drawer fully. Slide drawer divider
into slots in the center of the drawer. The
drawer should slide smoothly when you push
it closed.
Page 4

Notes
4
Page 5

Instructio
d'i stalloti
Pi desta!
Pi_destal blanc: GFXP1308FWW
Pi_destal rouge: GFXP1308FRR
Pi_destel cerbone m_tellique: GFXP1308FIvlc
Pour le module de luveuse :
GFWS2500, GFWS2505, GFWS2600, GFWS2605,
GHWS3600, GHWS3605, GFWS3700 et GFWS3705
For les modules de s_cheuses :
GFDS250, GFDS255, GFDS260, GFDS265, GHDS360,
GHDS365, GFDS370 and GFDS375
AVANT DE COMMENCER
Lisez uttentivement ces instructions duns leur
int_gralit_.
. IMPORTANT - Gardezcesinstructions
pour I'usage de I' inspecteur #lectrique local.
. IMPORTANT - Observeztoutesles
r#glementations et orctonnances en vigueur.
. Remurque pour le consommuteur - Gardez ces
instructions 6 titre de r#f#rence ult@ieure.
, D_lai d'ex_cution- 1 6 2 heures.
Lo responsabilit6 d'installer correctement
I'appareil relive de I'installateur.
, Toute d6faillance de I'appareil suite 5 une
installation incorrecte n'est pas couverte par la
garantie.
A MISE EN GARDE - Enraisonde
la taille et du poids de ces apporeils et afin de
r_duire ie risque de blessure ou de dommage.
materiel, L'INSTALLATION DOlT ETREEFFECTUEE
PAR DEU× PERSONNES.
Reportez-vous au× Manuel d'utilisation et
d'installation de la laveuse et de la s6cheuse
pour les directiveset exigences suppl#mentaires
d'installation.
CONTENU D'ENSEMBLE
OUTILS NI_CESSAIRES
C1Tournevis cruciforme
ClCl# 5 douille 8 mm
C1Cl# 5 douille 9/16"
C1CI6s5 molette 10 po
COMMENT PRI_PARER L'INSTALLATION
Retirez I'emballage.
Aplatissez le carton pour I'utiliser comme cale pour
poser la s#cheuse sur le c6t#. Utilisez le carton pour
prot#ger #galement le sol en face de I'endroit choisi
pour I'installation.
COMMENT RETIRER LES PIEDS
D#posez I'appareil avec pr#caution pour
acc#der aux pieds de nivellement dans sa
partie inf@ieure. Les boulons d'exp6dition de la
laveuse doivent demeurer en placejusqu'6 ce
que la laveuse soit replac6e en position droite.
Laveuse - Faire reposer sur sa face arri@re
S_cheuse - Faire reposer sur son c6t#
174 Vis d'assemblage -
S#cheuses
174 Boulons de montage
- Laveuse
r_ Utilisez une cl# 6 molette pour retirer les pieds
de la laveuse ou de la s#cheuse.
17CIoison du tiroir
Page 6

Instructions d'instollotion
ITI COMMENT PRI_PARER LE SOCLE
r_ Tirez le tiroir
maximum.
Retirez les vis
@
des glissi@es du
tiroir. Faites
sortir le tiroir
hors de la base
et laissez-le de
c6t6.
au
COMMENT INSTALLER LESOCLE SUR
B]
LA LAVEUSE OU LA SI_CHEUSE
Placez le socle au bas de I'appareil. Veillez 6
B]
ce que I'avant du tiroir soit plac6 6 ravant de
la laveuse.
Pour
fixer sur la s_cheuse :
Alignez les trous du socle sur ceux situ6s au
@
bas de I'appareil. Utilisez un tournevis
cruciforme pour installer les q boulons dans le
socle et la base de I'appareil. Ne les serrez pas.
D
Faites glisser le socle vers I'appareil,jusqu'6 ce
qu'il soit align6 de I'avant sur I'arri@re. Utilisez
une cl6 6 douille 8 mm pour serrer les boulons.
@_
fixer _ Io Ioveuse :
Alignez les trous du pi6destal sur les trous au
bas de I'appareil. Utilisez une cl6 6 douille 9/16
po pour visser les 4 boulons de montage de la
laveuse dans le pi6destal et I'appareil- ne pas
serre r.
Faites glisser le pi6destal vers I'appareil jusqu'6
D
ralignement d'avant en arri@re. Utilisez une cl6 6
douille 9/16 po pour serrer fermement les boulons.
6
Page 7

Instructions d'installation
F_ COMMENT METTRE LA LAVEUSE OU
LA St_CHEUSE DE NIVEAU
Placez la laveuse ou la s6cheuse debout.
[]
Placez-la proximit6 de I'endroit oO vous avez
pr6vu de I'installer.
Assurez-vous que I'appareil est de niveau en
@
plaqant un niveau dessus. V@ifiez le niveau de
gauche 6 droite, et de I'avant vers I'arri_re.
Utilisez une cl6
D
6 fourche pour
r6gler les pieds.
Vissez 1'6crou
de blocage au
bas du socle.
REMARQUE: Afin de r_duire les vibrations,
les _crous de blocage doivent 6tre serf,s au
maximum.
[_] COMMENT REINSTALLER LE TIROIR
r_ v@ifiez si les glissi@es sont ferm#es.
r_ Faites coulisser le tiroir dans I'ouverture.
Alignez les supports du tiroir sur les glissi6res
de chaque c6t6.
[_ COMMENT RETIRER LES VIS DE
TRANSPORT
Retirez les 4 vis de transport situ6es 6 I'arri@e de la
laveuse.
E_ COMMENT TERMINER L'INSTALLATION
Reportez-vous aux consignes d'installation de
la laveuse ou de la s6cheuse pour I'installer
correctement.
R6installez les vis dans chaque glissi@e de
tiroir. Serrez les deux vis.
Ouvrez compl6tement le tiroir. Faites glisser la
cloison dans les rainures situ6es au centre du
tiroir. Le tiroir doit coulisser en douceur
Iorsque vous le poussez vers le fond.
Page 8

Notes
Page 9

Instrucciones de
i stal ci"
Pedestal
Pedestal blanco: GFXP1308FWW
PedestaJ rojo: GFXP1308FRR
PedestaJ carbono met6Jico: GFXP1308FMC
Para modelo de lavadora:
GFWS2500, GFWS2505, GFWS2600, GFWS2605,
GHWS3600, GHWS3605, GFWS3700 y GFWS3705
Para modelos de secadora:
GFDS250, GFDS255, GFDS260, GFDS265, GHDS360,
GHDS365, GFDS370 and GFDS375
ANTES DE COMENZAR
Lea estas instrucdones por completo y con
detenimiento,
. IMPORTANTE- Guardeestas
instrucciones para el usa de inspectores
el#ctricos locales.
.IMPORTANTE-Cumplacon todoslos
c6digos y ordenanzas vigentes.
, Nota al usuario - Conserve estas instrucciones
para referencia futura.
, Tiempo de instalaci6n - 1 a 2 horas.
, El instalador tiene la responsabilidad de efectuar
una instalaci6n adecuada.
, La garantfa no cubre las fallas del producto
debido a una instalaci6n incorrecta.
A PRECAUCION: DebidooJpeso
y tama_o de estos productos, y para reducir
el riesgo de lesiones personales o da_os al
producto, SE NECESITAN DOS PERSONAS PARA
REALIZAR UNA INSTALACI6N CORRECTA.
, Consulte el Manual del propietario e instalaci6n de
la lavadora y la secadora para vet Iosrequisitos y
pautas de instalaci6n adicionales.
CONTENIDOS DEL KIT
HERRAMIENTAS NECESARIAS
17Destornillador Phillips
17Llave de casquillo de
9/16" 17Llaves ajustables
17Llave de casquillo de
8mm
de 10"
PREPARACI6N PARA LA INSTALACI6N
Quite el envoltorio.
Aplaste el cart6n del producto para poder utilizarlo
para colocar la lavadora o secadora de costado.
Siga usando el cart6n para proteger el piso frente al
lugar de instalaci6n.
C6MO QUITAR LAS PATAS
rT1
NIVELADORAS
Con cuidado apoye el electrodom@stico para
que las patas niveladoras accedan a su parte
inferior. Los tornillos enviados con arandelas
deben permanecer en su lugar hasta que la
arandela se vuelva a colocar la posici6n vertical.
Lavadora - Ap6yela sabre su parte trasera
Secadora - Ap6yela sabre su parte lateral
174 tomillos de montaje -
Secadora
174 tornillos de montaje -
Lavadora
r_ Utiliceuna Ilave de ajustable abierto para quitar
las patas niveladoras de la lavadora o secadora.
17Divisi6n de caj6n
Page 10

Instruccionesde instalaci6n
PREPARE EL PEDESTAL
r_ Abra el caj6n
hasta el
m6ximo.
Quite los
@
tornillos de los
deslizadores del
caj6n. Quite el
caj6n de la base
y deje a un
costado.
C6MO INSTALAR EL PEDESTAL EN
LA LAVADORA O SECADORA
Coloque el pedestal contra la parte inferior de
la unidad. Controle que el frente del caj6n se
encuentre en el frente de la lavadora.
Para
adjuntar a la secadora.
@
Alineelos orificios del pedestal con los orificios de
laparteinferiordelaunidad.Utiliceundestornillador
Phillips para instalar los 4 pernos a trav6s del
pedestal y dentro de la unidad; no ajuste.
D
Deslice el pedestal hacia la unidad, hasta que
se encuentre alineada de frente a parte trasera.
Utilice una Ilave de casquillo de 8 mm para
ajustar bien los pernos.
Para adiuntara la lavadora:
[] Alinee los agujeros en el pedestal con los
agujeros en la parte inferior de la unidad. Use
una Ilave de tubo de 9/16" para instalar las
cuatro tuercas de montaje de la lavadora a
trav6s del pedestal yen la unidad - no ajustar.
r_ Deslice el pedestal hacia la unidad, la cual est6
alineada del frente a la parte trasera. Use una
Ilave de tubo de 9/16" para ajustar los tornillos
con firmeza.
10
Page 11

Instruccionesde instalaci6n
r_ C6MO NIVELAR LA LAVADORA O
SECADORA
r_ Coloque la lavadora o secadora en posici6n
vertical. Col6quela cerca de su ubicaci6n
definitiva.
@ Verifique que la lavadora o secadora est6n
niveladas colocando un nivel en la parte
superior. Controle de lado a lado y del frente a
la parte trasera.
r_ Utilice una Ilave de /
extremo abierto para
ajustar las patas.
Ajuste tuerca de
fijaci6n contra la
parte inferior del
pedestal.
NOTA:Para minimizar la
vibraci6n, lastuercas de fijaci6n deben estar bien
ajustadas.
C6MOVOLVER A INSTALAR EL CAJ6N
la
[_] QUITE LOS TORNILLOS DE
Quitelos 4 tornillos de embalaje ubicados en la parte
trasera de la lavadora.
[_ FINALICE LA
Consultelas Instruccionesde instalaci6n de la
lavadora o secadora para finalizar la instalaci6n.
INSTALACI6N
EMPAQUE
[] Verifique que los deslizadores est6n cerrados.
rBj Abra el caj6n. Alinee los soportes del caj6n
con los deslizadores de carla lado.
E] Vuelva a instalar los tornillos originales dentro
de cada deslizador. Ajuste los dos tornillos.
rD1 Abra el caj6n por completo. Deslice la divisi6n
del caj6n dentro de las ranuras del centro del
caj6n. El caj6n debe deslizarse suavemente
cuando se Io cierra.
11
Page 12

SPECIFICATIONS SUBJECT TO CHANGE WITHOUT NOTICE
GEAppliances
General Electric Company
Louisville, Kentucky/40225
GEAppliances.com
12
 Loading...