

GE GFWR4805, GFWR4800, GFWS3705, GHWS3600, GFWS2605 Owner's Manual
...
GEAppliances.com
Safety Instructions .............. 2,s
Operating Instructions
Controls ............................ 4-9
Features .......................... 10-11
Loading and Using the Washer .... 12-13
Available Accessories ................. 13
Care and Cleaning ............ 14-17
Installation Instructions
Preparing to Install Your Washer ...... 18
Location of Your Washer ............. 19
Rough-In Dimensions................. 19
Unpacking Your Washer .............. 20
Electrical Requirements .............. 21
Grounding Requirements ............. 21
Drain Requirements .................. 22
Water Supply Requirements .......... 22
Installing the Washer .............. 22-23
Replacement Parts ................... 23
Adaptive Vibration Control ............ 24
GFWR4805
GFWR4800
GFWS3705
GFWS3700
GHWS3605
GHWS3600
GFWS2605
GFWS2600
GFWS2505
GFWS2500
Laveuses
la page 33La section fran(;ais commence
Troubleshooting Tips ......... 25-29
Consumer Support
Warranty (U.S.)....................... 30
Warranty (Canada) ................... 31
Consumer Support .......... Back Cover
I
ENERGYSTAR
As an ENERGY STAR @partner,
GEhas determined that this
product meets the ENERGYSTAR@
guidelines for energy efficiency.
Write the model and serial
numbers here:
Lavadoras
La secci6n en espafiol empieza en la p_gina 65
Model #
Serial #
Youcan find them on a label on the
Printed in the United States
sideof the washer.
49-90469 02-13 GE
IMPORTANT SAFETY INFORMATION.
READ ALL INSTRUCTIONS BEFORE USING.
m
Thisisthe safety alert symbol. Thissymbol alerts to potential hazards that can kill or hurt and others. Allsafety
messageswill follow the safety alert symbol and the word "DANGER","WARNING",or "CAUTION".Thesewords are defined as:
Indicates a hazardous situation which, if not avoided, will result in death or serious inJury.
Indicates a hazardous situation which, if not avoided, could result in death or serious inJury.
you you you
_ Indicates hazardous situation which, if not avoided,could result in minor moderate
a or
inJury.
IMPORTANT SAFETYINSTRUCTIONS
To reduce the risk of death,fire, explosion,electric shock,or injury to persons when usingyour appliance,
follow basic precautions, including the following:
[] Readall instructionsbeforeusingtheappliance.
[] DONOTwash or dry articles that have been previously cleaned in, washed in,soaked in or spotted with gasoline, dry-
cleaning solvents, or other flammable or explosive substances, as they give off vapors that could ignite or explode.
[] DONOTadd gasoline, dry-cleaning solvents, or other flammable or explosive substances to the wash water. These
substances give off vapors that could ignite or explode.
[] Under certain conditions, hydrogen gas may be produced in a hot-water system that has not been used for 2 weeks
or more. HYDROGENGAS ISEXPLOSIVE.If the hot water system has not been used for such a period, before using a
washing machine, turn on all hot-water faucets and let the water flow from each for several minutes. This will release
any accumulated hydrogen gas. As the gas is flammable, DO NOTsmoke or use an open flame during this time.
[] DONOTallow children to play on or inthis appliance. Close supervision of children is necessary when this appliance is
used near children. Before the washer is removed from service or discarded, remove the door or lid. Failure to follow
these instructions may result in death or injury to persons.
[] DONOTreach into the appliance if the tub or agitator is moving to prevent accidental entanglement.
[] DONOTinstall or store this appliance where it will be exposed to the weather.
[] DONOTtamper with controls, repair or replace any part of this appliance or attempt any servicing unless specifically
recommended in the user maintenance instructions or in published user repair instructions that you understand and
have the skills to carry out.
[] Keepthe area around your appliance clean and dry to reducethe possibilityof slipping.
[] DONOToperate this appliance if it isdamaged, malfunctioning, partially disassembled, or hasmissing or broken parts
including a damaged cord or plug.
[] Unplug the appliance or turn off the circuit breaker before servicing. Pressingthe Power button DOESNOTdisconnect power.
[] See "Electrical Requirements" located in the Installation Instructions for grounding instructions.
SAVETHESE INSTRUCTIONS

GEAppliances.com
PROPERINSTALLATION
_b This washer must beproperly installed and located in accordance with the Installation Instructions before it is used.
If you did not receive an Installation Instructions, you can receive one by visiting GEAppliences.com or by calling
800.GE.CARES(800./452.2757).
[] Ensurethat the hot water hose isconnected to the "H" Parts and Accessories
(internalred screened)valve and the cold water hose is
connected to the "C"(internal blue screened)valve.
[]
Installor store where it will not be exposed to
temperatures below freezing or exposedto the weather,
which could cause permanent damage and invalidatethe
warranty.
[]
Properlyground washer to conform with all
governing codesand ordinances. Followdetails
in Installation Instructions.
[] Thiswasher doesnot include water supply hoses.
GEstrongly recommends the use offactory specified
parts.A listof factory hoses availablefor purchase are
listed below.These hosesare manufactured and tested to
meet GEspecifications.
GEstrongly recommends the useof new water supply
hoses.Hosesdegrade over time and need to be replaced
every 5 years to reducethe risk of hose failures and water
damage.
Order on-line at GEApplianceparts.com today, 24 hoursa
day or by phone at 800.626.2002during normal business
hours.
Port Number
PM!4X!O002
Or
PM!4X!O005
WXlOXlO011
WX7X!
Accessory
4 ft RubberWater Supply Hoses
4 ft Braided Metal Water Supply Hoses
Tide®Washing Machine Cleaner*
Washer FloorTray
WHEN NOT IN USE
[] Turn off water faucets to minimize leakage if a break or
rupture should occur.Checkthe condition of the fill hoses;
GErecommends changing the hosesevery5 years.
SAVETHESE INSTRUCTIONS
* Tide® is a registered trademark of Procter &Gamble
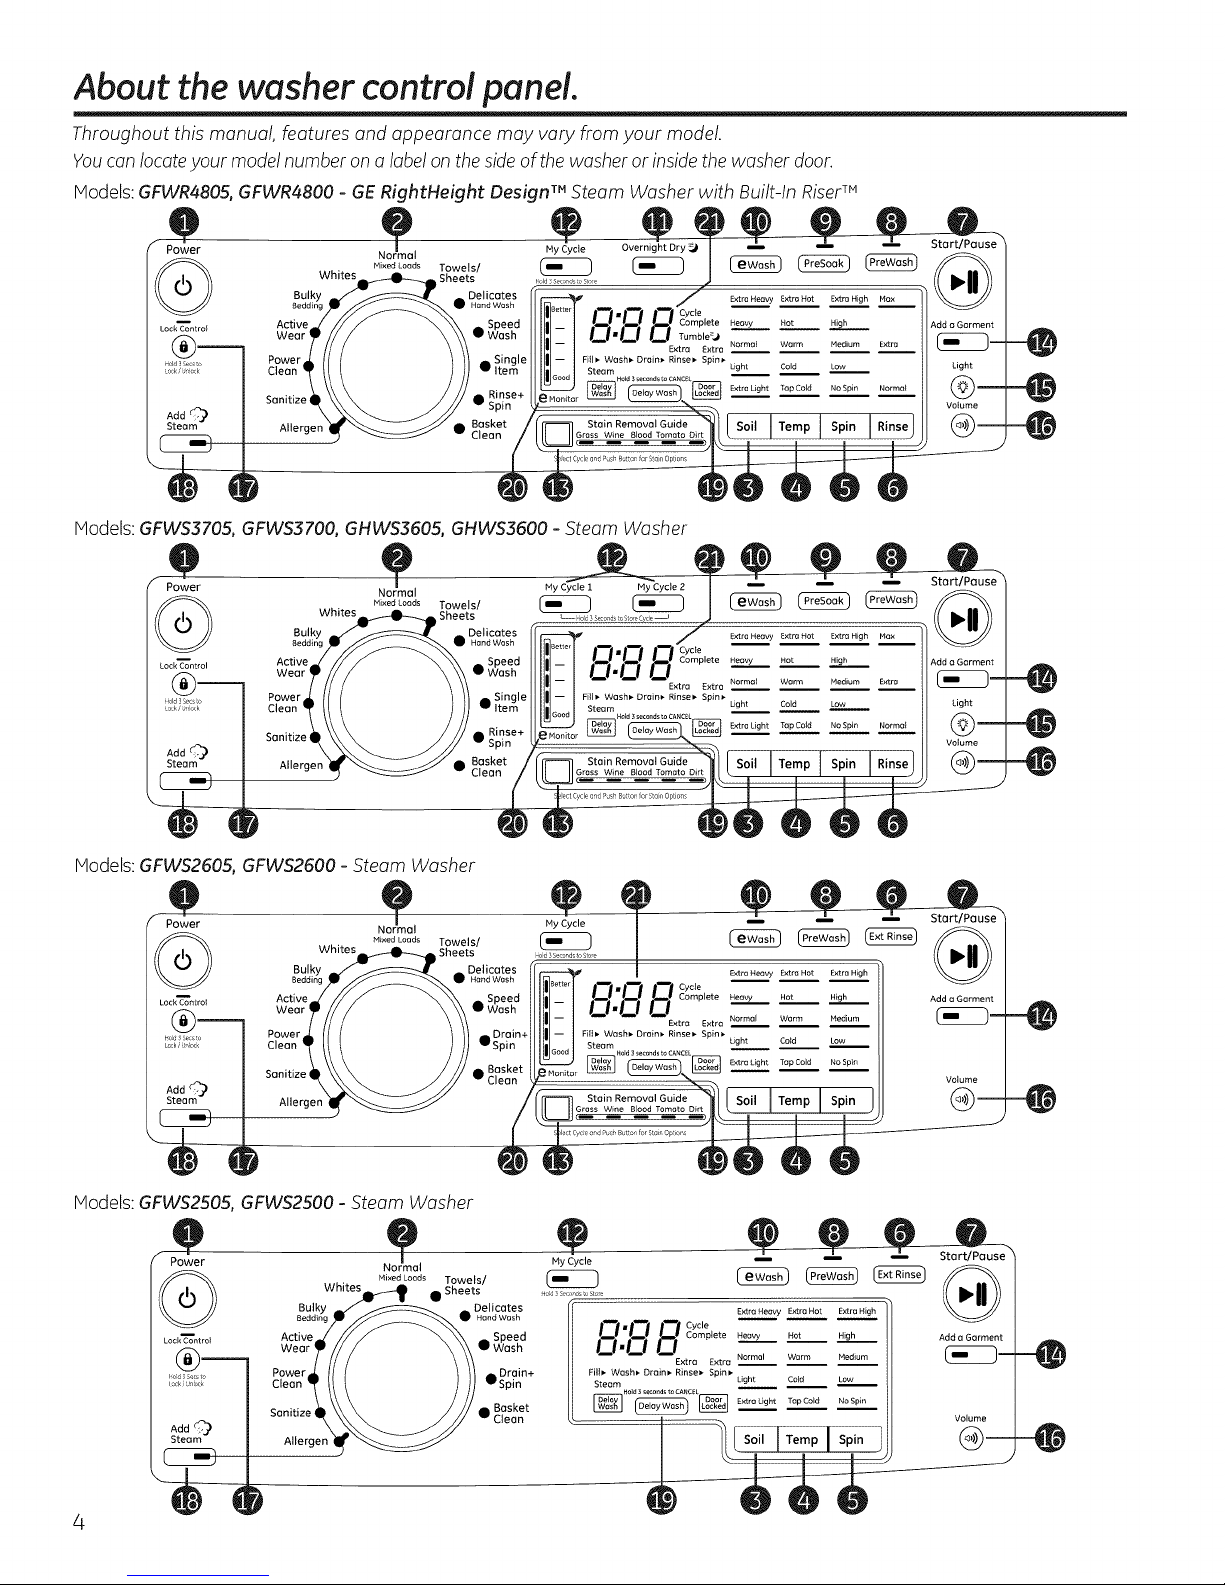
About the washer control panel.
Throughout this manual, features and appearance may vary from your model.
Youcan locateyour model number onalabel on the sideof thewasher or insidethe washer door.
Hodels: GFWR4805, GFWR4800 - GE RightHeight Design m Steam Washer with Built-In Riser m
Power
Bulky
Bedding
Active
Wear t
Whites
I
Mixed Loads Towels/
Sheets
Delicotes
• Hand Wash
_• Spe
A Sir
! w Ite
Rim
Wo._
v Spir
Basket
Cleon
Models: GFWS$705, GFWS3700, GHWS3605, GHWS3500- Steam Washer
O
Power
@
Add
Steam
Bulky
Bedding
Active
Wear q
Nor_mel _ StortiPouse _
....dLood,Towe,s/_ _ ___ _
Whites
Sheets od 3Secondso StoeC_Ce -- -- -- l_j ]
• Hand Wash j Extra Heow Extra Hot Extra High Max
Deticates I_
• Spe _)mplete Heow Hot High
! 'IF Ite Steam _ __ --
_ Rim I1__ _ .... _
Basket _ Stain Re I Soil I Temo I Slgin I Rinsel ('_--
Cleon _11 IIOrass_Wine BIoodiTomatoI__O_rtIII t I - t " I J
Ny Cycle 1 My Cycle 2 _ _
Sir Fill_ Wosh_* Orain_ Rinse_ Spin_
H°_d3 sac°ridst° CANC£L_ Extra Light TOp Cold NO Spin Normal _I
Spir _" Guide'_L-_m Volume
-0
-@
U_
Extro Extra _
right CaM Low Light
Hodels: GFWS2505, GFWS2600 - Steam Washer
.O
Power
@
Lock Control
Add ._
Steam
Bulky
Bedding
Active
Wear (
Allergen
Nor_mal
Mixed Loads
Hodels: GFWS2505, GFWS2500 - Steam Washer
(_ Mixed Loads Towels/
LockT_ontrol Active • Speed
_od3Sacsto
to_k,e_o
Add
Steam
Whites • Sheets
Wear _ Wash
Allergen
Delicotes
• Hand Wash
Basket
Cleon
Drain+
Spin
My Cycle
I-I'1-1 I-I cyo,o
,__.__,..,coo_,ot...._ ,o_, .,_h
Fil(_ Wash• Drain• Rinse_ Spin_ Light Co)d Low
Steam
Extra Extra Normal Worm Medium
Extra Heavy Extra Hot Extra H_gh
Extra Light Tap Cold NO Spin
/Sol,ITempISp'ni
Add a Garment
Volume
Add a Garment
Volume
®--
-@
-@
-@
Control settings. GEAppliances.com
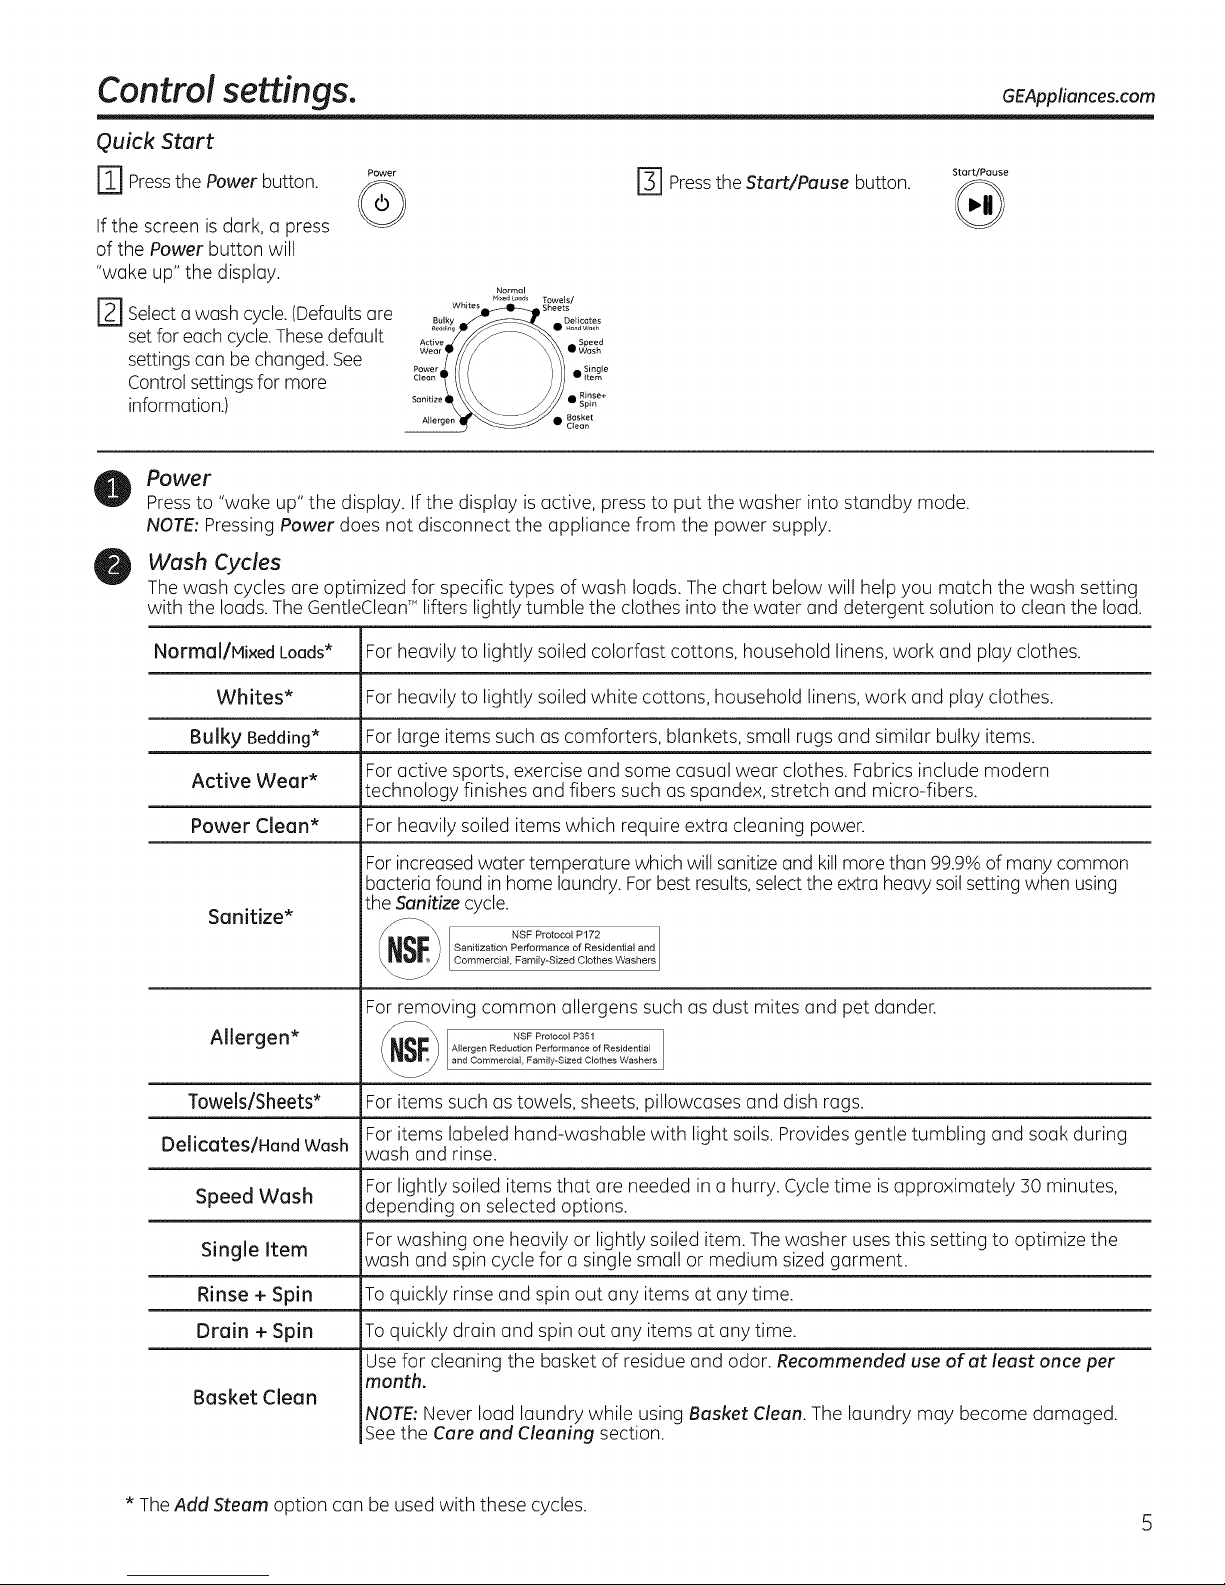
Quick Start
r_ Press the Power button. P....
j-_ Press the Start/Pause button.
If the screen is dark, a press
of the Power button will
"wake up" the display.
[] Selecta wash cycle. (Defaultsare
set for each cycle.Thesedefault
settings can be changed. See
Control settings for more
information.)
Wea • Wash
AoW// \y sooo
Cleon • Item
..... ii) s,oo,o
Son tZ]g_Albe _e sket• spmRir_se+
Normal
• M_×_dLoo_ Towels/
Whites Sheets
Power
Press to "wake up" the display. Ifthe display is active, press to put the washer into standby mode.
NOTE:Pressing Power does not disconnect the appliance from the power supply.
Wash Cycles
The wash cycles are optimized for specific types of wash loads. The chart below will help you match the wash setting
with the loads. The GentleCleaff" lifters lightly tumble the clothes into the water and detergent solution to clean the load.
Normal/Hixed Loads* Forheavily to lightly soiled colorfast cottons, household linens, work and play clothes.
Start/Pause
Whites* Forheavily to lightly soiled white cottons, household linens, work and play clothes.
Bulky Bedding*
Active Wear*
Power Clean*
Forlarge items such as comforters, blankets, small rugs and similar bulky items.
Foractive sports, exercise and some casual wear clothes. Fabrics include modern
technology finishes and fibers such as spandex, stretch and micro-fibers.
Forheavily soiled items which require extra cleaning power.
Forincreasedwater temperature which will sanitizeand kill more than 99.9%of many common
bacteria found in home laundry. Forbest results,select the extra heavy soil setting when using
Sanitize*
the Sanitize cycle.
_S___ NSF Pr°t°c°l P172 1
Sanitization Performance of Residential and
Commercial, Family-Sized Clothes Washers
Forremoving common allergens such as dust mites and pet dander.
Allergen*
Towels/Sheets* Foritems such as towels, sheets, pillowcases and dish rags.
Delicates/Hand Wash Jwashand rinse.
Speed Wash
Single Item
Foritems labeled hand-washable with light soils. Provides gentle tumbling and soak during
Forlightly soiled items that are needed in a hurry. Cycletime isapproximately 30 minutes,
depending on selected options.
Forwashing one heavily or lightly soiled item. The washer uses this setting to optimize the
wash and spin cycle for a single small or medium sized garment.
Rinse + Spin Toquickly rinse and spin out any items at any time.
Drain + Spin
Toquickly drain and spin out any items at any time.
Usefor cleaning the basket of residue and odor. Recommended use of at least once per
month.
Basket Clean
NOTE:Never load laundry while using Basket Clean. The laundry may become damaged.
See the Care and Cleaning section.
* The Add Steam option can be used with these cycles.
5
Control settings.
Soil Level
Ch(]ngingthe Soil levelincre(]sesor decre(]sesthe w(]sh time to remove different (]mounts of soil.
To ch(]ngethe Soil level,press the Soillevel button until you h(]ve re(]ched the desired setting. Youc(]n choose
between Extr(]Light,Light,Norm(][ He(]vyor Extr(]He(]vysoillevels.
Wash Temp
Adjust to selectthe proper w(]ter temper(]ture for the w(]sh cycle.The prew(]sh (]nd rinsew(]ter is(]lw(]yscold to help
reduce energy us(]ge (]nd reduce setting of st(]ins (]nd wrinkles.
Follow the f(]bric m(]nuf(]cturer's c(]re I(]belwhen selecting the w(]sh temper(]ture.
To change the w(]sh temper(]ture, pressthe w(]sh Temp button until you h(]ve re(]ched the desiredsetting. You c(]n
choose between T(]pCold,Cold,W(]rm, Hot or Extr(]Hot. Bydesign,to protect f(]brics, not (]11w(]sh temper(]tures (]re
(]v(]il(]blefor cert(]in w(]sh cycles.
NOTE:Thefirst 10 secondsof the w(]sh fill is (]lw(]ys cold.Thisfe(]ture (]ssistsin conditioning the f(]bric (]nd
preventing st(]insfrom setting on g(]rments.
Spin Speed
Ch(]ngingthe Spin speedch(]nges the fin(]l spin speed ofthe cycles.AIw(]ysfollow the g(]rment m(]nuf(]cturer's c(]re
I(]belwhen ch(]nging the Spin speed.
To ch(]ngethe Spin speed,pressthe Spin speed button until you h(]ve re(]ched the desired setting.Youc(]n choose
between No Spin,Low, Medium, Highor Extr(]High Spin.Higherspin speeds(]renot (]v(]il(]bleon cert(]in cycles,such
(]sDelicates.
Higherspin speeds remove more w(]ter from the clothes (]nd will help reduce dry time, but m(]y (]lso incre(]se the
possibilityof setting wrinkles on some fabrics.
Rinse
Ch(]ngingRinse will ch(]nge the number of rinsesthe cycle will use.Toch(]nge the rinse option, press Rinseuntilyou
h(]ve re(]ched the desired setting.On some models you c(]n choose between Norm(][ Extr(],ivl(]x((]third rinse),(]nd
no rinse.Inorder to select no rinse,pressthe Rinsebutton until no lights (]re lit in the rinsewindow.
On models with Rinse+Spin cycle,(]dr(]in (]nd spin cycle c(]n be (]chieved byselecting no rinse.
On models with Drain+Spin cycle, (] rinse (]ndspin cycle c(]nbe (]chievedby selecting Ext Rinseoption.
"- NOTE:Somemodels h(]ve only (]nExtra Rinseoption. Thisoption (]llows for (]n extr(] rinseduring (] cycleto
remove excess dirt (]nd detergent from soiledIo(]ds.Pressthe Ext Rinse button to select.
Start/Pause
Pressto st(]rt (] w(]sh cycle. Ifthe w(]sher isrunning, pressing it once will p(]usethe w(]sher (]nd unlockthe door.
It will t(]ke (]few secondsfor the door to unlock (]tier pressing Pouse.Press(]g(]into rest(]rt the w(]sh cycle.
NOTE:Ifthe w(]sher isp(]used(]ndthe cycle isnot rest(]rted within 15 minutes, the current w(]sh cyclewill be
c(]ncelled.
NOTE:In some cycles the w(]sher will dr(]in first, then unlock the door when it isp(]used.
NOTE:Thew(]sher performs (]utom(]tic system checks (]tier pressing the Start button. W(]ter will flow in/45seconds
or less.You m(]y he(]rthe door lock (]nd unlock before w(]ter flows; this is norm(]l.
GEAppliances.com
I
(PreWosh)
( PreSOOk )
/
(ewosh)
Overnight Dry
(-- ]
PreWash
Prewush isan extra wash before the
main wash. Use it for heavily soiled
clothes or for clothes with u care
label that recommends prewushing
before washing. Be sure to add liquid
or powder high-efficiency detergent,
or the proper wash additive to the
prewush dispenser.
PreSoak (onsome models)
For soaking your garments before the
wash cycle begins. This option begins
with a brief tumble and then proceeds
to soak the clothes for a specified
period of time. Once complete, the
cycle will begin automatically.
aWash (Energy Savings Wash)
(onsomemodels)
Use eWash to save energy on specified
wash cycles.
Overnight Dry TM
(onsomemodels)
Overnight Dry is available on the
following cycles: Active Wear, Whites,
Normal and Single Item.
Overnight Dry is intended for smaller
loads only. This feature is intended for
use when clothes need to be washed,
dried and ready to wear or finished the
next morning. Thisfeature will tumble
clothes and introduce u constant stream
of air into the machine compartment
upon completion of select wash cycles.
Clothes can be removed at any time by
pressing Pause.
The PreWash feature will fill the washer
(adding the prewush detergent), tumble
the clothes, drain and spin. Then the
washer will run the selected wash cycle.
NOTE:In some special cycles, the
prewush is selected automatically
as the default. You can modify this
selection at any time.
The PreSoak time is set in 1/2hour
increments, with the maximum
presoak set option of 8 hours.
If desired, add high-efficiency detergent
or the proper wash additive to the
prewash dispenser.
aWash cannot be used with Allergen,
Sanitize, Power Clean and Basket
Clean.
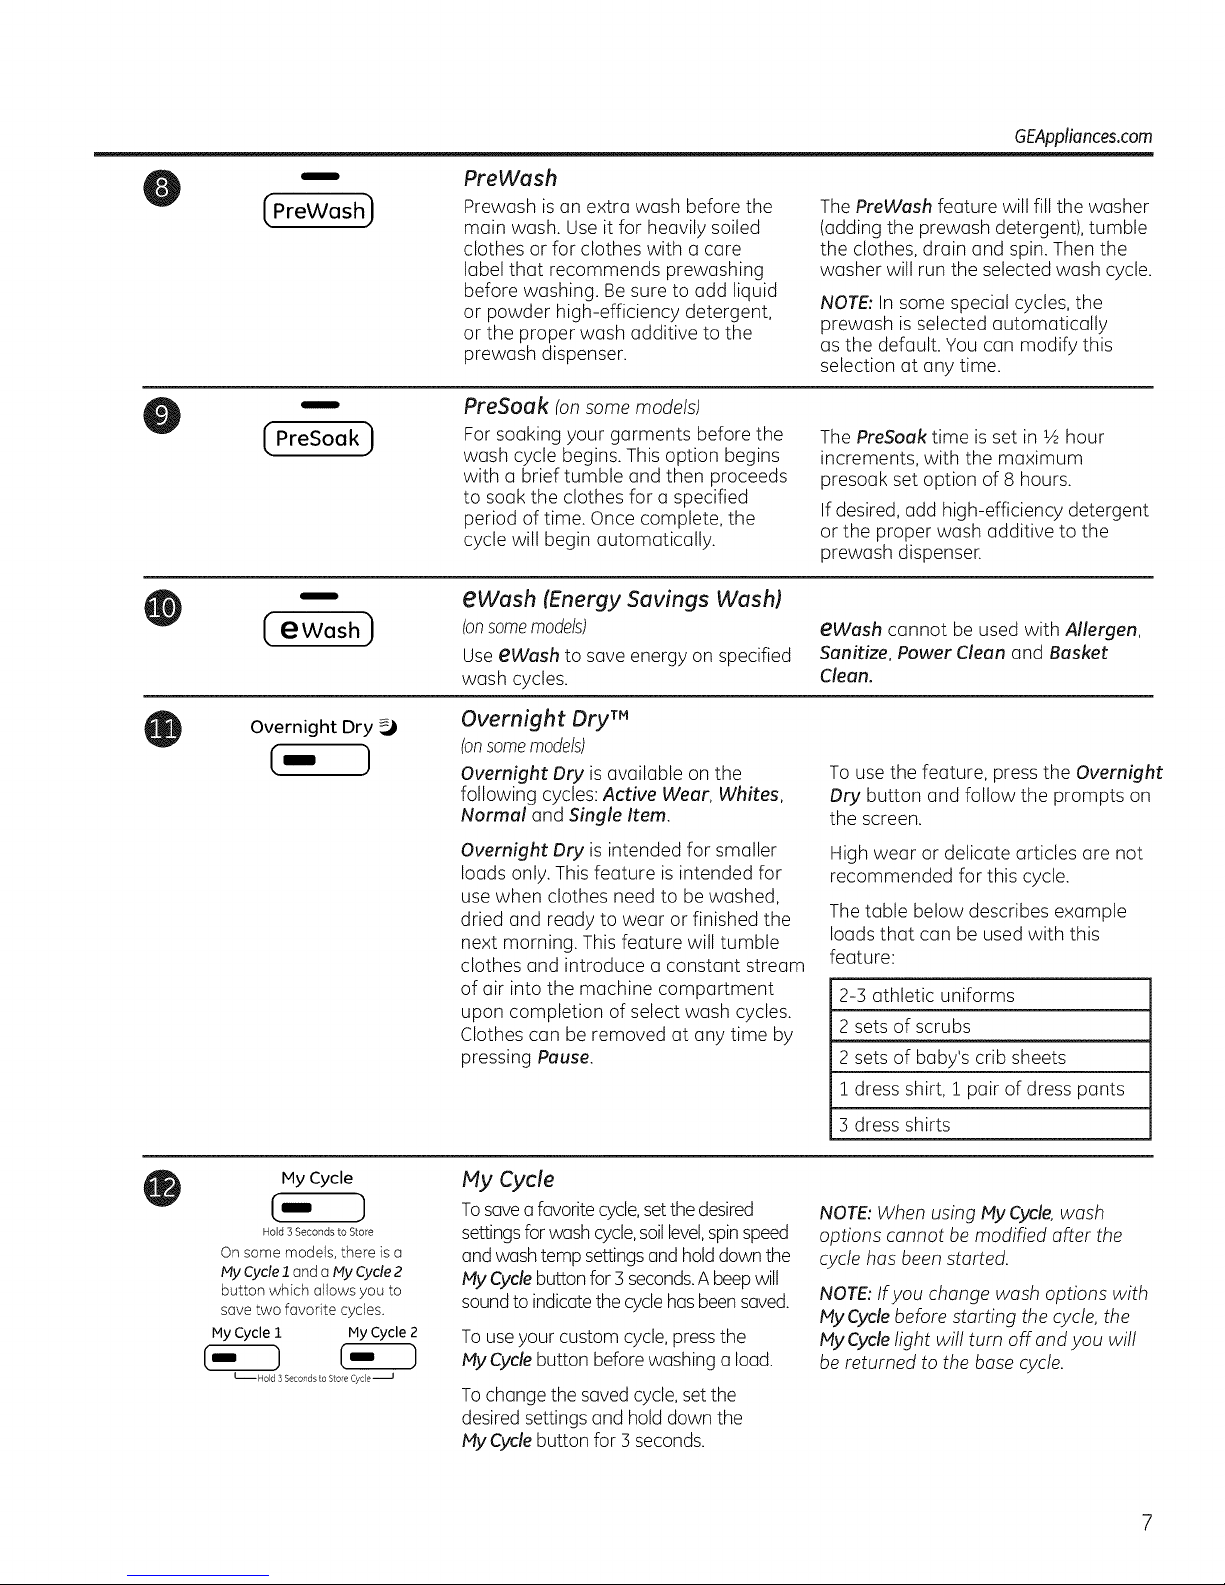
To use the feature, press the Overnight
Dry button and follow the prompts on
the screen.
High wear or delicate articles are not
recommended for this cycle.
The table below describes example
loads that can be used with this
feature:
2-3 athletic uniforms
2 sets of scrubs
2 sets of baby's crib sheets
1 dress shirt, 1 pair of dress pants
3 dress shirts
My Cycle
(.- )
Hold 3 Seconds to Store
On some models, there is a
My Cycle1 and a My Cycle2
button which allows you to
save two favorite cycles.
My Cycle I r4y Cycle 2
L HOld3 Seconds to Store Cyce -JJ
My Cycle
Tosaveo favorite cycle,setthe desired
settingsforwash cycle,soillevel,spinspeed
and wash temp settingsand holddownthe
My Cyclebuttonfor 3 seconds.A beepwill
soundto indicatethe cyclehasbeensaved.
To useyour custom cycle,pressthe
MVCyclebutton before washing a load.
Tochange the saved cycle, set the
desired settingsand hold down the
My Cyclebutton for 3 seconds.
NOTE:When using My Cycle wash
options cannot be modified after the
cycle has been started.
NOTE:Ifyou change wash options with
MVCycle before starting the cycle, the
My Cyclelight will turn off and you will
be returned to the base cycle.

Control settings.
[_ Stein Removal GuideGrass Wine Blood Tomoto Dirt)l
Select Cycle and PushButton for Stain Options
Stain Removal Guide
(on some models)
The Stain Removal Guide is pre-
programmed with the ideal wash and
rinse settings to tackle five common
stains: grass, wine, blood, tomato and
dirt. To use this feature, select the
desired wash cycle and then press
the Stain Removal Guide button
until the stain you want to remove is
highlighted. Once selected, press the
Start button to start the cycle.
Add a Garment
(-- )
Light
@
Volume
Lock Control
®
Hold3Secsto
Lock/ Unlock
Add A Garment (onsome models)
Ifyou needto adda garment afterthe
cyclehasstarted,presstheAdd A Garment
buttonand the unitwillunlockthe door,
allowingadditionalgarments.TheAddA
Garment feature isonlyavailablewhen the
LEDisliton the button.Aftera certainpoint
inthecycle,the LEDwill notbe litany longer
and addinga garment isnot allowed.
Basket Light (on some models)
The basket light will turn on and remain
on for 5 minutes when the door opens,
Start/Pause button is pressed, or by
pressing the Light button.
Volume
Toadjust the volume of the unit, press
the Volume button to select the desired
level.
Lock Control
You can lock the controls to prevent
any selections from being made. Or
you can lock or unlock the controls
after you have started a cycle.
Children cannot accidentally start the
washer by touching buttons with this
option selected.
To lock the washer, press and hold the
Lock Control button for 3 seconds.
The basket light can be turned off by
pressing and holding the Light button.
On models with Power Rinse, the
basket light will illuminate at the
beginning of each rinse cycle.
Thereare four sound levelsincluding OFF.
To unlock the washer controls, press
and hold the Lock Control button for 3
seconds.
A sound is made to indicate the lock/
unlock status.
The indicator light above the button
will illuminate when the controls are
locked.
NOTE:The Power button can still be
used when the machine islocked.
GEAppliances.com
Add
Steam
Hold 3 seconds to CANCEL
(Delay Wash)
y-
I Better
f
,I
I
Add Steam
Add Steam adds steam into the washer
early in the cycle to assist with loosening
stains on the Towels/Sheets, Normal,
Whites, Bulky, Active Wear, Power
Clean, Sanitize or Allergen cycles.
Delay Wash
You can delay the start of a wash cycle
for up to 2/4 hours. Press the Delay
Wash button to choose the amount
of time you want to delay the start of
the wash cycle. Once the desired time
is reached, press the Start button. The
machine will count down and start
automatically at the correct time.
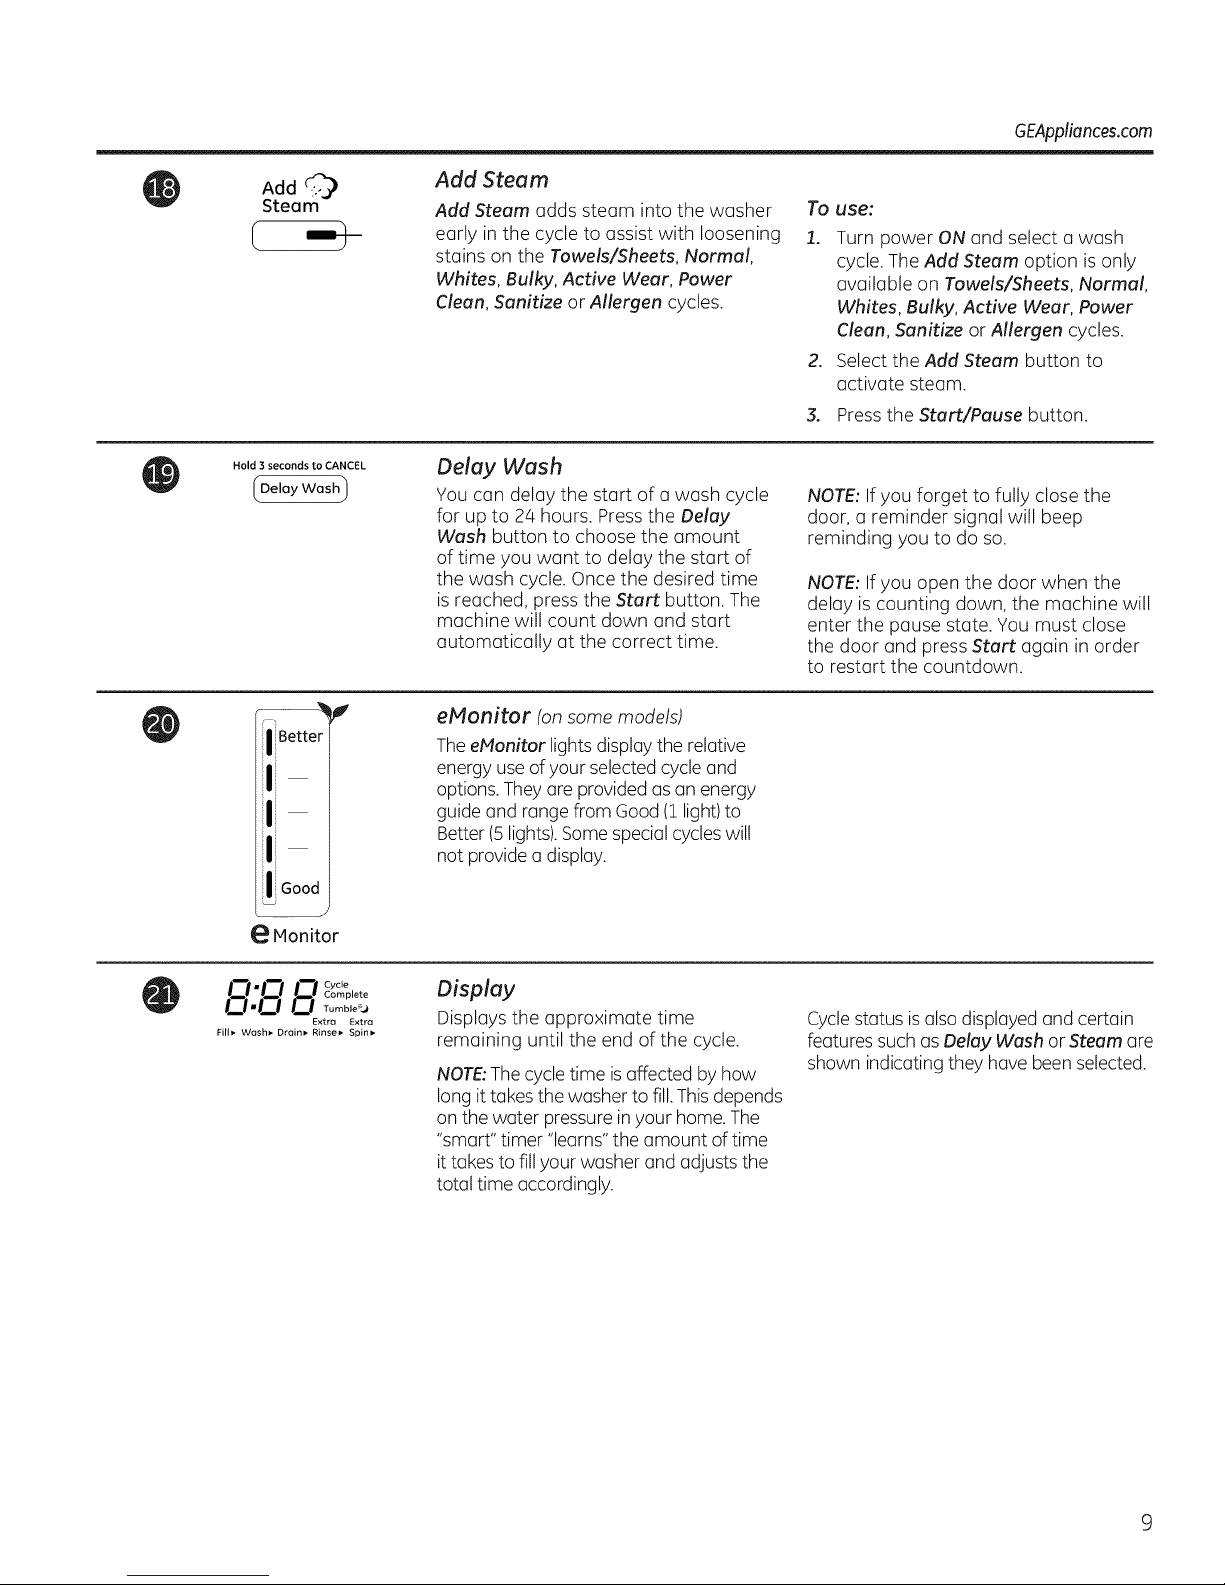
eMonitor (on some models)
TheeNonitor lights display the relative
energy useof your selected cycle and
options.They areprovided as an energy
guide and range from Good(1 light)to
Better (5 lights).Somespecial cycleswill
not provide a display.
To
use:
1.
Turn power ON and select a wash
cycle. The Add Steam option is only
available on Towels/Sheets, Normal,
Whites, Bulky, Active Wear, Power
Clean, Sanitize or Allergen cycles.
o
Select the Add Steam button to
activate steam.
3.
Press the Start/Pause button.
NOTE:Ifyou forget to fully close the
door, a reminder signal will beep
reminding you to do so.
NOTE: If you open the door when the
delay is counting down, the machine will
enter the pause state. You must close
the door and press Start again in order
to restart the countdown.
e Monitor
N-I-I I-I cyo,o
Ci.Ci Ci
Filt_ Wash_ Droin_ Rinse_ Spin_
Complete
Extro Extra
Display
Displays the approximate time
remaining until the end of the cycle.
NOTE:Thecycletime isaffected by how
long it takesthe washer to fill.Thisdepends
on the water pressurein your home. The
"smart" timer "learns" the amount of time
it takes to fillyour washer and adjuststhe
total time accordingly.
Cyclestatus isalso displayed and certain
features such asDelay Wash or Steam are
shown indicating they have been selected.

About the washer features.
The Dispenser Drawer
Slowlyopen the dispenser drawer by pulling
it out until it stops.
After adding laundry products,slowlyclose
the dispenserdrawer.Closingthe drawer
too quicklycouldresult in earlydispensing
of the bleach,fabric softener or detergent.
Youmay seewater inthe bleachand fabric
softenercompartmentsat the end of the cycle.
Thisisa resultof theflushing/siphoningaction
and ispart of the normaloperationof the
washer.
Useonly HEHigh-Efficiency
detergent.
Addpre-washto
thislocation
Detergent __
selection_,_lns_lll
NOTE:Useonly liquid or powder HE
detergents and additives in the dispenser
drawer. Laundry detergent packets
should only be added directly to the
wash tub following the manufacturer's
directions.
The Prewash Compartment
Onlyusethe prewashcompartment ifyou
are selectingthe PreWash or PreSoak
cyclefor heavilysoiledclothes.Add
measureddetergent or prewashadditiveto
the backleftprewashcompartment ofthe
dispenserdrawer.
Detergentor prewashadditive isflushed
from the dispenserinthe PreWash or
PreSoak cycle (ifselected).
DO NOT put detergent packets in the
dispenser drawer.
NOTE: Liquid detergent will drain
into the washer basket as it is added.
m
Detergentusagemay needto be adjusted
for watertemperature,water hardness,size
and soillevelof the load.Avoidusingtoo
much detergent inyour washeras it can
leadto oversudsinganddetergent residue
being left on the clothes.
10
For HE powder F-_
detergent
Detergent cup
remove the
andaddpowder
here \
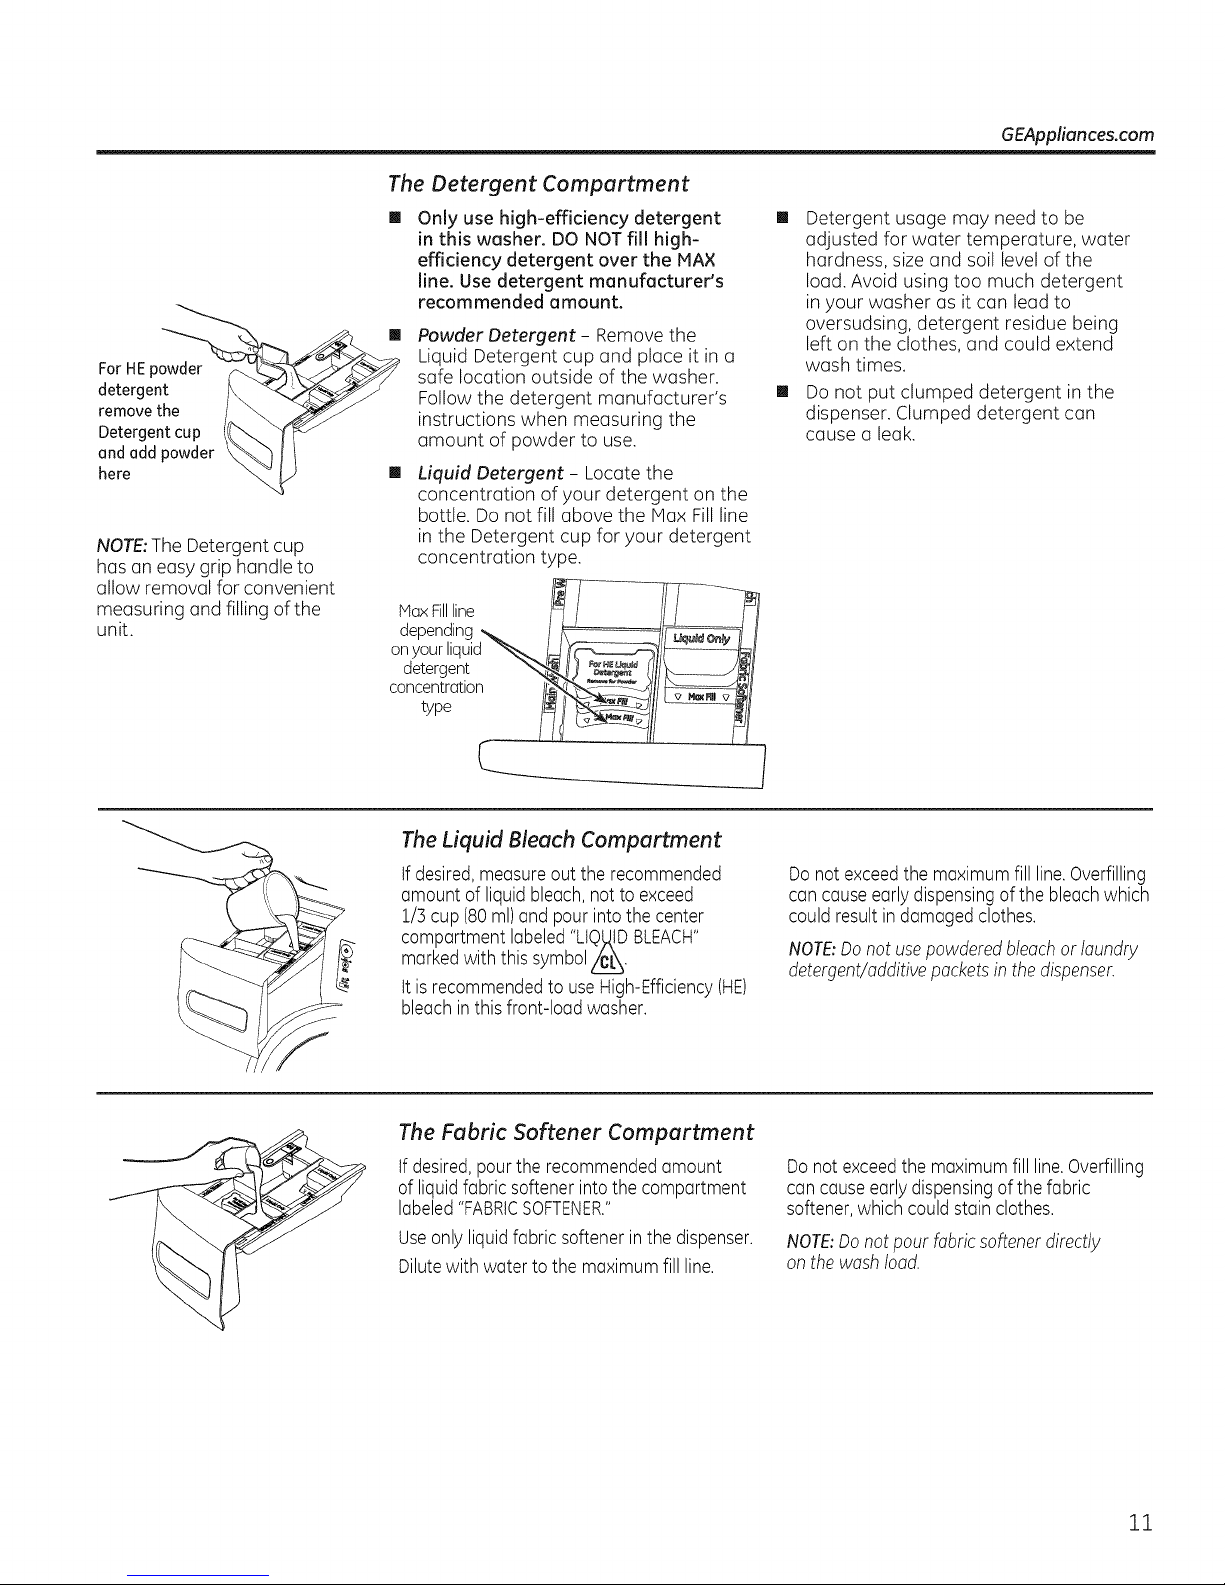
NOTE:The Detergent cup
has an easy grip handle to
allow removal for convenient
measuring and filling of the
unit.
The Detergent Compartment
[]
Only use high-efficiency detergent
in this washer. DO NOT fill high-
efficiency detergent over the MAX
line. Use detergent manufacturer's
recommended amount.
Powder Detergent - Remove the
Liquid Detergent cup and place it in a
safe location outside of the washer.
Follow the detergent manufacturer's
instructions when measuring the
amount of powder to use.
Liquid Detergent - Locate the
concentration of your detergent on the
bottle. Do not fill above the Max Fillline
in the Detergent cup for your detergent
concentration type.
MaxFillline /_
depending_._ /N =//_ H
onyourliquid "%.--_/__l/_/d
detergent "_'___ _///__/
c°ncentratl°n /__ _dl/__/H
type '_"_
GEAppliances.com
Detergent usage may need to be
adjusted for water temperature, water
hardness, sizeand soil level of the
load. Avoid using too much detergent
in your washer as it can lead to
oversudsing, detergent residue being
left on the clothes, and could extend
wash times.
Do not put clumped detergent in the
dispenser. Clumped detergent can
cause a leak.
The Liquid Bleach Compartment
tf desired,measureout the recommended
amount of liquidbleach,notto exceed
1/3cup (80ml)and pour into the center
compartment labeled"LIQ_tDBLEACH"
markedwith this symbol/___.
tt isrecommendedto useHigh-Efficiency(HE)
bleachin thisfront-load washer.
The Fabric Softener Compartment
tf desired,pour the recommendedamount
of liquidfabric softenerinto thecompartment
labeled"FABRICSOFTENER."
Useonly liquidfabric softenerin the dispenser.
Dilutewith water to the maximumfill line.
Donot exceedthe maximumfill line.Overfilling
cancauseearlydispensingof the bleachwhich
couldresult indamagedclothes.
NOTE:Donot usepowderedbleachor laundry
detergent/additivepacketsinthe dispenser.
Donot exceedthe maximumfill line.Overfilling
cancauseearlydispensingof thefabric
softener,which couldstain clothes.
NOTE:Donotpourfabricsoftenerdirectly
on thewash load.
12
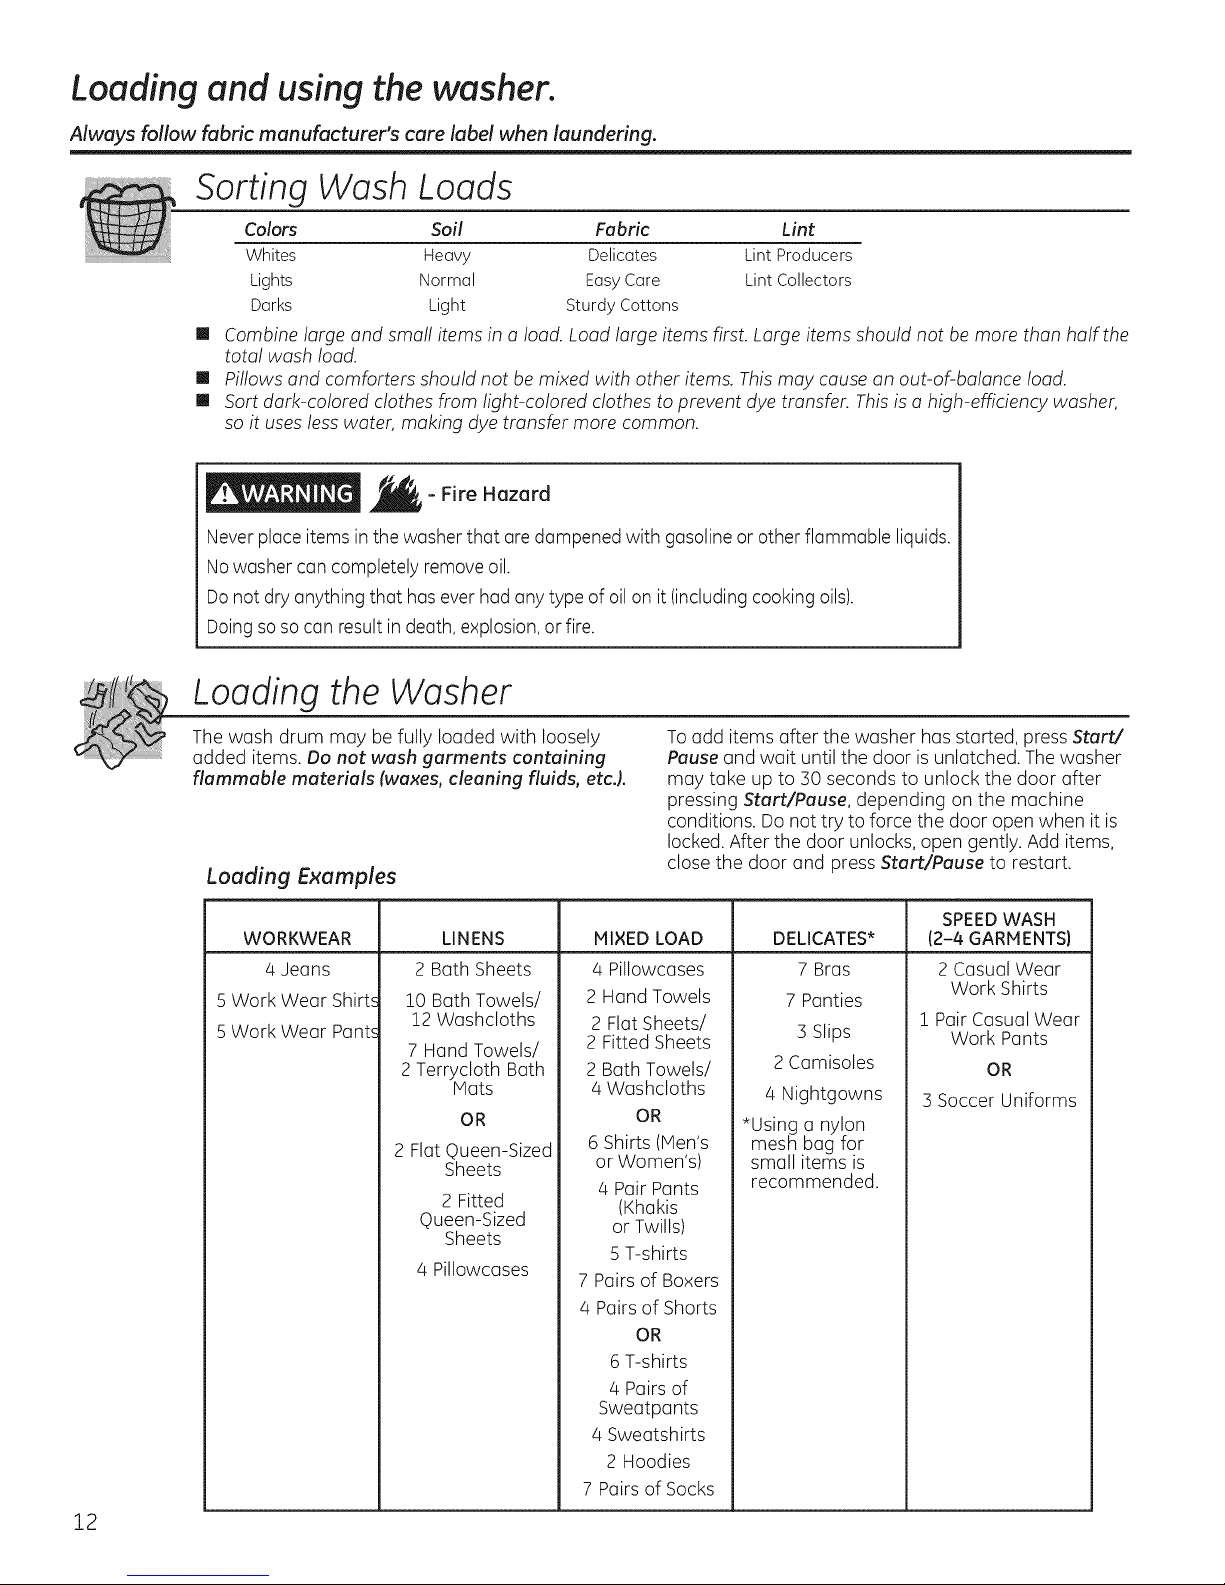
Loadingand usingthewasher.
Always follow fabric manufacturer's care label when laundering.
Sorting
Colors
Whites
Lights
Darks
[]
Combine large and small items in a load. Load large items first. Large items should not be more than ha#the
total wash load.
[]
Pillows and comforters should not be mixed with other items. This may cause an out-of-balance load.
[]
Sort dark-colored clothes from lighbcolored clothes to prevent dye transfer. This is a high-efficiency washer,
so it uses less water, making dye transfer more common.
Never place items in the washer that are dampened with gasoline orother flammable liquids.
Nowasher can completely remove oil.
Donot dry anything that has ever hadany type of oilon it (including cooking oils).
Doing sosocan result in death,explosion,orfire.
Wash Loads
Soil Fabric Lint
Heavy Delicates LintProducers
Normal EasyCare LintCollectors
Light SturdyCottons
- Fire Hazard
Loading the Washer
The wash drum may be fully loaded with loosely
added items. Do not wash garments containing
flammable materials (waxes, cleaning fluids, etc.).
Loading Examples
To add items after the washer has started, press Start/
Pause and wait until the door is unlatched. The washer
may take up to 30 seconds to unlock the door after
pressing Start/Pause, depending on the machine
conditions. Do not try to force the door open when it is
locked. After the door unlocks, open gently. Add items,
close the door and press Start/Pause to restart.
12
WORKWEAR
4 Jeans
5 Work Wear Shirts
5 Work Wear Pants
LINENS
2 Bath Sheets
10 Bath Towels/
12 Washcloths
7 Hand Towels/
2 Terrycloth Bath
Mats
OR
2 Flat Queen-Sized
Sheets
2 Fitted
Queen-Sized
Sheets
4 Pillowcases
MIXEDLOAD
/4Pillowcases
2 Hand Towels
2 Flat Sheets/
2 Fitted Sheets
2 Bath Towels/
4 Washcloths
OR
6 Shirts (Men's
or Women's)
4 Pair Pants
(Khakis
or Twills)
5 T-shirts
7 Pairs of Boxers
/4Pairsof Shorts
OR
6 T-shirts
4 Pairs of
Sweatpants
/4Sweatshirts
2 Hoodies
7 Pairs of Socks
DELICATES*
7 Bras
7 Panties
3 Slips
2 Camisoles
4 Nightgowns
*Using a nylon
mesh bag for
small items is
recommended.
SPEEDWASH
(2-4 GARMENTS)
2 Casual Wear
Work Shirts
i Pair Casual Wear
Work Pants
OR
3 Soccer Uniforms
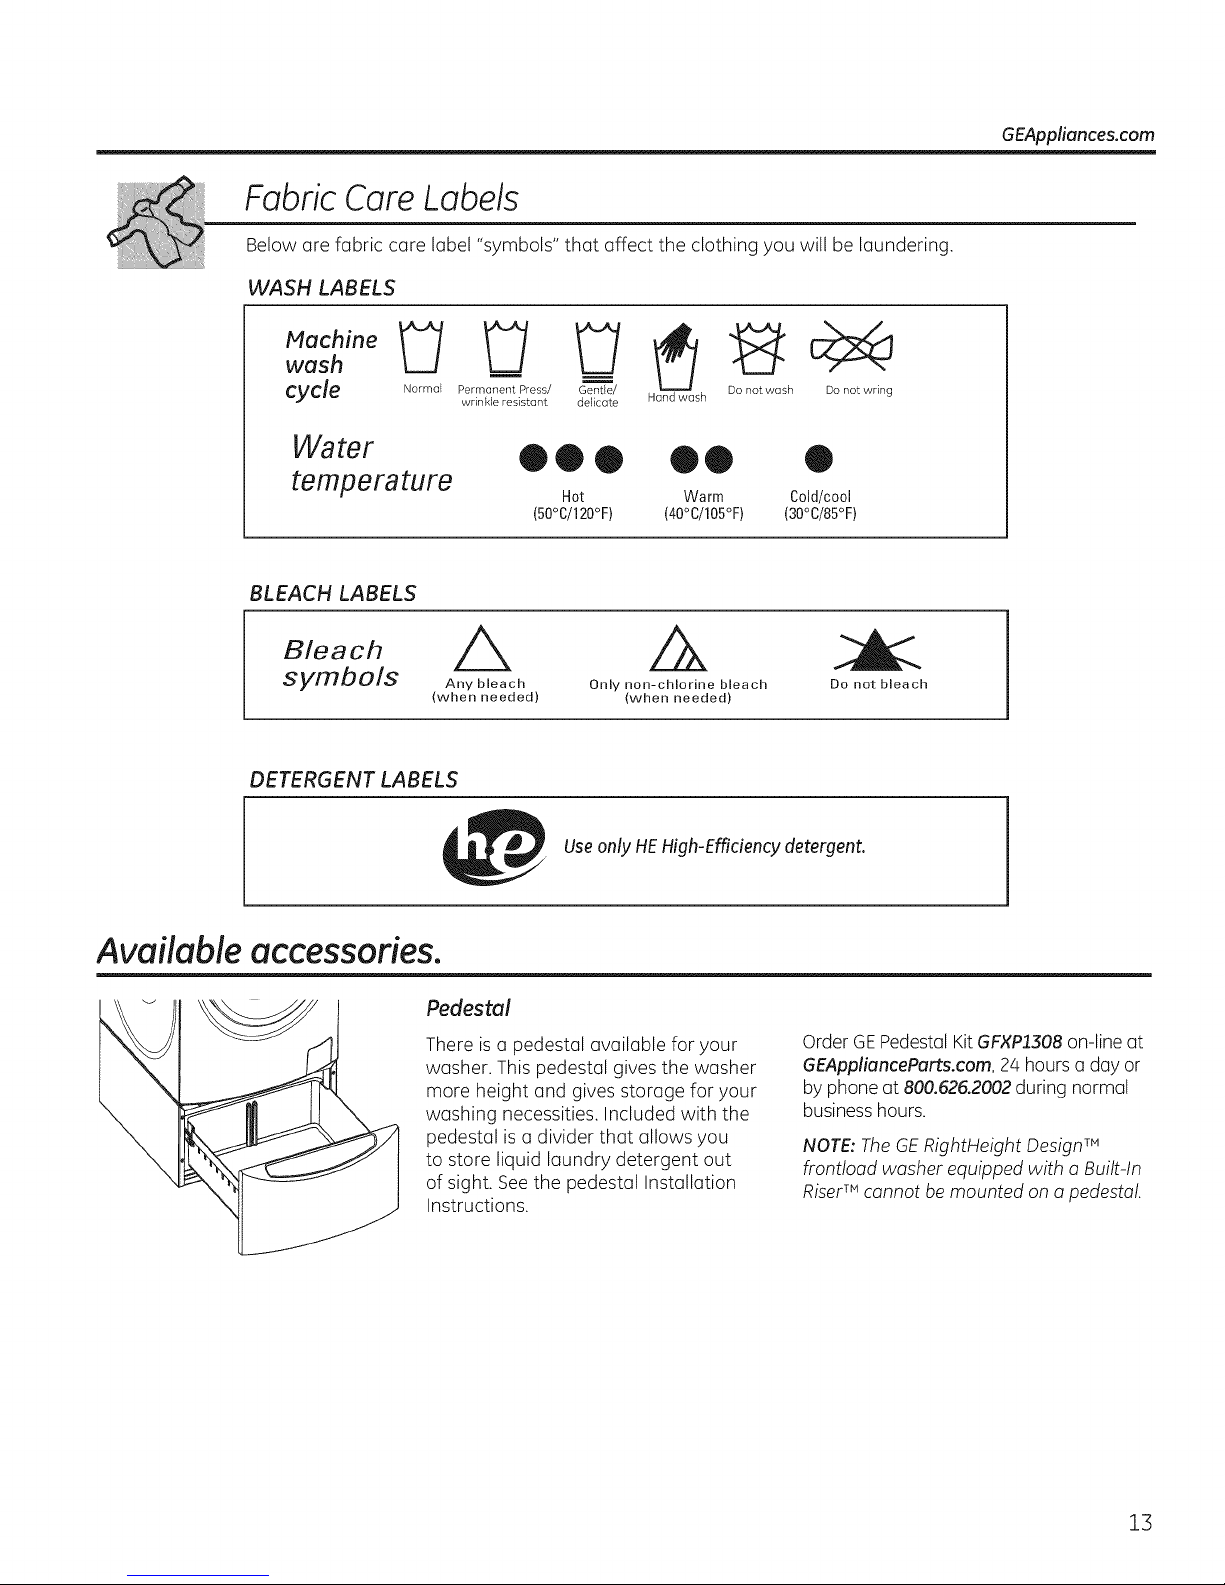
FabricCare Labels
Below are fabric care label "symbols" that affect the clothing you will be laundering.
WASH LABELS
g S
cycle Normal Permanent Press/ Gentled/ Do notwash Do not wring
Water • • • • • •
temperature Hot Warm Cold/cool
BLEACH LABELS
Bleach_,. , A A
symuois Any bleach Only non-chlorine bleach
wrinkle resistant delicate Hand wash
(50°C/120°F) (40°C/105°F) (30°C/85°F)
Do not bleach
(when needed) (when needed)
GEAppliances.com
DETERGENT LABELS
Available accessories.
Useonly HEHigh-Efficiency detergent.
Pedestal
There is a pedestal available for your
washer, This pedestal gives the washer
more height and gives storage for your
washing necessities, Included with the
pedestal isa divider that allows you
to store liquid laundry detergent out
of sight. Seethe pedestal Installation
Instructions.
Order GEPedestalKit GFXP1308on-line at
GEAppliuncePurts.com, 24 hours a day or
by phone at 800.525.2002during normal
businesshours.
NOTE:TheGERightHeight DesignTM
frontload washer equipped with a Built-In
RiserTM cannot be mounted ona pedestal.
13
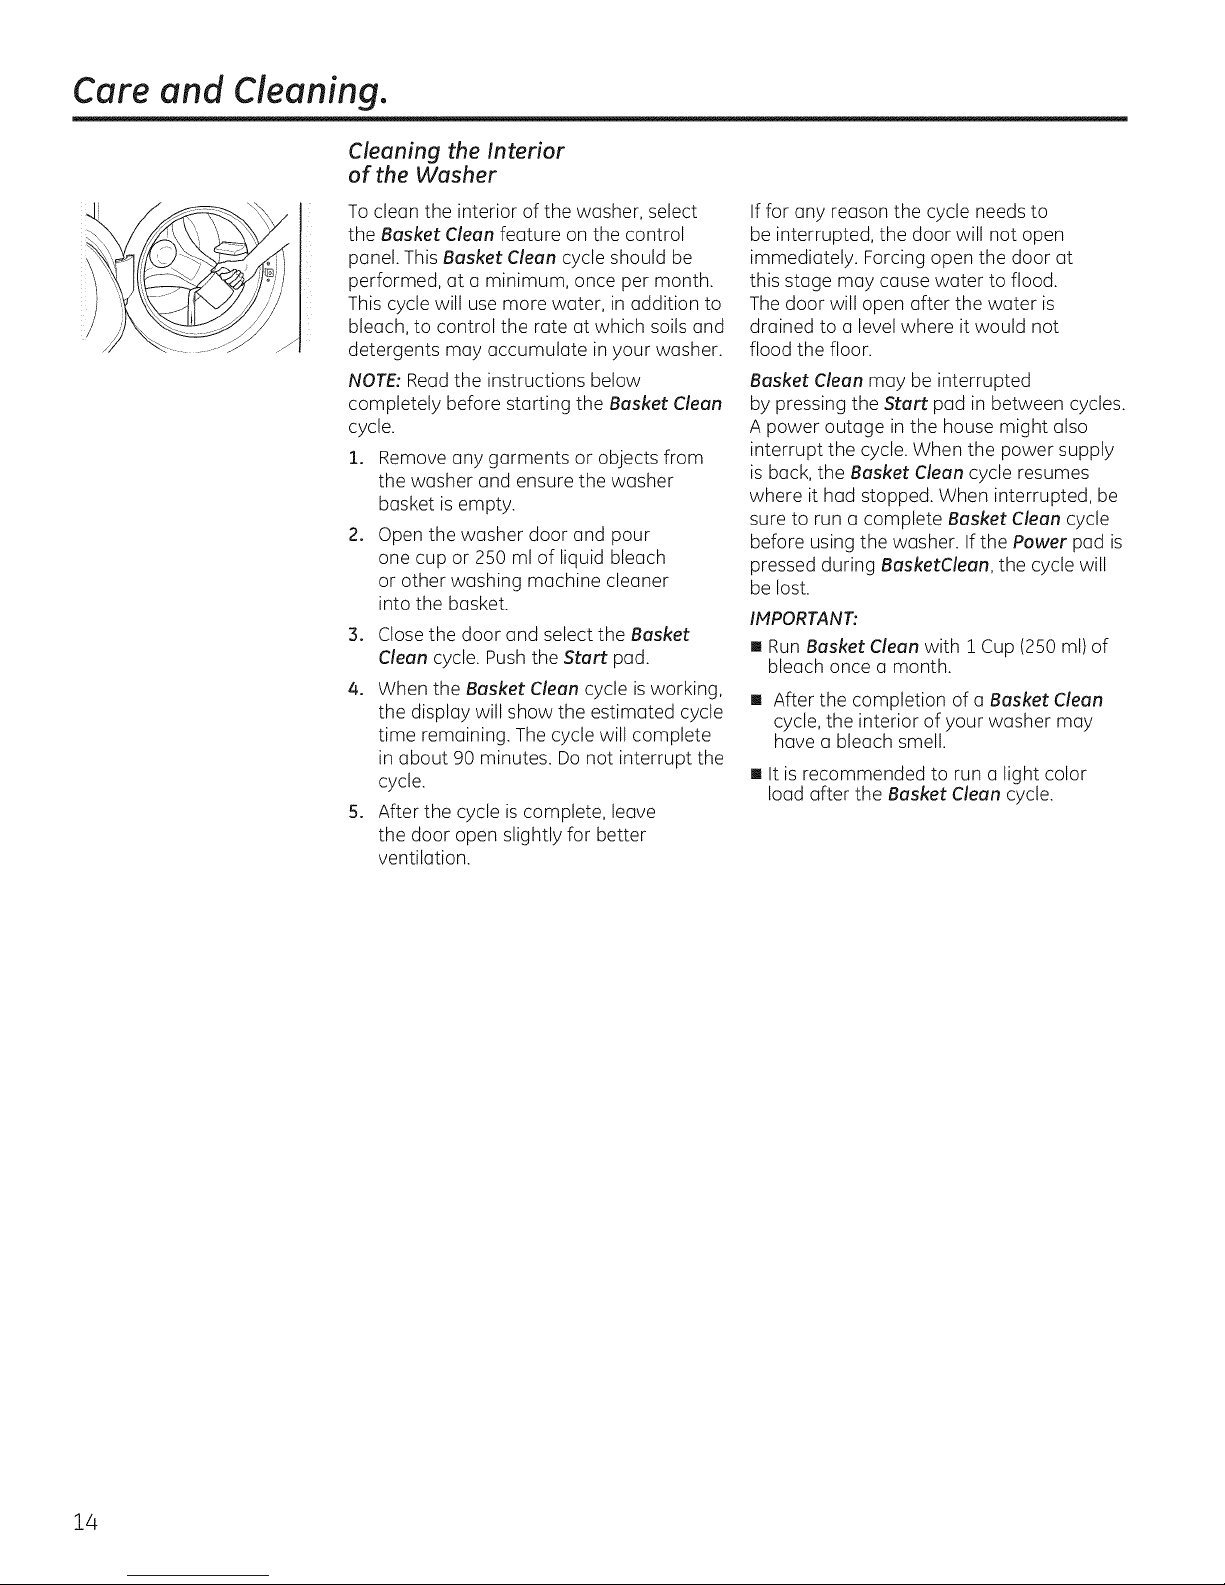
Care and Cleaning.
Cleaning the Interior
of the Washer
Toclean the interior of the washer, select
the Basket Clean feature on the control
panel. This Basket Clean cycle should be
performed, at a minimum, once per month.
This cycle will use more water, in addition to
bleach, to control the rate at which soils and
detergents may accumulate in your washer.
NOTE:Read the instructions below
completely before starting the Basket Clean
cycle.
1. Remove any garments or objects from
the washer and ensure the washer
basket is empty.
2. Open the washer door and pour
one cup or 250 ml of liquid bleach
or other washing machine cleaner
into the basket.
3. Close the door and select the Basket
Clean cycle. Pushthe Start pad.
4. When the Basket Clean cycle is working,
the display will show the estimated cycle
time remaining. The cycle will complete
in about 90 minutes. Do not interrupt the
cycle.
5. After the cycle is complete, leave
the door open slightly for better
ventilation.
If for any reason the cycle needs to
be interrupted, the door will not open
immediately. Forcing open the door at
this stage may cause water to flood.
The door will open after the water is
drained to u level where it would not
flood the floor.
Basket Clean may be interrupted
by pressing the Start pad in between cycles.
A power outage in the house might also
interrupt the cycle. When the power supply
is buck, the Basket Clean cycle resumes
where it had stopped. When interrupted, be
sure to run u complete Basket Clean cycle
before using the washer. If the Power pad is
pressed during BasketClean, the cycle will
be lost.
IMPORTANT:
[] Run Basket Clean with 1 Cup (250 ml) of
bleach once a month.
[] After the completion of u Basket Clean
cycle, the interior of your washer may
have u bleach smell.
[] It is recommended to run a light color
load after the Basket Clean cycle.
14
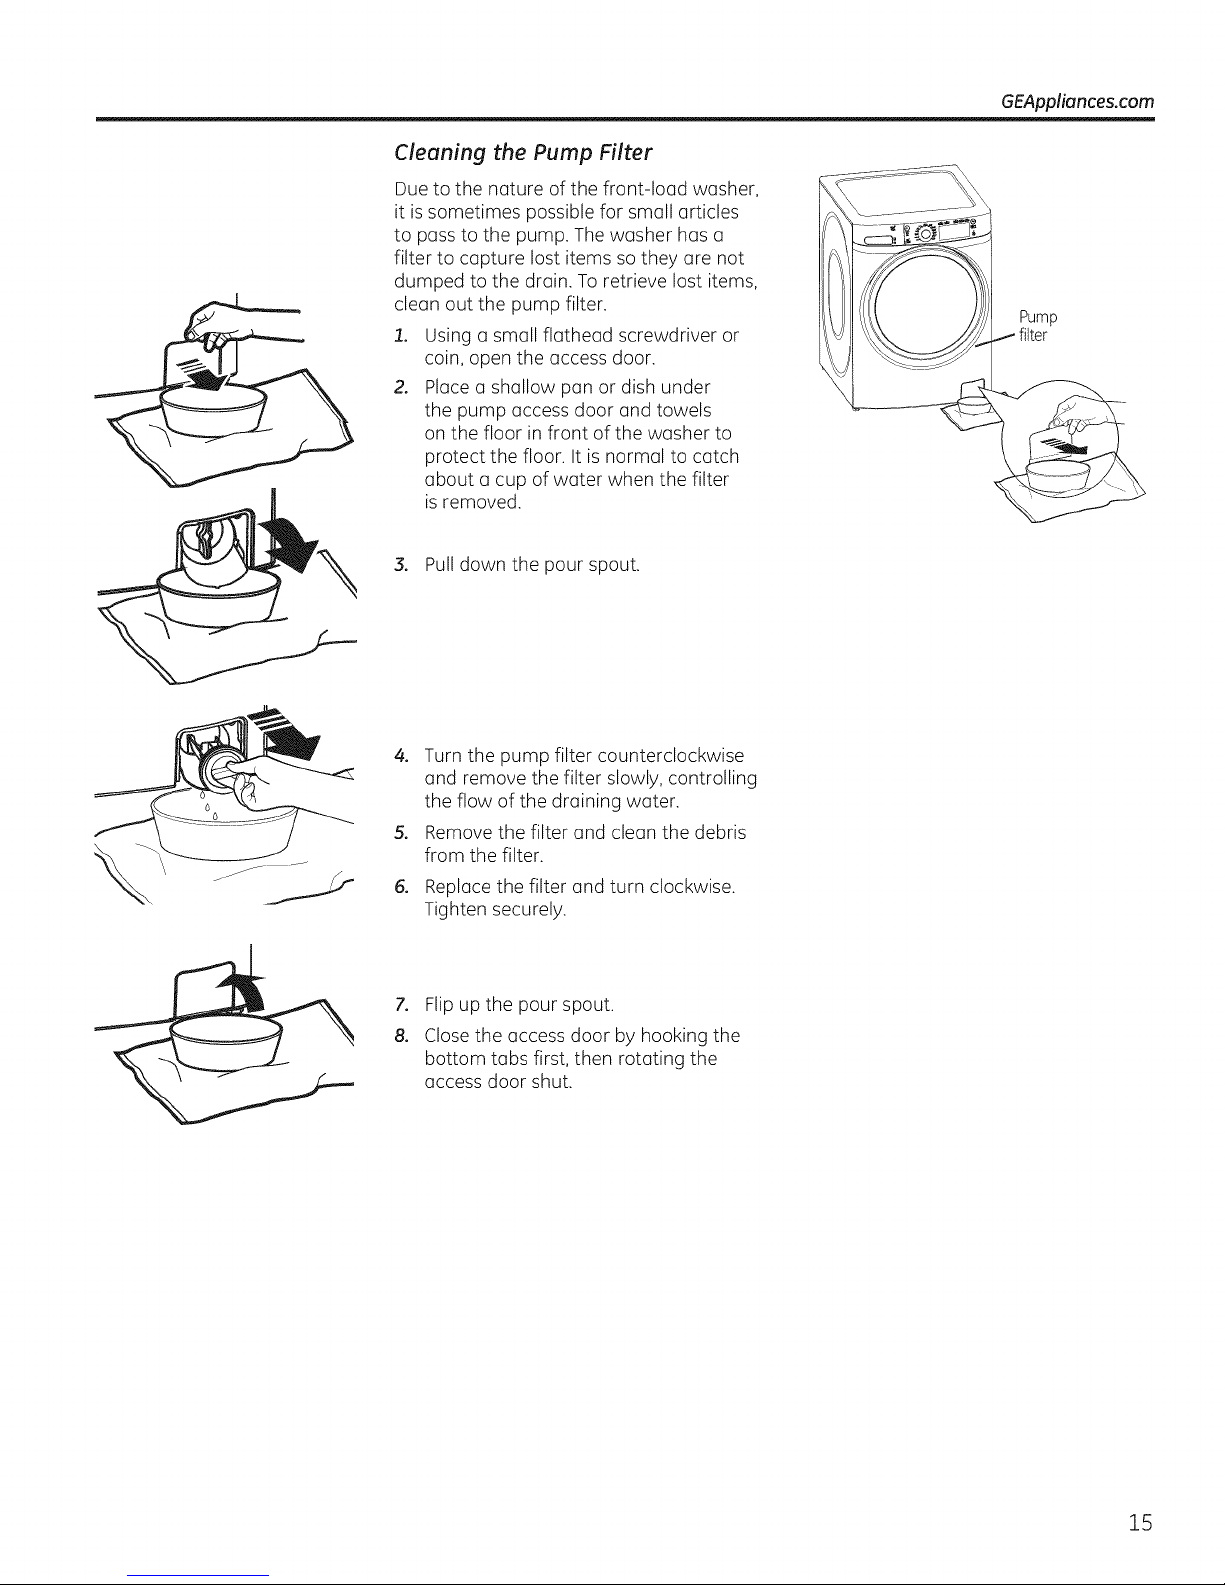
Cleaning the Pump Filter
Due to the nature of the front-lo(]d washer,
it is sometimes possible for small (]rticles
to pass to the pump. The washer has a
filter to capture lost items so they (]re not
dumped to the dr(]in. To retrieve lost items,
cle(]n out the pump filter.
1. Using a small flathead screwdriver or
coin, open the access door.
2. Pl(]ce (] shallow p(]n or dish under
the pump (]ccess door and towels
on the floor in front of the washer to
protect the floor. It is normal to catch
(]bout (] cup of w(]ter when the filter
is removed.
3. Pull down the pour spout.
GEAppliances.com
Pump
f filter
o
Turn the pump filter counterclockwise
(]nd remove the filter slowly, controlling
the flow of the dr(]ining w(]ter.
5o
Remove the filter (]nd cle(]n the debris
from the filter.
6.
Repl(]ce the filter (]nd turn clockwise.
Tighten securely.
o
Flip up the pour spout.
8.
Close the (]ccess door by hooking the
bottom t(]bs first, then rot(]ting the
(]ccess door shut.
15
Care and Cleaning.
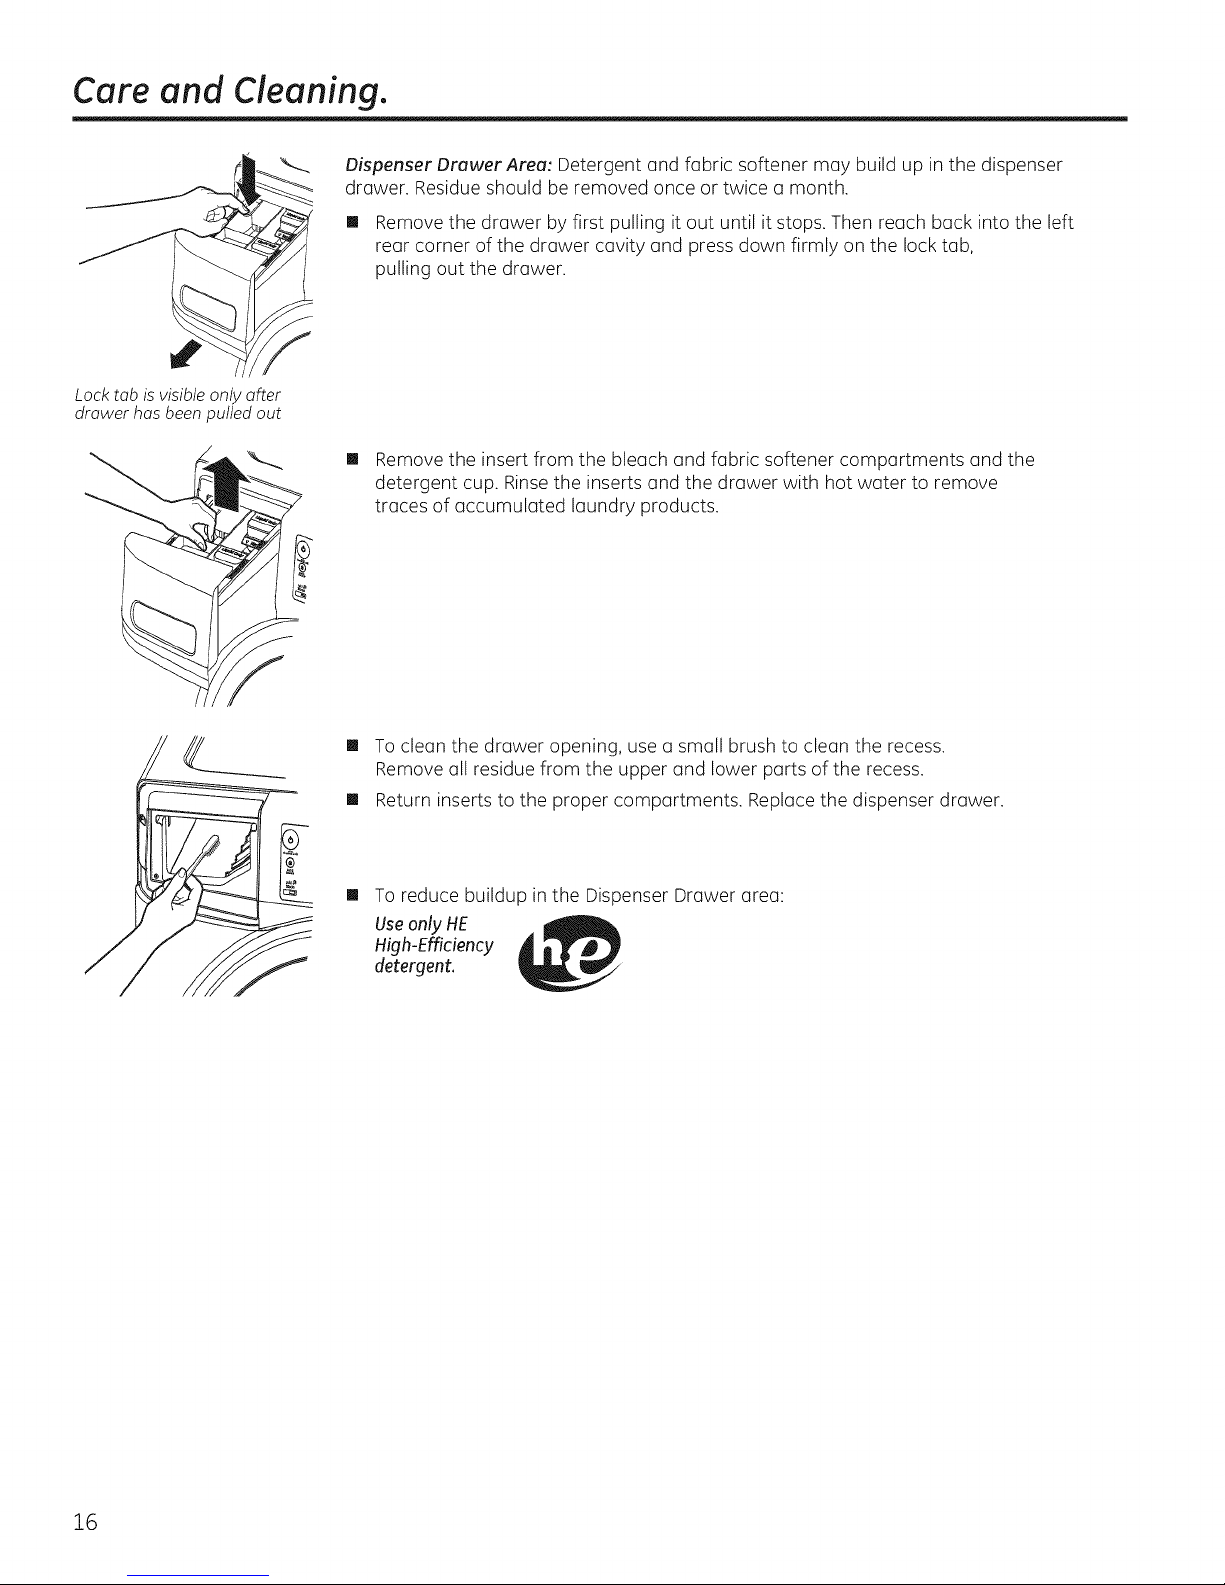
Dispenser Drawer Area: Detergent and fabric softener may build up in the dispenser
drawer. Residue should be removed once or twice a month.
[] Remove the drawer by first pulling it out until it stops. Then reach back into the left
Lock tab is visible only after
drawer has been pulled out
[]
rear corner of the drawer cavity and press down firmly on the lock tab,
pulling out the drawer.
Remove the insert from the bleach and fabric softener compartments and the
detergent cup. Rinsethe inserts and the drawer with hot water to remove
traces of accumulated laundry products.
[] To clean the drawer opening, use a small brush to clean the recess.
Remove all residue from the upper and lower parts of the recess.
[] Return inserts to the proper compartments. Replace the dispenser drawer.
[]
To reduce buildup in the Dispenser Drawer area:
Useonly HE
High-Efficiency
detergent.
16

GEAppliances.com
Cleaning the Door Gasket
Open the washer door. Using both hands, press down the door gasket. Remove any
foreign objects if found trapped inside the gasket. Make sure there is nothing blocking the
holes behind the gasket.
While holding down the door gasket, inspect the interior gasket by pulling it down with
your fingers. Remove any foreign objects if found trapped inside this gasket. Make sure
there is nothing blocking the holes behind the gasket.
When you are finished cleaning the door gasket, remove your hands and the gaskets will
return to the operating position.
17
Instailati
Washer
I str cti s
If you have any questions, call 800.GE.CARES(800.432.2737)
or visit our Website at: GEAppliances.com
In Canada, coil 1.800.561.3344 or visitwww.GEAppliances.ca
A his is the safety alert symbol. This symbol alerts you to potential hazards that can kill you or hurt you and others.
All safety messages will follow the safety alert symbol and the word "DANGER","WARNING", or "CAUTION". These
words are defined as:
Indicates a hazardous situation which, if not avoided, will result in death or serious injury.
Indicates a hazardous situation which, if not avoided, could result in death or serious injury.
_ Indicates a hazardous situation which, if not avoided, could result in minor or moderate injury.
BEFORE YOU BEGIN
Read these instructions completely and carefully.
. IMPORTANT- Savetheseinstructions
for local inspector's use.
. IMPORTANT - Observeallgoverning
codes and ordinances.
, Note to Installer - Be sure to leave these
instructions with the Consumer.
, Note to Consumer - Keepthese instructions
for future reference.
, Skill level - Installation of this appliance requires
basic mechanical and electrical skills.
, Completion time - 1-3 hours
. Proper installation isthe responsibility of the installer.
. Product failure due to improper installation is not
covered under the Warranty.
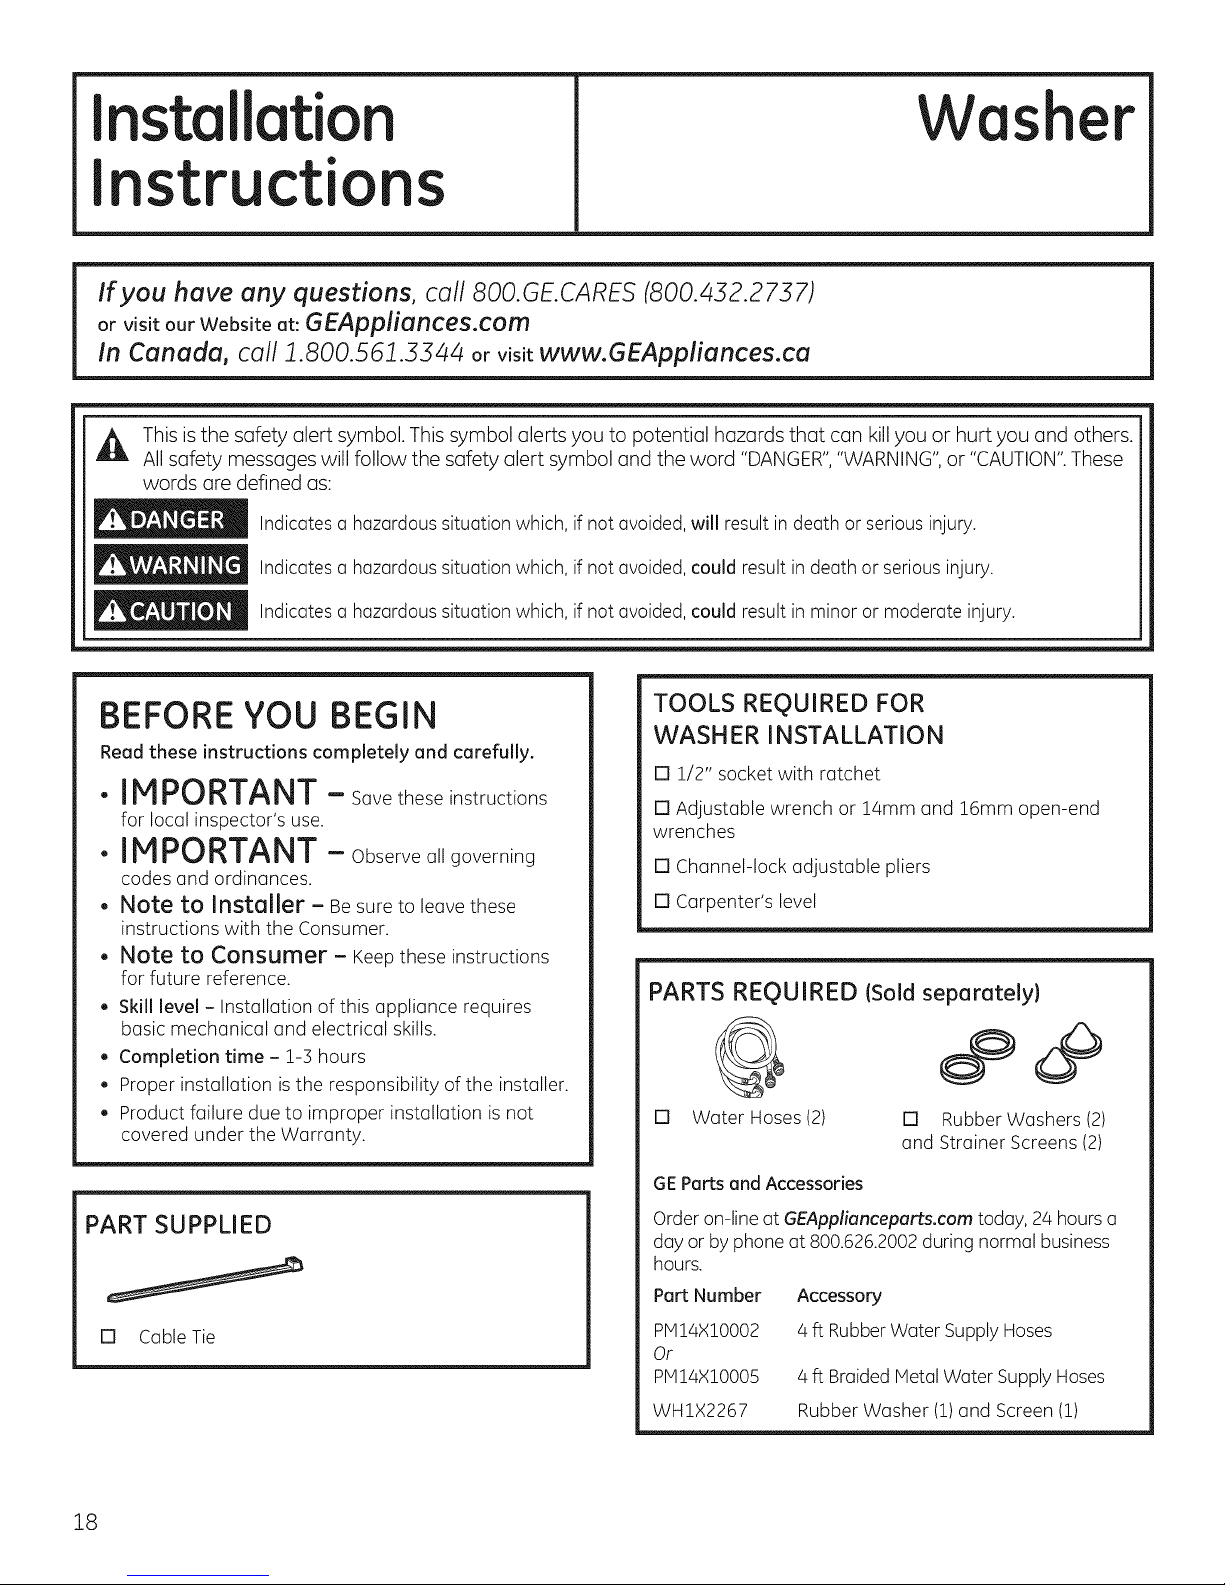
PART SUPPLIED
[] Cable Tie
TOOLS REQUIRED FOR
WASH ER INSTALLATION
[] 1/2" socket with ratchet
[] Adjustable wrench or 14mm and 16mm open-end
wrenches
[] Channel-lock adjustable pliers
[] Carpenter's level
PARTS REQUIRED (Sold separately)
o
[] Water Hoses (2) [] Rubber Washers (2)
and Strainer Screens (2)
GE Parts and Accessories
Order on-line at GEApplianceparts.com today, 24 hours a
day or by phone at 800.626.2002 during normal business
hours.
Part Number
PM14X10002
Or
PH14X10005
WHIX2267
Accessory
4 ff Rubber Water Supply Hoses
4 ft Braided MetalWater Supply Hoses
Rubber Washer (1)and Screen (1)
18
Installation Instructions
LOCATION OF YOUR WASHER
Do Not Install the Washer:
1.In an area exposed to dripping water or outside
weather conditions. The ambient temperature
should never be below 60°F (15.6°C)for proper
washer operation.
2. In an area where it will come in contact with curtains or
drapes.
3.On carpet. The floor MUSTbea hard surface with
a maximum slope of 1/2" per foot (1.27cm per
30 cm). To make sure the washer does not vibrate
or move, you may have to reinforce the floor.
NOTE:Iffloor is in poor condition, use 3/4" impregnated
plywood sheet solidly attached to existing floor covering.
IMPORTANT:
Minimum Installation Clearances
. When installed in alcove: Sides, Rear,
Top = O" (0cm)
. When installed in closet: Sides,Rear,
Top = O" (0cm), Front = 1" (2.54cm)
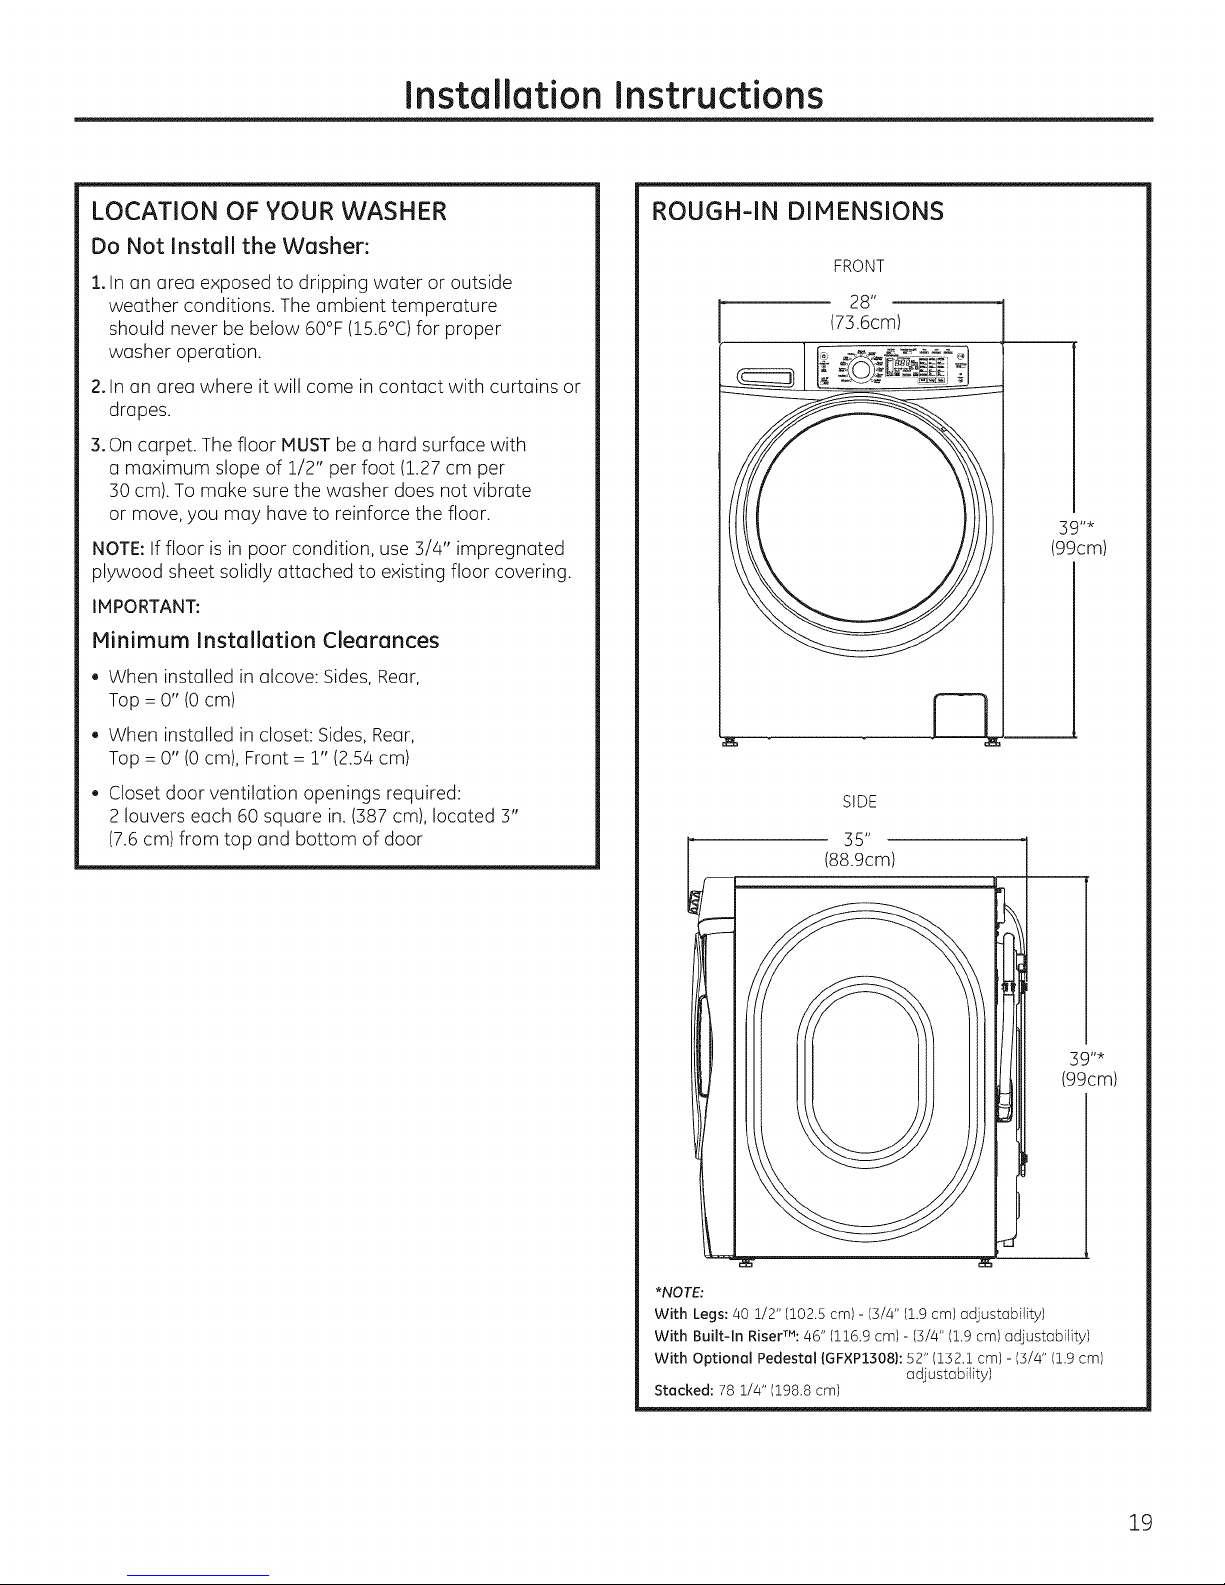
ROUGH-IN DIMENSIONS
FRONT
28"
(73.6cm)
(99cm)
• Closet door ventilation openings required:
2 louvers each 60 square in.(387 cm), located 3"
(7.6cm) from top and bottom of door
SIDE
35"
(88.9cm)
/
*NOTE:
With Legs: 40 1/2" (102.5 cm) - (5/4" (1.9 cm) adjustability)
With Built-In RiserTM:46" 1116.9 cm) - (5/4" 11.9cm) adjustability)
With Optional Pedestal IGF×P:1308):52" (152.1 cm) - (3/4" (1.9 cm)
Stacked: 78 1/4" (198.8 cm)
adjustability)
19
Installation Instructions
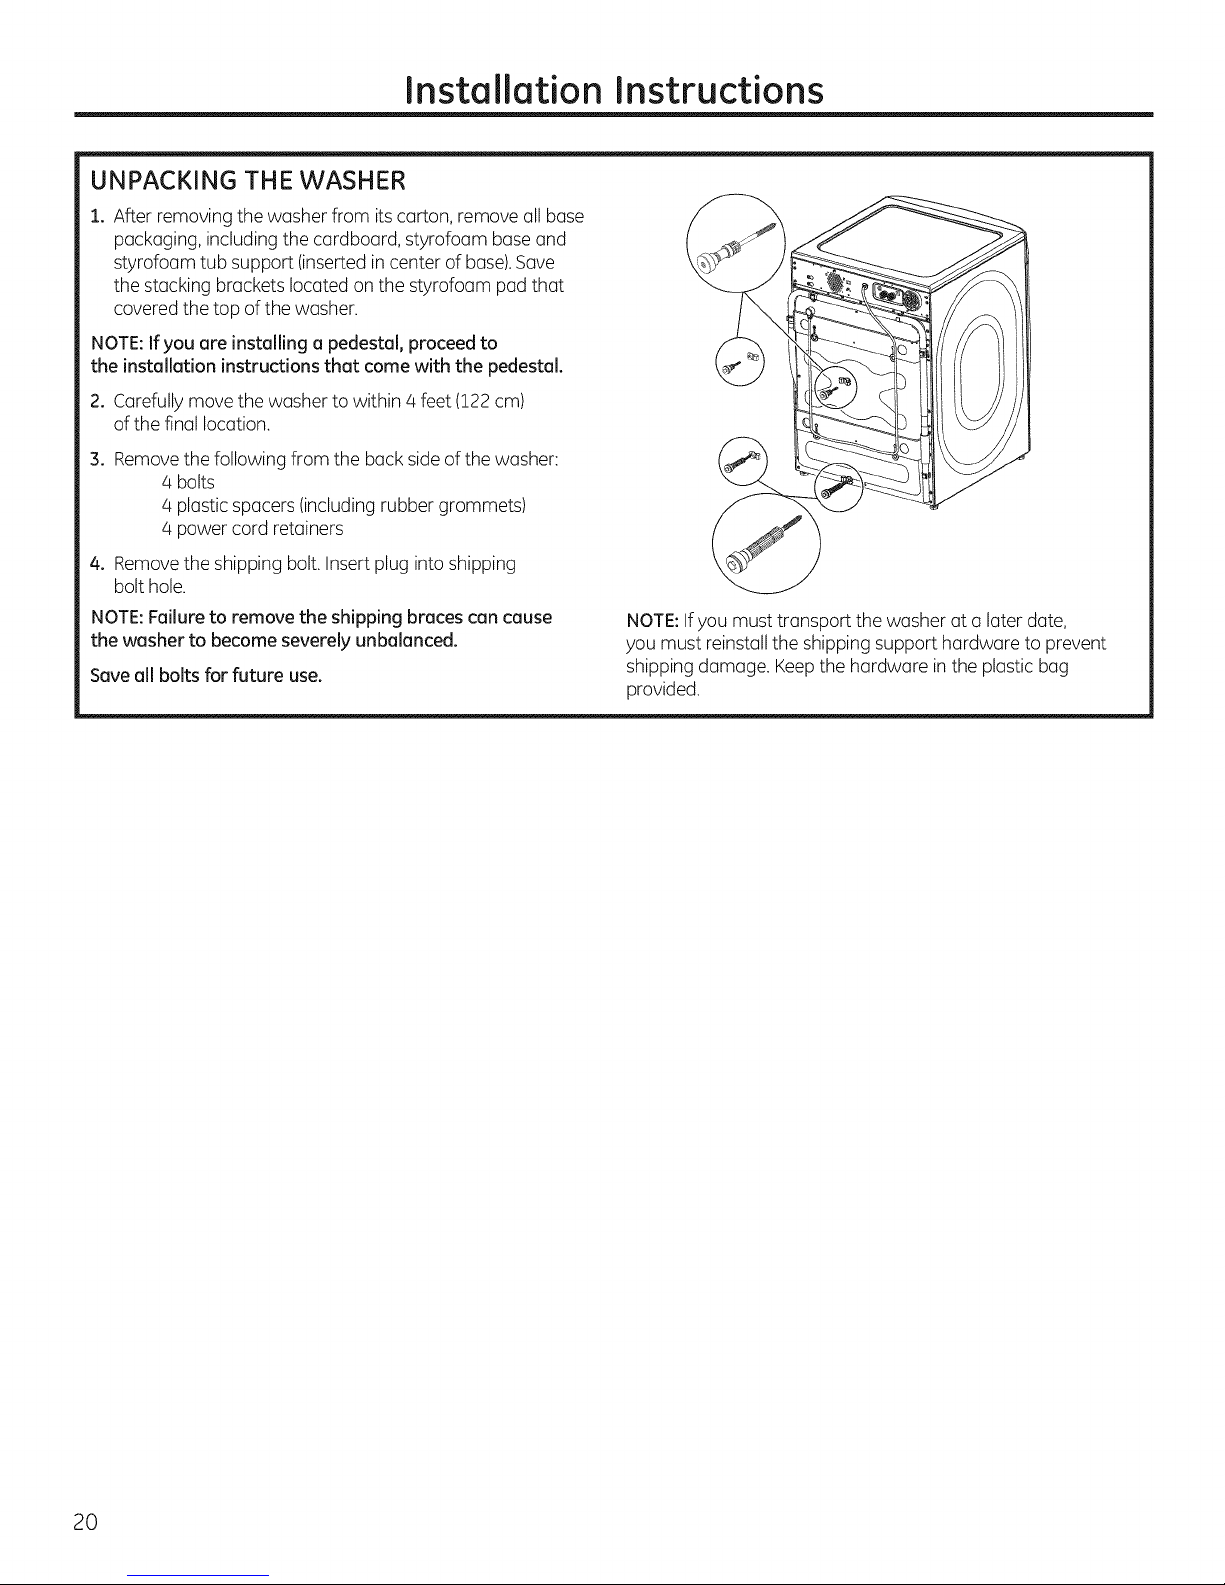
UNPACKING THE WASHER
1. After removing the washer from its carton, remove all base
packaging, including the cardboard, styrofoam baseand
styrofoam tub support (insertedincenter of base).Save
the stacking brackets located on the styrofoam padthat
covered the top of the washer.
NOTE: If you are installing a pedestal, proceed to
the installation instructions that come with the pedestal.
2. Carefullymove the washer to within 4 feet (122cm)
ofthe final location.
.
Removethe following from the back side of the washer:
4 bolts
4 plastic spacers (including rubber grommets)
4 power cord retainers
4. Removethe shipping bolt. Insert plug into shipping
bolt hole.
NOTE:Failure to remove the shipping braces can cause
the washer to become severely unbalanced.
Save all bolts for future use.
NOTE:Ifyou must transport the washer at a later date,
you must reinstallthe shipping support hardware to prevent
shipping damage. Keepthe hardware in the plastic bag
provided.
20
Installation Instructions
ELECTRICAL REQUIREMENTS
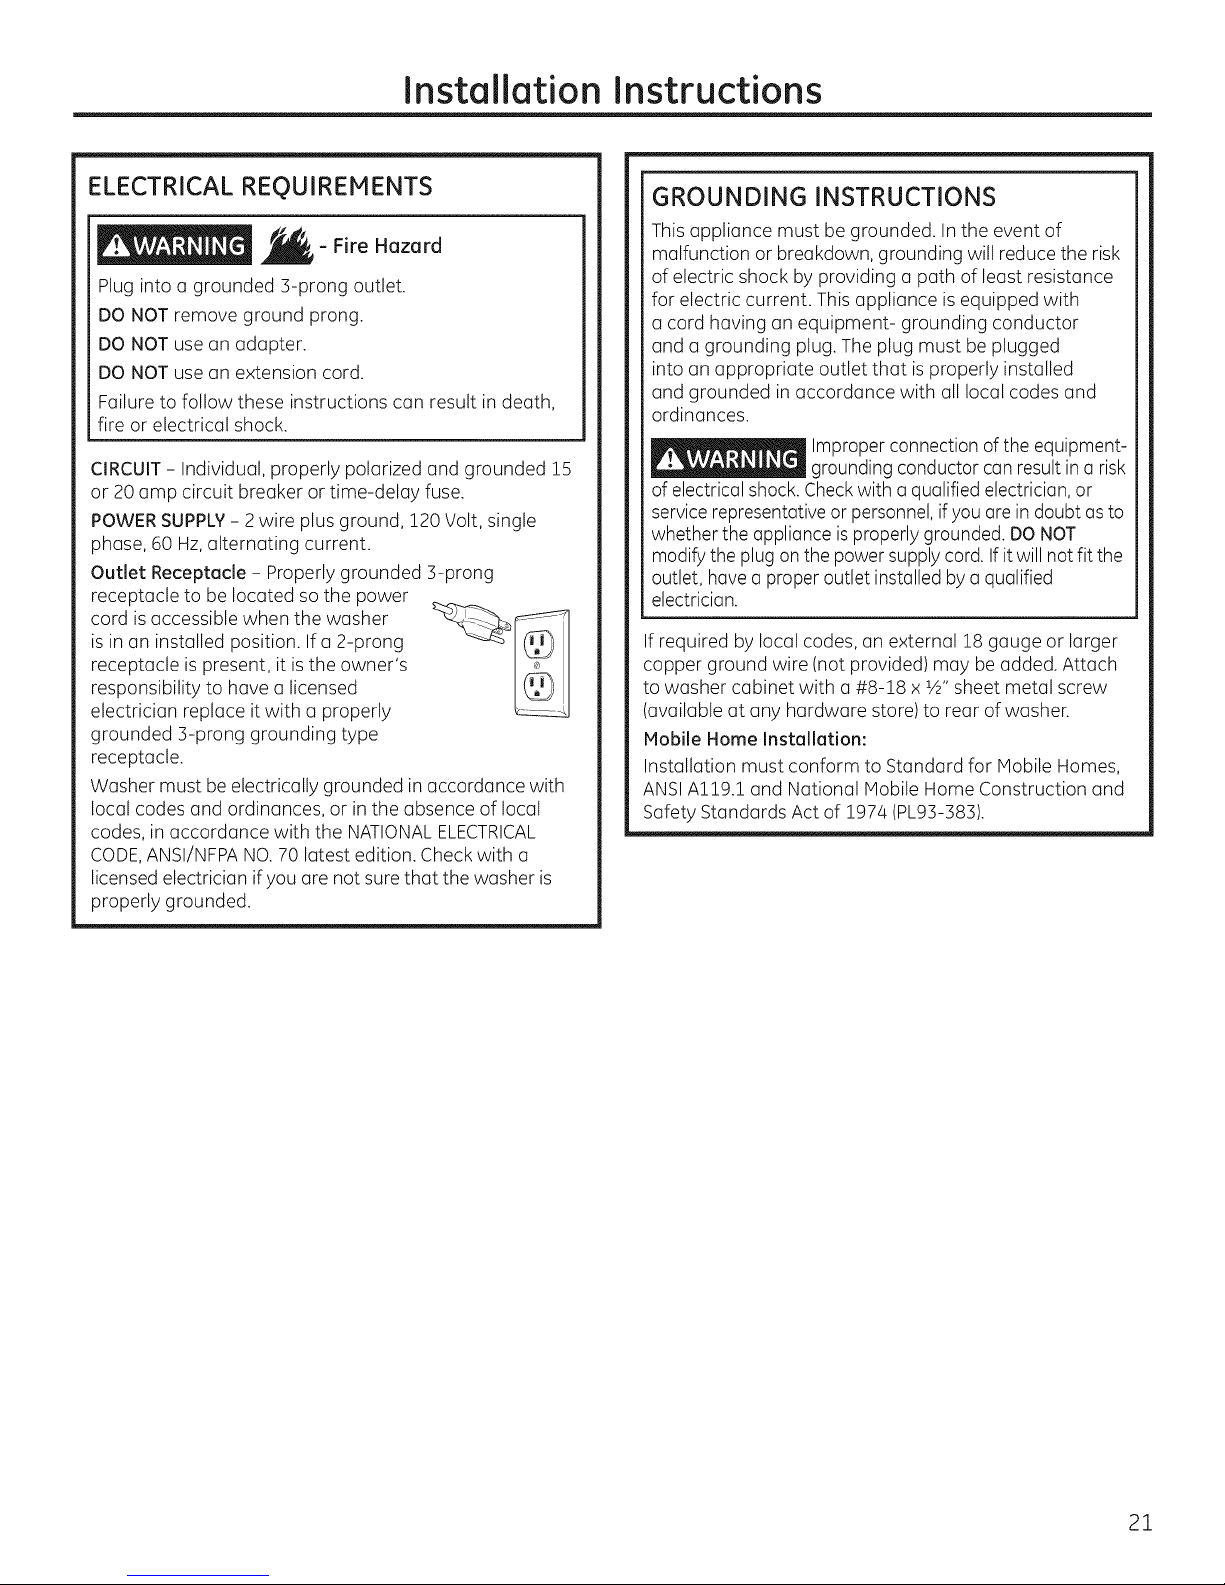
- Fire Hazard
Plug into a grounded 3-prong outlet.
DO NOT remove ground prong.
DO NOT use an adapter.
DO NOT use an extension cord.
Failure to follow these instructions can result in death,
fire or electrical shock.
CIRCUIT- Individual, properly polarized and grounded 15
or 20 amp circuit breaker or time-delay fuse.
POWERSUPPLY- 2 wire plus ground, 120 Volt, single
phase, 60 Hz,alternating current.
Outlet Receptacle - Properly grounded 3-prong
receptacle to be located so the power
cord isaccessible when the washer
is in an installed position. If a 2-prong
receptacle is present, it is the owner's
responsibility to have a licensed
electrician replace it with a properly
grounded 3-prong grounding type
receptacle.
Washer must be electrically grounded in accordance with
local codes and ordinances, or in the absence of local
codes, in accordance with the NATIONALELECTRICAL
CODE,ANSI/NFPANO.70 latest edition. Check with a
licensed electrician ifyou are not sure that the washer is
properly grounded.
GROUNDING INSTRUCTIONS
This appliance must be grounded. In the event of
malfunction or breakdown, grounding will reduce the risk
of electric shock by providing a path of least resistance
for electric current. This appliance is equipped with
a cord having an equipment- grounding conductor
and a grounding plug. The plug must be plugged
into an appropriate outlet that isproperly installed
and grounded inaccordance with all local codes and
ordinances.
Improper connection of the equipment-
grounding conductor can resultinu risk
of electrical shock. Checkwith u qualified electrician, or
service representativeorpersonnel, ifyou arein doubt usto
whether the appliance is properly grounded. DO NOT
modifythe plug on the power supply cord. If it will not fit the
outlet, haveu proper outlet installed byu qualified
electrician.
If required by local codes, an external 18 gauge or larger
copper ground wire (not provided) may beadded. Attach
to washer cabinet with a #8-18 x 1/2"sheet metal screw
(available at any hardware store) to rear of washer.
Mobile Home Installation:
Installation must conform to Standard for Mobile Homes,
ANSIAl19.1 and National Mobile Home Construction and
Safety Standards Act of 1974 (PL93-383).
21
Installation Instructions
WATER SUPPLY REQUIREMENTS
Hot and cold water faucets MUSTbe installed within
42 inches(107 cm)of your washers water inlet.The faucets
MUSTbe 3/4" (1.9cm) garden hose-type so inlet hosescan
be connected. Water pressureMUSTbe between 10 and 120
pounds per square inch.Your water department can advise
you of your water pressure.The hot water temperature
should besetto deliverwater at 120° to 140°F(48°-60°C)
to provide proper Automatic Temperature Control (ATC)
performance.
NOTE:Awater softener is recommended to reduce buildup of
scale insidethe steam generator ifthe home water supply is
very hard.
DRAIN REQUIREMENTS
1. Drain capable of eliminating 17 gals (64.3L)
per minute.
2. Astandpipe diameter of ZZ/4" (3.!8 cm) minimum.
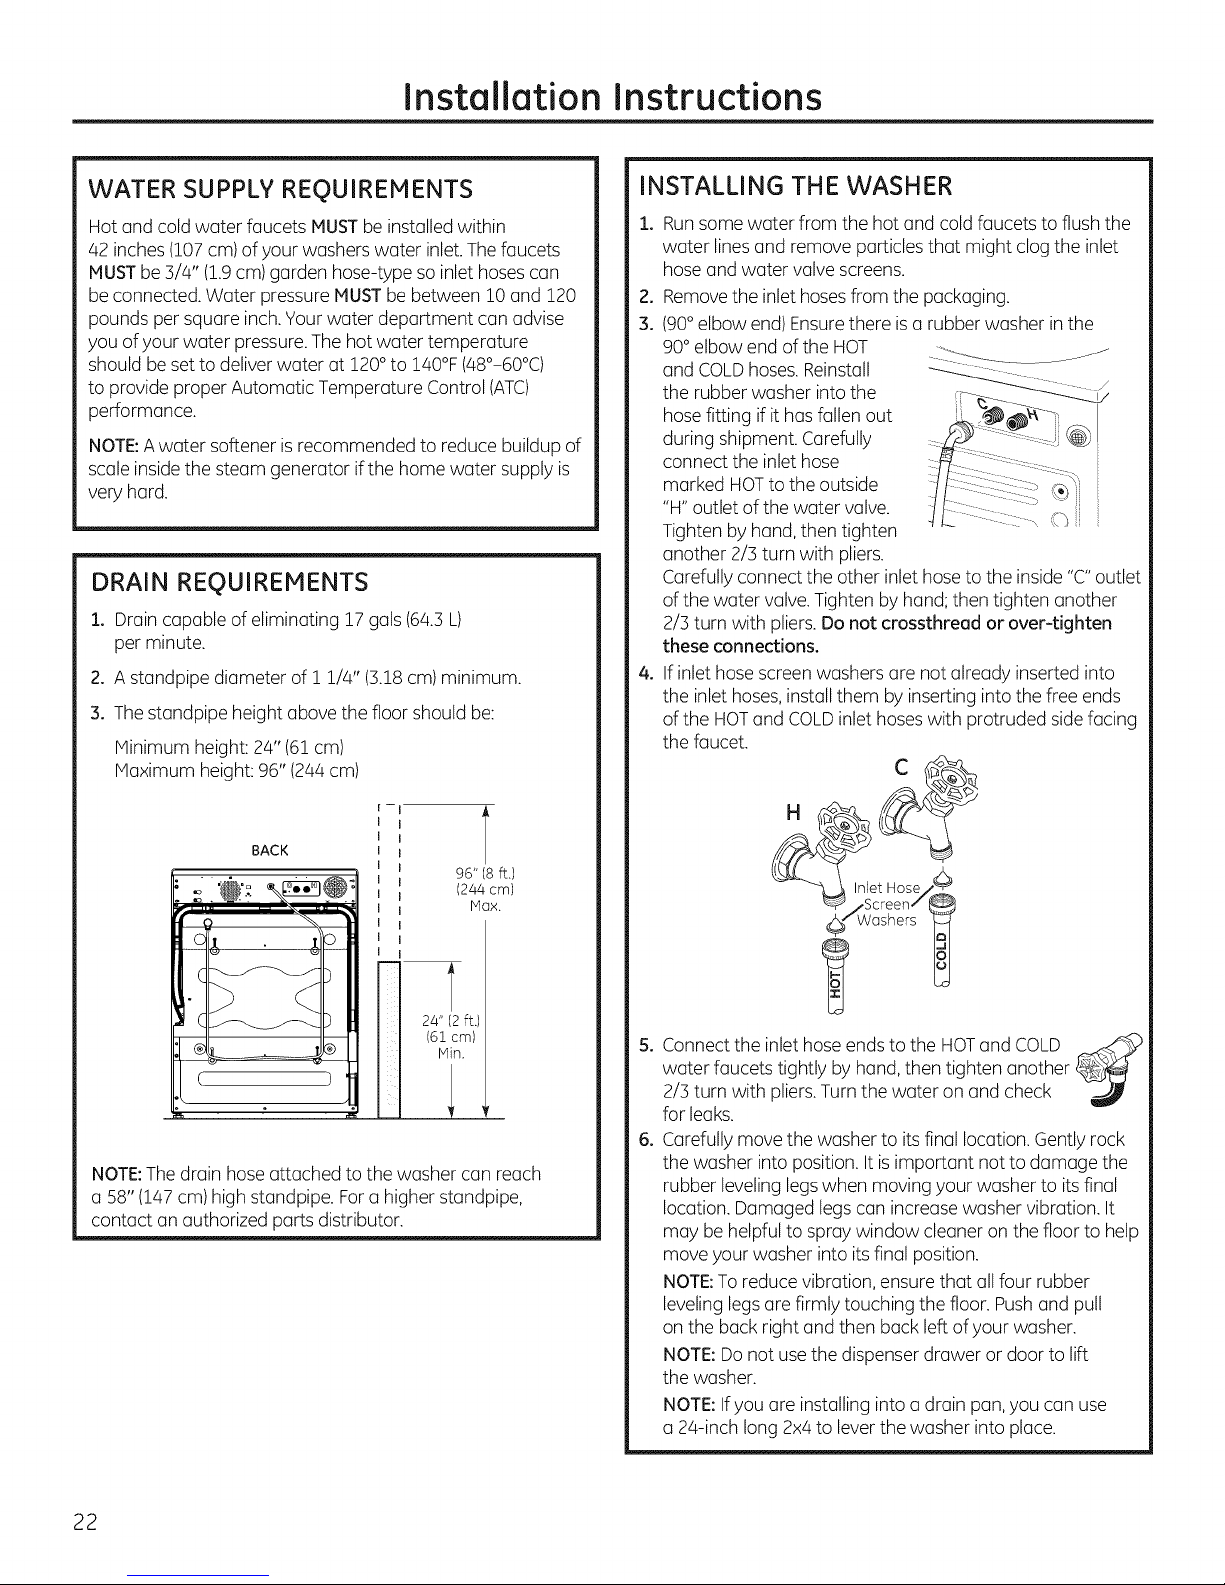
3. Thestandpipe height above the floor should be:
Minimum height: 24" (61cm)
Haximum height: 96" (244cm)
INSTALLING THE WASHER
.
Runsomewater from the hot and cold faucets to flush the
water linesand remove particlesthat might clogthe inlet
hose andwater valve screens.
.
Removethe inlet hosesfrom the packaging.
3.
(90°elbow end) Ensurethere is a rubber washer inthe
90° elbow end of the HOT _:::o_:.................
and COLDhoses.Reinstall
the rubber washer intothe ;,-- --__.__j
hosefitting if it hasfallen out
during shipment. Carefully
connect the inlet hose
marked HOTto the outside
"H" outlet of the water valve. ',_ib_
Tighten by hand, then tighten
another 2/3 turn with pliers.
Carefullyconnect the other inlet hoseto the inside"C"outlet
of the water valve.Tighten by hand;then tighten another
2/3 turn with pliers.Do not crossthread or over-tighten
these connections.
.
If inlet hose screen washers are not already inserted into
the inlet hoses,installthem by inserting into the free ends
of the HOTand COLDinlet hoseswith protruded sidefacing
the faucet.
_L
BACK
96" (8 ft,)
(244 cm)
Max.
24" (2 ft.)
(61 cm)
Min.
NOTE:The drain hoseattached to the washer can reach
a 58" (!47 cm)high standpipe. Fora higherstandpipe,
contact an authorized parts distributor.
__-_-h_,,rfleireHOS_/_
_Washers _
5. Connectthe inlet hoseends to the HOTand COLD
water faucets tightly by hand, then tighten another _
2/3 turn with pliers.Turnthe water on and check -J
for leaks.
6. Carefullymove the washer to its final location. Gentlyrock
the washer into position. Itis important not to damage the
rubber leveling legswhen moving your washer to itsfinal
location. Damaged legscan increasewasher vibration. It
may be helpfulto spray window cleaner on the floor to help
move your washer into itsfinal position.
NOTE:To reducevibration, ensure that allfour rubber
leveling legsare firmly touching the floor. Pushand pull
on the back right and then back left ofyour washer.
NOTE:Donot usethe dispenserdrawer or door to lift
the washer.
NOTE:Ifyou are installing into a drain pan,you can use
a 24-inch long 2x4to leverthe washer into place.
22
Installation Instructions
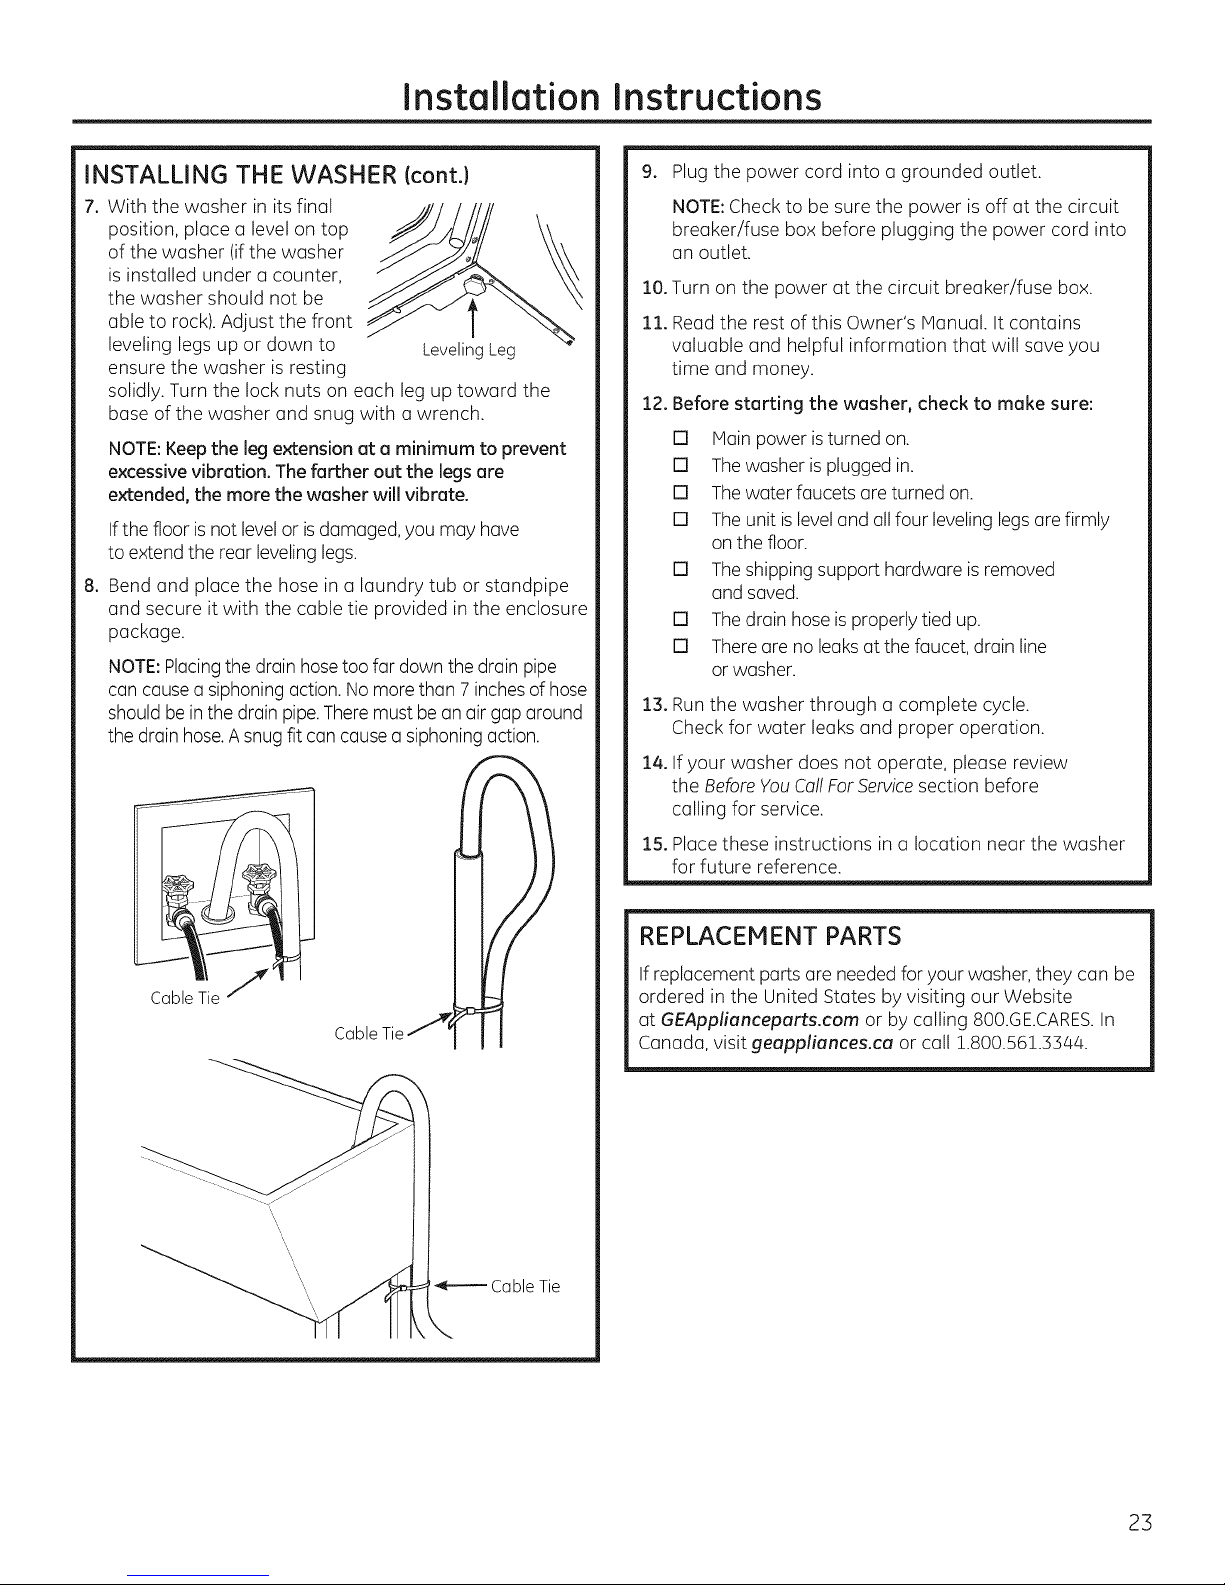
INSTALLING THE WASHER (cont.)
7. With the washer in its final
position, place a level on top
of the washer (ifthe washer
is installed under a counter,
the washer should not be
able to rock).Adjust the front
leveling legs up or down to LevelingLeg
ensure the washer is resting
solidly. Turn the lock nuts on each leg up toward the
base of the washer and snug with a wrench.
NOTE:Keepthe legextension at a minimum to prevent
excessivevibration. The farther out the legs are
extended, the more the washer will vibrate.
If the floor is not level or isdamaged, you may have
to extend the rear leveling legs.
8. Bend and place the hose in a laundry tub or standpipe
and secure it with the cable tie provided in the enclosure
package.
NOTE:Placingthe drain hosetoo far down the drain pipe
can causea siphoningaction. Nomore than 7 inchesof hose
should beinthe drain pipe.Theremust bean air gap around
the drainhose.A snugfit can causea siphoningaction.
.
Plug the power cord into a grounded outlet.
NOTE:Check to be sure the power is off at the circuit
breaker/fuse box before plugging the power cord into
an outlet.
10.Turn on the power at the circuit breaker/fuse box.
11. Readthe rest of this Owner's Manual. It contains
valuable and helpful information that will save you
time and money.
12. Before starting the washer, check to make sure:
[] Main power isturned on.
[] Thewasher is plugged in.
[] Thewater faucets are turned on.
[] Theunit is leveland all four levelinglegsare firmly
on the floor.
[] Theshipping support hardware is removed
and saved.
[] Thedrain hose isproperly tied up.
[] Thereare no leaksat the faucet, drain line
or washer.
:13.Runthe washer through a complete cycle.
Check for water leaks and proper operation.
:14.If your washer does not operate, please review
the BeforeYouCoilForServicesection before
calling for service.
:15.Placethese instructions in a location near the washer
for future reference.
CableTie /
Cable Tie
REPLACEMENT PARTS
If replacement parts are needed for your washer, they can be
ordered in the United States by visiting our Website
at G[:Applianceparts.com or by calling 800.GE.CARES.In
Canada, visit geappliances.ca or call 1.800.561.3344.
23
Installation Instructions
ADAPTIVE VIBRATION CONTROL
Your GEwasher is equipped with Adaptive Vibration Control
Technology. Using information about the floor,this system
can reduce vibration and improve spin performance in
some installations by adapting the spin cycle.The DEFAULT
configuration isspecially designedto provide optimal
performance across the widest range of floor types. Follow
the procedure below to enable more specific adaptive
settings.Yourwasher can be returned quicklyand easily
to the DEFAULTconfiguration at any time usingthe same
procedure.
Floor Type Selection
Placecontrol in the idle state. (Hakesure nocyclesor
options ore selected but that the washers Power is on.)
.
Pressand hold the Power and Spin buttons at the same
time for 3 seconds.
3. Onlythe Power,Start and display lightswill be lit in this
mode.
4. Pressingthe Power button in this mode will return the
control to the idle state and the defaults will be restored.
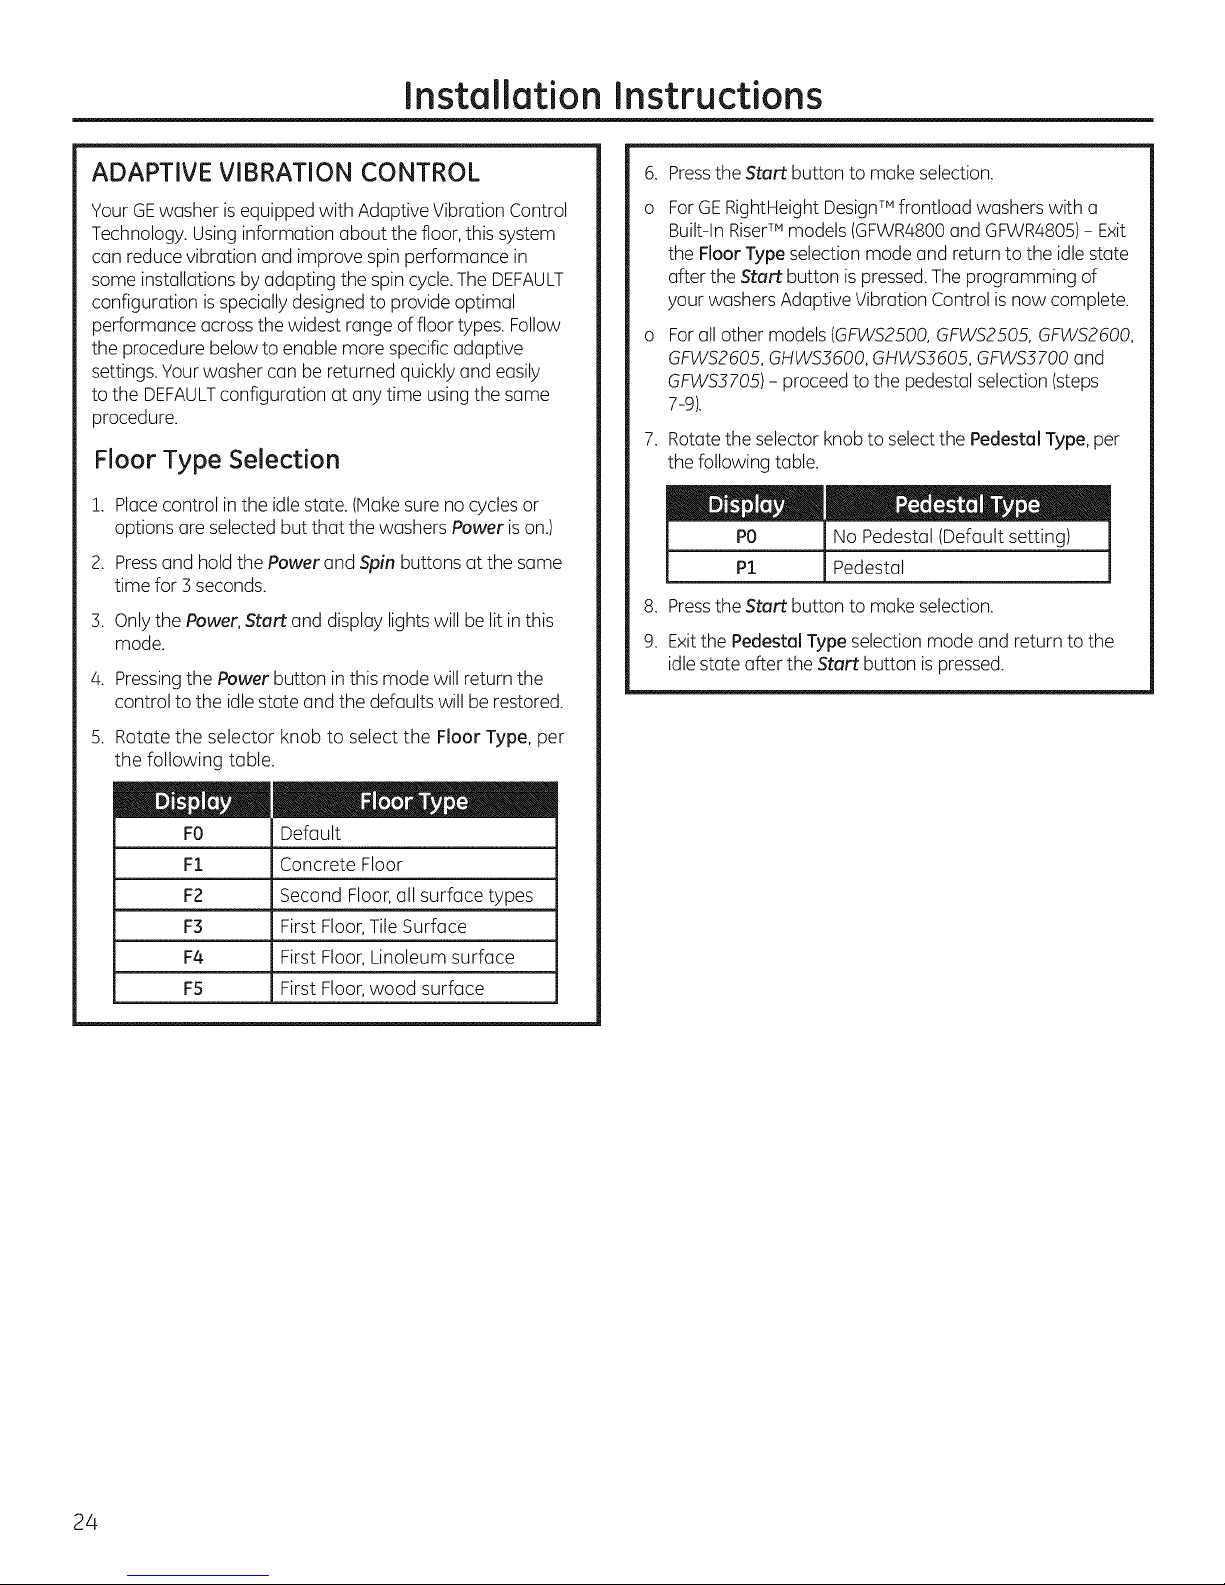
5.
Rotate the selector knob to select the Floor Type, per
the following table.
.
Pressthe Stortbutton to make selection.
0
ForGERightHeight DesignTM frontload washers with u
Built-In RiserTM models(GFWR4800and GFWR4805)- Exit
the Floor Type selection mode and return to the idle state
after the Stert button ispressed.Theprogramming of
your washers Adaptive Vibration Control isnow complete.
For all other models (GFWS2500, GFWS2505, GFWS2500,
GFWS2505, GHWS3500, GHWS3505, GFWS3700 and
GFWS3705) - proceed to the pedestal selection (steps
7-9).
7.
Rotatethe selector knob to select the Pedestal Type,per
the following table.
PO No Pedestal (Default setting)
P1 Pedestal
8. Pressthe Startbutton to make selection.
9. Exitthe PedestalType selection mode and return to the
idlestate after the Start button ispressed.
O0 t"
FO
F1
F2
Default
Concrete Floor
Second Floor,oil surface types
F3 First Floor,Tile Surface
F4 First Floor,Linoleum surface
F5 First Floor,wood surface
24
Beforeyou call for service... GEAppliances.com
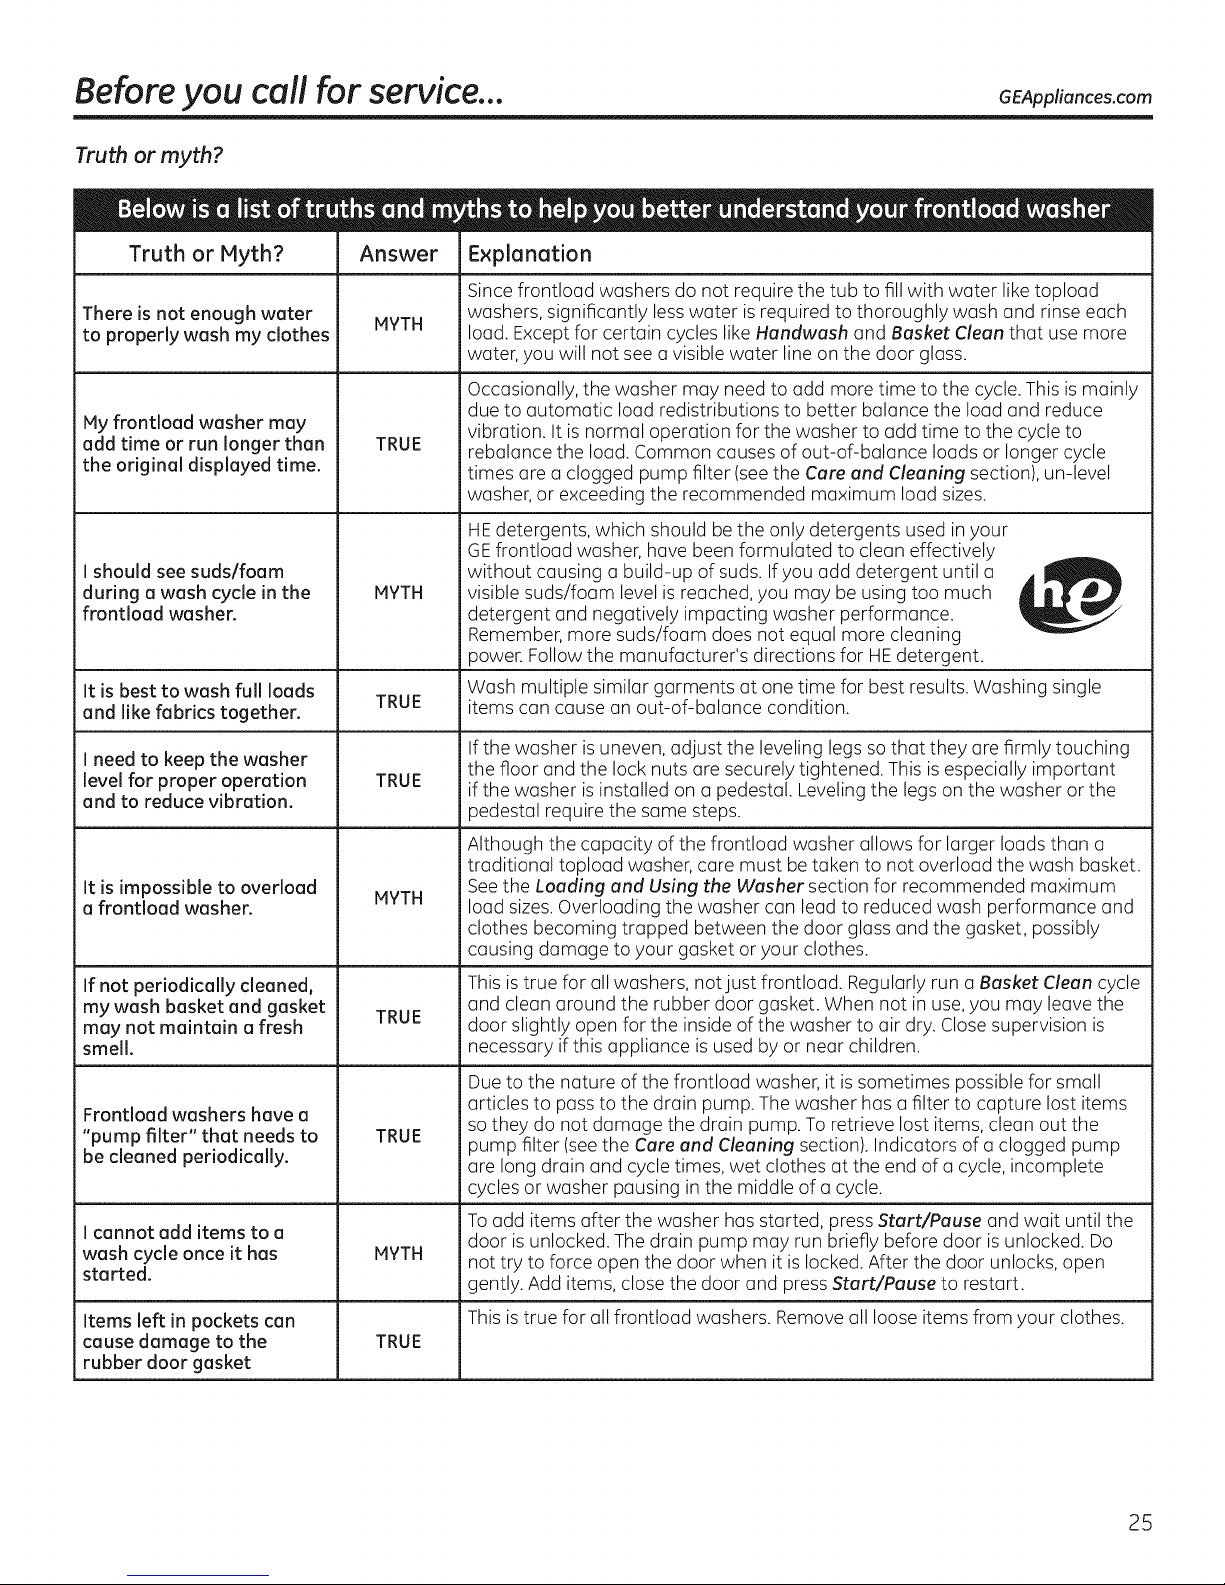
Truth or myth?
Truth or Myth? Answer Explanation
Sincefrontload washers do not require the tub to fill with water like topload
There is not enough water
to properly wash my clothes
My frontload washer may
add time or run longer then
the original displayed time.
I should see suds/foam
during a wash cycle in the
frontload washer.
It is best to wash full loads
and like fabricstogether.
MYTH
TRUE
MYTH
TRUE
washers, significantly less water is required to thoroughly wash and rinse each
load. Except for certain cycles like Handwash and Basket Clean that use more
water, you will not see a visible water line on the door glass.
Occasionally, the washer may need to add more time to the cycle. This ismainly
due to automatic load redistributions to better balance the load and reduce
vibration. It is normal operation for the washer to add time to the cycle to
rebalance the load. Common causes of out-of-balance loads or longer cycle
times are a clogged pump filter (seethe Care and Cleaning section), un-level
washer, or exceeding the recommended maximum load sizes.
HEdetergents, which should be the only detergents used in your
GEfrontload washer, have been formulated to clean effectively
without causing a build-up of suds. Ifyou add detergent until a ,__ _IIIL
visible suds/foam level is reached, you may be using too much
detergent and negatively impacting washer performance.
Remember, more suds/foam does not equal more cleaning
power. Follow the manufacturer's directions for HEdetergent.
Wash multiple similar garments at one time for best results. Washing single
items can cause an out-of-balance condition.
I need to keep the washer
level for proper operation
and to reduce vibration.
It is impossible to overload
a frontload washer.
If not periodically cleaned,
my wash basket and gasket
may not maintain a fresh
smell.
Frontload washers have a
"pump filter" that needs to
be cleaned periodically.
Icannot add items to a
wash cycle once it has
started.
Items left in pockets can
cause damage to the
rubber door gasket
TRUE
MYTH
TRUE
TRUE
MYTH
TRUE
If the washer is uneven, adjust the leveling legs so that they are firmly touching
the floor and the lock nuts are securely tightened. This is especially important
if the washer is installed on a pedestal. Leveling the legs on the washer or the
pedestal require the same steps.
Although the capacity of the frontload washer allows for larger loads than a
traditional topload washer, care must betaken to not overload the wash basket.
Seethe Loading and Using the Washer section for recommended maximum
load sizes. Overloading the washer can lead to reduced wash performance and
clothes becoming trapped between the door glass and the gasket, possibly
causing damage to your gasket or your clothes.
This istrue for all washers, not just frontload. Regularly run a BasketCleancycle
and clean around the rubber door gasket. When not inuse, you may leave the
door slightly open for the inside of the washer to air dry. Close supervision is
necessary if this appliance is used by or near children.
Dueto the nature of the frontload washer, it is sometimes possible for small
articles to pass to the drain pump. The washer has a filter to capture lost items
sothey do not damage the drain pump. To retrieve lost items, clean out the
pump filter (seethe Care and Cleaning section). Indicators of a clogged pump
are long drain and cycle times, wet clothes at the end of a cycle, incomplete
cycles or washer pausing in the middle of a cycle.
To add items after the washer has started, press Start/Pause and wait until the
door isunlocked. The drain pump may run briefly before door is unlocked. Do
not try to force open the door when it is locked. After the door unlocks, open
gently. Add items, close the door and press Start/Pause to restart.
This istrue for all frontload washers. Remove all loose items from your clothes.
25
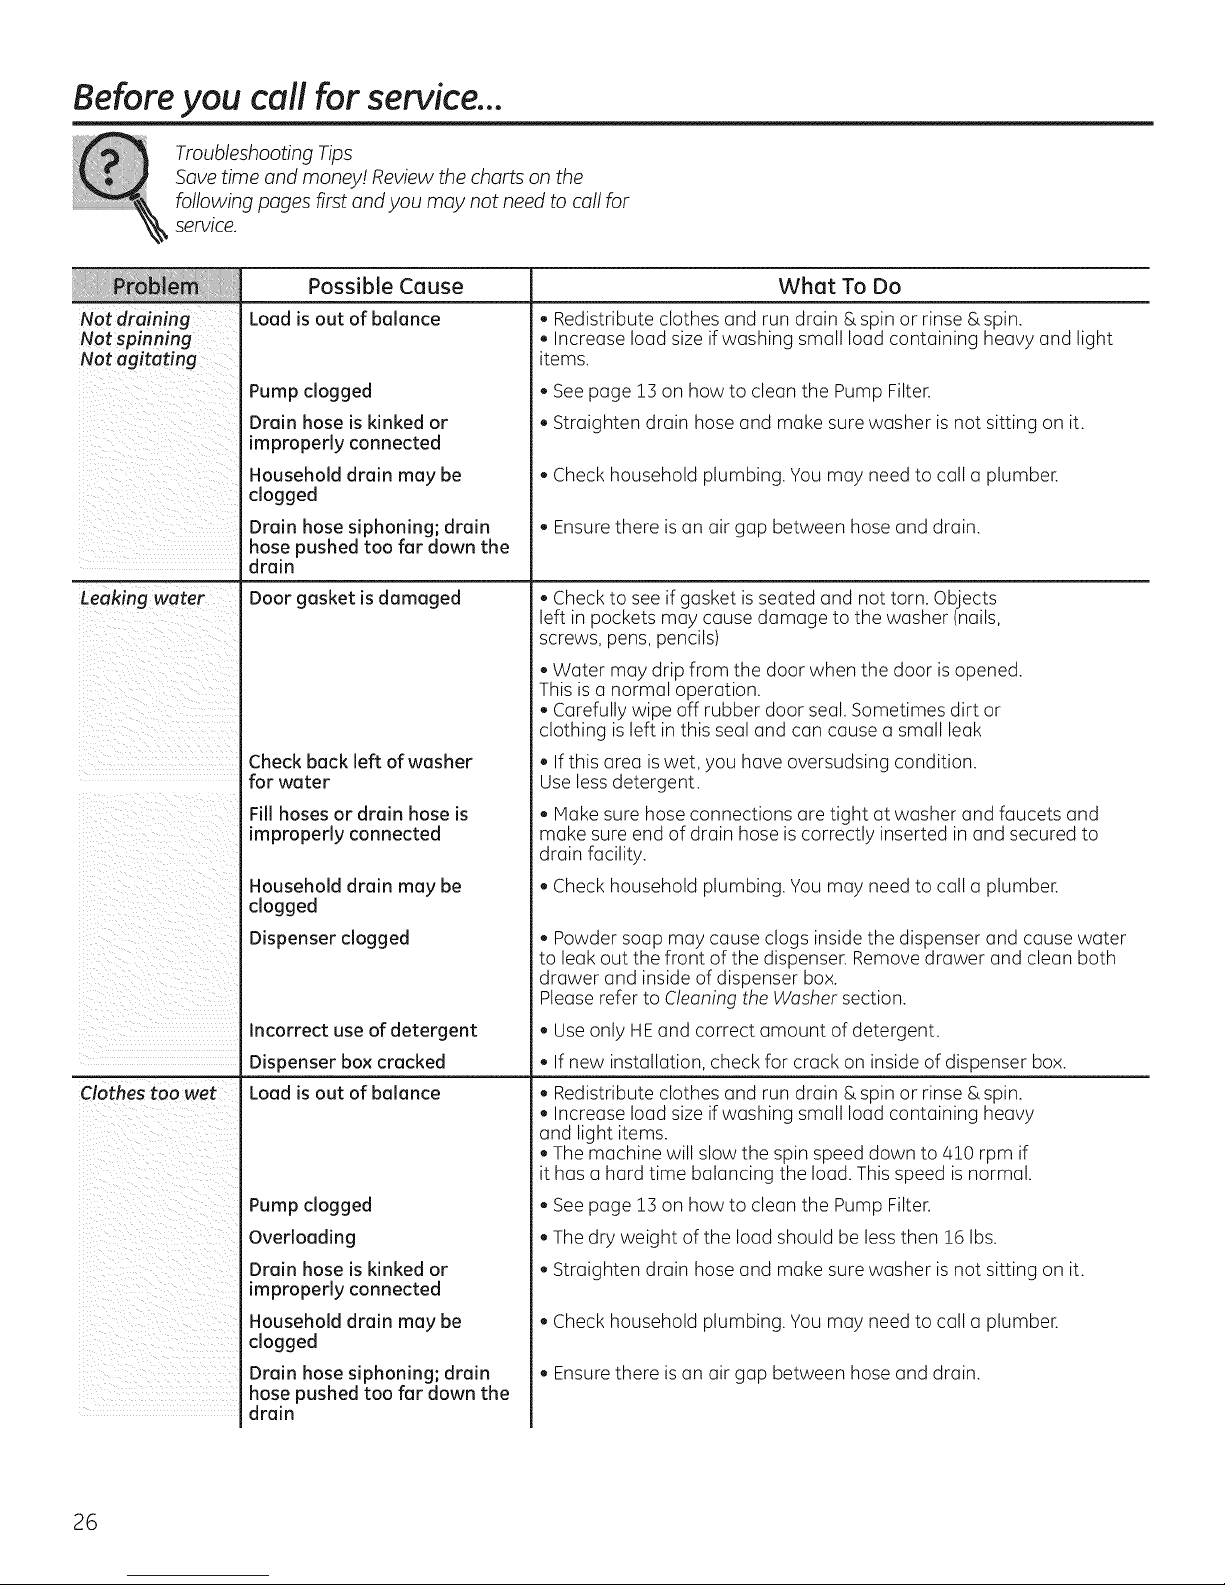
Before you call for service...
Troubleshooting Tips
Save time and money! Review the charts on the
following pages first and you may not need to call for
service.
Possible Cause What To Do
Not draining
Not spinning
Not agitating
Leaking water
Clothes too wet
Load is out of balance
Pump clogged
Drain hose is kinked or
improperly connected
Household drain may be
clogged
Drain hose siphoning; drain
hose pushed too far down the
drain
Door gasket is damaged
Check back left of washer
for water
Fill hoses or drain hose is
improperly connected
Household drain may be
clogged
Dispenser clogged
Incorrect use of detergent
Dispenser box cracked
Load is out of balance
Pump clogged
Overloading
Drain hose is kinked or
improperly connected
Household drain may be
clogged
Drain hose siphoning; drain
hose pushed too far down the
drain
. Redistribute clothes and run drain & spin or rinse & spin.
. Increase load size if washing small loud containing heavy and light
items.
. See page 13 on how to cleon the Pump Filter.
. Straighten drain hose and make sure washer isnot sitting on it.
. Check household plumbing. You may need to coil o plumber.
. Ensurethere ison air gap between hose and drain.
• Check to see if gasket is seated and not torn. Objects
left in pockets may cause damage to the washer (nails,
screws, pens, pencils)
• Water may drip from the door when the door is opened.
This is u normal operation.
. Carefully wipe off rubber door seal. Sometimes dirt or
clothing is left in this seal and con cause o small leak
• If this area iswet, you hove oversudsing condition.
Use less detergent.
. ivlokesure hose connections ore tight at washer and faucets and
make sure end of drain hose is correctly inserted in and secured to
drain facility.
. Check household plumbing. You may need to coil o plumber.
. Powder soap may cause clogs inside the dispenser and cause water
to leak out the front of the dispenser. Remove drawer and cleon both
drawer and inside of dispenser box.
Pleaserefer to Cleaning the Washer section.
. Useonly HEand correct amount of detergent.
. Ifnew installation, check for crock on inside of dispenser box.
. Redistribute clothes and run drain & spin or rinse & spin.
. Increase load size if washing small load containing heavy
and light items.
. The machine will slow the spin speed down to 410 rpm if
it has o hard time balancing the load. This speed is normal.
. See poge 1:3on how to cleon the Pump Filter,
. The dry weight of the load should be lessthen 16 Ibs.
. Straighten drain hose and make sure washer isnot sitting on it.
. Check household plumbing. You may need to coil o plumber.
. Ensurethere ison air gap between hose and drain.
26
GEAppliances.com
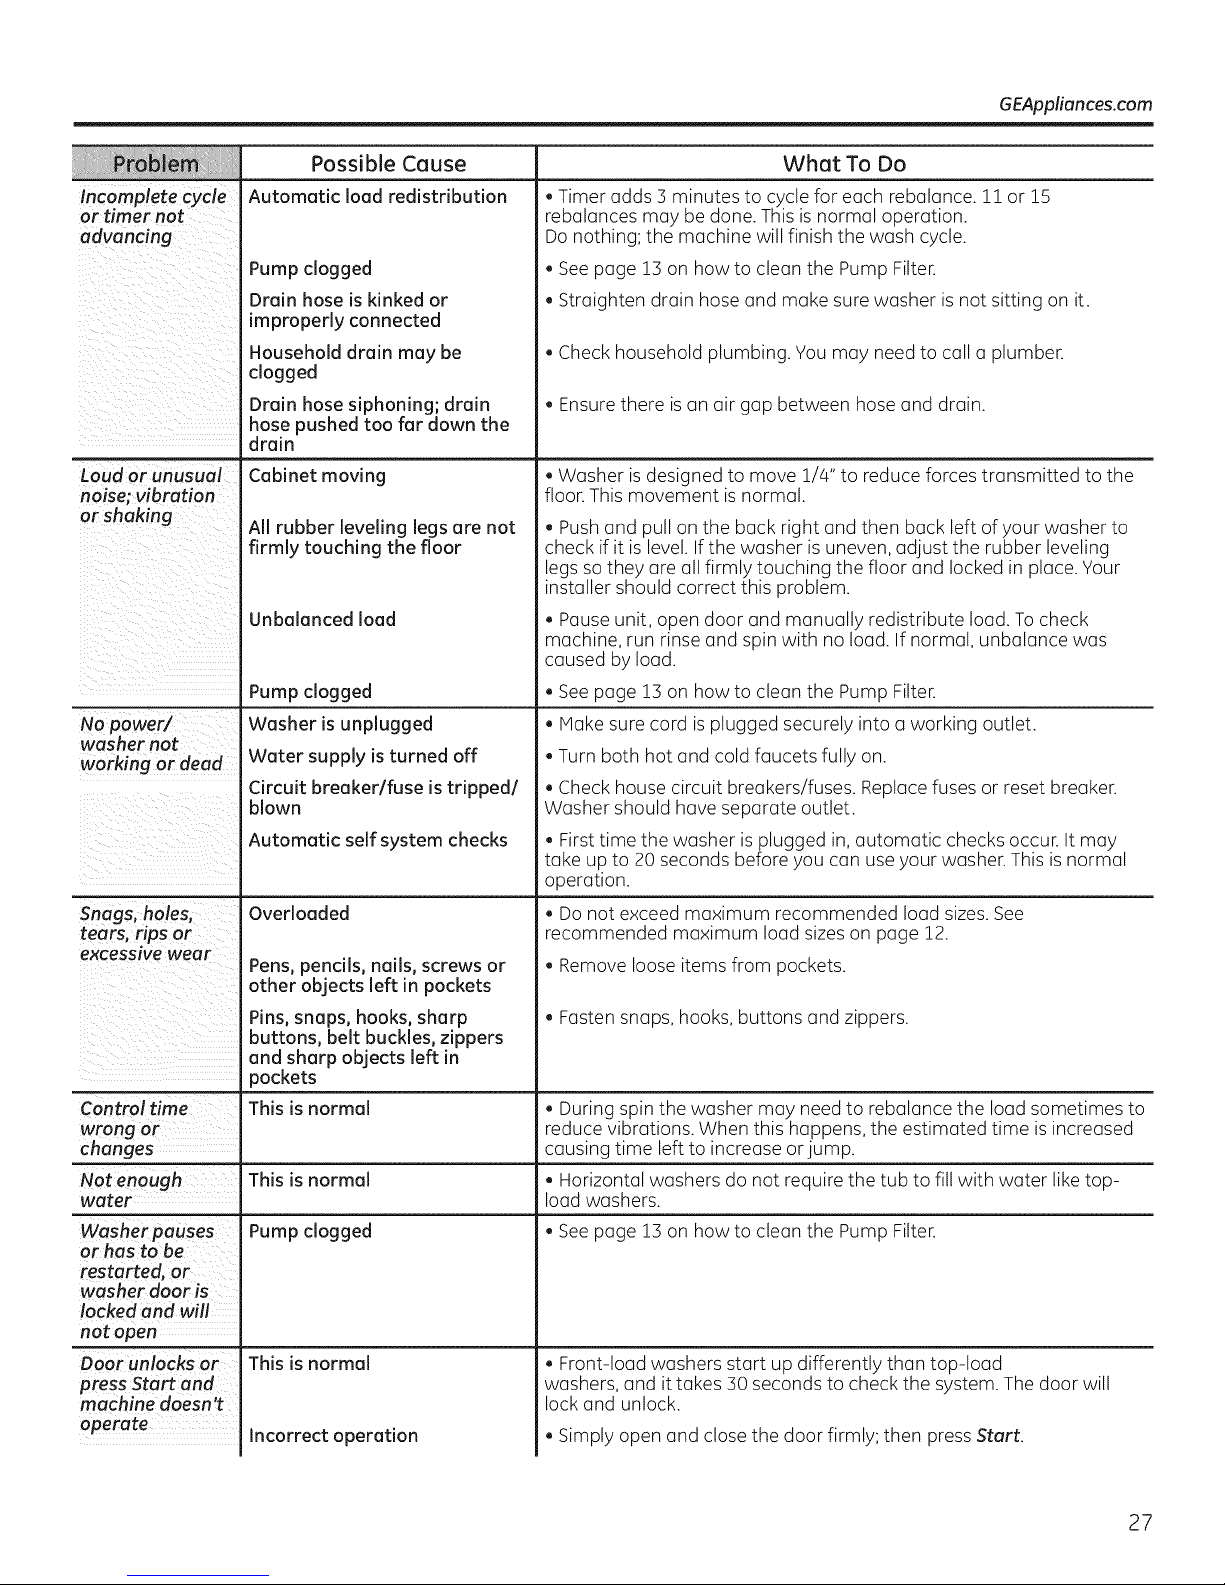
incomplete cycle
or timer not
advancing
Loud or unusual
noise; vibration
or shaking
No power/
washer not
working or dead
Snags, holes,
tears, rips or
excessive wear
Control time
wrong or
changes
Not enough
water
Washer pauses
or has to be
restarted, or
wosher door is
locked and will
not open
Door unlocks or
press Start and
machine doesn't
operate
Possible Cause
Automatic load redistribution
Timer adds :3minutes to cycle for each rebalance. 11or 15
What To Do
rebalances may bedone. This is normal operation.
Do nothing; the machine will finish the wash cycle.
Pump clogged
Drain hose is kinked or
See page 13 on how to clean the Pump Filter.
Straighten drain hose and make sure washer is not sitting on it.
improperly connected
Household drain may be
Check household plumbing. You may need to call a plumber.
clogged
Drain hose siphoning; drain
Ensure there is an air gap between hose and drain.
hose pushed too far down the
drain
Cabinet moving
Washer is designed to move 1/4" to reduce forces transmitted to the
floor. This movement isnormal.
All rubberleveling legs are not
firmly touching the floor
. Push and pull on the back right and then back left of your washer to
check if it is level. Ifthe washer is uneven, adjust the rubber leveling
legs so they are all firmly touching the floor and locked in place. Your
installer should correct this problem.
Unbalancedload
Pause unit, open door and manually redistribute load. Tocheck
machine, run rinse and spin with no load. If normal, unbalance was
caused by load.
Pump clogged
Washer is unplugged
Water supply is turned off
Circuit breaker/fuse is tripped/
blown
Automatic self system checks
See page 13 on how to clean the Pump Filter.
Make sure cord is plugged securely into a working outlet.
Turn both hot and cold faucets fully on.
Check house circuit breakers/fuses. Replace fuses or reset breaker.
Washer should have separate outlet.
First time the washer is plugged in, automatic checks occur. It may
take up to 20 seconds before you can use your washer. This is normal
operation.
Overloaded
Do not exceed maximum recommended load sizes.See
recommended maximum load sizeson page 12.
Pens, pencils, nails, screws or
. Remove loose items from pockets.
other objects left in pockets
Pins, snaps, hooks, sharp
Fasten snaps, hooks, buttons and zippers.
buttons, belt buckles, zippers
and sharp objects left in
pockets
This is normal
During spin the washer may need to rebalance the load sometimes to
reduce vibrations. When this happens, the estimated time isincreased
causing time left to increase or jump.
This is normal • Horizontal washers do not require the tub to fill with water like top-
load washers.
Pump clogged . See page 13on how to clean the Pump Filter.
This is normal
Front-load washers start up differently than top-load
washers, and it takes 30 seconds to check the system. The door will
lock and unlock.
Incorrect operation
. Simply open and close the door firmly; then pressStart.
27
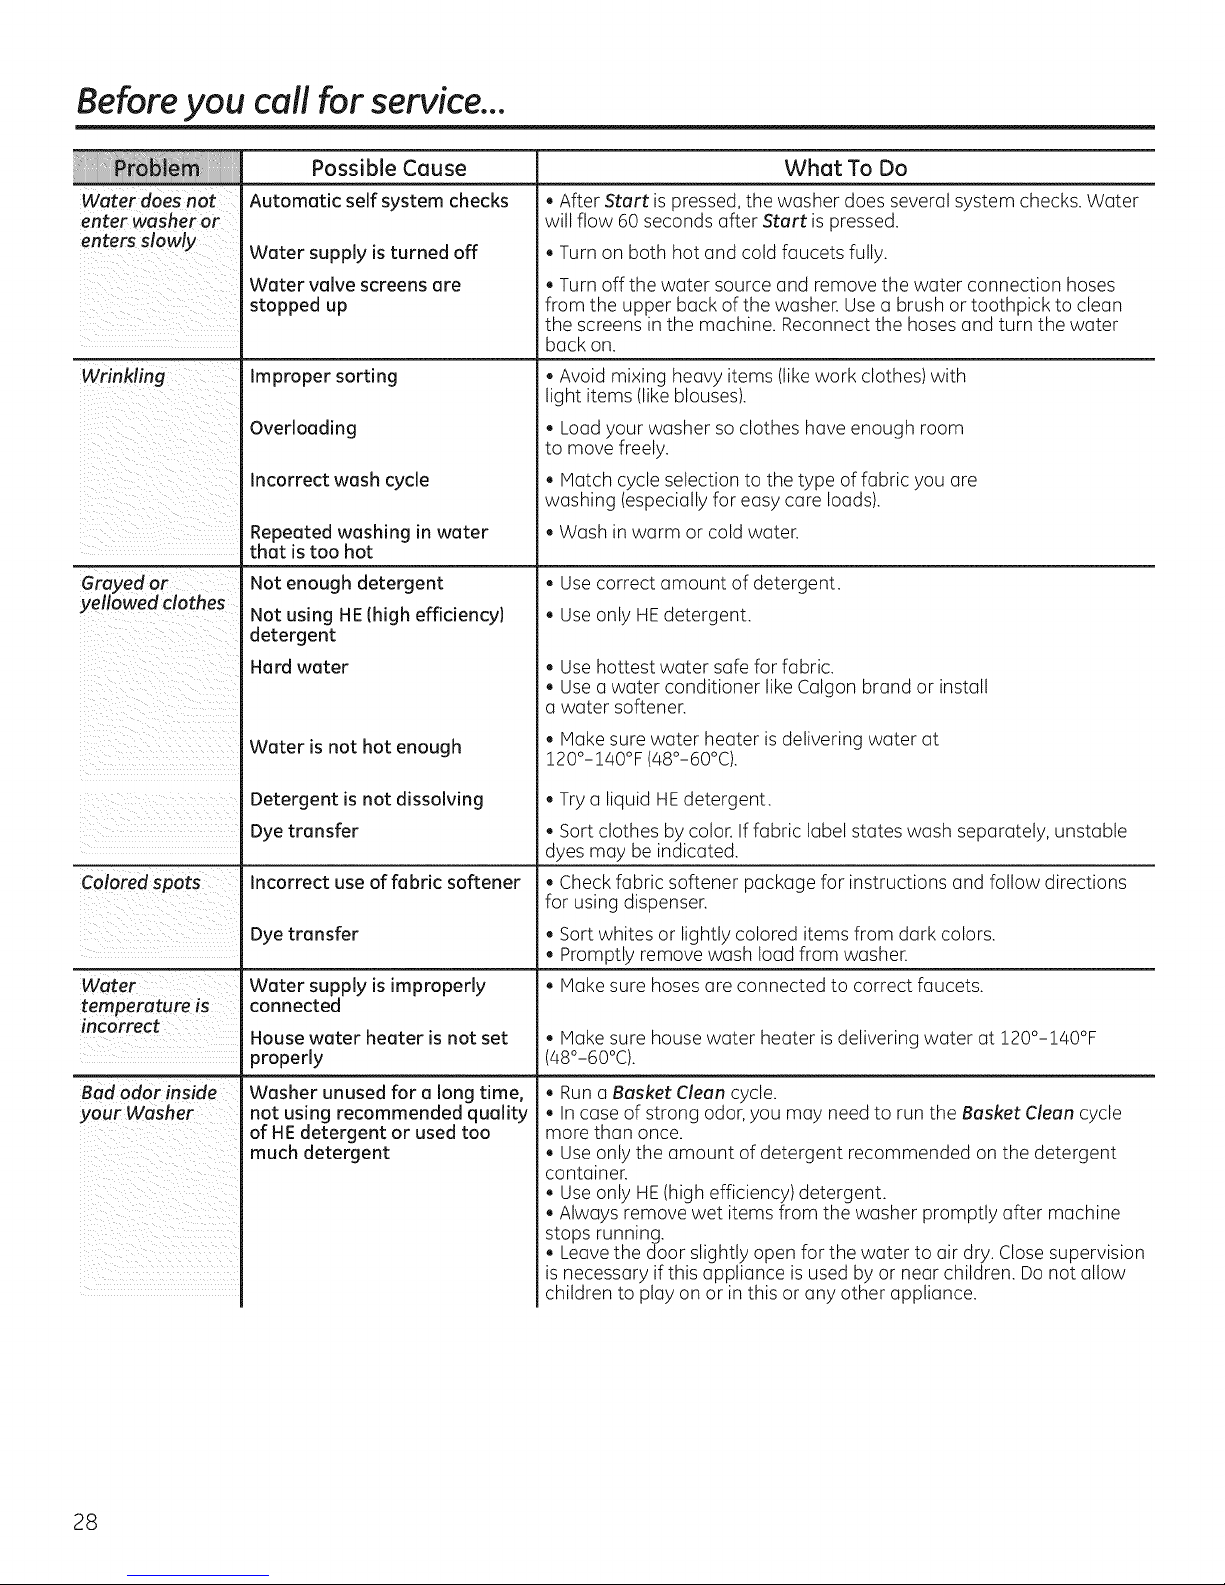
Before you call for service...
Water does not
enter washer or
enters slowly
Wrinkling
Grayed or
yellowed clothes
Possible Cause
Automatic self system checks
Water supply is turned off
Water valve screens are
stopped up
Improper sorting
Overloading
Incorrect wash cycle
Repeated washing in water
that is too hot
Not enough detergent
Not using HE (high efficiency)
detergent
Hard water
Water is not hot enough
What To Do
. After Start is pressed, the washer does several system checks. Water
will flow 60 seconds after Start is pressed.
. Turn on both hot and cold faucets fully.
. Turn off the water source and remove the water connection hoses
from the upper buck of the washer. Use a brush or toothpick to clean
the screens in the machine. Reconnect the hoses and turn the water
buck on.
• Avoid mixing heavy items (likework clothes) with
light items (like blouses).
. Load your washer so clothes have enough room
to move freely.
. Match cycle selection to the type of fabric you are
washing (especially for easy care loads).
. Wash in warm or cold water.
. Use correct amount of detergent.
. Use only HEdetergent.
. Use hottest water safe for fabric.
Use a water conditioner like Calgon brand or install
a water softener.
. Make sure water heater isdelivering water at
120°-140°F (48°-60°C).
Colored spots
Water
temperature is
incorrect
Bad odor inside
your Washer
Detergent is not dissolving
Dye transfer
Incorrect use of fabric softener
Dye transfer
Water supply is improperly
connected
House water heater is not set
properly
Washer unused for a long time,
not using recommended quality
of HEdetergent or used too
much detergent
. Trya liquid HEdetergent.
. Sort clothes by color. If fabric label states wash separately, unstable
dyes may be indicated.
. Check fabric softener package for instructions and follow directions
for using dispenser.
. Sort whites or lightly colored items from dark colors.
. Promptly remove wash load from washer.
. Make sure hoses are connected to correct faucets.
. Make sure house water heater isdelivering water at 120°-140°F
(48°-60°C).
. Runa Basket Clean cycle.
. Incase of strong odor,you may need to run the Basket Cleon cycle
more than once.
. Use only the amount of detergent recommended on the detergent
container.
. Use only HE(high efficiency) detergent.
. Always remove wet items from the washer promptly after machine
stops running.
. Leavethe door slightly open for the water to air dry. Close supervision
is necessary if this appliance is used by or near children. Do not allow
children to play on or inthis or any other appliance.
28
GEAppliances.com
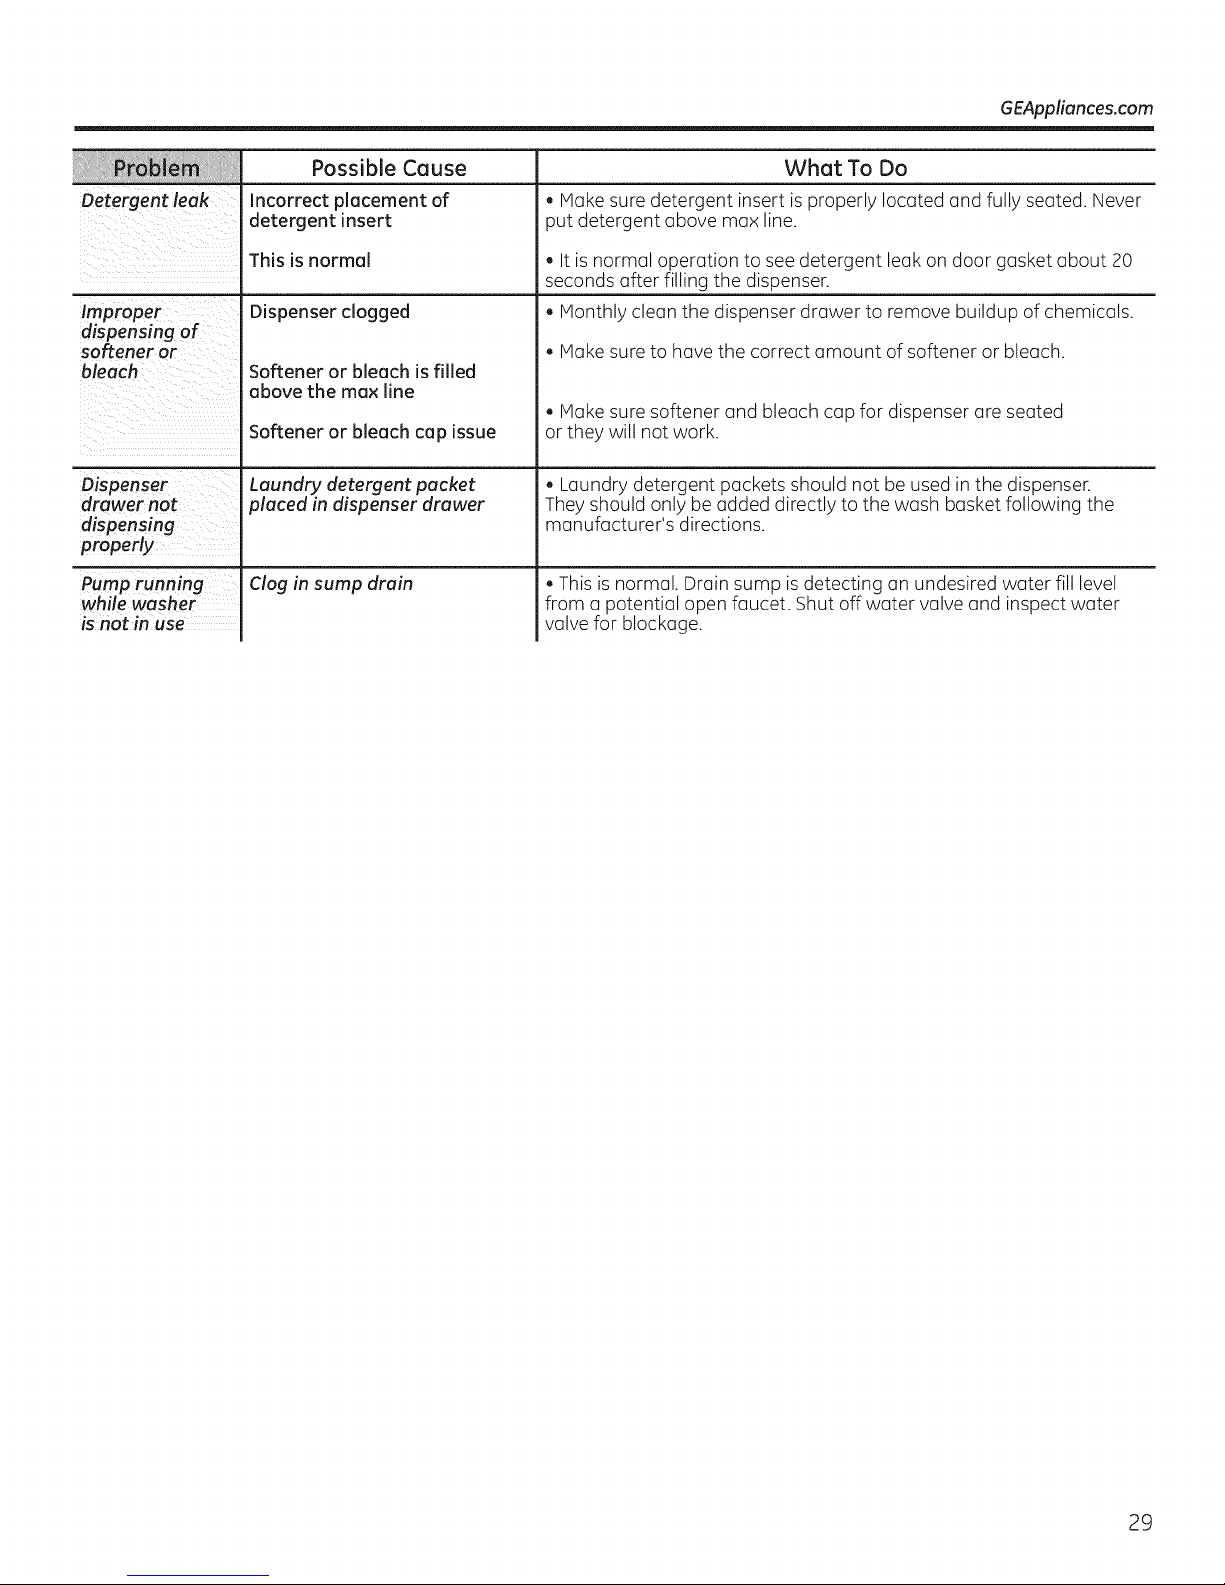
Detergent leak
Improper
dispensing of
softener or
bleach
Dispenser
drawer not
dispensing
properly
Pump runmng
while washer
is not in use
Possible Cause
Incorrect placement of
detergent insert
This is normal
Dispenser clogged
Softener or bleach is filled
above the max line
Softener or bleach cap issue
Laundry detergent packet
placed in dispenser drawer
Clog in sump drain
What To Do
, Hake sure detergent insert isproperly located and fully seated. Never
put detergent above max line.
, It is normal operation to see detergent leak on door gasket about 20
seconds after filling the dispenser.
, Honthly clean the dispenser drawer to remove buildup of chemicals.
, Hake sure to have the correct amount of softener or bleach.
, Hake sure softener and bleach cap for dispenser are seated
or they will not work.
• Laundry detergent packets should not be used in the dispenser.
They should only be added directly to the wash basket following the
manufacturer's directions.
, Thisis normal. Drain sump isdetecting an undesired water fill level
from a potential open faucet. Shut off water valve and inspect water
valve for blockage.
29
 Loading...