

Page 1

GE Fanuc Automation
Programmable Control Products
Genius
t
Hand-held Monitor
User’s Guide
GFK-0121E June 1994
Page 2

Warnings, Cautions, and Notes
as Used in this Publication
Warning notices are used in this publication to emphasize that hazardous voltages,
currents, temperatures, or other conditions that could cause personal injury exist in this
equipment or may be associated with its use.
In situations where inattention could cause either personal injury or damage to
equipment, a Warning notice is used.
Caution notices are used where equipment might be damaged if care is not taken.
GFL–002
Warning
Caution
Note
Notes merely call attention to information that is especially significant to understanding
and operating the equipment.
This document is based on information available at the time of its publication. While
efforts have been made to be accurate, the information contained herein does not
purport to cover all details or variations in hardware or software, nor to provide for
every possible contingency in connection with installation, operation, or maintenance.
Features may be described herein which are not present in all hardware and software
systems. GE Fanuc Automation assumes no obligation of notice to holders of this
document with respect to changes subsequently made.
GE Fanuc Automation makes no representation or warranty, expressed, implied, or
statutory with respect to, and assumes no responsibility for the accuracy, completeness,
sufficiency, or usefulness of the information contained herein. No warranties of
merchantability or fitness for purpose shall apply.
The following are trademarks of GE Fanuc Automation North America, Inc.
Alarm Master CIMSTAR Helpmate PROMACRO
Series Six CIMPLICITY GEnet Field Control
Logicmaster Series One Series 90 CIMPLICITY 90–ADS
Genius Modelmaster Series Three VuMaster
CIMPLICITY P owerTRA C Genius PowerTRA C ProLoop Series Five
W orkmaster
e
Copyright 1994 GE Fanuc Automation North America, Inc.
All Rights Reserved
Page 3

Preface
Content of this Manual
Chapter 1. Introduction: Chapter 1
describes the Hand-held Monitor. This
chapter lists catalog numbers and
specifications. It also explains
compatibility between different versions
of the Hand-held Monitor and various
other products.
Chapter 2. Hardware Setup: Chapter 2
gives instructions for powering the HHM,
changing its EPROM, and changing its
battery pack. It also describes how to
install the HHM on a panel, and how to
install a separate HHM connector on a
bus.
Chapter 3. Getting Started: Chapter 3
explains how turn on the Hand-held
Monitor, and how to set up its features for
your application. Chapter 3 also explains
how to test the Hand-held Monitor’s
operation.
Chapter 4. Device Configuration:
Overview: Chapter 4 gives basic
instructions for using the Hand-held
Monitor to configure Genius devices.
Chapter 5. Monitoring the Bus and its
Devices: Chapter 5 explains how to use the
Hand-held Monitor to displ ay data and
status information from other devices on
the bus. It also expl ai ns how to clear faults,
switch a dual bus , ex ecute Pulse Testing,
and display the bus scan time.
Chapter 6. Reading CPU Memory:
Chapter 6 explains how to use the HHM
to read the contents of specified memory
locations in CPUs on the bus.
Chapter 7. Error Messages: Chapter 7
defines messages that may be displayed
during HHM startup or operation, or
device configuration.
Related Publications
For more information, refer to these
publications:
Genius I/O System User’s Manual
(GEK-90486–1). Reference manual for
system designers, programmers, and
others involved in integrating Genius I/O
products in a PLC or host computer
environment. This book provides a
system overview, and describes the types
of systems that can be created using
Genius products. Datagrams, Global Data,
and data formats are defined.
Genius Discrete and Analog Blocks User’s
Manual (GEK-90486–2). Reference
manual for system designers, operators,
maintenance personnel, and others using
Genius discrete and analog I/O blocks.
This book contains a detailed description,
specifications, installation instructions,
and configuration instructions for all
currently–available discrete and analog
blocks.
Series 90-70 Remote I/O Scanner User’s
Manual (GFK-0579). Reference manual
for the Remote I/O Scanner , which
interfaces a drop containing Series 90-70
modules to a Genius bus. Any CPU
capable of controlling the bus can be used
as the host. This book describes the
Remote I/O Scanner features,
configuration, and operation.
Genius Bus Interface Unit and Field
Processor User’s Manual (GFK-0825).
Reference manual for the Bus Interface
Unit and the Field Processor, which
interface a station containing Field
Control modules to a Genius bus. Any
CPU capable of controlling the bus can be
used as the host. This book describes the
features, configuration, and operation or a
Bus Interface Unit or Field Processor.
Field Control I/O Modules User’s Manual
(GFK-0826). Reference manual for system
GFK-0121
E
Index-3
Page 4

Preface
designers, operators, maintenance
personnel, and others using Field Control
I/O modules. This book contains a
detailed description, specifications, and
installation instructions for all
currently–available I/O modules.
Series 90-70 Bus Controller User’s
Manual (GFK-0398). Reference manual
for the Bus Controller, which interfaces a
Genius bus to a Series 90-70 PLC. This
book describes the installation and
operation of the Bus Controller. It also
contains the programming information
needed to interface Genius I/O devices to
a Series 90-70 PLC.
Series 90-30 Bus Controller User’s
Manual (GFK-1034). Reference manual
for the Bus Controller, which interfaces a
Genius bus to a Series 90-30 PLC. This
book describes the installation and
operation of the Bus Controller. It also
contains the programming information
needed to interface Genius I/O devices to
a Series 90-30 PLC.
Series Six
Manual (GFK-0171). Reference manual
for the Bus Controller, which interfaces a
Genius bus to a Series Six PLC. This book
describes the installation and operation of
the Bus Controller. It also contains the
programming information needed to
interface Genius I/O devices to a Series Six
PLC.
Bus Controller User’s
describes the installation and operation of
the Bus Controller. It also contains the
programming information needed to
interface Genius I/O devices to a Series
Five PLC.
Genius I/O PCIM User’s Manual
(GFK-0074). Reference manual for the
PCIM, which interfaces a Genius bus to a
suitable host computer. This book
describes the installation and operation of
the PCIM. It also contains the
programming information needed to
interface Genius I/O devices to a host
computer .
Genius I/O Single-slot PCIM User’s
Manual (GFK-0881). Reference manual
for the Single-slot PCIM, which interfaces
a Genius bus to a suitable host computer.
This book describes the installation and
operation of the PCIM. It also contains the
programming information needed to
interface Genius I/O devices to a host
computer .
We Welcome Your Comments
and Suggestions
At GE Fanuc automation, we strive to
produce quality technical documentation.
After you have used this manual, please
take a few moments to complete and
return the Reader’s Comment Card
located on the next page.
Series Five Bus Controller User’s
Manual (GFK-0248). Reference manual
for the Bus Controller, which interfaces a
Genius bus to a Series Five PLC. This book
Index-4
Hand-held Monitor User’s Guide – June 1994
Jeanne L. Grimsby
Senior Technical Writer
GFK-0121E
Page 5

Contents
Chapter 1 Introduction 1-1 . . . . . . . . . . . . . . . . . . . . . . . . . . . . . . . . . . . . . . . . . . . . . . .
Hand-held Monitor Description 1-2 . . . . . . . . . . . . . . . . . . . . . . . . . . . . . . . . . . . .
HHM Compatibility 1-4 . . . . . . . . . . . . . . . . . . . . . . . . . . . . . . . . . . . . . . . . . . . . . . .
HHM Specifications 1-5 . . . . . . . . . . . . . . . . . . . . . . . . . . . . . . . . . . . . . . . . .
Ordering Information 1-5 . . . . . . . . . . . . . . . . . . . . . . . . . . . . . . . . . . . . . . . . . . . . .
Chapter 2 Hardware Setup 2-1 . . . . . . . . . . . . . . . . . . . . . . . . . . . . . . . . . . . . . . . . . . .
Power for the Hand-held Monitor 2-1 . . . . . . . . . . . . . . . . . . . . . . . . . . . . . . . . . . .
Changing the PROM 2-4 . . . . . . . . . . . . . . . . . . . . . . . . . . . . . . . . . . . . . . . . . . . . . .
Permanent Installation 2-6 . . . . . . . . . . . . . . . . . . . . . . . . . . . . . . . . . . . . . . . . . . . .
Installing a Separate Hand-held Monitor Connector 2-9 . . . . . . . . . . . . . . . . . . .
Chapter 3 Getting Started 3-1 . . . . . . . . . . . . . . . . . . . . . . . . . . . . . . . . . . . . . . . . . . . .
Chapter 4 Device Configuration: Overview 4-1 . . . . . . . . . . . . . . . . . . . . . . . . . . . .
Chapter 5 Monitoring the Bus and its Devices 5-1 . . . . . . . . . . . . . . . . . . . . . . . . . .
Monitor Block Display for Discrete I/O and Input Blocks 5-4 . . . . . . . . . . . .
Monitor Block Display for Discrete Relay Output Blocks 5-5 . . . . . . . . . . . .
Monitor Block Display for Analog Blocks 5-5 . . . . . . . . . . . . . . . . . . . . . . . . .
Monitor Block Display for RTD or Thermocouple Blocks 5-5 . . . . . . . . . . . .
Monitor Block Display for a High-speed Counter Block 5-6 . . . . . . . . . . . . .
Monitor Block Display for a P owerTRAC Block 5-7 . . . . . . . . . . . . . . . . . . . .
Monitor/Control Reference Display for a Discrete, Relay , or High-speed Counter
Block 5-9 . . . . . . . . . . . . . . . . . . . . . . . . . . . . . . . . . . . . . . . . . . . . . . . . . . . . . . . .
Monitor/Control Reference Display for an Analog, RTD, or Thermocouple Block
5-10
Monitor/Control Reference Displays for a P owerTRA C Block 5-11 . . . . . . . .
Chapter 6 Reading CPU Memory 6-1 . . . . . . . . . . . . . . . . . . . . . . . . . . . . . . . . . . . . .
Chapter 7 Error Messages 7-1 . . . . . . . . . . . . . . . . . . . . . . . . . . . . . . . . . . . . . . . . . . . .
GFK-0121E
Table of Contents i
Page 6

Restarts for autonumbers that do not restart in each
chapter .
figure bi level 1, reset
table_big level 1, reset
chap_big level 1, reset1
app_big level 1, resetA
figure_ap level 1, reset
table_ap level 1, reset
figure level 1, reset
table level 1, reset
these restarts must be in the header frame of chapter 1.
a:ebx, l 1 resetA
a:obx:l 1, resetA
a:bigbx level 1 resetA
a:ftr level 1 resetA
c:ebx, l 1 reset1
c:obx:l 1, reset1
c:bigbx level 1 reset1
c:ftr level 1 reset1
Reminders for autonumbers that need to be restarted
manually (first instance will always be 4)
let_in level 1: A. B. C.
letter level 1:A.B.C.
num level 1: 1. 2. 3.
num_in level 1: 1. 2. 3.
rom_in level 1: I. II. III.
roman level 1: I. II. III.
steps level 1: 1. 2. 3.
Chapter 1 Introduction
1
The Hand-held Monitor (HHM) is a convenient operator
interface device that can be used to set up and monitor a Genius
I/O and communications system.
The HHM features:
H
An LCD display with four lines of 16 characters each.
H
Selectable display language: English, German, French, or
Italian.
H
A 20-key sealed-membrane keypad.
H
A keyswitch that can be used to restrict operator access to
certain functions, as selected for the application.
H
Operation from its battery pack, or by 115 volt AC
or 230 volt AC power .
The Hand-held Monitor screen is the operator’s
window to the Genius bus and all of its devices. It can
be used to display:
h
I/O data for any device on the bus.
h
Diagnostics.
h
Bus scan time.
h
Descriptions of all devices on the bus.
h
Global Data addresses.
h
Memory data from CPUs on the bus.
The Hand-held Monitor can also be used for device configuration, fault clearing, and forcing I/O circuits
and dual bus selection. It can also be set up to prevent the use of any of these capabilities.
A k ey feature of the Hand-held Monitor is its ability to communicate with I/O blocks and to force discrete
and analog I/O, whether or not there is a PLC or computer connected to the bus. This greatly simplifies
system check-out prior to full-scale system operation.
GENIUS
Hand Held Monitor
GE Fanuc
F1 F2 F3 F4
789Home
456
123Clear
+
0
–
mon
cfg
Y
Menu
On
D
Off
GFK -0121E
1-1
Page 7

1
Hand-held Monitor Description
GENIUS
Hand Held Monitor
GE Fanuc
Mode Select Keyswitch
mon
cfg
HHM Cable
F1 F2 F3 F4
789Home
456
123Clear
+
–
Menu
0
D
Y
On
Off
LCD Display
Function Keys
Decimal Keys
Operation Keys
Connection for
Charger/Adapter
The HHM Keypad
The Hand-held Monitor keypad has three types of keys: function keys (F1 - F4), decimal
keys, and operation keys.
Function K eys: The four keys in the top row (F1, F2, F3, and F4) have functions that
change as the display changes.
F1 F2 F3 F4
The bottom line of the screen shows the current functions of these keys. For example:
Decimal Keys: The decimal keys are used to enter numbers and change sign.
Operation Keys: The four keys on the right side of the keypad are used to control HHM
operations:
Home
∆
Menu
1-2
Hand-held Monitor User’s Guide – June 1994
displays the Home menu.
displays the previous screen.
n x t p r v a c t v b u s
Clear
On
Off
clears HHM error messages,
clears Genius faults,
deletes HHM keypad entries.
turns the HHM on or off.
GFK-0121E
Page 8

The HHM Display
The Hand-held Monitor has a 4-line LCD screen. On a new Hand-held Monitor,
displays are in English. The display language can easily be changed to French, German,
or Italian. (Instructions for changing the display language are on page 3-5).
In addition to alphanumeric characters, the display uses the following special characters:
tri-state input.
I
T
Output with Feedback, or block with both inputs and outputs.
O
T
circuit is forced OFF .
4
circuit is forced ON.
1
relay block point is forced open.
O
relay block point is forced closed.
C
circuit controls a Bus Switching Module.
B
S
reference address or Device Number not yet assigned.
?
reference address is out of range for the presently-selected HHM host.
*
For a list of other HHM abbreviations and their meanings, select F3 (HELP) from the
HHM Utilities menu.
1
K eyswitch
The Hand-held Monitor’s keyswitch can be used to restrict access to certain features of
the HHM.
With the key present, the switch can be placed in either “configure” (cfg) or “monitor”
(mon) position.
cfg with the switch in Configure position, all HHM functions are available. In this
mode, the Hand-held Monitor can be configured to determine which of its features will be usable once the key is removed.
mon: with the keyswitch in Monitor position, the HHM can monitor bus and block
data. Additional HHM functions, such as clearing faults or configuring I/O
blocks, can be used in Monitor mode only if the HHM has been set up to permit
their use.
The key must be present to move the switch from Monitor to Configure mode position;
it can only be removed in MON position. Two identical keys are supplied with each
Hand-held Monitor . The key should be removed if system security is a concern.
Accessories
The Hand-held Monitor comes with:
H
A sturdy removable leather case. The case has a rear tab with snap closure for
carrying the HHM on a belt. The handle can be pivoted back to stand the
Hand-held Monitor upright on a table.
H
A rechargeable battery pack.
H
A battery charger/adapter with 8-ft cord.
H
Two keys for the mode-selection keyswitch.
H
A removable 5 ft (1.5 meter) coiled communications cable.
GFK-0121E
Chapter 1 Introduction
1-3
Page 9

1
HHM Compatibility
The following table shows which Hand-held Monitor versions are compatible with
specific Genius I/O, Field Control, and related products.
Note that the functionality of an older Hand-held Monitor can be upgraded by replacing
its firmware PROM. (PROM installation instructions are in chapter 2).
Product
Type
24/48VDC Analog 4 Input/2 Output block
24/48VDC RTD 6 Input block
24/48VDC Thermocouple 6 Input block
24/48VDC Current-Source Analog 4 Input/2 Output block
24/48VDC Current-Source Analog 6 Output block
115V A C Analog 4 Input/2 Output block
115V A C/125VDC RTD 6 Input block
115VA C/125VDC Thermocouple 6 Input block
115V A C/125VDC Current-Source Analog 4 Input/2 Output block
115V A C/125VDC Current-Source Analog 6 Output block
24/48VDC Source 16 I/O block
24/48VDC Sink 16 I/O block
24VDC Source 16 I/O block
24VDC Sink 16 I/O block
12/24VDC Source 32 I/O block
5/12/24VDC Sink 32 I/O block
115V A C 8 I/O block
115V A C 8 I/O Low Leakage block
115VA C 16 Input block
115V AC/10-30VDC High-Speed Counter block, v1.x
115V AC/10-30VDC High-Speed Counter block, v2.0
115/230VAC Relay Normally-closed 16 Output block
115/230VAC Relay Normally-open 16 Output block
115V AC/125VDC 8 I/O Isolated Block with Failed Switch Diagnostic
115V AC/125VDC 8 I/O Isolated without Failed Switch Diagnostic
115-230V A C/125VDC PowerTRAC block, v .2.2 or earlier
115-230VA C/125VDC PowerTRAC block, v.2.3
Product
Catalog
Number
IC660BBA020
IC660BBA021
IC660BBA023
IC660BBA024
IC660BBA025
IC660BBA100
IC660BBA101
IC660BBA103
IC660BBA104
IC660BBA105
IC660BBD020
IC660BBD021
IC660BBD022
IC660BBD023
IC660BBD024
IC660BBD025
IC660BBD100
IC660BBD101
IC660BBD110
IC660BBD120
IC660BBD120D
IC660BBR100
IC660BBR101
IC660BBS100
IC660BBS101
IC660BPM100
IC660BPM100C
Requires this Hand-
held Monitor Ver-
sion (or later)
any
IC660HHM501B (v2.0)
IC660HHM501D (v3.5)
IC660HHM501E (v3.7)
IC660HHM501G (v4.0)
any
IC660HHM501B (v2.0)
IC660HHM501D (v3.5)
IC660HHM501E (v3.7)
IC660HHM501G (v4.0)
any
any
any
any
IC660HHM501B (v2.0)
IC660HHM501B (v2.0)
any
any
IC660HHM501B (v2.0)
IC660HHM501D (v3.5)
IC660HHM501G (v4.0)
IC660HHM501B (v2.0)
IC660HHM501B (v2.0)
any
any
IC660HHM501D (v3.5)
IC660HHM501G (v4.0)
Series Five Genius Bus Controller
Series 90-70 Genius Bus Controller
Series Six Genius Bus Controller with Diagnostics
Series Six Genius Bus Controller without Diagnostics
Series 90-30 GENIUS Communications Module
GENIUS Network Interface (GENI) module
IBM PC Interface Module (PCIM)
GENIUS Network Interface (GENI) module with inverted connector
Series 90-70 Remote I/O Scanner IC697BEM733 IC660HHM501G (v4.0)
24/48VDC Bus Switching Module (BSM)
115V AC/125VDC Bus Switching Module (BSM)
Field Control products (all) IC670xxxxxx IC660HHM501J (v4.6)
1-4
Hand-held Monitor User’s Guide – June 1994
IC655BEM510
IC697BEM731
IC660CBB902
IC660CBB903
IC693CMM301
IC660ELB905
IC660ELB906
IC660ELB910
IC660BSM021
IC660BSM115
IC660HHM501C (v3.0)
IC660HHM501F (v3.8)
any
any
IC660HHM501C (v3.0)
any
any
any
any
GFK-0121E
Page 10

HHM Specifications
Operating temperature 0–60 C(32–140 F)
Storage temperature –40 to +70 C(–40 to 158 F)
Humidity 5-95% (non-condensing)
Weight: without case 1.3 lbs (0.6 Kg)
with case 1.8 lbs (0.8 Kg)
Size (HxWxD): without case 8.00” x” 3.75 x” 1.25 (cmx)
with case 10.85” x 4.30” x 2.25”
Requir ed AC power (for battery charger) 115/230VAC 15%, 47-63 Hz
Fully charged operation 6 hours
Display characters 4 lines each of 16 LCD (0.2” - 5 mm high)
K eyboard 20 sealed keys with tactile feedback
Featur es Performs Genius I/O block configuration, monitors
Display language English, German, French, or Italian
Drop T est Survives drop from 4 feet (1.2 meters) to concrete
Data Rates 153.6 Kbaud standard, 153.5 Kbaud extended, 76.8
1
(16-hour charging period for IC660BPM500B.
8-hour charging period for IC660BPM500A, now
discontinued.)
I/O data on Genius bus, displays diagnostic information.
floor landing on any surface or corner without affecting its operation.
Kbaud, 38.4 Kbaud
Ordering Information
GFK-0121E
Description Catalog Number
Hand-Held Monitor (includes all items listed below) IC660HHM501
Cable from HHM to I/O Block IC660HHC005
Battery P ack IC660BPM500
Battery Charger IC660BCM501
Optional Accessories
External HHM Connector: A panel-mountable or DIN rail-mountable HHM connector
(catalog number 44A736310-001-R001) is available. It can be used to provide a
permanent HHM connection point on a Genius bus. See chapter 2 for a description.
230VAC Power A dapter: An optional 230V AC P ower A dapter (IC660MCA512) can be
used to connect the Hand-held Monitor Charger to variety of 230 VAC power outlets by
means of a standard computer cable (not supplied). See chapter 2 for a description.
Extra HHM Keys: For applications requiring extra keys for the Hand-held Monitor, a
group of five sets can be ordered separately. The catalog number is IC660MKS511.
Chapter 1 Introduction
1-5
Page 11
Chapter 2 Har dwar e Setup
2
Power for the Hand-held Monitor
The Hand-held Monitor can be operated using its built-in battery, or connected to either
115 volt or 230 volt AC power. A battery pack must always be installed to operate the HHM,
even when using AC power.
A n optional 230VAC Power A dapter can be used to connect the Hand-held Monitor Charger
to variety of 230 VA C power outlets. See page 2-2 for more information.
Charging the Battery Pack for AC Operation
To operate the HHM using AC power , if the battery pack is new or has become fully
discharged by operating the HHM on battery power, it must be charged for at least 20
minutes. If it is necessary to restore temporary operation before charging is complete:
H
Plug the adapter cable into the HHM.
H
Wait 15 seconds and power up the HHM. It may be necessary to remove the battery pack
for 15 seconds, then reinstall it.
GFK-0121E
Note that continuall y usi ng the Hand-held Monitor in AC mode for an extended period of
time causes the battery pack to deteriorate. A fter up to two years of AC operation of the
HHM, the battery pack may not be able to accept enough charge to operate the HHM
independently. However, it can still be used for AC operation.
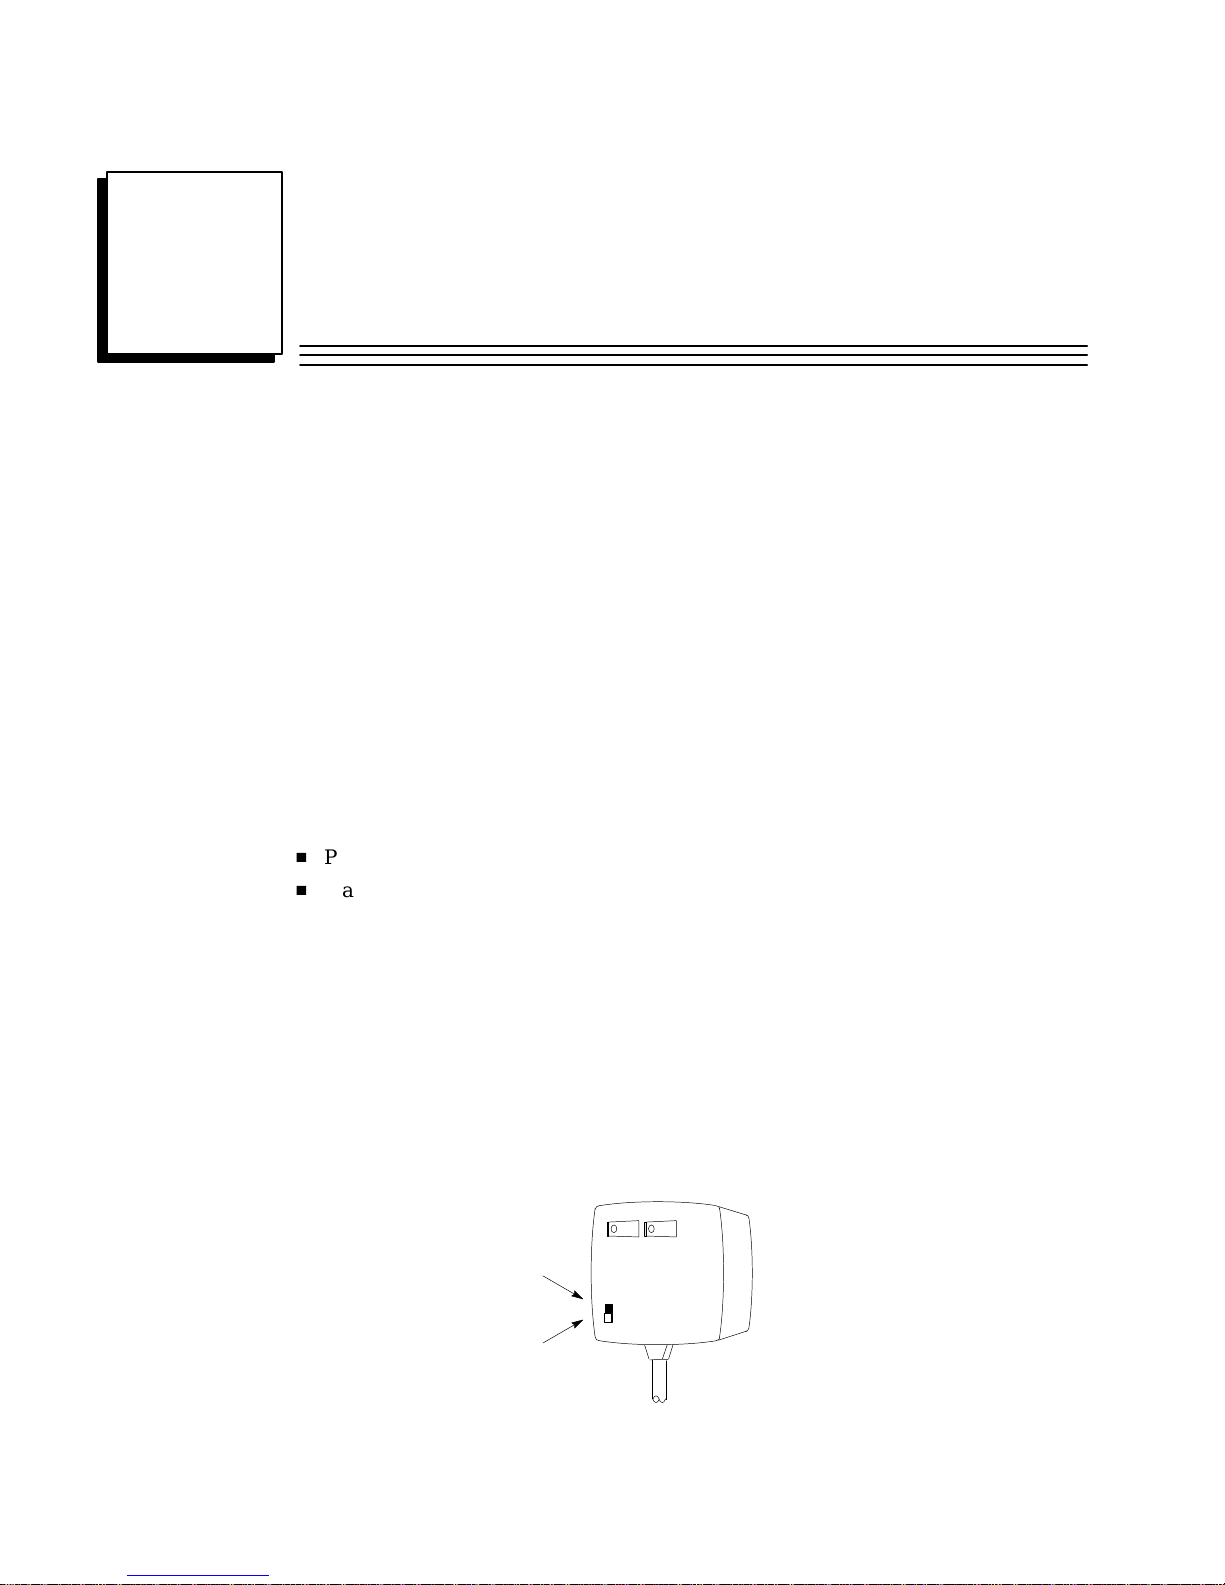
Selecting 120 VAC or 230 VAC
Before plugging the adapter into AC power to operate or charge the Hand-held Monitor,
be sure the switch at the base of the adapter is correctly set to match the incoming
power (120 volts AC or 230 volts A C).
120V
position
230V
position
The Hand-held Monitor will operate while the adapter is connected.
120V
230V
2-1
Page 12

2
Using the 230VAC Power Adapter
The optional 230VAC Power Adapter (IC660MCA512) can be used to connect the Handheld Monitor Charger to variety of 230 VAC power outlets by means of a standard computer cable (not supplied).
The Adapter has a receptacle on the top for the Hand-held Monitor Charger and an IEC
320 receptacle on the side for the computer cable.
HHM Charger receptacle in
top of Adapter
IEC 320 receptacle in
side of Adapter
Instructions
1. Se t the powe r selection switch on the Han d-held Monitor Charger to the 230V position.
120V
230V
position
2. Plug the Hand-held Monitor Charger into the top receptacle on the Power A dapter
unit.
3. Plug the computer cable into the IEC receptacle on side of the Power Adapter unit.
4. Connect the computer cable to a suitable 230VAC power source.
During normal operation, it is best to connect and disconnect the cable at the outlet, not
at the Adapter.
230V
2-2
Hand-held Monitor User’s Guide – June 1994
GFK-0121E
Page 13

Battery Operation
The HHM’s battery pack provides up to 6 hours of operation. To maximize battery life,
allow the battery to discharge fully between charges. The battery should be allowed to
fully discharge once a month.
Low Battery Power
Low battery power may cause this message:
**LOW BATTERY**
**HHM HALTED**
Please Recharge
Or the display may blank, or two black lines may appear briefly. Low battery power
suspends the current operation.
Charging the Battery Pack
When you receive a new Hand-held Monitor, its battery pack is not charged. Before
using a new battery pack to power the HHM for the first time, charge it by plugging the
adapter into a power source for 24 hours. After this initial charging, subsequent
rechanges will require only 16 hours.
Maintaining spare battery packs will allow the HHM to operate using one battery pack
while another is being charged.
If the battery pack won’t take a charge, it usually indicates a faulty battery pack, not a
faulty Hand-held Monitor. Try another batter y pack. Replacement (uncharged) batter y
packs are available.
If a battery pack is left uncharged for a long time, it may be necessary to remove the
battery pack from the HHM and charge it while removed for up to 15 minutes.
2
GFK-0121E
Replacing the Battery Pack
To replace the battery pack, use a Phillips screwdriver (size 0 or 1) to release the retaining
screw at the bottom of the HHM. Slide the battery pack out, insert another, and tighten
the screw.
Automatic Shutoff
To conserve power, the Hand-held Monitor automatically shuts off 10 minutes after the
last key is pressed. For applications where continual operation is preferred, the
automatic shutoff feature can be disabled. See page 3-5 for more information.
Chapter 2 Hardware Setup
2-3
Page 14
2
Changing the PROM
New features can be added to upgrade a Hand-held Monitor by replacing its PROM as
described below .
To prevent possible damage to the Hand-held Monitor, this operation should be
performed in an area equipped with suitable electrostatic discharge protection.
1. If the HHM is connected to AC power, disconnect it.
2. Remove the HHM battery pack as described on the previous page.
3. On the front of the Hand-held Monitor, remove the two Phillips-head screws located
near the 7 and HOME keys.
4. Gently raise the keyboard up from the bottom to release the lip between the
keyboard and the display.
Caution
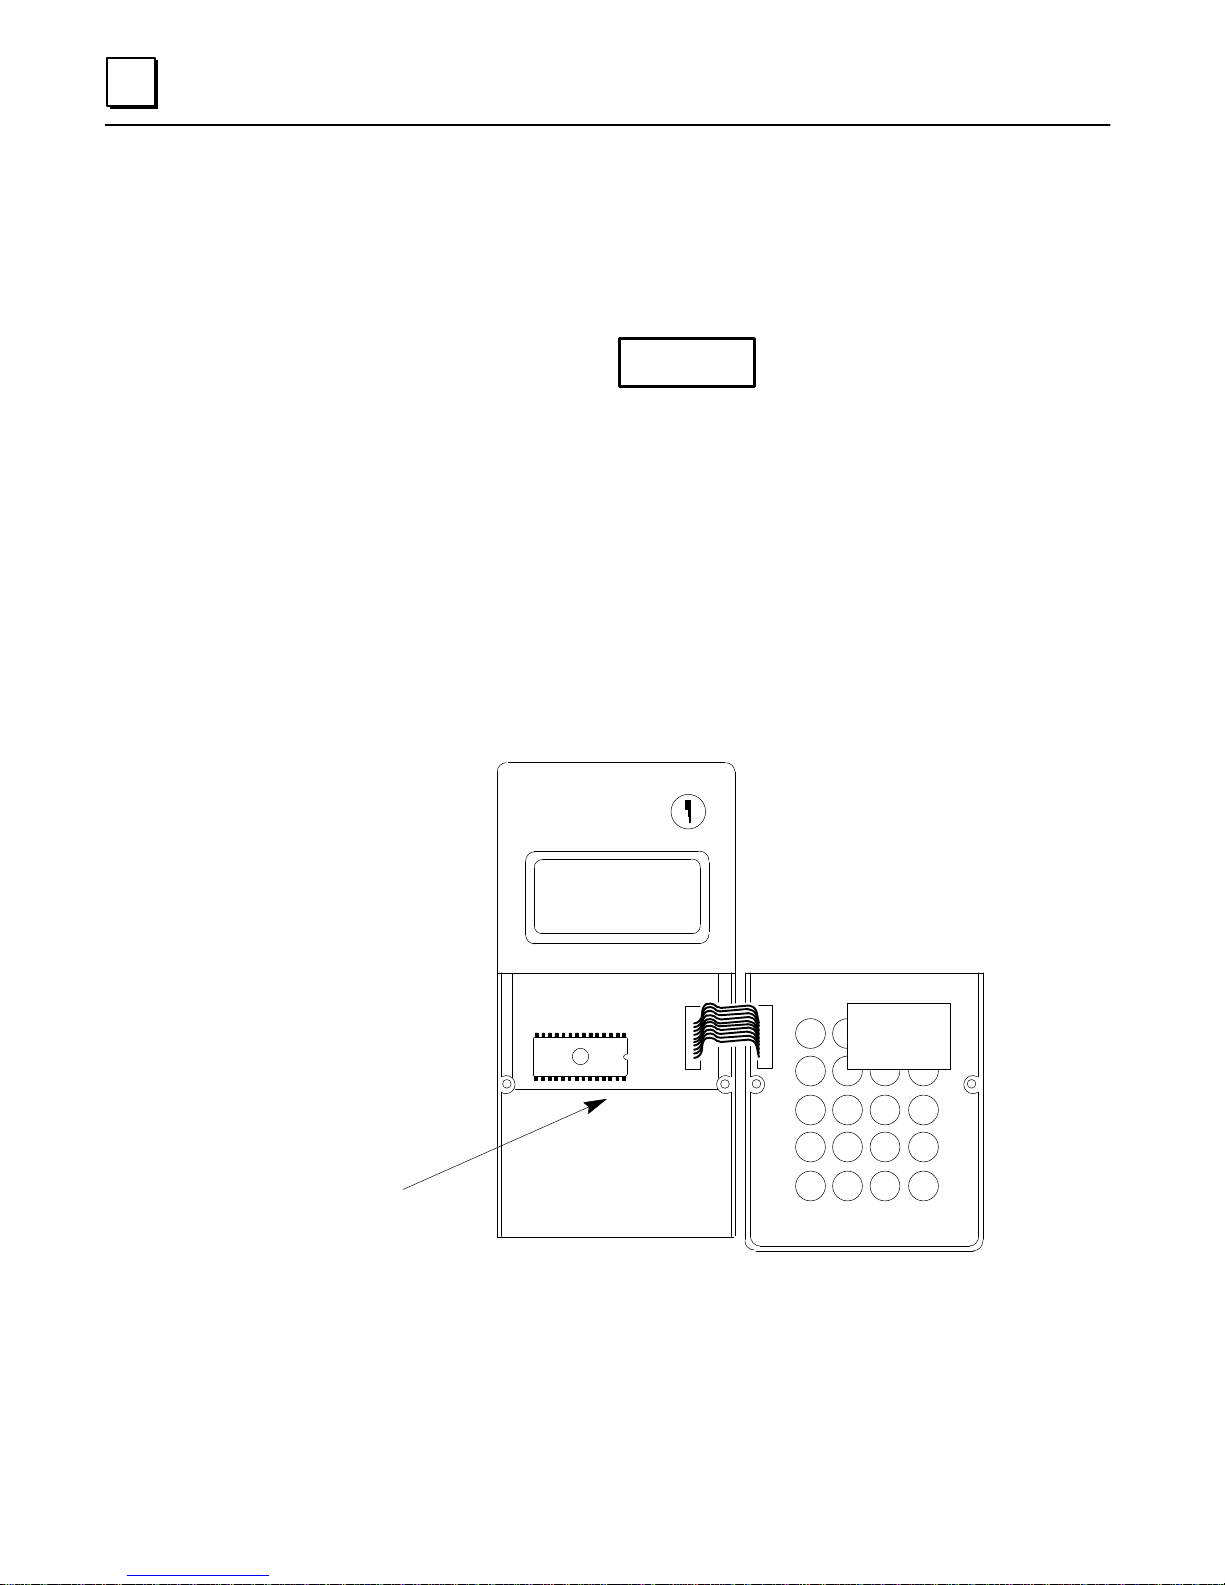
5. Once this lip is free, open the keyboard to the right, as illustrated below. It is not
necessary to remove the ribbon connector .
GENIUS
Hand Held Monitor
GE Fanuc
mon
cfg
Install PROM
with notch to
right as shown
6. Remove the old PROM. If you don’t have a PROM extraction tool, a small screwdriv-
er can be used instead, carefully working from side to side.
2-4
Hand-held Monitor User’s Guide – June 1994
GFK-0121E
Page 15
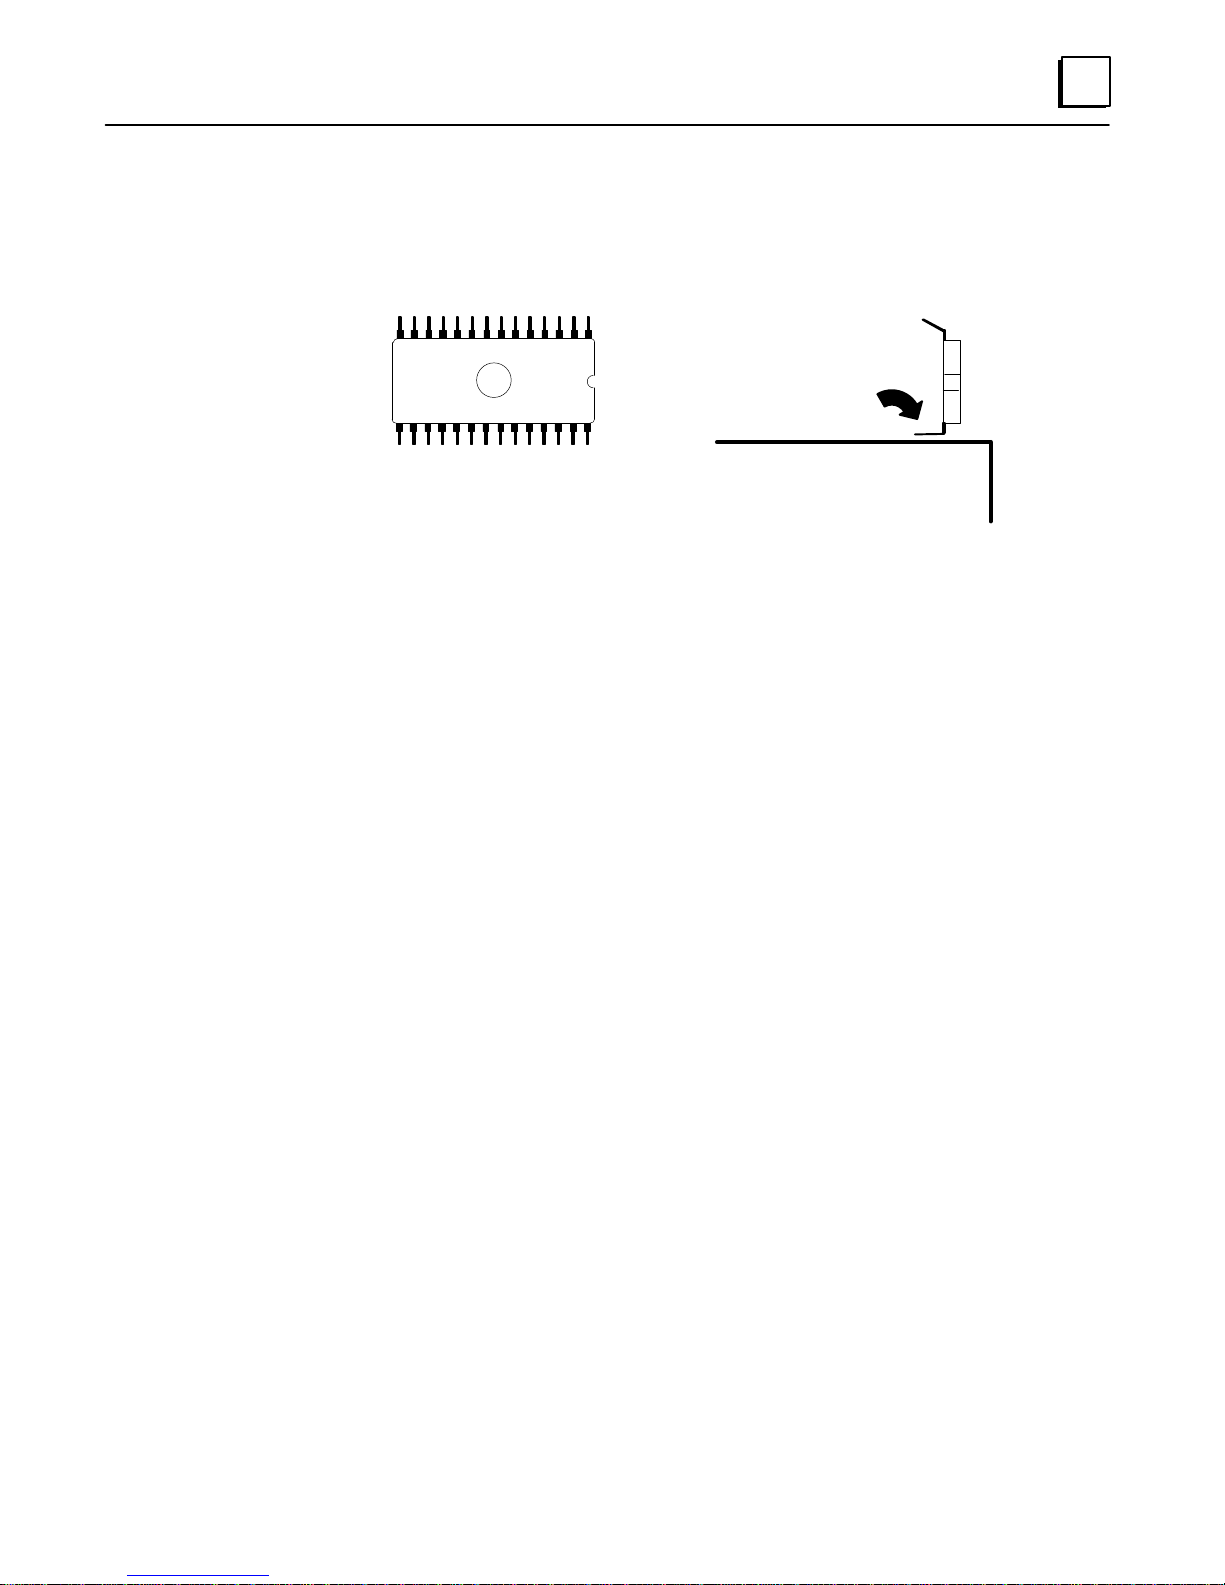
7. If necessary, bend the pins on the PROM so they line up properly with the holes in
the socket. Bend the pins by pressing each side against a clean desk or table top as
shown below. If possible, a conductive mat should be used.
46024
Conductive mat
8. Insert the EPROM or Battery-Backed RAM into the socket.
IMPORTANT: Inserting the PROM backward can damage the Micro PLC and
destroy the PROM.
2
Newer PROMs may be physically longer, but all PROMs must be inserted flush with
the left edge of the socket, with the notch toward the ribbon connector.
9. Reposition the keyboard in its lip and tighten the two screws.
10. Reinstall the battery pack.
GFK-0121E
Chapter 2 Hardware Setup
2-5
Page 16

2
Permanent Installation
If the Hand-held Monitor is to be installed using the metal bracket provided, follow the
instructions below. Do not install the HHM yet if it will be used to configure I/O blocks.
The mounting bracket provid ed can be used to install the Hand-held Monitor behind a
panel. You will need to make a cutout in the panel for the HHM (see next page).
You will also need to install a connector for the Hand-held Monitor within reach of the
HHM’s cable. The extra D-shell connector provided with the Hand-held Monitor
requires a panel cutout, with the bus cable and Hand-held Monitor located on the
opposite sides of the panel (see page 2-8).
An optional panel-mountable or DIN rail-mountable connector is also available. It does
not require a cutout. See page 2-9 for details.
Behind PanelBack of HHM
Bracket
To Power Source
Optional HHM
Connector
Bus In
Bus Out
Configuring a Permanently-installed HHM
Ordinarily, a Hand-held Monitor installed on a panel serves as an operator station. Its
configuration may be different from that of a portable HHM.
H
Its Device Number must be changed from 0 to some other number .
H
Automatic shutoff may be disabled.
H
I/O block configuration and other features may also be disabled.
After the HHM is configured, its keyswitch should be placed in MON position, and the
key removed.
2-6
Hand-held Monitor User’s Guide – June 1994
GFK-0121E
Page 17

HHM Installation Instructions
1. Select a suitable location for the HHM. Environmental specifications are listed on
page 1-5. The location must have 115 VAC or 230 VAC power.
2. Cut an opening 3.75I (9.53cm) wide x 8I (20.32cm) high in the panel. Drill four
mounting holes as shown below.
4.38in
(11.13cm)
3.75in
(9.53cm)
1.00in (2.54cm)
Cutout
6.00in
(15.24cm)
2
1.00in (2.54cm)
3. Attach the bracket to the HHM with the screws, washers, and lockwashers provided.
(4) holes for
mounting on
panel
(2) holes for mounting to
back of Hand-held Monitor
4. Using appropriate hardware (not provided), mount the HHM and bracket in the
cutout.
5. Connect the power cord to the HHM, and connect the signal cable to the connector.
GFK-0121E
Chapter 2 Hardware Setup
2-7
Page 18

2
Installing the D -Shell HHM Connector
Follow the instructions below if you are installing the supplied D-shell connector on the
bus.
1. Using the mounting plate as a template, cut an opening in the panel for the mating
connector. Also drill two holes for the mounting hardware.
2. Attach the mounting plate and mating connector to the panel using the mounting
hardware supplied.
3. Secure the two ends* of the serial bus cable to the back of the panel using strain
relief brackets.
4. Strip the ends of the wires. Twist the two Serial 1 wires together and attach them to
pin 5 of the connector. Twist the Serial 2 wires together and attach them to pin 9.
Similarly, attach the Shield wire(s)* to pin 4.
The following illustration shows connections for incoming and outgoing serial bus
cable. As with other devices, the HHM connector may be at either end of its bus. If it
is, there will only be one bus cable attached.
Bus
Cable
SER 2
(Pin 9)
Strain
Reliefs
SER 1
(Pin 5)
Crimp
(Qty. 3)
Bus
Cable
Shield
(Pin 4)
Mounting
Hardware
Mating
Connector
Mounting Surface
(rear view)
Mounting
Plate
a42240c
Hand-held
Monitor
Connector
When making bus connections, the maximum exposed length of bare wires should
be two inches. For added protection, each shield drain wire should be insulated with
spaghetti tubing to prevent the Shield In and Shield Out wires from touching each
other.
* If the HHM connector is at either end of its bus, it is necessary to install an
appropriate terminating resistor across the Serial 1 and Serial 2 wires. The Genius I/O
System and Communications User’s Manual lists appropriate terminating resistors for
each recommended bus cable type.
2-8
Hand-held Monitor User’s Guide – June 1994
GFK-0121E
Page 19
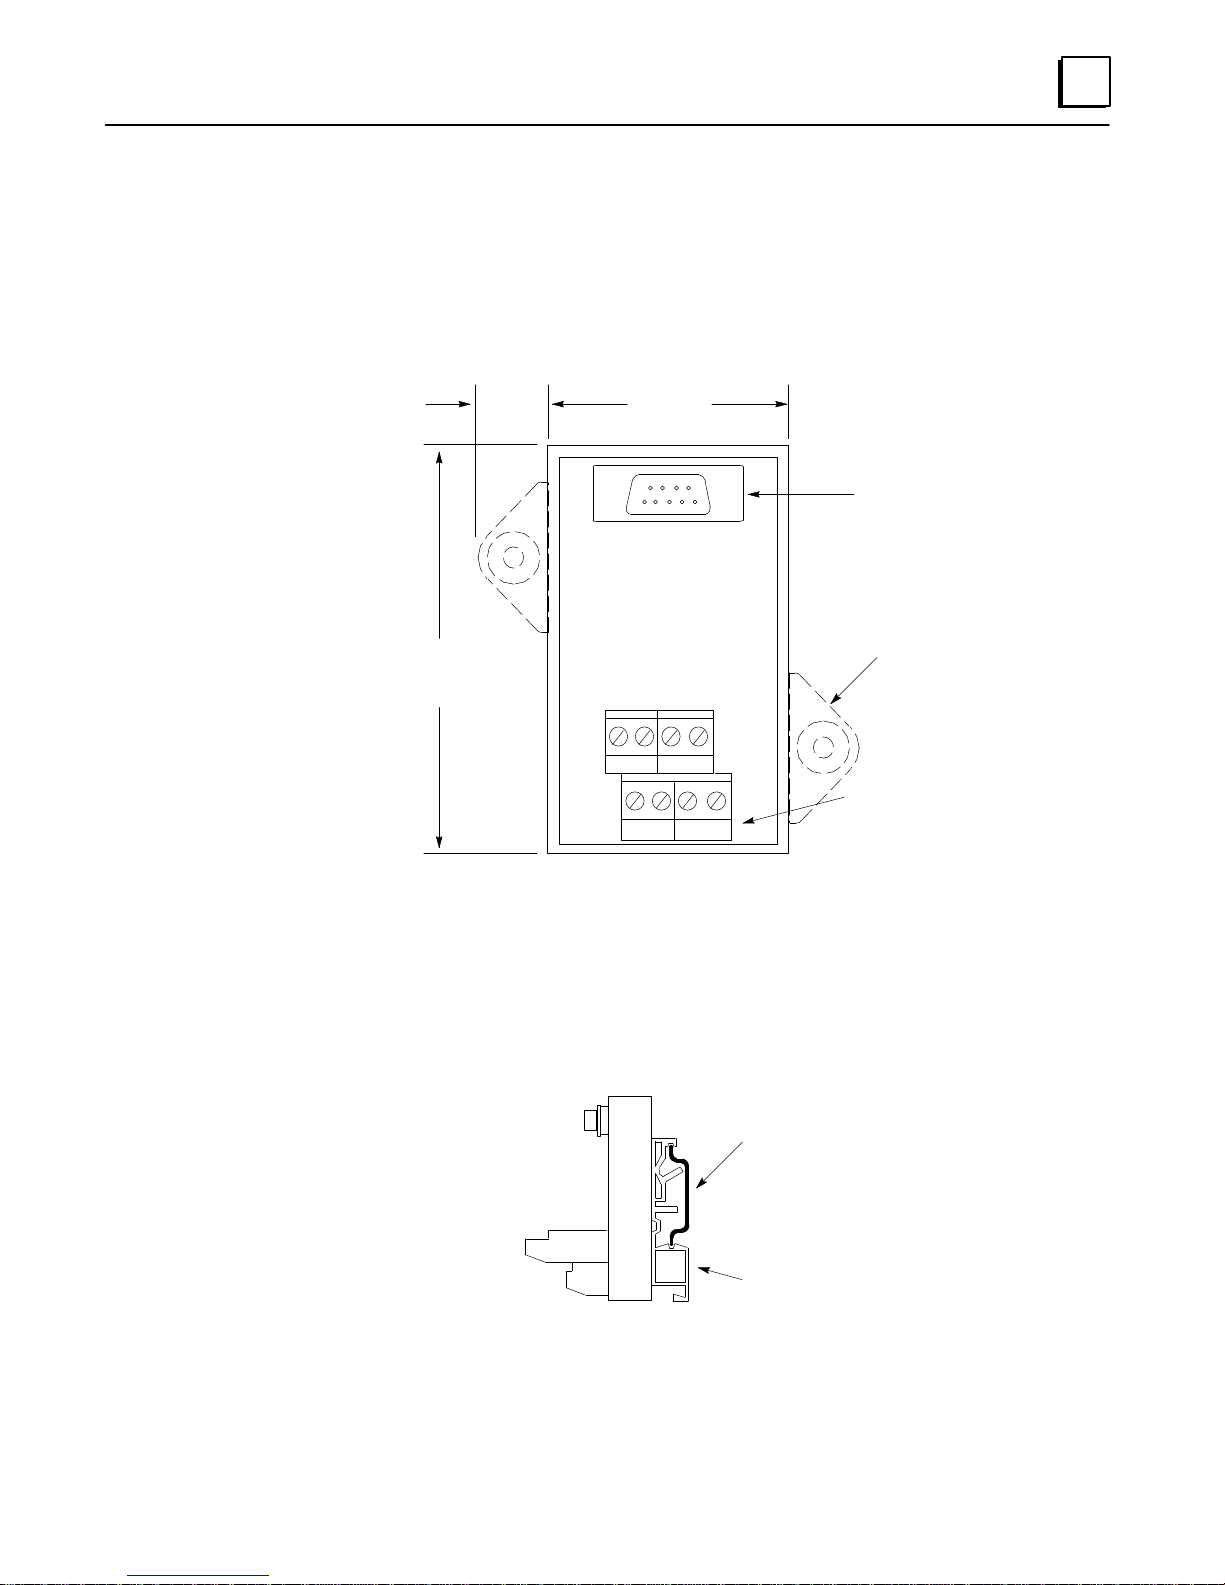
Installing a Separate Hand-held Monitor Connector
You can add a connector to the bus for a permanently-mounted Hand-held Monitor, or
to provide an additional attachment point for a portable HHM.
The unit shown below (catalog number 44A736310-001-R001) provides a Hand-held
Monitor connector and serial bus terminals.
2
.5 in
1.27 cm
7.198 cm
2.834 in
1.673 in
4.249cm
X1
X2 SA SB
X1 X2
SA SB
shown at 100% of actual size
46357
Hand-held Monitor
Connector
Panel Mounting Ear
Serial Bus Terminals
X1 Serial 1
X2 Serial 2
SA Shield In
SB Shield Out
GFK-0121E
Mounting the HHM Connector
This unit can be easily mounted on a rail such as a standard 35mm (shown below) or
15mm DIN rail. The panel-mounting ears are not used if the unit is installed on a DIN
rail.
46358
35mm DIN rail
(Removable) DIN rail
Mounting Feet
side view: shown at 50% of actual size
Alternatively, it can be installed directly on a panel using screws through its mounting
ears. The DIN rail feet on the back of the unit are removed when the unit is
panel-mounted.
Chapter 2 Hardware Setup
2-9
Page 20

2
Making the Bus Connections
The HHM connector has two sets of terminals; one for incoming cable and the other for
outgoing cable.
Connect the Serial 1, Serial 2, and Shield In terminal of either connector to the previous
device. Connect the Serial 1, Serial 2, and Shield Out terminal of the other connector to
the next device.
When making bus connections, the maximum exposed length of bare wires should be
two inches. For added protection, each shield drain wire should be insulated with
spaghetti tubing to prevent the Shield In and Shield Out wires from touching each other.
The following illustration shows connections for incoming and outgoing serial bus cable.
As with other devices, the HHM connector may be at either end of its bus. If it is, there
will only be one bus cable attached.
46366
Bus In
Bus Out
X1
X2 SA SB
X1 Serial 1
X2 Serial 2
X1 X2
SA SB
SA Shield In
SB Shield Out
As with other devices, if the HHM Connector is at either end of its bus, install an
appropriate terminating resistor across the Serial 1 and Serial 2 terminals. The Genius I/O
System and Communications User’s Manual lists appropriate terminating resistors for each
recommended bus cable type.
2-10
Hand-held Monitor User’s Guide – June 1994
GFK-0121E
Page 21

Chapter 3Getting Started
3
This chapter explains how to:
H
Turn on the Hand-Held Monitor
h
Set the HHM Baud Rate
h
Display the Home Menu
H
Change the Hand-held Monitor ’s configuration:
h
the HHM Device Number
h
the HHM Display Language
h
the Host CPU
h
automatic shutoff
h
ability to Change Block ID Parameters
h
ability to Change the Baud Rate of Devices on the Bus
h
ability to Configure Devices on the Bus
h
ability to Force I/O Circuits
h
ability to Clear Faults
H
H
GFK-0121E
Test the operation of the Hand-held Monitor.
h
the Keypad
h
the Display Screen
h
the Internal Electronics
Display an alphabetical list of definitions for the definitions used on the HHM screen.
3-1
Page 22

3
Turning on the Hand-Held Monitor
With the battery pack charged, or with the HHM
connected to a suitable AC power source, press the
ON/Off key to turn the Hand-held Monitor on.
Caution
Do not connect or disconnect the
HHM to/from another device or connector while it is ON.
Connecting or disconnecting the
HHM while it is ON may disrupt
communications on the bus.
Each time you turn on the Hand-held Monitor, it
executes a brief self-test.
GENIUS HHM (version)
COPR. (date)
GE Fanuc N.A.
SELFTEST WORKING
1. If the baud rates match, press F4 (Ok).
If the baud rates do not match, press F2
(Change) instead. The HHM screen changes to
allow you to select a different baud rate:
HHM BAUD RATE
ACTIVE=(baud rate)
PROG =(baud rate)
tgl entr ok
A. With the key in CFG position, press F2
(Toggle). The selection changes to 76.8K,
38.4K, 153.6K extended, and back to 153.6K
standard.
B. When the correct baud rate appears on line
3, press F3 (Enter). Press F4 (Ok) to return
to the first baud rate screen.
2. Press F4 (Ok) to display the Home menu.
Powerup Error Messages
Setting the HHM Baud Rate
Before the HHM completes the self-test, this
screen appears:
HHM BAUD RATE
ACTIVE=153.6K ST
MUST MATCH BUS
chng ok
It shows the baud rate that is currently set up for
the Hand-held Monitor. The baud rate
.
Chapter 7 lists error messages that may appear at
powerup.
Sometimes, an error message appears although
the HHM has powered up normally.
POWERUP ERROR #4 or #5 may be caused by
excessive noise on the bus, or by an attempt to use
different baud rates on the same bus.
3-2
Hand-held Monitor User’s Guide – June 1994
GFK-0121E
Page 23

Displaying the Home Menu
3
This is the Hand-held Monitor’s Home menu:
F 1 : H H M U T I L I T I E S
F 2 : A N A L Y Z E
F 3 : C O N F I G U R A T I O N
F 4 : D E V I C E M E M O R Y
Display the Home menu by either:
A. Pressing F4 (Ok) from the first baud rate
screen, or
The Main HHM Screens
F1: HHM CONFIG
F2: SELF–TEST
F3: HELP
F1
HHM CONFIG
BLOCK NO. 0
chng nxt
See page 3-4 for
instructions.
F2
F1: KEYPAD TEST
F2: DISPLAY TEST
F3: TEST INTRNALS
F4:
See page 3-7 for
instructions.
F3
(help screens)
F1: MONITOR BLOCK
F2: MNTR/CTRL REF
F3: BLOCK/BUS STS
F4: PULSE TEST
F1
REFS O
3 4 5 6 7 8 9 0
O O O O O O O
A 1 0 0 0 1 1 1
See page 5-4 for
instructions.
F2
MNTR/CNTL O
STATE: 0
NO FAULTS
> on off reles
See page 5-9 for
instructions.
F3
REFS O
DC16K 15 v2.0ACT
FORCED, NO FAULTS
nxt prv actv bus
See page 5-2 for
instructions.
F4
PULSE TEST
REFS 0
NO FAULTS
exec
See page 5-17 for
instructions.
B. Pressing the Home key or DMenu key from a
Use the Home menu to get to any other HHM
function, as shown below.
Notice that different screens appear, depending on
the type of device that is currently communicating
with the HHM.
F1: HHM UTILITIES
F2: ANAL YZE
F3: CONFIGURATION
F4: DEVICE MEMORY
F3F2F1
F1: PROG BLOCK ID
F2: CONFIG BLOCK
F3: COPY CONFIG
F1
PROG BLOCK ID
I/O
BLOCK NO.
ref blk nxt
See page 4-4 for
instructions.
F2
(individual feature
configuration
screens)
See Genius I/O
Blocks Manual or
individual block
manual for
instructions.
F3
COPY CONFIG
FROM : TO :
chng entr
See page 4-6 for
instructions.
For Most
Genius Devices
lower-level screen.
F2
F1: MONITOR
F2: CONFIGURATION
F1
F1 Monitor I/O
F2:Faults
F3 Previous Menu
See page 5-15 for
instructions.
F2
F1: GENIUS CONFIG
F2: Module Config
F3: Previous Menu
See page 4-7 for
instructions.
F4
DEVICE MEMORY #
(reference)
tgl chng entr SBA
See chapter 6 for
instructions.
For Field
Control
GFK-0121E
Chapter 3 Getting Started
3-3
Page 24

3
Configuring the Hand-held Monitor
You can change the following operating
characteristics of the Hand-held Monitor:
H
PLC reference format.
H
153.6 Kbaud “standard” baud rate.
H
Device Number set to 0.
H
English language displays.
H
Shutdown after 10 minutes of inactivity.
H
I/O block configuration enabled.
H
I/O circuit forcing enabled.
H
Fault clearing enabled.
Select F1 (HHM Utilities) from the Home menu to
access the HHM Utilities menu:
F1:HHM CONFIG
F2:HHM SELF TEST
F3:HELP
F4
To change the configuration of the Hand-held
Monitor, select F1 (HHM Config) from the HHM
Utilities menu.
Changing the HHM Device Number
The Device Number (serial bus address) assigned
to the Hand-held Monitor appears on line 2 of the
first HHM configuration screen.
HHM CONFIG
BLOCK NO. O
chng nxt
Each device on a Genius bus must have a unique
serial bus address number. A new HHM has
number 0. If multiple HHMs will be used on the
same bus, each of them must be assigned a
different Device Number.
If you want to change the HHM Device Number,
follow these steps:
H
Press the ON key. Go to the Home menu. Select F1 (HHM Utilities), then F1 (HHM Config).
H
From the HHM Configure menu, press F2
(Change) to clear the existing Device Number.
Enter the new number and press F3 (Enter).
Note
The HHM key must be in the keyswitch, turned to CFG position.
After setting up the configuration, you can prevent
changes by turning the keyswitch to the MON
position and removing the key.
Pressing F4 from the buad rate screen will advance
you through additional HHM configuration
screens. Press Home if you want to return to the
Home menu, or use the DMenu key to go back to
the previous screen.
3-4
Hand-held Monitor User’s Guide – June 1994
GFK-0121E
Page 25

3
Changing the HHM Display Language
The next display shows the current language
selection.
HHM CONFIG
LANGUAGE
ENGLISH
tgl entr nxt
Press F2 (TGL) to change the display language
(French, German, Italian, English). Press F3
(Enter) to save the change.
Selecting the Host CPU
The next display shows the Hand-held Monitor’s
host CPU selection. The choices are: Series Six,
Series Five, PCIM/QBIM/GENI, or Series 90.
SELECT HOST CPU
SERIES SIX
Enabling/Disabling Automatic Shutoff
The next screen shows whether automatic shutoff
is selected.
AUTO OFF = 1Omin
ENABLED
This feature conserves battery power by shutting
off the Hand-held Monitor 10 minutes after the
last key press. To change the current selection,
press F2 (Toggle), then F3 (Enter).
Enabling/Disabling the Ability to Change Block
ID Parameters
The next display shows whether the Hand-held
Monitor is able to configure the Block Number
(serial bus address) of bus devices, as well as the
I/O circuit mix of some types of I/O blocks.
To change the host CPU type, press the F2 (TGL)
key, then press F3 (Enter).
CHNG BLK ID
ENABLED
This selection also determines whether the HHM
is able to assign the Reference Address of I/O
blocks, or change the I/O mapping of a Remote
I/O Scanner (for the modules in its remote drop).
To enable or disable this capability , press F2 (TLG),
then F3 (Enter).
GFK-0121E
Chapter 3 Getting Started
3-5
Page 26

3
Enabling/Disabling the Ability to Change the
Baud Rate of Devices on the Bus
The next configuration screen shows whether the
HHM is able to change the baud rate of bus
devices.
CHNG BLK BAUD
ENABLED
To change the current selection, press F2 (Toggle),
then press F3 (Enter).
Enabling/Disabling the Ability to Configure
Devices on the Bus
The next display shows whether the HHM is able
to change the other configurable features of bus
devices.
Enabling/Disabling the Ability to Force I/O
Circuits
The next display shows whether the HHM can be
used to force I/O circuits.
CIRCUIT FORCING
ENABLED
To change the current selection, press F2 (Toggle),
then press F3 (enter).
Enabling/Disabling the Ability to Clear Faults
The next display shows whether the HHM can
clear faults on bus devices.
CLEAR BLK FAULTS
ENABLED
CHNG BLK CONFIG
ENABLED
To change the current selection, press F2 (Toggle)
then press F3 (Enter).
3-6
Hand-held Monitor User’s Guide – June 1994
GFK-0121E
Page 27

Testing Operation of the Hand-held Monitor
3
If you want to test the Hand-held Monitor display,
keypad, or internal electronics, select F2 (HHM
SELF- TEST) from the HHM Utilities menu. This
menu of tests appears:
F1:KEYPAD TEST
F2:DISPLAY TEST
F3:TEST INTRNALS
F4:
Testing the Keypad
Press F1 (KEYPAD TEST). The HHM prompts:
KEYPAD TEST
STRIKE ANY KEY
KEY=
MON/CFG KEY=CFG
H
Press any key you want to test. Each key press
is shown on the display. The HOME, D
MENU, and ON/OFF keys are tested by their
operation.
H
To test keyswitch operation, turn the key and
observe the bottom line of the display.
H
Press D MENU to perform another test, or
press HOME to return to the Home menu.
Testing the Display Screen
Press F2 (DISPLA Y TEST) from the HHM Utilities
menu. The screen first displays uppercase letters
and special characters:
Testing the Internal Electronics
Press F3 (TEST INTRNALS) from the Self -Test
menu. After a moment, the HHM displays:
TEST INTRNALS
SELFTEST WORKING
exec
If an error occurs, one of the following messages
will appear instead.
E : P R O C E S S O R F A I L
E : R A M F A I L U R E
E : E P R O M F A I L U R E
E : E E P R O M F A I L U R E
E : C O M M E R R O R
Press the Clear key and try the test again. If the
message returns, replace the HHM. Otherwise,
continue.
An EEPROM failur e will not pr event use of the
Hand-held Monitor. However, the HHM will not be
able to retain changes to its default configuration
through a power cycle.
The COMM ERROR message may indicate that
the Hand-held Monitor is not attached to a
correctly-terminated bus.
DISPLAY TEST
ABCDEFGHIJKLMNOP
QRSTUVWZYZO12345
6789:>?–./1O
Next, a screen of lowercase letters appears,
followed by a continuous test pattern, which
checks pixel operation. When the test pattern is
finished, press DMENU to perform another HHM
test, or press HOME to return to the Home menu.
GFK-0121E
Chapter 3 Getting Started
OII
T
3-7
Page 28

Chapter 4Device Configuration Overview
4
The Hand-held Monitor can be used to configure (establish the operating characteristics for) a wide
variety of other devices. Some configurable devices are:
H
Genius I/O Blocks, High-speed Counter Blocks, and P owerTRAC Blocks
H
the Series 90-70 Remote I/O Scanner and its remote drop
H
Field Control stations.
The Hand-held Monitor displays a unique set of configuration screens for each type of configurable
device.
Because of the wide assortment of configuration features provided by the HHM, it has not been possible
to include them all here. You should refer to the more detailed configuration instructions in the User’s
Manual for the type of device you are configuring.
GFK-0121E
4-1
Page 29

4
Online or Offline Configuration
Devices can be configured before or after
installation on a properly-terminated serial bus. If
a new device is to be added to an existing bus
running at a baud rate other than 153.6 Kbaud
standard, the device must first be configured
offline. Be careful adding new devices to existing
systems. Be sure the baud rate configured for the
new device matches that of the system - never mix
baud rates on a bus.
Online Configuration
When configuring a device on an operating bus,
the Hand-held Monitor must be the ONLY HHM
plugged into a device on the bus. If devices are
configured online, the HHM automatically check
for PLC reference address conflicts.
Offline Configuration
It may be most convenient to configure devices
off-line at a central location. Each device will need
to be connected to an appropriate source of power
and to earth ground. To prepare a device for
off-line configuration:
1. Connect a 75 ohm resistor across the Serial 1
and Serial 2 terminals, or use the 75 ohm
terminator plug (IC660BLM508).
Warnings
If the device is not properly grounded,
hazardous voltages may exist. Death or
injury may result.
DO NOT TOUCH the connectors or
wiring after powering up the device.
Hazardous voltages exist, and death or
injury may result.
Starting Configuration
Note: To assign a serial bus address, the
Hand-held Monitor must be directly attached to
the device being configured. Additional features
can be configured with the Hand-held Monitor
connected at any point on the bus. In that case, the
device being configured must be selected as the
active device (on the Block/Bus Status screen).
1. Begin with the Hand-held Monitor turned off.
Attach the HHM to the device (see below) or
to another bus connection point.
a42307
2. Attach a grounding strap to the device’s
ground screw. Be sure that the strap is
connected to earth ground.
a42468
Attach
Ground
Strap
Terminator
Plug
1
2
3
4
H
N
3. Wire the device to the power source and apply
power.
4-2
Hand-held Monitor User’s Guide – June 1994
2. Turn the Hand-held Monitor on. After the
HHM completes its powerup sequence, the
Home menu appears. The Hand-held
Monitor’s Change Block Configuration option
must be enabled to complete the instructions
in this section. For a new device, the HHM’s
Change Block ID and Change Block Baud
options must also be enabled.
GFK-0121E
Page 30

Displaying the Configuration Menus
4
The illustration below shows how to reach the
HHM’s device configuration menus from the Main
Menu.
H
For all devices, you will need to select F3 (Configuration) then F1 (Program Block ID) to configure a block’s required features.
h
Device Number (serial bus address).
h
I/O type for input/output blocks.
h
CPU references.
h
Baud rate.
For new blocks, this must be done first.
H
To configure Genius blocks, select F3 (Configuration) from the Main Menu, then F2 (Configure Block) to view and modify other features.
Detailed configuration instructions for each
type of device are provided in its User’s Manual.
You can use F3 (Copy Configuration) to copy a
configuration from one block on the same bus
to another.
H
To configure a remote drop, continue from the
Program Block ID screens to enter the remote
map (I/O References) and Drop ID. Then go to
the Configure Block screens to configure redundancy and Configuration Protection.
H
For a F ield Control device, select either F2
(Analyze) or F3 (Configuration) from the Main
Menu. The HHM will then display a special set
of screens for Field Control. (The currently-active device must be the Field Control device for
these screens to appear. See page 4-7 if you
need instructions to select the active device).
If the message E: CONFIG PROTECT appears,
you can remove Configuration Protection by:
1. Going through the configuration screens to
reach the Configuration Protection screen.
2. Pressing F2 (Toggle) to select either DISABLED
or ENABLED.
3. Pressing F3 (Enter) to save the selection.
4. Pressing F4 (Next) to go to the first configura-
tion display , D MENU to return to the Configuration menu, or HOME to return to the Home
menu.
Displaying the HHM
Configuration Menus
F 1 : P R O G B L O C K I D
F 2 : C O N F I G B L O C K
F 3 : C O P Y C O N F I G
F 4 :
F1
All Devices
P R O G B L O C K I D
I / O (device references)
B L O C K N O . (device)
r e f b l k n x t
Configure a Remote
Map
Remote I/O Scanner
F 1 : H H M U T I L I T I E S
F 2 : A N A L Y Z E
F 3 : C O N F I G U R A T I O N
F3
Configure an
Genius Blocks
and Remote I/O Scanner
F 4 : D E V I C E M E M O R Y
F2
C O P Y C O N F I G
F R O M : n T O :
c h n g e n t r
I/O Block
F2 or F3
F 1 : M o n i t o r
F 2 : C o n f i g u r a t i o n
F3
Field Control
Devices
F 1 : G E N I U S C O N F I G
F 2 : M o d u l e C o n f i g
F 3 : P r e v i o u s M e n u
GFK-0121E
Chapter 4 Device Configuration: Overview
4-3
Page 31

4
Completing the Program Block ID Screens
Select F1 (Program Block ID) from the
Configuration menu to complete the mandatory
part of a device’s configuration. (The HHM’s
CHNG BLK ID capability must be enabled).
When the HHM is set up for a PLC host, the
Program Block ID screen looks like this:
PROG BLOCK ID
I / O (device references)
BLOCK NO. (device #)
ref blk nxt
If there are ? symbols on the screen, the
reference address and/or Device Number have not
yet been configured. If there are * symbols on the
screen, a reference address was previously
assigned, but is out of range for the host CPU
currently set up for the HHM. If this happens,
check the host CPU setup in the HHM Utilities.
When the HHM is set up for a PCIM/QBIM/GENI
host, references are not used. Instead, the second
line describes the device:
To Complete the Program Block ID Screen: The
Program Block ID screen is used to configure
additional features for some devices. These vary
from device to device; you should refer to the
device’s User’s Manual if you need more
information.
To Change the Device’s Baud Rate: press F4
(Next) from the Program Block ID screen. (The
HHM’s CHNG BLK BAUD capability must be
enabled).
SELECT BAUD RATE
ACTIVE=153.6K ST
PROG =153.6K ST
tgl entr nxt
The bus will not operate unless all devices are set for the
same baud rate. Check the baud rate before
introducing blocks onto an operating bus.
H
To change the device’s baud rate, press F2
(Toggle), then press F3 (Enter).
H
Cycle power to all devices on the bus at the
same time to use the new baud rate.
PROG BLOCK ID
I S O L 8 (device #)
BLOCK NO. (device #)
ref blk nxt
To Enter or Change the Device Number: the
Hand-held Monitor must be connected directly to
the device.
1. Press F2 (blk). Then, enter the intended number (1-30). If you make a mistake, press F2
twice again, then enter the correct number.
2. Press the F3 (Enter) key. If the device is on-line
and the number has already been used, an error message appears.
To Set the I/O Map for a Remote I/O Scanner:
The next screen is used to assign data types and
lengths for a Series 90-70 Remote I/O Scanner. See
the next page.
4-4
Hand-held Monitor User’s Guide – June 1994
GFK-0121E
Page 32

Configuring a Remote I/O Scanner
4
After selecting the baud rate, the next Program
Block ID screen is used to assign data types and
lengths for a Series 90-70 Remote I/O Scanner.
PROG REMOTE MAP
%I
LENGTH(PTS)
tgl ref send nxt
Configuration Notes
The Remote I/O Scanner User’s Manual explains
remote drop configuration in detail. You should
use it as a reference during remote drop
configuration.
Also, look over the information below. Especially,
note that it is not always possible or desirable to
use a HHM for remote drop configuration.
H
If the remote drop includes any Analog Expander Modules, Logicmaster 90 must be used for
configuration; do not use a HHM.
H
When a remote drop is configured with a
HHM, all I/O modules will operate in default
mode; module options can only be configured with
the Logicmaster 90-70 software.
H
Unless the Remote I/O Scanner is configuration
protected, pressing F3 (send) from the Remote
Map configuration screen causes the HHM to
automatically configure the remote drop. This
configuration will REPLACE any existing I/O
configuration (including one entered using Logicmaster 90-70), and return I/O module options to their original defaults.
H
Remote drops configured with Logicmaster
90-70 are automatically protected. Please check
carefully before removing configuration protection with a Hand-held Monitor.
H
The Hand-held Monitor automatically creates a
configuration for a nine-slot rack, regardless of
the actual rack size. If the remote drop has a
five-slot rack, the HHM will later assume that
there are unfilled slots. If this is a problem, Logicmaster 90-70 can be used for configuration,
or to edit an automatic configuration done with
a Hand-held Monitor. Then, the configuration
can be stored to the Remote I/O Scanner.
Configuring the Remote Drop
To configure the remote drop with the HHM:
1. Enter a starting address and length for: %I (discrete inputs), %Q (discrete outputs), %AI (analog inputs), %AQ (analog outputs) on the
screen shown at left. The data lengths must
not add up to more than 128 bytes of inputs
and 128 bytes or outputs. If they do, an error
message will appear when you attempt to send
the data to the Remote I/O Scanner.
2. Next, press F2 (drop) and enter a Remote Drop
ID (between 16 and 254).
PROG REMOTE MAP
DROP ID _____________
tgl drp send nxt
3. Press the F3 (send) key to download these
selections to the Remote I/O Scanner.
Note: Do not perform this step if you want to
preserve a configuration entered using the Logicmaster software.
The HHM configures the I/O references of Series 90-70 I/O modules (only) in the remote
drop. It assigns references in ascending order,
starting with the slot next to the Remote I/O
Scanner. The leftmost module of each type (%I,
%Q, %AI, or %AQ) in the rack receives the first
available reference of the appropriate type.
4. Press F4 (nxt) to go to the Program Block ID
screen.
5. After completing these screens, press F2 (Configure Block) to complete the Genius configuration screens, or to display information about
the I/O modules in the remote drop.
The module description screens that appear
during the configuration sequence are readonly; boards cannot be configured here.
Go through these block description screens to
configure:
H
BSM Present
H
BSM Controller
H
CPU Redundancy
H
Configuration Protection
GFK-0121E
Chapter 4 Device Configuration: Overview
4-5
Page 33

4
Configuring Genius Blocks
To configure individual features of a Genius block,
the block must be the “active” device.
Selecting the Active Device
1. F rom the Analyze menu, select F3 (Block/Bus
Status).
2. Press F1 (Next) or F2 (Previous), to reach the
device’s description screen.
3. When the desired device appears, press F3 (Ac tive) to make it the active device. (On a dual
bus, the HHM must be on the same bus as the
active block. If it is not, either move the HHM
or force the bus selection as described on
page 5-3).
4. Press D MENU twice to return to the Main
Menu.
Configuring Block Features
Select F3 (Configuration), then F2 (Config Block).
For Genius blocks, the HHM shows the first
configuration display. For example:
PULSE TEST
REFS (block references)
ENABLED
tgl entr nxt
The HHM shows the feature to be configured (in
the example above, it is the Pulse Test option). It
also shows the current status of that feature.
When the Hand-held Monitor is set up for a PLC
host, line 2 shows the references assigned to the
device being configured. If there are ? symbols on
the screen, the device’s reference address has not
yet been configured. If there are * symbols on the
screen, a reference address was previously
assigned, but it is out of range for the host CPU
currently set up for the Hand-held Monitor. If this
happens, check the host CPU setup in the HHM
Utilities.
When the HHM is set up for a PCIM/QBIM/GENI
host, line 2 shows the device type and Device
Number (serial bus address) instead.
Because there are so many different device
configuration screens, it is not possible to show
O
I
them all here. You should refer to the User ’s
Manual for the device you are configuring for
descriptions of its configuration screens and
detailed instructions for completing them.
Configuration Instructions
1. To advance through the HHM configuration
displays making changes as needed, use the F4
(Nxt)key. You can pass through feature displays without making entries.
2. To change a feature, use the TGL and CHNG
keys to select choices or enter other values. On
screens used to enter individual I/O circuit options, use the F1 ( > ) key to choose a circuit,
then select the option using the TGL or CHNG
key. On some displays, you can enter new values from the keypad.
3. Press the F3 (Enter) key to save each change.
Copying a Configuration
If there are similar devices on an operating bus,
you can use the Copy Configuration feature to
copy the configuration from one to the another.
Both of the devices must have a Device Number
already configured, and they must be operating at
the same baud rate. The device to be copied TO
must not be Configuration Protected.
The device to be copied FROM must be the active
device (move the HHM to that block or select it
from the Block/Bus Status screen).
1. To begin, press F3 (Copy Configuration) from
the Configuration menu. The HHM shows:
COPY CONFIG
FROM: n TO:
chng entr
2. The Device Number of the active device appears next to the word FROM. Enter the Device Number of the device being copied TO.
Press F3 (Enter).
3. Press the F4 (Execute) key. The configuration is
copied.
4-6
Hand-held Monitor User’s Guide – June 1994
GFK-0121E
Page 34

Configuring Field Control Station
4
1. From the HHM Main Menu, display the special
set of menus for Field Control.
A. If the Bus Interface Unit or Field Processor is
the current-selected device, press F2 (analyze) twice or F3 then F2.
B. If it is NOT the currently-selected device:
H
Select F2 (analyze) then F3 (Block/Bus
Status).
H
Press the F1 (nxt) or F2 (prev) key repeatedly to reach the serial bus address of the
BIU or Fiel d Processor. Press F3 to make it
the active de vice. The n, press ∆Menu, followed by F2 (Monitor/Control Ref).
F1:Monitor
F2:Configuration
From this menu, press F2 (Configuration). This
menu appears:
F1:GENIUS CONFIG
F2:Module Config
F3:Previous Menu
H
Press F1 to configure the BIU/Field Processor.
H
Press F2 to configure individual modules.
Change the Bus Address
When you press F1 (Genius Configuration) from
the Configuration menu, the HHM shows the
serial bus address previously configured for the
BIU or Field Processor:
1. If you want to change the address, enter the
new address using the keypad.
2. Press F4 (entr). An error message appears if
the number has been used for another device.
Select a PLC Reference Address
If the host is not a Series Six PLC or Series Five
PLC, no entry is necessary here.
If the host is a Series Six PLC or Series Five PLC,
assign an I/O or register reference address.
S t a t T b l Addr
OOOOO
< > I O 6 e n t r
shows reference type
1. Use the F3 key to toggle the selection of Series
Six I/O memory, Series Five I/O memory, or
register memory. (See the BIU/F ield Processor
User’s Manual for information about memory
usage in the Series Five and Series Six PLC).
If I/O memory is used, the amount required is
equal to the number of bits of discrete data
PLUS analog data. Each analog reference used
consumes 16 points.
If register memory is used, an amount is required that is equal to the total number of bytes
of input data PL US all of the output data
2. Key in the number of the block’s beginning I/O
or register reference. This may be:
Series Six I/O 1 to 993
Series Five I/O 1 to 2041
Registers 1 to 16383
3. Press the F4 (Entr) key.
D e v i c e S B A
1 4
P r v > e n t r
If the bus address is correct, press F2 to go on.
Note: If a BIU or Field Processor has a Serial Bus
Address conflict on an operating bus, it will not
scan the modules in the station until the fault is
cleared.
GFK-0121E
Chapter 4 Device Configuration: Overview
Configure Additional Features
On the screens that follow, select these features:
H
Fault Reporting
H
Genius bus redundancy
H
BSM Controller
H
Output default time (for redundancy)
H
CPU redundancy
H
Duplex redundancy: default mode for outputs
H
Configuration protection
4-7
Page 35

4
Configuring Individual Field Control Modules
Go to the Field Control configuration menu:
F 1 : G E N I U S C O N F I G
F 2 : M o d u l e C o n f i g
F 2 : P r e v i o u s M e n u
From this menu, press F2 to configure the
individual modules in the station.
Disable the I/O Scan
While you configure the modules in the station,
you may want to disable I/O scanning. (The Bus
Interface Unit or Field Processor begins scanning
I/O as soon as it is powered up).
I O S c a n
D I S A B L E D *
P r v > t g l e n t r
Configure Data Addresses and Lengths
The next screens are used to assign the starting
addresses and lengths for I, then Q, then AI, then
AQ data.
If the host is a Series 90 PLC, these should
correspond to the memory assignments made for
the BIU or Field Process o r during PL C c onfi g uration.
If the host is a Series Six or Series Five PLC, only
the length selected here is used; the entry made
on the starting address screen is not used by the
PLC. For those PLC types, the starting address was
assigned on an earlier screen.
1. For each data type, enter a starting address for
disc rete input data (I). For example:
Blk Map Start 1
IOOOO1
< > e n t r
2. Press F4 to accept the value. Then, enter a
length in bits for I data. For example:
When the I/O scan is disabled, previously
unconfigured module inputs and outputs default
to 0. For previously-configured modules, inputs
and outputs either default or hold their last state
or value, as configured.
1. If you want to change the present selection,
press F3 (tgl).
2. Press F4 (entr). If you want to go to the next
screen without changing the selection, press F2
( > ).
B l k M a p L n g t h
6 4
< > e n t r
3. Press F4 (entr) to accept the value.
4. Continue as above, entering starting addresses
and lengths for the other data types.
The lengths entered must not add up to more
than 128 bytes of inputs (discrete + analog)
and 128 bytes of outputs (discrete + analog).
5. Press F1 ( > ) after entering the length for AQ
data (the fourth data type).
If you changed any starting address or length
entries, the HHM displays this screen:
M a p h a s c h a n g e d
A c c e p t ?
n o y e s
6. To accept the changes and continue to the next
menu, press F4 (yes).
4-8
Hand-held Monitor User’s Guide – June 1994
GFK-0121E
Page 36

4
Add Modules and Assign References
The first module configuration screen looks like this:
Rack
number
R O :S1 EMPTY
< > t g l r e a d
Use F1 and F2 to display
another slot (module)
The Rack Number is always 0.
The Slot Number refers to the location of the
module relative to the BIU or Field Processor.
Read a Module Identification
If there is a module in the currently-selected slot,
pressing F4 (read) from the “empty slot” screen
brings up the module identification screen:
Slot
number
Assign I/O References for the Module
After you “accept” a module into the slot, a screen
like this appears:
R O :S1 I16
I_
e n t r
Specify the I/O references to be used by the
module. For most applications, you can simply
have the BIU/Field Processor assign the next
available references in that memory type.
A. To assign the next available references, just
press F4 (entr).
B. If you want to assign specific references, enter
the starting address. Press F4 (entr).
Module references are automatically assigned by
the BIU or Field P rocessor based on its configured
data addresses and the number of points
appropriate for the module type.
R O :S1 Mod type?
D i s c r e t e O u t 1 6
t g l e n t r
H
If you want to change the module type displayed, press F3 (tgl) to list other module types.
H
To accept the module type, press F4 (entr).
Module
type
Select a Module Type
If a module is not present in the selected slot, press
F3 (tgl) to select Generic I/O or Special I/O. Then
press F4 (entr).
R O :S1 I/O type?
G e n e r i c I / O
t g l e n t r
H
Use the F3 (tgl) key again to go through the
module names.
H
When the correct module name appears, press
F4 (entr).
Editing a Module Configuration
To edit the module’s configurati on, press F4 (zoom).
Refer to the module configuration instructions in the
BIU/Field Processor User’s Manual.
Delete an Existing Module Configuration
To delete the configuration of the module in the
present slot, press F3 (delete) then F4 (enter). Note
that this removes the entire module configuration.
Configuring Module Features
Configure additional module features as described in
the BIU/Field Processor User’s Manual. For example:
H
Change the module’s reference address.
H
Module F ault Reporting (discrete)
H
Default inputs (or outputs) or Hold Last State
(discrete and analog)
H
Channel Fault Reporting (analog)
H
Channel Active (analog)
H
Input Current/Voltage Ranges (analog)
H
Input or output scaling (analog)
H
Alarm thresholds (analog)
H
Output default values (analog)
GFK-0121E
Chapter 4 Device Configuration: Overview
4-9
Page 37

Chapter 5Monitoring the Bus and its Devices
5
This chapter explains how to perform monitoring and control operations with the Hand-held Monitor.
Di s p la y in g Inform at i on A b o u t Bu s De v ic es (p age 5-2).
h
Selecting the Active Device (page 5-2) .
h
Cl ea r ing Fau l t s ( pa ge 5- 3) .
Display for a Bus Controller (page 5-3).
Monitoring the Bus Status (page 5-3).
Switching a Dual Bus (page 5-3).
Monitoring a Genius Block (page 5-4).
h
Discrete I/O and Inpu t Bl o c k s (p a g e 5- 4) .
h
Discr ete Relay Output Blocks (page 5-5).
h
A nal og Blocks (pa ge 5-5).
h
RT D or Thermocoupl e Blocks (pag e 5-5).
h
Hi g h - s pe e d Co u nt e r Bl o ck ( p a g e 5- 6) .
h
Power TRAC Bloc k ( page 5-7).
Monitoring and Operation
HHM Menus
F 1 : M O N I T O R B L O C K
F 2 : M N T R / C N T L R E F
F 3 : B L O C K / B U S S T S
F 4 : P U L S E T E S T
Monitoring and Controlling Individual Circuits on a
Genius Block (page 5-8).
h
Discr ete, Relay, High-speed Counter Block (p. 5-9).
– F o r cing an Input or Output (page 5-9).
– Clea r i n g Ci r c u i t F a u l t s (p a g e 5- 9) .
h
A nalo g, RTD, or Thermocou ple Block (page 5-10).
– F o r cing an Anal o g Value (page 5-10).
– Clearing Circuit Faults (page 5-10).
h
Power TRAC Bloc k ( page 5-11).
– F orc ing P o werT RAC Data (page 5-12).
– Diagnostics (page 5-12).
Monitoring /Controlling Remote Drop Data (page 5-13).
– Forcing a Circuit (page 5-1 4).
– Dis pl ay ing and Clear ing Fa ul ts (pag e 5-14).
Monitoring /Controlling Field Control Data (page 5-15).
–Forcing/Unfor c i ng the Refer enc e (p 5-15).
– Dis pl ay ing and Clear ing Fa ul ts (pag e 5-16).
P ul s e Testi n g Ou t p u t s on D is cre t e B lo ck s (pag e 5-17) .
F 1 : H H M U T I L I T I E S
F 2 : A N A L Y Z E
F 3 : C O N F I G U R A T I O N
F 4 : D E V I C E M E M O R Y
F 1 : M o n i t o r
F 2 : C o n f i g u r a t i o n
F2 or F3
(Field Control)
F1 (Genius)
R E F S (block references)
3 4 5 6 7 8 9 0
OIOIB
I I
S
A1011001
F2 (Genius)
M N T R 4 4 1 – 4 6 4 A
I 2 : – 1 9 3 7 0
N O F A U L T S
> f o r c e r e l e s
GFK-0121E
OIOIO
O
I
I
F4 (Genius)
Pulse Test
discrete outputs
F3 (All Devices)
R E F S (device references)
D C 1 6 K 1 5 v 2 . 0 A C T
F O R C E D , N O F A U L T S
n x t p r v a c t v b u s
S E R I A L B U S S T A T S
A C T V D E V I C E S = 7
S C A N T I M E = 1 0 m s
F 1 : M o n i t o r I / O
F 2 : F a u l t s
F 3 : P r e v i o u s M e n u
O
I
Select the
Active Device
here
5-1
Page 38

5
Displaying Information About Bus Devices
Select F3 (Block/Bus Status) from the Analyze
menu to:
H
Display the references assigned to any device.
H
Display the revision level of any device.
H
Display the description and Global Data address of a bus controller.
H
Display the fault status of a Genius block or
Remote I/O Scanner (remote drop).
H
Select the active device.
H
Clear all faults on the active device.
H
Access the Bus Status display.
This screen provides a quick way to check for faults
and forced circui ts before starting up a system.
Block/Bus Status Displays for Bus Devices
Example displ ays are shown below. (Display format
for bus controllers is shown on the next page).
Genius Block (discrete)
REFS (devicereferences)
DC16K 15 v2.OACT
FORCED,NO FAULTS
nxt prv actv bus
Remote I/O Scanner
REFS *_ * G
RIO 15 v3.5ACT
NO FORCE,FAULTS
nxt prv actv bus
BIU/Field Processor
REFS *_ *
fldpr 2O v1.OACT
NO FORCE
nxt prv actv bus
Line 1 shows the I/O references used by the device.
If * symbols appear instead of references, the
device’s references are incorrect for the type of host
CPU curren t ly set up f o r t he HHM. F o r e xamp le, if
a device is assigned to Series Six registers, and the
HHM is set up for a Series 90 host, the HHM will
display * sy m b o ls instead of references .
O
I
O
I
Line 1 also provides information about the device
currently being displayed:
= Input block
I
= Output block
O
O
= Block with both inputs and outputs
I
= Analog, RTD or Thermocouple block
A
= PowerTRAC block or Remote I/O Scanner
G
Line 2 identifies the device and shows its serial bus
address (also called its Device Number or block
number), and its revision level.
Line 3 shows whether the device presently has
any forces or faults. If the device is a Field Control
BIU or Field Processor, however, the presence of
faults is not indicated on this screen.
Selecting Another Device
Press F1 (Next) or F2 (Previous) as needed to
display information about other device.
Note: Poor bus conditions may cause the HHM to
skip (not display) a device that is present on the
bus. Try moving the HHM to a different
connector on the bus. Occasionally, this problem is
caused by certain older Genius blocks that do not
communicate with the HHM properly. If the
problem persists, such blocks can be upgraded.
Selecting the Active Device
Initially, the active device is the one to which the
HHM is connected.
You can display information about other devices
without making them “active”.
However, for many functions the HHM must be
attached to another device or the other device must
be made “active” by following the steps below.
1. F rom the Analyze menu, select F3 (Block/Bus
Status).
2. Press F1 (Next) or F2 (Previous), to reach the
device’s description screen.
3. When the device’s screen appears, press F3
(Active) to make it the active device. (On a
dual bus, the HHM must be on the same bus as
the active block. If it is not, either move the
HHM or force the bus selection)
4. Press D MENU to return to the Analyze menu.
5-2
Hand-held Monitor User ’s Guide – June 1994
GFK-0121E
Page 39

5
Clearing Faults from the Block/Bus Status Screen
Pressing the CLEAR key from this screen clears
faults on the active device. For Genius blocks, if
you want to clear a specific circuit fault, select F2
(Monitor/Control Reference) from the Analyze
menu instead.
all
Block/Bus Status Display for a Bus Controller
If the active device is a bus controller, the Block/Bus
Status display shows information appropriate to that
bus c o n t roller ty p e. For exam ple:
S E R I E S 6
B U S A D R : (device #)(vers)
R E G (registers)
n x t p r v r / g b u s
The first line identifies the bus controller type. If it
is a Series Five bus controller, PCIM, or QBIM, the
first line indicates:
G E N I
The second line of the display shows the bus
controller’s Device Number followed by its
firmware revision level.
Reading a Global Data Address
The third line of a bus controller’s Block/Bus Status
screen shows its assigned Global Data address.
If no Global Data address appears, it means that
either:
H
The bus controller has no Global Data address.
H
A Seri es 90-70 bus controller has a Global Data
address in % I, %Q , %AI, %AQ, or %R me mo r y,
and no optional Series Six register address was
configured for the bus controller.
If a Global Data address has been set up, you can
use the F3 (R/G) key to toggle between (R)egister
and (G)lobal memory format. If no Global Data
reference has been set up, the F3 key is not assigned.
Monitoring the Bus Status
To display the number of devices currently operating
on the bus, and the curren t bus scan time, select F4
(Bus) from the Block/Bus Status displ ay.
SERIAL BUS STATS
ACTV DEVICES= 7
SCAN TIME 1Oms
The bus scan time shown is rounded down to the
nearest millisecond (10mS represents 10.01 to
10.99mS).
Switching a Dual Bus
To force a bus switch in a redundant bus system,
the HHM must be connected to the same bus as
the presently-active device.
1. If necessary, make the BSM Controller the active device.
A. F rom the Analyze menu, select F3 (Block/
Bus Status).
B. Press F1 (Next) or F2 (Previous), to reach the
status screen for the BSM Controller.
C. When it appears, press F3 (Active) to make
the BSM Controller the active device.
2. Press D MENU to return to the Analyze menu.
3. F rom the Analyze menu, select F2 (Monitor/
Control Reference). The HHM shows the active bus and whether it is forced. For example:
M N T R / C T R L (input ref)
S T A T E : B U S B F R C
> b u s A b i s B r e l s
4. Press F2 or F3 to select the other bus. The LED
on the BSM is off when bus A is selected and
on when bus B is selected. The I/O Enabled
LED on each block on the active bus blinks.
GFK-0121E
Chapter 5 Monitoring the Bus and its Devices
5-3
Page 40

5
Monitoring a Genius Block
Select F2 (Monitor Block) from the Analyze menu to:
H
Display the I/O type of all circuits on the active
block.
H
Display (not change) forces on the active block.
H
Display the bus presently selected by the BSM
Controller.
Making the Block Active
If the block is not presently selected as the “active”
block, follow the steps below.
1. F rom the Analyze menu, select F3 (Block/Bus
Status).
2. Press F1 (Next) or F2 (Previous), to reach the
device’s description screen.
3. When the block’s screen appears, press F3 (Ac tive) to make it the active device. (On a dual
bus, the HHM must be on the same bus as the
active block. If it is not, either move the HHM
or force the bus selection)
4. Press D MENU to return to the Analyze menu.
After selecting the active device, use F1 (Monitor
Block) to monitor its data. This is a example
display for a discrete I/O block:
R E F S (block references)
3456789O
BSOIO
I
I
OIOIO
O
I
I
I
A1O11OO1
Monitor Block screens for other types of Genius
blocks are described below .
Block References
On all the Monitor Block screens for a Genius
blocks, line 1 shows the block references. If *
symbols appear instead, the references are out of
range for the CPU host currently setup for the
Hand-held Monitor. For example, if a block is
assigned to Series Six registers, and the HHM is set
up for a Series 90 host, the HHM displays
*symbols instead of references.
If the HHM is set up for PCIM mode, references
are not used; a device description appears instead.
Monitor Block Display for Discrete I/O
and I nput Blocks
For a discrete block, the Monitor Block display
shows the I/O type and current state of each
circuit. This is an example display for an 8-circuit
grouped I/O block:
R E F S (block references)
3456789O
BSOIO
I
I
OIOIO
A1O11OO1
Line 1 indicates the block’s I/O type:
= Input
I
= Output
O
O
= Combination (I/O)
I
Line 2 shows the last digit of each circuit’s
reference address. The abbreviation on line 3
describes the I/O type of each circuit:
= Input
I
I
= Tri–State input
T
= Output
O
O
= Output with feedback
I
= Circuit that controls a BSM
Bs
Line 4 shows the current state of each circuit. This
information is updated continuously as the I/O
states change.
An underline means a circuit is forced (and does
not reflect actual circuit status):
= OFF
O
= forced OFF
O
=ON
1
= forced ON
1
If the circuit is configured as a BSM controller, the
selected bus is displayed on line 4. If forced, the
active bus letter is underscored.
= bus A
A
= forced to bus A
A
= bus B
B
= forced to bus B
B
Displayin g A dd i ti onal Circuits for a 32-circuit DC
block: Press a key from F1 to F4 to toggle the
display between circuits 1 to 16 and circuits 17 to 32.
O
I
I
I
5-4
Hand-held Monitor User ’s Guide – June 1994
GFK-0121E
Page 41

5
Monitor Block Display for Discrete R elay
Output Blocks
For a Relay block, the Monitor Block screen shows
the current open (O) or closed (C) states of all
relay outputs:
REFS (blockreferences)O
123456789O123456
OOOOOOOOOOOOOOOO
OOOOCCOOOOOCOOCC
Line 2 shows the last digit of each circuit’s
reference address. The ‘O‘s on line 3 show that
each circuit is an output. Line 4 shows each relay
output’s present state. An underline means the
relay is forced.
= open
O
= forced open
O
= closed
C
= forced closed
C
Monitor Block Display for RTD or
Thermocouple Blocks
For an RTD or Thermocouple Input block, the
Monitor Block screen shows the current values of
two inputs at a time. Values reported by the block
may be tenths of degrees (Celsius or Fahrenheit),
tenths of ohms, or unconverted counts. This is an
example display showing tenths of degrees
Celsius:
REFS(circuit references) A
I1: 15O.O C
I2: 25.5 C
Line 1 indicates that the block is an (A)nalog block.
Lines 2 and 3 display the input values. The
abbreviation FRC means a value is forced.
Press F1 ( > ) to display the next pair of inputs.
Monitor Block Display for Analog Blocks
For an analog block, each Monitor Block screen
shows the current value of two circuits at a time.
This is an example display:
REFS(circuit references) A
I1: 18357
I2: 29O61 FRC
>
Line 1 indicates that the block is an (A)nalog block.
Lines 2 and 3 display the current values of two
circuits. On an analog block, each circuit may
report either unconverted analog data, or data
that has been scaled to be suitable for the
application.
The abbreviation FRC means a value is forced.
Press F1 ( > ) to display the next pair of circuits.
GFK-0121E
Chapter 5 Monitoring the Bus and its Devices
5-5
Page 42

5
Monitor Block Display for a High-speed Counter Block
For a High-speed Counter block, the Monitor
Block function displays a sequence of screens with
the following information:
1. The states of the block’s four Preset Outputs.
2. The states of the block’s Control Inputs.
3. The current values of the block’s internal data
storage registers: Accumulator, Counts per
Timebase, and Strobe.
The exact appearance and sequence of screens
depends upon whether the block has been set up
for four-counter (Type A), two-counter (T ype B), or
one-counter (Type C) operation. The letter a, b, or
c on the top line of the screen shows how the
block is set up.
Preset Outputs
First, the Preset Outputs are displayed:
R E F (ctrnumber) (ctrtype)
PRESET OUTPUT
1234
OOOO
Outputs that are forced are shown with an
underscore (forced outputs do NOT respond to
the actual value of the counter).
Control Inputs
Press F1 ( > ) to display the block’s Control Inputs:
CONTROL INPUTS c
1112123
DHPPSSS
111111O
On this screen, the numbers on line 2 identify the
first, second, third, of fourth control input of the
same input type on the block. The third line
identifies the input type: Disable Input (D), Home
Input (H), Preload Input(P), or Strobe Input (S).
The screen’s bottom line shows the current state of
each Control Input.
Register Values
Press F1 ( > ) to display the current value in each
counter’s accumulator, Counts-per- Timebase
register, and Strobe register(s):
R E F (number)(countertype)
ACC 1:_+(acc.value)
CTB 1:_+(countvalue)
> nxt
5-6
Use the F1 ( > ) key to display the strobe value(s),
and additional values appropriate to the counter
type. For more detailed instructions for using a
Hand-held Monitor with a High-speed Counter,
refer to the High-speed Counter User’s Manual.
Hand-held Monitor User ’s Guide – June 1994
GFK-0121E
Page 43

Monitor Block Display for a PowerTRAC Block
5
If the active device is a P owerTRAC block, the
HHM’s Monitor Block function displays the
following screens:
H
One screen showing the states of all of the
block’s Status Inputs.
H
Individual screens showing the block’s current
calculated data values. In the Monitor Block
function, these values are NOT labelled. It is
easier to display this information using the
Monitor/Control Reference function (F2), because those displays are labelled.
H
One screen showing the states of all of the
block’s Control Outputs.
On each of these screens, you can press F1 ( > ) to
display next screen, or press F2 (ref) and enter a
reference location to display a specific screen. For
a sequential list of the P owerTRAC block data, see
page 5-11.
Status Inputs
The Monitor Block function first displays the
P owerTRAC block’s Status Inputs:
R E F (inputreferences) I
123456789O123456
OOO11OOOOOO1OOOO
> ref
Line 2 indicates each of the 16 possible bit
locations for status data. Lin e3 shows the current
states of all inputs.
Bits 1 – 3 indicate the status of table data transfer,
for datagram communications.
Bit 4 = 1 indicates the block has captured an over-
current event.
Bit 5 should always be 1, indicating that the block’s
phase-lock loop is synchronized with the
incoming AC voltage.
Bit 12 = 1 means the overcurrent event indicated
by bit 4 occurred on phase A.
Bit 13 = 1 means the overcurrent event indicated
by bit 4 occurred on phase B.
Bit 14 = 1 means the overcurrent event indicated
by bit 4 occurred on phase C.
Bit 15 = 1 means the overcurrent event indicated
by bit 4 occurred on the auxiliary current
line.
Bit 16 = 1 indicates an internal calculation has re-
sulted in an out-of-range value. The block
should be reconfigured to prevent this.
Calculated Data
After the Status Inputs, the HHM displays the
block’s calculated data. If the P owerTRAC Block is
version 2.3 or later, this includes the additional
“low-priority I/O” data listed on page 5-11.
R E F (input reference) I
1 1 7
> r e f
Control Outputs
After the calculated data screens, the HHM’s
Monitor Block function displays the P owerTRAC
block’s Control Outputs. You can also display this
data by using the F2 (ref) key to select output 1.
You may need to toggle (F2) the memor y type.
R E F (outputreferences) O
123456789O123456
OOOOOOOOOOOOOOOO
> ref
Line 2 indicates each of the 16 possible bit
locations for Control Outputs. Line 3 shows the
current state of each Control Outputs. These
outputs are communications handshaking bits,
sent from the CPU to the block for certain
datagram communications. Information about
these outputs is in the PowerTR A C Block User’s
Manual.
GFK-0121E
Chapter 5 Monitoring the Bus and its Devices
5-7
Page 44

5
Monitoring and Controlling Individual Circuits on a Genius Block
Select F3 (Monitor/Control Reference) from the
Analyze menu to:
H
Display the present state or value of any circuit
on the active block.
H
Display the diagnostics status of any circuit.
H
Force and unforce individual circuits.
H
Force a bus switch on a dual bus.
H
Clear individual circuit faults.
Making the Block Active
The block whose circuits wil l be monitored or
controlled must first be made “active” by following
the steps below.
1. F rom the Analyze menu, select F3 (Block/Bus
Status).
2. Press F1 (Next) or F2 (Previous), to reach the
device’s description screen.
3. When the block’s screen appears, press F3 (Ac tive) to make it the active device. (On a dual
bus, the HHM must be on the same bus as the
active block. If it is not, either move the HHM
or force the bus selection)
Basic Monitor/Control Display Format
Each Monitor/Control Reference screen provides
information about one circuit, channel, or data
value. For example:
M N T R 4 4 1 – 4 6 4 A
I 2 : – 1 9 3 7
N O F A U L T S
> f o r c e r e l e s
Line 1 shows the references used by that circuit. If
these are out of range for the host CPU set up for
the Hand-held Monitor, line 1 instead shows:
M N T R (circuit number) + * A
For example, the first circuit on the block appears
as: 1 + *
If the HHM is set up for PCIM mode, references
are not used; a block description appears instead.
O
4. Press D MENU to return to the Analyze menu.
From the Analyze menu, press F2.
5-8
Hand-held Monitor User ’s Guide – June 1994
GFK-0121E
Page 45

Monitor/Control Reference Display for a Discrete, Relay, or High-speed Counter Block
5
For a discrete, Relay, or High-speed Counter block,
the Monitor/Control Reference screen looks like
this:
M N T R / C N T L (reference) I
S T A T E :
N O F A U L T S
> o n o f f r e l e s
Line 1 identifies the circuit currently being
monitored. Pressing F1 ( > ) displays other
circuits.
Line 2 shows the state of the circuit. In the
example above, the circuit is OFF and not forced
(no underline). Status is obtained directly from
the block for both inputs and outputs. If the
circuit is an output and no–load sensing is
enabled it reflects the current flow out of the I/O
block to the load, as well as voltage at the field
terminals; otherwise, it indicates only the voltage
at the field terminals (output from the switch).
O
Diagnostics
Line 3 of the Monitor/Control Reference screen
shows whether the circuit has any faults. If it
does, one of the following diagnostic messages
appears:
Failed switch: The commanded state of the circuit
does not match the actual state of the
switch or load.
Loss of I/O power: One pair of circuits on an dis-
crete isolated block is not receiving power.
No load: The load is drawing less than the block’s
minimum current level.
Open wire: An open wire condition has been de-
tected on a tristate input.
Overload: The output exceeds the block’s steady
state current limit.
Overtemperature: The block’s internal tempera-
ture exceeds 100_C.
Short circuit: Transient current above the block’s
short circuit limit.
Forcing an Input or Output
(The Hand-held Monitor’s circuit forcing
capability must be enabled to force or unforce a
circuit). To force a circuit on, press F2 (ON). To
force it off,press F3 (OFF). The force remains until
changed by the HHM (even through loss of block
power). To clear a force, press F4 (reles).
Clearing Circuit Faults
After correcting a fault condition, press the CLEAR
key to remove the message and restore the
reference to normal operation (the Clear Block
Faults function must be enabled to use this
feature). If the fault condition still exists, the fault
message will reappear.
GFK-0121E
Chapter 5 Monitoring the Bus and its Devices
5-9
Page 46

5
Monitor/Control Reference Display for an Analog, RTD, or Thermocouple Block
For an analog, RTD, or Thermocouple block, the
Monitor/Control Reference screen shows the
current value for each circuit. For example:
M N T R (ckt. reference) A
I 2 : – 1 9 3 7
N O F A U L T S
> f o r c e r e l e s
For an analog block, the values may represent
either engineering units or unscaled analog data.
For an RTD or Thermocouple block, the values
represent tenths of degrees (Celsius or
Fahrenheit), tenths of ohms, or unconverted
counts.
Press F1 ( > ) to display other circuits.
O
Forcing an Analog, RTD, or Thermocouple
Value
The HHM’s circuit forcing capability must be
enabled to perform this function.
1. Press F2 (Force) to force the displayed circuit.
2. If you make a mistake entering a value, use the
3. Press F3 (Enter) to save this value as the value
Clear key to delete one digit at a time, starting
with the last. To exit without forcing a circuit,
press F2 (Change).
for the circuit. The forced value will remain
until you press F4 (reles), or enter a new value.
Diagnostics
Line 3 shows whether the circuit has any faults. If
it does, one of these messages appears on line 3:
Feedback error: There is a wiring error or other
hardware fault on a Current-source Analog block. The output’s actual current differs from the commanded current by
more than 250mA.
High alarm/low alarm: An analog input value ex-
ceeds its high or low alarm limit.
Input shorted: An RTD input circuit measurement
is less than expected for the RTD type.
Internal fault: Internal calibration readings for a
pair of RTD circuits are out of tolerance.
Open wire: On an RTD block, the RTD is missing
or faulty, or there is an open wire. On an
analog block, an input configured for 4 to
20mA has less than 2mA present.
Overrange/underrange: An analog or RTD circuit
exceeds its maximum value.
Overtemperature: The block’s internal tempera-
ture exceeds 100_C.
Wiring error: There is a faulty connection be-
tween an RTD and the block.
Clearing Circuit Faults
After correcting a fault condition, press the CLEAR
key to remove the message and restore the
reference to normal operation (the Clear Block
Faults function must be enabled to use this
feature). If the fault condition still exists, the fault
message will reappear.
5-10
Hand-held Monitor User ’s Guide – June 1994
GFK-0121E
Page 47

Monitor/Control Reference Displays for a PowerTRAC Block
2
3
4
5
6
7
8
9
0
V oltage phase A to B
10
1
2
3
4
5
6
7
8
9
ated
Current phase C
A uxiliary CT current
5
For a PowerTRA C block, the Monitor/Control
Reference function displays:
H
16 screens, each showing the state of one Status
Input. This information is more easily displayed with the Monitor Block function,which
shows all 16 Status Inputs on one screen. See
page 5-7.
H
Individ ual labell ed dis pl ays of the block’s current
calcula ted d a ta v a lues. F o r PowerT R AC block
version 2.3 or later, this includes the “low-priority
I/O”screen s described on the next page.
H
16 screens, each showing the state of one of the
block’s Control Outputs. Control outputs are
also more easily di spl ayed using Monitor Block.
PowerTRAC Data Sequence
The following table shows the sequence of
P owerTRAC block data that can be displayed on
the Monitor/Control Reference screens:
Input
W ord
1
Status inputs
(16 screens in Monitor/Control Reference)
V oltage phase B to C
V oltage phase C to A
Voltage A to N (Line–to–neutral PTs only)
Voltage B to N (Line–to–neutral PTs only)
Voltage C to N (Line–to–neutral PTs only)
Current phase A
Current phase B
d Data
Current phase C
1
1
A ctive power phase A
1
A ctive power phase B
1
Calcul
A ctive power phase C
1
Reactive power A
1
Reactive power B
1
Reactive power C
1
Total power factor
1
A ccumulated power
1
20
Fundamental VARs phase A
21
Fundamental V ARs phase B
22
Fundamental V ARs phase C
23
Fundamental P ower Factor, total
24
Harmonic VARS as % of V–A, phase A
25
Harmonic VARS as % of V–A, phase B
26
Harmonic VARS as % of V–A, phase C
27
Harmonic VARS as % of V–A, total
28
Line Frequency
29
T emperature Alarm Status
Low–P riority I/O Data
30
Extended Watt-hour accumulator (upper 5 digits)
31
32–64
GFK-0121E
Output
W ord 1
Extended Watt-hour accumulator (lower 3 digits)
not used
Control outputs
(16 screens in Monitor/Control Reference)
Chapter 5 Monitoring the Bus and its Devices
For explanations of the data provided by a
PowerTRAC block, see the PowerTR A C Block User’s
Manual.
Selecting a Memory Type or Address
To select a specific data item, you can enter its
memory type and/or address. Press F2 (ref). This
screen appears:
M N T R __
t g l c h n g e n t r
1. Enter the reference number and press F3 (entr).
If the HHM is set up for a PLC host, I/O references increment by 16 and word(register) references increment by 1. For a PLC host, both I/O
and word references start at the first reference
assigned to the block. If the HHM is set up for
a PCIM/QBIM/GENI host, references begin at 1
and increment by 1.
2. The memory type blinks on the screen. To
change the memory type, use the F2 (tgl) key.
3. Press F3 (entr) to display the information.
5-11
Page 48

5
PowerTRAC Status Inputs Screens
First, the Hand-held Monitor displays 16 screens
showing the states of Status Inputs:
M N T R / C N T L (references) O
S T A T U S I N P U T S
S T S
> r e f f o r c e d i a g
To display additional data, press the F1 ( > ) key.
O
PowerTRAC Calculated Data Screens
After the Status Inputs, the HHM displays the
block’s calculated data values. Lines 2 and 3
identify the data being displayed and show its
present value. In the example below, voltage A to
N is 117 volts.
M N T R (input references) 1
V a n
S T S 1 1 7
> r e f f o r c e d i a g
PowerTRAC Control Outputs Screens
Finally, the HHM displays 16 screens showing the
states of individual Control Outputs (datagram
handshaking bits). If you use the F1 ( > ) key to
reach the Control Outputs, notice that there are
several unused references following the Extra
Calculated Data data. You can use F2 (ref) to go
directly to output 1. You may need to toggle the
memory type to %Q (or O, depending on the host
CPU setup of the HHM).
M N T R / C N T L (reference) O
C O N T R O L O U T P U T S
S T S
> r e f f o r c e d i a g
O
Forcing PowerTRAC Data
(The HHM’s circuit forcing capability must be
enabled to perform this function). Display the
data you want to force. Press F3 (force).
For bit data, the HHM displays:
m o n o n o f f r e l e s
PowerTRAC Extra Calculated Data (LPIO)
Screens
If the P owerTRAC block is version 2.3 or later , the
Hand-held Monitor next shows a series of screens
with extra calculated (“Low-Priority I/O”) data.
The block may or may not automatically provide
this data to the host, depending on the block’s
revision level and configuration. A CPU can use
datagrams to read the data.
L P I O # 1 W 2 O I
F U N D . V A R a
S T S – 2 7 O
> r e f d i a g
On these screens, the top line shows the serial bus
address of the block and the relative data word
being displayed. For example, the screen above
shows the 20th input word (Fundamental VARs
for phase A). This area of line 1 blinks as a
reminder that the numbers shown are not
reference addresses.
Press F2 (on) or F3 (off). To release the force, press
F3 (reles).
For word data, the HHM displays:
S T S 4
f o r c e r e l e a s e
Press F2 (force). The screen next displays:
F O R C E T O :
c h n g e n t r
Press F2 (chng). Enter the force value, then press
F3 (entr). To release the force, press F4 (release).
Diagnostics
The PowerTRAC block does not report circuit
faults. If you use the F4 (diag) key from the
Monitor/Control Reference screen, the message
NO FAULTS will appear.
5-12
Hand-held Monitor User ’s Guide – June 1994
GFK-0121E
Page 49

Monitoring/Controlling Remote Drop Data
5
The HHM can display diagnostics and current I/O
states, and force and unforce individual I/O points
on I/O modules in a remote drop.
When the active device is a Remote I/O Scanner,
the HHM’s Monitor Block and Monitor/Control
Reference functions display the same set of
screens. This is unlike HHM operation for Genius
blocks, where the screens for Monitor Block and
Monitor/Control Reference are different.
For the Remote I/O Scanner, the monitoring
screens provide the following information:
1. The states of the discrete inputs in the remote
drop, in ascending order.
2. The values of the analog inputs in the remote
drop, in ascending order.
3. The states of the discrete outputs for the remote drop, in ascending order.
4. The values of the analog outputs for the remote drop, in ascending order.
On each screen, line 3 shows the state or value of
one circuit at a time. It also indicates whether the
circuit is forced, or has a fault as illustrated below .
The first screen that appears is the Monitor screen
for the module with the first %I reference.
It shows the Remote Drop ID (143 in this
example), the rack number (0),the slot number (2),
and the memory type (%I). The number on the
righthand side of the second line represents a data
word.
1 4 3 # 4 . 2 % I 1
Starting reference
(groups of 16)
Reference Type
Slot Number
Rack Number
Remote ID Number
The Series 90-70 I/O reference for the circuit is one
less than the sum of the two numbers on the
righthand side of the HHM screen. For example:
M N T R 3
1 4 3 # 4 . 3 % I 3 3
3 + 33 – 1=35
In this example, the circuit being monitored is
%I0035.
GFK-0121E
MNTR 1
143#O.2 %I 1
STS O FAULT
> ref force diag
Line 1 shows the relative number in the word of
the circuit being monitored:
M N T R 1
Here, it is the first circuit on the block. The second
line identifies the I/O module being monitored:
1 4 3 # 4 . 2 % I 1
Chapter 5 Monitoring the Bus and its Devices
Displaying Other Circuits
To display additional circuits, press the F1 ( > ) key.
The HHM will step through each available circuit.
To jump directly to a particular device, memory
type, or address, press F2 (ref). This screen
appears, to enter the desired information.
M N T R 3
t g l c h n g e n t r
1. Enter the reference number. Press F3 (entr).
The memory type blinks on the screen.
2. If you want to select a different reference type
(for example, to display%AQ instead of %I),
press F2 (chng) to toggle the memory type.
3. With the desired information displayed, press
F3 (entr) to monitor the circuit.
5-13
Page 50

5
Forcing a Circuit
(The HHM’s circuit forcing capability must be
enabled to perform this function). Display the
circuit you want to force. Press F3 (force).
For a discrete circuit, the HHM displays:
m o n o n o f f r e l e s
Press F2 (on) or F3 (off) to force the circuit. The
forced state appears on line 3. To release the force,
press F3 (reles).
For an analog circuit, the HHM displays:
S T S 4
f o r c e r e l e a s e
Press F2 (force) to force the circuit. The screen
next displays:
F O R C E T O :
Press F2 (chng). Enter the force value, then press
F3 (entr). The forced value will appear on line 3.
Displaying and Clearing Remote Drop Faults
To display diagnostics for a circuit, press F4 (diag)
from the Monitor screen. If there is a fault, it
appears on line 3. For example:
DIAG 3
143#O.3 %I 33
OVERCURRENT
mon nxt
If there is no fault on the circuit you are
monitoring, the Hand-held Monitor searches the
Remote I/O Scanner’s internal fault table to see
whether there are any faults on the remote drop.
If there are any uncleared faults on the remote
drop, the HHM displays the fault that occurred
first (the oldest fault). For example:
DIAG 3
143#O.2 %AI 1
UNDERRANGE
mon nxt
F R C 1
> r e f f o r c e d i a g
To release the force, press F4 (release) from the
force/release screen.
The HHM identifies the location where the fault
occurred (on line 2). From this screen, you can
display additional faults on the remote drop by
pressing F4 (nxt). Faults will appear in the same
sequence in which they occurred. For example,if the
fourth oldest is being shown, pressing F4 (nxt)
displays the fifth oldest, and so on.
To return to the Monitor screen you started from,
press F1 (mon).
Clearing Faults
After correcting fault–causing conditions, you can
return to the Block/Bus Status menu to clear all
fault messages for the remote drop. (The Clear
Block Faults function must be enabled to use this
feature).
5-14
Hand-held Monitor User ’s Guide – June 1994
GFK-0121E
Page 51

Monitoring/Controlling Field Control Data
5
The HHM can display diagnostics and current I/O
states, and force and unforce individual I/O points
on Field Control modules.
1. From the HHM Main Menu, display the Field
Control main menu.
F 1 : M o n i t o r
F 2 : C o n f i g u r a t i o n
A. If the BIU or Field Processor is the active de-
vice, press either F3 (Configuration) or F2
(analyze) twice.
B. If it is NOT the active device select F2 (ana-
lyze) then F3 (Block/Bus Status).
H
Press the F1 (nxt) or F2 (prev) key repeatedly to reach the serial bus address
of the BIU/Field Processor . Press F3 to
make it the active device.
H
Then, press ∆Menu, followed by F2
(Monitor/Control Ref).
2. Press F1 (Monitor). This menu appears:
F 1 : M o n i t o r I / O
F 2 : F a u l t s
F 3 : P r e v i o u s M e n u
3. Select F1 (monitor I/O) to display the Monitor
screen for the first %I reference.
Reference
being
monitored
Indicates force is in effect
Current
state or value
Displaying Another Reference
Use the F2 ( > ) key to advance through the point
reference screens for the selected reference type.
Changing the Display Mode
The letter in the upper right corner of the display
shows the present data type:
B binary
Hhex
D decimal
Use the F4 (mode) key if you want to change the
display data type.
Returning to the Previous Menu
Press the HHM Clear key when you want to
return to the main Field Control menu.
Forcing/Unforcing the Displayed Reference
I/O points can be forced and unforced from the
Hand-held Monitor (the HHM’s circuit forcing
capability must be enabled to use this function).
Forcing an I/O point changes its state in the F ield
Processor’s EEPROM memory . If the circuit is an
output, the physical state of the output also
changes. If the circuit is an input, the forced input
data is sent to the CPU. A circuit retains its forced
state or value if power is removed. The forced
circuit ignores data from an attached input device,
or output data from the CPU. The force can
ONLY be removed from the Hand-held Monitor.
1. If the display is set to hex (H) or binary (B),
change it to decimal (D) by pressing F4.
2. Press the F3 (force) key to force the reference
now being displayed.
I OOOO1*O B
< > f r c h e x
Changing the Reference Type Being Displayed
Use the F1 ( < ) key to select a reference type: I
(discrete inputs), Q (discrete outputs), AQ (analog
outputs), or AI (analog inputs).
GFK-0121E
Chapter 5 Monitoring the Bus and its Devices
I OOOO1*1 D
f r c u n f r c
3. Press F3 (force) again. Then, enter the forced
state or value. The HHM displays an asterisk to
indicate the state of value now shown is forced.
See the illustration at left.
4. Use the F4 (unforce) key from the same screen
when you want to unforce the point.
5-15
Page 52

5
Displaying Field Control Faults
A Hand-held Monitor can display faults from a
Bus Interface Unit or Field Processor while
attached anywhere on the Genius bus.
1. From the HHM Main Menu, display the Field
Control main menu (instructions are on the
previous page).
F 1 : M o n i t o r
F 2 : C o n f i g u r a t i o n
2. From this menu, select F1 (Monitor). The following menu appears:
F 1 : M o n i t o r I / O
F 2 : F a u l t s
F 3 : P r e v i o u s M e n u
3. Select F2 (faults) to display fault information
for the Field Processor and its modules.
The Faults menu appears:
F 1 F i r s t 1 6 F l t s
F 2 L a s t 1 6 F l t s
F 3 P r e v i o u s M e n u
4. Press F1 to display the first set of 16 faults (one
fault at a time). For example:
S l o t # 1 F a u l t # 1
E X T R A I / O M O D U L E
< > e x i t
A. Use F1 and F2 to display another fault
B. If there are no faults, the HHM displays the
message: No Faults on the top line.
5. To display the last 16 faults (if any):
A. Press F4 (exit) to return to the screen shown
at the top if this page.
B. Press F2 (last 16 faults).
Clearing Field Control Faults
If faults are present, pressing the HHM Clear key
here has no effect. To clear faults from the
Hand-held Monitor you need to do the following:
1. Return to the HHM Main Menu.
2. Press F2 (Analyze).
3. Press F3 (Block./Bus Status).
4. Make the BIU or Field Processor the active device if it is not.
5. Press the Clear key.
Clearing faults from the Hand-held Monitor does
not clear faults at the host PLC. To keep the entire
system in step and up-to-date, fault clearing
should be performed from the host PLC.
5-16
Hand-held Monitor User ’s Guide – June 1994
GFK-0121E
Page 53

Pulse T esting Outputs on Discrete Genius Blocks
5
Pulse Testing verifies the ability of outputs on a
discrete block to change state. Pulse Testing also
indicates whether output circuits (wires, power
sources, loads) will start or stop current flow .
Pulse testing is recommended for blocks
controlling outputs that seldom change state. It
provides assurance that when needed, an output
will operate correctly. Blocks that control outputs
which frequently change state do not need to use
the Pulse Test feature. Pulse Testing does not
provide enough energy to activate mechanical
devices such as motor starters, relays, or solenoid
valves, but it may change the state of a very small
load.
Executing a Pulse Test
(To execute a Pulse Test, the Hand-held Monitor’s
PULSE TEST capability must be enabled). The
block being Pulse Tested must be the active block.
1. From the Analyze menu, press F4 (Pulse Test).
The Pulse Test display appears:
P U L S E T E S T
R E F S (ckt references)
N O F A U L T S
e x e c
O
I
Clearing Pulse Test Faults
If you press the CLEAR key from the Pulse Test
screen, all faults on the block will be cleared.
If you press the Clear key from the
Monitor/Control screen (after displaying a specific
circuit fault), only that fault will be cleared.
Pulse Test Error Messages
If the Pulse Test cannot be performed or if the
block fails to respond, an error message appears.
Press the Clear key to remove the message.
E : P U L T S T D I S A B L E
A Pulse Test cannot be performed unless the
block’s configuration is changed.
E : I N V L D B L K T Y P E
The block does not support Pulse Tests.
E : I N V L D B L K C O N F I G
The active block is an inputs–only block.
E : P U L S E T E S T F A I L
The HHM has not received an acknowledgement
from the block within the predetermined amount
of time. Retry the test. If it continues to fail, check
the serial bus cable and active block.
For a PLC host, line 2 shows the block’s assigned references and its I/O configuration.
Line 3 shows whether the block has any faults.
2. Press F1 (Execute) to pulse all outputs on the
block once. If the word FAULTS appears, it
means that one or more diagnostic errors have
occurred. Go to the Monitor/Control menu to
display the specific type of fault that has occurred.
GFK-0121E
Chapter 5 Monitoring the Bus and its Devices
5-17
Page 54

Chapter 6Reading CPU Memory
6
This chapter explains how to use a Hand-held Monitor to read data in a specified memory location in a
Series 90–70, Series Six, or Series Five PLC. New data from the specified memory location is displayed
every three seconds.
General Instructions _________________________________________
1. Be sure the Hand-held Monitor is set up for the type of PLC host you want to read data from. (See
page 3-5 for instructions).
2. If the Hand-held Monitor is NOT attached directly to the PLC’s bus controller, or if another device is
designated as “active” when you enter the Device Memory function, use the F4 (SBA) key and enter
the bus controller’s Device Number (serial bus address).
3. To read data from the selected bus controller, press F4 from the Main Menu and specify the memory
location to be read as instructed below.
GFK-0121E
6-1
Page 55

6
Series 90 PLC
For a Series 90-70 PLC, the Hand-held Monitor can
read data from %R, %AI, %AQ,%I, %Q, %T, %M,
%S, %SA, %SB, %SC, and %G memory.
For a Series 90-70 PLC, the memory
location/content screen looks like this example:
D E V I C E M E M O R Y 1 5
% R 1
t g l c h n g e n t r S B A
The top line shows the currently-selected Device
Number (15 in the example above). Line 2 shows
the memory type currently accessed, and a
reference location within that memory type. In
this example, the selected location is %R0001.
From this screen, use the HHM function keys to:
A. Select a different bus device (press F4 (SBA)).
B. Select another memory type (press F1 (tgl)).
C. Select another reference location (press
F2(chng), then enter the desired numerical
offset).
D. Display the current memory contents of the
specified location (press F3 (entr)).
When F3 (entr) is pressed, the HHM displays the
content in either bit or word format, as
appropriate for the selected memory type. For
example, here word data is displayed, because the
selected memory type (%R) is word-based:
D E V I C E M E M O R Y 1 5
% R 1
W O R D 1 3 9
> < l o c
From this screen, you can display the current
contents of other locations in the selected memory
type:
A. Use the F1 ( > ) key to increment the memory
offset (location).
B. Use the F2 ( < ) key to decrement the memory
offset.
C. Use the F3 (loc) key if you want to enter an off-
set from the HHM keypad.
6-2
Hand-held Monitor User’s Guide – June 1994
GFK-0121E
Page 56

Series Six PLC
6
For a Series Six PLC, the Hand-held Monitor can
read data from register memory. That includes I/O
data mapped into register memory, (it is easier to
display I/O data with the HHM’s Monitor Block or
Monitor Control Reference function).
For a Series Six PLC, the Device Memory screen
looks like this example:
D E V I C E M E M O R Y 7
M E M : (location)
t g l c h n g e n t r S B A
The top line shows the currently-selected Device
Number (7 in the example above). If there is a
currently-selected memory location, it appears on
the second line of the display as two numbers
separated by a colon.
The number on the left will be:
32768 for a Series Six PLC
The number on the right is the actual memory
location that will be read.
From this screen, use the Hand-held Monitor
function keys to:
A. Select a different device on the bus (press F4
(SBA)).
B. Select another memory type (press F2 (chng)).
See right for instructions.
C. Select another reference location in the dis-
played memory type (press F2(chng)). See
right for instructions.
D. Display the current memory contents of the
specified location (press F3 (entr)).
Enter or Change the PLC Type
To enter or change the PLC type:
1. Press F3 (chng). A cursor appears at the left of
the colon. For a Series Six PLC, enter the number 32768.
2. Press the F3 (entr) key.
Enter or Change the Memory Location
To enter or change the memory location:
1. On the same screen, press F1 ( > ) to move the
cursor to the right of the colon.
2. Press F2 (chng).
3. Enter a number equal to the actual register
number plus 16383. For example, for register#100, you would enter (16383 + 100), which
is 16483:
M E M : 3 2 7 6 8 : 1 6 4 8 3
Expanded I/O Data
Expanded I/O data is mapped into registers and
can be accessed as described above. I/O data from
channel 0, or the main I/O chain in an expanded
I/O system can be displayed using the integer
result of the following formula:
((point number – 1) / 8) + table offset
The table offset is either 8192 for the output table
or 8320 for the input table. Example: to display
input 672, you would enter: ((672 – 1) / 8) +8320,
which is 8403.
GFK-0121E
Chapter 6 Reading CPU Memory
6-3
Page 57

6
Series Five PLC
For a Series Five PLC, the Hand-held Monitor can
read data from register memory. That includes I/O
data mapped into register memory, (it is easier to
display I/O data with the HHM’s Monitor Block or
Monitor Control Reference function).
For a Series F ive PLC, the Device Memory screen
looks like this example:
D E V I C E M E M O R Y 7
M E M : (location)
t g l c h n g e n t r S B A
The top line shows the currently-selected Device
Number (7 in the example above). If there is a
currently-selected memory location, it appears on
the second line of the display as two numbers
separated by a colon.
The number on the left will be:
133 for a Series Five PLC
The number on the right is the actual memory
location that will be read.
From this screen, use the Hand-held Monitor
function keys to:
A. Select a different device on the bus (press F4
(SBA)).
B. Select another memory type (press F2 (chng)).
See right for instructions.
C. Select another reference location in the dis-
played memory type (press F2(chng)). See
right for instructions.
D. Display the current memory contents of the
specified location (press F3 (entr)).
Enter or Change the PLC Type
To enter or change the PLC type:
1. Press F3 (chng). A cursor appears at the left of
the colon. For a Series Six PLC, enter the number 32768.
2. Press the F3 (entr) key.
Enter or Change the Memory Location
To enter or change the memory location:
1. On the same screen, press F1 ( > ) to move the
cursor to the right of the colon.
2. Press F2 (chng).
3. Enter the byte offset of the data. This is equal
to (2 x register #) – 2. For example, for register#100, you would enter (2 x 100) – 2, which
is 198.
I/O Data
Series Five I/O data can be displayed using the
integer result of this formula:
(point number) / 8 + table offset
The table offsets for Series Five I/O are:
channel 1 inputs 32768
channel 2 inputs 32896
channel 1 outputs 33024
channel 2 outputs 33152
Example: to display channel 2 output 12, you
would enter:12/8 + 33152, which is 33153:
M E M : 1 3 3 : 3 3 1 5 3
Press F3 (ENTR) to save the memory location. To
display the memory content of this location, press
F3 (ENTR) again.
6-4
Hand-held Monitor User’s Guide – June 1994
GFK-0121E
Page 58

Changing the Data Format
6
When the memory display first appears, it looks
like this example:
D E V I C E M E M O R Y 7
M E M : 1 : 6 5 5 2 4
W O R D 1 2 3 4 5
v a l a d d r
You can display either one byte or one word of
data. You can also select either decimal display:
W O R D 1 2 3 4 5
B Y T E 3
or binary display:
4 4 1 4 4 1 1 1 4 4 4 4 4 4 1 1
4 4 4 4 4 4 1 1
To change the data format:
1. Press F2 (VAL).
2. Use the function keys to select the format you
want.
Changing the Selected Address
To change the address being monitored, press F3
(ADDR). The HHM shows:
D E V I C E M E M O R Y 7
M E M : (location)
W O R D (value)
> < l o c
To Display Information from Another Device:
press F3 (Location). The function key assignments
change. Now press F4 (SBA). Select the new
Device Number then press F3 (ENTR).
To Increment or Decrement the Memory Address:
use the F1 ( > ) and F2 ( < ) keys.
To Enter a New Address: press F3 (LOC). Line
4displays new function key assignments. Key in
the memory location as explained previously.
3. Press the D MENU key to return to the pre-
vious screen, where the value will be displayed.
GFK-0121E
Chapter 6 Reading CPU Memory
6-5
Page 59

Chapter 7Error Messages
7
This chapter explains error messages that may be displayed on the Hand-held Monitor.
Powerup Error Messages
If an error occurs during the Hand-held Monitor’s
self-test, this multi-language error display may
appear:
P W R U P E R R O R # 1
E R R E U R # 1
E I G T E S T : F E H L # 1
E R R O R E I N I Z # 1
Cycle power to the Hand-held Monitor and try
again. If the message returns, look for its error
number in the list at right.
#2 The HHM has a faulty EPROM. Obtain a
replacement or an HHM upgrade kit.
#4 The HHM may have been assigned a De-
vice Number already used on the bus. Press
the ON/OFF key, then disconnect the HHM
from the device it is attached to. Press the
ON/OFF key again. Following the instructions on page 3-4, assign the HHM a different Device Number.
At 38.4 Kbaud, unterminated HHM cable
may cause this message. Remove the HHM
cable or check that HHM is connected to a
properly-terminated bus.
This error may occur if the Hand-held Monitor is connected to a bus and an incorrect
baud rate is selected.
#5 This number indicates an internal fault, or
excessive noise on the bus, or that the bus is
operating at a different baud rate from the
HHM. Press the ON/OFF key then disconnect the HHM cable from the bus
the HHM. Press the ON/OFF key again. If
the message reappears, replace the HHM.
This error may occur if the Hand-held Monitor is connected to a bus and an incorrect
baud rate is selected.
and
from
GFK-0121E
#1, 2, 3, or 6 indicates that the Hand-held Monitor
must be replaced.
7-1
Page 60

7
Operating Error Messages
The HHM may display one of the messages
shown below when the ON/OFF key is pressed or
during operation. If a message appears, press the
Clear key, then follow any action suggested.
E : N O A C T I V E A D D R
No active device has been selected, so many
functions do not operate. See page 5-2 to select an
active device.
E : K E Y = M O N T R O N L Y
Place the keyswitch in Configure mode (the key
must be present). Press Clear, then retry the
operation. Press Enter.
E : F N C T N D I S A B L E D
The function just selected is disabled by the
HHM’s current configuration. Press the Clear key
to remove the message.
E : C O M M E R R O R
HHM cannot communicate with the device. If the
HHM is connected directly to a device which is not
on an ope rating bus, be sure a terminating resistor is
connected across Serial 1 and Serial 2. If the
message returns, check the bus controller and HHM
cab le connectio n s. Try other dev ices.
E : E E P R O M F A I L U R E
Configuration Error Messages
The following messages may appear while
configuring a bus device. They usually indicate an
incorrect selection.
E : C O N F I G P R O T E C T
The device’s configuration is protected, its features
cannot be changed. To configure the block, disable
Configuration Protection.
E : N O T O N B L O C K
To configure the Device Number, connect the
HHM directly to that device.
E : D U P B L O C K N O
The Device Number has already been assigned.
This message only appears if the device is
connected to a operating bus. Another number
must be assigned to one of the devices in conflict.
E : D U P L I / O R E F S
The PLC Reference Number conflicts with or
overlaps one already assigned to another device
on the bus. Assign a different reference to one of
the devices in conflict.
E : O U T O F R A N G E
The Reference Number is too high.
E : N O T B Y T E B N D R Y
If you are using the HHM to configure or force a
block, clear the message and go to Block/Bus
Status menu. Press the Clear key. If the block’s
Unit OK LED continues to blink, power down the
block and replace the Terminal Assembly,
configuring the replacement to match the original.
D I F F E R E N T B A U D
The HHM and block have been set for different
baud rates: one is set for 153.6Kbaud standard and
the other is set for 153.6 Kbaud extended (the
HHM will not communicate with the bus if any
baud rate conflict exists). All devices on the bus
must be set to the same baud rate.
Additional Messages: The following additional
messages may appear during normal system use:
E : F N C T N D I S A B L E D
E : N O S U C H D E V I C E
E : M O N I T O R O N L Y
7-2
Hand-held Monitor User’s Guide – June 1994
The Reference Number does not begin on a byte
boundary (1, 9, 17 . . .).
E : I N V A L D B L K C F G
The configuration entry is not valid.
E : N O S U C H D E V I C E
The destination device does not exist. Check the
Device Number.
E : D I F F B L K T Y P E S
Copy Configuration cannot be used between
dissimilar device types.
E : C O P Y E R R O R
An error has occurred during Copy Configuration.
Press Clear and try again.
E : F N C T N D I S A B L E D
The function is not currently enabled for the
HHM.
GFK-0121E
Page 61

Index
A
AC operation, 2-1
AC power required, 1-5 , 2-1
Accessories, 1-3
Active device, selecting on HHM, 4-6 , 5-2
, 5-4 , 5-8
Adapter
230VAC connector, 2-2
AC power, 2-1
Alar m diagnostic, 5-10
Analog blocks
Monitor block screen, 5-5
Monitor/Control Reference screens, 5-10
B
Battery pack, 1-3
charging, 2-1 , 2-3
operation, 2-3
replacing, 2-3
Baud rate, 1-5
configuring for bus devices, 4-4
configuring HHM to change for blocks,
3-6
error , 7-2
selecting after powering up HHM, 3-2
Block ID, configuring HHM to change for
blocks, 3-5
Block/Bus Status display
for Bus Controller, 5-3
for Genius block, Remote I/O Scanner ,
or Field P rocessor, 5-2
Bracket, mounting, 2-7
Bus
displaying number of devices on, 5-3
dual
switching, 5-3
viewing presently active bus, 5-4
scan time, display , 5-3
status, 5-3
Bus controllers
Block/Bus Status display, 5-3
compatibility with HHM versions, 1-4
Bus Switching Module, compatibility with
HHM versions, 1-4
C
Case, 1-3
Catalog numbers
Genius blocks and HHM versions, 1-4
HHM, options, accessories, 1-5
Charger, 1-3
catalog number, 1-5
using, 2-1
COMM Error message, 3-7
Communications error , 7-2
Compatibility with other devices, 1-4
Configuration
for bus devices
copying, 4-6
Field Control modules, 4-8
Field Processor, 4-7
Genius blocks, 4-6
grounding required for offline config-
uration, 4-2
menus, 4-3
online or offline, 4-2
Program Block ID, 4-4
Remote I/O Scanner , 4-5
for permanently installed HHM, 2-6
sequence for HHM, 3-4
setting up HHM to configure bus de-
vices, 3-6
Configuration Protected error, 4-3 , 7-2
Connector, external
catalog number, 1-5
installation instructions, 2-9
Copy error, 7-2
CPU, host, configuring HHM for, 3-5
Current, display for P owerTRAC block,
5-11
D
D connector, 2-8
Data type, changing when monitoring re-
mote drop, 5-15
Description, 1-2
Device number
HHM, 3-4
of bus device, changing, 4-4
Diagnostics
displaying, 5-9
GFK-0121E
Index-1
Page 62

Index
for analog, RTD, or Thermocouple
block, 5-10
Different Baud error, 7-2
Different Block Types error, 7-2
Dimensions, 1-5
Display, 1-5
special characters, 1-3
testing, 3-7
Duplicate Block Number error, 7-2
Duplicate I/O References error , 7-2
E
EEPROM failure, 3-7
EEPROM Failure error, 7-2
Error messages, during HHM test, 3-7
F
Failed switch diagnostic, 5-9
Fault clearing
configuring HHM to enable fault clear-
ing, 3-6
from Block/Bus Status screen, 5-3
on analog, RTD, or Thermocouple
block, 5-10
on discrete, relay or High-speed Count-
er block, 5-9
on remote drop, 5-14 , 5-16
Features, 1-1
Feedback Error diagnostic, 5-10
viewing present status of circuit on RTD
or Thermocouple block, 5-5
Function Disabled error, 7-2
G
Genius blocks
compatibility with HHM versions, 1-4
I/O type, 5-4
monitoring with HHM, 5-4
H
Hardware setup, 2-1
High-speed Counter blocks, Monitor
block screen, 5-6
High-speed Counter Block
Inputs, display , 5-6
presets, display , 5-6
Humidity, 1-5
I
I/O forced status, 5-4
I/O scanning, for Field Processor , disable,
4-8
I/O type, 5-4
Input Shorted diagnostic, 5-10
Installation, instructions, 2-6 , 2-7
Installed HHM, configuration sugges-
tions, 2-6
Internal Fault diagnostic, 5-10
Invalid Block Configuration error , 7-2
Field Control products, compatibility with
HHM versions, 1-4
Field P rocessor, configuration overview,
4-7
Forcing I/O
configuring HHM to perform, 3-6
on analog, RTD, or Thermocouple
block, 5-10
on Monitor/Control Reference screen,
5-9
on remote drop, 5-14 , 5-15
viewing present status, 5-4
viewing present status of analog circuit,
5-5
Index-2
K
Key=Monitor error, 7-2
Keypad, 1-1 , 1-2
testing operation, 3-7
Keys, 1-3 , 1-5
Keyswitch, 1-1
positions, 1-3
L
Languages, 1-1 , 1-5 , 3-5
GFK-0121E
Page 63

Index
LCD display , 1-1
Loss of I/O P ower diagnostic, 5-9
Low power, 2-3
M
Memory, reading, 6-1
Menus, main, 3-3
Monitor Block screens, 5-4
Monitor Only error, 7-2
Monitor/Control Reference screens
for Field Processor, 5-15
for Genius blocks, 5-8
for Remote I/O Scanner , 5-13
Monitoring, menus, 5-1
Mounting bracket, 2-7
N
No Active A ddress error, 7-2
No Faults diagnostic, 5-12
No Load diagnostic, 5-9
No Such Device error, 7-2
Not Byte Boundary error, 7-2
Not on Block error, 7-2
P owerTRAC block
data sequence, 5-11
display data, 5-7
Monitor/Control Reference screens, 5-11
P owerup, 3-2
P owerup Error messages, 7-1
Program Block ID screens, 4-4
PROM, changing, 2-4
Pulse Testing outputs, 5-17
R
Redundant bus, 5-4
switching, 5-3
References
asterisks appear on screen, 5-2
not on byte bundary, 7-2
of Genius block, displaying, 5-4
Relay blocks, monitor block screen, 5-5
Remote drop, configuration, 4-5
Remote I/O Scanner
compatibility with HHM versions, 1-4
configuring I/O map, 4-4 , 4-5
RTD blocks
Monitor block screen, 5-5
Monitor/Control Reference screens, 5-10
O
Open Wire diagnostic, 5-9 , 5-10
Operating time, 1-5
Out of Range error, 7-2
Overload diagnostic, 5-9
Overrange diagnostic, 5-10
Overtemperature diagnostic, 5-9 , 5-10
P
PCIM/QBIM, selecting as host, 3-5
P ower , display for PowerTRA C block, 5-11
P ower sources, 2-1
GFK-0121E
S
Serial bus address
configuring for HHM, 3-4
error caused by duplicating, 7-2
of bus device, changing, 4-4
Series 90 PLC
reading memory, 6-2
references displayed, 5-2
selecting as host type, 3-5
Series Five PLC
reading memory, 6-4
references displayed, 5-2
selecting as host type, 3-5
Series Six PLC
reading memory, 6-3
references displayed, 5-2
selecting as host type, 3-5
Index-3
Page 64

Index
Short Circuit diagnostic, 5-9
Shutoff
automatic, 2-3
configuring for HHM, 3-5
Specifications, 1-5
T
Temperature specifications, 1-5
Testing, 3-7
Thermocouple blocks
Monitor block screen, 5-5
Monitor/Control Reference screens, 5-10
U
Underrange diagnostic, 5-10
Upgrading the HHM, 2-4
V
V ARs, display for P owerTRA C block, 5-11
Voltage, display for PowerTRAC block,
5-11
W
W att-hours, display for PowerTRA C block,
5-11
Wiring Error diagnostic, 5-10
Index-4
GFK-0121E
 Loading...