

Page 1

GE
Security
GE 16X PTZ Camera
User Manual
g
1063752A
Page 2

Copyright Copyright © 2008 GE Security. All rights reserved.
This document may not be copied in whole or in part or otherwise reproduced without prior
written consent from GE Security except where specifically permitted under US and
international copyright law.
Document number/revision: 1063752A (October 2008).
Disclaimer The information in this document is subject to change without notice. GE Security (“GE”)
assumes no responsibility for inaccuracies or omissions and specifically disclaims any
liabilities, losses, or risks, personal or otherwise, incurred as a consequence, directly or
indirectly, of the use or application of any of the contents of this document. For the latest
documentation, contact your local supplier or visit us online at www.gesecurity.com.
This publication may contain examples of screen captures and reports used in daily operations.
Examples may include fictitious names of individuals and companies. Any similarity to names
and addresses of actual businesses or persons is entirely coincidental.
Trademarks and patents GE and the GE monogram are registered trademarks of General Electric Company.
GE 16X PTZ Camera product and logo are trademarks of GE Security.
Other trade names used in this document may be trademarks or registered trademarks of the
manufacturers or vendors of the respective products.
Intended use Use this product only for the purpose it was designed for; refer to the data sheet and user
documentation. For the latest product information, contact your local supplier or visit us online
at www.gesecurity.com.
FCC compliance This equipment has been tested and found to comply with the limits for a Class A digital device,
pursuant to part 15 of the FCC rules. These limits are designed to provide reasonable
protection against harmful interference when the equipment is operated in a commercial
environment. This equipment generates, uses, and can radiate radio frequency energy and, if
not installed and used in accordance with the instruction manual, may cause harmful
interference to radio communications.
Changes or modifications not expressly approved by the party responsible for compliance
could void the user’s authority to operate the equipment.
EU directives 2004/108/EC (EMC directive). Non-European manufacturers must designate an authorized
representative in the Community. Our authorized manufacturing representative is
GE Security B.V., Kelvinstraat 7, 6003 DH Weert, Nederland.
2002/96/EC (WEEE directive). Products marked with this symbol cannot be disposed of as
unsorted municipal waste in the European Union. For proper recycling, return this product to
your local supplier upon the purchase of equivalent new equipment, or dispose of it at
designated collection points. For more information, visit www.recyclethis.info.
Regulatory
Page 3

Contents
Preface. . . . . . . . . . . . . . . . . . . . . . . . . . . . . . . . . . . . . . . . . . . . . . . . . . . . . . . . . . . . . . . . . . . . . . . . . . . . . . . . . . . . . . . . . 1
Product overview. . . . . . . . . . . . . . . . . . . . . . . . . . . . . . . . . . . . . . . . . . . . . . . . . . . . . . . . . . . . . . . . . . . . . . . . . . . . . . . . 2
Features. . . . . . . . . . . . . . . . . . . . . . . . . . . . . . . . . . . . . . . . . . . . . . . . . . . . . . . . . . . . . . . . . . . . . . . . . . . . . . . . . . . . . . . . 2
Safety precautions . . . . . . . . . . . . . . . . . . . . . . . . . . . . . . . . . . . . . . . . . . . . . . . . . . . . . . . . . . . . . . . . . . . . . . . . . . . . . . 3
Camera setup menu . . . . . . . . . . . . . . . . . . . . . . . . . . . . . . . . . . . . . . . . . . . . . . . . . . . . . . . . . . . . . . . . . . . . . . . . . . . . . 4
Menu navigation . . . . . . . . . . . . . . . . . . . . . . . . . . . . . . . . . . . . . . . . . . . . . . . . . . . . . . . . . . . . . . . . . . . . . . . . . . . . . . . . 5
Camera menu settings. . . . . . . . . . . . . . . . . . . . . . . . . . . . . . . . . . . . . . . . . . . . . . . . . . . . . . . . . . . . . . . . . . . . . . . . . . . 7
Shadow tours . . . . . . . . . . . . . . . . . . . . . . . . . . . . . . . . . . . . . . . . . . . . . . . . . . . . . . . . . . . . . . . . . . . . . . . . . . . . . . . . . . 22
Preset tours . . . . . . . . . . . . . . . . . . . . . . . . . . . . . . . . . . . . . . . . . . . . . . . . . . . . . . . . . . . . . . . . . . . . . . . . . . . . . . . . . . .25
Alarm menus . . . . . . . . . . . . . . . . . . . . . . . . . . . . . . . . . . . . . . . . . . . . . . . . . . . . . . . . . . . . . . . . . . . . . . . . . . . . . . . . . . 28
Onscreen display . . . . . . . . . . . . . . . . . . . . . . . . . . . . . . . . . . . . . . . . . . . . . . . . . . . . . . . . . . . . . . . . . . . . . . . . . . . . . . . 29
Specifications . . . . . . . . . . . . . . . . . . . . . . . . . . . . . . . . . . . . . . . . . . . . . . . . . . . . . . . . . . . . . . . . . . . . . . . . . . . . . . . . . . 32
Contacting us . . . . . . . . . . . . . . . . . . . . . . . . . . . . . . . . . . . . . . . . . . . . . . . . . . . . . . . . . . . . . . . . . . . . . . . . . . . . . . . . . . 33
iii
Safety terms and symbols . . . . . . . . . . . . . . . . . . . . . . . . . . . . . . . . . . . . . . . . . . . . . . . . . . . . . . . . . . . . . . . . . . . . . . . . . 1
References and related documentation . . . . . . . . . . . . . . . . . . . . . . . . . . . . . . . . . . . . . . . . . . . . . . . . . . . . . . . . . . . . 2
Accessing programming menus . . . . . . . . . . . . . . . . . . . . . . . . . . . . . . . . . . . . . . . . . . . . . . . . . . . . . . . . . . . . . . . . . . . 6
Clear all settings . . . . . . . . . . . . . . . . . . . . . . . . . . . . . . . . . . . . . . . . . . . . . . . . . . . . . . . . . . . . . . . . . . . . . . . . . . . . . . . . . . 7
Exposure setting . . . . . . . . . . . . . . . . . . . . . . . . . . . . . . . . . . . . . . . . . . . . . . . . . . . . . . . . . . . . . . . . . . . . . . . . . . . . . . . . . . 7
Shutter setting. . . . . . . . . . . . . . . . . . . . . . . . . . . . . . . . . . . . . . . . . . . . . . . . . . . . . . . . . . . . . . . . . . . . . . . . . . . . . . . . . . . . 9
IRIS setting . . . . . . . . . . . . . . . . . . . . . . . . . . . . . . . . . . . . . . . . . . . . . . . . . . . . . . . . . . . . . . . . . . . . . . . . . . . . . . . . . . . . . . 10
AGC (automatic gain control) setting . . . . . . . . . . . . . . . . . . . . . . . . . . . . . . . . . . . . . . . . . . . . . . . . . . . . . . . . . . . . . . 11
White balance setting . . . . . . . . . . . . . . . . . . . . . . . . . . . . . . . . . . . . . . . . . . . . . . . . . . . . . . . . . . . . . . . . . . . . . . . . . . . . 11
Sharpness setting. . . . . . . . . . . . . . . . . . . . . . . . . . . . . . . . . . . . . . . . . . . . . . . . . . . . . . . . . . . . . . . . . . . . . . . . . . . . . . . . 16
Brightness setting . . . . . . . . . . . . . . . . . . . . . . . . . . . . . . . . . . . . . . . . . . . . . . . . . . . . . . . . . . . . . . . . . . . . . . . . . . . . . . . 16
Color setting. . . . . . . . . . . . . . . . . . . . . . . . . . . . . . . . . . . . . . . . . . . . . . . . . . . . . . . . . . . . . . . . . . . . . . . . . . . . . . . . . . . . . 17
Backlight setting . . . . . . . . . . . . . . . . . . . . . . . . . . . . . . . . . . . . . . . . . . . . . . . . . . . . . . . . . . . . . . . . . . . . . . . . . . . . . . . . . 18
Negative image. . . . . . . . . . . . . . . . . . . . . . . . . . . . . . . . . . . . . . . . . . . . . . . . . . . . . . . . . . . . . . . . . . . . . . . . . . . . . . . . . . 18
Zoom start position setting . . . . . . . . . . . . . . . . . . . . . . . . . . . . . . . . . . . . . . . . . . . . . . . . . . . . . . . . . . . . . . . . . . . . . . . 19
Zoom end position setting . . . . . . . . . . . . . . . . . . . . . . . . . . . . . . . . . . . . . . . . . . . . . . . . . . . . . . . . . . . . . . . . . . . . . . . . 20
Flickerless setting . . . . . . . . . . . . . . . . . . . . . . . . . . . . . . . . . . . . . . . . . . . . . . . . . . . . . . . . . . . . . . . . . . . . . . . . . . . . . . . . 20
Programming a new shadow tour. . . . . . . . . . . . . . . . . . . . . . . . . . . . . . . . . . . . . . . . . . . . . . . . . . . . . . . . . . . . . . . . . 22
To play a shadow tour. . . . . . . . . . . . . . . . . . . . . . . . . . . . . . . . . . . . . . . . . . . . . . . . . . . . . . . . . . . . . . . . . . . . . . . . . . . . 23
Deleting a shadow tour . . . . . . . . . . . . . . . . . . . . . . . . . . . . . . . . . . . . . . . . . . . . . . . . . . . . . . . . . . . . . . . . . . . . . . . . . . 24
Programming a preset tour. . . . . . . . . . . . . . . . . . . . . . . . . . . . . . . . . . . . . . . . . . . . . . . . . . . . . . . . . . . . . . . . . . . . . . . 25
Reviewing a preset tour . . . . . . . . . . . . . . . . . . . . . . . . . . . . . . . . . . . . . . . . . . . . . . . . . . . . . . . . . . . . . . . . . . . . . . . . . . 26
Deleting a preset tour . . . . . . . . . . . . . . . . . . . . . . . . . . . . . . . . . . . . . . . . . . . . . . . . . . . . . . . . . . . . . . . . . . . . . . . . . . . . 27
Setting alarms . . . . . . . . . . . . . . . . . . . . . . . . . . . . . . . . . . . . . . . . . . . . . . . . . . . . . . . . . . . . . . . . . . . . . . . . . . . . . . . . . . . 28
Online resources. . . . . . . . . . . . . . . . . . . . . . . . . . . . . . . . . . . . . . . . . . . . . . . . . . . . . . . . . . . . . . . . . . . . . . . . . . . . . . . . . 33
Page 4

GE 16X PTZ Camera
iv
User Manual
Page 5

Preface
This is the GE 16X PTZ Camera User Manual for models GEC-DV-16FN, GEC-DV-16FP, GEC-DV-16SN,
and GEC-DV-16SP. This document includes an overview of the product and detailed instructions explaining:
• How to configure the camera through the camera menus.
• How to use camera.
There is also information describing how to contact technical support if you have questions or concerns.
To use this document effectively, you should have the following minimum qualifications:
• A basic knowledge of CCTV systems and components
• A basic knowledge of electrical wiring and low-voltage electrical connections.
1
Read these instructions and all other documentation entirely before
installing or operating this product. The
most current versions of this and related documentation may be found on our website. Refer to Online
resources on page 33 for instructions on accessing our online publication library.
Note: A qualified service person, complying with all applicable codes, should perform all required hardware installation.
The following conventions are used in this document:
Bold Menu items and buttons.
Italic Emphasis of an instruction or point; special terms.
File names, path names, windows, panes, tabs, fields, variables, and other GUI elements.
Titles of books and various documents.
Blue italic (Electronic version.) Hyperlinks to cross-references, related topics, and URL addresses.
Monospace Text that displays on the computer screen.
Programming or coding sequences.
Safety terms and symbols
These terms may appear in this manual:
CAUTION: Cautions identify conditions or practices that may result in damage to the equipment or other property.
WARNING: Warnings identify conditions or practices that could result in equipment damage or serious personal injury.
Page 6

GE 16X PTZ Camera
2
User Manual
Product overview
The GE 16X PTZ cameras are designed for installation in an indoor/outdoor video surveillance system.The
camera incorporates the digital signal processor, pan/tilt mechanism, a X16 zoom lens and an RS-485
communication interface in a compact enclosure.
References and related documentation
For more information on the KTD-405 controller keypad, refer to:
• KTD-405/KTD405A User Manual (1036547)
Features
High Sensitivity support. The camera provides the high quality picture with 1/4 inch Super HAD CCD
effective pixels.
Preset tour. A preset tour moves the camera through a set of programmed positions. A maximum of 63
presets can be created. Using a keypad, you can register a combination of up to 18 presets per tour. The
camera movement speed and holding time are adjustable. Four preset tours can be created.
Shadow tour. A shadow tour is a tour that the camera “learns” by recording manual pan, tilt, and zoom
operations. A shadow tour can be stored and replayed.
Note: When the shadow tour recording memory is full, the shadow tour recording will automatically stop.
Autopan. The Autopan function pans the camera between 2 preset positions periodically.
Autoflip. The autoflip function allows the tilt angle to widen up to 180°. The image on the monitor screen
is flipped horizontally and vertically at the tilt angle of approximately 90°.
Optical Zoom. The optical zoom range is 1X to 16X.
Digital Zoom. Digital zoom enhances the systems zoom range to 8 times beyond the 16X optical zoom
limit. By utilizing the digital zoom function, the total system zoom range increases from 16X (1X digital
zoom) to 128X (8X digital zoom).
Alarm in function. Alarm signals are supplied from external devices through the ALARM IN connector.
When the signal is received, the camera turns to a preset position.
Protocols. GE and Pelco protocols are supported. The usable protocols are DIGIPLEX RS-422 (default),
IMPAC RS-485, ASCII, and PELCO D and P.
Connection capability up to 256 cameras. This camera can be connected to a maximum of 256 other
cameras.
Note: The maximum number of cameras that can be connected varies depending on which control protocol is used.
Power supply. Use a 24 VAC/24 VDC certified/listed class 2 power supply to power the camera.
Page 7

Safety precautions
Do not disassemble the camera. To prevent electric shock, do not remove the cover. The unit contains no
user-serviceable parts. If the camera isn’t working properly, have it repaired at a qualified service center.
Avoid placing the camera in direct sunlight. Do not aim the camera at bright objects. Whether the
camera is in use or not, do not face it towards direct sunlight or other extremely bright objects. Direct
sunlight or bright objects can cause blooming or smear to occur.
Handle the camera with care. Always handle and store the camera with care. The camera could be
damaged by improper handling or storage.
Do not use strong solvents or detergents to clean the camera. If the camera is dirty, wipe it with a
clean, dry cloth to clean it. If wiping the camera does not remove dirty residue, you may clean the unit
using a mild detergent solution.
Install and mount the camera in the proper position. This camera is designed for mounting on the
ceiling or wall. Do not install the camera upside down or at an angle. If you mount the camera improperly,
it may malfunction.
Before operating the camera, check the temperature, humidity, and power source ratings. Use the
camera under conditions where temperature is between 4 to 120°F (-10 to 50°C), and humidity is below
90%. The input power source is 24 VAC or 24 VDC.
3
Page 8

GE 16X PTZ Camera
4
User Manual
Camera setup menu
Tab le 1 shows the camera setup menu.
Table 1. GE 16X PTZ Camera menu structure
Camera Tour
Clear all Tour1 shadow tour
Yes New tour
No* Play tour
Exposure Delete tour
Auto
Partial auto* New tour
Manual Play tour
White balance Delete tour
Auto*
Manual New tour
Indoor Play tour
Outdoor Delete tour
Special
Sharpness New tour
0-15 (Default = 10) Play tour
Brightness Delete tour
0-99 (Default = 42)
Color New tour
On* Play tour
Off Delete tour
Backlight
On
Off* Disable
Negative Normal open*
On Normal close
Off*
Zoom start Disable
x1-x15 (Default = X1) Normal open*
Zoom end Normal close
x2-x128 (Default = X128)
Flickerless
On
Off*
Tour2 preset tour
Tour3 preset tour
Tour4 preset tour
Tour5 preset tour
Alarm
Alarm1
Alarm2
* Indicates default setting.
Note: Detailed descriptions of the menu begin with Camera
menu settings on page 7.
Page 9
Menu navigation
You can use the KTD-405/KTD-405A controller to setup and operate the GE 16X PTZ series cameras. You can
use the setup menus to restore factory default settings, and to adjust the camera and system settings.
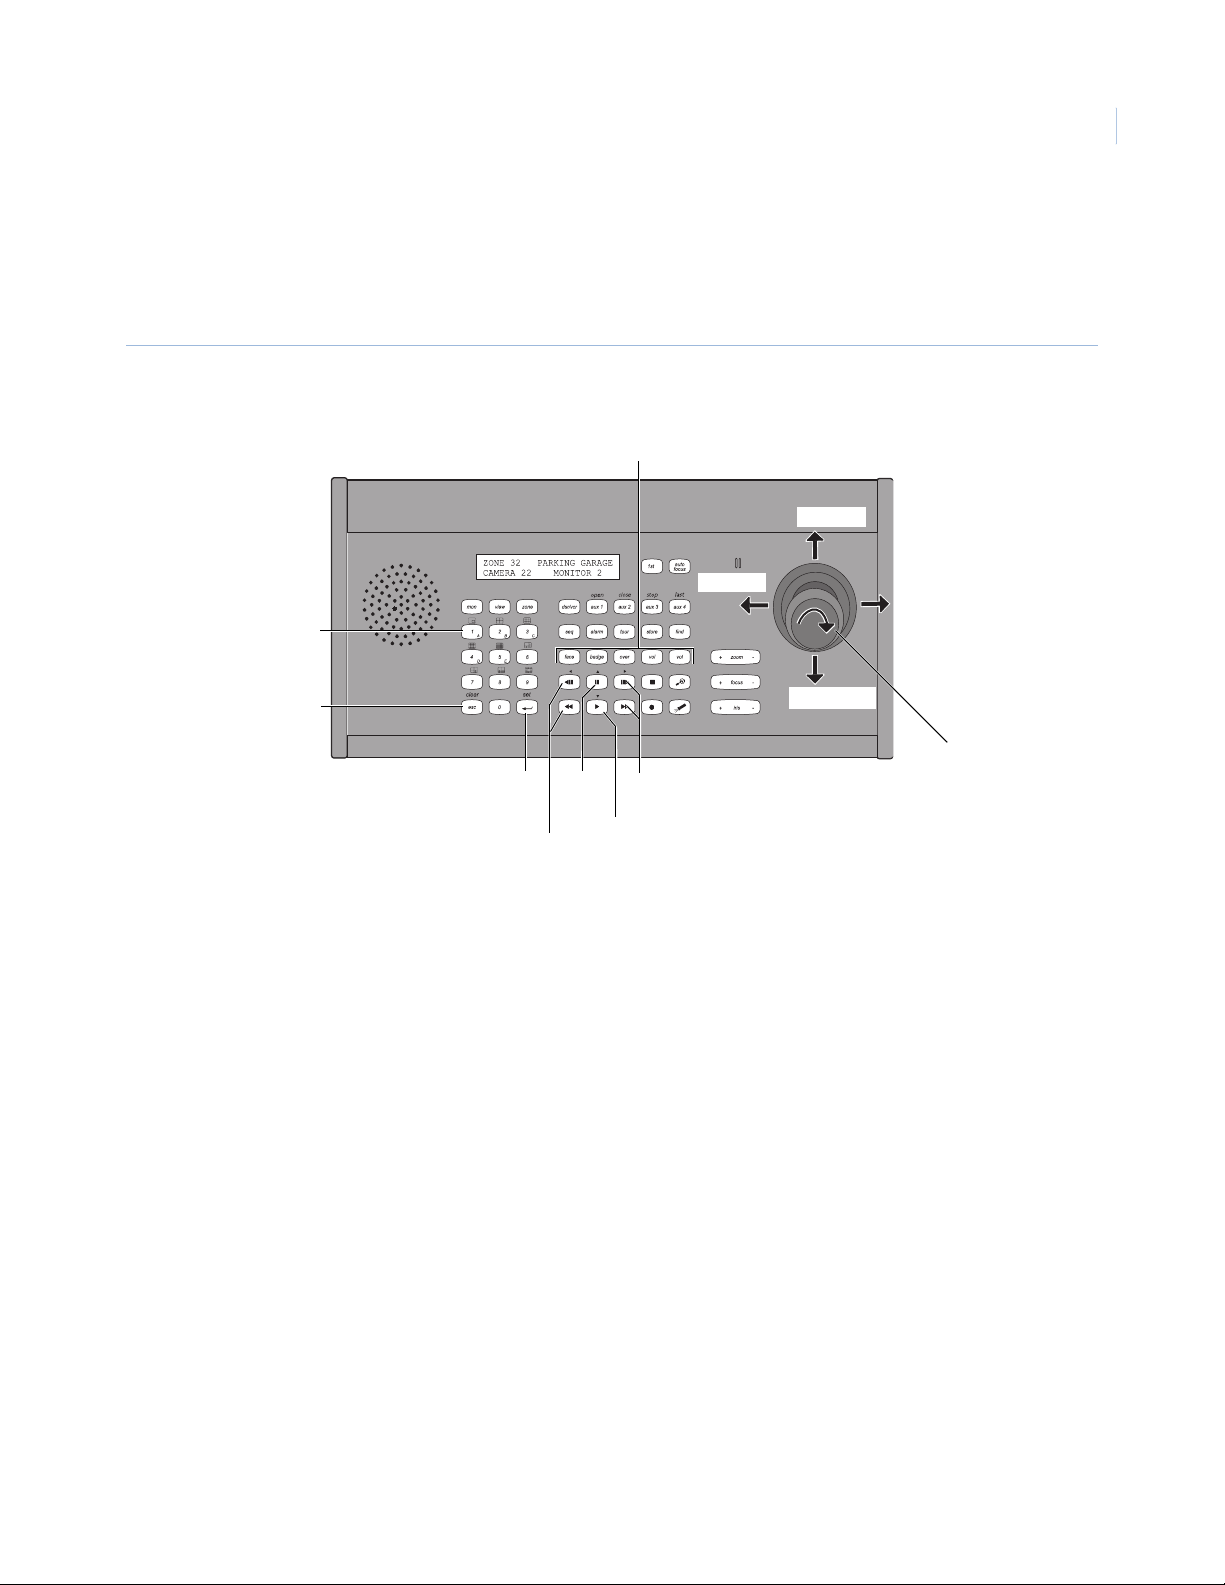
Figure 1. KTD-405/KTD-405A Controller
These keys
appear on the
KTD-405A only
Scroll up
5
Number buttons
esc button
Set
Previous
Scroll
up
Previous
Scroll down
Next
Scroll
down
Next
Edit (turn joystick
clockwise)
There are multiple methods for navigating through the menu system with your keypad:
Joystick navigation. Use the keypad joystick to move through menu items. When you get to the required
menu item, move the joystick to the right to advance through the available options. To back out of a menu,
move the joystick to the left.
Button navigation. Use the pause button to scroll up, play to scroll down, fast forward or forward frame
for the next item, and fast rewind or reverse frame for the previous item. When you have navigated to the
item you want, use seq, set, or fast forward to select that item. The arrow indicator on the GE 16X PTZ
menu identifies the property that will be changed.
To change a setting, press the iris + button. The setting will be saved when you advance to the next menu.
Depending on your protocol, you may be able to use the zoom + button to advance. Navigation and
selection shortcuts on the KTD-405/KTD-405A keypad may not work with all protocols.
Numerical navigation. Press the number associated with a menu item to select or highlight that option or
proceed to that menu. You will also use the number keys to enter numerical data, such as passwords.
Note: When you press the number associated with an option, and there is a value to set , you are automatically asked to set
that value. If there is no value to set, that option will be selected and the next menu is displayed.
Page 10

GE 16X PTZ Camera
6
User Manual
Accessing programming menus
To access the programming menus using the keys on a KTD-405/KTD-405A keypad, do the following:
1. Switch the keypad to the camera site you want to program.
2. Press and hold the set button until Enter programming code displays.
3. Enter the programming code 9, 5, 1. Then press the seq button.
4. At the first menu display, press 3.
5. At the Enter camera site number screen, enter the site number of the camera you want to program.
6. Press the set button.
At this point, you have access to the GE 16X PTZ programming menus.
Page 11

Camera menu settings
Clear all settings
The CLEAR ALL menu returns the camera to the factory default settings.
Figure 2. Camera menu
7
To clear all menu settings and return to the factory defaults, do the following:
1. From MAIN MENU, select CAMERA MENU.
2. From CAMERA MENU 1, select CLEAR ALL.
3. To confirm the restoration of factory defaults, do one of the following:
• Select NO to keep the current settings.
• Select YES to delete the current settings and reload the factory default settings. If you do this all
tours, presets, and autopan are cleared.
Exposure setting
The exposure control for a GE 16X PTZ camera is controlled through three different settings that each affects
the image exposure.
To set the Exposure mode, do the following:
1. From MAIN MENU, select CAMERA
MENU.
2. From CAMERA MENU 1, select
EXPOSURE (Figure 3).
Figure 3. CAMERA MENU 1
Page 12
GE 16X PTZ Camera
8
User Manual
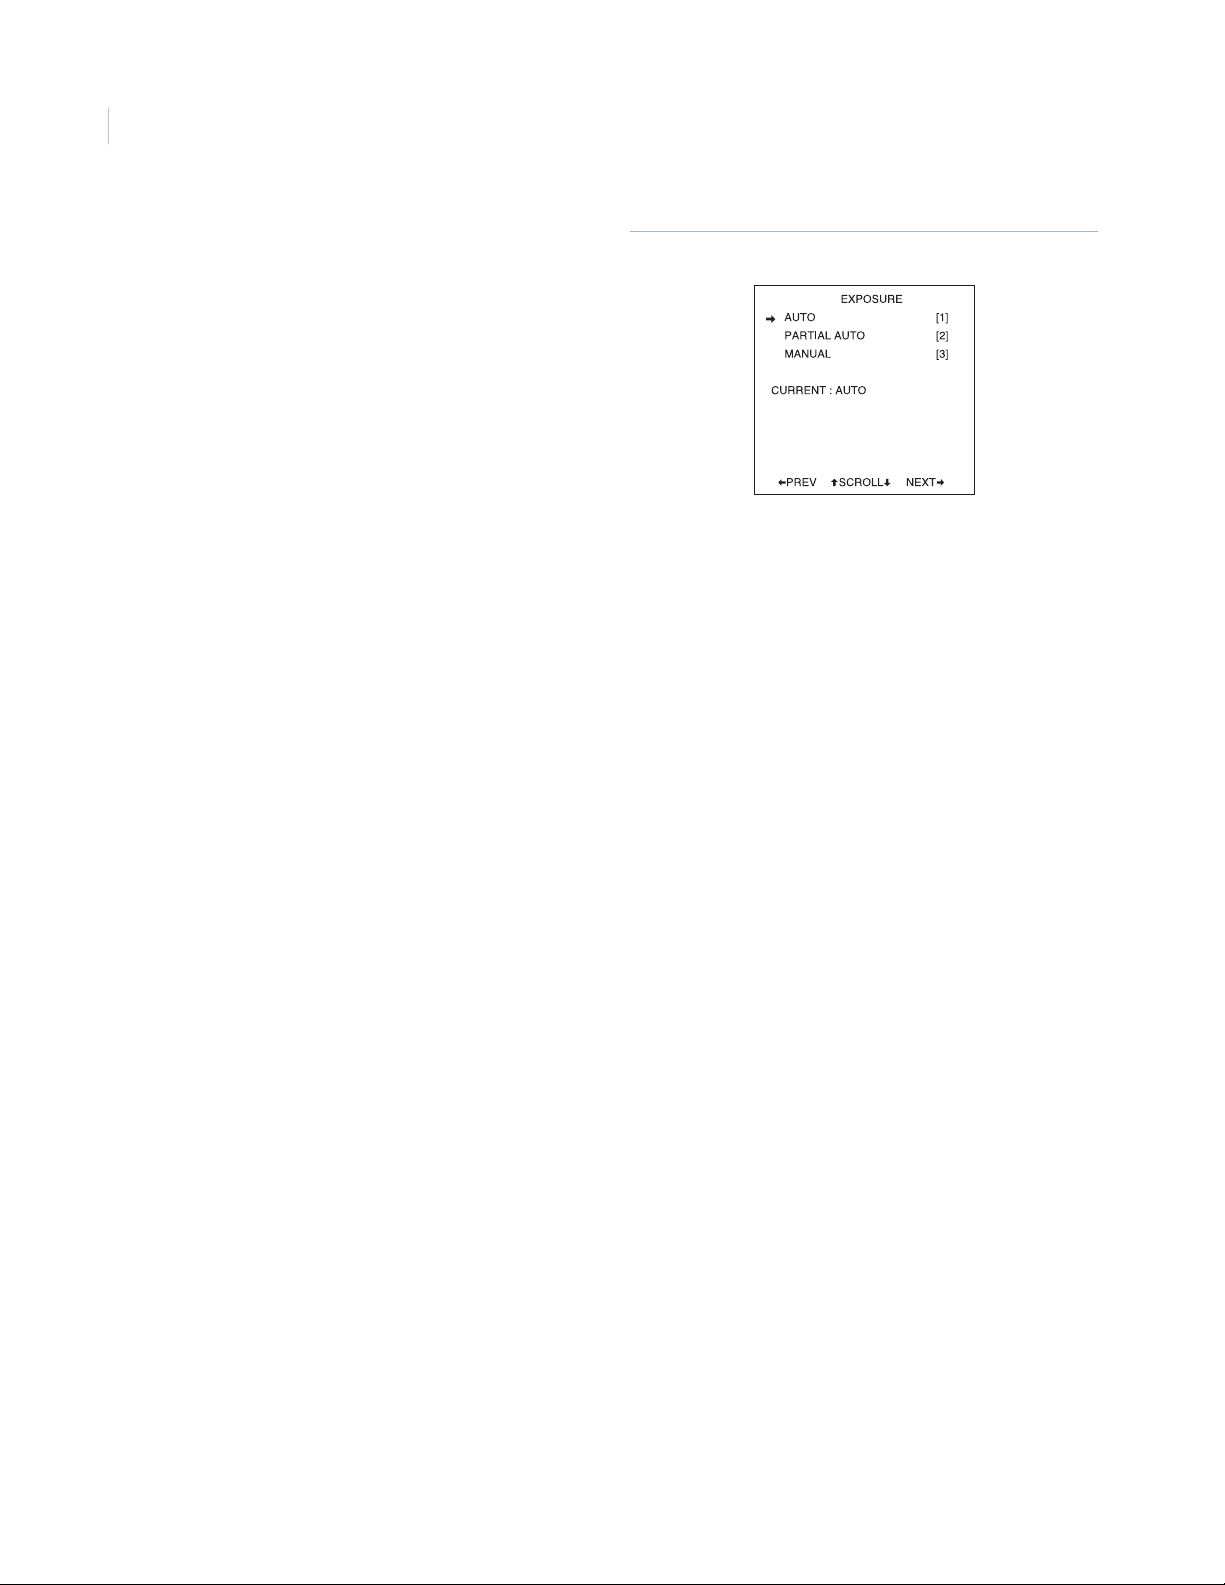
3. From EXPOSURE, select an Exposure mode
(Figure 4).
Figure 4. EXPOSURE menu
The three Exposure mode settings are:
AUTO. Use to compensate the exposure automatically with shutter, iris and AGC together.
PARTIAL AUTO. If you fix the one of these settings manually, the other settings are automatically set to
Auto mode. For example, you can use fixed shutter(1/100) and iris and AGC is controlled automatically to
make appropriate brightness.
Select one of the following options, and press set.
• SHUTTER: Select the desired shutter speed for camera exposure (Normal, or 1/125 to 1/10000 in
28 step increments). You can change the shutter speed to higher speed to capture fast-moving
subjects. The video signal will become temporarily darker when the shutter speed is increased. The
video signal will then automatically return to normal brightness via AGC and IRIS control.
• IRIS: Select the desired lens iris value for camera exposure (80 to180). If the iris value is 80, the
iris is fully closed. If the iris value is 180, the iris is fully open.
• AGC (Automatic Gain Control): AGC range is 0 to 255.
MANUAL. Set the Shutter speed, IRIS and AGC respectively in manual. Depending on light
environment, you can set shutter, iris, and AGC respectively.
Select one of the following options, and press set.
• SHUTTER: Select the desired shutter speed for camera exposure (Normal, or 1/125 to 1/10000 in
28 step increments).
• IRIS: Select the desired lens iris value for camera exposure. (80-180).
• If the iris value is 80, the iris is close condition. If the iris value is 180, the iris is full open
condition.
• AGC (Automatic Gain Control): AGC range is 0 to 255.
Page 13

Shutter setting
To set the shutter speed manually, do the following:
9
1. From MAIN MENU, select CAMERA
MENU.
2. From CAMERA MENU 1, select
EXPOSURE (Figure 5).
3. From EXPOSURE, select PART IAL A U TO
(Figure 6).
Figure 5. CAMERA MENU 1
Figure 6. EXPOSURE menu
4. From EXP PARTIAL AUTO, select
SHUTTER 1/250 to adjust the exposure
automatically (Figure 7).
Figure 7. EXP PARTIAL AUTO menu
Page 14

GE 16X PTZ Camera
10
User Manual
IRIS setting
To set the IRIS manually, do the following:
1. From MAIN MENU, select CAMERA
MENU.
2. From CAMERA MENU 1, select
EXPOSURE (Figure 8).
3. From EXPOSURE, select MANUAL
(Figure 9).
Figure 8. CAMERA MENU 1 menu
Figure 9. EXPOSURE menu
4. From EXP MANUAL, select IRIS.
5. Select the desired lens iris value (80-180) for
camera exposure (Figure 10). If the iris
value is 80, the iris is closed. If the iris value
is 180, the iris is fully open.
Figure 10. EXP MANUAL menu
Page 15

AGC (automatic gain control) setting
To set the AGC manually, do the following:
11
1. From MAIN MENU, select CAMERA
MENU.
2. From CAMERA MENU 1, select
EXPOSURE (Figure 11).
3. From EXPOSURE, select MANUAL
(Figure 12).
Figure 11. CAMERA MENU 1
Figure 12. EXPOSURE menu
4. From EXP MANUAL, select AGC.
Figure 13. EXP MANUAL menu
5. Manually change the AGC by entering a
range from 0 to 255 (Figure 13).
Note: When using auto exposure modes, the AGC and Iris settings are changed automatically by the camera. The last AGC and
Iris settings that were used in Auto will be the starting points when the user changes the manual or partial auto settings.
White balance setting
You can select 1 of 5 modes for how the camera shifts its output colors to compensate for the color of a light
source. The camera can monitor the color temperature automatically, or you can set the white balance
manually.
Page 16

GE 16X PTZ Camera
12
User Manual
Automatic white balance
To set the white balance and monitor the color temperature automatically, do the following:
1. From the MAIN MENU, select CAMERA
MENU.
2. From CAMERA MENU 1, select WHITE
BALANCE (Figure 14).
3. From the EXPOSURE menu, select AUTO
(automatic tracing white balance). In this
mode, the color temperature is monitored
continuously and the white balance is
automatically set. The color temperature
range for the proper white balance is
approximately 2,800 to 8,000°K. Proper
white balance may not be obtained under the
following conditions:
• When the color temperature is out of the
2,800 to 8,000°K range.
• When the scene contains high color
temperature objects such as a blue sky or
a sunset.
• When the scene is dim.
Figure 14. CAMERA MENU 1 menu
Figure 15. WHITE BALANCE menu
Manual white balance
To set white balance manually, you need to adjust the Red and Blue Gain values.
1. From MAIN MENU, select CAMERA
MENU.
2. From CAMERA MENU 1, select WHITE
BALANCE (Figure 16).
Figure 16. CAMERA MENU 1
Page 17

13
3. From WHITE BALANCE, select MANUAL
to manually adjust the hue value for white
balance control (Figure 17).
4. From WBAL MANUAL, select RED GAIN
or BLUE GAIN to set the hue (0-60) for
white balance control (Figure 18).
Note: For Pelco P/D, use the joystick to increase or
decrease the value.
Figure 17. WHITE BALANCE menu
Figure 18. WBAL MANUAL menu
Indoor white balance
To adjust the white balance for an indoor setting, do the following:
1. From MAIN MENU, select CAMERA
MENU.
2. From CAMERA MENU 1, select WHITE
BALANCE (Figure 19).
Figure 19. CAMERA MENU 1
Page 18

GE 16X PTZ Camera
14
User Manual
3. From WHITE BALANCE, select INDOOR
to adjust the color temperature range. The
Figure 20. WHITE BALANCE menu
proper white balance is approximately
3,200°K (Figure 20).
Outdoor white balance
To adjust the white balance for an outdoor setting, do the following:
1. From MAIN MENU, select CAMERA
MENU.
2. From CAMERA MENU 1, select WHITE
BALANCE (Figure 21).
Figure 21. CAMERA MENU 1
3. From EXPOSURE, select OUTDOOR to
adjust the color temperature. The
temperature for the proper white balance is
approximately 5,100°K (Figure 22).
Figure 22. Select OUTDOOR [3] from WHITE BALANCE menu
Page 19

Special white balance
You can select one preset white balance from a group of preset settings (0-99). Do the following:
15
1. From MAIN MENU, select CAMERA
MENU.
2. From CAMERA MENU 1, select WHITE
BALANCE (Figure 23).
3. From WHITE BALANCE, select SPECIAL
to adjust the color temperature. The
temperature for the proper white balance is
approximate 5,100°K (Figure 24).
Figure 23. CAMERA MENU 1
Figure 24. WHITE BALANCE menu
4. From WBAL SPECIAL, enter a number
between 0 and 99 (Figure 25).
Note: For Pelco P/D, use the joystick to increase or
decrease the value.
Figure 25. WBAL SPECIAL menu
Page 20

GE 16X PTZ Camera
16
User Manual
Sharpness setting
To adjust the sharpness of the image outline, do the following:
1. From MAIN MENU, select CAMERA
MENU.
2. From CAMERA MENU 1, select
SHARPNESS (Figure 26).
3. From SHARPNESS, select a value from 0 to
15 (Figure 27). If you increase the sharpness
value, the image becomes sharper. If you
decrease the sharpness value, the image
becomes softer.
Note: For Pelco P/D, use the joystick to increase or
decrease the value.
Figure 26. CAMERA MENU 1
Figure 27. SHARPNESS menu
Brightness setting
To adjust the brightness of a dark image, do the following:
1. From MAIN MENU, select CAMERA
MENU.
2. From CAMERA MENU 1, select
BRIGHTNESS (Figure 28).
Figure 28. Select BRIGHTNESS menu from CAMERA MENU 1
Page 21

17
3. From the BRIGHTNESS menu, select a value
from 0 to 99 (Figure 29). If you increase the
Figure 29. BRIGHTNESS menu
brightness value, the image becomes
brighter. If you decrease the brightness
value, the image becomes darker.
Note: The brightness setting can not be changed if the exposure setting is in Manual mode.
Note: For Pelco P/D, use the joystick to increase or decrease the value.
Color setting
You can switch the displayed picture to grayscale or color.
To adjust the color of the image, do the following:
1. From MAIN MENU, select CAMERA
MENU.
Figure 30. CAMERA MENU 1
2. From CAMERA MENU 1, select COLOR
(Figure 30).
3. From COLOR, select ON to display the
picture with color, or select OFF to display
the picture as grayscale (Figure 31).
Figure 31. COLOR menu
Page 22

GE 16X PTZ Camera
18
User Manual
Backlight setting
You may improve the visibility of a dark image by adjusting the backlight setting. The backlight setting
compensates for bright background lighting such as a spotlight.
To adjust the backlight setting of an image, do the following:
1. From MAIN MENU, select CAMERA
MENU.
2. From CAMERA MENU 2, select
BACKLIGHT (Figure 32).
3. From BACKLIGHT, select ON to
compensate the backlight. Select OFF to
turn off the backlight compensation
(Figure 33).
Figure 32. CAMERA MENU 2
Figure 33. BACKLIGHT menu
Negative image
To view a negative (inverse) image, do the following:
1. From MAIN MENU, select CAMERA
MENU.
2. From CAMERA MENU 2, select
NEGATIVE (Figure 34).
Figure 34. CAMERA MENU 2
Page 23

19
3. From NEGATIVE, select ON to view the
picture with reversed color and luminance.
Figure 35. NEGATIVE menu
Select OFF to turn off the negative image
feature (Figure 35).
Zoom start position setting
You may set the zoom start position of the camera. When you use the zoom feature, the zoom will always start
at the selected zoom start position.
To set a zoom start position, do the following:
1. From MAIN MENU, select CAMERA
MENU.
2. From CAMERA MENU 2, select ZOOM
START (Figure 36).
Figure 36. CAMERA MENU 2
3. From ZOOM START, enter a zoom start
position (X1 to X15) (Figure 37).
Figure 37. ZOOM START menu
Page 24

GE 16X PTZ Camera
20
User Manual
Zoom end position setting
You may set the zoom end position of the camera. When you use the zoom feature, the zoom will always end at
the selected zoom end position.
To set a zoom end position, do the following
:
1. From MAIN MENU, select CAMERA
MENU.
2. From CAMERA MENU 2, select ZOOM
END (Figure 38).
3. On ZOOM END, enter a zoom end position
from X2 to X128 (Figure 39).
4. Use the number buttons or joystick (up and
down) to set the zoom end position.
Note: If you set the zoom end position less than the zoom
start position, the zoom end position is automatically set to
one higher than the zoom start position (zoom end position
= zoom start position + 1).
Figure 38. CAMERA MENU 2
Figure 39. ZOOM START menu
Flickerless setting
To remove the flicker in the picture caused by fluorescent lighting, do the following:
1. From MAIN MENU, select CAMERA
MENU.
2. From CAMERA MENU 2, select
FLICKERLESS (Figure 40).
Figure 40. CAMERA MENU 2
Page 25

21
3. From FLICKERLESS, select ON to remove
the flicker, or select OFF to turn off the
flicker function (Figure 41).
Figure 41. FLICKERLESS menu
Page 26

GE 16X PTZ Camera
22
User Manual
Shadow tours
A shadow tour is a tour that the camera “learns” by recording your manual pan, tilt, and zoom operations.
When programming a new shadow tour, you use a keypad to direct the camera through the desired PTZ
movements. The camera stores the movements you performed in memory. The recorded tour can be replayed at
any time.
Programming a new shadow tour
To program a new shadow tour, do the following:
1. From MAIN MENU, select TOUR MENU.
2. From TOUR MENU, select TOUR1
SHADOW TOUR (Figure 42).
3. From NEW SHADOW TOUR, press iris + to
start the timer (Figure 43).
REC flashes on the monitor, and the USED
percentage will increase while moving the
camera through the tour.
Note: The maximum length of the shadow tour is
variable and is dependant on the number of PTZ
operations running in the tour recording. When more
quick PTZ hybrid movements are made, less
programming time is available for the shadow tour.
Figure 42. TOUR MENU
TOUR1 SHADOW TOUR [1]
TOUR2 PRESET TOUR [2]
TOUR3 PRESET TOUR [3]
TOUR4 PRESET TOUR [4]
TOUR5 PRESET TOUR [5]
Figure 43. NEW SHADOW TOUR menu
USED 0%
W TOUR
ESET TOUR
ESET TOUR
ESET TOUR
ESET TOUR
RECORDING
RECORDING
4. Move the camera through the desired
movements.
5. Press iris + to stop the recording and exit the
shadow tour menu.
Note: If the camera remains stationary while recording
a shadow tour, the percentage of memory used should
not increase until the camera moves again.
Shortcuts to programming the Shadow Tour
For KTD-405 keypad:
1. At the normal operating display, bring up the PROGRAM SHADOW TOUR display by pressing and
holding the esc key, and then press the tour key.
Page 27

2. To start recording a shadow tour, press the + side of the zoom, focus, or iris key.
3. Quickly move to the next step after the keypad beeps and the END SHADOW TOUR
PROGRAMMING display appears.
Note: You can press the , , or - keys to return to the normal operating display.
4. Begin the manual operation sequence you want to record as your shadow tour.
Note: The keypad is still recording your manual operation even though the END SHADOW TOUR PROGRAMMING display
returns to the normal operating display after a few seconds.
5. To stop recording the shadow tour, press the esc key.
For Pelco P/D keypad:
1. Press the PATTERN button for approximately two seconds.
2. Press the open key to start recording the shadow tour.
3. Begin the manual operation sequence you want to record as your shadow tour.
4. Press the open key to stop recording the shadow tour.
23
To play a shadow tour
To play an existing shadow tour, do the following:
1. From MAIN MENU, select TOUR MENU.
2. From TOUR MENU, select TOUR1
SHADOW TOUR (Figure 44).
3. From SHADOW TOUR, select PLAY
TOUR (Figure 45). The tour will play
indefinitely until you stop it by moving the
joystick or pressing a key.
Figure 44. TOUR MENU
TOUR1 SHADOW TOUR [1]
TOUR2 PRESET TOUR [2]
TOUR3 PRESET TOUR [3]
TOUR4 PRESET TOUR [4]
TOUR5 PRESET TOUR [5]
Figure 45. SHADOW TOUR menu
W TOUR
ESET TOUR
ESET TOUR
ESET TOUR
ESET TOUR
Page 28

GE 16X PTZ Camera
24
User Manual
Deleting a shadow tour
To delete a shadow tour, do the following:
1. From MAIN MENU, select TOUR MENU.
2. From TOUR MENU, select TOUR1
SHADOW TOUR (Figure 44).
3. From SHADOW TOUR, select DELETE
TOUR to delete the tour (Figure 45).
Figure 46. TOUR MENU
TOUR1 SHADOW TOUR [1]
TOUR2 PRESET TOUR [2]
TOUR3 PRESET TOUR [3]
TOUR4 PRESET TOUR [4]
TOUR5 PRESET TOUR [5]
Figure 47. SHADOW TOUR menu
W TOUR
ESET TOUR
ESET TOUR
ESET TOUR
ESET TOUR
Page 29

Preset tours
A preset tour is composed of a group of preset positions that the operator can link together in a sequence.
Programming a preset tour
To program a preset tour, do the following:
25
1. From MAIN MENU, select TOUR MENU.
2. From TOUR MENU, select TOUR2
PRESET TOUR, TOUR3 PRESET
TOUR, TOUR4 PRESET TOUR, or
TOUR5 PRESET TOUR (Figure 48).
3. From PRESET TOUR 1, select EDIT TOUR
(Figure 49).
Figure 48. TOUR MENU
TOUR1 SHADOW TOUR [1]
TOUR2 PRESET TOUR [2]
TOUR3 PRESET TOUR [3]
TOUR4 PRESET TOUR [4]
TOUR5 PRESET TOUR [5]
Figure 49. PRESET TOUR 1 menu
W TOUR
ESET TOUR
ESET TOUR
ESET TOUR
ESET TOUR
Page 30

GE 16X PTZ Camera
26
User Manual
4. From EDIT PRESET TOUR1, navigate
through and use the arrow buttons or joystick
Figure 50. EDIT PRESET TOUR1
to set the POS (preset number), DW (dwell
time) and SPD (speed) options (Figure 50).
5. Enter the following information:
• POS (01 to 63) - the preset number
assigned to that step of the tour.
• DW (5 to 255 seconds) - the dwell time
(this is the amount of time the position is
held before moving).
• SPD (1 to 127) - the speed the camera
travels to the next preset. 1 is the slowest
setting, and 127 is the fastest.
Note: If using a Pelco P/D, use the focus near
(increment) or focus far (decrement) buttons to input
the value for POS/DW/SPD options.
6. Press the esc key to end the tour.
Note: If you use the Pelco D or Pelco P protocol, you can not use some preset numbers for preset setting. The following preset
numbers have special functions, and are therefore unusable.
33. Flip operation 95. Enter Menu mode
34. Go to zero pan (go to home position) 96. Stop scan
92. Set left limit stop 98. Begin frame scan (Perform preset tour 1.
Only preset tour 1 is available.)
93. Set right limit stop
94. Remote reset 99.
Begin auto scan (starts auto pan function)
Reviewing a preset tour
To review a preset tour, do the following:
1. From MAIN MENU, select TOUR MENU.
2. From TOUR MENU, select TOUR2
PRESET TOUR, TOUR3 PRESET
TOUR, TOUR4 PRESET TOUR, or
TOUR5 PRESET TOUR (Figure 51).
Figure 51. Tour menu
TOUR1 SHADOW TOUR [1]
TOUR2 PRESET TOUR [2]
TOUR3 PRESET TOUR [3]
TOUR4 PRESET TOUR [4]
TOUR5 PRESET TOUR [5]
W TOUR
ESET TOUR
ESET TOUR
ESET TOUR
ESET TOUR
Page 31

27
3. From PRESET TOUR1, PRESET TOUR2,
PRESET TOUR3, or PRESET TOUR4 menu,
select PLAY TOUR to play the tour
(Figure 52).
4. Press the esc key to end the tour.
Deleting a preset tour
To delete a preset tour, do the following:
1. From MAIN MENU, select TOUR MENU.
2. From TOUR MENU, select TOUR2
PRESET TOUR, TOUR3 PRESET
TOUR, TOUR4 PRESET TOUR, or
TOUR5 PRESET TOUR (Figure 53).
Figure 52. PRESET TOUR 1 menu
Figure 53. Tour menu
TOUR1 SHADOW TOUR [1]
TOUR2 PRESET TOUR [2]
TOUR3 PRESET TOUR [3]
TOUR4 PRESET TOUR [4]
TOUR5 PRESET TOUR [5]
W TOUR
ESET TOUR
ESET TOUR
ESET TOUR
ESET TOUR
3. From PRESET TOUR1, PRESET TOUR2,
PRESET TOUR3, or PRESET TOUR4, select
DELETE TOUR (Figure 54).
Figure 54. PRESET TOUR 1 menu
Page 32

GE 16X PTZ Camera
28
User Manual
Alarm menus
The GE 16X PTZ camera has a terminal that can sense the alarm signals. The camera can be programmed to go
to a preset with a signal from any connected alarm device.
Setting alarms
To set an alarm, do the following:
1. From MAIN MENU, select ALARM MENU
(Figure 55).
2. From ALARM MENU, select ALARM1 or
ALARM2 (Figure 56).
Figure 55. MAIN MENU
Figure 56. ALARM MENU
3. Select NORMAL OPEN to activate the
alarm in the close position.
4. Select NORMAL CLOSE to activate the
alarm in the open position.
5. Select DISABLE to disable the alarm.
Note: The mapping between preset position and alarm is
fixed and not programmable.
When alarm1 is triggered, preset1 is activated. When
alarm2 is triggered, preset2 is activated. The presets run
continuously until alarm source is off.
If the corresponding preset is not programmed no alarm
action can be executed.
Figure 57. ALARM 1 menu
PRESET1
Page 33

Onscreen display
Some onscreen items display every time the camera is operated, and then disappear after 5 seconds.
Figure 58. Onscreen items
Wide
Optical zoom range
Digital + optical zoom range
Tele
Current zoom
level
21
29
3
4
Table 2. Onscreen display
Function OSD Format Description
1
2
3
4
Table 3. Zoom settings
Zoom Optical zoom Digital zoom Zoom Optical zoom Digital zoom
1X11 6X61
2X21 7X71
3X31 8X81
Current zoom
position indication
Optical and digital
zoom boundary
Zoom display The optical zoom range is 1x - 16x and the digital zoom
Camera ID No display Camera ID is 000.
001 to 255 Camera ID of currently selected camera.
This black box moves with the Zoom operation
The boundary indication between Optical Zoom and Digital
Zoom. This vertical line is fixed.
range is 17x - 128x. When users perform zoom operations
to the camera module, the zoom indicator (see
forward or backward matching the Current zoom level (see
Figure 58).
1) moves
4X41 9X91
5X 5 1 10X 10 1
Page 34

GE 16X PTZ Camera
30
User Manual
Table 3. Zoom settings (continued)
Zoom Optical zoom Digital zoom Zoom Optical zoom Digital zoom
11X11 1 42X16 2.625
12X12 1 43X16 2.688
13X13 1 44X16 2.75
14X14 1 45X16 2.813
15X15 1 46X16 2.875
16X 16 1 47x 16 2.938
17X 16 1.063 48X 16 3
18X 16 1.125 49X 16 3.063
19X 16 1.188 50X 16 3.125
20X 16 1.25 51X 16 3.188
21X 16 1.313 52X 16 3.25
22X 16 1.375 53X 16 3.313
23X 16 1.438 54X 16 3.375
24X16 1.5 55X16 3.438
25X 16 1.563 56X 16 3.5
26X 16 1.625 57X 16 3.563
27X 16 1.688 58X 16 3.625
28X 16 1.75 59X 16 3.688
29X 16 1.813 60X 16 3.75
30X 16 1.875 61X 16 3.813
31X 16 1.938 62X 16 3.875
32X16 2 63X16 3.938
33X 16 2.063 64X 16 4
34X 16 2.125 65X 16 4.063
35X 16 2.188 66X 16 4.125
36X 16 2.25 67X 16 4.188
37X 16 2.313 68X 16 4.25
38X 16 2.375 69X 16 4.313
39X 16 2.438 70X 16 4.375
40X16 2.5 71X16 4.438
41X 16 2.563 72X 16 4.5
Page 35

Table 3. Zoom settings (continued)
Zoom Optical zoom Digital zoom Zoom Optical zoom Digital zoom
73X 16 4.563 104X 16 6.5
74X 16 4.625 105X 16 6.563
75X 16 4.688 106X 16 6.625
76X 16 4.75 107X 16 6.688
77X 16 4.813 108X 16 6.75
78X 16 4.875 109X 16 6.813
79X 16 4.938 110X 16 6.875
80X 16 5 111X 16 6.938
81X 16 5.063 112X 16 7
82X 16 5.125 113X 16 7.063
83X 16 5.188 114X 16 7.125
31
84X 16 5.25 115X 16 7.188
85X 16 5.313 116X 16 7.25
86X 16 5.375 117X 16 7.313
87X 16 5.438 118X 16 7.375
88X 16 5.5 119X 16 7.438
89X 16 5.563 120X 16 7.5
90X 16 5.625 121X 16 7.563
91X 16 5.688 122X 16 7.625
92X 16 5.75 123X 16 7.688
93X 16 5.813 124X 16 7.75
94X 16 5.875 125X 16 7.813
95X 16 5.938 126X 16 7.875
96X 16 6 127X 16 7.938
97X 16 6.063 128X 16 8
98X 16 6.125
99X 16 6.188
100X 16 6.25
101X 16 6.313
102X 16 6.375
103X 16 6.438
Page 36

GE 16X PTZ Camera
32
User Manual
Specifications
Table 4. GE 16X PTZ camera specifications
Signal format NTSC, PAL
Pickup device 1/4 in. Super HAD CCD
Total pixels NTSC: 410K
Pickup device 1/4 in. Super HAD CCD
S/N ratio More than 48 dB
Lens X16 Zoom (F1.6(W), f = 3.9-63.0 mm)
Horizontal resolution More than 480 TV lines
Minimum illumination 1 lux (30 IRE)
Digital zoom Basic X8 (total zoom ratio X128), X2~X8 variable
Sync system Internal
PAL: 470K
White balance Auto, special, indoor, outdoor, manual
Control protocols DIGIPLEX RS-422 (default), IMPAC RS-485, ASCII, PELCO D, and PELCO P
Alarm input 2-channel
Video output Composite output, 1 Vp-p, 75 ohm
Electronic shutter NTSC: 1/60 to 1/10,000 sec (28 steps)
PAL: 1/50 to 1/10,000 sec (28 steps)
Panning range (speed) 0 to 350º (120º/sec)
Tilting range (speed) 0 to 90º (120º/sec)
Note: As the tilt angle approaches horizontal, a portion of the housing may be visible in
the video image.
Presets 63 positions
Camera ID 256 separate IDs
Number of shadow tours 1
Operating temperature 14 to 122ºF (-10 to 50ºC)
Storage temperature -40 to 140ºF (-40 to 60ºC)
Power supply 24 VAC/24 VDC (UL listed class 2 power supply only)
Power consumption Flush mount: Maximum 16 VA
Surface mount: Maximum 25 VA
Dimension (diam. x H) Flush mount: 7.22 x 7.9 in. (183.4 x 201.5 mm)
Surface mount: 7.22 x 8.9 in (183.4 x 226 mm
Weight Flush mount: 4.4 lb. (2.0 Kg)
Surface mount: 7.7 lb. (3.5 Kg)
Page 37

Contacting us
For help installing, operating, maintaining, and troubleshooting this product, refer to this document and any
other documentation provided. If you still have questions, contact us during business hours (Monday through
Friday, excluding holidays, between 5 a.m. and 5 p.m. Pacific Time).
Table 5. Technical support
North America Latin America
T: 888 GE Security (888.437.3287) Toll-free in the US,
Puerto Rico, and Canada.
503.885.5700 outside the toll-free area.
F: 888.329.0332 (Tualatin tech support)
561.998.6232 (Boca Raton tech support)
E: nstechsrv@ge.com
gesecurity.customerservice@ge.com
Australia, New Zealand China, India, Singapore, Taiwan, Southeast Asia
E: techsupport@gesecurity.com.au E: ges.asiatechservice@ge.com
Note: Be ready at the equipment before calling.
T: 305.593.4301
F: 305.593.4300
E:
InfraSec.TechnicalServicesLatinAmerica@ge.com
InfraSecCustomerService.LatinAmerica@ge.com
Europe, Middle East, and Africa
W: At www.gesecurity.eu, select Customer Support.
33
Online resources
Here are some useful links on our website www.gesecurity.com:
Online library. From the Customer Support menu, select the Resource Library link. After you register
and log on, you may search for the documentation you need.
Training. To view any available online training for GE Security products, select the Training link. (Online
training is not available for all products.)
Warranty and terms information. From the Customer Support menu, select Return and Warranty
Policy Statement or Terms and Conditions Policy Statement.
Customer service and technical support. From the Customer Support menu, select Customer Service or
Technical & Application. Select the appropriate product category for the contact information or use the
menu to select a location outside the US.
1
1. Many GE documents are provided in English only as PDFs. To read these documents, you will need Adobe Reader, which you
can download free from Adobe’s website at www.adobe.com.
Page 38

GE 16X PTZ Camera
34
User Manual
Page 39

Index
Index 35
A
alarms, setting......................................................................................... 28
automatic gain control ............................................................................ 11
B
backlight setting ..................................................................................... 18
brightness................................................................................................ 16
C
camera features......................................................................................... 2
color setting ............................................................................................ 17
D
documentation .......................................................................................... 2
E
exposure.................................................................................................... 7
I
IRIS setting............................................................................................. 10
M
menu
accessing programming menus............................................................ 6
navigation ............................................................................................ 5
structure ............................................................................................... 4
N
negative image........................................................................................ 18
P
picture flicker ......................................................................................... 20
preface ...................................................................................................... 1
preset tours ............................................................................................. 25
deleting............................................................................................... 27
programming ..................................................................................... 25
reviewing............................................................................................ 26
product
features................................................................................................. 2
overview ............................................................................................... 2
S
safety
precautions........................................................................................... 3
terms and symbols................................................................................ 1
screen items ............................................................................................ 29
settings
automatic gain control....................................................................... 11
backlight............................................................................................. 18
brightness........................................................................................... 16
color ................................................................................................... 17
exposure ............................................................................................... 7
flickerless ........................................................................................... 20
IRIS .................................................................................................... 10
restoring factory default ...................................................................... 7
sharpness ........................................................................................... 16
shutter speed ........................................................................................ 9
white balance
manual........................................................................................... 12
zoom
end position ................................................................................... 20
start position.................................................................................. 19
shadow tours........................................................................................... 22
deleting............................................................................................... 24
playing ............................................................................................... 23
programming a tour........................................................................... 22
sharpness ................................................................................................ 16
shutter speed ............................................................................................. 9
specifications .......................................................................................... 32
support .................................................................................................... 33
online resources................................................................................. 33
T
technical support centers ........................................................................ 33
W
white balance
manual ............................................................................................... 12
Page 40

GE 16X PTZ Camera
36
User Manual
zoom
end position........................................................................................ 20
start position ...................................................................................... 19
Z
 Loading...