

Page 1
Your
b-z2
Monoqam
Compactor
n
Page 2
Sam lnstrutions...........3
Operating
Instrutiions, ~ps
Features of Your
Trash Bag installation ..................6
Operating Your Compactor .......7
Care and Cleaning
Cleaninwlnside and Outside ...8
When Going on Vacation ........20
Problem
More questions
GEAnswer &nter@
80~626.2000
Compactor.4,
Solver................lO
?...call
5
your questions.
If you don’t understand
or need more help, write (include
your phone number):
Write down the model
and
You’ll
Installation
Electrical
Grounding ......................................9
Requirements..............9
the bag storage compartment,
behind the flip-down door.
~LP
US
Before using your
compactor, read this
book
It is intended to help you operate
and maintain your new compactor
properly.
Keep it handy for answers to
carefuUy.
Consumer Affairs
GE Appliances
Appfiance
Louisville, KY 40225
Park
sometiing
serial numbers.
fmd
them on a label inside
~LP
YOU...
These numbers are
Consumer Product Ownership
Registration Card that came with
your compactor. Before sending in
this card, please write these
numbers here:
Model Number
Serial Number
Use these numbers in any
correspondence or service calls
concerning your compactor.
H
you received a
dso
damaged compactor...
tiediately
(or builder) that sold you the
compactor.
contict the deder
Save time and money.
Before you call for
service;..
on the
Consumer Services.11
Appliance Registration ...............2
Model and Serial Numbers ........2
Warran~
...................... Back Cover
To obtain service,
Consumer Services page in the
back of this guide.
We’re proud of our service and
want you to
reason you are not happy with the
service you receive, here are three
steps to
~ST,
serviced your appliance. Explain
why you are not pleased. In most
cases, this will solve the problem.
fo~ow
contact the people who
sw
the
be
pleased. If for some
for
~er
help.
Check the Problem Solver in the
back of this book. It lists causes of
minor operating problems that you
can correct yourself.
NEXT, if you are still not pleased,
write
rdl
the details-including
your phone number—to:
Manager, Consumer Relations
GE Appliances
Appliance Park
Louisville, KY 40225
~ALLY,
not resolved, write:
Major Appliance Consumer
Action Panel
20 North
Chicago,
if your problem is still
Wacker
~
Drive
60606
Page 3
WORT~SmH
~STRUCnONS
Rad * k~ctiom kfom W* ti
W-&When
dwa~
exercise
including tie
●
This
compactor is
Use& app~anceody forit’s inknded
p-e as
●
To prevent
co~actor mnst be
gromded
M@ctions before
NSTD~ON
~
~~CA~
not
your compactor,
the
●
Clm s~pervisian
app~ce
allow the
unattended at anytime,
Q ~rn the
c~m~acting trash.
fromtampering
tim
●
Do
~t
or
fmi Trash
piecs of meti, or
caus~
●
Wh& remotig
keep@
may have pierced
●
Wh@ d-
be
Weti.
the ~
●
Whm
Glas$
of
the
●
Do ~~t touch
described in
in
USE
~eive an kstilation k$~ction
*rvice
location nearest
is
compactor
key to
operating it.
push trash into the drawer
injury.
bag
away from your body. Sharp objects
Glass
or be
cleaning
fragments may b
drawer.
using
basic safety
MS
appliance,
precautions,
fo~owing:
fer
household ~ ody.
the
Use and Cm book.
~rd of
accorticewith
eleetri~.shock, this
properly
instied and
the
it is
d SAW
~STRUmONS
SHOm YOU
MOW OR
YOUR COWACTOR.
you can
obtain one by contacting
you.
is necessary when any
operated
near c~drem Do not
to be @ as a
0~ md remove it when mot
This
wi~
help prevent
with
tie
compactor or
might contain broken glass, sharp
other
or carrying
sharp
objects
tie
trash
iL
the
inside of the
tigments
Iying in
the bottom of the cabinet.
the
trash
maybe s~ck
drawm,
eabhe~
be care~.
imW in
moving parts.
htiation
YOUR
FOR
~yOUdi~
sheet with
toy, or
to run
anyone
ctidren
with
hands
that might
b%
tu
the
stiace
apphe
●
Do not
take apart this
reassembly
can cause
appHanm bcorrect
electric shock when
subsequendy used.
●
Use ody
manual.
recommended
*Donut
and M, grapefruit
items and disposable diapers. These
very
for in~mded
Do not
use other than
accessory.
compati
food
strong tiers and
use as
d~ribed in
manufaaer’s
waste
such as raw meat
rind% persod
shotid not
hygiene
go into the
this
items
compactor.
Precautions against
unreaso=ble w 5f
your
eompacta~
●
Never
compact shotgun
for firearms, fireworks, etc., which are
explosive.
*Never compact
flammable
pain~ ofi-or gasobe-sahated
starting
fluid =s,
paint thinner cans,
spontaneous combustion or explosive vapor
coneentratiom could wcur.
* Never compact
mch
as strong insecticides or other poisonous
containm of @tic chemicrds
materiti+ompaction
fumes.
*
Never
compact
or
M&My toxic
aer~sol
chemicals.
aerosol cans contain non-tiardous materials such
as
shaving cream, cheese spread md whipped
cream, they
*Do
maybe compacted.)
not
compact
Eghted cigarettes,
hat or burning ~$em.
* Unpl~
re-
servicing be
*DO NOT USE AN
OR
the compactor
NOTE:
We
perfomd
ADAPTER PLUG
AN EXTENSION CORD
APPLMNCE.
sheEs, ctidges
materials such as
rags, engine
codd
release
cans
containing
@you
are
cigars, or
before m-
strongly
recommend that any
by
aqu~~ledperson.
-~
,tigMy
etc.—
tidous
explosive
sure the
other
any
create
E
~
~
M
s
w
@
~
Y
9
m
G
g
*
W*
g
m
*Do n~t
operate with a damaged cord
me*, or *r damage in
the a~fiance
an
a@o~ servi~mrm.
examined, repaired, or
any ~
seg plug,
er.
Have
adj-
by
●
Do
nut
store or
vapors and
use gaso~e
Kquids in
the vicinity of this or any
other apptianee.
SAW ~SE
~STRUCmONS
or
@ther ~ammable
3
I
Page 4
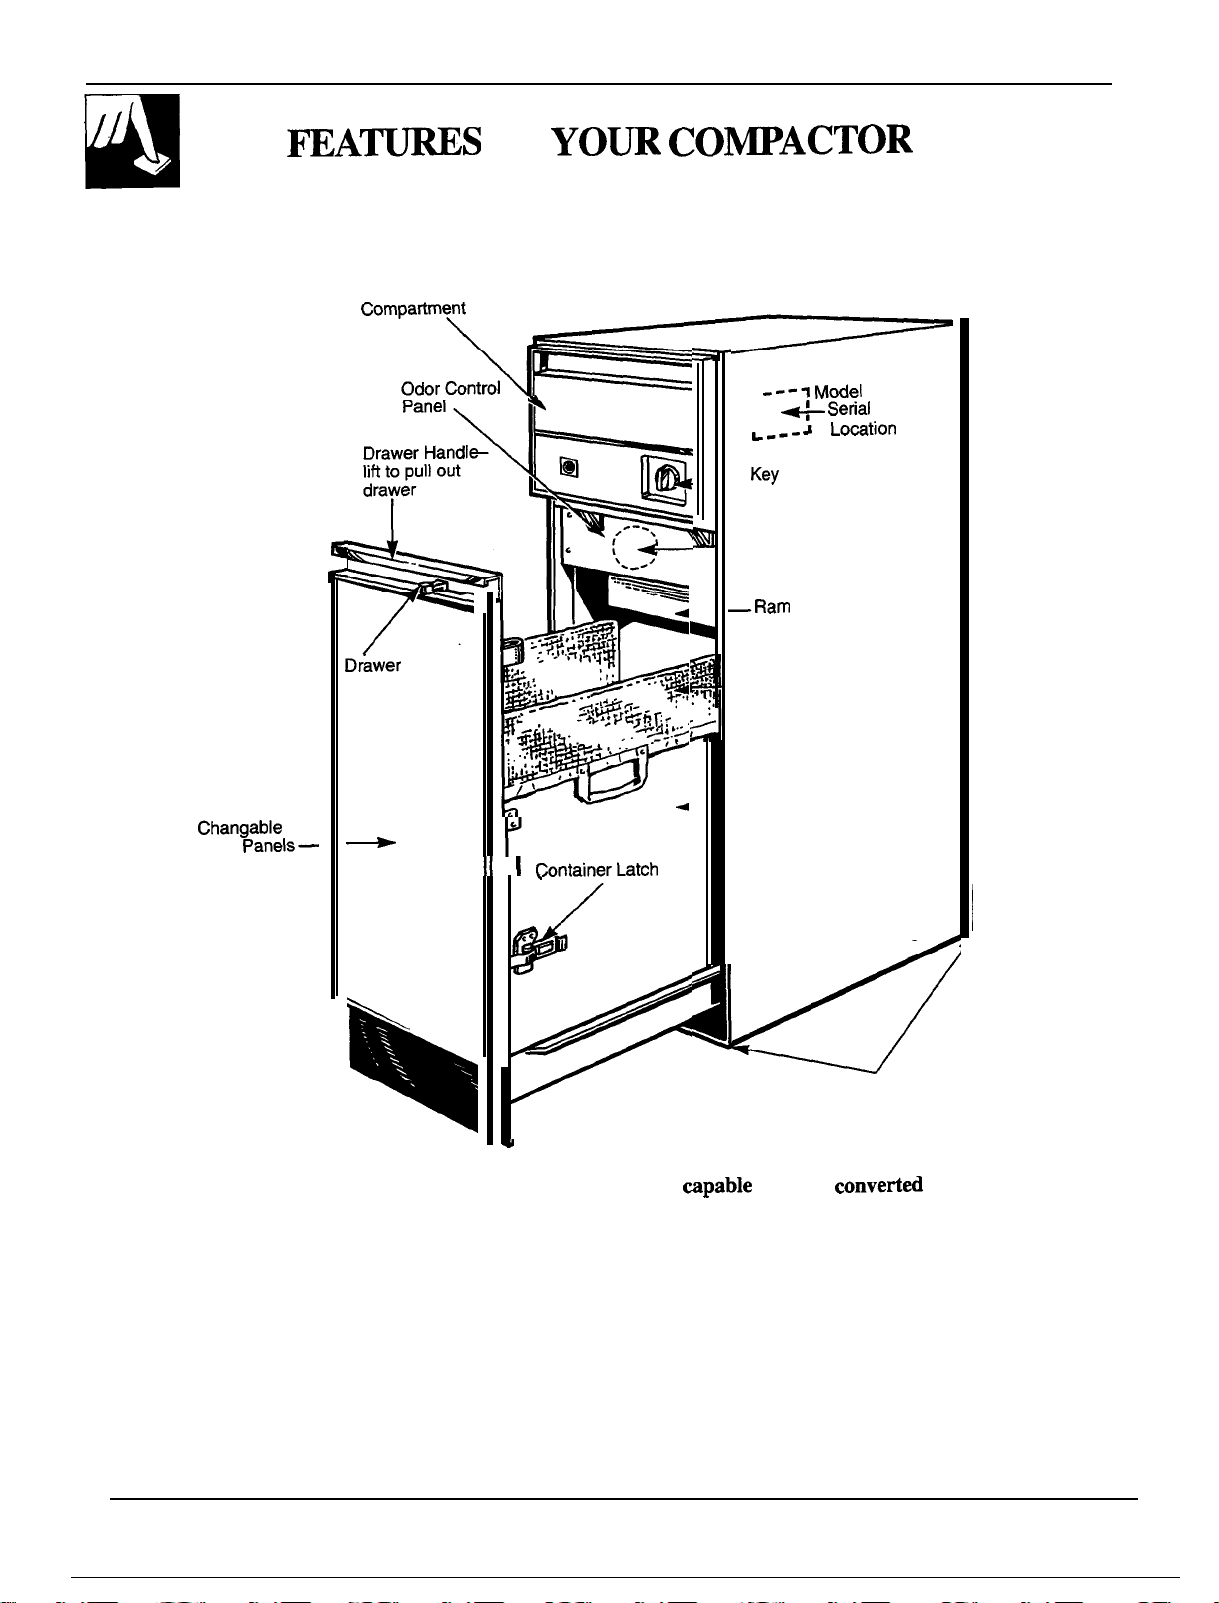
~AmS
Bag Storage
D;awer
Safety Latch
OF
YO~
CO~ACToR
---1
r
I
1
L---
—
Key
—
(not included)
—Ram
— Bag Caddy
Model
+ Serial
J LoMtion
Lock Switch
Mount optional
air freshener here
and
Number
Changable
Door Panels—

What It Does
Your compactor reduces household trash to as
1/12 of its
onginrd
volume.
How it Works
titie
as It compacts most refuse, including paper, cans,
botdes,
and some food wastes.
jars, plastic containers, wrappings, sweepings
Drop
mash
into a disposable bag that lines the trash
drawer and close the drawer.
compactor,
into the drawer, compacts trash, moves back up
again-ad
an electric~y-operated
the compactor shuts off
men
you start the
ram moves down
automaticdy.
NOTE:
will notice compaction because the ram travels only
about 2/3 of the way down into the drawer.
The
trash drawer must be 1/2
Key Lock Switch
A key lock switch is provided for your protection as a safety measure.
men
the key lock switch is in the OFF position, the compactor
operate. Lock the compactor when it is not in use, and remove the key for
safek~ping
anyone from tampering with it.
to keep children from operating the compactor or to prevent
wfi
not
Drawer Stiety Latch
me
latch has two positions— OPEN and CLOSE. me OPEN position
releases the latch so you can pull out the drawer.
only when you want to compact trash, provides a positive drawer lock and
an electrical safety interlock, preventing the drawer from being opened
while the ram is moving.
The
CLOSE position, used
fu~
before you
Odor Control Panel
A panel behind the drawer front is designed to hold an adhesive backed
freshener, such as a Stick-Up brand Air Freshener package. Simply open the
drawer and fasten the opened air freshener package on the panel. Replace
the air freshener as needed.
Bag Storage Compartment
me
compartment at the top of the compactor allows you to store trash bags
and air fresheners where they are used—right in the
swings down to make them readily accessible when they are needed.
applinace. me
door
5
Page 6

TMSH
BAG
mSTMLATION
Reinforced polyethylene bags come with your
compactor.
ready to be
You must use the
trash bags included
bags are available from your
Center. Ask for
prefer, you
~ese
bags have been
pre-cuffed
and are
instiled.
speeifiy desi~ed
tith
your compactor.
derder
catiog
number
ca
order by mail. A handy order form is
heavy-duty
~ese
or Factory Service
WC60X5015.
H you
provided with your compactor and is included in every
replacement bag package.
●
With trash drawer pulled out to f~st stop, move the
drawer to the second stop by lifting
drawer slightly and pulling forward.
the
front of the
~s
will clear
the back of the container from the cabinet for easy
installation of the bag.
●
Release container latch and swing door open.
●
Slide bag caddy into
drawer.
●
men
slide bag into
drawer. Cuffs must be
over top rim of drawer on
both sides.
“
Pull bag cuff down. Be
sure cuff goes over “V”
groove and will be
captured in “V” when
drawer is latched to door.
●
Press bag into dl comers
of drawer and smooth
the bottom.
●
Smooth and shape the bag
carefully to prevent the
bag from being pulled
down during compaction.
●
Gentiy
swing door shut,
assuring that the door
guide
‘;V’?
is aligned
properly with
tie
“V”
groove in the drawer and
that the bag cuff is
captured between them.
●
Finally, use
latch
the door.
tie
container
~o
completely close
~s
will pull the
door guide “V” snug in
the “V” groove in the
drawer flange and tightly
grasp the bag.
Failure to align the
“V”S
properly or to latch
the drawer to the door will
cause the compactor to
stall with the ram down.
~s
condition must be
corrected by a service technician.
To remove a
●
Gpen
the drawer latch and pull the drawer out to the
fwst
stop.
●
Unhook the container latch from the door catch
ftil
trash bag:
and swing the door open.
●
Uncuff
the bag and close it by rolling or folding the
bag top into the drawer, much as you would close a
sandwich bag.
6
●
Shp
YOU
hand through
both
han~es
in the bag
caddy and pull upward
and forward, tipping the
bag toward you. A full
bag of compacted trash
is easy to carry in
this manner.
u’
/
-/
“
1
Page 7

After
instrdling
Loading
OPERAT~G YO~
a trash bag, the compactor is ready to use.
CO~ACTOR
Lift the trash drawer handle and pull the drawer out as
far as necessary to load the items.
“ Botdes
●
and large cans compact best when laid flat
near the center of the drawer.
To help keep the ram clean when compacting messy
food waste, place a couple of folded sheets of
newspaper or a large grocery bag on top of the load
to be compacted.
Compacting
To start the compactor:
1.
Move the drawer safety latch to CLOSE.
2. Rotate the key past ON to the START position,
hold it momentarily at
back to ON. The motor will start and compacting
wi~
proceed.
The ram travels downward into the drawer,
compacting the trash. At the bottom of the stroke, the
ram automatically reverses direction, retracts out of
the
tiwer,
compactor shuts off automatically.
The cycle takes about one minute. As the trash drawer
fills, cycle time gets progressively shorter.
returns to its starting position, and the
ST~T,
and then release it
●
Folded newspaper will
fragments from flying out of the drawer into the
mechanism when compacting a large glass bottle, or
several
shatter.
●
Refuse too
to fit.
not attempt to force it in.
Q
Mthough it is not necessary to compact
drawer is ~ or nearly
m-urn
time a
Glass
during compaction. This is normal.
the trash drawer will not always break during the f~st
cycle. Breaking glass and associated noise may occur
several cycles later, depending on the type and
volume of the trash.
men boties
the bag may occur. This is normal and
affects the performance of the compactor. Always use
the bag caddy to carry the compacted trash to storage
or pick-up areas, and keep the bag away from your
body to prevent injury from sharp objects that may
have pierced the bag.
CA~ON: men
trash
behind the drawer. Items behind the drawer could
prevent it from closing completely and prevent the
compactor from operating. To remove such items
from behind the drawer, open the drawer and, if
necessary, remove it to clean them out. See Care
and Cleaning instructions.
boties
or jars, or any other items that might
b@’to
Hit
cannot be folded to fit into the drawer, do
compaction, you start the compactor each
si~cant
boties
drawer, some items may spill into the compactor
amount of trash is added.
can make a loud noise when they break
and cans are compacted, small tears in
emptying waste baskets into the
dso
help prevent glass
go into the drawer can be folded
unti
the
fufl,
we suggest
Mso,
in
tha~
for
boties in
no way
To Stop Compacting
me
compactor maybe stopped at any time by
sfiding
the drawer safety latch to OPEN.
is stopped, the ram moves backup to its starting position when
is
s-d
again.
-g
~enever
the key to OFF or by
the compacting operation
tie
compactor
7
Page 8

The inside and outside of your compactor are finished with durable baked-on enamel.
Cleaning—Outside
Keep the outside clean.
dishwashing
damage the paint. Do not use harsh or gritty cleansers
or scouring pads that may mar the finish. Apply a coat
of
titcheflappliance wax when the compactor is new,
and then several times a year.
Wax Cleaner (Cat. No.
GE Appliance Parts Marts.
cloth-it may leave a residue that can
Do not wipe with a
Apptiance Potish
WR97X216) is
avtiable
sotied
and
from
Cleaning—hside
To clean the cabinet interior:
1.
Pull out trash drawer until it stops.
2. Lift up on drawer slightly, then pull out drawer to
second stop.
3. Lift drawer up and out of compactor.
4. Vacuum clean cabinet base, track channels and
“
drawer, particularly in comers.
5. Wash the cabinet interior and trash drawer with
normal mild household cleaners, rinse and dry with
a clean cloth. Be sure trash drawer is
dry before inserting a new bag.
thoroug~y
When going on vacation
For vacations or other extended absences, remove the
trash bag to prevent a build-up of undesirable odor
2. Place hand on
ram face, being
careful to support
its entire length.
I
To clean the ram:
With trash drawer out of cabinet, remove the ram as
fouows:
1.
Remove bolt in
center of ram with
a 1/2” wrench.
FRONT
8
3. With other hand,
press back on
of
rm,
sliding it
until it releases.
4. Clean ram with normal mild household cleaners,
rinse and dry.
5.
Fit ram into grooves on the compacting mechanism
and slide it forward until it snaps into position.
6. Replace center bolt removed in Step 1.
fronl
I
Page 9

~ST&LA~ON
Electrical Requirements
Caution: Before Plugging In Compactor, Read The
Following Electrical Requirements.
Caution: For Personal Safety, Do Not Use
An Etiension Cord Or Adapter Plug With
This Appliance.
Do Not Under Any Circumstances, Cut Or
Remove The Third Grounding Prong From
The Power Cord.
Follow National Electrical Codes Or
Prevailing
Grounding Instructions
This appliance must be grounded. k the event of a
mtiction
risk of electric shock by providing a path of least
resistance for electric current.
Lod
Codes And Ordinances.
or breakdown, grounding will reduce the
~s apptiance
connected to an individud, properly grounded branch
circuit protected by a 15 or 20 amp circuit breaker or
time delay fuse.
If
the electic
above requirements,
Danger:
grounding conductor
shock. Check with a qualified electrician if you
are in doubt as to whether the appliance is
properly grounded.
Do not modify the plug with this appliance.
If it will not
ouflet instiled
must be
supply provided does not
hproper
fit
the
by a qualified electrician.
supptied
cdl
a licensed electrician.
connection of the equipment
can
result in a risk of electric
ouflet instiled,
with
120V, 60= and
mwt
have a proper
the
Ensure proper ground
exists before use
This
applimce is equipped with a cord having
equipment grounding conductor and a grounding
plug.
me
plug must be plugged into an appropriate
outlet that is properly
accordance with local codes
instiled and
and
ordinances.
grounded in
an
9
Page 10

●
QUESTIONS?
USE THIS PROBLEM SOLVER
PROBLEM
COMPA~R DO~
NOT OPERATE
DRAWER 1S
W
NOT OPEN
CQ~ARTMENT
DOESN’T STAY
OR IS TOO
OP~
TO CLOSE
DRAWER
STORAGE
AND CLOSE
-
~OS~
m
DOOR
TO
-
~SS~~
=
May not be plugged iato a live electrical
c E
plug is secure
app~i~ce
burned
* Key lock
* Key lock switch may not have been
compaction cycle.
●
Drawer may
.~OSE
●
Compactor has an automatic
repeate~y, this protector may
and the cutout
*
T-h
from
*
On rare occasions, a large
wrapped around the
becofies
“
The
re~ed
Key~k
For a door that is too
For a door that
I
,
“ Mwer
I
CAUSE
artd compactors~
tito
the same ou~et to
out
fise.
switch
may not be in ON position.
not
be
firrrdy
closed and drawer&e&
position.
the-
have
til reclose
may have
bekg clod
Keybk
to the
must be at least 1~ W of trash
fden
dislodged,
switch may have been
fu~
up position. Close
switch to
f~s down,
automatically.
behind me drawer and is
can
placed near
edge
of the ram, interfering with the opening of
“ON’
The ram wi~ return to
tid to
open ur
pushdown
outiet.
fails to operate, plug a
dete@e
opened the motor
if there is a tripped circuit breaker or
held
at
START
cutout.
tic
mod
tie
drawer, move safety
close,
tightiy.
bef
long enough to
latch
If
you
have
preventig
side of the drawer may become
to
~FF&~K”
the
up
just@ up
Adjust as necessary.
hmrp
or
s@l
start
the
may not
just
circtit. Wtit
psition automatic~y.
shghtiy.
be in
compacted
the safety switch
before the ram
latch
the
con~ul
tie
a
few
minutes
tie
drawer,
and turn
p~el.
ck
Cm
M
you need more
GE
hswer
Center”
help...ca~,
800.626.2000
consumer information service
10
toll free:
Page 11

With the purchase
ofyournewMono~
need information or assistance
appliance, receive
horn
GE, wdll be there. All you have to do is
tie
assurance
bat ifyou
cti-to~-tiee!
ever
lmhme Repair
Semice
80MEWES(80M2-273fl
AGE consumer service professional will provide expert repair service,
scheduled at a time that’s convenient for you. Many GE Consumer Service
company-perated locations offer you
convenience
Our
factory-vained
repairs can be handled in just one visit.
(7:00
a.m. to
7:00
p.m. weekdays,
technicians knowyour appliance inside and out–so most
setice
today or tomorrow, or at your
9:00
a.m. to
2:00
p.m. Saturdays).
GEhswerCente~
80~62E20f10
Whatever your question about any Monogram major appliance, GE Answer
Center@
will be answered prompdy and courteously. And you can call anytime. GE
Answer Center
‘w—-x==-
information service is available to help. Your call–and your question–
e
service is open 24 hours a day, 7 days a week.
hrCustimem W&
Special Needs...
80~62E2000
Consumers with impaired hearing or speech who have
access to a
information or
TDD
—-
Upon request, GE will provide
Braille controls for
Monogram appliances, and a call 800-TDD~EAC
brochure to assist in planning a
-..
barner-free
witi
limited mobility. To obtain
these items, free of
800.626.2000.
titchen
avtie~
for persons
charge, cdl
of
-
or a conventional
sefice.
(800S3=322)
tele~etiter
to request
may
You can have
after your warranty expires. Purchase a GE contract while your warranty is still
in effect
you’re assured
A*
tie
secure feeling that GE Consumer Service will still be there
andyou’11
andAccesories
receive a substantial discount. With a multiple-year contract,
oftiture
service at today’s prices.
80M262002
h&tidd qti]ed
can have needed parts or accessories sent
their home. The GE parts system provides access to over
47,000
parts... and all GE Genuine Renewal Parts are
fully warranted.
are accepted.
to
s&ce
thek o-
VISA,
MasterCard and Discover cards
appfiauces
direcdy
to
User maintenance
boo~et
cover procedures titended to be performed
bymyuser. Other
referred to
must be
cause unsafe
q-led sefice
exer&d, sbce kproper servi~g
operation.
instictions contied ti
servitig gene~shotid
personnel. Caution
this
be
may
Page 12

YOUR
COMPACTALL@
TRASH COMPACTOR
WARRANW
Save proof of original purchase date such as your sales slip or
Mncelled
check to establish warranty period.
WHAT
IS
COVERED
WHAT IS NOT COVERED
FULL ONE-YEAR
For
one year from date of original
purchase, we will provide, free of
charge, parts and service labor
in your home to repair or replace
any
pati
of the compactor that
fails because of a manufacturing
defect.
WARRAN~
This warranty is extended to
the original purchaser and
any
succeeding owner for products
purchased for
ordinay
home use
in the 48 mainland states, Hawaii
D.C.
and Washington,
In Alaska the
warranty is the same except that it
is LIMITED because you must pay
to ship the product to the service
shop or for the service
travel costs to your home.
All
warranty service will be
provided by
our
Facto~
tahnician’s
Service
Centers or by our authorized
Car@
Customer
servicers during
normal working hours.
Should your appliance need
service during warranty period or
beyond, call 800-GE-CARES
(800-432-2737)
●
Sewice trips to your home to
●
Replacement of house fuses or
teach you how to use the product. resetting of circuit breakers.
Read your Use and Care material.● Failure of the product if it is used
If you then have any questions
about operating the product,
please contact-your dealer or our
Consumer Affairs office at the
address below, or call, toll free:
GE Answer
Cente@
800.626.2000
consumer information service
●
improper installation.
for other than its intended purpose
or used commercially.
●
Damage to product caused
by accident, fire, floods or acts
of God.
WARRANTOR IS NOT
RESPONSIBLE FOR
CONSEQUENTIAL DAMAGES.
If you have an installation problem,
contact your dealer or installer.
You are responsible for providing
adequate electrical, and other
connecting facilities.
Pad
No. 165
Pub.
10-92
Some states do not allow the exclusion or limitation of incidental or consequential damages, so the above limitation or exclusion
may not apply to you. This warranty gives
To know what your legal rights are in your state, consult your local or state consumer affairs
you
specific
Iegd
rights, and you may also have other rights which
offim
or your state’s Attorney General.
vay
from state to state.
Warrantor: General Electric Company
If further help is needed concerning this warranty, write:
No.
49-5589
CG
Manager<onsumer
D3080P279
Affairs,
GE
Appliances, Louisville, ~ 40225
GCGIOOO
93041922
 Loading...