


GE GJSR2130, GCXR2100, GBSR1080, GJXR2130, GKSR2100 User Manual
...Washers
Safety Information . . . . . . 3
Operating Instructions
Control Panels and
Settings . . . . . . . . . . . . . . . .4–6
Features . . . . . . . . . . . . . . . . . 7
Loading and Using the
Washer . . . . . . . . . . . . . . .8–11
Stain Guide . . . . . . . . . .10, 11
Troubleshooting Tips
Before You Call For
Service . . . . . . . . . . . . . . 12–14
Customer Service
Service Telephone
Numbers . . . . . . . . . . . . . . . .16
Warranty . . . . . . . . . . . . . . . 15
GE Appliances
Owner’s Manual
GBSR1080
GBXR1080
GCXR2100
GJSR2130
GJXR2130
GKSR2100
GNSR2140
GUSR2130
175D1807P312 49-90046 7-00 JR
Safety Instructions
Operating Instructions
Troubleshooting Tips
Customer Service
A Service Partnership.
IMPORTANT!
 Staple sales slip or cancelled check here.
Proof of the original purchase date is needed to obtain service under the warranty.
 FOR YOUR RECORDS
Write the model and serial numbers here:
#
#
You can find them in the upper right corner on the back of your washer.
READ THIS MANUAL
Inside you will find many helpful hints on how to use and maintain your washer properly. Just a little preventive care on your part can save you a great deal of time and money over the life of your washer.
IF YOU NEED SERVICE
You’ll find many answers to common problems in the Before You Call For Service section. If you review our chart of Troubleshooting Tips first, you may not need to call for service at all.
If you do need service, you can relax knowing help is only a phone call away. A list of toll-free customer service numbers is included in the back section. Or call 1-800-361-3400.
2

IMPORTANT SAFETY INFORMATION.
READ ALL INSTRUCTIONS BEFORE USING.
WARNING! For your safety, the information in this manual must be followed to minimize the risk of fire or explosion, electric shock, or to prevent property damage, personal injury, or loss of life.
WATER HEATER SAFETY
Under certain conditions hydrogen gas may be produced in a water heater that has not been used for two weeks or more. Hydrogen gas can be explosive under these circumstances.
If the hot water has not been used for two weeks or more, prevent the possibility of damage or injury by turning on all hot water faucets and allowing them to run for several minutes. Do this before using any electrical appliance which is connected to the hot water system. This simple procedure will allow any built-up hydrogen gas to escape. Since the gas is flammable, do not smoke or use an open flame or appliance during this process.
PROPER INSTALLATION
This washer must be properly installed and located in accordance with the Installation Instructions before it is used. If you did not receive an Installation Instructions sheet, you can receive one by calling, toll-free 1-800-361-3400.
■Install or store where it will not be exposed to |
■Properly ground washer to conform with all governing |
temperatures below freezing or exposed to the weather. |
codes and ordinances. Follow details in Installation |
|
Instructions. |
YOUR LAUNDRY AREA
■Keep the area underneath and around your |
■Close supervision is necessary if this appliance is used |
appliances free of combustible materials such as |
by or near children. Do not allow children to play on, |
lint, paper, rags, chemicals, etc. |
with, or inside this or any other appliance. |
WHEN USING THE WASHER |
|
Use this appliance only for its intended purpose as described in this Owner’s Manual.
■Never reach into washer while it is moving. Wait until the machine has completely stopped before opening the lid.
■Do not mix chlorine bleach with ammonia or acids such as vinegar and/or rust remover. Mixing different chemicals can produce a toxic gas which may cause death.
■Do not wash or dry articles that have been cleaned in, washed in, soaked in, or spotted with combustible or explosive substances (such as wax, oil, paint, gasoline, degreasers, dry-cleaning solvents, kerosene, etc.) which may ignite or explode. Do not add these substances to the wash water. Do not use or place these substances around your washer or dryer during operation.
■The laundry process can reduce the flame retardancy of fabrics. To avoid such a result, carefully follow the garment manufacturer’s wash and care instructions.
■To minimize the possibility of electric shock, unplug this appliance from the power supply or disconnect the washer at the household distribution panel by removing the fuse or switching off the circuit breaker before attempting any maintenance or cleaning. NOTE: Turning the Cycle Selector knob to an off position does NOT disconnect the appliance from the power supply.
■Never attempt to operate this appliance if it is damaged, malfunctioning, partially disassembled, or has missing or broken parts, including a damaged cord or plug.
WHEN NOT IN USE
■Turn off water faucets to relieve pressure on hoses and valves and to minimize leakage if a break or rupture should occur. Check the condition of the fill hoses; they should be replaced after 5 years.
■Before discarding a washer, or removing it from service, remove the washer lid to prevent children from hiding inside.
■Do not attempt to repair or replace any part of this appliance unless specifically recommended in this Owner’s Manual, or in published user-repair instructions that you understand and have the skills to carry out.
■Do not tamper with controls.
 READ AND FOLLOW THIS SAFETY INFORMATION CAREFULLY.
 SAVE THESE INSTRUCTIONS
3
Instructions Safety
Instructions Operating
Tips Troubleshooting
Service Customer

Find your washer control panel.
InstructionsSafety |
You can locate your model number behind the top edge of the control panel. |
|
|
|
|
||
|
Model GBSR1080 |
|
|
InstructionsOperating |
1 |
3 |
4 |
Model GBXR1080 |
|
|
|
|
|
|
|
|
1 |
3 |
4 |
Troubleshooting Tips |
Model GKSR2100 |
|
|
|
|
|
|
|
1 |
3 |
4 |
Model GCXR2100
Customer Service |
|
|
|
|
4 |
1 |
2 |
3 |
4 |
|
|
|
|

Model GJSR2130
1 |
2 |
3 |
4 |
Model GJXR2130
1 |
2 |
3 |
4 |
Model GUSR2130
1 |
2 |
3 |
4 |
Instructions Safety
Instructions Operating
Tips Troubleshooting
Model GNSR2140
|
|
|
|
Service Customer |
1 |
2 |
3 |
4 |
5 |
|
|
|
|

Safety Instructions
Operating Instructions
Troubleshooting Tips
Customer Service
About the control settings.
1 Load Size
The water level should just cover the clothes. Adjust the load size accordingly. Loosely load clothes no higher than the top row of holes in the washer tub.
2 Wash/Spin Speed
The agitator moves clothes around for a cleaner wash; the basket spins later in the cycle to release water from the load. The Wash/Spin Speed dial sets the speed of both the agitator and the basket.
With Normal wash speed, the agitator moves faster. Use for cottons, denims and play clothes. With Delicate wash speed, the agitator moves slower. Use for delicate and knit items.
The Normal spin speed is for durable items. The Delicate spin speed is for delicate items like sweaters and lingerie. Clothes will be less dry than when using Normal spin speed.
3 Temperature
Select the water temperature for the wash and rinse cycles. Always follow fabric manufacturer’s care label or instructions when laundering. Follow the water temperature guide on the washer lid.
4 Wash Cycle
The wash cycle controls the length of the washing process. The chart below will help you match the wash cycle setting with your clothing.
COTTONS For heavy to lightly soiled cottons, household linens, work and play clothes.
EASY CARE For wrinkle-free and permanent press items, and knits.
HANDWASH For items labeled handwashable with light soils. Provides period of agitation and soak during wash and rinse.
DELICATE For lingerie and special-care fabrics with light to normal soil. Provides periods of agitation and soak during wash and rinse.
SUPER For heavily soiled and heavy-duty fabrics. This cycle provides a longer agitation.
PREWASH For heavily soiled clothes or for clothes with a care label that recommends prewashing before wearing.
QUICKWASH For lightly soiled items that are needed in a hurry.
QUICK RINSE For quickly rinsing chlorine, perspiration, stains, etc. out of clothes.
15 MIN/30 MIN For heavily soiled clothes. Begins with a brief agitation, soaks for a specified period of time, then moves AUTO SOAK through the rest of the cycle automatically.
6
About washer features. NOTE: Not all features are available on all washer models.
2nd Rinse Option (on some models)
When you use extra detergent or bleach to clean heavily soiled clothes, you may want to use the 2nd Rinse option. It provides a second deep cold rinse.
(appearance and features may vary)
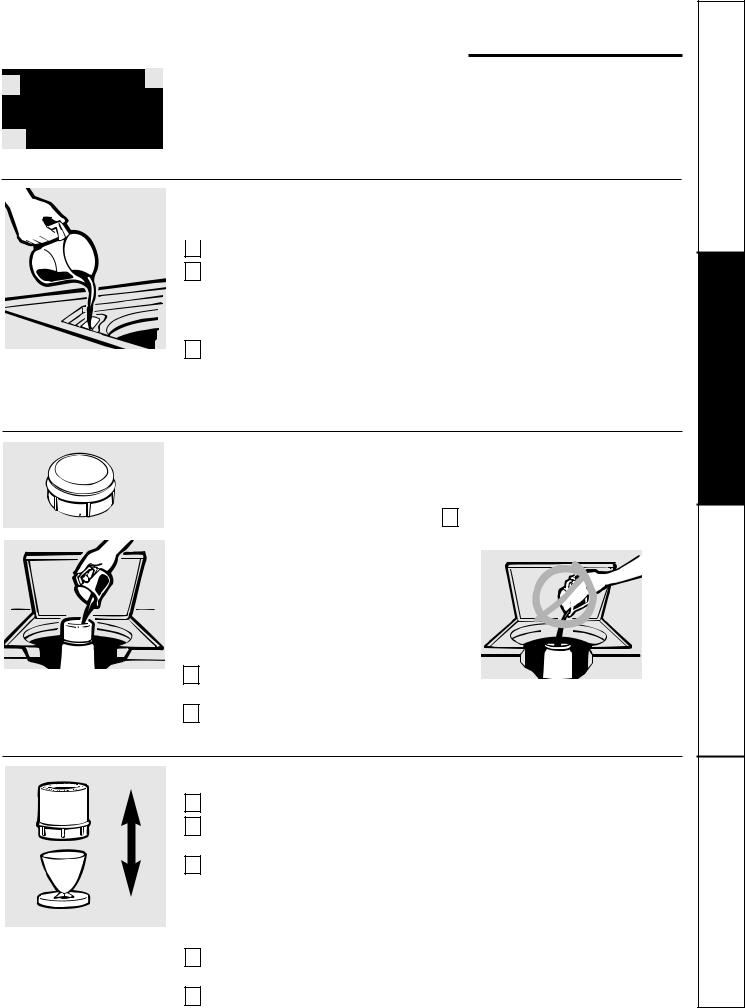
Liquid Bleach Dispenser (on some models)
The dispenser dilutes liquid chlorine bleach before it reaches into your wash load.
1 Check clothing care labels for special instructions.
2 Measure liquid bleach carefully, following instructions on the bottle.
■ Never pour undiluted liquid chlorine bleach directly onto clothes or into the wash basket.
■ Do not pour powdered bleach into bleach dispenser.
3 Before starting the washer, pour measured amount of bleach directly into bleach dispenser. Avoid splashing or over-filling dispenser. If you prefer to use powdered bleach, add it into the wash basket with your detergent.
■Do not mix chlorine bleach with ammonia or acids such as vinegar and/or rust remover. Mixing can produce a toxic gas which may cause death.
The Agitator Cap or Fabric Softener Dispenser (on some models)
The agitator cap fits into the top of the agitator. If it accidentally comes off, simply put it back on.
The fabric softener dispenser automatically releases liquid fabric softener at the proper time during the cycle.
Do not stop the washer during the first spin. This will cause the dispenser to empty
too soon.
To use, follow these steps:
1 Make sure dispenser is securely attached to agitator.
2 Use only liquid fabric softener. Pour into dispenser, using amount recommended on package.
Never pour fabric softener directly on clothes. It may stain them.
3 Add water to dispenser until it reaches the maximum fill line.
Do not pour anything into the agitator if the agitator cap or dispenser is removed.
Cleaning the Fabric Softener Dispenser (on some models)
1
2
3
Separate for cleaning.
Remove the dispenser from the top of the agitator.
Separate the dispenser cup from the cover by grasping the top and pushing down on the inside of the cup with your fingers. Dispenser cup will pop free from the cover.
To clean the dispenser, soak both the dispenser cup and the dispenser cover in the following solution:
■1 US gallon (3.8 liters) warm water
■1/4 cup (60 ml) heavy duty liquid detergent
■1 cup (240 ml) bleach
If necessary, loosen build-up with a clean, soft cloth after soaking. Do not use a stiff |
|
4 brush; you may roughen the surface of the dispenser. |
|
5 Rinse and reassemble dispenser. Place dispenser back on the agitator. |
7 |
Instructions Safety
Instructions Operating
Tips Troubleshooting
Service Customer
Safety Instructions
Operating Instructions
Troubleshooting Tips
Customer Service
Loading and using the washer. Always follow fabric manufacturer’s care label when laundering.
Sorting Wash Loads
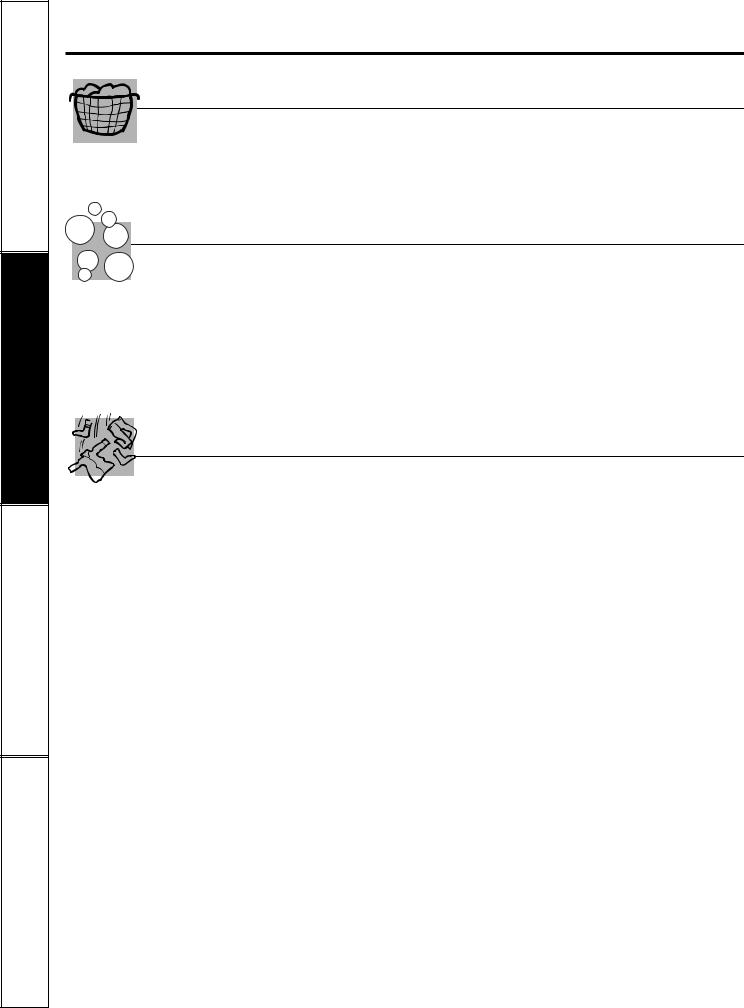
Sort by color (whites, lights, colors), soil level, fabric type (sturdy cottons, easy care, delicates), and whether the fabric produces lint (terry cloth, chenille), or collects lint (velveteen, corduroy).
Proper Use of Detergent
Add detergent as the wash basket fills with water, before you load clothes. Using too much detergent can be a common cause of laundry problems. Today’s detergents are formulated to be effective without highly visible sudsing. Be sure to carefully read and follow manufacturer’s recommendations for how much detergent to use in your wash. You can use less detergent if you have soft water,
a smaller load, or a lightly soiled load.
Loading the Washer
Load dry items loosely, no higher than the top row of holes in the washer tub. When loading wet items make sure you set the load/water level high enough to allow the items to move freely. Water level should just cover the clothes. To add items after washer has started, push in Cycle Dial and submerge additional items next to the agitator. Close the lid and pull Cycle Dial out
to restart.
■Do not wrap long items like sheets and pants around the agitator.
■Do not wash fabrics containing flammable materials (waxes, cleaning fluids, etc.).
■Water will fill and pump out of the washer and the timer will advance with the lid up, but as a safety precaution the washer will not agitate or spin.
8
Care and Cleaning of the Washer
Wash Basket: Leave the lid open after washing to allow moisture to evaporate. If you want to clean the basket use a clean soft cloth dampened with liquid detergent, then rinse. (Do not use harsh or gritty cleaners.)
Fill Hoses: Hoses connecting washer to faucet should be replaced every 5 years.
Lint Filter: The lint filter is located under the agitator. It is self-cleaning and requires no maintenance.
Exterior: Immediately wipe off any spills. Wipe with damp cloth. Try not to hit surface with sharp objects.
Moving and Storage: Ask the service technician to remove water from drain pump and hoses. Do not store the washer where it will be exposed to the weather. For information on how to keep the tub stationary when moving the washer write to: Manager, Consumer Relations, Camco Inc.,
1 Factory Lane, Suite 310, Moncton, N.B. E1C 9M3.
Long Vacations: Be sure water supply is shut off at faucets. Drain all water from hoses if weather will be below freezing.
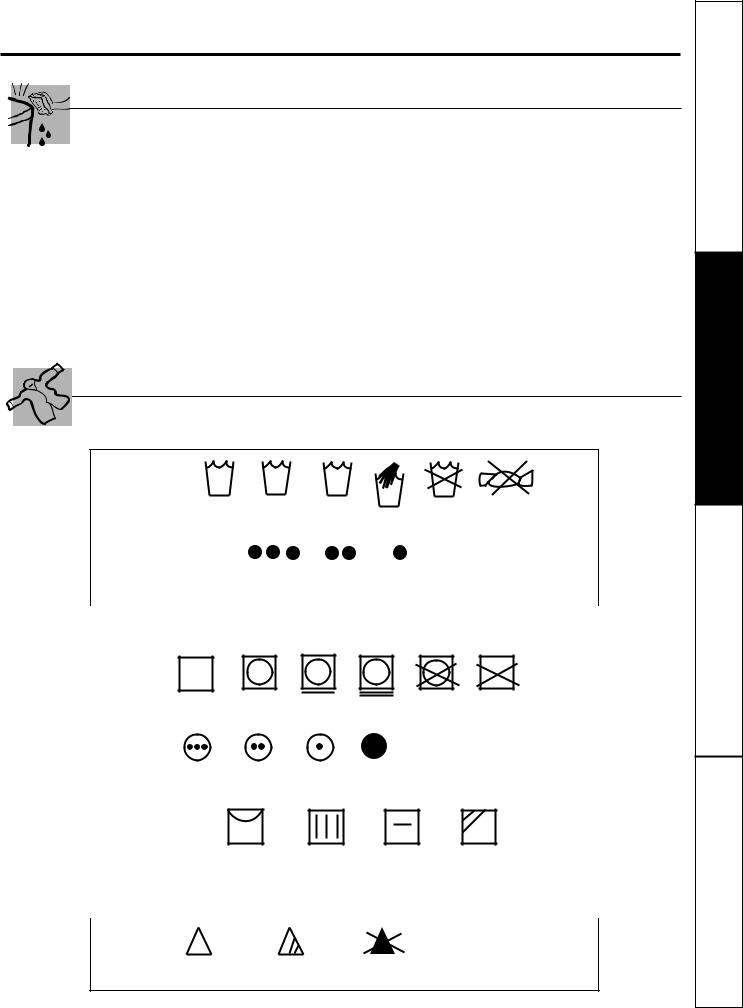
Fabric Care Labels
Below are fabric care label “symbols” that affect the clothing you will be laundering.
WASH LABELS
Machine wash
cycle |
Normal |
|
|
|
|
|
|
|
|
|
Permanent Press/ |
|
|
|
|
Do not wash |
Do not wring |
||||
|
Gentle/ |
|
Hand wash |
|||||||
|
|
wrinkle resistant |
delicate |
|
|
|
||||
Water |
|
|
|
|
|
|
|
|
|
|
temperature |
|
Hot |
|
Warm |
Cold/cool |
|
|
|||
|
|
(50°C/120°F) |
(40°C/105°F) (30°C/85°F) |
|
|
|||||
|
|
|
|
|
|
|
|
|
|
|
DRY LABELS |
|
|
|
|
|
|
|
|
|
|
|
|
|
|
|
|
|
|
|
|
|
Tumble |
|
|
|
|
|
|
|
|
|
|
dry |
|
|
|
|
|
|
|
|
|
Do not dry |
|
Dry |
Normal Permanent Press/ |
Gentle/ Do not tumble dry |
(used with |
||||||
|
|
|
|
wrinkle resistant |
delicate |
|
do not wash) |
|||
Heat |
|
|
|
|
|
|
|
|
|
|
setting |
|
|
|
|
|
|
|
|
|
|
|
High |
Medium |
Low |
No heat/air |
|
|
||||
Special |
|
|
|
|
|
|
|
|
|
|
instructions |
|
|
|
|
|
|
Dry flat |
|
|
|
|
Line dry/ |
Drip dry |
In the shade |
|||||||
|
hang to dry |
|
|
|
|
|
|
|||
|
|
|
|
|
|
|
|
|
|
|
BLEACH LABELS |
|
|
|
|
|
|
|
|
|
|
|
|
|
|
|
|
|
|
|
|
|
Bleach |
|
|
|
|
|
|
|
|
|
|
symbols |
Any bleach |
Only non-chlorine bleach |
Do not bleach |
|
|
|||||
|
(when needed) |
(when needed) |
|
|
|
|||||
9
Instructions Safety
Instructions Operating
Tips Troubleshooting
Service Customer

Safety Instructions
Operating Instructions
Troubleshooting Tips
Customer Service
Loading and using the washer. Always follow fabric manufacturer’s care label when laundering.
Removing Specific Stains
Bleach Solution: To remove stains on white or bleachable fabrics, try soaking the stained area in a container for five minutes in the following solution and then launder in the washer:
■1 US gallon (3.8 liters) cool water
■1/4 cup (60 ml) chlorine bleach
The invisible stain |
Foods on synthetic clothes may |
|
cause stains which are virtually |
|
invisible when you put the |
|
clothes in the washer. If these |
|
stains are not completely |
|
removed in the wash, they may |
|
pick up dirt from other clothes |
|
in the washer and appear after |
|
the clothes are dried. |
|
|
When They Become Visible:
•Rub the stain with undiluted liquid detergent.
•Let stand 30 minutes.
•Rewash using the hottest water that is safe for the fabric.
Preventing These Stains:
•Increase the amount of detergent used.
•Increase water temperature.
•Wash synthetics often.
STAIN |
White and Bleachable Fabrics |
Other Washable Fabrics |
|
|
|
Adhesives |
Rub with ice or immerse in |
• Same as white and bleachable fabrics. |
(chewing gum, etc.) |
very cold water. Use dull tool |
|
|
to carefully scrape off as much |
|
|
adhesive or gum as possible. |
|
|
Rub the stain with undiluted |
|
|
liquid detergent. Rinse well, |
|
|
then wash as usual. |
|
Antiperspirants, |
Apply undiluted liquid detergent. |
• Same as white and bleachable fabrics except use |
deodorants |
Rinse. If stain remains, use the |
non-chlorine bleach. |
|
Bleach Solution; launder. |
|
Blood |
Soak in cold water, then launder |
• Sponge or soak in cool water, then launder. |
|
in warm water. If stain remains, |
|
|
use the Bleach Solution; launder. |
|
Chocolate, cream, |
Soak in cold water. Use the |
• Same as white and bleachable fabrics except use |
ice cream and milk |
Bleach Solution; launder. |
non-chlorine bleach. |
Coffee and tea |
Without cream: Use the Bleach |
• Sponge with warm water. If stain remains, apply warm |
|
Solution; launder. |
glycerine (available at drug stores), let stand 30 minutes |
|
With cream: Soak in cold water, |
and rinse well. Wash as usual. |
|
|
|
|
then use the Bleach Solution; |
|
|
launder. |
|
Cosmetics, crayon |
Use the Bleach Solution; |
• Rub the stain with undiluted liquid detergent. |
|
launder. |
Rinse well, then wash as usual. |
10
 Loading...