

GE GSS25LSWCSS, GSS25KSWCSS, GSC23KSWHSS, GSC23KSWDSS, GCF23KGWDWW Owner’s Manual
...
ge.com
Safety Instructions ............... 2-3
°e..<
:/3
Operating Instructions
Automatic Icemaker ............... ] ]
Care and Cleaning .............. ] 3, ] 4
Crispers and Pans ................. ] 0
ExpressChill _'_ ..................... 5
Ice and V(ater Dispenser ......... 12, 13
Reflig>rator Doors ................. 9
Replacing the i Jgh t Bulbs ........... 15
Shelves and Bins ................. 7, 8
Temperauue Controls ............... 4
TurboCool _'' . ...................... 4
_'ater Filter . ...................... 6
Installation Instructions
Installing the Refligerator . ....... 21-24
Moving the Refligeramr . ........ 17-20
Preparing to Install
the Refligeramr . .................. 16
V(ater Line Installation .......... 25-27
Troubleshooting Tips ........... 28-31
Normal Operating Sounds .......... 28
Models22,23,25 and27
C6te fiC6te
R frig rateurs
La sectionfran_aise commencea la page40
Iado a Iado
Refrigeradores
La seccionen espa#ol empiezaen la pagina 75
Consumer Support
Consumer Support ......... Back Cover
Performance Data Sheet ............ 32
Product Registration (U.S.) ....... 33, 34
Product Registration (Canadian) . . .35, 36
State of Calitbrnia ¼'amr
Treatment Device Certificate ......... 37
X_'arianty (Canadian) ............... 38
V(arranty (U.S.) ..................
Write the model and serial numbers here:
Model #
Serial #
Find these numbe_ on a label inside
the refl'igerator compartment at the
top on the IJght side.
200DSO74P016 49-60491 12-06JR

IMPORTANTSAFETYINFORMATION.
READALLINSTRUCTIONSBEFOREUSING.
WARNING!
Use this appliance only for its intended purpose as described in this Owner's Manual
SAFETYPRECAUTIONS
When using electrical appliances, basic safety precautions should be followed, including the following:
i)::This refi'igerator must be properly installed
and located in accordance with tile Installation
Instructions before it is used.
i)::Do not allow children to climb, st;rod or hang
on the shelves in the reti-igerato_: They could
damage the refrigerator and seriously iqjure
themselves.
::_ Do not touch tile cold sui-lilces in tile fl'eezer
compartment when hands are damp or wet. Skin
may stick to these extremely cold surlhces,
}_'<Do not store or use gasoline or other flammable
\_q)o_ and liquids in tile \'icini_i of this or any
other appliance.
i)_:In refl'igerato_ with automatic icemake_,
avoid contact with the moving parts of the
ejector mechanism, or with tile heating element
locamd on tile bottom of tile icemake_: Do
not place tinge_ or hands on tile automatic
icemaking mechanism while the refrigerator
is plugged in.
i)::Kee I)finge_ ()/It of tile "pinch point" areas;
clearances between the doo_ and between
the doo_ and cabinet are necessarily small.
Be caretul closing doo_ when children are
in the area.
i)::Uni)lug tile refrigerator befiwe cleaning and
making repairs.
NOTE."We stronglyrecommendthatanyservicingbe
performedby aqualified individual
i)::Do not refi'eeze ti'ozen foods which have
thawed completel>
NOTE: rurnlhg the refwerator off wathe controlson
the touchpanel doesnot shut off electricalpower to the
refrigerator
2

DANGER!RISKOFCHILDENTRAPMENT
ge.com
11:1;i:;;:1111111111
PROPERDISPOSALOFTHEREFRIGERATOR
Child entrapn_ent and suffocation are not i)rol)lems Refrigerants
of the past.Junked or abandoned reti_igerato_ are
still dangerous...even if they will sit for "just a few _M1refl_igeration products contain refl'igerants,
days." If you are getting rid of your old refrigerator; which trader federal law must be removed prior
please follow the instructions below to help prevent to product disposal. If wm are getting rid of an
accidents, old refrigeration product, check with the
comi)am, handling, the disposal about what
Before YouThrowAway YourOld Refrigerator t,, d,,.
or F eezer:
or Freezer:
iJi::Tate off tll e doox_.
iJi::Take off the doo_.
}NI,( e,e the ',hel',es in place so tl
!i?:I,eave the shelves in place so that children max
not easilx climb inside.
n_ : easil) ( limb inside.
U5€_OFEXTENSII)N
USEOFEXTENSIONCORDS
Bec use of l _otential safety haz,
Because of potential safety hazards under certain conditions, we strongly recommend against the use
of a_ extens on cord.
of an extension cord.
Hox_ _'_eI; ilv )Ix Illtlst tlse }lI] ext(
Howe\'et; if you must use an extension cord, it is absolutely necessary that it be a UL-listed (in the United
Stat(;) or a ( iSA-listed (in C ma(
States) or a CSA-listed (in Canada), 3-wire grotmding D'pe appliance extension cord having a grounding
type )lug an, 1outlet and th; t th,
type plug and ouflet and that the electrical rating of the cord be 15 amperes (minimum) and 120 volts.
i_;gliiiiiiii
WARNING!
HOWTOCONNECTELECTRICITY
Donot, under any circumstances, cut or remove the third (ground) prong from the power cord. For
personal salon this appfiance must be properly grounded.
The power cord of this appliance is equii)ped
with a 3-prong (grounding) plug which mates
with a standard 3-prong (grotmding) wall outlet
to minimize the possibility oI electric shock hazard
fl'om this appliance.
Have the wall outlet and circuit checked bv a
qualified electrician to make sure the ouflet is
properly grounded.
If the outlet is a standard 9-prong outlet, it is
yore" personal responsibili_' and obligation to
have it replaced with a properly grounded
3-prong wall outlet.
The refi_igerator should always be plugged into its
own individual electrical outlet which has a voltage
rating that matches the rating plate.
This provides the best pe_imnance and also
I)rexents oxerloading, house wiring circuits which
could cause a fire hazard fl'om oxerheated wires.
Never unI_lug your reli_igerator by pulling on
the power cord. _Mwavs grip plug firefly and pull
straight out froln the outlet.
Repair or replace immediately all power cords that
have become ti'ayed or otherwise damaged. Do not
use a cord that shows cracks or abrasion damage
along its length or at either end.
\_]/ell moving the reflJgerator away fl'Oln the
wall, be careflfl not to roll over or damage the
power cord.
==
g
g
H
READANDFOLLOWTHISSAFETYINFORMATIONCAREFULLY.
SAVETHESEINSTRUCTIONS

Aboutthe temperaturecontrols.
Not all features are on all models. Your controls will look like one of the following:
i _iI iii_i
Adjust Ternperrlture
_ADOr_r_ _Warmer_ _ (Warmer_ furb0Co_
@
iill iii i _ i
5 i
g
iiii !iiii iiiii (iiii iill
• @ ® ® 0 @
i iii
to' 0 !i)IQu 0Filter ore ush ube ick I LOC
Mold 3 seconds to Reset Hold 3 s_onds
OR
Thetemperaturecontrolsarepresetinthefactoryat37°1:fortherefrigeratorcompartmentandO°Fforthe
freezercompartment,Allow24hoursforthetemperaturetostabilizeto thepresetrecommendedsetting&
ThetemperaturecontrolscandisplayboththeSETtemperatureaswellastheactualtemperaturein the
refrigeratorandfreezer,TheactualtemperaturemayvaryslighflyfromtheSETtemperaturabasedonusage
andoperatingenvironment,
iJi::Onsomemodels,settingbothcontrolstothewarmestsettinguntilthedisplayflashes(off)willstop
coolinginboththefreezerandrefrigeratorcompartments.
iJi::Onothermodels,settingeithercontrolto thewarmestsettinguntilthedisplayflashes(off)willstopthe
coolingto thefreezerandrefrigerator,
iJi::NOTE:Turningtherefrigeratoroffviathecontrolsonthetouchpaneldoesnotshutoffelectricalpower
totherefrigerator,
NOTE:Therefrigeratorisshippedwithprotectivefilmcoveringthetemperaturecontrols,ffthisfilmwasnot
removedduringinstallation,remove#now,
!ii iii_i i iii
PerformanceAk FlowSystem
The Performance Ailqqo_ System is
designed to maximize tempel_lttu'e control
in the ret_'igerator and t_'eezer compartments.
T]lis unique special teantre consists of the Air
To_er akmg the back wall of the reiiigerator
and the Air Tmmel on the bottom portion of
the ti'eezer rear \_al].Placing toed in ti'ont of
the louvex_ on these components will not aitect
About TurboCooE(on somemodels)
How # Works
TurboCoolrapidly cools d_e reliigemtor
comparUnent in order to more quickly
cool the(is, tlse TurboCoolwhenadding
VurboC
OR
iii i
4
a laxge amount of fi)od to die reliigemtor
compartment, putting muw foods after tbev
have been sitting out at ro{)m tetnperatm_"
or \dten putting m_;i} _;u'm leftovers. ]t can
also be used if the retiigerator has been
without po_r tbr an extended period.
Once activated, the coml)ressor will turn
on immediately and the tiros _qll cxcle on
and off at high speed as needed tot eight
hours. The compressor will contimm to run
until the ret}igerator compartment cools to
approximatel} 34°F (1°C), then it _qll cxcle (m
and off to maintain this setting. Alter 8 }tom_,
or if rurboCoolis pressed ag'ain, the reliigemtor
compartment will return to the original setting.
perR)rmance. Ald_ough the Air To_r and
the Air Tunnel can be removed, doing so will
ati(ct temperamx_ pertimnance. (For removal
instructions, on-line, 24 hom_ a din; contact us
at ge.com or call 800.GE.(2kRES. Ii_ Canada,
contact us at geappliances.ca or call
1.800.361.3400.)
Howto Use
PressTurboCool.Tl_e TurboCooltemperam_
displa} will slto_ Tcand the I.ED will be
acti_=_md.
.Mier TurboCooliscomplew, the rurboCoo/
indicator light will go out.
NOTES: The _>fiigerator temperature cannot be
changed during rurnoCoot
The ti'eezer mmperatm> is not affected
(luring rurboCoot
When opening the reliigemtor door
(luringr.rboCootthe rims will continue
to run if they hme cycled on.

About ExpressChilE (on somemodels) ge.com
How it Works
I
The ExpressChilFfeature is a s)'stem
of dmnI)ex_, a tim and a temi)erature
themfistor.
The pan is tightly sealed to prevent the pan's
temperattu'e ti'om causing temperature
fluctuations in the rest oI the reti_igerato_:
O Erupt}, the pan. Place the Chill trax in !;> To stop a feature before it is
the pan. Place the items on the trax and finished, trip that tFatm'e's pad
close the pan completely, until no options are selected and
How to Use
S - T_ the displax is off.
models you can then select the chill !;> During ExpressChill, the display (m
0. elect the ExpressChdl pad. On some ,
time (use chart to detemfine best the controls will count down the time
ExpressChi/Y" setting). Other models will only have in the cxcle.
one option (45 minutes). On models
with multiple settings, tap the pad until
the light ai)pem_ next to the desired
setting.
The controls for this pan are located in the
toi _ of the refi_igerator, or on the dispenser
with the temperature controls.
How to Remove and Replace the Drawer
Toremove:
O Pull the drawer out to the stop position.
O Rotnte all fimr swing locks to the unlock
position.
0 I,ift the fl'ont el the drawer up and out.
Toreplace:
Make sure all four swing locks are in the
unlock position.
@ Place the sides ot the drawer into the
drawer supi)orts, making sure the swing
locks fit on the drawer slots.
i,ock all fi)ur sx6ng locks by rotating
them to the lock position.
i_21iiiL_Yi)iiiiii_iiii
g
N"
ExpressChillTM Chart
..................................................NOTE:Results may vary depending
ExpressChill • aoMI. 15 Minutes
@ 15MIN
e 45MI_ _ 1 Bexerage (_an ( 12 oz) _!
_! 2 Small Juice Boxes
(6_ oz ea(h) J_
on packaging, starting temperature and other food traits.
30 Minutes
2 to 6 Beverage Cans
(12 oz ea(h)
2 Plastic 20 oz Bottles
of Beverage
4 to 6 Small Juice Boxes
(6-8 oz each)
3 Foil Juice Packets
Wine (7J>0 ml boule)
i_?; 2 IJters of Beverage
i_i: 1/2 Gallon of Juice
i_i: (',elatin--1 package
45 Minutes
i
H

Aboutthe water filter.(onsomemodels)
Water FilterCartridge
The water filter cartridge is located in the back upper right
corner of the refrigerator conq)artment.
When toReplace the Filter onModels With a
ReplacementIndicatorLight
There is a replacement indicator light for the water filter
cartridge on the dispense_: This light will mrn orange to tell
you that w}u need to replace the filter soon.
The filter cartridge should be replaced when the
replacement indicator light turns red or if the flow of water
to the dispenser or icemaker decreases.
When toReplace the Filter onModels Withouta
ReplacementIndicatorLight
The filter cartridge should be replaced every six months
or ea_tier if the flow of water to the water dispenser or
icemaker decreases.
Removingthe Filter Cartridge
If you are replacing the cartridge, first remove the old one
by slowly turning it to the left, Do notpull down on the
cartridge. A small amotmt of water may drip down.
Installing the Filter Cartridge
O If )ou are replacing a SmartWater cartridge with
an adapter, it must be remoxed betore installing the
cartridge. To remove the adapte_; mrn it to the left
about 1/4 turn.
O i,ine up the arrow on the cartridge and the cartridge
holder: Place the top of the new cartridge up inside the
holder Do not push it up into the holdex:
0 Slowly turn it to the right tmfil the filter cartridge stops.
DO NOTOVERTIGHTEN. As you turn the cartridge, it will
automatically raise itself into position. The cartridge will
IllOX, e about 1/2 turn.
Cartridg
Holder
Rml water fl'om the dispenser Rn" 3 minutes (about 1-1/2
gallons) to clear the system and prevent sputtering.
Press and hold the WATERFILTERpad (on some models)
on the dispenser fin" 3 seconds.
NOTE:A newl}qnstalled water filter cartridge may cause
water to spurt fl'om the dispensex:
FilterBypassPlug
You must use the filter b)pass I)lug when a replacement
filter cartridge is not a\;filable. The dispenser and the
icemaker will not operate without the filter or filter
b)pass I)lu _
re )lacino a Water by Culligan cartridge,lf_ouare I ,_
leave the adapter in place. This adapter will stay in the
reli-igerator _dmn you replace flmue cartridges.
Withadapter Withoutadapter
(appearancemay vary)
On models without a replacement indicator light,
apply the month and year sticker to the new cartridge
to remind _ou to replace the filter in six months.
0 Fill the replacement cartridge with water fl'om the tap
to allow fin" better flow from the dispenser immediately
after installation.
Filter_
gss .
])) use the filter 1)ypass plug on Water by Cu//igan models,
you must filet relllOVe the filter adapter fl'om the cartridge
holder b_ ttu'nin_d it to the left,
If wm have quesfions_visit ore" Website
at ge.coi//,
or call 1.800.GE.CARES (1.800.432.2737).
Replacement filters:
Toorder additional filter cartridges in the United States,
visit our Website at ge.coln, or call GEPartsandAccessories,
800.626.2002.
MSX4F
Suggested Retail $36.95-41.95
Customers in Canada should consult the yellow pages fin"
the nearest Mabe Se_Mce Center
i
SmartWater
Filter .,
Bypass
Plu
Waterby Culligan
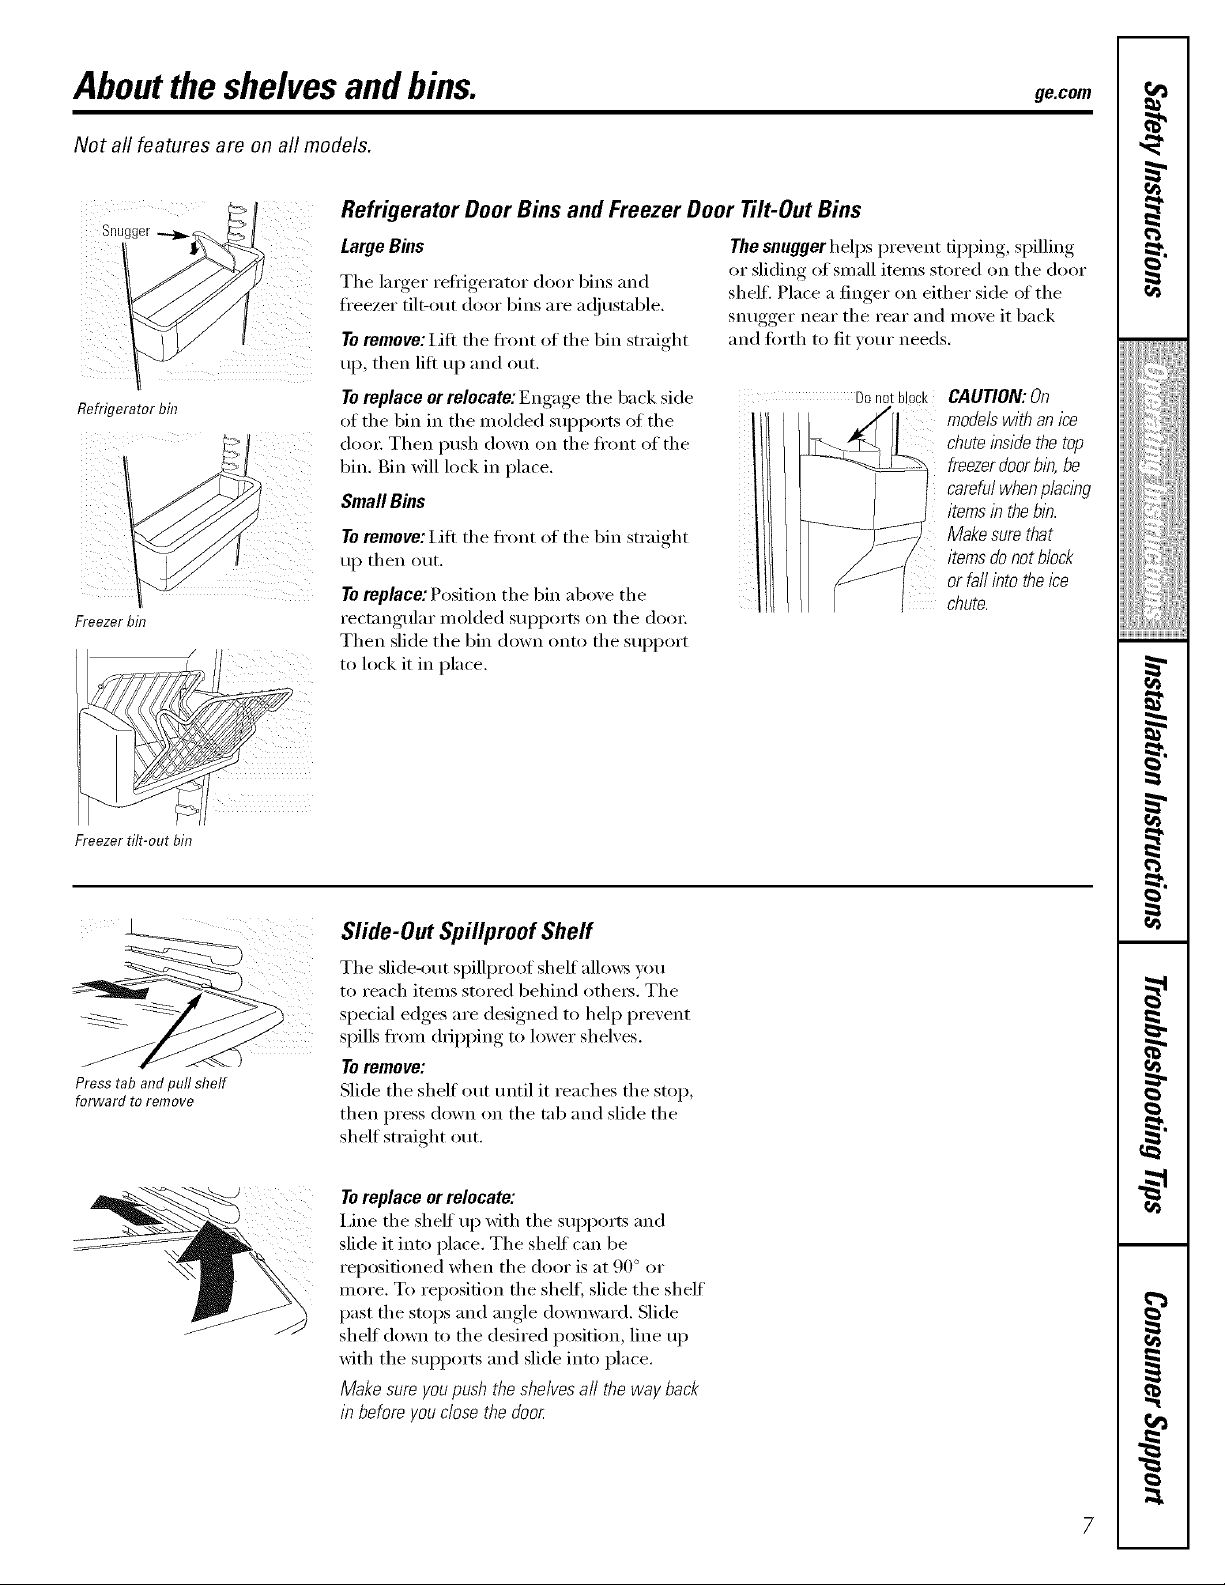
Abouttheshelvesandbins.
Not all features are on all models.
Refrigerator Door Bins and Freezer Door Tilt-Out Bins
Large Bins
Tile larger refl_gerator door bins and
fl'eezer tilt-out door bins are ac!iustable.
Toremove: i,ifi tile ti'ont of tile bin straight
up, then lilt up and out.
Refrigerawr om
Freezerbin
Toreplace or relocate: Engage tile back side Donotblock
of the bin in the molded supports of tile
dora: Then push down on tile front of tile
bin. Bin will lock in place.
SmallBms
Toremove: Lift tile fl'ont of tile bin straight
up then out.
Toreplace: Position tile bin above tile
rectangular molded supports on tile dora:
Then slide tile bin down onto tile support
to lock it in place.
ge.com
The snugger helps prevent tipping, spilling
or sliding of small items stored on the door
shel£ Place a finger on either side of the
snugger near tile rear and move it back
and forth to fit your needs.
CAUTION:On
modelswithanice
chuteinsidethetop
freezerdoorbin,be
carefulwhenp/aclbg
itemsinthebin.
Makesurethat
itemsdonotblock
orfailintotheice
chute.
I
,,,><,,,,,,,,,,,,,,,,,,
ii!iiiiii_i_iiiiiiiiiiiii
i
w
Freezer tilt-out bin
Presstabandpull shelf
forwardtoremove
Slide-Out Spillproof Sheff
Tile slide-out spillproot shell allows you
to reach items stored behind othe_s. The
special edges are designed to hel I) prevent
spills fl'om dripping to lower shelves.
Toremove:
Slide tile shell out tmtil it reaches tile stop,
then press down on tile tab and slide tile
shelf straight Otlt.
Toreplace orrelocate:
I,ine tile shelf up Mth tile supports and
slide it into place. The shelf can be
repositioned when tile door is at 90 ° or
more. To reposition the shelf, slide the shelf
past tile stops and angle downward. Slide
shelf down to the desired position, line up
with tile supports and slide into place.
Make sure youpush the shelves all the way back
in before you dose the door.
g
i
H
7

Abouttheshelvesandbins.
Not all features are on all models.
OuickSpace TM Sheff (onsomemodels)
This shelf splits ill half and slides under itself
fi)r storage of tall items on tile shelf below.
This shelf can be removed and replaced
or relocated just like Slide_)ut Spillproof
Shelves.
Freezer Baskets (on some models)
Toremove, slide out to the stop position,
lift the fi'ont past the stop position, and
slide out.
Freezer Baskets (onsomemodels)
Toremove, push the basket all the way to the
back of tile fi'eezei: I,iff up until tile back
pins are disengaged, lift the entire basket
up and pull out.
On some models, this shelf can not be used
ill the lowest position.
Makesureyoupushthebasketsall thewayback
in beforeyouclosethe door
Makesureyoupushthebasketsall thewayback
in beforeyouclosethe door
Slide-Out Freezer Shelves
Toremove, slide out to the stopposition,
lift tile fl'ont past tile stop position, and
slide ()tit fi'oI// rib.
Fixed Freezer Shelves
Toremove, lift the shelf up at the left side
and then bring tile shelf out.
Makesureyoupushtheshelvesall thewayback
in beforeyouclosethe door
NOTE FORDISPENSER MODELS: In order
to take flfll advantage of tile flit-out ice bin
(on some models), only store items on tile
shelf below tile ice bin that are no taller
than tile lowest point on tile bin.
Door Wine/Beverage Rack (onsomemodels)
This rack holds up to 5 cans, one bottle (ff
wine or one 2-liter bottle of soda.
The rack hangs fl'oln the sides oI the
daiI_' bin.
Toremove:
Empb tile wine/beverage rack.
Holdim,_ tile bottom of tile &flu bin,
lift tile fi'ont straight up, then lift up
and ()tit.
Toreplace:
O Reattach tile rack to tile sides
0 Engage the back side of the bin ill
of tile bin.
tile inolded SUl)ports on tile dool:
Then push down on tile fl'ont of the
bin. The bin will lock into place.
To detach tile rack fi'oln tile dai_ T bin,
pull the rack's side wires out of the
holes on each side of the dairy bin.
8

Abouttherefrigeratordoors.
Refrigerator Doors
ge.com
When the door is only partially open,
it will automatically close.
Beyond this stop the door will
stay open.
The refl_igerator (loo_ may teel different
than the ones you are used to. The
special door opening/closing teature
makes sm'e the do(n_ close all the way
and are secm'elv sealed.
_41_en opening and closing the door you
will notice a stop position. If the door is
opened past this stop point, the door will
I'eI/l}lin el)on 1o allow you to load }lll(1
tmload toed inore easily. _\]/en the door
is only partially open, it will automatically
close,
Door Alignment
It doot_ are tme\'en, at!just the
refl_gerator dooI:
O Using a 7/] 6" socket wrench, ttli'n
the door a(!justing screw to the right
to raise the door; to the left, to lower
it. (A nfl(m plug, imbedded in the
threads of the pin, prevents the pin
fl'om turning tmless a wrench is
used.)
The resistance xou teel at the stop
position will be reduced as the door
is loaded with fi)od.
I
,,,><,,,,,,,,,,,,,,,,,,
ii!iiiiii_i_iiiiiiiiiiiii
i
w
0 _Mter one or two turns of the
wrench, open and close the
refl_igerator door and check the
aligmnent at the top of the doors.
g
i
H

Aboutthe crispersandpans.
Not all features are on all models.
Fru# and Vegetable Crispers
Excess water that may accumulate in tile
bottom of tile drawexs should be wiped (h_':
On some models, tile bottom drawer has
fifll extension slides that allow fifll access
to tile (h'awex:
Adjustable Humidity Crispers
_(
Slide tile control all tile way to tile HIsetting
to provide high humidi_' recommended fi)r
most vegetables.
Slide tile control all tile wax to tile LO
,settim,_ to proxide lower humidity, lex els
x'econmlended fi)r most fl'uits.
Convertible Dell Pan (on some models)
®
I
Tile convertible dell pan has its own cold
air duct to allow a stream ot cold air fl'om
tile fl'eezer compartment or refl_igerator
compartment to flow to tile pan.
The variable temperature control regulates
tile air flow fl'om tile (]imate Keepex:
About crisper removal
Not all features are on all models.
Crisper Removal
Crispers can easily be remoxvd by pulling
tile drawer straight out and lifting tile
dlawer up and (wer tile stop location.
Set tile control to tile coldest setting to
stox'e fx'esh Xlleats.
Set tile control to coldto convert tile pan
to nomml refl_igerator temperature and
provide extra vegetable storage space. The
cold air duct is turxled off, Variable settings
between these extremes can be selected.
If tile door prevents you fl'om taldng out
the drawex_, first tU to xemove the door
bins. If this does not offer enough
clearance, tile refl{gerator will need to
be rolled fl)rward until tile door opens
enough to slide tile (h'awel_ out. In some
cases, when you roll the refligerator out,
you will need to mo\e tile refi_igerator
to the left or fight as you roll it out.
10

Abouttheautomaticicemaker, ge.com
A newly installed refrigerator may take 12to 24 hours to begin making ice.
Automatic Icemaker
Power
Switch
Green
PowerLight
Icemaker
The icemaker will produce seven cubes
per cycle----ai)i)roxilnately 100-130 cubes
in a 24-hour period, dei)ending on fl'eezer
cot/tl)at'ttllent tet/tl)et'atttt'e _ t'oot/t
teml)erature, mmg)er of door openings
and other use conditions.
See below fin" how to access ice and reach
the power switch on dispenser models.
If the reti_igerator is operated betore the
water connection is made to the icemaket;
set the power switch in the 0 (off) position.
When the refl-igerator has been connected
to the water sui)i)ly, set the power switch to
the I (on) position.
The k'emaker will fill with water when it
cools to 15°F (-10°C). A newly installed
refi_igerator may take 12 to 24 hours to begin
making ice cubes.
You will hear a buzzing sotmd each dine
the icemaker fills with water:
Throw awm the first tew batches of ice to
allow the water line to cleat:
Be sure nothing interteres with the sweep
of the feeler ram.
When the bin fills to the level of the teeler
aml, the icemaker will stop producing
ice. It is nomml tin"several cubes to be
joined together:
If ice is not used fl'equenfl> old ice cubes
will become cloudy, taste stale and shrink.
NOTE."Inhomeswith lower-than-averagewater
pressure,you mayhear the icemaker cyclemultiple
times whenmaking onebatch of ice.
I
,,,><,,,,,,,,,,,,,,,,,,
ii!iiiiii_i_iiiiiiiiiiiii
w
Models without a shelf
above the ice bin
Toaccessiceandreachthe
icemakerrowerswitch:
o Lift flTebin,thenpullit
forwarduntilthebin stops.
Lower thebin to access ice
or reach the power switch.
NOTE:In order to take full advantage
of the tilt-out ice bin, only store items
on the shelf below the ice bin that
are no taller than the Iowest poflTt
on the bin.
Accessing Ice and Reaching the
Power Switch on Dispenser Models
Thereare two typesof ice storage bins on
dispenser models. One has a shelf aboxe
tile bin, the other does not.
Special note about dispenser models
without ashelf above the ice bin:
These models have a tilt-out ice bin.
The bin can be tilted out as shown ill
the illustrations, and it will hold itself
up while you take ice out or turn the
icelnaker power switch on and off.
Be sure to put the bin back in place
betore closing the door:
To restore your ice level from an empty
12 hours alter the first batch of ice
has fifllen into the bin, dispense
3 to 4 cubes.
@ _Mter an additional 6 hems, dispense
3 to 4 cubes again.
These steps will restore your ice level
ill the shortest ai/tottnt of tilne.
Models with a shelf
above the ice bin
Toaccessice,pullthe binforward.
Toreach the power switch, pull the
shelf straight out Always be sure to
replace the shelf.
g
N"
i
H
11

Aboutthe ice and water dispenser.(onsome models)
ToUsetheDispenser
SpillShelf
Select CUBEDICE _, CRUSHEDICE
or WAIER_.
Press the glass gently against the top _ff the
dispenser cradle.
The spill shelf is not self-draining. To
reduce water spotting, tile shelf and its
grille should be cleaned regularly:
If no water is dispensed when the refn)erator is
first instafled, there maybe air in the water fine
system. Press the dispenser arm for at/east two
minutes to remove trapped air from the water
fine and to fi// the water system. Toflush out
impurities in the water /ine, throwaway the first _,\qlen _ou need ice
six glassfuls of water in a hmTv press this
CAUTION: Never put fingers or any other
objects into the ice crusher discharge opening, ick l)r°ducd°n" This will
Lockingthe Dispenser
Press tile LOCKpad fin.
dispenser and control
DispenserLight
This pad turns tile night
ig h and off. Tile light also
_L • lightin the dispenseron
coII]es on when tile
dispenser cradle is
pressed. If this light
bm'ns out, it should be
replaced with a 6 watt
12V maximmn bulb.
OuickIce (onsomemodels)
_LI j_ pad to speed up ice
increase ice production
fin" tile fi_lloMng
48 hem's or tmtil you
press the pad again.
DoorAlarm (onsome models)
Loc panel. To mflock, press
k_ 3 seconds to lock tile
and hold tile pad again
3 second_ fi'' 3 seconds.
O To set the alaxm,
" _ SS S
U _ pI'e._._thi._ pad until tile
/DooF J indicator light comes
I AJerm J °'.xhis"l"m''ill
J Solmd if either door
is open fin" more than
3 minutes. The light
goes out and the
beeping stops when
VO/I close tile dooi:
12
Important Facts About Your Dispenser
_: Do not add ice fl'om trm:s or bags to
tile storage (h'awe_: It may not crush or
dispense well.
iJi::Avoid oveHilling glass with ice and use of
narrow glasses, gacked-u I) ice can jam tile
chute or cause tile door in tile chute to
freeze shut. If ice is blocking the chute,
poke it through with a wooden spoon.
iJi::Beverages and foods should not be
quick-chilled in the ice storage drawer
Cans, bottles or food packages in tile
storage drawer may cause tile icemaker
or a/iger to jalll.
_: To kee I) dispensed ice fl'om missing
the glass, put the glass close to, but not
touching, tile dispenser opening.
_: Some crushed ice may be dispensed even
though you selected CUBED ICE.This
hapl)ens occasionally when a few cubes
accidentally get directed to the crushe_:
iJi::_Mter crushed ice is dispensed, some
water may drip fl'om tile chute.
_: Sometimes a small molmd of snow will
form on tile door in tile ice chute. This
condition is nomml and usually occms
when you have dispensed crushed ice
repeatedly. The snow will eventually
eV_ll)OI';Ite.

ge.com
Models without a shelf
above the ice bin
Toremove:
o Lift flTebin. then ouo/r
forward until me om swos.
o Lift and oull forward again
to remove the bin.
Removing and Replacing the Ice
Storage Bin on Dispenser Models
There are two types of ice storage bins on
dispenser models. One has a shelf ab,:,',e
the bin, the other does not.
Mways set tile icemaker power switch to tile
0 (off) position befiwe rein eying tile ice bin.
When replacing either type of ice bin:
Mways be sure to press it firefly into place.
If it does not go all the wa_ back reinoxe it
and rotate the drixe mechanism 1/4 tin'n.
Then push file bin back again.
Mechanism
Models with a shelf
above the ice bin
Toremove:
!
I
Pull the bin straight out, then lift past
the step position.
ii!iiiiii_i_iiiiiiiiiiiii
i
w
Careand cleaning of the refrigerator.
Cleaning the Outside
The dispenser drip area (on some models),
beneath tile grille, shotfld be wiped (h'v: _\'ater
left in this area may leave deposits. Remove
tile deposits by adding mMiluted vinegar to
Dispenser drip area.
tile well. Soak until tile deposits disappear
OI" becoil/e loose enotlgh to I_nse awav.
The dispenser cradle (on some models).
Before cleaning, lock tile disl)enser by
pressing and holding tile LOCKpad fi)r
3 seconds. Clean with wam_ water and
baking soda solution - about a tablesi)oon
(]5 ml) of baking soda to a quart (] liter)
of water: Rinse thoroughly and wipe (h_'.
Cleaning the Inside
To help prevent odors, leave an open bo× of
baking soda in tile fl'esh food and fl'eezer
COlllp_l i'tl/lents,
Unplug the refrigerator before cleaning. If this
is not practi(al, wring excess moistm'e out
of sponge or cloth when cleaning aro/md
switches, lights or controls.
Use warn/water and baking soda solution -
about a tablespoon (l 5 ml) of baking soda
to a quart (l liter) of water: This both
cleans and neutralizes o(lm_, Rinse and
wipe dry:
The doorhandles and trim. Clean with
a cloth dampened with soapy water:
Dry Mth a soft cloth.
Keep the outside clean. Wipe with a clean
cloth lightly dampened with kitchen
appliance wax or mild liqtfid dish (lete_gent,
Dry and polish with a clean, soft cloth.
Do not wipe the refn_?eratorwith a soiled dish
cloth or wet towel. Thesemay leave a residue
that can erode the paint. Do not use scouring
pads,powdered cleaners, bleach or cleaners
containing bleach because these products can
scratch and weaken the paint f/blsh.
Use of any cleaning solution other than that
which is recommended,especiallythose that
contain petroleumdistillates,can crack or
damage the interior of the refrigerator.
Avoid cleaningcoldglassshelves with hot water
because the extreme temperature difference
may cause them to break. Hand& glass shelves
carefull_ Bumping tempered g/ass can cause
it to shatter
Do not wash any p/astic refngerator parts in the
dishwashe_
i
H
13
Careand cleaning of the refrigerator.
Behind the Refrigerator
Be carethl when moving the refl_igerator
away fl'om the wall. _M1t,ipes of floor
coverings can be damaged, particularly
cushioned coverings and those with
embossed sm_hces.
Pull the reti_igerator straight out and return
it to position by pushing it straight in.
Moving the refl_igerator in a side direction
may result in damage to the floor covering
or refl_igeratm:
Preparing for Vacation
For long \;l(-ations or absences, i'eillove
food and unplug the refl_igerato_: Clean
the interior with a baking soda solution
of one tablespoon (15 ml) of baking soda
to one quart (1 liter) of water: I,eave the
dooi_ open,
Set the icemaker power switch to the
0 (Of'[}position and shut off the water
supply to the refl_igeratox:
When pushing the refngerator back, make sure
you don't rofl over the power cord or icemaker
supply hne (on some models).
If the temperature can drop below
fl'eezing, have a qualified servicer drain
the water supply system (on some models)
to prevent serious propert}, damage due
to flooding.
Preparing to Move
Secure all loose items such as shelves and
(h'awe_ by taping them secm'ely in place
to prevent damage.
\_]_en using a hand truck to move the
refl-igeratm; do not rest the front or back
of the refl_igerator against the hand truck.
This could damage the refl-igeratm: Handle
only fl'om the sides ot the refl-igeratm:
Be sure the refngerator stays in an upright
position during moving.
14

Replacingthe lightbulbs, gecom
NOTE: Turning the refrigerator off via the controls on the touch panel does not shut off electrical power to the
refrigerator.
Yourlight shield will look like
one of the following.
OR
i ii f .............. _ i
Pocket
Refrigerator Compartment--Upper Light
Unplug the refrigerator.
The bulbs are located at the top of the
compartn_ent, inside the light shield.
On some models, a screw at the fl'ont of
the light shield will have to be removed.
On other models, the screw is located
in the pocket located at the back ot
the shield.
@ To remove the light shield, on some
models, press in on the tabs on the sides
of the shield and slide fi)rward and out.
On other models,just slide the shield
fi)rward and out.
Refrigerator Compartment--Lower Light
This hght is iocated above the top drawe_
Unplug the refiigemt(n:
i,ifl the light shiekl up and pull it out.
_Mter replacing the bulb with an
appliance bull) ot the same or lower
wattage, replace the light shieM and
screw. X,\]_en repladng the light shield,
make sure that the tabs at the back of
the shield fit into the slots at the back
of the light shield housing.
Plug the mfl'igerator back in.
0
Mter replacing the bulb Mth an
appliance bulb of the Salne or lower
watta{m_, replace the shield.
Plug the refrigerator back in.
I
i
,,,><,,,,,,,,,,,,,,,,,,
ii!iiiiii_i_ii{iiii{iiiii
i
w
-g.
-g.
Freezer Compartment
Unplug the retiigerator.
Remove the shelf just above the light
shield. (The shelf will be easier to
remove if it is emptied fi_t.) Remove
the screw at the top of the light shield,
To remove the light shield, press in on
the sides, and lift up and out.
Dispenser
Unplug the reti_igeratox:
The bulb is located on the dispenser
trader the control panel.
Remove the light bulb by turning
it cotmterclockwise.
l_ Replace the bulb with an appliance
bulb of the same or lower wattage,
and reinstall the light shield. X,\'hen
reinstalling the light shield, make
sure the top tabs snap securelv
into place. Replace the screw.
Reinstall the shelf and plug the
refl'igerator back in.
Replace the bulb with a bulb of the
same size and wattage.
Plug the refrigerator back in.
/5
g
N"
-g.
i
i
i

Installation
Refrigerator
Instructions
Questions? Call 800.GE.CARES (800.432.2737) or Visit our Website at: ge.com
I
BEFORE YOU BEGIN
Read these instructions completely
and carefully.
• iMPORTANT - Savethese
instructions for local inspector's use.
• iMPORTANT - Observeall
governing codes and ordinances.
Note to Installer - Be sure to leave these
instructions with the Consumer.
Note to Consumer - Keep these
instructions for future reference.
Skill level - Installation of this appliance
requires basic mechanical skills.
Completion time - Refrigerator Installation
Proper installation is the responsibility of
the installer.
In Canada, call 1.800.361.3400 or Visit our Website at: www.geappliances.ca
PREPARATION
WATER SUPPLY TO THE ICEMAKER
If the refrigerator has an icemaker, it will have
to be connected to a cold water line. AGE
water supply kit (containing tubing, shutoff
valve, fittings and instructions) is available
at extra cost from your dealer, by visiting
our Website at go.corn (in Canada at
www.geappliances.ca) or from Parts and
Accessories, 800.626.2002 (in Canada
1.888.261.3055).
TOOLS YOU WILL NEED
30 minutes
Water Line installation
30 minutes
Models 22, 23, 25 & 27
3/8" and 5/16" Socket 1/2" and 7/16" Wrench
I
Product failure due to improper installation
is not covered under the Warranty.
if the refrigerator has already been installed,
remove the base grille (see Step 2 in Moving
the Refrigerator), then skip to Step 5 in
Installing the Refrigerator.
Plastic Putty Knife
Phillips Head Screwdriver
16

Installation Instructions
MOVING THE REFRIGERATOR
[] LOADING THE RERIGERATOR
ONTO A HAND TRUCK
Leave all tape and door pads on doors
until the refrigerator is in its final location.
To move the refrigerator, use a padded
hand truck. Center the refrigerator on the
hand truck and secure the strap around
the refrigerator. DO NOT OVERTIGHTEN
THE STRAP.
If the refrigerator must go through
any entrance that is less than 38"
wide, the doors must be removed.
Proceed to Step 3.
DO NOT remove the handles.
If all entrances are more than
38" wide, skip to Installing
the Refrigerator.
[] DISCONNECT THE WATER
COUPLING (on some models)
If the refrigerator has a water dispenser,
there is a water line from the cabinet into
the bottom hinge on the freezer door that
must be disconnected.
To disconnect, push in on the white collar
of the coupling and pull out the tubing.
White collar
[] REMOVE THE BASE GRILLE
Remove the grille by removing the two
Phillips head screws.
Bottom
freezer
hinge
17

Installation instructions
MOVING THE REFRIGERATOR (CONT.)
[] DISCONNECT THE POWER
COUPLING (on some models)
If the refrigerator has a water dispenser,
there is a power line (harness) from the
cabinet into the bottom hinge on the
freezer door that must be disconnected.
To disconnect pull apart at the coupling.
Bottom _ _ LJ o _//
freezer / _ __J_
hin
DISCONNECT THE ELECTRICAL
[]
CONNECTORS (on some models)
If the refrigerator has a refreshment
center, there are electrical connectors
(harnesses) from the cabinet into the
bottom hinge on the refrigerator door
that must be disconnected.
To disconnect, pull apart each connector.
[] CLOSE THE FREEZER AND
REFRIGERATOR DOORS
[] REMOVE THE FREEZER DOOR
[] Remove the freezer door top hinge cover
by either squeezing it and pulling it up or
by prying it off with a plastic putty knife.
[] Remove the two 5/16" hex head screws,
then lift the hinge straight up to free the
hinge pin.
5/16" Hex Head
Bottom
refrigerator
hinge
[] Open the freezer door to 90. °
90 °
18

Installation instructions
[] REMOVE THE
FREEZER DOOR (cont.)
[] As one person slowly lifts the freezer door
up and off the bottom hinge, the second
person should carefully guide the water
line and power line (harness) through the
bottom hinge.
[] Set the door on a non-scratching surface
with the inside up.
[] REMOVE THE
REFRIGERATOR DOOR (cont.)
[] Remove the two 5/16" hex head screws,
then lift the hinge straight up to free the
hinge pin.
5/16" Hex Head
[] Open the refrigerator door to 90. °
_H
[] REMOVE THE
REFRIGERATOR DOOR
[] Remove the refrigerator door top hinge
cover by either squeezing it and pulling
it up or by prying it off with a plastic
putty knife.
90 °
19

Installation Instructions
MOVING THE REFRIGERATOR (CONT.)
[]
REMOVE THE
REFRIGERATOR DOOR (cont.)
[]
Lift the refrigerator door up and off the
bottom hinge.
If the refrigerator has a refreshment
center, one person should slowly lift the
door up and off the bottom hinge and the
second person should carefully guide the
electrical lines (harnesses) through the
bottom hinge.
--=4
[] REPLACING THE DOORS
To replace the doors, simply reverse
steps 3 through 8.
However, please note the following:
• When lowering the doors onto the
bottom hinges, make sure the second
person carefully guides the tube and
harnesses through the holes in the
hinges.
• When connecting the water line, make
sure you insert the tubing all the way
to the mark.
L
90°
Refreshment Center Models only
[] Set the door on a non-scratching surface
with the inside up.
Mark
• Do not pinch the tubing and harnesses
when placing the doors on the bottom
hinges.
• When connecting the power line and
the electrical lines (refreshment center
models only), be sure that the
connectors are seated together fully.
20

Installation Instructions
INSTALLING THE REFRIGERATOR
REFRIGERATOR LOCATION
• Do not install the refrigerator where the
temperature will go below 60°F (16°C)
because it will not run often enough to
maintain proper temperatures.
• Do not install the refrigerator where the
temperature will go above 100°F (37°C)
because it will not perform properly.
• Install it on a floor strong enough to
support it fully loaded.
CLEARANCES
Allow the following clearances for ease
of installation, proper air circulation and
plumbing and electrical connections:
Sides 1/8" (4 mm)
Top 1" (25 mm)
Back 1" (25 mm)
21

Installation Instructions
INSTALLING THE REFRIGERATOR (CONT.)
[]
CONNECTING THE REFRIGERATOR
TO THE HOUSE WATER LINE
(icemaker and dispenser models)
A cold water supply is required for
automatic icemaker and dispenser
operation. If there is not a cold water
supply, you will need to provide one.
See "Installing the Water Line" section.
NOTES:
Before making the connection to the
refrigerator, be sure the refrigerator
power cord is not plugged into the wall
outlet.
• If your refrigerator does not have a
water filter, we recommend installing
one if your water supply has sand or
particles that could clog the screen of
the refrigerator's water valve. Install it
in the water line near the refrigerator.
If using GE SmartConnect TM Refrigerator
Tubing Kit, you will need an additional
tube (WX08X10002) to connect the filter.
Do not cut plastic tube to install filter.
[]
If you are using copper tubing, place a
compression nut and ferrule (sleeve) onto
the end of the tubing coming from the
house cold water supply.
If you are using the GE SmartConnect TM
tubing, the nuts are already assembled to
the tubing.
[]
If you are using copper tubing, insert
the end of the tubing into the refrigerator
connection, at the back of the refrigerator,
as far as possible. While holding the
tubing, tighten the fitting.
If you are using GE SmartConnect TM
tubing, insert the molded end of the
tubing into the refrigerator connection,
at the back of the refrigerator, and tighten
the compression nut until it is hand tight.
Then tighten one additional turn with a
wrench. Overtightening may cause leaks.
[] Fasten the tubing into the clamp provided
to hold it in position. You may need to pry
open the clamp.
Tubing Clamp 1/4" Tubing
1/4"
Compression
Ferrule
(sleeve)
Refrigerator
Connection
[] TURN ON THE WATER SUPPLY
Turn the water on at the shutoff valve
(house water supply) and check for
any leaks,
[] PLUG IN THE REFRIGERATOR
Before plugging in the refrigerator, make
sure the icemaker power switch is set to
the O (off) position.
SmartConnect TMTubing
22
See the grounding information attached
to the power cord.

Installation instructions
[] PUT THE REFRIGERATOR
IN PLACE
Move the refrigerator to its final location.
[] LEVEL THE REFRIGERATOR
The refrigerator can be leveled by
adjusting the rollers located near the
bottom hinges.
_"""""_ Rol Iers////_
Rollers have three purposes:
• Rollers adjust so the door closes easily
when opened about halfway. (Raise the
front about 5/8" [16 mm] from the floor.)
• Rollers adjust so the refrigerator is
firmly positioned on the floor and does
not wobble.
• Rollers allow you to move the
refrigerator away from the wall for
cleaning.
€'1
Raise
[] LEVEL THE DOORS
Adjust the refrigerator door to make the
doors even at the top.
To align:
[]
Using a 7/16" wrench, turn the door
adjusting screw to the right to raise the
door, to the left to lower it.
NOTE:
A nylon plug, imbedded in the threads
of the pin, prevents the pin from turning
unless a wrench is used.
[]
After one or two turns of the wrench,
open and close the refrigerator door and
check the alignment at the top of the doors.
_ Doors should be even at top
'!!
To adjust the rollers:
• Turn the roller ,) II I
adjusting screws _
clockwise to
raise the
refrigerator,
counterclockwise
to lower it. Use a
3/8" hex socket ) [] __
or wrench, or an _\
adjustable
wrench. Roller adjusting screw
\
23

Installation Instructions
INSTALLING THE REFRIGERATOR (CONT.)
[] REPLACE THE BASE GRILLE
Replace the grille by installing the two
Phillips head screws.
[] START THE ICEMAKER
Set the icemaker power switch to the
I (on) position. The icemaker will not
begin to operate until it reaches its
operating temperature of 15°F (-9°C)
or below. It will then begin operation
automatically. It will take 2-3 days to
fill the ice bin.
NOTE:
In lower water pressure conditions, the
water valve may turn on up to 3 times
to deliver enough water to the icemaker.
[] SET THE CONTROLS
Set the controls to the recommended
setting.
5 5
[.EOOMME.OEOCO.T.O'SE ..OS]
0 *FIS RECOMMENDED 37 *F IS RECOMMENDED
24

Installation instructions
iNSTALLiNG THE WATER LiNE (ICEMAKER& DISPENSER MODELS)
BEFORE YOU BEGIN
Recommended copper water supply kits are
WX8X2, WX8X3 or WX8X4, depending on the
amount of tubing you need. Approved plastic
water supply lines are GE SmartConnect TM
Refrigerator Tubing (WX08Xl0006,
WX08X 10015 and WX08X 10025).
When connecting your refrigerator to a GE
Reverse Osmosis Water System, the only
approved installation is with a GE RVKit. For
other reverse osmosis water systems, follow
the manufacturer's recommendations.
If the water supply to the refrigerator is from
a Reverse Osmosis Water Filtration System
AND the refrigerator also has a water filter,
use the refrigerator's filter bypass plug. Using
the refrigerator's water filtration cartridge in
conjunction with the RO filter can result in
hollow ice cubes and slower water flow from
the water dispenser.
This water line installation is not warranted
by the refrigerator or icemaker manufacturer.
Follow these instructions carefully to
minimize the risk of expensive water damage.
Water hammer (water banging in the pipes)
in house plumbing can cause damage to
refrigerator parts and lead to water leakage
or flooding. Call a qualified plumber to correct
water hammer before installing the water
supply line to the refrigerator.
To prevent burns and product damage, do not
hook up the water line to the hot water line.
If you use your refrigerator before connecting
the water line, make sure the icemaker power
switch is in the O (off} position.
Do not install the icemaker tubing in areas
where temperatures fall below freezing.
When using any electrical device (such as a
power drill) during installation, be sure the
device is double insulated or grounded in a
manner to prevent the hazard of electric
shock, or is battery powered.
All installations must be in accordance with
local plumbing code requirements.
WHAT YOU WiLL NEED
J
• Copper or GE SmartConnect TM Refrigerator
Tubing kit, 1/4" outer diameter to connect
the refrigerator to the water supply. If using
copper, be sure both ends of the tubing are
cut square.
To determine how much tubing you need:
measure the distance from the water valve
on the back of the refrigerator to the water
supply pipe. Be sure there is sufficient extra
tubing to allow the refrigerator to move out
from the wall after installation.
GE SmartConnect TMRefrigerator Tubing Kits
are available in the following lengths:
6' (1.8 m) -WX08Xl0006
15' (4.6 m) - WX08X10015
25' (7.6 m) - WX08X10025
25

Installation Instructions
INSTALLING THE WATER LINE (CONT.)
Install the shutoff valve on the nearest
WHAT YOU WILL NEED (CONT.)
NOTE: The only GE approved plastic tubing
is that supplied in GE SmartConnect"
Refrigerator Tubing kits, Do not use any
other plastic water supply line because the
line is under pressure at all times. Certain
types of plastic will crack or rupture with age
and cause water damage to your home.
= A GE water supply kit (containing tubing,
shutoff valve and fittings listed below) is
available at extra cost from your dealer or
from Parts and Accessories, 800.626.2002
(in Canada 1.888.261.3055).
• A cold water supply. The water pressure must
be between 20 and 120 p.s.i. (1.4-8.1 bar).
• Power drill.
• 1/2" or adjustable wrench.
= Straight and Phillips blade screwdriver.
frequently used drinking water line.
[] SHUT OFF THE MAIN WATER
SUPPLY
Turn on the nearest faucet long enough
to clear the line of water.
[] CHOOSE THE VALVE LOCATION
Choose a location for the valve that is
easily accessible. It is best to connect into
the side of a vertical water pipe. When it is
necessary to connect into a horizontal
water pipe, make the connection to the
top or side, rather than at the bottom,
to avoid drawing off any sediment from
the water pipe.
= Two 1/4" outer diameter compression nuts
and 2 ferrules (sleeves)--to connect the
copper tubing to the shutoff valve and the
refrigerator water valve.
OR
• if you are using a GE SmartConnect TM
Refrigerator Tubing kit, the necessary
fittings are preassembled to the tubing.
• If your existing copper water line has a
flared fitting at the end, you will need an
adapter (available at plumbing supply
stores) to connect the water line to the
refrigerator OR you can cut off the flared
fitting with a tube cutter and then use a
compression fitting. Do not cut formed end
from GE SmartConnect TMRefrigerator tubing.
• Shutoff valve to connect to the cold water
line. The shutoff valve should have a water
inlet with a minimum inside diameter of
5/32" at the point of connection to the COLD
WATER UNE. Saddle-type shutoff valves are
included in many water supply kits. Before
purchasing, make sure a saddle-type valve
complies with your local plumbing codes.
[] DRILL THE HOLE FOR THE VALVE
Drill a 1/4" hole in the water pipe (even if
using a self-piercing valve), using a sharp
bit. Remove any burrs resulting from
drilling the hole in the pipe.
Take care not to allow water to drain into
the drill.
Failure to drill a 1/4" hole may result in
reduced ice production or smaller cubes.
26

Installation Instructions
[] FASTEN THE SHUTOFF VALVE
Fasten the shutoff valve to the cold water
pipe with the pipe clamp.
Pipe
Saddle-Type
Shutoff Valve
NOTE: Commonwealth of Massachusetts
Plumbing Codes 248CMR shall be adhered
to. Saddle valves are illegal and use is not
permitted in Massachusetts. Consult with
your licensed plumber.
[] TIGHTEN THE PIPE CLAMP
Tighten the clamp screws until the sealing
washer begins to swell.
NOTE: Do not overtighten or you may
crush the tubing.
Washer
Pi
Clamp
Screw
Inlet End
[] CONNECT THE TUBING
TO THE VALVE
Place the compression nut and ferrule
(sleeve) for copper tubing onto the end
of the tubing and connect it to the
shutoff valve.
Make sure the tubing is fully inserted
into the valve. Tighten the compression
nut securely.
pe
For plastic tubing from a GE
SmartConnect TMRefrigerator Tubing kit,
insert the molded end of the tubing into
the shutoff valve and tighten compression
nut until it is hand tight, then tighten one
additional turn with a wrench.
Overtightening may cause leaks.
Saddle-Type
Shutoff Valve
Packing Nut
Outlet Valve
NOTE: Commonwealth of Massachusetts
Plumbing Codes 248CMR shall be adhered
to. Saddle valves are illegal and use is not
permitted in Massachusetts. Consult with
your licensed plumber.
Ferrule (sleeve)
Compression Nut
/ SmartConnect 'M
Tubing
[] ROUTE THE TUBING
Route the tubing between the cold water
line and the refrigerator.
Route the tubing through a hole drilled in
the wall or floor (behind the refrigerator or
adjacent base cabinet) as close to the wall
as possible.
NOTE: Be sure there is sufficient extra
tubing to allow the refrigerator to move
out from the wall after installation.
[] FLUSH OUT THE TUBING
Turn the main water supply on and flush
out the tubing until the water is clear.
Shut the water off at the water valve after
about one quart (1 liter) of water has been
flushed through the tubing.
go back to Step 1 in Installing the Refrigerator.
I To complete the installation of the refrigerator, I
27
I

,O
Newer refrigerators sound different from older refrigerators.
Modem refrigerators have more features and use newer
technology.
Do you hear what I hear? These sounds are normal.
HUMMM...
WHOOSH...
,O
• The new high etticiem,_ compressor ma) Hm faster
Normal operatingsounds.
and hmger than your old refrigerator and you mm
hear a high-i)itched hum or I)ulsating, sound while
it is oi)erating,.
• Sometimes the reli'igeramr runs tot an extended period,
especially when the doo_s are opened ti'equently. This
means that the Frost Guard_ feature is working to
prevent ti'eezer burn and improve tood preseP,'ation.
i
,O
• You may hear a whooshing sound when the (loo_ close.
This is due to pressure equalizing within the reliigerato_:
• You may hear the tans spinning at high speeds.
This hal)pens when the refrigerator is first plugged
in, when the doors are opened ti'equently or when
a large aI//OllIlt of l[Ood is added to the refrigerator
or ti'eezer compartments. The tans are helping to
maintain the correct temperatures.
• If either door is open fi_r over 3 minutes, you may
hear the trois come on in order to cool the light
bulbs.
• Tile £ms change speeds in order to provide optimal
cooling and energy savings.
• You may hear the tans running atter selecting one of
the CustomCoo[%ettings.
,O
• You may hear cracking or i)opping sounds when the
• Electronic dampers click open and closed to provide
iii_iii_!iiii;i/iiii!
i!_J_2;yii
iiiili!%_ii
• The compressor may cause a clicking or chiq)ing
• The electronic control board may cause a clicking
• Expansion and contraction of cooling coils during
iii/l! ii
l
• On models with an icemake_; alter an icemaking
E
CLICKS, POPS,
CRACKS and CHIRPS
reli'igerator is first i)lugged in. This hal)pens as the
reli'igerator cools to the correct temperature.
optimal cooling and energy savings.
sound when attempting to restart (this could take
up to 5 minutes).
sound when relays activate to control reti'igerator
COII/l)OIleIltS,
and alter deti'ost can cause a cracking or i)oi_ping
SOtlnd.
cycle, yotl Ill}IV hear the ice ctlbes dropping into
the ice bucket.
WATERSOUNDS
6
• Tile flow of refl'igerant through the fl'eezer cooling
coils may make a gurgling noise like boiling water.
• _4'ater dropping on the defl'ost heater can cause a
sizzling, I)opping or buzzing SOtlild during the
defl'ost cvcle.
• A water dripping noise may occur during the defrost
cycle as ice melts from the ewq)orator and flows into
the drain pan.
• Closing the door may cause a gurgling sound due to
pressure equalization.
28

Beforeyoucall forservice...
Troubleshooting -tips
Save time and money! Review the charts on the following
pages first and you maynot need to call for service.
Possible Causes What To Do
Refrigerator does not Refrigerator in defrost cycle. * Wait about 30 minutes tor deti'ost cycle to end.
operate Either or both controls set to OFF. * Set tile controls to a lower temperature setting.
Refrigerator is maplugged. * Push tile plug c(mq_letely into tire outlet.
The fuse is blown/cirettit * Replace fl/se or reset tire breaker.
breaker is tripped.
Refrigerator is ha showroom ]node. * tluplug tire refl'igerator and plug it back in.
Vibration or rattling Rollers need adjusting. * See Rollers.
(slight vibration
is normal)
Motor operates for Normal when refrigerator * _,Lfit 24 hotu_ tot the refi'igerator to completely
Iongperiods orcycles is In'st plugged ha. cool down.
on and off frequently.
(Modern refrigerators amounts of food are
with more storage
space and a larger placed in refrigerator.
freezer require more Door left open. * Check to see if package is holding door open.
operating time. They
start and stop often Hot weather or frequent * This is uonual.
tomaintain even door openings.
temperatures.) Temperature controls * See About the controls.
Often occurs when large * This is uon, al.
set at the coldest
setting.
ge.com
i
Refrigerator or freezer Temperature control not set * See About the controls.
compartment too warm cold enough.
Warm weather or frequent * Set tire teurperatttre control one step colder.
door openings. See About the controls.
Door left open. * Check to _ee if package i_ holding door open.
Frost or ice crystals Door left open. * Check to see if l)ackage, is holding, door open.
on frozen food
(frost within package Too frequent or too long
isnormal) door openings.
Divider between Automatic energy saver * Thi_ hellas Iareveut (oudeusafioi] oi] tire outside.
refrigerator and freezer system circulates warm
compartments liquid around front edge
feels warm of freezer compartment.
Automatic icemaker lcemaker power switch * Set tire l)ower switch to tire I(on) position.
does not work is in the 0 (Off)position.
Water supply turned off or * See Installing the water line.
not comaected.
Freezer compartment * _,Lfit 24 hotu_ 1or the reti_igerator to completely
too warm. cool dowl].
Piled up cubes ha the storage * Level cubes by hand.
bin cause the icemaker
to shut off.
!i_:;;i_iiiiii
iiiiii'_i?)ii!ii
!:?i:::iiiii
i
Ice cubes stuck ha icemaker.
(Green power light on
icemaker blhaking).
• Turn off the icemakei, remove cubes, and turn the
icei]]aker back oi].
i
29

,0
Beforeyoucall forservice...
t_
Possible Causes What ToDo
Ice cubes have Ice storage bin needs cleatfing. * Empb' and wash bin. Discard old cubes.
odor/taste
i
Small or hollow cubes Water filter clogged. * Replace filter cartridoe with new cartridge or with )hv,
Food trmasllfitthlg odor/taste * _'_I'ap fi)ods well.
to ice cubes.
Interior of refrigerator * See Care alTd C[Oal7il7g.
needs demfing.
,0
t_
,0
,0
Slow ice cube freezing Door left open. * Check to see if package is holding door open.
Telnperature control not set *SeeAbouttbocolTtro/s.
cold enough.
Orangeglowin Defrost heater is on. * This is nomml.
the freezer
Cube dispenser does not lcema_ker turned off or * Tm'n on icelnaker or water supply.
water supply turned off.
Ice cubes are frozen to * Rein o_,e cubes.
icema_ker feeler arm.
An item is blocking or has fallen * ]_elnove am iteln that ufight be blocking, or has tifllen
into the ice chute h_side the top into, tile chute.
door bin of the freezer.
Irregular ice clmnps in * Break up with fingertip pressure and discard
storage coutaJner, relnaining ('hlul)s
• Freezer into' be too walm. At!jUst tile fl'eezer control
to a colder setting, one position at a tilne, until clulnps
do not foil/l.
Dispenser is LOCKED. • Press and hold tile LOCKpad fin" 3 seconds.
Waterhaspoortaste/odor Water dispenser has not been • Dispense water until all water ill s}steln is replenished.
(ou some models) used for a long tbue.
Waterin firstglassis Normal when refrigerator • X'_ait 24 houI_ fin" tile refiJgerator to completely
is first installed, cool down.
iii_iii_!iiii;iliiii!
iiiili!%_ii
iiill! ii
l
E
Water dispenser has not been • Dispense water until all water ill s}steln is replenished.
used for along time.
Water system has been drained. • ?dlow several houi_ for replenished suppl} to chili.
Water dispenser does Water supply line turned • See 11TstallilT9tho wator lilTo
not work (on some models) off or not cmmected.
Water filter clogged. • Replace filter camJdge or relnove filter and install phlg.
Air may be trapped ha the • Press the dispenser aml for at least two mint_tes.
water system.
Dispenser is LOCKED. • Press and hold tile LOCKpadfi)r 3 seconds.
Waterspurting from Newly-hastMled filter cartridge. • ]_.un water fl'oln tile dispenser for 3 ulinutes (about
dispenser (on some models) one and a half galh)ns).
Waterisnotdispensed Water ill reservoir is • Call fi)r set\ice.
(onsomemodels)but frozen.
icemake r is working Refrigerator control settillg • Set to a Wallner settin ,
is too cold.
3O
 Loading...