

Page 1

GBSR1080
GBXR1080
GCXR2100
GJSR2130
GJXR2130
GKSR2100
GNSR2140
GUSR2130
Washers
175D1807P312 49-90046 7-00 JR
Safety Information . . . . . . 3
Operating Instructions
Control Panels and
Settings . . . . . . . . . . . . . . . .4–6
Features . . . . . . . . . . . . . . . . . 7
Loading and Using the
Washer . . . . . . . . . . . . . . .8–11
Stain Guide . . . . . . . . . .10, 11
Troubleshooting Tips
Before You Call For
Service . . . . . . . . . . . . . . 12–14
Customer Service
Service Telephone
Numbers . . . . . . . . . . . . . . . .16
Warranty . . . . . . . . . . . . . . . 15
Owner’s Manual
GE Appliances
Page 2
IF YOU NEED SERVICE
You’ll find many answers to common problems in the
Before You Call For Service
section. If you review our
chart of
Troubleshooting Tips
first, you may not need to call for service at all.
If you do need service, you can relax knowing help is only a phone call away. A list of toll-free customer
service numbers is included in the back section. Or call 1-800-361-3400.
A Service Partnership.
FOR YOUR RECORDS
Write the model and serial numbers here:
#
#
You can find them in the upper right corner on the back of your washer.
Inside you will find many helpful hints on how to use and maintain your washer properly. Just a little
preventive care on your part can save you a great deal of time and money over the life of your washer.
READ THIS MANUAL
IMPORTANT!
Staple sales slip or cancelled check here.
Proof of the original purchase date is needed to obtain service under the warranty.
2
Operating Instructions Safety InstructionsCustomer Service Troubleshooting Tips
Page 3
■Install or store where it will not be exposed to
temperatures below freezing or exposed to the weather.
■Properly ground washer to conform with all governing
codes and ordinances. Follow details in Installation
Instructions.
IMPORTANT SAFETY INFORMATION.
READ ALL INSTRUCTIONS BEFORE USING.
WARNING!
For your safety, the information in this manual must be followed to minimize the risk of fire
or explosion, electric shock, or to prevent property damage, personal injury, or loss of life.
WATER HEATER SAFETY
Under certain conditions hydrogen gas may be produced in a water heater that has not been used for two weeks
or more. Hydrogen gas can be explosive under these circumstances.
If the hot water has not been used for two weeks or more, prevent the possibility of damage or injury by turning on
all hot water faucets and allowing them to run for several minutes. Do this before using any electrical appliance
which is connected to the hot water system. This simple procedure will allow any built-up hydrogen gas to escape.
Since the gas is flammable, do not smoke or use an open flame or appliance during this process.
PROPER INSTALLATION
This washer must be properly installed and located in accordance with the Installation Instructions before it is used. If
you did not receive an Installation Instructions sheet, you can receive one by calling, toll-free
1-800-361-3400.
Customer ServiceTroubleshooting TipsOperating InstructionsSafety Instructions
■Keep the area underneath and around your
appliances free of combustible materials such as
lint, paper, rags, chemicals, etc.
■Close supervision is necessary if this appliance is used
by or near children. Do not allow children to play on,
with, or inside this or any other appliance.
YOUR LAUNDRY AREA
■Never reach into washer while it is moving. Wait
until the machine has completely stopped before
opening the lid.
■Do not mix chlorine bleach with ammonia or acids
such as vinegar and/or rust remover. Mixing
different chemicals can produce a toxic gas which
may cause death.
■Do not wash or dry articles that have been cleaned in,
washed in, soaked in, or spotted with combustible or
explosive substances (such as wax, oil, paint, gasoline,
degreasers, dry-cleaning solvents, kerosene, etc.) which
may ignite or explode. Do not add these substances to
the wash water. Do not use or place these substances
around your washer or dryer during operation.
■
The laundry process can reduce the flame retardancy
of fabrics. To avoid such a result, carefully follow the
garment manufacturer’s wash and care instructions.
■To minimize the possibility of electric shock, unplug
this appliance from the power supply or disconnect
the washer at the household distribution panel by
removing the fuse or switching off the circuit breaker
before attempting any maintenance or cleaning.
NOTE:
Turning the Cycle Selector knob to an off
position does
NOT
disconnect the appliance from
the power supply.
■Never attempt to operate this appliance if it is damaged,
malfunctioning, partially disassembled, or has missing
or broken parts, including a damaged cord or plug.
WHEN USING THE WASHER
■Turn off water faucets to relieve pressure on hoses
and valves and to minimize leakage if a break or
rupture should occur. Check the condition of the
fill hoses; they should be replaced after 5 years.
■Before discarding a washer, or removing it from
service, remove the washer lid to prevent children
from hiding inside.
■Do not attempt to repair or replace any part of this
appliance unless specifically recommended in this
Owner’s Manual, or in published user-repair
instructions that you understand and have the skills
to carry out.
■Do not tamper with controls.
WHEN NOT IN USE
READ AND FOLLOW THIS SAFETY INFORMATION CAREFULLY.
SAVE THESE INSTRUCTIONS
3
Use this
appliance
only for its
intended
purpose as
described in
this Owner’s
Manual.
Page 4
Model GBXR1080
Find your washer control panel.
Operating Instructions Safety InstructionsCustomer Service Troubleshooting Tips
You can locate your model number behind the top edge of the control panel.
4
Model GBSR1080
1
3
4
Model GKSR2100
Model GCXR2100
1 2
4
3
1
3
4
1
3
4
Page 5
Customer ServiceTroubleshooting TipsOperating InstructionsSafety Instructions
Model GJSR2130
1 2
4
3
Model GJXR2130
1 2
4
3
Model GUSR2130
1 2
4
3
Model GNSR2140
1 2
4
3
5
Page 6
Load Size
The water level should just cover the clothes. Adjust the load size accordingly. Loosely load clothes
no higher than the top row of holes in the washer tub.
Wash/Spin Speed
The agitator moves clothes around for a cleaner wash; the basket spins later in the cycle to release
water from the load. The Wash/Spin Speed dial sets the speed of both the agitator and the basket.
With Normal wash speed, the agitator moves faster. Use for cottons, denims and play clothes. With
Delicate wash speed, the agitator moves slower. Use for delicate and knit items.
The Normal spin speed is for durable items. The Delicate spin speed is for delicate items like
sweaters and lingerie. Clothes will be less dry than when using Normal spin speed.
Temperature
Select the water temperature for the wash and rinse cycles. Always follow fabric manufacturer’s care
label or instructions when laundering. Follow the water temperature guide on the washer lid.
Wash Cycle
The wash cycle controls the length of the washing process. The chart below will help you match the
wash cycle setting with your clothing.
COTTONS For heavy to lightly soiled cottons, household linens, work and play clothes.
EASY CARE For wrinkle-free and permanent press items, and knits.
HANDWASH For items labeled handwashable with light soils. Provides period of agitation and soak during wash
and rinse.
DELICATE For lingerie and special-care fabrics with light to normal soil. Provides periods of agitation and soak
during wash and rinse.
SUPER For heavily soiled and heavy-duty fabrics. This cycle provides a longer agitation.
PREWASH For heavily soiled clothes or for clothes with a care label that recommends prewashing before wearing.
QUICKWASH For lightly soiled items that are needed in a hurry.
QUICK RINSE For quickly rinsing chlorine, perspiration, stains, etc. out of clothes.
15 MIN/30 MIN For heavily soiled clothes. Begins with a brief agitation, soaks for a specified period of time, then moves
AUTO SOAK through the rest of the cycle automatically.
4
3
2
1
Operating Instructions Safety InstructionsCustomer Service Troubleshooting Tips
6
About the control settings.
Page 7
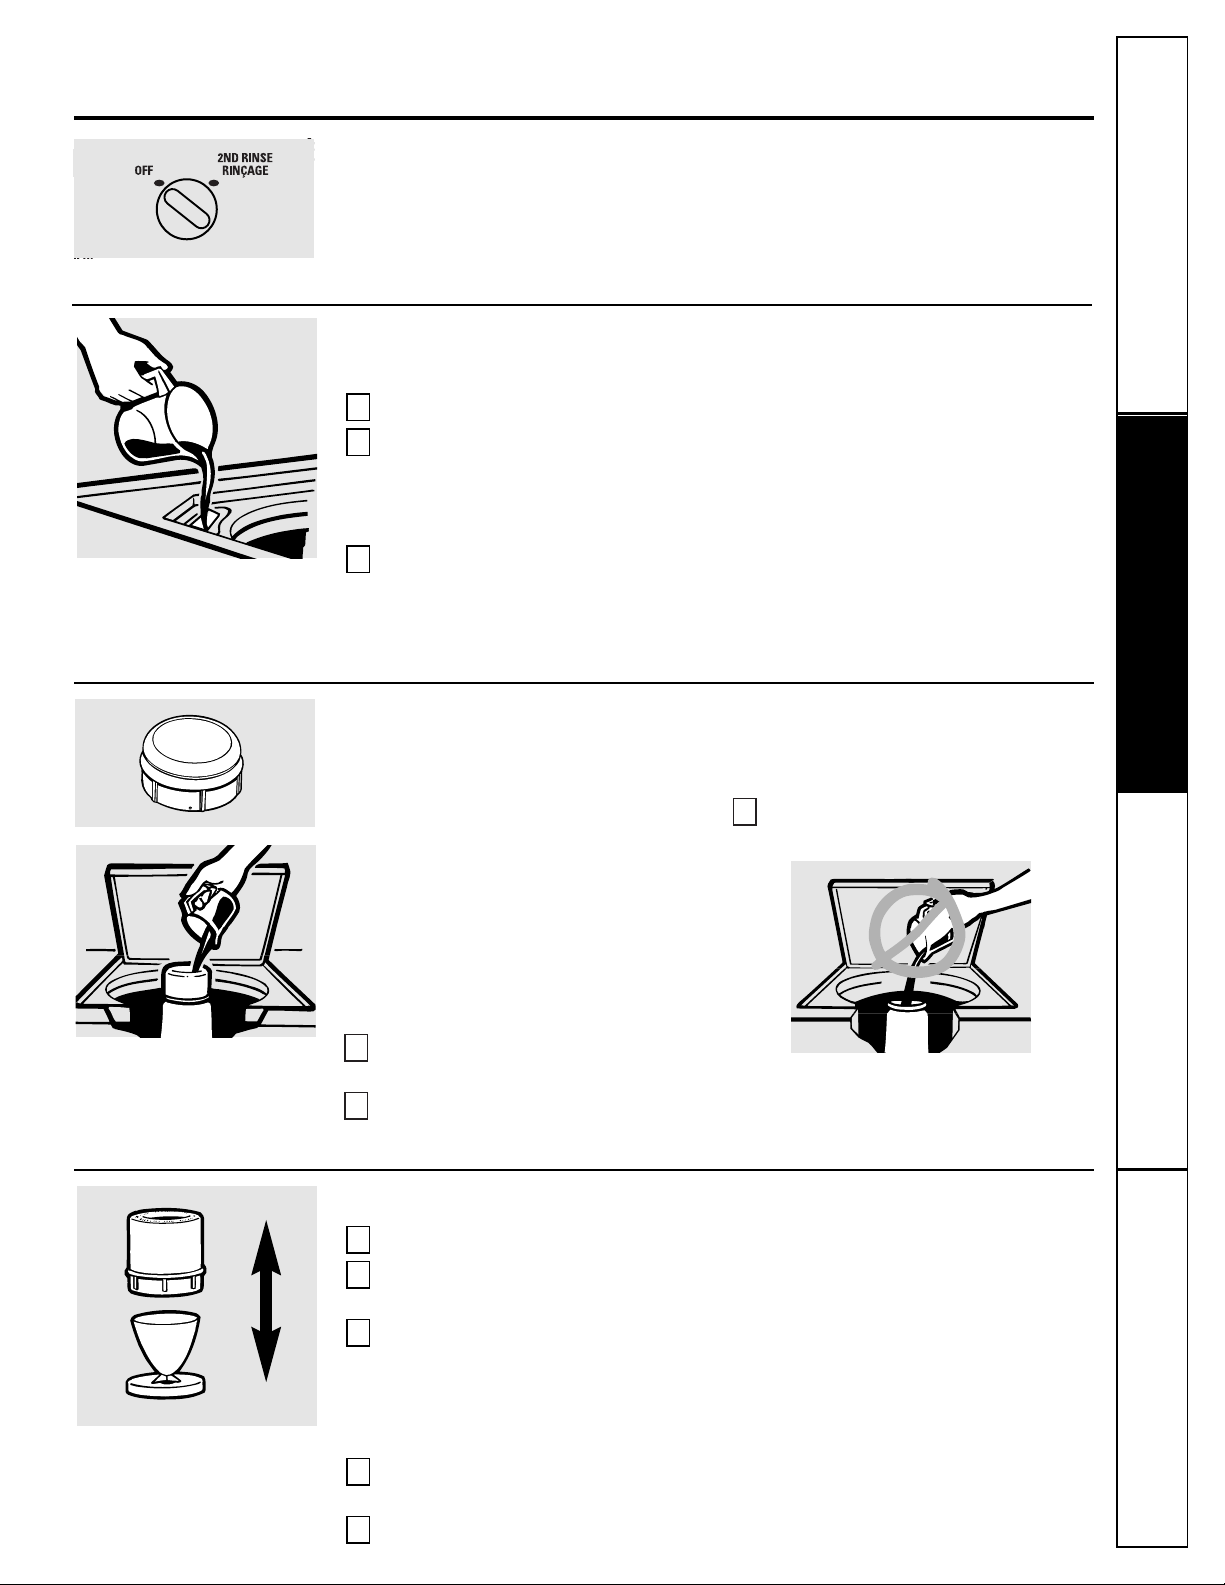
The Agitator Cap or Fabric Softener Dispenser (on some models)
The agitator cap
fits into the top of the
agitator. If it accidentally comes off, simply
put it back on.
The fabric softener dispenser
automatically
releases liquid fabric softener at the proper
time during the cycle.
Do not stop the washer during the first spin.
This will cause the dispenser to empty
too soon.
To use, follow these steps:
Make sure dispenser is securely attached
to agitator.
Use only liquid fabric softener. Pour
into dispenser, using amount
recommended on package.
Never pour fabric softener directly on
clothes. It may stain them.
Add water to dispenser until it reaches
the maximum fill line.
3
2
1
Do not pour anything into the agitator if
the agitator cap or dispenser is removed.
About washer features.
NOTE: Not all features are available on all washer models.
Liquid Bleach Dispenser (on some models)
The dispenser dilutes liquid chlorine bleach before it reaches into your wash load.
Check clothing care labels for special instructions.
Measure liquid bleach carefully, following instructions on the bottle.
■
Never pour undiluted liquid chlorine bleach directly onto clothes or into the wash basket.
■
Do not pour powdered bleach into bleach dispenser.
Before starting the washer, pour measured amount of bleach directly into bleach
dispenser. Avoid splashing or over-filling dispenser. If you prefer to use powdered
bleach, add it into the wash basket with your detergent.
■
Do not mix chlorine bleach with ammonia or acids such as vinegar and/or rust remover. Mixing can
produce a toxic gas which may cause death.
3
2
1
Cleaning the Fabric Softener Dispenser (on some models)
Remove the dispenser from the top of the agitator.
Separate the dispenser cup from the cover by grasping the top and pushing down on
the inside of the cup with your fingers. Dispenser cup will pop free from the cover.
To clean the dispenser, soak both the dispenser cup and the dispenser cover in the
following solution:
■
1 US gallon (3.8 liters) warm water
■
1/4 cup (60 ml) heavy duty liquid detergent
■
1 cup (240 ml) bleach
If necessary, loosen build-up with a clean, soft cloth after soaking. Do not use a stiff
brush; you may roughen the surface of the dispenser.
Rinse and reassemble dispenser. Place dispenser back on the agitator.
5
4
3
2
1
Separate for cleaning.
Customer ServiceTroubleshooting TipsOperating InstructionsSafety Instructions
7
2nd Rinse Option (on some models)
When you use extra detergent or bleach to clean heavily soiled clothes, you may want to use
the 2nd Rinse option. It provides a second deep cold rinse.
(appearance and features may vary)
Page 8

Operating Instructions Safety InstructionsCustomer Service Troubleshooting Tips
8
Loading and using the washer.
Always follow fabric manufacturer’s care label when laundering.
Sorting Wash Loads
Proper Use of Detergent
Add detergent as the wash basket fills with water,
before you load clothes. Using too much detergent
can be a common cause of laundry problems.
Today’s detergents are formulated to be effective
without highly visible sudsing. Be sure to carefully
read and follow manufacturer’s recommendations
for how much detergent to use in your wash. You
can use less detergent if you have soft water,
a smaller load, or a lightly soiled load.
Loading the Washer
Load dry items loosely, no higher than the top
row of holes in the washer tub. When loading
wet items make sure you set the load/water level
high enough to allow the items to move freely.
Water level should just cover the clothes. To add
items after washer has started, push in Cycle
Dial and submerge additional items next to the
agitator. Close the lid and pull Cycle Dial out
to restart.
■
Do not wrap long items like sheets and pants
around the agitator.
■
Do not wash fabrics containing flammable
materials (waxes, cleaning fluids, etc.).
■
Water will fill and pump out of the washer and the
timer will advance with the lid up, but as a safety
precaution the washer will not agitate or spin.
Sort by color (whites, lights, colors), soil level,
fabric type (sturdy cottons, easy care, delicates),
and whether the fabric produces lint (terry cloth,
chenille), or collects lint (velveteen, corduroy).
Page 9
Customer ServiceTroubleshooting TipsOperating InstructionsSafety Instructions
9
Care and Cleaning of the Washer
Wash Basket:
Leave the lid open after washing to
allow moisture to evaporate. If you want to clean the
basket use a clean soft cloth dampened with liquid
detergent, then rinse. (Do not use harsh or gritty
cleaners.)
Fill Hoses:
Hoses connecting washer to faucet should
be replaced every 5 years.
Lint Filter:
The lint filter is located under the agitator.
It is self-cleaning and requires no maintenance.
Exterior:
Immediately wipe off any spills. Wipe
with damp cloth. Try not to hit surface with sharp
objects.
Moving and Storage:
Ask the service technician
to remove water from drain pump and hoses.
Do not store the washer where it will be exposed
to the weather. For information on how to keep
the tub stationary when moving the washer write
to: Manager, Consumer Relations, Camco Inc.,
1 Factory Lane, Suite 310, Moncton, N.B. E1C 9M3.
Long Vacations:
Be sure water supply is shut off at
faucets. Drain all water from hoses if weather will
be below freezing.
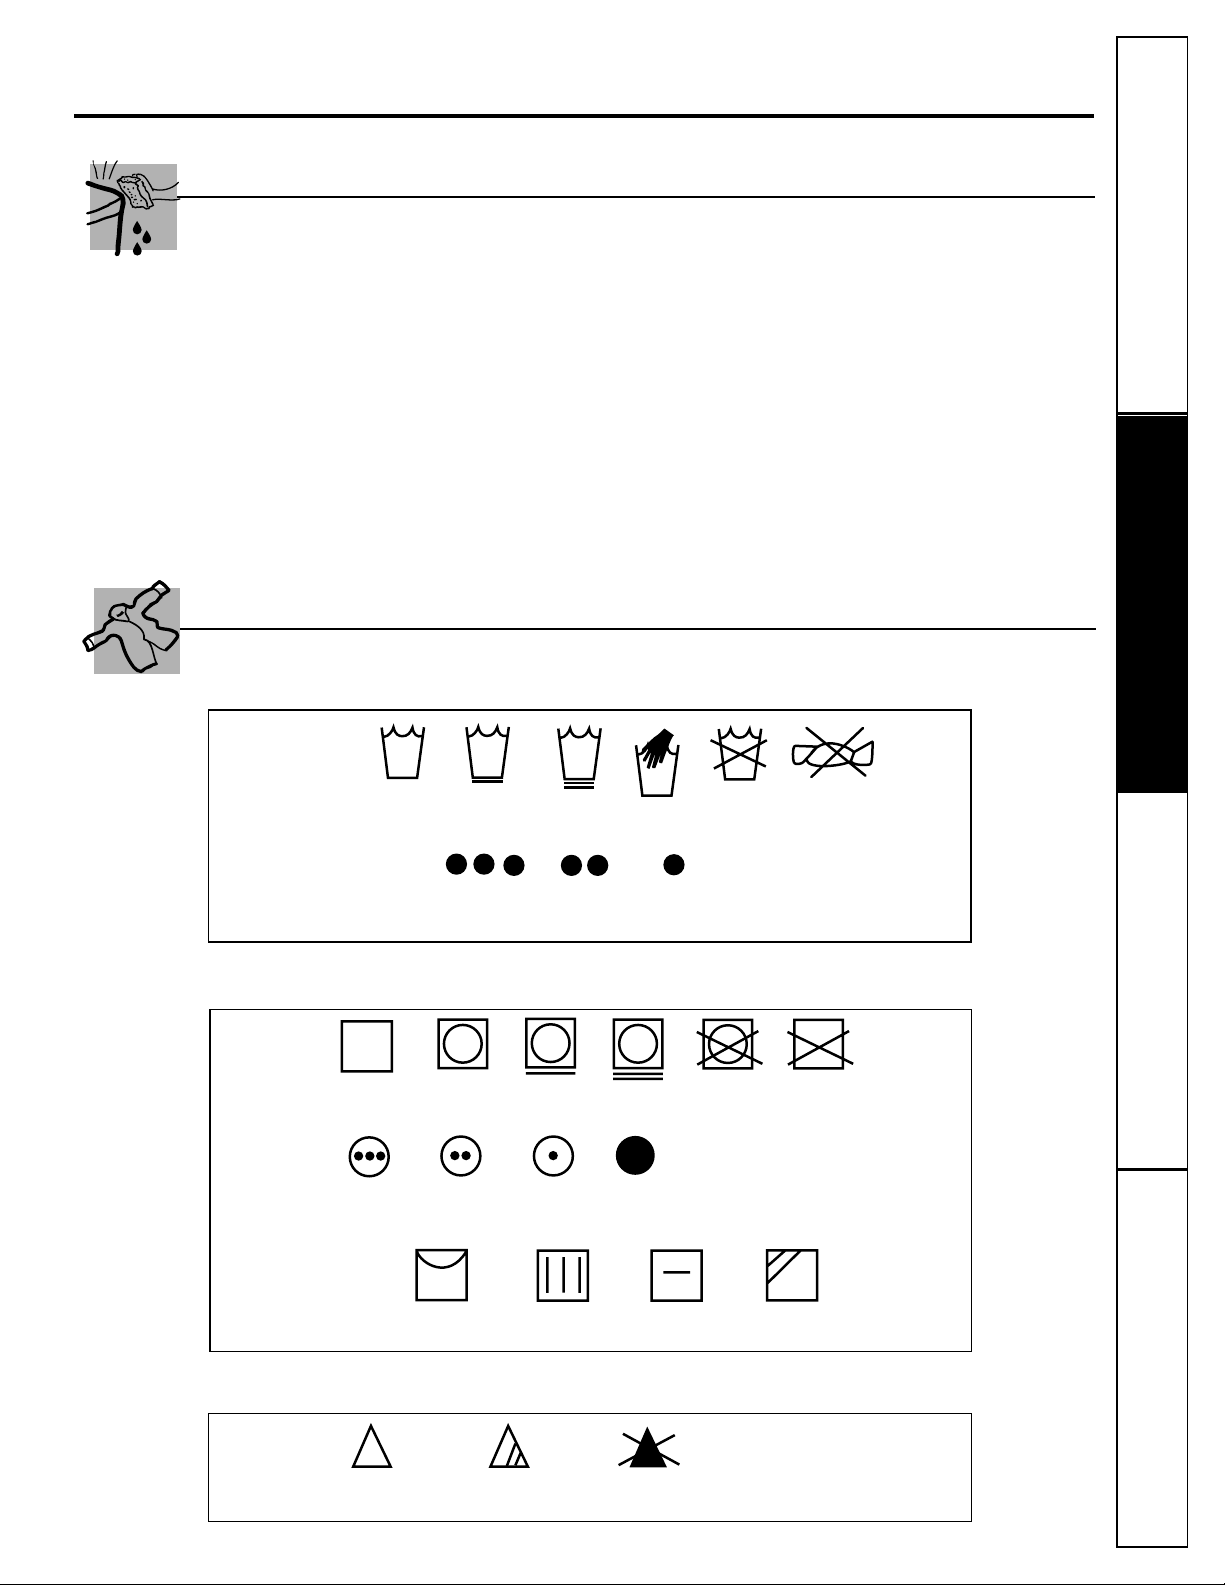
Fabric Care Labels
Machine
wash
cycle
Normal
Permanent Press/
wrinkle resistant
Gentle/
delicate
Hand wash
Do not wash Do not wring
Water
temperature
Hot
(50°C/120°F)
Warm
(40°C/105°F)
Cold/cool
(30°C/85°F)
Tumble
dry
Dry
Normal
Permanent Press/
wrinkle resistant
Gentle/
delicate
Do not tumble dry
Do not dry
(used with
do not wash)
Heat
setting
High
Medium
Low
No heat/air
Special
instructions
Line dry/
hang to dry
Drip dry
Dry flat
In the shade
Bleach
symbols
Any bleach
(when needed)
Only non-chlorine bleach
(when needed)
Do not bleach
Below are fabric care label “symbols” that affect the clothing you will be laundering.
WASH LABELS
DRY LABELS
BLEACH LABELS
Page 10

10
Operating Instructions Safety InstructionsCustomer Service Troubleshooting Tips
Loading and using the washer.
Always follow fabric manufacturer’s care label when laundering.
STAIN White and Bleachable Fabrics Other Washable Fabrics
Adhesives
Rub with ice or immerse in • Same as white and bleachable fabrics.
(chewing gum, etc.)
very cold water. Use dull tool
to carefully scrape off as much
adhesive or gum as possible.
Rub the stain with undiluted
liquid detergent. Rinse well,
then wash as usual.
Antiperspirants,
Apply undiluted liquid detergent. • Same as white and bleachable fabrics except use
deodorants
Rinse. If stain remains, use the non-chlorine bleach.
Bleach Solution; launder.
Blood
Soak in cold water, then launder • Sponge or soak in cool water, then launder.
in warm water. If stain remains,
use the Bleach Solution; launder.
Chocolate, cream,
Soak in cold water. Use the • Same as white and bleachable fabrics except use
ice cream and milk
Bleach Solution; launder. non-chlorine bleach.
Coffee and tea
Without cream: Use the Bleach • Sponge with warm water. If stain remains, apply warm
Solution; launder. glycerine (available at drug stores), let stand 30 minutes
and rinse well. Wash as usual.
With cream: Soak in cold water,
then use the Bleach Solution;
launder.
Cosmetics, crayon
Use the Bleach Solution; • Rub the stain with undiluted liquid detergent.
launder. Rinse well, then wash as usual.
Removing Specific Stains
Bleach Solution:
To remove stains on white or
bleachable fabrics, try soaking the stained area in a
container for five minutes in the following solution
and then launder in the washer:
■
1 US gallon (3.8 liters) cool water
■
1/4 cup (60 ml) chlorine bleach
The invisible stain When They Become Visible:
• Rub the stain with undiluted liquid detergent.
• Let stand 30 minutes.
• Rewash using the hottest water that is safe for the fabric.
Preventing These Stains:
• Increase the amount of detergent used.
• Increase water temperature.
• Wash synthetics often.
Foods on synthetic clothes may
cause stains which are virtually
invisible when you put the
clothes in the washer. If these
stains are not completely
removed in the wash, they may
pick up dirt from other clothes
in the washer and appear after
the clothes are dried.
Page 11

11
Customer ServiceTroubleshooting TipsOperating InstructionsSafety Instructions
STAIN White and Bleachable Fabrics Other Washable Fabrics
Grass, mildew, scorch
Apply undiluted liquid detergent; • Sponge with warm water. Apply undiluted liquid
launder. (Treat mildew spots detergent; launder. Bleach with non-chlorine bleach;
while they are fresh, before mold launder. Old mildew cannot be removed. Scorch can
has a chance to weaken fabric.) seldom be removed.
If either type stain remains,
use the Bleach Solution; launder.
(Severe scorch stains can seldom
be removed.)
Ink, ballpoint
Fresh stains: Place stain face • Same as white and bleachable fabrics except launder
down on an absorbent towel using non-chlorine bleach.
and use a spray cleaner.
Rinse well, then wash as usual.
Old stains: Use the Bleach
Solution; launder.
Juices, wine,
Soak stain in cool water. • Sponge with warm water. Bleach remaining stain with
food coloring
If stain remains, use the non-chlorine bleach.
Bleach Solution; launder.
Perspiration
Apply undiluted liquid detergent • Launder in warm water. Rinse well. Bleach with
and launder in warm water. non-chlorine bleach.
If color has changed you may
be able to restore it by treating
with ammonia or vinegar.
WARNING:
Do not mix chlorine bleach with
ammonia or acids such as vinegar
and/or rust remover. Mixing can
produce a toxic gas which may
cause death.
Page 12

Operating Instructions Safety InstructionsCustomer Service Troubleshooting Tips
12
Before you call for service…
Troubleshooting Tips
Save time and money! Review the charts on the following
pages first and you may not need to call for service.
WATER Possible Causes What To Do
Too many suds
Type of detergent • Switch to a lower sudsing detergent brand and follow
instructions on package.
Very soft water • Try less detergent.
Too much detergent. • Measure your detergent carefully. Use less soap if you
have soft water, a smaller load, or a lightly soiled load.
Water leaks
Fill hoses or drain hose is • Make sure hose connections are tight at faucets and make
improperly connected sure end of drain hose is correctly inserted in and secured
to drain facility.
Household drain may • Check household plumbing. You may need to call a
be clogged plumber.
Constant water pressure • Tighten hoses at the faucets and turn the water off after
to the fill hoses at the each use.
water source
• Check condition of the fill hoses; they should be replaced
after 5 years.
Using too much detergent • Use less detergent. Use less soap if you have soft water,
in washer a smaller load, or a lightly soiled load.
Water temperature
Control is not set properly • Check water temperature control (on some models)
is incorrect
or Cycle knob and adjust.
Water supply is turned off • Turn both hot and cold faucets fully on and make sure
or improperly connected hoses are connected to correct faucets.
Water valve screens are •
Turn off the water source and disconnect the water fill
stopped up
hoses from the upper back of the washer. Use a brush or
toothpick to clean the screens in the machine. Reconnect
the hoses and turn the water back on.
House water heater is • Make sure house water heater is delivering water
not set properly at 120°F.–140°F.(48°C.–60°C.).
Water won’t drain
Drain hose is kinked or • Straighten drain hose and make sure washer is not
improperly connected sitting on it.
• Top of drain outlet should be less than 8 ft. (2.5 m)
above floor.
Page 13

Customer ServiceTroubleshooting TipsOperating InstructionsSafety Instructions
13
PERFORMANCE Possible Causes What To Do
Colored spots
Incorrect use of fabric • Check fabric softener package for instructions and
softener follow directions for using dispenser.
• Pretreat stain and rewash.
Dye transfer • Sort whites or lightly colored items from dark colors.
Grayed or yellowed
Not enough detergent • Use more detergent (especially with larger loads).
clothes
Hard water • Use a water conditioner like Calgon brand or install
a water softener.
Water is not hot enough • Make sure water heater is delivering water at
120°F.–140°F. (48°C.–60°C.).
Washer is overloaded • Select load size to match clothes load.
Detergent is not • Add detergent as wash basket fills with water before
dissolving you load clothes.
Dye transfer • Sort clothes by color. If fabric label states
wash separately,
unstable dyes may be indicated.
Lint or residue on
Clothes are air or line dried • If you do not dry your clothes with a clothes dryer,
clothes
your clothes may retain more lint.
Incorrect sorting • Separate lint producers from lint collectors.
Washing too long • Wash small loads for a shorter time than larger loads.
Detergent not dissolving • Add detergent as wash basket fills with water, before you
load clothes.
• Try a liquid detergent.
• Use warmer water temperature.
Overloading • Load clothes no higher than the top row of holes in the
washer tub.
• Make sure load size selector matches clothes load size.
Incorrect use of fabric softener • Check fabric softener package for instructions and
follow directions for using dispenser.
OPERATION Possible Causes What To Do
Washer pauses in cycle
The washer normally pauses
between washing steps
Washer won’t operate
Washer is unplugged • Make sure cord is plugged securely into a working outlet.
Water supply is turned off • Turn both hot and cold faucets fully on.
Controls are not set • Check controls and make sure Cycle knob is pulled out
properly to ONposition.
Lid is open –safety feature • Close lid and reset cycle, to the beginning if necessary.
prevents agitation and spinning
when lid is up
Circuit breaker/fuse is • Check house circuit breakers/fuses. Replace fuses or
tripped/blown reset breaker. Washer should have separate outlet.
Page 14

14
Operating Instructions Safety InstructionsCustomer Service Troubleshooting Tips
Before you call for service…
OTHER Possible Causes What To Do
Labels on the exterior
Occasionally the adhesive • Use a hair dryer set at the lowest heat setting, directing
of the washer will not
used on the labels does the air at the label for a short amount of time. This will
peel off cleanly
not release cleanly release the adhesive easily, without damaging the surface
of the washer.
NOISE Possible Causes What To Do
Washer is noisy
Washer is uneven • To level the front of the washer, adjust the front leveling
legs by rotating the individual leg in the proper direction
for up or down. To level back of washer, lift back of
machine 4″(11 cm) and set down.
Washer load is • Push the Cycle knob in to stop the washer, open the lid
unbalanced and redistribute the load evenly. Close the lid and restart.
Shipping rod is still assembled • To remove shipping rod from washer, pull yellow tag and
in unit attached rod from the bottom right hand side of washer.
Washer is sitting too close
•
Pull washer away from the wall; about 4″(11 cm) is
to wall (causes knocking needed.
during cycle)
(con) PERFORMANCE Possible Causes What To Do
Pilling
Result of normal wear on • While this is not caused by the washer, you can slow the
poly-cotton blends and pilling process by washing garments inside out.
fuzzy fabrics
Snags, holes, tears, rips
Pins, snaps, hooks, sharp • Fasten snaps, hooks, buttons, and zippers.
or excessive wear
buttons, belt buckles,
• Remove loose items like pins, objects in pockets
zippers, and sharp objects
and sharp buttons.
left in pockets
• Turn knits (which snag easily) inside out.
Undiluted chlorine bleach • Check bleach package instructions for proper amount.
• Never add undiluted bleach to wash or allow clothes
to come in contact with undiluted bleach.
Chemicals like hair bleach • Rinse items that may have chemicals on them before
or dye, permanent wave washing.
solution
Wrinkling
Improper sorting • Avoid mixing heavy items (like work clothes) with
light items (like blouses).
• Try a fabric softener.
Overloading or • Load your washer so clothes have enough room
incorrect water level to move freely.
Incorrect wash and • Match Cycle selection to the type of fabric you are
dry cycles washing (especially for easy care loads).
Repeated washing in • Wash in warm or cold water.
water that is too hot
Page 15

15
Customer ServiceTroubleshooting TipsOperating InstructionsSafety Instructions
Washer Warranty
All warranty service provided by our Factory Service Centers or an authorized technician.
For service, call 1-800-361-3400.
What Is Not Covered:
One Year Any part
of the washer which fails due to a defect in materials or workmanship. During this
full
From the date of the one-year warranty,
we will also provide,
free of charge,
all labor and in-home service to replace the
original purchase
defective part.
Five Years The suspension rod and spring assembly,
if any of these parts should fail due to a defect in materials
From the date of the
or workmanship. We will also replace the
washer lid and cover
if they should rust under normal
original purchase
operating conditions. During this
additional four-year limited warranty,
you will be responsible for any
labor or
in-home service costs.
Ten Years The transmission, washer basket and washer tub,
if any of these parts should fail due to a defect in
From the date of the
materials or workmanship. During this
additional nine-year limited warranty,
you will be responsible
original purchase
for any labor or in-home service costs.
For The Period Of: We Will Replace:
■ Service trips to your home to teach you how to use the
product.
Read your Owner’s Manual.
If you then have any questions
about
operating the product, please contact
your dealer
or our Consumer Affairs office at the address below.
Manager, Consumer Relations
Camco Inc.
1 Factory Lane, Suite 310
Moncton, N.B.
E1C 9M3
■ Improper installation.
If you have an installation problem, contact your
dealer or installer. You
are responsible for providing
adequate
electrical, exhausting and other connecting
facilities.
■
Replacement of house fuses or resetting
of circuit
breakers.
■ Failure of the product if it is misused, or used for
other than the intended purpose or used
commercially.
■
Damage to product caused by accident,
fire, floods or
acts of God.
WARRANTOR IS NOT RESPONSIBLE FOR CONSEQUENTIAL DAMAGES.
Warrantor: CAMCO INC.
Page 16

16
Operating Instructions Safety InstructionsCustomer Service Troubleshooting Tips
Service Telephone Numbers.
Questions?
If you have any questions about your appliance, write to:
Manager, Consumer Relations, Camco Inc., 1 Factory Lane, Suite 310, Moncton, N.B., E1C 9M3.
Or call,
1-800-361-3400.
In-Home Repair Service
1-800-361-3400
Expert repair service is only a phone call away.
Service Contracts
1-800-461-3636
Purchase a Camco service contract while your warranty is still in effect and you’ll receive a
substantial discount. Camco will still be there after your warranty expires.
Parts and Accessories
Individuals qualified to service their own appliances can have parts or accessories sent directly
to their homes (VISA, MasterCard and Discover cards are accepted).
Instructions contained in this manual cover procedures to be performed by any user. Other servicing
generally should be referred to qualified service personnel. Caution must be exercised, since
improper servicing may cause unsafe operation.
Please consult your yellow pages for your local Camco number.
Service Satisfaction
If you are not satisfied with the service you received:
First,
contact the people who serviced your appliance.
Next,
if you are still not pleased, write all the details—including your phone number—to:
Director, Consumer Relations, Camco Inc., 1 Factory Lane, Suite 310, Moncton, N.B.,
E1C 9M3.
Page 17

GBSR1080
GBXR1080
GCXR2100
GJSR2130
GJXR2130
GKSR2100
GNSR2140
GUSR2130
Laveuses
175D1807P312 49-90046 7-00 JR
Mesures de sécurité . . . . . . . . . . 3
Directives de fonctionnement
Chargement et utilisation
de la laveuse . . . . . . . . . . . . . . .8–11
Les caractéristiques . . . . . . . . . . . .7
Les tableaux de commande
et leurs réglages . . . . . . . . . . . . .4–6
Tache . . . . . . . . . . . . . . . . . . .10, 11
Conseils de dépannage
Avant d’appeler
un réparateur . . . . . . . . . . . . .12–14
Service à la clientèle
Garantie . . . . . . . . . . . . . . . . . . . . 15
Numéros de service . . . . . . . . . . .16
Manuel d’utilisation
GE Appliances
Page 18

Un partenariat de service.
À CONSERVER SOIGNEUSEMENT
Transcrivez les numéros de modèle et de série ici.
N
o
N
o
Vous les trouverez derrière le tableau de commande.
Vous y trouverez de nombreux conseils pour l’utilisation et l’entretien de votre laveuse. Ces quelques
mesures préventives vous permettront d’économiser du temps et de l’argent, et, ainsi, de prolonger la
vie de votre laveuse.
LISEZ VOTRE MANUEL
SI VOUS AVEZ BESOIN DE SERVICE
Vous trouverez des solutions aux problèmes courants que vous pourriez rencontrer dans la section
Avant d’appeler un réparateur
. Et, en consultant d’abord nos
Conseils de dépannage
, vous pourrez peut-
être éviter de faire appel à un réparateur.
Si vous avez besoin de service, vous savez que vous n’avez qu’à nous téléphoner. Vous trouverez à la
fin du présent manuel les numéros sans frais du service à la clientèle. Ou composez le 1-800-361-3400.
IMPORTANT!
Agrafez ici votre facture ou une copie de votre chèque.
Pour bénéficier de réparations sous garantie, il faut fournir une preuve de la date d’achat d’origine.
2
Fonctionnement Mesures de sécuritéService à la clientèle Conseils de dépannage
Page 19

■Installez ou entreposez la laveuse à l’abri des
températures inférieures au point de congélation et
des intempéries.
■Mettez la laveuse à la terre conformément à tous les
codes et règlements en vigueur. Consultez les
Directives d’installation.
MESURES DE SÉCURITÉ IMPORTANTES.
LISEZ D’ABORD TOUTES LES DIRECTIVES.
MISE EN GARDE!
Pour votre sécurité, suivez les directives fournies dans le présent manuel afin
de minimiser les risques d’incendie, d’explosion et de chocs électriques et
prévenir des dégâts matériels et des blessures graves ou mortelles.
SÉCURITÉ DU CHAUFFE-EAU
Dans certaines circonstances, de l’hydrogène peut se former
dans le chauffe-eau s’il n’a pas été utilisé pendant deux
semaines ou plus. L’hydrogène peut être explosif dans ces
conditions.
Si l’eau chaude n’a pas été utilisée depuis deux semaines
ou plus, réduisez les risques de dommages ou de blessures
en ouvrant tous les robinets d’eau chaude et en laissant
couler l’eau pendant plusieurs minutes avant d’utiliser
un appareil électrique raccordé au système d’eau
chaude. L’hydrogène sera ainsi libéré dans
l’atmosphère. Comme c’est un gaz inflammable, ne
fumez pas ou n’utilisez pas une flamme nue ou un
appareil ménager ou cours de ce processus.
UNE INSTALLATION ADÉQUATE
Avant d’utiliser votre laveuse, assurez-vous qu’elle a été adéquatement installée, conformément aux Directives d’installation.
Si vous n’avez pas reçu de Directives d’installation avec votre laveuse, appelez sans frais au 1-800-361-3400.
Service à la clientèleConseils de dépannageFonctionnementMesures de sécurité
■Évitez toute accumulation de matériaux combustibles
(charpie, papiers, chiffons, produits chimiques, etc.) à
proximité de vos électroménagers.
■Il faut exercer une étroite surveillance lorsque
l’appareil fonctionne en présence d’enfants. Ne les
laissez pas jouer sur, avec ou à l’intérieur de cet
appareil ni aucun autre électroménager.
AUTOUR DE VOTRE LAVEUSE
■Ne mettez jamais la main dans
la laveuse pendant
qu’elle
fonctionne. Attendez que l’appareil se soit
complètement arrêté avant d’ouvrir le couvercle.
■
Ne mélangez pas de javellisant
avec de l’ammoniaque
ou des acides (vinaigres ou décapant pour la rouille).
Ce mélange peut produire un gaz toxique et mortel.
■Ne lavez pas et ne séchez pas des articles qui ont été
lavés ou trempés dans des produits combustibles ou
explosifs
(cire, huile, peinture, essence,
dégraissants,
solvants de nettoyage à sec, kérosène, etc.). Ne versez
pas ces substances dans l’eau de lavage. N’utilisez pas
ces substances à proximité de votre laveuse ou
sécheuse pendant qu’elle fonctionne.
■ La lessive peut atténuer les propriétés ignifugeantes
des tissus. Pour éviter cette situation, suivez les
directives données par le fabricant du vêtement.
■ Pour réduire les risques de
chocs électriques,
débranchez
toujours l’appareil ou débranchez la
laveuse au panneau de distribution en enlevant le
fusible ou en déclenchant le disjoncteur avant de la
réparer ou de la nettoyer.
REMARQUE :
Le fait de régler
le sélecteur de programme sur une position d’arrêt ne
coupe
PAS
l’alimentation électrique de l’appareil.
■ N’essayez jamais de faire fonctionner
l’appareil s’il est
endommagé,
défectueux, partiellement démonté, si
des pièces sont manquantes ou défectueuses
ou si le
cordon d’alimentation
ou la fiche est endommagé.
LORSQUE VOUS UTILISEZ LA LAVEUSE
■Fermez les robinets d’eau et diminuez la pression sur
les tuyaux et les mécanismes de distribution d’eau
pour minimiser la fuite s’il se produit une rupture ou
une cassure. Vérifiez l’état des tuyaux d’alimentation
d’eau, vous devez les remplacer tous les 5 ans.
■
Avant de jeter ou d’entreposer
une laveuse, enlevez le
couvercle de l’appareil afin d’empêcher les enfants de
se cacher à l’intérieur.
■Ne réparez et ne remplacez aucune pièce de cet
appareil, à moins que cela soit spécifiquement
recommandé dans le présent manuel ou dans des
directives de réparation que vous comprenez et que
vous êtes en mesure de suivre.
■Ne trafiquez pas les commandes de l’appareil.
LORSQUE LA LAVEUSE N’EST PAS UTILISÉE
VEUILLEZ LIRE ET SUIVRE ATTENTIVEMENT CES MESURES DE SÉCURITÉ.
CONSERVEZ CES DIRECTIVES
3
N’utilisez
cet
appareil
que pour
l’usage
auquel il
est destiné,
comme
expliqué
dans le
présent
manuel.
Page 20

Fonctionnement Mesures de sécuritéService à la clientèle Conseils de dépannage
4
Trouvez le tableau de commande de votre laveuse.
Vous pouvez repérer le numéro de votre modèle à l’arrière du tableau de commande.
Modèle GBXR1080
Modèle GBSR1080
1
3
4
Modèle GKSR2100
Modèle GCXR2100
1 2
4
3
1
3
4
1
3
4
Page 21

Service à la clientèleConseils de dépannageFonctionnementMesures de sécurité
5
Modèle GJSR2130
1 2
4
3
Modèle GJXR2130
1 2
4
3
Modèle GUSR2130
1 2
4
3
Modèle GNSR2140
1 2
4
3
Page 22

Réglage des commandes.
Load Size (taille de brassée)
Le niveau d’eau doit être suffisant pour couvrir le linge. Réglez donc la taille de votre brassée en conséquence.
Assurez-vous que les vêtements ont suffisamment de place pour bouger librement et ne dépassent pas la
rangée supérieure de trous de la cuve.
Wash/Spin Speed (vitesse de lavage/essorage)
L’agitateur bouge les vêtements pour un lavage plus propre; le panier tourne en fin de programme pour que
la laveuse puisse enlever l’eau de lavage. Le cadran Wash/Spin Speed (vitesse de lavage/essorage)
programme la vitesse de l’agitateur et du panier.
Au réglage Normal, l’agitateur oscille plus rapidement pour le lavage des cotons, toiles et vêtements de jeu.
Au réglage Delicate (délicat), l’agitateur oscille plus lentement pour le lavage des articles délicats et des tricots.
La vitesse d’essorage Normal convient aux articles durables. La vitesse d’essorage Delicate (délicat) convient
aux articles délicats tels que les tricots et la lingerie. Les vêtements seront moins séchés que lorsque vous
utilisez la vitesse d’essorage Normal.
Temperature (température)
Sélectionnez une température d’eau pour les programmes de lavage et de séchage. Lors de la lessive, observez
toujours les directives données sur l’étiquette d’entretien du vêtement. Suivez le guide de température d’eau
qui figure sous le couvercle de la laveuse.
Programme de lavage
Le programme de lavage détermine la durée du lavage. Le tableau ci-dessous vous aidera à choisir le
programme de lavage qui convient à votre brassée.
COTTONS (cotons) Pour les cotons, le linge de maison et les vêtements de travail ou de jeu légèrement ou très sales.
EASY CARE (entretien facile) Pour les articles exempts de faux plis et de pressage permanent, et les tricots.
HANDWASH (lavage à la main) Pour la lingerie et les articles avec étiquette indiquant lavable à la main avec saleté légère.
Fournit des périodes d’agitation et de trempage au cours du lavage et du rinçage.
DELICATE (tissus délicats) Pour la lingerie et les tissus qui demandent des soins spéciaux avec saleté de légère à normale.
Fournit des périodes d’agitation et de trempage au cours du lavage et du rinçage.
SUPER Pour les vêtements très sales et les toiles. Ce programme fournit une période d’agitation plus longue.
(tissus très lourds)
PREWASH Pour les vêtements très souillés et ceux munis d’une étiquette d’attention spéciale recommandant
(Pré-lavage) le pré-lavage avant l’usage.
QUICKWASH Pour les articles légèrement souillés rapidement requis.
(Lavage rapide)
QUICK RINSE (rinçage rapide) Pour éliminer rapidement le chlore, la sueur, les taches, etc. des vêtements.
15 MIN/30 MIN Pour les vêtements très sales. Commence par une brève agitation, effectue un trempage pour une
AUTO SOAK (auto-trempage) période précise, puis procède automatiquement avec le reste du programme.
4
3
2
1
Fonctionnement Mesures de sécuritéService à la clientèle Conseils de dépannage
6
Page 23

Nettoyage du distributeur d’assouplissant (sur certains modèles)
Enlevez le distributeur placé sur le dessus de l’agitateur.
Séparez le godet du distributeur de son couvercle en saisissant la partie supérieure du
distributeur et en poussant à l’intérieur du godet avec les doigts. Le godet du
distributeur se dégagera du couvercle.
Pour nettoyer, faites tremper les deux parties dans la solution suivante :
■
1 US gallon (3,8 litres) d’eau tiède
■
1/4 de tasse (60 ml) de détergent liquide
■
1 tasse (240 ml) de javellisant
Au besoin, enlevez les dépôts avec un linge propre et doux après le trempage. N’utilisez
pas une brosse rigide, car vous risquez d’endommager la surface du distributeur.
Rincez et assemblez le distributeur. Réinstallez le distributeur sur l’agitateur.
5
4
3
2
1
Séparez pour laver.
Service à la clientèleConseils de dépannageFonctionnementMesures de sécurité
7
Les caractéristiques de la laveuse.
REMARQUE : Toutes les caractéristiques ne sont pas disponibles sur tous les modèles.
Distributeur de javellisant liquide (sur certains modèles)
Ce distributeur dilue le javellisant liquide avant qu’il se distribue dans votre laveuse.
Vérifiez l’étiquette d’entretien des vêtements pour connaître les directives spéciales.
Mesurez le javellisant liquide en suivant les directives sur la bouteille.
■
Ne versez jamais de javellisant liquide non dilué sur les vêtements ou dans le panier de lavage.
■
Ne versez pas de javellisant en poudre dans le distributeur de javellisant.
Avant de mettre la laveuse en marche, versez la quantité mesurée de javellisant dans le
distributeur. Évitez les éclaboussures et les débordements. Si vous utilisez un javellisant
en poudre, versez-le directement dans le panier de la laveuse avec le détersif.
■
Ne mélangez pas de javellisant avec de l’ammoniaque ou des acides (vinaigre ou décapant de
rouille). Ce mélange peut produire un gaz toxique et mortel.
3
2
1
Capuchon de l’agitateur ou distributeur d’assouplissant (sur certains modèles)
Le capuchon de l’agitateur
s’installe sur le
dessus de l’agitateur. Si jamais il s’enlève
par inadvertance, remettez-le tout
simplement en place.
Ce distributeur
verse automatiquement
l’assouplissant liquide au moment
approprié pendant le programme.
N’arrêtez pas la laveuse au cours du
premier essorage. L’assouplissant sera
distribué trop tôt.
Pour l’utiliser, suivez les étapes ci-dessous :
Assurez-vous que le distributeur est bien
installé sur l’agitateur.
N’utilisez que de l’assouplissant liquide.
Versez dans le distributeur la quantité
d’assouplissant liquide recommandée
sur l’emballage.
Ne versez jamais d’assouplissant liquide
directement sur le linge. Les vêtements
seront tachés.
Ajoutez de l’eau dans le distributeur
jusqu’au repère de remplissage
maximum.
3
2
1
Ne versez aucun produit dans
l’agitateur lorsque le capuchon
ou le distributeur est enlevé.
Option de 2e rinçage (sur certains modèles)
Quand on utilise un détergent ou un agent de blanchiment extra pour nettoyer des
vêtements très sales, on peut vouloir utiliser l’option de 2e rinçage. Cette fonction fournit
un deuxième rinçage froid en profondeur.
(l’apparence et les caractéristiques
peuvent varier)
Page 24

Fonctionnement Mesures de sécuritéService à la clientèle Conseils de dépannage
8
Chargement et utilisation de la laveuse.
Lors de la lessive, observez toujours les directives données sur l’étiquette d’entretien du vêtement.
Tri du linge
Utilisation correcte du détersif
Ajoutez le détersif quand la cuve de lavage se remplit,
avant de mettre les vêtements. L’utilisation de trop
de détersif cause souvent des problèmes
de lavage. Les détersifs modernes sont conçus pour
être efficaces sans beaucoup de mousse visible.
Assurez-vous de lire avec soins et de suivre les
recommandations du fabricants sur la quantité
de détersif à utiliser.
Chargement de la laveuse
Ajoutez les articles secs en vous assurant que les
vêtements ne sont pas entassés et que leur niveau ne
dépasse pas celui de la rangée supérieure de trous de
la cuve. Lorsque vous placez dans la laveuse des
articles mouillés, assurez-vous que le niveau d’eau est
suffisamment élevé pour permettre aux articles de
bouger librement. Le niveau d’eau doit être suffisant
pour couvrir les vêtements. Pour ajouter des articles
après que la laveuse ait été mise en marche, appuyez
sur le sélecteur de programme et immergez les
articles près de l’agitateur. Fermez le couvercle et
tirez le sélecteur de programme pour remettre
l’appareil en marche.
■
Ne pas enrouler de longs articles comme les draps
et les pantalons autour de l’agitateur.
■
Ne lavez pas de tissus imbibés de substances
inflammables (cire, liquides de nettoyage, etc.)
dans votre laveuse.
■
L’eau remplira et vidangera la laveuse et la
minuterie avancera si le couvercle est soulevé,
mais comme précaution sécuritaire, la laveuse
n’exécutera pas une agitation ou un essorage.
Triez le linge par couleurs (blanc, couleur pale,
linge de couleur), niveau de souillures, type du
tissu (coton rigide, entretien facile, tissus délicats).
Vérifiez si le tissu produit de la charpie (tissu-éponge,
chenille) et s’il amasse de la charpie (velvet, velours,
velours côtelé).
Page 25

Service à la clientèleConseils de dépannageFonctionnementMesures de sécurité
9
Entretien et nettoyage de votre laveuse
Panier :
Après la lessive, laissez le couvercle ouvert
pour permettre à l’humidité de s’évaporer. Si vous
désirez nettoyer le panier, utilisez un linge doux et
propre imbibé de détergent liquide, puis rincez.
(N’utilisez pas de produits nettoyants abrasifs.)
Boyaux de remplissage :
Remplacez tous les cinq ans les
boyaux reliant la laveuse aux robinets.
Filtre à charpie :
Il est auto nettoyant, n’exige
pratiquement
aucun entretien, et se trouve au-dessous
de l’agitateur.
Extérieur :
Essuyez immédiatement tout produit
renversé avec un linge humide. Évitez de frapper la
surface avec des objets tranchants.
Entreposage et déménagement :
Demandez à un
réparateur de vidanger l’eau de la pompe et des
boyaux. Entreposez la laveuse à l’abri des intempéries.
Pour des renseignements sur comment garder
stationnaire le panier lorsque vous entreposez la
laveuse écrivez au : Directeur, Relations avec les
consommateurs, Camco Inc., 1 Factory Lane,
Bureau 310, Moncton, N.B. E1C 9M3
Vacances prolongées :
Coupez l’alimentation en
eau aux robinets. Vidangez l’eau des boyaux si la
température risque de descendre sous le point de
congélation.
Étiquettes d’entretien des tissus
Programme
de
lavage
Normal
Tissus sans repassage/
résistants aux plis
Doux/
délicat
Lavage à
la main
Ne pas laver Ne pas essorer
Température
de l'eau
Chaude
(50°C/120°F)
Tiède
(40°C/105°F)
Froide/fraîche
(30°C/85°F)
Séchage
par
culbutage
Sécher
Normal
Tissus sans repassage/
résistants aux plis
Doux/
délicat
Séchage par
culbutage interdit
Ne pas sécher
(en combinaison
avec ne pas laver)
Réglage
de la
chaleur
Haute
Moyenne
Basse
Sans chaleur/air
Directives
spéciales
Séchage sur corde/
pendre pour sécher
Laisser égoutter
Séchage à plat
Séchage à l'ombre
Symboles
d'eau de
Javel
Toutes les eaux
de Javel (si nécessaire)
Eaux de Javel sans
chlore (si nécessaire)
Eau de Javel interdite
Les “symboles” ci-dessous se trouvent sur les étiquettes d’entretien et ont un effet sur le lavage de vos vêtements.
ÉTIQUETTES POUR LE LAVAGE
ÉTIQUETTES POUR LE SÉCHAGE
ÉTIQUETTES POUR L’EAU DE JAVEL
Page 26

10
Fonctionnement Mesures de sécuritéService à la clientèle Conseils de dépannage
Chargement et utilisation de la laveuse.
Lors de la lessive, observez toujours les directives données sur l’étiquette d’entretien du vêtement.
TACHE Tissus blancs et javellisables Autres tissus lavables
Adhesifs
Frottez avec de la glace ou • Même chose que pour les tissus blancs et javellisables.
(gomme à mâcher, etc.)
immergez dans de l’eau très
froide. Enlevez le plus d’adhésif
possible avec un outil non
tranchant. Frottez la tache avec
du détergent liquide non dilué.
Rincez bien et lavez comme
d’habitude.
Antisudorifiques,
Appliquez du détergent liquide • Même chose que pour les tissus blancs et javellisables,
désodorisants
non dilué. Rincez. Si la tache mais utilisez un javellisant sans chlore.
persiste, utilisez la solution de
javellisant, puis lavez.
Sang
Faites tremper dans de l’eau • Imbibez à l’aide d’une éponge ou faites tremper dans
froide, puis lavez à l’eau tiède. de l’eau tiède, puis lavez.
Si la tache persiste, utilisez la
solution de javellisant, puis lavez.
Chocolat, crème,
Faites tremper dans de l’eau • Même chose que pour les tissus blancs et javellisables,
crème glacée, lait
froide. Utilisez la solution de mais utilisez un javellisant sans chlore.
javellisant; lavez.
Café, thé
Sans crème : Utilisez la solution • Épongez avec de l’eau tiède. Si la tache persiste, appliquez
de javellisant; lavez. de la glycérine tiède (vendue en pharmacie). Attendez
30 minutes, puis rincez. Lavez comme d’habitude.
Avec crème : Faites tremper dans
de l’eau froide, puis utilisez la
solution de javellisant; lavez.
Produits de beauté,
Utilisez la solution de • Frottez la tache avec du détergent liquide non dilué.
crayon
javellisant; lavez. Rincez bien et lavez comme d’habitude.
Taches «invisibles» Lorsqu’elles deviennent visibles :
• Frottez-les avec du détergent liquide non dilué.
• Attendez 30 minutes.
• Lavez de nouveau à l’eau la plus chaude possible que
le tissu puisse tolérer sans risque.
Pour empêcher ces taches :
• Augmentez la quantité de détersif utilisée.
• Augmentez la température de l’eau.
• Lavez les tissus synthétiques souvent.
Sur les tissus synthétiques,
les aliments peuvent causer des
taches pratiquement invisibles
au moment où vous mettez les
vêtements dans la laveuse.
Si elles n’ont pas complètement
disparu après le lavage, elles
peuvent recueillir de la saleté
dans l’eau de lavage et devenir
apparentes après le séchage.
Élimination de taches spécifiques
Solution de javellisant :
Pour détacher des tissus
blancs ou javellisables, faites tremper la tache dans
un contenant pendant cinq minutes dans la solution
suivante, puis lavez les tissus dans la laveuse :
■
1 US gallon (3,8 liters) d’eau froide
■
1/4 tasse (60 ml) de javellisant
Page 27

11
Service à la clientèleConseils de dépannageFonctionnementMesures de sécurité
TACHE Tissus blancs et javellisables Autres tissus lavables
Herbe, moisissure,
Appliquez du détergent liquide • Épongez avec de l’eau chaude. Appliquez du détergent
brûlure légère
non dilué, puis lavez. (Traitez liquide non dilué; lavez. Blanchissez avec un javellisant
les taches de moisissure sans chlore; lavez. Les vieilles taches de moisissure ne
lorsqu’elles sont fraîches, avant disparaissent pas. Les taches de brûlure légères
que les fibres n’aient été affaiblies.) disparaissent rarement.
Si la tache persiste, utilisez la
solution de javellisant; lavez.
(Les taches de brûlure importantes
disparaissent rarement.)
Encre, stylo à bille
Tache fraîche : Placez la tache • Même chose que pour les tissus blancs et javellisables,
à l’envers sur un essuie-tout mais utilisez un javellisant sans chlore.
absorbant et vaporisez avec un
produit détachant. Rincez bien,
puis lavez comme d’habitude.
Vieille tache : Utilisez la solution
de javellisant; lavez.
Jus de fruits, vin,
Faites tremper dans de l’eau • Épongez avec de l’eau chaude. Blanchissez la tache
colorant alimentaire
tiède. Si la tache persiste, utilisez persistante avec un javellisant sans chlore.
la solution de javellisant; lavez.
Transpiration
Appliquez du détergent liquide • Lavez à l’eau tiède. Rincez bien. Blanchissez avec un
non dilué et lavez à l’eau tiède. javellisant sans chlore.
S’il y a décoloration, vous pouvez
peut-être corriger le problème
en traitant le tissu avec de
l’ammoniaque ou du vinaigre.
MISE EN GARDE :
Ne mélangez pas de javellisant avec
de l’ammoniaque ou un acide,
comme du vinaigre ou du décapant
pour la rouille. Ce mélange pourrait
produire un gaz toxique et mortel.
Page 28

Fonctionnement Mesures de sécuritéService à la clientèle Conseils de dépannage
12
Avant d’appeler un réparateur…
Conseils de dépannage—Économisez du temps et de
l’argent! Consultez d’abord les tableaux qui suivent et vous
pourrez peut-être éviter de faire appel à un réparateur.
Eau Causes possibles Correctifs
Moussage excessif
Type de détersif •Adoptez un détersif qui mousse moins et suivez les
directives sur l’emballage.
Eau très douce •Utilisez moins de détersif.
Trop de détersif •Mesurez soigneusement le détersif. Utilisez moins de
détersif si votre eau est douce, si votre brassée est petite
ou si votre linge est légèrement sale.
Fuites d’eau
Boyaux de remplissage
•Assurez-vous que les boyaux sont bien raccordés aux robinets
ou boyaude vidange mal et que l’extrémité du boyau de vidange est solidement
raccordés insérée dans le renvoi.
Renvoi bouché •Vérifiez la plomberie. Vous aurez peut-être besoin
d’appeler un plombier.
Pression d’eau constante •Serrez les boyaux aux robinets et fermez les robinets après
aux boyaux de remplissage chaque utilisation.
raccordés
•Vérifiez l’état des tuyaux d’alimentation, vous devez les
remplacer tous les 5 ans.
Utilisation d’une trop grande •Utilisez moins de détersif. Utilisez moins de détersif
quantitè de dètersif dans la si votre eau est douce, si votre brassée est petite ou si
laveuse votre linge est légèrement sale.
La température de l’eau
Commandes mal réglées •Vérifiez le sélecteur de température de l’eau (sur certains
est incorrecte
modèles) ou
le sélecteur de
programme et réglez-le.
Robinets fermés ou boyaux •Ouvrez complètement les robinets d’eau chaude et d’eau
mal réglées froide et assurez-vous que chaque boyau est raccordé au
bon robinet.
Rondelles-filtres de •Fermez l’alimentation d’eau et débranchez les tuyaux
l’électrovanne obstruées d’alimentation d’eau situés en haut à l’arrière de la laveuse.
Utilisez une brosse ou un cure-dents pour nettoyer les
grilles de la machine. Re-branchez les tuyaux et re-ouvrez
l’alimentation d’eau.
Température incorrecte •Assurez-vous que la température de l’eau du chauffe-eau
de l’eau du chauffe-eau varie entre 120 °F et 140 °F (48 °C et 60 °C).
La laveuse ne se
Boyau de vidange pincé •Redressez le boyau de vidange et assurez-vous qu’il n’est
vide pas
ou mal raccordé pas coincé sous la laveuse.
•La partie supérieure du boyau de vidange doit être à moins
de 8 pi (2,5 m) au-dessus du sol.
Page 29

13
Service à la clientèleConseils de dépannageFonctionnementMesures de sécurité
Fonctionnement Causes possibles Correctifs
La laveuse s’arrêtent
Pauses normales entre
pendant les programmes
les étapes de lavage
La laveuse ne
Laveuse non branchée
• Assurez-vous que le cordon d’alimentation est bien branché dans une
fonctionne pas
prise opérationnelle.
Robinets fermés
• Ouvrez complètement les robinets d’eau chaude et d’eau froide.
Commandes mal réglées •
Vérifiez les commandes et assurez-vous que le sélecteur de
programme est tiré et réglé sur une position de
MARCHE.
Couvercle ouvert –
•
Fermez le couvercle et si nécessaire, redémarrez le cycle à partir
le dispositif de sécurité du début.
empêche l’agitation et
l’essorage lorsque
le couvercle est levé
Disjoncteur déclenché/ •Vérifiez le disjoncteur/fusibles de la résidence. Remplacez le fusible
fusible grillé ou réenclenchez le disjoncteur. La laveuse doit être branchée dans
une prise distincte.
Rendement Causes possibles Correctifs
Taches de couleur
Utilisation incorrecte de •Vérifiez les directives sur la bouteille d’assouplissant et suivez les
l’assouplissant directives pour l’utilisation du distributeur.
•Prétraitez la tache et relavez l’article.
Transfert de colorant •Séparez les articles blancs et de couleur pâle des vêtements de
couleur foncée.
Vêtements grisâtres
Quantité insuffisante de •Utilisez plus de détersif (surtout pour les grosses brassées).
ou jaunis
détersif
Eau dure •Utilisez un adoucisseur, comme celui de marque Calgon, ou
installez un adoucisseur d’eau.
Eau trop froide •Assurez-vous que la température de l’eau de votre chauffe-eau varie
entre 120 °F et 140 °F (48 °C et 60 °C).
Surcharge •Réglez le type de brassée en fonction de votre brassée.
Détersif non dissout •Versez le détersif lorsque la laveuse se remplit d’eau, avant d’y
mettre les vêtements.
Transfert de teinture
•Triez votre linge par couleur. Si l’étiquette de votre vêtement est
marquée
laver séparément,
il est possible que celui-ci ne soit pas bon
teint.
Charpie ou résidus
Les vêtements sont séchés à
•Lorsque vous ne le faites pas sécher dans une sécheuse, votre linge
sur les vêtements
l’air ou sur la corde à linge
peut retenir plus de charpie.
Tri incorrect
•Séparez les tissus qui produisent de la charpie de ceux qui la recueillent.
Lavage trop long
•Pour les petites brassées réglez un lavage plus court que pour les grosses.
Détersif non dissout •Ajoutez le détersif pendant que le panier se remplit d’eau et avant
d’ajouter les vêtements.
•Essayez un détersif liquide.
•Utilisez de l’eau plus chaude.
Surcharge •Le niveau des vêtements ne doit pas dépasser celui de la rangée
supérieure de trous de la cuve.
•
Réglez le sélecteur de type de brassée en fonction de votre brassée.
Utilisation incorrecte de •Vérifiez les directives sur la bouteille d’assouplissant et suivez les
l’assouplissant directives pour l’utilisation du distributeur.
Page 30

Avant d’appeler un réparateur…
14
Fonctionnement Mesures de sécuritéService à la clientèle Conseils de dépannage
Rendement (suite) Causes possibles Correctifs
Boules de fibre
Usure normale des tissus • Même s’il n’est pas causé par la laveuse, vous pouvez
duveteux et en coton-polyester atténuer ce problème en lavant les vêtements à l’envers.
Fils tirés, trous,
Épingles, boutons-pression, • Attachez les boutons-pression, crochets, boutons, et
déchirures, usure
crochets, boutons pointus, remontez les fermetures éclair.
excessive
boucles de ceinture, fermetures
• Enlevez les articles lâches, comme les épingles, les objets
éclair et objet pointus laissés
dans les poches et les boutons pointus.
dans les poches
• Tournez à l’envers les tricots (dont les fils se tirent
facilement).
Javellisant à base de chlore • Utilisez la quantité indiquée sur l’emballage.
non dilué
• Ne versez jamais de javellisant non dilué dans la laveuse
ou sur les vêtements.
Produits chimiques tels que • Rincez les articles imbibés de ces produits avant de les
décolorants capillaires, laver.
teintures, solutions à
permanente
Faux plis
Tri incorrect • Évitez de laver des articles lourds (comme des vêtements
de travail) avec des articles légers (comme des blouses).
• Utilisez un assouplissant.
Surcharge ou niveau d’eau • Assurez-vous que les vêtements ont suffisamment de
incorrect place pour bouger librement.
Programmes de lavage et de • Choisissez les programmes en fonction du type de tissu
séchage incorrects lavé (surtout les vêtements à entretien facile).
Lavage répété dans une eau • Lavez dans une eau tiède ou froide avec beaucoup de
trop chaude détersif.
Bruit Causes possibles Correctifs
La laveuse est bruyante
Laveuse inégale • Pour mettre l’avant de la laveuse de niveau, réglez les
pieds de nivellement en les tournant dans le sens
approprié pour abaisser ou relever la laveuse. Pour
mettre l’arriè de la laveuse de niveau, soulevez l’arrière de
la laveuse de 4 po (11 cm) et laissez-la ensuite redescendre.
Brassée mal répartie • Appuyez sur le sélecteur de programme pour arrêter la
laveuse. Ouvrez le couvercle et répartissez uniformément
les vêtements. Fermez le couvercle et remettez en marche.
La tige d’expédition n’a pas • Pour retirer la tige d’expédition de la laveuse, tirez sur
été retirée de la laveuse l’étiquette jaune fixée à la partie inférieure du côté droit
de a laveuse.
La laveuse est trop près du mur • Éloignez la laveuse du mur d’environ 4 po
(11 cm)
.
(frappe contre le mur pendant
le fonctionnement)
Autres Causes possibles Correctifs
Les étiquettes apposées
Il arrive que l’adhésif des •
À l’aide d’un séchoir à cheveux réglé à la température
sur la laveuse ne
étiquettes ne s’enlève pas la plus basse, dirigez l’air vers l’étiquette pendant
s’enlèvent pas
complètement quelques instants. Vous pourrez ensuite enlever
proprement
l’adhésif sans endommager le fini de la laveuse.
Page 31

15
Service à la clientèle
Conseils de dépannage
Fonctionnement
Mesures de sécurité
Garantie de votre laveuse
Toutes les réparations sous garantie seront effectuées par nos centres de réparation ou nos réparateurs autorisés.
Appelez le 1-800-361-3400.
■ Toute visite à votre domicile pour vous expliquer le
fonctionnement de l’appareil.
Lisez votre Manuel d’utilisation.
Pour toute question
concernant le fonctionnement de l’appareil, communiquez
avec votre marchand ou notre bureau des Relations avec les
consommateurs à l’adresse indiquée ci-dessous :
Directeur, Relations avec les consommateurs
Camco Inc.
1 Factory Lane, Bureau 310
Moncton, N.B.
E1C 9M3
■ Une installation inadéquate.
Si vous avez des questions concernant l’installation,
communiquez avec votre marchand ou votre installateur.
Il vous incombe de fournir les installations appropriées
d’évacuation et autres.
■ Le remplacement des fusibles ou le réenclenchement des
disjoncteurs du panneau de distribution.
■ Toute défectuosité du produit lorsqu’il est utilisé de façon
abusive, à des fins commerciales ou à toute autre fin que
celle pour laquelle il a été conçu.
■ Tout dommage au produit attribuable à un accident, un
incendie, une inondation ou un cas de force majeure.
Ce que GE ne couvrira pas :
Garant : CAMCO INC.
LE FABRICANT NE SE TIENT NULLEMENT RESPONSABLE DE TOUT DOMMAGE INDIRECT.
Pour une période de :
GE remplacera gratuitement :
Un an Toute pièce
de la laveuse qui se révèle défectueuse en raison d’un vice de matières ou de fabrication.
À compter de la date
Pendant cette
garantie complète d’un an,
nous assumerons également,
gratuitement,
tous les frais de
d’achat d’origine
main d’œuvre et de déplacement du réparateur à votre domicile pour remplacer la pièce défectueuse.
Cinq ans La tige de suspension et l’ensemble du ressort,
si l’une de ces pièces se révèle défectueuse en raison d’un
À compter de la date
vice de matières ou de fabrication. Nous remplacerons également
tout couvercle et dessus de laveuse
d’achat d’origine
qui rouille suite à une utilisation normale. Pendant cette
garantie limitée additionnelle de quatre ans
,
vous devez assumer tous les frais de main d’œuvre et de déplacement du réparateur à votre domicile.
Dix ans
La transmission,
le panier de la laveuse,
et la cuve de la laveuse,
si l’une de ces pièces se révèle
À compter de la date
défectueuse en raison d’un vice de
matières ou de fabrication. Pendant cette
garantie limitée
d’achat d’origine additionnelle de neuf ans
, vous devez assumer tous les frais de main d’œuvre et de déplacement
du réparateur à votre domicile.
Page 32

16
Fonctionnement Mesures de sécuritéService à la clientèle Conseils de dépannage
Numéros de service Camco.
Questions?
Si vous avez des questions au sujet de votre électroménager, écrivez au :
Directeur, Relations avec les consommateurs, Camco Inc., 1 Factory Lane, Bureau 310,
Moncton, N.B., E1C 9M3.
Ou composez le
1-800-361-3400.
Réparations à domicile
1-800-361-3400
Pour faire réparer votre électroménager Camco, il suffit de nous téléphoner.
Contrats d’entretien
1-800-461-3636
Achetez un contrat d’entretien Camco avant que votre garantie n’expire et bénéficiez d’un
rabais substantiel. Ainsi le service après-vente Camco sera toujours là après expiration de la
garantie.
Pièces et accessoires
Ceux qui désirent réparer eux-mêmes leurs électroménagers peuvent recevoir pièces et
accessoires directement à la maison (cartes VISA, MasterCard et Discover acceptées).
Les directives stipulées dans le présent manuel peuvent être effectuées par n’importe quel utilisateur.
Les autres réparations doivent généralement être effectuées par un technicien qualifié. Soyez prudent,
car une réparation inadéquate peut affecter le fonctionnement sécuritaire de l’appareil.
Veuillez consulter les pages jaunes pour connaître le numéro de la succursale Camco la plus près.
Un service satisfaisant
Si vous n’êtes pas satisfait du service après-vente dont vous avez bénéficié :
Premièrement,
communiquez avec les gens qui ont réparé votre appareil.
Ensuite,
si vous n’êtes toujours pas satisfait, envoyez tous les détails—numéro de téléphone
compris—au : Directeur, Relations avec les consommateurs, Camco Inc., 1 Factory Lane,
Bureau 310, Moncton, N.B., E1C 9M3.
 Loading...