

GE PNS20KSEAFSS, PFE22KSEAFSS, GNS22ESEBFSS, GNS22ESEAFSS, GNS22EGEBFWW Owner’s Manual
...
0
N
0
0
GEAppliances.corn
Safety Instructions ........... 2,s
Operating Instructions
Automatic Icemaker ............... 10
Care and Cleaning ............. 11, 12
Controls ............................ 4
Crispers and Pans ................... 7
Freezer ........................... 8, 9
Replacing the Light Bulbs .......... 13
Shelves and Bins .................... 6
Water Filter ......................... 5
Models 20, 22 and 23
Cong61ateur inf@ieur
R frig rateurs
E
Installation Instructions
Installing the Refrigerator ...... 15-19
Installing the Water Line ........ 28-30
Preparing to Install
the Refrigerator .................... 14
Removing and Replacing
the Doors (Double Door
Refrigerator Models only) ....... 25-27
Removing and Replacing the
Freezer Drawer ................ 20, 21
Reversing the Door Swing
(Single Door Refrigerator
Models only) ................... 22-25
Troubleshooting Tips ...... si-s4
Normal Operating Sounds .......... 3t
Consumer Support
consumer support ........ Back Cover
Performance Data Sheet ........... 41
State of California Water
Treatment Device Certificate ....... 42
Warranty for Canadian
Customers ......................... 40
Warranty for U.S.Customers ....... 3g
La section frangaise commence _ la page 43
Congelador inferior
Refrigeradores
La secci6n en espaflol empieza en la pSgina 81
Write the model and serial
numbers here:
Model #
Serial #
Find these numbers on a label
on the right side, near the top of the
refrigerator compartment.
200D9366PO04 49-60539-1 09-11GE

IMPORTANT SAFETY INFORMATION.
READ ALL INSTRUCTIONS BEFORE USING.
WARNING!
Use this appliance only for its intended purpose as described in this Owner's Manual.
SAFETYPRECAUTIONS
When using electrical appliances, basic safety precautions should be followed, including the following:
1iThis refrigerator must be properly installed
and located inaccordance with the Installation
Instructions before it is used.
1i Donot allow children to climb, stand or hang
on the shelves in the refrigerator.Theycould
damage the refrigerator and seriouslyinjure
themselves.
Donot touch the cold surfacesin the freezer
compartment when hands aredamp orwet.
Skinmay stick to these extremelycold surfaces.
1i Donot store or usegasoline orother flammable
vapors and liquids inthe vicinityof this or any
other appliance.
Keepfingers out of the "pinch point" areas;
clearances between the doors and between
the doors and cabinetare necessarilysmall.
Becareful closingdoors when children are
in the area.
_::Inrefrigerators with automatic icemakers,
avoid contact with the moving parts ofthe
ejector mechanism, or with the heating element
that releasesthe cubes. Donot place fingers or
hands on the automatic icemaking mechanism
while the refrigerator is plugged in.
1i Unplugthe refrigerator beforecleaning and making
repairs.
NOTE:Westrongly recommendthat any servicing
beperformed bya qualified individual.
1iSettingeither or both controls to the OFFposition
does not remove power to the light circuit.
1i Donot refreezefrozenfoods which have
thawed completely.
A DANGER! RISK OF CHILD ENTRAPMENT
PROPERDISPOSAL OF THE REFRIGERATOR
Childentrapment and suffocation are not problems of
the past. Junked or abandoned refrigerators are still
dangerous...evenif they will sit for "justa few days."
Ifyou are getting rid of your old refrigerator, please
follow the instructions below to help prevent
accidents.
Before You Throw Away Your Old
Refrigeretor or Freezer:
Takeoff the doors,
Leavethe shelvesin place sothat children may not
easilyclimb inside.
Refrigerants
All refrigeration products contain refrigerants,
which under federal law must be removed prior
to product disposal. If you are getting rid of an
old refrigeration product, check with the company
handling the disposal about what to do.
USEOF EXTENSION CORDS
Because of potential safety hazards under certain conditions, we strongly recommend against
the use of an extension cord.
However,ifyou must usean extension cord, it isabsolutely necessarythat it bea UL-listed(inthe United States)
or a CSAcertified (inCanada),3-wire grounding type appliance extension cord having a grounding type plug
and outlet andthat the electrical rating of the cord be 15amperes (minimum)and 120 volts.

GEAppliances.com
WARNING!
HOW TOCONNECTELECTRICITY
Do not, under any circumstances, cut or remove the third (ground) prong from the power cord.
For personal safety, this appliance must be properly grounded.
Thepower cord of thisappliance is equipped
with a :S-prong(grounding)plug which mates
with a standard :S-prong(grounding)wall outlet to
minimize thepossibility of electric shock hazardfrom
this appliance.
Havethe wall outlet and circuit checked bya
qualified electrician to make surethe outlet is
properly grounded.
Where astandard 2-prong wall outlet isencountered,
it isyour personalresponsibility and obligation to
have it replaced with a properly grounded :S-prong
wall outlet.
Therefrigerator should always be plugged into its
own individual electrical outlet which hasa voltage
rating that matches the rating plate.
USEOFADAPTER PLUGS
Adapter plugs are not permitted in Canada.
Thisprovidesthe best performance and alsoprevents
overloading housewiring circuits which could cause a
fire hazardfrom overheated wires.
Neverunplug your refrigerator by pullingon the
power cord.Always grip plugfirmly and pullstraight
out from the outlet.
Repairor replaceimmediately all power cords that
have become frayed or otherwise damaged. Donot
usea cord that shows cracks or abrasion damage
along itslength or at either end.
When moving the refrigerator away from the
wall, be careful not to roll over ordamage the
power cord.
READANDFOLLOWTHISSAFETYINFORMATIONCAREFULLY.
SAVETHESEINSTRUCTIONS

About the controls with temperature settings.
' "'"'......_°'°eDI_i'__oQ _i,m_"°'1'°"°'°'°''
.... 9 is Coldest .... 9 is Coldest
(on some models)
i ® o.o. ® .J
NOTE: Therefrigerator is shipped with protective film covering the digital temperature
controls. If this film was not removed during installation, remove it now.
Initially, set the refrigerator control at 5 and the freezer control at 5. Allow 2/4 hours for
the temperature to stabilize. Several adjustments may be required. Adjust the controls
one increment at a time, and allow 2/# hours after each adjustment for the refrigerator
to reach the temperature you have set.
getting either or both controls to 0 for digital and 0 for the refrigerator control knob
stops cooling in both the refrigerator and freezer compartments, but does not shut
off electrical power to the refrigerator.
ATdeJurns;Frretezer Adj_stmRpeefriogte rreat° r
9 is Coldest
(on some models)
4

About the water filter. (on some models) GEAppliances.com
J
J 0
Water Filter Cartridge
Thewater filter cartridge islocated in the
back upperright corner of the refrigerator
compartment.
When to Replace the Filter
Thefilter cartridge should bereplaced
when the flow of water to the icemaker
decreases,or everysix months.
Installing the Filter Cartridge
0 Ifyou are replacing the cartridge, first
remove the old one. Openthe cartridge
cover by pressing inon the tab at the
front and pulling down.
0 Removethe cartridge byslowly rotating
it counterclockwise.A small amount of
water may dripdown.
A CAUTION: ,fairhasbeen
trapped in the system,thefilter cartridge may
be ejectedasit isremoved.Usecaution when
removing.
Removethe protective foil from the end
of the cartridge.
Liningup the arrow onthe cartridge
O
and the cartridge holder,slowly rotate
the cartridge clockwise until itstops.
When the cartridge isproperly installed,
you will feel it "click"as it locksinto place.
Thegrip on the end of the cartridge
should be positioned vertically.
Do not overtighten.
Filter Bypass Plug
Youmust usethe filter bypass plug when a
replacement filter cartridge is not available.
Theicemakerwill not operate without the
filter orfilter bypass plug.
Replacement Filters:
Toorder additional filter cartridges
in the United States, visit our Website,
GEAppliances.com, or call GEParts and
Accessories, 800.626.2002.
Filter ModelGSWF
Customers inCanada should consult
the yellow pages for the nearest Habe
ServiceCenter.
Closethe cartridge cover.

About the shelves and bins.
Not all features are on all models.
Rearranging the Shelves
Shelvesin the refrigerator compartment areadjustable.
Refrigerator Compartment
Toremove:
il e ( i _O ¸
Some models have wire shelves
that can be adjusted in the same
manner.
-i
0 Removeall items from the shelf.
Tilt the shelfup at the front.
Liftthe shelf up at the back and bring the
shelf out.
Toreplace:
While tilting the shelf up, insertthe top
hook at the back of the shelf in aslot
on the track.
0 Lowerthe front of the shelfuntil the
bottom of the shelf locksinto place.
Non-AdJustable Shelves on the Door (onsomemodels)
Toremove: Liftthe shelf straight up; then
pull out.
Toreplace: Engagethe shelfin the molded
supports on the door and push down.
It will lockin place.
6

About the crispers and pans.
Not all features are on all models.
GEAppliances.com
It_ ,° :' °J _11¸¸
i i i i i
i_ i i
_i i i i
ii i _i i
Fruit and Vegetable Crisper
Excess water that may accumulate inthe
bottom of the drawers or under the drawers
should be wiped dry.
Adjustable Humidity Crisper (onsome models)
Slidethe control all the way to the
HIGHsetting to provide high humidity
recommended for most vegetables.
Slidethe control all the way to the LOW
setting to provide lower humidity levels
recommended for mostfruits.
Snack Pan (onsome models)
This pan can bemoved to the most useful
location for your family's needs.
Toremove, slidethe pan out to the stop
position,lift the pan upand past thestop
position and lift it out.

About the freezer drawer. (on some models)
Not oil features ore on oil models.
Freezer Shelves and Baskets
Appearance and features may vary
Appearance may vary
O A shelfabove the icestorage bin
O A half-width basket
O A deepfull-width basket
Basket Removal
Toremove the deep full-width basket on
freezer drawer models:
Open the freezerdrawer until itstops.
Thefreezer basket restson the inside
tabs onthe drawer slides.
Liftthe basket sothat it is out of all
6 slide bracket tabs.
Tilt the basket and lift out ofthe drawer.
Toremove the half-width basket:
Pullthe basket out to the stop location.
Liftthe basket upat the front to release
it from the stop hookson each side.
Liftthe basket out to remove itfrom
the sides.
NOTE:Do not fill baskets higher than the rim
of thebasket. This may cause basketsto stick
orjam when openingor closing.
When replacing the deep full-width basket:
Tiltthe basket back and lower it down
into the drawer. Rotate the basket to a
horizontal position and press it down into
the 6 alignment tabs.
NOTE:Always be sure that the basket is
seated in all 6 slide bracket tabs before
sliding back into the freezer. The basket can
be turned in either direction front to back and
installed intothe freezer.
When replacing the basket, make sure that
the basket goes under the stop hooks on
each side,
NOTE:Always be sureto fully closethis
basket.
Appearance may vary
8

About the freezer compartment. (on some models) GEAppliances.com
Not all features are on all models.
Freezer Shelf and Basket
ii ii ii ii ii ii
0 A full-width fixed wire shelf
0 A full-width sliding wire basket
Basket Removal
To remove the full-width sliding wire basket
on door models:
Open the basket out to its full extension.
Lift up the front of the basketand pull
straight out to remove.
Fixed Shelf Removal
NOTE:The full-width wire shelf is not intended
to slide,
To remove for cleaning:
Hold the shelf at the front and pullit firmly
forward.
NOTE:Do not fill basket higherthan the rim of
the basket. Thismay cause basket to stick or
jam when opening orclosing.
When replacing the full-width sliding
wire basket:
Insertthe wire basket into the lower liner's
railsand push back into place.
When replacing the full-width sliding wire
shelf:
Insertthe wire shelf intothe upper liner's rails
and push back into place.
To remove
To replace
Non-Adjustable Shelf on Freezer Door
Toremove: Liftthe shelf straight up;
then pull out.
Toreplace: Engagethe shelf inthe molded
supports on the door and push down. Itwill
lock in place.

About the automatic icemaker. Consome models)
A newly installed refrigerator may take J_2to 24 hours to begin making ice.
Power
Switch
X _ Icernaker
Gee /_
Power FeelerArm
Light
To reach the power switch.
ii!
Automatic Icemaker
Theicemakerwillproducesevencubespercycle-
approximately100-130cubesina24-hourperiod,
dependingonfreezercompartmenttemperature,
roomtemperature,numberofdooropeningsand
otheruseconditions.
Seebelowfor howto accessiceand reachthe
powerswitch.
iftherefrigeratorisoperatedbeforethewater
connectionismadetotheicemaker,setthepower
switchintheO(off_position.
Whentherefrigeratorhasbeenconnectedto
thewatersupply,setthe powerswitchto theII'on)
position.Theicemakerpowerlightwillturngreen
whenthefreezerlightswitchispressedinorwhen
thefreezerdoorisclosed.
Theicemakerwillfillwith waterwhenitcoolsto
15°F(-10°C).Anewlyinstalledrefrigeratormay
take12to 24hoursto beginmakingicecubes.
Accessing Ice and Reaching
the Power Switch
Toreachtheicemakerpowerswitch,pull
theshelfabovetheicebinstraightout.Always
besuretoreplacethe shelf.
Toaccessice,simplypullthe binforward.
Youwillheara buzzingsoundeachtime
theicemakerfillswithwater.
Throwawaythefirstfew batchesoficeto allow
thewater lineto clear.
Besurenothinginterfereswiththesweep
ofthefeelerarm.
Whenthebinfillsto thelevelofthefeelerarm,
theicemakerwill stopproducingice.It isnormal
forseveralcubestobejoinedtogether.
tficeisnotusedfrequently,oldicecubeswill
becomecloudy,tastestaleandshrink.
NOTE:Inhomeswithlower-than-overagewater
pressure,youmayheartheicemakercyclemultiple
timeswhenmakingonebatchofice.
NOTE:Setthepowerswitchto the0 (off)position
ifthewatersupplyisshutoff.
Ice Bin
To access ice.
i iii
Icemaker Accessory Kit
tfyourrefrigeratordidnotcomealreadyequipped
withanautomaticicemaker,an icemaker
accessorykitisavailableatextracost.
Checkthe backofthe refrigeratorforthe specific
icemakerkit neededforyourmodel.
10
Care and cleaning ofthe refrigerator. 6EAppliances.com
Cleaning the Outside
Thedoor handles and trim. Cleanwith a
cloth dampened with soapy water. Drywith
a soft cloth. Donot usewax on the door
handlesand trim.
Keep the outside clean. Wipe with
a clean cloth lightly dampened with kitchen
appliance wax or mild liquiddish detergent.
Dry and polish with a clean,soft cloth.
Do not wipe the refrigerator with a soiled
dish cloth or wet towel. These may leave
a residue that can erode the paint. Do not
usescouring pads, powdered cleaners,
bleach or cleaners containing bleach
because these products can scratch and
weaken the paint finish.
Cleaning the inside
Tohelp prevent odors, leavean open box
of baking soda in the refrigerator and freezer
compartments.
Unplug the refrigerator before cleaning.
Ifthis isnot practical, wring excessmoisture
out of sponge or cloth when cleaning around
switches, lights or controls.
Useanappliance wax polishon the inside
surface between the doors.
Usewarm water and baking soda solution-
about a tablespoon (15ml)of bakingsoda to
a quart (1 liter)of water. This both cleansand
neutralizesodors. Rinseand wipe dry.
Thestainless steel panels and door
handles. Stainlesssteel (onsome models)
can be cleaned with a commercially
availablestainless steel cleaner.A spray-on
stainlesssteelcleaner worksbest.
Do not useappliance wax or polish on the
stainlesssteel.
After cleaning the door gaskets,apply athin
layerof petroleumjelly to the door gaskets
at the hingeside.Thishelps keepthe gaskets
from sticking and bending out of shape.
Avoid cleaning cold glass shelves with hot
water because the extreme temperature
difference may cause them to break.
Handle glass shelves carefully. Bumping
tempered glass can cause it to shatter.
Do not wash any plastic refrigerator parts
in the dishwasher.
11

Careand cleaning of the refrigerator.
Behind the Refrigerator
Becareful when moving the refrigerator
away from the wall. Alltypes of floor
coveringscan bedamaged, particularly
cushioned coverings and thosewith
embossedsurfaces.
Raisethe levelinglegslocated at the bottom
front of the refrigerator.
Pullthe refrigerator straight out and return it
to position by pushing it straight in.Moving
Preparing for Vacation
Forlong vacations or absences,remove
food and unplug the refrigerator. Clean the
interior with a baking soda solution of one
tablespoon (!5 ml)of baking sodato one
quart (! liter)of water. Leavethe doors open.
Setthe icemaker power switch to the 0 (off)
position and shut off the water supply to
the refrigerator.
the refrigerator in aside direction may result
in damage to the floor coveringor
refrigerator.
Lowerthe leveling legs until theytouch the
floor.
When pushing the refrigerator back, make
sureyou don't roll over the power cord or
icemaker supply line (on some models).
If the temperature can drop below freezing,
have a qualified servicerdrain the water
supply system (onsome models)to prevent
serious property damage due to flooding.
Preparing to Move
Secureall looseitems suchas basegrille,
shelvesand drawers by taping them securely
in place to prevent damage.
When using a hand truck to movethe
refrigerator,do not restthe front or back
of therefrigerator against the hand truck.
Thiscould damage the refrigerator. Handle
onlyfrom the sidesof the refrigerator.
Be sure the refrigerator stays in an upright
position during moving.
12

Replacingthelightbulbs. GEAppliances.com
Turning the control to the Off position does not remove power to the light circuit.
Refrigerator Lights
Appearance may vary
A CAUTION:Lightbulbsmay
be hot.
Unplugthe refrigerator.
@
To removethe light shield,graspthe
0
shieldat the back and pull out to release
the tabs at the back.
Rotatethe shield down andthen forward
to releasethe tabs at the front of the
shield.
Freezer Light
A CAUTION:Lightbulbsmay
be hot.
Unplugthe refrigerator.
@
Thebulb islocated at the top of the
0
freezer insidea light shield.To remove
the shield,graspthe shieldat the back
and pull out to releasethe tabs at the
back.
Rotatethe shield down andthen forward
to releasethe tabs at the front of the
shield.
O After replacing with an appliance bulb
of thesame or lowerwattage, replace
the shield.
O Plugthe refrigerator back in.
NOTE:Appliance bulbs may beordered from
GEPartsand Accessories,800.626.2002.
After replacing with an appliance bulb
of thesame or lowerwattage, replace
the shield.
Plugthe refrigerator back in.
13

Installatio
efri erator
I str ct"
Questions? Call 800.GE.CARES {800.432.2737) or Visit our Website at: GEAppliances.com
In Canada, call 1.800.561.3344 or Visit our Website at: www.geappliances.ca
BEFORE YOU BEGIN
Read these instructions completely and carefully.
S
Models 20 and 22
TOOLS YOU MAY NEED
. IMPORTANT - Savetheseinstructions
for local inspector's use.
" IMPORTANT -Observe all governing
codes and ordinances.
, Note to Installer- Be sure to leave these
instructions with the Consumer.
, Note to Consumer - Keep these instructions for
future reference.
, Skill level - Installation of this appliance requires
basic mechanical skills.
, Completion time - Refrigerator Installation
20 minutes
Water Line Installation
30 minutes
Adjustable Wrench
1/4" Outer Diameter
Compression Nut
and Ferrule (sleeve)
(icemaker models only)
3/32", 1/8" and 3/16" Allen
wrenches
3/8" and 5/16" Socket
Ratchet/Driver
PhillipsHeadScrewdriver
, Proper installation is the responsibility of the
installer.
, Product failure due to improper installation is not
covered under the Warranty.
PREPARATION
MOVING THE REFRIGERATOR INDOORS
If the refrigerator will not fit through a doorway,
the refrigerator door and freezer drawer can be
removed.
, To remove the refrigerator door, see Step i in
the Reversing the Door Swing section.
, To remove the freezer drawer, see the Removing
the Freezer Drawer section.
WATER SUPPLY TO THE ICEMAKER AND DISPENSER
(ON SOME MODELS)
If the refrigerator has an icemaker, itwill have
to be connected to a cold water line.A GEwater supply kit
(containing tubing, shutoff valve, fittings and instructions) is
available at extra cost from your dealer,by visiting our
Website at GEAppliances.com (inCanada at
www.geappliances.ca) or from Partsand Accessories,
800.626.2002 (InCanada 1.888.661.1616).
1/8"DrillBit and
Electricor HandDrill
Pencil
Wire Cutters
\
Tape measure
1/4" Nut Driver
Level
14

Installation Instructions
INSTALLING THE REFRIGERATOR
REFRIGERATOR LOCATION
• Donot install the refrigerator where the temperature
will go below 60°F(16°C)because it will not run often
enough to maintain proper temperatures.
• Donot install the refrigerator where the temperature
will go above 100°F(]7°C) because it will not perform
properly.
Install it on a floor strong enough to support it fully
loaded.
CLEARANCES
Allow the following clearances for ease of installation,
proper air circulation and plumbing and electrical
connections.
Standard Depth
Models
Sides 1/8"(:Smm)
Top 1"(25 mm)
Back 1"(25 mm)
REMOVE TOP CAP (cont.} Jansomemodels}
REINSTALL DOORS, DRAWERS AND TOP CAP
rE1 Carefully lower the door(s) onto the center hinge(s).
Reinstalltop hinge(s).NOTE:Ensurethe door is
properly aligned to the case top to avoid
readjustment of the door during top cap
reinstallation.
r_ Placecap over the top of the refrigerator. Reinstall
the original screws in the top and back of the cap.
[] Reinstallthe bottom freezer drawer or door. Refer to
"Replacing the Freezer Drawer" section or Step 8 of
"Reversing the Door Swing"section.
A
REMOVE TOP CAP (on some models)
• IMPORTANTNOTE:This refrigerator is 34-112"deep.
Doors and passageways leading to the installation
location must be at least36" wide in order to leave
the doors and handles attached to the refrigerator
while transporting it into the installation location. If
passageways are less than 36",the refrigerator doors
and handles can easily be scratched and damaged.
The top cap and doors can be removed to allow the
refrigerator to be safely moved indoors. Start with Step A.
• If it is not necessary to remove doors, skip Step A.
Leave tape and all packaging on doors until the
refrigerator is in the final location.
• SKIDREMOVAL:Tilt refrigerator to each side to
remove skid.
• NOTE:Use a padded hand truck to move this
refrigerator. Place the refrigerator on the hand truck
with a side against the truck. We strongly recommend
that TWO PEOPLEmove and complete this installation.
[] Locate and remove the two Phillips head screws on
the top of the refrigerator. Removethe two screws
on each sideat the rear of the top cap. Lift off and
remove top cap.
r_ Remove the fresh-food door(s).Referto Steps I and ]
of "Reversing the Door Swing" section or Steps I and
2 of "Removing the Doors" section.
[] Remove the bottom freezer drawer or door. Referto
"Removing Freezer Drawer" section or Step 2 of
"Reversing the Door Swing" section.
r_ Move refrigerator to the installation location.
Top Hinge B
[_] CONNECTING THE REFRIGERATOR
TO THE HOUSE WATER LINE
(icemaker models)
A cold water supply is required for automatic
icemaker operation. Ifthere is not a cold water
supply, you will need to provide one. SeeInstalling the
Water Line section.
NOTES:
• Before making the connection to the refrigerator,
be sure the refrigerator power cord is not plugged
into the wall outlet.
Ifyour refrigerator does not have awater filter, we
recommend installing one if your water supply has
sand or particles that could clog the screen of the
refrigerator's water valve. Install it in the water line
near the refrigerator. If using GESmartConnecf"
Refrigerator Tubing Kit,you will need an additional
tube (WX08X10002)to connect the filter. Do not cut
plastic tube to install filter.
15

Installation Instructions
INSTALLING THE REFRIGERATOR (cont.)
B3CONNECTING THE REFRIGERATOR TO
THE HOUSE WATER LINE
(cont.}
r_ if you are using copper tubing, place a
compression nut and ferrule (sleeve) onto the
end of the tubing coming from the house cold
water supply.
If you are using the GE SmartConnect'"
tubing, the nuts are already assembled to
the tubing.
r_ if you are using copper tubing, insert
the end of the tubing into the refrigerator
connection, at the back of the refrigerator,
as fur as possible. While holding the tubing,
tighten the fitting.
If you are using GE SmartConnect T"tubing,
insert the molded end of the tubing into the
refrigerator connection, at the back of the
refrigerator, and tighten the compression
nut until it is hand tight. Then tighten one
additional turn with a wrench. Overtightening
may cause leaks.
r_ Fasten the tubing into the clamp provided to
hold it in position. You may need to pry open
the clamp.
r_ TURN ON THE WATER SUPPLY
(icemaker models)
Turn the water on at the shutoff valve (house
water supply) and check for any leaks.
[_] PLUG IN THE REFRIGERATOR
On models with an icemaker, before plugging in
the refrigerator, make sure the icemaker power
switch is set to the 0 (off} position.
See the grounding information attached to the
power cord.
One of the illustrations below will look like
the connection on your refrigerator.
Icemaker-Ready models
Tubing
Clamp
I/4D
Compression
Nut
Ferrule
(sleeve)
Refrigerator
SmartConnect"
Tubing
Icemaker-lnstalled Models
Ferrule i/4[]
Refrigerator (sleeve) Compression
Connection
SmartConnecf_
Tubing
1/413Copper
[] PUTTHEREFRIGERATORIN PLACE
Move the refrigerator to its final location.
[_] LEVEL THE REFRIGERATOR
Adjustable legs at the front corners of the
refrigerator should be set so the refrigerator is
firmly positioned on the floor, and the front is
raised just enough that the door closes easily
when opened about halfway.
To adjust the leveling legs, turn the legs
clockwise to raise the refrigerator,
counterclockwise to lower it.
TubingClamp
1/411Tubing
16

Installation Instructions
1_]REMOVE THE FRESH FOOD
DOOR HANDLE
(For placement in the installation location
or reversal of the handles - on some
models)
Stainless steel (on
some models):
O REMOVING
THE DOOR
HANDLE: Loosen
the set screws
with the 3/32"
Allen wrench
and remove
the handle.
NOTE: For
Double Door
models follow
the same
procedure on
the opposite door.
Mounting J
Fasteners
(appearance may vary)
FTIREMOVE THE FREEZER DOOR HANDLE
Stainless steel and plastic handles:
0 Loosen the set screws located on the
underside of the handle with the 1/8" Allen
wrench and remove the handle.
NOTE: If the handle mounting fasteners need
to be tightened or removed, use a 3/16" Allen
wrench.
1
Badge
Plastic handle
(on some models}:
O REMOVING THE DOOR HANDLE: Depress the
tab on the underside of the handle and slide
the handle up and off of the mounting
fasteners.
O
DOOR HANDLE
(on some
REVERSING THE _-t
models):
, Remove
the handle
mounting
fasteners with
a 3/16" Allen
wrench and
transfer
the handle
mounting
fasteners to
the right side.
, Remove the logo badge.
, Remove and transfer the plug button to
the left side of the fresh food door. NOTE:
Use a flat plastic edge to prevent
damaging the door. Remove any adhesive
on the door with a mild detergent. Remove
the paper covering on the adhesive
backing on the logo badge prior to carefully
attaching the badge to the door.
Haunting
Fasteners
(appearance may vary)
Badge
f
17

Installation Instructions
INSTALLING THE REFRIGERATOR (cont.)
181ATTACH THE FRESH FOOD
DOOR HANDLE
Stainless steel handle:
@ Attach the
handle to the
handle mounting
fasteners and
tighten the set
screws with a
3/32" Allen
wrench.
NOTE: For
Double Door
models follow
the same
procedure on the
opposite door.
Plastic handle:
@ Attach the handle to the handle mounting
fasteners by aligning the slots with the
handle mounting fasteners.
@ Slide it down until it is firmly locked into
position.
Mounting
Fasteners
(appearancemayvary)
r_ ATTACH THE FREEZER DOOR HANDLE
Stainless steel and plastic handles:
@ Attach the handle firmly to the mounting
fasteners and tighten the set screws on
the bottom of the handle with a 1/8" Allen
wrench.
(appearance may vary)
Slots on back of
handle
(appearance may vary)
18

Installation Instructions
LEVEL THE REFRIGERATOR
The leveling legs have 2 purposes:
l) Leveling legs adjust so the refrigerator is
firmly positioned on the floor and does not
wobble.
21 Leveling legs serve as a stabilizing brake
to hold the refrigerator securely in position
during operation and cleaning. The leveling
legs also prevent the refrigerator from
tipping.
r_ Remove the grille by removing the two Phillips
head screws.
r_ SET THE CONTROLS
Set the controls to the recommended setting.
5 5
o_soff oisoff
9 is CoFdest 9 is Cotdest
5 5
["EOOMME"OEOCO"'"O"SE''"OS1
r_ Turn the leveling legs clockwise to raise
the refrigerator, counterclockwise to lower it.
CAUTION: Toavoidpossible
personal injury or property damage,
the leveling legs must be firmly touching
the floor.
r_ Replace the base grille by inserting the two
Phillips head screws.
Adjust Freezer Adjust Refrigerator
Temperature Temperature
REMOVE PACKAGING, START
ICEMAKER (icemaker models)
A) Remove all tape, foam and protective
packing from shelves and drawers.
B} Remove the tie downs from the freezer
baskets.
C} Place half width basket onto drawer slides.
See About the freezer section for instructions.
Set the icemaker power switch to the I Ion} position.
The icemaker will not begin to operate until it
reaches its operating temperature of 15°F(-9°C) or
below. It will then begin operation automatically. It
will take 2-] days to fill the ice bin.
19
NOTE: In lower water pressure conditions, the
water valve may turn on up to 3 times to
deliver enough water to the icemaker.
Installation Instructions
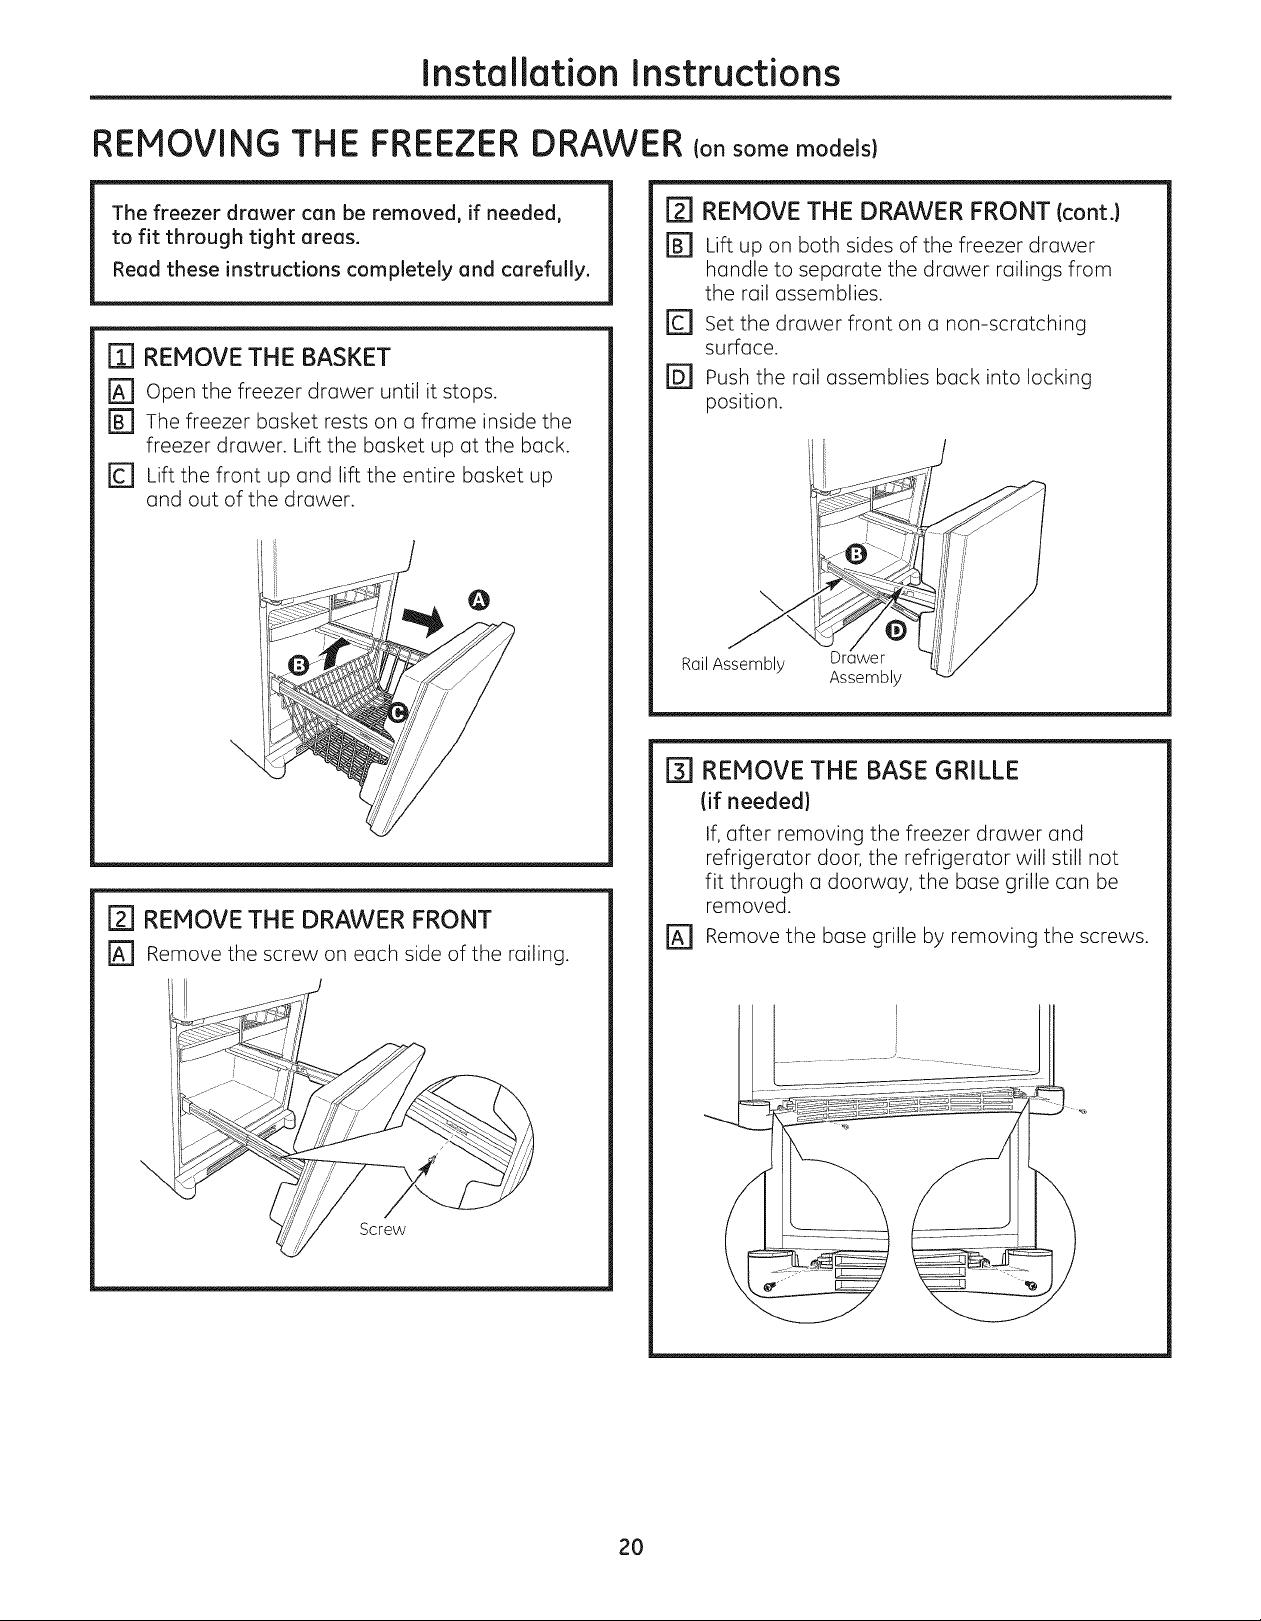
REMOVING THE FREEZER DRAWER (onsome models)
The freezer drawer can be removed, if needed,
to fit through tight areas.
Read these instructions completely and carefuJly.
[i] REMOVE THE BASKET
[] Open the freezer drawer until it stops.
r_ The freezer basket rests on a frame inside the
freezer drawer. Lift the basket up at the back.
[] Lift the front up and lift the entire basket up
and out of the drawer.
[] REMOVE THE DRAWER FRONT
[] Remove the screw on each side of the railing.
[]
REMOVE THE DRAWER FRONT (cont.)
[]
Lift up on both sides of the freezer drawer
handle to separate the drawer railings from
the rail assemblies.
Set the drawer front on a non-scratching
surface.
@
Push the rail assemblies back into locking
position.
Rail Assembly Drawer
Assembly
ITI REMOVE THE BASE GRILLE
(if needed)
If, after removing the freezer drawer and
refrigerator door, the refrigerator will still not
fit through a doorway, the base grille can be
removed.
rA] Remove the base grille by removing the screws.
Screw
20

Installation Instructions
REPLACING THE FREEZER DRAWER (onsomemodels)
F_ ATTACH AND SECURE THE DRAWER
Two people may be required to complete
this procedure.
m ATTACH AND SECURE THE DRAWER
FRONT TO THE SLIDES
r_ Pull out the rail assemblies to the full length
on each side of the cabinet.
FRONT TO THE SLIDES (cont.)
r_ Replace the screws on both rail assemblies.
i _!
..... _k
j//
r_ Locate the slots on the inside of the rail
assemblies near the back.
Rail assembly
Insert the hooks at the back of the drawer
©
railings into the slots on the rail assemblies.
@
Lower the front of the drawer, making sure the
tabs on the sides of the railings fit into the front
slots in the rail assemblies.
\
Screw
[] REPLACE THE FREEZER BASKET
Replace the lower freezer basket by lowering it
into the frame.
Slot
G
Slot
21

Installation Instructions
REVERSINGTHE DOOR SWING (Single Door Refrigerator Models only)
IMPORTANT NOTES
When reversing the door swing:
NOTE: Door swing is not reversible on stainless
steel models.
, Read the instructions all the way through before
starting.
, Parts are included in the door hinge kit.
, Handle parts carefully to avoid scratching paint.
, Set screws down by their related parts to avoid
using them in the wrong places.
, Provide a non-scratching work surface for
the doors.
IMPORTANT: Once you begin, do not move the
cabinet until door-swing reversal is completed.
These instructions are for changing the hinges
from the right side to the left side-if you ever want
to change the hinges back to the right side, follow
these same instructions and reverse all references
to left and right.
, Once door swing is finalized, ensure the logo
badge is properly aligned and permanently
secured to the door by removing the adhesive
cover on the back side. NOTE: A replacement
logo badge is included in the hinge kit.
Unplug the refrigerator from its electrical outlet.
Empty all door shelves, including the dairy
compartment.
[] REMOVE THE
REFRIGERATOR DOOR
r_ Tape the door shut with masking tape.
r_ Remove the hinge cover on top of the
refrigerator door by carefully prying it up with a
putty knife, if necessary.
[] Using a 5/16" socket ratchet/driver, remove
the bolts securing the top hinge to the cabinet.
Then lift the hinge straight up to free the hinge
pin from the socket in the top of the door.
r_ carefully remove the door thimble from inside
the socket. This will be used again when
reinstalling the door on the other side.
Q
Hinge Cover
Top Hinge
TOOLS YOU WILL NEED
Adjustable Wrench 5/16" Socket
Hasking Tape Thin-blade Screwdriver
Phillips Screwdriver
Ratchet/Driver
Torx T-20 Driver
Door Thimble
Remove the tape and tilt the door away from
the cabinet. Lift the door off the center hinge
pin. Ensure that the plastic hinge pin thimble
remains on the hinge pin or inside door hinge
pin hole located in the bottom of the door.
FF1Set the door on a non-scratching surface with
the inside up.
22

Installation Instructions
[] REMOVE THE FREEZER DOOR
r_ Tope the door shut with masking tape.
r_ Remove hinge pin from hinge bracket. This will
be used again with the new hinge bracket for
the other side.
©
Remove the tape and tilt the door away from
the cabinet. Lift the door off the bottom
hinge pin.
[]
Remove the button plug from the left side of
the door. Remove the door thimble from the
right side of the door. Install the door thimble
into the hole on the left and the button plug
into the hole on the right.
I_l TRANSFER CENTER HINGE
BRACKET Icont.)
r_ Transfer the plug button and screw hole
cover in the hinge holes on the left side
to the right side.
r_ Install the new center hinge bracket from the
kit on the left side.
r_ set the door on o non-scrotching surfoce, with
the inside up.
FJl TRANSFER CENTER HINGE BRACKET
r_ using o 5/16" socket ratchet/driver, remove the
bolts securing the center hinge to the cabinet.
@
REMOVE BOTTOM HINGE AND
LEVELING LEG
%
Using o 1/2" socket rotchet/driver, remove the
nut and hinge pin from the hinge brocket with
leveling leg. Using u 5/16" socket ratchet/driver,
remove the screws from the bottom hinge
bracket. These will be reinstalled on the
other side.
/ ottom Hinge
%
Using o 5/16" socket rotchet/driver, remove
the screws from the leveling leg bracket on
the other side. These will be reinstalled on the
opposite side.
Bracket
23
vehn
__iac_eg Leg

Installation Instructions
REVERSINGTHE DOOR SWING (cont.}
[] INSTALL BOTTOM HINGE AND
LEVELING LEG
[] Using a 1/2" socket ratchet/driver, install the
hinge pin and nut in the opposite hole on the
hinge bracket with leveling leg.
r_ using a 5/16" socket ratchet/driver, install the
hinge bracket with leveling leg on the left side
of the refrigerator. The pin will be toward the
outside of the ferric erator.
c
r_ using a 5/16" socket ratchet/driver, install the
leveling leg bracket on the right side of the
refrigerator.
TRANSFER REFRIGERATORAND
%
FREEZER DOOR STOPS
[_ Remove the door stop on the right side of the
bottom of the door by removing the two screws.
r_ Move the plastic hinge hole thimble to the
opposite hole.
r_ Install the door stop on the left side, making
sure to line up the screw holes in the door stop
with the holes in the bottom of the door.
Bottom of Door(Right Side)
Bottom of Door (LeftSide)
E_ TRANSFER REFRIGERATOR
DOOR HANDLE TO RIGHT
Refer to Remove the Fresh Food Door Handle
and Attach the Fresh Food Door Handle
sections for instructions.
[_ REHANG FREEZERDOOR
r_ Lower the freezer door onto the bottom hinge pin.
Ensure that the plastic hinge pin thimble is on the
hinge pin or inside the door hinge pin hole located
in the bottom of the door.
r_ straighten the door and line it up with the
center hinge bracket.
r_ Install the center hinge pin with a 3/4" socket
ratchet/driver. Turn it until it extends through
the hinge bracket and into the freezer door.
24

Installation Instructions
E] REHANG REFRIGERATOR DOOR
r_ Lower the refrigerator door onto the center hinge
pin. Ensure that the plastic hinge pin thimble is on
the center hinge pin or inside door hinge pin hole
located in the bottom of the door.
r_ Insert the door thimble into the hinge hole
on top of the refrigerator door and then
insert the top hinge pin. Make sure the door
is aligned with the cabinet. Attach the hinge
to the top of the cabinet loosely with the bolts.
_] Make sure the gasket on the door isflush against
the cabinet and is not folded. Support the door on
the handle side and make sure the door is straight
and the gap between the doors is even across the
front. While holding the door in place, tighten the
top hinge bolts. Replace the hinge cover.
REMOVING THE DOORS
(Double Door Refrigerator Models only)
IMPORTANT NOTES
NOTE: Door swing is not reversible.
, Read the instructions all the way through before
starting.
, Handle parts carefully to avoid scratching paint.
, Set screws down by their related parts to avoid
using them in the wrong places.
, Provide a non-scratching work surface for
the doors.
IMPORTANT: Once you begin, do not move
the cabinet.
These instructions ore for removing the doors.
Unplug the refrigerator from its electricol outlet.
Empty oil door shelves, including the doiry
comportment.
TOOLS YOU WILL NEED
INSTALL THE LOGO BADGE
Remove the adhesive backing paper
and align the pins on the back of the badge
with the holes in the door. Apply pressure to
the badge to ensure it sticks to the door.
Adjustable Wrench 3/8rl and !0 mm Socket
Masking Tape
Phillips Screwdriver
Ratchet/Driver
Thin-blade Screwdriver
25

Installation Instructions
REMOVING THE DOORS (Double Door Refrigerator Models only)
[_] REMOVE THE
REFRIGERATOR DOORS
r_ Tape the doors shut with masking tape.
% Start with left-hand door first: Remove
the screw securing the center hinge cover, lift
the hinge cover and place to the side on top of
the refrigerator.
oooJ
_.__ Remove hinge cover
(! Phillips screw)
[_] REMOVE THE REFRIGERATOR DOORS
(cont.)
Remove the tape and tilt the door away from
%
the cabinet. Lift the door off the center hinge
pin. Ensure that the plastic hinge pin thimble
remains on the hinge pin or inside door hinge
pin hole located in the bottom of the door.
r_ set the door on a non-scratching surface with
the inside up.
j_] Remove the hinge cover on top of the
refrigerator door by removing the Phillips head
screw and pulling the cover up.
r_ using a 5/16" socket ratchet/driver, remove
the bolts securing the top hinge to the cabinet.
Then lift the hinge straight up to free the hinge
pin from the socket in the top of the door.
0
Hinge Cover
Top Hinge_
"_'\\\\\ -.
[2] REMOVE CENTER HINGE
Using a 5/16" socket ratchet/driver, remove the
bolts securing the center hinge to the cabinet.
Set the hinge and bolts aside.
r_ REMOVE OPPOSITE DOOR
Follow the same procedure on the opposite
door. There are no center hinge covers on the
opposite side.
[_[]REMOVE FREEZER DRAWER
Refer to the Removing the Freezer Drawer
section for instructions.
26

Installation Instructions
REPLACING THE DOORS (Double Door Refrigerator Models only}
[] INSTALL CENTER HINGE
Install the center hinge on each side.
[] REHANG REFRIGERATOR DOORS
r_ Lower the refrigerator door onto the center
hinge pin. Ensure that the plastic hinge pin
thimble is on the center hinge pin or inside
door hinge pin hole located in the bottom
of the door.
_Hinge Pin ______
r_ Securely tape the door shut with masking tape
or have a second person support the door.
[] Insert the top hinge pin into the hinge hole on
top of the refrigerator door. Make sure the door
is aligned with the cabinet and opposite door.
Attach the hinge to the top of the cabinet
loosely with the bolts.
r_ lake sure the gasket on the door is flush
against the cabinet and is not folded. Make
sure the door is straight and the gap between
the doors is even across the front. While
holding the aligned door in place, tighten
the top hinge bolts. Replace the hinge cover
and screw.
ITI REPLACE OPPOSITE DOOR
Follow the same procedure on the opposite
door. There is no water line or hinge cover.
[] ALIGN DOUBLE DOORS
If the top of the doors are uneven, first try to
raise the lowest door by turning the leveling leg
on the same side as the door until the doors
are even. If the unit rocks, re-adjust the leveling
legs to the extent that the unit is stable.
If the doors remain uneven, turn the adjustable
pin to raise, or lower, the left door to match
the right door. Use a 1/4" Allen wrench to turn
the pin.
pin
REPLACE FREEZER DRAWER
Refer to the Replacing the Freezer Drawer
section for instructions.
Hinge Cover
Top Hinge Bolts --=___
(appearance may vary)
27

Installation Instructions
iNSTALLiNG THE WATER LiNE
BEFORE YOU BEGIN
Recommended copper water supply kits are
WX8X2, WX8XZor WX8X4, depending on the
amount of tubing you need. Approved plastic
water supply lines are GESmartConnectT_
Refrigerator Tubing (W×O8XlO006, W×O8XIOOlS
and WXO8XlO025).
When connecting your refrigerator to a GE Reverse
Osmosis Water System, the only approved
installation is with a GE RVKit.Forother reverse
osmosis water systems, follow the manufacturer's
recommendations.
If the water supply to the refrigerator is from
a Reverse Osmosis Water Filtration System
AND the refrigerator also has a water filter,
usethe refrigerator's filter bypass plug. Using
the refrigerator's water filtration cartridge in
conjunction with the ROfilter can result in hollow
ice cubes.
Thiswater line installation is not warranted by
the refrigerator or icemaker manufacturer. Follow
these instructions carefully to minimize the riskof
expensive water damage.
Water hammer (water banging in the pipes)in
house plumbing can cause damage to refrigerator
parts and lead to water leakage or flooding. Calla
qualified plumber to correct water hammer before
installing the water supply line to the refrigerator.
To prevent burns and product damage, do not hook
up the water line to the hot water line.
If you use your refrigerator before connecting
the water line, make sure the icemaker power
switch isin the 0 (off) position.
Do not install the icemaker tubing in areas where
temperatures fall below freezing.
When using any electrical device (such as a power
drill) during installation, be sure the device is double
insulated or grounded in a manner to prevent the
hazard of electric shock, or is battery powered.
All installations must be in accordance with local
plumbing code requirements.
(ICEMAKER MODELS)
WHAT YOU WILL NEED
J
, Copper or GESmartConnect'" Refrigerator
Tubing kit, 1/4" outer diameter to connect the
refrigerator to the water supply. If using copper, be
sure both ends of the tubing are cut square.
To determine how much tubing you need: measure
the distance from the water valve on the back
of the refrigerator to the water supply pipe.
Besure there is sufficient extra tubing to allow
the refrigerator to move out from the wall after
installation.
GE SmartConnect TMRefrigerator Tubing Kits
are available in the following lengths:
6' (1.8m) - WXO8XIO006
15' (4.6 m) - WXO8XIO015
25' (7.6 m) - WXO8XlO025
28

Installation Instructions
WHAT YOU WILL NEED (CONT.)
NOTE: The only GE approved plastic tubing
is that supplied in GE SmartConnect TM
Refrigerator Tubing kits. Do not use any other
plastic water supply line because the line is
under pressure at all times. Certain types of
plastic will crack or rupture with age and cause
water damage to your home.
. AGE water supply kit (containing tubing,
shutoff valve and fittings listed below)is available
at extra cost from your dealer or from Parts and
Accessories, 800.626.2002 (in Canada
1.888.261.3055).
o A cold water supply. The water pressure must
be between 20 and 120 p.s.i. (1.4-8.1 bar).
Install the shutoff valve on the nearest frequently
used drinking water line.
SHUT OFF THE MAIN WATER SUPPLY
Turn on the nearest faucet long enough
to clear the line of water.
CHOOSE THE VALVE LOCATION
Choose a location for the valve that is easily
accessible. It is best to connect into the side
of a vertical water pipe. When it is necessary
to connect into a horizontal water pipe, make
the connection to the top or side, rather than at
the bottom, to avoid drawing off any sediment
from the water pipe.
Power drill.
.1/2" or adjustable wrench.
, Straight and Phillips blade screwdriver.
. Two 1/4rl outer diameter compression nuts
and 2 ferrules Isleeves)-to connect the copper
tubing to the shutoff valve and the refrigerator
water valve.
OR
. If you are using a GE SmartConnecf"
Refrigerator Tubing kit, the necessary fittings
are preassembled to the tubing.
. If your existing copper water line has a flared
fitting at the end, you will need an adapter
(available at plumbing supply stores) to connect
the water line to the refrigerator OR you can cut
off the flared fitting with a tube cutter and then
use a compression fitting. Do not cut formed end
from GE SmartConnecf" Refrigerator tubing.
[_] DRILL THE HOLE FOR THE VALVE
Drill a 1/4" hole in the water pipe (even if using
a self-piercing valve), using a sharp bit. Remove
any burrs resulting from drilling the hole in
the pipe.
Take care not to allow water to drain into the
drill.
Failure to drill a 1/4" hole may result in reduced
ice production or smaller cubes.
o Shutoff valve to connect to the cold water line.
The shutoff valve should have a water inlet with
a minimum inside diameter of 5/32rl at the point
of connection to the COLD WATER LINE. Saddle-
type shutoff valves are included in many water
supply kits. Before purchasing, make sure a
saddle-type valve complies with your local
plumbing codes.
29

Installation Instructions
INSTALLING THE WATER LINE (CONT.)
[] FASTEN THE SHUTOFF VALVE
Fasten the shutoff valve to the cold water pipe
with the pipe clamp.
Pipe Clamp.
,)
j4
Saddle-Type
ShutoffValve
NOTE: Commonwealth of Massachusetts
Plumbing Codes 248CMR shall be adhered to.
Saddle valves are illegal and use is not permitted
in Massachusetts. Consult with your licensed
plumber.
[] TIGHTEN THE PIPE CLAMP
Tighten the clamp screws until the sealing
washer begins to swell.
NOTE: Do not overtighten or you may crush
the tubing.
PipeClamp%_,_
Clamp ._
Screw_
r_ ROUTE THE TUBING
:-- Vertical ColdWater Pipe
Washer
/Inlet End
CONNECT THE TUBING TO THE VALVE
rfl
Placethe compression nut and ferrule (sleeve)
for copper tubing onto the end of the tubing and
connect it to the shutoff valve.
Make sure the tubing is fully inserted into
the valve. Tighten the compression nut securely.
For plastic tubing from a GE SmartConnect T"
Refrigerator Tubing kit, insert the molded end
of the tubing into the shutoff valve and tighten
compression nut until it is hand tight, then
tighten one additional turn with a wrench.
Overtightening may cause leaks.
Saddle-Type
Shutoff Valve
,_ __/Tubing
Packing Nut
Outlet Valve
NOTE: Commonwealth of Massachusetts
Plumbing Codes 248CHR shall be adhered to.
Saddle valves are illegal and use is not permitted
in Massachusetts. Consult with your licensed
plumber.
Ferrule (sleeve)
Compression Nut
/ SmartConnect"
[_] FLUSH OUT THE TUBING
Turn the main water supply on and flush out
the tubing until the water is clear.
Shut the water off at the water valve after
about one quart (1 liter) of water has been
flushed through the tubing.
Route the tubing between the cold water line
and the refrigerator.
Route the tubing through a hole drilled in the
wall or floor (behind the refrigerator or adjacent
base cabinet) as close to the wall as possible.
To complete the installation of the refrigerator,
go back to Step 1 in Installing the Refrigerator.
3O
 Loading...