

GE GBS18SBPARSS, GDS18LCPBBB, GDS18LBPBCC, GDS18LBPBWW, GDS18SCPBLSS Owner's Manual And Installation Instructions
...Page 1
GEAppliances.com
Safety Instructions ........ 2-4
Operating Instructions
Getting Started ............. 5
Shelves, Bins and
V_'ater Dispenser . ........... 6
Crispers and Pans ........... 7
Additional Features .......... 8
Automatic Icemaker ...... 9, 10
Care and Cleaning ....... 11,12
Replacing the Light Bulbs .... 12
Installation Instructions
Preparing to Install
the Refiigera tot . ........... 13
V\'ater Line Installation . . .l 4-1 7
Reversing rite Door Swing.. 18-21
Troubleshooting Tips ... 22-24
Normal Operating Sounds . . .22
Consumer Support
_'arranty (Canadian) ....... 26
VVarranty (U.S.) ............ 27
Consumer Support ......... 28
Model 18
Write the model and serial numbers here:
Model #
Serial #
Find these numbers on a label on the
left side, near the top of the fl'eezer
COIllpa I'tlllen t.
162D9629PO07 49-60301 lO-03Jfl
Page 2
IMPORTANTSAFETYINFORMATION.
READALLINSTRUCTIONSBEFOREUSING.
WARNING!
Use this appliance only for its intended purpose as described in this Owner's Manual.
SAFETYPRECAUTIONS
When using electrical appliances, basic safety precautions should be followed, including the following:
This refl-igerator must be i)roperly installed
and located in accordance with the Installation
Instructions before it is used.
Do not allow chiMren to climb, st;rod or hang
on the shelves in the reti-igerat(n: Thev could
damage the refrigerator and seriously iqjm'e
themselves.
Do not touch tile cold sm_fi_ces in tile fl'eezer
compartment when hands are damp or wet.
Skin may stick to these extremely cold sm_hces,
Do not store or use gasoline or other flammable
\_q)(n_ and liquids in tile vicinity of this or any
other appliance.
Do not reti'eeze fl'ozen toods which have
thawed completel>
In refl_Jgerat(n_ with automatic icemake_, avoid
contact with the moving parts of the ejector
mechanism, or with the heating element located
on tile bottom of tile icemaket: Do not place
fingeis or hands on the automatic icemaking
mechanism while the refl-igerator is i)lugged in.
Kee I) finget_ out ot tile "pinch point" areas;
clearances between the dooi_ and between
the doo_ and cabinet are necessarily small.
Be caretul closing dom_ when children are
in the area.
Uni)lug tile refrigerator befin'e cleaning and
making repai_.
NOTE."Westrongiy recommendthat anyservicingbe
performedbya quaiified individual
Before replacing a btlFned-otlt light bulb,
tml)lug tile refl'igemtor or tm'n off power at tile
drcuit breaker or fllse box in order to avoid
contact with a live wire filament. (A burned-out
light bulb may break when being replaced.)
_ Tm'ning the control to the OFFposifion does
not remove power to tile light circuit.
Page 3
GEAppliances.com
DANGER!RISKOFCHILDENTRAPMENT
PROPERDISPOSALOFTHEREFRIGERATOR
Child entr;q)ment and suffocation are not problen_s
of the past.Junked or abandoned refl_igeratm_ are
still dangerous...even if' they will sit for 'ijust a few
dm:s." If vou are getting rid of yore" old refl_igerator,
please follow the instrucOons below to hel I) prevent
accidents.
Before YouThrowAway YourOldRefrigerator
or Freezer:
Take off the dome.
iiiiiiiiii!I,eave the shelves in place so that children
may not easily climb inside.
Refrigerants
_M1refl'igera0on products contain refrigerants,
which trader fecleral law must be removed prior
to product disposal. If wm are getting rid of an
old refl'igera0on product, check with the company
handling the disposal about what to do.
USEOFEXTENSIONCORDS
Because of potential safety hazards under certain conditions, we strongly recommend
against the use of an extension cord.
However, if you must use an extension cord, it is absolutely necessary that it be a UI,-listed (in the United
States) or a CSA cer0fied (in (,anada), . -_re ,gr°tmding, t_,l)e api)liance extension cord having a grotmding
type plug and outlet and that the electrical ra0ng of the cord be 15 amperes (minimum) and 120 xolts.
3
Page 4
IMPORTANTSAFETYINFORMATION.
READALLINSTRUCTIONSBEFOREUSING.
WARNING!
HOWTOCONNECTELECTRICITY
Do not, under any circumstances, cut or remove the third (ground) prong from the power cord.
For personal safety this appliance must be properly grounded.
Tile power cord of this appliance is equipped
with a 3-prong (grounding) plug which mates
with a stnndard 3-prong (grotmding) wall outlet
to minimize tile possibility of electric shock hazard
from this appliance.
Have tile wall outlet and circuit checked by
a qualified electrician to make sure tile outlet
is properly grounded.
Where a standard 2-prong wall outlet is
encotmtered, it is yore" personal responsibili_'
and obligation to have it replaced with a propedy
grotmded 3-prong wall outlet.
Tile refligerator should always be i)lugged into
its own individual electrical outlet which has
a w)ltnge rating that matches tile rating plate.
This provides tile best pe_l'imnance and also
I)re_ents oxerloading, house wiring circuits which
could cause a fire hazard fl'om oxerheated wires.
Never unI)lug your refrigerator by pulling on
tile power coM. Mways grip i)lug firefly and pull
straight out ti'Olll tile outlet.
Repair oI" replace immediately all power cords
that have become fi'aved oi" otherwise damaged.
Do not use a cord that sho_:s cracks or abrasion
damage along its length oi" at either end.
\.Vhen moving tile reflJgerator away fl'oin tile
wall, be carefld not to roll over or damage tile
power coM.
USEOFADAPTERPLUGS(Adapterplug_notpe_m_tted_nconodoj
Because of potential safety hazards under certain conditions, we strongly recommend against
the use of an adapter plug.
HoweveI; if'you, must use an adaptei; where local
codes pemfit, a temporary connection may be made
to a properly grounded 2-prong wall outlet by use
of a UI Aisted adapter a\:lilable at most local
1/_1 I'(1W_lI'e stores.
Tile linger slot in tile adapter must be aligned with
tile laiger slot in tile wall outlet to provide proper
polarity in tile com_ection of tile power cord.
When discom_ecting tile power cord fl'om tile
a(laptei; alwa_:s hold tile adaI)ter in place with one
hand while pulling tile power coM i)lug with tile
other hand. If this is not done, tile adapter ground
temfinal is very likely to break with repeated use.
If tile adapter ground temfinal breaks, DO NOT USE
tile refl-igerator, until a I)r°I ,)er ground has been
established.
Attaching the adapter ground terminal to a wall outlet
cover screw does not ground the appliance unless the
cover screw is metal andnot insulated, and the wall
outlet is grounded through the house wiring. Youshould
have the circuit checkedby a qualified electrician to make
sure the outlet is properly grounde_
READANDFOLLOWTHISSAFETYINFORMATIONCAREFULLY.
SAVETHESEINSTRUCTIONS
4
Page 5
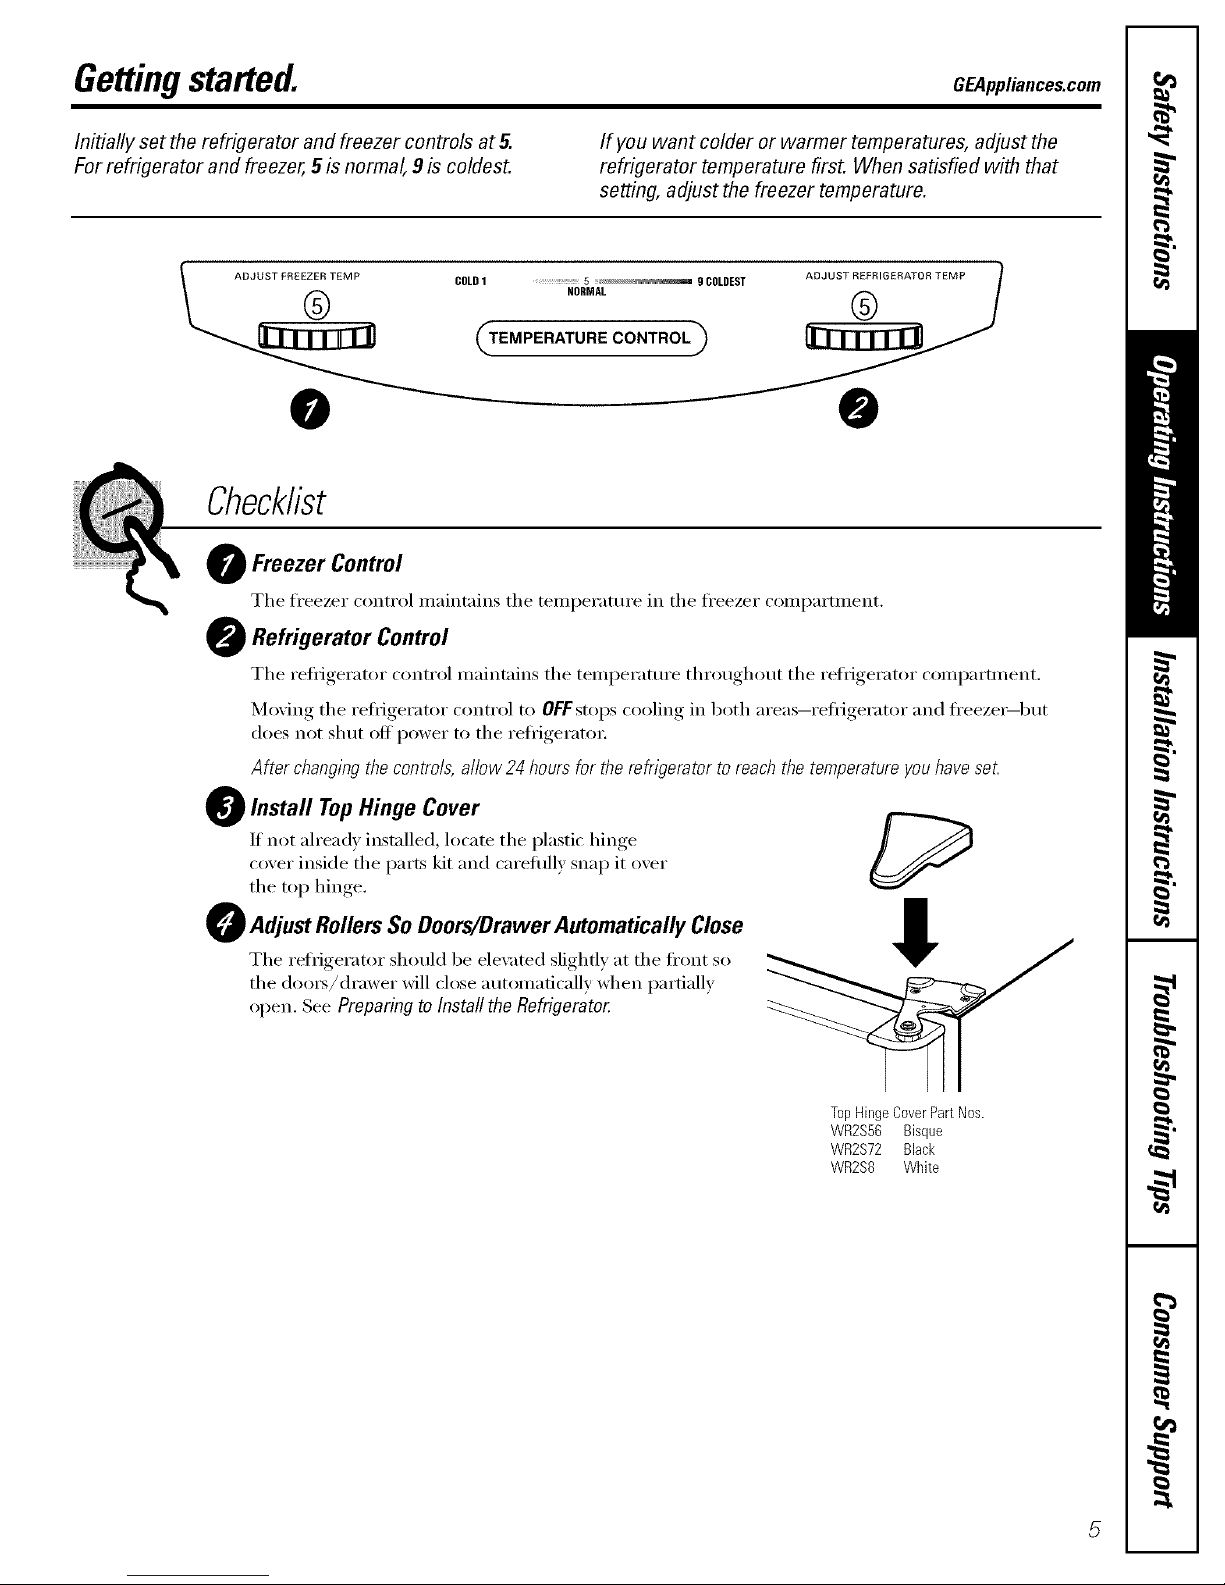
Gettingstarted. GEAppliances.com
Initially set the refrigerator and freezer controls at 5. If you want colder or warmer temperatures, adjust the
For refrigerator and freezer,5 is normal, 9is coldest, refrigerator temperature first. When satisfied with that
setting, adjust the freezer temperature.
COLD 1 5 _///_/_//A D COLDEST
NORMAL
0 @
TEMPERATURE CONTROL)
Checklist
)Freezer Control
The freezer control maintains the teml)erature in the ti'eezer COml)artn_ent.
1Refrigerator Control
The reli_igerator control maintains the temperature throtlghot/t, the refFigerator, ('Oral)aftra ent.
Moxing the refi_igerator control to OFFstops coolino_ in both areas-refl_igerator, and fl'eezex_but
does not shut off power to the refl_igerat(n;
After changingthecontrols,allow24hoursfor the refrigeratorto reachthe temperatureyouhaveset.
0_ Install TopHinge Cover
If not ah'eadv installed, locate the I)lasti( hinge
cover inside the parts kit and careflflly snap it over
the top hinge.
G) Adjust Rollers So Doors/Drawer Automatically Close
The ref_igerator should be ele\_te(l slightly at the ti'ont so
the doo_/ch'awer will close automatically when partially
open, See Preparingto Install the Refrigerator
TopHingeCoverPartNos.
WR2S56 Bisque
WR2S72 Black
WRBS8 White
Page 6
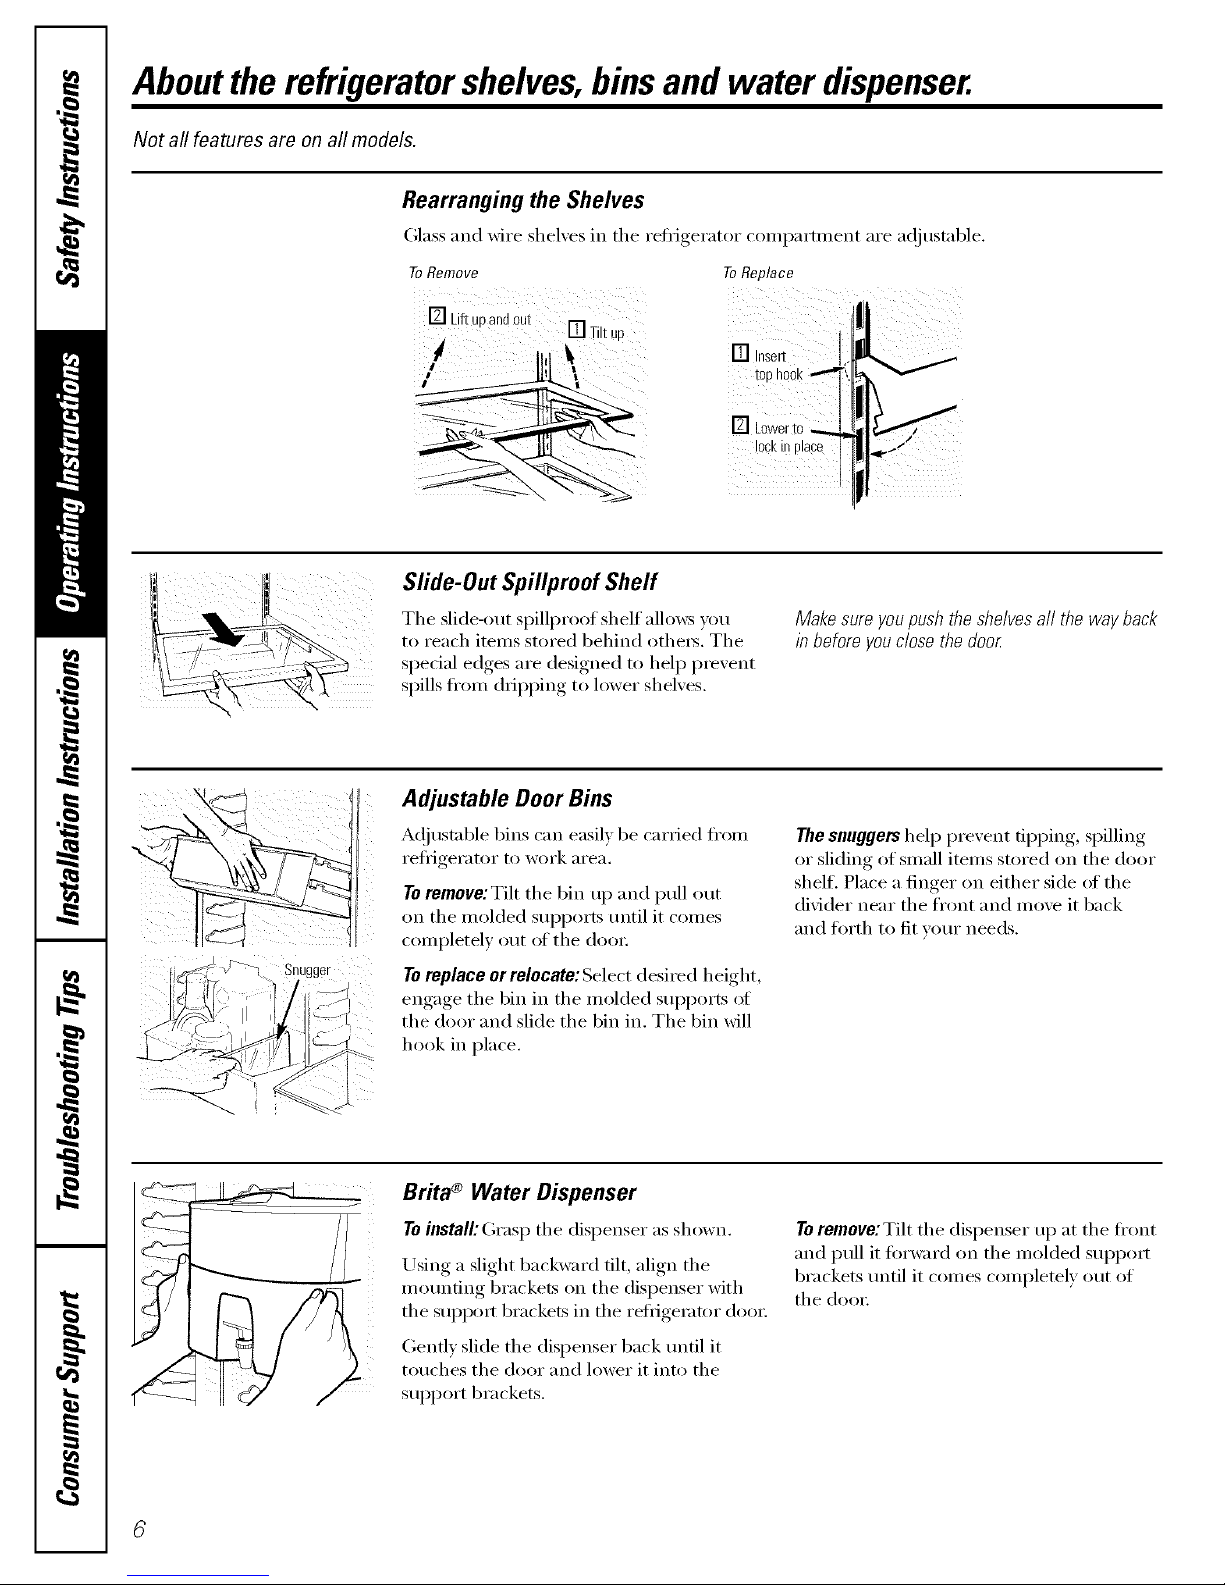
Aboutthe refrigeratorshelves,binsand water dispenser.
Not all features are on all models.
Rearranging the Shelves
(;lass and wire shelves in the refi_igerator compartment are ac!iustable.
ToRemove
E] Liftupandout r'_
U-ITiltup
/ ' \
ToReplace
Slide-Out Spillpmof Shelf
The slide-out spillproof shelf allo_vs )_m
to reach items stored behind others, The
spedal edges are designed to help prevent
spills fl'om dripping to l_m'er shelves,
Makesureyoupushtheshelvesallthewayback
in beforeyouclosethedoor
:nugger
Adjustable Door Bins
A(!justable bins can easily be carried ti'om
i'eflJgei';itor to work area.
Toremove:Tilt the bin up and pull out
on the molded supports until it comes
completely otlt of the (loo_:
7"0replace or relocate: Select desired height,
engage the bin in the molded sui)ports of
the door and slide the bin in. The bin will
hook in place.
Thesnuggers hel I) prevent tipping, spilling
or sliding of small items stored on the door
shelf. Place a finger on either side _ff the
divider near the front and move it back
and forth to fit wmr needs.
Brita® Water Dispenser
Toinstall: Grasp the dispenser as shown,
Using a slight backward tilt, align the
mounting brackets on the dispenser with
the supI)o_t brackets in the reliigemtor (loo_:
Gently slide the dispenser back until it
touches the door and lower it into the
suI)port brackets.
Toremove: Tilt the dispenser up at the fl'ont
and pull it ti)r_;_rd on the molded SUl)l)()x*
brackets until it comes completely out of
the (loo_:
Page 7
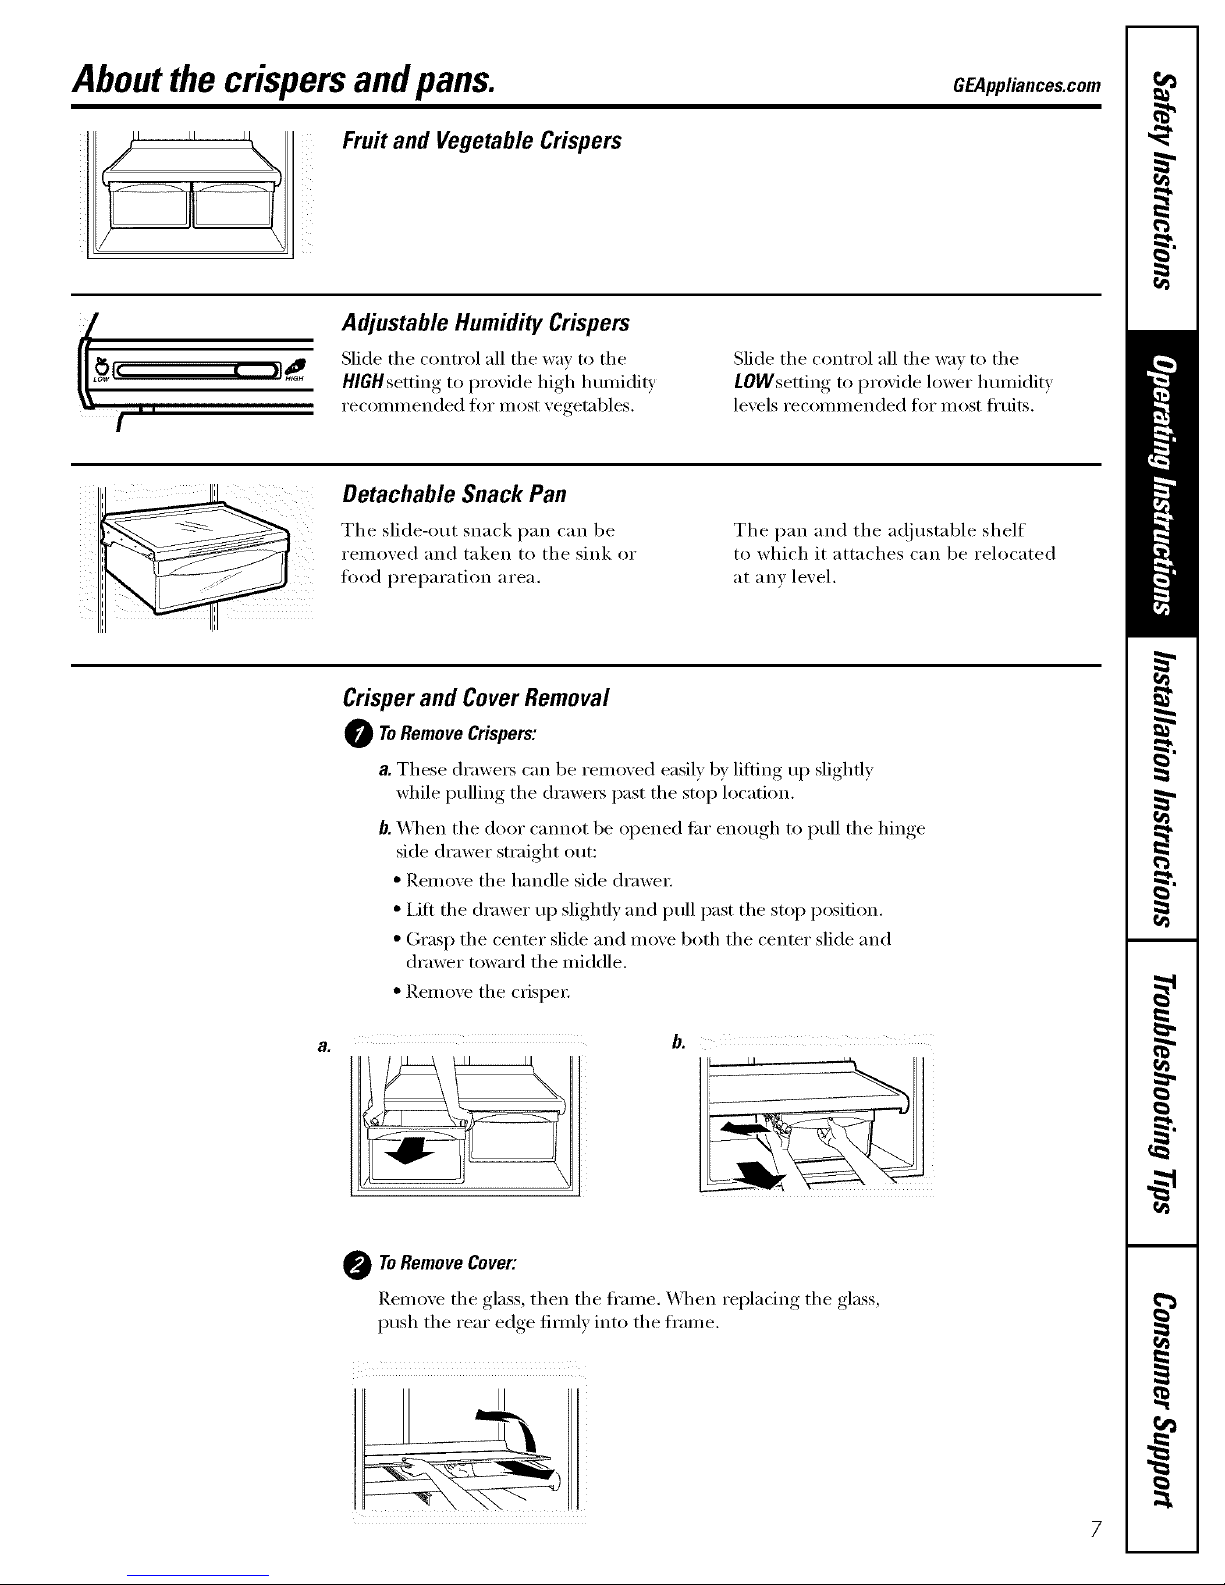
Aboutthe crispersandpans. GEApp,ia.cescom
Fruit and Vegetable Crispers
I
Adjustable Humidity Crispers
Slide the control all the wa_ to the
HIGH setting to pr_xide high h umiditv
reconm_ended for most xegetables,
Slide the control all the wa_ to the
LOWsetting to proxide lower lmmidit)
lexels recommended for most fi'uits,
Detachable Snack Pan
The slide-out snack pan can be
removed and taken to the sink or
fi)od preparation area.
The pan and the ac!justable shelf
to which it attaches can be relocated
at any lexel,
a.
Crisper and Cover Removal
O ToRemove Crispers:
a. These drawe_5 can be removed easily by lifting up slightly
while pulling the drawe_ past the stop location.
/1.\_]_en the door cannot be opened Ira" enough to pull the hinge
side drawer straight out:
• Remove the handle side ch'awe_;
• IJft the drawer up slightly and pull past the stop position.
• Grasp the center slide and move both the cenmr slide and
drawer toward the middle.
• Remove the crispe_:
O ToRemoveCover:
Remoxe the glass, then the ....fl'ame X_q_en tel)lacing* the _*lass,,.
push the rear edge fimfl) into the frame.
Page 8
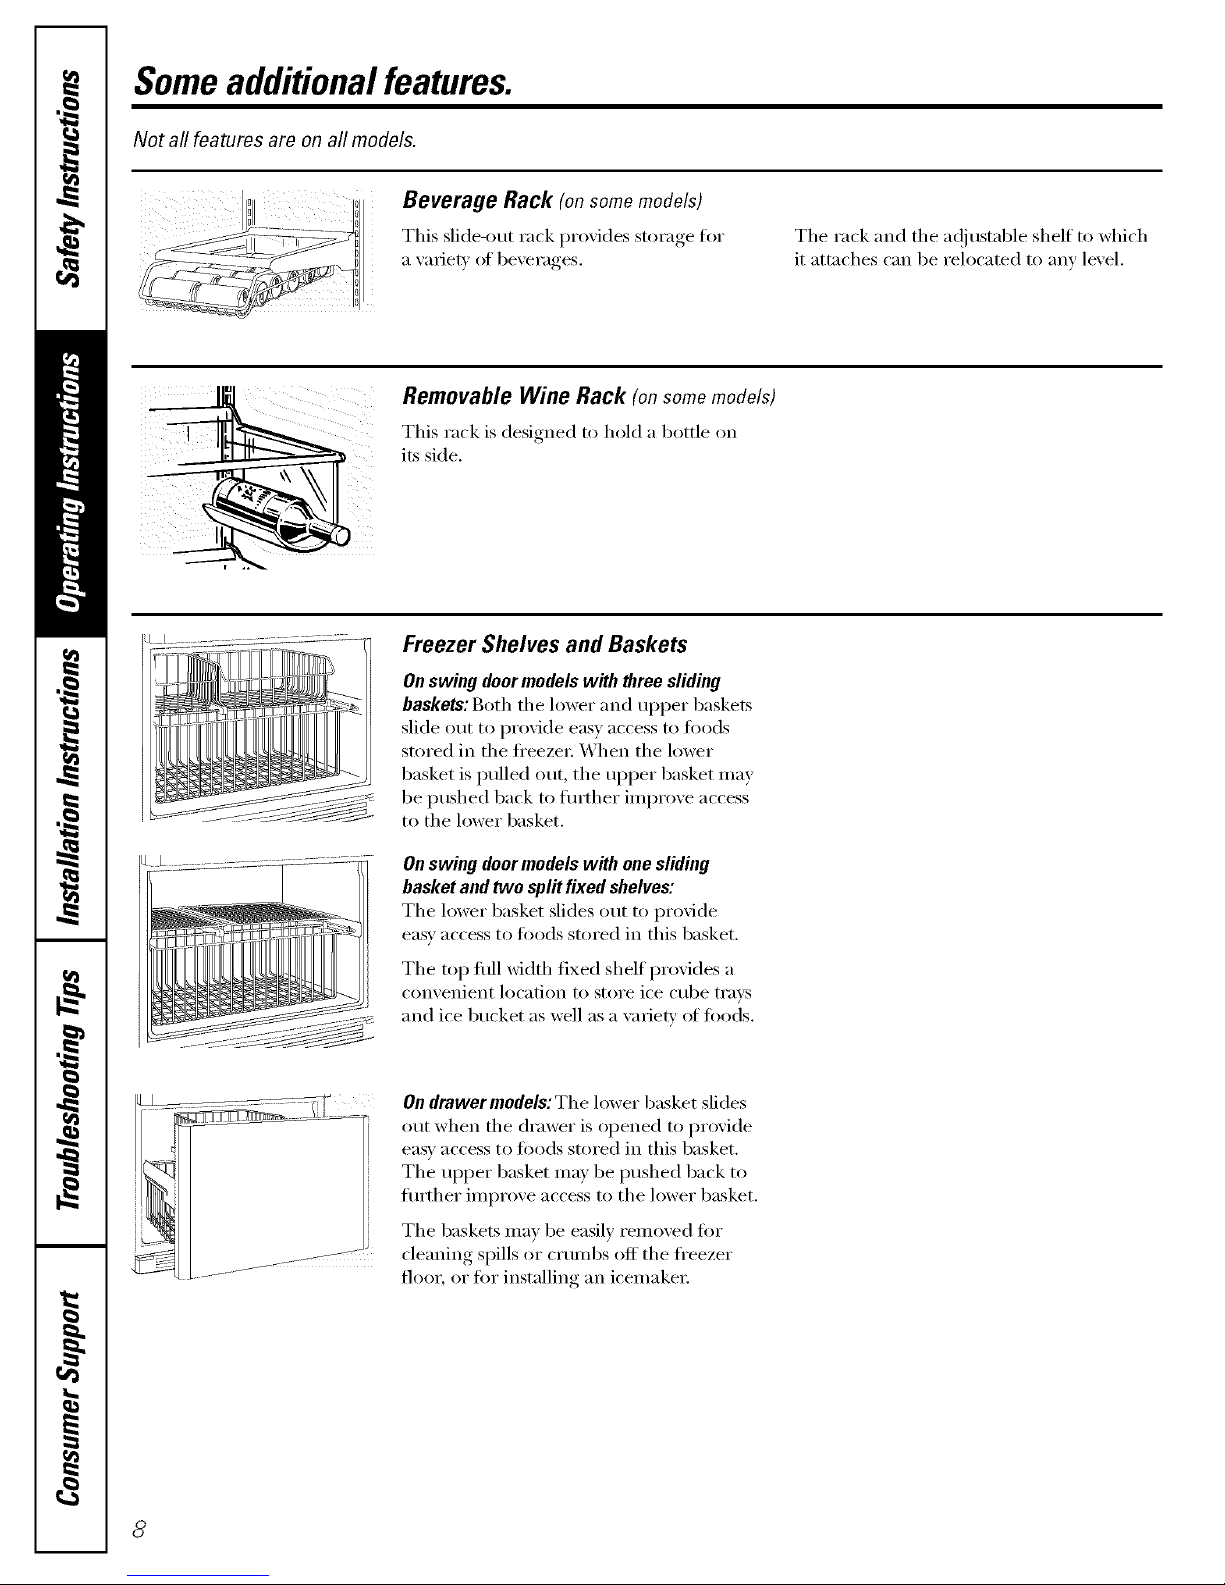
Someadditionalfeatures.
Not all features are on all models.
Beverage Rack (on some models)
This slide-out rack provides storage fi:,r
a wH]e V ot beverages,
The rack and the a(!justable shelf to which
it attaches can be relocated to any level.
ii
Removable Wine Rack (onsomemodels)
This rack is designed to hold a bottle on
its skle,
Freezer Shelves and Baskets
On swing doormodels with _ree sliding
baskets:Both the lower and upper baskets
slide out to provide easy access to fi)ods
stored in the fl'eezet; When the lower
basket is pulled out, the upper basket may
be I)ushed back to fluther improve access
to the lower basket.
On swing doormodels with one sliding
basket and two split fixed shelves:
The lower basket slides out to I)rovide
easy access to t0ods stored in this basket.
The top hill width fixed shelf provides a
convenient location to store ice cube trays
and ice bucket as well as a wn-ietv ot t0ods.
On drawer models: The h )wet basket slides
out when the drawer is opened to provide
easy access to fi)ods stored in this basket.
The ul)per basket may be l)ushed back to
flu'ther improve access to the lower basket.
The baskets may be easily removed for
cleaning spills or crumbs off the fl'eezer
floor, or for installing an icemake_:
Page 9
Aboutthe automaticicemaker. GE4ppliances.com
A newly-installed refrigerator may take 12-24 hours to begin making ice.
Icemaker Accessory Kit
If your reii_igerator did not c(nne ah'eadv
equipped with an automatic icemake_;
an icemaker accessory kit (IM4A fin" U.S.
models, or ]M4-I tar Canadian models) is
available at extra cost.
MountiegBJock Screws
PartNo.WR2M3604 Part No.WR1M478
Icemaker Installation
A special icemaker mortaring block must
be used when installing an icemaker
Directions on how to install the icemaker
motmting block are included in the
Icemaker Accessory Kit Installation
Instructions.
For U.S. models, the motmting block
is included with the _efl_Jgerato_: For
(_anadian models, the mortaring block
is included in the optional icemaker
accesso U kit (IM4-1).
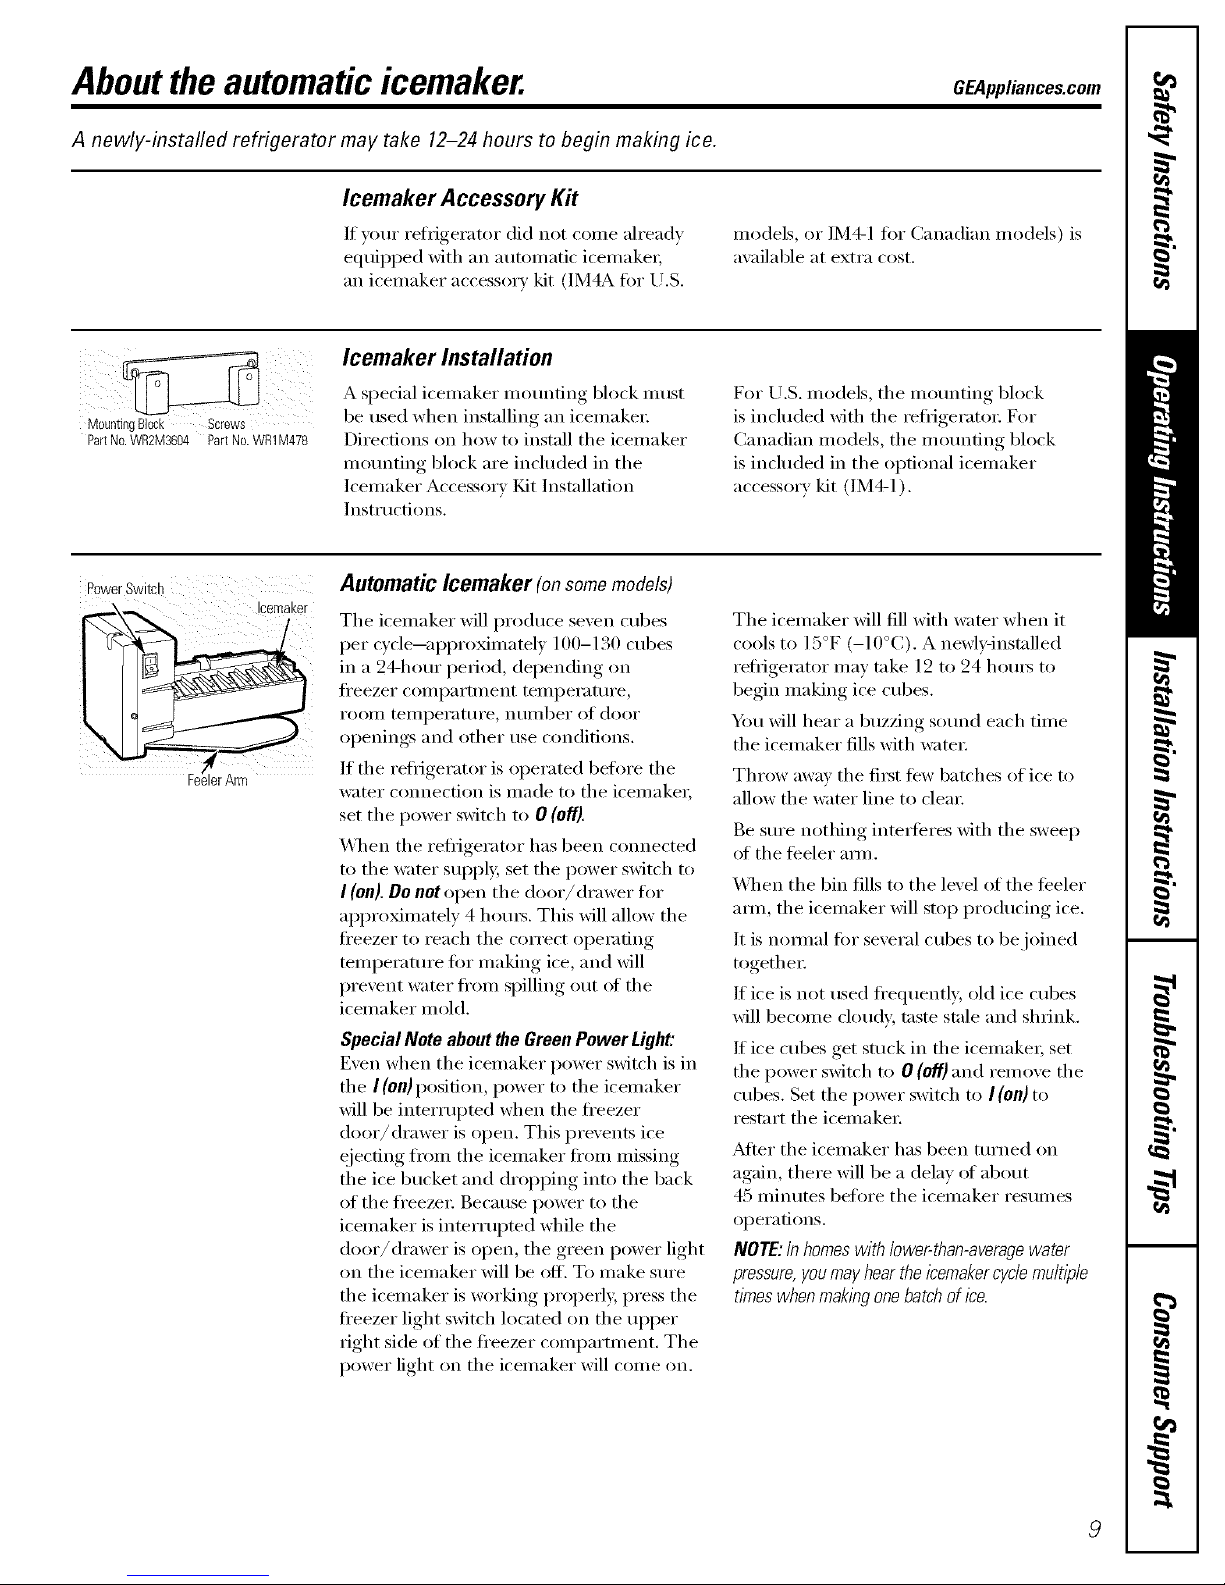
PowerSwitc
Automatic Icemaker (onsomemodels)
The icemaker will produce seven cubes
per cycle--approMmately 100-130 cubes
in a 24-hour period, depending on
fl'eezer compartment teml)eratm'e ,
I'OOIll tei/ll)ei';ittli'e , nHiilbei" of dooi"
openings and other use conditions.
If the refl_igerator is operated befl)re the
_;Iter com_ecfion is made to the icemaket;
set the power switch to 0 (off).
\,_]_en the refl_igerator has been connected
to the water SUl)l)ly, set the power switch to
I (on). Do not open the door/dra wet for
appro_mately 4 hom_. This will allow the
fl'eezer to reach the correct operating
temperature tor making ice, and will
prevent water fl'om spilling out at the
icemaker mold.
Special Note about the Green Power Light:
Even when the icemaker power switch is in
the I (on) position, power to the icemaker
will be interrupted when the fl'eezer
door/drawer is open. This prevents ice
ejecting fl'om the icemaker fl'om missing
the ice bucket and dropping into the back
of the fl'eeze_: Because power to the
icemaker is interrupted while the
door/drawer is open, the green power light
on the icemaker will be off. To make sm'e
the icelnaker is working properly, press the
fl'eezer light switch located on the upl)er
right side of the fl'eezer compartment. The
power light on the icemaker will come on.
The icemaker Mll fill with water when it
cools to ] 5°F (-I0°C). A newl)qnstalled
reflJgerator may take 12 to 24 hom_ to
begin making ice cubes.
You will hear a buzzing sotmd each time
the icemaker fills with water:
Throw away the fi_t tew batches of ice to
allow the water line to clem:
Be sm'e nothing inte_feres with the sweep
at the teeler amL
X,_]_en the bin fills to the level of the teeler
am_, the icemaker will stop producing ice.
It is nomlal fin" several cubes to be joined
together
If ice is not used fl'eqtmntly, old ice cubes
will become cloudy, taste stale and shrii_k.
If ice cubes get stuck in the icelnakei; set
the power switch to 0 (0f/) and relnove the
cubes. Set the power switch to I (on) to
restart the icemake_:
After the icemaker has been turned on
again, there will be a delay at about
45 minutes befl)re the icemaker resumes
opei'ations.
NOTE: In homes with lower-than-average water
pressure, you may hear the icemakercyc/emultiple
times when maklbgone batch of Ice.
Page 10

Aboutthe automaticicemaker.
A newly-installed refrigerator may take 12-24 hours to begin making ice.
Ice Cube TrayShelf (onsomemodels)
St)me models ha',e a small separate shelf
for ice cube trays.
Ice Traysand Bucket (onsomemodels)
To relnove ice cubes fl'om tile tray; place
tile tray upside down on tile bucket as
shown. Press down on the tray and the
cubes will pop out.
PartNo.
WR30S1
Large Ice Bucket (onsomemodels)
This bucket is requiredwhen using an
automatic icemakex: _._]_en installing an
icemakex; tile upper left basket IlltlSt be
i'ellloved ill oi'(lei" to make i'ooi11 _()I" tile
large ice bucket. If an icemaker is not
installed, the bucket can be removed
to provide more capaci F in tile fl'eezer
compartment. For U.S. models, tile bucket
is included with the refl_igerato_: For
Canadian models, the bucket is included
in the optional icemaker accessory'
kit (]M4-1).
10
Page 11

Careand cleaning of the refrigerator. CEAppliances.cem
Cleaning the Outside
Keep the outside clean. _]l)e with a clean
cloth lightly (lmnl)ened with mild liquid
dish detergent. Dry and polish with a clean,
soft cloth.
Donot wipetherefn_?eratorwithasoileddish
clothor wet towel. Thesemayleavea residue
thatcanerodethepaint.Donot usescouring
pads,powderedcleaners,bleachorcleaners
containingbleachbecausetheseproductscan
scratchand weakenthepaint finish.
The stainless steel panels and door handles
(on some models) can be cleaned with
a commercially a\_filable stainless steel
cleaner such as Stainless Steel Magic. ''_
Stainless Steel Magic is available at Ace,
True Value, Servista_; H_'/and other
leading stores. It is also a\;filable through
GE Parts and Accessories, 800.6262002, or
visit our Website, GEAppliances.com. In
Canada, call 1.888.261.3055 or \isit our
Website, geapl)liances.ca. Order part
n umber _*\_X10X 15.
Donotuseappliancewaxorpolishonthe
stainlesssteel
Cleaning the Inside
Tohelp prevent odors, leave an open box of
baking soda in the fl'esh load and freezer
COIIll)_lI'tlIlents.
Unplug the refrigerator before cleaning. If this
is not practical, wring excess moisture out
of sponge or cloth when cleaning around
switches, lights or controls.
Use warm water and baking soda solution--
about a tablespoon (15 ml) of baking soda
to a quart (1 1) at water: This both cleans
and neutralizes odo_s. Rinse and wipe oh>
_Mter cleaning the door gaskets, apply a
thin laver of paraffin wax to the door
gaskets at the hinge side. This helps kee I)
the gaskets fl'om sticking and bending out
of shape.
Avoid cleaning cold glass shelves (on
some models) with hot water because
the extreme temperature difference
may cause them to break. Handle glass
shelves carefully. Bumping tempered
glass can cause # to shatter.
TheBrita®WaterDispenser(onsomemodels)
isdishwashersafe.
Donot washanyotherplasticrefrigeratorparts
in the dishwasher
11
Page 12

Careand cleaningoftherefrigerator.
Behind the Refrigerator
Be caretul when moving tile refl_igerator
away fl'om tile wall. _M1types of floor
coverings can be damaged, particularly
cushioned coverings and those with
elllbossed S/li5[_lces.
Pull tile refl-igerator straight out and return
it m position by pushing it straight in.
Moving tile relAgerator in a side direction
may result in damage to tile floor covering
or refl_igerato_:
When pushing the refrigerator back,
make sure you don't roll over the
power cord.
Preparing for Vacation
For long \;l(-ations or absences, i'elllOVe
food and m_plug tile reliJgerator Move
tile control to tile OFFposifion, and clean
tile interior with a baking soda solution
of one tablespoon (15 ml) of baking soda
to one quart (1 l) of wam_: I,eave tile
doors open.
If an icemaker is installed, set tile icemaker
power switch to tile 0 (off) position and shut
off tile water supply to tile refrigerator.
Preparing to Move
Secm'e all loose items such as grille,
shelves and drawers by taping them
securely in place to prevent damage.
Besuretherefrigeratorstaysin anupn)ht
positionduringmoving.
Replacing the Light Bulbs
To replace a burned-out bulb, unplug tile
refl_igerator fl'om its electrical outlet.
In _e refrigerator compartment remove
tile lens cover by gently applying pressm'e
to the back corne_ ot the lens cover and
pulling tile cover fl'ee fl'oin tile control
housing. Unscrew tile bulb when cool
and replace it with an appliance bulb
of tile same or lower wattage.
In the freezer compartment, simply unscrew
and replace tile bulb after ensm_ing tile
refl-igerator is m_plugged.
Turre)_gthe control tothe OFFposition does not
removepower to the l/)ht circuit
12
Page 13

Installation
Instructions
Refrigerator
Model 18
I
Questions?Call 800.GE.CARES(800.432.2737)or visit,,,,,-x,_ebsite_,t:GEAppliances.com
In Canada,call 1.800.361.3400or visit,,m_ebsite;,t:geappliances.ca I
BEFORE YOU BEGIN
Read these instructions completely and carefully.
• IMPORTANT - S .ethese
instructions fi)r local inspector's use.
• IMPORTANT - Obse,,e ,ll
goverlfing codes and ordinances.
• Note to Installer - Be sure to leave these
instructions with the Consumer.
• Note to Consumer - Kee I) these instHictions
fl)i" fllture reference.
• Skill level - Installation of this appliance requires
basic mechanical skills.
• Completion time - Refrigerator Installation
15 minutes
• Proper installation is the responsibility of the
installer.
• Product tailure due to improper installation is not
covered trader the _.Varrantv.
WATER SUPPLY TO THE ICEMAKER
(ON SOME MODELS)
If the refrigerator has an icemaker, it will have to be
connected to a cold water line. AGE water SUl_ply kit
(contailfiI_g tubing, shutoff valve, fittings and
instructions) is available at extra cost fi'om yoN" dealer,
by visiting ore" _,Vebsite at GF_ppllances.com (in
Canada at geappfiances.ca) or fl'om Parts and
Accessories, 800.626.2002 (in Canada 1.888.261.3055).
REFRIGERATOR LOCATION
• Do not install the reflJgerator where the temperatm'e
will go beh)w 60 °F (l 6 ° C) beca use it will not run ()Den
enough to maintain proper temperatm'es.
• Do not install the refl'igerator where the temperature
will go above 100°F (37°C) because it will not pelti)m/
proI)erly.
• Install the refl_igerator on a floor strong enough to
support it when flfllv loaded.
13
PACKAGING TAPE
Retnove all packaging tape and peel-off fihns. These
tapes were added to secure and I)r°tect your, refrigerator,
during, shilI ) ring.
CLEARANCES
•) ) " (* " " s "_ of installation,
_Mlow the f( lh wm_ cle,uance,; f )r ease
proi)er air circulation and i)lmnbing and electrical
connections:
• Sides 1/8" (3 ram)
• Top 1" (25 mm)
• Back 1" (25 ram)
If the refrigerator is against a wall on either side, allow
a minimum of I:_A" (45 ram) between the wall and the
side ot the refl'igerator to allow fi)r door and handle
clearallce.
ROLLERS
The rollers have 2 purposes:
• The rollet_ are used to level the reti_igeratot:
NOTE: It is recommended that the refrigerator be
elevated 1/2" (13 man) ha the front. When installing m_
icemaker, make sure that the icemaJcer is completely
level while maintaining the refrigerator incline,
• ]?.olle,_ allow you to move the reliJgerator away fl'om
the wall fin" cleaning.
To adjust the rollers:
O Remove the base grille by pulling it straight out.
O Ttwn the two fl'ont roller _JJl[
adjustin,, screws clockwise
to raise the reffigeratm;
cotmterclockwise to lower it.
Lse a 3/8 socket wrench,
a(!justable wrench or plieI_. FrontRollerAdjustingScrew
NOTE: The refl_igerator must be SUl)ported by all fi)m"
rolleI_. To test, moxe the refl_igerator to inake sure it
does ilOt rock.
Page 14

Installation Instructions
INSTALLING THE WATER LINE CONSOMEMODELS)
BEFORE YOU BEGIN
Reconnnended copper water supply kits are WXSX2,
_4UX8X3 or _4UX8X4, depending on tile ai//(i/lllt of
tubing you need. Approved plastic water supply lines
are (;E SmartConnect'" Refrigerator Tubing
(WX08X10002, WX08X10006, WX08X10015 and
X._3X08X10025).
When connecting your refrigerator to a GE Reverse
Osmosis X._ter System, tile only approved installation
is with a GE RVKit. For other reverse osmosis water
systeIllS, tk,llow tile IIlaIltll_lcttlI'eI"S Fecoiiliileildatioils.
This water line installation is not warranted by tile
refrigerator or icen/aker manufacturer. Follow these
instructions carefldlv to minimize tile risk of expensive
water damage,
_'ater halnlner (water banging in tile pipes) in house
plmnbing can cause damage to refl'igerator parts and
lead to water leakage or flooding. Call a qualified
plmnber to correct water hamn/er beli)re installing tile
water supply line to the refl'igerator,
To prevent bm'ns and product damage, do not hook
up tile water line to tile hot water line.
If vou /lse yo/lr reli'igerator before connecting tile
water line, make sm'e the icemaker power switch is in
the 0 (off) position.
Do not install the icemaker tubing in areas where
temperatures tall below freezing.
When using any electrical device (such as a power
drill) during installation, be sure the device is double
insulated or grounded in a manner to prevent tile
hazard of electric shock, or is batte_ T powered.
All installations must be in accordance with local
plmnbing code requirements.
WHAT YOU WILL NEED
• Copper or GE SmartConnect'" Refrigerator Tubing
kit, 1/4" outer diameter to connect tile refl'igerator
to tile water supply. If using copper, be sm'e both ends
of tile tubing are cut square.
To detemfine how much tubing you need: Measure
tile distance ti'om tile water valve on tile back of tile
reti'igerator to tile water supply pipe. Then add 8'
(2.4 m). Be sm'e there is sufficient extra tubing (about
8' [2.4 m] coiled into 3 turns of about 10" [25 cnl]
diameter) to allow tile refrigerator to move otlt fl'oi//
tile wall atter installation.
GE SmartConnect'" Refl'igerator Tubing Kits are
available in the fi)llowing lengths:
2' (.6 m) - WX08X10002
6' (1.8 m) - WX08X10006
15' (4.6 m) - WX08X10015
25' (7.6 m) -WX08X10025
Be sure that tile kit vou select allows at least 8' (2.4 m)
as described above.
NOTE: The only GE approved plastic tubing is that
supplied in GE SmartCmmec( _"Refrigerator Tubing
kits. Do not use any other plastic water supply line
because the line is under pressure at all times. Certain
types of plastic will crack or rupture with age mad cause
water damage to your home.
14
Page 15

Installation Instructions
WHAT YOU WILL NEED (CONT.)
• A GE water supply kit (containing tubing, shutoff
valve and fittings listed below) is available at extra
cost fl'om w)ur dealer or fl'om Parts and Accessories,
800.626.2002 (in Canada, 1.888.261.3055).
• A cold water supply. Tile water pressm'e m ust be
between 20 and 120 p.s.i. (1.4-8.1 bar).
• Power drill.
• 1/2" or adjustable wrench.
• Straight and Phillips blade screwdriver.
• Two 1/4" outer dimneter compression nuts and
2 ferrules (sleeves)--to connect the COl)per tubing to
tile shutoff xalxe and tile refrigerator water xalxe.
OR
• If you are using a (;E SmartConnect _'*Refrigerator
Tubing kit, the necessary fittings are preassembled to
the tubing.
• If wmr existing COl)per water line has a flared fitting
at the end, you will need an adapter (available at
plmnbing supply stores) to connect the water line to
tile refl'igerator OR you can cut off tile flared fitting
with a tube cutter and then use a compression fitting.
Do not cut ire'reed end fl'om GE SmartConnect'"
Refl'igerator tubing.
• Shutoff valve to connect to tile cold water line.
The shutoff \zdve should have a water inlet with a
minimum inside diameter of 5/32" at the point of
connection to the COLD WATER LINE. Saddle-tyi)e
shutoffwdves are included in many water supply kits.
Belm'e imrchasing, make sure a saddle-type wdve
complies with vom" local i)lmnbing codes.
Install tile shutoff xalxe on tile nearest frequentl) used
drinking water line.
[] SHUT OFF THE MAIN WATER
SUPPLY
Turn on tile nearest taucet hmg enom,h_ to clear
tile line of water.
[] CHOOSE THE VALVE LOCATION
Choose a location fi_r tile valve that is easily
accessible. It is best to connect into tile side of a
vertical water pipe. When it is necessary to connect
into a horizontal water pipe, make tile connection
to tile top or side, rather than at tile bottom, to
avoid drawing off anv sediment fl'om tile water pipe.
[] DRILL THE HOLE FOR THE VALVE
Drill a 1/4" hole in tile water pipe (even it using a
sell:piercing valve), using a shaq) bit. Remove any
burrs resulting fl'om drilling the hole in tile pipe.
Take care not to allow water to drain into the drill.
Failure to drill a l/4" hole may result in reduced
ice I)roduction or slualler cubes.
15
Page 16

Installation Instructions
INSTALLING THE WATER LINE (CONT.)
[] FASTEN THE SHUTOFF VALVE
Fasten the shutoff _al_e to the cold water pipe with
tile pipe clamp.
PipeClamp
Saddle-Type
ShutoffValve
VerticalCold
WaterPipe
NOTE: Conm_onwealth of Massachusetts Plumbing
Codes 248CMR shall be adhered to. Saddle wflves
are illegal and use is not i)erlnitted in Massachusetts.
Consult with wmr licensed i)lumbe_:
[] TIGHTEN THE PIPE CLAMP
Tighten tile clamp screws/mtil tile sealing washer
begins to swell.
NOTE: Do not overtighten or vou may cHBh tile
tubing.
-Washer
Pipe End
ClamF
[] ROUTE THE TUBING
Route tile tubing between tile cold water line and
tile refl'igera tot.
Route tile tubing through a hole drilled in tile wall
or floor (behind tile refl'igerator or a@_cent base
cabinet) as close to the wall as possible,
NOTE: Be sm'e there is sufficient extra tubing
(about 8' [2.4 m] coiled into 3 turns of about 10"
[25 cm] diameter) to allow the refrigerator to move
()/it fFOll/ tile wall alier installation.
[] CONNECT THE TUBING
TO THE VALVE
Place tile compression nut and termle (sleexe)
fin" COl)per tubing onto tile end of tile tubing and
connect it to tile sh utoff xalxe.
Make sure tile tubing is flflly inserted into tile valve.
Tighten tile compression nut securelv.
For plastic tubing fl'om a GE SmartCmmect "_
Refrigerator Tubing kit, insert tile molded end
of the tubing into the shutoff valve and tighten
compression nut tmtil it is hand-tight; then tighten
one additional turn with a wrench. Overtightening
ill}iV ca rise lea ks.
--Compression
Nut
Saddle-Type
ShutoffValve
Packing Nut-
SmartConnectTM
ubing
OutletValve-- Ferrule(sleeve)
Check if the shutoff wdve is closed befi)re adwmcing
to tile next step.
NOTE: Commonwealth of Massachusetts Plumbing
Codes 248CMR shall be adhered to. Saddle valves
are illegal and use is not pelinitted in Massachusetts.
Consult with wmr licensed i)lmnber.
[] FLUSH OUT THE TUBING
Turn tile main water supply on and flush ()lit tile
tubing tmtil the water is clear.
Shut tile water off at tile water valve alter about
one quart (l liter) of water has been flushed
through tile tubing.
16
Page 17

Installation Instructions
[] CONNECT THE TUBING TO THE
REFRIGERATOR
NOTES:
• Before makii_g the COlmection to the refligerator,
be sure the refl'igerator power cord is not
I)lugged into the wall outlet.
• _'e recomlnei_d installing a water filter if wmr
water SUl)ply has sand or particles that could clog
the screen of the refl'igerator's water wdve, Install
it in the water line near the refl'igerator, If using
(;E Slnart(_onnect "_ Refl'igerator Tubing kit, you
will need an additional tube (WX08X10002) to
connect the filter. Do not cut plastic tube to
install filter.
Remove the screws holding the right side of the
access cover. Fold back the cover.
Remoxe the plastic flexible cap
from the water xalxe
tEJ
(refi'igerator COlmection),
Place the comi)ressiot_ nut and
terrule (sleeve) onto the end of
the tubing as shown, On GE
Slnart(]ot_t_ect _'_Refi]gerator
Tubing kit, the imts are ah'eadv
asselnbled to the robing.
Insert the end of the tubing into the water wdve
COlmection as fin" as possible. While holding the
tubing, tighten the fitting.
For plastic tubing fl'oln a GE Smart(_oimect "¢
Refl'igerator Tubing kit, insert the inolded end
of the tubing into the water wdve colmection and
tighten conq)ression nut until it is hai_d-tight;
then tighten one additional turn with a wrench.
Overtightelfing lnav cause leaks.
Fasten the tubing into the clam I) provided to hold
it in a vertical position. You inav need to pi T open
the clamp.
Tubing
1/4"Tubing
SmartConnectTM
Tubing
1/4"
Compression
Nut
Ferrule
Refrigerator
" Connection
[] TURN THE WATER ON AT THE
SHUTOFF VALVE
Tighten any COlmections that leak.
[] PLUG IN THE REFRIGERATOR
_rranoe the coil of tubing so that it does not _ibrate
a
against the back of the refrigerator or against the
wall, Push the refrigerator back to the wall,
START THE ICEMAKER
Set the icelnaker power switch to the I (on) position.
The icelnaker will not begin to operate until it
reaches its ol)erating teml)erature of 15°F (-9°C)
or below. It will then begin oi)eration automatically.
NOTE: In lower water i)ressure conditions, the
water xalxe Ina) turn on up to B tilnes to delixer
enou,d_ water to the icelnaker.
17
Page 18

Installation Instructions
REVERSING THE DOOR SWING
Read these instructions completely and carefully.
IMPORTANT NOTES
When reversing tile door swing:
• Read the inst_ uctions all the way through befln'e
sm fling.
• NOTE: Doors on stainless steel models are not
reversible.
• Handle parts careflfllv to avoid scratching paint.
• Set screws down by their related parts to avoid using
them in the wrong places.
• Provide a non-scratching work sm'tace fin" the doors.
These instructions are for changing the hinges fl'om
the right side to the left side--if you ever want to
change the hinges back to the right side, fl)llow these
sanle insti uctions and reverse all reterences to left
and right.
Unplug the refrigerator from its electrical outlet.
Empty all door shelves, including the dairy compartment.
TOOLS YOU WILL NEED
Phillipsscrewdriver
7/32," 5/16" and3/8"
socketwrench (6-pointsockets
arerecommended)
Masking tape
T-20or525 TorxDriver,
whicheveryourmodel
requires
Puttyknifeor
thin-bladescrewdriver
[] REMOVE THE REFRIGERATOR
DOOR (TOP DOOR)
Tape tile door shut with masking tape.
Remove tile hinge cover. _]th a 5/16" socket
wrench, remove the two screws that hold the top
hinge to tile cabinet.
I,ifl tile hinge straight up to fl'ee tile hinge pin fl'om
tile socket in tile top of tile dora:
I-_elnove tape, tilt tile door away fl'om tile cabinet and
lift it to ti'ee its bottom socket ti'om the hinge pin on
the center hinge bracket.
Set the door on a non-scratching surtilce with the
outside up.
[] REMOVE THE FREEZER DOOR
(BOTTOM DOOR) (For freezer
swing door models only)
Tape tile door shut with masking tape.
Remove tile hinge pin
with a 7/32" socket
wYench,
Remove tape and tilt tile
door away flxml tile cabinet, bracket
Remove and save the
washer on the hinge pin.
I,fit tile door straight up
to fl'ee its bottom socket
fl'om tile pin in tile
bottom hinge bracket.
PI t washer I
FreezerdoorJ
I
REMOVE CENTER HINGE PIN
(For models with a freezer drawer)
a t/32 socket w_ench.
Remoxe tile him,e_ pin xfith ....
18
Page 19

Installation Instructions
[] TRANSFER BOTTOM HINGE
BRACKET TO THE LEFT (For
freezer swing door models only)
Pull the base grille straight out to gain access to the
hinge bracket scre_vs.
Using a 5/] 6" socket wrench, remove the hinge
bracket, scrmvs, plastic washer and spacer shim from
the bottom right side of the cabinet.
Reinstall the spacer shim, hinge bracket, scrmvs and
plastic _:_sher to the bottom lett side of the cabinet.
Remove the cap fl'om the heft end of the base grille.
Install the cap, supplied inside the kit, on the right
end ot the base grille. Reinstall the base grille and
push it firefly into place.
[] TRANSFER CENTER HINGE
BRACKET TO THE LEFT
Remove the center hinge bracket and shim by
removing the three screws. NOTE: Keep these screws
with the hinge bracket. They are longer screws and will
be used when installing the hinge on the other side.
y
Remove the three painmd screws and take _:_she_
ti'om the center lett side of the cabinet. Screw them
into the holes on the right side, which were tmcovered
above.
Place the center hinge bracket and shim over the holes
at the center left side of the cabinet, Insert the three
screws that were removed with the center hinge bracket
at the begimfing of Step 4 and tighten secm'ely:
Do not install the him,e_ pin yet.
[] TRANSFER TOP HINGE
TO THE LEFT
Interchange hinge and shim at top right with two
plug buttons at top left of cabinet. Do not tighten
screws on hinge side at this time.
19
Page 20

Installation Instructions
REVERSING THE DOOR SWING (CONT.)
[] TRANSFER DOOR STOPS
On each do()); remove the metnl door stop./_)se the
center hinge pin as a guide to align the door stop,
supplied inside the kit, on the opposite side, after
reversing the handles.
On ti'eezer drawer models, only tile refiigerator door
has a door stop.
[] PREPARE FREEZER HANDLE
FOR DOOR SWING CHANGE (For
freezer swing door models only)
One of the illustrations below will look like your
freezer door hmldle.
Remove tile timr handle motmting screws. Remove
the I)lug button and I)lug button retniner and transfer
them to the opposite side, Reinstall handle,
Plug.buttonf
retainer
Handle
[rlountlng
screws
Remoxe tile )luo button and transfer it to tile
opposite side.
Plugbutton--
NOTE: Make sm'e tile door stop on tile bottom of the
door has been transferred to the left side of the door
as explained in step 6.
[]
TRANSFER REFRIGERATOR
DOOR HANDLE TO THE RIGHT
Remove tile fore" handle mortaring screws. On some
models, you IlltlSt tirst i'elllOve the screw covers.
Using a i)ut_ ' knife, remove the four screw hole i_lug
buttons fi'oln tile fight side of tile dora:
Reinstall the i)lug buttons on the left side of the door
_Mign the handle over the holes in the fight side (ff
the door and install the lore" mo/mting screws and
screw covei_ (on some models).
At the top of the dora; remove the plug button using
a i)utt} ' knife and reinstall it in tile top fight hand
side hole.
One of the illustrations below will look like your
refrigerator door hmldle.
Handle ?
moooting"tf,
screws _ r Refri_rator
Handle i_4lr_ door Plugbutton
Handle
mounting
screws'_
Handle
NOTE: Make sure tile door stop on tile bottom of
the door has been transferred to the left side of the
door as explained in step 6.
2O
Page 21

Installation Instructions
[] REHANG FREEZER DOOR (For
freezer swing door models only)
I,ower 1)ottom socket ot fi'eezer door onto pin on
bottom hinge bracket. Be sure washer is in place.
Tilt door toward cabinet and gently push door tln(lei"
center hinge bracket and align with the hole in the
center hinge bracket.
Reinstall hinge pin with a 7/39" socket wrench so it
extends through the hole in the center hinge bracket
and into socket on top cff fl'eezer doo_:
Plasticwasber_
Hingepin --_..._._._
Centerbinge
bracket "------'---'_ _(_[_
Freezerdeer---- l[
REPLACE CENTER HINGE PIN
(For models with a freezer drawer)
Reinstall hinge pin with a 7/32" socket w_ erich
so it extends through the hole in the center hinge
bracket.
[] REHANG REFRIGERATOR DOOR
I,ower bottom socket of the refligemtor door onto
center hinge pin. Be sm'e washer is in place.
Tilt door toward cabinet, lifting the top hinge so the
pin fits into the socket on top of the doo_:
Tighten the top hinge scrmvs after supporting the
door on the handle side and ensm_ing the gap
between the clo(n_ is even all across the fl'ont.
Replace the hinge covei:
21
Page 22

Normal operatingsounds.
Depending on the placement of the refrigerator in your kitchen,
you may want to place a piece of rubber backed carpet under
the refrigerator to reduce noise.
[]
[]
[]
[]
[]
[]
[]
[]
EvaporatorFan.You may hear air being torced through the cabinet
by the tim.
Evaporator.The flow of refrigerant through the evaporator inav create a
boiling or gm'gling sound.
Defrost Heater. Dtwing defl'ost cycles, water dripping onto the heater may
Catlsea hissing or sizzling sotuld, _dier defl'osting, a l)Ol)ping sound nlay
occur and the evaporator may create a boiling or gmgling sotmd.
Cold Control& Defrost Timer.These parts can produce a snapping sound
when turning the refl_igerator on or off. The timer also produces a sound
similar to an electric clock.
WaterPan. Water ma} be heard running into the drain pan during the
deii'ost cxcle.
Compressor.Modern, high efficienc) coml)ressoxs operate much tipster
than older models. The compressor may have a high pitched hum or
pulsating sound.
CondenserFan.Y()u may hear air being t0rced over the condenser by the tim.
Beforeyoucall forservice...
Troubleshooting -tips
Save time and money! Review the charts on the following
pages first and you may not need to call for service.
Possible Causes What To Do
Refrigerator does not Refrigerator in defrost cycle. * _._fit ab()ut 45 minutes ti n"defl'ost cycle to end.
operate Control ha OFFpos_fion. * Move the control to n teln )el'attire setting
Refrigerator is unplugged. *Push the plug completely into the outlet.
The fuse is blown/circuit * Replace fuse or reset the breaker.
breaker is tripped.
Vibration or rattling Rollers need adjusting. * See Preparing to Install the Refrigerator
(slight vibration
is normal)
22
Page 23

GEAppliances.com
Possible Causes What To Do
Motor operates for Normal when refrigerator • _lit 24 hotu_ fin" the refi_igerator to COml)letely
Iongperiodsorcycles is Fn'st plugged hi. cool (lowu.
on and eff frequently.
Often occurs when large * This is u(n_.al.
(Modernrefrigerators
withmorestorage amounts of food are
spaceandalarger placed in refrigerator.
freezer require more Door left open. * Check to see if l)ackage, is holding dr)or Ol)eU.
operating time. They * Rolle_ must be l)roperly a(!justed so dorn_/drawe_
Mart and stop often will ('lose automatically when partially r)pen. See
tomaintaineven Preparingto InstalltheRefrigerator
temperatures.)
Hot weather or frequent • This is ur)l_u;ll.
door openings.
Temperature control * See Getting started
set at the coldest setth_g.
Refrigerator or freezer Temperature controls not set • See Getting started.
compartment too warm cold enough.
Waxm weather or frequent * Set the tempe_mtre coutrr)l r)ue step colder.
door openings. See Gettingstarted.
Door left open. * ('Jwck to see if l)ackage is holding door Ol)eU.
• Rollel_ must be l)rOl_erlv a(!iusted so dr)ol_/ch'awel_
will close automatically when partially open. See
PreparingtoInstaflthe Refrigerator.
Fromor ice crystals Door left open. • Check tr) see if })ackage, is hr)ldiug dr)or r)l)eU.
on frozenfood • Rolle_ must be l)rOl)erly a(!justed so dr)rn_/drawe_
(from within package will close automatically when l)artially open. See
isnormaO Preparingto Installthe Refrigerator.
Too frequent or too long
door openings.
Ice cubes have Food _'mlsmitthag odor/taste • _Ya l) fi)r )ds well.
odor/taste to ice cubes.
Interior of refrigerator • See Careand cleaning.
needs clemfing.
if )acka_,e is hol(liug door Ol)eU.Slowice cube freezing Door left open. • Check tr) see l ,-
• ]?.olle_ must be l)rOl_erly a(!justed so doo_/ch'awe_
will close aUtOluatically when partially open. See
PreparingtoInstallthe Refrigerator.
Freezer control not set • See Getting started.
cold enough.
Refrigerator has odor Foods trm_sa_aitth_g • For)(ls with strong r)dr)I_ shr)tdd be tightly wI'al)ped.
odor to refrigerator. • Kee l) an open box of baking soda in tire refi_igeratr)r;
rel)lace ex'elw three mouths.
Interior needs clemling. • See Careand cleaning.
Frequent"buzzing" lcenaaker power switch is in • Set the l)ower swit( h to tire 0 (off)l)ositir)u. Keel)ilw_ it
sound the I (on) position, but the in tire I (on) l)r)sifiou will damage tire water valve.
water supply to the refrigerator
has not been comaected.
23
Page 24

Beforeyoucall forservice...
Possible Causes What To Do
Moisture forms on Not unusual during * _ipe sm_i_(e d_y and reset tile refiigerator control
outside of refrigerator periods of high humidity, one ,setfin,_ cl)l(le_:
Moisture collects inside Too frequent or too
(in humid weather, air long door openings.
carries moisture into
refrigerator when doors
are opened)
Food freezing in Food too close to air vent. * Move tile fi)od mvav from tile air vent (near tile controls).
the refrigerator
Refrigerator control is set * Move tile refl_igerator control to a waHuer temperature.
too cold.
Door/drawer does not Rollers need adjusting. • See Preparing to Install the Refrigerater
close by itself
Interiorlightdoes No power at outlet, * ]_,eplace ti/se or Feset tile bl'eakeL
net work
Light bulb burned out. *See Replacing the light bulbs.
Doorsqueakswhen Hinge mid/or gasket needs
opened lubrication.
Freezerdoor/drawer This is normal if, after popping • This indicates that there is a good seal on tile freezer
pops open when open, the freezer door/drawer door/ch'awel:/f tile freezer door/drawer does not
refrigerator door closed on its own. aUtOlnaficallv close after popping open, then see tile
is closed Problem:Door/drawer does not close by itself, abe,re.
Icemakerpower switch Freezer door/drawer is open. • This is nomial. Power to tile icemaker is interrupted
is in the I (on) position, when tile fi'eezer door/drawer is open to prevent ice
butgreen power light from ejecting and dropping into tl/e back of tl/e fi'eeze_:
is not on To check if icemaker is working, ln'ol/erk;, press the
freezer light switch located on the upper right side
of tl/e freezer. Tl/e green pl)wer light will come im.
Waterisspillingout
oficemakermold
Freezer door/da'awer was
opened shortly after icemaJcer
was h_stalled.
• Clean up spill, then shut tile fl'eezer door/drawer and
do not open for approximately 4 houx_. This will allow
the fl'eezer to reach tile correct operating temperattH'e
fin" n/aking ice.
Freezer door left open for an
extended period, then opened
mid closed frequently soon after.
• Because of door openings, fl'eezer could not maintain
tile correct operating telnperature fi:,r inaking ice. (]lean
up spill, then shut the fl'eezer door/drawer and do not
open for approximately 4 houi_.
Cubestoosmall/
reduced ice production
Not enough water pressure
to icemaker water valve.
• Collar t)pe sell:piercing water \:dyes are not
recomlnei_ded uldess a 1/4" hole is pre(h_lled in home
water line. See Installingthe WaterLineinstrucfioI_s in
tile ]cemaker Accessory Kit ]nstallatioi_ h_strucfions.
24
Page 25

Notes.
I
m
_L
m
w
€_
m
€_
25
Page 26

CUSTOMER WARRANTY
(for customers in Canada)
Your refrigerator is warranted to be free of defects in material and workmanship.
JVhat is covered How Long Warranted Parts Labour
(From Date of Sale) Repair or Replace
at Camco's Option
3ompressor:
SE Profile Models Ten (10) Years Ten (10) Years
3E Models Five (5) Years Five (5) Years Five (5) Years
3ealed System (including Five (5) Years Five (5) Years Five (5) Years
_vaporator, condenser
:ubing and refrigerant)
_,ll Other Parts One (1) Year One (1) Year One (1) Year
TERMS AND CONDITIONS: WHAT IS NOT COVERED:
1. This warranty applies only for single
family domestic use in Canada when the
Refrigerator has been properly installed
according to the instructions supplied by
Camco and is connected to an adequate
and proper utility service.
Damage due to abuse, accident,
commercial use, and alteration or
defacing of the serial plate cancels all
obligations of this warranty.
Service during this warranty period must
be performed by an Authorized Camco
Service Agent.
2. Neither Camco nor the Dealer is liable for
any claims or damages resulting from
failure of the Refrigerator or from service
delays beyond their reasonable control.
3. To obtain warranty service, purchaser
must present the original Bill of Sale.
Components repaired or replaced are
warranted through the remainder of the
original warranty period only.
4. This warranty is in addition to any
statutory warranty.
• Owner is responsible to pay for service
calls related to product installation and/or
teaching how to use the product.
• Damage to finish must be reported
within 48 hours following the delivery
of the appliance, as indicated on the
Consumer Notice label posted on the
exterior of the refrigerator door.
• Improper installationiproper installation
includes adequate air circulation to the
refrigeration system, adequate electrical,
plumbing and other connecting facilities.
• Replacement of house fuses or resetting
of circuit breakers.
• Replacement of light bulbs.
• Damage to product caused by accident,
fire, floods or acts of God.
• Loss of food due to spoilage.
• Proper use and care of product as listed
in the owner's manual, proper setting of
controls.
• WARRANTOR IS NOT RESPONSIBLE
FOR CONSEQUENTIAL DAMAGES.
IMPORTANT
Keep this warranty and your bill of sale as proof of original purchase and purchase date.
Camco Service is available coast to coast.
If further help is needed concerning this
warranty, contact:
Manager, Consumer Relations
Camco Inc., Consumer Service
1 Factory Lane
Suite 310,
Moncton, New Brunswick
ElC 9M3
Staple your receipt here.
Proofof the orighTalpurchase
date is needed to obtain service
under the warrantz
26
Page 27

RefrigeratorWarranty.(ForcustomersintheUnitedStates)
Aft warranty service provided by our Factory Service Centers, or
an authorized Customer Care®technician. To schedule service,
on-line, 24 hours a day, visit us at www.GEAppfiances.com, or
carl 800.GE.CARES(800.432.2737).
Staple your receipt here.
Proof of the original purchase
date is needed to obtain service
under the warrantg
Fromthedateof the
origina!purchase
Fromthedateof the
origina!purchase
GEWill Replace:
Anypart of the reflJgerator which tifils due to a defect in materials or worknmnship.
During this full one-year warranty, GE will also proxide, free ofcharge, all labor
and in-home serxice to replace the defi_cfixe part.
Any part of the sealed refrigerating system (the compressoi; condensei; evaporator
and all com_ecting tul)ing) which tifils due to a (lete'('t in materials or workmanship.
During this full five-year sealed refrigerating system warranty, GE will also provide,
free of charge, all labor and in-home service to replace the (lefe('fi\'e part.
i ,ii,iAff !_iii! iDii iliiiliii!]iiii iiiiiii
Service trips to your home to teach you how to use
the product.
hnproper h_sta31ation, delivery or maintenance.
Failure of the product if it is abused, misused, or used for
other than the intended purpose or used commercia]ly.
Loss of food due to spoilage.
Dmnage caused after delivery.
iiiili!Replacement of house fuses or resetting of circuit
breakers.
iiiili!Replacement of the light bulbs.
Dmnage to the product caused by accident, fire, floods
or acts of God.
iiiili!Incidental or consequential damage caused by possible
defects with this applimlce.
This warranty is extended to the original purchaser and any succeeding owner for products purchased for home
use within the USA. In Alaska, the warranty excludes the cost of shipping or service calls to your home.
Some states do not allow the exclusion or limitation of incidental or consequential damages. This warranty gives
you specific legal rights, and you may also have other rights which vary from state to state. Toknow what your
legal rights are, consult your local or state consumer affairs office or your state's Attorney General
Warrantor: General Electric Company. Louisville, KY 40225
27
Page 28

ConsumerSupport.
GEAppliancesWebsite i,,the,._._.s.:GEAppliances.com
Have a question or need assist;race with your appliance? Try the (;E Al)pliances Website 24 hom_ a (la_;
any day of the year'. For greater convenience and faster se_Mce, you can now download Owner's Manuals,
order parts, catalogs, or even schedule service ondine. You can also "_&skOur Team of Experts"'" your questions,
and so much more... In Cmaada: geapplimaces.ca
ScheduleService i.theu.s.: GEAppliances.com
Expert GE repair se_Mce is onlx one step awa) fi'om your (loo_; Get on-line and schedule your serxice at xour
convenience 24 hom_ any da) of the year! Or call 800.GE.(:ARES (800.432.2737) during nomml business hom_.
In Cmmda, call 1.800.361.3400
RealLifeDesignStudio i. theu.s.:GEAppliances.com
GE suI_ports the Universal Design concei)t--products, services :rod environments that can be used by people of all
ages, sizes and capabilities. _A'erecognize the need to design fin" a wide range of physical and mental abilities and
impaim_ents. For details of GE's Universal Design applications, including kitchen design ideas for people with
disabilities, check out our Website today. For the heating impaired, please call 800.TDD.GEAC (800.833.4322).
In Cmmda, contact: Manage_, COllSulner Relations, Camco, Inc.
Suite 310, 1 Facto_w i,ane
Moncton, N.B. E1 C 9M3
ExtendedWarranties i,,theu.s.:GEAppliances.com
Purchase a (;E extended warrant}, and learn about special discounts that are axailable while your warran b is still
in elibct. Ybu can i)urchase it on-line an'4ime or call 800.626.2224 during nomml business hom_. GE Consumer
Home Set\ices will still be there after your warran b expires. In Canada, call 1.888.261.2133
PartsandAccessories 1,,theu.s.:GEAppliances.com
Individtmls qualified to se_Mce their own appliances can have parts or accessories sent directly to their homes
(VISA, MasterCard and Discover cards are accepted). (-)rder on-line UMay, 24 hours e\'ei T day or by phone at
800.626.2002 during nomml business l_otu_.
Instructions contained in thN manual cover procedures to be performed by any user. Other servicing generally should be
referred to qualified service personnel Cautionmust be exercised, since improper servicing may cause unsafe operation.
Customex_ in Cmmda should consult the yellow pages fin" the nearest Cameo service centex; or call 1.888.2t;1.3055.
ContactUs i,,theu.s.:GEAppliances.com
If you are not satisfied with the service you receive from GE, contact us on our _A'ebsite with ;Ill the details
including your phone numbe_; or write to: General Manage_; Customer ]?.elations
GE Appliances, Appliance Park
i,ouisville, KY 40225
In Cmaada: geapplimaces.ca, or write to: Director; Consumer Relations, Camco, Inc.
Strite 310, 1 Factory i _lne
Moncton, N.B. E 1C 9M3
RegisterYourAppliance i,,theu.s.: GEAppliances.com
Register your new appfimace on-lhae_at your convenience! Timely product registration will allow fin.
enhanced communication and prompt service under the temps of your warranty, should the need a_ise.
You may also mail in the pre-pfinted registration card included in the packing material.
ha Cmmda: geapplimaces.ca
2_ Printed in Canada
 Loading...