

Page 1
CALL WAITING
LOW
CALL WAITING
LOW
CALL WAITING
LOW
CALL WAITING
LOW
User’s Guide
CALL WAITING
LOW
Model: EX30014
SPEAKERPHONE WITH CALL WAITING/CALLER ID
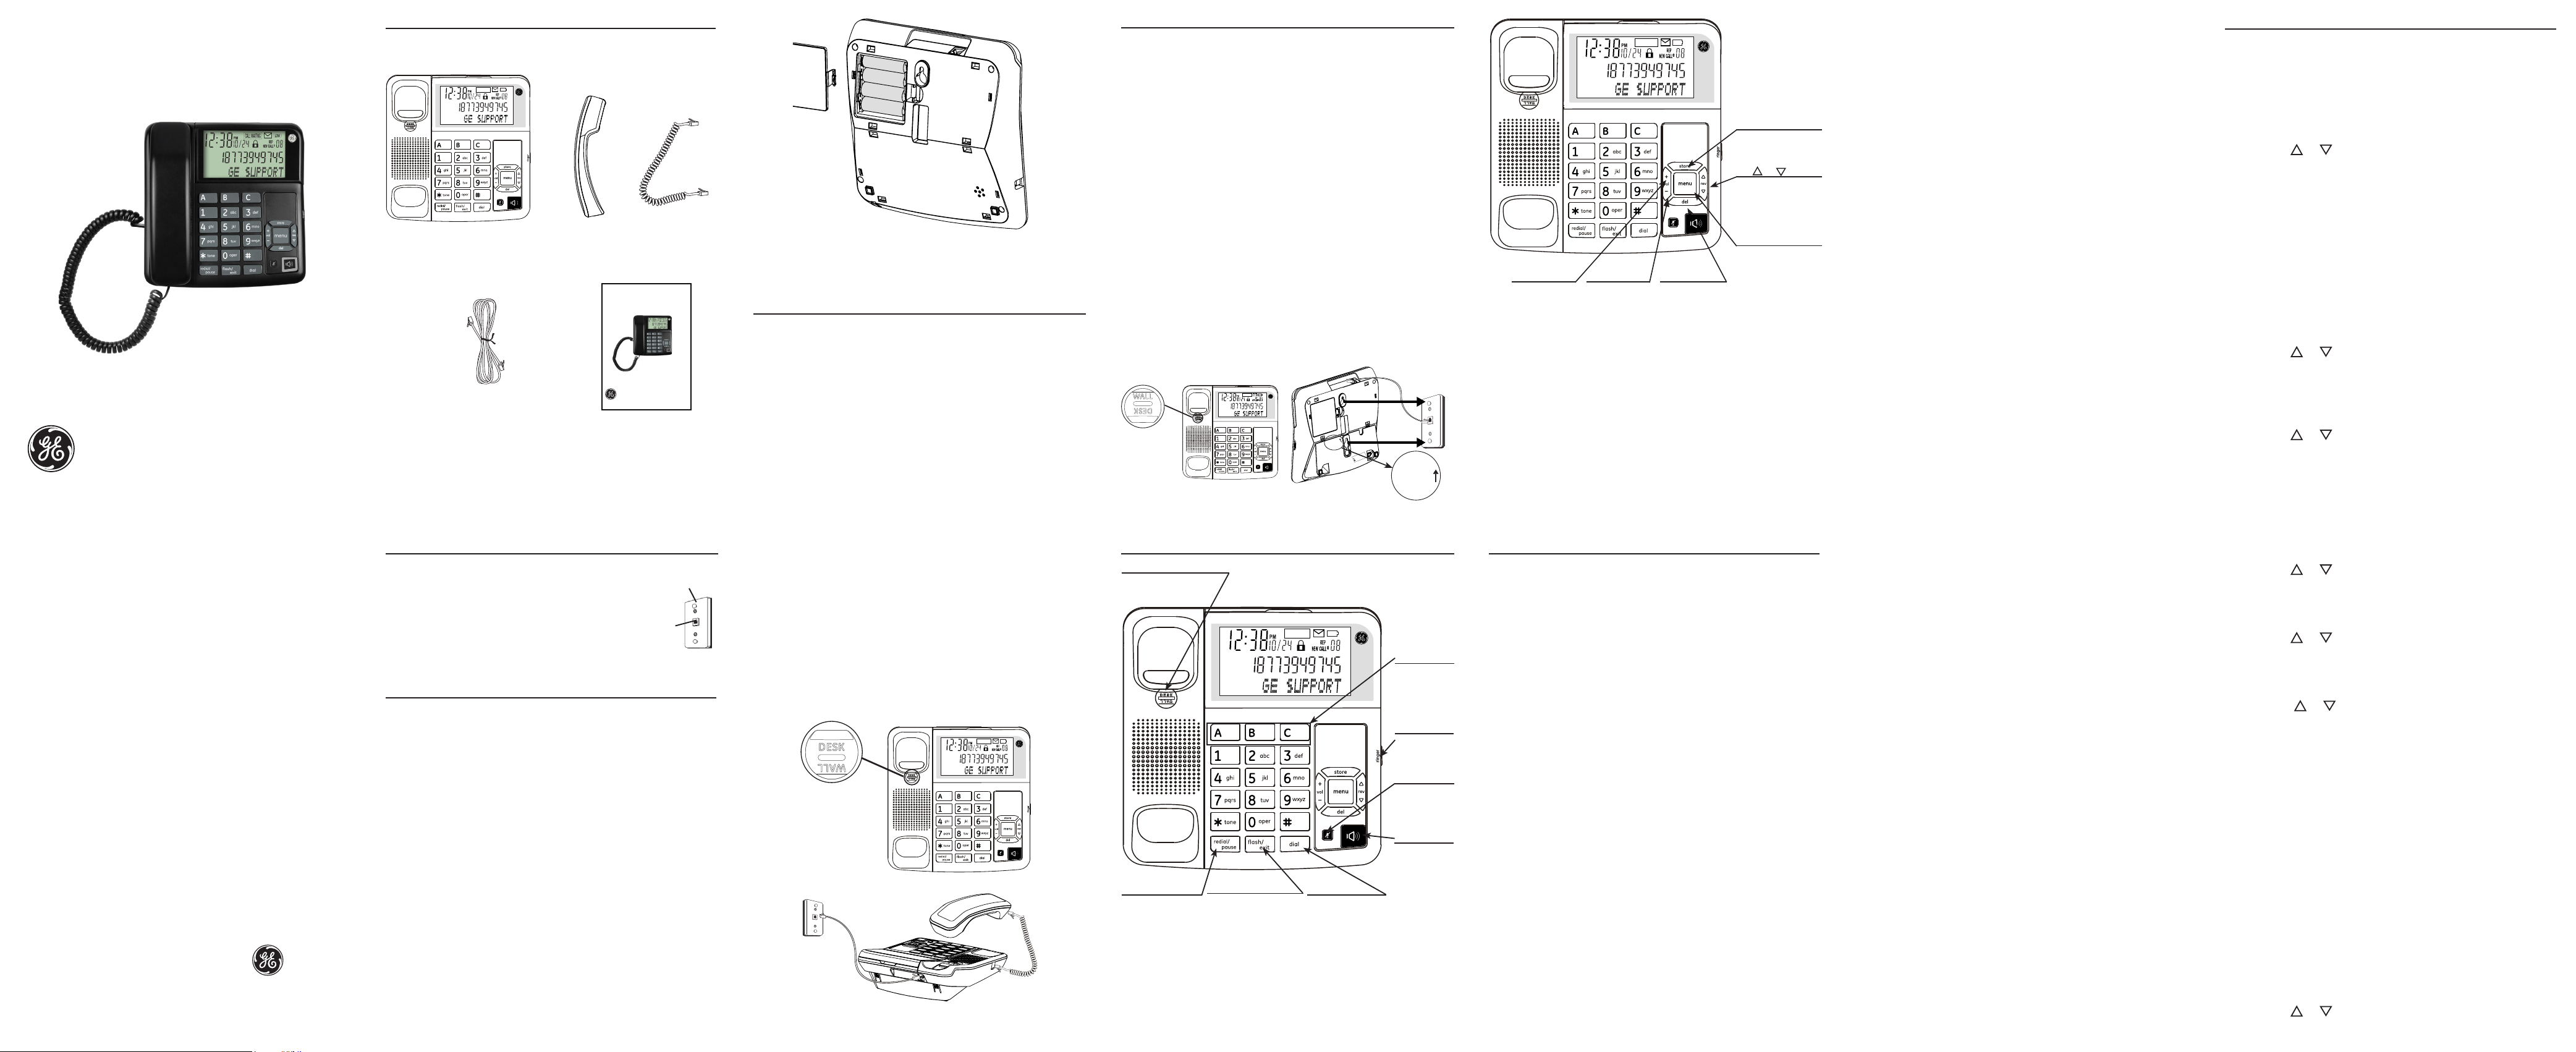
Parts checklist
Your telephone package includes the items shown below.
Telephone base
with mounting
Handset
Handset
coiled cord
bracket attached
User’s Guide
Model: EX30014
SPEAKERPHONE WITH CALL WAITING/CALLER ID
Telephone
line cord
1
User’s guide
+
BATTERY
COMPARTMENT
-
+
+
-
-
+
REMOVE THE DESK/WALL MOUNT BRACKET
TO ACCESS THE BATTERY COMPARTMENT
Installing on a desk or table
1. Choose an area near a telephone modular jack (RJ11C), and
place your telephone on a level surface, such as a desktop or
tabletop (for wall mounting, see instructions on page 5).
2. Make sure the rotating handset tab is rotated to the DESK
position as shown in gure 1 below. You can use a coin or a
small at tool if needed.
3. Plug one end of the handset coiled cord into the jack on the
bottom of the handset (near the mouthpiece) and the other
end into the handset jack (on the left side of the base), then
place the handset onto the base cradle.
3
Installing on a wall
1. Turn the rotating handset tab to the WALL position as shown
in gure 3 below. You can use a coin or a small at tool if
needed.
2. Detach the mounting bracket by pressing on the top of the
bracket. Turn the mounting bracket until the text “THIS END
UP FOR WALL USE” is correctly oriented, and then replace
the bracket onto the base as shown in gure 4.
3. Plug one end of the handset coiled cord into the bottom of
the handset (near the mouthpiece) and the other end of the
cord into the handset jack (on the left side of the base), then
place the handset onto the base cradle.
4. Plug one end of the telephone line cord into the telephone
jack at the top of the base and the other end into the
modular telephone jack as shown in gure 4 below. Please
Note: If you have DSL high speed Internet service, a DSL lter
is required (not included). Contact your DSL service provider
for more information about DSL lters.
5. Slip the mounting holes (on the bottom of the base) over the
wall plate posts on the modular jack and slide the unit down
rmly into place.
The unit is properly installed if you pick up the handset and
hear a dial tone. If you do not hear a dial tone, re-check all
installation steps.
BATTERY
MENT
COMPART
THIS END UP FOR
WALL USE
DESK USE
THIS END UP FOR
DESK/WALL MOUNT BRACKET
THIS END UP FOR
WALL USE
Figure 3
Figure 4
5
vol +
Press to increase
the volume during
a call.
vol -
Press to decrease
the volume during
a call.
del
Press to delete the
last number or
letter entered.
7
store
Press to program
number into memory
locations.
rev or
• Press to review caller
ID records.
• Press to switch
between options
during programming.
menu
• Press to enter the
telephone setting
menu.
• Press to save a
setting and move to
the next setting.
Speakerphone
1. Press speaker to answer a call when the telephone rings.
2. Press speaker again to hang up.
You may switch between speakerphone and normal handset
use anytime during a call.
Speakerphone to Handset - Lift the handset to disable
speakerphone. The speakerphone indicator turns o.
Handset to Speakerphone - Press speaker, and then return the
handset to the base. The speakerphone indicator turns on and
the handset is disabled.
Volume
You can adjust the volume of both the handset and the
speakerphone.
While using the handset or speakerphone, press vol
+/- to adjust the handset volume from level 1 to 4 or the
speakerphone volume from level 1 to 8. A tone emits when the
volume is adjusted to the maximum or minimum level.
Temporary Tone Dialing
This feature allows you to switch to touch-tone dialing
temporarily when you are using pulse dialing service.
Press * to switch to tone dialing during a call. The telephone
returns to pulse dialing after you hang up.
Flash
Press ash/exit during a call to access customer calling
services such as call waiting or call transfer, which are provided
by your telephone service provider.
9
Telephone settings
NOTE: When you nish a setting, press menu to save and move to the next
setting, or press ash/exit to return to idle mode.
Viewing the Set Up menu
You can view the Set Up menu structure as follows:
1. Place the handset in the cradle of the telephone base.
2. Press menu. The screen displays DATE/TIME.
3. Press rev or to scroll the menu structure and view
the submenus (DATE/TIME, LANGUAGE, CONTRAST, LOCAL
AREA CODE, LONG DIST CODE, LOCK, CHANGE PIN ?, T/P
DIAL MODE, and FLASH TIME).
NOTE: You may press the del key anytime to exit the Set Up menu. If no keys are
pressed within 10 seconds, the phone automatically exists the Set Up menu and
returns to the NO CALLS summary screen.
Setting date/time
You can set the date (month and day) and time (hour and
minute) of the telephone unit.
1. Press menu. The screen displays DATE/TIME.
2. Press menu again to show the current hour setting.
3. Press rev or to select the desired digits for hour setting:
• 0 to 23 for 24-hour format
• 1 to 12 for 12-hour format
4. Press menu to conrm your setting and move to the minute
setting.
5. Press rev or to select the desired digits for minute
setting (00 to 59).
6. Press menu to conrm your setting and move to the month
11
visit our website
www.thehomephones.com
Model EX30014
P/N: 905-30014204-00
EX.E Version 1.0 06/2011
Printed in China
© 2011 CCT Tech Global Limited
is a trademark of
The General Electric Company,
and is under license by
CCT Tech Global Limited,
Central, Hong Kong
Telephone Jack Requirements
To use this phone, you need an RJ11C type modular telephone
jack installed on your line. If you do not have
Wall plate
a modular jack, call your telephone service
provider to nd out how to have one installed.
If you have DSL high speed Internet service,
a DSL lter is required (not included). Contact
Modular
telephone
jack
your DSL service provider for more information
about DSL lters.
Installing or replacing batteries
IMPORTANT: The caller ID records and memory location records will
be lost approximately 90 seconds after the batteries are removed
from the telephone. Please read the instructions before replacing
the batteries and have the batteries ready for replacement.
Your telephone uses 4 AA-size alkaline batteries for receiving
and storing caller ID records and for storing the numbers you
use for memory dialing, pulse dialing, and redial.
1. Turn the telephone base over, and detach the mounting
bracket by pressing on the top of the bracket.
2. Press on the tab to open the battery compartment cover
on the back of the base. Insert 4 AA alkaline batteries (not
included) into the compartment matching the engraving in
the battery compartment as shown.
3. Replace the mounting bracket to the telephone base with
the engraved texts “THIS END UP FOR DESK USE” correctly
oriented.
CAUTION: If the telephone will not be used for an extended period of
time, remove the batteries from the base to prevent possible leakage.
2
4. Plug one end of the telephone line cord into the LINE jack at
the top of the base and the other end into a modular jack as
shown in gure 2 below. Please Note: If you have DSL high
speed Internet service, a DSL lter is required (not included).
Contact your DSL service provider for more information
about DSL lters.
The unit is properly installed if you pick up the handset and
hear a dial tone. If you do not hear a dial tone, re-check all
installation steps.
Figure 1
Figure 2
4
Telephone base layout
Rotating handset tab
Rotate to switch between
desk/wall installation.
One-touch
memory
locations
Press to dial
programmed
one-touch
memory
numbers.
ringer switch
Switch to adjust
the ringer
volume level.
mute
Press to mute
a call, press
again to resume
conversation.
speaker
Press to switch
between
speakerphone
redial/pause
• Press to redial
the last dialed
number.
• Press to add a
dialing pause
when dialing or
entering numbers
into memory.
ash/exit
• During a call, press
to answer a second
incoming call if you
receive a call waiting
alert (if you have
subscribed to the
call waiting feature
from your telephone
service provider.
• During programming,
press to cancel and
return to idle mode.
dial
• Press to call
numbers in the
caller ID records.
• Press to call
numbers in
the memory
locations.
6
and normal
handset use.
Telephone operation
Placing a call
Handset
1. Lift the handset and listen for a dial tone.
2. Dial the number.
3. Return the handset to the base to end the call.
Speakerphone
The speakerphone works similarly to a two-way radio (also
called FRS or “Walkie-Talkies”) in that you can only listen or talk
at one time. Stay within 2 to 3 feet of the phone so that you can
be clearly heard by the caller.
The speaker indicator lights when the speakerphone is in use.
You can adjust the speaker volume by adjusting the vol +/-
buttons while the speakerphone is in use.
For best speakerphone performance, avoid the following:
• Areas with high background noise (the microphone might
pick up these sounds and prevent the speakerphone from
going into the receiving mode when you nish talking).
• Surfaces aected by vibration.
• Recessed areas such as in a corner, under a cupboard, or
next to a cabinet, which can generate an echo eect.
1. Press speaker on the base and listen for a dial tone.
2. Dial the number.
3. Press speaker again to end the call.
Answering a call
Handset
1. Lift the handset when the telephone rings.
2. Return the handset to the base to end the call.
8
Redial
Redial the last number you called by pressing redial/pause
after you hear a dial tone.
NOTE: The redial memory stores the last number you dialed (maximum
of 32 digits). All numbers, including numbers dialed to access voicemenu system, are recorded in the memory.
Mute
Press mute to mute the microphone during a call. You will hear
the calling party but they will not hear you. Press mute again to
resume conversation.
10
setting.
7. Press rev or to select the desired digits for month
setting (1 to 12).
8. Press menu to conrm your setting and move to the day
setting.
9. Press rev or to select the desired digits for day setting
(01 to 31).
10. Press menu to conrm your setting and move to the Time
Format.
11. Press rev or to select the desired time format setting
(12H or 24H).
12. Press menu to conrm your setting.
The date and time will be updated, every time a FSK Caller ID
message has been received.
If a DTMF Caller ID has been received, then it will get the date
and time from the system clock of the phone.
NOTE: The phone returns to idle mode if no key has been pressed for 10
seconds or if the delete key is pressed before the completion of the current
operation. The phone will time out and return to idle mode without changing the
current time.
Setting the language
You can select ENGLISH, RUSSIAN, ROMANIAN, BULGARIAN,
TURKISH, POLISH, GREEK, SPANISH or FRENCH as the display
language. The default setting is ENGLISH.
1. Place the handset in the cradle of the telephone base.
2. Press menu. The screen displays DATE/TIME.
3. Press rev or until LANGUAGE appears.
12
Page 2
CAUTION
RISK OF ELECTRICAL SHOCK, DO NOT OPEN
CALL WAITING
LOW
4. Press menu to show the current language setting.
5. Press rev or to select the desired language.
6. Press menu to again to store your language setting.
Setting the LCD contrast
This setting allows you to adjust the display contrast and
viewing angle for easier readability.
1. Place the handset in the cradle of the telephone base.
2. Press menu. The screen displays DATE/TIME.
3. Press rev or until CONTRAST appears.
4. Press menu to show the current contrast setting. There are
ve levels of contrast (1 to 5), with the default set to 3.
5. Press rev to increase the contrast or until CONTRAST
to decrease the contrast.
6. Press menu again to store your contrast setting.
Setting the local area code
The Caller ID feature uses the programmed area code to
determine the number format to display when a valid Caller ID
signal is received.
1. Place the handset in the cradle of the telephone base.
2. Press menu. The screen displays DATE/TIME.
3. Press rev or until LOCAL AREA CODE appears.
4. Press menu to show the current local area code. The default
is ----.
5. The rst digit ashes, indicating that it is ready to accept the
new area code entry.
13
5. Press menu again. The screen displays CALL LOCK ON ! The
call lock icon appears at the corner.
To deactivate call lock
1. Place the handset in the cradle of the telephone base.
2. Press menu. The screen displays DATE/TIME.
3. Press rev or until LOCK appears.
4. Press menu. The screen displays CALL LOCK OFF ?
5. Press menu again. The screen displays ENTER PIN CODE. The
rst digit ashes.
6. Press 0 to 9 on the dial key pad to complete the entry for PIN
code. The default is 0000.
7. If the PIN code is correct, the screen displays CALL LOCK OFF
! If the PIN code is incorrect, the screen displays INCORRECT
PIN ! and the deactivation fails.
NOTE: If you make a mistake, press the del key to reset your entries.
Changing PIN
You can change the PIN on your phone.
1. Place the handset in the cradle of the telephone base.
2. Press menu. The screen displays DATE/TIME.
3. Press rev or until CHANGE PIN ? appears.
4. Press menu. The screen displays ENTER PIN CODE. The rst
digit ashes.
5. Press 0 to 9 on the dial key pad to complete the entry for PIN
code. The default is 0000.
6. After a correct PIN is entered, the screen displays ENTER
NEW PIN.
7. Press 0 to 9 on the dial key pad to enter the new PIN. The
screen displays RE-ENTER PIN.
15
Memory
You can store up to 13 numbers in memory for quick dialing.
You can store 10 numbers in the dial pad keys (0-9) and 3
numbers in the one-touch dialing buttons (A, B or C). Each
memory location can store number up to 32 digits.
To store a number in memory
1. Lift the handset, then press store. The screen then displays
LOCATION ?
2. Press a desired memory location (0-9, A, B or C), or press rev
or to scroll to the desired memory location, and then
press store.
3. Enter the number using the dial pad keys (up to 16 digits) and
then press store.
4. Return the handset to the telephone base.
To add a pause to a memory location
You can insert a dialing pause in the dialing sequence when storing
a number that requires a pause. In step 3 of the section To store a
number in memory above, you can add a pause in the dialing sequence
by pressing the redial/pause key. The pause time is approximately four
seconds.
To change a stored number
You can change a stored number by simply writing over it. Follow the
steps in the section To store a number in memory above, and the new
number will overwrite the existing number.
To store a redial number to memory
1. Lift the handset, then press store. The screen then displays
LOCATION ?
17
To review a number stored in memory
1. Lift the handset, then press the dial key.
2. Press rev or to select the desired memory location. The
number shows on the display.
To erase a stored number
1. Press rev or to select the desired memory location.
-OR-
Press the store key and then press the desired memory
location (0-9) to locate the record.
2. Press the del key. The screen displays “ERASE MEM ?”
3. Press the del key again to erase the stored number.
To erase all stored numbers
1. Press the store key or dial key. The screen displays
LOCATION ?
2. Press and hold the del key until ERASE ALL MEM ? appears
on the screen.
3. Press the del key again. The screen displays EMPTY ! All
stored numbers are erased.
19
• Press rev repeatedly to scroll through the call records from
the most recent to the oldest.
• Press rev repeatedly to scroll through the call records from
the oldest to the newest.
• The screen displays START/END when the call log reaches the
end.
Deleting a caller ID record
• Press rev or to scroll through the call log, press del
when the desired entry is displayed on the screen.
Deleting all the caller ID records
• To delete all caller ID records, press and hold del when
reviewing the call log. The screen then displays DELETE ALL?
Press del again to conrm.
Dialing back
1. Press rev or to scroll through the call log when the
telephone is in idle mode to review the Caller ID records.
2. Press the dial key to dial back the phone number shown on
the display.
If you programmed your local area code in the Set up menu
1. Press rev or to scroll through the call log when the
telephone is in idle mode to go to the number you want to
dial.
• If you see a number with 7 digits (e.g., 555-1234), then the call
was received from within your area code. However, this does
not guarantee the call is a local call.
• If you see a number with 11 digits (e.g., 1-234-555-1234), then
the call received was not from your area code.
21
Troubleshooting guide
Problem Cause/solution
No dial tone • Check all cabling to make sure that all
connections are secure and not damaged.
• Check the hook switch. Make sure it fully
extends when the handset is lifted from the
cradle of the base.
No display • Replace batteries.
• Make sure the batteries are properly installed.
No
information
is shown
after the
phone rings
• In order to receive Caller ID records, you must
subscribe to the standard name and number
Caller ID service available through your local
telephone company.
• Be sure to wait until the second ring before
answering.
Phone does
not ring
• Make sure the ringer switch is not set to
silent.
• You may have too many extension phones on
your line. Unplug some extension phones.
• Check for a dial tone. If there is no dial tone,
see solutions for No dial tone.
Other party
cannot hear
you
• Make sure the telephone line cord is securely
plugged in.
• Make sure extension phones are not in use
at the same time you are using the phone.
It is normal for the volume to drop when
additional extension phones are used at the
same time.
23
CAUTION: Disconnect the phone cord from the wall outlet before
installing or replacing the batteries.
• Never install telephone wiring during a lightning storm.
• Never touch un-insulated telephone wires or terminals,
unless the telephone line has been disconnected at the
network interface.
• Install or modify telephone lines with caution.
• Never install a telephone in a wet or damp location.
25
6. Press rev to select the rst digit (0 to 9). When the desired
number is ashing, press rev to conrm and advance to
the next digit.
7. Repeat steps 5 and 6 until you have entered all the digits for
your area code.
-OR-
Press 0 to 9 on the dial key pad directly to enter the local
area code. The cursor moves to the next digit automatically.
8. Press menu again to store your new local area code.
NOTE: If you make a mistake, press the del key to reset your entries.
Setting the long distance code
You can congure your phone to store a 1-digit long distance
code.
1. Place the handset in the cradle of the telephone base.
2. Press menu. The screen displays DATE/TIME.
3. Press rev or until LONG DIST CODE appears.
4. Press menu to show the current long distance code.
5. Press rev or to select 1, 0, or <space> (default).
6. Press menu again to store your new long distance code.
Activating or deactivating call lock
You can activate or deactivate call lock on your phone.
To activate call lock
1. Place the handset in the cradle of the telephone base.
2. Press menu. The screen displays DATE/TIME.
3. Press rev or until LOCK appears.
4. Press menu. The screen displays CALL LOCK ON ?
14
8. Press 0 to 9 on the dial key pad to re-enter the new PIN. The
screen displays PIN SAVED! The PIN code is changed.
Setting the dialing mode
You can choose between touch-tone dialing or pulse (rotary)
dialing for your telephone. The telephone is preset for touchtone dialing.
1. Place the handset in the cradle of the telephone base.
2. Press menu. The screen displays DATE/TIME.
3. Press rev or until T/P DIAL MODE appears.
4. Press menu to show the current dialing mode.
5. Press rev or to select either TONE DIAL or PULSE DIAL.
6. Press menu again to store your new dialing mode.
Setting the ash time
Flash time is the value used by either the local telephone
company or PBS system to identify a soft “on-hook” signal. You
can set the ash time for your phone.
1. Place the handset in the cradle of the telephone base.
2. Press menu. The screen displays DATE/TIME.
3. Press rev or until FLASH TIME appears.
4. Press menu to show the default ash time setting.
5. Press rev or to change the ash time value (100 MS to
900 MS, each increment is 100 MS).
6. Press menu again to store your new ash time.Ocultis cont
viris, publica; C. munique viviri sulica dum nox se culto
consupiorum inulintim mo haciendam se cotanum iam vit, C.
Ur, unum supiem tum intentimus impra? Otatiliceps, Palibul
egerdius, usquis? Foris vereto et? Ex nium publini scerfex
movis addum quam tus bonis ad conlos maximorbefex se
16
2. Press the desired memory location (0-9, A, B or C), or press
rev or to scroll to the desired memory location, and then
press store again.
3. Press redial/pause to display the last number dialed, and
then press store again.
4. Return the handset to the telephone base. The last number
dialed is now stored in the memory location you specied.
To copy caller ID memory to user memory
1. Lift the handset, then press store. The screen then displays
LOCATION ?
2. Press rev or to scroll to display the number you want to
copy, and then press store again.
3. Press the desired memory location (0-9, A, B or C), or press
rev or to scroll to the desired memory location. If the
memory location is occupied, the displayed number ashes.
4. Press store again to save the number, the screen displays
SAVED!
5. Return the handset to the telephone base. The caller ID
memory is copied to user memory.
To dial a number from memory
1. Lift the handset, then press the dial key.
2. Press the desired memory location (0-9) to call, or press A, B,
C keys directly.
-OR-
1. Press dial when the handset is on the base.
2. Press rev or to select the desired memory location.
3. Lift the handset to call.
18
Caller ID
IMPORTANT: To use the Caller-ID capabilities of this telephone
system, you must subscribe to Caller-ID services from your service
provider. Check with your telephone service provider for details.
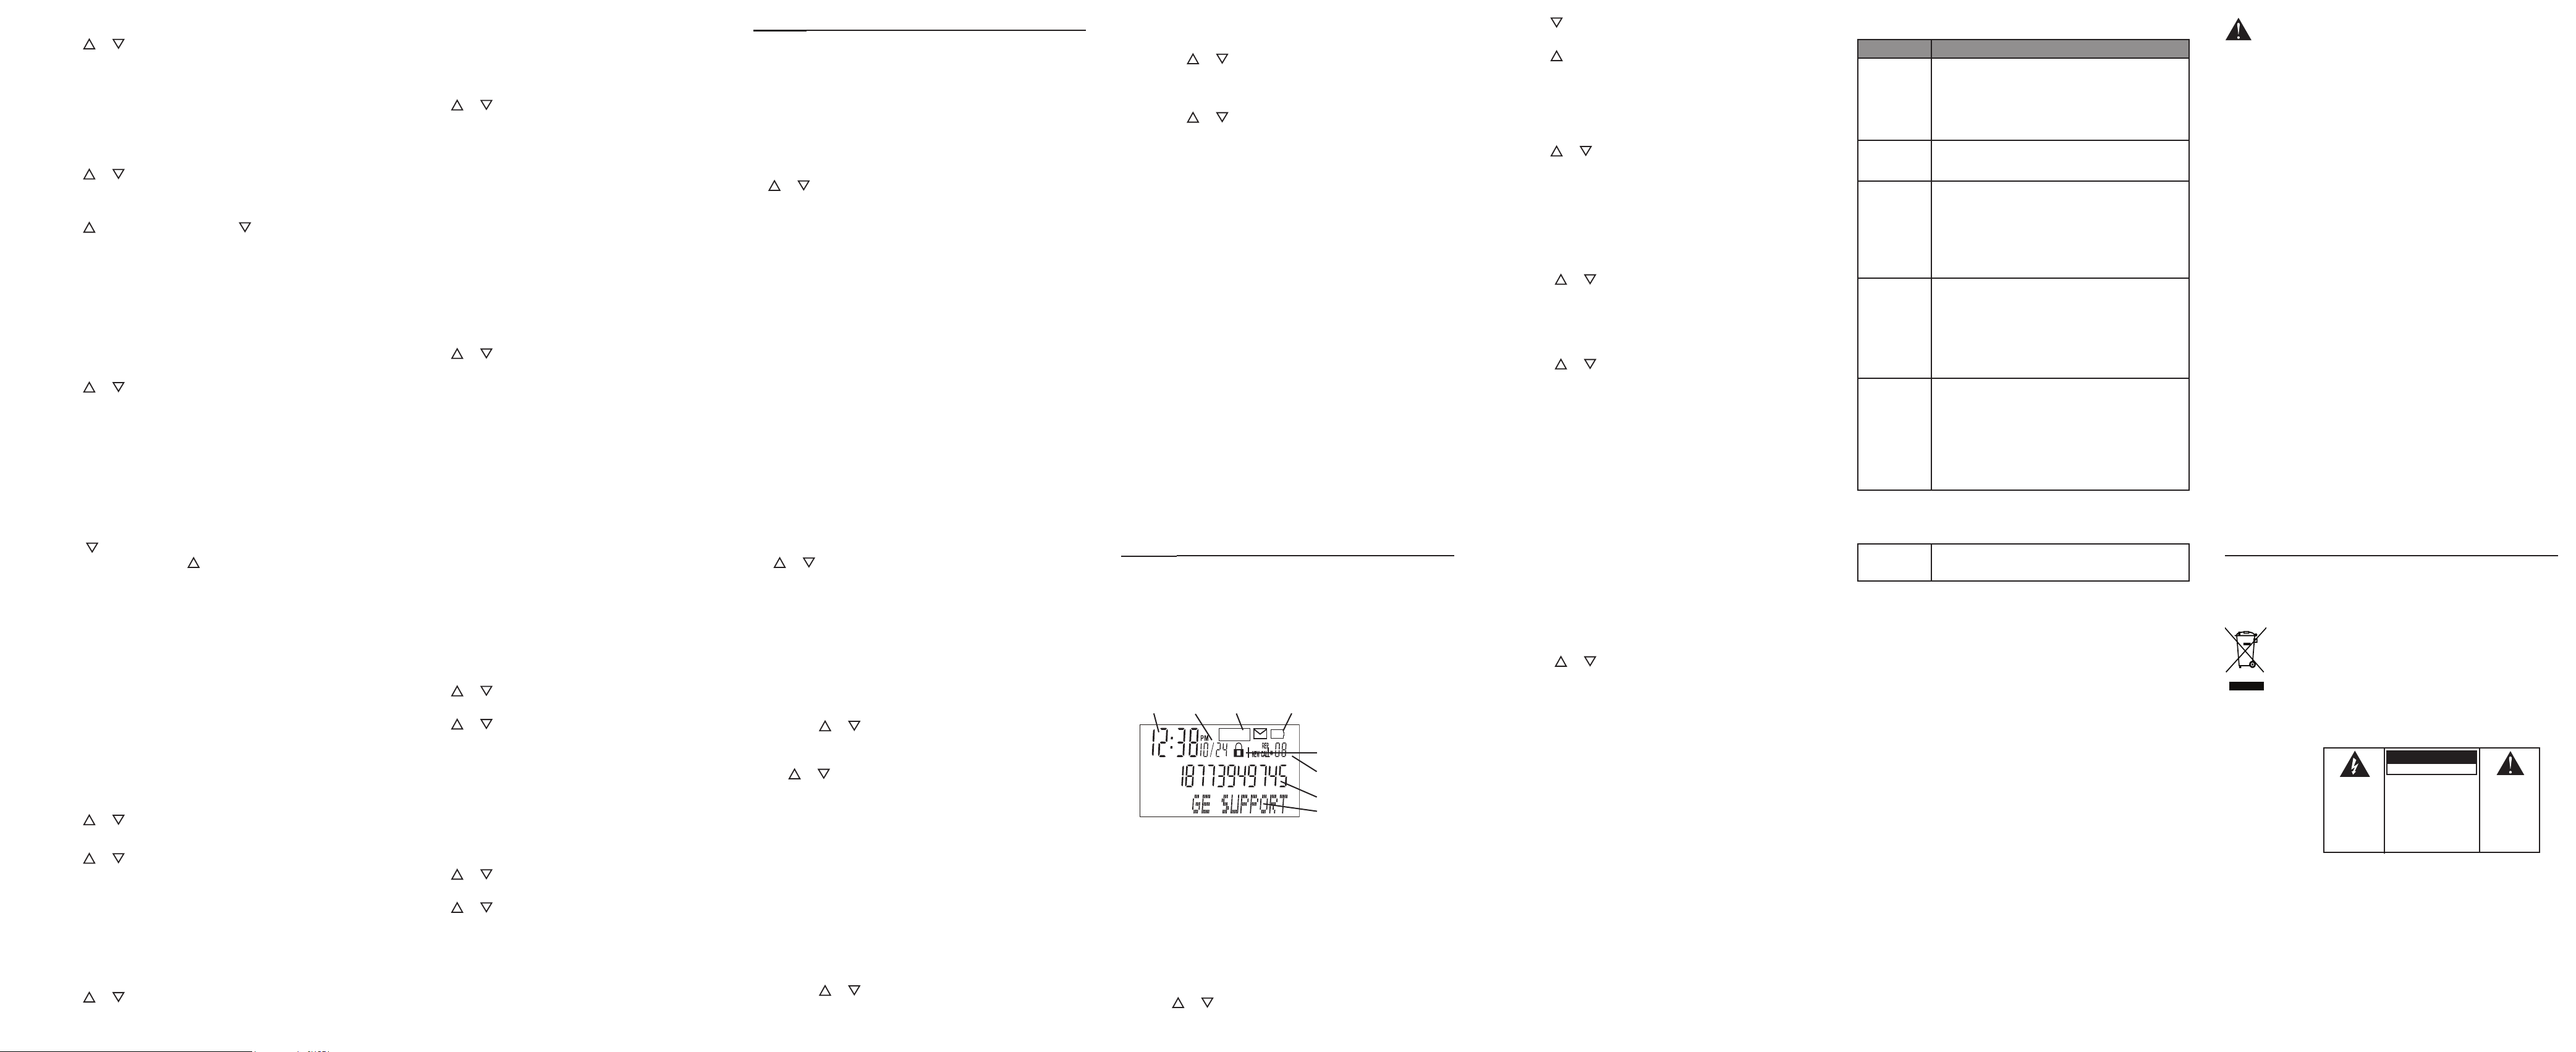
Summary Screen
The Summary Screen shows the current time, date, and number
of new calls to be reviewed. It displays until any key is pressed.
Within 60 seconds of receiving a new call, the Summary Screen
appears.
Receiving and storing CID records
The unit receives and displays CID information transmitted
by your local phone company. This information can include
the phone number, date, and time. The unit stores call records
for later review. When the memory is full, a new call record
automatically replaces the oldest call record in memory. NEW
appears on the display for calls received that have not been
reviewed. REP appears on the display for calls received more
than once which have not been reviewed.
Reviewing CID records
Press rev or to review your Caller ID records. Caller ID
records are stored in the order they are received.
DateTime
Call Waiting
Indicator
Low battery
indicator
Call lock icon
Caller ID sequence number
Caller’s phone number
Caller’s name
20
2. Press the dial key, a 10 second timer also starts in the upper
right side of the display, letting you know the time remaining
time the unit returns to the Summary Screen. If you adjust
the number to be dialed, the timer automatically resets itself.
3. To dial the displayed number, pick up the handset before the
timer reaches 0.
If you did not program your local area code in the Set up menu
1. Press rev or to scroll through the call log when the
telephone is in idle mode to go to the number you want to
dial. You will only see digit numbers (e.g., 234-555-1234).
2. Repeat steps 2 and 3 in the above section.
NOTE: If PICKUP PHONE shows on the display, no other changes to the number
can be made. The information sent from the telephone company is known to
be a valid number to dial back (available only in limited areas). Once you pick up
the phone, the number is automatically dialed.
Visual message waiting indicator
When you have a message in the centralized voice mail system,
this indicator will be lit. You need to contact your services
provider for more details.
Caller ID display messages
The following special message indicate the status of a message
or the unit:
Battery power level is low. Please replace the batteries as
soon as possible in order to maintain Caller ID operation.
22
Cannot dial
out
• Make sure the T/P dialing mode is set to the
type of phone service you are subscribed to.
General Product Care
• Avoid putting the phone near heating appliances and
devices that generate electrical noise (for example, motors or
uorescent lamps).
• Avoid dropping the phone and other rough treatment.
• Clean the phone with a soft cloth.
• Never use strong cleaning agents, paint thinner, abrasive
powder, alcohol, or other chemical products to clean the unit.
Doing so may damage the nish.
• Retain the original packaging in case you need to ship the
phone at a later date.
• DO NOT expose to direct sunlight or moisture.
24
Environment
Used equipment must be disposed of in compliance with
current environmental protection regulations. You should
return it to you reseller or dispose of it in an approved
recycling center.
Do not attempt to open the batteries as they contain
chemical substances. In the event of leakage, avoid
contact with the skin, eyes and mouth. In the event
of contact, rinse the aected part for several
minutes in running water. Clean the product with
absorbent paper or a dry cloth and contact your
reseller for replacement batteries.
WARNING: TO PREVENT
FIRE OR ELECTRICAL
SHOCK HAZARD, DO
NOT EXPOSE THIS
PRODUCT TO RAIN OR
MOISTURE.
THE LIGHTNING
FLASH AND ARROW
HEAD WITHIN
THE TRIANGLE IS
A WARNING SIGN
ALERTING YOU
OF “DANGEROUS
VOLTAGE” INSIDE
THE PRODUCT.
CAUTION: TO REDUCE THE
RISK OF ELECTRICAL SHOCK,
DO NOT REMOVE COVER (OR
BACK). NO USER SERVICEABLE
PARTS INSIDE. REFER
SERVICING TO QUALIFIED
SERVICE PERSONNEL.
26
THE EXCLAMATION
POINT WITHIN
THE TRIANGLE IS
A WARNING SIGN
ALERTING YOU
OF IMPORTANT
INSTRUCTIONS
ACCOMPANYING
THE PRODUCT.
 Loading...