

GE Electronic Dishwasher Use And Care Manual

PAPIER RECYCLE
RECYCLABLE
Use and Care Guide
Electronic Dishwasher
RECYCLED PAPER
RECYCLABLE
H
We care about our environment
Safety Instructions …………3
Installation Instructions
Built-in Dishwasher …………18-25
Portable Dishwasher …………4-5
Operating Instructions, Tips
Appliance Registration ……………2
China, Crystal, Sterling …………15
Detergent Guide …………………..9
Dispenser Cups …………………..9
Features ………………………....6 -9
How to Operate ………………....6-9
Loading ………………………10, 11
Operating Instructions ………....6-9
Rinse Agent ………………………..8
Water Temperature ………………..8
Consumer Services
Model and Serial Numbers ………2
Repair Service ……………………2
Mabe Service …..………………27
Care and Cleaning
Winter Storage ……………………14
Wood Top …………………………14
Preparation
Front Panel Change ……………12
Problem Solver …………23-25
For service please call
1-800-361-3400
TRY
For Virtually Spotless results!
1v. 4
www.GEappliances.ca
®
TRY
FOR DEEP CLEANING POWER
500A430P001
B
ADD ONE LITRE OF WATER INTO
DISHWASHER BEFORE INITIAL START
NOTE: This product was verified to be in excellent condition when it left
our manufacturing facility. If it has been damaged during transit or in
installation, please report that damage immediately to the Retail Outlet
where it was purchased. Although your warranty covers manufacturing
defects in material or workmanship, it does not include coverage for
delivery damage. Please refer to your warranty document in this manual
for specific information about warranty terms and conditions.
IMPORTANT
2
A NOTE TO CONSUMERS
We’d like to thank you and congratulate you for making the wise decision in purchasing your dishwasher.
This User Guide is designed to be kept near your dishwasher at all times for quick and easy reference.
Features may vary on some dishwasher models. Please read the following tips to insure your dishwasher is
operating at its best performance.
We care about you and your appliance and we want your dishwasher to do its job for you.
• HOT WATER – Your dishwasher
needs hot water for best results.
Water entering the dishwasher
should be at least 120°F. but your
dishwasher performs BETTER with
HIGHER water temperatures not to
exceed 150°F.
• WATER HARDNESS – The
hardness of the water plays an
important part in how well your
dishwasher cleans. In areas where
water is very hard (12 grains or
more), it may be necessary to install
a water softener. If you do not know
the hardness of your water supply,
contact your local water department.
• DETERGENTS – Only use
detergents labeled for use in
automatic dishwashers.
Never use laundry detergents or
liquid soaps…that will cause
oversudsing and leaks. The amount
of detergent you use depends on the
water hardness and the amount of
soil on your dishes. In most cases,
detergent amounts should be
increased for hard water and heavy
soil.
• RINSE AGENT – should always be
used:
– to reduce water spotting
– to improve drying.
Always check and refill the rinse
agent when necessary.
• FOR BEST RESULTS – The cycles
and the options you choose have an
effect on the results you get. Please,
see the Operating Instructions and
Tips for more information.
Before using your dishwasher, read this guide
carefully.
It is intended to help you operate and maintain your
new dishwasher properly.
Keep it handy for answers to your questions.
If you don’t understand something or need more
help, call:
1-800-361-3400
If you received a damaged
dishwasher…
Immediately contact the dealer (or
builder) that sold you the dishwasher.
Save time and money.
Before you request service…
Check the Problem Solver in the back of this guide.
It lists causes of minor operating problems that you
can correct yourself.
Write down the model and
serial numbers.
You’ll find them on a label fastened to
the tub wall just inside the dishwasher
door.
These numbers are also on the Consumer Product
Ownership Registration Card that came with your
dishwasher. Before sending in this card, please write
these numbers here:
_____________________________________________
Model Number
_____________________________________________
Serial Number
Use these numbers in any correspondence or service
calls concerning your dishwasher. Staple sales slip
here.
We’ll be there…
No matter what major appliance you buy from us,
you always get more than a quality product. You
receive the added assurance that, should you ever
need our help, we’ll be there.
We ask that you please be sure to read all the
Important Safety Instructions before operating your
new appliance to insure your safety.
or refer to page 27.
®
2
NOTE AU CONSOMMATEUR
Nous aimerions vous remercier et vous féliciter d’avoir pris la bonne décision lors de l’achat de votre lave-vaisselle.
Veuillez conserver en tout temps le présent Guide d’utilisation et d’entretien à proximité de votre lave-vaisselle pour
une consultation rapide et facile. Les caractéristiques peuvent être différentes sur certains modèles de lave-vaisselle.
Veuillez lire les conseils qui suivent pour assurer le bon fonctionnement de votre lave-vaisselle.
Votre électroménager et votre satisfaction nous tiennent à coeur et nous désirons que votre lave-vaisselle fasse le travail
à votre place.
•
EAU CHAUDE — Pour obtenir de
bons résultats, votre lave-vaisselle a
besoin d’eau chaude. La
température de l’eau qui alimente
le lave-vaisselle doit être d’au moins
120 °F. Toutefois, votre lave-
vaisselle offre un MEILLEUR
rendement lorsque la température de
l’eau est PLUS ÉLEVÉE, sans
dépasser 150 °F.
• DURETÉ DE L’EAU — La dureté
de l’eau joue un rôle important dans
l’efficacité de lavage de votre lave-
vaisselle. Dans les régions où l’eau
est très dure (12 grains ou plus), il
peut être nécessaire d’installer un
adoucisseur d’eau. Si vous ne
connaissez pas la dureté de votre eau,
communiquez avec le service des
eaux de votre localité.
• DÉTERGENT — N’utilisez que des
détergents recommandés pour les
lave-vaisselle automatiques.
N’utilisez jamais de savon
liquide ou de détersif pour la lessive,
car ils provoquent un moussage
excessif et des fuites. La quantité de
détergent à utiliser dépend de la
dureté de votre eau et de la saleté de
votre vaisselle. Dans la plupart des
cas, il faut augmenter la quantité de
détergent lorsque l’eau est dure et
que la vaisselle est très sale.
• PRODUIT DE RINÇAGE — Il faut
toujours utiliser ce produit :
— pour réduire les taches d’eau;
—
pour améliorer le séchage.
Vérifiez toujours et remplissez au
besoin le réservoir de produit de
rinçage.
• POUR OBTENIR DE BONS
RÉSULTATS — Les résultats que
vous obtenez dépendent des
programmes et options que vous
choisissez. Pour de plus amples
renseignements, voir la section
«Fonctionnement et conseils»
Avant d’utiliser votre lave-
vaisselle, lisez attentivement
le présent guide.
Il a été conçu pour vous aider à faire fonctionner et
entretenir convenablement votre nouveau lave-vaisselle.
Gardez-le à portée de la main pour le consulter au besoin.
Si vous avez des questions ou si vous désirez des
renseignements complémentaires, composez le :
1-800-361-3400
Si le lave-vaisselle que vous
avez reçu est endommagé...
Communiquez immédiatement avec le
marchand (ou l’entrepreneur) qui vous a
vendu l’appareil.
Économisez du temps et de l’argent.
Avant d’appeler un réparateur...
Consultez le Guide de dépannage à la fin du présent
Guide. Vous y trouverez les causes de problèmes de
fonctionnement mineurs que vous pouvez corriger
vous-même.
Inscrivez les numéros
de modèle et de série.
Ils sont inscrits sur une étiquette fixée à la
paroi de la cuve, à l’intérieur de la porte du
lave-vaisselle.
Ces numéros figurent également sur le Certificat
d’enregistrement qui accompagnait votre lave-vaisselle.
Avant de retourner ce certificat, transcrivez ces numéros
ci-dessous :
Numéro de modèle
Numéro de série
N’oubliez pas de mentionner ces numéros dans votre
correspondance ou lorsque vous effectuez un appel de
service pour votre lave-vaisselle. Brochez la facture ici.
Nous sommes là...
Peu importe l’électroménager que nous vous avons vendu,
vous obtenez toujours beaucoup plus qu’un produit de
qualité. Si jamais vous avez besoin d’aide, vous avez
l’assurance que nous sommes toujours là.
Pour votre sécurité, nous vous demandons de bien vouloir
lire toutes les mesures de sécurité importantes avant de
faire fonctionner votre nouvel électroménager.
ou référer à la page 27.
M
D
Veuillez lire les directives qui suivent avant d'utiliser votre appareil.
notamment les suivantes :
• N'utilisez le lave-vaisselle que pour l'usage
auquel il est destiné, comme expliqué dans
le présent Guide d'utilisation et d'entretien.
• Cet appareil doit être relié a un système de
câblage électrique permanent, mis à la terre.
Sinon, un fil de mise à la terre pour l'appareillage
doit être installé et raccordé à la borne ou au fil
de mise à la terre de l'appareil. Voir les
instructions d’installation pour plus de détails sur
la mise à la terre.
• Pour éviter les surcharges électriques, reliez
l'appareil à un circuit d'alimentation protégé de la
puissance appropriée.
• N'utilisez que des détergents liquides ou en
poudre et les produits de rinçage recommandés
pour lave-vaisselle.
• Ne lavez pas d'articles en plastique dans le lave-
vaisselle, à moins qu'ils portent la mention «Ne
craint pas le lave-vaisselle» ou l'équivalent.
Lorsque les articles de plastique ne portent
aucune mention, lisez les recommandations du
fabricant.
• Placez les articles légers en plastique de façon
qu'ils ne bougent pas ou ne tombent pas au fond
de l'appareil pendant le lavage. Ils pourraient être
endommagés s'ils entrent en contact avec
l'élément chauffant.
Pour réduire les risques
de blessures
AVERTISSEMENT
La vaisselle lavée à l’aide du programme
SaniWash peut être chaude. Procéder avec
précaution lors du déchargement.
• Lorsque vous chargez le lave-vaisselle :
A. Placez les articles pointus ou tranchants de
• B. Placez ces articles le manche vers le haut
• Ne modifiez pas les commandes.
3
WARNING - When using this
appliance, always exercise basic safety
precautions, including the following.
•
Use this appliance only for its intended
purpose, as you will find described in this Use
and Care Guide.
This dishwasher must be properly
installed and located in accordance with
the Installation Instructions before it is
used.
- This appliance must be connected to a grounded
metal, permanent wiring system; or an equipmentgrounding conductor must be run with the circuit
conductors and connected to the equipmentgrounding terminal or lead of the appliance. See
Installation Instructions for grounding details.
- Connect to a properly rated, protected and sized
power-supply circuit to avoid electrical overload.
Do not store or use combustible
materials, gasoline or other
flammable vapors and liquids in
the vicinity of this or any other
appliance .
• Use only powder or liquid detergents or wetting
agents recommended for use in a dishwasher
• Do not wash plastic items unless marked
"dishwasher safe" or the equivalent. For plastic
items not so marked, check the manufacturer's
recommendations.
• Load light plastic items so they will not become
dislodged and drop to the bottom of the
dishwasher - they might come into contact with the
Calrod® heating element and be damaged.
To minimize the possibility of
injury.
CAUTION
Contents washed in SaniWash cycle may be hot to
the touch. Use care before unloading.
• When loading items to be washed:
A. Locate sharp items so that they are not likely
to damage the door seal, and
• B. Load sharp knives with handles up to reduce
the risk of cut-type injuries.
• Do not tamper with controls.
• Do not touch the Calrod® heating element during
or immediately after use.
• Do not operate your dishwasher unless all
enclosure panels are properly in place.
• Do not abuse, sit on, or stand on the door or dish
rack of the dishwasher.,
• Close supervision is necessary if this appliance is
used by or near children. Do not allow children to
play inside, on or with this appliance or any
discarded appliance. Dispose of discarded
appliances and shipping or packing material
properly. Before discarding a dishwasher, remove
the door of the washing compartment.
• Keep all washing detergents
and wetting agents out of the
reach of children, preferably
in a locked
cabinet. Observe all warnings on container labels
to avoid personal injury.
• To minimize the possibility of electric shock,
disconnect this appliance from the power supply
before attempting any maintenance. NOTE:
Turning the
control dial to the OFF position does
not disconnect the appliance from the power
supply. We recommend having a qualified
technician service your appliance.
WARNING-HYDROGEN GAS is
produced by the chemical action
within your water heater. It can
accumulate in the water heater and/or
water pipes if hot water has not been used for a
period of two weeks or longer. HYDROGEN GAS
IS EXPLOSIVE. To prevent the possibility of
damage or injury, if you have not used hot water for
two weeks or more, or moved into a residence in
which the hot water system may not have been used
for some time, turn on all hot water faucets and
allow them to run for several minutes before using
any electrical appliance which is connected to the
hot water system. This will allow any hydrogen gas
to escape. Also, since the gas is flammable, do not
smoke or use an open flame or appliance during this
process.
SAVE THESE
INSTRUCTIONS
Important Safety Instructions
IMPORTANT SAFETY INSTRUCTIONS
Read all instructions before using this appliance.

HOW TO USE THE UNICOUPLE
(Portable Models Only)
Before operating your dishwasher the first time...
Attach the Faucet Adapter. The special faucet
adapter supplied with your dishwasher must be
assembled to the sink faucet before you can use
your dishwasher.
The faucet adapter is designed to fit standard
spouts having internal or external threads. You will
find the adapter and two washers in the “Faucet
Adapter’’ packet in your dishwasher.
To install faucet adapter, first remove the old
aerator or trim ring on your faucet spout.
If faucet has external
threads:
Insert the thinner of the two
washers into the faucet
adapter and attach it to the
faucet spout.
Tighten with pliers.
If faucet has internal threads:
Insert both washers into the
faucet adapter and attach it to
the faucet spout.
Tighten with pliers.
If the faucet adapter threads
do not match your faucet
spout, your local hardware or
plumbing supply
store normally has additional fittings to adapt your
faucet spout to the special faucet adapter.
NOTE: A sink spray attachment hose can burst if it
is installed on the same sink with your dishwasher.
We suggest that you disconnect the sink spray
attachment if your sink has one and plug the hole.
How to connect the Unicouple
1. Pull Unicouple and its hoses completely out from
storage compartment located at rear of dishwasher
and attach it to the faucet adapter.
2. Attach the Unicouple
connector to the faucet
adapter by depressing
collar at the top of the
connector. When
Unicoupler is all the way
up onto the adapter,
release the collar. It will
then snap into position to
lock the Unicouple in
place.
The Unicouple's small hose carries water from the
faucet to the dishwasher. Its large hose carries drain
water to the sink. Be sure Unicouple is pointing
toward the sink bowl drain opening and the sink
drain is open for water that will drain from your
dishwasher. If your dishwasher drains into a disposer, operate the disposer until it is completely
empty before starting the dishwasher.
3. Turn hot water fully on before starting the dishwasher.
PULL RING DOWN
How to disconnect the Unicouple from faucet adapter
1. Turn off the hot water.
2. Release the water pressure by depressing the
pressure release button. This relieves water
pressure and protects you, and the room, from
severe splashing.
3. Release Unicouple from faucet by depressing
the collar at the top of the Unicouple connector.
How to disconnect your dishwasher
1. Remove the power cord plug from the wall
receptacle.
2. Disconnect Unicouple from faucet adapter.
NOTE:
When motor stops at the end of the final
rinse, the Unicouple can be disconnected and
returned to storage.
How to drain excess water from Unicouple hoses
If the sink is 34" or higher from the floor, the excess water in Unicouple hoses cannot
be drained directly into the sink. It will be necessary to drain excess water from hoses
into a bowl or suitable container that is held outside and lower than the sink.
4
UTILISATION DU RACCORD AVEC DÉRIVATION
(Modèles mobiles seulement)
Avant de faire fonctionner votre lave-vaisselle pour la première fois...
Installez l'adaptateur de robinet. Avant d'utiliser
votre lave-vaisselle, vous devez installer au robinet de
votre évier l'adaptateur de robinet spécial fourni avec
votre appareil.
Cet adaptateur a été conçu de façon à s'installer sur
tous les becs standard de robinet à filetage interne ou
externe. Vous trouverez cet adaptateur, ainsi que deux
rondelles, dans un emballage fourni avec votre lave-
vaisselle.
Pour installer l'adaptateur de robinet, enlevez
d'abord l'aérateur ou la rondelle décorative, à
l'extrémité du bec du robinet.
Si le robinet est doté d'un
filetage externe :
Insérez la rondelle la plus
mince dans l'adaptateur de
robinet et vissez l'adaptateur
au bec du robinet.
Serrez avec des pinces.
Si le robinet est pourvu d'un filetage interne :
Insérez les deux rondelles dans
l'adaptateur de robinet et vissez
l'adaptateur au bec du robinet.
Serrez avec des pinces.
Si les filets de l'adaptateur de
robinet ne conviennent pas à
ceux du bec de votre robinet,
procurez-vous chez votre
quincaillier ou votre plombier local un raccord
permettant d'installer l'adaptateur de robinet spécial
au bec de votre robinet.
REMARQUE : Le boyau de l'arroseur de votre
évier peut éclater s'il est installé sur le même évier
que votre lave-vaisselle. Si votre évier est pourvu
d'un arroseur, nous vous recommandons de
l'enlever et d'obturer le trou à l'aide d'un bouchon.
Installation du raccord
1. Sortez complètement le raccord avec dérivation et
les boyaux de leur compartiment à l'arrière du
lave-vaisselle et fixez le raccord à l'adaptateur de
robinet.
2. Installez le raccord au
robinet en abaissant la
bague située à la partie
supérieure du raccord.
Lorsque l'adaptateur de
robinet est complètement
inséré à l'intérieur du
raccord, relâchez la
bague. Celle-ci revient à
sa position initiale pour
verrouiller le raccord en
place.
Le petit boyau du raccord avec dérivation
amène l'eau du robinet au lave-vaisselle, tandis
que le gros boyau assure la vidange de l'eau
dans l'évier. Assurez-vous que le raccord est
placé vis-à-vis du renvoi dans le fond de l'évier
et que le renvoi est ouvert pour que l'eau de
vidange du lave-vaisselle puisse s'écouler. Si
votre lave-vaisselle se vidange dans un
broyeur, faites fonctionner le broyeur jusqu'à
ce qu'il soit vide avant de mettre le lave-
vaisselle en marche.
3. Avant de mettre l'appareil en marche, ouvrez
complètement le robinet d'eau chaude.
ABAISSEZ LA BAGUE
Pour enlever le raccord du robinet
1. Fermez le robinet d'eau chaude.
2. Réduisez la pression de l'eau en appuyant sur le
détendeur. De cette façon, vous éliminez la
pression d'eau et vous vous protégez contre les
éclaboussures.
3. Dégagez le raccord du robinet en abaissant la
bague à la partie supérieure du raccord.
1. Débranchez de la prise de courant la fiche du
cordon d'alimentation.
2. Enlevez le raccord avec dérivation de
l'adaptateur de robinet.
Pour débrancher votre lave-vaisselle
REMARQUE : Lorsque le moteur s'arrête à la fin
du dernier rinçage, vous pouvez enlever le raccord
avec dérivation et le remettre en place dans son
compartiment.
Pour vidanger le surplus d'eau des boyaux du raccord
Si votre évier se trouve à 34 po ou plus du sol, vous ne pouvez vidanger dans l'évier
le surplus d'eau des boyaux du raccord avec dérivation. Il vous faudra vidanger le
surplus d'eau dans un bol ou un contenant approprié à l'extérieur de l'évier et à une
hauteur inférieure à celle de votre évier.
4

Cet appareil doit être mis à la terre. En cas de mauvais fonctionnement ou de bris de l’appareil, la
mise à la terre réduira les risques de choc électrique en offrant un parcours de moindre résistance au
courant électrique. Cet appareil est pourvu d’un cordon à conducteur de terre et d’une fiche de mise
à la terre. Brancher la fiche dans une prise installée adéquatement et mise à la terre conformément
à tous les codes et règlements locaux.
Une mauvaise connexion du conducteur de terre peut présenter des risques de choc électrique.
Consulter un électricien ou un technicien qualifiés, si vous n’êtes pas certain que l’appareil est mis
à la terre adéquatement. Ne pas modifier la fiche de l’appareil. Si elle ne pénètre pas bien dans la
prise, faire installer une prise adéquate par un électricien qualifié.
Attention – Pour votre sécurité :
N'UTILISEZ PAS DE CORDON PROLONGATEUR OU D'ADAPTATEUR
DE FICHE AVEC CET ÉLECTROMÉNAGER.
NE COUPEZ OU N'ENLEVEZ JAMAIS LA TROISIÈME BROCHE
(MISE À LA TERRE) DE LA FICHE DU CORDON D'ALIMENTATION.
Le lave-vaisselle doit être mis à la terre conformément aux codes et règlements en vigueur dans
votre région.
Exigences électriques
• Cet appareil doit être raccordé à un circuit mis
à la terre de 120 volts, 60 Hz, protégé par un
disjoncteur ou un fusible de 15 ampères.
• Si la tension secteur ne satisfait pas aux
exigences ci-dessus, nous
vous recommandons de
faire installer une prise
de courant approuvée par
un électricien qualifié.
5
How to Connect Unicouple How to Connect Electricity
HOW TO CONNECT ELECTRICITY
GROUNDING INSTRUCTIONS
This appliance must be grounded. In the event of a malfunction or breakdown, grounding will
reduce the risk of electric shock by providing a path of least resistance for electric current. This
appliance is equipped with a cord having an equipment-grounding conductor and a grounding plug.
The plug must be plugged into an appropriate outlet that is installed and grounded in accordance
with all local codes and ordinances.
WARNING
Improper connection of the equipment-grounding conductor can result in a risk of electric shock.
Check with a qualified electrician or service representative if you are in doubt whether the appliance
is properly grounded. Do not modify the plug provided with the appliance; if it will not fit the outlet,
have a proper outlet installed by a qualified electrician.
Caution, for personal safety:
DO NOT USE AN EXTENSION CORD OR AN ADAPTER PLUG WITH THIS APPLIANCE.
DO NOT, UNDER ANY CIRCUMSTANCES, CUT OR REMOVE THE THIRD GROUNDING
PRONG FROM THE POWER CORD.
Dishwasher must be electrically grounded in accordance with local codes and ordinances.
Electrical requirements
• This appliance must be supplied with 120V,
60 Hz, and connected to an individual,
properly grounded branch circuit, protected by
a 15 amp circuit breaker or fuse.
• If the electric supply
provided does not meet
the above specifications,
it is recommended that a
licensed electrician install
an approved outlet.
• Your dishwasher circuit should not be used for
any other appliance while the dishwasher is in
operation as the dishwasher requires the full
capacity of the circuit.
• If the wall receptacle you plug
the dishwasher's power cord
into is controlled by a switch,
turn on the switch.
INSURE PROPER
GROUND EXISTS
BEFORE USE
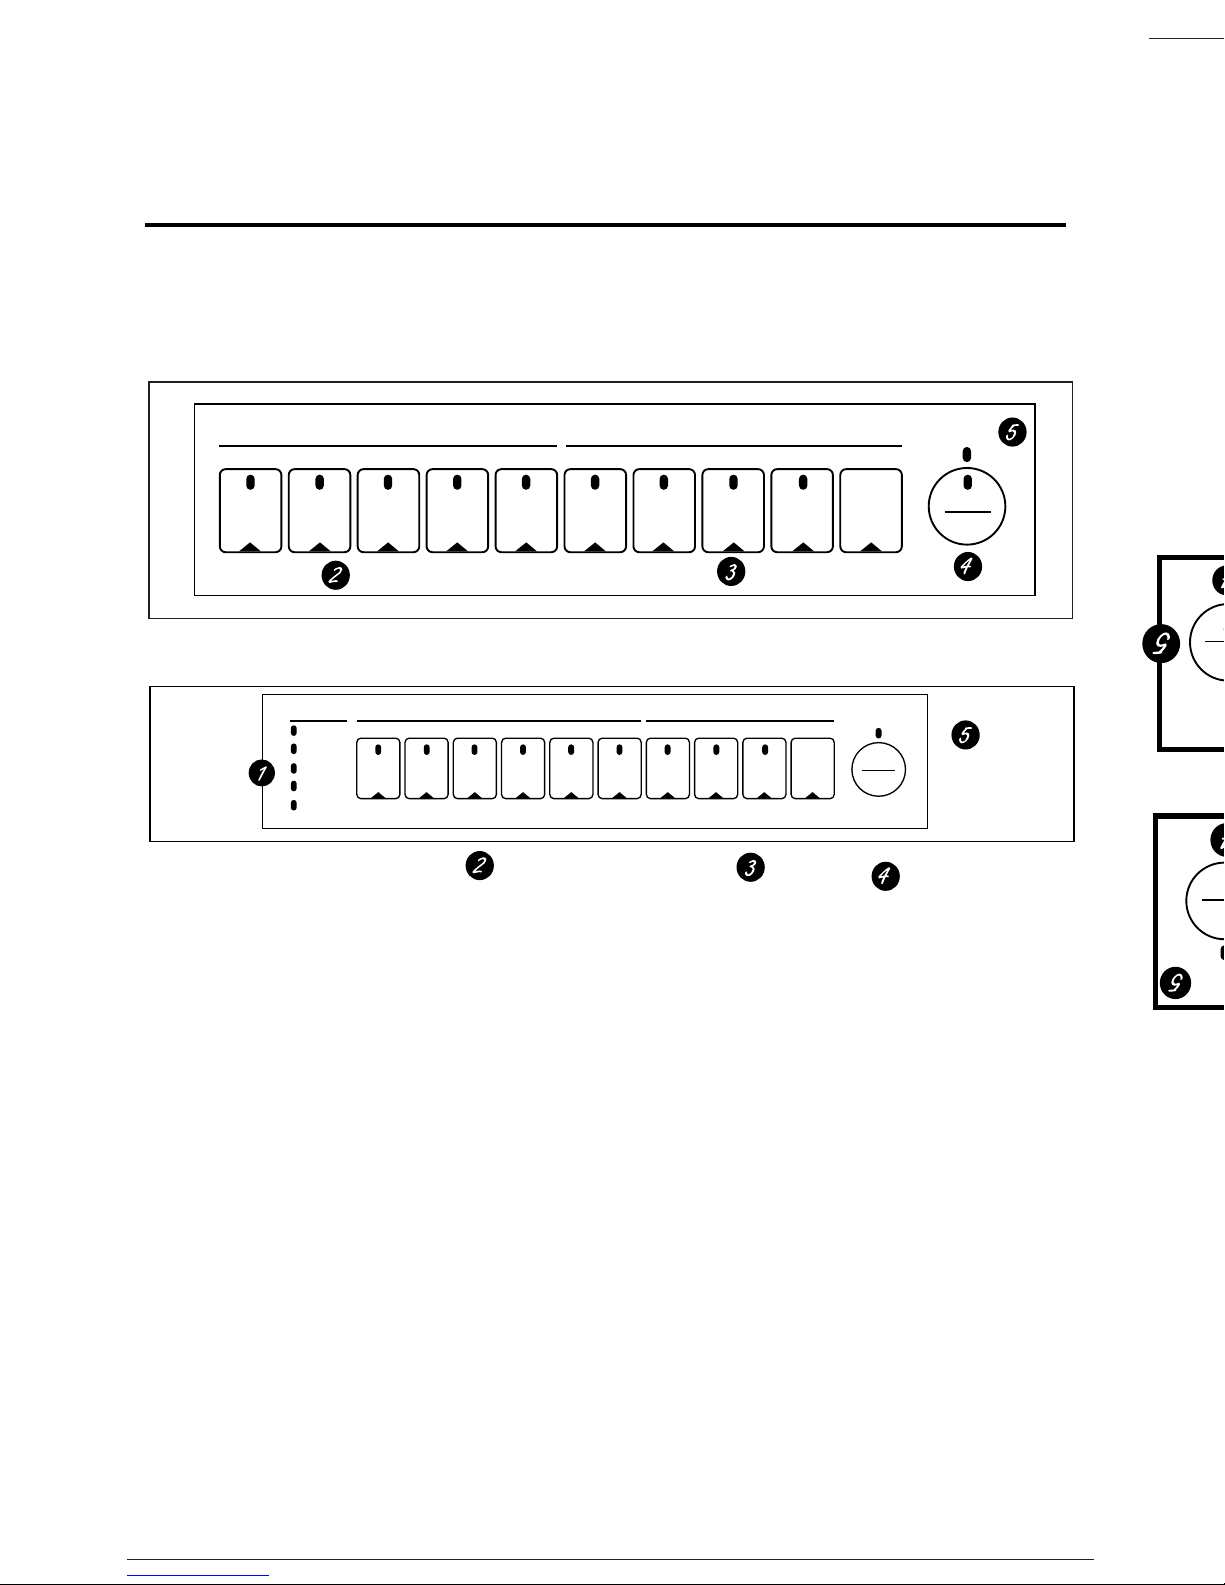
About the dishwasher control panel.
OPTIONSCLEAN SENSOR SELECTIONS
STATUS
POTS
& PANS
LIGHT
WASH
RINSE
ONLY
HEATED
DRY
DELAY
HOURS
LOCK
(2 TIMES)
POWER
PRESOAK
SANI
WASH
NORMAL
CHINA
CRYSTAL
SENSING
WASHING
RINSING
DRYING
SANITIZED
2 4 8
CLEAN
START
RESET
Model Series GSD5911
You can locate your model number on the tub wall just inside the door. Throughout this manual
features and appearance may vary from your model.
CLEAN
OPTIONSCYCLE SELECTIONS
START
RESET
DELAY
2 4 8
HOURS
LOCK
(2 TIMES)
HEATED
DRY
HI TEMP
WASH
HI TEMP
RINSE
RINSE
ONLY
CHINA
CRYSTAL
LIGHT
WASH
NORMAL
POTS
& PANS
Model Series GSD5211-5311-5411-5511
6
CHALEUR
CYCLES OPTIONS
RINÇAGE
RINÇAGE
LAVAGE
VERROU
(x2)
DÉLAI
(HRS)
SÉCHAGE
CASSEROLES
NORMAL
LÉGER
PORCELAINE
2 4 8
PROPRE
DÉPART
RESET
CYCLES OPTIONS
RINÇAGE
LAVAGE
RAPID
VERROU
(x2)
DÉLAI
(HRS)
SÉCHAGE
RAPID
PRÉTREMPAGE
CASSEROLES
NORMAL
LAVAGE SANI
SENSEUR
PORCELAINE
2 4 8
PROPRE
DÉPART
RESET
SENSEUR
LAVAGE
RINÇAGE
SÉCHAGE
SANITISÉ
Numéro de modèle GSD5211-5311-5411-5511
Numéro de modèle GSD5911
FONCTIONNEMENT DE VOTRE
LAVE-VAISSELLE
Pour trouver le numéro de modèle de votre lave-vaisselle, regarder sur le côté de la cuve. À travers ce
manuel, les caractéristiques et l'apparence peuvent varier selon votre modèle
6

NSF/ANSI 184 Lave-vaisselle résidentiels
Operati
n
The Status
The Status display tells you what is happening while the dishwasher is in operation and also any malfunctions if they occur (see page X).
The lights will come ON indicating the sequence of operation the dishwasher is in.
SENSOR Displayed during periods using CleanSensor technology to measure the amount of soil in the load and decide if another prewash is needed.
WASH Displayed during prewash and main wash periods.
RINSE Displayed during rinse periods.
DRY Displayed during
SPEED DRY/HEATED DRY
.
SANITIZED Displayed when cycle has met sanitization conditions. Light remains ON until door is opened.
Load Selections
The light above the selected pad will be ON to indicate which LOAD SELECTION has been selected.
SANI WASH Heavy 11.5 gal., 99 min., Medium 9.9 gal., 93 min., Light 8.2 gal., 93 min.
This cycle raises the water temperature in the final rinse to sanitize your dishware. The cycle length will vary depending on the temperature
of your inlet water.
NOTE:
The SaniWash cycle is monitored for sanitization requirements. If the cycle is interrupted during or after the main wash portion or
if the incoming water temperature is so low that adequate water heating cannot be achieved, the sanitizing conditions will not be met.
In these cases, the sanitized light will not illuminate at the end of the cycle.
Control Settings
g
Instructions
POTS & PANS Heavy 13.1 gal., 101 min., Medium 11.5 gal., 79 min., Light 9.9 gal., 55 min.
For heavily soiled dishes or cookware with dried-on or baked-on soils.
Everyday dishes may be included. This cycle will not remove
burned-on foods.
NORMAL
Heavy 9.9 gal., 72 min., Light 8.2 gal., 43 min.
For loads of everyday dishes, glasses and cookware with medium soils.
NOTE:
Many dishes have lighter soil than normal. Choosing a
cycle other than
NORMAL
will save energy and water.
SPEED WASH/
Heavy 9.9 gal., 37 min., Medium 8.2 gal., 34 min., Light 6.6 gal., 25 min.
LIGHT WASH
For dishes with light soils.
CHINA CRYSTAL
Heavy 9.9 gal., 52 min., Medium 8.2 gal., 39 min., Light 6.6 gal., 35 min.
For lightly soiled china and crystal.
RINSE ONLY
Heavy 3.3 gal., 7 min., Light 1.6 gal., 4 min.
For rinsing partial loads that will be washed later. Do not use detergent.
NOTE:
If the dishwasher is equipped with Clean Sensor technology, cycle length and time may vary depending on soil and temperature conditions.
Options
The light above the selected pad will be ON to indicate which OPTION has been selected.
POWER For use with heavily soiled and/or dried-on, baked-on soils. This option
MUST
be selected
PRIOR
to starting the cycle.
PRESOAK
This option adds 16 minutes to the cycle time.
SPEED DRY/ Shuts off the drying heat option. Dishes air dry naturally and energy is saved. You can prop the door open after the
CLEAN
light
HEATED DRY illuminates.
OFF
SPEED DRY/ Turns the heater on for fast drying. This cycle will extend the time to your wash cycle by 40 minutes for the
CHINA CRYSTAL
and
HEATED DRY
POTS & PANS
cycle and 24 minutes for the
NORMAL, SPEED WASH/LIGHT WASH
and
SANI WASH
cycle.
ON
NOTE:
Cannot be selected with
RINSE ONLY
cycle.
LOCK
When the
LOCK
pad is touched twice within 3 seconds, all pads become inoperative. You can lock the controls to prevent any selections
from being made. Or you can lock the controls after you have
started a cycle or selected
DELAY START
so the cycle or
DELAY START
is not interrupted.
Children cannot accidentally start dishwasher by touching pads with this option selected.
To unlock the dishwasher after it has been locked, touch the
LOCK
pad twice within 3 seconds. The light above the
LOCK
pad will turn off.
DELAY HOURS You can delay the start of a wash cycle for up to 8 hours. Press the
DELAY HOURS
pad to choose the number of hours you want to
delay
the start of the cycle, then press
START/RESET
. The machine will count down and start automatically
at the correct time. Pressing
START/RESET
a second time will cancel the
DELAY START
selection.
NOTE:
If you forget to fully close the door, a reminder
signal will beep until you do so.
RESET To change a cycle after washing starts, touch the
START/RESET
pad to cancel the cycle. After water is pumped out and the motor
stops, you can reprogram and restart the dishwasher. This will take approximately 90 seconds.
Start
Close and latch the door. Touch the
START/RESET
pad to begin the cycle. Water fill begins, and approximately 60 seconds later
the wash action begins.
NOTE:
The dishwasher remembers your last cycle so you don’t have to reprogram each time. When the dishwasher is loaded and
the door latch is in the locked position, the control panel lights will be ONand display the last settings you selected.
If you don’t want to change any of the settings, simply touch the
START/RESET
pad to begin the cycle.
Also, if a power failure occurs,
NORMAL
and
SPEED DRY/HEATED DRY
will automatically be programmed. Make any new selections
and touch the
START/RESET
pad to begin the cycle.
Clean
This light is illuminated when a wash cycle is complete. The light will stay
ON
until the door is opened.
5
7
NSF/ANSI 184 Residential Dishwashers
Certified residential dishwashers are not intended for licensed food establishments.

Flashing display lights (on some models)
6
Status Lights What It Means What To Do
CLEANSENSOR
Error If the sensing light doesn’t come on during the first part of the cycle,
the
CLEANSENSOR
is not working. Call for service. The dishwasher will
continue to work without the
CLEANSENSOR
.
NOTE:
This light will NOT stay on the entire cycle.
START/RESET
pad Allow up to 90 seconds for the dishwasher to drain and reset before selecting
has been pressed a new cycle.
Control Error Press the
START/RESET
pad to turn off the beeper. Turn off power at the circuit
breaker for 10 seconds, then restore power. If the rinsing light continues to
flash, then call for service.
Control Error Press the
START/RESET
pad to turn off the beeper and the dishwasher will
attempt to reset. Then restart the wash cycle. If this error continues, call
for service.
Filling the Dispenser
Fill the rinse agent dispenser until it reaches the bottom
of lip inside the opening. Replace cap.
To check if rinse agent is needed, press the clear center
of the fill cap 2 or 3 times. If rinse agent fills the center
of the cap, you have enough.
A full dispenser should last about one month.
If rinse agent spills, wipe up the excess.
Check the Water Temperature
The entering water must be at least 120°F and
not more than 150°F for effective cleaning and to
prevent dish damage. Check the water temperature
with a candy or meat thermometer. Turn on the
hot water faucet nearest the dishwasher, place
the thermometer in a glass and let the water run
continuously into the glass until the temperature
stops rising.
Use Jet-Dry® Rinse Agent
Jet-Dry
®
rinse agent removes spots and prevents new film buildup on your dishes,
glasses, flatware, cookware and plastic.
Using the dishwasher.
STATUS
SENSING
WASHING
RINSING
DRYING
SANITIZED
STATUS
SENSING
WASHING
RINSING
DRYING
SANITIZED
STATUS
SENSING
WASHING
RINSING
DRYING
SANITIZED
PLUS A
BEEPING
SOUND
STATUS
SENSING
WASHING
RINSING
DRYING
SANITIZED
PLUS A
BEEPING
SOUND
8
Lumières d’affichage
(sur certains modèles)
Affichage Signification Solution
Proposée
SENSEUR
LAVAGE
RINÇAGE
SÉCHAGE
SANITISE
SENSEUR
LAVAGE
RINÇAGE
SÉCHAGE
SANITISE
SENSEUR
LAVAGE
RINÇAGE
SÉCHAGE
SANITISE
PLUS UN
SON “BIP”
SENSEUR
LAVAGE
RINÇAGE
SÉCHAGE
SANITISE
PLUS UN
SON “BIP”
Si le lumière de senseur n’allume pas
durant le cycle NORMAL ou
CASSEROLE. Le capteur de turbidité
est défectueux, appeler un technicien de
service. Le lave-vaisselle fonctionnera
quand même.
NOTE: Cette lumière ne reste pas
allumée durant le cycle complet.
Laisser le lave-vaisselle se vidanger et appuyer sur
touche ANNULE avant de sélectionner un autre
cycle.
Appuyer sur la touche ANNULE pour arrêter le
son. Mais la lumière RINÇAGE continuera de
clignoter. Si cela se poursuit, appeler un technicien
de service.
Appuyer sur la touche ANNULE pour arrêter le
son. Ensuite appuyer de nouveau sur la touche
MARCHE. Si cela se poursuit, appeler un
technicien de service.
Défectuosité du capteur
turbidité
“CLEANSENSOR”
Le bouton MARCHE /
ANNULE a été enfoncé.
Erreur du CONTRÔLE
Erreur du CONTRÔLE
8
Choix et utilisation du détergent
Versement du détergent
Il y a deux distributeurs de détergent dans la
porte du lave-vaisselle parce que certains
programmes comportent deux lavages.
(Assurez-vous que le
cadran du
programmateur
est à OFF (arrêt)
avant de verser le
détergent, sinon, le
distributeur de
détergent ne se
ferme pas et ne se
verrouille pas
convenablement.)
N'utilisez qu’un détergent liquide ou en poudre
conçu spécialement pour les lave-vaisselle. Les
autres types de détergent moussent de façon
excessive.
Vérifiez également la teneur en phosphate. Le
phosphate empêche la formation de taches ou de
pellicule sur la vaisselle. Si votre eau est du
e (7 grains ou plus), il faut accroître l’efficacité
de votre détergent. Les détergents qui contiennent
une plus grande quantité de phosphate seront
probablement plus efficaces. Si la teneur en
phosphate est faible (8,7 % ou moins), vous
devrez utiliser une plus grande quantité de
détergent si votre eau est dure.
Les services publics de votre municipalité
peuvent vous renseigner sur la dureté de l’eau.
Vous pouvez également vous informer auprès de
votre ingénieur-agronome ou de l'entreprise qui
adoucit l’eau dans votre région. Il suffit de
demander combien de grains contient votre eau.
Quelle quantité de détergent devez-vous
utiliser? Cela dépend. Votre eau est-elle «dure»
ou «douce»? Si elle est dure, vous avez besoin
d'une plus grande quantité de détergent. Par
contre, si elle est douce, vous avez besoin de
moins de détergent.
9
Hot Water Rinse Agents Detergents
HOW TO OPERATE YOUR DISHWASHER
Using the dishwasher
Dish Preparation Prior to Loading
• No pre-rinsing of normal food soil is
required.
• Scrape off hard soils, including bones,
toothpicks, skins and seeds.
• Remove large quantites of any remaining
foods.
• Remove leafy vegetables, meat trimmings,
and excessive amounts of grease or oil.
• Remove acidic food soils that can discolor
stainless steel.
Using the Dishwasher Door
1. The door must be closed to select a LOAD SELECTION or an ENHANCEMENT.
2. If the door is opened during a cycle and left open, the dishwasher will beep once every
minute until the door is closed.
Forgot to Add a Dish?
A forgotten dish can be added anytime
before the main wash.
1. Squeeze the door latch to release the door.
2. Do not open the door until the water spray
action stops. Steam may rise out of the
dishwasher.
3. Add forgotten dishes.
4. Close the door.
Proper Use of Detergtent
Use only detergent specifically made for use
in dishwashers. Electrasol®Automatic
Dishwashing Detergent has been approved
for use in all GE dishwashers. Keep your
detergent fresh and dry. Don’t put detegent
into the dispenser until you’re ready to wash
dishes.
All wash cycles except RINSE ONLY
require detergent in the main and pre-wash
cup. The amount of detergent to use depends
on whether your water is hard or soft. With
hard water, fill the main wash section and
pre-wash section completely. With soft
water, fill both sections halfway. When using
automatic dishwashing detergent tabs, simply
place one tab in the main wash section and
close.
Protect your dishes and dishwasher by
contacting your water department and asking
how hard your water is. Twelve or more
grains is extremely hard water. A water
softener is recommended. Without it, lime
can build up in the water vlave, which could
stick while open and cause flooding. Too
much detergent with soft water can cause a
permanent cloudiness of glassware, called
etching.
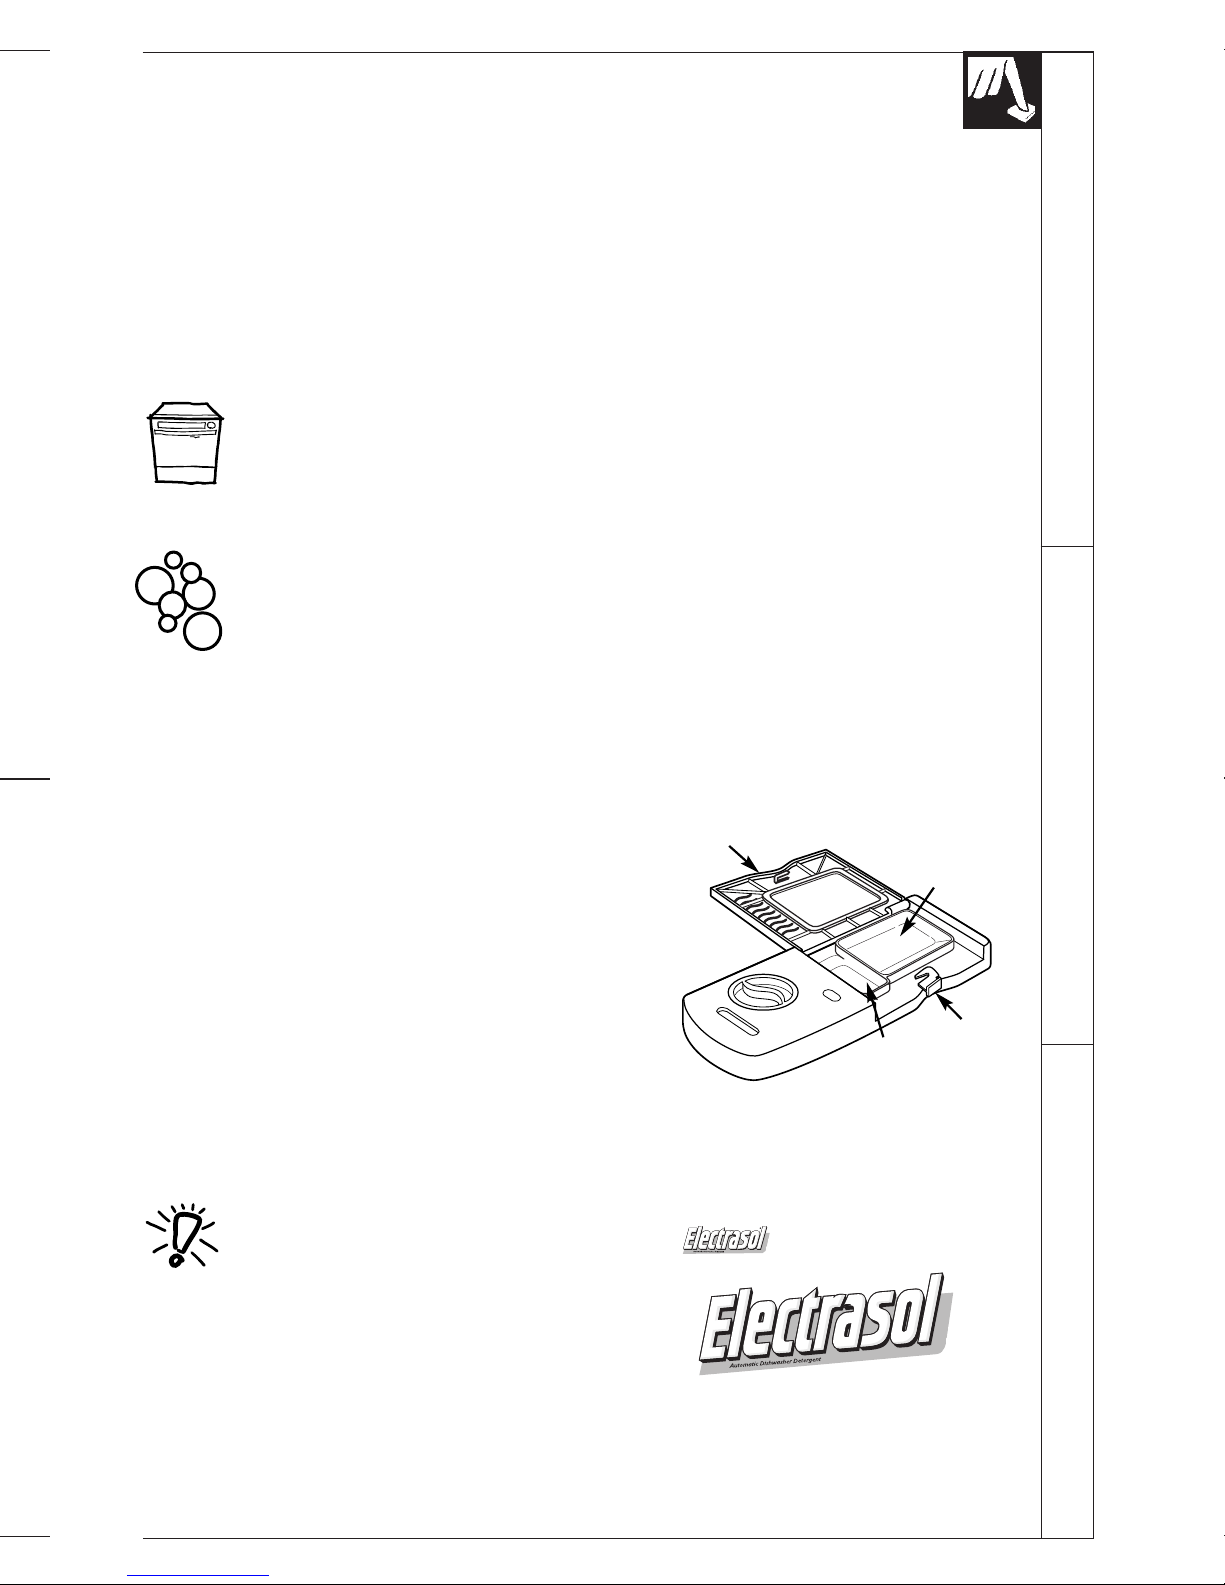
Filling the Dispenser
1. If the dispenser cover is closed, open the
cover by depressing the cover latch.
2. Fill the Main Wash section with detergent.
3. Fill the Pre-Wash section if needed.
4. Close the dispenser cover.
It is normal for the cover to open partially
when dispensing detergent.
Cover
Main Wash
Section
Cover Latch
Pre-wash Section
Try for Deep Cleaning Power!
For Virtually
Spotless results!
No need to pre-wash
your dishes
®
 Loading...