

Page 1
E4, E4LE, EZ4 Series
Water Purification Machines
Operation and Maintenance Manual
2,200 GPD to 13,200 GPD
8.3 m
3
/day to 50 m3/day
July 4, 2014
Document PN 1161875, Rev G
http://www.gewater.com
1
Page 2

TABLE OF CONTENTS
1. DESCRIPTION .......................................................................................................................................... 4
1.1. Definitions ................................................................................................................................................. 4
1.1.1. Permeate Rate (Product Water Rate) [Qp] ........................................................................ 4
1.1.2. Concentrate Rate (Reject Rate) [Qc] .................................................................................... 4
1.1.3. Feed Rate [Qf] ................................................................................................................................ 4
1.1.4. Reverse Osmosis (RO) ................................................................................................................ 4
1.1.5. Membrane Elements .................................................................................................................. 5
1.1.6. CIP ...................................................................................................................................................... 6
1.1.7. Average Pressure [P
1.1.8. Concentration ............................................................................................................................... 6
1.1.9. Salt (Ionic) Passage ..................................................................................................................... 6
1.1.10.Recovery .......................................................................................................................................... 6
1.1.11.Salt (Ionic) Rejection ................................................................................................................... 6
1.2. Machine Nomenclature ...................................................................................................................... 7
1.3. Specifications for E-Series Machines ........................................................................................... 8
2. INSTALLATION ........................................................................................................................................ 8
2.1. Mounting the Unit ................................................................................................................................. 8
2.2. Plumbing ................................................................................................................................................... 8
2.3. Installing Clean-In-Place Valves ..................................................................................................... 9
2.4. Concentrate Outlet Connections .................................................................................................... 9
2.5. Feed Water Requirements .............................................................................................................. 10
2.6. Transporting Pure Water (Permeate) to Point-of-Use ........................................................ 10
2.7. Pressure Correction Factors ........................................................................................................... 10
2.8. Electrical .................................................................................................................................................. 11
2.8.1. Single-Phase Electrical ............................................................................................................ 11
2.8.2. Three-Phase Electrical ............................................................................................................ 11
2.9. Machine Control................................................................................................................................... 12
2.9.1. Economy Model ......................................................................................................................... 12
2.9.2. Deluxe Model ............................................................................................................................... 12
3. PREPARATION AND STARTUP ........................................................................................................12
3.1. Pretreatment for Water Purification ........................................................................................... 12
3.2. Machine Start-Up Preparation ...................................................................................................... 13
3.3. Machine Start-Up ................................................................................................................................ 13
3.4. Temperature Correction Factor .................................................................................................... 14
3.5. Autoflush Timer .................................................................................................................................... 15
3.5.1. Programming the Autoflush Timer .................................................................................... 15
3.6. Calibrating the Conductivity Probe ............................................................................................. 15
4. OPERATION AND MAINTENANCE .................................................................................................16
Daily Flushing for the Economy Model ............................................................................ 16
4.1.1.
4.1.2. Daily Flushing for the Deluxe Model ................................................................................. 17
4.2. Pre-filter Cartridge .............................................................................................................................. 17
] ............................................................................................................ 6
AVG
2
Page 3

4.3. Membrane Element Cleaning ........................................................................................................ 17
4.3.1. Step Wise Cleaning ................................................................................................................... 17
4.3.2. Procedure to Clean with a CIP Pump ............................................................................... 18
4.4. Suction Cleaning .................................................................................................................................. 19
4.5. Changing Out Membrane Elements ........................................................................................... 20
5. TROUBLESHOOTING ..........................................................................................................................22
6. SPARE PARTS LIST ...............................................................................................................................26
7. RETURN GOODS AUTHORIZATION (RGA) PROCEDURE .......................................................26
8. WARRANTY/GUARANTEE .................................................................................................................26
9. START-UP DATA ...................................................................................................................................26
10. DAILY LOG DATA FOR GE WATER AND PROCESS TECHNOLOGIES MEMBRANE
MACHINES ........................................................................................................................................................26
List of Tables
Table 1. Flow Specifications for E4 Machines, 50-75% Recovery ................................................ 8
Table 2. Connections ........................................................................................................................................ 8
Table 3. Feed Water Requirements ......................................................................................................... 10
Table 4. Pressure Correction Factors ...................................................................................................... 10
Table 5. Troubleshooting Guide ................................................................................................................ 22
List of Figures
Figure 1. Normal vs. Crossflow Filtration .................................................................................................. 5
Figure 2. Membrane Element with Interconnectors ............................................................................ 5
Figure 3. Cross-Sectional View of Membrane Element ...................................................................... 6
Figure 4. Principle of Operation ..................................................................................................................... 7
Figure 5. Three-Phase Allen Bradley Motor Starter ............................................................................ 12
Figure 6. Conductivity Probe Display ........................................................................................................ 16
Figure 7. Clean-In-Place Pump and Tank Hook-Up ........................................................................... 18
3
Page 4

1. DESCRIPTION
Your E-Series reverse osmosis (RO) machine is a durable piece of equipment which,
with proper care, will last for many years. These instructions give operation and
maintenance details vital to the sustained performance of the machine. Please read
this manual completely before operating your machine.
1.1. Definitions
The operating definitions provided below will help you further understand your
machine and this manual.
1.1.1. Permeate Rate (Product Water Rate) [Q
The flow rate of purified water, which has passed through the membrane and out of
the membrane element, expressed in gal/min (gpm) or gal/hr (gph) or liter/min (lpm)
or cubic meters/hour (m3/h). Specified permeate rates are based on a feed water
temperature of 77 F (25C). Permeate rate will vary with temperature.
1.1.2. Concentrate Rate (Reject Rate) [Q
The flow rate of water containing rejected solids to drain in gpm or gph (lpm or m3/h).
1.1.3. Feed Rate [Q
The flow rate of incoming water in gpm or gph (lpm or m3/h). Feed water rate equals
permeate rate plus concentrate rate.
]
f
]
c
]
p
1.1.4. Reverse Osmosis (RO)
The separation of one component of a solution from another component by means of
pressure exerted on a semipermeable membrane. In other words, reversing the
natural passage of a liquid from a concentrated solution to a more dilute solution by
using external pressure. Removal of ionic, organic, and suspended /dissolved
impurities occurs during the RO process. Unlike a filter, which separates by “normal”
filtration, the membrane element separates using a process called crossflow
filtration. Feed water solution is separated in to two streams, permeate and
concentrate, and collected from both sides of the membrane. A semipermeable RO
membrane, under sufficient pressure, allows passage of purified water while rejecting
and concentrating dissolved and suspended solids.
4
Page 5
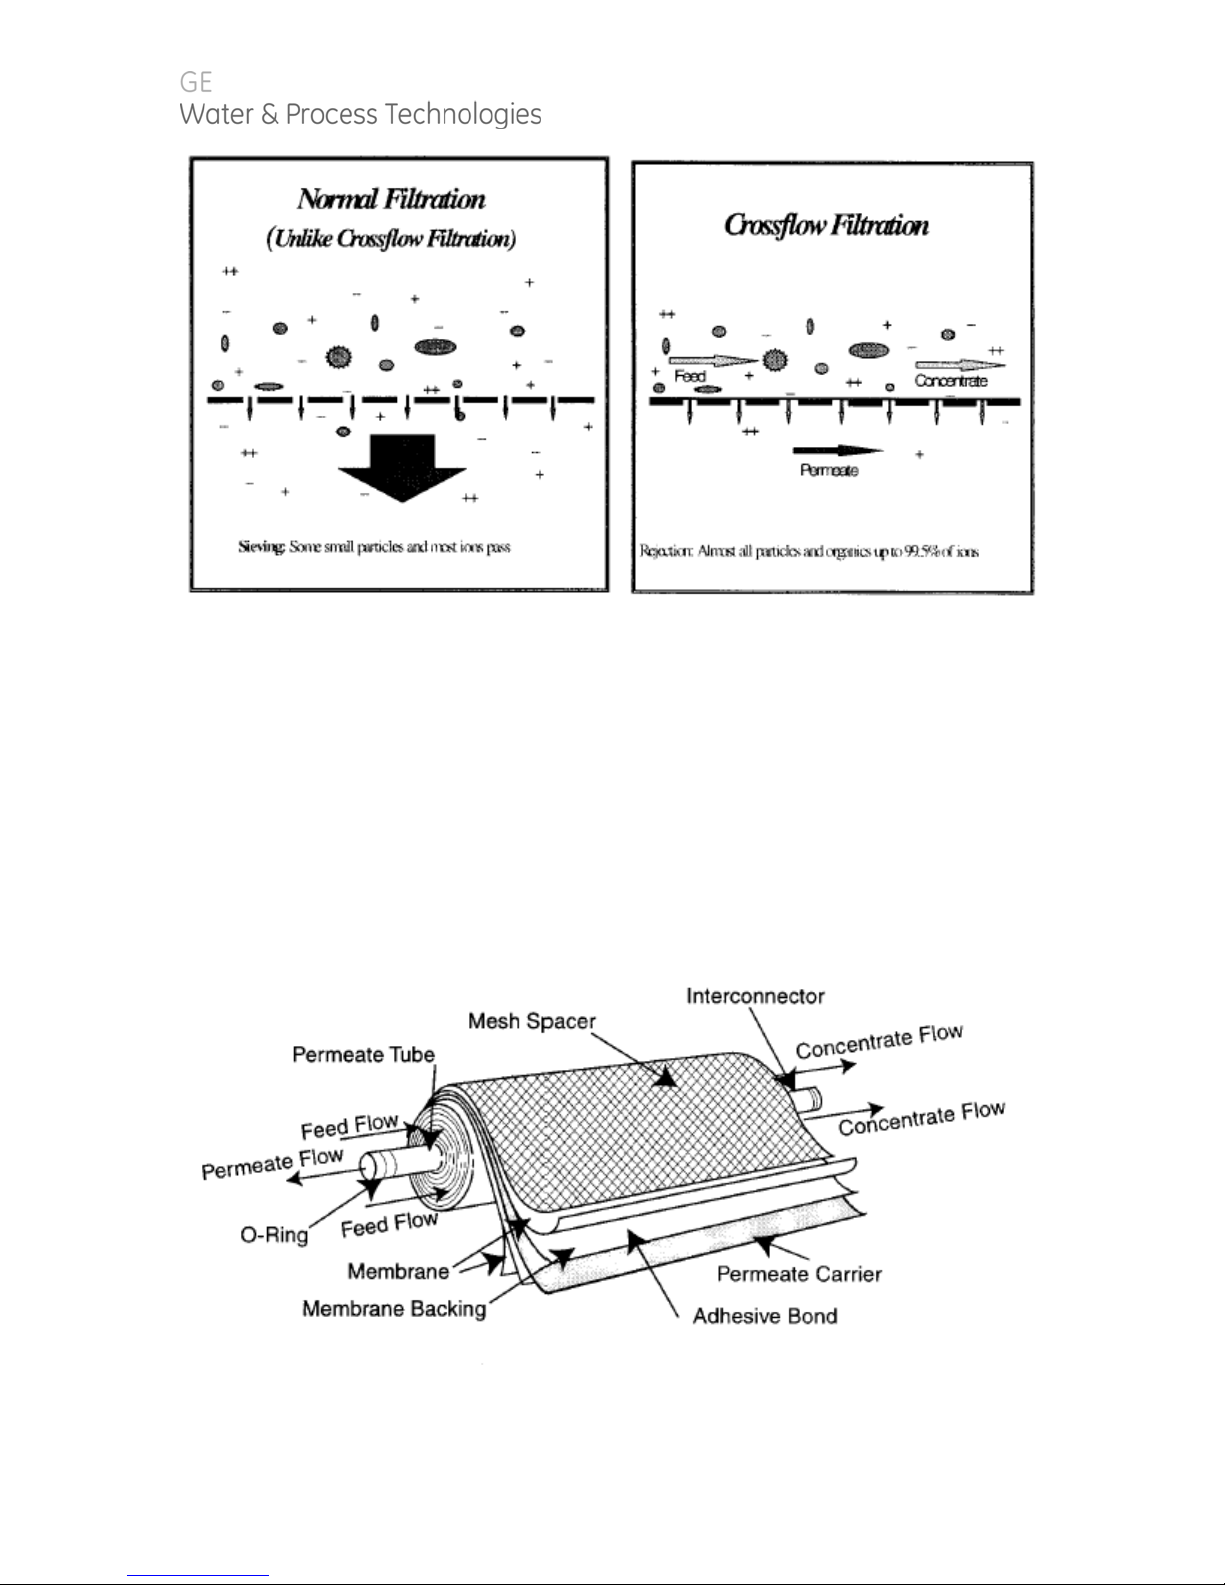
Figure 1. Normal vs. Crossflow Filtration
1.1.5. Membrane Elements
Membrane elements are the key to reverse osmosis. Interleaved layers of
semipermeable membrane, spacer and permeate carrier spiraled around a central
permeate tube make up the element. The spacer allows for movement of the
concentrate past the membrane, and the permeate carrier carries the purified water
out of the membrane element. GE Water & Process Technologies manufactures a
patented spiral wound membrane element with a turbulent flow design. This
membrane module collects the purified water within the central tube, the permeate
tube. The E8 RO machine utilizes between 8 and 20 membrane elements.
Figure 2. Membrane Element with Interconnectors
5
Page 6

Figure 3. Cross-Sectional View of Membrane Element
1.1.6. CIP
The abbreviation for clean-in-place.
1.1.7. Average Pressure [P
PP
FinalPrimary
AVG
]
2
1.1.8. Concentration
Concentration equals the Total Dissolved Solids (TDS) concentration of a solution
expressed as parts per million (ppm) or conductivity (microSiemens/cm).
Cf = Feed Concentration
Cp = Permeate Concentration
Cc = Concentrate Concentration
C
= Average Concentration in Machine
avg
1.1.9. Salt (Ionic) Passage
The percent of dissolved salts passed through the membrane or 100% minus
rejection.
1.1.10. Recovery
Permeate rate divided by feed rate, expressed as a percentage. For example, 33%
recovery means that out of a given feed rate, 33% is produced as purified water
(permeate).
1.1.11. Salt (Ionic) Rejection
The percent of dissolved salt rejected by the membrane, calculated from an average
concentration over the membrane.
6
Page 7

An example of how to calculate salt rejection and recovery is given below.
Figure 4. Principle of Operation
Given the system case in the figure above:
Average Concentration,
CC
pAvg
Rejection
Passage
C
Avg
C
p
C
Avg
100
8.3mg/L
237.5mg/L
CC
C
Avg
cf
2
8.3mg/L237.5mg/L
237.5mg/L
%5.3100
375mg/L100mg/L
2
%5.96100
Recovery
Q
p
100
Q
f
18gpm
24gpm
%75100
TDS 237.5mg/L
1.2. Machine Nomenclature
E-Series water purification machines are numbered in such a way as to indicate the
permeate flow you can expect from the machine and other specifications.
Example: RO,E4-4400-DLX,460,6,HR(PA)
RO indicates the machine is a reverse osmosis machine.
E4 indicates the machine series (E) and 4-inch housings/membrane elements
4400 indicates the rated permeate flow in thousands of gallons per day at 77F
(25C), i.e. 4400 = 4400 gallons per day
DLX indicates the deluxe model and ECN indicates the economy model
460 indicates 460 VAC, 3-phase voltage to starter. Standard models offer 460
VAC, 60 Hz, 3-phase and 380 VAC, 50 Hz, 3-phase.
6 indicates 60 Hz operation, (50 Hz operation is also available and is indicated by
a 5 in place of the 6.
7
Page 8

HR(PA) indicates that the machine includes high rejection (HR) polyamide (PA)
membranes. Low energy membranes are also available and are indicated by
LE(PA).
1.3. Specifications for E-Series Machines
The machine flow specifications listed in Table 1 below are based on 77°F (25°C) and
2,000 ppm NaCl.
Table 1. Flow Specifications for E4 Machines, 50-75% Recovery
Model E4-2200 E4-4400 E4-6600 E4-8800 E4-11000 E4-13200
Units
Permeate Rate
Concentrate
Rate
Feed Rate
gpm
(m3/h)
1.5 (0.3) 3 (0.7) 4.5 (2.0) 6 (1.4) 7.5 (1.7) 9 (2.1)
1.5-0.5
(0.3-0.1)
3.0-2.0
(0.6-0.4)
gpm
(m3/h)
3.0-1.0
(0.7-0.2)
6.0-4.0
(1.4-0.9)
gpm
(m3/h)
4.5-1.5
(1.0-0.3)
9.0-6.0
(3.0-2.3)
gpm
(m3/h)
6.0-2.0
(1.4-0.5)
12.0-8.0
(2.8-1.9)
gpm
(m3/h)
7.5-2.5
(1.7-0.9)
15-10
(3.4-2.6)
gpm
(m3/h)
9.0-3.0
(2.1-0.7)
18-12
(4.2-2.8)
2. INSTALLATION
2.1. Mounting the Unit
When installing your new GE Water & Process Technologies reverse osmosis (RO)
machine, allow at least 45-inches (114 cm) above the machine for membrane
element removal and loading. If space is not available, the entire membrane element
housing can be removed for membrane element change outs. If the membrane
element housings are to be removed to change out the membrane elements, at least
6-inches (15.2 cm) is required at the end of each membrane element housing and 24inches (61 cm) behind the machine.
2.2. Plumbing
The feed water source must be able to provide water quantity and pressures to
maintain an operating feed water pressure of 30 - 60 psig (2.1 - 4.1 barg). If the feed
water pressure with the machine is in excess of 60 psig (4.1 barg) or fluctuates by
more than 5 psig (0.34 barg) a pressure regulator should be installed up stream of the
machine Inlet. If proper water pressure cannot be maintained to the RO, a booster
pump may need to be installed in front of the pretreatment to provide the proper
water quantity and pressure for the operation of the machine.
Table 2. Connections
Model
E4-2200
E4-4400
E4-6600
Inlet
inches (cm)
0.75 (1.9) 0.5 (1.27) 0.5 (1.27)
0.75 (1.9) 0.5 (1.27) 0.5 (1.27)
0.75 (1.9) 0.5 (1.27) 0.5 (1.27)
Permeate
inches (cm)
Concentrate
inches (cm)
8
Page 9

E4-8800
E4-11000
E4-13200
0.75 (1.9) 0.75 (1.9) 0.75 (1.9)
0.75 (1.9) 0.75 (1.9) 0.75 (1.9)
0.75 (1.9) 0.75 (1.9) 0.75 (1.9)
2.3. Installing Clean-In-Place Valves
NOTE: Clean-In-Place (CIP) valves are not included with the machine. The CIP valves
must be purchased and installed by the customer.
When installing the CIP valves, a three-way valve should be installed in the inlet feed
stream of the machine. The tees on the permeate and concentrate lines should be
installed with two-way valves. All valves should be installed in a manner that will
allow circulation of the cleaning chemicals through the machine and back to the CIP
container during cleaning.
CAUTION: If CIP valves are not installed when machine is installed, provisions must be
made to bypass permeate and concentrate to drain for flushing at start-up.
WARNING: NEVER OPERATE THE MACHINE WITH THE CONCENTRATE OR PERMEATE
LINES BLOCKED. SEVERE DAMAGE TO THE UNIT MAY RESULT.
2.4. Concentrate Outlet Connections
Connect proper size drain line to the concentrate outlet (Table 2) and run to an open
drain. The drain capacity needs to be large enough to properly drain the feed water
flow of the RO. The maximum concentrate back pressure is 60 psig (4.1 barg) for the
RO machine.
CAUTION: Operation above 60 psig (4.1 barg) concentrate back pressure may
damage the machine.
CAUTION: A vacuum breaker must be installed at the highest point along the
concentrate line. Failure to do so may cause a vacuum to form within this line after
shutdown. This may in turn cause numerous problems, including biological fouling,
water hammer, leaks from RO housing side-ports, and the siphoning of treatment
chemicals.
1. Connect the concentrate line to the RO machine’s concentrate outlet. A
vacuum breaker must be installed at the highest point along the concentrate
line. This provides an atmospheric break upstream from where the flow enters
the drainage system. For systems which include multiple RO machines, install
check valves along each machine’s concentrate line prior to connecting the
lines to a common manifold.
9
Page 10

2.5. Feed Water Requirements
The following feed water requirements must be met before installing your new E4
machine to ensure quality permeate and extended membrane element life. Refer to
Table 3 for feed water information.
Table 3. Feed Water Requirements
Temperature
Inlet Pressure
Chlorine (continuous feed)
Operating pH
Silt Density Index (SDI)
*American Standard for Testing Materials
Typical: 50-85F (10-29C)
Maximum: 32-104F (0-40C)
Minimum 30 psig (2.1 bar)
Maximum 60 psig (4.1 bar)
0 ppm
For soft water (less than 1 grain per gallon (gpg) or 17
mg/L hardness), acceptable pH is 4.0-11.0.
For unsoftened water (contact factory with water
analysis, acceptable pH is 5.5-6.0.
For short term (cleaning) a pH range of 2-12 is
acceptable.
Less than or equal to 3 to minimize membrane fouling
and extend cleaning intervals. Refer to ASTM standard
D4189.
2.6. Transporting Pure Water (Permeate) to Point-of-Use
The pure water, or permeate, is in an aggressive state and should only be transported
from the machine to the point-of-use in food grade flexible nylon, stainless steel (SS)
tubing, or polyvinyl chloride (PVC) material for the inlet, permeate, and concentrate
piping sizes. Refer to Connections (Table 2) for inlet, permeate, and concentrate piping
sizes.
WARNING: MACHINE DAMAGE MAY OCCUR IF PERMEATE BACK PRESSURE EXCEEDS
60 PSIG (4.1 BARG) DURING OPERATION.
2.7. Pressure Correction Factors
It is often necessary to operate RO machines with permeate back pressure. Permeate
back pressure will decrease permeate production. See Table 2.3 (Pressure Correction
Factors) to calculate loss of permeate.
Table 4. Pressure Correction Factors
Back Pressure
10 psig (0.7 barg) 5% 10% 0.95 0.90
20 psig (1.4 barg) 10% 20% 0.90 0.80
30 psig (2.0 barg) 15% 30% 0.80 0.70
% Loss of Permeate Flow
E4/EZ4 E4LE
Pressure Correction Factor
E4/EZ4
E4LE
10
Page 11

40 psig (2.7 barg) 20% 40% 0.70 0.60
50 psig (3.4 barg) 25% 50% 0.60 0.50
60 psig (4.1 barg) 30% 60% 0.50 0.40
WARNING: IF PERMEATE BACK PRESSURE EXCEEDS 60 PSIG (4.1 BARG) MACHINE
DAMAGE MAY OCCUR.
WARNING: INSTALLING A CHECK VALVE WILL PREVENT REVERSE FLOW THROUGH
THE MEMBRANE ELEMENT WHEN THE MACHINE IS NOT IN OPERATION. REVERSE
FLOW, WHEN THE MACHINE IS NOT IN OPERATION, CAN SEVERELY DAMAGE THE
MEMBRANE ELEMENTS.
2.8. Electrical
This RO machine requires two supply voltages; the control voltage and the pump
motor voltage.
2.8.1. Single-Phase Electrical
The control voltage can be connected to either a 115 VAC, 60 Hertz or 220 VAC, 50
Hertz single-phase power supply. The RO control circuit should always be installed on
at least a 15 Amp, single-phase dedicated circuit. Reverse osmosis machines with
115 VAC, single-phase control voltage include an eight-foot (2.4 m) cord which plugs
into a three-prong grounded receptacle. All machines shipped with a 220 VAC, singlephase control circuit are shipped with an eight-foot electrical cord, but customers
must provide electrical plug.
2.8.2. Three-Phase Electrical
The three-phase pump motor requires a 15 AMP dedicated circuit. Always verify
correct voltage and Amp rating by checking voltage tag on the starter box or by
checking electrical specifications on the pump. The motor is wired for 460 Volts, 60
Hertz, three-phase voltage from the factory (Figure 5, Three-Phase Allen Bradley
Motor Starter). The pump motor can be rewired to 208 or 230 Volts. If this is done, a
wiring change must be made internally in the pump motor and a higher amperage
relay and starter may need to be installed. All field wiring must comply with
applicable local and national electrical codes.
After checking the voltage tag on the motor starter to ensure the available voltage
and amperage are correct, connect the provided three-phase power to the motor
starter (Figure 5). This can be done by connecting the three phase power to the top of
the starter relay terminals: L1, L2, and L3. A separate, fused disconnect for the motor
wiring with proper protection for the Horsepower and Amp draw of the motor is
recommended. All field wiring must comply with applicable local and national
electrical codes. See Figure 5 for three phase Allen Bradley Starter Hook-Up.
11
Page 12

Figure 5. Three-Phase Allen Bradley Motor Starter
2.9. Machine Control
2.9.1. Economy Model
To remotely control the Economy Model (ECN) with float switches and/or
pretreatment lockout, remove the jumper noted on the electrical drawing and wire in
the float switches or pretreatment components in series. After all field wiring is
complete and complies with local and national electrical codes, move onto Section
3.1 (Pretreatment for Water Purification).
NOTE: External control contacts are normally closed, dry contacts.
2.9.2. Deluxe Model
To remotely control the Deluxe Model (DLX), with float switches and/or pretreatment
lockout, remove the jumper noted on the electrical drawing and wire in the float
switches and pretreatment components in series. After all field wiring is complete and
complies with local and national electrical codes, move onto Section 3.1
(Pretreatment for Water Purification).
NOTE: External control contacts are normally closed, dry contacts.
3. PREPARATION AND STARTUP
3.1. Pretreatment for Water Purification
A water analysis of your feed water should have been performed, as part of the
planning and engineering that went into developing your RO system.
12
Page 13

The water analysis will provide information on what type of pretreatment may be
required and what recovery the machine can be run at on the feed water provided. If
the machine is moved to a different water source, a new water analysis should be
taken before operating the machine.
Your RO is designed to operate on tap feed water with an SDI of 5 or less. The pH
should be in a range of 5.5 - 8.5. Exposure to any levels of chlorine may cause
irreversible damage to the thin-layer composite (TLC) polyamide (PA) membrane
elements in your machine. Daily water checks are recommended to ensure the
integrity of your pretreatment and RO system.
3.2. Machine Start-Up Preparation
Check the function and integrity of your pretreatment equipment. Ensure that your
water softener and activated carbon filters have been leaked checked and properly
flushed, before starting up your RO machine.
CAUTION: Improperly flushed pretreatment may cause serious RO machine problems
at start-up.
3.3. Machine Start-Up
Turn the feed water supply ON, while checking for leaks in the pretreatment and inlet
feed water lines.
Check to ensure power to the motor is de-energized and the ON/OFF button on the
machine is in the OFF position.
Plug in the factory-supplied power for the control voltage.
For initial start-up, redirect the permeate and concentrate lines to the drain.
Open the concentrate and recycle flow control valves two complete turns. These
valves are positioned on the flow control plumbing in the top right rear section of the
machine.
Turn the ON/OFF button on the machine ON. System will open allowing water to flow
through the machine to the drain through the permeate and concentrate CIP valves.
Let the machine run to drain for 5 - 10 minutes. This provides a wet start-up of the
pump and removes any air in the system.
Turn the ON/OFF button on the machine to the OFF position.
Re-energize the pump power and trigger the ON/OFF button on the machine to check
rotation of the pump motor. Observing from the back of the pump motor, pump
rotation should be clockwise. If rotation is wrong, de-energize the pump voltage from
the source and switch any two of the three-phase wires coming in on top of the
13
Page 14

three-phase starter. Re-energize the pump voltage and re-check, to ensure correct
rotation for the start-up and operation of your machine.
WARNING: IF THE RO PUMP IS STARTED WITH INCORRECT ROTATION (i.e.,
BACKWARDS), A NOTICEABLE DROP IN FLOWS AND PRESSURES WILL RESULT. IF
PUMP MOTOR OPERATES BACKWARDS FOR ANY LENGTH OF TIME, PUMP DAMAGE
MAY RESULT.
After correct rotation has been verified, you are now ready to start the machine and
set the flows and pressures.
With the recycle and concentrate orifices still two (2) turns open and adequate feed
water available, start the machine by turning the ON/OFF button to the ON position.
As the pump starts to build pressure, begin to adjust the orifices in the following
manner: start by slowly closing the concentrate orifice while slowly opening the
recycle valve.
Primary Pressure for Normal Operation at 77°F (25°C):
E4-Series: 220 psi (15.2 bar) at 77°F (25°C)
EZ4/E4LE-Series: 115 psi (7.9 bar) at 77°F (25°C)
While you are doing these valve adjustments, to obtain correct flows and pressures,
observe the primary or pump pressure. The pump pressure, while adjusting the
orifices, should never operate outside of these ranges:
E4-Series Range: 190 - 275 psi (13.1 - 19.0 bar)
EZ4/E4LE-Series Range: 100 - 140 psi (6.9 - 9.6 bar)
The concentrate valve is drilled, and when completely closed the machine is running
at the correct concentrate flow for a 75% recovery (Table 1, Flow Specifications for
E4-Series Machines).
If the temperature of the inlet feed water is not 77°F (25°C) use the Temperature
Correction Factor Table (Technote 113). The proper adjustment of the recycle and
concentrate valves are critical to the correct operation of the machine.
CAUTION: Optimum recovery will vary according to water quality.
3.4. Temperature Correction Factor
If the temperature of the inlet feed water is not 77°F (25°C), refer to Technote 113 for
Temperature Correction Factors.
14
Page 15

NOTE: Optimum recovery will vary according to water quality.
3.5. Autoflush Timer
3.5.1. Programming the Autoflush Timer
The Autoflush timer clock operates and displays in real time, but the Autoflush feature
will only work when the RO machine is operating. When the machine is operating in
the Autoflush Mode, the total flow through the machine is increased. This provides
extra cross flow, which flushes the loose foulants from the surface of the membrane
elements. When the machine is operating in the Autoflush Mode a slight drop in
permeate production, as well as a decrease in the primary and final pressures may
be observed. An ideal way to set the timer is to program ten Autoflush sequences,
with a 10 to 15 minute duration, per 24 hours. To do this, follow the procedure in the
Technote 126 containing the programming manual for the Autoflush Timer.
3.6. Calibrating the Conductivity Probe
1. Make sure the calibration meter is in Measure Mode (with the MEAS LED light
ON).
2. Immerse the Conductivity Probe in a HI 7033 prepared calibration solution
(84.00 microSiemens (mS)).
3. Immerse and agitate Conductivity Probe, and wait for the reading to stabilize.
4. Calibrate the meter by adjusting the CAL adjustment screw until the Liquid
Crystal Display (LCD) display reads 84 mS of the solution.
The meter is now calibrated.
NOTE: The alarm and dosing pump selector switch function on the conductivity meter
is not used on E4/EZ4/E4LE Series machines and should be switched to OFF.
15
Page 16

Figure 6. Conductivity Probe Display
4. OPERATION AND MAINTENANCE
The operation and maintenance of an E-Series RO machine requires regular data
recording and routine preventative maintenance. It cannot be emphasized enough
the importance of filling out the Daily Log Sheet (Technote 106) during each operating
shift. A Start-Up Data Sheet (Technote 105) should have been completed at startup
containing pertinent facts on the operation of your machine. These two records are
invaluable in diagnosing the performance of the equipment, and must be kept for
reference. If you have questions concerning the operation of your machine or the
method of data recording, contact the manufacturer.
Three preventative maintenance procedures, which must be done on a regular basis,
are as follows:
1. Change the pre-filter cartridges as needed. Pressure drop across the pre-
filters should not exceed 8 psi (0.6 bar).
2. Clean the RO membrane elements with approved cleaners at least quarterly,
depending on feed water quality.
3. Flush the RO machine daily.
4.1.1. Daily Flushing for the Economy Model
If your E4-Series machine is an ECN Model it needs to be manually flushed daily. The
DLX E4-Series machine is equipped with an Autoflush Timer (Section 3.5, Autoflush
Timer). A daily manual flush must be performed. To flush the machine:
1. With the machine running, open the concentrate valve 1/2 - 3/4 turn.
16
Page 17

NOTE: During flushing procedure, the machine must be running.
2. Allow the machine to operate with the concentrate valve open (Step 1) for 10 -
15 minutes.
3. After 10 - 15 minutes, return the concentrate valve to its previous setting, and
return to normal operation.
CAUTION: When opening the concentrate valve, never allow the machine’s
primary pressure to drop more than 10% below normal operating pressure.
4.1.2. Daily Flushing for the Deluxe Model
The DLX Model machine includes an Autoflush Timer Option. The Autoflush Timer
Option automatically flushes the machine at preset intervals.
4.2. Pre-filter Cartridge
A 1-micron pre-filter cartridge is factory installed to protect the membrane elements
and valves from particles, which may be in the feed water. To order replacements,
see the Spare Parts List.
A pressure drop across the filter of 8 psi (0.55 bar) or more during operation indicates
that the pre-filters cartridge(s) need changing. Use only GE approved filters rated for 5
microns or less. Do not attempt to clean used filters.
IMPORTANT NOTE: Failure to change the pre-filter cartridge according to these
requirements will void machine warranty.
4.3. Membrane Element Cleaning
GE recommends that you clean your RO every quarter, depending on the quality of
your feed water. Cleaning of the membrane elements is vital because contaminants
can build up on the membrane element surfaces, reducing the permeate flow rate
and affecting the quality of the permeate.
4.3.1. Step Wise Cleaning
This RO machine and many others have a centrifugal pump on them. Centrifugal
pumps are not designed to draw water. They are designed to operate with flooded
suction only. The manufacturer recommends using a Clean-In-Place (CIP), or booster
pump, to provide water pressure and flow to the RO machine pump from the CIP
container.
17
Page 18

4.3.2. Procedure to Clean with a CIP Pump
1. With the machine running, open the CIP permeate valve, close the permeate
service valve and fill the CIP tank with permeate water. When the container is
filled to desired level, turn machine OFF.
2. Add and mix up the cleaners in the CIP container. Please use only PA
membrane element compatible cleaners.
3. Close the inlet feed water supply valve to the machine and open the CIP inlet
feed water to the CIP container.
4. Close the permeate valve to point of use and also the concentrate valve drain.
5. Open the CIP valves, allowing permeate and concentrate to return to the CIP
container. When set properly, the RO machine, the CIP pump, and the CIP
container should be assembled in a loop configuration to recirculate the water
through the machine and back to the container during cleaning. The size of
the CIP container should be a minimum of three times the permeate rate.
CAUTION: GE recommends the use of a CIP or booster pump to provide the proper
feed water pressure and quantity to the RO machine during cleaning.
Figure 7. Clean-In-Place Pump and Tank Hook-Up
With the machine set-up in the CIP configuration and the cleaning solution mixed in
the container, you are now ready to start the CIP process. Follow the Steps below.
1. Check to ensure that the feed, permeate, and concentrate valves and line are
open and unrestricted in the tank loop.
18
Page 19

2. Start the CIP and RO machine pumps together. As they start up, observe all RO
machine pressures and flows.
3. Recycle the cleaning solution for about 15 minutes. Damage may result to
membrane elements if the temperature of the CIP solution exceeds 105°F
(40°C). If the water temperature exceeds 100°F (38°C), place bags of ice into
the CIP container to absorb the extra heat.
4. After recirculating the cleaner for 15 minutes, shut down the RO and the CIP
pump.
5. Let the CIP solution dwell in the machine for 20 minutes.
6. After the 20-minute dwell time, start the CIP recirculation process again for 10
minutes.
7. After the 10-minute recirculation time is complete, de-energize the machine.
Then, open the inlet water line and route the concentrate and permeate lines
to the drain.
8. Start the RO machine and flush to drain for 20 minutes. Verify the permeate
quality is good before returning to normal operation.
9. After permeate quality is verified as good, route the permeate to point of use
and concentrate to drain. You are now ready for normal operation.
4.4. Suction Cleaning
GE does not recommend the suction cleaning method to clean the E4-Series RO
machine. If using suction cleaning, reference cleaning with a CIP pump above
(Section 4.3.2, Procedure to Clean with a CIP Pump).
1. Arrange the RO and the CIP container in a closed loop situation with the
cleaning solution, reference Section 4.3 (Membrane Element Cleaning).
2. Move the L1 and L2 wires on the pressure switch across to the motor
terminals (Figure 5, Three Phase Allan Bradley Motor Starter). The wires can
also be temporally jumped.
3. Open the inlet feed valve.
4. Start the RO machine
5. As the machine starts up on inlet feed water, slowly close the inlet feed water
valve while slowing opening the feed water valve to the CIP tank.
You will begin to hear the RO pump draw the CIP solution into the machine
and circulate it back into the CIP tank. After achieving prime, observe the RO
19
Page 20

closely to ensure that you do not loose pump prime, which may result in pump
damage.
6. Refer to the CIP cleaning procedure (Section 4.3.1) for cleaning steps.
WARNING: LOSS OF PRIME DURING SUCTION CLEANING MAY RESULT IN SERIOUS
DAMAGE TO THE PUMP.
NOTE: As previously mentioned, the manufacturer recommends use of a CIP or
booster pump to circulate the cleaning solution during membrane element cleaning.
7. After suction cleaning cycle is complete, reopen inlet water and flush machine
to drain for twenty minutes.
8. After permeate quality is verified as good, return machine to normal operation
mode.
4.5. Changing Out Membrane Elements
CAUTION: Replacement membrane elements are shipped from the factory in a
plastic bag with a small amount of bactericide solution to prevent biological growth.
When installing the membrane elements, always provide adequate ventilation and
wear gloves while handling the membrane elements as recommended. The
membrane elements must be kept moist at all times in to prevent possible damage to
the membrane element material.
1. Remove the top end caps and clamps from the membrane element housings.
Lubricate all O-rings and brine seals, and the PVC membrane element stems
(stingers) with a non-petroleum based lubricate (i.e., glycerin or poly water).
2. Load the down flow membrane elements first, by inserting the membrane
element into the membrane element housing with the brine seal end of the
membrane element up. Slowly turn the membrane element as you lower it
into the membrane element housing. As you reach the bottom of the housing
slowly guide the PVC stem or stinger on the end of the membrane element
into the head of the end cap. As the membrane element slides into the
housing the brine seal will be on the top.
3. Next, load the up flow membrane elements, by lubricating all brine seals, O-
rings, and the membrane element stingers. With the up flow membrane
element and the brine seal will be on the bottom of the membrane element.
Turn the membrane element slowly as you lower it down into the housing. As
with the down flow membrane element, one must slowly guide the PVC
stinger on the end of the membrane element into the end cap.
20
Page 21

4. Reinstall the end caps by using non-petroleum based lubricant to lubricate the
O-ring inside the end cap. Reinstall the end cap on the membrane element by
first, aligning the stinger into the hole in the end cap and then turn the end
cap slowly clockwise, as you push it down into the membrane element
housing.
5. Reattach the housing clamp and tighten.
6. Next reconnect the permeate and concentrate lines.
The machine is ready for start-up.
21
Page 22

5. TROUBLESHOOTING
This troubleshooting guide can assist you in identifying common operating problems
you may experience with your machine. Many of these problems can be easily
corrected by the operator, however, for those that persist or are not understood, you
should contact the GE Customer Support Center. Have the following information
available when calling the Customer Support Center:
1. Machine installation date
2. Model number
3. Serial number
4. Weekly log sheets
5. Detailed description of problem
Table 5. Troubleshooting Guide
Symptom (Alarm) Possible Cause
Low inlet pressure
Low operating
pressure
Insufficient feed water
pressure
Clogged pre-filter Replace the pre-filters.
Solenoid valve not
opening
High flow rates Close the orifice bypass valve, check
Pump discharge screen
(low primary pressure)
Dirty or fouled
membranes
(low final pressure)
Warm operating
conditions
Pump rotating
backwards
(3-phase power only)
Pump not operating
correctly
Remedies
Increase the feed pressure, open the
inlet/feed valve, check for
restrictions, and consider installing a
feed water boost pump.
Clean or replace the solenoid valve.
Clean air line for adequate pressure.
Check regulator for correct
operation and setting.
the permeate and concentrate flow
rates and adjust if necessary.
Excessive permeate flow may
indicate improper interconnector
installation.
Inspect and clean.
Clean the membranes.
Correct temperature.
Switch any two 3-phase leads to the
motor starter.
See pump instructions.
22
Page 23

TROUBLESHOOTING GUIDE
Symptom (Alarm) Possible Cause
Low permeate flow
rate
Low operating
pressure
Dirty or fouled
membranes
Operating on cold
water less than 55 60°F (13 - 16°C)
Membranes installed
backwards or
damaged concentrate
seal
Flow meter inaccurate Check the flow rate manually with a
Low concentrate flow
rate, normal or higher
than normal pressure
Concentrate valve
plugged
Concentrate outlet line
restricted
Flow meter inaccurate Check the flow rate manually with a
High operating
pressure
Recycle or concentrate
lines plugged
Inaccurate pressure
gauge
Service and CIP valves
closed at the same
time
Restricted or reduced
permeate flow rate
Remedies
See the possible causes for low
operating pressure.
Clean the membranes.
Install a hot/cold feed water
tempering valve if more permeate
flow is needed. Operate with a feed
water temperature of 72 - 77°F (22 25°C).
Install membranes in the direction of
fluid flow. Clean the machine
immediately.
Membranes with damaged
concentrate seals should be
cleaned.
stopwatch and calibrated container
(such as CIP tank).
Disassemble and the clean the
plumbing to the valve.
Examine the concentrate line for
obstructions or a closed valve.
stopwatch and calibrated container.
Note: CIP tank can be used for this
purpose.
Disassemble the plumbing to the
recycle orifice and remove foreign
particles.
Replace or calibrate the gauge as
required.
Verify water path to both is open.
See the possible causes for low
permeate flow rate.
23
Page 24

TROUBLESHOOTING GUIDE
Symptom (Alarm) Possible Cause
Excessive pressure
drop [exceeding max
Restricted flow after
pump outlet
∆P] (high primary
pressure – low final
pressure)
Telescoped membrane
covering membrane
housing outlet port
Severely fouled or dirty
membranes
Water flowing when
machine is turned off
Inlet control valve not
closing or seating
properly.
Declining rejection
(high permeate
conductivity)
Dirty or fouled
membranes
O-ring seal broken or
damaged
Change in incoming
water quality
Inaccurate
conductivity monitor or
fouled probe
Low recycle flow Adjust recycle flow (if applicable).
Remedies
Check for blockage of the
concentrate flow at the inlets and
outlets of the membrane housings.
Check for blockage at the pump
discharge screen.
Ensure that the anti-telescoping
device (ATD) is located properly on
the membrane.
Clean the membranes.
Clean or replace the solenoid valve.
Clean the membranes immediately.
Water must not pass through the
inlet when the machine is off.
Repair or replace valve components
as necessary.
Clean the membranes.
Replace the O-ring, check the
sealing surfaces on the O-ring
groove, interconnectors and end
caps. Replace damaged parts.
NOTE: This typically only happens
immediately after membrane
installation.
Open the concentrate valve and
flush. Test the water for pH,
hardness, TDS, and iron content. A
water analysis should be sent to GE
Water & Process Technologies for
review.
Calibrate the monitor with a
conductivity standard solution or
check the readings with another
conductivity meter. Replace or clean
the probe. Check the connections
between the probe and monitor.
24
Page 25

TROUBLESHOOTING GUIDE
Symptom (Alarm) Possible Cause
Switch on, unit not
operating
Pressurized storage
switch or float switch
has cut power to the
machine
Thermal overload in
motor has tripped.
No power to machine. Check the fuses or circuit breakers;
Deluxe (DLX) Electrical
machine shutdown
Alarm condition has
turned off machine.
Motor and/or pump
not operating properly.
Timer relay
defective/burned out
Motor starter
overloaded, heater
tripped.
Remedies
Check the permeate backpressure
or position of float in the storage
tank.
Allow the machine to cool; check the
feed water supply and/or amp draw
of the motor.
measure the voltage.
Restart the machine by pushing the
alarm bypass. Check all possible
alarm conditions; inlet pressure and
push alarm reset switch.
See the pump instructions. Contact
GE for repair of replacement.
Replace the relay.
Turn the switch off; let the heater(s)
cool.
25
Page 26

6. SPARE PARTS LIST
For detailed spare part lists, please refer to the manual addendum. Contact the GE
Water & Process Technologies Customer Support Center to order parts.
7. RETURN GOODS AUTHORIZATION (RGA)
PROCEDURE
Refer to addendum Technote 114.
8. WARRANTY/GUARANTEE
Refer to addendum Technote 100 for the machine Warranty/Guarantee document.
9. START-UP DATA
Refer to addendum Technote 101 for the machine startup data sheet document.
10. DAILY LOG DATA FOR GE WATER AND
PROCESS TECHNOLOGIES MEMBRANE MACHINES
Refer to addendum Technote 106 for the daily log data sheet document.
26
 Loading...