

Page 1

GEAppliances.com
Safety Instructions ........ 2-4
Operating Instructions
Control Panels ............... 5
Control Settings .............. 6
Dryer Features ............... 7
Loading and Using the Dryer . . .9
Reversing the Door ........... 8
Venting the Dryer ........... 10
Troubleshooting Tips .... 11, 12
Consumer Support
Consumer Support... Back Cover
Product Registration ...... 13, 14
Warranty .................. 15
DWSR405
DWXR485
Write themodeland serial
numbershere:
Model #
Serial#
You can find them on a label
on the front of the dryer behind
the doo_:
175D1807P355 49-90093
06-01JR 500A277P039
Page 2

IMPORTANTSAFETYINFORMATION.
READALLINSTRUCTIONSBEFOREUSING.
A WARNING!
Foryoursafety,the informationin this manual mustbe followed to minimize the risk of fire
or explosion,electric shock,or to prevent propertydamage,personal injury,ordeath.
• Donot storeor use gasolineor other
flammable vaporsandliquids in the
vicinily ofthis or any other appliance.
• Installation and service mustbe performed
by a qualifiedinstaller, service agencyor
the gassupplier.
WHATTODOIF YOUSMELLGAS:
]Do nottryto light a match, or cigarette, or
turnon anygas orelectrical appliance.
]Do nottouchany electrical switch; do not
useany phone in yourbuilding.
] Clearthe room,buildingor area of
all occupants.
Califomia Safe Drinking Water and Toxic Enforcement Act
This act requires file governor of California to publish a list of substances known to the state to cause cancel;
birth defects or other reproductive harm and requires businesses to warn customers of potential exposure
to such substances.
Gas appliances can cause minor exposure to four of these substances, namely benzene, carbon monoxide,
tormaldehyde and soot, caused primarily by"the incomplete combustion of natural gas or LP fuels.
[]Immediately call yourgassupplier from
a neighbors phone. Follow the gas
supplier'sinstructionscarefully,
[] ffyoucannotreach yourgas supplier,
call the fire department
Properly adjusted dryers will minimize incomplete combustion. Exposure to these substances can be
minimized further by properly venting the dwer to the outdoors.
PROPERINSTALLATION
This dryer must be properly installed and located in accordance with the Installation Instructions
before it is used. If you did not receive an Installation Instructions sheet, you can receive one by
visiting GEAppliances.com, or by calfing 800.GE.CARES(800.432.2737).
• Properly ground dwer to conform with all
governing codes and ordinances. Follow derails
in Installation lnstmctiolls.
• Illstall or store where it will not be exposed to
temperatures below fi'eezing or exposed to
the weathmt
• Connect to a properly rated, protected and sized
power supply circuit to avoid electrical overload. []
• Remove all sharp packing items and dispose of
all shipping materials properly.
Exhaus#Ducting:
[]Gas diTers MUSTbe exhausted to the outside.
[Exhausting electric diTers to the outside is
strongly roeommondod to prevent large amounts
of moisture and lint from being blown into
the room.
Use only rigid metal or flexible metal 4"
diameter ductwork inside the &Ter cabinet or
for exhausting to the outside. USEOFPLASTIC
OROTHERCOMBUSTIBLEDUCTWORKCAN
CAUSEA FIRE.PUNCTUREDDUCTWORKCAN
CAUSEA FIREIFIT COLLAPSESORBECOMES
OTHERWISERESTRICTEDIN USEORDURING
INSTALLATION.
2 lnstmctioils.
For complete details, follow the Installation
Page 3
GEAppliances.com
YOURLAUNDRYAREA
• Keep tim area undemeatb and around your • Keep all laundry aids (such as detergents,
appliances free of combustible mamrials bleaches, etc.) out of the reach of children,
(lint, papm; rags, etc.), gasoline, chemicals preferably" in a locked cabinet. Observe all
and other flammable vapors and liquids, warnings on container labels to avoid injury:
• Keep the floor around your appliances clean
and dry to reduce tim possibility"of slipping.
• Close supervision is necessary if this appliance
is used by or near children. Do not allow
children to play on, widl or inside tiffsor
any other appliance.
• Never climb Oil or stand Oil the dryer top.
A WARNING!
WHENUSINGYOURDRYER
• Never reach into the dryer while the drum is
moving. Betore loading, unloading or adding
clothes, wait until the dram has completely
stopped.
• Clean the lint filter before each load to prevent
lint accumulation inside the dryer or in the
room. DONOTOPERATETHEDRYERWITHOUT
THELINTFILTERIN PLACE.
• Do not wash or dry articles that have been
cleaned in, washed in, soaked in, or spotted
with combustible or explosive substances (such as
wax, oil, paint, gasoline, degreasers, dry-cleaning
solvents, keromne, etc.) which may ignite or
explode. Do not acid these substances to the
wash water. Do not use or place these substances
around your washer or dryer during operation.
• Do not place items exposed to cooking oils in
your dryer. Items contaminated with cooking oils
may contribute to a chemical reaction that could
cause a clothes load to catch fire.
• :Mly article on which you have umd a cleaning
solvent or that contains flammable materials
(such as cleaning cloths, mops, towels used in
beauty" salons, restaurants or barber shops, etc.)
must not Ix- placed in or near the dryer until
solvents or flammable materials have been
removed. There are many highly flammable
items used in homes such as acetone, denatured
alcohol, gasoline, kerosene, some household
cleanm.'s, some spot removers, turpentines,
waxes, ,a-ax removers and products conVaining
petroleum distillates.
• The lmmdry process can reduce the flame
retardancy of fabrics. To avoid such a result,
carefully follow the garment manufacturer's
care instructions.
• Do not dry articles containing rubber, plastic,
foam, or similar materials such as padded bras,
tennis shoes, ,galoshes, bath mats, rags, bibs, baby
pants, plastic bags, pillows, etc., that may melt or
bum. Some robber materials, when heated, can
under certain circumstances produce fire by
spontaneous combustion.
• Do not store plastic, paper or clothing that may
burn or melt on top of tim dryer during operation.
• Garments labeled DryAway from Hoator Do Not
Tumblo Dry (such as lite jackets conVaining Kapok)
must not Ix- put in your dryer.
• Do not dry fiberglass articles in your dryer.
Skin irritation could result from the remaining
particles that may Ix- picked up by clothing
during subsequent dryer uses.
• To minimize the possibility of electric shock,
unplug this appliance from the power supply"
or disconnect tim dryer at the household
distribution panel by"removing the fuse or
switching off the circuit breaker before
atmmpting any maintenance or cleaning
(except the removal and cleaning of the lint
filter). NOTE:Turning the Cycle Selector knob
to an offposition, or pressing PAUSE does NOT
disconnect the appliance from the power supply:
3
Page 4
IMPORTANTSAFETYINFORMATION.
READALLINSTRUCTIONSBEFOREUSING.
A WARNING!
WHENUSINGYOURDRYER(cont.)
• Never attempt to operate this appliance
if it is damaged, malfimctioning, partially
disassembled, or has missing or broken parts,
including a damaged cord or plug.
• The interior of the machine and the exhaust
duct connection inside the dryer should be
cleaned at least once a year by a qualified
technician. Seethe Loadingand UsingtheDryer
section.
• If yours is a gas dryer, it is equipped with an
automatic electric ignition and does not have a
pilot light. DONOTATTEMPTTOLIGHTWITHA
MATCH.Burns may result from having your hand
ill the vicinity of the burner when the automatic
ignition turns on.
WHENNOTUSINGYOURDRYER
• Grasp the plug firmly" when disconnecting this
appliance to avoid damage to the cord while
pulling. Place the cord away from traffic areas
so it will not be stepped on, nipped over or
sul_ected to damage.
• Do not attempt to repair or replace any part of
this appliance or attempt any servicing unlms
specifically recommended in this Owner's Manual
or in published user-repair instructions that you
understand and have the skills to carry out.
• You may wish to soften your [mmdered fabrics
or reduce the static electricity" in them by using
a dryer applied fabric softener or an anti-static
conditioner. We recommend you use eiflmr a
fabric softener in the wash cycle, according to
the manut:acturer's instructions for those
products, or try a dryer-added product fbr
which the manut:actorer gives written assurance
on the package that their product can be safely
used in your dryer. Service or performance
problems cruised by use of these products are
the responsibility of the manufacturers of those
products and are not covered under the warranty
to this appliance.
• Before discarding a dryer, or removing it fi'om
service, remove the dryer door to prevent
children fi'om hiding inside.
• Do not tamper with controls.
"y_ READANDFOLLOWTHISSAFETYINFORMATIONCAREFULLY.
SAVETHESEINSTRUCTIONS
4
Page 5
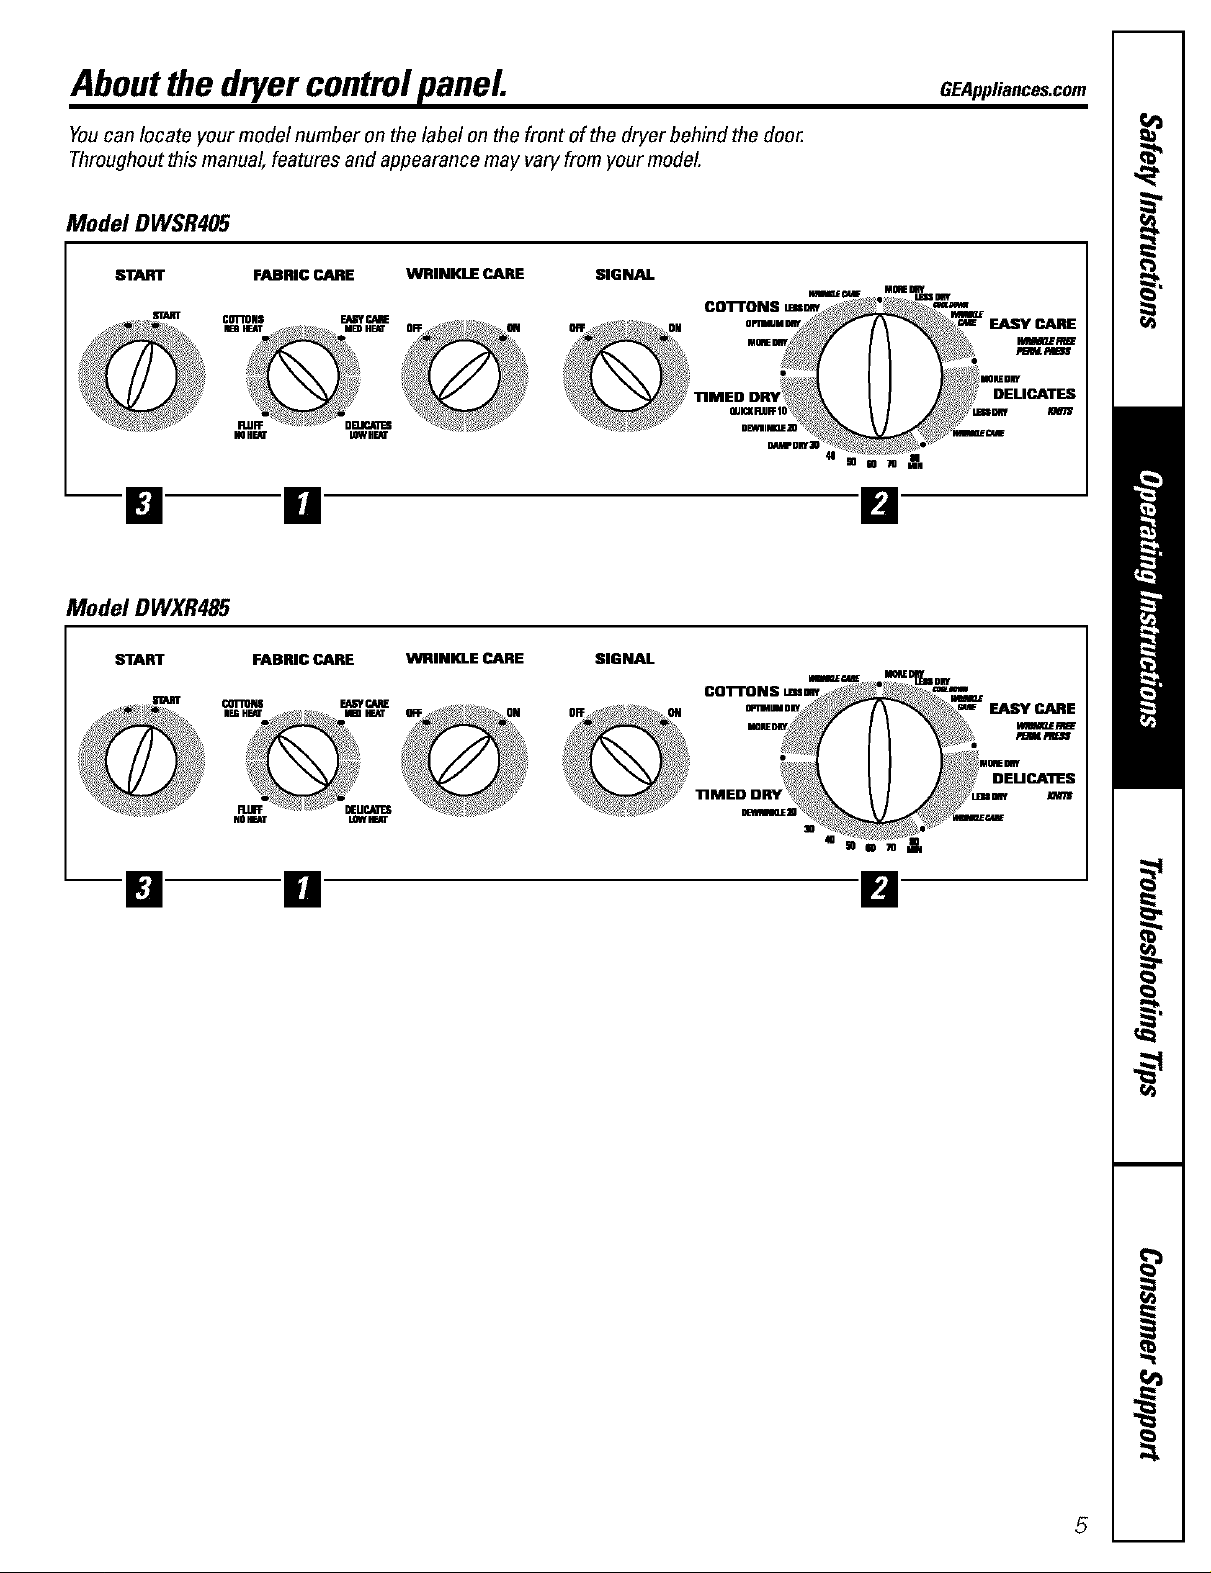
Aboutthedryer controlpanel GEA_,a.cos.co=
Youcan locate your model number on the label on the front of the dryer behind the door.
Throughout this manual, features and appearance may vary from your model.
Model DWSR405
START FABRIC CARE
_'rDIIT
C01_0N$ EAliYC_VE
NOH_" LOWH_"
WRINKLE CARE SIGNAL
--191 IDI
Model DWXR485
START FABRIC CARE VVIRINI_LE CARE SIGNAL
C0_0_ EA_ CA_
N0 ir_M" L0Wir_T
om_um ,_!!_i<.... +ii_ __ EASY CARE
ED DRY _ DEL CATES
QUW(RUFFIO i_ LE_mrr
-'_+ ""_'_" 1
* +
EASY CARE
F_lw
DEUCATES
--m
IOl
5
Page 6

Aboutthecontrolsettings.
IMPORTANT: Clean the lint filter each time you use the dryer.
H Fabric Care
COTI'ONS Forregularto heawcottons.
REG.HEAT
EASYCARE Forsynthetics,blends,delicatesanditemslabeledpermanentpress.
MED.HEAT
FLUFFForfluffingitemswithoutheat.UsetheTIMEDDRYcycle.
NOHEAT
DELICATESFordelicates,syntheticsanditemslabeledtumbledrylow.
LOWHEAT
ir'j
DryingCycles--Automaticcycles automatically determine fhbric &Tness. Select LESSDRYifyou want
your clothes slightly damp at the end of the drying cycle. Select MOREDRYif you
want them to feel drier. Timed cycles run for tim selected time.
COTI'ONS Forcottonsandmostlinens.FormostloadsselectOPTIMUMDRY.
EASYCARE Forwrinkle-free,permanentpressanddelicateitems,andknits.
DELICATESFordelicateitems,speciabcarefabricsandknits.
TIMEDDRY SettheCycleSelectoratthedesireddryingtime.
DAMPDRY Forleavingitemspartiallydamp.
DE'WRINKLEForremovingwrinklesfromitemsthatarecleananddryorthatareverylightlydamp.
QUICKFLUFF Forfresheningorfluffingupalreadydryclothing,fabric,linensandpillows.Usewith FLUFFNOHEAT
Provides10minutesofno-heattumbling.
[] Sta_ Close the dwer door. Select STARTOpening the door during operation will stop tim dwer.
To restart tim dryer, close the door and select STARTto complete tim cycle.
NOTE:Drying times will vary according to the type of heat used (Electric, Natural or LP gas),
size of load, types of fabrics, wetness of clothes and condition of exhaust ducts.
ColorLogic
Select the correct FABRICCAREsetting.
Match the particular color below the words
with the same color on the Cycle Dial.
Example:Drying a load of clothing labeled
permanent press.
-]] Choose the FABRIC CARE setting--for
this load it would be the EASY CARE
MED. HEAT (which is a particular color).
r2--]Turn the Cycle Dial to the area that has
the same color as the FABRIC CARE
setting you have chosen--for this load
it would be the EASY CARE AUTOMATIC,
6
Page 7

Aboutthedryerfeatures. GEAppliances.com
WRINKLE CARE
SIGNAL
(appearance may vary)
Wrinkle Care
Use this option to minimize the wrinkles
in clothes. It provides approximately
15 minutes of no-heat tumbling after
the clothes are dry:
This option can only be used with the
COTTONS,EASYCAREand DELICATES
cycles. If you are using the CYCLESIGNAL
and you select the WRINKLECAREoption,
a signal will sound at the end of the
drying time and several times during the
WRINKLECAREcycle. This will remind you
that it is time to remove the clothes.
End of Cycle Signal
This signal will sound just before the end
of the cycle to remind you to remove the
clothes. On some models, the signal
sound level can be adjusted.
If you selecmd the WRINKLECAREopdon,
the signal will sound at the end of the
drying time and will sound several times
during the WRINKLECAREcycle. This will
remind you that it is time to remove
the clothes.
If WRINKLECAREis not ON, the dryer will
stop once the timer reaches the WRINKLE
CAREmark on the cycle dial.
NOTE:
• Removegarmentspromptlyat the sound
of the signal Place clotheson hangers
sowrinkles won'tset in.
• Use the END OFCYCLESIGNALespecially
when dryingfabrics like polyesterknits
andpermanentpress.Thesefabricsshould
be removedsowrinkles won'tset in.
Dryness
Sensor Cycle
Dryness Sensor Cycle (onsomemodels)
This feature is only activated in the
COTTONS,EASYCAREand DELICATEScycles.
The Dryness Sensor provides greater
drying accuracy than standard machines,
resuhing in shorter dry times and better
clothes care. As the clothes tumble, they
touch a moisture sensor. The sensor will
stop the heating cycle as soon as the
clothes have reached the selected dryness.
Drum Lamp
Before replacing the light bulb, be sure to
unplug the dryer power cord or disconnect
the dryer at the household distribution
panel by"removing the filse or switching off
the circuit breaken Reach above dryer
opening from inside the drum. P,emove the
bulb and replace with the same size bulb.
Drying Rack (on some models)
A handy drying rack may be used fbr
drying delicate items such as washable
sweaters.
Hook the rack over the lint filter so
the rack extends into the dryer drum.
NOTE:
• Thedrying rack must be used with the
TIMEDCYCLE.
• Do not use this drying rack when there
are other clothes in the drye_
7
Page 8

Aboutreversingthe door.
Reversing the Door
Toolsneeded.
• Standard//2
Phillipsscrewdriver
[]Open the door and remove the filler plugs opposite the hinges. With the door
completely open, remove the bottom screw from each hinge on the dryer face.
Insert these scre,a_ about halfway into the TOPholes, for each hinge, on the
opposite side (where you removed the filler plugs). Apply firm pressure to get
the screw started in new holes.
[]Loosen top screw from each hinge on the &Ter face halfway: With one hand
holding the top of the door and the other hand holding the bottom, remove
the door from the dl3,er by lifting it OPand OUT
• Tape-tipped
putty knife
[]Rotate the door 1807 Insert it on the opposite side of the opening by" moving
the door//Rand OOWN until the top hinge and the bottom hinge are resting
on the top screws inserted in step 1.
/
[]Remove the remaining screws from the side of the opening from which the door
was removed. With these screws secure each hinge at the bottom. Tighten the
two top scre,a_ of each hinge. Reinsert the plastic plugs on the side from which
the door was removed.
8
Page 9

Aboutloadingand usingthedryer. GEAppliauoos.oom
Always follow the fabric manufacturer's care label when laundering.
SortingandLoadingHints
As a general rule, if clothes are sorted properly
for the washer, they are sorted properly for
the drym_
Do not add fabric softener sheets once the load
has become warm.Theymay cause fabric softener
stains. Bounce®Fabric Conditioner Dryer Sheets
have been approved for usein all GEDryers when
used in accordance with the manufacturer's
ins_uctions.
Donotovedoa_Thmwastes energy and causes
wrinkfing.
Donotdrythe followingitems:fiberglass items,
woolens,rubber-coated items,plastics, items with
plastic trim and foam-filled items.
CareandCleaningof theDryer
The Exterior:Wipe or dust any spills or washing
compounds with a damp cloth. Dryer control
panel and finishes may be damaged by some
laundry pretreatment soil and stain remover
products. Apply these products away fi'om the
dryeE The fabric may then be washed and dried
normallT¢: Damage to your dryer caused by" these
products is not covered by your warrantT¢:
The Lint Filter: Clean the lint filter before each
use. Moisten your fingers and reach into the
filter opening. Run your fingers across the fihen
Have a qualified technician vacuum the lint
fi'om the dryer once a yeas:
The Exhaust Duct: Inspect and clean the exhaust
ducting at least once a year to prevent clogging.
A partially clogged exhaust can lengthen the
drying time.
Follow these steps:
_Turn off electrical supply by disconnecting
the plug from the wall socket.
[_ Disconnect the duct from the dryer.
_ Vacuum the duct with the hose attachment
and reconnect the duct.
The ExhauMHood:Check with a mirror that the
inside flaps of the hood move freely when
operating. Make sure dmt there is not wildlife
(birds, insects, etc.) nesting inside the duct
or hood.
FabricCareLabels
Below are fabric care label "symbols" that affect the clothing you will be laundering.
WASH LABELS
Machine _wash _ _] _ _ _=
wdnk]ecesi_ar_ _e]i_at_
Water • • • •• •
temperature .o, w°,,, col_/_ool
(soocm_Ft (4ooc/losoFt (aooc/sso_l
BLEACHLABELS
Bleach _ Z_ ._
DRY LABELS
.eet _ ® ®0
setting
instructions
_i_h M_a_m L_w Noh_a_a_
9
Page 10

Aboutventingthedryer.
For the best drying performmlce the dryer needs to be properly vented. The dryer
will usemoreenergyand runlongerif it is notventedtothebelow specifications.Carefully
follow the details onExhaustingin theInstallation Instructions.
• Useonly rigid metal or flexible metal 4" diameter ductwork inside the dryer cabinet or for
exhausting to the outside.
• Do not useplastic or other combustible ductwork.
• Usethe shortest length possible.
• Do not crushor collapse.
• Avoid resting the duct on sharp objects.
• Ventingmustconformtolocal buildingcodes.
Correct
Venting
Incorrect
Venting
10
Page 11

Beforeyoucall forservice... GEAppliances.com
Troubleshooting 77ps
Save time and money! Review the charts on the following pages, or
visit GEApplianees.eom. Youmay not need to call for service.
Problem Possible Causes What ToDo
Dryer doesn't start Dryer is unplugged * Make sm'e dm dryer plug is pushed completely into
Fuse is blown/circnlt breaker • Check the house fuse/circuit breaker box and replace
is tripped filse or reset breakel: NOTE:Most electric dryers use
Dryer doesn't heat Fuse is blown/circnlt breaker is • Check the house fuse/circuit breaker box and replace
tripped, the dryer may tumble both filses or reset tx_th breakers. Your dryer may" tumble
but not heat if only one fuse is blovm or one breaker is tripped.
Gas service is off • Make sure gas shutoff at dryer and main shutoff are
Dryer shakos or Some shaking/noise is normal. • Move dryer to an even floor space, or adjust leveling legs
makes noise Dryer may be sitting unevenly as necessary until even.
Greasy spots on clothes Improper use of fabric softener • Follow directions on fabric softener package.
Drying dirty items • Use your dry'or to dry only clean items. Dirty items can
with dean ones stain clean imms and the dryeE
Clothes were not • Sometimes stains which cannot be seen when dm clothes
completely clean are wet appearafter drying. Use proper washing
Lint on clothes Lint Filter is full • Clean lint screen [x-fbre each load.
Improper sorting • Sort lint producers (like chenille) fi'om lint collectors
tim outlet.
two fuses/breakers.
fiflly open.
procedures before drying.
(like corduroy).
Static dectridty can attract lint • See suggestions in this section under STATIC.
Overloading • Separate large loads into smaller ones.
Paper, tissue, etc., left in pockets • Empty all pockets before, laundering clothes.
Static occurs No fabric softener was used • 'fit a fabric softenel:
• Bounce® Fabric Conditioner Dryer Sheets have been
approved for use in all GE Dryers when used in
accordmace with the manuihcmrer's insmmtions.
Overdrying • 'fit a fabric softenel:
• Adjust setting to LESSDRY or DAMP DRY.
Synthetics, permanent press • 'l)Tr"a fabric softener.
and blends can cause static
Inconsistent Type of heat • Automatic drying times will vary" according to the type
dryingtimes of heat used (electric, natural or LP gas), size of load,
types of fabrics, wemess of clothes and condition of"
exhaust ducts.
11
Page 12

Before youcall forservice...
Problem Possible Causes What ToDo
Clothestaketoolong Improper sorting
redo/
Large loads of heavy fabrics
(like beach towels)
Controls improperly set
Lint filter is full
Improper or obstructed
duc_ag
Blown fuses or tripped • Replace fhses or reset circuit breakers. Since most dryers
circuit breaker use 2 fuses/breakers, make sure both are operating.
Overloadlng/comblning loads • Do not put more than one washer load in the dryer at
Underloadlng • lfyvm are drying only one or two items, add a fbw items
Clothesare wrinkled Overdrying • Select a shorter drying time.
* Separate heavy items from lightweight items (generally;
a welMorted washer load is a welMorted dryer load).
* Large, heavy fabrics contain more moisture and take
longer m dry: Separate. large, heavy iZabricsinto smaller
loads to speed drying time.
• Match control settings to the load you are drying.
• Clean lint filter before every"load.
• Check installation instructions for proper
ducting/veming.
• Make sure ducting is cleaal, free of kinks and
unobstructed.
• Check to see if outside v_dl damper operates easily:
• Check the Installation Instructions to make sure the
dryer venting is correct.
a time.
to ensure proper rambling.
• Remove items while they still hold a slight amount of
moisture. Select a LESSDRYor DAflllPDRYsetting.
Letting items sit in dryer • Remove items when cycle ends and fold or hang
after cycle ends immediately:
Clothesshrink Some fabrics will naturally shrink • _ib avoid shrinkage, follow garment care labels exactly:
when washed. Others can be • Some items may be pre._sed back into shape after drying.
safely washed, but will shrink
in the dryer • lfy_u are concerned about shrinkage in a particular
item, do not machine wash or ramble dry"it.
12
Page 13

GE Service Protection Plus TM
GE, a name recognized worldwide tor qualily and dependability, offers you
Service Protection PhtsT_'--comprehensive protection on all your appliances--
No Matter What Brand!
Benefits Include:
• Backed by GE
• All brands covered
• Unlimited service calls
• All parts and labor costs included
• No out-of-pocket expenses
• No hidden deductibles
• One 800 number to call
You will be completely satisfied with our service protection or you may request your money back
on the remaining value of your contract. No questions asked. It's that simple.
Protect your refrigerator; dishwashm; ,a-asher and drym; range, _7, VCR and much more--any brand!
Plus there's no extra charge for emergency service and low monthly financing is available. Even icemaker
coverage and food spoilage protection is oftered. You can rest easy; knowing that all your valuable
household products are protected against expensive repairs.
Place your confidence in GE and call us in the U.S. toll-fi'ee at 800.626.2224
for more information.
* 9
All brands coveied, up to _0 years old, in the continental U.S.
We'll CoverAnyAppliance.
Anywhere. Anytime.*
.............
Pleaseplacein envelopeand mailto:
General Electric Company
Warranty Registration Department
P.O. Box 32150
Louisville, KY 40232-2150
13
Page 14

Consumer Product Ownership Registration
Dear Customer:
Thank you for purchasing our product aim thank you for placing your confidence in us.
We are proud to have you _ a customer!
Follow these three steps to protect your new appliance investment:
Complete and mail
your Consumer
Product Ownership
Registration today.
Have tile peace of
mind of knowing we
can contact you in
the unlikely event of
a sMety modification.
2
After mailing the
registration below,
store this doculllent
in a satb place. It
contains intormafion
you will need should
you require service.
Our service m_mber is
800,GE.CARES
(800.432.2737).
Model Nmnber Serial Nmnber
I I I I I I I I I I I
Illllll
Important: If you did not get a registration card with your
product, detach and return the form below to
ensure that your product is registered, or register
online at GEAppliances.com.
Consumer Product Ownership Registration
Read your Owner's
Manual careflllly.
It will help you
operate your new
appliance properly.
.__ Cut here
I I I I I I I I I I I I I I I I I
Model Number Serial Number
Mr.D Ms.D Mrs. D MissD
First I Dust I
Name I I I I I I I I I Name I I I I I I I I I I I I
Street ]
Address I I I I I I I I I I I I I I I I I I I I I I I I
Apt. # I I I I I I I I E-mail Address*
ci_'llllllllllllll Statel
DatePlaced
Number I
* Please provide yotlr e-mail address to receive, via e-mail, disco/hi/S, special oft_a's alld other important
conmmnications from GE Appliances (GEA).
[_ Check here if yon do not want to receive conmmnications h'om GEA's careflflly selected partners.
G£Appliance$
General Elecffi_ Company
LoxlisvJlle, Kentll_k_*
GEApplianees.eom
ZipI
Code I I
I I
I I
I I
14
Page 15

GEDryer Warranty.
All warranty service provided by our Factory Service Centers,
or an authorized Customer Care®technician. Toschedule service,
on-line, 24hours a day, visit us at GEAppliances.com, or call
800.GE.CARES(800.432.2737).
For The Period Of:
OneYear
Fromthe date ofthe
originalpurchase
We Will Replace:
Any part of the dryer which fhils due m a defect in materials or workmanship. During this
fullone-year warranty, GE will also provide, free ofcharge, all labor and in-home service to
replace the defective part.
Staple your receipt here.
Proof of the original purchase
date is needed to obtain service
under the warranty
What Is Not Covered:
• Service trips to your home to teach you how to use
the product.
• Improper installation.
• Failure of the product if it is abused, misused, or used for
other than the intended purpose or used commercially.
This warranty is extended to the original purchaser and any succeeding owner for products purchased for home
use within the USA. In Alaska, the warranty excludes the cost of shipping or service calls to your home.
• Replacement of house fuses or resetting of circuit
breakers.
1Damage to the product caused by accident, fire, floods or
acts of God.
• Incidental or consequential damage caused by possible
defects with this appliance.
Some states do not allow the exclusion or limitation of incidental or consequential damages. This warranty gives
you specific legal rights, and you may also have other rights which vary from state to state. Toknow what your
legal rights are, consult your local or state consumer affairs office or your state's Attorney General
Warrantor: General Electric Company. Louisville, KY 40225
15
Page 16

ConsumerSupport.
GEAppliancesWebsite
Have a question or need assistance with your appliance? Tiy the GE Appliances Website 24 hours a day,
any day" of the year! For greater convenience and fkster service, you can now download Owner's Manuals,
order parts, catalogs, or even schedule service on-line. You can also "Ask Our 'R-am of Experts *''
your questions, and so much more...
ScheduleService
Expert GE repair service is only one step away from y_ur door. Get on-line and schedule y_ur service at
your convenience 24 hours any day of the year! Or call 800.GE.CARES (800.432.2737) during normal
business hours.
RealLifeDesignStudio
GE supports the Univepsal Design concept--products, services and environments that can Ix- used by
people of all ages, sizes and capabilities. We recognize the need m design fbr a wide range of physical and
mental abilities and impairments. For details of GE's Universal Design applications, including kiwhen
design ideas for people with disabilities, check out our Website today: For the hearing impaired, please call
800.TDD.G_C (800.833.4322).
ExtendedWarranties
GEAppliances.com
GEAppliances.com
GEAppliances.com
GEAppliances.com
Purchase a GE extended warranty" and learn about special discounts that are available while your warranty
is still in ef[ect. You can purchase it on-line anydme, or call 800.626.2224 during normal business hours.
GE Consumer Home Services will still be there after your warranty expires.
PartsandAccessories
IndMduals qualified to service their own appliances can have parts or accessories sent directly to their
homes (VISA, Masted'Card and Discover cards are accepted). Order on-line today; 24 hours evmy day or
by"phone at 800.626.2002 during normal business hours.
Instructionscontainedin thismanualcoverproceduresto beperformedby anyuser.Otherservicinggenerally
shouldbereferredtoqualifiedservice personnel.Cautionmustbeexercised,sinceimproperservicingmaycause
unsafeoperation.
ContactUs
ffyou are not satisfed with the service you receive from GE, contact us on our Website with all the details
including your phone number, or write to: General Managel; Customer Relations
GE Appliances, Appliance Park
Louisville, KY40225
GEAppliances.com
GEAppliances.com
RegisterYourAppliance GEAppliances.com
Register your new appliance on-lille---at your convenience! Timely product regisn_tion will allow for
enhanced communication and prompt service under tim terms of your vmrranry, should the need arise.
You may also mail in the pre-printed registration card included in the packing material, or detach and
use tim form in this Ouqmr's Manual.
Printed in Canada
 Loading...