

GE Appliances PGB900, PGB910, PGB980, CGS975, CG5985 Owner's Manual And Installation Instructions
...Page 1
GEAppliances.com
L9
®l
0
0
09
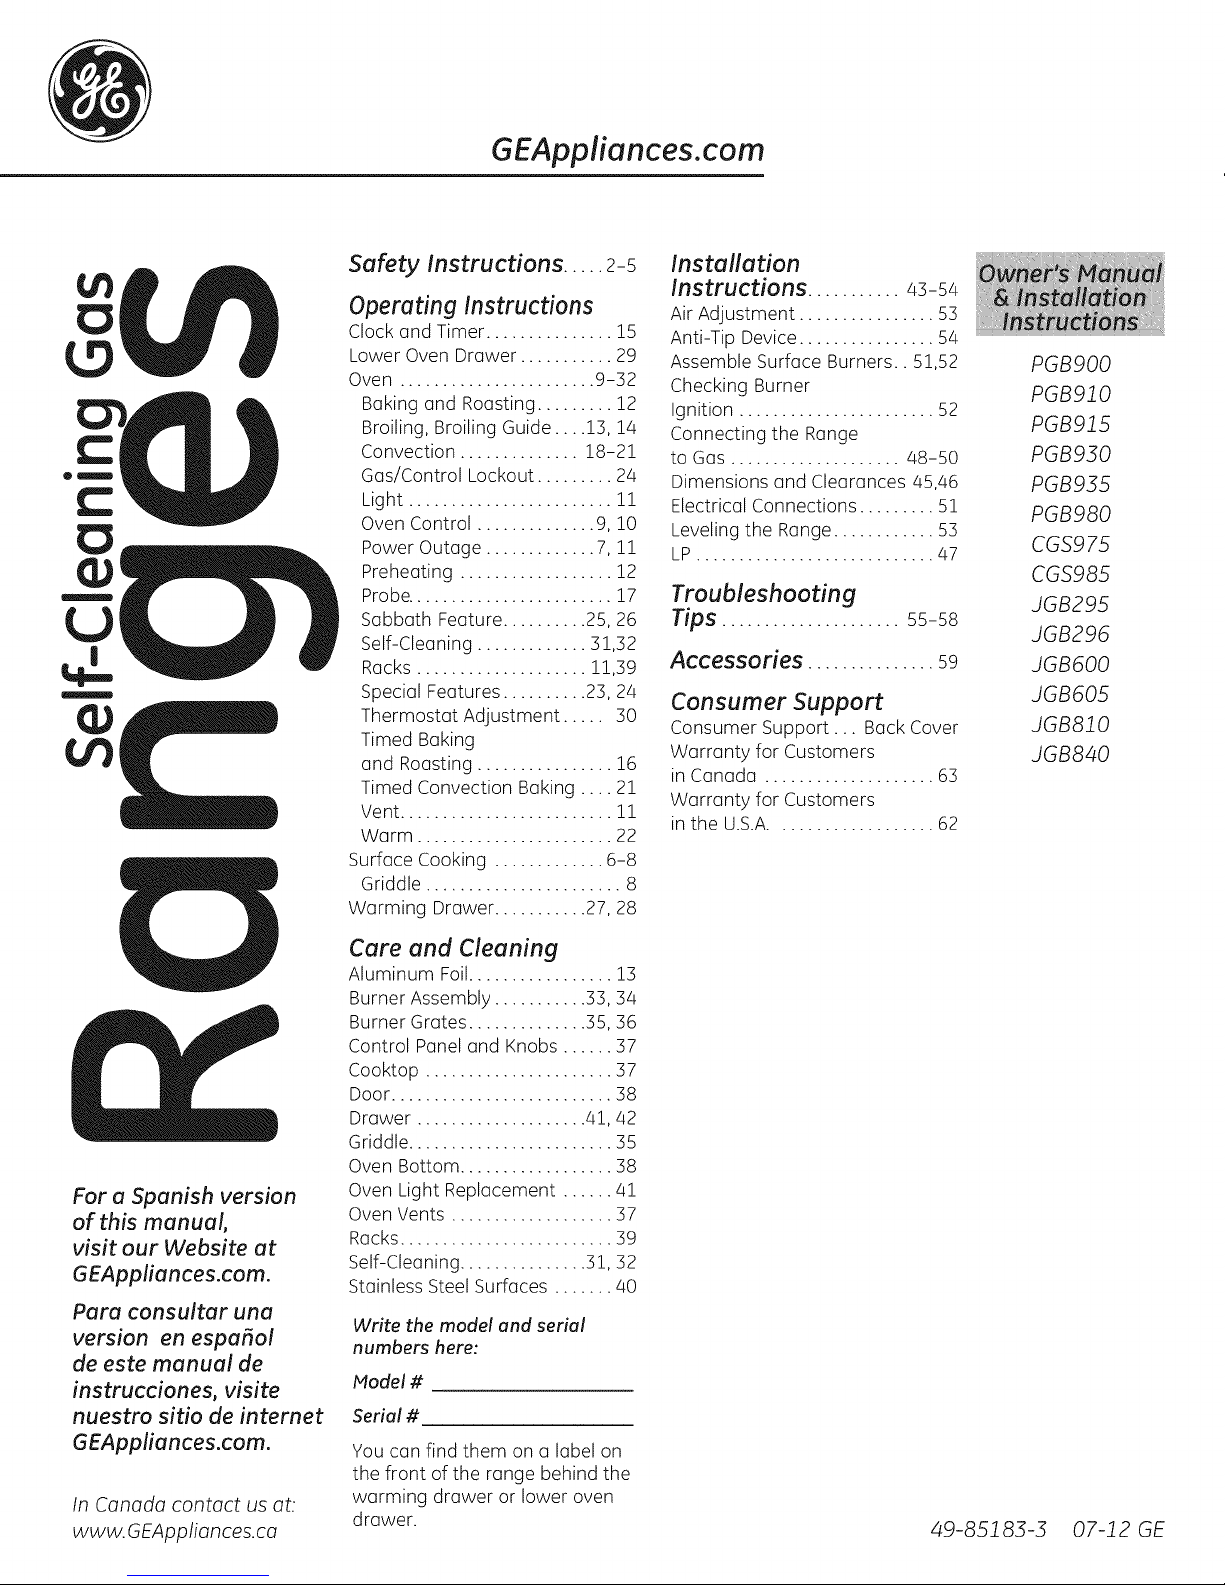
Safety Instructions ..... 2-5
Operating Instructions
Clock and Timer ............... 15
Lower Oven Drawer ........... 29
Oven ....................... 9-32
Baking and Roasting ......... 12
Broiling, Broiling Guide.... !3, !4
Convection .............. !8-2!
Gas/Control Lockout ......... 24
Light ........................ 11
Oven Control .............. 9, !0
Power Outage ............. 7, !!
Preheating .................. !2
Probe........................ 17
Sabbath Feature .......... 25, 26
Self-Cleaning ............. 31,32
Racks .................... 11,39
Special Features .......... 23, 24
Thermostat Adjustment ..... 30
Timed Baking
and Roasting ................ 16
Timed Convection Baking .... 21
Vent......................... !1
Warm ....................... 22
Surface Cooking ............. 6-8
Griddle ....................... 8
Warming Drawer........... 27, 28
Installation
Instructions ........... 43-54
Air Adjustment ................ 53
Anti-Tip Device................ 54
Assemble Surface Burners.. 51,52
Checking Burner
Ignition ....................... 52
Connecting the Range
to Gas .................... 48-50
Dimensions and Clearances 45,46
Electrical Connections ......... 51
Leveling the Range............ 53
LP ............................ 47
Troubleshooting
Tips ..................... 55-58
Accessories ............... 59
Consumer Support
Consumer Support ... Back Cover
Warranty for Customers
in Canada .................... 63
Warranty for Customers
in the U.S.A................... 62
PGB900
PGB910
PGB915
PGB950
PGB955
PGB980
CGS975
CG5985
JGB295
JGB296
JGB600
JGB605
JGB810
JGB840
For a Spanish version
of this manual,
visit our Website at
GEAppliances.com.
Para consultar una
version en espafiol
de este manual de
instrucciones, visite
nuestro sitio de internet
GEAppliances.com.
In Canada contact us at:
www. GEAppliances.ca
Cure end Cleaning
Aluminum Foil................. 13
Burner Assembly ........... 33, 34
Burner Grates .............. 35, 36
Control Panel and Knobs ...... 37
Cooktop ...................... 37
Door .......................... 38
Drawer .................... 41,42
Griddle........................ 35
Oven Bottom .................. 38
Oven Light Replacement ...... 41
Oven Vents ................... 37
Racks......................... 39
Self-Cleaning ............... 31, 32
Stainless Steel Surfaces ....... 40
Write the model end serial
numbers here:
Model #
Serial #
You can find them on a label on
the front of the range behind the
warming drawer or lower oven
drawer.
49-85183-3 07-12 GE
Page 2
IMPORTANT SAFETY INFORMATION.
READ ALL INSTRUCTIONS BEFORE USING.
IA WARNING I Ifthe information in this manual is not followed exactly, cl fire or explosion may
result, causing property damage, personal injury or death.
- Do not store or use gasoline or other flammable vapors and liquids in the vicinity of this or any other appliance.
- WHAT TO DO IFYOU SMELL GAS
_:_ Do not try to light any appliance.
':, Do not touch any electrical switch; do not use any phone in your building.
':, Immediately call your gas supplier from a neighbor's phone. Follow the gas supplier's instructions.
':, If you cannot reach your gas supplier, call the fire department.
- Installation and service must be performed by a qualified installer, service agency or the gas supplier.
[A WARNING j
All ranges can tip.
BURNS or other SERIOUSINJURIEScan result.
INSTALLand CHECK the anti-tip bracket following the instructions supplied with the bracket.
To reduce the risk of tipping the range, the range must be secured by a properly installed anti-tip
bracket. See installation instructions shipped with the bracket for complete details before attempting
to install.
To check if the bracket is installed and engaged properly, look underneath the range to see that the
rear leveling leg is engaged in the bracket. On some models, the storage drawer or kick panel can be
removed for easy inspection. If visual inspection is not possible, slide the range forward, confirm the
anti-tip bracket is securely attached to the floor or wall, and slide the range back so the rear leveling leg is under the
anti-tip bracket.
If the range is pulled from the wall for any reason, always repeat this procedure to verify the range is properly secured
by the anti-tip bracket.
Never completely remove the leveling legs or the range will not be secured to the anti-tip device properly.
If you did not receive an anti-tip bracket with your purchase, call 1.800.626.8774 to receive one at no cost (in Canada,
call 1.800.561.3344). For installation instructions of the bracket, visit GEAppliances.com (inCanada, GEAppliances.ca).
[ WARNING ]IMPORTANT SAFETYNOTICE
The California Safe Drinking Water and Toxic Enforcement Act requires the Governor of California to publish a list of
substances known to the state to cause cancer, birth defects or other reproductive harm, and requires businesses to
warn customers of potential exposure to such substances.
The fiberglass insulation in self-clean ovens gives off a very small amount of carbon monoxide during the cleaning cycle.
Exposure can be minimized by venting with an open window or using a ventilation fan or hood.
SAVE THESE INSTRUCTIONS
Page 3
[A WARNING ] GENERAL SAFETYINSTRUCTIONS
iiiil}i
Do not leave children alone or unattended in an
[A WARNING j
NEVER use this appliance as a space heater to heat
or warm the room. Doing so may result in carbon
monoxide poisoning and overheating of the oven.
Use this appliance for its intended purpose as described
in this owner's manual.
area where an appliance is in use. They should never
be allowed to climb, sit or stand on any part of the
appliance.
iiiiiiili_
Do not store items of interest to children above o range
or on the backguard of a range-children climbing on
the range to reach items could be seriously injured.
GEAppliances.com
Have your range installed and properly grounded by
a qualified installer in accordance with the provided
installation instructions. Any adjustment and service
should be performed only by o qualified gas range
installers or service technicians. Do not attempt to repair }
or replace any part of your range unless it is specifically
recommended in this manual.
_::Your range is shipped from the factory set for use with
natural gas. It can be converted for use with LP gas.
If required, these adjustments must be made by a
qualified technician in accordance with the installation
instructions and local codes. The agency performing this
work assumes responsibility for the conversion.
i Have the installer show you the location of the range
gas shut-off valve and how to turn it off if necessary.
Plug your range into o 120-volt grounded outlet only. Do
not remove the round grounding prong from the plug.
If in doubt about the grounding of the home electrical
system, it is your responsibility and obligation to have an
ungrounded outlet replaced with a properly grounded,
three prong outlet in accordance with the Notional
Electrical Code. Do not use on extension cord with this
appliance.
Before performing any service, unplug the range
or disconnect the power supply at the household
distribution panel by removing the fuse or switching off
the circuit breaker.
Be sure all packing materials are removed from the
range before operating to prevent ignition of these
materials.
Do not allow anyone to climb, stand or hang on the
oven door, drawer or cooktop. They could damage the
range or tip it over causing severe injury or death.
Never block the vents (air openings) of the range. They
provide the air inlets and outlets that are necessary for
the range to operate properly with correct combustion.
Air openings ore located at the rear of the cooktop, at
the top and bottom of the oven door, and at the bottom
of the range under the warming drawer, lower oven
drawer or kick panel.
iiiil}i
Use only dry pot holders-moist or damp pot holders on
hot surfaces may result in burns from steam. Do not let
pot holders touch surface burners, burner grate, or oven
heating element. Do not use a towel or other bulky cloth
in place of pot holders.
Be careful not to touch hot surfaces of the range.
Potentially hot surfaces include burners, grates, cooktop,
backguard, oven and door interior and crevices around
the oven door.
Do not heat unopened food containers. Pressure could
build up and the container could burst, causing an
injury.
iiiil}i
To protect against foodborne illness, ensure that
temperatures of meat and poultry products meet
or exceed the USDA minimum recommended
temperatures for food safety. For more information
see: www.isitdoneyet.gov or call the USDA meat and
poultry hotline at 1-888-674-6854.
_::Avoid scratching or impacting glass doors, cooktops or
control panels. Doing so may lead to glass breakage. Do
not cook on a product with broken glass. Shock, fire or
cuts may occur.
SAVE THESE INSTRUCTIONS
3
Page 4
IMPORTANT SAFETY INFORMATION.
READ ALL INSTRUCTIONS BEFORE USING.
iA WARNING iKEEP FLAMMABLE MATERIALS AWAY FROM THE RANGE
Do not store or use flammable materials in an oven or
near the cooktop, including paper, plastic, pot holders,
linens, wall coverings, curtains, drapes and gasoline or
other flammable vapors and liquids.
Never wear loose-fitting or hanging garments while
using the appliance. Avoid storing commonly used
items in cabinets above the range and be careful when
reaching over the range. Clothing inclose proximity to
burners or hot surfaces may ignite causing severe burns.
Do not let cooking grease or other flammable materials
accumulate in or near the range. Grease in the oven or
on the cooktop may ignite.
Clean ventilating hoods frequently. Grease should not
be allowed to accumulate on the hood or filter.
IAWARNINGI INTHE EVENT OF A FIRE,TAKE THE FOLLOWING STEPS
TO PREVENT INJURYAND FIRESPREADING:
Do not use water on grease fires. Never pick up
a flaming pan. Turn the controls off. Smother a
flaming pan on a surface burner by covering the pan
completely with a well-fitting lid, cookie sheet or flat
tray. If necessary, use a multi-purpose dry chemical or
foam-type fire extinguisher.
If there is a fire in the oven during baking, turn the oven
off and keep the door closed until the fire goes out. If
IA WARNING iCOOKTOP SAFETY INSTRUCTIONS
necessary, use a multi-purpose dry chemical or foam
type fire extinguisher.
iiiiiil
If there is a fire in the oven during self-clean, turn the
oven off and wait for the fire to go out. Do not force
the door open. Introduction of fresh air at self-clean
temperatures may lead to a burst of flame from the
oven. Failure to follow this instruction may result in
severe burns.
Never leave the surface burners unattended at medium
or high heat settings. Foods, especially oily foods, may
ignite resulting in fire that could spread to surrounding
cabinets.
Never leave oil unattended while frying. If allowed to
heat beyond its smoking point, oil may ignite resulting
in fire that may spread to surrounding cabinets. Use a
deep fat thermometer whenever possible to monitor oil
temperature.
To avoid oil spillover and fire, use a minimum amount of
oil when shallow pan-frying and avoid cooking frozen
foods with excessive amounts of ice.
_:, Use proper pan size and avoid pans that are unstable
or easily tipped. Select cookware that is matched to the
size of the burner. Burner flames should be adjusted so
that they do not extend beyond the bottom of the pan.
Excessive flame may be hazardous.
Always use the LITEposition when igniting the top
burners and make sure the burners have ignited.
When usingglass/ceramic cookware, makesure it is
suitable for cooktop service;others may breakbecause
of sudden change intemperature.
To minimize the possibility of burns, ignition of
flammable materials and spillage, the handle of a
container should be turned toward the center of the
range without extending over nearby burners.
When preparing flaming foods under a hood, turn the
fan on.
Do not use a wok with a round metal support ring. the
ring may trap heat and block air to the burner resulting
in a carbon monoxide hazard.
iiiiiil
Do not attempt to lift the cooktop. Doing so may
damage the gas tubing to the surface burners resulting
in a gas leak and risk of fire.
iiiiiiili_
When disabling Gas/Control Lockout (on some models),
make sure the surface controls are set to the OFF
position. This will prevent unintended gas flow from the
burners.
iiiil}i
Do not use aluminum foil to cover the grates or line
any part of the cooktop. Doing so may result in carbon
monoxide poisoning, overheating of the cooktop
surfaces, or a potential fire hazard.
4 SAVE THESE INSTRUCTIONS
Page 5
iA WARNING jOVEN SAFETYINSTRUCTIONS
iiiil}i
laln WARN IN t' -INEVER coverany slots,holes,or
passages in the oven bottom or cover on entire rock with
materials such as aluminum foil. Doing so blocks air flow
through the oven and may cause carbon monoxide
poisoning. Aluminum foil linings may also trap heat, causing
o fire hazard.
Stand away from the range when opening the oven
door. Hot air or steam which escapes can cause burns }
to hands, face and/or eyes.
Keep the oven free from grease buildup. Grease inthe
oven may ignite. }
} Place oven racks in desired location while oven is cool.
If rack must be moved while oven is hot, be careful to }
avoid touching hot surfaces.
Pull the oven rack to the stop-lock position when
loading and unloading food from the oven. This helps
prevent burns from touching hot surfaces of the door
and oven walls.
iiiiiiili_
Do not leave items such as paper, cooking utensils or
food in the oven when not in use. Items stored in an
oven can ignite.
Do not leave items on the cooktop near the oven vent
which is in the center of the backguard. Items may
overheat resulting in a risk of fire or burns.
When using cooking or roasting bags in the oven, follow
the manufacturer's directions.
Never broil with door open. Open-door broiling is not
permitted due to overheating of control knobs.
GEAppliances.com
IA WARNING iSELF-CLEANING OVEN SAFETY INSTRUCTIONS
The self-cleaning feature operates the oven at temperatures high enough to burn away food soils in the oven.
Follow these instructions for safe operation.
Before operating the self-clean cycle, remove pans,
shiny metal oven racks and other utensils from the
oven. Only porcelain-coated oven racks may be left in
the oven. Do not use self-clean to clean other parts, }
such as grates.
Beforeoperating the self-clean cycle,wipe grease and
food soilsfrom the oven.Excessiveamount of grease
may ignite leadingto smoke damage to your home.
If the self-cleaning mode malfunctions, turn the oven off
and disconnect the power supply. Have it serviced by a
qualified technician.
Do not clean the door gasket. The door gasket is
essential for a good seal. Care should be taken not to
rub, damage or move the gasket.
iiiiiil
Do not use oven cleaners. No commercial oven cleaner
or oven liner protective coating of any kind should be
used in or around any part of the oven.
iAWARNING l WARMING DRAWER/LOWER OVEN DRAWER SAFETY
INSTRUCTIONS (Somemodels)
The purpose of the warming drawer is to holdhot
cooked foods at serving temperature. Bacteria will grow
very rapidly in food that is between 40 and 140°F. Do
not put cold food in warming drawer. Do not keep food
in the warming drawer for more than 2 hours. Failure to
follow these instructions may result in foodborne illness.
Do not leave paper products, plastics, canned food or
combustible materials in the drawer. They may ignite.
Usecare when opening the drawer. Openthe drawer a
crack and let hot airor steam escape before removing
or replacing food. Hot air orsteam that escapescan
cause burnsto hands,face and/or eyes.
Do not use aluminum foil to line the warming drawer.
Foil is an excellent heat insulator and will trap heat
beneath it.This will upset the performance of the
drawer and potentially cause a fire hazard.
Do not touch the heating element or the interior surface
of the drawer. These surfaces may be hot enough to
cause burns.
SAVE THESE INSTRUCTIONS s
Page 6
Using the gas surface burners.
Throughout this manual, features and
Before Lighting a Gas Burner
Hake sureall burners are in place.
Make sureall grates on the range are
properly placed before using any burner.
Ifyour range has the Gas/Control Lockout
feature, make sure it is disabled before
attempting to light the surface burners.
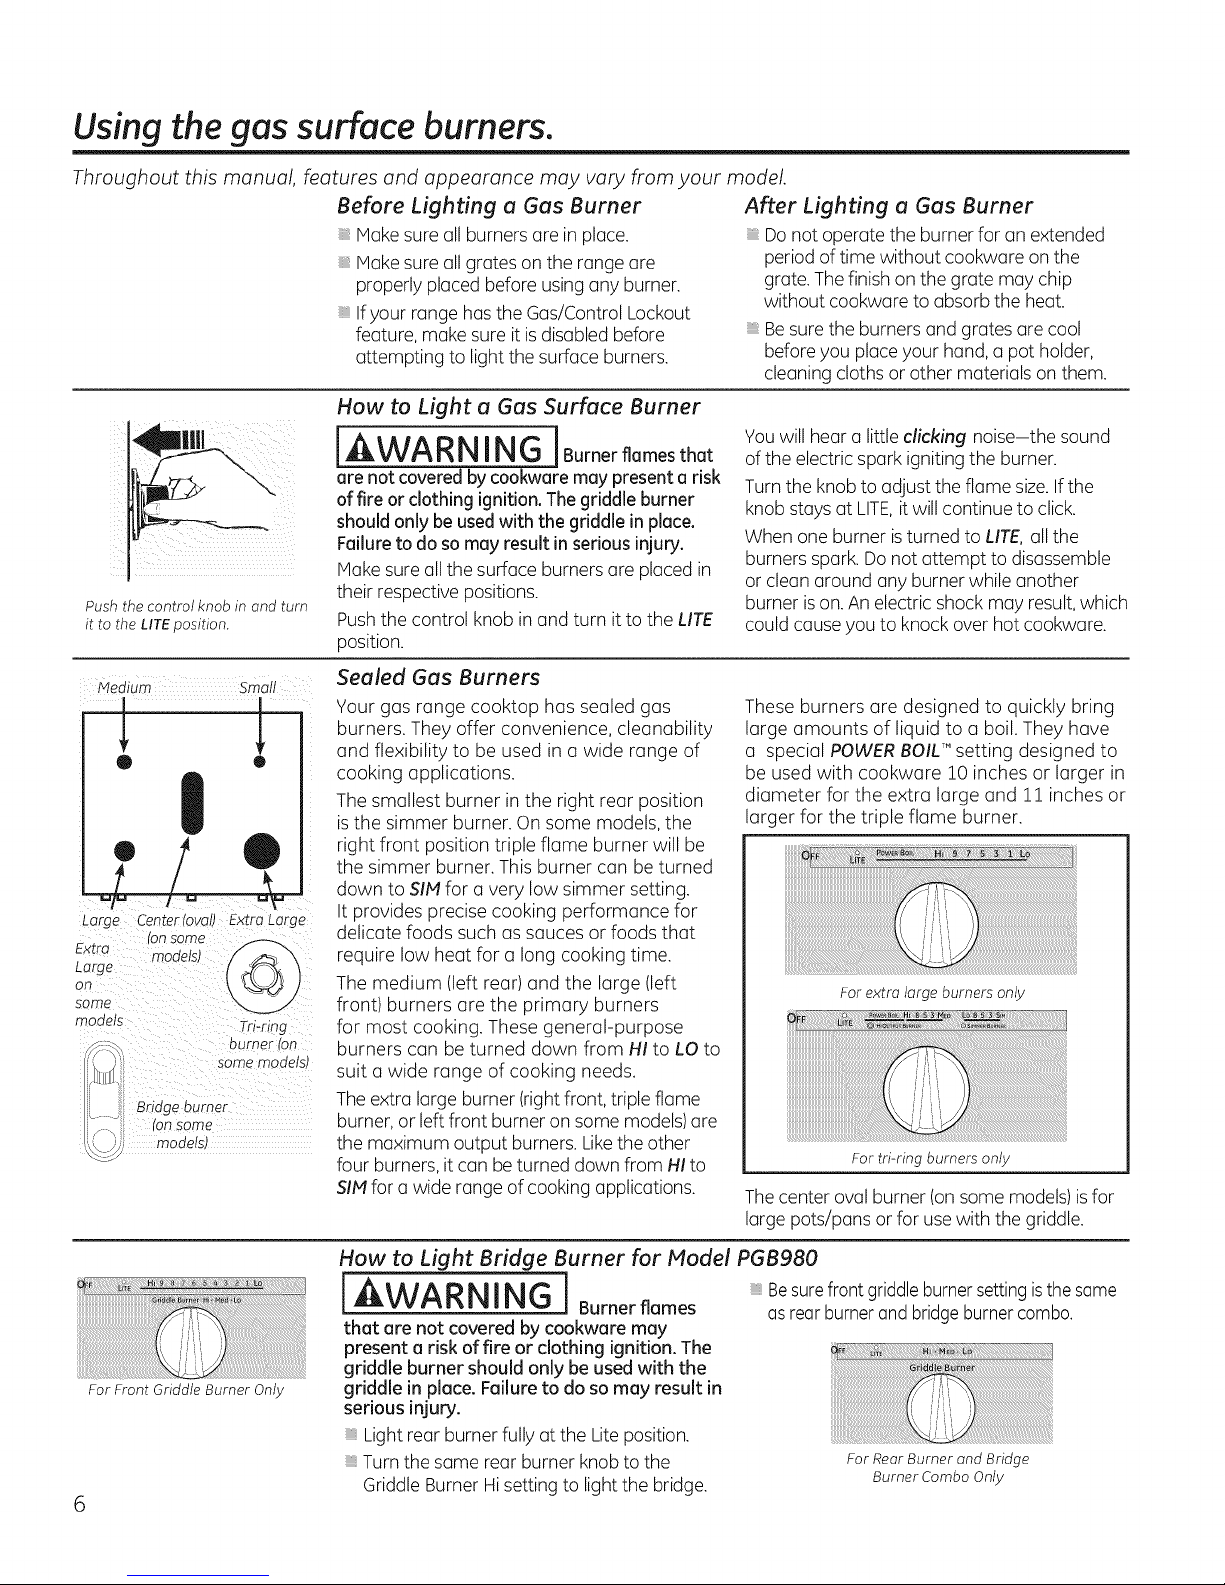
How to Light a Gas Surface Burner
[ WARNING lBurner,omesthat
ill __x_ ¸
i _il iI
Push the control knob in and turn
it to the LITEposition.
Medium Small
! !
® •
|
Large Center (ova# Extra Large
Extra
onLarge (
some
models Tri-ring
ion some
models_
ourner ion
some modelsl
Bridge burner
on some
are not covered by cookware may present a risk
of fire or clothing ignition. The griddle burner
should only be usedwith the griddle in place.
Failureto do so may result in serious injury.
Hake sure all the surface burners are placed in
their respective positions.
Pushthe control knob in and turn itto the LITE
position.
Sealed Gas Burners
Your gas range cooktop has sealed gas
burners. They offer convenience, cleanability
and flexibility to be used in a wide range of
cooking applications.
The smallest burner in the right rear position
isthe simmer burner. On some models, the
right front position triple flame burner will be
the simmer burner. This burner can be turned
down to SIN for a very low simmer setting.
It provides precise cooking performance for
delicate foods such as sauces or foods that
require low heat for a long cooking time.
The medium (left rear) and the large (left
front) burners are the primary burners
for most cooking. These general-purpose
burners can be turned down from Ill to LO to
suit a wide range of cooking needs.
Theextra large burner (right front, triple flame
burner, or left front burner on some models)are
the maximum output burners. Likethe other
four burners, it can be turned down from Ill to
SIN for a wide range of cooking applications.
appearance may vary from your model.
After Lighting a Gas Burner
Donot operate the burner for an extended
period of time without cookware on the
grate.Thefinish on the grate may chip
without cookware to absorb the heat.
Besure the burners and grates ore cool
beforeyou placeyour hand, a pot holder,
cleaning cloths or other materials on them.
Youwill hear a little clicking noise-the sound
of the electric spark igniting the burner.
Turnthe knob to adjust the flame size. Ifthe
knob stays at LITE,it will continue to click.
When one burner is turned to LITE,all the
burners spark. Donot attempt to disassemble
or clean around any burner while another
burner ison. An electric shock may result,which
could cause you to knock over hot cookware.
These burners are designed to quickly bring
large amounts of liquid to a boil. They have
a special POWERBOILTM setting designed to
be used with cookware 10 inches or larger in
diameter for the extra large and 11 inches or
larger for the triple flame burner.
For extra large burners only
For tri-ring burners only
Thecenter oval burner (onsome models)is for
large pots/pans or for use with the griddle.
How to Light Bridge Burner for Model PGB980
[AWARNING J Burner flames as rear burnerand bridgeburnercombo.
that are not covered by cookware may
present a risk of fire or clothing ignition. The
griddle burner should only be used with the
For Front Griddle Burner Only
griddle in place. Failure to do so may result in
serious injury.
Lightrear burner fully at the Lite position.
Turnthe same rear burner knob to the
Griddle Burner Hisetting to light the bridge.
Besurefront griddleburnersettingisthe same
For Rear Burner and Bridge
Burner Combo Only
Page 7
How to Select Name Size
GEAppliances.com
AWARNING ] Flames that are
not covered by cookware may present a risk
of burns or clothing ignition. Never let flames
extend beyond the sides of the cookware.
Top-of-Range Cookware
Aluminum: kledium-weight cookware is
recommended because it heats quickly
and evenly. Host foods brown evenly in an
aluminum skillet. Use saucepans with tight-
fitting lids when cooking with minimum
amounts of water.
Cast-Iron: Ifheated slowly, most skillets will
give satisfactory results.
Enamelware: Under some conditions, the
enamel of some cookware may melt. Follow
cookware manufacturer's recommendations
for cooking methods.
Glass: There are two types of glass
cookware-those for oven use only and
Watch the flame, not the knob, as you adjust
heat. When fast heating is desired,the flame
sizeon a gas burner should match the
cookware you are using.
Flameslarger than the bottom ofthe cookware
will not result in faster heating and may be
hazardous.
those for top-of-range cooking (saucepans,
coffee and teapots). Glass conducts heat
very slowly.
Heatproof Glass Ceramic: Can be used for
either surface or oven cooking. It conducts
heat very slowly and cools very slowly. Check
cookware manufacturer's directions to be
sure it can be used on gas ranges.
Stainless Steel: This metal alone has poor
heating properties and is usually combined
with copper, aluminum or other metals for
improved heat distribution. Combination
metal skillets usually work satisfactorily
if they are used with medium heat as the
manufacturer recommends.
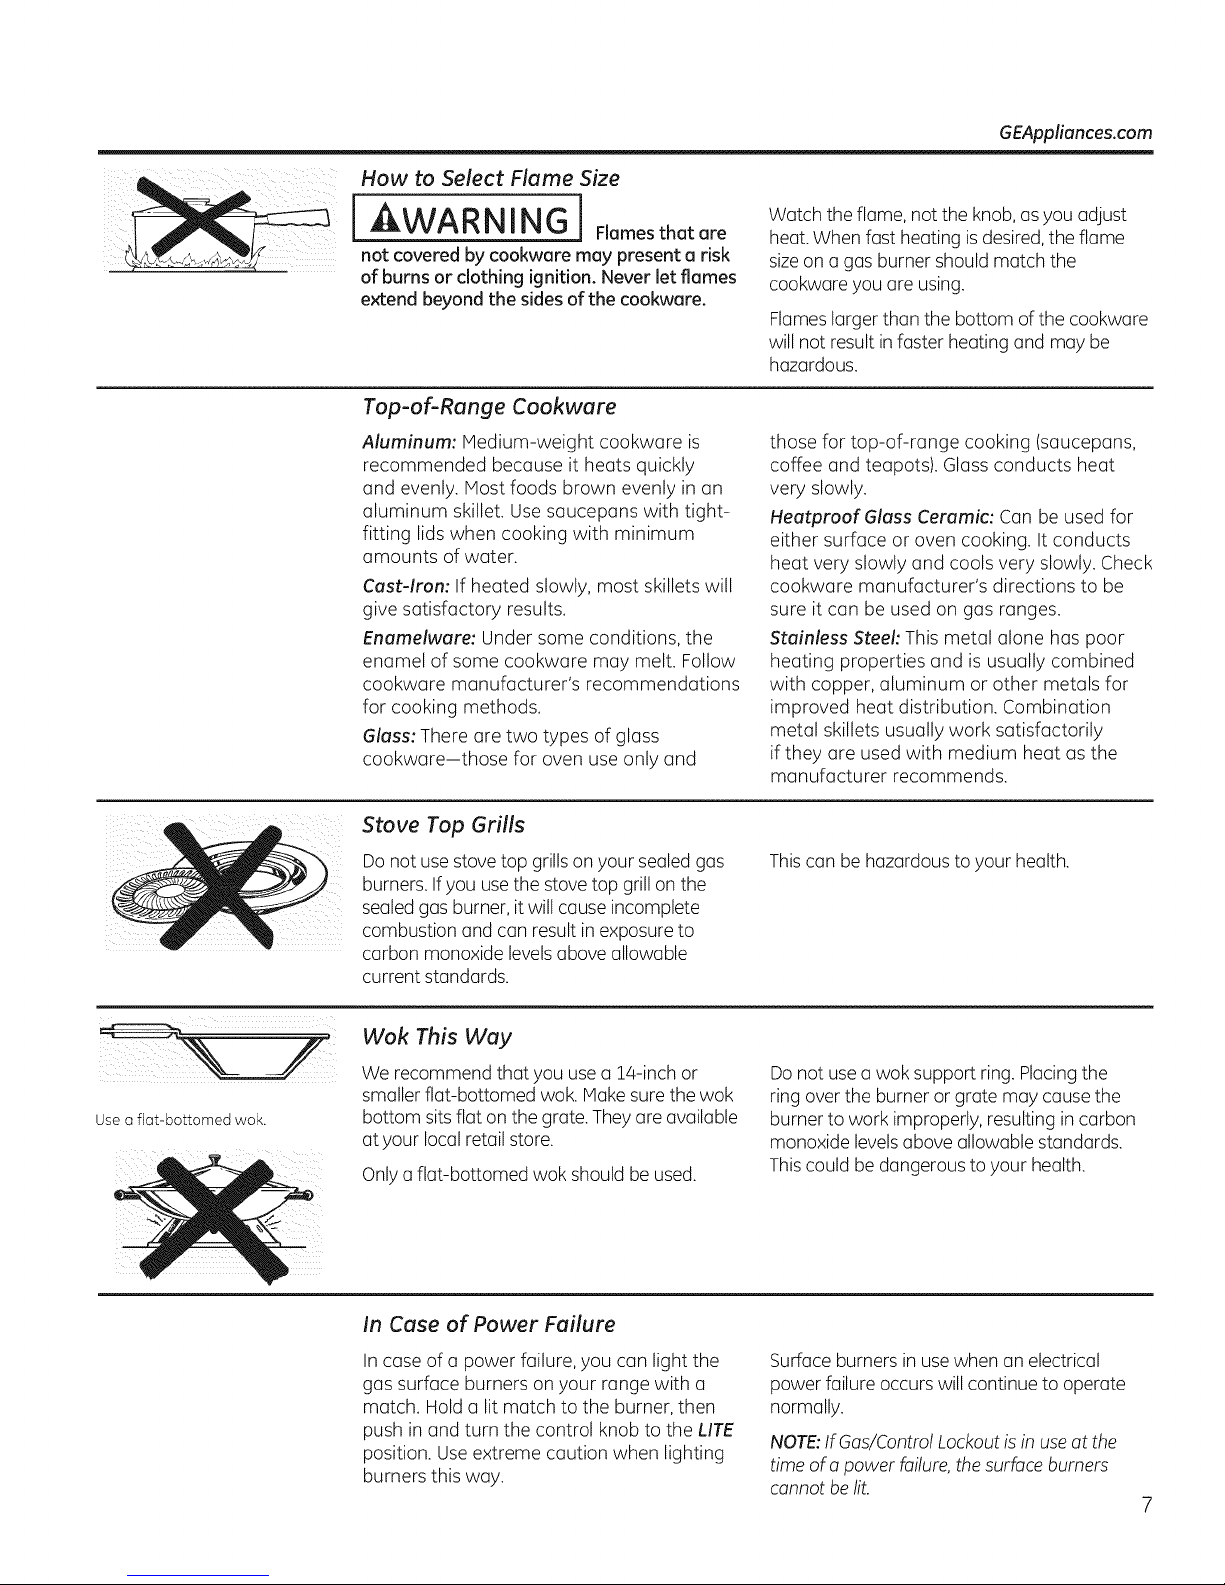
Use a fiat-bottomed wok.
Stove Top Grills
Do not usestove top grills on your sealedgas
burners. Ifyou use the stove top grill on the
sealedgas burner, it will cause incomplete
combustion and can result in exposure to
carbon monoxide levelsabove allowable
current standards.
Wok This Way
We recommend that you use a 14-inch or
smaller flat-bottomed wok. Make surethe wok
bottom sits flat on the grate. They are available
at your local retail store.
Onlya flat-bottomed wok should be used.
In Case of Power Failure
In case of a power failure, you can light the
gas surface burners on your range with a
match. Hold a lit match to the burner, then
push in and turn the control knob to the LITE
position. Use extreme caution when lighting
burners this way.
Thiscan be hazardous to your health.
Donot usea wok support ring. Placingthe
ring over the burner or grate may causethe
burner to work improperly, resulting in carbon
monoxide levelsabove allowable standards.
Thiscould be dangerous to your health.
Surface burners in use when an electrical
power failure occurs will continue to operate
normally.
NOTE:If Gas/ControlLockout is in useat the
time of a power failure,the surface burners
cannot be lit.
Page 8
Using the griddle, Consomemode sl
Your nonstick coated griddle or preseasoned
griddle (onsome models) provides an extra-large
cooking surface for meats, pancakes or other
food usually prepared in a frying pun or skillet.
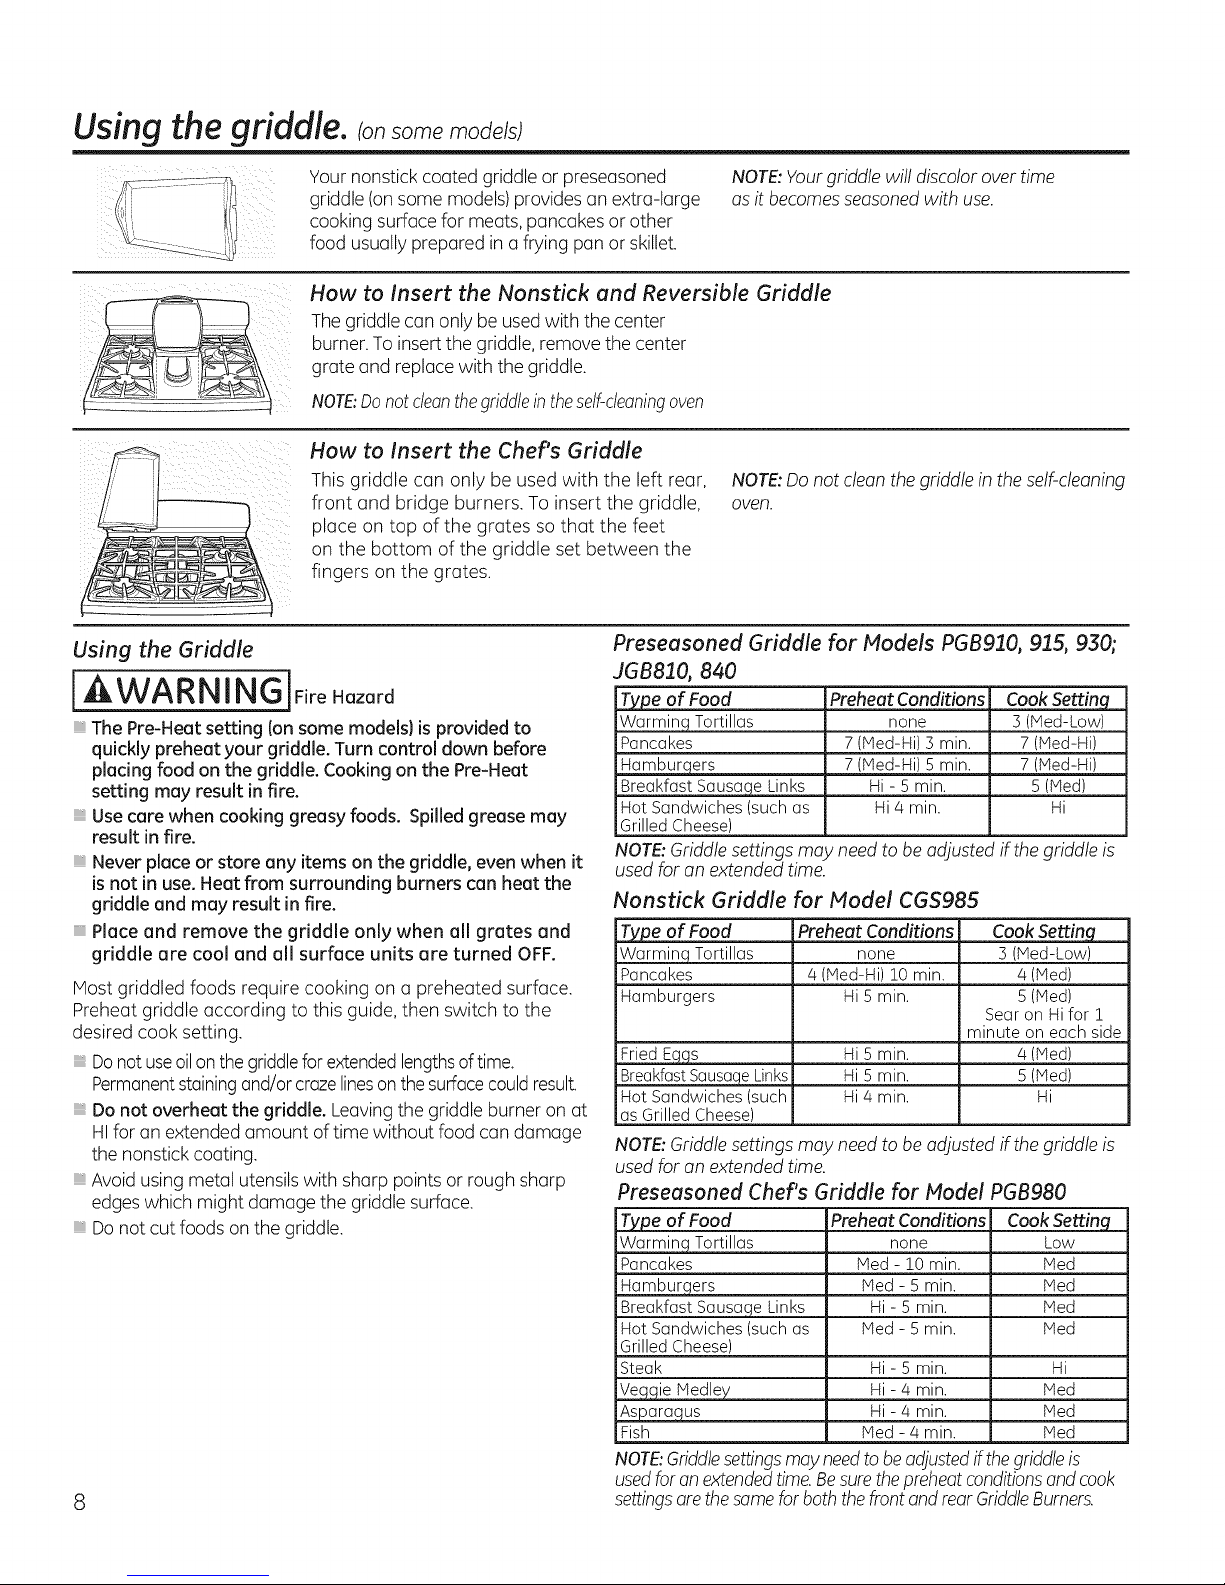
How to Insert the Nonstick end Reversible Griddle
The griddle can only be used with the center
burner. To insert the griddle, remove the center
grate and replace with the griddle.
NOTE:Donotcleanthegriddlein theself-cleaningoven
How to Insert the Chef's Griddle
This griddle can only be used with the left rear,
front and bridge burners. To insert the griddle,
place on top of the grates so that the feet
on the bottom of the griddle set between the
fingers on the grates.
Using the Griddle
[AWARNINGIFire,ozord
The Pre-Heat setting (on some models) is provided to
quickly preheat your griddle. Turn control down before
placing food on the griddle. Cooking on the Pre-Heat
setting may result in fire.
Usecare when cooking greasy foods. Spilled grease may
result in fire.
Never piece or store any items on the griddle, even when it
is not in use. Heat from surrounding burners con heat the
griddle end may result in fire.
Piece end remove the griddle only when oil grates end
griddle ore cool end oil surface units ore turned OFF.
Most griddled foods require cooking on a preheated surface.
Preheat griddle according to this guide, then switch to the
desired cook setting.
Donot useoilonthe griddlefor extendedlengthsof time.
Permanentstainingand/orcrazelineson thesurfacecouldresult.
Do not overheat the griddle. Leavingthe griddle burner on at
HIfor an extended amount of time without food can damage
the nonstick coating.
Avoid using metal utensilswith sharp points or rough sharp
edgeswhich might damage the griddle surface.
Donot cut foods on the griddle.
NOTE:Yourgriddle will discolor over time
as it becomesseasoned with use.
NOTE:Do not clean the griddle in theself-cleaning
oven.
Preseasoned Griddle for Models PGB910, 915, 930;
JAB810, 840
Type of Food Preheat Conditions CookSettin9
Warming Tortillas none 5(Med-Low)
Pancakes 7(Med-Hi)5 min. 7(Med-Hi)
Hamburgers 7(Med-Hi) 5 min. 7 (Med-Hi)
BreakfastSausageLinks Hi- 5 min. 5 (Med)
HotSandwiches(suchas Hi4 min. Hi
GrilledCheese)
NOTE:Griddlesettings may need to be adjusted if the griddle is
usedfor an extended time.
Nonstick Griddle for Model CGS985
Type of Food
Warming Tortillas
Pancakes
Hamburgers
Fried Eggs
BreakfastSausaqeLinks Hi5 min: 5 (Med)
Hot Sandwiches (such Hi/4 min. Hi
as Grilled Cheese)
Preheat Conditions
none
4 (Med-Hi) 10 min.
Hi 5 min.
Hi 5 min.
Cook Setting
3 (Med-Low)
4 (Med)
5 (Med)
Sear on Hifor 1
minute on each side
4 (Med)
NOTE:Griddlesettings may need to be adjusted if the griddle is
usedfor an extended time.
Preseasoned Chef's Griddle for Nodel PGB980
Type of Food
Warming Tortillas
Pancakes
Hamburgers
Breakfast Sausage Links
Hot Sandwiches (such as
Grilled Cheese)
Steak
Veggie Medley
Asparagus
Fish
PreheatConditions
none
Med- 10 min.
Med- 5 min.
Hi- 5 min.
Med- 5 min.
Hi- 5 min. Hi
Hi- 4 min. Med
Hi-/4 min. Med
Med- 4 min. Med
Cook Setting
Low
Med
Med
Med
Med
NOTE:Griddlesettingsmayneedto beadjustedifthe griddleis
usedfor an extendedtime.Besurethepreheatconditionsandcook
settingsarethesamefor boththe front andrearGriddleBurners.
Page 9
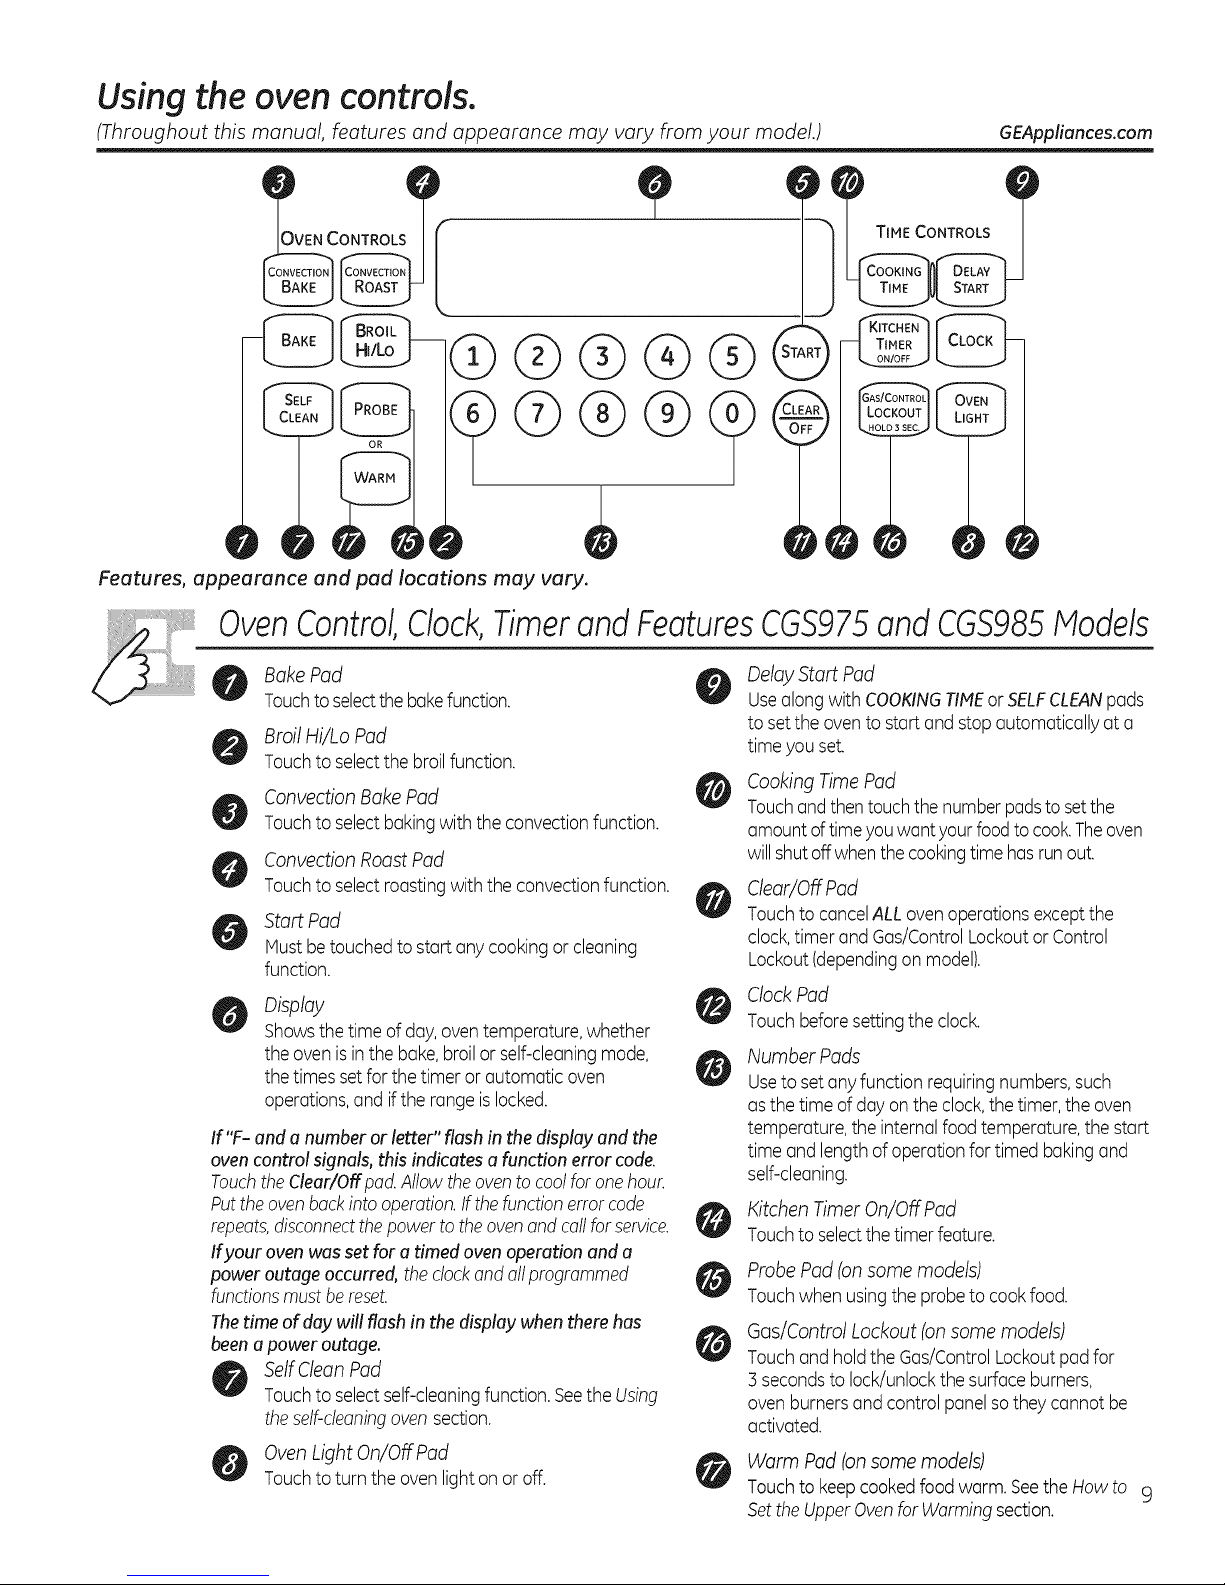
Using the ovencontrols.
(Throughout this manual, features and appearance may vary from your modd.) GEAppliances.com
0
q
Features, appearance and pad locations may vary.
OvenControl,Clock,TimerandFeaturesCGS975and CGS985,Ulode/s
Bake Pad
Touchto selectthebakefunction.
Broil Hi/Lo Pad
Touchto selectthe broilfunction.
Convection Bake Pad
Touchto select bakingwith the convectionfunction.
Convection RoastPad
Touchto select roastingwith the convectionfunction.
Start Pad
Mustbetouched to start any cookingor cleaning
function.
Display
Showsthe time of day,oventemperature,whether
theoven isin the bake,broil or self-cleaningmode,
thetimes set forthe timer or automatic oven
operations,and if the rangeis locked.
If "F- and a number or letter" flash in the display and the
oven control signals, this indicates a function error code.
TouchtheClear/Offpad. Allowthe ovento coolfor onehour.
Putthe ovenbackinto operation.If thefunctionerror code
repeats,disconnectthepowerto theovenand calfforserdce.
Ifyour oven was set for a timed oven operation and a
power outage occurred, the clockandattprogrammed
functionsmustbe reset.
Thetime of day will flash in the display whenthere has
beena power outage.
SelfClean Pad
Touchto select self-cleaningfunction.Seethe Using
thestir-cleaningovensection.
Oven Light On/Off Pad
Touchto turn the oven lighton or off.
@
®
®@
)
Delay Start Pad
Usealong with COOKINGTIMEorSELFCLEANpads
to setthe ovento start and stopautomatically at a
time you set.
Cooking Time Pad
Touchandthentouchthe numberpadsto setthe
amount oftimeyou wantyourfood to cook.Theoven
willshutoff whenthe cookingtimehas runout.
Clear/Off Pad
Touchto cancelALL ovenoperationsexceptthe
clock,timer and Gas/ControlLockoutor Control
Lockout(dependingonmodel).
Clock Pad
Touchbeforesettingthe clock.
Number Pads
Useto setany function requiringnumbers,such
asthe time of day on theclock,the timer,theoven
temperature,the internalfood temperature,the start
time and lengthof operationfor timed bakingand
self-cleaning.
Kitchen Timer On/Off Pad
Touchto selectthetimer feature.
Probe Pad (on some models)
Touchwhen usingthe probeto cookfood.
Gas/Control Lockout (onsome models)
Touchand holdthe Gas/ControlLockoutpad for
3 secondsto lock/unlockthe surfaceburners,
oven burnersand control panelsothey cannot be
activated.
Warm Pad (on some models)
Touchto keepcookedfood warm. SeetheHow to 9
Setthe UpperOvenfor Warmingsection.
Page 10
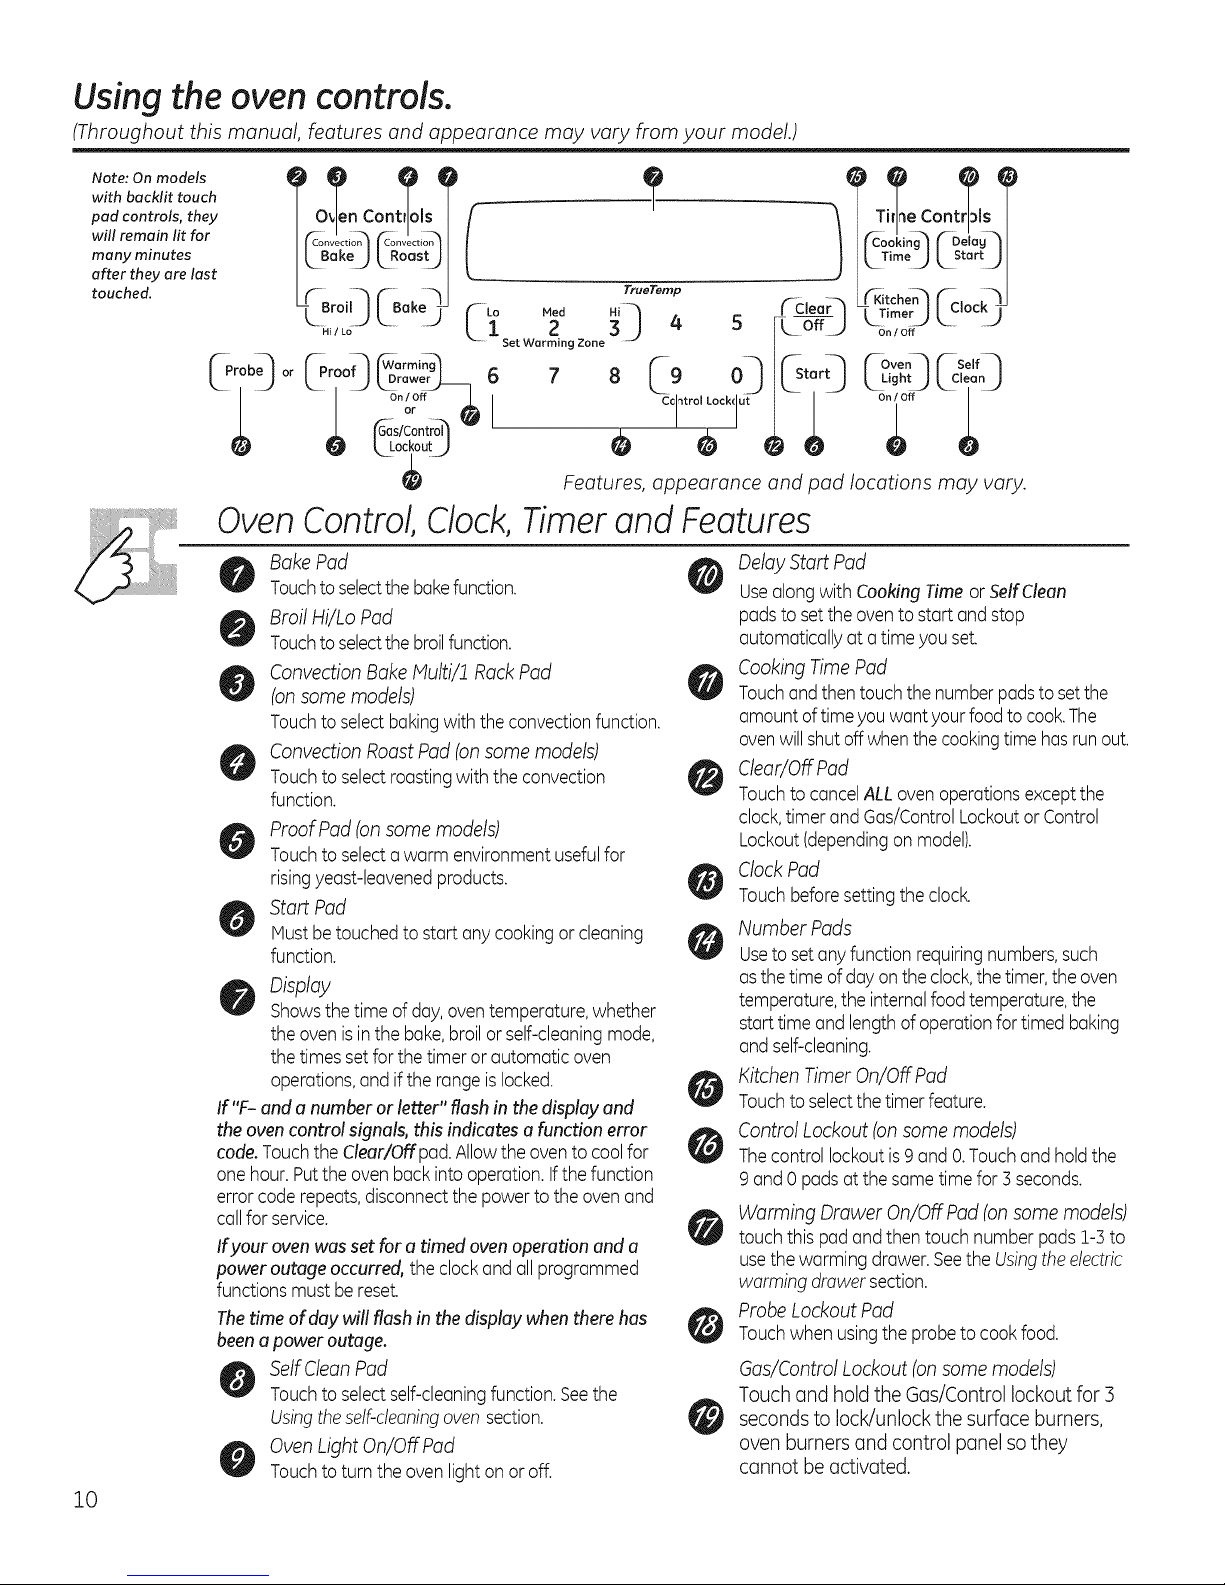
Using the ovencontrols.
(Throughout this manual, features and appearance may vary from your modd.)
with backlit touch
0 _,_i_oir _e¢ontr_ly_.,i_
many minutes
pad controls, they n Con s I
will remain lit for I _a'l_tio_ _Rno_asi_ I
after they are last
roi ak
Hi / Lo _.
_Probe_ or _roof_ _D'°rram_
ivied
Lo
6 7
2
Set Warming Zone
TrueTemp L_._Cher_ _€,ock _:
4 5 [-L--6_J oo/o,
oq o, oZ rG oO
okin_'/F-polo
J I_. Tire° J [.. Start J I
lO
i _-asl_r°ntr°_ _
I oo,o, " _L
Oven Control, Clock,
BakePad
Touchto selectthebakefunction.
Broil Hi/Lo Pad
Touchto selectthebroilfunction.
Convection Bake Multi/1 RackPad
(on some models)
Touchto selectbakingwith the convectionfunction.
Convection Roast Pad (on some models)
Touchto select roastingwith the convection
function.
Proof Pad (onsome models)
Touchto select awarm environmentusefulfor
risingyeast-leavenedproducts.
Start Pad
Mustbetouched to start any cookingor cleaning
function.
Display
Showsthetime of day,oventemperature,whether
the oven isin the bake,broil orself-cleaningmode,
thetimes set forthe timer or automatic oven
operations,and if the rangeis locked.
If "F- and a number or letter" flashin thedisplay and
the oven control signals,this indicates a function error
code.Touchthe Clear/Offpad. Allowthe ovento coolfor
one hour.Puttheoven back intooperation.Ifthe function
error coderepeats,disconnectthepower to the ovenand
callfor service.
Ifyour oven was set for a timed oven operation and a
power outage occurred,the clockand all programmed
functionsmust be reset.
Thetime of day will flash in the display whenthere has
beena power outage.
Self Clean Pad
Touchto select self-cleaningfunction.Seethe
Usingtheself-cleaningoven section.
OvenLight On/Off Pad
Touchto turn the oven lighton or off.
Timerand Features
o o;; ;
Features, appearance and pad locations may vary.
HL°,ho J
Delay Start Pad
Usealongwith CookingTime or SdfClean
padsto setthe ovento start and stop
automaticallyat a time youset.
Cooking Time Pad
Touchandthentouch the numberpadsto setthe
amount oftimeyou want yourfood to cook.The
ovenwill shutoff whenthe cookingtime hasrunout.
Clear/Off Pad
Touchto cancelALLoven operationsexceptthe
clock,timer and Gas/ControlLockoutor Control
Lockout(dependingon model).
ClockPad
Touchbeforesetting the clock.
Number Pads
Useto setany function requiringnumbers,such
asthe time ofday onthe clock,the timer,the oven
temperature,the internalfoodtemperature,the
starttime and length ofoperationfor timed baking
and self-cleaning.
Kitchen Timer On/Off Pad
Touchto selectthe timerfeature.
Control Lockout (onsome models)
Thecontrol lockout is9 and 0. Touchand holdthe
9 and 0 padsat thesametime for 3 seconds.
Warming Drawer On/Off Pad (on some models)
touch this pad andthen touch number padsZ-3to
usethe warming drawer.Seethe Usingthe electric
warming drawersection.
Probe Lockout Pad
Touchwhen usingthe probeto cook food.
Gas/Control Lockout (onsome models)
Touch and hold the Gas/Control lockout for :3
seconds to lock/unlock the surface burners,
oven burners and control panel so they
cannot be activated.
Page 11
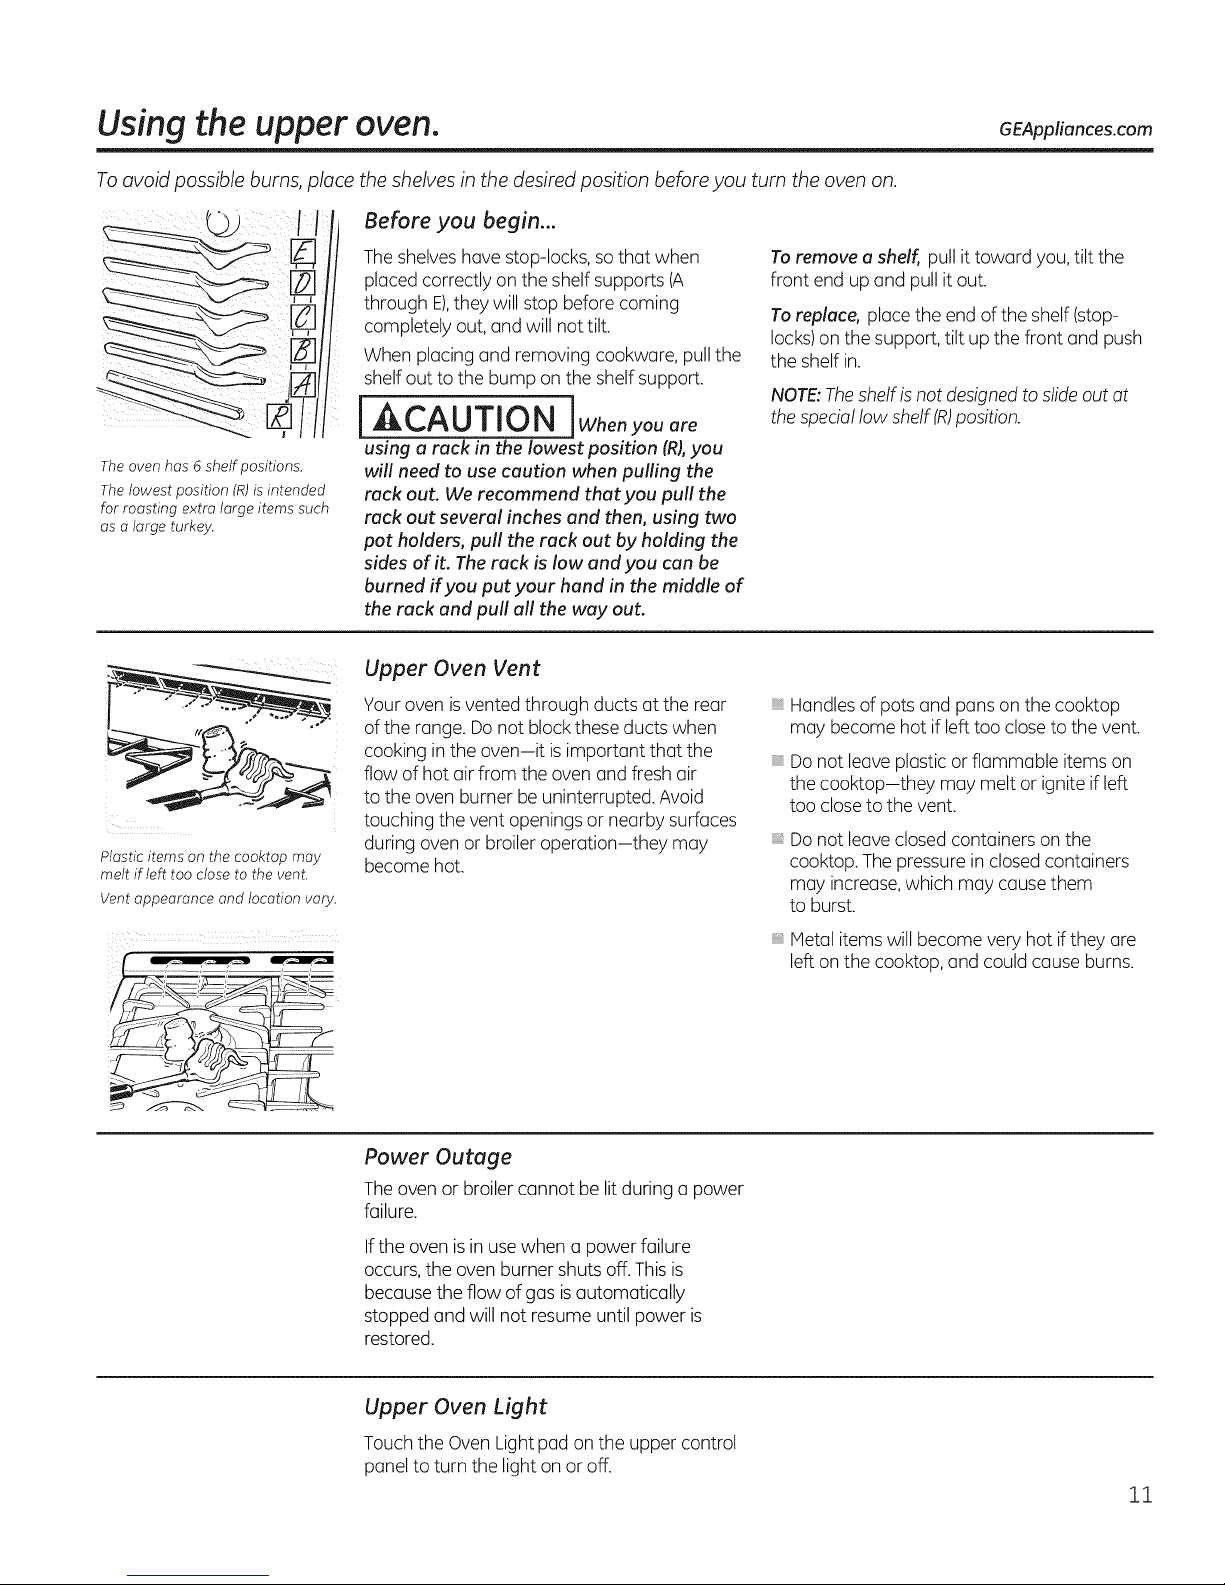
Using the upper oven. GEAppliances.com
To avoid possible burns, place
I I
The oven has 6 shelf positions.
The lowest position (R)is intended
for roasting extra large items such
as a large turkey.
Plastic items on the cooktop may
melt if left too close to the vent.
Vent appearance and location vary.
the shelves in the desired position before you tam the oven on.
Before you begin...
Theshelves have stop-locks, so that when
placed correctly on the shelf supports (A
through E),they will stop before coming
completely out, and will not tilt.
When placing and removing cookware, pull the
Toremove a shelf, pull ittoward you, tilt the
front end up and pull it out.
To replace, place the end of the shelf (stop-
locks) on the support, tilt up the front and push
the shelf in.
shelf out to the bump on the shelf support.
NOTE:Theshelf isnot designedto slideout at
[ACAUTION jWhenyouare
thespecial low shelf (R)position.
using a rock in the lowest position (R),you
will need to use caution when pulling the
rack out. We recommend that you pull the
rack out several inches and then, using two
pot holders, pull the rack out by holding the
sides of it. The rack is low and you can be
burned if you put your hand in the middle of
the rack and pull all the way out.
Upper Oven Vent
Your oven is vented through ducts at the rear
of the range. Do not block theseducts when
cooking inthe oven-it isimportant that the
flow of hot air from the oven and fresh air
to the oven burner be uninterrupted. Avoid
touching the vent openings or nearby surfaces
during oven or broiler operation-they may
become hot.
Handlesof pots and pans on the cooktop
may become hot if left too closeto the vent.
Donot leaveplastic or flammable items on
the cooktop-they may melt or ignite if left
too closeto the vent.
Donot leaveclosed containers on the
cooktop, The pressure in closed containers
may increase,which may cause them
to burst.
Power Outage
Theoven or broiler cannot be litduring a power
failure.
If the oven isin use when a power failure
occurs,the oven burner shuts off. Thisis
because the flow of gas is automatically
stopped and will not resume until power is
restored.
Upper Oven Light
Touch the Oven Light pad on the upper control
panel to turn the light on or off.
Metal items will become very hot ifthey are
left on the cooktop, and could cause burns.
11
Page 12
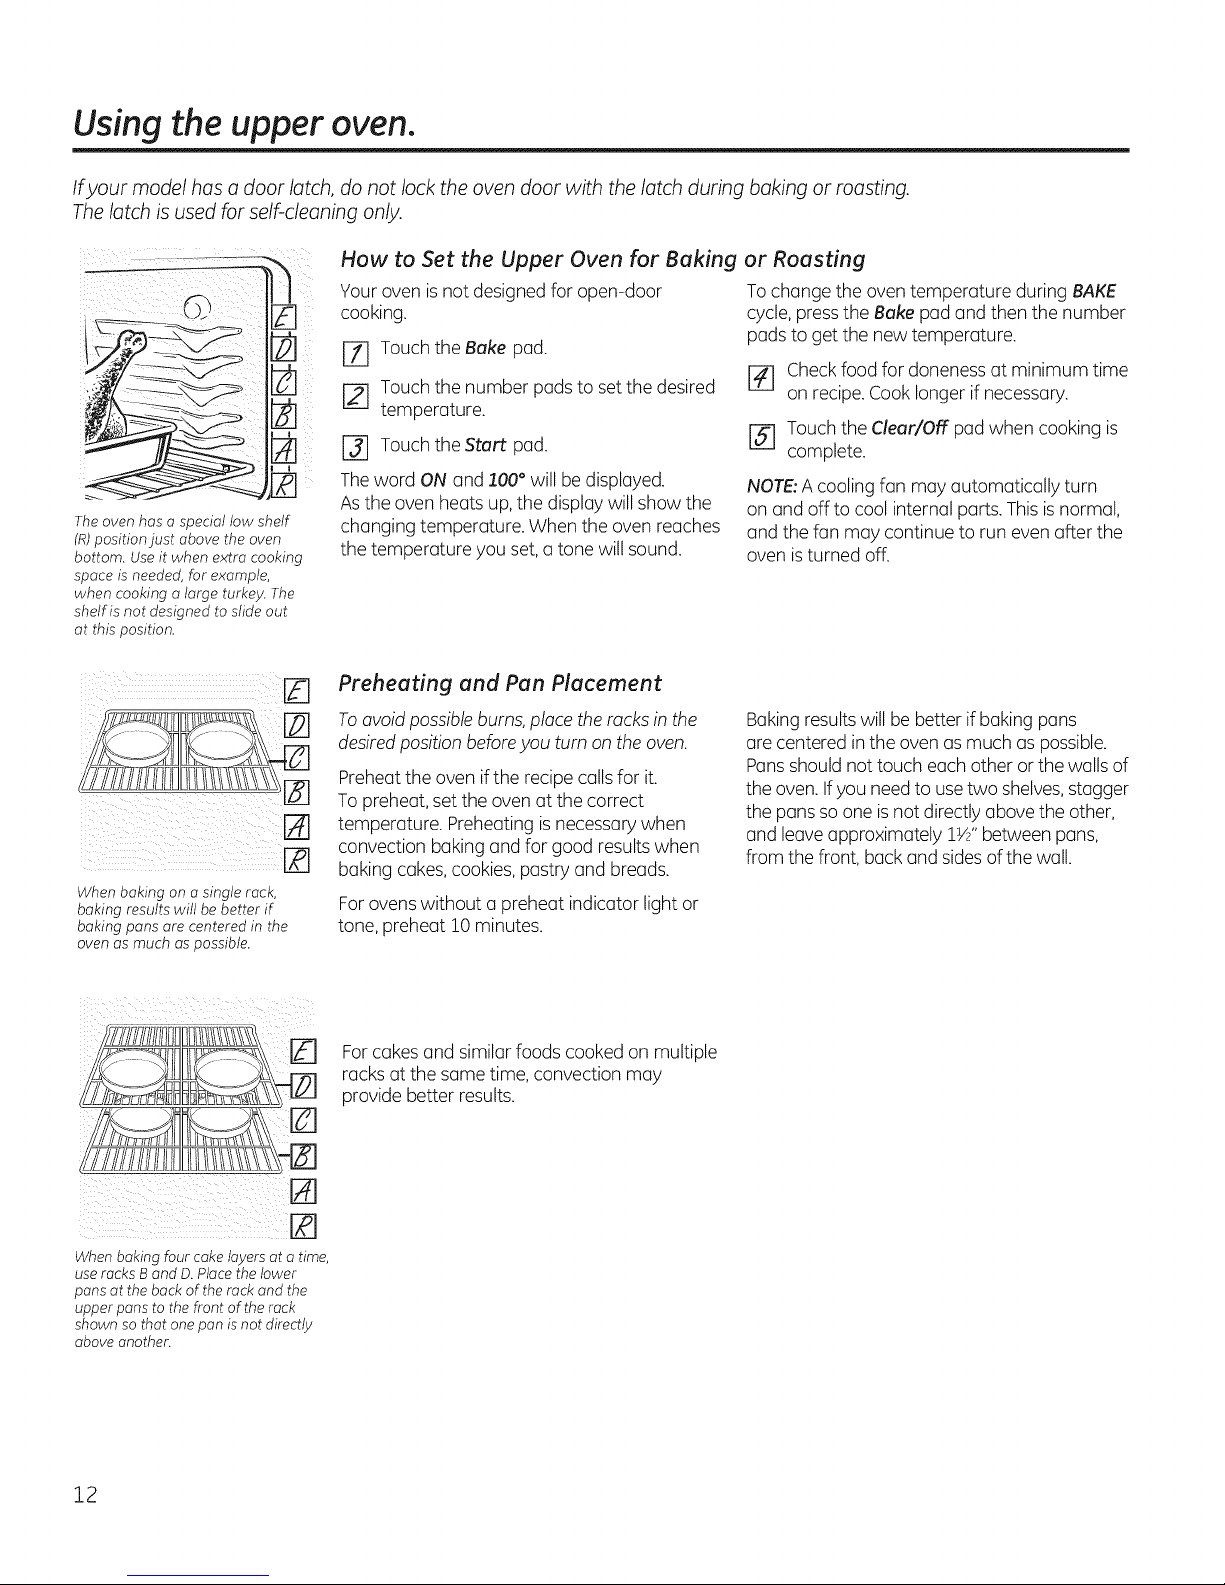
Using the upper oven.
Ifyour model has a door latch, do not lock the oven door with the latch during baking or roasting.
The latch is used for self-cleaning only.
The oven has o special low shelf
(R)position just above the oven
bottom. Use it when extra cooking
space is needed, for example,
when cooking o large turkey. The
shelf is not designed to slide out
at this position.
When baking on a single rack,
baking results will be better if
baking pans ore centered in the
oven as much as possible.
How to Set the Upper Oven for Baking
Your oven is not designed for open-door
cooking.
r-_ Touch the Bake pad.
[2--1Touch the number pads to set the desired
temperature.
[] Touch the Start pad.
The word ON and 100° willbe displayed.
As the oven heats up, the display willshow the
changing temperature. When the oven reaches
the temperature you set, a tone willsound.
Preheating and Pan Placement
To avoid possible burns, place the racks in the
desired position before you turn on the oven.
Preheatthe oven if the recipe calls for it.
To preheat, set the ovenat the correct
temperature. Preheatingis necessary when
convection baking and for good resultswhen
baking cakes,cookies, pastry and breads.
Forovens without a preheat indicator light or
tone, preheat !O minutes.
or Roasting
To change the oven temperature during BAKE
cycle, press the Bake pad and then the number
pads to get the new temperature.
[] Checkfood for doneness at minimum time
on recipe.Cook longer if necessary.
[] Touch the Clear/Off pad when cookingis
complete.
NOTE:Acooling fan may automatically turn
on and off to cool internal parts. Thisisnormal,
and the fan may continue to run even after the
oven is turned off.
Bakingresults will be better if baking pans
are centered in the oven as much aspossible.
Pansshould not touch each other or the walls of
the oven. Ifyou needto use two shelves,stagger
the pans so one is not directly above the other,
and leaveapproximately 1W' between pans,
from the front, back and sides ofthe wall.
Forcakes and similar foods cooked on multiple
racksat the same time, convection may
provide better results.
When baking four cake layers at a time,
use rocks B and D.Place the lower
pans at the back of the rack and the
upper pons to the front of the rack
shown so that onepan is not directly
above another.
12
Page 13
Aluminum Foil
GEAppliances.com
Do not use aluminum foil to line oven bottoms.
Thefoil will trap heat below and upset the
performance of the oven. Foilcan melt and
permanently damage the oven bottom.
Damage from improper use of aluminum foil is
not covered by the product warranty.
Foilmay be used to catch spillsby placing a
sheet on a lower rack, several inches below
the food .Donot use more foil than necessary
and never entirely cover an oven rack with
aluminum foil. Keepfoil at least 1-!/2" from
oven walls to permit heat circulation.
Oven Moisture
Asyour oven heats up, the temperature change
of the air in the oven may cause water droplets
to form on the door glass.These droplets
are harmlessand will evaporate as the oven
continues to heat up.
Ifyour model has a door latch, do not lock the oven door with the latch during broiling.
The latch is used for self-cleaning only.
How to Set the Upper Oven for Broiling
il _ii IL
i i
iii i
Closethedoor: Always broil with
the door closed.
Place the meat or fish on a broiler grid in
[Z] a broiler pun.
[] Follow suggested shelf positions in the
Broiling Guide.
[_ The oven door must be closed during
broiling.
[_ Touchthe Broil Hi/Lo pad oncefor
Hi Broil.
To change to Lo Broil, touch the Broil Hi/
Lo pad again.
r_ Touchthe Start pad. A "CLOSEdoor"
reminder is displayed.
[] When broiling isfinished,touch the Clear/
Offpad.
Servethe food immediately, and leavethe pan
outside the oven to cool during the meal for
easiest cleaning.
UseLo Broilto cook foods such as poultry
or thick cuts of meat thoroughly without over-
browning them.
13
Page 14
Using the upper oven.
Broiling Guide
The size,weight, thickness, cut, starting
temperature and personal preference of
doneness will affect broiling times.Thisguide
isintended asa general recommendation and
isbased on meats at refigerator temperature.
Preheatingthe broiler 910 minutes is
recommended.
Adjust rack position or broil setting to
achieve different results.
For greater searing and less internal
doneness:
• Preheat the broiler for 10 minutes
• Use rack positions closer to the broiler
• Use Broil Hi setting
For less searing, meat that iscooked
through and thicker cuts of meat:
• Use rack positions farther from the broiler.
•Try broil low setting.
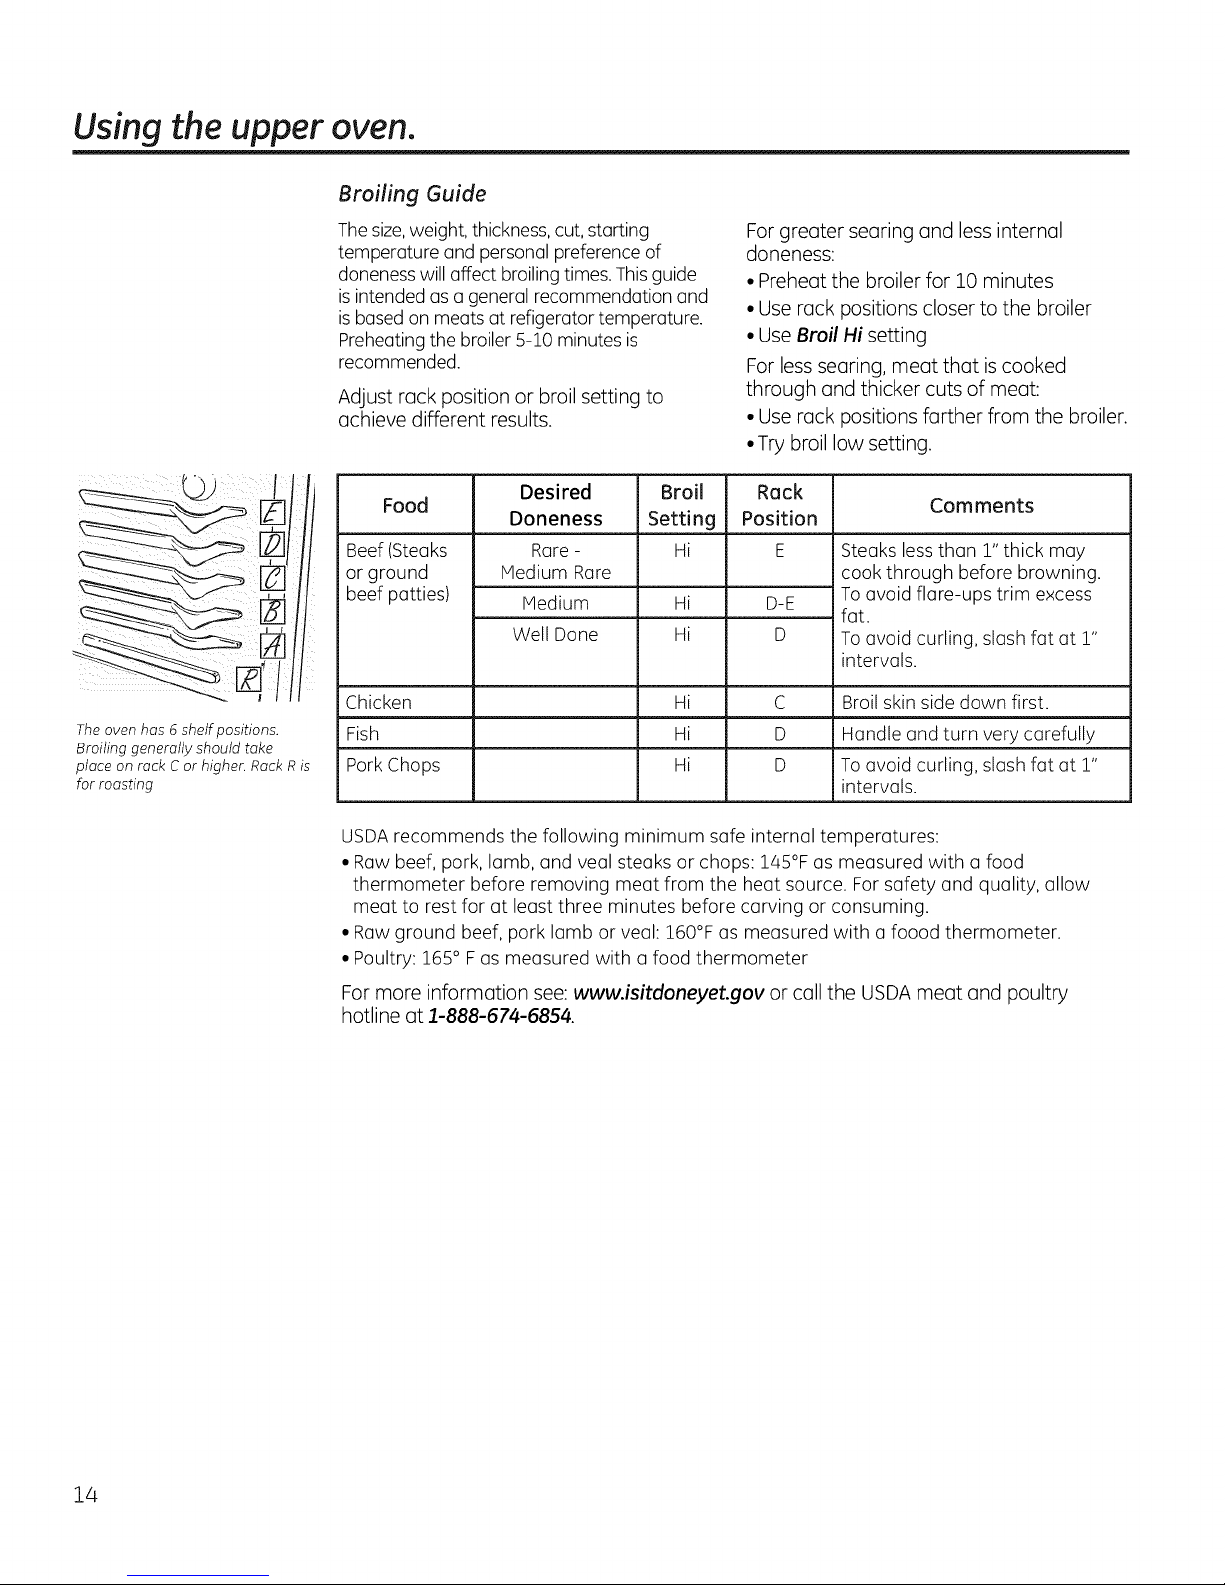
The oven has 6 shelf positions.
Broiling generally should take
place on rack Cor higher. Rack R is
for roasting
Food
Beef (Steaks
or ground
beef patties)
Desired
Doneness
Rare -
Medium Rare
Medium
Well Done
Broil Rack
Setting Position
Hi E
Hi D-E
Hi D
Comments
Steaks less than 1"thick may
cook through before browning.
Toavoid flare-ups trim excess
fat.
Toavoid curling, slash fat at 1"
intervals.
Chicken Hi C Broil skin side down first.
Fish Hi D Handle and turn very carefully
PorkChops Hi D Toavoid curling, slash fat at 1"
intervals.
USDArecommends the following minimum safe internal temperatures:
• Rawbeef, pork, lamb, and veal steaks or chops: 145°Fas measured with a food
thermometer before removing meat from the heat source. For safety and quality, allow
meat to rest for at least three minutes before carving or consuming.
• Rawground beef, pork lamb or veal: 160°F as measured with a foood thermometer.
• Poultry: 165° Fas measured with a food thermometer
For more information see: www.isitdoneyet.gov or call the USDA meat and poultry
hotline at 1-888-674-6854.
14
Page 15
Using the clock and timer. GEAppliances.com
Not all features are on all models.
To Set the Clock
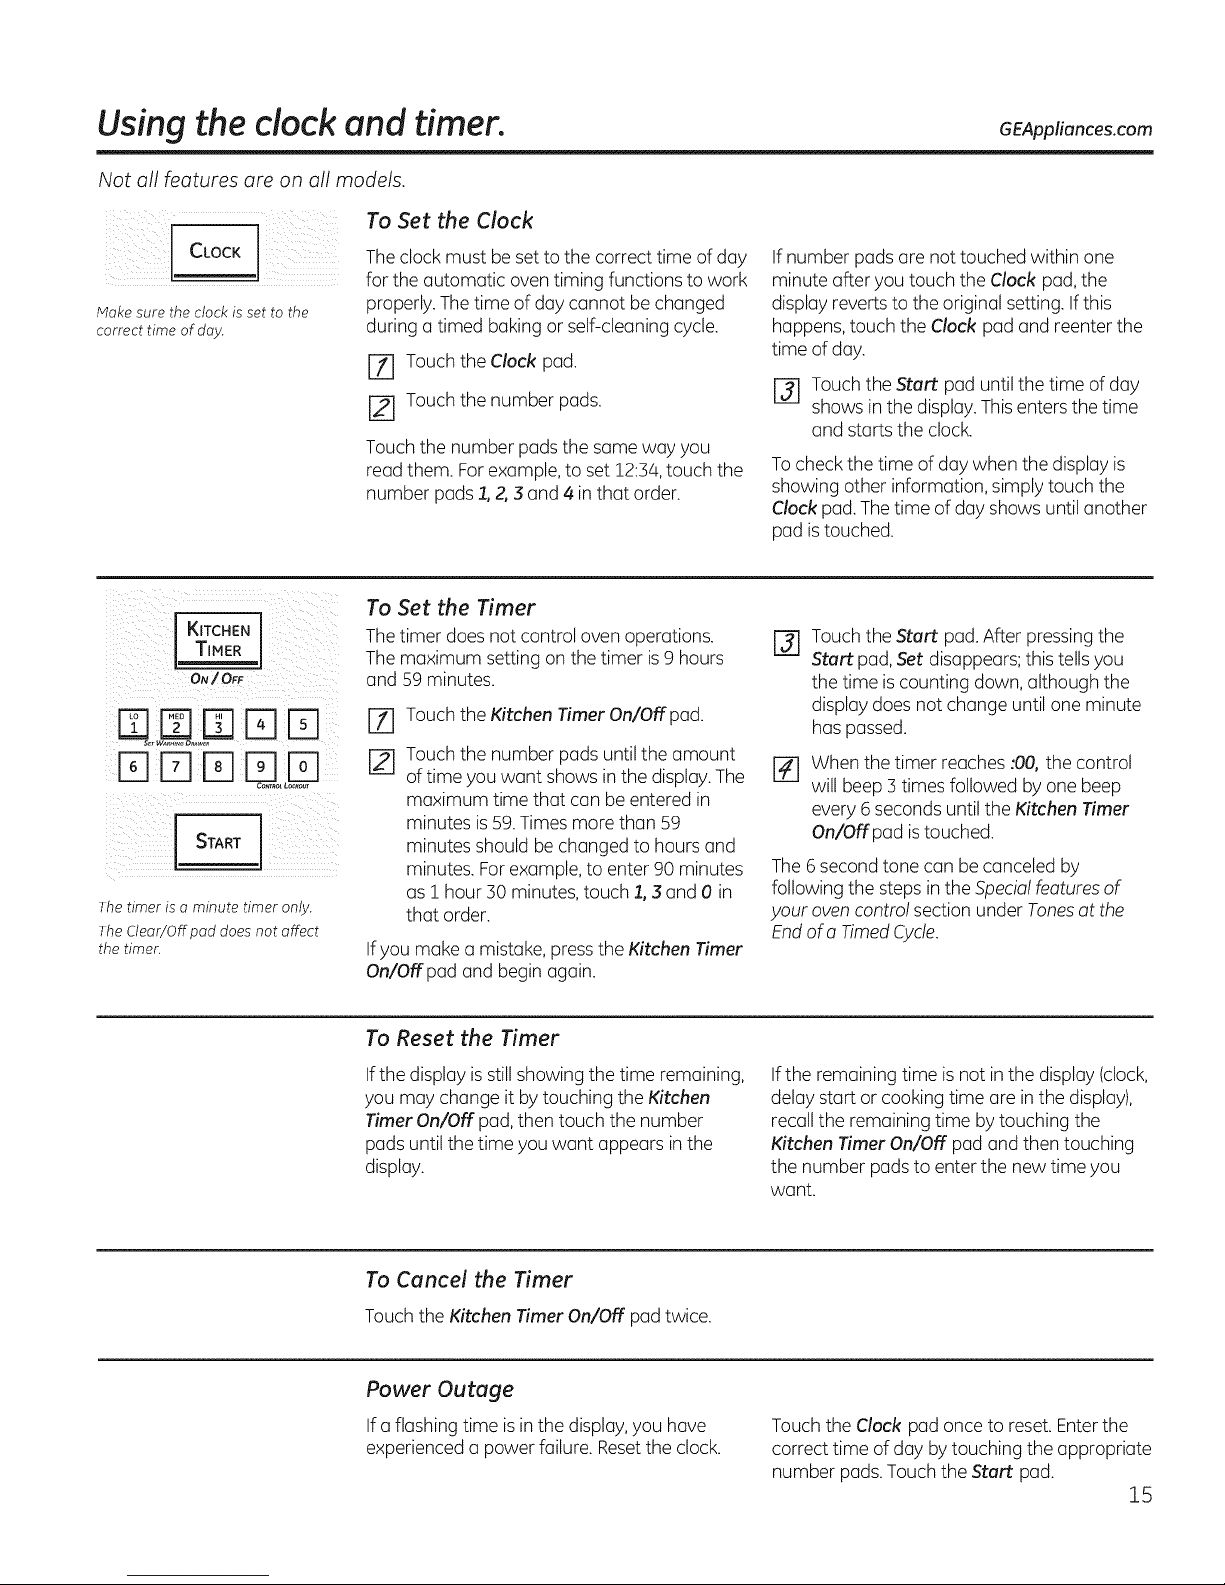
/J c ocK
Make sure the clock is set to the
correct time of day.
START
The timer is a minute timer only.
The Clear/Off pad does not affect
the timer.
Theclock must be set to the correct time of day
for the automatic oventiming functions to work
properly.Thetime of day cannot be changed
during a timed baking or self-cleaning cycle.
[] Touchthe Clock pad.
[] Touchthe number pads.
Touch the number pads the same way you
read them. For example,to set 12:34,touch the
number pads 1,2, 3 and 4 in that order.
To Set the Timer
Thetimer does not control oven operations.
The maximum setting on the timer is9 hours
and 59 minutes.
Touchthe Kitchen Timer On/Off pad.
%
Touchthe number pads until the amount
of time you want shows in the display.The
maximum time that can be entered in
minutes is 59.Times more than 59
minutes should be changed to hours and
minutes. Forexample, to enter 90 minutes
as ! hour 30 minutes, touch 1,3 and 0 in
that order.
Ifyou make a mistake, pressthe Kitchen Timer
On/Offpad and begin again.
If number pads are not touched within one
minute after you touch the Clock pad, the
display revertsto the original setting. If this
happens,touch the Clock pad and reenter the
time of day.
[] Touch the Start pad untilthe time of day
shows in the display.Thisenters the time
and starts the clock.
Tocheck the time of day when the displayis
showing other information, simply touch the
Clock pad. Thetime of day shows until another
pad istouched.
Touch the Start pad. After pressingthe
@
Start pad, Set disappears;this tells you
the time is counting down, although the
display doesnot change until one minute
haspassed.
When the timer reaches :00, the control
%
will beep 3 times followed byone beep
every 6 seconds until the Kitchen Timer
On/Off pad istouched.
The6 second tone can be canceled by
following the steps in the Specialfeaturesof
your oven control section under Tonesat the
End of a TimedCycle.
To Reset the Timer
Ifthe display is still showing the time remaining,
you may change it by touching the Kitchen
Timer On/Off pad, then touch the number
pads until the time you want appears in the
display.
To Cancel the Timer
Touch the Kitchen Timer On/Off pad twice.
Power Outage
Ifa flashing time is in the display, you have
experienced a power failure. Reset the clock.
If the remaining time isnot in the display (clock,
delay start or cooking time are inthe display),
recallthe remaining time by touching the
Kitchen Timer On/Off pad and then touching
the number padsto enter the new time you
want.
Touch the Clock pad once to reset.Enterthe
correct time of day by touching the appropriate
number pads.Touch the Start pad.
15
Page 16
Using the timed baking and roasting features, upperovenonU
Ifyour model has a door latch, do not lock the oven door with the latch during timed cooking. The latch is used for self-
cleaning only.
NOTE: Foods that spoil easily-such as milk, eggs, fish, stuffings, poultry and pork-should not be allowed to sit for more
than ;_hour before or after cooking. Room temperature promotes the growth of harmful bacteria. Be sure that the oven
light is off because heat from the bulb will speed harmful bacteria growth.
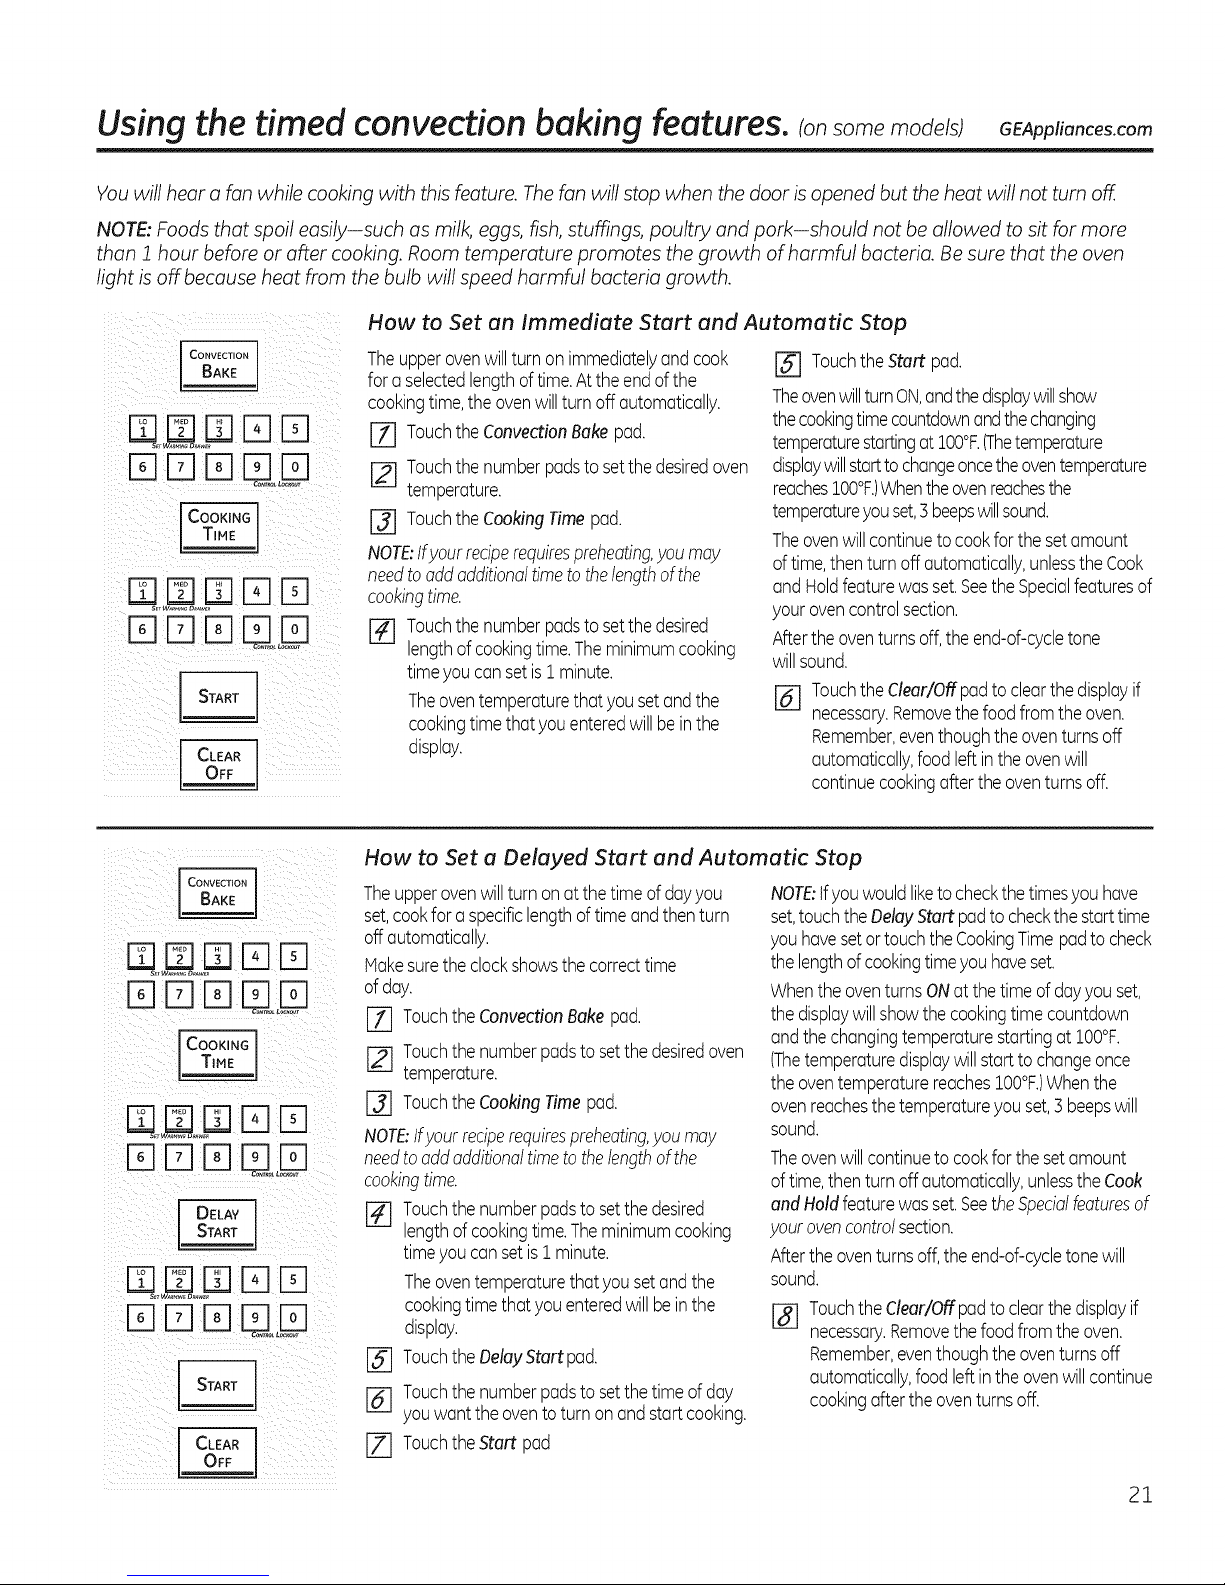
How to Set an Immediate Start and Automatic Stop
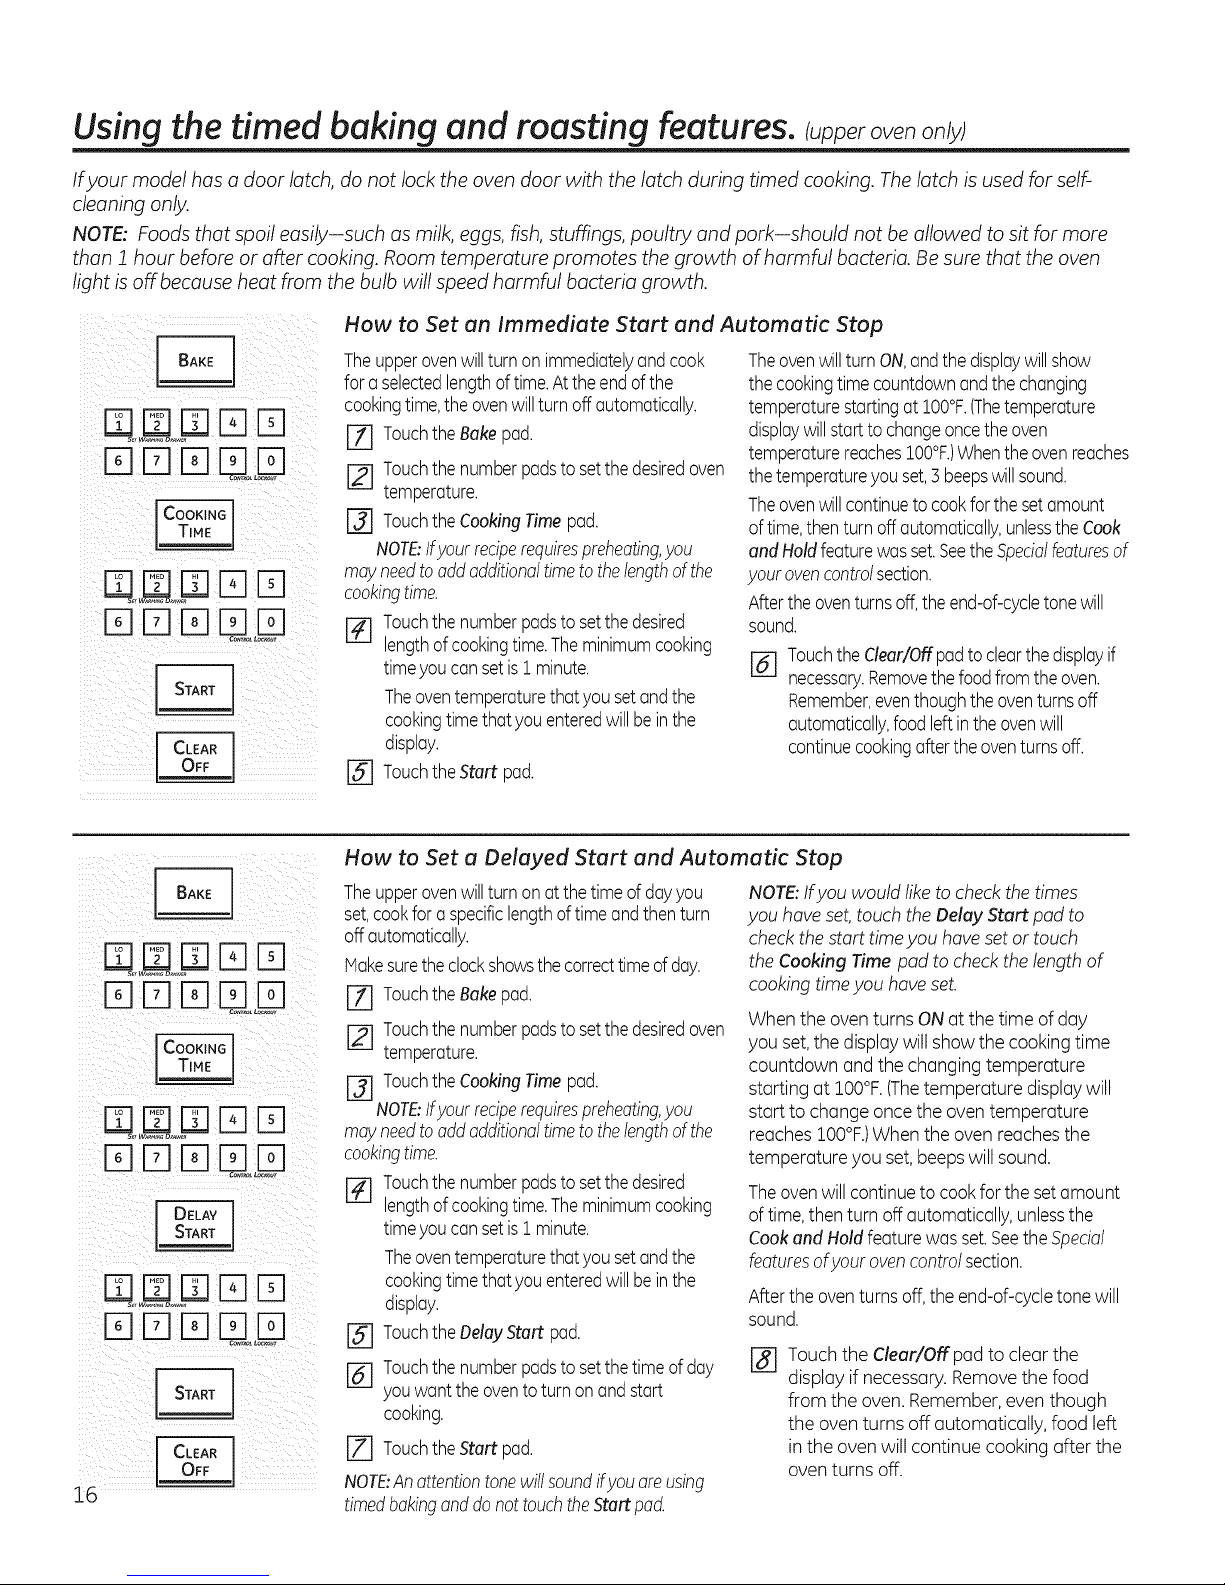
Dmma D
DmD L
Theupperovenwillturn on immediatelyandcook
fora selectedlengthoftime.Attheendof the
cookingtime,the ovenwillturnoffautomatically.
[] TouchtheBakepad.
[] Touchthenumberpadstosetthe desiredoven
temperature.
[] TouchtheCookingTimepad.
NOTE:If#our reciperequirespreheating,you
mayneedtoaddadditionaltimetothe lengthofthe
cookingtime.
r4l Touchthenumberpadsto setthedesired
lengthofcookingtime.Theminimumcooking
timeyoucansetis1 minute.
Theoventemperaturethatyou setandthe
cookingtimethat youenteredwillbein the
display.
[] TouchtheStart pad.
Theovenwillturn ON,andthe displaywillshow
thecookingtimecountdownandthechanging
temperaturestartingat IO0°F.(Thetemperature
displaywillstartto changeoncetheoven
temperaturereachesIO0°F.)Whentheovenreaches
thetemperatureyouset,3 beepswillsound.
Theovenwillcontinueto cookforthe setamount
oftime,thenturn off automatically,unlesstheCook
andHoldfeaturewasset.SeetheSpecialfeaturesof
yourovencontrolsection.
Aftertheoventurnsoff,the end-of-cycletone will
sound.
[] TouchtheClear/Offpadtoclearthedisplayif
necessary.Removethefoodfromtheoven.
Remember,eventhoughtheoventurnsoff
automatically,foodleftintheovenwill
continuecookingaftertheoventurnsoff.
How to Set a Delayed Start and Automatic Stop
Theupperovenwillturn on atthe timeofdayyou
set,cookfor aspecificlengthof timeandthenturn
off automatically.
Hakesuretheclockshowsthe correcttimeof day.
TouchtheBakepad.
Touchthenumberpadsto setthedesiredoven
temperature.
TouchtheCookingTimepad.
NOTE:Ifyourreciperequirespreheating,you
mayneedtoaddadditionaltimetothe lengthofthe
cookingtime.
r41 Touchthenumberpadstosetthedesired
lengthofcookingtime.Theminimumcooking
timeyoucansetis1 minute.
Theoventemperaturethat yousetandthe
cookingtimethat youenteredwillbein the
display.
r_ TouchtheDelayStart pad.
[_] Touchthenumberpadstosetthetime ofday
youwantthe ovento turnonand start
cooking.
[] TouchtheStart pad.
NOTE:Anattentiontonewillsoundifyouareusing
timedbakinganddonot touchtheStartpad.
NOTE:Ifyou would like to check the times
you have set,touch the Delay Start pad to
checkthe start timeyou have setor touch
the Cooking Time pad to checkthe length of
cooking time you have set.
Whenthe oven turns ON at the time of day
you set,the display will show the cookingtime
countdown and the changing temperature
starting at IO0°F.(Thetemperature displaywill
start to change once the oven temperature
reaches IO0°F.)When the oven reachesthe
temperature you set,beeps willsound.
Theovenwill continueto cookfor the setamount
oftime, thenturn off automatically,unlessthe
Cookand Holdfeaturewas set.SeetheSpecial
featuresofyour ovencontrolsection.
Aftertheoven turnsoff,the end-of-cycletonewill
sound.
Touch the Clear/Offpad to clear the
raq
display if necessary. Removethe food
from the oven. Remember,even though
the oven turns off automatically, food left
in the oven will continue cooking after the
oventurns off.
Page 17
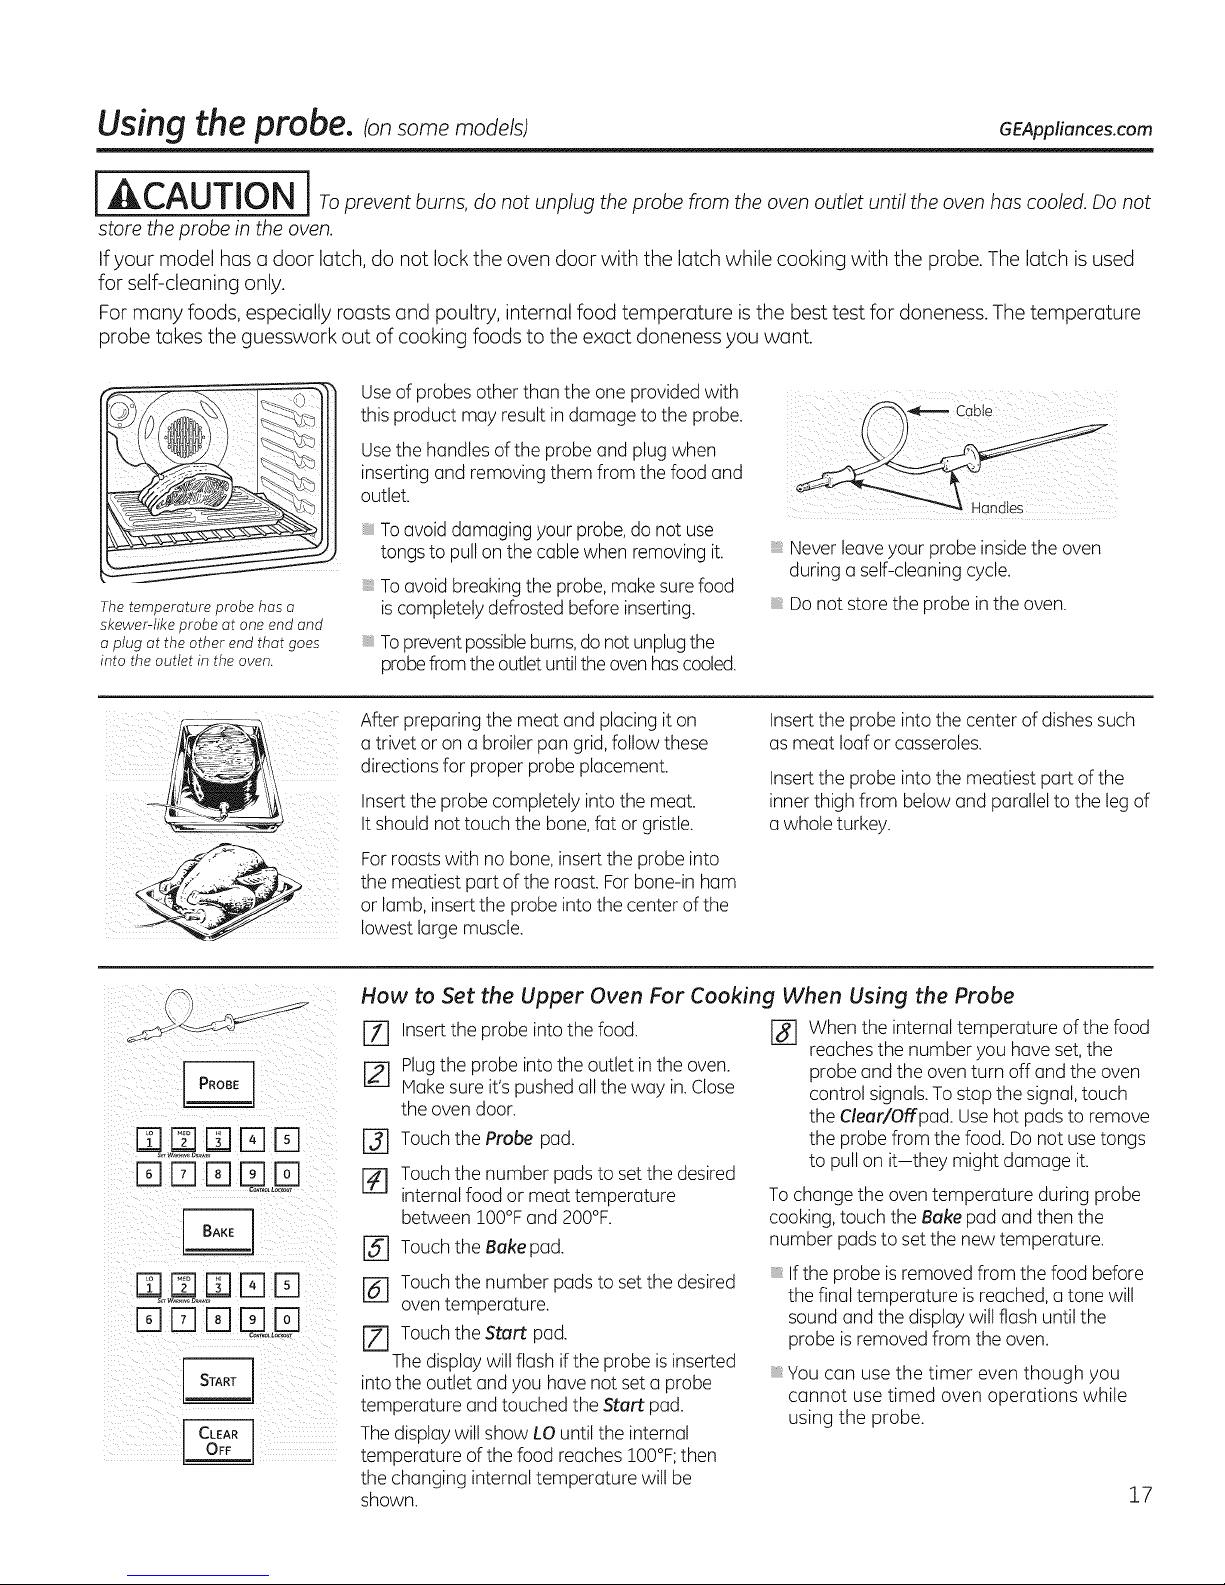
Using the probe. ConsomemodelsI GEAppliances.com
iACAUTION i Toprevent burns,do not unplug theprobe Fromtheoven outlet until the ovenhas cooled.Donot
storetheprobe in the oven.
Ifyour model hasa door latch, do not lock the ovendoor with the latch while cooking with the probe.Thelatch is used
for self-cleaning only.
Formany foods, especiallyroasts and poultry,internal food temperature isthe besttest for doneness.Thetemperature
probe takes the guessworkout of cooking foods to the exact donenessyou want.
Use of probes other than the one provided with
this product may result in damage to the probe.
Usethe handles of the probe and plug when
inserting and removing them from the food and
outlet.
The temperature probe has a
skewer-like probe at one end and
a plug at the other end that goes
into the outlet in the oven.
DDD LD
DDD LD
Toavoid damaging your probe,do not use
tongs to pullon the cablewhen removing it.
Toavoid breakingthe probe,make sure food
iscompletely defrosted before inserting.
Topreventpossibleburns,do not unplugthe
probefrom the outletuntil theoven hascooled.
After preparing the meat and placing it on
a trivet or on a broiler pan grid,follow these
directions for proper probe placement.
Insertthe probe completely into the meat.
It should not touch the bone, fat or gristle.
Forroasts with no bone, insert the probe into
the meatiest part of the roast. For bone-in ham
or lamb, insert the probe into the center of the
i ii!i
lowest large muscle.
How to Set the Upper Oven For Cooking When Using the Probe
[Z] Insert the probe into the food.
[] Plugthe probe into the outlet in the oven.
Hake sure it's pushed all the way in.Close
the oven door.
[_ Touch the Probe pad.
r_ Touch the number pads to setthe desired
internal food or meat temperature
between 100°Fand 200°F.
[_ Touch the Bake pad.
[] Touch the number pads to setthe desired
oven temperature.
[Z] Touch the Start pad.
Thedisplay will flash if the probe is inserted
into the outlet and you have not set a probe
temperature and touched the Start pad.
Thedisplay will show LO until the internal
temperature of the food reaches 100°F;then
the changing internal temperature will be
shown.
Neverleaveyour probe insidethe oven
during a self-cleaning cycle.
Donot store the probe in the oven.
Insertthe probe into the center of dishes such
as meat loaf or casseroles.
Insertthe probe into the meatiest part of the
inner thigh from below and parallel to the leg of
a whole turkey.
r_ When the internal temperature of the food
reaches the number you have set,the
probe and the oven turn off and the oven
control signals.To stop the signal,touch
the Clear/Offpad. Usehot pads to remove
the probe from the food. Do not usetongs
to pull on it-they might damage it.
Tochange the oven temperature during probe
cooking,touch the Bake pad and then the
number pads to set the new temperature.
If the probe is removed from the food before
the final temperature is reached, a tone will
sound and the display will flash until the
probe isremoved from the oven.
You can use the timer even though you
cannot use timed oven operations while
using the probe.
17
Page 18
Usingthe convection oven.roesomemode s
If your model has a door latch, do not lock the oven door with the latch during convection cooking. The latch is used for
self-cleaning only.
The convection oven fan shuts off when the oven door is opened. DO NOT leave the door open for long periods of time
while using convection cooking.
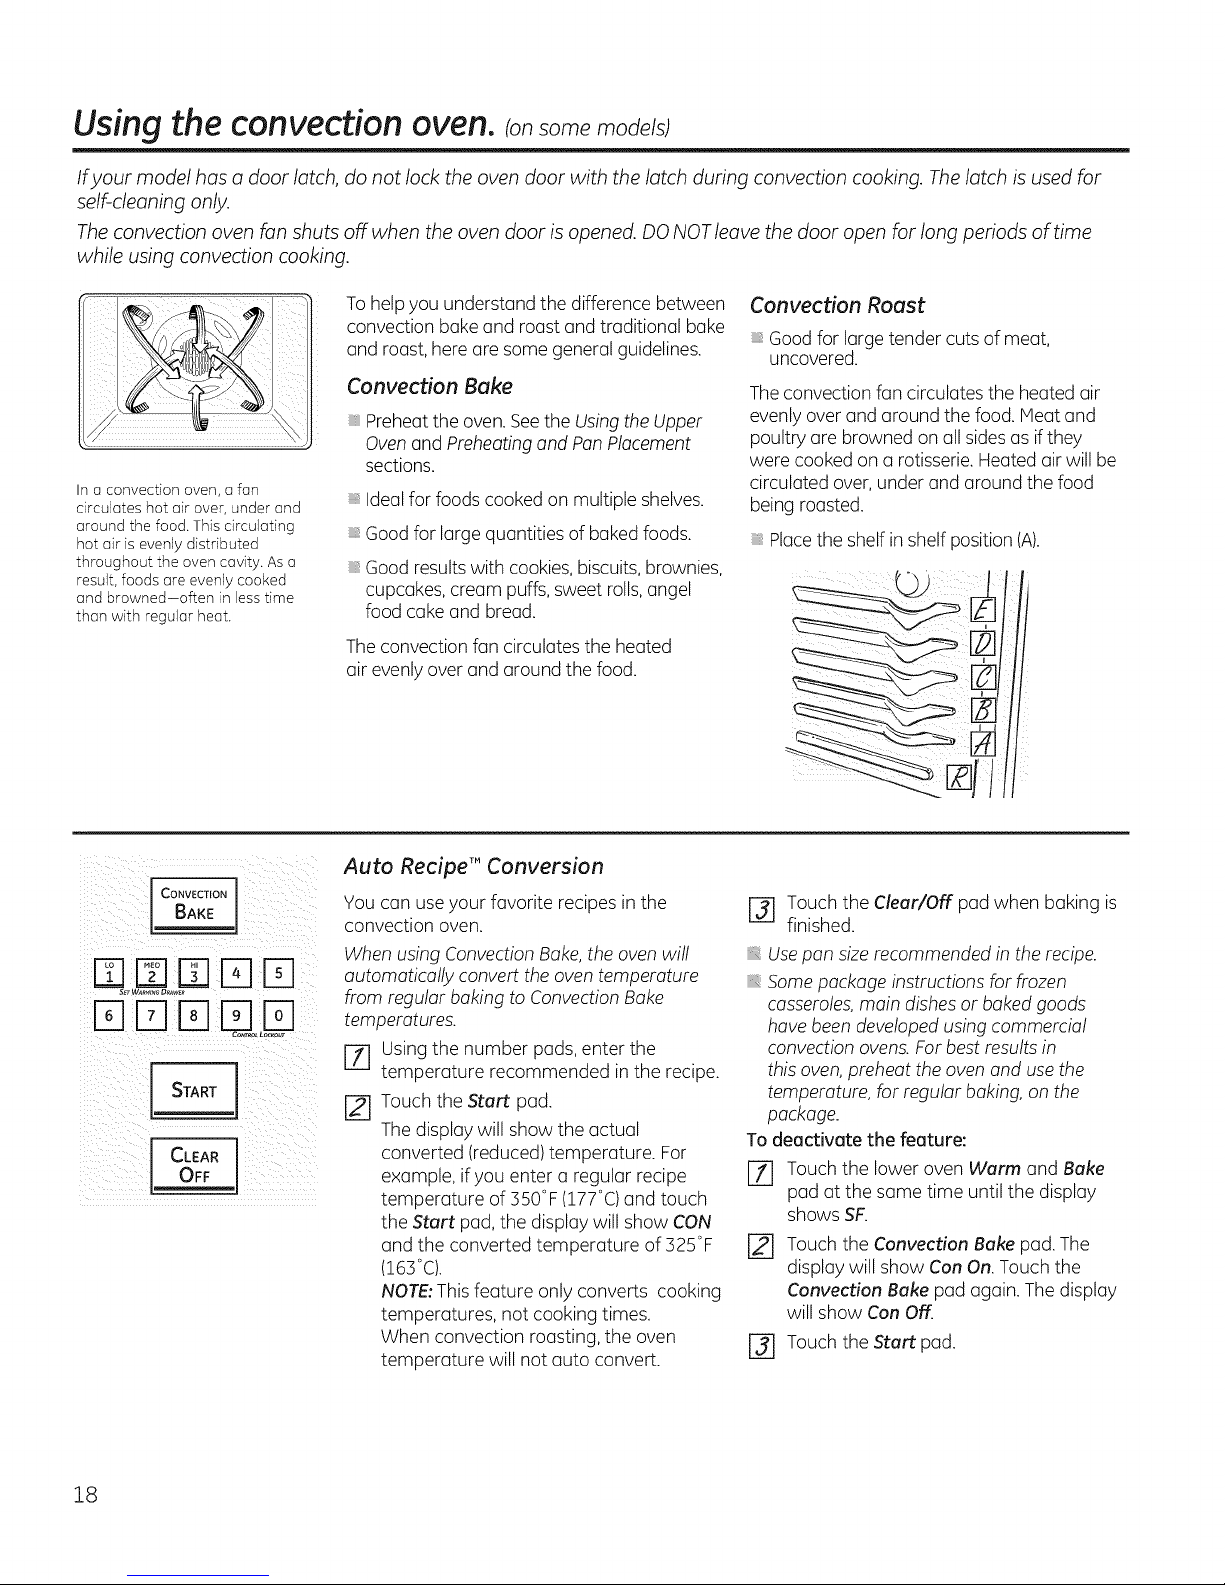
In a convection oven, a fan
circulates hot air over, under and
around the food. This circulating
hot air is evenly distributed
throughout the oven cavity. As a
result, foods are evenly cooked
and browned-often in less time
than with regular heat.
CONVECTION
BAKE
START l
CLEARl
_ OFF J
Tohelp you understand the difference between
convection bake and roast and traditional bake
and roast, here are some general guidelines.
Convection Bake
Preheatthe oven. Seethe Using the Upper
Ovenand Preheating and PanPlacement
sections.
Idealfor foods cooked on multiple shelves.
Good for large quantities of baked foods.
Good resultswith cookies,biscuits, brownies,
cupcakes, cream puffs, sweet rolls,angel
food cake and bread.
Theconvection fan circulates the heated
air evenlyover and around the food.
Auto Recipe'" Conversion
You can use your favorite recipes in the
convection oven.
When using Convection Bake,the oven will
automatically convert the oven temperature
from regular baking to Convection Bake
temperatures.
Eli Using the number pads, enter the
temperature recommended inthe recipe.
[] Touch the Start pad.
The display will show the actual
converted (reduced) temperature. For
example, if you enter a regular recipe
temperature of 3SO°F(177°C)and touch
the Start pad, the display will show CON
and the converted temperature of 325°F
(163°C).
NOTE:Thisfeature only converts cooking
temperatures, not cooking times.
When convection roasting, the oven
temperature will not auto convert.
Convection Roast
Good for large tender cuts of meat,
uncovered.
Theconvection fan circulates the heated air
evenly over and around the food. Meat and
poultry are browned on all sidesas if they
were cooked on a rotisserie.Heated air will be
circulated over, under and around the food
being roasted.
Placethe shelf in shelf position (A).
[] Touch the Clear/Off pad when baking is
finished.
Usepan sizerecommended in the recipe.
Somepackage instructions for frozen
casseroles,main dishes or bakedgoods
have been developed using commercial
convection ovens.For best resultsin
this oven,preheat the oven and use the
temperature, for regular baking, on the
package.
To deactivate the feature:
I-f] Touch the lower oven Warm and Bake
pad at the same time until the display
shows SF.
Touch the Convection Bake pad.The
display will show Con On.Touch the
Convection Bake pad again. The display
will show Can Off.
Touch the Start pad.
18
Page 19
Cookware for Convection Cooking
GEAppliances.com
I co.vEc,,o.I
rqm LLU
oFFCLEAR j
i
Before using your convection oven,check
to see ifyour cookware leavesroom for air
circulation in the oven. Ifyou are baking with
several pans, leavespace between them. Also,
be sure the pans do not touch each other or
the walls of the oven.
Paper and Plastic
Heat-resistant paper and plastic containers
that are recommended for usein regular
ovens can be used in convection ovens.Plastic
cookware that is heat-resistant to temperatures
of 400°Fcan also be used,when oven is below
400°F.
Metal and Glass
Any type of cookware will work in your
convection oven. However, metal pans heat the
fastest and are recommended for convection
baking.
Darkenedor matte-finished pans will bake
faster than shiny pans.
Glassor ceramic pans cook more slowly.
When baking cookies,you will get the best
resultsif you use a flat cookie sheet instead of a
pan with low sides.
Forrecipes like oven-baked chicken, usea pan
with low sides. Hot air cannot circulate well
around food in a pan with high sides.
How to Set the Upper Oven for Convection Baking or Roasting
[-7-] Touch the Convection Bake or Convection
Roast pad.
[] Touch the number padsto setthe desired
oven temperature.
r_ Touchthe Start pad.
Tochange the oven temperature, touch the
Convection Bake or Convection Roast pad
and then the number pads to set the new
temperature.
When the oven starts to heat, the changing
temperature, starting at !O0°F,will be displayed.
When the oven reachesthe temperature you
set,3 beepswill sound.
[] Touch the Clear/Offpad when finished.
NOTE:Youwill hear a fan while cooking with
convection.Thefan will stop when the door is
opened,but the heat will not turn off.
Thefan will not start until thepreheat
temperature is reached.
NOTE:When convection baking,the oven
temperature will be 25F(!40 lower than theset
temperature. SeeAuto RecipeConversionfor
more information. When convection roasting,
oventemperature will not auto convert.
19
Page 20
Usingthe convection oven.consomemode s
Ifyour model has a door latch, do not lock the oven door with the latch during convection cooking. The latch is used for
self-cleaning only,
How to Set the Upper Oven for Convection Roasting when Using the Probe
(onsome models)
Thedisplaywill flash PROBEandthe oven r_ When the internal temperature of the
control willsignal ifthe probe is insertedinto food reaches the number you have set,
For best results when roasting
large turkeys and roasts, we
recommend using the probe
included in the convection oven.
I CONVECTION I
DrqDuo D
rqrfl I]]
the outlet, and you have not set a probe
temperature and touched the Start pad.
rfl Placethe shelf in the shelfposition(A).
Insertthe probe completely into the food.
r_ Plugthe probe into the outlet in the oven.
Hake sure it ispushed all the way in.Close
the oven door.
[_] Touch the Convection Roast pad.
[]_] Touch the number padsto set the desired
oven temperature.
[] Touch the Probe pad.
[]_] Touch the number padsto set the desired
internal food temperature.
Tochange the oven temperature during the
Convection Roastcycle,touch the Convection
Roast pad and then touch the number pads to
set the new desiredtemperature.
[] Touch the Start pad.
When the oven starts to heat,the word LO will
be inthe display.
After the internal temperature of the food
reaches IO0°F,the changing internal
temperature will be shown in the display.
the probe and the oven turn off and the
ovencontrol signals.Tostop the signal,
touch the Clear/Off pad. Usehot pads to
remove the probe from the food. Donot
usetongs to pull on it-they might
damage it.
[ACAUTION lTopreventburns,
do not unplug the probe from the ovenoutlet
until the oven has cooled.Do not store the
probe in the oven.
NOTE:
If the probe is removed from the food before
the final temperature is reached,a tone will
sound and the display will flash until the
probe isremoved from the oven.
Youwill hear a fan while cooking with this
feature.The fan will stop when the door is
opened but the heat will not turn off.
Youcan use the timer even though you
cannot usetimed oven operations while
using the probe.
Not all locationsin the meat cook atthe same
rate.Attempt to place the probein the slowest
heating portion ofthe item being cooked.
Checkthe temperature at other locations with
a meat thermostat once cooking hasstopped
to ensure safetemperatures havebeen
reached inall areas of the meat.
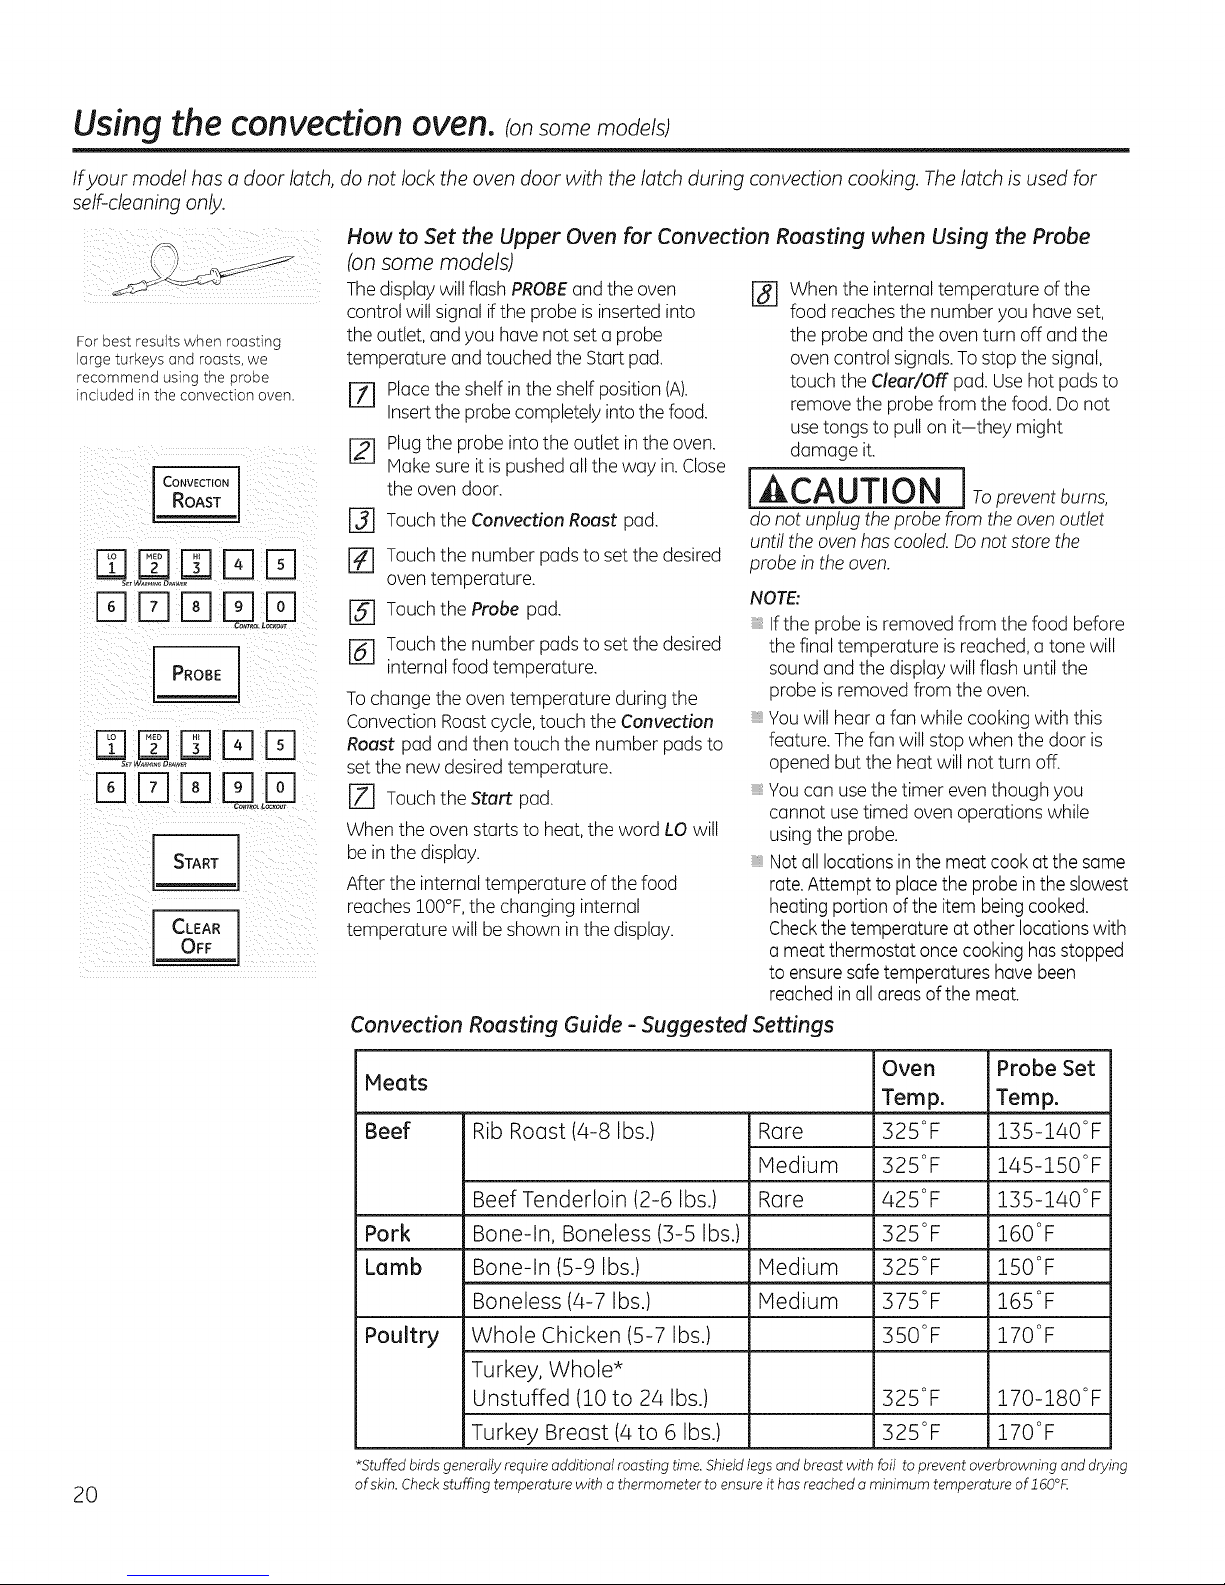
Convection Roasting Guide - Suggested Settings
Meats Temp. Temp.
Beef Rib Roast (4-8 Ibs.) Rare 325°F 135-140°F
Pork Bone-In, Boneless (3-5 Ibs.) 325°F 160°F
Lamb Bone-In (5-9 Ibs.) Medium 325°F 150°F
Poultry Whole Chicken (5-7 Ibs.) 350°F 170°F
*Stuffed birds generally require additional roasting time.Shield legs and breast with foil to prevent overbrowning anddrying
20
of skin.Checkstuffing temperature with athermometer to ensure it has reached a minimum temperature of l gO°K
Oven Probe Set
Medium 325°F 145-150°F
Beef Tenderloin (2% Ibs.) Rare 425°F 135-140°F
Boneless (4-7 Ibs.) Medium 375°F 165°F
Turkey, Whole*
Unstuffed (10 to 24 Ibs.) 325°F 170-180°F
Turkey Breast (4 to 6 Ibs.) 325°F 170°F
Page 21
Using the timed convection baking features, co. GEAppliances.com
You will hear a fan while cooking with this feature. The fan will stop when the door is opened but the heat will not turn off.
NOTE: Foods that spoil easily-such as milk, eggs, fish, stuffings, poultry and pork-should not be allowed to sit for more
than 1 hour before or after cooking. Room temperature promotes the growth of harmful bacteria. Be sure that the oven
light is off because heat from the bulb will speed harmful bacteria growth.
How to Set an Immediate Start and Automatic Stop
D D D
E]N
E]EEE3Uo,
E]D
D D
Theupperovenwillturn on immediatelyandcook
for aselectedlengthof time.Attheendof the
cookingtime,theovenwillturnoff automatically.
[Z] TouchtheConvectionBakepad.
[] Touchthenumberpadsto setthedesiredoven
temperature.
I-_ TouchtheCookingTimepad.
NOTE:Ifyourreciperequirespreheating,youmay
needtoaddadditionaltimetothelengthofthe
cookingtime.
[_ Touchthenumberpadsto setthedesired
lengthofcookingtime.Theminimumcooking
timeyou cansetis1minute.
Theoventemperaturethat yousetandthe
cookingtimethat youenteredwillbeinthe
display.
[_ TouchtheStart pad.
TheovenwillturnON,andthe displaywillshow
thecookingtimecountdownandthechanging
temperaturestartingat 100°F.(Thetemperature
displaywillstarttochangeoncetheoventemperature
reaches100°F.)Whentheovenreachesthe
temperatureyouset,3 beepswillsound.
Theovenwillcontinueto cookforthe setamount
oftime,thenturn off automatically,unlesstheCook
andHoldfeaturewasset.SeetheSpecialfeaturesof
yourovencontrolsection.
Aftertheoventurnsoff,the end-of-cycletone
willsound.
[_ TouchtheClear/Offpadto clearthedisplayif
necessary.Removethefoodfromtheoven.
Remember,eventhoughtheoventurnsoff
automatically,food leftintheovenwill
continuecookingaftertheoventurnsoff.
How to Set a Delayed Start and Automatic Stop
Theupperovenwillturn on atthe timeofdayyou
set,cookfora specificlengthof timeandthenturn
offautomatically.
Hakesurethe clockshowsthecorrecttime
ofday.
[Z] TouchtheConvectionBakepad.
r_ Touchthe numberpodsto setthedesiredoven
temperature.
[_] TouchtheCookingTimepad.
NOTE:Ifyourreciperequirespreheating,you may
needtoaddadditionaltimetothelengthofthe
cookingtime.
[_ Touchthe numberpadsto setthedesired
lengthofcookingtime.Theminimumcooking
timeyoucansetis1minute.
Theoventemperaturethatyousetandthe
cookingtimethat youenteredwillbeinthe
display.
TouchtheDelayStart pad.
@
Touchthe numberpodsto setthetimeof day
@
youwont the ovento turnonandstart cooking.
[Z] TouchtheStart pad
NOTE:ifyouwouldliketocheckthetimesyouhave
set,touchtheDelayStart padto checkthestarttime
youhavesetortouchtheCookingTimepadto check
thelengthofcookingtimeyouhaveset.
WhentheoventurnsONat thetimeof dayyou set,
thedisplaywillshowthecookingtimecountdown
andthechangingtemperaturestartingat100°F.
(Thetemperaturedisplaywillstartto changeonce
theoventemperaturereaches100°F.)Whenthe
ovenreachesthetemperatureyouset,3 beepswill
sound.
Theovenwillcontinueto cookforthe setamount
oftime,thenturn offautomatically,unlesstheCook
andHoldfeaturewasset.SeetheSpecialfeaturesof
yourovencontrolsection.
Aftertheoventurnsoff,the end-of-cycletonewill
sound.
[_ TouchtheClear/Offpadto clearthedisplayif
necessary.Removethefoodfromtheoven.
Remember,eventhoughtheoventurnsoff
automatically,food leftintheovenwillcontinue
cookingaftertheoventurnsoff.
21
Page 22
Using the timed convection baking features, consomemode/s
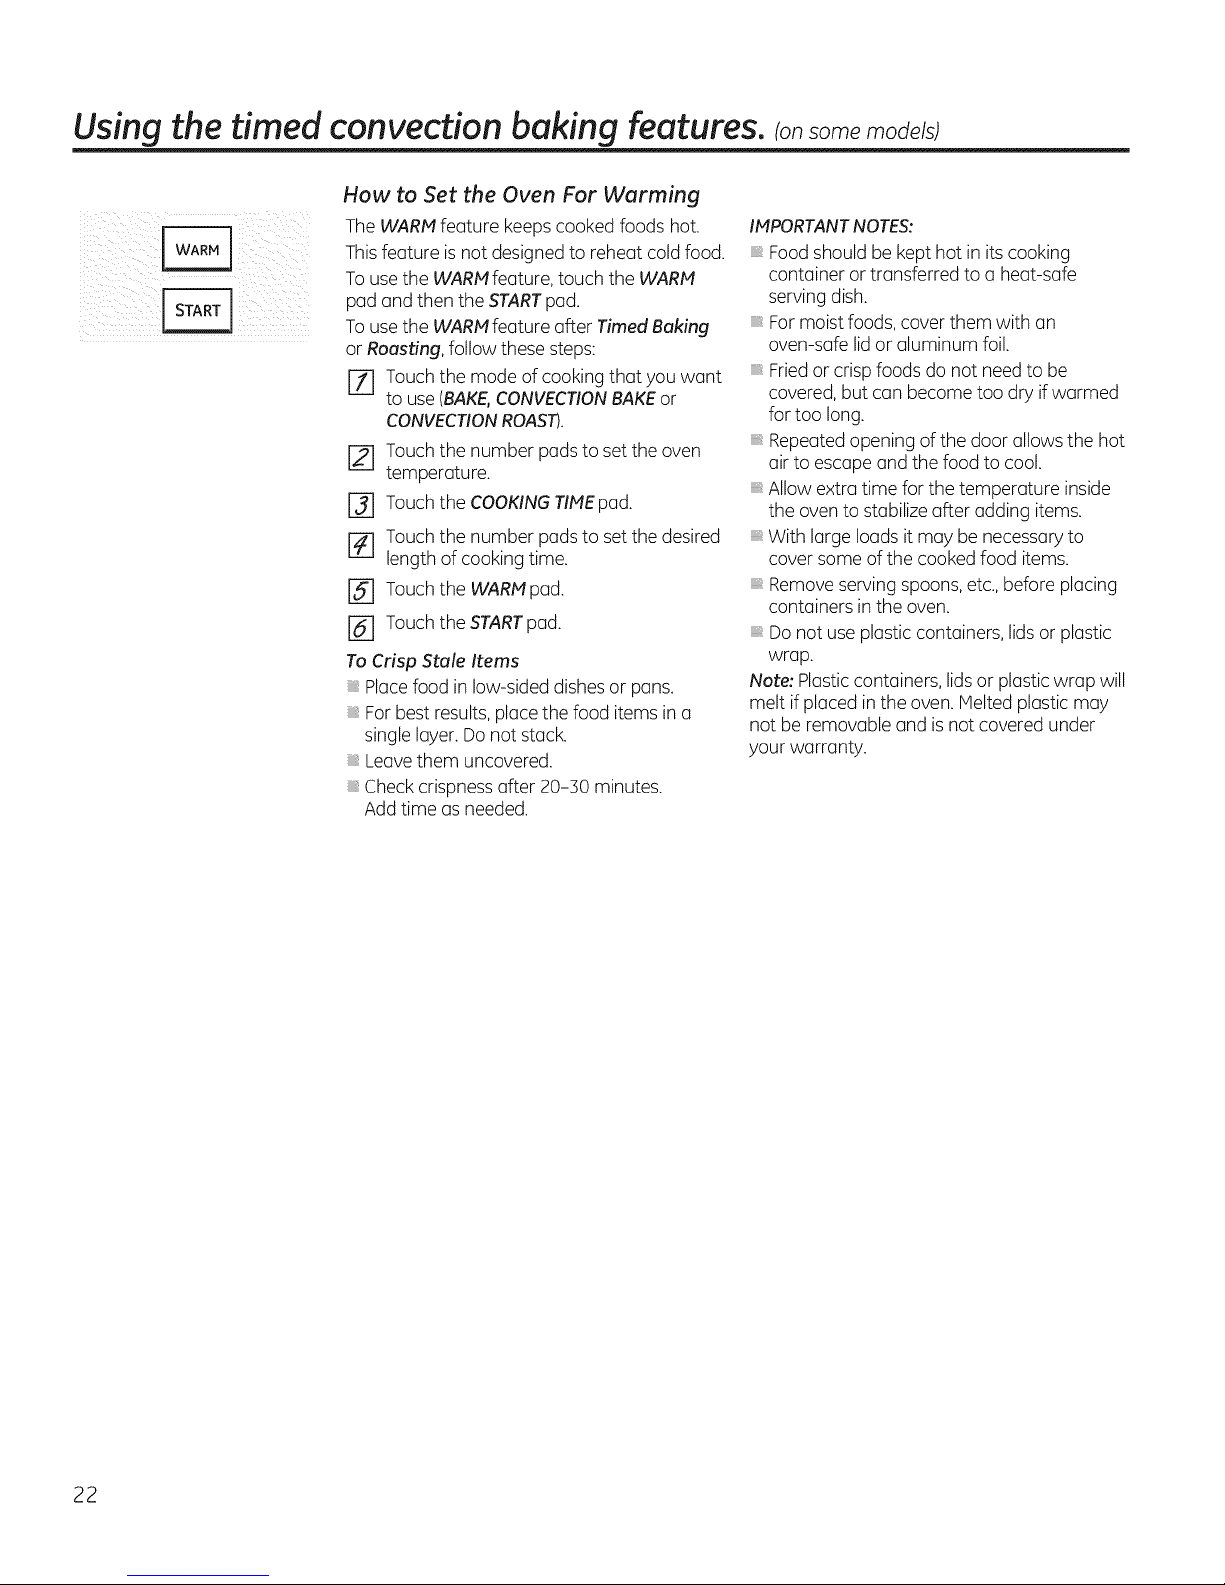
How to Set the Oven For Warming
The WARM feature keepscooked foods hot.
Thisfeature isnot designedto reheat cold food.
To use the WARN feature,touch the WARM
pad and then the STARTpad.
To use the WARN feature after Timed Baking
or Roasting, follow these steps:
r_ Touch the mode of cooking that you want
to use (BAKE,CONVECTIONBAKEor
CONVECTIONROAST),
Touch the number padsto set the oven
r2]
temperature.
Touch the COOKINGTIMEpad.
@
Touch the number padsto set the desired
%
length of cooking time.
Touch the WARN pad.
@
[] Touchthe STARTpad.
To Crisp Stale Items
Placefood in low-sided dishes or pans,
For best results,place the food items in a
single layer.Do not stack.
Leavethem uncovered.
Checkcrispnessafter 20-30 minutes.
Add time as needed.
INPORTANT NOTES:
Foodshould be kept hot in its cooking
container or transferred to a heat-safe
serving dish.
Formoist foods, cover them with an
oven-safe lid or aluminum foil.
Friedor crisp foods do not needto be
covered,but can become too dry if warmed
for too long.
Repeatedopening of the door allows the hot
air to escape and the food to cool.
Allow extra time for the temperature inside
the oven to stabilize after adding items.
With large loads it may be necessaryto
cover some of the cooked food items.
Removeserving spoons, etc.,before placing
containers in the oven.
Do not use plastic containers, lidsor plastic
wrap.
Note: Plasticcontainers, lidsor plastic wrap will
melt ifplaced inthe oven. Melted plastic may
not be removable and is not covered under
your warranty.
22
Page 23

Special features ofyour upper ovencontrol. GEApUiancescom
Yournew touchpad control has additional featuresthat:you may chooseto use.Thefollowing are the features and how
you may activate them.
The special feature modes can only be activated while the display isshowing the time of day. They remain in the control's
memory until the steps are repeated.
Whenthedisplayshowsyour choice,touchthe Start pad. Thespecialfeatures wi!!remain inmemory aftera power failure.
12 Hour Shut-Off
+:BAKE
H_/LO
START
START
l od
H!/ Lo
COOKI.GI÷ T,._
START
i !+ BAKE
iif ¸?] K,TC.E.j
i: I T,.ERI ¸
ON/OFF
With thisfeature,shouldyou forget and leavethe
ovenon,the control will automaticallyturn off the
ovenafter !2 hoursduring bakingfunctions or
after 3 hoursduring a broilfunction.
Ifyou wish to turn OFFthis feature, follow the
stepsbelow.
[] Touchthe Bake and Broil Hi/Lo padsat
the same time for 3 seconds until the
display shows SF.
Fahrenheit or Celsius Temperature Selection
Your oven control is set to usethe Fahrenheit
temperature selections, but you may change
this to use the Celsiusselections.
Touchthe Bake and Broil Hi/Lo padsat
%
the same time for 3 seconds until the
display shows SF.
Tones at the End of a Timed Cycle
At the end of a timed cycle,3 short beepswill
sound followed by one beep every 6 seconds
until the Clear/Off pad istouched. This
continual 6-second beep may be canceled.
To cancel the 6-second beep:
Touchthe Bake and Broil Hi/Lo pads at
the same time for 3 seconds until the
display shows SF.
[]
@
@
[] Touch the Start pad.
[-_ Touch the Start pad.
Touch the Delay Start pad. Thedisplay
will show 12shdn (12hour shut-off).Touch
the Delay Start pad again and the display
will show no shdn (no shut-off).
Touch the Start pad to activate the no
shut-off and leavethe control set in this
special features mode.
Touch the Broil Hi/Lo and Cooking Time
pads at the same time. The displaywill
show F (Fahrenheit).
Touch the Broil Hi/Lo and Cooking Time
pads again at the same time.
Thedisplay will show C (Celsius).
Touch the Kitchen Timer On/Off pad.The
display shows CONBEEP(continual beep)
and BEEP.Touchthe Kitchen Timer On/
Off pad again. The display shows Beep.
(Thiscancelsthe one beep every 6
seconds.)
Tone Volume (on some models)
Thisfeature allowsyou to adjust thetone
volumesto a more acceptable volume.There
are threepossiblevolume levels.
EEl Touchthe upper oven Broil Hi/Lo and
_ii ii i i
Bake pads at the same time until the
display shows SF.
Touchthe Cook Time pad.The display
shows2 BeepThisis the middle volume
level.
Touch the Cook Time pad again. The
display will show 3 Beep.Thisisthe loudest
volume level.
Touch the Cook Time pad again. The
display will show 1 Beep.This isthe quietest
volume level.
Choosethe desired sound level (1Beep,2
@
Beep, 3 Beep).
Touch the Start pad. 23
%
Page 24
Special features ofyour upper ovencontrol.
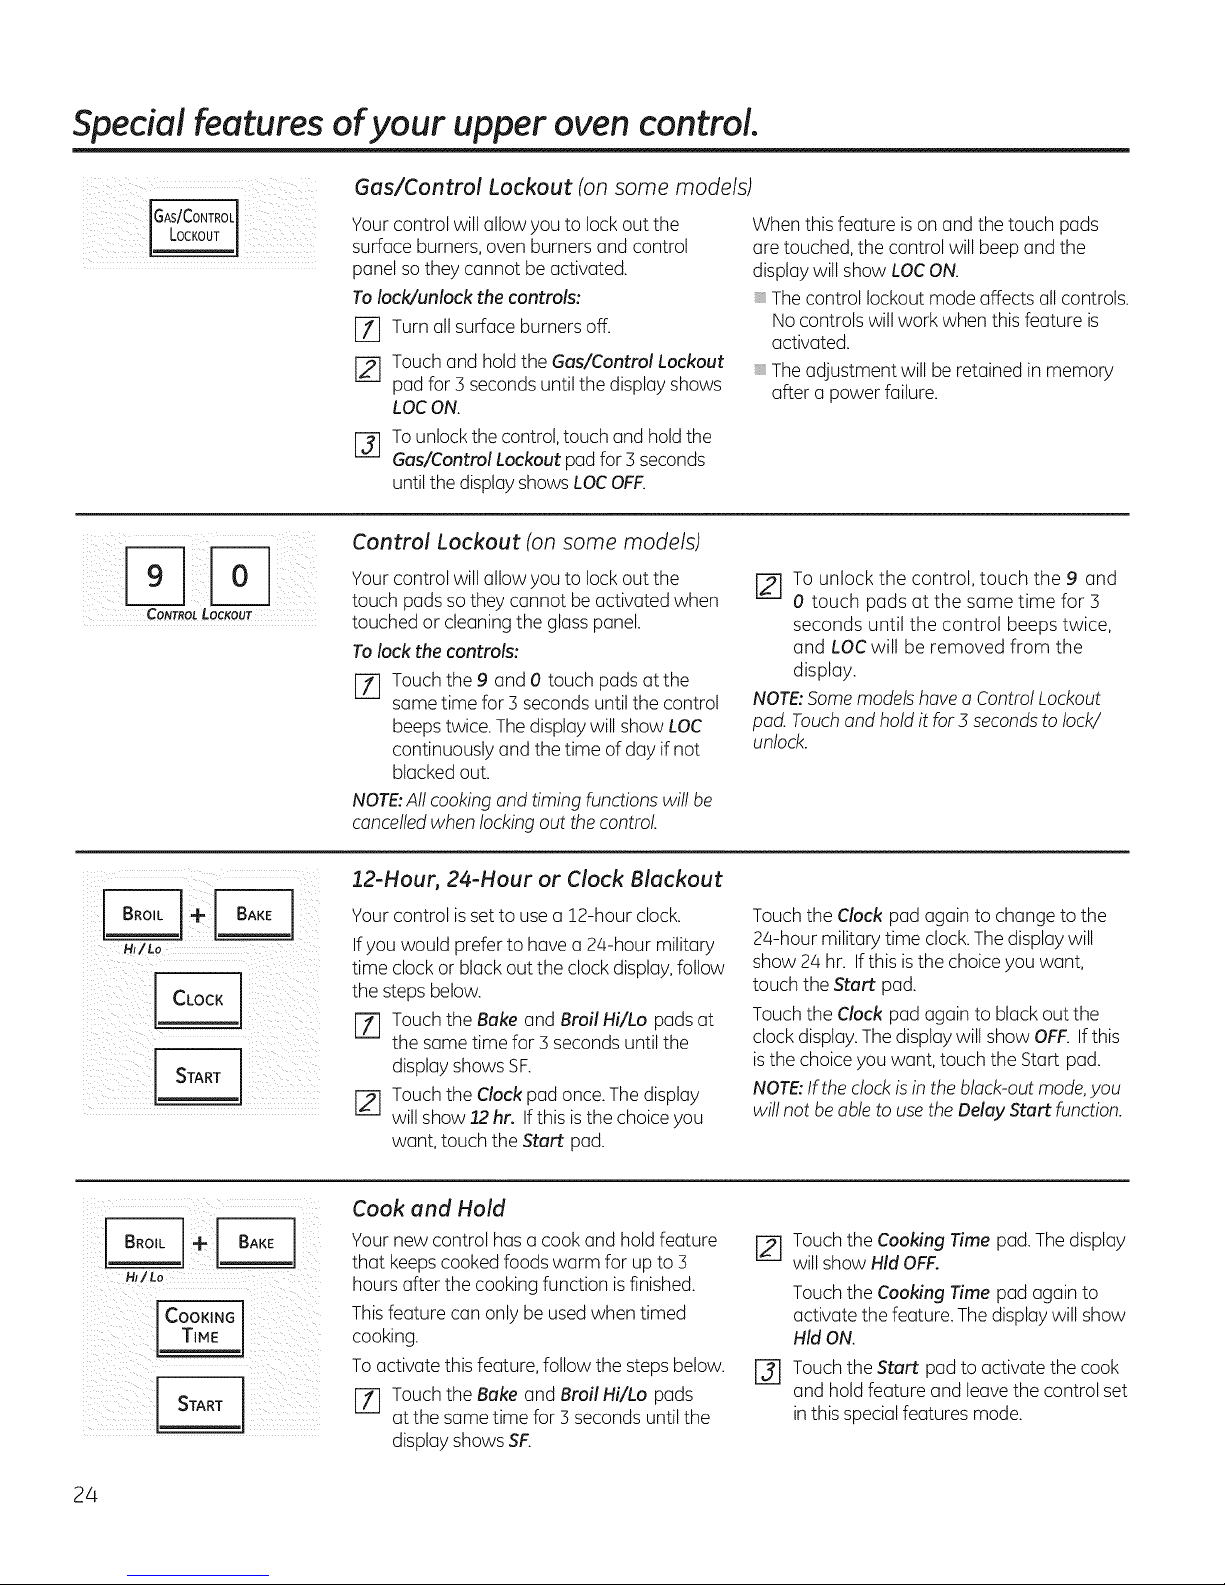
Gas/Control Lockout (on some models)
IGAslCoNTROL
Lot,ouT.
Your control will allow you to lock out the
surface burners, oven burners and control
panel so they cannot be activated.
Tolock/unlock the controls:
Turnall surface burners off.
%
Touch and hold the Gas/Control Lockout
[]
pad for 3 seconds until the display shows
LOCON.
Tounlockthe control,touch and holdthe
@
Gas/Control Lockout pad for 3 seconds
untilthe display showsLOCOFF.
Control Lockout (on some models)
When this feature is on and the touch pads
are touched, the control will beep and the
display will show LOCON.
Thecontrol lockout mode affects all controls.
Nocontrols will work when this feature is
activated.
Theadjustment will be retained in memory
after a power failure.
CONTROL LOCKOUT
! .
Your control will allow you to lock out the
touch pads so they cannot be activated when
touched or cleaning the glass panel.
Tolock the controls:
Touchthe 9 and 0 touch pads at the
%
same time for :3seconds until the control
beepstwice. The display will show LOC
continuously and the time of day if not
blacked out.
NOTE:All cooking and timing functions will be
cancelledwhen locking out thecontrol.
22-Hour, 24-Hour or Clock Blackout
Your control isset to use a 12-hour clock.
Ifyou would prefer to havea 24-hour military
time clock or black out the clock display,follow
the steps below.
[71 Touchthe Bake and Broil Hi/Lo pads at
the same time for 3 seconds until the
display shows SF.
Touchthe Clock pad once.Thedisplay
will show 12 hr. If this isthe choice you
want, touch the Start pad.
JY] To unlock the control, touch the 9 and
0 touch pads at the same time for 3
seconds until the control beeps twice,
and LOCwill be removed from the
display.
NOTE:Somemodels havea ControlLockout
pad. Touchand hold it for3 secondsto lock/
unlock.
Touchthe Clock pad again to change to the
24-hour military time clock.The display will
show 2/4hr. Ifthis isthe choice you want,
touch the Start pad.
Touchthe Clock pad again to black out the
clock display.Thedisplay will show OFF. Ifthis
isthe choice you want, touch the Start pad.
NOTE:Ifthe clockis in the black-out mode,you
willnot be able to use the Delay Start function.
Cook and Hold
Your new control has a cook and hold feature
that keeps cooked foods warm for up to 3
hours after the cooking function is finished.
I COOKING I
ii iii l ili!!
24
This feature can only be used when timed
cooking.
To activate this feature, follow the steps below.
[Z] Touch the Bake and Broil Hi/Lo pads
at the same time for 3 seconds until the
display shows SF.
Touch the Cooking Time pad. Thedisplay
will show Hid OFF.
Touch the Cooking Time pad again to
activate the feature. Thedisplay will show
Hid ON.
I-_ Touch the Start pad to activate the cook
and hold feature and leavethe control set
in this specialfeatures mode.
Page 25
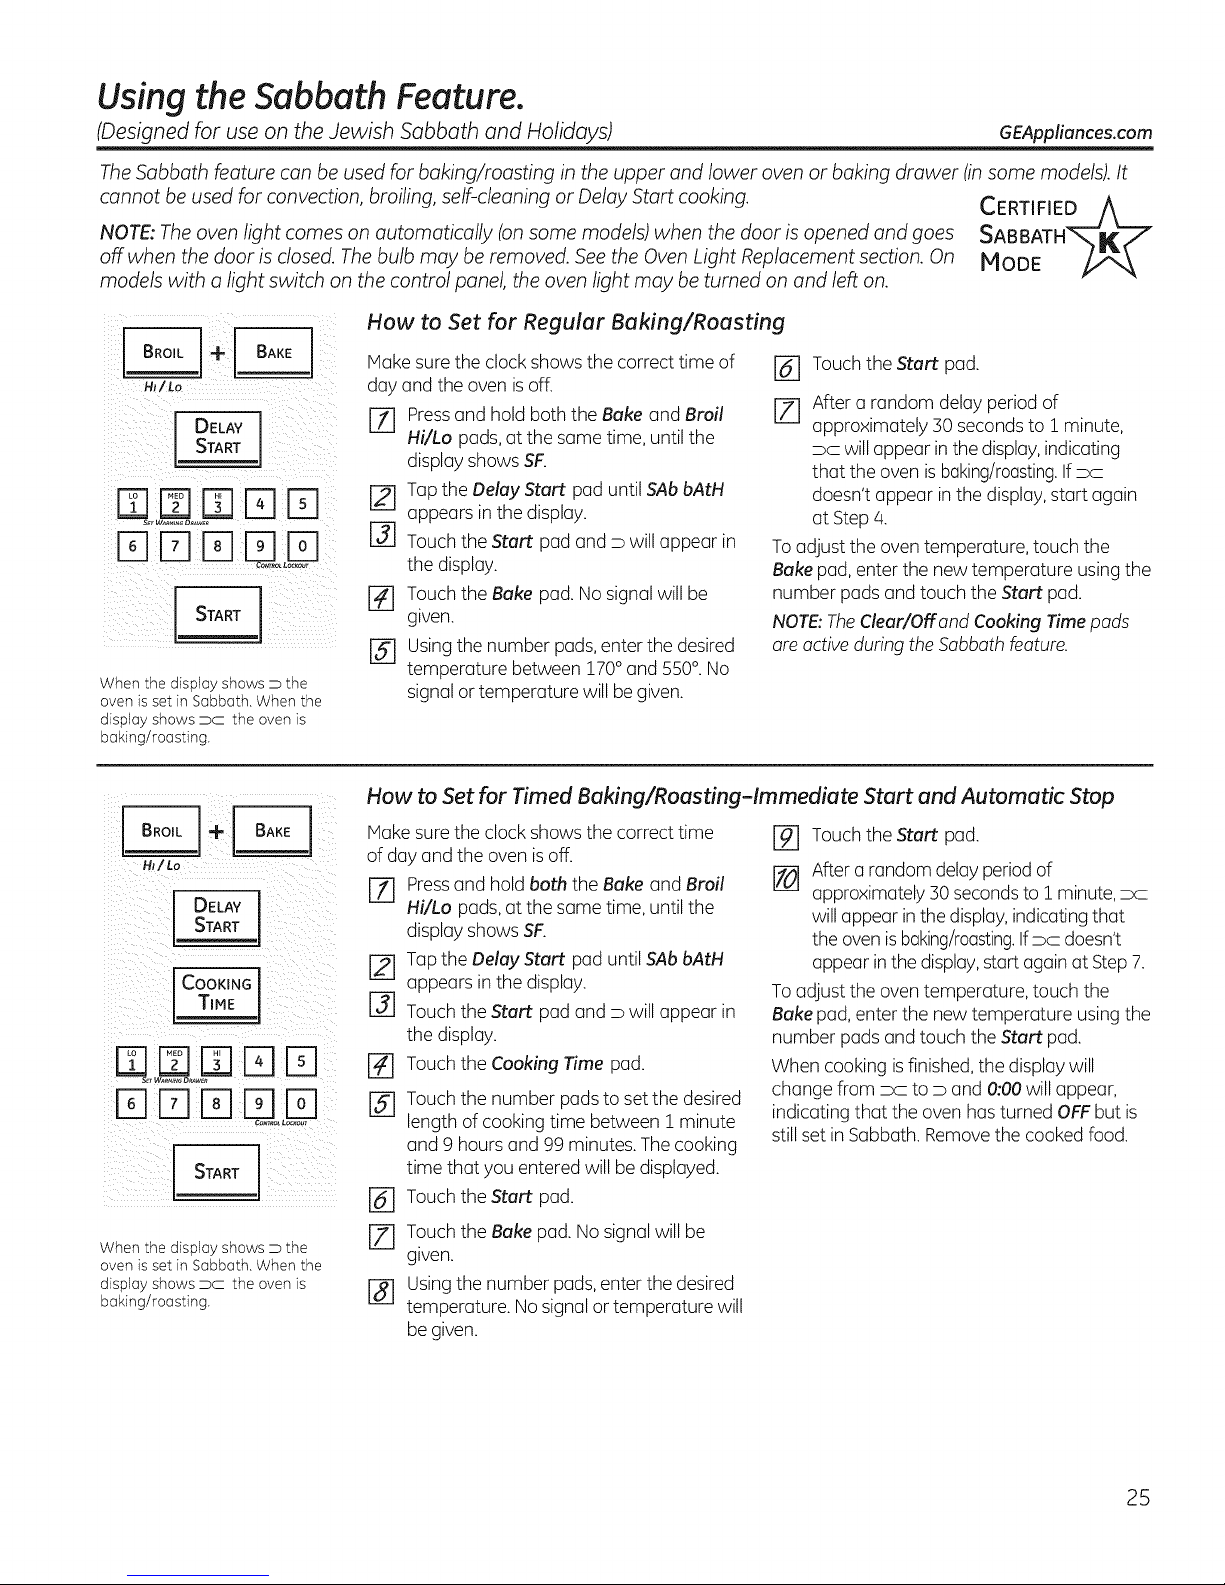
Using the Sabbath Feature.
(Designed for use on the Jewish Sabbath and Holidays) GEAppliances.com
TheSabbath feature can be used for baking/roasting in the upper and lower oven or baking drawer (in some models). It
cannot be used for convection, broiling, self-cleaning or Delay Start cooking. CERTIFIED A
NOTE: The oven light comes on automatically (on some models) when the door is opened and goes SABBATH'_K_7
off when the door is closed. The bulb may be removed. Seethe Oven Light Replacement section. On MODE //2_
models with a light switch on the control panel, the oven light may beturned on and left on.
How to Set for Regular Baking/Roasting
HI/ Lo
DELAY
D D D
When the display shows D the
oven is set in Sabbath. When the
display shows PC the oven is
baking/roasting.
HI/Lo
DELAY
START
COOKINGTIME l
DD
DDDE]D
When the display shows D the
oven is set in Sabbath. When the
display shows PC the oven is
baking/roasting.
CoNr_ L_K_T
Hake sure the clock shows the correct time of
day and the oven is off.
r-f] Pressand hold both the Bake and Broil
Hi/Lo pads,at the same time, until the
display showsSF.
[] Tap the Delay Start pad until SAbbAtH
appears in the display.
[-_ Touch the Start padand D will appear in
the display.
[] Touch the Bake pad. No signalwill be
given.
[] Usingthe number pads,enter the desired
temperature between !70 ° and 550°.No
signal or temperature will be given.
How to Set for Timed Baking/Roasting-Immediate Start and Automatic Stop
Hake sure the clock shows the correct time
of day and the oven isoff.
rf] Pressand hold both the Bake and Broil
Hi/Lo pads,at the same time, until the
display shows SF.
r_ Tapthe Delay Start pad until SAb bAtH
appears inthe display.
r_ Touchthe Start pad and D will appear in
the display.
r_ Touch the Cooking Time pad.
Touch the number padsto setthe desired
%
length of cooking time between 1 minute
and 9 hoursand 99 minutes. The cooking
time that you entered will be displayed.
Touch the Start pad.
@
Touch the Bake pad. Nosignal will be
rzl
given.
Usingthe number pads, enter the desired
%
temperature. Nosignal or temperature will
be given.
[_ Touchthe Start pad.
[_ After a random delay period of
approximately 30 secondsto I minute,
DC will appear inthe display,indicating
that the oven isbaking/roasting.Ifx
doesn't appear in the display,start again
at Step 4.
Toadjust the oventemperature, touch the
Bakepad, enter the new temperature using the
number pads and touch the Start pad.
NOTE:The Clear/Off and Cooking Time pads
are active during the Sabbath feature.
Touch the Start pad.
%
After a random delay periodof
[]
approximately 30 secondsto I minute, x
will appear inthe display,indicatingthat
the oven isbaking/roasting.IfDC doesn't
appear in the display,start again at Step7.
Toadjust the oven temperature, touch the
Bake pad, enter the new temperature using the
number pads and touch the Start pad.
When cooking isfinished,the display will
change from x to D and 0:00will appear,
indicating that the oven hasturned OFFbut is
still set in Sabbath. Removethe cooked food.
25
Page 26
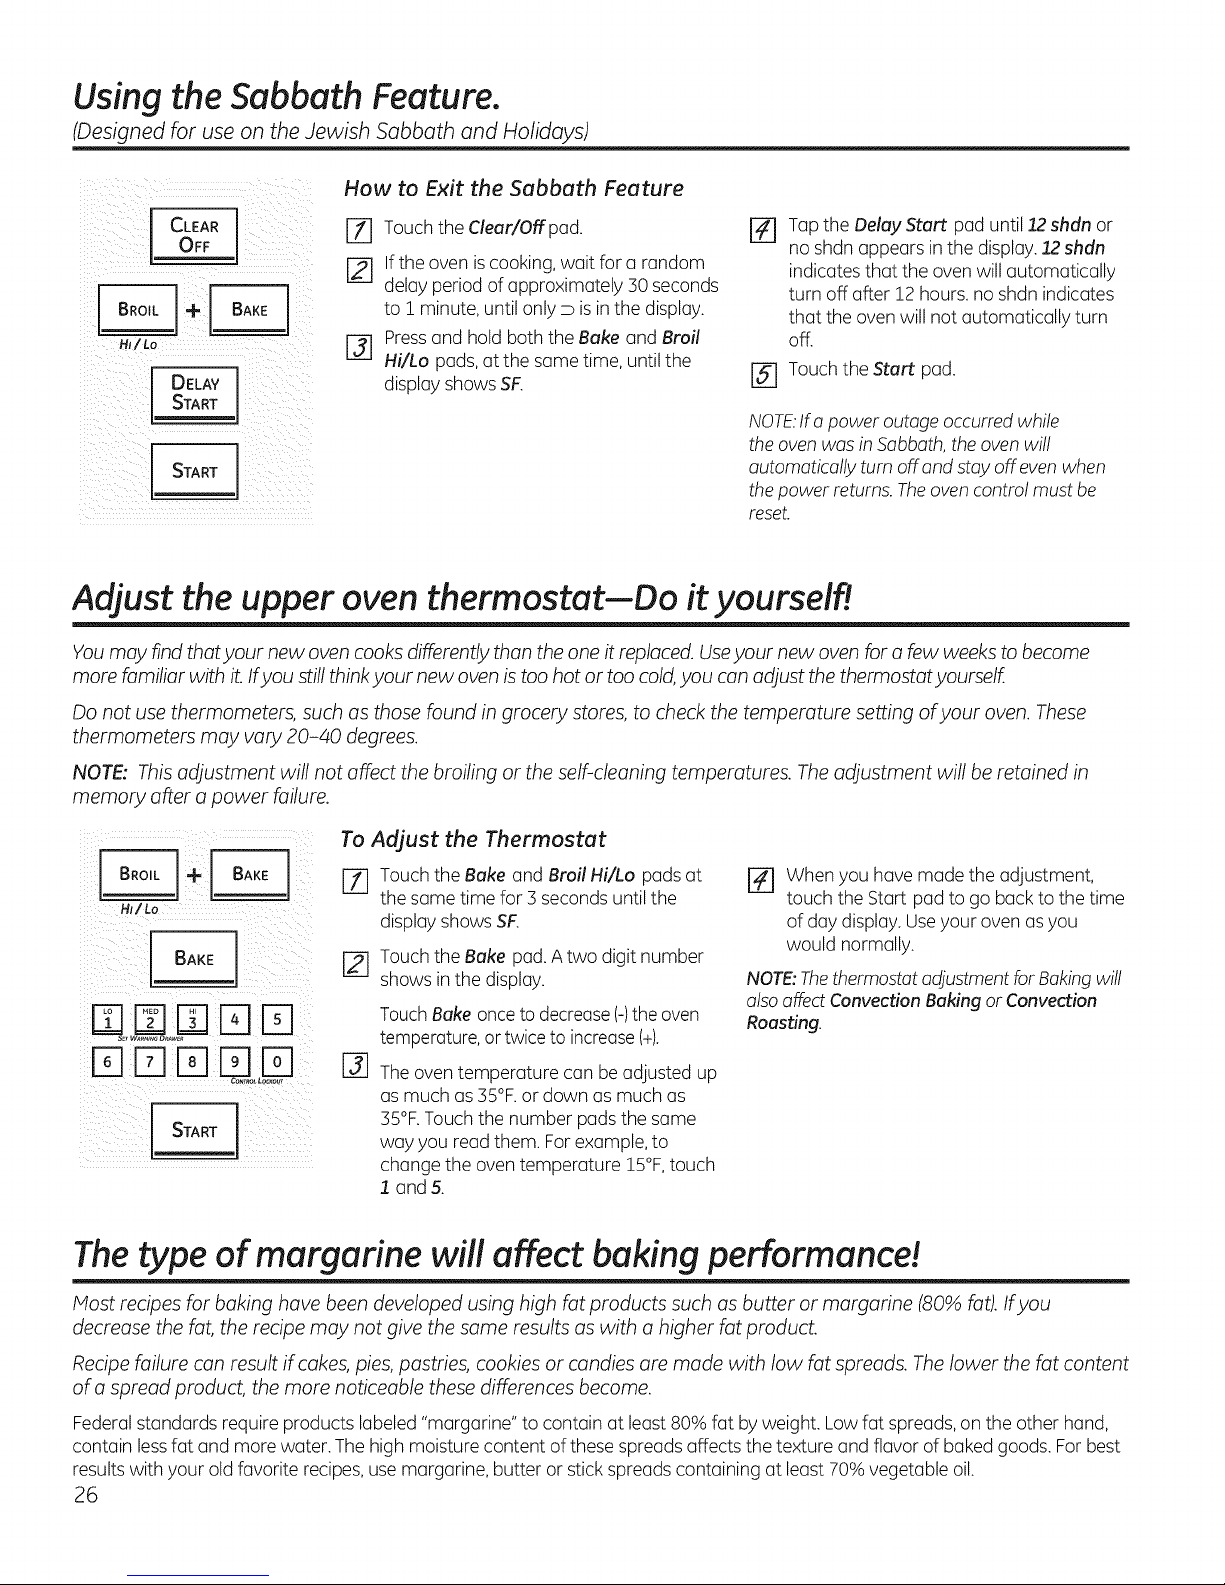
Using the Sabbath Feature.
(Designed for use on the Jewish Sabbath and Holidays)
How to Exit the Sabbath Feature
CLEAR []
HJ/ Lo [_
DELAY
START
START I
Touchthe Clear/Off pad.
If the oven iscooking, wait for a random
delay period of approximately 30 seconds
to 1 minute, until only D is inthe display.
Pressand hold both the Bake and Broil
Hi/Lo pads, at the same time, until the
display shows SF.
_-] Tap the Delay Start pad until 12shdn or
no shdn appears in the display. 12shdn
indicates that the ovenwill automatically
turn off after !2 hours, no shdn indicates
that the oven will not automatically turn
off.
[-_ Touchthe Start pad.
NOTE.Ira power outage occurred while
the oven was in Sabbath,the oven will
automatically turn off and stay off even when
thepower returns.The ovencontrol must be
reset.
Adjust the upper oven thermostat--Do it yourself!
You may find that your new oven cooks differently than the one it replaced. Useyour new oven for a few weeks to become
more familiar with it. Ifyou still think your new oven is too hot or too cold,you can adjust the thermostat yourself.
Do not use thermometers, such as those found in grocery stores, to check the temperature setting of your oven. These
thermometers may vary 20-40 degrees.
NOTE: This adjustment will not affect the broiling or the self-cleaning temperatures. The adjustment will be retained in
memory after a power failure.
i_ i--_ _
4" BAKE
CO_r_O_LOCKOUT
To Adjust the Thermostat
[Z] Touchthe Bake and Broil Hi/Lo padsat
the same time for 3 seconds until the
display shows SF.
[] Touchthe Bake pad. A two digit number
shows in the display.
TouchBakeonceto decrease(-)the oven
temperature,or twiceto increase(+).
@
Theoven temperature can be adjusted up
as much as 35°F.or down as much as
35°F.Touch the number pads the same
way you read them. Forexample, to
change the oventemperature 15°F,touch
I and 5.
r_ When you have made the adjustment,
touch the Start pad to go back to the time
of day display. Useyour oven as you
would normally.
NOTE:Thethermostatadjustment for Bakingwill
alsoaffectConvection Baking or Convection
Roasting.
The type of margarine will affect baking performance!
Most recipes for baking have been developed using high fat products such as butter or margarine (80% fat). Ifyou
decrease the fat, the recipe may not give the same results as with a higher fat product.
Recipe failure can result if cakes, pies, pastries, cookies or candies are made with low fat spreads. The lower the fat content
of a spread product, the more noticeable these differences become.
Federalstandards require products labeled "margarine" to contain at least80%fat byweight. Lowfat spreads,onthe other hand,
contain lessfat and more water. The high moisture content of these spreads affects the texture and flavor of baked goods. Forbest
resultswith your old favorite recipes, usemargarine, butter or stick spreadscontaining at least 70% vegetable oil.
26
Page 27
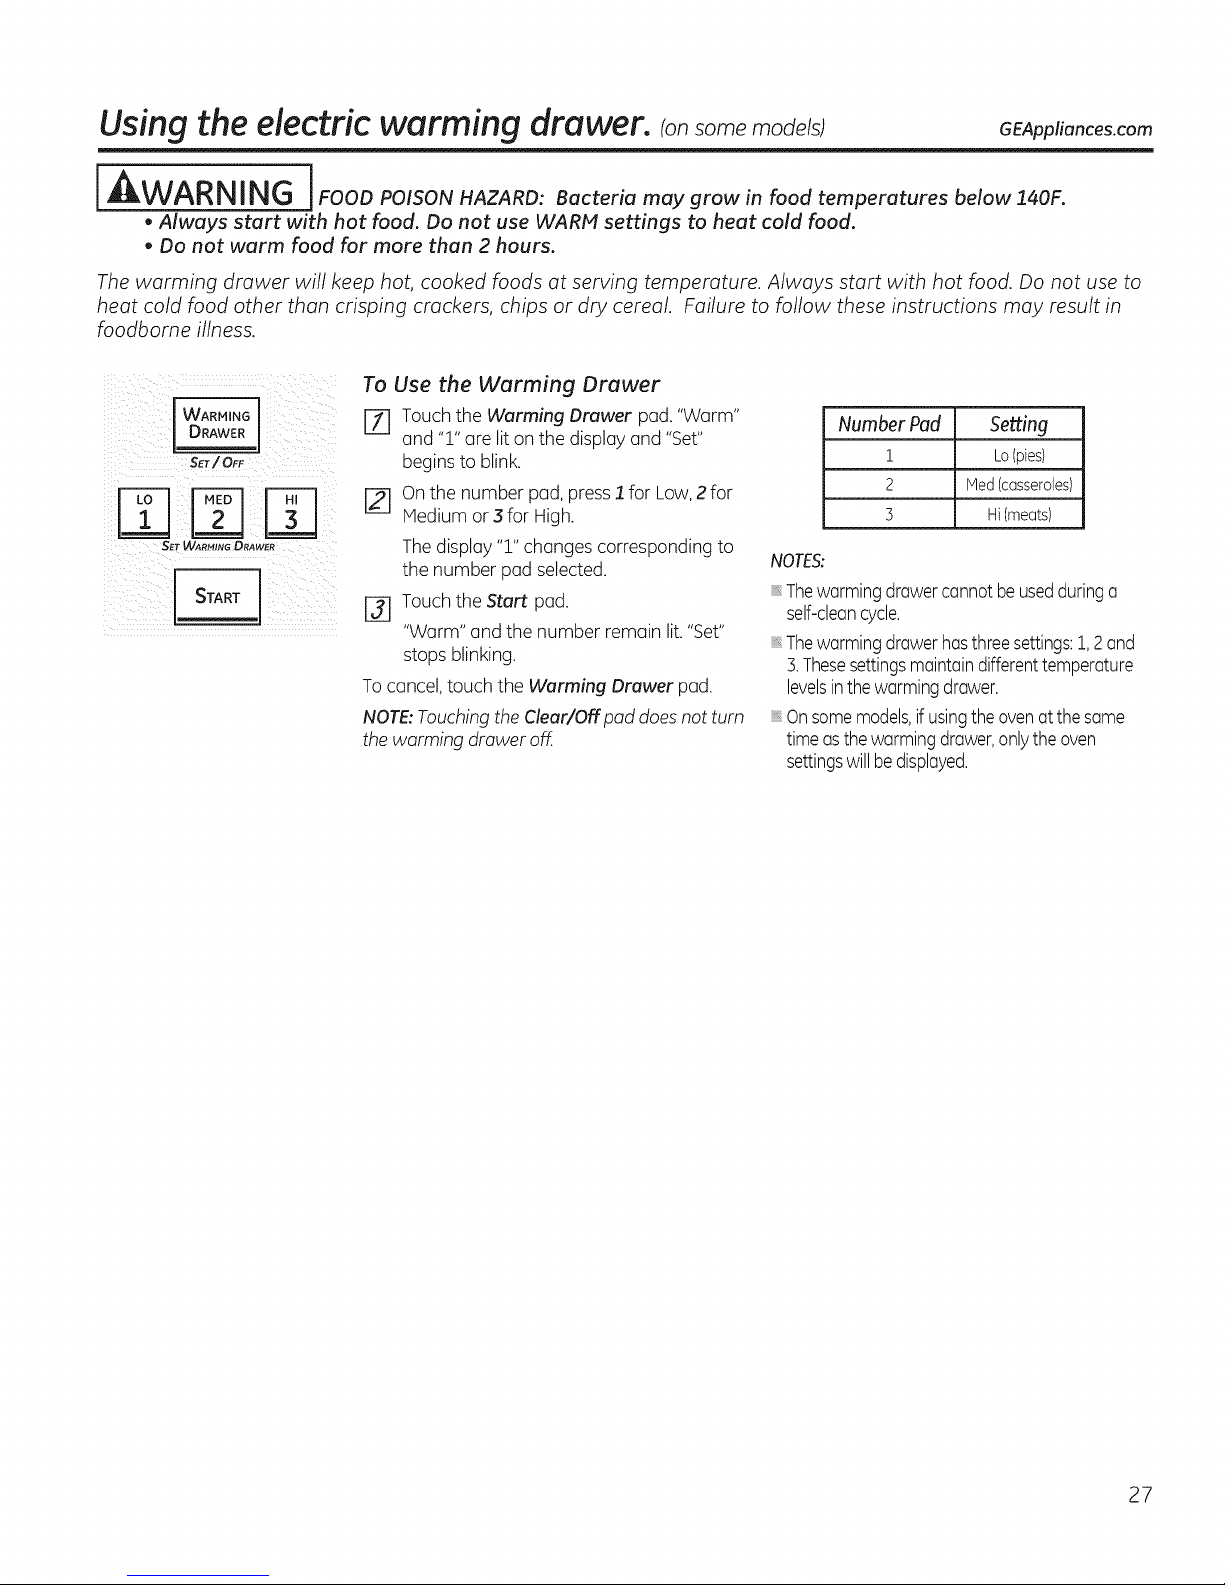
Using the electric warming drawer, consomemode sl GEApp,onces.com
Jl'_WARNING llFooopoison.AZARO:Oocteriomaygrowinfoodtemperaturesbelow140F.
• Always start with hot food. Do not use WARM settings to heat cold food.
• Do not worm food for more than 2 hours.
The warming drawer will keep hot, cooked foods at serving temperature. Always start with hot food. Do not use to
heat cold food other than crisping crackers, chips or dry cereal. Failure to follow these instructions may result in
foodbome illness.
To Use the Warming Drawer
1
DRAWERiif :i:i
ii i i _
SET/OFF
START
[] Touch the Warming Drawer pad. "Warm"
and "!" are liton the display and "Set"
begins to blink.
[] On the number pad, press 1 for Low,2 for
Medium or 3 for High.
The display "!" changes corresponding to
the number pad se(ected.
[-_ Touch the Start pad.
"Warm" and the number remain lit."Set"
stops blinking.
To cancel, touch the Warming Drawer pad.
NOTE: Touching the Clear/Off pad does not turn
the warming drawer off.
Number Pad Setting
i Lo(pies)
2 Med(casseroles)
5 Hi (meats)
NOTES:
Thewormingdrawercannotbeusedduringo
self-cleoncycle.
Thewormingdrawerhasthreesettings:1,2and
3.Thesesettingsmaintaindifferenttemperature
levelsinthewormingdrawer.
Onsomemodels,if usingtheovenat thesome
timeasthe wormingdrawer,onlythe oven
settingswillbedisplayed.
27
Page 28
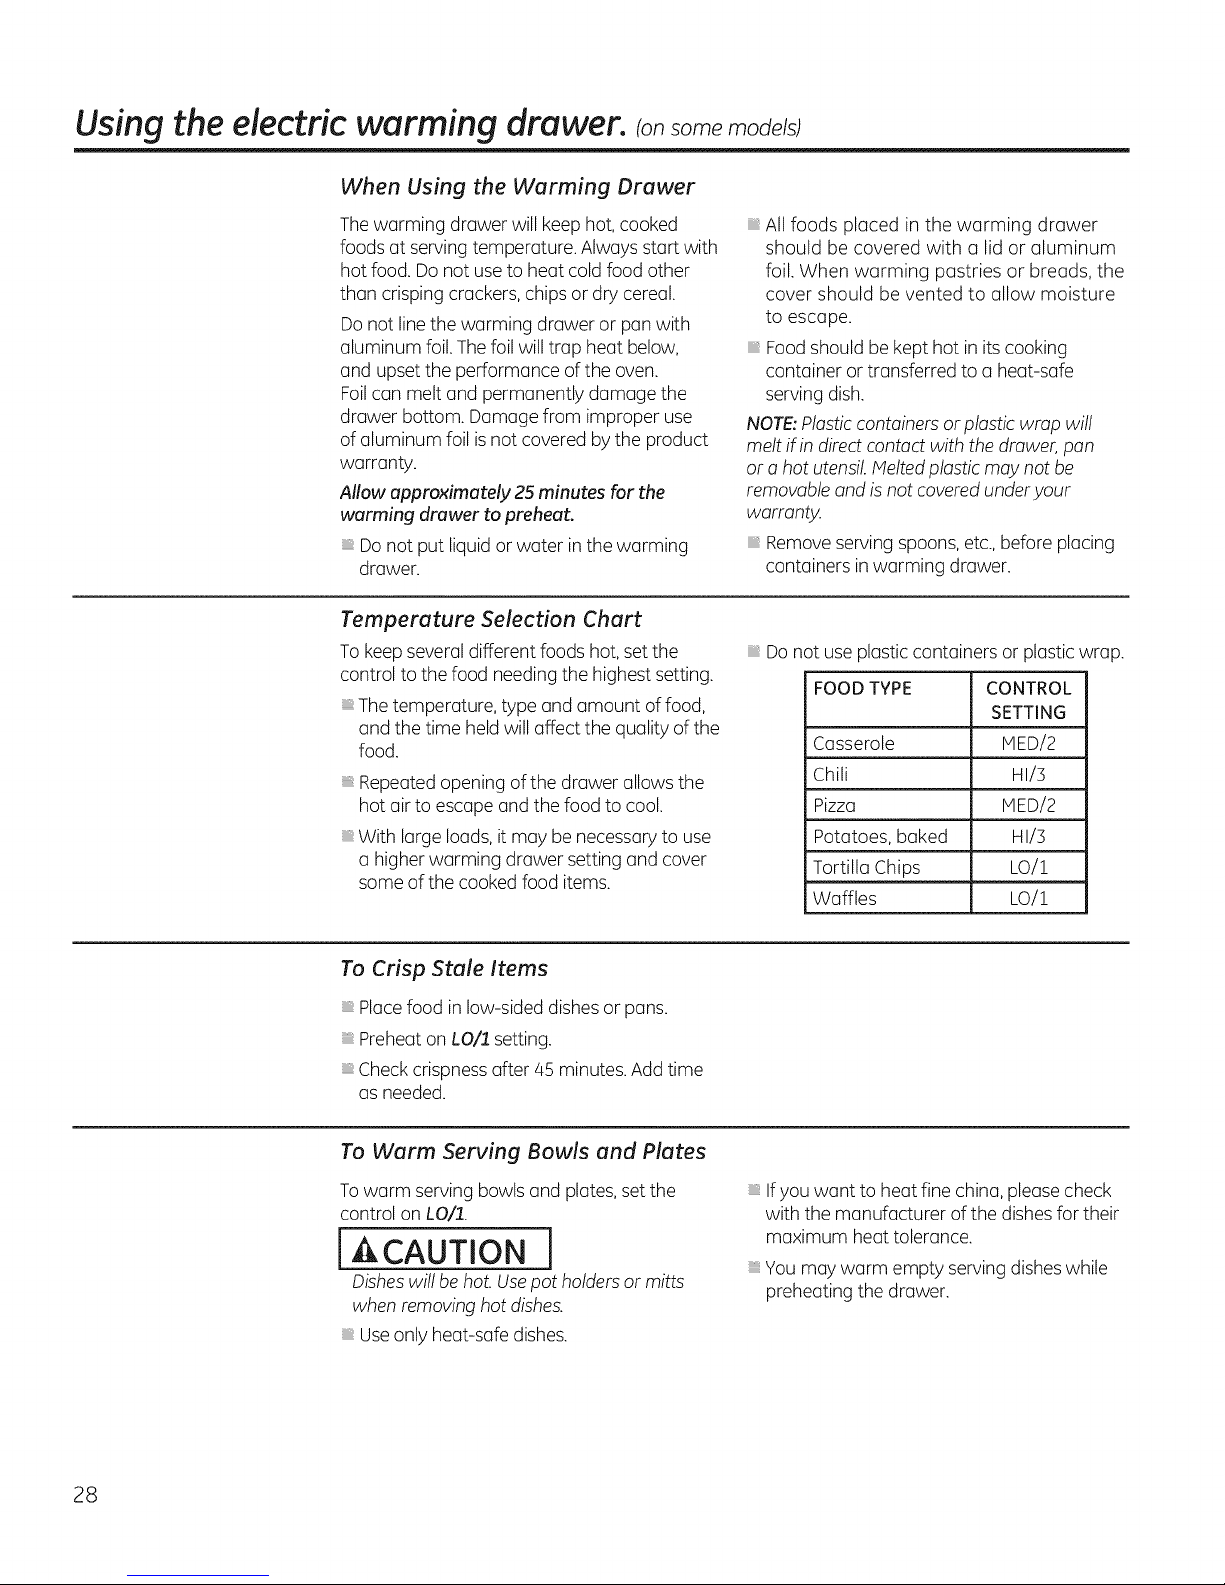
Using the electric warming drawer, consomemode sl
When Using the Warming Drawer
Thewarming drawer will keep hot, cooked
foods at serving temperature. Always start with
hot food. Do not use to heat cold food other
than crisping crackers, chips or dry cereal.
Do not line the warming drawer or pan with
aluminum foil. Thefoil will trap heat below,
and upset the performance of the oven.
Foilcan melt and permanently damage the
drawer bottom. Damage from improper use
of aluminum foil isnot covered by the product
warranty.
Allow approximately 25 minutes for the
warming drawer to preheat.
Donot put liquid or water in the warming
drawer.
Temperature Selection Chart
To keep several different foods hot, setthe
control to the food needing the highest setting.
Thetemperature, type and amount of food,
and the time held will affect the quality of the
food.
Repeatedopening ofthe drawer allows the
hot air to escape and the food to cool.
With large loads,it may be necessaryto use
a higher warming drawer setting and cover
some of the cooked food items.
All foods placed in the warming drawer
should be covered with a lid or aluminum
foil. When warming pastries or breads, the
cover should be vented to allow moisture
to escape.
Foodshould be kept hot in its cooking
container or transferred to a heat-safe
serving dish.
NOTE:Plasticcontainersor plastic wrap will
melt if in direct contact with the drawer, pan
or a hot utensil Nelted plastic may not be
removable and is not covered under your
warranty.
Removeserving spoons,etc., before placing
containers in warming drawer.
Donot useplastic containers or plastic wrap.
FOODTYPE CONTROL
SETTING
Casserole MED/2
Chili HI/3
Pizza MED/2
Potatoes, baked HI/3
Tortilla Chips LO/1
Waffles LO/1
28
To Crisp Stale Items
Placefood in low-sided dishesor pans.
Preheaton LOll setting.
Checkcrispness after 45 minutes. Add time
as needed.
To Warm Serving Bowls and Plates
Towarm serving bowls and plates, set the
control on LOll.
{ACAUTION j
Disheswill be hot. Usepot holders or mitts
when removing hot dishes.
Useonly heat-safe dishes.
Ifyou want to heat fine china, pleasecheck
with the manufacturer of the dishes for their
maximum heat tolerance.
You may warm empty serving disheswhile
preheating the drawer.
Page 29
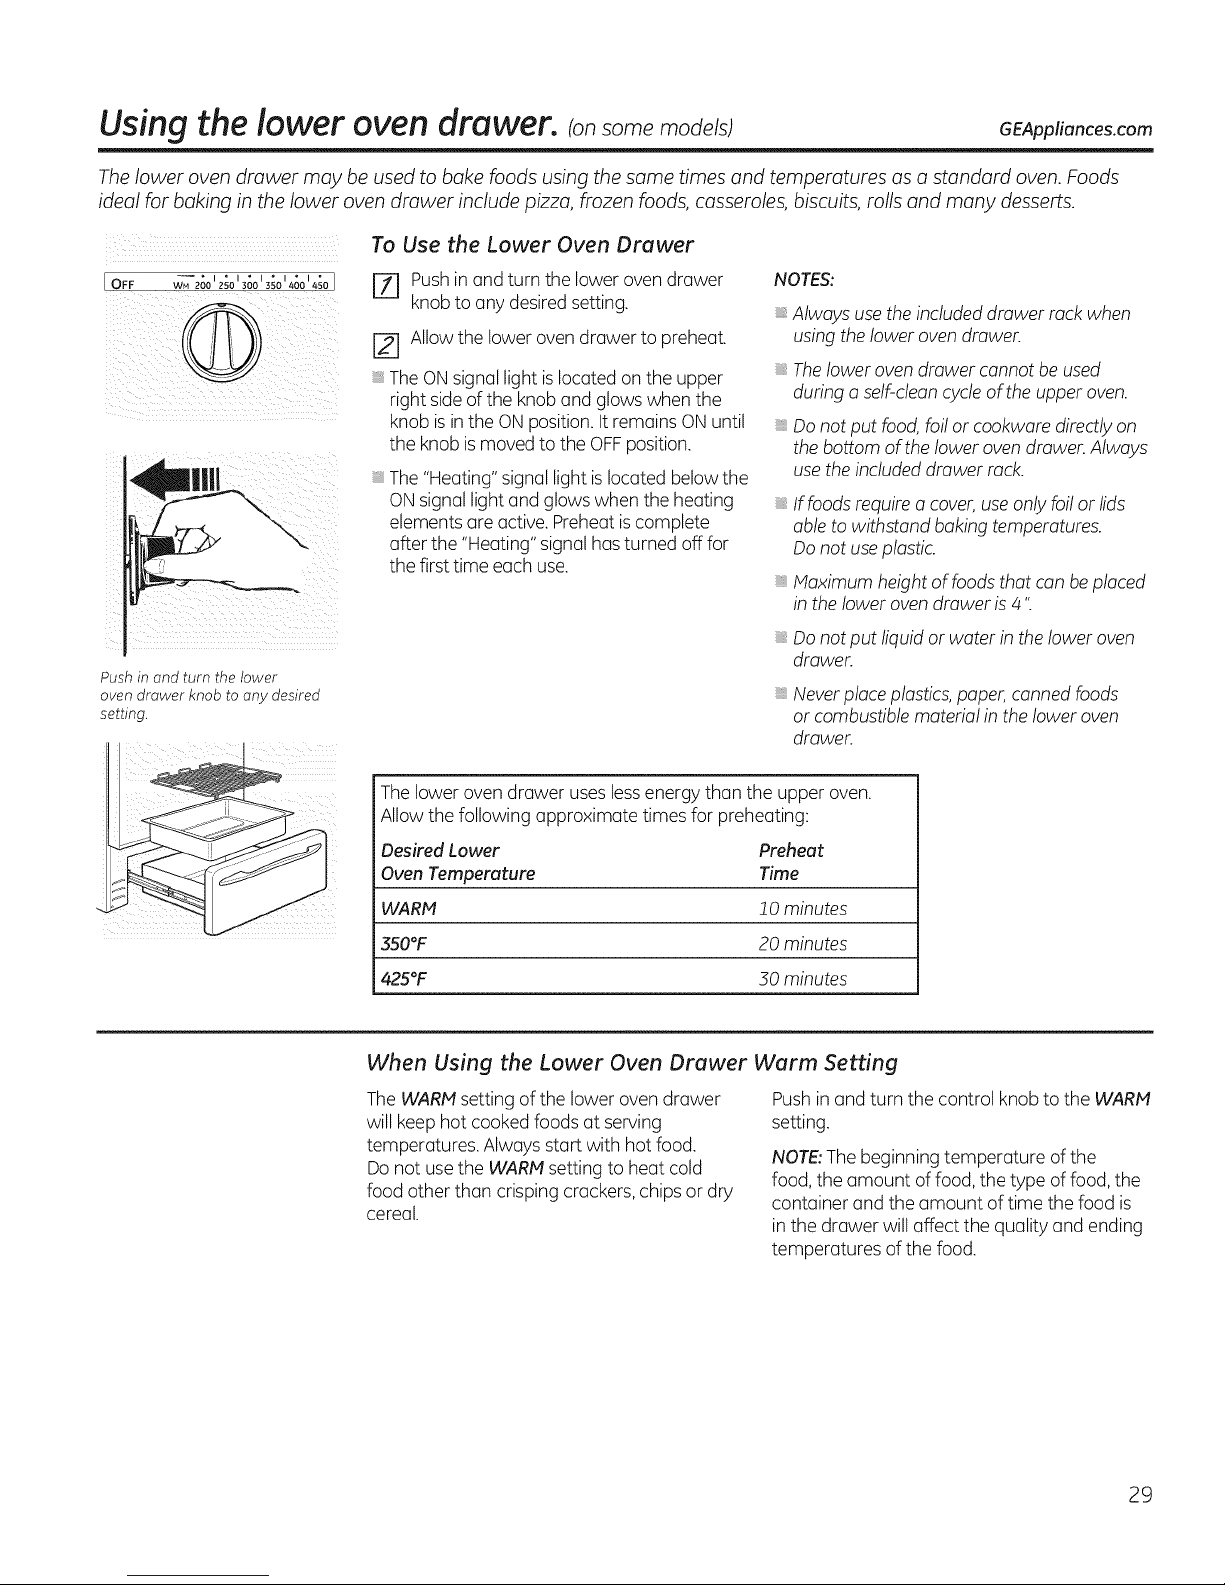
Using the lower oven drawer. (onsome models) GEAppliances.com
The lower oven drawer may be used to bake foods using the same times and temperatures as a standard oven. Foods
ideal for baking in the lower oven drawer include pizza, frozen foods, casseroles, biscuits, rolls and many desserts.
To Use the Lower Oven Drawer
OFF _-T20o'4030o'3_o'4o0'4°I rfl Pushin and turn the lower oven drawer
knob to any desired setting.
[] Allow the lower ovendrawer to preheat.
TheON signal light islocated on the upper
right side of the knob and glows when the
knob is in the ON position.It remainsONuntil
the knob ismoved to the OFFposition.
The"Heating" signallight islocated belowthe
ONsignal light and glows when the heating
elements are active. Preheat iscomplete
after the "Heating" signalhas turned off for
the first time each use.
Push in and turn the lower
oven drawer knob to any desired
setting.
Thelower oven drawer uses lessenergy than the upper oven.
Allow the following approximate times for preheating:
Desired Lower Preheat
Oven Temperature Time
WARM i 0 minutes
NOTES:
iiiiiiiiiiii_iii
Always use theincluded drawer rack when
using the lower oven drawer.
iiiiiiiiiiii_iii
Thelower ovendrawer cannot be used
during a self-cleancycleof the upper oven.
iiiiiiiiiiii_iii
Donot put food, foil or cookware directly on
the bottom of the lower oven drawer. Always
usethe includeddrawer rack.
iiiiiiiiiiii_iii
Iffoods require a cover, use only foilor lids
able to withstand baking temperatures.
Do not use plastic.
iiiiiiiiiiii_iii
Maximum height of foods that can be placed
in the lower oven drawer is4".
Donot put liquid or water in the lower oven
drawer.
Neverplaceplastics, paper,canned foods
or combustiblematerial in the lower oven
drawer.
350°F 20 minutes
425°F 50 minutes
When Using the Lower Oven Drawer Warm Setting
TheWARM setting of the lower oven drawer
will keep hot cooked foods at serving
temperatures. Always start with hot food.
Donot usethe WARMsetting to heat cold
food other than crisping crackers, chips or dry
cereal.
Pushin and turn the control knob to the WARM
setting.
NOTE:The beginning temperature of the
food, the amount of food, the type of food, the
container and the amount of time the food is
in the drawer will affect the quality and ending
temperatures of the food.
29
Page 30
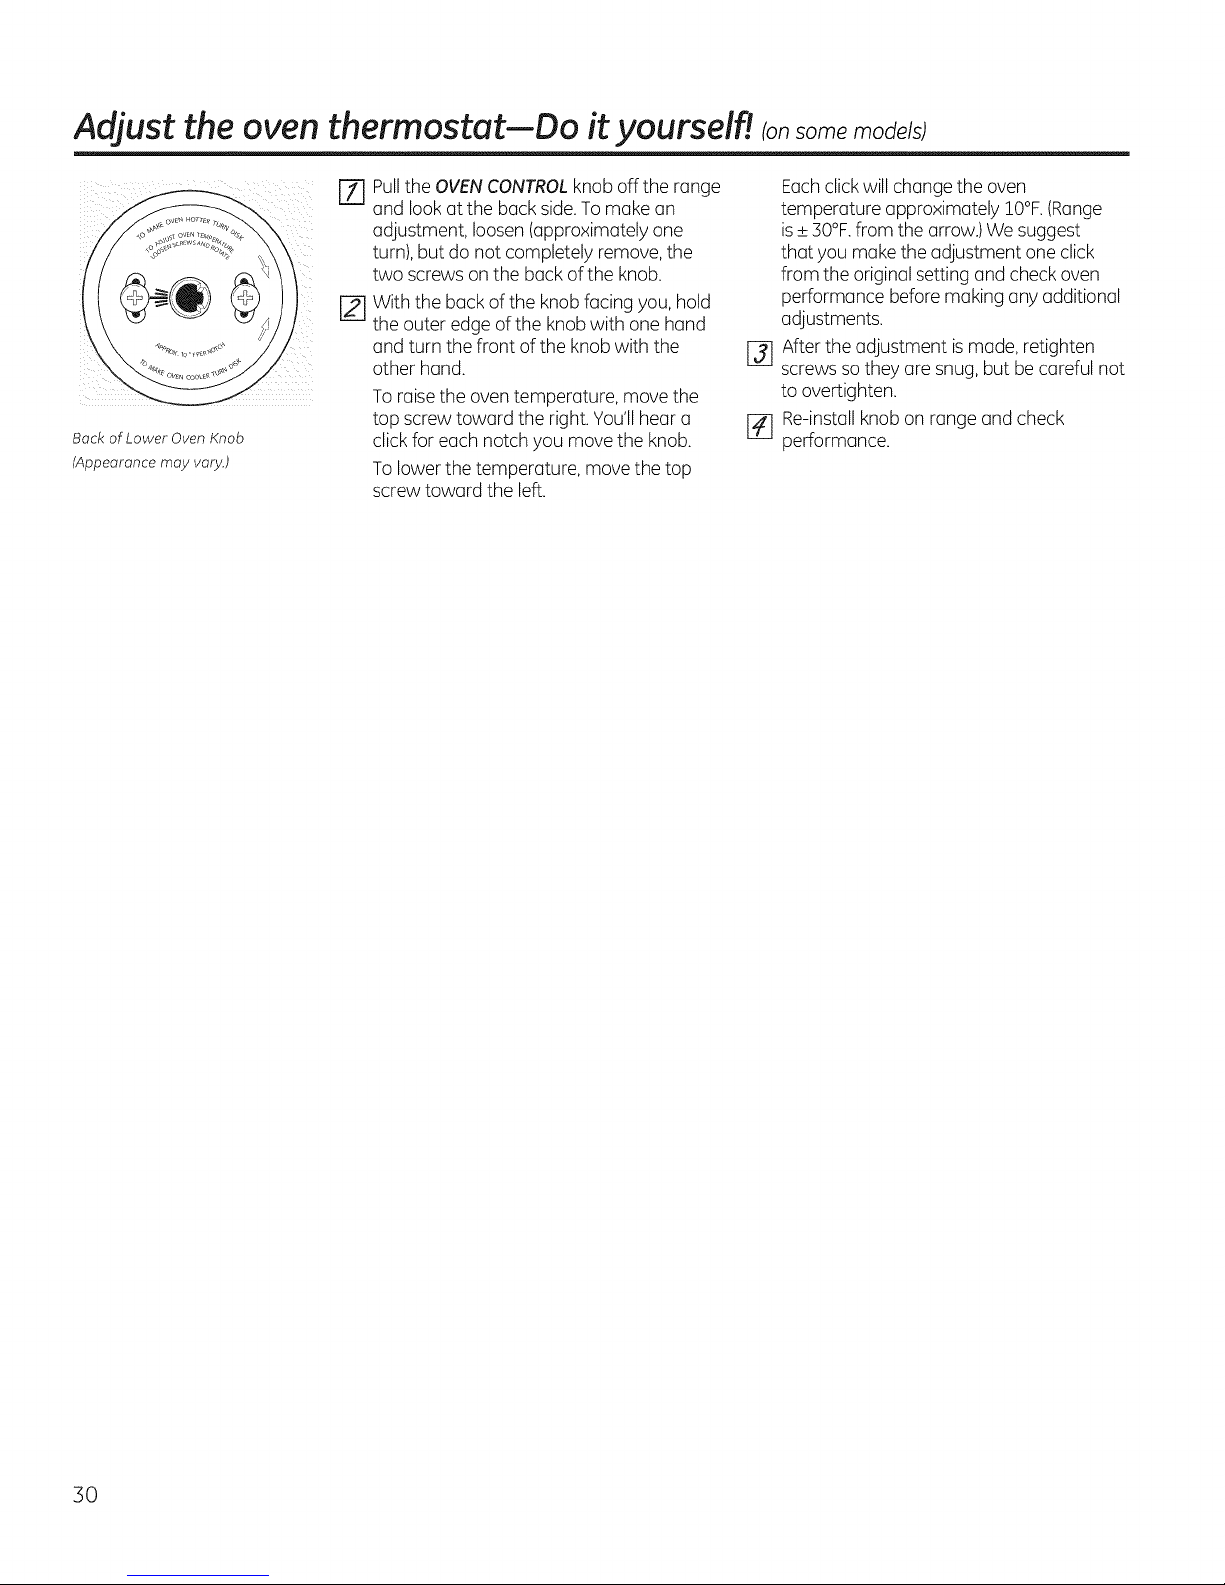
Adjust the oven thermostut--Do it yourselfl ionsomemode sI
Back of Lower Oven Knob
(Appearance may vary.)
Pullthe OVENCONTROLknob off the range
and look at the back side.To make an
adjustment, loosen (approximately one
turn), but do not completely remove,the
two screws on the back of the knob.
With the back of the knob facing you, hold
the outer edge of the knobwith one hand
and turn the front of the knob with the
other hand.
Toraise the oven temperature, move the
top screw toward the right. You'llhear a
clickfor each notch you move the knob.
Tolower the temperature, move the top
screw toward the left.
Eachclick will change the oven
temperature approximately IO°F.(Range
is_+30°F.from the arrow.)We suggest
that you make the adjustment one click
from the original setting and check oven
performance before making any additional
adjustments.
After the adjustment is made, retighten
@
screws so they are snug, but be careful not
to overtighten.
Re-installknob on range and check
%
performance.
30
Page 31

Using the sdf-deaning upper oven. GEAppliances.com
Ifyour model has a door latch, never force the latch handle. Forcing the handle will damage the door lock mechanism.
The oven door must be closed and all controls set correctly for the cycle to work properly.
Before a Clean Cycle
Wipe up heavy soil on the oven
bottom.
DO NOT hand
clean gasket. (On DO hand clean
some models, inside door flame
the gasket is on and glass.
the inrer door.
DO hand clean oven flame.
Forthe first self-clean cycle,we recommend
venting your kitchen with an open window or
usinga ventilation fan or hood.
Removeany broiler pan,broiler grid, all
cookware, probe and any aluminum foil from
the oven-they cannot withstand the high
cleaning temperatures.
NOTE:
Ifyour oven isequipped with nickel oven
shelves,remove them beforeyou begin the
self-clean cycle.
Ifyour oven isequipped with gray
porcelain-coated oven shelves,they may be
left in the oven during the self-clean cycle.
Soilon the front frame of the range and
outside the gasket on the front frame will
need to be cleaned by hand. Clean these
areas with hot water, soap-filled scouring
pads or cleansers such as Soft Scrub_. Rinse
well with clean water and dry. Wipe off the
flat inner door and glass with soapy water
and sponge.
Do not clean the gasket.Thefiberglass
material of the front frame gasket cannot
withstand abrasion. It isessential for the
gasket to remain intact. Ifyou notice it
becoming worn or frayed, replace it.
Wipe up any heavy spillovers on the oven
bottom.
Make surethe oven light bulb cover is inplace
and the oven light is off.
IHPORTANT:The health of some birdsis
extremely sensitiveto the fumes given off
during the self-cleaning cycle of any range.
Move birds to another well ventilated room.
NOTE:Usecaution when opening the upper
ovenafter the self-cleancycle hasended. The
ovenmay still be hot.
I SELF I
DDD o ,D
START I
How to Set the Upper Oven for Cleaning
[Z] On models with Gas/Control Lockout,
touch and hold the Gas/Control Lockout
pad for 3 seconds to turn it off.
NOTE:Thesurfaceburners must be turned off
prior to the self-cleanstart time.
[] Ifyour model has a latch, latch the door.
[] Touch the SelfClean pad.
Usingthe number pads,enter the desired
clean time, if a time other than 4 hours is
needed.
Cleancycle time isnormally 4 hours.You can
change the clean time to any time between
3 hours and 5 hours, depending on how dirty
your oven is.
[_ Touch the Startpad.
On models without a door latch, the door locks
automatically. The display will show the clean
time remaining. It will not be possible to open
the oven door untilthe temperature drops
belowthe lock temperature and the LOCKED
DOOR light goes off.
Theoven shuts off automatically when the
clean cycle iscomplete.
[_ When the LOCKEDDOOR light isoff, slide
the latch handle to the left as far as itwill
go and open the door. If your range does
not have a latch,the door will unlock
automatically.
Thewords LOCKDOORwill flash and the
oven control will signal if you setthe clean
cycle and forget to close the oven door or
forget to latch the door on models with a
latch.
Tostop a clean cycle,touch the Clear/Off
pad. When the LOCKEDDOOR light goes
off, indicating the oven has cooled below
the locking temperature, unlatch the door
(on modelswith a latch)and open the door.
31
Page 32

Care and cleaning of the range,
The oven door must be closed and all controls set correctly for the cycle to work properly.
How to Delay the Start of Cleaning
i SELF I
I CLEANJ
DELAY
START ]
N N N
START j
Hake sure the clock shows the correct time of
day.
[Z] On models with Gas/Control Lockout, [-_
touch and hold the Gas/Control Lockout
pad for 3 seconds to turn it off.
NOTE:The surface burners must be turned off
prior to the self-cleon start time.
Ifyour model has a latch, latch the door.
Touch the Self Clean pad.
[]
Usingthe number pads, enter the desired
clean time.
Touch the Delay Start pad. Theearliest
@
start time you can set will appear in the
display.
[] Usingthe number pads, enter the time of
day you want the clean cycle to start.
Theoven shuts off automatically when the
clean cycle iscomplete.
When the LOCKEDDOOR light is off, slide
the latch handle to the left as far as itwill
go and open the door. Ifyour range does
not have a latch,the door will unlock
automatically.
Thewords LOCKDOORwill flash and the
oven control will signal if you setthe clean
cycle and forget to close the oven door or
forget to latch the door on models with a
latch.
To stop a clean cycle,touch the Clear/Off
pad.When the LOCKEDDOOR light goes
off,indicating the oven has cooled below the
locking temperature, unlatch the door (on
models with a latch) and open the door.
[] Touch the Start pad.
On models without a door latch,the door locks
automatically. Thedisplay will show the start
time. It will not be possibleto open the oven
door until the temperature drops belowthe
lock temperature and the LOCKEDDOOR light
goesoff.
After a Clean Cycle
You may notice some white ash in the oven.
Wipe it up with a damp cloth after the oven
cools.
If white spots remain,remove them with a
soap-filled scouringpad and rinsethoroughly
with a vinegar and water mixture.
Thesedeposits are usually a salt residuethat
cannot be removed by the clean cycle.
Ifthe oven isnot clean after one clean cycle,
repeat the cycle.
iiiiiiiiiiii_iii
You cannot setthe oven for cooking until the
oven is cool enough for the door to unlock.
iiiiiiiiiiii_iii
While the oven is self-cleaning, you can
touch the Clock pad to display the time
of day. To return to the clean countdown,
touch the Cooking Time pad.
iiiiiiiiiiii_iii
Ifthe shelves become hard to slide,apply a
smallamount ofvegetable oil or cooking oil to
a paper towel and wipe the edgesof the oven
shelveswith the papertowel.
32
Page 33

Be sure electrical power is off and all surfaces are cool before cleaning any part of the range.
I^ I
I_WARNINGI/fyour rangeisremovedforcleaning,servicingoranyreason,be
sure the anti-tip device is reengaged properly when the range is replaced. Failure to take
this precaution could result in tipping of the range andcauseinjury.
Tocheck if the bracket is installed and engaged properly, carefully tip the range forward. The
bracket should stop the range within 4 inches. If it does not, the bracket must bereinstalled.
If the range is pulled from the wall for any reason, always repeat this procedure to verify the
range is properly secured by the anti-tip bracket.
Ifyour range has no anti-tip bracket, call !.800.626.8774 to receive one at no cost.
Sealed Burner Assemblies fan some models)
GEAppliances.com
Turnall controls OFF before removing the
burner parts.
Theround side burner caps and burner
heads can be lifted off, making them easyto
clean.The electrodes are not removable.
Theoval center burner head and cap
assembly can be lifted off, making it easy
to clean. The burner electrode isnot
removable.
Thetri-ring burner inner cap can be lifted
off for cleaning, the outer cop and base
assembly can be lifted off the cooktop as one
piecefor cleaning purposes.
[ACAUTION i _onotoperotethe
cooktop without all burner parts and grates
in place.
Electrode --
or
Electrode
Tri-dng bose
(onsome models)
Theelectrode of the spark igniter is
exposed when the burner head is
removed.When one burner isturned
to LITE,all the burners spark. Do
not attempt to disassembleor clean
around any burner while another
burner ison. An electric shock may
result,which could cause you to knock
over hot cookware.
!iiiiiiiiiiiiiiii
IACAUTION I_onotremove
tri-ring or bridge burner cap from head.
Thetri-ring or bridge burner head and cap
assembly can be lifted off, making it easyto
clean. Theelectrode is not removable.
33
Page 34

Care and cleaning of the range,
Burner Caps, Bases and Heads
Beforeremovingthe burner capsand heads(on
some models),remembertheir sizeand location.
Replacethem inthe same location after cleaning.
NOTE: Do not use steel wool or scouring
powders to clean the burner parts.
Burner caps
Lift off when cool.Wash burner caps in hot,
soapy water and rinsewith clean water. You
Burner cap is Burner cap is
properly seated. NOTproperly
Burner heads (onSome models)
The burner heads (on sOmemOdels)
are removable: Simply lift them off
Tri-ring head(on some models)
Burnerhead
Burnerbase
MakeSuretheringintheburnerhead
ispositionedovertheelectrodeand
thatthe burner head isfullyinserted
insidethe burnerbase.Asmallgap
between the baseand headis normal.
Front-right head (on s0me modeis),
front-left head, back-right head and
Stability nber useasewing
Burner(k._-_,,_..)) tounclogthe
• "_'_ smallholeinthe
has_ Electrode burnerhead:
Make Surethe Slotin the burner head
Theovalburnerhead/capassemblyis
removable_Simplyliftit Offtherange for
cleaning usea sewingneed!eortwistTtie
to Unclogthe smallholeinthe burner
heads,
baCk:left head
_i_ needleort_vistTtie
iSpositioned Overthe electrode,
seated.
)
Hole in
head
34
may scour with a plastic scouring padto
remove burned-on food particles.To get rid of
burned on food, place the caps in a covered
container. Add 1/4 cup ammonia and let soak
for several hours or over night. Wash, rinsewell
and dry.
Tri-ring burner (onsome models)
Theouter cap on the tri-ring burner is not
removable.Only the center round cap may be
removed for cleaning.
Tocleanthe burnerbases,usesoapywater anda
plasticscouringpad.Wipecleanwith a dampcloth.
Makesure that no water gets into the burner
bases.Allow them to dry fully before using.
Burner Heads (on some models) and Oval
(Center) Burner Head/Cap Assembly
The burner heads and the oval burner head/cap
assembly are removable. Simply lift them off the
range for cleaning.
For proper ignition, make sure the small hole in
the section that fits over the electrode is kept
open. A sewing needle or wire twist-tie works
well to unclog it.
The slits in the burner heads must be kept clean
at alltimes for an even, unhampered flame.
Clogged or dirty burner ports or electrodes will
not allow the burner to operate properly.
Any spill on or around an electrode must
be carefully cleaned. Take care to not hit an
electrode with anything hard or it could be
damaged.
Clean the burner heads routinely, especially
after bad spillovers, which could clog the
openings. Liftoff when cool.
To remove burned-on food, soak the burner
heads in a solution of mild liquid detergent
and hot water for 20-30 minutes. Formore
stubborn stains, use a toothbrush.
After cleaning
Beforeputting the burner caps,heads (onsome
models)and ovalhead/cap assemblyback,shake
out excesswater and then drythem thoroughly
bysetting in a warm ovenfor 30 minutes.
Replacement Burner Heads (onsomemodels)
Replaceburner heads over the electrodes on
the cooktop, inthe correct locations according
to their size.There isone small, one medium,
one large and one extra-large burner head.
Front of range
-_ ,,
'onsomemoae_s
Trl-rln ] neaa
Makesurethe slotor no_edependingonmodel
tneournerheadispositionedovertneelectroae.
4ole
:troae
_S at or
E ectr
Oval (CentedBurner Head/Cap Assembly
ReD,aceme ova center)neaa/caDassemD_yover
theelectrodeonme COOKtOp.
Ovai neaa andcad
assemE.,
MaKe sure 1:hesict in l:ne
burner heac [s oositioned
over _ne electrode.
0
Front of ranoe
Caps
Reo,acethematchingsizeCaDSontome burner
Dosesorheads
Hakesurethatthe headson somemodelsana
capsarereplacedin tnecorrectlocatlons
. i__ _om e models)
. o
Front of range Trl-nng caF
°/
Elec_roae
on some models
0
Page 35

GEAppliances.com
Lodge ® Reversible and Chef's Cast-Iron Griddles (on some models)
Rinse with hot water (do not use soap), and
dry thoroughly.
Before cooking, prepare the surface with
cooking spray or vegetable, oil.
After cooking, clean the griddle with a stiff
brush and hot water. Using soap is not
recommended, and harsh detergents should
never be used.
Towel dry immediately and apply a light coat
of cooking spray or vegetable oilwhile the
griddle isstill warm.
Storein a cool,dry place.
Donot wash in the dishwasher.
Griddle Precautions:
Ifsomething has spilled under the griddle, it
should be cleaned up as soon as possible to
prevent "baked on" food soil.
Do not allow grease to accumulate under the
griddle as it can be a fire hazard. Clean under
the griddle as soon as it is cool. Clean with hot
soapy water.
Donot placeyour griddle in the microwave.
,, Always turn off allsurface burners before
removing the griddle. Usecaution when
handling a hot griddle.
Nonstick Griddle (on some models)
NOTES:
The griddle is to be used over the center
burner only.
Donot cleanthe griddleina self-cleaningoven.
Donot clean the griddle in a dishwasher.
Wash with hot, soupy water after each use
while using a sponge or dishcloth.
If oil or food residue is left on the griddle,
further cooking will harden the residue and
cause sticking over time. In this case, use a
nonabrasive cleanser such us Ban Ami® or
one of the soft scrub cleansers. Apply with
u sponge, Scrunge® or other cleaning pad
labeled safe for non-stick puns
Useonly plastic, nylon or wooden utensils
or SilverStone® kitchen tools to prevent
marring of the coating.
Never use knives or cut food on the grid-
dle. Wash with hot, soupy water after each
use. Store carefully to prevent scratching.
Griddle Precautions:
If something has spilled under the griddle,
it should be cleaned up us soon us possible
to prevent "baked on" food soil.
Do not allow grease to accumulate under
the griddle as it can be a fire hazard. Clean
under the griddle us soon us it is cool.
Clean with hot soupy water.
Do not place your griddle in the microwave.
Always turn all surface burners before
removing the griddle. Use caution when
handling u hot griddle.
Burner Grates
Yourrange has multipledouble and singlegrates.
Thesegrates are position-specific.Formaximum
stability,these grates should only be usedin their
proper position;they cannot be interchanged
left to right or front to back.Forconvenienceon
double grates,the undersidesofthe left and right
Appearancemayvary.
Thegrates maybe cleanedina
dishwasher.
Left Front Center Rght Front
grates are marked "LEFTFRONT"and "RIGHT
FRONT."Makesurethe front portion of both
grates isin front. Themiddle grate has a bow in
front. Makesure the bowed portion istoward the
front ofthe range.In addition,the middle grate is
supported bythe left and right grates and must
iii
be installed LASTfor stability.
Cleaning
Lift out when cool. Grates should be washed
regularly and, of course, after spillovers.Wash
them in hot, soapy water and rinsewith clean
water. When replacingthe grates, be sure
they are positioned securelyover the burners.
Replacethe grates so that continuous arcs are
formed with the center ribs of all three grates.
Do not operate a burner for an extended period
of time without cookware on the grate. The
finish on the grate may chip without cookware
to absorb the heat.
Toget rid of burned-on food, place the grates in
a covered container. Add 1/z_cup ammonia and
let them soak several hours or overnight. Wash,
rinsewell and dry.
Although they are durable, the grates will
gradually lose their shine,regardless of the
best care you can give them. Thisisdue to their
continual exposure to high temperatures. You
will notice this sooner with lighter color grates.
NOTE:Do not clean the grates in a self-cleaning
oven. 35
Page 36

Care and cleaning of the range,
Burner Grates for Model CG5985 Only
Your range hasthree professional-style double
grates.These grates are position-specific. For
maximum stability,these grates should only be
usedin their proper position.For convenience,
the undersides of the side grates are marked
Appearance may vary.
The grates may be cleaned in a
dishwasher,
Outside Center Outside
Grate Grate Grate
The oven has 6 rack positions.
Place the gray porcelain-coated
racks in positions "R", "B" and "D"
for self-cleaning the grates. Place
one grate each on the oven racks
from side to side.
"OUTSIDE".Makesurethe front portion of
both grates is in front. The center grate can be
interchanged front to back.
Cleaning Grates - Soap and Water
Lift grates out when cool.Grates should be
washed regularly and, of course, after spillovers.
Wash them in hot, soapy water and rinsewith
clean water. When replacing the grates, be sure
they are positioned securely over the burners.
Replacethe grates so that straight lines are
formed with the center ribs of all three grates.
Cleaning Grates--Self-Clean Oven
Toget rid of burned-on food, you may usethe
self-clean cycle ofyour range.Remove any
burnt-on food particlesthat you can prior to
placingthe grates in the oven. Place the gray
porcelain-coated racks in positions "R","B"and
I'D_,"
NOTE:Do not clean thegriddle in the self-
cleaning oven.
Placeone grate each on the oven racks from
sideto side.Follow the instructions for how to
set the upper oven for cleaning.
NOTE:Usecaution when removing the grates
from the oven after the self-cleancyclehas
ended.Thegrates may still be hot.
Forheavily-soiled grates,you may notice some
white ash on the grate. Wipe it off with a damp
cloth after the grate cools. Ifwhite spots remain,
remove them with a soap-filled scouring pad
and rinsethoroughly with a vinegar and water
mixture.
Thesedeposits are usually a salt residue that
cannot be removed bythe clean cycle.
Cleaning Grates--Dishwasher
Thegrates may be cleaned inthe dishwasher.
Removeany burnt-on food particlesthat
you can prior to placing the grates inthe
dishwasher. Placethem on the lowest rack
of the dishwasher and run on a "heavy duty"
cycle.
Donot operate a burner for an extended period
of time without cookware on the grate. The
finish on the grate may chip without cookware
to absorb the heat.
Although the grates are durable, they will
gradually lose their shine, regardless of the
best careyou can give them. Thisis due to their
continual exposure to high temperatures and
abrasion by the cookware.
Support Bumpers
Ifone or more of the circular siliconegrate
support bumpers in the cooktop are missingor
damaged, replacement parts can be obtained
by calling 1.800.GE.CARES.
Toinsertthe newbumpers,simplyinsertthecone
shapedendandpushdownwhilegentlytwistingor
rockingthebumper.
36
Page 37

Cooktop Surface
To avoid damaging the porcelain-enamel
surface of the cooktop and to prevent it
from becoming dull, clean up spills right away.
Foods with a lot of acid (tomatoes, sauerkraut,
fruitjuices, etc.) or foods with
high sugar content could cause a dull spot
ifallowed to set.
Oven Air Vents
Never block the vents (air openings)of the
range.They provide the air inlet and outlet that
are necessaryfor the range to operate properly
with correct combustion.
Air openings are located at the rear of the
cooktop, at the top and bottom of the oven
door,and at the bottom ofthe range.
Upper Control Panel
On models so equipped, lock out the touch pads
before cleaning.
See the Gas/Control Lockout information in
the Special features of your oven control section
in this manual.
Cleanup splatters with a damp cloth.
GEAppliances.com
When the surface has cooled, wash and rinse.
Forother spillssuch as fat spatterings, wash
with soap and water once the surface has
cooled.Then rinse and polish with a dry cloth.
NOTE:Forstainless steel cooktops, refer
to the Stainless steel surfaces section.
Vent appearance and location vary.
Youmay also use a glass cleaner.
Removeheavier soilwith warm soapy water.
Do not useabrasives of any kind.
Unlockthe touch pads after cleaning.
Surface burner knob
_eal e
Upper oven knob (on some models)
sbet
i
Stem
holes
Lower Control Panel (Front Manifold Panel) and Knobs
It'sagood ideato wipe the control panel after
each use of the oven. Usea damp cloth to
clean or rinse. For cleaning, usemild soap and
water or a 50/50 solution of vinegar and water.
Forrinsing, use clean water. Polishdry with a
soft cloth.
Do not useabrasive cleansers,strong liquid
cleaners,plastic scouring pads or oven cleaners
on the control panel-they will damage the
finish.
Do not try to bend knobs by pulling them up
or down or by hanging a towel or other such
loads.Thiscan damage the gas valve shaft.
Thecontrol knobs may be removed for easier
cleaning.
Hake surethe knobs are in the OFFpositions
and pull them straight off the stems for
cleaning.
The knobs can be cleaned in a dishwasher or
they may alsobe washed with soap and water.
Makesurethe insidesof the knobs are dry
before replacing.
Replacethe knobs in the OFFposition to ensure
proper placement.
Metal parts can be cleaned with soap and
water. Do not use steelwool, abrasives,
ammonia, acids or commercial oven cleaners.
Dry with a soft cloth.
To determine the correct location of the knob
on the front control panel, examine the back
of the knob. Knobswith labels and two stem
holesare not interchangeable with other
types of knobs and should be returned to the
front panel first. Locate the proper position
by matching the label and the front panel
description or by matching the shape of the
knob holes to the shape of the control panel
stems. Knobswithout labels and only one stem
hole can be returned to any position on the
front control panel that hasonly one stem.
37
Page 38

Care and cleaning of the range.
Oven Bottom
The oven bottom has a porcelain-enamel
finish. To make cleaning easier, protect the
oven bottom from excessive spillovers by
placing a cookie sheet on the rack below the
rack you are cooking on. This isparticularly
important when baking a fruit pie or other
foods with a high acid content. Hot fruit
fillings or other foods that are highly acidic
Lift-Off Oven Door (onsome models)
iii ¸:: I __
i
Pull hinge locks down to unlock.
Removal position
Bottom
edge of
slot
Hinge arm
The door is very heavy. Be careful when
removing and lifting the door.
Donot lift the door by the handle.
To remove the door:
[Z] Fullyopen the door.
[] Pullthe hinge locks down toward the door
frame, to the unlocked position. A tool,
such asa small flat-blade screwdriver,
may be required.
r_ Firmly grasp both sidesof the door at the
top.
r4] close door to the door removal position,
which ishalfway between the broil stop
position and fully closed.
[] Lift door up and out until the hinge arm
isclear of the slot.
(such as tomatoes, sauerkraut and sauces
with vinegar or lemon juice) may cause pitting
and damage to the porcelain-enamel surface
and should be wiped up immediately.
Toclean up spillovers, use soap and water, an
abrasive cleaner or soap-filled scouring pad.
Rinsewell to remove any soap before self-
cleaning.
To replace the door:
rT] Firmlygrasp both sidesof the door at the
top.
With the door at the same angle
r2]
as the removal position,seat the
indentation of the hinge arm into the
bottom edge of the hinge slot.The notch
inthe hinge arm must be fully seated into
the bottom of the slot.
r_ Fullyopen the door. Ifthe door will not
fully open,the indentation is not seated
correctly inthe bottom edge of the slot.
r_ Pushthe hinge locks up against the front
frame of the oven cavity to the locked
position.
Closethe oven door.
Lift the door straight up and
off the hinges.
38
Lift-Off Oven Door (on some models)
The oven door is removable, but it is heavy.
You may need help removing and replacing
the door.
To remove the door:
r-f] open it a few inches to the special stop
position that will hold the door open.
r_ Grasp firmly on each side and lift the
door straight up and off the hinges.
NOTE:Be careful not to place hands be-
tween the hinge and the oven door frame
since the hinge could snap back and pinch
fingers.
H!ng!
lock
arm
Push hinge locks up to lock.
To replace the door:
[Z] Hake sure the hinges are inthe special
stop position. Position the slots in the
bottom of the door squarely over the
hinges.
Lower the door slowly and evenly over
both hinges at the same time. If the
hinges snap back against the oven
frame, pull them back out.
Page 39

Oven Racks
GEAppliances.com
All oven racks may be cleaned by hand with an
abrasive cleaner or steel wool. After cleaning,
rinsethe rackswith clean water and dry with a
clean cloth. Grayporcelain-coated oven racks
may remain in the oven during the self-cleaning
cyclewithout being damaged. If nickel-plated
cleaning cycle,they will losetheir luster and
become hard to slide. It will be necessary to
grease all oven rack side edges with a light
coating of vegetable oil after cleaning them by
hand or in the oven.This will help maintain the
easeof sliding the racks in and out of the oven.
oven racks remain inthe oven during the self-
Extension Rack (on some models)
Extensionracks may be cleaned by hand with
an abrasive cleaner or steelwool. During
d
cleaning, be careful not to allow water or
cleaner to enter the extension slideson the
sides ofthe rack.
NOTE:Do not clean in a dishwasher.
If the rack becomes hard to remove or
replace, wipe the oven rack supports with
cooking oil.Do not wipe cooking oil on the
slides.
To lubricate the slides:
NOTE:Do not spray extensionrack with cooking
spray or other lubricant sprays.
[71 Removethe rack from the oven.See
ExtensionRackin the Usingthe oven
section.
[] Fullyextend the rack on a table or
countertop. Newspaper may be placed
underneath the rack for easy cleanup.
Ifthere is debris in the slidetracks, wipe it
@
away usinga paper towel.
NOTE:Any graphite lubricant wiped away
must bereplaced - seesteps 4 through 7.
Ifthe rack becomes difficult to slide or if the
paddle isdifficult to actuate, the rack may need
to be lubricated using the Graphite Lubrication
shippedwith your oven.To order additional
Graphite Lubrication, call our National Parts
Centerat 800.626.2002and reference
WBO2TIO$O$.
r_ open and closethe rackseveraltimes to
distribute the lubricant.
[-Z---]Replacethe cap on the lubricant and
shake it again. Turn the rack over and
repeat steps 3,4, 5 and 6.
[] Closethe rack,turn rack right-side-up and
place in the oven. SeeExtensionRackin
the Usingthe ovensection.
To lubricate the paddle:
Shakelubricant and
apply to the moving
parts ofthe paddle
mechanisms as shown.
r_ Shakethe graphite lubricant before
opening it. Starting with the left slide
mechanism of the rack, place four (4)
small drops of lubricant on the two (2)
bottom tracks of the slide close to the
bearing carriers.
Rackright-side-up
r_ Repeatfor the right slidemechanism of
the rack.
39
Page 40

Care and cleaning of the range.
Cleaning the Door
Toclean the inside of the door:
Do not allow excesswater to run into any
holesor slots in the door.
]
The gasket is designed with a gap
at the bottom to allow for proper
air circulation.
Do not rub or clean the door
gasket-it has an extremely low
resistance to abrasion.
If you notice the gasket becoming
worn, frayed or damaged in any
way or if it has become displaced
on the door, you should have it
replaced.
Wipe dishwashing detergent over any
baked-on spatters on the glass.Usea single
sidedsafety razor blade to clean it off. Then
wipe over the glass with a soapycloth to
remove any residue and dry off.
Thearea outside the gasket can be cleaned
with a soup-filled plastic scouring pad.
Stainless Steel Surfaces (onsome models)
Toclean the outside of the door'.
Usesoup and water to thoroughly cleanthe
top, sidesand front of the oven door. Rinse
well. You may also use a glass cleaner to
cleanthe glass on the outside
ofthe door.
Spillageof marinades, fruit juices,tomato
saucesand basting materials containing
acids may cause discoloration and should be
wiped up immediately. When the surface is
cool,clean and rinse.
Do not useoven cleaners,cleansing powders
or harsh abrasives on the
outside of the door.
Do not usea steel wool pad; it will scratch the
surface.
IMPORTANT: APPLY A PROTECTIVE COAT
OF CERAMA BRYTE®PART # WBO2T10111
STAINLESS STEELBRIGHTENER BEFORE
USING.
Thiswill helpyou to maintain the brightness
and appearance of your stainlesssteel range.
Inorder to avoid any discolorations and/or
grease stains,we recommend cleaning and
removing any spills,spots and grease from
the range after use.
It isimportant to use a soft cloth or paper
towel every time the range is cleaned to
avoid any scratches.
Readcarefully the instructions on the back of
the Brightener for better results.
Cleaning Instructions:
1. Removegrates.
2. Wash using warm, soapy water:
Wet soft cloth or paper towel (avoid using
excessivewater).
Wipe the surface in the direction of the grain
(following the steel lines).
Rinseand wring out a soft cloth or paper
towel and dry the range.
3. Apply a degreaser that does not contain
sodium hydroxide or stainless steel cleaner
(follow instructions).
4. Apply Cerama Bryte®StainlessSteel
Brightener(follow instructions).
5. Repeatsteps 2-/4as many times as needed.
6. Put grates back in place.
Followthese instructions for any stainless steel
surface on your range.
DONOT USE for cooktop or stainless steel
parts cleaning:
, Caustic lye (sodium hydroxide) or cleaners
containing this chemical
. Hard or steelwool pads
Abrasive materials or chemicals
Toinquire about purchasing stainlesssteel
appliance cleaner or polish,or to find the
location of a dealer nearest you, please call our
toll-free number:
National Parts Center 800.626.2002(U.S.)
800.661.1616(Canada)
GEAppliances.com(U.SJ
www.GEAppliances.ca (Canada)
40
Page 41

GEAppliances.com
IA
WARNING
l m_ I Shock or Burn Hazard: Before replacing oven light bulb, disconnect the electrical power to the
range at the main fuse or circuit breaker panel. Failure to do so may result in electric shock or burn.
I
Oven Light Replacement (on some models)
Besure to let the light cover and bulb cool
completely.
Toremove the cover:
[Z] Twist lenscounterclockwise about a
quarter turn to remove.
Donot remove any screws to remove the cover.
[] Replacebulb with a 40-watt appliance
bulb or two-prong halogen bulb,as
appropriate.
To replace the coven
IT] Lineup tabs of lensin front of tabs on
housing and rotate clockwise to engage.
Oven Light Replacement (on some models)
Wide cover holder.
i,ACAUTION i Before replacing
your oven light bulb, disconnect the electrical
power to the range at the main fuse or circuit
breaker panel. Be sure to let the light cover
and bulb cool completely.
The oven light bulb is covered with a remov-
able glass cover that isheld in place with a
bail-shaped wire. Remove the oven door, if
desired, to reach cover easily.
Toremove:
Hold a hand under the cover so it
%
doesn't fall when released. With fingers
of the same hand, firmly push back the
wire cover holder. Lift off the cover.
F_ Do not touch hot bulb with awet cloth.
Replace bulb with a 40-watt household
appliance bulb.
To replace cover:
[Z] Place it into the groove of the light
receptacle. Pull the wire forward to the
center of the cover until it snaps into
place. When in place, the wire holds the
cover firmly. Be certain the wire is in the
depression in the center of the cover.
Connect electrical power to the range.
Do not remove any screws to remove
the cover.
] ¸¸¸5¸: / :¸¸¸¸¸¸/
The storage drawer may be
removed for cleaning under the
range.
Removable Storage Drawer (on some moddsl
Thestorage drawer isa good place to store
cookware and bakeware. Do not store plastics
and flammable material in the drawer.
Thestorage drawer may be removed
for cleaning under the range. Cleanthe storage
drawer with a damp cloth or sponge. Never use
harshabrasives or scouring pads.Toremove
storage drawer:
F-f] Pulldrawer straight out until it stops.
[-2-7Tilt the front of the drawer up and free of
the range.
To replace storage drawer:
[Z] set the stops on the back of the drawer
over the stops in the range.
[71 Slide drawer evenly and straight back, so
that the rails inthe range are engaged.
41
Page 42

Care and cleaning of the range. GEAppliances.com
Removable Drawer (Warming Drawer Models only)
NOTE:Formodels with an electric warming
drawer, beforeperforming any adjustments,
cleaning or service,disconnectthe range
electricalpower supply at the household
distribution panel by removing the fuseor
switching off thecircuit breaker.Makesure
the warming drawer heating element is cool.
Most cleaning can be done with the drawer in
place. However,the drawer may be removed if
further cleaning is needed.Usesoap and warm
water to thoroughly clean.
To remove the drawer:
rfl Pullthe drawer straight out until
it stops.
Removable Drawer (Lower Oven Drawer Models only)
NOTE:Formodels with an electric warming
drawer or lower ovendrawer, before
performing any adjustments, cleaning or
service,disconnect therange electrical
power supply at the household distribution
panel by removing the fuse or switching off
the circuit breaker.Makesure the warming
drawer heating element iscool.
Most cleaning can be done with the drawer in
place. However,the drawer may be removed if
further cleaning is needed.Usesoap and warm
water to thoroughly clean.
To remove the drawer'.
r2] Pressthe left rail releaseup and pressthe
right rail release down, while pulling the
drawer forward and free.
To replace the drawer'.
Placethe left drawer rail around the inner
[]
left rail guide and slideit in
slightly to hook it.
Placethe right drawer rail around the inner
right rail guide and slide it inslightly to
hook it.
r3] Slidethe drawer all the way in.
r2] Pressthe tabs on both sides in while
pulling the drawer forward and free.
To replace the drawer:
Placethe left drawer rail around the inner
%
left rail guide and slideit in slightly to hook
it.
Placethe right drawer rail around the inner
right rail guide and slide it inslightlyto
hook it.
r_ Slidethe drawer all the way in.
r_ Pullthe drawer straight out until
it stops.
Removable Lower Oven Drawer Pan
NOTE:For models with an electric warming
drawer or lower ovendrawer, before
_erforming any adjustments, cleaning or
service,disconnect the range electricalpower
supply at the household distribution panel
byremoving the fuse or switching off the
circuit breaker.Make sure the drawer heating
element iscool.
NOTE:Allow lower oven drawer to cool before
removing pan.
42
NOTE: Wipe spillspromptly after each use.
Never place,use or self-clean the lower oven
drawer pan inthe upper oven.
B Loweroven drawer has a removable pan for
easycleaning. Cleanwith hot soapy water
and a sponge or dish towel. Dry with a clean
cloth. Replacethe pan in the lower oven
drawer.
Page 43

I
stall ti
I
structi
Ra e
I_l__ouhave guestions, call 1.800.GE.CARES or visit our Website at: GEAp_pliances.com
In the Commonwealth of Massachusetts
. This product must be installed by a licensed plumber or
gas fitter.
. When using ball type gas shut-off valves, they shall be
the T-handle type.
. A flexiblegas connector,when used,must not exceed3 feet.
BEFORE YOU BEGIN
Read these instructions completely and carefully.
Installation of this range must conform with local
codes, or in the absence of local codes, with the
National Fuel Gas Code, ANSI Z223.1/NFPA.54, latest
edition. In Canada, installation must conform with
the current Natural Gas Installation Code, CAN/
CGA-B149.1 or the current Propane Installation
Code, CAN/CGA-B149.2, and with local codes where
applicable. This range has been design-certified by
CSA International according to ANSI Z21.1, latest
edition and Canadian Gas Association according to
CAN/CGA-I.1 latest edition.
As with any appliance using gas and generating heat,
there are certain safety precautions you should follow.
You will find these precautions in the Important Safety
Information section in the front of this manual. Read
them carefully.
. IMPORTANT - Savetheseinstructionsfor
localelectricalinspector'suse.
.IMPORTANT -Observeallgoverning
codesand ordinances.
, Note to Installer - Leavetheseinstructionswith
theapplianceafterinstallationiscompleted.
, Note to Consumer - KeepthisOwner'sManual
and Installation Instructions for future reference.
. Note - Thisappliance must be properly grounded.
. Servicer - The electrical diagram is in an envelope
attached to the back of the range.
. Proper installation isthe responsibility of the installer.
Product failure due to improper installation is not
covered under the Warranty.
Mobile Home - Additional Installation Requirements
The installation of this range must conform to the
Manufactured Home Construction and Safety Standard,
Title 2/4CFR,Part 3280 (formerly the Federal Standard
for Mobile Home Construction, use the Standard for
Manufactured Home Installations, ANSIA225, 1/NFPA
S01A or with local codes.
Mobile home installations require:
" When this range isinstalled in a mobile home, it must
be secured to the floor during transit. Any method of
securing the range is adequate as long as it conforms to
the standards listed above.
FOR YOUR SAFETY
Do not store or use combustible materials, gasoline
or other flammable vapors and liquids in the vicinity
of this or any other appliance.
If you smell gas:
0 Open windows,
0 Don't touch electrical switches.
Extinguish any open flame.
O Immediately call your gas supplier.
TOOLS YOU WILL NEED
Phillips screwdriver
Fiat-blade screwdriver Open-end or
adjustablewrench
_<_r_ _j_rJj ,..................................
Pencilandruler
Level
Pipe wrenches (2)
(onefor backup) Drill,owlor nail
MATERIALS YOU MAY NEED
. Gas line shut-off valve
. Pipejoint sealant or UL-approved pipe thread tape with
Teflon* that resistsaction of natural and LPgases
Flexiblemetal appliance connector (1/2" I.D.)
A 5-foot length is recommended for ease of installation
but other lengths are acceptable. Never usean old
connector when installing a new range.
Flareunion adapter for connection to gas supply line
(3/4" or 1/2" NPTx 1/2" I.D.)
. Flare union adapter for connection to pressure regulator
on range (1/2" NPTx 1/2" I.D.)
Liquidleak detector or soapy water.
Lag bolt or 1/2" O.D.sleeve anchor (for concrete
floors only).
*Teflon: Registeredtrademark of DuPont
43
Page 44

Installation Instructions
I ,WAR ING]
INSTALLATION SAFETY
INSTRUCTIONS
Read these instructions completely and carefully.
Failure to follow these instructions can result in
electrical shock, fire, serious injury, or death.
[] Improper installation, adjustment, alteration, service
or maintenance can cause injury or property
damage. Refer to this manual. For assistance or
additional information, consult a qualified installer,
service agency, manufacturer (dealer) or the gas
supplier.
[] Never reuse old flexible connectors. The use of old
flexible connectors can cause gas leaks and personal
injury. Always use NEW flexible connectors when
installing a gas appliance.
[] Leak testing of the appliance shall be conducted
according to the manufacturer instructions.
[] Remove all packing material and literature from oven
before connecting gas and electrical supply to range.
[] Do not attempt to operate the oven of this range
during a power failure (Electric Ignition models only).
[] Have your range installed by a qualified installer.
[] Your range must be electrically grounded in
accordance with local codes or, in the absence of
local codes, in accordance with the National Electrical
Code (ANSI/NFPA70, latest edition). In Canada,
electrical grounding must be in accordance with the
current CSAC22.! Canadian Electrical Code Part !
and/or local codes. See Electrical Connections in this
section.
The ventilating hood must be constructed
of sheet metal not less than 0.0122" thick.
Install above the cooktop with a clearance of not
less than 1/4" between the hood and the underside
of the combustible material or metal cabinet. The
hood must be at least as wide as the appliance and
centered over the appliance. Clearance between the
cooking surface and the ventilation hood surface
MUSTNEVERBE LESSTHAN 24".
EXCEPTION:Installation of a listed microwave oven or
cooking appliance over the cooktop shall conform to
the installation instructions packed with that appliance.
[] If cabinets are placed above the range,
allow a minimum clearance of 30" between the
cooking surface and the bottom of unprotected
cabinets.
If a 30" clearance between cooking surface and
overhead combustible material or metal cabinets
cannot be maintained, protect the underside of the
cabinets above the cooktop with not less than 1/4"
insulating millboard covered with sheet metal not less
than 0.0122"thick. Clearance between the cooking
surface and protected cabinets HUST NEVERBELESS
THAN 24".
The vertical distance from the plane of the cooking
surface to the bottom of adjacent overhead cabinets
extending closer than 1" to the plane of the range
sides must not be less than 18". (Seethe Dimensions
and Clearances illustration in this section.)
Donot install this product with an air curtain hood or
other range hood that operates by blowing air down on
the cooktop. Thisairflow may interfere with operation of
the gas burners resulting in fire or explosion hazard.
[] Before installing your range on linoleum or any other
synthetic floor covering, make sure the floor covering
can withstand !80°F without shrinking, warping or
discoloring. Do not install the range over carpeting
unless a sheet of !/4" thick plywood or similar
insulator is placed between the range and carpeting.
[] Make sure the cabinets, floor and wall coverings
around the range can withstand heat generated by
the range up to 200°F.
[] Avoid placing cabinets above the range. To reduce
the hazard caused by reaching over the open flames
of operating burners, install aventilation hood over
the range that projects forward at least 5" beyond
the front of the cabinets.
CAUTION - Onlythe GECaf6 branded series
of Advantium ®or microwave over-the-range ovens are
designed to be installed above the GECaf6 range. Surfaces
above a gas range can become hot. Installation of any other
over-the-range oven above a GECaf6 range may result in
surface temperatures that can cause burns.
44
Page 45

Installation Instructions
DIMENSIONS AND CLEARANCES
Provide adequate clearances between the range and adjacent combustible surfaces. These dimensions must be
met for safe use of your range. The location of the electrical outlet and pipe opening (see Gas Pipe and Electric
Outlet Locations) may be adjusted to meet specific requirements.
The range may be placed with 0" clearance {flush) at the back wall. {Some models will not fit flush.)
For island installation, Models CGS975and CGS985,maintain 2-1/2" minimum from cutout to back edge of
countertop and 3" minimum from cutout to side edges of countertop.
*lV]odels PGB900,
PGB910, PGB915,
PGB930, PGB935,
JGB295, JGB296,
JGB600, JGB605,
JGB810 and JGB840
require only 3"
minimum clearance
to left wall. 18"-
"nm.mto1!!
cabinets on
either side | 3 0"
of the range F
6"
Minimum-_ Minimum --_ 6" Minimum
clearance clearance to
to leftwall* |
To cabinets
below
cooktop and--_. _ 0"
at the range
back
30"
right
/
36"
wall
Maximum
depth for
cabinets above
countertops
i14"
(minimum)
Tocabinets below
cooktop and at the
range back
Depthwith door closed (includesdoor handle)
Depthvaries dependingon model.
Seespecifications sheetfor your model.
36i/j' _+l/j'
45
Page 46

Installation Instructions
DIMENSIONS AND CLEARANCES fMode/s CGS975 and CGS985 only)
Depth with door closed
30" ..................... "_'--29 ½"
_,- (includes door handle)
,......._......................
*Height to backguard bused on
Caf6 style backguard kit installed.
\x
Depth with door open: "\
461A'' \ _
\\\\ \ \
\
46
Page 47

Installation Instructions
LOCATION
Do not locate the range where it may be subject to strong drafts. Any openings in the floor or wall behind the range
should be sealed. Make sure the openings around the base of the range that supply fresh air for combustion and
ventilation are not obstructed by carpeting or woodwork.
Your range, like many other household items, is heavy and can settle into soft floor coverings such as cushioned vinyl
or carpeting. Use care when moving the range on this type of flooring. It is recommended that the following simple and
inexpensive instructions be followed to protect your floor.
The range should be installed on a sheet of plywood (or similar material). When the floor covering ends at the front of
the range, the area that the range will rest on should be built up with plywood to the same level or higher than the floor
covering.
This will allow the range to be moved for cleaning or servicing. Also, make sure your floor covering will withstand 180°F.
(Seethe Installation Safety Instructions section.)
Hake sure the cabinets and wall coverings around your range can withstand the heat generated (upto 200°F) by the
range. (Seethe Installation Safety Instructions section.)
IMPORTANT!
Remove all tape and packaging. Hake sure the burners are properly seated and level.
Take the accessory pack out of the oven and/or drawer.
Check to be sure that no range parts have come loose during shipping.
CONVERTING TO LP GAS (or converting back to natural gas from LP)
This range )eaves the factory set for use with natura) gas. If you want to convert to LPgas, the conversion must be
performed by a qua)ified LPgas insta))er.
The conversion instructions can be found on back of the range or attached to the range next to the pressure regulator.
Keep these instructions and the orifices in case you want to convert back to natural gas.
The conversion instructions identify where to find the kits on the model. The possible locations are defined in the picture
below.
Single Oven
Rear of Range
OrificeBoxLocation
(somemodels)
Bracket-LPOrificeSpud
47
Page 48

Installation Instructions
F-i-]PROVIDE ADEQUATE GAS SUPPLY
Your range is designed to operate at a pressure of 5"
of water column on natural gas or, if designed for LPgas
(propane or butane), !0" of water column.
Make sure you are supplying your range with the type
of gas for which it is designed.
This range is convertible for use on natural or
propane gas. If you decide to use this range on LPgas,
conversion must be made by a qualified LP installer
before attempting to operate the range on that gas.
For proper operation, the pressure of natural gas supplied
to the regulator must be between 6" and 13" of water
column.
For LP gas, the pressure supplied must be between ii"
and 13" of water column.
When checking for proper operation of the regulator,
the inlet pressure must be at least 1" greater than the
operating (manifold) pressure as given above.
The pressure regulator located atthe inlet of the range
must remain inthe supply line regardless of whether
natural or LPgas is being used.
A flexible metal appliance connector used to connect the
range to the gas supply line should have an I.D. of 1/2"
and be 5 feet in length for ease of installation. In Canada,
flexible connectors must be single wall metal connectors
no longer than 6 feet in length.
[Z] CONNECT THE RANGE TO GAS
Shut off the main gas supply valve before disconnecting
the old range and leave it off until the new hook-up
has been completed. Don't forget to relight the pilot on
other gas appliances when you turn the gas back on.
Because hard piping restricts movement of the range,
the use of a CSA International-certified flexible metal
appliance connector isrecommended unless local codes
require a hard-piped connection.
Never use an old connector when installing a new range.
If the hard piping method is used,you must carefully align
the pipe; the range cannot be moved after the connection
is made.
To prevent gas leaks, put pipe joint compound on, or wrap
pipe thread tape with Teflon* around, all male (external)
pipe threads.
A.
Install a manual gas line shut-off valve in the gas line in
an easily accessed location outside of the range. Make
sure everyone operating the range knows where and
how to shut off the gas supply to the range.
B.
Install male 1/2" flare union adapter to the 1/2" NPT
internal thread at inlet of regulator. Use a backup
wrench on the regulator fitting to avoid damage.
When installing the range from the front, remove
the 90° elbow for easier installation.
C.
Install male 1/2" or 3/4" flare union adapter to the
NPTinternal thread of the manual shut-off valve,
taking care to back-up the shut-off valve to keep it
from turning.
D.
Connect flexible metal appliance connector to the
adapter on the range. Position range to permit
connection at the shut-off valve.
E.When all connections have been made, make sure
all range controls are in the off position and turn on the
main gas supply valve. Use a liquid leak detector at all
joints and connections to check for leaks in the system.
[ WARNINGjFire hazard: DO not use
a flame to check for gas leaks.
When using test pressures greater than 1/2 psig to
pressure test the gas supply system of the residence,
disconnect the range and individual shut-off valve from
the gas supply piping. When using test pressures of 1/2
psig or less to test the gas supply system, simply isolate
the range from the gas supply system by closing the
individual shut-off valve.
*Teflon: Registered trademark of DuPont
48
Page 49

Installation Instructions
GAS PIPE AND ELECTRICAL OUTLET LOCATIONS
Recommendedarea for 120V
outreton rear wartand area for
through-the-walt connection of
pipe stub and shut-off varve.
Recommendedarea
for through-the-floor
connectionof pipestub
andshut-off valve.
[ _CAUTIONITo prevent
drafts from affecting burner
operation, seal all openings in floor
and wall.
49
Page 50

Installation Instructions
FLEXIBLE CONNECTOR HOOKUP
Pressure
regulator
Installer: Inform
the consumer of
the location of the
gas shut-off valve.
RIGID PIPE HOOKUP OPTIONS
45°Elbow
90°Elbow
/"x/'/._',.."X / T II-I Black
f_,,S/,)"_ Nipple / _IAi'_-- ironpipe
un,o U
(,0')_ "x... Pressure _- Union
_-_ regulator
Adapter
4_----_ Adapter
1/2"or s/4" _ shut-off
Gaspipe valve
__ Gas
Flex
connector
16ft. max.)
Alternate Hookup
Adapter
90° Elbow ._v_:=:_f.._ I 90 ° Elbow
N,pp,e -_ j _Quick connect
!_ I_ ./or union
. Gas _ _ Nipple Pressure
%0r u,ato,
Installer: Inform _ Gas
the consumer of I _J_ shut-off
the Iocotion of the _1_].t__ vai_e ,,
gas shut-off valve. L_---- 1/2 or3/4
jp Nipple
Gaspipe
Elbow
1/2"or 3/4" 90° Elbow
Gaspipe Ada
Installer: Inform thej
consumer of the J
location of the gas I
shut-off volve, J
5O
Page 51

Installation Instructions
ELECTRICAL CONNECTIONS
Electrical Requirements
120-volt, 60 Hertz, properly grounded dedicated circuit
protected by a !5-amp or 20-amp circuit breaker or time
delay fuse.
Note: Use of automatic, wireless, or wired external
switches that shut off power to the appliance are not
recommended for this product.
Grounding
[ WARN JNG j ShockHazard:This
appliance must be properly grounded. Failure
to do so can result in electric shock.
Thepower cord of this appliance is equipped with a
three-prong (grounding) plug which mates with a standard
three-prong grounding wall receptacle to minimize the
possibility of electric shock hazard from this appliance.
The customer should have the wall receptacle and circuit
checked by a qualified electrician to make sure the
receptacle is properly grounded.
Where a standard two-prong wall receptacle is
encountered, it is the personal responsibility and
obligation of the customer to have it replaced with a
properly grounded three-prong wall receptacle.
DO NOT, UNDERANY CIRCUMSTANCES,CUTORREMOVE
THE THIRD (GROUND)PRONG FROMTHE POWERCORD,
DO NOT USEAN ADAPTER.DO NOT USEAN EXTENSION
CORD.
A word about GFCI's- GFCI'sare not required or
recommended for gas range receptacles.
Ground Fault Circuit Interrupters (GFCI's)are devices that
sense leakage of current in a circuit and automatically
switch off power when a threshold leakage level is
detected. These devices must be manually reset by the
consumer. The National Electrical Code requires the use of
GFCI'sin kitchen receptacles installed to serve countertop
surfaces. Performance of the range will not be affected
if operated on a GFCI-protected circuit but occasional
nuisance tripping of the GFCIbreaker is possible.
SEAL THE OPENINGS
Sealany openings in the wall behind the range and inthe
floor under the range when hookups are completed.
ASSEMBLE SURFACE BURNERS
GqBurner Heads (onsome models)
Placeburner
heads over
the electrodes
on the
cooktop, in
the correct
locations
Front of range
according to
their size.
IVlakesure the slot in the
burner head is positioned
over the electrode.
or
Electr_Slot
Front right burner
Ion some models)
Triple flame head
Hole
[] Oval (Center) Burner Heed/Cop Assembly
Placethe oval (center)head/cap assembly over the
electrode on the cooktop.
Oval head and cap
assembly burner head is positioned
Make sure the slot in the
over the electrode.
, |o
Front of range Electrode
[_ Cops
Placethe matching sizecaps onto the burner bases
or heads.
Hake sure that the heads (onsome models)and caps
are replaced in the correct locations.
_lodels)
51
front of range
Tn-nng cap
c_g
on sorne rnode s
Page 52

Installation Instructions
F_ ASSEMBLE SURFACE BURNERS (CONT.)
r_ Grates
Single Grates
Singlegrates only fit one way. Locator bumps need
to face each other.
Locator Bumps
Double Grates
LeftFront Center RightFront
Placethe left,right and center grates on the cooktop.
Thesegrates are position specific.The undersides of
the left and right grates are marked "LEFTFRONT"and
"RIGHTFRONT."Onsome modelsthe underside of the
grates are marked "Outside".Placethe middle grate
with its bowed front toward the front of the range.
IIi,CAUTIONidanot operate the burner
without ell burner parts in place.
E_]CHECK IGNITION OF SURFACE
BURNERS
Operation of all cooktop and oven burners should be
checked after the range and gas supply lines have been
carefully checked for leaks.
Electric Ignition Models
Select a top burner knob and simultaneously push
in and turn to LITE position. You will hear a clicking sound
indicating proper operation of the spark module. Once the
air has been purged from the supply lines, burners should
light within/4 seconds. After burner lights, rotate knob out
of the LITE position. Try each burner in succession until all
burners have been checked.
I-_CHECK IGNITION OF SURFACE
BURNERS (CONT.)
Quality of Flames
The combustion quality of burner flames needs to be
determined visually.
(A) Yellow flumes--
Call for service
{B)Yellow tips
on outer cones--
Normal for LP gas
{C)Softblue
flumes--Normal
for natural gas
If burner flames look like (A),call for service. Normal
burner flames should look like {B}or (C},depending on
the type of gas you use.
With LP gas, some yellow tipping on outer cones
is normal.
[-_ CHECK IGNITION OF OVEN BURNER
The oven is designed to operate quietly and
automatically. To operate the oven, press the Bake pad
and then press the number pads until 350° appears in
the display. Touch the Start pad. After 30-90 seconds,
the oven burner will ignite and burn until the set
temperature is reached. The oven burner will continue
to cycle on and off as necessary to maintain the oven at
the temperature indicated by the display.
Tocheck ignition of the broil burner, touch the Broil Hi/
Lo pad and then the Start pad. After 30-90 seconds, the
broil burner will ignite.
Electric ignition models require electrical power to
operate. In case of a power outage, the oven burners on
these models cannot be lit manually with a match. Gas
will not flow unless the glow bar is hot.
If the oven isin use when a power outage occurs, the
burner will shut off and cannot be re-lit until power is
restored.
52
Page 53

Instollotion Instructions
r_ ADJUST BROIL AND OVEN BURNER
AIR ADJUSTMENT SHUTTER
IF NECESSARY
Air edjustment shutters for the top end bottom burners
regulete the flow of oir to the flemes.
The air adjustment shutter for the top (broil) burner is in
the center of the rear wall of the oven.
Air adjustment
shutter
The shutter for the bottom (oven)burner is near the buck
wall behind the warming drawer. Remove the drawer. See
the Care and cleaning of the range section.
To adjust the flow of air to either burner, loosen the
Phillips heed screw end rotate the shutter toward open
or closed position us needed.
[-_ ADJUST BROIL AND OVEN BURNER
AIR ADJUSTMENT SHUTTER IF
NECESSARY (CONT.)
To remove the oven bottom:
A. Remove the screws holding down rear of the oven
bottom.
B.
Grasp the oven bottom at finger slots on each side.
C.
Lift the rear of the oven bottom enough to clear the
lip of the range frame, push it buck, and then pull it up
and out.
I-_ LEVELING THE RANGE
A.
Install the oven shelves in the oven and position the
range where it will be installed with front access to
front leveling legs and rear access to rear leveling legs.
All legs must be leveled BEFOREthe product is installed.
Raise Lower
range range
!__ Lower
Leg _ _ _b,
leveTer ____t,__
range
range
The flames for the top (broil) burner should be steady with
approximately 1" blue cones and should not extend out
over the edges of the burner baffle.
To determine if the bottom burner flames are burning
properly, remove the oven bottom. Flumes should have
approximately 1" blue cones and, if range is supplied
with natural gas, should burn with noyellow tipping.
(With most LPgas, small yellow tips at the end of outer
cones are normal.) Flames should not lift off burner ports.
If lifting is observed, gradually reduce air shutter opening
until flumes are stabilized.
(on some models)
Ion some models)
B.Check for levelnessby placing a spirit levelor acup,
partially filled with water, on one ofthe oven shelves.
If usinga spirit level,take two readings-with the level
placed diagonally first in one direction and then the other.
C. Removethe drawer (onsome models).Seethe Cam and
cleaningof the range section.The front levelinglegs can
be adjusted from the bottom and the rear legs can be
adjusted from the top (onsome models)or the bottom.
D. Use an open-end or adjustable wrench to adjust the
leveling legs until the range is level.
i _IL WARN I NG j Nevercompletelyremove
the leveling leg as the range will not be secured to the
anti-tip device properly.
E.After leveling the unit, slide it into final position and
verify levelness.
F.After the range is level, slide the range away from the
wall so that the Anti-Tip device can be installed.
53
Page 54

Installation Instructions
[] INSTALLING THE ANTI-TIP DEVICE
AWARNING
ANTI-TIP
To reduce the risk of tipping the range, the range must
be secured by a properly installed anti-tip bracket. Follow
the instructions packaged with the bracket.
To check if the bracket is installed and engaged
properly, look underneath the range to see that the
rear leveling leg is engaged in the bracket. On some
models, the storage drawer or kick panel can be
removed for easy inspection. If visual inspection is not
possible, slide the range forward, confirm the anti-tip
bracket is securely attached to the floor or wall, and
slide the range back so the rear leveling leg is under
the anti-tip bracket.
If the range is pulled from the wall for any reason, always
repeat this procedure to verify the range is properly
secured bythe anti-tip bracket.
DEVICE
e
All ranges can tip.
e
BURNSor other SERIOUSINJURIES
can result.
. INSTALLand CHECKthe
anti-tip bracket following the
instructions supplied with the bracket.
WHEN ALL HOOKUPS ARE COMPLETED
Make sure all controls are left in the off position.
Make sure the flow of combustion and ventilation air
to the range is unobstructed.
If your range has no anti-tip bracket, call 1.800.626.8774
to receive one at no cost.
54
Page 55

Before you call for service...
GEAppliances.com
Troubleshooting Tips
Save time and money! Review the charts on the following
pages first and you may not need to call for service.
Possible Causes What To Do
Top burners do not light Plug on range is not completely . Make sure electrical plug is plugged into a live,properly
or do not burn evenly, inserted in the electrical outlet, grounded outlet.
(Thefront right burner is Burner slits on the side of the . Remove the burners and clean them. Check the
designed to have slightly burner may be clogged, electrode area for burned-on food or grease. See
smaller flames between the Care and cleaning of the range section.
the 6 and 9 o'clock
positions. This isnormalJ Improper burner assembly. * Make sure the burner parts are installed correctly.
See the Care and cleaning of the range section.
Burner flames very Improper air to gas ratio. * Ifrange is connected to LPgas, contact the person
large oryellow who installed your range or mode the conversion.
Surface burners light The oven gas shut-off valve * To check the oven gas shut-off valve, remove the
but oven does not may have accidentally been drawer (see the Care and cleaning of the range
moved during cleaning or section). For lower oven drawer models, remove the
moving, rear access panel by unscrewing the thumb screws
in the upper left and right corners. Look for the gas
shut-off lever at the buck of the range.
shownclosed
Thumbscrews
Sealedburner models
Lower oven drawer models
Control signals after You forgot to enter a bake . Touch the Bake pad and desired temperature
entering cooking time temperature or cleaning time. or the Self Clean pad and desired clean time.
or start time
Food does not bake or Oven controls improperly set. • See the Using the upper oven section.
roast properly in the
upper oven Shelf position is incorrect. . See the Using the upper oven section.
Incorrect cookware or cookware • See the Using the upper oven section.
of improper size being used.
Oven thermostat needs . See the Adjust the upper oven thermostat Do it
adjustment, yourself! section.
Clocknot set correctly. • Seethe Usingthe clockand timer section.
Aluminum foil used improperly • Seethe Careand cleaning of the range section.
in the oven.
Oven bottom not securely . See the Installation of the range section.
seated in position.
Burners do not light Gas/Control Lockoutfeature . Allow the range to cool down and touch and hold the
isactivated. Gas/Control Lockout pad (on some models)for 3 seconds
untilthe display shows LOCOFF.
Plug on range is not . Hakesure electrical plug isplugged into a live,properly
completely inserted in the grounded outlet.
electrical outlet.
Gassupply not connected . Seethe Installation Instructions that came with your
or turned on. range.
Bridge burner won't light . SeeHow to Light Bridge Burner for Model PGB980section.
55
Page 56

Before you call for service...
Troubleshooting Tips
Possible Causes What To Do
Burners do not light A fuse in your home may be • Replacethe fuse or resetthe circuit breaker.
(cont.) blown or the circuit breaker
tripped.
Burner parts not replaced . Seethe Care and cleaningof the range section.
correctly.
Gas/Control Lockout , If LOCON appears in the display,the range control is
or Control Lockout locked.Turn this feature off to use the range. Seethe
feature is activated Gas/ControlLockout or Control Lockout section.
Fooddoes not broil Oven controls improperly set. • Hakesure you touch the Broil Hi/Lo pad.
properly in the upperoven Oven door not closed. • Seethe Using the upper ovensection.
Improper shelf position . Seethe Broiling Guide.
being used.
Food being cooked • Forbest results,use a pan designedfor broiling.
in a hot pan. Hake sure it iscool.
Cookware not suited • For best results,usea pan designed for broiling.
for broiling.
Oven bottom not securely . Seethe Installation of the range section.
seated in position.
Upper oven temperature Oven thermostat . Seethe Adjust the upper oven thermostat Do it
too hot or too cold needs adjustment, yourselfi section.
CIockand timer Plug on range is not completely . Hake sure electrical plug isplugged into a live,properly
do not work inserted inthe electrical outlet, grounded outlet.
A fuse in your home may be • Replacethe fuse or reset the circuit breaker.
blown or the circuit breaker
tripped.
Oven controls improperly set. . Seethe Using the clockand timer section.
Upper oven light does Light bulb is loose or defective. • Tighten or replace the bulb.
not work
Upperoven will not The oven temperature is too . Allowthe range to cool to room temperature and
self-clean high to set a self-cleanoperation, resetthe controls.
"Crackling"or Thisis the sound of the . Thisis normal.
"popping" sound metal heating and cooling
Plug on range is not completely . Hake sure electrical plug is plugged into a live,properly
inserted in the electrical outlet, grounded outlet.
Oven controls improperly set. • Seethe Using theself-cleaning upper oven section.
On models with a door latch, . Hake sureyou move the door latch handle all the way
the oven door isnot in the to the right.
locked position.
during both the cooking and
cleaning functions.
56
Page 57

Possible Causes What To Do
GEAppliances.com
Excessive smoking Excessive soil. . Touch the Clear/Off pad. Open the windows to
rid the room of smoke, Wait until the LOCKEDDOOR
light goes off.Wipe up the excess soil and reset the
clean cycle.
Ovendoor will not open Oven too hot. . Allow the oven to cool below locking temperature.
after a clean cycle Do not lock the door with the door latch except when
using the self-clean feature.
Oven not clean after a Oven controls not properly set. • See the Using the self-cleaning upper oven section,
clean cycle Oven was heavily soiled. . Cleanup heavyspilloversbefore starting the clean
cycle. Heavilysoiled ovens may needto self-clean
again or for a longer period of time.
"Door" appears in the Latch handle was moved to the . Move the latch handle to the right only when setting
display (on models right but a program other than the self-cleaning cycle.
with a door latch) self-clean was selected.
"CLOSEdoor" flashes . "CLOSEdoor" reminder isalways displayed at the beginning
in the display of broil cycle. Keepdoor closedwhile broiling.
"LOCKDOOR"flashes
in the display
The self-clean cycle has been
selected but the door is not
. Closethe oven door and on models with a latch, move
the latch all the way to the right.
closed and on models with a latch,
the latch was not moved all the
way to the right.
LOCKEDDOORlight
is on when you want
to cook
The oven door is locked
because the temperature
inside the oven has not
. Touch the Clear/Off pad.Allow the oven to cool
and then, on models with a door latch, unlockthe door.
dropped below the
locking temperature.
"F--and a number or
letter" flash in the display
On models with a door latch,
if a function error code appears
during the self-cleaning cycle,
_ m
• Thelatch may have been moved,even if only slightly,
from the locked position. Makesure the latch ismoved
to the right as far as it will go.
check the oven door latch.
You have a function error code.
If the function code repeats. . Disconnectall power to the range for 5minutes
Oven shelves are
difficult to slide
The nickel shelves (if so equipped)
were cleaned in a self-clean cycle.
The gray porcelain-coated shelves
(if so equipped)were improperly
cleaned.
"Probe" appears in
the display (some models)
This isreminding you to enter a
probe temperature after plugging
in the probe.
in the --
display
The Gas/Control Lockout feature
is activated.
. Touch the Clear/Off pad. Allow the oven to cool for
one hour. Put the oven back into operation.
and then reconnect power. Ifthe function error
code repeats, call for service.
Apply a small amount of vegetable oil to apaper
towel and wipe the edgesof the oven shelveswith
the paper towel. Donot spray with Pam®or other
lubricant sprays.
. Enter a probe temperature.
. Besure the surface burner controls are turned OFF.
Turn this feature off to use the range. See the Gas/Control
Lockout section.
57
Page 58

Before you call for service...
Troubleshooting Tips
Possible Causes What To Do
Display goes blank A fuse in your home may be • Replacethe fuse or reset the circuit breaker.
blown or the circuit breaker tripped.
Theclock is in the black-out mode.. See the Special features of your oven control section.
Display flashes Power failure. . Resetthe clock.
Unable to get the Oven control pads were . The Bake and Broil Hi/Lo pads must be touched at
display to show "SF" not pressed properly, the same time and held for 3 seconds.
Power outage, Power outage or surge. . Resetthe clock. Ifthe oven was in use,you must reset
clock flashes it by touching the Clear/Off pad, setting the clock
and resetting any cooking function.
tnB - _s tt " ii
urnmg or only This is normal in a new oven . To speed the process, set a self-clean cycle for a
odor emitting from and will disappear in time. minimum of 3 hours. See the Using the self-cleaning
the vent oven section.
Strong odor An odor from the insulation . This istemporary.
Fan noise (some modelsJ A cooling fan or a convection fan . This isnormal. The cooling fan will turn on to cool internal
Convection fan not Preheat temperature , Fanwill start automatically once the preheat
working (some modelsJ not reached, internal parts. It may run for up to 1-1/2 hours after
Drawer does not slide The drawer is out of alignment. , Fully extend the drawer and push it all the way in.
smoothly or drags See the Care and cleaning of the range section.
Lower oven drawer or A fuse in your home may be • Replace the fuse or reset the circuit breaker.
warming drawer will blown or the circuit breaker
not work tripped.
around the inside of the oven
is normal for the first few times
the oven is used.
(depending on the function you parts. It may run for up to 1 !/2 hrs after the oven is turned
are using) may turn on. off. The convection fan will cycle on and off until the
function isover or the door is opened.
the oven isturned off. The convection fan will cycle
on and off until the function isover or the door isopened.
Drawer is over-loaded or load , Reduce weight. Redistribute drawer contents.
is unbalanced.
The oven is self-cleaning. • Wait for the self-clean cycle to finish and the oven to cool.
Controls improperly set. , See the Electric warming drawer or Lower oven
drawer section.
Excessive condensation Liquid in drawer. • Remove liquid.
in the drawer
Food dries out in the Moisture escaping. • Cover food with lid or aluminum foil.
lower oven drawer or
warming drawer
58
Uncovered foods. • Cover food with lid or aluminum foil.
Temperature setting too high. . Reducetemperature setting.
Drawer not fully closed. , Pushdrawer in until latch engages.
Page 59

Accessories. GEAppliances.com
Looking For Something More? (Not all accessories are available for all models.)
You can find these accessories and many more at GEAppliances.com (U.S.)
or www.GEAppliances.ca (Canada), or call 800.626.2002 (U.S.) or 800.661.1616 (Canada)
(during normal business hours). Have your model number ready.
Grates Surface Burner Headsand Caps Surface Elements and Drip Knobs
Griddle Oven Racks Oven Elements
Pans
Light Bulbs
Experience these other great products to keep your kitchen looking great!
_'_'OLA_t,.... Ceramic Cooktop _ Ceramic Cooktop _ Stainless Steel
__ Cleaning Kit: Cleaning Wipes Appliance Polish
scraper and pad
Includes cleaner, __ __.. Wipes
WX10Xll7GCS WXIOX]OS WXIOXIO001
Appliance
Cleaner
__ Stainless Steel
PMIOX311
Get the most out of your Broiler Pan! (Not for use with Broiler Drawer models.)
Useyour pan and grid cover to broil hamburgers, seafood,steaks,vegetables, bacon, chops and so much
more! The pan below catches the excessfats and oils.
. GenuineGEPart
, EasyTo Clean
, One-Year Warranty
Limited Time Offer! Free Shipping!
Whenyou order your broiler pan within 30 days of purchasing your GEcooking product.
Small Large*
U.S. Part # WB/48X10055 WB/48X10056
Canada Part # 222D2097GO01 222D2097GO02
Dimensions 8-5/4"Wxl-1/4"HxlJ-1/2"D 12-5/4"Wxl-1/4"HxlG-1/2"D
17"Wx I-I/4"H xI9-1/4"D
_L**
WB48XIO057
N/A
* Thelarge (standard)broil pan does not fit in20"/24" ranges.
** The XL pan does not fit in 24" wall ovens, 27" drop-insor 20"/24" ranges.
Toplaceyour order, call 800.626.2002 (U.S.),800.661.1616 (Canada)or mail this form to;
In the U.S.:GEPorts,P.O.Box 221027, Memphis, TN38122-1027. In Canada: GEPorts, 1Factory Lone, IVloncton,N.B.EIC9M3
Quantity
Model Number
First Name
Address
City
Phone
Check
Call 800.626.2002 in the U.S. or 800.661.6161 in Canada far current pricing. All credit card orders must be called in.
Money Order
Broiler Pan Order Form
Part Number
Serial Number Brand Date of Purchase
Last Name
State Zip Code
E-Mail
59
Page 60

NOTES. GEAppliances.com
60
Page 61

NOTES. GEAppliances.com
61
Page 62

GE Gas Range Warranty. CForcustomersintheUnitedStates)
All warranty service provided by our Factory Service Centers,
or on authorized Customer Core®technician. To schedule
service, on-line, 24 hours a day, visit us at GEAppliances.com, or
coil 800.GE.CARES (800.432.2737). Please have serial number and
model number available when calling for service.
GE Will Replace:
Any part of the range which fails due to a defect inmaterials or workmanship. During this
Fromthe date of the
original purchase
Service trips to your home to teach you how to use
the product.
Improper installation, delivery or maintenance.
Product damage or failure of the product if it is abused,
misused, modified, used for other then the intended
purpose, or used commercially.
Replacement of house fuses or resetting of circuit breakers.
limited onecveer warranty, GEwill also provide, free of charge, all labor and in-home service
to replace the defective part.
Stapleyour receipt here.
Proof of the original purchase
date is needed to obtain service
under the warranty.
Damage to the product caused by accident, fire, floods
or acts of God.
,, Incidental or consequential damage caused by possible
defects with this appliance.
Damage caused offer delivery.
,, Product not accessible to provide required service.
EXCLUSION OF IMPLIED WARRANTIES--Your sole and exclusive remedy is product repair as provided
in this Limited Warranty. Any implied warranties, including the implied warranties of merchantability or
fitness for a particular purpose, are limited to one year or the shortest period allowed by low.
This warranty is extended to the original purchaser and any succeeding owner for products purchased for home
use within the USA.If the product is located in on area where service by a GEAuthorized Servicer is
not available, you may be responsible for a trip charge or you may be required to bring the product to on
Authorized GEService Location for service. In Alaska, the warranty excludes the cost of shipping or service calls to
your home.
Some states do not allow the exclusion or limitation of incidental or consequential damages. This warranty gives
you specific legal rights, and you may also have other rights which vary from state to state. To know what your
legal rights are, consult your local or state consumer affairs office or your state's Attorney General.
Warranton General Electric Company. Louisville, KY 40225
62
Page 63

GEGas
Range Warranty. cForcustomersinCanada)
All warranty service provided by our Factory ServiceCenters
or an authorized Customer Care®technician. For service,
call 2_.800.561.3344. Please have serial number and model
number available when calling Forservice.
Mabe Will Replace:
One Year
From the date Ofthe
original purchase
Service trips to your home to teach you how to use
the product.
Improper installation, delivery or maintenance.
Product damage or failure of the product if it is abused,
misused, modified, used for other than the intended
purpose, or used commercially.
Replacement of house fuses or resetting of circuit breakers.
Any part ofthe rangewhich failsdue to a defect in materials or workmanship. During this
limited one:year warranty, Mabewill also provide, free of charge, all labor and in-home service
to replace the defective part.
Staple your receipt here.
Proof of the original purchase
date is needed to obtain
service under the warranty.
Damage to the product caused by accident, fire, floods
or acts of God.
Incidental or consequential damage caused by possible
defects with this appliance.
Damage caused after delivery.
Product not accessible to provide required service.
EXCLUSION OF IMPLIED WARRANTIES--Your sole and exclusive remedy is product repair as provided
in this Limited Warranty. Any implied warranties, including the implied warranties of merchantability or
fitness for a particular purpose, are limited to one year or the shortest period allowed by law.
WARRANTOR IS NOT RESPONSIBLE FOR CONSEQUENTIAL DAMAGES.
Warrantor: h4ABE CANADA INC.
63
Page 64

Consumer Support.
GEAppliances Website Intheu.s...GEAppliances.com
Have a question or need assistancewith your appliance? Trythe GEAppliancesWebsite 24hours a day,
any day of the year! Forgreater convenience and faster service,you can now download Owner's Hanuals,
order parts or even schedule service on-line. In Canada: www.GEAppliances.ca
Schedule Service theu.s...GEAppliances.com
Expert GErepair service is only one step away from your door. Get on-line and schedule your service at your
convenience 24 hours any day of the year! Orcall 800.GECARES (800.432.2737) during normal business hours.
In Canada, call 1.800.561.3344
RealLifeDesignStudio IntheU.S...GEAppliances.com
GEsupports the Universal Designconcept-products, servicesand environments that can be used by people of
all ages, sizesand capabilities.We recognize the need to design for a wide range of physical and mental abilities
and impairments. For details of GE'sUniversal Designapplications, including kitchen design ideas for people with
disabilities,check out our Website today. Forthe hearing impaired, pleasecall 800.TDD.GEAC(800.833.4322).
In Canada, contact: Hanager, Consumer Relations,MabeCanada Inc.
Suite310, 1 Factory Lane
Honcton, N.B.E1C9H3
ExtendedWarranties
Purchase a GEextended warranty and learn about special discounts that are available while your warranty isstill
in effect. Youcan purchase iton-line anytime, or call 800.626.2224during normal business hours.GEConsumer Home
Serviceswill still be there after your warranty expires.In Canada, call 1.888.261.2133
PartsandAccessories
Individuals qualified to service their own appliances can have parts or accessoriessent directly to their homes (VISA,
HasterCard and Discovercards are accepted).Order on-line today, 24 hours every day or by phone at
800.626.2002during normal business hours.
Instructions contained in this manual cover procedures to be performed by any user. Other servicing generally
should be referred to qualified service personnel Caution must be exercised, since improper servicing may cause
unsafe operation.
Customers in Canada should consult the yellow pages for the nearest Habe service center, or call 1.888.261.3055.
Contact Us
If you are not satisfied with the service you receivefrom GE,contact uson ourWebsite with all the detailsincluding
your phone number, or write to: General Manager, Customer Relations
GEAppliances,Appliance Park
Louisville,KV/40225
In Canada: www.GEAppliances.ca, or write to: Director, Consumer Relations,Habe Canada Inc.
Suite310, 1 Factory Lane
Honcton, N.B.EIC 9H3
In the 05.: GEAppliances.com
In the 05.: GEAppliances.com
In the 05.: GEAppliances.com
Register Your Appliance ,ntheu.s...GEAppliances.com
Register your new appliance on-line--at your convenience! Timely product registration will allow for enhanced
communication and prompt service under the terms of your warranty, should the need arise.You may also mail
in the pre-printed registration card included in the packing material. In Canada: www.GEAppliances.ca
Printed in Mexico
This book is printed on recycled paper.
Page 65

GEAppliances.com
Instrucciones de
seguridad ................ 2-s
Instrucciones de
• _ Funcionamiento
_ Relojy Temporizador ........... 15
Caj6n del Homo Inferior ....... 30
Horno ...................... 9-33
Horneado y Dorado.......... 12
• _ Asado, Gufa para Asar .... !3, !4
._.1
0
,0
®l
O
I
Bloqueo del Control .......... 24
Convecci6n .............. 18-21
Luz.......................... 11
Control del Homo .......... 9, !0
Corte de Corriente ......... 7, !!
Precalentamiento ............ 12
Sonda ....................... 17
ivlodo Sabatico ........... 26, 27
Auto Limpieza ............ 32,33
Repisas .................. !!, 40
Funciones Especiales ..... 24, 25
Ajuste del Termostato ....... 31
Horneado y Dorado
por Tiempo .................. 16
Horneado con Convecci6n
por Tiempo .................. 22
Ventilaci6n .................. !1
Caliente ..................... 23
Cocci6n Superficial ........... 6-8
Plancha ...................... 8
Caj6n Calentador .......... 28, 29
Ventiladores del Homo ........ 38
Estantes ...................... 40
Auto Limpieza.............. 32, 33
Superficiesde Acero Inoxidable.. 41
Instrucciones de
Instalaci6n ............ 44-ss
Ajuste del Aire................. 54
Dispositivo Anti-Volcaduras .... 55
Ensamblede q)uemadores
Superficiales................ 52, 53
Control de Encendido del
Quemador .................... 53
Conexi6ndelaCocinaalGas .. 49-51
Dimensiones y Espacio ..... 46,47
Conexiones EI6ctricas ......... 52
Nivelaci6n de la Cocina ........ 54
LP ............................ 48
Consejos para Solucionar
Problemas ............. 56-59
Accesorios ................ 60
Soporte el Cliente
Soporte al Cliente .... Contratapa
Garant[a para Clientes
en Canad_ .................. 64
Garant[a para Clientes
en EE.UU ................... 63
PGB900
PGB9"I O
PGB9"I 5
PGB930
PGB935
PGB980
CGS985
JGB295
JGB296
JGB600
JGB605
JGB8.1_O
JGB840
_., Cuidado y Limpieza
O PapeldeAluminio ............. 13
O Ensamble delquemador .... 34,35
Rejillas del quemador ...... 36, 37
Panel de Control y Perillas ..... 38
Cocina ........................ 38
Retiro de la Puerta ............ 37
Caj6n ...................... 42, 43
Plancha ....................... 36
Fondo del Homo .............. 39
Reemplazode la Luzdel Homo .. 42
Escribu los n6meros de modelo y
de serie uquf:
N ° de Modelo
N° de Serie
Los puede encontrar en la etiqueta
En Canadd, comuniquese
con nosotros en:
www. GEAppliances.ca
que se encuentra en el frente de la
cocina, detr@sdel caj6n calentador
o en el caj6n inferior del horno.
49-85.1.8._-._ 07-.1.2 GE
Page 66

INFORMACION IMPORTANTEDESEGURIDAD.
LEA TODASLASINSTRUCCIONESANTES DE USAR.
ADVERTENCIA j si la informaci6n de este manual no se sigue exactamente, se podr6
producirun incendioo e×plosi6n,ocasionando da_os sobrelapropiedad,lesioneso lamuerte.
- No guarde ni use gasolina u otros vapores inflamables y liquidos cerca de este ni de otros electrodom6sticos.
- OUI_ DEBE HACER Sl HUELE GAS
_ No intente iluminar ning_n electrodom6stico.
':, No toque ningOn interruptor el6ctrico; no use tel6fonos en su edificio.
':, De inmediato Ilame a su proveedor de gas desde el tel6fono de un vecino.
':, Si no se puede comunicar con su proveedor de gas, Ilame al departamento de bomberos.
- La instalaci6n y las reparaciones deber6n set realizadas pot un instalador calificado, agencia de servicios o el
proveedor de gas.
ADVERTENCIA j
Todas lascocinas pueden sufrircaidas.
Se pueden producir q)UEMADURASy otras LESIONESGRAVES
INSTALEy CONTROLEel soporte anti-volcaduras, siguiendo las instrucciones suministradas
con el soporte.
A fin de reducir el riesgo de caida de la cocina, 6stadeber6 estar asegurada pot un soporte anti-
volcaduras correctamente instalado.Consultelas instruccionesde instalaci6n provistas con el
soporte, paraacceder a detallescompletos antes de intentar realizarla instalaci6n.
Paracontrolar sielsoporte esinstalado y ajustado de forma apropiada, controle que debajo de
la cocina la pata niveladoratrasera est6ajustada al soporte. Enalgunos modelos,elcaj6n de
almacenamiento o el panel de protecci6n se pueden retirar para una f6cil inspecci6n.Si no es posiblerealizar una
inspecci6nvisual,deslice la cocina haciaadelante, confirme que elsoporte anti-volcaduras est6ajustado de forma
segura al pisoo lapared,y deslicelacocina hacia atr6s de modo que la pata niveladoratrasera se encuentre debajo
del soporte anti-volcaduras.
Encasode que lacocina sea empujada de la pared por alguna raz6n,siempre repita este procedimiento para
verificar que la cocina est6correctamente asegurada por elsoporte anti-volcaduras.
Nuncaretire completamente laspatas niveladoras,ya que lacocina noestar6 asegurada deforma adecuada al
dispositivo anti-volcaduras.
Si no recibi6 el soporte anti-volcaduras con su compra, Ilame al 1.800.626.8774 para recibir uno sin costo (en
Canad6, Ilame al 1.800.561-3344). Para acceder a instrucciones de instalaci6n del soporte, visite GEAppliances.
corn (en Canad6, GEAppliances.ca).
ADVERTENCIAJAVISODESEGURIDADIMPORTANTE
La LeydeAgua PotableInocua y Tratamiento de ResiduosT6xicosdeCalifornia (CaliforniaSafeDrinkingWater and
ToxicEnforcement Act)solicita al Gobemador de Californiaque publiqueuna lista de sustancias que el estado reconoce
que producen c6ncer,defectos de nacimiento u otros da_os reproductivosy solicita a losempresariosque adviertan a
susclientes sobre la posibleexposici6na tales sustancias.
Elaislante defibra devidrio enlos homos de auto limpiezadespide una pequeBa cantidad de mon6xido de carbono
durante el ciclo de limpieza.Laexposici6npuede ser minimizada si seventila con unaventana abierta o si se usaun
ventilador o campana.
2 GUARDE ESTAS INSTRUCCtONES
Page 67

GEAppliances.com
[A ADVERTENCIA lINSTRUCCIONESGENERALES DESEGURIDAD
iii[iil
ADVERTENCIA]
NUNCA use este electrodom@stico para calentar el
ambiente. Como consecuencia de esto, se podr6
producir envenenamiento con mon6×ido de carbono y
el sobrecalentamiento del horno.
i Use este electrodom6stico s61opara su prop6sito
original, coma se describe en el manual del propietario.
Solicitequeun instalador calificado instale su cocina
y que est6 correctamente conectada a tierra, de
acuerdo con lasinstruccionesde instalaci6n provistas.
Cualquierajuste y trabajo deserviciot6cnico deber6
set realizado0nicamente par instaladoresdecocinas
a gas calificados o par t6cnicosdel servicio.No intente
reparar o reemplazar ninguna parLede la cocina,a
menosque esto serecomiende especificamente en este
manual.
_::Sucocina esenviada desdela f6brica para usa con
gas natural. PuedeserconverLidapara usacon gas LP.
Sise requieren,estos ajustesdeben set realizadospar
unt6cnico calificado de acuerdo con las instrucciones
deinstalaci6n y c6digos locales.Laagencia que realiza
estetrabajo asume la responsabilidadde laconversi6n.
Solicitequeel instalador le muestre la ubicaci6n de la
v61vulade cierre de la cocinaa gas y c6mo apagarla en
casode sernecesario.
Enchufe la cocina en un tomacorriente con conexi6n
a tierra de 120 voltios 0nicamente. No retire la pata
redonda de conexi6n a tierra del enchufe. Sitiene dudas
sabre la conexi6n a tierra del sistema el6ctrico para
hogar, es su responsabilidad y obligaci6n contar con
el reemplazo de un tomacorriente sin conexi6n a tierra
par un tomacorriente de tres patas correctamente
conectado a tierra, de acuerdo con el C6digo Nacional
de Electricidad. No use prolongadores con este
electrodom6stico.
Antes de realizar cualquier servicio t6cnico, desenchufe
la cocina o desconecte el suministro de corriente desde
el panel de distribuci6n del hogar, retirando el fusible o
desconectando el disyuntor.
Aseg0rese de que todos los materiales de embalaje
sean retirados de la cocina antes de su usa, a fin de
evitar que estos materiales se incendien.
_:: Evite ralladuras o impactos sabre las puertas de metal,
cocinas o paneles de control. Hacer esto podr6 producir
la rotura de vidrios. No cocine un producto con un vidrio
rata. Esposible que se produzcan descargas, incendio o
cortes.
No deje a los niflos solos o fuera de su radio de
atenci6n en el 6rea donde el electrodom6stico se
encuentre en usa. Nunca se les deber6 permitir
trepar, sentarse o pararse sabre ninguna parle del
electrodom6stico.
iii[iiili_
No guarde articulos de inter6s para los niflos sabre una
cocina o en la parle trasera de la misma - Si un niflo
trepa sabre la cocina para alcanzar arliculos, es posible
que sufra lesiones graves.
No permita que nadie setrepe, se pare o secuelgue de
la puerLadel homo, delcaj6n o de la parle superior de
la cocina.Se podr6 daflar lacocina o provocarsu caida,
ocasionando lesionesgraves ola muerLe
Nuncabloquee las ventilaciones(aberlurasde aire)de
la cocina. Lasmismas brindan lasentradasy salidas
de aire que son necesarias para que la cocina opere
de forma correcta con la combusti6n adecuada. Las
aberturas deaire est6n ubicadas en la parLetrasera
de la cocina, en la parle superior e inferior de la puerLa
del homo,y en laparle inferior de la cocina debajodel
caj6n calentador, del caj6n del homo inferior odel panel
de protecci6n.
iii[iil
Use s61osostenedores de alias secos - los sostenedores
hOmedos sabre superficies calientes pueden producir
quemaduras debido al vapor. No permita que los
sostenedores de alias tengan contacto con los
quemadores superficiales, la parrilla de los quemadores,
o el elemento de calefacci6n del horno. No use una
toalla u otra tela voluminosa para reemplazar el mango
de las cacerolas.
iii[iiili_
Tengacuidado de no tocar lassuperficiescalientes
de la cocina. Lassuperficies potencialmente calientes
incluyenlos quemadores, parrillas,parle superior de
la cocina,parLetrasera, homo e interior de la puerta y
aberLurasalrededor dela puerLadel horno.
iii[iiili_
Nocaliente envasesde comida que no hayan sido
abierLos.Se podria acumular presi6n y elcontenedor
podria explotar, ocasionando una lesi6n.
iii[iiili_
Coma protecci6n contra enfermedades transmitidas a
trav6s de la comida, aseg0rese de que las temperaturas
de los productos con came y ave alcancen o superen
las temperaturas minimas de seguridad alimentaria
recomendadas par USDA. Para m6s informaci6n visite:
www.isitdoneyet.gov o Ilame a la linea gratuita de
carnes y aves de USDA al 1-888-614-68S4.
GUARDE ESTAS INSTRUCCtONES s
Page 68

INFORMACION IMPORTANTEDESEGURIDAD.
LEA TODASLASINSTRUCCIONESANTES DE USAR.
]AADVERTENCIAj IVlANTENGALOSMATERIALESINFLAIVlABLES
ALEJADOSDELACOCINA
No guarde ni use materiales inflamables enun homo
o cerca de la parte superior de la cocina, incluyendo
papel,pl6stico,sostenedoresde ollas,trapos,cobertores
depared, cortinas, pa_osy gasolina u otrosvapores y
liquidosinflamables.
Nuncauseprendas holgadaso que cuelguen mientras
usael electrodom@stico.Eviteacumular articulos
com0nmente usadosen gabinetessobre la cocina,y
tenga cuidado al extender la mano sobrelacocina.
Laropa quese encuentre cercade losquemadores o
superficiescalientesse podr6 encender,ocasionando
quemaduras graves.
iii[iil
Nopermita que la grasa de la cocci6nu otrosmateriales
inflamablesse acumulenen o cercade lacocina. La
grasadel homo o sobre lacocina sepodr6 incendiar.
iii[iiili_
Limpielascampanas deventilaci6n de forma frecuente.
Nose debe permitir la acumulaci6n de grasa en la
campana o elfiltro.
JAADVERTENCIA ] ENCASODEINCENDIO,SIGALOSSIGUIE,NTESPASOS
PARAEVITARLESIONESO LAPROPAGACIONDELFUEGO:
No useaguasobreelfuego de lagrasa.Nuncatome una
ollaqueseest@incendiando.Apagueloscontroles.Extinga
la ollaqueseest@incendiandosobreunquemador
superficial,cubriendolaolla completamentecon su
tapa correspondiente,una hop met61icadegalletaso
una banclejaplana.Siesnecesario,use un qu[micoseco
multiusoo un extintorde chorrodeespuma.
Encasode que hayafuego en el homo durante la
cocci6n,apagueel homo y mantenga lapuerta cerrada
JA ADVERTENClA JINSTRUCCIONES
hastaque elfuego seextinga.Siesnecesario,useun
qdmico secomultiusoo un extintordechorrode espuma.
Encasode que haya fuego en el homo durante el
periodode auto limpieza,apague el homo y espere
a que elfuego seextinga. Nofuerce la puerta
para abrirla. Laentrada de aire fresco sobre las
temperaturas de auto limpiezapodr6 conducir a la
producci6n dellamas enel homo. Sinose siguenestas
instrucciones,se podr6n producir quemaduras graves.
DESEGURIDAD DE LA PARTE
SUPERIORDE LA COCINA
_:,Nuncapierda de vista losquemadores cuando se
encuentrenen lasconfiguracionesde calor media o alta.
Lascomidas,especialmentelasquese preparan con
aceite,se pueden incendiar,Iocual puedeocasionar un
incendioquese propague a losgabinetes pr6ximos.
_:,Nunca pierda de vista el aceite cuando est6friendo. Si
secalienta m6sall6 de su punto decocci6n, el aceite
sepuede quemar y provocar un incendioque se puede
propagar a losgabinetes pr6ximos. Useun term6metro
para grasasprofundas siempre que sea posible,a fin de
monitorear la temperatura del aceite.
':, Paraevitar derrames e incendios, use una cantidad
minima deaceite cuando est6friendo en unaolla que
noseaprofunda y evite cocinar comidas congeladas
con cantidades excesivasde hielo.
':, UseeltamaBode ollaadecuadoparaevitarquesean
inestableso quesufranca[dasfacilmente.Seleccione
utensiliosquecoincidancon eltamaBodelquemador.Las
llamasdelquemadorsedeber6najustar de mocloque no
seextiendanmasalki de la parte inferiordela olla.Una
cantidad excesivade llama puederepresentarun riesgo.
_:,Siempreusela posici6nLITEal encenderlosquemadores
superioresy asegLiresede queestossehayan encendido.
_:,AIusarutensiliosdevidrio/cer6mica,aseg0resedeque
seanadecuadosparaelserviciodecocina;otrossepodrdn
romperdebidoa uncambiorepentinodetemperatura.
4
A fin de minimizar posibles quemaduras, incendio de
materiales inflamables y derrames, la manija de un
envase deber6 ser inclinada hacia el centro de la cocina
sin que se extienda sobre los quemadores cercanos.
AI preparar comidas Ilameantes debajo de una
campana, encienda el ventilador.
} No use un wok con un anillo con soporte de metal
redondo. El anillo podr6 atrapar calory bloquear el aire
hacia el quemador, produciendo el riesgo de emisi6n de
mon6xido de carbono.
No intente elevarla cocina. Haceresto podria da_ar
la tuberia de gas hasta losquemadores superficiales,
ocasionando una p@didadegasy riesgode incendio.
AIinhabilitar elBloqueodel Controlde Gas(enalgunos
modelos),asegOresedeque loscontroles de superficie
se encuentren en la posici6nOFF (Apagado).Esto
evitar6 que haya un flujo de gas nointencional desde
los quemadores.
No use papel dealuminio para cubrir rejillascualquier
parte de la cocina. Sise hace estose podr6 producir
envenenamiento con mon6xido de carbono,
sobrecalentamiento de lassuperficies dela cocina o un
posibleriesgode incendio.
GUARDEESTASINSTRUCCIONES
Page 69

IA ADVERTENCIA lINSTRUCCIONES DE SEGURIDAD
_::Coloque el estante del horno en la posici6n de bloqueo,
ADVERTENCIA] NUNCAcubraninguna
ranura, agujeros o pasajes en el fondo del homo ni cubra
un estante entero con materiales tales como papel de
aluminio. Hacer esto bloquea el flujo de aire a trav@s del
horno y puede ocasionar envenenamiento con mon6xido
de carbono. Los recubrimientos de aluminio tambi@n
pueden atrapar el calor, causando riesgo de incendio.
Mant6ngasealejado de lacocinaal abrir la puerta del
horno.Elaire caliente o el vapor que sale puede causar
quemaduras en las manos, rostra y/u ojos.
Mantenga el homo libredeacumulaci6n degrasa. La
grasa enel homo se puedeincendiar.
Coloquelosestantes delhomo en laubicaci6n
correspondiente mientras 6ste seencuentra frio. Si
es necesario retirar el estante mientras el homo se
encuentra caliente, evite tocar lassuperficies calientes.
al introducir y retirar comida del horno. Esto ayuda a
evitar quemaduras par tocar superficies calientes de la
puerta y las paredes del horno.
_:: No deje productos tales coma papel, utensilios de
cocina ni comida en el homo cuando no est6 en
usa. Los articulos guardados en el homo se pueden
incendiar.
Nodeje articulos en la porte superior de la cocina cerca
de la ventilaci6n del homo, que est6 en el centro de la
parte trasera. Losarticulos se pueden sobrecalentar,y
existeriesgode incendio o quemaduras.
AIusar las balsas para cocinar o dorar en el homo,siga
las instruccionesdel fabricante.
Nunca ase con la puerta abierta. Se prohibe asar con la
puerta abierta debido al sobrecalentamiento de las perillas
de control.
GEAppliances.com
ADVERTENCIA l
FUNCION DE AUTO
La funci6n de auto limpieza usa el homo en temperaturas Io suficientemente altas coma para consumir restos de
comida que haya dentro del mismo. Para un funcionamiento seguro, siga estas instrucciones.
Antes de utilizar el ciclo de auto limpieza, retire los Si el modo de auto limpieza funciona de forma
alias, estantes de metal brillante del homo y otros
utensilios que haya dentro del mismo. $61o se pueden
dejar dentro del homo los estantes para homo con
recubrimiento de porcelana. No use la funci6n de auto
limpieza para limpiar arras partes, tales coma parrillas.
Antes de utilizar el ciclo de auto limpieza, limpie la grasa
y restos de comida que haya en el horno. Una cantidad
excesiva de grasa se puede incendiar, Io cual puede
producir daflos con humo en su hogar.
INSTRUCCIONES DE SEGURIDAD DEL HORNO CON
LIMPlEZ
incorrecta, apague el homo y desconecte el suministro
de corriente.Soliciteelservicio de un t6cnico calificado.
Nolimpie lajunta de la puerta. Lajunta dela puerta es
esencial para un buensellado.Sedebe tener cuidado
de nofrotar, daflar nimover lajunta.
Nouse limpiadorespara homo. No sedeber6 usar
limpiador para hornos comerciales ni revestimientos
de protecci6n para hornos de ningQntipo en o
alrededor de cualquier parte del horno.
[AADVERTENCIA j INSTRUCCIONESDESEGURIDADDELCAJON
CALENTADOR/CAJaN DELHORNO INFERIORCflgur osmoddosI
El prop6sito del caj6n calentador es mantener las
comidas cocinadas a temperatura para servir. Las
bacterias crecen de forma muy r6pida en las comidas
con temperaturas entre 40°F y 140°F. No coloque
comida fria en el caj6n calentador. No guarde comida
en el caj6n calentador par m6s de 2 horas. Si no
se siguen estas instrucciones, se podr6n producir
enfermedades generadas en la comida.
No deje productos de papel, pk_sticos,comida enlatada o
materiales combustibles en el caj6n. Sepueden incendiar.
} No toque el elemento calentador ni la superficie
interior del caj6n. Es posible que las superficies est6n
Iosuficientemente calientes coma para provocar
quemaduras.
GUARDE ESTAS INSTRUCCtONESs
Tengacuidado alabrirel caj6n.Abra un poco elcaj6n
ydeje que salga airecalienteo vapor antesde retirar o
reemplazarla comida. Elaire calienteo elvaporque sale
puede causar quemaduras enlas manos,rostray/u ojos.
No use papel dealuminio para revestirel caj6n
calentador. Elaluminio es un excelenteaislante del
calory atrapar6 el calor debajode 6ste.Estoalterar6
el funcionamiento delcaj6n y existe el riesgo de que se
produzcaun incendio.
Page 70

C6mo usar los quemadores superficiales de gas.
Esposible que las funciones y apariencias varien con relaci6n a su modelo a Io largo del manual.
Empuje el mango de control y gire
el mismo hasta laposici6n LITE.
Antes de Encender un Ouemador de Gas
Aseg0rese de que todos los quemadores
est6n en su lugar.
Aseg0rese de que todas las parrillas de la
cocina est6n correctamente ubicadas antes
de usar un quemador.
Sisu cocina cuenta con lafunci6n Bloqueo
del Control de Gas,asegQresede que est6
deshabilitada antes de intentar encender los
quemadores superficiales.
C6mo Encender un Quemador Superficial de Gas
[A ADVERTENCIA JLa ,ama
del quemador que no est6n cubiertas por el
utensilio de cocina pueden presentar un riesgo
de incendio o incendio de telas. Elquemador de
la plancha s61osedeber6 usar cuando la
plancha est@en su lugar. Siesto no secumple,
sepueden sufrir lesionesgraves.
AsegQresede que todos losquemadores
superficiales est6n ubicados en sus posiciones
respectivas.
Empuje el mango de control y gire el mismo
hasta la posici6n LifE.
Luego de Encender un Ouemador de Gas
No utilice el quemador durante un perfodo de
tiempo prolongado sinun utensilio de cocina
sabre la parrilla. Elacabado de la parrilla se
puede resquebrajar si no hay un utensiliode
cocina que absorba el color.
Aseg0rese de que losquemadores y las
parrillasest6n frfos antes de colocar la mano,
tomar el mango de una alia, trapos de
limpieza u otros materiales sabre estos..
Escuchar5 un pequeSo ruido de clic- el
sonido de la chispa el6ctrica que enciendeel
quemador.
Girela perilla para ajustar el tamaho de
la llama. Sila perilla permanece en LITE,
continuar(_hacienda clic.
Cuando un quemador segira a LITE,todos
losquemadores hacen chispa. No intente
desensamblar ni limpiar un quemador mientras
otro quemador est5 encendido. Esposible que
se produzca una descarga el6ctrica, Io cual
podr[a hacer que vuelque un utensilio de cocina
caliente.
Mediono Pequeho
• •
!
Gr_e
Extra
a,gunosenGrandemoaetos (_)
modelos Ouemaaor ae
lOVOlOdO
Ienalgunos / _
tres anillos
Ouemador ten algunos
ouen[e len modelos
atgunos
modelos,
Quemadores de Gas Sellados
La parte superior de su cocina a gas cuenta
con quemadores de gas sellados. Le ofrecen
conveniencia, facilidad de limpieza y flexibilidad
para ser usados en una amplia variedad de
aplicaciones de cocina.
Elquemador mSs pequeSo en la posici6n
trasera derecha es el quemador a fuego lento.
En algunos modelos, el quemador de triple
llama que se encuentra en la posici6n frontal
derecha es el quemador a fuego lento. Este
quemador se puede pasar a SIM (Fuego Lento)
para que funcione a un fuego muy lento. Brinda
un funcionamiento de cocci6n muy preciso
para comidas delicadas tales como salsas o
comidas que requieren fuego lento durante un
per[odo de tiempo de cocci6n largo.
Los quemadores mediano (atrSs a la
izquierda) y grande (frente a la izquierda) son
los quemadores principales para la mayor[a
de las cocciones. Estos quemadores de uso
general se pueden pasar de HI (Alto) a LO
(Bajo), a fin de que se adecOen a una amplia
variedad de necesidades de cocci6n
Elquemador extra grande (alfrente a la
derecha, quemador de triple llama, o al frente
a la izquierda en algunos modelos) esel
quemador de mc_ximaproducci6n. AIigual que
losotros cuatro quemadores, sepuede pasar
de HI (Alto)aSIM (FuegoLento)para una amplia
variedad de aplicaciones de cocci6n.
Estos quemadores est6n disehados para
Ilevar rSpidamente grandes cantidades de
liquido a punto de hervor. Cuentan con la
funci6n especial POWERBOILTI, diseF_ada
para su usa con utensilios de cocina de
!O pulgadas o mc_sdedi@metro para el
quemador extra grande y !2 pulgadas o mc_s
para el de triple llama.
Elquemador oval central (enalgunos modelos)
es para grandes alias/cacerolas o para usa
con la plancha.
S61opara quemadores extra grandes
S61opara quemadores de tres anillos
Page 71

Consulte la secci6n C6mo Iluminar el Quemador del Puente para el Modelo PGB980
[A ADVERTENCIAJLas
$61opara el Quemador de la
Plancha Frontal
$61opara el Quemador Trasero y
el Combo del Quemador del Puente
llamas del quemador que no est6n
cubiertas par el utensilio de cocina pueden
presentar un riesgo de incendio o incendia
de telas. Elquemadar de la plancha s61ase
deber6 usar cuanda la plancha est6 en su
lugar. Si esto no se cumple, se pueden sufrir
lesiones graves.
C6mo Seleccionar el Tamafio de la Llama
ADVERTENCIA] Las,amas
del quemador que no est6n cubiertas par el
utensilio de cocina pueden presentar un
riesgo de quemaduras o incendio de telas.
Nunca permita que las llamas se extiendan
mOsal16de los costados del utensilio.
Utensilio sabre la Cocina
Aluminio: Serecomienda un utensilio de peso mediano, ya
que calienta de forma r6pida y pareja. La mayor[a de las
comidas se doran de forma pareja en un sart6n de aluminio.
Use cacerolas con tapa herm@ica cuando cocine con
cantidades m[nimas de agua.
Hierro Forjado: Sicocinar6 de forma lenta, la mayor[a de los
sartenes le dar6n resultados satisfactorios.
Utensilios de esmalte: Bajo ciertas condiciones, el esmalte
de algunos utensilios de cocina se pueden derretir. Siga las
recomendaciones sabre m6todos de cocci6n del fabricante
de utensilios de cocina.
Vidrio: Existendos tipos de utensilios de cocina de vidrio -
aquellos para usa con el homo 0nicamente y aquellospara
GEAppliances.com
Lq)uemadorliviano trasero totalmente en la
posici6n Lite.
Girela mismaperilladelquemadortraseroa
laposici6nHi(Alto),Med(media)oLo(Bajo)clel
q)uemadorde laPlanchaparailuminarel puente.
Aseg0resede quela configuraci6ndelquemador
de la planchafrontalsea elmismoqueel
quemadortraseroy elcombodelquemadordel
puente.
Observe la llama, no la perilla,a medida que
reduce elcolor. Cuando sedesee calentar de
farina r6pida, el tamaho de la llama de un
quemador de gas deber6 set equivalente con el
utensilio de cocina que est6 usando.
Cuandolas llamas seanm@sgrandesque laparte
inferiordel utensiliodecocina, no calentar6n el
utensitiom6s r6pidoy podrian serriesgosas.
la cocci6n en la parte superiorde la cocina(cacerolas,caf@y
teteras).Losconductores de vidrio calientan de forma muy lenta.
Cer6mica de Vidria Resistente al Color: Se pueden usar para
cualquier superficie o para cocci6n en el homo. Conduce el
calor de forma muy lenta y se enfria deforma muy r6pida.
Consulte las instrucciones del fabricante de utensiliosde cocina
para saber con seguridad si se puede usar con cocinas a gas.
Acero Inoxidable: Este metal posee propiedades de
calentamiento limitadas y normalmente se combina
con cobre, aluminio u otros materiales para una mejor
distribuci6n del color. Los sartenes con combinaci6n de
metales normalmente funcionan deforma satisfactoria si se
usan con color media, coma Io recomienda el fabricante.
Parrillas para la Porte Superior de la Cocina
No use parrillas para la porte superior de la exposici6n a nivelesde mon6xido de carbono
cocina sabre los quemadores de gas sellados.Si superioresa losest6ndares actualmente
usa la parrilla para la porte superior dela cocina permitidos.
en el quemador de gas sellado,ocasionar6 Thiscan be hazardous to your health.
una combusti6n incompleta y podr6 producir
Use el Wok de Esta Farina
Recomendamos que use un wok de 14 pulgadas
Jse un WOK con fondo aloha
En Caso de Carte de Corriente
En caso de carte de corriente, puede encender los
quemadores de gas superficiales de la cocina con un f6sforo.
Acerque un f6sforo prendido al quemador, y luego presione y
gire la perilla de control hasta la posici6n LITE.Tenga especial
cuidado al encender los quemadores de esta manera.
o m6s peque_o con rondo piano. AsegOrese de
que elrondo del wok se apoye de forma plana
sabre la parrilla. Est6n disponibles en su tienda
minorista local.
S61ose deber6 usar un wok con rondo piano.
No use un anillo de soporte para wok. Colocarel
anillo sabre el quemador o parrilla podr6 hacer
que el quemador funcione de forma inadecuada,
produciendo nivelesde mon6xido de carbono
que superan los est6ndares permitidos. Esto
puede ser peligroso para susalud.
Losquemadoresquese est@nusando cuandose produzcaun
carte decorriente el@ctricacontinuar6nfuncionando normalmente.
NOTA:Siel Bloqueo del Control de Gas est6 en usaenel
momenta del carte de corriente, losquemadores superficiales
no sepodr6n encender. 7
Page 72

Uso de la plancha, tena/gunosmode/osl
Suplancha cubierta y antiadherente o plancha NOTA:Suplancha se descolorar6 con el paso
presazonada (enalgunos modelos)brinda una del tiempo, a medida que se sazone con elusa.
superficiede cocci6n extra grande para carnes,
panqueques u otras comidas normalmente
preparadas en una alia o sart6.npara fre[r
C6mo Insertar la Plancha Antiadherente y Reversible
La plancha s61osepuede usar con el quemador NOTA:No limpielaplanchaenelhomodeauto
central. Parainsertar la plancha, retire la parrilla limpieza.
central y reemplace la misma con laplancha.
C6mo Insertar la Plancha del Chef
Esta plancha s61ose puede usar con el
quemador izquierdo trasero, el frontal y del
puente. Para insertar la plancha, coloque
la misma sabre las parrillas, de modo que
los pies en la parte inferior de la plancha se
ubiquen entre los dedos de las parrillas.
NOTA:No limpie la plancha en el homo deauto
limpieza.
Uso de la Plancha.
ADVERTENCIA j Riesgode,ncendio
Laconfiguraci6n Pre-Heat (Precalentar) (en algunos
modelos) se brinda para precalentar la plancha de farina
r6pida. Apague el control antes de colocar comida en
la plancha. La cocci6n en la configuraci6n Pre-Heat
(Precalentar) puede ocasionar un incendio.
Tenga cuidado al cocinar comidas con grasa. La grasa
esparcida puede provocar un incendio.
Nunca coloque ni guarde un articulo en la plancha, incluso
cuando no est6 en usa. Elcalor de los dem6s quemadores
puede calentar la plancha y provocar un incendio.
Coloque y retire la plancha s61ocuando todas las
parrillas y la plancha est6n frias y todas las unidades
superficiales est6n en OFF(Apagado).
La mayoria de las comidas a la plancha requieren una
cocci6n en una superficie precalentada. Precaliente la
plancha de acuerdo con esta guia, y luego cambie a la
configuraci6n de cocci6n deseada.
Nouseaceitesabrela planchaduranteperfodosdetiempo
prolongados.Esposibleque seproduzcanmanchaspermanentes
y/o grietas.
Plancha Presazonada para los Modelos PGB910,
9./.5, 930; JGB810, 840
Tipa de Comida Condiciones de Canfiquraci6n
C6moCalentarTortillas Ninguno 3(Med-Bajo)
Panqueques 7 (Med-Alto)3 rain. 7 (Med-Alto)
Harnburguesas 7 (Med-Alto)Srain. 7 (Med-Alto)
EmbutidosparaelDesayuno Alto- Smin_ S(Med)
S6ndwichesCatientes(Tates Alto- 4 in. Alto
comaconOuesoalaHancha)
NOTA:Esposible que sea necesario ajustar lasconfiguraciones
de la plancha si se usard par un periodo prolongado.
Precalentamiento de Cocci6n
Do not overheat the griddle. Leavingthe griddle burner on at
HIfor an extended amount of time without food can damage
the nonstick coating.
Eviteel usade utensilios de metal con puntas pronunciadas
o extremos muy filososque podr[an da_ar la superficiede la
plancha.
Nocarte las comidas en la plancha.
Plancha Antiadherente para el Modelo CGS985
Tipo de Comida Condiciones de Configuraci6n de
C6moCalentarTortillas Ninguno 3 (Med-Bajo)
Panqueques 4 (Med-Alto)!0 4 (Med)
Hamburguesas Alto - Smin. S(iVied)DorarenHi
Huevos Fritos
Embutidospara etDesayuno
S6ndwichesCalientes(Tales
comacon0ueso ataPlancha)
NOTA:Esposible que sea necesario ajustar lasconfiguraciones
de la plancha si seusard par un periodo prolongado.
Precalentamiento Cocci6n
min.
(Alto)par! minuto
decadalacto
Alto- Smin. a (iVied)
Alto- 5 min. S(iVied)
Alto- 4 min. Alto
Plancha del Chef Presazonada para el PGB980
Tipo de Comida
C6mo Calentar Tortillas
Panqueques
Harnburquesas
Embutidospara etDesayuno
S6ndwichesCalientes(Tates
comacon0ueso ataPtancha)
Bistec
Mezcla de Verduras
E_;o6[Epg_ Alto -/4 min. iVied
Pescado iVied-/4 min. iVied
NOTA:Esposiblequeseanecesarioajustarlosconfiguracionesde
laplanchasiseusardpar unperiodoprolongado.AsegOresede
queloscondicionesdeprecalentamientoy losconfiguracionesde
cocci6nseanlosmismastanto para los@uemadoresdela Plancha
frontaly trasera.
PreheatConditions CookSetting
. Ni__q_no Baio
Ned - !0 min.
Ned - 5 min.
Alto - 5 min.
Ned - 5 min.
Alto - S min.
Alto -/4 min.
iVied
iVied
iVied
iVied
Alto
iVied
Page 73

Uso de los controles de!homo.
(Esposible que las funciones y apariencias vafien con relaci6n a su modelo a Io largo del manual.)
Las f.unc!ones, 9Pariencia
y uo_cac_onesae _asreaas
pueaen variar.
i
Controldel Homo, Reloj,Temporizadory Funcionesen lVlodelos
CG5985.
TectadeHorneado
Presioneparaseleccionarlafunci6nhomear.
TectaBroilHi/Lo (AsarAtto/Bajo)
Presionepara seleccionarlafunci6nasar.
TectadeHorneadopar Conveccidn
Presionepara seleccionarhornearcon la funci6nde
convecci6n.
TectadeTostadopar Conveccidn
Presione.paraseleccionartostar conlafunci6n de
convection.
TectaIniciar.
Sedeber6presionarpara comenzarcualquier
funci6n decocci6no limpieza.
Pantafta
Muestrala horadel da, temperatura delhomo, si el
homo est6en el maria hornear,asaro auto limpieza,
lostiempos configuradospara las funcionesdel
temporizadoro de homo autom6tico,y si lacocina
est6 bloqueada.
Si "F-y un n4mero o letra" titilan en la pantalla y el
control delhomo da una serial,esto indJcaun c6dJgode
error de funci6n.Toquela tecla Clear/ Off tBorrar/ Apagar).
Permitaque elhomo se enfrfedurante una hora.Coloqueel
homonuevamenteen funcionamiento.Siel c6digo de error
de funci6n serepite,desconectela corrientedelhomo y
Ilameal serviciot@cnico.
Si su homo rue configurado para un funcionamiento par
tiempo y se produce un carte de corriente, elrelojy las
funciones programadas ser6n reiniciados.
La hora del dia titilar6 en lapantalla cuando haya habido
un carte de corriente.
Tec/a deAuto Limpieza
Presione para seleccionar la funci6n de auto
limpieza. Lea la secci6n homo con funci6n de auto
/impieza.
TecladeLuzOn/Off(Encendida/Apagada)delhomo.
Presionepara encenderoapagarlaluzdel homo.
TectadeTiempodeRetraso
Usejunto con lasteclas COOKINGTIME(TJempo
de Cocci6n) o SELFCLEAN(Auto Limpieza) para
configurar elhomo para que se iniciey detengade
forma autom6tica en el tiempo queconfigur6.
TectadeTiempodeCoccidn
Presionelateclay hego presionelasteclasnum@ricas
paraconfigurarlacantidaddetiempo duranteelcual
deseequesu comidasecocine.Elhomoseapagar6
cuandoeltiempode cocci6nsehayaterminado.
TectaClear/Off(Borrar/Apagar)
Presionepara cancelarTODASlasoperacionesdel
homo, exceptoel reloj,temporizadory Bloqueodel
ControldeGaso BloqueodelControl(dependiendo
del modelo).
TectadeRetoj
Presioneantesde configurarel reloj.
TectasNumdficas
Useestatecla para configurarcualquierfunci6n que
requieranOmeros,talescoma la hora deldfaenel
reloj,eltemporizador,latemperatura del homo,la
temperatura interna de lacomida,la horade inicio
y la duraci6ndelfuncionamiento para horneadopar
tiempoy auto limpieza.
TectaKitchenTimerOn/Off (TemporizadordeCocina
Encendido/Apagado)
Presionepara seleccionarlafunci6n delcontador.
TectadeSonda
Presioneal usarlasonda para realizarunacocci6n.
BloqueodelControldeGas(enafgunosmodelog
Mantengapresionadalatecla Gas/Control Lockout
(Bloqueodel Controlde Gas)durante3 segundos
para bloquear/desbloquear losquemadores
superficiales,losquemadoresdelhomoy elpanelde
control,de coda queno puedanseractivados.
TeclaWarm(Colentar)(enalgunosmodelos)
Presionepara mantenercalienteslascomidasya
cocinadas.Leala secci6nC4moConfigurorelHomo
Superiorpara Calentar. 9
GEAppliances.com
Page 74

Uso de loscontrolesdd homo.
(Esposible que las funciones y apariencias vafien con relaci6n a su moddo a Io largo del manual.)
Nota: En los
modelos con con-
troles de tecla de
iluminaci6n trasera,
permanecer6n
encendidos par
muchos minutos
luego de haber sido
presionadas.
Probe
or rooO
Med
2
Set Warming Zone
r.,_mp .... I,':.,:.._ F _[
3J 4 _ ILoffd %o,o,,-'_ ....-"
8 r_9 o_} I_starO _L°g_9_C_e e_fn)
/
I On / Off_" 1
I G_s/_r°ntr°_ _
U L Lo_otJ
_-C(1 ltrol Lock( ut_" I" / .... On/Off /
Control delHomo, Reloj,Temporizadory Funciones
Tedade Homeado
Presionepara seleccionarlafunci6nhornear.
TedaAsarAlto/Bajo
Presionepara seleccionarlafunci6nasar.
HorneadoMOttiptepar Conveccidn/1Tecfade
Estonte(enafgunosmodetos)
Presionepara seleccionarhornearcon la funci6n
de convecci6n.
Tedade Tostadopar Conveccidn(enatgunos
modetog
Presione.paraseleccionartostarcon lafunci6n de
convecclon.
TectadePrueba(enafgunosmodefog
Presionepara seleccionarunambientec61ido
que seaOtilpara la elevaci6nde productos
fermentadosa basede levadura.
TedaInidar
SedeberOpresionarpara comenzarcualquier
funci6n decocci6no limpieza.
Pantaffa
Muestrala horadel dfa,temperatura del homo,
siel homo est6 enel modo hornear,asaro auto
limpieza,lostiemposconfiguradospara las
funcionesdeltemporizador o de homoautom@ico,
ysi lacocina est6bloqueada.
Si"F-y unn6mero o letra" titilan enlapantalla y el
control del homo do una sefia_ estoindica un c6digo
de error defunci6n.Toque latecla Clear/Off (Borrar/
Apagar). Permitaqueelhomo seenfrfeduranteuna
hora.Coloqueel homo nuevamenteenfuncionamiento.
Sielc6digode errorde funci6n se repite,desconectela
corrientedel hornoy Ilameal serviciot@cnico.
Sisuhomo fueconfigumdo paru un funcionamiento par
tiempo y se produce un carte decorriente, el relojy las
funcionesprogramadasser6n reiniciados.
La hora dd dia titilar_ en lapantalla cuando haya
habido un corte de corriente.
TedadeAuto Limpieza
Presionepara seleccionarlafunci6ndeauto
limpieza.Leala secci6nhomo con funci6nde auto
limpieza.
LuzdefHomo Encendida/Apagada
Presionepara encenderoapagarlaluzdel homo.
10
Tedade TiempodeRetraso
Usejunto con lasteclasCookingTimeffiempo
de Cocci6n)oSelfClean(AutoLimpieza)para
configurarel homo para quese iniciey detengade
forma automOticaen el tiempo queconfigur6.
Tedade TiempodeCoccidn
Presionelateclay luegopresionelasteclas
num6ricasparaconfigurarla cantidaddetiempo
duranteelcualdeseequesu comidasecocine.El
homoseapagard cuandoeltiempode cocci6nse
hayaterminado.
TedaBorrar/ Apagar
Presionepara cancelarTODASlasoperacionesdel
homo, exceptoel reloj,temporizadory Bloqueodel
ControldeGaso BloqueodelControl(dependiendo
del modelo).
Tedade Retoj
Presioneantesde configurarel reloj.
TedasNumdricas
Useestatecla para configurarcualquierfunci6n
que requieran0meros,talescoma hora deldfa
en elreloj,eltemporizador,latemperatura del
homo,la temperaturainternade la comida,la hora
de inicioy la duraci6ndelfuncionamientopara
horneadopartiempo yauto limpieza.
Tedade Temporizadorde CocinaEncendido/
Apagado
Presionepara seleccionarlafunci6ndelcontador.
BtoqueodefControl(enafgunosmodefog
Thecontrol lockout is9 and O.Touchand holdthe
9 and 0 padsat thesametime for 3 seconds.
CajdnCafentadorEncendido/Apagado(enafgunos
modetog.
Presioneestateclay luegopresionelasteclas
num@icasi y 3para usarelcaj6n calentador.
Consultelasecci6nde Usadelcaj6ncalentador
el@ctrico.
ProbeLockoutPad
Touchwhen usingthe probeto cook food.
Gas/ControlLockout(onsomemodels)
Touchand holdthe Gas/Controllockoutfor 3
secondsto lock!unlockthe surfaceburners,oven
burnersand controlpanel sothey cannot be
activated.
Las funciflnes,
a,paneocla y
UOlCOClOneS
de los teclas
pueden variar.
Page 75

Uso del Homo Superior. GEAppliances.com
Para evitar posibles quemaduras, coloque los estantes en la posici6n deseada antes de encender el homo.
I I
El homo tiene 6 posiciones de
estantes.
La funci6n de la posici6n mds baja
(R)es dorar comidas extra grandes
tales coma un povo grande.
Los articulos de pldstico sabre la
porte superior del homo se podrdn
derretir si se los deja demasiodo
cerca de Io ventilociOn.
Lo apariencia y la ubicaciSn de la
ventilaci6n varian,
Antes de comenzar...
Losestantes poseen bloqueadores, de modo
que al colocarlos correctamente sobre los
soportes(Aa E)se detendr@nantesde salirse
completamente y no se inclinar@n.
AIcolocar y retirar utensilios de cocina, empuje
el estante hacia afuera del tope sabreel
soporte del estante.
[APRECAUCI6N: I Alusar
un estante en la posici6n m_s baja (R),se
deber6 tener cuidado al empujar el estante
varias pulgadas hacia afuera y luego,
utilizando dos sostenedores de olla, empuje
el estante hacia afuera sosteniendo los
lados. El estante est_ en una posici6n baja y
usted podria sufrir una quemadura si coloca
la mano en medio del mismo al empujar
hacia afuera.
Ventilaci6n del Horno Superior
Suhomo es ventilado a trav6s de conductos
en la parte trasera de la cocina. Nobloquee
estosconductos al cocinar en el homo - es
importante que el flujo de aire caliente desde
el homo y el aire fresco hacia el quemador
del homo no sean interrumpidos. Evitetocar
lasaberturas de la ventilaci6n o superficies
cercanas durante el funcionamiento del horno
y el asador - sepodran calentar.
Para retirar el estante, empuje el mismo hacia
usted,incline el extremo frontal hacia arriba y
empuje hacia afuera.
Para hacer un reemplazo, coloque el extremo
del estante (bloqueadores)en el soporte,incline
el frente hacia arriba y empuje elestante hacia
adentro.
NOTA:Elestante no estddisehadopara
deslizarsehacia afueraen la posici6n especial
del estantebajo (R).
iiiiiiiiiiii_iii
Lasmanijas de los ollasy cacerolas se
podrc_ncalentar al estar en la parte superior
del homo si selas ubica demasiado cerca de
laventilaci6n..
iiiiiiiiiiii_iii
Nodeje art[culos de plc_sticoo inflamables
sobre la parte superior de la cocina;
se podrc_nderretir o incendiarse si se
encuentran demasiado cerca de la
ventilaci6n
iiiiiiiiiiii_iii
Nodeje envases cerrados en la parte
superior de la cocina. La presi6nen envases
cerrados se podrc_incrementar, Iocual podrc_
hacer que exploten.
iiiiiiiiiiii_iii
Losart[culos de metal se calentar@n
demasiado si se losdeja sobre la parte
superior de la cocina y podrdn ocasionar
incendios.
Corte de Corriente
Elhomo o parrilla no se podr6n iluminar
durante un corte de corriente.
Luz de! Horno Superior
Presionela tecla Oven Light(Luzdel Homo)
en el panel de control superior para encender
o apagar la luz.
Siseproduce un carte de corriente mientras
el homo est6 en usa,el quemador del homo
seapaga. Estose debe a que el flujo de gas se
detiene de forma autom6tica y no sereinicia
hasta que regresa la corriente.
11
Page 76

Uso de!horno superior.
Sisu modelo cuent:aconuna t:rabapara puerto,no bloqueela puerto conla t:rabadurant:eelhorneadoo t:ost:ado.
Lot:roboseusapare lafunci6n deauto limpieza Onicament:e.
C6mo Configurar el Horno Superior para Horneado o Dorado
Suhomo no estc_diseBado para la cocci6n con (Hornead y luego lasteclas num@icaspara
la puerta abierta, obtener la nueva temperatura.
El homo cuenta con una posici6n
especial pore estante bojo (R)justo
sabre la porte inferior del homo.
Use esta posici6n cuando necesite
espocio odicional pore la cocci6n.
Par ejemplo, cuando cocine un
pave gronde. El estante no estd
disehado pore deslizorse y set
levantado en esta posici6n.
AI hornear en un solo estante,
los resultados del horneodo
serdn mejores si los cacerolas
de horneado seencuentran en el
centre del homo tanto come sea
posible.
rT] Presionelatecla Bake (Hornead.
F-_ Touch the number pads to set the desired
temperature.
Presionela tecla Start (Inidad.
@
Aparecerc_la palabra ON (EncendidoJy 100°.
A medida que el homo secaliente, la pantalla
mostrar6 el cambio de temperatura. Cuando el
homo alcance la temperatura que program6,
sonarc_nun pitido.
Para cambiar latemperatura del homo durante
el ciclo BAKE(Hornear), presionelatecla Bake
Precalentamiento y Ubicaci6n de Ollas
Para evitarposibles quemaduras,coloque
los estantes en la posici6n deseada antes de
encender elhomo.
Precaliente el homo sila receta Io requiere.
Para calentar el homo previamente, ajuste la
temperatura correcta. Esnecesario precalentar
el homo para el horneado per convecci6n y
para obtener buenos resultados al cocinar
tortas, galletas, pastelesy panes.
Para homes sin una luzo tone indicador de
precalentamiento, precaliente durante !0
minutes.
[] Controle que la comida est6 hecha enel
tiempo minima de cocci6n de la receta.
Cocinedurante mas tiempo si es
necesario.
[_ Presionelatecla Clear/ Off (Borrar/
Apagafl cuando la cocci6n est6completa.
NOTA:Esposible que el ventilador se encienda
y apague de forma automStica para enfriar las
partes interiores.Estoes normal,yes posible
que el ventilador contin0e funcionando incluso
luego de que el homo se apague.
Losresultados del horneado serc_nmejores
si los cacerolasde horneado se encuentran
en el centre del homo la mayor cantidad de
tiempo posible. Lascacerolas no deben tocarse
mutuamente ni tocar lasparedes del homo. Si
necesita usar dos estantes, escalone lasollas
de mode que uno no est_ directamente sabre
el otro, y deje aproximadamente un espacio
de 1 1/2"entre las alias,desde elfrente, la parte
trasera y los costados de la pared.
Paratortas o comidas similares cocinadas
en varies estantes al mismo tiempo, la
convecci6n puede brindar mejores resultados.
AIhorneor cuatro copes deterra de
una solo vez, uselos estantes 8y
D.Coloque los olios inferiores en la
porte trosem delestante y los olios
superiores en la porte frontal del
estante qua se muestro, de mode qua
una alia no est4 directomente sabre
la otto.
12
Page 77

Papel de Aluminio
GEAppliances.com
No use papel de aluminio para revestir el
fondo del homo. Elaluminio atrapar6 el calor
inferior y alterar6 el funcionamiento del horno.
Elaluminio se puede derretir y dahar de
forma permanente la parte inferior del horno.
Losdahos pot uso inadecuado del papel de
aluminio no estdn cubiertos por la garantia del
producto.
Sepodr6 usar aluminio para evitar derrames,
colocando una hoja sobre un estante inferior,
varias pulgadas debajo de la comida. Nouse
m6s aluminio que el necesario y nunca cubra
totalmente el estante de un homo con papel de
aluminio. Mantenga el aluminio a por Io menos
! !/2" de lasparedes del homo, para permitir
una circulaci6n deficiente del calor.
Humedad del Horno
A medida que el homo secaliente, el cambio
de temperatura en elaire del horno podr6
generar la formaci6n de gotas de agua en el
vidrio de la puerta. Estasgotas son inofensivas
y se evaporar6n a medida que el homo sesiga
calentando.
Sisu modelo cuentoconunotroba poro puerto, no bloqueela puerto con Io troba duronte el osodo.
Lotroba seusa paro Io funci6n deauto limpiezo Onicomente.
C6mo Programar el Homo Superior para Asar
Coloquela carneo pescado sobre una
_i ikl_....
Jlli
Cierrela puerto. Siempre asecon la
puerto cerrada.
%
rejilla para asar en una cacerola para
asar.
r_ use lasposicionessugeridaspara repisas
en la Guiapara Asar.
[] La puerta del homo sedeber6 cerrar
durante el asado.
[] Presionela tecla Broil Hi/ Lo (AsadoAlto/
Bajo) una vez para AsadoAlto.
Para cambiar a Lo Broil (Asado BajoL
presione la tecla Broil Hi (AsadoAltoJ
nuevamente.
r_ Presionela tecla Start (Iniciad. Seexhibe
el recordatorio "CERRARla puerta".
r_ una vez terminado el asado,presione la
tecla Clear/Off(BorrariApagad.
Sirva la comida de forma inmediata, y deje
la olla afuera del homo para que seenfr[e
durante la comida para una limpieza m6s f6cil.
Use Lo Broil (Asado Bajo) para cocinar
comidas como pavo o cortes gruesos de came
en forma completa sin que se doren en exceso.
13
Page 78

Usa de!homo superior.
Guia para Asar
El homo cuenta con 6 posiciones
de estantes. Generolmente se
deberfa osar en el estante C o en
uno superior. El estante Res para
doror.
Eltama_o, peso,grosor, carte, temperatura
inicialy su preferencia de preparaci6n
afectarc_nlostiempos del asado. Lafinalidad de
la guia es brindar una recomendaci6n general
y est(_basada en carnes con temperatura de
refrigerador. Serecomienda precalentar la
parrilla entre 5y i0 minutos.
Para Iograr resultados diferentes, ajuste
la posici6n del estante o la configuraci6n
para asar.
Para un mayor dorado de la superficie y
menor cocci6n interna:
• precaliente la parrilla durante i0 minutos.
• Precaliente la parrilla durante 10 minutos.
• Usela configuraci6n Broil Hi (Asado Alto).
Para un menor dorado extemo de la came
que es completamente cocinada y los
cortes gruesos de came:
• Uselas posiciones de los estantes m6s
• Usela configuraci6n de asado bajo.
Comida
Bile (Bistecs
o ham-
Conf.iflu-
Preparaci6n
Deseada
Jugoso - media Alto E
T@mino media Alto D-E
raclon
para
Asar
Posici6n
Estante
burguesas
de carne
Bien cocido Alto D cocinen antes de dorarse.
picada)
Polio Alto C
Pescado Alto D
Costillas de Alto D
cerdo
alejadas de la parrilla.
del
Comentarios
Esdificil cocinar en el punto
jugoso los bistecs de un grosor
inferior a 1".Esposible que se
Para evitar ondeados, carte la
grasa par intervalos de !".
Ase del lado de la piel hacia
abajo primero.
Sostenga y gire con mucho
cuidado.
Para evitar ondeados, carte la
grasa par intervalos de !".
USDArecomienda las siguientes temperaturas m[nimas internas y seguras:
• Came cruda, cerdo, cordero, y bistec de ternera o costillas: Z4S°Fde acuerdo con la
medici6n de un term6metro de comida antes de retirar la carne de la fuente de calor.
Par cuestiones de seguridad y calidad, deje descansar la came durante par Io menos tres
minutos antes de cortar o consumir.
•Carne picada cruda, cerdo, cordero o ternera: 160°F de acuerdo con la medici6n de un
term6metro de comidas.
• Ave: 165°Fde acuerdo con la medici6n de un term6metro de comidas.
Para m6s informaci6n visite: www.isitdoneyetgov o Ilame a la linea gratuita de cames y
aves de USDA al 1-88-674-6854.
14
Page 79

Uso dd rdoj y el temporizador. GEAppliances.com
No todas los funciones corresponden a todos los modelos.
Para Configurar el Reloj
Silas teclas num@icasno setocan dentro del
perfodode un minuto luego de haber tocado
latecla Clock(RelojLla pantallavuelve a la
configuraci6n original. Siesto sucede,presione
latecla Clock[Reloj)y vuelva a ingresarla hora
del dfa.
r_ Tpresione la tecla start (Iniciar)hasta que
la hora del dia aparezca en la pantalla.
Estoingresa la hora e inicia el reloj.
Paracontrolar la hora del dia cuando la pantalla
muestraotra informaci6n, simplemente
presionela tecla Clock(Reloj).Lahora deldia
aparece hasta que otra tecla espresionada.
Sicomete un error, presione la tecla Kitchen
Timer On/Off (Encendido/ Apagado del
Temporizador de Cocinu) y vuelva a comenzar.
[] Presionela tecla Start (Iniciafl. Luegode
presionar la teda Start flniciafl, Set
(Configuraci6n) desaparece; esto le indica
que el tiempo estc_ en cuenta regresiva,
aunque la pantalla no cambia hasta que
haya pasado un minuto.
[_ Cuando el contador Ileque a :00, el control
harc_3 pitidos seguidospor un pitido coda
6 segundos, hasta que se presione la teda
Kitchen Timer On/Off(Encendido/
Apagado del Temporizador de CocinaL
Eltono de 6 segundos se puede cancelar
siguiendo los pasos en la secci6n de control de
funciones Especiales de su horno, en Tones at
the End of a Timed Cycle (Tonos al Final de un
Ciclopot Tiempo).
AsegOreseque el reloj marque la
hora correcta del dia.
Lo funci6n de temporizador s61o
cuenta par minutos. Lo funci4n
Clear/Off (Borrar/ Apagar) no
afecta el temporizador.
Elreloj sedeber6 configurar en la hora correcta
del dfa para que las funciones autom@icas
del temporizador del homo funcionen de
forma adecuada. La hora del dfa no se puede
cambiar durante un horneado par tiempo o el
ciclo de auto limpieza.
[Z] Presionelatecla Clock (Reloj).
[2] Presionelasteclas num@icas.
Presionelas teclas num@icas de la misma
forma que laslee. Parejemplo: para configurar
12:34,presione lasteclas num#ricas .1,2, 3y 4
en esearden.
Para Configurar el Temporizador
Eltemporizador no controla el funcionamiento
del homo. La configuraci6n mc_ximadel
temporizador es 9 horas y 59 minutos.
[71 Presione latecla Kitchen Timer On/Off
(Encendido/ Apagado del Temporizador
de Cocina).
r_ Presionelasteclas num@icashasta que la
cantidad de tiempo que deseaaparezca
en la pantalla. Eltiempo m6ximo que se
puede ingresaren minutos es S9.Los
tiempos superiores a S9minutos se
deberian cambiar a horasy minutos. Par
ejemplo: para ingresar 90 minutos coma 1
hora y :SOminutos, presione !, :3y 0 en ese
arden.
Para Reiniciar el Temporizador
Sila pantalla aOn muestra el tiempo restante,
la puede cambiar presionando la teda Kitchen
Timer On/Off (Encendido/Apagado del
Temporizador de Cocina), y luego presionando
los teclas num6ricas hasta que el tiempo que
desea aparezca en la pantalla.
Para Cancelar el Temporizador
presione la teda Kitchen Timer On/Off
(Encendido/ Apagado del Temporizador de
Cocina) dos veces.
Carte de Corriente
Sila hora aparece titilando en la pantalla,
significaque se produjo un carte de corriente.
Reinicieel reloj.
Siel tiempo restante no se encuentra en la
pantalla (retraso del comienzo del reloj o
tiempo de cocci6n aparecen en la pantalla),
recuerde el tiempo restante presionando
la tecla KitchenTimer On/Off (Encendido/
Apagado del Temporizador de Cocina)y luego
presionando las teclas num6ricas para ingresar
el nuevo tiempo que desee.
Presionela tecla Clock (Reloj)una vez para
reiniciar.Ingrese la hora del dia correcta
presionando las teclas num@icas apropiadas.
Presionela tecla Start (Inicio). 15
Page 80

Usa de losfunciones de horneado
y dorado par tiempo.Inomosuperio nicome t l
Si su modelo cuenta con una traba pan puerto, no 81oquee la puerto con la traba dumnte la cocci6n con temporizador.
Lo troba se usa pan la funci6n de auto limpieza Onicomente.
NOTA: Los comidos que se echon o perder rdpidomente, tales coma leche, huevos, pescodo, rellenos, avey cerdo, no se
deberdn dejor reposor par mds de 1 horo antes y despu#s de Io cocci6n. Lo temperaturo ombiente estimula el desarrollo
de 8octerios nocivos. Asegdrese de que Io luz del homo estd opagodo, yo qua el color de Io Idmpom ocelemrd el
crecimiento de bocterios nocivos.
C6mo Configurar un Inicio Inmediato y Detenci6n Autom6tica
_i__i:il_IIIII_I_ii_i_!__ !_!_ii_i_i_iiiI _
Oi
D D
E] I-qEE[-q
/b q CLEARli i
Elhomosuperiorseencender6deforma
inmediatayse cocinar6par unperfododetiempo
seleccionado.AIfinaldeltiempodecocci6n,el homo
seapagar6autom6ticamente.
PresionelateclaBake(Homead.
r71
Presionelosteclasnum@icasparaprogramar
r_ latemperaturadeseadadelhomo.
[] PresionelateclaCookingTimeffiempode
Cocci6n).
NOTA:Sisurecetarequiemcalentarenformaprevia,
esposiblequanecesitetiempoadicionalsabreel
tiempodecoccidn.
Presionelosteclasnum@icasparaconfigurar
[_ elperbdodetiempodecocci6ndeseado.El
tiempomfnimodecocci6nquepuede
configurares1 minuto.
Latemperaturadelhomoqueconfigurey el
tiempodecocci6nqueingres6aparecer6nen
la pantalla.
[] PresionelateclaStart(Iniciar).
Elhornoaparecer6enON(Encendido),y lapantalla
mostrar6lacuentaregresivadeltiempoyelcambio
detemperaturaapartirdelos100oF.(Lapantallade
temperaturacomenzar6elcambiounavezquela
temperaturadelhomoalcancelos100oF).Cuando
elhomoalcancelatemperaturaqueprogram6,
sonar6nSpitidos.
Elhomocontinuar6lacocci6ndurantelacantidad
detiempoprogramada,luegoseapagar6
autom6ticamente,a menosquelafunci6n
CookandHold(MantenerlaCocci6n)hayasido
programada.LeolosfuncionesEspeciolesde la
secci6ndecontroldelhomo.
Luegodequeelhomoseapague,sonar@eltonode
findelciclo.
PresionelateclaCleariOff(Borrar/,4pagar)
@
paraapagarla pantallasiesnecesario.Retire
lacomidadelhomo.Recuerdequeaunqueel
homoseapaguedeformaautom@tica,la
comidaquepermanezcadentrode6ste
continuar@cocin@ndosecuandoelhomo est6
apagado.
rqrqrq
N ,N oNEEEE
r-qrqrq
%N%D%
16
C_r_ L_.our
C6mo Configurar un Inicio Retrasado y Detenci6n Autom6tica
Elhomosuperiorseencender@enelhorario
deldfaqueconfigure,cocinar@duranteun
periododetiempoespecificoy luegoseapagar@
autom@ticamente.
AsegOresequeelrelojmarquelahoracorrectadeldia.
[7J PresionelateclaBake(Homead.
Presionelosteclasnum6ricasparaprogramar
[] latemperaturadeseadadelhomo.
PresionelateclaCookingTimeffiempode
@
Cocci6n).
NOTA:Sisurecetamquierecalentarenformaprevia,
esposiblequanecesitetiempoadicionalsabreel
tiempodecocci6n.
Presionelosteclasnum@icasparaconfigurar
[] elperbdodetiempodecocci6ndeseado.El
tiempomfnimodecocci6nquepuede
configurares1 minuto.
Latemperaturadelhomoqueconfigurey el
tiempodecocci6nqueingres6aparecer@nen
la pantalla.
PresionelateclaDelayStart(RetrasarInicio).
@
Presionelosteclasnum6ricasparaconfigurar
lahoradeldiaenquedeseaqueel homose
encienday comiencea cocinar.
PresionelateclaStart flniciad.
NOTA:Untono deatenci6nsonardsiestdusandoel
horneadopartiempoy nosedebetocarlateclaStart
(Inicio).
NOTA:Sideseacontrolarloshorariosconfigurados,
presionelateclaDelayStart (InicioRetrasado)para
eontrolarlahorade inicioque configur@o presionela
teda CookingTimeffiempo deCocci6n)paracontrolar
elperiodode tiempode cocci@queprogram@.
Cuando el homo est6 en ON (Encendidol a
la hora del dfaque configur6, en la pantalla
aparecerd la cuenta regresivade la cocci6n y
el cambio de temperatura a partir de los:].O0°F.
(Lapantalla detemperatura comenzarOa
cambiar una vez que la temperatura del homo
alcance los ZOO° F).Cuandoel homo alcance
la temperatura que program6, sonaran ratios
pitidos.
Elhomocontinuar@la cocci6ndurante la cantidad
detiempo programada,hego seapagar@
autom@ticamente,a menosquela funci6n
Cookand Hold(t4antenerla Cocci6nlhayasiclo
programada.LealosfuncionesEspecialesde la
secci6ndecontrol delhomo.
Luegode queel horno seapague,sonar@eltono
defin delciclo.
PresionelateclaClear/OfffBorrariApagadpara
%
apagarlapantallasiesnecesario.Retirela
comidadelhomo.Recuerdequeaunqueelhomo
seapaguedeformaautom@tica,lacomidaque
permanezcadentrodeestecontinuar@
cocin@ndosecuandoelhomoesteapagado.
Page 81

U$o de _a sonda. (enalgunosmodelos) 6EAppliances.com
ilAPRECAUClON Jj Para evitar quemaduras, no desenchufe la sonda desde el enchufe del homo hasta que
este (lltimo se haya enfriado. No guarde la sonda dentro del homo.
Si su modelo cuenta con una traba para puerta, no bloquee la pue_a con la traba durante lacocci6n con la sonda. La
traba se usa para la funci6n de auto limpieza Qnicamente.
Para muchas comidas, especialmente comidas tostadas y ave, la temperatura intema de la comida es la mejor prueba
de que est6 hecha. Lasonda de temperatura elimina las conjeturas con relaci6n a la cocci6n de las comidas, e indica
con exactitud la preparaci6n que usted desea.
Siseusa una sonda que no sea la provista con
n
o t_-_.._"
Lo sonda de temperatura cuenta
con una sonda tipo brocheta en
un extremo y un enchufe en el
otro extremo que se conecto en el
enchufe del homo.
este producto, se podr6n producir dahos sobre
III
_sta.
Itl
Use lasmanijas de la sonda para enchufarla al
insertar y retirar las mismas de lacomida y del
enchufe.
Paraevitar daflos sobre la sonda,no use
agarraderas para empujar el cableal retirarlo
Para evitar romper la sonda, asegOrese de
que la comida haya sido completamente
descongelada antes de insertarla.
Paraevitarposiblesquemaduras,no
desenchufelasondadel enchufedelhomo
hastaque este@imosehayaenfriado.
Nunca deje la sonda dentro del homo
durante un ciclo de auto limpieza.
Noguarde la sonda dentro del homo.
rqrqm LD
rqrq
Luego de preparar la came y de colocar la
misma en el salvamanteles o en una rejilla de
olla para asar, siga estas instruccionespara
ubicar la sonda de forma correcta.
Inserte la sonda completamente en la carne.
No deber[a tocar el hueso,la grasa ni el
cartilago.
Para dorar sin huesos,inserte la sonda en la
parte m6s carnosa del dorado. Paracocinar
jam6n o cordero con hueso,inserte la sonda en
el centro del m0sculo o articulaci6n m6s baja y
larga.
Inserte la sonda en el centro de platos tales
como pastel de came o cazuelas.
Inserte la sonda en la parte m6s carnosa del
muslo interno desde abajo y paralelo a lapata
de un pavo entero.
C6mo Configurar el Horno Superior para Cocinar Cuando se usa la Sonda
[] Insertela sonda en la comida.
[] Enchufela sonda en el enchufe del homo.
Aseg0resede que est6 completamente
enchufado. Cierre la puerta del horno.
[] Presionela tecla Probe (SondaL
[] Presionelas teclas num@icas para
configurar la comida interna deseada o la
temperatura de la came entre 1000Fy
2000 F.
[] Presionela tecla Bake (Horneafl.
r_ Presione las teclas num@icas para
programar la temperatura deseada del
homo.
r_ Presione la tecla Start (Iniciafl.
La pantalla dar6 un aviso si la sonda es
enchufada en el enchufe de entrada y no se
configur6 latemperatura ni se toc6 la tecla
Start (Inicio).
La pantalla mostrar6 LO (Bajo)hasta que la
temperatura interna de la comida Ileguea
los 1000F;luego se mostrar6 el cambio de la
temperatura interna.
r-_ cuando la temperatura interna de la
comida Ilegueal n0mero que configur6, la
sonda y el homo se apagar6n y el control
del homo da una sepal. Paradetener la
sehal, presionela tecla Clear/Off(Borrar/
Apagafl. Use un guante de cocina para
retirar la sonda de la comida. No use
agarraderas para empujarla; podrian
dahar la sonda.
Para cambiar la temperatura del homo durante
la cocci6n con sonda, presione latecla Bake
(HarnearJy luego las teclas num6ricas para
configurar la nueva temperatura.
Si la sonda es retirada de lacomida antes de
que Ileguea la temperatura final, sonar6 un
tono y la pantalla titilar6 hasta que la sonda
sea retirada del horno.
Puede usar el Temporizador, aunque no
puede usar operaciones del homo por 17
tiempo al usar la sonda.
Page 82

Usa del homo par convecci6n canoUunosmode/as)
Si su modelo cuento con una traba para puerto, no bloquee Io puerto con Io tmbo durante Io cocci6n par convecci6n. Lo
troba se usa pore Io funci6n de auto limpieza Onicamente.
El ventilodor par convecci6n se opoga cuondo Io puerto del homo se obre. NO deje Io puerto obierto duronte perfodos
prolongodos de tiempo mientras usa Io cocci6n par convecci6n.
Enun homo par convecci6n, un
ventilador hace circular aire sabre,
debajo y alrededor de la comida.
Este aire caliente que circula
se distribuye de forma pareja a
trav6s de la cavidad del homo.
Como resultado, las comidas son
cocinadas y doradas de forma
pareja; con frecuencia en menos
tiempo que con el calor regular.
CONVECTION 1
BAKE_
E] E] FqE] D
COnTrOLL_CXO_
START ]
CLEAR]
Paraayudarle a entender la diferencia entre
el horneado y el tostado por convecci6n y el
horneado y tostado tradicional, aqui figuran
algunas pautas generales.
Horneado par Convecci6n
precaliente el homo. Lea la secci6n Usa del
Precalentamiento del Homo y Ubicaci6n de
la Olla.
Idealpara comidas cocinadas en estantes
m01tiples.
Bueno para grandes cantidades de comidas
horneadas.
Buenosresultadoscongalletas,galletitas,
bizcochosde chocolatey nuez,bocaditosde
crema,arrolladosdulces,pastelde 6ngely pan.
Elventilador por convecci6n hace circular el
aire caliente de forma pareja sobrey alrededor
de la comida.
Conversi6n de Auto Recipe TM
Puede usar sus recetas favoritas en el homo
por convecci6n.
AIusar CONVECTIONBAKE(Horneado por
Convecci6n), el homo convertir6 de forma
autom@ticalatemperatura del homo del
horneado regular alas temperaturas de
Horneado por Convecci6n.
I-f1 Utilizando lasteclas num@ricas,ingrese la
temperatura recomendada en la receta.
r_ Presionela tecla Start (Iniciafl.
La pantalla mostrar6 la temperatura real
convertida (reducida). Por ejemplo: si se
ingresa la temperatura regular de una
receta de 3500 F(1770C)y se presiona la
tecla Start (Iniciar),la pantalla mostrar6
CONy la temperatura convertida de
3250 F(1630C).
NOTA: Estafunci6n s61oconvierte
lastemperaturas de cocci6n, y no
lostiempos de cocci6n. AIasar par
convecci6n, la temperatura del homo no
se convertir6 en forma autom6tica.
[] Presione latecla Clear/Off(Borrari
Apagafi cuando la cocci6n est6
completa.
Tostado par Convecci6n
Buena para cortes de came descubiertos
que sean grandes y tiernos.
Elventilador par convecci6n hace circular el
aire caliente de farina pareja sabre y alrededor
de la comida. La came y el ave son dorados
en todos sus lados, coma sihubiesen sido
cocinados en una rotiserfa. Elaire caliente
circula sabre, debajo, y alrededor de la comida
que se est6 dorando.
Coloque el estante en la posici6n de estante (A).
Useel tamaho de olla recomendado en la
receta.
Algunas instrucciones del paquete para
cazuelas congeladas, platos principales o
productos horneados fueron desarrolladas
utilizando hornos por convecci6n
comerciales. Para mejores resultados con
este homo, precaliente el mismo y use la
temperatura, para un horneado regular,
que figura en el paquete.
Para desactivar la funci6n:
Presione las teclas Warm (Calentafl y
%
Bake (Horneado) al mismo tiempo hasta
que la pantalla muestre SF.
Presione la tecla Convection Bake
(Horneur par Convecci6n). La pantalla
mostrar6 Con ON (Convecci6n
Encendidal. Presione la tecla Convection
Bake (Hornear par Convecci6n)
nuevamente. La pantalla mostrar6 Con
Off (Convecci6n Apagadal.
Presionela tecla Start (Iniciafl.
@
18
Page 83

GEAppliances.com
Utensilios de Cocina para Cocci6n por
Antes de usar el homo par convecci6n, controle
que su utensilio de cocina deje espacio paru
la circulaci6n de aire en el horno. Sihornearc_
con varius alias, deje espacio entre las mismas.
Ademc_s,aseg@resede que lasalias no se
toquen entre s[y que no toquen las paredes del
horno.
Pape! y Pl6stico
Elpapel resistente al calory losenvases de
plc_sticoque se recomiendan para usacon
hornos regulates se pueden usar en hornos par
convecci6n. Los utensiliosde cocina de plc_stico
resistentesa temperaturas de/4000 Ftambi6n
sepueden usar, cuando el homo se encuentre
par debajo de los4000 F.
Convecci6n
Metal y Vidrio
Cualquier tipo de utensilio de cocina funcionard
en su homo par convecci6n. Sinembargo,
lasalias metc_licascalientan mc%srhpido y se
recomiendan para el horneado par convecci6n.
Lasalias oscurecidas o con acabado tipo
mate hornearc_nmc_src_pidoque las alias
brillantes.
Lasalias de vidrio o cerc_micacocinan con
mayor lentitud.
AIcocinar galletas, obtendr@mejores
resultadossi usa una hoja plana para galletas
en lugar de una alia con lados bajos.
Para recetastales coma polio al homo, use una
alia con lados bajos. Elaire no puede circular
bien alrededor de la comida en una alia con
ladosaltos.
C6mo Configurar el Horno Superior para Horneado o Dorado par
Convecci6n
E]mE]U D
E_ Presione la tecla Convection Bake
(Hornear par Convecci6n) o Convection
Roast (Darer par Convecci6n).
[] Presionelas teclas num@icas para
programar la temperatura deseada del
horno.
E_ Presionela tecla Start gniciafl.
Paracambiar la temperatura del homo,
presione la tecla Convection Bake (Horneado
par Convecci6nJ o la tecla Convection
Roast (Dorado par Convecci6nl y luego las
teclas num@icas para configurar la nueva
temperatura.
Cuando el homo seempiece a calentar,
seexhibir@el cambio de temperatura, que
comenzarc_en los100°F.Cuandoel homo
alcance latemperatura que program6, sonarc_n
3 pitidos.
[] Presionela tecla Clear/ Off (Borrar/
Apagad cuando la cocci6n est6 completa.
NOTA:Escuchardun ventilador al cocinar par
convecci6n.Elmismo sedetendrd cuando
seabra la puerta, pero el calentador nose
apagard.
Elventilador no comenzardhasta que se Ilegue
a la temperature de precalentamiento.
NOTA:AIhomear par convecci6n,la
temperature del homo serdde 25° F(14° C),
inferior a la tempemtura configurada. Pare
mds informaci6n, lea Auto RecipeConversion
(Conversi6nAutomdtica de Recetas).AIasar
par convecci6n,la temperature delhomo no se
convertird en forma automdtica.
19
Page 84

Usa del horno par convecci6n, cono/gunosmode/osl
Si su modelo cuenta con una traba para puerto, no bloquee la puerto con la traba durante la cocci6n par convecci6n. Lo
traba se usa para la funci6n de auto limpieza 5nicamente.
C6mo Configurar el Horno Superior para Tostar par Convecci6n Cuando se
Usa la Sonda. (on algunos modelos)
Para obtener mejores resultados al
tostar paros grandes y tostados,
recomendamos el usa de la
sonda induida en el homo par
convecci6n.
D D rnDo,,D
CLEAR
OFF ]
Lapantalla har6 que titile la palabra PROBE
(5ondoJy elcontrol delhomo dar6 la se5alsila
sonda es enchufada en el enchufe de entrada y
no se configur6 latemperatura de lasonda y se
toc6 la tecla Start (Inicio).
Coloqueel estante en la posici6n de
E]
estante (A).Insertela sonda
completamente en la comida.
r2q
Enchufe la sonda en el enchufe del homo.
Aseg0resede que est6 completamente
enchufada. Cierre la puerta del homo.
Presionela tecla Convection Roost
(Tostodopor Convecci6nl,
Presionelas teclas num@icas para
programar la temperatura deseada del
horno.
Presionela tecla Probe (SondoJ.
Presionelas teclas num@icas para
programar la temperatura interna
deseada de la comida.
Paracambiar la temperatura del horno
durante el ciclo de Tostado par Convecci6n,
presione la tecla Convection Roost (Tostodo
por Convecci6n) y luego presione las
teclas num@icas para configurar la nueva
temperatura deseada.
[Z] PresionelateclaStart (lniciorl.
Cuando el homo comience a calentar, la
palabra LO (Bajo)aparecer6 en la pantalla.
Luego de que la temperatura interna de la
comida alcance los 1000F,los cambios de la
temperatura interna aparecer6n en la pantalla.
Cuando la temperatura interna de la
r?l
comida Ilegueal nOmero que configur6, la
sonday el homo se apagar6n y el control
del homo da una se_al. Paradetener la
se_al,presione la tecla Clear/Off_Borror/
Apogud. Useguantes de cocina para
retirar la sonda de la comida. No use
agarraderas para empujarla; podrian
da_ar la sonda.
[ PRECAUCI6N JPoroev tor
quemaduras, no desenchufe la sonda desde
el enchufe del homo hasta que este Oltimo
se haya enfriado. No guarde la sonda dentro
del homo.
NOTA:
iiiiiiiiiiii_iii
Sila sonda es retirada de la comida antes de
que Ileguea la temperatura final, sonar6 un
tono y la pantalla titilar6 hasta que la sonda
sea retirada del homo.
iiiiiiiiiiii_iii
Escuchar@un ventilador al cocinar con esta
funci6n. Elmismo se detendrc_cuando se
abra la puerta, pero elcalentador no se
apagar@.
iiiiiiiiiiii_iii
Puede usarel temporizador, aunque no
puede usar operaciones del homo par
tiempo al usar la sonda.
Notodas las partes de la came secocinan al
mismo tiempo. Intente colocar la sonda en la
parte de cocci6n mc_slento delproducto que
se cocinard Controle la temperatura y otras
ubicaciones con eltermostato para carne una
vez que la cocci6n se detuvo,para asegurar
que sehayan alcanzado temperaturas seguras
en todas laspartes de la came.
2O
Page 85

Guia de Tostado por Convecci6n - Configuraciones Sugeridas
GEAppliances.com
Comes
Temper-
atura del
Horno
Temper-
atura
Config-
urada de
la Sonda
Bile
Asado de Costilla (4 a 8
Ibs.)
Jugoso
T@mino
325°F
325°F
135-140°F
145-150°F
medio
Bife de Lomo (2 a 6 Ibs.) Jugoso 425°F 135-140°F
Cerdo Deshuesada y Con Huesos 325°F 160°F
(3 a 5 Ibs.)
Cordero Con Huesos (5 a 9 Ibs.) T#rmino 525°F 150°F
medio
Deshuesada (4 a 7 Ibs.) T@mino 375°F 165°F
medio
Ave Polio Entero (5 o 7 Ibs.) 350°F 170°F
Pavo, Entero*
Sin Relleno (10 o 24 Ibs.) 325°F 170-180°F
Pechuga de Pavo (4 a 6 325°F 170°F
Ibs.)
*Lasavesrellenas genemlmente requieren fiempo adicional de dorado. Cobralas patas ypechuga con papel de aluminio
para evitar dorados excesivosy que lapiel seseque. Controle latemperatura del relleno con un term6metro para asegurar
que haya alcanzado una temperatura mfnima de160°E
21
Page 86

Usodelasfuncionesdehomeadoporconveca'6npottiempo,tenoUunosmode_os;
Escuchardun ventilador al cocinar con esta funcidn.E!mismo sedetendrd cuando seabra lapuerta,peroe!calentador no seapagard.
NOTA: Las comidas que se echan a pettier rdpidamente, tales coma leche, huevos, pescado, rellenos, ave y cerdo, no se
deberdn dejar reposar par rods de 1 hora antes y despu4s de la cocci6n. La temperatura ambiente estimula el desarrollo
de bacterias nocivas. Asegdrese de que la luz de/homo estd apagada, ya que el calor de la Idmpara acelerar6 el
crecimiento de bacterias nocivas.
C6mo Configurar un Inicio Inmediato y Detenci6n Autom6tica
i:EElEl !71El El i
ii_i_iiii_i_iiIi_ !__ ii!iI
! ¸¸¸El/3]
Elhomosuperiorseencender6deforma
inmediataysecocinar6porun per[odo detiempo
seleccionado.AIfinaldeltiempode cocci6n,elhomo
seapagar6autom6ticamente.
[Z] PresionelateclaConvectionBake(Hornear
por Convecci6n).
Presionelasteclasnum6ricasparaprogramar
[] latemperaturadeseadadelhomo.
[] PresionelateclaCookingTimeffiempo de
Cocci6n).
NOTA:Sisurecetarequiemcalentarenformaprevia,
esposiblequenecesitetiempoadicionalsobreel
tiempodecoccidn.
Presionelasteclasnum6ricasparaconfigurar
[] el perfododetiempodecocci6ndeseado.El
tiempominimodecocci6nquepuede
configurares1 minuto.
Latemperaturadelhomoqueconfigurey el
tiempodecocci6nqueingres6aparecer6nen
la pantalla..
r_ PresionelateclaStartflniciarL
Elhornoestar6 en la posici6nON(Encendido)y
en la pantallaaparecer6 el conteode la cocci6n
y el cambio de temperatura a partirdelos
100°F.(Lapantalladetemperatura comenzar6a
cambiar unavez quela temperatura del homo
alcancelos 100° F).Cuandoel homo alcancela
temperaturaque program6,sonar6n Spitidos.
Elhomocontinuardlacocci6ndurantelacantidad
detiempoprogramada,luegoseapagar6
autom6ticamente,a menosquelafunci6n
Cookand Hold(iVlantenerlaCocci6n)hayasido
programada.LealasfuncionesEspecialesde la
secci6nde controldel homo.
Luegodequeelhomoseapague,sonar6eltonode
findelciclo.
r_ PresionelateclaClear/Off(Borrar/Apagar)
paraapagarla pantallasiesnecesario.Retire
lacomidadelhomo.Recuerdequeaunqueel
homoseapaguedeformaautom6tica,la
comidaquepermanezcadentrode@ste
continuar6cocin6ndosecuandoelhomoest@
apagado.
mrqm L
rqrq
rqr-qULD
J DELAYI
I3]El ITID is-I
I CLEARI
22
Co_L L_KOU_
C6mo Configurar un Inicio Retrasado y Detenci6n Autom6tica
Elhornosuperiorseencender6enelhorario
delda queconfigure,cocinar6duranteun
periododetiempoespecificoy luegoseapagar6
autom6ticamente.
Aseg0resequeel relojmarquela horacorrectadel
dfa.
F71 PresionelateclaConvectionBake(Homear
por Convecci6n).
Presionelasteclasnum_ricasparaprogramar
r_ latemperaturadeseadadelhomo.
PresionelateclaCookingTimeffiempo de
Cocci6n).
NOTA:Sisurecetarequiemcalentarenformaprevia,
esposiblequenecesitetiempoadicionalsobreel
tiempodecoccidn.
Presionelasteclasnum@ricasparaconfigurar
el perfododetiempodecocci6ndeseado.El
tiempominimodecocci6nquepuede
configurares1 minuto.
Latemperaturadelhomoqueconfigurey el
tiempodecocci6nqueingres6aparecer6nen
la pantalla.
PresionelateclaDelayStart (RetrasarInicio).
@
Presionelasteclasnum6ricasparaconfigurar
@
lahoradeldiaen quedeseaqueelhomo se
encienday comiencea cocinar.
PresionelateclaStart(Iniciar).
Fz-1
NOTA:Si@seacontrolarloshorariosconfigurados,
presionelateclaDelayStart (InicioRetrasado)
parecontrolarlahoradeinicioqueconfigurdo
presionelateclaCookingTimeffiempodeCocci6n)
paracontrolarelperfododetiempodecoccidnque
program&
Cuandoel homoest@enON(Encendido)a lahora
deldfaqueconfigur6,en lapantallaaparecer6
lacuentaregresivadelacocci6nyelcambiode
temperaturaapartir delos100°F.(Lapantallade
temperaturacomenzar6a cambiarunavezquela
temperaturadelhomo alcancelos100°F).Cuando
elhomoalcancelatemperaturaqueprogram6,
sonar6n3pitidos.
Elhomocontinuar6lacocci6ndurantela cantidad
detiempoprogramada,luegoseapagar6
autom6ticamente,a menosquelafunci6n
Cookand Hold(HantenerlaCocci6n)hayasido
programada.LealasfuncionesEspecialesdela
secci6nde controldel homo.
Luegodequeelhomoseapague,sonar6eltonode
fin delciclo.
PresionelateclaClear/Off(Borrar/Apagar)
paraapagarlapantallasiesnecesario.Retire
lacomidadelhomo.Recuerdequeaunqueel
homoseapaguedeformaautom6tica,la
comidaquepermanezcadentrode@ste
continuar6cocin6ndosecuandoelhomoest@
apagado.
Page 87

iiiiiiiiiiiii i!iii iiIIiiii
!i i il !i!i!!!iiiiiiiilli
C6mo Programar el Horno para Calentar
Lafunci6n WARM(Calentar)mantiene
calientes las comidas cocinadas. Estafunci6n
no fue dise5ada para volver a calentar comida
fria.
Para usar lafunci6n WARM (Calentar),presione
la tecla WARM(Calentar)y luego la tecla START
(Iniciar).
Para usar lafunci6n WARM (Calentar)luego
del Tiempode Homeado o Dorado,siga los
siguientespasos:
Presione el modo de cocci6n que desee
%
usar (HORNEADO, HORNEADO POR
CONVECCION o DORADO POR
CONVECCION).
[] Presionelasteclas num@icaspara
configurar la temperatura del horno.
[] Presionela tecla COOKINGTIME
(Temporizadorde Cocci6n).
r-_ Presionelasteclas num@icaspara
configurar el periodo de tiempo de
cocci6n deseado.
r_ Presionelatecla WARM(Calentar).
[] Presionela tecla START(Iniciar).
Para que los Productos Duros queden
Crocantes
• Coloquecomida en platos o cacerolas enla
parte inferior.
• Paraobtener mejores resultados, coloque
lascomidas en una sola capa. No las
amontone.
D6jelosdescubiertos.
Controle siest6 crocante luego de entre 20
y 30 minutos. Agregue tiempo segL_nsea
necesario.
GEAppliances.com
NOTAS IMPORTANTES:
• Lacomida sedeberia mantener caliente en
suenvase de cocci6n o sertransferida a un
plato con protecci6n t@mica paraservir.
• Paracomidas hL_medas,cubra lasmismas
con una tapa segura para el homo o papel
de aluminio.
• No es necesario cubrir las comidas fritas
o crocantes, pero es posibleque se
sequendemasiado si secalientan durante
demasiado tiempo.
• Laapertura repetida del caj6n hace queel
aire caliente salgay que la comida seenfrie.
• Dejetranscurrir untiempo adicional para
que latemperatura interior del homo se
estabilice luego de agregar productos.
• Congrandes cantidades esposibleque sea
necesario cubrir algunas de lascomidas
cocinadas.
• Retirelascucharas para servir,etc.,antes de
colocar recipientesen el homo.
• No userecipientes,tapas nienvoltorios de
pl6stico.
Nota: Losrecipientes o tapas de pl6stico o
envoltorios pl6sticos se derretir6n si selos
coloca dentro del homo. Esposibleque no
pueda quitar el pl6stico derretido y esto no
est6 cubierto por la garantia.
23
Page 88

Funcionesespecialesenelcontroldel homo superior.
Su nuevo control de teclas tdctiles cuenta con funciones adicionales que puede elegir usar. Los siguientes son los
funciones y c6mo los puede activar.
Los modos de funciones especiales s61opueden set activados mientras que la pantalla estd mostrando la hora de/dia.
Permanecen en la memoria del control hasta que se repiten los pasos.
Cuando la panta!la muestm su elecci6n, presione la tecla Start (Iniciar).Los funciones especiales permanecerdn en la
memoria luego de un corte de corriente.
Corte de12 Horas
HI/Lo
[ O LAVSTART
START
l JCOOKING l
LUROmJ + TiME
/-/!/to
Con esta funci6n, en caso de olvidarse y dejar
el homo prendido,elcontrol apagar@deforma
autom@ticaelhomo luegode 12 horasdurante
losfunciones de horneado y luegode 3 horas
durante lafunci6n asar.
Sideseadesactivar esta funci6n, siga los
siguientespasos.
E_ PresionelosteclasBake and Broil Hi/Lo
(Hornear y Asar en Alto/Bajo) al mismo
tiempo durante 3 segundos, hasta que la
pantalla muestre SF.
Selecci6n de Temperatura Fahrenheit o Celsius
Elcontrol de su homo est@configurado para
usar seleccionesde temperatura Fahrenheit,
pero puede cambiar este usoa seleccionesen
Celsius.
E_ PresionelosteclasBake and Broil Hi/Lo
(Horneor y Asor en Alto/Bojo) al mismo
tiempo durante 3 segundos, hasta que la
pantalla muestre SF.
[] Presione latecla Delay Start (Retrasar
Inicio).La pantalla mostrar6 12shdn
(apagado luego de 12 horas).Presionela
tecla Delay Start (Inicio Retrasado)
nuevamente y la pantalla mostrar6 no
shdn (sinapagado).
[] Touch the Start pad to activate the no
shut-off and leavethe control set in this
special features mode.
[-21 Presione los teclas Broil Hi/Lo (Asar en
Alto/Bajo) Y Cooking Time (Tiempo de
Cocci6n) al mismo tiempo. Lapantalla
mostrarc_ F(Fahrenheit).
Presionelos teclas Broil Hi/Lo (Asar en
@
Alto/Bajo) y Cooking Time (Tiempo de
Cocci6n)nuevamente al mismo tiempo.
La pantalla mostrarc_C(Celsius).
24
[
H,/Lo _
COOK
[
Tonos al Final de un Ciclo par Tiempo
AIfinalizar un ciclo por tiempo sonarc_n3
pitidos cortos, seguidos de un pitido coda 6
segundos hasta que se presione latecla Clear/
Off(BorrariApagad. Estepitido continuo cada
6 segundos puede sercancelado.
Para cancelar el pitido coda 6 segundos:
[] Presione losteclasBake and Broil Hi/Lo
(Hornear y Asar en Alto/Bajo) al mismo
tiempo durante :3segundos,hasta que la
pantalla muestre SF. r_
Volumen del Tono len algunos modelos)
Esta funci6n le permite ajustar los volOmenes
del tono en un volumen mds aceptable. Hay tres
niveles de volumen posibles.
r71 Presione los teclas Broil Hi/Lo (Asar Alto/
Bojo)y Bake (Horneurl al mismo tiempo
hasta que la pantalla muestre SF.
Presione latecla Cook Time iTiempo de
Cocci6n). En la pantalla aparece 2 Beep (2
Pitidos). Este es el nivel de volumen
intermedio.
r_ Presione latecla Start flniciafl.
Presionelatecla Kitchen Timer On/Off
(Encendido/ Apagado del Temporizador
de Cocinal. Lapantalla muestra CON
BEEP(Pitido Continual y BEEP(Pitidol.
Presionelatecla Kitchen Timer On/Off
(Encendido/ Apagado del Temporizador
de Cocina/nuevamente. Enla pantalla
aparece BEEP(Pitidol.(Estocancela un
pitido coda 6 segundos.)
Presionelatecla Start (Iniciad.
Presione nuevamente la tecla Cook Time
tremporizador de Cocci6n). La pantalla
mostrar6 3 Beep (1Pitido). Este es el nivel
de volumen m6s alto.
Presione nuevamente la tecla Cook Time
iTemporizador de Cocci6n). La pantalla
mostrar6 1 Beep (1 Pitido;. Este es el nivel
de volumen m6s bajo.
[_] Elijael nivel de sonido deseado (1 pitido, 2
pitidos, 3 pitidos).
[] Presione latecla Start (Iniciad.
Page 89

Funcionesespecialesenelcontroldel homo superior. GEApUiancoscom
Bloqueo de Control del Gas (en algunos modelos)
GAslCoNTROL
Loc,ou
CONTROL LOCKOUT
Sucontrol le permitir6 bloquearlosquemadores
superficioles,quemadoresde homo y elpanel de
control de modoque no puedanset activados.
Para bloquear/ desbloquear los controles:
[Z] Cierretodos los quemadores
superficiales.
Hantenga presionadala tecla Gas/Control
[]
Lockout (Controlde Bloqueo del Gas)
durante3 segundos,hasta que la pantalla
muestreLOCON(BIoqueoActivado).
Paradesbloquearel control, mantenga
@
Bloqueo del Control (en algunos modelos)
Sucontrol le permitir6 bloquear lasteclas de
control, de modo que no se puedan activar al
tocar o limpiar el panel de vidrio.
Para bloquear el control:
[Z] Presionelasteclast6ctiles 9y Oal mismo
tiempo durante 3 segundos, hasta que el
control emita 2 pitidos.La pantalla
mostrar6 LOC(Bloqueado)
continuamente y la hora del dia si no est6
apagada.
presionada latecla Gas/Control Lockout
(Control de Bloqueo del Gag durante 3
segundos,hasta que la pantalla muestre
LOCOFF(BloqueoDesactivado).
Cuandoestafunci6nest6activaday lasteclas
t6ctilesseanpresionadas,elcontroldar6un pitido
y la pantallamostrar6LOCON(BloqueoActivado).
Elmodo de bloqueo de control afecta todos
loscontroles. Ning6n control funcionar6
cuando esta funci6n est6 activada.
Losajustes seguardar6n en la memoria
luego de un corte de corriente.
NOTA:Todaslos funcionesde cocci6ny
temporizador serdn canceladasal bloquear el
control.
Para desbloquear el control, presione
los teclas t6ctiles 9 y 0 al mismo tiempo
durante 3 segundos, hasta que el
control emita 2 pitidos, y LOC(bloqueafl
ser6 eliminado de la pantalla.
NOTA:Algunos modelos cuentan con la
tecla Control Lockout(Bloqueodel Control).
Mantenga presionada la misma pot 3
segundospare bloquear/ desbloquear.
illSTART
/i; JSTARTIiii
.12Horas, 24 Horas o Apagado
Sucontrol est6 configurado para serusado en
un reloj de 12 horas.
Siprefiereutilizar un reloj con horatio militar de
24 horaso apagar la pantalla del reloj,siga los
siguientespasos.
F7] Presionelasteclas Bake and Broil Hi/Lo
(Hornear y Asar en Alto/Bajo) al mismo
tiempo durante 3 segundos, hasta que la
pantalla muestre SF.
Presionelatecla Clock (Reloj)una vez. La
pantalla mostrar6/2 hr (12horas). Si6sta
esla opci6n que desea, presionela tecla
Start (Iniciar).
Cocinar y Esperar
Elnuevo control cuenta con la funci6n de
cocinar y esperar, que mantiene calientes las
comidas cocinadas por hasta 3 horas una vez
que la funci6n cocinar finaliz6.
Estafunci6n s61opuedeser usada cuando se
usela cocci6n por tiempo.
Para activar esta funci6n, siga los siguientes
pasos.
I-_ Presionelasteclas Bakeand Broil Hi/Lo
(Hornear y Asar en Alto/Bajo) al mismo
tiempo durante 3 segundos, hasta que la
pantalla muestre SF.
Presionelatecla Clock (Reloj)nuevamente
para cambiar al horario militar de 24 horas.
La pantalla mostrar6 24 hr (24horas).Si6sta
esla opci6n que desea, presionela tecla Start
(Iniciar).
Presionelatecla Clock (Reloj)para apagar la
pantalla del reloj. La pantalla mostrar6 OFF
(Apagado).Si6sta es la opci6n que desea,
presione latecla Start (Iniciar)..
NOTA:Sielrelojest6enelmodoapagado,no
podr6 usarlafuncidnDelayStart (RetrasarInicio).
Presionela tecla Cooking Time (Tiempo
de Cocci6n). Lapantalla mostrar6 Hid
OFF(Demorar Apagado).
Presionela tecla Cooking Time (Tiempo
de Cocci6n) nuevamente para activar la
funci6n. La pantalla mostrar4 Hid ON
(Oemorar Encendido).
Presionela tecla Start (Inicio) para activar
[] la funci6n decocci6n y demora,y deje la
configuraci6n del control en este modo
de funciones especiales.
25
Page 90

Uso de! Modo Sab6tico.
(Dis@ado para usar en el Descanso Judb y Feriados)
La funci6n Sabbath (Sabdtico) se puede usar para hornear/ asar en el homo superior e inferior o en el caj6n calentador
(en algunos modelos). No se puede usar para la cocci@ pot convecci6n, asar, auto limpieza o Delay CERTIFIED A
Start (Inicio Retrasado). SABBATH.__,K7
NOTA: La luz del homo se enciende de forma automdtica (enalgunos modelos) cuando la puerto MODE
se abre, y se apaga cuando la puerto se cierra. La Idmpara se puede retirar. Lea la secci6n de
Reemplazo de la Luz del Homo. En modelos con interruptor de luz en el panel de control, la luz del iVlODOSABiTICO
homo se puede encender y dejar encendida. CERTIFICADO
C6mo programar un Horneado/Asado Com_n
k i!iii !ii iiiii i i
Cuando la pantalla muestra D -,
elhomoest@configuradoen
Sabbath(Sab@ico).Cuandola
pantallamuestrapc el homo est6
configuradoenhorneado/asado.
HI/Lo
Elrfl
E]ElE] 171i-s]
Cuando la pantalla muestra D el
homo est6 configurado en Sabbath
(Sab6tico).Cuando la pantalla
muestra :zx:z el homo est6
configurado en horneado/asado.
Aseg@reseque el reloj marque la hora correcta
del dfay que el horno est_ apagado.
J-f] Presionelosteclas Bake and Broil Hi/Lo
(Hornear y Asar en Alto/Bajo), al mismo
tiempo, hasta que la pantalla muestre SF.
[] Presionela tecla Delay Start (Retrasar
Inicio) hasta que SAbbATH (Sab6tico)
aparezca en la pantalla.
[] Presionela tecla Start (Inicio)y D
aparecerc_en la pantalla.
[] Presionela tecla Bake (Hornead. Nose
darc_ninguna serial.
[] Utilizandolos teclasnum6ricas, presione la
temperatura deseada entre 1700y 550°.
Nose dara ninguna serialni temperatura.
Presionela tecla Start (Iniciad.
Luego del per[odo de demora al azar de
entre aproximadamente 30 segundos y 1
minuto, x aparecerc_enla pantalla,
indicando que el homo estc_horneando/
asando. Six no aparece enla pantalla,
comience nuevamente en el Pasoa,.
Para ajustar la temperatura del homo, presione
la tecla Bake(Hornear),ingrese la nueva
temperatura usando lasteclas num6ricas y
presionela tecla Start (Inicio).
NOTA: Los teclas Clear/Off (Borrar/ Apagar)
y Cooking Time (Tiempo de Cocci6n) estdn
activas dumnte la funci6n Sabbath (Sabdtico).
C6mo Configurar Horneado/ Asado por Tiempo - Comienzo Inmediato y
Detenci6n Autom6tica
AsegOreseque el reloj marque la hora correcta r_
del day que el homo est6 apagado.
[Z] Presionelosteclas Bakeand Broil Hi/Lo
(Hornear y Asar en Alto/Bajo), al mismo
tiempo, hasta que la pantalla muestre SF.
r_ Presionela tecla Delay Start (Retrasar
Inicio) hasta que SAbbATH(Sab6tico)
aparezca en la pantalla.
[-_ Presionela tecla Start (Iniciad y D
aparecerc_en la pantalla.
[-_ Presionela tecla Cooking Time ffiempo
de Cocci6n).
Presionelas teclas num6ricas para
@
configurar el tiempo de cocci6n deseado
entre 1 minuto y 9 horasy 99 minutos.
Aparecerc_el tiempo de cocci6n que
ingres6.
Presionela tecla Start flniciad.
@
Presionela tecla Bake (Hornead. Nose
D
darc_ninguna serial.
Presionelas teclasnum6ricas e ingresela
temperatura deseada. No sedar6 ninguna
serialni temperatura.
Presionela tecla Start (lniciar).
%
Luegodel per[odode demora al azar de
[]
entreaproximadamente 30 segundosy 1
minuto, x aparecerc_en la pantalla,
indicandoque el homo estc_horneando/
asando.Six no aparece en la pantalla,
comiencenuevamente en el Paso7.
Paraajustar latemperatura del homo, presione
la tecla Bake(Hornead, ingrese lanueva
temperatura usando lasteclas num6ricas y
presionela tecla Start (Inicio).
Cuando la cocci6n haya finalizado, la pantalla
cambiar6 de x a D y aparecerc_0:00,
indicando que el homo estc_en OFF(Apagado)
pero a6n estc_en Sabbath (Sab@ico).Retirela
comida cocinada.
26
Page 91

C6mo Salir el Modo Sab6tico
GEAppliances.com
Fh/ Lo
CLEAR
OFF
START
DELAV J
--START ,
EEl Presionela tecla Clear/ Off (Borrar/
Apagad.
[] Sielhomo est6 cocinando, espere un
per[ado de retraso al azar de
aproximadamente entre 30 segundos y !
minuto, hasta que s61oD aparezca en la
pantalla.
[] Presionelosteclas Bake and Broil Hi/Lo
(Hornear y Asar en Alto/Bajo), al mismo
tiempo, hasta que la pantalla muestre SF.
r4] Presione latecla Delay Start flnicio
Demorado) hasta que 12 shdn (apagar
luego de 12 horas)o no shdn (no apagar)
aparezca en la pantalla. 12shdn (apagar
luego de 12 horas)indica que el homo se
apagar6 autom6ticamente luego de 12
horas. No shdn (no apagar)indica que el
homo no se apagar6 de forma
autom6tica.
[_ Presionelatecla Start (Iniciafl.
NOTA: Si se produjem un carte de luz mientms
el homo se encuentra en Modo Sabdtico, dste
seapagar6 automdticamente y permanecerd
apagado inclusocuando regrese la luz.El
control del homo se debereiniciar.
Ajuste el termostato del homo superior- iH6gulo usted mismo!
Esposible que encuentre que su homo nuevo cocina de forma diferente al que reemplaz6. Usesu homo nuevo durante
algunas semanas para familiarizarse con el mismo. Si aOnpiensa que su homo nuevo estd demasiado caliente o demasiado
fifo, podrd ajustar el termostato usted mismo.
No use term6metros, tales coma los que se venden en los tiendas, para controlar la temperatura del homo. Estos
term6metros pueden variar entre 20 y 40 grados.
NOTA: Este ajuste no afectar6 el asado o los temperaturas de auto limpieza. El ajuste se guardar6 en la memoria luego de
un cartedecorriente.
Para Ajustar el Termostato
[Z] PresionelosteclasBake and Broil Hi/Lo
(Hornear y Asar en Alto/Bajo) al mismo
tiempo durante 3 segundos, hasta que la
pantalla muestre SF.
de 350 F.Presionelas teclas num6ricas a
medida que las lee.Parejemplo, para
cambiar la temperatura del horno en !5 °
F,presione 1y S.

Usadd caj6ncalentadord ctrico . mod o ;
[___'_d RIESGO DE ENVENENAMIENTO CON COMIDA Se pueden desurrollur bucterius
cuundo lu comidu est_ u unu temperuturu inferior u los 140 °.
• Siempre comience con comidu culiente. No use configuruciones en WARN (Culientel puru culendur
comidu friu.
• No culiente comidu durunte ross de 2 horus.
El caj6n calentador mantendrd las comidas calientes y cocinadas en la temperatura para servir. Siempre comience
con comida caliente. No use comida fifo para calendar excepto galletas crujientes, papas fritas o cereales secos. Si
no se siguen estas instrucciones, se podrdn producir enfermedades generadas en la comida.
Para Usar el Caj6n Calentador
SEt WARMINGDRAWER
[] presione la teda Warming Drawer (Caj6n
Calentador). "Warm" (Calentar) y "!" se
encienden en la pantalla 7 "Set"
(Configurar) comienza a titilar.
[] En la tecla num@ica, presione ! para Low
(Bajo),
La pantalla "Z"cambia de acuerdo con la
tecla num@icaseleccionada.
Presionela tecla Start (IniciurJ.
@
"Warm" (Calentar)y el nOmero
permanecen encendidos."Set"(Configurar)
deja de titilar.
Para cancelar, presione la tecla Wurming
Druwer _Cuj6nCulentudorl.
NOTA: Presionar la tecla Cleur/ Off (Barter/
Apugud no apaga el caj6n calentador.
Teda Configumci6n
Num_rica
1 Bajo(tartas)
2 IVledio(Cazuelas)
5 Alto(Cames)
NOTAS:
Elcaj6ncalentadornose puedeusarduranteun
ciclodeautolimpieza.
Elcaj6ncalentadorposeetresconfiguraciones:1,
2y S.Estasconfiguracionesmantienendiferentes
nivelesdetemperaturaenel caj6ncalentador.
Enalgunosmodelos,siseusaelhomoalmismo
tiempoqueelcaj6ncalentador,s61osemostrarOn
lasconfiguracionesdelhomo.
28
Page 93

AI Usar el Caj6n Calentador
GEAppliances.com
Elcaj6n calentador mantendr@lascomidas
calientesy cocinadas en la temperatura para
servir.Siempre comience con comida caliente.
No use comida fria para calendar excepto
galletas crujientes, papas fritas o cereales
secos.
Nocubra el caj6n calentador o la olla con
papel de aluminio. Elpapel atrapar@en calor
del fondo y alterarc_el funcionamiento del
homo. Elpapel sepodrc_derretir y da_ar de
forma permanente la parte inferior del caj6n.
Cualquierda_o pot uso inadecuado del papel
de aluminio no estate cubierto por la garantia
del producto.
Deje que el caj6n calentador se precaliente
durante aproximadamente 25 minutos.
Nocoloque Ifquido ni agua en el caj6n
calentador.
Cuadro de Selecci6n de Temperatura
Para mantener calientes varios tipos de
comidas diferentes, programe la temperatura
en la configuraci6n para comidas que
necesitan el grado mc_salto.
Latemperatura, tipo y cantidad de comida, y
el tiempo afectarc_nla calidad de la comida.
Laapertura repetida del caj6n permite que el
aire caliente salgay que la comida seenfrie.
Concantidades grandes es posibleque sea
necesario usaruna configuraci6n del caj6n
calentador m6s alta y cubrir parte de los
items de comida cocinados.
No use recipientes ni envoltorios de plastico.
Todas las comidas colocadas en el caj6n
calentador se deberc_ncubrir con una tapa
o papel de aluminio. AI calentar pasteles
o panes, la tapa se deber6 ventilar para
dejar que la humedad salga.
Lacomida se deberia mantener caliente
en suenvase de cocci6n o transferirla a un
plato con protecci6n t@mica para servir.
NOTA:Los envasesdepldstico o envoltorios
depldstico se derretirdn si estdn en contacto
directo con elcaj6n, olla o utensiliocaliente. Es
posible que no pueda quitar el pldsticoderretido
y esto no estdcubierto pot la garanda.
Retirelascucharas para servir,etc.,antes de
colocar los envases en el caj6n calentador.
TIPO DECOMIDA CONFIGURACI6N
DELCONTROL
Cazuela HEDIO/2
Chili ALTO/3
Pizza MEDIO/2
Papas, horneadas ALTO/3
Tortilla Chips BAJO/1
Barquillos BAJO/1
Para que los Productos Duros queden Crocantes
Coloquecomida en platos o cacerolas en la
parte inferior.
Precalienteen la configuraci6n LO/.!.
(BAJO/lJ.
Para Calentar Tazones y Platos para Servir
Para calentar tazonesy platos para servir
configure el control en LOll (BAJO/lJ.
Ia,PRECAUCl6N]
Losplatos estardn calientes.Usesostenedores
de ollaso guantes al retimr platos calientes.
Uses61oplatosresistentes al calor.
Controle si est@crocante luegode 45
minutos. Agregue tiempo seg0n sea
necesario.
Sidesea calentar porcelana fina, consulte
al fabricante de los platos sobre el nivel de
tolerancia mc_ximaal calor.
Puedecalentar platos vados para servir
mientras precaliente el caj6n.
29
Page 94

Uso del caj6n del homo bajo. mode/o l
El caj6n del homo bajo sepuede usar para hornear comidas usando los mismos tiempos y temperaturas que en un homo
normal. Las comidas ideales para hornear en el caj6n del homo inferior incluyen pizza, cazudas de comidas congeladas,
oatletas, arrollados v muchos postres.
OFF
--" I ° I" I" I" I t ]
WM 200 250 300 350 400 450 I
@
Presione hacia adentro y gire la
perilla del cajOn del homo inferior
hacia cualquier configuraciOn
deseada.
Para Usar el caj6n de! Horno Inferior
[] Presionehacia adentro y gire laperilladel NOTAS:
caj6n del homo inferior hacia cualquier i
configuraci6n deseada
[] Permita queelcaj6n del homo inferior se i
precaliente.
Lasepal luminosa ON (Encendido)est6
ubicada en el lado superior derecho de la
perillay brilla cuando la perilla est6 en la
posici6nON(Encender).Permaneceen ON
(Encender)hastaque la perilla es movida a la
posici6nOFF(Apagar).
LaseBalluminosa "Heating" (Calentar)
est6 ubicada debajo de la sepal luminosa
ON(Encender)y brilla cuando los
elementos de calefacci6n est6n activos. El
precalentamiento est6 completo luego de
que la seBal"Heating" (Calentar)se haya
apagado por primera vezen cada uso.
Siempreuse elestante del caj6n incluido al
usar el caj6n del homo inferior.
Elcaj6n del homo inferior no se puede usar
durante un ciclo de auto limpieza del homo
superior..
iiiiiiiiii[_iii
No coloque comida,papel de aluminio ni
utensiliosde cocina directamente en el rondo
del caj6n del homo inferior.Siempreuse el
estantedel caj6n incluido.
iiiiiiiiii[_iii
Silascomidas requieren estar cubiertas,use
s61opapel de aluminio otapas queresistan
lastemperaturas de horneado. No use
pldstico..
iiiiiiiiii[_iii
La altura mdxima de lascomidas que se
pueden ubicar en el caj6n del homo inferior
esde 4".
No coloque Ifquidoni agua en el caj6n del
homo inferior.
Nunca coloquepldsticos, papel,comidas
enlatadas o materiales combustibles en el
caj6n del homo inferior.
Elcaj6n del horno inferior utiliza menos energ[a que elhomo superior.
Permita lossiguientes tiempos aproximados para precalentar:
Temperatura del Horno Tiempo de
Inferior Deseada Precalentamiento
CALIENTE ! 0 minutos
350°F 20 minutos
425°F 30 minutos
AI Usar la Configuraci6n de Calor del Caj6n del Horno Inferior
Laconfiguraci6n WARM(Caliente) del caj6n
del horno inferior mantendr6 las comidas
cocinadas a la temperatura para serw.
Siemprecomience con comida caliente. Nouse
la configuraci6n WARM (ColienteJpara calentar
comida fria, excepto galletas crujientes, papas
fritas o cerealessecos.
Empujehacia adentro y gire la perillade control
hasta la configuraci6n WARM (CalienteJ.
NOTA:Latemperatura inicialde la comida,
la cantidad de comida, el tipo de comida,
el envasey la cantidad de tiempo que la
comida est6 en el caj6n afectar6n la calidady
temperaturas finales de la comida.
3O
Page 95

Ajusteeltermostato de!homo - iH6galoustedmismo! tenoUunosmode os
,_o_, ,_, [] Con la parte trasera del tornillo hacia
o,,0_._o usted,sostenga el extremo exterior de la []
Porte Trosero de Io Perillo del Homo
Inferior (Looporiencia puede voriar.)
jTJ Empujela perilla OVENCONTROL(Control
del Homo) hacia afuera y observe la parte
trasera. Para realizar un ajuste,afloje
(aproximadamente un giro),pero sin quitar
completamente, losdos tornillos en la
parte trasera de la perilla.
perilla con una mano y gire el frente de la
misma con la otra.
Para elevar la temperatura del homo,
mueva el tornillo superior hacia la derecha.
Escucharc_un sonido de clic por cada
abertura que mueva la perilla.
Para bajar la temperatura, mueva el
tornillo superior hacia la izquierda.
Cadaclic cambiar@latemperatura del
homo en aproximadamente 100F.(Eltango
esde 60oFdesdela flecha).Sugerimos
que haga el ajuste de a un clic desde la
configuraci6n original y que controle el
rendimiento del homo antes de hacer
cualquier ajuste adicional.
Unavez realizado el ajuste,vuelva a
ajustar el tornillo de modo que est@firme,
pero tenga cuidado de no ajustarlo en
exceso.
[] Vuelva a instalar la perilla en la cocina y
controle el rendimiento.
31
Page 96

Usa de!homo superior con auto limpieza .
Sisu modelocuentaconunatraba,nunca fuercela manijade la traba.Forzarla manijadaMrd el mecanismodebloqueo
dela puerta.Lapuertadel homo deberdestarcerraday todosloscontmlesconfiguradosdefarina correctapare quaelciclo
funcione adecuadamente.
Antes de un Ciclo de Limpieza
Limpie cualquier suciedad
importonte sabre el rondo del homo.
NO limpie
lajunta
manualmente..
(an algunos
madras, lajunta
se encuentra en
la pue_
HAGA una limpieza manual de la
estructura del horno.
HAGA una limpieza
manual dentro
de la puerta y del
vidrio.
Parael primerciclo de limpieza,
recomendamos ventilar su cocina con una
ventana abierta o usar un ventilador o
campana de ventilaci6n.
Retirecualquier alia para asar, rejillapara
asar,todos los utensilios de cocina, sonda y
cualquier papel de aluminio dentro del homo,
ya que no resistir6n lasaltas temperaturas de
limpieza.
NOTA:
Siel homo se encuentra equipado con
estantes para homo de n[quel,retire los
mismos antes de comenzar con el ciclo de
auto limpieza.
Sisu homo est6 equipado con estantes
para homo grisesy cubiertos de porcelana,
se podr6n dejar dentro del homo durante el
ciclo de auto limpieza.
La suciedad en la estructura frontal dela
cocina y la parte externa de lajunta de la
estructura frontal se deber6n limpiar en
farina manual. Limpie estas 6reas con agua
caliente, almohadillas de viruta y jab6n
o limpiadores tales coma SoftScrub@.
Enjuague bien con agua caliente y seque.
Limpie la puerta plana interior y el vidrio
con agua yjab6n y esponja.
No limpie lajunta. Elmaterial de libra de vidrio
de lajunta de la estructura frontal no resiste la
abrasi6n. Esesencial que lajunta permanezca
intacta. Siobserva que comienza a gastarse o
deshilacharse,reemplace la misma.
Limpie cualquier derrame importante sabre
el rondo del horno.
AsegSresede que la tapa de la 16mparade luz
del homo se encuentre en su lugar y que la
luzdel mismo est6 apagada.
IHPORTANTE:Lasalud de algunas ayes
esextremadamente sensible a los humos
emitidos durante el ciclo de auto limpieza de
cualquier cocina. Coloquelas ayes en otra
habitaci6n bien ventilada.
NOTA:Tengacuidado al abrir el homo
superior una vez qua el ciclo de auto
limpieza haya finalizado. Es posible qua el
homo aSn est_ caliente.
SELF
mmm o, D
STARTJ
32
C6mo Configurar el Horno Superior para su Limpieza
[Z] Enmodelos con Bloqueo de Control/
Gas,mantenga presionada la tecla
Bloqueo de Contrail Gaspar 3
segundos para apagarla.
NOTA:Los quemadores superficialesse
deberdn apagar antes de la ham de iniciode la
funci6n de auto limpieza.
[] Sisu modelo poseeuna traba, trabe la
puerta.
[_ Presionelatecla SelfClean (Auto
LimpiezaL
[] AI usar lasteclas num6ricas, ingreseel
tiempo de limpieza deseado, sies
necesario usar un tiempo de 4 horas.
Eltiempo del ciclo de limpieza es
normalmente de 4 horas. Puedecambiar el
tiempo de limpieza a cualquier tiempo entre
3 horasy 5 horas,dependiendo del nivelde
suciedad que haya en el horno.
[] Presionela tecla Start (Iniciar).
Enmodelos sintraba en la puerta, la
puerta se bloquea autom6ticamente. La
pantalla mostrar6 el tiempo de limpieza
restante. Noser6 posibleabrir la puerta del
homo hasta que la temperatura seainferior a
la temperatura de bloqueo y que se apague la
luzde LOCKEDDOOR(PUERTABLOQUEADA],
Elhorno seapaga de forma autom6tica
cuando el ciclo de limpieza es completado.
r-_ cuando la luz de LOCKEDDOOR(Puerta
BloqueadaJest6 apagada, deslice la
manija de la traba hacia la izquierda tan
lejoscomo Ileguey abra la puerta. Sisu
horno no cuenta con una traba, la puerta
sedesbloquear6 de forma autom6tica.
Laspalabras LOCKDOOR(Puerta
Bloqueada) titilar6n y el control del homo
dar6 una seBalsi configura el ciclo de
limpieza y olvida cerrar la puerta del horno
u olvidatrabar la puerta en modelos con
traba.
Paradetener el ciclo de limpieza, presione
la tecla Clear/Off(Borrari Apagafl. Cuando
LOCKEDDOOR(PuertaBloqueadal se
apague, indicando que el homo se enfri6
por debajo de la temperatura de bloqueo,
desbloquee la puerta (enmodelos con
trabaja) y abra la puerta.
Page 97

Cuidado y limpieza de la cocina. GEAppliances.com
La puerta del horno deberd estar cerrada y todos los controles configurados de forma correcta para que el ciclo
funcione adecuadamente.
Como Retrasar el Inicio de la Limpieza
L SELF I
E3 DU D
DELAY
START J
START I
Aseg@reseque el reloj marque la hora correcta
del dfa.
Enmodelos con Bloqueo de Control/Gas,
%
mantenga presionada la tecla Bloqueo de
Control/Gas por 3 segundos para
apagarla.
NOTA:Los quemadoressuperficialessedeberdn
apagar antes de la hora de iniciode la funci@
de auto limpieza.
[] Sisu modelo posee una traba, trabe la
puerta.
Presionela tecla Self Clean(Auto
@
Limpieza).
Usando lasteclas num6ricas, presione el
%
tiempo de limpieza deseado.
Presionela tecla Delay Start (Retrasar
@
Inicio). Eltiempo de inicio mc_spr6ximo
que pueda configurar aparecera en la
pantalla.
Usando lasteclas num6ricas, ingrese la
@
hora del dia que desee para que elciclo
de limpieza comience.
Presionela tecla Start (Iniciafl.
rz-1
Enmodelos sin traba en la puerta, la puerta
se bloquea autom@icamente. La pantalla
mostrarc_la hora de inicio.No serc_posibleabrir
la puerta del homo hasta que la temperatura
sea inferior a la temperatura de bloqueo y que
se apague la luz de LOCKEDDOOR(PUERTA
BLOQUEADA].
Elhomo se apaga de forma automatica
cuando el ciclo de limpieza es completado.
Cuando la luz de LOCKEDDOOR(Puerta
r?l
Bloqueada) est6 apagada, deslice la
manija de la traba hacia la izquierda tan
lejoscomo Ileguey abra la puerta. Sisu
homo no cuenta con una traba, la puerta
sedesbloqueara de forma autom@ica.
Laspalabras LOCKDOOR (Puerta
Bloqueada) titilarAn y el control del horno
dar6 una seAal si configura el ciclo de
limpieza y olvida cerrar la puerta del homo
u olvida trabar la puerta en modelos con
traba.
iiiiiiiiiiii_iii
Paradetener el ciclo de limpieza,presione
la tecla Clear/Off (Borrar/Apagar). Cuando
LOCKEDDOOR(PuertaBloqueada)se
apague, indicando que el homo se enfri6
por debajo de latemperatura de bloqueo,
desbloqueela puerta (en modelos con
trabaja) y abra la puerta.
Despu@s de un Ciclo de Limpieza
Esposible que observe ceniza blanca en el
homo. Limpie la misma con una tela hOmeda
una vez que el homo se enfr[e.
Siquedan man@as blancas,eliminelas
mismas conun estropajo conjab6n y enjuague
completamente con una mezclade agua y
vinagm.
Estosdep6sitos sonnormalmente un residuode
salque no puede ser eliminado por el ciclode
limpieza.
Siel homo no se limpia luego de unciclo de
limpieza,repita el ciclo.
No puede configurar el horno para
cocinar hasta que el mismo est6 Io
suficientemente caliente para que la
puerta se desbloquee.
Mientrasel horno estc_realizando la funci6n
de auto limpieza, puede presionar la tecla
Clock(Reloj)para visualizarla hora del dia.
Pararegresar a la cuenta regresiva de
limpieza,presione la tecla CookingTime
(Tiempode Cocci6n).
Siresulta dificildeslizarlosestantes,aplique
una cantidad reducidade aceitevegetal o
aceitede cocina a una toalla de papely limpie
losextremosde los estantesdel homo con
una toalla de papel.
33
Page 98

Cuidado y limpieza de la cocinao
AsegSrese de que la corriente eldctrico estd apagada y que todos los superficies estdn frfos antes de limpiar
cuolquier porte de la cocino.
i i
lAADVERrENClAI ,o o ,no ,,m io o,
colocodo de formo correcto cuondo Io cocino sea instolodo nuevomente. Si no se tiene
_,_ o cualquier otra razdn, asegSrese de que el dispositivo anti-volcoduras vuelvo a ser
esta precaucidn, se podrd ocasionar la cafda de la cocina y provocor lesiones.
Para controlar que elsoporte estd instalado y sujetado de forma adecuada, con cuidado incline
la cocina hacia adelante. Elsoporte deberfa detener la cocina dentro de las 4pulgadas. Sino Io
hace, el soporte se deberd volver a instalar.
En caso de que la cocina sea empujada de la pared por alguna razdn, siempre repita este
procedimiento para verificar que la cocina estd correctamente asegurada por el soporte anti-
volcaduras.
Sila cocina no cuenta con el soporte anti-volcaduras, Ilame al !.800.626.8774 para recibir uno
sin costo.
Ensambles de! Quemador Sellado (en algunos modelos)
Coloquetodos los controlesen la posici6n
OFF(Apagafl antes de retirar las partes del
quemador.
Lastapas del quemador lateral redondo y
las cabezas de losquemadores se pueden
levantar, facilitando su limpieza. Los
electrodos no se pueden retirar.
Lacabeza del quemador central ovalado
y los ensambles de las tapas sepueden
levantar, facilitando su limpieza. Elelectrodo
del quemador no se puede retirar.
La tapa interna del quemador de tres anillos
sepuede levantar para su limpieza.Latapa
externa y el ensamble de la base sepueden
levantar de la parte superior de la cocina
como una sola pieza con prop6sitos de
limpieza.
]A PRECAUCIO_JNouse/a
parte superior de la cocina sinque todaslas
partes de los quemadoresy lasparrillas estdn
en sus respectivoslugares.
Electrodo .__
o
Electrodo _@
Basede tres anillos
(enalgunos modelos)
Elelectrodo del encendedor de la
chispa esexpuesto cuando la cabeza
del quemador es retirada. Cuando
un quemador se gira a LITE,todos los
quemadores hacen chispa. No intente
desensamblar ni limpiar un quemador
mientras otro quemador est@
encendido. Esposible que se produzca
una descarga el6ctrica, Iocual podr[a
hacerque vuelque un utensilio de
cocina caliente.
iAPRECAUCI6N jNoretire
la tapa del quemador delpuente de la
cabeza.
Lacabeza del quemador del puente o de
tres arosy losensambles de lastapas se
pueden levantar, facilitando su limpieza. El
electrodo no sepuede retirar.
34
Page 99

Latapadel Latapadel
quemadorest6 quemador
correctamente NOest6
colocada, correctamente
Cabezasdet quemador (ena!gu0os
modelos)
colocada,
LasCabezasdelquemador(en
algunosmodelos)sepuedenretirar.
simp!ementelevantelasmismasde
laparritlaparasulimpieza.
Cabezadetresani!I0s(ena!gunos
Cabezadel
quemador
/
Aseg0resedequeelanillode
laCabezadelquemadorest_
posicionad0Sabreetelect_-od0y
quelacabezadelquemadorest_
Campletamenteinsertadadentrode
labasedelquemador.UnapequeBa
brechaentrelabasey lacabezaes
normal.
Cabezafrontalderecha(onatgunos
modetos),cabeza frontal izquierda,
cabezatraseraderechaycabeza
!ras_ra!zquierda
C6marode useunac
, enla cabezadel
precintos
paradesbloquear
elpeque_oagujero
quemaa0[ quemador.
Aseg_iresedequelaranura de
la Cabezadelquemad0rest@
posicionadasabree!e!ectrodol
_:_ en la
i_:-_,r_._J_ cabezadel
i£' ..... .
Etensambledelacabeza/tapaovaldot
quemadorsepuederetirar.Simplemente
IevanteIarnisrnadelacocinapara
sulimpieza,useanaagujadecosero
precintosparadesbloquearelpequeho
agujeroenetquemador.
Agujero
quemador
GEAppliances.com
Topos, Bases y Cabezas de Ouemadores
Antes de retirar las tapas y cabezas de los Reemplazo de los Cabezas de los
quemadores (en algunos modelos), recuerde su Quemadores (en algunos modelos)
tamaHo y ubicaci6n. Reemplace losmismos en
la misma ubicaci6n luego de la limpieza.
NOTA:No useestropajos ni polvos para fregar
para limpiar los partes del quemador.
Topos de los Ouemadores
Reemplacelascabezasdelosquemadoressabrelos
electrodosenla partesuperiorde lacocina,en las
ubicacionescorrectasdeacuerdoconsutama_o.
Hayunacabezadequemadorpequeha,una
medianaunagranaey unaextragranae.
Levantar cuando est@nfrfas.Lavelas tapas de los
quemadores en agua caliente conjab6n y enjuague
conagualimpia.Puedefregarconunabasede
fregadopl6sticaparaeliminarparticulasdecomida
quemadas.Agregueun _Adetazadeamonfacoy
dejequepermanezcanmojadasdurantevariashoras
o durantelanoche.Lave,enjuaguebieny seque.
Quemador de tres anillos lenalgunos modelos)
La capa exterior del quemador de tres anillos no
se puede retirar.S61o la tapa redonda del centro
sepuede retirar para sulimpieza.
Paralimpiarlasbasesde losquemadores,use
agua conjab6ny una baseparafregar depl6stico.
Aseg0rese ae que a ranura oagujero aeoendiendo
ae moaelo ael auemador este aosicionadoSOl)ree
elec_roao.
Frente de la coana _
enalgunosnoaelos
Cabeza de tresanillos
Limpiecon unatelah0meda.
Aseg0resedequenoingreseaguaalas basesde
losquemadores.Permitaquesesequentotalmente
antesde usar.
Cabezas de los Quemadores (en algunos
modelos) y Ensamble de la Tapa/Cabeza
de! Ouemador Ovalado (Centro)
Loscabezasdelosquemadoresy elensambledela
cabeza/tapade/quemadorovaladosepuedenretirar.
Simplementelevantelosmismasdelacocinaparasu
limpieza.
Paraunencendidoadecuado,aseg0resedeque
Ensamble de la Cabeza/ Tapa del Ouemador
Ovalado (Centrol
Reeml)laceelensambtedetacabeza _aDaovalaaa
cen_rolsol)reelelectroaoen laportesuperiorde tococina.
elagujeropeque_l)enlasecci6nquecoincidecon
elelectrodosemantengaabierto.Puedeusaruna Cabezaovalada,
agujadecosero un precintoparadesbloquearlo, ensambledelataoa
Loshendidurasdeloscabezasdelosquemadores
Aseg0rese de qJe la ranura
de la cabeza deI quemador
eS;cetrDoOc_icionaaasooree,
sedebenmantenerlimpiasentodomomentapara
obtenerunallamaparejay sinobstruccidn.
Laspartesbloqueadaso suciasdelosquemadores
o loselectrodosnopermitir6nqueelquemador
funcionedeformacorrecta.
Cualquierderrameenoalrededordeun electrodose
deber6limpiardeformacuidadosa.Tengacuidado
deno golpearun electrodocon nadaduro,yaquese
podr6da_ar
Limpielascabezasdelosquemadoresdeforma
rutinaria,especialmenteluegodederrames
importantesquepodrfanbloquearlasaberturas.
Levantarcuandoest@frfa.
Paraeliminarlacomida quemada,moje las
cabezasde losquemadoresen unasoluci6nde
L.'d
_rente de la cocina
Topos
ReemD_ace_as_caasae tama_l) coincidente en _as
Doses_ caDezas de os auemaaores.
Aseg0rese de que as caDezas en algunos modelos
y lastopos sean reemplazadas en los ubicaciones
correc[as.
Electrodo_
detergenteIfquidosuavey agua calientepar entre
20y 30 minutos.Cuandosetrate de manchas
mcisdiffciles,useun cepillode dientes.
Luego de lu limpiezu
Antes de colocar las tapas y cabezas de
los quemadores (en algunos modelos) y el
ensamble de la cabeza/tapa nuevamente,
escurra el exceso de agua y luego seque las
mismas totalmente, programando el homo
para que est6 caliente por ]0 minutos.
Frente de la cocina
Taoa detres anillos
/enalo Jnosmodelos)
nura
C)
35
Page 100

Cuidado y limpieza de la cocinao
Lodge ® Reversible y Planchas para Chef de Hierro Forjado
(en algunos modelos)
Enjuagueconagua caliente (nousejab6n) y
sequetotalmente.
_,Antes de cocinar,preparelasupenficiecon
espray de cocinao aceitevegetal
_,Luegode cocinar,limpie la plancha con
un cepilloduro y agua caliente.No se
recomienda el usadejab6n, y nunca se deben
usardetergentes potentes.
Sequeconunatoalladefarinainmediatay aplique
unacapasuavedeespraydecocinaoaceite
vegetalmientraslaplanchaaOnestdcaliente.
Guardeen un lugar frfoy seco.
,, Nolave en el lavavajillas.
Plancha Antiadherente (en algunos modelos)
NOTAS:
Lo plancha se deberc_usar sabre el
quemador central 5nicamente.
Nolimpie laplanchaenel homo deauto
limpieza.
No limpie la plancha en un lavavajillas.
Lave la misma con agua caliente yjab6n
luego de cada usa, mientras usa una
esponja y un paho de cocina.
Si quedan residuos de aceite o comida
sabre la plancha, las cocciones posteriores
endurecer6n el residuo y generar6n
adherencias con el paso del tiempo. En
este caso, use un limpiador no abrasivo tal
coma Ban Ami®o uno de los limpiadores
para fregado suave. Aplique con una
esponja, Scrunge®uotra almohadilla de
limpieza con etiqueta que indique que es
segura para alias antiadherentes.
Uses61outensilios de pldstico, nylon
o madera o herramientas de cocina
Precauciones de la Plancha:
Sialga sederram6 debajo de la plancha,
sedeberd Iimpiar tan pronto coma sea
posiblepara evitar la suciedad de la comida
"homeada".
Nopermita quese acumule grasa debajo
de la plancha,ya que puede haber riesgo de
incendio.Limpiela parte inferior de laplancha
tan pronto coma estd fria. Limpiecon agua
calienteyjab6n.
Nocotoqueta pfanchaen ethomo microondas.
Siempreapague los quemadores superficiales
antes de retirar la plancha. Tenga cuidado al
sosteneruna plancha caliente.
SilverStone®para evitar que searruine el
recubrimiento.
Nunca use cuchillos ni carte la comida
sabre la plancha. Lave con agua caliente
yjab6n luego de cada usa. Guarde con
cuidado para evitar ralladuras.
Precauciones de la Plancha:
Si alga se derram6 debajo de la plancha,
se deber6 limpiar tan pronto coma sea
posible para evitar la suciedad de la
comida "horneada".
No permita que se acumule grasa debajo
de la plancha, ya que puede haber riesgo
de incendio. Limpie la parte inferior de la
plancha tan pronto coma est6 fr[a. Limpie
con agua caliente yjab6n.
Nocoloque la planchaen el homo microondas.
Siempreapaguelosquemadoressuperficiales
antesderetirarla plancha.Tengacuidadoal
sostenerunaplanchacaliente.
Parrillas de los Quemadores
Sucocina cuenta con m01tiplesparrillasdobles
ysimples. Estas parrillas poseen posiciones
especificas. Para una estabilidad maxima,
estas parrillas s61ose deber6n usar en su
posici6n adecuada; no se pueden cambiar
de izquierda a derecha o del frente a atras.
La apariencia puede variar.
Las parrillas se pueden limpiar en
un lavavajillas.
Para su conveniencia con las parrillas
dobles, los lados inferiores de las parrillas
izquierda y derecha estan marcadas "LEFT
FRONT"(Frente Izquierdo) y "RIGHT FRONT"
(Frente Derecho). Aseg0rese de que la
posici6n frontal de ambas parrillas est@
en el frente. La parrilla intermedia posee
un arco en el frente. Aseg0rese de que
la parte arqueada est@hacia el frente de
Frente Centro Frente
Izquierdo Derecha
la cocina. Ademas, la parrilla intermedia
esta apoyada par las parrillas izquierda y
derecha y debe ser instalada al final para
mayor estabilidad.
Limpieza
Levante las mismas cuando est6n fr[as. Las
parrillas se deben lavar de forma regular y, par
supuesto, luego de derrames. Lave lasparrillas
36
con agua caliente yjab6n y enjuague con agua
limpia. AIreemplazar las parrillas, asegSresede
que est6n posicionadas de farina segura sabre
losquemadores. Reemplacelas parrillas de
modo que se formen arcos continuos con las
lineascentrales de lastres parrillas.
Noutiliceelquemadorduranteunperiododetiempo
prolongadosinunutensiliodecocinasabrelarejilla.
Elacabadodelaparrillasepuederesquebrajarsino
hayunutensiliodecocinaqueabsorbaelcalor.
Para liberarsede comidas quemadas,coloque
lasparrillas en un envase cubierto.Agregue
una taza de 1Ade amonfacoy deje que
permanezcan mojadas varias horas durante la
noche. Lave,enjuague bieny seque.
Aunque sondurables,las parrillasperderdn
gradualmente su brillo,mds al16del mejor
cuidado que les pueda dar. Estose debe a
la exposici6ncontinua a altas temperaturas.
Observardesto antes con parrillas de color clara.
NOTA:No limpielas parrillas en el homo de auto
Iimpieza.
 Loading...