

Page 1

Q
N
Q
Q
L__
LL
E
0
0
0
|
GEAppliances.com
Safe ty Instructions ............ 2- 4
Operating Instructions
Features .......................... 5, 6
Controls .......................... 7, 8
Odor Remover ...................... 9
Dispenser .......................... 10
Hot Water ......................... 11
Water Filter ........................ 12
Fresh Food Storage Options ..... 13,14
Climate Zone & Temperature
Controlled Drawer ............... 15,16
Freezer ............................ 17
Automatic Ice maker ............... 18
Care and Cleaning ................ 19
Replacing the Lights ................ 20
Installation Instructions
Preparing to Install the
Refrigerator .................... 21, 22
Installing the Anti-Tip Bracket... 29, 30
Installing the Refrigerator ....... 23-33
Installing the Water Line ........ 34-35
GE car6 TM models
Models that start with CFEare
St_nd_rd Depth Models (SD)
Models that stuartwith CYEare
Counter Depth Models (CD)
Troubleshooting Tips ...... 38, 39
Normal Operating Conditions ....... 37
Service - Truth or Myth ......... 40, 41
Consumer Support
Warranty for U.S,Customers ........ 42
RPWF Water Filter Cartridge Limited
Device Certificate ................. 43
Performance Data Sheet ........... 44
State of California Water Treatment
Warranty .......................... 45
m
Consumer Support ........ Back Cover
_L
I
Write the model and serial
numbers here:
Model #
Serial #
Find these numbers on a label
on the left side, near the middle
of the refrigerator compartment,
239D3389PO03 Pub No. 4,9-60678-3 05-74 GE
Page 2

IMPORTANT SAFETYINFORMATION.
READALL INSTRUCTIONSBEFOREUSING.
IMPORTANT SAFETY INFORMATION READ ALL INSTRUCTIONS BEFORE USING
For more information on your refrigerator's operation, visit
GEAppliances website
1
........www, GEAppliances. corn
REFRIGERATOR SAFETY INFORMATION
_This is the safety alert symbol, This symbol alerts you to potential hazards that can kill or hurt you and others, All safety
_nessages will follow the safety alert symbol and the word "DANGER", "WARNING", or "CAUTION", These words are defined as:
Indicates a hazardous situation which, if not avoided, will result in death or serious injury,
Indicates a hazardous situation which, if not avoided, could result in death or serious injury,
Indicates a hazardous situation which, if not avoided, could result in minor or moderate injury,
IMPORTANT SAFETY INSTRUCTIONS
To reduce the risk of fire, explosion, electric shock, or injury when using your
refrigerator follow these basic safety precautions:
This refrigerator must be properly installed and located in
accordance with the Installation Instructions before it is
used,
Unplug the refrigerator before cleaning and making repairs,
NOTE: Repairs must be performed by a qualified Service
Professional,
, Replace all parts and panels before operating,
, Because of potential safety hazards under certain
conditions, we strongly recommend against the use of an
extension cord, However, if you must use an extension cord,
it is absolutely necessary that it be a UL-listed (in the United
States) or a CSA certified (in Canada), 3-wire grounding type
appliance extension cord having a grounding type plug
and outlet and that the electrical rating of the cord be 15
amperes (minimum) and 120 volts,
, To prevent suffocation and entrapment hazards to children,
Remove the fresh food and freezer doors from any
refrigerator before disposing of it or discontinuing its use,
, Do not store or use gasoline or other flammable vapors and
liquids in the vicinity of this or any other appliance,
, Power to the refrigerator cannot be disconnected by
any setting on the control panel, refrigerator must be
unplugged to remove power,
Do not allow children to climb, stand or hang on the door
handles or the shelves in the refrigerator, They could
seriously injure themselves,
, In refrigerators with automatic ice makers, avoid contact
with the moving parts of the ejector mechanism, or with
the heating element that releases the cubes, Do not place
fingers or hands on the automatic ice making mechanism
while the refrigerator is plugged in,
, Do not clean glass shelves or covers with warm water
when they are cold, Glass shelves and covers may break if
exposed to sudden temperature changes or impact, such
as bumping or dropping, Tempered glass is designed to
shatter into many small pieces if it breaks,
, Keep fingers out of the "pinch point" areas; clearances
between the doors and between the doors and cabinet are
necessarily small, Be careful closing doors when children are
in the area,
, Do not touch the cold surfaces in the freezer compartment
when hands are damp or wet,, skin may stick to these
extremely cold surfaces,
, Do not refreeze frozen foods which have thawed completely,
, Use a sturdy glass when dispensing ice (on models with ice
dispenser)
Page 3

IMPORTANT SAFETYINFORMATION.
READALL INSTRUCTIONSBEFOREUSING.
GEAppliances.com
INSTALLATION
'_ Explosion Hazard.
Keep flammable materials and vapors, such as gasoline, away from refrigerator.
Failure to do so can
result in fire, explosion, or death.
_1_/_ Tip Over Hazard.
Built-in style models (model PYE, CYE, and PWE) are top heavy, especially with any doors open. These
models must be secured with the anti-tip floor bracket to prevent tipping forward, which could result
in death or serious injury. Read and follow the entire installation instructions for installing the anti-tip
floor bracket packed with your refrigerator.
CONNECTING ELECTRICITY
Electrical Shock Hazard.
Plug into a grounded 3-prong outlet
Do not remove the ground prong
IDo not use an adapter
lFailure to follow these instructions can result in death, fire, or electrical shock.
Do not, under any circumstances, cut or remove the third (ground) prong from the power cord.
For personal safety, this appliance must be properly grounded.
The power cord of this appliance is equipped with a 3-prong
(grounding) plug which mates with a standard 3-prong
(grounding) wall outlet to minimize the possibility of electric
shock hazard from this appliance,
Have the wall outlet and circuit checked by a qualified
electrician to make sure the outlet is properly grounded,
Where a standard 2-prong wall outlet is encountered, it is
your personal responsibility and obligation to have it replaced
with a properly grounded 3-prong wall outlet, Do not use an
adapter,
The refrigerator should always be plugged into its own
individual electrical outlet which has a voltage rating that
matches the rating plate,
A 115 Volt AC, 60 Hz, 15- or 20-amp fused, grounded
electrical supply is required, This provides the best
performance and also prevents overloading house wiring
circuits which could cause a fire hazard from overheated
wires,
Never unplug your refrigerator by pulling on the power cord,
Always grip plug firmly and pull straight out from the outlet,
Repair or replace immediately all power cords that have
become frayed or otherwise damaged, Do not use a cord
that shows cracks or abrasion damage along its length or at
either end,
When moving the refrigerator away from the wall, be careful
not to roll over or damage the power cord,
Page 4

IMPORTANT SAFETYINFORMATION.
READALL INSTRUCTIONSBEFOREUSING.
HOT WATER DISPENSER
A Scalding Hazard.
The hot water dispenser is capable of heating water to a temperature of approximately 185°F (85°C).
Water temperatures above 125°F (52°C) can cause severe burns or death from scalding. Children, the
disabled, and the elderly are at highest risk of being scalded.
Use this appliance only for its intended purpose as described in this Owner's Manual, To reduce the risk of severe burns,
scald injuries, or death when using your hot water dispenser, the instructions below must be followed:
, The water coming from the dispenser is very hot, Use
extreme caution when dispensing and drinking water, Allow
water to cool to a drinkable temperature before drinking,
, When dispensing water below 125°F, always test the
temperature of the water before drinking,
, When dispensing hot water, the container can become
very hot, Use a temperature insulating container, such
as ceramic or Styrofoam, Using container materials such
as paper or plastic may result in a burn while holding the
cup, Do not use glass containers, as thermal shock can
cause the container to break and may result in scalding or
lacerations,
, Do not permit children to use the hot water dispenser,
, The hot water dispensing knob requires both twist and
push motions in order to reduce the risk of hot water being
dispensed unintentionally or by small children, Do not
tamper with or modify the hot water dispensing knob,
, Always follow the formula manufacturer's instructions for
preparation of baby formula,
, Hold your cup or container close to the dispensing point to
minimize splashing of hot water that could contact your
hand, Do not dispense hot water into a cup resting on the
dispenser tray, as this will increase water splash,
, Do not use with water that is microbiologically unsafe or of
unknown quality,
, The hot water dispenser is designed to only dispense water,
Do not attempt to heat or dispense anything other than
water, Do not attempt to disassemble or clean the tank,
, A newly installed water filter cartridge will cause water to
spurt from the dispenser, Run 2 gallons of water through
the cold water dispenser (about 5 minutes) to remove air
from the system, Until this air is removed from the system
through the cold water dispenser, DO NOT use the hot water
dispenser as it may result in spurting of hot water and lead
to hot water scalding,
, The hot water dispensing tank is a non-pressurized tank,
with a vent on the tank and a dispenser tube outlet, Do
not modify the system, close or block the dispense tube, or
connect any other type of device to the tank or dispense
tube, Doing so may lead to rupture of the tank and hot
water scalding,
PROPER DISPOSAL OF YOUR OLD REFRIGERATOR
Suffocation and child entrapment hazard.
Remove fresh-food and freezer doors from the refrigerator, prior to disposal. Failure to do so can result
in child entrapment which can lead to death or brain damage.
IMPORTANT:
Child entrapment and suffocation are not problems of the past.
,Junked or abandoned refrigerators are still dangerous even if
they will sit for 'lust a few days." If you are getting rid of your old
refrigerator, please follow the instructions below to help prevent
accidents,
Before You Throw Away Your Old Refrigerator or
Freezer:
' Take off the fresh food and freezer doors.
' Leave the shelves in place so that children may not easily
climb inside.
Refrigerants
All refrigeration products contain refrigerants, which under
federal law must be removed prior to product disposal. If you
are getting rid of an old refrigeration product, check with the
company handling the disposal about what to do.
READAND FOLLOWTHISSAFETYIAIFORMAT/ONCAREFULLX
SAVETHESEINSTRUCTIONS
Page 5

About the features. GEAppliances.com
i
O
Space-saving ice maker
0
Ice maker and bin are located on the door creating more usable
storage space.
Showcase LED lighting
0
LED lighting is positioned throughout the interior to spotlight areas
in the refrigerator. LEDs are located under the fresh food door to
light the freezer when opened.
Drop-down tray
0
Allows for extra door storage when you need it and tucks away
when you don't.
Full-width temperature controlled drawer
O
Adjustable temperature control bin that can accommodate
larger items.
Dairy bin
Separate compartment for your items,
Utility bin
A utility bin designed for flexible storage,
0 QuickSpaceTM shelf
Functions as a normal full-sized shelf when needed and easily slides
back to store tall items below.
O Spillproof shelves
Designed to capture your spills for easier clean up.
O Removable condiment bin
Separate bin designed for easy removal and storage.
Removable door bin
Can be removed for those with a wall limiting the door opening,
Climate zone bin
Separate bins for produce storage.
_ In-the-door filter
Located in the door for more available space in the fresh-food section
and easy replacement.
_I Odor filter
Removes food smells and odors.
Page 6

About the features.
Door ice bin
0
1. Open left fresh food door.
2. Pull down latch to release bin door.
3. Using handhold lift ice bucket up
and out to clear Iocators in bottom of bin.
4. To replace the ice bucket, set it on the
guide brackets and push until the ice
bucket seats properly.
5. If bucket cannot be replaced, rotate the
Ice Bucket Fork 1/4 turn clockwise.
Drop down dairy bin
0
1. Open right fresh food door.
2. Depress both buttons on lower sides and
bin will drop down.
3. Reverse to reinstall.
Door ice/water filter
0
Remove filter/bypass plug
Push the indent on the cover and open filter
door. Pull up on filter/bypass plug and pull
straight out to remove.
Installing the filter cartridge
Push the indent at the bottom of the cover
and open. Lift door and align tabs on filter
to filter/holder and push filter into place.
Ice bucket
Drop tray
(tray open)
Filter cover is designed to be
reinstalled if accidently removed
Push/Pull
Swing
Do not twist
Water & Ice Filter (in door)
Page 7

About the controls with temperature settin s. GEAppliancescom
CYE/CFE Control Style
Water
Changing the Temperature
To Change the Refrigerator Temperature:
Access By:Temperature Button
Acdvate By: Below the word "Refrigerator", use the
arrows to select the desired temperature, Press DONEwhen
finished to return to HOME screen,
To Change the Freezer Temperature:
Access By: Temperature Button |
Acdvate By: Below the word "Freezer", use the arrows to
select the desired temperature,
Press DONEwhen finished to return to HOME screen,
To turn OFF cooling system, access SETTINGS from the
HOME screen, Page over and tap COOLING SYSTEM ON
Press DONEto return to HOME screen,
To turn ONcooling system, access SETT/NGSfrom the HOME
screen, Page over and tap COOLING SYSTEM OFF, Press
DONE to return to HOME screen,
Turning the cooling system off stops the cooling to
refrigerator, but it does not shut off the electrical power,
NOTE: For optimal temperature performance, we recommend to avoid placing food or other items directly at the air
flow vents or the fresh food air tower, thus blocking the air flow.
Page 8

About the controls features.
lemperature I Express lqodes I Settngs
Wmter
NOTE;The refrigerator is shipped with protective film covering the temperature
controls, If this film was not removed during installation, remove it now,
The temperature controls are preset in the factory at 37°F for the refrigerator compartment and 0°F for the freezer
compartment, Allow 24 hours for the temperature to stabilize to the preset recommended settings,
The temperature controls can display both the SET temperature as well as the actual temperature in the refrigerator and
freezer, The actual temperature may vary slightly from the SET temperature based on usage and operating environment,
Hot Water
Dispenses up to 10 ounces of filtered hot water from user
selected ranges of 90°F to 185°F,
Hot Water Knob
Illuminates to indicate hot water is ready, Dispenses with two
motions: a counter-clockwise twist and then push to dispense,
Precise Fill
Precisely dispenses filtered water in accurate measurements
in ounces, cups, quarts, or liters using paddle,
Refrigerator temp control
Adjust freezer compartment temperature,
Fresh food temp control
Adjust fresh food compartment temperature,
TurboFreeze TM setting
Activate TurboFreeze to quickly restore freezer
temperatures after frequent door openings,
TurboCool TM setting
Activate TurboCool to quickly restore fresh food temperature after
frequent door openings,
Odor Remover setting
Activate Odor Remove to remove food smells and odors.
Lock controls
Press and hold 3 seconds to lock out ice and water dispenser
and all feature and temperature buttons,
LED dispenser light
LEDlighting that can be turned on/off to light your dispenser,
Photo Upload
Insert USB memory stick to upload personal photos to the
refrigerator LCD screen, LCD will provide on screen prompts to
load and view slideshow, Make sure the photos are in the root
directory in your USB,
Additional Settings
• Connected Home ready
• Slideshow
• Reset filter
• Ice maker on/off
• Door alarm
• Sound control
• Cooling system On/Off
• Metric/English units
Additional Modes
• Sabbath Mode
Press and hold lock & light simultaneously for 3 seconds to
enter/exit Sabbath mode,
Activate Sabbath Mode to turn off interior lights, tempera-
ture control and advanced features, Compressor will run on
a timed defrost when in Sabbath mode,
Page 9

About Odor Remover. GEAppliances.com
Using Odor Remover Mode
To access the
Odor Remover
Mode, press f["
Express Modes
on the main LCD Water
Temperature
screen,
Press Odor Remover
to turn the mode On
or Off, Press Done
to return to the main
menu,
The mode will
automatically end
after 4 hours,
Install/Replace Odor Filter
The Odor Filter is located in the
upper left corner of the fresh food
compartment, GE recommends
replacement of the odor filter every
6 months or when odor becomes
objectionable, A reminder will
appear on the main screen after 6
months to change the filter,
Express Hodes Settings J
lace: Odor Filter
Express Modes
Odor Filter
Replace filter cover by
sliding it on from the front, _--_
/
Make sure the front edge is
flush against the
refrigerator wall,
To Reset the Odor Filter Replacement reminder on the main
screen:
From the main screen on the LCD select Settings, Scroll until
Odor Filter is visible and press, This shows the current status of
the filter and how to reorder, To reset the reminder, press Reset,
Temperature [ Express Hode Settings
Water
I iili
System Settings
To Replace Filter:
Remove the cover of the odor m-_]_,
filter by sliding the front
portion towards the front of
the refrigerator,
Remove the old filter by
pulling out,
Remove the replacement
filter from the plastic, Insert
the filter into the housing by
pushing it in,The filter will
snap into place,
Odor Filter: Replace
To order d repldcement filter, cdll (877]-959-8686
or order online vid www.gedpplidncepdrts.com.
Page 10

About the dispenser.
k4
Water & Ice Dispenser
(See about the controls with
Temperature settings & about the
Control features)
_Dispenser
Tray
If no water is dispensed when the refrigerator is first installed,
there may be air in the water line system. Press the dispenser
paddle for at least five minutes to remove trapped air from the
water line and to fill the water system. To flush out impurities in
the water line, throw away the first six full glasses of water.
Hazard
, Never put fingers or any other object into ice crusher
discharge opening. Doing so can result in contacting the ice
crushing blades and lead to serious injury or amputation
, Use a sturdy glass when dispensing ice. A delicate glass may
break and result in personal injury.
Important Facts About Your Dispenser
_ Do not add ice from trays or bags to the door ice maker
bucket. It may not crush or dispense.
_ Avoid overfilling glass with ice and use of narrow glasses.
Backed-up ice can jam the chute or cause the door in the
chute to freeze shut. If ice is blocking the chute remove the ice
bucket, poke it through with a wooden spoon.
_ Beverages and foods should not be quick-chilled in the
door ice maker bin. Cans, bottles or food packages in the
storage drawer may cause the ice maker or auger tojam.
Toremove Dispenser Tray
Pull Dispenser Tray out until it stops.
;_ Locate tab in the center on the bottom and push in.
_ Pull Dispenser Tray assembly out.
_ Lift metal Dispenser Tray out at center notch to clean.
Toreinstafl Dispenser Tray
_ Place the Dispenser Tray cover on top of catch tray and
position under the two plastic retainers on either side.
_ Center Dispenser tray, and align with center guides.
_ Push in until it firmly in place.
_ To keep dispensed ice from missing the glass, put the glass
close to, but not touching, the dispenser opening.
_ Some crushed ice may be dispensed even though you
selected CUBED ICE.This happens occasionally when a few
cubes accidentally get directed to the crusher.
_ After crushed ice is dispensed, some water may drip from the
chute.
_ Sometimes a small mound of snow will form on the door in the
ice chute. This condition is normal and usually occurs when you
have dispensed crushed ice repeatedly. The snow will eventually
evaporate.
10
Page 11

About Hot Water. GEAppliances.com
To Use Hot Water Dispenser
• Press HOTWATER button.
• Select desired water temperature on the LCDscreen (90, 150,
170, 185, or Custom).
• When hot water is ready (indicated on the screen and by a
beeping sound) hold container with left hand centered in the
recess under the spout.
• To dispense water, rotate the hot water knob counterclockwise
and then push it in. The knob must be held in during dispense.
Important Facts about HOT WA TER
Scalding Hazard.
The water coming from the dispenser is very hot and can cause
scalds or burns. Read all warnings prior to use. (Seepage 4.)
Always use a container that issuitable for hot liquids (ceramic,
styrofoam, etc.)
The maximum single hot water dispense amount is 10 oz.
Additional hot water can be dispensed by restarting the hot
water feature through the LCDscreen.
HOTWATERworks best with household water pressure of 40 to
1O0 psi.
HOTWATERwill time out if unused and may require a short
reheat time.
11
Page 12

About the GE® RPWF water filter cartridge.
Water Filter Cartridge
The water filter cartridge islocated in one of the following places:
Bottom-freezer (BF)refrigerators:
- Inthe water filter compartment on the right side wall of the
left-hand fresh food door.
- Inthe fresh food interior on the left side wall, near the top.
When to replace the filter cartridge
The filter cartridge should be replaced every six months or earlier
if the flow of water to the dispenser or icemaker decreases.
Touch Screen Models: A filter status message will appear on the
screen when the water filter needs to be replaced. The filter status
message must be reset manually.
The "Water Filter: Replace" status message can be reset by
entering the Settings menu from the home screen. Then, select
the Water Filter menu and press the RESETbutton. This will reset
the filter status.
Non-touch Screen Models: A filter indicator light (ormessage)
will illuminate on the screen when the water filter needs to be
replaced. This light must be reset by pressing and holding the
Reset Filter button for three seconds.
The filter cartridge has a maximum life of six months and
should be replaced when indicated by the filter indicator on the
refrigerator, or sooner if a significant reduction in flow occurs.
Removing the filter cartridge
Toreplace the filter, first remove the old cartridge by opening
the filter door and pulling on the bottom of the cartridge to allow
it to swing outward. When the cartridge can no longer swing,
gently pull to unseat it from the cartridge holder. DO NOT TWIST
CARTIDGE.A small amount of water may drip out.
Installing the Filter Cartridge
1.Align top of filter with cartridge holder and push until cartridge
is fully seated.
2.While continuing to ensure cartridge
is fully seated in the holder, gently
swing the filter inward until it is in a
vertical position. Iffilter will not swing
easily, check to ensure filter is properly
aligned and fully seated within the
cartridge holder.
3. Run 2gallons of water through the cold
water dispenser {about 5 minutes) to
remove air from the system. A new_
installed filter cartridge will cause
water to spurt from the dispenser. Use
a large pitcher or sports bottle to catch
the water spray. DO NOT use the hot
water dispenser or hands-free auto-fill
(some models) until all air is removed
from the system.
4. Reset Filter Status message
Touch Screen Models: Access RESETbutton through the Water
Filter menu.
Non-touch Screen Models: Press and hold the Reset Filter button
for three seconds.
_ ARNING Using the hot water dispenser prior to purging air
from the system may result in spurting of hot water and lead
to hot water scalding. Follow the instructions above to purge all air
from the system through the cold water dispenser prior to using the
hot water dispenser.
Note: It isnormal for water to appear discolored during the initial
system flush. Water color will return to normal after first few minutes
of dispensing.
Filter Bypass Plug
To reduce the risk of property damage due to water leakage, you
MUST usethe filter bypass plug when a replacement filter cartridge
is not available. The dispenser and icemaker will not operate without
either the filter or bypass plug installed. The bypass plug is installed
in the same way as afilter cartridge.
pu_sh/Pull
Z_ WARNING
To reduce the risk associated with choking, do not altow cMEdren under 3 years of age to have access to
smart parts during the installation of this product. The disposable filter cartridge should be replaced every
6 months at the rated capacity, or sooner if a noticeable reduction in flow rate occurs.
For the maximum benefit of your filtration system, GE recommends the use of GE-branded filters only. Using GE-branded filters in GE
and Hotpoint ®refrigerators provides optimal performance and reliability. GEfilters meet rigorous industry NSF standards for safety
and quality that are important for products that are filtering your water. GE has not qualified nomGE-branded filters for use in GEand
Hotpoint refrigerators and there is no assurance that nomGE-branded filters meet GE's standards for quality, performance and reliability.
If you have questions, or to order additional filter cartridges, visit our website at www.geapplianceparts.com or call
GE Parts and Accessories, 800.626.2002.
Customers in Canada should consult the yellow pages for the nearest Camco Service Center.
GE
Appliances
Appliance Park
Louisville, KY40225
geappiianceparts.com
12
© 2012 General Electric Company PC71879
Refer to 239D4126P002 Pub# 31-45497
RPWF
Page 13

About the fresh food storage options. GEAppliances.com
Rearranging the Shelves
Shelves in the refrigerator compartment are adjustable,
To remove:
0 Remove all items from the shelf,
Tilt the shelf up at the front,
Lift the shelf up at the back and bring the
shelf out,
To replace:
1
While tilting the shelf up, insert the top hook
atthe back of the shelf in a slot on the
track,
Lower the front of the shelf until the bottom
of the shelf locks into place,
Spillproof Shelves
Spillproof shelves have special edges to help
prevent spills from dripping to lower shelves,
Quick Space Shelf
This shelf splits in half and slides under itself for
storage of tall items on the shelf below,
This shelf can be removed and replaced or
relocated (just like spillproof shelves),
NOTE: The back half of the Quick Space Shelf is
not adjustable,
13
Page 14

About the fresh food storage options.
Non-AdJustable Dairy Bin
ii T
i_
To remove: Lift the dairy bin straight up,
then pull out,
Adjustable Bins on the Door
Adjustable bins can easily be carried from
refrigerator to work area,
To remove: Lift bin straight up, then pull out,
To replace or relocate: Slide in the binjust
above the molded door supports, and push
down, The bin will lock in place (see page 33),
To replace: Engage the bin in the molded door
supports and push down, The bin will lock in
place, See page 33,
Drop down tray
(tray open)
1, Open right fresh food
door
2, Depress both buttons
on lower sides of bin
and bin will drop down,
3, Reverse to reinstall,
Non-Adjustable Bins on the Door
To remove: Lift the bin straight up, then pull
out,
To replace: Engage the bin in the molded
supports on the door and push down,
It will lock in place,
The ice maker door bins are not
interchangeable, note the location upon
removal and replace the bin in its proper
location,
14
Page 15

About the climate zone and temperature
controlled drawer.
GEAppliances.com
Clima rezone
Keep fruits and vegetables organized in
separate compartments for easy access,
Excess water that may accumulate in the
bottom of the drawers or under the drawers
should be wiped dry,
Temperature Controlled Drawer
The Temperature Controlled Drawer is a
full-width drawer with adjustable temperature
control, This drawer can be used for large
miscellaneous items,
To change setting, press select button,
Note: when fresh food temperature is set to 40 ° or
higher, temperature controlled drawer can only be
set to citrus,
HEAT
32°
BEVERAGE
"1
134 °
l
m
m
l
L
PRODUCE CHEESE CITRUS
36° 38° 4O°
Laceration Hazard.
Do not store glass bottles at this setting. If I
they are frozen, they can break and result
in personal injury.
"3
I
m
J
15
Page 16

About the climate zone and temperature controlled drawer.
How to Remove and Replace the Adjustable Deli/Produce Drawer
Toremove:
0 Pull the drawer out to the stop position,
Toreplace:
Pull left and right slides until fully extended,
0 Lift the front of the drawer up and out,
Place drawer back in first and rotate drawer
front down to seat on slide,
0 Push the drawer in to closed position,
How to Remove and Replace Drawer Divider
Toremove: Toreplace:
Pull the drawer out to the stop position, Reverse steps 1 and 2 to replace drawer
Slide pan divider to right to release it from
pan,
divider,
16
Page 17

About the freezer. GEAppliancescom
Freezer Basket and Drawer
0 Basket,
Drawer
Utility Bin
Non-Adjustable Bin in the Freezer
Toremove: push in plastic tab on either left or
right side
Toreplace: slide bin into location until it
locks into place,
Basket Removal
Toremove, CFE only:
Open freezer door to the stop position,
Remove freezer door bin by pushing
plastic tab on either left or right side to
release bin hinge pin,
Remove freezer basket by lifting up the
rear of the basket and moving basket
rearward until the front of the basket
can be rotated upward and out,
Lift it out to remove,
Toremove, CYEonly:
Open fresh food doors,
Open freezer doorto the stop position,
Remove freezer basket by lifting up the
rear of the basket and rotate it
upward,
Lift it out to remove,
Toreplace:
Reverse step 1 thru 4 to replace,
17
Page 18

About the automatic ice maker.
A newly installed refrigerator may take 12 to 24 hours to begin making ice.
Automatic Ice maker (on some models)
I
i
Ice maker
The ice maker will produce seven cubes
per cycle approximately 100-130 cubes
in a 24-hour period, depending on freezer
compartment temperature, room temperature,
number of door openings and other use
conditions,
The ice maker will fill with water when it cools to
15°F (-10°C), A newly installed refrigerator may
take 12 to 24 hours to begin making ice cubes,
Ifthe refrigerator is operated before the water
line connection is made to the unit or if the
water supply to an operating refrigerator is
turned off, make sure that the ice maker is
turned off, Once the water has been connected
to the refrigerator, the ice maker may be turned
on, See the table below for details,
To minimize the risk of personal injury, avoid contact with the moving parts of the ejector
mechanism, or with the heating element that releases the cubes. Do not place fingers or
hands on the automatic ice making mechanism while the refrigerator is plugged in.
You may hear a buzzing sound each time the
ice maker fills with water,
Throw away the first few batches of ice to allow
the water line to clear,
Be sure nothing interferes with the sweep of the
feeler arm,
When the bin fills to the level of the feeler
arm, the ice maker will stop producing ice, It is
normal for several cubes to bejoined together,
If ice is not used frequently, old ice cubes will
become cloudy, taste stale and shrink,
NOTE: In homes with lower-than-average water
pressure, you may hear the ice maker cycle
multiple times when making one batch of ice,
l Cafe. Control Style
Ice Box
Lift and pull
How to Turn the ice Maker On/Off
CYE/CFE Use the settings menu on the touchscreen
Ice Bucket and Dispenser
. Open the ice box door on inside of the left
door,
. Pull up and out on on the ice bucket in
the left hand door to remove it from the
compartment,
. To replace the ice bucket, set it on the
guide brackets and push until the ice
bucket seats properly,
. If bucket cannot be replaced, rotate the ice
bucket fork 1/4 turn clockwise,
Extra Ice Storage
There is additional ice storage in the freezer compartment drawer,
. Open the freezer drawer,
. The ice bucket is located on the left side below the mullion,
. Pull the ice bucket forward,
18
Page 19

Care and cleaning of the refrigerator.
Cleaning the Outside
The stainless steel panels, door handles and trim.
Do not use appliance wax, polish, bleach, or other products
containing chlorine on stainless steel,
Stainless steel can be cleaned with a commercially available
stainless steel cleaner, A spray-on stainless steel cleaner
works best,
Cleaning the Inside
Unplug the refrigerator before cleaning.
If this is not practical, wring excess moisture out of sponge or
cloth when cleaning around switches, lights or controls,
Use an appliance wax polish on the inside surface between
the doors,
Use warm water and baking soda solution-about a
tablespoon (15 ml) of baking soda to a quart (1 liter) of water,
This both cleans and neutralizes odors, Rinse and wipe dry,
Behind the Refrigerator
Be careful when moving the refrigerator away from the wall, All
types of floor coverings can be damaged, particularly cushioned
coverings and those with embossed surfaces,
GEAppliances.com
Silver-accented plastic parts.
Wash parts with soap or other mild detergents, Wipe clean with
a sponge, damp cloth or paper towel,
Do not use scouring pads, powdered cleaners, bleach or
cleaners containing bleach because these products can
scratch and weaken the paint finish,
Should spill tray need cleaning use lime remover.
Do not clean glass shelves or covers
with warm water when they are cold, Glass shelves and
covers may break if exposed to sudden temperature
changes or impact such as bumping or dropping,
Tempered glass is designed to shatter into many small
pieces if it breaks.
Pull the refrigerator straight out and return it to position by
pushing it straight in, Moving the refrigerator in a side direction
may result in damage to the floor covering or refrigerator,
Raise the leveling legs located at the bottom front of the
refrigerator,
Preparing for Vacation
For long vacations or absences, remove food and unplug the
refrigerator, Clean the interior with a baking soda solution of
one tablespoon (15 ml) of baking soda to one quart (1 liter) of
water, Leave the doors open,
LCD Models: turn refrigerator off at control (pg 7),
If the temperature can drop below freezing, have a qualified
service technician drain the water supply system to prevent
serious property damage due to flooding,
1) Turn refrigerator off (pg, 7) or unplug the refrigerator,
2) Empty ice bucket
Preparing to Move
Secure all loose items such as shelves and drawers by taping
them securely in place to prevent damage,
When using a hand truck to move the refrigerator, do not rest
the front or back of the refrigerator against the hand truck, This
could damage the refrigerator,
Lower the leveling legs until they touch the floor,
When pushing the refrigerator back, make sure you don't
roll over the power cord or water supply line.
3) Turn water supply off
If you cut the water supply off, turn offthe ice maker (pg. 18).
Upon returning from vacation:
1) Replace the water filter,
2) Run 2 gallons of water through the cold water dispenser
(about 5 minutes) to flush the system,
3) Dispense 185°F hot water 3 times (10 oz, each) to flush the
system,
Handle only from the sides of the refrigerator,
Be sure the ref_'igemtor st_j/s in an upright position during
moving,
19
Page 20

Replacing the lights
Refrigerator Lights (LEDs)
There is LED lighting in fresh food
compartment and on the bottom of
the fresh food doors to light the freezer
compartment,
An authorized technician will need to
replace the LED light,
If this assembly needs to be replaced, call
GE Service at 1,800,432,2737
in the United States or 1,800,561,3344
in Canada,
2O
Page 21

Installation
Refrigerator
Instructions
Questions? Call 800.GE.CARES(800.432.2737) or visit our Website at: GEAppliances.com
In Canada, call 1.800.561.3344 or visit our Website at: www.GEAppliances.ca
BEFORE YOU BEGIN
Read these instructions completely and carefully.
Built-in style models (model PYE,CYE,and PWE) are
top heavy, especially with any doors open. These
models must be secured with the anti-tip floor
bracket to prevent tipping forward, which could
result in death or serious injury. Read and follow
the entire installation instructions for installing the
anti-tip floor bracket packed with your refrigerator.
• IMPORTANT-Observeallgoverningcodes
and ordinances. Savethese instructions for local
inspector's use,
• Note to Installer- Besureto leavethese instructions with
the Consumer,
• Note to Consumer- Keepthese instructionsfor future
reference,
• Skilllevel- Installation of this appliance requires basic
mechanical skills,
• Completion time - Refrigerator Installationcan vary
Water Line Installation 30 minutes
• Properinstallation isthe responsibilityof the installer,
• Product failure due to improper installation isnot covered
under the Warranty,
TOOLSYOU MAY NEED
Adjustable Wrench
1/4" Outer Diameter
Compression Nut
and Ferrule (sleeve)
1/8", 3/32", 1/4" & 5/32"
Allen Wrenches
1/8" Drill Bit and
Electric or Hand Drill
Pencil 1/4" Nut Driver
GE CaT#TM models
3/_" Socket Ratchet/Driver
Phillips-Head Screwdriver
Flat-Head Screwdriver
Tape Measure
PREPARATION
MOVING THE REFRIGERATOR INDOORS
If the refrigerator will not fit through a doorway, the
refrigerator door and freezer drawer can be removed,
• To remove the refrigerator door, seethe Installingthe
Refrigeratorsection,
• To remove the freezer drawer, seethe Removing the
FreezerDrawer section,
WATER SUPPLY TO THE ICE MAKER AND DISPENSER
If the refrigerator has an ice maker, it will haveto be
connected to a cold water line,AGEwater supply
kit (containing tubing, shutoff valve,fittings and
instructions)is availableat extra cost from your dealer,
byvisiting our website at GEAppliances,com (inCanada
at www,GEAppliances,ca)orfrom Partsand Accessories,
800,626,2002(inCanada 1,800,661,1616),
21
Pliers
Torx T20,T25
Level
Page 22

Installation Instructions
DIMENSIONS All measurements are given with leveling leg fully retracted,
69
CYEOnly
......... 35_4" ..............
31¼"
CFE Only
......... 3 53/4" ...............
Case Depth w/o
Doors 29 _" CFE
24 _/' CYE
23 ¼" CFE
¼" CYE
Height from
floor to hinge
cover top 69 7/j,
69"
Additional Dimensions
CFE CYE
Overall Height to Top of 697A'' 69W'
Hinge Cover
MOVING THEREFRIGERATOR
• Usingthe char below determine ifthe width of your passageway can accommodate the depth of the refrigerator,
Ensureyou have clearance to prevent damage to the refrigerator before safely moving it to the final location,
• Ifpassageways are large enough to accommodate the refrigerator without removing the handles skip to Step 6,Leave
tape, film and all packaging on doors until the refrigerator isin the final location,
• NOTE:Usea padded hand truck or moving straps to move this refrigerator. Placethe refrigerator on the hand truck
with a side against the truck. We strongly recommend that two people move and complete this installation.
If your model number starts with CFE
Fully Removing P_emo_ng Casew/ Case on_
_bled Handles LHDoor FzSlides (no hln_les)
36.25" 35.25" 33.75" 30.25" 29,375"
Remove door parts In order untlldlmenslon Is less than _penlng
Height to Top of Cabinet 69" 69"
Case Depth without Doors 29%" 24%
Overall Exterior Case Width 35_" 35_"
Overall Exterior Depth 36X" 31X"
Doors/Drawers with Handles
If your model number starts with eYE
Fully Removing Removing Casew/ Case only
Assembled Handles LH Door FzSlides (no hinges)
. 28.75" 25.25" 24.375"
22
Page 23

Installation Instructions
INSTALLING THE REFRIGERATOR
REFRIGERATORLOCATION
• Do not install the refrigerator where the temperature will
go below 60°F(16°C)because it will not run often enough
to maintain proper temperatures,
• Do not install the refrigerator where the temperature will
go above l O0°F(37°0)becauseit will not perform properly,
• Install iton a floor strong enough to support it fully loaded,
REMOVE THE FRESH FOOD
E]
DOOR HANDLE
Handle Design varies based on models, however
Installation is same,
Stainlesssteel and plastic handles:
Q Loosen the set screws with the 1/8" Allen wrench and
remove the handle,
NOTE: If the handle mounting fasteners need to be tightened or
removed, use a 1/4" Allen wrench,
CLEARANCES
Allowthe following clearances for ease of installation, proper
air circulation and plumbing and electrical connections,
Sides 1/8" (3 mm)
Top 1"(25mm) Cabinet/Hinge Cover
Back 2" (50mm)
REMOVINGTHEREFRIGERATORDOORS
• IMPORTANTNOTE.'Thisrefrigerator is 361/4"deep(311/4"
for CYEmodels),Doorsand passageways leading to the
installation location must be at least 36W' wide in order to
leavethe doors and handlesattached to the refrigerator
while transporting it into the installation location, If
passagewaysare lessthan 36W', the refrigerator doorsand
handlescan easily be scratched and damaged, Thetop cap
and doors can be removed to allow the refrigerator to be
safelymoved indoors,Ifpassageways are lessthan 31W',
start with Step 1,
• If it is not necessaryto remove doors,skipto Step11,Leave
tape and all packaging on doors until the refrigerator is inthe
final location,
• NOTE."Usea padded hand truck to move this refrigerator,
Placethe refrigerator on the hand truck with a sideagainst
the truck, Westrongly recommend that TWOPEOPLEmove
and complete this installation,
Mounting
Fasteners
Leave film
on until after
installation
E]
REMOVE THE FREEZER DOOR HANDLE
Handle Designvaries based on models, however
Installation is same,
Stainlesssteel and plastic handles:
Loosen the set screws with the 1/8" Allen wrench and remove the
handle,
NOTE:If the handle mounting fasteners need to be tightened or
removed, use a 1/4" Allenwrench,
Mounting
Fasteners
23
Leave film
on until after
installation
Reinstall the handles using the same
procedure as removing,
Page 24

Installation Instructions
INSTALLING THE REFRIGERATOR (cont.)
D REMOVETHEREFRIGERATORDOORS
r_Securely tape the door shut with masking tape or have
a second person support the door,
r_Start with left-hand door first; Remove the hinge cover
on top of the left refrigerator door by removing all hex
screws and pulling it up, Do the same for the
right-hand door and the middle cover,
Hinge
Cover '_
r_Disconnect both electrical connectors at the top cover,
REMOVETHEREFRIGERATORDOORS(cont}
r_ Disconnect the line from the back of the unit
pressing down on the dark grey collar while pulling up
on the water line,
Pull waterline through case conduit from the top to frec
the line for door removal, The water line is more than 4'
long and may need to be taped to Door for accessibilit)
when reinstalling,
water
/
r_using a 3/8" socket ratchet/driver, remove the screws
securing the top hinge to the cabinet,
then lift the hinge straight up to free the hinge pin frorr
the location in the top of the door,
by
Remove the 1/4" hex head screw to disconnect the
ground wire from the hinge,
Remove the 1/4" hex head screw to remove the strain
relief from the water line,
Ground
_ screw
Lifting Hazard.
Single person lift could cause injury. Use assistance
when handling, moving or lifting the refrigerator doors.
Note: when removing door, to prevent damage to door
and electronics, carefully place the door in a proper
location,
Note: The lower door hinge pin and hinge are keyed and
must be matched correctly for the door to self close
properly, Please follow the directions carefully,
24
Page 25

Installation Instructions
INSTALLING THE REFRIGERATOR (cont.)
REMOVETHEREFRIGERATORDOORS(cent}
Note:for proper installation later, pleasefollow the next step
carefully.
r_ Fresh Food doors to be REMOVEDand INSTALLED
opened at 90 with case front,
Lift up & off
center hinge
)en Door
to 90°
REMOVE OPPOSITE DOOR
Follow the same procedure on the opposite
door, There are no wires or water lines on the opposite
side
F]REMOVE CENTER HINGE (if necessary)
Remove the 3/8" screws securing the center hinge to the cabinet,
Use T20 driver to remove outboard screw
[ REINSTALLINGTHEREFRIGERATORDOORS
Reversesteps 1through 4 to reinstall refrigerator, follow
details below for critical alignments.
r_ Reinstall center hinge first and torque the screws to
65 in-lbs. With the LH door at 90° to the front of
the case, lower the refrigerator door onto the center
hinge. Ensurethat the door and hinge align correctly.
r_ Rotate doors closed and make sure moveable center
sealing portion of the door aligns with the striker./fthe
door will not self-close after reinstalling, remove door,
turn door upside down, check alignment mark and
arrow, (there isan alignment mark on the door closure
mechanism/t corresponds to an alignment mark on
the bottom end cap. Rotate door closure mechanism to
align mark and arrow, reinstall door).
Underside OF
Fresh Food Door i_
Remove
center
screw Loosen Outer screws
align marks
If door cannot be installed at 90 ° follow steps below:
1. If space or model limits opening door to less than 180", then:
a) Remove door, carefully turn door upside down.
b) Check alignment of door closure mechanism shaft on
underside of door. The flats on the shaft should
correspond to alignment tab on plastic ring or mark
on bottom end cap.
c) If shaft is not aligned to tab/mark, using 5/32" Allen
wrench, rotate door closure mechanism shaft
counterclockwise for right door and clockwise for left
door. Then align flat with tab/mark.
d) Install the door at 90 _'.
Securely tape the door shut with masking tape or
have a second person support the door. Reinstall the
top hinge and torque the screws to 65 in-lbs.
r_ Be sure to reinstall the ground wire and strain reliefto
the top hinge.
r_ Reinstallthe hinge cover. Note: Ensure wires are not
pinched or under screw bosses before tightening screws.
25
Page 26

Installation Instructions
INSTALLING THE REFRIGERATOR (cont.)
l'_ REMOVETHE FREEZERDOOR
E] Pullthe freezer door open to full extension,
r_ Remove3 attachment screws,located at the bottom
on each side of the freezerdoor using3/8" hexsocket
driver,
i
E] REPLACING THE FREEZERDOOR
r_ Pullthe slide Mechanism to full extensionusing both
hands simultaneously,
r_ Removethe basket resting on the slides,
_1|1 ',..... -"
Lifting Hazard
Freezer door is heavy Use both hands to secure the
door before lifting,
r_ Liftthe freezer door and place it on the slide mechanism
_ Lifting Hazard
Freezerdoor is heavy Useboth handsto secure the
door before lifting,
[] Liftthe freezer door to disengage itfrom the slide
mechanism
Thedoor can safely rest on the bottom, Do not rest the
door on any other surfacesto avoid scratches,
Pushthe slide mechanism backcompletely until it self
retracts,
Align and insert
tab on freezer
door bracket
into slot on
freezer slide
bracket,
r_ Replacethe attachment screws and torque the screws
to 65 in-lb
r_ Foradjusting freezer door gaps, follow the instructions
on pg 27,
r_ Replacethe basket
26
Page 27

Installation Instructions
INSTALLING THE REFRIGERATOR (cont.)
Instructions for adjusting freezer door gaps:
IMPORTANT!
The 6 mounting screws (3 on each side) are NOT interchangeable with the center or top hinge
screws. Drawer screws have flat washer heads, and other screws have lines/ribs on washer heads.
After installation of the freezer door, check for uniform gaps (top and bottom of right and left hand side)
with the template provided.
In the event of excessive gaps use the following steps to adjust the freezer door.
Step 1 - Loosen the 3 screws on each side (right and left) of the freezer door.
Step 2 - Adjust set screw clockwise if gap at the top is too big (see template). Turn the set screw using 3/32" hex
key clockwise by quarter to half a rotation
Step 3 - Adjust set screw counter-clockwise if gap at the bottom is too big (see template). Turn the set screw
using 3/32" hex key counter-clockwise by quarter to half a rotation
Step 4 - Tighten the 3 screws on each side (right and left).
Step 5 - Re-check the gaps using the template and repeat steps 1 to 4 if required and complete with step 5.
Fold here for using ternplz?te
Template for checking gaps.
Gap should be 0.6" or below.
Gabarit pour ve.rifier les
e.carts. L'e.cart dolt 6tre de
0,6 po (1,5 cm) ou moins.
Plantilla para el control de
espacios. Elespacio deberia
ser de 0.6" o inferior.
Set Screw
Vis d'ajustement
Tornillo del Set
GE Appliances
General Electric Company
Louisville, KY40225
GEAppfiances, com
Plier ici pour uti/iser /e gabarit
Step 2
Etape 2
Paso 2
Re_rto 239D4744POO7
27
Dob/e/o aquf para usar I_ plz_nti/lz_
\
Step 1
Etape 1
Paso1
Step 4
Etape4
Paso4
f
Step 3
Etape 3
Paso 3
Pub No. 37-45474-2 77- 72 GE
Page 28

Installation Instructions
INSTALLING THE REFRIGERATOR (cont.)
LEVEL THE FREEZER DOOR
Locate the height adjuster cam in the freezer
D
door. Slightly loosen the three door attachment
screws on both sides using a 3/8" hex socket
driver.
LEVELTHEFREEZERDOOR(cont.)
[] Lift the door on the side requiring adjustment,
rotate the cam to required position.
0
0 - Initial position
1 - Lift by 0.050"
-1 - Lower by 0.050"
-2 - Lower by 0.100
-3 - Lower by 0.150"
r_ After adjustment tighten the 3 attachment
screws using to 65 in-lb.
r_ Locate and loosen the cam screw using the
T-27 screw driver.
\
[_1 REMOVEPACKAGING
A) Remove all tape, foam and protective
packing from shelves and drawers.
28
Page 29

Installation Instructions
INSTALLING THE REFRIGERATOR (cont,)
Anti-Tip Floor Bracket Installation (Models PYE,CYE,and PINE only)
_Tip Over Hazard.
Built-in style models (model PYE,CYE,and PWE) are
top heavy, especially with any doors open. These
models must be secured with the anti-tip floor
bracket to prevent tipping forward, which could
result in death or serious injury. Read and follow
the entire installation instructions for installing the
anti-tip floor bracket packed with your refrigerator.
NOTE:
If you did not receive an anti-tip bracket with your
purchase, call 1.800.626.8774 to receive one at no
cost. (In Canada, call 1.800.561.3344.)
For installation instructions of the bracket, visit:
www.GEApplia nces.com.
(In Canada, www.GEAppliances.ca.)
MATERIALSYOU MAY NEED (notincluded)
TOOLS YOU WILL NEED
1/8" (3 mm) Drill Bit and
Electric or Hand Drill
,aoZ_ F.....................
Pencil
_1 OCATING THE ANTI-TIP FLOOR
BRACKET
r_ Placethe anti-tip floor bracket locater template
(included inside the anti-tip kit) onto the floor up
against the rear wall, within W, and in line with the
desired location of the RHside of the refrigerator
(seeFigure 1),
Figure 1 - Installation Overview
Floor - Concrete Holes
(2 Holes)
Floor -
(2 Holes) Holes
Tape measure
5/16" (8 mm) Nut Driver
Floor Bracket
to Install
Lag B_
1/4" (6 mm) x 1-1/2" (38 mm)
Drill BitAppropriate for Anchors
For Anti-Tip Bracket Mounted on CONCRETE Floors Only
[_] MEASURECABINETOPENING
AVAILABLEVS.REFRIGERATORWIDTH
Anchor Sleeves
1/2" (12mm) OD
Measure width of cabinet opening where refrigerator
will be placed, W,
Be sureto account for any countertop overhang,
baseboard thickness and any clearance desired, Width,
W, should not be lessthan 36", The refrigerator will be
placed approximately in the middle of this opening,
Rear Wall
._ W '_' Overhang
"_ Larger) Plus
REFRIGERATOR
Front
Baseboard
I _ Thickness or
' I Countertop
(Whichever Is
Any Desired
Clearance
RHSide
Base Bracket _--_ RH Side of
on the
Refrigerator Refrigerator
Placethe anti-tip floor bracket onto the locater
[]
template with its RHfloor holes lined up with
the floor holes indicated on the template sheet,
approximately 15 X" from the edge of the sheet or
the RHside of the refrigerator,
Hold down in position and use the anti-tip floor
r61
bracket as a template for marking the holes based
upon your configuration and type of construction
as shown in Step 3, Mark the hole locations with a
pencil, nail or awl,
NOTE:
• It is REQUIREDto use at least 2 screws to mount
the floor bracket (one on each side of the anti-tip
floor bracket), Both must be into either the wall
or the floor, Figure 2 indicates all the acceptable
mounting configurations for screws, Identify the
screw holes on the anti-tip floor bracket for your
configuration,
Refertp 239D1142 POOl Pub# 31-45484-2
29
Rear RH
Corner of
Cabinet Wall
Locater Template
Sheet
Page 30

Installation Instructions
INSTALLING THE REFRIGERATOR (cont,)
And- Tip Floor Bracket Installation (Models PYE,CYE,and PINE only) (cont.)
CONCRETEWall and Floor Construction:
I_ OCATING THE ANTI-TIP FLOOR
BRACKET (cont.)
Figure 2 - Acceptable Screw
Placement Locations
Recommended Installation
- Wood
Minimum Acceptable #1 -
Wall Plate Stud
Recommended Installation
- Concrete
Minimum Acceptable #2 -
Wood Floor
m
• Anchors required (not provided):
4 each 1/4" (6 mm) x 1-1/2" (38 mm)lag bolts
4 each 1/2" (12 mm) O.D. sleeve anchors
• Drill the recommended size holes for the
anchors into the concrete at the center of the
holes marked in Step 2.
• Install the sleeve anchors into the drilled
holes. Place the anti-tip floor bracket as
indicated in Step 2. Remove the Iocator
template from the floor.
• Install the lag bolts through the anti-tip floor
bracket and tighten appropriately.
WOOD Wall and TILE Floor Construction:
[]
• For this special case, locate the 2 wall holes
identified in Fig. 1. Drill an angled 1/8" (3 mm)
pilot hole (approx. as shown in Fig. 3)in the
center of each hole.
• Mount the anti-tip floor bracket using the
Minimum Acceptable Installation #1, as
illustrated in Fig. 2.
Minimum Acceptable #3 -
Concrete Floor
_ ANTI-TIPBRACKETINSTALLATION
rA1 WOOD Wall and Floor Construction:
• Drill the appropriate number of 1/8" (3 mm)
pilot holes in the center of each floor bracket
hole being used (a nail or awl may be used
if a drill is not available) AND remove the
Iocator template from the floor.
• Mount the anti-tip floor bracket by fastening the
2, or recommended 4, #10-16 hex-head screws
tightly into place as illustrated in Figure 3,
Figure 3 - Attachment to Wall and Floor
2 Screws Floor rl Wall
RearRH MustEnter Bracket II
Cornerof the Woodor _ I I
Refrigerator _J]]]_ MetalStud _ X I ] Wall
Floor
_] OSITIONING THE REFRIGERATOR
TO ENGAGETHEANTI-TIP FLOOR
AND BASEBRACKETS
Before pushing the refrigerator into the
opening, plug the power cord into the
%
receptacle and connect waterline (if equipped).
Check for leaks.
Locate the refrigerator's RH side and move back
approximately in line with the RH side of the
cabinet opening, W, This should position the
anti-tip floor bracket to engage the anti-tip base
bracket on the refrigerator,
Gently roll the refrigerator back into the cabinet
[] opening until it comes to a complete stop, Check to
see if the refrigerator front lines up with the cabinet
front face, If not, carefully rock the refrigerator
forward and backward until engagement occurs
and you notice that the refrigerator isfully pushed
up against the rear wall,
If Applicable: Adjust the rear (and front) wheel
height settings to fully engage the rear anti-tip
rD1 brackets, while also aligning the refrigerator
front with the cabinet front face.
NOTE:
If you pull the refrigerator out and away from the wall for
any reason, make sure the anti-tip floor bracket is engaged
when the refrigerator ispushed back against the rear wall,
3O
Refer tp 239D1142 P001 Pub# 31-45484-2
Page 31
Installation Instructions
INSTALLING THE REFRIGERATOR (cont.)
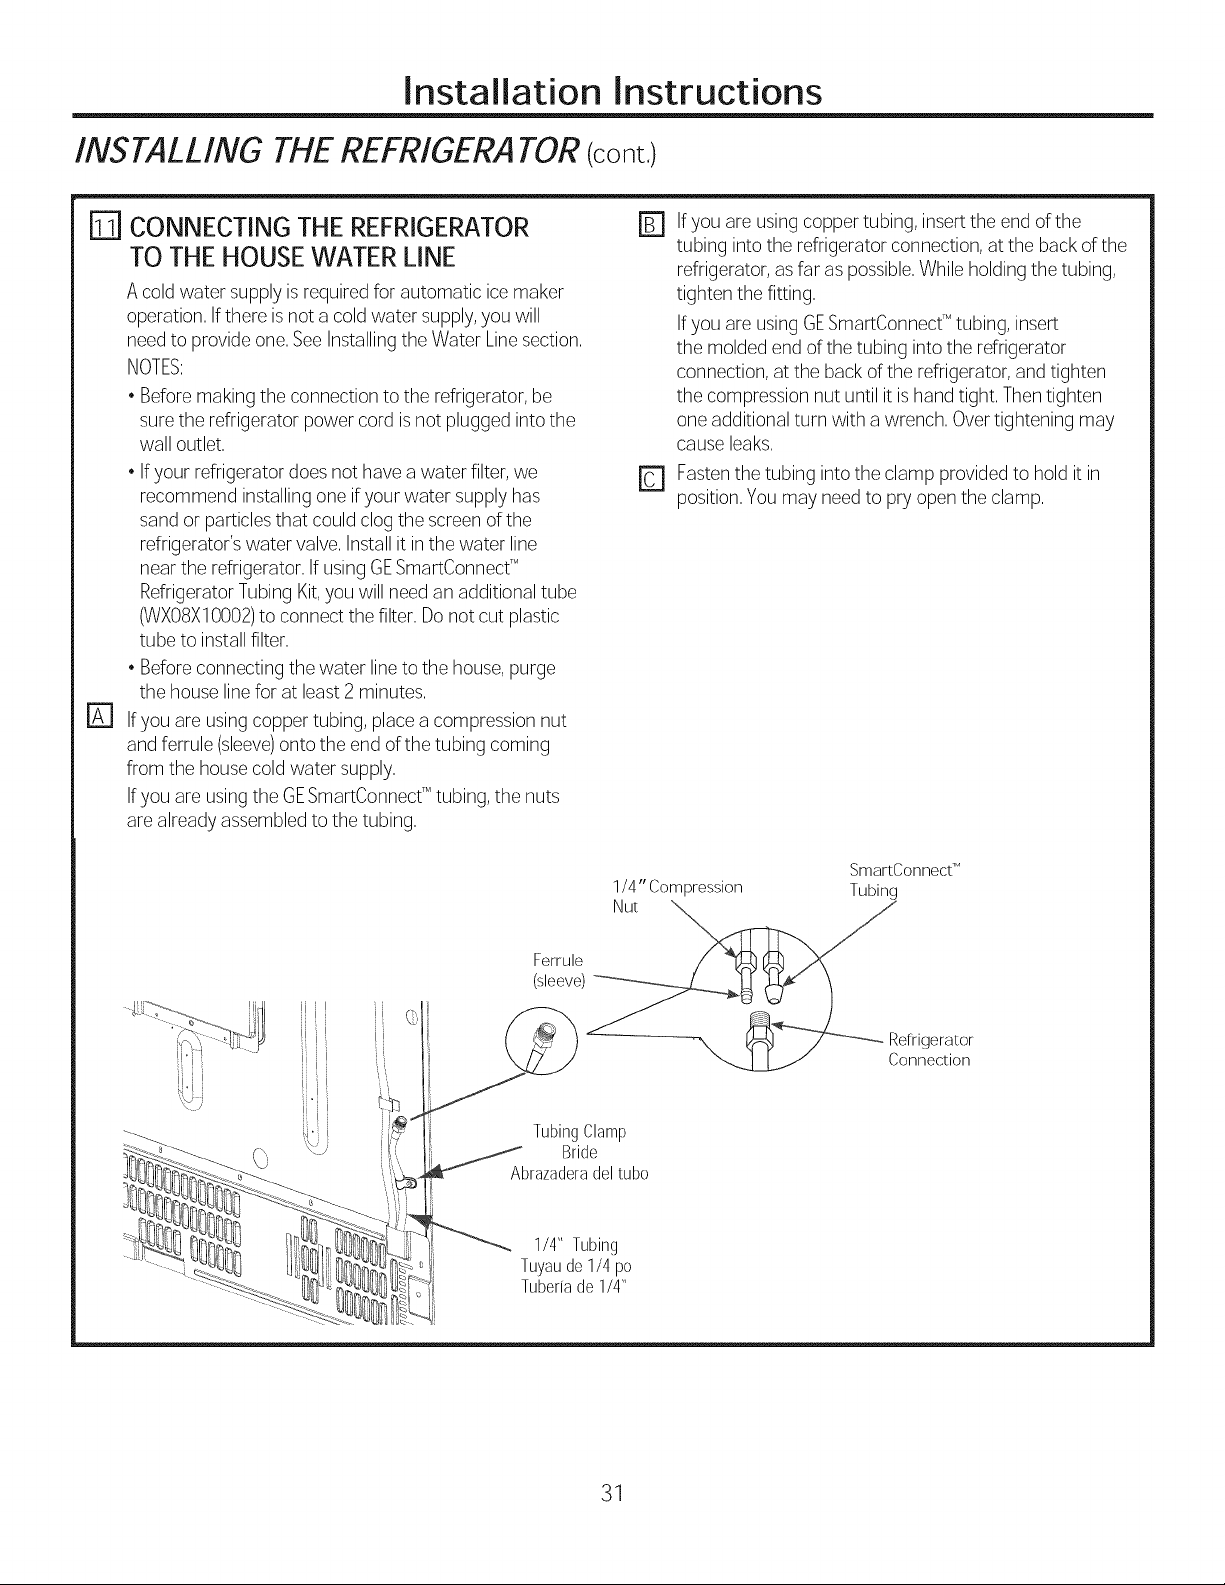
CONNECTING THE REFRIGERATOR []
TO THE HOUSE WATER LINE
A coldwater supply is required for automatic icemaker
operation, Ifthere is not a cold water supply,you will
need to provideone, SeeInstallingthe Water Linesection,
NOTES:
• Beforemaking the connection to the refrigerator, be
surethe refrigerator power cord isnot plugged into the
wall outlet,
• Ifyour refrigerator does not have a water filter, we
recommend installing one ifyour water supply has
sandor particlesthat could clogthe screen ofthe
refrigerator'swater valve, Installit in the water line
near the refrigerator, If using GESmartConnecC
RefrigeratorTubing Kit,you will need an additional tube
(WXO8X10002)to connect the filter, Donot cut plastic
tube to install filter,
• Beforeconnecting the water lineto the house,purge
the house linefor at least 2 minutes,
D
Ifyou are usingcopper tubing, placea compression nut
and ferrule (sleeve)onto the end of the tubing coming
from the house coldwater supply,
Ifyou are usingthe GESmartOonnecfMtubing, the nuts
are already assembledto the tubing,
If you are usingcopper tubing, insertthe end of the
tubing into the refrigerator connection, at the back of the
refrigerator, asfar as possible,While holding the tubing,
tighten the fitting,
If you are usingGESmartConnecfMtubing, insert
the molded end of the tubing into the refrigerator
connection, at the back of the refrigerator, and tighten
the compression nut until it is hand tight, Thentighten
one additional turn with a wrench, Overtightening may
cause leaks,
Fastenthe tubing into the clamp provided to hold it in
n
position,Youmay needto pry open the clamp,
ii _
ii
SmartConnect 'M
1/4" Compression Tubing
Ferrule / _ _) ._
.... _ _ _ Refrigerator
%4,7 _ __ Connection
TubingClamp
Bride
Abrazaderadeltubo
1/4" Tubing
Tuyaude 1/4 po
Tuberfade 1/4"
31
Page 32

Installation Instructions
INSTALLING THE REFRIGERATOR (cont.)
IT_ TURN ON THE WATER SUPPLY
Turnthe water on at the shutoff valve (housewater
supply)and check for any leaks,
IT_ PLUG IN THE REFRIGERATOR
Seethe grounding information attached to the power
cord,
LEVELTHE REFRIGERATOR
The leveling legs have 2 purposes:
1) Leveling legs adjust so the refrigerator is
firmly positioned on the floor and does not
wobble.
2) Leveling legs serve as a stabilizing brake
to hold the refrigerator securely in position
during operation and cleaning. The leveling
legs also prevent the refrigerator from
tipping.
LEVELTHEREFRIGERATORDOORS
Remember a level refrigerator is necessary for
getting the doors perfectly even. If you need
help, review the previous section on leveling the
refrigerator.
r_ if you open the freezer door, you can see
the center hinge.
r_ Insert 1/4" Allen wrench into the shaft of the
center hinge.
r_ Adjust the height by turning clockwise
or counterclockwise. When you turn
counterclockwise, the door will move up.
When
the left
door is
lower than
the right
door,
Adjustment
point
When
the left
door is
higher
than
the right
door.
r_ Turn the leveling legs clockwise to raise
the refrigerator, counterclockwise to lower it.
Flat-Head Screwdriver
NOTICE:To avoid possible property
damage, the leveling legs must be firmly
touching the floor.
32
Page 33

Installation Instructions
INSTALLING THE REFRIGERATOR (cont.)
Refrigerator Assembly Instructions, suggested assembly.
e<ZZ3
I _ (Select
To place bins into doors:
Match your bin with the letter shown.
O
Position the bin hooks over the
bin Iocator and push forward until
inserted fully.
O Push bin down until locked into
position.
models
Bin hook
rear each side
Bin Iocatol
each side
33
Referto 239D4129P002 Pub# 31-45498
Page 34

Installation Instructions
INSTALLING THE WA TE!?LINE
BEFOREYOU BEGIN
Recommended copper water supply kits are WX8X2,
WXSX3 or WXSX4, depending on the amount of tubing
you need. Approved plastic water supply lines are GE
SmartConnect _MRefrigerator Tubing (WXOSX10006,
WXOSX10015 and WXOSXl 0025).
When connecting your refrigerator to a GE Reverse
Osmosis Water System, the only approved installation
iswith a GE RVKit. For other reverse osmosis water
systems, follow the manufacturer's recommendations.
If the water supply to the refrigerator is from a
Reverse Osmosis Water Filtration System (RO)
AND the refrigerator also has a water filter,
use the refrigerator's filter bypass plug. Using
the refrigerator's water filtration cartridge in
conjunction with an ROwater filter can result in
hollow ice cubes.
This water line installation is not warranted by the
refrigerator or ice maker manufacturer. Follow
these instructions carefully to minimize the risk of
expensive water damage.
Water hammer (water banging in the pipes)in
house plumbing can cause damage to refrigerator
parts and lead to water leakage or flooding. Call a
qualified plumber to correct water hammer before
installing the water supply line to the refrigerator.
To prevent burns and product damage, do not hook
up the water line to the hot water line.
For LCD Models: If the refrigerator is operated
before the water connection is made to the ice
maker, see ICE MAKER under "settings" menu of
the LCD Operations section and follow the screen
commands to turn the ice maker OFF.
WHAT YOU WILL NEED
J
• Copper or GE SmartConnect 'MRefrigerator Tubing
kit, 1/4" outer diameter to connect
the refrigerator to the water supply. If using
copper, be sure both ends of the tubing are
cut square.
To determine how much tubing you need:
measure the distance from the water valve
on the back of the refrigerator to the water supply
pipe. Be sure there is sufficient extra tubing to allow
the refrigerator to move out from the wall after
installation.
GE SmartConnect 'MRefrigerator Tubing Kits are
available in the following lengths:
6' (1.8 m) - WXOSX10006
15'(4.6 m) - WXOSX10015
25'(7.6 m) - WXOSX10025
Do not install the ice maker tubing in areas where
temperatures fall below freezing.
When using any electrical device (such as a power
drill) during installation, be sure the device is double
insulated or grounded in a manner to prevent the
hazard of electric shock, or is battery powered.
All installations must be in accordance with local
plumbing code requirements.
34
Page 35

Installation Instructions
INSTALLING THEWATE!?LINE (cont,)
WHAT YOU WILL NEED (CONT.)
NOTE:The only GE approved plastic tubing
is that supplied in GE SmartConnect _MRefrigerator
Tubing kits. Do not use any other plastic water
supply line because the line is under pressure at all
times. Certain types of plastic will crack or rupture
with age and cause water damage to your home.
• AGE water supply kit (containing tubing,
shutoff valve and fittings listed below)is available
at extra cost from your dealer or from Parts
and Accessories, 800.626.2002 (in Canada
1.800.661.1616).
• A cold water supply. The water pressure must be
between 20 and 120 p.s.i.(1.4-8.1 bar).
• Power drill. "-Y "_
.1/2" or adjustable wrench.
• Straight and Phillips blade screwdriver.
Install the shutoff valve on the nearest frequently
used drinking water line.
IT] SHUT OFF THE MAIN WATER SUPPLY
Turn on the nearest faucet long enough to clear
the line of water.
IT] CHOOSE THE VALVE LOCATION
Choose a location for the valve that is easily
accessible. It is best to connect into the side
of a vertical water pipe. When it is necessary
to connect into a horizontal water pipe, make
the connection to the top or side, rather than at
the bottom, to avoid drawing off any sediment
from the water pipe.
• Two 1/4" outer diameter compression nuts
and 2 ferrules (sleeves)-to connect the copper
tubing to the shutoff valve and the refrigerator
water valve.
OR
• If you are using a GE SmartConnect rM
Refrigerator Tubing kit, the necessary fittings
are preassembled to the tubing.
• If your existing copper water line has a flared
fitting at the end, you will need an adapter
(available at plumbing supply stores) to connect
the water line to the refrigerator ORyou can cut
off the flared fitting with a tube cutter and then
use a compression fitting. Do not cut formed end
from GE SmartConnect _MRefrigerator tubing.
• Shutoff valve to connect to the cold water line.
The shutoff valve should have a water inlet with
a minimum inside diameter of 5/32" at the point of
connection to the COLD WATER LINE. Saddle-type
shutoff valves are included in many water supply
kits. Before purchasing, make sure a saddle-type
valve complies with your local plumbing codes.
D DRILL THE HOLE FOR THE VALVE
Drill a 1/4" hole in the water pipe (even if using
a self-piercing valve), using a sharp bit. Remove
any burrs resulting from drilling the hole in
the pipe.
Take care not to allow water to drain into
the drill.
Failure to drill a 1/4" hole may result in reduced
ice production or smaller cubes.
35
Page 36

Installation
INSTALLING THE WATER LINE (cent,)
Instructions
I_3 FASTEN THE SHUTOFF VALVE
Fasten the shutoff valve to the cold water pipe
with the pipe clamp.
Pipe Clam
,)
Saddle-Type
Shutoff Valve
NOTE: Commonwealth of Massachusetts
Plumbing Codes 248CMR shall be adhered to.
Saddle valves are illegal and use is not permitted
in Massachusetts. Consult with your licensed
plumber.
D TIGHTEN THE PIPECLAMP
Tighten the clamp screws until the sealing
washer begins to swell.
NOTE: Do not over tighten or you may crush
the tubing.
Washer
Pipe
-- Vertical Cold
Water Pipe
Inlet End
F1CONNECT THE TUBING TO THE VALVE
Place the compression nut and ferrule (sleeve)
for copper tubing onto the end of the tubing
and connect it to the shutoff valve.
Make sure the tubing is fully inserted into
the valve. Tighten the compression nut securely.
For plastic tubing from a GE SmartConnect _M
Refrigerator Tubing kit, insert the molded end
of the tubing into the shutoff valve and tighten
compression nut until it is hand tight, then
tighten one additional turn with a wrench. Over
tightening may cause leaks.
Saddle-Type
Shutoff Valve
,_ _ lubing
Packing Nut
Outlet Valve
NOTE: Commonwealth of Massachusetts
Plumbing Codes 248CMR shall be adhered to.
Saddle valves are illegal and use is not permitted
in Massachusetts. Consult with your licensed
plumber.
Ferrule (sleeve)
Compression Nut
/ SrnartConnect 'M
Clam
Screw
E] ROUTE THE TUBING
Route the tubing between the cold water line
and the refrigerator.
Route the tubing through a hole drilled in the
wall or floor (behind the refrigerator or adjacent
base cabinet) as close to the wall as possible.
[] FLUSH OUT THE TUBING
Turn the main water supply on and flush out
the tubing until the water is clear.
Shut the water off at the water valve after about
one quart (1 liter), or 2 minutes, of water has
been flushed through the tubing.
To complete the installation of the refrigerator, go back
to Step 11 in Installing the Refrigerator.
36
Page 37

conditions.
Newer refrigerators sound different from older refrigerators.
Modern refrigerators have more features and use newer technology
Do you hear what I hear? These conditions are normal.
HUMMM...
--WHOOSH...
The new high efficiency compressor may run faster and longer
than your old refrigerator and you may hear ahigh-pitched hum
or pulsating sound while it isoperating,
You may hear a whooshing sound when the doors close,This is
due to pressure equalizing within the refrigerator,
After dispensing ice, a motor will close the icechute to keep
warn room air from entering the ice bucket, maintaining ice at a
freezing temperature,
The hum of the motor closing the icechute is normal, shortly after
dispensing ice,
CLICKS,POPS,
CRACKSand SNAPS
You may hear cracking or popping sounds when the refrigerator
isfirst plugged in,This happens as the refrigerator cools to the
correct temperature,
Expansionand contraction of cooling coils during and after
defrost can cause a cracking or popping sound,
On models with an ice maker, after an ice making cycle,you may
hear the ice cubes dropping into the ice bucket,
On models with a dispenser, during water dispense,you may
hear the water lines move at initial dispense and after dispenser
button isreleased,
WHIR!
iiiiiii_i¸
You may hear the fans spinning at high speeds,This happens
when the refrigerator isfirst plugged in,when the doors are
opened frequently or when a large amount of food isadded to
the refrigerator or freezer compartments, Thefans are helping to
maintain the correct temperatures,
iiiiiii_i¸
Thefans change speeds in order to provide optimal cooling and
energy savings,
WATERSOUNDS
6
Theflow of refrigerant through the cooling coils may make a
gurgling noise like boiling water,
Water dropping on the defrost heater can cause a sizzling,
popping or buzzing sound during the defrost cycle,
Awater dripping noise may occur during the defrost cycle as ice
melts from the evaporator and flows into the drain pan,
Closingthe door may cause a gurgling sound due to pressure
equalization,
STARTUPCOOLING
Itcan take upto 24 hours for the refrigerator and freezer
temperatures to match the display, During that time refrigerator and
freezer door openings should be minimized,
TIPS
Freezer coolsfirst,
Refrigerator compartment cools last; it may take several
hours after the freezer,
Turning off ice maker makes both fresh food and freezer
food cool fasten
37
Page 38

Before you carl for service...
Troubleshooting Tips
S'avetime and money./Review the charts on the following
pages first and you may not need to call for service.
Possible Causes What to Do
Water filter indicator must be reset On the LCD screen select
This is normal, This indicator will turn See About the Wz_terFilterfor more
on to tell you that you need to replace information,
the filter soon,
Handle needs adjusting See Attach Fresh Food H_ndle and
This is door alarm Turn off or disable with door closed,
The cooling system is off See About Controls,
Water dispenser has not been used Dispense water, until all water in system
for a long time is replenished,
Normal when refrigerator is first Wait 24 hours for the refrigerator to
installed completely cool down,
Water dispenser has not been used Dispense water, until all water in system
for a long time is replenished,
Water system has drained Allow several hours for replenished
Water supply line turned off or not See/nst_lling the W_ter Line,
connected
Water filter clogged or filter/bypass Replace filter cartridge or remove filter
plug not installed and install bypass plug,
Air may be trapped in the water Press the dispenser arm for at least 5
system minutes,
system SETTINGS, then WATER FILTER,
Select RESET,
Attach the Freezer Handle sections for
detailed instructions,
If door open and alarm is sounding, you
can only snooze the alarm,
supply to chill,
Water in reservoir is frozen because Set the refrigerator control to a warmer
the controls are set too cold setting and wait 24 hours, If the water
does not dispense after 24 hours, call for
service,
Newly installed filter cartridge Run cold water from the dispenser for
5 minutes (about 2 gallons),,
38
Page 39

Troubleshooting Tips {cont)
GEAppliances.com
Possible Causes
Supply line or shutoff valve is clogged
Water filter is clogged
Filter cartridge not properly installed
Ice maker is turned off
Air may be present in the water line
system, causing water to drip after
being dispensed
Photos not in root directory of USB
Photos not in JPEG format
Camera/PC used with USB cord
Normal, PRECISE FILL requires use of
dispenser paddle
Normal, when refrigerator first
plugged in or after extended power
outage
Normal
Operation disabled
Low water pressure Make sure water line is not kinked
Water supply line turned off or not See #_smlling the kV_ter Line
connected
What to Do
Call a plumber
Replace filter cartridge or remove filter and
install bypass plug
Remove and reinstall filter cartridge,
being certain that it locks in place,
Check that the ice maker is turned on, See
About the Automatic/ce M_ker,
Dispense water for at least 5 minutes to
remove air from system
Make sure the photos are in the root direc-
tory in your USB
Photos must be in JPEG format
Must use a USB drive
For a specific amount of water, select PRE-
CISE FILL to dispense water
Wait 24 hours for temperature in both
compartments to reach selected
temperatures,
The ice dispenser door may open after
closing freezer door to allow access
Make sure "Hot Water Disabled" is not
selected
Water filter clogged or filter/bypass
plug not installed
Water filter is partially clogged or low
water pressure (<40 psi)
39
Replace filter cartridge or remove filter and
install bypass plug
Replace filter cartridge or remove filter
and install bypass plug or increase water
pressure
Page 40

Truth or Myth?
The refrigerator water filter may require replacement,
even though the filter indicator has not turned red, or
reads "Filter Expired,"
The automatic ice maker in my refrigerator will
produce ice when the refrigerator is plugged in to a
power receptacle,
After the refrigerator has been plugged in and
connected to water, I will immediately have unlimited
chilled water available from the water dispenser,
After water dispenses, a few drops of water are
normal,
I will never see frost inside the freezer compartment,
When the refrigerator is installed, or after replac-
ing the water filter, I must dispense water for five
minutes,
To fill the ice bucket to the maximum capacity, I
should dispense 12 and 18 hours after installation,
I can use the water filter bypass plug to determine if
the filter requires replacement,
The top of the refrigerator doors will always be
aligned,
Refrigerator door handles can be easily tightened,
There may be odor and taste problems with your ice,
I can make fine adjustments to the fresh food doors
to align them,
Door handles should always be removed for
installation,
Answer
TRUE
MYTH
MYTH
TRUE
MYTH
TRUE
TRUE
TRUE
MYTH
TRUE
TRUE
TRUE
MYTH
Explanation
The water filter indicator will indicate the need to replace the water filter
every six months, Water quality varies from city to city; if water flow from
the dispenser slows, or ice production decreases, the water filter should
be replaced, even though the filter indicator may not indicate the need for
replacement,
The refrigerator must be connected to water, and the ice maker must be
turned on, Make sure the ice maker is turned on, only after the water line
is connected and water is turned on, The ice maker can be turned on/
offfrom the controls and ensure the ice maker is on, as indicated on the
refrigerator control panel, See About the Automatic/ce Maker,
The water dispenser tank located inside the refrigerator stores water
for dispensing, The water in this tank requires 24 hours to chill after
installation, High usage conditions will not allow time for the water to
chill,
A few drops of water may fall from the dispenser, after the dispenser
paddle has been released, To minimize the drops, remove the glass
slowly from the dispenser,
Frost inside the freezer typically indicates that the door is not properly
sealed, or has been left open, If frost is found, clear the frost using a
plastic spatula and towel, then check to ensure that no food packages
or containers are preventing the freezer door from closing, Check the
refrigerator control panel to ensure the door alarm is on,
A newly installed refrigerator or water filter contains air in the water lines,
Press the dispenser paddle and dispense cold water for at least 5 minutes
to remove air from the water line, and flush the filter,
Dispensing 3-4 cubes 12 hours and 18 hours after installation, allows ice
to disperse within the ice bucket, which in turns calls on the ice maker to
produce additional ice, Normal ice production lOO cubes in 24 hours,
Decrease in flow from the water dispenser, or decreased ice production,
may indicate the need to replace the water filter, Install the water filter
bypass plug (provided with the refrigerator), and check flow from the
dispenser, If water flow returns to normal with the bypass plug in place,
replace the water filter,
Several things can affect the fresh food door alignment, including the
floor the refrigerator is installed on and loading of doors, If the top of
the fresh food doors are not aligned, use a 1/4" allen wrench to adjust
the right/left hand door, The adjustment screw is located on the bottom
right or left hand side of the door; open the freezer door to access the
screw, On some models, the left hand fresh food door may be raised using
spacers, Call 800-GECARES to obtain the spacers,
If door handles are loose or have a gap, the handle can be adjusted using
a 1/8" allen wrench, on set screws located on the ends of the handles,
After starting the ice maker throw away 24 hours of ice production to
avoid odor and taste problems,
If the fresh food doors are not aligned, use a 1/4" Allen wrench to adjust
the right hand door, The adjustment screw is located on the bottom of the
right door, Open the freezer door to access, The left hand fresh food door
may be raised using spacers, Call 800-GECARES to obtain the spacers,
Check chart on reverse side of this instruction, If the doors must be
removed do not remove the handles, or if the refrigerator will fit easily
through the passage way opening, Adjust handles that are loose or have
a gap, by adjusting 1/8" set screws on either end of handles,
4O
Page 41

Truth or Myth? Answer Explanation
Door removal is always required for installation, MYTH Check chart on reverse side of this instruction, Doors should only be
removed when necessary to prevent damage from passage way or
access to final location,
Refrigerator doors that won't close aRer installation, TRUE Door mechanism works best if installed at 90°+, If installed at 180 °,
can be adjusted to close properly, remove the door from the mid hinge, and swing the door 180 ° before
reinstalling, See Reinst_ffling the Ref?igerz_tor Doors,
There is an adjustment to rear wheels, MYTH Front leveling legs are adjustable and should be used to balance the
refrigerator, Leveling legs are used to make initial fresh food door
adjustment,
Check for leaks after all water connections are made, TRUE While purging the air from the water system, check all water line
My LCD display will always be on when I plug the MYTH If the refrigerator has been stored in a cold environment, the LCD may be
power cord in at installation, slow to give a proper display, Give the refrigerator enough time to warm
Any packaging residue can be cleaned off the MYTH Do not use wax, polish, bleach, or other products containing chlorine on
refrigerator using any cleaner, Stainless Steel panels, door handles and trim, Check this instruction under
connections for leaks, Check the connection to the household water
supply at back of refrigerator, and door water line connect,
up, and the display should be okay,
"Cleaning the Outside" for full details,
41
Page 42
Refrigerator Warranty. (ForcustomersJntheUnitedst t s}
All warranty service provided by our Factory Service Centers, or
an authorized Customer Care '_technician. Toschedule service,
visit us online at GEAppliances.com, or call 800.GE.CARES
(800. 432.2737). Please ha ve serial number and model number
available when calling for service.
Staple your receipt here.
Proof of the original
purchase date is needed
to obtain service under the
warranty,
Servicing your refrigerator may require the use of the onboard data port for diagnostics. This gives a GE
Factory Service technician the ability to quickly diagnose any issues with your appliance and helps GE
improve its products by providing GE with information on your appliance, ff you do not want your appliance
data to be sent to GE,please advise your technician NOT to submit the data to GE at the time of service.
GE Will Replace
One }lear Anypart of the refrigerator which failsdueto a defect in materialsor workmanship.
From the dateofth eoriginal Duringthe limited one-year warranty, GEwill alsoprovide, freeof charge, all labor and related
purchase service to replacethe defective part.
TbirtyDays Anypartofthewaterfiltercartridgewhichfailsdueto a defect in materials or workmanship. During
(V_Vaterfilter,#included) this limited thirty-day warranty, GEwill alsoprovide, freeof charge, a replacementwater filter
From theoriginalpurchase
date of therefrigerator cartridge.
GEPROFILETMAND GECAFETM MODELS
Five Years Anypart of the sealed refrigerating system(the compressor,condenser,evaporator anall
From the dateofthe connecting tubing)which fails dueto a defect in materials or workmanship.
purchase Duringthis limited five-year sealed refrigerating system warranty, GEwill alsoprovide, freeof
charge, all labor and related serviceto replace the defective part inthe sealed refrigerating system.
_ Service trips to your home to teach you how to use the product.
Improper installation, delivery or maintenance.
Failure of the product if it is abused, misused, or used for other
than the intended purpose or used commercially.
Loss of food due to spoilage.
Replacement of house fuses or resetting of circuit breakers.
Damage caused after delivery.
Replacement of the water filter cartridge, if included, due to
water pressure that isoutside the specified operating range or
due to excessive sediment in the water supply.
Replacement of the light bulbs, if included, or water filter
cartridge, if included, other than as noted above.
Damage to the product caused by accident, fire, floods or acts
of God.
Incidental or consequential damage caused by possible defects
with this appliance.
Product not accessible to provide required service.
Damage caused by a non-GE Brand water filter.
EXCLUSION OF IMPLIED WARRANTIES--Your sole and exclusive remedy is product repair as provided in this
Limited Warranty. Any ,implied warranties, including the impfied warranties of merchantability or fitness
for a particular purpose, are limited to one year or the shortest period allowed by law
This warranty is extended to the original purchaser and any succeeding owner for products purchased for home
use within the USA. If the product is located in an area where service by a GE Authorized Servicer is not available,
you may be responsible for a trip charge or you may be required to bring the product to an Authorized GE Service
location for service. In Alaska, the warranty excludes the cost of shipping or service calls to your home.
Some states do not allow the exclusion or limitation of incidental or consequential damages. This warranty gives
you specific legal rights, and you may also have other rights which vary from state to state. To know what your
legal rights are, consult your local or state consumer affairs office or your state's Attorney General.
Warrantor: General Electric Company. Louisvifle, KY 40225
42
Page 43

RPWF Water Filter Cartridge Limited
Warranty.
Contact us at www.geapplianceparts.com,
or call 800.GE.CARES.
We Will Replace, At No Charge To You:
Any port of the water filter cartridge which foils due to a defect in materials or
From the date of the workmanship during this limited thirty-day warranty.*
original puichaSe
• Service trips to your home to teach you how to use the product.
• Improper installation.
• Failure of the product if it is abused, misused, used for other than the intended
purpose or used commercially.
Replacement of house fuses or resetting of circuit breakers.
Replacement of the water filter cartridge due to water pressure that is outside the
specified operating range or due to excessive sediment in the water supply.
• Damage to the product caused by accident, fire, floods or acts of God.
• Incidental or consequential damage caused by possible defects with this appliance.
Staple your receipt
here. Proof of the
original purchase
date is needed to
obtain service
under the warranty.
This warranty is extended to the original purchaser and any succeeding owner for products purchased for
home use within the U.S.A. In Alaska, the warranty excludes the cost of shipping or service calls to your home.
Some states do not allow the exclusion or limitation of incidental or consequential damages. This warranty
gives you specific legal rights, and you may also have other rights which vary from state to state. To know
what your legal rights are, consult your local or state consumer affairs office or your state's Attorney General
For Purchases Made In Iowa: This form must be signed and dated by the buyer and seller prior to the
consummation of this sale.
This form should be retained on file by the seller for a minimum of two years.
Buyer: Seller:
Name Name
Address Address
City State Zip City State Zip
Signature Date Signature Date
*If your GE part fails because of a manufactu ring defect within thirty days from the date of original purchase for use, we will give you a new or, at ou r option, a rebuilt part without charge.
Return the defective pa rt to the parts supplier from whom it was pu rchased together with a copy of the "proof of purchase" for the part. If the part is defective and shows no signs of a buse,
it will be exchanged. The warranty does not cover the failure of parts which are damaged while in your possession, are abused, or have been installed improperly. It does not cover the cost
of returning the part to the supplier from whom it was purchased nor does it cover the cost of labor to remove or install it to diag nose the fault. It does not cover parts used in products in
commercial use except in the case of air conditioning equipment. In no event shall GE be liable for consequential damages. Warrantor: General Electric Company
EXCLUSION OF IMPLIED WARRANTIES: Your sole and exclusive remedy is part exchange as provided in this Limited Warranty. Any implied warranties, including the implied warranties of
merchantability or fitness for a particular purpose, are limited to six months or the shortest period allowed by law.
GE
Appliances
Appliance Park
Louisville, KY40225
geapplianceparts.com
© 2012 General Electric Company PC66596
43
Page 44

Performance Data Sheet
Model: GE RPWF
Use Replacement Cartridge RPWR
Theconcentration of the indicated substances in water entering the system was reduced to aconcentration lessthan or equal tothe permissible
limit for water leavingthe system as specified in NSF/ANStStandard 42 and Standard 53.System tested andcertified by NSFInternational against
NSF/ANSIStandard 42 and Standard 53 for the reduction of substances listed below.
Capacity 170 Gallons 643.5 Liters). Contaminant Reduction Determined b' NSFtesting.
Substance Tested NSFspecified Avg% Water
for Reduction Average Influent Challenge Concentration Reduction Concentration
2.0 mg/L
7,633,333 pts/mL
109 MFL
0.009 mg!L
0.016 mg!L
0.08 mg/L
104,750 cysts/L
0.140 mg/L
0.158 mg/L
0.006 mg/L
0.006 mg!L
0.002 mg/L
0.222 mg/L
0.015 mg!L
0.218 mg!L
0.278 mg/L
*Based on the useof Cryptosporidium parvum oocysts.
2.0 mg/L _+10%
At least 10,000 particles/mL
107 to 108 fibers/L; fibers
greater than lOpm in length
0.009 mg/L _+10%
0.015 mg/L _+10%
0.08 mg!L _+10%
Minimum 50,000 cysts/L
0.15 mg!L _+10%
0.15 mg/L _+10%
0.006 mg/L _+10%
0.006 mg/L _+10%
0.002 mg/L _+10%
0.225 mg/L _+10%
0.015 mg/L _+10%
0.210 mq/L_+lO%
0.300 mg/L _+10%
97.4%
99.0%
99.99%
94.4%
96.4%
98.8%
99.99%
99.3%
98.3%
91%
88.3%%
99%
99.8%
93.5%
99.9%
97.7%
0.05 mg/L
71,850 pts/ml
<1 MFL
0.0005 mg/L
0.001 mg/L
0.001 mg/L
3 cyst!L
0.001 mg/L
0.002 mg/L
0.0003 mg/L
0.0007 mg/L
0.00002 mg/L
0.0005 mg/L
0.001 mg/L
0.0001 mg/L/L
0.0015 mg/L
The following pharmaceutical reduction claims have not been certified by NSFInternational. Claims tested and verified
by independent laboratory:
' I
Contaminant
Reduction
Average Influent
1088 ng/L
845ng!l
898 ng/L
945 ng/L
403 ng!L
NSFspecified
ChallengeConcentration
N/A
N/A
N/A
N/A
N/A
Avg%
Reduction
99.5%
99.4%
98.8%
99.4%
99.5%
Average Product Woter i _ ProductWoter NSF
...... Concentration ' Concentration Test Repo_
5.0 ng/L N/A J-00103221
5.0 ng/L N/A J-00103221
9.9 ng/L N/A J-00103726
5.5 ng/L N/A J-00103727
2.0 ng/L N/A J-00103221
Max Permissible
ProductWater
Concentration
Requirements
N/A
N/A
N/A
0.003 mg!L
0.005 mg!L
0.04 mg/L
N/A
0.010 mg!L
0.010 mg/L
0.002 mg/L
0.002 mg/L
0.0002 mg/L
0.075 mg!L
0.003 mg/L
0.07 mcz!L
N/A
, Mox Permissible
->99.95%
>50%
>85%
->99%
N/A
N/A
N/A
N/A
N/A
N/A
N/A
N/A
N/A
N/A
N/A
->95%
Test Report
J-00102044
J-00106249
J-00102069
J-00102058
J-00102065
J-00102059
J-00102057
J-00102052
J-00102053
J-00102054
J-00104087
J-00102063
J-00102067
J-00102061
J-00102064
J-00102070
Application Guidelines/Water Supply Parameters
Service Flow Water Pressure
Water Su_ Water Temperature
It isessentialthat themanufacturer'srecommendedinstallation,maintenanceandfilter replacementrequirementsbecarriedout for the product to performas advertised.
SeeinstallationManualforWarranty information.
Note: While the testing was performed under standard laboratory conditions,
actual performance may vary.
Replacement Cartridge: RPWEForestimated costs of replacement elements
pleasecall 1-800-626-2002 or visitour website at www.geapplianceparts.com.
Z_WARNING
Toreduce the risk associated with ingestion of contaminants:
, Do not use with water that is microbiologically unsafe or of unknown quality
without adequate disinfection before and after the system. Systems certified
for cyst reduction may be usedon disinfected water that may contain filterable
cysts. EPAEstablishment Number 070595-MEX-O01.
exceeds 80 psi,youmust install apressure-limiting valve.Contact a plumbing
professional if you are uncertain how to check your water pressure.
, Do not installwhere water hammer conditions may occur. Ifwater hammer
conditions exist you must install awater hammer arrester. Contact a plumbing
professional if you are uncertain how to checkfor this condition.
, Do not installon hot water supply lines The maximum operating water
temperature ofthis filter system is100° F(38°C).
, Protect filter from freezing. Drain filter when temperatures drop
below 33°F(0.6°C).
, Thedisposable filter cartridge must be replaced every 6months at the
rated capacity, or sooner if a noticeable reduction in flow rate occurs.
NOTICE
Toreduce the risk associated with property damage due to water leakage:
, Read and follow use instructions before installation and use ofthis system.
, Installation and use MUSTcomply with all state and local plumbing codes.
, Do not install if water pressure exceeds 120 psi (827kPa).Ifyour water pressure
GE
Appliances
Appliance Park
Louisville, KY 40225
geapplianceparts.com
For conditions of use, health claims certified by the California Department of Public
Health, and replacements, see performance data sheet. California Department
of Public Health Certification #11-2110. The contaminants or other substances
removed or reduced by this water filter are not necessarily in all users' water.
InternationalagainstNSF/ANSIStandard
42andStandard53inmodelGERPWF
_I SystemtestedandcertifiedbyNSF
forthe reductionoftheclaimsspecified
ontheperformancedatasheet,
34-8708-7119-0
EPA #070595-MEX-001
© 2012 General Electric Company PC71879
44
Page 45
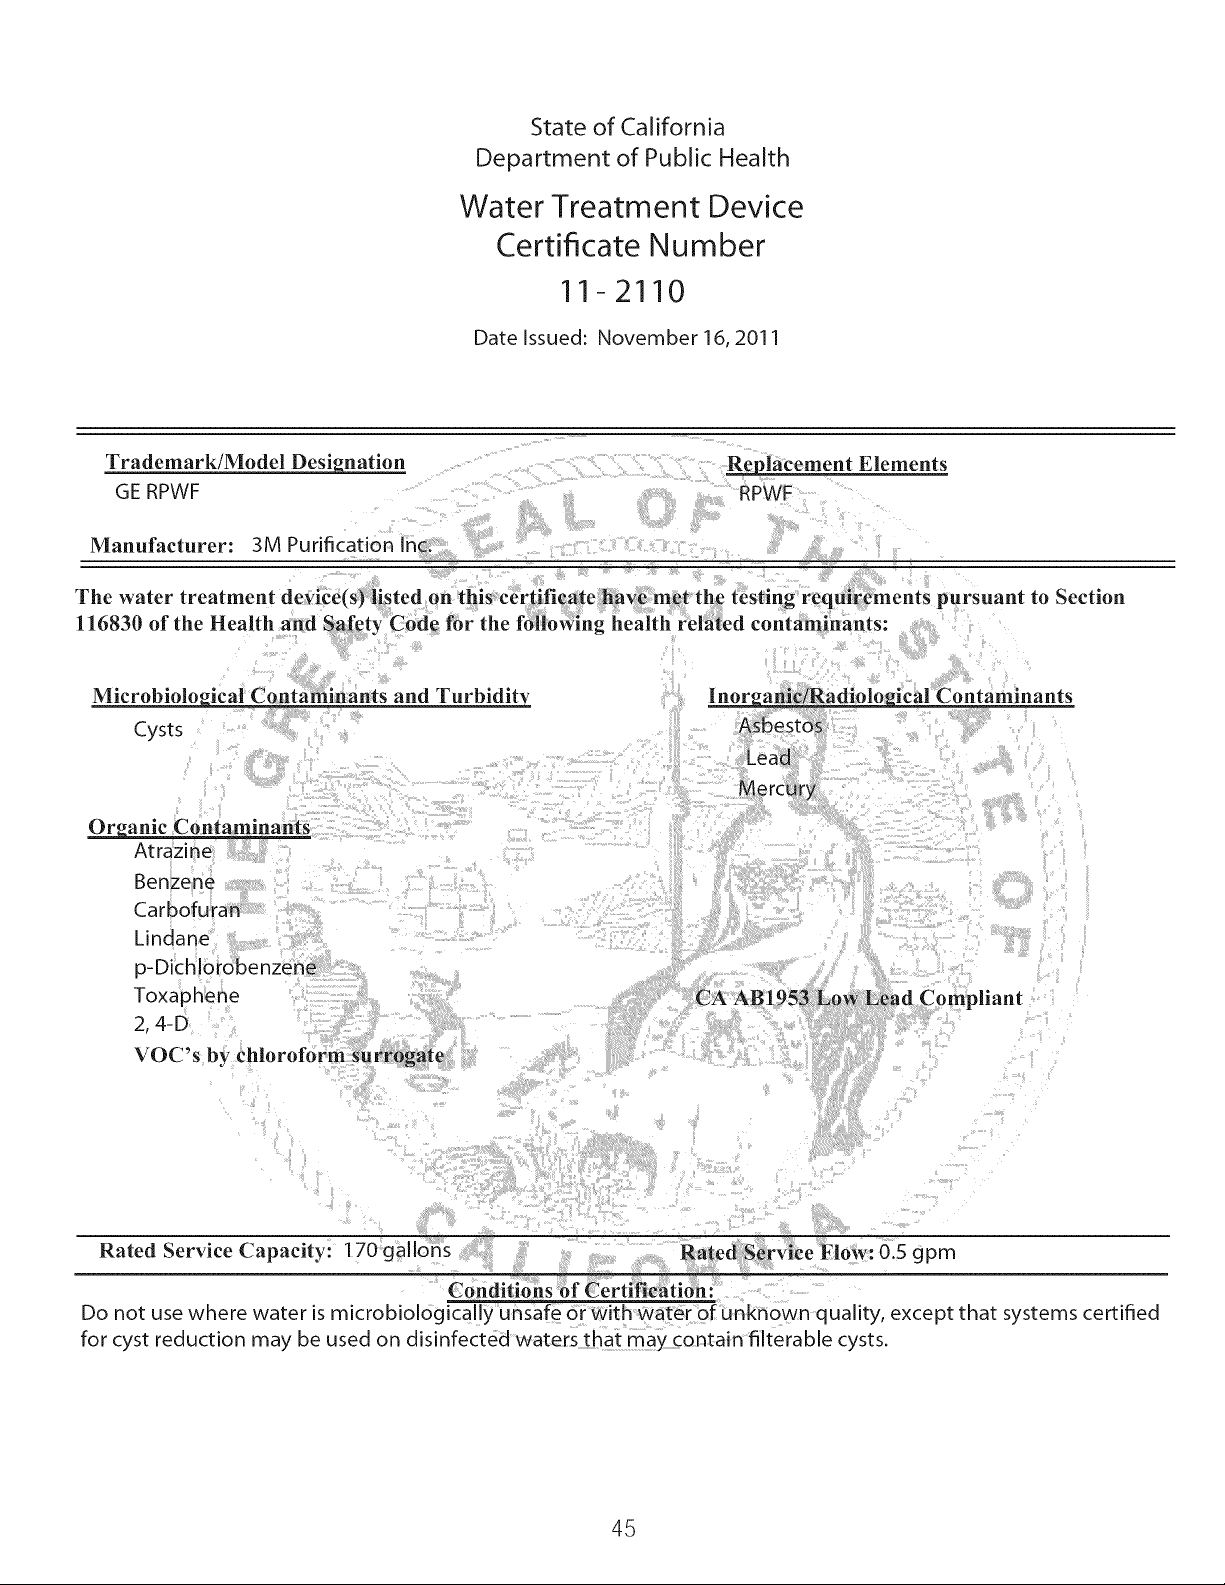
State of California
Department of Public Health
Water Treatment Device
Certificate Number
11-2110
Date Issued: November 16, 2011
TrademarklModel Designation
GE RPWF
Manufacturer: 3M Purification Inc.
The water treatment device(s)listed on this certificate_met th_ testing requ_ments pursuant
116830 of the Health and Safety Code for the fotiowing health relaied contaminants:
Microbioloaic ants and Turbidity
Cysts
Organic Contaminants
Atrazine
Benzene
Carbofu ran
Toxaphene
2,4-D
VOC's by chloroform surrogate
___placement Elements
RPWF
ical Contaminants
CA AB1953 Low Lead Compliant
to Section
Rated Service Capacity: 170 gallofls RatedService Flow: 0.5 gpm
Conditions bf Certification:
Do not use where water is microbiologicaliy unsafe Or with water of unknown quality, except that systems certified
for cyst reduction may be used on disinfected waters that may contain filterable cysts.
45
Page 46
Notes
46
Page 47
Notes GEAppliances.com
47
Page 48

Consumer Support.
GEAppliances Website In the U,S,:GEAppliances, com
Have a question or need assistance with your appliance? Try the GEAppliances website, 24 hours a day, any day
of the year! For greater convenience and faster service, you can now download Owner's Manuals, order parts
or even schedule service on-line, In Canada: www,GEAppliances,ca
Schedule Service _ntheU,S,:GEAppliances,com
Expert GErepair service is only one step away from your door, Get on-line and schedule your service at your
convenience any day of the year! Or call 800,GE,CARES(800,432,2737) during normal business hours,
In Canada, call 1,800,561,3344
_nStudio intheu,s,:GEAppliances.com
i: Ii GE supports the Universal Design concept-products, services and environments that can be used by people of
| all ages, sizes and capabilities, We recognize the need to design for a wide range of physical and mental abilities
J and impairments, For details of OE's Universal Design applications, including kitchen design ideas for people with
disabilities, check out our Website today, For the hearing impaired, please call 800,TDD,GEAC (800,833,4322),
In Canada, contact: Manager, Consumer Relations, Mabe Canada Inc,
Suite 310, 1 Factory Lane
Moncton, N,B, E1C 9M3
Extended Warranties
Purchase a GE extended warranty and learn about special discounts that are available while your warranty is still
in effect, You can purchase it on-line anytime, or call 800,626,2224 during normal business hours, GEConsumer Home
Services will still be there after your warranty expires, In Canada, call 1,888,261,2133
Parts and Accessories
Individuals qualified to service their own appliances can have parts or accessories sent directly to their homes
(VISA,MasterCard and Discover cards are accepted), Order on-line today, 24 hours every day or by phone at
800,626,2002 during normal business hours,
Instructions contained in this manual cover procedures to be performed by any user, Other servicing generally should
be referred to qualified service personnel, Caution must be exercised, since improper servicing may cause unsafe
operation,
Customers in Canada should consult the yellow pages for the nearest Mabe service center, or call 1,800,661,1616,
Contact Us
If you are not satisfied with the service you receive from GE,contact us on our Website with all the details including your
phone number, or write to: General Manager, Customer Relations
GEAppliances, Appliance Park
Louisville, KY40225
In Canada: www,GEAppliances,ca, or write to: Director, Consumer Relations, Mabe Canada Inc,
Suite 310, 1 Factory Lane
Moncton, N,B, E1C 9M3
In the U,S,:GEAppliances, com
In the U,S,: GEApplianceParts, com
In the U,S,:GEAppliances, com
i_! _ister Your_ _ntheU,S,:GEAppliances.com
Register your new appliance on line (It your conveniencel Timely product registration will allow for enhanced
/ /
_.. J mail in the pre-printed registration card included in the packing material, In Canada: www,GEAppliances,ca
Printed in United States
Page 49

@
B m
q__
C
B m
@
GEAppliances.com
Consignes de securite ........ 2-4
Consignes d'utilisation
Fonctions ...................... 5, 6
Commandes ...................... 7, 8
Elimination des odeurs .............. 9
Distributeur ........................ 10
Eau chaude ........................ 11
Filtre a eau ......................... 12
Options de stockage des
produits frais .................. 13,14
Zone climatisee & Tiroir
temperature contrOlee ........ 15,16
Congelateur ....................... 17
Machine a_gla¢ons automatique .... 18
Entretien et nettoyage ............. 19
Remplacement des ampoules ...... 20
Moddes GE CareTM
Lesnurneros de rnodde cornrnenGantpar
CFEsont des rnodP.lesdeprofondeur normale
(PN),
Les nurneros de modde cornmenGant par
CYEsont des moddes de profondeur
de comptoir (PC),
'(D
C
0
0
Instructions d'instal/ation
Preparing to Install the
Refrigerator .................... 21, 22
Preparation avant installation
du refrig6rateur .............. 29, 30
Installation du r6frigerateur ..... 23-33
Installation de I'alimentation
en eau ...................... 34-35
Conseils de depannage .... 38,39
Fonctionnement normal ............ 37
Entretien - Mythe ou realite ..... 40, 41
Assistance a la clientele
Garantie pour les clients aux U.S.A..42
Certificat de garantie du filtre
eau a cartouche RPWF ......... 43
Donnees de performance .......... 44
Certificat de I%tat de Californie pour
le dispositif de traitement
des eaux ......................... 45
Assistance a_la clientele .... Plat verso
Inscrivez ici les num#ros de mod#le et de
serie :
Mod#le #
Num#ro de Sdrie #
Vous trouverez ces nume.ros sur I%tiquette
apposee sur le cote. gauche _-_mi-hauteur
du compartiment de re.frige.ration,
239D3389PO03 Pub No. 49-60678-3 05-74 GE
Page 50

IMPORTANTE$CON$1GNE$DE$£CURITE.
VEUILLEZLIRE TOUTE$LE$CON$1GNE$AVANTUTILISATION.
LES
Site/ntemet dE/ectromenagers GE
_NTES CONSIGNES DE SECURITE VEUlLLEZ LIRE TOUTES CONSIGNES A VANT UTILISA TION
_kCe symbole represente une alerte de securite Ce symbole vous avise de dangers possibles pouvant causer
a mort, des blessures ou autres Tousles messages de securite seront precedes du symbole d'alerte de securite
_insi que des mots <<DANGER >>,<<AVERTISSEMENT >>ou <<MISE EN GARDE >>Ces messages sont les suivants :
_ ignale une situation qui presente un danger imminent et qui, si elle n'est pas evitee, entrainera des blessures
_ ignale une situation qui presen,te un danger imminent et qui, si elle n'est pas evitee, peut entrainer desblessures graves, voire la mort,
Pour de p/us arnp/es in formations sur /e fonct/onnement de votre
refrig6rateur, consu/tez le site www. GEAppliances.com
CONSIGNES DE SECURITE POUR LE REFRIGERATEUR
graves, voire la mort,
Signale une situation qui presente un danger imminent et qui, si elle n'est pas evitee, peut entrainer des
blessures mineures ou graves,
IMPORTANTES CONSIGNES DE SFCURIT¢
Pour reduire le risque d'incendie, d'explosion, de choc electrique ou de blessures
Iorsque vous utilisez votre refrigerateur, veuillez suivre ces consignes de securite :
, Ce refrigerateur doit 6tre correctement installe
conformement aux Consignes d'lnstallation avant route
utilisation,
, Debranchez lerefrigerateur avant tout entretien ou
reparation,
, REMARQUE: Les reparations doivent 6tre effectuees par un
professionnel qualifie,
, Remettez routes les pieces et panneaux en place avant
d'utiliser I'appareil,
, Nous deconseillons fortement I'utilisation d'une rallonge
_ cause des risques potentiels dans certaines conditions,
Cependant, si I'utilisation d'un cordon prolongateur est
necessaire, ce dernier doit obligatoirement 6tre homologue
UL (aux USA)ou CSA(au Canada), _ trois brins avec mise _ la
terre pour appareil electromenager et doit 6tre 6quipe d'une
fiche et d'une prise femelle avec terre, Les caracteristiques
electriques du cordon prolongateur doivent 6tre de 15
amperes (minimum) et de 120 volts,
, Pour eviter les risques d'asphyxie et d'enfermement pour
les enfants, Demontez les portes du congelateur et du
compartiment de refrigeration avant de le mettre au rebut
ou d'interrompre son utilisation,
, Ne stockez pas ou n'utilisez pas d'essence ou d'autres
vapeurs et liquides inflammables _ proximite de cet appareil
ou de tout autre appareil electromenager,
, L'alimentation electrique du refrigerateur ne peut
pas 6tre coupee par I'intermediaire du panneau de
commande, Pour ce faire, il est necessaire de debrancher
le refrigerateur pour couper I'alimentation,
, Ne laissez pas les enfants grimper, se mettre debout ou
se suspendre aux poignees de portes dans le refrigerateur
ou aux clayettes du refrigerateur, IIspourraient se blesser
gravement,
, Si votre refrigerateur est dote d'une machine _ glaqons
automatique, evitez le contact avec les pieces mobiles du
mecanisme ejecteur, ou avec I'element chauffant qui libere
les glaqons, Ne posez pas les doigts ou les mains sur le
mecanisme de la machine _ glaqons automatique pendant
que le refrigerateur est branche,
, Ne nettoyez pas les clayettes ou les couvercles en verre
avec de I'eau tiede quand ceux-ci sont froids, Les clayettes
et couvercles en verre peuvent se casser s'ils sont exposes
_ des changements soudains de temperature ou si vous les
cognez ou les faites tomber, Le verre trempe est conqu pour
se briser en petits morceaux en cas de casse,
, Eloignez les doigts des parties du refrigerateur o@I'on peut
facilement se pincer : les espaces entre les portes, et entre
les portes et les placards sont toujours etroits, Soyez prudent
Iorsque vous fermez les portes du refrigerateur en presence
d'enfants,
, Ne touchez pas les surfaces froides du congelateur Iorsque
vous avez les mains humides ou mouillees, La peau risque
d'adherer _ ces surfaces extr_mement froides,
, Ne recongelez pas les aliments surgeles qui ont
completement degele,
, Utilisez un verre resistant pour prendre des glaqons (sur les
modeles avec distributeur de glaqons),
Page 51

IMPORTANTE$CON$1GNE$DE$£CURIT£.
VEUILLEZLIRETOUTE$LE$CON$1GNE$AVANTUTILiSATION.
GEAppliances.com
INSTALLATION
_1_ Risque d'explosion.
Conservez les materiaux et vapeurs inflammables tels que I'essence a I'ecart de votre refrigerateur.
Une explosion, un incendie voire la mort pourrait en resulter.
_1_/_ Risque de basculement
Les modeles encastres (modeles PYE, CYE et PWE) sont plus Iourds au niveau de leur pattie superieure,
surtout avec les portes ouvertes. Ces modeles doivent etre fixes 8 I'aide du systeme anti-basculement par
fixation au sol pour eviter que I'appareil ne bascule vers I'avant, ce qui pourrait entrainer des blessures
graves, voire mortelles. Lisez et suivez les instructions d'installation completes pour I'installation du systeme
anti-basculement par fixation au sol Iivre avec votre refrigerateur.
BRANCHEMENTS ELECTRIQUES
Risque de choc electrique,
Branchez I'appareil dans une prise triple avec terre.
N,e retirez pas la broche de terre.
IN utilisez pas d adaptateur.
Le non-respect de ces instructions peut entrainer des risques d'incendies, des chocs electriques ou la mort.
Ne coupez pas ou n'enlevez pas, sous aucun pretexte, la troisieme broche de raise a la terre du
cordon d'alimentation. Pour des raisons de securite, cet appareil doit etre correctement mis a la
terre.
Le cordon d'alimentation de cet appareil est equipe d'une
fiche a trois broches (pour une mise a la terre) qui s'adapte
la prise de courant standard a 3 broches (pour une mise a la
terre) pour minimiser les risques de chocs electriques par cet
appareil,
FaResverifier la prise murale et le circuit electrique par
un electricien qualifie pour s'assurer que le systeme est
correctement mis a la terre,
Dans le cas d'une prise biphasee, I'installateur a la
responsabilite et I'obligation de la remplacer par une
prise triphasee correctement mise a la terre, N'utilisez pas
d'adaptateur,
Le refrigerateur doit toujours etre branche a sa propre prise
electrique cl'une tension nominale correspondant a celle
indiquee sur sa plaque signaletique,
Une alimentation electrique a 115 volts CA, 60 Hz, avec
un fusible de 15 ou 20 amperes et une mise a la terre est
necessaire, Ceci permet d'obtenir un meilleur rendement et
evite de surcharger les circuits electriques du domicile qui
risque d'occasionner un incendie en surchauffant,
Ne debranchezjamais le rdrigerateur en tirant sur le cordon
d'alimentation, Prenez toLljours fermement la fiche en main
et tirez pour la sortir de la prise,
Reparez ou remplacez immediatement tout cordon
electrique use ou endommage, N'utilisez pas un cordon
fissure ou presentant des dommages dus aux ffottements
soit sur sa Iongueur ou aux extremit6s,
Lorsque vous eloignez votre refrig6rateur du mur, fares
attention a ne pas le faire fouler sur le cordon d'alimentation
afin de ne pas I'endommager,
Page 52

IMPORTANTESCONSIGNESDES£CURITE.
VEUILLEZLIRETOUTESLESCONSIGNESAVANTUTILISATION.
DISTRIBUTEUR D'EAU CHAUDE
_Risque de braiures.
Le distributeur d'eau chaude peut chauffer I'eau a une temperature d'environ 185°F (85°C). Une eau
a une temperature superieure a 125°F (52°C) peut provoquer de graves br@lures pouvant entrainer la
mort. Les enfants, les personnes handicapees et agees sont plus a risque de se br@ler.
N'utilisez cet appareil qu'aux fins prevues decrites dans le manuel d'utilisation, Pour reduire le risque de br@lures graves,
d%chaudures, voire la mort lots de I'utilisation de votre distributeur d'eau chaude, veuillez suivre les instructions suivantes '
, L'eau delivree par le distributeur est t@s chaude, Soyez
extr6mement prudent Iors de la distribution et de la
consommation de cette eau, Laissez I'eau refroidir h une
temperature adaptee h la consommation avant de la boire,
, Lorsque vous prenez de I'eau en dessous de 125°F, verifiez
toujours la temperature de I'eau avant de la boire,
, Lors de la distribution d'eau chaude, le recipient peut devenir
tres chaud, Utiliser un recipient calorifuge, par exemple
en ceramique ou en polysty@ne, Dans le cas contraire,
I'utilisation de materiaux tels que le papier ou le plastique
peut provoquer des br@lures Iorsque vous tenez la tasse,
N'utilisez pas de recipients en verre, Par un choc thermique,
le pourrait se casser et entrainer des br@lures ou des
lacerations,
, Ne laissez pas les enfants utiliser le distributeur d'eau chaude,
, II est necessaire de faire pivoter et d'enfoncer le bouton de
distribution d'eau chaude, Ces deux mouvements reduisent
les risques de faire couler I'eau chaude involontairement ou
de permettre h dejeunes enfants de se servir, Ne pas alterer
ou modifier le bouton de distribution d'eau chaude,
, Veuillez toujours suivre les instructions du fabricant pour la
preparation du lair maternise,
, Tenez votre tasse ou votre recipient h cote de la sortie d'eau
chaude pour eviter d%clabousser votre main avec I'eau
chaude, Ne versez pas d'eau chaude dans une tasse posee
sur la grille du distributeur, les projections d'eau seront plus
importantes,
N'utilisez pas une eau qui est microbiologiquement insalubre
ou de qualite inconnue,
Le distributeur d'eau chaude est conc u pour distribuer
uniquement de I'eau, N'essayez pas de rechauffer ou de
verser un autre liquide que de I'eau, Ne tentez pas de
demonter ou de nettoyer le reservoir,
iiiiiiiii_
Une cartouche de filtre heau nouvellement installee peut
provoquer des eclaboussures en sortie du distributeur, Fakes
passer 2 gallons (environ 7,5 litres) d'eau dans le distributeur
d'eau froide (environ 5 minutes) pour eliminer I'air du
systeme, Tant que I'air dans le systeme n'a pas ere purge
par le distributeur d'eau froide, N'utilisez PASle distributeur
d'eau chaude, L'air dans le circuit pourrait provoquer des
eclaboussures d'eau chaude et donc causer des br@lures,
iiiiiiiii_
Le reservoir de distribution d'eau chaude est un reservoir
non pressurise equipe d'un event et d'un distributeur, Ne
modifiez pas le systeme, ne fermez pas ou ne bloquez
pas le tuyau de distribution ou ne connectez aucun autre
type de dispositif au reservoir ou au tuyau de distribution,
Cela pourrait conduire h une rupture de la cuve et I'eau
bouillante,
Un enfant risque de suffoquer ou d'y etre emprisonne.
Demontez les portes du compartiment de refrigeration et du compartiment de cong@ation du
refrigerateur, avant mettre ceiui-ci au rebut. Le non-respect de cette recommandation peut entrainer
I'enfermement d'un enfant qui peut entrainer la mort ou des lesions cerebrales.
IMPORTANT:
Les enfants pris au piege ou morts d'asphyxie sont to@ours
d'actualite. Les refrigerateursjetes ou abandonnes restent
dangereux meme si vous ne les laissez au rebut que pour <<
quelquesjours ,>.Si vous voulezjeter votre ancien rdrigerateur,
suivez les instructions suivantes pour empecher les accidents.
Avant dejeter votre ancien refrigerateur ou
congelateur:
' Demontez les portes du compartiment de refrigeration et du
compartiment de congelation.
' Leave the shelves in place so that children may not easily
climb inside.
Fluides frigorigenes
Les appareils refrigerants corrtiennent des fluides frigorigenes
qui conformement _Jla legislation federale doivent etre retires
avant la mise au rebut de I'appareil. Si vous mettez au rebut
un ancien refrigerateur contenant des fluides frigorigenes,
verifiez la procedure _Jsuivre aupres de la compagnie
responsable de I%limination.
LI,%ZETSUIVEZ, OIGNEU,%MENTCESCON, IGNESDESECURITE,
CONSERVEZCESINSTRUCTIONS
Page 53

A propos des fonctions. GEAppliances.com
i
I
O
OMachine a gla£:ons a faible encombrement
La machine _ glaqons et son bac sont situes sur la porte permet-
tant d'avoir un espace de stockage plus spacieux.
_Eclairage a DEL
L'eclairage a DEL est place dans tout le compartiment pour eclairer
differentes zones du refrigerateur. Des DEL sont situees sous la
porte du refrigerateur pour eclairer le congelateur Iorsque celui-ci
est ouvert.
OPlateau rabattable
Permet un espace de stockage dans la porte en cas de besoin. II se
replie Iorsqu'il ne sert pas.
OTiroir de pleine largeur a temperature contrOlee
Bac a temperature contr61ee qui peut accueillir les produits les plus
volumineux.
OBac a produits laitiers
Compartiment separe pour vos produits.
OBac utilitaire
Un bac utilitaire conqu pour un stockage varie.
OCiayette OuickSpace TM
Elle s'utilise comme une clayette normale de pleine largeur. Elle se
glisse vers I'arriere pour stocker des produits hauts.
O Clayettes anti-debordements
Conques pour empecher les aliments renverses de couler et per-
mettre ainsi un nettoyage facile.
O Bac amovibie a condiments
Bac separe conqu pour faciliter le retrait et le stockage.
Bac de porte amovibie
Peut etre enleve pour les refrigerateurs a c6te d'un tour limitant
I'ouverture de porte.
O Bac climatise
Bacs separes pour le stockage des produits.
GFiitre integre a ia porte
Situe dans la porte pour une perte d'espace minime dans la partie
de stockage des denrees alimentaires fraiches et pour un rein-
placement facile.
_Filtre a odeur
Elimine les odeurs et les odeurs des aliments
Page 54

A propos des fonctions.
Bac a glace de porte
1. Ouvrez la porte gauche du
compartiment de refrigeration.
2. Tirez le Ioquet vers le bas pour ouvrir
la porte du bac.
3. A I'aide de la poignee, soulevez le
seau a glace pour liberer les reperes
au fond du bac,
4, Pour remettre le seau a glace,
placez-le sur les guides et enfoncez-le
jusqu'a ce qu'il soit correctement en
place,
5, Si vous n'arrivez pas ale remettre,
faites tourner la fourche d'1/4 de
tour dans le sens des aiguilles d'une
montre.
Bac rabattable les
produits laitiers.
1. Ouvrez la porte droite du
compartiment de refrigeration.
2. Appuyez sur les deux boutons sur les
cotes inferieurs et le bac s'ouvrira.
3. Faites la manceuvre en sens inverse
pour le reinstaller.
pour
Seau a glace
Plateau rabattable
[bac ouvert]
Filtre a eau/a glace integr6
0
la porte
Retrait du filtre et du bouchon
de derivation
Poussez sur I'encoche du couvercle et
ouvrez le volet du filtre. Tirez le filtre et le
bouchon de derivation vers le haut pour
le retirer.
Installation de la cartouche
filtra nte
Poussez sur I'encoche au bas du
couvercle et ouvrez celui-ci. Soulevez
la porte et alignez les languettes du
filtre avec celle du support de filtre et
appuyez sur le filtre pour le positionner
correctement.
Le couvercle du filtre est conqu
pour 6tre reinstalle s'il est retire
accidentellement.
Pousser/Enlever
Pivoter
Ne pas tourne
0
Filtre a eau eta glace (integre a la porte)
Page 55

A propos des parametres de temperature.
Commandes des modeies CYE/CFE
Water
GEAppliances.com
Modification de la temp#rature
Pour modifier la temp#rature du r#frig#rateur :
Acc#dez au syst#mepar: Le bouton de temp6rature_
Activezen : Utilisant les fleches en dessous du mot
<<Refrigerator >>(refrigerateur) pour selectionner la
temperature desi@e, Appuyez sur DONE(Termine)Iorsque
vous avez termine pour revenir f-_I%cran d'accueil,
Pour modifier la temp#rature du cong#lateur :
Acc#dez au syst#mepar: Le bouton de temperature
Activez en : utilisant les fleches en dessous du mot <<Freezer
>>(Congelateur) pour selectionner la temperature desiree,
Appuyez sur DONE (Termine) Iorsque vous avez termine pour
revenir f-_I%cran d'accueil,
Pour desactiver le systeme de refroidissement, accedez aux
commandes <<SETTINGS >>(Parametres) par I%cran d'accueil,
Passez _-_la page suivante puis touchez COOLING SYSTEM
ON(refroidissement active), Appuyez sur DONE(Termine)
pour revenir f-_I%cran d'accueil,
Pour activer le systeme de refroidissement, accedez aux
commandes <<SETTINGS >>(Parametres) par I%cran d'accueil,
Passez f-_la page suivante puis touchez COOL/NGSFSTEM
OFF(refroidissement desactive), Appuyez sur DONE(Termine)
pour revenir f-_I%cran d'accueil,
En desactivant le systeme de refroidissement, le
refroidissement est ar@te dans le refrigerateur, mais
I'alimentation electrique n'est pas coupee,
REMARQUE "Pour une temperature optimale, il est recommande d%viter de placer la nourriture ou d'autres produits
directement devant les bouches de circulation d'air ou devant la tour de ventilation autour des aliments frais,
empechant ainsi le flux d'air.
Page 56

A propos des commandes.
lemperature I Express Modes I Settngs
Water
REMARQUE: Le r6frigerateur est livre avec un film protecteur sur les commandes de temperatures, Si le film n'a pas ete retire
pendant I'installation, retirez-le maintenant,
Les commandes de temperatures sont prereglees en usine _-_3°C (37°F) pour le compartiment refrigerateur et _-_-18°C
(O°F)pour le compartiment congelateur, Veuillez attendre 24 heures pour que la temperature se stabilise au prereglage
recommande,
Les commandes de temperatures peuvent afficher les temperatures SET(fixees) ainsi que les temperatures reelles _-_
I'interieur du refrigerateur et du congelateur, La temperature actuelle peut legerement varier de la temperature SET (fixee)
suivant les conditions d'utilisation et de fonctionnement,
Eau chaude
Permet de produirejusqu'a 10 onces d'eau chaude filtree
des temperatures variant de 90°F (32°C) a 185°F (85°C) selec-
tionnees par I'utilisateur,
Bouton d'eau chaude
S'allume pour indiquer que I'eau chaude est prete, Necessite
deux mouvements pour verser I'eau : Tournez dans le sens
inverse des aiguilles d'une montre puis appuyez pour verser,
Remplissage precis
Verse une quantite precise d'eau filtree en onces, en tasses, en
pintes ou en litres a I'aide du bras de distribution
Commande de temperature du refrigerateur
Permet de regler la temp6rature du cong61ateur,
Commande de temperature du compartiment de
refrigeration
Permet de regler la temperature du compartiment de
refrigeration,
Commande TurboFreeze TM
Active le TurboFreeze pour retablir rapidement la temperature
du congelateur apres des ouvertures frequentes de la porte,
Commande TurboCool TM
Active le TurboCool pour retablir rapidement la temperature du com-
partiment de refrigeration apres des ouvertures frequentes de la porte.
Commande d'elimination des odeurs
Active I'elimination des odeurs et des odeurs des aliments
Verrouillage des commandes
ppuyez sur la touche et maintenez-la enfoncee pendant 3
secondes pour verrouiller le distributeur de glace et d'eau et
toutes les touches de fonction et de temperature,
@ Eclairage a DEL du distributeur
L'eclairage a DEL peut etre active/d6sactiv6 pour illuminer
votre distributeur,
Chargement de photos
Inserez une cle USB pour charger vos photos personnelles
et les afficher a I'ecran LCD du refrig6rateur, L'ecran LCD
affichera des invites pour charger et afficher un diaporama,
Assurez-vous que les photos sont dans le repertoire racine de
votre cle USB,
Commandes supplementaires
• Connexion prete
• Diaporama
• Reinitialiser le filtre
• Activation/desactivation
de la machine a glace
Modes supplementaires
• Mode Sabbat
Appuyez simultanement sur la touche et le voyant et
maintenez-les enfonces pendant 3 secondes pour activer/
desactiver le mode Sabbat,
Activez le mode Sabbat pour eteindre I'eclairage interieur,
les commandes de temperature et les fonctions avancees,
En mode Sabbat, le compresseur fonctionne sur un cycle de
degivrage programme,
• Alarme de Porte
• Reglage du son
• Activation/desactivation du
systeme de refroidissement
• Unites metriques/anglo-saxonnes
Page 57

A propos de IWimination des odeurs. GEAppliances.com
Utilisation du mode Odor Remover (Elimination
des odeurs)
Pour acceder ["
au mode Temperature
OdorRe.,over Water
(Elimination des
odeurs), appuyez
sur Express Modes
(Modes express)
sur I%cran LCD
principal,
Appuyez sur Odor
Remover(Elimination
des odeurs) pour
activer ou desactiver
ce mode, Appuyez
sur Done (Termine)
pour revenir au
menu principal,
Le mode s'ar@te
automatiquement au
bout de 4 heures,
Installation et remplacement
du filtre a odeurs
Le filtre _ odeurs est situe dans
le coin superieur gauche du
compartiment de @ffigeration, GE
recommande de remplacer lefiltre
tousles 6 mois ou Iorsque I'odeur
deviant desagreable, Un rappel
apparaitra _ I%cran principal au
bout de 6 mois pour vous rappeler
de changer le filtre,
Express Hodes Settings
lace: Odor Filter
Express Hodes
Filtre b_odeurs
Replacez le couvercle du
filtre en le faisant glisser par_ >
/
I'avant, Assurez-vous qua le
bord avant est au m6me
niveau qua la pardi du _.
refrigerateur, _-_
Pour reinitialiser le rappel de remplacement du filtre a odeurs
[%cran principal:
A partir de I%cran LCD principal, selectionnez Settings
(Parametres), Faites defilerjusqu% afficher Odor Filter(Filtre
_ odeurs) puis appuyez sur carte touche, Cette manipulation
affiche I%tat actual du filtre et explique comment commander
un nouveau filtre, Pour reinitialiser le rappel, appuyez sur Reset
(reinitialiser),
System Settings
Rempiacement du fiitre :
Retirer le couvercle du filtre _)
odeurs en faisant coulisser la
pattie avant vers le devant du
refrigerateur,
Enlevez I'ancien filtre en le
tirant vers vous
Retirez le filtre de
remplacement de son
emballage en plastique,
Inserez le filtre dans le boitier
en le poussant, Le filtre
s'encastrera au ben endroit,
Odor Filter: Replace
To order d repldcement filter, cdll (877]-959-8686
or order online vid www.gedpplidncepdrts.com.
Page 58
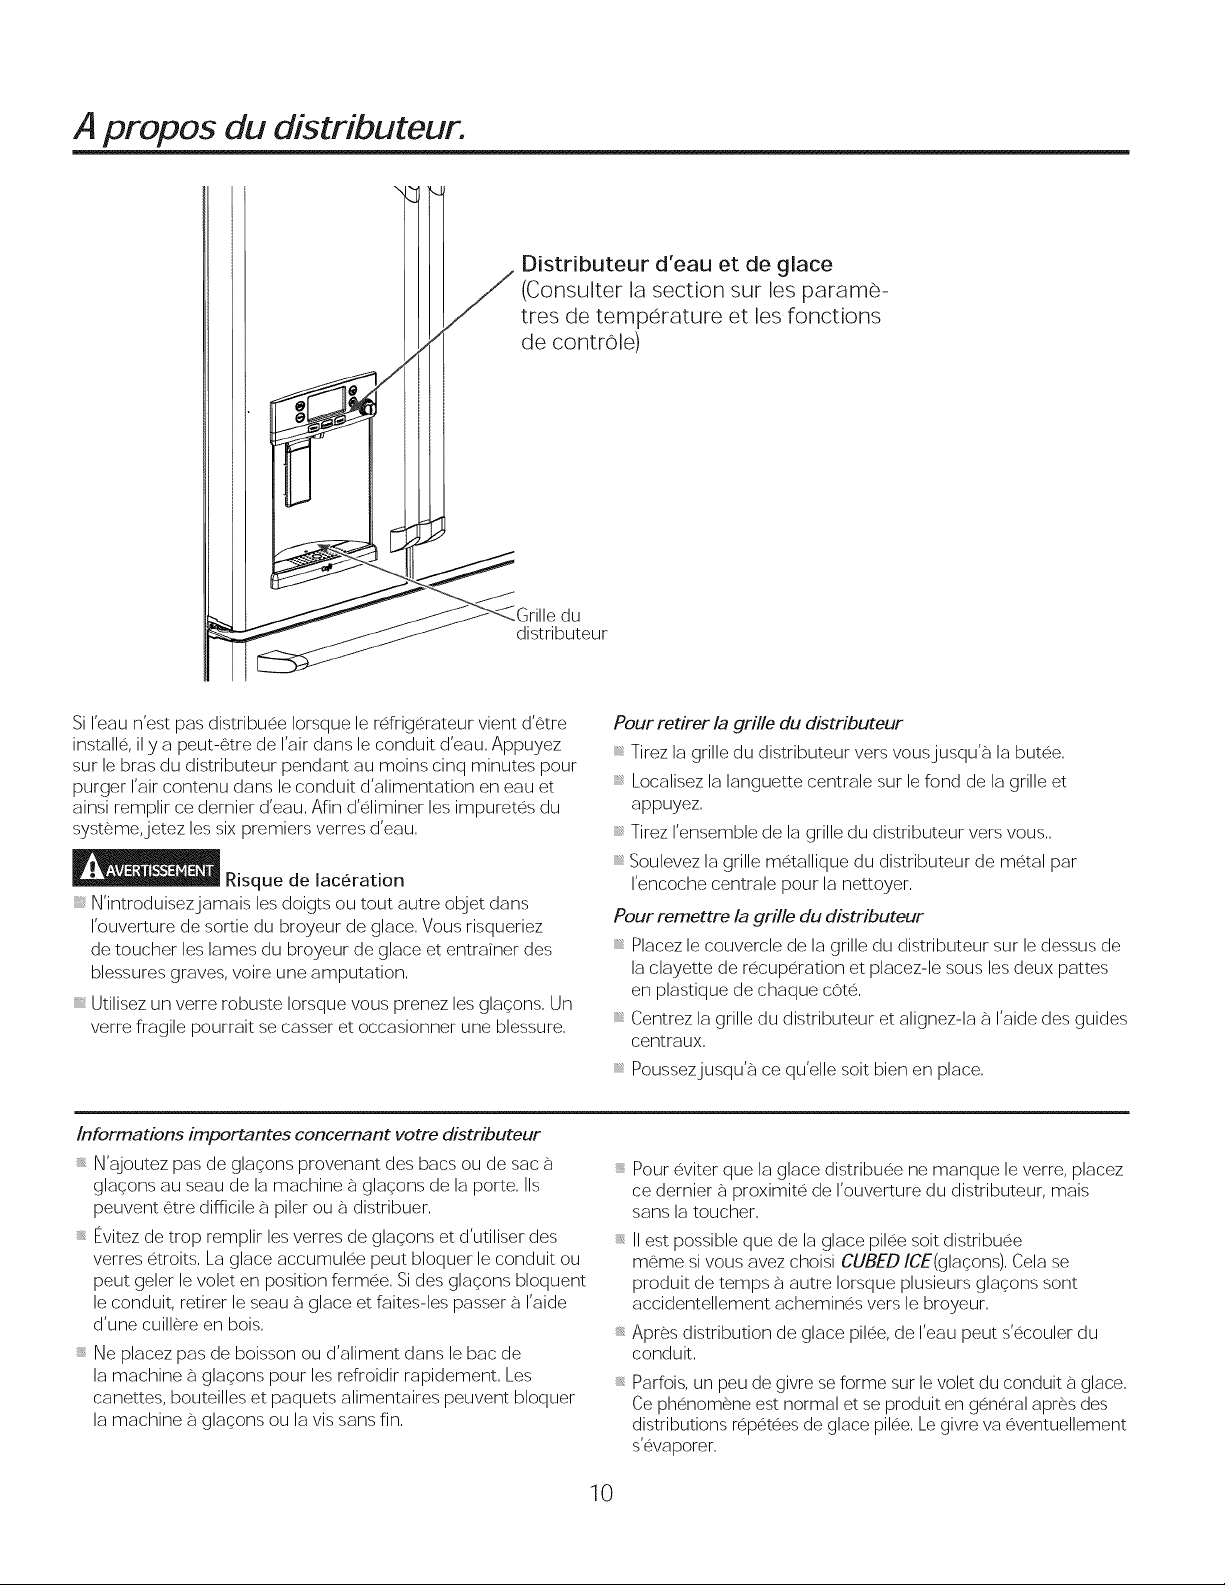
A propos du distributeur.
/ (Consulter la section sur les parame-
/ Distributeur d'eau et de glace
/ tres de temperature et les fonctions
/ de control@
_ Gi_ebdu_eur
Si I'eau n'est pas distribuee Iorsque le refrigerateur vient d%tre
install& il y a peut-6tre de I'air dans le conduit d'eau, Appuyez
sur le bras du distributeur pendant au moins cinq minutes pour
purger I'air contenu dans le conduit d'alimentation en eau et
ainsi remplir ce dernier d'eau, Afin d%liminer les impuretes du
systeme,jetez les six premiers verres d'eau,
ue de laceration
N'introduisezjamais les doigts ou tout autre objet dans
I'ouverture de sortie du broyeur de @ace, Vous risqueriez
de toucher les lames du broyeur de glace et entrafner des
blessures graves, voire une amputation,
Utilisez un verre robuste Iorsque vous prenez les glacpns, Un
verre fragile pourrait se casser et occasionner une blessure,
Informations importantes concemant votre distributeur
_ N'ajoutez pas de gla_ons provenant des bacs ou de sac _ _
glacons au seau de la machine _ glaqons de la porte, IIs
peuvent 6tre difficile _ piler ou _ distribuer,
Evitez de trop remplir les verres de glacons et d'utiliser des
verres etroits, La glace accumulee peut bloquer le conduit ou
peut geler le volet en position fermee, Si des glaqons bloquent
le conduit, retirer le seau _ glace et faites-les passer _ I'aide
cl'une cuillere en bois,
_ Ne placez pas de boisson ou d'aliment dans le bac de
la machine _ gla_ons pour les refroidir rapidement, Les _
canettes, bouteilles et paquets alimentaires peuvent bloquer
la machine _ glacons ou la vis sans fin,
Pour retirer la grille du distributeur
_ Tirez la grille du distributeur vers vousjusqu% la butee,
_ Localisez la languette centrale sur le fond de la grille et
appuyez,
_ Tirez I'ensemble de la grille du distributeur vers vous,,
_ Soulevez la grille metallique du distributeur de metal par
I'encoche centrale pour la nettoyer,
Pour remettre la grille du distributeur
_ Placez le couvercle de la grille du distributeur sur le dessus de
la clayette de recuperation et placez-le sous les deux pattes
en plastique de chaque cote,
_ Centrez la grille du distributeur et alignez-la _ I'aide des guides
centraux,
_ Poussezjusqu% ce qu'elle soit bien en place,
Pour eviter que la glace distribuee ne manque le verre, placez
ce dernier _ proximite de I'ouverture du distributeur, mais
sans la toucher,
IIest possible que de la glace pilee soit distribuee
m6me si vous avez choisi CUBED/CE(glaqons), Cela se
produit de temps _ autre Iorsque plusieurs glacons sont
accidentellement achemines vers le broyeur,
Ap@s distribution de @ace pilee, de I'eau peut s%couler du
conduit,
Parfois, un peu de givre se forme sur le volet du conduit a @ace,
Ce phenomene est normal et se produit en general ap@s des
distributions @petees de @ace piBe, Le givre va eventuellement
s%vaporer,
10
Page 59

A propose de I'eau chaude. GEApp,iancescom
En utilisant le distributeur d'eau chaude
• Appuyez sur la touche HOTWATER(eau chaude),
• %lectionnez la temperature de I'eau souhaitee a I%cran LCD
(90, 150, 170, 185 ou personnalisee),
• Lorsque I'eau chaude est pr6te (indique a I%cran et par un
signal sonore), tenez le recipient avec la main gauche au centre
de la cavite sous le bec verseur,
• Pour verser de I'eau, faites tourner le bouton d'eau chaude dans
le sens inverse des aiguilles d'une montre puis appuyez dessus,
IIest necessaire de maintenir le bouton enfonce pendant la
distribution,
Informations importantes concernant I'eau chaude
• _Z_Risque de brQlures.
L'eau deliv@e par le distributeur est tres chaude et peut
provoquer des brOlures et des echaudures, Veuillez lire tous les
avertissements avant utilisation, (Voir page 4,)
• Veuillez toujours utiliser un recipient qui est adapte aux liquides
chauds (ceramique, mousse de polystyrene expanse, etc,)
• La quantite maximale d'eau chaude qui peut etre versee en une
seule lois est de 10 onces, Une quantite supplementaire d'eau
chaude peut etre distribuee en relan_ant la fonction Hot Water
(Eau chaude) a I%cran LCD,
• La fonction HOT WATER(Eau chaude) fonctionne mieux avec
une pression d'eau dans le circuit domestique allant de 40
1O0 psi,
• La fonction HOT WATER(Eau chaude) s'arrete si elle n'est pas
utilisee, Ellepeut necessiter un court temps pour le rechauffage,
11
Page 60
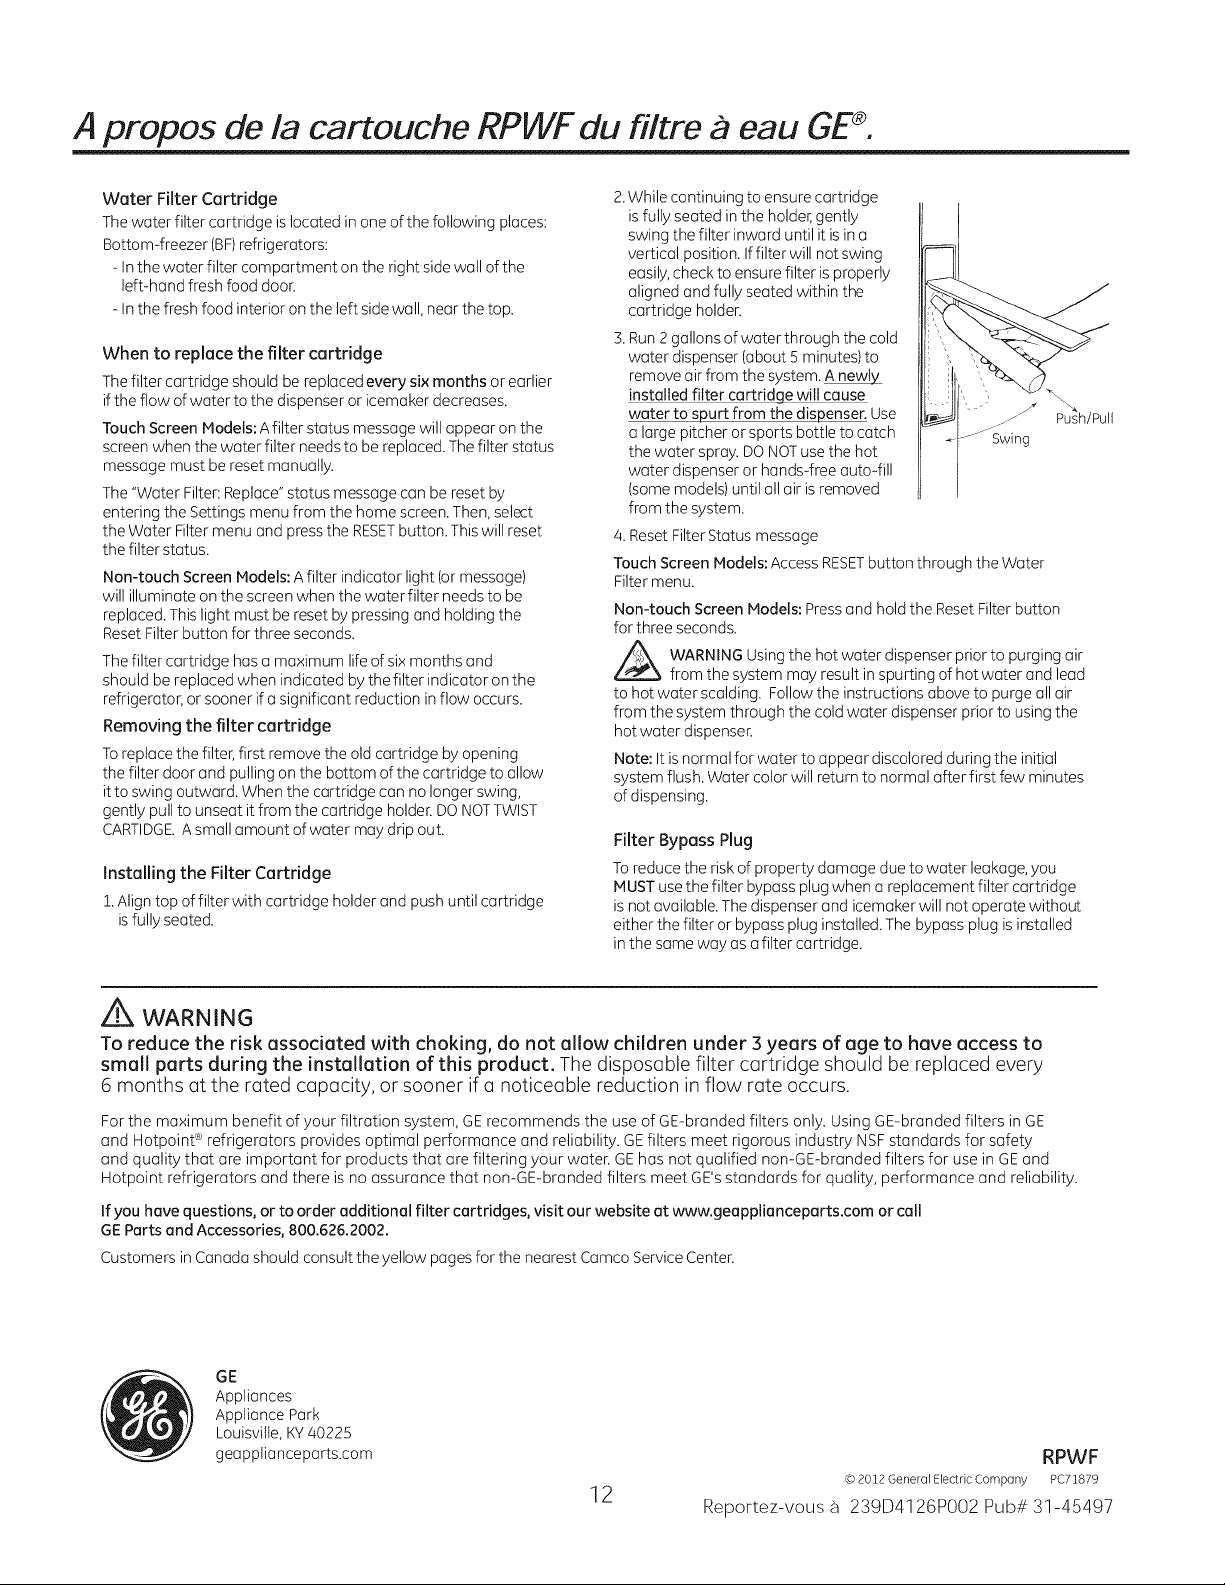
A propos de la cartouche RPWF du filtre a eau GE®.
Water Filter Cartridge
The water filter cartridge is located in one of the following places:
Bottom-freezer (BF)refrigerators:
- Inthe water filter compartment on the right side wall of the
left-hand fresh food door.
- Inthe fresh food interior on the left side wall, near the top.
When to replace the filter cartridge
The filter cartridge should be replaced every six months or earlier
if the flow of water to the dispenser or icemaker decreases.
Touch Screen Models: A filter status message will appear on the
screen when the water filter needs to be replaced. The filter status
message must be reset manually.
The "Water Filter: Replace" status message can be reset by
entering the Settings menu from the home screen. Then, select
the Water Filter menu and press the RESETbutton. This will reset
the filter status.
Non-touch Screen Models: A filter indicator light (ormessage)
will illuminate on the screen when the water filter needs to be
replaced. This light must be reset by pressing and holding the
Reset Filter button for three seconds.
The filter cartridge has a maximum life of six months and
should be replaced when indicated by the filter indicator on the
refrigerator, or sooner if a significant reduction in flow occurs.
Removing the filter cartridge
Toreplace the filter, first remove the old cartridge by opening
the filter door and pulling on the bottom of the cartridge to allow
it to swing outward. When the cartridge can no longer swing,
gently pull to unseat it from the cartridge holder. DO NOT TWIST
CARTIDGE.A small amount of water may drip out.
Installing the Filter Cartridge
1.Align top of filter with cartridge holder and push until cartridge
is fully seated.
2.While continuing to ensure cartridge
is fully seated in the holder, gently
swing the filter inward until it is in a
vertical position. Iffilter will not swing
easily, check to ensure filter is properly
aligned and fully seated within the
cartridge holder.
3. Run 2 gallons of water through the cold
water dispenser {about 5 minutes) to
remove air from the system. A new_
installed filter cartridge will cause
water to spurt from the dispenser. Use
a large pitcher or sports bottle to catch
the water spray. DO NOT use the hot
water dispenser or hands-free auto-fill
(some models) until all air is removed
from the system.
4. Reset Filter Status message
Touch Screen Models: Access RESETbutton through the Water
Filter menu.
Non-touch Screen Models: Press and hold the Reset Filter button
for three seconds.
Z_ WARNING Using the hot water dispenser prior to purging air
from the system may result in spurting of hot water and lead
to hot water scalding. Follow the instructions above to purge all air
from the system through the cold water dispenser prior to using the
hot water dispenser.
Note: It isnormal for water to appear discolored during the initial
system flush. Water color will return to normal after first few minutes
of dispensing.
Filter Bypass Plug
To reduce the risk of property damage due to water leakage, you
MUST usethe filter bypass plug when a replacement filter cartridge
is not available. The dispenser and icemaker will not operate without
either the filter or bypass plug installed. The bypass plug is installed
in the same way as afilter cartridge.
pu_sh/Pull
Z_ WARNING
To reduce the risk associated with choking, do not altow cMMren under 3 years of age to have access to
smart parts during the installation of this product. The disposable filter cartridge should be replaced every
6 months at the rated capacity, or sooner if a noticeable reduction in flow rate occurs.
For the maximum benefit of your filtration system, GE recommends the use of GE-branded filters only. Using GE-branded filters in GE
and Hotpoint ®refrigerators provides optimal performance and reliability. GEfilters meet rigorous industry NSF standards for safety
and quality that are important for products that are filtering your water. GE has not qualified non-GE-branded filters for use in GEand
Hotpoint refrigerators and there is no assurance that non-GE-branded filters meet GE's standards for quality, performance and reliability.
If you have questions, or to order additional filter cartridges, visit our website at www.geapplianceparts.com or call
GE Parts and Accessories, 800.626.2002.
Customers in Canada should consult the yellow pages for the nearest Camco Service Center.
GE
Appliances
Appliance Park
Louisville, KY40225
geappiianceparts.com
12
© 2012 General Electric Company PC71879
Reportez-vous _-_239D4126P002 Pub# 31-45497
RPWF
Page 61
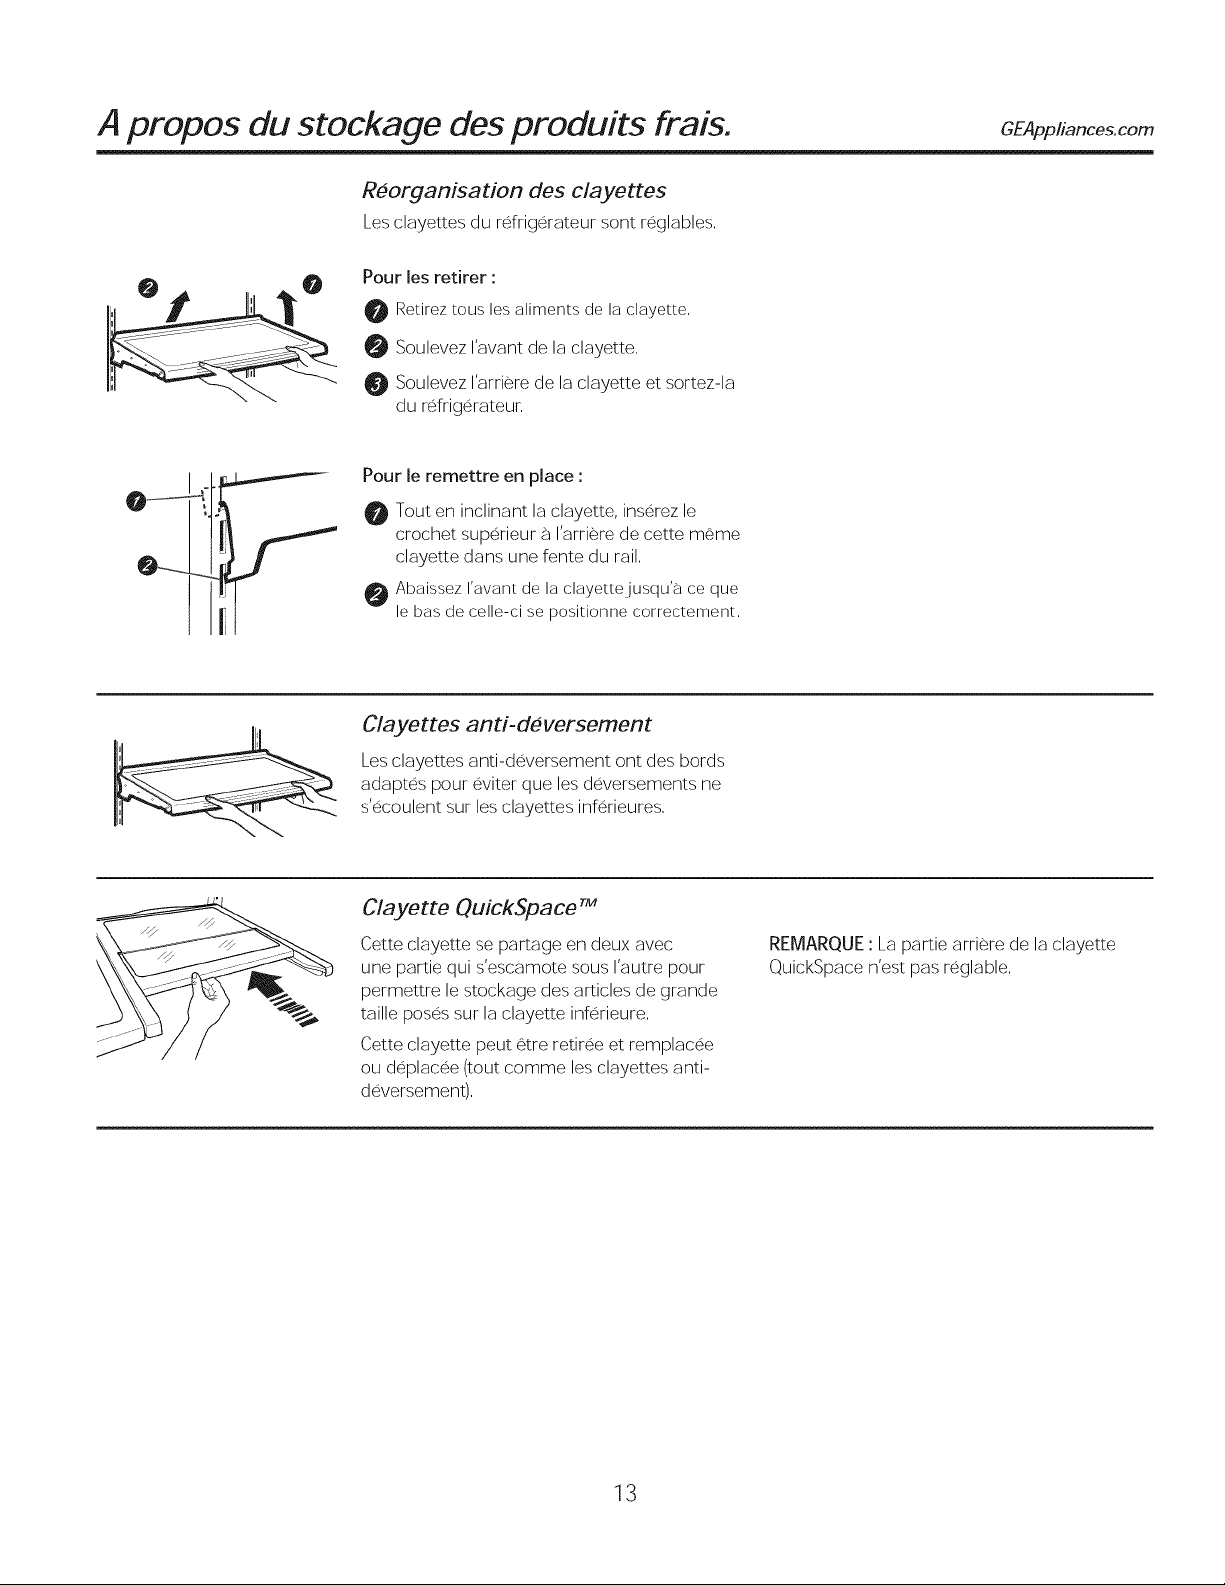
A propos du stockage des produits frais.
Reorganisation des clayettes
Les clayettes du refrigerateur sont reglables,
Pour les retirer :
Retireztous les aliments de la clayette,
0 Soulevez I'avant de la clayette,
0 Soulevez I'arriere de la clayette et sortez-la
du refrigerateur,
Pour le remettre en place :
0 Tout en inclinant la clayette, inserez le
crochet superieur _ I'arriere de cette m6me
clayette dans une fente du rail,
Abaissez I'avant de la clayettejusqu'a ce que
le bas de celle-ci se positionne correctement,
GEAppliances.com
Clayettes anti-deversement
Les clayettes anti-deversement ont des bords
adaptes pour eviter que les deversements ne
s'ecoulent sur les clayettes inferieures,
Clayette QuickSpace TM
Cette clayette se partage en deux avec
une partie qui s'escamote sous I'autre pour
permettre le stockage des articles de grande
taille poses sur la clayette inferieure,
Cette clayette peut 6tre retiree et remplacee
ou deplacee (tout comme les clayettes anti-
deversement),
REMARQUE : La partie arriere de la clayette
QuickSpace n'est pas reglable,
13
Page 62

A propos du stockage des produits frais.
Bac a produits laitiers non reglable
T
i
Pour le retirer : Tirez le bac _ produits laitiers
vers le haut, puis retirez-le,
Bacs de porte reglables
Les bacs reglables peuvent facilement 6tre
transportes du refrigerateur _ votre surface de
travail,
Pour les retirer : Tirez le bac vers le haut, puis
retirez-le,
Pour les remettre ou pour les deplacer :
Engagez le bac dans les supports de porte
moules et poussez-le vers le bas, Le bac
s'encastrera, (Volt page 33),
Pour le remettre en place : Engagez le
bac dans les supports de porte moules et
poussez-le vers le bas, Le bac s'encastrera, Voir
page 33,
Plateau rabattable
(bac ouvert)
1, Ouvrez la porte droite
du compartiment de
refrigeration,
2, Appuyez sur les deux
boutons sur les cotes
inferieurs du bac et
celui-ci s'ouvrira,
3, Faites la manceuvre en sens inverse pour
le reinstaller,
Bacs de porte non reglables
Pour les retirer : Tirez le bac vers le haut, puis
retirez-le,
Pour les remettre en place : Engagez le
bac dans les supports de porte moules et
poussez-le vers le bas, Le bac s'encastrera,
Les bacs de porte de la machine _ glacons
ne sont pas interchangeables, notez leur
emplacement Iorsque vous les retirez afin de
les remettre au bon endroit,
14
Page 63
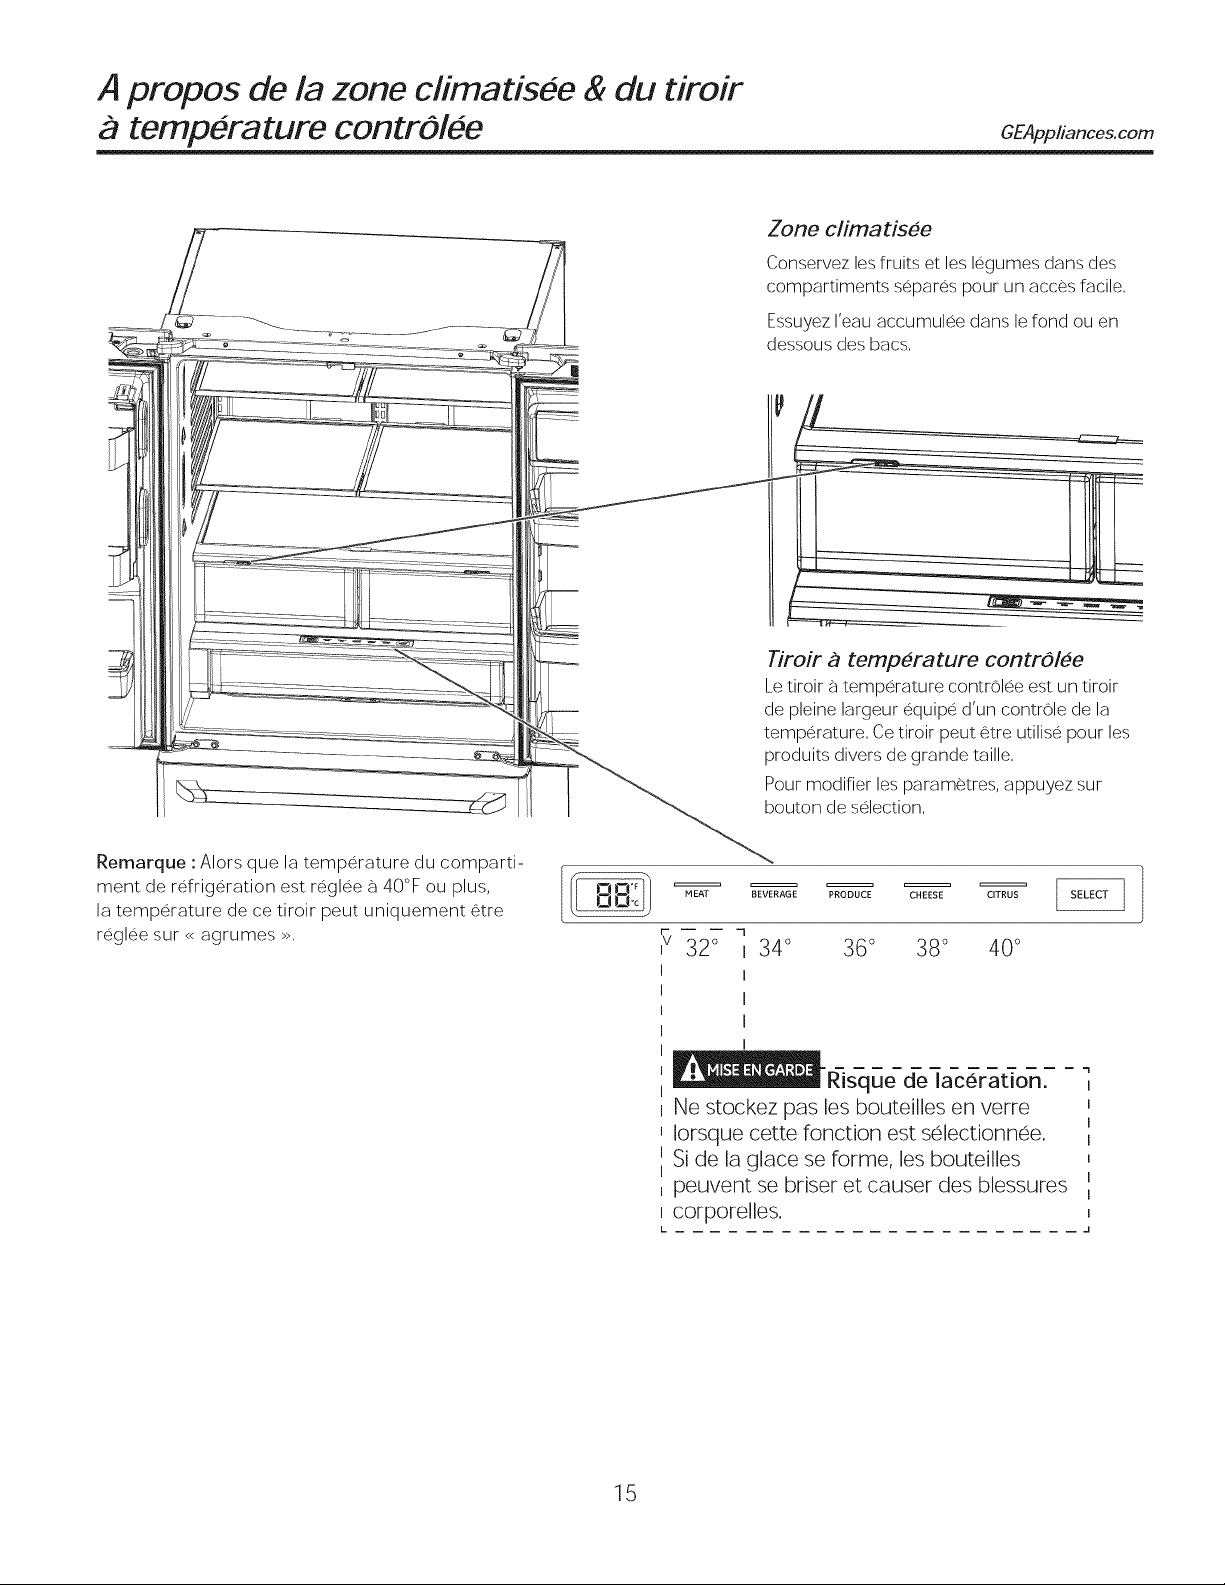
A propos de la zone climatisee & du tiroir
temperature contrOlee GEAppliances.com
Zone clima tis#e
Conservez les fruits et les Bgumes dans des
compartiments separe.s pour un acce.s facile.
Essuyez I'eau accumulee dans le fond ou en
dessous des bacs.
Tiroir a temperature contrOlee
Le tiroir _-_temperature contrOlee est un tiroir
de pleine largeur e.quipe d'un controle de la
temperature. Ce tiroir peut 6tre utilise pour les
produits divers de grande taille.
Pour modifier les parame.tres, appuyez sur
bouton de selection.
Remarque : Alors que la tempe.rature du comparti-
ment de re.frige.ration est re.glee _-_40°F ou plus,
la temperature de ce tiroir peut uniquement 6tre
re.glee sur <<agrumes >>.
HEAT BEVERAGE PRODUCE CHEESE CITRUS
r- 7
v 32 ° 134 o 36° 38 ° 40°
I I
I I
I
I
I
i Ne stockez pas les bouteilles en verre
Iorsque cette fonction est s@ectJonnee.
Si de la @ace se forme, les bouteilles
i
peuvent se briser et causer des blessures
_corporelles.
L
I
I
ue de laceration,
"1
i
i
i
i
i
i
i
i
J
15
Page 64

A propos de la zone climatisee & du tiroir a temperature contrOlee
Retrait et remise en place du tiroir a charcutene/a produits frais r#glable
Pour le retirer :
0 Tirez le tiroirjusqu?-_ la butee,
0 Soulevez I'avant du tiroir puis fakes le sortir
en tirant,
Pour le remettre en place :
Tirez les glissieres gauche et droitejusqu?-_
ce qu'elles soient completement sorties,
Placez I'arriere du tiroir en premier, puis
faites pivoter I'avant du tiroir vers le has
pour que celui-ci repose sur les glissieres,
0 Poussez le tiroirjusqu?-_ sa position fermee,
Comment retirer le s#parateur du tiroir et le remettre en place
Pour le retirer : Pour le remettre en place :
Tirez le tiroirjusqu?-_ la butee, Proceder en sens inverse pour remettre le
Fakes glisser le separateur vers la droite separateur en place,
pour le degager du tiroir,
16
Page 65

A propos du congdateur. GEAppliances.com
Panier et tiroir du congelateur
0 Panier
0 Tiroir
Bac utilitaire
Bac non reglable clans le congelateur
Pourle retirer: Enfoncez la languette en
plastique de chaque cote.
Pour/e remettre en place : Faites glisser
le bac dans la position souhaiteejusqu%
encastrement,
Retrait d'un partier
Pour le retirer d'un mod#le CFE uniquement :
Ouvrez la porte du congelateurjusqu% la
position d'ar@t,
Retirez le bac de la porte du
congelateur en poussant la languette
de plastique du cote droit ou gauche
afin de liberer I'axe de charniere du
bac,
0
Retirez le panier du congelateur en le
soulevant _ I'arriere et en le d6plaqant
vers I'arrierejusqu% ce que I'avant du
panier puisse pivote vers le haut et
sorti,
O Soulevez-le pour le sortir du congelateur,
Pour le retirer d'un mod#le CYEuniquement :
Ouvrez les portes de la section
refrigerateur,
Ouvrez la porte du congelateurjusqu% la
position d'arr6t,
Retirez le panier du congelateur en le
soulevant _ I'arriere et en le faisant
pivoter vers le haut,
Soulevez-le pour le sortir du
congelateur,
Pour/e remettre en p/ace :
Proceder en sens inverse pour remettre le
bac en place,
17
Page 66

Apropos de la machine a gla¢ons automatique.
II faut prevoir entre 12 et 24 heures avant qu'un rdrigerateur nouvellement
Machine
Bras de detection
Machine b gla_:ons automatique
(sur certains modeles)
La machine _ glacpns produit sept glaqons
par cycle - environ 100-130 cycles par 24
heures, selon la temperature du compartiment
de congelation, la temperature de la piece,
le nombre d'ouverture de porte et les autres
conditions d'utilisation,
La machine _ glaqons se remplit d'eau Iorsque
sa temperature atteint 15°F (-10°C), II faut
p@voir entre 12 et 24 heures avant qu'un
refrigerateur nouvellement instalB commence _
prod@re des glacpns,
Si le refrigerateur est mis en marche avant
que la machine _ glaqons ne soit raccordee
_ I'alimentation en eau ou si I'alimentation en
eau du rdrigerateur est fermee, assurez-vous
que la machine _ glaqons est eteinte, Une lois
que I'eau a ere raccordee au refrigerateur, la
machine _ glacpns peut 6tre mise en marche,
Pour minimiser les risques de blessures, evitez le contact avec les pieces mobiles du
mecanisme @ecteur, ou avec I%lement chauffant qui libere les glaqons, Ne posez pas les
doigts ou les mains sur le mecanisme de la machine a_gla¢ons automatique pendant que le
refrig6rateur est branche.
Comment allumer ou eteindre la machine a gla_ons ?
installe commence a produire des gla¢ons,
Referez-vous au tableau ci-dessous pour de
plus amples informations,
Vous entendrez un bourdonnement _ chaque
lois que la machine _ glacpns se remplit d'eau,
Jetez les premiers bacs de glacpns pour bien
nettoyer le conduit d'eau,
Verifiez que rien n'interfere avec le deplacement
du bras de detection,
Quand le bac se remplitjusqu'au niveau du bras
de detection, la machine _ glaqons s'ar@te de
prod@re des glaqons, IIest normal de trouver
des glacpns qui soient soudes ensemble,
Sivous n'utilisez pas souvent vos glacpns, les
vieux glaqons deviennent opaques, prennent un
mauvais goOt et retrecissent,
REMARQUE : Dans les maisons qui ont une
pression d'eau plus faible que la moyenne,
vous entendrez peut-6tre la machine _ glacpns
recommencer plusieurs lois son cycle pour
prod@re un lot de glacpns,
l Type Cafe Control CYE/CFE Utilisez le menu Settings (parametres) de I%cran tactile
Porte du
glace
Soulevez eLtirez
Seau a gla_;ons et distributeur
. Ouvrez la porte du bac _ glace _ I'interieur
de la porte de gauche,
. Tirez le seau _ glaqons vers le haut dans
la porte de gauche pour le sortir du
compartiment,
. Pour remettre le seau _ glace, placez-le sur
les guides et enfoncez-lejusqu%_ ce qu'il
soit correctement en place,
. Si vous n'arrivez pas _ le remettre, fakes
tourner la fourche d'1/4 de tour dans le
sens des aiguilles d'une montre,
Stockage de glace supplementaire
Un bac de stockage supplementaire est fourni dans le tiroir de
congelation,
. Ouvrez le tiroir de congelation,
. Le seau _ glacons est situe sur le cote gauche sous la cloison,
. Tirez le seau _ glacons vers vous,
18
Page 67

Entretien et nettoyage du refrigerateur GEAppliancescom
Nettoyage de I'exterieur
Panneaux, poignees de porte et garniture en acier
inoxydable.
N'utilisez pas de cire pour appareil menager, de produit
polissant, dejavellisant ou de tout autre produit contenant
du chlore sur I'acier inoxydable
L'acier inoxydable peut 6tre nettoye avec un nettoyant
specialement formule pour I'acier inoxydable, Les meilleurs
resultats sont obtenus _ I'aide d'un nettoyant pour acier
inoxydable _ vaporiser,
Nettoyage de I'interieur
D(}branchez I'appareil avant de le nettoyer.
S'il est trop difficile de debrancher I'appareil, essorez bien
votre chiffon ou votre eponge pour enlever I'exces d'eau
Iorsque vous nettoyez autour des interrupteurs, des lampes
ou des commandes, Utilisez une cire pour appareil menager
sur la surface interieure entre les pokes,
Utilisez une solution d'eau tiede et de bicarbonate de soude
(environ une cuillere _ soupe (15 ml) de bicarbonate de soude
dans un litre d'eau) afin de nettoyer tout en neutralisant les
odeurs, Rincez et sechez,
Pieces en plastique argente.
Lavez ces pieces avec du savon ou un autre detergent doux, Essuyez
ensuite avec une eponge, un linge humide ou de I'essuie-tout,
N'utilisez pas de tampons a @curer, de produits nettoyants en
poudre, dejavellisants ou de produits contenant dujavellisant
sous peine de rayer la finition et de la rendre moins @sistante,
N'utilisez pas de tampons a recurer, de produits nettoyants en
poudre, dejavellisants ou de produits contenant dujavellisant
sous peine de rayer la finition et de la rendre moins resistante
Ne nettoyez pas les clayettes ou les
couverdes en verre avec de I'eau tiede quand ceux-ci
sont ffoids, Lesclayettes et couvercles en verre peuvent
se casser s'ils sont exposes a des changements soudains
de temperature ou si vous les cognez ou les fakes
tomber, Le verre trempe est concu pour se briser en petits
morceaux en cas de casse.
Derri#re le refrigerateur
Soyez prudent Iorsque vous eloignez votre refrigerateur
du mur, Tousles types de rev6tements de sol peuvent 6tre
endommages, en particulier les rev6tements matelasses et ceux
dont la surface est gaufree,
Relevez les pieds de mise _ niveau situes sur la partie inferieure
avant du refrigerateur,
Tirez le refrigerateur en ligne droite et Iorsque vous le
remettez en place, poussez-le vers lemur en ligne droite,
Depart en vacances
Encas d'absences ou de vacances prolongees, retirez tousles
aliments du reffigerateur et debranchez-le, Nettoyez I'interieur
avec une solution de bicarbonate de soude (environ une cuillere
_ soupe (15 ml) de bicarbonate de soude dans un litre d'eau),
Laissez les portes ouvertes,
Modeles avec affichage ICE): Eteindre le refrigerateur au
niveau des commandes (page 7),
Dans le cas o@la temperature pourrait descendre en dessous
de zero, demandez _ un technicien qualifie de vidanger le
systeme d'alimentation en eau pour eviter les deg_ts des eaux,
1) Eteignez ou debranchez le refrigerateur (p,7),
Les deplacements lateraux du refrigerateur pourraient
endommager le rev6tement de sol ou le refrigerateur,
Abaissez les pieds de mise _ niveaujusqu% ce qu'ils touchent le
sol,
Lorsque vous remettez le refrigerateur en place en le
poussant, veillez a ne pas le faire fouler sur le cordon
d'a limenta tion.
2) Videz le seau _ glacons,
3) Fermez I'arrivee d'eau
Si vous fermez I'alimentation en eau, eteignez la machine
gla_:ons (p. 18).
Retour de vacances :
1) Remettez le filtre _ eau,
2) Fakes passer 2 gallons (7,5 litres) d'eau dans le distributeur
d'eau ffoide (pendant environ 5 minutes) pour purger le
systeme,
3) Tirez de I'eau _ 185°F (85°C) _ 3 reprises (10 oz _ chaque lois)
pour vidanger le systeme,
Demenagement
Immobilisez routes los pieces amovibles, relies que los clayettes
et les bacs, _ I'aide de ruban gomme pour eviter de les
endommager,
Lorsque vous utilisez un diable pour deplacer le refrigerateur, ne
fakes pas reposer le devant ou I'arriere du refrigerateur contre
le diable, sous peine d'endommager votre refrigerateur,
Ne le manipulez que par les cotes,
Assurez-vous que le mfrigerateur reste en position verticale
pend_nt son d#.menagement,
19
Page 68

Remplacement des ampoules
Ampoules du refrigerateur (DEL)
Le compartiment de re.frige.ration est
equip6 d'un e.clairage _-_DEL. De plus,
le bas de la porte du compartiment
re.frige.rateur est e.galement 6quipe de
DELpour e.clairer le compartiment de
conge.lation
Le remplacement des ampoules _-_DEL
doit 6tre effectue par un technicien
autorise.
Si cet ensemble doit 6tre remplace.,
contactez le service GE au 1.800.432.2737
aux Etats-Unis ou au 1.800.561.3344 au
Canada.
2O
Page 69

Instructions
Refrigerateur
d'installation
Des Questions ? Appelez 800,GE,CARES(800,432,2737) ou consultez notre site internet : GEAppliances,com
Au Canada, appelez le 1,800,561,3344 ou consultez notre site internet www,GEAppliances,ca
AVANT DE COMMENCER
Lisez ces instructions entierement et attentivement.
_l_Risque de basculement
Les modeles encastres (modeles PYE,CYEet PWE)
sont plus Iourds au niveau de leur partie superieure,
surtout avec les portes ouvertes. Ces modeles doivent
6tre fixes a I'aide du systeme anti-basculement par
fixation au sol pour eviter que I'appareil ne bascule
vers I'avant, ce qui pourrait entrainer des blessures
graves, voire mortelles. Lisez et suivez les instructions
d'installation completes pour I'installation du systeme
anti-basculement par fixation au sol livre avec votre
refrigerateur.
• IMPORTANT-- %specte touslescodeset
r%lements en vigueur. Conservez ces instructions pour
I'inspecteur local.
• RemarquepourI'lnstallateur- Assurez-vousderemettreces
instructions_ I'utilisateur.
• Remarque pour I'utilisateur- Conservezces instructions
pour route rderence future.
• Niveau decompetence - L'installationde cet appareil
demande desconnaissancesde base en mecanique.
• Delai d'execution- Variable pour I'installationdu
rdrigerateur
30 minutes pour I'installation de
I'alimentation en eau
• L'installateur est responsablede I'installationcorrecte de
I'appareil,
• La panne de I'appareil due aune mauvaise installation n'est
pascouverte par la garantie,
PREPARATION (suite)
ALIMENTATION EN EAU DE LA MACHINE A
GLA[_ONS ET DU DISTRIBUTEUR
Sile rdrigerateur estequipe dune machine a glagons,il
devra etre branche a une alimentation en eau froide.Vous
pouvezvous procurer une trousse GEde branchement
I'alimentation d'eau (contenant tuyau, robinet, raccords
et instructions)aupres de votre fournisseur,en consultant
notre site internet GEAppliances.com(au Canadapar le
site GEAppliances.ca),ou au Centrede PiecesDetacheeset
dAccessoires,au 800.626.2002(auCanada, 1.800.661.1616).
OUTILLAGEDONTVOUSPOUVEZAVOIRBESOIN
Cle a molette
Cle hexagonale de type
Allen de 1/8 po, 3/32 po,
¼ poet de 5/32 po
Moddes GECareTM
Tournevis a cliquet /_TN
de 3/8 po 0
Ecrou a compression de
diametre externe d'Y4 po
et d'une bague
Tournevis cruciforme
PREPARATION
DEPLACEMENT DU REFRIGERATEURA L'INTI:_-RIEUR
DE LA MAISON
Sile rdrigerateur ne peut pas passerpar la porte, vous
pouvezenlever la porte du compartiment de refrigeration et
letiroir du compartiment de congelation.
• Pourenlever la porte du compartiment de refrigeration,
consultez la section<<Installation du refrigerateur >>
• Pourenlever la porte du compartiment de congelation,
consultez la section<<Retraitdu tiroir de congelation >>.
Meche de 1/8 poet
Perceuse manuelle ou
electrique
Tournevis Torx T20,
21
Crayon
Pinces
T25
Tournevis a tete plate
Metre
Tournevis a douille Y4po
Niveau
Page 70

Instructions d'installation
DIMENSIONS Toutes les rnesures sont donnoes avec les pieds de rnise 8 niveau escarnotos,
69
CYE uniquement
......... 35_4"
31¼"
CFE uniquement
......... 35Y4" ...............
'rofondeur du r6frigerateurj4_
sans les portes 29 £J' CFE
24 ?_"
23 W' CFE
W' CYE
Hauteur entre le
sol et la partie
superieure du cache
de la charniere 69 7/j,
Dimensions
supplementaires
CFE CYE
Hauteur hors tout du haut du cache de la 697A'' 697A''
charniere
Hauteur du haut du refrigerateur 69" 69"
Profondeur du refrigerateur sans les portes 29_" 243A
Largeur horstout du refrigerateur 353i'' 353i''
Profondeur hors tout du refrigerateur avec les 36W' 31W'
portes et les tiroirs equipes de leurs poignees
DEPLACEMENT DU REFRIGERATEUR
• Enutilisant le tableau ci-dessous, determinez sila largeur de votre couloir et embrasures de porte peuvent accommoder la profondeur du
rdrigerateur, Assurez-vous d'avoir assezd'espace pour eviter d'endommager le @frigerateur avant de ledeplacer en toute securite vers son
emplacement final,
• Sivotre couloir et embrasures de porte sont assezlarge pour laisserpasser le rdrigerateur sans enlever les poignees, passezdirectement _
I%tape6,Laisserles bandes adhesives, le film et tousles emballages sur les portesjusqu%_ce qua le @ffigerateur soit dans sa position finale,
• REMARQUE: Utilisez un diable rembourre ou des sangles de demenagement pour deplacer ce refrigerateur. Placez le refrigerateur sur
le diable en appuyant un des cotes contre le diable. II est fortement recommande qua DEUXPERSONNESdeplacent le rdrigerateur et
effectuent cette installation,
Si votre numero de modele commence par CFE
Completement Retrait des Retrait de la Refrigdrateur Refrigerateur
assemble poignees porte gauche congelateur charnieres)
36.25" 35.25" 33,75 _ :30.25" 29,375"
avec glissieresdu saul (sans
Si votre numero de modele commence par CYE
Completement Retrait des Retrait de la
assemble poignees porte gauche
Refrigerateur Refrigerateur
avec glissieresdu saul(sans
congelateur charnieres}
25.25 '_ 24.375 '_
Retirez les pieces des portesjusqu'a ce que
la dimension soit inferieure a votre ouverture
22
Page 71

Instructions d'installation
INSTALLATION DU REFRIGERATEUR
EMPLACEMENT DU REFRIGERATEUR
• N'installezpas le refrigerateur dans une pieceo@les
temperatures descendent en-dessous de 60°F(16°0)parce
qu'il serait difficile d'ymaintenir une temperature correcte,
• N'installezpas lerdrigerateur dans un endroit ou la
temperature ambiante sera superieure 8 37°C,il ne
fonctionnera pascorrectement,
• IIdoit etre installesur une surface suffisamment solide pour
supporter le poidsdun rdrigerateur rempli,
DEGAGEMENTS
Prevoyez les degagements suivants pour faciliter
I'installation, la circulation d'air et les raccordements
hydrauliques et electriques.
Cotes 1/8po(3mm)
Dessus 1po (25ram)corpsdu rdrigerateur/
cache de charniere
Arriere 2 po (50ram)
RETRAITDESPORTESDURfiFRIGfiRATEUR
• REMARQUEIMPORTANTE:La profondeur de ce rdrigerateur
est de 36 1/4po(31 Y4po pourlesmodeles CYE),Lesportes
et lespassages qui menent 8 I'emplacement d'installation
doivent avoir une largeurd'au moins 36 Y4po si vous
souhaitezles portes et lespoigneessur le rdrigerateur lots de
sondeplacement, Si la largeur des passagesest inferieure 8
36 F4po,lesportes et lespoignees du refrigerateur peuvent
etrefacilement rayees et endommagees, Lecache superieur
et lesportes peuvent _tre retires pour permettre de deplacer
le rdrigerateur 8 I'interieuren route securite,Sila largeur des
passagesest inferieure 8 31F4po, commencez par I'etape1,
• S'iln'est pas necessairederetirer lesportes, passez
directement 8 I'etape11,Laisserles bandesadhesiveset tous
lesemballages sur les portesjusqu'a ce que le rdrigerateur
soit dans saposition finale,
• REMARQUE:Utilisezun diable rembourre pour deplacer ce
rdrigerateur, Placezle rdrigerateur sur lediable en appuyant
un descotes contre le diable,IIest fortement recommande
que DEUXPERSONNESdeplacent lerdrigerateur et
effectuent cette installation,
R]
RETRAIT DESPOIGNfiES DE PORTE DU
COMPARTIMENT DE REFRIGERATION
La conception des poignees varie en fonction des
modeles,mais I'installation reste la m6me,
Poigneesen acier inoxydable et en plastique:
Q Desserrez lesvis de reglage avec la cle Allen d'l/8 poet
retirez la poignee,
REMARQUE:Si les fixations de la poignee ont besoin d'etre
resserrees ou enlevees, utilisez une cB Allen d'1/4 po,
Fixations
Ne retirez le
film qu'apres
installation
E]
RETRAIT DES POIGNCES DEPORTE DU
COMPARTIMENT DE CONGELATION
Laconception des poigneesvarie en fonction des
modeles, mais I'installation reste la m6me,
Poigneesen acier inoxydable et en plastique:
0 Desserrez lesvis de reglage avec la cB Allen d'l/8 poet retirez la
poignee,
REMARQUE:Si les fixations de la poignee ont besoin d'etre resserrees
ou enlevees, utili'
Fixations
Ne retirez le
film qu'apres
installation
23
Reinstallez les poignees en utilisant
la mCme procedure que pour les retirer,
Page 72

Instructions d'installation
INSTALLATION DU REFRIGERATEUR(suite)
RETRAITDESPORTESDUREFRIGERATEUR
r_Maintenez la porte bien fermee _ I'aide de ruban-cache
ou demandez _ une deuxieme personne de maintenir
la porte,
r_Commencez par la porte de gauche : Retirez le cache
de la charniere superieure de la porte gauche du
refrigerateur en retirant les vis cruciformes et en le
tirant vers le haut, Fakes de m6me pour la porte de
droite et le cache central,
Cache de
charniere f !
RETRAITDESPORTESDUREFRIGERATEUR(suite)
r_ Debranchez I'alimentation en eau _ I'arriere de
I'appareil en appuyant sur le collier gris fence tout en
tirant le tuyau d'alimentation en eau vers le haut,
Fakes passer le tuyau d'alimentation en eau _ travers
le passage prevu _ cet effet pour liberer le tuyau avant
de retirer la porte, La Iongueur du tuyau d'alimentation
en eau est superieure _ 4 pi, Celui-ci doit 6tre fixe
_ I'aide de ruban adhesif _ la porte pour y acceder
facilement lots de la reinstallation de la porte
r_A I'aide d'un tournevis _ cliquet de 3/8 po, retirez les
vis de fixation de la charniere superieure au corps
du refrigerateur, puis soulevez la charniere vers
le haut pour degager I'axe de la charniere de son
emplacement dans le haut de la porte,
r_D6branchez les deux connecteurs electriques au niveau
du cache superieur,
Retirez la vis _ t6te hexagonale de 1/4po pour
debrancher le fil de masse de la charniere,
Retirez la vis _ t6te hexagonale de 1/4po pour
debrancher reducteur de tension du tuyau
d'alimentation en eau,
Vis de
_e tension ?
_ terre
_educteur 1
Risque Iors du levage de charge
Une seule personne soulevant ces charges pourrait
se blesser. Demandez I'aide d'une autre personne
pour manipuler, deplacer ou lever les portes du
refrigerateur.
Remarque : Iorsque vous retirez la porte, pour eviter
d'endommager celle-ci ainsi que les composants
electroniques qu'elle contient, placez-la soigneusement
dans un endroit approprie,
Remarque : La charniere inferieure et son axe sent
numerotes, IIs doivent donc 6tre associes pour que la
porte se ferme correctement de facon automatique,
Veuillez suivre les instructions scrupuleusement,
,s! I .............
24
Page 73

Instructions d'installation
INSTALLATION DU REFRIGERATEUR(suite)
RETRAITDESPORTESDUREFRIGERATEUR(suite)
Remarque:pour que l'installation sefassecorrectement plus
tard, veuillezsuivre attentivement la prochaine etape,
[]Los portes du compartiment de refrigeration doivent
RETIREESet INSTALLEESen position ouverte _ 90°
avec la facade du refrig6rateur,
Soulevez et retirez la
charniere centrale
la
porte a 90°
RETRAIT DE LA PORTE OPPOSEE
Effectuez la mF.me proce.dure sur la porte du cote oppose,
II n'y a pas de c_bles ou de tuyau d'alimentation en eau
sur la porte du cote oppose,
E]RETRAIT DE LA CHARNIERE CENTRALE (si
necessa ire)
Retirez los vis de 3/8 po maintenant la charniere centrale au
corps du refrigerateur, Utilisez le tournevis T20 pour retirer la
vis exterieure,
DREINSTALLATIONDESPORTESDU
REFRIGERATEUR
r_ Inverser en sons inverse,etapes 4 _ 1,pour @installerlos
pokes du refrigerateur, Suivezlosinstructions suivantes
pour los alignements critiques,
Reinstallezla charniere centrale d'abord, pub serrez
lesvis a un couple de 65 po-lb.
Avec la porte gauche a 90° par
rapport a lafaqade du @ffigerateur,
abaissezla porte du rdrigerateur
sur lacharnierecentrale,Assurez-
vous que la porte et la charniere
s'alignentcorrectement,
_Fermez los portes et assurez-vous que lapartie mobile
d%tancheit6de la porte soit alignee avecla gSche, Si
la porte ne se ferme pas automatiquement apres la
re/hstallat/bn,mtJrezla porte, mtoumez-la, verifiezlerepere
d'alignement etla fleche(ily a unrepere d'a/ignement sur le
mecanisme de fermeture de b porte, Celui-dcorrespond
un repere d'alignement sur © cacheinferieur,Faitespivoter
© mecanisme de fermeture de b porte pour aligner©
repere etla fleche Rdnstallez ensuitela poftej.
du compartiment de
refrigeration.
Do apo
Retirez
la vis
centrale
¢
Desserrez los vis
ext@rieures
®
alignez les reperes
Si la porte ne peut pas _tre installe a 90°, suivez les etapes ci-dessous :
1. Si I'espace disponible ou le modele limite I'ouverture de la porte a moins
de 180 °, alors :
a) Enlevez la porte, retournez-la doucement.
b) Verifier I'alignement de I'axe du mecanisme de fermeture de la
porte sur le dessous de la porte. Les parties planes sur I'axe
correspondent au repere d'alignement sur I'anneau en plastique
ou au repere sur le cache inferieur
c) Si I'axe n'est pas aligne sur le repere, a I'aide d'une cle Allen de
5/32 po, faites pivoter I'axe du mecanisme de fermeture de la
porte dans le sens inverse des aiguilles d'une montre pour la
porte droite, et dans le sens des aiguilles d'une montre pour la
porte gauche. Ensuite, alignez les parties planes avec le repere.
d) Installez la porte _J90t
Mainterez la porte bien ferm_e a I'aidede ruban-cache ou
demandez a une deuxieme personne de maintenir la porte,
Reinstallez la chamiere superieure d'abord, puis serrez les
vis a un couple de 65 po-lb.
r_Be sure to reinstall the ground wire and strain reliefto the
Assurez-vous d'avoir remis lefil de terre et le @ducteur
de tension au niveau de la charniere superieure.
r_ Reinstallezle cache de la charniere. Remarque :
25
Assurez-vous que les ills ne sont pas pinces ou sous des
emplacement de vis avant de serrerces dernieres.
Page 74
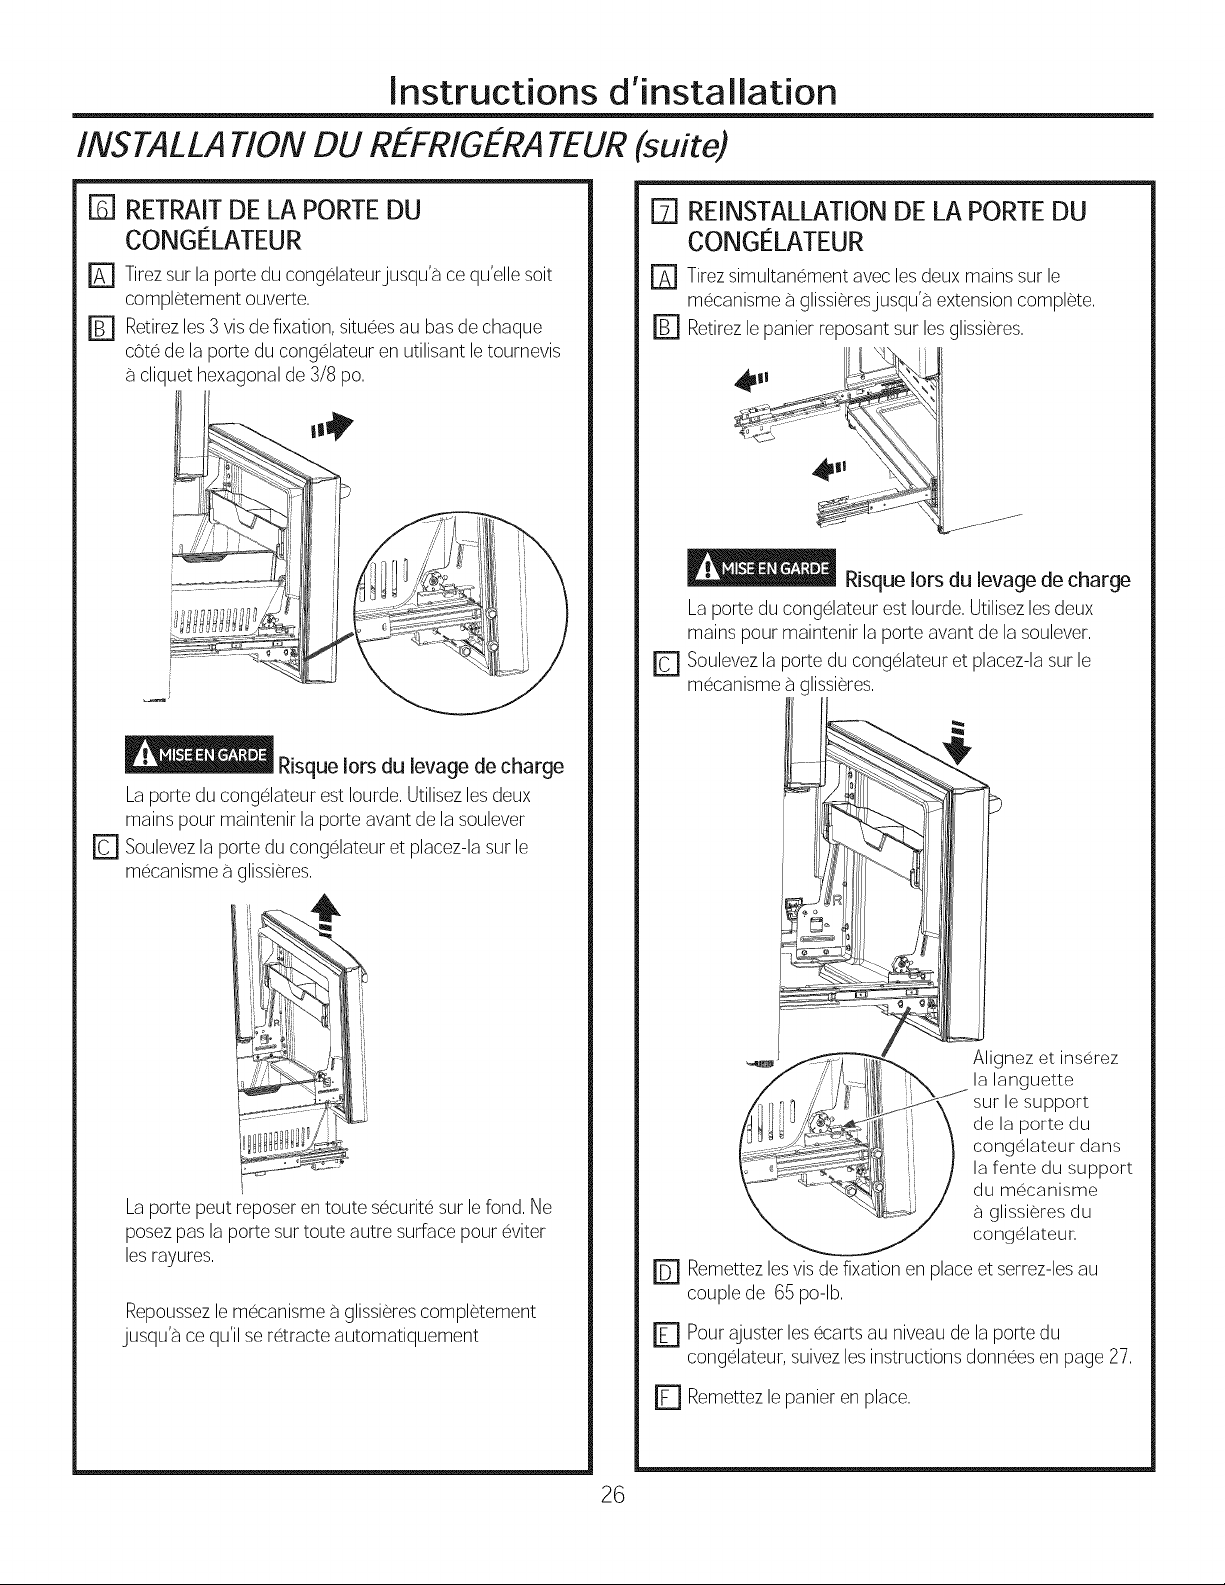
Instructions d'installation
INSTALLATION DU REFRIGERATEUR(suite)
[_ RETRAITDELA PORTEDU
CONGELATEUR
E] Tirezsur la porte du congelateurjusqu'a cequ'elle soit
completement ouverte,
r_ Retirezles3 vis de fixation, situeesau basde chaque
cote de la porte du congelateur en utilisant letournevis
cliquet hexagonal de 3/8 po,
_ Risque lots du levage de charge
Laporte du congelateur est Iourde,Utilisezlesdeux
mains pour maintenir la porte avant de la soulever
r_ Soulevezla porte du congelateur et placez-lasur le
mecanisme a glissieres,
E] REINSTALLATIONDELA PORTEDU
CONGELATEUR
r_ Tirezsimultanement avec les deux mains sur le
mecanisme a glissieresjusqu'a extensioncomplete,
r_ Retirezle panier reposantsur les glissieres,
Risque Iors du levage de charge
Laporte du congelateur est Iourde,Utilisezlesdeux
mains pour maintenir la porte avant de la soulever,
r_ Soulevezla porte du congelateur et placez-lasur le
mecanisme a glissieres,
Laporte peut reposer en route securite sur lefond, Ne
posezpas la porte surtoute autre surface pour eviter
lesrayures,
Repoussezle mecanisme a glissierescompletement
jusqu'a ce qu'il seretracte automatiquement
Alignez et inserez
la languette
sur le support
de la porte du
congelateur dans
la fente du support
du mecanisme
_ glissieres du
congelateur,
r_ Remettezlesvis de fixation en place et serrez-lesau
couple de 65 po-lb,
r_ Pour ajuster lesecarts au niveaude la porte du
congelateur, suivezles instructionsdonnees en page 27,
r_ Remettezle panier en place,
26
Page 75

Instructions d'installation
INSTALLATION DU REFRIGERATEUR(suite)
instructions concernant i'a]ustement des ecarts
de ia porte du congelateur •
iMPORTANT!
Les 6 vis de montage (3 de chaque cote) ne sont PAS interchangeabies avec ies vis de ia charniere
centrale ou superieure. Apres I'installation de la porte du congelateur, verifiez que les ecarts sont uniformes (le
haut et le bas des cotes gauche et droit) a_I'aide du gabarit fourni.
Si des ecarts trop importants sont observes, suivez les etapes suivantes pour ajuster la porte du congelateur.
letape 1 - Desserrez les 3 vis de chaque cote (droit et gauche) de la porte du congelateur.
letape 2 - Tournez la vis d'ajustement dans le sens des aiguilles si I%cart dans le haut est trop important (voir le
gabarit). A I'aide d'une cle hexagonale de 3/32 po, tournez la vis d'ajustement dans le sens des aiguilles sur un
quart a_un demi- tour.
letape 3 - Tournez la vis d'ajustement dans le sens contraire des aiguilles si I%cart dans le bas est trop important
(volt le gabarit). A I'aide d'une cle hexagonale de 3/32 po, tournez la vis d'ajustement dans le sens contraire des
aiguilles sur un quart a_un demi- tour.
letape 4 - Serrez les 3 vis de chaque cote (droit et gauche).
letape 5 - Verifiez les ecarts de nouveau a_I'aide du gabarit et rep6tez les etapes 1 a_4 s'il y a lieu et terminez par
I%tape 5.
Prier ici pour uti/iser /egabarit
[tape 1
[tape 4
Gabarit pour verifier les
ecarts, L%cart dolt 6tre de
0,6 po (1,5 cm) ou moins,
Vis d'ajustement
GEAppliances
General Electric Company
Louisville, KY40225
GEAppfiances,com
[tape 2
[tape 3
239D4744P007 Pub No. 37-45474-2
27
Page 76

Instructions d'installation
INSTALLATION DU REFRIGERATEUR(suite)
MISE A NIVEAU DE LA PORTE DU
CONGELATEUR
_b
i
i
i
i
i
9
r_ Localisez la came de reglage de la hauteur
dans la porte du congelateur. Desserrez les
trois vis de fixation de la porte sur les deux
glissieres a I'aide d'un tournevis a cliquet
hexagonal de 3/8 po.
Localisez et desserrez la visa came en utilisant
r_ le tournevis T-27.
MISE A NIVEAU DE LA PORTE DU
F1CONGELATEUR(suite}
Soulevez la porte sur le cote necessitant un
reglage, fakes tourner la camejusqu% la
position requise.
O
0 - Position initiale
1 - Lever de 0,050 po
-1 - Abaisser de 0,050 po
-2 - Abaisser de 0,1 O0 po
-3 - Abaisser de 0,150 po
r_ Une fois le reglage termine, resserrez les 3 vis
de fixationjusqu% un couple de 65 po-lb.
RETRAIT DE L'EMBALLAGE
A) Retirez les bandes adhesives, les emballages
en mousse et les protections des clayettes et
des tiroirs.
\
28
Page 77
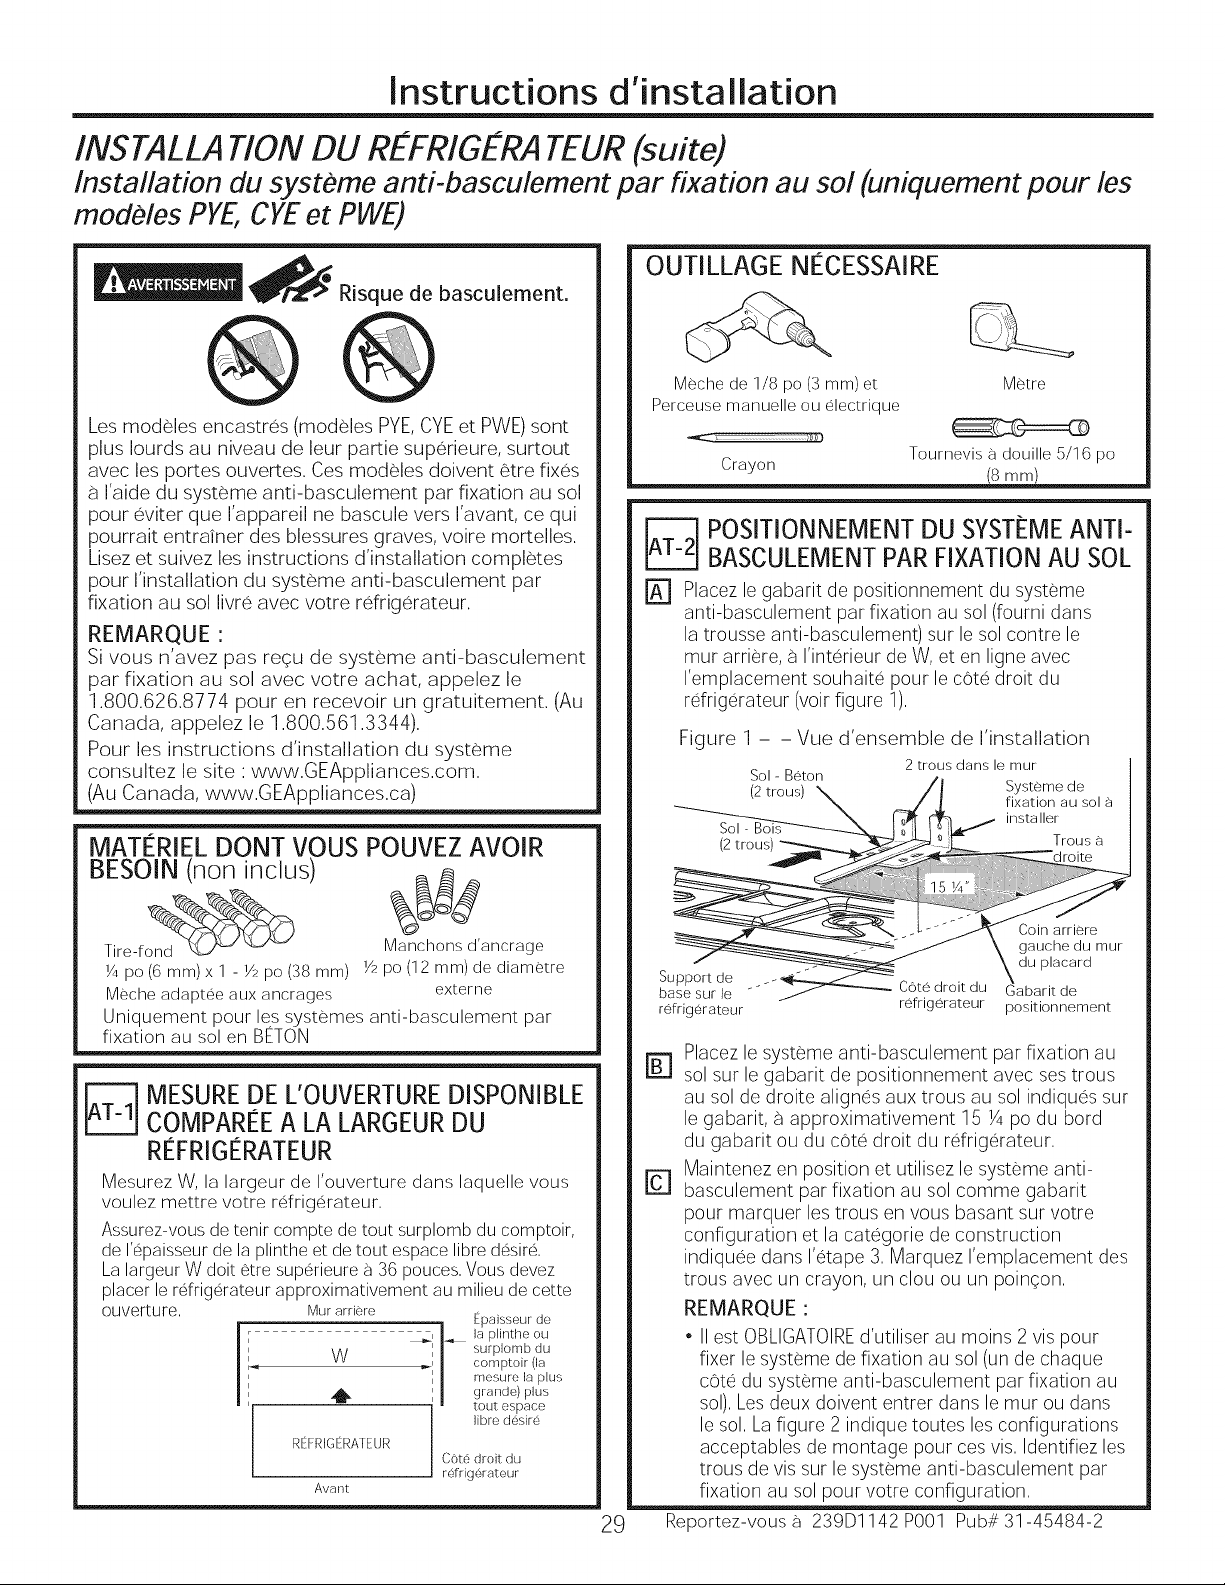
Instructions d'installation
INSTALLATiON DU REFRIGERATEUR(suite)
Installation du systeme anti-basculement par fixation au sol (uniquement pour les
modeles PYE,CYEet PWE)
OUTILLAGE NECESSAIRE
_r_ Risque de bascuiement
Mechede 1/8 po (3mm)et Metre
Perceuse manuelle ou electrique
Les modeles encastres (modeles PYE,CYEet PWE) sont
plus Iourds au niveau de leur partie superieure, surtout
avec les portes ouvertes. Ces modeles doivent 6tre fixes
I'aide du systeme anti-basculement par fixation au sol
pour eviter que I'appareil ne bascule vers I'avant, ce qui
pourrait entrainer des blessures graves, voire mortelles.
Lisez et suivez les instructions d'installation completes
pour I'installation du systeme anti-basculement par
fixation au sol livre avec votre refrig6rateur.
REMARQUE :
Si vous n'avez pas regu de systeme anti-basculement
par fixation au sol avec votre achat, appelez le
1.800.626.8774 pour en recevoir un gratuitement (Au
Canada, appelez le 1.800.561.3344).
Pour les instructions d'installation du systeme
consultez le site : www.GEAppliances.com.
(Au Canada, www.GEAppliances.ca)
Crayon 8 mm
I_ OSITIONNEMENTDUSYSTFMEANTI-
BASCULEMENTPARFIXATIONAU SOL
r_ Placez le gabarit de positionnement du systeme
anti-basculement par fixation au sol (fourni dans
la trousse anti-basculement) sur le sol contre le
mur arriere, a I'interieur de W, et en ligne avec
I'emplacement souhaite pour le c0te droit du
rdrigerateur (voir figure 1),
Figure 1 - -
Vue d'ensemble de I'installation
Tournevis a douille 5/16 po
2 trous clans le mur
MATERIEL DONT VOUS POUVEZ AVOIR
BESOIN (non inclus)
Tire-f_ %_
Y4po (6ram)x 1 - Y,po (38ram) Y2po(12ram)de diametre
Mecheadapteeauxancrages externe
Uniquement pour les syste.mesanti-basculement par
fixation au sol en BNON
[_ ESUREDE L'OUVERTUREDISPONIBLE
COMPAREEALA LARGEURDU
Manchonsd'ancrage
REFRIGERATEUR
Mesurez W, la largeur de I'ouverture dans laquelle vous
voulez mettre votre refrigerateur,
Assurez-vous de tenir compte de tout surplomb du comptoir,
de I%paisseur de la plinthe et de tout espace libre desi@,
La largeur W dolt 6tre superieure a 36 pouces, Vous devez
placer le @frigerateur approximativement au milieu de cette
ouverture,
Mur arriere [paisseur de
_I _" surplomb du
W _, comptoir (la
R[FRIGt'RATEUR
Avant
i
I mesure la plus
j la plinthe ou
I grand@ plus
Iibre d_}sir_}
i tout espace
COte droit du
r_}frig_}rateur
base sur le
r@frig@rateur refrigerateur positionnement
Placez le systeme anti-basculement par fixation au
m
sol sur le gabarit de positionnement avec ses trous
au sol de droite alignes aux trous au sol indiques sur
le gabarit, a approximativement 15 P4po du bord
du gabarit ou du cote droit du rdrigerateur.
Maintenez en position et utilisez le systeme anti-
D
basculement par fixation au sol comme gabarit
pour marquer les trous en vous basant sur votre
configuration et la categorie de construction
indiquee dans I%tape 3. Marquez I%mplacement des
trous avec un crayon, un clou ou un poin¢on.
REMARQUE :
• IIest OBLIGATOIREd'utiliser au moins 2 vis pour
fixer le systeme de fixation au sol (un de chaque
cote du systeme anti-basculement par fixation au
sol). Lesdeux doivent entrer dans lemur ou dans
le sol. Lafigure 2 indique routes lesconfigurations
acceptables de montage pour ces vis. Identifiez les
trous de vis sur le systeme anti-basculement par
fixation au sol pour votre configuration.
29 Reportez-vous _ 239D1142 POOl Pub# 31-45484-2
Page 78
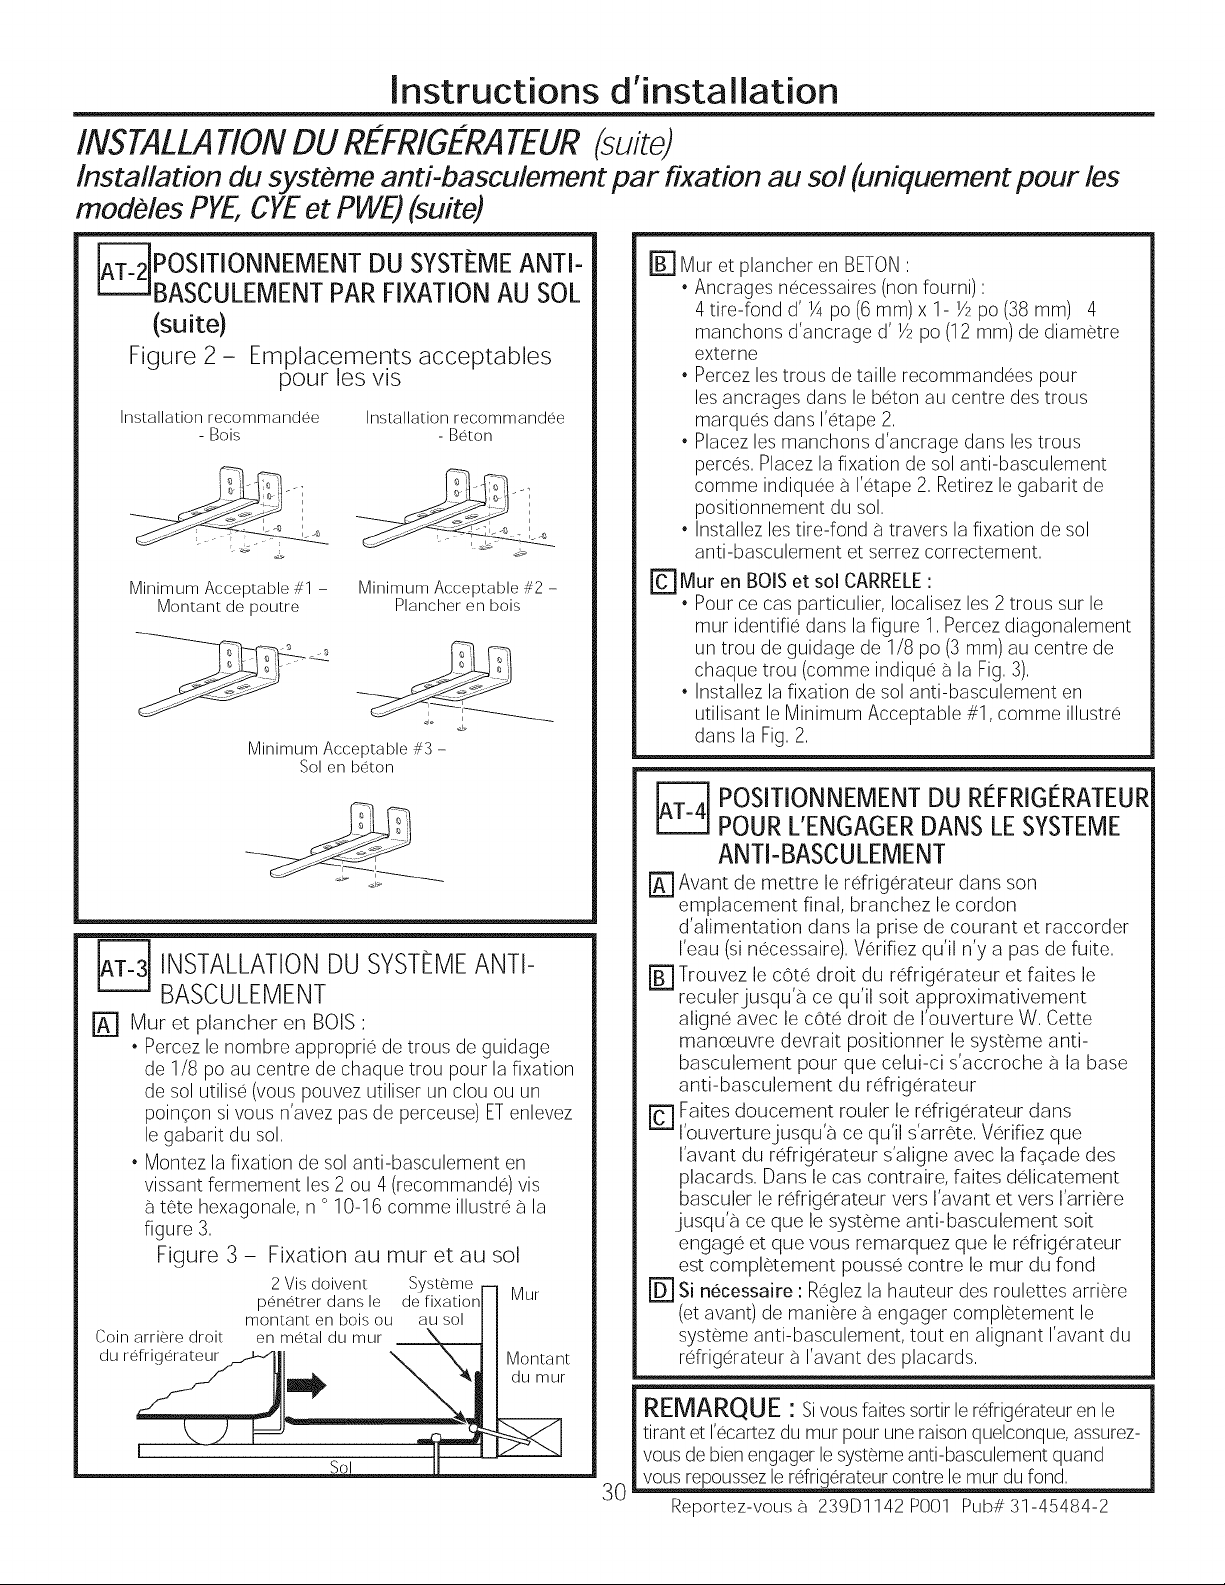
Instructions d'installation
INSTALLATIONDU REFRIG£RATEUR (suite)
Installation du systeme anti-basculement par fixation au sol (uniquement pour les
modeles PYE,CYEet PWE)(suite)
_POSITIONNEMENT DU ANTI-
BASCULEMENTPARFIXATIONAU SOL
(suite)
Figure 2 - Emplacements acceptables
pour les vis
SYSTEME
Installation recommandee
- Bois
Minimum Acceptable #1 -
Montant de poutre
Minimum Acceptable #3 -
Sol en beton
_ NSTALLATIONDU SYSTI_MEANTI-
BASCULEMENT
rA] Mur et plancher en BOIS :
* Percez le nombre approprie de trous de guidage
de 1/8 po au centre de chaque trou pour la fixation
de sol utilise (vous pouvez utiliser un clou ou un
poin¢on si vous n'avez pas de perceuse) ETenlevez
le gabarit du sol,
* Montez la fixation de sol anti-basculement en
vissant fermement les 2 ou 4 (recommande) vis
t@tehexagonale, n ° 10-16 comme illustre a la
figure 3,
Figure 3- Fixation au tour et au sol
2 Visdoivent Systeme --
penetrerdansle defixationJ I
montant en bois ou au sol I I
Coin arriere droit en metal du mur _ J ]
du rdrig6rateurF._--ql I _ \.H Montant
Installation recommandee
Minimum Acceptable #2 -
- Beton
Plancher en bois
Mur
r_ Mur et plancher en BETON:
* Ancrages necessaires (non fourni) :
4 tire-fond d' Y4po (6 mm) x 1- Y2po (38 mm) 4
manchons d'ancrage d' Y2po (12 mm) de diametre
externe
* Percez les trous de taille recommandees pour
les ancrages dans le heron au centre des trous
marques dans I'etape 2,
* Placez les manchons d'ancrage dans lestrous
perces, Placez la fixation de sol anti-basculement
comme indiquee a I'etape 2, Retirez legabarit de
positionnement du sol,
* Installez les tire-fond atravers la fixation de sol
anti-basculement et serrez correctement,
Fcl Mur en BOIS et sol CARRELE:
* Pour ce cas particulier, Iocalisez les 2 trous sur le
mur identifie dans la figure 1, Percez diagonalement
un trou de guidage de 1/8 po (3 mm) au centre de
chaque trou (comme indique 8 la Fig,3),
* Installez la fixation de sol anti-basculement en
utilisant le Minimum Acceptable #1, comme illustre
dans la Fig, 2,
_] OSITIONNEMENT DU REFRIGCRATEUR
POUR L'ENGAGER DANS LESYSTEME
ANTI-BASCULEMENT
r_ Avant de mettre le rdrigerateur dans son
emplacement final, branchez le cordon
d'alimentation dans la prise de courant et raccorder
I'eau (sinecessaire), Verifiez qu'il n'y a pas de fuite,
[] Trouvez le cote droit du r6frigerateur et faites le
reculerjusqu'a ce qu'il soit approximativement
aligne avec le cote droit de I'ouverture W, Cette
manoeuvre devrait positionner le systeme anti-
basculement pour que celui-ci s'accroche a la base
anti-basculement du r6frigerateur
r_ Faites doucement rouler le rdrigerateur clans
I'ouverturejusqu'a ce qu'il s'arrOte, Wrifiez que
I'avant du reffigerateur s'aligne avec la faqade des
placards, Dans le cas contraire, faites delicatement
basculer le reffig6rateur vers I'avant et vers I'arriere
jusqu'a ce que le systeme anti-basculement soit
engage et que vous remarquez que le reffigerateur
est completement pousse centre lemur du fond
r_ si necessaire : Reglezla hauteur des roulettes arriere
(et avant) de maniere a engager completement le
systeme anti-basculement, tout en alignant I'avant du
rdrigerateur a I'avant des placards,
REMARQUE : sivous fares sortir lerefrigerateur en le
tirant et I'ecartezdu mur pour uneraison quelconque, assurez-
vous de bien engager le systemeanti-basculement quand
vous repoussezle rdrigerateur centre le mur du fond,
3O
Reportez-vous _ 239Dl142 POOl Pub# 31-45484-2
Page 79
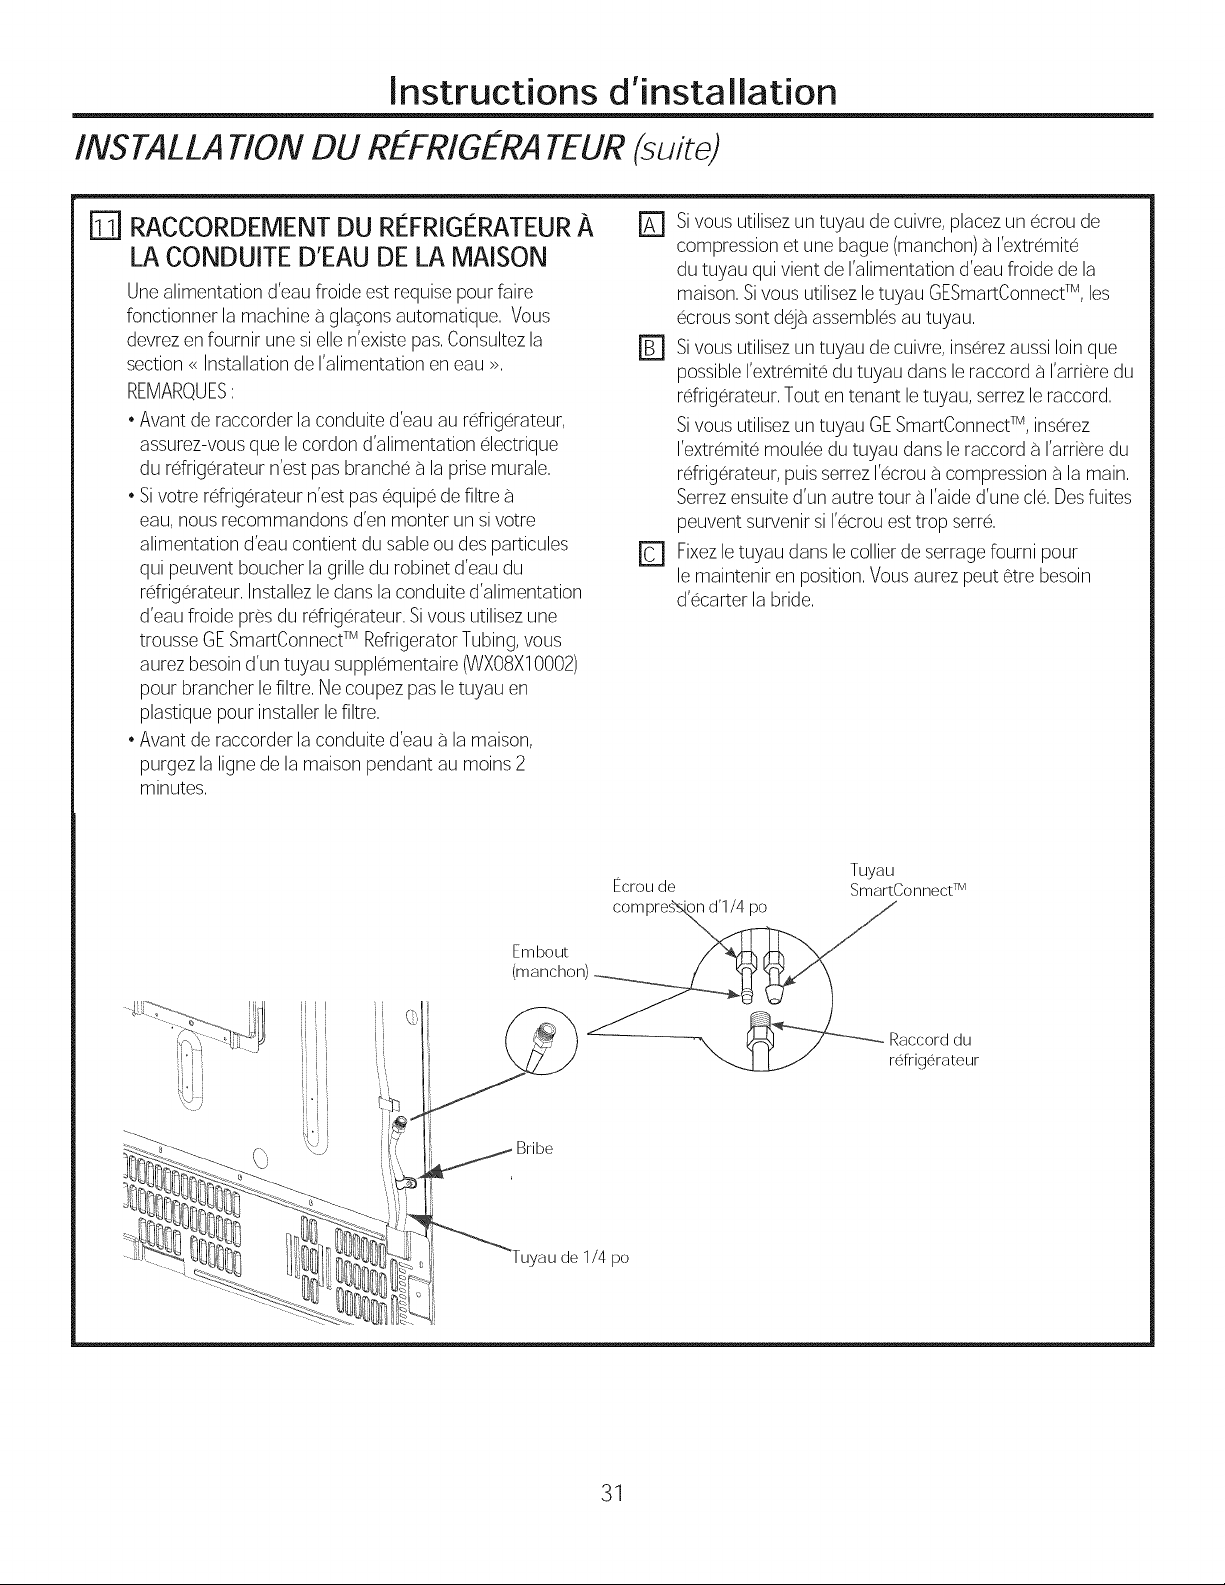
Instructions d'installation
INSTALLATION DU REFRIGERATEUR(suite)
RACCORDEMENTDU REFRIGERATEURA
LA CONDUITE D'EAU DE LA MAISON
Unealimentation d'eau froide est requisepour faire
fonctionner la machine agla¢ons automatique, Vous
devrez enfournir une si elle n'existepas,Consultezla
section <<Installation de I'alimentation en eau >>,
REMARQUES:
•Avant de raccorder la conduite d'eau au rdrigerateur,
assurez-vousque le cordon d'alimentation electrique
du rdrigerateur n'estpas branche a la prisemurale,
• Sivotre rdrigerateur n'est pas equipe de filtre
eau,nous recommandons den monter un si votre
alimentation d'eau contient du sableou desparticules
qui peuvent boucher la grille du robinet d'eau du
rdrigerateur, Installezle dansla conduite d'alimentation
d'eau froide pres du rdrigerateur, Sivous utilisezune
trousse GESmartConnectTM RefrigeratorTubing,vous
aurezbesoin dun tuyau suppbmentaire (WXO8X10002)
pour brancher le filtre,Ne coupez pasle tuyau en
plastique pour installerlefiltre,
•Avant de raccorder la conduite d'eau a lamaison,
purgez la ligne de la maison pendant au moins 2
minutes,
[_ Sivous utilisezun tuyau de cuivre,placez un ecrou de
compression et une bague(manchon)a I'extremite
du tuyau qui vient de I'alimentation d'eau froide de la
maison,Sivous utilisezletuyau GESmartConnectTM, les
ecrous sont deja assemblesautuyau,
r_ si vous utilisezun tuyau decuivre, inserezaussi loin que
possibleI'extremite du tuyau dans le raccord a I'arriere du
rdrigerateur, Tout en tenant letuyau, serrezle raccord,
Sivous utilisezun tuyau GESmartConnectTM, inserez
I'extremite moube du tuyau dans leraccord a I'arrbre du
rdrigerateur, puisserrez I'ecrou a compression a la main,
Serrezensuite dun autre tour a I'aidedune cb, Desfuites
peuvent survenir siI'ecrouest trop serre,
F] Fixezle tuyau dans le collierde serragefourni pour
le maintenir en position,Vousaurez peut etre besoin
d'ecarter labride,
Ecroude
compresL'_, d'1/4 po
Embout
(manchon)
ii
_ Bribe
_Tuyau de 1/4 po
Tuyau
SmartConnect TM
Raccord du
r6ffig6rateur
31
Page 80

Instructions d'installation
INSTALLATION DU REFRIGERATEUR(suite)
OUVRIR L'ALIMENTATION EN EAU
OuvrezI'alimentation d%auau niveau du robinet
d%r@t(alimentation en eau de la maison)et verifiez
qu'il n'y a pasde fuite.
[] BRANCHEMENTDU CORDON
D'ALIMENTATIONDUREFRIGERATEUR
Veuillezlire losinformations de mise a latorte fixees au
cordon d%limentation,
MISEA NIVEAUDESPORTESDU
REFRIGERATEUR
Rappelez-vous qu'il est necessaire que le
refrigGrateur soit de niveau pour que les portes
soient parfaitement de niveau. Si vous avez besoin
d'aide, consultez la section prec6dente sur la raise
niveau du refrig6rateur.
Lorsque la
gauche
est plus
basse que
la porte de
porte de
droite,
rA] Si vous ouvrez la porte du congelateur, vous
verrez la charniere centrale.
Lorsque la
gauche
est plus
haute que
la porte de
porte de
droite,
Point de reglage
MISE A NIVEAU DU REFRIGERATEUR
Les pieds de raise a niveau servent :
1) a ajuster le refrigGrateur pour que celui-ci
soit correctement positionne sur le sol et ne
vacille pas
2) de frein pour stabiliser le refrig6rateur
pendant son utilisation et son nettoyage.
Les pieds de raise a niveau permettent aussi
d'empecher le refrig6rateur de basculer.
r_ Tournez les pieds de mise a niveau dans le
sens des aiguilles d'une montre pour relever le
refrigGrateur et darts le sens inverse des aiguilles
d'une montre pour I'abaisser.
Toumevis a tete plate
r_ Inserez une cle Allen d'¼ po darts I'axe de la
charniere centrale.
D Ajustez la hauteur en tournant dans le sens des
aiguilles d'une montre ou darts le sens inverse
des aiguilles d'une montre. Lorsque vous
tournez darts le sens inverse des aiguilles d'une
montre la porte se deplace vers le haul
REMARQUE"Pour6vitertout
dommage materiel, les pieds de raise a niveau
doivent bien reposer sur le sol.
32
Page 81

Instructions d'installation
INSTALLATION DU REFRIGERATEUR(suite)
Instructions de montage du refrigerateur (suggestion).
cz_
Pour positJonner les bacs darts les
portes •
Faites correspondre votre bac avec
O
la lettre indiquee. Positionnez les
crochets du bac sur le repere et le
pousser en avantjusqu'a insertion
complete.
O Appuyez sur le bacjusqu'a ce qu'il
soit bien encastre dans sa position
finale.
Repere du bac
de chaque cote
S6F
(sur certains
modeles
uniquement)
Crochet de
bac arriere de
chaque cote
33
Reportez-vous a 239D4129P002 Pub# 31-45498
Page 82

Instructions d'installation
INSTALLATION DE LA CONDUITE D'EAU
AVANT DE COMMENCER
Nous recommandons les trousses d'alimentation
d'eau en cuivre WX8X2, WXSX3, WXSX4, selon
la Iongueur de tuyau dont vous avez besoin.
Nous approuvons les conduites d'eau en matiere
plastique GE SmartConnect TM Refrigerator Tubing
(WXO8X10006, WXO8X10015 et WXO8X10025).
Si vous installez un systeme d'eau a osmose inverse GE
dans votre @frigerateur, la trousse GERVKITest la seule
installation approuvee, Pour les autres systemes a osmose
inverse,suivez les recommandations du fabricant,
Si I'alimentation d'eau du refrigerateur provient d'un
systeme de filtration de I'eau par osmose inverse
(01) ET si votre refrigerateur est equipe d'un filtre
eau, utilisez le bouchon de derivation du filtre du
refrigerateur. En cas d'utilisation de la cartouche de
filtration d'eau du refrigerateur associee a un filtre
OI peut produire des gla¢ons creux.
L'installation de cette conduite d'eau n'est pas
garantie par le fabricant du refrigerateur ou de
la machine a gla¢ons. Suivez attentivement ces
instructions afin de minimiser le risque de fuite
d'eau et de dommages onereux.
Les coups de belier (coups dans les tuyaux) dans la
tuyauterie de la maison peuvent endommager les
pieces de votre refrigerateur et provoquer des fuites
d'eau ou des inondations. Appelez un plombier
certifie pour corriger les coups de belier avant de
brancher I'alimentation en eau au refrigerateur.
Pour prevenir les br@lures et eviter d'endommager
votre produit, ne branchez pas le tuyau d'eau a une
conduite d'eau chaude.
Pour les modeles avec affichage LCD : Si le
refrigerateur est mis en marche avant que la
machine a glaqons ne soit branchee a I'alimentation
en eau, consultez la section ICE MAKER (machine
gla¢ons) dans le menu Settings (Parametres) de la
section Fonctionnement LCD. Suivez les commandes
I%cran pour eteindre la machine a glaqons.
N'installez pas la tuyauterie de la machine
gla¢ons dans un endroit ou la temperature descend
en dessous de zero.
Lorsque vous utilisez un appareil electrique (tel
qu'une perceuse)Iors de I'installation, assurez-vous
que celui-ci est a double isolation ou relie a la terre
pour prevenir tout risque de choc electrique. L'outil
peut egalement etre alimente par batterie,
Toutes les installations doivent etre conformes aux
exigences du code de plomberie local.
PIFCES NECESSAIRES
J
• Tuyaux en cuivre ou trousse GE SmartConnect TM
Refrigerator Tubing, diametre exterieur d'¼ po
pour brancher le refrigerateur a I'alimentation
d'eau. Si vous utilisez un tuyau en cuivre, les deux
extremites du tuyau doivent etre coupees bien
droll
Pour determiner la Iongueur de tuyau dont vous
avez besoin : mesurez la distance entre le robinet
d'eau a I'arriere du refrigerateur et le tuyau
d'alimentation en eau. Assurez-vous d'avoir une
Iongueur de tuyau suffisante pour permettre
d%loigner le refrigerateur du tour apres I'installation.
Les trousses de tuyauterie pour refrigerateur GE
SmartConnect TM sont disponibles darts les Iongueurs
suivantes :
6 pi (1,8 m) - WXOSX10006
15 pi (4,6 m) - WXOSXl 0015
25 pi (7,6 m) - WXOSX10025
34
Page 83

Instructions d'installation
INSTALLATION DE LA CONDUITE D'EAU (suite)
Installez le robinet d'arr6t sur la canalisation d'eau
PIECES NECESSAIRES (suite)
REMARQUE : Les seuls tuyaux en plastique
autorises par GE sont fournis avec la trousse GE
SmartConnect TMRefrigerator Tubing. N'utilisez pas
d'autres tuyaux d'alimentation d'eau en plastique,
cette ligne etant sous pression en permanence.
Certains types de plastique peuvent se fissurer
ou se rompre avec le vieillissement et causer des
degSts d'eau dans votre maison.
• Vous pouvez vous procurer une trousse GE de
branchement _sI'alimentation d'eau (contenant
tuyau, robinet, raccords et instructions) aupres
de votre fournisseur ou au Centre de Pieces
Detachees et d'Accessoires, au 800.626.2002 (au
Canada, 1.800.661.1 61 6).
• Alimentation en eau froide La pression de
I'alimentation d'eau dolt 6tre entre 20 et 120 psi (1,4
_a8,1 bar). ___
• Perceuse electrique.
. Cle d'Y2 po ou cle re@able
• Un tournevis _st#te plate et un tournevis
cruciforme.
• Deux ecrous _acompression d'un _Q-,_
diametre exterieur de ¼ poet deux
bogues {monchons)-pour broncher
le tuyau en cuivre au robinet d'arr#t
et au robinet d'eau du refrigerateur.
OU
• Si vous utilisez une trousse GE SmartConnect TM
Refrigerator Tubing, les raccords necessaires sont
deja assembles au tuyau.
• Si votre canalisation d'eau
actuelle en cuivre est -11s_/(, //
equipee d'un raccord evase
_sune extremite, vous aurez
besoin d'un adaptateur (que vous trouverez
darts votre magasin de materiel de plomberie)
pour brancher le tuyau d'eau au refrigerateur,
OU BIEN vous pouvez couper le raccord evase _a
I'aide d'un coupe-tube, puis utiliser un raccord _a
compression. Ne coupezjamais I'extremite finie
d'un tuyau de la trousse GE SmartConnect TM
Refrigerator Tubing.
• Robinet d'ar@t pour brancher
le tuyau d'eau froide. Le robinet
d'ar@t dolt avoir une entree d'eau
avec un diametre interieur minimal
de 5/32 po au point dejonction avec le TUYAU
D'EAU FROIDE. Des robinets d'arr#t de type vanne
_setrier sont souvent inclus dans les trousses
d'alimentation d'eau. Avant d'en acheter, assurez-
vous que ce type de robinet est conforme _avos
codes de plomberie Iocaux.
potable la plus proche.
rT] FERMETUREDE L'ALIMENTATION D'EAU
PRINCIPALE
Ouvrez le robinet le plus proche pour purger
I'eau des tuyauteries.
rFIOUVREZLEROBINETLEPLUSPROCHEPOUR
PURGERL'EAUDESTUYAUTERIES.
Choisissez un emplacement pour le robinet qui
soit facilement accessible. II est preferable de se
connecter sur le cote d'un tuyau vertical. Si vous
devez vous connecter _sun tuyau horizontal,
fakes le branchement vers le haut ou sur le
cote, plutOt qu'en has du tuyau pour eviter de
recevoir des sediments provenant de la conduite
d'eau.
[_] PERCAGED'UN TROU POUR LE ROBINET
Percez un trou de 1/4 po dans le tuyau d'eau,
I'aide d'un foret dur, m6me si vous utilisez un
robinet auto-forant. Enlevez toutes les bavures
dues au per€age du trou dans le tuyau.
Veillez _ane pas laisser I'eau couler dans votre
perceuse.
Si vous ne percez un trou d' ¼ po, votre
production de glace ainsi que la taille des
gla¢ons seront reduites.
4°
35
Page 84

Instructions d'installation
INSTALLATION DE LA CONDUITE D'EAU (suite)
D FIXATION DU ROBINET D'ARRFT
Fixez le robinet d'ar@t a la canalisation d'eau
froide a I'aide du collier de serrage.
Collier de \,
serra_
Robinet d'arret de
type vanne a etrier
-- Tuyau vertical
d'eau froide
REMARQUE : L'installation sera conforme aux
codes de plomberie 248CMR du Commonwealth
du Massachusetts. L'utilisation de robinets-
vannes a etrier sont interdites au Massachusetts.
Demandez I'avis de votre plombier qualifie.
D SERRAGE DU COLLIER
Serrez les vis du collierjusqu% ce que la rondelle
d%tanch6ite commence a enfler.
REMARQUE : Ne serrez pas trop, vous risquez
d%craser le tuyau.
Collier de
serrage
Rondelle
Entree
FflBRANCHEMENTDU TUYAUAU ROBINET
Placez un ecrou de compression et une bague
(manchon) a I'extremit6 du tuyau et branchez-les
au robinet d'ar@t
Assurez-vous que le tuyau soit bien inser6 dans
le robinet. Serrez bien I%crou de compression.
Pour le tuyau en matiere plastique d'une trousse
GE SmartConnect TM Refrigerator Tubing, inserez
I'extr6mite moulee du tuyau dans le robinet
d'ar@t et serrez I%crou de compression a la
main, puis serrez d'un tour supplementaire avec
une cle. Des fuites peuvent survenir si I%crou est
trop serre.
Robinet d'arret de
type vanne a etrier
Ecrou de compression
_,_ / _Tuyau
__ SmartC°nnecVM
Presse:joint
Robinet de sortie
REMARQUE : L'installation sera conforme aux
codes de plomberie 248CMR du Commonwealth
du Massachusetts. L'utilisation de robinets-
vannes a etrier sont interdites au Massachusetts.
Demandez I'avis de votre plombier qualifie.
Bague (manchon)
Vis
collier
E] PASSAGE DU TUYAU
Fakes passer le tuyau entre la conduite d'eau
froide et le refrig6rateur.
Fakes passer le tuyau par un trou perce dans le
tour ou le plancher (derriere le r6frigerateur ou
au niveau du placard adjacent) aussi pres du
tour que possible.
[_]PURGE DU TUYAU
Ouvrez le robinet d'alimentation principale d'eau et
purgez le tuyaujusqu% ce que I'eau soit claire.ear.
Fermez I'eau au niveau du robinet d'eau apres
ecoulement d'environ 1 litre (1 quart) d'eau par le
tuyau ou au bout de 2 minutes.
Pour terminer I'installation du refrigGrateur, retournez
I%tape 11 de la section Installation du refrig6rateur.
36
Page 85

Bruits normaux de fonctionnement.
Lesr4frig4roteurs plus recents font des bruits c/ifferents de ceux des anciens. Les r4frig4roteurs moc/emes
proposent plus de fonctions et sont plus avances sur le plan technologique.
Entendez-vous ce que f entends ?Ces conditions sont norrnaux.
Lenouveau compresseur h rendement elev6 peut fonctionner
plus Iongtemps et plusvite que votre ancien @ffigerateur et vous
pouvez entendre un son moduB ou un ronflement aigu pendant
son fonctionnement,
Vous entendrez peut-etre un sifflement Iorsqueles portes se
ferment,
Ceci estdL]h I%quilibragede la pressiondans le@ffigerateu_
Ap@sdistribution de @ace,un moteur ferme lagoulotte de @ace
pour empecher I'airtiede ambiant d'entrer dans leseau h @ace,
permettant ainsi de maintenir la glace h une temperature en
dessous de zero,
Leronronnement du moteur fermant la goulotte de gla_ons est
normal, quelques instants ap@s la distribution de glace,
WHIR!
iiiiiii_i¸
Vous pouvez entendre lesventilateurs tourner h hautes vitesses,
Celase produit Iorsque lereffig6rateur vient d%tre branche,
Iorsque les portes sont ouvertes ffequemment ou lots de I'ajout
d'une grande quantite d'aliments dans lereffig6rateur ou le
congelateur, Lesventilateurs permettent de maintenir les bonnes
temperatures,
iiiiiii_i¸
Lavitesse des ventilateurs varie pour fournir un refroidissement
et une economie d%nergie optimum,
CLICS,CRAQUEMENTS ET
CLAQUEMENTS
Vous entendrez peut-etre des craquements ou des bruits secs
Iorsque le @frigerateur vient d%tre branche, Cecise produit Iorsque
le refrig6rateur serefroidit pour atteindre la bonne temperature,
L'expansion et la contraction des serpentins de reffoidissement
pendant et ap@sle degivrage peuvent provoquer des
craquements ou des claquements,
Surles modeles equipes d'une machine h gla_ons, ap@sun cycle
de fabrication de gla_ons, vous entendrez les gla_ons tomber
dans le seau h glace,
Surles modeles equipes d'un distributeur, au cours de la
distribution d'eau, vous entendrez peut-etre le deplacement des
tuyaux d'eau au debut de la distribution et ap@savoir rehche le
bouton du distributeur,
REFROIDISSEMENTAU
DEMARRAGE
24 heures peuvent etre necessaires pour que lestemperatures dans
lereffig6rateur et le congelateur correspondent h celles affichees _
I%cran,Pendant ce temps, il est pref6rable de @duireau maximum
I'ouverture des portes du reffig6rateur et du congelateur,
CONSEiLS
BRUITSD'EAU
6
La circulation du liquide ffigorigene dans le systeme provoque
parfois des gargouillements comme de I'eau en ebullition,
L'eauqui tombe sur lechauffage de degivrage peut parfois
provoquer des crepitements, des bourdonnements pendant le
cycle de degivrage,
Vous entendrez peut-etre des bruits de ruissellement pendant le
cycle de degivrage quand la glace sur I%vaporateurfond et coule
dans le bac collecteur,
iiiiiii_i¸
Lafermeture de la porte peut provoquer un gargouillement dL]h
I%quilibragede la pression,
, Le congelateur se refroidit en premier,
, Le compartiment de refrig6ration se refroidit en dernier,
cela peut prendre plusieurs heures apres le congelateur,
, En eteignant la machine _-_glagons, les aliments dans
le congelateur et le refrigerateur se refroidissent plus
rapidement,
37
Page 86

Avant d'a2peler a un reparateur...
Conse/Is de depannage
Econom/sez du temps et de/'argent / Consu/tez d'abord les
tableaux dans les pages su/vantes pour peut-_tre ev/ter de
fa/re aDDel buN techn/c/en.
Causes Possibles Solution
L'indicateur de filtre _ eau doit 6tre %lectionnez SETTINGS (Parametres) _
@initialise I%cran LCD, puis WATER FILTER(Filtre _
Ceci est normal. Ce voyant s'allume Consultez la section Apropos du Nitre
pour vous signaler que le filtre devra Ez_upour de plus amples informations.
bientot 6tre remplace.
La poignee doit 6tre ajustee.
II s'agit de I'alarme de la porte Ar@tez-la ou desactivez-la avec la
Le systeme de refroidissement est Consultez la section Apropos des corn-
etei nt mandes
eau). Selectionnez RESET(Reinitialiser)
Consultez les sections Fixation de
la Poignee du Compartiment de
Refrigeration et Fixation de la Poignee
du Congelateur pour des instructions
detaill6es.
porte fermee. Si la porte est ouverte
et I'alarme retentit, vous ne pouvez
qu'ar@ter I'alarme.
Le distributeur d'eau n'a pas ere uti- Tirez de I'eaujusqu% ce que route I'eau
lise pendant une Iongue periode, du systeme soit remplacee.
Ceci est normal Iorsque le refrigera- Attendez 24 heures pour que le
teur vient d%tre branche refrigerateur refroidisse completement
Le distributeur d'eau n'a pas ere uti- Tirez de I'eaujusqu% ce que route I'eau
lise pendant une Iongue periode du systeme soit remplacee.
Le systeme d'eau a ete vidange Attendez quelques heures pour que
I'eau se refroidisse.
Le robinet d'eau est ferme ou n'est Consultez la section/nst_Wz_tion de Iz_
pas branche, conduite d_au
Le filtre _ eau est bouche ou le filtre/ Remplacez la cartouche de filtre ou
le bouchon de derivation n'est pas retirez le filtre et installez le bouchon de
installe derivation.
De I'air peut 6tre piege dans le sys- Appuyez sur le bras de distribution pen-
teme d'eau, dant au moins 5 minutes.
L'eau dans le reservoir est gelee parce
que les commandes sont reglees sur
une temperature trop froide.
La cartouche du filtre vient d%tre
installee
Reglez la commande du refrigerateur
sur une temperature plus elevee et
attendez 24 heures. Si le distributeur ne
donne pas d'eau au bout de 24 heures,
contactez un reparateur
Fakes couler I'eau du distributeur
pendant 5 minutes (environ 2 gallons ou
7,5 litres).
38
Page 87

Consei/s de depannage {suite}
Causes Possibles Solution
La ligne d'alimentation ou le robinet Appelez un plombier
d'ar@t est bouche
Le filtre _ eau est bouche Remplacez la cartouche de filtre ou
La cartouche du filtre n'est pas cor- Retirez et reinstallez la cartouche de filtre,
rectement installee en etant certain qu'elle est bien verrouillee
La machine _ glacons est eteinte Verifier que la machine _ glacons est en
L'air est peut 6tre present dans le Distribuez de I'eau pendant au moins 5
systeme d'alimentation en eau, minutes pour eliminer I'air du systeme
amenant I'eau _ goutter ap@s
distribution
Lesphotosnesontpasdanslereper- Assurez-vousquelesphotossontdansle
toire racine de I'USB repertoire racine de votre cle USB
Les photos ne sont pas au format Les photos doivent 6tre au format JPEG
JPEG
L'appareil photo/l'ordinateur est uti- Vous devez utiliser une cle USB
lise avec le cordon USB
C'est normal, PRECISEFILL (Remplis- Pour une quantite specifique d'eau,
sage precis) necessite I'utilisation d'un selectionnez PRECISE FILL (Remplissage
bras de distribution precis) pour distribuer de I'eau
Ceci est normal Iorsque le refrigera- Attendez 24 heures pour que la
teur vient d%tre branche ou ap@s temperature dans les deux compartiments
une panne d%lectricite d'une Iongue atteigne les temperatures selectionnees,
duree,
Normal La porte du distributeur de glace peut
Le fonctionnement est desactive Assurez-vous que <<Eau chaude
La pression d'eau est basse Assurez-vous que le tuyau d'eau n'est pas
Le robinet d'eau est ferme ou n'est Consultez la section/nst_Wz_tion de I_ con-
pas branche, duite d_au
Le filtre _ eau est bouche ou le filtre/ Remplacez la cartouche de filtre ou
le bouchon de derivation n'est pas retirez le filtre et installez le bouchon de
installe derivation,
Le filtre _ eau est partiellement
bouche ou la pression d'eau est faible
(<40 psi)
GEAppliances.com
retirez le filtre et installez le bouchon de
derivation,
marche Consultez la section ,4 propos de I_
machine a gt_cons automatique
s'ouvrir apres la fermeture de la porte du
congelateur pour permettre I'acces
Desactivee >>n'est pas selectionne
plie
Remplacez la cartouche de filtre ou retirez
le filtre et installez le bouchon de derivation
ou encore augmentez la pression d'eau,
39
Page 88

Mythe ou reaiite ? Explication
Le filtre _ eau du refrigerateur peut necessiter
un remplacement m6me si I'indicateur de filtre
n'a pas vire au rouge ou indique Filtre Epuise,
La machine _ glaqons automatique dans mon
refrigerateur produira de la glace Iorsque le
refrigerateur est branche _ une prise sect-
eur,
Une fois que le refrigerateur est branche
_ une prise electrique et raccorde _ une
alimentation en eau,j'aurai immediatement des
quantites illimitees d'eau glacee disponibles au
distributeur d'eau,
Ap@s distribution d'une quantite d'eau, la
presence de quelques gouttes d'eau est nor-
male,
II n'y aurajamais de givre dans le compartiment
de congelation,
Ap@s installation du refrigerateur ou ap@s le
remplacement de la cartouche filtrante,je dois
tirer de I'eau pendant cinq minutes,
Pour remplir le seau _ glacejusqu% sa capacite
maximale,je dois distribuer des glacons environ
12 _ 18 heures ap@s I'installation,
Je peux utiliser le bouchon de derivation du
filtre _ eau pour determiner si le filtre doit 6tre
remplace,
La partie superieure de la porte du refrigerateur
sera toujours alignee,
Reponse
VRAI
MYTHE
MYTHE
VRAI
MYTHE
VRAI
VRAI
VRAI
MYTHE
L'indicateur du filtre 9_eau vous indiquera la necessite de
remplacer le filtre _ eau tousles six mois, La qualite de I'eau varie
d'une ville _ I'autre, Si le debit d'eau du distributeur ralentit ou si
la production de glace diminue, le filtre 9_eau doit 6tre remplace,
m6me si I'indicateur de filtre peut ne pas indiquer la necessite d'un
remplacement,
Le refrigerateur doit _tre raccorde _ une alimentation en eau
et la machine _ glaqons doit _tre allumee, Assurez-vous que la
machine _ glaqons est en marche, mais seulement ap@s avoir
raccorde le systeme _ I'alimentation en eau et que celle-ci est
ouverte, La machine _ glaqons peut _tre allumee ou eteinte _
partir des commandes, Veillez _ ce que la machine _ glacons
soit en marche, comme indique sur le panneau de commande
du refrigerateur, Consultez la section/i pro/sos de/_ machine
g£_£ons automatique,
Le bac du distributeur d'eau situe _ I'interieur du refrigerateur
sert _ stocker I'eau 9_distribuer, 24 heures sont necessaires pour
que I'eau de ce reservoir soit refroidie apres I'installation, Une
utilisation trop importante ne permet pas _ I'eau de se refroidir,
Quelques gouttes d'eau peuvent tomber du distributeur apres que
le bras de distribution air ere rel_ch6, Pour minimiser les pertes,
retirez lentement votre verre du distributeur,
La presence de givre dans le congelateur indique generalement
que la porte n'est pas bien fermee ou a ere laissee ouverte, En
cas de givre, eliminez le I'aide d'une spatule en plastique et d'un
torchon, Puis verifiez qu'aucun aliment ou conteneur emp6che la
fermeture de la porte du congelateur, Verifiez sur le panneau de
controle du refrigerateur si I'alarme de la porte est activee,
Un refrigerateur ou un filtre _ eau nouvellement installe contient de
I'air dans les tuyaux d'eau, Appuyez sur le bras du distributeur pour
tirer de I'eau froide pendant au moins 5 minutes pour eliminer I'air
du tuyau d'alimentation en eau et rincer le filtre,
La distribution de 3 ou 4 glaqons, entre 12 heures et 18 heures
apres I'installation, permet 9_la glace de se disperser dans le seau
_ glace, Celui-ci indique _ la machine _ glaqons de produire des
glaqons supplementaires, Production normale de glacons = 100
glacons en 24 heures,
La reduction de debit du distributeur d'eau ou de la production
de glace peut indiquer la necessite de remplacer le filtre _ eau,
Installez le bouchon de derivation du filtre _ eau (fourni avec le
refrigerateur), et verifiez le debit au niveau du distributeur, Si le
debit d'eau revient _ la normale avec le bouchon de derivation en
place, remplacez le filtre _ eau,
Plusieurs facteurs peuvent affecter I'alignement des portes du
compartiment de refrigeration, y compris le sol sur lequel le
refrigerateur est installe et la quantite d'aliment (charge) dans les
portes, Si les parties superieures des portes du compartiment de
refrigeration ne sont pas alignees, utilisez une cle Allen de 6,3 mm
(1/4 po) pour ajuster les portes gauche et droite, La vis de reglage
se trouve sur le cote inferieur gauche ou droit de la porte, Ouvrez
la porte du congelateur pour acceder _ cette vis, Sur certains
modeles la porte gauche du compartiment de refrigeration peut
6tre relevee _ I'aide d'entretoises, Appelez 800-GECARES pour
obtenir ces entretoises,
4O
Page 89

Mythe ou realite ? Reponse Explication
Los poignees de porte du refrigerateur peuvent VRAI Si los poignees de porte sent I_ches ou s'il y a un espace vide au
6tre facilement resserrees, niveau de la poignee, celle-ci peut 6tre ajustee _ I'aide d'un cle
Allen d' 1/8 po sur les vis de reglage situees sur les extremites des
poignees,
II peut y avoir des problemes d'odeur et de goOt VRAI Apres la raise en marche de la machine _-_glacons,jetez les
avec votre glace, premieres 24 heures de production de glace pour eviter tous
probleme d'odeur et de goOt,
VRAI Si les portes du compartiment de refrig6ration ne sent pas alignees,Je peux effectuer des reglages precis des portes du
compartiment de refrig6ration pour les aligner,
Les poignees de porte doivent toujours etre retirees
pour I'installation,
Les portes doivent tOL_jours etre retirees pour
I'installation,
Les portes du refrig6rateur qui ne ferment pas apres
I'installation peuvent etre a_just6es pour qu'elles
ferment correctement,
Les roues arriere peuvent etre ajustees,
Verifiez I'absence de fuites d'eau apres avoir effectue
tous les raccordements,
Men ecran LCD sera toL_jours allume Iorsqueje
branche le cordon d'alimentation Iors de I'installation,
Tout residu d'emballage peut etre nettoye a I'aide de
n'importe quel detergent,
MYTHE
MYTHE
VRAI
MYTHE
VRAI
MYTHE
MYTHE
utilisez une cle Allen d' 1/4po pour ajuster la porte de droite, La vis de
reglage est situee au bas de la porte de droite, Ouvrez la porte du
congelateur pour y acceder, La porte de gauche du compartiment de
refrig6ration peut etre relevee a I'aide d'entretoises, Appelez 800-GECARES
pour obtenir ces entretoises,
Consultez le tableau au verso de ces instructions, Si les portes doivent
etre retirees ou si le refrig6rateur passe facilement dans les ouvertures, ne
retirez pas les poignees, Ajustez les poignees qui sont 18ches ou s'il y a un
espace vide au niveau de celles-ci, en ajustant les vis de reglage a chaque
extremit6 des poignees,
Consultez le tableau au verso de ces instructions, Les portes doivent
uniquement etre enlevees Iorsque cela est necessaire pour prevenir les
dommages provoques par des ouvertures trop etroites ou pour acceder
I'emplacement final,
Le mecanisme de la porte fonctionne mieux si celle-ci est installee a 90°+,
Si elle est installee a 180 °, retirez la porte a partir de la charniere centrale
puis ouvrez la porte a 180 ° avant de la reinstaller, Consultez la section
R#insta//ation des portes du r#f?ig#rateur
Lorsque vous purgez I'air du systeme, verifiez I'absence de fuites au
niveau de toutes les connexions, Verifiez la connexion 8 I'alimentation en
eau du domicile 8 I'arriere du refrig6rateur ainsi que la connexion de ce
tuyau au niveau de la porte,
Si le refrig6rateur a et6 stocke dans un environnement froid, il est possible
que I'ecran LCD mette un certain temps avant de donner un affichage
correct, Laissez assez de temps pour que le refrig6rateur atteigne une
temperature normale, I'affichage dewar alors etre correct,
If the refrigerator has been stored in a cold environment, the LCD may be
slow to give a proper display, Give the refrigerator enough time to warm
up, and the display should be okay,
N'utilisez pas de cire, dejavellisant ou de tout autre produit contenant
du chlore sur les panneaux, les poignees de porte et les garnitures en
acier inoxydable, Verifiez ces instructions dans la section Nettoyage de
I'exterieur du refrig6rateur pour plus de details,
41
Page 90
Garantie du refrigerateur, po. p od./ts Et t -unJ )
Toutes les reparations en vertu de la garantie sont fourn/s par
nos Centre de Service d'Usine ou par un technicien autor/se
................... I Agrafez votre facture ici
CUSEOfT?er L.are L_, /-'our prevoIr gne reparOElOn consultez noEre sl[e I ..... . . , . '
GEAppl/ances corn ou appelez le 800 G£ CARE5 (800 432 2737) . "
,, .. • ' _ .... '_ ' _ . '- ' -..' . I dereparatlonsousgarantle
veullleZ avoIr VO[FC NUFReFO die serle e[ VOEFC NUFReFO die FROdiele a I ...... '
portee de main Iorsque vous appelez pour obten/r un serwce ....
Pour le diagnostic, la r#paration de votre r#frig#rateur peut n#cessiter I utilisati_ ........ dcs
embarqu#. Celui-ci permet au technicien de r#paration GE de diagnostiquer rapidement des probl#mes
avec votre appareil. II permet #galement a GE d'am#liorer ses produits en fournissant aces derniers des
informations sur votre appareil. Si vous ne voulez pas que les donn#es de votre appareil soient envoy#es
GE, veuillez demander a votre technicien de NE PA$ soumettre les donn#es a GE pendant la r#paration.
Un.4n Toutepi#cedu refrigerateur qui s'avere defectueuse en raison d'un defaut de materiau ou de
A compteFdela dated'achat fabrication, Pendant la validite de la pr#sentegarantie limiteed'un an, GEfournira egalement
initial gratuitement la main d'ceuvre et le service pour reparer la piece ddectueuse,
Trentejours Toute piece de la cartouche filtrante qui ne fonctionne pas f-_cause d'un vice de materiau ou de main
(f/!trea eau,si/nctus)Acompterde d'ceuvre, Pendant la validite de la presente garantie limit#e de 30jours, GEfournira gratuitement une
b dated'achatin/bat cartouche filtrante de remplacement,
SEULEMENT MODELE$ GEPROFILE AND GE CAFE
A compterde la dated#chat les tuyaux de raccordement) qui s'avere defectueuse en raison d'un defaut de materiau ou de
• ' I_our Denerlcler du service
.... une preuve @ela @ate@acnat
• I _n_t_a_est necessa_re,
GE remplacera :
TM TM
Toutepiece du systeme ferme du refrigerateur (compresseur, condenseur, evaporateur et tous
fabricati_n. Pendant _ava_idite de _aPresente garantie _mitee de cinq an_ GEf_urnira ega_ement
gratuitement la main d'ceuvre et le service pour reparer la piece ddectueuse dans le systeme ferme
du refrigerateur,
iii i
Les deplacements a votre domicile pour vous expliquer
I'utilisation de ce produit
Une installation, livraison ou maintenance defectueuse.
Une panne du produit par abus d'utilisation, par mauvaise
utilisation, par modification ou s'il a ete utilise darts un but autre
que celui pour lequel il a ete fabriqu&
Deterioration des aliments.
Le remplacement des fusibles ou le reenclenchement du
disjoncteur du domicile.
Les dommages causes apres la livraison.
Le remplacement de la cartouche filtrante, si incluse, a cause
d'une pression d'eau en dehors de la gamme de fonctionnement
IEXCLUSION DES GARANTIES TACITES- Votre recours exclusff est I_change du produit suivant les modalit#s de
la Garantie Limitee. Toutes garanties tacites, y compris les garanties de valeurs marchandes ou d adequation
des fins particulieres, sont limitees a Line duree d un an ou a la duree la plus courte autorisee par la Ioi.
Cette garantie est etendue a I'acheteur d'origine et aux proprietaires suivants pour tout produit achete pour une
utilisation domestique aux Etats-Unis. Si le produit est installe darts une region ou ne se trouve aucun reparateur
autorise GE, vous devrez peut-_tre assumer les frais de transport ou apporter I'appareil a un centre de service
autorise GE. En Alaska, cette garantie exclut le coot d'expedition ou de depannage a votre domicile.
Certains etats n'acceptent pas d'exclusion ou de limites aux dommages indirects consecutifs. Certains droits
particuliers vous sont devolus en vertu de la presente garantie et peuvent s'accompagner d'autres droits qui
varient selon votre lieu de residence. Pour connaitre vos droits juridiques, veuillez consulter le bureau local ou le
bureau d'etat des affaires aux consommateurs ou le Procureur General de votre etat.
Garant : General Electric Company. Louisville, KY 40225
recommandee ou a cause d'une concentration excessive de
sediments darts I'eau d'alimentation.
Le remplacement des ampoules, si incluses, ou la cartouche
filtrante, si incluse, et darts des conditions autres que celles
susmentionnees.
_Tout dommage cause par accident, incendie, inondation ou une
catastrophe naturelle.
_Tout dommage fortuit ou indirect cause par des defauts
eventuels de cet appareil.
Le service s'il est impossible d'avoir acces au produit.
Dommages causes par I'utilisation d'un filtre qui n'est pas de
marque GE.
42
Page 91

Certificatde garantiede lacartoucheRPWF du filtre6 eau.
Agrafez votre f(]cture ici.Pour
Contactez-nous sur www.geappli(]nceparts.com
ou appelez le 800.GE.CARES.
Nous remplacerons gratuitement :
Trentejours Toute pi6ce de la cartouche filtrante qui s'ov6re d6fectueuse en raison d'un d6faut
A Compter de 10 date de mat6riau ou de fabrication pendant cette p6riode de garantie de trentejours.*
d achat initial
• Les d6placements 6 votre domicile pour vous expliquer I'utilisation de ce produit.
Une installation incorrecte.
Une panne du produit par abus d'utilisation, par mauvaise utilisation, par modification ou s'il a 6t6 utilis6
dans un but autre que celui pour lequel il a 6t6 fabriqu6 ou de faqon commerciale.
Le remplacement des fusibles ou le r6enclenchement du disjoncteur du domicile.
Le remplacement de la cartouche filtrante (_cause d'une pression d'eau en debars de la gamme de
fonctionnement recommand6e ou 6 cause d'une concentration excessive de s6diments dans I'eau d'alimentation.
Tout dommage caus6 par accident, incendie, inondation ou une catastrophe naturelle.
Tout dommage fortuit ou indirect caus6 par des d6fauts 6ventuels de cet appareil.
obtenir le servicesous g(]rantie,
unepreuve de la date d'achat
initial est n_cessaire.
Cette gorontie est dtendue 8 I'ocheteur d'origine et oux propridtaires suivants pour tout produit ochetd pour
une utilisotion domestique oux Etots-Unis. En Alaska, cette gorontie exclut le coot d'expddition ou de ddponnoge
8 votre domicile.
Certains dtats n'acceptent pas d'exclusion ou de limites oux dommoges indirects consdcutifs. Certains droits
particuliers vous sont ddvolus en vertu de Io prdsente gorontie et peuvent s'accompogner d'autres droits qui
vorient selon votre lieu de rdsidence. Pour connoTtre vos droits juridiques, veuillez consulter le bureau local ou
le bureau d'dtot des offoires oux consommoteurs ou le Procureur Gdndrol de votre dtot.
Pour les ethers effed:u_s en Iowe : Ce formulaire dolt _tre signs et dat6 par I'acheteur et le vendeur avant
la r6alisation de cette vente.
Ce formulaire doit 6tre conserv6e au dossier par le vendeur pendant une p6riode minimale de deux ans.
Acheteur : Vendeur-
Nom Nom
Adresse Adresse
Ville Et(]t Code postal Ville Et(]t Code postal
Signature Date Signature Date
*Si votre pi@ce GE s'av@re d6fectueuse en raison d'un d6faut de fabrication dans les trentejours 6 tempter de la date d'achat initiale, nous vous fournirons gratuitement une nouvelle piece, ou, 6 notre
gr@,une pi@ce reconstruite. Renvoyez la piece d6fectueuse au fournisseur de pi_ces aupr@s duquel cette piece a 6t6 achet6e avec une copie de la preuve d'achat de la piece. Si la piece est d6fectueuse
et n'indique aucun signe d'une utilisation abusive, celle-ci sera 6chang6e. La garantie ne couvre pas la d@faillance de pi@ces qui sont endommag6es en votre possession, sont utilis6es de fagon abusive
ou ant 6tO mal install_es. Elle ne couvre pas les frais de retour de la piece au fournisseur aupr@s duquel elle a _t@achet_. Elle ne couvre pas non plus le coot de main d'oeuvre pour retirer ou installer cette
piece pour diagnostiquer la panne. Elle ne couvre pas les pi_ces utilis@es dans les produits 6 usage commercial, saul dans le cas des @quipements de climatisation. Enaucun cas, GE ne peut _tre tenu
responsable des dommages indirects. Garant :General Electric Company
EXCLUSION DES GARANTIES TACITES :Votre recours exclusif est 1'6change du produit suivant les modalit6s de la Garantie Limit_e. Toutes garanties tacites, y compris les garanties de valeurs
marchandes ou d'ad_quation 6 des fins particuli_res, sont limit_es 6 une dur_e de six mois ou 6 la dur_e la plus courte autoris_e par la Ioi.
Appliances
Appliance Park
Louisville, KY40225
geapplianceparts.com
@2012 General Electric Company PC66596
43
Page 92
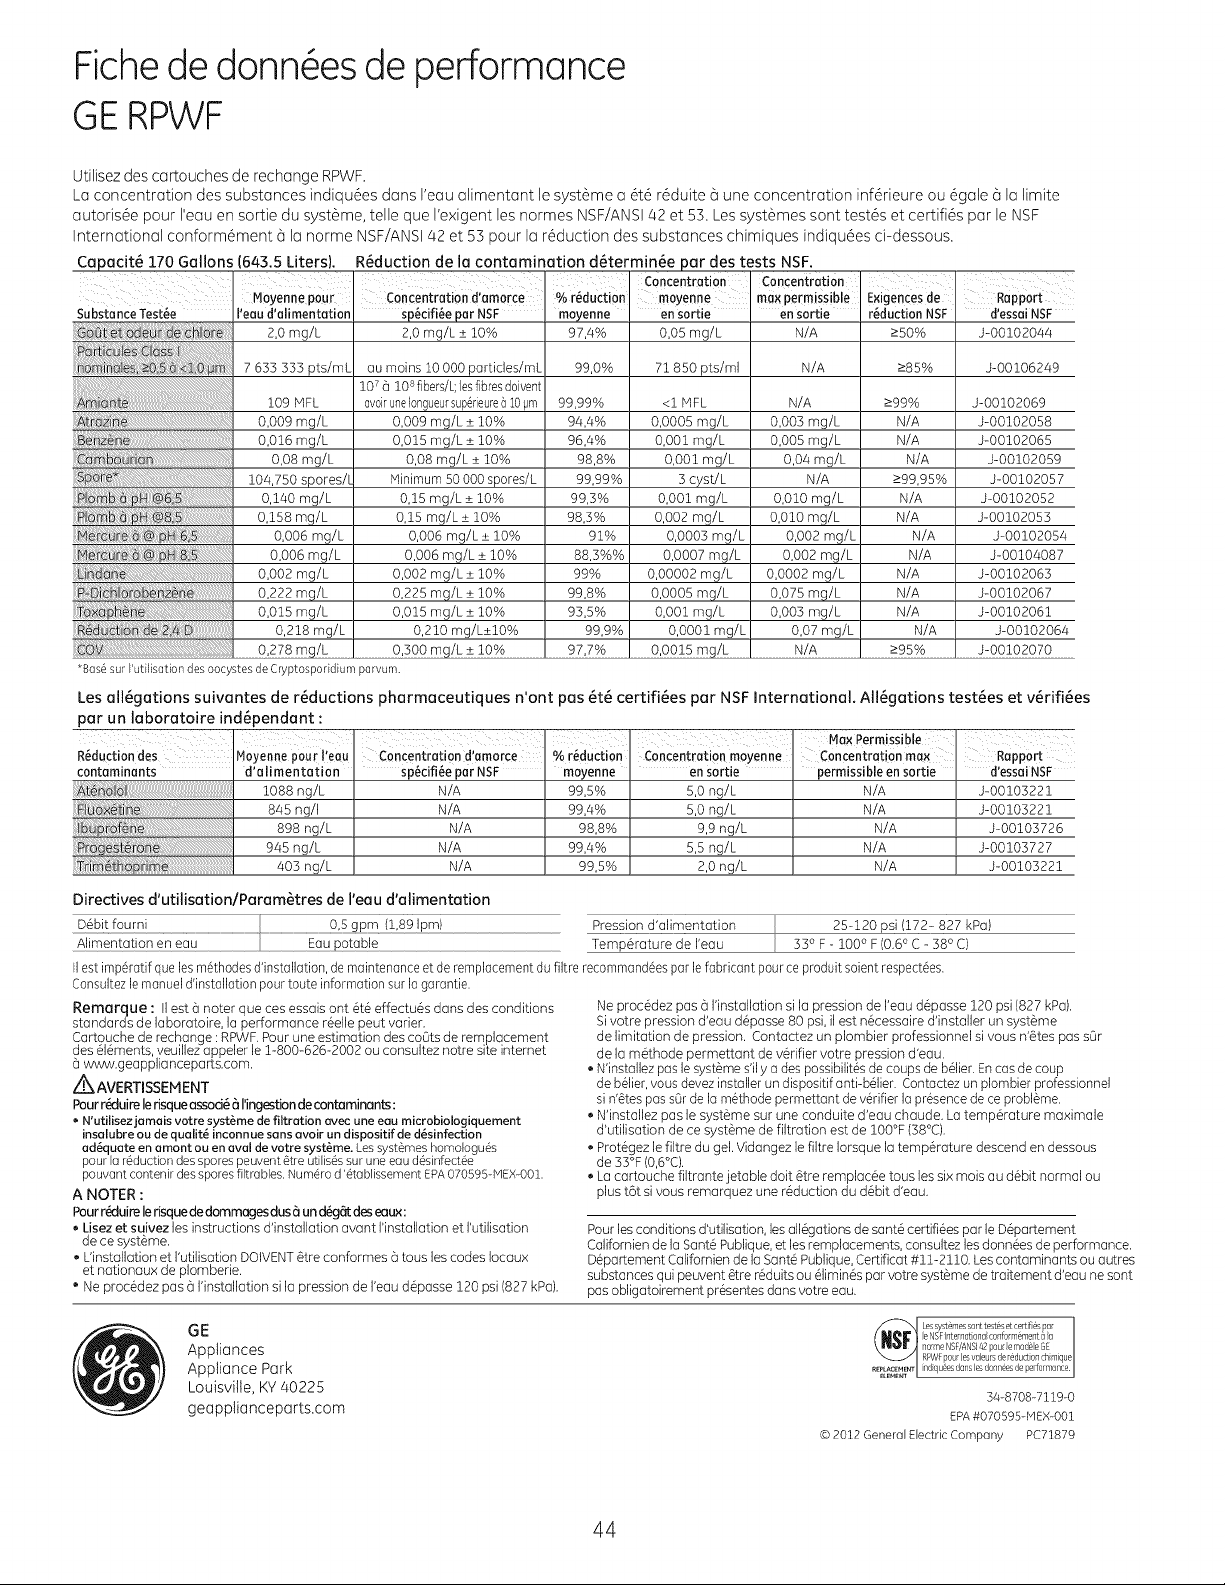
Fichede donn@s de performance
GERPWF
Utilisez des cartouches de rechange RPWF.
La concentration des substances indiqu6es dans I'eau alimentant le syst6me a @6 r6duite 6 une concentration inf@ieure ou 6gale 6 la limite
autoris6e pour I'eau en sortie du syst6me, telle que I'exigent les normes NSF/ANS142 et 53. Les syst6mes sont test6s et certifi6s par le NSF
International conform6ment 6 la norme NSF!ANS142 et 53 pour la r6duction des substances chimiques indiqu6es ci-dessous.
Capacit6 170 Gallons (643,5 Liters). RGduction de la contamination dGterminGe par des tests NSF.
SubstanceTest_e I'eaud'alimentation spGcifiGeparNSF moyenne ensortie ' ensortie
Moyennepour concentrationd'amorce % r_ducton moyenne maxPermSsble
2,0 mg/L
7 633 333 pts/mL
109 MFL
III!_@_il_i_!i_!i_!i_!i_!i_!i_!i_!i_!i_!i_!i_!i_!iii_i_i_illi_lil_l_l!l_l!!i!i!_i:_l_l_l_l_l_l_l_l_l_l_l_l_l_l_l_l_l_l_l_l_l_l_l_l_l_!_!{_{
J 6 : ;
M:rc :
il¸_!l!_ii_i_@_i!_!!!i@ii_ii_ii_ii_i!_!@_ii_i_;lil_l_l_l_l_l_l_l_lil_IiI!I!l!l_ili¸_ili¸_ili¸_ili¸_ili¸_ili¸_ili¸_ili¸_ili¸_ili¸_i¸ii¸ii_;i¸I_
i hi ;::::::::::::::::::::::::::
*Bas@sur I'utilisation desoocystesde Cryptosporidiumparvum.
0,009 mg/L
0,016 mg/L
0,08 mg/L
104,750 spores/[
0,140 mg/L
0,158 mg/L
0,006 mg/L
0,006 mg/L
0,002 mg/L
0,222 mg/L
0,015 mg/L
0,218 mg/L
0,278 mg/L
2,0 mg/L _+10%
au mains 10 000 particles/mL
107 6 10sfibers/L;lesfibresdoivent
avoiruneIongueursup@rieurea10pm
0,009 mg/L _+10%
0,015 mg/L _+10%
0,08 mg/L _+10%
Minimum 50 000 spores/L
0,15 mg/L _+10%
0,15 mg/L_+ 10%
0,006 mg/L _+10%
0,006 mg/L _+10%
0,002 mg/L _+10%
0,225 mg/L _+10%
0,015 mg/L _+10%
0,210 mg/L_+lO%
0,300 mg/L _+10%
Les all6gations suivantes de r6ductions pharmaceutiques n'ont pas 6t6 certifi6es par NSF International. AII6gations test6es et v6rifi6es
par un laboratoire ind6pendant :
R6duction des M0yenne pour l'eau
contaminants
f_
d'alimentation
1088 ng/L
845 ng/I
898 ng/L
945 ng/L
403 ng/L
conCentration d,amorce
Sp6cifi6e par NSF
N/A
N/A
N/A
N/A
N/A
Directives d'utilisation/Param_tres de I'eau d'alimentation
I Concentration Concentration
97,4%
99,0%
99,99%
94,4%
96,4%
98,8%
99,99%
99,3%
98,3%
91%
88,3%%
99%
99,8%
93,5%
99,9%
97,7%
% r_duction
moyenne
99,5%
99,4%
98,8%
99,4%
99,5%
0,05 mg/L
71 850 pts/ml
<1 MFL
0,0005 mg/L
0,001 mg/L
0,001 mg/L
3 cyst/L
0,001 mg/L
0,002 mg/L
0,0003 mg/L
0,0007 mg/L
0,00002 mg/L
0,0005 mg/L
0,001 mg/L
0,0001 mg/L
0,0015 mg/L
Concentration moyenne
en Sortie
5,0 ng/L
5,0 ng/L
9,9 ng/L
5,5 ng/L
2,0 ng/L
N/A
N/A
N/A
0,003 mg/L
0,005 mg/L
0,04 mg/L
N/A
0,010 mg/L
0,010 mg/L
0,002 mg/L
0,002 mg/L
0,0002 mg/L
0,075 mg/L
0,003 mg/L
0,07 mg/L
N/A
Concentrationmax
permissibleensortie
E×igencesde Rappoit
rGduction NSF
>50%
>85%
>99%
N/A
N/A
N/A
>99,95%
N/A
N/A
N/A
N/A
N/A
N/A
N/A
N/A
>95%
MaxPermissible
N/A
N/A
N/A
N/A
N/A
d'essai NSF
J-00102044
J-00106249
J-00102069
J-00102058
J-00102065
J-00102059
J-00102057
J-00102052
J-00102053
J-00102054
J-00104087
J-00102063
J-00102067
J-00102061
J-00102064
J-00102070
Rappo_
d'essai NSF
J-00103221
J-00103221
J-00103726
J-00103727
J-00103221
IIest imp_ratif que les m_thodes d'installation, de maintenance et de remplacement du filtre recommand@s par le fabricant pour ce pro@it soient respect@s.
Consultez le manuel d'installation pour toute information sur la garantie.
Remarque : IIest (3noter que ces essais ont 6tO effectu@s dans des conditions
standards de laboratoire, la performance r@ellepeut verier,
Cartouche de rechange : RPWF, Pour une estimation des coots de remplacement
des @16ments,veuillez appeler le 1-800-626-2002 ou consultez notre site internet
(3www,geapplia nceparts,com,
Z_ AVERTISSEM ENT
Pour r_duire lerisque assod6 6 l'ingestion de contaminants:
, N'utilisezjornois votre syst_me de filtration ovec une eou microbiologiquement
inselubre ou de qualit_ inconnue sans ovoir un dispositif de d_sinfection
adequate en ornont ou en oval de votre syst_me. Lossyst_mes homologu@
pour la rGduction desspores peuvent _tre utilis_s surune eaud_sinfectGe
pouvant contenir dessporesfiltrables. Num_ro d'_tablissement EPA070595-MEX-O01.
A NOTER :
Pour r_duire lerisque de dommacjes dus 6 un d6cj6€deseaux:
, Lisez et suivez les instructions d'installation avant I'installation et I'utilisation
de ce syst6me.
L'instollotion et I'utilisotion DOIVENT @re conformes 6 tousles codes Iocoux
et notionoux de plomberie,
Ne proc_dez pas 6 I'installation si la pression de I'eau d_passe 120 psi (827 kPa),
GE
Appliances
Appliance Park
Neproc@dezpas 6I'installationsi la pressionde I'eaud@asse 120psi (827 kPa).
Sivotre pressiond'eau d@asse80 psi,il estn@cessaired'installerun syst@me
delimitation de pression,Contactezunplombier professionnelsivousn'@tespas s0r
dela m@thodepermettant dev@ifiervotre pressiond'eau,
N'installezpaslesyst@mes'ily a despossibilit6sdecoupsdeb61ier.Encosdecoup
deb61ier,vousdevezinstallerundispositifanti-b61ier.Contactezunplombierprofessionnel
sin'@espass0rde la m@hodepermettantdev@rifierla pr6sencedeceprobl_me.
N'installezpasle syst@mesur uneconduite d'eau chaude, Latemp@aturemaximale
d'utilisation de cesyst_me de filtration est de IO0°F(38°C).
Prot@gezlefiltre du gel.Vidangezlefiltre Iorsquelatemp@aturedescendendessous
de33°F(0,6°C).
Lacartouchefiltrantejetable dolt _tre remplac@tousles sixmoisaud@bitnormal ou
plustStsi vous remarquezuner@ductiondud@bitd'eau.
Pour les conditions d'utilisation, ]esall6gations de sant6 certifi6es par le D6partement
Californien de la Sant6 Publique, et les remplacements, consultez les donn@s de performance,
D6partement Califomien de la Sent6 Publique, Certificat #11-2110. Les contaminants ou autres
substances qui peuvent 6tre r6duits ou 6limin6s par votre syst_me de traitement d'eau ne sont
pas obligatoirement pr6sentes dons votre eau.
e NSFInternational conforrlement a la
normeNSF/ANS]42 poure modee _E
RPWFpourlesvaleusde r#duct onch tuqueI
_ Lessystemessonttestesetcert es ar
_c[._.r ndiqu@sdonsesdann@sdepeflarmance
Louisville, KY 40225
geapplianceparts.com
© 2012 General ElectricCompany PC71879
44
J
34-8708-7119-0
EPA#070595-MEX-O01
Page 93
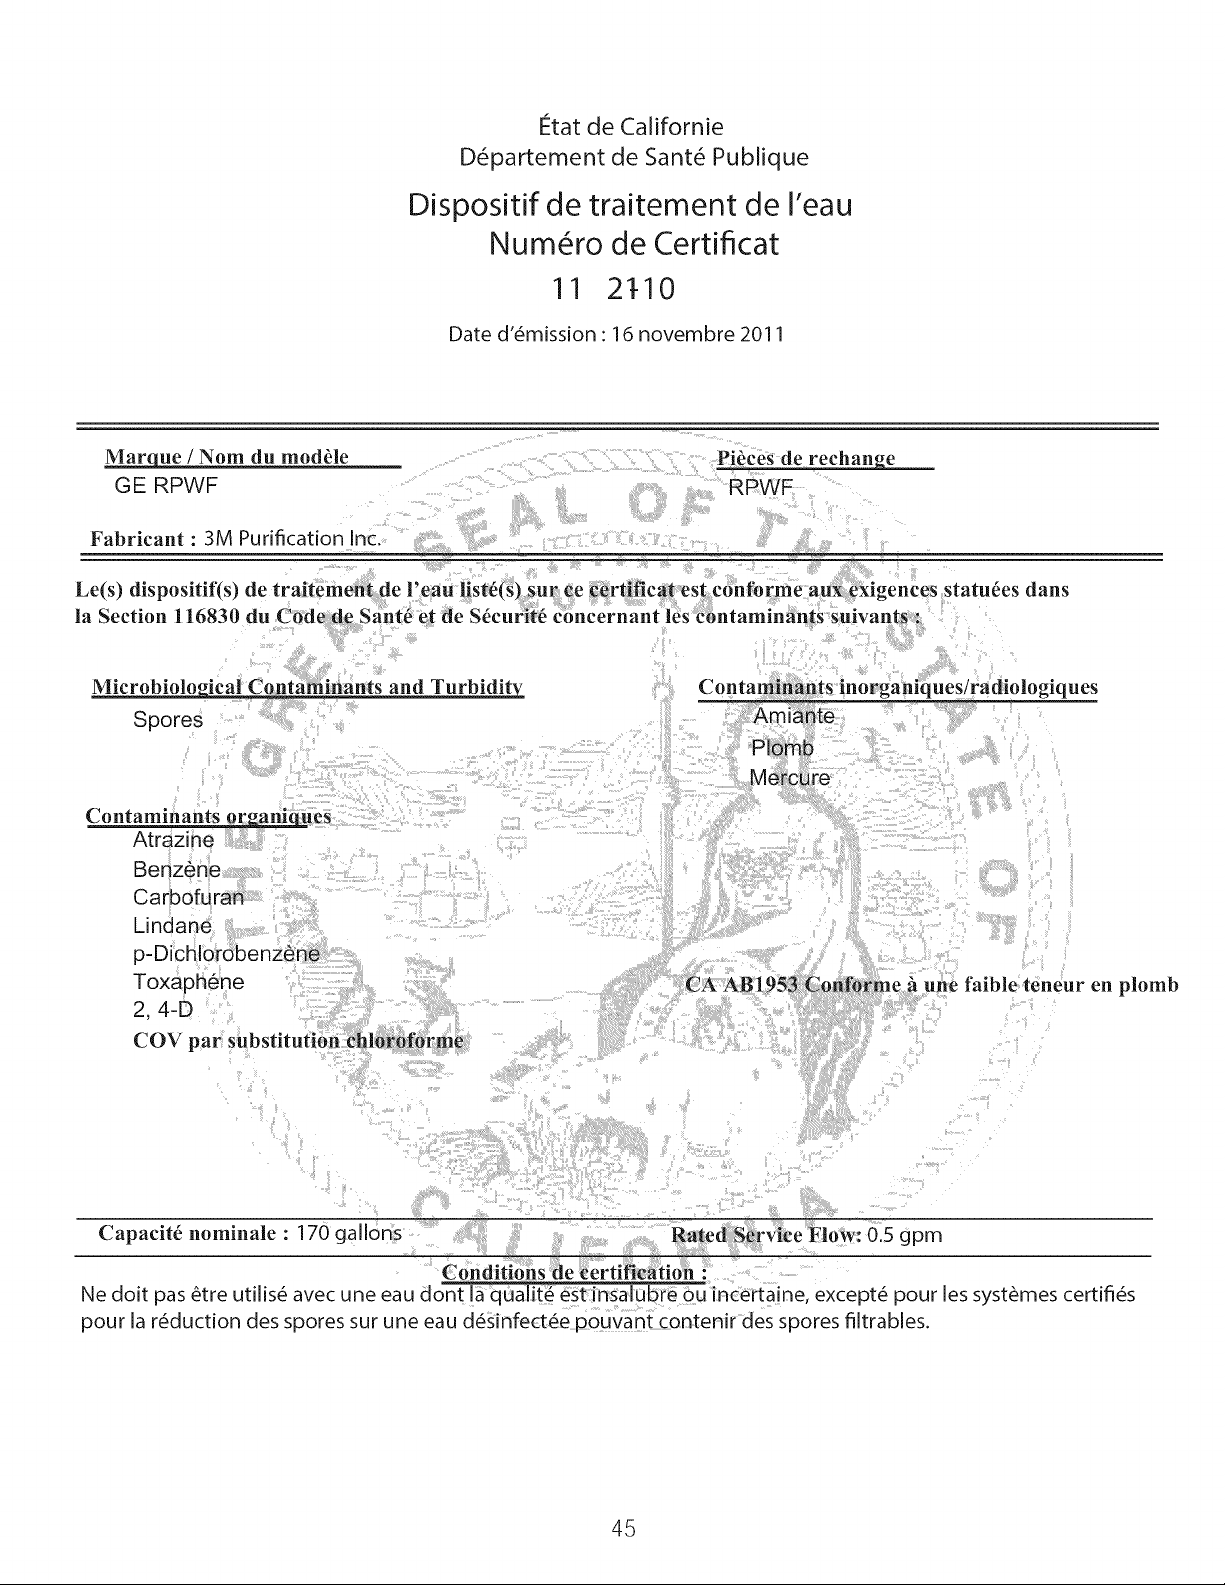
Fttat de Californie
D_partement de Sant_ Publique
Dispositif de traitement de I'eau
Num_ro de Certificat
11 2_I0
Date d'@mission:16 novembre 2011
Marque / Nora du module
GE RPWF
Fabricant : 3M Purification Inc.
Le(s) dispositif(s) de traitement de l'eau list_(s) _ur ce certificat est conforme auX exigences statutes dans
la Section 116830 du C0de de Sant6 et de S6curlt6 cbnCernant les contaminants suivants :
Microbiolo_ic ants and Turbidity
Spores
Contamin_es
Atrazine
Benzene
Ca_bofura_
Toxaphene
2, 4-D
COV par substitution chloroforme
Pi_ces de rechang£
RPWF
Contaminants inorganiques/radiologiques
CA AB1953 Conforme fi une faible teneur en plomb
Capacit6 nominale : 170 gallons RatedService Flow: 0.5 gpm
ConditiOns de _ertificatioh
Ne doit pas 6tre utilis6 avec une eau dont [a quaiit6 est insalubre Ou incertaine, except6 pour les systbmes certifi6s
pour la r6duction des spores sur une eau d_sinfect_e pouvant contenir des spores filtrables.
45
Page 94

Notes
46
Page 95
Notes GEAppliances.com
47
Page 96

Assistance a la clientele.
Site Internet d'Electromenagers GE
Vous avez une question ou avez besoin d'aide pour votre appareil electromenager, Consultez le Site Internet
Electromenagers GE 24 heures sur 24, tous lesjours de I'annee ! Pour une plus grande commodite et un service plus
rapide, vous pouvez maintenant teBcharger votre Manuel d'Utilisation ou m6me programmer un entretien en ligne, Au
Canada : www, GEAppliances,ca
Aux Etats-Unis ' GEAppliances.com
Programmation d'une reparation Aux Etats-Unis: GEAppliances,com
I_1 Le service de reparations GE est tout p@s de chez vous, Allez en ligne et programmez votre @paration au moment qui
vous convient, _ tout moment !Ou appelez le 800,GE,CARES(800,432,2737) pendant les heures normales d'ouverture,
Au Canada appelez le 1 800 561 3344
Studio de Conception Realiste
GEsoutient I'idee de Conception Universelle o@les produits, les services et I'environnement peuvent 6tre utilises par
des personnes de tout _ge, taille et capacite, Nous reconnaissons le besoin de concevoir nos produits pour un vaste
eventail d'aptitudes et de deficiences mentales et physiques, Pour de plus amples informations sur les applications de
la Conception Universelle de GE,y compris des idees de conception de cuisine pour les personnes _ mobilite @duite,
consultez notre site Internet des aujourd'hui, Pour les consommateurs malentendants, veuillez appeler le 800,TDD,
GEAC(800,833,4322),
Au Canada, contactez : Directeur, Relations Clientele, Mabe Canada Inc,
Suite 310, 1 Factory Lane
Moncton,N,B, EIC9M3
ntie AuxEtats-Unis: GEAppliances.com
Vous
I pouvez souscrire _ une extension de garantie et en savoir davantage sur les remises particulieres disponibles
avant expiration de votre garantie, Vous pouvez souscrire en ligne _ tout moment ou en appelant le 800,626,2224
k. J pendant les heures normales d'ouverture, Les Services _ Domicile pour les Clients GEseront toujours disponibles
m6me ap@s expiration de la garantie, Au Canada, appelez le 1,888,261,2133
Aux Etats-Unis: GEAppliances, com
Pieces Detach s et Accessoires
Les personnes qualifiees pour reparer leurs propres appareils peuvent commander des pieces detachees et des
accessoires et les faire envoyer directement _ leur domicile, Les cartes bancaires VISA, MasterCard ou Discover sont
acceptees, Commandez en ligne des aujourd'hui, 24 heures sur 24 ou par telephone au 800,626,2002 pendant nos
heures normales d'ouverture,
Les instructions contenues dans ce manuel detaillent les procedures _ utiliser pour n'importe quel utilisateu_ IIest
preferable que les autres reparations soient effectuees par un reparateur qualifie, La prudence doit 6tre de mise, toute
maintenance incorrecte peut entrafner un fonctionnement dangereux,
Les clients au Canada devront consulter les pagesjaunes pour trouver le Centre de Service Mabe le plus proche ou
appeler le 1,800,661,1616,
Nouscontacter
Sivous n%tes pas satisfait du service recu par GE,veuillez nous contacter par I'intermediaire de notre site internet avec
toutes vos coordonnees, y compris votre numero de telephone ou ecrivez _ I'adresse suivante :
Responsable Principal, Relations Clientele,
Electromenagers GE,Appliance Park,
Louisville, KY40225
Au Canada :www,GEAppliances,ca, ou ecrivez-nous _ I'adresse suivante :
Directeur, Relations Clientele, Mabe Canada Inc,
Suite 310, 1 Factory Lane
Moncton, N,B, E1C 9M3
Aux Etats-Unis' 6"EApplianceParts, com
Aux Etats-Unis: GEAppliances.com
! votre AuxEtats-Unis: GEAppliancos.com
Enreglstrez votre nouvel apparell en hgne quand cela vous convlent Un enreglstrement de votre prodult dans
/ ............................................................................./ les tempsvous permettra une me;lleure communication et garanlira,'si besoin, des_reparations r_pides dans les
t.. J conditions de votre garantie, Vous pouvez egalement envoyer la carte d'enregistrement p@-imprimee incluse dans
I'emballage, Au Canada :www, QEAppliances,ca
Imprime aux Etats-Unis.
Page 97

L__
0
E m
L__
C
L__
Q
N
(1)
dP
L__
LL
0
GEAppliances.com
Instrucciones de seguridad.. 2-4
Instrucciones de Funcionamiento
Funciones ........................ 5, 6
Controles ......................... 7, 8
Eliminador de Olores ................ 9
Dispensador ....................... 10
Agua Caliente ...................... 11
Filtro de Agua ...................... 12
Opciones de Almacenamiento
de Comidas Frescas .......... 13,14
Climate Zone y Cajon
de Temperatura Controlada... 15,16
Freezer ............................ 17
Maquina de Hacer Hielo
Automatica ...................... 18
Cuidado y Limpieza ............... 19
Reemplazo de las Luces ............ 20
Instrucciones de Instalacion
Preparacion para Instalar
el Refrigerador ............. 21, 22
Instalacion del Soporte
Anti-Volcaduras ............. 29, 30
Instalacion del Refrigerador .... 23-33
Instalacion del Suministro
de Agua ..................... 34-35
Modelos GECafJ M
Los modelos que cornienzan con I_?sletms CFEson
Modelos con Profundid_?d Est_nd_r (SD)
Los rnodelos que corn ienzan con I_?sletms CYEson
Modelos con Profundidz_d de Mesz_d_ (CD)
m
£__
Consejos para la Solucion
de Problemas ............ 38, 39
Condiciones de Funcionamiento
Normal .......................... 37
Servicio Tecnico - Verdad
o Mito ....................... 40, 41
&oporte al Cliente
Garantia para Clientes de EE.UU .... 42
RPWF Certificado Limitado del
Dispositivo del Cartucho
del Filtro de Agua RPWF.......... 43
Ficha Tecnica de Rendimiento ...... 44
Garantia de Tratamiento del Agua
del Estado de California .......... 45
Soporte al Cliente ......... Contratapa
Escriba los numeros de modelo y de serie aquL"
N ° de Modelo
N ° de Serie
Busque estos numeros en una etiqueta del
lado izquierdo, cerca de la parte intermedia
del compartimiento del refrigerador,
239D3389PO03 Pub No. 4,9-60678-3 05-74 GE
Page 98

INFORMACION IMPORTANTEDE SEGURIDAD.
LEA TODASLAS INSTRUCCIONESANTES DE USAR.
[
INFORMACION IMPORTANTE DE SEGURIDAD LEA TODAS LAS INSTRUCCIONES ANTES DE USAR
Sitio Web de E/ectrodomesticos de GE
Para rnas information sobre e/funcionarniento de su refrigerador, v/site
www GEAppliances. corn
m
_1_ Este es el simbolo de alerta de seguridad, El mismo alerta sobre potenciales riesgos de muerte o lesiones tanto para
Jsted con para otras personas, Todos los mensajes de seguridad estaran a continuacion del simbolo de alerta de seguridad
con la palabra "PELIGRO", "ADVERTENCIA" o "PRECAUCION", Estas palabras se definen como:
_ Indica una situacion de si no se evita, resultar en la muerte o en lesiones
Indica una situacion de riesgo que, si no se evita, podria resultar en la muerte o en lesiones graves,
Indica una situacion de riesgo que, si no se evita, podria resultar en lesiones menores o moderadas,
A fin de reducir el riesgo de incendio, explosion, descargas electricas o lesiones
al usar su refrigerador, siga estas precauciones basicas de seguridad:
Este refrigerador se debera instalar y ubicar
adecuadamente de acuerdo con las Instrucciones de
Instalacion antes de set usado,
Desenchufe el refrigerador antes de realizar su limpieza o
reparaciones,
NOTA: Las reparaciones deberan set realizadas por un
Profesional del Servicio Tecnico calificado,
Reemplace todas las piezas y paneles antes de utilizar,
Debido a los posibles riesgos sobre la seguridad bajo
ciertas condiciones, recomendamos enfaticamente no
usar prolongadores, Sin embargo, si es necesario usar
un prolongador, es absolutamente necesario que sea un
prolongador para electrodomestico de la lista UL (en Estados
Unidos) o uno certificado pot CSA (en Canada), de 3 cables
con conexion a tierra, que cuente con un enchufe con
conexion a tierra y un tomacorriente con una graduacion
electrica del cable de 15 amperes (minimo) y 120 volts,
A fin de evitar riesgos de que los ni_os sufran asfixia o
queden atrapados, retire las puertas de comidas frescas y
del freezer de cualquier refrigerador antes de deshacerse o
dejar de usar el mismo,
No guarde ni use gasolina u otros vapores inflamables y
liquidos cerca de este o de otros electrodomesticos,
La corriente al refrigerador no puede set desconectada
pot ninguna configuracion del panel de control; el
refrigerador debe set desconectado para quitar la
corriente,
INFORMACION DE SEGURIDAD DEL REFRIGERADOR
riesgo
que,
INSTRUCCIONES IMPORTANTES DE SEGURIDAD
podria
, No permita que los ni_os se trepen, paren o cuelguen de
las manijas de la puerta o de los estantes del refrigerador,
Podrian sufrir lesiones graves,
En refrigeradores con maquinas de hacer hielo automaticas,
evite el contacto con las partes moviles del mecanismo
eyector o con el elemento de calefaccion que libera los
cubos, No coloque los dedos ni las manos en el mecanismo
de la maquina de hielo automatica mientras el refrigerador
este enchufado,
, No limpie estantes de vidrio ni tapas con agua caliente
cuando esten frios, Los estantes de vidrio y las tapas se
pueden romper si son expuestos a cambios de temperatura
repentinos o impactos, tales como sacudones o caidas, El
vidrio templado esta diser]ado para destruirse en pequer]as
piezas en caso de rotura,
Mantenga los dedos fuera de los espacios de "riesgo de
lastimaduras"; los despejes entre las puertas y entre las
puertas y el gabinete son necesariamente pequer]os,
Tenga el cuidado de cerrar las puertas cuando los ni_os se
encuentren en el area,
, No toque las superficies frias del compartimiento del freezer
cuando las manos esten homedas o mojadas, la piel se
podra adherir a estas superficies extremadamente frias,
No vuelva a congelar comidas que hayan estado totalmente
congeladas en forma previa,
Use un vidrio solido al dispensar hielo (en modelos con
dispensador de hielo),
graves,
i
Page 99

INFORMACION IMPORTANTEDE SEGURIDAD.
LEA TODASLAS INSTRUCCIONESANTES DE USAR.
GEAppliances.com
INSTALACION
_' Riesgo de Explosion.
Mantenga cualquier material }/vapores inflamables, tales como gasolina, alejados del refrigerador. Si
no se cumple con esto se podra producir una explosion, incendio o la muerte.
_1_ Riesgo de Caida.
Los modelos con estJlo incorporado (modelo PYE, CYE, }/PWE) son inestables, especialmente con
las puertas abiertas. Estos modelos deben ser asegurados con el soporte antJ-volcaduras, a fin
de evitar caidas hacia adelante, que podrian resultar en la muerte o lesiones graves. Lea }/siga
las Jnstrucciones de instalacion en su totalJdad, a fin de instalar el soporte de piso antJ-volcaduras
embalado con su reffigerador.
CONEXION DE LA ELECTRICIDAD
RJesgo de Descarga EIoctrica.
Enchufe en un tomacorriente con conexion a tierra de 3 cables.
No elJmine el cable de conexion a tJerra.
INo use un adaptador.
ISi no se siguen estas instrucciones se podra producir a muerte,
incendios o descargas electricas.
Nunca, bajo ninguna circunstancia, corte o elimine
Para su seguridad personal, este electrodomestico
El cable de corriente de este electrodomestico contiene un
enchufe de 3 cables (conexion a tierra) que se conecta a un
tomacorriente de pared estandar de 3 cables (conexion a
tierra) para minimizar la posibilidad de riesgos de descargas
electricas por parte del mismo,
Contrate a un electricista calificado para que controle el
tomacorriente }/el circuito electrico, a fin de asegurar que el
enchufe este correctamente conectado a tierra,
Encaso de contar con un tomacorriente de pared de 2
cables, es su responsabilidad }/obligacion reemplazarlo
por un tomacorriente de pared de 3 cables correctamente
conectado a tierra, No use un adaptador,
El refrigerador deberia estar siempre conectado a un
enchufe especifico con un indice de volta_je equivalente al
que figura en su etiqueta de caracteristicas tecnicas,
el tercer cable (tierra) del cable de corriente.
debe estar adecuadamente conectado a tierra.
Se requiere un suministro electrico con fusible }/conexion
a tierra de 115 voltios de CA, 60 Hz, 15 o 20 amperes, Esto
garantiza el mejor funcionamiento }/ademas previene
la sobrecarga de los circuitos del hogar, Io cual podria
ocasionar riesgos de incendio debido al recalentamiento de
cables,
Nunca desenchufe el refrigerador tirando del cable de
corriente, Siempre tome su enchufe firmemente }/empLlje el
mismo hacia afuera para retirarlo,
Repare o reemplace de inmediato todos los cables de
corriente pelados o con cualquier tipo de dano, No use
un cable con cortaduras o abrasion sobre su extension o
extremos,
AI alejar el refrigerador de la pared, se debera] tener cuidado
de que no ruede sobre ni dane el cable de corriente,
Page 100

INFORMACION IMPORTANTEDE SEGURIDAD.
LEA TODASLASINSTRUCCIONESANTESDE USAR.
DISPENSADOR DE AGUA CALIENTE
A Riesgo de Escaldadura.
El dispensador de agua caliente puede calentar agua a una temperatura de aproximadamente 185°F (85°C),
Las temperaturas del agua superiores a los 125°F (52°C) pueden ocasionar quemaduras graves o la muerte pot
escaldadura, Los ninos, las personas incapacitadas o mayores presentan el mayor riesgo de sufrir escaldaduras,
Use este electrodomestico solo para su proposito original, como se describe en el Manual del Propietario, A fin de reducir el
riesgo de quemaduras severas, lesiones pot escaldadura, o la muerte al usar el dispensador de agua caliente, se deber_in seguir
las siguientes instrucciones:
Elagua proveniente del dispensador esta muy caliente, Tenga
extremo cuidado al dispensar 3/beber agua, Espere a que el
agua se enffie hasta que sea posible beberla antes de tomarla,
AIdispensar agua pot debajo de los 125°F, siempre controle la
temperatura del agua antes de beber la misma,
AIdispensar agua caliente, el envase puede alcanzar una
temperatura muy alta, Use un envase con aislante de
temperatura tal como ceramica o gomaespuma, Eluso de
materiales para envases tales como el papel o el plastico
pueden resultar en una quemadura al sostener la taza, No use
envases de vidrio, ya que los cambios de temperatura pueden
hacer que el envase se rompa 3/produzca escaldaduras o
laceraciones,
No permita que los ninos usen el agua caliente del dispensador,
La perilla para dispensar agua caliente requiere movimientos
de giro 3/empuje, a fin de reducir el riesgo de que sedispense
agua caliente de forma no intencional o pot pare de ninos
pequenos, No manipule indebidamente ni modifique la perilla
para dispensar agua caliente,
Siempre siga las instrucciones del fabricante para la
preparacion de formula de bebe,
Mantenga la taza o envase cerca del punto desde donde se
dispensa, a fin de minimizar salpicaduras de agua caliente
que podrian tomar contacto con su mano, No dispense agua
caliente en una taza apoyada en la bandeja del dispensador,
ya que esto incrementara las salpicaduras de agua,
No use con agua que no sea segura a nivel microbiologico o de
calidad desconocida,
Eldispensador de agua caliente esta disenado para dispensar
agua 0nicamente, No intente calentar o dispensar ninguna
otra cosa que no sea agua, No intente desensamblar o limpiar
el tanque,
Un cartucho del filtro de agua instalado en forma reciente
puede hacer que chorree agua del dispensador, Deje cotter
2 galones de agua a traves del dispensador de agua fria
(aproximadamente 5 minutos) a fin de eliminar el aim del
sistema, Hasta que el aire sea eliminado del sistema a traves
del dispensador de agua fria, NO use eldispensador de agua
caliente ya que puede hacer que chorree agua caliente y
ocasionar escaldadura con agua caliente,
Eltanque para dispensar agua caliente no esta presurizado, y
cuenta con una ventilacion en el tanque y una salida del tubo
para dispensar, No modifique el sistema, ni cierre o bloquee
el tubo para dispensar, ni conecte cualquier otto dispositivo al
tanque o tubo para dispensar, Hacer esto podra conducir a la
ruptura del tanque y escaldaduras con agua caliente,
FORMA ADECUADA DE DESCARTAR SU ANTIGUO REFRIGERADOR
: Riesgo de que los ni_os sufran asfixia o y queden atrapados.
_etire del re1 erador las puertas de comidas frescas y del freezer, antes de descartar el refrigerador,
Si esto no se realiza, los ninos podran quedar atrapados y ocasionar la muerte o dano cerebral,
IMPORTANTE:
Que un nino quede atrapado o que sufra una asfixia no
son problemas del pasado. Los reffigeradores antiguos o
abandonados aun son peligrosos, incluso aunque se conserven
pot "solo unos pocos alias". Si se deshara de su antiguo
refrigerador, siga las siguientes instrucciones a fin de evitar
accidentes.
Antes de Descartar su Antiguo Refrigerador o
Freezer:
Retire las puertas de comidas frescas y del freezer.
' Deje los estantes en su lugar de modo que los ninos no
puedan trepar dentro con facilidad.
Refrigerantes
Todos los productos de refrigeracion cuentan con
refrigerantes, que de acuerdo con la ley federal deberan set
eliminados antes de descartar el producto. Si se deshara de
un producto de refrigeracion antiguo, consulte a la compahia
a cargo sobre como deshacerse del mismo.
LEAFSIGAE,.,qTAINFORMACIONDESEGURIDADCUIDADO,.%MENT£
GUARDEESTASINSTRUCCIONES
 Loading...