

Page 1

ge.com
>
o
U
(1)
LL
--d
qJ
U
qJ
U3
Safety Instructions ...... 2-8
Operating Instructions
Convection Oven .......... 19-23
Roasting Guide .............. 22
Timed Convection Baking ...... 23
Gas/Control Lockout ........... 25
Gas Surface Burners ....... 9, 11
Griddle ........................ 10
Lower Oven Drawer .......... 28
Thermostat ................ 27, 28
Upper Oven ............... 12-27
Aluminum Foil ............. 14
Baking or Roasting ........ 14
Broiling Guide ............. 15
Clock and Timer ........... 16
Oven Controls ............. 12
Preheating ................. 14
Probe ................... 18, 21
Sabbath Feature .......... 26
Self-Cleaning ............. 29, 30
Special Features ......... 24, 25
Timed Baking and
Roasting Features ........... 17
Care and Cleaning
Burner Grates ................. 33
Burner Caps and Heads ...... 32
Control Panel and Knobs ..... 37
Cooktop Surface ............ 33
Griddle ...................... 34
Lift-Off Oven Door .......... 35
Lower Oven Drawer ........ 36
Oven Air Vents .............. 37
Oven Heating Elements ..... 35
Oven Light Replacement ...... 38
Oven Shelves ................. 38
Sealed Burner Assemblies .... 31
Self-Cleaning .............. 29, 30
Stainless Steel Surfaces ....... 34
Installation
Instructions ............ 39-52
Anti-Tip Device ................ 52
Check Ignition of
Surface Burners ........... 50, 51
Connect Range
to Electric ................. 44, 46
Connect Range to Gas ..... 43, 45
Dimensions and
Clearances .................... 41
Electrical Connections ...... 47-49
Level the Range ............... 51
Location Guidelines ........... 42
LP ............................. 52
Safetg Instructions ........ 39, 40
Accessories .................. 57
Troubleshooting Tips .53-56
Consumer Support
Consumer
Support .............. Back Cover
Product Registration ...... 61, 62
Warrantu for Customers
in Canada ..................... 62
Warrantu for Customers
in the U.S.A.................... 61
C25980
In Canada contact us at
www.GEAppliances.ca
Write the model and serial
numbers here:
Model #
Serial #
You can find them on a label on the
front of the range behind the lower
oven drawer.
183D5580P214 49-85130-2 01-08JR
Page 2

IMPORTANTSAFETYINFORMATION.
READALL INSTRUCTIONSBEFOREUSING.
WARNING!
ANTI-TIPDEVICE
_ ALL RANGES CAN TIP
_ INJURY TO PERSONS
COULD RESULT
_ INSTALL ANTI-TIP
DEVICES PACKED WITH
RANGE
_ SEE INSTALLATION
INSTRUCTIONS
_kWARNING: Iftheinformation
in this manual is not followed exactly,
a fire or explosion may result causing
property damage, personal injury
or death.
-- Do not store or use gasoline or other
flammable vapors and liquids in the
vicinitg of this or ang other appliance.
- WHAT TODO IF YOU
SMELL GAS
_ Do not trg to light ang appliance.
_ Do not touch ang electrical switch;
do not use ang phone in gour building.
_ Immediatelg call gour gas supplier
from a neighbor's phone. Follow the
gas supplier's instructions.
_;_If gou cannot reach gour gas supplier,
call the fire department.
-- Installation and service must be
performed bg a qualified installer,
service agencg or the gas supplier.
Page 3
_e,com
WARNING!
For your safety, the information in this manual must be followed to minimize the risk of fire or
explosion, electric shock, or to prevent propertg damage, personal injur_l, or loss of life.
ANTI-TIPDEVICE
All ranges con tip and injury could result.
Toprevent occidental tipping of the range, attach it to the wall bg installing the Anti-Tip device supplied.
To check if the device is installed and engaged properl_l, carefullg tip the range forward. The Anti-Tip
device should engage and prevent the range from tipping over.
If Uou pull the range out from the wall for anu reason, make sure the device is properlu engaged
when Uou push the range back against the wall. If it is not, there is a possible risk of the range tipping
over and causing injuru if Uou or a child stand, sit or lean on an open doon
Please refer to the Anti-Tip device information in this manual. Failure to take this precaution could
result in tipping of the range and injuru.
3
Page 4

IMPORTANTSAFETYINFORMATION.
READALL INSTRUCTIONSBEFOREUSING.
WARNING!
IMPORTANTSAFETYNOTICE
The California Safe Drinking Water and Toxic Enforcement Act requires the Governor of California to
publish o fist of substances known to the state to cause birth defects or other reproductive harm, and
requires businesses to wom customers of potential exposure to such substances.
Gas appliances con cause minor exposure to four of these substances, nomelg benzene, carbon
monoxide, formaldehgde and soot, caused primarily bg the incomplete combustion of natural gas
or LP fuels. Properly adjusted burners, indicated bg a bluish rather than a gellow flame, will minimize
incomplete combustion. Exposure to these substances con be minimized bg venting with on open
window or using a ventilation fan or hood.
SAFETYPRECAUTIONS
When using electrical appliances, basic safety precautions should be followed, including the following:
s'_Use this appliance onlu for its intended s'_Do not leave children alone--rehildren should
purpose as described in this Owner's Manual.
s'_Besure uour appliance is properly installed
and grounded bu a qualified technician in
accordance with the provided installation
instructions.
S'_Do not attempt to repair or replace anu
part of uour range unless it is specificallu
recommended in this manual. Allother
servicing should be referredto a qualified
technician.
not be left alone or unattended inan area
where an appliance is in use.They should
never be allowed to sit or stand on ang part
of the appliance.
_f_Do not allow anuone to climb,stand or hang
onthe door,storage drawer,or cooktop.
Theu could damage the range and even tip
itover,causingseverepersonal injuru.
S'_Do not store flammable materials in an oven
or near the cooktop.
_'_Before performing anu service, disconnect
the range power supplu at the household
distribution panel by removing the fuse
or switching off the circuit breaker.
CAUTION: Items of interest to children
should not be stored in cabinets above a
range or on the baeksplash of a range-
children climbing on the range to reach items
could be seriously injurecL
SAFETYPRECAUTIONS
Have the installer show gou the location of the range gas shuboff valve and how to shut it off if neeessarg.
;_ Have your range installed and properly
grounded by a qualified installer, in
accordance with the Installation Instructions.
Any adjustment and service should be
performed only by qualified gas range
installers or service technicians.
_'_Do not attempt to repair or replace any
part of your range unless it is specifically
recommended in this manual. All other service
should be referred to a qualified technician.
Page 5
SAFETYPRECAUTIONS
ge,com
S'_Locate the range out of kitchen traffic path
and out of draftu locations to prevent poor
air circulation.
_f_Be sure all packaging materials are
removed from the range before operating it
to prevent fire or smoke damage should the
packaging material ignite.
s'_Besure your range is correctlu adjusted by
a qualified service technician or installer for
the tupe of gas (natural or LP)that is to be
used. Your range can be converted for use
with either tupe of gas. See the Installation
of the range section.
WARNING: Theseadjustments
must be made by a qualified service
technician in accordance with the
manufacturer's instructions and aft codes
and requirements of the authorit_l having
jurisdiction. Failure to follow these instructions
could result in serious injurg or property
damage. The qualified agencg performing
this work assumes responsibilitg for the
conversion.
s'_After prolonged use of a range, high floor
temperatures mau result and many floor
coverings will not withstand this kind of use.
Never install the range over vinuI tile or
linoleum that cannot withstand such tupe
of use. Never install it directlu over interior
kitchen carpeting.
_f_Do not leave children alone or unattended
where a range is hot or in operation. Theu
could be seriouslu burned.
s'_Do not allow anuone to climb, stand or hang
on the oven door, drawer or cooktop. Theu
could damage the range and even tip it over,
causing severe personal injuru.
CAUTION: Itemsofinterestto
children should not be stored in cabinets
above a range or an the backsplash of a
range-children climbing on the range to
reach items could be seriouslg injured.
_f_For your safety, never use your appliance
for warming or heating the room.
]'_Never wear loose-fitting or hanging garments
while using the appliance. Be careful when
reaching for items stored in cabinets over the
range. Flammable material could be ignited
if brought in contact with flame or hot oven
surfaces and may cause severe burns.
_f:Do not store flammable materials in an oven,
a range drawer or near a cooktop.
_f:Do not store or use combustible materials,
gasoline or other flammable vapors and
liquids in the vicinity of this or any other
appliance.
s'gDo not let cooking grease or other flammable
materials accumulate in or near the range.
_f:Do not use water on grease fires. Never
pick up a flaming pan. Turn the controls off.
Smother a flaming pan on a surface burner
by covering the pan completely with a
well-fitting lid, cookie sheet or flat tray.
Use a multi-purpose dry chemical or
foam-type fire extinguisher.
Flaming grease outside a pan can be put
out by covering it with baking soda or,
if available, by using a multi-purpose dry
chemical or foam-type fire extinguisher.
Flame in the upper oven or lower oven drawer
can be smothered completely by closing the
oven door or drawer and turning the control to
off, or by using a multi-purpose dry chemical
or foam-type fire extinguisher.
s'gLet the burner grates and other surfaces cool
before touching them or leaving them where
children can reach them.
_f_Never block the vents (air openings} of the
range. They provide the air inlet and outlet
that are necessary for the range to operate
properly with correct combustion. Air openings
are located at the rear of the cooktop, at the
top and bottom of the oven door, and at the
bottom of the range under the lower oven
drawer or kick panel.
_f_Do not lift the cooktop. Lifting the cooktop can
lead to damage and improper operation of
the range.
_f_Large scratches or impacts to glass doors
can lead to broken or shattered glass.
5
Page 6
IMPORTANTSAFETYINFORMATION.
READALL INSTRUCTIONSBEFOREUSING.
AkWARNING!
SURFACEBURNERS
Use proper pan size-avoid pans that are unstable or eadlytipped. Select cool<ware having flat
bottoms large enough to cover burner grates. Toavoid spillovers, mal<esure cool<ware is large enough
to contain the food properly. This will both save cleaning time and prevent hazardous accumulations
of food, since heavy spattering or spillovers left on range can ignite. Use pans with handles that can
be easily grasped and remain cool.
_ Always use the LITE position when igniting
the top burners and make sure the burners
have ignited.
]'_Never leave the surface burners unattended
at high flame settings. Bailovers cause
smoking and greasy spillovers that may
catch an fire.
_d_Adjust the top burner flame size so it does
not extend beyond the edge of the caokware.
Excessive flame is hazardous.
]'_Use only dry pot holders-maist or damp pot
halders an hot surfaces may result in burns
from steam. Do not let pot holders come near
open flames when lifting cookware. Do not use
a towel or other bulky cloth in place of a pot
holder.
_d_When using glass cookware, make sure it
isdesigned far top-of-range coaking.
_d_To minimize the possibility of burns, ignition
of flammable materials and spillage, turn
cookware handles toward the side or back
of the range without extending over adjacent
burners.
_d_Carefully watch foods being flied at a high
flame setting.
_ Do not flame foods on the cook!op. If you do
flame foods under the hood, turn the fan on.
_ Da not use a wok on the cooking surface
if the wok has a round metal ring that is placed
over the burner grate to support the wok. This
ring acts as a heat trap, which may damage
the burner grate and burner head. Also, it may
cause the burner ta work improperly. This may
cause a carbon monoxide level above that
allowed by current standards, resulting in
a health hazard.
_ Foods for flying should be as dry as possible.
Frost on frozen foods or moisture on fresh
foods can cause hot fat to bubble up and
over the sides of the pan.
S'_Never try to move a pan af hot fat, especially
a deep fat flyen Wait until the fat is cool.
s'_Do nat leave plastic items on the coaktop-
they may melt if left too close to the vent.
_ Keep all plastics away from the surface
burners.
_ To avoid the possibility of a burn, always be
certain that the controls for all burners are
at the OFF position and all grates are cool
before attempting to remove them.
_d_Always heat fat slowly, and watch as it heats.
_ Da not leave any items on the cooktop. The
hot air flam the vent may ignite flammable
items and will increase pressure in closed
containers, which may cause them to burst.
_ If a combination of oils ar fats will be used
in flying, stir together before heating or
as fats melt slowly.
_ Use a deep fat thermometer whenever
possible ta prevent overheating fat beyond
the smoking point.
_ Use the least passible amount of fat far
effective shallow ar deep-fat frying. Filling the
pan too full of fat can cause spillavers when
food is added.
_ If range is located near a window, do not hang
long curtains that could blow over the surface
burners and create a fire hazard.
S'_If you smell gas, turn off the gas to the range
and call a qualified service technician. Never
use an open flame to locate a leak.
_d_Always turn the surface burner controls off
before remaving caokware.
:_When disabling Gas/Control Lockout, make
sure the surface controls are set to the OFF
position. This will preclude gas flow when the
range is turned on
Page 7
LOWEROVENDRAWER
ge.com
_'_The purpose of the warm setting of the lower
oven drawer isto hold hot cooked foods at
serving temperature. Alwaus start with hot
food; cold food cannot be heated or cooked
using the warm setting of the lower oven
drawer.
_ Do not use the lower oven drawer to dru
newspapers. If overheated, theu can catch
on fire.
_'_Do not leave paper products, plastics, canned
food or combustible materials in the drawee
S'_Never leavejars or cans of fat drippings in
or near uour lower oven drawen
s'_Do not warm food in the lower oven drawer
for more than two hours.
_'_Do not touch the heating element or the
interior surface of the lower oven drawer.
These surfaces mau be hot enough to burn.
REMEMBER:The inside surface of the lower
oven drawer mau be hot when the drawer
is opened.
s'_Use care when opening the lower oven
drawer. Open the drawer a crack and let
hot air or steam escape before removing
or replacing food. Hot air or steam which
escapes can cause burns to hands, face
and/or eyes.
_d_:Do not use aluminum foil to linethe lower
oven drawer. Foil is an excellent heat insulator
and will trap heat beneath it. This will upset
the performance of the drawer and it could
damage the interior finish.
_d_:Never place, use or self-clean the lower oven
drawer pan in the upper oven.
Page 8

IMPORTANTSAFETYINFORMATION.
READALL INSTRUCTIONSBEFOREUSING.
COOKMEATAND POULTRYTHOROUGHLY...
Cook meat and poultry thoroughly-meat to at least an INTERNALtemperature of 16O°Fand poultry
to at least an INTERNALtemperature of 180°F Cooking to these temperotures usually protects against
foodbome illness.
UPPEROVEN
Stand away from the range when opening the door of a hot oven. The hot air and steam that escape
can cause bums to hands, face and eyes.
_d_Do not use the oven for a storage area.
Items stored in the oven can ignite.
_d_Keep the oven free from grease buildup.
_d_Place the oven shelves in the desired position
while the oven iscool. If shelves must be
handled when hot, do not let
pot holder contact the heating elements.
]'_Pulling out the shelf to the stop-lock is a
convenience in lifting heavy foods. It is also
a precaution against burns from touching hot
surfaces of the door or oven walls. The lowest
position "R" is not designed to slide.
_: Do not heat unopened food containers.
Pressure could build up and the container
could burst, causing an injury.
SELF-CLEANINGUPPEROVEN
_ Be sure to wipe up excess spillage before
self-cleaning operation.
_ Before self-cleaning the oven, remove
the shelves, any broiler pan, grid and
other cookware.
_: When using cooking or roasting bags in the
oven, follow the manufacturer's directions.
_: Do not use your oven to drg newspapers.
If overheated, they can catch fire.
_: Do not leave paper products, cooking utensils
or food in the oven when not in use.
;'gKeep the oven vent unobstructed.
_: Make sure any broiler pan isin place correctly
to reduce the possibility of grease fires.
_: If you should have a grease fire in a broiler
pan, press the CLEAR/OFF pad and keep
the oven door closed to contain fire until
it burns out.
_: Never place, use or self-clean the lower oven
drawer pan in the upper oven.
_d_Clean only parts listed in this Owner's Manual.
_'_If the self-cleaning mode malfunctions,
turn the oven off and disconnect the power
supply. Have it serviced by a qualified
technician.
S'_Never place, use or self-clean the lower oven
drawer pan in the upper oven.
S'_Do not clean the door gasket. Thedoor gasket
isessentialfor a good seal.Careshould be
taken notto rub,damage or
movethe gasket.
s'_Donot useovencleaners.No commercial
oven cleaner or oven liner of any kind should
beused in or around any part of the oven.
Residuefrom oven cleanerswill damage the
insideof the oven when the self-cleancycle
isused.
READAND FOLLOWTHISSAFETYINFORMATIONCAREFULLY.
SAVETHESEINSTRUCTIONS
Page 9
Usingthegas surface burners.
Throughout this manual, features and appearance may vary from your model.
ge.com
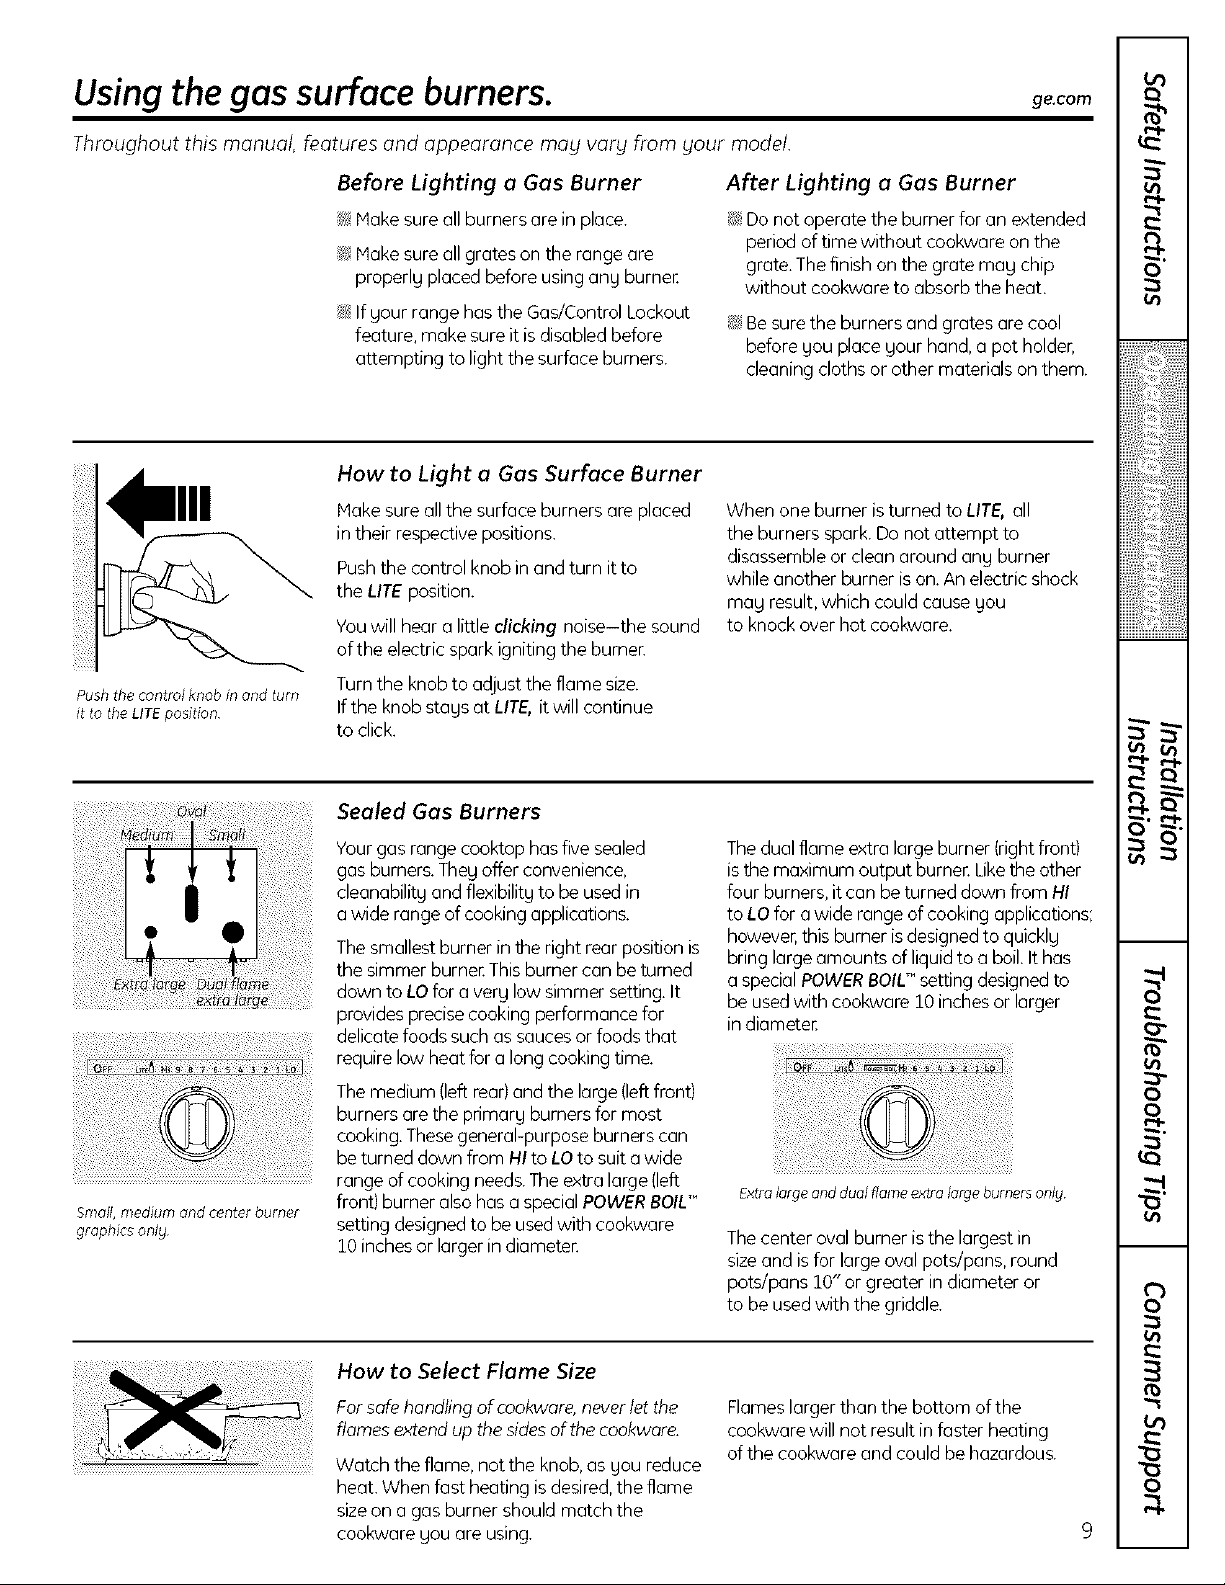
Push the control knob in and turn
it to the LITE position
Before Lighting a Gas Burner
!2_Hake sure all burners are in place.
!2_Hake sure all grates on the range are
properlg placed before using ang burner,
_>_Ifgour range has the Gas/Control Lockout
feature, make sureit is disabled before
attempting to light the surface burners.
How to Light a Gas Surface Burner
Hake sure allthe surface burners are placed
in their respectivepositions.
Pushthe control knob in and turn it to
the LITE position.
Youwill hear a little clicking noise-the sound
of the electric spark igniting the burner.
Turnthe knobto adjust the flame size.
If the knobstags at LITE,it will continue
to click.
After Lighting a Gas Burner
!::f:Do not operate the burner for an extended
period of time without cookware on the
grate. The finish on the grate mag chip
without cookware to absorb the heat.
!24Besurethe burners and grates are cool
before gou place gour hand,a pot holder,
cleaning cloths or other materials on them.
When one burner is turned to LITE, all
the burners spark. Donot attempt to
disassemble or clean around ang burner
while another burner is on.An electric shock
mag result,which could cause gou
to knockover hot cookware.
O
i iii ;iiiiiiiiii!i!i!iiiiiij
iiiiiiiiiiii!! iii i!iiiiii!
L
Sealed Gas Burners
Yourgas range cooktop has five sealed
gas burners.Thegoffer convenience,
!
_!_!(ii_!_!il!ll_!_l!_!!l!!_!!l!!_!!l!!_!!l!!_!!l!!_!!l!!_!!l!ll_lill(_ii_(_l_i!_ii_i_i_!_i_!_(_i_il_!_(l(!l_!_i!!i_i_!i_i_!i_i_!i_i_!iil_!i
Small, medium and center burner
graphics onlg
cleanabilitg and flexibilitg to be usedin
a wide range of cooking applications.
Thesmallestburner in the right rear position is
the simmer burner,Thisburner can be turned
down to LOfor a verg low simmer setting. It
provides precisecooking performance for
delicate foods such as saucesor foods that
require low heat for a long cooking time.
Themedium {left rear)andthe large{leftfront)
burners are the primarg burners for most
cooking.Thesegeneral-purpose burners can
be turned down from HI to LOto suit awide
range ofcooking needs.Theextra large (left
front) burner also has a special POWERBOIL"
setting designed to be used with cookware
10inchesor larger in diameter.
Thedual flame extra large burner (rightfront}
isthe maximum output burnen Likethe other
four burners, it can be turned down from HI
to LOfor a wide range of cooking applications;
however,this burner isdesignedto quicklg
bring largeamounts of liquid to a boil.Ithas
a special POWERBOIU"setting designedto
be used with cookware 10 inchesor larger
in diameter.
Extra large and dual flame extra large burners onlg
Thecenter oval burner isthe largest in
sizeand is for large oval pots/pans, round
pots/pans 10" or greater in diameter or
to be usedwith the griddle.
How to Select Flame Size
Forsafe handling of cookware, never let the
flames extend up the sides of the cookware.
Watch the flame, not the knob,as gou reduce
heat. When fast heating is desired,the flame
sizeon a gas burner should match the
cookware gou are using.
Flameslarger than the bottom of the
cookware will not result in faster heating
of the cookware and could be hazardous.
to
o_
0
0
to
0
9
Page 10
Using the griddle.
Yournon-stick coated griddle provides
an extra-large cooking surface for meats,
pancakes or other food usuallg prepared
in a frging pan or skillet.
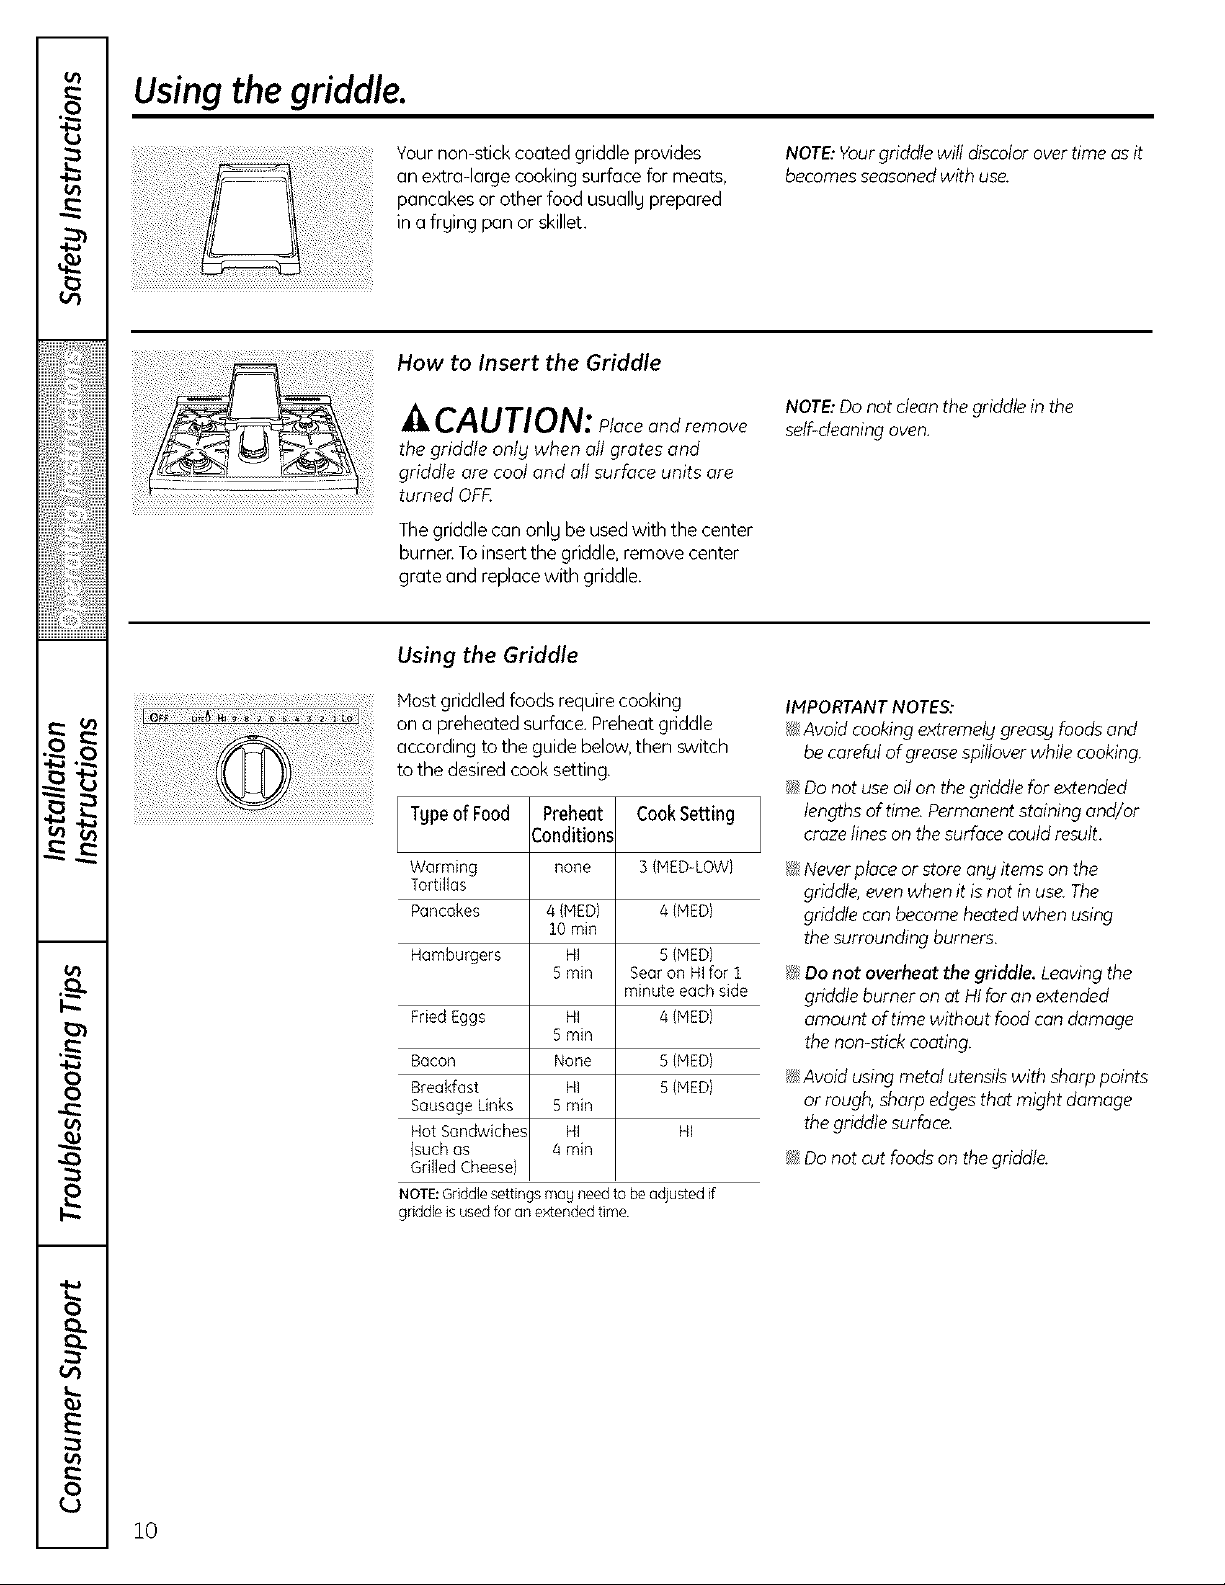
How to Insert the Griddle
CAUTION: Placeandremove
the griddle onlg when oil grates and
griddle are cool and all surface units are
turned OFF:
Thegriddle can onlg be usedwith the center
burnenToinsertthe griddle, remove center
grate and replacewith griddle.
Using the Griddle
lost griddled foods require cooking
on a preheated surface. Preheat griddle
according to the guide below,then switch
to the desired cook setting.
Tgpeof Food Preheat CookSetting
Conditions
Warming none 3 (HED-LOW}
Tortillas
Pancakes 4 (MED) 4 {MED)
10rain
Hamburgers HI 5 (NED}
5min Searon HIfor 1
minuteeachside
FriedEggs HI 4 (MED}
5rain
Bacon None 5 {PIED)
Breakfast HI 5{PIED}
SausageLinks 5min
HotSandwiches Hi Hi
(suchas arain
GrilledCheese)
NOTE:Gdddle settings mag need to beadjusted if
griddle is used for an extended time
NOTE:Yourgriddle will discolor overtime asit
becomesseasonedwith use.
NOTE:Do not clean the griddlein the
self-cleaningoven.
IMPORTANTNOTES:
i!i:,Avoid cooking extremely greasy foodsand
be careful of greasespilloverwhile cooking.
;'_Donot use oil on the griddle for extended
lengths of time. Permanent staining and/or
craze lineson thesurface could result.
i!i:.Neverplace or store ong items on the
griddle,evenwhen it is not in use The
griddle con become heated when using
the surrounding burners.
i!i:,Donot overheat the griddle. Leavingthe
griddle burner on at HIfor on extended
amount of time without food con damage
thenon-stick eoadng.
i!i:,Avoid using metal utensils with sharp points
or rough, sharp edges that might damage
the griddle surface.
_'_Do not cut foods on the griddle.
10
Page 11
Usingthe gas surface burners.
Top-of-Range Cookware
ge.com
Aluminum: Medium-weight cookware is
recommended because it heats quicklg
and evenlg.Mastfoods brown evenlg in an
aluminum skillet.Use saucepanswith tight-
fitting lidswhen cooking with minimum
amounts of water.
Cast-Iron: If heated slowlg, most skilletswill
give satisfactarg results.
Enamelware: Under some conditions,
the enamel of some cookware mag melt.
Follow cookware manufacturer's
recommendations far cooking methods.
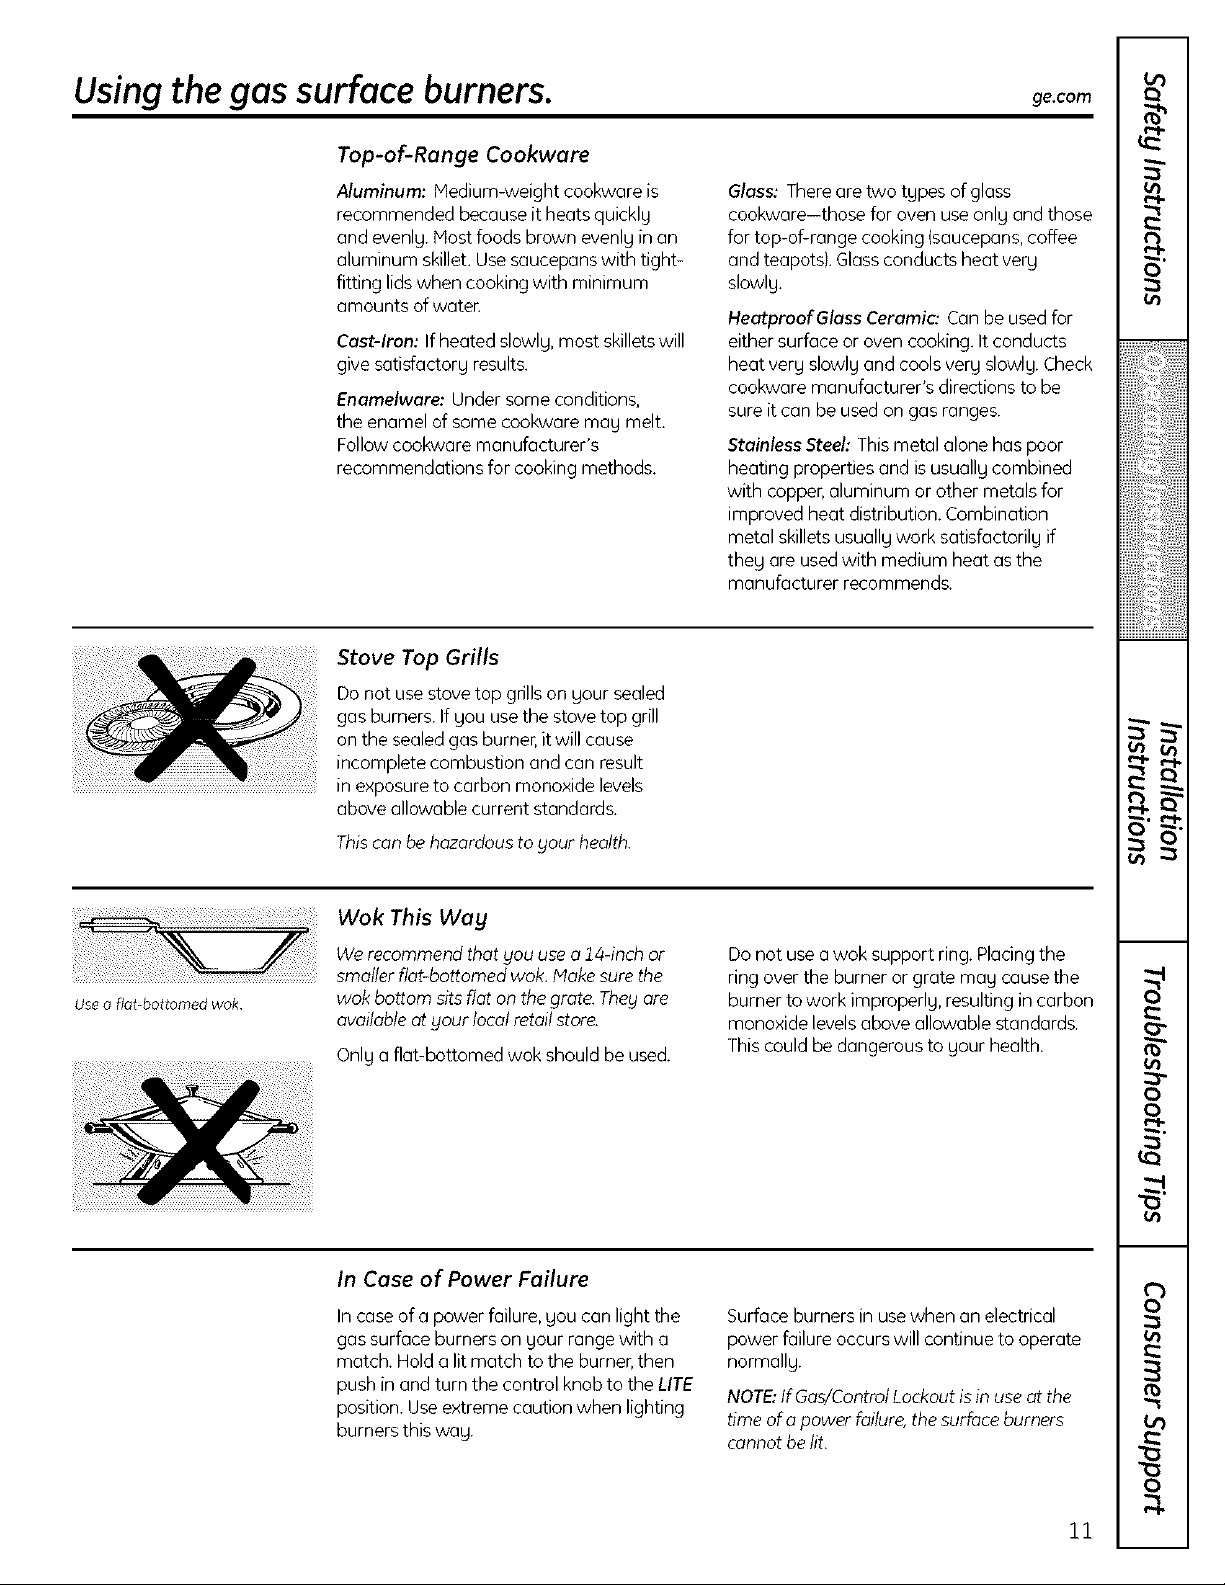
Stove Top Grills
Do not use stove top grills on gour sealed
gas burners. If gou use the stove top grill
on the sealed gas burner, it will cause
incomplete combustion and can result
...................................................................................in exposure to carbon monoxide levels
above allowable current standards.
Glass: Therearetwo tgpes of glass
cookware-those far oven use onlg and those
for top-of-range cooking (saucepans,coffee
and teapots).Glassconducts heat verg
slowlg.
HeatproofGlass Ceramic: Canbe usedfor
either surface or oven cooking. It conducts
heat verg slowlg and cools verg slowlg.Check
cookware manufacturer's directionsto be
sure it can be used on gas ranges.
Stainless Steel: Thismetal alone has poor
heating properties and isusuallgcombined
with copper,aluminum or other metals for
improved heat distribution. Combination
metal skilletsusuallgwork satisfactorilg if
theg are usedwith medium heat as the
manufacturer recommends.
0
i iii i;iiiiiiiii!i!i!iiiiiij
i{iiiiiiiiii!! iii i!iiiiii!
!i!ii !i_)()(!))((!))((!))(i_i:(i!!!!ii
Use a flat bottomed wok
Thiscan behazardousto your health.
Wok This Way
Werecommend that you use a14-inch or
smaller fiat-bottomed wok. Makesurethe
wok bottom sits flat on thegrate. They are
availableat gout localretailstare.
Onlg a flat-bottomed wok should be used.
In Case of Power Failure
In case of a power failure,gou can light the
gas surface burners on gour range with a
match. Hold a lit match to the burner,then
push in and turn the control knob to the LITE
position. Useextreme caution when lighting
burners this wag.
Donot usea wok support ring.Placingthe
ring over the burner or grate mag cause the
burner to work improperlg, resulting in carbon
monoxide levelsabove allowable standards.
Thiscould be dangerous to gour health.
Surface burners in use when an electrical
power failure occurs will continue to operate
narmallg.
NOTE:IfGas/ControlLockoutisin use at the
time ofa power failure,the surfaceburners
cannot belit.
E
0
0
o
f_
11
0
Page 12

Using the upper oven controls.
(Throughout this manual, features and appearance may vary from your model.)
OVENCO_ROLS0
@®®®®
Feature5 and appearance may vat)
OvenControl,Clock,Timerand Features
12
BAKEPad 0
Touchto selectthebakefunction.
BROILHI/LOPad
Touchto selectthebroilfunction.
CONVECTIONBAKEMULTI/1RACKPad
Touchto selectbakingwiththe convection
function.
CONVECTIONROASTPod
Touchto selectroastingwith the convection
function.
STARTPod
Hustbetouchedto start ang cookingor
cleaningfunction.
Display
Showsthe time of day, oventemperature,
whether theoven is in thebake,broilor
self-cleaningmode,the times set for
thetimer or automatic ovenoperations,
and if the rangeislocked.
SELF-CLEANPad
Touchto selectself-cleaningfunction.Seethe
Usingtheself-cleaningovensection.
If'F- and o numberor letter" flash in the display
and the oven controlsignals,this indicates a
function error code.TouchtheCLEAR/OFFpod.Allow
theovento coolfor onehour.Puttheovenbackinto
operation. If the function error code repeats, disconnect
the power to the oven and coilfor service.
Ifyour oven was set for a timed oven operation and
a power outage occurred, the clock and all
programmed functions must be reset.
Thetime of day will flash in the display whenthere
has been a power outage,
OVENLIGHTPad
Touchto turn theoven light on or off.
DELAYSTARTPad
Use along with COOKING TIME or SELF
CLEAN pads to set the oven to start and
stop automaticallg at a time gou set.
COOKINGTIMEPad
0
Touchandthentouchthenumberpadsto set
theamount of time gouwant gourfood to
cook.Theovenwill shut off when the cooking
time hasrun out.
CLEAR/OFFPad
Touchto cancelALL upperovenoperations
exceptthe clock,timer andGas/Control
Lockout.
CLOCKPad
Touchbeforesettingtheclock.
Number Pods
@
Use to set ang function requiring numbers
such as the time of dag on the clock, the
timer, the oven temperature, the internal food
temperature, the start time and length of
operation fortimed baking and self-cleaning.
KITCHENTIMERON/OFFPad
Touchto selectthetimer feature.
PROBEPad
@
Touchwhen usingthe probeto cookfood.
GAS/CONTROLLOCKOUTPad
Touchand holdtheGAS/CONTROLLOCKOUT
pad for 3secondsto lock/unlockthesurface
burners,ovenburnersand control panelso
theg cannot beactivated.
Page 13

Using the upper oven.
To avoid possible burns, place the shelves in the desired position before gou turn the oven on.
Before you begin...
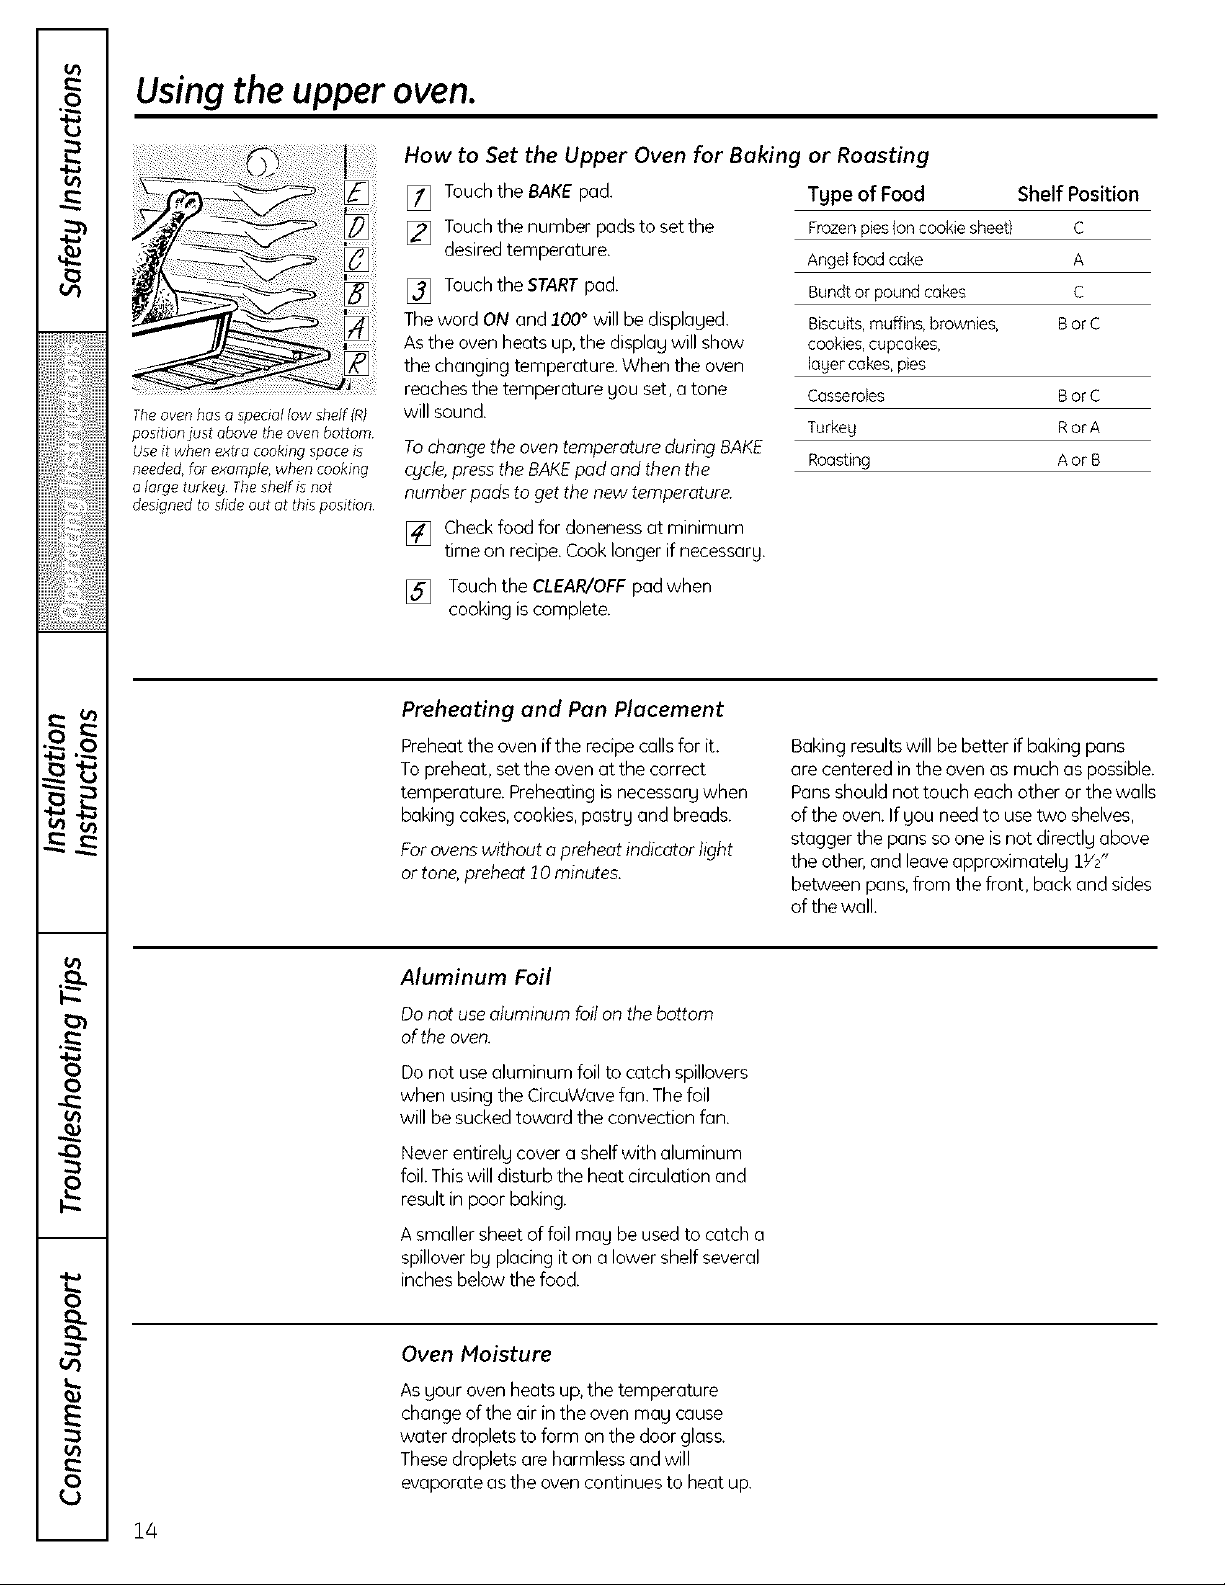
il
The oven has 5 shelf positions
It also has a special low shelf
position (R)for extra large items,
such as a large turkey
Plastic items on the cooktop may
melt if left too close to the vent
Vent appearance and location varg
Theshelveshavestop-locks, so that when
placed correctlg on the supports, theg will
stop before coming completelg out, and
will not tilt.
When placing and removing cookwure,
pull the shelf out to the bump on the
shelf support.
Upper Oven Vent
Your oven is vented through ducts at the rear
of the range. Do not block these ducts when
cooking in the oven-it is important that the
flow of hot air from the oven and fresh air
to the oven burner be uninterrupted. Avoid
touching the vent openings or nearby
surfaces during oven or broiler operation-
they may become hot.
Toremove a shelf, pull it toward gou,tilt the
front end up and pull it out.
Toreplace, placethe end of the shelf
(stop-locks}on the support, tilt up the
front and push the shelf in.
NOTE:Theshelf is not designed to slide out
at the speciallow shelf(R)position.
!_fHandles of pots and pans on the cooktop
mag becomehot if left too closeto the vent.
!_fDo not leaveplastic items on the cooktop-
theg may melt if left too closeto the vent.
i_,Do not leave any items on the cooktop. The
hot air from the vent may ignite flammable
items and will increasepressurein dosed
containers, which may causethem to burst.
_÷_iMetal items will become very hot if they are
left on the cooktop,and couldcause burns.
ge, com
t_
0
i , , ,iii i;iiiiiiiii!i!i!iiiiiij
iiiiiiiiiiii!! iii i!iiiiii!
Upper Oven Light
Touchthe OVENLtGHTpad to turn the light
on or off.
E
0
0
0
e_e
13
Page 14
Using the upper oven.
The oven has a special low shelf (RJ
position just above the oven bottom
Use it when extra cooking space is
needed, for example, when cooking
a large turkeg The shelf is not
designed to slide out at this position
How to Set the Upper Oven for Baking
[] Touchthe BAKEpad.
[] Touchthe number pads to set the
desiredtemperature.
[] Touchthe STARTpad.
Theword ON and 100° will be displaged.
Asthe oven heats up,the displag will show
the changing temperature. When the oven
reachesthe temperature gou set, a tone
willsound.
Tochange the oven temperature during BAKE
cgcle,pressthe BAKEpad and then the
numberpads to getthe new temperature.
[] Checkfood for doneness at minimum
time on recipe.Cook longer ifnecessarg.
[] Touchthe CLEAR/OFFpadwhen
cooking iscomplete.
Preheating and Pan Placement
or Roasting
Tgpe of Food Shelf Position
Frozenpies(oncookiesheet} C
Angelfood cake A
Bundtor poundcakes C
Biscuits,muffins,brownies, BorC
cookies,cupcakes,
lagercakes,pies
Casseroles BorC
Turkeg RorA
Roasting AorB
Preheatthe oven if the recipe callsfor it.
Topreheat, setthe oven at the correct
temperature. Preheating isnecessargwhen
baking cakes,cookies,pastrg and breads.
Forovenswithout o preheat indicator light
or tone,preheat 10 minutes.
Aluminum Foil
Donot use aluminum foilon the bottom
of the oven.
Do not usealuminum foil to catch spillovers
when usingthe CircuWave fan. Thefoil
will be suckedtoward the convection fan.
Never entirelg cover a shelfwith aluminum
foil.Thiswilldisturb the heat circulation and
result in poor baking.
A smaller sheet of foil mag be used to catch a
spillover bg placing iton a lower shelf several
inches below the food.
Baking resultswill be better if baking pans
are centered in the oven as much as possible.
Pansshould not touch each other or the walls
of the oven. If gou need to use two shelves,
stagger the pans so one is not directlg above
the other,and leave approximatelg lY/"
between pans, from the front, back and sides
of the wall.
14
Oven Moisture
Asgour oven heats up,the temperature
change of the air in the oven mag cause
water droplets to form on the door glass.
Thesedropletsare harmless and will
evaporate asthe oven continues to heat up.
Page 15
ge,com
J
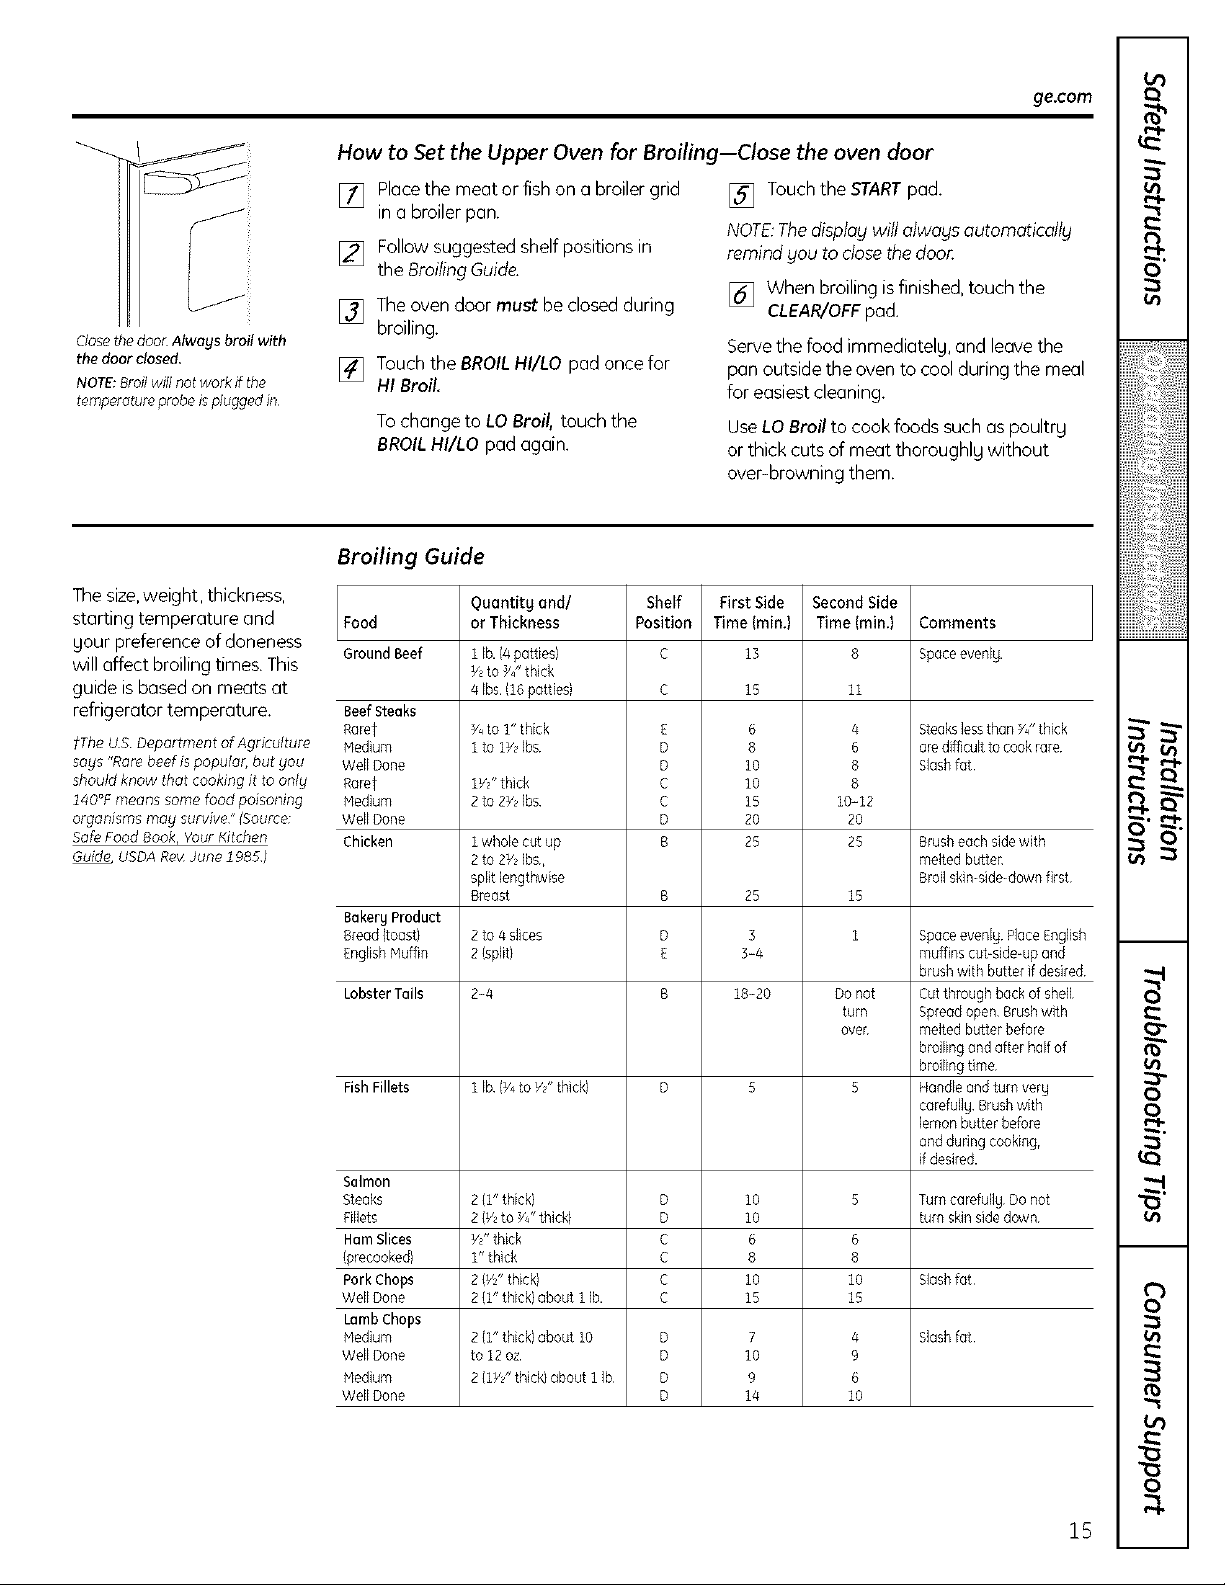
How to Set the Upper Oven for Broiling--Close the oven door
[] Placethe meat or fish on a broiler grid
in a broiler pan.
[] Followsuggested shelf positionsin
the BroilingGuide.
[] Theoven door must be closed during
Closethe doo_:Always broil with
the door closed.
NOTE:Broil will not work if the
temperature probe isplugged in
broiling.
[] Touchthe BROILHI/LO pad oncefor
HI Broil.
Tochange to LO Broil, touch the
BROILHI/LO pad again.
Broiling Guide
Thesize,weight, thickness,
starting temperature and
gour preference of doneness
Food
Ground Beef
will affect broiling times. This
guide isbased on meats at
refrigerator temperature.
fThe US Deportment of Agriculture Medium
sags "Rare beef is papule< but gou Well Done
should know that cooking it to onlg Rarer
140°F means some food poisoning Medium
organisms meg survive" (Source: WellDone
Safe Food Book, Your Kitchen Chicken
Guide USDA R_ June 1985)
BeefSteaks
Raref
BakergProduct
Bread(toast)
EnglishMuffin
LobsterTails
FishFillets
Salmon
Steaks
Fillets
HamSlices
(precooked)
Pork Chops
WellDone
Lamb Chops
Medium
WellDone
Medium
WellDone
Ouantitg end/
or Thickness
1 lb.(4patties)
Y,to _J' thick
4 [bs.(16patties)
Y_to 1" thick
i to 1vz Ibs
1W' thick
2to 2Y2Ibs
1whole cut up
2to 2Y_lbs,
split bngthwise
Breast
2to 4slices
2{split)
2-4
i Ib (Y4to Y/' thick)
2(1"thick}
2(V,to Y4"thick)
Y/thick
1" thick
2(Y_"thick)
2(1"thick}about 1 lb.
2(1"thick)about 10
to 12oz.
2(1W' thick} about 1 Ib
Shelf
Position
E
D
D
C
C
D
B
B
D
E
B
D
D
C
C
C
C
D
D
D
D
[] Touchthe STARTpad.
NOTE:Thedisplay will alwags automaticdlg
remind you to close thedoo_
[] When broiling isfinished, touch the
CLEAR/OFFpad.
Servethe food immediatelg, and leave the
pan outside the oven to coolduring the meal
for easiest cleaning.
UseLOBroil to cook foods such as poultrg
or thick cuts of meat thoroughlg without
over-browning them.
First Side
Time(min.)
13
15
6
8
lO
lO
15
20
25
25
3
3-4
18-20
lO
lO
6
8
1o
15
7
lO
9
1/4
SecondSide
Time (min.)
11
4
6
8
8
10-12
20
25
15
1
Donot
turn
over
6
8
io
15
4
9
6
10
Comments
Spaceevenlg.
Steakslessthan YJ'thick
aredifflcu[ttocook rare
Slashfat
Brusheachsidewith
melted butte_
Broilskin-side-downfirst
Spaceeven[g PlaceEnglish
muffinscut-side-up and
brush with butter if desired
Cutthrough back of shell
Spreadopen Brushwith
melted butter before
broilingand after half of
broilingtime
Handleand turn verg
carefullg Brushwith
lemon butter before
andduring cooking,
if desired.
TurncarefuHg Donot
turn skin sidedown
Slashfat
Slashfat
t_
0
i , , ,iii ;;iiiiiiiii!i!i!iiiiii]
[[[[[iii}!i_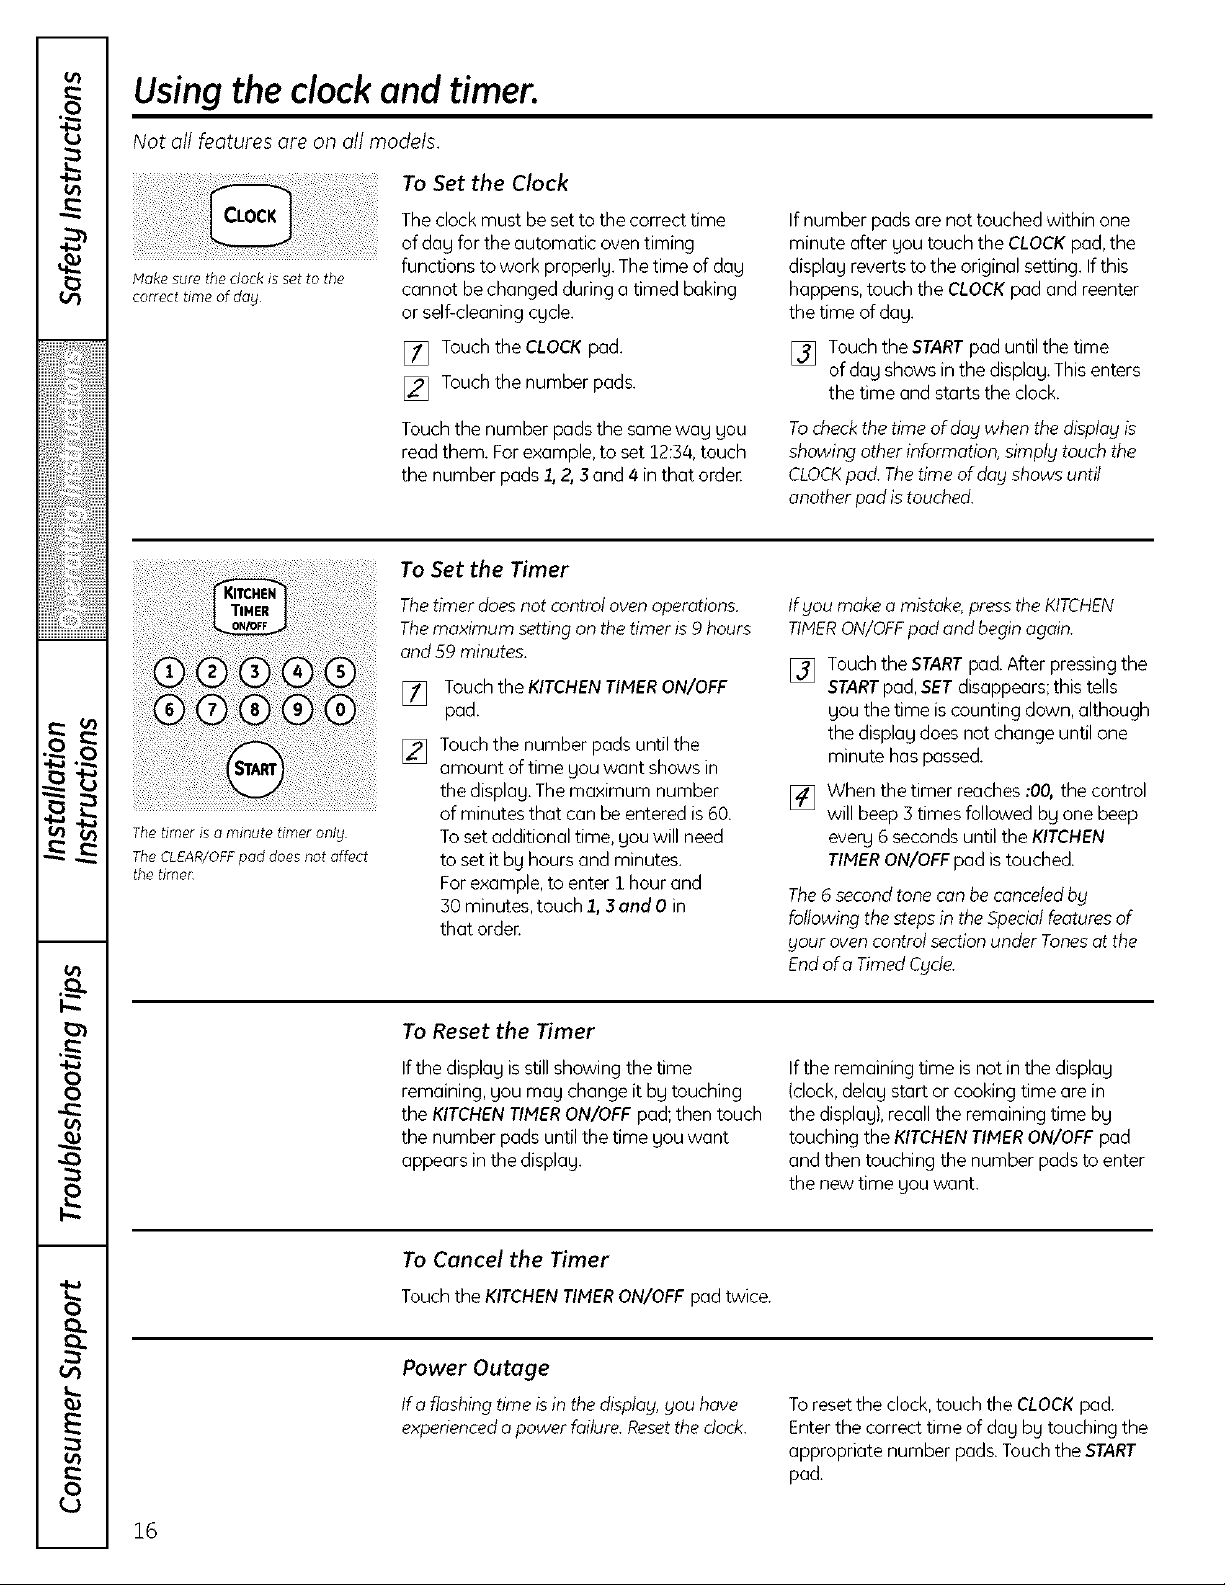
Using the clockand timer.
Not all features are on all models.
To Set the Clock
MoResure the clock is set to the
correct time of day
The timer is o minute timer only
The CLEAR/OFFpad does not affect
the time_
Theclock must be set to the correct time
of dag for the automatic oven timing
functions to work properlg.Thetime of dag
cannot be changed during a timed baking
or self-cleaning cgcle.
[] Touch the CLOCKpad.
[] Touch the number pads.
Touch the number pads the same wag gou
read them. Forexample,to set 12:34,touch
the number pads1, 2, 3 and 4 in that order
To Set the Timer
Thetimer doesnot control ovenoperations.
Themaximum settingon thetimer is 9 hours
and 59 minutes.
[] Touchthe KITCHENTIMERON/OFF
pad.
[] Touch the number pads until the
amount oftime gou want shows in
the displag.Themaximum number
of minutes that can be entered is60.
Toset additional time, gou will need
to set it bg hours and minutes.
Forexample,to enter 1 hour and
30 minutes, touch 1,3 and 0 in
that arden
If number pads are not touched within one
minute after gou touch the CLOCKpad, the
displag reverts to the original setting. Ifthis
happens, touch the CLOCKpadand reenter
the time of dag.
[] Touchthe STARTpad until the time
of dag shows in the displag.This enters
the time and starts the clock.
Tocheckthe time ofday when the display is
showing otherinformation, simply touch the
CLOCKpod. Thetime of day shows until
another pad is touched.
If you make o mistake,press the KITCHEN
TIMERON/OFFpad and begin again.
Touch the STARTpad.After pressing the
[]
STARTpad,SETdisappears; this tells
gou the time is counting down, although
the displagdoes not change until one
minute has passed.
When the timer reaches :00, the control
[]
will beep 5 times followed by one beep
everg6 seconds until the KITCHEN
TIMERON/OFFpad istouched.
The6 secondtone conbe canceledby
following thesteps in the Specialfeaturesof
your ovencontrol section under Tonesat the
End of o Timed@de.
16
To Reset the Timer
Ifthe displag isstillshowing the time
remaining, gou mag change it bg touching
the KITCHENTIMERON/OFF pad;then touch
the number pads untilthe time gou want
appears in the displag.
To Cancel the Timer
Touch the KITCHENTIMERON/OFF pad twice.
Power Outage
If o flashing time isin thedisplay,you have
experiencedopower failure.Resetthe clock.
If the remaining time isnot in the displag
(clock,delag start or cooking time are in
the displag),recall the remaining time bg
touching the KITCHENTIMERON/OFFpad
and then touching the number pads to enter
the new time gou want.
Toresetthe clock,touch the CLOCKpad.
Enterthe correct time of dag bg touching the
appropriate number pads.Touch the START
pad.
Page 17

Using the timed baking and
roasting features (upper oven only).
NOTE: Foods that spoil easily-such as milk, eggs, fish, stuffings, poultr_l and pork-should not be allowed to sit for
more than 1 hour before or after cooking. Room temperature promotes the growth of harmful bacteria. Be sure that
the oven light is off because heat from the bulb will speed harmful bacteria growth.
How to Set an Immediate Start and Automatic Stop
Theupper ovenwill turn on immediately and
cook far o selectedlength of time.At the end
of the cooking time,the oven will turn off
automatically.
[] Touchthe BAKEpad.
[] Using the number pads,enter the
desiredtemperature.
[] Touch the COOKING TIME pad.
NOTE:Ifyour recipe requirespreheating, you
may needto add additional time to the length
of the cooking time.
[] Using the number pads,enter the
desiredbaking time. The oven
temperature and the cooking time
that you entered will be displayed.
Theword ON and I00 °will bedisplayed.
Thecook time will begin to count down.
Asthe oven heats up,the display will show
the changing temperature. When the oven
reaches the temperature you set, 3 beeps
will sound.
Atthe end of timed baking,the oven will turn
off.Theend of cycle tone will sound.
Touchthe CLEAR/OFFpad to clear the
display.
ge.com
O
i iii i;iiiiiiiii!i!i!iiiiiij
i{iiiiiiiiii!! iii i!iiiiii!
[] Touch the STARTpad.
How to Set a Delayed Start and Automatic Stop
Youconsetthe upper oven control to delay-
start the oven,cook for a specificlength of
time and then turn off automotically.
Hake surethe clock shows the correct
time of day.
[] Touchthe BAKEpad.
[] Using the number pads,enter the
desiredtemperature.
[] Touchthe COOKINGTIMEpad.
NOTE:Ifyour recipe requirespreheating, you
may needto odd additional time to the length
of the cooking time.
[] Using the number pads,enter the
desiredbaking time.
[] Touchthe OELAVSTARTpad.
[] Using the number pads,enter the
time of day you want the oven to
turn on and start cooking.
[] TouchtheSTARTpad.
Ifyou would like to check the times you have
set,touch the DELAVSTARTpad to check the
start time you have set or touch the
COOKINGTIMEpad to check the length
of cooking time you have set.
Theovenwill turn on automatically.
Theword ON and 100° will be displayed.
Thecook time will begin to count down.
As the oven heats up, the display will show
the changing temperature. The oven will cook
for the programmed cooking time and shut
off automatically.
At the end of timed baking,the oven will
turn off.Theend of cycle tone will sound.
Touchthe CLEAR/OFFpad to clearthe
display.
E
0
0
u_
NOTE:An attention tone will sound ffyou ore
usingtimed baking and do not touch the
STARTpod after entering the baking
temperature.
0
17
Page 18
Using the probe.
For many foods, especially roasts and poultry, internal food temperature is the best test for doneness.
The temperature probe takes the guesswork out of roasting by cooking foods to the exact aloneness you want.
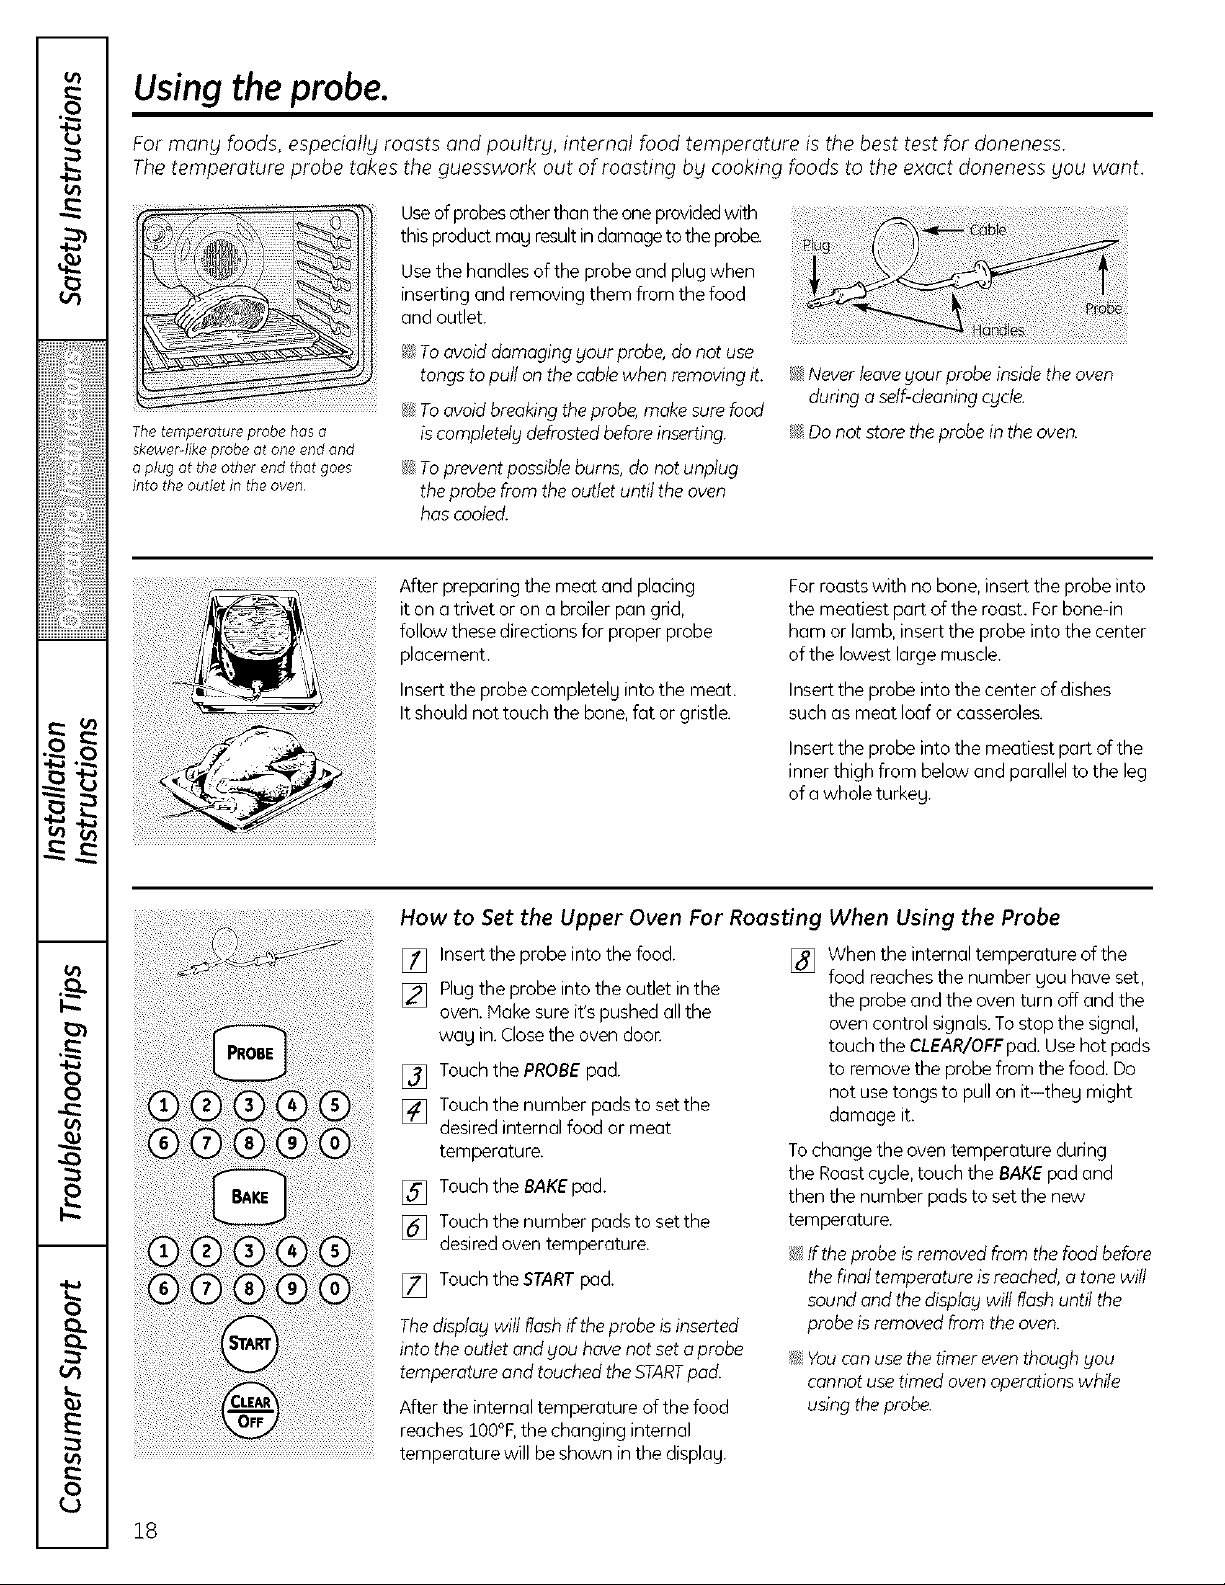
Useofprobesotherthan theone providedwith
this productmag resultindamageto the probe.
Usethe handles of the probe and plug when
inserting and removing them from the food
and outlet.
!_!_Toovoid damaging gour probe, do not use
The temperature probe has o
skewer like probe at one end and
o plug at the other end that goes
into the outlet in the oven
tongs to pull on the cable when removing it.
_ To ovoid breaking the probe make sure food
is completelg defrosted before inserting.
_ Toprevent possible burns, do not unplug
the probe from the outlet until the oven
has cooled.
_ Never leaveyour probe inside the oven
during a self-cleaningcycle.
_ Donot store the probe in the oven.
After preparing the meat and placing
it on a trivet or on a broiler pan grid,
follow these directions for proper probe
placement.
Insert the probe completelg into the meat.
It should not touch the bone, fat or gristle.
How to Set the Upper Oven For Roosting When Using the Probe
[] Insertthe probe into the food.
[] Plugthe probe into the outlet inthe
oven. Hake sureit's pushed all the
wag in.Closethe oven door.
[] Touch the PROBEpad.
[] Touch the number pads to set the
desired internal food or meat
temperature.
[] Touch the BAKEpad.
[] Touch the number pads to set the
desiredoven temperature.
[] Touch the STARTpad.
Thedisplay will flashif the probe is inserted
into theoutlet and you hovenot set a probe
temperature and touched the STARTpad.
After the internal temperature of the food
reaches IO0°F,the changing internal
temperature will be shown in the displag.
Forroastswith no bone, insert the probe into
the meatiest part of the roast. For bone-in
ham or lamb, insertthe probe into the center
of the lowest large muscle.
Insertthe probe into the center of dishes
such as meat loaf or casseroles.
Insertthe probe into the meatiest part of the
inner thigh from below and parallel to the leg
of a whole turkey.
When the internal temperature of the
[]
food reaches the number gou have set,
the probe and the oven turn off and the
ovencontrol signals.To stop the signal,
touch the CLEAR/OFFpad. Usehot pads
to remove the probe from the food. Do
not use tongs to pull on it-theg might
damage it.
Tochange the oven temperature during
the Roastcycle, touch the BAKEpadand
then the number pads to set the new
temperature.
i_:_Iftheprobe is removed from the foodbefore
the final temperature isreached,a tonewill
sound and the display will flash until the
probe is removed from the oven.
_; You can use the timer even though gou
cannot use timed oven operations while
using the probe.
18
Page 19

Usingthe convectionoven.
ge.com
The convection oven fan shuts off when the oven door is opened. DONOTleove the door open for long periods of time
while using convection cooking.
In a convection oven, Ofan
circulates hot air over, under and
around the food This circulating
hot air is evenlg distributed
throughout the oven cavity As a
result, foods are evenlg cooked and
browned-often in less time thor)
with regular heat
NOTE:Tomaximize cooking
evenness, the fan is designed to
rotate in both directions with o
pause in between Thisis normal
Tohelp gou understand the difference
between convection bake and roast and
traditional bake and roast, here are some
general guidelines.
Convection Bake
i_ Preheatthe oven.Seethe Usingthe Oven-
Preheatingand Pan Placementsection.
_1Ideal for foodscooked on multiple shelves.
_1Goodfor large quantitiesof bakedfoods.
i_ Goodresults with cookies,biscuits,
brownies, cupcakes,creampuffs, sweet
rolls, angel food cake and bread.
Theconvection fan circulates the heated
air evenlg over and around the food.
Convection Roast
_! Good for large tender cuts of meat,
uncovered.
Theconvection fan circulates the heated air
evenly over and around the food. Meat and
poultry are browned on all sidesas if the9
were cooked on a rotisserie.Heatedair will
be circulated over,under and around the
food being roasted.Theheated air sealsin
juices quickly for a moist and tender product
while, at the same time, creating a rich
golden brown exterion
Roastsorpoultry shouldbe cooked on shelf
position (A).
When gou are convection roasting,it is
important that gou usea broiler pan and grid
for best convection roasting results.Thepan
isusedto catch grease spillsandthe grid is
usedto prevent greasespatters.
_!_Placetheshelfin shelfposition (A).
0
i , , ,iii i;iiiiiiiii!i!i!iiiiiij
i{iiiiiiiiii!! iii i!iiiiii!
Auto Recipe" Conversion
Youcan use your favorite recipes in the
convection oven.
When using CONVECTIONBAKE,the oven
will automaticall9 convert the oven
temperature from regular baking to
Convection Bake temperatures.
[] Using the number pads, enter
the temperature recommended
in the recipe.
[] Touch the STARTpad.
Thedisplag will show the temperature
gnu entered from gour recipe.The
oven will automaticallg convert it to
the convection cooking temperature.
[] Touch the CLEAR/OFFpad when
baking is finished.
_!_Use pan size recommended in the recipe.
_1Somepackage instructions for frozen
casseroles,main dishesor baked goods
have been developed using commemial
convection ovens.For best results in this
oven,preheat the oven and use the
temperature, for regular baking, on the
package.
19
E
0
0
0
e_e
Page 20

Usingthe convectionoven.
Cookware for Convection Cooking
Beforeusing your convection oven,check
to see if gour cookware leaves room for air
circulation in the oven. If gou are bakingwith
several pans,leave space between them.
Also,besurethe pans do not touch each
other or the walls of the oven.
Paper and Plastic
Heabresistant paper and plasticcontainers
that are recommended for use in regular
ovens can be used in convection ovens.
Plasticcookware that is heat-resistant to
temperatures of 400°F can also be used,
when ovenis below 400°E
Metal and Glass
Ang tgpe of cookware will work in your
convection oven. However,metal pans heat
the fastest and are recommended for
convection baking.
_i:.Darkenedor matte-finished pans will bake
fasterthan shiny pans.
_i:.Glassor ceramicpans cook more slowlg.
When baking cookies,gou will get the best
resultsif gou usea flat cookie sheet instead
of a pan with low sides.
Forrecipes likeoven-baked chicken,usea
pan with low sides.Hot air cannot circulate
well around food in a pan with high sides.
How to Set the Upper Oven for Convection Baking or Roasting
Touchthe CONVECTIONBAKEMULTI/
[]
1 RACKpad once for multi-rack
convection baking. Thismode is used
for cooking food itemson more than
one rack (i.e.,2,Sor more racks)at the
same time in convection bake.Seethe
Multi-ShelfBaking sectionfor more
information. Touch the CONVECTION
BAKEMULTI/1RACKpad twice for one
rack convection baking.Thismode is
usedfor cooking food items on only
one rack in convection bake.
Touch the CONVECTIONROASTpad
for convection roasting.
Touch the number pads to set
[]
the desired oven temperature.
Remember to adjust baking
temperature accordingly. See the
Adapting Recipes section.
[] Touchthe STARTpad.
Tochange the oven temperature, touch the
CONVECTIONBAKEorCONVECTIONROAST
pad and then the number pads to set the
new temperature.
When the oven starts to heat the changing
temperature, starting at lOB°F,will be
displaged.When the oven reachesthe
temperature gou set, 3 beepswill sound.
[] Touchthe CLEAR/OFFpadwhen finished.
NOTE:Youwill hear a fan while cooking with
convection.Thefan will stop when the door
is openedbut the heat will not turn off.
Thefanwill not start until the preheat
temperature is reached.
In convectionbakemodes,for maximum
cooking evenness,the fan is designedto rotate
in both directions,with a pause in between.
Thisisnormal.
,i i Becauseheateda,r,sc,rculatedevenlg
iii!iiiil......iiiiiiliii!ii¸¸i! i¸
!ii i!i!ii!ii!!i!!illi!ithroughouttheovenfoodscanbebaked
II_ Hulti-shelf baking mag increasecook times
(_ slightlg for some foods but the overall result is
Whenconvectionbakingwithonlg Tocook food onmore than one rack in
1 shelf, followtheshelfpositions
recommendedin theUsingthe convection bake,useCONVECTIONBAKE
Ovensection MULTI,
20
w,thexcellentresultsus,ngmult,pleshelves
time saved.Cookies,muffins, biscuits,and
otherquickbreadsgiveverggoodresults
with multi-shelf baking.
When baking larger foods on 3 shelves,place
one shelf in the 2nd (A)position,one on the
4th (C)position and the third shelf in the 6th
(E)position.
When baking cookies,placethe shelves
inthe 3rd (B),4th (C)and Sth (D)positions.
Page 21

ge,com
How to Set the Upper Oven for Convection Roasting when Using the Probe
For best results when masting large
tur_e[js and roasts, we Fecomrrlend
using the probe included in the
convectioR over
Thedisplay will flash PROBEand the oven
control will signal if the probe isinserted into
the outlet, and you have not set a probe
temperature and touched the STARTpad.
[] Placethe shelfin the shelfposition(A}.
Insertthe probe completelg into the food.
[] Plugthe probe into the outlet in the
oven. Hake sure it ispushed all the wag
in.Closethe ovendoor
[] Touchthe CONVECTIONROASTpad.
[] Touchthe number pads to set the
desiredoven temperature.
[] Touchthe PROBEpad.
[] Touchthe number pads to set the
desiredinternal food temperature.
To change the oven temperature during
the Convection Roast cgcle, touch the
CONVECTION ROAST pad and then touch
the number pads to set the new desired
temperature.
[] Touchthe STARTpad.
When the oven starts to heat, the word
LO will be inthe displag.
After the internal temperature of the food
reaches IO0°F,the changing internal
temperature will be shown in the displag.
When the internal temperature of the
[]
food reachesthe number gou haveset,
the probe and the oven turn off and the
oven control signals.Tostop the signal,
touch the CLEAR/OFFpad.Use hot
pads to remove the probe from the
food. Donot use tongs to pull on it-
theg might damage it.
A CAUTION:7opreventpossible
burns, do not unplug theprobe from the
ovenoutlet until theoven hascooled.Do
not store the probe in theoven.
NOTE:
;'_Ifthe probe is removed from the food
beforethe find temperature isreached,o
tone will sound and the display will flash
until the probe isremoved from theoven.
Youwill hear a fan while cookingwith this
feature.Thefan will stop when the door is
opened but the heatwill not turn off.
Youconusethe timer eventhough gou
cannot usetimed oven operations while
usingtheprobe.
t_
0
i iii i;iiiiiiiii!i!i!iiiiiij
iiiiiiiiiiii!! iii i!iiiiii!
21
0
0
0
Page 22

Usingthe convectionoven.
ConvectionRoastingGuide
Meats Minutes/Lb. Oven Temp. Internal Temp.
Beef Rib(3 to 5 Ibs.) Raret 20 24 325°F 140"F
BonelessRib,TopSirloin Raret 20 24 325°F 140°F
BeefTenderloin Raret 10 14 325°F 140°F
PotRoast(27zto 3 Ibs.)chuck,rump 35 45 300°F 170°F
Park Bone-in(3to 5 Ibs.) 23 27 325':F 170°F
Boneless(3to 5 Ibs.) 23 27 325°F 170°F
PorkChops(½to 1" thick) 2chops 3075 total 325°F 170"F
Ham Canned(3Ibs.fully cooked) 1_18 325°F 140°F
Butt (5Ibs.fullycooked) 1_18 325°F 140F
Shank(5Ihs.fullycooked) 1_18 325°F 140°F
Lamb Bone-in(3to 5 Ibs.) Medium 17 20 325°F 160"F
Boneless(3to 5 Ibs.) Medium 17 20 325°F 160"F
Seafood Fish,whole(3to5 Ibs.) 3040 total 400°F
LobsterTails(6to 8 oz.each) 20_5 total 350°F
Poultry WholeChicken(2½to 3½ Ibs.) 2_26 350°F 180" 185"F
CornishHensUnstuffed(1to 1½Ibs.) 50 55 total 350>F 180° 185°F
CornishHensStuffed(1to 17zIhs.) 55 60 total 350':F 180° 185°F
Buckling(4to 5 Ibs.) 2_26 325°F 180° 185°F
Turkey,whole*
Unstuffed(lOto 16Ibs.) 8 11 325°F 180° 185°F
Unstuffed(18to 24 Ibs.) 7 10 325':F 180° 185°F
TurkeyBreast(4to6 Ibs.) 16 19 325°F 170"F
_:Shl/]_'d bhzl_ _q'_n_,_/l{y _'(_F_i_ ;0-45 mhml_'_ _dditiomll _o(_ti_L_" libra,. 5hiHd I¢£:__z_d/n'(_(__l wilk /_fil I_ i_,,_'_lt
Medium 24_28 325°F 160"F
Well 28 32 325°F 170°F
Medium 2_28 325°F 160F
Well 28 32 325°F 170°F
Medium 144 8 325°F 160°F
4chops 3540 total 325°F 170"F
6chops 4045 total 325°F 170°F
Well 20 24 325°F 170°F
Well 20 24 325°F 170"F
22
Page 23

Usingthe timed convection
baking features (upperovenonly}.
You will hear a fan while cooking with this feature. The fan will stop when the door is opened but the heat
will not turn off
NOTE: Foods that spoil easilg-such as milk, eggs, fish, stuffings, poultrg and pork-should not be allowed to
sit for more than 1 hour before or after cooking. Room temperature promotes the growth of harmful bacteria.
Be sure that the oven light is off because heat from the bulb will speed harmful bacteria growth.
How to Set an Immediate Start and Automatic Stop
The upper oven will turn on immediately and
cook for o selected length of time. At the end
of the cooking time, the oven will turn off
automatically.
Ilq Touch the CONVECTION BAKE MULTI/
1 RACK pad once for multi-rock
convection baking. This mode is used for
cooking food items an mare than one
rack (i.e.,2, 5 or more rocks) atthe some
time in convection bake. See the Multi-
Shelf Baking section for more information.
Touch the CONVECTION BAKE MULTI/
.i.RACKpad twice for one rack convection
baking. This mode is used for cooking food
items an only one rack in convection bake.
Touch the CONVECTION ROAST pad
for convection roasting.
[] Touch the number pads to set the
desired oven temperature.
[] Touch the COOKING TIME pad.
NOTE:Ifyour recipe requirespreheating,you
mog needto odd additional time to the length
of the cooking time.
[] Touch the number pads to set the
desired length of cooking time.
The minimum cooking time you
can set is i minute.
The oven temperature that gou set and
the cooking time that gou entered will be
in the displag.
[] Touch the START pad.
Thedisplagshows the oventemperature that
gou set and the cooking time countdown. The
displag starts changing once the temperature
reaches IO0°F.
r_q Atthe end of timed convection bakethe
ovenwill turn off.Theend of cycle tone
will sound.Touchthe CLEAR/OFFpad
to clear the display if necessary.
FTq Removethe food from the oven.
Remember,foods that are left in the
oven continue cooking after the
controls are off.
ge.com
t-,I-
t_
0
(_
i iii ;;iiiiiiiii!i!i!iiiiiij
[{iiiiiiiiii!! iii i!iiiiii!
I"lp i,-.I.
How to Set a Delayed Start and Automatic Stop
Youconsetthe upper oven control to delog-
start the oven,cook for o specificlength of
time and then turn off outom_icollg.
Hake surethe clock shows the correct
time of dag.
I?q Touchthe CONVECTIONBAKEiVlULTI/2
RACKpad once for multi-rack
convection baking. Thismode is usedfor
cooking food items on more than one
rack (i.e.,2,3 or more racks)at the same
time in convection bake. Seethe Hulti-
SheffBakingsection for more
information. Touchthe CONVECTION
BAKEMULTI/1RACKpad twice for one
rack convection baking.This mode is
usedfor cooking food items an onlg one
rack in convection bake.
Touch the CONVECTION ROAST pad
for convection roasting.
Touch the number pads to set the
[]
desired oven temperature.
Touch the COOKING TIME pad.
[]
NOTE:Ifyour recipe requirespreheating, you
may needto odd additional time to the length
of the cooking time.
[] Touchthe number pads to set the
desiredcooking time.
[] Touch the DELAVSTARTpad.
[] Touch the number pads to set the
time of dag gou want the oven to
turn on and start cooking.
Ifgou would liketo check the times gou have
set,touch the DELAVSTARTpad to check
the start time gou have set or touch the
COOKINGTIMEpad to check the length
of cooking time gou have set.
[] Touch theSTARTpad.
NOTE:An attention tone will sound if gou ore
using timed baking and do not touch the START
pod after entering the baking temperature.
When the oven turns on at the time of
dag gou have set, the displag will show
the changing temperature (starting at IO0°F}
and the cooking time countdown.
At the end of timed convection bake the oven
will turn off. The end of cgcle tone
will sound.
[] Touch the CLEAR/OFFpad to clearthe
displag if necessarg.When baking is
finished,remove the food from the oven.
Remember,eventhough the oven shuts
off automaticallg, foods continue
cooking after the controls are off. 2 }
E
0
0
_Q
0
Page 24

Special features of your upper oven control.
Your new touch pad control has additional features that you may choose to use. The following are the features and
how you may activate them.
The special feature modes can only be activated while the display is showing the time of day. They remain in the
control's memory until the steps are repeated.
When the displa_t shows gout choice, touch the STARTpad. The special features will remain in memory after
a power failure.
12 Hour Shut-Off
With this feature, should you forget and leave
the oven on, the control will automatically turn
off the oven after 12 hours during baking
functions or after 3 hours during o broil function.
If you wish to turn OFF this feature, follow
the steps below.
[] Touch the BAKE and BROIL HI/LO pads
at the same time for 3 seconds until the
display showsSF.
Fahrenheit or Celsius Temperature Selection
Yourovencontrolis set to use the Fahrenheit
_i_}_}il}}!}i}iiii,il)i(i ii!(}i_!iii_!_
_iil}ii!!)(_i!;;;!;i_ _ d((!)
if!i!i iiii i!!iiii! iiii !iii ii!ii iiii!iiii
temperature selectionsbut you may change
this to use the Celsiusselections.
[] Touch the BAKE and BROIL HI/LO pads
at the same time for 3 seconds until the
display shows SF.
Tones at the End of a Timed Cycle
Touchthe DELAYSTARTpad.The
[]
display will show 12shdn (12 hour
shut-off}.Touch the DELAYSTARTpad
again and the display will show no shdn
(no shut-offl.
Touch the START pad to activate the no
[]
shut-off and leave the control set in this
special features mode.
[] Touchthe BROILHI/LO pad. Thedisplay
will show F (Fahrenheit).
[] Touchthe BROILHI/LO pad again.
Thedisplay will show C (Celsius}.
[] TouchtheSTARTpad.
At the end of a timed cycle,3 short beepswill
sound followed bg one beep every 6 seconds
until the CLEAR/OFFpod istouched.This
continual 6 secondbeep may be conceleck
Tocancel the 6 second beep:
i!!i!I .................
[] Touch the BAKE and BROIL HI/LO pads
24
at the same time for 3 seconds until the
display showsSF.
[] Touchthe KITCHENTIMERON/OFF
pad.Thedisplay shows CONBEEP
(continual beep).Touchthe KITCHEN
TIMERON/OFF pad again.The display
shows BEER(Thiscancelsthe one beep
every 6 seconds.}
[] TouchtheSTARTpad.
Page 25

Gos/Control Lockout (on some modeJs)
ge,co_
Your control will ollow gou to lock out the
surface burners, oven burners and control
panel so theg cannot be activated.
To lock/unlock the controls:
[] Turn all surface burners off.
[] Touch and hold the GAS/CONTROL
LOCKOUTpadfor 5 secondsuntil the
displagshows LOC.
[] To unlock the control, touch and hold
the GAS/CONTROLLOCKOUTpad for
3 secondsuntil LOCdisappears from
the displag.
12 Hour, 24 Hour or Clock Block-Out
Yourcontrolisset to usea 12 hour clock.
If you would preferto have a 24 hour military
time clockor black-out the clock displag,
follow the steps below.
ii ]iliiiii! iii!!i
[] Touchthe BAKEand BROILHI/LO
pads at the same time for 3 seconds
until the displag shows SF.
[] Touchthe CLOCKpad once.
Thedisplagwill show 12hr.
If this isthe choice gou want,
touch the STARTpad.
When this feature is on and the touch pads
are touched, the control will beep and the
displag will show LOC
!_ Thecontrollock-out mode affects all
controls.No controlswill work when this
feature is activated.
i_ Theo ' '
, djustment will be retained in memorg
after a power failure.
Touchthe CLOCKpad again to change
to the 24 hour militarg time clock.Thedisplag
will show 24 hr. Ifthis isthe choice gou want,
touch the STARTpad.
Touchthe CLOCKpad again to black-out
the clock displag.Thedisplagwill show OFF.
If this isthe choice gou want, touch the
STARTpad.
NOTE:Ifthe clock isin the black-out mode gou
will notbe able to usethe DelagStart function.
¢3
0
(_
i iii i;iiiiiiiii!i!i!iiiiiij
iiiiiiiiiiii!! iii i!iiiiii!
_ _C_I_!IIIII_ TM J _b)i_i_!i_ iiii_ii(_
i_ilili!_ili_llii_!i_i_i_i!iiiiiii!i!i;!:___!_iiiiii!i!ii_i_!i!i!i!i_!ii_iiii!!iii!iii_i!_iii!iii!iiii'i_
Cook and Hold
Yournew control has a cook and hold feature
that keepscookedfoodswarm for up to 3
hoursotter the cooking function isfinished.
Thisfeature can onlg be usedwhen
timed cooking.
Toactivate this feature, follow the steps
below.
[] Touch the BAKE and BROIL HI/LO
pads at the same time for 5 seconds
until the displag shows SF.
[] Touchthe COOKINGTIMEpad.The
displagwill show Hid OFF.
Touchthe COOKINGTliVtEpad again
to activate the feature. The displag
will show Htd ON.
[] Touchthe STARTpadto activate the
cook and hold feature and leave the
control set in this specialfeatures mode.
E
0
0
0
25
Page 26

Usingthe SabbathFeature.(onsomemode/s
(Designed for use on the Jewish Sabbath and Holidays)
The Sabbath feature con be used for baking/roasting in the upper oven only. It cannot be used for convection,
broiling, self-cleaning, or Delay Start cooking.
NOTE: The oven light comes on automatically when the door is opened and goes off when the door is closed.
The bulb may be removed. See the Oven Light Replacement section.
How to Set for Regular Baking/Roasting
Makesurethe clock shows the correct time of day
and the oven isof_
i!!
iiii! !i ii iii®!i!i!ii!i!iOiii!!!i!i!® !i! ii il :Oi!ii !i!i i01!i i! iiiii !i!i!i ii! i
When the display shows • the
oven is set in Sabbath When the
display shows D c the oven is
baking/roasting
] Pressand hold both the BAKEand BROIL
HI/LO pads,at the same time, untilthe
display shows BF
[] Tapthe DELAYSTARTpad until SAbbAtH
appears in the display.
[] Touch the STARTpad and __will appear
in the display.
[] Touch the BAKE pad.No signalwill be given.
[] Using the number pads, enter the desired
temperature between 170°and 550°.
No signal or temperature will be given
[] Touch the STARTpad.
[] After a random delay period of
approximately 30 secondsto i minute, _7•
will appear in the display indicating that the
oven isbaking/roastingIfD c doesn't appear
in the display, start again at Step4.
Toadjust the oven temperature, touch the
BAKEpad, enter the new temperature using
the number pads, and touch the STARTpad
NOTE:The CLEAR/OFFand COOKINGTIMEpads
are active during the Sabbath feature.
When the display shows D the
oven is set in Sabbath When the
displag shows • c the oven is
baking/roasting
How to Set for Timed Baking/Roasting--Immediate Start and Automatic Stop
Hake sure the clock shows the correct time of day
and the oven iso_
[] Pressand hold both the BAKEand BROIL
HI/LO pads,at the same time, untilthe
display shows SF,
[] Tapthe DELAYSTARTpad until SAbbAtH
appears in the display.
[] Using the number pads, enter the desired
temperature. No signal or temperature will
be given.
Touch the START pad.
[]
Afterarandomdelayperiodof
[]
approximately30secondsto i minute,• c
willappearinthedisplayindicatingthat the
ovenisbaking/roastingIfD C doesn'tappear
[] Touch the STARTpad and _7will appear in
the display.
] Touchthe COOKINGTIMEpad.
[] Touch the number pads to set the desired
length of cooking time between 1 minute and
g hoursand 99 minutes. Thecooking time
that you entered will be displayed.
Touch the STARTpad.
[]
[] Touch the BAKEpad. No signal will be given.
inthedisplay,startagainatStep7.
Toadjust the oven temperature, touch the
BAKEpad, enter the new temperature using
the number pads, and touch the STARTpad
When cooking is finished,the display will change
from • c to • and O:OOwill appear, indicating that
the oven has turned OFFbut is still set in Sabbath.
Removethe cooked food.
How to Exit the Sabbath Feature
] Touchthe CLEAR/OFFpad.
[] If the oven iscooking, wait for a random
delay period of approximately 30 secondsto
1 minute, until only __isin the display.
] Pressand hold both the BAKEand BROIL
HI/LO pads,at the same time, until the
display shows BF,
[] Tapthe DELAYSTARTpad until 12shdn
or no shdn appears in the display.
12shdn indicates that the oven will
automatically turn off after 12 hours.
no shdn indicatesthat the oven will not
automatically turn off.
[] Touch the STARTpad.
NOTE:If o power outage occurred while the oven
was in Sabbath,the oven will automatically turn
off and stag off even when the power returns. The
ovencontrol must be reset.
26
Page 27

Adjust the upper oven thermostat--Do it yourself!
You mag find that gour new oven cooks differentlg than the one it replaced. Use gour new oven for a few
weeks to become more familiar with it. If gou still think gout new oven is too hot or too cold, gou can adjust
the thermostat gourself
ge.com
Do not use thermometers, such as those found in grocer_t stores, to check the temperature setting of gour
oven. These thermometers mag varg 20-/40 degrees.
NOTE: This adjustment will not affect the broiling or the self-cleaning temperatures. The adjustment will be
retained in memory after a power failure.
To Adjust the Thermostat
[] Touchthe BAKEand BROILHI/LO pads
at the same time for 3 seconds until the
display shows SF.
[] Touchthe BAKEpad. A two digit number
shows in the display.
Touch BAKEonce to decrease (-)
the oven temperature, or twice to
increase (+).
Theoventemperature can be adjusted
[]
up asmuch as 35°For down as much
as 35°F.Touchthe number pads the
same way you read them. Forexample,
to change the oven temperature 15°F,
touch 1 and 5.
[] When you have made the adjustment,
touch the STARTpadto go back to the
time of day display. Useyour oven as
you would normally.
NOTE:Thethermostat adjustment for Baking
will also affect ConvectionBakingor
ConvectionRoasting.
t_
o
i , , ,iii iiiiiiiiiiii!i!i!iiiiiij
iiiiiiiiiiii!! iii i!iiiiii!
Thetype of margarine will affect baking performance!
Most recipes for baking have been developed using high fat products such as butter or margarine (80% fat).
If you decrease the fat, the recipe may not give the same results as with a higher fat product.
Recipe failure can result if cakes, pies, pastries, cookies or candies are made with low-fat spreads. The lower
the fat content of a spread product, the more noticeable these differences become.
Federalstandards require products labeled "margarine" to contain at least80% fat by weight. Low-fat spreads,on the
other hand,contain lessfat and more water. The high moisture content ofthese spreads affects the texture and flavor
of baked goods. Forbest results with your old favorite recipes,use margarine, butter or stick spreads containing at least70%
vegetable oil.
E
o
o
f_
27
o
e_e
Page 28

¢/1
o=
Using the lower oven drawer
Thelower oven drawer may be used to bake foods using the same times and temperatures as a standard oven. Foods
ideal for baking in the lower oven drawer include pizza, frozen foods, casseroles, biscuits, rolls and many desserts.
)ii ToUsetheLowerOven r°wer
iii))_?!;_!Hiill
iiiiiiii{_}i_ii,
iiiii_i{!!ii!iii_ii_i_iiiiiiil
iiiijjiiiii_v!!!{ii!i!i!i!i!i!iii
m
Push in and turn the lower oven
drawer knob to ang desired
setting
I_q Pushinand turn the lower oven drawer
knobto ang desiredsetting.
[_] Allow the lower ovendrawer to preheat.
!i
_ TheONsgnal lightis located on the upper
right side of the knob and glows when the
knob is in the ON position. It remains ON
until the knob ismoved to the OFFposition.
;'_The"Heating" signal light is located below
the ON signal light and glows when the
heating elements are active.Preheatis
complete after the "Heating" signal has
turned off forthe first time
with each use.
NOTES:
}::_Always use the included drawer rack when
using the Lower Oven Drawer
i_:_The lower oven drawer cannot be used
during a self-dean cycle of the upper oven.
_ Do not put food, foil or cookware directly
on the bottom of the lower oven drawer
Always use the included drawer rack.
}2:If foods require a cover, use only foilorlids
able to withstand baking temperatures. Do
not use plastic.
_>_Maximum height of foods that can be
placed in the lower oven drawer is 4".
_; Do not put liquid or water in the lower oven
drawer.
}2_Never place plastics, paper, canned foods
or combustible material in the lower oven
drawer
The lower oven drawer uses less energg than the upper oven.
Allow the following approximate times for preheating:
Desired Lower Preheat
Oven Temperature Time
WARM 10 minutes
350°F 20 minutes
425°F 30 minutes
Adjust the oven thermostat--Do it yourself!
You mag find that gour new oven cooks differentlg than the one it replaced. Use gour new oven for a few weeks
0
0
v
0
to become more familiar with it. If gou still think gour new oven is too hot or too cold, gou can adjust the
thermostat yourself.
Do not use thermometers, such as those found in grocery stores, to check the temperature setting of your oven.
These thermometers may vary 20-/40 degrees.
NOTE:This adjustment will not affect the broiling temperatures.
Ilq Pullthe OVENCONTROLknob off
the range and look at the back side.
Tomake an adjustment, loosen
(approximatelgone turn),but do not
completelg remove, the two screws
on the back of the knob.
[_ With the back of the knob facing gou,
hold the outer edge of the knob with one
hand and turn the front of the knob with
Eachclick will change the oventemperature
approximatelg IO°F.(Rangeis+_60°Rfrom
the arrow.)We suggestthat gou make the
adjustment one clickfrom the original setting
and check oven performance before making
ang additional adjustments.
[_] After the adjustment is made, retighten
screws sotheg are snug,but be careful
not to overtighten.
the other hand.
[] Re-install knobon range and check
Back of Lower Oven Knob
(Appearance mag varg )
Toraise the oventemperature, move the
top screw toward the right. You'llhear a
clickfor each notch gou move the knob.
performance.
Tolower the temperature, move the top
28
screwtoward the left.
Page 29

Usingtheself-cleaning upper oven.
The oven door must be closed and all controls set correctly for the cycle to work properly.
Before o Cleon Cycle
iiiiiii} ii!i@!Fi!¸¸u¸¸¸¸¸¸¸"% !il}}i{ii!{iiiii!iiii! i! li¸
i ii}ii
Wipe up heavy soil on the oven
bottom
Forthe first self-clean cycle,we recommend
venting your kitchen with an open window
or usinga ventilation fan or hood.
Removethe shelves,any broiler pan,
broiler grid, probe, all cookware and
any aluminum foil from the oven.
Theoven shelvescan be self-cleaned,
but they will darken, losetheir luster
and become hard to slide.
Soilonthe front frame of the range and
outside the gasket on the door will need
to be cleaned by hand. Cleanthese areas
with hot water, soap-filled scouring pads or
cleanserssuch as Soft Scrub_eRinsewell
with clean water and dry.
Do not clean the gasket. The fiberglass
material of the ovendoor gasket cannot
withstand abrasion. It is essentialfor the
gasket to remain intact. If you notice it
becoming worn or frayed, replace it.
Wipe up any heavg spillovers on the oven
bottom.
Hake surethe oven light bulb cover is
in place and the oven light isoff.
IMPORTANT: The health of some birds is
extremely sensitive to the fumes given off
during the self-cleaning cycle of any range.
Hove birds to another well-ventilated room.
NOTE:Use caution when opening the upper
oven after the self-clean cycle hasended.
Theoven may stillbe hot.
ge, com
r-,I-
t_
O
ii!iiiiii;iiiiiii[i@
_i!iii ¸ iiiiiW_W_
il,:_!;;qiiiiiiiiil
!i:!iiii!i: iiiiiiiiii
i_::)!i!iiiiiiiii
How to Set the Upper Oven for Cleaning
[] Touchthe SELFCLEANpad.
_i!_!ili_ _iii_i!!i!i_.... _i_ii_i!il}!;_'_i_i_!{i!_i,!_
[] Using the number pads,enter the
Cleancycle time isnormally 4 hours.Youcan
change the clean time to any time between
3 hours and 5 hours,depending on how dirty
your oven is.
[] Touch the START pad.
Touchand hold the GAS/CONTROL
LOCKOUTpad for 5 secondsto turn it
off.Seethe Gas/ControlLockoutsection.
NOTE: Thesurface burners must be
turned off prior to the self-dean start
time.
desiredclean time, if a time otherthan
4 hours is needed.
Thedoor locks automatically. The display
will show the clean time remaining. It will
not be possibleto open the oven door
untilthe temperature drops below the lock
temperature and the LOCKEDDOOR
light goes off.
Theoven shuts off automatically when the
clean cycle is complete.
[] When the LOCKEDDOORlight is off,
the door will unlock automatically.
@Thewords LOCKDOORwill flashand
the oven control will signal if gou set
the clean cycle and forget to closethe
ovendoor.
@Tostop a clean cycle, touch the
CLEAR/OFFpad. When the LOCKEDDOOR
light goes off indicating the oven has
cooled below the locking temperature,
you may open the door.
_i:,Donot use the lower oven drawer during
a self-clean cycle.
F _
r _
r _
E
0
0
L--
29
0
Page 30

Usingthe self-cleaning upper oven.
The oven door must be closed and all controls set correctly for the cycle to work properlg.
How to Delag the Start of Cleaning
Hake surethe clock shows the correct time
of day.
lYq Touch and hold the GAS/CONTROL
LOCKOUTpad for 5 secondsto turn
it off.
NOTE:The surface burnersmust be
turned off prior to the self-dean start
time.
Touchthe SELFCLEANpad.
[]
Usingthe number pads,enter the
[]
desiredclean time.
Touchthe DELAYSTARTpad.The
[]
earliest start time gou can set will
appear in the displag.
Usingthe number pads,enter the time
[]
of dag gou want the clean cgcle
to start.
Thedoor locks automaticallg. Thedisplagwill
show the start time. It will not be possibleto
open the oven door until the temperature
drops below the lock temperature and the
LOCKEDDOOR light goes off.
Theoven shuts off automaticallg when the
clean cgcle iscomplete.
[] When the LOCKEDDOORlight isoff,
the door will unlock automaticallg.
Thewords LOCKDOORwill flash and the
oven control will signal if gou setthe clean
cgcle and forget to close the oven door.
;'_Tostop a clean cgcle,touch the
CLEAR/OFFpad. When the LOCKEDDOOR
lightgoes off indicating the oven has
cooled below the locking temperature,
gou mag open the door.
[] Touchthe STARTpad.
After a Clean Cycle
You mag notice some white ash in the
oven. Wipe it up with a damp cloth after
the oven cools.
If white spotsremain, removethem with a
soap-filledscouringpad and rinse thoroughlg
with a vinegar and water mixture.
Thesedepositsare usuallga salt residue
that cannot be removed bg the clean cgcle.
If the oven isnot clean after one clean cgcle,
repeat the cgcle.
Youcannot set the oven for cooking until
the oven is coolenough for the door to
unlock.
_;While the oven is self-cleaning,gou can
touch the CLOCKpad to displag the time
of dag. To return to the clean countdown,
touch the COOKINGTIME pad.
_ Ifthe shelvesbecome hard to slide,
applg a small amount of vegetable oil or
cooking oil to a paper towel and wipe
the edges of the oven shelveswith the
paper towel.
30
Page 31

Careand cleaning of the range, ge.com
Be sure electrical power is off and all surfaces are cool before cleaning any part of the range.
If gout range is removed for cleaning, servicing or ang reason, be sure the anti-tip
device is re-engaged praperlg when the range is replaced. Failure to take this
precaution could result in tipping of the range and cause injury.
t_
0
Sealed Burner Assemblies
Turnall controls OFF before removing the
burner parts.
Theround side burner caps and burner
headscan be lifted off, making them easy
to clean.Theelectrodes are not removable.
Theoval center burner head and cap
assembly can be lifted off, making it easy
to clean.Theburner electrode is not
removable.
CAUTION:Donotoperatethe
cooktopwithout all burner parts and grates
in place.
Electrode
Burner head @
Electrode _
Front I_fL,back
right and back left
burner
Theelectrode of the spark igniter is
exposedwhen the burner head is
removed.When one burner is turned
to LITE, all the burners spark. Donot
attempt to disassemble or clean around
an9 burner while another burner is on.
An electric shock may result, which
could cause you to knock over hot
cookware.
%;';
Front right burner
i[!iiiiii;ii;iiii[ii_
_i!iii ¸ iiiii_
i!,:_!;;_iiiiiiiiiil
!i:!iiii!i: iiiiiiiiii
i_:i!i!iiiiiiiii
L--
F _
r _
31
E
0
0
e-',l,,
0
Page 32

Care and cleaning of the range.
Burner Caps and Heads
Beforeremovingtheburnercapsandheads
remembertheirsizeandlocation.Replacethem
inthesameIoosdonofferdeaning.
NOTE:Donot usestealwool or scouring powders
to clean the burner parts.
Burner caps
!iii!i !i{{ii!ii!!!ii {i!!
Burner cop _s Burner cop is NOT
propert9 s_oted properlg seated
Liftoff whencoolWashburnercapsinhot,soapg
waterandrinsewith cleanwater:Youmagscour
withaplasticscouringpadto removeburned-on
foodparticles.
Burner Heads and Oval (Center)Burner
Head/Cap Assembly
Theburnerheadsandtheovalburnerhead/cap
assemblyareremovable.Simplylift themoffthe
rangefordeoniog.
Forproperignition,makesurethesmallhole
inthesectionthat fits overtheelectrodeiskept
open.A sewingneedleorwiretwist-tieworks
v_eilto unclogit.
Theslitsintheburnerheadsmustbekeptdean
atalldinesforaneven,unhamperedflame.
Replacement
Burner Heads
Replaceburnerheadsovertheelectrodeson
thecooktop,inthe correctlocationsaccordingto
theirsize.Thereisonesmall,onemedium,one
extralargeand onedualflameextralargeburner
head.
I
Makesuretheslot(onfromtleft,backrightand
backleft heads}andthehole(frontrighthead}in
theburnerheadispositionedovertheelectrode.
Cloggedor dirtg burnerportsorelectrodeswill
notallowthe burnerto operateproperig.
Angspillonoraroundanelectrodemust
becarefullgcleaned.Takecareto nothitan
electrodewithangthinghardor itcould be
damaged.
Cleantheburnerheadsroutinelg,especialigafter
badspillovers,whichcouldclogthe openings.Lift
offwhencool.
Toremoveburned-onfood,soaktheburnerheads
inasolutionof mildliquiddetergentand hotwater
for20-30minutes.Formorestubbornstains,use
atoothbrush.
After cleaning
Beforeputtingthe burnercaps,headsandoval
head/capassemblgback,shakeoutexcesswater
andthendrgthemthoroughlgbgsettingina
warmovenfor 30minutes.
Oval (Centefl Burner Head/Cap Assembly
Replacetheoval(center}head/capassembigover
theelectrodeonthe cooktop.
i!i(}i}((B_iiii_;iii_i!_}i}i!!i{i}_i!_}_i(_i_!f_i_h_};i}(¸'uos ssmuasssx eu
• L_ e _i@_l'_l_B
• I • ........
Caps
Replacethematchingsizecapsontotheburner
basesor heads.
32
I
Makesurethatthe headsandcapsarereplaced
inthecorrectlocations.
Page 33

Burner Grates
ge,com
el-
Appearance may vary.
The grates may be cleaned in a
dishwasher
The oven has 5 shelf positions.
Place the grog porcelain-coated
racks in positions "R", "B" and "O"
for self-cleaning the grates Place
one grate each on the oven rocks
from side to side
Yourrangehasthree professional-stgledouble
grates.Thesegratesareposition-specific.
Formaximum stability, thesegratesshould
only be used in their proper positions.For
convenience,the undersidesof the sidegrates
are marked "OUTSIDE."Hakesurethe front
portion of both grates isinfront. The center
grate can be interchangedfront to back.
Cleaning Grates--Soap and Water
Lift grates out when cool.Grates should be
washed regularlg and, of course,after
spillovers.Wash them in hot, soapy water
and rinsewith clean waten When replacing
the grates, be surethey are positioned
securely over the burners. Replacethe grates
sothat straight linesare formed
with the center ribs of all three grates.
Cleaning Grates--Self-Clean Oven
Toget rid of burned-on food, you may use
the self-clean cycle of your range. Remove
ang burnt-on food particles that you can
prior to placing the grates in the oven.Place
the gray porcelain-coated racks in positions
"R","B"and "D".
NOTE:Donot dean the griddle in the
stir-cleaning oven.
Placeone grate each on the oven racks
from sideto side.Followthe instructions
for how to set the upper oven for cleaning.
NOTE: Use caution when removing the grates
from the oven after the self-dean cgde has
ended. The grates may sdl be hot.
For heavily-soiled grates, you may notice
some white ash on the grate. Wipe it off
with a damp cloth after the grate cools.
If white spots remain, remove them
with a soap-filled scouring pad and rinse
thoroughly with a vinegar and water mixture.
Thesedepositsare usually a salt residue that
cannot be removed by the clean cycle.
Cleaning Grates--Dishwasher
Thegrates may be cleanedin the dishwasher.
Removeany burnt-on food particles that
you can prior to placing the grates in the
dishwasher.Placethem on the lowest rack
of the dishwasher and run on a "heavy duty"
cycle.
Do not operate a burner for an extended
period of time without cookware on the grate.
Thefinish on the grate may chip without
cookware to absorb the heat.
Although the grates are durable, they will
gradually lose their shine, regardless of the
best care you can give them. This is due
to their continual exposure to high
temperatures and abrasion by the eookware.
Support Bumpers
If one or more of the circular silicone grate
support bumpers in the eooktop are missing
or damaged, replacement parts can be
obtained by calling 1.800.GECARES.
Toinsert the new bumpers,simply insert
the cone shaped end and pushdown while
gently twisting or rocking the bumpen
t_
0
_i!iii ¸ iiiii_
i!,:_%_iiiiiiiiiil
!i:!iiii!i: iiiiiiiiii
i_:)!i!iiiiiiiii
L--
F _
r _
r _
E
----iiii!!i!i!_i_iii{_ii
Cooktop Surface
Toavoiddamagingthe stainlesssteelsurface
ofthe cooktop andto preventit from becoming
iii!
dull,cleanupspillsrightaway.Foodswith a lot
ofacid{tomatoes,sauerkraut,fruitjuices,etc.}
or foodswith high sugarcontent could cause
a dullspotifallowed to set.
Whenthe surface hascooled,wash and rinse.
Forother spillssuchas fat spatterings,etc.,
wash with soap and water oncethesurface
hascooled.Then rinseand polishwith a
dry cloth.
0
0
NOTE: Do not store flammable materials
in on oven,drawer or nearthe cooktop.
Donot store or use combustible materials,
gasolineor other flammable vapors and
liquids in the vidnitg of this or any other
appliance.
NOTE:Donotlift thecooktop.Liftingthecooktop
can leadtodamageandimproperoperation
of the range.
0
e_e
33
Page 34

Care and cleaningof the range.
GHd_e
::::::::::::::::::::::::::::::::::::::::::::::::::::::::::::::::::::::::::::::::::
34
NOTES:
_ The griddle is to be used over the center
burner onlg.
i_ Do not clean the griddle in o self-cleaning oven.
_ Donot dean the griddle in o dishwashe_
!_!?Wash with hot, soopg water after eachuse
while using a sponge or dishcloth.
_4If oil or food residue is left on the griddle,
further cooking will harden the residue and
cause sticking over time In this case, use o
non-abrasive deonser such as Ban Ami ®or
one of the soft scrub cleansers. Applg with
osponge, Scrunge ®or other cleaning pad
labeled safe for non-stick pans
_4Use only plastic, nylon or wooden utensils
or SilverStone ¢ kitchen tools to prevent
marring of the coating.
Stainless Steel Surfaces (onsome models)
Protecting
STAINLESSSTEELhas a reputation for
withstanding tough abusefor gears.Thisisa
keg reason whg it is so popular with the food
serviceindustrg.
However,stainlesssteel appliances can have
surface imperfections, discolorations or
blemishesthat consumers with a critical ege
notice and find unattractive in the home.
Thesediscolorationsor blemishes can be
caused bg something as simple as leaving
fingerprint smudges on the stainlesssteel
surface overnight.
Forstainlesssteelappliances where
blemishesare prone to show on the surface,
we recommend APPLYINGA COATOFCERAHA
BRYTE®StainlessSteelCleaning Polish&
Conditioner (purchased separatelg-follow
instructions}.
Thiswill helpgouto maintain the brightnessand
appearanceof gour stainlesssteelappliance.
Cleaning
Do not use a steel wool pad, it will scratch
the surface,
_4!¢Inorder to avoid ang discolorations and/or
grease stains,we recommend cleaning
and removing ang spills,spots and grease
from the range after use.
_4!¢It is important to use a soft cloth or paper
towel everg time the range is cleaned to
avoid ang scratches.
Readcarefullg the instructions on the back
of the Brightener (includedwith gour range}
for better results.
_'s_Neveruseknivesor cut food on the griddle.
Wash with hot, soapy water after each use.
Storecorefullg to prevent scratching
Griddle Precautions:
_ If something hasspilledunder thegriddle,
it should be cleanedup as soon as possible
to prevent "bakedon"food soil.
_'s!Do not allow grease to accumulate under
the griddle as it con be a fire hazard. Clean
under thegriddle as soonas it iscool.Clean
with hot soapy woten
i_ 0o not place gout griddle in the microwave.
i_ Always turn off ell surface burners before
removing the griddle. Use caution when
handing o hot griddle.
Cleaning Instructions:
[] Removegrates.
[] Wash using warm, soapg water:
Wet soft cloth or paper towel (avoid
using excessivewater).
Wipethe surface in the direction of the
grain (followingthe steel lines}.
Rinseandwring out a soft cloth or paper
towel and drg the range.
[] Applg a degreaserthat does not contain
sodium hgdroxide or StainlessSteel
Cleaner(follow instructions}.
[] Applg Cerama Brgte®StainlessSteel
Brightener (follow instructions}.
[] Repeat steps 2-4 as mang fimeaas needed.
[] Putgrates back in place.
Follow these instructions for ang Stainless
Steelsurface on gour range.
DONOTUSEthe following products for
cleaning the Cooktopor StainlessSteelparts:
• Caustic Lge(SodiumHgdroxide)or cleaners
containing this chemical
• Hard or SteelWool Pads
• Abrasive Haterials or Chemicals
Toinquire about purchasing stainlesssteel
appliance cleaner or polish,or to find the
location of a dealer nearest gou, pleasecall
our toll-free number:
NationalParts Center 800.626.2002(U.S.)
888.261.3055(Canada)
ge.com(U.S.)
www.GEAppliances.ca (Canada)
Page 35

Lift-Off Oven Door
ge.com
r-,I-
Lift the door straight up and off
the hinges
..........................................................hinge could snap back and pinch ringers.
The gasket is designed with a gap
at the bottom to allow for proper
air circulation
Do not rub or cleon the door
gasket-it has on extremely low
resistance to abrasion
If you notice the gasket becoming
worn, flayed or damaged in ong
wag or ff it has become displaced
on the door, gou should have it
replaced
The oven door is removable, but it is heavy.
You mag need help removing and replacing
the door
Do not lift the door bg the handle. Make sure
the oven is completelg cool.
Toremove the door, open it a few inches
to the specialstop position that will hold the
door open.Grasp firmlg on each side and lift
the door straight up and off the hinges.
NOTE: Becareful notto place hands between
the hinge and the ovendoor frame as the
Toreplace the door, make sure the hinges
are in the specialstop position. Positionthe
slotsin the bottom of the door squarelg over
the hinges.Then lower the door slowlg and
evenlgover both hinges at the same time. If
the hinges snap back against the oven frame,
pull them back out.
Tocleanthe inside of the door:
i_:_Do not allow excesswater to run into
ang holesor slotsin the doon
i_ Becausethe area insidethe gasket is
cleaned during the self-clean cgcle, gou do
not need to clean this bg hand. Ang soap
left on the liner causes additional stains
when the oven is heated.
S>;Thearea outside the gasket can
be cleanedwith a soap-filled plastic
scouring pad.
Donot allow food spillswith a high sugar
or add content (suchasmilk,tomatoes,
sauerkraut, fruitjuices or pie rifling)to remain
on the surface. They may cause a dull spot
evenafter cleaning.
To cleon the outside of the door:
i!!_Usesoap and water to thoroughlg clean
the top, sidesandfront of the oven door
Rinsewell. You may also use a glass
cleaner to clean the glass on the outside
of the door.
!_fSpillageof marinades,fruit juices, tomato
sauces and basting materials containing
acids mag cause discoloration and should
be wiped up immediatelg. When the
surface iscool,clean and rinse.
!#fDonot useoven cleaners, cleansing
powders or harsh abrasives on the
outside of the doon
O
ii!iiiiii;iiiiiii[ii_
_i!iii ¸ iiiii_
i!,:_!;;_iiiiiiiiiil
!i:!iiii!i: iiiiiiiiii
i_:)!i!iiiiiiiii
s
iiii
L--
F _
r _
L _
r _
Oven Heating Elements
Do not clean the bake element or the broil
element. Ang soil will burn off when the
elementsare heated.
Tocleanthe oven floor,gentlg lift the bake
element. Clean with warm soapg waten
to
0
0
0_
to
0
35
Page 36

Care and cleaning of the range.
Removable Lower Oven Drawer
NOTE: Before performing ang adjustments,
cleaning or service, disconnect the range
electrical power supplg at the household
distribution panel bg removing the fuse or
switching off the circuit breaker Hake sure
the drawer heating element is cool.
Host cleaning can be done with the drawer
in place. However,the drawer mag be
removed if further cleaning isneeded. Use
soap and warm water to thoroughlg clean.
To remove the drawer:
[] Pullthe drawer straight out until
it stops.
[] Pressthe tabs on both sides in,while
pulling the drawer forward and free.
Removable Lower Oven Drawer Pan
NOTE:Before performing ang adjustments,
deoning or service, disconnect the range
electrical power supply at the household
distribution panel by removing the fuse or
switching off the circuit breaker lake sure
the drawer heating element is cool.
NOTE:Allow lower oven drawer to cool
beforeremoving pan.
NOTE: Wipe spillspromptly after each use.
To replace the drawer:
[] Placethe left drawer rail around
the inner left rail guide and slide
it in slightly to hook it.
[] Placethe right drawer rail around
the inner right rail guide and slide
it in slightlg to hook it.
[] Slidethe drawer all thewag in.
Never place, use or self-clean the lower
oven drawer pan in the upper oven.
i#i' Lower oven drawer has a removable pan
for easg cleaning. Cleanwith hot, soapg
water and a sponge or dish towel. Drg
with a clean cloth. An oven cleaner,such
as Easg-Offf, mag alsobe used.Besureto
follow the directions on the oven cleaner
Replacethe pan in the lower oven drawer
36
Glass Window
Tocleanthe outsideglassfinish,useaglass
cleaner.Rinseandpolishwith a drg cloth.
Page 37

Vent appearance and location varg
Oven Air Vents
Never block the vents (air openings/of the
range.They provide the air inlet and outlet
that are necessary for the range to operate
properly with correct combustion.
Air openingsare located at the rear of
the cooktop, at the top and bottom of the
oven door, and at the bottom of the range,
under the lower oven drawen
ge.com
r-,I-
t_
0
ii!iiiii>;iiiiiii[ii_
_i!iii ¸ iii>i_
i!,:_!;;_iiiiiiiiiil
Surfaceburnerknob
Upper Control Panel
Lockout the touch pads before cleaning.
Seethe Gas/ControlLockoutinformation
in the Special featuresof gour oven control
section in this manual.
Cleanup splatters with a damp cloth.
Youmag also usea glass cleaner.
Lower Control Panel and Knobs
It'sa good ideato wipe the control panel
after each useof the oven.Cleanwith
mild soap and water or vinegar and water,
rinsewith cleanwater and polishdry with
a softcloth.
Do not useabrasive cleansers,strong liquid
cleaners,plastic scouring pads or oven
cleaners on the control panel-theg will
damage the finish. A 50/50 solution of
vinegar and hot water works well.
Removeheaviersoilwith warm soapgwaten
Do not useabrasives of ang kind.
Unlockthe touch pads after deaning.
Seethe ControlLockout information inthe
Specialfeatures of gour oven control section
in this manual.
Thecontrol knobs may beremoved foreasier
cleaning.
Hake surethe knobs are in the OFFpositions
and pull them straight off the stems for
cleaning.
Theknobs can be cleaned in a dishwasher
or theg mag alsobe washed with soap and
waten Makesurethe insidesof the knobs
are drg before replacing.
Replacethe knobs in the OFF position
to ensure proper placement.
!i:!iiii!i: iiiiiiiiii
i_::)!i!iiiiiiiii
r;
L_
F _
r _
L _
r _
E
Hetal parts can be cleanedwith soap
and waten Do not use steelwool,abrasives,
ammonia, acidsor commercial oven cleaners.
Drgwith a soft cloth.
NOTE:Thelower oven drawer controlknob is
not interchangeable with the surface burner
knobs.Besureto reinstall the lower oven
drawer knob to the original location. Thelower
ovendrawer knob may be identified bg the
increasing numbers from "W*d'to "45Q"
37
0
0
o
0
Page 38

Careand cleaningof the range.
_ _ _:_ _ _ __ _ _ Oven Shelves and Drawer Racks
"F
: Cleanthe shelveswith an abrasive cleansen
Theoven shelvesmag be cleaned in the
self-cleaning oven.However,the shelves
will darken in color,losetheir luster and
become hard to slide if cleaned during
the self-cleaning cgcle.
Oven Light Replacement
CAUTION: Beforereplacinguour
oven light bulb,disconnectthe electrical
power to the range at the main fuse or
circuit breaker panel Besureto letthe
light cover and bulb coolcompletely.
Wire cover holder
Theoven light bulb is coveredwith a
removable glasscover that isheld in place
with a bail-shapedwire. Removethe oven
door,ifdesired,to reach cover easily.
TO remove;
Holda hand under the cover so it
[]
doesn't fall when released.With fingers
of the same hand, firmly push back the
wire cover holdenLiftoff the coven
Tomake the shelvesslidemore easilg,applg
a small amount of vegetable oil or cooking oil
to a paper towel and wipe the edgesof the
oven shelveswith the paper towel.
To replace cover:
[] Place it into the groove of the light
receptacle. Pull the wire forward to
the center of the cover until it snaps into
place. When in place, the wire holds the
cover firmly. Be certain the wire is in the
depression in the center of the coven
[] Connect electrical power to the range.
Do not remove any screws to remove
the cover.
[] Donot touch hot bulb with a wet cloth.
Replacebulb with a 4B-watt household
appliance bulb.
38
Page 39

Installation of the range.
Read these instructions completelg and carefullg.
IN THE COMMONWEALTH OF MASSACHUSETTS
i;1;This product must be installed by a licensed
plumber or gas fitter.
When using ball type gas shut-off valves, they
shall be the T-handle type.
t_
0
_ A flexible gas connector, when used, must not
exceed 3 feet.
BEFORE YOU BEGIN
Installation of this range must conform with local codes, or in the absence of local codes,
with the National Fuel Gas Code, ANSI Z223.1/NFPA.Sa, latest edition. In Canada, installation
must conform with the current Natural Gas Installation Code, AN/CGA-B149.1 or the current
Propane Installation Code, CAN/CGA-Bl aY.2, and with local codes where applicable. This range
has been design-certified bg CSA International according to ANSI Z21.1, latest edition and
Canadian Gas Association according to CAN/CGA-I.1 latest edition.
Aswith any appliance using gas and generating
heat, there are certain safety precautions you
should follow. Youwill find these precautions in
the Important Safety Information section in the
front of this manual. Readthem carefully.
IMPORTANT: OBSERVEALL GOVERNING CODES
AND ORDINANCES.
NOTE:Thisappliance must be properly grounded.
IMPORTANT: Save these instructions for the local
electrical inspector's use.
NOTE TO INSTALLER: Leave these instructions
with the appliance after installation is completed.
NOTE TO CONSUMER: Keep this Owner's Hanual
and Installation Instructions far future use.
SERVICER:Theelectricaldiagram is in an envelope
attached to the back of the range.
@
a
i.q.
c_
0
FOR YOURSAFETY
Do not store or usecombustible materials, gasoline or other flammable vapors and liquids
in the vicinity of this or any other appliance.
If gou smell gas:
[] Open windows.
[] Don'ttouch electrical switches.
[] Extinguishany open flame.
[] Immediately call your gas supplier
ELECTRICALREQUIREMENTS
CAUTION:FORPERSONALSAFETY,
DONOTUSEAN EXTENSIONCORDWITHTHIS
APPLIANCE.REMOVEHOUSEFUSEOROPEN
CIRCUITBREAKERBEFOREBEGINNING
INSTALLATION.
Thisappliance must be suppliedwith the proper
voltage and frequency, and connected to an
individual, properly grounded circuit, protected
by a circuit breakeror time-delay fuse,as noted
on the rating plate.
Wiring must conform to National ElectricCodes.
If the electric service provided does not meet the
above specifications, have a licensed electrician
install an approved outlet.
Becauserange terminals are not accessible after
range isin position,flexible service conduit or cord
must be used.
39
0
0
e",l,,
0
e.,,i,,
Page 40

e
Installation of the range.
,,,i,,o
WARNING!INSTALLATIONSAFETYINSTRUCTIONS
Improper installation, adjustment, alteration, service or maintenance can cause injury or
property damage. Refer to this manual. For assistance or additional information, consult
a qualified installer, service agency, manufacturer (dealer)or the gas supplier.
Neverreuseold flexibleconnectors. The use
m
of old flexibleconnectors can causegas leaks
and personal injurg.Alwagsuse NEW flexible
.o
o,1
connectorswhen installing agas appliance.
IMPORTANT: Remove all packing material and
literature from oven before connecting gas
and electrical supplg to range.
£_Have gour range installed bg a qualified
installen
]'_Yourrange must be electricallg grounded
in accordance with local codes or,in the
absence of local codes,in accordance with the
National ElectricalCode(ANSI/NFPA70, latest
edition).In Canada,electrical grounding must
be in accordance with the current CSAC22.1
Canadian ElectricalCode Part Iand/or local
codes.SeeElectricalConnectionsin this
_f_The ventilating hood must be constructed
of sheet metal not less than 0.0122" thick.
Install above the cooktop with a clearance of
not less than 1/4" between the hood and the
underside of the combustible material or metal
cabinet. The hood must be at least as wide
as the appliance and centered over the
appliance. Clearance between the cooking
surface and the ventilation hood surface
MUST NEVER BE LESSTHAN 24 INCHES.
EXCEPTION: Installation of a listed microwave
oven or cooking appliance over the cooktop shall
conform to the installation instructions packed
with that appliance.
s'_Ifcabinets are placedabove the range,
allow a minimum clearance of 30" between
the cooking surface and the bottom of
unprotected cabinets.
section.
s'_Ifa 30" clearance between cooking surface
and overhead combustible material or metal
cabinets cannot be maintained, protect the
underside of the cabinets above the cooktop
with not lessthan 1/4" insulating millboard
covered with sheet metal not less than
0.0122" thick.
s'_Clearance between the cooking surface
and protected cabinets MUSTNEVER BE
LESSTHAN 24 INCHES. The vertical distance
from the plane of the cooking surface to
the bottom of adjacent overhead cabinets
extending closer than [" to the plane of
the range sides must not be less than 18".
(Seethe Dimensions and Clearances
illustration in this section.)
CAUTION: Items of interest to children
should not be stored in cabinets above a
range or on the bocksplosh of o range-
children climbing on the range to reach items
could be seriously injured.
o't
o
o
o_
v
_f_Before installing gour range on linoleum
or ang other sgnthetic floor covering, make
sure the floor covering can withstand 180°F
without shrinking, warping or discoloring.
Do not install the range over carpeting
unless a sheet of 1/4" thick plgwood or
similar insulator is placed between the
range and carpeting.
£_Hake sure the wall coverings around the
range can withstand heat generated bg
the range up to 200°F.
_f_Avoid placing cabinets above the range.
To reduce the hazard caused bg reaching over
the open flames of operating burners, install
a ventilation hood over the range that projects
forward at least 5" begond the front of
the cabinets.
o
40
Page 41

Read these instructions completelg and carefullg.
DIMENSIONS AND CLEARANCES
Provide adequate clearances between the range and adjacent combustible surfaces. These
dimensions must be met for safe use of gout range. The location of the electrical outlet and
pipe opening (see Gas Pipe and Electric Outlet Locations) mag be adjusted to meet specific
requirements.
Depth with door closed [includes door handle)
28-1/4" to 29"
Depth varies depending on model
gee specifications sheet for your model
¢n
¢3
0
2
0
Minimum to
cabinets on
either side of 30"
tile range
6"...J,_ 30"
-18" Minimum ' Minimum
clearance
to left wdl
Tocabinets-
ondatthe
range back
.-_,_- 6" Minimum clearance
to right wall
E
0
0
Maximum depth F_
for cabinets I
above I
countertops L_
I
Front edge of
tt_erange sidP
panel forward
from cabinet
l/4""-J ""1--
Tocabinetsbdow
cooktopandat
therangebock
0
t,,.,,i,,
41
Page 42

.£
Installation ofthe range.
TOOLSYOUWILLNEED
_/,_*:; _i:,Phillips and fiat-blade screwdrivers N Flare union adapter forconnection to gas supply
!__!,,_ line (3/4" or 1/2 " NPTx 1/2 " I.D.)
_ _i:,Penciland ruler
[1
_'_Twopipe wrenches (onefor backup)
i!i:,Open-endoradjustable wrench
i!i:,Nut driver or wrench: 1/4 "
_'_Drill
i_:_Flareunion adapter for connectionto pressure
regulator on range (2/2" NPTx 2/2 " I.D.)
_;Liquid leakdetector or soapy waten
Lag bolt or 1/2 " O.D.Sleeveanchor (for concrete
floors only).
4_
ADDITIONAL MATERIALS YOU HAY NEED:
Gaslineshut-off valve
Pipejointsealantor UL-approvedpipe threadtape
with Teflon*thatresistsactionofnatural andLPgases.
*Teflon:Registeredtrademark of DuPont
i#i"Flexiblemetalappliance connector(1/2"I.D.).A5-
foot length is recommended for ease ofinstallation
but otherlengths are acceptable.Neverusean old
connector when instalfinga new range.
!_SqueezeConnector matching the sizeof the bracket
opening (ontherange back behindthe wiring cover)
and thehouse conduit. Obtainonly if replacing the
power cord with conduit.
LOCATION GUIDELINES
Do not locate the range where it mag be subject to strong drafts. Any openings in the floor or
wall behind the range should be sealed. Hake sure the openings around the base of the range
that supply fresh air for combustion and ventilation are not obstructed bg carpeting or woodwork.
Yourrange, likemang other household items,
isheavg and can settle into soft floor coverings
such as cushioned vingl or carpeting. Usecare
when moving the range on this tgpe of flooring.
It is recommended that the following simple and
inexpensiveinstructions befollowed to protect
gour floon
Therange should be installed on a sheet of plgwood
0
0
(orsimilar material).When the floor covering ends at
the front of the range,the area that the range will rest
on shouldbe built up with plgwood to the same level
or higher than the floor covering.
Thiswill allow the range to be moved for cleaning
or servicing.Also,make sure gour floor covering
will withstand 180°F.(Seethe InstallationSafety
Instructions section.)
Make surethe wall coverings around gour range
can withstand the heat generated (upto 200°F)
bg the range.(Seethe Installation Safety Instructions
section.)
IMPORTANT!
v
0
42
Remove all tape and packaging. Hake sure the burners are properly seated and level.
Take the accessory pack out of the oven.
Check to be sure that no range parts have come loose during shipping.
Page 43

Read these instructions completelg and carefully.
[] Gas Supplg Requirements
Recommended Gas Pipe Outlet Locations
NOTE: Make gas connections on
the left side of the cutout opening
30"
Recommended area for
through-the-well connection
of pipe stub/shut-off valve
This aroo allows
i
i
,1
flushinstallationto
rear wall
Recommended area
for through-the-floor
connection of pipe stub/
shuboff valve
t_
O
2
c_
0
Provide Adequate Gas Supplg
Your range is designed to operate at a pressure of b " of water column on natural gas or,
if designed for LP gas (propane or butane), 10" of water column.
Hake sure gou are supplging gour range
with the tgpe of gas for which it isdesigned.
Thisrange is convertible for useon natural or
propane gas. If gou decide to use this range on
LPgas,conversion must be made bg a qualified
LPinstallerbefore attempting to operate the
range on that gas.
For proper operation, the pressure of natural
gas supplied to the regulator must be between
5" and 15" of water column.
For LPgas,the pressuresupplied must be between
10"and 13" of water column.
When checking for proper operation of the
regulator,the inlet pressuremust be at least 1"
greater than the operating (manifold)pressure
as given above.
Thepressureregulatorlocatedat the inlet ofthe range
manifold must remaininthe supplglineregardlessof
whether naturalor LPgas is beingused.
A flexible metal appliance connector usedto
connect the range to the gas supplg line should
have an I.D.of 1/2" and be 5 feet in length for ease
of installation. InCanada,flexible connectors must
be single wall metal connectors no longer than
6 feet in length.
E
ul
0
0
LC_
0
43
Page 44

Installation ofthe range.
,,,i,,o
[] Electrical Power Supply Requirements
Recommended Electrical Outlet Locations
NOTE: Hake electrical connections
on the right side of the cutout opening
m
.£
electrical outlet area orient
the electrical receptacle so the
Recommended acceptable l
length is parallel to the floor
Wall Mounted
Product is shipped with 4prong
plug Recommended outlet isa
NEHA 2450R receptacle
4_
£J
Provide Proper Electrical Supply
Theseranges must be supplied with 208/240 volt,
60 Hz.,and connected to an individual, properlg
grounded circuit protected bg a circuit breaker
or time-delag fuse (40amp}.Thereceptacle must
0
0
v
0
be NEHA14-SORto accept the 4-prong plug
suppliedwith the range.
If the electrical service provided does not meet
the above specifications, it is recommended that
a licensed electrician install an approved outlet.
_ Locate the electric supplg as illustrated.
44
Page 45

Read these instructions completely and carefully.
[] Connect the Range to the Gas Supply
Shut off the main gas supplg valve before disconnecting the old range and leave it off
until the new hookup has been completed. Don't forget to rdight the pilot on other gas
appliances when gou turn the gas back on.
Becausehard piping restricts movement of the
range,the use of a CSAInternational-certified
flexiblemetalapplianceconnectorisrecommended
unlesslocalcodesrequireahard-pipedconnection.
Never usean old connector when installing a
new range. If the hard piping method is used,gou
must carefully align the pipe; the range cannot be
moved after the connection is made.
Toprevent gas leaks,put pipejoint compound on,
or wrap pipe thread tape with Teflon* around, all
male {external}pipe threads.
[] Installa manual gas lineshut-off valve in the
gas line in an easily accessed location outside
of the range. Make sureeveryone operating
the range knowswhere and how to shut off
the gas supply to the range.
[] Install male 1/2" flare union adapter to
the 1/2" NPTinternal thread elbow at inlet
of regulator. Usea backup wrench on the
regulator fitting to avoid damage.
When installing the range from the front,
remove the 90°elbow for easierinstallation.
[] Install male 1/2" or 3/4" flare union adapter to
the NPTinternal thread of the manual shut-off
valve,taking careto backup the shut-off valve
to keep it from turning.
Connect flexiblemetal appliance connector
[]
to the adapter on the range. Positionrange
to permit connection at the shut-off valve.
Whenall connections havebeen made, make
[]
sureall range controls are in the off position
and turn on the main gas supplgvalve.
Use a liquid leak detector at alljoints and
connections to check for leaks in the sgstem.
CAUTION: ooNOTUSEA
FLAME TO CHECK FOR GAS LEAKS.
When usingtest pressuresgreater than 1/2 psig
to pressure test the gassupplg sgstem of the
residence,disconnect the range and individual
shut-off valve from the gassupply piping. When
usingtest pressuresof 1/2 psigor lessto test the
gas supplg sgstem, simplg isolate the range from
the gas supplg sgstem bg closing the individual
shut-off valve.
*Teflon: Registered trademark of OuPont
¢3
0
@
(b
0
Flexible Connector Hookup
Installer: Inform I _ Gas
the location of the ]JZ'°r3/4"_l II L_ rave
the consumer of I h .r_ lit _E'_ shut-off
gas shut-off va ve. Gas pipe b--J
Rigid Pipe Hookup Options
E
0
0
e..l-
_--.,.
to
0
e,,l.
Page 46

Installation ofthe range.
[] Connect the Range to the Electrical Supply
¢tl
m
.£
Skip to Step 5 if the power cord shipped on the range does not match your
wall receptacle.
Using an Existing NEMA 14-50R Receptacle
Plugthe range power cord into a properly
groundedwall receptacle.Skipto Step6 ifthe
range power cord matches thewall receptacle.
NOTE:Yourrange is shipped with a 4-prong plug
to be used in a NEMA14-50Rreceptoda Should
you chooseto changegour plug, useonly a 3-
wire power cord, 3-wire conduit or 4-wire
conduit. Follow the appropriate instructions
below,inStep5, for your application.
EffectiveJanuary 1,1996, the National Electric Code
requires that new construction (not existing} utilize a
4-conductor connection to on electric range.
A range cord rated at 40 amps with 125/250
minimum volt range isrequired.A SO-amprange
cord is not recommended but if used, it should
be marked for usewith nominal 13/d"diameter
connection openings. Care should be taken
to center the cable and strain reliefwithin the
knockout hole to keep the edge from damaging
the cable.
NOTE:A 4-conductor cordis to be used when
the appliance is installed in a mobile home or
when local codesdo not permit grounding
through theneutral.
%
0
0
4_
v
[] Replace the Power Cord (Optional)
Perform this step only if the power cord shipped on the range does not match your wall receptacle.
[] Remove the wire cover (on the back of
the range) bg removing two (2}screws
using a 1//4"nut driver.
Do not discard these screws.
Back of range
[] Removethe 3 lower power cord terminal
screws from the terminal block and the
ground screw and _late.
Wire cover
[] Loosenthe strain reliefscrews and remove
the power cord.
NOTE:Thereplacementpower cord must be a
3-conductor or a 4-conductor UL-listedrange
cordor conduit. Cordsmay be providedwith ring
terminals on wire and a strain relief device.
[] Follow the 3-wire power cord (option SA),
3-wire conduit (option 5B)or 4-wire conduit
(option 50 sections as appropriate for
your application.
) ro_ _ [I _rrOUnl Pn_te
_ _ {orange}
ound
0
46
[] Placethe terminal screws and ground
screw in safe location for later use.
Page 47

Read these instructions completely and carefully.
[] Replace the Power Cord (Optional) Continued
Perform this step only if the power cord shipped on the range does not match Four wall receptacle.
[] 3-Wire Power Cord Installation Option
WARNING: Theneutralorground
wire of the power cord must be connected to
the neutral terminal located in the center of
the terminal block. Thepower leads must be
connected to the lower left and the lower right
terminals of the terminal block.
Locate the copper ground strap on the
[]
lower back of the range.
Loosenthe upper center screw on the
[]
terminal block.
Slide the open slotted end of the ground strap
[]
under the upper center screw on the terminal
block. Hake sure the ground strap is all the
wag against the upper center screw and
tighten it in place.
Placethe ground plate (removed earlier)over
[]
the bottom of the ground strap, pressthem
against the range frame and attach them
with the ground screw (removed earlier).
Insertthe new power cord through the strain
[]
relief.Allowenough slackto easily attach the
wires to the terminal block.
Insertthe 3 terminal screws (removedearlier)
[]
through each power cord terminal ring and
into the lower terminals of the terminal block.
Be certain that the center wire (white/neutral)
isconnected to the center lower position of
the terminal block.Tighten screwssecurelg
(approximatelg 20 inchdbs.) into the terminal
block.
[] Securethe strain relief in place in the bracket
bg tightening the strain reliefscrews.
Ground ,_ ,s ,,
/ /
Ground strap
X_ Open slotted end
{appearance
mayvary)
"_ _ Terminalblock
.._,,_.o _ Ground strap
O
@
r,,I-
ilq.
Lc_
t_
_.
0
E
to
o_
0
0
47
LC_
o_
o_
to
O_
0
Page 48

Installation ofthe range.
[] Replace the Power Cord (Optional) Continued
(fl
m
(f)
.o
Perform this step only if the power cord shipped on the range does not match _lour wall receptacle.
[] 3-Wire Conduit Installation Option
[] Locate the copper ground strap on the
lower back of the range.
[] Loosenthe upper center screw on the
terminal block.
Slide the open slotted end of the ground strap
[]
under the upper center screw on the terminal
block. Hake sure the ground strap is all the
wag against the upper center screw and
tighten it in place.
Place the ground plate {removed earlier) over
[]
the bottom of the ground strap, press them
against the range frame and attach them
with the ground screw {removed earlier).
[] Remove the strain relief clamp from the
bracket.
Squeezeconnector
7'
Conduit Bracket
4::
Assemble the squeeze connector {obtained
[]
Iocallg), matching the diameter of your
conduit, in the bracket hole. Insert the conduit
through the squeeze connecton Allow enough
slack to easily attach the wires to the terminal
block.
NOTE: Do not install the conduit without a
squeeze connector:
Insert the center bare wire (white/neutral) tip
[]
through the bottom center terminal block
opening. On certain models, the wire will need
to be inserted through the ground strap
opening and then into the bottom center
block opening. Insert the two side bare wire
tips into the lower left and the lower right
0
0
(tl
v
terminal block openings, lighten the screws
until the wire is firml 9 secure (approximatel 9
20 inchdbs./.
NOTE: Hake sure the wire iscompletelg
inserted into the terminal block and a secure
connection ismade.
[] Secure the squeeze connector in place in the
bracket by tightening the squeeze connector
screws.
NOTE:ALUiVilNUM WIRING:
Aluminum building wire mag be used but it must
be rated for the correct amperage and voltage
to make connection.
Wireh s _]1_ _ _'_ lY,_-ll
Bracket
t
Ground strap
_ Open slotted end
Wire used, location and enclosure of splices,
etc., must conform to good wiring practices and
local codes.
LJ
0
48
Page 49

Read these instructions completelg and carefullg.
[] Replace the Power Cord (Optional) Continued
Perform this step only if the power cord shipped on the range does not match Four wall receptacle.
[] 4-Wire Conduit Installation Option
[] Removethe strain reliefclamp from the
bracket.
Assemblethe squeezeconnector (obtained
[]
Iocallg),matching the diameter of gour
conduit, in the bracket hole.Insertthe conduit
through the squeezeconnector. Allow enough
slackto easilg attach the wires to the terminal
block.
NOTE: Do not install the conduit without
a squeeze connector
Insertthe ground bare wire tip between the
[]
range frame and the ground plate (removed
earlier}and secureit in place with the ground
screw (removedearlier}.Insert the bare wire
(white/neutral} tip through the bottom center
of the terminal block opening. Insert the two
sidebare wire tips into the lower left and the
lower right terminal block openings. Tighten
the screws until the wire isfirmlg secure
(approximatelg 20 inch-lbs.).
Squeeze connector
Conduit Bracket
T[_rc_in °J/'_l/J: _ I Ground
_ _ plate
WEretips.,......j_ to range}
el}
¢3
0
2
€/}
/
c_
0
(grounding
NOTE:lake surethe wire is completelg
inserted into the terminal block and a secure
connection is made.
[] Secure the squeeze connector in place in the
bracket bg tightening the squeeze connector
screws.
NOTE: ALUMINUM WIRING:
Aluminum building wire nag be used but it must
be rated for the correct amperage and voltage
to make connection.
[] Replace the Wire Cover
Replacethe wire cover on the range back bg sliding
its right edge under the retaining tab and replacing
the two screws removed earlier.Hakesure that
nowires are pinched between the cover and the
range back.
Wire used, location and enclosure
of splices, etc., must conformto good wiring
practices and local codes.
2 screws
to replace
wire cover
Bracket
E
0
0
49
0
e_e
Page 50

Installation ofthe range.
[] Seal the Openings
Seal ang openings in the wall behind the range
and in the floor under the range when hookups
are completed.
[] Assemble Surface Burners
m
[] Burner Heads (onsome models) [] Caps
.£
Placeburner headsover the electrodes Placethe matching size caps onto the burner
on the cooktop, in the correct locations bases or heads.
according to their size.Thereisone small, one
medium, one extra large and one dual flame HediurrlcapI • I Smallcap
,ra,ar urnerh a,.
| E×t,a _ronto_rong_iorgeoa?tro
Extralarge -- - DuaEframe replaced in the correct locations.
head Frontofrange
Front left, backright and back left burners
Burner cap
_hamber_
Burner bose
Hake sure the spot
in the burner head
tit
is positioned over
the electrode
Hake sure the hopein the burner head
_. Hake surethat the heads and caps are
extraBargehead
[] Grates
Front right burner
Burner G_p
head
Burner @
Electr_
Burner
base
Placethe left, right and center grates on the
cooktop. Thesegrates are position specific.
Theundersides ofthe left and right grates are
marked "OUTSIDE."Placethe middle grate with
its bowed front toward the front of the range.
Outside grate Center grate Outside grate
_I,CAUTION:Donotoperotetheburner
[] Oval (Center)Burner Head/Cap Assemblg
0
0
Placethe oval (center)head/cap assemblg
over the electrode on the cooktop.
Oval head and Hake sure the slot
cap assemblg inthe burnerhead
_-_ ispositioned over
theelectrode
without all burner parts in place.
v
_t
0
50
,.
Front of range Electrode
Page 51

Read these instructions completelg and carefullg.
[] Check Ignition of Surface Burners
Operationof all cooktop burners should be checked
after the range and gas supplg lines have been
carefullg checked for leaks.
Oualitg of Flames
Thecombustion qualitg of burner flames needs
to be determined visuallg.
(A)Yellow flames--
Call for service
(B)Yellow tips an
outer cones--
Normal for LP gas
(C)Soft blue
flames--Normal
for natural gas
Electric Ignition
Selectatop burner knob and simultaneouslg
push in and turn to LITE position. Youwill hear
a clicking sound indicating proper operation of the
spark module. Once the air has been purged from
the supplg lines,burners should lightwithin
4 seconds.After burner lights, rotate knob out
of the LITE position.Trg each burner in succession
until all burners have been checked.
O
@
a
e,,I-
LQ
q-
0
If burner flameslook like(A),call for service.Normal
burner flames should look like(B)or (C),depending
on the type of gasyou use.
With LPgas,some gellow tipping on outer cones
isnormal.
[]
Level the Range
[] Installthe oven shelves in the oven and
position the range where it will be installed.
range range
Raise_l! °wer
range
(on some models}
[] Checkfor levelnessbgplacing a spirit level
or a cup, partiallg filled with water, on one
of the oven shelves.If using a spirit level,take
two readings-with the levelplaced diagonallg
first in one direction and then the othen
(on some models)
E
Is}
0
0
I_q Removethe lower oven draweeSeethe Care
and cleaning of the range section. Thefront
levelinglegscan be adjusted from the bottom
and the rear legscan be adjusted from the top
or the bottom.
[] Usean open-end or adjustable wrench to
adjust the levelinglegsuntil the range islevel.
[] After the range islevel,slidethe range awag
from the wall so that the Anti-Tip device can
be installed.
0
e_e
51
Page 52

0
Installation ofthe range.
[] Install the Anti-Tip Device
Ill
m
Ill
.o
An Anti-Tip bracket is suppliedwith
instructions for installation in a varlets
of locations.Theinstructions include
all necessary information to complete the
installation. Readthe SafetyInstructions
and the instructions that fit sour situation
before beginning installation.
Typical installation ofanti-tip bracket attachment to wdl
WARNING:
b!¢Range must be securedbg Anti-Tip bracket
supplied.
i_ISee instructions to install {supplied with bracket}.
_!_Unlessproperlg installed, the range could
be tipped bg stepping or sitting on the dean
Injurg might result from spilled hot liquids
or from the range itselfi
When All Hookups Are Completed:
MAKE SURE ALL CONTROLS ARE LEFT tN THE
OFF POSITION.
MAKE SURE THE FLOW OF COMBUSTION
AND VENTILATION AIR TO THE RANGE IS
UNOBSTRUCTED.
4::
Converting to LP Gas (or converting back to natural gas from LP)
This range leaves the factory set for use with natural The conversion instructions and LP orifices can
gas. If you want to convert to LPgas, the conversion be found attached to the range next to the
must be performed by a qualified LP gas instolle_ pressure regulaton
Keep these instructions and the orifices in case
you want to convert back to natural gas.
0
0
ill
v
LJ
0
52
Page 53

Beforeyou coilfor service.., ge.com
Troubleshooting Tips
Save time and mone_l! Review the charts on the following
pages first and you may not need to call for service.
Possible Causes What To Do
Plug on range is not completelg • Hake sure electrical plug is plugged into a live, properlg
inserted in the electrical outlet, grounded outlet.
Burner hole or slits on the side • Remove the burner caps and clean them. Check and
of the burner mag be clogged, clean the electrode area for burned-on food or grease.
See the Care and cleaning of the range section.
Improper burner assemblg. • Make sure the burner parts are installed correctlg.
See the Core and cleaning of the range section.
The oven gas shut-offvalve
mag have accidentallg been
moved during cleaning or
moving.
Improper air to gas ratio. • If range is connected to LP gas, contact the person
You forgot to enter a bake • Touch the BAKE pad and desired temperature or the
temperature or cleaning time. SELF CLEAN pad and desired clean time.
Oven controls improperly set. * See the Using the upper oven section.
Shelf position is incorrect, • See the Using the upper oven section.
Incorrect cookware or cookware • See the Using the upper oven section.
of improper size being used.
Oven thermostat needs • See the Adjust the upper oven thermostat-
adjustment. Do it gourselfi section.
Clock not set correctlg. • See the Using the clock and timer section.
Aluminum foil used improperlg • See the Core and deoning of the ronge section.
in the oven.
• To check the oven gas shut-off valve, remove the
drawer {seethe Care and deaning of the range section}
Remove the rear access panel bg unscrewing the thumb
screws in the upper left and right cornen Look for the
gas shut-off lever at the back of the range.
Thumbscrews
PULLTO OPEN
who installed gour range or made the conversion.
Oven bottom not securely * See the Installation of the range section.
seated in position,
Gas/Control Lockout feature • Allow the range to cool down and touch and hold the
is activated. GAS/CONTROL LOCKOUT pad {on some models} for
3 seconds until LOC disappears from the displag.
Plug on range is not • Hake sure electrical plug is plugged into a live, properlg
completelg inserted in the grounded outlet.
electrical outlet.
Gas supplg not connected • See the Installation Instructions that came with gour
or turned on. range.
A fuse in gour home mag be • Replace the fuse or reset the circuit breaker.
blown or circuit breaker tripped.
• See the Core and cleaning of the range section. 53Burner parts not replaced
correctlg.
Page 54

Beforeyou callfor service...
Troubleshooting Tips
Possible Causes What To Do
Thedisplay will always • This is a normal reminder to close the door when
automatically remind you to broiling.
close the door.
Oven controls improperly set. • Hake sure you touch the BROILHI/LO pad.
Oven door not closed. • Seethe Usingthe upper oven section.
Improper shelf position * Seethe Broiling Guide.
being used.
Food being cooked in * Forbest results, usea pan designed for broiling.
a hot pan. Hake sureit iscool.
Cookware not suited * Forbest results, usea pan designedfor broiling.
for broiling.
Oven bottom not securely • Seethe Installation of the range section.
seated in position.
• If LOCONappears in the display, the range control is
locked. Turn this feature off to use the range. See the
Gas/Control Lockout section.
Oven thermostat * Seethe Adjust the oven thermostat--Do it gourself!
needs adjustment, section.
Plug on range is not completely * Hake sureelectrical plug isplugged into a live,
inserted in the electrical outlet, properly grounded outlet.
A fuse in your home may be * Replacethe fuse or resetthe circuit breaker.
blown or the circuit breaker
tripped.
Oven controls improperly set. * Seethe Usingthe dock and timer section.
Light bulb is loose or defective. • Tighten or replace the bulb.
Plug on range is not completely • Hake sure electricalplug is plugged into a live,
insertedinthe electrical outlet, properly grounded outlet.
Theoven temperature is too • Allowthe range to cool to room temperature and
high to set a self-clean operation, reset the controls.
Oven controls improperly set. * Seethe Usingthe stir-denning upper oven section.
This is the sound of the • Thisisnormal.
metal heating and cooling
during both the cooking
and cleaning functions.
Excessivesoil. * Touchthe CLEAR/OFFpad.Open the windows to
rid the room of smoke.Wait until the LOCKEDDOOR
light goes off.Wipe up the excesssoiland resetthe
clean cycle.
54
Oven too hot. * Allow the oven to cool below locking temperature.
Page 55

ge,com
Possible Causes What To Do
Oven controls not properlg set. • Seethe Usingthe self-cleaning oven section.
Oven was heavilg soiled. • Cleanup heavg spillovers before starting the clean cgcle.
Heavilg soiled ovens mag need to self-clean again or
for a longer period of time.
The self-clean cgcle has been • Closethe oven door.
selected but the door is not
closed.
The oven door is locked * Touchthe CLEAR/OFFpad.Allowthe ovento cool.
because the temperature
inside the oven has not
droppedbe,owthelocking temperature.
You have a function error code. * Touch the CLEAR/OFF pad. Allowthe oven to cool for
one hour. Put the oven back into operation.
If the function code repeats. ° Disconnect all power to the range for 5 minutes and
then reconnect power. Ifthe function error code
repeats,call for service.
This is reminding gou to enter ° Enter a probe temperature.
a probe temperature after
plugging in the probe.
A fuse in gour home mag be ° Replacethe fuse or resetthe circuit breaker.
blown or the circuit breaker
tripped.
The clock is in the ° Seethe Specialfeaturesof your ovencontrol section.
black-out mode.
Power failure. ° Resetthe clock.
Oven control pads were ° The BAKEand BROILHI/LO pads must be touched at
not pressed properlg, the same time and heldfor 5 seconds.
Power outage or surge. ° Resetthe clock. If the oven was inuse,you must reset
it bg touching the CLEAR/OFFpad,setting the clock
and resetting any cooking function.
This is normal in a new oven * Tospeedthe process,seta self-cleancgcle for a
and will disappear in time. minimum of 3 hours. Seethe Usingthe self-cleaning
oven section.
An odor from the insulation ° Thisistempororg.
around the inside of the oven
is normal for the first few times
the oven is used.
The Gas/Control Lockout feature * Besure the surface burner controls ore turned OFE
is activated. Turn this feature offto use the range. Seethe
Gas/ControlLockoutsection.
55
Page 56

Beforeyou coilfor service...
Troubleshooting Tips
Possible Causes What To Do
The convection fan mag turn ° This is normal. Tomaximize cooking evenness, the
on and off automaticallg, fan is designed to operate in both directions with a
Preheat temperature ° Fan will start automaticallg once the preheat
not reached, temperature isreached.
Thedrawer isout of alignment. ° Fullgextend the drawer and push itall the wag in.
Drawer isoverloaded or load ° Reduceweight. Redistributedrawer contents.
is unbalanced.
A fuse in gour home mag be ° Replacethe fuse or reset the circuit breaker
blown or the circuit breaker
tripped.
pause in between.
Seethe Coreand deoning of the range section.
The upper oven isself-cleaning. ° Wait for the self-clean cgcle to finish and the oven
Controls improperlgset. • Seethe Loweroven drawer section.
Liquid in drawer. ° Remove liquid.
Uncovered foods. ° Coverfood with lid or aluminum foil.
Temperature setting too high. * Reducetemperature setting.
¸ i iiii ii!i !! ! iiiiiiiii !!i!il¸iii!ii!i
Moistureescaping. * Coverfood with lid or aluminum foil.
ili__ !i_ _i!_ _ _i _ii!!i!ii¸ilii!iiii¸¸!¸¸!!il
Oven drawer not fullg closed. * Pushdrawer inuntil latch engages.
to cool.
56
Page 57

Accessories.
Looking For Something More?
You can find these accessories and many more at ge.com (U.S.)or
www.GEAppliances.ce (Canada), or call 800.626.2002 (U.S.)or 888.2613035 (Canada)
(during normal business hours). Have your model number ready.
ii!!(iiiili)iiiiii_!_!ii_iiii!_i_!;i!ii_ ,_!__i,!iFi!ili!!ii_i!!!_!ii_ii(i_ii_!ii!)!i!ii!i,
Grates Surface Burner Caps
Oven and Drawer Rocks
Light Bulbs Knobs
Tired of discolored racks? Wishing you had extra-heavg-dutg oven racks?
Broiler Pan
NOW AVAILABLE for your range:
GE'sinnovative, self-cleanable porcelain-coated oven racks!
• Heavy Duty
• Durable
• Able to be cleaned in a self-cleaning oven
Cleaner
Visit ge.com (U.S.)or www.GEAppfiences.co (Canada) for more information.
57
Page 58

m
Notes.
m
m
0
0
m
v
L.
0
58
Page 59

GE Service Protection Plus"
GE, a name recognized worldwide for quality and dependability, offers you
Service Protection PlusT"--comprehensive protection on all your appliances--
No Matter What Brand!
Benefits Include:
• Backed by GE
• All brands covered
• Unlimited service calls
• All parts and labor costs included
• No out-of-pocket expenses
• No hidden deductibles
• One 800 number to call
You will be completelg satisfied with our service protection or gou mag request gour moneg back
on the remaining value of gour contract. No questions asked. It's that simple.
Protect gour refrigerator, dishwasher, washer and drger, range, TV,VCRand much more-any brandJ
Plusthere's no extra charge for emergencg service and low monthlg financing is available. Even icemaker
coverage and food spoilage protection is offered. You can rest easg, knowing that all gout valuable household
products are protected against expensive repairs.
Place gour confidence in GEand call us in the U.S.toll-free at 800.626.2224
for more information.
*All brands covered, up to 20 gears old, in the continental US
........................................................................................... _,.-- Cut here
We'll Cover Ang
Appliance. Angwhere.
Angtime.*
Pleaseplace in envelope and mail to:
General Electric Compang
Warranty Registration Department
P.O.Box 32150
Louisville, KY40232-2150
59
Page 60

Consumer Product Ownership Registration
Dear Customer:
Thank you for purchasing our product and thank you for placing your confidence in us.
We are proud to have you as a customer!
Follow these three steps to protect your new appliance investment:
Important: If gou did not get a registration card with gour
.................................................................................................... _-:.._z____:_......
Consumer Product Ownership Registration
Complete and moil
_our Consumer
Product Ownership
Registration today.
Hove the peace of
mind of knowing we
con contact you in the
unlikely event of g
safety modification
After mailing the
registration below,
store this document
in a safe place It contains
information you will need
should you require
service Our service
number is 800 GECARES
(800 432 2737)
Model Number Serial Number
I I I I I I I I I I I I I I I I I I I
product, detach and return the form below to
ensure that gour product is registered, or register
online at ge.com.
Read your Owner's
Manual carefully
Itwillhe}pyou
opelate your new
applianceproperly
I I I I I I I I I I I I I I I I I I
Model Number Serial Number
Mr Ms M_s Miss
FirstI LastI
Name I I I I I I I I I Name I I I I I I I I I I I I
Street I
Address I I I I I I I I I I I I I I I I I I I I I I I I
Apt # I I I I I I I I E-mailAddress*
city I I I I I I I I I I I I I I stateI I Codel I I I I
Date Placed
In Use I_ I_ PboYle
Month Day Number I I I I I I I
* Please provide your e-mail address to receive, via e-maN, discounts, special offers and other
important communications from GEAppliances (GEA}
[ Check here if you do not want to receive communications from GEA's carefully selected
partners
FAILURETOCOMPLETEAND RETURNTHISCARDDOESNOTDIMINISHYOUR
WARRANTYRIGHTS
For information about GEA'sprivacy and data usage policy, go to gecom and crick on "Privacy
Policy" or coil 8006262224
O
GE Consumer & Industrial
Appliances
General Electric Company
Louisville, KY40225
ge.com
6O
Z_p
Page 61

GEDual Fuel Range Warrantg. IForcustomersinthe UnitedStates)
Ll
Q
All warrantg service provided bg our Foctorg Service Centers,
or an authorized Customer Care ®technician. To schedule
service, on-line, visit us at ge.eom, or call 800.GE.CARES
(800.432.2737). Please have serial number and model number
available when calling for service.
Ang part of the range which fails due to a defect in materials or workmanship. During this
_imited _ne-_ear warranty_ GEwi__a_s_pr_vide_free _f charge_a___ab_rand in_h_meservice
to replacethe defective part.
_i_"Service trips to gour home to teach gou how to use
the product.
Improper installation, delivergor maintenance.
Failure of the product if it is abused, misused,
or used for other than the intended purpose or
used eommereiallg.
!i Replacement of house fuses or resetting of circuit
breakers.
EXCLUSION OF IMPLIED WARRANTIES--Your sole and exclusive remedg is product repair as provided
in this Limited Warrantg. Ang implied warranties, including the implied warranties of merchantabilitg
or fitness for o particular purpose, are limited to one gear or the shortest period allowed bg law.
I
!2;Damage to the product causedbg accident,fire, floods
or acts of God.
_;_Incidental or consequential damage caused bg possible
defects with this appliance,
_;_Damage caused after deliverg.
i!!_Product not accessible to provide required service.
Staple your receipt here.
Proof of the original purchase
date is needed to obtain service
under the warranty.
£
t}
II
3"
e,t
t_
Q
q
(3
This warrantg is extended to the original purchaser and ang succeeding owner for products purchased
for home use within the USA. If the product is located in an area where service bg a GE Authorized Servicer
is not available, gou mag be responsible for a trip charge or gou mag be required to bring the product to
an Authorized GE Service Location for service. In Alaska, the warrantg excludes the cost of shipping or service
cars to gour home.
Some states do not allow the exclusion or limitation of incidental or consequential damages. This warrantg
gives gou specific legal rights, and gou mag also have other rights which varg from state to state. Toknow
what gour legal rights ore, consult gour local or state consumer affairs office or gour state's Attorneg General.
Warrantor: General Electric Compang. Louisville, KY 40225
(3
(3
y,
<;
61
Page 62

GEDual Fuel Range Warrantg. ImrcustomersinCanada)
All warranty service provided by our Factory Service Centers
or an authorized Customer Care ®technician. For service,
call 1.800.561.3344. Please have serial number and model
number available when calling for service.
Mabe Will Replace:
Any part ofthe range which fails due to a defect in materials or workmanship. Duringthis
limited one-year warranty, Mabewill also provide,free of charge, all labor and in-home service
to replacethe defective part.
_ Servicetrips to gour home to teach gou howto use
the product.
_ Improper installation, deliverg or maintenance.
!2_Failure of the product if it is abused, misused,
or used for other than the intended purpose or
used commercially.
!2_Replacement of house fuses or resetting of circuit
breakers.
Staple gour receipt here.
Proof of the original purchase
date is needed to obtain service
under the warrantg.
_ Damage to the product caused bg accident, fire, floods
or acts of God.
_ Incidental or consequential damage caused bg possible
defects with this appliance.
!2_Damage caused after deliverg.
!2_Product not accessible to provide required service.
EXCLUSION OF IMPLIED WARRANTIES--Your sole and exclusive remedy is product repair as provided
in this Limited Warranty. Any implied warranties, including the implied warranties of merchantability
or fitness for a particular purpose, are limited to one gear or the shortest period allowed by law.
I
I WARRANTOR ISNOT RESPONSIBLE FOR CONSEQUENTIAL DAMAGES. I
I Warrantor: MABE CANADA INC. I
62
Page 63

Notes.
m
e_e
0
_o
e_e
c_
0
_3 E_
0
o
63
0
Page 64

Consumer Support.
k._______i
GEAppliancesWebsite
Have a question or need assistance with gour appliance? Trg the GEAppliancesWebsite ang dag of the gear!
Forgreater convenienceand faster service,gou can now download Owner's Manuals,order parts or even schedule
serviceondine. In Canada: www.GEAppliances.ca
Inthe U.S.:ge.com
ScheduleService Inthe U.S.:ge.com
Expert GErepair service is only one step away from your doon Get on-line and schedule your serviceat your
convenience 24 hours ang dag ofthe year! Or call800.GE.CARES(800.432.2737)during normal business hours.
In Canada, call 1.800.561.3344
Real LifeDesign Studio
GEsupports the Universal Designconcept-products, services and environments that can be used bg people of all
ages,sizesand capabilities.We recognize the need to design for a wide range of phgsical and mental abilitiesand
impairments. Fordetails of GE'sUniversalDesignapplications,including kitchen designideas for people with disabilities,
check out our Website todag. For the hearing impaired, pleasecall 800.TDD.GEAC(800.833.4322).
In Canada, contact Manager,Consumer Relations,Habe Canada Inc.
Suite310, 1 Factory Lane
Moncton, N.B.EIC 9M3
ExtendedWarranties
In the U.S.:ge.com
In the U.S.:ge.com
Purchasea GEextendedwarrantg and learn about special discounts that are available while gour warrantg is still
in effect. Youcan purchase it on-line angtime, or call 800.626.2224during normal businesshours. GEConsumerHome
Serviceswill still be there after gour warrantg expires.In Canada, call 1.888.261.2133
Partsand Accessories
Individualsqualified to service their own appliances can have parts or accessoriessentdirectlg to their homes(VISA,
HasterCard and Discovercards are accepted).Orderon-line todag, 24 hours everg dag or bg phone at
800.626.2002during normal businesshours.
Instructions containedin this manual coverproceduresto beperformed byany user.Other servicing generally should be
referredto qualified servicepersonnel.Cautionmust beexercised,sinceimproper servicingmay causeunsafeoperation.
Customersin Canada should consult the yellow pages for the nearest Mabeservice center,or call 1.888.281.3055.
Contact Us
If gou are not satisfied with the service gou receive from GE,contact us on our Website with all the details including
gour phone number, or write to: General Manager, Customer Relations
GEAppliances, Appliance Park
Louisville, KY40225
In Canada: www.GEAppliances.ca, or write to: Director,ConsumerRelations,ivlabeCanada Inc.
Suite310, 1 Factorg Lane
Moncton, N.B.EIC 9M3
In the U.S.:ge.com
In the U.S.:ge,com
RegisterYourAppliance
Register gour new appliance on-line--at gour convenience! Timelg product registrationwill allow for enhanced
communication and prompt service under the terms of gour warrantg, should the need arise.Youmag also mail
in the pre-printed registration card included in the packing material. In Canada: www.GEAppliances.ca
This book is printed on recgded pape_
In the U.S.:ge.com
Printed in Mexico
 Loading...