

Page 1

• Side by Side
Refrigerators
Safety Information .......... 2-4
For Australia and New Zealand...21
Operating Instructions
Automatic Icemaker ........... 10
Controls ..................... 5
Ice and Water Dispenser . ...... 11
Shehes, Bins and Racks ....... 6-8
Storage Drawers .............. 9
Care and Cleaning ....... 12, 13
Replacing the Light Bulbs ...... 13
Installation Instruc_tions .... 14-16
For Australia and
New Zealand .............. 22-24
Troubleshooting Tips
Befbre You (:all For Service . . .18-20
Normal Operating Sounds ...... 17
Models20,22and25
C6te "ac6te
Rdfrigdrateurs
La section fran_aise commence a la page 26
I,ado a lad()
Frigorfficos
La seccion en espafiol empieza en la pagina 50
Write }tourmodel and serial numbers here:
Model #
Serial #
Find these numbers on a label inside
the refrigerator compartment at the top
on the right side behind the controls.
EXPORT 19703352P008 49-80472 08-08 Jfl
Page 2

iMPORTANTSAFETYiNFORMATiON.
READALLiNSTRUCTiONSBEFOREUSING.
WARNING!
Use this appliance only for its intended purpose as described in this Owner's Manual
SAFETYPRECAUtiONS
When using electrical appliances, basic safety precautions should be foflowed, including the following:
it::This refl'igerator must be properly installed
and located in accordance with the Installation
Instructions before it is used. Also see the How to
Connect Electricity section.
:_;_Do not attempt to stand on top of the refl'igerator.
Doing st) may result in bodily iqjury or damage to
the refl'igera tor.
;;_Do not allow children to play with the refl'igerator
or tamper with the controls.
i)_:Do not allow children to climb, stand or hang on
the shelves in the refl'igerator. Thev could damage
the refl'igerator and seriously it_jm'e themselves.
;_J/Do not touch the cold surfaces in the fl'eezer
compartment when hands are damp or wet.
Skin may stick t() these extremely cold surtaces.
::_¢Do not store or use gasoline or other flammable
w_pors and liquids in the vicinity of this or any
other appliance.
::_¢In refl'igerators with automatic icemakers, awfid
contact with the moving parts of the ejector
mechanism, or with the heating element located
on the bottom of the icemaker. Do not place
fingers or hands on the automatic icemaking
mechanism while the refl'igerator is plugged in.
it::Installation of the icemaker must be done by
a qualified service technician.
::_Keep fingers out of the "pinch point" areas;
clearances between the doors and between the
doors and cabinet are necessarily small. Be carefifl
closing doors when children are in the area.
::_Llnplug the refl_igerator beli_re cleaning and
making repairs.
NOTE: We strongly recommend that any servicing be
performed by a qualified individual.
::_Before replacing a burned-out light bulb, the
refrigerator should be unplugged in order to avoid
contact with a live wire filament. (A bm'ned-out
light bulb may break when being replaced.)
NOTE: Turningthe freezer control to the 0 position does not
remove power to the h_?htcircuit.
::_¢Do not refreeze fl'ozen foods which have thawed
completely:
2
Page 3

DANGER!RISKOFCHILDENTRAPMENT
PROPERDISPOSALOFTHEREFRIGERATOR
(_hild enti'ai)ment and suffocation are not problen_s
of the past.,]m_ked or abandoned refl'igeratm_ are
still dangerous...even if they will sit fin" "just a few
days." If you are getting rid of your old refl'igerator,
please fi)llow the instluctions below to help i)revent
accidents.
Before You Throw Away YourOld Refrigerator
or Freezer:
!i_Take off the doors and discard separately.
!i?:I,eaxe the shelxes in place so that children max
not easilx climb inside,
iJi::If the refrigerator has a lock, make it mmsable.
Refrigerants
_M1 refl'igeration products contain refl'igerants,
which under fe(leI'al law must be removed prior
to i)roduct (lisposal. If you are getting rid of an
old refl_igeration i)roduct, check with the comi)ai_y
hai_dling the disposal about what to do.
Page 4
iMPORTANTSAFETYiNFORMAtiON.
READALLiNSTRUCTiONSBEFOREUSING.
a, WARNING!
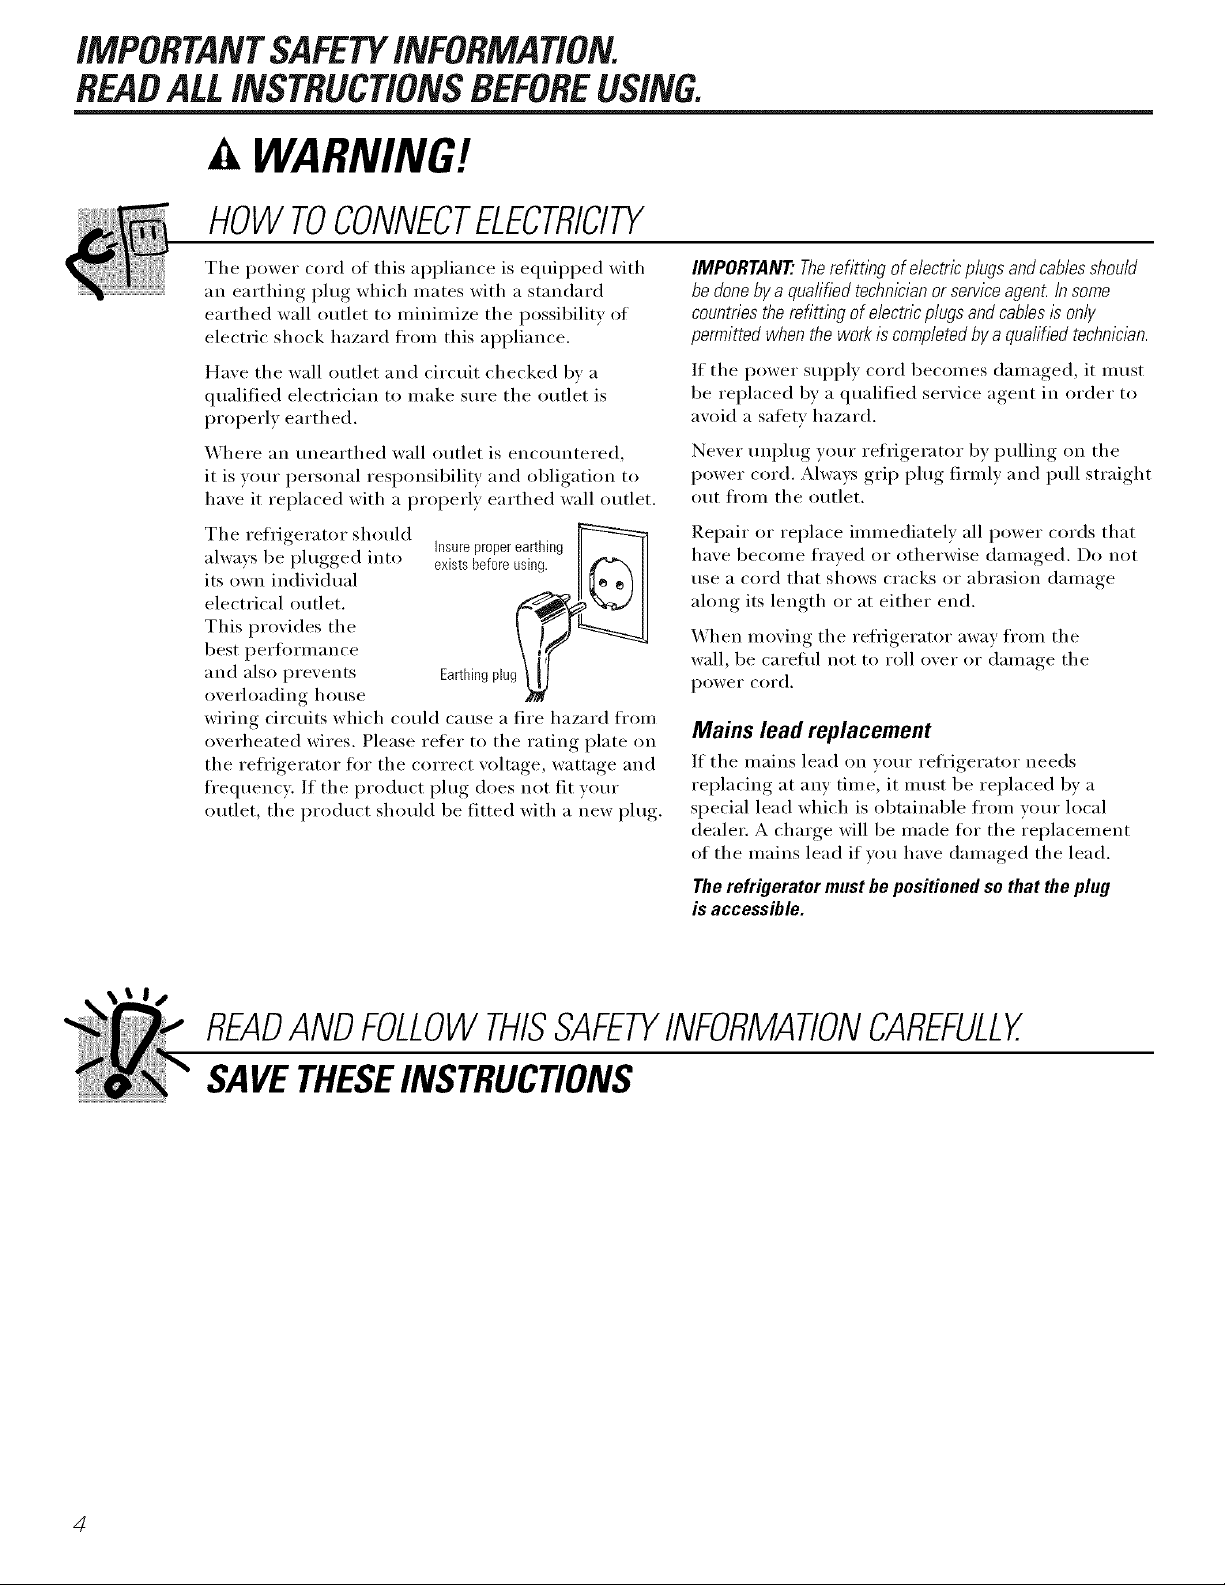
HOWTOCONNECTELECTRICITY
The power cord of this appliance is equipped with
an earthing plug which mates with a standard
earthed wall outlet to minimize the possibility of
electric shock hazard fl'om this appliance.
Have the wall outlet and circuit checked bv a
qualified electrician to make sure the outlet is
properly earthed.
Where an unearthed wall outlet is encountered,
it is veto" personal responsibili V and obligation to
have it replaced with a properly earthed wall outlet.
The refrigerator should
always be i)lugged into
its own individual
electrical outlet.
This provides the
best pertimnance
and also prevents
overloading house
wiring circuits which could cause a fire hazard fl'om
overheated wires. Please relk_r to the rating plate on
the reli'igerator for the correct voltage, wattage and
fl'equency. If the product i)lug does not fit your
outlet, the product should be fitted with a new plug.
insureproperearthing
existsbeforeusing. II I_'_
Earthingplug_ _ll_T)
IMPORTANT."Therefittlbg of electric plugs and cables should
be done bya quafified technician orservice agent Insome
countries the refitting of electric plugs and cablesis on/}/
permitted when the work is completed bya quafified technician.
If the power supply cord becomes damaoed_ , it must
be replaced by a qualified serxice agent in order to
axoid a safety hazard.
Ne',er tin )luo
power cord. Always, grip I)lug firml) and pull ,strai_*ht
out fl'om the outlet.
Repair or replace immediately all power cords that
have become fl'aved or otherwise damaged. Do not
use a cord that shows cracks or abrasion damage
along its length or at either end.
When moving the refrigerator away from the
wall, be carefifl not to roll over or damage the
power cord.
I _ yore" refrigerator b) pulling on the
Mains lead replacement
If the mains lead on your refrigerator needs
replacing at any time, it must be replaced by a
special lead which is obtainable fl'om veto" local
dealer. A charge will be made fi)r the replacement
of the mains lead if wm have damaged the lead.
The refrigerator must be positioned so that the plug
is accessible.
READANDFOLLOWTHISSAFETYINFORMATIONCAREFULLY.
SAVETHESEINSTRUCtiONS
4
Page 5

Aboutthe controls onthe refrigerator.
Yourcontrols will look like one of the following:
"I
FREEZER REFRIGERATOR
Startup Steps for Proper Temperature Control
I
I
STEP l--Set Fresh Food Control on "5{
STEP 2--Set Freezer Control on "5."
STEP %-W, MT 12HOURS tot temperature to stabilize.
STEP _-]fa change is needed, moxe tile control one number at a time and allo_x 12hom_
for temperature to stabilize.
NOTE:Setting tile controls to the 0 (off) position does not l_mo_e power to tile light circuit.
Controlsettings will vary based on personal preferences, usage and
operating conditions and may require more than one adjustment.
=
0 ISOFF
AdjustTemperature
(_WarrniO _Warme_r_
0 is Off / 5 is Norrnat / 9 is Coldest
®
® ® ® ®
Hold 3 seconds
Ambient Room Temperature Limits
This refrigerator is designed to operate in ambient temperatures specified by
its Temperature Class, which is marked on the rating plate.
Temperature
Class
Extended-
Temperate
Temperate
Subtropical
Tropical
Symbol Ambient Temperature
Maximum Minimum
SN
N
ST
T
32 °C 10 °C
32 °C 16 °(2
38 °C 18 °C
43 °C 18 °C
NOTE:/ntema/temperature may be affectedbysuchfactorsas the/ocation of the refrigerator,
ambient temperatureand frequencyof dooropenings.Adjust temperaturecontro/s as required
tocompensatefor these factors.
Page 6

Abouttherefrigeratorshelves andbins.
Not all features are on all models.
Bins on the Refrigerator Compartment Boor
A@ustable bins can easily be carried t]'om
refl-Jgerator to work area.
To remove: I,ifl the fl'ont of the bin up, then
pull out.
To replace orrelocate:Engage the bin in the
molded supports of the do(m and push in.
Bin will lock in })lace.
Rearranging the Shelves
The snuggerhelps prevent tipping, spilling or
sliding ot small items stored on the door shelt_
}'lace a finge*" on either side ot the divider
near the rear and move it back and torth to
fit your needs.
Refrigerator Shelves:
ToRemove
0 LiftuFanoout el]It up
ToReplace
G
lockin place
Freezer Shelves:
ToRemove
FreezerBaskets:
ToRemove
Remove the basket by pulling it fl_rward,
lifting up the fl'ont and sliding it past the
stoplocation.
WARNING:Poorperformancemayoccurif
freezerbasketsarenotused Storageof itemsin
thefreezerwithoutusingbasketsmayresult in
poortemperatureperformanceduetorestrictions
of airflow within thefreezercompartment.
Page 7

Slide-Out Spillproof Shelf (onsomemodels)
The slide-out spillproof shelf alh_ws you to
reach items stored behind othe_. The special
edges are designed to help prevent spills fi'om
dripping to lower shelves.
Spillproof Shelves (onsomemodels)
Spillproof shelves have special ed_es to help
prexent spills from dripping to lower shelxes,
Quick Space Sheff (onsomemodels)
,k _ ......... _ This shelf splits in half and slides under itself
fiw storage of tall items on the shelf below,
Oeep Ooor Shelves
Detachable shelf extenders deepen and
enclose fixed door shel_ es, providing more
,stor'_oe,_room and greater storage flexibility.
Makesureyoupushtheshelvesall thewaybackin
beforeyouclosethedoor
To replace" En ,a ,e the shelf extender in the
molded suppo_s on the doo_ and push in.
It xSll lock in place.
TO remove: I,i'* the she', extelldel" S[l',ti_ht tip
then pull ()tit.
7
Page 8

Abouttheadditional features.
Not all features are on all models.
ShelfSaver TM Rack
Use this rack to store bexerage cans for
easy access.
Loading the Freezer Compartment
I,oad so that at least 15 mm of space remains
clear between stacks of packages and 15 mm
to 95 mm of space between the top of any
stack and anv shelf or basket above it.
Packages may hang over the front of shelves
but must remain l 5 mm fl'om doors.
::J?::Food to be frozen illtlSt ilOt be placed
in direct contact with tood in storage.
If ti)od is to be frozen every (la 5 it may
be necessary to reduce the quantity to
be frozen.
_: If a quantity of tood needs to be fl'ozen,
set the ti'eezer control to its coldest setting.
_Mter the tood is frozen, reset the freezer
control to its initial position.
N Food is most quickly fl'ozen on the middle
three shelves of the fl'eezer compartment
and most slowly in the freezer door
shelves.
It can also hold a 22 cm x 33 cm baking
dish.
::Ji::Do not store commercially quick-fl'ozen
tood longer than the time recommended
bv the ti)od n/anufilcturers.
::J?::If the power to the appliance is shut off tot
an extended time or if the refl_igerating
system tails, do not open the doors tmless
absolumlv necessary. When it is necessary,
close them as quicl(ly as possible so the
frozen tood will stay ti'ozen as long as
possible.
_: The freezer door storage shelves marked
with a two-star label are only ai)i)ropriate
fi)r the storage of previously fl'ozen fi)od.
Effervescent drinks should not be stored in the
freezer compartment.
Freezer Performance
This Refrigerator/Freezer has an merall
"Four Star" ratillg.
Freezer pertormance is classified by star
ratim,s defined bx ]SO 85(; 1 STANDARD
AND SUMMARY BEI,OX._ :
CODE
®
0I"
Load Limiting Line: _' _
On models 20 and 22, h zen ti)od l)acka°es_, should
not be loaded aboxe the load limiting line h)cated at
8
the back of the fl'eezer compartment.
FREEZING-I,OAD TEME
(FOOD TEMPEIt&_TU RE)
Below-6°C.
Beh)w -12 °C.
Beh_w -18 °C.
Howexer, these limited areas haxe a two star
rating as permitted b) the standard:
Models I_ocafion of Og_) Freezer Shelves
20, 22 Without i(emaker: All ti'et_zer door shelves.
20,22 With i(emaker: All tieezer door shelves and
the shelf above the i(e bu( ket.
2,') With icenlaker: All fieezer door shelves.
Page 9

Aboutthestorage drawers.
Not all features are on all models.
Storage Drawers
Excess water that ma_ accumulate in the
_iiii_II
bottom of the dra_ers should be _il)ed (h).
"\
ttumi,t#v Csmrol
/ / _ ]1 Trivet
Coldest
Adjustable Humidity Drawers
Slide the control all the wa_ to the High
or J setting, to l)r°xide high humidit_
recommended for most xegetables.
Trivet and Divider (onsome
Divider
models)
The trivet is designed to keep yore" fluits and vegetables off
the floor of the drawer and awa_ from any moisture that
might form. The dixider will keep the larger fluits and
xegetables, from thlliw,_ or rolling, onto the more delicate
ones. B) lifting straight up on the dixider, you can detach it
from the trixet and ac!iust it from side to side, then push
down and into position.
Adjustable Temperature Drawer
The a(!iustable temperature drawer has its
own cold air duct to allow a stream of cold
air fl'om the fl'eezer compartment to flow
around the drawer.
The variable temperature control regulates
the air flow from the freezer compartment.
Slide the control all the way to the Lower
,settino_ to provide lower hmniditv le_ els
i'ecoi/ti/t ended tor IX)ost h )tits.
Set control lever tip to convert the drawer
to normal refligerator temperature. Cold air
duct is turned off. Variable settings between
these extremes can be selected.
Set control lever down to the coldest setting
to store fresh meats. If lever is leit in meat
position tot a long period of time, some fl'ost
may form on the inside of the drawer.
Aboutstoragedrawer removal
Not all features are on all models.
Drawer
Guides
When replacing flTedrawers, make
sure you slide them through the
drawer guides.
Drawer Removal
Drawers can easily be removed b) tilting up
slightly and pulling past stop location.
If the door prevents you fl'om taking out
the drawers, the reiiigerator will need to
be rolled Ire'ward until the door opens
enough to slide the drawers out. In some
cases, when w)u roll the refrigerator ottt,
wm will need to move the refrigerator to
the left as wm roll it out.
Page 10

Abouttheautomaticicemaker.
A newly-installed refrigerator may take 12-24 hours to begin making ice.
Power Automatic Icemaker (onsome models)
Switch
The icemaker will produce seven cubes
per cycle--approximately 100-130 cubes
in a 24-hour period, depending on fl'eezer
coI/ipaFtIllent {el/lpel'attlFe, Fooill
temperature, number of door openings
and other use conditions.
If the refl'igerator is operated befl_re the
water connection is made to the icemaker,
set the power switch in the O position.
When the refl'igerator has been connected
to the water supply, set the power switch to
the Iposition.
The icemaker will fill with water when it
cools to fi'eezing. A newly-installed
refi'igerator mav take 12 to 24 hom_ to
begin making ice cubes.
You will hear a buzzing somld each time the
icemaker fills with water.
Thro_ awa) the first few batches of ice to
allow the water line to clear.
Be sure nothing interferes with the sweep
of the feeler arm.
It is normal for several cubes to be joined
together.
If ice is not used fl'equently, old ice cubes will
become cloud> taste stale and shrink. If the
ice cubes become stuck in the icemaker, turn
off the icemakel; remo\ e the ctlbes and ttlrn
the icemaker back on.
There is at?upper freezer shelf
above fl?eicemaker that cat?be
used for storage.
WARNING: Connect topotable water supply
only, Installation of the icemaker must fie
done by a qualified service technician.
/ 77
Ll..............
_'\ hen the bin fills to the level of the feeler
arm, the icemaker will stop producing ice.
Ice Storage Drawer
Toaccess ice, pull the drawer out.
Toremove the drawer, pull it straight out
and lift it past the stop location.
Icemaker Accessory Kit
If )our refl'igerator did not COlne already
equipped with an automatic icemaker,
an icelnaker accessory kit is axailable at
extra cost.
Check the back of the refl-igerator for the
specific icemaker kit needed tor wmr model.
WARNING: Connect to potable water supply
on/_ Installation of the icemaker must be
done by a qualified service technician.
7O
Page 11

Aboutthe ice and water dispenser.
On some models
ToUsetheDispenser
SpillShelf
Select CUBED ICE _ , CRUSHED ICE _-_ (>r
WATER _.
Press tile glass gently against tile top of tile
dispenser cradle.
Tile spill shelf is not self-draining. To reduce
water spotting, tile shelf and its grille should
be cleaned regularly.
If no water is dispensed when the refrigerator is first
instal/eci, there may be ak in the water hne system.
Pressthe dispenser arm for at least two minutes to
remove trapped ak from the water line and to tiff the
water system. Toflush out impur/ties in the water
line, throwaway the first slX g/assfu/s of water
CAUTION: Never put fingers or any other
objects into the ice crusher discharge opening.
Ice Storage Drawer
on Dispenser Models
Toremove:
Set tile i(emaker power switch to tile
0 position. Pull tile drawer straight out
and then lift past tile step position.
Toreplaoe:
When replacing tile drawer, make sm'e to
push it firmly into place. If it does not go
all tile way back, rem_we it and rotate tile
drive mechanism 1/4 turn. Then push tile
drawer back again.
Locking the Dispenser (onsome models}
Press tile LOCK CONTROL
pad fi)r 3 seconds to lock
tile dispenser and control
panel. To unlock, press
LOCKCONTROL for 5 seconds.
HOLD3 SECS
and hold tile pad again
DispenserLight
This pad turns tile night
light in tile dispenser on
and off. Tile light also
coIIleS on when tile
LIGHT
Vlechanisn
dispenser cradle is pressed.
If this light bm'ns out, it
should be replaced with
a 6 watt maximmn, 12 volt
DC bulb.
Important Facts About Your Dispenser
_: Do not add ice fi'om trays or bags to
tile storage bin. It may not crush or
dispense well.
_: A\'oid overfilling glass with ice and use
of narrow glasses. Backed-up ice can jam
the chute or cause the door in the chute
to fl'eeze shut. If ice is blocking the chute,
poke it through with a wooden spoon.
iJi::Beverages and ti)o(ls should not be quick-
chilled in the ice storage bin. Cans, bottles
or food packages in tile storage bin may
ca use tile icemaker or auger to jam.
_: Some cHlshed ice may be dispensed even
though you selected CUBED ICE.This
happens occasionally when a few cubes
have been lett in the c_usher.
_: Atter crashed ice is dispensed, some water
may drip fl'om tile chute.
iJi::Sometimes a small molmd of snow will
ti)rm on tile door in tile ice chute. This
condition is normal and usually occm's
when you have dispensed crushed ice
repeatedly. Tile snow will eventually
evaporate.
CAUTION: Someproducts such as water ices should
not be consumed too co/cL
II
Page 12

Careand cleaning of the refrigerator.
Cleaning the Outside
The dispenser drip area, (on some models)
beneath the grille, should be wiped dry.
_'ater left in this area ma_ leaxe deposits.
Dispenser drip area.
Remoxe the deposits b) adding tmdiluted
xinegar to the well. Soak tmtil the deposits
disappear or becoi/le loose enotl(rh_ to
rinse _lxv_lvk
The dispenser cradle (on some models).
Betore cleaning, lock the dispenser by
pressing and holding the LOCI( CONTROL pad
tot 3 seconds. Clean with warm water and
baking soda solution--about a tablespoon
(l 5 ml) of baking soda to a quart (l liter)
of water. Rinse thoroughly and wipe dry.
Cleaning the Inside
The door handles and trim. Clean with a
cloth dampened with soap) water. Dr_
with a soft cloth.
Keep the outside clean. Wipe with a clean
cloth lightly dampened with kitchen
al)l)liance wax or mild liquid dish detergent.
Dry and polish with a clean, soft cloth.
Do not w/_)ethe refngeretor with a soiled dish cloth
or wet towel Thesemay leave aresidue that can
erode thepaint. Do not use scouring pads, powdered
cleaners, bleach or cleaners contaimbg bleach
because these products can scratch and weaken
the paint finish.
Tohelp prevent odors, leave an open box of
baking soda in the refl'igerator and ti'eezer
COIIll)_l I'tIIl e nts.
Unplug the refrigerator before cleaning If this
is not practical, wring excess illoisttlre ()tit
of sponge or cloth when cleaning around
switches, lights or controls.
Use warm water and baking soda solution--
about a tablespoon (l 5 ml) of baking soda
to a quart (1 liter) of water. This both cleans
and neutralizes odors. Rinse and wipe dry.
AfiLer cleaning the door gaskets, apply a thin
laver of petrolemn.jelly to the door gaskets
at the hinge side. This helps kee I) the gaskets
from sticking and bending out of shape.
Behind the Refrigerator
Be carehfl when moving the refrigerator
away fl'om the wall. All tvl)es of floor
coverings can be damaged, particularly
cushioned coverings and those with
eIl/bossed StlI'J[_l ces.
Pull the refrigerator straioht out and return
it to position by, l)ushing, it ,straioht_ in.
Drain opening in freezer compartment. During
yearly cleaning, remove bottom fl'eezer
basket and flush a solution of baking soda--
1 teaspoon (5 ml) and 2 cups (500 ml) of
hot (not boiling) wate_ through the drain
line with the hel I) of a meat baster. This
will hel I) eliminate odor and reduce the
likelihood of a clogged drain line. If drain
becomes clogged, use a meat baster and
baking soda solution to force the clog
through the drain line.
Avoid cleaning cold glass shelves with hot water
because the extreme temperature difference may
cause them to break. Handle glass shelves carefuflg
Bumping tempered g/ass can cause it to shatter
Do not wash anyplastic refrigerator parts in
the dishwasher
Moving the refl'igerator in a side direction
may result in damage to the floor covering
or refl'igerator.
When pushing the refngeretor back, make sure you
don't roll over the power cord or icemaker supply line
(on somemodels).
12
Preparing for Vacation
For long vacations or absences, relllOVe food
and unl)lug the reli'igerator Move the freezer
control to the 0 position, and clean the
interior with a baking soda soludon of one
tablespoon (l 5 ml) of baking soda to one
qt:mrt (l liter) of water: I,eave the doors open.
Set the icemaker power switch to the
0position and shut off the water SUl)ply
to the refrigerator.
If the temperature can drop below freezing,
have a qualified servicer drain the water
SUl)ply system (on some models) to prevent
serious property damage due to flooding.
Page 13

Preparing to Move
Secure all loose items such as grille, shelves
and drawers by taping then_ securely in
place to prevent damage.
Replacingthelightbulbs.
Turning the control to the 0 position does not remove power to the light circuit.
Refrigerator Compartment--Upper Light
Thisbulb/s locatedbehindthecontrols. O
O Unl)lt]g the refrigerator.
On models with pad controls--The bull)
is located near the ui)i)e_qefl rear corner
of the compartment, behind the light
shield. Remove the light shield by sliding
it forward and out of the compartment,
On models with knob controls--To
remove the light shield, push it up
and back.
Besure the refrigerator stays in an upright position
during moving.
On models with pad controls--Replace
the light shield by holding it against the
left wall and sliding up and toward the
rear wall tmtil it snaps in place.
On models with knob controls--To
replace the light shield, position the
plastic hooks on the light shield so
they fit into the holes on the back
of the control ai'ea,
Plug the refl'igerator back in.
Replace the bull) with an appliance bull)
ot the same or lower wattaoe
Refrigerator Compartment--Lower Light (onsomemodels)
This//_Tht is located above the top drawer.
Unplug the refl'igerator.
@Grasp the lip at the bottom of the light
shield and pull it up and fro'ward.
0 After rei)lacin,,_ >Ath an appliance bulb
of the same or lo_er _attage, replace
the shield.
O Plug the refrigerator back in.
Freezer Compartment
O Unplug the refrigerator.
@ Remove the shelfjtlst below the light
shield. (The shelf will be easier to
remove if it is emptied first.)
i,ifl up on the light shield to relnove.
O After rei_lacino_ with an appliance bull) of
the same or lower wattage, reinstall the
shield b) hanging it from the three tabs.
0 Reinstall the shelf and plug the
refrigerator back in.
Dispenser
0 UnI)lug the refl'igerator.
The bull) is located on the dispenser
under the control panel. Remove the
light bull) by tm'ning it cotmterclockwise.
0 Replace the bull) with a bull) of the same
size and watta *e
Plug the refrigerator back in.
13
Page 14

Installation
Refri erator
Instructions
BEFORE YOU BEGIN
Read these instructions completely and carefully.
"IMPORTANT - S.,'e_he_e
instructions for local inspector's use.
•IMPORTANT - Ob e,,e..
_oveFIlillo codes and ol"dillallces.
• Note to Installer - Besure to leave these
instructions with the Consumer.
• Note to Consumer - Keepthese instructions
for hlture reference.
• Skill level - Installation of this appliance requires
basic mechanical skills.
• Completion time - Refrigerator Installation
]5 minutes
• Proper installation is the responsibilit? of the
installer.
• Product failure due to improper installation is not
covered under the _'XTarrallt},
Models 20,22,25
CLEARANCES
_Mlow the fi_llowing clearances t0r ease of installation,
proper air circulation and plmnbing and electrical
connections.
• Sides 4 mm
• Top 25 mm
• Back 25 mm
A side clearance of 19 mm is needed fl)r a 90 ° door
opening which provides better access to the fi)od
storage aYea.
DIMENSIONS
2O
A* 1689 mm
B 800 mm
C** 864 mm
22 25
1689 mm 1746 mm
851 mm 908 mm
864 mm 864 mm
WATER SUPPLY TO THE ICEMAKER
(on some models)
If the reli'igerator has an icemaker, it will have to be
connected to a cold drinking water line. An approved
water supply kit is awfilable at extra cost fl'om vom"
local distributor.
Maximum permissible inlet water pressure--8.3 bars.
Minimum permissible inlet water pressure--l.4 bars.
Installation of the icemaker must be done by a
qualified service techulcim_.
REFRIGERATOR LOCATION
• Do not install the reflJgerator where the temperatm'e
will go below 16°C because it will not _tm often enough
to maintain proper temperatm'es.
• Install it on a floor strong enough to support it flfllv
loaded.
D 121 (5m m
E 1207 mm
F 1018 mm
G 115(.) mm
H 112. mm
*t ]eighl does not include ]tinge.
*':Depth in(ludes handle.
I--- B-----fl
_3
71 I
It II tl
ili i II
I
I
I
1267 mm 1267 mm
1076 mm 1207 mm
1074 mm 1113 mm
1233 mm 1294 mm
1172 mm 1171 mm
7
| |
I
I_; III
i
14
Page 15

Installation Instructions
ROLLERS
The rollers have 3 purposes:
0 RolleI_ a(!just so the door closes easily when opened
about halfivav:
O Rollels a(!just so tile refl_igerator is firmly positioned
on the floor and does not wobble.
O Rollels allow )ou to inoxe tile reflJgerator axvay fl'oln
tile wall fin" cleaning.
To adjust the milers, remove the base grille by pulling it
out at tile bottom.
Turn the roller ac!jusfing screws dockwise to raise the
refl_igeratoi; comltercloclc_vise to lower it. Use an
a(!iustable wrench (3/8" hex head bolt) or pliers.
DOOR ALIGNMENT
_MteI"leveling, inake sure that tile doolS are even at tile top.
To Inake file doolS even, a(!jttst file I'efiigeI_m n"door as t611_s:
O Relnove tile Base Grille, open tile dools, then pull tile
grille straight out.
Detemfine which otthe two doo_s is higher than the other:
O i,ifl tile lower dooi; along with tile slnall cam.
Place the shim between the Door Metal Hinge and the
small C_llI] _IS shown.
Press in tile shiln so that it fits in between tile inetal
hinge and tile plastic cam.
Close the dools and check if they are level at the top.
If one door is still lower than the othei; repeat the
process and insert another shiln.
_- uMerthefreshfood
doortophiogecover.
Shim
To replace base grille, line up the clips on back of grille
between tile bar and tile bottom _ff tile cabinet. Push
tin'ward until grille snaps into place.
INSTALLING THE WATER LINE
BEFORE YOU BEGIN
Tile water lille installation is not warranted bv tile
refl'igerator or icelnaker inanulhcturer. Follow these
recomlnendations carefllllv to ufinilnize tile risk of
exi)ensive water dalnage.
Water hammer (water banging in tile pipes) in house
pltmd)ing can cause damage to refrigerator parts and
lead to water leakage or flooding. Call a qualified
plumber to correct water hammer before installing
the water sui)ply line to the refrigerator,
To i)revent burns and I)roduct dalnage, do not hook
up tile water line to tile hot water line.
If wm use wmr refl'igerator before connecting the
water line, inake sure the icelnaker power switch is
in the O (off) position.
15
NOTE: If tile (loolS are not even and tile shim is alreadx
inserted, you can remoxe tile shiln to lower tile (looI:
BEFORE YOU BEGIN (CONT.)
Do not install tile icelnaker tubing ill areas where
telnl)eratures tall below freezing.
When using any electrical device (such as a power
drill) dtuJng installation, be sure the device is
insulated or wired in a manner to prevent tile hazard
of electric shock.
All installations must be in accordance with local
plumbing code requirements.
Installation of the icemaker must be done by a
qualified service tech_ficim_.
a, WARNING!Coimect to potable
water sui)pl ) only.
Page 16

Installation Instructions
INSTALLING THE WATER LINE (CONT.)
[] CONNECT THE TUBING TO THE
REFRIGERATOR
NOTES:
• Befl}re making the connection to the refrigerator,
be sure the refl-igerator power cord is not
plugged into the wall outlet.
• We recommend installing a water filter if your
water sui)ply has sand or particles that could clog
the screen of the refl-igerator's water wdve. Install
it in the water line near the refligerator.
Some models ha\e the refl'igerator comlection at
the end of tubing located outside the compressor
compartment access cover. On other models, the
compressor compartment access cover must be
removed in order to access file refl'ig_rator com_ection
at file water valve.
On models using the
refl'igeratkm connection at
the water valve, remove the
plastic flexible cap.
©
[] CONNECT THE TUBING TO THE
REFRIGERATOR (CONT.)
Tubing
Typical
CompressionNut
Ferrule
(sleeve)
Refrig
Reattacb the access cover.
Tubing
[] TURN THE WATER ON AND PLUG
IN THE REFRIGERATOR
Arrange the coil of tubing so that it does not vibrate
against the back of the refl'igerator or against the
wall. Push the refl'igerator back to the wall.
Place the compression nut and ferrule (sleexe) onto
the end of the tubing as shown.
Insert the end of the tubing into the water _al_e
connection as tier as possible. X_qfile holding the
tubing, tighten the fitting.
Fasten the robing into the clamp provided to hold
it in a vertical position. "_%uma) need to pr) open
the clamp.
The illustration below or at right Mll look like the
connection on your icemaker.
Tubing
Clamp
Typical
Compression
Nut
Ferrule
(sleeve)
Refrig
Connection
[] START THE ICEMAKER
Set the icemaker power switch to the I position. The
icemaker will not begin to operate until it reaches
its operating temperatm'e of-9°C or below. It will
then begin operation automatically if the icemaker
power switch is in the Iposition.
ON
switch_
NOTE: In lower water pressm'e conditions, the
water xalxe ma) turn on up to 3 times to delixer
enou,*h water to the icemaker.
16
Page 17

Normaloperatingsounds.
Newer refrigerators sound different from older refrigerators.
Modem refrigerators have more features and use newer
technology.
Do youhear what I hear? Thesesoundsare normal.
HUMMM...
--WHOOSH...
• The new high efficiency compressor may Hm faster
and hmger than your old refl'igerator and you may
hear a high-pitched hum or pulsating sound while
it is operating,
• Sometimes the reflJgerator runs fin" an extended period,
especially when the doo_s are opened fl'equently: This
n]eans that the FrostGuard"feature is working to
prevent fl'eezer bm'n and improve t0od preservation.
• 54m may hear a whooshing sound when the (loo_ close.
This is due to pressure equalizing within the reli_igerato_:
CLICKS, POPS,
CRACKS and CHIRPS
• You may hear cracking or i)oi)ping sotmds when the
refl'igerator is first i)lugged in. This hal)pens as the
refrigerator cools to the correct tei/ll)erattlre.
• Electronic dampers click open and closed to provide
optimal cooling and energy savings,
• The compressor may cause a clicking or chirping
sotmd when attempting to restart (this could take
up to 5 minutes).
• The electronic control board may Catlse a clicking
sound when relays activate to control refrigerator
coIIll) OI]eIltS,
• Expansion and contraction of cooling coils dm'ing
and after deti'ost can Catlse a cracking or i_oi_ping
SOtlnd.
• On models with an icemake_; after an icemaking
cycle, you may hear the ice cubes dropping into
the ice bucket.
WHIR./
• You may hear the rims spinning at high speeds.
This hal)pens when the refrigerator is first i)lugged
in, when the doors are opened fl'equently or when
a large _llllOtlll[ of food is added to the refl'igerator
or freezer comI)amnents. The rims are helping to
maintain the correct temperatures.
• If either door is open fin" over 3 minutes, you may
hear the rims come on in order to cool the light
bulbs.
• The £ms change speeds in order to provide optimal
cooling and energy savings.
WATERSOUNDS
6
• The flow of refl'igerant through the fl'eezer cooling
coils may make a gm'gling noise like boiling water.
• Water dropping on the defrost heater can cause a
sizzling, i_oi_ping or buzzing sotmd dm'ing the
defl'ost cycle.
• A water dripping noise may occm" dm'ing the defrost
cycle as ice melts from the evaporator and flows into
the drain pan.
• Ch)sing the door mav cause a gmgling sound due to
pressure equalization.
/7
Page 18

Beforeyoucall forservice...
Troubleshooting -tips
Save time and money/.Review the charts on the following pages first
and you may not need to call for service.
Possible Causes What ToDo
Refrigerator does not Refrigerator in defrost cycle. * _,_hit ab()ut 30 minutes fi)x" defi'ost cycle to end.
operate Freezer control in O position. * M()ve the fl'eezer (()ntr()l t() a temperature setting.
Refrigerator is unplugged. * Ptlsh tile ph/g c(nupletely into tile ()tiff el.
The fuse is blown/cirettit * Replace fl/se or reset tile bre:lker.
breaker is tripped.
Vibration or ranting Front rollers need adjusting. * See Rollers.
(slight vibration
is normal)
Motor operates for Normal when refrigerator * _'ait 24 i_()tus fin" ti_e refi_igemtor to completely
Iong periods or cycles is first plugged ha. cool down.
onandofffrequently.
(Modernrefrigerators amounts of food are
with more storage
space and a larger placed in refrigerator.
freezer require more Door left open. * (_he(k to see if l)ackage, is holding door open.
operating time. They
start and stop often Hot weather or frequent * This is mmual.
to maintain even door opelmlgs.
temperatures.) Temperature controls • See About thecontrols.
Often occurs when large * This is hernial.
set at the coldest
setting.
Refrigeratororfreezer Temperature control not set • SeeAbout thecontrols.
compartment too warm cold enough.
Warm weather or frequent * Set tile temperature control one step (ol(lel:
door opelmlgs. See About thecontrols.
Door left open. * (_he(k to see if package is holding door open.
Frostorice crystals Door left open. • Check to see it package is holding doln" open.
onfrozenfood
(frostwithinpackage Too frequent or too long
isnormal) door opelfings.
Divider between Automatic energy saver • This helps prevent clmdensafion on tile outside.
refrigerator and freezer system circulates warm
compartments liquid around front edge
feels warm of freezer compartment.
Automatic icemaker lcemaker power switch * Set tile power switch to tile I position.
does not work is in the O position.
(onsome models) Water supply turned off or * See Installingthe water line
not comaected.
Freezer compartment * _Mfit 24 houl_ fin" the refi_igemtor to completely cool down.
tOO _varln.
Piled up cubes in the storage * l,evel cubes by hand.
bin cause the icemaker
to shut off.
Ice cubes stuck in icemaker.
(Green power light on
icemaker blhlking).
• Turn off the icemakei, remove cubes and turn the
iceulaker back on.
/8
Page 19

Possible Causes What To Do
Ice cubeshave Ice storage bin needs clem_hag. * Erupt)and wash bin. Discard old cubes.
odor/taste Food lrmasmitthag odor/taste * _'_rap foods well.
to ice cubes.
Interior of refrigerator * See Care and cleaning.
needs clem_hag.
Slow ice cube freezing Door left open. * Check to see if package is holding door open.
Temperature control not set * See About the controls.
cold enough.
Doornot closing Door gasket on hinge side *_II_-) )lx',i)etroletun .jelly, on tilce of ,gasket,.
properly stickhag or folding over.
Orange glowin Defrost heater is on. * This is nomml.
Cube dispenser does not lcema_ker turned off or * Turn on icemaker or water supply.
work (on some models) water supply turned off.
Ice cubes are frozen to * ]_emove cubes.
icelnaJker feeler arm.
Irregular ice clumps in * Break up with fingertip pressm'e and discard remaining, clmni)s.
storage container. * Freezer max be too wamL A(!just the fl'eezer control to a colder
,setting, one position at a time, tmtil clmnps do not titan.
Dispenser is LOCKED. • Press and hold the LOCK CONTROL I)ad fin 3 seconds.
Water haspoortaste/odo r Water dispenser has not been * Dispense water until all water in s}steul is replenished.
(onsome models) used for a long time.
Waterin firstglass is Normal when refrigerator * _'_fit 24 horns fin" the refl_gemtor to completel} cool down.
is first hlstalled.
Water dispenser has not been * Dispense water tmtil all water in s) stem is replenished.
used for a long thne.
Water system has been drained. * _dlow several hom_ fi)r replenished supply to chill.
Water dispenser does Water supply line turned * See Installing the water line.
not work (on somemodels) off or not comaected.
Air may be _capped in the * Press the dispenser area fin" at least two minutes.
water sTstem.
Dispenser is LOCKED. * Press and hold the LOCKCONTROLpad fi,_ 3 seconds.
Water is not dispensed Water ha reservoir is * (_dl for sertice.
buticemaker is working frozen.
/9
Page 20

Beforeyoucall forservice...
Troubleshooting -tips
Possible Causes What To Do
No water or ice cube Supply line or shutoff * Call a l)hunbei:
production valve is clogged.
Dispenser is LOCKED. • Press and hold the LOCKCONTROLpad fi)r 3 seconds.
Foods trmasnfitthag * Foods with ,strom,_odoI_ should be tightly wrapped.
odor to refrigerator. * Kee I) an open box of baking soda ill the refl_igerator; replace
exerv three ill onths.
Interior needs clemlhag. * See Care and cleaning.
Defrost water drainage • See Care and cleaning.
sTstenl needs cleaning.
Moisture forms on Not unusual during • _,Vil)e surfi_ce (h3,:
outside of refrigerator periods of high humidity.
Moisture collects inside Too frequent or too
(in humid weather, air long door openhags.
carries moisture into
refrigerator when doors
are opened)
Interiorlightdoes No power at outlet. • Replace fuse or reset the breakei:
not work
Water on kitchen floor Drain ha the bottoln of • See Care and cleaning.
on bottom of freezer the freezer clogged.
Hot air from bottom Normal air flow cooling
CUBEDICEwas Selected
butCRUSHEDICE
Light bulb burned out. • See Replacing the light bulbs.
Cubes jmnmed ha chute. • Poke ice through with a wooden spoon.
motor, ha the refrigeration
process, it is normal that
heat be expelled ha the
area under the refrigerator.
So efloorcove ag
sensitive mad will discolor at
these normal mad safe temperatures.
Last setting was CRUSHEDICE. • A few cubes were left ill the crusher fl'om the prexious settin ,
This is nomlal.
wasdispensed
(onsomemodels)
2O
Page 21

Special Safety Instructions forAustralia and New Zealand.
(in addition to other information in Owner's Manual)
IMPORTANTSAFETYINSTRUCTIONS
Toreduce the risk of personal injury or damage to property, follow basic safe_/ precautions when using this
refrigerator, including the following:
When using any Electrical Product, basic precautions should always be followed, including the following:
READTHESEINSTRUCTIONSCAREFULLYBEFORE
USINGTHEREFRIGERATOR.KEEPTHEINSTRUCTIONS
HANDYFORFUTUREREFERENCE.
_7_IMPORTANT'Always operate the refl'igerator
fl'oIn a power source of the saine Voltage,
Frequency and Rating as indicated on the
refl'igerator identification plate. Operate the
refl'igerator fl'om an Earthed (Grotmded) 3 pin
power outlet flfllv accessible when the refl'igerator
is located in its normal operating position.
_::_Close supervision is necessary when any electrical
product is used by or operated near children or
infirm persons; young children should be
supervised to ensure that they do/10t play with
the refl'igera tot.
_::_IMPORTANT"Do not operate the refl'igerator with
a damaged Supply cord or Plug. If it is damaged,
it must be replaced by the illantlfi_cttli'er,
distributor or its service agent or a similarly
qualified person in order to avoid a hazard.
Special tools are required to replace the
Supply flexible cord.
IAIA D IlII IlI I _.
cords. If it is necessary to use an extension cord,
prior to its rise, make stli'e the extension cord is
safe to use, capable of handling the electrical load
(if the product (refer to Product identification
plate) and has been checked and tested b) )our
electricity supplier or a qualified technician.
To axoid becomino entangled in the cord, oever
lay it throu(,h_ or along, a walkwa) or thoroughfi_re.
_;_Do not allow the cord to hang, oxer the edge, of a
bench top where it inav be grabbed by children or
becon_e entangled with the user.
27
Page 22

Special InstallationInstructionsforAustralia and New Zealand.
Installingthe WaterLbe
For Australian and New Zealand installation, read these instructions completely and carefully.
Before You Begin
::_IMPORTANT" Government legislation and Codes
in most States and Territories of Australia
require installation by a licensed i)lmnber.
The installation must conflmn to Australian
Standard AS 3500.1 _,_ater SUl)pl >
_?_.V_ter hammer (water banging in the pipes)
in house plmnbing can cause damage to the
refl'igerator parts and lead to water leakage or
flooding. Call a qualified plmnber to correct
water hammer befl)re installing the water sui)ply
line to the refl'igerator.
Shut Off the Main Water Supply
For models fitted with an icemake_, a water supplF
kit (containing flexible tubing and fittings) is
SUl)plied with the refl'igerator.
The water pressure must be between ] 38 and
827 kPa on models without a water filter ftted,
and between 275 and 827 kPa on models with
a water filter fitted.
Turn Offthe water and open a low tap to drain
the water from the pipe.
Complying with the plmnbing codes, install
a suitable branch fitting (not supl)lied ) to the
cold water SUl)ply:
Extend the branch to a suitable location a(!jacent
to the refl'igerator when it is located in its operating
position. Terminate the branch with a shutoffwflve
(not sui)plied ) .
IMPORTANT"The shutoff wflve should be accessible
(such as in an ac!jacent cupboard, as close to the
wall as possible) when the refl'igerator is in its
normal operating position.
i_' To prevent bm'ns and refl'igerator damage, do
not hook up the water line to the hot water line.
i(;]f you rise Votlr refl'igerator before connecting the
water line, make sure the icemaker power switch
is set to the 0 position.
_:; Do not install the icemaker tubing in areas where
the temperatm'es fall below fl'eezing.
If wmr water sui)ply pressure is higher than 690 kPa
during the day (if so, it may reach higher levels at
night), install a suitable Pressure limiting wflve (not
sui)plied), alter the shutoff wflve, making sm'e the
"flow arrows" on the body of the device lace the
same direction as the water flow.
If necessary, assemble a suitable fitting (not
sui)plied ) to the upstream end of the shutoffwflve
(or pressm'e limiting wflve) fin" attachment of the
fitting sui)plied with the water sui)ply kit.
NOTE'. PTFE tape should be used for a watertight
seal when assembling all the above fittings.
Do Bet turn the water sui)ply On at this time.
22
Page 23

Connecting the Tubing to the Shutoff Valve
Attach the fitting with the male thread supplied
with the water supply kit to the shutoff valve
(or pressure limiting _dve, if fitted), and tighten.
NOTE: PTFE tape should be used fi)r a watertight
seal when assembling all the above fittings.
Rome the robing through a hole drilled in the side
of the cupboard as dose to the wall as possible.
Make sure there is sufficient length of tubing
[approximately 240 cm coiled into 3 turns of
approximately 25 cm] to allow the refrigerator
to move out from the wall after installation.
Connecting the Tubing to the Refrigerator
Before making the connection to the refrigerator, be
sure the power is turned OFFand the power cord is
disconnected from the Power Outlet.
If your refl'igerator does not include a water filter,
we recommend installing one in the water line near
the refl'igerator if your water supply has sand or
particles that could clog the screen of the
refl'igerator's water valve.
Insert and push the end of the robing into the
fitting as flu" as possible.
With the fl'ee end of the tubing located in a
suitable containe_; turn the main water supply
On and flush out the tubing tmtil the water is clear.
Turn Off the shutoff valve alter approximately 1 litre
of water has been flushed through the tubing.
Attach the fitting with the temale thread supplied
with the water supply kit to the water valve and
tighten.
Insert and push the end of the robing into the
fitting as flu" as possible.
Fasten the tubing into the clamp provided to hold
it in position. You may need to pry open the clamp.
Remove the refrigerator access cover.
Remo\ e the plastic flexible cap fl'om the water _dve
(refrigerator connection).
23
Page 24

Special InstallationInstructionsforAustralia and New Zealand.
Installingthe WaterLbe (continued)
Turn the Water On
Turn tile water On at the shutott _dve.
Tighten any connection that leaks.
Replace the access cover and tighten all screws
(on some models).
Plug in the Refrigerator
Plug ill tile refl-igerator to tile Power Outlet and
turn On.
IMPORTANT'.Always operate tile Refrigerator fl'om
a power sotlrce of tile same Voltage, Frequency
and Rating as indicated on the Re_l"igerator
Identification Plate. Operate tile Refl'igerator
fi'om an Earthed (Grounded) 3 Pin Power Outlet
fully accessible when tile retligerator is located
in its normal operating position.
Arrange tile coil of tubing so that it does not
vibrate against the back of the reti'igerator or
against the wall.
Start the Icemaker
Set tile icemaker power switch to tile ] position.
Tile icemaker will not begin to operate until it
reaches its operating temperature of-9°C or below.
It will then begin operation automatically if the
icemaker power switch is in the / position.
NOTE: In lower water pressure conditions, the
water valve may turn on tip to 3 times to make sure
enough water reaches the icemaker.
Push the refl'igerator back to tile wall, making sure
tile power cord and tile water line tubing are not
trapped, entangled or squashed by tile refl'igerator
(including tile wheels) or wall.
switch_
24
Page 25

Notes.
25
Page 26

Mesures de s&'urit_ .......... 27-29
Instructions de fonc_tionnement
gacs de rangement ............ :,:_,°°34
(:layettes, bacs et paniers ...... 31,32
Distributeur de glaqons
et d'eau ..................... 36, 37
Machine ii glacons automatique . . . 35
ROglages ...................... 30
Soins et nettoyage .......... 37-38
Remplacement des
ampoules _lectriques ............ 39
Instruc_tions d 'installation .... 40-43
Liste de v&ifications pr&entives
A_ant d'appeler m_ r_parateur . . 45-48
Bruits normaux de
fbnctionnement ................. 44
/nscrivez le num_m de mode/e et le
num_m de s_rie ci-dessous :
Num_ro de modele :
Num_ro de s_rie :
V(ms les trouverez sur tree _tiquette situ_e en
haut 5 droite du compartiment rg_fi'igg_ration,
derri6re les rg_glages.
26
Page 27

MESURESBESk'CUR/Tk"/MPORTANTES.
USEZTOUTESLES/N.STRU.CT/ONSAVANT
B'UT/USERVOTREREFR/GERATEUR.
AVERTISSEMENT!
N'utilisez cet appareil qu'aux fins pr#vues clans le pr#sent Manuel du propri#taire.
MESURESDESECURITE
Pour utiliser un appareil #lectrom#nager #lectrique, vous devez prendre des mesures de s#curit#, en particulier :
:_;;Vous devez bien installer et placer votre
rg_fi'igg_ratetH', conform(_ment aux Instructions de
montage avant de l'utiliser. Consultez (_galement
la section Comment raccordor au r#seau #lectrique.
::_N'essayezjamais de monter sur w)tre rg_fl'igg_rateur.
Cela peut occasionner des blessures coq)orelles et
des dommages au rg_frig_rateur.
NNe permettezjalnais aux enfants dejouer avec
votre rg_fl'ig_rateur ou de modifier ses rg_glages.
i)::Ne pem_ettezjamais aux enfants de grimpe_; de
monte_; de se tenir ou de se pendre aux clayettes
de votre rg_frigg_rateur. ]Is peuvent endommager le
rg_ti'ig0rateur et se blesser s0rieusement.
::_Ne touchezjamais les surfaces fl'oides darts le
compartiment conggdation quand w)s mains sont
humides ou inouillg_es. Votre peau peut coller ;'1
ces surlhces extr&mement fl'oides.
:_J;Ne conservezjamais ou n'utilisezjamais d'essence
ou d'autres liquides ou gaz inflammables ;'1
proximit(_ de votre rg_fl'ig(_rateur ou de tout autre
appareil _lectrom &roger.
::_Dans les r6fl'igg_rateurs qui ont des machines _'1
glagons, _vitez tout contact avec les (dg_ments
mobiles du m_canisme d'6jection, ou avec les
(_l(_ments de chauflhge situ_s en has de la machine
;'1gla¢ons. Ne mettezjamais vos doigts ou w_s
mains sur le mt)canisme de thbrication
automatique de gla(:ons quand le
r_frigtqrateur est branch,.
:_i7Lln technicien de se_wice qualifi_ doit installer
la machine ;'1gla<ons.
::_Ne laissezjamais vos doigts darts des endroits or'/
ils risquent d'etre pinc_s, i,'(_cartement entre les
portes et l'armoire est ng_cessairement petit.
i)::DObranchez votre rOli'ig_rateur avant de le
nettover et de le rOparer.
NOTE: Nous vousrecommandons fortement de fake
accomp/ir tout service par un technicien qua/ifib.
_;Avant de remplacer une ampoule brfil#e, vous devez
d#brancher votre r#frigerateur pour vous &'iter
d'entrer en contact a;'ec tin [ilaxllent portetlr
d'gdectricit(_ (vous pouvez briser tlne lampe b_filg_e
en essavant de la changer).
NOTE: gousn'enl&erez pas le courant Olectrique du circuit
de/a/umi#re en toumant /er@/age en position O.
i)::Ne recongelezjamais des aliments congel_s qui
ont ('ompl_tement dg_gel(_.
27
Page 28

MESURESDESf:CURITf:IMPORTANTES.
LISEZTOUTESLESIIVSTRUCTIONSAVANT
D'UTILISERVOTREREFRIGERATEUR.
DANGER! RISQUEDE PRISEAU PIEGE
BONNEMISEAUREBUTDEVOTREREFRIGERATEUR
I]enfennen_ent et l'asphyxie des enfimts ne sont pas
des histoires du passe. I,es r_fi'ig_rateursjet_s ou
abandonn_s sont totljom's dangereux.., in6ine s'ils
ne doivent rester l_'l clue <_quelquesjours,,. Si vous
vous d_barrassez de votre vieux rOti'igOratem; suivez
les inst_ uctions suiwmtes pour prOvenir tout
accident.
Avant de jeter votre vieux refrigerateur ou
congelateur :
_: Enlevez les portes etjetez-les s()par()ment.
::Ji::i,aissez les Otag_)res montOes, pore" Oviter que
des enfimts puissent tacilement tenir darts
votre r_frig()ra tern'.
iJi::Si votre r()frig_ratem" a tree seHure, cassez-la.
Refrigerants
Tousles appareils de r_fl'igOration contiennent des
r_fl'ig_rants qui, confl)rmOment aux lois fOclOrales,
doivent _tre enlev_s awmt route _limination de
l'appareil. Si vous jetez m_ vieil appareil de
r()fl'ig_ration, v()rifiez comment proc_(ler
aupr_s de la soci_t_ qui est charg_e de
l'_limination de cet appareil.
28
Page 29

i !
MESURESBESECUR/TE/MPORTANTES.
USEZTOUTESLESiNSTRUCTiONSAVANT
B'UT/USERVOTREREFR/GERATEUR.
AVERTISSEMENT!
BRANCHEMENTELECTR/OUE
i,e cordon d'alimentation de cet appareil est muni
d'tme fiche ;'l trois broches (bipolaire avec terre) qui
se met darts tree prise murale _'ltrois trous (bipolaire
avec terre), pour rg_duire le risque de secousse
(_lectrique occasionng_ par cet appareil.
Faites vgMfier la prise murale et le circuit (dectrique
par tm (_lectricien qualifi(_ pour vous assurer que la
prise tam'ale est bien raise _'lla terre.
Si vous avez une prise nlurale _'l deux broches
seulement (sans terre), vous &tes personnellement
responsable et obligt) de la taire remplacer par une
bonne prise murale avec terre, bien raise _'l la terre.
Vous devez toqjours
brancher votre
rg_flig_ratem" _'l sa
propre prise (_lectrique.
I,e rendement de
votre rg_flig_ratem" sera
meilleur et vous (Mterez
ainsi de surcharger les
circuits (_lecttiques et de
surchaufl'er le cfiblage de w)tre maison, avec tous
les risques d'incendie connexes. Veuillez consulter
la plaque signal_tique de votre r_fl'ig_rateur pore"
trouver le bon w_ltage, wattage et fr&luence. Si la
fiche de votre appareil ne correspond pas ;'l w_tre
prise inurale, vous devez inonter une nouvelle fiche
sur w)tre appareil.
Assurez-v0us qu'ulle
b0nneraisea laterre II
existeavant d'utiliser _)
Ficheave: ITt_;_ _
IMPORTANT"Vousdevezfakeeffectuer/aposedesficheset
descordonsd'ahknentationb/ectriquepar unblectricienqualifid
ouunagentdeservice.Danscerta/i_spays,/areposedefiches
et decordonsd'a/imentationdectrklue n'estautonsbequesi
eriea Orbeffectubeparunb/ectricienqua/ifib.
Si le cordon d'alimentation est endommag_, vous
dexez le taire remplacer par tm agent de serxice
qualifi(_ pour (_xiter tout risque en mati_re de
st)cmit(_.
Ne dg_branchezjamais votre rg_frig_rateur en tirant
sur le cordon d'alimentation. Tenez totljom's la fiche
termement et enlevez-la de la prise en tirant droit.
Rg_parez ou remplacez imm&liatement tout cordon
d'alimentation us(_ ou endommag& N'utilisezjamais
de cordon fissur_ ou us(_ sur sa longueur ou ;'1l'tme
de ses extrg_mitg_s.
Pour _carter votre rg_flig_ratem" du m m; taites
attention de ne pas _craser ou d'endommager le
cordon d'alimentation.
Remplacement du cordon d'alimentation
Pour remplacer n'importe quand le cordon
d'alimentation de w)tre rg_flig&'ateur, w)us devez
le remplacer par tm cordon spg_cial qui n'est
disponible que chez votre revendeur local. Vous
devrez payer les fl'ais de remplacement du cordon
d'alimentation si w)us l'avez endommag&
Vous devez placer le refrigerateur darts un endroit o#
vous avez acces a la prise.
LISEZETSUIVEZSOIGNEUSEMENTCESMESURESDESECURITE
CONSERVEZCESINSTRUCTIONS
29
Page 30

geg/egede votrerefrig&eteur.
Le r_glage ressemble _ I'une des figures suivantes :
Etaposde demarrago pour Io contrOIo do temperature approprie
]_TAPE 1 - R_glez_,,lle contr6le <_Fresh Food ,_ (aliments frais) _'l<_5 ,_.
t_TAPE 2 - R_glez le contr_le du cong_latem __'l<_5 >>.
]_TAPE °3--ATTENDEZ 12 HEURES pour que la temperature se stabilise.
ETAPE _-S'il fatlt changer quelque chose, d_placez le contrgle d'tm chifl're
fi la lois et attendez 12 heures pour que la telnp_rature se stabilise.
REMARQUE:I,e r_glage des contr61es fi la position 0 (art'&t) ne coupe pas le co/li'ant
du circuit d'_clairage.
Le reglage des commandes variera en fonction des preferences
personnelles, de I'usage et des conditions d'utilisation et pourront
necessiter plusieurs ajustements.
// l/
f
Adjust Temperature
0 is Off/5 is Normot / 9 is Coldest
• ® Q
®
llo_d 3 seconds
Limites de temperature ambiante dartsla piece
V0tre r_h'ig_ratem" est concu pore" fonctiomler darts les temp_ratm'es ambiantes
indiqu_es par sa Classe de temp_ratm'e qui est marquee sin" sa plaque signal_tique.
Classe de
temp&rature
Symbole Temp&rature ambiante
Maximale Minimale
30
TempOrOe-
Etendue
Temp_r_e
Subtropicale
Tropi cale
NOTE::La temp&ature interne peut Otreinfluenc_epar des facteurs te/s queI'emp/acement& r_frig_rateur,
la temperatureambiante et la fr_quencedes ouverturesdeporte.Ajustez les boutons der_g/agede
tempbraturedemanibre _compenser/'action deces facteurs.
SN
N
ST
T
32°C 10°(2
32°C 16°C
38°C 18°(2
43°C 18°C
Page 31

C/ayettes et bats de votre refrigerateur.
Tous les modOles n'ont pas toutes ces caract_risfiques.
:lti0n ajustabie
Bacs dans la porte du compartiment refrigeration
Vous pomez _iicilement trmlsporter les bacs
aiustables (Ill r_ffig_rateurjusqu'_'l _otre sm'ii_ce
de travail.
En/evement: Soulevez l'avall[ (hi bac, puis tirez.
Remise enplace ou changement d'omplacement :
Engagez le bac darts le suppol_ moul6 de la
porte et poussez vers l'int6fiem: ll se bloquera
en place.
Changement d'emp/acement des clayettes
Clayettesdu compartiment refrigeration:
Enlbvement
Soulevezet _ Faites
enlevez _asculer
Clayettesducompartimentcongelation:
Enlbvement
Lopartition ajustableemp6che les petits ailicles
plac& sin" le balconnet de la pm_e de coulee; de
se renverser ou de glissel: Mettez tm doigt de
chaque cg_t6 de la partition pr6s de Farri&re et
bougez-la darts tm sens ou darts l'autre selon
_,_)S besoillS,
Paniersducompartimentcongelation:
Enlbvement
Remise en place
0 s_rez _,
SUpe!'_!'rI / IJ/ F""
p0urrnettre I I |_"-
(i ¸
Enlevez le panier en le tirant vers l'awmt,
en soulewmt l'awmt et en hfi taisant
dOpasser sa position d'arrOt en glissant.
AVERTISSEMENT: Si vous n'ufi/isez pas /es
panierducompart/knentcongblation,le
rendementseramauvais.Vousobtiendrezun
mauvaisrendementdetempbraturesi vous
rangezdesarticlesclanslecompartiment
congblationsansutiliserlospaniers,carvous
rbduisezla circulationd'air clansce
compart/menL
Clayette coulissante anti-deversement (surcertains modbles)
I_ clavette coulissante anti-d&xersement xous Assurez-vous de bienpousser /a c/ayettejusqu'au
pem/et d'atteindre des articles pos_s derfiOre ford avant de former la porte.
d'autres articles. Sos rebords sp(_ciaux sent
conqus pore" emp_cher les liquides de couler
sur les clavettes inliariem'es.
Clayettes anti-deversement (sur certa/ns modbles)
i,es cla)ettes anti-dOve_sement ont un rebord
special pore" emp_cher les liquides de couler
sur les clayettes inf&iem'es.
31
Page 32

Clayetteset bacs de votrerefrig&ateur.
Tous les modbles n'ont pas toutes ces caract#risfiques.
Clayette repliables (surcertainsmod_/es)
Cette cla_ette se replie en deux et sa moifi_
ext_riem'e glisse sous sa moiti(_ intg_rieure pour
pem_ettre le rangement d'articles de haute
taille sm _la clmette intiariem'e.
Clayettes profondes de porte
Des ralhmges d(_tachables approfimdissent
et endosent les clayettes fixes de polles, en
iburnissant plus de place et plus de souplesse
de rangement.
Enlovement: Sotllevez la ralhmge droit vel_ le
haut, puis tirez-la.
Caracteristiquessupplementaires.
Remise en place •En _-.to-ezla r'dhmoe darts les
supports moulOs de la po,le et poussez vel>
Fint(!riem: Elle se fixera en place.
Tous los modbles n'ont pas routes cos caract_risfiques.
Panier ShelfSavef _
Utilisez ce partier pore" avoir tm acc_s facile
aux boites de boissons.
ll peut _galement contenir tm plat de
Ctlisson de 22 Clll X 33 cm.
Chargement du compartiment congelation
Rangez \'os aliment de mani_re 5 laisser
au moins 15 mm d'espace libre entre les
paquets de nourriture et de 15 mm fi 25 mm
d'espace libre entre le haut de vos paquets
et toute clavette ou partier situ(_ au dessus
d'eux. Vous pouvez laisser awmcer les
paquets de nourriture 5 l'avant des
clayettes, mais wins devez les (_carter
a 15 mm des portes.
_: Vous ne devez pas placer vos aliments 5
congeler en contact direct avec les
aliments fl'ais. Si wins devez congeler des
aliments chaque jour, vous devez peut-_tre
rg_duire la quantit(_ d'aliments 5 congeler.
_: Si vous devez congeler une grande quantit(_
d'aliments, r_glez le compartiment
cong_lation 5 sa temp_ratm'e la plus basse.
Une lifts les aliments congel_s, r_glez 5
notlveatl le COlnparfilnent conggdation 5 sa
temperature normale.
::Ji::Vous cong_lerez plus tacilement les
32
aliments en les mettant sin" les trois
clavettes du milieu du compartiment
cong_lation et plus diflicilement en les
mettant darts les balconnets de porte du
compartiment cong_lation.
_: Ne conservezjamais d'aliments 5
cong_lation rapide plus hmgtemps que
le temps recommand(_ par le producteur
d'aliments.
_: Si vous coupez l'alimentation _lectrique
de votre rg_fl_ig&'ateur pendant tree hmgue
durg_e, ou si le svstOme de rg_frig_ration
tOlllbe eI1 p}llllle_ n'o/IvI'ez les portes (]tl'ell
cas de ng_cessit(_ absolue. Si wins devez le
taire, reli_rmez-les le plus rapidement
possible de mani&re 5 conserver congel_s
vos aliments le plus hmgtemps possible.
::_i::i,es balconnets de porte du compartiment
cong_lation portant une (_tiquette avec
deux (_toiles ne conviennent qtl'atl
rangement d'aliments d#:j5congel_s.
Vousne devez jamais ranger de boissons
gazeuses dans le compartiment congelation.
Page 33

Caracteristiquessupplementaires.
Performance du congelateur
Ce r(_tiJ o(_rat eur/cong(_lateur_ , coini)orte une
classification "Quatre Etoiles" _.
I,a perfimnance d'tm congSlateur est
classt)e par une classification d'_toiles,
comme &Xlini par I']SO 8561 I,ES NORMES
ET I,E Rt_CAPITUIATIF SONT PRt_CISt_S
C]-DESSOUS :
CODE
®
()11
Ligne de charge maximum : "_'_' '_
Darts les modules 20 et 22, vous ne devez pas d_passer la
ligne de charge ill_lxii/ltlll/ situt)e ;'1l'arribre de votre
compartiment congt)lation quand vous mettez vos paquets
d'aliments.
CONGt_I ATI O N-TEM Pt_I_L_tTURE
(TEMPt_ILCTURE DES AHMENTS)
Moins -6°(;
Moins -12 °C
Moins -18 °C
Cependant, ces endroits limit(_s ont une
notation de deux (_toiles pemfise par la
ilOi]l/e :
Mod_'les Emplatemcm des C_gj Clavettes du
20, 22 &ms machine fi glacons : tomes les clavctles
20, 22 ,\vcc machine fi glaqons : routes les
25 ,\vcc machine _'tglaqons : routes les
compartimem cong(qation
de porto du compurtiment congdlation
clayetWs de porte du compartiment
congdlation et la clayctte au-dessus
du bat: h glacons
clavetws tie porte du compartiment
congg'lalion
Bats de rangement.
Tous los mod#les n'ont pas toutes cos caractOristiques.
.¸.,.2........... _
I
Bacs de rangement
V()us devez essu}er route eau qui s'acct=mule
au fond des bacs.
........v2
q
'\
Bacs a humidite reglable
Faites glisser le m(_canisme de r_glage en
position High (haut) ou ¢2_ pore" obtenir
tm degr(_ d'humidit_ (_lev_, recommand(_
pore" la plupart des l(_gumes.
Faites glisser le m_canisme de r_glage en
position Low (bas) ou (_ pore" obtenir tm
degr_ d'humidit(_ bas, recommand_ pore"
la plupart des fruits.
33
Page 34

rac ristiquos supplemontairos.
Sous-plat et separation (surterrainsmodales)
S@arati0n I.e sous-plat est conqu pour (_carter vos fi'uits et vos l(_gumes
eIl_hlfl_;l_12_2_s;_)Z_)]t6eg_e_;_(_)_;tf_i_t(_d_t_`t_t_ur_it_egu_iesEns_,t_s-_;_t_)_,siti_n._e`,;_nttout droitdeetlat°l''ber oudel.g_glella s(aparation,votlSd,unrouler sur lesautres(._)t(_.1l'autre, pOu;'ezlapuis laPlUsd(alicats.l.el)ousselSg_l)al.el" du
Normal
Leplusfroid
Bac a temperature reglable
I,e bac _'ltempgmm/re r(aglable a sa propre
conduite d'aic qui amine du compartiment
cong(qation un com_mt d'air fl'oid qui
drrule dans le bac.
Le reglage de temperature variable ajuste
le com_mt d'air en provenance &l
compartiment cong_lation.
R0glez le levier en position up (haut) pour
mettre le bac ;'1la tempg_lture normale du
compartiment r(q'rig(aration. Cela coupe le
En/evementdubac a rangement
Tous los modOles n'ont pas toutes ces caract&istiques.
-Guides
!de
Enremettant on place les bacs,
assurez-vous de bien les glisser
dans leurs guide&
Enl#vement du bac
Vous pouvez fhrilement enlever les ba(s en
les sou]e\_mt l_gbreinent et en les tirant au
del_'_ de lent position d'arrOt.
com_mt d'air froid. Vous pouvez choisir des
temp_l_lmres intenn_diaires entre ces deux
extr&mes.
R(_glez le levier en position down (bas) pour
mettre le bac _'lla tempg_lture la plus t_'oide
et conserver la viande frairhe. Si le levier
reste en position down (has) pendant
longtemps, il petit se crg_er un peu de gi;Te
_'ll'int_ariem" du bac.
Si ]a porte vous crop&the de tirer les
bacs compl&tement, vous devez tirer le
r_fl'ig_ratenr vers l'extg_fieur en le roulant
jusqu'k ce que sa porte s'ou', re suflisamment
pour laisser sortir les bacs. Dans certains cas,
vous devez 6galement tirer le r6fl'igg_l:_teur
vers la gauche en le fhisant sortir de son
enlplacenlent.
34
Page 35

Machine a gla ons automatique.
Un r_frig_rateur juste branch_ peut prendre de 12 _ 24 heures pour commencer _ faire des glagons.
Cornmutateur
de marche Machine
Lumi_reverte palpeur
indiquantla
glagons
marche
Machine a glagons autematique
(sur certains mofl_les)
La machine 5 glaqons produit sept glacons
par cycle, soit environ 1O0 _ 130 glacons
par 94 heroes, sehm la temp&'ature du
compartiment cong6lation, la temp6rature
de la piece, le hombre de lifts que la porte
est ouverte et ]es autres Collditions
d' utilisation.
Si vous fidtes flmcti(mner le rg_fl'igg_rateur
avant de raccorder l'eau fi la machine fi
glagons, mettez le comm utatem" de marche
en position 0.
Apr_s avoir raccord_ le r_fi'ig(4rateur _:t
l'alimentation d'eau, mettez le commutateur
de marche en position I.
La machine a glaqons se remplit d'eau
quand elle atteint le point de congg_lati(m.
Un r_frig(4ratem" nouvellement install_
prend de 12 a 24 hem'es pour commencer
fi fhbriquer des glacons.
Vous entendrez tree vibration chaque lois
que la machine 5 glacons se remp]it d'eau.
.]etez les premiers lots de glacons p(mr
permettre 5 la conduite d'eau de se purger.
Assm'e>vous que rien ne gbne la course du
bras palpeur.
Quand l'eau atteint le niveau du bras
palpeur, la machine fi glac(ms s'arrOte de
fhbfiquer des glacons.
I1 est normal de tromer des glaoms qui
soient soud_s ensemble.
Si vous n'utilisez pas souvent yes glacons, les
vieux glacons deviem*ent opaques, prennent
un mauvais gofit et r(4trOcissent. Si des
glacons se coincent darts la machine :rJ
glagons, mettez le comm utateur de marche
en position OFF (arr_t) et enlevez les
glacons. Ensuite, remettez le commutatem"
de marche en position ON (marche) pour
remettre en marche la machine ::mglagons.
g
g
g
II y a une clayette sup&ieure de
compartiment cong#lation au-
dessus dela machflTe_glacons,
que vous pouvez utiliser pour ranger
des al#nents.
A VERTISSEMENT: Branchez uniquement _ une
a/imentation d'eau potab/e, Un technicien de
service qua/ififi dolt instal/er /a machine
g/agons.
Bac a glagons
Pour avoir acc_s aux glagons, tirez le bac
xers l'extg_rieur.
Ensemble accessoire de machine a gla_ons
Si votre rg_fl'ig_rateur n'est pas d_:jfi &luip(_
d'uI_e nmchine 5 glaqons, vous pouvez
acheter tm ei_semble access(fire de nmchine
5 glagons.
Pour enlever le bac, tirez-le dolt vers
l'ext_rietu" et soulexez-le pour hfi taire
(l_passer sa positioi_ d'arr_t.
Vous trouverez derri&re votre rg_fl'ig_rateur
le mod&le d'ei_semble de nmchine 5 gla(:ons
qui convient 5 votre mod_le de i'(_fl'igg_rateur.
AVERTISSEMENT : Branchezuniquement
uneah?nentation d'eau potabie. Un technicien
de service qualifi# dolt installer la
machine a glagons.
35
Page 36

Distributeur de glagons et d'eau.
Sur certains modOles
Uti/isation du distributeur
Choisissez CURED ICE (gla(ons) _,
CRUSHER ICE (glace concass(4e)
ou WATER (eau) _.
Appu}ez le "_erre dourement contre le bras
de distribution.
Le bac de trop-plein n'est pas muni d'un
s}_st_me d'_coulement. Pore" enlever les
Laches dues ;'l l'eau, wins devez le nettoyer
rg_gulii_rement, ainsi que sa grille.
Bacdetrop-piein
Si vousn'avezpasdistnbu_d'eauapr_savoir/)Tsta//_
le r_fr/_7_rateur,/Ipeuty avoirdeI'air danela
conduite d'eau. Appuyezsur /e bras de &stribution
pendant au moins deux minutes pour expulser /'ak de
/a conduite d'eau et mrnp/ir /e systbme de distnbution
d'eau. Pour_/iminer route impuret_en provenance de
/a conduite d_au, jetez /es six premiers verres d_au.
ATTENTION: Nemettezjamaisvosdol)ts ou
d'autresobjetsdans/'ouvertumdudistnbuteur.
Verroui/lage du distributeur (sur certains mode/es)
@ Appu_ ez sur la touche
LOCKCONTROL et son I b b "
HOLD3SECS )'mne'm de rg_oh ,e
LOCKCONTROL
(verrouillage) pendant
.'_ secolldes po{ir
xerrouiller le distributeur
Pour d& errouille_,
appu}ez sur la touche
pendant 3 secondes.
Lumibredudistrifluteur
Cette touche allmne
et _teint la lumiere du
distributem: Cette lmnii_re
s'allume (_galement quand
on appuie sur le bras de
LIGHT distribution. Si l'ampoule
brfile, vous devez la
remplacer par une
ampoule de 1;watts,
12 volts DC.
Bac de glaGonssur les modeles g_
distributeur
Enlevement :
R_glez le commutateur de la machine fi
gla(ons en position O. Tirez le bac drolL vers
vous et soulevez-le pore" d_passer sa position
d'arr_t
Remise en place :
Pour remettre en place le bac, assurez-vous
de bien le pousser en place. S'il n'entre pas
compl&tement, enlevez-le et tom'nez le
m_canisme de ti)nctionnement (l'tm qtlart
de tour. Remettez en place le bac.
36
Page 37

Renseignements importants sur votre distributeur
!i>N'ajoutezjanmis darts ;otre bac _'1gla(:ons
des gladoils en pi'o%enan('e de sacs Oil de
plateaux. Ils risquent d'6tre difficiles fi
concasser ou _'_distribuer.
N t_vitez de trop remplir les xerres de
glacons et d'utiliser des xerres _troits. Des
glac ms peuxent bloquer le conduit ou
emp&'her le volet de fermeture de se
fenner en gelant. Si des glacons bloquent
le conduit, taites-les passer fi l'aide d'une
cuill0re en bois.
_: Ne placezjamais de boissons ou
d'aliments darts le bac _'lgla(:ons pore" les
rafraichir rapidement. I,es boites, les
bouteilles ou les paquets d'aliments plactqs
darts le bac _'lgla(:on peuvent coincer la
machine _'lglacons ou la vis sans fin.
Soinset nettoyagede votrerefrig#rateur.
::Ji::Si vous choisissez CUBED ICE (gla(:ons), il
peut se produire que de la glace concass_e
tombe darts votre verre. Cela se produit de
telnps _'lautre quai_d il reste des gla(:ons
dans le conc_lsse/iY.
_: Apr0s distribution de glace concass_e, de
l'eau peut s'(_couler du conduit.
::Ji::Du givre se forlne parfois sur le volet du
conduit fi glacons. C'est nornlal et cela se
produit ggm_ralen/ent apr_s des
distributions r(_p_t(_es de glace concass(_e.
Ce givre s'_vapore de lui-m6me.
ATTENTION : Vous no devez pas consommer trod
froidscertainsproduitscomme /es g/aces _ l'eau.
Bac de trop-plein du distributeur.
Nettoyage de I'exterieur
Bac de trop-plein du distributeur (sur certains
mod01es). Vous devez essuver compl0tement
jusqu';'l ce qu'il soit bien sec le bac de trop-
plein du distributem" situ_ sous la grille.
I,'eau laiss_e darts ce bac peut laisser des
d_p6ts. Enlevez tous ces d_pgts en versant
du vinaigre non dilu_ darts le bac. I,aissez
reposerjusqu'fi ce que tousles d(_pgts
disparaissent ou deviennent suftisamment
mous pour 6tre enlevg_s.
Berceau du distributeur (sur certains
mod01es). Avant de le nettoyex; verrouillez le
distributeur en appuyant sur la touche LOCK
CONTROL(verrouillage) pendant 3 secondes.
Nettovez avec une solution d'eau chaude et
de bicarbonate de soude (environ 15 ml, ou
tree c. fl soupe, de bicarbonate de soude
pore" 1 litre d'eau). Rincez soigneusement
et s_chez compl()tement en essmm_t.
Les poign_es de porte et les garnitures.
Netto_ez axec un liw,e_ tremp_ darts l'eau
saxonneuse. S_chez axec un linge doux.
Censervez I'extOrieur propre. Essuyez avec un
linge propre l(_g_rement humect(_ de cite ;'1
appareil (_lectrom(mager ou de d(_tersif
liquide fi vaisselle doux. S_chez et polissez
avec tm linge doux, propre.
N'essuyezjamais votrer#frig#rateuravecuntorchon
saieouuneserviettemouil/fie.Ce/apeut/aisserun
rOsiduquirisqued'endommageria peinture.N'utiiisez
jamais detampon_ rficurer,denettoyantenpoudre,
d'eaudejavei oudepro&it nettoyantcontenantun
agentdebianchiment,carcesproduitspeuventrayer
etendommager/ape/))ture.
37
Page 38

Soinset nettoyagede votrerefrigerateur.
Nettoyage de I'interieur
Pour aider a emp_cher les odeurs, laissez une
boite omerte de bicarbonate de soude darts
les compartin/ents r(_frig(_ration et
congOlation.
Oebranchez votre r_frigerateur avant de le
nettoyer. Si (e n'est pas pratique, enlevez
toute hmni(lit(_ au moven d'tme Oponge ou
(l'un chiflim pour nettoyer atltotlr des
colnlnutateurs, des lumi&res ou des rOglages.
Utilisez une solution d'eau chaude et de
bicarbonate de soude (une cuillOre fi soupe
environ, soit 15 ml, de bicarbonate de soude
darts une pinte, soit 1 litre, d'eau). Cette
solution nettoie tout en neutralisant les
odeurs. Rincez et s_chez en essuvant.
Aprbs avoir nettoy_ lesjoints de portes,
mettez tree couche mince de p(_trolatmn sur
lesjoints de portes du c6t0 de la charni_re.
Cela aide fi emp_cher lesjoints de coller et
de se d0timner.
Orifice d_coulement darts le compartiment
coug_latiou. Au (l(_but du nettoyage, enlevez
la corbeille du bas du compartiment
cong01ateur et fidtes 0couler une solution
de 5 ml (tree cuillOre 5 th(_) de bicarbonate
de soude pore" 500 ml d'eau chaude (pas
bouillante) par l'orifice d'Ocoulement fi
l'aide d'tllle poire fijus. Cela aidera fi
Oliminer l'odeur et fi r(_(luire la possibilitO
d'obstruction de l'(_coulement. Si
l'(_coulement est bloqu(_, utilisez tree poire a
j us et une solution de bicarbonate de soude
pore" pousser le bouchon darts la conduite
d'_coulement.
Evitez de nettoger los clayettes froides on verre{sur
certains modb/es) _ l'eau chaude,parce qu'el/es
risquent de se casser _ cause de/a grande diffbrence
de tempbratures. Manipulez avec soins /e verre. Vous
pouvez briser en bc/ats /e verre trempb en /e heurtant
Ne /avez aucune pibce en matibre p/astique de votre
rdfngdrateur clansvotre machine _ /aver /a vaissefle.
Derriere votre refrigerateur
Fakes attention quand vous 0cartez votre
rOfl_igOrateur du ram'. Vous pouvez
endommager votre rev&tement de plancher,
en particulier s'il est matelass(_ ou s'il a tree
sm'tace en relief.
D(_placez le r(_frig(_rateur en le tirant droit et
remettez-le en place en le poussant droit.
Preparation de depart en vacances
Po/lr de longues V}lCaIl(es Oil abseil(es_
enlevez tous vos aliments et d_branchez wme
r6frig(_rateur. Mettez le freezer control en
position 0 (arr6t) et nettovez l'int(_riem" avec
tree solution de bicarbonate de soude, d'une
cuill_re fi soupe (l 5 ml) de bicarbonate de
soude pour tree pinte (l litre) d'eau. I,aissez
les portes o/ivertes.
Preparation de demenagement
Fixez en place toutes les piOces mobiles,
comme la grille, les clayettes et les tiroirs, a
l'aide de ItlbaIl adh_sif, [)()Ill" emp6cher tout
dommage.
Si vous bougez le r(_fl'ig(_ratem" de c6t_, vous
pouvez endommager le rev_tement de
plancher ou le r(_frigOratem'.
Lorsque vous remettez en p/ace votre rbfngbrateur,
assurez-vousde ne pas /e rou/er sur /ecordon
d'ahYnentation ou /a conduite d'eau de/a machine
g/a_ons(sur certains modbles).
Mettez le commutateur de marche de la
machine fi glaqons en position 0 et fermez
l'alimentation d'eau du r_frig_ratem'.
Si la tempOramre risque de descendre en
dessous du point de cong_lation, demandez
5 tm technicien qualifi(_ de purger votre
svstOme d'alimentation d'eau (sur certains
modOles) pour emp_cher des inondations
pouvant occasionner des (l_gfits s0rieux.
Assurez-vousque votrerdfngdrateursoit enposition
droitependantledbmbnagement.
38
Page 39

Remplacementdesampoulese/ectriques.
Vous ne d#branchez pas votre r#frig#rateur du circuit d'alimentafion #lectrique en mettant le bouton de r@lage en
position 0 (arr#t).
Compartiment refrigeration--Ampoule sup#rieure
DObranchez le rOffig&'ateur.
@
Sur les modbles dotOs de touches de
@
commande--IJampoule est situ_e
pr& du coin supOrieur gauche du
compartiment, derribre le protecteur
de Fampoule. Retirez le protecteur en
le fidsant glisser vers l'a_mt pour le faire
sortir du compartiment.
Sur les modbles dotg_s de bo_atons
rotatits--Pour retirer l'Ocran protecteur
de l'ampoule, poussez l'(_cran vers ]e
haut et vers ]'arrihre.
]_.elnplacez ]'ampoule avec une ampoule
@
pore" appareil m6nager de capacit6 en
_atts 6gale ou inf6riem'e.
0 Sin" les mod&les dotg_s de touches clte
commande--Placez le protectem" contre
le c6t(_ gauche, puis ]e fidre glisser vers le
haut en le poussant vers l'arri&rejusqu'a
ce qu'il s'enclenche.
Sur les modules dotg_s de boutons
rotatits--Pour remettre l'& ran
protecteur en place, positionnez les
crochets en plastique de l'_cran de fhgon
_'lce qu'ils s'adaptent aux trous situt4s
(|axis ]a ZOlle des COl//l//alldes.
O Rebranchez ]e r6frig6rateur.
Compartiment refrigeration--Ampoule inferieure (sur certains modbles)
L'ampoule est situ#e au dessus du bac sup#fieur
0 D_branchez la rg_fl'igg_ratem'.
Saisissez la patte situ_e en bas de l'(_cran
protectem" de l'ampoule et tirez-le vers le
haut et l'awmt.
Aprbs avoir remplac_ par une ampoule
d'appareil (_lectrom_nager de m_me
w)ltage ou de w)ltage inf_riem; remettez
l'_cran protecteur de l'ampoule en
place.
Rebranchez le rg_fl'ig_ratem'.
Compartiment congelation
D_branchez la r_li'ig&'atem'.
@ Enlevez la clavette situg_ejuste en
dessous de l'(_cran protecteur de
l'ampoule (Vous pourrez l'enlever plus
ta('ilement en la vidant d'abord).
O Enlevez l'(_cran protectem" de l'ampoule
en le tirant vers le haut.
Apr&s avoir remplac_ par une ampoule
d'appareil (_lectromgmager de m_me
voltage ou de w)ltage inf>rieut; remettez
l'_cran protectem" de l'ampoule en place
en le pendant _'_ses trois taquets.
Remettez la clavette en place et
rebranchez le rg_fl'ig_rateur.
Distributeur
O D_branchez la r_fl'ig_ratem'.
O I,'ampoule est situ_e sur le distributeur,
sous le panneau de rg_glage. Enlevez
l'ampoule en la tournant darts le sens
oppos(_ aux aiguilles d' une nlontre.
O P,emplacez l'ampoule par une ampoule
d'appareil _lectrom&mger de in_ine
taille et xoltaoe
O Rebranchez le rg_frigg_rateur.
39
Page 40

Instructions
Refrig6rateur
d'installation
AVANT DE COMMENCER
Lisez les instructions compl_tement et attentivement.
• IMPORTANT - Co._e_-,e_ce_
instructions pour votre inspecteur local
• IMPORTANT - Ob_e,,e_.,.__e_
codes et les oi'dollllallCeS ell vigueur.
• Note h l'installateur - Assurez-vous de laisser
ces illstl'tlctions atl COllSOil/Ill;/tetlY,
• Note au consommateur - C(mservez ces
instructions pore" r6f6rences futm'es.
• Niveau de cornp6tence - L'installation de cet
appareil 6lectrom6nager n6cessite des comp6tences
m6caniques de base.
• Dur_e requise pour l'installation - h_stal]ation
du _6frig6rateur : 15 minutes
• L'installateur est responsable d'une b(mne
installation.
• Toute pam*e de l'appareil due 5 une mauvaise
installation est exclue de la garantie.
Modoles 20, 22,25
DEGAGEMENTS
Pr6voyez les d6gagements suivants pour laciliter votre
installation, permettre tlne bonne circulation d'air et les
raccordements d'_lectridt_ et de plomberie.
• Cgt_s 4 mm
• Haut 25 mm
• Atria)re 25 mm
/Jn d0gagement de c6t_ de 19 mm est n_cessaire pour
ouwir xotre porte _'l90 degr_s, et axoir ainsi tm meillem"
acc&s au comi)artim ent r_ti'ig_ration,
DIMENSIONS
20 22 25
A* 1689 mm 1689 mm 1746 mm
B 800 mm 851 mm 908 mm
C** 864 mm 864 mm 864 mm
ALIMENTATION D'EAU DE LA
MACHINE A GLAqONS
(sur certains modeles)
Si votre rg_flJgg_rateur a une machine _'_glagons, il
taudra le brancher _'lune conduite d'eau fl'oide. Vous
trouverez tree trousse d'alimentation d'eau approuv_e
chez votre revende/ir.
Pression maximtm d'afimentation d'eau - 8,3 bars
Pression mhfimmn d'alhnentation d'eau - 1,4 bars
La machine il gla_ons doit _tre install_e par tm
tech_ficien de service qualifi&
EMPLACEMENT DU
REFRIGERATEUR
• N'installezjamais votre r6fl'ig(_ratem" darts une pi&ce
ot't la tempgwatm'e ambiance risque d'etre inf'_riem'e
fl 16 °C, parce qu'il ne se mettra pas en marche
S/l{][iSallllnent so/ivent p(s/1Y illaintenii" de bonnes
tempgwatures.
• lnstallez votre r_flJg_rateur sur tm plancher
suflisamment solide pore" le supporter quand
il est plein.
D 1216 mm 1267 mm 1267 mm
E 1207 mm 1076 mm 1207 mm
F 1018 mm 1074 mm 1113 mm
G 1159 mm 1233 mm 1294 mm
H 1123 mm 1172 mm 1171 mm
*1a halltem? I/(! ( OlllpF(!nd p_tS 1}t ( h}tl'llJ('l°e.
....I_alargeur corot)rend la poign('e.
7
I
mBm
I Jl
1
I I
I I
I I
4O
Page 41

Instructions d'installation
ROULETTES
Les roulettes servent a trois fins :
0 Les roulettes servent 5 vous permettie, une J[bis bien
rOglOes, de tbnner fi_dlement la porte (island elle est
ouves_e 5 moitiO.
O Les roulettes servent 5 vous peHnettre, sine ibis bien
r0gl0es, de bien poser votre r0tiig&'atem" sur le
plancher pour lui &'iter d'osdllel:
OLes roulettes servent 5 vsms permettre d'0carter
votre r0fi'ig0ratem" du tour pour nettoyer.
Pour rdgler les roulettes, enlevez la grille de base ell la
tirant par le bas.
Tom'nez les vis de nivellement des roulettes darts le sens
des Mguilles d'tme montre pour monter votie
rOfi_g&atem, darts le sens oppos_ a celm des aJgttilles
d'tme montre pour l'ab_fisser. Llfilisez sine clO anglaise
(bouhm a tote hexagonale de 3/8") ou des pinces.
ALIGNEMENT DES PORTES
AprOs avoir ntis 5 Ifiveau votre rOflJg(qrateui; assurez-vous
que les portes sont 5 la n_Olne hauteur au somlnet.
Pour _galiser les portes de l'appareil, rOglez la porte
du i'Oli_igOi'ateur colmne suit :
O Pour retirer la grille de base, ouvrez les portes puis
tirez droit sur la grille de base vei_ l'ext&_ieui:
0 DOtelminez laquelle des deux portes est plus OlevOe
qtle l'atltre.
0 Relevez la porte qui est plus basse de n_Olne que
la petite came.
0 lns&'ez une cale entre la charniOre mOtallique
de la porte et la petite came COlmne illustr&.
0 lns&'ez la cale de sorte qu'elle s'adapte entre la
charniOre mOtallique et la petite calne en plastique.
O Fei_nez les portes et v0riliez si elles sont 5 Ifiveau au
somlnet. Si tree des portes est t(mjoui_ plus basse que
l'autre, i'0p0tez la proc&lure et ins&'ez sine autre cale.
!_" Lescalesseplacentsous
le couvercledelacharniere
supdrieuredeiaporte
alimentsfrais.
Pour remettre en place la grille, alignez les pinces se
trou_:mt derfiOre la grille entre la barre et le bas du
compartiment t Ot/_igOration. Poussez en ax;mtjusqu'5 ce
(isle la grille soit tixOe ell })lace.
Cale
l_MARQUE : Si les portes ne sont pas fi Ifiveau et que
la cale est d_:j_'_en place, il est possible de la retirer pour
abaisser la porte.
41
Page 42

Instructions d'installation
INSTALLATION DE LA CONDUITE D'EAU
AVANT DE COMMENCER
I,'installation d'une conduite d'eau n'est pas exig_e
par le tabricant du r_li'ig_rateur ou de la machine
fi glaqons. Respectez ces recommandations
soigneusement afin de r&luire les risques de
dommages onei'e/ix CatlS(_S pay l'eau.
I,es coups de b_lier (earl qui donne des coups dans
les tuyaux) darts la tuvauterie de la maison peut
occasionner des dommages aux pi0ces de w)tre
rg_frig_ratem; ainsi que des flfites ou des inondations.
Appelez un plombier certifi(_ pore" corriger les coups
de b_lier avant d'installer la conduite d'eau de votre
r_li'ig&'a tern'.
Pore" pr_venir toute b_filure et tout dommage 5 votre
rg_li'ig_rateui; ne branchezjamais la conduite d'eau 5
une canalisation d'eau chaude.
Si vous utilisez votre rg_fl'ig_rateur avant de brancher la
conduite d'eau, assm'ez-vous de laisser le commutateur
de la machine 5 glaqon en position 0 (arrSt).
N'insmllezjamais les tuvaux de la machine 5 glaqon
darts des endroits off la temperature risque de
descendre en dessous du point de cong_lation.
[] BRANCHEZ LE TUYAU A VOTRE
RI FRIGERATEUR (SUITE)
Sin" certains modules de rg_fl'ig_ratem's, le raccord
se trouve 5 l'extr&nit_ du tuwm situ_ 5 l'ext_rieur
de couvercle d'acc0s de compartiment du
compresseur. Sin" d'autres mod_)les, le couvercle
d'acc0s au compartiment du compresseur doit _tre
retir_ pore" acc&ler au raccord du r_frig&'ateur au
robinet d'alimentation d'eau.
Sur les mod&les dot_s du
raccord Jill robinet
d'alimentation d'eau,
retirez le bouchon en
plastique flexible.
©
Si vous utilisez un outil (dectrique (comme une
perceuse (dectrique) pendant l'installation, assurez-
wins que l'isolement ou le cfiblage de cet outil
emp_che tout danger de secousse (dectrique.
Vous devez proc6der h toutes vos installations
conform6ment aux exigences de votre code local
de plomberie.
Un teclmicien de service qualifi6 doit installer votre
machine a glaqons.
-&AVERTISSEMENT!
Branchez uniquement ;'_une alimentation d'eau potable.
BRANCHEZ LE TUYAU A VOTRE
RI FRIGCRATEUR
NOTES :
• Avant de brancher le tuyau 5 votre rg_li'iggm_teur,
assm'ez-vous que le cordon d'alimentation
(dectrique du rg_fl'igg_rateur ne soit pas branch(_
darts la prise murale.
• Nous VO/IS I'eCoII/IIl_lndons de poser tlIl tiltre 5
eau si w)tre alimentation d'eau contient du sable
ou des particules qui peuvent boucher la grille du
robinet d'eau de votre r_frig&'ateur. Installez-le
sur la conduite d'eau pros de votre rgffrig&'ateur.
Placez l'_crou de compression et la bague
(manchon) 5 l'extr&nit_ du ttlXatl COlllllle indiqu_
darts l'illustration.
lns&'ez l'extr&nit_ du tuyau darts le raccord du
robinet d'eau aussi proflmd&nent que possible.
Tout en tenant le tuyau, serrez le raccord.
Fixez le tuwlu dans le collier fourni pour qu'il soit
maintenu en position verticale. I1 est possible que
wins avez 5 ouwir le collier.
L'm_ des sch6mas ci-dessous ou h droite
sera similaJre au montage du raccord de
votre r6frig6rateur.
42
Page 43

Instructions d'installation
INSTALLATION DE LA CONDUITE D'EAU (SUITE)
[] BRANCHEZ LE TUYAU A VOTRE
REFRIGERATEUR (SUITE)
C011et_tuyau
Ecr0ude
compression
normal
Collet
(manchon)
Branchementaur6frig_rateur
I-#,emettez le couvercle d'ac(_s.
[] OUVREZ LE ROBINET D'EAU ET
BRANCHEZ LE REFRIGERATEUR
Disposez la spire du tuyau de telle thton que
celui-ci ne vibre pas contre la patois artiste du
rg_fl'igg_rateur ou contre le tour. Repoussez le
r_fl'ig_rateur contre le tour.
[] METTEZ EN MARCHE LA
MACHINE A GI.A_ONS
Mettez le commutateur de la machine _'lgla(:ons
en position I. i,a machine _'_gla_ons ne se met en
marche qtle lorsqu'elle atteint title tempg_rature de
fonctionnement de -9 °(: ou moins. Elle commence
imm_diatement _'lflmctionner si le commutateur de
la machine _'lgla¢ons est en position I,
C0mm
NOTE : Si votre pression d'eau est trop taible, le
robinet peut se remettre en marchejusqu'_'l trois
fois pour envoyer suftisamment d'eau _'lla machine
fi glaqons.
43
Page 44

Bruitsnormauxde fonctionnement.
Les r_frig_rateurs modemes font des sons cliff, rents de
ceux des vieux r_frig_rateurs. Les r_frig_rateurs modemes
ont davantage de caract_ristiques et utilisent une
technologie de pointe.
Entendez-vous ce son? Ce son est normal
HUMMM...
--WHOOSH...
• I,e nouveau compresseur 5 rendement _lev_ peut
marcher plus rapidement et plus hmgtemps que
cehfi de w)tre vieux r_fl'igdrateur et wins pouvez
entendre une tonalit_ _lev_e ou une pulsations
quand il timctionne.
• Parl0is, le illotettF (lit r_li'igdrateur t0nctionne
longteinl)s , StlI'tOtl[ (ltl_lIl(l votts OtlVI'ez sottveilt
ses portes. Par cons(_quent, le FrostGuard%loit
timctionner pore" emp6cher la nomTitm'e de prendre
un mauvais goflt et pour amdliorer la conse_wation
des aliments.
• Vous pouvez entendre tm <_whoosh,, quand vous tem_ez
la porte. Ce son est dfi fi l'_galisation de la pression fi
l'int&iem" du r_fiig(q'amm:
CLICKS, POPS,
CRACKS et CHIRPS
• Vous pouvez entendre des <_crao, ou <q)oI>, quand
vous branchez pore" la premk)re tois le r(_fl'ig(_ratem'.
Cela se i)roduit quand le r(_fl'ig_rateur se refl'oidit
pore" arriver 5 la bonne temp&'amre.
• I,es amortisseurs (_lectroniques s'ouw'ent et se
ferment en taisant tm <<clic,, et pour fimrnir un
refi'oidissement optimal et &'onomiser l'_nergie.
• I,e compresseur peut occasionner des <<lie,, ou des
<_chiri>, quand il essave de red&hatter (cela peut
prendrejusqu'5 5 minutes).
• i,e tableau de contr61e dlectronique peut
occasionner tm <_clic,, quand les relais se mettent en
marche pour contrgler les (_l(_ments du r(_fl'ig_rateur.
• Une expansion et tree contraction des seq)entins
de refroidissement pendant et apr0s le ddgivrage
peuvent occasionner des <q)oi>, ou des <_crac,,.
• Sur les mod01es qtli ont tlne machine 5 glacons,
al)r_)s tm cvcle de thbrication de glaqons, vous pouvez
entendre les glaqons tomber darts le bac 5 glaqons.
WHIR.!
• Vous pouvez entendre les ventilatem5 qui tournent 5
haute vitesse. Cela se produit quand vous branchez
pore" la premk)re t0is le r_fl'ig&'atem', quand vous
ouvrez fr0quelnlnent les portes ou quand vous
ajoutez une grande quantit_ d'aliments darts le
compartiment r(_frig_ration ou darts le compartiment
cong(qation. I,es ventilateurs aident 5 conserver la
bonne temp(_rature.
• Si l'tme des portes reste ouverte plus de 3 minutes,
VOttS potlvez entendi'e les ventilateurs se illetti'e en
marche, pore" rafraichir les ampoules (_lectriques.
• I,es ventilateurs changent de vitesse pour flmrnir tm
refl'oidissement optimal et (monomiser l'(mergie.
SONSD'EAU
6
• I,a circulation de r(_fl'ig_rant 5 travers les serpentins
de refl'oidissement du compartiment cong_lation
peut occasionner tm bruit de bouilhmnement.
• I,'eau qui coule goutte 5 goutte sur le chauflage du
d_givreur peut occasionner des <_sizzle,,, <q)op,, ou
<d)uzz,, pendant le cycle de d_giw'age.
• Un bHfit d'eau qui coule peut se produire pendant
le cycle de d_givrage, quand la glace fired de
l'(_val)orateur et coule dans le plateau de drainage.
• Vous pouvez occasionner un <_gurgle,> quand vous
fermez la porte, 5 la suite de l'(_galisation de
pression.
44
Page 45

Avantd'appelerunreparateur...
Liste de v_rifications preventives
Economisezvotre temps et votre argenfl Consultez les tableaux des
pages suivantes, vous #viterez peut-#tre d'appeler un r@arateur.
Causes possibles Solutions
Votre refrigerateur ne Votre r6frig6rateur se trouve * Atteudez environ 30 minutes la fin du (h:givrage.
fonctionnepas dans son cycle de d6givrage.
R6glage du comparthnent * Chaugez le r_glage du couq)artimeut (oug_lateur eu position
cong61ateur en position 0 (le reti'oi(lissement.
(afrO).
Le r6frig6rateur est * Poussez la ti(he (oml)lbteu/eut (laus la prise mtu'ale.
d6brmach6.
Le fusible a saut6 ou le * Chaugez le tusible ou rebrauchez le (lisjouctetu'.
disjoncteur a saut6.
Vibrations ou bruitsde Vous devez r6gler les * Cousultez Roulettes
casse (il est normal roulettes de devm_t.
d'avoir depetites
vibrations)
Le moteur fonctionne C'est normal quand on met * Atteudez 24 hetu'es que le r#frig6ratetu" se refroidisse
pendant de leagues en marche le r6frig6rateur couq)l_temeut.
p6riodes ou se met en pour la premibre lois.
marche et s'arr_te Cela arrive souvent quand * C' est normal.
frequemment (les on met beaucoup d'aliments
rOfrigerateurs medernes, dans le r6frig6rateur.
qui oat davantage
d'espace de rangement La porte est rest6e ouverte. * V_lJfiez (]l/'uu }_aquet de uourlJture u'euq)&che })as la porte de
et un compartiment se thinner.
congelation plus grand, ll fah chaud ou vous ouvrez * C'est nt)ru/al.
necessitent plus de souvent la porte.
temps de
fonctionnement.IIs se La telnp6rature est r6gl6e * (_()ustdtez R@/ages.
mettent en marche et dm_s sa position la plus froide.
s'arr_tent souvent pour
maintenit des
temperatures
constantes).
Le compartiment Le bouton de r_glage de * Coustdtez R@lages
refrigeration ou temp6rature est mis h tree
congelation est trop ternp6rature trop basse.
chaud. I] fair chaud ou vous ouvrez * Mettez le boutou (le r6glage de teml)_rature uu uumOro plus
souvent la porte, fi'oid. (_ousultez R@lages.
La porte est rest6e ouverte. * Vcafifiez qu'uu paqtlet tie uourfiture u'euq_&che pas la porte tie
Ou givre ou des cristaux La porte est rest6e ouverte. * Vc:rifiez qu' uu paquet de uotu'riture u'euq_&che pas la l)o_Xe de
de glace se ferment sur se tbnn er.
les aliments congeles Vous ouvrez la porte trop
(dugivre_ Hnt_rieur
des paquets d'aliments
est normal)
souvent ou trop longtemps.
45
Page 46

Avantd'appelerunreparateur...
Liste de v_rifications preventives
Solutions
• Cela aide _'lemp_cher la condensation _'ll'ext_rietu;
La s_paration entre le
compartiment refrigeration
et le compartiment
cengelation demeure
chaude.
Causes possibles
Le systbme automafique
d'6conomie d'bnergie faJt
circuler tm liquide chaud
autour des axOes de devmlt
du comparthnent cong_lation.
Lamachine _ gla_ons Le commutateur de marche • Mettez le c()mm utateur en l)()sition I.
automatique ne est en position OFF (arrSt).
fonctionnepas L'aJitnentation d'eau est
(sur certains modMes) arr6t6e ou n'est pas brmlchbe.
L'aJJmentation en eau est coup6e • Consultez Installationde la conduite d'eau.
ou n'est pas raccord6e.
Le compartiment cong61ateur • Attendez 24 hetn'es qtw le rbtiJg_ratetn" soit
est _cop chaud, c()mpl_tement fl'(rid.
Une accumulation de glaqons • Nivelez les gla_ons _'lla main.
dmas le tiroir a gla_zons
pent causer tm afro de la
maclahle a glaqons.
Des glacons sont coh_c6s • Arr_tez la machine _'lgla_ons, enlevez les gla_ons et remettez en
dm_s la machhae h glacons marche la machine _'lgla_ons.
(la lumi6re verte de la
machine a glaqons scintille).
Lesgla_ons ontune Le bach glacons doit blre nettoy6. • Videz et la\'ez le bac _'lgla_ons.,[etez les vieu× gla(:ons.
odeur on nn go_t Les aliments dom_ent de • Emballez bien les aliments.
l'odeur ou du goat attx glaqons.
L'h_t6rieur du r6frig6rateur • (_onstdtez Soins et nettoyage de votre r6frig6rateur
a besohl d'etre nettoy6.
La formation des La porte est rest6e ouverte • V_fiiiez (lt/'tm paqttet de nourfittn'e n'emp&che pas la
gla_ons estlente porte de se tel]uel;
Le bouton de r6glage de • (:onstdtez R#gIages.
telnp6rature est mis h lille
temp6rature trop basse.
La porte ne se Le johzt de porte du c6t6 de la • Mettez (In pbtrolatum stu" lejoint.
ferme pas bien chamfi_re colle ou se replie.
IIya unelueurorangee Le d6givreur du • C'est normal.
dansle compartiment comparthuent cong6lation
congelation fonctiom_e.
46
Page 47

Causes possibles Solutions
Le distributeur de gla_ons La machine h gla_ons * Mettez en marche la machine _'lgla<ons ou omrez
ne fonctionne pas est azcrat6e, ou l'aJhnentation l'alimenmfion d' ea u.
d'eau est axrat6e.
Des glaqons sont coll6s * Enlexez les glaqons.
au bras de distribution.
ll y a des flacons de glace
irr6guliers da_as le comparfiment
de rmagement.
Le distributeur est verrouill6.
• Cassez-les entre les doigts etjetez les autres n_orceaux irr4guliers.
• 11est possible que le colnpartilnent cong_lation soit trap chaud.
R_glez la telni)_rature du colni)artilnent cong_lation ell position
plus ti'oide, un nuln(_ro fi la tois,jusqu'fi ce qu'il ne se tornle
plus de flacons.
• Appuyez sur la touche LOCKCONTROL(verrouillage)
pendant 3 secondes.
L'eauamauvaisgoOtou Vous n'avez pas utilis6 le •_dimentez ell eaujusqu'_'l ce que le r6ser\'oir (It/
mauvaiseodenr distributeur d'eau depuis distfibuteur soit rempli.
(sur certains modMes) lon_emps.
Loan versee darts le C'est nonllal qumld le • Attendez 94 heures que le r6ii_ig_rateur se
premierverre est chaude r6frig6rateur vient d'etre h_stall6, reii'oidisse c()nq)lbtenlent.
(surcertainsmodMes)
Le distributeur d'eau n'a pas • _Mimentez ell eaujusquYi ce que le r6servoir (It/distributeur
06 ufilis6 depuis longtemps, s()it rempli.
Le systbme d'eau n'a pas 6t6 purg6. • Attendez quelques heures que le nouvel
apl)rovisionnen/ent reii'oidisse.
to distributeur d'oau La conduite d'alimentation • ()msultez Installation de la conduite d'eau.
ne fonctionnepas d'eau est coup6e ou d6branch6e.
(surcertainsmodMes)
11peut y avoir de l'afir • Appuyez sur le bras de distribution l)end:ult au moins
dm_s le systbme d'eau, deux minutes.
Le distributeur est verrouill6. • Appuyez sur la touche LOCKCONTROL(verrouillage)
pendant 3 secondes.
IIn'ya pas de distribution L'eau est gel6e dm_s le r6servoir. • Appelez le selMce de r_paration.
d'eaumaisla machine
glaFonsfonctionne.
IIn'ya pas de distribution La conduite ou le robinet • Appelez un l)lonlbiel:
d'eau on de glaFons, d'approvisiomzement d'eau
est bloqu6.
Le distributeur est verrouill6. • Appuyez sur la touche LOCKCOIVTROL(VeiTouillage)
pendant 3 secondes.
to rOfrigOrateursent Les aliments dom_ent •Vous de;'ez bien eml)aqueter les aliments qui sentent ti)rt.
une odeur au r6frig6rateur. • (_OllSel'Vez line boite ou;'erte de bicarbonate de soude d;ins
votre r_iiJg&rateur; reml)laceMa tousles re)is ranis.
L'hlt_rieur a besoin d'ml nettoyage. • Consultez Soins ot,ottovagO do votro rOfri@ratour
Le systbme d'6vacuafion d'eau • Consultez Soins et nettoyagede votre rOfrigOrateur
de d6gel a besoh_ d'tm nettoyage.
47
Page 48

Avantd'appelerunreparateur...
Liste de v&ifications preventives
Causes possibles
II SeformedeI'humidite Ce n'est pas bdaabituel
Solutions
• Essuvez la surlhce jusqu'_'l ce qu'elle soit bien s_che.
I'exMrieurdu qum)d il faJt W_s htunide.
refrigerateur
II se formedeI'humidit_
HnMrieur (quandil fait
Vous ouvrez les portes trop
souvem ou trop lon_emps.
humide,rair transporte
deI'humidite_ I_nMrieur
durefrigerateurquand
vousouvrezlesportes)
La lumi&m iMerieure Le courmlt n'arrive pas h la prise. • I_emplacez le fl/sible ou rebranchez le disioncWtu:
ne fonctionne pas L'mnpoule est brOl6e. • Constdtez Remplacement des ampoules.
IIy a de I'eau sur le La conduite d'6lhnhlation * (;onstdtez SoiiTset nettoyage.
plancher de la cuisine ou de l'eau ell bas du coliipartinlent
en bas du departement cong61ation est bouch6e.
congelation Des gla_:ons sont coh_c6s * Enlevez la glace avec une ctfillbre en bois.
dm_s l'orifice de distribution.
Lebasdurefrig_rateur
emetdeI'air chaud
VousavezchoisiCUBEICE
(gla_ons),maisc'est
dela glaceconcassee
C'est normM, le moteur
est refroidJ pax air.
Dmls le processus de r6frig6ration,
il est normal que de la chaJeur
soit 6raise en dessous du
r6 frig6rateur. CertaJns
revbtements de platlchers
sont sensibles et se d6colorent
fi ces temp6ratures normaJes
et pas dmlgereuses.
Votre r6glage pr6c6dent
6taJt en position CRUSHED ICE
(glace concass6e).
• 11restait quelques glaqons dans le m6canisme de distribution,
de xotre r_glage,, [)r_c_(lent.... (Test noi_nal.
quisort(surcertains
modMes)
48
Page 49

Notes.
49
Page 50

Informaci6n de seffuridad ...51-53
Ins_rucdones
de funcionamiento
C_jones de ahnacenamiento ..... 58
Controles .................... 54
Dispensador de agua y de hielo . .60
Dispositi_ o automfitico
para f,_bricar hielo ............. 59
Estantes, recipientes
y reiillas .................. 55-57
Cuidado y limpieza ........ _1, _2
Cambio de bombillas ........... 63
Ins_rucdones
de instalaci6n ............. 64-67
Consejos de soluci6n de problemas
Antes de llamar
al servicio tScnico .......... 69-71
Sonidos normales durante
la operaci6n .................. 68
Pnote aqui el modelo jt nt_mero de serie:
Modelo:
Nhmero de sefie:
Podr_ encontrar estos dntos en la
etiqueta, dentro del compartimiento
del fl'igor_fico, ell la parte superior
derecha, bajo los controles.
5O
Page 51

INFORMAC/ONIMPORTANTEBESEGURIDAD.
PRIMEROLEACOMPLETAMENTE/.ASINSTRUCCIONES.
;PRECAUCION!
Use este aparato solo para los fines que so describen on este Manual gel usuario.
NORMASDESEGURIDAD
Cuando use electrodom6sticos, siga las normas b#sicas de seguridad, incluyendo las siguientes:
i)::Antes de usarse, este fl'igorflico deberfi estar
instalado y ubicado de acuerdo con las
instrucciones de instalaci6n. Vet tambi_n la
secci6n C6mo Conectar a la Rod.
:#i/No intente ponerse de pie sobre el fl'igorflico.
Eso podrfa resultar en daflos personales o del
frigorffico.
;);Evite que los nifiosjueguen con el fl'igorffico o
que manipulen indebidamente los controles.
i)::]mpida que los niflos se suban, se pongan de pie
en los estantes del frigorflico o se cuelguen de los
mismos. Podrfa daflarse el fl'igorflico y ademfis
causarles serias lesiones.
i)::No toque las superficies fl'fas del congelador con
las manos hfimedas o mojadas. I,a piel se podrfa
adherir alas superficies extremadamente frfas.
:)_No almacene ni use gasolina ni otros wq_ores o
lfquidos inflamables cerca de _ste o de cualquier
otto _lI)_l Y_lto.
:_1/Si su fl'igorflico tiene tm dispositivo automfitico
para fid)ricar hielo, evite el contacto con las partes
mdviles del mecanismo de expulsidn, o con el
resistencia t(_rmica ubicada en la parte inferior
del dispositiw_ automfitico para fabricar hielo.
No ponga los dedos ni las manos en el mecanismo
automfitico para hacer hielo mientras el fi'igorffico
est_ conectado.
i)::i,a instalaci6n del dispositivo automfitico de hielo
debe realizarse finicamente pot tm t(_cnico
cualificado.
:_J)No toque las partes i)tmzanartes con los dedos.
i,os espacios entre las puertas y entre las puertas
V lOS _lI'II/_lI'ios de cocina son estrechos por
necesidad. Cierre las puertas con cuidado
Ctlando ha_31n niflos cei'ca.
:)_Desconecte el fl'igorflico antes de limpiarlo o de
efectuar reparaciones.
OBSERVACION: Recomendamos enNticamente encargar
cualquier reparacl6n servlcio de asistencia t#cnlca.
__Antes de reemplazaruna bombilla fundida, el
frigorificodebera ser desconectado para evimr el
contacto con tm cable con corriente. (i,a bombilla
podrfa romperse al reemplazarla.)
OBSERVACION: Colocar el control del congelador on
posiciSn0nodosconoctao/ circuitodo/a/uz.
i)::No vtlelva a congelar los alimentos tma vez qtle se
havan descongelado.
5/
Page 52

INFORMACIONIMPORTANTEDESEGURIDAD.
PRIMEROLEACOMPLETAMENTELASINSTRUCCIONES.
iPELIGRO! RIESGODE QUEUN NIKIO PUEDA
QUEDARATRAPADO
COMOELIMINARSUFRIGORfFICODEFORMAAPROPIADA
E1 riesgo de que los nifios queden atrapados
v se asfixien no es un pioblema del pasado.
Los fl'igorfficos abandonados o tirades ...aunque
sea s61o per unos pocos dfas siguen siendo tm
peligro. Si se deshace de su viejo aparato, per fhvor
siga hs instrucciones que le dames a continuaci6n,
pare avudar a prevenir accidentes.
Antes de deshacerse de su viejo frigorifice
o conge/ador:
::Ji::Quite todas las puerms y tfrelas per separado.
_: Deje los esmntes en su sitio pare que los niflos
no se Sill)an en(-iilla.
iJi::Si su viejo ffigorffico tiene un candado,
ilmtilfcelo.
Refrigerantes
To(los los productos de refrigeraci6i_ coi_tiei_en
refl'igerantes, los cuales per ley fl_deral debe
retiralse antes de elinfinar el producto. Si planea
desechar su viejo ffigorffico, consulte los
procedimientos con la compaflfa a cargo
del desecho.
52
Page 53

f
;PRECAUCIOIV!
COMOCONECTARA LAREDELE-CTRICA
E1 cable el_ctrico de este aparato est;_ equipado con
un enchufe de tres clav!ias (tierra) que encaja en
una toma de corriente estfindar de pared de tres
entradas (tierra) a fin de reducir al mfiximo la
posibilidad de dafios pot descarga el_ctrica al usar
este aparato.
Haga que tm electricista cualificado revise la toma
de corriente de la pared y el la instalaci6n para
asegurarse de que la salida est_ conectada
debidamente a tierra.
Cuando s61o se
disponga de tma
salida de corriente sin
Antesde usarlo II --"-'1
tOI/l_l de tierra_ es S[I
responsabilidad
reemplazarla pot una
salida adecuado para
tres clav!ias con toina de
tierra. E1 fl'igorflico debe estar siempre
enclmfado a tma toma de electricidad propia.
Esto le proporcionarfi el mejor rendimiento v
ademfis evitarfi la sobrecarga de los circuitos
el_ctricos de la vivienda, lo cual podrfa causar tm
incendio si los cables se sobrecalentaran. En la placa
indicadora de potencia del fl'igorffico encontrar_i
el voltaje, potencia y fl'ecuencia adecuados. Si el
enchufe del producto no encaja en su salida de
corriente, deberfa cambiarse el enchuti _ del aparato
poI" tlno ntlevo.
Enchufecon_
tomadetierra_
IMPORTANTE:Loscamb/osdeenchufesy cablesdeberfa
reah_arsepor unt#cnicocualiflcadooun agentedeservicio.
Ena/gunosparses,sS/oestfipermitidocamblarenchufesy
cablesa t#cnicoscua/ificados.
Si el cable de corriente viene dafiado de filbrica,
debe set reemplazado pot el servicio de asistencia
t_cnicopara evitar cualquier riesgo.
Ntmca desconecte el fl'igorflico tirando del cable.
Tome siempre firmemente el enchtfli _y sfiquelo del
contacto directamente hacia flmra.
Repare o reemplace imnediatamente cualquier
cable que se haw_ desgastado o daflado pot
cualqtfier razdn. No utilice cables que muestren
roturas o dafios pot abrasidn a lo largo de €)ste
ni en algtmo de sus extremos.
A1 alejar su fl'igorflico de la pared, evite pisar
el cable o daflarlo.
Come cambiar el cable de corriente
Si el cable de corriente de su fl'igorflico necesita
cambiarse en algfin momento, deberfi sustituirlo pot
un cable especial que podrfi COlnprar en su tienda
de repuestos. Si usted ha daflado el cable, los gastos
COITeI';/n _1 s/I C_II'_O.
Oebe situarse el frigorifico de forma que el enchufe
sea accesible.
LEAYSIGACUIDADOSAMENTELAINFORMACIONDESEGURIDAD.
CONSERVEESTASINSTRUCCIONES
53
Page 54

Loscontro/esen e/frigorifico.
Los controles tendr_n uno de los siguientes aspectos:
FREEZER
REFRIGERATOR
0 ISOFF
9 |SCOLDEST
Pasos de inicio para un correcto control de la temperatura
PASO l: Coloque el Control de alimentos frescos en "5".
PASO 2: Coloque el Control del congelador en "5".
PASO 3: ESPERE 12HORAS para que la temperatura se estabilice.
I
I
PASO 4: Si es necesario realizar un cambio, muew_ el control nfimero uno una
vez y deje pasar 12 horas para que la telnperatura se estabilice.
NOTA:Colocar los controles en la posici6n 0 (apagado) no quita la corriente
del circuito de luz,
Los ajustes de los controles cambiaMn seg#n las preferencias
personales, la utilizacion y las condiciones de operaci6n y pudieran
necesitar mas de un ajuste.
(-
Adjust Temperature
54
0 is Off / S is Normal / 9 is Coldest
@ ® ® ®
Hold 3 seconds
tim#es de temperatura ambiente en la hab#aci6n
Este h'ig{}r_fico estfi disef_ado pax'a hmcionar en temperaturas ambient:des espe{ifi{adas
p{}r (2lase de Temperatm'a que est;_ marcada en la placa indicadora de p{}tencia.
Temperatura
Clase de
Extendido
Tem pla do
Templado
Subtropical
Tropical
OBSERVAC/OIV:La temperatura /ntemapuedeverseafectadaper factorescome/a ubicacibnde/aparato,
/a temperaturaambiente )/ /a frecuenciacon queso abren /as puertas.Ajuste /os contro/es de temperatura
segEln/o requieraa fin decompensarestos factoras.
Simbolo Temperatura Ambiente
M£tximo Minimo
SN
N
ST
T
320(2 10°C
32°C 16°C
38°C 18°C
430(2 18°(2
Page 55

Losestantes y mcipientes de/fdgorifico.
No todos los modelos fienen todas las caractedsficas.
Los mcipientes en la puerta de/compartimiento de fr_gorifico
I,os redpientes _iustables se pueden lle\m"
iScilmente de] iiJg(Mfico al 5tea de trabajo.
Parasacarlo: Le\;mte la parte fi'ontal de]
redpiente hacia arriba, luego s_queh).
Para reemplazarlos o reubicarlos: Nuste el
recipiente en los soportes moldeados de la
puerta y empuie hada dentro. E1 redpiente
se ajustar5 en su lugal:
Reorganization de los estantes
!..atapa desfizante ayuda a prevenir que tm
golpedto haga derramal_e algo o que ]as cosas
pequeflas guardadas en el interior del estante
de la puerta se caigan o resbalen. Ponga un
dedo en cada lado del dMsor hada la parte
trasera v m u6\ulo hada delante v hada at_Ss
hasta que se ajuste a sus necesidades.
Estantes del frigorifico:
Para extraertos
TirenacBarnba _ LeJan[elo
f hacafuera
Para cambiarlos
_ Introduzca [_
_1g_,!cho_ld[L
super!Sr _.
"j p
I/ii
Estantes de congelador:
Paraoxtraerios
Cestasde congelador:
Para oxtraerlas
I
Extraiga la cesta tirando de la misma
hacia delante v lewmtando la parte
delantera hasta sobrepasar el punto
donde se para.
ADVERTENCIA: g n0 so usa, los cestas de/
congelador es posibie que el rendimiento sea
pobre. Si se a/macenanaiimentos en el
congelador sin usarlas el rendimiento de la
temperatura podrfa ser bajo por falta de
circulacidn de/aire en el congeiador
55
Page 56

Losestantesyrecipientesdelfrigorifico.
No todos los modelos tienen todas las caracterfsticas.
Estante deslizante a prueba de derrames (ena/gunosmodelos)
E1 estante deslizante a prueba de derrames Aseg&esedehaberempujadolosestanteshastael
pemfite alcanzar artfculos situados detr;is de rondo antes de cerraria puerta.
otros, i,os bordes especiales est;hl disefiados
para ayudar a prexenir derramanfielm)S
o goteos a los estantes que se elict/ellti'all
m_isabajo.
Estantes a prueba de derrames (ena/gunosmodeios)
I,os hordes especiales est_in disefiados para
ax'tldar, a [)i'ex ellir.... derralllalllieiltos o ,g°te°s a
los estnntes que se encuentran mils ab@).
Estante a]ustable (enalgunosmoclelos)
Este estante se divide en (los v la mitad se
desliza debajo de sf mismo para guardar
artfculos muy altos ubicados en el estante
se elictlellti'a ill}iS abaio.
Estantes profundos de la puerta
/
Los extensores de estante desmontables dan
profm_didad y enderran las estanterfas f!jas
de las puelqras, ofl'edendo I/layor espado y
flexibilidad de almacenamiento.
Para sacar/o: kevallte el extensor directamente
hacia arfiba } ]uego hacia fuera.
Para camb]ar[o: Coloque el extensor del estante
en los sop(n_es moldeados en la puerta }
empt!ie hada dentro. Se a.iustar;_ en su lug;u-
56
Page 57

Caracteristicasadiciona/es.
No todos los modelos fienen todas las caracter[sticas.
Rejilla ShelfSaver _
Use este dispensador de latas para guardar laths
de bebidas v alcanzarlas con mayor li_dlidad.
ComoIlenar el congelador
IJene el fi_igor_fico de timna que quede m_
espacio libre de, al menos, 15 mm entre los
paquetes y 25 mm de espacio entre la parte
superior de cualquier paquete y el estnnte o
la cesta pot endma del mismo. I,os paquetes
pueden colgar por fllera de la parte fl'ontnl de
los estanms, pero deberfin nmi_tener tma
distnncia de tmos 15 iron con las puertas.
::Ji::ix)s alimentos a congelar no debe situa_e en
conmcto directo con la comida ahnacenada.
Si necesim congelar productos cada dfa,
puede que sea necesario reducir la cantidad
a congekm
::Ji::Si necesitn congelar una cantidad elevada de
alimentos, ajusm el control del congelador a
su posicidn infixima. Una vez que el
producto ha)_ sido congelado vuel\_ a
@lstnr el control del congelador a su
posicidn inicial.
_md)i_n puede sostener un plato de cocinar
de 22 cmx 33 cm.
_: Ia comida se congela mils rfipidamente
en las tres esmntes del centro del
compartimiento del congelador y mils
lentnmente en las esmntes de la puertn
del congeladm:
::Ji::No almacene comida rfipida congelada
pot mils tiempo del recomendado pot
sus tid)ricantes.
::Ji::Si el electrodom_stico se desconectara por
tm perfodo extenso de tiempo o si fifllase el
sistema fl_igor_fico, no abra las puertns a
iileil()S que sea absohlt_li//eilte ilecesaiJo.
En ese, ci_rrelas tan pronto como pueda
para que la comida congelada pemmnezca
en dicho estndo el mayor tiempo posible.
_: Ins estnntes de las puertns del congelador
marcadas con tma etiquetn de dos estrellas
s61o deben ahnacenar alimentos previamenm
congelados,
Las bebidas carbOnicas no deben guardarse en
el congelador.
Rendimiento del congelador
Este fl_igor_fico/congelador tiene tma
calificacidn general de "Cuatro Estrellas"
EEEI
E1 rendimiento del congelador estfi e\_fluado
pot calificaciones de estrellas definidas pot el
EST_NDAR Y RESUMEN ISO 8561
ESPECIF]( :ADO M,_S ADEIANTE:
Sin embargo, esms fireas limitadas tienen tma
clasNcaci6n de dos estrellas segfin lo pemfite
el estfindar:
CODIGO:
®
o
Linea del limite de carga: ,,-,,._ _,-,-,
En los modelos 2() y 22 no se deberfin cargar paquetes de alimentos congelados
pot encima de la lfnea del lfmite de carga ubicada en la parte posterior del
comparfimiento del congelador.
TEME DE IA CARGA CONGEHM)A
(TEMPEIt_,TUIt_, DE I,OS AI JMENTOS)
Menos que-6°C
Menos que -12°C
Menos que -18°C
Modelos Ubicacidn de (_gJ esmmes del congeladol:
20, 22 Sin m_iquina de hMos: "Ibdos los estantes
de la puerto del ( ongelador.
20, 22 Con m_iquina tie hielos: "Ibdos los estames
de la puerto del (ongelador y el estanm pot
entima de la (ubem de hielos.
25 Con m{tquina tie hi( los: "Ibdos los estantes
de la puerto del ( ongclador.
57
Page 58

Loscajones de almacenamiento.
No todos los modelos tienen todas las caractedsticas.
J
,J&_U'2'22MEA,j
Cajones de almacenamiento
E1 exceso de agua que pueda acmnularse
en el fondo de los compartin/ientos debe
secarse.
i/
J
Cajones con humedad regulable
Deslice el control hasta llegar a la posici6n
High (alto) o ¢2_ para proporcionar el
infixiino nivel de huinedad, recoinendado
para la mavorfa de los vegetales.
Soporte y divisor {ona/_unosmode/os)
Divisor E1 soporte est;i diseflado para que sus hutas v verduras no
x-_ ......../" escarcha _1. E1 divisor que las
l _ 1 /_ tOqt/en el StlelO del ('aj6n y nO entren en ('OntaC'tO ('Onlaqt/e pudiera [oriilarse en e'_itaI';i
fltltaS V veYdtlras de illaVOi" taillal-lO caigan o itleden enciilla
de las m_is delicadas. AI levantar el divisor puede separarlo
del soporte y ajustarlo de tm lade a otto, luego vuelva a
apretarlo hacia abajo y hasta que entre en su posici6n.
Deslice el control hasta llegar a la posici6n
Low (b@)) o _ para obtener el ni'_el
mfnimo de hmnedad, recomendado para
la mavorfa de las frutas.
Normal
L0masfri0
Cajon temperatura ajustable
EsW caj6n temperamra ajustab]e tiene su
propio conducto de refi_igeraci6n, que pemfite
la circulacidn de aire ti'fo proveniente del
congeladm:
El controlde temperatura variable regula el flujo
de aire desde el congeladm:
Comesacar e/cajon dea/macenamiento.
No redes los modelos tienen todas las caractedsticas.
Guiasdel
caJ0n
AIcambiarlos cajones,asegtiresede
deslizarlosper susgufas
58
Come sacar los caionos
Pueden extrael_e fi_dlmente lexantfindolos
ligeramente } tirando de ellos hasta pasar
el punto de tope.
Deslice la palanca de control hacia arriba para
obtener en el caj6n la temperatm'a nomml
del ffigorflico. E1 conducto de refi_igeraddn
queda apagado. Se pueden selecdonar
posiciones variables entre estos extremes.
Deslice la palanca de control hacia abajo, en la
posici6n mils frfa, para conser;'ar carne ti'esca.
Si la palanca pemmnece touche tiempo en esta
posid6n, se podr_i fimnar escarcha en el
intelior del caj6n.
Si la puerta no le permite sacar los ca jones,
necesitarfi empqjar el fiigorffico hacia
delante hasta que la puerta se abra 1o
suficiente para poder sacarlos. En algtmos
cases, cuando se hace rodar el aparato hacia
ftlera, serfi IlecesalJo n/overlo a ]a vez hacia
la izquierda.
Page 59

Eldispositivoautomaticopara fabricar hielo.
Un frigorffico reci_n instalado puede tardar de 12 a 24 horas antes de empezar a fabricar hielo.
Interruptor
deCorriente Dispositivopara
fabricarhielo
Corriente
Bispositivo autom#tico para fabricar
hielo (ena/gunosmo_dos)
El dispositiw) para hacer hielo dispensar_
siete cubitos por ciclo-- aproximadamente
100-130 cubitos en un pe6odo de 24 horas,
dependiendo de la temperatura del
congelador, de la temperatura ambiente,
del nfimero de veces que se abra la puerta y
de otras condiciolles de uso.
Si el fl'igorffico se pone en marcha antes
de que se instale la toma de agua en el
dispositiw_ para fi_bricar hielo, ponga el
intermptor de funcionamiento del mismo
en ]a posici6n 0 (DESACTIVADO).
Cuando el fi'igorffico se haya conectado
al smninistro de agua, ponga el intermptor
en la posiddn I (ACTIVADO).
E1 dispositivo para hacer hielo se llena*5
de agua cnando la temperamra alcance
el pmlto de congelaci6n. LIn fl'igorNco
recigm instalado puede tardar entre
12 y 24 horas en empezar a fitbricar hielo.
Escuchar_ un sonido de un murmullo
cada vez que el dispositivo autom:_tico
para fhbricar hielo se ]lene de agua.
Tire las primeras cargas de cubitos de hielo
para permitir (isle el circuito de agua se
limpie.
Asegfirese que nada impida el movimiento
del brazo detector.
Cuando el recipiente se ]lene hasta el hive]
del brazo detector, el dispositiw) autolm_tico
para fhbricar hielo dejar_i de producir hielo.
Es normal que algtmos cubitos salgan
pegados.
Si no se usa hie]o con flecuencia, los cubitos
de hie]o viejos se opacan, disminuyen de
tamafio y adquieren un sabor desagradable.
Si los cubitos de hielo se pegasen a]
dispositivo, apfiguelo, saque los cubitos
y vueE_l a c(mectarlo.
Hay un estante an la parle superior de/
congelador por endma de/disposifivo
para hacer hielo que puede usarse para
a/macof?alT?leRto
,_ ABVERTENC/A:So/oconectea/sum/n/strode
aguapotab/e,ta instalaci6n de/dispesitivo
autematicedehielo deflerealizarse
finicamente per un t#cnico cualificado.
Cajoncillo para almacenaje de/hielo
Para acceder al hielo, tire del cajoncillo hacia
l_i/ei-a.
Para extraer el cajoncillo, fire del nfislno hacia
flmra v le',fintelo hasta sobrepasar el punto
donde se para.
Accesorios del dispositivo automglticopara hacer hielo
Si su fl'igorffico no estaba equipado de serie
con tm dispositivo autonMtico para hacer
hielo, puede adquirir tm dispositivo para
hacer hielo, por tm precio adicional.
Vea la parte trasera de su aparato para saber
eljuego de accesorios de dispositivo para
hacer hieh) que su modeh) necesita
especfficalnei_te.
ADVERTENCIA: Solo conecte ai sumk_lstro de
agua potabie. La instalaciOn del dispositivo
autemMico de hiele debe realizarse
finicamente por tin Mcnico cualificado.
59
Page 60

Eldispensadorde aguayhielo.
En algunos modelos
Para usar el dispensador
RecipienteRecogedor
Seleccione CUBEDICE (Hielo en cubitos)_,
CRUSHED ICE (Pica&>) _ o WATER (Agua)
Presione el vaso StlaVeillente conti';i el brazo
del dispensador. E1 recipiente recogedor
no se vacfa solo. Para evitar las manchas de
agua, el recogedor y la parrilla se deberfin
lilnpiar regularlnente,
S/no hay agua corriante cuando soacaba de i)_staiar
el frlgorffico, puede que entre aire en el circuito del
agua. Presione el brazodel &spensador durante al
menos dos minutos para eh_ninarel aire acumuiado y
llenar el sistema de agua. Paraeliminar /as knpurezas
de ia lfnea de agua, deseche los primems seis vasos
de agua.
PRECAUCION: Nunca introduzca los dodosni
cualquiar otro objeto en ia apertura de salida del
triturador de hialo.
Cajon de almacenamiento de hielo en
modelos con dispensador
Parasacarla:
l-'onga el interruptor de mar(ha del
dispositivo de hieh) en la posid6n 0. Tire
del c_tjdn directamente hada fuem y luego
levSntela hasta pasar el prom) on que so
detiene.
Para cambiarla:
AI cambiar el cajdn aseg0rese de presionarla
firmemente en su sitio. Si no llega hasta el
final, vueE:l a sacarla y gire el mecanismo de
Parabloquearel dispensador(ena/gunosmodelos)
@ Presione la teda LOCK
CONTROL(control de
bloqueo) durante tres
segundos para cerrar el
dispensador _, el panel de
LOCKCONTROL control. Para desbloquearlo,
HOLD3 SECS
presione la nfisma tecla
durante tres segundos
ntle_,aillente.
Luzdeldispensador
Esta tecla enciende y
al)aga, la luz nocturna del
dispensadoi: I_ luz tambi_n
se enciende al presionar el
LIGHT
maneio l/4 de vue]ta. Luego emp(uelo de
llt/evo.
brazo del dispensadoi: Si
esta luz se tirade deberfa
reeilll)lazarse con tlI1}l
bolnbilla de un infixinlo
de 6 _atios v 12 _olfios DC.
60
Datos importantes sobre su dispensador
_:No agregue hielo de bandeias o de bolsas
en el recil)iente de almacenamiento.
Podrfa provocar que no salga bien o que
Ill) se triture adectladail/ente.
?_:No llene demasiado los vasos de hielo ni
use vasos estrechos. E1 hielo }lil/onton}ldo
podrfa obstluir el orificio o hacer que se
congele la puerta de la salida de inanera
que no se pueda abrir. Si hubiera hielo
bloquefindolo, eml)(ljelo con una cuchara
de inadera.
::Ji::No deberfa tlsarse el recipiente de hielo
para enfi'iar rfil)idalnente bebidas ni
alilnentos, i,as latas, botellas o paquetes de
Colnida podrfan hacer que el dispositivo
de hielo se agqjereara o obturase.
_: Puede que salga algo de hielo triturado
aunque haya seleccionado la opci6n
CUBED ICE (Hielo en Cubitos). Esto sucede
ell ocasiones Ctlando algtlnos cIIBos se
cuelan por el triturador.
::Ji::Despu_s de dispensar hielo tfiturado,
puede gotear un poco de agua de la
salida.
::Ji::Aveces, se torlnarfi tm pequefio inontdn
de nieve en la salida del hielo de la
puerta. Esto es norlnal y, por regla
general, sucede cuando ha dispensado
hielo picado repetidamente, i,a nieve se
ewlporarfi por sf nlisnla.
PRECAUCION: A/gunos productos como e/agua
heiada no deberian consurnirse dernasiado frfos.
Page 61

Cuidadoylimpiezade/frigorifico.
timpieza de! exterior
El receptor de/dispensador (en :dgunos
modelos), pot deb;!io de la pamilla, debe
mantenei_e limpi(5 y seco. E1 agua que se
,4readegoteo del dispensador
queda en esta 5tea puede dejar dep6sitos.
Quite los depdsitos agregando vinagre sill
diluir al tbnd(). Remoje hasta que
desaparezcan los dep6sit()s o hasm que se
desprendan lo suficiente pare quitarlos.
El betGnde/dispensader (en algtmos modelos).
Antes de limpiarlo, cierre el dispensador
presi(mando y manteniendo apretada la tecla
LOCKCONTROLdurante 3 segundos. Llse ague
caliente v una soluci6n de bicarb(mato de
sodio--apr(syJmadamente una cucharada
(15 ml) de bicarbonate de sodio per cada
cnarto (1 litro) de agua. Aclare
c(sn/pletan}ente cosl agile y seque.
Limpieza de/interior
Para evitar Mores, deje una recipiente de
bicarbonat() de s()di() destapado en los
compartimientos Tie fl'ig(srflico y del
c(sngelad(5i:
Desconecte el frigorifico antes de limpiarlo.
Si n(5 tuera posible, escurra el exceso Tie
humedad Tie la espoqja (5 del pail(5 cuand(5
limpie ah'ededor Tie b(mmes, bombillas (5
((sITtroles.
Use agua caliente y una soltlci6n de
bicarb(mato de sodio--aproximadamente una
cucharada (15 ml) de bicarb(mato de sodio
p()r cada litro de agua. Esta s()luci6n limpia y
neutralize olores. Eqjuague y SgXluelo.
Despug_s de limpiar las jtmtas de las puertas,
aplique una capa delgada de vaselina al lado
de la bisagra. Esto avuda a evitar que las
jtmtas se doblen (5se peguen.
tas manijas de la puerta y los emamentes.
Se limpian con un patio h(mledo yjabdn
netl[FO, Seque Co51 tlSl pal_5(5 suave,
Mantenga Ihnpieel exterior.Idmpielo con tm
pail(5 limpi(5 ligeramente humededdo con
cera pare aparatos de c(st-hla o C(5511151
detergente neutro y ague. Seque y abrillante
con un patio limpio y suave.
No//Tnpiee/fr/gorffico con un patio sucio ni hdmedo
Estospodrfan dejarresiduos quedarien la pbtura.
No use estropajos, detergentes enpolvo, lejfa ni
Iknpiadoresque contengan lejfa, ya que estos
productos podrfan rayar y desprender el acabado
depbtura.
Des*ape la apertura del congelador. En la
limpieza anual, retire la canasta inferior
del c(mgelador e introduzca, con ayuda de
una jeringa pare carne, una s()luci6n de
bicarbonato de sodi(5--/ma cucha_vMita
(5 ml) y 2 tazas (500 ml) de agua caliente
(no hirviendo)--en la tuber[a de desagfie,
Est(5 ayudarfi a eliminar los olores v a redudr
la probabilidad Tie que se obstm_. Si la salida
del desagfie se obturara, use una je_inga
de came y tma s(51tlciGn de bicarbonato de
sodi() para fl)rzar que la materia pase a tray,s
de la lfnea de desagfle.
Evitelimpiar losestantes de cristal con agua caliente
dadoque elcambio extremo de temperatura podrfa
hacer que se rompan.Maneje los estantes de vidrio
con cuidado. Go/pearun vidrio tempiadopuede hacer
quese rompa enpedazos.
No/ave nlegunaparte pibstica de/frigorffico en el
iavavajl//as.
DetMs de/frigorifico
Se deberfi tenet ('uidaTl() al retirar el
fl'ig(srflic(5 de la pared. Todos los suelos
se pueden daflar, sol)re todo parquet y
moquetas y los que tienen relieves.
Tire del fligorflico en fisrma recta y empuje
nue\mnente para devolverlo a su posiddn.
Mover el fl_igorflico en direccidn lateral
puede causar dafios al recub_imiento del
piso o al fligorflico.
Cuandoempujeel frigorfhcohaciaatrbs,debe
asegurarsedequenoestbpasandopor enc/made/
cabledecorrlenteo dele Ifneadeaguade/d/sposifivo
automfitleodehlelo(enalgunosmodelos).
61
Page 62

Cuidadoy limpiezadelfrigorifico.
Preparacion para vacaciones
En el caso de ;'a('a('iones 0 atlsencias
prolongadas, retire los alimentos v
desenchuli _ el ffigorffico. Coloque el
control del congelador en la posici6n
0 (apagado) y limpie el interior con tma
soluci6n de bicarbonato de tma cucharada
(15 ml) de bicarbonato pot tm litro de
agua. Deie las puertns abiertns.
Preparacion para mudanzas
Asegm'e to(los los elementos sueltos como
parrillas, estantes y cajones peg_indolos con
cinta adhesiva en su lugar para evitar dafios.
Ponga el intermptor del disposifiw) de hielo
en la posici6n 0 v cierre el paso del agua al
fl'igorffico. Si la temperatm'a ambiente
pudiera llegar a estar pot debajo del ptmto
de congelaci6n, haga que tma persona
cualificada desagfie el sistema de suministro
de agua (en algunos modelos) para evitar
daflos a la propiedad causados por
immdaci6n.
Aseg_resequeel frigorfficoso coloqueonposicidn
vertlcaiduranteia mudanza.
62
Page 63

Comocambiarlas bombil/as.
Colocar el control en posiciSn 0 no desconecta el circuito de la luz.
Compartimiento de frigorifico--luz superior
La bombiiia est# iocah#ada detr#s de los contro/es.
O Desconecte el fi'igorffico.
@ En modelos con controles de bot6n:
I,a 1)ombilla estfi simada cerca de la
esquina superior izquierda trasera del
compartimiento, detrfis de la cubierta
de la luz. Quite la cubierta de la luz
desliz;indola hacia delante v sac;indola
del compartimiento.
En modelos con control de palanca:
Para retirar el protector de luz,
empOjelo hacia atrfis v hacia arriba.
Calnbie la bombilla por tma bombilla 0
para aparatos electrodomg_sticos del
n_ismo o menor w_tio.
Compartimiento de frgjorifico--luz inferior (ena/qunosmo_,/os;
Esta /uz estbsituada por enc/nTade/a gaveta
superior.
0 Desenchufe el frigorffico.
@ Tome la lengfieta de la parte inferior de
]a cubierta de ]a luz } tire de esta hacia
delante.
En illodelos con controles de bot()n:
Vuelw_ a colocar la cubierta de la luz
sosteni_ndola fl'ente a la pared izquierda
v desliz_indola hacia arriba v hacia la
pared posterior, hasta que encaje ell
su lugar.
Ell inodelos con control de pill[lilt[l:
Para sustituir el protector de luz,
coloque los ganchos en el pi'otector
de luz de tal ilmnera que ajusten en los
agqieros que estfin en la parte posterior
del firea de los controles.
Conecte el frigorffico otra xez.
Despug_s de reemplazar la bombilla pot
otra de] mismo voltaje o inferior, vueEa
a co]ocar]a cubierta.
@ Vuelva a enchufiu" el frigorffico a la
corlJellte.
Compartimiento del congelador
Desenchufe el ti'igorffico.
Saque el estante que estfi justo debajo de
la cubierta de la hlz. (Serfi mils filcil de
quitarlo si se vacfa prilnero.)
0 I,evante la cubierta de la luz para
extraer.
Oispensador
O Desenchufe el frigorffico.
@ I,a bon_billa estfi situada en el dispensador
bajo el panel de control. Quite la
bombilla giMndola en el senfido contralio
al de las agujas del reloi.
Despu_s de colocar tma bombilla nuew_
de igual o n_enos potencia, vuelva a
instalar la cubierta colgfindola de las tres
pestafias.
0 Vuelw_ a instalar el estante v enchufe el
fl'igorffico de Imew).
0 Cambie la bombilla pot otra del mismo
tamafio y xoltaje.
Vuelxa a enchtflhr el frigorffico a la red
el6ctrica.
63
Page 64

Instrucciones de
Frigorifi
Instalacion
ANTES DE QUE ENIPIECE
Lea todo este manual cuidadosamente.
" IMPORTANTE - G._.dee_e
manual para que lo pueda usar el inspector local.
• IMPORTANTE - si,,.,_,,do_lo_
cddioos x leves relacionados.
O
• Nota para el Instalador -_segfirese de
devolxer el m:muaJ de instrucciones a[ (kmsmnidor.
. Nora al Consumidor - Guarde este manual
para rexisar[o en el futuro.
• Nivel de Conocimientos - La instalaci6n de este
electrodom_stico requiere conocimientos
mec:_nicos b:_sicos.
* Tiempo de montaje - Instalaci6n de] frigorifico
* E1 instalador es el responsable de que la instalaci6n
se efectfie de forma adecuada.
* Ix)s flflh)s del producto fluto de una instalaci6n
illCOlTecta 11o es[_II c/ib]el'tOs por ]a g;ll';/lltlH.
15 minutos
Modelos 20,22,25
ESPACIOS DE SEGURIDAD
Deje suficiente espacio para fi_cilitar la instalacidn,
la circulacidn adecuada de aire v las conexiones de
fimtanerfa v electicidad.
• Pot los lados 4 mm
• Pot arfiba 25 mm
• Pot detrfis 25 mm
Se necesita tm espado lateral de 19 mm para abfir la
puerta a 90 grados, lo cual ofl'ece tm mejor acceso al
firea de almacenamiento de alimentos.
DIMENSIONES
20 22 25
A* 1689 mm 1689 mm 1746 mm
B 800 mm 851 mm 908 mm
C** 864 mm 864 mm 864 mm
SUMINISTRO DE AGUA AL
DISPOSITIVO DE HIELO
(en algunos modelos}
Si el higorifico tiene tm dispositivo de hielo, deberfi
estar conectado a [a tuberfa de agua potable frfa.
Puede adquirirse, con tm costo adicional tmjuego de
smninistro de agua en su servicio de asistencia t_cnica.
Presi6n de entrada del agua m£xima permitida -
8.3 bars.
Presi6n de entrada del agua mfifima permitida -
1.4 bars.
La instalacion del dispositivo automfitico de hielo debe
rea]izarse tnficamente por tm t6ofico cualificado.
UBICACION DEL FRIGORIFICO
• No instale el fligorffico entm lugar donde la
temperatm'a ambiente bajar:i de los [6°(; );_ que no se
pondrfi en marcha lo sttficiente para mantener una
temperatm'a apropiada.
• Instfilelo sobre tma superficie suficientemente fimrte
para aguantar su peso cuando est0 lleno.
D 1216 mm 1267 mm 1267 mm
E 1207 mm 1076 mm 1207 mm
F 1018 mm 1074 mm 1113 mm
G 1159 mm 1233 mm 1294 mm
H 1123 mm 1172 mm ll7hmn
*Ahura no incluye bisagra.
*':t rohmdidad in(line man{ja.
|
|
|
-/
A"---"
E_
mBm
I Jl
It II II D
/
ij ,
III II
I
I
7
F
64
Page 65

Instrucciones de instalacion
RODILLOS
Los rodJllos tienen 3 propositos:
i,os rodillos se _justan de fom/a que la puerta se
cierre filcihnente cuando estO medio abierta.
I,os rodillos se ajustan para que el fl'igorffico est(_
firmemente apoyado ell el suelo v no se tambalee.
0 I,os rodillos pemfiten moxer el flJgorflico para
retirarlo de la pared para su limpieza.
Paxa ajustax los rodillos, quite la parrilla de la base,
tirando hacia flmm pot debajo.
Gire los tornillos que ajustan el rodillo en el sentido de las
agujas del reloj para elevar el fl_igorNco yen el sentido
con_axio paxa b_!jaito. Use una llave ajustable (de 3/8"
hexagonal) o tenazas.
ALINEADO DE LAS PUERTAS
Despu(_s de ni\'elai; aseg(n'ese que las puertas
se encuentren alineadas ell la parle superioi;
Para alinear las puertas, ajuste la puerta del flJgorffico
de la siguiente manera:
0 Quite la parrilla de la base, abra las puertas y luego
tire de la parfilla recta hacia afllem.
@ Detemfine cufil de las (l_s puertas _ mils ;tim que la omt.
I,e\mlte la puerta inlerioi; junto con la leva pequefia.
O Coloque el calce entre la bisagra metfilica de la puerta
v la le\:t como se Ill/lestI';I.
0 AprJete el calce de modo que encaje entre la bisagra
metfilica v la leva plfistica.
O Cierre las pttertas y revise que est(m niveladas ell la
parle superioi; Si una de las puemts ;trill estfi mils baja
que la otto, repit;t el proceso e inserte un calce adidonal.
Loscalcesseguardandebaj0
dela cubiertadelabisagrasuperior
dela puertadeicompartimiento
paraaliment0sfrescos.
Paxa volver a colocar la paxfilla de la base, alinee los
ganchos de la parle trasera de la parrilla entre la barra y la
parle infi_fior del aimario. Presi6nela hacia delante hasta
que los ganchos queden t!jos ell su lugaI:
NOTA: si las puertas est_hl desalineadas y ya se ha
colocado el calce, puede quitarlo para bajar la puerta.
INSTALACION DE LA TOMA DE AGUA
ANTES DE EMPEZAR
I,a instalaci6n de la lfnea de agtta no estfi protegida
por el fitbricante del ffigorffico o de la mfiquina de
cubitos. Siga estas recomendadones cuidadosamente
para mininfizar el riesgo de costosos dafios causados
por el agua.
E1 agua qtte suena coino till martillo en las tuberfas,
puede dafiar algunas partes del fi'igorffico y mmbi_n
causar escapes o inundaciones. IJan/e a un t&nico
cualificado para arreglar los problen/as de fimtaneria
antes de instalar el suministro de agua ell el fl'igorffico.
Para prevenir quemaduras y &trios al aparato, no lo
conecte a la salida de agua caliente.
Si usa el fl'igorffico antes de qtte se instale la conexi6n
de agua ell el dispositiw) para hacer hielo, ponga el
interiuptor de flmcionamiento del mismo ell la
posicidn 0 (apagado),
ANTES DE EMPEZAR (CONT.)
No instale el tttbo del dispositivo para hacer hielo ell
sitios ell donde la temperatura pudiera descender por
debajo del punto de congelaci6n.
()lando utilice un aparato el(%trico (como, por
ejemplo, un taladro) durante la instalaci6n, asegfirese
de que dicho aparato est(_ el(_ctricamente aislado o
conectado de tal manera que no exista peligro de que
se produzcan descargas el_ctricas.
Todas las instalaciones deben adecuarse a las normas
vigentes en materia de obras de fontanerla.
La instalacidn del dispositivo automfitico de hielo debe
realizarse flificmnente por un t_cnico cualificado.
A iPRECAUCION! (]on&'telos61o
a tomas de agua potable.
65
Calce
Page 66

Instrucciones de instalaci6n
INSTALACION DE LA TOMA DE AGUA (CONT.)
[] CONECTE EL TUBO AL
FRIGORIFICO
OBSERVACIONES:
• Antes de efectuar la conexi6n al fl'igorffico,
asegdrese de que el cable no est_ enchufhdo a la
toma de cmTiente de la pared.
• Si su abastecimiento de agua contiene arena o
partfculas que pudieran obst_ uir la v;ilvula del
agua del fl'igorffico, recomendamos que instale
tm filtro para agua. ]nst;ilelo en el tubo de agua
cerca del fl'igorffico.
Algtmos modelos tienen la conexi6n del fl'igorflico
al final de la tuberfa localizada en la parte exterior
del cobertor de acceso del compartimento del
compresor. En otros modelos, el cobertor de acceso
del compartimento del compresor debe set
removido para tener acceso a la conexi6n del
fl'igorffico a la vfilvula de agua.
En modelos que usan la
conexi6n de la vfilvula de
agua, quitar la tapa de
pblstico flexible,
©
[] CONECTE EL TUBO AL
FRIGORiFICO (CONT.)
Una de las ilustraciones mils abajo se asemejar_i la
conexion en su frigorifico.
Abrazadera
t__beria
cornpresl6n /._ (_
F6ruia _ L_
ConexiSnal_--_
frigorifico
Abrazaderade Tuberia
la tuberia
Tuercatipica de
compresi6n
F_rula
(manga)
Conexi6ndel
frigorifico
Vuelva a colocar la cubierta de acceso.
.1-/
(_oloque la tuerca de compresi6n ) la f6_ula
(mam,a_ al extreino del tubo, tal como se indica en
la ilustraci6n.
Inserte el extremo de la tuberfa eta la conexi6n de
la _filvula de agua hasta donde sea posible. Mientras
usted sostiene el tubo, apriete el ajuste.
Apriete la tuberfa en la abrazadera proporcionada
para sostenerla en tma posici6n ".ertical. Q,uizfis
abrir la abrazadera reqtfiera tm pequefio esfuerzo.
66
Page 67

Instrucciones de instalacion
INSTALACION DE LA TOMA DE AGUA (CONT.)
[] ENCIENDA EL AGUA Y CONECTE
EL CONGELADOR
Arregle el rollo de tuberfas para que no _ibre contra
la parte posterior del frigorffico o contra la pared.
Empqie el congelador contra la pared otra _ez.
[] PONGA EN MARCHA EL
DISPOSITIVO PARA FABRICAR
HIELO
Ponga el intenuptor de marcha del dispensador
de hielo en la posici6n I. E1 dispositiw_ para hacer
hielo no entrar5 en flmcionamiento hasta que haya
alcanzado su temperatm'a de operaci6n de -9 °C,
O IIlenos, En dicho iiloiilento eIltI'_lI'_/ en
flmcionamiento, si el interruptor de corriente del
dispositivo estfi en la posici6n I.
OBSERVACION: En casos en que la presi6n del
agua sea baja, la llave de paso del agua podrfa
tardar hasta tres veces mrs en llenar de agua
suficiente el dispositiw_ de hielo.
67
Page 68

Sonidosnorma/esdeoperacl n.
Los frigodficos m#s nuevos suenan diferente a los modelos
m#s antiguos.
Los frigorificos modemos tienen m#s caractedsticas y usan
tecnologfa m#s nueva.
gEscucha Io que tlo escucho ?Estos sonidos son normales.
HUMMM...
--WHOOSH...
• E1 compresor nuew) de alta eficiencia puede operar
mils rfipido y pot mils tiempo que su fl'igorffico
anterior ves posible que escuche un zumbido alto
i/lientras opera,
• _Mgunas veces el fl-igorffico opera pot tm periodo
prolongado, espedahnente cuando las puertas se ablen
con fi'ecuencia. Esto significa que la caracterNfica Frost
Guard_"estfi flmcionando para evitar que el congelador
se queme y mejore la preser\:_ci6n de los alimentos.
• Puede escuchar un soplido cuando las puertas se
derren. Esto se debe a la nivelad6n de la presi6n en
el fi_igorNco.
CHASQUIDOS,
ESTALLIDOS, CRUJIDOS y
CHIRRIDOS
• Puede escuchar sonidos de c_t/jidos o estallidos
cuando el fl'igorffico se conecta iniciahnente. Esto
ocurre inientras el fi'igor/fico se enfr/a hasta alcanzar
la telilperat/li'a coi'recta,
• i,os reguladores electr6nicos se abren v cierran para
ofl'ecer enfl'iamiento 6ptimo y ahorro de energfa.
• E1 compresor puede causar tm chasquido o chirrido
al reiniciar (esto podrfa tomar hasta 5 minutos).
• E1 tablero de control electrdnico puede causar un
sonido de chasquido cuando los rel_s se activan para
controlar los componentes del ti'igorffico.
• I,a expansi6n y contraccidn de las bobinas de
enfi'iamiento durante y despu_s de la descongelaci6n
pueden causar cH!jidos o estallidos.
• En los modelos con dispositivo automfitico para
fabricar hielo, despuSs del ciclo del dispositivo,
es posible escuchar cuando los cubos de hielo
caen en la bandeja de hielos.
WHIR.!
• Puede escuchar el sonido de la rotaci6n del
ventilador al operar a altas velocidades. Esto ocmTe
cuando el fl'igorffico se conecta por prilnera vez,
cuando las puertas se abren fl'ecuentemente o
cuando se agrega una gran cantidad de alilnentos en
los compartimientos del frigorifico o congelador, i,os
ventiladores avudan a mantener las temperatm'as
correctas.
• Si cualqtfiera de las puertas se abre pot mils de
3 minutos, puede escuchar cuando los ventiladores
se encienden para enfi'iar las bombillas.
• I,os ventiladores cambian de velocidad para ofl'ecer
un enfriamiento 6ptimo y ahorrar energfa.
SONIDOSDELAGUA
6
• E1 flt/jo del fl'igorifico a tray& de las bobinas de
enfl'iamiento del congelador puede producir tm
borboteo como de agua hirviendo.
• E1 agua al caer en el canal de descongelaci6n puede
causar un chisporroteo, estallido o zumbido din'ante
el ciclo de descongelacidn.
• Un sonido de agua que cae puede ocurrir durante
el ciclo de descongelaci6n a medida que el hielo se
derrite del evaporador y fluye hacia la bandeja de
drenaje,
• Cerrar la puerta puede causar tm sonido de borboteo
debido a la nivelaci6n de la presi6n,
6S
Page 69

Antesde Ilamar al serviciotecnico...
Soluci6n de problemas
iAhorre tiempo y dinero/. Revise las tablas en las p#ginas
siguientes y tal vez no necesite Ilamar al servicio t#cnico.
Posibles Causas Que hacer
El trigorifico no E1 frigorifico estfi en ciclo * Espere unos 30 minutos a que tei_nine el cMo
funciona de descongelacion, de descongelacidn.
E1 control del congelador estfi * Ponga el control en una posicidn de temperattu'a.
en posJci6n O.
E1 frigorifico estfi * Apriete el enchulF hasta el fi)ndo de la toma de corlJente.
desenchufado.
Se ha fundido un fusible/ * Calnbie el fusible o reconecte el diferencial.
ha saltado el diferencial.
Vibracionos osacudidas Los rodillos frontales *Ver Rodillos.
(es normal que vibre necesitan ajustarse.
ligeramente)
EImOtoresM enmarcha Es normal cumldo * Espere 24 horas a que el trigorflico se enfi'fe por ('Olnpleto.
pormuchotiompooso se enchufa al prhlcipio.
enciendey apagacon Sucede a menudo cumldo se * Es noi_nal.
frecuencia.(Los guaxdmz cmztidades grmldes
frigorificos modernos con de comida.
masespacioymayores
congeladores necesitan Puerta quedo abierta. * Revise que no hava tm paquete que impida (errar la puerta.
mas tiempo de Hace caJor o la puerta * Es noi_nal.
funcionamientaSeponen se abre frecuentemente.
en marcha y se apagan
para mantener su Seleccionado el nivel mils bajo • Vet Controles.
temperatura.) del control de temperatura.
Frigorificoocongelador Control de temperatura en • Wr Contro/es.
posicion poco frla.
Hace caJor o la puerta * Ajuste el control de telnperattu'a a tm ni'_el mils bajo.
se abre frecuentemente. VeI" Contro/es.
Puerta quedo abierta. • Rexise qtle ilo ]lava till paquete qt/e ilo pennite ('errar la ptleI't_l.
So ha acumulado hiolo en Puerta quedo abierta. * Re'dse que no hava till paquete que ilnpida cerrar la puertn.
losalimentoscongolados
(esnormalquehayahielo La puerta seabre con
dentrodelpaquete)
demasiada frecuencia.
Eldivisor entre el E1 sistema de aJaorro energ6fico * Esto a,_u(la a que no se fi)i_ne condensacidn ell el exterioi:
congeladory olfrigorifico hace circular llquido templado
parece caliente por el borde del congelador.
Eldispos#ivo de hielo E1 hlterruptor del dJspositivo * Ponga el interrui)tor en posicidn I.
nofunciona estfi en posici6n O.
(enalgunosmodelos) Sumhfistro de agua apagado * Ver/nsta/aci6n de/a/[nea de agua.
0 no conectado.
Congelador demasiado caliente. * Espere 24 horas para que el aparato se enfl'fe por COlnpleto.
Hay cubitos amontonados en * Nix ele los cubitos (on la inano.
el recipiente que hacen que
el dispositivo se apague.
Hay cubitos pegados al
dJspositivo. (La luz verde
del dJspositivo paa'padea).
• AI)ague, el dispositivo, saque los cubitos v vuelva a
pollerlo ell Ill_lI'Ch_l.
89
Page 70

Antesde Ilamar al servicioMcnico...
Solucidn de problemas
Posibles Causas Quehacer
Los cubitostienen Hay que lhnpiaJc el recipiente. * Vacie y limpie el recipiente. Tire los cubitos vieios.
La cornida esttl dm_do maJ * Envuel;a bien los alimentos.
olor/sabor a los cubitos.
E1interior del frigorifico *Vet Cuidado y/impieza.
necesita lhnpiaJese.
Congelaci6n Puerta quedo abierta. * Rexise que no hma ma paquete impidiendo que se cierre
cubitos lenta la puerta.
Control de temperatura * Vex" Contro/es.
ajustado demasiado alto.
Puerta nose cierrabien Lajmlta selladora de la puerta en • Ponga vaselina en la parte delantera de la junta.
lado de bisagras se pega o se dobla.
Luznaranja on Calentador de descongelacion * Es noHnal.
el congelador en maxcha.
El dispositivo de cubitos Dispositivo apagado o paso * Encienda dispositi_ o o abra paso de agua.
nofunciona de agua cerrado.
(en algunos modelos) Hay cubitos pegados al brazo * Qtrite los ctd)itos.
detector del dJspositivo.
Bloques de hielo irregulaxes en * ]_.6mpalos con la presi6n de sus de(los (no mils) y tire
el recipiente de a!macenamiento, los resmntes.
• Congelador puede estar demasiado caliente. Vaya ajust;mdo el
control del congelador, a tma I)°sicidn mils frfa, de tma posicidn
a la otra, hasta que no se fi)IIaaela bloques.
E1 dJspensador esttl LOCKED * Presione la tecla LOCK CONTROLnralatelfi(elKh)l'a apret;Ma
(bloqueado). pot 3 segulados.
El agua tiene mal No se ha usado el dJspea_ador * Saque agua del (lispensador hasta que se relmeve toda el agua
olor/sabor en mucho tiempo, del sistema.
(en algunos modelos)
El agua delprimervaso Es normal cuando el frigorifico * Espere 24 horas a que el ffigor/fico se enfHe por completo.
esM templada es_ reci6n hlsta]ado.
(ell algunos mode!os) No se ha usado el dJspea_ador * Saque agua del dispensador hasta que se relmexe toda el agua
ell Inucho tieln:po, del sistenla.
E1 sistema del agua se ha vaciado. * Deje pasar xarias horas hasta que el Nuexo depdsito se elali'fe.
El dispensadorde agua Smnhfistro de agua apagado * Vet/nsta/acidn de/a/rhea de agua.
nofunciona o no estfi conectado.
(en algunosmodelos)
Puede haber aJre atrapado * Mantenga presionado el brazo del dispensador tm nfinin/o
en el circuito del agua. de dos nfilmtos.
E1 dJspensador estfi LOCKED * Presione la tecla LOCKCONTROL nmnteni&Mola apretada
(bloqueado). I)()I"3 segtmdos.
y
dehielosi
7O
E1 agua en la reserva esttl * IJame al servicio de i'eparaciones.
congelada.peroel dispositivo
Page 71

Posibles Causas Que hacer
No sale agua ni La lkma de agua o la • I£une a un fimmnero.
cubitos de hielo vfilvula estfin obturadas.
E1 dispensador es_ LOCKED * Presione la te(la LOCK CONTROLmm_teni&_(lola apretada
(bloqueado). por 3 segundos.
El frigorifieo huele mal Algmm comida es_ '*l;is ('()midas que desprendma tuertes oh)res deben en\'ol\'e_xe
desprendiendo olores muv bien.
en el frigorifico. * Deie una caja de bicarbonSto s6dico abierta en el ti'igorifico,
cfimbiela cada tres meses.
F,1 interior del frigorifico * Ver Cuidado VLimpioza.
necesita lhnpiaxse.
Descongele el desag_e * Ver Cuidado y Limpieza.
el sistema necesita limpiarse.
So forma hnmedad No es hmsual en perlodos * Seqt/e 1;Isupel_ficie.
fuera del frigorifico de mucha humedad.
Seacumulahumedad
(enel interiorcuando
Las puertas se abren demasiado
veces o por mucho rato.
hacehumedad,elaim
introducehumedad
enel frigorificecuando
laspuertasse abren)
Nofuncionala luz
interior
No hay corriente en la toma.
La bombilla se ha ftmdJdo.
• (_mflgie el fl/sible o reconecte el ditbrencial.
• Vex"C6mocambiarlasbombillas.
Hay agua en e! suelo
de la cocina o en
el fondu del congelador
Aire calientedeparte
inferiordel aparato
Seseleccion6CUBEDICE
perusalioCRUSHEDICE
(hie!opicado)
(enatgonosmode/os)
E1 desagfie del fondo
del congelador estal obturado.
Cubitos atascados en la salida.
Circulad6n de aJre normal que
enfrla d motor. F_a_d proceso de
refrigeracion, es normal que salga
calor en el firea bajo el frigorifico.
Algtmos suelos son sensibles y
pueden perder color a estas
temperaturas normales y seguras.
La ulfima seleccion fu6
CRUSHEDICE.
• Vex" Cuidado y limpieza.
• Empqie el hielo hacia fl/ex'a con uxla cuchax'a de madera.
• Habfan quedado unos cuaxltos cubitos en la txJtux'adox'a
de la selecci6n antefi(m Esto es normal.
7/
Page 72

Thisapplianceconformsto the following EECDirectives:
Cetappareilm_nagerest conformeauxdirectivesCEEsuivantes:
Esteelectrodom_sticose adect_aa los requisitosdela CEE:
LowVoltageEquipment
Appareilsm_nagersa hasvoltage
Paraelectrodom_sticosdebajovoltaje
73/23/EEC
93/68/EEC
ElectromagneticCompatibility
Compatabilit__lectromagn_tique
Compatibilidadelectromagn_tica
89/336/EE0
92/31/EEC
93/68/EE0
Printedin the United States
Impdm@aux Etats-Unis
Impresoen losEstadosUnidos
 Loading...