

GE Appliances Quickset III, Appliances Quickset IV, Quickset III, Quickset IV Owner's Manual
Page 1
k_.
14_
U
_m
k._
U
Iii
GEAppliances.com
Safety Instructions ......... 2-e
Operating Instructions
Clock and Timer ................... 16
Control Lock Out .................. 18
Energy Saver IVlode ............... 18
Oven .......................... 11-22
Adjust the Oven Thermostat ..... 18
Aluminum Foil ................... 13
Broiling, Broiling Guide .......... 14
Controls .......................... 11
Convection Oven ................ 15
Power Outage ................... 12
Sabbath Feature ................. 19
Self-Cleaning ................. 20, 21
Special Features ................. 18
Steam Cleaning .................. 22
Timed Baking .................... 17
Surface Units .................... 7-9
Care and Cleaning
Coil Surface Units ................. 29
Control Knobs .................... 23
Drip Pans ........................ 29
Glass Cooktop ................ 27, 28
Lift-Off Oven Door................ 25
Lift-Up Cooktop ................... 29
I
Light ............................. 26
Oven Heating Elements ........... 25
Racks ............................ 25
Standard-Clean Oven Interior .... 24
Vent .............................. 24
Troubleshooting Tips..... 30-33
Accessories ................... 34
Consumer Support
Consumer Support ...... Back Cover
Warranty ......................... 35
Quickset III and
Quickset IV Models
For a Spanish version of this
manual, visit our Website at
GEAppliances.com.
Para consultar una version
en espa_ol de este manual de
instrucciones, visite nuestro sitio
de internet GEAppliances.com.
In Canada contact us at:
www. GEAppliances.ca
Write the model and serial
numbers here:
Model #
Serial #
You can find them on a label
behind the drawer or behind the
lower oven door on the front of
the range frame.
Printed on
Recycled Paper
49-80632 03-11 GE
Page 2
IMPORTANT SAFETY INFORMATION.
READ ALL INSTRUCTIONS BEFORE USING.
[A WARNING I
Read all safety instructions before using the product. Failure to follow these instructions may result in fire, electric shock,
serious injury or death.
ANTI-TIP DEVICE
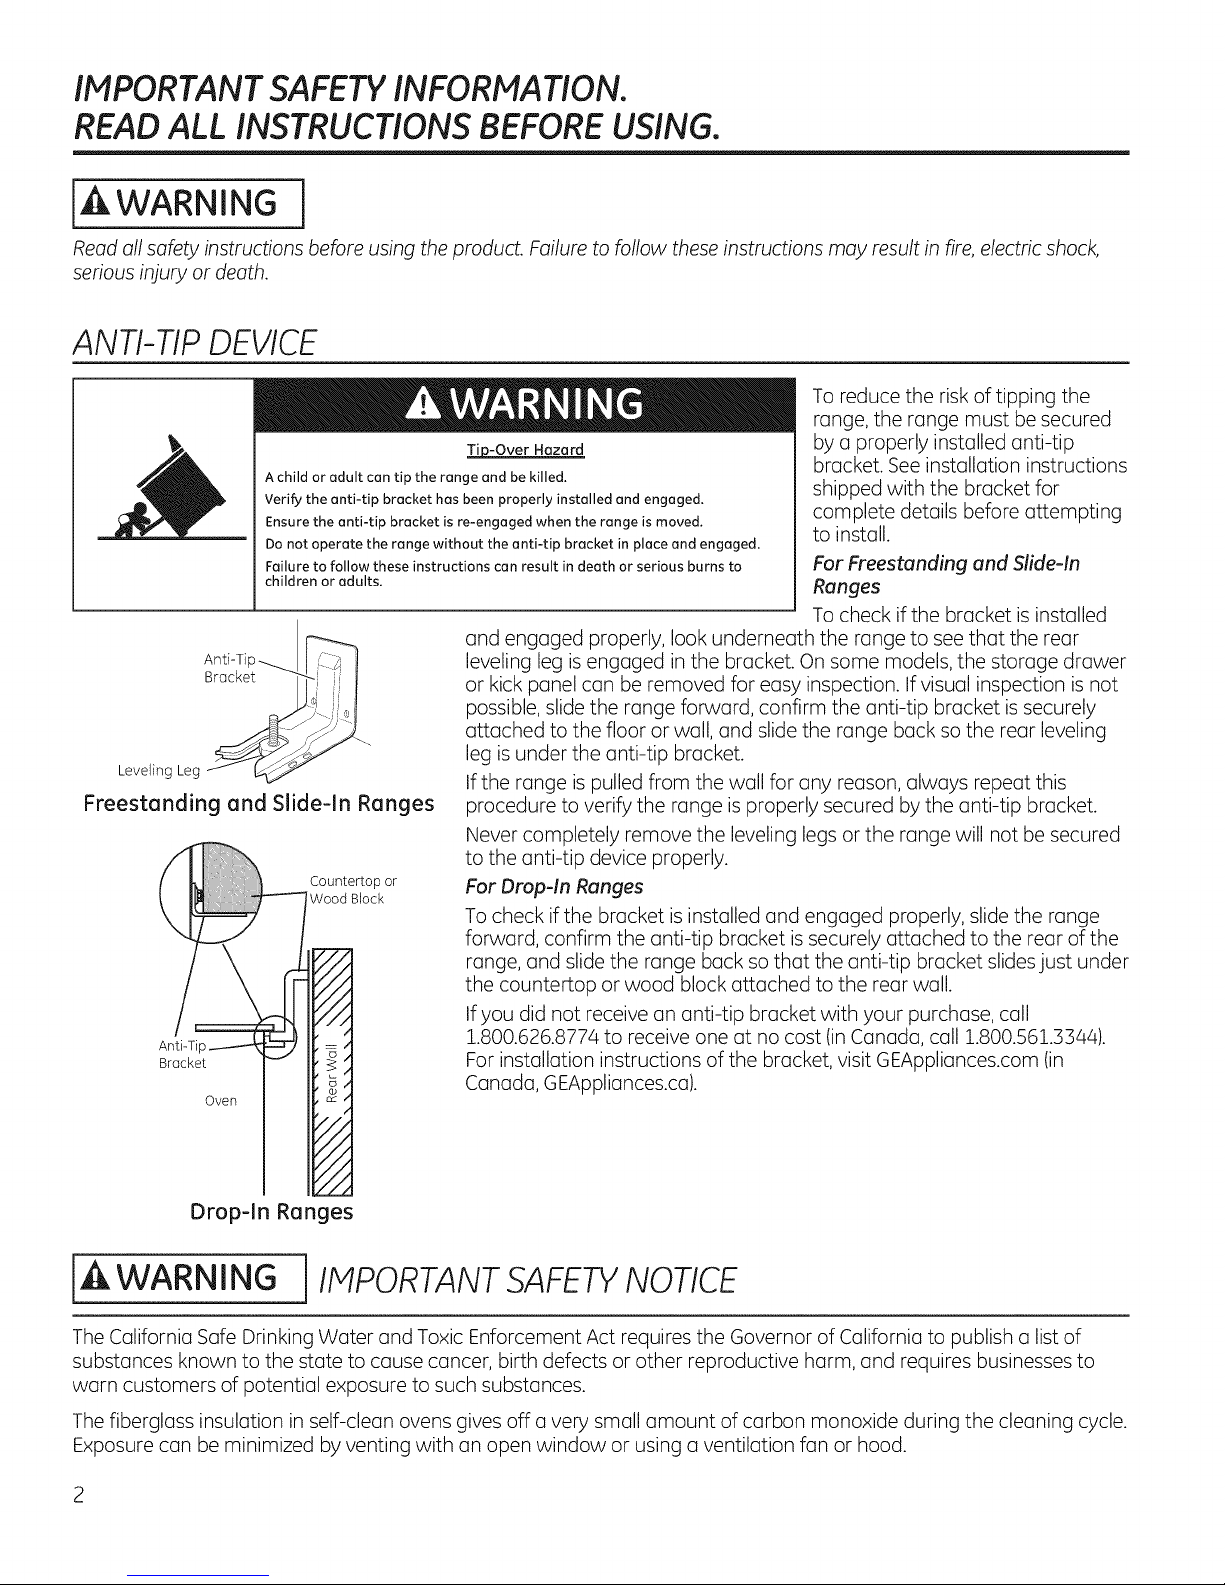
To reduce the risk of tipping the
range, the range must be secured
by a properly installed anti-tip
bracket. See installation instructions
shipped with the bracket for
complete details before attempting
to install.
For Freestanding and Slide-In
Ranges
To check if the bracket is installed
A child or adult can tip the range and be killed.
Verify the anti-tip bracket has been properly installed and engaged.
Ensure the anti-tip bracket is re-engaged when the range is moved.
Do not operate the range without the anti-tip bracket in place and engaged.
Failure to follow these instructions can result in death or serious burns to
children or adults.
AntPTip _
Bracket -'_--- ; !
LevelingLeg__
Freestanding and Slide-ln Ranges
Countertop or
Wood Block
Anti-T
Bracket
Oven
Tji0-Over Hazard
and engaged properly, look underneath the range to see that the rear
leveling leg is engaged in the bracket. On some models, the storage drawer
or kick panel can be removed for easy inspection. If visual inspection is not
possible, slide the range forward, confirm the anti-tip bracket is securely
attached to the floor or wall, and slide the range back so the rear leveling
leg is under the anti-tip bracket.
If the range is pulled from the wall for any reason, always repeat this
procedure to verify the range is properly secured by the anti-tip bracket.
Never completely remove the leveling legs or the range will not be secured
to the anti-tip device properly.
For Drop-In Ranges
To check if the bracket is installed and engaged properly, slide the range
forward, confirm the anti-tip bracket is securely attached to the rear of the
range, and slide the range back so that the anti-tip bracket slides just under
the countertop or wood block attached to the rear wall.
If you did not receive an anti-tip bracket with your purchase, call
1.800.626.8774 to receive one at no cost (in Canada, call 1.800.561.3344).
For installation instructions of the bracket, visit GEAppliances.com (in
Canada, GEAppliances.ca).
Drop-ln Ranges
[A WARNING i IMPORTANT SAFETYNOTICE
The California Safe Drinking Water and Toxic Enforcement Act requires the Governor of California to publish a list of
substances known to the state to cause cancer, birth defects or other reproductive harm, and requires businesses to
warn customers of potential exposure to such substances.
The fiberglass insulation in self-clean ovens gives off a very small amount of carbon monoxide during the cleaning cycle.
Exposure can be minimized by venting with an open window or using a ventilation fan or hood.
Page 3
[A WARNING ] GENERAL SAFETYINSTRUCTIONS
GEAppliances.com
Use this appliance for its intended purpose as described
in this Owner's Manual.
Be sure your appliance is properly installed and
grounded by a qualified installer in accordance with the
provided installation instructions.
Do not attempt to repair or replace any part of your
range unless it is specifically recommended in this
manual. All other servicing should be referred to a
qualified technician.
Before performing any service, unplug the range
or disconnect the power supply at the household
distribution panel by removing the fuse or switching off
the circuit breaker.
Do not leave children alone-children should not be left
alone or unattended in on area where on appliance is in
use. They should never be allowed to climb, sit or stand
on any part of the appliance.
CAUTION : Do not store items of interest to
children above a range or on the backguard of a
range-children climbing on the range to reach items
could be seriously injured.
Use only dry pot holders-moist or damp pot holders on
hot surfaces may result in burns from steam. Do not let
pot holders touch hot surface units or heating elements.
Do not use a towel or other bulky cloth in place of pot
holders.
iiiil}i
Do not touch the surface units, the heating elements
or the interior surface of the oven. These surfaces may
be hot enough to burn even though they are dark in
color. During and after use, do not touch, or let clothing
or other flammable materials contact the surface units,
areas nearby the surface units or any interior area of
the oven; allow sufficient time for cooling first. Other
surfaces of the appliance may become hot enough
to cause burns. Potentially hot surfaces include the
cooktop, areas facing the cooktop, oven vent opening,
surfaces near the opening and crevices around the
oven door.
iiiiiiili_
Do not heat unopened food containers. Pressure could
build up and the container could burst, causing an
injury.
iiiiiiili_
Donot use aluminum foil to line drip pans or anywhere
inthe oven,except as described in this manual. Foilcan
trap heat or melt, resulting indamage to the product
and a shock or fire hazard.
iiiiiiili_
Avoid scratching or impacting glass doors, cook tops or
control panels. Doing so may lead to glass breakage. Do
not cook on a product with broken glass. Shock, fire or
cuts may occur.
iiiiiiili_
Cook meat and poultry thoroughly-meat to at least an
internal temperature of 160°F and poultry to at least
an internal temperature of 180°F. Cooking to these
temperatures usually protects against foodborne illness.
Never use your appliance for warming or heating the
room.
iA WARNING
1KEEPFLAMMABLE MATERIALSAWAY FROM
THERANGE.
Do not store or use flammable materials in an oven or
near the cooktop, including paper, plastic, pot holders,
linens, wall coverings, curtains, drapes and gasoline or
other flammable vapors and liquids.
Never wear loose-fitting or hanging garments while
using the appliance. These garments may ignite if they
contact hot surfaces causing severe burns.
Do not let cooking grease or other flammable materials
accumulate in or near the range. Grease in the oven or
on the cooktop may ignite.
Clean ventilating hoods frequently. Grease should not
be allowed to accumulate on the hood or filter.
Page 4
IMPORTANT SAFETY INFORMATION.
READ ALL INSTRUCTIONS BEFORE USING.
i
WARNING j IN THEEVENTOFA FIRE,TAKETHEFOLLOWINGSTEPS
TOPREVENT THEFIREFROM SPREADING:
*:, Do not use water on grease fires. Never pick up a
flaming pan. Turn the controls off. Smother a flaming
pan on a surface unit by covering the
pan completely with a well-fitting lid, cookie sheet or flat
tray. Use a multi-purpose dry chemical or foam-type fire
extinguisher.
*:, If there is a fire in the oven during baking, smother the
fire by closing the oven door and turning the oven off or
by using a multi-purpose dry chemical or foam-type fire
extinguisher.
If there is a fire in the oven during self-clean, turn the
oven off and wait for the fire to go out. Do not force
the door open. Introduction of fresh air at self-clean
temperatures may lead to a burst of flame from the
oven. Failure to follow this instruction may result in
severe burns.
iA WARNING j COOKTOPSAFETYINSTRUCTIONS
Never leave the surface units unattended at medium or
high heat settings. Boilovers cause smoking and greasy
spillovers that may catch on fire.
Never leave oil unattended while frying. If allowed to
heat beyond its smoking point, oil may ignite resulting
in fire that may spread to surrounding cabinets. Use a
deep fat thermometer whenever possible to monitor oil
temperature.
To avoid oil spillover and fire, use a minimum amount of
oil when shallow pan-frying and avaid caaking frazen
foads with excessive amounts of ice.
Useproper pan size--select cookware having flat
bottoms largeenough to cover the surface heating
element.The use of undersizedcookware will expose
a portion of the surface unit to direct contact and may
resultin ignition of clothing. Properrelationship of
cookware to surface unit will also improve efficiency.
iiiiiil
Onlycertain typesof glass,glass/ceramic, earthenware
orother glazed containers are suitablefor cooktop
service;others may break because of the sudden
change intemperature.
iiiiiiili_
To minimize the possibility of burns, ignitian of
flammable materials and spillage, the handle of a
container should be turned toward the center of the
range withaut extending aver nearby surface units.
iiiiiiili_
When preparing flaming foods under a hood, turn the
fan on.
iiiiiiili_
If power is lost to an electric cooktop while a surface
unit is ON, the surface unit will turn back on as soon
as power is restored. In the event of power loss, failure
to turn all surface unit knobs to the OFF position may
result in ignition of items on or near the cooktop, leading
to serious injury or death.
Page 5
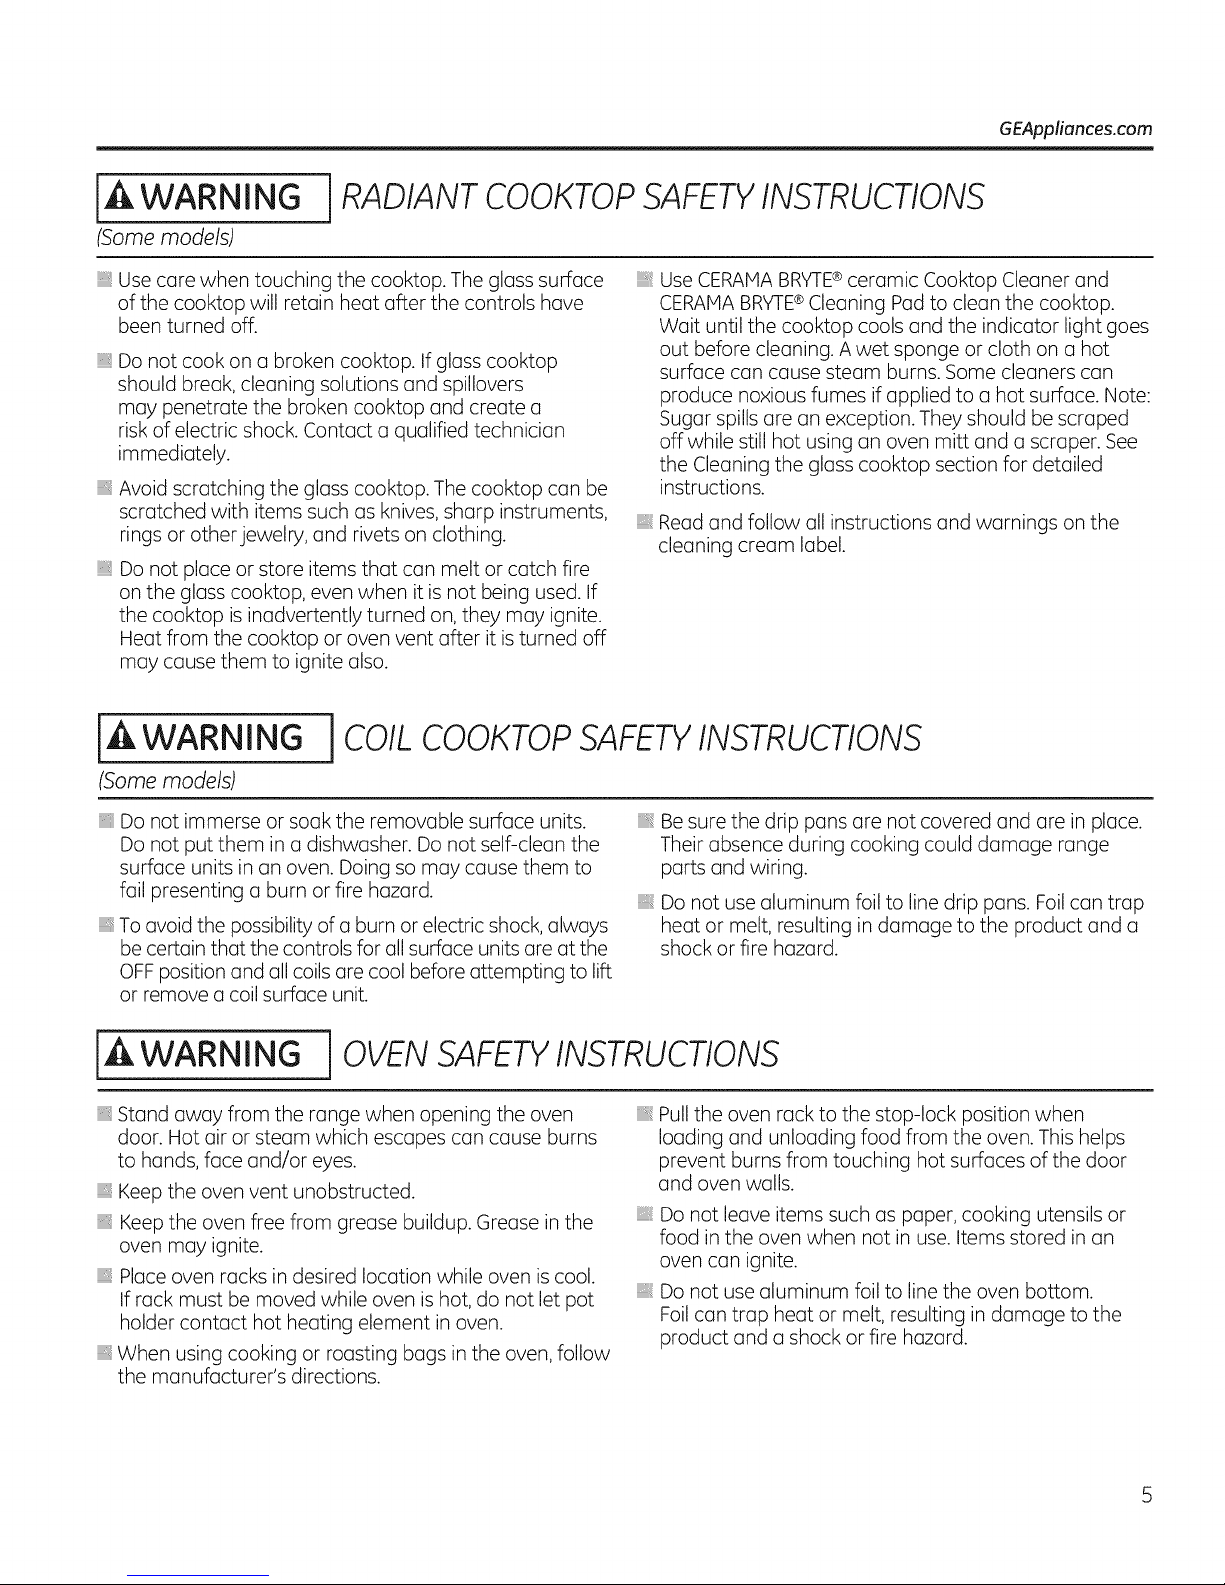
IA WARNING 1RADIANT COOKTOP SAFETYINSTRUCTIONS
(Some models)
GEAppliances.com
Use care when touching the cooktop. The glass surface
of the cooktop will retain heat after the controls have
been turned off.
Do not cook on a broken cooktop. If glass cooktop
should break, cleaning solutions and spillovers
may penetrate the broken cooktop and create a
risk of electric shock. Contact a qualified technician
immediately.
Avoid scratching the glass cooktop. The cooktop can be
scratched with items such as knives, sharp instruments,
rings or other jewelry, and rivets on clothing.
Do not place or store items that can melt or catch fire
on the glass cooktop, even when it is not being used. If
the cooktop is inadvertently turned on, they may ignite.
Heat from the cooktop or oven vent after it is turned off
may cause them to ignite also.
[A WARNING
(Some models)
Do not immerse or soak the removable surface units.
Do not put them in a dishwasher. Do not self-clean the
surface units in an oven. Doing so may cause them to
fail presenting a burn or fire hazard.
To avoid the possibility of a burn or electric shock, always
be certain that the controls for all surface units are at the
OFFposition and all coils are cool before attempting to lift
or remove a coil surface unit.
i COIL
COOKTOPSAFETYINSTRUCTIONS
iiiil}i
Use CERAHA BRY1-E®ceramic Cooktop Cleaner and
CERAHA BRYTE®Cleaning Pad to clean the cooktop.
Wait until the cooktop cools and the indicator light goes
out before cleaning. A wet sponge or cloth on a hot
surface can cause steam burns. Some cleaners can
produce noxious fumes if applied to a hot surface. Note:
Sugar spills are an exception. They should be scraped
off while still hot using an oven mitt and a scraper. See
the Cleaning the glass cooktop section for detailed
instructions.
iiiiiiili_
Read and follow all instructions and warnings on the
cleaning cream label.
Be sure the drip pans are not covered and are in place.
Their absence during cooking could damage range
ports and wiring.
Do not use aluminum foil to line drip pans. Foil can trap
heat or melt, resulting in damage to the product and a
shock or fire hazard.
iA WARNING 1OVEN SAFETYINSTRUCTIONS
Stand away from the range when opening the oven
door. Hot air or steam which escapes can cause burns
to hands, face and/or eyes.
} Keep the oven vent unobstructed.
Keep the oven free from grease buildup. Grease in the
oven may ignite.
Place oven racks in desired location while oven is cool.
If rack must be moved while oven is hot, do not let pot
holder contact hot heating element in oven.
When using cooking or roasting bags in the oven, follow
the manufacturer's directions.
iiiil}i
Pull the oven rack to the stop-lock position when
loading and unloading food from the oven. This helps
prevent burns from touching hot surfaces of the door
and oven walls.
_:, Do not leave items such as paper, cooking utensils or
food in the oven when not in use. Items stored in an
oven can ignite.
_:, Do not use aluminum foil to line the oven bottom.
Foil can trap heat or melt, resulting in damage to the
product and a shock or fire hazard.
Page 6
IMPORTANT SAFETY INFORMATION.
READ ALL INSTRUCTIONS BEFORE USING.
[_ WARNING
(Some models)
The self-cleaning feature operates the oven at temperatures high enough to burn away food soils in the oven.
Follow these instructions for safe operation.
Before operating the self-clean cycle, remove pans,
shiny metal oven racks and other utensils from the
oven. Only gray porcelain-coated oven racks may be
left in the oven. Do not use self-clean to clean other
parts, such as drip pans or bowls.
Beforeoperating the self-clean cycle,wipe grease and
food soilsfrom the oven.Excessiveamount of grease
may ignite leadingto smoke damage to your home.
JSELF-CLEANINGOVENSAFETYINSTRUCTIONS
If the self-cleaning mode malfunctions, turn the oven off
and disconnect the power supply. Have it serviced by a
qualified technician.
Do not clean the door gasket. The door gasket is
essential for a good seal. Care should be taken not to
rub, damage or move the gasket.
iiiiiil
Do not use oven cleaners. No commercial oven cleaner
or oven liner protective coating of any kind should be
used in or around any part of the oven.
[A WARNING i WARIVllNG DRAWER/LOWER OVEN DRAWER SAFETY
INSTRUCTIONS (Somemodels)
_:,The purpose of the warming drawer is to hold hot
cooked foods at serving temperature. Bacteria will grow
in food while it is below 140°F. Do not put cold food
in warming drawer. Do not heat food for more than 2
hours. Failure to follow these instructions may result in
foodborne illness.
Do not leave paper products, plastics, canned food or
combustible materials in the drawer. They may ignite.
Use care when opening the drawer. Open the drawer a
crack and let hot air or steam escape before removing
or replacing food. Hot air or steam that escapes can
cause burns to hands, face and/or eyes.
Do not use aluminum foil to line the lower drawer.
Foil can trap heat or melt, resulting in damage to the
product and a shock or fire hazard.
Do not touch the heating element or the interior surface
of the drawer. These surfaces may be hot enough to
cause burns.
Page 7
Using the surface units, ionsomemode_sI GEApUionces.com
jA WARNING FIREHAZARD: Never leave the range unattended with the cooktop on medium or highsettings. Keep flammable items away from the cooktop. Turn off all controls when
done cooking. Failure to follow these instructions can result in fire, serious injury or
death.
Throughout this manual, features and appearance may vary from your model.
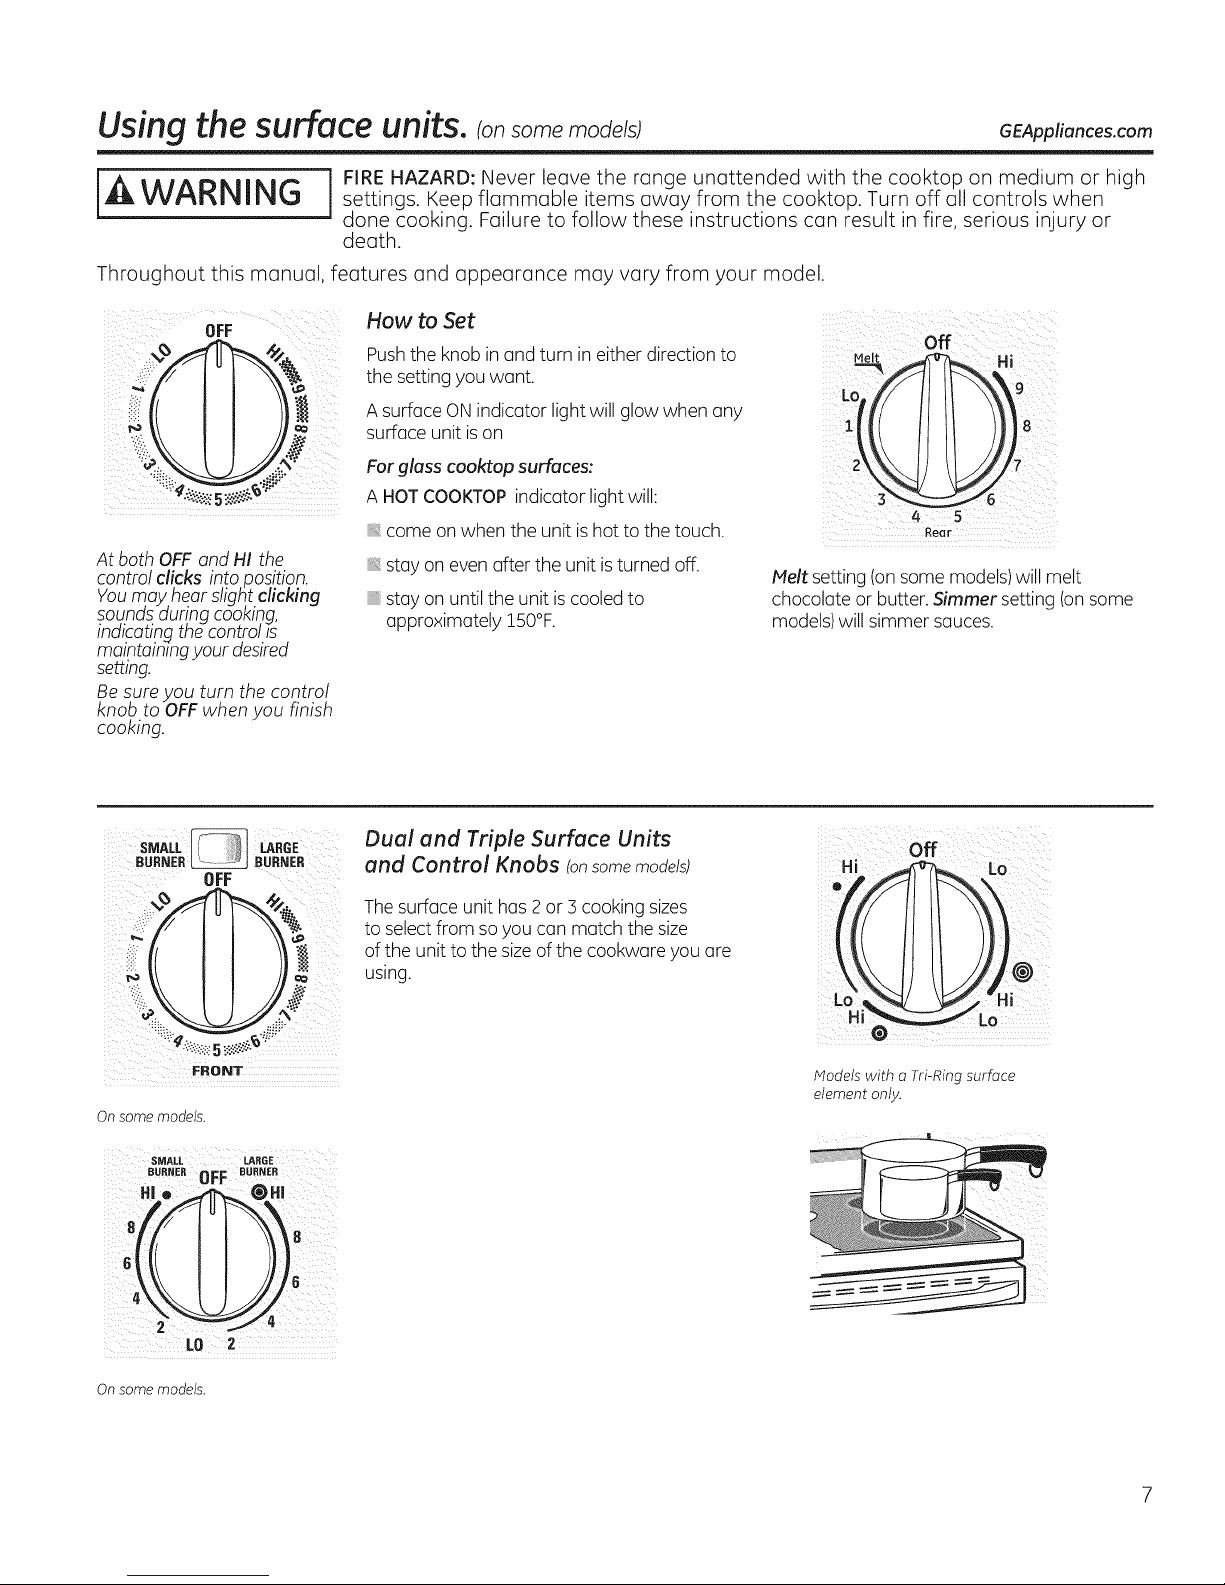
JFF
i ii:>_ i_, ¸
At both OFF and HI the
control clicks into position.
Youmay hear slight clicking
sounds dur!ng cooking,
indicating the controlss
maintainingyour desired
setting.
Be sure you turn the control
knob to OFFwhen you finish
cooking.
iiZ_,x ) f
How to Set
Pushthe knob in and turn in either direction to
the setting you want.
A surface ON indicator light will glow when any
surface unit is on
Forgloss cooktop surfaces:
A HOTCOOKTOPindicator light will:
come on when the unit ishot to the touch.
stay on even after the unit isturned off.
stay on until the unit is cooled to
approximately 150°F.
Dual and Triple Surface Units
and Control Knobs (onsomemodels)
The surface unit has2or 3 cooking sizes
to select from so you can match the size
of the unit to the size of the cookware you are
using.
iill iilk ii ii
Rear
Melt setting (on some models)will melt
chocolate or butter. Simmer setting (on some
models)will simmer sauces.
Hi _ Lo
O
!_ii!!_¸
FBONIF
Onsomemodels.
SMALL LABGE
BUe.EROFF ....E.
8
LO 2
Onsomemodels.
Models with a Tri-Ring surface
element only.
Page 8

Using the surface units,
Throughout this manual, features and appearance may vary from your model.
Warming Zone
Using the Warming Zone (on some models)
Forbest results,all foods on the WARMING
IAWARNING
FOODPOISONHAZARD:Bacteriamay grow in
food at temperatures below 140°F.
Always start with hot food. Donot use warm
setting to heat cold food.
Donot use warm setting for more than
2 hours.
Failureto follow these instructions may result in
foodborne illness.
The WARMINGZONE,located in the back
center of the glass surface,will keephot, cooked
food at serving temperature. Always start with
hot food. Do not useto heat cold food. Placing
uncooked or coldfood on the WARMINGZONE
could result in foodborne illness.
Pushand turn the control knob to any desired
setting.
ZONEshould be covered with a lid or aluminum
foil.When warming pastriesor breads,the
cover should be vented to allow moisture to
escape.
Usethe lowest setting for breads and pastries.
Usea medium setting for vegetables, sauces,
stews,cream soups, butter and chocolate. Use
the highest setting for soups (liquid)and hot
beverages.Theseinitial suggested settingsare
for reference only.Thetemperature, type and
amount of food, type of pan, and the time held
will affect the quality of the food.
Always use pot holders or oven mitts when
removing food from the WARMINGZONE,
since cookware and plates will be hot.
NOTE:Thesurface warmer will not glow red
likethe cooking elements.
Home Canning Tips
Be surethe canner iscentered over the surface
unit.
Make surethe canner isflat on the bottom.
Toprevent burns from steam or heat, use
caution when canning.
Use recipesand procedures from reputable
sources.Theseare availablefrom
manufacturers such as Ball®and Kerr®and the
Department of Agriculture Extension Service.
Flat-bottomed canners are recommended. Use
of water bath canners with rippled bottoms
may extend the time required to bring the
water to a boil.
8
Page 9
GEAppliances.com
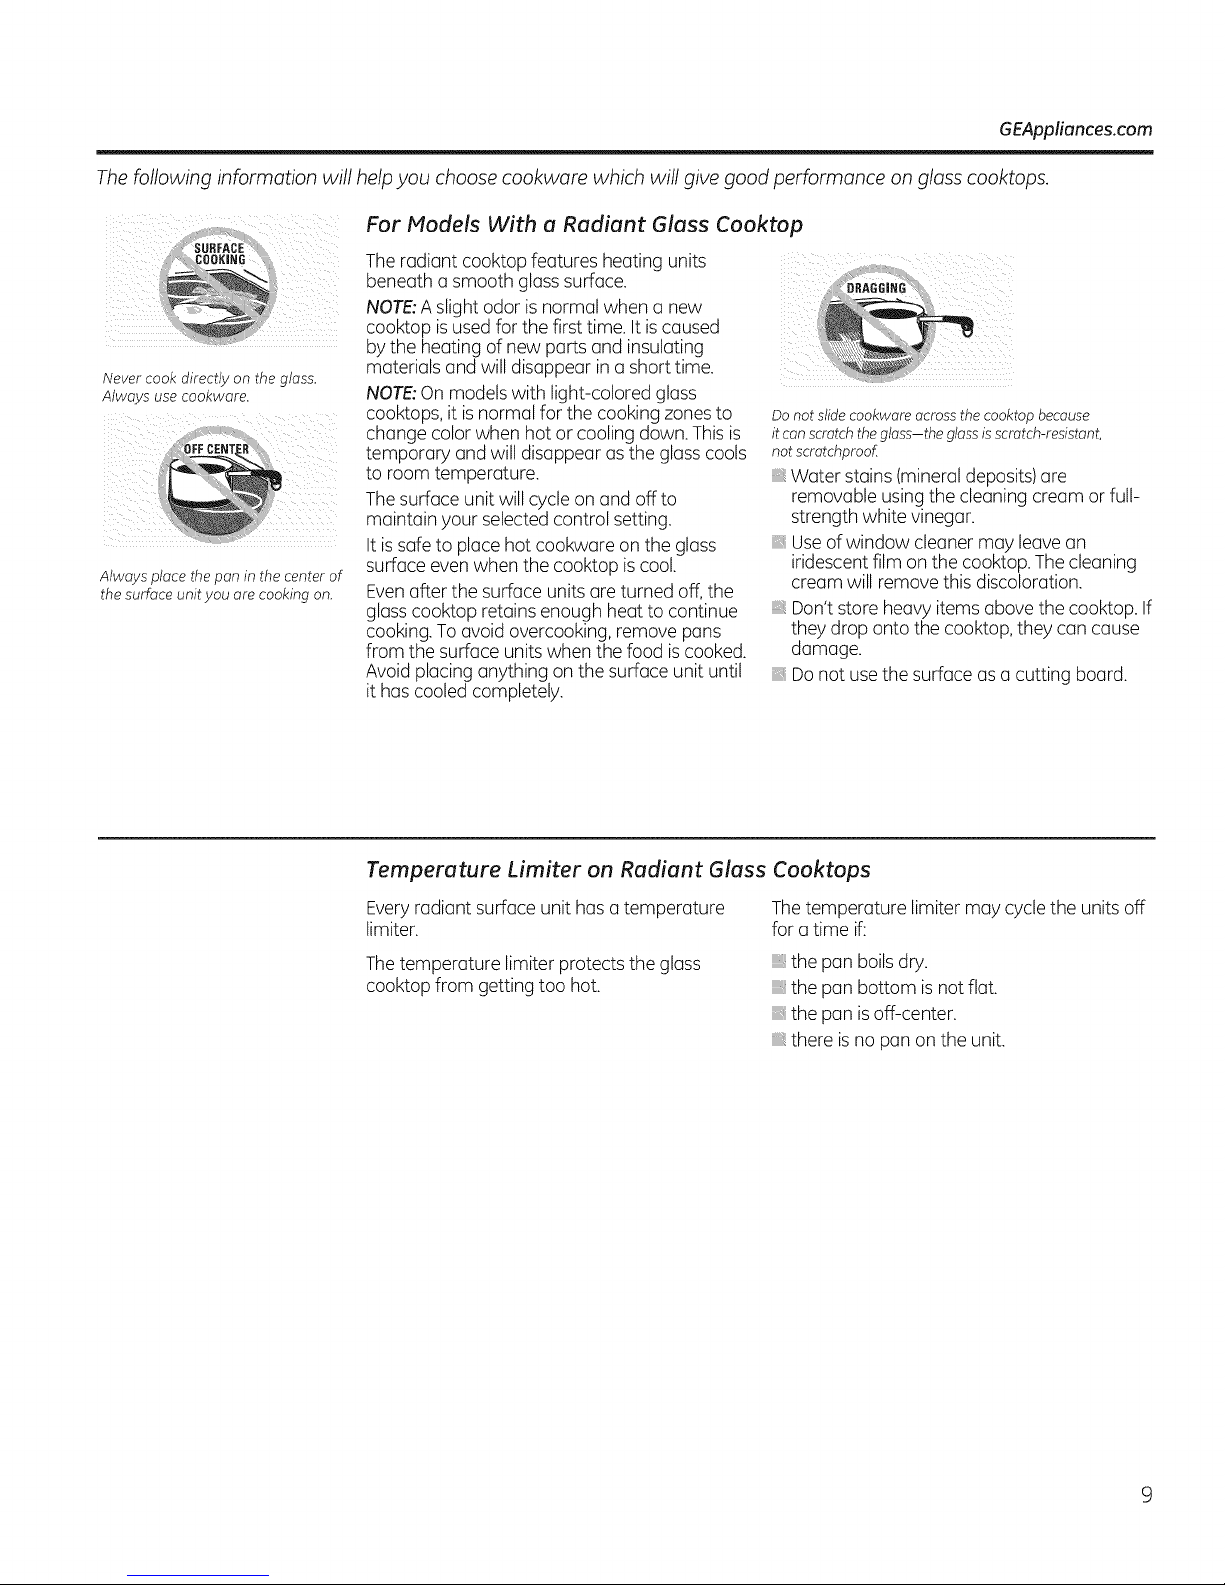
The following information will help you choose cookware which will give good performance on glass cooktops.
For Models With a Radiant Glass Cooktop
The radiant cooktop features heating units
beneath a smooth glass surface.
cooktop isused for the first time. It iscaused
NOTE:Aslight odor is normal when a new _
bythe heating of new parts and insulating
I\lever COOK OlreC[ly on [ne g ass.
AIvi oys use COOKWOFe.
Always place the pan in the center of
the surface unit you are cooking on.
materials and will disappear in a short time.
NOTE:Onmodels with light-colored glass
cooktops,it is normal for the cooking zonesto
change color when hot or cooling down. This is
temporary and will disappear as the glass cools
to room temperature.
Thesurface unit will cycle on and off to
maintain your selectedcontrol setting.
It issafe to place hot cookware on the glass
surface even when the cooktop is cool.
Evenafter the surface units are turned off, the
glasscooktop retains enough heat to continue
cooking.To avoid overcooking, remove pans
from the surface units when the food is cooked.
Avoid placing anything on the surface unit until
Do not slide cookware across the cooktop because
it can scratch the glass-the glassis scratch-resistant,
not scratchproof
,, Water stains (mineraldeposits) are
removable using the cleaning cream or full-
strength white vinegar.
,, Useofwindow cleaner may leavean
iridescent film on the cooktop. The cleaning
cream will remove this discoloration.
Don'tstore heavy items above the cooktop. If
they drop onto the cooktop, they can cause
damage.
Donot usethe surface asa cutting board.
it has cooled completely.
Temperature Limiter on Radiant Glass
Everyradiant surface unit has a temperature
limiter.
Thetemperature limiter protects the glass
cooktop from getting too hot.
Cooktops
Thetemperature limiter may cycle the units off
for a time if:
the pan boils dry.
the pan bottom isnot flat.
the pan isoff-center.
there isno pan on the unit.
Page 10
Selecting types of cookware for radiant glass cooktop models.
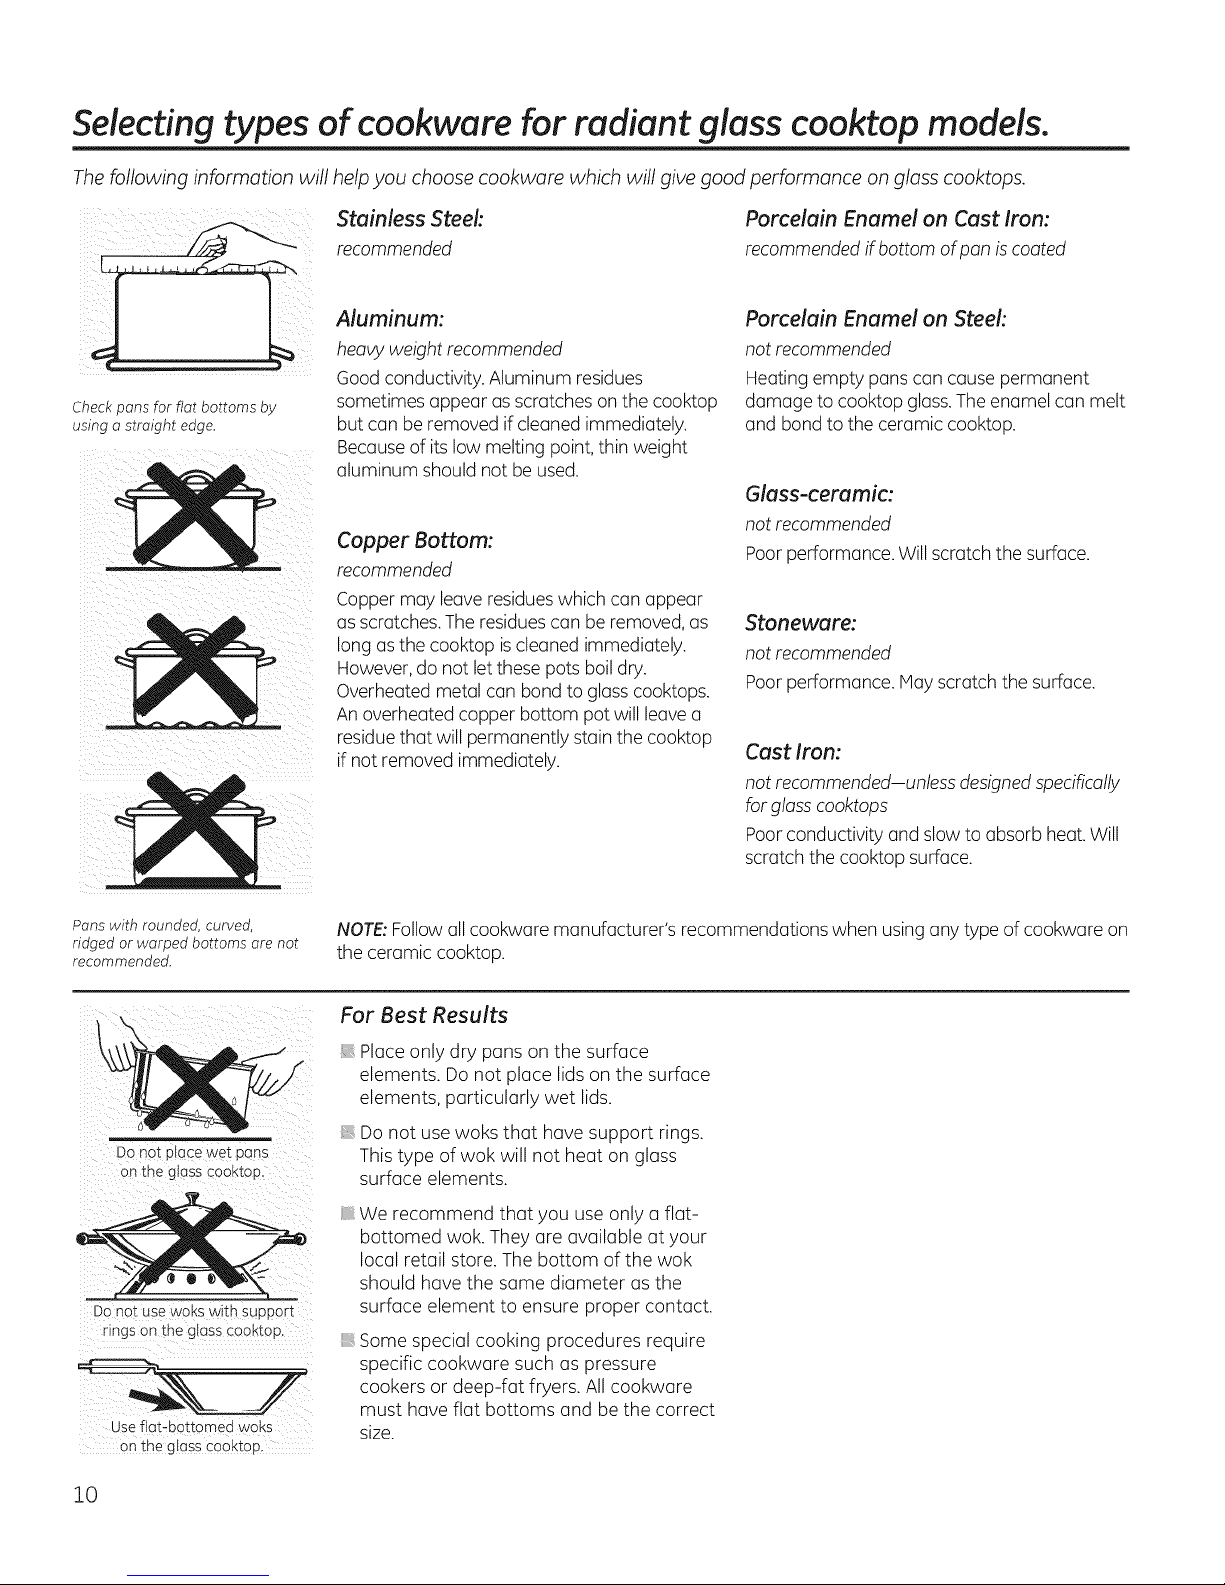
The following information will help you choose cookware which will give good performance on glass cooktops.
Check pans for flat bottoms by
using o straight edge.
Stainless Steel:
recommended
Aluminum:
heavy weight recommended
Good conductivity. Aluminum residues
sometimes appear asscratches on the cooktop
but can be removed ifcleaned immediately.
Becauseof its low melting point, thin weight
aluminum should not be used.
Copper Bottom:
recommended
Copper may leaveresidueswhich can appear
as scratches.The residuescan be removed,as
long asthe cooktop is cleaned immediately.
However, do not let these pots boil dry.
Overheated metal can bond to glass cooktops.
An overheated copper bottom pot will leavea
residuethat will permanently stain the cooktop
if not removed immediately.
Porcelain Enamel on Cast Iron:
recommended if bottom of pan is coated
Porcelain Enamel on Steel:
not recommended
Heating empty pans can cause permanent
damage to cooktop glass.Theenamel can melt
and bond to the ceramic cooktop.
Glass-ceramic:
not recommended
Poor performance. Willscratch the surface.
Stoneware:
not recommended
Poor performance. May scratch the surface.
Cast Iron:
not recommended-unless designedspecifically
for glass cooktops
Poor conductivity and slow to absorb heat.Will
scratch the cooktop surface.
Pans with rounded, curved,
ridged or warped bottoms are not
recommended.
Do not place wet pans
Do not use woks with SUppo[t
Use flat-bottomed woks
Onthe glass cooktop.
10
NOTE:Followall cookware manufacturer's recommendations when using any type of cookware on
the ceramic cooktop.
For Best Results
i Placeonly dry pans on the surface
elements. Do not place lids on the surface
elements, particularly wet lids.
Do not use woks that have support rings.
This type of wok will not heat on glass
surface elements,
: We recommend that you use only a flat-
bottomed wok. They are available at your
local retail store. The bottom of the wok
should have the same diameter as the
surface element to ensure proper contact.
Some special cooking procedures require
specific cookware such as pressure
cookers or deep-fat fryers. All cookware
must have flat bottoms and be the correct
size.
Page 11
Using the oven control clock
and timer features and settings. GEApplionces.com
Throughout this manual, features and appearance may vary from your model.
®
_a k0
Temp Recall
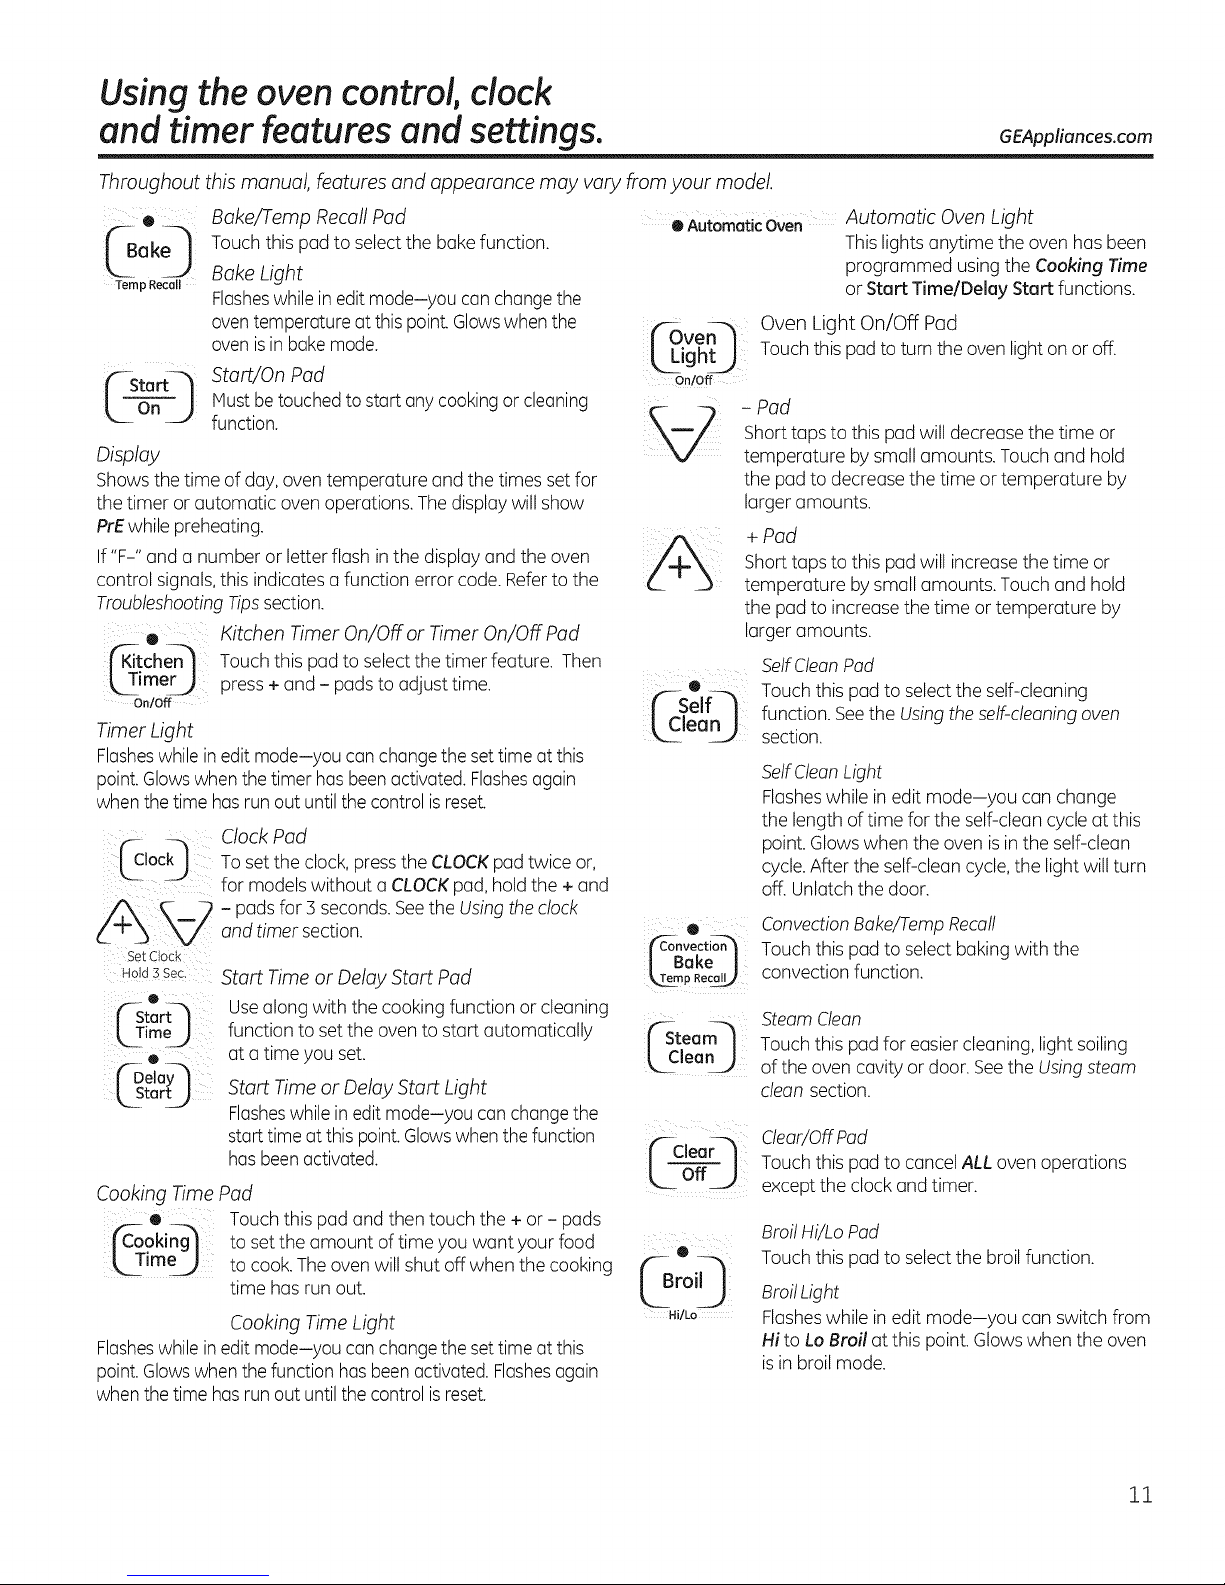
Display
Shows the time of day, oven temperature and the times set for
the timer or automatic oven operations. Thedisplay will show
PrEwhile preheating.
If "F-" and a number or letter flash in the display and the oven
control signals,thisindicates a function error code. Referto the
TroubleshootingTipssection.
• Kitchen Timer On/Offor Timer On/OffPad larger amounts.
_tch_q Touch this pad to select the timer feature. Then
_ mer__ press + and - padsto adjust time. O
oo/off _"- Self-"l
Timer Light _lean_
Flasheswhile inedit mode-you can changethe settime at this
point.Glowswhenthe timer has beenactivated.Flashesagain
when the time hasrunout untilthe control isreset.
Set Clock
Hold 3 Sec,
O
('--Start_
_ Time__
o
CDelayq
L2to U
Cooking Time
k TimeJ
Flasheswhile inedit mode-you can changethe settime at this
point.Glowswhenthe function hasbeen activated.Flashesagain
when the time hasrunout untilthe control isreset.
Bake/Temp Recall Pad
Touch this pad to selectthe bakefunction.
Bake Light
Flasheswhile in editmode-you can changethe
oventemperature at this point.Glowswhenthe
ovenis in bakemode.
Start/On Pad
Mustbetouched to start any cookingor cleaning
function.
Clock Pad
Toset the clock, pressthe CLOCKpad twice or,
for models without a CLOCKpad, hold the +and
- padsfor 3 seconds.Seethe Using the clock
and timer section. •
o AutomaticOven Automatic Oven Light
['_0ven_ Oven Light On/Off Pad
_ight_ Touch this pad to turn the ovenlight on or off.
OnfOff
d;ovocti
Start Time or Delay Start Pad _TempRecel_
Usealong with the cooking function or cleaning
function to set the oven to start automatically f-Steam--'j
at a time you set. _lean _
Start Time or Delay Start Light
Flasheswhile in editmode-you can changethe
starttime atthis point.Glowswhen the function ["-CleaQ
hasbeenactivated. L off J
Pad
Touch this pad and then touch the + or - pads
to set the amount of time you want your food
to cook.The oven will shut off when the cooking
time has run out.
Cooking Time Light
I Bake I
:0
ro,0
Hi/Lo
Thislights anytime the oven has been
programmed using the Cooking Time
or Start Time/Delay Start functions.
Shorttaps to this pad will decrease the time or
- Pad
temperature by small amounts. Touch and hold
the pad to decrease the time or temperature by
larger amounts.
+ Pad
Shorttaps to this pad will increasethe time or
temperature bysmall amounts. Touch and hold
the pad to increase the time or temperature by
SelfClean Pad
Touch this pad to selectthe self-cleaning
function. Seethe Usingtheself-cleaningoven
section.
SelfClean Light
Flasheswhile in edit mode-you can change
the length of time for the self-clean cycle at this
point. Glowswhen the oven is inthe self-clean
cycle.After the self-clean cycle,the light will turn
off. Unlatchthe door.
ConvectionBake/Tamp Recall
Touch this pad to select bakingwith the
convection function.
Steam Clean
Touch this pad for easier cleaning, light soiling
of the oven cavity or door. Seethe Usingsteam
clean section.
Clear/Off Pad
Touch this pad to cancel ALL oven operations
except the clock and timer.
Broil Hi/Lo Pad
Touch this pad to selectthe broil function.
Broil Light
Flasheswhile in edit mode-you can switch from
Hi to Lo Broil at this point. Glows when the oven
isin broil mode.
11
Page 12

Using the oven control clock
and timer features and settings.
Throughout this manual, features and appearance may vary from your model.
Flashing Display - Power Outage
Ifa flashing time isin the display,you have experienced
a power failure. Resetthe clock. Seethe Usingthe clock
and timer section.
Ifyour oven was set for a timed oven operation and a
power outage occurred, the clock and all programmed
functions must be reset.
Usingthe oven.
To avoidpossible burns,place the racks in the desiredposition before you turn the ovenon.
Before you begin...
Theracks have stop-locks, sothat when placed
correctly on the rack supports, they will stop
before coming completely out and will not tilt.
When placing and removing cookware, pull the
rack out to the bump on the rack support.
To remove a rack, pull ittoward you, tilt the
front end up and pull it out.
To replace, place the end of the rack (stop-
locks)on the support, tilt up the front and push
the rack in.
Number of rack positions vary by
model.
IA CAUTION
BURNHAZARD:Avoid touching the hot door
surface when using the oven rack in the lowest
position.Always use 2 hands and 2 mitten pot
holders to move the rack. Pullthe rack out a
few inches and then carefully grasp the sides of
the rack to pull it out the rest of the way.
Toavoid possibleburns,place
Do not place foods or baking stone
direct], on the oven floor.
the racks in the desired position before you turn on the oven.
Preheating and Pan Placement
Preheatthe oven ifthe recipe calls for it.
Preheating is necessaryfor good resultswhen
baking cakes,cookies, pastries and breads.
Thedisplaywill show "PrE"while preheating.
When the oven reachesthe selected
temperature, the ovencontrol will beep and the
displaywill show the oventemperature.
If baking four cake layers atthe same time,
placetwo layers on rack C and two layers on
rack E,Stagger pans on the rack so one is not
directly abovethe other.
Baking results will be better ifthe food is
centered in the oven as much as possible.
Angel Foodcake isthe exception and should
be placed on the bottom oven rack (position A).
Follow package direction on prepackaged and
frozen foods for pan placement. Pansshould
not touch each other or the walls ofthe oven.
If you need to use two racks,stagger the pans
soone isnot directly above the other. Leave
approximately 11½"between pansand from
the front, back and sidesof oven wall.
12
Page 13

Using the oven. GEAppliances.com
How to Set the Oven for Baking
[Z] Touchthe Bakepad.
[] Touchthe+or- padsuntilthedesired
temperatureisdisplayed.
[] TouchtheStart/On pad.Theovenwillstart
automatically.ThedisplaywillshowPrEwhile
preheating.Whentheovenreachesthe
selectedtemperature,the ovencontrolwill
beepseveraltimesandthedisplaywillshow
theoventemperature.
TochangetheoventemperatureduringBAKEcycle,
touchtheBakepadandthenthe +or- padstoget
thenewtemperature.
[] Checkfoodfor donenessat minimumtimeon
recipe.Cooklongerifnecessary.
[-5-1 TouchtheClear/Offpadwhenbakingis
finishedandthenremovethefoodfromthe
oven.
Aluminum Foil
Do not use aluminum foilto line oven bottoms.
The foil willtrap heat below, and upset the
performance of the oven. Foilcan melt and
permanently damage the oven bottom.
Damage from improper use of aluminum foil is
not covered by the product warranty.
Foilmay be used to catch spillsby placing a
sheet on a lower rack,severalinchesbelow
the food. Donot use more foil than necessary,
and never entirely cover an oven rack with
aluminum foil. Keepfoil at least i 1/2" from the
oven walls to prevent poor heat circulation.
The type of margarine will affect baking performance!
Most recipes for baking have been developed using high-fat products such as butter or margarine (80%fat).Ifyou decrease the fat,
the recipemay not givethe same results aswith a higher-fat product.
Recipefailure can result if cakes,pies,pastries,cookies or candies are made with low-fat spreads.Thelower the fat content of a
spread product, the more noticeable these differences become.
Federalstandardsrequireproductslabeled"margarine"to contain at least80%fat byweight.Low-fat spreads,onthe other hand,contain
lessfat and morewater.Thehighmoisturecontentof these spreadsaffectsthe texture andflavor of bakedgoods.Forbestresultswith
yourold favorite recipes,usemargarine,butter or stickspreadscontainingat least70%vegetableoil.
13
Page 14

Usingthe oven.
Door Positioning During Broiling:
For models JSS28 and JDS28,
For all other models:
Leave the door open to the broil
stop position. The door stays open
by itself, yet the proper temperature
is maintained in the oven.
How to Set the Oven for Broiling
UseLo Broil to cook foods such as poultry
or thick cuts of meat thoroughly without
overbrowning them.
[Z] Placethe food on a broiler grid in a broiler
pan designedfor broiling.
[] Followsuggested rack positions in the
Broiling Guide.
[] Touch the Broil Hi/Lo pad once for Hi
Broil.
Tochange to Lo Broil, touch the Broil Hi/
Lo pad again.
[] Touch the Star pad.
[] When broiling is finished,touch the Clear/
Off pad.
The size, weight, thickness,
starting temperature
and your preference
of doneness will affect
broiling times. This guide
is based on meats at
refrigerator temperature.
The U.S, Department of
Agriculture says "Rare beef is
popular: but you should know
that cooking it to only ] 4O°F
means some food poisoning
organisms may survive." (Source:
Safe Food Book. Your Kitchen
Guide. USDA Rev. June 2985.)
Broiling Guide
Preheatthe broiler for 2 minutes to improve performance.
Type or
Food Doneness Thickness Rack Position Comments
Beef Rare (140°F) Steaks - 1" Eor F (foodshould be 1" to 5" Steakslessthan!"thickare difficult to
thick from broil element) cook rare.Theycookthrough before
browning. To prevent curling of
meat, slash fat at 1" intervals.
Medium Steaks - 5/4" to E(food should be 5" to 4" from
(160°F) 1"thick broil element)
Well Done Steaks - 5/4" D or E(foodshould be 5" to 5"
(170°F) to 1"thick or from broil element)
Ground Beef
Patties
Chicken Breast, C(food should be 8" to 9" from Broil skin-side-down first.
boneless broil element)
Breast, bone-in C(food should be 7" to 8" from
broil element)
Fish 1/2" to 1' thick D or E (foodshould be 5" to 6" Handle and turn very carefully.
Fillets from broil element)
Pork Well Done 3/4" thick D (food should be 6" to 7" from I To prevent curling of meat, slash fat
Chops (170°F) broil element) at 1" intervals.
Ifyour range isconnected to 208 volts, rare steaks may be broiled by preheating the
broiler and positioning the oven rack one position higher.
14
Page 15

Using the convection oven. (on some models) GEAppliances.com
In 8 convection oven, (]fan circuk_tes
hot (]ir over, under (]nd (]round the
food.This circulating hot (]ir isevenly
distributed throughout the oven
cavity. As (] result,foods (]re evenly
cooked (]nd browned - often in less
time th(]n with regular he(]t.
Convection Baking
Ideal for evenly browned baked foods
cooked on multiple shelves.
. Good for large quantities of baked foods.
. Good results with cookies, biscuits,
brownies, cupcakes, cream puffs, sweet
rolls, angel food cake and bread. The
convection fan circulates the heated air
evenly over and around the food.
The Convection Fun
The convection fan is programmed to run
intermittently for maximum performance
during convection bake and during
preheating. If the fan ison when the oven
door is opened, the fun will stop. The fan will
resume operation when the door isclosed.
Auto Temp Conversion
When convection baking, the Auto
Temp Conversion feature automatically
reduces the set temperature for optimal
performance.
Increase the Convection Baking temperature
setting 20°F higher for faster cooking of
large cuts of meat and poultry.
How to Set the Oven for Convection
Baking
FY] Touch the Convection Bake pad.
F_ Touch the + or - pads until the desired
temperature is displayed.
Touch the Sturt/On pad.
@
The oven will start automatically.
%
The display will show PrE while
preheating. When the oven reaches the
selected temperature, the oven control
will beep several times and the display
will show the oven temperature.
Check food for doneness at the
@
m_n_mumtime on the recipe. Cook
longer if necessary.
Touch the Clear/Off pad when baking is
@
finished, and then remove the food from
the oven.
Tochange the oven temperature during
Convection Bake, touch the Convection Bake
pad and then the + or- pads to set the new
temperature.
When b(]king cookies,you will get
the best results if you use (] fl(]t
cookie sheet inste(]d of (] punwith
low sides.
Cookwure for Convection Cooking
Before using your convection oven, check
to see if your cookware leaves room for air
circulation in the oven. If you are baking with
several pans, leave space between them.
Also, be sure the pans do not touch each
other or the walls of the oven.
Paper and Plastic
Heat-resistant paper and plastic containers
that are recommended for
use in regular baking can also be used
for convection baking but should not be
used at temperatures higher than the
temperature recommended by the cookware
manufacturer. Plastic cookware that is heat-
resistant to temperatures of 400°F can also
be used.
Metal and Glass
Any type of cookware will work inyour
convection oven; however, metal pans heat
the fastest and are recommended
for convection baking.
. Darkened or matte-finished pans will bake
faster than shiny pans.
. Glassor ceramic pans cook more slowly.
For recipes like oven-baked chicken,
use a pan with low sides. Hot air cannot
circulate well around food in a pan with high
sides.
15
Page 16

Using the clock and timer.
Not all features are on all models.
To Set the Clock
57 lock 6¸¸¸¸¸¸¸:!t
FStart-'_
LonJ
Hake sure the clock is set to the
correct time of day.
Theclock must be set to the correct time
of day for the automatic oventiming functions
to work properly,Thetime of day cannot be
changed during a delayed cooking or a delayed
self-cleaning cycle,
ry] Touch the Clock pad twice.
Formodels without a Clock pad:
Holdthe + and - pads for 3 seconds.
Touch the +or - pads.
To Turn Off the Clock Display
If you hoveseveral clocks in your kitchen,you
may wish to turn off the time of day clock display
on your range.
[Z] Touch the Clock pad once to turn off the
time of day display. Although you will not be
able to seeit, the clock maintains the
correct time of day.
[] Touch the Clock pad twice to recallthe
clock display.
Ifthe +or - pads are not touched within one
minute after Step!, the display revertsto the
original setting. If this happens, repeat Step1
and reenter the time of day.
r_ Touch the Start/On pad untilthe time of
day shows in the display.Thisentersthe
time and starts the clock.
Tocheck the time of day when the display is
showing other information, simply touch the
Clock pad. Thetime of day shows until another
pad istouched.
Formodels without a Clock pad:
[Z] Touch the Bake and Broil Hi/Lo pads at the
same time until the display shows SF.
Touch the Timer pad.Thedisplay will show
ON(Clockdisplay on).Touch the Timer pad
again until the display shows OFF(Clock
display off).
r3] Touch the Start/On pad to leavethe control
set in this mode.
NOTE:If the clock cannot be recalled or itwill not
stay permanently displayed,the EnergySaver
Hode feature ison.Toturn the feature off, see
the EnergySaver Hode section.
o
jrKitchen--"]
l_imer_
On/Off
Start--_
LOn J
Thetimer s a minutetimer only,
TheClear/Off pad doesnot affect
the timer.
16
To Set the Timer
The timer does not control oven operations.
The maximum setting on the timer is 9 hours and
59 minutes.
[] Touch the Kitchen Timer On/Off pad.
r_ Touch the + or - pads until the amount of
time you want shows in the display.The
maximum time that can be entered in
minutes is59. Timesmore than 59 minutes
should be changed to hours and minutes.
To Reset the Timer
Ifthe display isstill showing the time remaining,
you may change itby touching the Kitchen
Timer On/Off pad,then touching the + or - pads
until the time you want appears in the display.
To Cancel the Timer
Touch the Kitchen Timer On/Off pad twice.
Ifyou make a mistake,touch the Kitchen Timer
On/Offpad and begin again.
[] Touch the Start/On pad.Thetime will start
counting down, although the display does
not change until one minute has passed.
[] When the timer reaches :000,the control will
beep 3 times followed by one beep every 6
secondsuntil the Kitchen Timer On/Off pad
istouched.
If the remaining time is not in the display (clock,
start time or cooking time are in the display),
recallthe remaining time bytouching the
Kitchen Timer On/Off pad and then touching the
+ or - pads to enter the new time you want.
Page 17

Usingthe timed baking feature, consomemode sI GEAppliances.com
Do not lock the oven door with the latch during timed cooking. The latch is used for self-cleaning and steam-cleaning only.
NOTE: Foods that spoil easily-such as milk, eggs, fish, stuffings, poultry and pork-should not be allowed to sit for more
than 1 hour before or after cooking. Room temperature promotes the growth of harmful bacteria. Be sure that the oven
light is off because heat from the bulb will speed harmful bacteria growth.
How to Set an immediate Start and Automatic Stop
Temp Recall
®
Temp Recall
Cookin_
.__TimeJ
• •
_-Start_ or jf-Delay-_
_ Timej j _ Sta[t )
f-Start_
k°nJ
FC,eor
LoffJ
Theoven will turn on immediately and cook
for a selected length of time.At the end
of the cooking time, the oven will turn off
automatically.
[Z] Touch the Bake pad.
[-27 Touch the + or - pads to set the oven
temperature.
_-_ Touch the Cooking Time pad.
NOTE:Ifyour recipe requirespreheating,you
may need to add additional time to the length
of the cooking time.
[_ Touchthe + or - padsto set the baking
time.
Thecooking time that you entered will be
displayed.(Ifyou select Cooking Time first and
then adjust the BakeTemperature,
the oven temperature will be displayed instead.)
[] Touch the Start/On pad.
Thedisplay shows either the oven temperature
that you set or the cooking time countdown.
(Thedisplay starts with PrEif showing the oven
temperature.)
Theoven will continue to cook for the
programmed amount of time,then turn
off automatically.
[] Touch the Clear/Off pad to cancel
if necessary.
Removethe food from the oven.
Remember,even though the oven shuts off
automatically, foods continue cooking after
controls are off.
How to Set a Delayed Start and Automatic Stop
Theoven will turn on at the time of day you set,
cook for a specific length of time and then turn
off automatically.
Make surethe clock showsthe correct time of
day.
Touchthe Bake pad.
%
Touchthe + or- padsto set the oven
[]
temperature.
Touchthe Cooking Time pad.
@
Touchthe + or - padsto set the desired
[]
length of cooking time.
Touchthe Start Time or Delay Start pad.
%
Touchthe + or- padsto set the time of
@
dayyou want the oven to turn on and start
cooking.
Touchthe Start/On pad.
%
NOTE:Anattention tone will sound ifyou are
usingtimed baking and do not touch the Start/
On pad.
NOTE:Ifyou would liketo checkthe timesyou
have set,touch the Start Time or Delay Start
pad to checkthe start time you haveset or
touch the Cooking Time pad to checkthe length
of cooking time you have set.
When the oven turns on at the time of day
you have set, the display will show PrE until it
reaches the selected temperature, then itwill
display the oven temperature.
Atthe end of cooking time, the oven will turn off
and the end-of-cycle tone will sound.
[_ Touchthe Clear/Off pad to cancel
if necessary.
Removethe food from the oven.
Remember,even though the oven shuts off
automatically, foods continue cooking after
controls are off.
17
Page 18

Special features ofyour oven control.
Energy Saver Mode Consome models)
To save energy, you con turn off the time of
day clock and the display when the range is
not in use.
Pressand hold the + and- pads at the same
time to enable or disable this feature. This will
turn the display on or off.
NOTE:The display will reset after a power
outage.
CONTROLLOCK/UNLOCK
PRESS+AND -AND HOLDFOR3SECONDS
Control Lockout Ion some models)
Your control will allow you to lock out the
touch pads so they cannot be activated when
touched.
To lock/unlock the controls:
[-_ Touch the + and - pads at the same time
for 3 seconds, until the display shows
LOC ON.
[] Tounlockthecontrol,touchthe + and - pads
display shows LOCOFF.
When this feature is on and the touch pads
are touched, the control will beep and show
LOC ON.
. The control lockout mode affects all touch
pads. No touch pads will work when this
feature is activated.
. The adjustment will be retained in memory
after a power failure.
atthe same time for 3 seconds,untilthe
Your new touch pad control has additional features that you may choose to use. The following are the features and how
you may activate them.
Thespecial feature modes can only be activated while the display is showing the time of day. They remain in the
control's memory until the steps are repeated.
When the display shows your choice, touch the Start/On pad. The special features will remain in memory after
a power failure.
NOTE: The Sabbath feature and the Thermostat Adjustment feature are also Special Features, but they are addressed
separately in the following sections.
12 Hour Shutoff
With this feature,shouldyou forget and leavethe
ovenon, thecontrol will automaticallyturn off the
ovenafter 12hoursduring bakingfunctionsor
after 3 hoursduringabroilfunction.
Ifyou wish to turn OFF this feature, follow the
steps below.
I-f] Touch the Bake and BroilHi/Lo pads at the
same time untilthe display shows SF.
Touchthe Clock pad,or for models with no
Clock pad, touch the Cooking Time pad.
Thedisplay will show ON (12 hour shutoff).
Touchthe Clock pad (orCooking Time pad
for models with no Clock pad)repeatedly
until the display shows OFF(noshutoff).
D[] Touchthe Start/On pad to activate
the no shut-off and leave the control set in
this special features mode.
Adjust the oven thermostat--Do it yourselfl
Youmay find that your new oven cooks differently than the one it replaced. Use your new oven for a few weeks to become more
familiar with it. Ifyou still think your new oven is too hot or too cold, you can adjust the thermostat yourself
Do not use thermometers, such as those found in grocery stores, to check the temperature setting of your oven. These
thermometers may vary 20-40 degrees.
NOTE: This adjustment will not affect the broiling or the self-cleaning temperatures. The adjustment will be retained in
memory after a power failure.
_BakO +(_-Broi 0
Temo Reca H_ILo
18
• •
___Baeke)
Temo Reca_
_Start_'_
L_°° J
To Adjust the Thermostat
[71 Touchthe Bake and Broil Hi/Lo pads at
the same time until the display shows SF.
Touch the Bake pad.A two-digit number
shows in the display.
r_ Theoven temperature can be adjusted up
to (+)35°Fhotter or (-) 35°Fcooler. Touch
the + pad to increase the temperature in
!-degree increments.
Touch the - pad to decreasethe
temperature in !-degree increments.
rd] When you have made the adjustment,
touch the Start/On pad to go back to the
time of day display.Useyour oven as you
would normally.
Page 19

-'-usingthe Sabbath feature. (onsomemode/s)
(Designed for use on the Jewish Sabbath and Holidays) GEAppliances.com
TheSabbathfeaturecanbeusedforbakingonly.Itcannotbeusedforbroiling,self-cleaning,convectionbaking,steamcleaningordelaystartcooking.
NOTE:Theovenlightcomesonautomatically(onsomemodels)whenthedoorisopenedandgoesoffwhenthedoorisclosed.Thebulbmayberemoved.See
theOvenLightReplacementsection.Onmodelswithalightswitchonthecontrolpanel,theovenlightmaybeturnedonandlefton.
How to Set Sabbath Feature for Regular Baking
_Bok9 € (Br°i 9
Te!mpRe!o,,,,Lo
Cock Q Time
When the display shows D the oven
is set in Sabbath. When the display
shows PC the oven is baking/roasting.
i _:ook ng
L_Onj
Temp Recall
_,._OnJ
NOTE:Tounderstandhowtheovencontrolworks,practice
usingregularbaking(non-Sabbath)beforeentering
Sabbathmode.
Hakesuretheclockshowsthecorrecttimeofdayand the
ovenisoff.
E_ TouchandholdboththeBakeandBroilHi/Lopads,at
thesametime,untilthedisplayshowsSF.
[] Tapthe Clockpad (orCookingTimepadfor models
with noClockpad)untilSAbappearsinthedisplay.
[-_ TouchtheStart/On padandD wiltappearinthe
display.
[] Touchthe Bakepad.Nosignalwiltbegiven.
@Thepresetstarting temperature will automatically be
setto350.Tap the+ or- padstoincreaseor
decreasethetemperaturein25° increments.The
temperaturecan be setbetween 175°and 550.°No
signal or temperature witt be given.
[6-] TouchtheStart/On pad.
Z] Aftera randomdelayperiodofapproximately30
secondsto i minute,PC witiappearinthe display
indicatingthatthe ovenisbaking/roasting.IfPC
doesn'tappearinthe display,startagainat Step/4.
Toadjusttheoventemperature,touch theBakepad
andtap the + or- padstoincreaseor decreasethe
temperaturein25°increments.TouchtheStart/On pad.
NOTE:TheClear/OffandCookingTimepadsareactive
duringtheSabbathfeature.
ffsto t--/
LOnj
When the display shows D the
oven is set in Sabbath. When the
display shows :zx:zthe oven is
baking/roasting.
_-Bake ÷ Br%i,
Temp Recall Hi!Lo
LOnJ
How to Set Sabbath Feature for Timed Baking-Immediate Start and Automatic Stop
NOTE:Tounderstandhowtheovencontrolworks,practice
usingregular(non-Sabbath)ImmediateStartandAutomatic
StopbeforeenteringtheSabbathmode.
Makesurethe clockshowsthecorrecttimeofdayand the
ovenisoff.
[-_ TouchandholdboththeBakeandBroilHi/Lopads,at
thesametime,untilthedisplayshowsSF.
Tapthe Clockpad (orCookingTimepadfor models
with noClockpad)untilSAbappearsinthedisplay.
TouchtheStart/On padand D wittappearin the
@
display.
TouchtheCookingTimepad.
%
Touchthe+ or- padsto setthedesiredlengthof
@
cookingtimebetweeni minuteand 9hoursand 59
minutes.Thecookingtime thatyouenteredwittbe
displayed.
TouchtheStart/On pad.
@
Touch the Bake pad. No signal witt begiven.
Fz-1
[-_The preset starting temperature wittautomatically be
set to 550.°Tap the + or- pads to increase or
decreasethetemperaturein25° increments.The
temperaturecanbesetbetween175°and 550.°No
signalortemperaturewittbegiven.
TouchtheStart/On pad.
%
Aftera randomdelayperiodofapproximately30
[]
secondsto iminute,PC wittappearinthe display
indicatingthatthe ovenisbaking/roasting.IfPC
doesn'tappearinthe display,startagainat Step7.
Toadjusttheoventemperature,touch theBakepad
andtap the + or- padstoincreaseor decreasethe
temperaturein25°increments.TouchtheStart/On pad.
Whencookingisfinished,thedisplaywittchangefromPC
toD indicatingthattheovenhasturnedOFFbutisstillsetin
Sabbath.Removethecookedfood.
How to Exit the Sabbath Feature
E_ TouchtheClear/Offpad.
Iftheoveniscooking,waitfor arandomdelayperiod
ofapproximately50secondsto i minute,untilonly
isinthedisplay.
Touchandholdboth theBake and BroilHi/Lo
pads,at thesametime, untilthe displayshowsSF.
TaptheClackpad(orCookingTimepadfor models
with noClockpad)untilONorOFFappearsinthe
display.ONindicatesthattheovenwillautomatically
turn off after 12hours. OFFindicatesthat the ovenwill
not automatically turn off. SeetheSpecialFeatures
sectionfor an explanationof the 12-HourShutoff
feature.
[-5-] Touchthe Start/On pad.
NOTE:If a power outage occurredwhile the ovenwas
in Sabbath,the ovenwittautomatically turn off and
stayoff even when the power returns.Theoven control
mustbe reset.
19
Page 20

Usingthe sdf-cleaning oven. some
[_CAUTION] FIREHAzARD:Wipegreaseandheavys°ilfr°m°venbef°reself-deaning'Failuret°d°s°mayresult in an oven fire.
A CAUTION jitems rated for high temperature may permanently adhere to oven bottom or cause heat
®
if-Self--'_
L_Clean__
Wipe up heavy soil on the oven
bottom.
j Never place cooking utensils, baking stones, foil, or any other items on the oven floor. Even
damage to the oven, flooring or items in storage drawer.
If your range has this control pad, it has a self-cleaning oven. Follow these
instructions.
Ifnot,refertothePorcelainOvenCleaningsectionforovencleaninginstructions.
Before a Self-Clean Cycle
We recommend venting your kitchen with an
open window or using a ventilation fan or hood
during the first self-clean cycle.
Removebroiler pan, broiler grid,all cookware
and any aluminum foil from the oven.
NOTE:
Ifyour oven is equipped with shiny, silver-
colored oven racks,we recommend to
remove them beforeyou begin the self-clean
cycle.They may remain in the oven during
the self-clean cycle, but they will darken,lose
their luster and become hard to slide.
_, Ifyour oven is equipped with gray porcelain-
coated oven racks,they may be left in the
oven during the self-clean cycle.
Soilon the front frame of the rangeand outside
the gasketon the doorwill needto be cleaned
by hand.Cleantheseareaswith hotwater,
soap-filledor plasticscouringpads or cleansers
such asSoftScrub_.Rinsewellwith cleanwater
and dry.
Donot clean the gasket.Thefiberglass material
of the oven door gasket cannot withstand
abrasion. It isessentialfor the gasket to remain
intact. If you notice it becoming worn or frayed,
replace it.
Makesure the oven light bulb cover isin place
and the oven light is off.
IMPORTANT:Thehealthof somebirdsis
extremelysensitiveto the fumesgiven off during
the self-cleaningcycleof any range.Movebirds
to another well-ventilatedroom.
How to Set the Oven for Self-Cleaning
Followthe directions in the BeforeaSelfClean
Cyclesection.
[Z] Latchthe door.
NOTE:Neverforce the latch. If the oven is too
O
hot,you will not be able to slidethe latch. Allow
the ovento cool.
¢-self-q
kC,eonJ
__On )
20
[-_ Touch the Self Clean pad.
[-_ Touch the + or - pads until the desired
CleanTime is displayed.
TheClean Time isnormally 4 hours and 20
minutes.You can change the CleanTime to
any time between 3 and 5 hours,depending on
the amount of soilinyour oven.
[-_ Touch the Start/On pad.
Theself-clean cycle will automatically begin
and the time countdown appears in the
display.
While the oven isself-cleaning,you can touch
the Clock pad to display the time of day.To
return to the clean countdown, touch the Self
Clean pad.
Theoven shuts off automatically when the
clean cycle is complete, and 0:00will flash in
the display.
[] Slidethe latch handle to the left asfar as it
will go and open the door.
Neverforce the latch handle.
Forcing the handle will damage the door lock
mechanism.
Page 21

0
¢ self-h
LCleo
• •
LTim%; L_stor
FSta rt_
LonJ
How to Delay the Start of Self-Cleaning _onsome models)
Hake surethe clock showsthe correct time of
day.
[7] Latch the door.
[_ Touchthe Self Clean pad.
[_ Using the + or- pads, enter the desired
clean time.
r_ Touchthe Start Time or Delay Start pad.
Theearliest start time you can set will
appear in the display.
[] Usingthe + or- pads, enter the time of
dayyou want the clean cycle to start.
[_ Touchthe Start/On pad.
Thedisplay will show the start time. Itwill not
be possible to unlatch the oven door until the
temperature drops below the lock temperature.
Theoven shutsoff automatically when the
clean cycle iscomplete,and 0:00will flash in
the display.
GEAppliances.com
To Stop a Self-Clean Cycle
Touch the Clear/Off pad.
Wait until the oven has cooled below the
locking temperature to unlatch the door.You
will not be able to open the door right away
unlessthe oven has cooled below the locking
temperature.
After a Self-Clean Cycle
You may notice some white ash in the oven.
Wipe it up with a damp cloth offer the oven
cools.
If white spots remain, remove them with a
soap-filled steel wool pad and rinse thoroughly
with a vinegar and water mixture.
These depositsare usually a salt residuethat
cannot be removed bythe clean cycle.
If the oven is not clean offer one clean cycle,
repeat the cycle.
You cannot set the ovenfor cooking until
the oven is cool enough for the door to be
unlatched.
While the oven isself-cleaning,you
can pressthe Clock pad to display the time
of day. To return to the clean countdown,
press the Self Clean pad.
Apply a small amount of vegetable oil
to a paper towel and wipe the edges of the
ovenracks with the paper towel. Do not spray
with Pam®orother lubricant sprays.
21
Page 22

Using Steam Clean. consomemode/s
CAUTION the oven bottom becomes hot
[,_ ] During the steam clean cycle,
enough to cause burns. Wait
until the cycle is over (30 minutes) before wiping the
inside surfaces of the oven. Failure to do so may result
in burns.
The Steam Clean cycle makes it easier to clean light soiling
off the standard-clean porcelain oven interior.
If your range has this control pad, it has a steam-cleaning oven. Follow
these instructions.
Ifnot,refertothePorcelainOvenCleaningsectionforovencleaninginstructions.
To Begin Steam Clean Cycle:
The range should be at room temperature before
beginning the Steam Clean cycle. If the oven is too hot,
"hot" will appear on the display and the cycle will not
activate until the oven cools down.
The Steam Clean cycle performs best on new spills or soils.
Burned-on food is more difficult to remove.
Pour 8 ounces of water onto the
oven floor.
lean J
J71 Removeracks and accessoriesfrom the
oven cavity. Donot place cookware or
other items in the oven during the Steam
Cleancycle,
j-_ Pour i cup (8oz.)room-temperature water
onto the recessed area of the oven bottom.
Do not add cleaning solutions or chemicals
of any kind to the water. Onlyadd water
when usingthe Steam Clean Cycle.Donot
add water when using the Self-CleanCycle
[-_ Closethe door. Formodels with a latch,
latch the door. Note: Never force the latch.
If the oven istoo hot, you will not be able to
slidethe latch. Allow the oven to cool.
[] Pressthe Steam Clean pad; then press
Start/On.
[] A 30-minute cycle will begin to count down
on the display.
When the Steam Clean cycle iscomplete,
@
the oven control will beep.Pressthe Clear/
Offpad and open the door.
The oven bottom and remaining water will
D
still be very warm at the end of the cycle.
This isnormal.
[_] Removeany remaining water with a dry
cloth or sponge.
[] Leavethe door open to air dry.
IMPORTANTNOTES:
If a steam clean cycle isinitiated without
water, pressthe Clear/Offpad to end the
cycle.Wait for the range to coolto room
temperature before pouring water into the
recessedarea and initiating another steam
cycle.
Donot open the door during the Steam
Cleancycle.An error beep will sound upon
opening the door.
PressClear/Offpad at any time to end the
cycle.
If mineral deposits remain in the oven
bottom after cleaning, use a cloth or sponge
soaked in vinegar to remove them.
Somewater may drip from the bottom of
the oven door. Ifthis happens, wipe it up at
the end of the cycle.
Thedoor gasket may bewet when the
Steam Clean cycle finishes.This is normal.
Donot clean the gasket.
If soilstill remains after cleaning the oven,
seethe Care and cleaningof the range
sectionof the Owner's Manual for additional
options.
Removesoilsusing a scrub brush or nylon
ra]
scouring pad.Asoap-filledsteelwool pad
may be used only on the porcelain oven
interior.The use of abrasive pads will
scratch the door glass.Donot wipe soil or
22
water onto the door gasket.
Page 23

Care and cleaning of the range. GEAppliances.com
Be sure all controls are off and all surfaces are cool before cleaning any part of the range.
Ifyour range is removed for cleaning, servicing or any reason, be
IA, WARNING j
How to Remove Protective Shipping Film and Packaging Tape
Carefullygraspacorneroftheprotectiveshipping
film withyourfingersandslowlypeelitfromthe
appliancesurface.Donotuseanysharpitemsto
removethefilm.Removeallof thefilm beforeusing
theapplianceforthe firsttime.
Control Knobs
Thecontrolknobsmayberemovedforeasier
cleaning.
HakesuretheknobsareintheOFFpositionsand
pullthemstraightoffthe stemsforcleaning.
sure the anti-tip device is reengaged properly when the range is
replaced. Failure to take this precaution could result in tipping of
the range and can result in death or serious bums to children or
adults.
Toensurenodamageisdoneto thefinishof the
product,thesafestwayto removetheadhesivefrom
packagingtapeon newappliancesisan application
ofa householdliquiddishwashingdetergent.Apply
witha softclothandallowto soak.
NOTE:Theadhesivemustberemovedfrom allparts.
ttcannotberemovedifit isbakedon.
Theknobscanbecleanedina dishwasherorthey
mayalsobewashedwithsoapandwater.Hake
suretheinsideoftheknobsaredry beforereplacing.
Replacethe knobs,intheOFFpositiontoensure
properplacement.
Control Panel
it'sa goodideatowipethecontrolpanelaftereach
useoftheoven.Useadamp clothto cleanorrinse.
Forcleaning,usemildsoapandwaterora50/50
solutionofvinegarandwater.Forrinsing,useclean
water.Polishdrywitha softcloth.
Painted Surfaces
Paintedsurfacesincludethesidesofthe rangeand
thedoor,topof controlpanelandthedrawerfront.
Cleanthesewithsoapandwateroravinegarand
water solution.
Stainless Steel Surfaces (on some models)
Do not use a steel wool pad; it will scratch the
surface.
Toclean the stainless steelsurface, usewarm,
sudsywater or a stainless steelcleaner or
polish.Always wipe the surface in the direction
of the grain. Followthe cleaner instructions for
cleaning the stainlesssteel surface.
Porcelain Enamel Cooktop (onsome models)
Donot useabrasivecleansers,strongliquidcleaners,
plasticscouringpadsorovencleanersonthecontrol
panel-they willdamagethefinish.
Donot usecommercialovencleaners,cleaning
powders,steelwoolorharshabrasivesonany
paintedsurface.
Toinquire about purchasing stainlesssteel
appliance cleaneror polish,or to find the
location of a dealer nearest you, pleasecall our
toll-free number:
National Parts Center 1.800.626.2002
GEAppliances.com
The porcelain enamel finish issturdy but
breakable if misused.Thisfinish is acid-
resistant. However,any acidic foods spilled
(suchasfruit juices,tomato or vinegar)should
not be permitted to remain on the finish.
If acids spillon the cooktop while it ishot, use
a dry paper towel or cloth to wipe it up right
away. When the surface hascooled, wash with
soap and water. Rinsewell.
Forother spillssuch as fat spatterings, wash
with soap and water or cleansing powders
after the surface hascooled. Rinsewell. Polish
with a dry cloth.
23
Page 24

Care and cleaning of the range,
r
Porcelain Oven Interior (on standard-clean models)
Radiantglass models:
With propercare,the porcelainenamelfinish on
the insideofthe oven-top, bottom, sides,back
and insideof the door-will stay new-lookingfor
years.
Letthe ovencoolbeforecleaning.Werecommend
that you wear rubbergloveswhen cleaningthe
oven.
Soapandwater willnormallydothejob. Heavy
spatteringor spilloversmay requirecleaningwith
a mildabrasivecleaner.Soap-filledscouringpads
may alsobe used.
Donot allowfoodspillswith a high sugar oracid
content(suchastomatoes,sauerkraut,fruitjuices
or piefilling)to remainonthesurface.Theymay
causea dull spotevenafter cleaning.
Householdammonia may make thecleaningjob
easier.Place:]./2cup in ashallow glassor pottery
container ina coldoven overnight.Theammonia
Oven Vent on Radiant Glass or Coil Cooktops
On glasscooktop models,the oven vent is
located behind the right-rear surface unit.
i
On coilcooktop models, the oven isvented
through an opening under one of the rear
surface units.
fumeswill help loosenthe burned-on greaseand
food.
If necessary,you may usean oven cleaner.Follow
the packagedirections.
, Donot sprayoven cleaneron the electrical
controlsand switchesbecauseitcould cause
a short circuitand resultin sparkingor fire.
, Donot allow a film from the cleanerto build up
on the temperature sensor-it couldcausethe
ovento heat improperly.(Thesensorislocated
at the top of theoven.)Carefullywipethe
sensorcleanafter each ovencleaning,being
careful notto movethe sensorasa changein
its positioncouldaffect how the oven bakes.
, Donot sprayany ovencleaner onthe oven
door,handlesor anyexteriorsurface ofthe
oven,cabinetsor painted surfaces.Thecleaner
can damage thesesurfaces.
It isnormal for steam to come out of the vent,
and moisture may collect underneath it when
the oven is in use.
Thevent isimportant for proper air circulation.
Never block this vent.
Coil cooktop models:
1
Thegasketisdesigned with a gap
at the bottom to allowfor proper air
circulation.
Donot rub or cleanthe door gasket-it
has anextremely low resistanceto
abrasion.
Ifyou noticethe gasket becoming
worn,frayed or damaged in any way
or if it hasbecome displaced on the
door,you should haveit replaced.
24
This area could become hot during oven use.
Cleaning the Oven Door
Toclean the inside of the door:
On self-cleanmodels.
;, Becausethe area insidethe gasket is
cleaned during the self-clean cycle,you do
not need to clean this by hand.
Thearea outside the gasket and the door
liner can be cleaned with a soap-filled
or plastic scouring pad, hotwater and
detergent. Rinsewell with a vinegar and
water solution.
On standard-clean models.
Soap and water will normally work. Heavy
spattering or spilloversmay require cleaning
with a mild abrasive cleaner.Soap-filled
scouring pads may also be used.
;, Seealso PorcelainOvenInterior section.
To clean the outside of the door'.
iiiB_
Usesoap and water to thoroughly clean the
top, sidesand front of the oven door. Rinse
well. Youmay also usea glass cleanerto
clean the glass on the outside of the door. Do
not let water drip into the vent openings.
Ifany stain on the door vent trim is
persistent,use a soft abrasive cleaner and a
sponge-scrubber for best results.
Spillageof marinades,fruit juices, tomato
sauces and basting materials containing
acids may cause discoloration and should be
wiped up immediately.When surface iscool,
clean and rinse.
Donot use oven cleaners, cleaning powders
or harsh abrasiveson the outside of the
door.
Page 25

Lift-Off Oven Door
GEAppliances.com
iii/ii iI
Hinge
lock
Pull hinge locks down to unlock.
Removal position
The door is very heavy. Be careful when
removing and lifting the door.
Do not riftthe door by the hand@.
To remove the door'.
[Z] Fullyopenthe door.
[] Pullthe hinge locksdown toward the door
frame, to the unlocked position. A tool,
such asa small flat-blade screwdriver,
may be required.
Firmlygrasp both sidesof the door
at the top.
Closedoor to the door removal position,
which is halfway between the broil stop
position and fully closed.
[] Lift door up and out until the hinge arm
_sclear of the slot.
To replace the door'.
[-_ Firmlygrasp both sides of the door
at the top.
Oven Racks
With the door at Bottom Hingearm
the same angle
as the removal
position,seat the
indentation of the hinge
arm into the bottom
edge of the hinge slot.
Thenotch in the hinge
arm must be fully seated into the bottom
of the slot.
Fullyopen the door. Ifthe door will not
@
fully open,the indentation is not seated
correctly inthe bottom edge of the slot.
Pushthe hinge Io,
%
frame of the
oven cavity to lock
the locked
position. Hinc
Closetheovendoor.
arm
Push hinge locks up to lock.
il Stop guide
Alloven racksmay be cleaned by hand with an
abrasive cleaner or steel wool. After cleaning,
rinsethe racks with clean water and dry with
a clean cloth. Gray porcelain-coated oven
racks may remain inthe oven during the self-
cleaning cycle without being damaged. The
shiny,silver-colored oven racks may remain in
Storage Drawer Removal
To remove the drawen
[Z] Pullthe drawer out until it stops.
Liftthe front of the drawer untilthe stops
clear the guides.
r_ Removethe drawer.
Oven Heating Elements
Do not clean the bake element or the broil
element. Anysoil willburn offwhen the
elements are heated.
the oven during the self-cleaning cycle, but they
will lose their luster and become hard to slide.
It will be necessaryto grease all oven rack side
edgeswith a light coating of vegetable oil after
cleaning them by hand or in the oven.Thiswill
help maintain the ease of slidingthe racks in
and out of the oven.
To replace the drawer'.
r_ Placethe drawer rails on the guides.
[_ Pushthe drawer back until itstops.
r_ Liftthe front of the drawer and push back
until the stops clearthe guides.
r_ Lowerthe front of the drawer and push
back until it closes.
Toclean the oven floor, gently lift the bake
element (ifelement isabove oven floor).Clean
with warm, soapy water.
25
Page 26

Care and cleaning of the range,
A WARNING j theelectricalpowertotherangeatthemainfuseorcircuitbreakerpanel.
j SHOCK OR BURN HAZARD: Before replacing oven light bulb, disconnect
Failure to do so may result in electric shock or burn.
[A CAUTION
Receptacle Socket
BURN HAZARD: The glass cover and bulb should be removed when cool.Touching hot glass with bare hands or a damp cloth can cause burns.
Oven Light Replacement (on some models)
Toremove:
r_ Turnthe glass cover counterclockwise 1/4
turn until the tabs of the glass cover clear
the grooves of the socket.Wearing latex
gloves may offer a better grip.
[] Using gloves or a dry cloth, remove the
G6.35 Bulb
bulb by pulling it straight out.
To replace:
[-_ Usea new 120/130-volt halogen bulb,not
to exceed 50 watts. Replacethe bulb with
I
Glass cover
the same type of bulb that was removed.
Yourmodel will have one of the two types
shown on the left.Todetermine the
(on some models)
correct replacement bulb,check the bulb
terminals. Bulbswith 2 straight pin
terminals are G6.35bulbs. Bulbs with 2
looped terminals are G9bulbs. (Donot
Placethe tabs of the glass cover intothe
grooves of the socket.Turn the glass cover
clockwise 1/4 turn.
interchange.)Besure the replacement
bulb israted 120 volts or 130volts (NOT12
volts).
Forimproved lighting insidethe oven,
clean the glasscover frequently usinga
wet cloth. Thisshould be done when the
Using gloves or a dry cloth, remove the
bulb from its packaging. Do not touch the
bulb with bare fingers. Oilfrom skin will
oven is completely cool.
[] Reconnect electrical power to the oven.
damage the bulb and shorten its life.
gloves or
cloth
r_ Pushthe bulb straight into the receptacle
all the way.
Glosscover
(onsome models)
Oven Light Replacement (modelsequipped with standard 40-watt appliance bulbs)
Besure to let the light cover and bulb cool
completely.
Toremove the cover:
_ _i! !iiiiiii _i]!iiii
[Z] Holda hand under the cover so it doesn't
fall when released.With fingers of the
_ ____i_i_ii):i_ _ii__ii:_i__iiiii_!III_
Wire cover holder
26
same hand,firmly push back the wire
cover holder.Liftoff the cover.
Do not remove any screws to remove the cover.
Replacebulb with a 40-watt appliance
bulb.
Toreplace the cover:
r_ Placeit into groove of the light receptacle.
Pullwire forward to the center of the
cover until itsnaps into place,
r_ Connectelectrical power to the range.
Page 27

Cleaning the glass cooktop, consomemodels; GEAppliances.com
Normal Daily Use Cleaning
Clean your cooktop after
each spill. Use CERAHA
BRYTE®Ceramic Cooktop
Cleaner.
ONLYuseCERAIV]ABRVTE®Ceramic Cooktop
Cleaneron the glasscooktop. Other creams
may not be aseffective.
Tomaintain and protect the surface ofyour
glasscooktop, follow these steps:
Beforeusing the cooktop for the
%
first time,clean it with CERAIVlABRVTE®
Ceramic Cooktop Cleaner.This helps
protect the top and makescleanup easier.
[] Daily use of CERAMABRVTE®Ceramic
Cooktop Cleaner will help keepthe
cooktop lookingnew.
r-_ Shakethe cleaning cream well. Applya
few drops of CERAHABRYTE®Ceramic
Cooktop Cleanerdirectly to the cooktop.
r_ use a paper towel or CERAIVlABRYTE®
CleaningPad for CeramicCooktopsto
cleanthe entire cooktop surface.
Use a dry cloth or paper towel to
remove all cleaning residue. No need to
rinse.
NOTE:It is very important that you DO NOT
heat the cooktop until it has been cleaned
thoroughly.
_ i_ii i_il}iiiiii_i_:I iii_}i!_iiii_/
Use a CERAMABRYTE®Cleaning
Pad for Ceramic Cooktops.
The CERAMABRYTE® Ceramic
Cooktop Scraper and all
recommended supplies are
available through our Parts
Center. See instructions under "To
Order Parts" section on next page.
NOTE: Do not use a dull or
nicked blade.
Burned-On Residue
NOTE:DAMAGEto your glass surface may
occur if you use scrub pads other than those
recommended.
r_ Allow the cooktop to cool.
Spread a few drops of CERAiVlABRYTE®
Ceramic Cooktop Cleaneron the entire
burned residue area.
Using the included CERAMABRYTE®
@
Cleaning Padfor Ceramic Cooktops,rub
the residue area, applying pressure as
needed.
Heavy, Burned-On Residue
Allow the cooktop to cool.
F71
Use a single-edge razor blade scraper
at approximately a 45° angle against
the glass surface and scrape the soil. It
will be necessary to apply pressure to
the razor scraper in order to remove
the residue.
After scraping with the razor scraper,
@
spread a few drops of CERAMABRYTE®
CeramicCooktop Cleaneronthe entire
burned residuearea. Usethe CERAMA
BRVTE®Cleaning Padto remove any
remaining residue.
If any residue remains, repeat the steps
%
listed above as needed.
For additional protection, after all
@
residue has been removed, polish the
entire surface with CERAMABRVTE®
Ceramic Cooktop Cleaneranda paper
towel.
For additional protection, after all
%
residue has been removed, polish the
entire surface with CERAMABRVTE®
CeramicCooktop Cleanerand a paper
towel.
27
Page 28

Cleaning the glass cooktop, somemode/s
Metal Marks and Scratches
[Z] Be careful not to slide pots and pans
across your cooktop. It will leave metal
markings on the cooktop surface.
These marks are removable using the
CERAMABRYTE®CeramicCooktop Cleaner
with the CERAMABRYTE®CleaningPad
for Ceramic Cooktops.
[] If pots with a thin overlay of aluminum
or copper are allowed to boil dry, the
overlay may leave black discoloration
on the cooktop.
Cooktop Seal
To clean the cooktop seal around the edges minutes, then wipe clean with nonabrasive
of the glass, lay a wet cloth on it for a few cleaners.
Glass surface--potential for permanent damage.
Our testing shows that
if you are cooking high
sugar mixtures such as
jelly or fudge and have
a spillover, it can cause
permanent damage to the
glass surface unless the
spillover is immediately
removed.
Damage from Sugary Spills and Melted Plastic
r_ Turn off all surface units. Remove hot
pans.
Wearing an oven mitt:
r2]
a. Use a single-edge razor blade scraper
(CERAIVlABRYTE®Ceramic Cooktop
Scraper) to move the spill to a cool
area on the cooktop.
b. Remove the spill with paper towels.
This should be removed immediately
before heating again or the
discoloration may be permanent.
NOTE'.Carefully check the bottom of pans
for roughness that would scratch the
cooktop.
r4] Don't use the surface units again until all
of the residue has been completely
removed.
NOT& If pitting or indentation in the glass
surface has already occurred, the cooktop
glass will have to be replaced.
In this case, service will be necessary.
r_ Any remaining spillover should be left until
the surface of the cooktop has cooled.
To Order Parts
To order CERArqABRYTE®Ceramic Cooktop
Cleanerand the cooktop scraper, please call
our toll-free number:
National Parts Center 800.626.2002
CERAMABRYTE®Ceramic
Cooktop Cleaner .......... #WX10X300
CERAMABRYTE®Ceramic
Cooktop Scraper .......... #WX10X0302
Kit ........................ #WB64XS027
(Kitincludes cream and cooktop scraper)
28
CERAMABRYTE®Cleaning Pads for
Ceramic Cooktops ...... #WX!0X350
Page 29

Care and cleaning of the coil cooktop, consomemodelsl GEAppliances.com
Be sure the controls are turned to OFF and the surface units are cool before attempting to remove them.
Surface Units
Diip
Tocleanthesurfaceunits,turnthecontrolto the
highestsettingfor a minute.Thecoilswillburnoff
anysoil.
Toremovea surfaceunit:
Toreplace a surface unit:
rfl Replacethedrippanintothe recess
inthecooktop.Hakesuretheopening
inthepan linesupwiththereceptacle.
Locking tab rim
Cooktop
When properly seated, the locking
tab should lock onto the cooktop
rim through the notch in the drip
pan.
Toremovethedrippansforcleaning,
thesurfaceunitsmustberemovedfirst.
[Z] pushthesurfaceunitbacktoward
thereceptacletofreethelockingtab
fromthecooktop.
Receptacle
Drip pan
[] Liftthe surfaceunitabout1 inchabovethedrip
panand pullitout.
Donot liftthesurfaceunitmorethan1inch.
Ifyoudo,itmaynot lieflaton thedrippan
whenyouplugit backin.
NOTE:Repeatedliftingofthesurfaceunit
morethan I inchabovethedrippancan
permanentlydamagethereceptacle.
Drip Pans
Removethesurfaceunits.Thenliftoutthe drippans.
Forbestresults,cleanthedrippansbyhand.Place
themina coveredcontainer(oraplasticbag)with
cupammoniato loosenthe soil.Rinsewithclean
waterandpolishwithacleansoftcloth.
Thedrippansmayalsobecleanedina dishwasher.
Cleantheareaunderthedrippansoften.Built-up
soil,especiallygrease,maycatchfire.
Donot coverthedrippanswithfoil.Usingfoilso
closeto thereceptaclecouldcauseshock,fireor
damagetothe range.
r_ Inserttheterminalsofthesurfaceunitthrough
theopeninginthe drippanand intothe
receptacle.
Locking ta5
r_ pushthesurfaceunitin anddownto lockthe
tabin placesoit restsevenlyinthe cooktop.
Donot immersethesurfaceunitsinliquidsof any
kind.
Donot cleanthesurfaceunitsinadishwasher.
Donot bendthesurfaceunitplugterminals.
Donot attemptto clean,adjustorinanyway repair
theplug-inreceptacle.
NOTE:tfyour cooktopisequippedwithshiny,silver-
coloreddrippans,donot cleantheminthe self-
cleaningoven.Permanentdamagetothe finishcan
occur.
tfyourcooktopisequippedwithblackorgray
porcelain-coateddrippans,theycan becleanedin
theovenduringtheself-cleaningcycle.Beforeyou
beginaself-cleaningcycle,removeanyheavysoil
from thedrippansand placethemonthe porcelain-
coatedovenracks.Donotplacethedrippans
directlyonthe ovenbottom.Afterthe self-cleaning
cycleiscompletedandthe drippansarecool,wipe
themwith a dampclothto removeanyremaining
ashorresidue.
Lift-Up Cooktop
Theentirecooktopmaybeliftedupandsupportedin
the uppositionforeasiercleaning.
Thesurfaceunitsdo notneedto beremoved;
however,youmayremoveoneto makeraisingthe
cooktopeasier.Therearetwosidesupportsthat lock
Besure all surface units are turned
off before raising the cooktop.
intopositionwhenthecooktopis
liftedup.
Aftercleaningunderthecooktopwithhot,
mildsoapywaterandacleancloth,lowerthe
cooktop.Becarefulnotto pinchyourfingers.
Tolowerthecooktop,pushtherodsbackandgently
lowerthecooktopuntilitrestsin place.
29
Page 30

Before you call for service...
Troubleshooting Tips
Save time and money! Review the charts on the following
pages first and you may not need to call for service.
Possible Causes What To Do
Surface units will not Improper cookware , Usepans which are flat and match the diameter
maintain a rolling boil being used. of the surface unit selected.
or cooking is not
fast enough
Radiant surface units A fuse in your home may be * Replacethe fuse or reset the circuit breaker.
do not work properly blown or the circuitbreaker
tripped
Cooktop controls , Check to see the correct control is set for the surface
improperly set. unit you are using.
Surface unitstops , Thisis normal.The unit is still on and hot.
glowing when turned
to a lower setting
Scratches (may appear Incorrect cleaning , Scratches are not removable.Tiny scratches will become
as cracks) on radiant methods being used. lessvisible in time as a result of cleaning.
cooktop glass surface Cookware with rough bottoms * Toavoid scratches, usethe recommended cleaning
being used or coarse particles procedures. Hake surebottoms of cookware are clean
(salt or sand} were between before use,and use cookware with smooth bottoms.
the cookware and the surface
of the cooktop.
Cookware has been slid
across the cooktop surface.
Areas of discoloration Food spillovers not cleaned , See the Cleaning the glass cooktop section.
on the radiant glass before next use.
cooktop Hot surface on a model , This isnormal. The surface may appear discolored
with a light-colored glass when it is hot. This istemporary and will disappear
cooktop, as the glass cools.
Plastic melted to Hot cooktop come into . See the Glass surface potential for permanent damage
the radiant surface contact with plastic placed section in the Cleaning the glass cooktop section.
on the hot cooktop.
Pitting (or indentation) Hot sugar mixture spilled , Call a qualified technician for replacement.
of the radiant glass on the cooktop.
coaktop
Frequent cycling off Improper cookware ,, Useonly flat cookware to minimize cycling.
and on of radiant being used.
surface units
Control signals after You forgot to enter a , Touch the Bake pad and desired temperature or the
entering cooking time bake temperature or Self Clean pad and desired clean time.
or delay start cleaning time.
=
Coilsurface units do The surface units ore . With the controls off, check to make sure the surface
not work properly not plugged in solidly, unit is plugged completely into the receptacle.
The surface unit controls . Check to see the correct control is set for the surface
improperly set. unit you are using.
The drip pans are not set . With the controls off, check to make sure the drip
securely in the cooktop, pan is in the recess in the cooktop and that the
30
opening in the pan lines up with the receptacle.
Page 31

GEAppliances.com
Possible Causes What To Do
Food does not bake Oven controls improperly set. • Seethe Usingthe oven section.
or roast properly Rackposition is incorrect, . Seethe Usingthe oven section.
or the rack is not level.
Incorrectcookwareor cookware * Seethe Usingthe oven section.
of improper size being used.
Oven thermostat needs . See the Adjust the oven thermostat Do it yourself!
adjustment, section.
Clock and timer do Plug on range isnot completely . Hakesure electrical plug isplugged into a live,properly
not work inserted in the electrical outlet, grounded outlet.
A fuse in your home may • Replacethe fuse,or reset the circuit breaker.
be blown or the circuit
breaker tripped.
Oven controls improperly set. • See the Using the clock and timer section.
Control is in Energy Saver . See the Energy Saver Node section.
Hode.
Oven light does Light bulb is loose or defective.. Tighten or replace the bulb.
not work
Switch operating light , Call for service.
is broken.
Food does not Door not open to the broil stop • Seethe Usingthe oven section.
broil properly position as recommended.
Oven controls improperly set. • Hake sure you touch the Broil Hi/Lo pad.
Improper rack position • See the Broiling Guide.
being used.
Cookware not suited • For best results, use a pan designed for broiling.
for broiling.
Insome areas the power . Preheatthe broil element for 10 minutes.
{voltage) may be low.
. Broilfor the longest period of time recommended
in the Broiling Guide.
Oven temperature too Oven thermostat . See the Adjust the oven thermostat Do it yourself!
hot or too cold needs adjustment, section.
Oven willnot work Plug on range isnot . Hakesure electrical plug isplugged into a live,
completely inserted in properly grounded outlet.
the electrical outlet.
A fuse in your home may • Replacethe fuse or resetthe circuit breaker.
be blown, or the circuit
breaker tripped.
Oven controls improperly set.
Door left in the locked
position.
• Seethe Usingthe oven section.
. Ifnecessary,allow the oven to cool;then unlock
the door.
31
Page 32

Before you call for service...
Troubleshooting Tips
Possible Causes What To Do
Storage drawer Rear drawer support is . Reposition the drawer. Seethe Storage Drawer
is crooked ontop of the guide rail. Removal instructions in the Care and cleaning
of the range section.
Storage drawer Power cord may be • Repositionthe drawer and power cord. Seethe
won't close obstructing drawer StorageDrawer Removalinstructions in the Careand
in the lower back cleaningof the range section.
of the range.
Rear drawer support is . Reposition the drawer. Seethe Storage Drawer
on top of the guide rail. Removal instructions in the Core and cleaning of the
range section.
Oven will not self-clean The oven temperature is . Allowthe oven to cool to room temperature and
too high to set a self-clean reset the controls.
operation.
Oven controls improperly set. • See the Using the self-cleaning oven section.
Oven door is not in the locked . Make sure you move the door latch handle all the
position, way to the right.
Oven will not Display flushes HOT. . Allowthe oven to cool to room temperature and
steam-clean reset the controls.
Oven controls improperly set. • See the Using steam clean section.
Oven door is not closed or in . Make sure you close the door. For models with a latch, make
the locked position, sureyou move the door latch handle all the way to the right.
"Crac :--" --
klm9 u_ This is the sound of the . This isnormal.
"popping" sound metal heating and cooling
during both the cooking and
cleaning functions.
Excessive smoking Excessive soil. . Touch the Clear/Off pad. Open the windows to
during a clean cycle rid the room of smoke. Wait until the light on the
Self Clean pad goes off. Wipe up the excess soil and
reset the clean cycle.
Oven door will not Oven too hot. . Allow the oven to cool below locking temperature.
unlock
Ovennot clean after Oven controls not properly set. • Seethe Using theself-cleaning ovenor Usingsteam clean section.
a clean cycle Oven was heavily soiled. . Clean up heavy spillovers before starting the clean
cycle. Heavily soiled ovens may need to be cleaned again.
Control will not stop Oven door must be opened . Open oven door and wipe to remove any remaining
beeping after steam- after steam clean, water and soil.
clean cycle
32
Page 33

GEAppliances.com
Possible Causes What To Do
"F -" and a number
or letter flash
in the display
You have a function
error code.
. Disconnect all power to the range for at least
30 seconds and then reconnect power. If the function
error code repeats, call for service.
. On self-cleaning models, if a function error code appears during
the self-cleaning cycle, check the oven door latch. The latch
may have been moved, if only slightly, from the locked position.
Hake sure the latch is moved to the right as far as it will go.
Touch the Clear/Offpad. Allow the oven to cool for one hour.
Putthe oven back into operation.
Water remaining on This is normal. . Remove any remaining water with a dry cloth or sponge.
oven floor after Steam
Clean cycle
Display flashes "bAd" The installed connection . Contact installer or electrician to correct miswire.
then "linE" with a from the house to the unit
loud tone is miswired.
Display goes blank Afuse in your home may be • Replacethe fuse or reset the circuit breaker.
blown, or the circuit breaker
tripped.
The clock is turned off from . See the Using the clock and timer and/or the Energy
showing in the display. Saver Mode section.
Unable to get the Oven control pads were . The Bake and Broil Hi/Lo pads must be touched
display to show "SF" not pressed properly, at the same time and held for 3 seconds.
Clock flashes, Power outage or surge. . Reset the clock. Ifthe oven was in use, you must reset
power outage it by touching the Clear/Off pad, setting the clock
and resetting any cooking function.
"Burning" or "oily" This is normal in a new oven . To speed the process, set a self-clean cycle for a
odor emitting from and will disappear in time. minimum of 3 hours. See the Using the self-cleaning
the vent oven section.
Strong odor An odor from the insulation . This is temporary.
around the inside of the
oven is normal for the first
few times the oven is used.
Drawer does not slide The drawer is out of • Fully extend the drawer and push it all the way in smoothly or
drags alignment. See the Core and cleaning of the range section,
Drawer is overloaded or loud . Reduceweight. Redistribute drawer contents.
is unbalanced.
Fun Noise The convection fan will turn .This is normal operation of the convection fan,
on and off intermittently
during preheat.
After oven is preheated, . This is normal operation of the convection fan.
the convection fan will run
continuously in one direction
during convection baking.
33
Page 34

Accessories.
Looking For Something More? (Not all accessories are available for all models.)
You can find these accessories and many more at GEAppliances.com (U.S.) or www.GEAppliances.ca
(Canada), or call 800.626.2002 (U.&)or 800.661.1616 (Canada) (during normal business hours). Have your
model number ready.
/! ii/iiii i i ii'
J CE_AMmC
_s_ COOKTOP
_E/j CL_ANINGKIT
Grates Surface Burner Heads and Caps Surface Elements and Drip Knobs
Oven Rocks Oven Elements
Ceramic Cooktop _ Ceramic Cooktop _ Stainless Steel
Includes cleaner, Wipes
scraper and pad
Cleaning Kit: !_ Cleaning Wipes __ Appliance Polish
WX10Xl17GCS WX10XS05 WX10X10001
Pans
Get the most out of your Broiler Pan! (Not for use with Broiler Drawer models.)
Useyour pan and grid cover to broil hamburgers, seafood,steaks,vegetables,
bacon, chops and so much more! Thepan below catches the excessfats and oils.
. Genuine GE Part
. EasyTo Clean
. One-Year Warranty
Limited Time Offe!! Free Shipping!
Whenyou order your broiler pan within 30 days of purchasing your GEcooking product.
Small Large*
Part # WB48X10055 WB48X10056
Dimensions 8-5/4" W x 1-1/4" Hx 15-1/2" D 12-5/4" W x 1-1/4" H x 15-1/4"D
* The large (standard) broil pan does not fit in 20"/24" ranges.
** The XL pan does not fit in 24" wall ovens, 27" drop-ins or 20"/24" ranges.
Appliance
Cleaner
Stainless Steel
pIV]lOX511
XL**
WB/48X1005 7
15-1/2" W x 1-1/4" H x 19" D
Toplaceyour order, call800.626.2002 (U.S.),800.661.1616 (Canada)or mail this farm to.
Inthe U.&: GEPorts,P.O.Box221027, Hemphis, TN 58122-1027. In Canada: GEPorts,1 Factory Lone,Honcton, N.B.EIC9P15
Quantity
Model Number
First Name
Address
City
Phone
Check
Call 800.626.2002 in the U.& or 800.661.6161 in Canada for current pricing. All credit card orders must be called in.
Money Order
Serial Number Brand Dote of Purchase
34
Broiler Pun Order Form
Port Number
Lost Name
State Zip Code
E-Mail
Page 35

GEElectric Range Warranty. GEAppliances.com
All warranty service provided by our Factory Service Centers,
or an authorized Customer Care®technician. To schedule service, visit
us on-line at GEAppliances.com, or call 800.GE.CARES(800.432.2737).
Please have serial number and model number available when calling
for service.
GE Will Provide:
Anypart of the range which fails due to a defect in materials or workmanship.
From the date of the During this limited one-year warranty, GEwill also provide, free of charge, all labor
and in-home serviceto replace the defective part.
Service trips to your home to teach you how to use
the product.
Improper installation, delivery or maintenance.
Product damage or failure of the product if it isabused,
misused, modified, or used for other than the intended
purpose, or used commercially.
Replacement of house fuses or resetting of circuit breakers.
Damage to the product caused by accident, fire, floods or
acts of God.
Incidental or consequential damage caused by possible
defects with this appliance.
Damage caused after delivery.
Product not accessible to provide required service.
Stapleyour receipt here.
Proof of the original purchase
date isneeded to obtain service
under the warranty.
Warranty. Any implied warranties, including the implied warranties of merchantability or fitness for a particular purpose,
I XCLUSION OF IMPLIED WARRANTIES--Your sole and exclusive remedy is product repair as provided in this Limited
are limited to one year or the shortest period allowed by law.
This warranty is extended to the original purchaser and any succeeding owner for products purchased for home
use within the USA. If the product is located in an area where service by a GEAuthorized Servicer is not available, you
may be responsible for a trip charge or you may be required to bring the product to an Authorized GEService location for
service. In Alaska, the warranty excludes the cost of shipping or service calls to your home.
Some states do not allow the exclusion or limitation of incidental or consequential damages. This warranty gives
you specific legal rights, and you may also have other rights which vary from state to state. To know what your
legal rights are, consult your local or state consumer affairs office or your state's Attorney General.
Warranton General Electric Company. Louisville, KY 40225
35
Page 36

Consumer Support.
GEAppliances Website GEAppliances.com
Have a question or need assistancewith your appliance?Try the GEAppliances Website 24 hours a day,
any day of the year! Forgreater convenience and faster service,you can now download Owner's Manuals,
order parts or even scheduleservice on-line.
Schedule Service GEAppliances.com
Expert GE repair service is only one step away from your door. Get on-line and schedule your service at
your convenience any day of the year! Or call 800.GECARES (800.432.2737) during normal business hours.
Real Life Design Studio GEAppliances.com
GEsupports the Universal Designconcept-products, servicesand environments that can be usedby
people of all ages, sizesand capabilities.We recognize the need to design for a wide range of physical and
mental abilities and impairments. For details of GE'sUniversalDesignapplications,including kitchen design
ideasfor people with disabilities,check out our Website today. For the hearing impaired, pleasecall 800.TDD.
GEAC(800.833.4322).
Extended Warranties
Purchasea GEextended warranty and learn about special discounts that are available whileyour warranty
isstill in effect. You can purchase it on-line anytime, or call 800.626.2224during normal businesshours.
GEConsumer Home Serviceswill still be there after your warranty expires.
Partsand Accessories
Individualsqualified to servicetheir own appliances can have parts or accessoriessent directly to their homes
(VISA,iVlasterCardand Discovercards are accepted).Order on-line today, 24 hours every day or by phone at
800.626.2002during normal businesshours.
Instructions contained in this manual cover procedures to be performed by any user. Other servicing
generally should be referred to qualified service personnel. Caution must be exercised, since improper
servicing may cause unsafe operation.
Contact Us
Ifyou are not satisfied with the serviceyou receive from GE,contact uson our Websitewith all the details
includingyour phone number, or write to: General Manager,Customer Relations
GEAppliances,Appliance Park
Louisville,KV40225
GEAppliances.com
GEAppliances.com
GEAppliances.com
Register Your Appliance GEAppliances.corn
Register your new appliance on-line--at your convenience! Timelyproduct registration willallow for
enhanced communication and prompt service under the terms of your warranty, should the need arise.
You may also mail in the pre-printed registration card included in the packing material, or detach and use
the form inthe Owner's Manual.
Printed in the United States
 Loading...