

Page 1
©
©
www. GEAppliances.com
Safety Instructions ........ 2, 3
Operating Instructions
Controls ................. 4, 5
Care and Cleaning
Air Filter .................. 6
Grille and Case ............. 6
()utdoor (:oils .............. 6
Installation Instruc_tions
Through-the-_A'all
Installation--()pfional ....... 16
Window Installation ....... 7-15
Troubleshooting Tips ... 17, 18
Normal ()perating Sounds . . .18
T(,AK_13 AKVI2
©
Consumer Support
Consumer Support ......... 24
Product Registration ..... 21,22
Warranty ................. 23
Write the model and serial numbers here:
Model #
Serial #
Find these numbers on a lal)el on the
side of the air conditioner.
49-7454 11-02Jfl
Page 2

IMPORTANTSAFETYINFORMATION.
READALLINSTRUCTIONSBEFOREUSING.
WARNING!
For your safe_ the information in this manual must be followed to minimize the risk of fire, electric shock
or personal injury.
SAFETYPRECAUTIONS
Use this appliance only %r its intended
pui])ose as described in this Owner's
Manual.
This air conditioner must be propedy
installed in accordance with the Installation
Instructions before it is used.
Never unplug your air conditioner 1)y
pulling on the power cord. Always grip
plug firefly and pull straight out flom the
receptacle.
Repair or replace immediamly all electric
service cords that have become flwed or
otherwise damag>d. Do not use a cord
that shows cracks or abrasion damage
along its length or at either the plug or
conilector end.
q?{:_Turn the mode control to 0FFand unplug
_?_:_Fox your safety...do not store or use
_f?:,:All air condiuoners contain reDigerants,
HOWTOCONNECTELECTRICITY
Do not, under any circumstances, cut or remove
the third (ground) prong from the power cord. For
personal safe_ this appliance must be properly
grounded.
The air conditioner should ahvays be
plugg>d into its owxxindividual electrical
outlet which has a xolmg> rating that matches
the rating plato.
your air conditioner before making any
repairs or cleaning.
NOTE."We strongly recommend that any
servicing be performed by a quafified individual
combustible mamrials, gasoline or other
flammable vapors or liquids in the vicinity
of this or any other appliance.
which under federal law must be remoxed
prior to product disposal. If you are getting
rid of an old product with refligerants, check
with the company handling disposal about
what to do.
The power cord of dfis appliance is equipped
with a 3-prong (grounding) plug which mates
with a standard 31)iong (grounding) wall
outlet m minimize the possibility of electric
shock hazard flom this appliance.
Haxe the wall outlet and circuit checked by a
qualified electrician to make sure the outlet is
properly grounded.
Where a 9-prong wall outlet is encounmred,
it is your personal responsibility and obligation
m have it replaced with a properly grounded
3-prong wall outlet.
This proxqdes the best performance and also
prments overloading house wiring circuits
which could cause a fire hazard flom
oxerheated wires.
See the Installation Instructions, Electrical
Requirements section fox specific elecuica]
connection requirements.
2
Page 3
WARNING!
USEOFEXTENSIONCORDS--115-Voltmodelsonly
vvww.GEAppliances.com
Because of potential safety hazards under certain
conditions, we strongly recommend against the
use of an extension cord.
Howex_, if you must use all extension cord,
it is absolutely necessat T that it be a UiAismd,
14 gauge, 3-wire grounding type appliance
extension cord having a grounding type plug
and outlet and that the elecuJcal rating of the
cord be 15 amperes (minimum) and 195 volts.
CAUtiON:
DO NOT use an extension cord with any ofthe
230/208 volt models.
USEOFADAPTERPLUGS--115-Voltmodelsonly
Because of potential safety hazards under certain
conditions, we strongly recommend against the
use of an adapter plug.
Howex>[; if you must use all adaptei; where
local codes i)emfit, a temporaryconnection may
be made to a properly grounded 2-prong wall
outlet by use of a UiTlisted adapter available
at most local hardware stores.
Tile larger slot ill tile adapter must be aligned
with tile larger slot ill the wall outlet to I)rovide
proper polarity in the connection of the
power cord.
'Whei:, disconnecting file power cord flora tile
adaptel, alwws hold tile adaptor ill place with
one hand while pulling tile I)ower cord I)lug
with tile other hand. If this is not done, the
adaptor ground terminal is xetT likely to break
with repeamd use.
If the adapter ground terminal breaks, DO NOT
USEtile air co,_,ditio,_,er m_,ti]aproper grom_,d
has been established.
Attachingthe adaptergreundterminalto a waftoutlet
coverscrewdoesnot groundthe applianceunlessthe
coverscrewis metal,andnot bsulated, andthe wall
outlet is groundedthreughthe housewiring. Youshould
havethecircuitcheckedby a qualifiedelectricianto
makesuretheoutlet is properlygrounded.
READANDFOLLOWTHISSAFETYINFORMATIONCAREFULLY.
SAVETHESEINSTRUCtiONS
Page 4
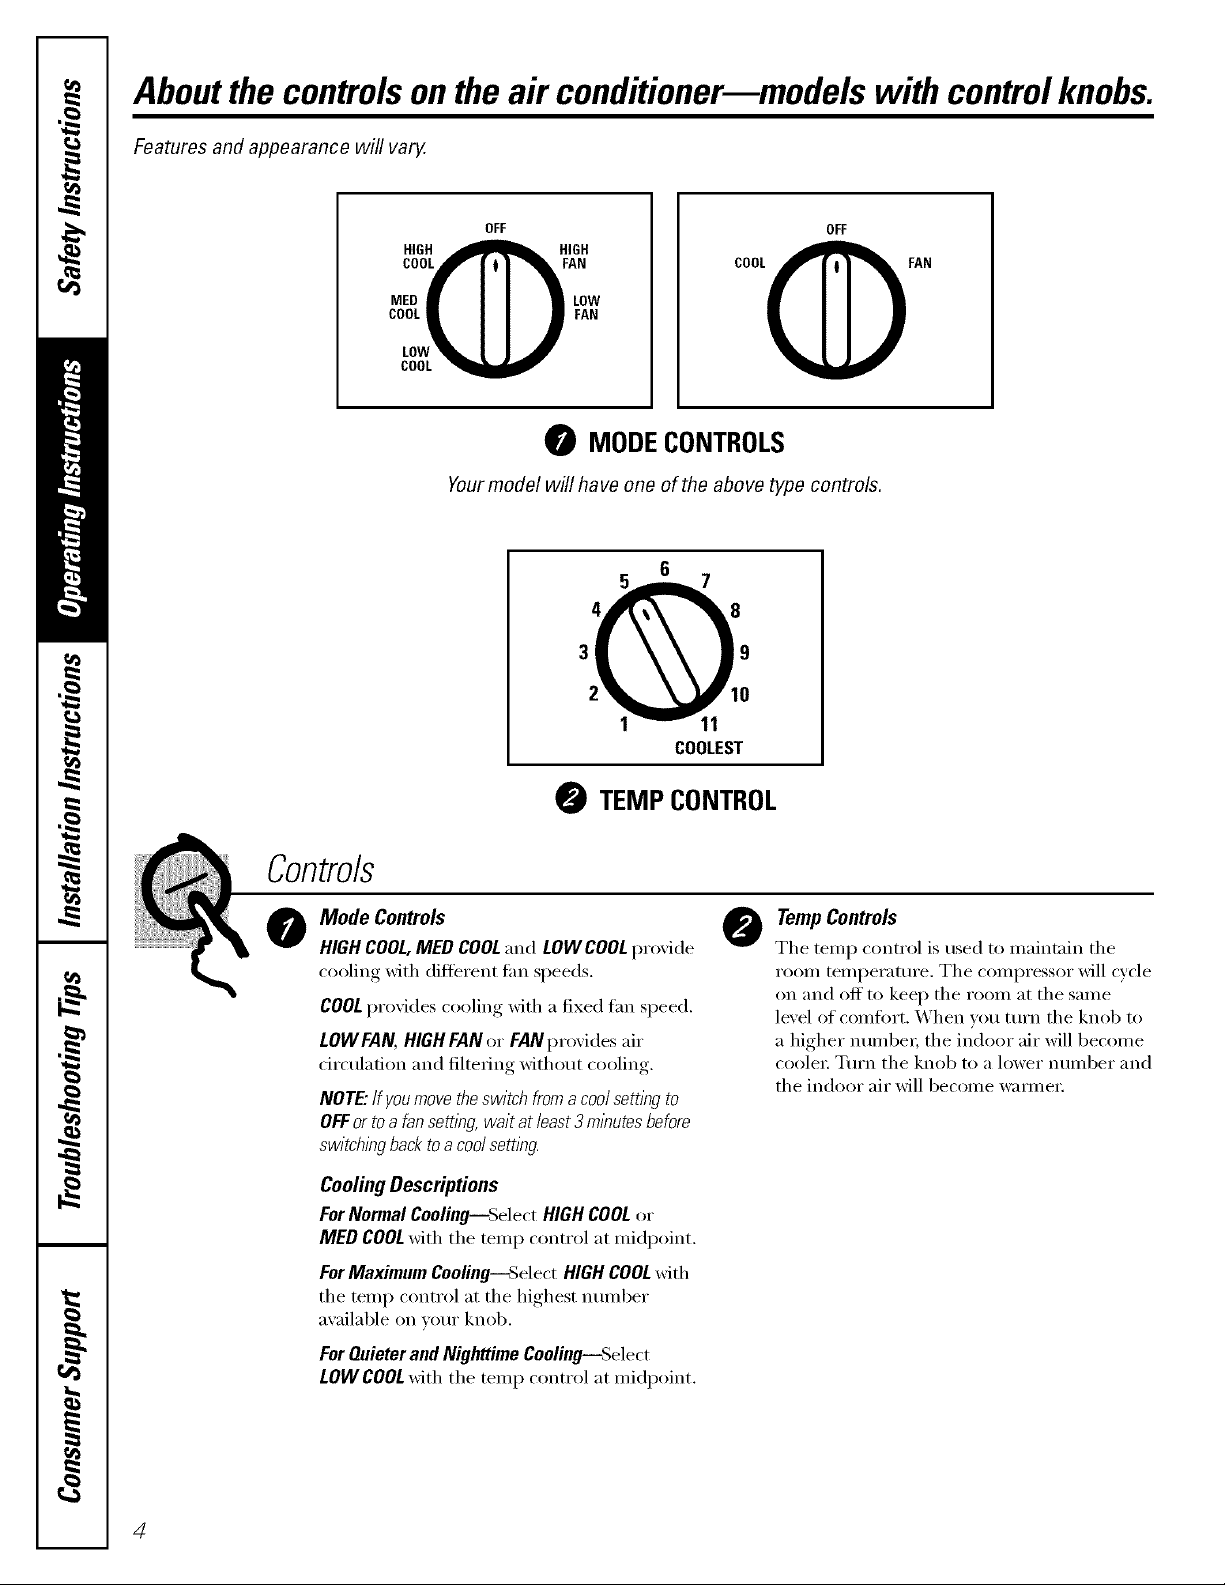
Aboutthecontrolsontheair conditionermmodels with controlknobs.
Features and appearance will vary.
OFF
HIGH _ HIGH
MED • I I • LOW
LOW _ | |
COOL
COOLOFAN
0 MODECONTROLS
Yourmodel will ha ve one of the above type controls.
6
3 9
0
1 11
I0
COOLEST
0 TEMP CONTROL
OFF
Controls
Mode Controls
0
HIGHCOOL,MED COOLand LOWCOOLprovide
cooling with (lifterent tim speeds.
COOLprovides cooling with a fixed tm_ speed.
LOWFAN, HIGHFANor FAN pr(Mdes air
circulation and filtering Mthout cooling.
NOTE."Ifyoumovetheswitchfroma coolsettlWto
OFFortoa fansetting,waitat least3minutesbefore
switchingbacktoa coolsetting.
CoolingDescriptions
ForNormalCooling--SelectHIGHCOOLor
MED COOLwith the temp control at midpoint.
ForMaximumCooling--Select HIGHCOOLMth
the temp control at the highest nmnber
available on w_ur knob.
For Quieter and Nighttime Cooling--Select
LOW COOLwith the temp control at midpoint.
TempControls
0
The temp control is used to maintain the
room temperature. The compressor will cycle
on and off' to kee I) the room at the same
level of comfort. When w)u ttlrn the knob to
a higher ntlI//beI; the indoor air will become
coole_: Turn the knob m a lower number and
the indoor air will become wam_e_:
4
Page 5
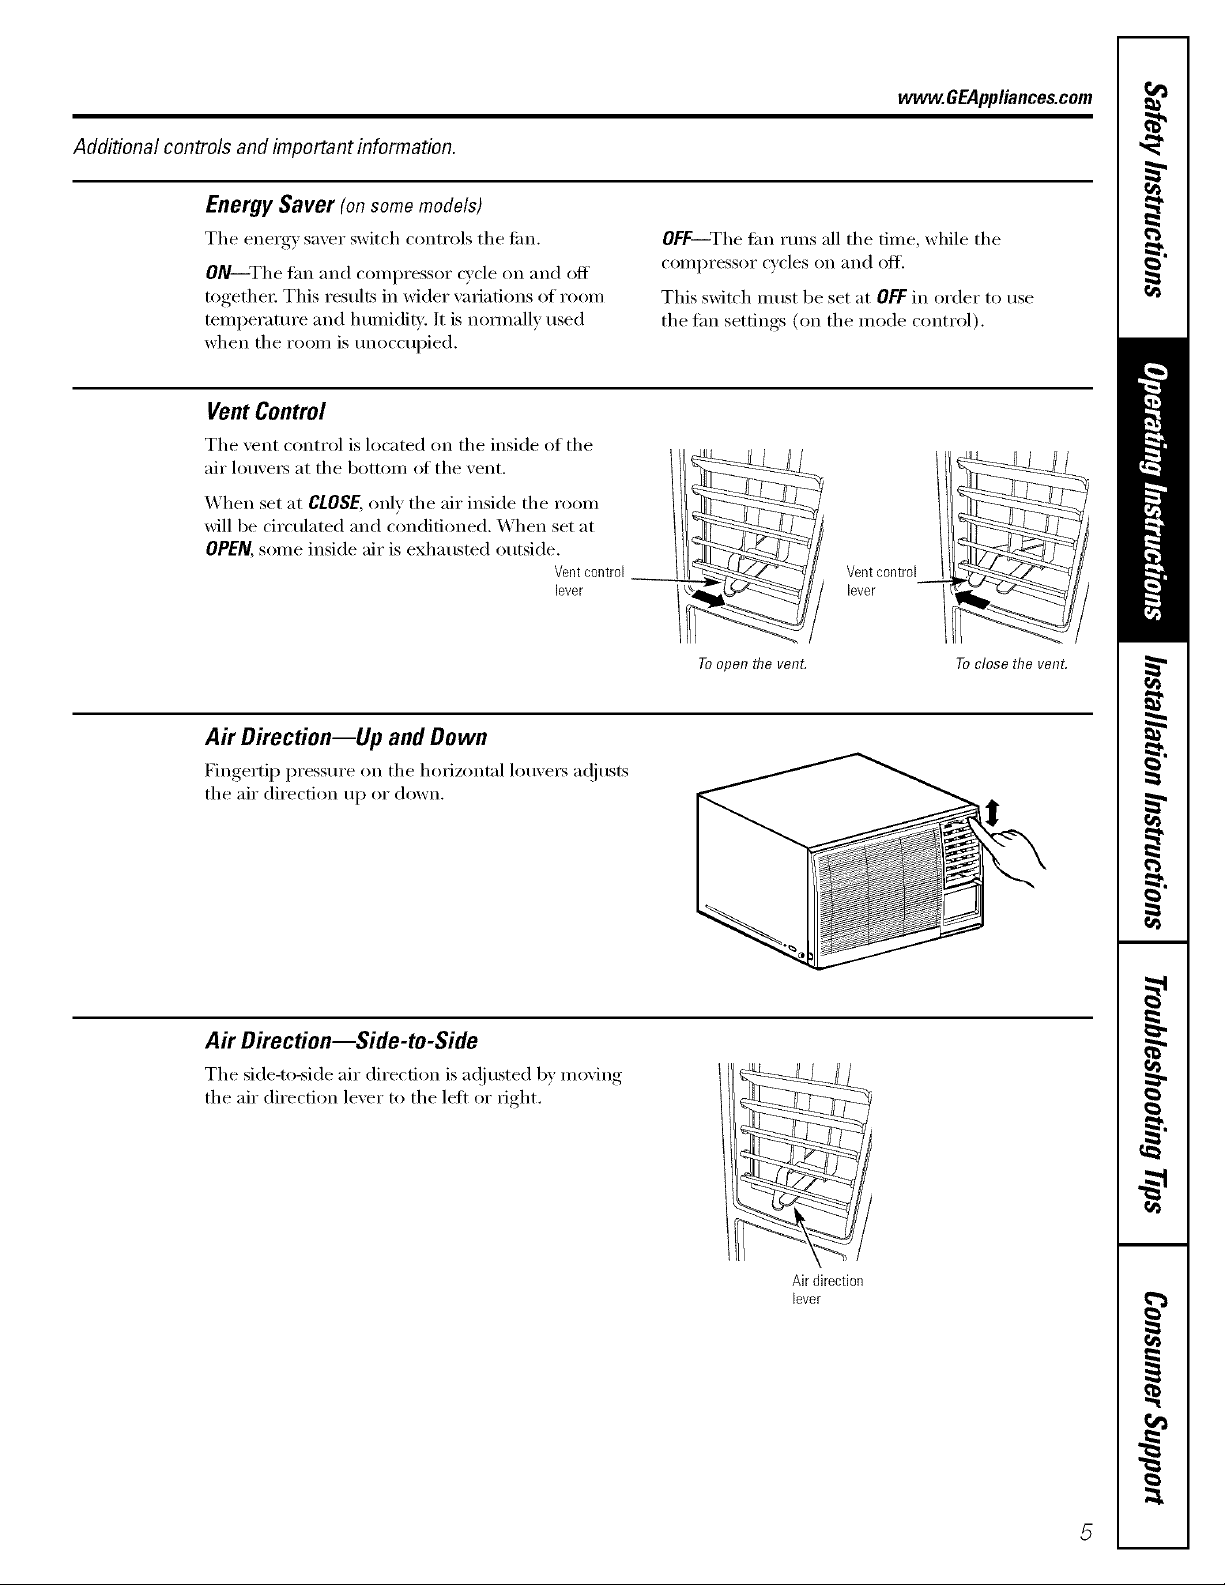
Additional controls and important information.
Energy Saver (on some models)
The energy saver switch controls the tim.
ON--The tan and c()mpressor cycle on and off
together: This results in wider wu_iations of room
temperature and humidity. It is nommllv used
when the room is m_occupie(l.
Vent Control
The vent control is located on the inside of the
air louxe_ at the bottom of the xent. /
X4hen set at CLOSE,only the air inside the room /
will be circulated and conditioned. X,\hen set at
OPEN, some inside air is exhausted outside.
Vent control
lever
wvvw.GEAppliances.com
OFF--The tim runs all the time, while the
compressor cycles on and off.
This switch nlust be set at OFFin order t() use
the tan settings (on the mode c(mtrol).
/
Ventcontrol
lever
Air Direction--Up and Down
Fingertip pressm'e on the horizontal lou\'e_ a(!iusts
the air direction up or down.
Air Direction--Side-to-Side
The side-to-side air direction is a(!i usted by moving
the air direction lever to the left or right,
Toopen the venL
To close the venL
Air direction
lever
Page 6
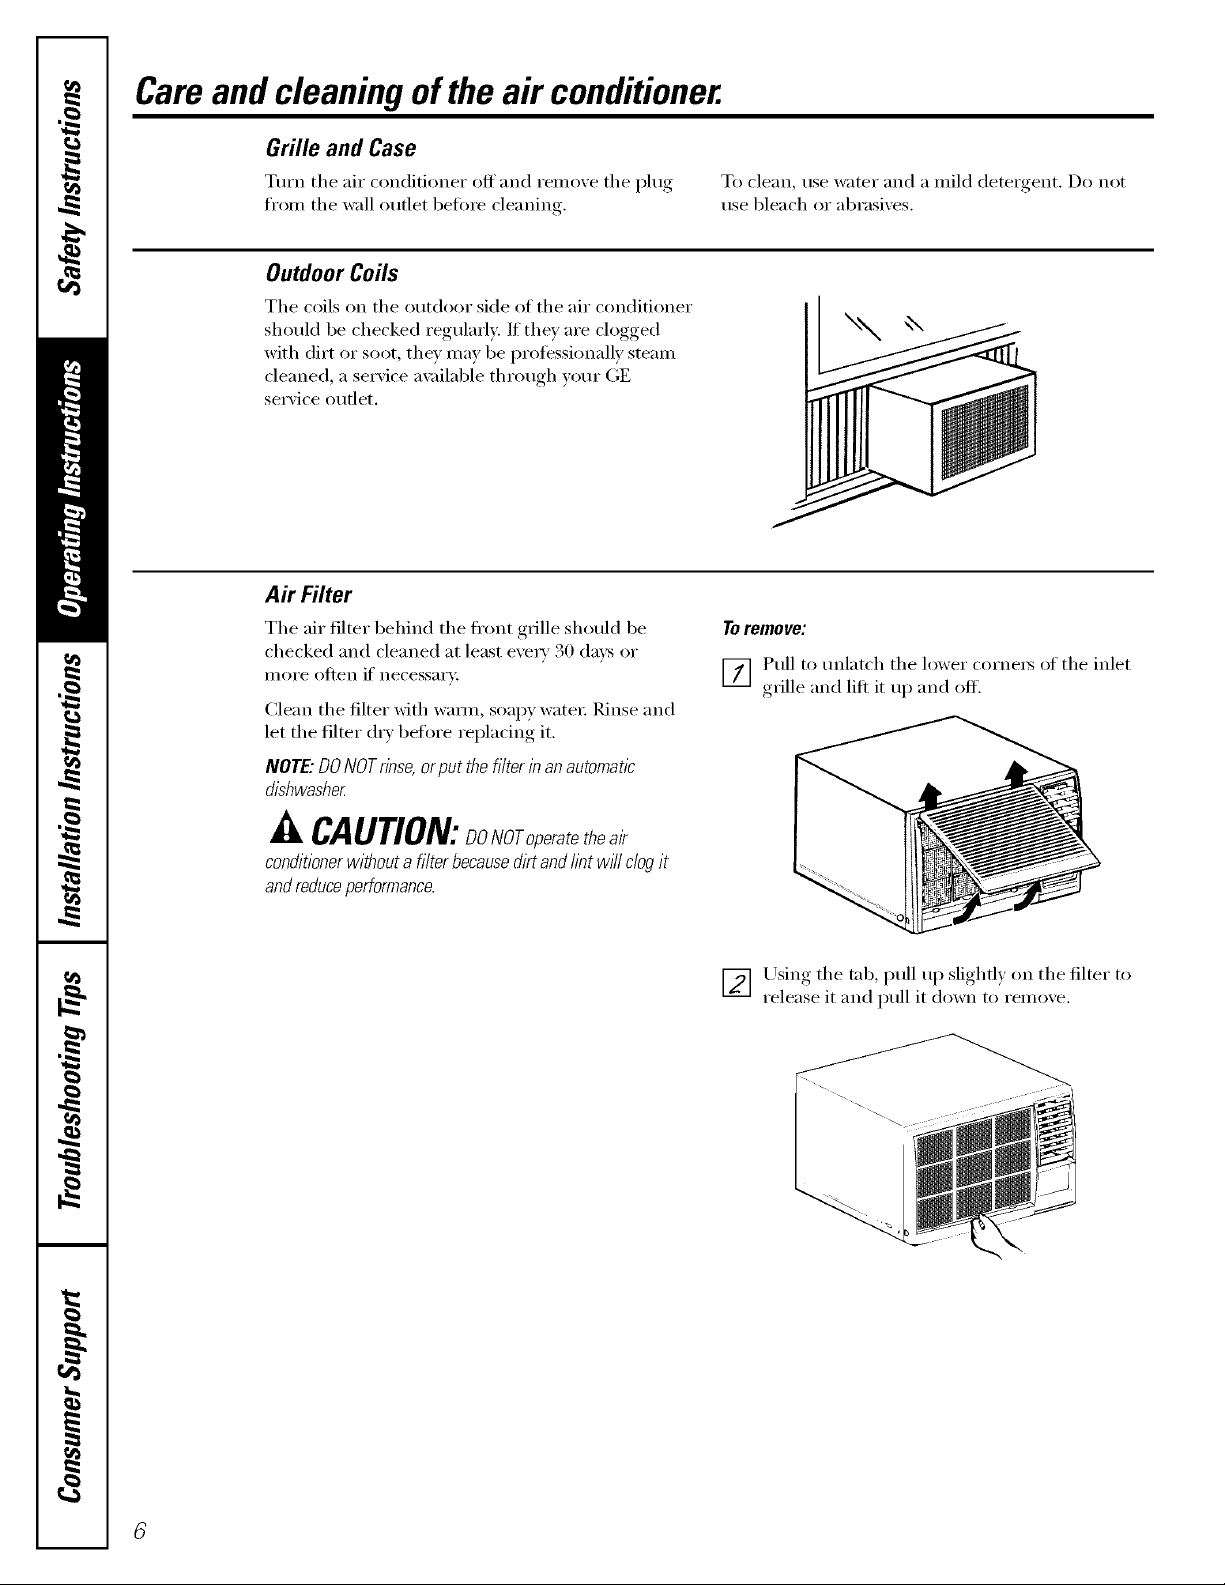
Careand cleaningof theair conditioner.
Grille and Case
Turn the ......air conditioner off and remo'_e the I)lug, To clean, use water and a mild detergent. Do not
from the wall outlet heft)re cleaning, use bleach or abrasixes.
Outdoor Coils
The coils on the outdoor side oI the air conditioner
should be checked regularly. If they are clogged
with dirt or soot, they may be protessionally steam
cleaned, a service a\_filable through yore" GE
service outlet.
Air Filter
The air filter behind the fl'ont grille should be
checked and cleaned at least exe_' 30 daxs or
illoi'e ()lien if' necessarv.
Clean the filter with wam_, soapy water: Rinse and
let the filter dry before replacing it.
NOTE: DONOTrinse, orput the filter inan automatic
dishwasher
Toremove:
] Pull to tmlatch the lower corne_ of the inlet
grille and lift it up and off.
A CAUTION:DONOroperetetheal
conditioner without a filter becausedirt and lintwHIclog it
andreduceperformance.
] Using the tab, pull up slighfl) on the filter to
release it and pull it down to remoxe.
Page 7
Preparingtoinstall theair conditioner.
Read these instructionscompletely and carefully.
BeforeYouBegin
NOTE TOINSTALLER:Leave these instructions with
the air conditioner after installation is completed.
NOTE TOCONSUMER:Keep this Owner's Manual
and Installation Instructions for future use.
IMPORTANT NOTES:
For personal safety, this air conditioner must be
properly grounded.
It is important to have the wall outlet and circu#
checked by a quafified electrician if there is any
doubt as to whether aproper ground exists.
Follow National Electrical Codes (NEC) and/or local
codes and ordinances.
A CAUTION:
Do not under any circumstances, cut or remove
the third (ground) prong from the power cord.
Do not change the plug on the power cord of this
air conditioner
Aluminum house wiring may present special
problems--consult a qualified electrician.
ElectricalRequirements
(_ Some models require 115/120-volt a.c.,
The 3-prong grounding plug minimizes the (----"_
possibili b of electric shock hazard. If the wall outlet k.E/
you plan to use is only a 2-prong outlet, it is xour
responsibili b to haxe it replaced with a properly
,gr°unded .3-1)tong, wall outlet.
60 Hz grounded outlet protected with a
15-amp time delay fuse or circuit breaker:
ToolsYouWillNeed
!:_Phillips-head screwdi_Jver
!'!:_A(!iustable wrench
_: Ruler or tape measure
::Ji::Drill
!_ Scissor5 or knife
!'!:_Pencil
!i_:I,evel
Some models require 230/20S-volt a.c.,
protected with a time delay filse or circuit
breaker These models should be installed
on their own single branch circuit fiw best
performance and to prevent overloading
house or apartment wiring circuits, which
could cause a possible fire hazard fl'om
()x'erheating wires.
7
Page 8
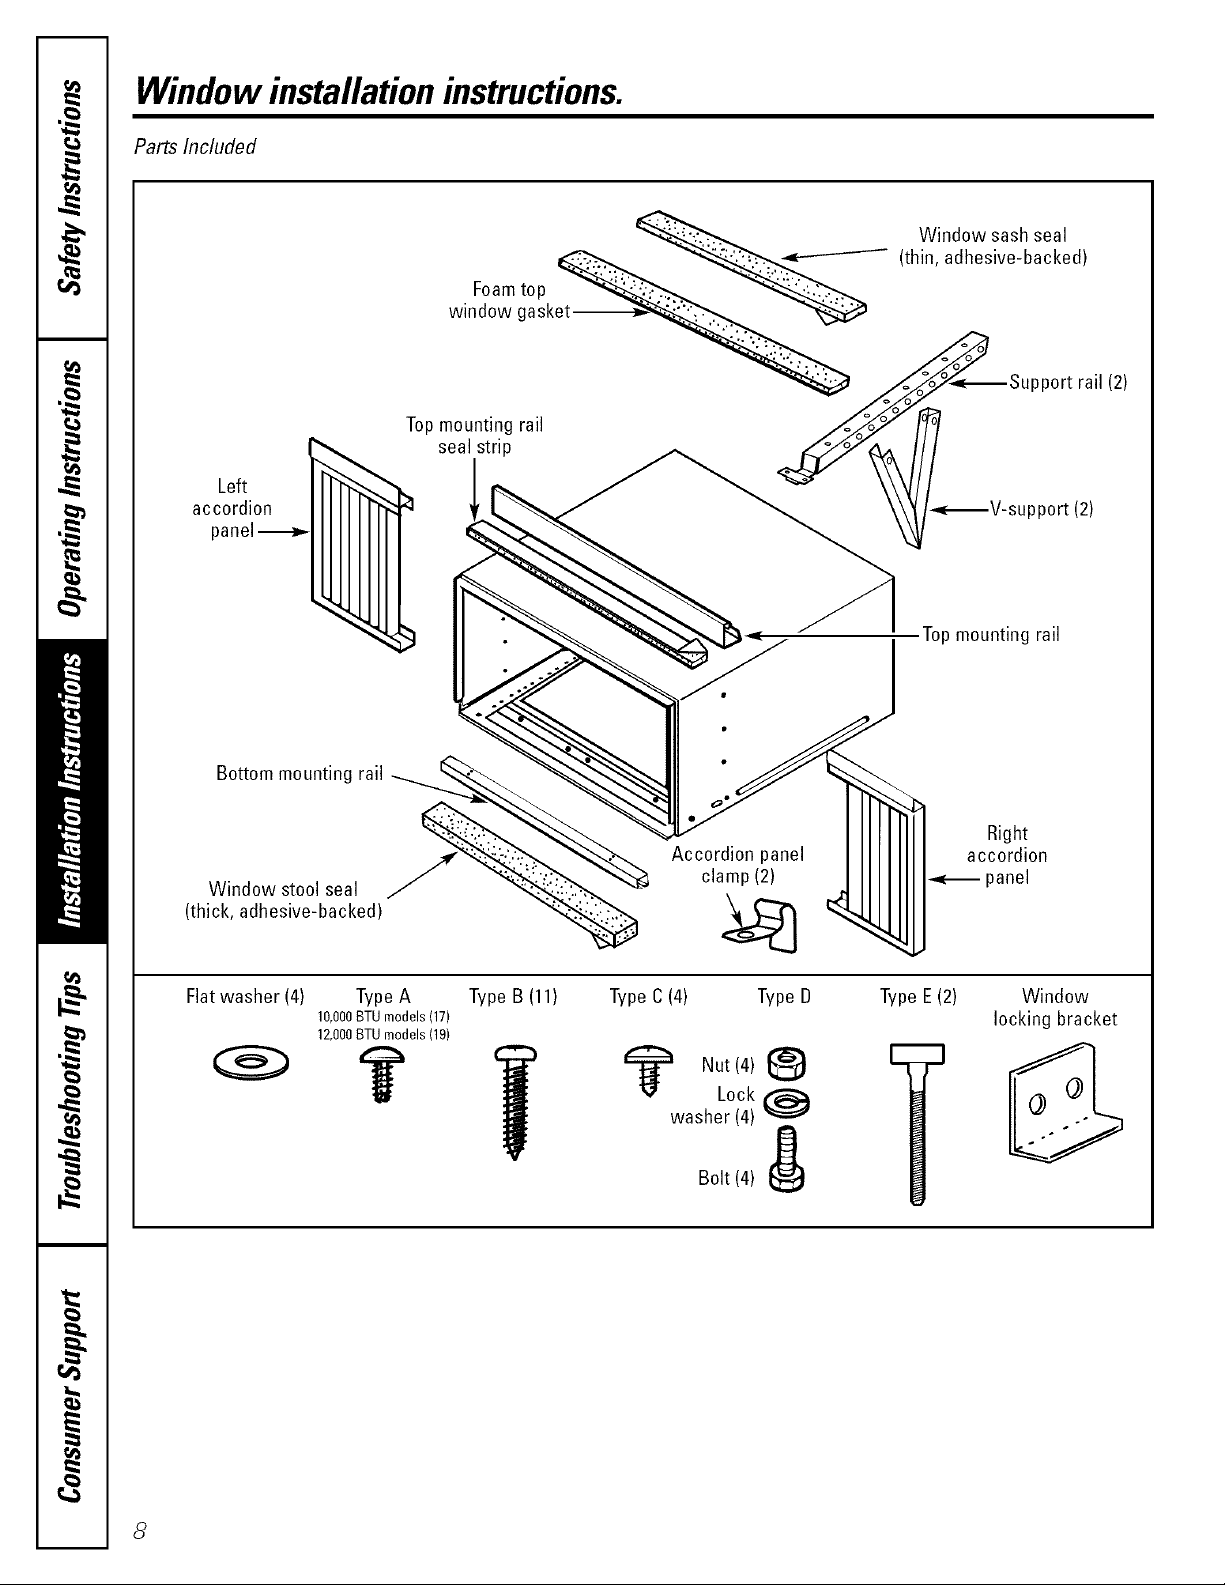
Window installationinstructions.
Parts Included
__,---------_ (thin, adhesive-backed)
Foamtop ___
window gasket _,____
Topmountb_grail /4oJo°7
Left
accordion
panel-_
:_ seal strip _ _/'__-_V-sup port (2)
Window sash seal
__Support rail (2)
Topmounting rail
Bottom mounting rail
Window stool seal /
(thick, adhesive-backed)
Flat washer (4) Type A Type B (11)
10,000BTU models (17)
12,000BTU models (19)
Accordion panel accordion
clamp (2) _ panel
Type C(4) TypeD
1_ Nut(4) _)
Lock @
washer (4)
Bolt (4) _
Type E(2)
Right
Window
locking bracket
8
Page 9

Read completely, then follow step-by-step.
Window Requirements
iJi::These instructions are fin" a standard double-
hung window. You will need to inodifv them for
other t,ipes of windows.
_: The air conditioner can be installed without
the accordion panels if needed to fit in a narrow
window. See the window opening dimensions.
@ M1 sui@orting pa*ts must be secured to tim/
Woo(l, iilasoni'_ oi" metal.
!i_:The electrical outlet must be within reach of
the power cord.
10,000BTUmodels
I I
[3====43
17½"rain.
26"to39"
(Withaccordionpanels/
22¼" rain.
(Withoutaccordionpanels)
Storm Window Requirements
A strum window fl'ame will not allow the air
conditioner to tilt towards the outside and
will kee I) it from draining i)ropefly. To at!just
fin" this, attach a piece of wood to the stool.
1/2" higher
thanframe
t Stool
frame
Im
_ Wood
12,000BTUmodels
//" I
D====IB
18¼"rain.
30"to43"
(Withaccordionpanels)
m
r"
I
I
26¼" loin.
(Withoutaccordionpanels)
WOODPIECES--
WIDTH: 2"
LENGTH: I,ong enough to tit inside the window
[i'aII/e.
THICKNESS: To detemfine the thickness, place a
piece of wood on the stool to make it 1/2" higher
than the top of the stom_ window ti'ame.
Attach secm'elv with nails or screws provided by
the installe_:
Page 10

Window installationinstructions.
Remove the Air Conditioner From the Case
F_ Remoxe and discard the 2 shipl_ing screws
fl'om the bottom rear of the case.
6.
6.
] Pull to unlatch the lower cornex_ of the inlet
grille and lift it up and off.
] Using the tab, pull up slightly on the filter
to release it and pull it down to remoxe.
] On some models, )ou must also disconnect
the control connectox_ befin'e the grille fl'ame
can be remoxed. Press the locking tabs in
• " o" )
while I)ulhn_ _n the other side to release.
Pressin
!
Pressin
F_ Remove the locking screw and locking bracket
fl'om the lower fi'ont of the unit.
10
] Remoxe the two grille fl'ame screws.
(;rasp the lower cornex5 of the grille fl'ame
[]
while I_ressing, in on the case sides with your
finger tips. Pull out to release and lift it up.
NOTE:Do not pull the
bottom edgetoward
youmore than3" or
youmay damagethe
tabs of the grille.
] Remove the screw securing the ground wire
to the right side ti_ce of the unit.
j
"£ _ Groundwire
'_ i'"_1___ Screw
] Slide the air conditioner fl'om the case by
,Ilgfi) )ino_ the base pan handle and I)ulling,
fin'ward while bracing the case.
Page 11

Install the Mounting Rails onto the Case
] Remoxe the backing fl'om the top mounting
rail seal strip and attach it to the bottom of
the top mounting rail.
TypeA _
screws _I
[_] Attach the to _ mortaring rail onto the top
of the case with 5 Type A screws (on 10,000
BTU models) or 7 TH)e A screws (on 12,000
BTU models).
_] Attach the bottom motmting rail to the
bottom of the case from the inside, usin,*
4 T)pe A screws.
NOTE:Referto thelabelonthebottommountingrail
for proper orientation of the rail.
oTypeA screws
(for12,000BTU
TypeA screw
modelsonly)
Label
11
Page 12

Window installationinstructions.
Install the Side Accordion Panels
_] Slide the left and n_ht ace )_(h m panels into
the tol _ and lx_ttom mounting, rails.
TypeA screwst
*0" " ( " "(
Prepare the Window
[_] Attnch the accordion panels to the case using
Bottorn mounting rail
4 Type A screws on each side.
pmountingrail
_]Cut the window sash seal to the window width
and stick the adhesixe side to the bottom of
the sash.
] Mark the centerline of the stool. Measure and
mark the locations fi)r the support assemblies
from both sides of the centerline:
10,000BTUmodels- 10%"on each side
12,000BTUmodels- 12_A"on each side
Stool
12
Page 13

Place, Assemble and Install the SupportBrackets
] Detem/ine the position that the V-support
will be placed within the suI)port rail b)
placing the support rail against the back
edge of the stool.
NOTE:lithe wall extendspast the sill, note the
nearest side hole in the support rail that is past
this construction.
INSIDE
OUTSIDE
Support rail
location flTatispast flTesill
_] _&ssemble the V-sui)i)ort to the sui)port rail
using 9 T,1)e D nuts, lock washers and bolts, at
the location noted. The shortest portion of the
V-sui)i)ort should be placed fi_cing the neck of
the suI)port rail. Repeat for second V-sui)port
and support rail.
Support Assembly
_] I,ine up the V-notches in the suI)I)ort assemblies
on the left and right marks on the stool. Make
sure that the stq)port rail is against the back tff
the stool and drill two l/8" pilot holes into the
stool through the holes in the support rail neck.
Attach the sui)port assemblies to the stool using
2 _'pe g screws in each assembly:
TypeB
WOOd SCreWS
.\ "_ sill,,.. ?
A(!just the Type E leveling bolts against the
outside wall so that the assemblies have a slight
tilt to the outside. Use a level; about a l/2
bubble will be the correct slant to the outside.
TypeBwood screws
1/2Bubble]
I...... %,,, ..... '......... It.a=_ Neck
"x_,.__ I1"" Type D nuts
__ andbolts(2>
_J_..-- TypeEbolt
Thread a Tx])e E bolt about 1/2 of the wax
into the outer thce of the shortest angle of
each V-suI)I)ort.
t \\
soppo \\ /1l
bracket XX,,XJIJ
TypeElevelin{
NOTE:Use a wood block between the leveling
bolts and the wall if the wall is weak or if the
weight of the air conditioner falls between the
studs in the wall.
[_ Attach the adhesive side of the window stool seal
(thick, adhesixe-backed) to the window stool.
Windowstoolseal
|
13
Page 14
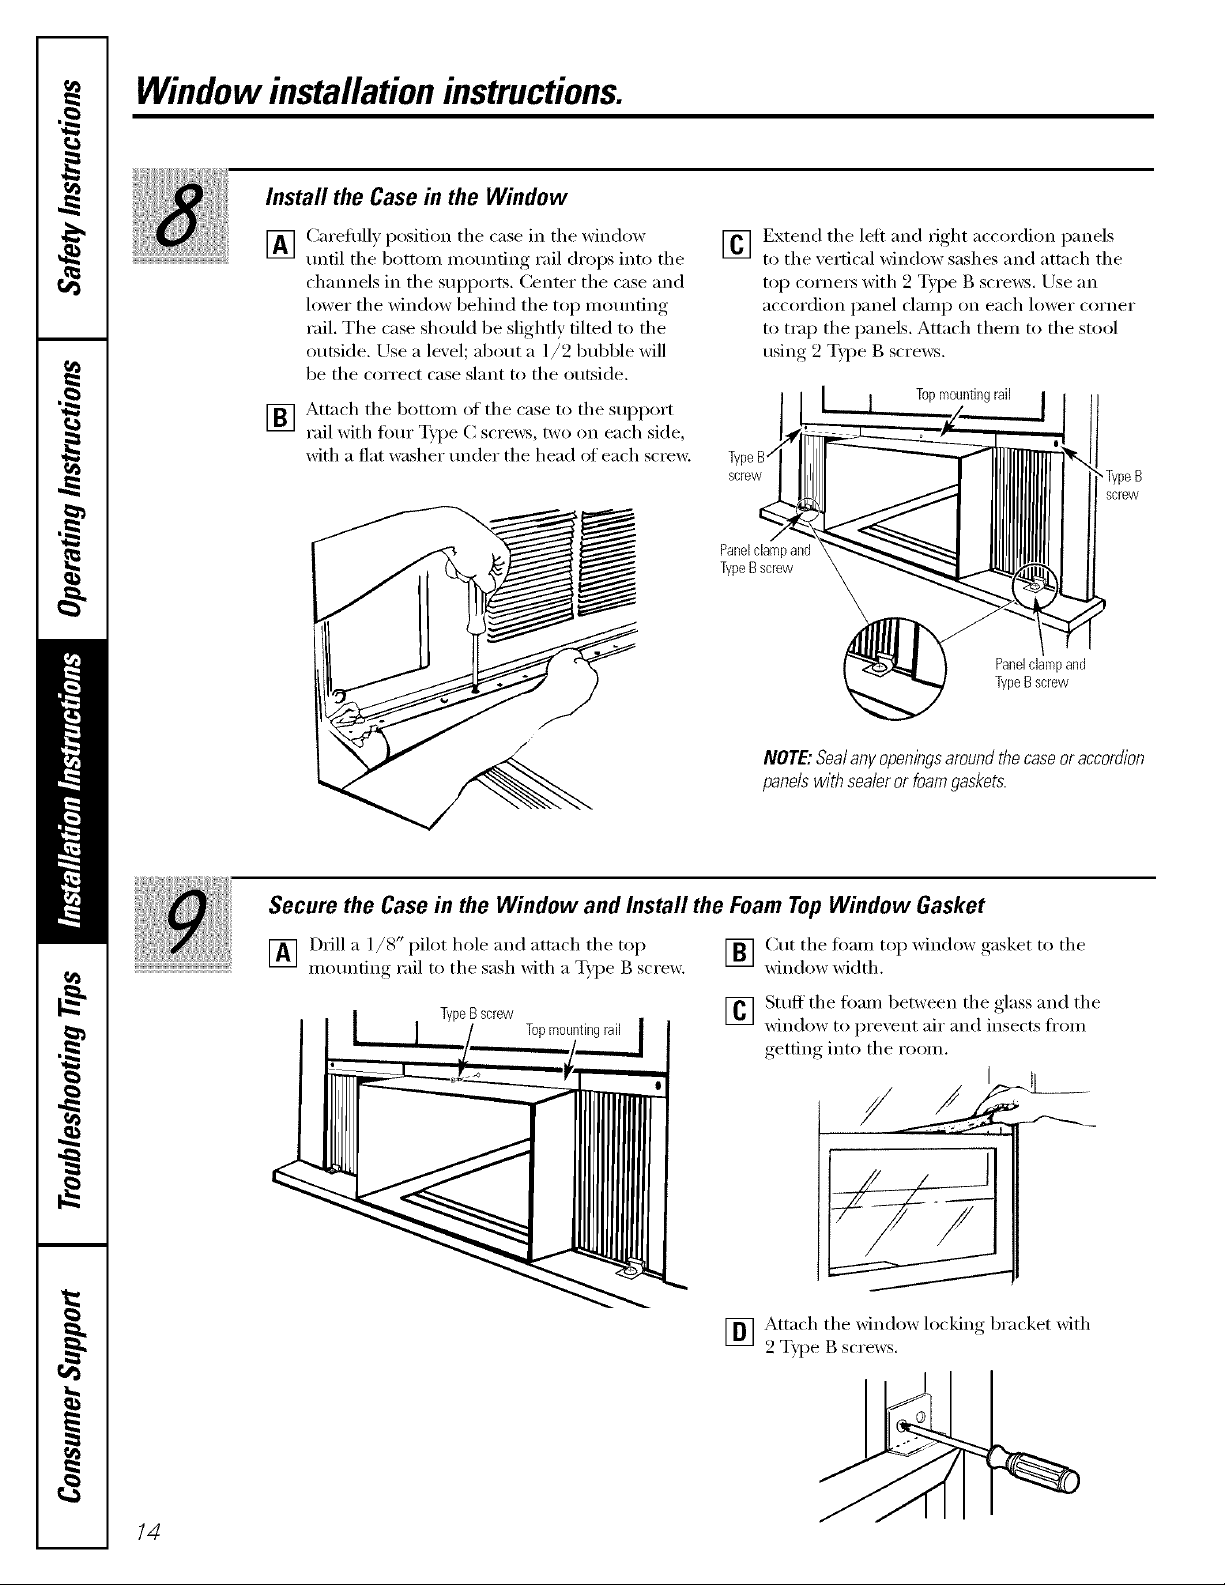
Window installationinstructions.
Install the Case in the Window
_] Carefl/lly position the case in the window
until the botton/mounting rail drops into the
channels in the supports. Center the case and
lower the window behind the top mortaring
rail. The case should be slightly filmd to the
outside. Use a level; about a l/2 bubble will
be the correct case slant to the outside.
_] Attach the bottom of the case to the support
rail with Ibm" Type C screws two on each side,
with a fiat washer under the head of each sciex<
] Extend the left and right accordion panels
to the _ertical window sashes and attach the
top cornei_ with 2 Type g scre_vs. Use an
accoi'dioil pailel clall/p Oil each lower coi'ileF
to trap the panels. Attach them to the stool
using 2 _'pe B scre_vs.
Topmountingrail
screw
Panelclampand
TypeBscrew
Panelclampand
TypeB screw
NOTE:Sealany openingsaroundthecaseor accordion
panelswith sealer or foamgaskets.
TypeB
screw
Secure the Case in the Window and Install the Foam TopWindow Gasket
] Drill a 1/8" pilot hole and attach the top
mounting rail to the sash with a T_])e B screw.
TypeB screw
Topmo_
] Cut the fi)am top window gasket to the
window width.
_] Stuffthe fi)am between the glass and the
xdndow to prexent air and insects fl'om
getting into the room.
// I I
_] Attach the window locking bracket xdth
2 T_1)eB screws.
14
Page 15

Install the Air Conditioner in the Case
] Slide the air conditioner into the case. Do not
push on the controls or the rimmed coils.
Make sure the air conditioner is firefly seated.
/ /
] Reinstall the locking brackets and screws
reillo_, ed earliei;
] /MPORTANT! Reconnect the ground wire to
the air condifionex;
_] Attnch the front grille fl'ame to the case b)
inserting the tabs on the grille fl'ame into
the slots on the fl'ont top of the case. Push
the grille fl'ame in m_fil it snaps into place
arom_d the power cord on the right side.
GuideflTelevers carefully
flTroughflTegrille frame
as youpush it in.
] Secm'e the fl'ont grille frame to the case by
re _lacin,, the screws remoxed earliei;
] If yore'model has the control connecting,
reconnect them to the fl'ont grille bv, ix'essino_
them tooether_ tmfil the locking, tabs snap
into place.
] Install the filte_; Hook the inlet grille in the
fl'ame and close it. (2onnect power;
15
Page 16

Through-the-wallinstallationinstructions--optionaL
IMPORTANT
Through-the-wall installation isnot appropriate if any
of the side louvers in the case will be obstructed by
the wall
All side louvers in the case must project on the outdoor
side of the wall.
Theroomsideofthecasemustprojectintotheroom
at least13/4" fromthefinishedwall
The case must be installed level from side-to-side
and with a slight tilt from front to rear. Use a level;
about a I/2 bubble will be the correct case slant to
the outside.
_A_ Remo_e the air conditioner fl'om the case.
For specific insti'tlction, refer to the I/Vindow
InstallationInstructions.
_] Make certain a wall receptacle is axailable close
to the hole location c,r make arrangements to
install a receptacle.
Finish the Wall Opening
_] Place the case in the wall o )enin,* and
secure with 12 l" hmg #10 wood screws.
NOTE."Driftpiiothoies,ifnecessan/forproper
instai/ation.Iftheframeisoversized,useshims
topreventcasedistortion.
i i
i
Caulk all fi_m" sides on the outdoor side of the case to prevent moistm'e fl'om ,getfin'*,_ through, to the
interior wall. Use of flashing (drip rail) will fimher prexent water fl'om dripping inside the wall and
down the outside of the building
/ _ Plasterline
I J_i
Caulking
II (ifdesired)
OUTSIDE
INSIDE
Airlouvers_--
(mustprojecton
theoutdoorside
ofthewall)
Woodfillerandcaulkin(
(aboveandbelowthe
flashing)
Flashing(driprail)
t
1¾"min.
rail
16
Page 17

Beforeyoucall forservice...
Troubleshooting -tips.
Save time and money! Review the chart below first and
you may not need to call for service.
vvww.GEAppliances.com
Possible Causes
Airconditioner
doesnotstart
Air conditiouer does not Airflow is restricted. • Make sure there are no curtains, blinds or fiwniture
The air conditioner
is unplugged.
The fuse is blown/circuit • Check tile house ti]se/circuit breaker box and repla(e
breaker is tripped, the fl]se or reset the breake];
Power failure. •/f power tililm'e occm_, turn the air conditioner OFF.
What ToDo
• Make sure the air conditioner i)lug is i)ushed completely
into the outlet.
_]]en power is restored, wait 3 mim]tes to restnrt the
air conditioner to prevent tril)ping oI the compressor
overload.
coolasit should blocking th e ti'ont of the air conditi()nel:
The temp control ]nay not • Turn the temperatm'e knob to a higher numbe];
be set correctly.
The air f'dter is dirty. • (:lean the filter at least eve] T 30 days.
See the Operating Instructions section.
The room ]nay have been hot. • _Aq/en the air conditioner ix ti]st turned on, you need to
allow ti]]]e t0r the ]'oo]//1o COO1 dowl].
Cold air is escaping. • Check for oi)en fi/rnace floor registe]_ and cold air
I'etl]]']]S.
• Set the air ( onditioner's vent to the closed position.
Cooling coils have iced up. • See "Air conditioner freezingup" below.
Air conditioner Ice blocks the air flow and • Set the mode control at HIGHFANor HIGH COOL
freezing up stops the air conditioner with the temp at I or 2.
from cooling the room.
Water drips outside Hot mid hmnid weather. • This ix n(mnal.
Water drips indoors The air conditioner is not • g(w ire)per water disp()sal, make sure the air c()]](lift()]]el"
tilted to the outside, slants slightly ti'om the case ti'ont to the re:H:
Water collects in Moisture removed from air
base pan and dxahzs into base pan.
• This is n(mnal fi)r a short period in areas with little
lmmidity; n(mnal for a longer period in very humid areas.
/7
Page 18

Beforeyoucall forservice...
Normal Operating Sounds
?_:You may hear a pinging noise caused by water
being picked up and thrown against the
condenser on rainy da):s or when the humidity
is high. This design feature helps relnove
moistm'e and improve eflidency.
_: You may hear the them_ostat click when the
COIIII)I'eSSOI" cycles on and off.
)_:X4"_ter will collect in the base pan dm_ing high
humidi_' or on rainy days. The water may
ovet{h)w and drip from the outdoor side ot
the mfit,
::Ji::The tim may mn even when the compressor
does not.
18
Page 19

Notes.
I
m
w
m
w
19
m
Page 20

m
_ Notes_
€_
r_
m
m
Q_
€_
2O
Page 21

GE Service Protection Plus 'M
GE, a name recognized worldwide fbr quality and dependability, of{ers you
Service Protection Plus'_--comprehensive protection on all your appliances--
No Matter What Brand!
Benefits Include:
• Backed by GE
• All brands covered
• Unfimited service calls
• All parts mid labor costs included
• No out-of-pocket expenses
• No hidden deductibles
• One 800 nmnber to call
You will be completely satisfied with our service protection or you ma) request }our mone) back
on the remaining value of your contract. No questions asked. It's that simple.
Protect your refrigerator; dishwasher; washer and dryer; range, TV, VCR and much more--any brine!!
Plus there's no extra charge tot emergency service and low monthly financing is available. Even icemaker
coverage and fi)od spoilage protection is otfered. You can rest eas)', knowing that all vour valuable
household products are protected against expensive repairs.
Place your confidence in GE and call us in the U.S. toll-free at i_UU.OZO.ZZZ_
for uloi'e ilatorlnation,
"*Allbrands cmered, up to 20 }ears _ld. in the contin< nlal [.S.
We71CoverAnyAppliance.
Anywhere. Anytime.*
_(_t/I here
Please place in envelope and mail to:
General Electric Company
Warranty Registration Department
P.O. Box 32150
Louisville, KY 40232-2150
21
Page 22

Consumer Product Ownership Registration
Dear Customer:
Thank you for purchasing our product and thank you for placing your confidence in us.
_47eare proud to ha_e you as a C/lStOlller!
Follow these three steps to protect your new appliance investment:
Complete mid mail
your Consumer
Product Ownership
Registration today.
t]a_c the peace of
mind of knowing we
(an comact you in
th( unlikely (win of
a sa/;_qv modi/icaiion.
After mailing ille
registraiion below,
store {his doctll//ellt
in a sad place, h
( o11tail/s i11{()rlllatioll
you will need should
you require service.
()ur service mmlber
is 800.GE.CARES
(800.432.2737).
Model Number Serial Number
I I I I I I
Important: If you did not get a registration card with your
product, detach and return the form below to
ensure that your product is registered, or register
online at www.GEAppliances.com.
Consumer Product Ownership Registration
Read your ()wner's
Mamml carefulE.
h will help you
operam your new
at_pliame properly.
, I
_,_(_//I here
Model Number Serial Number
Mn Ms. M*>,. Mi_s
Fir, d] I L:_sl]
Name I I I I I I I I I Naln(! I I I I I I
Stlx (!1 [
Addr(ss I I I I I I I I I I I I I I I I I I I I I I I I
I I I I I I
Ap_#I , , , , , , , I E-nlailA([([ress::
Zip
Dine Pla(ed
NUlnber I i i i i i i
': Pl(ase provide your e-mail address Io r( ceiv(, via e-mail, discounts, sp( cial off(rs and ofll¢r important
communications from GE Appliances ((;EA).
(:h¢(k h(r( if you do 11ol WaHt to I-(X ( iv( (ommuni(ations from (;EA's ( arefully sel((le([ partners.
GEAppliances
GEConsumer Prodocts
General Electric Company
Lotrisville,Kentucky
www.GEAppliances.com
22
I
I
Page 23

Air ConditionerWarranty.
Aft warranty service provided by our Factory Service Centers,
or an authorized Customer Care®technician. Toschedule service,
on-line, 24 hours a day, visit us at www.GEAppliances.com, or
call 800.GE.CARES(800.432.2737).
We Will Replace:
Anypart of the air conditioner which thils due to a detect in materials or w(n'kmanship.
Fromthe dateof the
originalpurchase
FiveYears
Fromthedateof the
originalpurchase
::Ji::Service trips to your home to teach you how to ::Ji::
use the product.
_: Improper installation, delivery or maJntenm_ce. If you _:
have an h_staJlation problem, or if the air conditioner
is of improper cooling capacity for the intended use, !;?:
contact your dealer or hlstaJler. You axe responsible
for providing adequate electrical com_ecthlg facilities.
::Ji::Failure of the product resulting from modifications to
the product or due to tmreasonable use h_dudJng failure
to provide reasonable and necessary maintenance. ::Ji::
_: In commercial locations labor necessary to move the
refit to a location where it is accessible for service
by an h_dfrviduaJ teclufidaal.
During this full one-year warranty, we will also provide, free of charge, all labor and in-home
serxi(e to replace the (lefe(d_e [)art,
Any part of the sealed refrigerating system (the compress(n; con(lensei; evaporator and
all c(mnecting ttfl)ing) which fifils due to a (lefect in materials or workmanship. During this
four-year additional warranty, we will also provide, free of charge, all labor and in-home service
to replace the (lefecfi\'e part.
Staple your receipt here.
Proof of the original purchase
date is needed to obtain service
under the warrantF
Replacement of house fuses or resetting of circuit
breakers.
Failure due to corrosion on models not corrosion-
protected.
Dmnage to the product caused by hnproper power supply
voltage, accident, f'we, floods or acts of God.
hlcidentaJ or consequential dmnage caused by possible
defects with this air conditioner.
Dmnage after delivery.
This warranty is extended to the original purchaser and any succeeding owner for products purchased for home
use within the USA. In Alaska, the warranty excludes the cost of shipping or service calls to your home.
Some states do not allow the exclusion or limitation of incidental or consequential damages. This warranty gives
you specific legal rights, and you may also have other rights which vary from state to state. To know what your
legal rights are, consult your local or state consumer affairs office or your state's Attorney General.
Warrantor: General Electric Company. Louisville, KY 40225
23
Page 24

ConsumerSupport.
Haxe a question or need assistance with )our appliance? Try the (;E Appliances _.Vebsite 24 hotn_ a day
! l gEAppliancesWebsite www.GEAppliances.com
' any day of the xear'. For greater comenience and faster service, you can now download Owner's Manuals,
O " S i.order parts, catalogs, or exert schedule set\ice on-line. You can also "_sk Our Team f Expert.
yo/tI" qtlestions, and so Illtlcl/iiloi'e...
ScheduleService
Expert (;E repair sets,ice is onl) one step awa} fl'om your (loot; Get on-line and schedule vc,ur service at
veto', conxenience 24 hom_ am {lm of the '_ear! Or call 800.GE.(_AI_ES (800.432.2737) during n{mnal
business hom_.
www.GEAppliances.com
RealLifeDesignStudio www.GEAppliances.com
GE SUl_ports the Uni\'et_al Design concept--products, services and environments that can be used by
people of all ages, sizes and capabilities. We recognize the need to design fin" a wide range of ph):sical and
mental abilities and impaim/ents. For details of GE's Universal Design applications, including kitchen
design ideas fin" people with disabilities, check ottt ottr _,Vebsim today. For the heating impaired, please call
800.TDD.GEAC (800.833.4322).
Extended Warranties www.GEAppliances.com
Pro'chase a (;E extended wart'an_ and learn about special discounts that are axailable while _our warrant'
is still in effect. You can i_urchase it on-line an)time, or call 800.626.2224 dtwing nomml business hom_.
GE (_onsumer Home Serxices will still be there after your warrant} expires.
PartsandAccessories www.GEAppliances.com
]ndividtmls qualified to set_'ice their own apl_liances can have parts or accessories sent directly to their
homes (VISA, MasterCard and Discover cards are accepted). Order on-line toda 5 24 hotn_ every' day
or by phone at 800.626.2002 dining natural business hom_.
Instructionscontainedin thismanualcoverprocedurestobeperformedbyanyuser.Otherservicing generally
should be referred to qualified service personnel Caution must be exercised, since improper servicing may cause
unsafe operation.
ContactUs www.GEAppliances.com
If you are not satisfied with the service you receive ti'om GE, contact its on otn" _.Vebsite with all the details
including yam" phone ntttllbeI; oI" write to: General Manager; Customer Relations
GE Al)pliances, Appliance Park
I,ouisville, KY 40225
RegisterYourAppliance www.GEAppliances.com
Register your new applimlce on-line----at your €onvenience[ Titnel) l_ro(htct registration will allow tar
enhanced commtmication and prompt service under the terms of_our warranty should the need arise.
You may also mail in the pre-printed registration card included in the packing material.
24 Printed in China
 Loading...