

GE AHH10AQW1 Owner’s Manual
GEAppliances.com
Safety Instructions ............. 2,3
Operating Instructions
Controls ........................... 4-6
Care and Cleaning
Air Filter .............................. 6
Outdoor Coils ......................... 6
Installation Instructions ...... 7-1o
Troubleshooting Tips ............ 11
Normal Operating Sounds ............ 11
AHH08*
AHHI0*
AHH12*
0_
0_
0
Consumer Support
Consumer Support .......... Back Cover
Ownership Registration for
Customers in Canada only ........ 13, 14
Warranty for Customers
in Canada ........................... 16
Warranty for Customers
in the U.S.A........................... 15
*ENERGY STAR ® labeled product
I
ENERGYSTAR
As an ENERGYSTAR®partner, GE has
determined that this product meets
the ENERGYSTAR®guidelines for
energy efficiency.
O_
Write themodelandserial numbershere:
Model #
Serial#
Find these numbers on a label on the
sideof the airconditioner.
In Canada, contact us at:
www.GEAppliances.ca
4.9-7676 12-10 GE
IMPORTANT SAFETY INFORMATION.
READ ALL INSTRUCTIONS BEFORE USING.
A WARNING!
Foryour safety, the information in this manual must be followed to minimize the risk of fire, electric
shock or personal injury.
SAFETYPRECAUTIONS
Use this appliance only for its intended
purpose as described in this Owner's
IVlonual.
This air conditioner must be properly
installed in accordance with the Installation
Instructions before it is used.
Never unplug your air conditioner by pulling
on the power cord. Always grip plug firmly
and pull straight out from the receptacle.
Replace immediately all electric service
cords that have become frayed or otherwise
damaged. A damaged power supply cord
must be replaced with a new power supply
cord obtained from the manufacturer and
not repaired. Do not use a cord that shows
cracks or abrasion damage along its length
or at either the plug or connector end.
Turn the unit OFFand unplug your air
conditioner before cleaning.
GEdoes not support any servicing of the
air conditioner. We strongly recommend
that you do not attempt to service the air
conditioner yourself.
For your sufety...do not store or use
combustible materials, gasoline or other
flammable vapors or liquids in the vicinity
of this or any other appliance.
All air conditioners contain refrigerants,
which under federal law must be removed
prior to product disposal. If you are getting
rid of an old product with refrigerants, check
with the company handling disposal about
what to do.
If the receptacle does not match the plug,
the receptacle must be changed out by a
qualified electrician.
These R/410Aair conditioning systems
require contractors and technicians to
use tools, equipment and safety standards
approved for use with this refrigerant.
DO NOT use equipment certified for
R22 refrigerant only.
HOW TO CONNECT ELECTRICITY
Do not, under any circumstances, cut or remove
the third (ground) prong from the power cord.
For personal safety, this appliance must be
properly grounded.
DO NOT use an adapter plug with this appliance.
The power cord of this appliance is equipped
with a 3-prong (grounding) plug which mates
with a standard 3-prong (grounding) wall outlet
to minimize the possibility of electric
shock hazard from this appliance.
Power cord includes a current interrupter device.
A test and reset button is provided on the plug
case. The device should be tested on a periodic
basis by first pressing the TESTbutton and
then the RESETbutton while plugged into the
outlet. If the TESTbutton does not trip or if the
RESETbutton will not stay engaged, discontinue
use of the air conditioner and contact a qualified
2
service technician.
Have the wall outlet and circuit checked by
a qualified electrician to make sure the outlet
is properly grounded.
Where a 2-prong wall outlet is encountered,
it is your personal responsibility and obligation to
have it replaced with a properly grounded
3-prong wall outlet.
The air conditioner should always be plugged
into its own individual electrical outlet which has
a voltage rating that matches the rating plate.
This provides the best performance and also
prevents overloading house wiring circuits which
could cause a fire hazard from overheated wires.
See the Installation Instructions, Electrical
Requirements section for specific electrical
connection requirements.
GEAppliances.com
A WARNING!
USEOFEXTENSIONCORDS
RISK OF FIRE. Could cause serious injury or
death.
• DO NOT use an extension cord with this
Window Air Conditioner.
• DO NOT use surge protectors or multi-outlet
adaptors with this Window Air Conditioner.
READAND FOLLOWTHISSAFETYINFORMATIONCAREFULLY.
SAVETHESEINSTRUCTIONS
About the controlson theair conditioner
Features and appearance will vary.
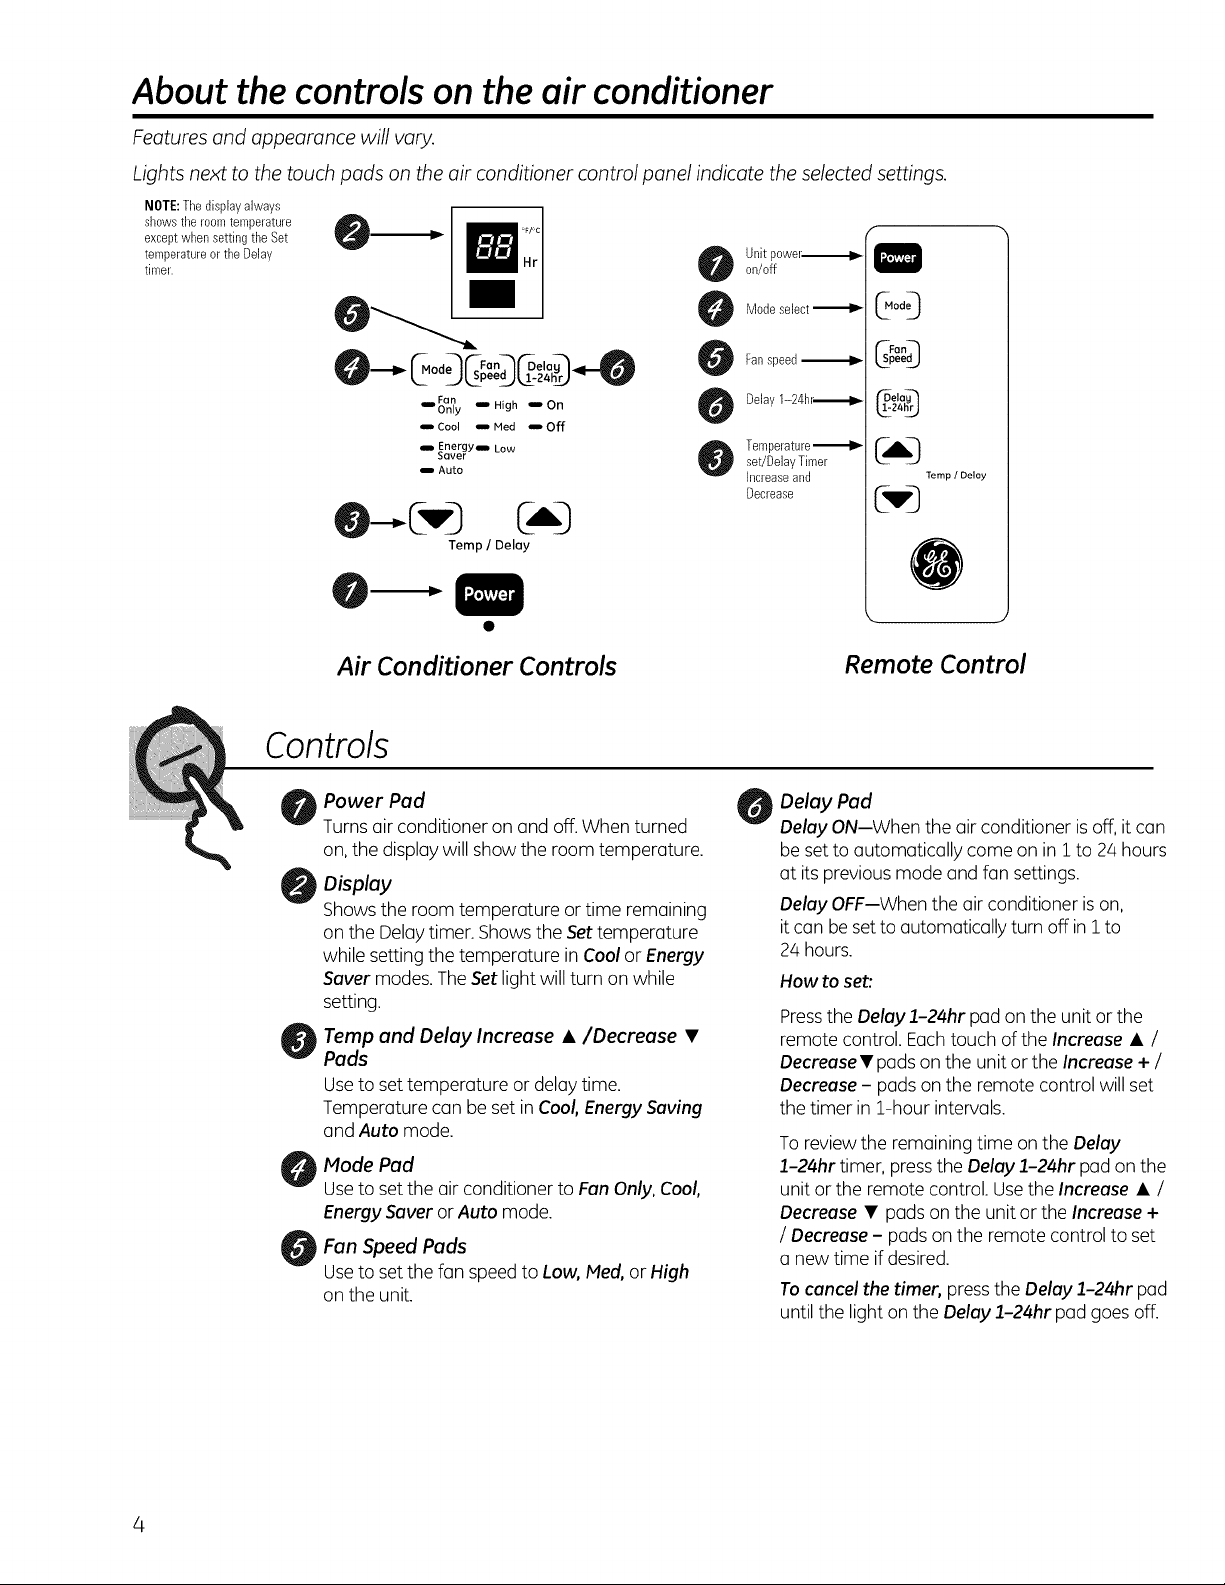
Lights next to the touch pads on the air conditioner control panel indicate the selected settings.
NOTE:Thedisplay always
showsthe roomtemperature
exceptwhen setting the Set _!
temperatureor the Delay
timer.
Unit power_
on/off
e--...,m
Fan Delay
ImFan
Only m High Im On
Cool _Hed _Off
Energyll Low
Saver
! Auto
Temp / Delay
Air Conditioner Controls
Controls
Power Pad
Turns air conditioner on and off.When turned
on,the display will show the room temperature.
Display
Shows the room temperature or time remaining
on the Delaytimer. Showsthe Settemperature
while setting the temperature inCool orEnergy
Saver modes.TheSet light will turn onwhile
setting.
Tamp and Delay Increase •/Decrease •
Pads
Useto settemperature or delaytime.
Temperature can be set in Cool,Energy Saving
and Auto mode.
Mode Pad
Useto setthe airconditioner to FanOnly, Cool,
Energy Saver orAuto mode.
Fan Speed Pads
Useto setthe fan speedto Low, Med,or High
on the unit.
Modeselect '_
Fanspeed_
Delay1-24hr--_-
Temperature,_lP _
set/DelayTimer
Increaseand
Decrease
@od_
e_
@el_
z4_Z)
Temp / Delay
['w'D
Remote Control
Delay Pad
Delay ON--When the air conditioner is off,it con
be set to automatically come on in1to 24hours
at its previousmode and fan settings.
Delay OFF--Whenthe air conditioner is on,
itcan be setto automatically turn offin1 to
24 hours.
How to set:
Pressthe Delay 1-24hr pad onthe unit or the
remote control. Eachtouch of the Increase • /
Decrease• padson the unit or the Increase + /
Decrease - pads onthe remote control will set
the timer in 1-hour intervals.
To reviewthe remaining time on the Delay
1-24hr timer, pressthe Delay 1-24hr pad onthe
unit orthe remote control. Usethe Increase • /
Decrease • pads on the unit or the Increase+
/ Decrease - padson the remote control to set
a new time if desired.
To cancel the timer, press the Delay 1-24hr pad
until the light on the Delay 1-24hr pad goes off.
4
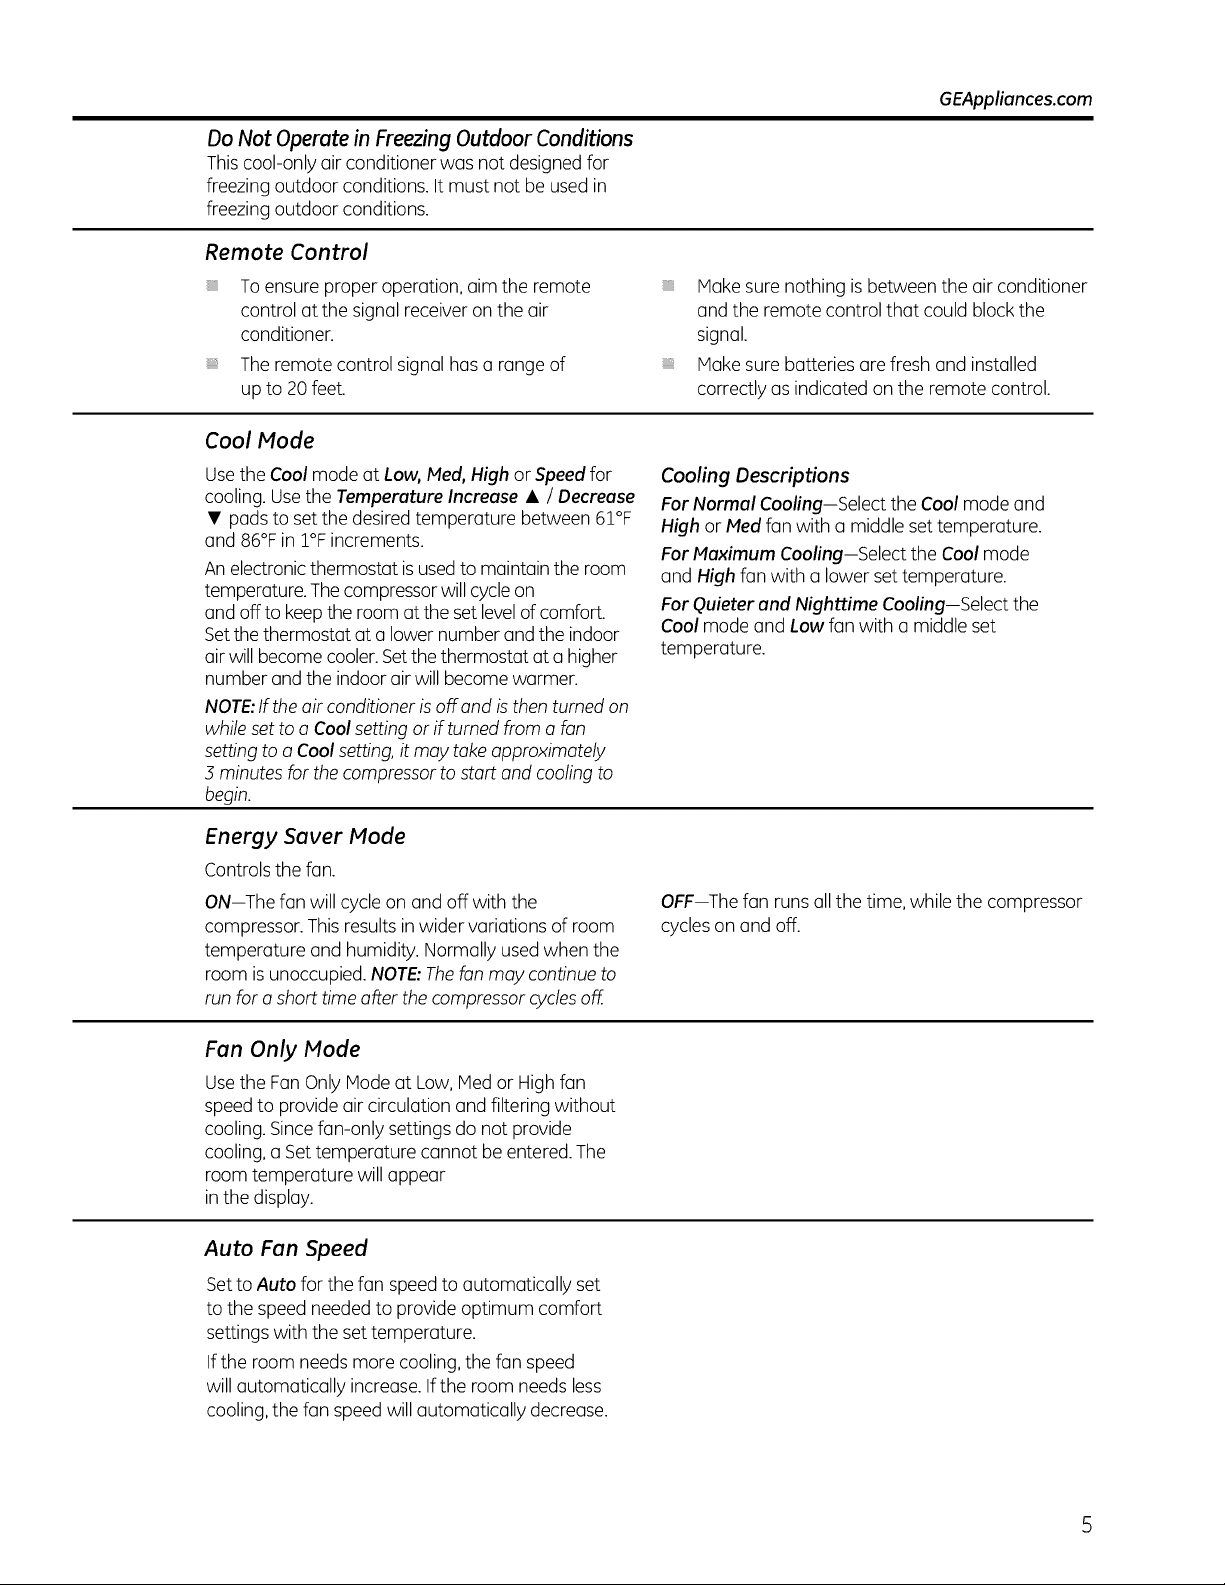
Do Not Operate in Freezing Outdoor Conditions
Thiscool-only air conditioner was not designed for
freezing outdoor conditions. Itmust not be usedin
freezing outdoor conditions.
Remote Control
GEAppliances.com
To ensure proper operation, aim the remote
control at the signal receiver on the air
conditioner.
Theremote control signal has a range of
up to 20feet.
Cool Mode
Usethe Cool mode at Low, Med,High or Speedfor
cooling. Usethe Temperature Increase • / Decrease
• pads to set the desiredtemperature between 61°F
and 86°Fin 1% increments.
An electronicthermostat isusedto maintain the room
temperature. Thecompressorwill cycleon
and off to keepthe room at the set levelof comfort.
Setthe thermostat at a lower number and the indoor
air will becomecooler.Setthe thermostat at a higher
number and the indoor airwill become warmer.
NOTE:Iftheair conditionerisoff and is then turned on
while setto aCool setting or if turned from a fan
setting to a Coolsetting,it may take approximately
3 minutes for thecompressor to start and coolingto
begin.
Energy Saver Mode
Controls the fan.
ON--The fan will cycleon and off with the
compressor.Thisresultsin wider variations of room
temperature and humidity. Normally usedwhen the
room is unoccupied. NOTE:Thefan may continueto
run for ashort time after the compressorcyclesoff.
Make sure nothing isbetween the airconditioner
and the remote control that could blockthe
signal.
Make sure batteries arefresh and installed
correctly as indicated onthe remote control.
Cooling Descriptions
For Normal Cooling-Select the Cool mode and
High orMad fan with a middle settemperature.
For Maximum Cooling--Select the Cool mode
and High fan with a lower settemperature.
For Quieter end Nighttime Cooling-Select the
Cool mode and Low fan with a middle set
temperature.
OFF--Thefan runsall the time, while the compressor
cycles on and off.
Fan Only Mode
Usethe FanOnly Modeat Low, IViedor Highfan
speedto provide air circulation and filtering without
cooling. Sincefan-only settingsdo not provide
cooling, a Set temperature cannot beentered. The
room temperature will appear
in the display.
Auto Fun Speed
Setto Auto for the fan speedto automatically set
to the speedneededto provide optimum comfort
settings with the settemperature.
If the room needsmore cooling,the fan speed
will automatically increase.Ifthe room needs less
cooling, the fan speedwill automatically decrease.
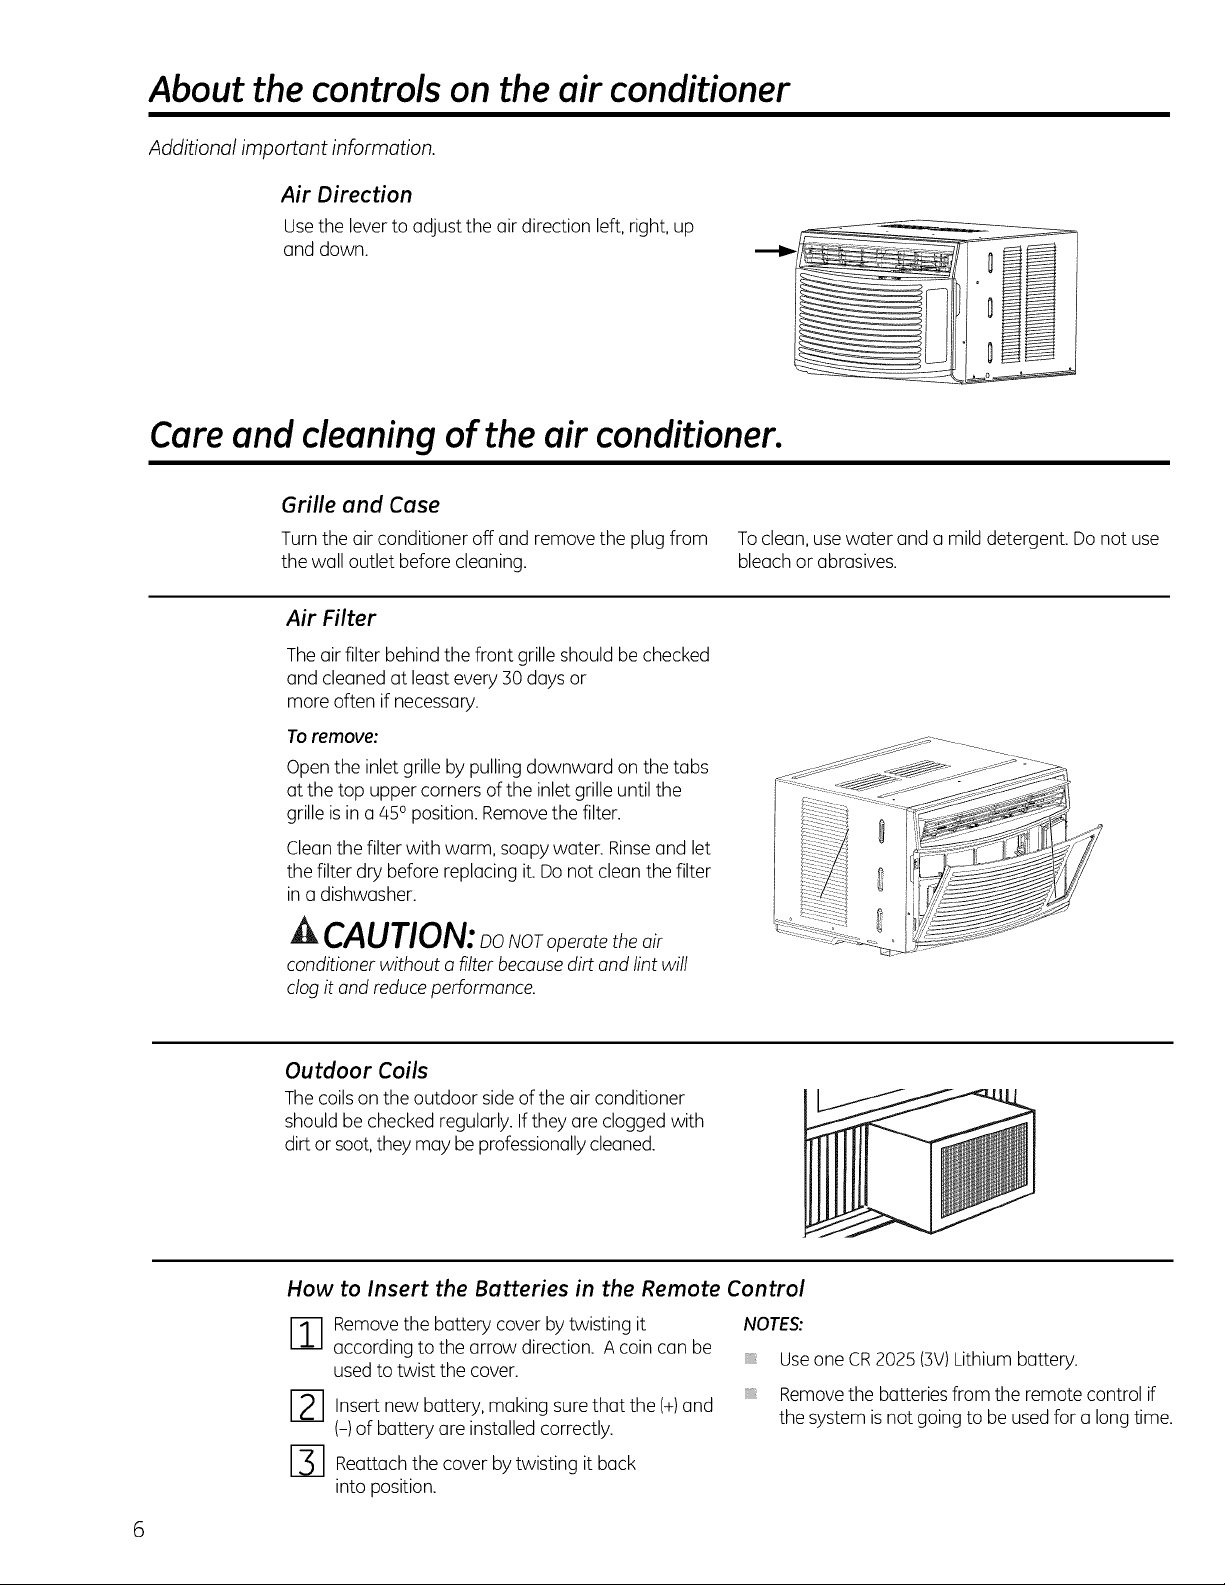
About the controlson the air conditioner
Additional important information.
Air Direction
Usethe leverto adjust the airdirection left,right, up
and down.
Careand cleaningof the air conditioner.
Grille and Case
Turn the air conditioner off and remove the plug from
the wall outlet before cleaning.
Air Filter
Theairfilter behind the front grille should bechecked
and cleaned at least every 30daysor
more often if necessary.
Toremove:
Open the inlet grilleby pulling downward on the tabs
at the top upper corners ofthe inlet grille until the
grille is ina 450position. Removethe filter.
Cleanthe filter with warm, soapy water. Rinseand let
the filter dry before replacing it. Donot cleanthe filter
in a dishwasher.
Toclean,usewater and a mild detergent. Do not use
bleachor abrasives.
ik CAUTION:_oNOro_erotetheair
conditioner without o filter becausedirt and lint will
clog it and reduceperformance.
Outdoor Coils
Thecoilson the outdoor sideof the air conditioner
should bechecked regularly. Ifthey are clogged with
dirt orsoot,theymay be professionallycleaned.
How to Insert the Batteries in the Remote Control
-_---1 emove the buttery cover by twisting it
according to the arrow direction. A coin can be
usedto twist the cover.
12] Insertnew battery, making sure
(-) of battery are installed correctly.
I-_ Reattachthe cover bytwisting it back
into position.
that the
(+)
NOTES:
and
Useone CR2025 (3V)Lithium battery.
Removethe batteriesfrom the remote control if
the system isnot goingto be usedfor along time.
6
]l.s,a,,a:io".s,ruc,,o.s] ,irCo.di,io.er]
|
In Canada, call 1.800.561.3344or visit www.GEAppliances.ca
J I"_"I Questions? Call 800.GE.CARES(800.432.2737)or Visit our Website at: GEAppliances.com
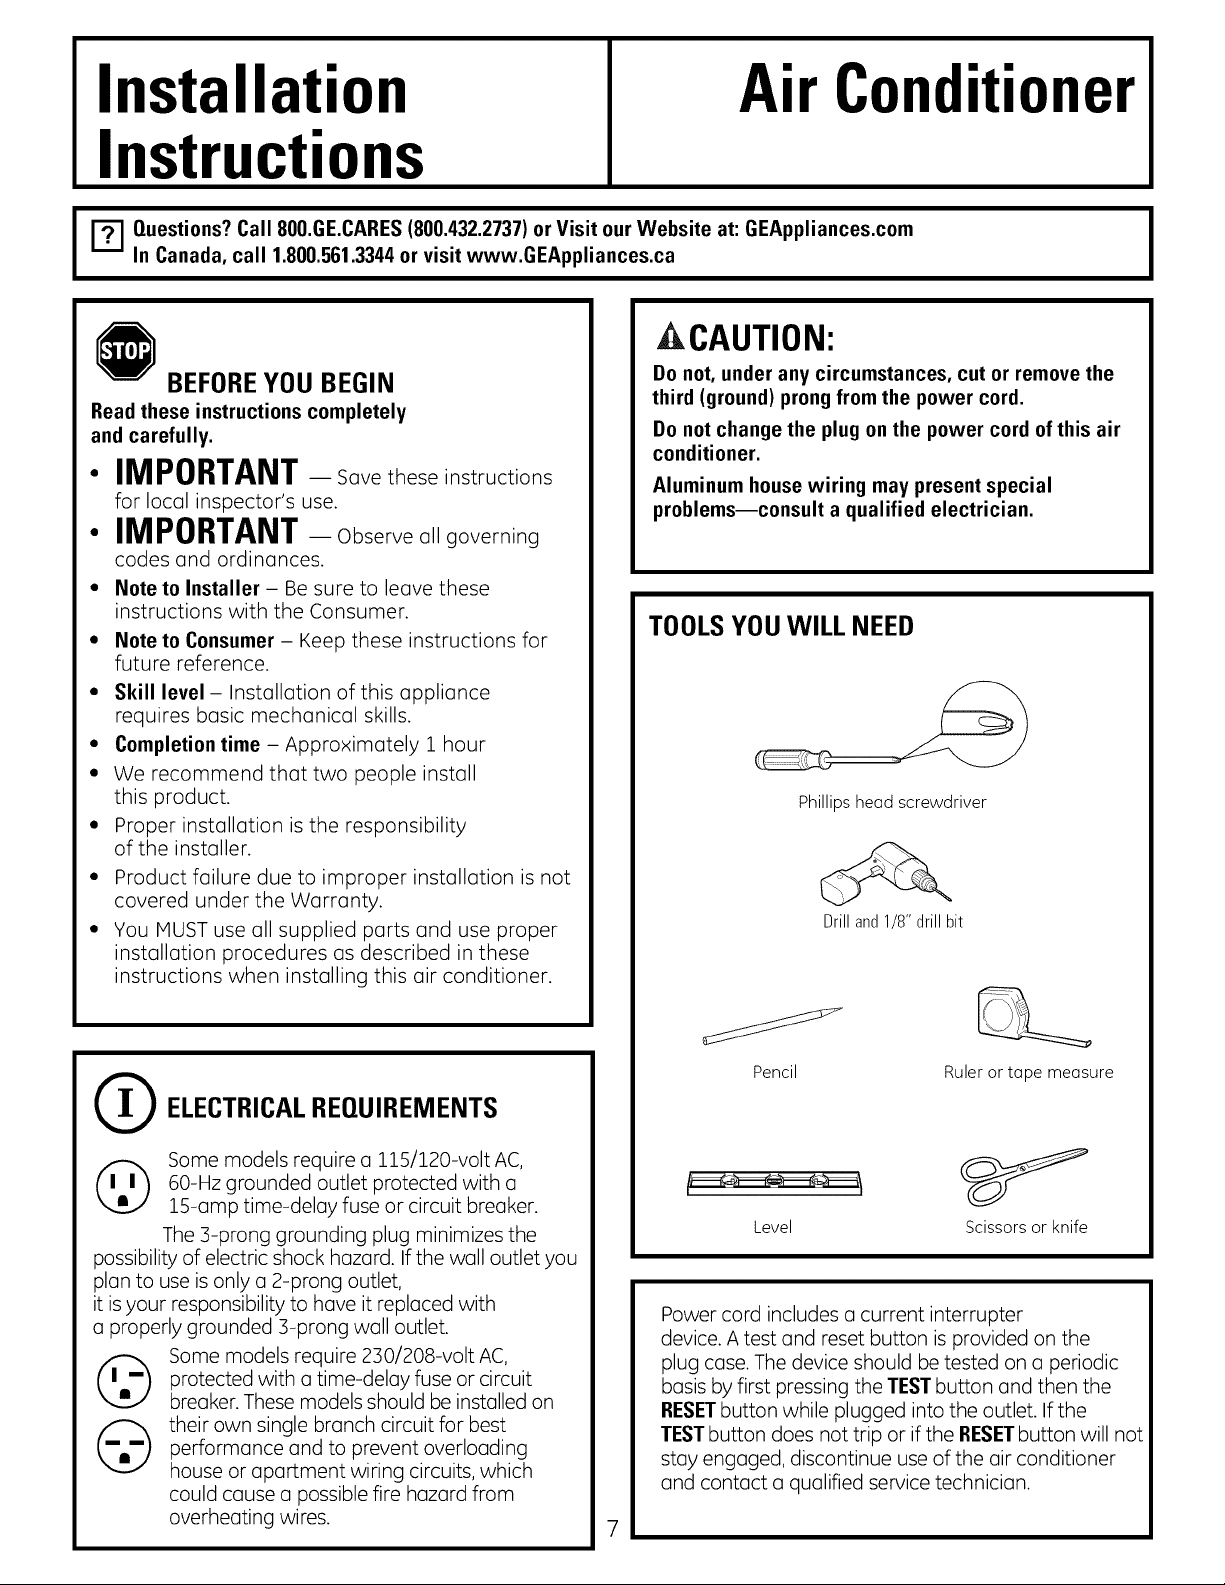
ACAUTION:
I
BEFOREYOU BEGIN
Read these instructions completely
and carefully.
• IMPORTANT- Sovetheseinstructions
for Iocol inspector's use.
• IMPORTANT--Observe oil governing
codes ond ordinonces.
• Note to Installer- Be sure to leove these
instructions with the Consumer.
• Note to Consumer - Keep these instructions for
future reference.
• Skill level- Instollotion of this opplionce
requires bosic mechonicol skills.
• Completion time - Approximotely 1 hour
• We recommend thor two people instoll
this product.
• Proper instollotion is the responsibility
of the instoller.
• Product foilure due to improper instollotion is not
covered under the Worronty.
• You MUST use oil supplied ports ond use proper
instollotion procedures os described in these
instructions when instolling this oir conditioner.
Do not, under any circumstances, cut or remove the
third (ground) prongfrom the power cord.
Do not change the plug on the power cord of this air
conditioner.
Aluminum house wiring may present special
problems--consult a qualified electrician.
TOOLSYOUWILL NEED
Phillips head screwdriver
Drill and 1/8" drill bit
ELECTRICALREQUIREMENTS
(_ ome models require o llS/120-voltAC,
possibility of electric shock hozord. If the woll outlet you
plon to use is only o 2-prong outlet,
it is your responsibility to hove it reploced with
o properly grounded 3-prong woll outlet.
©
60-Hz grounded outlet protected with o
15-omp time-deloy fuse or circuit breoker.
The 3-prong grounding plug minimizes the
Some models require 230/208-volt AC,
protected with o time-deloy fuse or circuit
breoker. These models should be instolled on
their own single bronch circuit for best
performonce ond to prevent overlooding
house or oportment wiring circuits, which
could cuuse o possible fire hozord from
overheoting wires.
Pencil
Level Scissors or knife
Power cord includes o current interrupter
device. A test ond reset button is provided on the
plug cuse. The device should be tested on u periodic
bosis by first pressing the TESTbutton ond then the
RESETbutton while plugged into the outlet. Ifthe
TESTbutton does not trip or if the RESETbutton will not
stoy enguged, discontinue use of the oir conditioner
ond contoct o quolified service technicion.
Ruler or tape measure
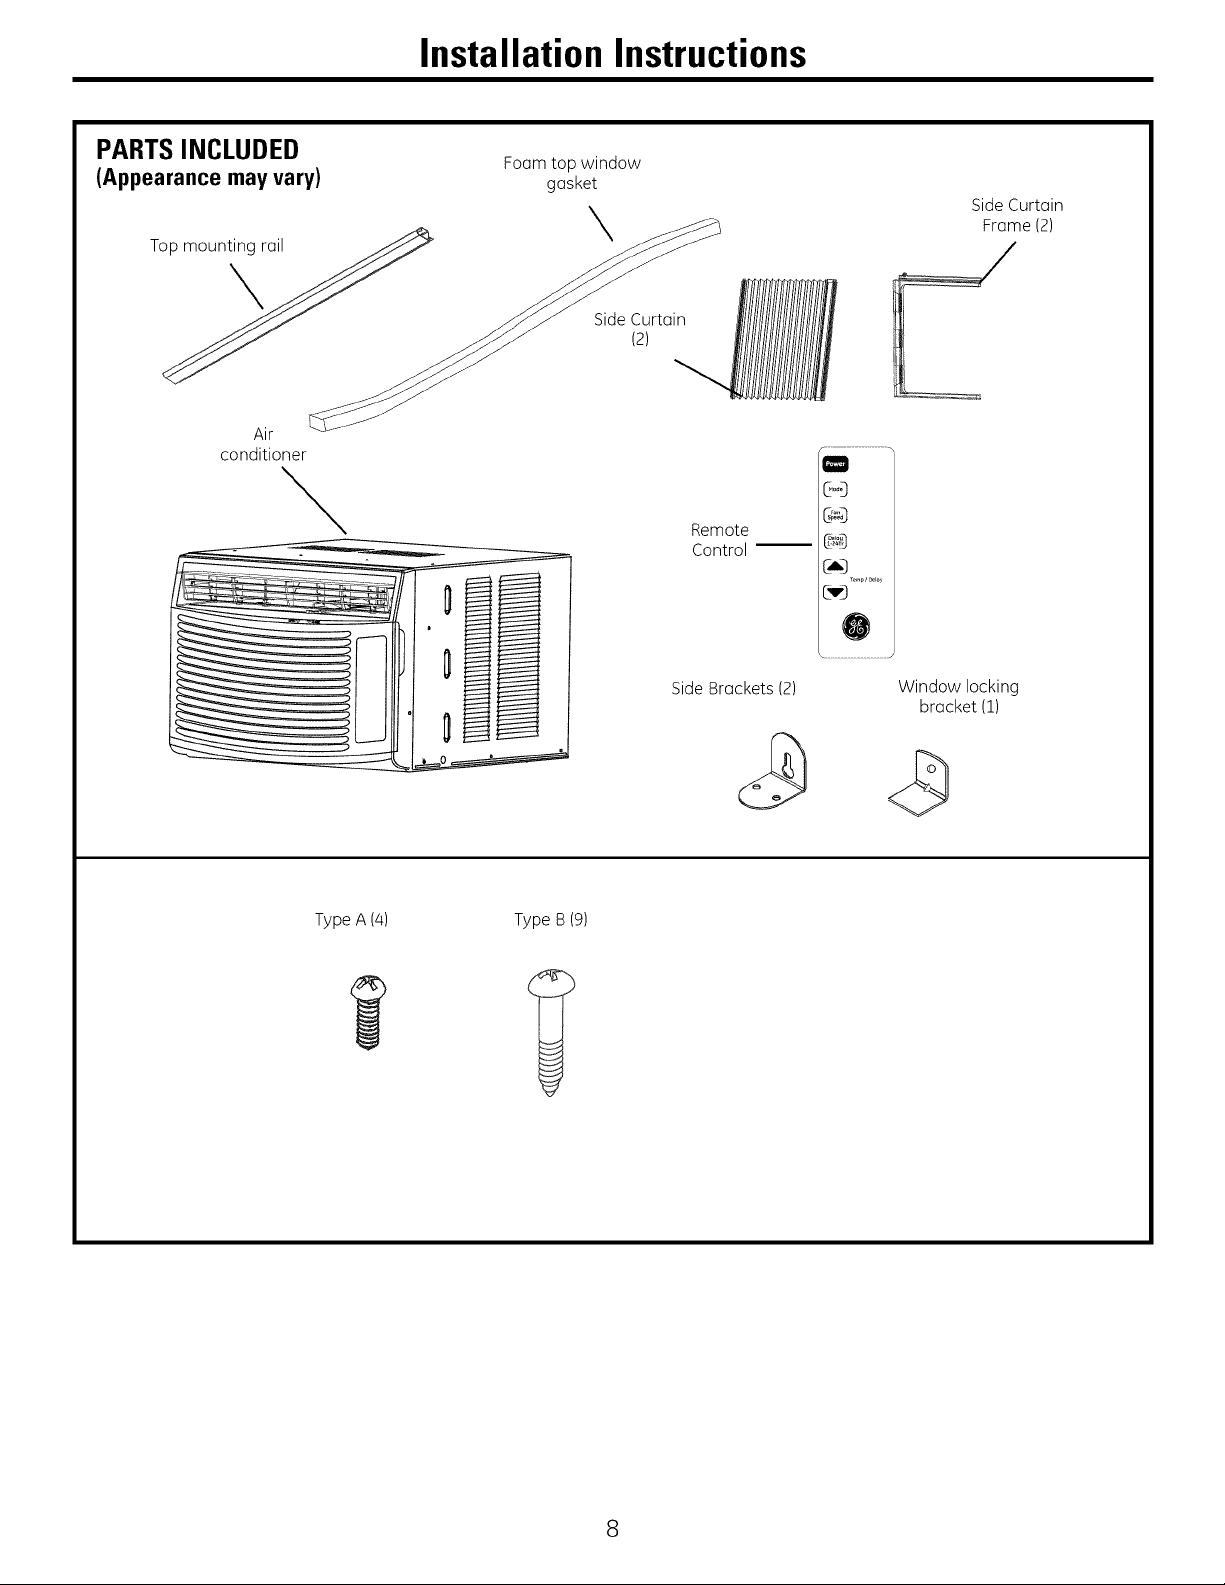
Installation Instructions
PARTS INCLUDED
(Appearancemayvary)
Air
conditioner
\
Foam top window
gasket
\
SideCurtain
(2)
Remote
Control --
Side Brackets (2)
Side Curtain
Frame (2)
f ..............................................
@@
@_
0
Window locking
bracket (1)
Type A (4) Type B (9)
8
Installation Instructions
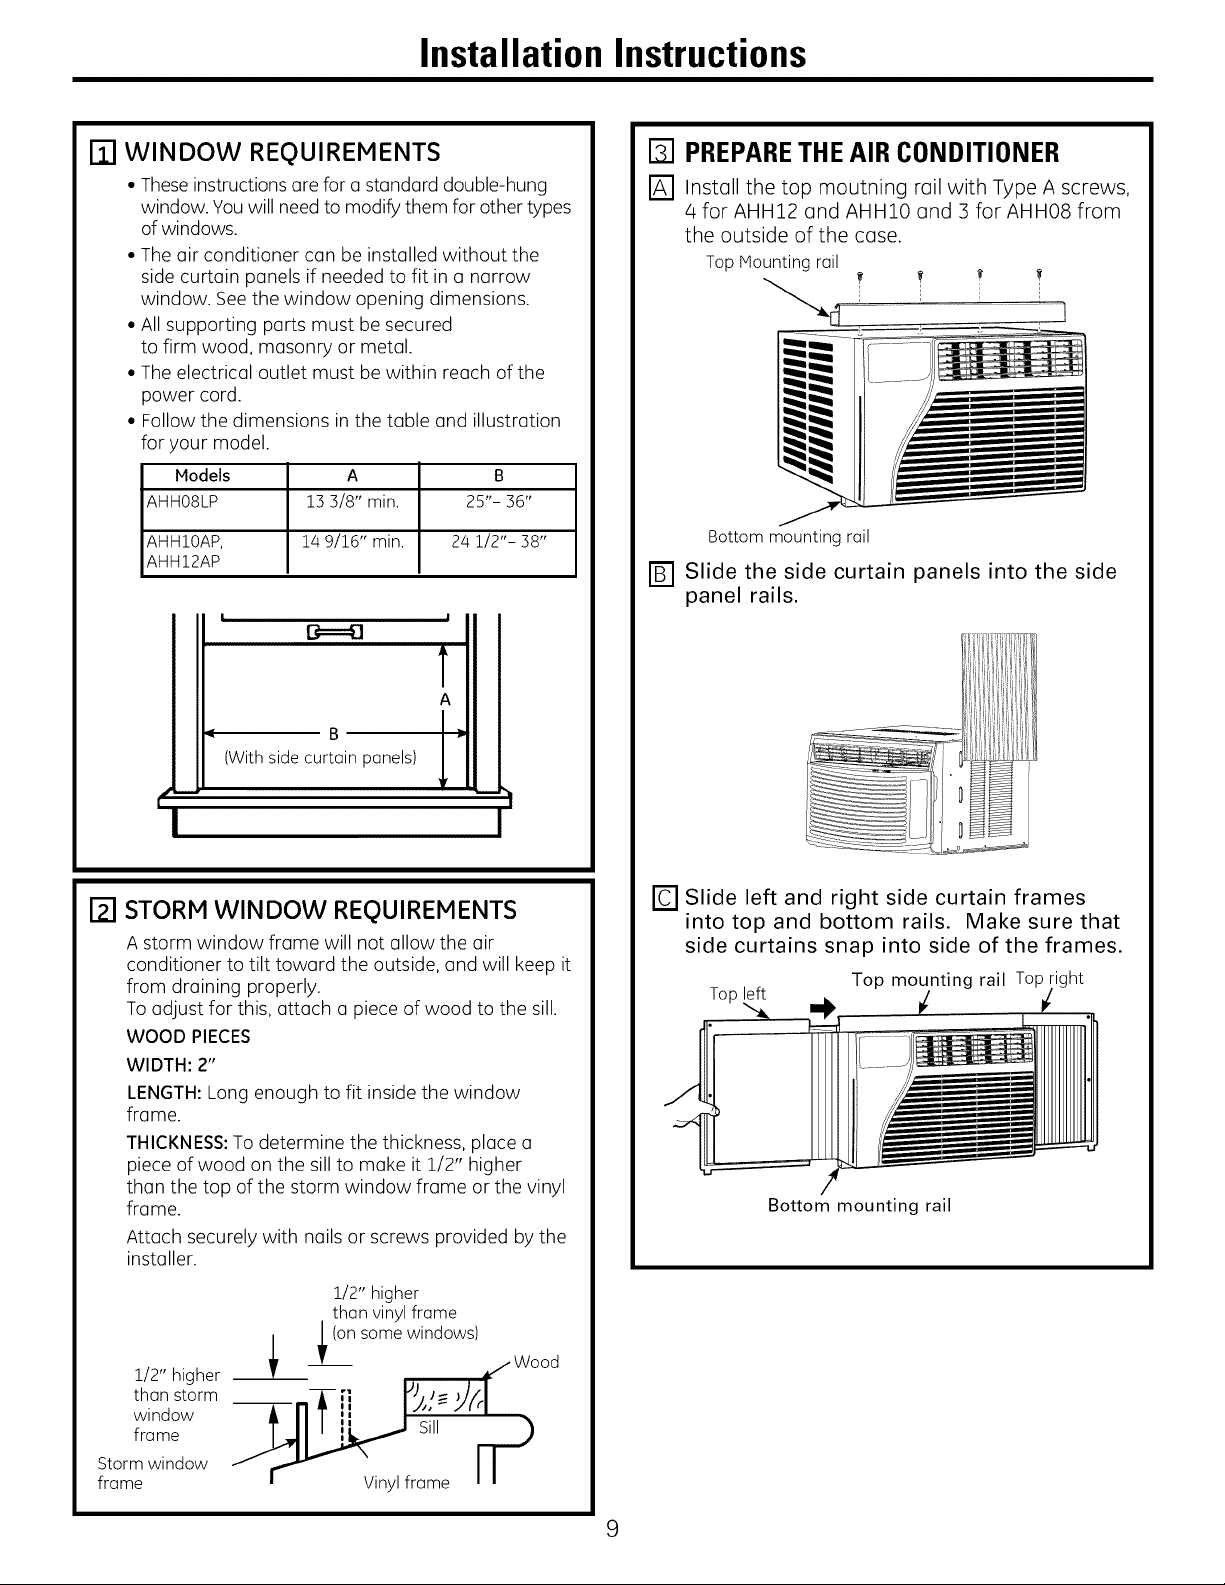
D WINDOW REQUIREMENTS
• Theseinstructions are for a standard double-hung
window. You will need to modify them for other types
of windows.
• The air conditioner can be installed without the
side curtain panels if needed to fit in a narrow
window. See the window opening dimensions.
• All supporting parts must be secured
to firm wood, masonry or metal.
• The electrical outlet must be within reach of the
power cord.
• Follow the dimensions in the table and illustration
for your model.
Models A B
AHH08LP 13 3/8" min. 25"- 36"
AHH10AP, 14 9/16" min. 24 1/2"- 38"
AHH12AP
I !
B==4]
A
B
(Withside curtain panels)
D PREPARETHEAIR CONDITIONER
[] Install the top moutning rail with Type A screws,
4 for AHH12 and AHH10 and 3 for AHH08 from
the outside of the case.
Top Mounting rail
!
Bottom mounting rail
r_ Slide the side curtain panels into the side
panel rails.
Y
r_l STORM WINDOW REQUIREMENTS
A storm window frame will not allow the air
conditioner to tilt toward the outside, and will keep it
from draining properly.
To adjust for this, attach a piece of wood to the sill.
WOOD PIECES
WIDTH: 2"
LENGTH:Long enough to fit inside the window
frame.
THICKNESS: To determine the thickness, place a
piece of wood on the sill to make it 1/2" higher
than the top of the storm window frame or the vinyl
frame.
Attach securely with nails or screws provided by the
installer.
1/2"higher
than vinyl frame
1/2" higher
than storm
window
frame
Storm window
frame
_ _(°ns°mewind°ws /Woo d
__ Sill n_
I Vinylframe , i
Slide left and right side curtain frames
into top and bottom rails. Make sure that
side curtains snap into side of the frames.
Top mounting rail Top ight
Top left i_
Bottom mounting rail
9
Installation Instructions
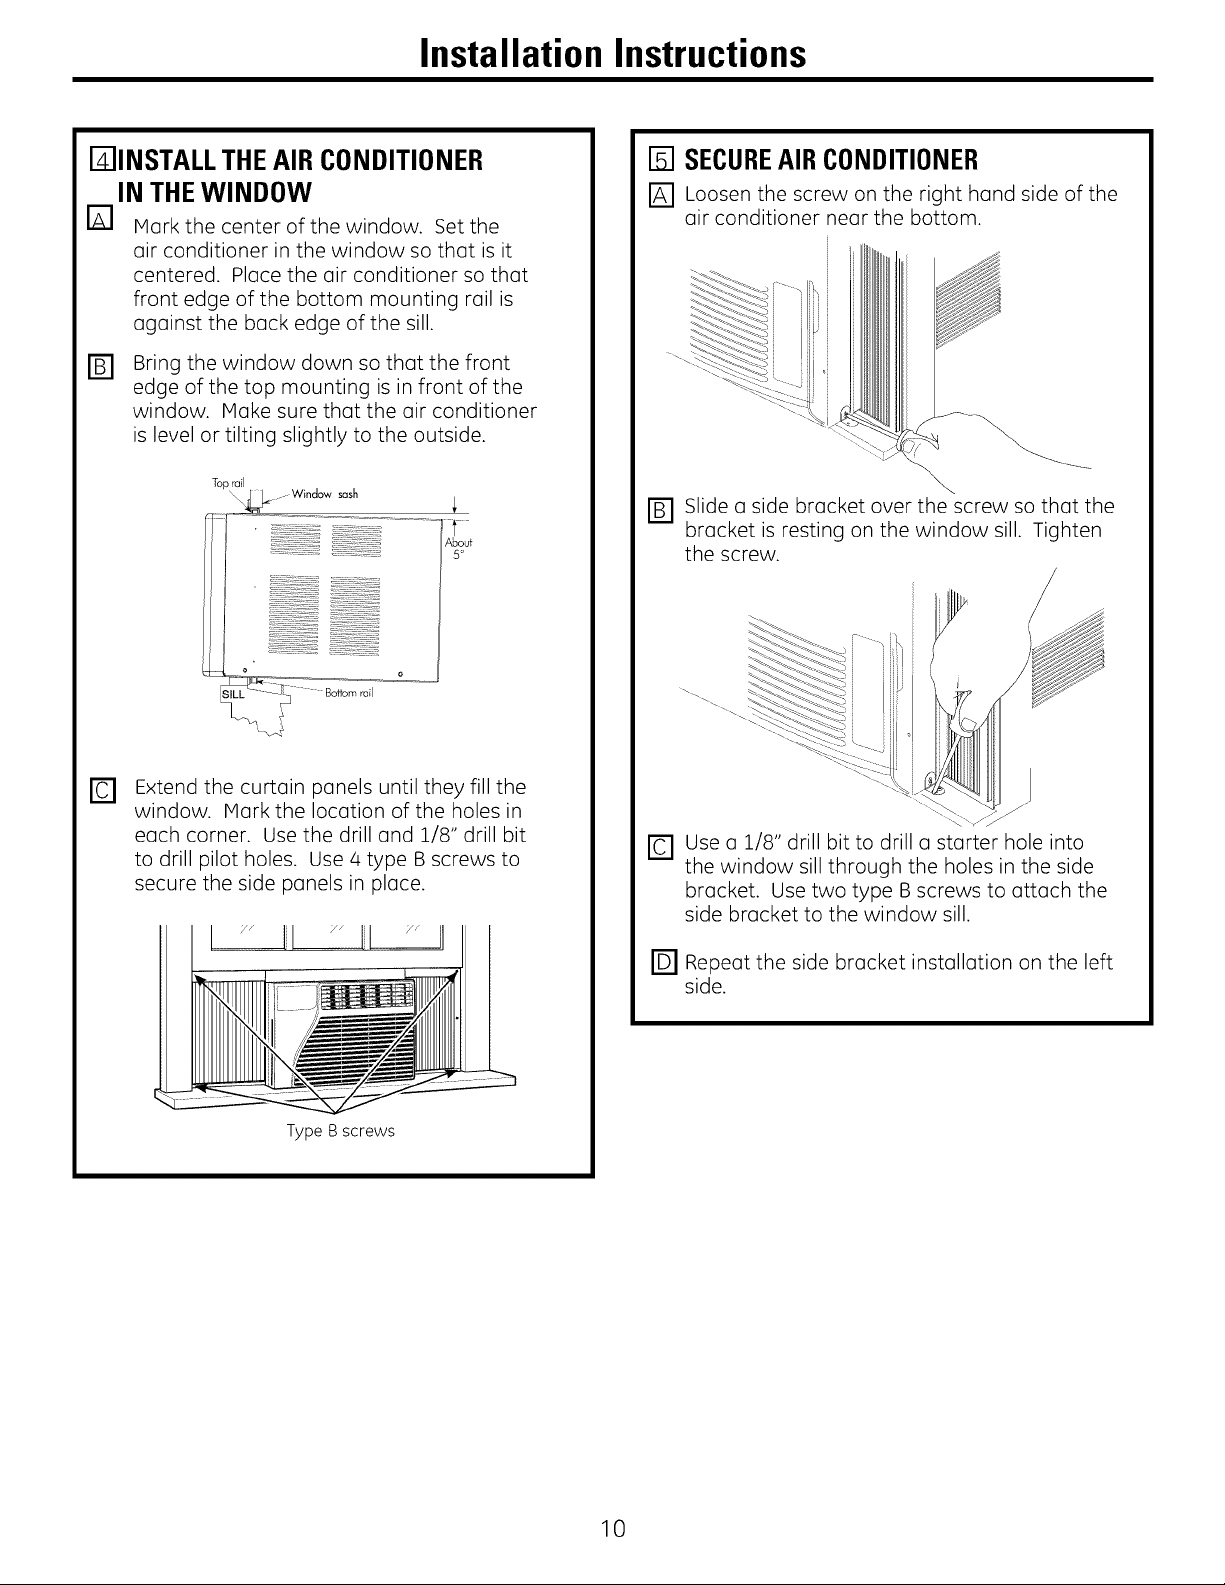
DINSTALL THEAIR CONDITIONER
IN THEWINDOW
[] Mark the center of the window. Set the
air conditioner in the window so that is it
centered. Place the air conditioner so that
front edge of the bottom mounting rail is
against the back edge of the sill.
Bring the window down so that the front
D
edge of the top mounting is in front of the
window. Make sure that the air conditioner
is level or tilting slightly to the outside.
Top rail
_o- Window sash
About
5o
D SECUREAIRCONDITIONER
r_ Loosen the screw on the right hand side of the
air conditioner near the bottom.
\
FB1 Slide a side bracket over the screw so that the
bracket is resting on the window sill. Tighten
the screw.
\
Extend the curtain panels until they fill the
BI
window. Mark the location of the holes in
each corner. Use the drill and 1/8" drill bit
to drill pilot holes. Use 4 type B screws to
secure the side panels in place.
I
Type B screws
rc1 Use a 1/8" drill bit to drill a starter hole into
the window sill through the holes in the side
bracket. Use two type B screws to attach the
side bracket to the window sill.
Repeat the side bracket installation on the left
side.
10
 Loading...