

GE AFQ08FAW2 Owner’s Manual

©
©
www. GEAppliances.com
Safety Instruc_tions ........ 2, 3
Operating. Instructions
Controls ................. 4, 5
Care and Cleaning
Air Filter .................. 6
Grille and Case ............. 6
()utdoor (:oils .............. 6
Installation Instruc_tions . . .7-14
Troubleshooting Tips ....... 15
Normal ()perating Sounds . . .l 6
Consumer Support
Consumer Support ......... 20
Product Registration ..... 17, 18
VCarranty ................. 19
AFQ08
©
Write the model and serial numbers here:
Model #
Serial #
Find these numbers on a label on the
side of the air conditione_:
TINSC2317C2RO 49-7486
02-04 JR
IMPORTANTSAFETYINFORMATION.
READALLINSTRUCTIONSBEFOREUSING.
WARNING!
For your safe_ the information in this manual must be followed to minimize the risk of fire, electric shock
or personal injury.
SAFETYPRECAUTIONS
Use this appliance only %r its intended
pui])ose as described in this Owner's
Manual.
This air conditioner must be propedy
installed in accordance with the Installation
Instructions before it is used.
Never unplug your air conditioner 1)y
pulling on the power cord. Always grip
plug firefly and pull straight out flom the
receptacle.
Repair or replace immediamly all electric
service cords that have become flwed or
otherwise damag>d. Do not use a cord
that shows cracks or abrasion damage
along its length or at either the plug or
conilector end.
q?{:_Turn the mode control to 0FFand unplug
_?_:_Fox your safety...do not store or use
_f?:,:All air condiuoners contain reDigerants,
HOWTOCONNECTELECTRICITY
Do not, under any circumstances, cut or remove
the third (ground) prong from the power cord. For
personal safe_ this appliance must be properly
grounded.
The air conditioner should ahvays be
plugg>d into its owxxindividual electrical
outlet which has a xolmg> rating that matches
the rating plato.
your air conditioner before making any
repairs or cleaning.
NOTE."We strongly recommend that any
servicing be performed by a quafified individual
combustible mamrials, gasoline or other
flammable vapors or liquids in the vicinity
of this or any other appliance.
which under federal law must be remoxed
prior to product disposal. If you are getting
rid of an old product with refligerants, check
with the company handling disposal about
what to do.
The power cord of dfis appliance is equipped
with a 3-prong (grounding) plug which mates
with a standard 31)iong (grounding) wall
outlet m minimize the possibility of electric
shock hazard flom this appliance.
Haxe the wall outlet and circuit checked by a
qualified electrician to make sure the outlet is
properly grounded.
Where a 9-prong wall outlet is encounmred,
it is your personal responsibility and obligation
m have it replaced with a properly grounded
3-prong wall outlet.
This proxqdes the best performance and also
prments overloading house wiring circuits
which could cause a fire hazard flom
oxerheated wires.
See the Installation Instructions, Electrical
Requirements section fox specific elecuica]
connection requirements.
2
WARNING!
USEOFEXTENSIONCORDS--115-Voltmodelsonly
Becauseofpotentialsafe_hazardsundercertain_ CAUTION:
conditions, we strongly recommend against the
use of an extension cord.
Howex_. if you must use all extension cord,
it is absolutely necessat T that it be a UiAismd,
14 gauge, 3-wire grounding type appliance
extension cord having a grounding type plug
and outlet and that the elecuJcal rating of the
cord be 15 amperes (minimum) and 195 volts.
USEOFADAPTERPLUGS--115-Voltmodelsonly
DO NOT use an extensioncord with any of the
230/208 volt models.
www.GEAppliances.com
Because of potential safety hazards under certain
conditions, we strongly recommend against the
use of an adapter plug.
Howex>[; if you must rise all adaptei; where
local codes i)emfit, a temporaryconnection may
be made to a properly grounded 2-prong wall
outlet by use of a Ui,-listed adapter available
at most local hardware stores.
Tile larger slot ill tile adapter must be aligned
with tile larger slot ill the wall outlet to I)rovide
proper polarity in the connection of the
power cord.
'Whei:, disconnecting file power cord Ram tile
adaptel, alwws hold tile adaptor ill place with
one hand while pulling tile I)ower cord I)lug
with tile other hand. If this is not done, the
adaptor ground terminal is xetT likely to break
with repeamd use.
If the adapter ground terminal breaks, DO NOT
USEtile air co,_,ditio,_,er m_,ti]a proper grom_,d
has been established.
Attachingthe adaptergreundterminalto a waftoutlet
coverscrewdoesnot groundthe applianceunlessthe
coverscrewis metal,andnot bsulated, andthe wall
outlet is groundedthreughthe housewiring. Youshould
havethecircuit checkedby a qualifiedelectricianto
makesuretheoutlet is properlygrounded.
READANDFOLLOWTHISSAFETYINFORMATIONCAREFULLY.
SAVETHESEINSTRUCTIONS
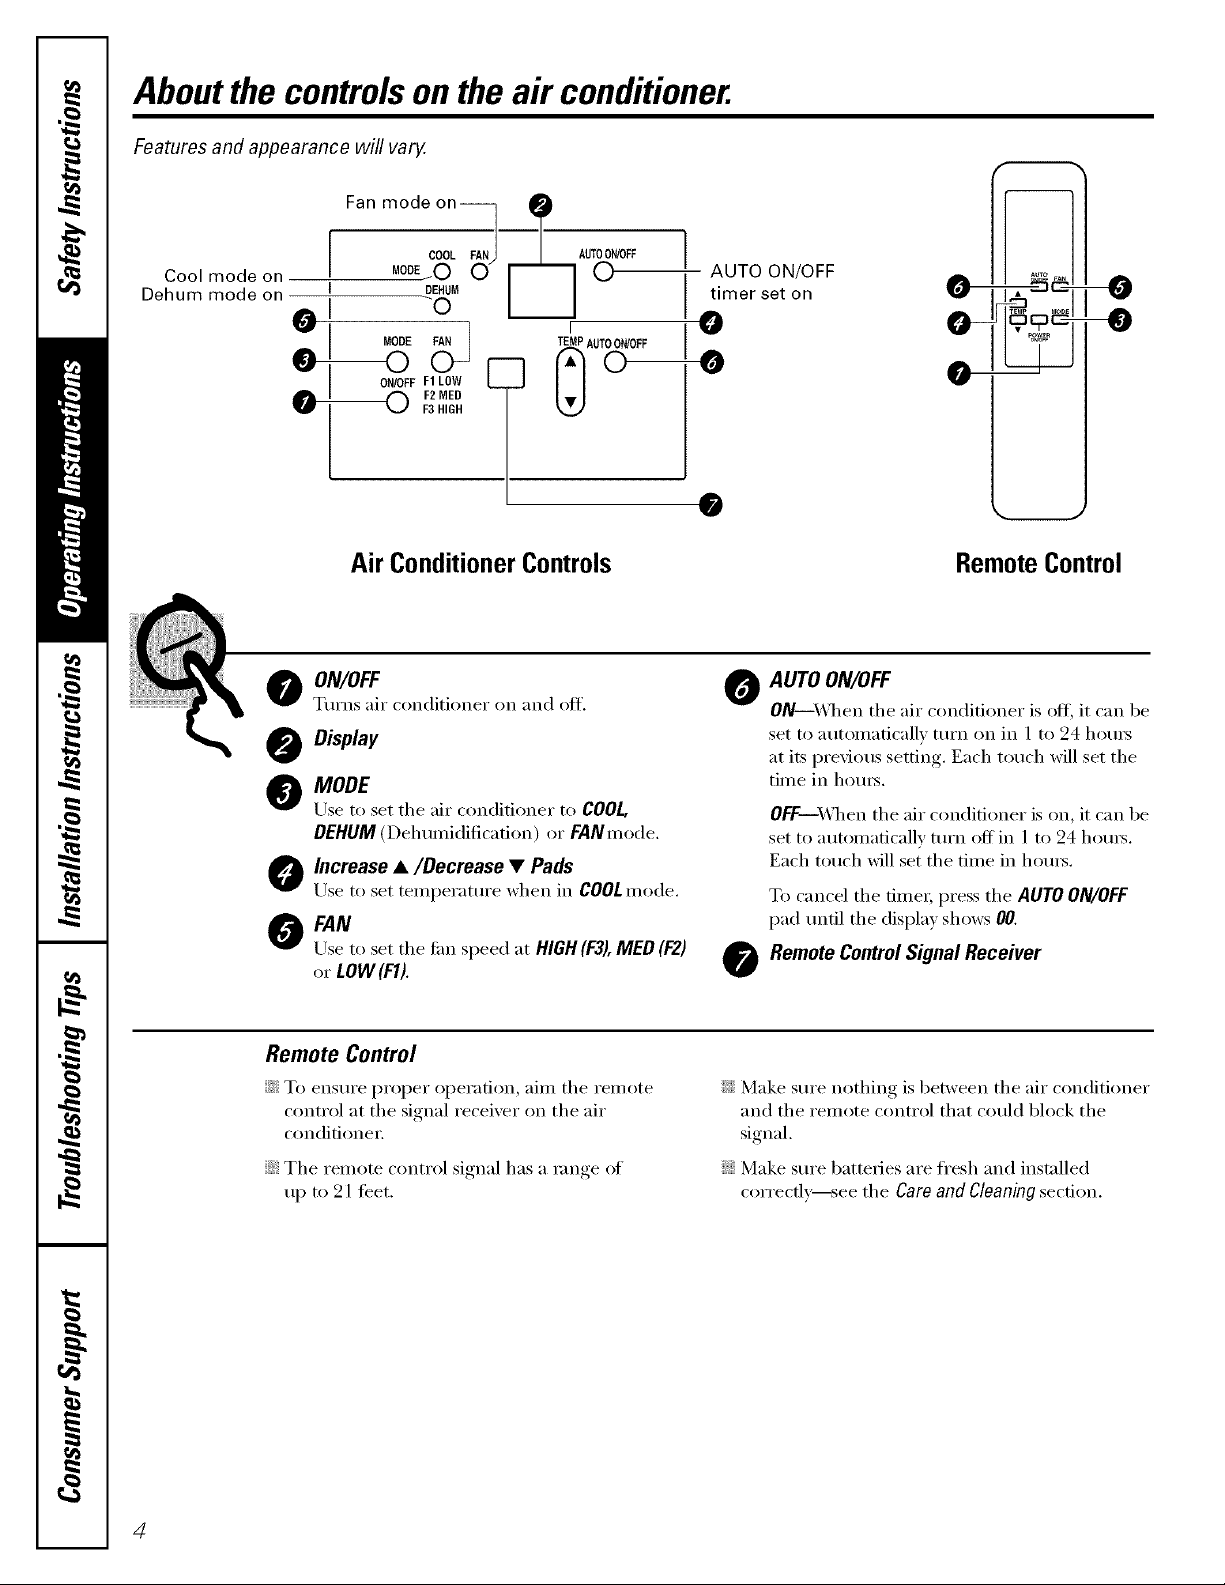
Aboutthe controlsontheair conditioner.
Features and appearance will vary.
Fan mode on e
Cool mode on
Dehum mode on
_ MODULO 0 _ AUTO ON/OFF
I timer set on
0 , @
0
0-
0
AirConditionerControls Remote Control
O ON/OFF 0
Turns air conditioner on and off'.
Display
O MODE
Use to set the air conditioner to COOL
DEHUM(Dehumidification) or FANmode.
O Increase •/Decrease • Pads
Use to set temperatm'e when in COOL mode.
0 FAN
Use to set the tim speed at HIGH(F3),MED (F2)
or LOW(F1).
AUTO ON/OFF
ON--_'_l/ell tile air conditioner is oIt_ it can be
set to automatically turn on in 1 to 24 hom_
at its previous setting. Each touch will set the
time in hom_.
OFF--X,_qlen tile air conditioner is on, it can be
set to autoinaficallv turn off in 1 to 24 houI3.
Each touch will set the time in hom_.
To cancel tile dmex; press tile AUTO ON/OFF
pad tmtil tile displa) shows 00.
Remote ControlSignal Receiver
0
Remote Control
::Ji::To ensure proper operation, aim tile remote
control at the signal receiver on the air
conditionei;
iJi::Tile remote control signal has a range of
up to 21 teet.
4
::Ji::Make sure nothing is between tile air conditioner
and the remote control that could block the
signal.
::Ji::Make stlre batteries are fl'esh and installed
correctly see the Care and Cleaning section.
www.GEAppliances.com
When the air conditioner is turned on, it will
automatically start in the setting last used,
except the timer will be cancelled if it was set.
COOLMode
Use tile COOLmode with HIGH(F3),MED(F2)or LOW
(FI) tim for cooling. Lrse the Increase •/Decrease
• pads to set the desired temperature between
60°F and 86°F in 1°F increments.
A them_ostat is used to maintain the room
temperature. The compressor will cycle on and off
to kee I) the room at the set level of comtort. Set the
them_ostat at a lower number and the indoor air
will become cooler. Set the them_ostat at a higher
number and the indoor air will become warn/e_:
NOTE."If theairconditionerisoffandis thenturnedonwhile
settoCOOL,it willtakeapproximately3mbutesforthe
compressortostartandcoding tobegin.
DEHUM Mode--Dehumidification
Use the DEHUM mode to provide dehumidification
only: The tim will mn at a fixed speed at this setting,
so a tim speed cannot be set. Keep windows and
do(n_ closed tin" the best dehumidif}'ing effects.
Lights on the air conditioner control panel indicate
the selected settings.
CoolingDescriptions
ForNormalCooling-_Selectthe COOLmode and
HIGH(F3),MED(F2)or LOW(F/)tim with a middle set
temperature.
ForMaximumCooling--Select the COOL mode and
HIGH (F3)tim with a lower set temperature.
For Quieter & Nighttime Cooling--Select the COOL
Inode and LOW(FI)tim with a Iniddle set
temperamre.
• Press the MODEpad until the DEHUMindicator
light is lit.
In the DEHOMmode, a set temperature will not be
displayed.
FAN Mode
Use the FAN at HIGH (F3), MED (F2) or LOW(FI) to Since tim only settings do not provide cooling,
provide air circulation and filtering without cooling, a temperature setting will not be displayed.
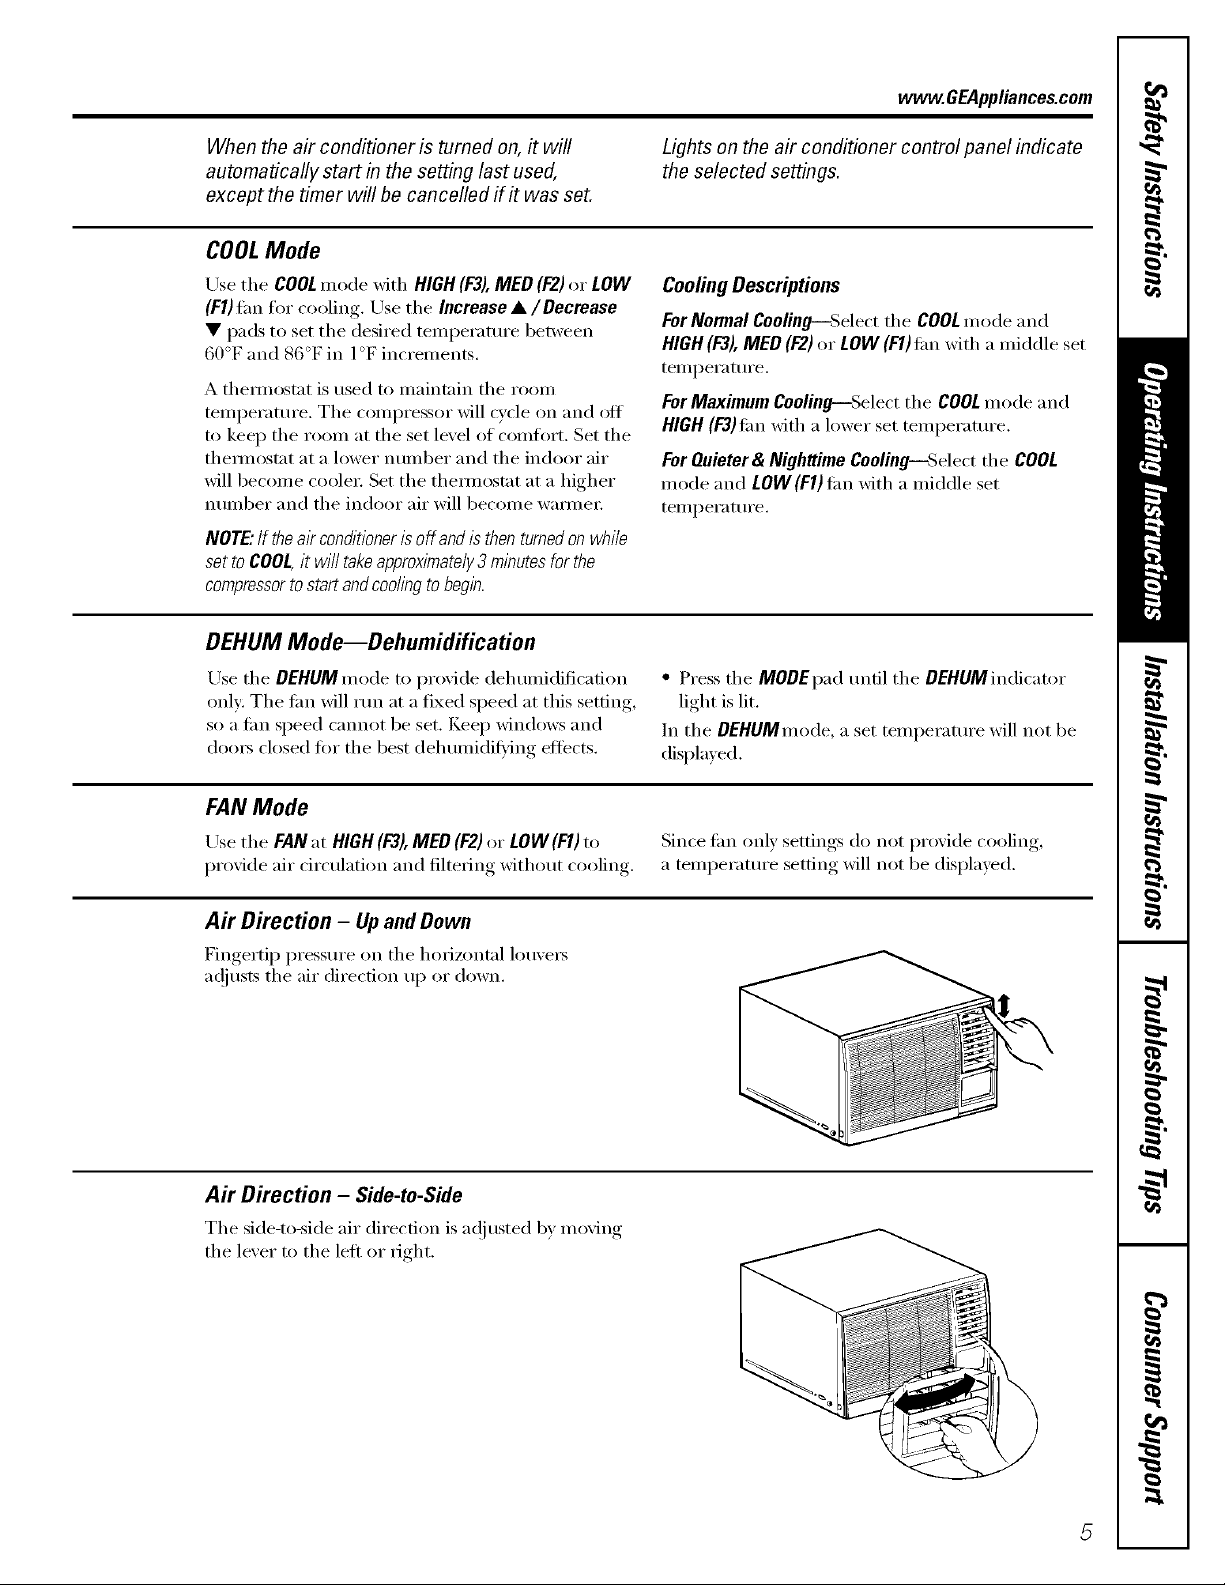
Air Direction - Up and Down
Fingertip pressure on the horizontal louvex_
a(!iusts the air direction up or down.
Air Direction - Side-to-Side
The side-to-side air direction is a(!iusted 1)y moving
the lever to the lett or right,

Careand cleaningoftheair conditioner.
Grille and Case
Turn the ......air conditioner off and remo',e the I_lug, To clean, use water and a mild detergent. Do not
from the wall outlet heft)re cleaning, use bleach or abrasixes.
Outdoor Coils
The coils on the outdoor side oI the air conditioner
should be checked regularly. If they are clogged
with dirt or soot, they may be protessionally steam
cleaned, a service a\_filable through yore" GE
service outlet.
Air Filter
The air filter behind the fl'ont grille should be
checked and cleaned at least eve_' 30 dm_s or
IllOI'e otteIl it' necessai'v.
Toremove:
Using the tab, pull the filter to the right to remove.
Clean the filter with wam_, soapy water: Rinse and
let the filmr dry before replacing it.
NOTE."DONOTput the filter in anautomatic dishwasher
A CAUTION:DONOroperatethea,_
conditioner without a filterbecausedirt and iint wffl
dog it andreduceperformance.
 Loading...