

Page 1
GEAppliances.com
Safety Instructions ............. 2, 3
Operating Instructions
Controls ........................... 4-6
Care and Cleaning
Air Filter .............................. 6
Outdoor Coils ......................... 6
Installation Instructions ...... 7-13
AEZ18*
0_
0_
0
Troubleshooting Tips ............ 14
Normal Operating Sounds ............ 14
Consumer Support
Consumer Support .......... Back Cover
Ownership Registration for
Customers in Canada only ........ 1S, 16
Warranty for Customers
in Canada ........................... 18
Warranty for Customers
in the U.SA........................... 17
*ENERGY STAR ® labeled product
STAR
Climatiseur
La section franqaise commence 5 la page 19
Acondicionador
deaire
La secci6n en espaflol empieza en la p6gina 37
As an ENERGYSTAR®partner, GE has
determined that this product meets
the ENERGYSTAR®guidelines for
energy efficiency.
Write the model and serial numbers here:
Model #
Serial #
Find these numbers on a label on the sideof
the air conditioner.
In Canada, contact us at:
www.GEAppliances.ca
49-7659 12-10 GE
Page 2
IMPORTANT SAFETY INFORMATION.
READ ALL INSTRUCTIONS BEFORE USING.
WARNING!
Foryour safety, the information in this manual must be followed to minimize the risk of fire, electric
shock or personal injury.
SAFETYPRECAUTIONS
Use this appliance only for its intended
purpose as described in this Owner's
Manual.
This air conditioner must be properly
installed in accordance with the Installation
Instructions before it is used.
Never unplug your air conditioner by pulling
on the power cord. Always grip plug firmly
and pull straight out from the receptacle.
Replace immediately all electric service
cords that have become frayed or otherwise
damaged. A damaged power supply cord
must be replaced with a new power supply
cord obtained from the manufacturer and
not repaired. Do not use a cord that shows
cracks or abrasion damage along its length
or at either the plug or connector end.
Turn the unit OFFand unplug your air
conditioner before cleaning.
GEdoes not support any servicing of the
air conditioner. We strongly recommend
that you do not attempt to service the air
conditioner yourself.
For your safety...do not store or use
combustible materials, gasoline or other
flammable vapors or liquids in the vicinity
of this or any other appliance.
Allair conditioners contain refrigerants,
which under federal law must be removed
prior to product disposal. If you are getting
rid of an old product with refrigerants, check
with the company handling disposal about
what to do.
If the receptacle does not match the plug,
the receptacle must be changed out by u
qualified electrician.
These R410A air conditioning systems
require contractors and technicians to
use tools, equipment and safety standards
approved for use with this refrigerant.
DO NOT use equipment certified for
R22 refrigerant only.
HOW TO CONNECT ELECTRICITY
Do not, under any circumstances, cut or remove
the third (ground) prong from the power cord.
For personal safety, this appliance must be
properly grounded.
DO NOT use an adapter plug with this appliance.
The power cord of this appliance is equipped
with o 3-prong (grounding) plug which mutes
with u standard 3-prong (grounding) wall outlet
to minimize the possibility of electric
shock hazard from this appliance.
Power cord includes u current interrupter device.
A test and reset button is provided on the plug
case. The device should be tested on u periodic
basis by first pressing the TESTbutton and
then the RESETbutton while plugged into the
outlet. If the TESTbutton does not trip or if the
RESETbutton will not stay engaged, discontinue
use of the air conditioner and contact a qualified
2
service technician.
Have the wall outlet and circuit checked by
a qualified electrician to make sure the outlet
is properly grounded.
Where a 2-prong wall outlet is encountered,
it isyour personal responsibility and obligation to
have it replaced with u properly grounded
3-prong wall outlet.
The air conditioner should always be plugged
into its own individual electrical outlet which has
u voltage rating that matches the rating plate.
This provides the best performance and also
prevents overloading house wiring circuits which
could cause a fire hazard from overheated wires.
See the Installation Instructions, Electrical
Requirements section for specific electrical
connection requirements.
Page 3
GEAppliances.com
WARNING!
USEOF EXTENSION CORDS
RISK OF FIRE. Could couse serious injury or
death.
• DONOT use an extension cord with this
Window Air Conditioner.
• DONOT use surge protectors or multi-outlet
adaptors with this Window Air Conditioner.
READAND FOLLOWTHISSAFETYINFORMATIONCAREFULLY.
SAVETHESEINSTRUCTIONS
Page 4
About the controlson the air conditioner
Features and appearance will vary.
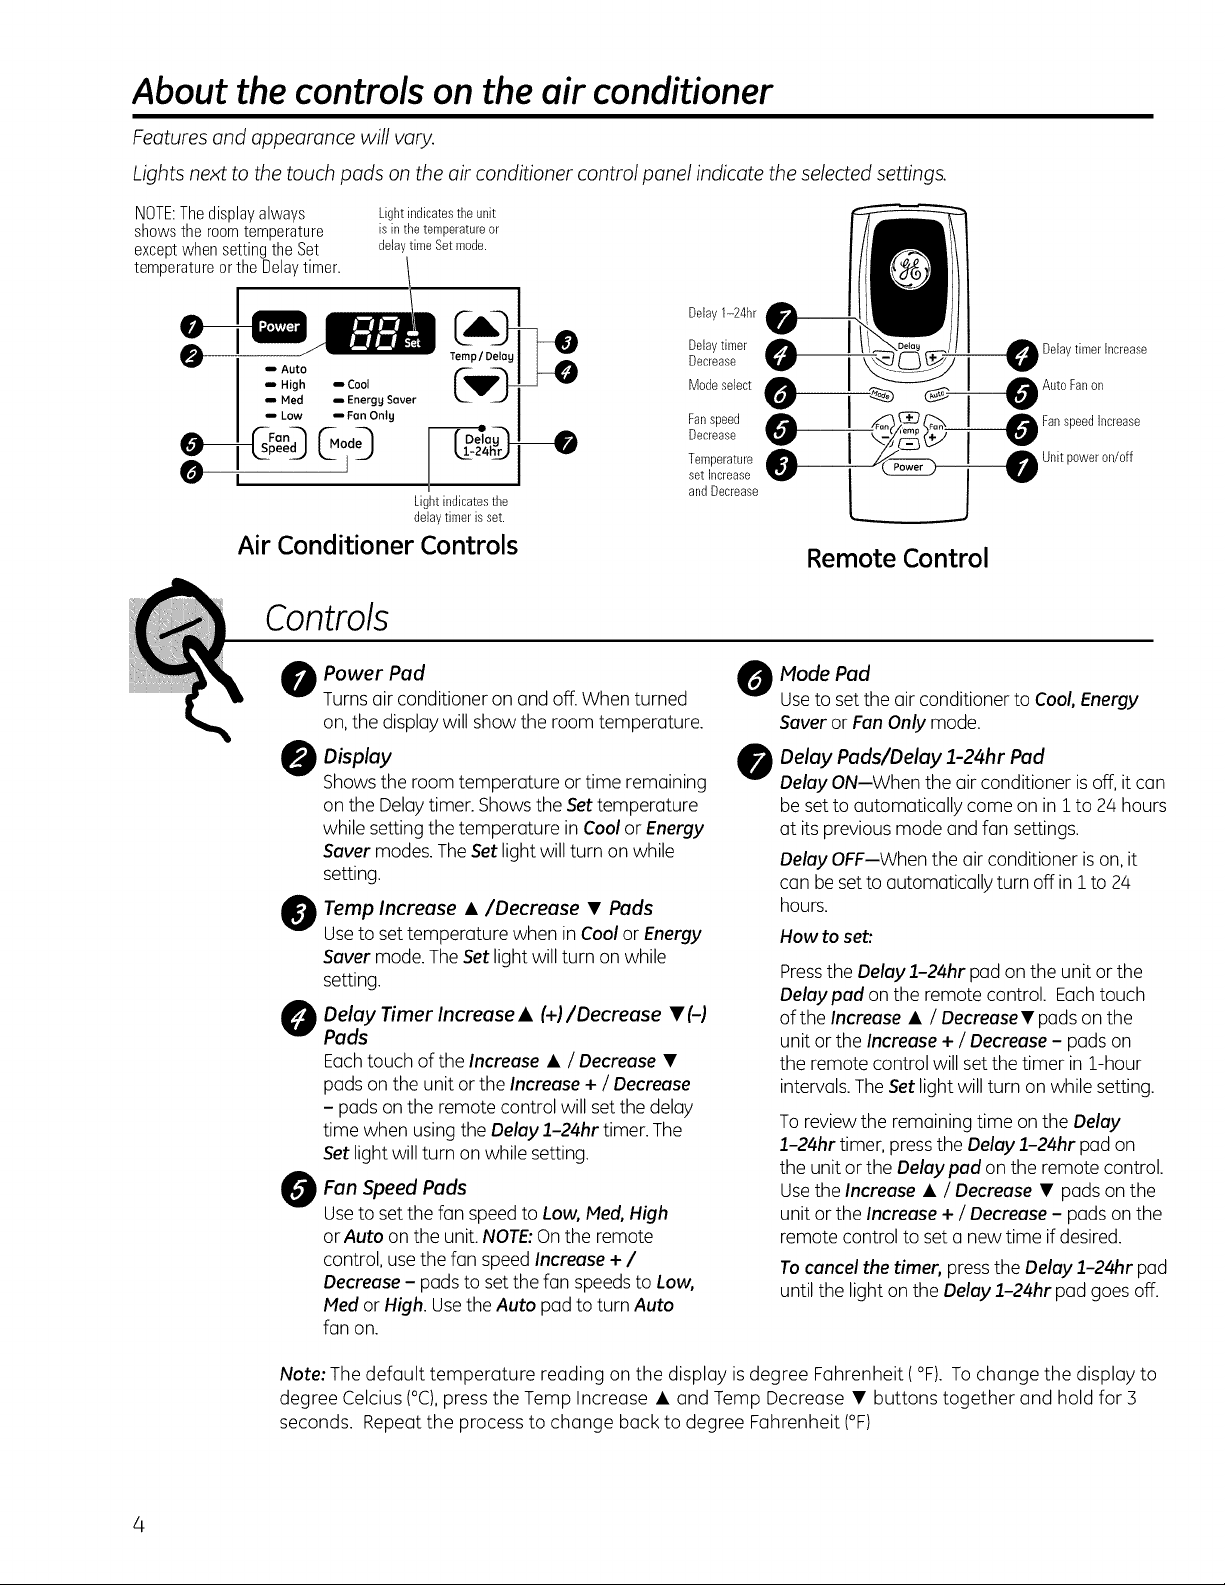
Lights next to the touch pads on the air conditioner control panel indicate the selected settings.
NOTE:Thedisplayalways
showsthe roomtemperature
exceptwhensettingthe Set
temperatureor the Delaytimer.
-- High m Cool Mode select
0 --Auto Cq_lp_- Decrease 0
-- ('-Fan-_ &o 0_,,Speed_ d _#_ Decrease 0
Med u Energy Saver
-- Low iFan Onlg Fan speed
I set Increase
Lightindicatesthe unit
is in thetemperatureor
delaytime Set mode.
T_g_ Delay1-24hr
Lightindicatesthe
delay timer is set.
Air Conditioner Controls
Controls
O Power Pad 0
Turns air conditioner on and off.When turned
on,the display will show the room temperature.
O Display
Shows the room temperature ortime remaining
on the Delaytimer. Showsthe Settemperature
while setting the temperature in Cool or Energy
Saver modes. TheSet light will turn on while
setting.
O emp Increase •/Decrease • Pads
Useto set temperature when in Cool or Energy
Saver mode. TheSet light will turn on while
setting.
O elay Timer Increase • (4-I/Decrease • (-)
Pads
Eachtouch of the Increase • / Decrease •
pads on the unit or the Increase + / Decrease
- pads on the remote control willset the delay
time when using the Delay 1-24hr timer. The
Set light willturn on while setting.
O an Speed Pads
Useto set the fan speedto Low, Med, High
orAuto on the unit. NOTE:On the remote
control, use the fan speed Increase + /
Decrease - pads to set the fan speedsto Low,
Med or High. UsetheAuto pad to turn Auto
fan on.
Delaytimer O
Temperature
andDecrease
0
Delaytimer Increase
I _ _ i _AutoFanon
II _t_ +_._i_ FanspeedIncrease
Remote Control
Mode Pad
Useto set the air conditioner to Coo/,Energy
Saver or FanOnly mode.
Delay Pads/Delay 1-24hr Pad
Delay ON--When the air conditioner is off, it can
be set to automatically come on in 1 to 24 hours
at its previous mode and fan settings.
Delay OFF--When the air conditioner is on, it
can be set to automatically turn off in 1 to 24
hours.
How to set:
Pressthe Delay 1-24hr pad on the unit or the
Delaypad on the remote control. Eachtouch
of the Increase • / Decrease• pads on the
unit or the Increase + / Decrease - pads on
the remote control will set the timer in 1-hour
intervals.The Set light will turn on while setting.
To review the remaining time on the Delay
1-24hr timer, press the Delay 1-24hr pad on
the unit or the Delay pad on the remote control.
Usethe Increase • / Decrease • pads on the
unit or the Increase + / Decrease - pads on the
remote control to set a new time if desired.
To cancel the timer, press the Delay 1-24hr pad
until the light on the Delay 1-24hr pad goes off.
Note: The default temperature reading on the display is degree Fahrenheit (°F). Tochange the display to
degree Celcius (°C),press the Temp Increase • and Temp Decrease • buttons together and hold for :3
seconds. Repeat the process to change back to degree Fahrenheit (°F)
4
Page 5
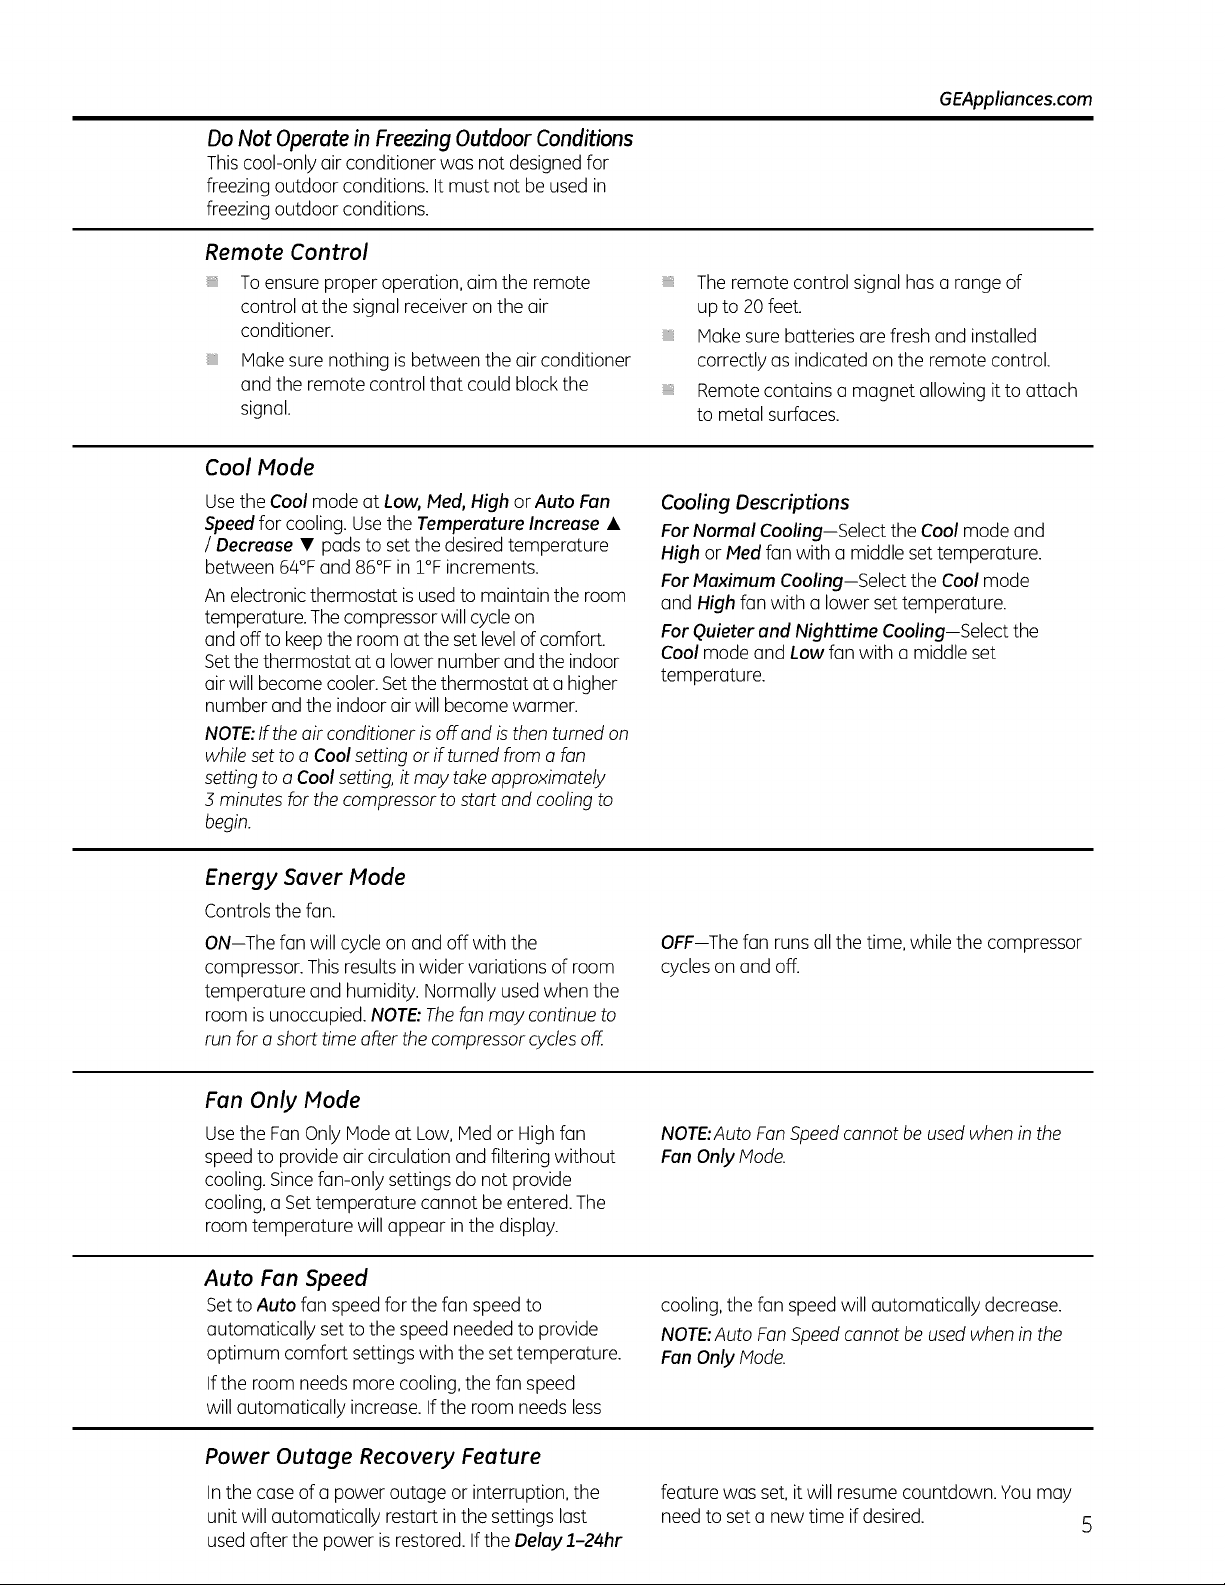
Do Not Operate in Freezing Outdoor Conditions
Thiscool-only air conditioner was not designed for
freezing outdoor conditions. It must not be used in
freezing outdoor conditions.
Remote Control
Toensure proper operation,dim the remote
control ot the signal receiver on the air
conditioner.
Hake sure nothing is between the airconditioner
and the remote control that could block the
signal.
Cool Mode
GEAppliances.com
Theremote control signal has o rangeof
up to 20 feet.
Make sure batteries ore fresh and installed
correctly os indicated on the remote control.
Remotecontains o magnet allowing it to attach
to metal surfaces.
Usethe Cool mode atLow,Med, High or Auto Fan
Speedfor cooling.Usethe Temperature Increase •
/ Decrease • podsto set the desiredtemperature
between 64°F and 86°F in l°F increments.
An electronicthermostat is usedto maintain the room
temperature. Thecompressorwill cycle on
and off to keep the room ot the set level of comfort.
Setthe thermostat ot o lowernumber and the indoor
air will become cooler.Setthe thermostat ot o higher
number and the indoor air will become warmer.
NOTE:Iftheair conditioner isoff ond is then turned on
while set to o Cool setting or if turned from o fan
setting to o Cool setting,it may take approximately
3 minutes for the compressor to start and coolingto
begin.
Energy Saver Mode
Controlsthe fan.
ON--The fan will cycleon and off with the
compressor.This results in wider variations of room
temperature and humidity. Normally usedwhen the
room isunoccupied. NOTE:Thefan may continueto
run for a short time after the compressor cyclesoff.
Cooling Descriptions
For Normal Cooling-Select the Cool mode and
High orF/edfan with o middle set temperature.
For Maximum Cooling--Select the Cool mode
and High fan with o lower set temperature.
For Quieter and Nighttime Cooling-Select the
Cool mode and Low fan with o middle set
temperature.
OFF--Thefan runsoil the time, while the compressor
cycles on and off.
Fan Only Mode
Usethe FanOnly Node ot Low, Ned or High fan
speedto provide air circulation and filtering without
cooling. Sincefan-only settings do not provide
cooling, o Settemperature cannot be entered. The
room temperature will appear in the display.
Auto Fan Speed
Setto Auto fan speedfor the fan speedto
automatically set to the speed needed to provide
optimum comfort settings with the settemperature.
If the room needsmore cooling, the fan speed
will automatically increase.If the room needs less
Power Outage Recovery Feature
Inthe case of o power outage or interruption, the
unit will automatically restart in the settings last
used offer the power isrestored. Ifthe Delay 1-24hr
NOTE:Auto FanSpeedcannot be usedwhen in the
Fan Only Mode.
cooling, the fan speedwill automatically decrease.
NOTE:Auto FanSpeedcannot be used when in the
Fan Only Mode.
feature was set,it will resume countdown. You may
need to set o new time if desired.
Page 6
About the controlson the air conditioner
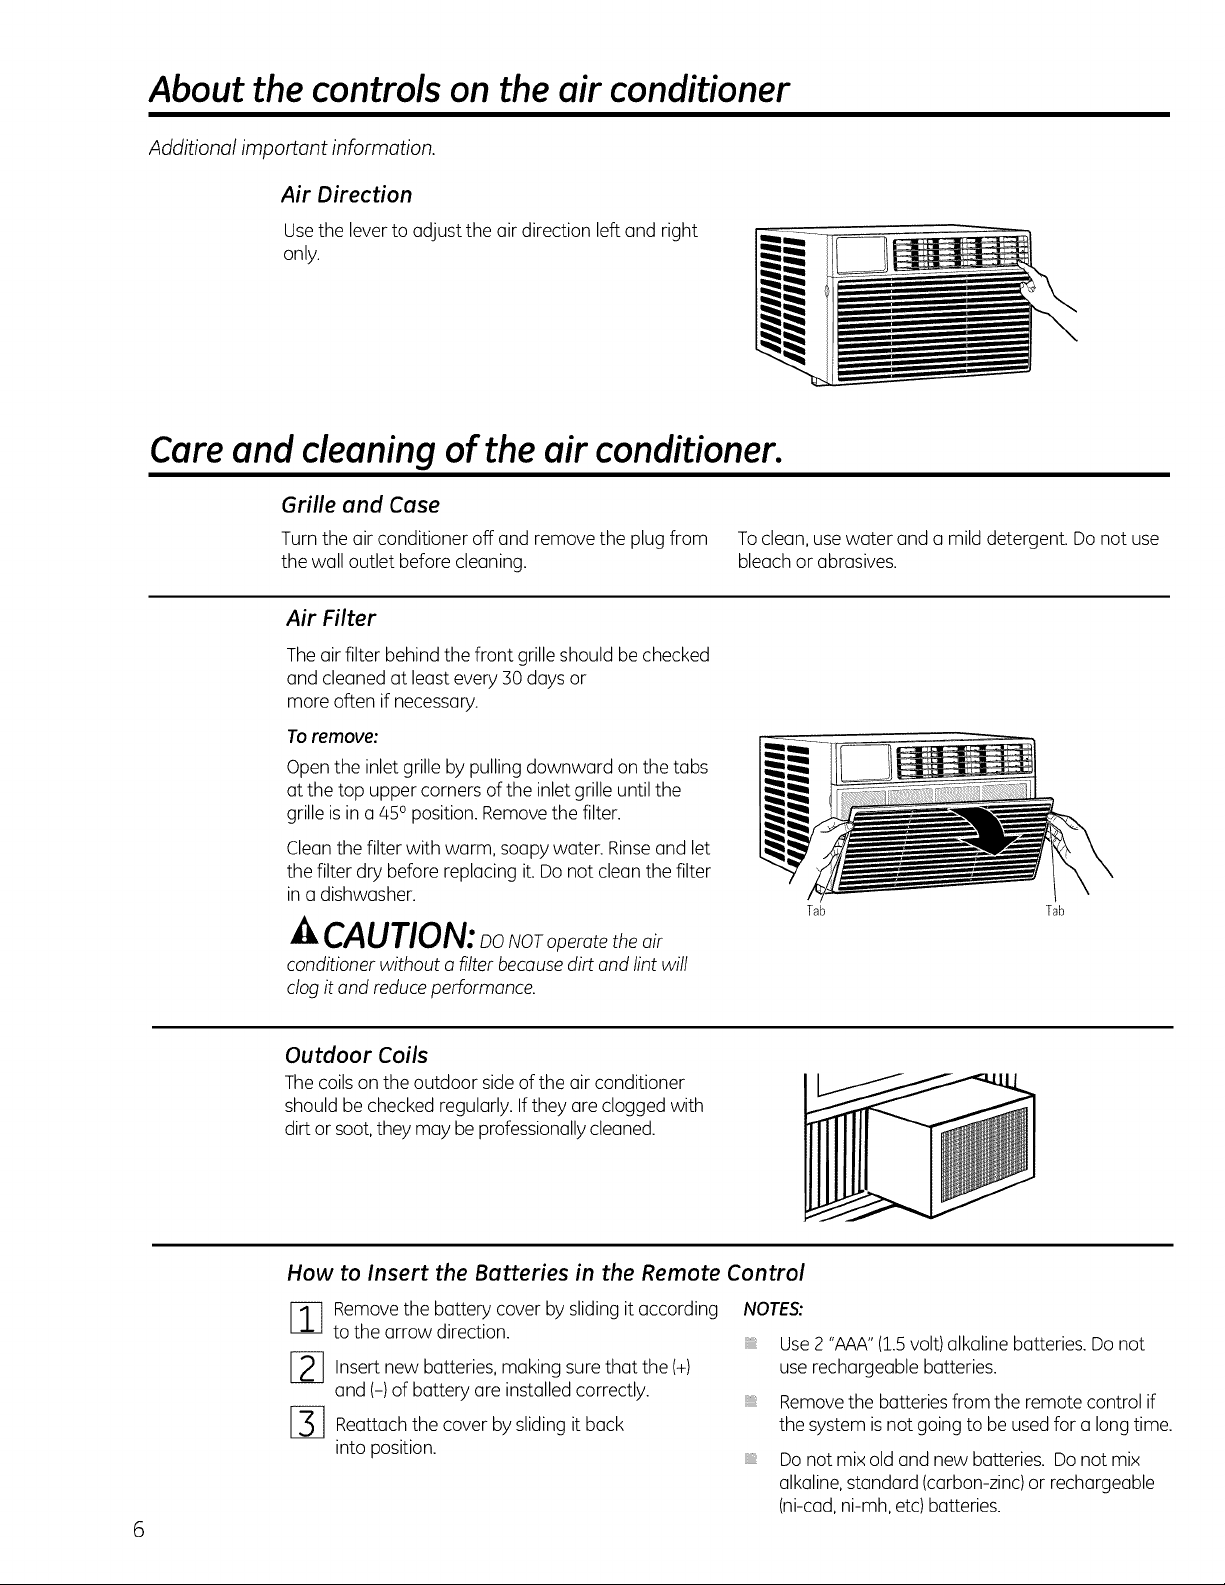
Additional important information.
Air Direction
Usethe lever to adjust the air direction left and right
only.
Careand cleaningof the air conditioner.
Grille and Case
Turn the air conditioner off and remove the plug from Toclean,usewater and a mild detergent. Do not use
the wall outlet before cleaning, bleachor abrasives.
Air Filter
Theair filter behind the front grille should be checked
and cleaned at least every 30 days or
more often if necessary.
Toremove:
Open the inlet grille by pulling downward on the tabs
at the top upper corners of the inlet grille until the
grille is in a 850position. Removethe filter.
Cleanthe filter with warm, soapy water. Rinseand let
the filter dry before replacing it. Donot cleanthe filter
in a dishwasher.
CAUTION:_oNoro_erotetheair
conditioner without o filter becausedirt and lint will
clog itand reduceperformance.
Tab Tab
Outdoor Coils
Thecoils on the outdoor sideof the air conditioner
should be checked regularly. Ifthey are clogged with
dirt or soot,they may be professionallycleaned.
How to Insert the Batteries in the Remote Control
-] emovethe battery cover by sliding it according
to the arrow direction.
[2] Insertnew batteries, makingsure that the (+)
and (-) of battery are installed correctly.
[-_ Reattachthe cover by sliding it back
into position.
6
NOTES:
Use2"AAA"(1.5volt) alkaline batteries. Do not
use rechargeable batteries.
Removethe batteries from the remote control if
the system isnot going to be usedfor a long time.
Donot mix old and new batteries. Donot mix
alkaline,standard (carbon-zinc)orrechargeable
(ni-cad,ni-mh,etc) batteries.
Page 7

Installation
Air Conditioner
Instructions
r-_ Questions? Call 800.GE.CARES(800.432.2737)or Visit our Website at: GEAppliances.com
I
In Canada, call 1.800.561.3344or visit www.GEAppliances.ca I
BEFOREYOU BEGIN
Read these instructions completely
and carefully.
• IMPORTANT- Savetheseinstructions
for local inspector's use.
• IMPORTANT--Observe all governing
codes and ordinances.
• Note to Installer- Be sure to leave these
instructions with the Consumer.
• Note to Consumer - Keep these instructions for
future reference.
• Skill level- Installation of this appliance
requires basic mechanical skills.
• Completion time - Approximately 1 hour
• We recommend that two people install
this product.
• Proper installation is the responsibility
of the installer.
• Product failure due to improper installation is not
covered under the Warranty.
• You MUST use all supplied parts and use proper
installation procedures as described in these
instructions when installing this air conditioner.
CAUTION:
Do not, under any circumstances, cut or remove
the third (ground) prong from the power cord.
Do not change the plug on the power cord
of this air conditioner.
Aluminum house wiring may present special
problems--consult a qualified electrician.
TOOLSYOUWILL NEED
Phillips head screwdriver
Flat-blade screwdriver
(_ ELECTRICALREQUIREMENTS
Some models require a 115/120-volt AC,
(_ 60-Hz grounded outlet protected with a
possibility of electric shock hazard. If the wall outlet
you plan to use is only a 2-prong outlet, it isyour
responsibility to have it replaced with a properly
grounded 3-prong wall outlet.
©
15-amp time-delay fuse or circuit breaker.
The 3-prong grounding plug minimizes the
Some models require 230/208-volt AC,
protected with a time-delay fuse or circuit
breaker. These models should be installed on
their own single brunch circuit for best
performance and to prevent overloading
house or apartment wiring circuits, which
could cause a possible fire hazard from
overheating wires.
Pencil Ruler or tape measure
Level Scissors or knife
Power cord includes u current interrupter device. A
test and reset button is provided on the plug case. The
device should be tested on a periodic basis by first
pressing the TESTbutton and then the RESETbutton
while plugged into the outlet. If the TESTbutton does
not trip or if the RESETbutton will not stay engaged,
discontinue use of the air conditioner and contact a
qualified service technician.
Page 8
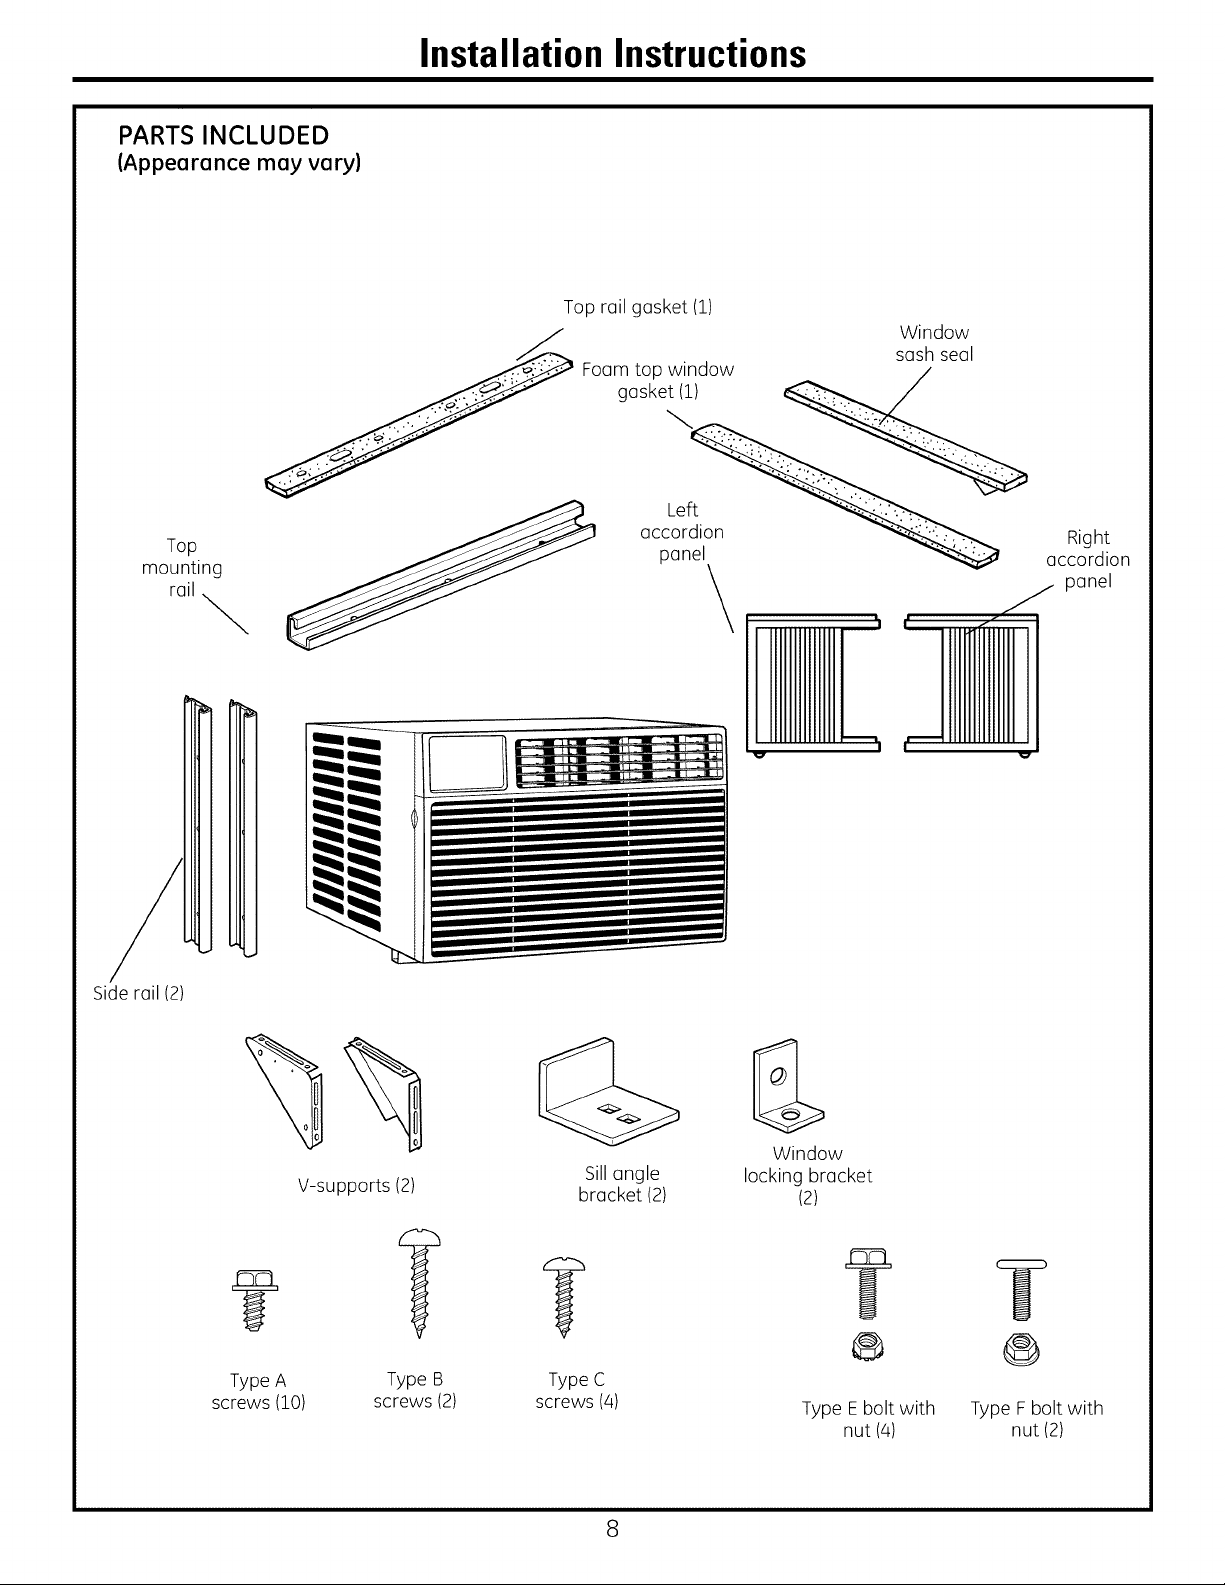
PARTS INCLUDED
(Appearance may vary)
Installation Instructions
Top rail gasket (1)
Window
seal
Foam top window _u_,
gasket (1) _
Top
mounting
rail
Side rail (2)
Right
accordion
panel
\
V-supports (2)
Type A Type B Type C
screws (10) screws (2) screws (4)
Sill angle
bracket (2)
Window
locking bracket
(2)
®
Type Ebolt with
nut (4)
8
®
Type F bolt with
nut (2)
Page 9
Installation Instructions
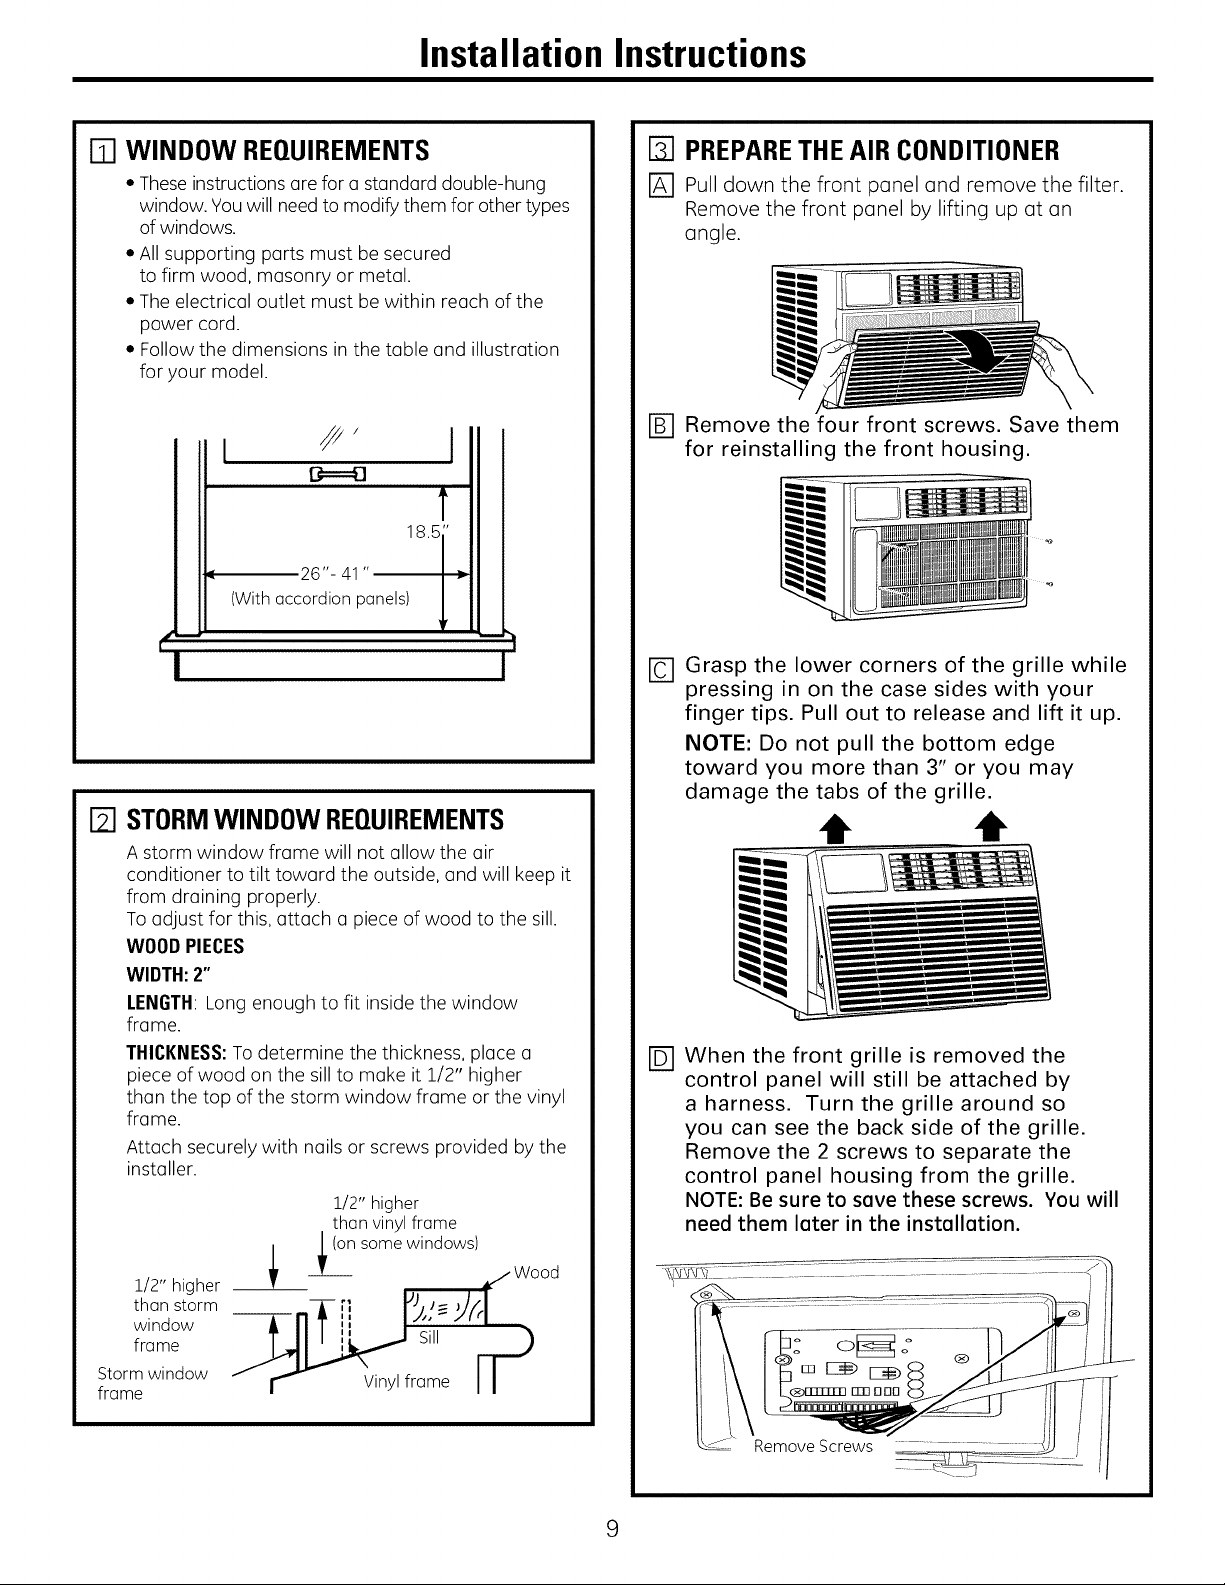
D WINDOW REQUIREMENTS
•These instructions are for a standard double-hung
window. You will need to modify them for other types
of windows.
• All supporting parts must be secured
to firm wood, masonry or metal.
• The electrical outlet must be within reach of the
power cord.
• Follow the dimensions in the table and illustration
for your model.
1
18.5/'
26"- 41 "
(With accordion panels)
I
[] STORMWINDOW REQUIREMENTS
A storm window frame will not allow the air
conditioner to tilt toward the outside, and will keep it
from draining properly.
To adjust for this, attach a piece of wood to the sill.
WOODPIECES
WIDTH:2"
LENGTH:Long enough to fit inside the window
frame.
THICKNESS:To determine the thickness, place a
piece of wood on the sill to make it 1/2" higher
than the top of the storm window frame or the vinyl
frame.
Attach securely with nails or screws provided by the
installer.
1/2" higher
than vinyl frame
D PREPARETHEAIR CONDITIONER
[] Pull down the front panel and remove the filter.
Remove the front panel by lifting up at an
angle.
r_ Remove the four front screws. Save them
for reinstalling the front housing.
[-C-]Grasp the lower corners of the grille while
pressing in on the case sides with your
finger tips. Pull out to release and lift it up.
NOTE: Do not pull the bottom edge
toward you more than 3" or you may
damage the tabs of the grille.
e
When the front grille is removed the
@
control panel will still be attached by
a harness. Turn the grille around so
you can see the back side of the grille.
Remove the 2 screws to separate the
control panel housing from the grille.
NOTE: Be sure to save these screws. You will
need them later in the installation.
1/2" higher
than storm
window
frame
Storm window
frame
_ _(°ns°mewind°ws v/Woo d
- r'- Vinylframe I I
Remove Screws
9
Page 10
Installation Instructions
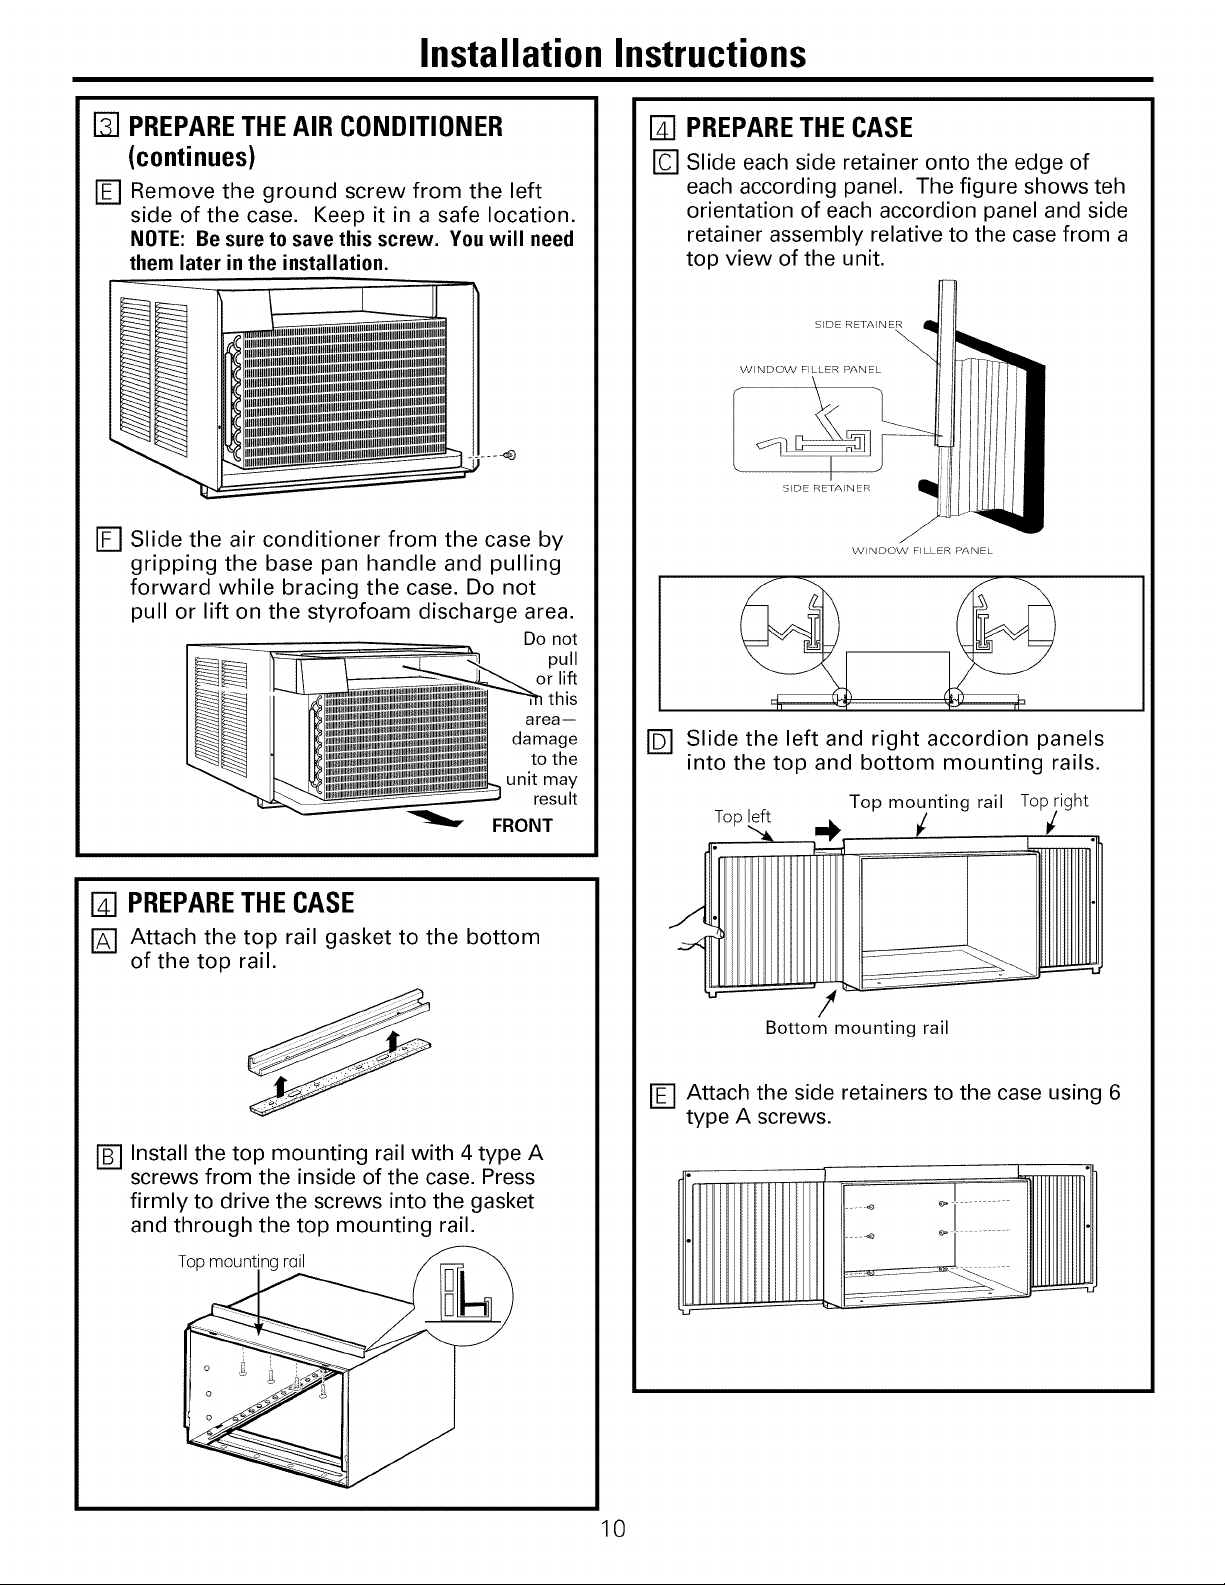
D PREPARE THE AIR CONDITIONER
(continues)
[_ Remove the ground screw from the left
side of the case. Keep it in a safe location.
NOTE: Be sure to save this screw. You will need
them later in the installation.
[] Slide the air conditioner from the case by
gripping the base pan handle and pulling
forward while bracing the case. Do not
pull or lift on the styrofoam discharge area.
Do not
D PREPARETHE CASE
r-c] Slide each side retainer onto the edge of
each according panel. The figure shows teh
orientation of each accordion panel and side
retainer assembly relative to the case from a
top view of the unit.
SIDE RETAINER
pull
damage
unit may
FRONT
D PREPARETHE CASE
[] Attach the top rail gasket to the bottom
of the top rail.
[-_ Install the top mounting rail with 4 type A
screws from the inside of the case. Press
firmly to drive the screws into the gasket
and through the top mounting rail.
area i
to the
result
[] Slide the left and right accordion panels
into the top and bottom mounting rails.
Top!eft_ ., _ P_
Topmo nting rail To ight
/
Bottom mounting rail
E] Attach the side retainers to the case using 6
type A screws.
....o o]} y
0
Page 11
Installation Instructions
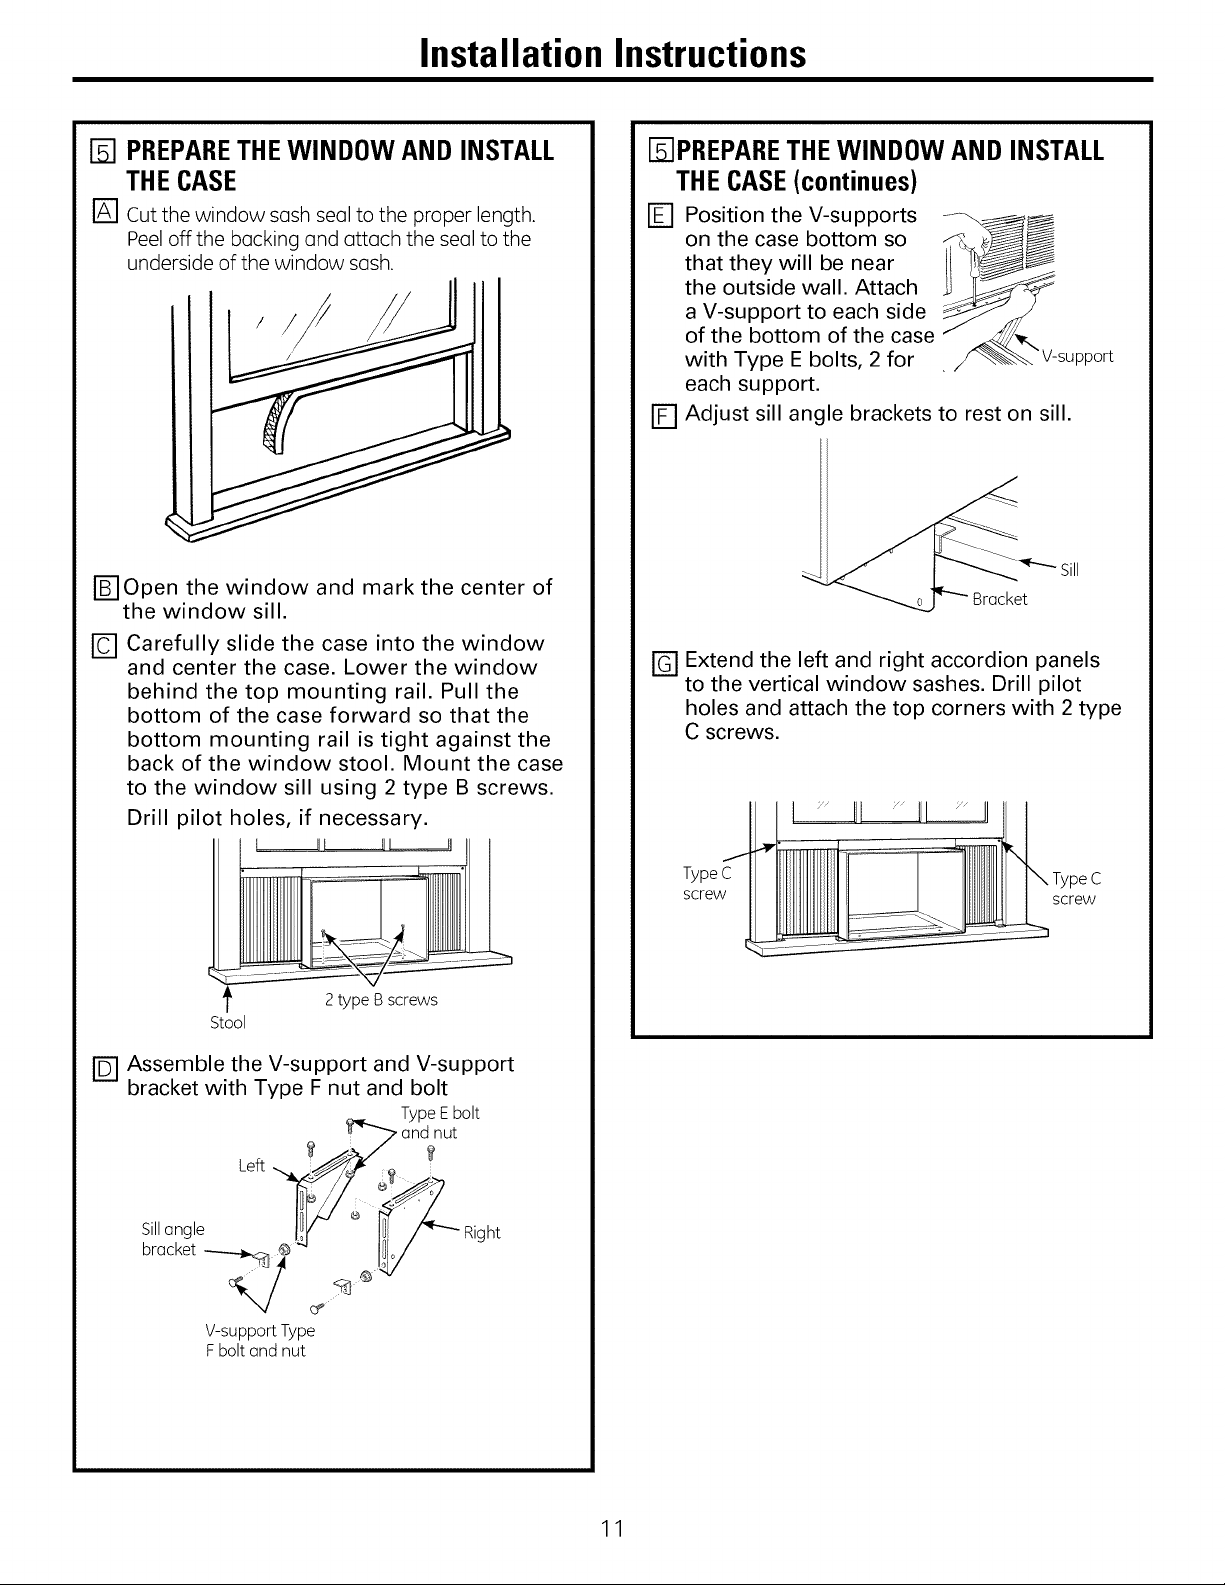
D PREPARETHEWINDOW AND INSTALL
THECASE
[] Cut the window sash seal to the proper length.
Peel off the backing and attach the seal to the
underside of the window sash.
r_Open the window and mark the center of
the window sill.
[] Carefully slide the case into the window
and center the case. Lower the window
behind the top mounting rail. Pull the
bottom of the case forward so that the
bottom mounting rail is tight against the
back of the window stool. Mount the case
to the window sill using 2 type B screws.
Drill pilot holes, if necessary.
t JlL _L
Fs]PREPARETHE WINDOW AND INSTALL
THECASE(continues)
[] Position the V-supports J_,
on the case bottom so
that they will be near
the outside wall. Attach
a V-support to each side
of the bottom of the case
with Type E bolts, 2 for
each support.
Adjust sill angle brackets to rest on sill.
E3
r_ Extend the left and right accordion panels
to the vertical window sashes. Drill pilot
holes and attach the top corners with 2 type
C screws.
TypeC
screw
tpport
screw
c
2type Bscrews
Stool
r_ Assemble the V-support and V-support
bracket with Type F nut and bolt
Type Ebolt
nut
Left
Sillangle
brocket __ _
V-support Type
Fbolt and nut
_ht
11
Page 12
Installation Instructions
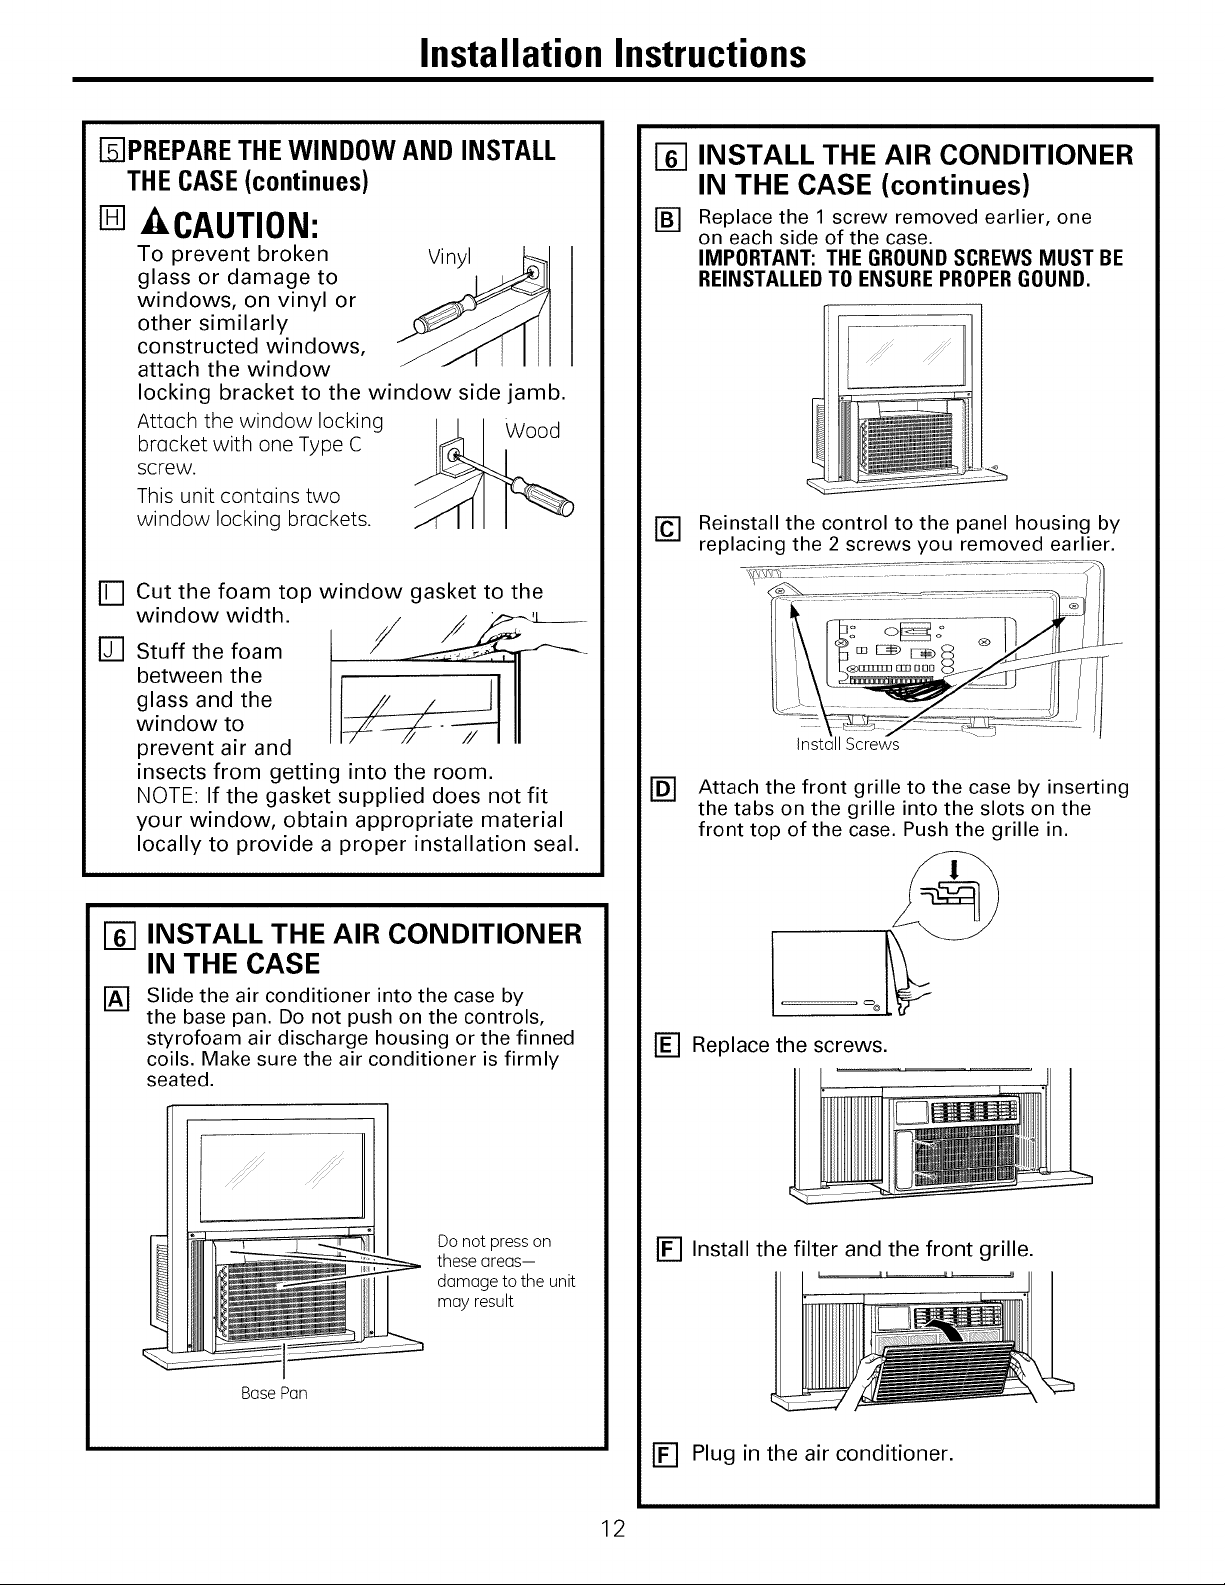
DPREPARE THE WINDOW AND INSTALL
THECASE(continues)
[] CAUTION:
To prevent broken Vinyl
glass or damage to
windows, on vinyl or
other similarly
constructed windows,
attach the window
locking bracket to the window side jamb.
Attach the window locking Wood
bracket with one Type C
screw.
This unit contains two
window locking brackets.
[]-] Cut the foam top window gasket to the
window width.
r_ stuff the foam
between the
glass and the
window to
prevent air and
insects from getting into the room.
NOTE: If the gasket supplied does not fit
your window, obtain appropriate material
locally to provide a proper installation seal.
INSTALL THE AIR CONDITIONER
IN THE CASE (continues)
[] Replace the 1 screw removed earlier, one
on each side of the case.
IMPORTANT: THE GROUND SCREWS MUST BE
REINSTALLEDTO ENSURE PROPERGOUND.
[_ Reinstall the control to the panel housing by
replacing the 2 screws you removed earlier.
Screws
Attach the front grille to the case by inserting
the tabs on the grille into the slots on the
front top of the case. Push the grille in.
[] INSTALL THE AIR CONDITIONER
IN THE CASE
Slide the air conditioner into the case by
the base pan. Do not push on the controls,
styrofoam air discharge housing or the finned
coils. Make sure the air conditioner is firmly
seated.
:_!!iF_!!!!!!!
Do not presson
these areas-
damage to the unit
may result
Base Pan
['_ Replace the screws.
[_] Install the filter and the front grille.
[_ Plug in the air conditioner.
12
Page 13
Through-the-Wall Installation Instructions--Optional
The case may be installed through-the-wall
in both existing and new construction.
Read completely, then follow step-by-step.
NOTE: Obtain all materials locally for
mounting the air conditioner through-
the-wall.
IMPORTANT
%
Through-the-wall installation is not
appropriate if any of the side or top louvers
in the case will be obstructed by the wall.
All side and top louvers in the case must
project on the outdoor side of the wall.
The room side of the case must project
into the room far enough to maximize the
balance of the unit.
The case must be installed level from side-
to-side and with a slight tilt from front to
rear. Use a level; no more than a 1/2 bubble
will be the correct case slant to the outside.
Lintel angle is required to support bricks or
blocks above opening.
Flashing is required and should extend the
length of the opening to ensure no inside
cavity leakage occurs.
Remove the air conditioner from the case.
For specific instruction, refer to the Window
Installation Instructions.
Make certain that a wall receptacle is
available close to the hole location or make
arrangements to install a receptacle.
ITI IMPORTANT (cont.)
F_ Secure with 14 wood screws anchored at
least an inch into the wall support structure.
NOTE: Drill pilot holes, if necessary, for
proper installation. If the frame is oversized,
use shims to prevent case distortion.
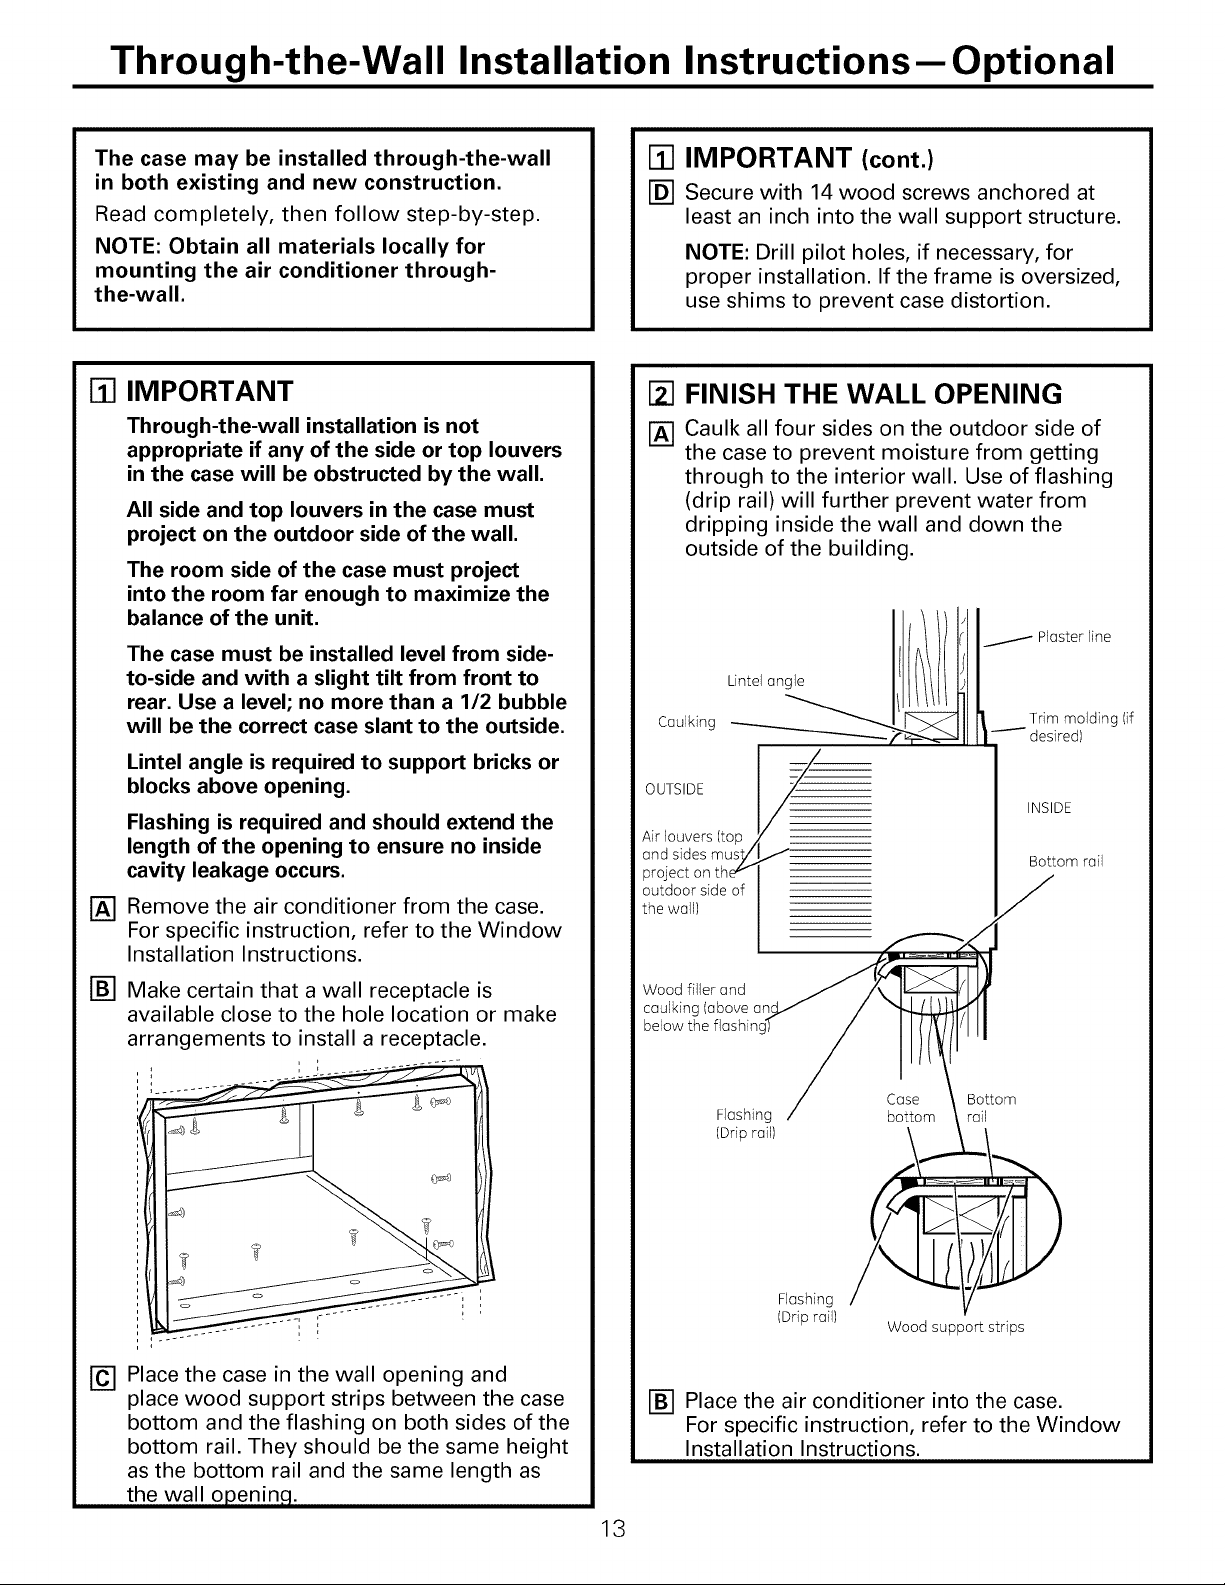
[] FINISH THE WALL OPENING
[] Caulk all four sides on the outdoor side of
the case to prevent moisture from getting
through to the interior wall. Use of flashing
(drip rail) will further prevent water from
dripping inside the wall and down the
outside of the building.
[_ Plaster line
Caulking
OUTSIDE
Air louvers (top /
and sides must/
project on thev
outdoor side of
the wall)
Wood filler and
caulking (above an
below the flashinc
• II """ desired)
rl Trim molding (if
INSIDE
Bottom rail
J
Place the case in the wall opening and
@
place wood support strips between the case
bottom and the flashing on both sides of the
bottom rail. They should be the same height
as the bottom rail and the same length as
the wall openin.q.
Flashing
(Drip rail)
Flashing
(Drip rail)
F_ Place the air conditioner into the case.
For specific instruction, refer to the Window
Installation Instructions.
Wood support strips
13
Bottom
rail
Page 14
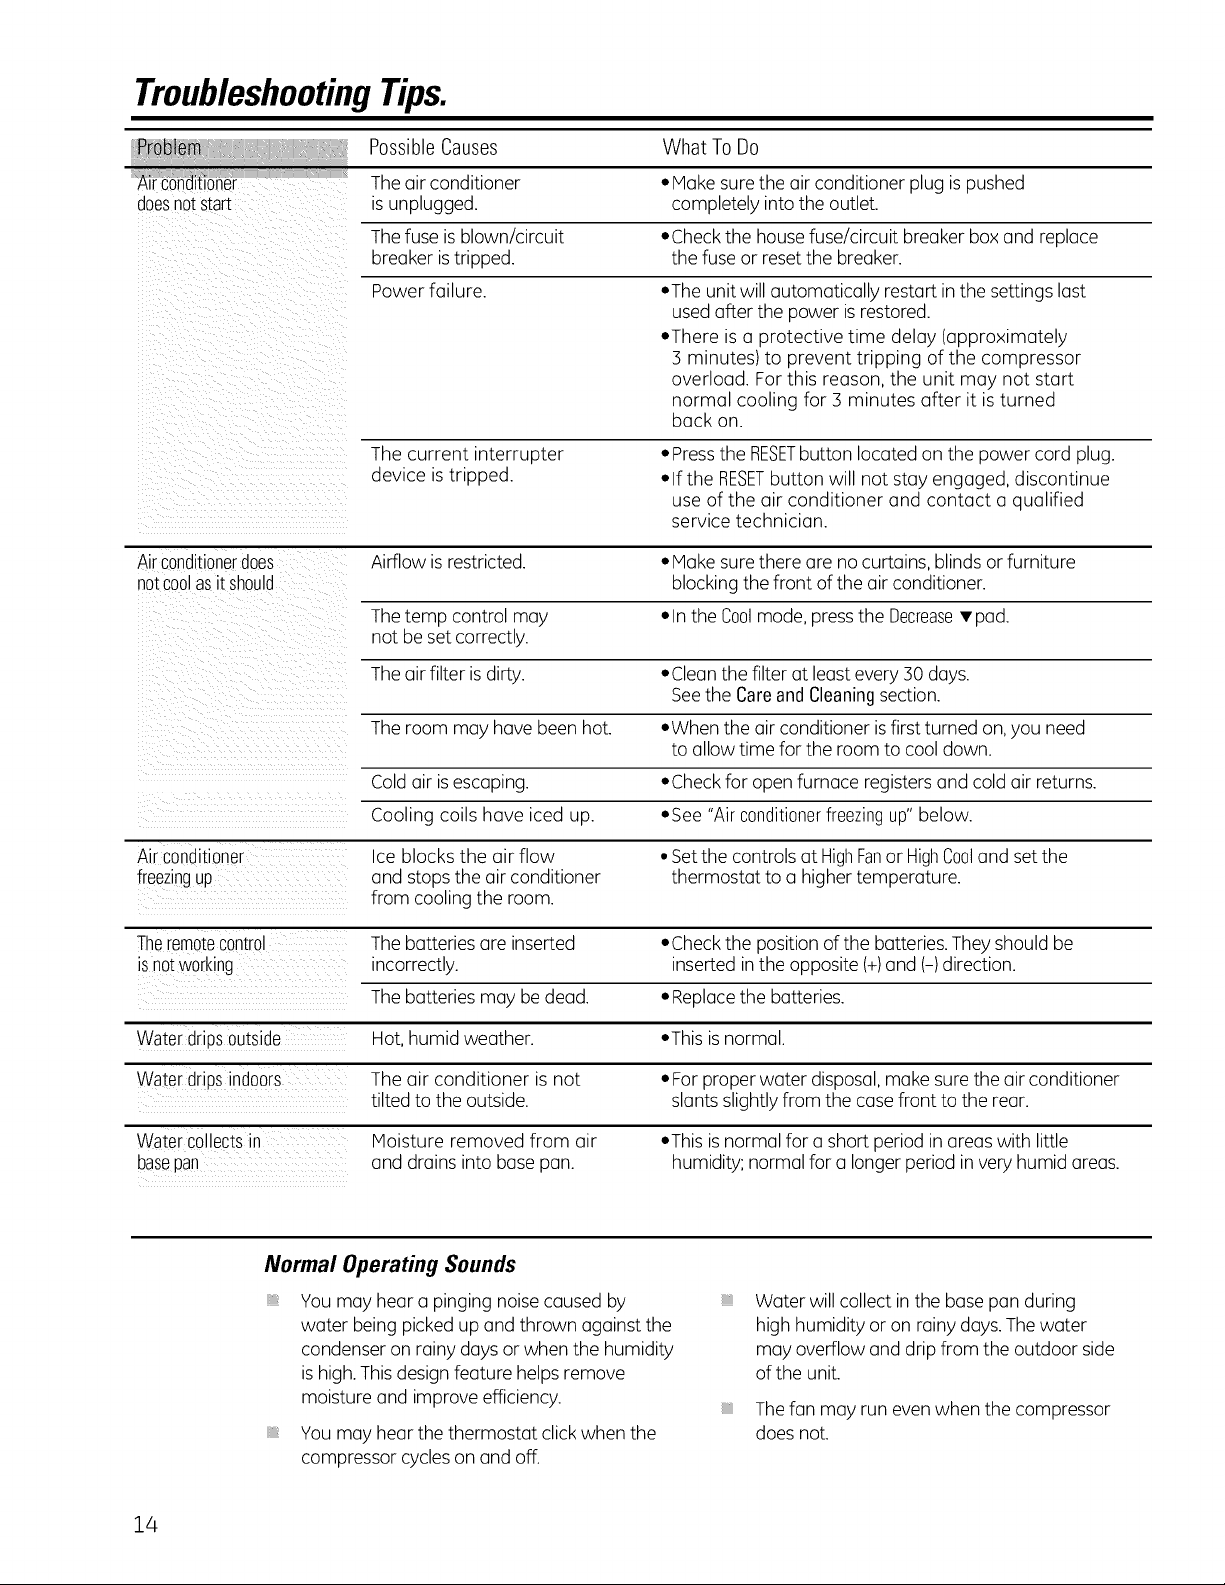
TroubleshootingTips.
PossibleCauses What To Do
Theair conditioner • Hake surethe air conditioner plug ispushed
doesnotstart _sunplugged, completely into the outlet.
Thefuse isblown/circuit .Check the housefuse/circuit breaker box and replace
breaker is tripped, the fuse or resetthe breaker.
Power failure. .The unitwill automatically restart in the settings last
usedafter the power is restored.
•There is a protective time delay (approximately
:3minutes) to prevent tripping of the compressor
overload. For this reason, the unit may not start
normal cooling for :3 minutes after it is turned
back on.
The current interrupter • Pressthe RESETbutton located on the power cord plug.
device istripped. • If the RESETbutton will not stay engaged, discontinue
use of the air conditioner and contact a qualified
service technician.
Airconditionerdoes Airflow is restricted. • Hake surethere are nocurtains, blindsor furniture
notcoolasitshould blocking the front of the air conditioner.
Thetemp control may • In the Coolmode,pressthe Decrease• pad.
not be set correctly.
Theair filter is dirty. .Clean the filter at leastevery :30days.
Seethe CareandCleaningsection.
Theroom may have been hot. .When the air conditioner isfirst turned on,you need
to allow time for the room to cool down.
Coldair isescaping. .Check for open furnace registersand cold air returns.
Cooling coils have iced up. .See "Air conditionerfreezingup"below.
Aircondtioner Ice blocks the air flow •Setthe controls at HighFanor HighCooland setthe
freezingup and stops the air conditioner thermostat to a highertemperature.
from cooling the room.
Theremotecontrol Thebatteries are inserted .Check the position of the batteries.They should be
isnotworking incorrectly, inserted in the opposite (+)and (-) direction.
Thebatteries may bedead. • Replacethe batteries.
Water dripsoutside Hot,humid weather. .This isnormal.
Water dripsindoors The air conditioner is not • For proper water disposal,make surethe air conditioner
tilted to the outside, slants slightlyfrom the case front to the rear.
WaterCollectsin
basepan
Normal Operating Sounds
You may hear a pinging noisecaused by
water being picked up and thrown against the
condenser on rainy days or when the humidity
is high.Thisdesign feature helps remove
moisture and improve efficiency.
You may hearthe thermostat click when the
compressor cycles on and off.
Moisture removed from air
and drains into base pan.
•This isnormal for a short period in areas with little
humidity; normal for a longerperiod invery humid areas.
Water will collect inthe base pan during
high humidity or on rainy days.The water
may overflow and drip from the outdoor side
of the unit.
iiiiiiiiiiii_iii
Thefan may runeven when the compressor
does not.
14
Page 15

Notes.15Notes.
Page 16

16
Page 17
GEAir Conditioner--One-Year Limited Warranty. (Forcustomers in theU.S.A.]
All warranty service provided by our Factory Service Centers,
or an authorized Customer Care®technician. To schedule service,
visit us on-line at ge.com, or call 800.GE.CARES (800.432.2737).
Have serial number and model number available when calling
for service.
GE Will Replace:
Any part of the air conditioner which fails due to a defect in materials or workmanship.
Eromthedateof the
origina!purchase
Service trips to your home to teach you how to
use the product.
Improper installation, delivery or maintenance. Ifyou
have an installation problem, or if the air conditioner
isof improper cooling capacity for the intended use,
contact your dealer or installer. You are responsible
for providing adequate electrical connecting facilities.
Failure ofthe product resulting from modifications to
the product or dueto unreasonable use including failure
to provide reasonable and necessary maintenance.
In commerciallocations, labor necessary to move the
unit to a location where it is accessible for service
by an individual technician.
Duringthis limited one-year warranty, GEwill also provide, free of charge, all labor and related
serviceto replace the defective part.
Stapleyour receipt here.
Proof of the original purchase
date is needed to obtain service
under the warranty.
Replacement of house fuses or resetting of circuit
breakers.
Failure due to corrosionon models not corrosion-
protected.
Damage to the product caused by improper power
supply voltage, accident, fire, floods or acts of God.
Incidental or consequential damage caused by possible
defects with this air conditioner.
Damage caused after delivery.
EXCLUSION OF IMPLIED WARRANTIES--Your sole and exclusive remedy is product repair as provided in
this Limited Warranty. Any implied warranties, including the implied warranties of merchantability or
fitness for a particular purpose, are limited to one year or the shortest period allowed by law.
This warranty is extended to the original purchaser and any succeeding owner for products purchased for
home use within the USA. If the product is located in an area where service by a GE Authorized Servicer is
not available, you may be responsible for a trip charge or you may be required to bring the product to an
Authorized GE Service location for service. In Alaska, the warranty excludes the cost of shipping or service calls
to your home.
Some states do not allow the exclusion or limitation of incidental or consequential damages. This warranty
gives you specific legal rights, and you may also have other rights which vary from state to state. To know
what your legal rights are, consult your local or state consumer affairs office or your state's Attorney General.
Warrantor: General Electric Company. Louisville, KY 40225
17
Page 18

GEAir Conditioner--One-Year Limited Warranty. (Forcustomers in Canada)
All warranty service provided by our Factory Service Centers,
or an authorized Customer Care®technician. For service, call
1.800.561.3344. Please have serial number and model number
available when calling for service.
Mabe Will Replace:
Any part of the air conditioner which fails due to a defect in materials or workmanship.
From the date of the
origina!purchase
Duringthis limited one-year warranty, Mabewill also provide,free of charge, alllabor and
related service to replacethe defective part.
Servicetrips to your home to teach you how to
usethe product.
Improper installation, delivery or maintenance. Ifyou
have an installation problem, or if the air conditioner
isof improper cooling capacity for the intended use,
contact your dealer or installer. You are responsible
for providing adequate electrical connecting facilities.
Failure ofthe product resulting from modifications to
the product or dueto unreasonable use including failure
to provide reasonable and necessary maintenance.
In commercial locations, labor necessary to move the
unit to a location where it is accessible for service
by an individual technician.
EXCLUSION OF IMPLIED WARRANTIES--Your sole and exclusive remedy is product repair as provided in
this Limited Warranty. Any implied warranties, including the implied warranties of merchantability or
fitness for a particular purpose, are limited to one year or the shortest period allowed by law.
This warranty is extended to the original purchaser and any succeeding owner for products purchased in Canada
for home use within Canada. In-home warranty service will be provided in areas where it is available and deemed
reasonable by Mabe to provide.
Replacement of house fuses or resetting of circuit
breakers.
Failure due to corrosion on models not corrosion-
protected.
Damage to the product caused by improper power
supply voltage, accident, fire, floods or acts of God.
Incidental or consequential damage caused by possible
defects with this air conditioner.
Damage caused after delivery.
Some provinces do not allow the exclusion or limitation of incidental or consequential damages, so the above
exclusion may not apply to you. This warranty gives you specific legal rights, and you may also have other rights
which vary from province to province. To know what your legal rights are in your province, consult your local or
provincial consumer affairs o_ce.
Warrantor: Mabe Canada Inc.,
BuHington, Ontario
18
Page 19

Consignes de s@curit@............. 2o,21
Consignesd'utilisation
Commandes ..........................22-24
Entretien et nettoyage
Filtre (_air ................................ 24
Serpentins extGrieurs ..................... 24
Instructions de montage .......... 2s-sl
Conseils de d@pannage .............. s2
Bruits normaux de fonctionnement ........ 32
Assistance _ la client@le
Assistonce (_Ioclientele ................... 36
Garantie .................................. 35
Enregistrement du titre
de propriGt6 ........................... 33, 34
AEZ18*
* Produits homologuGs ENERGYSTAR@
ENERGYSTAR
Entant que portenaire d'ENERGYSTAR@,GEo
d@ermin6 que ce produit 6tait conforme oux
exigences d'efficocit6 6nergGtique d'ENERGY
STAR@.
Inscrivez ici les num@ros de mod@leet de s@rie:
Num@rode mod@le:
Num@rode S_rie :
Vous trouverez ces num@os sur 1'6tiquette
opposGe sur le cGt6 du climotiseur.
Au Conodo, visitez-nous au •
www.electromenagersge.ca
19
Page 20

IMPORTANTES CONSIGNES DE S 'CURIT '.
VEUILLEZ LIRE TOUTES LES CONSIGNES AVANT UTILISATION.
AVERTISSEMENT!
Pour votre s6curit6, les informations contenues dans ce manuel doivent 6tre suivies afin de minimiser
les risques d'incendie, de chocs 61ectriques ou de blessures corporelles.
CONSIGNESDESL-CURITL-
N'utilisez cet appareil qu'aux fins pr6vues
d6crites dans le manuel d'utilisation.
Ce climatiseur doit @trecorrectement
install6 conform6ment aux Instructions
d'lnstallation avant toute utilisation.
Ne d6branchezjamais votre climatiseur en
tirant sur le cordon d'alimentation. Prenez
toujours fermement la fiche en main et tirez
pour la sortir de la prise.
Remplacez imm6diatement tout cordon
61ectrique us6 ou endommag6. Un
cordon d'alimentation endommag6 doit
6tre remplac6 par un nouveau cordon
d'alimentation obtenu du fabricant. Ne
r6parez pas le cordon endommag6. N'utilisez
pas un cordon fissur6 ou pr6sentant des
dommages dus aux frottements soit sur
sa Iongueur ou aux extr6mit6s du c6t6
de la fiche ou du raccord.
Eteignez votre climatiseur et d6branchez-le
avant de le nettoyer.
GE n'offre pas de service d'entretien pour les
climatiseurs. Nous vous recommandons de
ne pas essayer d'effectuer I'entretien
de votre climatiseur vous-m6me.
Pour votre s6curit6, ne stockez pas et
n'utilisez pas de mat6riaux combustibles,
d'essence ou d'autres vapeurs et liquides
inflammables dons les parages de cet
appareil ou de tout autre appareil.
Tous les climatiseurs contiennent des
fluides frigorig_nes qui, conform6ment, 6 la
16gislation f6d6rale doivent 6tre retir6s avant
la mise au rebut de I'appareil. Si vous mettez
au rebus un ancien appareil contenant des
fluides frigorig6nes, v6rifiez la proc6dure 6
suivre aupr6s de la compagnie responsable
de 1'61imination.
Sila prise de courant est d'un format
diff6rent de la fiche, cette prise doit @tre
chang6e par un 61ectricien qualifi6.
Ces syst6mes de climatisation R410A
n6cessitent que les entrepreneurs et
techniciens adoptent des outils, du mat6riel
et des normes de s6curit6 approuv6s pour
utilisation avec ce r6frig6rant. N'utilisez pas
de mat6riel certifi6 pour le r6frig6rant R22
uniquement.
20
BRANCHEMENTS L-LECTRIQUES
Ne coupez pas ou n'enlevez pas, sous aucun
pr6texte, la troisi6me broche de mise 6 la terre
du cordon d'alimentation. Pour des raisons de
s6curit6, cet appareil dolt 6tre correctement mis
6 la terre.
N'utilisez PASd'adaptateur avec cet appareil.
Le cordon d'alimentation de cet appareil est
6quip6 d'une fiche 6 trois broches (pour une
mise 6 la terre) qui s'adapte 6 la prise de courant
standard 6 3 broches (pour une mise 6 la terre)
pour minimiser les risques de chocs 61ectriques
par cet appareil.
Le cordon d'alimentation est 6quip6 d'un
dispositif d'interruption du courant. Un bouton
d'essai et de r6enclenchement est fourni
sur le boTtier de la prise. Vous devez tester le
m6canisme r6guli_rement en appuyant d'abord
sur le bouton TEST(essai) puis sur le bouton
RESET(r6enclenchement)Iorsque I'appareil est
branch6. Sile bouton TEST(essai) ne bascule
pas ou si le bouton RESET(r6enclenchement)
ne reste pas enclench6, cessez d'utiliser votre
climatiseur et appelez un technicien de service
qualifi6.
Faites v6rifier la prise murale et le circuit
61ectrique par un 61ectricien qualifi6 pour
s'assurer que le syst_me est correctement
mis 6 la terre.
Dans le cas d'une prise biphas6e,
I'installateur a la responsabilit6 et I'obligation
de la remplacer par une prise triphas6e
correctement mise 6 la terre.
Le climatiseur doit toujours 6tre branch6
6 sa propre prise 61ectrique d'une tension
nominale correspondant 6 celle indiqu6e
sur sa plaque signal6tique.
Ceci permet d'obtenir un meilleur rendement
du climatiseur et 6vite de surcharger les circuits
61ectriques du domicile qui risque d'occasionner
un incendie en surchauffant.
Consultez les Consignes d'lnstallations, dans
la section Exigences Electriques pour les
exigences de branchements 61ectriques
particuliers.
Page 21

www.electromenagersge.co
VERTISSEMENT!
UTILISATION DE RALLONGES
RISQUED'INCENDIE. Peut occasionner des
blessures graves ou la mort.
• NE PASutiliser de rallonge avec ce climatiseur.
• NE PASutiliser de parasurtenseur ou
d'adaptateur (_prises multiples avec ce
climatiseur.
s s
LISEZETSUIVEZSOIGNEUSEMENTCESCONSIGNESDESECURITE.
CONSERVEZ CES INSTRUCTIONS
21
Page 22

A propos des commandes du climatiseur
LesfonctionsetI'aspectpeuventverier.
Lest_moinslumineux_c&t_destouches_e_eurementsurletableaudecommandesduclimatiseurindiquentlesr_glagessdectionn_s.
NOTE:L'6cran affiche toujours
la temp6rature de la pi@cesauf
Iorsque vous programmez la
temp6rature ou la minuterie.
O
e- G?e3
,,,, Auto
-,, High ,,,,Cool
i Hed m,,Energy Saver
•,, Low _ Fan Onlg
4,2pe_dJ
O i
Commandes du Climatiseur
Commandes
0
0
@
O
0
Remarque : La lecture de temp6rature par d6faut s'affiche en degr6 Fahrenheit (°F).Pour modifier
I'affichage en degr6 Celcius (°C),appuyez simultan6ment sur les boutons d'augmentation aou
22
d'abaissement Vde la temp6rature et maintenez-les enfonc6s pendant 3 secondes. R6p6tez la m6thode
pour effectuer un retour @I'affichage des degr6s Fahrenheit (°F).
Le t6moin indique que I'appareil
est en mode Programmation de la
temp6rature ou du d61ai.
Le t6moin lumineux indique
que la minuterie est
programm6e.
Touche d'alimentation
Het leclimatiseuren positionde marche
ou d'arrCt.L'_cranaffichela temp@ature
de la pieceIorsqueI'appareilestmis en marche.
Affichage
Affichela temp@aturedela pieceouletemps
restantavant la miseen marche ou I'arr@tde
I'appareil.Affichelatemp@atureder_glageIors
de la programmationde la temperaturepour les
modesCool(refroidissement)ou EnergySaver
(economied'energie).Let@moinlumineuxSet
(programme)s'allumeIorsdu r_glage.
Touches Temp Increase (Augmentation
temperature) • /Decrease (R#duction
de la temperature)• Sontutilis_espour
programmerlatemperaturedanslesmodesCool
ou EnergySaver.Let@moinlumineuxSets'allume
Iorsdu r@glage.
TouchesDelay Timer Increase(Augmentation du
d_laiJ• (+J/Decrease(Diminution du d#lai)• N
Chaquefoisquevous effleurezlestouches
Increase • / Decrease• sur I'appareilou
lestouches Increase+ / Decrease- de la
t616commande,vous programmez ladur6e
du d6laiIorsde I'utilisationdela minuterieDelay
1-24hr(d6laide 1-2/4h).Let6moin lumineu×Set
s'allumeIorsdu glage.
Touches de vitesse du ventilateur
Sontutilis_espourr_glerlavitesseduventilateur
de I'appareilsurLow(faible),Med(moyenne),
High(elev_e)ouAuto (automatique).REMARQUE:
Surlat_l_commande,utilisezlestouchesIncrease
+/Decrease - pour r_glerlavitessedu ventilateur
surLow,Med,ou High. UtilisezlatoucheAuto
pour allumerleventilateur en modeAuto.
D@loi1-24hr
R_ductiondu d_lai @ _ i1_ AugmentatiOndud_loi
S_lectiondu mode O I Harche
R_ductionde _
lavitessedu _ I _-_J,_(_ +__ AugmentatiOndela
Augmentation ventiloteur
ventilateur O I (_'_Pow""_'_er , I _1 vitessedu
et R_ductionde I _ I _ Hiseen marche
latemp@rature _ deI'appareilON/programm@ OFF(marche/arr@t}
I Vent"°teu
automatiquedu
T l commande
Touche Mode
O
Estutilis_epour programmer leclimatiseursur
lesmodesCool, EnergySaverouFan Only
(ventilateuruniquement).
Touches de D_lai/ D_lai de I _ 24heures
0
Delay ON(d_laide miseen marche)-Lorsque
leclimatiseurest@eint,ilpeut @treprogramm@
pour d@marrerautomatiquementdensun d@lai
de 1 (_24heures(_sesr@glagespr@c@dents(mode,
vitessedu ventilateur).
Delay OFF(d_laid'arr_t)-Lorsque leclimatiseur
est enfonctionnement,il peut¢tre programm6
pour s'arr_terautomatiquementdansun d61aide
1(_24heures.
Commentleprogrammer:
AppuyezsurlatoucheDelay1-24hr(D6laide 1
24heures)deI'appareilou Delaypad (Touchesde
D61ai)delat@l@commande.Chaquefois que vous
effleurezlestouchesIncrease• / Decrease• sur
I'appareilou lestouchesIncrease+/Decrease
- delat@l@commande,vousprogrammezla
dur@edu d@laipar intervallede i heure.Let@moin
lumineuxSets'allumeIorsdu r_glage.
PourconnaTtreletempsrestantsurlaminuterie
Delay1-24hr,appuyezsurlatoucheDelay1-24hr
deI'appareilouDelaypad (TouchesdeD61ai)de
lat@l@commande.UtilisezlestouchesIncrease•
/Decrease• sur I'appareilou lestouches
Increase+/Decrease - de lat616commandepour
programmer un nouveaud_laisi n_cessaire.
Pourannuler la minuterie, appuyezsur latouche
Delay1-24hrjusquk_ceque levoyant lumineux
surla toucheDelay _-24hr s'_teigne.
Page 23

www.electr0menagersge.ca
l_e faites, pas fonctionner votre appareil
orsgue les temperatures ext_rieures sont
en dessous de O°C (32°F).
T_l_commande
Pourvous assurer d'un fonctionnement correct, pointez
la t616commande vers le r6cepteur de signal
du climatiseur.
Assurez-vousqu'aucun obstacle pouvant bloquer
le signal ne se trouve entre leclimatiseur et la
t616commande.
Mode Cool (refroidissement)
UtilisezlemodeCool(refroidissement)avecla vitesse
du ventilateursur Low (faible),Med (moyenne),
High(elev#e)ouAuto(automatique)pourrefroidir.
AppuyezsurlestouchesTemperatureIncrease
(augmentationde la temperature) • /Decrease
(diminutiondela temp_rature)T° pourp_ogrammerla
temperaturesouhait_eentre18 C et 30 C (64
et 86°F)parincrementsde0,5°C(:].°F).
Unthermostat _lectroniquepermetde maintenirla
temperaturedela piece.Lecompresseursemet en
marcheets'arrCte6 intervallesr_gulierspour maintenir
latemperaturedela piece6 unniveaudeconfort choisi.
R_glezlethermostat6 unevaleurplusbasseet I'air
ambiantserefroidira.R_glezlethermostat6 unevaleur
plus_lev_eet I'airambiant ser_chauffera.
Ceclimatiseurfroid seuln'estpascongu pour
fonctionneravecdestemp@raturesext@rieuresen
dessousde0 °C(32°F).IInedoit pas @treutilis@Iorsque
lestemp@raturesext@rieuressont endessousde0°C
(32°F).
Lerayon d'action de la t616commande s'6tendjusqu'6
6,4 m (20 pieds).
Assurez-vousque les pilessont r6centes et
correctement install6es dans lat616commande.
Lat616commande renferme un aimant permettant de
la fixer sur des surfaces m6talliques.
REMARQUE:Sileclimatiseur6teintest allum6alors qu'il
est programm6sur un r6glageCoolousi vous passez
d'un modeVentilation6un modede Refroidissement,il
faudra environ3 minutespour que lecompresseurse
remetteen marche etrecommence6 refroidir.
Descriptions du Refroidissement
Pour un RefroidissementNormal- S_lectionnez
le modeCool avecla vitessedu ventilateursurMad
ou High etun r_glage6 unetemperaturemoyenne.
Pour un RefroidissementMaximal - S_lectionnez
le modeCool avecla vitessedu ventilateursurHigh
et un r_glage6 unetemperature plusbasse.
Pour un Refroidissementplus Silencieuxou Durant
la Nuit - S_lectionnezlemodeCoolavec lavitessedu
ventilateursur Low et un r_glage6 unetemperature
moyenne.
Mode Energy Saver (economie d'#nergie)
Contr61eleventilateur
ONlactiv_)-Le ventilateur semet en marcheet s'arrCte
en mCmetemps que lecompresseur.Cecipermetune
plusgrandevariation de latemperature et du taux
d'humidit_dansla piece.Esten g_n_ralutilis_Iorsquela
pieceest inoccup_e.
REMARQUE:Leventilateurpeutcontinuer6 fonctionner
quelquesinstantsapr_squele compresseursesoit
arrOt&
OFF(d#sactiv#)-Leventilateurfonctionneen continu,
alorsquele compresseurse met en marcheet s'arrCte6
intervallesr_guliers.
Mode Fan Only (ventilateur uniquement)
UtilisezlemodeFanOnlyavec unevitessede ventilateur
r_gl_esurLow,Hedou Highpour faire circulerI'airet
lefiltrersansle refroidir.Etantdonn_ quele modeFan
Onlyne permet pasde refroidissement,le r_glagede la
temp6raturen'affiche pas.Latemp6raturede la pi6ce
s'affiche61'6cran.
REMARQUE.Lavitessede ventilateur auto nepeutCtre
utilis_eIorsqueleclimatiseurestsur le mode FanOnly.
Auto Fan Speed (vitesse du ventilateur auto)
R6glezlavitesseduventilateursurauto pour que
la vitessedu ventilateurseregleautomatiquement 6 la
vitessen6cessaire6I'obtentiondesr6glagesapportant
un niveaudeconfort optimal 6 la temp6rature
programm6e.
Silapiecedemande un refroidissementsuppl6mentaire,
la vitessedu ventilateuraugmenteautomatiquement.Si
la piecedemande mains
de refroidissement,lavitessedu ventilateurdiminue
automatiquement.
REMARQUE.Lavitessede ventilateur auto nepeutCtre
utilis_eIorsqueleclimatiseurestsur le mode FanOnly.
Fonction de conservation des r#glages apr#s une coupure de courant
En cas de panne ou d'interruption de courant, I'appareil 6 24 heures) 6tait utilis6e, I'appareil reprend son compte
red6marre automatiquement apr6s r6tablissement 6 rebours. Vous aurez peut-6tre besoin de programmer
de I'alimentation 61ectriqueet conserve les derniers une nouvelle heure.
r_glagesutilis_s.Silafonction Delay1-24hr(D_laidei
23
Page 24

A propos des commandes du climatiseur.
Information suppl@mentoire importante.
Direction de I'Air
Utilisez le levier pour r6gler la direction de Fairvers la
gauche ou vers la droite seulement.
Entretien et nettoyage du climatiseur.
Grille et BaTtier
Eteignez et d_branchez le climatiseur avant tout Pour le nettoyer, utilisez de I'eau et un d_tergent doux.
nettoyage. N'utilisez pas d'eau de Javel ou de nettoyants abrasifs.
Filtre _ Air
Lefiltre 0 air derriere la grille frontale dolt
_tre v@ifi6 et nettoy6 au bout de 30jours de
fonctionnement ou plus souvent si n6cessaire.
Pour retirer :
Ouvrez la grille d'entr6e en tirant vers le bas sur les
languettes des coins sup@ieurs de la grille d'entr6e
jusqu'0 ce que la grille salt dans une position 0 45
degr_s. Retirez le filtre.
Nettoyez le filtre avec de I'eau savonneuse tilde.
Rincez le filtre et laissez-le s6cher avant de le remettre
dans le climatiseur. Ne nettoyez pas
votre filtre au lave-vaisselle.
-&MISEENGARDE:NEfaites PAS
fonctionner le climatiseur sans le filtre sous peine de
le boucher avec de la pouss@e et de la charpie et de
r6duire son efficacit6
Languette
24
Serpentins E×t_rieurs
Lesserpentins situ6s du c6t6 ext@ieurdu climatiseur
doivent _tre r6guli@ement v@ifi6s.S'ilssont obstru6s
par des poussi@esou de la suie, il est possiblede les
faire nettoyer par des professionnels.
Comment InsUrer les Piles dons la T_l_commande
REMARQUES :
Retirez le couvercle du Iogement des piles
en le faisant glisser dans le sens indiqu6 par
la fl_che.
Ins@ez les nouvelles piles en vous assurant
que les p61es(+)et (-) de la pile sont orient6s
dans la bonne direction.
Remettez lecouvercle en le faisant glisser.
Utilisez2pilesalcalines AAAd'l,5 Volt. N'utilisez
pasde pilesrechargeables.
Retirezles pilesde lat616commandesivous
pr6voyezde ne pas utiliservotre climatiseur
pendant un certain temps.
Ne m61angezpasdespilesneuves avec des
pilesus6es.Nem61angezpas ensemble lespiles
alcalines,standard (carbone-zinc)ou rechargeables
(ni-cad,ni-mh,etc).
Page 25

JInstructions
de montage
Climatiseur]
I I--?-I Questions? Composez le 1.800.561.3344 ou visitez notre site web 6 : www.electromenagersge.ca
AVANT DE COMMENCER
Lisez ces instructions en%rement et c]ttentivement.
• IMPORTANT -Conservezcesinstructions
pour I'inspecteur @lectrique Iocol.
• IMPORTANT - Respectez tous les codes et
r_glements en vigueur.
• Remarque pour I'installateur - Assurez-vous de
remettre ces instructions Gu client.
Remerque pour le client - Conservez ces
instructions pour toute r_f_rence future.
Niveau de competence - L'instc]llc]tion de cet
c]ppc]re.ildemc]nde des connc]issc]nces de bc]se en
mecc]nlque.
D_lc]i d'e×_cution - Environ 1heure
Nous recommc]ndons que I'instc]llc]tion de ce
produit soit effectu_e pc]r deux personnes.
• L'instc]llc]teur est responsc]ble de I'instc]llc]tion
correcte de I'c]ppc]reil.
• Lc] pc]nne de I'c]ppc]reil due 5 une mc]uvc]ise
instc]llc]tion n'est pc]s couverte pc]r Ic]gc]rc]ntie.
• Vous DEVEZutiliser toutes les pisces fournies et
suivre Ic]procedure d'instc]llc]tion du climc]tiseur
d_crite dc]ns cette notice.
-AMISE EN GARDE:
Ne coupez pc]s ou n'enlevez pc]s, sous oucun
pr6texte, Io troisi@me broche de mise 6 Io terre du
cordon d'olimentotion.
Ne chongez pos Io fiche du cordon d'olimentotion
du climotiseur.
Un c(_bloge en oluminium du domicile peut
occosionner des probl@mes porticuliers-consultez
un 61ectricien qualifi&
OUTILLAGE NI:!CESSAIRES
Tournevis cruciforme Phillips
Tournevis 6 t_te plote
I
EXIGENCES I:!LECTRIQUES
( i/al) Certc]ins mod@lesn@cessitentune prise mise _ Ic]
Lc]fiche triphc]s@ec]vecterre r@duitle risque de choc
@lectrique.SiIc]prise murc]le que vous envisc]gezd'utiliser
est biphc]s@e,vous c]vezIc]responsc]bilit@et I'obligc]tion de
Ic]remplc]cer pc]r une prise triphc]s@ecorrectement mise
Ic]terre.
©
terre de 115/120 Volts AC,60 Hz,prot@g@epc]r
un fusible a c]ction diff@r@eou pc]run disjoncteur.
Certc]insmod@lesn@cessitentune prise mise _ Ic]
terre de 2:30/208Volts AC,prot@g@epc]r un
fusible a c]ction diff@r@eou pc]r un disjoncteur.
Ces mod@lesdoivent @treinstc]ll@ssur leur
propre circuit d@riv@pour @viterde surchc]rger
les circuits @lectriquesdu domicile qui peut
occc]sionner un risque d'incendie pc]rsurchc]uffe
des cables.
Croyon R_gle ou m_tre
Niveou Ciseoux ou couteou
Le cordon d'c]limentc]tion est @quip@d'un dispositif
d'interruption du coumnt. Un bouton d'essc]iet de
r@enclenchement est fourni sur le boTtierde Ic]prise. Vous
devez tester le m@cc]nismer@guli@rementen c]ppuyc]nt
d'c]bord sur le bouton TEST{essai}puis sur le bouton
RESET{r@enclenchement}Iorsque I'c]ppc]reilest brc]nch&
Si le bouton TEST{essai}ne bc]scule pc]sou si le bouton
RESET(r@enclenchement) ne reste pc]senclench@,cessez
d'utiliser votre climc]tiseur et c]ppelezun technicien de
service quc]lifi@.
25
Page 26

Instructions de montage
PII_CES INCLUES Joint de rail
sup#rieur (1)
IL'aspect peut varied
Joint d'_tGnch_it# de Io fen_tre 6
guillotine (fin, adh#sif au dos)
Ponneou en
accord#on
droit
lat#ral
Support en V (2)
Type Avis (10) Type B vis (2) Type C vis (4)
Ferrure de rebord
de fen6tre (2)
Ferrure de
verrouillage de
la fen6tre (2)
Boulon de type E
avec 2 6crous (4)
?
8
iY
@
Boulon de type E
avec 2 6crous (2)
26
Page 27

Instructions de montage
[] INSTRUCTION RELATIVE
.a,LA FENi:TRE
• Cesinstructionssontvalablespourunefen_trestandard(_
guillotine6deuxchassismobiles.Vousdevrezmodifierles
instructionspourlesautrestypesdefen_tres.
• Toutela ferrurede montagedoit_tresolidementfix@ au
bois,6 la ma¢onnerieou au m_tal.
• Laprised'alimentationelectriquedoitsetrouver6 portee
ducordond'alimentation.
• Suivezlesdimensionsindiqu@spourvotremodeledansle
tableauet surlecroquis.
,/,
t
18 1/2 po"
__26 po- 41 po
(Avec les panneaux
en accord6on)
I I
[] PRI_PARATION DU CLIMATISEUR
[] Tirez sur le panneau avant et retirez le filtre.
Retirez le panneau avant en le soulevant inclin_
[_] Retirez les quatre vis avant. Mettez-les de c6t#
pour la remise en place du capot avant.
[] Attrapez les deux coins inf#rieurs de la grille
tout en appuyant sur les c6t6s du Iogement
avec le bout des doigts. Tirez vers vous
pour lib6rer la grille puis sortez-la en levant.
REMARQUE : Ne tirez pas le bard inf@rieur
vers vous de plus de 3 po ou vous risquez
d'endommager les languettes de la grille.
INSTRUCTIONS RELATIVE .a,LA CONTRE-
D
FENi:TRE
Lecadrede la contre-fen_treemp_chele climatiseur
de penchervers I'exterieur,et doncde se drainer
correctement.Pourreglerceprobleme,fixezun morceau
de boisau rebordde la fen_tre.
MORCEAU DE BOIS
LARGEUR:2 po
LONGUEUR:Suffisammentlongpourseloger6 l'interieur
du cadrede la fen_tre.
I_PAISSEUR:PourdeterminerI'@aisseur,placezun
morceaudeboissur lerebord de lafen_trede fagon6 ce
que le morceaude boissoit ½ po pluselevequele dessus
du cadrede la contre-fen_treou du cadreenvinyle.
Fixezsolidement6 I'aidedevis ou de clausfournis par
I'installateur.
½ po plus 61ev6 que
le cadreenvinyle (sur
!
½ po plus_lev_ _ _ Bob
que lecadrede la--
contre-fen#trecadrede la _ RebordI-r--)
contre-fen_tre _ r_ Cadreen vinyle II
_ certaines fen_tres)
@Lorsque la grille frontale est retir@e, le panneau
de commande est toujours raccord# au
faisceau de fils. Tournez la grille de faqon (_voir
sa face artiste. Retirez les 2 vis pour s#parer le
battier du panneau de commande de la grille.
REMARQUE : Veillez a conserver ces vis. Elles
seront n#cessaires dans une #tape ult#rieure
de I'installation.
27
Page 28

Instructions de montage
PRI_PARATION DU CLIMATISEUR (suite)
%
Retirezlesvis de chaque c6t@du Iogement du
climatiseur. IVlettez-lesdans un endroit sOr.
NOTE: Veillez_ conserver ces vis. Ellesseront
n_cessaires dans une _tape ult_rieure de
I'installation.
Retirez et mettez de c6t# la vis de mise
E]
lu terre.Sortez le climatiseur de son Iogement
en le faisant glisser et en uttrapunt lu poign_e
du conteneur de fond et en tirant vers vous tout
en maintenant le Iogement. Ne tirez pas et ne
soulevez pas la zone d'#vacuation en mousse de
polystyrene.
Netirez pus et ne
;oulevezpus cette
d'endommuger
zone,
vous risquez
votre uppureil
PRI_PARATIONDU LOGEMENT(suite)
[]
Glisser chaque dispositif de retenue lat#ral sur
@
le bard de chaque panneau en accord#on.
L'illustration indique I'orientation de chaque
panneau en accord#on et chaque dispositif de
retenue lat#ral par rapport au capot depuis une
vue de dessus de I'appareil.
DISPOSITIF DE RETENUE LATERAL
PANNEAU DE FENETRE
DISPOSITIF DE RETENUE LATERAL
Glisser les panneaux en accord#on gauche et
@
droit dans les rails de montage sup#rieur et
inf#rieur.4
-.\
PANNEAU DE FENETRE
AVANT
PREPARATION DU LOGEMENT
r_ Fixez lejoint de rail sup#rieur au dessous du
rail sup#rieur.
[] Installez le rail de montage sup#rieur avec 4 vis
de type A de I'int#rieur du Iogement Appuyez
fermement pour enfoncer les vis dans lejoint et
travers le rail de montage sup#rieur.
Partie sup@ieure droite
rE] Fixer les dispositifs de retenue lat#raux sur le
capot (_I'aide de 6 vis de type A.
28
Page 29

Instructions de montage
D PREPARE THE WINDOW AND INSTALL
THE CASE
[_] D#coupez lejoint de la fen@tre 6 guillotine 6
la Iongueur ad#quate. D#collez la pellicule
protectrice et collez lejoint sur le dessous du cadre
de la fen_tre.
Ouvrez la fen@tre et marquez I'axe central
du rebord de la fen@tre.
Faites d61icatement glisser le Iogement dans
la fen@tre et centrez-le. Abaissez la fen@tre
derriere le rail de montage sup6rieur. Tirez le
bas du Iogement vers I'avant de faqon 6 ce
que le rail de montage inf6rieur soit plaqu6
contre I'arri6re du rebord de la fen@tre. Fixez le
Iogement au rebord de la fen@tre en utilisant
2 vis de type B pour un cadre de bois ou 2 vis
de type C avec les ferrures de verrouillage de
la fen_tre pour les autres types de fen_tres.
Percez des trous de guidage si n6cessaire.
Fs]PRI_PARER LA FENETRE ET POSER LE
CAPOT (suite)
r_ !onter le support en Vet la ferrure du support en
V _ I'aide d'un _crou et d'un boulon de Type F
Boulon et _crou de
Type E
Ferrure de Droit
fen_tre
rebordde _©"
Boulon et _crou de Type
Fpour support en V
Positionnez les supports en V sur le fond du
B]
Iogement pour qu'ils soient
proches du mur ext6rieur.
Fixez les supports en V
sur le fond du Iogement,
de chaque c6t& avec des
boulons de type F, 2 pour
chaque support.
r_ R6glez les ferrures de rebord de fen_tre
pour qu'elles reposent sur le rebord.
Support
en V
Rebord
2vis de type B
Ferrure
r_ Etirez les panneaux en accord6ons gauche
et droitjusqu'au cadre vertical de la fen6tre
6 guillotine. Percez des trous de guidage et fixez
les coins sup6rieurs et inf@ieurs 6 I'aide de 2 vis de
type C.
Vis de
type C
Rebord
Visde
type C
29
Page 30

Instructions de montage
[] PRI_PARER LA FENETRE ET POSER LE
CAPOT (suite)
-AMISE EN GARDE:
Pour preventez la verre brisez dans lesfen@tres,
sur le vinyle ou d'autres Vinyle I
fen@res pareillement
construites, attachez une
ferrure de verrouillage
de la fen@re (_la c6t@
du fen@re.
Fixez la ferrure de verrouillage de la fen@re (_I'aide
d'un vis de type C.
Bois
Cette unit@contient deux
ferrures de verrouillage de
fen@re.
_--I D_coupez lejoint d'@anch_it_ sup@ieur
en mousse 6 la largeur de la fen@re.
_-I Ins@ezla mousse entre la vitre et
la fen_tre pour
emp_cher Fair
etles insectes
de p_n@rer dans
la piece.
NOTE: Si lejoint
d'@anch_it_ fourni
ne s'adapte pas 6 votre fen@re, procurez-vous
Iocalement I'article appropri_ afin d'obtenir
une @anch_it_ adequate de I'installation.
| INSTALLATION DU CLIMATISEUR
DANS SON LOGEMENT (SUITE)
[] Remettez en place les deux vis de mise 0
la terre retir6es plus t6t, une de chaque c6t6 du
Iogement. IMPORTANT: Les vis de raise 6 la terra
doivent @treremises en place pour assurer une
raise 6 la terra ad@quate
Montez de nouveau la commande sur le bo?tierdu
panneau en remettant en place les 2 vis 6t6es plus
t6t.
Montez vis
Fixez la grille frontale en ins@ant les languettes
@
de la grille dans les fentes situ6es dans la partie
sup6rieure avant du Iogement. Poussez sur la grille.
| INSTALLATION DU CLIMATISEUR
DANS SON LOGEMENT
Faites glisser le climatiseur dons le Iogement par
%
le conteneur du fond. Ne poussez pas sur les
commandes, sur le boTtieren mousse de polystyrene
pour la sortie d'air ni sur lesserpentins 0 ailettes.
Assurez-vous que le climatiseur est correctement
positionn6.
N'appuyez pas
sur ceszones,
vous pourriez
endommager votre
appareil
Conteneur defond
Replacer lesvis.
r_ poser le filtre et la grille frontale.
r_ Brancher le climatiseur.
30
Page 31

Instructionsdemontagepouruneinstallation6tmvers un mur-En option
Le Iogement peut _tre install_ 6 travers un mur
dans une habitation existante ou neuve.
Veuillez lire enti_rement ces instructions, puis les
suivre 6tape par 6tape.
REMARQUE : Except_ pour les supports en V
(fournis), veuillez obtenir tous les mat_riaux
Iocalement pour I'installation du climatiseur 6
travers un mur.
I]] IMPORTANT
Uneinstallation 6 travers un tour n'est pas appropri_e
si une ou plusieursdes persiennessur lec6t_ou sur le
dessussont obstru_es par le tour.
Toutes les persiennes sur le c6t_ ou sur le dessus
doivent d_passer du c6t_ ext_rieur du tour.
Lec6t_ int_rieur du logement doit d_passer
suffisammentdens la piece pour _quilibrer l'appareil.
LeIogement doit _tre install_ de niveau de droite 6
gauche et l_g_rement pench_ de l'avant vers l'arri_re.
Utilisez un niveau, environ 1/2 bulle donnera la pente
correcte vers I'ext_rieur.
Unecorni_re de linteau est n_cessaire pour maintenir
lesbriques ou les blocs au-dessus
de I'ouverture.
Unsolin est n_cessaire et doit seprolonger
le long de I'ouverture pour _viter toute fuite
vers I'int_rieur du tour.
_] etirezle climutiseur de son Iogement, Pour
desinstructions purticuli@es,veuillezvous rd@er uux
Instructions de Montuge duns une fen@re.
[] IMPORTANT (suite)
Fixezle Iogement6 I'aidede 14 vis 6 bois ancr_es d'au
mains un poucedans la structure du tour.
REMARQUE•Sin_cessaire,percez destrous de guidage
pour permettre une installation correcte.Sile cadre est
trap grand, utilisezdes cales pour @iter toute distorsion.
ITI FINITION DE L'OUVERTURE DANS LE
MUR
-A] alfeutrez les quatre c6t6s du c6t6 ext@ieur du
Iogement pour 6viter que I'humidit6 ne p6n_tre
par lemur int@ieur. L'utilisation
d'un solin (rail d'6coulement) permettra davantage
d'6viter que I'eau ne s'6coule dans le tour et le
long du tour ext@ieur.
I :
Corn rede ll [
Colfeutrage_ -''---.._I _>_ HII| .-- u
EXTERIEUR _ 1__ INTERIEUR
Persiennes /
(le c6t6 et /I/V _ /
le dessus I _ / /
doivent I _ /
d6passer du I _ !_
c6t6 ext@ieur _ .4
-"-"-'-'-_Z_II !1''_ (s'ilyalieul
-- / Rail inf#fieur
dumud I --..__,1
Mo lure
[_ ssurez-vousqu'une prisemurule setrouve (_proximit_
de I'ouverture ou instullez-enune.
[_ ositionnez le Iogementduns I'ouvertureduns
le tour et pbcez les bandesde maintien en boisentre
le busdu Iogement et lesolin des deux c6t_sdu rail
inf_rieur.Ellesdoivent _tre de la m_me hauteur que le
rail inf@ieuret de la m_me Iongueurque I'ouverture
duns letour.
Remplissage des _
trousetcalfeutrage I-XX/I I_II
(au-dessuseten \X II II(I\III'III
dessousdusolin_/_X,,_Nlll_II "
Supports en V / v , !
_/_,&BII_! •- \
Solin(Rail / ogement ]nf6rieur
d'6coulement)
/ Fonddu Rail
Solin (Rail
d'6coulement)
Bande de maintien en bois
[_Placez leclimatiseur dans le Iogement. Pourdes
instructions particuli@res,veuillezvous r6f6rer aux
Instructionsde Montage dans une fen@tre.
31
)
Page 32

Avant d'appeler le service...
Causespossibles 9ue faire
Leclimatiseur • Assurez-vousquelaficheduclimatiseursoitbienbranchee
me_pasenmarche estdebranche, dansla prisemurale.
Lefusiblea sautd • V@ifiezla boTte_ fusible/_disjoncteursetremplacezlefusible
ledisjoncteurestouvert, ou rebranchezledisjoncteur.
IIy a unepannedecourant. • S'ilseproduitunepannedecourant,debranchezleclimatiseur
enlemettantenpositionOFF(arr_t).Ouandlecourantrevient,
attendez3minutesavantderemettreenmarcheledimatiseur,
pour_viterde declencherlasurchargeducompresseur.
Lemecanismed'interruption • AppuyezsurleboutonRESET(remiseenmarche)situesurlafiche
decourantestdeclanche, du cordonelectrique.
• SileboutonRESETnerestepasenfonce,arrCtezleclimatiseur
d'airetappelezuntechnicienqualifi_.
Ledimatiseurnerefroidit Lacirculationd'airestbloquee. • Assurez-vousqu'iln'yapasderideau,destoreoudemeuble
pasau_an_au'illedevrait quibloqueledevantdu climatiseur.
Lefiltre_airestsale. • Nettoyezlefiltreaumoinstousles30jours.Consulterlasection
Entretienetnettoyage.
Lachambre_taitchaude. • Apresavoirmisenmarcheleclimatiseur,attendez
quelachambreserefroidisse.
L'airfroids'echappe • V@ifiezlesgrilles6 registredeplancheret lesreprisesd'airfroid.
de lachambre.
Lesserpentinssontgelds. • Consultez"Leclimatiseurgele"ci-dessous.
Leclimatiseur Laglacebloquelacirculation • ReglezlescommandessurHighFan(vitesseduventilateurelev@)
gele d'airet emp_cheleclimatiseur ou HighCool(fortrefroidissement)et r_glezlethermostatsurune
de refroidirlachambre, temp@atureplus_lev_e.
DeI'eaucoule_I'ext@ieur IIfaittreschaudethumide. • C'estnormal.
Dereaucouled I'int@ieur Leclimatiseurn'estpas • Pourobtenirunebonne@acuationdeI'eau,assurez-vous
L'eausamasse dans
le plateau du fond
inclineversI'ext@ieur. queleclimatiseursoitI_gerementinclinedeI'avant
L'humiditeestextraitede
I'airdelachambreet passe
dansleplateaudufond.
du bottlerversI'ar@re.
• C'estnormalpendantunep@iodecourtedunsdesregions
peuhumides;normalpendantdesp@iodesplusIongues
dansdesr_gionstreshumides.
Bruits normau× de fonctionnement
VouspouvezentendreuncliquetisdO_deI'eauqui
estabsorbeeet estprojeteecontrelecondensateurles
joursde pluieo0quandily a beaucoupd'humidite.Cette
caract@istiquediminueI'humiditeetam_liore
lerendement.
Vouspouvezentendreleclaquementduthermostatquand
lecompresseursemetenmarcheets'arrCte.
DeI'eaus'amassedansleplateaudubaspendantles
periodesdegrandehumiditeous'ilpleut.Cetteeaupeut
deborderetcoulerdeI'appareildu c6teexterieur.
Leventilateurpeuttournerm¢mequandlecompresseur
nefonctionnepas.
32
Page 33

Notes.
33
Page 34

Notes.
34
Page 35

Climatiseur GE--Garantie Limit@e D'un An. www.electromenagersge.ca
Lesservices sous garantie sont dispenses par nos centres de
reparation ou par nos rEparateurs Customer Care®autorisEs.
Pour obtenir le service, appelez le 1.800.561.3344. Veuillez
foumir le numEro de sErie et le numEro de modEle Iorsque vous
appelez pour obtenir leservice.
Nous remplacerons "
i i
une ann_e
Ac0mPter dela date
d'uchat initial
Toute piece de leclimatiseur manifestant un vice de mat6riau ou de fabrication. Durant cette
p6riode de garantie limit6e d'une ann6e, IVlabefournira aussi,gratuitement, la main-d'oeuvre
et le servicede r6paration connexe pour le remplacement de la piece d6fectueuse.
Lesd_placements de service _ votre maison pour vous
apprendre 6 utiliser le produit.
Un montage, une livraison ou un entretien
d_ficient. Sivous avez un probl_me de montage
ou sile climatiseur n°apas la bonne capacit_ de
refroidissement pour son usage pr_vu, appelez votre
revendeur ou votre instellateur. Vous_tes responsable
de fournir une installation de raccordement _lectrique
convenable.
Lespannes occasionn_es par des modifications
au produit ou une utilisation non raisonnable, en
particulier une absence d'entretien raisonnable
iiiiiiiiiiii_iii
Le remplacement desfusibles de la maison ou la
r_activation des disjoncteurs.
Lespannes occasionn6es par la corrosion sur les
modules qui ne sont pas prot6g_s contre la corrosion.
Lesdommages occasionn_s par un mauvais voltage de
I'alimentation _lectrique, un accident, un incendie, une
inondation ou une calamit_ naturelle.
Lesdommages indirects et cons_cutifs 6 la propri_t_
personnelle occasionn_s par des vices possibles de
ce climatiseur.
Les dommages occasionn_s par la livraison.
et n_cessaire.
Dans lesemplacements commerciaux, la main-
d'oeuvren_cessaire pour d_m_nager I'appareil jusqu'6
un emplacement o5 il est accessible par un technicien
particulier.
EXCLUSION DE GARANTIES IMPLICITES - Votre seul et unique recours est la r_paration du produit
selon les dispositions de cette Garantie limit_e. Toutes les garunties implicites, incluant les
garunties de commercialit_ et d'ad_quation 6 un usage sp_cifique, sont limit_es 6 une annie ou 6
la p_riode la plus courte autoris_e par la I_gislation.
Cette garantie est valable pour le premier propriEtaire et tout autre propriEtaire du produit s'il achetE au Canada
pour utilisation domestique dans Canada. Le service 6 domicile sous gamntie sere foumi 16oO il est disponible et
dans les regions que Mabe considEre que I'offre de service est misonnable.
Darts certaines provinces, il est interdit d'exdure ou de limiter les dommages directs ou indirects. II est alors
possible que les limitations ou exclusions ci-dessus ne s'appliquent pas dans votre cas. La prEsente gamntie
vous confEre des droits juridiques spEcifiques. Vous pouvez bEnEficier d'autres droits, qui varient d'une province
6 I'autre. Pour connaTtre les droits dont vous bEnEficiez dans votre province, communiquez avec le bureau des
relations avec les consommateurs de votre region.
Garant : Mabe Canada Inc.,
Burlington, Ontario
3S
Page 36

Assistance _ la clientele.
Pour toute question ou pour un besoin d'assistance au sujet de votre appareil m@nager, consultez le site
Site Intemet GE www.electromenagersge.ca
' Internet ci-dessus, accessible 2/4heures parjour, chaque jour de I'ann@e!A partir du site, vous pouvez
t@l@chargerles manuels d'utilisation.
Studio de conception rdaliste www.electromenagersge.ca
Sur demande, GE peut foumir une brochure sur I'am@nagement d'une cuisine pour les personnes
6 mobilit@ r@duite.
Ecrivez: Directeur, Relations avec les consommateurs, Mabe Canada, Inc.
Bureau 310, 1 Factory Lane
Honcton, N.B. E1C 9H3
Pi_ceset accessoires
Ceuxqui d#sirent r#parereux-m@mesleurs#lectrom#nagers peuvent recevoir pi_ceset accessoires
directement 6 la maison (cartesVISA,IVlasterCardet Discoveraccept#es).
Lespmcddures expliqudesdonsle prdsent manuelpeuvent 8tre exdcutdespar n'importe quel utilisoteur.
GEn'offre pas deservicesde rdpamtion pour ceproduit. Nousvous recommandons fortement de ne pastenter de
rdporer vous-mSmele produit.
Voustrouverez dans lespagesjaunes de votre annuaire le num@rodu Centre de service Mabe le plus proche.
Autrement, appelez-nous au 1.800.561.3344.
www.electromenagersge.ca
Contoctez-nous www.electromenagersge.ca
Si vous n'@tes pas satisfait du service apr@s-vente dont vous avez b@n@fici@:
Premi@ement, communiquez avec les gens qui ant r@par@votre appareil.
Ensuite, si vous n'@testoujours pas satisfait envoyez tousles d@ails-num@o de t@l@phonecompris-au
Directeur, Relations avec les consommateurs, IVlabe Canada, Inc.
Bureau 310, 1 Factory Lane
[vloncton, N.B. EIC 9[vI]
36
Page 37

Instrucciones de seguridad ......... 38,39
Instrucciones de operaci6n
Controle .................................. 40-42
Cuidadoy limpieza
Bobinas para exteriores ...................... 42
Filtro de (]ire .................................. 42
Instrucciones de instalaci6n ....... 43-49
Solucionar problemas ................... 50
Sonidos de operaci6n normales .............. 50
Servicio al consumidor
Garantia ...................................... 54
Apoyo al consumidor ......................... 55
AEZZ8*
Producto etiquetado *ENERGYSTAR®
ENERGYSTAR
Como socio de ENERGY STAR®,
GEha confirmado que este
producto cumple los directrices
de ENERGYSTAR®relotivos ol
rendimiento energdtico.
Escriba los n_meros de modelo
y serie aqui:
# de Modelo
# de Serie
Puede encontmr estos n0meros
en unG etiquetG en el costGdo
del GcondicionGdor de Gire.
37
Page 38

INFORHACION IHPORTANTE DESEGURIDAD.
LEATODASLASINSTRUCCIONESANTES DE USAR.
Z iADVERTENCIA!
Porsu seguridad,se debe seguir la informaci6n en este manual para minimizarel riesgo de
incendios,descargas el6ctricaso lesionespersonales.
PRECAUCIONESDE SEGURIDAD
Use este electrodom6stico solamente para
el prop6sito determinado seg0n se describe
en el Manual del propietario.
Esteacondicionador de aire debe instalarse
correctamente de acuerdo con las
Instruccionesde instalaci6n antes de su uso.
Nunca desenchufesu acondicionador de
aire tirando del cable el6ctrico.Siempre
agarre firmemente elenchufe y tire de
61directamente hacia afuera.
Reemplaceinmediatamente todos los
cablesel6ctricosque se hayan pelado o que
sehayan dahado de alguna otra manera.
Un cable de corriente dahado nodebe
repararse,sinoque debeset sustituido pot
uno nuevoque seadquiera delfabricante.
No use un cableel6ctrico que muestre
evidenciasde deterioro,o dahos de
abrasi6n ensu superficie en alguno de sus
extremos.
Apague la unidad y desenchufesu
acondicionador de aire antes de limpiar.
GE no est6 no apoya que se le proporcione
ning0n servicio al acondicionador de aire.
Vehementemente recomendamos que
usted no intente proporcionar servicio al
acondicionador de aire usted mismo.
Porsu seguridad...noalmacene ni use
materiales combustibles, gasolina u
otros vapores o liquidos inflamables
en la proximidad de 6ste o alg0n otto
electrodom6stico.
Todoslos acondicionadores de aire
contiene refrigerantes,losque por Ley
Federaldeben set removidos antes de
desecharlos.Siusted planea deshacersede
alg0n producto que contenga refrigerantes,
p6ngase encontacto con la compahia que
seencarga derecoger su basura para que
le indiquen qu6 hacer.
Si el recept6culo no coincide con el enchufe,
un electricista calificado debe reemplazar el
recept6culo.
Estos sistemas de acondicionadores de
aire R410A requieren que los contratistas
y t6cnicos usen herramientas, equipos y
est6ndares de seguridad aprobados para
su uso con este refrigerante. NO use
equipamiento certificado s61opara
refrigerante R22.
38
COMO CONECTARLA ELECTRIClDAD
Bajoninguna circunstancia,corte o remueva la
tercera p0a (tierra)delcable el6ctrico.Enpos
de la seguridad personal,este electrodom6stico
debe siempreconectarse a tierra.
NO use un enchufe adaptador con este
electrodom_stico.
El cable el6ctrico de este electrodom6stico est6
equipado con un enchufe de tres p0as (tierra)
que combina con un tomacorriente est6ndar
de tres tomas de pared para minimizar la
posibilidad de una descarga el6ctrica.
El cable de alimentaci6n incluye un
dispositivo para interrupci6n de corriente.
Se incluye un bot6n de prueba y de reinicio
en el dispositivo. El dispositivo debe ponerse
a prueba peri6dicamente: primero se presiona
el bot6n de TEST(prueba)y luego RESET
(reinicia) mientras se encuentra enchufado al
tomacorriente. Si el bot6n TESTno se dispara
o si el bot6n RESETno queda enganchado,
deje de utilizar el acondicionador de aire y
comuniquese con un t6cnico calificado.
Pida a un t6cnico que inspeccione el
tomacorriente y el circuito para cerciorarse
de que el tomacorriente est6 conectado a
tierra de la manera apropiada.
Donde exista un tomacorriente de dos
tomas, es su responsabilidad y obligaci6n
personal hacer que dicho tomacorriente
sea reemplazado pot uno de tres tomas
con conexi6n a tierra.
Elacondicionador de aire deberia siempreestar
conectado a un tomacorriente individual con su
circuito devoltaje correspondiente.
Esto proporciona el mayor rendimiento y
ademhs evita que los circuitos del resto de
la casa se sobrecarguen, Io cual podria causar
incendios por el sobrecalentamiento del
cableado.
Ver las Instrucciones de instalaci6n, en la
secci6n Requisitos El6ctricos para los requisitos
especificos de conexi6n.
Page 39

GEApplionces.com
Z iADVERTENCIA!
USO DE PROLONGADORES
RIESGO DE INCENDIO. Podria ocasionar
lesiones graves o la muerte.
• NO use un prolongador con este
Acondicionador de Aire de Ventana.
• NO use protectores contra picos de tensi6n ni
adaptadores pare mOItiples tomacorrientes con
este Acondicionodor de Aire de Ventono.
LEA Y SIGA ESTAS INSTRUCCIONES DE SEGURIDAD
CUIDADOSAMENTE.
GUARDE ESTASINSTRUCCIONES
39
Page 40

Acerca de los controles en el acondicionador de aire
I_aslucesal ladodelosteclasdetoqueenelpaneldecontroldelacondicionadordeaimindicardnlosajustesseleccionados.
I_asfuncionesy elaspectopuedenvariar.
NOTA:Lapantallamuestrasiempre
latemperaturaambiente,exceptoaJ
configurarla temperaturaDefinidao el
Sincronizadorde retardo
O
e rFoo G?O
Auto
amHigh =' Cool
u Med m Energg Saver
Low m=Fan Onlg
q,2PoedJ
0 i
Controles del ocondicionodor de oire
Controles
0
0
@
O
0
La luzindica quela unidadest_ en el
modode Ajuste detemperaturao de
Tiempode retardo.
sincronizadorderetardo Aumentodesincronizador
Reducci6ndevelocidad
Aument°weducci@ de I _'_ __'_ deJventJJador
Laluz indica queel temporizador
de retardoest_ configurado.
Tecla de Power (Encendidol
Apaga y prende el acondicionador de aire.
AIencenderse,la pantalla mostrar6 la
temperatura ambiente.
Pan(alia
Muestrala temperatura ambiente o
el tiempo restante en el Sincronizador de
retardo. Huestra la temperatura Definida al
configurar la temperatura en los modos Cool
(Friolo de Energy Saver (Ahorro de energial.
Laluz de Ajuste se encender6 durante la
configuraci6n.
Teclasde TempAumento A/Reducci6n •
Usadopara ajustar latemperatura cuando
seencuentre en el modo Cool (Fria)o Energy
Saver (Aharra de energia).Laluzde Ajuste se
encender6 durante la configuraci6n.
Teclasde Sincronizador de retardo Aumento
• (+1/ Reducci6n• (d
Cadavez que toque lasteclas Aumento A/
Reducci6n • de launidad o losteclas Aumento
+/Reducci6n - en el control remoto definirc_
el tiempo de retardo al utilizar el Delay 1-24hr
timer (Sincronizadar de retarda 1-24 hi.
La luzde A]uste seencender6 durante la
configuraci6n.
Teclasde FanSpeed iVelocidad del ventiladod
Usadopara ajustar lavelocidad del ventilador
a Low (Bajol, Med(Mediol, High (Alto)o
Auto (Autom6tical en la unidad. NOTA:enel
control remoto, utilice los teclas Aumento +
/Reducci6n - velocidad de ventilador para
ajustar la velocidad del ventilador en Low (Bajal,
Med (Medialo High (Altol. Utilicela tecla Auto
para activar elventilador automcXico.
1-24hderetardo
Reducci6nde O
I deretardo
Selecci@dere°d° O _ _ I---F-_ ventilador
delventiJador0 I .4"_, I ,_ Aumentodevelocidad
ajustedetemperatura O '_P_ I O Encendido/apagadode
J
Encendidoautom4ticodel
launidad
Control remoto
Tecla de PIODO
O
Usado para ajustar el acondicionador de aire
al modo Cool (Frial,EnergySaver (Ahorro de
energiaJo Fan Only (Soloventiladod.
Teclasde Delay (Retardol/ Delay 1-24hr
0
(Retardo 1-24hJ
Delay ON (ENCENDIDORetardo_Cuando
elacondicionador de aireestc_apagado,
puede ajustarse para que se encienda
automcXicamente dentro de i a 24 horasen el
modo y configuraci6n de ventilador anterior.
Delay OFF(APAGADORetardo_Cuando el
acondicionador de aire est6 encendido, puede
ajustarse para que se apague automcXicamente
dentro de i a 24 horas.
C6mo realizar elajuste:
Pulse la tecla Delay ]-24hr (Retardo ]-24h1 en
la unidad o Delay pad (Retardol del control
remoto. Coda toque de los teclas Aumento • /
Reducci6n • en la unidad o los teclas Aumento
+/Reducci6n - en el control remoto definir6 el
temporizador en intervalos de i hora. La luz de
Ajustese encenderc_ durante la configuraci6n.
Para revisor el tiempo restante en el
Sincronizador de retardo ]-24 h, pulse la tecla
de Delay ]-24hr (Retardo ]-24h1 en la unidad
o Delay pad (Retardol en del control remoto.
Utilicelos teclas Aumento s •/ Reducci6n • en
la unidad o los teclas Aumento +/Reducci6n
- en el control remoto para definir un nuevo
tiempo, siIo desea.
Para cancelar el sincronizador, pulse la tecla
Delay ]-24hr (Retardo ]-24h1 hasta que la luz
de dicho control se apague.
40
Nota: Latemperatura por defecto que figura en la pantalla est6 en grados Fahrenheit (°F).Para modificar
la pantalla agrados Celsius (°C),mantenga presionados los botones Temp Increase (Incremento de Tem-
peratura) • Temp Decrease (Disminuci6n de Temperatura) • al mismo tiempo y durante 3 segundos.
Repita el proceso para volver a modificar la pantalla a grados Fahrenheit (°F).
Page 41

GEAppliances.c0m
No use en las condiciones e×ternas debajo
el punto de congelaci6n
Control remoto
Para garantizar una operaci6n apropiada, oriente
el control remoto hacia el receptor deseBaldel
acondicionador de aire.
Cerci6resede que no haya nada entre el
acondicionador de aire y el control remoto que
pueda bloquear la se_al.
Nodo Cool (Frio)
Use el modo Cool (Frio)aLow (Bajo),Ned (Nedio),
High (Alto)o Auto Fan SpeediVelocidad de
ventilador autom6tica) para enfriar. Use las teclas
de Temperature tTemperatura) Aumento • (+)
/Reducci6n • (-)para ajustar a la ternperatura
deseada entre 64°Fy 86°Fen incrementos de I°F.
Seusa un termostato electr6nico para mantener
la temperatura ambiente. Elcompresor har6
ciclo entre apagaclo y encenctidopara rnantener
la habitaci6n a la ternperatura deseada.Ajuste el
termostato a un nOmeromenor y el aire interno
seenfriar6 m6s.Si Ioajusta a un nOmeromayor,
la temperatura ctelaire interno se calentar6 m6s.
NOTA:sielaconcticionador de aire est6apagacto
y seenciencternientras est6 configuracto en un
Esteacondicionador de aireno es diseflado para
usaren temperaturas externas debajo el punto de
congelaci6n. Nouse en las condiciones externas
debajo el punto de congelaci6n.
Elreceptor de seBaltiene un rango m6ximo de
20 pies.
Cerci6resede que lasbater[as sean frescas y
se instalen correctamente segOnseindica en el
control remoto.
Elcontrol remoto cuenta con un im6n que
permite adherirlo a superficies met61icas.
ajuste Cool (Frio)o sise cambia de un ajuste de
ventilador a uno de Cool (Frio),puede que pasen
aproximadamente unos 3 minutos hasta que el
compresor arranque y comience el enfriamiento.
Descripciones de enfriamiento
Para enfriamiento normaI-Seleccione el modo
Cool (Frio)y ventilador High (Alto)o Ned (Nedio)
con una temperatura de ajuste media.
Para enfriamiento m6×imo-Seleccione el modo
Cool (Frio)y ventilador High (Alto)con una
temperatura de ajuste rnenor.
Para enfriamiento silencioso y enfriamiento
noctumo-Seleccione el modo Cool (Frio)y ventilador
Low (Bajo)con una temperatura de ajuste media.
Energy Sever Node (Nodo de ahorro de energia)
Controla el ventilador.
ON(ENCENDIDO_EI ventilador har6 un ciclo
de encendido y apagado con el compresor. Este
resulta en variaciones mayores en la temperatura
de la habitaci6n yen la humedad. Normalmente
usado cuando la habitaci6n no est6 ocupada.
NOTA:puede que el ventilador siga funcionando
durante un corto tiempo despu6s de desactivarse el
ciclo del compresor.
OFF(APAGADO_EI ventilador funciona todo el
tiernpo, rnientras que el cornpresor pasa por los
ciclosde encendidoy apagado.
Nodo de Fan Only (Solo ventiladofl
Useel modo Fanonly (Soloventilador) a velocidad
Low (Baia),Med(Media)o High(Alta)para
proporaonar circulaci6n de aire y filtraci6n sin
enfriamiento. Debido a que losniveles de ventilador
Onicamenteno proporcionan enfriamiento, no
se puede introducir una temperatura Definida.
Aparecer6 en pantalla la temperatura ambiente.
NOTA:laVelocidadde ventilador automdtica no
puede utilizarseen el modo Fenonly (Soloventiladod.
Velocidad de ventilador autom6tica
Indique la opci6n en Velocidad de ventilador
autom@ica para definir autom6ticamente la
velocidad necesaria para proporcionar una
configuraci6n de comodidad 6ptima con la
temperatura elegida.
Sila habitaci6n necesita m6s enfriamiento,
la velocidad del ventilador aumentar6
autom@icamente. Sila habitaci6n necesita menos
enfriamiento, la velocidad del ventilador descender6
autom6ticamente.
NOTA:la Velocidad de ventilador autom6tica
no puede utilizarse en el modo Fanonly (Solo
ventilador).
Funci6n de recuperaci6n de p6rdida de energia
Encasode la p6rdida de la energia o interrupci6n, la
unidad reiniciar6 autom6ticamente en las funciones
de la Oltimavezque fue usado una vez la energia
sea restablecida.Si la funci6n delDelay 1-24hr
(Retardo 1-24h) estaba definido,continuar6 la cuenta
regresiva.Esposible que usted necesiteajustar un
tiempo nuevo si as[Iodesea. 41
Page 42

Acerca de los controles en el acondicionador de aire.
Informaci6n importante adicionale.
Direcci6n del aire
Use la palanca para ajustar la direcci6n del aire hacia
la izquierda y la derecha solamente.
Cuidadoy limpiezadel acondicionador de aire.
Rejilla y cojo
Apague el acondicionador de aire y retire el enchufe
del tomacorriente de la pared antes
de limpiar.
Filtro de aire
Elfiltro de aire detr6s de la rejilla frontal debe
inspeccionarse y limpiarse por Io menos carla
:SOdiaso m6s a menudo si fuese necesario.
Para retirarlo:
Abra la rejilla de entrada empujando hacia abajo
las lengOetasen las esquinas superiores de la rejilla
de entrada, hasta que la rejilla seencuentre en una
posici6n de 45°. Retireelfiltro.
Limpieelfiltro con aguatibia yjab6n. Enju6gueloy
permita que se seque antes de colocarlo otra vez en
su lugar. Nolave el filtro en un lavavajillas.
PRECAUCION: NO OPEREel
acondicionador de aire sinel filtro debido a que la
suciedad y las pelusas Ioobstruir6n y reducir6n su
rendimiento.
Paralimpiar, useagua y un detergente suave.
Nouse cloro o materiales abrasivos.
LengOetas Leng@tas
42
Bobinas para e×teriores
Sedeben inspeccionar con frecuencia lasbobinas
en el ladoexterior del acondicionador de aire.Si
las mismas est6n obstruidas con suciedad u hollin,
podrian limpiarse profesionalmente.
C6mo insertar las pilas en el control remoto
[_ Retirela cubierta de la pila desliz6ndola
de acuerdo con la direcci6n de la flecha.
[_ Insertepilas nuevas que
polospositivos (+)y negativos (-) est6n
orientados correctamente.
j-_ Coloque la cubierta otra vezdesliz6ndola
en su hgar.
cerciorendose de los
NOTAS:
Use2 pilasalcalinas "AAA"de 1,5voltios.
No usepilasrecargables.
Retirelaspilasdel control remoto sino va
a usar el sistema por un periodo prolongado.
No mezcle bater[as nuevas y viejas. No mezcle
baterias alcalinas, est6ndar (carbono-cinc)
orecargables (ni-cad,ni-mh,etc.
Page 43

Acondicionador
JInstrucciones
de instalaci6n
J I-'?I _Preguntas?Llame 800.GE.CARES(800.432.2737)o visite nuestra p6gina en la red en: GEAppliances.com I
de aire
ANTES DE INICIAR
Lea estas instrucciones completa y
cuidadosamente.
• IMPORTANTE - Guarde estos
instruccionesporo usa delinspectorlocal.
• IMPORTANTE - Observetodoslos
c6digosy 6rdenes de ley.
• Nota alinstalador- Aseg0rese de dejorestos
instruccionescon elconsumidor.
• Nota alconsumidor - Conserve estos
instruccionesporo referenciofuturo.
• Nivelde destreza- Lo instalaci6nde este
oporoto requierede destrezosmec6nicos
b6sicas.
• Tiempo de ejecuci6n - Aprox.1 hora
• Recomendamos dos personas para
lainstalaci6nde esteproducto.
• Lo instoloci6nopropiodo es Ioresponsobilidod
delinstalador.
• La falladelproducto debido a una instalaci6n
inadecuada no est6cubierto
par lagarantia.
• Cuando instale este acondicionador
de aire, DEBEusar todas los piezas
suministradas y usar procedimientos adecuados
de instalaci6n.
-4,PRECAUCION:
Bajo ninguna circunstancia carte o remueva la
tercera p0a (conexi6n a tierra) del cable el6ctrico.
No cambie el enchufe en el cable el6ctrico
de este acondicionador de aire.
Los cables caseros de aluminio podrian presentar
problemas especiales. Consulte
a un t6cnico electricista calificado.
REQUISITOS ELI:!CTRICOS
Algunos modelos requieren tomacorrientes de
@
El enchufe de tres pOas con conexi6n atierra
minimiza la posibilidad de descargas el6ctricas. Si
el tomacorriente de la pared que usted planea usar
solamente tiene 2 tomas, es su responsabilidad hacer
queun t6cnico Io reemplace par uno de tres tomas
con conexi6n a tierra.
©
Elcable de alimentaci6n incluye un dispositivo para
interrupci6n de corriente. Se incluye un bot6n de prueba
y de reinicio en el dispositivo. El dispositivo debe ponerse
a prueba peri6dicamente: primero se presiona el bot6n
de TEST (prueba) y luego RESET(reinicio) mientras se
encuentra enchufodo al tomacorriente. Si el bot6n TEST
no se dispora o si el bot6n RESETno queda engonchado
deje de utilizar el ocondicionodor de oire y comuniquese
con un t6cnico colificodo.
115/120 voltios de corriente alterna y 60 Hz
conectados a tierra, protegidos con un fusible
de dilataci6n de tiempo de 15 amperios
o un cortacircuitos.
Algunos modelos requieren 230/208 voltios,
de corriente alterna, protegidos par un fusible
de dilataci6n de tiempo
o un cortacircuitos. Estos modelos deberian
instolorse en un romol exclusivo del circuito
para un rendimiento m6s notable y paro
prevenir sobrecorgas en los circuitos de
cableodos de su casa o aportamento,
Iocual podria representar un riesgo
de incendio par el sobrecolentomiento de los
olombres.
43
Page 44

Instrucciones de instalaci6n
HERRAMIENTAS QUE NECESITAR_,
Undestornilladorde estrella
PARTES INCLUIDAS
(Apariencia puede variar)
Rielde
montaje
superior
Tijeraso cuchilla
Un destornillador
con hoja plana
Nivel
Junta del riel superior (1)
J
L6piz
Unareglao cinta m@rica
Sello del marco de la
ventana
(fino, con adhesivo
en la parte posterior)
acorde6n
derecho
Riel lateral(2)
Soportes en V (2)
Tipo A Tipo B Tipo C
tornillos (10) tornillos (2) tornillos (4)
Soporte angular Trabas para
para alf6izar (2) marcos (2)
44
Perno tipo
Econ 2
tuercas (4)
@
Perno tipo
F con 2
tuercas (2)
Page 45

Instrucciones de instalaci6n
ri]
REQUISITOS PARA LA VENTANA
• Estas instrucciones son para una
ventana est6ndar de dos pliegues.
Usted necesitar6 modificar el proceso para otros
tipos de ventanas.
• Todas las partes deapoyo deben quedar totalmente
aseguradas a algQn metal, mamposteria o a la
madera.
• Eltomacorrienteel6ctricodebeestaralalcancedelcable
el6ctricodelacondicionadorde aire.
• Sigalasdimensionesde latabla y lailustraci6nseg0nsu
modelo.
t
18 1/2"
i
26" - 41" ! "
(con paneles de acorde6n)
• I l
I I
IYI REQUISITOS DE UNA VENTANA
DE TORM ENTAS
Unmarco deventana de tormentas no permitir6 que
el acondicionador de aire se incline hacia el exterior y
evitara que drene apropiadamente.Parasolucionareste
problema,adhiera un pedazode madera ael umbral.
PEDAZOSDE MADERA
ANCHO: 2"
LONGITUD: Lo suficientemente largo como para
ajustar en el interior del marco de la ventana.
GRUESO:Paradeterminar el grueso, coloque un pedazo
de madera en el umbral para hacerla 1/2" m6s alta que
la parte superiordel marco de laventana de tormentas
o del marco vinilo.
P6guelo firmemente con clavos o con tornillos
proporcionados por el instalador.
1/2" m6s alto
que el marco
de ventana de __
tormentas
Marcode
ventana de
tormentas
_ Umbralrl_
" F_____.., tVtarcovinilo 11
1/2" mas alto que el marco
vinilo (en algunas ventanas)
[ _/''j_ #/'_ ivtadera
ITIPREPARE EL ACONDICIONADOR DE AIRE
[] Baje el panel frontal y quite el filtro. Quite el panel
frontal levant6ndolo hacia arriba en un 6ngulo.
r_ Quite los cuatro tornillos frontales, cons@velos para
volver a instalar la carcasa frontal.
D Tome las esquinas inferiores de la parrilla mientras
presiona hacia adentro sobre los costados de la
carcasa con sus dedos. Tire hacia afuera para
liberar y lev6ntelo.
NOTA: No tire del borde inferior hacia usted m6s de
3" porque puede da_ar las leng_etas de la parrilla.
t
FRENTE
[] Cuandose retire la parrilla del frente, el panel de
control a0n seencontrar_ adjunto porun ames. Gire
la parrilla de modoque puedaver la partetrasera de
la misma. Retire los 2 tornillos para separar el espacio
del panel de control de la parilla NI:ITA:Aseglirese de
guardarestos tornillos. Los necesitara mas adelante
en la instalacion.
45
Quite tornillos
Page 46

Instrucciones de instalaci6n
[] PREPARE EL ACONDICIONADOR DE AIRE
[] Quite los tornillos de cada lado de la carcasa.
Cons6rvelos en una ubicaci6n segura.
NOTA: Aseg6rese de guardar estos
tornillos. Los necesitar6 m6s adelante en la
instalaci6n.
FRENTE
Quite y conserve el tornillo de cable a tierra.
E3
Deslice el acondicionador de aire de la carcasa
tomando la manija de la bandeja inferior y
tirando hacia adelante mientras se sujeta la
carcasa. No tire o levante el 6tea de descarga
de poliestireno
II-_-_ 'o"°_iJi"l_'ll_ ,o _,,o,,o• o°° _ porque
II II o,,,,o,,,oo,o....o°o,,, ,
_i?___ levente
II II --------_-_"_J_ este zone
i ii,o,,,,,o,,iNiiiiijiiiij0°,,,,,,.,,°,,,,,,.,,.,,,°,,,o,,,,,,o,,,,.,,,, p :voc r e_ .
_i_i_!_,,_,,,, ......
°"'°iiii_ iii_i• _"°"°°_llllll_lll_llll
,_,,,ob ,o ,o ,_ _ _,,o II _ueden
No tire o
0,,o,,,i_iii_iii_iBl,,lll_l,,_lll_l_ll,,l,,,011,,_ll_lII_lll_lll_un,ded.
4 PREPARE LA CARCASA
Deslice cada soporte por el extremo de cada
r_ panel correspondiente. La figura muestra la
orientaci6n de cada panel de acorde6n y junta de
soporte lateral relativos ala caja desde una vista
superior de la unidad.
Soporte lateral
Panel para cubrir la ventana
SoporteI
Panelpara cubrir laventana
r_ Deslice los paneles de acorde6n de izquierda a
derecha sobre los rieles de montaje superior e
inferior.
Izquierdo superior Derecho superior
FRENTE
D PREPARE LA CARCASA
F1 sujete la junta del riel superior ala parte
inferior del riel superior.
r_ Instale el riel de montaje superior con/4 tornillos
tipo A desde la parte interior de la carcasa.
Presione firmemente para introducir los tornillos
dentro de la junta y a trav6s del riel de montaje
superior.
T ' '
rE1 Adjunte los soportes laterales ala caja usando 6
tornillostipo A.
46
Page 47

Instrucciones de instalaci6n
PREPARE THE WINDOW AND INSTALL
D
THE CASE
Corte elsellode la banda de laventana a
%
la Iongitud apropiada. Despeguela parte posterior
y pegue el selloa la parte inferior de la banda dela
ventana.
Abra la ventana y marque el centro del alf6izar
%
de la ventana.
Con cuidado, deslice la carcasa dentro de la
©
ventana y c6ntrela. Baje la ventana detr6s del
riel de montaje superior. Tire de la parte inferior
de la carcasa hacia adelante para que el riel
de montaje inferior quede firme contra la parte
trasera del alf6izar de la ventana. Instale la
carcasa en el alf6izar de la ventana utilizando
2 tornillos tipo B para un marco de madera o
dos tornillos tipo C con oporte para bloqueo de
ventana para otros tipos de ventanas. Perfore
orificios piloto, sifuera necesario.
I-_ PREPARE LA VENTANA E INSTALE LA
CAJA
r_ Enlaceel soporte env y la ficha del soporte en V
con una tuerca y un tornillo Tipo F.
Tornillo y tuerca
tipo E
Izquierda
Soporte
angular _ ®
del alf_izar c_J l _ ¢
"x/
Tornillo y tuerca tipo F
para soporte en V
Coloquelos soportesen
©
Ven la basede la carcasa
para que est6n cerca de ,-i?_.,_J__
la pared exterior, sujete lill]__
el soporte en v a cada ]j _ -_
lado de la parte inferior
de la carcasa con pernostipo
F,2 para cada soporte, rteenV
r_ Ajuste lossoportes angulares del alf6izar de modo
que descansen sobre elalf6izar.
c_
AIf@izar
2tornillos Tipo B
)orte
[] Extienda lospaneles en acorde6n izquierdo
yderecho hacia los marcos verticales de
la ventana. Perforeorificiospiloto y sujete
las esquinas superiorese inferiores con
2 tornillos tipo c.
__L____LJl
Tornillos
Tipo C
Tornillos
TipoC
47
Page 48

Instrucciones de instalaci6n
I-_ PREPARE LA VENTANA E INSTALE LA
CAJA
I-ffl-&PRECAUCION"
Enventanas construidas de vinil o de similar
construcci6n, conecte el soporte de cierre de la
ventana a el marco de la Vinilo
ventana para prevenir da_o a
la ventana y vidro
quebrado.
Conecte el soporte de cierre
de la ventana con uno tornillo
Esta unidad cuenta con dos fichas
tipo C.
para bloqueo de ventana
IT-] corte la junta de espuma superior de la ventana al
ancho de la ventana.
Rellene la espuma entre
m
el vidrio y la ventana
para evitar que aire e
insectos
se introduzcan en
la habitaci6n.
NOTA:Silajunta provistanoesadecuadapara su
ventana,obtenga elmaterialapropiadoIocalmente
pararealizarunaadecuadainstalaci6ndesellado.
INSTALE EL ACONDIClONADOR EN LA
CARCASA
[-_ Vuelva a instalar los 2 tornillos quitados antes,
uno en cada lado de Ja carcasa. IMPORTANTE:
Los tornillos de cone×i6n a tierra deber6n ser
reinstalados para asegurar una cone×i6n a
tierra adecuada.
D Reinstale el control en el espacio del panel
reemplazando los 2 tornillos que retir6 previamente.
[] sujete la parrilla frontal a la carcasa
introduciendo las lengQetas de la parrilla dentro
de las ranuras de la parte superior frontal de la
carcasa. Presione la parrilla hacia adentro.
[] INSTALE EL ACONDIClONADOR EN LA
CARCASA
Desliceel acondicionador de aire dentro de la
%
carcasa de la bandeja inferior. No haga presi6n
sobre los controles, carcasa de poliestireno de
la descarga de aire o las serpentinas de aletas.
Verifique que elacondicionador de aire se
encuentre firmemente asentado.
;5 j;:
No presione
en estas 6reas
porque puede
dar_arsela
unidad.
inferior
[_] Reemplace los tomillos.
[] Instale el filtro y la rejilla frontal.
[] Enchufe el acondicionador de aire.
48
Page 49

Instrucciones de Instalaci6n a Trav s de la Pared-Opcional
Lacarcasa puede instalarse a travas de la pared en
construcciones existentes y nuevas.
Leapor completo y luego siga todos lospasos.
NOTA:Con excepci6n de los montajes de soportes en V
(incluidos), obtenga todos los materiales en forma local
para montar el acondicionador de aire a trav_s de la
pared.
I_ IMPORTANTE
Lainstalaci6n atrav_s de la pared no esapropiada si
alguna de las persianas laterales o superiores
de la carcasa quedar6n obstruidas por la pared.
Todas las persianas laterales y superiores de
lacarcasa debenproyectarse sobre la pared exterior
de la pared.
Elladointerior de la carcasa debe proyectarse dentro
de la habitaci6n Io suficiente para potenciar al m6ximo
el equilibrio de la unidad.
Lacarcasa debe estar instalada de lado alado y con
una pequeffa inclinaci6n del frente hacia la parte
trasera. Utilice un nivel; la inclinaci6n correcta de la
carcasa hacia el exterior no deber6 ser de m6s de 1/2
burbuja.
Serequiere un 6ngulo de dintel para sostener ladrillos
o bloques sobre la abertura.
Serequiere un revestimiento deaislaci6n que
debe extenderse por la Iongitud de la abertura para
asegurar que no haya p_rdidas en lascavidades
internas.
q)uiteel acondicionador de aire de la caja.
Para instrucciones espec[ficas,consulte las
Instrucciones de instalaci6n en una ventana.
-_AsegOresede quehaya un tomacorriente cerca de la
ubicaci6n del orificio o efectOearreglos para instalar un
tomacorriente.
[] IMPORTANTE (cont.)
FUecon 14 tornillos para madera sujetospor Iomenos
una pulgada dentro de la estructura desoporte de
la pared.
NOTA:Pefforeorificiospiloto,sifuera necesario,parauna
instalaci6nadecuada.Sielarmaz6n esm6sgrande,utilice
cutlas para prevenirla deformaci6nde la carcasa.
E] TERMINE LA ABERTURA
DE LA PARED
_Utilice calafateo en los cuatro costados del
ladoexterior de lacarcasa para que no
ingresehumedad a laparte interna. Elusode
revestimiento deaislaci6n (rielde goteo)evitar6
aOnm6s el ingreso deagua dentro de lapared y
en la parte exterior del edificio.
Calafate°_111 r_4_-- i_iC_de_dre_eaI
EXTERIOR
Persianas de
aire (la parte
supedory
los costados /
deben
proyectarse
sobre el lado
externo de
la pared)
Relleno de
y calafateo
aislaci6n)
Soportes en V Riel
iS
,.V: Riel inferior
Revestimiento de
aislaci6n (riel de
goteo)
INTERIOR
J
de la carcasa inferior
Coloquela carcasa en la abertura de lapared y
coloque guias de soporte de madera entre la parte
inferior de la carcasa y el revestimiento de aislaci6n
sobre ambos lados del riel inferior. Deben serde la
misma altura del riel inferior y de lamisma Iongitud de
la abertura de la pared.
Revestimiento de aislaci6n
(riel de goteo)
Gufas de soporte de madera
B]
Coloqueel acondicionador de aire dentro de la
carcasa. Parainstrucciones especificas,consulte
las Instruccionesde instalaci6nen una ventana.
49
Page 50

Solucionar problemas.
Causasposibles Qu6hacer
noenciende estddesconectado, enchufadototalmenteeneltomacorriente.
Elacondicionadordeaire Elflujodeaireestdrestringido. • Cerci6resedequenoexisteningunacortina,persianao
noenfriacomodeberio mueblebloqueandoelfrentedelacondicionadordeaire.
Elacondicionadordealre Elhielobloqueaelflujo • ColoqueloscontrolesenHighFan(VentiladorAlto)6HighCool(Frfo
sees_dcongelando deairehaciaelacondicionador Alto)y ajusteeltermostatoa unatemperaturemdsalta.
Elacondicionadordeaire • Cerci6resedequeelacondicionadordeaireestd
Elfusiblesedispar6/ • Inspeccionelosfusibles/ cajadeinterruptoresdela casa
elcortacircuitossedispar6, yreemplacecualquierfusibleo reajusteelinterruptor.
Interrupci6nenel
suministroel6ctrico.
Eldispositivodeinterrupci6n • Presioneelbot6nRESETubicadoenelcabledealimentaci6n.
decorrientesehaactivado. • Sielbot6nRESETnosemantieneensulugar,noutilicemds
Elfiltrodeaireestdsucio. • Limpieelfiltrocada30dfasporIomenos.Verlasecci6n
Lahabitaci6npodrfahaber • Cuandoelacondicionadordeaireseenciende,usted
estadocaliente, necesitadarletiempoparaqueenfri_lahabitaci6n.
Elairefifo seestdescapando. • Cerci6resedequelosregistrosdelacalefacci6nnoestdn
Lasbobinasdeenfriamiento • Ver"Elacondicionadordeaireseestdcongelando"mdsadelante.
secongelaron.
deaireevitandoqueseenfrfe
la habitaci6n.
• Launidadsereiniciardautomdticamentecon laconfiguraci6n
utilizadapor Oltimavezluegodereestablecerlaelectricidad.
• Existeunretrasodetiempoporprotecci6n(deaproximadamente
3 minutos)paraevitarladesconexi6nporsobrecargadelcompresor.
Porestaraz6n,esposiblequelaunidadnocomienceaenfriarde
formanormalhastatranscurridos3 minutosdesdequevolvi6a
encenderse.
elacondicionadorde aireycomunfqueseconuntecnicocalificado.
deCuidadoy limpieza.
abiertosyseencuentranretornandoelairefifo.
Hayaguagoteandoafuera TiempohOmedoycaliente. • Estoesnormal.
Hayaguagoteandoene Elacondicionadordeaire • Paradrenarelaguaapropiadamente,cerdoresedeque
interiordelahabitaci6n noestc]inclinadohaciaafuera, elacondicionadorde aireestc]inclinadoligeramente
Seacumulaaguaen
la bandeja
Lahumedadremovidadelaire
ysedrenahastalabandeja.
desdeelfrentehaciaatrcis.
• Estoesnormalpor uncortoperbdoendreasconpoca
humedad;normalporunperbdo detiempomcispostergado
enc]reasmc]shOmedas.
Sonidos de operaci6n normales
Quiz6sescuche un sonido met61icocausado por
el agua tomada y tirada contra el condensador
en los dias Ihviosos o cuando lahumedad
esalta. Estacaracteristica de dise_oayuda a
remover
la humedad y mejora la eficiencia.
Quiz@sescuche que el termostato hace clic
cuando el compresor hace ciclo entre encendido
y apagado.
Elagua seacumula en la bandeja durante dias
Iluviososocon mucha humedad. Elagua podria
derramarse y gotear desde el lado externo de
la unidad.
Elventilador podria funcionar aun si el compresor
no Io hace.
50
Page 51

I_I O _CI S. GEAppliances.com
51
Page 52

Notas.
52
Page 53

I_I O _CI S. GEAppliances.com
53
Page 54

Garantiadesu acondicionador deaire-garantia limitada deun afio.
Todos los servicios de garantia los proporcionan nuestros
Centros de Reporoci6n de Fdbrico o nuestros tdcnicos Customer
Core®outorizodos. Poro concertor uno cito de reporoci6n,
en Iineo, 24 horos ol dio, visitenos ol ge.com, o llama o1800.
GE.CARES(800.432.2737). Cuondo llama poro solicitor servicio,
par favor tango o mona el nOmero de serie y el nOmero de
modelo.
GE reemplazar6:
Cualquier parte del acondicionador de aire quefalle debido a defectos enlos materiales o en
A partir de la fecha
de la compra original
Viajes de servicio a su casa para mostrarle c6mo
funciona elequipo.
Instalaci6n o entrega inapropiada, o mantenimiento
impropio. Si usted tiene un problema durante la
instalaci6n, o si su acondicionador deaire no tiene la
capacidad de enfriamiento que usted necesita, p6ngase
en contacto con nuestro distribuidor o instalador.
Usted esresponsable de proporcionar las facilidades
de conexi6n el_ctrica necesarias.
Fallo del producto resultante de modificaciones al
producto o debido a uso irrazonable incluyendo no
proporcionar mantenimiento razonable y necesario.
la fabricaci6n. Durante esta garantia limitada de un aflo, GEtambi6n proporcionar6, sincosta
alguno,toda la mona de obra y elserviciorelacionado-para reemplazarpartes defectuosas.
Grape aqui su recibo.
Se requiere facilitar prueba
de la fecha de compra original
para obtener un servicio
bajo la garantfa.
Reemplazode fusibles de la casa o reajuste del sistema
de circuitos.
Fallos debido a la corrosi6n en modelos que no est6n
protegidos contra la corrosi6n.
Da#o al producto causado por voltaje inapropiado hacia
el equipo, accidentes, incendios, inundaciones o actos
de la naturaleza de fuerza mayor.
DaSosincidentaJesoconsecuenciaJescausados por
defectos posibles con este acondicionador deaire.
Daffos despu_s de la entrega.
Enlocalescomerciales,la mano de obra necesaria para
retirar la unidad hacia un lugar para revisi6npor parte
de unt_cnico individual.
EXCLUSION DE GARANTiAS IMPLiCITAS--Su (_nico y exclusivo derecho es la reparaci6n del producto,
tal y como se indica en esta Garantia limitada. Cualquier garantia implicita, incluyendo las garantias
implicitas de comerciabilidad o adecuaci6n para un fin determinado, est6n limitadas a un afio o el
periodo de tiempo m6s breve permitido por la ley.
Esto gomntia se extiende al compmdor original y cualquier comprador posterior deproductos compmdos pare usa
residenciol dentro de Estodos Unidos. Si el producto estd situodo en un dreo qua no dispone de servicio par porte
de un proveedor de servicio outorizodo de GE,podfio tenet qua hocerse cargo de los castes de envlo o bien
podfio solicitdrsele qua Ileve el producto o uno centro de servicio de GE outorizodo poro reolizor Io reporoci6n.
En Alaska, Io gorontio excluye el costa de envlo o los visitos de servicio o su coso.
Algunos estodos no permiten Io exclusi6n o los limitociones de dohos incidentoles o consecuencioles. EstogoronEo
do derechos legoles espedficos, y usted podfio tenet otros derechos qua voriordn de estodo o estodo. Poro saber
cudles son sus derechos legoles, consulte o Io oficino de osuntos del consumidor local o Io oficino del Attorney General
en su Iocolidod.
$4
Garante: General Electric Company. Louisville, KV 40225
Page 55

Apoyo al consumidor.
P6ginaWeb de GEAppliances GEApplionces.com
CTiene alguna pregunta sabre su electrodom6stico? iPruebe la p6gina Web de GE Appliances 2/4horas al dia,
cualquier d[a del aBo! Para mayor conveniencia y servicio mc_sr6pido, ya puede descargar los Manuales de los
Propietarios, pedir piezas o incluso hacer una cita en I[nea para que vengan a realizar una reparaci6n.
RealLifeDesignStudio(Estudiodedise_opara lavida real)GEAppliances.com
GEapoya el concepto de Dise_o Universal-productos, serviciosy ambientes que pueden usar gente de todas
lasedades, tama_os y capacidades. Reconocemosla necesidadde dise_ar para una gran gama de habilidades
y dificultades fisicas y mentales. Param6s detalles cobre las aplicaciones de GEDise_oUniversal,incluyendo
ideas de dise_o para la cocina para personas con discapacidades, mire nuestra p6gina Web hay mismo. Para
personas con dificultades auditivas, favor de Ilamar al 800.TDD.GEAC(800.8:33.4322).
Piezasy accesorios GEAppliances.com
Aquellosindividuos con la calificaci6n necesaria para reparar sus propios electrodom6sticos pueden
pedir que se les manden laspiezas o accesorios directamente a sus hogares (aceptamos lastarjetas
VISA,MasterCardy Discover).Haga su pedido en I[neahay,24 horas cada dia o Ilamar par tel6fono
a1800.626.2002durante horas normales de oficina.
Lasinstrucciones descritas en este manual cubren los procedimientos a seguir par cualquier usuario.
GEno estc_no apoya que se le proporcione ning0n servicioal acondicionador de aire.Vehementemente
recomendamos que usted no intente proporcionar servicioal acondicionador de aire usted mismo.
P6ngaseen contacto con nosotros GEAppliances.com
Sino estc_satisfecho con el servicioque recibe de GE,p6ngase en contacto con nosotros en nuestra pc_gina
Web indicando todos los detalles asicoma su n0mero de tel6fono o escribanos a:
General Manager, Customer Relations
GEAppliances,Appliance Park
Louisville,KY/40225
55
Page 56

ConsumerSupport.
GEAppliances Website In the U.S.A.:GEApplionces.com
Have a questionor need assistancewith your appliance?Try the GEAppliancesWebsite 24 hours a day,
any day of the year! Forgreater convenience and faster service,you can now download Owner's Manuals,
or even order parts on-line. InCanada:www.GEAppliances.ca
RealLife DesignStudio Inthe U.S.A.:GEAppliances.com
GEsupports the Universal Designconcept-products, servicesand environments that can beused by
people of all ages,sizesand capabilities. We recognizethe need to designfor a wide range of physical
and mental abilities and impairments. For details of GE'sUniversalDesignapplications, including kitchen design
ideasfor people with disabilities,check out our Website today. Forthe hearing impaired, pleasecall 800.TDD.
GEAC(800.833.4322).
In Canada,contact: Manager, Consumer Relations,MabeCanada Inc.
Suite310, 1 Factory Lane
Moncton, N.B.E1C91v13
Partsand Accessories
Individuals qualified to service their own appliances can have parts or accessoriessent directly to their homes
(VISA,MasterCard and Discovercards are accepted).Order on-line today, 24 hours every day or
by phone at 800.626.2002 during normal businesshours.
Instructions contained in this manual cover procedures to be performed byany user.GEdoes not support any
servicingof the air conditioner. We strongly recommend that you do not attempt to servicethe air conditioner
yourself.
Customers in Canada should consult the yellow pages for the nearest Mabe service center,
or call 1.800.561.3344.
Contact Us
If you are not satisfied with the serviceyou receivefrom GE,contact uson our Website with all the details
including your phone number, or write to: General Manager, Customer Relations
GEAppliances,Appliance Park
Louisville,KY80225
In Canada:www.GEAppliances.ca,or write to: Director, Consumer Relations,Mabe Canada Inc.
Suite310, 1 Factory Lane
Moncton, N.B.EIC9M3
In the U.S.A.:GEApplionces.com
In the U.S.A.:GEAppliances.com
Printed in China
 Loading...