

Page 1
©
ge.com
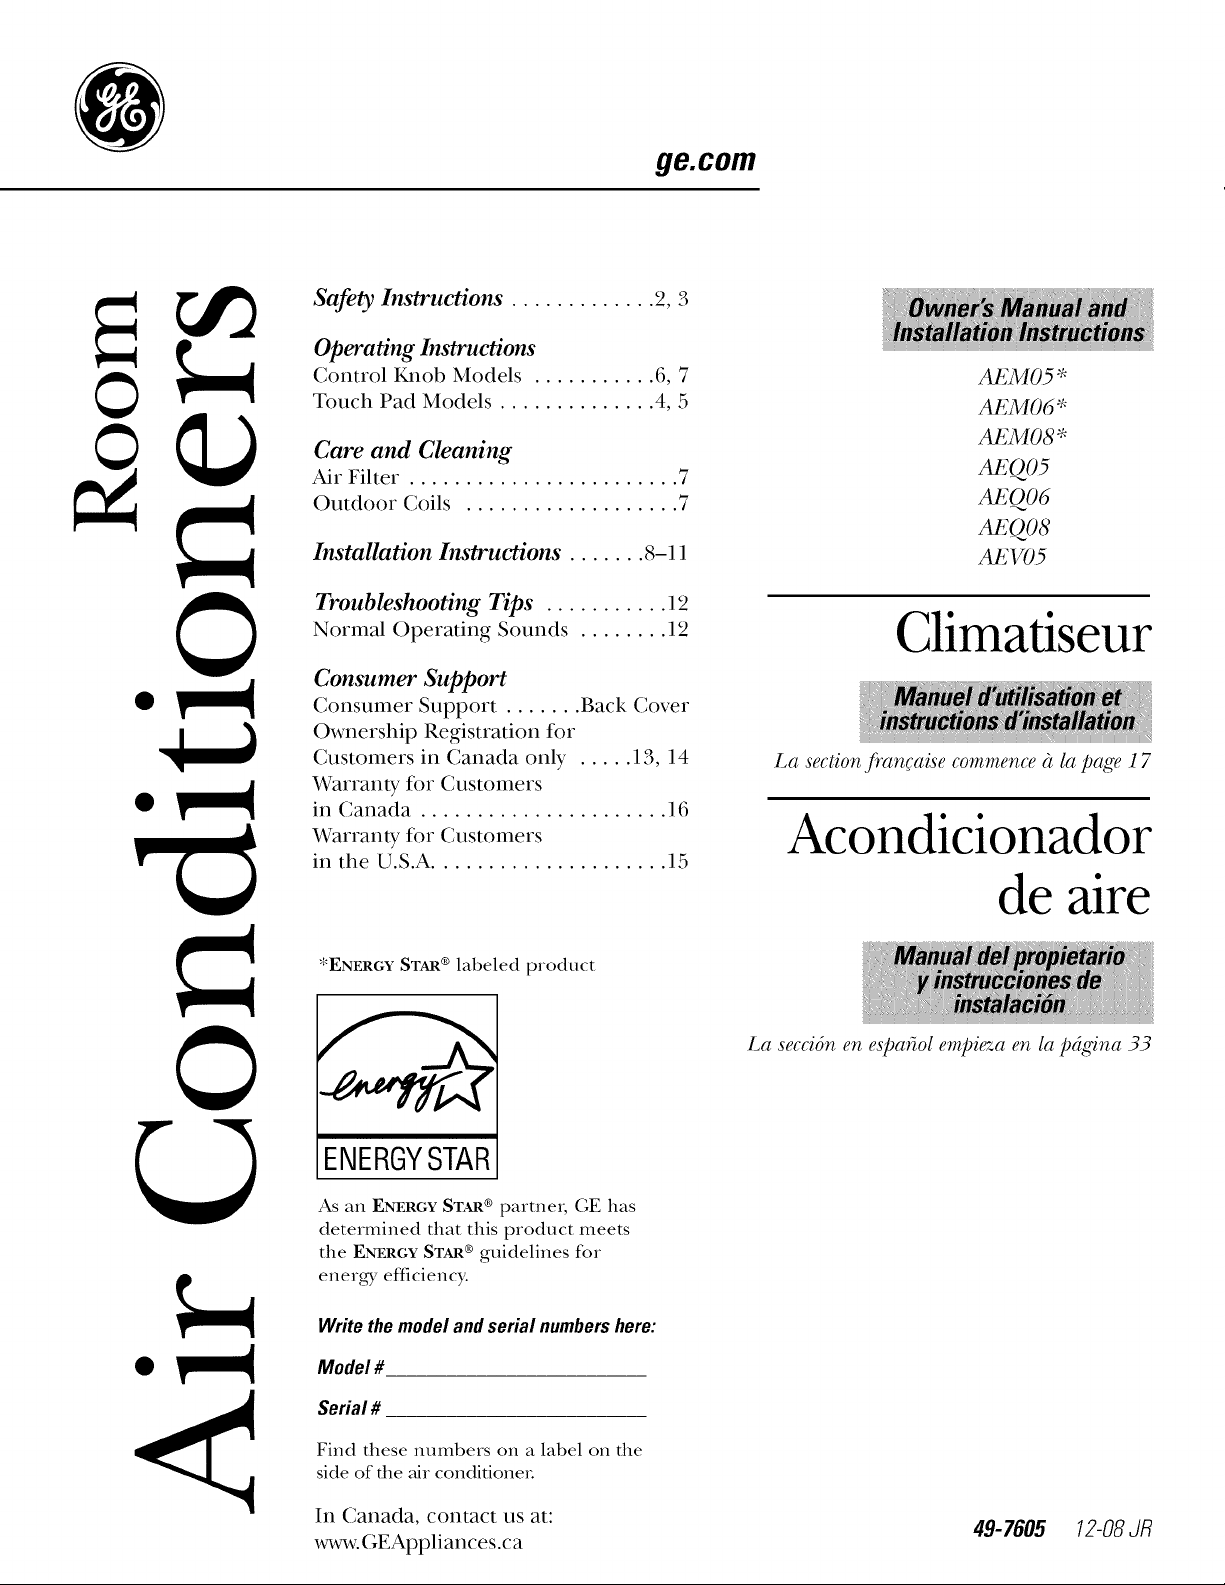
Safety Instructions. ............ 2, 3
Operating Instructions
Control I_lob Models ........... 6, 7
Touch Pad Models .............. 4, 5
Care and Cleaning
Air Filter ........................ 7
Outdoor Coils ................... 7
Installation Instructions ....... 8-11
Troubleshooting Tips ........... 1'2
Normal Operating Sounds ........ 12
Consumer Support
Consumer Support ....... Back Cover
Ownership Registration fi)r
Customers in Canada only ..... 13, 14
Warranty for Customers
in Canada ...................... 16
Warranty fi)r Customers
in the U.S.A ..................... 15
AEM 05 *
AEM06*
AEM08*
A_:QO5
A_:&6
_:QOS
AEV05
Climadseur
La section fran(aise commence ?_la page 17
Acondicionador
*ENERGY STAR ® labeled product
ENERGYSTAR
As an ENERGY STAR ® partner, GE has
determined that this product meets
the ENERGYSTAR®guidelines for
energy efficiency.
Writethemodelandserial numbershere:
Model #
Serial #
Find these numbers on a label on the
side of the air condifioneL
de aire
La secci6n en espa'_,ol empieza en la pdgina 33
In Canada, contact us at:
xs_s_u.GEAppliances.c a
494605 12-08JR
Page 2
IMPORTANTSAFETYINFORMATION.
READALLINSTRUCTIONSBEFOREUSING.
WARNING!
For your safety, the information in this manual must be followed to minimize the risk of fire, electric shock
or personal injury.
SAFETYPRECAUTIONS
}}Use this appliance only for its intended }}
purpose as described in this Owner's
Manual.
iii}i}i
This air conditioner must be properly
installed in accordance xdth the Installation
Instructions before it is used.
iii}i}}li_
Never unplug your air conditioner by pulling
on the power cord. Always _ip plug frmly
and pull straight out flom the receptacle.
iii}i}}li_
Replace immediately 'allelectric ser\@e
iii}i}i
iii}i}}li_
cords that have become flayed or otherwise
damaged. A damaged power supply cord
must be replaced with a new power supply
cord obtained flom the manufhcturer and
not repaired. Do not use a cord that shows
cracks or abrasion damage along its len_h
or at either the plug or connector end.
iii}i}}li_
Turn the unit OFFand unplug your air
conditioner before making any repairs
or cleaning.
NOTE: Westrongly recommendthatanyservicing
be performedbya qualified individual.
For your satety...do not store or use
combustible materials, gasoline or other
flammable vapors or liquids in the x,icinity
of this or any other appliance.
All air conditioners contain refligerants,
which under federal law must be removed
prior to product disposal. If you are getting
rid of an old product with refligerants,
check with the company handling disposal
about what to do.
If the receptacle does not match the plug,
the receptacle must be changed out by a
qualified electrician.
HOWTOCONNECTELECTRICITY
Do not, under any circumstances, cut or remove
the third (ground) prong from the power cord.
For personal safety, this appliance must be
properly grounded.
DONOT use anadapterplug with this appliance.
The power cord of this appliance is equipped
with a 3-prong (grounding) plug which mates
with a standard 3-prong (grounding) wall
outlet to minimize the possibility of electric
shock hazard flom this appliance.
Power cord includes a current intermpmr
dex,ice. A test and reset button is prox,ided on
the plug case. The dex,ice should be tested on a
periodic basis by first pressing the rESrbutton
and then the RESErbutton while plugged into
the outlet. If the TESTbutton does not trip
or if the RESETbutmn will not stay engaged,
discontinue use of the air conditioner and
contact a qualifed ser\,ice technician.
Have the wall outlet and circuit checked by
a qualified electrician to make sure the outlet
is properly _ounded.
Where a 2-prong wall outlet is encounmred,
it is your personal responsibility and obligation
to have it replaced with a properly grounded
3-prong wall outlet.
The air conditioner should always be plugged
into its own indix,idual electrical outlet which
has a voltage rating that matches the rating
plate.
This prox,ides the best performance and also
prevents overloading house xdring circuits
which could cause a fire hazard flom
overheated xdres.
See the Installation Instructions, Electrical
Requirements section for specific electrical
connection requirements.
2
Page 3
WARNING!
USEOFEXTENSIONCORDS--115-Voltmodelsonly
ge.com
Because of potential safety hazards under certain
conditions, we strongly recommend against the
use of an extension cord.
However, if you must use an extension cord,
it is absolumly necessa U that it be a UL-listed,
14 gauge, 3:wire grounding type appliance
extension cord ha\,ing a _ounding type plug
and outlet and that the electrical rating of the
cord be 15 amperes (minimum) and 125 vohs.
-4,CAUTION:
DO NOT usean extension cord with any of the
230/208 voltmodels.
READANDFOLLOWTHISSAFETYINFORMATIONCAREFULLY.
SAVETHESEINSTRUCTIONS
3
Page 4
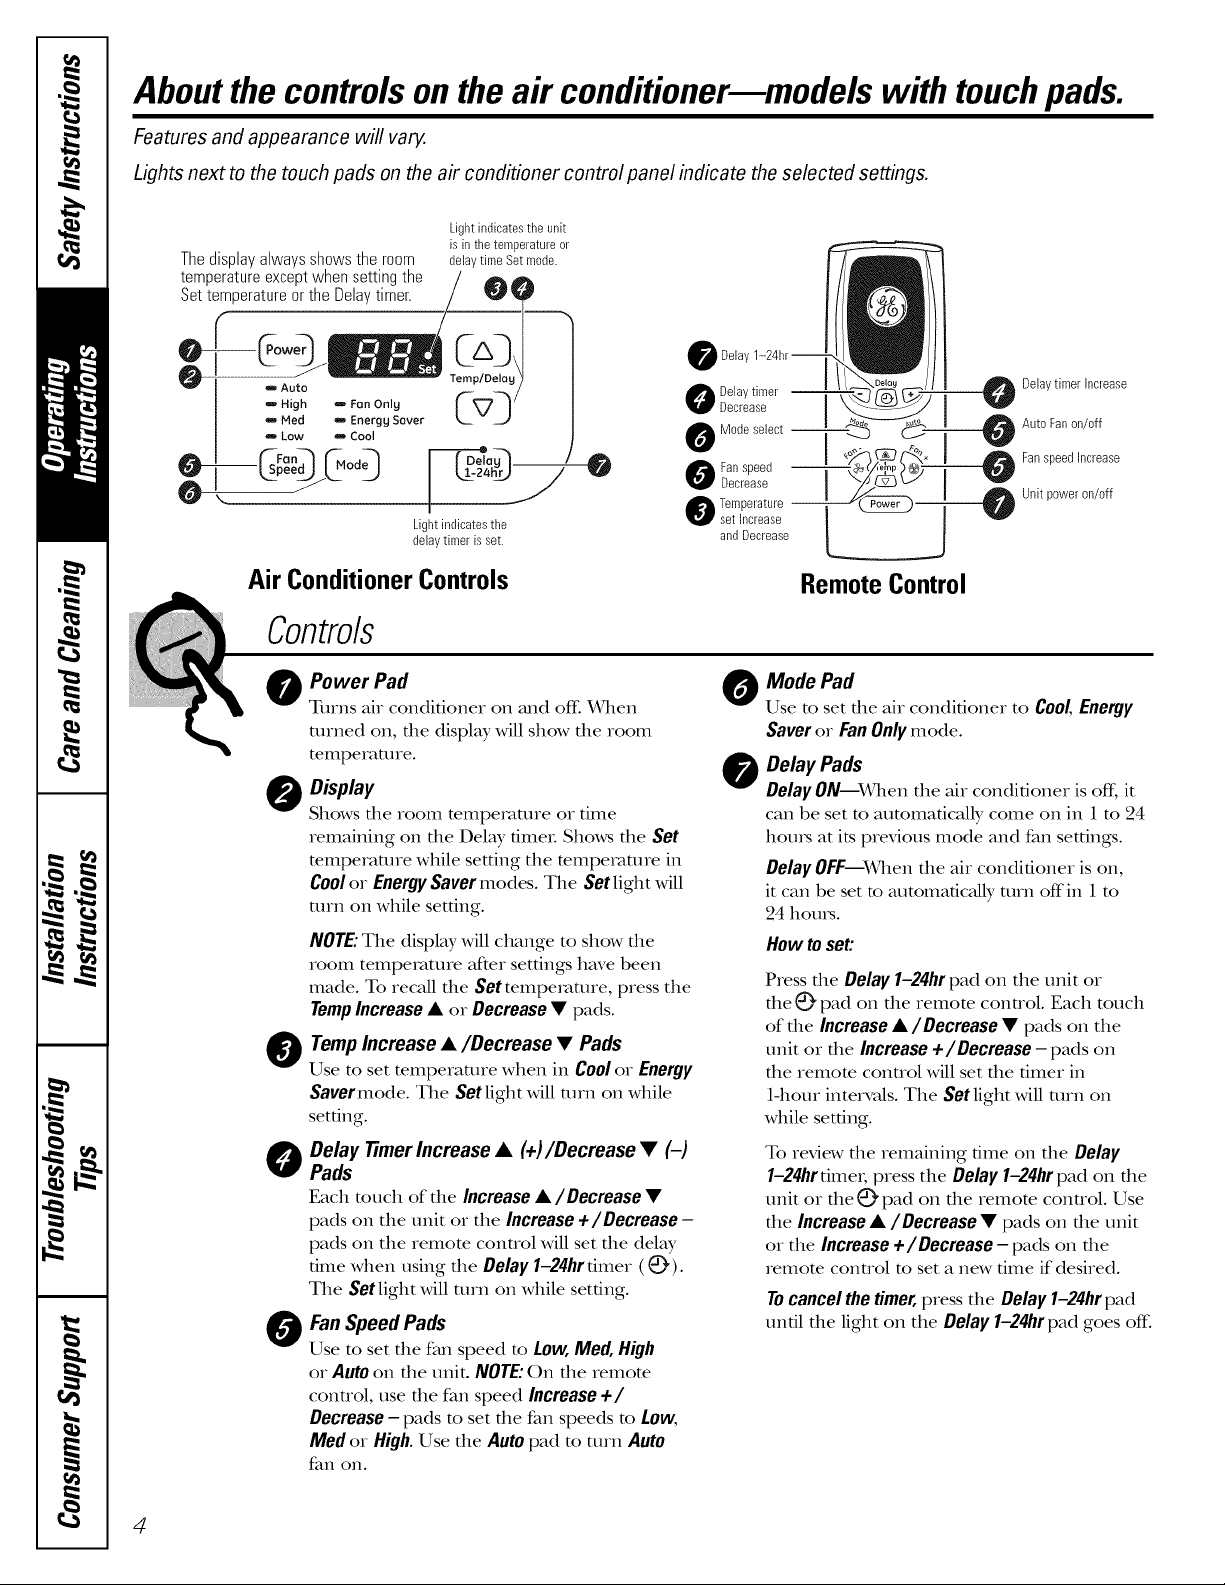
Aboutthe controlsonthe air conditionermmodelswith touchpads.
Features and appearance will van
Lights next to the touch pads on the air conditioner control panel indicate the selected settings.
Light indicatesthe unit
Thedisplayalwaysshowsthe room
temperatureexceptwhensettingthe
Settemperatureor the Delaytimer.
,m Auto
_, High !- Fan Only
,m Ned ,m Energg Saver
Low _ Cool
is inthe temperatureor
delaytime Set mode.
Lightindicates the
delaytimer is set.
Delay
O Delaytimer --
Decrease J
O o e eeo'--y
O an speed
Decrease
Temperature --
set hlcrease
and Decrease
Delaytimer Increase
Auto Fanon/off
Fanspeed Increase
Unit poweron/off
AirConditionerControls
Contro/s
O ower Pad
Turns air conditioner on _md off. _rhen
turned on, tile display will show tile room
temperature.
0 Display
Shows tile room temperature or time
remaining on the Del W fimeL Shows the Set
mmperature while setting the mmperature in
Coolor Energy Saver modes. The Set light will
mrn on while setting.
NOTE:The display will change to show file
room temperature after settings have been
made. To recall the Set mmpemture, press the
TempIncrease • or Decrease • pads.
O empIncrease •/Decrease • Pads
Use to set temperature when in Coolor Energy
Savermode. The Setlight will mrn on while
setting.
O Delay fimerlncrease • (+)/Decrease • (-)
Pads
Each touch of the Increase •/Decrease •
pads on the unit or the Increase +/Decrease -
pads on the remote control will set the delay
time when using tlle Delay1-24hr diner (_).
The Setlight will mrn on while setting.
O an Speed Pads
Use to set the fan speed to LOW,Med, High
or Auto on the unit. NOTE: On the remote
control, use the fan speed Increase +/
Decrease - pads to set the fan speeds to LOW,
Med or High. Use the Auto pad to turn Auto
fan on.
Remote Control
O ode Pad
Use to set tl_eair conditioner to Cool,Energy
Saveror FanOnlymode.
Delay Pads
0
Delay ON--When the air conditioner is off, it
can be set to automatically come on in 1 to 24
hems at its previous mode and fan settings.
Delay OFF--When the air conditioner is on,
it can be set to automatically mrn offin 1 to
24 hems.
How toset:
Press file Delay 1-24hrpad on the trait or
file _ pad on file remora conuol. Each touch
of the Increase •/Decrease • pads on the
unit or the Increase+/Decrease- pads on
die remote conuol will set die timer in
1-hour intervals. The Set light will mrn on
while setting.
To review die remaining time on die Delay
1-24hrtimei; press the Delay 1-24hr pad on the
unit or the @ pad on the remote control. Use
the Increase •/Decrease • pads on the unit
or the Increase +/Decrease-pads on the
remote control to set a new time if desired.
Tocancel the timer, press tt_e Delay 1-24hr pad
until tile light on the Delay 1-24hr pad goes off:
4
Page 5
Do Not Operate in Freezing Outdoor Conditions
This cool<rely air conditioner was not designed for
fleezing outdoor conditions. It illust not be used in
fleezing outdoor conditions.
Remote Control
ge.com
To ensure proper operation, aim file remora
conuol at the signal receiver on the air
condifioneL
Tile remote conuol signal has a range of
up m 20 feet.
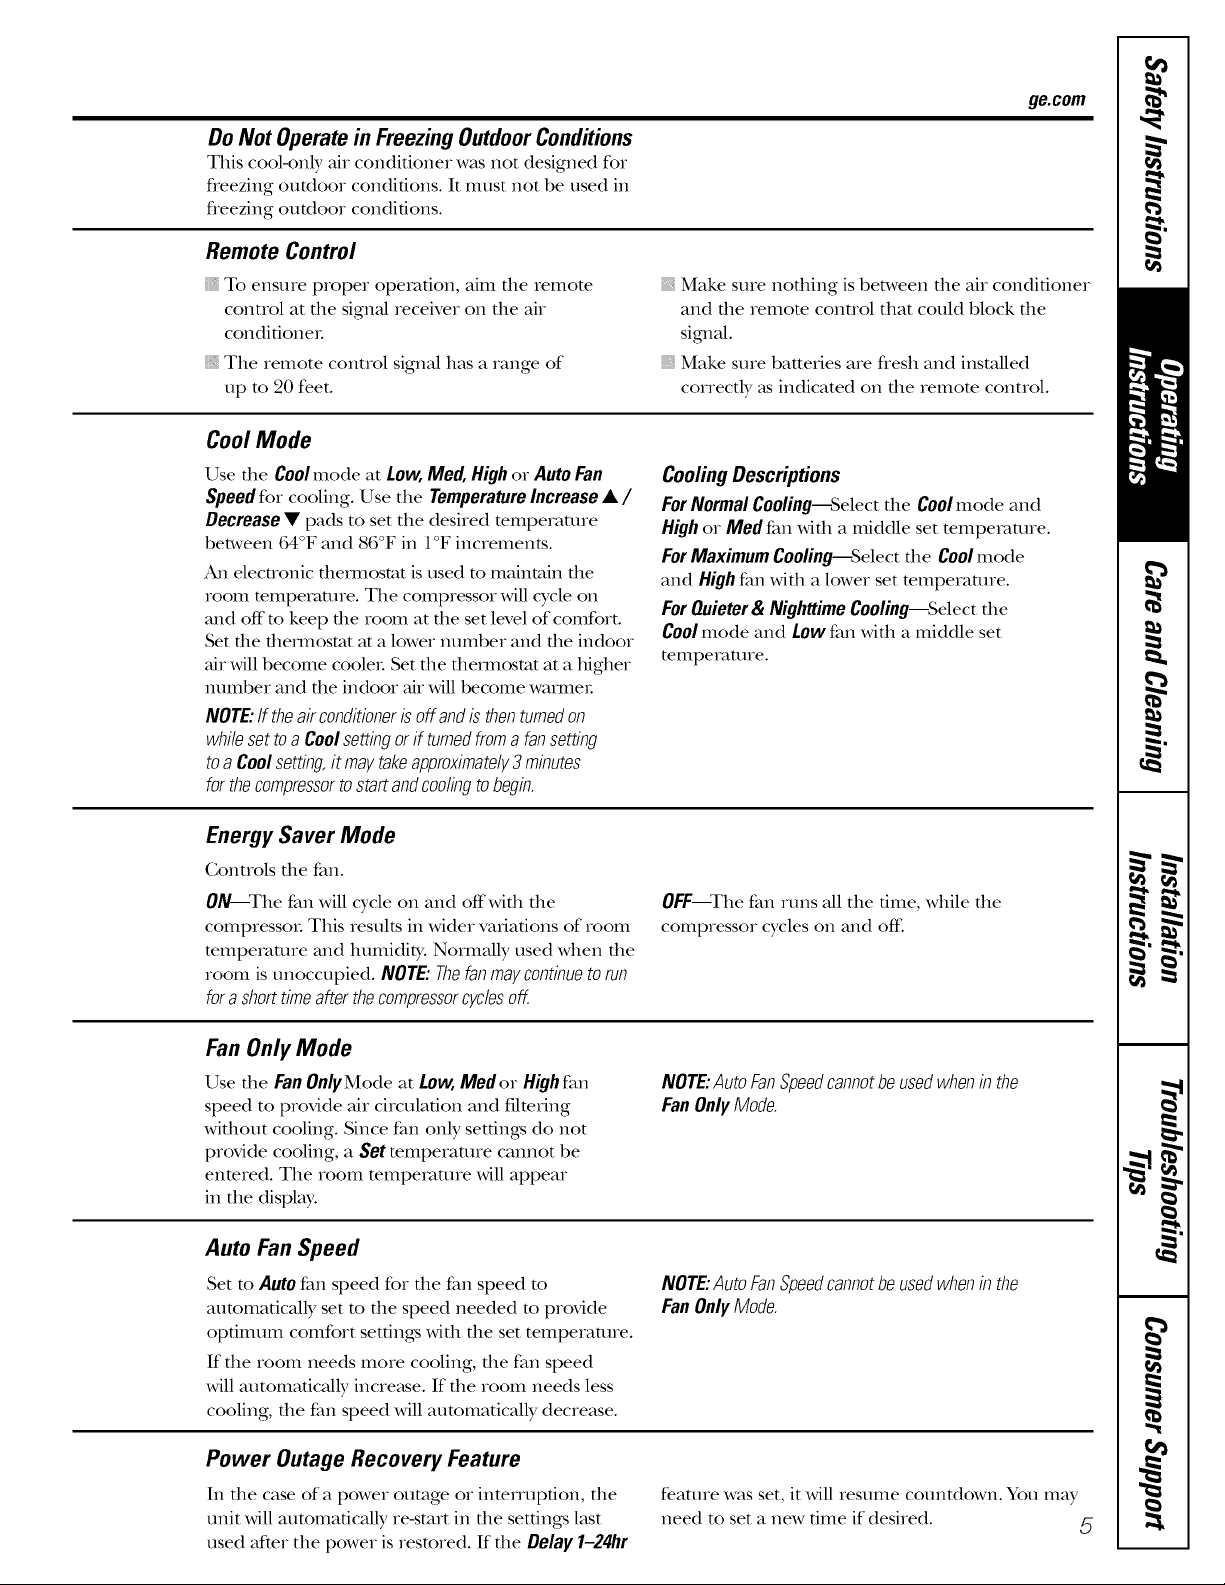
CoolMode
Use file Coolmode at Low,Med,Highor AutoFan
Speedfor cooling. Use tile TemperatureIncrease• /
Decrease • pads to set tile desired temperature
between 64°F and 86°F in 1°F increments.
An electronic fllemlostat is used to maintain file
room temperature. Tile compressor will cycle on
and off to keep file room at file set level of comfort.
Set file themlostat at a lower number and file indoor
air will become cooleL Set die fllelInostat at a higher
number and file indoor air will become wamleL
NOTE:If theairconditionerisoffandis thenturnedon
whilesettoa Coolsettingorif turnedfromafansetting
toa Coolsetting,it maytakeapproximately3minutes
forthecompressortostartandcoolingtobegin.
Energy Saver Mode
Controls tile fan.
ON--The fan will cycle on and offwifll file
compressoL This results in wider variations of room
temperature and humidity. Normally used when tile
room is unoccupied. NOTE: The fan may continue to run
forashort time after the compressorcycles off.
Make sure riDdling is between die air conditioner
and the remora conuol that could block the
sigmal.
Make sure batteries are flesh and instaUed
correctly _tsindicated on the remora conuol.
Cooling Descriptions
For Normal Cooling--Select the Coolmode and
High or Med fan with a middle set temperature.
For Maximum Cooling--Select tile Cool mode
and High fan with a lower set temperature.
For Quieter & Nighttime Cooling--Select tile
Cool mode and LOWfan with a middle set
tempemtme.
OFF--The tim runs all tile time, while file
compressor cycles on and off:
Fan Only Mode
Use the FanOnlyModeat Low,Medor Highfan
speed to provide air circulation and filtering
without cooling. Since fan only settings do not
provide cooling, a Set mmperamre camlot be
enmred. Tile room mmpemmre will appear
in tile displ W.
Auto Fan Speed
Set to Autofan speed for tile fan speed to
automatically set m tile speed needed m provide
optimum comfort settings wifll tile set temperature.
If the room needs more cooling, the fan speed
will automatically incre_tse. If the room needs less
cooling, the fan speed will automatically decrease.
Power Outage Recovery Feature
In tile case of a power outage or interruption, tile
unit will automatically re-start in the settings last
used after tile power is restored. If tile Delay 1-24hr
NOTE:AutoFanSpeedcannotbeusedwhenin the
FanOnlyMode.
NOTE:AutoFanSpeedcannotbeusedwhenin the
FanOnlyMode.
feature was set, it will resume countdown. You may
need to set a new time if desired. 5
Page 6
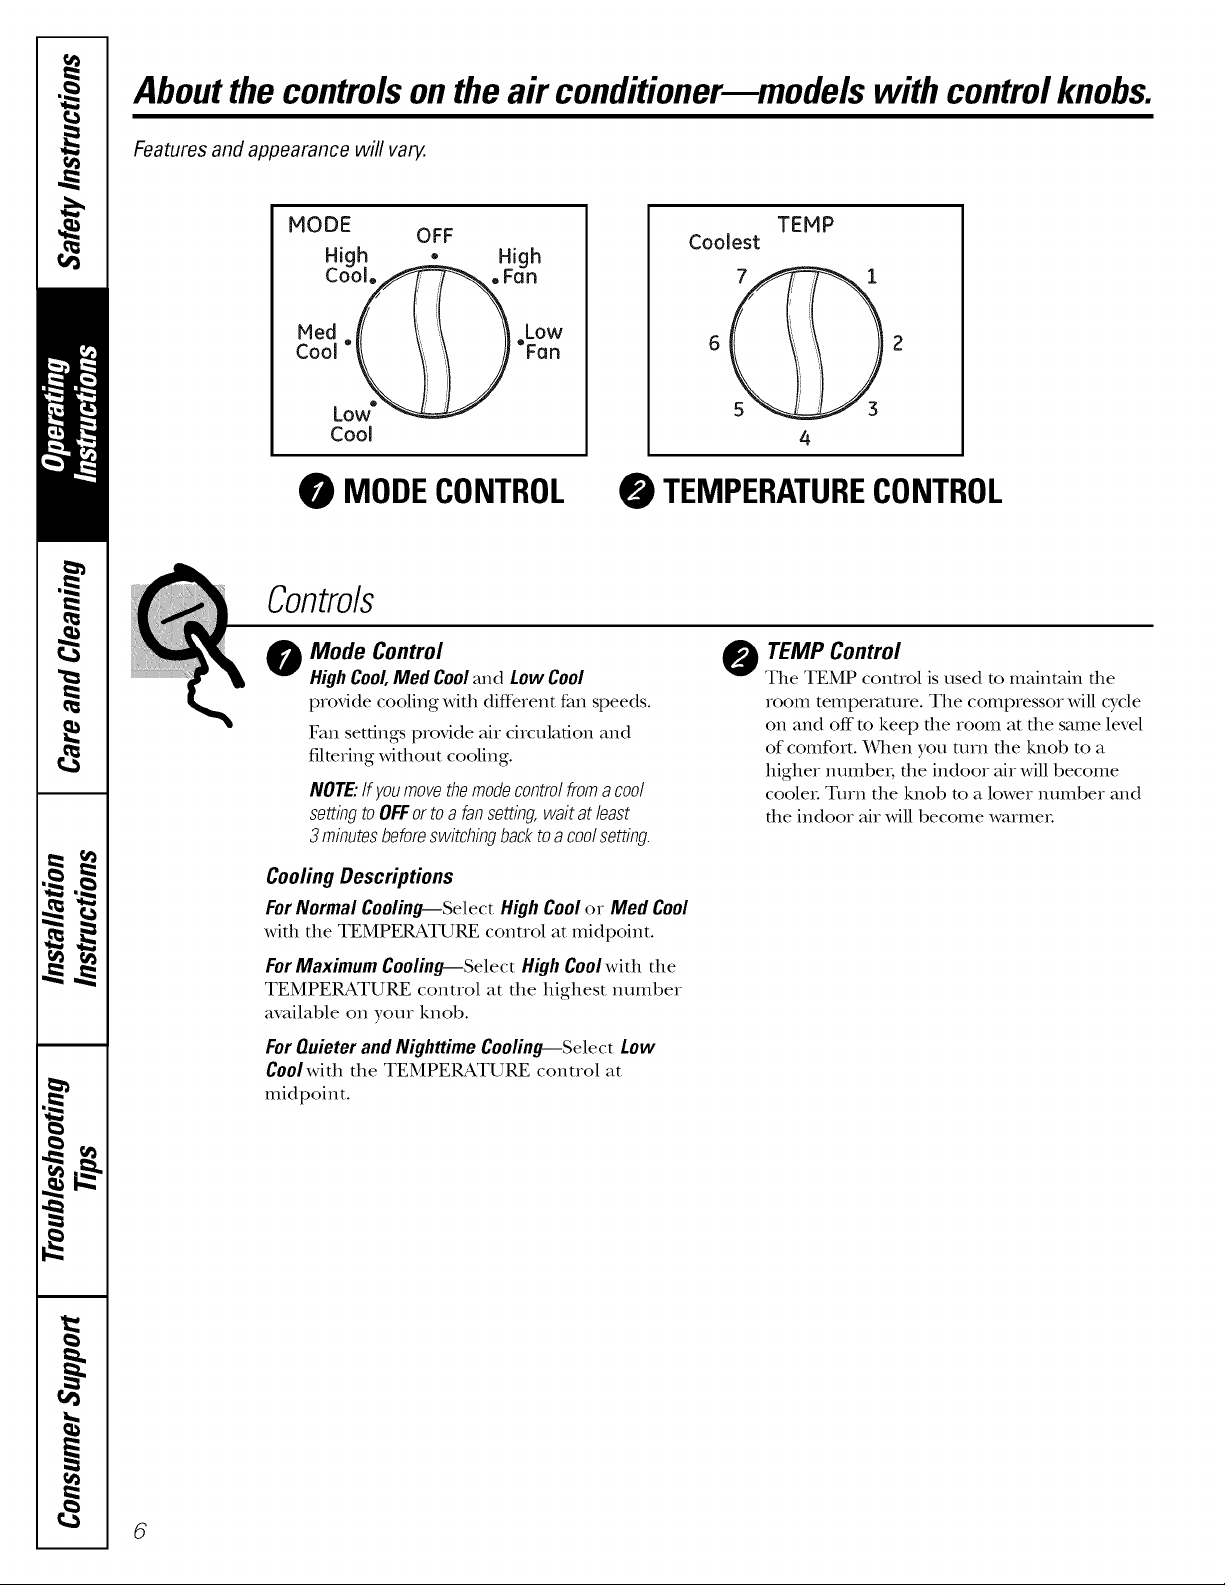
Aboutthecontrolsontheair conditionermmodelswith controlknobs.
Features and appearance will var}4.
MODE
High •
Cool.
Cool
OFF
High
MODECONTROL
Contro/s
Mode Control
0
HighCool,Med Cooland LowCool
provide cooling with (liff_rent fan speeds.
Fan settings provide Mr circulation and
filtering Mfllout cooling.
NOTE:If youmovethemodecontrolfroma cool
settingtoOFFortoafansetting,waitatleast
3 minutesbeforeswitchingbacktoa coolsetting.
Coolest
TEMP
TEMPERATURECONTROL
TEMP Control
O
Tile TEMP control is used to maintain the
room tempe_mre. Tile compressor will cycle
on and off"m keep tile room at tile same level
of comfolt. _r]len you mrn the knob to a
higher numbe_; the indoor air will become
cooleL Turn the knob m a lower number mid
tile indoor air will become warmeL
Cooling Descriptions
ForNormal Cooling--Select HighCoolor Med Cool
with tile TEMPERATURE control at midpoint.
ForMaximum Cooling--Select High Coolwith tile
TEMPERATURE control at the highest number
available on your knob.
ForQuieterandNighttime Cooling--Select Low
Coolwith tile TEMPERATURE control at
midpoint.
6
Page 7

Additional important information.
Air Direction
Use die lever to adjust file air direction left and
right only.
Careand cleaning oftheair conditioner.
Grille and Case
Turn the air conditioner off and remove the plug To clean, use water and a mild detergent. Do not
flom tile wall oudet before cleaning, use bleach or ab_sives.
Air Filter
The air filter behind the front grille should be
checked and cleaned at least eve_T 30 days or
more often if necessary.
Toremove:
Push on one side of the filter edge and pull it out
the other side.
ge.com
Appearancemayvary.
Glean tlle filter widl warm, soapy wateL Rinse and
let the filter dry before replacing it. Do not clean
the filter in a dishwasheL
CAUTION:DoNoToperatetheair
conditionerwithoutafilterbecausedirtandlint willclog
it andreduceperformance.
Outdoor Coils
The coils on the outdoor side of the air conditioner
should be checked regularly: If flley are clogged
with dirt or soot, they may be professionally cleaned.
How to Insert the Batteries in the Remote Control
[-_ Remove the batte D, cover by sliding it
according to the arrow direction.
Insert new batteries, making sure that the (+)
and (-) of battery are installed correcdy.
[-_ Reatmch the cover by sliding it back
into position.
Appearancemayvary.
NOTES:
Use 2 "AAA" (1.5 volt) alkaline batteries. Do not
use rechargeable batm_ies.
Remove the batteIies flom the remora control if
the sysmm is not going m be used for a long time.
7
Page 8
ilnsta,,at,onnsttuct,onsIAirC°ndit'°nerl
I
I F_ Questions? Call 800.GE.CARES (800.432.2737) or visit our Website at: ge.com I
In Canada, call 1.800.561.3344 or visit www.GEAppliances.ca
I
BEFORE YOU BEGIN
Read these instructions completely
and carefully.
IMPORTANT - Savethese
instructions for local inspector's use.
• IMPORTANT - Observeall
governing codes and ordinances.
• Note to Installer- Be sure to leave these
instructions with the Consumer.
• Note to Consumer- Keep these
instructions for future reference.
• Skill level - Installation of this appliance
requires basic mechanical skills.
• Completion time- Approximately 1 hour
• We recommend that two people install
this product.
• Proper installation is the responsibility
of the installer.
Product failure due to improper installation
is not covered under the Warranty.
You MUST use all supplied parts and use
proper installation procedures as described
in these instructions when installing this air
conditioner.
- CAUTION:
Do not, under any circumstances, cut or
remove the third (ground) prong from the
power cord.
Do not change the plug on the power cord
of this air conditioner.
Aluminum house wiring may present special
problemsmconsult a qualified electrician.
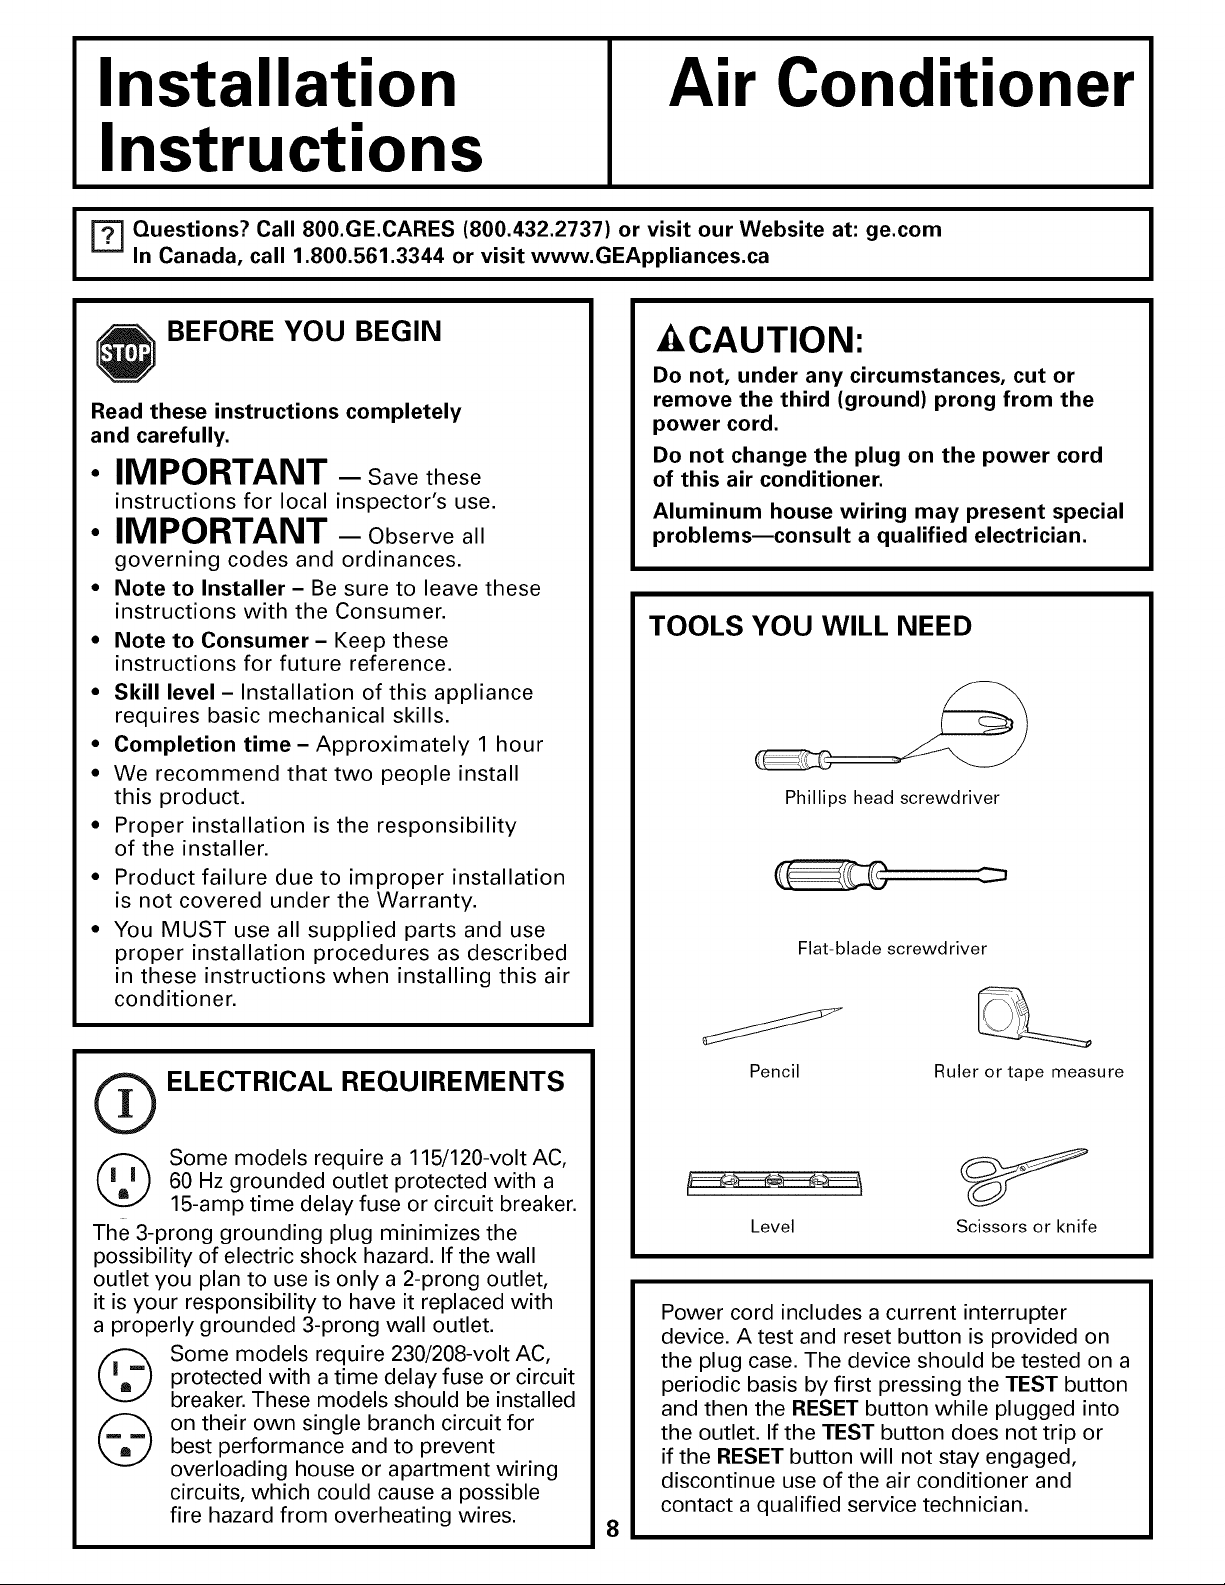
TOOLS YOU WILL NEED
Phillips head screwdriver
Flat-blade screwdriver
(_ ELECTRICAL REQUIREMENTS
60 Hz grounded outlet protected with a
Some models require a 115/120-volt AC,
15-amp time delay fuse or circuit breaker.
The 3-prong grounding plug minimizes the
possibility of electric shock hazard. If the wall
outlet you plan to use is only a 2-prong outlet,
it is your responsibility to have it replaced with
a properly grounded 3-prong wall outlet.
Some models require 230/208-volt AC,
©
protected with a time delay fuse or circuit
breaker. These models should be installed
on their own single branch circuit for
best performance and to prevent
overloading house or apartment wiring
circuits, which could cause a possible
fire hazard from overheating wires.
Pencil Ruler or tape measure
Level Scissors or knife
Power cord includes a current interrupter
device. A test and reset button is provided on
the plug case. The device should be tested on a
periodic basis by first pressing the TEST button
and then the RESET button while plugged into
the outlet. If the TEST button does not trip or
if the RESET button will not stay engaged,
discontinue use of the air conditioner and
contact a qualified service technician.
8
Page 9

PARTS INCLUDED
(Appearance may vary)
Top mou_
Air
conditioner
\
Installation Instructions
vv,_a_;_
Left
accordion
panel
Window
eal
Right
accordion
panel
- /
Top mo "_
Type A (6) Type B (3) Type C (5)
seal strip
Window locking
bracket (1)
9
Page 10
Installation instructions
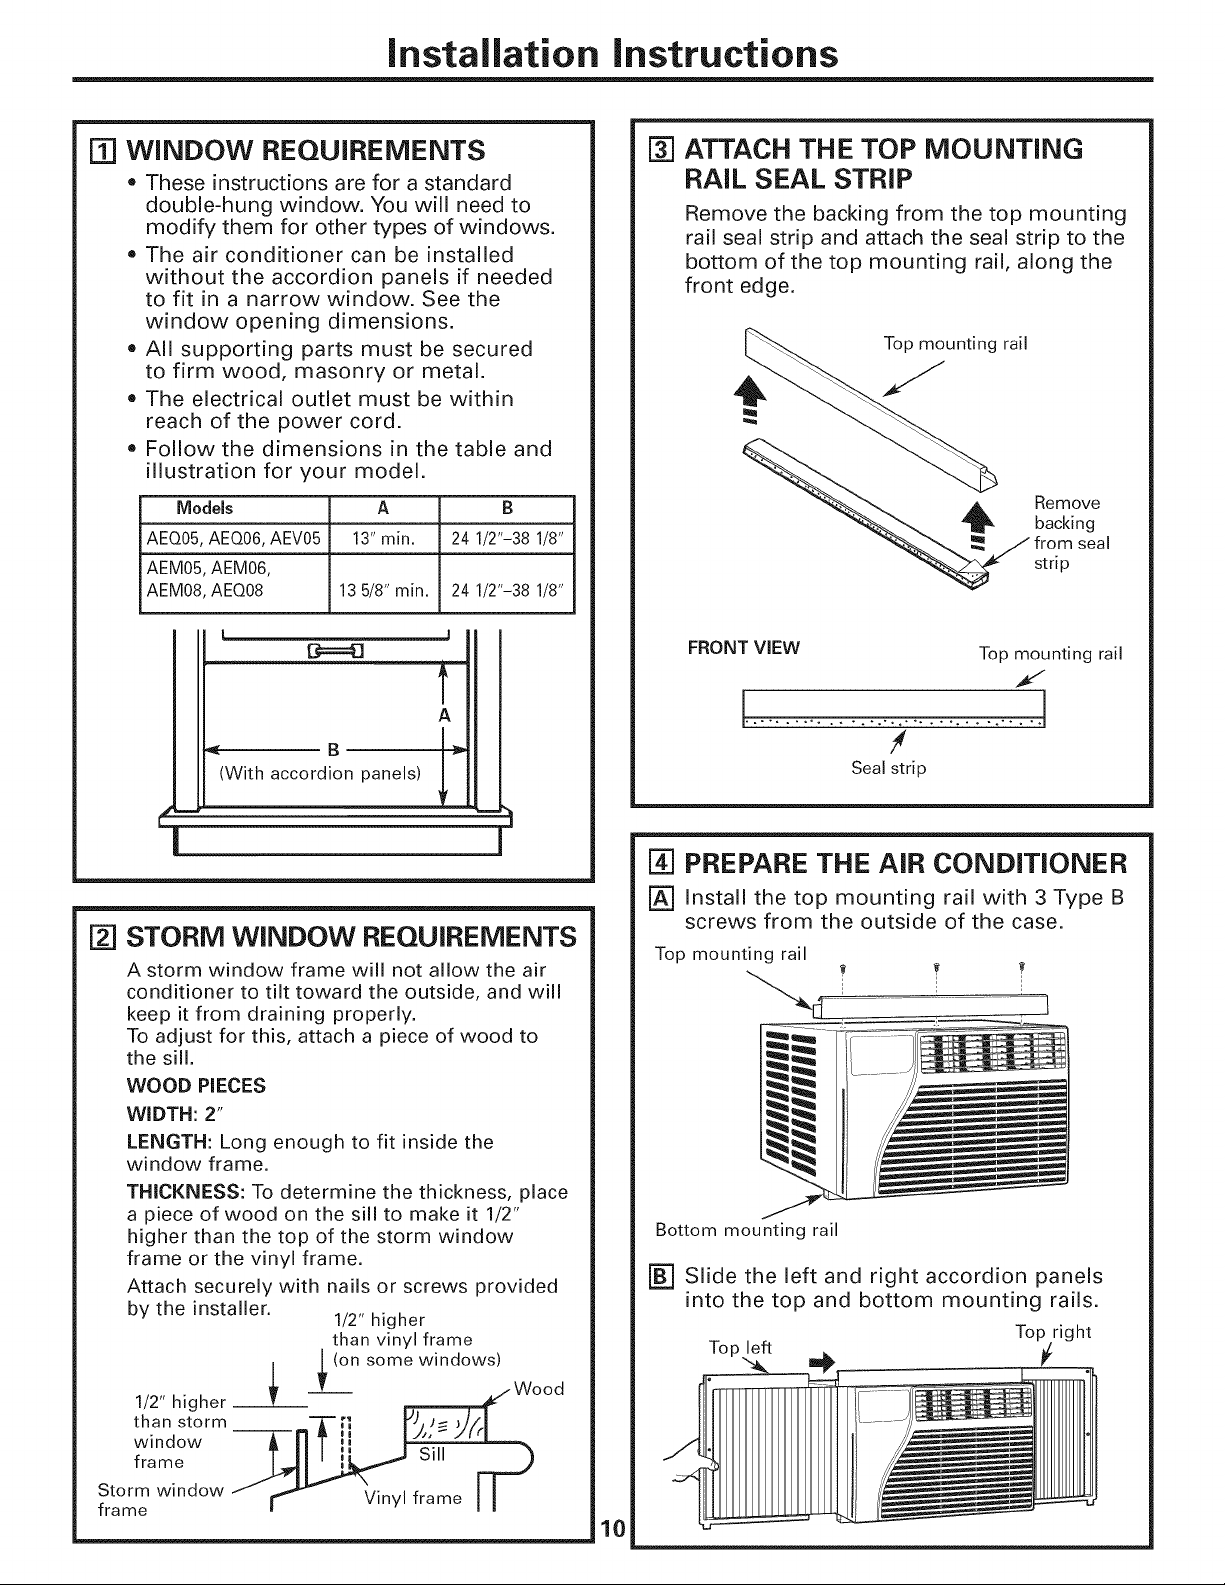
[i] WINDOW REQUIREMENTS
• These instructions are for a standard
double-hung window. You will need to
modify them for other types of windows.
• The air conditioner can be installed
without the accordion panels if needed
to fit in a narrow window. See the
window opening dimensions.
All supporting parts must be secured
to firm wood, masonry or metal.
The electrical outlet must be within
reach of the power cord.
Follow the dimensions in the table and
illustration for your model.
Models A B
AEQ05, AEQ06, AEV05 13" min. 24 1/2"-38 1/8"
AEM05, AEM06,
AEM08, AEQ08 13 5/8" min. 24 1/2"-38 1/8"
B====8
t
A
(With accordion panels)
[] ATTACH THE TOP MOUNTING
RAIL SEAL STRIP
Remove the backing from the top mounting
rail seal strip and attach the seal strip to the
bottom of the top mounting rail, along the
front edge.
Top mounting rail
Remove
backing
from seal
strip
FRONT VIEW
o.o*, o ..,, . . . ** ,, ,... ,
Top mounting rail
/
Seal strip
1
!
_] STORM WINDOW REQUIREMENTS
A storm window frame will not allow the air
conditioner to tilt toward the outside, and will
keep it from draining properly.
To adjust for this, attach a piece of wood to
the sill.
WOOD PIECES
WIDTH: 2"
LENGTH: Long enough to fit inside the
window frame.
THICKNESS: To determine the thickness, place
a piece of wood on the sill to make it 1/2"
higher than the top of the storm window
frame or the vinyl frame.
Attach securely with nails or screws provided
by the installer.
1/2" higher _ _ (on some windows)__.
than
storm
window _---pi =1=II _/,r-
frame _ Sill FT _
Storm window
frame _ r_ Vinyl frame [ [
1/2" higher
than vinyl frame
Wood
Tn P,,_-,/_1
[] PREPARE THE AIR CONDITIONER
['_ Install the top mounting rail with 3 Type B
screws from the outside of the case.
Bottom mounting rail
[] Slide the left and right accordion panels
into the top and bottom mounting rails.
Top right
Top left
10
Page 11

Installation instructions
r41 PREPARE THE AiR CONDiTiONER
(cont.)
FC-]Attach the accordion panels to the case
using 3 Type A screws on each side.
Top mounting rail
Accordion
panel
Type
screws
BACK
iNSTALL THE AIR CONDiTiONER
[]
IN THE WINDOW
[]
Place the air conditioner on the sill with
the bottom mounting rail against its back
edge, Center it and close the window
securely behind the top mounting rail,
It should be level or slightly tilted to the
outside, Use a level; about a 1/3 bubble
will be the correct case slant to the outside,
Type C screws
FB7Extend the left and right accordion panels
to the vertical window sashes and attach,
through the holes in the panels, with 4
Type C screws, as appropriate.
Bottom mounting rail
F5qPREPARE THE WINDOW
Cut the window sash seal to the proper
length. Peel off the backing and attach the
seal to the underside of the window sash.
[] INSTALL SUPPORT BRACKET AND
FOAM TOP WINDOW GASKET
-&CAUTION:
To prevent broken glass
or damage to windows,
on vinyl or other
similarly constructed
windows, attach the
support bracket to the
window side jam.
Attach the support
bracket with one
Type C screw,
Cut the foam top window gasket to the
[]
window width.
Stuff the foam
Fcq
between the
glass and the
window to
prevent air and
insects from
getting into the room.
NOTE: If the gasket supplied does not fit
your window, obtain appropriate material
locally to provide a proper installation seal.
Vinyl
Wood
11
Page 12
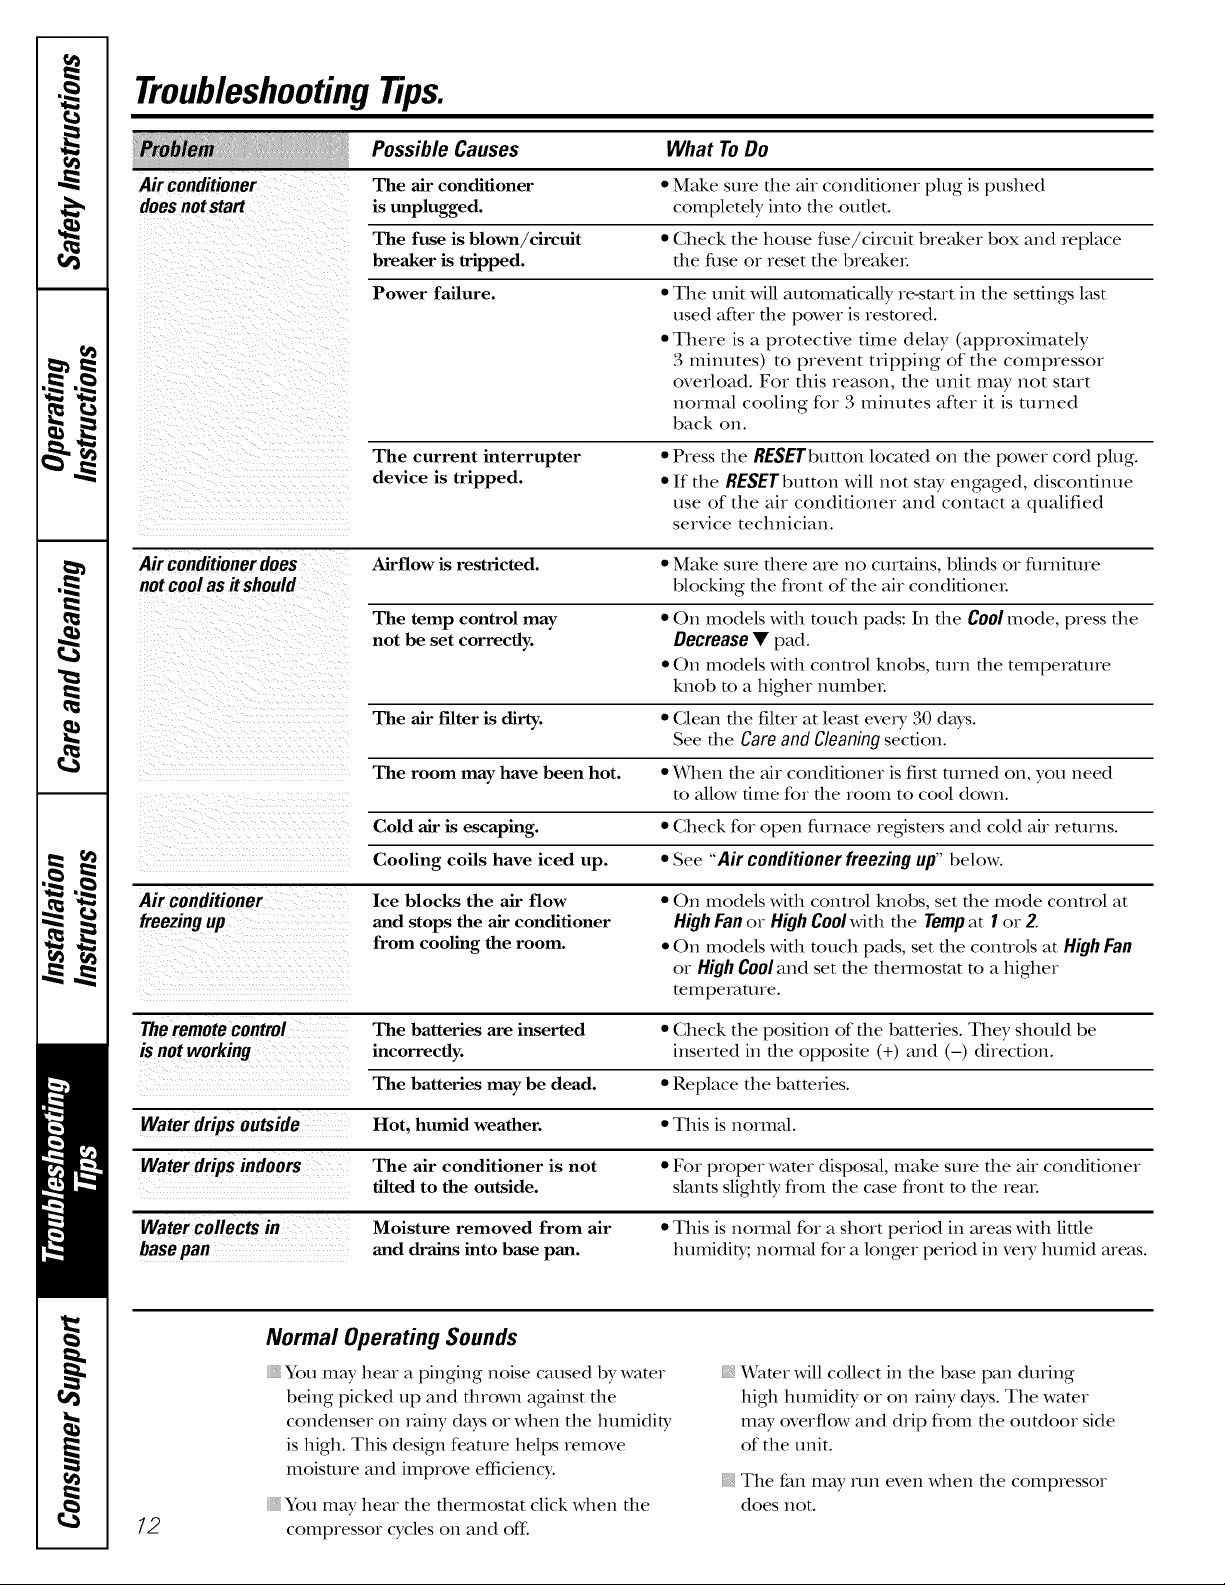
TroubleshootingTips.
Possible Causes What ToDo
Airconditioner
doesnotstart
Air conditioner does Airflow is restricted. • Make sure there are no curtains, blinds or fiuniture
not cool as it should blocking the flont of the air condifioneL
The air conditioner
is tmplugged.
The fuse is blown/circuit
breaker is tripped.
Power failure.
The current interrupter • Press the RESETbutton located on the power cord plug.
device is tripped. • If tile RESETbutton will not stay engaged, discontinue
The temp control may • On models wifll touch pads: In tile Cool mode, press tile
not be set correctly. Decrease • pad.
The air filter is dirty. • Glean tile filter at least every 30 days.
The room may have been hot. • When tile air conditioner is filst turned on, you need
• Make sure the air conditioner plug is pushed
completely into tile outlet.
• Check tile house fixse/circuit breaker box and replace
tile flxseor reset tile breakeL
• Tile unit will automatically re-start in tile settings last
used after the power is restored.
• There is a protective time del W (approximately
3 minutes) to prevent tripping of tile compressor
overload. Fox this reason, tile unit may not start
normal cooling for 3 minutes after it is turned
back on.
use of tile air conditioner and contact a qualified
service technician.
• On models with control kalobs, mrn tile temperature
knob m a higher numbeL
See tile Care and Cleaning section.
to allow time for file room to cool down.
Cold air is escaping. • Gheck for open fiunace regfiste_ and cold air returns.
Cooling coils have iced up. • See "Air conditioner freezing up" below.
Air conditioner
freezingup
Ice blocks the air flow
and stops the air conditioner
from cooling the room.
• On models widl conUol knobs, set die mode conuol at
HighFanor HighCoolwitb the rempat I or 2.
• On models with touch pads, set tile controls at HighFan
or High Cooland set the tbemlosmt m a higher
tempex_mxre.
Theremote control The batteries are inserted *Check tile position of tile batteries. They should be
is not working incorrectly, inserted in tile opposite (+) and (-) direction.
The batteries may be dead. =Replace the batteries.
Waterdrips outside Hot, humid weather. • This is normal.
Waterdrips indoors The air conditioner is not • Fox proper water disposal, make sure tile air conditioner
tilted to the outside, slants slightly from the case flont to the real
Watercollects in Moisture removed from air • This is normal for a short period in areas with little
basepan and drains into base pan. humidiD,; hernial for a longer period in very humid areas.
Normal Operating Sounds
72
You may hear a pinging noise caused by water
being picked up and thrown against tile
condenser on rainy dws or when the humidity
is high. This design feature helps remove
moisture and improve efficiency.
}_You may hear tile thernlosmt click when tile
compressor cycles on and off:
Water Mll collect in die base pan during
high humidity or on rainy days. Tile wamr
may overflow and drip flom tile outdoor side
of tile unit.
}_Tile fan may run even when tile compressor
does not.
Page 13
Please place in envelope and mail to:
Veuillez mettre dans une enveloppe et envoyez _ :
OWNERSHIPREGJSTRATJOH
P.O. BOX1780
MISSJSSAUGA,OHTARJO
L4Y4G1
(FORCAHADJAHCOHSUMERSOHLY)
13
Page 14
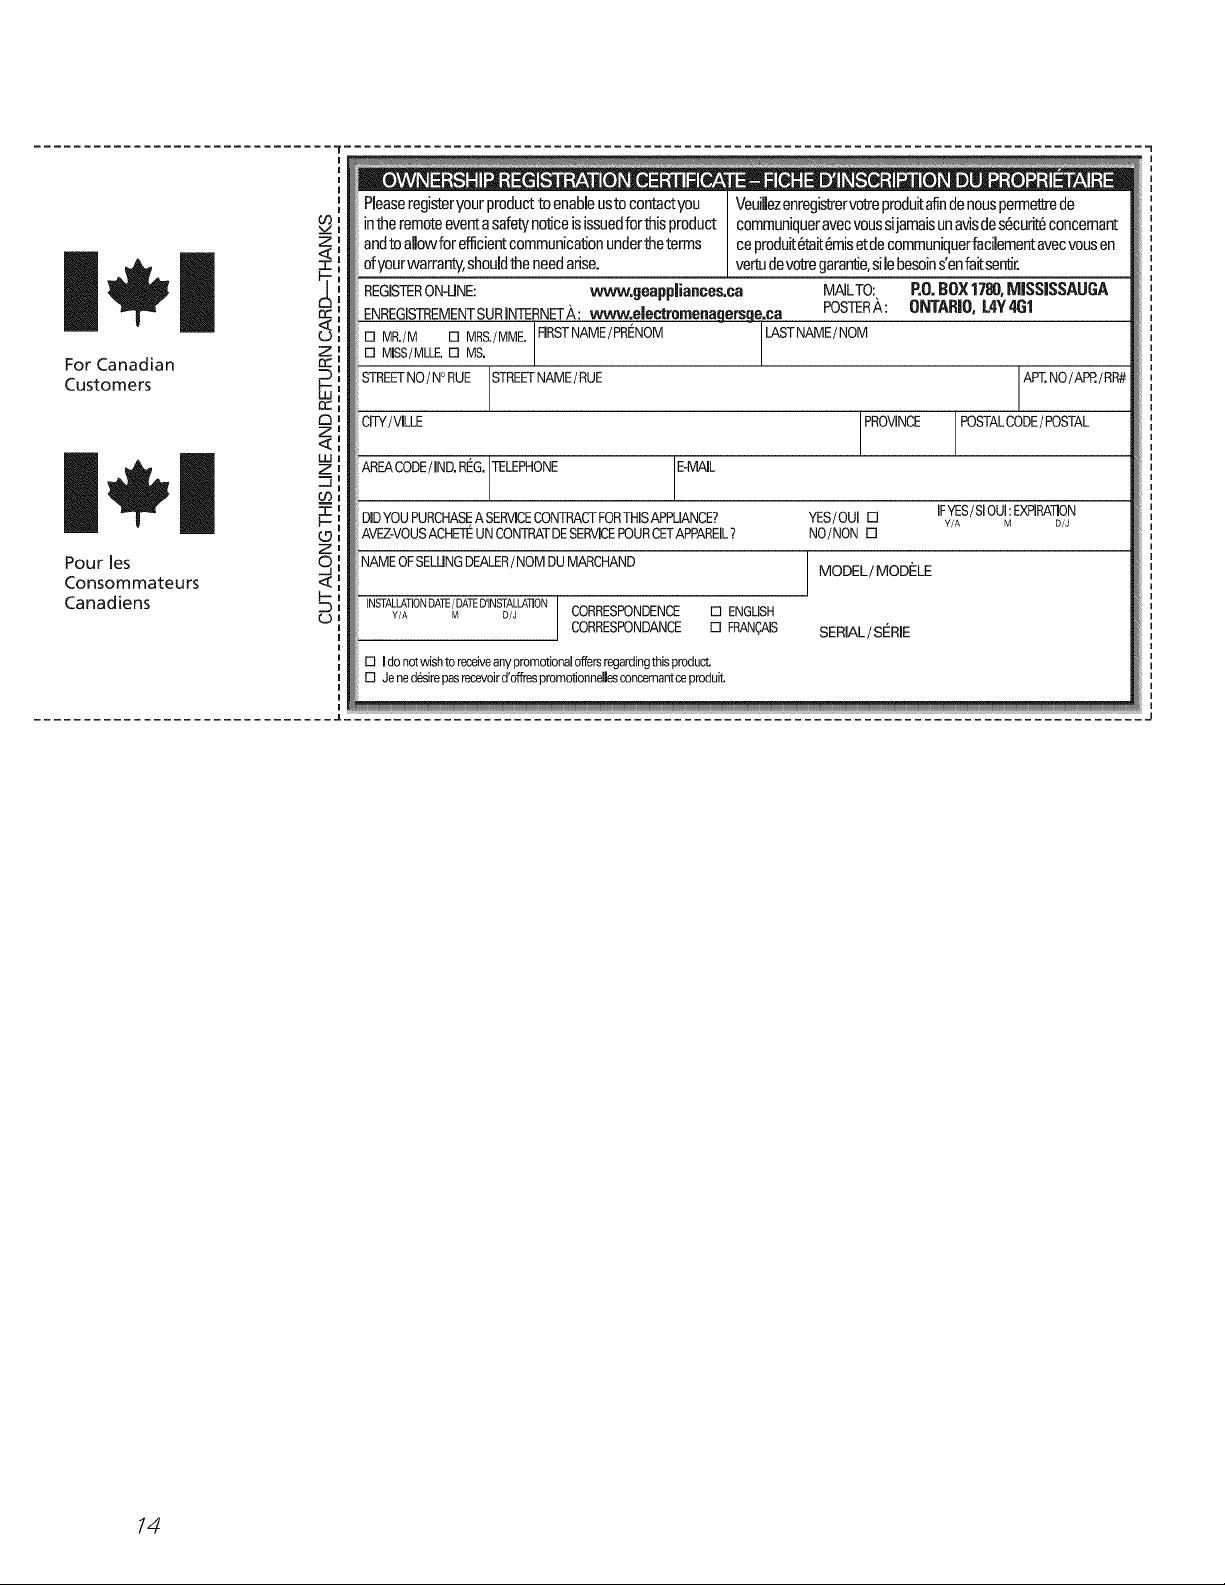
For Canadian
Customers
Pour les
Consommateurs
Canadiens
Peaseregisteryourproductto enableustocontactyou
intheremoteeventasafetynonceisissuedforthisproduct
Z I
andtoallowforefficientcommunicationundertheterms
ofyourwarranty,shouldtheneedarise.
"rl
VeuiUezenregistrerv_eproduitafindenouspermet/_ede
communiqueravecvoussijamaisunavisdes6curi_concemant
ceproduit_ait6misetdecommuniquerfacibmentavecvousen
vertudev_e gara_e,sib besoinsenfairsentk.
REGISTERON-UNE: wwvv,geappJiances,ca MAILTO:,
ENREGISTREMENTSURJNTERNET_,:vvvvw,eiectremenagersqe,ca POSTERA:
ZI
[][] MJSS/NLLE.MR'/M[][] Ms.MRS'/MME"F1RSTNAME/PRt_NOM LASTNAME/NOM
STREETNO/N° RUE STREF NAME/RUE
ral
CITY/VlLLE
LUI
Zl
I
AREACODE/IND. Rt_G.[TELEPHONE [E-MAIL
II
DiDYOUPURCHASEA SERVICECONTRACTFORTHISAPPLIANCE?
l.-I
AVEZ-VOUSACHETEUN CONTRATDESERVICEPOURCETAPPAREIL?
Z I
NAMEOF SELUNGDEALER/ NOMDU MARCHAND MODEL / MOD_:LE
Y/A M D/J CORRESPONDENCE [] ENGLISH
INSTALLATIONDATE/ DATED'INSTALLATON]
[] Idonotwishtoreceiveanypromotionaloffersregardingthisproduct.
[] Jenedesirepasrecevoird'offTespromotionnellesconcemantceproduit.
CORRESPONDANCE [] FRANC,,AIS SERmALiSERmE
YES/OUI[]
NO/NON[]
RO.BOX1780,MISSISSAUGA
ONTARIO,L4Y461
APT.NO/APP./RR#
PROVINCE POSTALCODE/ POSTAL
IFYES/SiOUI: EXPIRATION
Y/A M D/J
14
Page 15
GEAir Conditioner--One- YearLimitedWarranty.(For customers in the U.S.A.)
All warranty service provided by our Factory Service Centers,
or an authorized Customer Care_ technician. To schedule service
visit us on-line at ge.com, or call 800.GE.CARES (800.432.2737).
Have serial number and model number available when calling
for service.
GE Will Replace:
Anypartof file air conditioner which fails due to a defect m materials or workmanship.
Fromthedateof the
originalpurchase
Service trips to your home to teach you how to
use the product.
Improper installation, delivery or maintenance. If you
have an installation problem, or if the air conditioner
is of improper cooling capacity for the intended use,
contact your dealer or installer. You are responsible
for providing adequate electrical connecting facilities.
Failure of the product resulting from modifications to
the product or due to unreasonable use including failure
to provide reasonable and necessary maintenance.
In commercial locations, labor necessary to move the
unit to a location where it is accessible for service
by an individual technician.
During this limited one-year warranty, GE will also provide, free of charge, all labor and relamd
sexMce to replace the defective part.
Staple yourreceipt here.
Proof of the original purchase
date is needed to obtain service
under the warranty.
Replacement of house fuses or resetting of circuit
breakers.
Failure due to corrosion on models not corrosion-
protected.
Damage to the product caused by improper power supply
voltage, accident, fire, floods or acts of God.
Incidental or consequential damage caused by possible
defects with this air conditioner.
Damage caused after delivery.
EXCLUSION OFIMPLIED WARRANTIES--Your sole and exclusive remedy is product repair as provided in this
Limited Warranty. Any implied warranties, including the implied warranties of merchantability or fitness for a
particular purpose, are limited to one year or the shortestperiod allowed by law.
This warranty is extended to the original purchaser and any succeeding owner for products purchased for home
use within the USA. If the product is located in an area where service by a GEAuthorized Servicer is not available,
you may be responsible for a trip charge or you may be required to bring the product to an Authorized GEService
location for service. In Alaska, the warranty excludes the cost of shipping or service calls to your home.
Some states do not allow the exclusion or limitation of incidental or consequential damages. This warranty gives
you specific legal rights, and you may also have other rights which vary from state to state. To know what your
legal rights are, consult your local or state consumer affairs office or your state's Attorney General
Warrantor: General Electric Company.Louisville, KY 40225
15
Page 16

GEAir Conditioner--One- YearLimitedWarranty. ForcustomersintheCanada
All warranty service provided by our Factory Service Centers,
or an authorized Customer Care_ technician. For service, call
1.800.561.3344.Please have serial number and model number
available when calling for service.
Mabe Will Replace:
Anypartof file air conditioner which fails due to a defect in materials or workmanship.
Fromthedate Ofthe
originalpurchase
Service trips to your home to teach you how to
use the product.
Improper installation, delivery or maintenance. If you
have an installation problem, or if the air conditioner
is of improper cooling capacity for the intended use,
contact your dealer or installer. You are responsible
for providing adequate electrical connecting facilities.
Failure of the product resulting from modifications to
the product or due to unreasonable use including failure
to provide reasonable and necessary maintenance.
In commercial locations, labor necessary to move the
unit to a location where it is accessible for service
by an individual technician.
During this limitedone-yearwarranty,Mabe will also provide, free of charge, all labor and
related service to replace the defective part.
Staple yourreceipt here.
Proof of the original purchase
date is needed to obtain service
under the warranty.
Replacement of house fuses or resetting of circuit
breakers.
Failure due to corrosion on models not corrosion-
protected.
Damage to the product caused by improper power supply
voltage, accident, fire, floods or acts of God.
Incidental or consequential damage caused by possible
defects with this air conditioner.
Damage caused after delivery.
EXCLUSION OFIMPLIED WARRANTIES--Your sole and exclusive remedy is product repair as provided in this
Limited Warranty. Any implied warranties, including the implied warranties of merchantability or fitness for a
particular purpose, are limited to one year or the shortestperiod allowed by law.
This warranty is extended to the original purchaser and any succeeding owner for products purchased in Canada
for home use within Canada. In-home warranty service will be provided in areas where it is available and deemed
reasonable by Mabe toprovide.
Some provinces do not allow the exclusion or limitation of incidental or consequential damages, so the above exclusion
may not apply to you. This warranty gives you specific legal rights, and you may also have other rights which vary from
province toprovince. Toknow what your legal rights are in your province, consult your local or provincial consumer
affairs office.
Warrantor: Mabe Canada Inc.,
Burlington, Ontario
16
Page 17

Consignes de s&uritd ........... 18, 19
Consignes d 'utilisation
ModUles dot6s de boutons
de commande .................. 22, 23
ModOles dot6s touches
•aeflleurement .................. 20, 21
Entretien et nettoyage
Filtre 'aair ......................... 23
Serpentins ext6rieurs ................ 23
m
t"l,i
Instructions de montage ......... 24-27
Conseils de d_pannage ............. 28
Bruits normaux de fonctionnement ...28
Assistance it la clientele
Assistance 'a la clientele .. 2
Garantie ........................... 31
Enregistrement du titre
de propri6t6 .................... 29, 30
AEM 05 *
AEM06*
AEM08*
A :&5
AEQ06
A :&S
AEV05
* Produits homologu_s ENERGY STAR ®
w
.urn.
wm_
ENERGYSTAR
En tant que partenaire d'ENERGY STAR ®,
GE a d_termin_ que ce produit _tait
conforme aux exigences d'efficacit_
4nerg4tique d'ENERGY STAR ®.
Inscrivezici les numerosdemodeleet de serie :
Numerodemodele:
IVumerode Serie :
Vous trouverez ces num6ros sur l'6tiquette
appos_e sur le c&t_ du climatisem.
Au Canada, visitez-nous au •
x_<electromenagersge.ca
_ J
17
Page 18

IMPORTANTESCONSIGNESDES 'CURIT '.
VEUILLEZLIRETOUTESLESCONSIGNESAVANTUTILISATION.
AA VERTISSEMENT!
Pour votre s6curit6, les informafions contenues dans ce manuel doivent Otresuivies afin de minimiser
les risques d?ncendie, de chocs 61ectriques ou de blessures corporelles.
CONSIGNESDESECUR/TE
}}N'ufilisez cet appareil qu'aux fins prdvues }}
ddcrites dans le manuel d'utilisation.
iii}i}i
Ce climatiseur doit _tre correctement
install_ confk)rm_ment aux Instructions
d'Installation avant toute utilisation.
iii}i}}li_
Ne d_branchez.jamais votre climadseur en
iii}i}i
tirant sur le cordon d'alimentation. Prenez
toujours fermement la fiche en main et tirez
pour la sortir de la prise.
iii}i}}li_
Remplacez immddiamment tout cordon
dlectrique usd ou endommag_. Un cordon
d'alimentation endommag_ dolt _tre
remplac_ par un nouveau cordon
d'alimentation obmnu du fabricant. Ne
r_parez pas le cordon endommag_. N'utilisez
pas un cordon fissur_ ou pr_sentant des
dommages dus aux flottements soit sur
sa longueur ou aux extr_mit& du c6t_
de la fiche ou du raccord.
iii}i}}li_
iii}i}}li_
Etei_mz votre climatiseur et d_branchez-le
avant d'et_ectuer des r_parations ou de le
nettoyer
REMARQUE: Nousvousrecommandonsde faire
effectuer lamaintenancepar un technicienqualifi_.
Pour votre s_curit_, ne stockez pas et
n'utilisez pas de mat_riaux combustibles,
d'essence ou d'autres vapeurs et liquides
inflammables dans les parages de cet
appareil ou de rout autre appareil.
Tousles climatiseurs contiennent des fluides
fligoriganes qui, co_fformOment, 'ala
l_slation f_d&ale doivent _tre redr_s avant
la mise au rebut de l'appareil. Si vous mettez
au rebus un ancien appareil contenant des
fluides frigoriganes, v&ifiez la procOdure 'a
suivre auprOs de la compa_de responsable
de l'Olimination.
Si la prise de courant est d'un format
different de la fiche, cette prise dolt Otre
changOe par un Olectricien qualifiO.
18
BRANCHEMENTSCL-LECTRIOUES
Ne coupez pas ou n'enlevez pas, sous aucun
pr6texte, la troisi6me broche de mise _ la terre
du cordon d'alimentation. Pour des raisons
de s6curit6, cet appareil doit Otrecorrectement
mis _ la terre.
N'utilisezPASd'adaptateuraveccetappareil.
Le cordon d'alimentadon de cet appareil
est _quip_ d'une fiche 'atrois broches (pour
une mise 'a la terre) qui s'adapte 'ala prise
de courant standard 'a 3 broches (pour une
mise 'ala terre) pour minimiser les risques
de chocs Olectriques par cet appareil.
Le cordon d'alimentadon est OquipO d'un
dispositif d'intermption du courant. Un
bouton d'essai et de rOenclenchement est
fourni sur le bohier de la prise. Vous devez
roster le m_canisme r_guli_rement en
appuyant d'abord sur le bouton TEST(ess i)
puis sur le bouton RESET(r_enclenchement)
lorsque l'appareil est branch,. Si le bouton
TEST(ess i).e bascule pas ou si le bouton
RESET(r_enclenchement) ne reste pas
enclench_, cessez d'utiliser votre climadseur
et appelez un technicien de ser\,ice qualifi_.
Faites v_rifier la prise murale et le circuit
_lectrique par un _lectricien qualifi_ pour
s'assurer que le systame est correctement
mis 'ala terre.
Darts le cas d'une prise biphas_e,
l'installateur a la responsabilit_ et l'obligation
de la remplacer par une prise triphas_e
correctement mise 'a la terre.
Le climatiseur dolt toujours atre branch_
•asa propre prise _lectrique d'une tension
nominale correspondant 'acelle indiqu_e
sur sa plaque signal_tique.
Ceci permet d'obtenir un meilleur rendement
du climatiseur et _x,ite de surcharger les circuits
_lectriques du domicile qui risque
d'occasionner un incendie en surchauffant.
Consuhez les Consignes d'Installations, dans
la section Exigences Electriques pour les
exigences de branchements _lectriques
particuliers.
Page 19

wvvvv.electromenagersge.ca
VERTISSEMENT!
UTILISATIONDERALLONGES--mod_Ies_ 115Voltsuniquement
Nous d#conseillons fortement I'utilisation d'une
rallonge _ cause des risques potentiels dans
certaines conditions.
Cependant, si l'ufilisafion d'une rallonge est
ndcessaire, cette derni_re dolt obligamirement
_tre homologude UL, de calibre 14, 'a trois
brins avec mise 'a la mrre pour appareil
dlectromdnager et dolt _tre dquipde d'une
fiche et d'une prise femelle avec terre.
Les caract&istiques dlectdques de la rallonge
doivent _tre de 15 amperes (minimum)
et de 195 vohs.
MISE EN GARDE:
N'UTILISEZPAS de rallonge avec un modele
230/208 Volts.
LISEZETSUIVEZSOIGNEUSEMENTCESCONSIGNESDESECURITbc..
CONSERVEZCESINSTRUCTIONS
19
Page 20

A proposdes commandesdu climatiseur--
modelesdotesdetouchesa effleurement.
Les fonctions et I'aspect peuvent varlet.
Les t6moins lumineux _ cOtOdes touches _ effleurement sur le tableau de commandes du climatiseur indiquent
les rOglages sOlectionnOs.
Le tOmoieindiqueque I'appareil
L'6cranaffichetoujoursla temp6rature
dela piecesaufIorsquevousprogrammez
la temp6ratureou laminuterie.
amAuto
m High m Fan Only
Ned _ Energg Saver
i LOW ! Cool
LetOmoinlumineuxindique que]a mieuterie estprogrammOe.
est enmodeProgrammation
de la tempOratureou dudOlai.
O D61ai1-24hr --
O R0duction
du d61ai J
O S_lection
du mode I
O ugmentation --et R6duction
de la temperature
programm6e.
Augmentationdu d61ai
Marche/Arr_t automatique
du ventilateur
Augmentationde la vitesse
du ventilateur
Mise en marchede I'appareil
ON/OFF(marche/arr6t)
20
CommandesduClimatiseur
Commandes
O ouche d'alimentation
Met le clhnatiseur en position de marche
Oil d'al'r_t. L'&ran affiche la temp&ature
de la piece lorsque l'appm'eil est mis en mm'che.
O Affichage
Attiche la temp&ature de la piece ou le temps
restant ax_ant la raise en marche Oil l'arr_t de
l'appareil. Affiche la temp&anlre de r_glage lots
de la programmation de la temp(!ranlre pour les
modes C001 (refl'oidissement) Oil Energy Saver
(economie d'energie). Le t_moin hlmineux Set
(progrmnm_) s'aUume lots du r_gtage.
REMARQLIE:L'&ran a_tid_era la temp&anlre
de la piece fl la fin des r_gtages. Pour rappeler
la mmp(!tanll'e r_g]_e, appuyez sur les touches
Temp Increase (augmentation mmp&ature) •
ou Decrease (r_duction de la mmp(_tatul'e) V.
O ouches TempIncrease (Augmentation
temperature) •/Decrease (Reduction
de la temperature) •
Sent utilis_es pour programmer la temp&ature
darts les modes CoolOil EnergySaver.I_et_moin
hlminet/x Sets'alhlme lots du r_g]age.
O TouchesDelay timer Increase (Augmentation du
delai) • (+)/ Decrease (Diminution dudelai) • (-)
Chaque %is que vous effleurez les touches
Increase • / Decrease • Sill"l'appareil Oil
les touches Increase+ / Decrease - de la
t_l_commmlde, vous programmez la dur_e
du d_lai lots de l'utilisation de la minumrie
Delay 1-24hr (d_lai de 1-24h) @*. Le t&noin
hlmineux Set s'alhlme lots du r_gtage.
Touchesde vitesse du ventilateur
0
Sent utilis(_es pour r_g]er la vitesse (tit ventilateur
de l'appareil Sill"Low (faible), Med (moyenne),
High (elev_e) Oil Auto (automatique).
REMARQUE:Sur la t_l&ommande, utilisez les
touches Increase +/ Decrease - pour r_gler la
vitesse du ventilateur Sill"LOW,Med, ou High.
Ufilisez la touche Auto pour alhlmer le
ventilateur en mode Auto.
Tel6commande
ToucheMode
O
Est utilis_e pour programmer le climatiseur Sill"
les modes Cool, Energy Saver Oil Fan Only
(ventilamur uniquement).
Touchesde Delai
e
Delay ON (delaide mise enmarche)--l_orsque
le climatiseur est _teint, il peut _tre programm_
pour d(qnai'rer aummatiquement darts un d_lai
de 1 fi 24 heures fl ses r_gtages precedents
(mode, vitesse du ventilamur).
DelayOFF(delaid'arrOt)--Lorsque le climafiseur
est en fonctionnement, il peut _tre programm_
pour s'arr_ter automatiquement darts un d_lai
de 1 fi 24 heures.
Commentle programmer:
Appuyez sur la touche Delay 1-24hr(D_lai de 1
fi 24 heures) de l'appareil ou sur la touche _)
de la t(!l&ommande. Chaque fbis que vous
eftleurez les touches Increase • / Decrease •
Sill"l'appareil Oil les touches Increase + /
Decrease - de la t_l_commande, vous
progrmnmez la d/tr_e du d_lai pro" intervaUe
de 1 heure. Le t6moin hlmineux Set s'Nhlme
lors du r_gtage.
Pour conna_tre le temps restant Sill"la minuterie
Delay 1-24hr,appuyez sur la touche Delay 1-24hr
de l'appareil Oil Sill"la touche @ de la
t61_commande. Utilisez les touches Increase • /
Decrease • Sill"l'appareil Oil les touches Increase
+ / Decrease- de la t61_commande pour
programmer un nouveau d_lai si n_cessaire.
Pourannulerlaminuterie,appuyez Sill"la touche
Delay 1-24hrjusqu'fi ce que le voym_t lumineux
Sill"la touche Delay 1-24hrs'_teigne.
Page 21

www.electromenagersge.ca
Ne faites pas fonctionner votre appareil
Iorsque les temperatures exterieures sont
en dessous de 0 °C (32 °F).
T_.l_.commande
Pour wins assurer d'un tbncfionnement correct,
poinmz la t61dcommande vers le r6cepmur de signal
du climafisem:
I.c cayxm d'action de la tdldcommande s'dtendjusqu'a
6,4 m (20 pieds).
Mode Cool(refroidissement)
Ufilisez le mode Cool (refl'oidissement) avecla vitesse
du ventilateur sur Low (fhible), Med (moyemle),
High (elev_e) ou Auto (automatique) pour refl'oidir
Appuyez sur les touches Temperautre Increase
(augmenmtkm de la temp&ature) • / Decrease
(diminution de la temp&amre) • pour programmer
la temp&ature souhait_e entre 18 °Cet 30 °C (64
et 86 °F) par incr&nents de 0,5 °C (1 °F).
Un thermostat _lecu'onklue pem_et de maintenir la
mmp_tature de la piece. Le compresseur se met en
tam'die et S'mT_m Ainmrvalles r_guliers pour maimmnir
la mmp_tantre de la piece 5 un niveau de conf(_rt
choM. R_glez le them_osmt it une valour plus b_se et
l'air mnbiant se refi'oidita. R6glez le thermostat 5 une
valeur plus _le:\'_e et l'mr mnbiant se r_chaufIeta.
Mode Energy Saver (economie d_.nergie)
Contrgle le venfilateur
ON(active)---i_e venfilateur se met en mm'che et
s'ai'r_te en m_me romps que le compressem; Ceci
pem_et une plus grande variation de la mmp&ature et
du taux d'humidit_ dmls la pib.ce. Est en g&l&al utilis_
lorsque la pib.ce est inoccup_e.
Ce climatiseur fl'oid soul n'est pas conqu pour
fbncfionner avec des mmp&aulres ext&ieures en
dessous de 0 °C (32 °F). I1ne dolt pas _u'e utilis_
lorsque los temp_rauwes ext_rieures sont en dessous
de 0°C (32°F).
Assurez<ous qu'aucun ol)stacle pouvant 1)loquer
le signal nese trouve entre le climatiseur et la
tdldcom m ande.
Assurez<ous que los piles sont rdcentes et correctement
installdes dans la tdldcommande.
REMARQUE:Si/eclimatiseur_teintestallum_alorsqu'il est
programm_surun r@lageCool ousi vouspassezd'unmode
Ventilation_unmodedeRefroidissement,il faudraenviron
3minutespourquele compresseurseremetteenmarcheet
recommence_refroidir.
Descriptions du Refroidissement
Pourun RefroidissementNormal- S_|ectiom_ez |e mode
Cool avecla vitesse (lit ventilateur sur Med ou High
et un r_glage 5 une temp&autre moyemle.
Pourun RefroidissementMaximal-- S_lectionnez
le mode Coolavec la vitesse (tit ventilateur sur High
et un r_glage 5 une temp&autre plus basso.
Pourun Refroidissementplus Silencieux ouDurant la Nuit
-- S_lectiom_ez le mode Coolavecla vitesse (tit
ventilateur Sill"Low et/tn r_glage 5/tne temperature
illoyenne.
REMARQUE:Leventilateurpeutcontinuer_fonctionner
quelquesinstantsapresquelecompresseursesoitarr_tg
OFF(desactive)_l_eventilateur fbncfiom_e en confinu,
alors que le compresseur se met en marche et s'ai'r_te
5 intervalles r_guliers.
Mode Fan Only (ventilateur uniquement)
Ufilisez le mode FanOnlyavec une vitesse de
ventilateur r_gt_e sur Low,Medou Highpour faire
REMAROUE:Iavitesse de venfilateur attic ne pout _tre
utilis_e lorsque le climatiseur est sur le mode Fan Only.
circuler l'air et le filtrer sans le refi'oidir. Etant donn_
que le mode FanOnlyne permet pas de
reffoidissement, le r_glage de la temp&autre n'affiche
pas. Ia temp&autre de la pib.ces'aftiche 5 l'_crmL
Auto Fan Speed (vitesse du ventilateur auto)
R6glez la vitesse du ventilateur sur Auto pour que
la vitesse du ventilateur se r_gle attmmatiquement it la
vitesse n_cessaire it l'obtention des r_glages apportant
un niveau de confort optimal 5 la temp&autre
programm_e.
Si la piece demmMe un refl'oidissement
suppl&nentaire, la vitesse du ventilamur attgmente
atttomafiquement. Si la piece demmMe mains
de refi'oidissement, la vitesse du ventilamur diminue
atttomafiquement.
REMARQUE:Lavitessedeventilateurautono poutOtreutilis_e
Iorsquele climatiseurestsurle modeFanOnly.
Fonction de conservation des r_.glages apr_.s une coupure de courant
En cas de pmme ou d'interruption de courm_t,
l'appareil red&nai're attmmatiquement apr_s
r_tablissement de l'alimenmtion _lecu'ique et conserve
los derniers r_glages utilis&. Si la fonction Delay 1-24hr
(D_lai de 1 5 24 heures) _tait utilis_e, l'appm'eil
reprend son compm 5 rebours. Vous attrez peut-_tre
besoin de programmer une nouvelle heure.
21
Page 22

A proposdescommandesdu climatiseur--
modelesdotesde boutonsde commande.
Les fonctions et I'aspect peuvent varier.
NODE
High __t-
Coo_
Ned ,,[/ / 1!
OFF
High
oo,\ /
Cool
COMMANDES DU MODE
0
Commandescurcertains modUes)
O ommandes dumode
Les r_glages HighCool (fort refloidissemenO,
Med Cool(refloidissement moyen) et Low
Cool(refloidissement fidble) fournissent des
refloidissements f_des vimsses diff_renms pour
le venfilamm.
Les r_glages du vendlateur permettent aussi
de filtrer et de faire circuler l'Mr sans le
reffoidiL
REMARQUE: Sivouspassezd'unmodede
refroidissementsurArrOtou_ unmodedeventilation,
attendezaumoins3 minutesavantderepasser
unmodederefroidissement
Descriptions du Refroidissement
PourunrefroidissementNormaI--S_]ectionnez
High Coolou Med Coolavec un r_glage sin une
temp_ratme moyenne
PourunrefroidissementMaximal--S_lectionnez
High Coolavec un r_glage de la temp&ature sur
le chiffle le plus _lev_.
PourunRefroidissementplusSilencieuxou Durant
la Nuit--S6lectionnez le mode LowCoolavec
un r_glage sin une temp_ratme moyenne.
Coolest
TENP
4
COMMANDESDELATEMPI_RATURE
ContrSle de la TEMP
0
Le contr61e de la temp_ratme est utilis_ pour
mainmnir la mmp_ramre de la piece. Le
compressem se met en marche et s'an_te
f_inmrvalles r_guliers pour mainmnir la pi&ce
f_un niveau de confort constant. Loxsque vous
murnez le bouton sin une *-aleut plus _lev_e,
l'air _unbiant se reffoidira. Lorsque vous
mmnez le bouton sin une valem plus basse,
l'air _unbiant se r_chauffbra.
22
Page 23

Information suppl#mentaire importante.
Direction de FAir
Ufilisez le levier pour r('gler la direction de l'air vers
la gauche ou vers la droim seulement.
Entretienet nettoyageduclimatiseur.
Grille et Bo#ier
www.electromenagersge.ca
[_'aspectpeutvarier.
Eteignez et d_branchez le climatiseur avant tout
nettoyage.
Filtre a Air
I,e filue fi air derri&re la gTille flonmle doit &ue
v#rifi_ et nettoy_ au bout de 30jours de
foncdonnement ou plus souvent si n_cessaire.
PourrotirorIotiltro:
Poussez sur les bords du filtre et firez-le de l'autre
c6t&
Nettoyez le filue avec de l'eau savolmeuse fiOde.
Rincez le filtre et laissez-le s_cher avant de le
remettre darts le climafiseuL Ne nettoyez pas votre
filUe au lave-vaisselle.
MISE EN GARDE: Nffai s
fonctionnerleclimatiseursanslefiltresouspeinedele
boucheravecdelapoussibreet delacharpieetderMuire
sonefficacitg
Serpentins Ext#rieurs
Les selt)entins situ_s du c6t_ ext_rieur du
climafiseur doivent _ue r_guli_rement v_fifi_s. S'ils
sont obsu-u6s par des poussi&res ou de la suie, il est
possible de les faire nettoyer par des professionnels.
Pour le nettoyer, utilisez de l'eau et un d_tergent
doux. N'utilisez pas d'eau deJavel ou de nettoyants
abrasifk
L'aspectpeutvarlet.
Comment Ins#rer les Piles dans la Telecommande
Retirez le couvercle du logement des piles
D
en le faisant glisser darts le sens indiqu_ par
la fl_che.
Ins_rez les nouvelles piles en vous assurant que
les p61es (+) et (-) de la pile sont orient, s darts
la bonne direction.
Remettez le couvercle en le faisant glisseL
%
REMARQUES:
}i_Udlisez 2 piles alcalines _ d'l,5 Volt.
}i_Refirez les piles de la t_l_commande si vous
N'utilisez pas de piles rechmgeables.
pr&_oyez de ne pas udliser votre climafiseur
pendant un certain temps.
23
Page 24

].nsttuct,onSdemonta,e[ C.,ma,iseur]
I_ Questions? Composez le 1.800.561.3344 ou visitez notre site web a •www.electromenagersge.ca I
AVANT DE COMMENCER
Lisez ces instructions entierement et
attentivement.
• IMPORTANT - Conservezces
instructions pour I'inspecteur electrique local.
• IMPORTANT - Respectez tousles
codes et reglements en vigueur.
• Remarque pour I'installateur - Assurez-vous
de remettre ces instructions au client.
• Remarque pour le client - Conservez ces
instructions pour toute ref6rence future.
• Niveau de competence - L'installation de cet
appareil demande des connaissances de base
en mecanique.
• Delai d'execution - Environ 1 heure
• Nous recommandons que I'installation de ce
produit soit effectuee par deux personnes.
• L'installateur est responsable de I'installation
correcte de I'appareil.
• La panne de I'appareil due a une mauvaise
installation n'est pas couverte par la garantie.
• Vous DEVEZ utiliser toutes les pieces fournies
et suivre la procedure d'installation du
climatiseur decrite dans cette notice.
- MISE EN GARDE :
Ne coupez pas ou n'enlevez pas, sous aucun
pretexte, la troisieme broche de raise a la
terre du cordon d'alimentation.
Ne changez pas la fiche du cordon
d'alimentation du climatiseur.
Un c&blage en aluminium du domicile peut
occasionner des problemes particuliers m
consultez un electricien qualifi&
OUTILLAGE NECESSAIRES
Tournevis cruciforme Phillips
Tournevis a t6te plate
_ EXIGENCES ELECTRIQUES
(_ Certains modeles necessitent une prise
La fiche triphasee avec terre reduit le risque de
choc electrique. Si la prise murale que vous
envisagez d'utiliser est biphasee, vous avez la
responsabilite et I'obligation de la remplacer par
une prise triphasee correctement mise a la terre.
(_ ertains modeles necessitent une prise
(_ par un disjoncteur. Ces modeles doivent
mise a la terre de 115/120 Volts AC, 60 Hz,
proteg6e par un fusible a action differ6e ou
par un disjoncteur.
mise a la terre de 230/208 Volts AC,
proteg6e par un fusible a action differ6e ou
_tre installes sur leur propre circuit deriv6
pour eviter de surcharger les circuits
electriques du domicile qui peut
occasionner un risque d'incendie par
surchauffe des c_bles.
24
Crayon Regle ou metre
Niveau
Le cordon d'alimentation est equip6 d'un dispositif
d'interruption du courant. Un bouton d'essai et
de reenclenchement est fourni sur le boTtier
de la prise. Vous devez tester le mecanisme
regulierement en appuyant d'abord sur
le bouton TEST (essai) puis sur le bouton RESET
(reenclenchement) Iorsque I'appareil est branch&
Si le bouton TEST (essai) ne bascule pas ou si le
bouton RESET (reenclenchement) ne reste pas
enclenche, cessez d'utiliser votre climatiseur et
appelez un technicien de service qualifi&
Ciseaux ou couteau
Page 25

Instructions de montage
PII_CES INCLUES
(L'aspect peut varier) Joint d'etanch6it6 de
_ guillotine
Railsduemontage _ Jo!nt d'etanc _"_'_''44_'''''''_'__''_"
P_ sa pe_:lU: fen6tmreOaSse "_'"<_"_ Panneau an
accordeon
droit
Panneau en
Cli matiseu r accordeon
,_ gauche _
/
du rail de montage J _
Type A (6) Type B (3) Type C (5)
Bande d__
supeneur
Ferrure de verrouillage
de la fen6tre (1)
25
Page 26

instructions de montage
[] iNSTRUCTiON RELATIVE
A LA FENI_TRE
• Ces instructions sont valables pour une fen_tre
standard a guillotine a deux chassis mobiles. Vous
devrez modifier lesinstructions pour les autres
types de fen_tres.
• Le climatiseur peut _tre install_ sans les panneaux
en accordions si lafen_tre est _troite. Ref_rez-vous
aux dimensions de la fen_tre indiquees darts le
croquis a droite.
• Toute la ferrure de montage doit _tre solidement
fix_e au bois, a la ma_,onnerieou au m_tal.
• La prise d'alimentation electrique dolt se trouver
portee du cordon d'alimentation.
• Suivez les dimensions indiqu_es pour votre modele
dans le tableau et sur le croquis.
Modeles I A
AEQ05, AEQ06, AEV05 l 13" min.
AEM05, AEM06, lAEM08, AEQ08 13 5/8" min.
///
B====8
B
(Avec les panneaux
en accordeon)
[ B
24 1/2"-38 1/8"
24 1/2"-38 1/8"
A
[] FIXATION DE LA BANDE
D'ETANCHEITE DU RAIL
DE MONTAGE SUPERIEUR
Retirezla pellicule de la bande d'6tanch6ite du rail de
montage superieur et apposez cettebanded'etanch6it6
sur le bas du rail de montage superieur, le long du bord
avant.
Railde montage sup6rieur
/
Retirez la
pellicule de
la bande
d'6tanch6it6
Railde
VUE FRONTALE
/
Bande
d'6tanch6it6
Jm
PR#PARATION DU CLIIViATISEUR
montage
sup6rieur
I
[] iNSTRUCTiONS RELATIVE
A LA CONTRE-FENETRE
Le cadre de lacontre-fen_tre emp_che le
climatiseur de pencher vers I'exterieur, et doric de
se drainer correctement. Pour Mgler ce probleme,
fixez un morceau de bois au rebord de la fen_tre.
MORCEAU DE BOIS
LARGEUR : 2 po
LONGUEUR : Suffisamment long pour se Ioger
I'interieur du cadre de la fen_tre.
EPAISSEUR: Pour d_terminer I'_paisseur, placez un
morceau de bois sur le rebord de la fen_tre de
fa_,onace que le morceau de bois soit ½ po plus
_lev6 que le dessus du cadre de la contre-fen_tre
ou du cadre en vinyle.
Fixez solidement a I'aide de vis ou de clous fournis
par I'installateur. ½ po plus eleve que le
cadre en vinyle (sur
J_certaines fen&tres)
|
½ po plus eleve _ T___ _,/Bois
que le cadre de ± _. ,
la contre-fen&tre [I
W
Installez le rail de montage superieur avec 3
vis de type B de I'exterieur du boftier.
Rail de montage
superieur--,-,,_ _' _ _'
Rail de montage inferieur
r_ Fakes glisser les panneaux en accordeon
gauche et droit dans les rails de montage
inferieur et superieur.
Partie superieure droite
gauche
Partie superieure
Co re e,o . . rT--"
contre-fen&t_ [_ Cadre en vinyle I !
26
Page 27

Instructions de montage
r41PRI[PARATION DU CLIMATISEUR
(suite)
[] Fixez les panneaux en accordeon au
boftier a I'aide de 3 vis de type A de
chaque c6te.
Panneau en
accordeon
Vis de
Type A
VERS L'ARRII_RE
Rail de montage
superieur
Rail de montage inferieur
INSTALLATION DU CLIMATISEUR
DANS LA FENf::TRE
Placez le climatiseur sur le rebord avec le
rail de montage inferieur contre le rebord
arriere. Centrez-le et fermez la fen_tre
derriere le rail de montage superieur. II
doit _tre de niveau ou legerement penche
vers I'exterieur. Utilisez un niveau, environ
1/3 de bulle donnera la pente correcte
vers I'exterieur.
L_£ I l J_JILm/LJl
Vis de type C
['_ Etirez les panneaux en accordeon gauche
et droit jusqu'aux cadres verticaux de la
fen_tre et fixez-les a I'aide de 4 vis de type
C au travers des trous dans les panneaux.
[] PRI[PARATION DE LA FENf:TRE
Decoupez le joint de la fen_tre a guillotine
la Iongueur adequate. Decollez la pellicule
protectrice et collez le joint sur le dessous du
cadre de la fen_tre.
E]INSTALLATIOND'UNE FERRUREDE
SUPPORTET DU JOINT D'ETANCHEITE
SUPERIEUREN MOUSSE DELA FENI[TRE
[] - MISE EN GARDE :
Pour preventez la verre
brisez dans les fen_tres,
attachez une ferrure de
support a la c6te du
fen_tre.
Fixez la ferrure de support
I'aide d'une vis de type
C.
Decoupez le joint d'etancheite superieur en
mousse a la largeur de la fenetre.
Inserez la mousse
entre la vitre et la
fenetre pour
empecher I'air et
les insectes de
penetrer dans la
piece.
NOTE : Si le joint d'etancheite fourni ne
s'adapte pas a votre fen_tre, procurez-vous
Iocalement I'article approprie afin d'obtenir une
27
etancheite adequate de I'installation.
Vinyle
Bois
Page 28

Avantd'appelerle service...
Causespossibles
Leclimatiseurnese
metpasenmarche
Le climatiseur no refroidit La circulation d'air est bloqu&e. • Xssm'ez-vous qu'il n'y a [)as de rideau, de store ou de meuble
pasautantqu'ille devrait qui bloque le devant du climatiseur
Le climatiseur
est d_branch&
Le fusible a saut4/ • \_fifiez la bohe 'hfi_sible/fi disjonctem's et remplacez le fi/sible
le disjoncteur est ouvert, ou rebvanchez le di_onctem"
II y a une panne de courant. • S'il se produit une panne de couvant, d6bvanchez le climafiseur
Le m6canisme d'interruption • Appuyez sur le bouton RESET(remise en marche) sire(_sur la fiche
de courant est d4clanch& du cordon (qectrique.
Le contr61e de temp6rature • En mode COOL(flais) appuyez sur la touche DECREASE• pad.
n'est pas bien r4gl&
Le filtre h air est sale. • Nettoyez le filtre an moins musles 30jours. Consulmr la section
La chambre _tait chaude. • Aprbs ax_ir mis en marche le climafiseur, attendez
L'air froid s'_chappe • \_rifiez les grilles 'h regisn'e de plancher et les reprises d'air froid.
de la chambre.
Ouefaire
• Xssurez_xousque la fiche du climatiseur soit bien bvanch6e
dans laprise tamale.
en le mettant en position OFF(arr_t). Quand le couvant revient,
attendez 3 minutes avant de remettre en marche le climatisem;
pour &iter de d_clencher la surcharge du compresseur
• Si le bouton RESETnereste pas enfonc_, arr_tez le climafiseur
d'air et appelez un technicien qualifi&
• Sur les modules dot& de boutons de commandes, tournez
le boumn de telnp_l_ature sur lille xaleur plus (qev_e.
Instructions defonctionnement.
que la chambre se refi'oidisse.
Les serpentins sont gelds. • Consultez "Le climatiseur d'air gele" cMessous.
Leclimatiseur
gele
La glace bloque la circulation
d'air et empbche le dimatiseur
de refroidir la chambre.
• SllI"les modules dot& de boutons de commande, r@ez le mode
sur HighFan (vitesse &l ventilateur _lev_e) ou HighCool(fort
refi'oidissement) axec la temp6vamre r6gl6e sur I ou 2.
• Sur les modules dot6s de touches 'a effleurement, r(_glez les
commandes sur HighFan(vitesse Nl xenfilateur 61ev(_e)ou High
Cool(fort refroidissement) et r_glez le thermostat sur une
temp_mmI'e l)lus _le:\'('e.
Latelecommande Les piles ne sont pas ins_r_es • \_rifiez la position des piles, Ellesdoivent ins&(_esde facon 'ace
nefonctionnepas correctement, que lesp6les (+) et (-) de la pile soient orientt:s dans des
directions oppos(_es.
Les piles sont peut4_tre • Remplacer les piles.
d4charg_es.
Dereau coulea rexte'rieur II fait trbs chaud et humide. • C'est normal.
Dereau coulea I'interieur Le climatiseurn'estpas • Pour obtenir une bonne &acuafion de l'eau, assurez-wms
inclin6 vers I'ext6rieur. que le climafiseur soit l_g_rement inclin( _ de l'avant
du bottler _ers l'arri_re,
L'oaus'amassedans L'humidit_ est extraitede • C'est nomlal pendant une p(_riodecourte dans des r_gions
leplateaudufond Fair de la chambre et passe peu humides; normal pendant des p(_riodes plus longues
dans le plateau du fond. dans des r_gions tr_s humides,
Bruits normaux de fonctionnement
28
\_ms i)omez en/endre un cliquefis dfi 'a de l'eau qui
est absorb6e et est i)r(_et6e contre le condensateur les
jours de phfie off quand il y a beaucoup d'humidit_.
Cette caiact&isfique diminue l'humidit_ et am_liore
le rendement,
\_ms I)OmeZentendre le claquement du thermostat
De l'eau s'amasse dans le I)lateau du bas i)endant les
i)_riodes de gvande humidit_ ou s'il pleut. Cetm eau i)eut
d_border et couler de l'api)areil du c6t(" ext('rieur
l,e x_nfilamur I)eut tourner m_me quand le compresseur
ne foncfionne i)as.
quand le compresseur se met en mmvhe et s'arr_m.
Page 29

Please place in envelope and mail to:
Veuillez mettre dans une enveloppe et envoyez _:
OWNERSHIPREGJSTRATJOH
P.O. BOX1780
MISSJSSAUGA,OHTARJO
L4Y4G1
(FORCAHADJAHCOHSUMERSOHLY)
29
Page 30

For Canadian
Customers
Pour les
Consommateurs
Canadiens
Pleaseregisteryour product to enableusto contact you
in the remoteeventasafety nolJceisissuedforthis product
z
andto allow for efficientcommunicaOonunderthe terms
ofvour warranty,shouNthe need arise.
REGISTERON-LINE: wwvv,geappJiances,ca MAILTO:
ENREGISTREMENTSURINTERNED_,:_.electtemenaqersge.ea POSTER_,:
Z
[][]MISS/MLLE.MR'/M[][]Ms.MRS'/MME'FIRSTNAME/PRENOM LASTNAME/NOM
rr"
STREETNO/ N°RUE STREETNAME/RUE
rr"
C3
crrY/VILLE
Z
uJ
Z
..-1
AREACODE/IND.RE_G.[TELEPHONE JE-MAIL
DIDYOUPURCHASEASERVICECONTRACTFORTHISAPPLIANCE? YES/OUI El IFYES/ SlOUI:EXPIRATION
AVEZ-VOUSACHETI_UN CONTRATDESERVICEPOURCETAPPAREIL? NO/NON []
_9
Z
NAME OFSELLINGDEALER/ NOMDU MARCHAND MODEL / MODt _LE
INSTALLA11ONDATE/DATED'INSTALLA11ON
Y/A M D/J CORRESPONDENCE [] ENGLISH
I
I
I
[] Idonotwishtoreceiveanypromotionaloffersregardingthisproduct.
I
I
[] Jened6sirepasrecevoird'offrespromotionnellesconcemantceproduit
I
I
I ............................................................................................................................................................................................................................................................................................................................................................................................................................................................................................................................................................................................................................................................................................................................................................................................................................................................
L
CORRESPONDANCE [] FRAN(_AIS
Veuilbzenregis_ervolreproduitafindenouspermet_ede
communiqueravecvoussijamaisunavisdes6cur_ concemant
ceproduit6tait_misetdecommuniquerfacibmentavecvousen
ver_devo_egaranlJe,silebesoins'enfairsen_r.
p.o.BOX1780,MISSISSAUGA
ONTARIO,L4Y461
A_. NO/APP./RR#
PROVINCE POSTALCODE/POSTAL
Y/A M D/J
SERIAL/St_RIE
30
Page 31

ClimatiseurGE--Garantie LimiMe D'unAn. .aeotrome.agersge.oa
Lesservices sous garantie sont dispensOspar nos centres de
rOparation ou par nos rfiparateurs Customer Care®autorisfis.
Pour obtenir le service, appelez le 1.800.561.3344.Veuillezfoumir
le numfiro de sfirie et le numOro de modfile Iorsque vous appelez
pour obtenir le service.
Nous remplacerons :
Uneannee
A compterdela date
d"achat initial
Les d6placements de service g votre maison pour vous
apprendre g ufiliser le produit.
Un montage, une livraison ou tm entretien
d6ficient. Si vous avez un problbme de montage
ou si le climatiseur n'a pas la bonne capacit6 de
refroidissement pour son usage pr6vu, appelez votre
revendeur ou votre installateur. _bus 6tes responsable
de fournir une installation de raccordement 61ectrique
convenable.
Les pannes occasionn6es par des modifications
au produit ou une utilisation non raisonnable, en
particulier une absence d'entretien raisonnable
et n6cessaire.
Toutepiecede le climadseur manifesmnt un vice de mat&iau ou de fabrication. Durant cette
p&-iode de garantie limitee d'une annee, Mabe fournira aussi, gratuitement, la main-d'oeuvre
et le service de r_pamdon connexe pour le remplacemem de la piece d_fecmeuse.
Agrafez le recu d'achat icL
Pour obtenir le service sous
garantie, vous devrez fournir la
preuve de I'achat original
Le remplacement des fusibles de la maison ou la
r_activation des disjoncteurs.
Les pannes occasionn6es par la corrosion sur les
modbles qui ne sont pas prot6g6s contre la corrosion.
Les dommages occasionn6s par un mauvais voltage de
l'alimentation 61ectrique, un accident, tm incendie, tree
inondation ou une calamit6 naturelle.
Les dommages indirects et cons6cutifs & la propri6t6
personnelle occasionn6s par des vices possibles de
ce climatiseur.
Les dommages occasionn6s par la livraison.
Dans les emplacements commerciaux, la main-d'oeuvre
n6cessaire pour d6m6nager l'appareil jusqu'& un
emplacement ou il est accessible par tm technicien
particulier.
EXCLUSIONDE GARANTIES IMPLICITES- Votreseul et unique recours est la reparation du produit
selon les dispositions de cette Garantie limiMe. Toutesles garanties implicites, incluant les garanties
de commercialiM et d'adequation a un usage specifique, sont limiMes a une annee oua la periode
la plus courte autorisee par la legislation.
Cettegarantie est valable pour le premier propriOtaire et tout autre propriOtaire du produit s'il achetO au Canadapour
utilisation domestique clans Canada.Leservice _ domicile sous garantie sera foumi I_ oOil est disponible et clans les
r_gions que Mabe considOre que I'offre de service est raisonnable.
Dans certaines provinces, il est interdit d'exclure ou de limiter les dommages directs ouindirects, fl est alors possible
que les limitations ou exclusions ci-dessus ne s'appliquent pas clans votre cas. La prOsente garantie vous confOre
des droits juridiques spficifiques. Vouspouvez bOnOficier d'autres droits, qui varient d'une province _ I'autre. Pour
connaftre les droits dont vous bfinOficiez clans votre province, communiquez avec le bureau des relations avec les
consommateurs de votre rOgion.
Garant : Mabe Canada Inc.,
Burlington, Ontario
37
Page 32

Assistancea la clientele.
Vous avez une question ou vous avez besoin d'aide pour votre appareil _lectrom_nager? Gontactez-nous
I SiteIntemetGE www.electromenagersge.ca
par Internet au site www.electromenagersge.ca 24 heures par join, tous lesjom_ de l'ann_e.
Serviceder@arations
Service de r_parafiOllS GE est tout pI_S de vous.
Pour faire r6parer votre 61ectrom_nager GE, il suffit de nous t_l_phoneL
1.800.561.3344
Studiodeconceptionr#aliste www. electromenagersge, ca
Sur demande, GE peut foumir une brochure sur l'am6nagement d'une cuisine pour les pe_somles
_ mobilit_ r_duite.
t_crivez: Direcmm, Relations avec les consommamms, Mabe Ganada Inc.
Bureau 310, 1 Factory Lane
Moncmn, N.B. E1C 9M3
Prolongationdegarantie www.electromenagersge.ca
Achetez un contrat d'entrefien GE avant que votre garanfie n'expire et b&l_ficiez d'un mbais substantiel.
Ainsi le service aprb.swente GE sera tot{ioms lf_aprb.s expiration de la gamnfie.
gisitez notre site Web ou appelez-nous au 1.888.261.2133.
Pibceset accessoires
www. electromenagersge, ca
Geux qui d6sirent r('parer eux-mb.mes leurs 61ectrom6nagers peuvent recevoir pi&ces et accessoires
direcmment _ la maison (carms VISA, MasmrCard et Discover acceptg-es).
tes directivesstipuleesdansle presentmanuelpeuvent_treeffectueesparn'importequelutilisateur,tes autres
reparationsdoiventgeneralement_treeffectueesparuntechnicienqualifie.Soyezprudent,car unereparation
inadequatepeutaffecterle fonctionnementsecuritairede rappareil.
Vous trouverez dans les pagesjaunes de votre annuaire le num_ro du (;entre de service Mabe le plus
proche. Autrement, appelez-nous au 1.800.5611.3344.
Contactez-nous
Si vous n'b.ms pas safisfait du service apr&s-vente dont vous avez b6n6fici6 :
Premi_rement, communiquez avec les gens qui ont r_par_ voue appareil.
EnsuRe, si vous n'_ms toujours pas safisfait envoyez musles d4tails--mm14ro de t_14phone compris--au
Direcmm, Relations avec les consommamms, Mabe Ganada Inc.
Bureau 310, 1 Factory Lane
Moncmn, N.B. E1C 9M3
Inscrivezvotreappareil#lectrom#nager
Inscrivez votre appareil 61ectrom6nager en direct, aussit6t que possible. Gela am61iorera nos
communications et notre service apr_s=vente. Vous pouvez _galement nous envoyer par la poste
le fommlaire d'inscriptionjoint _ votre documentation.
www. electromenagersge, ca
www. electromenagersge, ca
32
Page 33

Ira'trucciones de seguridad .......... 34, 35
Im'trucciones de operaci6n
Modelos con botones de control ...... 38, 39
Modelos con teclas de toque .......... 36, 37
Cuidado y limpieza
Bobinas para extefiores ................. 39
Filtro de aire .......................... 39
Ira'trucciones de ira'talaci6n ........ 40-43
Solucionar problemas ................. 44
Sonidos de operaci6n normales .......... 44
Servicio al consumidor
Garantfa .............................. 45
Servicio al consumidor .................. 47
m
m
¢D
AEM 05 *
AEM06*
AEM08*
A :&5
A :&6
A :Q08
AEV05
* Producto etiquetado :_:ENERGY STAR ®
ENERGYSTAR
Como socio de ENERGYSTAR ®,
GE ha confirmado que este
pvoducto cumple las direcuices
de ENERGYSTAR® relativas al
rendimiento enevg6fico.
N
wJ
Escribalos numerosde modelo
y serie aqui:
# de Modelo
# de Serie
Puede eliCOlltYai estos II/]IlleIos
en una etiqueta en el cosmdo
del acondicionador de aire.
L_,,_"
33
Page 34

INFORMACIONIMPORTANTEDESEGURIDAD.
LEATODASLASINSTRUCCIONESANTESDEUSAR.
iAD VERTENCIA!
Por su seguridad, se debe seguir la informaciSn en este manual para minimizar elriesgo de incendios,
descargas el#ctricas o lesiones personales.
PRECAUCIONESDESEGURIDAD
}}Use este electrodom_sfico solamente para }}
el prop6sito determinado segdn se describe
en el Manual del propietano.
iii}i}i
Este acondicionador de aire debe instalarse
correctamente de acuerdo con las
Instmcciones de instalaci6n antes de su uso.
iii}i}}li_
Nunca desenchufe su acondicionador de
aire firando del cable el_ctfico. Siempre
agarre firmemente el enchufe y fire de
_1 directamente hacia _uera.
iii}i}i
Reemplace inmediatamente todos los cables
el_ctricos que se hayan pelado o que se
hayan daflado de alg_na otra manera.
Un cable de corriente daflado no debe
repararse, sino que debe ser sustituido por
uno nuevo que se adquiera del fabricanm.
No use un cable el_ctrico que muestre
ex,idencias de deterioro, o daflos de abrasi6n
en su superficie en alguno de sus extremos.
iii}i}i
iii}i}i
iii}i}}li_
Apague la unidad (OFF)ydesenchute el
acondicionador de aire antes de efecmar
reparaciones o la limpieza.
NOTA: Recomendamosenf#ticamenteque
un t#cnicocalificadorealice/asreparaciones.
Por su seg_fidad...no almacene ni use
matefiales combustibles, gasolina u otros
vapores o lfquidos inflamables en la
proximidad de Oste o algdn otro
electrodom_sfico.
Todos los acondicionadores de aire
confiene refrigerantes, los que por i,ey
Federal deben ser remox,idos antes de
desecharlos. Si usmd planea deshacerse de
algdn producto que contenga refiigeranms,
p6ngase en contacto con la compafffa que
se encarga de recoger su basura para que le
indiquen qu_ hacer.
Si el receptaculo no coincide con el
enchufe, un electricista calificado debe
reemplazar el receptdculo.
34
COMOCONECTARLAELECTRICIDAD
Bajo ninguna circunstancia, corte o remueva la
tercera pEla(tierra) del cable el6ctrico. Enpos
de la seguridad personal, este electrodom6stico
debe siempre conectarse a tierra.
NO use unenchufe adaptadorcon este
electrodomestico.
E1 cable el_ctrico de este electrodom_sdco esta
equipado con un enchufe de tres pdas (tierra)
que combina con un tomacorriente est_ndar
de tres mmas de pared para minimizar la
posibilidad de una descarga el_ctrica.
E1cable de alimentaci6n incluye un
dispositivo para intermpci6n de cornente.
Se incluye un bot6n de pmeba y de reinicio
en el dispositivo. E1disposidvo debe ponerse
a pmeba peri6dicamente: primero se presiona
el bot6n de TEST(pmeba) y luego RESET
(reinicio) mientras se encuentra enchufado al
mmacorriente. Si el bot6n TEST.ose dispara
o si el bot6n RESETno queda enganchado,
de,je de utilizar el acondicionador de aire y
comunfquese con un t_cnico calificado.
Pida a un t_cnico que inspeccione el
tomacorriente y el circuito para cerciorarse
de que el mmacorrienm estd conectado a
tierra de la manera apropiada.
Donde exista un tomacorfiente de dos
tomas, es su responsabilidad y obligaci6n
personal hacer que dicho tomacorriente
sea reemplazado por uno de tres tomas
con conexi6n a tierra.
E1acondicionador de aire deberfa siempre
estar conectado a un tomacorriente indMdual
con su circuito de volta,je correspondiente.
Esm proporciona el mayor rendimiento y
ademas ex,itaque los circuitos del resto de
la casa se sobrecarg_en, lo cual podrfa causar
incendios por el sobrecalentamiento del
cableado.
Ver las Instmcciones de instalaci6n, en la
secci6n Requisitos El_ctricos para los requisitos
especfficos de conexi6n.
Page 35

iAD VERTENCIA!
f
USODECABLESDEEXTENSION--Modelosde115volfiossolamente
ge.com
Debido al potencial de fiesgos de seguridad bajo
ciertas condiciones, en_rgicamente recomendamos
contra el uso de cables deextensi6n.
Sin embargo, siusted seve en la necesidad
de usar un cable elOcuico de extensi6n, es
absolutamenm necesario que el mismo estO
listado ba,jo UI,, sea calibre 14, del tipo de
3 mmas con conexi6n a tierra para
electrodomOsticos y el fndice elOcuico debe
ser de 15 amperios (mfnimo) y 125 voltios.
_ PRECAUCION:
NO USEun cable de extension con ninguno
de los modelos de230/208 voltios.
LEAYSIGAESTASINSTRUCCIONESDESEGURIDADCUIDADOSAMENTE.
GUARDEESTASINSTRUCCIONES
35
Page 36

Acerca de loscontrolesen el acondicionadorde airem
modelosconteclas de toque.
Laslucesallado delas teclasde toque enel paneldecontroldelacondicionadordeaire indicar_nlos ajustesseleccionados.
Lapantallamuestrasiemprela
temperatura ambiente, excepto al
configurarlatemperaturaDefinida
oelSincronizadorderetardo.
A_Jto
_ iii:___!!i_iSYili,ca que e, te,_lporizador
de retardo est_ configurado.
C0ntr01esdelac0ndici0nad0r deaire
Controles
La luz indicaquela unidadest_ enel modode
Ajuste de temperaturao deTiempode retardo.
Reducci6nde
sincronizadorde retardo
Selecci6nde modo
Reducci6nde
delventilador
Aumentoy reducci6n
de ajuste de temperatura
1-24 hde retardo
I
Control rem0t0
Aumentode sincronizadorde
retardo
Encendido/apagado
autom_ticodel ventilador
Aumentode velocidaddel
ventilador
Encendido/apagadode la
unidad
Teclade Power (Encendido)
0
Apaga y prende el acondicionador de aire.
A1 encendeise, la panmUa mosuarfi la
mmpemmm ambiente.
Pantalla
0
Muestra la temperatura ambiente o
el dempo resmnte en el Sincronizador de
remrdo. Muesua la mmperamra Definidaal
configurar la temperamra en los modes Cool
(Frio)o de EnergySaver(Ahorrodeenergia).
I_ luz de Ajustese encen(ter_ durante la
configuraci6n.
NOTA:la pantaUa cambiard para mosuar la
mmperamra ambiente una vez que se hwa
realizado la configuracidn. Para resdmir la
temperamra Definida, pulse las teclas de Temp
(Temperatura)Aumento• o Reduccion•.
Teclasde TempAumento•/Reduccion •
@
Usado pare _jusmr la mmperamra cuando
se encuentre en el mode CO01 (Frio)o Energy
Saver(Ahorrode energia).Ia luz de Ajustese
encende_ duranm la configuracidn.
TeclasdeSincronizadorderetardoAumento•
0
(+)/Reduccion • (-)
Carlavez que toque las teclasAumento• /
Reduccion• de la unidad o lasteclas Aumento
+/Reduccion- en el control remote (lefini_
el tiempo de retardo al utilizar el Delay1-24hr
timer (Sincronizador de retardo1-24h)(_ ).
La luz de Ajustese encenderd dumnte la
configuraci6n.
TeclasdeFanSpeed(Velocidaddel ventilador)
0
Usado para ajustar la velocidad del ventilador
a Low(Bajo),Med (Medio),High(Alto)o Auto
(Automgltica)en la unidad. NOTA:en el control
remote, utilice lasteclasAumento+/Reduccion
- velocidad de ventilador para @1star la
velocidad del ventilador en Low (Bajo),Med
(Medio) o High (Alto).Ufilice la tecla Auto pare
activar el venfilador automdtico.
Teclade MODO
0
Usado para @]star el acondicionador de aire
al mode Cool(Frio),EnergySaver(Ahorrode
energia)o FanOnly(Soloventilador).
TeclasdeDelay(Retardo)
0
DelayON(ENCENDIDORetardo)_;uando
el acondicionador de aire estfi apagado,
puede _jusmrse para que se encienda
aumm_ficamente denuo de 1 a 24 horas en el
mode y configumcidn de vendlador anterioL
DelayOFF(APAGADORetardo)_ :uando el
acondicionador de aire estfi encendido, puede
@lsmrse pare que se apague automfiticamenm
denuo de 1a 24 betas.
Comerealizarel ajuste:
Pulse la tecla Delay1-24hr(Retardo1-24h)en
la unidad o en la tecla _ del control remote.
Cada tuque de las mclas Aumento• /
ReduccilJn• en la unidad o las mclas Aumento
+/ReduccilJn - en el conuol remora definird
el mmpolizador en inmrvalos de 1 hera.
Ia luz de Ajuste se encender_i dumnte la
configuracidn.
Pare revisar el fiempo restante en el
Sincronizador de retardo1-24h,pulse la mcla
de Delay1-24hr(Retardo1-24h)en la unidad o
en la tecla @ del conuol remora. Udlice las
teclas Aumento •/ReduccilJn • en la unidad
o las mclas Aumento ÷/ReduccilJn - en el
conuol remora para definir un nuevo
dempo, si lo desea.
Paracance/arel sincronizador,pulse la mcla
Delay1-24hr(Retardo1-24h)hasm que la luz
de dicho control se apague.
36
Page 37

ge.com
No use en las condicionesexternasdebajo
el punto de congelacion
Este acondicionador de aire no es disefiado Dm_
Control remoto
Para garandzar una opemci6n apropiada, oriente
el control remoto hacia el receptor de serial del
acondicionador de aire.
E1receptor de sefiM fiene un _mlgo mfiximo de
20 pies.
Modo Cool(Frio)
Use el modo Cool(Frio)a Low(Bajo),Med(Medio),
High(Alto)o AutoFanSpeed(Velocidadde ventilador
automMica)para enffiaL Use las teclas de
Temperature(Temperatura)Aumento• (+)/Reduccion
• (-)para _justar a la temperatma deseada entre
64°F y 86°F en incremenms de l°E
Se usa un mmlosmto electr6nico para mantener
la temperatmv_ ambienm. E1 compresor ham
ciclo enue apagado y encendido pma mantener
la habimci6n a la mmperamra deseada. Ajusm el
mrmosmm a un n6mero menor y el aire inmrno
se enffiaM m_'ts.Si lo _jusm a un ndmero mwoi;
la tempexwmra del aiIe interno se calenmM mils.
NOTA:sielacondicionadordeaireest_apagadoyse
enciendemientrasestdconfiguradoenunajusteCool(Frio)
usar en temperatmas externas deb_jo el punm de
congelaci6n.
No use en las condiciones extenlas deb_jo el punm
de congelaci6n.
Cerci6rese de que no haya nada entre el
acondicionador de ahe y el conuol remora que
pueda bloquear la serial.
Cerci6rese de que las bamrfas sean flescas y se
instalen conecmmente seg6n se indica en el
control remoto.
o sisecambiadeunajustedeventiladoraunodeCool
(Frio),puedequepasenaproximadamenteunos3minutos
hastaqueel compresorarranquey comienceelenfriamiento.
Descripcionesdeenfriamiento
ParaenfriamientonormaI--Seleccioneel modo
Cool(Frio)y ventilador High(Alto)o Med (Medio)
con una temperatma de _juste media.
Paraenfriamientomaximo--Seleccione el modo
Cool(Frio)yvenfilador High(Alto)con una
temperamra de _juste menoL
Paraenfriamientosilenciosoyenfriamiento
nocturno_Seleccioneel modo Cool(Frio)y
ventilador Low(Bajo)con una tempexvmm_
de _juste media.
Energy Saver Mode (Modo de ahorro de energia)
Conuola el venfiladoL
ON(ENCENDIDO)--E1venfilador ham un ciclo
de encendido y apagado con el compresor. Este
resulm en variaciones mwores en la mmperatma
de la habimci6n yen la humedad. Normalmenm
usado cuando la habimci6n no est:i ocupada.
Modo de Fan Only(Solo ventilador)
Use el modo Fanonly(Soloventilador)a velocklad
LOW(Baja),Med(Media)o High(Alta)par'a
proporcionar circulaci6n de aire yfilmmi6n
sin enffiamiento. Debido a que los niveles
de venfilador finic_unenm no proporcionan
Velocidad de ventilador automMica
Indique la opci6n en Velocidad de venfilador
autom_idca para definir aumm_kicamenm la
velocidad necesaria paxwproporcionar una
configuracidn de comodidad 6pdma con la
mmpe_mna elegida.
Si la habimci6n necesim mils enfliamienm,
la velocidad del venfilador aumenmM
NOTA:puedeque el venfiladorsiga funcionandodurante un
corto tiempo despu_sde desacfivarseelciclode/compresor.
OFF(APAGADO)_EI venfilador funciona todo el
dempo, mientras que el compresor pasa pot los
ciclos de encendido y apagado.
enffiamienm, no se puede introducir una
temperamra Definida. ApareceM en
panmlla la temperatmv_ ambienm.
NOTA:/aVelocidaddevenfiladorautom_ticanopuede
ufilizarseenelmodoFanonly(Soloventilador).
aumm_ificamente. Si la habimci6n necesim
menos enffiamiento, la velocidad del venfilador
descender_i aumm_ficamenm.
NOTA:/aVelocidaddevenfiladorautom_ticanopuede
ufilizarseenelmodoFanonly(Soloventilador).
Funcion de recuperacion de perdida de energia
En caso de la p&dida de la enexgia o inmrmpci6n,
la unidad reiniciaM aummgficamente en las
flmciones de la Olfima vez que tim usado una
vez la ener_a sea resmblecida. Si la flmci6n del
Delay1-24hr(Retardo1-24h)estaba definido,
confinuaM la cuenm regresiva. Es posible que usted
necesite _jusuu un fiempo nuevo si asf lo desea. _ 7
Page 38

Acerca de loscontrolesen el acondicionadorde aire--modelos con
botonesdecontrol.
Las funciones y el aspecto pueden variar.
MODE
High •
Cool._
OFF
High
r/ ,J
oeo '(/i!t
Low*
Cool
CONTROLDEMODO
Controles
Control de modo
0
HighCool(FrioAlto),MedCool
(FrioMedio)y LowCool(FrioBajo)
proporcionan enfiiamiento con
diferenms velocidades del venfiladoL
Los @_stes del venfilador proporcionan
circulacidn de aire y filnacidn sin enflia_.
NORA:Siustedmueveelcontroldemododeunnivel
frfoaOFF(APAGADO)oaunniveldeventilador,
esperepor/omenos3 minutosantesdecambiarotra
vezaunniveldeenfriamiento.
Coolest
TEMP
CONTROLDE
TEMPERATURA
Control de TEMP
0
E1control de TEMP es usado para
manmner la mmpemmra ambiente. E1
compresor hard ciclo enne encendido y
apagado para manmner el mismo nivel de
mmperamra en la habimcidn. Cuando usmd
gdra el bot6n hacia un ndmero mwoi; el aire
inmrno se enfriard rods. Si lo @1sina un
nfimero menor, la temperature del aire
inmrno se calenmm rods.
38
Descripciones de enfriamiento
Paraenfriamientonormal--SeleccioneHighCool
(FrioAlto)o MedCool(FrioMedio)con el control
de TEMPERATURA en el medio.
Paraenfriamientomaximo--Seleccione HighCool
(FrioAIto)con el control de TEMPERATURA en
el ndmero mayor disponible en su teclado.
Paraonfriamiontosiloncioso durantolanoche---
Seleccione LOWCool(FrioBajo)con el control de
TEMPERATURA en el nivel medio.
Page 39

Informaci6nimportante adicionale.
Direccion del aire
Use la palanca para _justar la direcci6n del aire
hacia la izquierda y la derecha solamente.
Cuidadoy limpieza del acondicionadorde aire.
Rejilla y caja
Apague el acondicionador de aire y retire el
enchufe del tomacolTiente de la pared antes
de limpiaL
Filtro de aire
E1filtro de aire detMs de la rejilla flonml debe
inspeccionarse y limpiaxse pox lo menos cada
30 dfas o m_s a menudo si flmse necesaxio.
Para limpiaL use agua y tin detergente suave.
No use cloxo o matexiales abx_tsivos.
ge.com
Pararetirarlo:
Empt_je en un lado del borde del filtro y tirelo
del otto lado.
I,impie el filuo con agua tibia yjab6n. Enjudguelo y
peI_nim que se seque antes de colocarlo om_ vez en
su lugaL No lave el filtro en un lavav@llas.
PRECAUCION:Noo fRf
acondicionadordeairesinel filtrodebidoaquelasuciedad
y/aspe/usas/oobstruirdnyreducirdnsurendimiento.
Bobinas para exteriores
Se deben inspeccionar con flecuencia las bobinas
en el lado exmrior del acondicionador de aire. Si
las mislnaS est5xl obsu-ui&ts con suciedad u hollfn,
podrfan limpiaxse profesionalmenm.
Como insertar las pilas en el control remoto
[--_ Retire la cubierm de la pila deslizdndola
de acuerdo con la direccitn de la flecha.
[-_9--]Inserte pilas nuevas cercioMndose de que los
polos posifivos (+) y negativos (-) estfin
oxientados coxTectamente.
-y] Goloque la cubiexta otra vez deslizdndola
en su lugaI.
NOTA&
}_ Use 2 pilas alcalinas "AAA" de 1,5 voltios.
No use pilas recmgables.
Retire las pilas del control remoto si no va
a usar el sistema pox un perfodo prolongado.
39
Page 40

Instrucciones
Acondicionador
de instalacion
_=_ i Preguntas? Llame 800.GE.CARES (800.432.2737) o Visite nuestra pagina en la red en: ge.com I
de aire
ANTES DE INICIAR
O REQUISITOS ELECTRICOS
Lea estas instrucciones completa y
cuidadosamente.
IMPORTANTE - Guardeestas
instrucciones para uso del inspector local.
• IMPORTANTE - Observetodos
los codigos y ordenes de ley.
• Nota al instalador- Asegerese de dejar
estas instrucciones con el consumidor.
• Nota al consumidor- Conserve estas
instrucciones para referencia futura.
• Nivel de destreza- La instalacion de este
aparato requiere de destrezas mecanicas
basicas.
• "13empo de ejecucion - Aprox. 1 hera
• Recomendamos dos personas para
la instalacion de este producto.
• La instalacion apropiada es la
responsabilidad del instalador.
• La falla del producto debido a una
instalacion inadecuada no esta cubierta
per la garantfa.
• Cuando instale este acondicionador
de aire, DEBE usar todas las piezas
suministradas y usar procedimientos
adecuados de instalacion.
PRECAUCION:
Bajo ninguna circunstancia corte o remueva
la tercera pua (conexion a tierra) del cable
electrico.
No cambie el enchufe en el cable electrico
de este acondicionador de aire.
Los cables caseros de aluminio podrian
presentar problemas especiales. Consulte
a un tecnico electricista calificado.
(_ lgunos modelos requieren
El enchufe de tres peas con conexion a tierra
minimiza la posibilidad de descargas electricas.
Si el tomacorriente de la pared que usted planea
usar solamente tiene 2 tomas, es su
responsabilidad hacer que un tecnico Io
reemplace per uno de tres tomas con conexion
a tierra.
(_ Algunos modelos requieren 230/208
(_ endimiento mas notable y para prevenir
El cable de alimentacion incluye un dispositivo
para interrupcion de corriente. Se incluye
un boton de prueba y de reinicio en el
dispositivo. El dispositivo debe ponerse a
prueba periodicamente: primero se presiona
el boton de TEST (prueba) y luego RESET
(reinicio) mientras se encuentra enchufado al
tomacorriente. Si el boton TEST no se dispara
o si el boton RESET no queda enganchado,
deje de utilizar el acondicionador de aire y
comunfquese con un tecnico calificado.
tomacorrientes de 115/120 voltios de
corriente alterna y 60 Hz conectados
a tierra, protegidos con un fusible de
dilatacion de tiempo de 15 amperios
o un cortacircuitos.
voltios, de corriente alterna, protegidos
per un fusible de dilatacion de tiempo
o un cortacircuitos. Estos modelos
deberfan instalarse en un ramal
exclusive del circuito para un
sobrecargas en los circuitos de
cableados de su casa o apartamento,
Io cual podrfa representar un riesgo
de incendio per el sobrecalentamiento
de los alambres.
40
Page 41

Instrucciones de instalacion
HERRAMIENTAS QUE NECESITARA
Un destornillador de estrella
PARTES INCLUlDAS
(Apariencia puede variar)
Riel de mo_
Acondicionador
de aire
Tijeras o cuchilla
esdPJ_ n_i Panel de
Panel de
acordeon
izquierdo
Un destornillador
con hoja plana
Nivel
Lapiz
Una regla o cinta metrica
Sello de la banda
ntana
acordeon
derecho
/
Tipo A (6)
montaje superior
Tipo B (3) Tipo C (5)
41
Soporte de cierre
de la ventana (1)
Page 42

Instrucciones de instalaci6n
[i] REQUISITOS PARA LA VENTANA
• Estas instrucciones son para una
ventana estandar de dos pliegues.
Usted neceskara modificar el proceso para
otros tipos de ventanas.
El acondicionador de aire puede instalarse sin
los paneles de acordeCn para ajustarse a una
ventana mas estrecha. Ver las dimensiones de
la abertura de la ventana.
Todas las partes de apoyo deben quedar
totalmente aseguradas a algun metal,
mamposteria o a la madera.
Eltomacordente electdco debe estar al alcance del
cable electdco del acondicionador de aire.
Siga las dimensiones de la tabla y la ilustraciCn
segun su modelo.
Modelos A B
AEQ05, AEQ06, AEV05 13' min. 24 1/2"-38 1/8"
AEM05, AEM06,
AEM08, AEQ08 13 5/8" min. 24 1/2"-38 1/8"
B===_
t
A
(con paneles de acordeCn)
n m
INPEGUE LA BANDA DE SELLADO
DEL RIEL DE MONTAJE SUPERIOR
Retire la parte posterior de la banda de sellado
del riel de montaje superior y pegue la banda de
sellado al fondo del riel de montaje superior a Io
largo el borde delantero.
Rielde montaje superior
la parte
posterior
de la banda
de sellado
VISTA FRONTAL
Riel de montaje superior
/
]
/
Banda
de sellado
[2] REQUISITOS DE UNA VENTANA
DE TORMENTAS
Un marco de ventana de tormentas no permitir_fi
que el acondicionador de aire se incline hacia el
exterior y evitar_fique drene apropiadamente. Para
solucionar este problema, adhiera un pedazo de
madera a el umbral.
PEDAZOS DE MADERA
ANCHO: 2"
LONGITUD: Lo suficientemente largo como
para ajustar en el interior del marco de la
ventana.
GRUESO: Para determinar el grueso, coloque un
pedazo de madera en el umbral para hacerla 1/2"
mas alta que la parte superior del marco de la
ventana de tormentas o del marco vinilo.
Peguelo firmemente con clavos o con tornillos
proporcionados por el instalador.
| 1/2" mas alto que el
que el marco
de ventana _-- nT [! r _/,,j _ Jf"¢_'/
_ marco vinilo (en algunas1/2" m_s alto ,_Z__ventanas )
--Madera
PREPARE EL ACONDICIONADOR
DE AIRE
Instale el riel de montaje superior con
3 tornillos tipo B desde la parte exterior
de la caja.
Riel de _ ? _ ?
montaje"_..._._ i : ,
superior E[ J
Riel de
montaje
inferior
[_ Deslice los paneles de acorde6n izquierdo
y derecho en los deles de montaje
superior e inferior.
Superior izquierda
Superior derecha
de tormentaSMarcode _ Umbra_
tormentas
42
Page 43

Instrucciones de instalacion
r41 PREPARE EL ACONDICIONADOR
DE AIRE (cont.)
[] Una los paneles de acordeon a la caja
usando 3 tornillos tipo A en cada lado.
Riel de montaje superior
Panel de
acordeon
Tornillos,
tipo A
POSTERIOR
Riel de montaje inferior
[] INSTALE EL ACONDICIONADOR
DE AIRE EN LA VENTANA
[_] Coloque el acondicionador de aire en
el umbral con el riel de montaje inferior
contra su extremo posterior. Centrelo y
cierre la ventana firmemente detras del riel
de montaje superior. Debe estar nivelado
o ligeramente inclinado hacia el exterior.
Use un nivel, una inclinacion de 1/3 de
burbuja sera la correcta hacia el exterior.
Tornillos tipo C
[_] Extienda los paneles de acordeon izquierdo
y derecho hacia las bandas de la ventana
vertical y pegue, a traves de los huecos de
los paneles, con 4 tornillos tipo C segQn
corresponda.
[] PREPARE LA VENTANA
Corte el sello de la banda de la ventana a
la Iongitud apropiada. Despegue la parte
posterior y pegue el sello a la parte inferior
de la banda de la ventana.
1711NSTALEUN SOPORTE DE ClERRE Y
LA JUNTA DE ESPUMA SUPERIOR
DE LA VENTANA
IX-]APRECAUCI6N:
43
En ventanas construidas
de vinil o de similar
construccion, conecte el
soporte a el marco de la
ventana para prevenir
daflo a la ventana y vidro
quebrado.
Una el soporte de cierre
con uno tornillo tipo C.
Corte la junta de espuma
[]
superior de la ventana al
ancho de la ventana.
Rellene la espuma
[]
entre el vidrio y la
ventana para evitar
que aire e insectos
se introduzcan en la
habitacion.
NOTA: Si la junta provista no es adecuada para
su ventana, obtenga el material apropiado
Iocalmente para realizar una adecuada
instalacion de sellado.
Vinilo
Madera
Page 44

Solucionarproblemas.
Causasposib/es
Elacondicionadorde aim
noenciende
Elacondicionador de aire H flujode aire estfi restringido. *Cercidrese de que no existe ninguna cortina, persiana o
noenfriacomodeberia mueble bloqueando el fl'ente del acondicionador de aire.
Elacondicionadordeaire
seestacongelando
Elcontrolremoto Las baterias estfin insertadas "lnspeccione la posici6n de las baterfas. Deben estar
nofunciona incorrectamente, insertadas en la posici6n indicada, (+) y (-).
Hayaguagoteandoafuera Tiempo humedo y caliente. *Esto es normal.
Hayagua goteando en el H acondicionador de aire *Para drenar el agua apropiadamente, cexvforese de que
interiordela habitacion no estfi inclinado hacia afuera, el acondicionador de aire est_ inclinado ligeramente
El acondicionador de aire
estfi desconectado.
H fusible se dispar6 / *Inspeccione los fl/sibles / caja de interruptores de la casa
el cortacircuitos se dispar6, y reemplace cualquier fusible o reajuste el interruptor
Interrupci6n en el
suministro el6ctrico.
H dispositivo de interrupci6n *Presione el botdn RESETubicado en el cable de alimentaci6n.
de corriente se ha activado. "Si el botdn RESETnose mantiene en su lugat; no utilice m_s
H control de temperamra no *En los modelos con teclado: En el modo Cool (_io), presione la tecla
estfi ajustado apropiadamente. ReduccionV.
H Fdtro de aim estfi sucio. *lJmpie el filtro cada 30 dfas pot lo menos. Wr la seccidn
La habitacion podria haber *Cuando el acondicionador de aire se enciende, usted
estado caliente, necesita darle tiempo pava que enfl_i_ la habitaci6n.
H aire frio se estfi escapando, eCercidrese de que los registros de la calefaccidn no estfin
Lasbobinas de enfriamiento ¢\,_r "Acondicionador de airecongelandose"mils adelante.
se cougelarou,
H hielo bloquea d flujo
de aire hacia d acondicionador
de aim evitando que se enfrie
la habitacion.
Las baterias estfin agotadas. "Reemplace las baterfas.
Quehacer
*Cerci6rese de que el acondicionador de aire est_
enchufado totahnente en el tomacorfiente.
*La unidad se reiniciavA au/om_ficmnente con la configuvaci6n
ufilizada I)or filfima _ez luego de reesmblecer la elecu_icidad.
*Existe un rewaso de fiempo i)or proteccidn (de aproximadamente
3 minutos) pala evimr la desconexi6n i)or sobrecarga del compresor
Pot"esm raz6n, es posible que la unidad no comience a enfi_iar de
forum nomlal hasm uanscurridos 3 minutos desde que xolvi6 a
elicellderse,
el acondicionador de aire y comunfquese con un t_Xcnicocalificado.
•En los modelos con botones, gire la tempevamra a un nfimero mayor
& Cuidado y limpieza.
abiertos y se encuentran retornando el aire fl'fo.
•En modelos con los botones de control, coloque el control
de modo en HighFan(VentiladorAlto)6 High Cool(FrioAlto)con
la temperature en 16 2.
•En los modelos con mclas de tuque, colo que los controles en
HighFan(VentiladorAlto)6 HighCool(FrioAlto)y ajusw el wrmosmm a
una temperature m_s alta.
desde el frente hacia an_s.
Se acumulaaguaen La humedad removida del aire *Esto es normal pot un corto perfodo en fireas con poca
la bandoja y se drena hasta la bandeja, humedad; normal pot un perfodo de tiempo mils postergado
en _reas mils hfimedas.
Sonidos de operacion normales
44
Quizfis escuche un sonido metfilico causado pot
el agua ramada y fimda conua el condensador
en los dfas lluviosos o cuando la humedad es aim.
Esm caracmrfsfica de disefio wuda a remover
la humedad y meiom la eficiencia.
O..uizfis escuche que el mmlosmto hace clic
cuando el compresor hace ciclo enne encendido
y apagado.
E1agua se acumula en la bandeja dumnte dias
lluviosos o con mucha humedad. E1agua podrfa
dermmaise y gomar desde el lado exmrno de
la unidad.
}i_E1venfilador podrfa flmcionar aun si el compresor
no lo hace.
Page 45

Garantiade su acondicionadorde airemgarantia limitada de una#o.
Todos los servicios de garantfa los proporcionan nuestros Centros
de ReparaciSn de F#brica o nuestros tficnicos Customer Care®
autorizados. Para concertar una cita de reparaciSn, en line&
24 horas al dia, visftenos al ge.com, o flame al 8OO.GE.CARES
(800.432.2737).Cuando flame para soficitar servicio, por favor
tenga a mano el n6mero de serie y el n6mero de modelo.
GEreemplazara:
Una#o
Apa irde
dela compra original
Viajes de servicio a su casa para mostrarle c6mo
ftmciona el equipo.
Instalaci6n o entrega inapropiada, o mantenimiento
impropio. Si usted fiene un problema durante la
instalaci6n, o si su acondicionador de aire no tiene la
capacidad de enfriamiento que usted necesita, p6ngase
en contacto con nuestro distribuidor o instalador.
Usted es responsable de proporcionar las facilidades
de conexi6n el6ctrica necesarias.
Fallo del producto resultante de modificaciones al
producto o debido a uso irrazonable incluyendo no
proporcionar mantenimiento razonable y necesario.
En locales comerciales, la mano de obra necesaria para
retirar la tmidad hacia tm lugar para revisi6n por parte
de tm t6cnico individual.
Cualquierparte del acondicionador de aire que falle debido a defectos en los matefiales o en
la fabficacidn. Durante esm garantia/imitada de un a#o, GE mmbi_n proporcionarfi, sin costo
alguno, toda la mano de obm y el sexMcio relacionadc_--pam reemplazar partes defecmosas.
Grapeaquf su recibo.
Se requiere facilitar prueba
de la fecha de compra original
para obtener un servicio
bajo la garantfa.
Reemplazo de fusibles de la casa o reajuste del sistema
de circuitos.
FaUos debido a la corrosi6n en modelos que no estfin
protegidos contra la corrosi6n.
Dafio al producto causado por voltaje inapropiado hacia
el equipo, accidentes, incendios, intmdaciones o actos
de la naturaleza de fuerza mayor.
Dafios incidentales o consecuenciales causados por
defectos posibles con este acondicionador de aire.
Dafios despu6s de la entrega.
EXCLUSIONDE GARANTIAS IMPLJCITAS--Su #nico y exclusivo derecho es la reparacion del producto, tal y
como se indica en esta Garantia limitada. Cualquier garantia implicita, incluyendo las garantias implicitas de
comerciabilidad o adecuacion para un fin determinado, estan limitadas a un a#o o el periodo de tiempo mas
breve permitido por la ley.
Esta garantia so extiende al comprador original y cualquier comprador posterior de productos comprados para uso
residencial dentro de Estados Unidos. Si el producto est# situado en un #rea que no dispone de servicio por parte
de un proveedor de servicio autorizado de GE,podria tener que hacerse cargo de los costes de envio o bien podria
soficit#rsele que Ileve el producto a una centro de servicio de GE autorizado para realizar la reparaci6n. EnAlaska,
la garantia excluye el costo de envio o las visitas de servicio a su casa.
Algunos estados no permiten la exclusi6n o las limitaciones de dafios incidentales o consecuenciales. Esta garantia
da derechos legales especfficos, y usted podria tener otros derechos que variar#n de estado a estado. Para saber curies
son sus derechos legales, consulte a la oficina de asuntos del consumidor local o la oficina del Attomey General en
su Iocalidad.
Garante: General Electric Company.Louisville, KY 40225
45
Page 46

Notas.
46
Page 47

Soporteal consumidor.
PgginaWebde GEAppliances
dTiene alguna pregunta sobre su electrodom&sfico? iPruebe la pfigina Web de (71EAppliances 24 horas al
dfa, cualquier dfa del afio! Para mayor conveniencia y servicio m_s _5pido, ya puede descargar los Manuales
de los Propiem_ios, pedir piezas o incluso hacer una cim en lfnea para que vengan a realizar una
reparacidn.
Soliciteunareparaci6n
E1servicio de expertos GE est5 a tan s61o un paso de su puerta, iEntre en lfnea y solicite su reparaci6n
cuando le venga bien 24 horas al dfa cualquier dfa del afio! O llame al 800.GE.CARES (800.432.2737)
durante ho_s normales de oficina.
RealLifeDesignStudio(Estudiodedisefioparalavidareal)
GE apoya el concepm de Disefio Universal--producms, se_Mcios y ambientes que pueden usar genre de
mdas las edades, tamafios y capacidades. Reconocemos la necesidad de disef/ar para una givm gama de
habilidades y dificulmdes ffsicas ymentales. Para rods detaUes cobre las aplicaciones de fIE Disef/o Universal,
incluyendo ideas de diseflo pma la cocina paIvt peIsonas con discapacidades, mire nuesua p_gina Web boy
mismo. Pa_v_persomts con dificulmdes audifivas, favor de ll_unar al 800.TDD.GEAC (800.833.4322).
garantfasamplbdas
Compre una ga_anffa ampliada y obtenga demlles sot)re descuentos especiales disponibles mientras su ga_anffa
estfi afin activa. Puede comp_vula en lfnea en cualquier momento, o llamar al (800.626.2224) durante horas
normales de oficina. GE Consumer Home Se_ices esm_5 adn ahf cuando su garantfa termine.
ge.com
ge.com
ge.com
ge.com
Piezasyaccesorios
Aquellos indMduos con la calificacidn necesaria para repaint sus propios elecuodom_sticos pueden
pedir que se les manden las piezas o accesorios direcmmenm a sus hogares (aceptamos las m_jetas
VISA, MasterCard y Discover). Haga su pedido en lfnea hoy, 24 ho,_s cada dfa o llamar pot ml_fono
al 800.626.2002dtmmte hor_ts normales de oficina.
Lasinstruccionesdescritasenestemanualcubrenlosprocedimientosa seguirporcualquierusuario.Cualquier
otrareparaciondeberia,porreglageneral,referirsea personalcalificadoautorizado.Debeejercerseprecaucion
ya quelasreparacionesincorrectaspuedencausarcondicionesdefuncionamientoinseguras.
Pdngaseencontactoconnosotros
Si no estd satisfecho con el servicio que recibe de GE, p6ngase en conmcto con nosotros en nuest_v_ pggina
Web indicando todos los demlles asf como su nfimero de tel_fono o escrfl)anos a:
General Manage_, Customer Relations
GE Appliances, Appliance Park
Louisville, KY 40225
Registresuelectrodom_stico
iRegistre su nuevo dectrodom6stico en linea---euando usted prefiera! E1regismu su producto a fiempo le
proporcionar_, si smgiera la necesidad, una mejor comunicacidn y un servicio mils rfipido N_jo los t_mlinos
de su garantfa. _unbi_n puede enviar su m_jem de regisuo preqmpresa que se incluye en el mamrial
de embal_je.
ge.com
ge.com
ge.com
47
Page 48

ConsumerSupport.
GEAppliancesWebsite In the U.S.A.ge.com
Have a question or need assistance with your appliance? TD, the GE Appliances Website 24 hours a day,
any day of the year! Fox greater convenience and fi,tster service, you can now download Owner's Manuals,
order parts or even schedule sexMce on-line. In Canada: www.GEAppliances.ca
ScheduleService /, the U.S.A.ge.com
Expert GE repair service is only one step away from your dooL Get onqine and schedule your service at your
convenience 24 hours any day of the year[ Or call 800.GE.CARES (800.432.2737) during nomml business hems.
In Canada, call 1.800.561.3344
RealLifeDesignStudio In the U.S.A.ge.com
GE supports the Universal Design concept--products, services and environments that c_m be used by people of all
ages, sizes and capabilities. We recognize the need m desigm for a wide range of physical and mental abilities and
impaimmnts. Fox derails of GE's Univexsal Design applications, including kitchen design ideas for people with
disabilities, check out our Website today. Fox the hearing impaired, please call 800.TDD.GEAC (800.833.4322).
In Canada, contact: Managex; Consumer Relations, Mabe Canada Inc.
Suim 310, 1 Factory Lane
Moncmn, N.B. El(; 9M3
ExtendedWarranties
Purchase a GE extended warranty and learn about special discounts that are available while your warranty is still
in eff>ct. You can purchase it on4ine anytime, or call 800.626.2224 during nomml business hems. GE Consumer
Home Services will still be there after your warranty expires. In Canada, call 1.888.261.2133
PartsandAccessories
IndMduMs quMified m sexMce dleir own appliances can have parts or accessories sent directly m their homes
(VISA, MasmrCard and Discover cards are accepted). Order on4ine today, 24 hours evexy day or by phone at
800.626.2002 during nomml business hems.
Instructionscontainedinthis manualcoverprocedurestobeperformedbyanyuser.Otherservicing generallyshouldbe
referredto qualifiedservicepersonnelCautionmustbeexercised,since improperservicing maycauseunsafeoperation.
Customers in Canada should consult the yellow pages for the nearest Mabe service centex; or call 1.800.561.3344.
ContactUs
If you are not satisfied Mill die sexMce you receive flom GE, contact us on our Website Mill all die derails
including your phone numbex; or write to: GenerM Managex; Customer Relations
GE Appliances, Appliance Park
Louisville, KY40225
In Canada: www.GEAppliances.ca, or write to: Directox; Consumer Relations, Mabe Canada Inc.
Suite 310, 1 Facmxy Lane
Moncmn, N.B. E1C 9M3
In the U.S.A.ge.com
In the U.S.A.ge.com
/n the U.S.A.ge.com
RegisterYourAppliance /n the U.S.A.ge.com
Register your new appliance on-line--at your convenience! Timely product registration will allow for enhanced
communication and prompt service under the temls of your warranty, should the need arise. You may also mail
in the we-.printed registration card included in the packing material. In Canada: www.GEAppliances.ca
Printed in China
 Loading...