

Page 1
GEAppliances.com
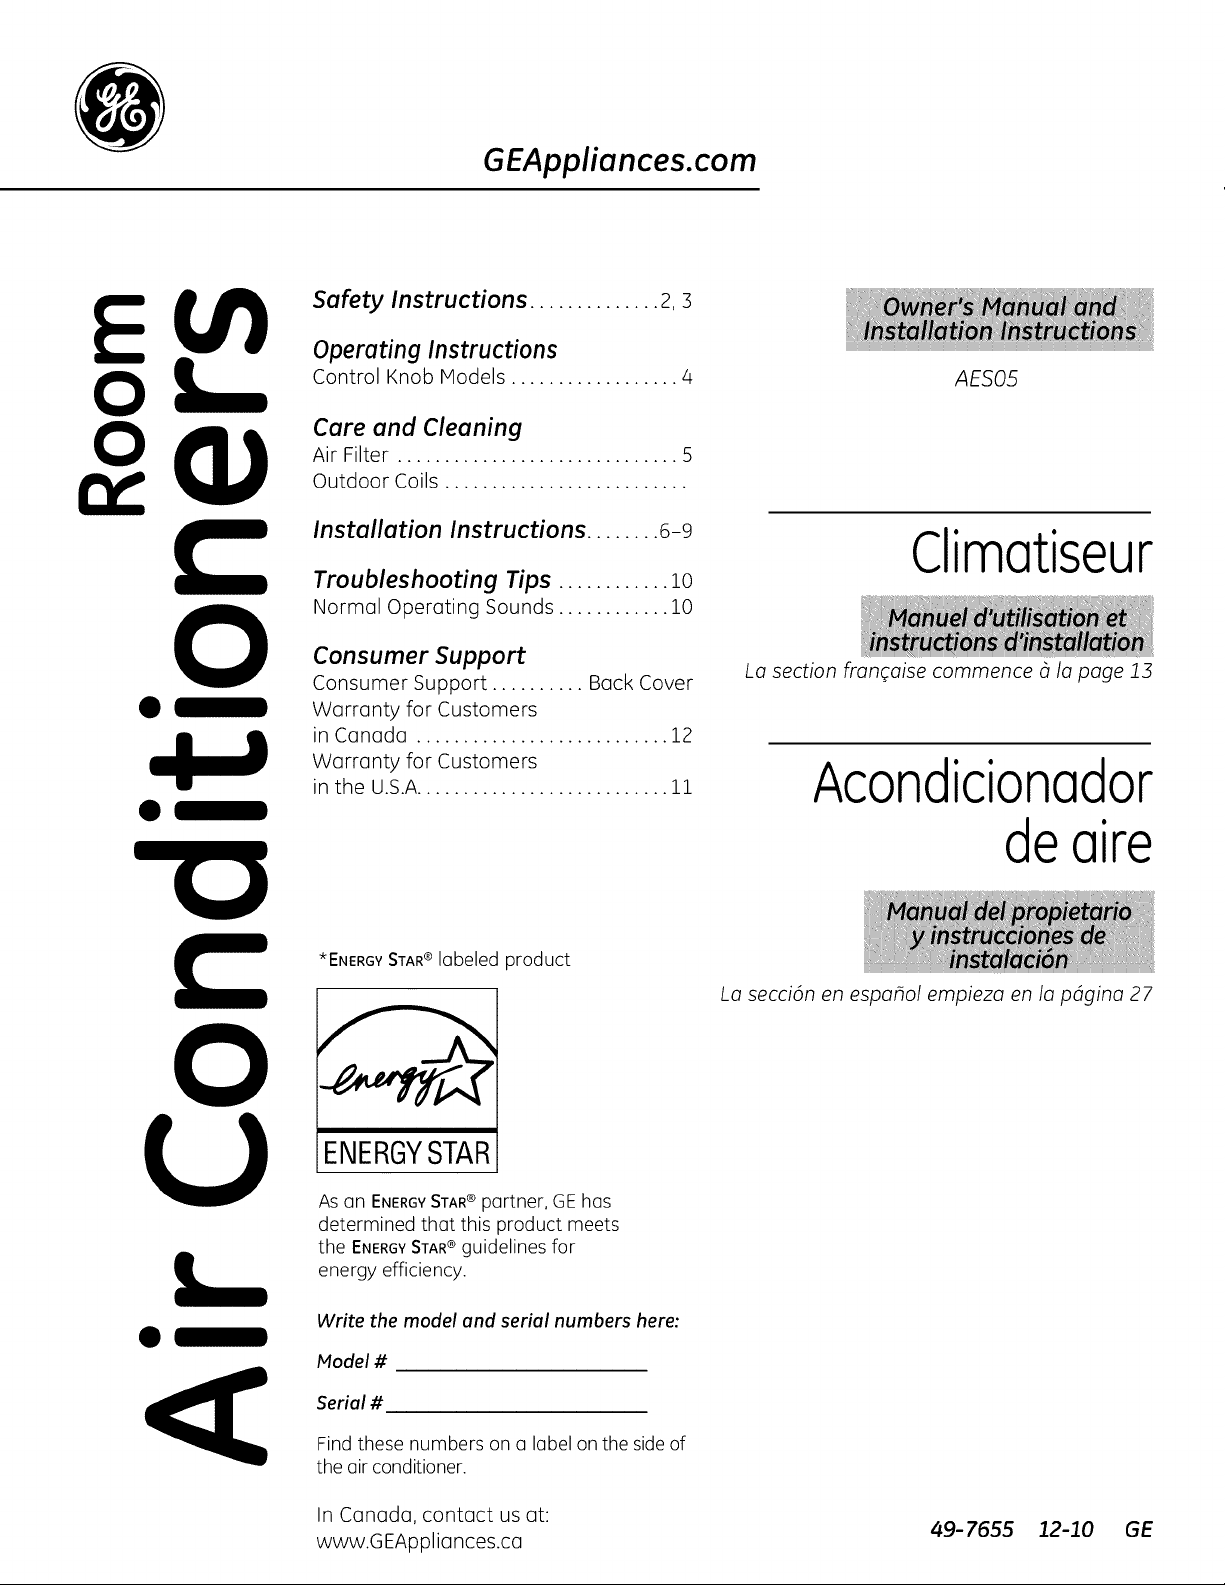
Safety Instructions .............. 2,3
Operating Instructions
Control Knob Models .................. 4
Care and Cleaning
Air Filter .............................. 5
Outdoor Coils ..........................
Installation Instructions ........ 6-9
Troubleshooting Tips ............ lO
Normal Operating Sounds ............ 10
AES05
Climotiseur
0_
0_
0
Consumer Support
Consumer Support .......... Back Cover
Warranty for Customers
in Canada ........................... 12
Warranty for Customers
in the U.SA........................... 11
*ENERGY STAR® lobeledProduct
ENERGYSTAR
As on ENERGYSTAR®portner, GE hos
determined thot this product meets
the ENERGYSTAR®guidelines for
energy efficiency.
Lo section franqaise commence _ la page 13
Acondicionador
deoire
Lo secci6n en espahol empieza en la pdgina 27
0_
Write the model and serial numbers here:
Model #
Serial #
Find these numbers on o label onthe side of
the air conditioner.
In Canada, contact us at:
www.GEAppliances.ca
49-7655 12-10 GE
Page 2

IMPORTANT SAFETY INFORMATION.
READ ALL INSTRUCTIONS BEFORE USING.
WARNING!
Foryour safety, the information in this manual must be followed to minimize the risk of fire, electric
shock or personal injury.
SAFETYPRECAUTIONS
Use this appliance only for its intended
purpose as described in this Owner's
Manual.
This air conditioner must be properly
installed in accordance with the Installation
Instructions before it is used.
Never unplug your air conditioner by pulling
on the power cord. Always grip plug firmly
and pull straight out from the receptacle.
Replace immediately all electric service
cords that have become frayed or otherwise
damaged. A damaged power supply cord
must be replaced with a new power supply
cord obtained from the manufacturer and
not repaired. Do not use a cord that shows
cracks or abrasion damage along its length
or at either the plug or connector end.
Turn the unit OFF and unplug your air
conditioner before cleaning.
GEdoes not support any servicing of the
air conditioner. We strongly recommend
that you do not attempt to service the air
conditioner yourself.
For your safety...do not store or use
combustible materials, gasoline or other
flammable vapors or liquids in the vicinity
of this or any other appliance.
Allair conditioners contain refrigerants,
which under federal law must be removed
prior to product disposal. If you are getting
rid of an old product with refrigerants, check
with the company handling disposal about
what to do.
If the receptacle does not match the plug,
the receptacle must be changed out by u
qualified electrician.
These R410A air conditioning systems
require contractors and technicians to
use tools, equipment and safety standards
approved for use with this refrigerant.
DO NOT use equipment certified for
R22 refrigerant only.
HOW TO CONNECT ELECTRICITY
Do not, under any circumstances, cut or remove
the third (ground) prong from the power cord.
For personal safety, this appliance must be
properly grounded.
DO NOT use an adapter plug with this appliance.
The power cord of this appliance is equipped
with o 3-prong (grounding) plug which mutes
with u standard 3-prong (grounding) wall outlet
to minimize the possibility of electric shock
hazard from this appliance.
Power cord includes u current interrupter device.
A test and reset button is provided on the plug
case. The device should be tested on u periodic
basis by first pressing the TESTbutton and
then the RESETbutton while plugged into the
outlet. If the TESTbutton does not trip or if the
RESETbutton will not stay engaged, discontinue
use of the air conditioner and contact a qualified
2
service technician.
Have the wall outlet and circuit checked by
a qualified electrician to make sure the outlet
is properly grounded.
Where a 2-prong wall outlet is encountered,
it is your personal responsibility and obligation to
have it replaced with u properly grounded
3-prong wall outlet.
The air conditioner should always be plugged
into its own individual electrical outlet which has
u voltage rating that matches the rating plate.
This provides the best performance and also
prevents overloading house wiring circuits which
could cause a fire hazard from overheated wires.
See the Installation Instructions, Electrical
Requirements section for specific electrical
connection requirements.
Page 3
GEAppliances.com
WARNING!
USEOF EXTENSION CORDS
RISK OF FIRE. Could couse serious injury or
death.
• DO NOT use an extension cord with this
Window Air Conditioner.
• DO NOT use surge protectors or multi-outlet
adaptors with this Window Air Conditioner.
READAND FOLLOWTHISSAFETYINFORMATIONCAREFULLY.
SAVETHESEINSTRUCTIONS
Page 4
About the controlson theair conditioner
Features and appearance will vary.
High Low
Cool _ Cool
Low
Fan
OFF
MODE
I-0 MODE CONTROL
Controls ionsome models)
Mode Control
0
High Cool,Med Cool and Low Cool
provide cooling with different fan speeds.
Fansettings provide air circulation and filtering
without cooling.
NOTE:Ifyou move the mode control from ocool
setting to OFFor to o fan setting,wait at least
3 minutes beforeswitching backto o cool setting.
Coolest
TEMP
_7 1..
4
0
TEMPERATURECONTROL
TEHP Control
@
TheTEHPcontrol isused to maintain the room
temperature. Thecompressor will cycle on
and off to keepthe room at the same levelof
comfort. When you turn the knob to c]higher
number, the indoor air will becomecooler.Turn
the knob to c]lower number and the indoor air
will become warmer.
Cooling Descriptions
For Normol Cooling--Select High Cool or Hod
Cool with the TEHPERATUREcontrol at midpoint.
For Maximum Cooling--Select High Cool with
the TEMPERATUREcontrol at the highest number
(]vailable onyour knob.
For Quieter end Nighttime Cooling-Select Low
Cool with the TEHPERATUREcontrol at midpoint.
Controls (onsome models)
OFF
ON
ON/OFF Control
Turnsair conditioner on and off.
NOTE:Ifthe air conditioneris offand isthen turned
on whilesetin o Cool mode, itwill tokeopproximotely
3 minutes for the compressor to stort ond coolingto
begin.
4
Page 5
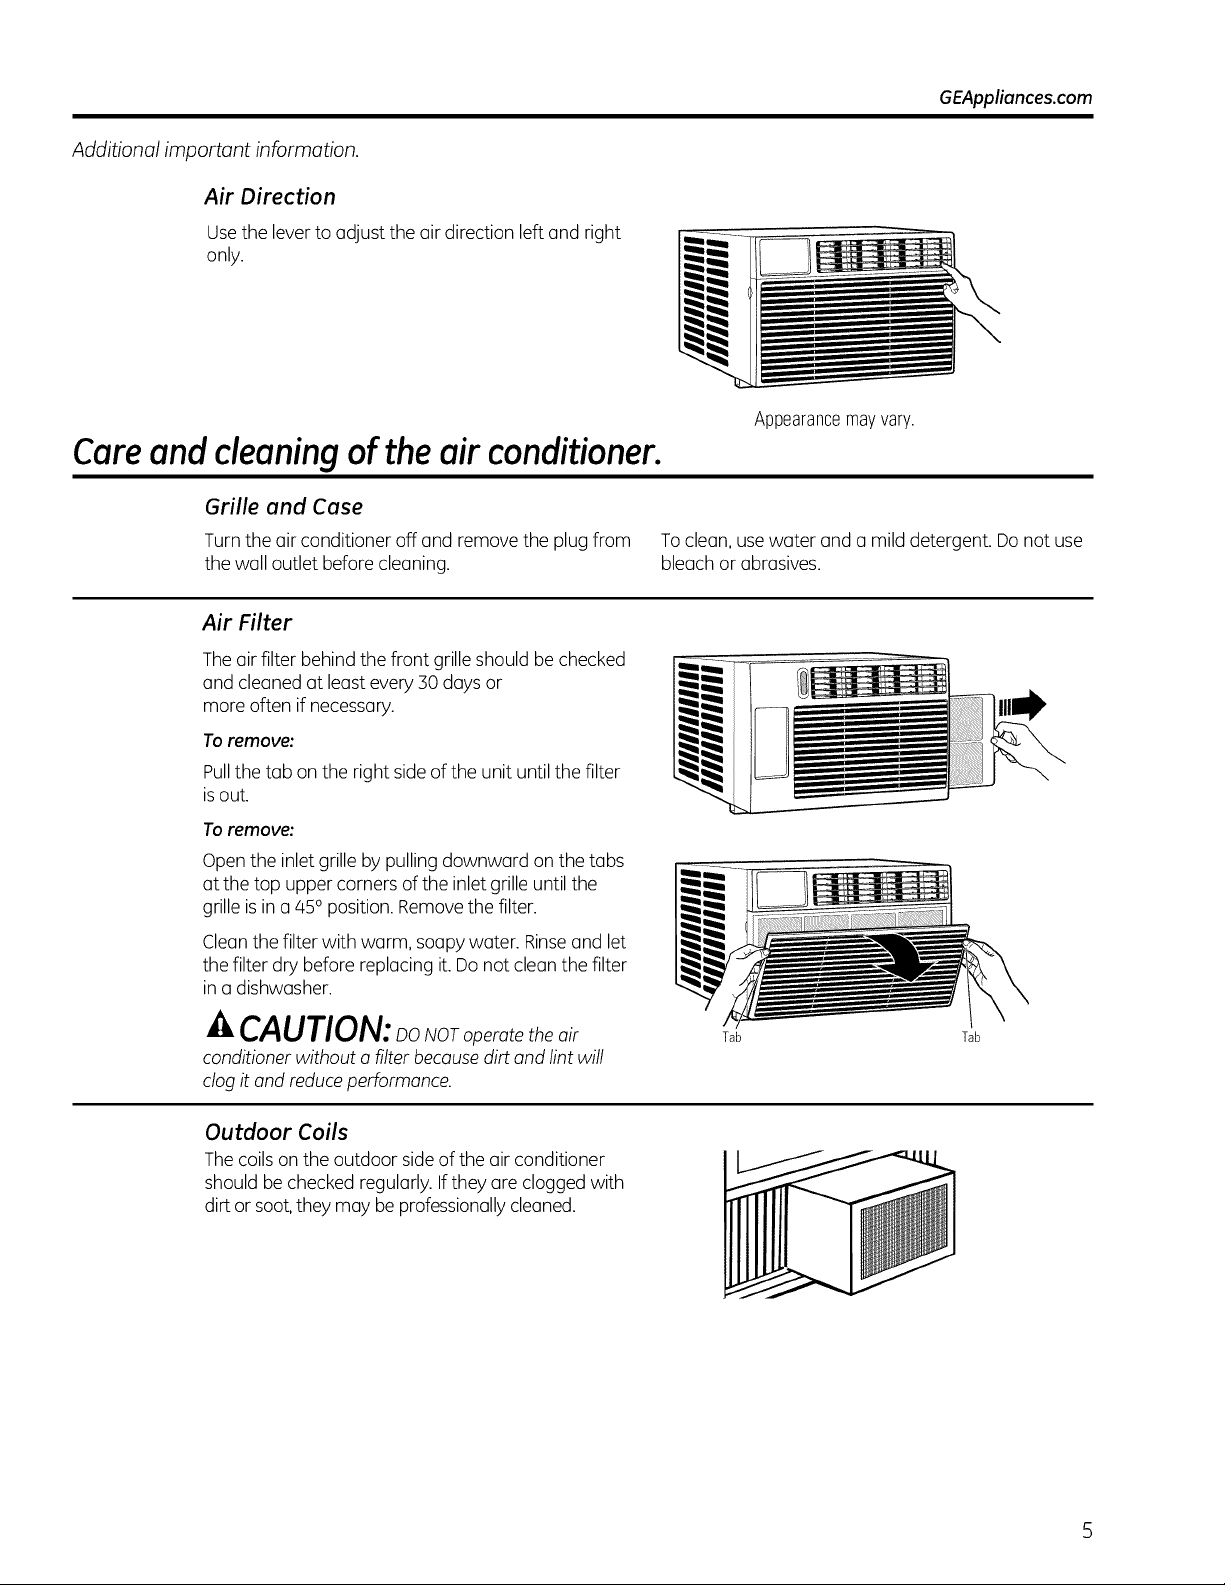
Additional important information.
Air Direction
Usethe leverto adjustthe airdirection left and right
only.
Careand cleaning ofthe air conditioner.
Grille and Case
Turnthe air conditioner off and remove the plug from
the wall outlet before cleaning.
Air Filter
Theairfilter behind the front grille should bechecked
and cleaned at least every30days or
more often if necessary.
Toremove:
Pullthe tab on the right sideof the unit until the filter
isout.
Toremove:
Open the inlet grille by pulling downward on the tabs
at the top uppercorners ofthe inlet grilleuntil the
grille is ina 450position. Removethe filter.
GEAppliances.com
Appearancemayvary.
Toclean,usewater and a mild detergent. Donot use
bleach or abrasives.
Cleanthe filter with warm, soapy water. Rinseand let
the filter dry before replacing it.Donot cleanthe filter
in a dishwasher.
.4,CAUTION:_oNoroperatetheair
conditioner without afilter becausedirt and lint will
clog it and reduce performance.
Outdoor Coils
Thecoilson the outdoor sideof the air conditioner
should bechecked regularly. Ifthey are clogged with
dirt orsoot,they may beprofessionallycleaned.
Tab Tab
5
Page 6
Installation
Air Conditioner
Instructions
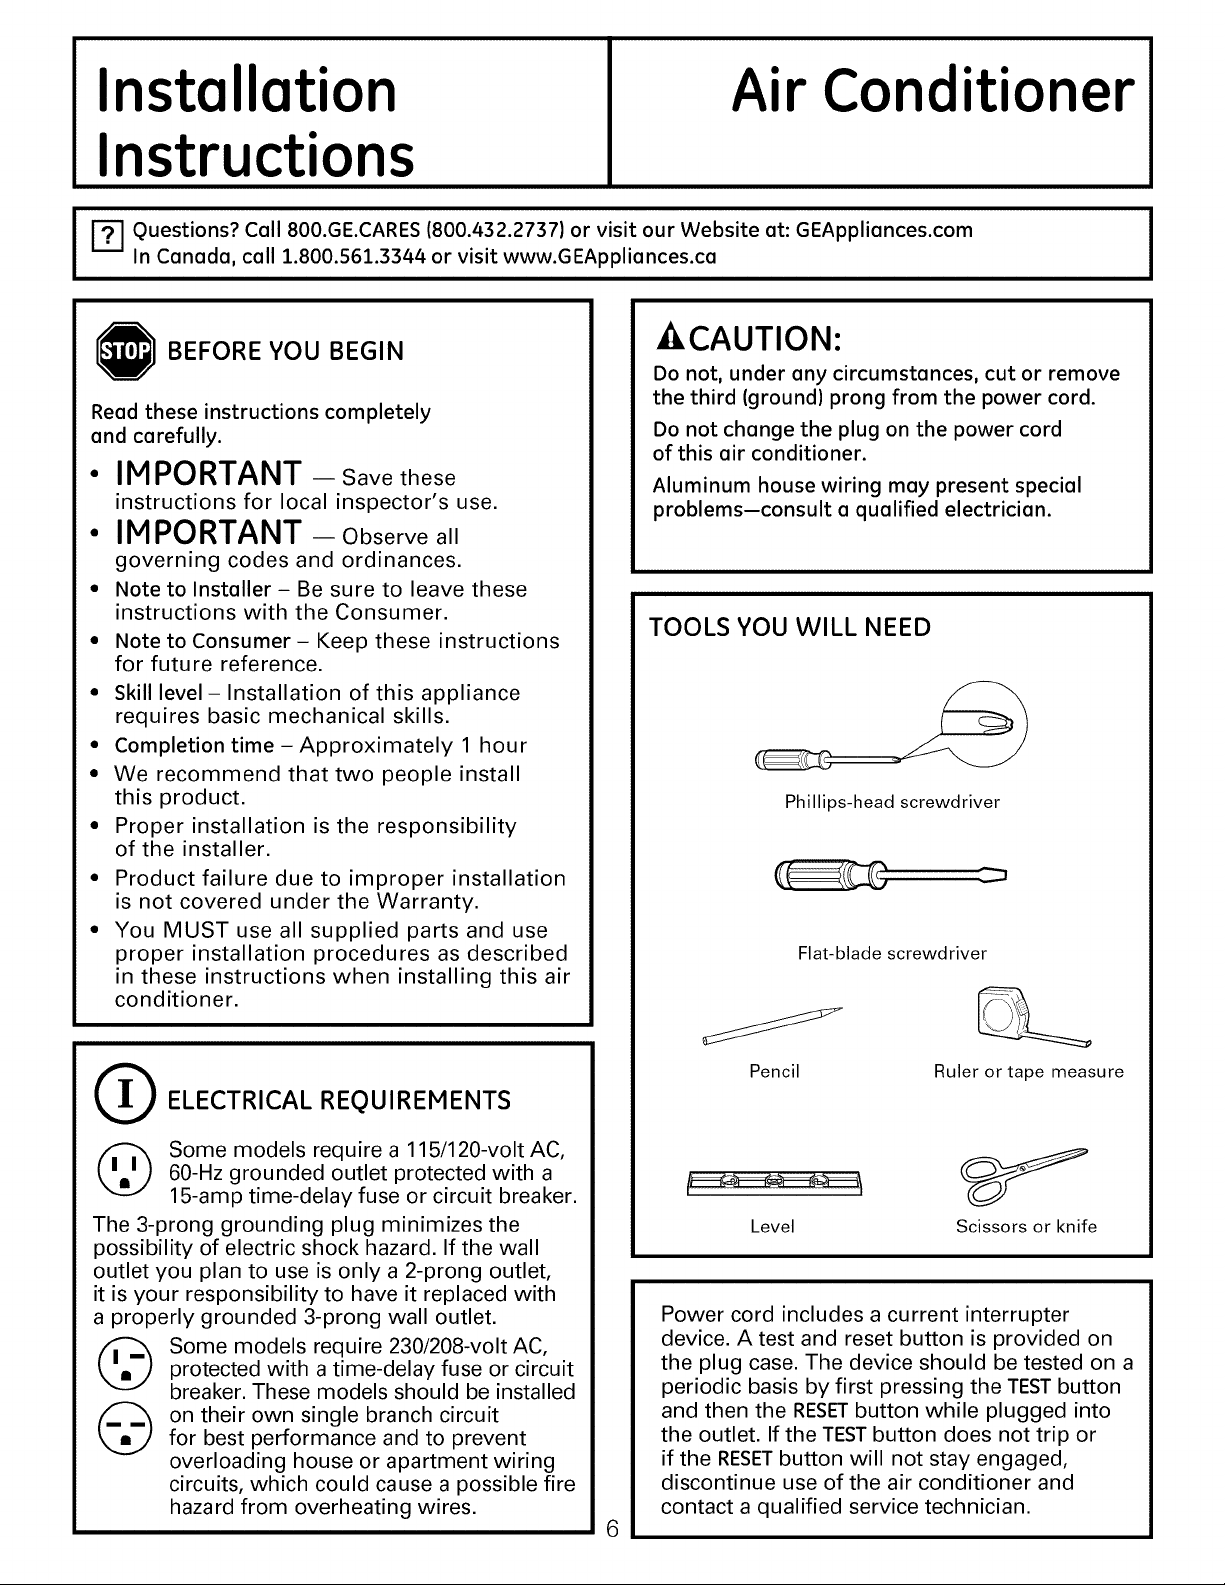
I-_ Questions? Call 800.GE.CARES (800.432.2737) or visit our Website at: GEAppliances.com
I
In Canada, call 1.800.561.3344 or visit www.GEAppliances.ca I
BEFORE YOU BEGIN
Read these instructions completely
and carefully.
• IMPORTANT - Savethese
instructions for local inspector's use.
• IMPORTANT - Observe all
governing codes and ordinances.
• Note to Installer- Be sure to leave these
instructions with the Consumer.
• Note to Consumer- Keep these instructions
for future reference.
• Skill level- Installation of this appliance
requires basic mechanical skills.
• Completion time- Approximately 1 hour
• We recommend that two people install
this product.
• Proper installation is the responsibility
of the installer.
Product failure due to improper installation
is not covered under the Warranty.
You MUST use all supplied parts and use
proper installation procedures as described
in these instructions when installing this air
conditioner.
-&CAUTION:
Do not, under any circumstances, cut or remove
the third (ground) prong from the power cord.
Do not change the plug on the power cord
of this air conditioner.
Aluminum house wiring may present special
problems--consult a qualified electrician.
TOOLS YOU WILL NEED
Phillips-head screwdriver
Flat-blade screwdriver
(_ ELECTRICAL REQUIREMENTS
60-Hz grounded outlet protected with a
Some models require a 115/120-voltAC,
15-amp time-delay fuse or circuit breaker.
The 3-prong grounding plug minimizes the
possibility of electric shock hazard. If the wall
outlet you plan to use is only a 2-prong outlet,
it is your responsibility to have it replaced with
a properly grounded 3-prong wall outlet.
Some models require 230/208-volt AC,
©
@
protected with a time-delay fuse or circuit
breaker. These models should be installed
on their own single branch circuit
for best performance and to prevent
overloading house or apartment wiring
circuits, which could cause a possible fire
hazard from overheating wires.
Pencil Ruler or tape measure
Level Scissors or knife
Power cord includes a current interrupter
device. A test and reset button is provided on
the plug case. The device should be tested on a
periodic basis by first pressing the TEST button
and then the RESETbutton while plugged into
the outlet. If the TEST button does not trip or
if the RESETbutton will not stay engaged,
discontinue use of the air conditioner and
contact a qualified service technician.
6
Page 7
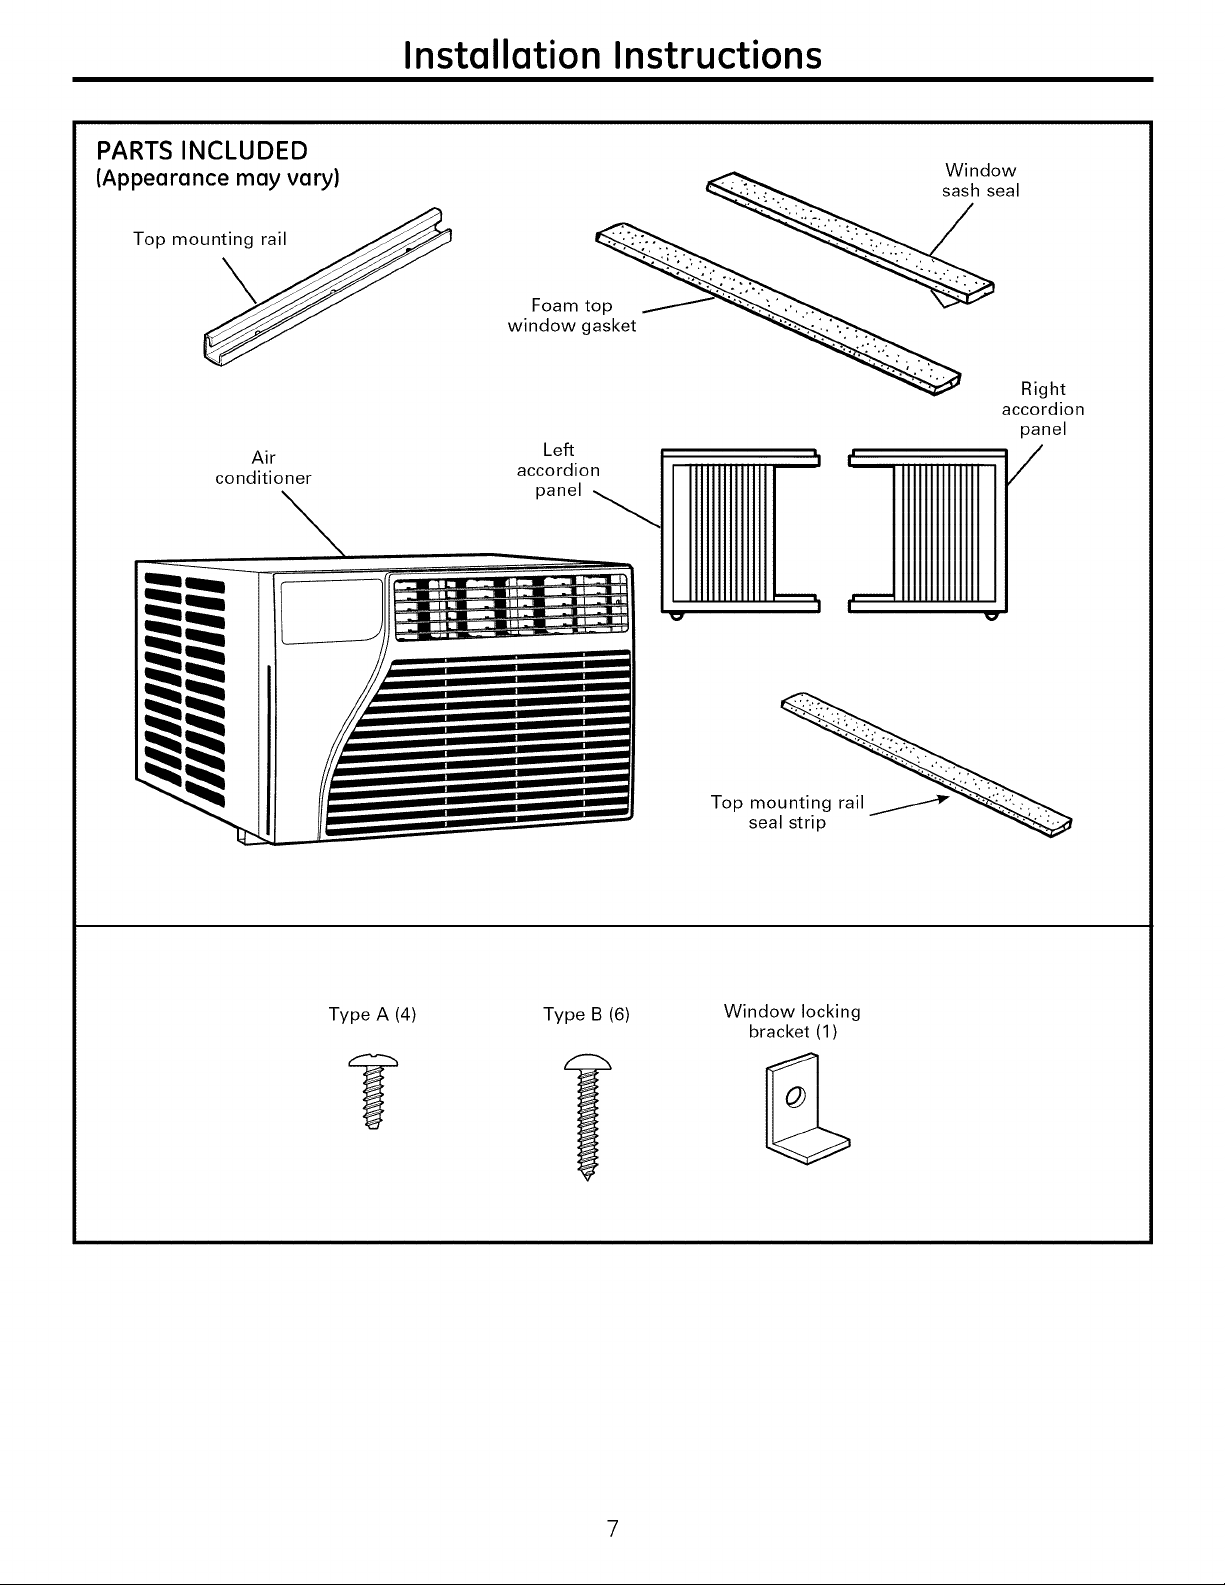
PARTS INCLUDED
(Appearance may vary)
Top mo_
Air
conditioner
Installation Instructions
Window
eal
w F_)awm;_ Right
accordion
panel
Left
accordion
panel
Type A (4) Type B (6)
Top mo "_
seal strip
Window locking
bracket (1)
Page 8

Installation Instructions
FI WINDOW REQUIREMENTS
* These instructions are for a standard
double-hung window. You will need to modify
them for other types of windows.
* The air conditioner can be installed without
the accordion panels if needed to fit in a
narrow window. See the window opening
dimensions.
* All supporting parts must be secured
to firm wood, masonry or metal.
* The electrical outlet must be within reach of
the power cord.
* Follow the dimensions in the table and
illustration for your model.
B==4]
23" to 38"
(Withaccordionpanels)
12.5" min.
E]ATTACH THE TOP MOUNTING
RAIL SEAL STRIPS
(Some models may have the seal strip already
attached to the top mounting rail. If applicable, skip
this step.)
Remove the backing from the top mounting rail seal
strip and attach the seal strip to the bottom of the
top mounting rail, along the front edge.
Top mounting rail
Remove
backing
from seal
strip
FRONTVIEW Top mounting rail
I
[] STORM WINDOW REQUIREMENTS
A storm window frame will not allow the air
conditioner to tilt toward the outside, and will keep it
from draining properly.
To adjust for this, attach a piece of wood to the sill.
WOOD PIECES
WIDTH: 2"
LENGTH:Long enough to fit inside the window
frame.
THICKNESS: To determine the thickness, place a
piece of wood on the sill to make it 1/2" higher than
the top of the storm window frame or the vinyl
frame.
Attach securely with nails or screws provided by the
installer.
1/2" higher
than vinyl frame
1/2,,higher _ ; (°n s°me wind°ws)
than storm _-- n@ll I/,, --Yf_l
window
frame _ Sill I--_
Storm window
frame - r v Vinyl frame I I
-rr; I;) j_ )J/I
.,/-Wood
Seal_rip
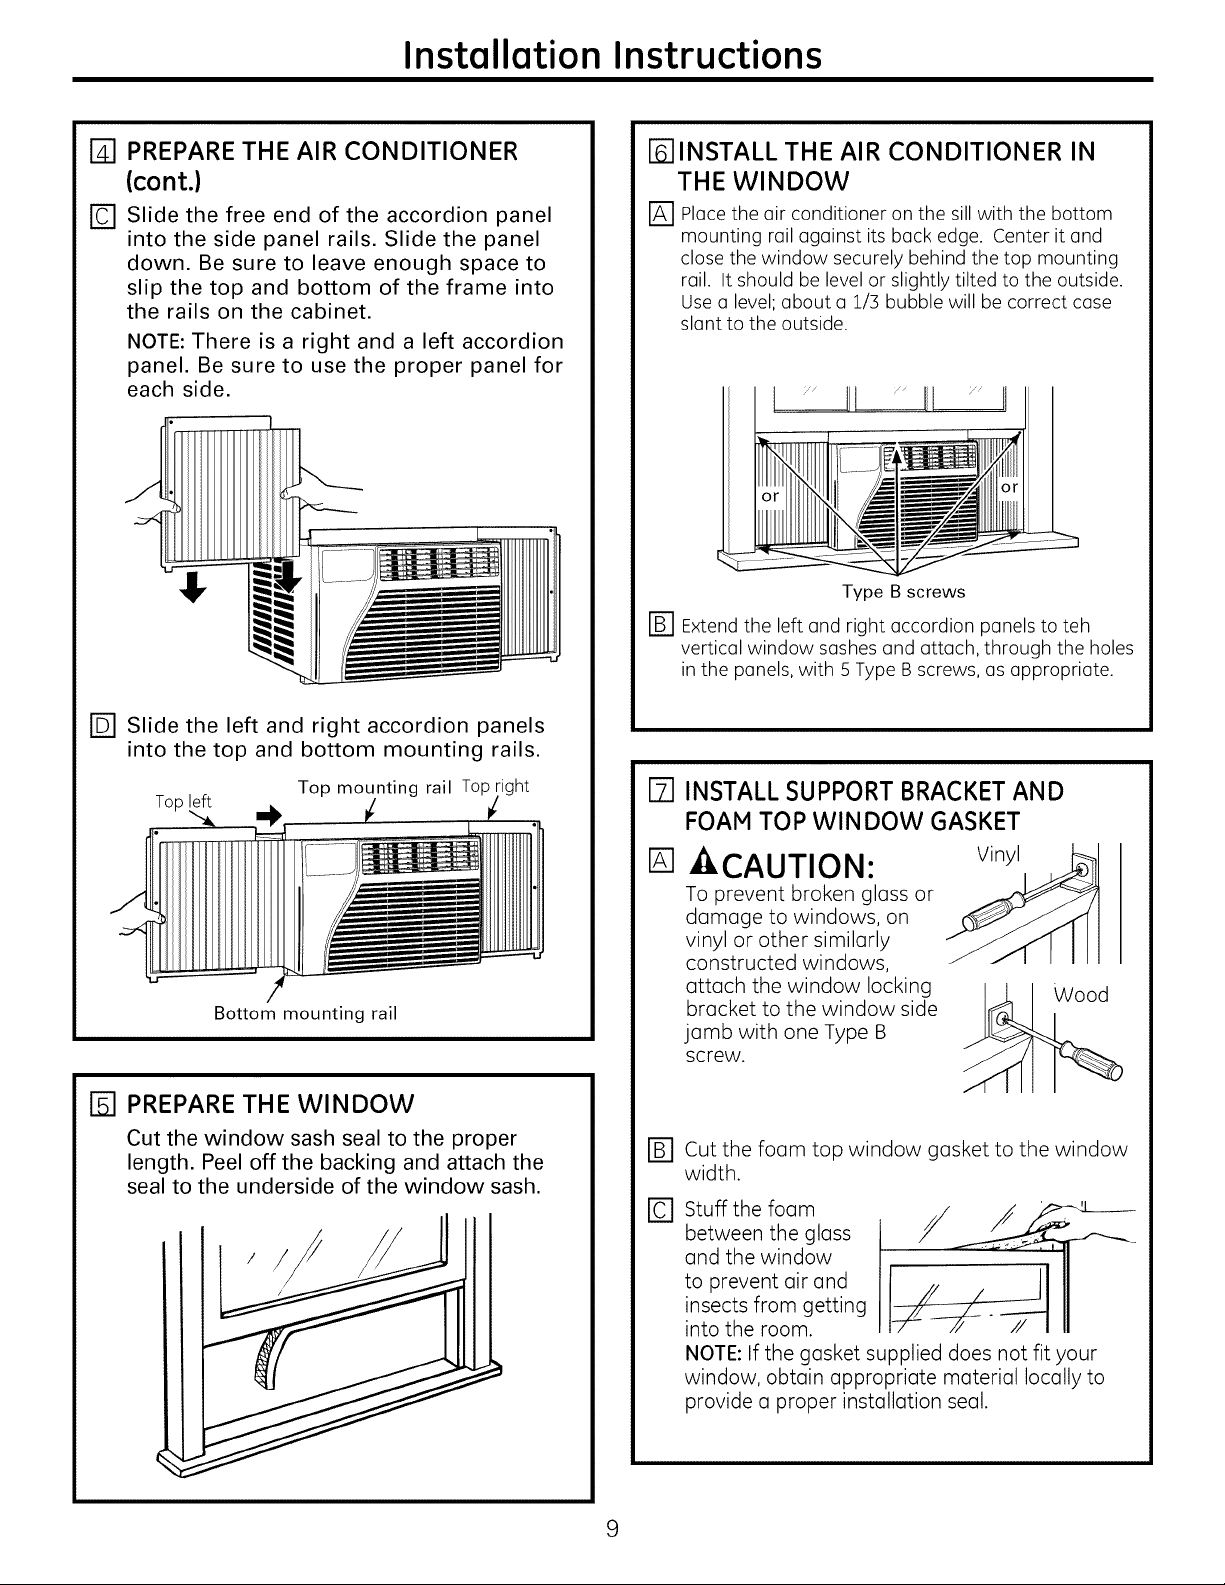
I_1 PREPARE THE AIR CONDITIONER
r_ Install the top mounting rail with 4 Type A
screws from the outside of the case.
Top mounting rail
]
Bottom mounting rail
[] Hold the accordion panel in one hand and
gently pull back to free the open end.
8
Page 9
Installation Instructions
PREPARE THE AIR CONDITIONER
@
(cont.)
Slide the free end of the accordion panel
©
into the side panel rails. Slide the panel
down. Be sure to leave enough space to
slip the top and bottom of the frame into
the rails on the cabinet.
NOTE: There is a right and a left accordion
panel. Be sure to use the proper panel for
each side.
[-6-]INSTALL THE AIR CONDITIONER IN
THE WINDOW
[] Place the air conditioner on the sill with the bottom
mounting rail against its buck edge. Center it and
close the window securely behind the top mounting
rail. It should be level or slightly tilted to the outside.
Use u level; about u 1/3 bubble will be correct case
slant to the outside.
Type B screws
Extend the left and right accordion panels to teh
vertical window sashes and attach, through the holes
in the panels, with 5 Type B screws, as appropriate.
[] Slide the left and right accordion panels
into the top and bottom mounting rails.
Top mounting rail Top ight
Top left _{
Bottom mounting rail
PREPARE THE WINDOW
%
Cut the window sash seal to the proper
length. Peel off the backing and attach the
seal to the underside of the window sash.
[] INSTALL SUPPORT BRACKET AND
FOAM TOP WINDOW GASKET
@
ACAUTION:
To prevent broken glass or
damage to windows, on
vinyl or other similarly
constructed windows,
attach the window locking
bracket to the window side
jamb with one Type B
screw.
%
Cut the foam top window gasket to the window
width.
Stuff the foam
re]
between the glass
and the window
to prevent air and
insects from getting
into the room.
NOTE: If the gasket supplied does not fit your
window, obtain appropriate material locally to
provide a proper installation seal.
Vinyl
Wood
9
Page 10
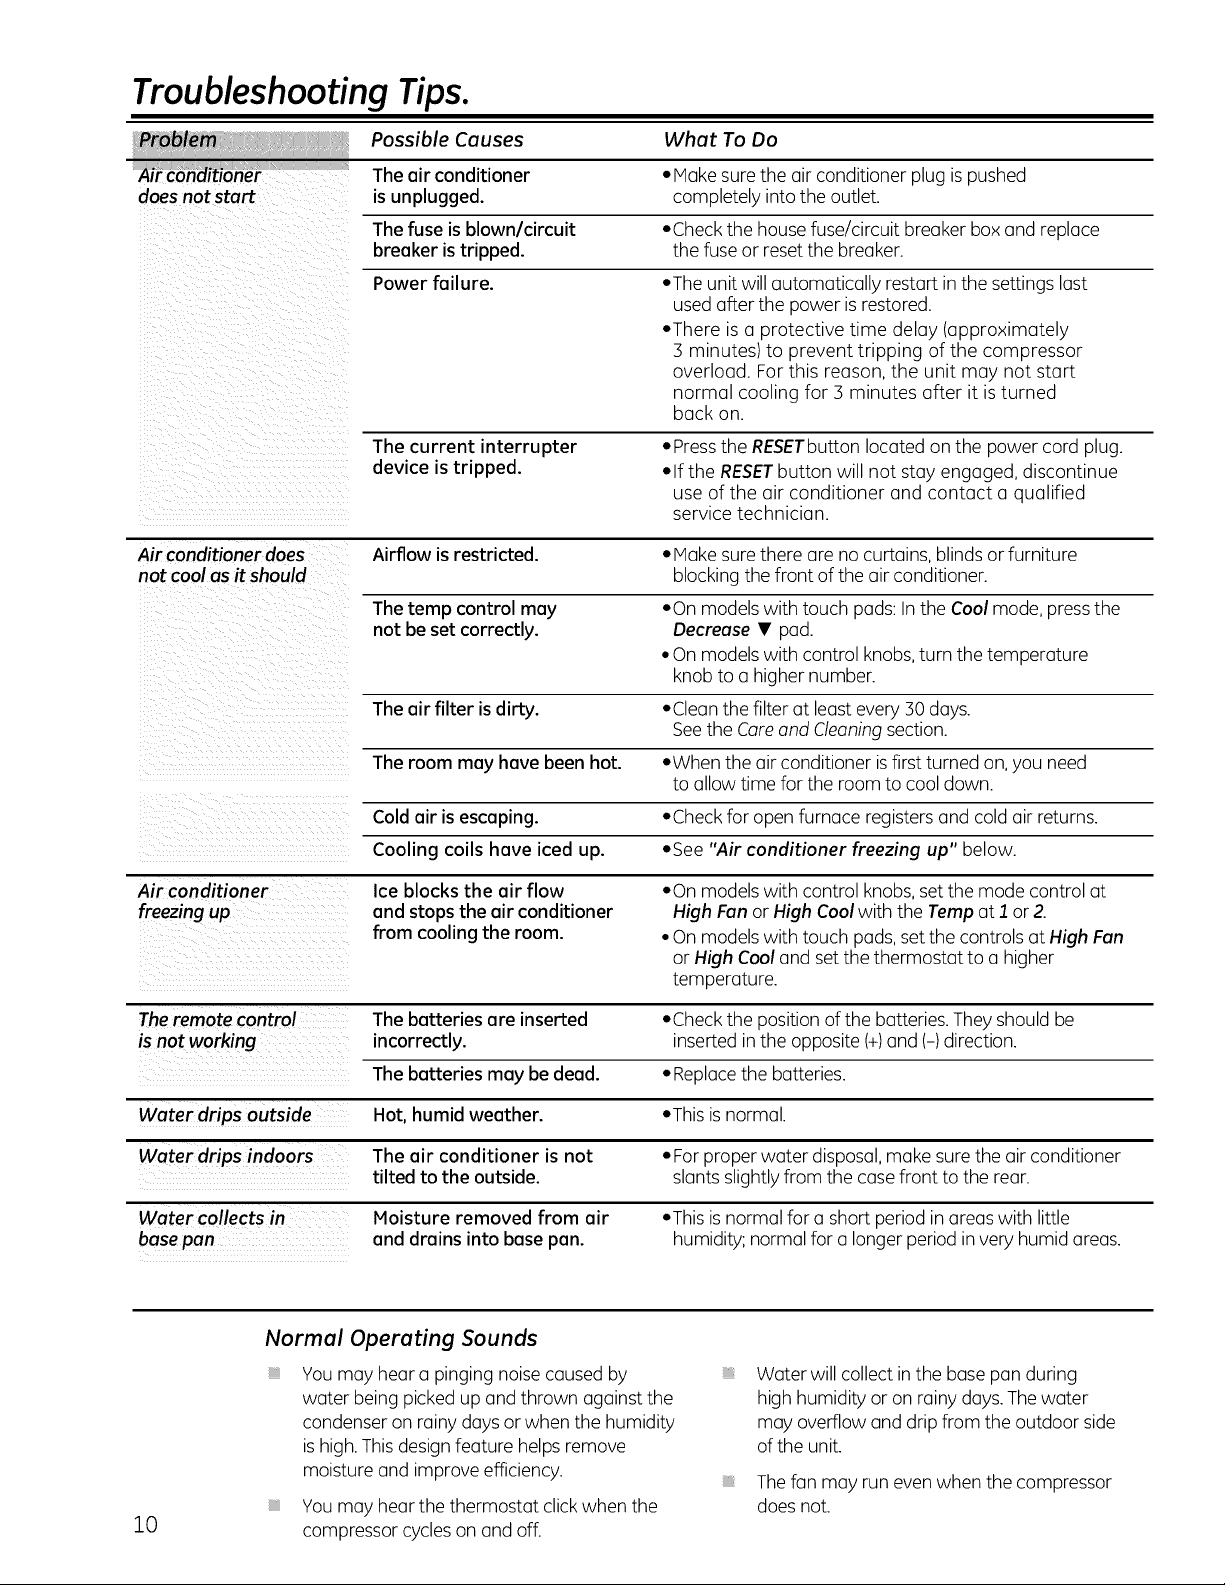
Troubleshooting Tips.
Possible Causes What To Do
Theair conditioner •Hake surethe air conditioner plug ispushed
doesnot start is unplugged, completely into the outlet.
Thefuse is blown/circuit •Check the house fuse/circuit breaker box and replace
breaker is tripped, the fuse or reset the breaker.
Power failure. •The unit will automatically restart inthe settings lost
used afterthe power isrestored.
•There is a protective time delay (approximately
3 minutes) to prevent tripping of the compressor
overload. For this reason, the unit may not start
normal cooling for 3 minutes after it is turned
buck on.
The current interrupter •Pressthe RESETbuttonlocated on the power cord plug.
device is tripped. •If the RESETbutton will not stay engaged, discontinue
use of the air conditioner and contact u qualified
service technician.
Air conditioner does Airflow is restricted. • Hake surethere are no curtains, blinds or furniture
not cool as it should blocking the front of the air conditioner.
Thetamp control may •On modelswith touch pods: In the Cool mode, pressthe
not be set correctly. Decrease • pad.
• On models with control knobs, turn the temperature
knob to o higher number.
The air filter is dirty. •Clean the filter at least every 30 days.
See the Core and Cleaning section.
The room may have been hot. •When the air conditioner isfirst turned on, you need
to allow time for the room to cool down.
Cold air is escaping. •Check for open furnace registers and cold air returns.
Cooling coils have iced up. •See "Air conditioner freezing up" below.
Air conditioner
freezing up
The remote control The batteries are inserted •Check the position of the batteries.Theyshould be
is not working incorrectly, inserted inthe opposite (+)and (-)direction.
Water drips outside Hot, humid weather. •This isnormal.
basepan and drains into base pan. humidity; normal for a longerperiodin very humid areas.
Ice blocks the air flow
ond stops the oir conditioner
from cooling the room.
The batteries may be dead. •Replacethe batteries.
The air conditioner is not • For proper water disposal, make sure the air conditioner
tilted to the outside, slants slightlyfrom the case front to the rear.
Moisture removed from air •This isnormal for a short period in areaswith little
•On models with control knobs, set the mode control at
High Fan or High Cool with the Tamp at 1 or 2.
• On models with touch pads, set the controls at High Fan
or High Cool and set the thermostat to a higher
temperature.
Normal Operating Sounds
iiiiiiiiii[_iii
10
Youmay hear a pinging noisecaused by
water being picked up and thrown against the
condenser on rainy days or when the humidity
is high.This designfeature helpsremove
moisture and improveefficiency.
Youmay hear the thermostat click when the
compressor cycles on and off.
Water will collect in the basepan during
high humidity oron rainy days.Thewater
may overflow and dripfrom the outdoor side
of the unit.
Thefan may run even when the compressor
does not.
Page 11
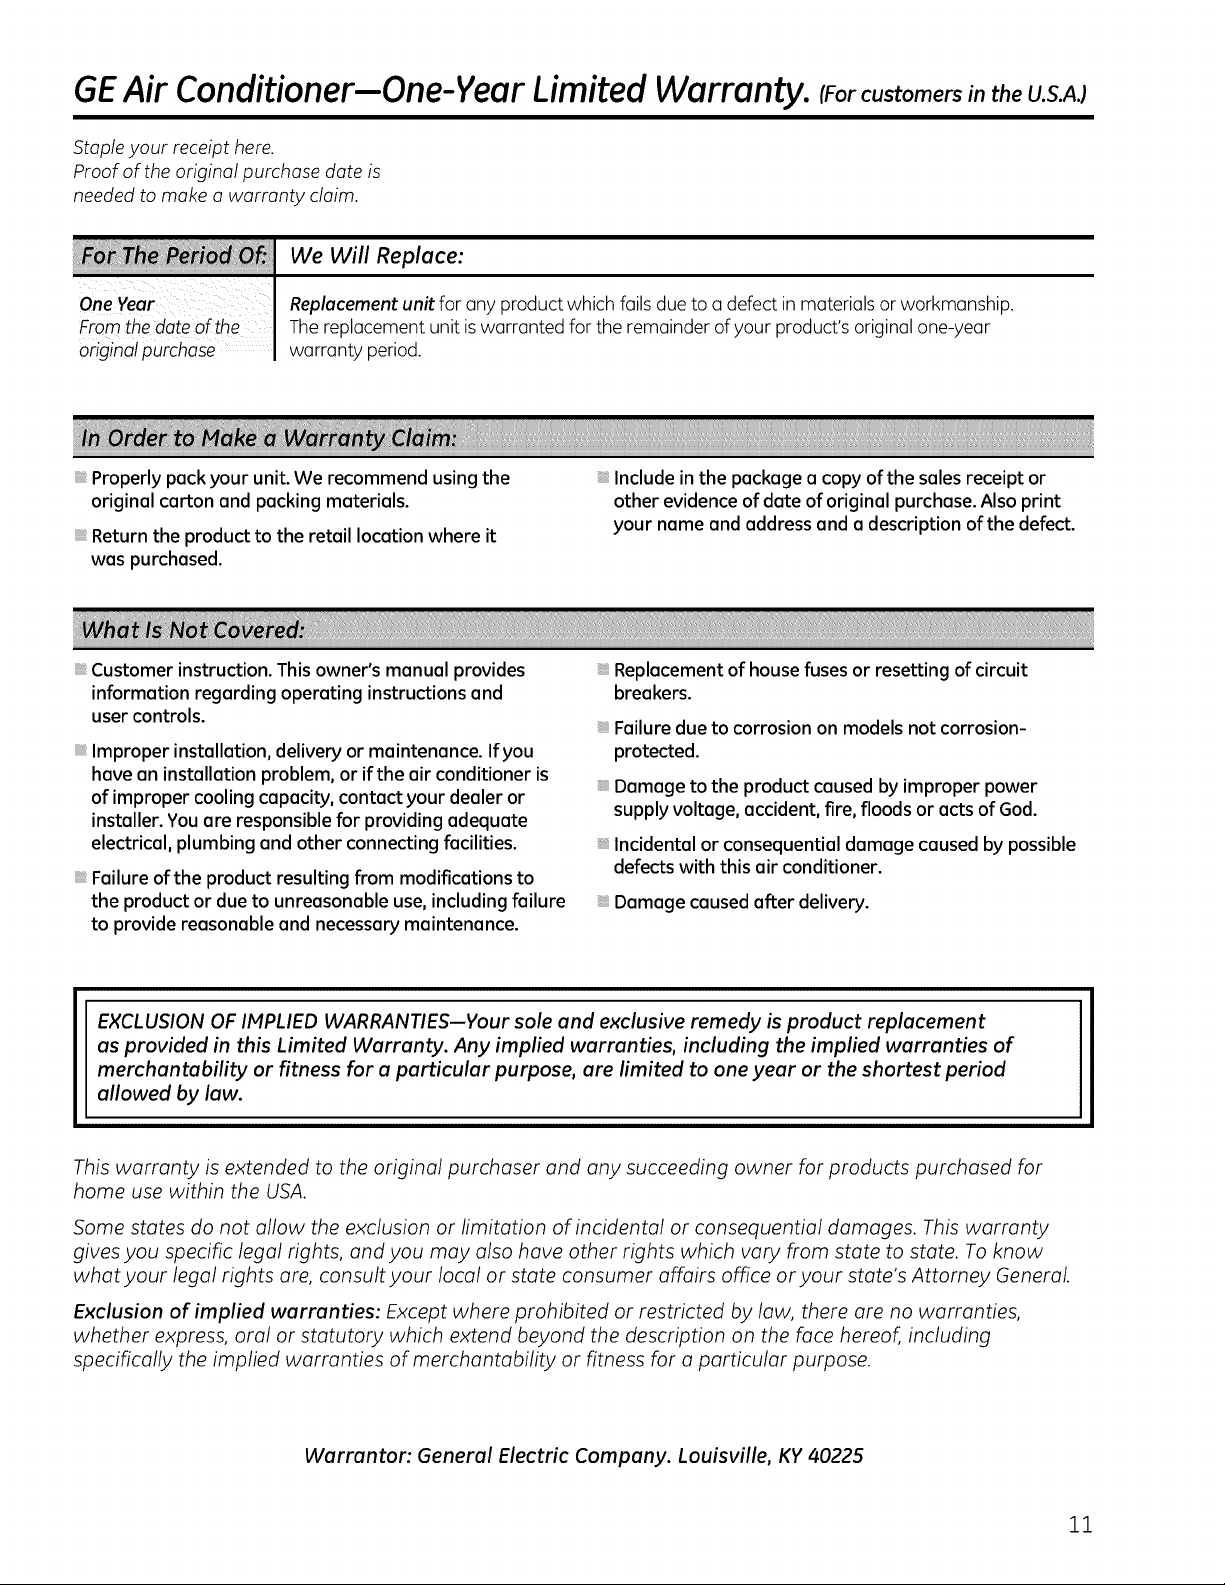
GEAir Conditioner-One-Vear Limited Warranty. (Forcustomers in theU.S.AJ
Staple your receipt here.
Proof of the original purchase date is
needed to make a warranty claim.
We Will Replace:
Onevear Replacement unit for any product which fails due to a defect in materials or workmanship.
Fromthe date of the I The replacement unit iswarranted for the remainder ofyour product's original one-year
originalpurchase I warranty period.
Properly pack your unit. We recommend using the
original carton and packing materials.
Return the product to the retail location where it
was purchased.
Customer instruction. Thisowner's manual provides
information regarding operating instructions and
user controls.
Improper installation, delivery or maintenance. If you
have an installation problem, or if the air conditioner is
of improper cooling capacity, contact your dealer or
installer. You are responsible for providing adequate
electrical, plumbing and other connecting facilities.
Failure of the product resulting from modifications to
the product or due to unreasonable use, including failure
to provide reasonable and necessary maintenance.
EXCLUSION OF IMPLIED WARRANTIES--Your sole and exclusive remedy is product replacement
as provided in this Limited Warranty. Any implied warranties, including the implied warranties of
merchantability or fitness for a particular purpose, are limited to one year or the shortest period
allowed by law.
Include in the package acopy of the sales receipt or
other evidence of date of original purchase. Also print
your name and address and a description of the defect.
Replacement of house fuses or resetting of circuit
breakers.
Failure due to corrosion on models not corrosion-
protected.
Damage to the product caused by improper power
supply voltage, accident, fire, floods or acts of God.
Incidental or consequential damage caused by possible
defects with this air conditioner.
Damage caused after delivery.
This warranty is extended to the original purchaser and any succeeding owner for products purchased for
home use within the USA.
Some states do not allow the exclusion or limitation of incidental or consequential damages. This warranty
gives you specific legal rights, and you may also have other rights which vary from state to state. To know
what your legal rights are, consult your local or state consumer affairs office or your state's Attorney General
Exclusion of implied warranties: Except where prohibited or restricted by law, there are no warranties,
whether express, oral or statutory which extend beyond the description on the face hereof, including
specifically the implied warranties of merchantability or fitness for a particular purpose.
Warrantor: General Electric Company. Louisville, KV 40225
ZZ
Page 12

6EAir Conditioner-One-Vear Limited Warranty. (Forcustomers in Canada)
Staple your receipt here.
Proof of the original purchase date is
needed to make a warranty claim.
wi,
One Year I Replacement unit for any product which fails clueto a defect in materials or workmanship.
Fromthe date of the I The replacement unit iswarranted for the remainder ofyour product's originalone-year
originalpUrehase I warranV period.
Properly pack your unit. We recommend using the
original carton and packing materials.
Return the product to the retail location where it
was purchased.
Customer instruction. Thisowner's manual provides
information regarding operating instructions and
user controls.
Improper installation, delivery or maintenance. If you
have an installation problem, or if the air conditioner is
of improper cooling capacity, contact your dealer or
installer. You are responsible for providing adequate
electrical, plumbing and other connecting facilities.
Failure ofthe product resulting from modifications to
the product or due to unreasonable use, including failure
to provide reasonable and necessary maintenance.
EXCLUSION OF IMPLIED WARRANTIES--Your sole and exclusive remedy is product replacement
as provided in this Limited Warranty. Any implied warranties, including the implied warranties of
merchantability or fitness for a particular purpose, are limited to one year or the shortest period
allowed by law.
Include in the package acopy of the sales receipt or
other evidence of date of original purchase. Also print
your name and address and a description of the defect.
Replacement of house fuses or resetting of circuit
breakers.
Failure due to corrosion on models not corrosion-
protected.
Damage to the product caused by improper power
supply voltage, accident, fire, floods or acts of God.
Incidental or consequential damage caused by possible
defects with this air conditioner.
Damage caused after delivery.
This warranty is extended to the original purchaser and any succeeding owner for products purchased in Canada
for home use within Canada.
Some provinces do not allow the exclusion or limitation of incidental or consequential damages, so the above
exclusion may not apply to you. This warranty gives you specific legal rights, and you may also have other rights
which vary from province to province. To know what your legal rights are inyour province, consult your local or
provincial consumer affairs o_ce.
Exclusion of implied warranties: Except where prohibited or restricted by law, there are no warranties,
whether express, oral or statutory which extend beyond the description on the face hereof, including
specifically the implied warranties of merchantability or fitness for a particular purpose.
Warrantor: Mabe Canada Inc.,
Burlington, Ontario
12
Page 13

Consignes de s4curit4 ............. 14,15
Consignesd'utilisation
ModUles dot6s de boutons
de commande ............................ 16
Entretien et nettoyage
Filtre 6 air ................................ 17
Serpentins ext6rieurs ..................... 17
Instructions de montage .......... 18-21
Conseils de d_pannage .............. 22
Bruits normaux de fonctionnement ........ 22
Assistance _ la clientele
Assistance 6 la clientele ................... 26
Garantie .................................. 25
AES05
* Produits homologuGs ENERGYSTAR@
ENERGYSTAR
En tant que partenaire d'ENERGYSTAR®,GEa
d@ermin6 que ce produit @ait conforme aux
exigences d'efficacit6 6nerg@ique d'ENERGY
STAR®.
Inscrivez ici les num_ros de module et de s_rie :
Num_ro de module :
Num_ro de S_rie :
Vous trouverez ces num@os sur 1'6tiquette
appos6e sur le c8t6 du climatiseur.
Au Canada, visitez-nous au
www.electromenagersge.ca
13
Page 14

IMPORTANTES CONSIGNES DE S 'CURIT '.
VEUILLEZ LIRE TOUTES LES CONSIGNES AVANT UTILISATION.
- AVERTISSEMENT!
Pour votre s_curit_, les informotions contenues dons ce manuel doivent @tresuivies ofin de minimiser
les risques d'incendie, de chocs dlectriques ou de blessures corporelles.
CONSIGNESDES cCURIT c
N'utilisez cet appareil qu'aux fins pr6vues
d6crites dans le manuel d'utilisation.
Ce climatiseur doit @trecorrectement
install6 conform6ment aux Instructions
d'lnstallation avant toute utilisation.
Ne d6branchezjamais votre climatiseur en
tirant sur le cordon d'alimentation. Prenez
toujours fermement la fiche en main et tirez
pour la sortir de la prise.
Remplacez imm6diatement tout cordon
61ectrique us6 ou endommag6. Un
cordon d'alimentation endommag6 doit
6tre remplac6 par un nouveau cordon
d'alimentation obtenu du fabricant. Ne
r6parez pas lecordon endommag6. N'utilisez
pas un cordon fissur6 ou pr6sentant des
dommages dus aux frottements soit sur
sa Iongueur ou aux extr6mit6s du c6t6
de la fiche ou du raccord.
Eteignez votre climatiseur et d6branchez-le
avant de le nettoyer.
GE n'offre pas de service d'entretien pour les
climatiseurs. Nous vous recommandons de
ne pas essayer d'effectuer I'entretien
de votre climatiseur vous-m6me.
Pour votre s6curit6, ne stockez pas et
n'utilisez pas de mat6riaux combustibles,
d'essence ou d'autres vapeurs et liquides
inflammables dans les parages de cet
appareil ou de tout autre appareil.
Tousles climatiseurs contiennent des
fluides frigorig_nes qui, conform6ment, 6 la
16gislation f6d6rale doivent 6tre retir6s Grant
la mise au rebut de I'appareil. Si vous mettez
au rebus un ancien appareil contenant des
fluides frigorig6nes, v6rifiez la proc6dure 6
suivre aupr6s de la compagnie responsable
de 1'61imination.
Si la prise de courant est d'un format
diff6rent de la fiche, cette prise doit @tre
chang6e par un 61ectricien qualifi6.
Ces syst@mes de climatisation R410A
n6cessitent que les entrepreneurs et
techniciens adoptent des outils, du mat6riel
et des normes de s6curit6 approuv6s pour
utilisation avec ce r6frig6rant. N'utilisez pas
de mat6riel certifi6 pour le r6frig6rant R22
uniquement.
14
BRANCHEMENTS ELECTRIQUES
Ne coupez pos ou n'enlevez pos, sous oucun
pr_texte, Io troisi@mebroche de mise 8 Io terre
du cordon d'olimentotion. Pour des raisons
de s_curit_, cet opporeil doit _tre correctement
mis 8 Io terre.
N'utilisez PASd'adaptateur avec cet appareil.
Le cordon d'alimentation de cet appareil
est 6quip6 d'une fiche 6 trois broches (pour une
mise 6 la terre) qui s'adapte 6 la prise
de courant standard 6 3 broches (pour une mise
6 la terre) pour minimiser les risques
de chocs 61ectriques par cet appareil.
Le cordon d'alimentation est 6quip6 d'un
dispositif d'interruption du courant. Un bouton
d'essai et de r6enclenchement est fourni
sur le battier de la prise. Vous devez tester le
m6canisme r6guli_rement en appuyant d'abord
sur le bouton TEST(essai) puis sur le bouton
RESET(r6enclenchement)Iorsque I'appareil est
branch6. Sile bouton TEST(essai) ne bascule pas
ou si le bouton RESET(r6enclenchement) ne reste
pas enclench6, cessez d'utiliser votre climatiseur
et appelez un technicien de service qualifi6.
Faites v6rifier la prise murale et le circuit
61ectrique par un 61ectricien qualifi6 pour
s'assurer que le syst_me est correctement
mis 6 la terre.
Dans le cas d'une prise biphas6e,
I'installateur a la responsabilit6 et I'obligation
de la remplacer par une prise triphas6e
correctement mise 6 la terre.
Le climatiseur doit toujours 6tre branch6
6 sa propre prise 61ectrique d'une tension
nominale correspondant 6 celle indiqu6e
sur sa plaque signal6tique.
Ceci permet d'obtenir un meilleur rendement
du climatiseur et 6vite de surcharger les circuits
61ectriques du domicile qui risque d'occasionner
un incendie en surchauffant.
Consultez les Consignes d'lnstallations, dans
la section Exigences Electriques pour les
exigences de branchements 61ectriques
particuliers.
Page 15

www.electromenagersge.co
VERTISSEMENT !
UTILISATION DE RALLONGE5
RISQUED'INCENDIE. Peut occasionner des
blessures graves ou la mort.
• NE PASutiliser de rallonge avec ce climatiseur.
• NE PASutiliser de parasurtenseur ou
d'adaptateur h prises multiples avec ce
climatiseur.
LISEZET5UIVEZ 501GNEUSEMENTCESCONSIGNESDE
J J
5ECURITE.
CONSERVEZ CES INSTRUCTIONS
15
Page 16

A propos descommandes du climatiseur-
modules dot s de boutons de commande.
Les fonctions et I'ospect peuvent vorier.
High Low
Cool _ Cool
Low
Fon
OFF
MODE
Q O
COMMANDES DU MODE
Commondes isurcertoins mod@tes)
O ommandes du mode
Lesr#glc]gesHigh Cool (fort refroidissement),
Med Cool (refroidissementmoyen) et Low
Cool (refroidissementfaible)fournissent des
refroidissements c3desvitessesdiff6rentes pour
le ventilateur.
Lesr6glages du ventilc]teurpermettent (]usside
filtrer et defaire circuler I'airsansle refroidir.
REMARQUE: Sivouspossezd'un mode de
refroidissementsur Arr_t ou 8 un mode de
ventilotion, ottendezou moins 3 minutes ovont
de reposser8 un mode de refroidissement.
Descriptions du Refroidissement
Pour un refroidissement NormaI--S61ectionnez
High Cool ou F/ed Cool avec un r6glage sur une
temp6rature moyenne.
Pour un refroidissement MaximaI--S61ectionnez
High Cool avec un r6glage de la temp6rature sur
le chiffre le plus 61ev&
Pour un Refroidissement plus Silencieu× ou
Durant la Nuit--S61ectionnez le mode Low Cool
avec un r6glage sur une temp6rature moyenne.
Coolest
TEMP
7
2
5
COMMANDES DE LA TEMPERATURE
Contr61e de la TEMP
0
LecontrSle de la temp6rature est utilis6 pour
maintenir la temp6rature dela piece.Le
compresseur semet en marche et s'arr_te
6 intervallesr6guliers pour maintenir la piece
6 un niveau de confort constant. Lorsque
vous tournez le bouton sur unevaleur plus
61ev6e,I'air ambiant se refroidira. Lorsquevous
tournez le bouton sur une valeur plus basse,I'air
ambiant ser6chauffera.
16
Commandes (surcertainsmod@tes)
OFF
ON
Commande ON/OFF (marche/arr_t)
Met le climotiseur en position de morche
ou d'orr_t.
REMARQUE: Sile climotiseur _teint est ollum_
olors qu'il est programme sur un r_gloge Cool
(refroidissement),il faudro environ3 minutespour que
le compresseurseremette enmorche et recommence
8 refroidir.
Page 17

Information suppldmentaire importante.
Direction de I'Air
utilisez lelevier pour r6gler la direction de I'air
vers la gauche ouvers la droite seulement.
Entretien et nettoyage du climatiseur.
Grille et BoTtier
Eteignezet d_branchezleclimatiseuravant tout Pourle nettoyer,utilisezde I'eauet und_tergentdoux.
nettoyage. N'utilisezpasd'eaude Javelou de nettoyantsabrasifs.
Filtre _ Air
Lefiltre (_air derriere lagrillefrontale dolt I_
_tre v6rifi6et nettoy6 au bout de30 jours de -_'_1_
fonctionnement ou plus souvent sin6cessaire. _
Pourretirer : _
Tirezl'onglet sur lec8t6 droit del'c]ppareiljusquk_ce
que lefiltre soit sorti.
Pour retirer :
Ouvrez la grille d'entr6e en tirant vers le bassur les
languettes des coins sup6rieurs de lagrille d'entr6e
jusqu'6 ceque la grillesalt dans uneposition 6 45
degr6s. Retirezlefiltre.
Nettoyez lefiltreavec de I'eausavonneuse tilde.
Rincezle filtre et laissez-les6cher avant de leremettre
dans leclimatiseur. Ne nettoyez pas votre filtre au
lave-vaisselle.
A MISE EN GARDE: NEfaites
fonctionner leclimatiseursansle filtre souspeinede le
boucher avecde lapoussiSreet delacharpie et de
rdduire sone_cacitd.
L'aspect peut varier.
=.=
Lenguette
www.electromenogersge.co
Languette
Serpentins E×t_rieurs
Lesserpentins situ6sdu c6t6 e×t6rieur du clirnatiseur
doivent _tre r6guli_rement v6rifi6s.S'ilssont obstru6s
par des poussi_resou de la suie,il est possiblede les
faire nettoyer par des professionnels.
17
Page 18

JInstructions
de montage
Climatiseur]
I I--?-IQuestions? Composez le 1.800.561.3344 ou visitez notre site web 6 : www.electromenagersge.ca
AVANT DE COMMENCER
Lisezces instructions enti_rement et attentivement.
• IMPORTANT -Conservezcesinstructions
pourlqnspecteur@lectdquelocal.
• IMPORTANT - mespecteztouslescodes et
r@glementsen vigueur.
• Remarque pour l°installateur- Assurez-vousde
remettreces instructionsau client.
Remarque pour le client - Conservez ces
instructions pour toute r@f@rencefuture.
Niveau de comp@tence - L'installation de cet
a@are.il demande des connaissances de base en
mecanlque.
D@laid'ex@cution - Environ 1heure
Nous recommandons que I'installotion de ce
produit salt effectu@e par deux personnes.
• L'installoteur est responsable de I'installation
correcte de I'appareil.
• Lo panne de I'oppareil due _ une mauvaise
installation n'est pas couverte par Io garantie.
• Vous DEVEZutiliser toutes les pi@cesfournies et
suivre Io proc@dure d'installotion du climatiseur
d@critedons cette notice.
-AMISE EN GARDE:
Ne coupez pas ou n'enlevez pas, sous aucun
pr6texte, la troisi_me broche de raise 0 la terre
du cordon d'alimentation.
Ne changez pas la fiche du cordon d'alimentation
du climatiseur.
Un c6blage en aluminium du domicile peut
occasionner des probl6mes particuliers--
consultez un 61ectricien qualifi&
OUTILLAGE NI_CESSAIRES
Tournevis cruciforme Phillips
Tournevis _] t_te plote
I
(_ EXIGENCES I_LECTRIQUES
(_ ertains mod@lesn_cessitent une prise mise _ la
Lafiche triphas_e avec terre r_duit le risque de choc
_lectrique. Si la prise murale que vous envisagez d'utiliser
est biphas_e, vous avez la responsabilit_ et I'obligation de
la remplacer par une prise triphas_e correctement mise
la terre.
terre de 1Z5/120 Volts AC,60 Hz,protegee par
un fusible _ action diff_r_e ou par un disjoncteur.
Certains mod@lesn@cessitentune prise mise
la terre de 230/208 Volts AC, prot@g@epar un
fusible a action diff@r@eou par un disjoncteur.
Cesmod@lesdoivent @treinstall@ssur leur
propre circuit d@riv@pour @viterde surcharger
lescircuits @lectriquesdu domicile qui peut
occasionner un risque d'incendie par surchauffe
desc6bles.
Croyon R_gle ou m_tre
Niveou Ciseoux ou couteou
Le cordon d'alimentation est _quip_ d'un dispositif
d'interruption du courant. Un bouton d'essai et de
r_enclenchement est fourni sur le boTtierde la prise. Vous
devez tester le m_canisme r_guli_rement en appuyant
d'abord sur le bouton TEST(essai)puis sur le bouton
RESET(R_enclenchement)Iorsque I'appareil est branch&
Si le bouton TEST(essai)ne bascule pas ou si le bouton
RESET(r_enclenchement) ne reste pas enclench& cessez
d'utiliser votre climatiseur et appelez un technicien de
service qualifi&
18
Page 19

Instructions de montage
PII_CES INCLUES
(L'aspect peut varier) Joint d'6tanch6it6 de la
Rail de mon_ _guillotine
suJoiinluard_a_tt_ panneauen
accord6on
droit
Panneau en
Climatiseur accord6on
,_ gauche _
/
TypeA (4) Type B (6)
_and_ __
superleur
Ferrure de verrouillage de
la fen#tre (1)
19
Page 20

Instructions de montege
[] INSTRUCTION RELATIVE
A LA FENETRE
• Cesinstructionssontvalablespourunefen_trestandard
guillotine_ deuxchassismobiles.Vousdevrezmodifierles
instructionspourlesautrestypesdefen_tres.
• Leclimatiseurpeut@treinstallesanslespanneauxen
accordeonssilafen@treestetroite.Rderez-vousaux
dimensionsdelafen@treindiqu@sdanslecroquis@droite.
• Toutela ferruredemontagedoit@tresolidementfixeeau
bois,@la ma_onnerieouau m@tal.
• Laprised'alimentationelectriquedoitsetrouver@port@
ducordond'alimentation.
• Suivezlesdimensionsindiqueespourvotremo@ledansle
tableauet surlecroquis.
I I
[3==43
t
12.5 po min.
23 po - 38 po _L_
(Avec les panneaux
enaccord@on)
m m
!
FIXATION DE LA BANDE
%
D'I_TANCHI_ITI_ DU RAIL DE MONTAGE
SUPI_RIEUR
(Danscertainsmo@les,labanded'6tancheitepeutdej6¢tre
fix@surle raildemontagesuperieur.Lecas@cheant,ignorez
cette@tape.)
Retirezlapelliculedelabanded'etancheiteduraildemontage
sup@ieuretapposezcettebanded'etancheitesurlehasdu
raildemontagesuperieur,lelongdubordavant.
Railde montagesup@ieur
Retirezla
pelliculede
la bande
d'@tanch@it@
VUEFRONTALE Raildemontagesup@ieur
,,,-, , ,,*, , , , , ,,,.oO o. , • .o , , ,,., . Oo
[] INSTRUCTIONS RELATIVE
A _ CONTRE-FENETRE
Lecadredela contre-fen@treemp¢cheleclimatiseur
de pencherversI'exterieur,etdoncdesedrainer
correctement.Pourreglerce probleme,fixezun morceau
de boisau rebordde la fen¢tre.
MORCEAU DE BOIS
LARGEUR:2 po
LONGUEUR :Suffisammentlongpourselogerb l'int@ieur
du cadrede la fen_tre.
I_PAISSEUR:PourdeterminerI'@aisseur,placezun
morceaude boissur lerebord de lafen¢tre defa¢on@ce
que le morceaude boissoit ½ po pluselevequele dessus
du cadrede la contre-fen@treoudu cadreenvinyle.
Fixezsolidement@I'aidedevis ou declousfournis par
I'installateur.
½ poplus@lev@que
le cadre en vinyle (sur
½ poplus@lev@ T _ Bois
que lecadrede la--
contre-fenetre _--n-J_ II [_"" J("l
^ rl J J_J
_ certainesfen_tres)/
T l lilL _ Rebord
Cadrede la _ iT --)
contre fenetr
- e r"- Cadreen vinyle I I
Banded'@tanch@it@
FI PRI_PARATION DU CLIMATISEUR
[] Installez le rail de montage sup@ieur avec 4 vis de
type A de I'ext@rieurdu bottler.
Railde montage
sup@ieur _ ._ _' V _'
Railde montageinf@ieur
r_ Vlaintenez le panneau en accord@on clans une main
et tirez doucement pour lib@rerI'extr@mit@ouverte.
: i
I
20
Page 21

Instructions de montage
PRI_PARATION DU CLIMATISEUR
(suite)
Faites glisser I'extr6mit6 libre du panneau en
accord6on dans les rails de panneau lat6ral.
Faites glisser le panneau vers le bas. Assurez-
vous de laisser suffisamment d'espace pour
glisser le haut et le bas du cadre dans les rails
de I'enceinte.
NOTE: IIy a un panneau en accord6on gauche
et un panneau en accord6on droit. Assurez-
vous d'utiliser le panneau appropri6 pour
chaque c6t&
INSTALLATION DU CLIMATISEUR
DANS LA FENf:TRE
Placez le climatiseur sur lerebord avec le rail
de montage inf6rieur contre le rebord arri_re.
Centrez-le et fermez la fen@trederriere le rail
de montage sup6rieur. II dolt @trede niveau ou
16g_rement pench6 vers I'ext@ieur. Utilisez un
niveau, environ 1/3 de bulle donnera la pente
correcte vers I'ext6rieur.
Visde typeB
r_ Etirez les panneaux en accord6on gauche et
droitjusqu'aux cadres verticaux de la fen@tre
et fixez-les 6 I'aide de 5 vis de type B au travers
des trous dans les panneaux.
r_ Faites glisser les panneaux en accord6on
gauche et droit dans les rails de montage
inf6rieur et sup6rieur, partie
Partiesup@ieure sup@ieur
gauche
Railde montage inf@ieur
Raildemontage droite
sup@ieure
IT1 PRI_PARATION DE LA FEN£=TRE
D6coupezlejoint de lafen@tre(hguillotine
6 la Iongueurad6quate. D6collezla pellicule
protectrice et collezlejoint surledessous
du cadrede la fen@tre.
INSTALLATION D'UNE FERRURE DE SUPPORT
rq
ET DU JOINT D'I_TANCHI_ITI_ SUPI_RIEUR EN
MOUSSE DE LA FENf:TRE
B]
MISE EN GARDE:
Pour preventez la verre brisez
dans les fen@res, attachez une
ferrure de verrouillage de la
fen@re 6 la c6t@du fen@tre
I'aide d'une vis de type B.
D@coupezlejoint d'@tanch@it@sup@rieuren mousse (_
%
la largeur de la fen@re.
Ins@ez la mousse
%
entre la vitre et
la fen@re pour
emp@cherFairet les
insectes de p@n@trer
dans la piece.
NOTE:Silejoint d'@tanch6it6fourni ne s'adapte pas
(_votre fen@tre,procurez-vous Iocalement I'article
appropri@afin d'obtenir une @tanch@it@ad@quatede
I'installation.
Vinyle
Bois
21
Page 22

Avant d'appeler le service...
Causespossibles
Leclimatiseur
metpasenmarche
Leclimatiseurnerefroidit Lacirculationd'air estbloqu_e. • Assurez-vousqu'iln'ya pasderideau,destoreoudemeuble
pasautant qu'il ledevrait qui bloqueledevantduclimatiseur.
est d_branch&
Lefusibleasaute/ • Verifiezla boTte6 fusible/6disjoncteursetremplacezlefusible
le disjoncteurestouvert, ou rebranchezledisjoncteur.
IIy aunepannedecourant. • S'ilseproduitunepannedecourant,debranchezleclimatiseur
Lem_canismed'interruption • AppuyezsurleboutonRESET(remiseenmarche)situesurlafiche
decourantestd_clanch& ducordonelectrique.
LecontrSledetemperature • EnmodeCool(frais)appuyezsurlatoucheDecrease• pad.
n'estpas bienr_gl&
Lefiltre 6 air estsale. • Nettoyezlefiltreau moinsbus les30jours.Consulterlasection
Lachambre_tait chaude. •Apresavoirmisenmarcheleclimatiseur,attendez
L'airfroid s'_chappe • V_rifiezlesgrilles6 registredeplancheretles reprisesd'airfroid.
de lachambre.
Quefaire
• Assurez-vousquelaficheduclimatiseursoitbienbranchee
dansla prisemurale.
en lemettanten positionOFF(arr6t).0uandlecourantrevient,
attendez3minutesavantderemettreenmarcheleclimatiseur,
pour6viterdedeclencherla surchargedu compresseur.
• SileboutonRESETnerestepasenfonc&arr¢tezleclimatiseur
d'airet appelezuntechnicienqualifi&
• Surlesmodelesdotesdeboutonsdecommandes,tournezle
boutondetemperaturesurunevaleurplus_lev_e.
Instructionsdefonctionnement.
quela chambreserefroidisse.
Lesserpentinssont gelds. • Consultez"Ledimatiseur d'airg#le"ci-dessous.
Leclimatiseur Laglacebloquela circulation • Surlesmodelesdotesdeboutonsdecommande,reglezlemode
g#le d'air et emp6cheleclimatiseur surHighFan(vitessedu ventilateurelevee)ouHighCool(fort
de refroidirla chambre, refroidissement)aveclatemperaturer_gleesur1ouZ
° Surlesmodelesdotesdetouches6 effleurement,reglezles
commandessurHighFan(vitesseduventilateurelevee)ou
HighCool(fortrefroidissement)etr_glezlethermostatsurune
temperatureplus61ev6e.
Lat#l#commande Lespilesnesontpas ins_r_es • Verifiezla positiondespiles.Ellesdoiventinsereesdefaqon
nefonctionnepas correctement. 6 cequelesp61es(+)et(-)dela pilesoientorientesdansdes
directionsoppos_es.
Lespilessont peut-6tre • Remplacerlespiles.
d_charg_es.
DeI'eaucoule_ I'ext_rieur IIfait tr_schaudet humide. • C'estnormal.
DeI'eaucoule_I'int#rieur Leclimatiseurn'estpas • PourobtenirunebonneevacuationdeI'eau,assurez-vous
inclin_vers I'e×t_rieur. queleclimatiseursoitI_gerementinclinedeI'avant
L'eaus'amasseclans Uhumidit_estextraite de
leplateaudufond I'air dela chambreet passe
clansleplateaudufond.
du bottlerversI'arriere.
• C'estnormalpendantuneperiodecourtedansdesregions
peuhumides;normalpendantdesperiodesplusIongues
dansdesr_gionstreshumides.
Bruits normaux de fonctionnement
22
VouspouvezentendreuncliquetisdO6 deI'eauqui
estabsorbeeet estprojeteecontrelecondensateurles
joursde pluieoOquandily abeaucoupd'humidit&Cette
caracteristiquediminueI'humiditeet am_liore
lerendement.
Vouspouvezentendreleclaquementduthermostat
quandlecompresseursemetenmarcheets'arrCte.
DeI'eaus'amassedansleplateaudubaspendantles
periodesdegrandehumiditeou s'ilpleut.Cetteeaupeut
deborderet coulerdeI'appareilduc6teexterieur.
Leventilateurpeuttournerm¢mequandlecompresseur
nefonctionnepas.
Page 23

Climatiseur GE--Garantie Limit e D'un An. elec omenoge ,geco
Agrafez votre facture ici.
Une preuve de la date d'achat initial est ndcessaire
pour faire une rdclamation sous garantie.
i ' i_,,_ii"_"_iill _,_'_ 'i '_ _: i i_'_i=i i i_
Nous remplacerons •
1
un An I
A partir de!adate I
dVchatinitial I
Emballez correctement votre appareil. Nous vous
recommandons d'utiliser lecarton et le materiel
d'emballage d'origine.
Ramenez le produit au magasin o5 vous I'avez achet_.
La formation du client. Ce manuel d'utilisation donne les
informations n_cessaires sur lefonctionnement et les
commandes.
Une installation, livraison ou maintenance d_fectueuse.
Encas de probl_me d'installation, ou si votre climatiseur
n°apas la bonne capacit6 de refroidissement, contactez
votre revendeur ou votre installateur. Vous6tes
responsable de la provision d'un syst_me _lectrique,
d'une plomberie et d'autres connexions appropri_s.
Une panne du produit r_sultant de modifications
apport6es au produit ou due 6 une utilisation
d(_raisonnable,y compris tout manquement 6 un
entretien r(_gulieret n(_cessaire.
Un appareil de remplacement pour tout produit qui s'ov_re d6fectueux en raison cl'und6fout
de mot6riou ou de fabrication. L'opporeilde remplocement est goronti pour le reste de Io
dur6e de Iogorontie d'origine ct'unon.
Ajoutez une copie devotre facture ou route autre preuve
de la date d'achat d'origine 6 votre emballage. Inscrivez
(_galement votre nomet votre adresse ainsi qu'une
description du d_faut.
Le remplacement des fusibles ou le r_enclenchement du
disjoncteur du domicile.
Lespannes provoqu_es par la corrosionsur lesmodules
n'_tant pas proteges contre la corrosion.
Lesdommages au produit causespar une mauvaise
tension d'alimentation, un accident, un incendie, une
inondation ou une catastrophe naturelle.
Tout dommage fortuit ou indirect caus_ par d'_ventuels
d_fauts du climatiseur.
Lesdommages causas apr_s la livraison.
EXCLUSION DES GARANTIES TACITES--Votre recours exclusif est I'_chonge du produit suivont les
modolit_s de Io Garontie Limit_e. "routes goronties tocites, y compris les goronties de voleurs
morchondes ou d'od_quotion 6 des fins porticuli_res, sont limit_es 6 une dur_e d'un on ou 6 Io dur_e Io
plus courte autoris_e par la Ioi.
Cette garantie est valable pour le premier propri@taire et tout autre propri@taire du produit s'il achet@au Canada pour
utilisation domestique dons Canada.
Dons certaines provinces, il est interdit d'exclure ou de limiter les dommages directs ou indirects. II est alors possible
que les limitations ou exclusions ci-dessus ne s'appliquent pas dons votre cos.Lo pr@sentegarontie vous conf@re
des droits juridiques sp@cifiques.Vous pouvez b@n@ficierd'autres droits, qui varient d'une province _ I'autre. Pour
connaFtre les droits dont vous b@n@ficiezdons votre province, communiquez avec le bureau des relations avec les
consommateurs de votre r@gion.
Exclusion des gerenties recites: Sauf si elles sont interdites ou restreintes par la Ioi, il n'y a pas de garantie
qu'elle soit expresse, verbale ou statutaire, qui s'@tende au-del5 de la pr@sente description, en particulier
aucune garantie implicite de qualit@ marchande ou de convenance _ un besoin particulier.
Garant : Mabe Canada Inc.,
Burlington, Ontario
23
Page 24

Notes.
24
Page 25

Notes.
25
Page 26

Assistance d la clientele.
Site Internet GE www.electromenagersge.ca
Pour toute question ou pour un besoin d'(]ssistonce (]u sujet de votre opporeil m6noger, consultez le site
Internet ci-dessus, accessible 24 heures p(]rjour, ch(]que jour de I'(]nn6e! A portir du site, vous pouvez
t616chorger les monuels d'utilisotion.
Sur demonde, GEpeut fournir une brochure sur I'om6nogement d'une cuisine pour les personnes
I _ 1 Studiodeconceptionr_aliste www.electromenagersge.ca
6 mobilit6 r6duite.
Ecrivez: Directeur, Relotions ovec les consommoteurs, Mobe Canada, Inc.
Bureau 310, 1 Factory Lane
Moncton, N.B. E1C9M3
Pi_ces et accessoires
Ceux qui d6sirent r6porer eux-m_mes leurs 61ectrom6n(]gers peuvent recevoir pi_ces et occessoires
directement (_Io moison (cortes VISA, MosterCord et Discover occept6es).
Les procedures expliqu_es duns le present manuel peuvent _tre ex_cut_es par n'importe quel utilisuteur.
GE n'offre pus de services de r_purution pour ce produit. Nous vous recommundons fortement de ne pus
tenter de r_purer vous-mEme le produit.
Voustrouverez dans lespagesjaunes de votre annuaire lenum6ro du Centredeservice Mabele plus proche.
Autrement, appelez-nous au 1.800.561.3:384.
www.electromenagersge.ca
Contoctez-nous www.electromenagersge.ca
Si vous n'_tes pos sotisfoit du service opr_s-vente dont vous ovez b6n6fici6 :
Premi_rement, communiquez ovec les gens qui ont r6por6 votre opporeil.
Ensuite, si vous n'_tes toujours pos sotisfoit envoyez tous les d6toils-num6ro de t616phone compris-ou
Directeur, Relotions ovec les consommoteurs, Mobe Canada, Inc.
Bureau 310, 1 Factory Lane
Moncton, N.B. E1C9M:3
26
Page 27

Instrucciones de seguridad ......... 28,29
Instrucciones de operaciGn
Modelos con botones de control .............. 30
Cuidadoy limpieza
Bobinas para exteriores ...................... 31
Filtro de aire.................................. 31
Instrucciones de instalaciGn ....... 32-3s
Solucionar problemas ................... s6
SonidosdeoperaciGnnormales.............. 36
Servicio al consumidor
Garantia ...................................... 37
Servicio al consumidor ....................... 39
AES05
Producto etiquetado *ENERGYSTAR®
ENERGYSTAR
Como socio de ENERGYSTAR ®,
GEha confirmado que este
producto cumple las directrices
de ENERGYSTAR®relativas al
rendimiento energGtico.
Escriba los nElmeros de modelo
y serie aqui:
# de Modelo
# de Serie
Puede encontrar estos nOmeros
en una etiqueta en el costado
del acondicionador de aire.
27
Page 28

INFORMACION IMPORTANTEDESEGURIDAD.
LEATODASLASINSTRUCCIONESANTES DEUSAR.
iADVERTENCIA!
Par su seguridad, se debe seguir la informaci6n en este manual para minimizar el riesgo de incendios,
descargas el_ctricas o lesiones personales.
PRECAUCIONESDE SEGURIDAD
Use este electrodom6stico solamente para
el prop6sito determinado segOn se describe
en el Manual del propietario.
Este acondicionador de aire debe instalarse
correctamente de acuerdo con las
Instrucciones de instalaci6n antes de su usa.
Nunca desenchufe su acondicionador de
aire tirando del cable el6ctrico. Siempre
agarre firmemente el enchufe y tire de
61directamente hacia afuera.
Reemplace inmediatamente todos los
cables el6ctricos que se hayan pelado o que
se hayan dahado de alguna otra manera.
Un cable de corriente dahado no debe
repararse, sino que debe ser sustituido par
uno nuevo que se adquiera del fabricante.
No use un cable el6ctrico que muestre
evidencias de deterioro, o dahos de
abrasi6n en su superficie en alguno de sus
extremos.
Apague la unidad y desenchufe su
acondicionador de aire antes de limpiar.
GE no est6 no apoya que se le proporcione
ning0n servicio al acondicionador de aire.
Vehementemente recomendamos que
usted no intente proporcionar servicio al
acondicionador de aire usted mismo.
Par su seguridad...no almacene ni use
materiales combustibles, gasolina u
otros vapores o liquidos inflamables
en la proximidad de 6ste o alg0n otro
electrodom6stico.
Todoslos acondicionadores de aire
contiene refrigerantes,los que par Ley
Federaldeben ser removidosantes de
desecharlos.Siusted planeadeshacersede
alg0n producto quecontenga refrigerantes,
p6ngase encontacto con la compahia que
seencarga de recoger su basura para que
le indiquen qu6 hacer.
Si el recept6culo no coincide con el
enchufe, un electricista calificado debe
reemplazar el recept6culo.
Estos sistemas de acondicionadores de
aire R410A requieren que los contratistas
y t6cnicos usen herramientas, equipos y
est6ndares de seguridad aprobados para
su usa con este refrigerante. NO use
equipamiento certificado s61o para
refrigerante R22.
28
COMO CONECTARLA ELECTRIClDAD
Bajo ninguna circunstancia, carte o remueva la
tercera pOa (tierra) del cable eldctrico. En pos
de la seguridad personal, este electrodomdstico
debe siempre conectarse a tierra.
NO use un enchufe adaptador con este
electrodom_stico.
El cable el#ctrico de este electrodom6stico est6
equipado con un enchufe de tres p0as (tierra)
que combina con un tomacorriente est6ndar
de tres tomas de pared para minimizar la
posibilidad de una descarga el6ctrica.
El cable de alimentaci6n incluye un
dispositivo para interrupci6n de corriente.
Se incluye un bot6n de prueba y de reinicio
en el dispositivo. El dispositivo debe ponerse
a prueba peri6dicamente: primero se presiona
el bot6n de TEST(prueba) y luego RESET
(reinicio) mientras se encuentra enchufado al
tomacorriente. Si el bot6n TESTno se dispara
o si el bot6n RESETno queda enganchado,
deje de utilizar el acondicionador de aire y
comuniquese con un t6cnico calificado.
Pida a un t#cnico que inspeccione el
tomacorriente y el circuito para cerciorarse
de que el tomacorriente est6 conectado a
tierra de la manera apropiada.
Donde exista un tomacorriente de dos
tomas, es su responsabilidad y obligaci6n
personal hacer que dicho tomacorriente
sea reemplazado par uno de tres tomas
con conexi6n a tierra.
Elacondicionador de airedeberia siempreestar
conectado a un tomacorriente individual con su
circuito de voltaje correspondiente.
Esto proporciona el mayor rendimiento y
adem6s evita que los circuitos del resto de
la casa se sobrecarguen, Io cual podria causar
incendios par el sobrecalentamiento del
cableado.
Ver las Instrucciones de instalaci6n, en la
secci6n Requisitos EI6ctricos para los requisitos
especificos de conexi6n.
Page 29

ZkiADVERTENCIA!
USO DE PROLONGADORES
RIESGO DE INCENDIO. Podria ocasionar
lesiones graves o la muerte.
• NO use un prolongador con este
Acondicionador de Aire de Ventana.
• NO use protectores contra picos de tensi6n ni
adaptadores pare mOItiples tomacorrientes con
este Acondicionodor de Aire de Ventono.
LEAVSIGAESTASINSTRUCCIONESDESEGURIDAD
CUIDADOSAIENTE.
GEAppliances.com
GUARDEESTASINSTRUCCIONES
29
Page 30

Acerca de loscontroles en el acondicionadorde aire-modelos
conbotonesde control.
Los funciones y el aspecto pueden variar.
High Low
Cool _ Cool
Low
Fan
OFF
Controles I_nmodetos setectos)
Control de modo
0
High Cool (FrioAlto),Med Cool
(FrioIVledio)y Low Cool (FrioBajo)proporcionan
enfriamiento con diferentes velocidades del
ventilador.
Losajustes del ventilador proporcionan
circulaci6n de airey filtraci6n sinenfriar.
NOTA:Siustedmueve el control de modo de
un nivelfrio a OFFIAPAGAO0)oaun nivelde
ventilador,esperepar Io menos 3 minutos antes
de cambiar otto vez aun niveldeenfriamiento.
Coolest
TEMP
7
CONTROL
DETEMPERATURA
Control de TEMP
0
Elcontrol de TEIVlpes usado para mantener la
temperatura ambiente. Elcompresor harc_ciclo
entre encendido y apagado para mantener el
mismo nivelde temperatura en lahabitaci6n.
Cuando ustedgira el bot6n hacia un nOmero
mayor, elaire interno seenfriar6 mc_s.Si Io
ajusta a un nOmero menor, la temperatura del
aire interno secalentar6 m6s.
30
Descripciones de enfriamiento
Para enfriamientonormaI-Seleccione High Cool
(FrioAlto)o Med Cool (FrioIVledio)con elcontrol de
TEMPERATURAen el media.
Para enfriamiento m6ximo--Seleccione High Cool
(Fr[oAlto)con el control de TEMPERATURAen el
n0mero mayor disponible en su teclado.
Poro enfriamiento silencioso duronte la noche-
SeleccioneLow Cool (FrioBajo)con el control de
TEMPERATURAen el nivel media.
Controles(enmodetossetectos)
OFF
ON
Control ON/OFF
Enciendey upugu el ucondicionudor de uire.
NOTA:Sielacondicionador de aim estd apagado
y entonces esencendido mientms estden un
modo Cool (Enfriado),elcompresor necesitard
aproximadamente 3 minutos para iniciary pare que el
enfriamiento comience.
Page 31

Informaci6n importante adicionale.
Direcci6n del aire
Use la palanca para ajustar la direcci6n del airehacia
la izquierday la derecha solamente.
El aspecto pueden variar.
Cuidado y limpieza del acondicionadorde aire.
Rejilla y caja
Apague el acondicionador de aire y retire el enchufe
del tomacorriente de la pared antes
de limpiar.
Filtro de aire
Elfiltro de aire detr@sde larejilla frontal debe
inspeccionarse y limpiarse por Io menoscarla
:SOdias o m@sa menudo sifuese necesario.
Para retirarlo:
Empuje laleng(Jetadel lado derecho de la unidad
hasta haber retirado el filtro.
Para retirarlo:
Abra la rejilla de entrada empujando hacia abajo
las lengOetasen lasesquinas superioresdela rejilla
de entrada, hasta que la rejillaseencuentre en una
posici6n de 45°. Retireelfiltro.
Limpie elfiltro con agua tibia yjab6n. Enju6gueloy
permita que seseque antes decolocarlo otra vezen
su lugar. Nolave elfiltro en un lavavajillas.
Para limpiar, use agua y undetergente suave.
No usecloro o materiales abrasivos.
I
GEAppliances.com
PRECAUCION:No d
acondicionadordeaimsinel filtrodebidoa quefasuciedad
y laspelusasIo obstruirdny reducirdnsu rendimiento.
Bobinas para exteriores
Sedeben inspeccionar con frecuencia lasbobinas
en el lado exterior delacondicionador deaire.Si
las mismasest@nobstruidas con suciedad u hollin,
podrian limpiarse profesionalmente.
LengBeta Leng_eta
31
Page 32

Acondicionador
JInstrucciones
de instalaci6n
J l-?l 2Preguntas? Llame 800.GE.CARES(800.432.2737) ovisite nuestra p6gina en la red en: GEAppliances.com I
de aire
ANTES DE INICIAR
Lea estas instrucciones completa y
cuidadosamente.
• IMPORTANTE - Guorde estos
instruccionesporo uso delinspectorlocol
• IMPORTANTE Observetodoslos
c6digosy 6rdenes de ley
• Nota alinstalador- Aseg0rese de dejorestos
instruccionescon elconsumidor
• Nota alconsumidor - Conserve estos
instruccionesporo referenciofuturo
• Nivelde destreza- Lo instoloci6nde este
oporoto requierede destrezosmec6nicos
b6sicas.
• Tiempo de ejecuci6n - Aprox. 1 hora
• Recomendamos dos personas para la
instalaci6n de este producto.
• Lo instalaci6n apropiada es la responsabilidad
del instalador.
• Lo falla del producto debido a una instalaci6n
inadecuada no est6 cubierta por la garantia.
• Cuando instale este acondicionador de aire,
DEBE usar todas los piezas suministradas y usar
procedimientos adecuados de instalaci6n.
PRECAUCI6N:
Bajo ninguna circunstancia corte o remueva
la tercera p_a (conexi6n a tierra) del cable
el_ctrico.
No cambie el enchufe en el cable el_ctrico de
este acondicionador de aire.
REQUISITOS ELI:!CTRICOS
Algunos modelos requieren tomocorrientes de
@
Elenchufe detres pOascon conexi6n a tierra
minimiza la posibilidaddedescargasel6ctricas. Si
el tomacorriente de la paredque usted planea usar
solamente tiene 2tomas, essu responsabilidad hacer
que un t6cnico Io reemplacepor uno de tres tomas
con conexi6n a tierra.
Elcable de alimentaci6n incluye un dispositivopara
interrupci6n de corriente. Seincluye un bot6n de prueba
yde reinicioen eldispositivo.Eldispositivodebe ponerse
a prueba peri6dicamente: primero se presiona el bot6n
de TEST (prueba)y luego RESET(reinicio)mientras se
encuentra enchufado al tomacorriente. Siel bot6n TEST
nosedispara o sielbot6n RESETno queda enganchado
dejede utilizar elacondicionador de aire y comuniquese
con un t6cnico calificado.
115/120 voltios de corriente alterna y 60 Hz
conectados a tierra, protegidos con un fusible
de dilataci6n de tiempo de 15 amperios
o un cortacircuitos.
Algunos modelos requieren 230/208 voltios,
de corriente alterna, protegidos por un fusible
de dilataci6n de tiempo
o un cortacircuitos. Estos modelos deberian
instalarse en un ramal exclusivo del circuito
para un rendimiento m6s notable y para
prevenir sobrecargas en los circuitos de
cableados de su casa o apartamento,
Io cual podria representar un riesgo
de incendio por el sobrecalentamiento de los
alambres.
Los cables caseros de aluminio podrian
presentar problemas especiales. Consulte a un
t_cnico electricista calificado.
32
Page 33

Instrucciones de instalaci6n
HERRAMIENTAS QUE NECESITAR_,
Un destornillador de estrella
PARTES INCLUIDAS
(Apariencia puede variar)
Rielde mon_'
Acondicionador
de aire
Tijeras o cuchilla
esjp_ Panel de
Panel de
acorde6n
izquierdo
Un destornillador
con hoja plana
Nivel
L6piz
Una regla o cinta m@rica
Sello de la banda
tana
acorde6n
derecho
/
Tipo A (4) Tipo B(6)
33
dBc?_ide?_
superior
Soporte de cierre de
la ventana (1)
Page 34

Instrucciones de instalaci6n
B3
REQUISITOS PARA LA VENTANA
• Estasinstrucciones sonpara una ventana est6ndar
de dos pliegues.Usted necesitar6 modificar el
proceso para otros tipos de ventanas.
• Elacondicionador deaire puede instalarsesin los
panelesde acorde6n para ajustarse a una ventana
m(_sestrecha. Ver lasdimensiones de la abertura de
laventana.
• Todaslaspartes de apoyo debenquedar totalmente
aseguradas a algQn metal, mamposteria o a la
madera.
• Eltomacorrienteel6ctricodebeestaralalcancedelcable
el6ctricodelacondicionadorde aire.
• Sigalasdimensionesde latabla y lailustraci6nseg0nsu
modelo.
12.5" min
(conpaneles de acordedn)
_T m m
I I
I_I PEGUE LA BANDA DE SELLADO DEL RIEI
DE MONTAJE SUPERIOR
(Esposible queen algunos modelos la banda de
selladoya seencuentre sobre el rielde montaje. Si
corresponde, saltee estepaso.)
Retire la parte posterior de la banda de sellado del riel
de montaje superior y pegue labanda desellado al
fondo del rielde montaje superior a Io largo el borde
delantero
Rieldemontajesuperior
Retire
la parte
posterior
de la banda
de sellado
Rieldemontajesuperior
VISTA FRONTAL j
I]'I REQUISITOS DE UNA VENTANA
DE TORM ENTAS
Unmarco deventana de tormentas no permitir6 que
el acondicionador de aire se incline hacia el exteriory
evitar(_que drene apropiadamente Parasolucionareste
problema,adhiera un pedazode madera aelumbral
PEDAZOSDE MADERA
ANCHO: 2"
LONGITUD: Lo suficientemente largo como para
ajustar en el interior del marco de la ventana.
GRUESO:Paradeterminar el grueso, coloque un pedazo
de madera enel umbral para hacerla 1/2" m6salta que
la parte superiordel marco de laventana de tormentas
odel marco vinilo.
P6guelo firmemente con clavos o con tornillos
proporcionados por el instalador.
1/2" mas alto
que el marco
de ventana de __
tormentas
Marcode
ventana de
tormentas
i_n]i-[] b L_ #fr_ Madera
Um rard
" L ivtarc°vinil° 11
1/2" mas alto queel marco
vinilo(enalgunasventanas)
...... ,..... , , ,,,.,-., , , -.. , ...* , ,.
I
Bandadesellado
PREPARE EL ACONDICIONADOR DE
AIRE
Instale el riel de montaje superior con
4 tornillos tipo A desde la parte exterior de la
caja.
Rielde _ _ _ _
montaje _ i ',
superior [.1 I
Riel de
montaje
inferior
r_ Sostenga el panel de acorde6n con una mano
y suavemente retire hacia atr6s para liberar el
extremo abierto.
34
Page 35

Instrucciones de instalaci6n
PREPARE EL ACONDICIONADOR DE
AIRE (cont.)
Deslice el extremo libre del panel de acorde6n
sabre los rieles del panel lateral. Deslice el
panel hacio obajo. Aseg0rese de dejor espacio
suficiente para deslizar la parte superior e
inferior de la estructura sabre los rieles en el
gabinete.
NOTA" Hay un panel con formo de acorde6n
derecho y uno izquierdo. Aseg0rese de usar el
panel opropiodo poro coda Iodo.
FIINSTALE EL ACONDICIONADOR DE
AIREEN LA VENTANA
[] Coloque el acondicionador de aire en
el umbral con el riel de montaje inferior contra
su extremo posterior. C6ntrelo y cierre la
ventana firmemente detr6s del riel de montaje
superior. Debe estar nivelado
o ligeramente inclinado hacia el exterior. Use un
nivel; una inclinaci6n de 1/3 de burbuja ser6 la
correcta hacia el exterior.
Tornillos tipo B
r_ Extienda los paneles de acorde6n izquierdo y
derecho hacia las bandas de la ventana vertical y
pegue, a trav6s de los huecos de los paneles, con
5 tornillos tipo Bseg0n corresponda.
rD1 Deslice los paneles de acorde6n izquierdo y
derecho en los rieles de montaje superior e
inferior. Superior
Superior Rielde montoje superior derecho
izquierdo _'
Rielde je inferior
PREPARE LA VENTANA
B]
Corte el sello de la banda de la ventana a
la Iongitud apropiada. Despegue la parte posterior
y pegue el sello a la parte inferior de la banda de la
ventana.
rfl
INSTALEUN SOPORTEDE CIERREY LA
JUNTA DE ESPUMASUPERIOR
DE LA VENTANA
%
-4,PRECAUCI6N:
Enventanas construidas de Vinilo
vinil o de similar construcci6n,
conecte el soporte de cierre
de la ventana a el marco de
la ventana con uno tornillo
tipo B para prevenir daBo
a la ventana y vidro quebrado. _adera
.J-dlI%
Corte la junta de espuma superior de la ventana al
%
ancho de la ventana.
©
Rellenela espumaentre
elvidrio ylaventana
paraevitarque airee
insectos
seintroduzcanen
la habitaci6n.
NOTA:Silajunta provista no esadecuadapara su
ventana,obtenga elmaterialapropiadoIocalmente
pararealizarunaadecuadainstalaci6nde sellado.
35
Page 36

Solucionarproblemas.
Causasposibles Ou6hacer
noenciende est6desconectado, enchufadototalmenteeneltomacorriente.
Elacondicionadordeaire Elflujo deaire est6restringido. • Cerci6resedequenoexisteningunacortina,persianao
noenfriacomadeberia mueblebloqueandoelfrentedelacondicionadordeaire.
Elacondicionadordeaire
seest6congelando
Elcontrolremoto Losbateriasest6ninsertadas ° Inspeccionela posici6ndelosbaterbs.Debenestar
nofunciona incorrectamente, insertadasenla posici6nindicada,(+)y(-).
Elacondicionadordeaire • Cerci6resedequeelacondicionadordeaireest6
Elfusiblesedispar6 / • Inspeccionelosfusibles/ cajadeinterruptoresdelacasa
elcortacircuitossedispar6, yreemplacecualquierfusibleoreajusteelinterruptor.
Interrupci6nenel
suministroel_ctrico.
Eldispositivode interrupci6n • Presioneelbot6nRESETubicadoenelcabledealimentaci6n.
decorriente sehaactivado. • Sielbot6n RESETnosemantieneensulugar,no utilicem6s
Elcontrol detemperatura no • Enlosmodelosconteclado:EnelmodoCool(Frb),presionelatecla
est6ajustadoapropiadamente. Reducci6n0.
Elflltro deaire est6sucio. • Limpieelfiltrocada]0 d[asparIo menos.Verlasecci6n
Lahabitaci6npodriahaber • Cuandoel acondicionadordeaireseenciende,usted
estadocaliente, necesitadarletiempoparaqueenfri6la habitaci6n.
Elaire frio seest6escapando. • Cerci6resedequelosregistrosdelacalefacci6nnoest6n
Losbobinasdeenfriamiento • Ver"Acondicionadordeairecongel6ndose"m6sadelante.
secongelaron.
Elhielobloqueaelflujo
deaire haciael acondicionador
deaire evitandoque seenfrie
la habitaci6n.
Losbateriasest6nagotadas. • Reemplacelasbaterbs.
• Launidadsereiniciar6automaticamenteconlaconfiguraci6n
utilizadapar Oltimavezluegodereestablecerlaelectricidad.
• E×isteunretrasodetiempoparprotecci6n(deapro×imadamente
3 minutos)paraevitarladescone×i6nparsobrecargadelcompresor.
Parestaraz6n,esposiblequela unidadnocomiencea enfriarde
farinanormalhastatranscurridos3 minutosdesdequevolvi6a
encenderse.
elacondicionadorde aireycomun[queseconuntecnicocalificado.
• Enlosmodelosconbotones,girelatemperaturaa unnOmeromayor.
deCuidadoy limpieza.
abiertosy seencuentranretornandoelairefib.
• Enmodelosconlosbotonesdecontrol,coloqueelcontrol
demodoen HighFan(VentiladorAlto)6 HighCool(Fr[oAlto)con
latemperaturaen$6 2.
• Enlosmodelosconteclasdetoque,colaqueloscontrolesen
HighFan(VentiladorAlto)6HighCool(FrbAlto)yajusteeltermostatoa
unatemperaturem6salta.
Hayaguagoteandoafuera Tiempoh_medoy caliente. • Estoes normal.
Hayaguagoteandoenel Elacondicionadordeaire • Paradrenarelaguaapropiadamente,cercbresedeque
interiordelahabitaci6n no est6inclinadohaciaafuera, elacondicionadorde aireest6inclinadoligeramente
Seacumulaagua en Lahumedadremovidadel aire • Estoesnormalparuncortoperbdoen6reasconpoca
la bandeja y sedrenahastalabandeja, humedad;normalparunperbdo detiempom6spostergado
desdeelfrentehaciaatr6s.
en6reasm6sh0medas.
Sonidos de operaci6n normales
36
Quiz6s escuche un sonido met61ico causado por
el agua tomada y tirada contra el condensador
en los dias Iluviososo cuando la humedad
es alta. Esta caracteristica de dise_o ayuda a
removerla humedad y mejora la eficiencia.
Quiz6s escuche que el termostato hace clic
cuando el compresor hace ciclo entre encendido
y apagado.
Elagua seacumula en la bandeja durante dias
Iluviososo con mucha humedad. Elagua podria
derramarse y gotear desde el lado externo de
la unidad.
Elventilador podria funcionar aun siel compresor
no Iohace.
Page 37

6arantia desu acondicionador deaire-garantia limitada de un afio.
Grape aqui su recibo.
Serequiere facilitar prueba de la fecha de compra
original para hacer un reclamo de garantia.
Nosotros reemplazaremos:
Unafio
A partirde la fecha
de la compra original
Empaque su unidad apropiadamente. Recomendamos
usar el cart6n original y los materiales de empaquetado.
Regrese el producto al local de ventas donde usted
Io compr6.
Instrucciones al cliente. El Manual del propietario
proporciona informaci6n acerca de las instrucciones de
operaci6n y de los controles del usuario.
Instalaci6n inapropiada. Siusted tiene un problema
durante la instalaci6n, o si su acondicionador de
aire no tiene lacapacidad de enfriamiento que usted
necesita, p6ngase en contacto con nuestro distribuidor
o instalador. Usted esresponsable de proporcionar las
facilidades de conexi6n el_ctrica necesarias.
Fallo del producto resultante de modificaciones al
producto o debido ausa irrazonable incluyendo no
proporcionar mantenimiento razonable y necesario.
Unidad de reemplazopara cualquier producto que falle debidoa defectos en losmateriales oen
el proceso de fabricaci6n. Launidadde intercambio est6garantizada para el resto del perbdo
de un aho de garantia original del producto.
Incluya en el paquete una copia del recibo deventa
u otra evidencia de la fecha original de la compra.
Adem6s imprima su nombre y direcci6n y una
descripci6n del defecto.
Reemplazo defusibles de la casa o reajuste delsistema
de circuitos.
Fallo debido ala corrosi6n en modelos que no estan
protegidos contra la corrosi6n.
Daho al producto causado por voltaje inapropiado hacia
el equipo, accidentes, incendios, inundaciones oactos
de la naturaleza de fuerza mayor.
Dahosincidentales oconsecuenciales causados par
defectos posibles con este acondicionador de aire.
Causar dahos despu_s dela entrega.
EXCLUSION DE GARANTiAS IMPLiCITAS--Su (Jnico y exclusivo derecho es el cambio del producto, tal y
como se indica en esta Garantia limitada. Cualquier garantia implicita, incluyendo las garantias
implicitas de comerciabilidad o adecuaci6n para un fin determinado, est6n limitadas a un afio o el
periodo de tiempo m6s breve permitido por la ley.
Esta garantia se extiende al comprador original y cualquier compmdor posterior de productos comprados para usa
residencial dentro de Estados Unidos.
Algunos estados no permiten la exclusi6n o los limitaciones de dahos incidentales o consecuenciales. Esta gamntla
do derechos legales espedficos, y usted podfia tenet otros derechos que vafiardn de estado a estado. Pare saber
cudles son sus derechos legales, consulte a la oficina de asuntos del consumidor local o la oficina del Attorney General
en
su Iocalidad.
Exclusi6n de garantias implicadas: Excepto donde estd prohibido o restringido par la ley, no hay garantias,
expresas, orales o estatutarias que extiendan mds alld de la descripci6n espedfica, incluyendo espedficamente
los garantias implicadas de mercantibilidad o propiedad para un prop6sito particular.
Garante: General Electric Company. Louisville, KY 40225
37
Page 38

Notas.
38
Page 39

Apoyo al consumidor.
P6ginaWeb de GEAppliances GEAppliances.com
iLTiene alguna pregunta sabre su electrodom6stico? iPruebe la pc_gina Web de GEAppliances, cualquier
d[a del a_o! Para mayor conveniencia y servicio mc_src_pido,ya puede descargar los Manuales de los
Propietarios, pedir piezas o incluso hacer una cita en I[nea para que vengan a realizar una reparaci6n.
RealLifeDesignStudio(Estudiodedise_oparalavidareal) 6EAppliunces.com
GEapoya el concepto de Dise_o Universal-productos, serviciosy ambientes que pueden usar gente de todas
lasedades,tama_os y capacidades. Reconocemosla necesidad de dise_ar para una gran gama de habilidades
y dificultadesfisicasy mentales. Param6s detalles cobre las aplicaciones deGEDise_oUniversal,incluyendo
ideas dedise_o para lacocina para personas con discapacidades, mire nuestra p6gina Web hay mismo. Para
personas con dificultades auditivas, favor de Ilamar al 800.TDD.GEAC(800.833.4322).
Piezasy accesorios GEAppliances.com
Aquellos individuos con la calificaci6n necesaria para reparar sus propios electrodom6sticos pueden
pedir que se les manden las piezas o accesorios directamente a sus hogares (aceptamos las tarjetas
VISA,MasterCard y Discover). Haga su pedido en I[nea hay, 24 horas cada d[a o Ilamar par tel6fono
a1800.626.2002 durante horas normales de oficina.
Lasinstrucciones descritas en estemanual cubren los procedimientos aseguir par cualquier usuario.
GEno estc_no apoya que seleproporcione ningOnservicio al acondicionador de aire. Vehementemente
recomendamos que usted no intente proporcionar servicioal acondicionador de aire usted mismo.
P6ngaseen contacto con nosotros GSAppliances.com
Sino est6 satisfecho con el servicio que recibe de GE,p6ngase en contacto con nosotros en nuestra p6gina
Web indicando todos los detalles asf coma su n0mero de tel6fono o escrfbanos a:
General Manager, Customer Relations
GEAppliances, Appliance Park
Louisville,KY40225
39
Page 40

ConsumerSupport.
Have a question or needassistancewith your appliance?Trythe GEAppliancesWebsite 24 hours aday,
GEAppliances Website In the U.S.A.:GEAppliances.com
any day of the year! Forgreater convenience and faster service,you can now download Owner's Manuals,
or evenorder parts on-line. InCanada:www.GEAppliances.ca
Real Life Design Studio In the U.S.A.:GEAppliances.com
GEsupports the Universal Designconcept-products, servicesand environments that can beused by
people of allages,sizesand capabilities.We recognizethe need to designfor a wide rangeof physical
and mental abilities and impairments. Fordetailsof GE'sUniversal Designapplications, including kitchen design
ideasfor people with disabilities,check out our Website today. Forthe hearing impaired,pleasecall 800.TDD.
GEAC(800.833.4322).
In Canada,contact: Manager, Consumer Relations,MabeCanada Inc.
Suite310, 1 Factory Lane
IVloncton,N.B.E1C91v13
Parts and Accessories
Individuals qualified to servicetheir own appliances can have parts or accessoriessent directly to their homes
(VISA,MasterCard and Discovercards are accepted).Order on-line today, 24 hours every day or
by phone at 800.626.2002 during normal business hours.
Instructions contained in this manual cover procedures to be performed by any user. GE does not support
any servicing of the air conditioner. We strongly recommend that you do not attempt to service the air
conditioner yourself.
Customers inCanada should consult the yellow pagesfor the nearest Mabe servicecenter,
or call 1.800.561.3344.
Contact Us
If you are not satisfiedwith the service you receivefrom GE,contact us on our Website with all the details
including your phone number, or write to: General Manager, Customer Relations
GEAppliances,Appliance Park
Louisville,K¥/40225
In Canada:www.GEAppliances.ca,or write to: Director, Consumer Relations,Mabe Canada Inc.
Suite310, 1 Factory Lane
[vloncton,N.B.E1C91v13
In the U.S.A.: GEAppliances.com
In the U.S.A.: GEAppliances.com
Printed in China
 Loading...