

Page 1
©
Safety In_truclions ........ 2, 3
Operating Instructions
Additional Controls .......... 7
Control Knob Models ........ 6
Touch Pad Models ......... 4, 5
Care and Cleaning
Air Fiher . ................. 8
Grille and Case ............. 8
Outdoor Coils .............. 8
Installation Instruc_tions . .9-14
ge.com
AEH24
A 24
AEV24
AEW24
©
©
Troubleshooting Tips ...... 15
Normal Operating Sounds . . .16
Consumer Support
Consumer Support ......... 20
Product Registration ..... 17-18
_\arranty ................. 19
Write the model and serial numbers here:
Model #
Serial #
Find these numbers on a label on the
side of the air conditionex:
49-7516 12-05JR
Page 2
iMPORTANTSAFETYiNFORMATiON.
READArt iNSTRUCTiONSBEFOREUSING.
it =!
For your safeN the information in this manual must be followed to minimize the risk of fire, electric shock
or personal injury.
SAFETYPRECAUTIONS
_{_:Use this appliance only %r its intended
pulj)ose as described in tills )wrier s
Manual.
_{::This air conditioner must be properly
installed in accordance with tile Installation
Instructions before it is used.
_::Nexer unplug your air conditioner by pulling
on the power cord. Always grip plug firmly
and pull straight out fiom tile receptacle.
_: Replace immediately all elecu_ic service
cords that haxe become fiwed or otherwise
damaged. A damaged power supply cord
must be replaced with a new power supply
cord obtained from file ma*mfacun_er and
not repaired. Do not use a cord that shows
cracks or abrasion damag_ along its length
or at eidler die plug or connector end.
• (
qT{_:Turn the unit OFFand unplug your air
_:;For your safety...do not store or use
E:,IAll air conditioners contain refi_igerants,
HOWTOCONNECTELECTRICITY
Do not, under any circumstances, cut or remove
the third (ground) prong from the power cord. For
personal safe_ this appliance must be properly
grounded.
The power cord of dfis appliance is equipped
with a 3-prong (grounding) plug which mates
with a standard 3-prong (grounding) wall
outlet m minimize the possibility of electric
shock hazard fiom this appliance.
Power cold includes a current intemq)ter
device. A rest and reset button is provided on
the plug case. The device should be msmd on a
periodic basis by first pressing the TESTbutton
and then the RESETbutton. If the rESrbutmn
does not trip or if tile RESETbutton will not
stay engwged, discondmm use of tile air
conditioner and contact a qualified service
technician.
Where a 9-prong wall outlet is encountered,
it is your personal responsibility and obligation
to haxe it replaced with a properly grounded
3-prong wall oudet.
Tile air conditioner should always be
plugged into its own individual electrical
outlet which has a xoltage rating that matches
tile rating plate.
This provides tile best perfommnce and also
prexents oxerloading house wiring circuits
which cou]d cause a fire hazard from
oxerheated wires.
See the Installation Instructions, Electrical
Requirements section for specific electrical
connection requirements.
conditioner before making any repairs
or cleaning.
NOTE"Westronglyrecommendthat anyservicing
be performedby a qualified individual.
combustible materials, gasoline or other
flammable vapors or liquids in tile vicinity
of this or any other appliance.
which under federal law must be removed
prior to product disposal. If you are g>tfing
rid of an old product with refrigerants, check
with tile company handling disposal about
what to do.
Haxe the wall outlet and circuit checked by a
qualified electrician to make sure tile outlet is
properly grounded.
2
Page 3
WARNING!
USEOFEXTENSIONCORDS--115-Voltmodelsonly
Because ofpotential safety hazards under certain..ACAUTION:
conditions, we strongly recommend against the
use of an extension cord.
Howexei; if you must use an exmnsion cord,
it is absolutely necessai T that it be a UiAismd,
14 gauge, 3-wire grounding type appliance
extension cord having a grounding type plug
and outlet and that the elecuJcal rating of file
cord be 15 amperes (nfinimum) and 195 x_lts.
USEOFADAPTERPLUGS--115-Voltmodelsonly
DO NOT use an extension cord with any of the
230/208 voltmodels.
go.corn
Because of potential safety hazards under certain
conditions, we strongly recommend against the use
of an adapter plug.
Howe\>i; if yon must use an adaptei; where
local codes i)ermit, a temporaryconnection may
be made to a i)roperly grounded 21)rong wall
on0et 1)yuse of a UiAismd adaptor available
at nlost local hardware stores.
Tile larger slot ill tile adaptor must be alig_led
x_4thfile larger slot in tile wall outlet to provide
proper polarity ill the connection of the
power cord.
When disconnecting fl)e power cold flom tile
adaptei; alwws hold the adapter ill place with
one hand while I)ulling tile I)ower cord I)lug
with the other hand. If this is not done, tile
adaptor ground ml_ninal is x_U liken to bleak
with rei)eated use.
If tile adapter ground tem_inal breaks, DO NOT
USEtile air conditioner until a proper ground
has been established.
Attachingthe adaptergroundterminalto a waftoutlet
coverscrewdoesnotgroundthe applianceunlessthe
coverscrewis metal,andnot lesulated, andthe waft
outlet is groundedthrough the housewiring. Youshould
havethecircuitcheckedby a quafifiedelectricianto
makesuretheoutlet is properlygrounded.
READANDFOLLOWTHISSAFETYINFORMATIONCAREFULLY.
SAVETHESEINSTRUCTIONS
Page 4
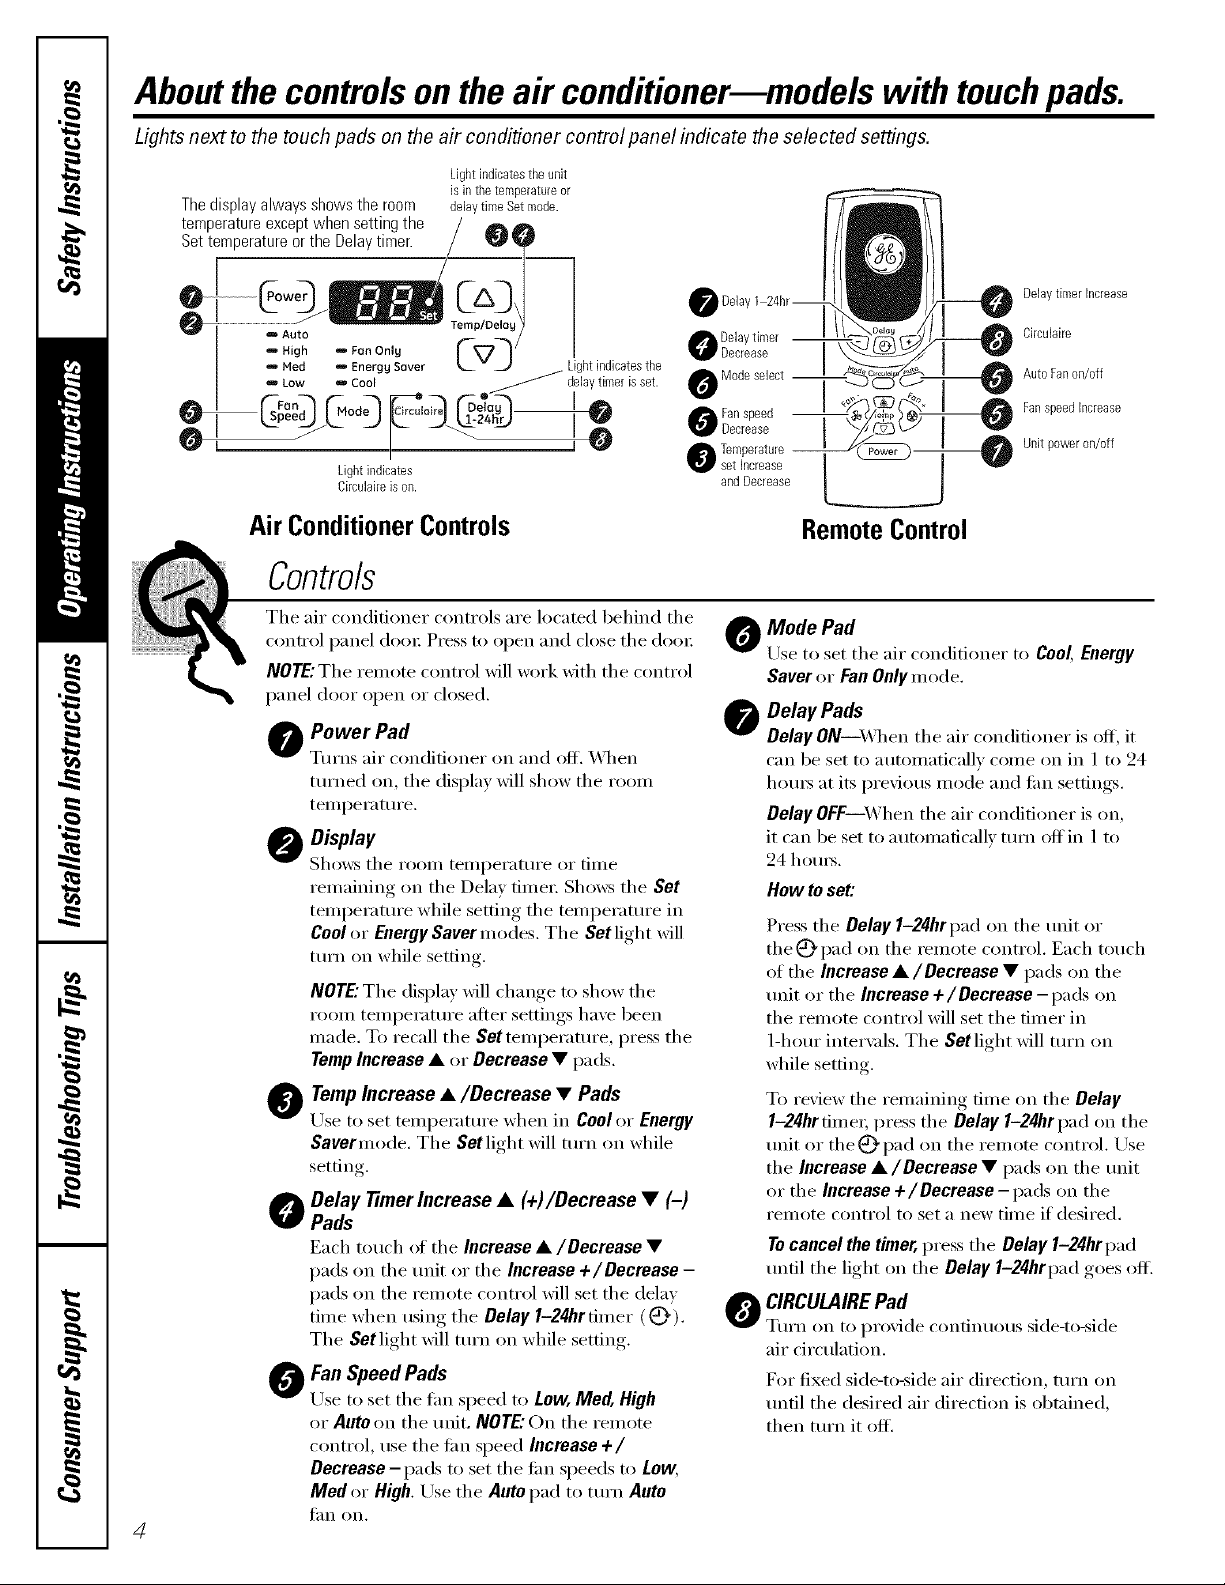
Aboutthe controlson theair conditioner--models with touchpads.
Lights next to the touch pads on the air conditioner control panel indicate the selected settings.
Lightindicatesthe unit
Thedisplayalwaysshowsthe room delay time Set mode.
temperatureexceptwhensetting the / _
Setterr_re orthe Delaytimer. / _ V
:High Z Fen Only VVq / J
Ned Energy Sever _ J _i Lightindicatesthe
m Low m Cool / delaytimer is set.
0 L0 G_en_Cb,lodO _rci,_.,_k_@_r_ _[ ! 0 __L_ FanspeedDecrease --
Lightindicates
Circulaireis on. andDecrease
is in the temperatureor
O Mode select
Delaytimer Increase
Ckculaire
Auto Fanon/off
Fanspeed Increase
Unit power on/off
Air ConditionerControls
RemoteControl
Controls
The air conditioner controls are located behind the ,d_
NOTE."The remote control will work with the control
panel door open or closed.
O ower Pad
Tm'ns air conditioner on and off. _Aq_en
turned on, the display will show the room
temperatm'e.
Display
Sho_:s the room temperature or time
remaining on the Delay time_: Sho_:s the Set
temperature while setting the temperature in
Cool or EnergySaver modes. The Set light will
mrn on while setting.
NOTE."The display Mll change to show the
room temperatm'e after settings have been
made, To recall the Set temperature, press the
TempIncrease • or Decrease • pads.
Temp Increase •/Decrease • Pads
@
Use to set temperature when in Cool or Energy
Savermode. The Set light will turn on while
setting.
Delay timer Increase • (+)/Decrease • (-)
O
Pads
Each touch of the Increase •/Decrease •
pads on the refit or the Increase +/Decrease -
pads on the remote control will set the delay
time when using the Delay 1-24hrdmer (_).
The Set light will turn on while setting.
Fan Speed Pads
0
Use to set the fan speed to Low, Med, High
or Auto on the refit. NOTE."On the remote
control, use the tim speed Increase +/
Decrease- pads to set the tim speeds to Low,
Med or High. Lrse the Auto pad to mrn Auto
4
J;lil oil,
Mode Pad
Vcontrol panel door Press to open and close tile door
Use to set the air conditioner to Cool, Energy
Saver or Fan Only mode.
Delay Pads
O
Delay ON--_4l_en the air conditioner is off; it
can be set to automatically come on in 1 to 24
hom_ at its previous mode and tim settings.
Delay OFF--When the air conditioner is on,
it can be set to automatically mm off in 1 to
24 hem's.
How to set:
Press the Delay 1-24hrpad on the unit or
the @'pad on the remote control. Each touch
of the Increase •/Decrease • pads on the
refit or the Increase +/Decrease -pads on
the remote control will set the timer in
1-hem" interx:fls, The Set light will tm'n on
while setting,
To review the remaining time on the Delay
1-24hr tim ex;press the Delay 1-24hr pad on the
refit or the @" pad on the remote control. Use
the Increase •/Decrease • pads on the refit
or the Increase +/Decrease- pads on the
remote control to set a new time if desireE1.
Tocancel the timer,press the Delay 1-24hr pad
tmtil the light (m the Delay 1-24hrpad goes (>ft.
O CIRCULAIREPad
Tm'n on to proxicle continuous side-to-side
air circulation.
For fixed side-to-side air direction, mrn on
tmtil the desired air direction is obt;fined,
then turn it off.
Page 5
CoolMode
g_com
Use the Coolmode at Low,Med, High or Auto Fan
Speed for cooling. Use the Temperature Increase •/
Decrease • pads to set the desired temperature
between 64°F and 86°F in 1°F increments,
An electronic them_ostat is used to maintain the
room temperatm'e. The compressor will cycle on
and off to kee I) the room at the set level of comfi)rt.
Set fl_e them/ostat at a lower number and fl_e indoor
air will become coole_: Set the them_ostat at a higher
number and the indoor air will become warme_;
NOTE"If theairconditionerisoff andisthenturnedon
whilesetto a Coolsettingorff turnedfroma fansetting
toa Coolsetting,itmaytakeapproximately3minutes
forthecompressortostartandcodingtobegin.
Energy Saver Mode
Controls the tim.
ON--The tim will cycle on and off with the
compresso_: This results in wider wuiations of room
temperature and humidity. Nommlly used when the
room is m_occupied. NOTE: Thefan maycontinue to run
fora short time after thecompressorcyc/esofL
OFF--The tim runs all the time, while the
COIIIpI'eSSOI" cycles OIX and off',
Cooling Descriptions
For Normal Cooling---Select the Cool mode and
High or Medfim with a middle set temperature.
For Maximum Cooling--Select the Cool mode
and High tim with a lower set temperature.
For Quieter & Nighttime Cooling--Select the
Coolmode and Low tim with a middle set
temperatm'e.
Fan Only Mode
Use the Fan OnlyMode at Low, Med or Hightim
speed to provide air circulation and filtering
without cooling. Since tim only settings (lo not
provide cooling, a Set temperature cmmot be
entered. The room temperatm'e will appear
in the display.
Auto FanSpeed
Set to Auto tim speed fi)r the ,fire speed to
automatically set to the speed needed to provide
optimmn comfi)rt settings with the set temperatm'e.
If the room needs more cooling, the tim speed
will automatically increase. If the room needs less
cooling, the tim speed will automatically decrease.
Power Outage Recovery Feature
In the case of a power outage (:,r interruption, the
refit will automatically re-start in the settings last
used after the power is restored. If the Delay 1-24hr
Remote Control
NOTE:AutoFanSpeedcannotbeusedwheninthe
FanOnlyMode.
NOTE:AutoFanSpeedcannotbeusedwheninthe
FanOnlyMode.
leattlI'e _;ls set, it will I'eS/lllle Co/lnt(lown. _i_)/i IllaV
need to set a new time if desired.
_ To ensure proper operation, aim the remote
control at the signal receiver on the air
(-onditionei:
_: The remote control signal has a range _ff
up to 20 teet.
_: Make sure nothing is between the air conditioner
and the remote control that could block the
signal,
_: Make sure batteries are fl'esh and installed
correctly as indicated on the remote control. 5
Page 6
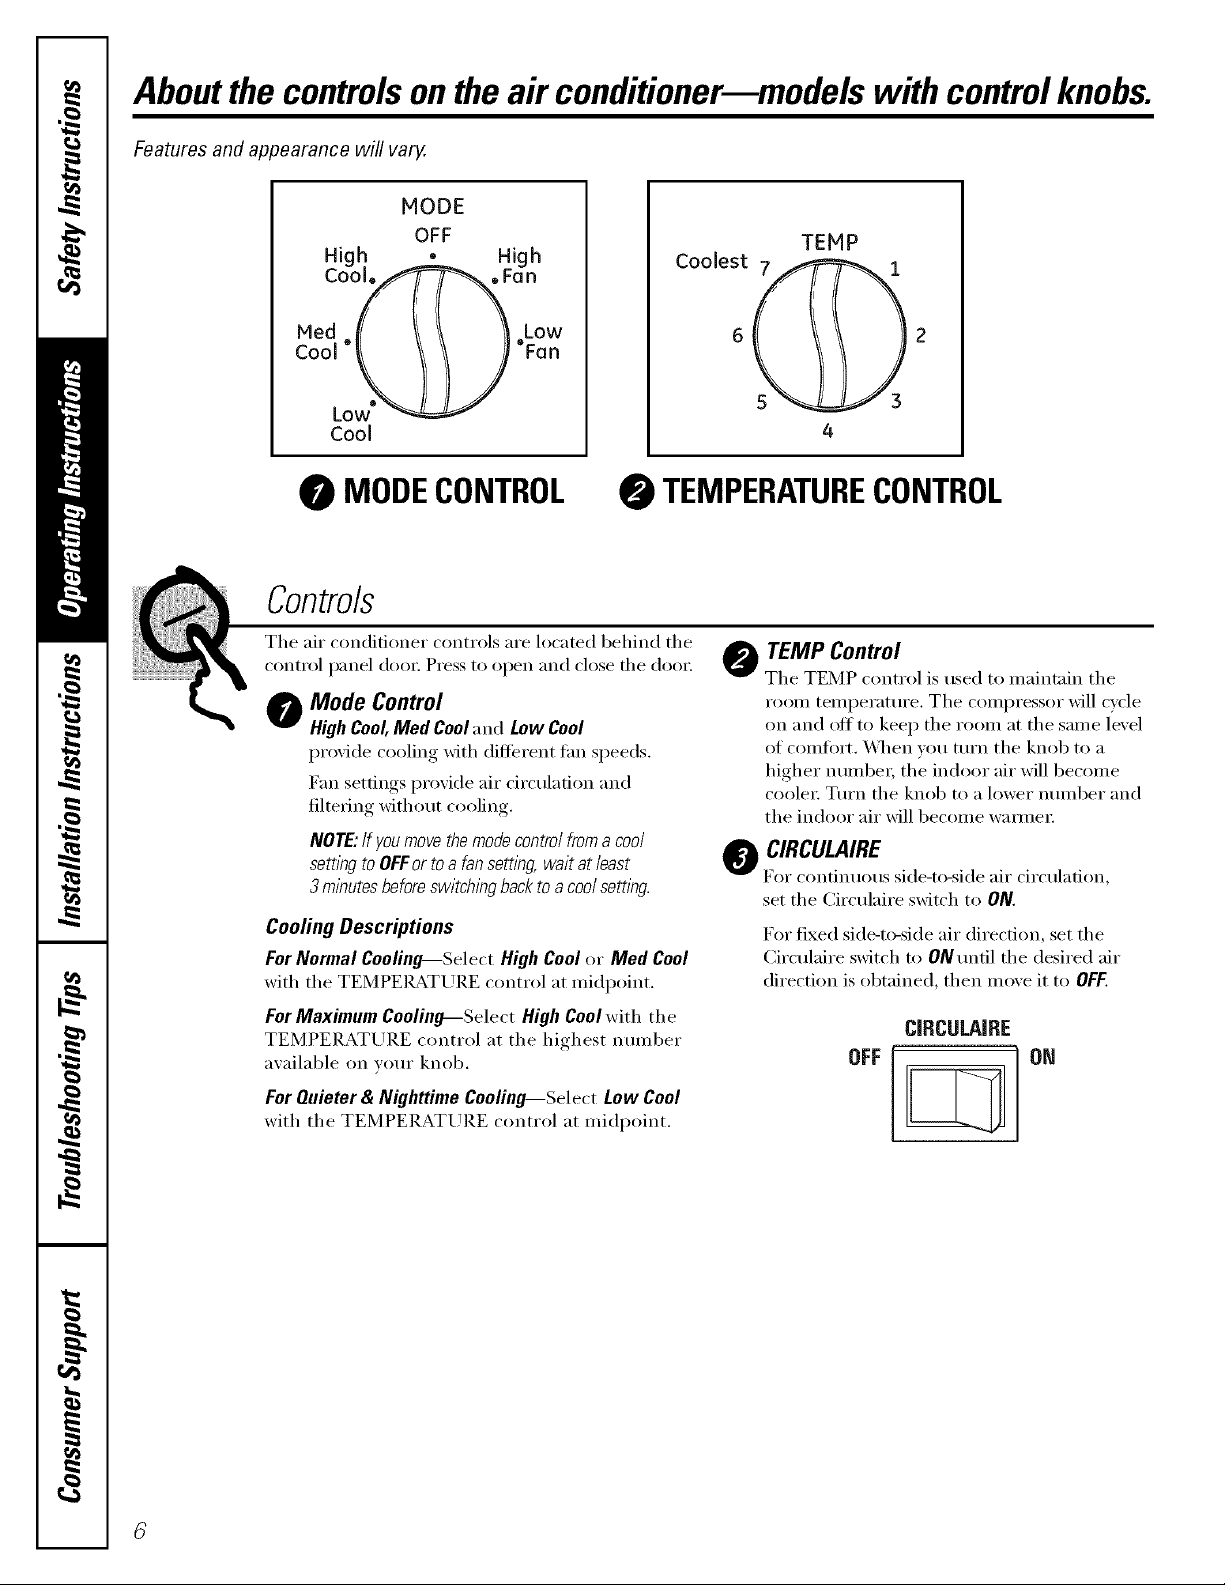
Aboutthe controlsonthe air conditionermmodelswith controlknobs.
Features and appearance will vary.
MODE
OFF
High ,
Cob_
High
Coolest 7 1
6 2
TEMP
LOW"
Cool
MODECONTROL
TEMPERATURECONTROL
Controls
The air conditioner controls are located behind the
control panel doo_: Press to open and close fl_e doo_:
Mode Control
HighCool,MedCooland Low Cool
provide cooling with different tim speeds.
Fan settings provide air circulation and
filtering without cooling.
NOTE:Ifyoumovethemodecontrolfroma cool
settlbgtoOFFor toa fansetting,waitatleast
3minutesbeforeswitchingbacktoacoolsettiW.
Cooling Descriptions
ForNormalCooling--Select HighCoolor Med Cool
with the TEMPEILa_TLrRE control at midpoint.
ForMaximum Cooling--Select HighCoolwith the
TEMPERATUI_.E control at the highest nmnber
available (m v(mr knob.
5 3
TEMP Control
The TEMP control is used to maintnin the
room temperatm'e. The compressor will cycle
on and off to kee I) the room at the same level
of comfiwt. \,_l_en vou ttlI'n the knob to a
higher numbe_; the indoor air will become
cooler: Tm'n the knob to a lower nmnber and
the indoor air will become wam/er
O CIRCULAIRE
For contimums side-to-side air circulation,
set the Circulaire switch to ON.
For fixed side-to-side air direction, set the
Circulaire switch to ON tmtil the desired air
direction is obtained, then moxe it to OFF.
CIBCULAIBE
OFF ON
ForQuieter& Nighttime Cooling--Select Low Cool
with the TEMPERATURE c(mtrol at midpoint.
Page 7

Additionalcontrols, gecom
Vent Control
The vent control is located above the control
panels,
When set at CLOSE, only the air inside the room
will be circulated and conditioned, When set at
OPEN, some outside air is let into the room,
Toopen the vent, push the lever to the righL
Toclose it, push it to the left.
Air Direction--Up and Down
Fingertip pressm'e on tile ho_-izontal lou\'e_
a(!iusts the air direction up or down,
Control Panel Door
Press to open _lIl(] dose the dooi:
NOTE."Tile remote control (on some models) will
work with the control panel door open or closed.
Page 8

Careand cleaningof theair conditioner.
Grille and Case
Turn the air coi_ditioner off and relno_.e the To clean, use water and a mild deter ,ent Do not
_lu,, froln the wall outlet before cleanin , use bleach or abrasives.
OutdoorCoils
The coils on the outdoor side of the air conditioner
should be checked regularly, ]t they are dogged
with dirt or soot, they Inay be proiessiolmllv cleaned.
Air Filter
The air flter behind the fl'ont grille should be
checked and cleaned at least e\w y 30 da_:s or
l//ore otten it Ilecess;iQ'.
To remove:
] Open the inlet grille upward by _ullin,, out tile
bottom of tile inlet grille.
] Using tile tab, pull up slightl) on tile filter
to release it and pull it down.
Clean tile filter with warn/, soapy watel: Pdnse and
let tile flter dry beibre repladng it. Do not clean
tlle flter in a ciishwashel:
A
conditionerwithoutafilterbecausedirtandI/btwillclogit
and reduce peffomTance.
Grille Frame Removal fif necessary for coil cleaning)
P.em(we the air filter: See the Air Filter section above.
If present, rein eve th e gillle fl'am e atta chin ent screw.
Grasp the lower corne_ of the grille fl'ame while
pressing in on tile case side tabs with yore" finger
tips. Pull out to release and lift it up.
NOTE."Do not pull thebottom edgetoward youmore than3"
or youmay damagethe tabs of the grille.
How to Insert the Batteries in the Remote Control
] Remo_e tile battery cmer by sliding it
according to the arrow direction.
] Insert new batteries, making sure that the (+)
and (-) of batter_ are installed correctly.
] Reattach tile co_er l:,y sliding it back
into position.
NOTES:
_: Use 2 "_t" (1.5 volt) alkaline batteries. Do not
::Ji::I_.emove tile batteries fl'Oln tile relnote control if'
CAUtiON:DoNoroperatethe
'_,
_t"
use recha_geable batteries.
tile svsteln is not going to be used tor a long tilne.
8
Page 9

Installation
Instructions
Air Conditioner
I r_ Questions? Call 800.GE.CARES (800.432.2737) or Visit our Website at: ge.com
BEFORE YOU BEGIN
Read these instructions completely
and carefully.
• IMPORTANT - Savethese
instructions for local inspector's use.
• IMPORTANT - Observeall
governing codes and ordinances.
• Note to Installer - Be sure to leave these
instructions with the Consumer.
• Note to Consumer - Keep these
instructions for future reference.
• Skill level - Installation of this appliance
requires basic mechanical skills.
• Completion time - Approximately 1 hour
• We recommend that two people install
this product.
• Proper installation is the responsibility
of the installer.
CAUTION:
Do not, under any circumstances, cut or
remove the third (ground) prong from the
power cord.
Do not change the plug on the power cord
of this air conditioner.
Aluminum house wiring may present special
problems--consult a qualified electrician.
TOOLS YOU WILL NEED
Adjustable wrench
Phillips head screwdriver
I
Flat-blade screwdriver
• Product failure due to improper installation
is not covered under the Warranty.
O ELECTRICAL REQUIREMENTS
The 3-prong grounding plug minimizes the
possibility of electric shock hazard. If the wall
outlet you plan to use is only a 2-prong outlet,
it is your responsibility to have it replaced with
a properly grounded 3-prong wall outlet.
Some models require 230/208-volt a.c.,
©
protected with a time delay fuse or circuit
breaker. These models should be installed
on their own single branch circuit for
best performance and to prevent
overloading house or apartment wiring
circuits, which could cause a possible
fire hazard from overheating wires.
Pencil
Level
Power cord includes a current interrupter
device. A test and reset button is provided on
the plug case. The device should be tested on a
periodic basis by first pressing the TEST button
and then the RESET button. If the TEST button
does not trip or if the RESET button will not stay
engaged, discontinue use of the air conditioner
and contact a qualified service technician.
Ruler or tape measure
Scissors or knife
Page 10

PARTS INCLUDED
(Appearance may vary)
Left
accordion
panel
Installation Instructions
Window
sash seal
Foam top
moruT°_ingwindow gasket_
Right
accordion
panel
-- V-support (2)
Window locking
bracket (2)
Type A (6) Type B (4) Type C (7) Type D (6) Type E (4) Type F (2)
Bolt (2) & nuts (2)
10
Page 11

Installation instructions
[] WINDOW REQUIREMENTS
• These instructions are for a standard
double-hung window. You will need to
modify them for other types of windows.
• The air conditioner can be installed
without the accordion panels if needed
to fit in a narrow window. See the
window opening dimensions.
• All supporting parts must be secured
to firm wood, masonry or metal.
• The electrical outlet must be within
reach of the power cord.
[ j
[Y====8
18" min.
30" to 41"
(With accordion panels)
1[
26W' min.
(Without accordion panels)
[] REMOVE THE AIR CONDITIONER
FROM THE CASE
IAq Remove the locking screw and locking
bracket from the lower frame. Save to
reinstall later.
I_q Remove the ground screw and save to
L_J
reinstall later.
Remove the ground screw
and save to reinstall later
/
j-
[] Slide the air conditioner from the case by
gripping the base pan handle and pulling
forward while bracing the case.
STORM WINDOW REQUIREMENTS
[]
A storm window frame will not allow the
air conditioner to tilt toward the outside,
and will keep it from draining properly.
To adjust for this, attach a piece of wood
to the stool.
WOOD PIECES-
WIDTH: 2"
LENGTH: Long enough to fit inside the
window frame.
THICKNESS: To determine the thickness,
place a piece of wood on the stool to
make it 1/2" higher than the top of the
storm window frame.
Attach securely with nails or screws
provided by the installer.
+
1/2" higher
than frame
Storm
window
frame
Stoo
[] PREPARE THE WINDOW
Cut the window sash seal to the proper
length. Peel off the backing and attach the
seal to the underside of the window sash.
11
Page 12

Installation Instructions
[] PREPARE THE CASE
[] Install the top mounting rail with 4 type B
screws from the inside of the case.
[] Insert the frames for the accordion panels
into the top mounting rail and the bottom
frame guides. Attach the accordion panels
to the side of the case using 3 type A screws
on each side.
Note: When attaching the accordion panels,
make sure to only screw the inner panels
to the case sides.
Top mounting rail
INSTALL THE CASE
[]
IN THE WINDOW
Carefully slide the case into the window and
[]
center the case. Lower the window behind
the top mounting rail. Pull the bottom of the
case forward so that the bottom mounting
rail is tight against the back of the window
stool. Mount the case to the window sill using
4 type E screws. Drill pilot holes, if necessary.
Stool
[] Make sure the bolts and nuts are all of the
way in both the left and right V-supports.
Type A
screws
Bottom mounting rail
Bolt an__
BACK
[] Position the V-supports on the case bottom
so that they will be near the outside wall,
Attach a V-support to each side of the
bottom of the case using type C screws,
3 on each side.
V-support
12
Page 13

Installation instructions
[] INSTALL THE CASE
IN THE WINDOW (cont.)
[] Use a wood block (obtained locally) between
the leveling bolts and the wall if the wall is
weak or if the weight of the air conditioner
falls between the studs in the wall.
[] Adjust the leveling bolts and nuts against the
outside wall so that the case has a slight tilt
to the outside. Tighten nuts with an adjustable
wrench. Use a level; about a 1/2 bubble will
be the correct case slant to the outside.
[] INSTALL SUPPORT BRACKETS
AND THE FOAM TOP WINDOW
GASKET
[] Drill pilot holes and attach the support
brackets with two type D screws, one on
each side.
[] Cut the foam top window gasket to the
window width.
[] Stuff the foam between the glass and the
window to prevent air and insects from
getting into the room.
[] Extend the left and right accordion panels
to the vertical window sashes. Drill pilot
holes and attach the top and bottom corners
with 4 type D screws.
Top mounting rail
Type D
screw
screw
Type D
screw
// I 1
Type D
screw
13
Page 14

Installation Instructions
[] INSTALL THE AIR CONDITIONER
IN THE CASE
[] Make sure the ground
wire is off to the side
and slide the air j
conditioner into the
case. Do not push
on the controls or the
finned coils. Make
sure the air
conditioner is
firmly seated,
[] Reinstall the locking bracket and screw
removed earlier.
[] Reconnect the ground wire to the air
conditioner using the screw removed earlier.
IMPORTANT: The ground wire must be
reinstalled to ensure a proper ground.
[] INSTALL THE AIR CONDITIONER
IN THE CASE (cont.)
Pull the coiled power cord from its shipped
[]
position in the air discharge area. Attach
the front grille frame to the case by inserting
the tabs on the grille frame into the slots
on the front top of the case.
Guide the lever carefully
through the grille frame
as you push it in.
Press the grille frame in around the power
[]
cord on the right side. Secure the grille with
a type F (painted) screw on each side and a
type C screw in the front.
[] Remove the front grille from its box and
remove the shipping tape,
[] Grasp the inlet grille at the bottom corners
and pull it forward. Unhook it from its top
hinges and set it aside.
[] Using the tab, pull up slightly on the filter
to release it and pull it down and out.
Type F L I __ ;""--J,].
screw "--....__ _,
Type C screw
Iqq Reinstall the filter,
LJJ
[] Reinstall the inlet grille. Connect power.
14
Page 15

TroubleshootingTips. ge.com
Troubleshooting -tips.Save time and money! Review the chart below
first and you may not need to carl for service.
Possible Causes What ToDo
Airconditioner
doesnotstart
The air conditioner
is unplugged.
The fuse is blown/circuit • Check the house fllse/circuit breaker box and replace
breaker is tripped, the fllse or reset the breakei:
Power failure. • The unit will automatically re-start in the settings last
The current interrupter • Press the RESETbutton located on the power cord plug.
device is tripped. • If the RESETbuttou will not st;Iv euml,_ed discontinue
• Make sure the air conditioner plug is pushed completely
into the outlet.
used after the power is restored.
• There is a protective tiine delay (approxinlately 3 ininutes)
to prevent tripping oI the compressor overload. For this
reason, the unit may not start nomml cooling tot
3 minutes after it is turned back on.
use of tile air conditioner and contact a qu;dilied selMce
tech nicia n.
Airconditionerdoesnot Airflow is restricted. • Make sure there are no curtnins, blinds or flJrniture
cool as itshould blocking tile fl'out of tile air couditionel:
The temp control may not • On models with tl)uch pads:/n tile Cool mode, press the
be set correctly. Decrease • pad.
• On models with control knobs, turn tile temperature
knob to a higher utmibel:
The air Filter is dirty. • Clean the filter at least every 30 dm_s. See the
OperatingInstructionssectiol_.
The room lnay have been hot. • _l/en tile air conditioner ix filst turued ou, }'l)//need to
Cold air is escaping. • Check fi)r open flU'hate floor registel.s ;rod cold air returns.
Cooling coils have iced up. • See "Air conditioner freezing up" beh)w.
Air conditioner Ice blocks the air flow and • On models with control knobs, set the mode control at
allow time ti)r tile room to cool (h)wn.
• Set tile air conditioner's vent to tile closed position.
freezingup stops the air conditioner HighFanor HighCoolwith the Tempat I or 2.
from cooling the room. • On models with touch pads, set the controls at HighFan
or HighCooland set the themlostat to a higher
tel//pel';Itt/l'e.
Theremotecontrol The batteries are hlserted • Check tile position of tile batteries. They should be
is not working incorrectly, inserted in the opposite (+) and (-) direction.
The batteries may be dead. • Replace the batteries.
Water drips ontside Excessively hot and • This ix nlmual.
Water drips indoors The air conditioner is not • For proper water disposal, make sure the air conditioner
Water collects in Moisture is removed from • This ix hernial for a short period in areas with little
base pan indoor air and drains into hmnidity; nlnmal for a hmger peliod in very humid areas.
hmnid weather.
tilted to the outside, slants slightly fl'om the case fl'out to the re;u:
rear of a cabinet where a fml
blows it against the outdoor
condenser coil.
Delay 1-24hrfeature not A power outage or interruption • The unit will autou/atically re-start in tile settings last used
working properly occurred, after the pl>wer ix restored./f the Delay 1-24hrfeature was
set, it will l'eStlll/e cot/utdowu. _)t/ Ill;IV need to set a Ile%v
time if desired.
15
Page 16

Troubleshootingtips.
Normal Operating Sounds
_: Ym may hear a pinging noise caused by water being
picked up and thrown against tile condenser on rainv
days or when tile humidi V is high. This design teatm'e
helps remove moistm'e and improve efficiency.
::Ji::Ym may hear the them/ostat click when the compressor
cycles on and off.
!i?:X4_Ker will collect in tile base pan dufin(*_ high, hmniditv
or on rain) days. The water inav oxerflow and drip fl'om
tile outdoor side of tile trait.
iJi::Tile lilil ill}l] i'[in exen when tile COilll)i'essoi" does not,
16
Page 17

GE Service Protection Plus 'M
GE, a name recognized _,_orldwide for quality and dependability; o£%rs yon
Service Protection Plns'_'--comprehensive protection on all y'om appliances--
No Matter What Brand!
Benefits Include:
. Backed by GE
. All brands covered
* Unlimited service calls
o All parts and labor costs included
o No out-of-pocket expenses
o No hidden deductibles
* One 800 number to call
You will be completel} satisfied with ore" service protection or ",ou ma} request yore" mone} back
on the remaining value of)our contract. No questions asked. IVs that simple.
Protect yoltr refrigerator, dishwasher, washer and dryer, range, TV; VCR and m uch more--any brand!
Plus there's no extra charge tor emexgency service and low monthly financing is available. Even icemaker
coverage and toed spoilage protection is offered. You can rest easy, knowing that all your valuable
household products are protected against expensive repairs.
Place ,,our confidenre in (liE and call us in the IJ.S. toll-free at _UU,OZ_,ZZZz]:
for n/ore inforI//atioll.
,M1 brands (o_erecl, tip to 20 years old, in the (ontinem d U.S.
We 71 Cover Any Appliance.
Anywhere. Anytime.
_ (]tll hel-e
Please place in envelope and mail to:
General Electric Company
Warranty Registration Department
EO. Box 32150
Louisville, KY 40232-2150
77
Page 18

Consumer Product Ownership Registration
Dear Customer:
Thank you tbr purchasing our product and thank you for placing your confidence in tts.
VVeare proud to haxe you as a customer'.
Follow these three steps to protect your new appliance investment:
Complete and mail
your Consumer
Product Ownership
Registration today.
ttavc tim peace ot
mind of knowing we
C_lll COllt_lct VOll ill
the tmlikel_ e_ent of a
sat_w modification.
LMtel- mailing tile
registration below,
store this (l()clllllell_
in a salb place. It
contains inf_)rmation
you will need should
you require selwice.
Our serxice nmnber is
800.GE.CARES
(800.432.2737).
Model Number Serial Number
I I I
Important: If you did not get a registration card with your
product, detach and return the form below to
ensure that your product is registered, or register
online at ge.com.
Consumer Product Ownership Registration
Read your Owner's
Manual carefillly.
It will help you
operate yore- new
appliance properl>
._Cm h(r(
Model Number Serial Number
Mr. Ms. M*s. Miss
Fil"q I I L_slI
Naln( I I I I I I I I I Nalne I I I I I I I I I I I I
Str(!el [
Addr( ss I I I I I I I I I I I I I I I I I I I I I I I I
Apt. # [ [ [ [ [ I I I [ E-lnail Address:
1)m('Placed t)holle
'"_'_1 , I ,,_,,I , I _,,_,rl, I _.m.er II , , II , , ' IMonth I I
* Please provide your e-mail address to receive, via emmil, discounts, special ottk,p, and other
GE Consumer & Industrial
Appliances
General Electric Compan U
Louisville, KY 40225
ge.com
important communications trom (;E Appliances (GEA).
[ Check here if vou do not want to receive communications ti-om GEA's careflflly selected
p_lrt llers.
FAILI HZE T() COMPI.ETE AND RE'F[ RN Tt tIS CARD DOES NOT DIMINISII YOI JR
"_,I\RRAN'IX RIGIITS.
For intk)rmation about GEA's pri_acy and data usage polic}; go to ge.com and click on 'Pri_acv
Policy" or call 800.626.2224.
/8
Page 19

GEAir ConditionerWarranty.
Aft warranty service provided by our Factory Service Centers,
or an authorized Customer Care®technician. Toschedule service,
on-line, 24 hours a day, visit us at ge.com, or carl 800.GE.CARES
(800.432.2737).Have serial number and model number available
when calling for service.
GEWill Replace:
Anypart of the air conditioner which thils due to a defect in materials or workmanship,
Fromthe dateof the
originalpurchase
Fromthedateof the
originalpurchase
_: Service trips to your home to teach you how to
use the product.
!i::hnproper h_staJlation, delivery or maintenance. If you
have an installation problem, or if the air conditioner
is of improper cooling capacity for the intended use,
contact your dealer or installer. You axe responsible
for providing adequate electrical cmmecth_g facilities.
_: Failure of the product resulting from modifications to
the product or due to mlreasonable use including failure
to provide reasonable m_d necessary mah_tenm_ce.
_: In commerciaJ locations labor necessary to move the
unit to a location where it is accessible for service
by ma individual technician.
During this limited one-year warranty, (;E will also proxide, free of charge, all lab(n" and related
set\ice to replace the deiecti',e part,
Any part ofthe sealed refrigerating system (the compressor; con(lenset; evaporator and
all connecting ttfl)ing) which fifils (lue to a (lefect in materials or workmanship. During this
four-year limited additional warranty, GE will also i)r(wide, free of charge, all labor and related
service to replace the defecti\'e part.
Staple your receipt here.
Proof of the original purchase
date is needed to obtain service
under the warrantF
!i_:Replacement of house fuses or resetting of circuit
breakers.
)_:Failure due to corrosion on models not corrosion-
protected.
::Ji::Daanage to the product caused by bnproper power supply
voltage, accident, fire, floods or acts of God.
_:i:_Incidental or consequentiaJ dmnage caused by possible
defects with this air conditioner.
iJi::Dmnage caused after delivery.
EXCLUSION OFIMPLIED WARRANTIES--Your sole and exclusive remedy is product repak as provided in this
Limited Warranty. Any implied warranties, including the implied warranties of merchantability or fitness for a
particular purpose, are limited to one year or the shortest period allowed by law.
This warranty is extended to the original purchaser and any succeeding owner for products purchased for home
use within the USA. In Alaska, the warranty excludes the cost of shipping or service calls to your home.
Some states do not aflow the exclusion or limitation of incidental or consequential damages. This warranty gives
you specific legal rights, and you may also have other rights which vary from state to state. To know what your
legal rights are, consult your local or state consumer affairs office or your state's Attorney General
Warrantor: General Electric Company. Louisville, KY 40225
19
Page 20

ConsumerSupport.
Hme a question o_ need assistance _dth }our appliance? %'7 tlle (;E Appliances "_ebsite 24 hours a day,
I GEAppliancesWebsite ge.com
, , , )" i /all_ (lax ( f tile leak': For greater conxelliellce alld [hster service, _o/k can llOW downlotd ()Wllek's ]\/lallH/Is,
order parts, catalogs, or exert schedule service on-line. You can also "_sk Our Team f Expell,
}our questions, alld so n/Hch In(we...
o " s i.
ScheduleService
Expexl GE repair selxice is onl} one step awa} flx)m }our dotm Get on-line and schedule xour serx]ce at
xour, convenience 24 hom_ an} da} of the }ear! Or call 800.(;E.CARES (800A32.2737) during noHnal
bHsilIess h OHl'S.
go.corn
RealLifeDesignStudio ge.com
GE suppolqrs tlle I_Jnixvrsal Design concept--pxodu(ts, selMces and environments that can be used by
people (d all ages, sizes and capabilities. We recognize the need to design tiw a wide range kffphysical and
mental abilities and impaim_ents. For derails of GE's Llnivel_al Design applications, including ldtchen
design ideas fiw people with disabilities, check out our Website today. For tlle heating impaired, please call
800.TDD.GEAC (800.833.4322).
ExtendedWarranties
Purchase a GE extended warrant} and learn about special discounts that are available while }our warrant}
is still in effect. You can pro'chase it on-line am'time or call 8 .626.2224 dmJng normal business hours.
GE Consumer Home Services will still be there after }our _<u'rant} expires.
00 "_ " __
PartsandAccessories
go.corn
go.corn
Individuals qualified to sel_'ice their own appliances call have pails or accessories sent directly to their
homes (VISA, MasterCard and Disco\ er cards are accepted). Order on-line today, 24 hours e\vry clay
Or 1)} r phone at 800.626.2002 during hernial business hours.
Instructions contained in this manual cover procedures tohe performed by any user. Other servicing generally
should he referred to qualified service personnel. Caution must he exercised, since impreper servicing may cause
unsafe operation.
ContactUs
If you are not satisfied with the service you recei;v fl'om GE, contact us on our Website with all tlle details
including your phone numbek; or write to: General Managek; Customer Relations
GE Appliances, Appliance Park
Ix_uisville, KY 40225
go.corn
go.corn
Register your new appliance on-line---at your convenience! Timely, l)r°duct registration, will allow for
q RegisterYourAppliance
20 Printed in China
enhanced communication and prompt service under the temls of }our _arrant}; should tlle need raise.
D_u max also mail in tlle pre-plJnted registration card included in tile l)acldng, matekial.
 Loading...