

Ge Adkw65lnw2, Ader30lnl1, Ader50lnl1 Owner's Manual
GEPpp/iances.com
Safety Instructions .........................2,3
0
E
Operating Instructions
About the Controls
on the Dehumidifier ....................................4
Automatic Defrost .........................................5
Choosing a Location ....................................5
How the Dehumidifier Operates ............5
Removing Collected Water ....................6
Water Level ......................................................6
Care and Cleaning
Air Filter .............................................................7
Grille and Case ................................................7
Water Bucket ...................................................7
Troubleshooting Tips .........................8
Consumer Support
Consumer Support ...................Back Cover
Ownership Registration for
Customers in Canada only ................9, 10
Warranty for Customers
in Canada ........................................................13
Warranty for Customers
in the U.S.A......................................................12
ADER30
ADER40
ADERSO
ADER65
ADEHSO
D6humidificateur
La section franqaise commence 8 la page 24
Deshumedificador
ENERGY STAR(R) labeled )roduct
ENERGYSTAR
AS an ENERGY STAR(R) partner,GE has
determined that this product meets the
ENERGYSTAR(R)guidelines for energy efficiency.
Write the model and serial numbers here:
Model #
Serial #
You can find them on a label on the back
of the dehumidifier.
In Canada, contact us at:
www. GEApplia nces.ca
Lo seccidn en espahol empieza en la pdgina 26
49-7619-1 12-09GE
iMPORTANTSAFETYINFORMATION.
READALLiNSTRUCTiONSBEFOREUSING.
m
For your safety, the information in this manual must be followed to minimize the risk of fire, electric shock
or personal injury.
SAFETYPRECAUTIONS
When using this dehumidifier, always follow basic safety
[] Use this appliance only for its intended []
purpose as described in this Owner's Manual.
[] This dehumidifier must be properly installed
and grounded as described
in this manual before it is used.
[]
Never operate this dehumidifier in an area
that is likely to accumulate standing water.
If this condition develops, for your safety
disconnect the power supply before stepping
into the water.
[]
Never unplug your dehumidifier by pulling on
the power cord. Always grip plug firmly and
pull straight out from the receptacle.
[]
Replace immediately all electric service
cords that have become frayed or otherwise []
damaged. A damaged power supply cord []
must be replaced with a new power supply
cord obtained from the manufacturer and not
repaired. Do not use a cord that shows cracks
or abrasion damage along its length or at
either the plug or connector end. []
[]
If the receptacle does not match the plug,
the receptacle must be changed out by a
qualified electrician
[]
Turn the dehumidifier OFFand unplug it
before cleaning.
precautions, including the following:
GE does not support any servicing of
the dehumidifier. We strongly recommend
that you do not attempt to service the
dehumidifier yourself.
[]
For your safety, do not store or use
combustible materials, gasoline or other
flammable vapors or liquids in the vicinity
of this or any other appliance.
[]
All dehumidifiers contain refrigerants, which
under federal law must be removed prior to
product disposal. If you are getting rid of an
old product with refrigerants, check with the
company handling disposal about what to
do.
Do not use outdoors.
This dehumidifier is intended for
indoor residential applications only.
This dehumidifier should not be used
for commercial or industrial applications.
These R410A Dehumidifier Systems require
contractors and technicians to use tools,
equipment and safety standards approved
for use with this refrigerant. DO NOT use
equipment certified for R22 refrigerant only.
HOWTOCONNECTELECTRICITY
Do not, under any circumstances, cut or remove
the third (ground) prong from the power cord.
For personal safety, this appliance must be properly
grounded.
DO NOTusean adapter plug with this appliance.
The power cord of this appliance is equipped
with a 3-prong (grounding) plug which mates
with a standard 3-prong (grounding) wall outlet
to minimize the possibility of electric
shock hazard from this appliance.
Have the wall outlet and circuit checked by a
qualified electrician to make sure the outlet is
properly grounded.
2
Where a 2-prong wall outlet is encountered,
it is your personal responsibility and obligation to
have it replaced with a properly grounded
3-prong wall outlet.
The dehumidifier should always be
plugged into its own individual electrical
outlet, which has a voltage rating matching
the rating plate.
This provides the best performance and also
prevents overloading house wiring circuits, which
could cause a fire hazard from overheated wires.
USEOFEXTENSIONCORDS
GEAppliance&com
Because of potential safety hazards under
certain conditions, we strongly recommend
against the use of an extension cord.
However, if you must use on extension
cord, it is absolutely necessory that it be
o UL-listed, 14 -gouge, S-wire grounding
type opplionce extension cord hoving
o grounding-type plug ond outlet ond
thot the electrical rating of the cord be
15 omperes (minimum) ond 125 volts.
READAND,FOLLOWTH/SSAFETYINFORMAT/ONCAREFULLY.
SAI/ETHESEINSTRUCTIONS
Aboutthecontrolsonthe dehumidifier.
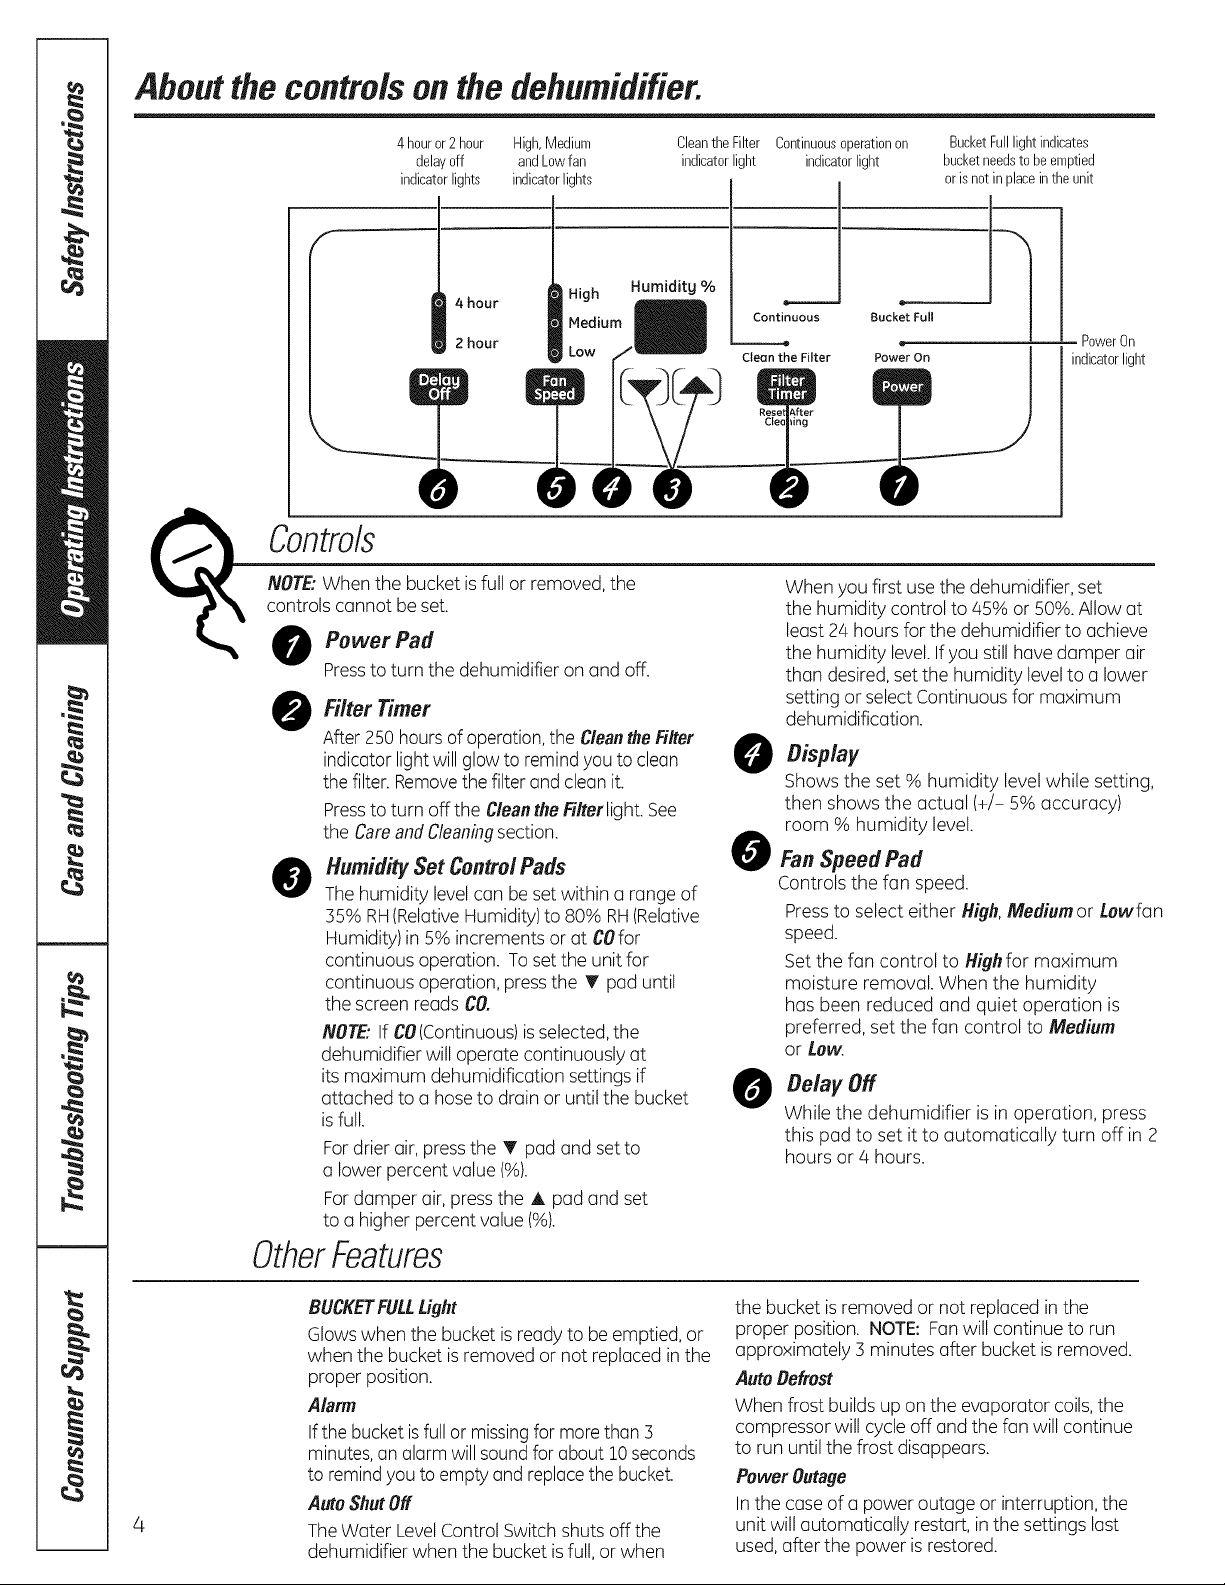
4houror2hour High,Medium
delayoff andLowfan
indicatorlights indicatorlights
4 hour
2 hour
NOTE:When the bucket isfull or removed,the
controls cGnnot beset.
Controls
O Power Pad
Pressto turn the dehumidifier on and off.
O Fiiter Timer
After 250 hoursof operation,the CleantheFilter
indicator lightwill glow to remindyou to clean
the filter. Removethe filter and clean it.
Pressto turn off the CleantheFilterlight.See
the Careand Cleaningsection.
Humidity Set Control Pads
@
Thehumidity levelcan be set within a range of
35% RH(RelativeHumidity)to 80% RH(Relative
Humidity) in 5% increments or at COlor
continuous operation. To set the unit for
continuous operation, pressthe T pad until
the screen reads CO.
NOTE:If CO(Continuous)is selected,the
dehumidifier will operate continuously at
its maximum dehumidification settings if
attached to a hoseto drain or until the bucket
isfull.
Fordrier air, pressthe V pad and set to
a lower percent value (%).
Fordamper air, pressthe A pad and set
to a higher percent value (%).
High
Mediul
Low
CleantheFilter Continuousoperationon
indicatorlight indicatorlight
Humidity %
o-
Continuous
Clean the Filter
When you first usethe dehumidifier, set
the humidity control to 45% or 50%.Allowat
least 24 hours for the dehumidifier to achieve
the humidity level.Ifyou stillhave damper air
than desired,set the humidity level to a lower
setting or select Continuousfor maximum
dehumidification.
Shows the set % humidity levelwhile setting,
then shows the actual (+/- 5% accuracy)
room % humidity level.
0
Fan Speed Pad
Controls the fan speed.
Pressto select either High,Medium or Lewfan
speed.
Setthe fan control to Highfor maximum
moisture removal. When the humidity
has been reduced and quiet operation is
preferred, set the fan control to Medium
or Low.
Delay Off
O
While the dehumidifier is inoperation, press
this pad to set it to automatically turn off in 2
hours or/4 hours.
e,
Bucket Full
Power On
BucketFulllightindicates
bucketneedstobeemptied
orisnotinplaceintheunit
]
PowerOn
indicatorlight
OtherFeatures
BUCKETFULLLight
Glowswhen the bucket isready to be emptied, or
when the bucket is removed or not replaced in the
proper position.
Alarm
Ifthe bucket isfull or missingfor morethan 3
minutes,an alarmwill soundfor about 10seconds
to remindyou to empty and replacethe bucket.
AutoShutOff
4
TheWater LevelControl Switchshuts off the
dehumidifier when the bucket isfull, or when
the bucket isremoved or not replaced inthe
proper position. NOTE: Fanwill continue to run
approximately 3 minutes after bucket isremoved.
AutoDefrost
When frost builds uponthe evaporator coils,the
compressor will cycle off and the fan will continue
to run until the frost disappears.
Power Outage
Inthe case of a power outage or interruption, the
unit will automatically restart, inthe settings last
used,after the power isrestored.

Usingthedehumidifier, c rplia,oos.oom
When first using the dehumidifier, operate the unit continuously for 24 hours.
How the Behumidifier Operates Automatic Defrost
Moist, humid GirisdrGwn over a cold refrigerGted
dehumidifying coil. Moisture in the Gircondenseson
this coil and drains into a bucket (orthrough
a hoseand drain).
Dry,clean air is drawn through the condenser where
it is heated and discharged out the top grille into the
room.
It is normalforthesurroundingair to becomeslightly
warmerasthe dehumidifieroperates.
Choosing a Location
A dehumidifier operating in a basement will have little
or no effect in drying an adjacent enclosedstorage
area,such as a closet, unlessthere isadequate
circulation of air in and out of the area.
[]
DOnotuseoutdoors.
[]
Thisdehumidifieris intendedfor indoorresidential
appficationsonly.Thbdehumidifiershouldnotbe
usedfor commercialorindustrial appfications.
[] Placethe dehumidifierona smooth,levelfloorstrong
enoughto supporttheunit with a furlbucketof water.
[] Allow at least 12-18inchesof airspace on allsides of
theunit forgood air circulation.
[] Placethe dehumidifierin anarea where the
temperaturewill not fallbelow41°F(5°C).Thecoils
canbecomecoveredwith frostattemperatures
below 41°F,which mayreduceperformance.
[] Usethedehumidifierincooking,laundry,bathing
anddishwashingareas thathaveexcessivemoisture.
NOTE"Placethe dehumidifieraway
fromthe clothesdryer.
[] Usethedehumidifiertopreventmoisture damage
anywherebooksor valuablesarestored.
[] Usethedehumidifierina basementto helpprevent
moisturedamage.
[] Thedehumidifiermust be operatedin an enclosed
areato bemost effective.
Closeall doors,windowsandotheroutsideopenings
tothe room.
When frost buildsup onthe evaporator coils, the
compressor will cycleoff and the fan will continue to
run until the frost disappears.
When the coil isdefrosted, the compressor or fan will
automatically restart and dehumidifying will resume.
YES NO
12"-18" rnin. 12"-18" rain.
NOTE:Thedehumidifierhas rollerstoaidplacement,
butit shouldonlybe rolled onsmooth,flatsurfaces.
Donot attempttoroll thedehumidifieroncarpet or
overobjects.
Usingthedehumidifier.
Alwaysmakesurethewaterbucketis lockedintoplace onthe dehumidifier.
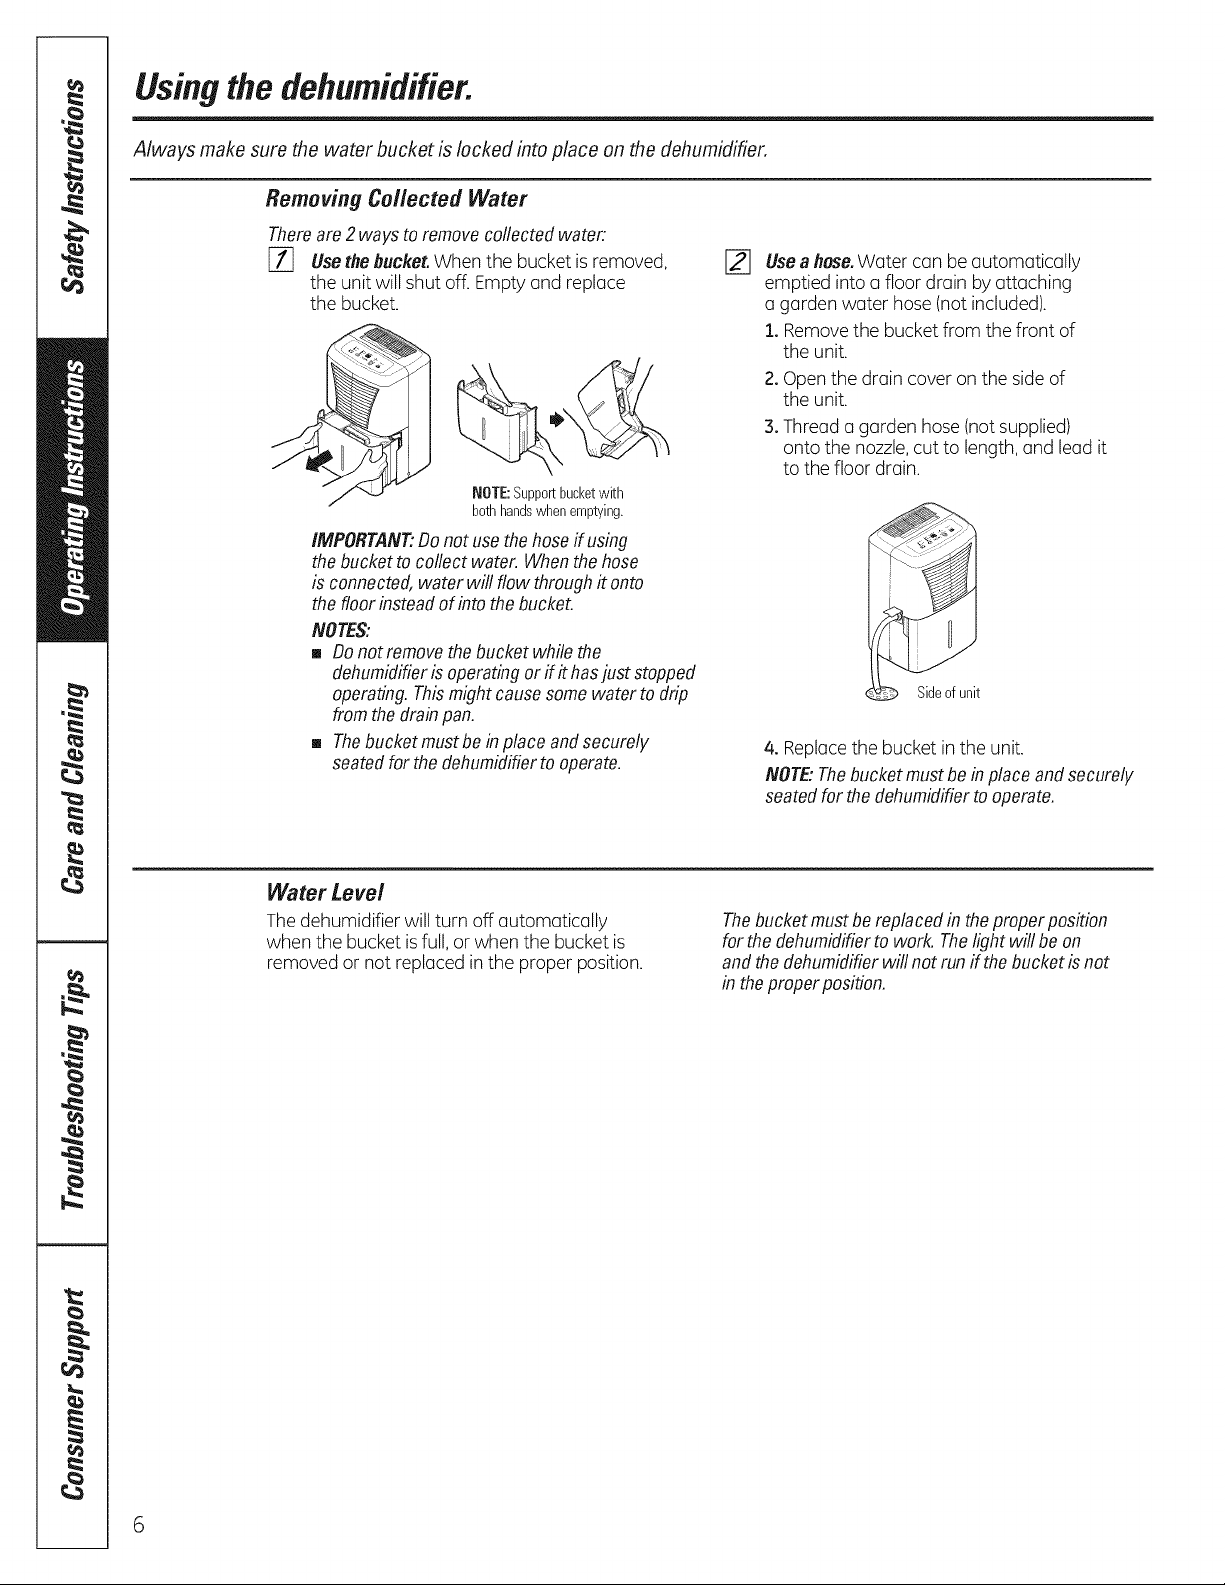
Removing Collected Water
Thereare2 waystoremove collectedwater:
[_ Usethe bucket.When the bucket isremoved,
the unit will shutoff. Empty and replace
the bucket.
NOTE:Supportbucketwith
bothhandswhenemptying.
IMPORTANT"Donot use thehoseff using
thebucket tocollect water. Whenthe hose
is connected,water will flow through# onto
thefloor insteadof into thebucket.
NOTES:
[] Donotremove thebucket whilethe
dehumidifierisoperating orflit hasjust stopped
operating.Thismightcausesomewater to drip
fromthedrainpan.
[] Thebucket mustbe inplace andsecurely
seatedforthe dehumidifierto operate.
[] Usea hose.Water can be automatically
emptied into a floor drain byattaching
a garden water hose (notincluded).
1. Removethe bucket from the front of
the unit.
2.Open the drain cover on the side of
the unit.
3.Thread a garden hose (notsupplied)
onto the nozzle,cut to length, and lead it
to the floor drain.
Sideofunit
4. Replacethe bucket in the unit.
NOTE:Thebucket mustbeinplace andsecurely
seatedfor thedehumidifiertooperate.
Water Level
Thedehumidifier will turn off automatically
when the bucket isfull, or when the bucket is
removed or not replaced in the proper position.
Thebucket mustbe replacedin the properposition
for thedehumidifierto work.Thelight will be on
and thedehumidifierwillnot run ff the bucketb not
in theproperposition.
6
Careandcleaningofthedehumidifier. C .pliances.com
Turn offthe dehumidifier and remove the plug from the waft outlet before cleaning.
Grille and Case
Toclean thecase:
Usewoter ond o mild detergent. Do not use
bleoch or obrosives.
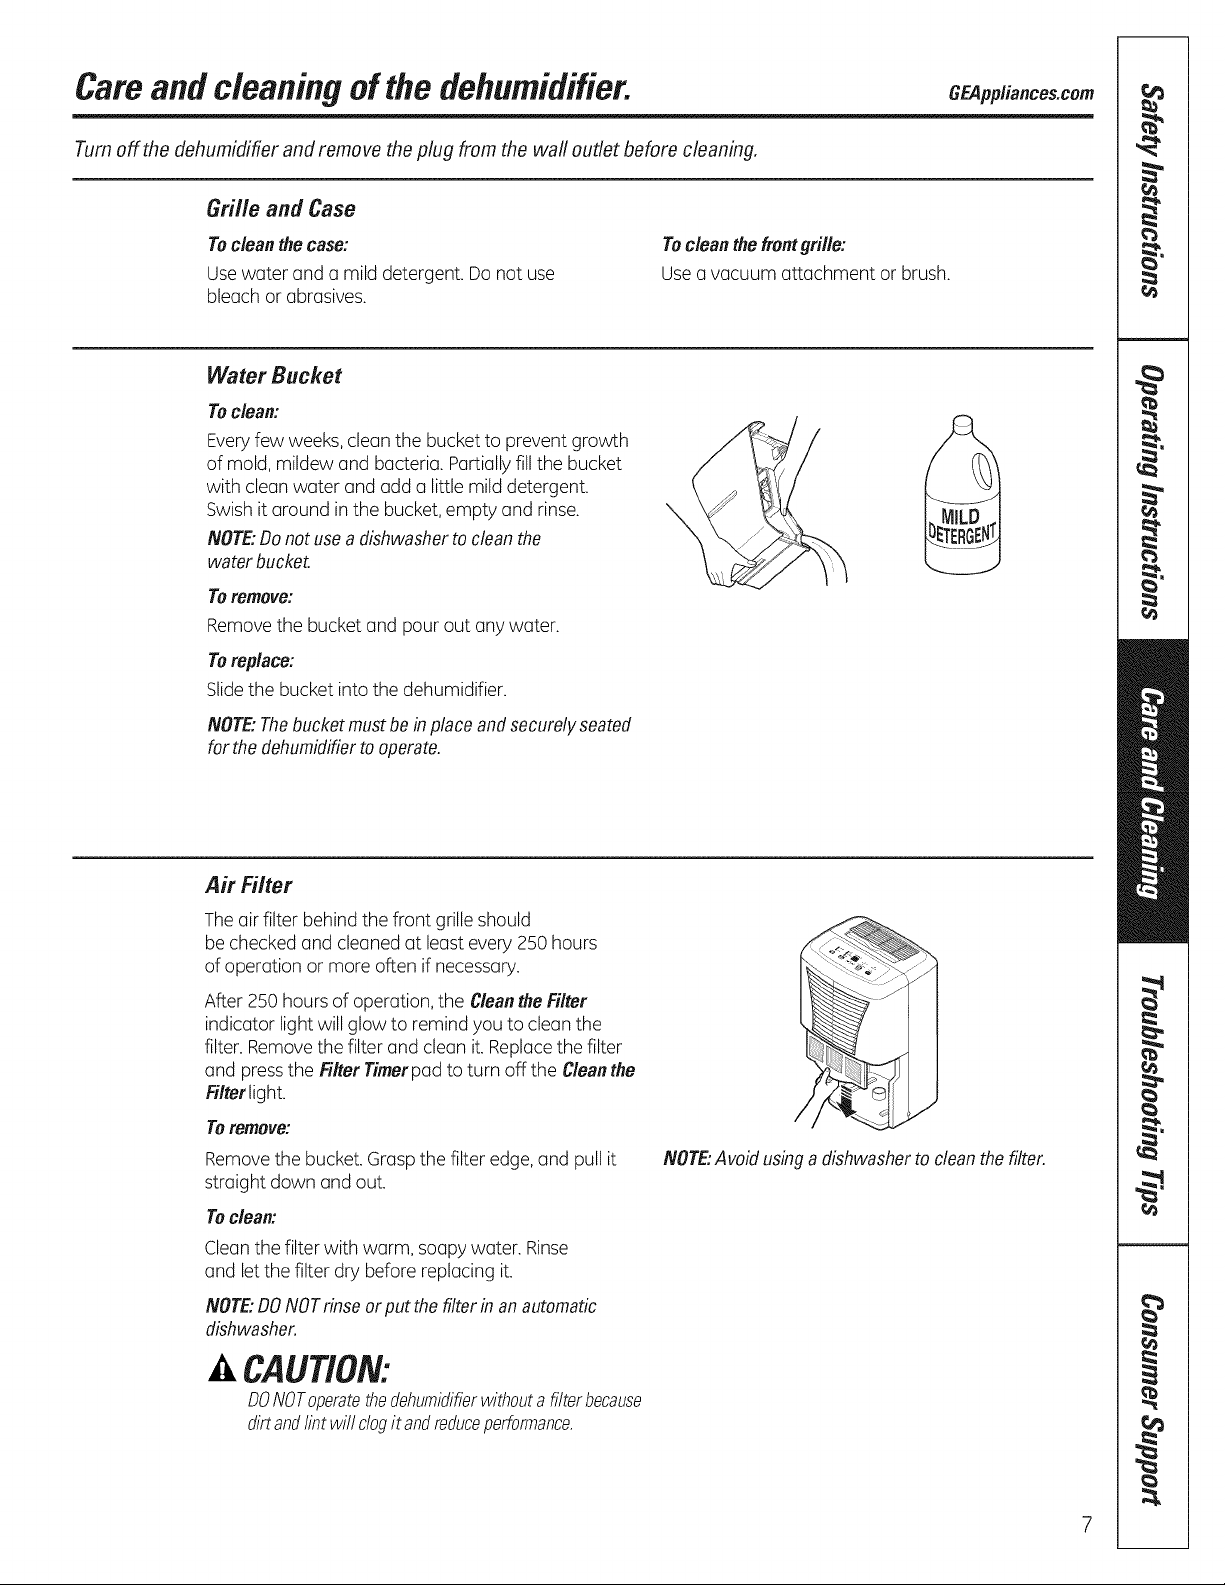
Water Bucket
Toclean:
Everyfew weeks,cleon the bucket to prevent growth
of mold, mildew ond bucteriu. Portiullyfill the bucket
with cleon woter ond odd o little mild detergent.
Swish it oround inthe bucket,empty ond rinse.
NOTE:Do notusea dishwasher tocleanthe
waterbucket.
Toremove:
Removethe bucket ond pour out ony woter.
Toreplace:
Slidethe bucket into the dehumidifier.
Tocleanthe frontgrille:
Use o vocuum ottochment or brush.
NOTE:Thebucket mustbe inplaceandsecurely seated
for thedehumidifiertooperate.
Air Filter
Theair filter behindthe front grille should
be checked ond cleoned ot leostevery 250 hours
of operotion or more often if necessory.
After 250 hours of operotion, the Cleanthe Filter
indicotor lightwill glow to remind you to cleonthe
filter. Removethe filter ond cleon it. Replacethe filter
ond pressthe FilterTimerpodto turn off the Cleanthe
Filterlight.
Toremove:
Removethe bucket. Grospthe filter edge, ond pull it
stroight down ond out.
Toclean:
Cleonthe filter with worm, soupy woter. Rinse
ond let the filter dry before replocing it.
NOTE:DONOTrinse or putthe filter inanautomatic
dishwasher.
/
,t"
NOTE:Avoidusinga dishwasherto cleanthe filter.
CAUTION:
O0NOToperatethedehumidifierwithoutafilterbecause
dirtandlint willclogitandreduceperformance.
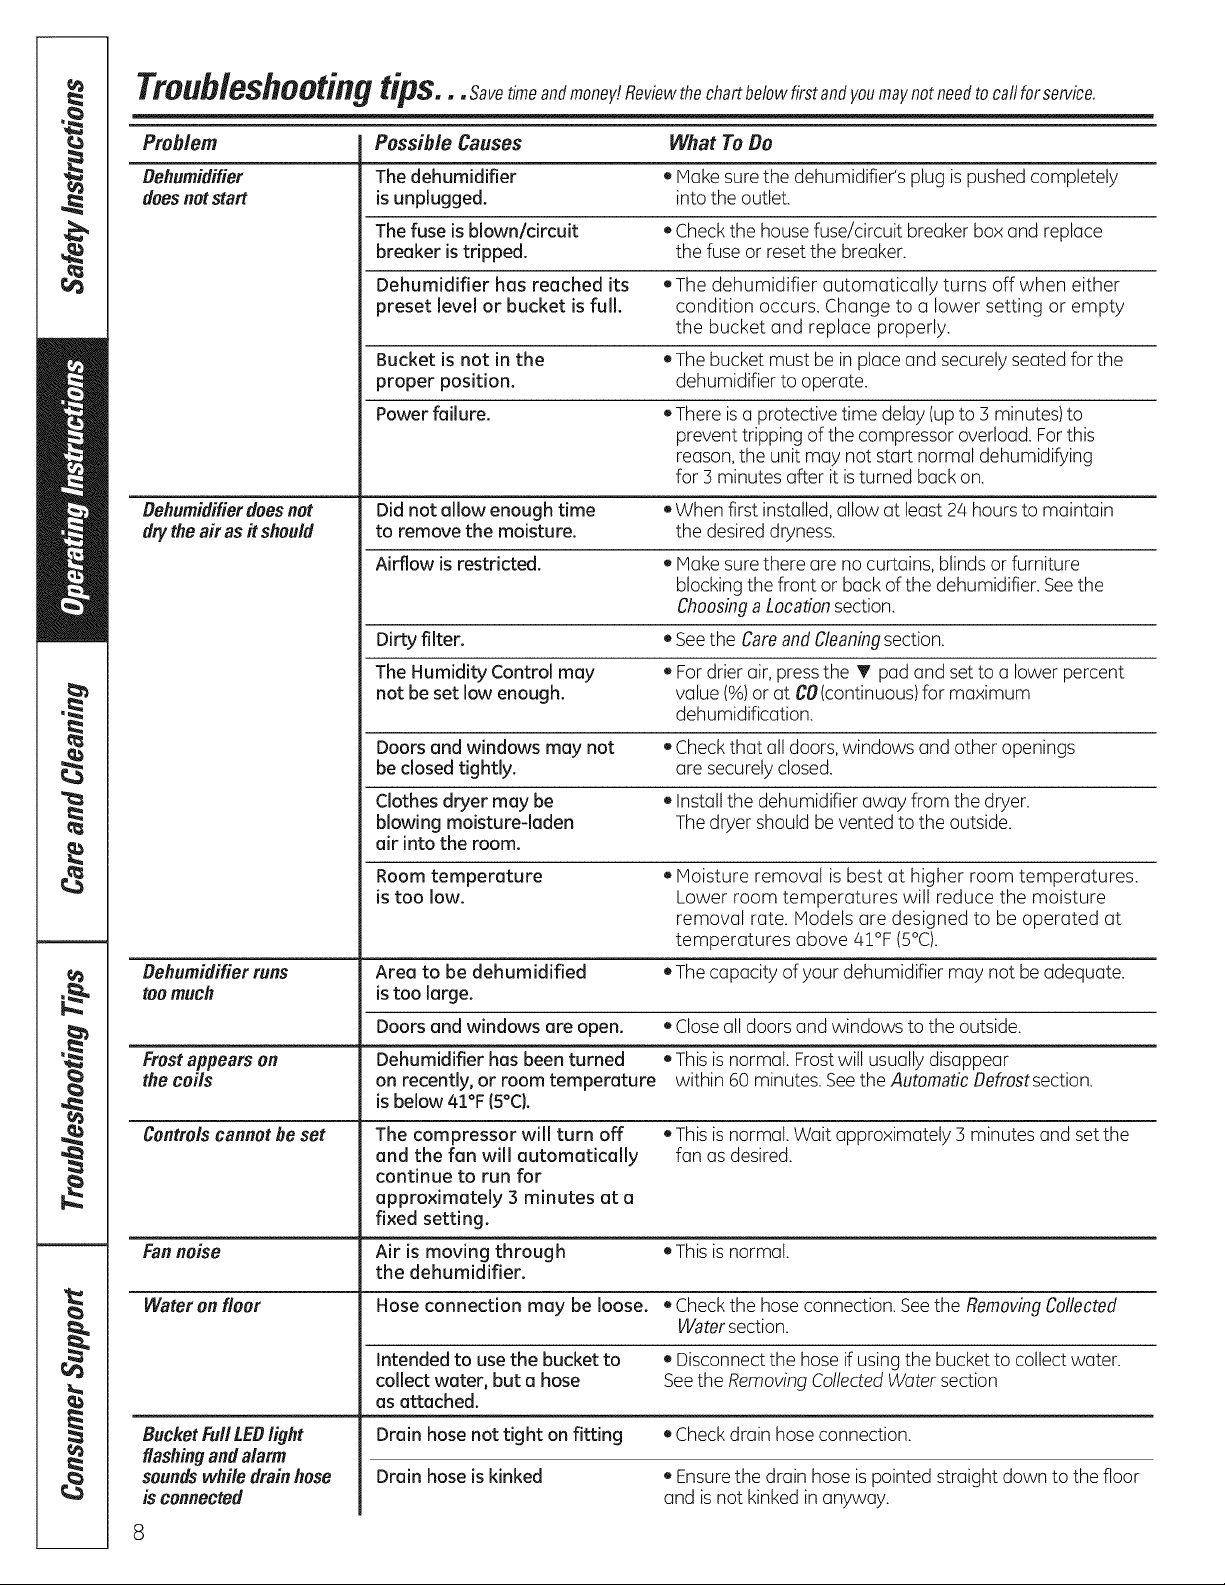
Problem Possible Causes What To Do
Dehumidifier The dehumidifier • Hake surethe dehumidifier's plug is pushed completely
doesnotstart isunplugged, into the outlet.
The fuse is blown/circuit , Check the housefuse/circuit breaker box and replace
breaker is tripped, the fuse or resetthe breaker.
Dehumidifier has reached its • The dehumidifier automatically turns off when either
preset level or bucket isfull. condition occurs. Change to a lower setting or empty
the bucket and replace properly.
Bucket is not in the • Thebucket must be in place and securelyseated for the
proper position, dehumidifier to operate.
Power failure. • There is a protective time delay (upto 3 minutes)to
prevent tripping of the compressor overload. Forthis
reason,the unit may not start normal dehumidifying
for 3 minutes after it isturned back on.
Dehumidifierdoesnot Did not allow enough time ,,When first installed,allow at least 24 hoursto maintain
drytheairas #should to remove the moisture, the desireddryness.
Airflow isrestricted. • Hake surethere are no curtains, blinds orfurniture
blocking the front or back of the dehumidifier. Seethe
Choosinga Locationsection.
Dirty filter. , Seethe Careand Cleaningsection.
The Humidity Control may • Fordrier air, pressthe T pad and set to a lower percent
not be set low enough, value (%)orat CO(continuous)for maximum
dehumidification.
Doors and windows may not • Checkthat all doors,windows and other openings
be closed tightly, are securelyclosed.
Clothes dryer may be • Installthe dehumidifier away from the dryer.
blowing moisture-laden Thedryer should beventedto the outside.
air into the room.
Room temperature • Hoisture removal is best at higher room temperatures.
is too low. Lower room temperatures will reduce the moisture
removal rate. Models are designed to be operated at
temperatures above 41°F (5°C).
Dehumidifier runs Area to be dehumidified * Thecapacity of your dehumidifier may not be adequate.
toomuch istoo large.
Doors and windows are open. * Closeall doors and windows to the outside.
Frostappearson Dehumidifier has been turned * This isnormal. Frostwill usuallydisappear
the coils on recently, or room temperature within 60 minutes. Seethe AutomaticDefrostsection.
isbelow 41°F(5°C).
Controls cannot be set
The compressor will turn off
and the fan will automatically
continue to run for
approximately 3 minutes at o
fixed setting.
• Thisisnormal.Wait approximately 3 minutes and set the
fan as desired.
Fannoise Air is moving through "This isnormal.
the dehumidifier.
Water on floor Hose connection may be loose. • Checkthe hoseconnection. Seethe RemovingCollected
Watersection.
BucketFullLEDlight
flashingandalarm
soundswhile drainhose
is connected
8
Intended to use the bucket to • Disconnectthe hoseif using the bucket to collect water.
collect water, but e hose Seethe RemovingCollectedWater section
us attached.
Drain hose not tight on fitting • Checkdrain hose connection.
Drain hose iskinked
• Ensurethe drain hose is pointed straight down to the floor
and isnot kinked in anyway.
Please place in envelope and mail to:
Veuillez mettre dans une enveloppe et envoyez _ :
OWHERSHJPREGJSTRATJOH
P.O. BOX1780
MISSISSAUGA,OHTARIO
L4Y4G1
(FORCAHADJAHCOHSUMERSOHLY)
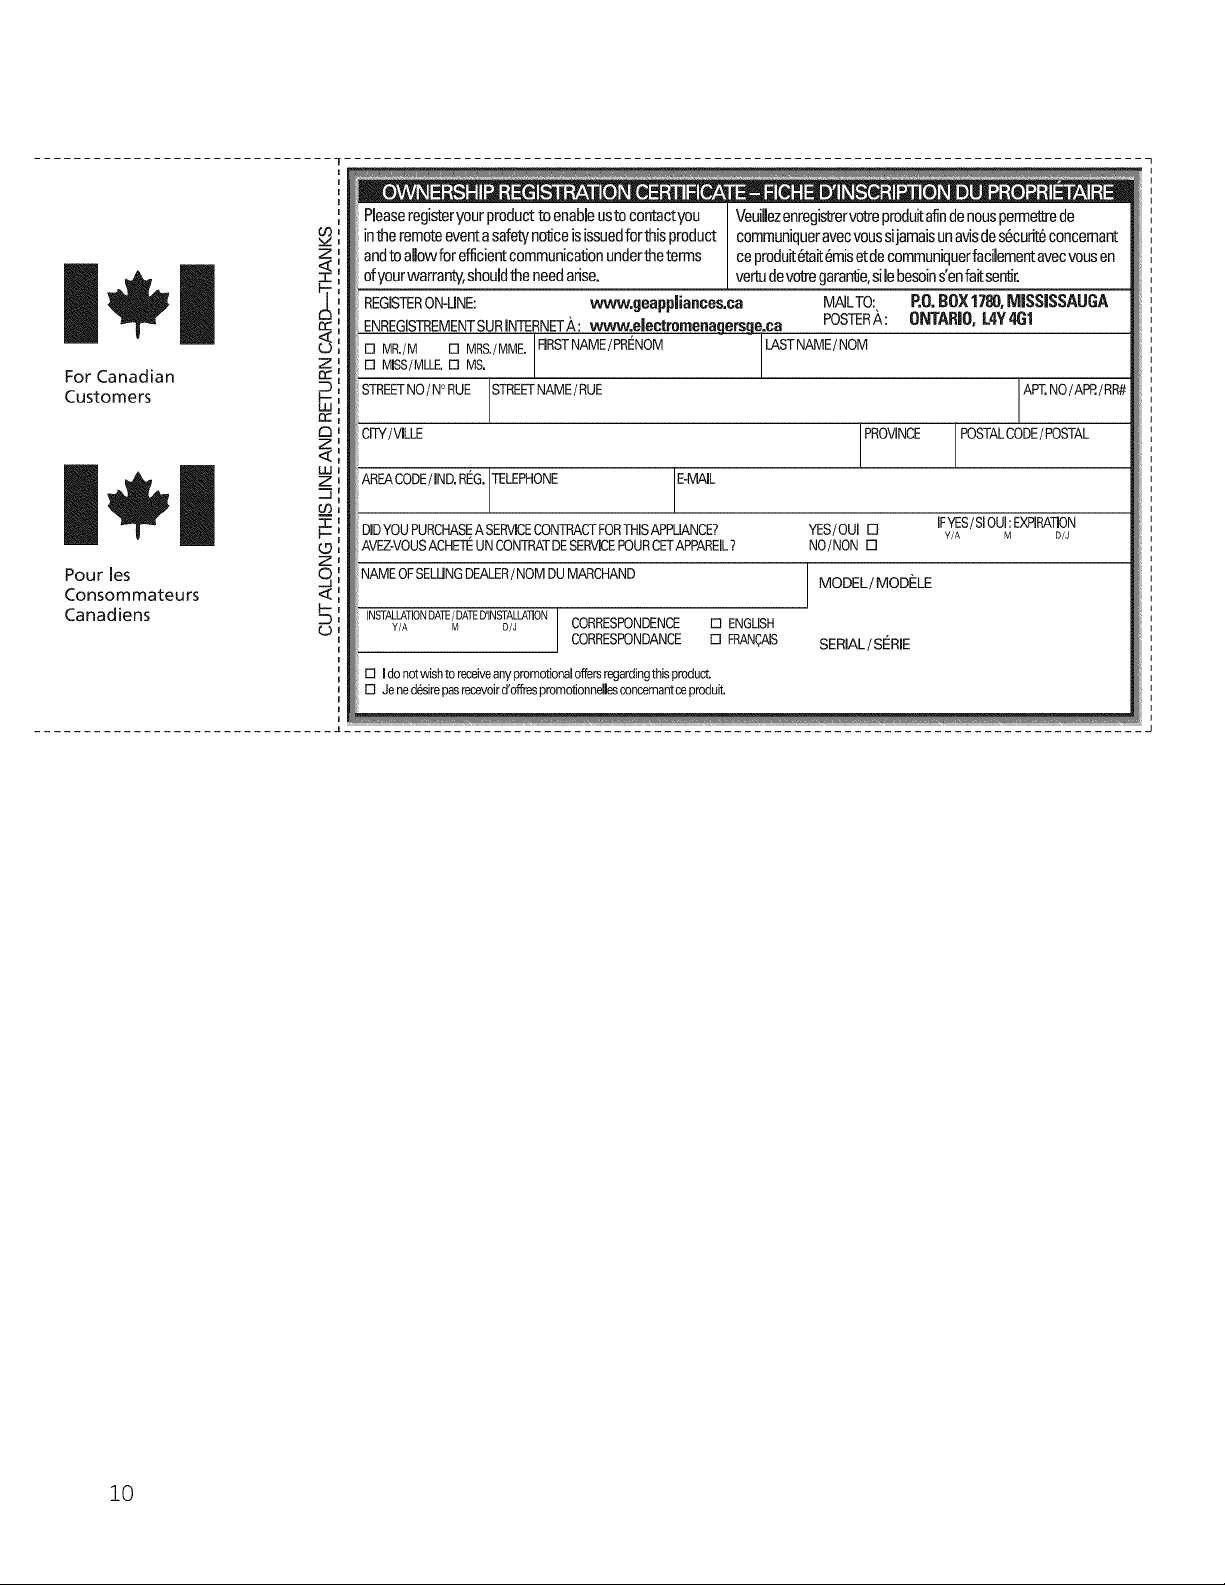
Pleaseregisteryourproductto enableustocontactyou
intheremoteeventasafetynonceisissuedforthisproduct
i
andtoaUowforefficientcommunicationundertheterms
ofyourwarranty,shouldtheneedarise.
B
VeuiUezenregistrervotreproduitafindenouspermet_ede
communiqueravecvoussijamaisunavisdes6curit6concemant
ceproduit_*_it6misetdecommuniquerfacilementavecvousen
vertudev_e gararrde,silebesoinsenfairsenlJr.
)N-LINE: WNw.geappliances.ca MAILTO:,
ENREGISTREMENTSURJNTERNET/_:www, eJectmmenagetsge,ca POSTERA:
p.o.BOX1788,MISSISSAUGA
ONTARIO,L4Y461
For Canadian
Customers
Pour les
Consommateurs
Canadiens
MR./M [] MRS./MME. F1RSTNAME/PRI_NOM LASTNAME/NOM[] MISS/MLLE.[] MS.
STREETNO/N° RUE STREF NAME/RUE
ra_
CITY/VILLE
Z I
<I
LUI
Z_
I
AREACODE/IND. R(G.[TELEPHONE [E-MAIL
2,
DIDYOUPURCHASEA SERVICECONTRACTFORTHISAPPLIANCE?
AVEZ-VOUSACHETEUN CONTRATDESERVICEPOURCETAPPAREIL?
el
Z_
NAMEOF SELUNGDEALER/ NOM DU MARCHAND
Y/A M D/J CORRESPONDENCE [] ENGLISH
I
INSTALLATIONDA]_/ DATEDIINSTALLA'_ON J
[] Ido notwishto receiveanypromotionaloffersregardingthisproduct.
[] Jenedesirepasrecevoird'o_es promotionnellesconcemantceproduit.
CORRESPONDANCE [] FRANC_AIS
PROVINCE POSTALCODE/POSTAL
YES/OUI[]
NO/NON[]
MODEL/MODELE
SERIAL/SERIE
IFYES/SIOUl:EXPIRAllON
Y/A M D/J
APT.NO/APP./RR#
10
Notes.
GEAppliances.com
m
m=
0
m=
m
m=
0
m
m
m
m=
0
m
M=
0
"-4
0
m
0
0
m=
.,-I
m=
11
0
n=
 Loading...