

Page 1

Item Stock Number
168946
UPC:
681131689465
Three Basket Deep Fryer
www.gehousewares.com
For product service, call customer service at (877j 207-0923
Page 2

Deep Fryer Safety
IMPORTANT SAFEGUARDS
Wlien using electrical appliances, basic safety precautions should always be
followed, including the following:
13, Do not use appliance for odier dian intended use.
14, Be sure handle is properlv assembled to basket and locked in place. (See
detailed disassembly/assembly sequence)
1. Read all instructions before using.
2. Do not toudi hot siurfaces. Use handles or knobs.
3. To protect against electric shock, do not immerse Removable Control Pod.
cord or plugs in water or otlier liquids.
4. Close super' ision is necessary when any appliance is used near children.
This appliance is not to be used bv children.
5. Unplug from outlet when not in use and before cleaning. Allow to cool before
putting on or taking off parts, and before cleaning tlie appliance.
6. Do not operate any appliance with a damaged cord or plug or after the
appliance malfunctions, or has been damaged in any manner. Retiurn
appliance tomanufactiu:er (see warranty) for examination, repair, or
adjustment.
7. The use of accesscrvattachments not recommended bv manufacturer may
cause injuries.
8. Do not use outdoors.
9. Do not let cord hang over die edge of table or counter; or touch hot surfaces.
10. Do not place on or near a hot gas or electric burner, or in a heated osen.
11. Extreme caution must be used when mosing fryer containing hot oil.
12. .Always attach plug to appliance first, dien plug cord in die wall outlet
To disconnect, turn control to lowest temperature, dien remóse plug fraii
svall oudet
SAVE THESE INSTRUCTIONS!
Consumer Safety Information
THIS APPUANCE IS INTENDED FOR HOUSEHOLD USE ONLY
This appliance has a polarized plug (one blade is wider dian the odier).
To reduce the risk of electric shock, diis plug will fit in a polarized oudet only
one way. If die plug does not fit fully in die outlet, reserse the plug. If it still
does not fit. coiiDct a qualified electrician. Do not attempt to modify die plttg in
any way.
Congratttlations on die pttrchase of your New GE Deep Frver. This Deep Fryer
is ecjttipped widi a Break-away Power Cord System, which inchtdes a detachable
magnetic cord designed to separate fraii die unit when certain aiiiotints of force
are applied,
NOTE : This cord meets reiised Underwriter's Laborattxies (ULi Standard 1085
reqttireiiients effectise Mav SO, 2001.
short power supply cord is provided toredttce die risk resttlting fraii
becoming entangled in or atipping oier a laiger cord.
WARNING: Do not use an extension cord.
No user-sersiceable parts inside Renioiable Cona'ol Pod.
Do not attempt to service diis products.
Page 3
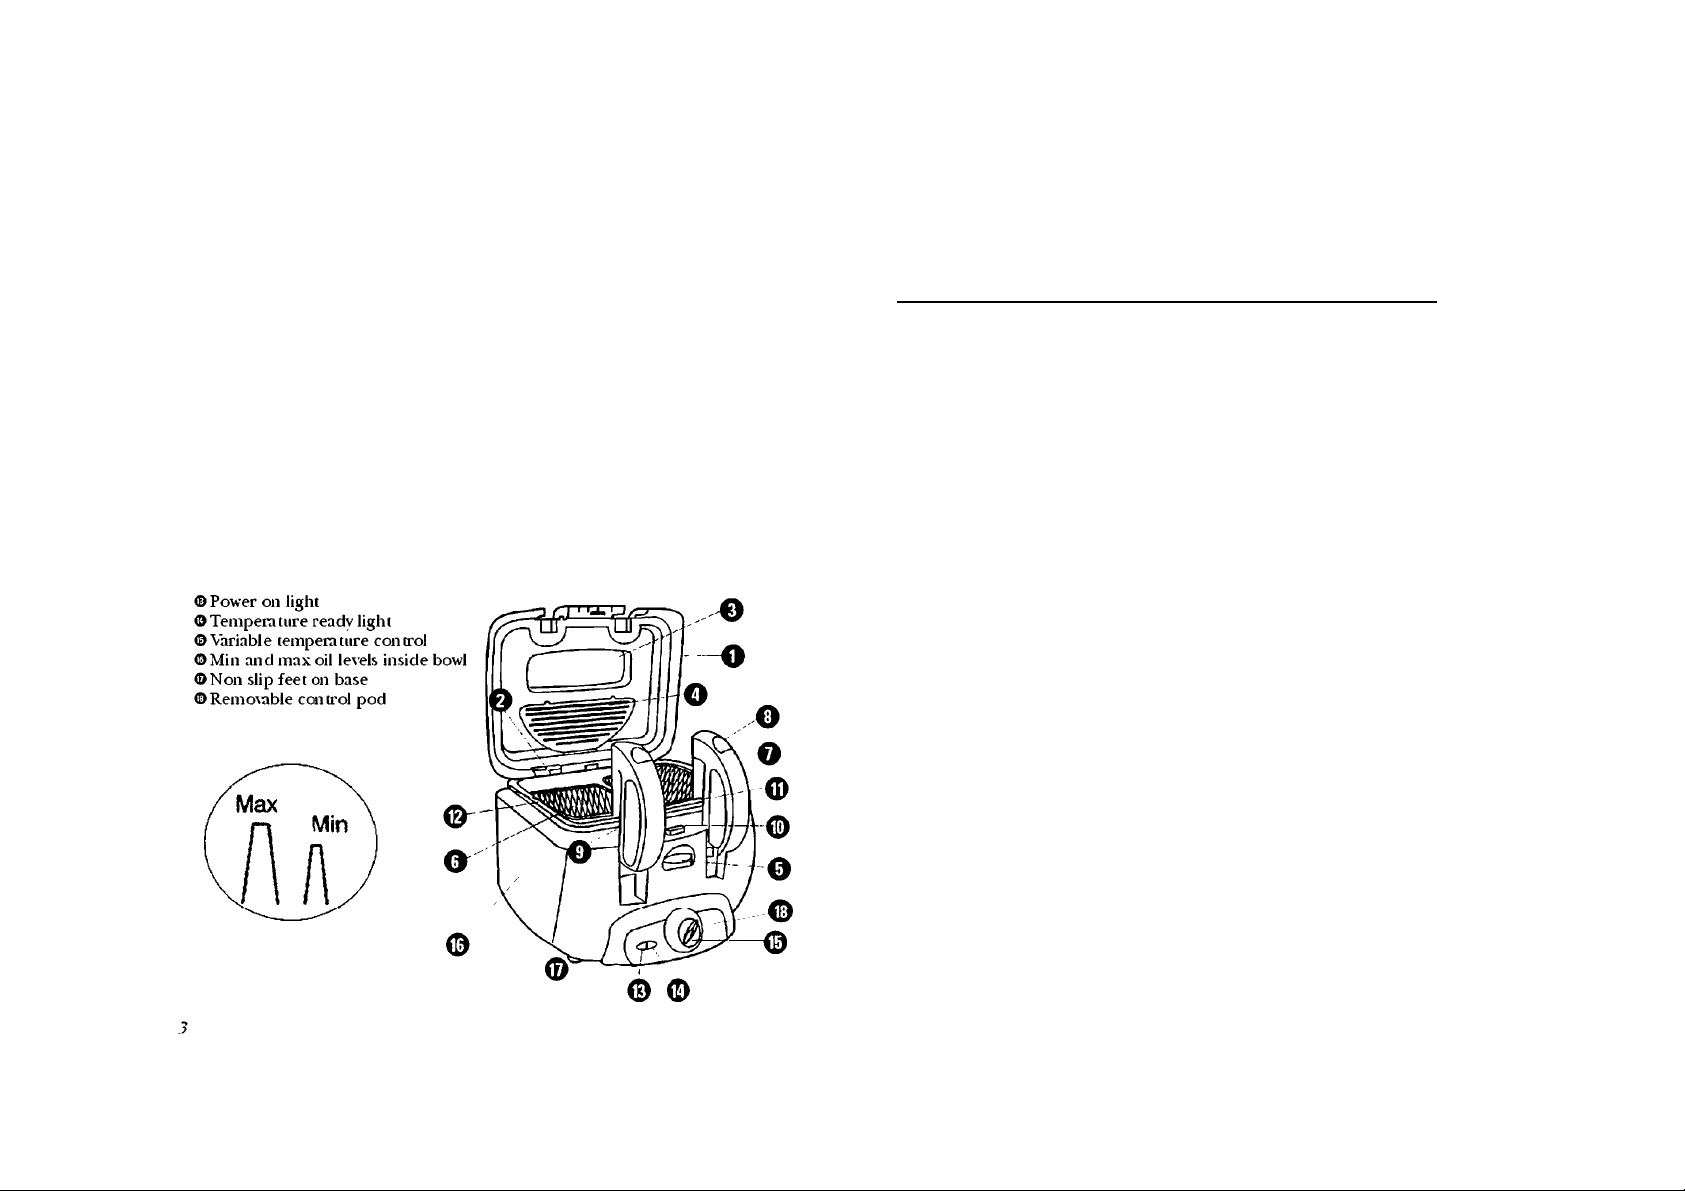
Three Basket Deep fryer
Parts and Features
O Spring leaded renicRable lid
ODd location guides x 2
0
Viewing window
O Steam %ents
0Lid release button
O Baskets x 3
©Basket handle x 2
O Basket lower release button
©Basket rest (not shown)
©Lid lock catch
©Basket handle location guides x 2
® Remosable bowl
Getting to know your new deep fryer
Before using your deep fryer for first time
• Read all sections of the instruction manual carefullv.
• Remóse all packaging materials including plastic bags, instruction manual,
notices and labels inside,
• Raise the basket handle to its highest position (a click will be heard) and tlien
lift tlie basket out of tlie frver.
• Make sure tlie frver is unplugged. Clean tlie frying basket and cooking pot
witli hot water, a small amount of dishwashing liquid and a non-abrasise sponge
or cleaning pad. Neser immerse tlie body of tlie unit in water. Wipe the inside
of tlie lid and tlie outer housing with a clean, damp clotli.
• Dry all parts of your fryer tlioroughly and replace tlie lid. bowl and basket(s).
Insert die bowl widi die max/min lines to die rear.
• The fryer body or reniosable control pod© must neser be immersed in water
or any odier liquid.
• Neser operate svidi die oil lesel below minimum mark (2.0 litres) or abose
maximum mark (2.5 litres).
CAUTION: Never connect the fryer to the electricity supply without
oil in the bowl.
Page 4

Lid operation
To install tlie lid, simplv locate in tlie guides and slide tlie spring into tlie slot.
Close tlie lid by pressing down in die center and ensure locking catch is fully
engaged.
Press die lid release button, die lid is spring loaded and will rise up on its own.
In die upper pcsidon die lid will lift out of its guides at die back for easy deaning.
To replace, locate in die guides and slide back in to posidon.
Basket operation
The handles are renioiable so diey can be attached to die 2 small or 1 large basket.
• Removal of iiandles Press die handle down straigh t against die spring and pull away from die basket
to renios'e.
Note: Please place die basket on table and hold die basket firmly widi one hand.
Push down hard on die handle undl a "click” sound is heard to remove
basket(s).
• Attaciiing tlie liaiidle to a ba.<iket .\lign die handle widi die slots of die basket, push in and then pull straight
upwards against die spring.
' Basket Insertion and Positioning -
Widi die lid open, die basket can be raised into die rest/draining posidon or
removed conipletelv.
Wlien lowering die basket into die fryer, posidon die basket handles over die
guide rails on die front of die fryer. This will put die basket into die rest/draining
posidai. When in die rest/draining position, die baskethandle is autoniaticallv
locked on die basket rest lip (shown by arrow). Press die basket release button to
lower die basket into die cooking posidon.
Wlien using die large single basket, bodi basket release buttons must be pressed
to allowdie basket to lower into die oil.
Page 5

Disassembly/Assembly sequence
The fryer has to be disassembled and assembled in the following order.
1. Unplug fi’om tlie wall outlet and remove power cord from tlie frver.
2. Open die lid and remoie.
3. Remove the baskets.
4. Lift out die tank.
5. Pidl out die removable control pod.
3. Close die lid, lower die basket into die oil.
• You can observe die cooking process by raising the lid or looking dirough
die liewing window to obserie progress.
4. When die food is cooked, raise die basket dieii lift die lid. and place it in its
raised rest posidon for a few seconds to drain.
5. Lift die basket out and shake die fried food in to a dish prepared widi paper
towels to renioie excess oil.
6. .Yfter use, disconnect from die main supply and allow to cool. Wipe any oil
from die fr’yer body.
.\sseniblv is die reierse of die aboie process.
Removal of control pod
1. Unplug from die wall outlet and renioie power cord from the fryer.
2. Cfrip die renioiable control pod as shown and pull out.
3. Replace by locating pod in die guides and push in fully.
General cooking method
1. Place baskets in die raised posidon. The basket should be in die raised position
when it is to be filled widi food.
2. Place food into die raised basket. The food should be as dry as possible. Wlieii
frying frozen food, shake the basket torenioie excess ice and fr'ost. The oil
temperature and oil life expectancy will be improied.
CAUTION: The oil may splatter as the food is added.
____________
Cooking home-battered foods
This niediod allows for die fact diat if wet batter is placed in die basket prior to
cooldng the food may stick.
• It is advised diat die large basket is used.
1. Leai'e die baskets in the down posidon.
2. Coat die raw food in die batter and allow it to drain slighdy to get rid of die
excess coadng.
3. Very carefully, slowly lower die coated food into die hot dl. using a suitable
implement or taigs. Tliis allows the batter to become solid and prevents it
from sticking to the mesh of die basket
4. Wlien food is cooked, raise die basket and lift die lid out of oil into rest/drain
position and let drain for a few seconds.
________
WARNING: Use caution as the oil may splatter as the food is added.
Getting the best from your fryer
Oil
• .Always ensiure diat you use good quality oil for deep frying. We recommend
liquid vegetable dls. alternatively use corn, groundnut or rapeseed oil. Avoid
mixing oils of different types and quality.
• Solid fat (lard) and solid oil can be used, this should be melted in a pan first
until softened, dieii carefully transferred into die fryer bowl.
• Change die oil when it becomes brown or doudy in color,
Page 6

Cooking
• Food must always be completely dry in order to avoid overflowing. This will also
prolong tlie use of tlie oil and give a crisper finish to tlie food.
• As a general guide raw foods need a higher coolUng temperatiure tlian pre-cooked
foods.
• Do not overload the basket (s) as it may cause a drop of temperature tliat may
leave die food greasy
• Cook vour food dioroughly Remember that yoiu: food may begin to tiu’n golden
brow'll before it is cooked dirough.
• Ai'oid leasing food to drain for too long in die basket as die food may become soft
and lose its crunchiness.
• Select your cooking utensils widi care. Do not use utensils diat may melt Metal
utensils become hot and dierefore should hase insulated handles. Wlien using
metal utensils, take care not to damage die non-stick coadng of die bowl.
• All foods contain moisture. Wlien lowered into die hot oil die water turns to
steam. Use caudon when opening die lid. as trapped steam will be vervhot.
IMPORTANT: Never fill the basket more than VI to 2/3 lull of food(1/4
to 1/2 is best), since this will cause the temperature of the oil to
decrease below the optimal frying temperature and result in foods
that are not as light or crispy as they can be.
French fries
• Old potatoes are ideal for making french fries. Your french fries should be eienly
sized so diat diey cook ei'enly They should be rinsed in a colander under a cold
tap and dried using a kitchen towel or absorben t paper. For best results fry your
french fries for 10-12 minutes; shaking die basketat intenals to ensure french
fries get an overall browning.
• For bestresults. we recommend no more dian 900g/31oz of frozen french fries
or 1200g/42oz of fresh fr'ench fries are fried.
Filter removal and replacemen t
The lid is fitted widi a replaceable chai’ccal and grease filter which ccilects oil
from passing steam. The filter can be used for about 15 frying sessions, it must be
changed to maintain die effectiveness of die odor filter system.
1. Lift die filter panel from die lid by pressing die tab and lifting upwards, remove
die black charcoal and white cotton filter and discard.
2. Insert the new white grease filter first dieii die black charcoal filter, replace die
panel. Contact die customer service number for replacement filter packs.
Emptying and clmning
WARNING:
Cleaning should only be carried out with the plug removed from the
socket. The fryer should have completely cooled. Allow 3 hours for
cooling.
1. Remove die lid.
2. Remove die baskets.
3. Lift out die bowl.
10
Page 7

4. Pour out the oil tlirough fine muslin or absorbent paper placed in a suitable
funnel into a container.
5. Wash die lid. basket, handles and die inside of die tank by hand widi hot soapy
ivater. Alwavs remóse die two-piece filter before cleaning die lid.
• The lid can be washed in a dishwasher.
• The basket and bowl should NOT be washed in a dishwasher.
6. Qean die body of die fryer widi a warm moistened clodi. iiiilci dish soap can
be used.
IMPORTANT: Never immerse the removable control pod in water.
Remove any stains with a moistened cloth.
7. Dry all parts of your firyer dioroughlvand reassemble all parts widi max and
min at die back of die bowl. (Refer to die disassembly / assembly sequence.)
• The outside of die bowl is not non-stick coated, if care is taken, it is unlikelv to
become dirtv. If oil does drip down die exterior when die oil is being enipded
out. make sure diat it is hand-washed thoroughly. Tlie exterior may appear
discolored, this is quite normal and will not affect the performance of
the frver.
Frying Time and Temperature
The fi-ving dines in this chart are a guide and should be adjusted to suit die
different cjuanddes or diickness of food and to suit your own taste.
FOOD TEMP. SETTING TIME (MINUTES)
Chicken Strips 375'" F 5 to 8
Chicken pieces, bone-in 360“ F 15 to 20
Fish. Battered 375“ F 4 to 5
French fries, frozen Follow directions on packatte
Fri tters 375° F 2 to 4
Onion Riiitis 375° F 2 to 3
Shrimp, breaded 360° F 2 to 4
French fries
1 lai^e potato
1/2 teaspoon paprika
1/2 teaspoon cliUi powder
1. Preheat oil to SSO’"' F.
2. Cut potato into wedges. Mix olive oil, paprilta, garlic powder, chili powder
and onion powder togedier. Coat potatoes with oil/spice mixture and place
in die deep fryer.
3. Fry for 10-15 minutes luidl golden brown.
1 tablespoon olive oil
1/2 teaspocHi garlic powder
1/2 teaspoon onion powder
Beer battered fried vegetables
2 Clips all-piiq>ose flour Tl/2 Clips beer
2 eggs 1 cup milk
Salt and pepper to taste 1 carrot, cut into diick strips
1 onion, sliced into rings 6 fresh mushrooiiK, stems removed
1 green bell pepper
1. In a medium bowl, mix togetlier 1-1/2 cup flour and beer with a wooden
spoon; let stand for at least 3 lioiurs at room temperature.
2. Mix eggs and milk in a small bowl. In a separate bowl mix togedier 1/2 cup
flotir and salt and pepper.
3. Preheat oil to 375'' F.
4. Dip each \egetable in die egg and milk mixture, tlien dip die s’egetable into
die flour and seasoning mixture. Next, clip die legetable in die beer and flour
mixture. Place die segetables into die oil and fiy undl golden brown.
Easy fried chicken
12-oz. can evaporated milk
Salt and pepper to taste
Slice chicken lengdiwise to make approximately 3 strips for each breast.
Place strips in a large bowl and coser widi evaporated milk. Preheat oil to
35(F F. Shake excess milk off chicken strips; coat strips widi com flake cereal
crumbs. Place in heated oil. Fry chicken undl golden brown. Drain on paper
towels. Salt and pepper to taste.
2 cu[)s corn flake cereal cnuiibs
2 to 4 boneless, skinless cliicken breasts
11
12
Page 8

Easv doughnuts
2 Clips floiir
2 pinches balling soda
legs
1/2 Clip Initteniiilk
1. Sie%e flour, baking soda and baking powder togetlier in a bowi.
2. In another bowl beat egg well. Add sugar and bent again. Then add
tanilla extract and beat again.
3. Mix this beaten mixture with die floitr.
4. Add the btittermilk, then make a dough.
5. Put diis aside for 10 minutes.
6. Then roll out into 1/2 inch diicklaver on a floured surface.
7. Cut it widi a doughn lit cutter.
8. Preheat the oil to SSO“"' F and deep flry until golden brown.
9. Sprinkle powdered sugar on the doughnuts.
1 teaspoon balling powder
1/4 teaspoon salt
1/2 Clip sugar
1/2 teaspoon 'vanilla extract
7.5
Customer Assistance
If yoti hate a claim tuider diis warranty, please call our Customer Assistance
Number. For foster service please have model, series, and type numbers ready
for operator to assist you. These n umbers can be found on die bottom of your
Deep Frver.
MODEL:
Qis tamer Assistance Niunlier 1-877-207-0923
Keep diis muiiber for future reference!
Two-Year Limited Warranty
What does your warranty co\«rf
■ AnvciefecLin material or Vi'orkmanshlp.
For how long after the original piirchase?
■ Tvo yi^ars,
Wliat will we do?
■ ProTide VDU with a new unit.
■ The exchange unit is warranted for the
How do yon make a warranty claim?
■ Properly puck, vaur unic "We recommend
■ Include in the package a copy of the sales
■ Return the product to your nearest
General Electric Company
andis used underlicense by
WAL-MART Stores, Inc.
Bentomvilia, AR 72718
________________
remainder of your product's original
two-year warranty period,
using the original carton and packing
materials.
receipt or other evidence of date of original
purchase, If the uiait was a gift, proride a
statement specifying the date receded.
Also print your name and address and a
description of the defect,
WAL^lA^JiT store or call Customer
Assistance at 1-877-207-0923,
IS a trademark of
TYPE:
__________________
What does joiir warranty not coveii
■ Glass parts, ghss contriners,
cutter/sti’ainer, blades and/or agitntors,
* Commercial use or anvother use not
lound in. printed direcdoix,
■ Damage from misuse, abuse, or neglect.
‘ Products purchased or serviced outside
the USA.
How does state law relate to this
warranty?
■ This wan’antvgives you specific legal
rights, and you may also hate other
rights w^hich taryfrom snte to state,
■ WAL-MART expressly disclaims all
responsl-bility for consequenriai
damages or incidental losses caused
by use of this appliaiTce, Some states
do notallow this exclusion or limitation
of incidental of consequential losses
so the foregoing disclaimer maynot
apply to vuiU,
Wliat if you purclinsed you product in
the U.S., Canada or Mexico and
encoiuiter a problem while using it
outside the country of purcliase?
■ The warraiityis talid only in the country
of purchase and if you follow the
warrantyclaim procedure as noted
WAL1YMART Stores, Inc.
Bentomvtila, AR 72718
SERIES:
_______________
14
 Loading...