

Page 1
We bring good things
to
life.
EQUIPMENT APPROVAL INFORMATION
Your telephone equipment is approved for connection to the Public Switched Telephone Network and is in
compliance with parts 15 and 68, FCC Rules and Regulations and the Technical
Requirements
forTelephoneTerminal Equipment published by ACTA.
1 Notification to the Local Telephone Company
On the bottom of this equipment is a label indicating, among other information, the US
number and Ringer
Equivalence Number (REN) for the equipment. You must, upon request,
provide this information to your
telephone company.
The REN is useful in determining the number of devices you may connect to your telephone
line and still have
all of these devices ring when your telephone number is called. In most (but
not all) areas, the sum of the
RENs of all devices connected to one line should not exceed 5. To be certain of the number of devices you
may connect to your line as determined
by
the
REN, you should contact your local telephone company.
A plug and jack used to connect this equipment to the premises wiring and telephone network
must comply
with the applicable FCC Part 68 rules and requirements adopted by the ACTA. A
compliant telephone cord
and modular plug is provided with this product. 11 is designed to be connected to a compatible modular jack
that is also compliant. See installation instructions
for details.
Notes
This equipment may not be used on coin service provided by the telephone company.
Party li nes are subject to state tariffs, and therefore, you m ay not be able to use your own
telephone
equipment if you are on a party line. Check with your local telephone company.
Notice must be given to the telephone company upon permanent disconnection of your telephone from
your line.
If your hom~ has specially wired alarm equipment connected to the telephone line, ensure the installation
of this product does not dIsable your alarm equipment. If you have questions about what will disable alarm
equipment consult your telephone company or a qualified installer.
Rights of the Telephone Company
Should your equipment cause trouble on your line which may harm the telephone network, the telephone
company shall, where practicable, notify you that temporary discontinuance of service may be required. Where
prior notice is not practicable and the circumstances warrant such action, the telephone company may
temporarily discontinue service immediately. In case of such
temporary discontinuance, the telephone
company must: (1) promptly notify you of such
temporary di~continuance; (2) afford you the opportunity to
correct the situation; and (3) in~orm you of your right to bring a complaint to the CommiSSion pursuant to
procedures set forth In
Subpart E of Part 68, FCC Rules and Regulations.
The telephone company may make changes in its communications facilities, equipment, operations or
procedures where such action is required in the operation of its business and not inconsistent with FCC Rules
and Regulations. If these changes are expected to affect the use or performance of your telephone equipment
the telephone company must give you adequate notice, in writing, to allow you to maintain uninterrupted
service.
INTERFERENCE INFORMATION
This device complies with Part 15 of the FCC RUles. Operation Operation is subject to the following two conditions:
(1) This device may not cause harmful interference; and (2) This device must accept any interference received.
including interference that may cause undesired operation.
This equipment has been tested and found to comply with the limits for a Class B digital device,
pursuant to
Part 15 of the FCC Rules. These limits ar~ designed to proVide reasonable protecti on against harmful
interference in a residential Installation.
This equipment generates, uses, and can radiate radio frequency energy and,
if not installed and used in
accordance with the instructions, may cause harmful interference to radio communications. However, there is no
guarantee that interference will not occur in a particular installation.
If this equipment does cause harmful interference to radio or television reception, which can be determined
by turning the equipment off and on, the user is encouraged to try to correct the interference by one or more
of the following measures:
Reorient or relocate the receiving antenna (that is, the antenna for radio or television that is "receiving"
the interference).
Reorient or relocate and increase the separation between the telecommunications equipment and receiving
antenna.
Connect the telecommunications equipment into an outlet on a circuit different from that to which the receiv ing
antenna is connected.
If these measures do not eliminate the interference, please consult your dealer or an experienced radioltelevision
technician for additional sug9,estions. Also, the Federal Communications
Commission has prepared a helpful
booklet, 'HowTo Identify and Resolve RadiolTV Interference Problems:' This booklet is available from the U.S.
Government Printing Office, Washington, D.C. 20402. Please specify stock number 004·000·00345-4 when
ordering copies.
US NUMBER IS LOCATED ONTHE CABINET BOTTOM REN
NUMBER IS LOCATED ONTHE CABINET BOTTOM
WARNING:TO
PREVENT FIRE OR
ELECTRICAL SHOCK
HAZARD, DO NOT
EXPOSETHIS
PRODUCT TO RAIN
OR MOISTURE.
.
'1"_
I
RISK OfELECTRIC
A
OONOTOPEN
A
THE LIGHTNING CAUTION: TO REDUCE THE
THE
FLASH ANO
RISK OF ELECTRIC SHOCK,
POINT WITHIN THE
HEAD WITHIN THE
NOT REMOVE COVER (OR
TRIANGLE IS A
TRIANGLE IS A
BACK). NO WAR
NING SIGN
WARNING SIGN
SERVICEABLE PARTS
ALERTING YOU OF
ALERTING YOU OF
REFER SERVICING TO
IMPORTANT
"DANGEROUS
QUALIFIED SERVICE
INSTRUCTIONS
VOLTAGE" INSIDE
PERSONNEL.
ACCOMPANYING
THE PRODUCT. THE PROOUCT.
SEE MARKING ON BOTTOM I BACK OF PRODUCT
Model 29888
16018110 (Rev. 1 E/S)
03-15
INTRODUCTION
CAUTION: When using telephone equipment, there are
basic safety instructions that should always be followed.
Refer to the IMPORTANT SAFElY INSTRUCTIONS
provided with this product and save them for fi.nure
reference.
Your Digital Messaging System is designed to give you
flexibility in use and high quality performance. To get the
most from your new messaging system, we suggest that you
take a few minutes right now to read through this instruction
manual.
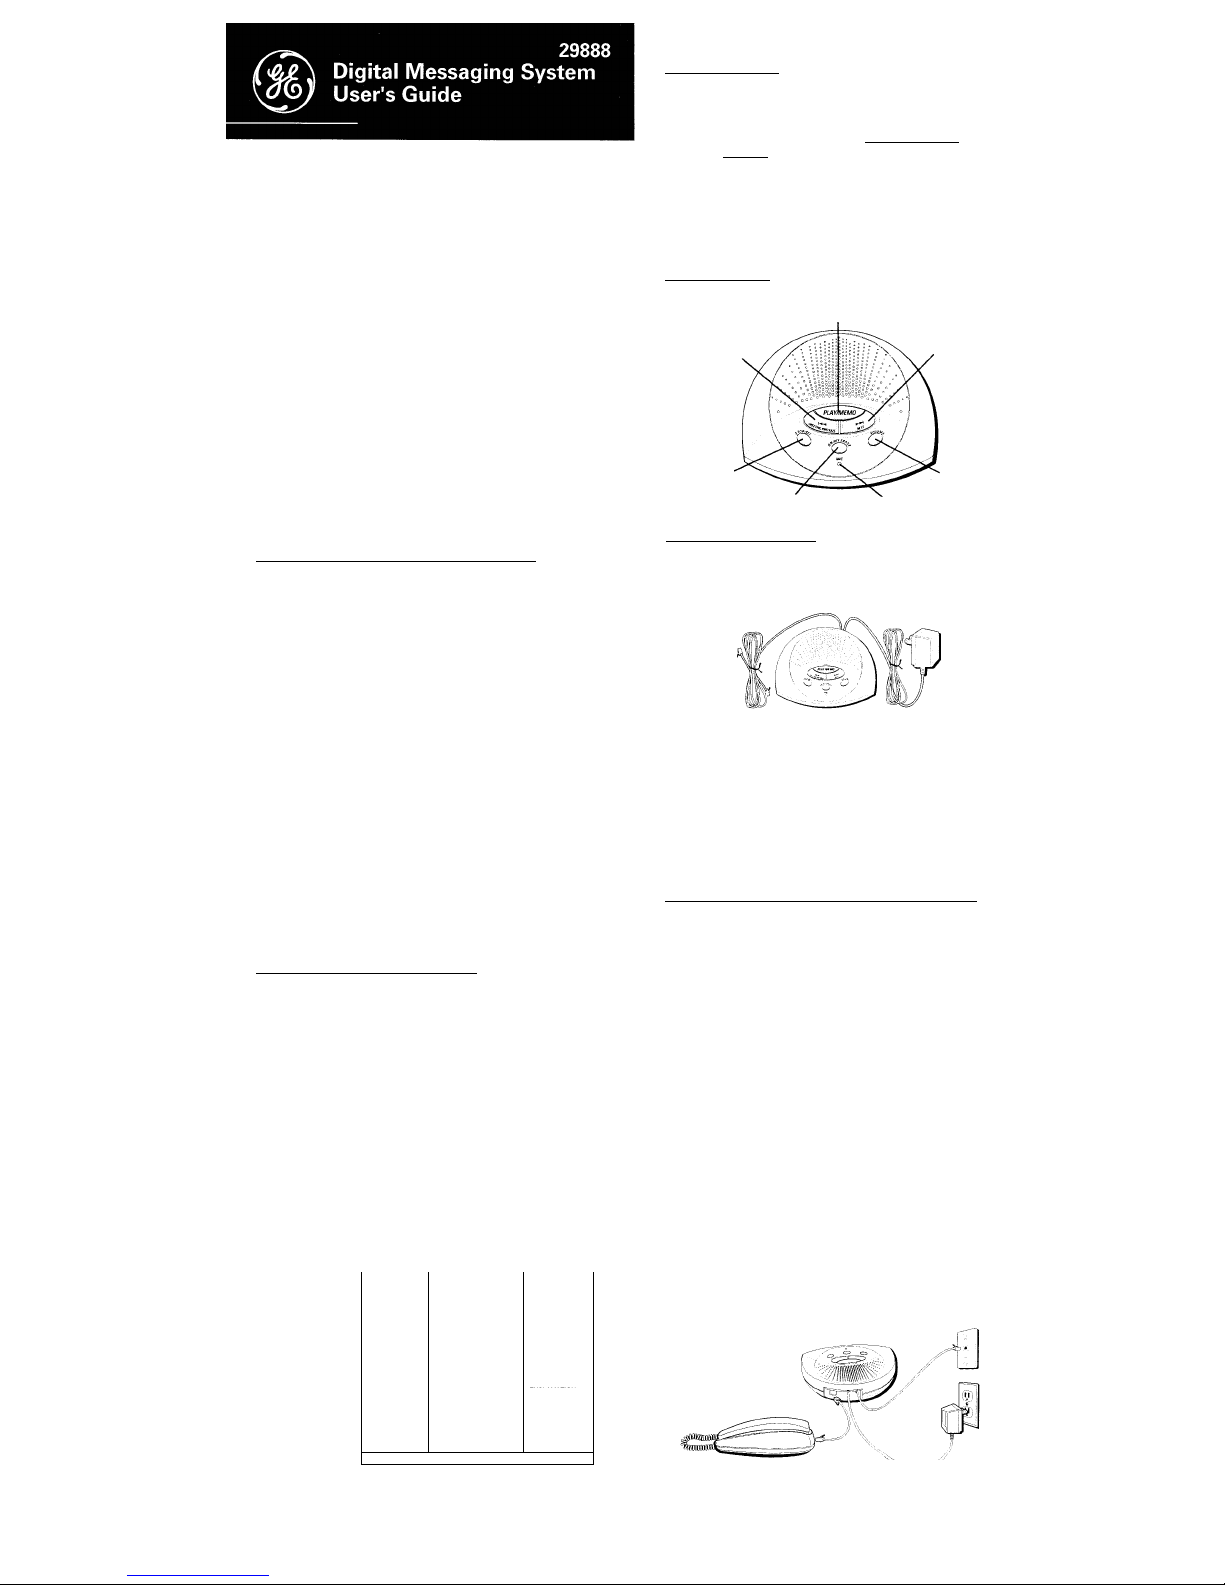
BASE LAYOUT
PLAY/MEMO button or MESSAGES
indicator
STOP/SET
button
VOLUME
button
GREETING/
PREVIOUS
button
NEXT
button
ON/OFF ERASE button
MIC
BEFORE
You
BEGIN
PARTS CHECKLIST
Make sure your package includes the following items:
Digital messaging system
TELEPHONE JACK REQUIREMENTS
To use this phone, you need an RJ11C type
modular telephone jack, which might look
like the one pictured here, installed in your
home. If you don't
have a modular jack, call your local
phone company to find out how to get
one installed.
IMPORTANT INSTALLATION INFORMATION
•
Never install telephone wiring during a lightning storm.
• Never touch non-insulated telephone wires or terminals,
unless the telephone line is disconnected at the network
interface,
• Use caution when installing or modifying telephone lines
(attached to the back of the digital messaging system).
IMPORTANT INSTALLATION GUIDELINES
• Install messaging system near both a telephone
(mOdular) jack and an electrical power outlet.
• Avoid sources of noise, such as a window by a busy
street, and electrical noise, such as motors, microwave
ovens, and fluorescent lighting,
• Avoid heat sources, such as heating air ducts, heating
appliances, radiators, and direct sunlight.
• Avoid areas of excessive moisture or extremely low te
m peratu res.
• Avoid dusty locations,
INSTALLING THE MESSAGING SYSTEM
Choose the best location to install your messaging system. Your
messaging system should be placed on a level surface
such as a desk or table top,
Page 2

1. Plug the telephone line cord (attached to the back of the
messaging system) into a modular wall jack.
NOTE: It is not necessary that a telephone be connected to the
messaging system in order for it to record messages.
HOUR
1. Press and hold the STOP/SET button for two seconds, then
release. The unit announces, "Time (the current time and day
setting) . To set hour, press NEXT. Press SET to continue."
2. To set the hour, press and release the NEXT or
GREETING/PREVIOUS button, and the unit announces an
hour, such as "12am, 1am, 2am," or "12am, 11pm, 10pm:'
3. After choosing the hour, press and release the STOP/SET
button to store the hour. The unit enters the Minute menu.
2. Connect a telephone to the jack on the back of the
messaging system.
3. Plug the power supply into and electrical outlet.
Wait for the beep. The unit is ready for setup or to answer
calls with the default greeting and settings.
MOVING THE MESSAGING SYSTEM
To move the messaging system to a different location in the
house, follow these instructions:
1. Disconnect the telephone line or any phones you may
have connected to the unit.
2. Unplug the power supply from the electrical outlet.
3. Move the messaging system and phone line to the
desired location.
4. Plug the power supply into the new electrical outlet.
5. Connect the telephone line.
MESSAGING SYSTEM SET UP
MINUTES
1. The unit announces, "(the current minutes setting) To set
minutes, press NEXT. Press SET to continue."
2. To change the minutes, press and release the NEXT or
GREETING/PREVIOUS button and the unit announces a
minute such as "1, 2, 3."
3. After choosing the minute, press and release the STOP/
SET button to store the minute. The unit enters the Day
menu.
RECORDING THE GREETING
Before using your new messaging system, you should record a
greeting (the announcement callers hear when your messaging
system answers a call). If you don't record a greeting, callers
hear a default greeting which says,
"We
are unavailable to tahe yo ur
mil. Please leave a message. Thanh you for calling. "
DAY
1. The unit announces, "(the current day setting) To set day,
press NEXT. Press SET to continue:'
2. To change the day, press and release the NEXT or
GREETING/PREVIOUS button and the unit announces a
day, such as "Sunday, Monday" or "Sunday, Saturday:
3. After choosing a day, press and release the STOP/SET
button to store the day. The unit enters the Rings to
Answer menu.
When recording the greeting you should be about six to eight
inches from the unit. Eliminate as much background noise as
possible.
1. Prepare your greeting.
Sample Greeting:
Hi, this is (use your name here). I can't a nswer the
phone right now, so jJlease lea ve your name, number, and a brief message
alter the tone, and I'll get ba ch to you. Thanks.
2. Press and hold the GREETING/PREVIOUS button. The unit
announces
"Record greeting a/ier tone."
After the tone you have
30 seconds to record your greeting.
3. Release the GREETING/PREVIOUS button when finished.
The unit beeps, and the greeting plays back
automatically.
REVIEWING OR ERASING THE GREETING
1. To review the default or recorded greeting, press and quickly
release the GREETING/PREVIOUS button. The unit plays
the current greeting.
2. To erase your greeting, press and hold the ON/OFF
ERASE button while your recorded greeting is playing.
Hold it until the voice prompt states "Greeting erased." The
default greeting is restored.
NOTE: Your recording time should not be less than two seconds.
Otherwise the unit will return to the default greeting.
RINGS TO ANSWER
This setting allows you to select the number of rings before the
unit answers a call.
1. The unit announces, "Rings to Answer (the current rings to
answer setting )To set rings to answer, press NEXT. Press
SET to continue."
2. To change the rings to answer, press and release the NEXT
or GREETING/PREVIOUS button and the unit announces a
number, such as "2,3,4;' or "2, toll saver,S:'
3. After choosing a number, press and release the STOP/ SET
button to store the rings to answer. The unit confirms the
setting and enters Message Length menu.
TOLL SAVER
Toll Saver saves you the cost of making a call when you
access your messages from another location:
• If you have new messages, the unit answers after the 2nd
ring.
• If you have no new messages, the unit answers after the 5th
ring.
You can hang up after the 3rd ring and save the pay
telephone or long distance charge.
Timc
Hour 12
a.m. -
11 p.m.
Minute 0- 59
Day Sunday - Monday
Rings 2,3,4,5 toll saycr
to Answer
Mcssage
time
1,2,,4, rninntcs
Secnrity 0-9.0-9.0-9
Code
Default Settings
Time 12 a.m. Sunday
Rings to Answcr 4
Jvlessage tirne 2
Security Code 123
SETTING THE INCOMING MESSAGE TIME
This setting allows you to select the length of recording time
of the incoming message.
1. The unit announces" Message Time (current message
length) minutes. To set message time, press NEXT. Press
SET to continue."
2. To change the message length, press and release the
NEXT or GREETING/PREVIOUS button and the unit
announces a number, such as "1, 2, 3, 4."
3. After choosing a number, press and release the STOP/ SET
button to store the message time. The unit enters the Security
Code Menu.
SETTING THE SECURITY CODE
This setting allows to change the factory-set security code,
wh
ich you use to access your digital answering system
remotely. The default code is 123.
1. The unit announces, "Security code (the current 3
number Security Code setting). To set security code,
press NEXT. Press SET to stop."
NOTE: If you press and release the STOP/SET button, the unit
announces all the new settings and exits the set up menu.
CHANGING THE SETTINGS
This function allows you to change the Time/Day, Rings to
Answer, message time and Security Code settings. To
change the settings, follow the message system's voice
instructions.
TIME/DAY
This setting allows you to set the current time and day for the
Time/Day stamp attached to each message.
Range of Settings
Page 3

If you press and release NEXT or GREETING/PREVIOUS
button, the unit announces "Security Code (current 3
numbers). To set security code, press NEXT. Press SET to
continue:'
2. To change the first security code number, press and release
the NEXT or GREETING/PREVIOUS button again. The unit
announces all three numbers, but only the first number
changes, such as "123, 223:' or "123, 023:'
3. After choosing the first number, press and release the
STOP/SET button to store the first number.
4. The unit automatically advances to the second number and
announces "Security Code (current 3 numbers). To set
security code, press NEXT. Press SET to continue:' To
change the second and third numbers, repeat steps 4 and 5.
After the third number is stored, the unit announces all the
stored settings and exits the setup menu.
REVIEWING THE SETTINGS
At any time, press and release the STOP/SET button to
review the current time/day, rings to answer, message
time, and security code.
VOLUME
Press the VOLUME button to adjust the listening level. There
are eight different volume levels. The default is level 5, The
unit emits a tone, indicating loudness. With each press of the
volume button, the volume level increases. When you reach
the maximum volume level, the volume level returns to the
minimum level.
MESSAGES INDICATOR
NOTE:
• An 'old' message is a message that has been listened to in its
entirety (including the time and day) and not erased.
• A 'new' message is a message that has not been heard in its
entirety.
• At the end of each message the unit announces the time and
day the message was received.
At the end of messages playback the unit announces "End of
messages."
ERASING ALL MESSAGES
This feature allows you to erase all old messages at one time
but not new messages. If you do not have any messages, the
unit announces,
"Zero Messages.
"When the messaging system isn't
playing or recording messages, press and hold the ON/OFF
ERASE button until you hear the
"Messages Erased"
announcement.
Release the button after the announcement.
NOTE: To erase new messages, play them, then press ERASE
during playback.
LEAVING A MEMO
Press and hold the PLAY/MEMO button, After you hear the
announcement and beeps, record your message. Release the
PLAY/MEMO button when you're finished. The unit treats the
memo as a new message, and the MESSAGES indicator
flashes.
STATUS
Message Indicator flashes slowly
Message Indicator flashes rapidly.
Message Indicator is lit and not flashing.
Message Indicator is off.
SYSTEM OPERATION
EXPLANATION/ SOLUTION
There are new messages.
Press the PLAY/MEMO button
to hear your messages.
Memory is full. Erase some
messages
Answering system is on. No
action required, unit is ready
to receive calls.
Answering system is off, Press
ON/OFF/ERASE button to turn
on.
SCREENING CALLS (AUTO DISCONNECT)
When a call comes in the unit rings the pre-set number of times,
plays the greeting, and records the caller's message.
You may screen incoming calls by listening as the caller leaves
a message. If you want to speak to that caller, pick up any
extension phone. Auto Disconnect tells the unit to stop playing
the greeting or recording a message when an extension phone
is picked up. Sometimes you may pick up the phone and the
machine keeps playing the greeting. This is normal. If you want
to pick up the phone while the greeting is playing, wait about
two seconds after the system answers before picking up the
phone.
If the greeting continues to play after picking up an extension
phone, press and release the STOP/SET button.
REMOTE ACCESS
PLAYING MESSAGES
When the message indicator flashes slowly it means you have
received new messages. Messages play in first received order.
If there are new messages, the unit plays new messages first,
followed by old messages. During remote access, the unit plays
all messages, new and old, in first-received order,
NOTE: Vvnen the messaging system is off, it answers after 10
rings but doesn't play the greeting. The messaging system doesn't
take messages when it is turned off.
ο To play messages, press and release the PLAY/MEMO
button.
ο To stop playback, press and release the STOP/SET button.
ο To restart a current message, press and hold the
GREETING/PREVIOUS button until the message restarts
from the beginning.
ο To return to the beginning of a previous message, press and
release the GREETING/PREVIOUS button within one
second.
ο To fast forward through a message, press and hold the
NEXT button.
ο To skip to the beginning of the next message, press and
release the NEXT button.
To erase a message while it is playing, press and release the
ON/OFF ERASE button. The answering system announces,
"Message Erased" to confirm the message has been erased.
You can access your messaging system from any touchtone
phone by entering your 3-digit security code (the default
security code is 123, but you can change it.) Be aware that
remote functions do not work with rotary or push-button,
pulse-dialing phones. You can cut out the wallet-size remote
card located at the end of this instruction book so you will
have the touch-tone commands when picking up messages
from a remote location.
1. Call your telephone number.
2. After you hear the beep that follows the greeting, enter your
3-digit security code. To bypass the greeting, enter your 3digit security code any time while the greeting is playing.
NOTE: The unit beeps to confirm you haye accessed the remote
functions and begins playing the remote functions menu.
3. Select the function you want to use, and press the
corresponding number on the phone's touch-tone pad.
4. To end the call, hang up or press the "6" number button
while the menu is playing.
NOTE: The unit answers on the 10th ring if the unit is turned off or
the memory is full. To access the messaging system, enter the 3digit security code after the beeps. If memory is full, playback your
messages and erase some of them to restore memory. If the
messaging system is off, press the 2 key on your phone to turn it on.
If you want to end the call press and release the "6" button twice on
the phone you are using while a message is playing.
The MESSAGES indicator lets you know the status of your
unit.
Page 4

GENERAL PRODUCT CARE
To keep your unit working and looking good, follow these
guidelines:
• Avoid putting it near heating appliances and devices that
generate electrical noise (for example, motors or fluorescent
lamps).
• DO NOT expose to direct sunlight or moisture.
Avoid dropping digital answering system and/or other
rough treatment.
• Clean with a soft cloth.
• Never use a strong cleaning agent or abrasive powder
because this will damage the finish.
• Retain the original packaging in case you need to ship it at a
later date.
TROUBLESHOOTING TIPS
DOESN'T ANSWER, OR ANSWERS ON 10TH RING
• Make sure messaging system is turned on.
• Memory is full, erase some messages.
• Check power supply and phone line connections.
I"lCOMING MESSAGES ARE INCOMPLETE
• An extension phone may have been picked up during
recording.
• The caller may have tried to leave a message that is
longer than the allowable message length.
• Memory is full. erase some messages.
• You may have accidentally pressed the STOP/SET button
during message playback.
WON'T RESPOND TO REMOTE COMMANDS
• You must use touch-tone phone with remote access.
• You must enter the correct security code.
Did the unit hang up? If you take no action for a period of
time, it automatically hangs up.
MESSAGING SYSTEM DOESN'T WORK
• Reset the system. Unplug the power supply from the
electrical outlet and plug it back in.
CAN'T HEAR MESSAGES
• Adjust the volume control.
CAN'T RESTART THE MESSAGE
• You must play messages for at least five seconds before
pressing and holding the GREETING/PREVIOUS button.
MESSAGES INDICATOR FLASHES RAPIDLY
• Memory is full, erase some messages.
LIMITED WARRANTY
What your warranty covers:
• Defects in materials or workmanship.
For how long after your purchase:
One year, from date of purchase.
(The warranty period for rental units begins with the first rental or 45 days from date
of shipment to the rental firm, whichever comes first.)
What we will do:
• Provide you with a new or, at our option, a refurbished unit. The exchange unit is
under warranty for the remainder of the original product's warranty period.
How you get service:
Properly pack your unit. Include any cables, etc., which were originally provided with
the product. We recommend using the original carton and packing materials.
"Proof of purchase in the form of a bill of sale or receipted invoice which is
evidence that the product is within the warranty period, must be presented to
obtain warranty service." For rental firms, proof of first rental is also required. Also
print your name and address and a description of the defect. Send via standard
UPS or its equivalent to:
ATLINKS USA, Inc.
c/oThomson
11721 B Alameda Ave.
Socorro, Texas 79927
Pay any charges billed to you by the Exchange Center for service not covered by the
warranty.
Insure your shipment for loss or damage. ATLINKS accepts no liability in case of
damage or loss.
A new or refurbished unit will be shipped to you freight prepaid.
What your warranty
does not
cover:
Customer instruction. (Your Owner's Manual provides information regarding
operating instructions and user controls. Any additional information, should be
obtained from your dealer.)
Installation and setup service adjustments.
Batteries.
Damage from misuse or neglect.
Products which have been modified or incorporated into other products.
Products purchased or serviced outside the USA.
Acts of nature, such as but not limited to lightning damage.
Limitation of Warranty:
THE WARRANTY STATED ABOVE ISTHE ONLY WARRANTY
APPLICABLETOTHIS PRODUCT. ALL OTHER WARRANTIES, EXPRESS OR
IMPLIED (INCLUDING ALL IMPLIED WARRANTIES OF MERCHANTABILITY OR
FITNESS FOR A PARTICULAR PURPOSE) ARE HEREBY DISCLAIMED. NO
VERBAL OR WRITTEN INFORMATION GIVEN BY ATLINKS USA, INC., ITS
AGENTS, OR EMPLOYEES SHALL CREATE A GUARANTY OR IN ANYWAY
INCREASE THE SCOPE OFTHIS WARRANTY.
REPAIR OR REPLACEMENT AS PROVIDED UNDERTHISWARRANTY ISTHE
EXCLUSIVE REMEDY OFTHE CONSUMER. ATLINKS USA, INC. SHALL NOT BE
LIABLE FOR INCIDENTAL OR CONSEQUENTIAL DAMAGES RESULTING FROM
THE USE OFTHIS PRODUCT OR ARISING OUT OF ANY BREACH OF ANY
EXPRESS OR IMPLIED WARRANTY ON THIS PRODUCTTHIS DISCLAIMER OF
WARRANTIES AND LIMITED WARRANTY ARE GOVERNED BYTHE LAWS
OFTHE STATE OF INDIANA. EXCEPTTOTHE EXTENT PROHIBITED BY
APPLICABLE LAW, ANY IMPLIED WARRANTY OF MERCHANTABILITY OR
FITNESS FOR A PARTICULAR PURPOSE ON THIS PRODUCT is L1MITEDTOTHE
APPLICABLE WARRANTY PERIOD SET FORTH ABOVE.
How state law relates to this warranty:
Some states do not allow the exclusion nor limitation of incidental or consequential
damages, or limitations on how long an implied warranty lasts so the above
limitations or exclusions may not apply to you.
This warranty gives you specific legal rights, and you also may have other rights that
vary from state to state.
If you purchased your product outside the USA:
• This warranty does not apply. Contact your dealer for warranty information.
GREETING CONTINUES TO PLAY EVEN AFTER AN EXTENSION PHONE
IS PICKED UP
• This is normal operation. Auto disconnect is delayed for two
seconds after the unit answers a call. If you are near the unit.
press the STOP/SET button to stop the greeting.
SERVICE
If trouble is experienced with this equipment, for repair or
warranty information, please contact customer service at '-
800-448-0329. If the equipment is causing harm to the
telephone network, the telephone company may request that
you disconnect the equipment until the problem is resolved.
This product may be serviced only by the manufacturer or its
authorized service agents. Changes or modifications not
expressly approved by ATLINKS USA, Inc, could void the user's
authority to operate this product. For instructions on how to
obtain service, refer to the warranty included in this guide or call
customer service at '-800-448-0329.
Or refer inquiries to:
ATLINKS USA, Inc.
Manager, Consumer Relations
POBox 1976
Indianapolis, IN 46206
Attach your sales receipt to the booklet for future reference or
jot down the date this product was purchased or received as a
gift. This information will be valuable if service should be
required during the warranty period.
Purchase date
Name of store
Cut out this remote
access card so that you
can take it with you to
help you use the remote
features.
FOLD
To: Press:
Play messages ...... .................... 1
Play previous ................... .......... 7
(during message playback)
Skip to next message ............. 9
(during message playback)
Erase message ................ ...... 0
(during message playback)
Turn on answering system ......... 2
Turn off answering system ......... 3
Record message ....................... 4
(press 6 again when finished)
Record greeting ............... .......... 5
(press 6 again when finished)
Stop playback .................. .......... 6
(during message playback)
To set security code ................... 7
Play greeting ............................. 8
Erase message .......................... 0
Page 5

Page 6

Page 7

Page 8

 Loading...