

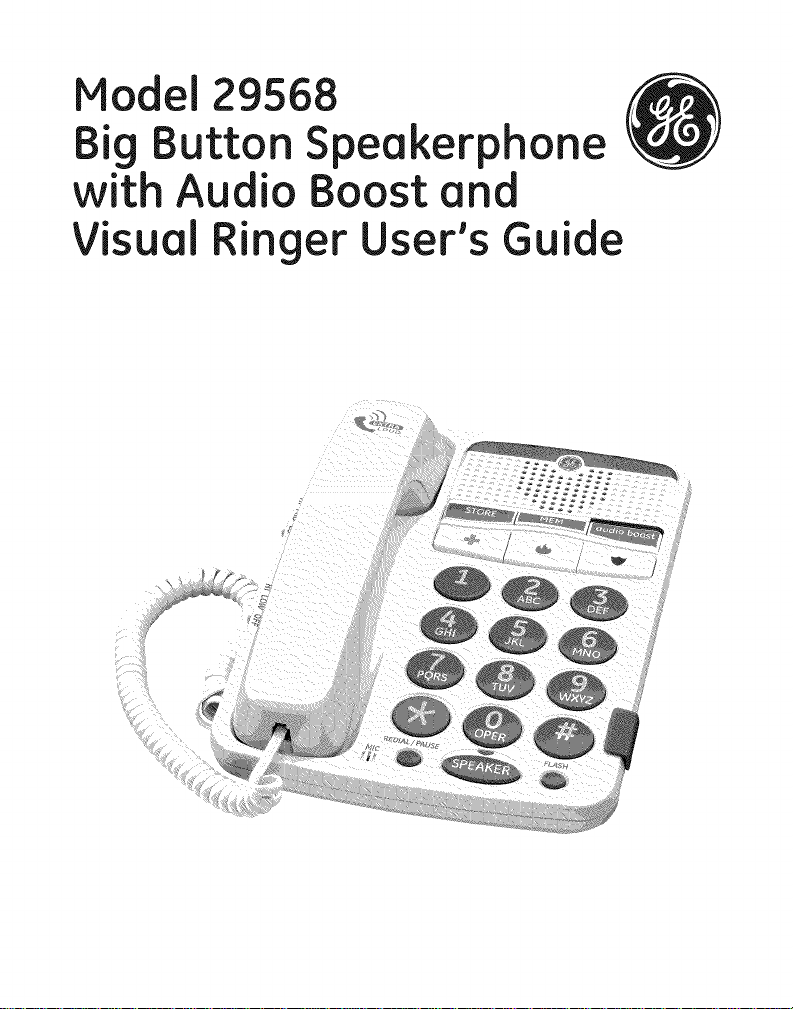
Model 29568
Big Button Speakerphone
with Audio Boost and
Visual Ringer User's Guide
E ui ment A royal Information
Your telephone equipment is approved for connection to the Public
Switched Telephone Network and is in compliance with parts 15 and
68, FCC Rules and Regulations and the Technical Requirements for
Telephone Terminal Equipment published by ACTA.
1 Notification to the Local Telephone Company
On the bottom of this equipment is a label indicating, among other
information, the US number and Ringer Equivalence Number (REN)for
the equipment. You must, upon request, provide this information to
your telephone company.
The RENis useful in determining the number of devices you may
connect to your telephone line and still have all of these devices ring
when your telephone number is called. In most (but not all) areas, the
sum of the RENs of all devices connected to one line should not exceed
5. To be certain of the number of devices you may connect to your line
as determined by the REN,you should contact your local telephone
company.
A plug and jack used to connect this equipment to the premises wiring
and telephone network must comply with the applicable FCC Part 68
rules and requirements adopted by the ACTA.A compliant telephone
cord and modular plug is provided with this product. It is designed to
be connected to a compatible modular jack that is also compliant. See
installation instructions for details.
Notes
This equipment may not be used on coin service provided by the
telephone company.
Party lines are subject to state tariffs, and therefore, you may
not be able to use your own telephone equipment if you are on a
party line. Check with your local telephone company.
Notice must be given to the telephone company upon permanent
disconnection of your telephone from your line.
Ifyour home has specially wired alarm equipment connected to
the telephone line, ensure the installation of this product does not
disable your alarm equipment. Ifyou have questions about what
will disable alarm equipment, consult your telephone company or
a qualified installer.
USNumber is located on the cabinet bottom.
REN Number is located on the cabinet bottom.
2 Rights of the Telephone Company
Shouldyour equipment cause trouble on your line which may harm the
telephone network, the telephone company shall,where practicable,
notify you that temporary discontinuance of service may be required.
Where prior notice is not practicable and the circumstances warrant
such action, the telephone company may temporarily discontinue
service immediately. In caseof such temporary discontinuance, the
telephone company must: (1)promptly notify you of such temporary
discontinuance; (2)afford you the opportunity to correct the situation;
and (3)inform you of your right to bring a complaint to the Commission
pursuant to procedures set forth in Subpart Eof Part 68, FCCRulesand
Regulations.
Thetelephone company may make changes in its communications
facilities, equipment, operations or procedures where such action is
required in the operation of its businessand not inconsistent with FCC
Rulesand Regulations. Ifthese changes are expected to affect the use
or performance of your telephone equipment, the telephone company
must give you adequate notice, in writing, to allow you to maintain
uninterrupted service.
3
Interference Information
Thisdevicecomplieswith Part15oftheFCCRules.Operationissubject
to thefollowing twoconditions:(1)This devicemaynot causeharmful
interference; and (2)Thisdevicemustaccept any interference received,
including interference that maycauseundesiredoperation.
Thisequipment hasbeentestedandfound to comply with the limits
for a ClassBdigital device, pursuant to Part15of the FCCRules.These
limitsare designed to provide reasonable protection against harmful
interference ina residentialinstallation.
Thisequipmentgenerates,uses,andcanradiateradiofrequency
energyand,if notinstalledand usedin accordancewiththe
instructions,maycauseharmfulinterferenceto radiocommunications.
However,thereisnoguaranteethat interferencewillnot occur ina
particularinstallation.
Privacyof Communicationsmaynotbeensuredwhenusingthis
product.
Ifthisequipmentdoescauseharmfulinterferenceto radioortelevision
reception,which can bedeterminedbyturningthe equipmentoffand
on,theuserisencouragedtotry to correctthe interferencebyoneor
moreof thefollowingmeasures:
• Reorientor relocatethe receivingantenna(that is,the antennafor
radioortelevisionthat is"receiving"the interference).
• Reorientor relocateandincreasetheseparationbetweenthe
telecommunicationsequipmentandreceivingantenna.
• Connectthetelecommunicationsequipmentintoan outlet on
acircuitdifferentfromthat to whichthereceivingantennais
connected.
4
If these measures do not eliminate the interference, please consult
your dealer or an experienced radio/television technician for additional
suggestions. Also, the Federal Communications Commission has
prepared a helpful booklet, "How To Identify and ResolveRadio/
TVInterference Problems."This booklet isavailable from the U.S.
Government Printing Office, Washington, D.C. 20402. Please specify
stock number 004-000-00345-4 when ordering copies.
Notice: The changes or modifications not expressly approved by the
party responsible for compliance could void the user's authority to
operate the equipment.
Hearin Aid Corn atibilit (HAC)
Thistelephone system meets FCCstandards for Hearing Aid
Compatibility.
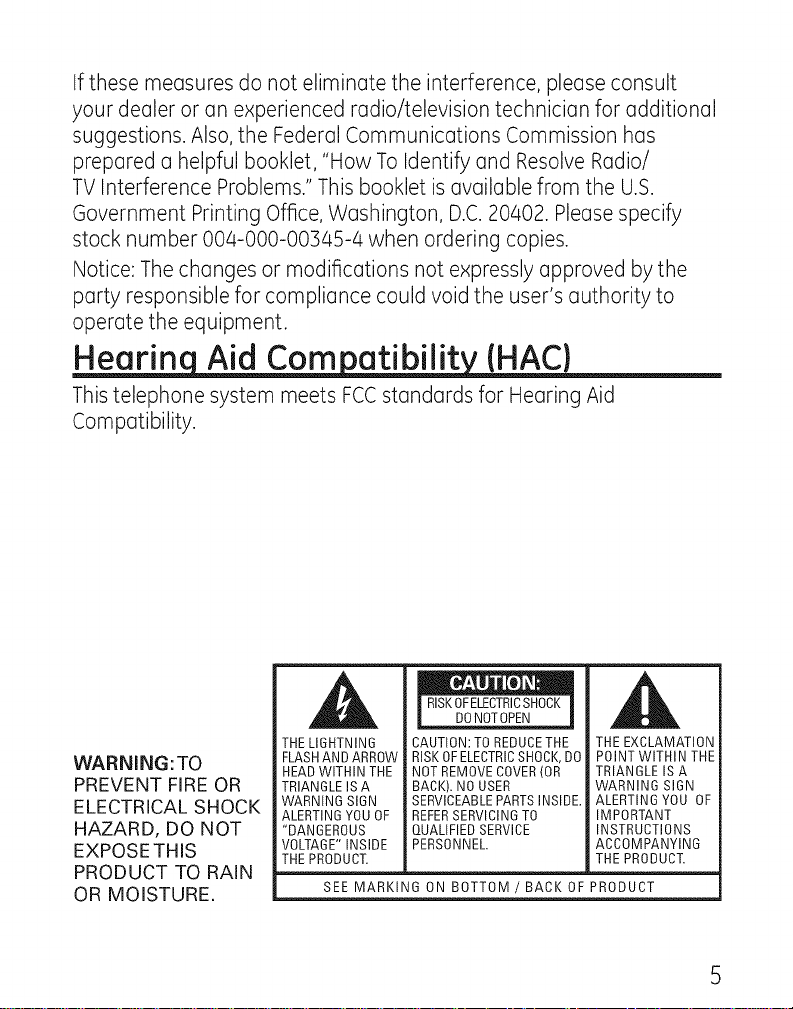
WARNING: TO
PREVENT FIRE OR
ELECTRICAL SHOCK
HAZARD, DO NOT
EXPOSETHIS
PRODUCT TO RAIN
OR MOISTURE.
RISKOFELECTRICSHOCK
DONOTOPEN
THE LIGHTNING
FLASHAND ARROW
HEAD WITHIN THE
TRIANGLE IS A
WARNING SIGN
ALERTING YOU OF
"DANGEROUS
VOLTAGE" INSIDE
THE PRODUCT.
SEE MARKING ON BOTTOM / BACK OF PRODUCT
CAUTION: TO REDUCETHE
RISK OFELECTRICSHOCK,DO
NOT REMOVE COVER(OR
BACK). NO USER
SERVICEABLEPARTS INSIDE.
REFERSERVICING TO
QUALIFIED SERVICE
PERSONNEL.
THE EXCLAMATION
POINT WITHIN THE
TRIANGLE IS A
WARNING SIGN
ALERTING YOU OF
IMPORTANT
INSTRUCTIONS
ACCOMPANYING
THE PRODUCT.
5
Table of Contents
EQUIPMENT APPROVAL
INFORMATION .................. 2
INTERFERENCEINFORMATION,,,4
HEARING AID COMPATIBILITY
(HAC)........................... 5
INTRODUCTION ..................... 7
BEFORE YOU BEGIN .............. 8
PARTS CHECKLIST.................. 8
TELEPHONEJACK
REQUIREMENTS................... 8
INSTALLATION ...................... 9
IMPORTANTINSTALLATION
GUIDELINES........................ 9
BASE LAYOUT .................... 10
INSTALLING THE PHONE ....... 11
CONNECTING THETELEPHONE
LINE ................................ 11
INSTALLINGTHE WALL
MOUNTING BRACKET...... 12
TELEPHONE OPERATION ...... 13
SPEAKERPHONE................... 13
PLACING A CALL ................. 14
HANDSET ....................... 14
SPEAKERPHONE.............. 14
ANSWERING A CALL....... 14
AUDIO BOOST................ 14
HANDSET ....................... 14
SPEAKERPHONE.............. 15
VOLUME .............................. 15
FLASH ................................. 15
REDIAL................................ 16
MEMORY ............................. 16
STORINGA NUMBER IN
MEMORY......................... 16
ADDING A PAUSETO THE
DIALING SEQUENCE........ 17
CHANGING A
STORED NUMBER ............ 17
DIALING A NUMBER FROM
MEMORY......................... 17
DIALING THE EMERGENCY
QUICKDIALNUMBERS...17
CHAIN DIALING FROM
MEMORY......................... 18
TROUBLESHOOTING GUIDE... 18
GENERAL PRODUCT CARE ,,, 20
SERVICE............................ 21
LIMITED WARRANTY ........... 22
INDEX .............................. 26
Introduction
CAUTION: When using telephone equipment,
_ here are basic safety instructions that
should always be followed. Refer to the
IMPORTANT SAFETY INSTRUCTIONS provided
with this product and save them for future
reference.
7
Before You Be in
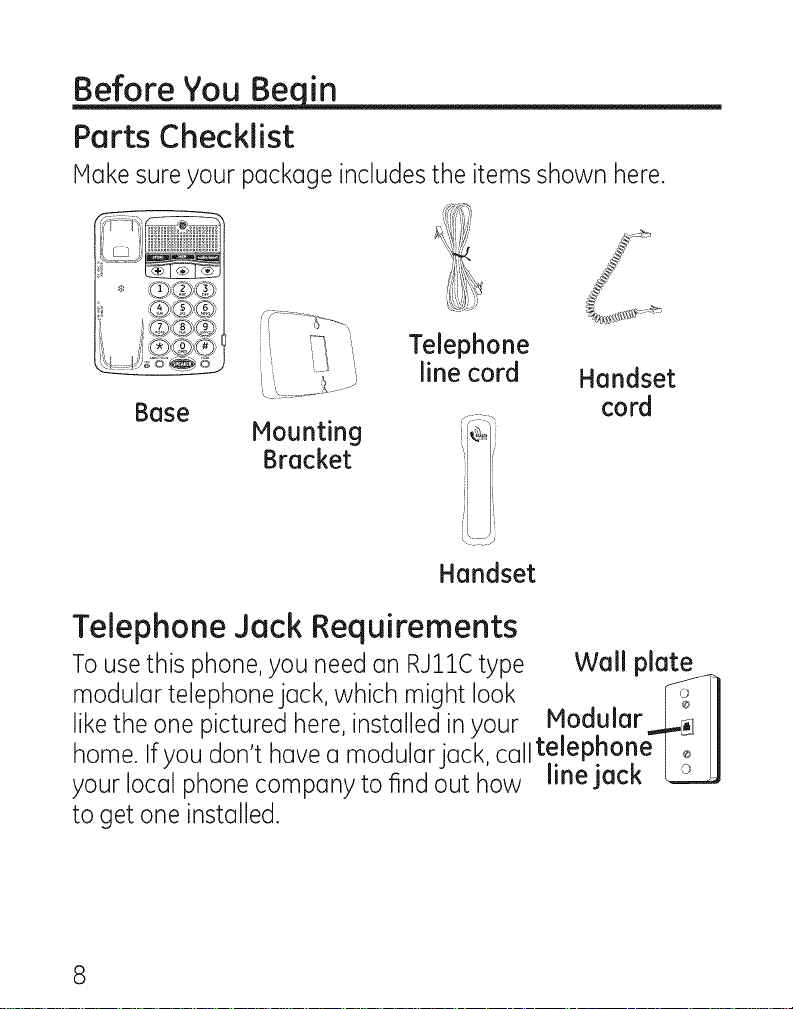
Parts Checklist
Makesureyour package includesthe items shown here.
Telephone
line cord
Mounting
Bracket
Telephone Jack Requirements
Tousethis phone,you needan RJllC type Wall plate
modular telephonejack, which might look
Handset
cord
likethe one pictured here,installed in your Modular
home. Ifyou don t have a modular jack, calltelep h°ne E] I
your local phone companyto find out how linejack I_,_L.JJ
to get one installed.
8
Installation
important Installation GuideJines
• Avoid sources of noise ond heot, such os motors,
fluorescent lighting, microwove ovens, heoting
opplionces ond direct sunlight.
• Avoid oreos of excessive dust, moisture ond low
temperoture.
• Avoid other cordless telephones or personol computers.
• Never instoll telephone wiring during o lightning storm.
• Never instoll telephonejocks inwet Iocotions unless the
jock isspecificolly designed for wet Iocotions.
• Never touch non-insuloted telephone wires or terminols,
unless the telephone line hos been disconnected ot the
network interfoce.
• Use coution when instolling or modifying telephone lines.
9
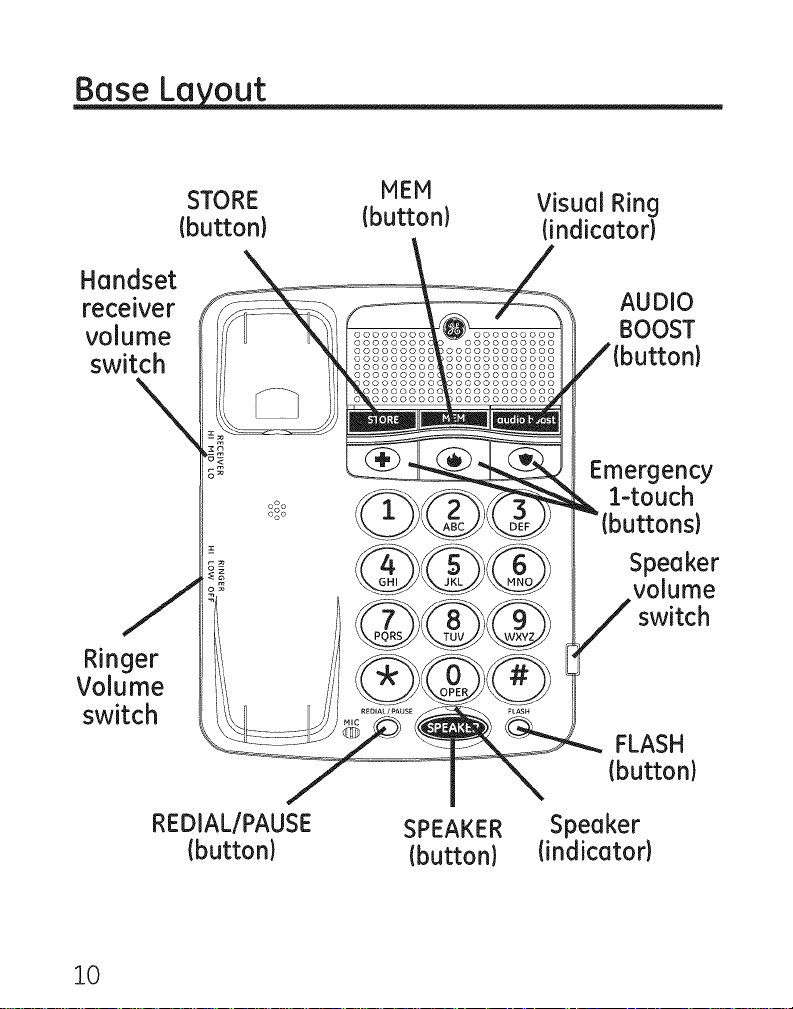
Base La out
STORE HEM Visual Ring
(button) (button) (indicator)
Handset
receiver AUDIO
volume BOOST
switch
Emergency
l-touch
buttons)
Speaker
volume
switch
Ringer
Volume
switch
FLASH
(button)
10
REDIAL/PAUSE
(button)
SPEAKER
(button)
Speaker
(indicator)
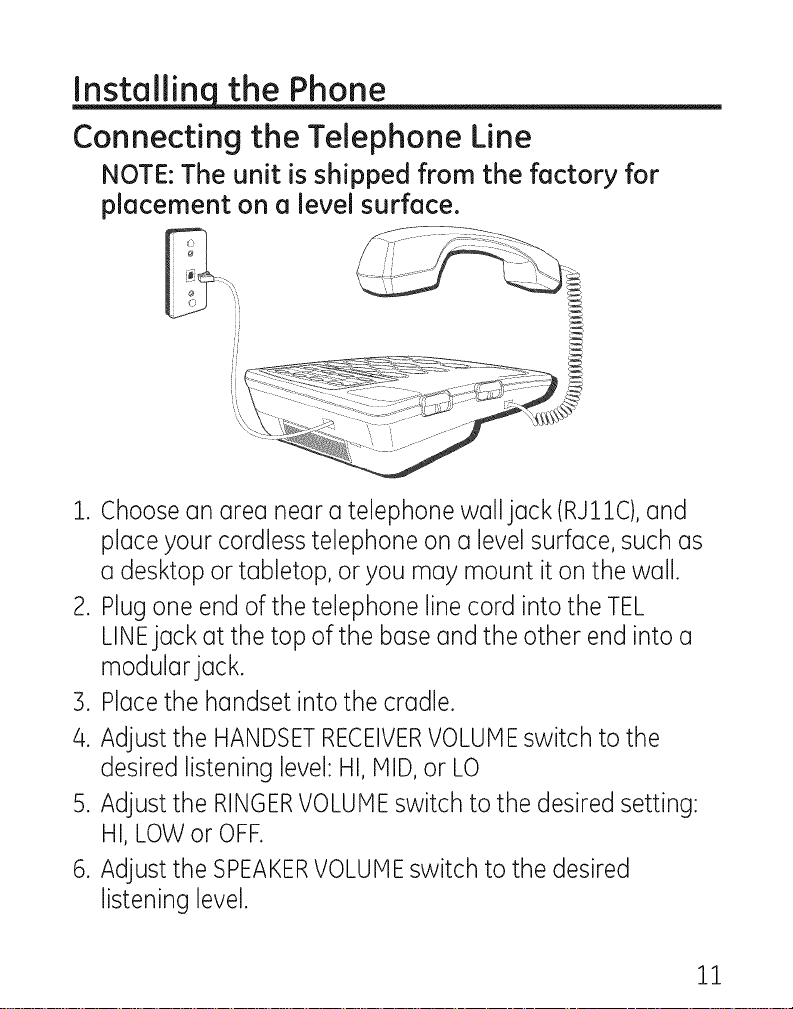
Installin the Phone
Connecting the Telephone Line
NOTE: The unit is shipped from the factory for
placement on a level surface.
1. Choose an area near a telephone walljack(RJ11C),and
placeyourcordlesstelephoneona levelsurface,suchas
a desktop or tabletop, or you may mount it on the wall.
2. Plugoneendofthe telephonelinecordintotheTEL
LINEjack at thetop ofthe baseandtheotherendintoa
modular jack.
3. Place the handset into the cradle.
4. Adjust the HANDSETRECEIVERVOLUMEswitch to the
desired listening level: HI, MID,or LO
5. Adjust the RINGERVOLUMEswitch to the desired setting:
HI, LOW or OFF.
6. Adjust the SPEAKERVOLUMEswitch to the desired
listening level.
11
Theunit isproperly installed if you pick up the handset and
hear the dialtone. Ifyou don't hear a dial tone recheckall
the installation steps.
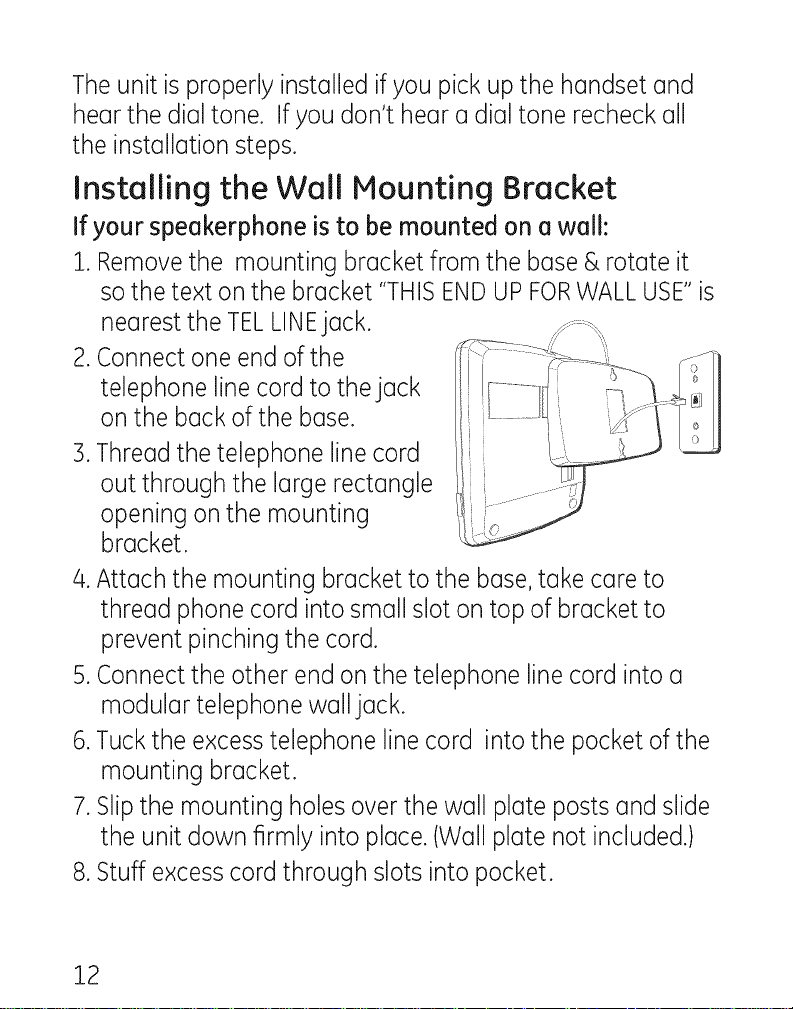
Installing the Wall Mounting Bracket
If your speakerphone is to be mounted on awall:
l. Removethe mounting bracketfrom the base & rotate it
sothe text on the bracket "THISENDUPFORWALLUSE"is
nearestthe TELLINEjack.
2.Connectone end of the
telephone line cord to the jack
on the back of the base.
3.Threadthe telephone linecord
out through the large rectangle
opening on the mounting
bracket.
4.Attach the mounting bracket to the base,take care to
thread phone cord into small slot on top of bracket to
prevent pinching the cord.
S.Connect the other end on the telephone line cord into a
modular telephone wall jack.
6.Tuckthe excesstelephone linecord into the pocket of the
mounting bracket.
7.Slipthe mounting holesover the wall plate posts and slide
the unit down firmly into place.(Wall plate not included.)
8.Stuff excesscord through slots into pocket.
12

Tele hone 0 eration
Speakerphone
For h(unds-free operation and convenience, this unit is
equipped with (uspe(ukerphone.
For best spe(ukerphone performance, avoid the following:
,, Areas with high background noise. (The microphone
might pick up these sounds and prevent the
spe(ukerphone from going into the receiving mode when
you finish talking.)
,, Surfaces affected by vibration.
,, Recessed areas such (usin (ucorner, under (ucupboard, or
next to (ucabinet, which can generate an echo effect.
Note the following guidelines when using the
speakerphone:
,, The spe(ukerphone works similar to (utwo-w(uy radio in
that you can only listen or talk at one time.
,, Stay reasonably close to the phone so that you can be
clearly heard by the person to whom you are talking.
• Youcanadjustthe speakervolumebyadjustingthe
VOLUMEcontrol on the right side of the base.
,, The speakerphoneindicator comes on when the
speakerphoneisin use.
13
Placing a Call
Handset
1. Pick up the handset and listen for a dial tone.
2. Dial the number you want to call.
3. When finished, hang up the handset.
Speakerphone
1. Pressthe SPEAKERbutton on the base and listen for a dial
tone.
2. Dial the number you want to call.
5. When finished, press the SPEAKERbutton to hang up.
Answering a Call
NOTE:Hake sure the ringer switch is set to HI
or LO, or the phone will not ring. The visual ring
indicator will flash at all settings.
Audio Boost
You may press this button to temporarily boost the volume of
the handset receiver during a call. To return to normal levels,
press the button again. The Volume levels will also return to
normal when handset is replaced on the base after a call.
Handset
1. When the phone rings, pick up the handset.
2. When finished, hang up the handset.
14
Speakerphone
1. When the phone rings,pressthe SPEAKERbutton to
answer a call.
2. When finished, pressthe SPEAKERbutton to hang up.
Youmay switch between the speakerphone and the handset
during the dialing processor anytime during a conversation.
Speakerphone to Handset - Pickup the handset to disable
the speakerphone.The speakerphone indicator turns off.
Handset to Speakerphone - Pressthe SPEAKERbutton, and
then hang up the handset. Thespeakerphone indicator turns
on and the handset is disabled.
Volume
Youcan control the volume of both the handset receiver and
the speakerphone.
While using the handset or speakerphone,you may adjust
the receiver orspeaker volume controls,to the desired
listening level.
Flash
Pressthe FLASHbutton to activate customer calling services
such ascall waiting orcall transfer,which are provided by
your local phone company.
15
Redial
You may redial the last number you called by pressing the
REDIAL/PAUSEbuttonafteryougeta dialtone.
NOTE: The Redial feature holds in memory the
last phone number you dialed (as many as
32 digits). If you pressed any numbers after
dialing the phone number, (for example, when
accessing a voice-menu system) those numbers
also are redialed.
Storeasmanyas13numbersinmemoryfor easydialing°
Three can be stored in the Emergency Quick Dial locations,
and ten additional numbers in the numbered keys(0-9).
Storing a Number in Memory
1. Make sure the telephone is properly installed. Pick up the
handset and listen for the dial tone. Ifyou don't hear the
dial tone, recheck or repeat the installation steps.
2. Pressthe SPEAKERbutton or pick up the handset.
3. Pressthe STOREbutton.
4. Dial the number to be stored (up to 16 digits)
5. Pressthe STOREbutton again.
6. Pressa memorylocation(0-9onthe keypad),or an
Emergency Quick Dial button.
7. Pressthe SPEAKERbutton or hang up the handset.
16
Adding a Pause to the Dialing Sequence
Usethe REDIAL/PAUSEbutton to insert a delay inthe dialing
sequencewhen storing a number,for example, when you
needto dial 9 to get an outside line.
PressREDIAL/PAUSEat the point in the dialing sequence in
which a pause isrequired.
Thepausetime is approximately four seconds,if additional
time is needed,pressthe REDIAL/PAUSEbutton again.
Changing a Stored Number
Changea stored number byreplacing it with adifferent
number.
Dialing a Number from Memory
Youcan dial numbersfrom memory when using the handset
or speakerphone.When you get a dial tone, pressthe MEM
button followed bythe memory location (0-9)for the number
you want to dial.
Dialing the Emergency Quick Dial Numbers
Ifyou have previouslyprogrammed your EmergencyQuick
Dialnumbers,you only needto pressthe button after you
get a dial tone.
17

Chain Dialing from Memory
Usethis feature to make calls which require o sequence
of numbers,for instance if you use o calling card for a
frequently called longdistance number.Bydialing each part
of the sequencefrom memory. Thefollowing exampleshows
how you can usechain dialing to make o call through o long
distance service:
The Number For
Long Distance Access Number
Authorization Code
Frequently called long distance number 9
Memory Location
7
8
1. PressSPEAKER(or pick up the handset).
2. Pressthe MEMbutton and then press 7.
3. When you hear the accesstone, pressthe MEMbutton
and then press8.
4. At the next accesstone, pressthe MEMbutton and then 9.
Troubleshooting Guide
Nodial tone
• Checkinstallation:
Makesure the telephone line cord is connected to the
base unit and the wall phonejack.
• Checkthe hook switch. Makesure it fully extends when
the handset is lifted from the cradle.
18

• Youmust havetouch-tone serviceon your lineto usethis
phone. Ifyou do not know what type of serviceyou have,
check with the phone company.
• Hakesure speakerphone indicator comes on (if
using speakerphone.)
• Unplugthe phone,wait :30seconds,and plug the phone
back in.Then lift the handsetto check the dialtone.
• Connectanother phoneto the samemodular jack; if the
second phone doesn't work, the problem might bewith
your wiring or local service.
• Placethe handset in the basefor at least 20 seconds.
Phonedoesn't ring
• Hakesure ringer switch is set to LOor HI.
• Youmay have too many extension phones on your line.
Unplugsome extension phones.
• Checkfor a dial tone. Ifthere isno dial tone,see solutions
for "Nodial tone."
Low handset or speaker volume
• Check the receiver or speaker volume settings.
Can't be heard by other party
• Hake sure phone cord is securely plugged in.
• Hake sure extension phones are on the hook at the same
time you're using the phone. It is normal for the volume
to drop when additional extension phones are used at
the same time.
19

Memory dialing
,, Makesure you entered numbers correctly. (See
"Memory.")
,,Makesurethetelephoneisproperlyinstalled.Pickupthe
handsetandlistenforthedialtone.Ifyoudon'thearthe
dialtone,recheckorrepeatthe installationsteps.
General Product Care
Tokeepyour telephoneworking andlookinggood,follow
theseguidelines:
, Avoidputting the phonenearheating appliancesand
devicesthat generateelectricalnoise(forexample,
motorsor fluorescent lamps).
DONOTexposeto directsunlight ormoisture.
Avoiddroppingthe unit andother roughtreatment.
, Cleanwith a soft cloth.
, Neverusea strong cleaningagent or abrasivepowder
becausethiswill damagethe finish.
, Retaintheoriginalpackagingin caseyou needto ship
the phoneat a later date.
20

Service
If trouble is experienced with this equipment, for repair or
warranty information, please contact customer service at
1-800-448-0329. If the equipment is causing harm to the
telephone network, the telephone company may request
that you disconnect the equipment until the problem is
resolved.
This product may be serviced only by the manufacturer or
its authorized service agents. Changes or modifications not
expressly approved by Thomson Inc. could void the user's
authority to operate this product. For instructions on how to
obtain service, refer to the warranty included in this guide or
call customer service at1-800-448-0329.
Or refer inquiriesto:
Thomson Inc.
Manager,Consumer Relations
P0 Box 1976
Indianapolis, IN46206
Attach your salesreceipt to the guide for future reference or
jot down the date this product was purchased or receivedas
a gift. This information will bevaluable if serviceshould be
required during the warranty period.
Purchasedate
Name of store
21

Limited Warrant
What your warranty covers:
• Defectsinmaterialsorworkmanship.
Forhowlongafteryourpurchase:
,, Oneyear,from dateof purchase.
(Thewarrantyperiodfor rentalunitsbeginswith thefirst
rentalor 45daysfromdate ofshipmenttothe rentalfirm,
whichevercomesfirst.)
Whetwewill do:
,, Provideyouwith a newor,at ouroption,a refurbished
unit.Theexchangeunitisunderwarrantyforthe
remainderofthe originalproduct'swarrantyperiod.
Howyou get service:
• Properlypackyour unit. Includeanycables,etc.,which
wereoriginallyprovidedwiththe product.Werecommend
usingtheoriginalcartonandpackingmaterials.
• "Proofof purchaseinthe formof a billofsaleorreceipted
invoicewhich isevidencethat the productiswithinthe
warrantyperiod,mustbepresentedto obtainwarranty
service."Forrentalfirms,proofof first rentalisalso
required.Alsoprintyour nameandaddressand a
descriptionofthe defect.SendviastandardUPSor its
equivalent to:
22

Thomson, Inc.
11721 BAlameda Ave.
Socorro, Texas79927
,, Payany charges billed to you by the ExchangeCenterfor
service not covered by the warranty.
,, Insureyour shipment for lossor damage. Thomson Inc.
accepts no liability in case of damage or loss.
,, A new or refurbished unit will be shipped to you freight
prepaid.
What your warranty does not cover:
,, Customer instruction. (YourOwner's Manual provides
information regarding operating instructions and user
controls. Anyadditional information, should be obtained
from your dealer.)
• Installation and setup serviceadjustments.
• Batteries.
• Damagefrom misuseor neglect.
,, Productswhich have been modified or incorporated into
other products.
,, Productspurchased or serviced outside the USA.
• Acts of nature, such as but not limited to lightning
damage.
23

Product Registration:
• Pleasecomplete and mail the Product Registration Card
packedwith your unit. It will make it easier to contact you
should it ever be necessary.The return of the card is not
requiredfor warranty coverage.
Limitation of Warranty:
• The warranty stated above is the only warranty
applicable to this product. All other warranties,
express or implied (including all implied warranties of
merchantability or fitness for a particular purpose} are
hereby disclaimed. No verbal or written information
given by Thomson Inc., its agents, or employees shall
create a guaranty or in any way increase the scope of
this warranty.
• Repairor replacement as provided under this warranty
isthe exclusive remedy of the consumer. Thomson
Inc. shall not beliable for incidental or consequential
damages resulting from the useof this product or
arising out of any breach of any express or implied
warranty on this product. This disclaimer of warranties
and limited warranty are governed by the laws of the
state of Indiana. Exceptto the extent prohibited by
applicable law, any implied warranty of merchantability
or fitness for a particular purpose on this product is
limited to the applicable warranty period set forth
above.
24

How state law relates to this warranty:
• Somestates do not allow the exclusion nor limitation
of incidental or consequential damages,or limitations
on how longan implied warranty lasts so the above
limitationsorexclusionsmaynotapplytoyou.
• This warranty gives you specific legal rights, and you also
may have other rightsthat vary from stateto state.
If you purchased your product outside the USA:
• This warranty does not apply. Contact your dealer for
warranty information.
25

index
A
Adding a Pause to the
Dialing Sequence 17
Answering a Call 14
Audio Boost 14
B
Base Layout 10
Before You Begin 8
C
Chain Dialing from
Memory 18
Changing a Stored
Number 17
Connecting the
Telephone Line
D
Dialing a Number from
Memory 17
Dialing the Emergency
Quick Dial Numbers
17
11
E
Equipment Approval
Information 2
F
Flash 15
G
General Product Care 20
H
Handset 14
Hearing Aid Compatibility
(HAC) 5
I
Important Installation
Guidelines 9
Installation 9
Installing the Phone 11
Installing the Wall
Mounting Bracket 12
Interference Information
4
Introduction 7
26

L V
Limited Warranty 22 Volume 15
M
Memory 16
P
Parts Checklist 18
Placing a Call la
R
Redial 16
S
Service 21
Storing a Number in
Memory 16
Speakerphone 13,14,15
index
T
Telephone Jack
Requirements 8
Telephone Operation 13
Troubleshooting Guide
18
27

Model 29568
00018558 (Rev.0 Dom E/S)
07-13
Printed in China
THO 4SON
images & beyond/
Thomson inc.
10330 North Meridian Street
Indianapolis, IN 46290
© 2007 Thomson Inc.
Trademark(s) ® Registered
Marco(s) Registrada(s)

Modelo 29568 Tei_fono
e Botones Grandes
con Altavoz Realce de Au
Timbre
VisualGu_a delUsuario
Joy

Informaci6n sobre la A robaci6n de E ui o
Elequipodesutel@fonoestaaprobadoparalaconexi6nconlared
Telef6nicaPOblica(PublicSwitchedTelephoneNetwork)ycumplecon
losrequisitosestablecidosenlassecciones15y68delasReglasy
RegulacionesdelaFCCy con losRequerimientosT@cnicosparaEquipos
deTerminalesTelef6nicas(TechnicalRequirementsforTelephone
TerminalEquipment),publicadopotACTA.
1 Notificaci6n a laCompa_iaTelef6nicaLocal
Enlapartedeabajo deesteequipohayunaetiquetaqueindica,
entreotra informaci6n,elnOmerodeUSy el NOmerodeEquivalencia
deTimbres(REN)paraesteequipo.Usteddebe,cuandosea
requerido,proveerestainformaci6na sucompa_iatelef6nica.
ElRENesOtilparadeterminarel nOmerototaldeartefactosque Ud.
puedeconectara sulineatelef6nica,todaviaasegurandoquetodos
estosartefactossonar6ncuandoseIlamesunOmerotelef6nico.En
la mayoriadelas6teas(peronoentodas),eltotal delosnOmeros
RENdetodoslosartefactosconectadosa unalineanodebeexceder
S.ParaestarsegurodelnOmerototal deartefactosque Ud.pueda
conectarasu linea(determinadopotel REN),Ud.deber6ponerseen
contactocon sucompa_iatelef6nicalocal.
Cualquierenchufeyconexi6nqueseutiliceparaconectareste
equipoalcableadodeledificioyala redtelef6nica,debeestaren
conformidadconel reglamentodela FCCParte68quehasido
adoptadopot laACTA.Uncabletelef6nicoyunenchufemodularque
hansidoaprobadosy est6nenconformidadcon dichoreglamento
hansidoprovistoscon esteproducto.Est6ndise_adospara set
conectadosaunenchufemodularcompatible,quetambi@nest_
enconformidad.Param6sdetalles,yealasinstruccionespara la
instalaci6n.

Notes
• No se puede usar este equipo con unteldono de previo pago
pravefdo par la compa_fa telef6nica.
• LasI[neascompartidas son sujetas alas tarifas del estado,y por
eso,esposible que Ud.no pueda usar su propio equipo telef6nico
siUd.estuviera compartiendo lamisma I[neatelef6nica con otros
abonadas.
• Se debe notificar la compaflfa telef6nica cuandose desconecte
permanentemente sutel_fono de la linea.
• Sisu casatiene algOnequipo de alarma especialconectado a la
lineatelef6nica, asegOreseque la instalaci6n de este praducto no
desactivesu equipa de alarm& Siustedtiene alguna pregunta sobre
qu_ puede desactivar su equipode alarma, consulte a su compaflfa
telef6nica o a uninstalador calificado..
Eln6mera de la USest6 ubicada en el fanda de la bose
Elnumera RENesta ubicado en el fondo de la bose.
ADVERTENC_,: PARA
PREVENIR
ELRIESGODE
UNFUEGO O DE UNA
SACUDIDA
ELECTRICA,NO
EXPONGA
ESTEAPARATOA LA
LLUVIA © A LA
HUMEDAD.
,&
ELREL/_.MPAG0Y LA
PUNTADE FLEPHA
DENTR0DELTRIANGUL0
ESUNA SEiIAL DE
#,DVER[rENCIA,
#,LERTANDOLEA UD.DE
[_UEHAY"VOLTAJE
PELIGROS0"DENTR0DEL
PRODUCT0.
VEAADVERTENCIAEN LAPARTEPOSTERIOR/BASEDELPRODUCT&
RIESG0DESACUDIDA
ELECTRICANOABPA
RUIDADO: PAPA REDUCIR
EL RIESOO BE UNA SARUDIDA
ELEOTRIPA, NO QUITE LA
PUBIERTA (0 PARTE
POSTERIOR) NO USE PARTES
DE REPUESTO UENTR0.
C0NSULTE A ALGUNA
PEPSONA PALIFIOADA UEL
SERVIRIO DE REPARARIONES.
I
,&
ELSIRNO DE
EXCIAMACION DENTRO
DELTRIANGUL0ESUNA
SENAL DE
ADVEI_TPN PIA,
ALTERTANUOLEA UD. DE
QUEEL PRODUPT0,TRAE
INPLUCIDO,
INSTRUCTIONESMUY
IMPORTANTES.
3

2 Derechos de la Compafiia Telef6nica
Sisu equipo ceusese algOn probleme en su linee que pudiere defter
le red telef6nica, la compaflfe telef6nica siempre que sea posible
le eviserd de le posible interrupci6n temporal de su servicio. En
case que le compaflfe no pudiere eviserle de entemeno y hubiere
necesided de tomer tel ecci6n, le compaflfa telef6nice podrd
interrumpir su servicio inmedietemente. Encase detel interrupci6n
telef6nica temporal le compeflfe debe :(1)derle eviso el memento
de tel interrupci6n temporal de service, (2)concederle e Ud. le
oportunided de corregir le situeci6n, (3)informarle e Ud.de sus
derechos de presenter une questa e le Comisi6n de ecuerdo con
los procedimientos dictedos en le Subperte Ede le Porte 68 de los
Regulecionesy Reglesde le FCC.
Lacompefl[e telef6nice puede hecer los cambios en sus
instaleciones de comunicaci6n, en equipos, en sus funcionemientos
o procedimientos que digne necesarios peru el menejo de
sus negocios y que no seen incompatibles con los Reglesy
Regulecionesde I e FCC.Siestos cembios pudieren elterer el useo
el funcionemiento desu equipo telef6nico, le compeflfe telef6nice
deber(_durle eviso edecuedo en escrito pore que Ud.goce de un
service ininterrumpido.
Informaci6n de Interferencias
Esteertefacto cumple con le Porte 15 de los Reglesde la FCC.Su
funcionomiento es sujeto e los dos condiciones siguientes: (I)Este
ertefecto no puede causer interferencia daflosa, y (2) Esteartefecto
debe ecepter cuolquier interferencia recibide, incluyendo interferencie
que puede causer un funcionemiento nodeseedo.
Esteequipo ha side probado y cumple con los I[mites pare un ertefecto
digital de le Close B,de conformided con le Porte 15 de los Regles
de le FCCEstos I[mites hun side disefledos pare proporcioner une
protecci6n razoneble centre una interferencie deflose que puede
existir en une insteleci6n dom#stice.
4

Esteequipogenera,usaypuederadiarlaenergiadefrecuenciadeuna
radioy, sinofuerainstaladoy usadodeacuerdoconlasinstrucciones,
puedecausarinterferenciada_osaalas transmisionesradiales.Sin
embargo,nohay garantfaquela interferencianoocurriraen una
instalaci6nenparticular.
Laaislamientodecomunicacionesno puedesetaseguradaalusar
esteproducto.
Siesteequipocausaenefectounainterferenciada_osaala recepci6n
dela radioo delatelevisi6n,Iocualpuedesetdeterminadoapagando
y prendiendoelequipo,leanimamosa Ud.detratar decorregirla
interferenciapotmediodeuna(om6s)delassugerenciassiguientes:
• Cambielaposici6no laubicaci6ndelaantena(quieredecir
laantenadela radioodelatelevisi6nqueest@recibiendola
interferencia).
Cambielaposici6nocambiela ubicaci6ny aumentela distancia
entreelequipodetelecomunicacionesy la antenareceptoradela
radioodelatelevisi6nqueest(_recibiendolainterferencia.
Conecteelequipodetelecomunicacionesa unatoma enun
circuitodiferentedelcircuitoal cuallaantenareceptoraest@
conectada.
Siestasmedidasnoeliminanla interferencia,favor deconsultara
sudistribuidoro a unt@nicoderadio/televisi6nexpertopot otras
sugerencias.Tambi@n,laComisi6nFederaldeComunicaciones(FCC)
hapreparadounfolletomuyOtil,"HowToidentifyand ResolveRadio/
TVinterferenceProblems"("ComoIdentificary ResolverProblemas
deInterferenciadeRadio/Televisi6n').Estefolletosepuedeobtener
delU.S.GovermentPrintingOffice,Washington,D.C.20402.Favorde
especificarelnOmero004-000-00345-4cuandohagasupedido.
Aviso:Loscambioso lasmodificacionesno noexpresoaprobadospot
el partidoresponsabledeconformidadpodiananularlaautoridaddel
usuarioparafuncionarelequipo.
5

Tabla de Contenido
INFORMACION SOBRE LA
APROBACI6N DE EQUIPO ... 2
INFORMACKT)N DE INTERFERENCIAS
4
TABLA DE CONTENIDO ............ 6
COMPATIBILIDAD CON AUDiFONOS
(CCA)............................ 7
INTRODUCCI6N ...................... 7
ANTES DE COMENZAR ............. 7
LISTA DE PARTES...................... 7
REQUERIMIENTOS PARA
ENCHUFE TELEFONICO ......... 8
INSTALACl6N......................... 8
INFORMACION IMPORTANTE
PAPA LA INSTALACION ......... 9
FORMATO DE LA BASE ............. 9
INSTALAR EL TELI_FONO ......... 10
PAPA CONECTAR LA L[NEA
TELEFONICA ...................... 10
PAPA INSTALAR LA PLACA DE
MONTAJE PAPA PARED .... 11
OPERACION BASlCA DEL
TELEFONO ..................... 12
ALTAVOZ ................................ 12
PAPA HACER UNA
LLAMADA .......................... 13
AURICULAR ...................... 1:3
ALTAVOZ ........................... 13
PAPA CONTESTAR UNA
LLAMADA ......................... 13
ACOUSTQUE ACCRUE...... 13
AURICULAR...................... 14
ALTAVOZ........................... 14
VOLUMEN.............................. 14
SERVICIOSESPECIALES.......... 15
VOLVERA MARCAR................ 16
MEMORIA ........................... 15
PAPA ALMACENARUN NfJMERO
EN LA
MEMORIA.......................... 15
COMO INTRODUCIRUNA
PAUSAEN LA SECUENOA DE
MARCAR ........................... 16
COMO CAMBIAR UN NOMERO
ALMACENADO ................... 16
COMO MARCAR UN NOMERO DE
LA MEMORIA..................... 16
PAPA MARCAR LOS NOMEROS
DE MARCACION RAPIDA DE
EMERGENCIA..................... 17
COMO _ARCAR EN CADENA
DESDELA MEMORIA.......... 17
SOLUCI6N DE PROBLEMAS..... 18
CUlDADO GENERAL DEL
PRODUCTO.................... 20
C6Mo OBTENER SERVICIOS DE
MANTENIMIENTO ............ 21
GARANTiA LIMITADA ............. 22
iNDICE ............................... 26

Sejuzgo que este tel@fonoes compatible con oud[fonos, en bose o los
normos de IoFCC.
Introducci6n
CUIDADO: Cuando utilice equipo telef6nico,
hay instrucciones b6sicas de seguridad que
_ siempre deben Refi@rase la guia de
INSTRUCCIONES DE SEGURIDAD IMPORTANTES
provista con este producto y gu6rdela para
referencia futura.
seguirse.
Antes de Comenzar
Lista de Partes
Aseg0rese de que su paquete incluye los articulos mostrados
aqui.
Base _
Auricular auricular
Cl
Cable del
Soporte de
montaje
Cable
de linea
telef6nica
7

Requerimientos Para Enchufe Telef6nico
Para utilizar este tel_fono, usted puede
necesitar un enchufe modular telef6nico
tipo RJllC coma el ilustrado aqui, instalado
en su hogar.Siusted no tiene este %0 de
enchufe, Ilame a su compaflia telef6nica
local para preguntar c6mo conseguirlo.
Placa de pared
Enchufe
telefo nico'_'_ _ I
modular
Instalaci6n
Informaci6n Importante para ia Instalaci6n
• Evitefuentes de ruido, coma una ventana que d_ a una calle
con mucho tr6fico, un ruido el_ctrico, coma motores, hornos
de microondas, o lucesfluorescentes.
• Evite6teas con humedad excesiva o temperaturas
demasiado bajas.
• Evite lostel_fonos inal6mbricos o las computadoras
personales.
• Nunca instale cableado telef6nico durante una
tormenta de rel6mpagos.
• Nunca instale enchufes telef6nicos en Iocalizaciones mojadus
a menos que el enchufe haya sido disehado especificamente
para Iocalizaciones mojadas.
• Nunca toque cables o terminales noaislados, a menos que la
linea telef6nica haya sido desconectada en la interfaz de la
red.
• Utilice precauci6n cuando instale o modifique
lineastelef6nicas.
8

Formato de la Base
STORE
(bot6n para MEN Timbre Visual
almacenar} {bot6n) {indicador}
Interruptor de
volumen del audio boost
receptor del {bot6n
auricular audio)
Interruptor
de volumen
del timbre
Ice de
Emergencia
itoque
{botones)
Interruptor
volumen
del altavoz
FLASH
{bot6n}
REDIAL/PAUSE
{bot6npara
volver a marcar/
borrar}
SPEAKER
{bot6n de
altavoz}
Altavoz
{indicador}
9

Instalar el Tel fono
Para Conectar ia Linea Telef6nica
NOTA: El aparato viene del fabricante para ser
colocado sobre superficies planas.
1.Elijaun 6rea cerca de una toma de corriente el_ctrica yde
un recept6culo de pared detel_fono (RJllC), y coloque su
tel_fono inal6mbrico sobre una superficie nivelada,tal como
un escritorio o una mesa, ousted puede montarlo en la pared.
2. Conecte un extremo del cable de la lineatelef6nica en el
receptaculo LINEATEL(TEL
LINE)en la parte superior de
la base y el otto extremo en
un recept6culo modular.
:3.Coloque el auricular en la
base.
.
Ajuste el interruptor de
VOLUMEN DELRECEPTORDELAURICULARen el nivel de
escucha deseado en: ALTO,MEDIO O BAJO
S.
Ajuste el interruptor de VOLUMEN DELTIMBREen el nivel de
escucha deseado en: ALTO,BAJO, u OFF.
.
Ajuste el interruptor de VOLUMENDELALTAVOZen el nivel de
escucha deseado.
Launidadest6adecuadamenteinstaladasiustedlevantael
auricularyescuchadeltono demarcaci6n.Siustednoescucha
untono demarcaci6nvuelvaa verificartodoslospasosde
instalaci6n.
10

Para Instalar ia Piaca de Montaje para
Pared
Sisu tel_fono sera montado sobre la pared:
1.Remuevaelsoporte de monta]e de la basey girelo de manera
que el texto en el soporte "ESTEEXTREMOHACIAARRIBAPARA
USOENLAPARED"("THISENDUPFORWALLUSE")seael m_s
cercano al receptaculo TELLINE.
2.Conecte un extremo del cable de la lineatelef6nica al
receptaculo en la parte trasera de la base.
3. Inserte el cable de la lineatelef6nica
a trav@sdela apertura rectangular
grande en el soporte de montaje.
4. Fijeel soporte de montaje a la base,
tenga cuidado en insertar el cable
telef6nico dentro de la ranura pequeha
en la parte superior del soporte para
evitar perforar el cable.
5.Conecte el otro extremo del cable de la linea telef6nica en un
recept6culo detoma de pared telef6nico modular.
6.Guardeel exceso de cable de la linea telef6nica en la cavidad
del soporte de montaje.
7. Deslicelos orificios de montaje sobre los postes de la placa
de la pared y deslice la unidad hacia abajo firmemente en su
lugar.(Placade pared no incluida).
8.Guardeel exceso de cable a trav@sde las ranuras en la
cavidad.
11

0 eraci6n B6sica del Tel fono
Altavoz
Paralaoperaci6namanoslibresyparasuconveniencia,este
aparatoest6equipadocon unaltavoz
Paraelmejorfuncionamientodelaltavoz,eviteIosiguiente:
• Areasconmuchoruidodefondo.(Elmicr6fonopuederecoger
estossonidosy evitaqueelaltavozsecambiea modalidad
pararecibircuandoustedterminadehablar).
• Superficiesafectadasporvibraci6n.
• Areasremetidas,comounaesquina,abajode unagaveta,o
junto aungabinete,loscualespuedengenerarunefectode
eco.
Sigalassiguientespautascuandoutilice elaltavoz:
• Eltel@fonoconaltavozfuncionademanerasimilara un
radiodedosviasencuantoa queustedsolamentepuede
escucharo hablaralavez.
• Permanezcarazonablementecercadeltel@fonodemanera
queustedpuedasetescuchadoclaramenteporla persona
conquienest6hablando.
• Ustedpuedeajustarelvolumendelaltavozajustandoel
bot6ndevolumen("VOLUME"),Iocalizadoenelcostado
derechodela base.
• Elindicadordeltel@fonocon altavozseactivacuandoel
altavozest6en uso.
12

Para Hacer Una Liamada
Auricular
1. Levanteelauricularyescucheparaversi haytonodemarcar.
2. Marqueeln0meroal queustedquieraIlamar.
3. Cuandohayaterminado,cuelgueelauricular.
Aitavoz
1. Optimaelbot6ndealtavoz("SPEAKER")en labasey escuche
paraversihaytono demarcar.
2. Marqueeln0meroal queustedquieraIlamar.
3.Cuandohayaterminado,oprimael bot6ndealtavoz
("SPEAKER")paracolgar.
Para Contestar una Liamada
NOTA:aseg6rese de qua el interruptor del timbre
est@ establecido en ALTO(HI) o BAJO (LO),o el
tel@fono no sonar6. El indicador de timbre visual
parpadear6 en todas las selecciones.
Realce de Audio
Ustedpuede presionar este bot6n para realzar
temporalmente elvolumen del receptor del auricular durante
una Ilamada. Pararegresar a los niveles normales, presione
el bot6n otra vez.Losnivelesdevolumen regresar6n a
normales cuando el auricular sea colocado nuevamente en
la basedespu@sde una Ilamada.
13

Auricular
1. Cuando el tel_fono timbre, levante el auricular.
2. Cuando hayaterminado, cuelgue el auricular.
Aitavoz
1. Cuando el tel_fono timbre, optima el bot6n de altavoz
("SPEAKER")para contestar la Ilamada.
2. Cuando hayaterminado, optima nuevamente el bot6n de
altavoz ("SPEAKER")para colgar.
Usted puede alternar entre altavoz y auricular durante el proceso
de marcado o en cualquier momento durante una conversaci6n.
Altavoz a Auricular- Levante el auricular para desactivar el
altavoz. Elindicador del altavoz se apaga.
Auricular a Altavoz- Optima el bot6n de altavoz ("SPEAKER"),y
despu6s cuelgue el auricular. Elindicador delaltavoz se ilumina
yel auricular se desactiva.
Volumen
Usted puede controlar elvolumen, tanto delauricular como del
altavoz.
Mientras usa el auricular o el altavoz, usted puede ajustar los
controles de volumen del receptor o altavoz, al nivel de escucha
deseado.
14

Servicios Especieles ("FLASH")
Oprimaelbot6ndeservicios("FLASH/EXIT") paraactivarlos
serviciosespecialescomoIlamadaenesperao transferenciade
Ilamada,quelesonprovistospotsucompahiatelef6nicalocal.
Volver a Marcar ("REDIAL")
Ustedpuedemarcarel01timon0meromarcadosimplemente
oprimiendoelbot6nparavolvera marcar ("REDIAL/PAUSE")
despu6sdequeustedrecibeuntonode marcar.
NOTA: La funci6n de Volver a Harcar ("REDIAL")
retiene en la memorio el 51timo nSmero que usted
marc6 (hasta 32 digitos). Si usted oprimi6 cualquier
tecla despu@sde morcar el nSmero telef6nico (por
ejemplo, par(] tener occeso a un sistemo de men5
de voz), esos nSmeros tombi@n ser6n morcodos).
Memoria
Almacenehasta13n0merosenmemoriapara marcaci6nf6cil.
TrespuedensetalmacenadosenlasubicacionesdeMarcaci6n
R6pidadeEmergencia,ydiezn0merosadicionalesenlasteclas
numeradas(0-9).
Para Almacenar un N_mero en ia Memoria
.
Aseg0reseque eltel6fonoest6instaladoadecuadamente.
Levanteelauricularyescucheeltono demarcar.Siustedno
escuchaeltono demarcar,verifiqueorepita lospasosdela
instalaci6n.
2. Oprimaelbot6ndealtavoz("SPEAKER")o levanteelauricular.
3. Optimaelbot6nparaalmacenar.
15

4. Marqueeln0meroa seralmacenado(hasta16digitos).
5. Optimanuevamenteelbot6nparaalmacenar.
6. Presioneunaubicaci6nenmemoria(0-9enelteclado
num@ico),ounbot6ndeIVlarcaci6nR6pidadeEmergencia.
7. Optimaelbot6ndealtavoz("SPEAKER")ocuelgue
elauricular.
C6mo Introducir una Pausa en la Secuencia
de Marcar
Utiliceel bot6nparavolvera marcar("REDIAL/PAUSE")para
introducirunapausaen lasecuenciademarcadodeun nOmero
telef6nicoalmacenado,potejemplo,despu@sdequeusted
marca9 paraobtenerlineaexterna.
Optimael bot6nparavolvera marcar ("REDIAL/PAUSE") enel
puntodelasecuenciademarcadoendon@serequiereuna
pausa.
Eltiempode pausaesdeaproximadamentecuatrosegundos,si
esnecesariotiempoadicional,presioneelbot6nREDIAL/PAUSE
(REMARCACION/PAUSA)otravez.
C6mo Cambiar un N_mero Aimacenado
Cambieunn_meroalmacenadosimplementereemplaz6ndolo
con unnOmerodiferente.
C6mo Marcar un N6mero de ia Memoria
UstedpuedemarcarnOmerosdesdememoriacuandousa
elauricularo elaltavoz.Cuandoustedobtengauntono de
marcaci6n,presioneelbot6niViEIViseguidopot laubicaci6nen
memoria(0-9)paraelnOmeroqueustedquieremarcar.
16

Para Marcar Los NSmeros de Marcaci6n
R6pida de Emergencia
Siusted ha programado previamente sus nOmerosde Marcaci6n
R6pidade Emergencia,usted solamente necesita presionar el
bot6n despu@sde escuchar un tono de marcaci6n.
C6mo Marcar en Cadena desde la Memoria
Utilice esta funci6n para hacer Ilamadas que requieren una
secuencia de nOmeros,por ejemplo siusted usa una tarjeta para
Ilamar frecuentemente a un nOmerode larga distancia. Semarca
cada parte de la secuencia de marcado desde la memoria. El
siguiente ejemplo le muestra c6mo usted puede marcar desde la
memoria para hacer una Ilamada a trav@sde un servicio de larga
distancia:
ElNF;meropara Localizaci6ndeMemoria
N0merodeAccesodeLargaDistancia 7
C6digodeAutorizaci6n 8
N0merode largadistanciaIlamadofrecuentemente 9
1. Optima el bot6n "SPEAKER"(o levante el auricular).
2. Presioneel bot6n MEMy luego presione 7.
3. Cuando usted escucheel tono de acceso,presione el bot6n
MEMy luego presione 8.
/4. Enel siguiente tono de acceso, presione el bot6n MEM9.
17

Soluci6n de Problemas
Nohaytono de marcar.
• Verifiquela instalaci6n:
AsegOresedequeelcablede lalineatelef6nicaest@
conectadoa launidadbasey al recept6culotelef6nicodela
pared.
• Verifiqueelganchoparacolgar.Debeextenderse
completamentecuandoelauricularselevantadela base.
• Usteddebetenet serviciodetonosensu lineaparausareste
tel@fono.Siustednosabequ@tipo deserviciotiene,verifique
conlacompahiatelef6nica.
• AsegOresedequeel indicadordelaltavozseilumina(siest6
usandoelaltavoz).
• Desconecteeltel@fono,espere30segundos,yvuelvaa
conectarlo.Despu@s,levanteelauricularparavet sida linea.
• Conecteotto tel@fonoal mismorecept6culomodular,siel
segundotel@fononofunciona,elproblemapodriaestar
relacionadoconsucableadooconelserviciolocal.
• Coloqueelauricularen labasepot al menos20segundos.
18

Eltel_fononotimbra
• AsegOresequeelselectordetimbre("RINGER")est_enla
posici6ndebajo("LO")o alto ("HI"}.
• Ustedpuedetenetdemasiadasextensionesdetel_fonosen
sulinea.Intentedesconectaralgunasde lasextensionesde
tel_fono.
Verifiquequehayatono de marcar.Sinohaytonodemarcar,
yealassolucionespara"Nohaytono demarcar."
Volumen del auricular y altavoz muy bajos
• Verifique las programaciones devolumen delauricular y del
altavoz.
A usted no le escucha la otra otra persona
• Aseg0resede que el cable telef6nico est@conectado
adecuadamente.
Aseg0resedequelasextensionesdeltel@fonoest@ncolgadas
mientrasustedest6eneltel@fono.Esnormalqueelvolumen
disminuyacuandose utilizanotrasextensionesdeltel@fono
al mismotiempo.
Lafunci6nde marcar
AsegOresede que inscribi6 losnOmeroscorrectamente. (Yea
la secci6n "Memoria').
Aseg0resedequeelaparatoest@adecuadamenteinstalado.
Levanteelauricularyescucheeltonode marcar.Siusted
noescuchaeltono demarcar,verifiquelospasosdela
instalaci6n.
19

Cuidado General del Producto
Paramantener sutel@fonofuncionandobieny conbuena
apariencia,observelassiguientespautas:
• Eviteponereltel@fonocercadecalentadores(calefactores
deambientey dispositivosquegenereninterferencia
el@trica ejemplo,motoreso 16mparasfluorescentes).
NoIoexpongaa laluzsolardirectao a lahumedad.
Evitequesecaigaeltel@fono,asicomoel maltratodel
mismo.
Limpieeltel@fonoconuntraposuave
Nuncauseunagentede limpiezafuerte ni unpolvoabrasivo,
yaqueestodahar6elacabado.
Retengaelempaqueoriginalencasodequenecesite
embarcarelauricularenelfuturo.
20

C6mo Obtener Servicios de
Mantenimiento
Siustedexperimentaproblemasconesteequipo,para
reparacioneso parainformaci6nde garantia,comuniquesecon
eldepartamentodeservicioalclienteal 1-800-448-0:329.Siel
equipoest6causandodahosa laredtelef6nica,lacompahia
telef6nicapuedepedirlequedesconectesuequipohastaqueel
problemahayasidoresuelto.
EsteproductopuedeOnicamenteset reparadopot elfabricante
osusagentesdereparaci6nautorizados.Cualquiercambioo
modificaci6nnoaprobadosexpresamentepotThomsonInc.
podriasetmotivodeanulaci6ndelaautoridaddelusuario
paraoperaresteproducto.Pararecibirinstruccionessobre
c6moobtenerserviciosdemantenimiento,potfavor consulte
la garantiaincluidaen estaGuia,o IlameaInformaci6nparael
Usuario,1-800-448-0329.
0 envb sus preguntas a:
Thomson Inc.
Manager,Consumer Relations
P0 Box 1976
Indianapolis, IN46206
Adjunte su recibo al folleto, para futura referencia, o anote la
fecha en la que se compr6 o recibi6 este producto como regalo.
Estainformaci6n ser(_valiosasi se Ilegasea requerir durante el
perbdo de garantia
Fecha de compra
Nombre de la tienda
21

Garantia Limitada
Lo que cubre su garantia:
• Defectosde materialeso detrabajo.
Porcu6nto tiempo despu_sdela compra:
• Unaflo,a partir delafechadecompra.
(Elperiododegarantiaparaunidadesarrendadasseiniciacon
la primerarentao45diasde lafechadelembarquea lafirma
dearrendamiento,Ioqueocurraprimero).
Loqueharemos:
• Proporcionarleunaunidadnuevao,a nuestraopci6n,una
reacondicionada.Launidaddeintercambioquedar6bajo
garantiapot el restodelperiododegarantiadelproducto
original.
C6moobtener servicio:
Empaquebienlaunidad,incluyendotodosloscables,etc.,que
originalmentevenianconel producto.Serecomiendausarel
cart6ny materialesdeempaqueoriginales.
• "Pruebadecompracomofactura orecibodecompra,que
ofrezcaevidenciadequeelproductoest6dentrodelperiodo
degarantia,debesetpresentadoparaobtenerserviciobajo
garantia."Paracompafliasdearrendamiento,serequiere
comoevidenciaelprimercontratode renta.Tambi@nescriba
claramentesunombre,direcci6ny ladescripci6ndeldefecto.
Man@viaUPSo unserviciodepaqueteriaequivalentea:
22

Thomson, Inc.
11721 BAlameda Ave.
Socorro, Texas 79927
• Pague cualquier cargo que le facture el Centre de Intercambio
per servicio que no est_ cubierto per garantia.
• Asegure su empaque para prevenir p_rdida o daho. Thomson
Inc. no acepta responsabilidad en case de p_rdida o daho.
• Un aparato nuevo o uno remozado sele enviar(_ con los
cargos pagados.
Lo que no cubre la garantia:
• Instrucciones al cliente. (Su manual de propietario le
proporciona la informaci6n con respecto alas instrucciones
de operaci6n y los controles del usuario. Cualquier informaci6n
adicional debe obtenerse con su agente de ventas.
• Ajustes de instalaci6n y de preparaci6n del servicio.
• Baterias.
• Daho per mal use o negligencia.
• Productos que han side modificados o incorporados a otros
productos.
• Productos comprados o que han recibido servicio fuera de los
Estados Unidos.
• Desastres naturales, per ejemplo y sin limitarse a olios, dahos
per rel6mpagos.
Registro del Producto:
• Per favor Ilene y envie per coffee la Tarjeta de Registro del
Producto que se embarc6 con su producto. Har(_ m(_s f(_cil
23

que hagamos contacto con usted si fuera necesario. No se
requiere la devoluci6n de la tarjeta para tenet la cobertura de
la garantia.
Limitadones sobre la Garantia:
• LA GARANTiA ESPECIFICADA ANTERIORMENTE ESLA I.]NICA
GARANTiA APLICABLE A ESTEPRODUCTO. CUALQUIER OTRA
GARANTiA, EXPRESAO IMPLiCITA (INCLUVENDO TODAS LAS
GARANTiAS IMPLiCITAS DE MERCADO O DE SALUD PARA
CUALQUIER PROPOSlTO} SON CONSlDERADAS NO V#,LIDAS.
NINGUNA INFORMACION VERBAL O ESCRITAOTORGADA
PORTHOMSON INC., SUSAGENTES, O EMPLEADOS SER#,
CONSlDERADA PARACREAR UNA GARANTiA NI PARA
AUMENTAR BAJO NINGUNA CIRCUNSTANCIA LA COBERTURA
DEESTAGARANTiA.
• LA REPARACION O REEMPLAZO DE UN PRODUCTO COMO
SE ESPECIFICABAJO ESTAGARANTiA ESEL REMEDIO
EXCLUSlVO DEL CONSUMIDOR. THOMSON INC. NO SE
HACE RESPONSIBLEPOR DANOS INCIDENTALES, DANOS
DERIVADOSCOMO CONSECUENCIA DEL USO DE ESTE
PRODUCTO,O COMO RESULTADODEL INCUMPLIMIENTO
DECUALQUIER GARANTiA IMPLiCITA O EXPRESADE ESTE
PRODUCTO. LA INVALIDEZ DE LAS GARANTiAS O LAS
GARANTiAS LIMITADAS ESTANREGLAMENTADAS POR LAS
LEVESDEL ESTADO DE INDIANA. EXCEPTOPOR ELALCANCE
ESTABLECIDOPOR LAS LEVESAPLICABLES, CUALQUIER
GARANTiA IMPLiCITA DE MERCADO O DESALUD PARA
CUALQUIER PROPOSITO, EN ESTEPRODUCTO ESLIMITADA At
PERIODO DE GARANTIA ESPECIFICADOANTERIORMENTE.
24

C6mo se Relaciona la Ley Estatal a esta Garantia:
• Algunosestadosnopermitenlaexclusi6nnilimitaci6ndedaho
incidentalo derivadodealgunaconsecuencia,o lalimitaci6n
con respectoal periododetiempo quedebeaplicarsepara
garantiasimplicitas,pot Iotanto laslimitacionesy exclusiones
mencionadasanteriormentepuedennoseraplicablespara
usted.
• Estagarantialeofrecederechoslegalesespecificos,y usted
puedetenetotrosderechoslegalesquevariandeestadoa
estado.
Sicompr6su productofuera delos EstadosUnidos:
• Estagarantb noseaplica.Veaasudistribuidorpara
informaci6nsobrelagarantb.
25

Jndice
A
Acoustique Accrue 13
Altavoz 12, 13, 14
Antes de Comenzar 7
Auricular 13, 14
C
C6mo Cambiar un
NOmero
Almacenado 16
C6mo Introducir
una Pausa en la
Secuencia de
Harcar 16
C6mo HarcarenCadena
desdelaHemoria 17
C6mo Harcarun NOmero
dela Hemoria 16
Cuidado General del
Producto 20
F
Formato de la Base 9
G
Garantia Limitada 22
I
Informaci6n Sobre la
Aprobaci6n de
Equipo 2
Informaci6n de
Interferencias 4
Instalar el Teldono i0
Introducci6n 7
Instalaci6n 8
Informaci6n Importante
Para la Instalaci6n 8
C6mo ObtenerServicios
de Hantenimiento21
Compatibilidadcon
Audifonos7
26
L
Lista de Partes 7
M
Memoria 15

J
Indice
0
Operaci6n B6sica del
Tel@fono 12
P
Para Almacenar un
NOmero en la
Memoria 15
Para Conectar la Linea
Telef6nica 10
Para Contestar Una
Llamacta 13
Para Hacer Una
Llamacta 13
Para Instalar la Placa
de Montaje Para
Pared 11
Para Marcar Los
NOmerosde
S
Servicios Especiales 15
Soluci6n de
Problemas 18
T
Tabla de Contenicto 6
V
Volumen 14
Volvera Marcar 15
Marcaci6n R6pida de
Emergencia 17
R
Requerimientos Para
Enchufe Telef6nico
8
27

Model 29568
00018558 (Rev.0 Dom E/S)
07-13
Printed in China
THOI 4SON
Thomson Inc.
10330 North Meridian Street
Indianapolis, IN 46290
© 2007 Thomson Inc.
Trademark(s) ® Registered
Marca(s) Registrada(s)
 Loading...