

Page 1

Model 28301
2 in 1 - Internet Phone
Additional Handset
User’s Guide
Page 2

2
Important Information
NOTICE: This product meets the applicable Industry Canada technical
specifications.
Operation is subject to the following two conditions: (1) This device may not
cause interference, and (2) This device must accept any interference, including
interference that may cause undesired operation of the device.
The equipment must be installed using an acceptable method of connection.
The customer should be aware that compliance with the above conditions may
not prevent degradation of service in some situations.
Repairs to certified equipment should be made by an authorized Canadian
maintenance facility designated by the supplier. Any repairs or alterations
made by the user to this equipment, or equipment malfunctions, may give the
telecommunications company cause to request the user to disconnect the
equipment.
Users should ensure for their own protection that the electrical ground
connections of the power utility, telephone lines and internal metallic water
pipe systems, if present, are connected together. This precaution may be
particularly important in rural areas.
CAUTION: Users should not attempt to make such connections themselves, but
should contact the appropriate electric inspection authority, or electrician, as
appropriate.
NOTES: This equipment may not be used on coin service provided by the
telephone company.
Page 3

Interference Information
This equipment generates and uses radio frequency energy which may
interfere with residential radio and television reception if not properly
installed and used in accordance with instructions contained in this
manual. Reasonable protection against such interference is ensured,
although there is no guarantee this will not occur in a given installation. If
interference is suspected and verified by switching this equipment on and
off, the user is encouraged to try to correct the interference by one or more
of the following measures: Reorient the radio/television receiver’s antenna,
relocate the equipment with respect to the receiver, plug the equipment
and receiver into separate circuit outlets. The user may also wish to
consult a qualified radio/television technician for additional suggestions.
This equipment has been fully tested and complies with all limits for Class
B computing devices pursuant to part 15 FCC Rules and Regulations.
Telephone Network Information
Should your equipment cause trouble on your line which may harm the
telephone network, the telephone company, where practicable, may notify you
that temporary discontinuance of service may be required. Where prior notice
is not practicable and the circumstances warrant such action, the telephone
company may temporarily discontinue service immediately.
The telephone company may make changes in its communications facilities,
equipment, operations or procedures where such action is required in the
operation of its business. If these changes are expected to affect the use or
performance of your telephone equipment, the telephone company will likely
give you adequate notice to allow you to maintain uninterrupted service.
Notice must be given to the telephone company upon termination of your
telephone from your line.
3
Page 4

4
REN Number
On the bottom of this equipment is a label indicating, among other information,
the Ringer Equivalence Number (REN) for the equipment.
The REN is useful in determining the number of devices you may connect to
your telephone line and still have all of these devices ring when your telephone
number is called. In most (but not all) areas, the sum of the RENs of all devices
connected to one line should not exceed 5. To be certain of the number of
devices you may connect to your line as determined by the REN, you should
contact your local telephone company.
REN Number is located on the cabinet bottom.
Hearing Aid Compatibility (HAC)
This telephone system meets FCC standards for Hearing Aid Compatibility.
Licensing
Licensed under US Patent 6,427,009.
FCC RF Radiation Exposure
Statement
This equipment complies with FCC RF radiation exposure limits set forth for an
uncontrolled environment. This equipment should be installed and operated
with a minimum distance of 20 centimeters between the radiator and your
body. This transmitter must not be co-located or operated in conjunction with
any other antenna or transmitter.”
For body worn operation, this phone has been tested and meets the FCC RF
exposure guidelines when used with the belt clip supplied with this product.
Use of other accessories may not ensure compliance with FCC RF exposure
guidelines.
Information for DECT Product
This 28301 telephone is compliant with the DECT 6.0
standard which operates in the 1.92GHz to 1.93GHz
frequency range.
Page 5
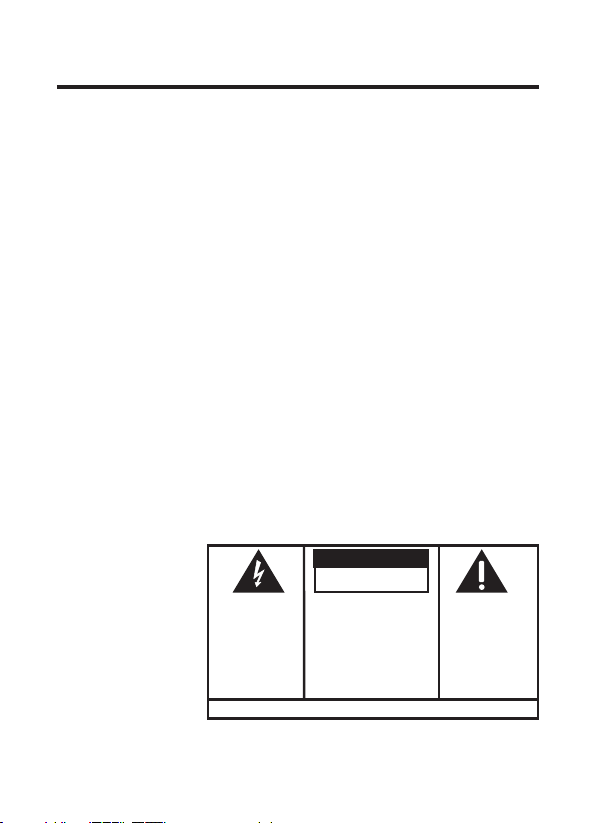
Table of Contents
SE E M ARK ING ON BO TTO M / BA CK OF PRO DUC T
RISK OF ELECTRIC SHOCK
DO NOT OPEN
WARNING: TO
PREVENT FIRE OR
ELECTRICAL SHOCK
HAZARD, DO NOT
EXPOSE THIS
PRODUCT TO RAIN
OR MOISTURE.
THE LIGHTNING
FLASH AND ARROW
HEAD WITHIN THE
TRIANGLE IS A
WARNING SIGN
ALERTING YOU OF
“DANGEROUS
VOLTAGE” INSIDE
THE PRODUCT.
CAUTION: TO REDUCE THE
RISK OF ELECTRIC SHOCK, DO
NOT REMOVE COVER (OR
BACK). NO USER
SERVICEABLE PARTS INSIDE.
REFER SERVICING TO
QUALIFIED SERVICE
PERSONNEL.
THE EXCL AMATION
POINT W ITHIN THE
TRIANGL E IS A
WARNING S IGN
ALERTIN G YOU OF
IMPORTANT
INSTRUC TIONS
ACCOMPANYI NG
THE PRO DUCT.
CAUTION:
Important InformatIon ............... 2
Interference InformatIon ........... 3
telephone network InformatIon 3
ren number .............................4
hearIng aId compatIbIlIty (hac) 4
lIcensIng ...................................4
fcc rf radIatIon exposure
statement .......................... 4
InformatIon for dect product 4
table of contents ..................... 5
IntroductIon .............................6
before you begIn ...................... 6
Parts CheCklist ........................... 6
InstallatIon ............................... 7
Digital seCurity system ............. 7
imPortant installguiDelines ...... 7
handset layout ......................... 8
InstallIng the phone ..................9
installing the hanDset Battery 9
hanDset Charge CraDle ..........10
telephone operatIon ...............10
Power on/off oPeration .......10
registration ...............................10
Deregistration ...........................11
seleCt Base ................................12
Default setting .........................12
changIng the battery .............. 13
battery safety precautIons .....13
troubleshootIng guIde ............14
telePhone solutions ...........14
Caller iD solutions ............16
skyPe solutions....................17
Battery solutions ................18
general product care ............18
causes of poor receptIon ........19
servIce..................................... 19
lImIted warranty .................... 20
Index .......................................23
5
Page 6
6
Introduction
CAUTION: When using telephone equipment,
there are basic safety instructions that
should always be followed. Refer to the
IMPORTANT SAFETY INSTRUCTIONS provided
with this product and save them for future
reference.
IMPORTANT: Because cordless phones operate
on electricity, you should have at least one
phone in your home that isn’t cordless, in case
the power in your home goes out.
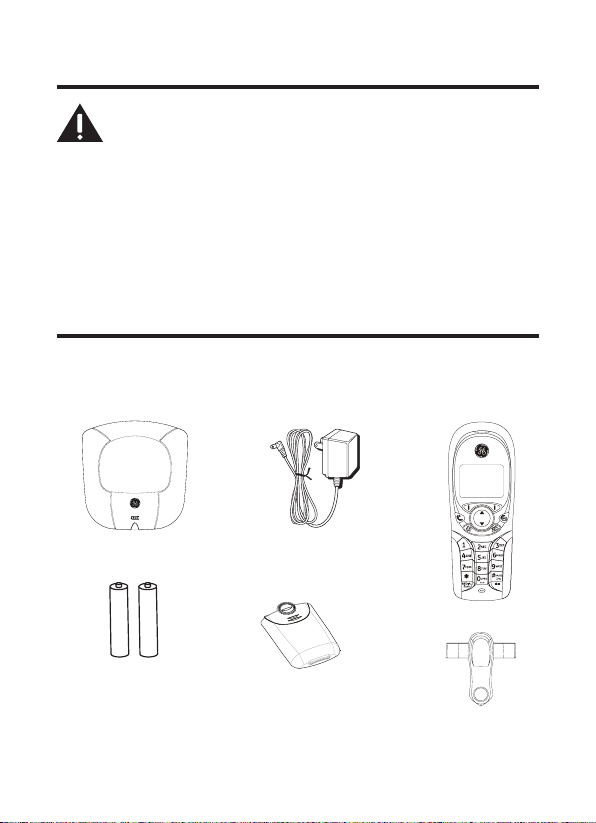
Before You Begin
Parts Checklist
Make sure your package includes the items shown here.
Handset
charge cradle
2 AAA
Nickel-metal
Hydride batteries
AC power
adaptor
Battery
compartment
cover
Handset
Belt clip
Page 7

Installation
Digital Security System
Your cordless phone uses a digital security system to protect
against false ringing, unauthorized access, and charges to your
phone line.
INSTALLATION NOTE: This product operates at a
frequency of 1.9GHz. to provide communication
with minimal interference from other electronic
devices. To further minimize the possibility of
interference, the base of the cordless telephone
should not be placed near or on top of a
TV, microwave oven, or VCR. If interference
continues, move the cordless telephone further
away from these appliances.
Important Installation Guidelines
• Avoid sources of noise and heat, such as motors, fluorescent
lighting, microwave ovens, heating appliances and direct
sunlight.
• Avoid areas of excessive dust, moisture and low
temperature.
• Avoid other cordless telephones.
• Never install telephone wiring during a lightning storm.
• Never install telephone jacks in wet locations unless the jack
is specifically designed for wet locations.
• Never touch non-insulated telephone wires or terminals,
unless the telephone line has been disconnected at the
network interface.
• Use caution when installing or modifying telephone lines.
7
Page 8
8
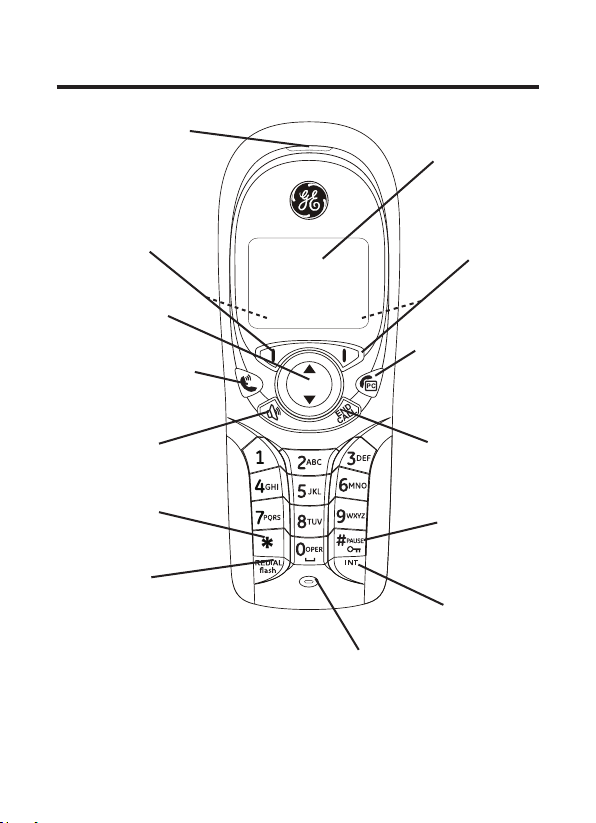
Handset Layout
earpiece
display
Soft Key Left
(SKL/ | )
(button)
5/6Navigational
(button)
Landline (button)
[traditional call]
speaker
(button)
*
(button)
REDIAL/flash
(button)
Soft Key Right
(SKR/ | )
(button)
Skype (button)
[computer call]
END CALL
(button)
#/PAUSE/lock
(button)
INT
(intercom button)
microphone
Page 9

Installing the Phone
Installing the Handset Battery
NOTE: You must connect the handset battery
before using the cordless handset(s).
CAUTION: To reduce the risk of fire or
personal injury, use only the Thomson Inc.
approved model GP80AAAHC - NiMH 1.2V
800mAh rechargeable Nickel-metal Hydride
battery, which is compatible with this unit.
1. Locate batteries and battery door which are packaged
together inside a plastic bag and are separate from the
handset.
2. Locate the battery compartment on the back of the handset.
3. Insert the batteries.
4. Close the battery compartment by pushing the door up until
it snaps into place.
9
Page 10

10
Handset Charge Cradle
1. Choose an area near an electrical outlet and place your
cordless telephone on a level surface.
2. Plug the AC power converter into the electrical outlet and the
DC connector into the jack on the back of the cradle.
3. Place the handset in the cradle. The CHARGE indicator turns
on, verifying the battery is charging.
Allow handset to charge for 16 hours prior to first use. If you
do not properly charge the handset, battery performance is
compromised.
CAUTION: Use only the model 5-2718 power
adaptor that came with this unit. Using other
power adaptors may damage the unit.
Telephone Operation
Power On/Off Operation
The handset is powered on by connecting the battery or if the
handset has been powered down, press and hold the END CALL
button for 2 seconds.
To power off the handset, press and hold the END CALL button
for 2 seconds.
Note: If the handset is on the cradle, only the
(speaker) and END CALL buttons are functional.
Registration
YOU MUST REGISTER THE HANDSET TO THE MAIN BASE
BEFORE USE! It is not recommended that handset be
registered again unless absolutely necessary.
Page 11

From the HANDSET SETTINGS menu;
1. Use the 6 or 5 button to scroll to REGISTRATION.
2. Press the OK (SKL) button to enter the menu.
3. Use the 6 or 5 button to scroll to a specific base (1-4).
4. Press the OK (SKL) button.
5. While the system is searching, press and hold the PAGE
button on base station for 2 seconds until the Charge/In Use
indicator blinks.
NOTE: The maximum number of handsets that
can be registered to a base, is six. The maximum
number of bases to which a handset can be
registered to, is four.
Deregistration
Deregistration cancels registration. During the deregistration
process, keep the handset near the base.
From the HANDSET SETTINGS menu;
1. Use the 6 or 5 button to scroll to DE-REGISTRATION.
2. Press the OK (SKL) button to enter the menu.
3. Use the 6 or 5 button to scroll to a specific handset (1-6)
and press the OK (SKL) button.
4. Press the OK (SKL) button to confirm the selection. You will
hear a confirmation tone when handset is deregistered.
WARNING: It is not recommended that a handset be
deregistered unless absolutely necessary because
once a handset is deregistered, that handset’s
telephone features cannot be used until the handset
is re-registered.
11
Page 12

12
5. Select Back, if you do not want to deregister.
NOTE: When you complete the deregistration
process, NOT REGISTERED shows on the display.
To use the handset, you must register the
handset.
Select Base
This option allows you to register a handset to more than
one base and select which base it takes the signal from.
The handset can also search for the most suitable base
automatically if Auto Base is selected.
From the HANDSET SETTINGS menu;
1. Use the 6 or 5 button to scroll to SELECT BASE.
2. Press the OK (SKL) button to enter the menu.
3. Use the 6 or 5 button to scroll to a specific base (1-4, Auto
Base).
4. Press the OK (SKL) button to save your selection.
Default Setting
This option allows you to return the handset to factory preset
settings.
From the HANDSET SETTINGS menu;
1. Use the 6 or 5 button to scroll to DEFAULT.
2. Press the OK (SKL) button to enter the menu.
3. Press the OK (SKL) button to confirm the selection.
NOTE: If you select OK, all the settings in the
programmable menu are returned to factory
default setting. You will hear a confirmation
tone.
Page 13

Changing the Battery
CAUTION: To reduce the risk of fire or
personal injury, use only the Thomson Inc.
approved model GP80AAAHC - NiMH 1.2V
800mAh rechargeable Nickel-metal Hydride
battery, which is compatible with this unit.
1. Make sure handset is OFF (not in TALK mode) before you
replace battery.
2. Remove the battery compartment door.
3. Remove the batteries from the handset.
4. Insert the new batteries.
5. Put the battery compartment door back on.
6. Place handset in the base or handset charge cradle to
charge. Allow the handset battery to properly charge
(for 16 hours) prior to first use or when you install new
batteries. If you do not properly charge the phone, battery
performance will be compromised.
Battery Safety Precautions
• Do not burn, disassemble, mutilate, or puncture. Batteries
of this type could release toxic materials which can cause
injury.
• To reduce the risk of fire or personal injury, use only the
Nickel-metal Hydride battery listed in the User’s Guide.
• Keep batteries out of the reach of children.
• Remove batteries if storing over 30 days.
13
Page 14

14
Troubleshooting Guide
NOTE: The RBRC seal on the battery used in your Thomson Inc. product
indicates that we are participating in a program to collect and recycle the
rechargeable battery (or batteries).
For more information go to the RBRC web site at www.rbrc.org
or call 1-800-8-BATTERY or contact a local recycling center.
Telephone Solutions
No dial tone
• Check and repeat installation steps:
Ensure the base power cord is connected to a working
electrical outlet .
Ensure the telephone line cord is connected to the base
and the wall jack.
• Connect another phone to the same jack; if there is still
no dial tone, the problem might be your wiring or local
service.
• The handset may be out of range of the base. Move closer
to the base.
• Ensure the batteries are installed correctly.
No signal icon
• The handset may be out of range of the base. Move closer
to the base.
• Register handset.
Handset does not ring
• Make sure the handset ringer switch is turned ON, this can
be done through the handset setup menu - Ringer Volume.
Page 15

• The handset may be out of range. Move closer to the base.
• You may have too many extension phones on your line. Try
unplugging some phones.
• Check for dial tone.
No sound from handset
• Adjust handset volume.
• Check and adjust sound settings in Skype, under "Sound
Devices".
You experience static, noise, or fading in and out
• The handset may be out of range of the base. Move closer
to the base.
• Make sure base is not plugged into an outlet with another
household appliance. If necessary, relocate the base.
Unit beeps
• Clean charging contacts on cordless handset.
• See solutions for “No dial tone”.
• Replace the battery.
Memory Dialing doesn’t work
• Did you program the memory location keys correctly?
• Did you follow proper dialing sequence?
Unit locks up and there is no communication between the base
and cordless handset
• Unplug the USB cable and the AC power adaptor from the
wall outlet and the back of the base. Remove the handset
battery. Wait for 30 seconds and plug the power adaptor
15
Page 16

16
back into the base and wall outlet. Reconnect the battery
and charge for 16 hours.
Handset displays "SEARCHING" or "NOT REGISTERED" and
cannot link up with the base when the TALK/CALL BACK
button is pressed.
• Handset may be out of range of the base. Move closer to
the base.
• Make sure the power adaptor is properly installed.
• Disconnect the handset battery and plug it in again. Place
the handset on the cradle for at least 2 to 3 minutes.
• Disconnect the power adaptor and plug it in again. Then
place the handset on the cradle for at least 2 to 3 minutes.
Handset displays "HANDSET NEEDS REGISTRATION"
• Follow the programming in the telephone procedures to
re-register the handset to the base.
• Press the SELECT button to begin handset registration.
Follow instructions on Handset screen.
Registration did not work
• Charge the batteries for 16 hours.
• Uplug and then plug in the power adaptor.
Caller ID Solutions
No Display
• Charge or replace the batteries.
• Make sure that the unit is connected to a non-switched
electrical outlet. Disconnect the AC power adaptor from
the base and reconnect it.
Page 17

Caller ID Error Message
• The unit displays this message if it detects anything other
than valid Caller ID information during the silent period
after the first ring. This message indicates the presence of
noise on the line.
No Caller ID
• In order to receive Caller ID information, you must
subscribe to the standard name/number Caller ID service
from your local telephone company.
Skype Solutions
Unable to make Skype Call
• Check to see that Skype is logged into and running
properly (NOTE: The Skype software should be 1.4 or later
version).
• 28300 Hardware is connected to PC and USB Driver is
functioning properly.
• PC may be in hibernate mode.
Unit Locks Up During Skype Call
• Reboot your computer.
Skype Ring Delay
• When making a Skype-IN call, the landline callers hears 2
or more rings before the PC/Handset starts to ring. This is
a network connection problem.
Poor Sound Quality
• Choppy, drop-outs, static, echo during Skype call is an
indication of network connection problem.
17
Page 18

18
Music/Sound can be heard on the phone; or no sound can be
heard from PC Speakers while USB base station is plugged in
to the PC.
• Change the setting of your PC audio to:
Win 2000: Control Panel-->Audio and Multimedia->Audio--> default devices of “Sound playback” & “ Sound
recording”-> select the SOUND CARD device from the
drop-down list.
Win XP: Control Panel->Sounds and Audio Device->Audio>default devices of “Sound playback” & “Sound recording”> select the SOUND CARD device from the drop-down list.
Battery Solutions
If you experience any of the following problems, even after fully
recharging the battery, you may need to replace the battery
pack:
• Short talk time
• Poor sound quality
• CHARGE/IN USE indicator on the base fails to illuminate.
• Limited range
General Product Care
To keep your unit working and looking good, follow these
guidelines:
• Avoid dropping the handset, as well as other rough
treatment to the phone.
• Wipe the base station with a damp cloth or an antistatic
wipe. Never use a dry cloth as this can cause static
discharge.
Page 19

• Retain the original packaging in case you need to ship the
phone at a later date.
• Periodically clean the charge contacts on the handset and
remote charger with a clean pencil eraser.
Causes of Poor Reception
• Aluminum siding.
• Foil backing on insulation.
• Heating ducts and other metal construction that can
shield radio signals.
• You’re too close to appliances such as microwaves, stoves,
televisions, entertainment centers, etc.
• Atmospheric conditions, such as strong storms.
• Base is installed in the basement or lower floor of the
house.
• Base is plugged into AC outlet with other electronic
devices.
• Handset battery is low.
Service
Thomson Digital Technologies Ltd., warrants to the purchaser or gift
recipient that if any manufacturing defect becomes apparent in this
product within 1 year from the original date of purchase, it will be
replaced free of charge, including return transportation.
This warranty does not include damage to the product resulting from
accidents, misuse or leaking batteries.
Should your product not perform properly during the warranty period,
either:
19
Page 20

20
1. Return it to the selling dealer with proof of purchase for
replacement,
OR
2. Remove the batteries (where applicable), and pack product
complete with accessories in the original carton (or equivalent).
— Mail prepaid (with proof of purchase) and insured to:
Thomson Digital Technologies Ltd.
6200 Edwards Boulevard
Mississauga, Ontario
Canada L5T 2V7
The provisions of this written warranty are in addition to and not a
modification of or subtraction from the statutory warranties and
other rights and remedies contained in any applicable legislation, and
to the extent that any such provisions purport to disclaim, exclude or
limit any such statutory warranties and other rights and remedies,
such provisions shall be deemed to be amended to the extent
necessary to comply therewith.
If you are unable to find a qualified servicer for out of warranty
service, you may write to:
Thomson Digital Technologies Ltd.
c/o Thomson Inc.
P.O. Box 0944
Indianapolis, Indiana, U.S.A., 46206-0944
Attach your sales receipt to this booklet for future reference.
This information is required if service is needed during the
warranty period.
PURCHASE DATE _________________________________________
NAME OF STORE __________________________________________
Page 21

212223
Page 22

Page 23

Index
A
Accessory Information 24
B
Battery Safety Precautions 13
Battery Solutions 18
Before You Begin 6
C
Caller ID Solutions 16
Causes of Poor Reception 19
Changing the Battery 13
D
Default Setting 12
Deregistration 11
Digital Security System 7
E
Equipment Approval Information 2
F
FCC RF Radiation Exposure
Statement 4
G
General Product Care 18
H
Handset Layout 8
Hearing Aid Compatibility (HAC) 4
I
Important Information 2
Important Install Guidelines 7
Information for DECT Product 4
Installation 7
Installing the Handset Battery 9
Installing the Phone 9
Interference Information 3
Introduction 6
L
Licensing 4
P
Parts Checklist 6
Power On/Off Operation 10
R
REN Information 4
Registration 10
S
Select Base 11
Service 19
Skype Solutions 17
T
Table of Contents 5
Telephone Network Information 3
Telephone Operation 10
Telephone Solutions 14
Troubleshooting Guide 14
Page 24

Accessory Information
DESCRIPTION MODEL NO.
DC power adaptor for handset charge cradle 5-2718
Belt clip 5-2712
Wired headset 5-2713
To order, call the nearest distributor for your area;
Ontario: (905) 624-8516 Manitoba: (204) 783-2088
British Columbia: (604) 438-8001 Quebec: (514) 352-9071
A shipping and handling fee will be charged upon ordering.
It is required by law to collect appropriate sales tax for each individual state,
country, and locality to which the merchandise is being sent. Items are subject to
availability.
Model 28301
00016606 (Rev. 0 CAN E/F)
06-37
Printed in China
Thomson Digital Technologies Ltd.
© 2006 Thomson Digital Technologies Ltd.
Trademark(s) ® Registered
Marque(s) déposée(s)
Page 25

Modèle 28301
Téléphone Internet
2 en 1 Combiné
Supplémentaire
Guide de l’utilisateur
Page 26

2
Renseignements Importants
AVIS: Ce produit est conforme aux spécifications techniques applicables
d’Industrie Canada.
Son fonctionnement est soumis aux deux conditions suivantes : (1) Cet
appareil ne peut causer de l’interférence, et (2) Cet appareil doit accepter toute
interférence, y compris l’interférence pouvant entraîner le fonctionnement non
souhaitable de l’appareil.
Avant d’installer cet appareil, l’utilisateur doit vérifier s’il est permis de le
raccorder aux installations de la compagnie locale de télécommunications.
L’installation doit de plus respecter les méthodes de raccordement approuvées.
L’abonné doit savoir que le respect des conditions mentionnées ci-dessus
n’empêche pas nécessairement la détérioration du service dans certaines
situations.
La réparation des appareils certifiés doit être confiée à un service de
maintenance canadien dûment autorisé, désigné par le fournisseur. Toute
réparation ou modification effectuée par l’utilisateur peut amener la
compagnie à exiger le débranchement de l’installation.
Par mesure de sécurité, les utilisateurs doivent s’assurer du raccordement
réciproque des circuits de mise à la terre du service public d’énergie, des lignes
téléphoniques et — s’il y a lieu — des systèmes intérieurs de conduites d’eau
métalliques. Cette précaution peut s’imposer particulièrement dans les régions
rurales.
ATTENTION: Les utilisateurs ne doivent pas essayer de faire eux-mêmes
ces raccordements. Ils doivent communiquer avec le service d’inspection
compétent ou faire appel à un électricien, selon le cas.
NOTES: Cet appareil ne peut être utilisé pour le service payant (monnaie) fourni
par la compagnie de téléphone.
Renseignements sur L’interférence
Cet appareil produit et utilise l’énergie radiofréquence qui peut gêner la
réception radio et télévision résidentielle s’il n’est pas installé ou utilisé
conformément aux instructions contenues dans ce guide. Une protection
raisonnable est assurée contre une telle interférence, mais rien ne garantit
qu’un appareil donné ne produira pas d’interférence. Si on soupçonne et
Page 27

confirme une interférence d’une ou plus des façons suivantes: réorienter
l’antenne du récepteur radio ou télévision, éloigner l’appareil du récepteur
ou brancher l’appareil et le récepteur dans des prises de circuits différents.
L’utilisateur peut aussi demander conseil à un technicien en radio-télévisìon
compétent. Cet appareil a été mis à l’essai et répond à toutes les limites
des appareils informatiques de Classe B, conformément à l’alinéa 15, des
Règlements de la FCC.
Information sur le Réseau
Téléphonique
Si cet appareil provoque des dérangements sur la ligne et, par conséquent, sur
le réseau téléphonique, la compagnie de téléphone signalera, s’il y a lieu, qu’elle
doit temporairement interrompre le service. Si elle est dans l’impossibilité de
le faire et que les circonstances dictent une telle mesure, la compagnie de
téléphone peut immédiatement interrompre le service pendant un certain
temps.
La compagnie de téléphone peut apporter des changements à ses installations
de télécommunications, à son équipement, à son exploitation ou à ses
politiques si la poursuite des affaires nécessite de tels changements. Si l’on croit
que ces changements influeront sur l’utilisation ou le rendement du téléphone,
la compagnie doit donner un préavis suffisant pour permettre de maintenir le
service.
Il faut aviser la compagnie de téléphone si l’on désire déconnecter son
téléphone de façon permanente.
Facteur D’équivalence de Sonnerie (REN)
L’étiquette sous cet appareil indique notamment le facteur d’équivalence de
sonnerie de l’appareil.
Le REN permet de déterminer le nombre d’appareils que vous pouvez raccorder
à votre ligne téléphonique et qui sonneront quand votre numéro de téléphone
est composé. Dans la plupart des régions (mais pas toutes), la somme des
REN de tous les appareils raccordés à une ligne ne doit pas dépasser 5. Pour
connaître le nombre d’appareils que vous pouvez raccorder à votre ligne,
compte tenu du REN, communiquez avec votre compagnie de téléphone.
REN (facteur d’équivalence de sonnerie) SE TROUVE À LA BASE DE L’APPAREIL.
3
Page 28

4
Compatibilité avec les Prothèses
Auditives
Ce téléphone est conforme aux normes FCC/Industrie Canada en matière de
compatibilité avec les prothèses auditives.
Licensing
Sous license du brevet US 6,427,009.
Énonce sur L’exposition au
Rayonnement RF de la FCC
Cet équipement est conforme aux limites d’exposition au rayonnement RF de
la FCC établies pour un environnement non contrôlé. Cet équipement doit être
installé et utilisé en maintenant une distance minimale de 20 centimètres entre
le radiateur et votre corps. Cet émetteur ne doit pas être placé ou utilisé avec
une autre antenne ou un autre émetteur
Pour l’utilisation sur soi, ce téléphone a été mis à l’essai et est conforme aux
lignes directrices en matière d’exposition RF de la FCC lorsque utilisé avec la
pince-ceinture fournie avec ce produit. L’utilisation d’autres accessoires peut ne
pas être conforme avec les lignes directrices de la FCC en matière d’exposition
RF.
Renseignements sur le produit DECT
Cet appareil 28300 est conforme à la norme DECT 6.0 qui
utilise la gamme de fréquences 1,92 à 1,93 GHz.
Page 29

Table des Matieres
VOIR LES INSCRIPTIONS SOUS L'APPAREIL OU À L'ARRIÉRE DU BOÎTiER.
RISQUE DE CHOC ÉLECTRIQUE
NE PAS ENLEVER
AVERTISSEMENT:
AFIN D'ÉVITER LES
DANGERS
D'INCENDIE ET
D'ÉLECTROCUTION,
NE PAS EXPOSER
CET APPAREIL À LA
PLUIE NI À
L'HUMIDITÉ.
LE SYMBOLE DE
L'ÉCLAIR ILLUSTRÉ
DANS UN TRIANGLE
EST UN AVERTISSEMENT INDIQUANT
UNE "TENSION
DANGEREUSE" À
L'INTÉRIEUR DE
L'APPAREIL.
ATTEN TION :AFIN D E R ÉDUI RE
LES RI SQUES
D'ÉL ECTR OCUT ION, NE PAS
ENLE VER LE COUVE RCLE (NI LE
CÔTÉ A RRIÈR E). AUC UNE
PIÈC E INTÉR IEUR E N E PEUT
ÊTRE R ÉPARÉE PA R
L'UT ILIS ATEUR. P OUR TOU TE
RÉPAR ATION , C ONSU LTER DES
TECH INIC IENS CO MPÉT ENTS .
LE POINT D’EXCLAMATION
ILLUSTRÉ DANS UN
TRIANGLE EST UN
AVERTISSEMENT
INDIQUANT QUE
L’APPAREIL EST FOURNI
AVEC DES INSTRUCTIONS
IMPORTANTES.
ATTENTION:
Renseignements impoRtants .........2
Renseignements suR L’inteRféRence
infoRmation suR Le Réseau
téLéphonique ......................3
facteuR D’équivaLence De sonneRie
(Ren) .................................3
compatibiLité avec Les pRothèses
auDitives ............................4
Licensing ....................................4
énonce suR L’exposition au
Rayonnement Rf De La fcc 4
Renseignements suR Le pRoDuit
Dect .................................4
tabLe Des matieRes ......................5
intRoDuction ..............................6
avant De commenceR ..................6
Liste de Pièces .............................. 6
instaLLation ................................7
système de sécurité Numérique 7
imPortaNtes LigNes directrices
sur L’iNstaLLatioN ........................ 7
2
pRésentation Du combiné ............8
instaLLation Du téLéphone ...........9
iNstaLLatioN de La PiLe du combiNé
9
socLe de chargemeNt de combiNé
10
fonctionnement Du teLephone ..10
mise eN marche et arrêt ........10
eNregistremeNt .....................10
deseNregistremeNt ...............11
séLectioN de La base ...........12
regLage Par defaut .............12
RempLacement De La piLe ...........13
pRécautions à pRenDRe ..............13
guiDe De Depannage..................14
déPaNNage skyPe ..................17
soins et entRetien ....................19
causes De mauvaise Réception ...19
seRvice apRès-vente ..................20
inDex ........................................23
infoRmation pouR accessoiRes ...24
5
Page 30

6
Introduction
ATTENTION : Vous devez respecter certaines
règles de sécurité lorsque vous utilisez un appareil
téléphonique. Reportez-vous aux INSTRUCTIONS
IMPORTANTES DE SÉCURITÉ qui accompagnent ce
produit et conservez-les pour référence ultérieure.
IMPORTANT: Étant donné que les téléphones sans
cordon fonctionnent à l’électricité, vous devriez
disposer d’au moins un téléphone avec cordon dans
la maison, en cas de panne de courant.
Avant de Commencer
Liste de Pièces
Assurez-vous que la boîte contient les articles suivants.
Socle de
chargement de
combiné
Adaptateur
CA
Combiné
2 AAA
baterías d’hydrure de
Nickel-métal (Ni-MH)
Couvercle du
compartiment
de pile
Pince-ceinture
Page 31

Installation
Système de Sécurité Numérique
Lorsque vous déposez le combiné sur la base, l’appareil vérifie
son code de sécurité, qui empêche les fausses sonneries d’autres
téléphones sans cordon.
NOTE SUR L’INSTALLATION: Cet appareil fonctionne sur
une fréquence de 1,9 GHz pour une communication
qui minimise l’interférence avec d’autres appareils
électroniques. Pour minimiser encore plus la possibilité
d’interférence, la base du téléphone sans fil ne doit pas
être placée près ou sur un téléviseur, un four micro-ondes
ou un magnétoscope. Si l’interférence persiste, déplacez
le téléphone sans fil à une plus grande distance de ces
appareils.
Importantes Lignes Directrices sur
L’installation
•
Évitez les sources de bruit et de chaleur, comme les moteurs, les
lampes fluorescentes, les fours à micro-ondes, les appareils de
chauffage et le soleil direct
• Évitez les endroits extrêmement poussiéreux, humides et froids.
• Évitez les autres téléphones sans cordon et les ordinateurs
personnels.
• Ne jamais installer les câbles téléphoniques pendant un orage
électrique.
• Ne jamais installer de prises téléphoniques dans des endroits
humides, à moins qu’elles soient spécialement conçue pour
endroits humides.
• Ne jamais toucher les fils ou bornes téléphoniques non isolés, à
moins que la ligne téléphonique ait été débranchée de l’interface
réseau.
• Installer ou modifier les lignes téléphoniques avec soin.
.
7
Page 32

8
Présentation du Combiné
haut-parleur
Soft Key Left
(SKL/ | )
(Touche souple de
gauche)
5/6
(Button de
navigation)
Landline
(Ligne terrestre )
[appel téléphonique
conventionnel]
speaker
(bouton haut-
parleur)
*
(bouton)
REDIAL/flash
(bouton recomposition/
flash)
afficheur
Soft Key Right
(SKR/ | )
(Touche souple de
droite)
Skype
[appel téléphonique
par ordinateur]
END CALL
(botón fin)
#/PAUSE/lock
(bouton pause/
serrure)
INT
(bouton
interphone)
microphone
Page 33

Installation du Téléphone
Installation de la pile du combiné
REMARQUE : Vous devez brancher la pile du combiné
avant de l’utiliser.
A
TTENTION: Pour réduire le risque d’incendie ou de
blessures, utilisez seulement la batterie approuvé
par Thomson Inc. d’hydrure de Nickel-métal (NiMH) du model
qui est compatible avec cette unité.
1. Repérez les batteries et le couvercle du compartiment de la pile qui
sont emballés ensemble dans un sac de plastique séparément du
combiné.
2. Repérez le compartiment de la pile à l’arrière du combiné.
3. Raccordez le connecteur de la pile dans la prise située à l’intérieur
du compartiment.
GP80AAAHC - NiMH 1.2V 800mAh
,
4. Refermez le compartiment de la pile en poussant le couvercle vers
le haut jusqu’à ce qu’il s’enclenche.
9
Page 34

10
Socle de Chargement de Combiné
1. Choisissez un endroit près d’une prise de courant et placez le
téléphone sans fil sur une surface plane.
2. Branchez le convertisseur d’alimentation c.a. dans la prise de
courant et le connecteur c.c. dans la prise à la dos de le socle de
recharge.
3. Placez le combiné sur le socle de recharge. L’indicateur CHARGE
s’allume pour confirmer que la pile se charge.
Laissez le téléphone se charger pendant 16 heures avant
l’utilisation initiale. Si vous ne chargez pas correctement le
téléphone, le rendement de la pile sera compromis.
ATTENTION : Utilisez seulement l’adapteur modèle
de la puissance 5-2718 qui accompagne l’appareil.
L’utilisation d’autres adapteurs de puissance peut
endommager l’unité
.
Fonctionnement du Telephone
Mise en Marche Et Arrêt
Ce combiné fonctionne en connectant une pile ou si celle-ci est
faible, appuyez et gardez enfoncé le bouton END CALL pendant deux
secondes.
Pour fermer le combiné, appuyez et gardez enfoncé le bouton END
CALL pendant deux secondes.
REMARQUE: Si le combiné est sur son socle, seuls
les boutons du (haut-parleur) et END CALL
fonctionnent.
Enregistrement
Vous combiné sont préenregistrés et prêts à être utilisés. On ne
recommande pas d’enregistrer de nouveau le combiné à moins que ce
ne soit absolument nécessaire.
Page 35

Par le menu Réglage Combiné:
1. Utilisez le bouton 6 ou 5 pour afficher ENREGISTREMENT.
2. Appuyez sur le bouton OK (SKL) pour ouvrir ce menu.
3. Utilisez le bouton 6 ou 5 pour afficher une base en particulier (1 à
4).
4. Appuyez sur le bouton OK (SKL).
5. Pendant la recherche, appuyez et gardez enfoncé pendant deux
secondes le bouton PAGE sur la base jusqu’à ce que le témoin
Charge/In Use clignote.
REMARQUE: Vous pouvez enregistrer jusqu’à
six combinés sur la base. Un combiné peut être
enregistré sur un maximum de quatre bases.
Desenregistrement
Le désenregistrement annule l’enregistrement. Pendant le processus
de désenregistrement, gardez le combiné près de la base.
Par le menu Réglage Combiné:
1. Utilisez le bouton 6 ou 5 pour afficher DÉSENREG.
2. Appuyez sur le bouton OK (SKL) pour ouvrir ce menu.
3. Utilisez le bouton 6 ou 5 pour afficher un combiné en particulier
et appuyez sur le bouton OK (SKL).
4. Appuyez sur le bouton OK (SKL) pour confirmer votre choix. Vous
entendrez une tonalité de confirmation lorsque le combiné sera
désenregistré.
AVERTISSEMENT: Il n’est pas recommandé de
désenregistrer un combiné à moins que cela ne
soit absolument nécessaire parce qu’un combiné
est désenregistré, que les fonctions du combiné
sont inutilisables tant que le combiné n’a pas été
réenregistré.
11
Page 36

12
5. Choisissez ARRIÉRE pour ne pas désenregistrer.
REMARQUE: Une fois le désenregistrement terminé,
PAS ENREGISTRÉ apparaît dans l’afficheur. Vous devez
enregistrer le combiné avant de l’utiliser.
Sélection de La Base
Cette option vous permet d’enregistrer un combiné sur plusieurs bases
et de choisir celle qui lui fournira le signal. Le combiné peut aussi
rechercher automatiquement la base la plus appropriée si l’option
Base Auto a été sélectionnée.
Par le menu Réglage Combiné:
1. Utilisez le bouton 6 ou 5 pour afficher DÉSENREG.
2. Appuyez sur le bouton OK (SKL) pour ouvrir ce menu.
3. Utilisez le bouton 6 ou 5 pour afficher une base en particulier (1 à
4, Base Auto).
4. Appuyez sur le bouton OK (SKL) pour confirmer votre choix.
Reglage par Defaut
Cette option permet de restaurer les parametres par defaut du
combine.
Par le menu Réglage Combiné:
1. Utilisez le bouton 6 ou 5 pour afficher PAR DÉFAUT.
2. Appuyez sur le bouton OK (SKL) pour ouvrir ce menu.
3. Appuyez sur le bouton OK (SKL) pour confirmer votre choix.
REMARQUE: Si vous choisissez OK, tous les reglages
du menu programmable retournent au reglages par
defaut de l’usine. Vous entendrez une tonalite de
confirmation.
Page 37

Remplacement de la Pile
A
TTENTION: Pour réduire le risque d’incendie ou de
blessures, utilisez seulement la batterie approuvé
par Thomson Inc. d’hydrure de Nickel-métal (NiMH) du model
qui est compatible avec cette unité
1. Assurez-vous que le combiné est désactivé (pas en mode
conversation) avant de remplacer la pile.
2. Retirez la porte du logement à piles.
3. Enlevez les batteries du combiné.
4. Insérez la nouvelle pile et rebranchez la fiche.
5. Remettez la porte du logement à pile en place.
6. Placez le combiné sur la base ou le socle de chargement pour
charger la pile. Si vous ne chargez pas correctement la pile du
combiné (pendant 16 heures) au moment de l’installation initiale
du téléphone et/ou quand vous installez un bloc-pile neuf, le
rendement à long terme de la pile sera compromi.
GP80AAAHC - NiMH 1.2V 800mAh
.
,
Précautions à Prendre
• Ne pas brûler, démonter, mutiler ni percer la pile. Comme d’autres
piles de ce type, des produits toxiques peuvent s’échapper et causer
des blessures.
• Afin de réduire les risques d’incendie ou de blessure, utilisez
seulement la pile
dans le Guide de l’utilisateur.
• Garder les piles hors de la portée des enfants.
• Retirez les piles si vous rangez l’appareil pour plus de 30 jours.
d’hydrure de Nickel-métal (Ni-MH)
indiquée
13
Page 38

14
Guide de Depannage
REMARQUE : Le sceau RBRC (Société de recyclage des piles rechargeables)
sur la pile de cet appareil Thomson signale que nous participons à un
programme de collecte et de recyclage des piles rechargeables.
Pour plus de renseignements, allez sur le site www.rbrc.org/cellarecycler/,
appelez au 1-800-8-BATTERY ou contactez votre centre de recyclage.
Solutions-Telephone
Aucun signal de manœuvre
• Vérifiez ou répétez les étapes d’installation :
Le cordon d’alimentation de la base est-il branché dans une prise
sous tension ?
Le cordon téléphonique est-il branché dans la base et la prise
murale ?
• Branchez un autre téléphone dans la même prise. S’il ne
fonctionne pas, le problème se situe peut-être au niveau du
câblage ou du service local.
• Le combiné est-il hors de la portée de la base ? Rapprochez-vous
de la base.
• Assurez-vous que les batteries est correctement installé.
Pas de symbole de signal
• Le combiné est peut-être trop éloigné de la base; rapprochezvous de la base.
• Enregistrez le combiné.
Page 39

Le combiné ne sonne pas
• Assurez-vous que l’interrupteur de sonnerie est à la position ON;
cela peut être fait par le menu de configuration du Volume de
sonnerie.
• Sinon, il faut peut-être charger la pile. Rapprochez-vous de la
base.
• Il y a peut-être trop de postes sur la même ligne. Essayez de
débrancher quelques postes téléphoniques.
• Vérifiez le signal de manœuvre.
ucun son du combiné
• Réglez le volume du combiné.
• Vérifiez et modifiez les paramètres audio de Skype, sous « Sound
Devices ».
Électricité statique, bruit ou fluctuations
• Le combiné est-il hors de la portée de la base ? Rapprochez-vous
de la base.
• Assurez-vous que la base n’est pas branchée dans une prise de
courant avec un autre appareil ménager. Au besoin, déplacez la
base.
L’unité émet un signal
• Nettoyez les contacts de chargement du combiné sans fil.
• Voir les solutions pour «Aucun signal de manœuvre» à la page
précédente.
• Remplacez la pile.
15
Page 40

16
La composition-mémoire ne fonctionne pas
• Avez-vous programmé les touches d’emplacement-mémoire
correctement ?
• Avez-vous suivi la bonne séquence de composition?
L’appareil bloque et aucune communication entre la base et le
combiné sans cordon
• Débranchez l’alimentation de la prise de courant et à l’arrière
de la base. Retirez la pile du combiné. Attendez 30 secondes
et rebranchez l’alimentation dans la base et la prise murale.
Rebranchez la pile et chargez-la pendant 16 heures.
Le combiné affiche « ENREG. EN. COURS » ou « PAS ENREGISTRÉ » et
ne peut communiquer avec la base lorsque le bouton TALK/CALL BACK
est activé.
• Débranchez la pile du combiné et rebranchez-la. Placez le
combiné sur la base de recharge pendant deux ou trois minutes.
• Débranchez le bloc d’alimentation et rebranchez-le. Placez le
combiné sur la base de recharge pendant deux ou trois minutes.
Le combiné affiche HANDSET NEEDS REGISTRATION
• Suivez la procédure de programmation du téléphone pour
enregistrer à nouveau le combiné sur la base.
• Appuyez à nouveau sur le bouton SELECT pour lancer
l’enregistrement. Suivez les instructions à l’écran du combiné.
L’enregistrement n’a pas réussi
• Rechargez les piles pendant 16 heures.
• Débranchez et rebranchez l’adaptateur.
Page 41

Solutions- Afficheur
Aucun affichage
• Rechargez ou remplacez les piles.
• Assurez-vous que l’appareil est branché dans une prise de
courant non commutée. Débranchez l’alimentation de la base et
rebranchez-la.
Message d’erreur d’afficheur
• L’unité affiche ce message si elle détecte autre chose que
l’information d’appelant valide durant le silence qui suit la
première sonnerie. Ce message indique la présence de bruit sur
la ligne.
Aucun afficheur
• Vous devez être abonné au service d’afficheur de nom/numéro
offert par la compagnie de téléphone pour recevoir l’information
d’appelant.
Dépannage Skype
Incapable de faire des appels Skype
• Vérifiez si Skype est connecté et s’il fonctionne correctement
(REMARQUE : la version du logiciel Skype doit être 1.4 ou plus
récente).
• Vérifiez si l’appareil 28300 est branché à l’ordinateur et si le pilote
USB fonctionne correctement.
• L’ordinateur est peut-être en mode d’hibernation.
L’appareil gèle pendant les appels Skype
• Redémarrez l’ordinateur.
17
Page 42

18
Retard de sonnerie Skype
• En faisant un appel Skype-IN, les appelants par ligne terrestre
entendent deux sonneries ou plus avant que l’ordinateur et
le combiné commencent à sonner. Il s’agit d’un problème de
connexion réseau.
Mauvaise qualité du son
• Les coupures, manques, les parasites et l’écho pendant un appel
Skype sont dus à des problèmes de connexion de réseau.
Le son et la musique peuvent être entendus par le téléphone, mais pas
par les haut-parleurs de l’ordinateur lorsque la base USB est branchée
à l’ordinateur.
• Modifiez les paramètres audio de l’ordinateur :
Windows 2000 : Panneau de configuration Sons et multimédia-
-> Audio --> périphériques par défaut sous « Lecture des sons »
et « Enregistrement des sons » --> sélectionnez la carte de son
dans la liste.
Windows XP : Panneau de configuration ( Sons et multimédia-->
Audio --> périphériques par défaut sous « Lecture des sons » et «
Enregistrement des sons » --> sélectionnez la carte de son dans
la liste.
Batterie
Si vous éprouvez l’un ou l’autre des problèmes suivants, même après
avoir rechargé complètement la pile, vous devrez peut-être remplacer
la pile :
• Courte période de conversation
• Mauvaise qualité du son
• Portée limitée
• Indicateur de chargement/recherche ou d’antenne de combiné
ne s’allume pas
Page 43

Soins et Entretien
Voici quelques conseils simples pour préserver le bon fonctionnement
et l’apparence de ce téléphon:
• Éviter d’échapper le combiné et de l’utiliser abusivement
• Essuyez la base avec un chiffon humide ou avec un chiffon antistatique.
N’utilisez jamais un chiffon sec, car cela pourrait causer une décharge
électrostatique.
• Ne jamais utiliser un nettoyeur puissant ou une poudre abrasive afin de
ne pas endommager le fini.
• Conserver l’emballage original pour utilisation ultérieure.
Causes de Mauvaise Réception
• Parements en aluminium.
• Endos métallique d’isolation.
• Conduites de chauffage et autre construction métallique pouvant
bloquer les signaux radio.
•
Trop près d’appareils comme un four micro-ondes, une cuisinière,
un ordinateur, etc.
• Conditions atmosphériques, comme un orage électrique.
• Base installée au sous-sol ou à l’étage inférieur de la maison.
• Base branchée dans une prise c.a. avec d’autres appareils
électroniques.
• Un écouteur de surveillance de bébé utilise la même fréquence.
• Pile de combiné faible.
19
Page 44

20
Service Après-vente
Thomson Digital Technologies Ltd., garantit à l’acheteur de cet appareil ou à la
personne qui le recevrait en cadeau, que si cet appareil présente un défaut de
fabrication pendant l’année suivant la date d’achat, il sera remplacé sans frais.
Les frais de transport de retour sont payés.
Cette garantie ne couvre pas les dommages attribuables aux accidents, à une
mauvaise utilisation ni à des piles qui fuient.
Si cet appareil ne fonctionne pas convenablement pendant qu’il est sous
garantie:
1. Le retourner au marchand vendeur avec la preuve d’achat pour être
remplacé.
OU
2. Retirer les piles (s’il y a lieu) et emballer l’appareil et les accessoires dans la
boîte originale (ou l’équivalent).
— Le faire parvenir port payé (avec la preuve d’achat) et assuré à :
Thomson Digital Technologies Ltd.
6200 Edwards Boulevard
Mississauga, Ontario
Canada L5T 2V7
Page 45

Les dispositions de cette garantie s’ajoutent (sans les modifier ni les restreindre)
aux garanties légales et autres droits ou recours prévus par toute législation
applicable; pour autant que ces dispositions tendront à rejeter, exclure
ou limiter toute garantie légale ou tout autre droit et recours, elles seront
considérées comme modifiées dans la mesure nécessaire pour s’y conformer.
S’il est impossible de trouver un réparateur qualifié pour effectuer une
réparation non garantie, écrire à :
Thomson Digital Technologies Ltd.
c/o Thomson Inc.
B.P. 0944
Indianapolis, Indiana, É.-U., 46206-0944
Joindre le reçu de caisse à ce guide pour référence ultérieure. Cette information
pourrait être demandée s’il faut faire réparer l’appareil pendant qu’il est sous
garantie.
DATE D’ACHAT______________________________________________
NOM DU MAGASIN __________________________________________
21
Page 46

22
Page 47

Index
A
Avant de Commencer 6
C
Causes de Mauvaise Réception 19
Compatibilité avec les Prothèses
Auditives 4
D
Desenregistrement 11
Dépannage Skype 17
E
Énonce sur L’exposition au
Rayonnement RF de la FCC 3
Enregistrement 22
F
Facteur D’équivalence de Sonnerie
(REN) 3
Fonctionnement du Telephone 10
G
Guide de Depannage 14
I
Importantes Lignes Directrices sur
L’installation 7
Information pour Accessoires 24
Information sur le Réseau
Téléphonique 3
Installation 7
Installation de la pile du combiné 9
Installation du Téléphone 9
Introduction 6
L
Licensing 4
Liste de Pièces 6
M
Mise en Marche Et Arrêt 10
P
Précautions à Prendre 13
Présentation du Combiné 8
R
Reglage par Defaut 12
Remplacement de la Pile 13
Renseignements Importants 2
Renseignements sur L’interférence
2
Renseignements sur le produit
DECT 4
S
Sélection de La Base 12
Service Après-vente 20
Socle de Chargement de Combiné
10
Soins et Entretien 19
Système de Sécurité Numérique 7
T
Tables des Matieres 5
23
Page 48

Information pour Accessoires
DESCRIPTION No. PIÈCE.
Adaptateur d’alimentation CC pour la
socle de chargement de combiné
Pince-ceinture 5-2712
Casque d’écoute 5-2713
Pour commande, appelez le distributeur le plus proche pour votre
secteur;
Ontario: (905) 624-8516 Manitoba: (204) 783-2088
British Columbia: (604) 438-8001 Quebec: (514) 352-9071
Des frais d’expédition et de manutention seront ajoutés au montant de
la commande.
Nous sommes tenus par la loi de percevoir la taxe de vente appropriée
pour chaque province dans laquelle la marchandise est expédiée. Les
articles sont assujettis à la disponibilité des stocks.
5-2718
Modèle 28301
00016606 (Rév. 0 CAN E/F)
06-37
Imprim´en Chine
Thomson Digital Technologies Ltd.
© 2006 Thomson Digital Technologies Ltd.
Trademark(s) ® Registered
Marque(s) déposée(s)
 Loading...