

Use and Care & Installation Guide
GE Appliances
English Version.................................. 2
Version française.......................... 23
Versión en español...................... 45
Safety Instructions ........................ 2
Operating Instructions, Tips
Accessories..................................................... 5
Anti-Moisture Switch.................................... 3
Automatic Icemaker ..................................... 8
Freezer Compartment .................................. 7
Icemaker Accessory Kit ............................... 8
Shelves ........................................................ 4, 5
Storage Drawers ....................................... 6, 7
Temperature Controls .................................. 3
Care and Cleaning
Behind Refrigerator....................................... 9
Cleaning—Inside and Outside..................... 9
Drawer and Cover Removal................. 9, 10
Light Bulb Replacement............................ 10
Under Refrigerator ........................................ 9
Problem Solver ...................... 20, 21
Normal Operating Sounds........................ 20
Preparation
Clearances .................................................... 11
Dimensions................................................... 11
Rollers ............................................................ 11
Vacation and Moving................................. 11
Water Supply to Icemaker........................ 11
Installation ................................. 12–19
Earthing.................................................. 12, 13
Electrical Requirements..................... 12, 13
Fitting a Different Plug............................... 13
Great Britain and Ireland ........................... 13
Mains Lead Replacement .................... 2, 13
Reversing the Door Swing ................ 16–19
Water Line Installation ....................... 14, 15
Model and Serial Numbers ......................... 2
Refrigerator
Réfrigérateur
Frigorífico
Top-Mount No-Frost 18-25
Sans givre à compartiment supérieur 18-25
Montaje superior sin escarcha 18-25
Export
HELP US HELP YOU…
Read this guide carefully. Write down the model and serial numbers.
It is intended to help you operate and maintain your new refrigerator
properly. Keep it handy for answers to your questions.
If you received a damaged refrigerator…
Immediately contact the dealer (or builder) that sold you
the refrigerator.
Save time and money. Before you request service…
Check the Problem Solver. It lists minor operating problems that you
can correct yourself.
You’ll see them on a label on the left side, near the top of the fresh
food compartment.
Model Number
Serial Number
Use these model and serial numbers in any correspondence or service
calls concerning your refrigerator.
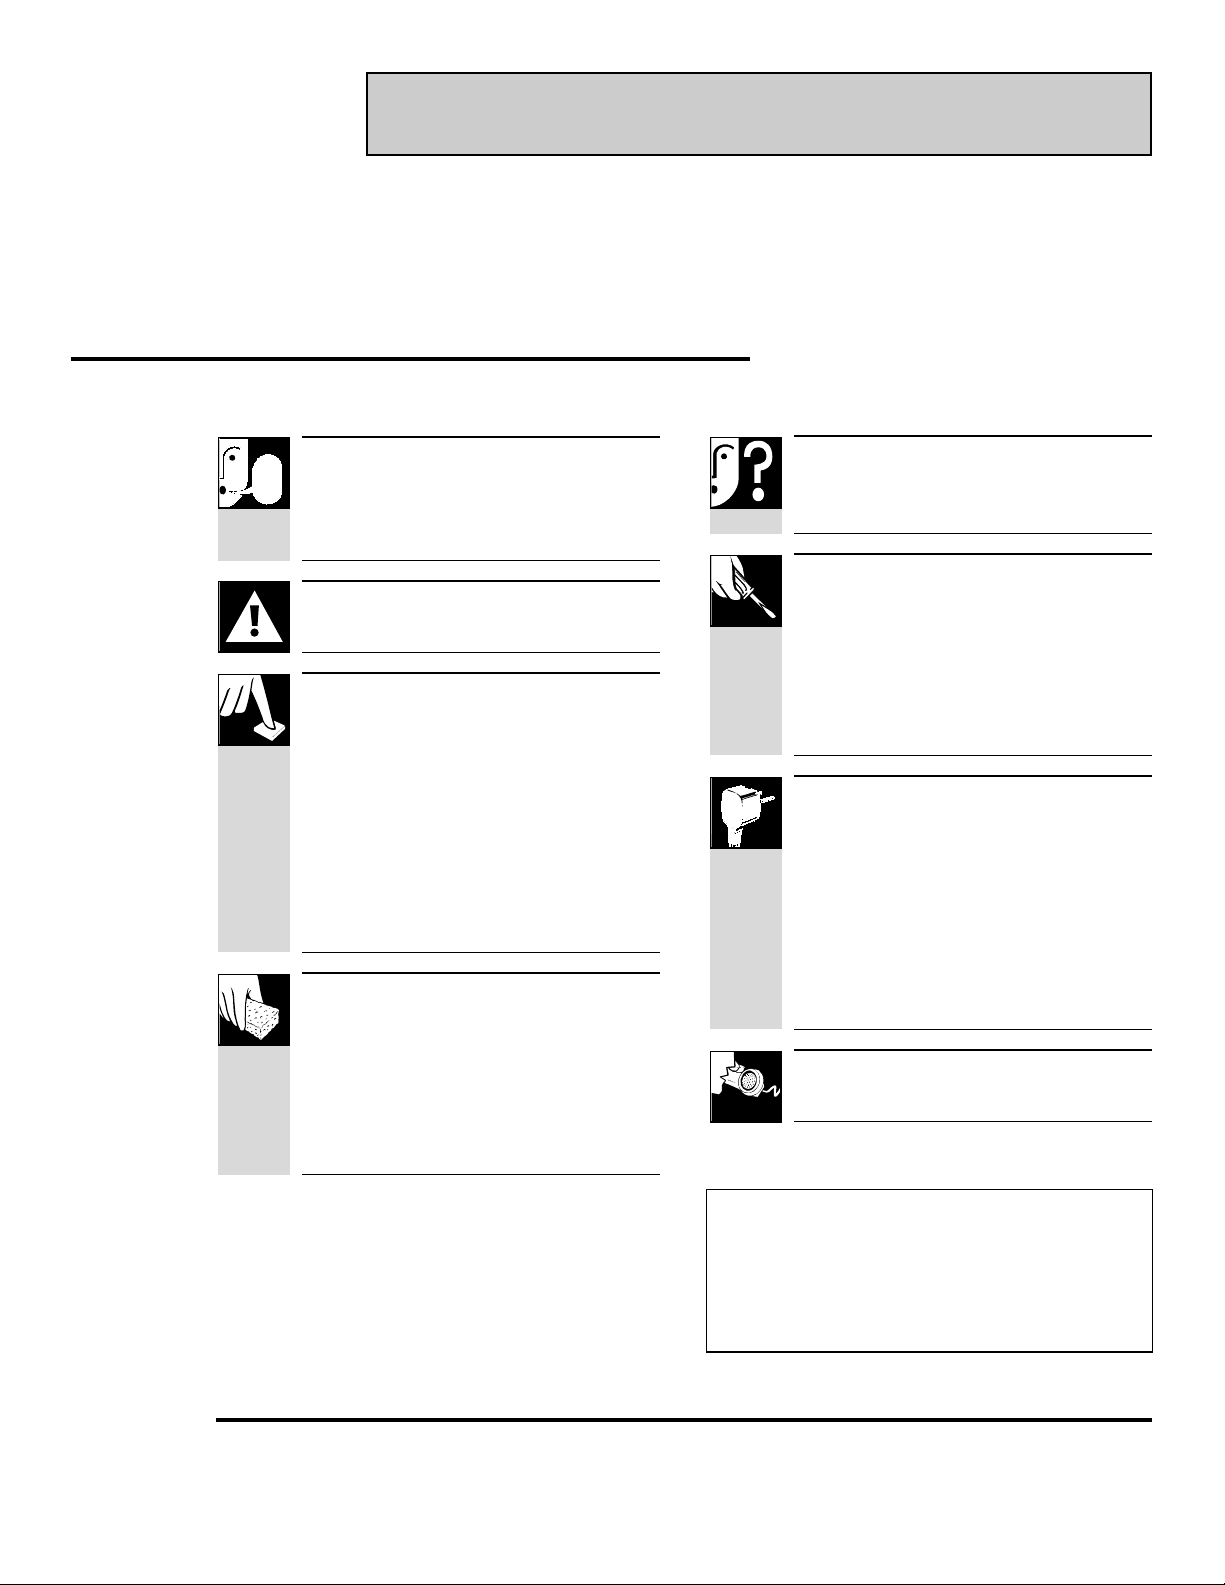
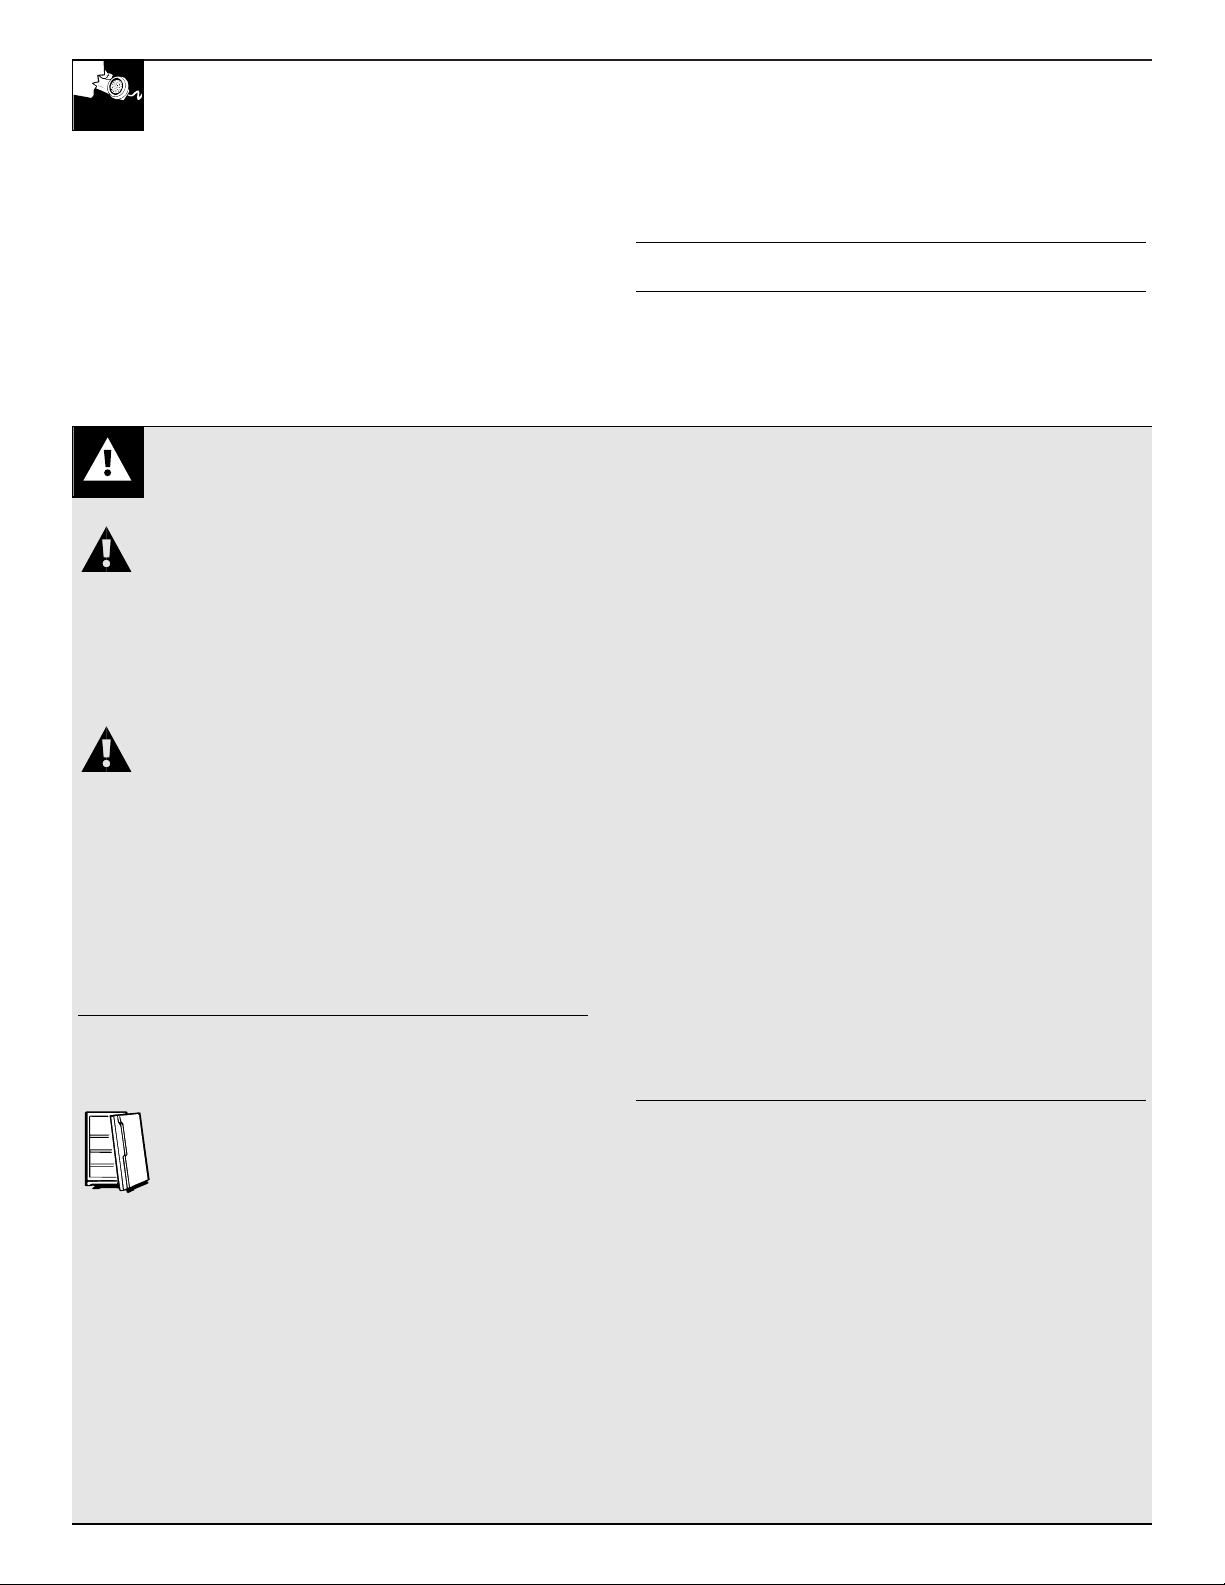
WARNING—When using this appliance, always
exercise basic safety precautions, including the
following:
• Use this appliance only for its intended purpose as described
in this Use and Care Guide.
• This refrigerator must be properly installed in accordance
with the Installation Instructions before it is used. See
grounding instructions in the Installation section.
WARNING: Connect to potable water supply
only.
• Never unplug your refrigerator by pulling on the power
cord. Always grip plug firmly and pull straight out from
the outlet.
• Repair or replace immediately all electric service cords
that have become frayed or otherwise damaged. Do not use
a cord that shows cracks or abrasion damage along its length
or at either the plug or appliance end.
• When moving your refrigerator away from the wall, be
careful not to roll over or damage the power cord.
• Do not allow children to climb, stand or hang on the shelves
in the refrigerator. They could damage the refrigerator and
seriously injure themselves.
• If your old refrigerator is still around the house
but not in use, be sure to remove the doors. This
will reduce the possibility of danger to children.
• After your refrigerator is in operation, do not touch the
cold surfaces in the frozen food storage compartment,
particularly when hands are damp or wet. Skin may adhere
to these extremely cold surfaces.
• If your refrigerator has an automatic icemaker, avoid
contact with the moving parts of the ejector mechanism, or
with the heating element that releases the cubes. Do not
place fingers or hands on the automatic icemaking mechanism
while the refrigerator is plugged in.
• Don’t refreeze frozen foods which have thawed completely.
Food safety experts say:
‘‘…You may safely refreeze frozen foods that have thawed if
they still contain ice crystals or if they are still cold—below 4°C.
‘‘…Thawed ground meats, poultry or fish that have any off-odor
or off-color should not be refrozen and should not be eaten.
Thawed ice cream should be discarded. If the odor or color of
any food is poor or questionable, get rid of it. The food may be
dangerous to eat.
‘‘…Even partial thawing and refreezing reduces the eating
quality of foods, particularly fruits, vegetables and prepared
foods. The eating quality of red meats is affected less than that of
many other foods. Use refrozen foods as soon as possible to save
as much of their eating quality as you can.’’
• Unplug your refrigerator before cleaning and making
repairs. NOTE: We strongly recommend that any servicing
be performed by a qualified individual.
• Before replacing a burned-out light bulb, the refrigerator
should be unplugged in order to avoid contact with a live wire
filament. (A burned-out light bulb may break when being
replaced.) NOTE: Turning control to “0” position does not
remove power to the light circuit.
• Do not store or use gasoline or other flammable vapors and
liquids in the vicinity of this or any other appliance.
Mains lead replacement
If the mains lead on your refrigerator needs replacing at any time,
it must be replaced by a special lead which is obtainable from
your local dealer. A charge will be made for the replacement of
the mains lead if you have damaged the lead.
SAVE THESE
INSTRUCTIONS
IMPORTANT SAFETY INSTRUCTIONS
Read all instructions before using this appliance.
2

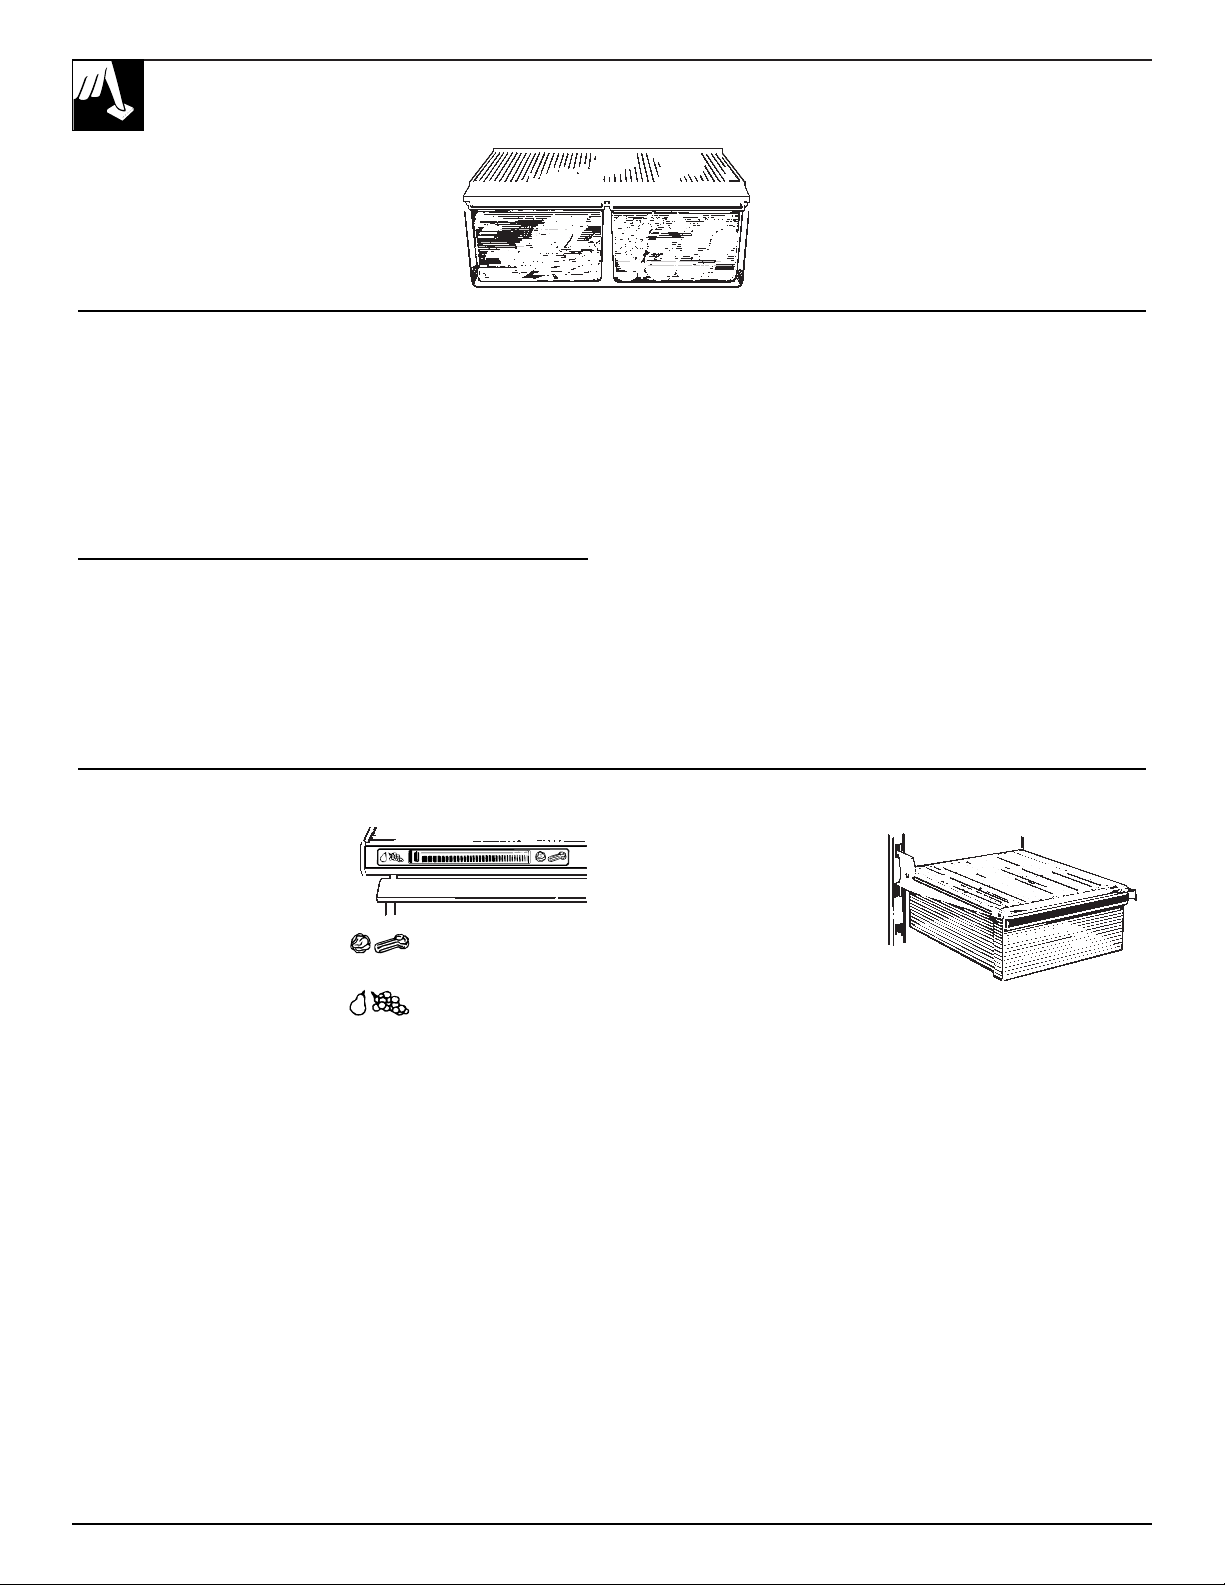
TEMPERATURE CONTROLS
Important Safety Instructions Temperature Controls
How to Test Temperatures No Defrosting
Use the milk test for the fresh food compartment. Place a
container of milk on the top shelf in the fresh food compartment.
Check it a day later. If the milk is too warm or too cold, adjust the
temperature controls.
Use the ice cream test for the frozen food storage compartment.
Place a container of ice cream in the center of the frozen food storage
compartment. Check it after a day. If it’s too hard or too soft, adjust
the temperature controls.
After changing the controls, always allow 24 hours for the
refrigerator to reach the temperature you have set.
It is not necessary to defrost the frozen food storage compartment
or fresh food compartment. Although your refrigerator is designed
and equipped to defrost itself automatically, some frost on packages
is normal.
3
Fresh Food Frozen Food
Initially set both controls at “4.”
The fresh food control moves
a damper to change the amount
of cold air that moves from the
frozen food compartment to the
fresh food compartment.
The frozen food control
maintains the temperatures
throughout the frozen food
storage compartment. Moving
the frozen food control to “0”
stops cooling in both areas—
fresh food and frozen food
storage compartments—but
does not shut off power to
the refrigerator.
Effervescent drinks should not be stored in the frozen food storage
compartment. For fastest food freezing, set the frozen food control at
position “7.” Since the compressor will run 100% of the time at this
setting, don’t forget to turn back the setting after the food is frozen.
Cold air
from frozen
food storage
compartment
Side View
Damper
(coldest setting)
(warmest setting)
Damper
Ambient Room Temperature Limits Anti-Moisture Switch
This refrigerator is designed to operate in ambient temperatures
specified by its Temperature Class which is marked on the rating plate.
Temperature Symbol Ambient Temperature
Class
Maximum Minimum
ExtendedTemperate SN 32°C 10°C
Temperate N 32°C 16°C
Subtropical ST 38°C 18°C
Tropical T 43°C 18°C
NOTE: Internal temperature may be affected by such factors as the
location of the refrigerator, ambient temperature and frequency of
door openings. Adjust temperature controls as required to compensate
for these factors.
The anti-moisture switch is located on the
temperature control panel. To reduce the amount
of electricity required to operate your refrigerator,
push switch to the left.
This turns off the unit in your refrigerator that
prevents moisture from forming on the inside or
outside surfaces.
With this unit turned off, moisture may form on the
inside or outside of your refrigerator, especially when the weather is
humid. The humidity is most likely to be high in the summer, in the
early morning hours, and in homes which are not air conditioned.
Over an extended period of time, moisture that forms on the
refrigerator surface may cause deterioration of the paint finish. It will
be important to protect the finish by using appliance polish wax as
described in the Care and Cleaning section.
The cost to operate the low-wattage unit is about the same as it costs
to use two night lights.
When you move the anti-moisture switch to the right, low wattage
electricity flows through the unit and warms the outside of the
refrigerator and the top of the fresh food section. Under most
conditions, this prevents the forming of moisture or water droplets.
7
4
1
7
0
6
5
4
3
2
1
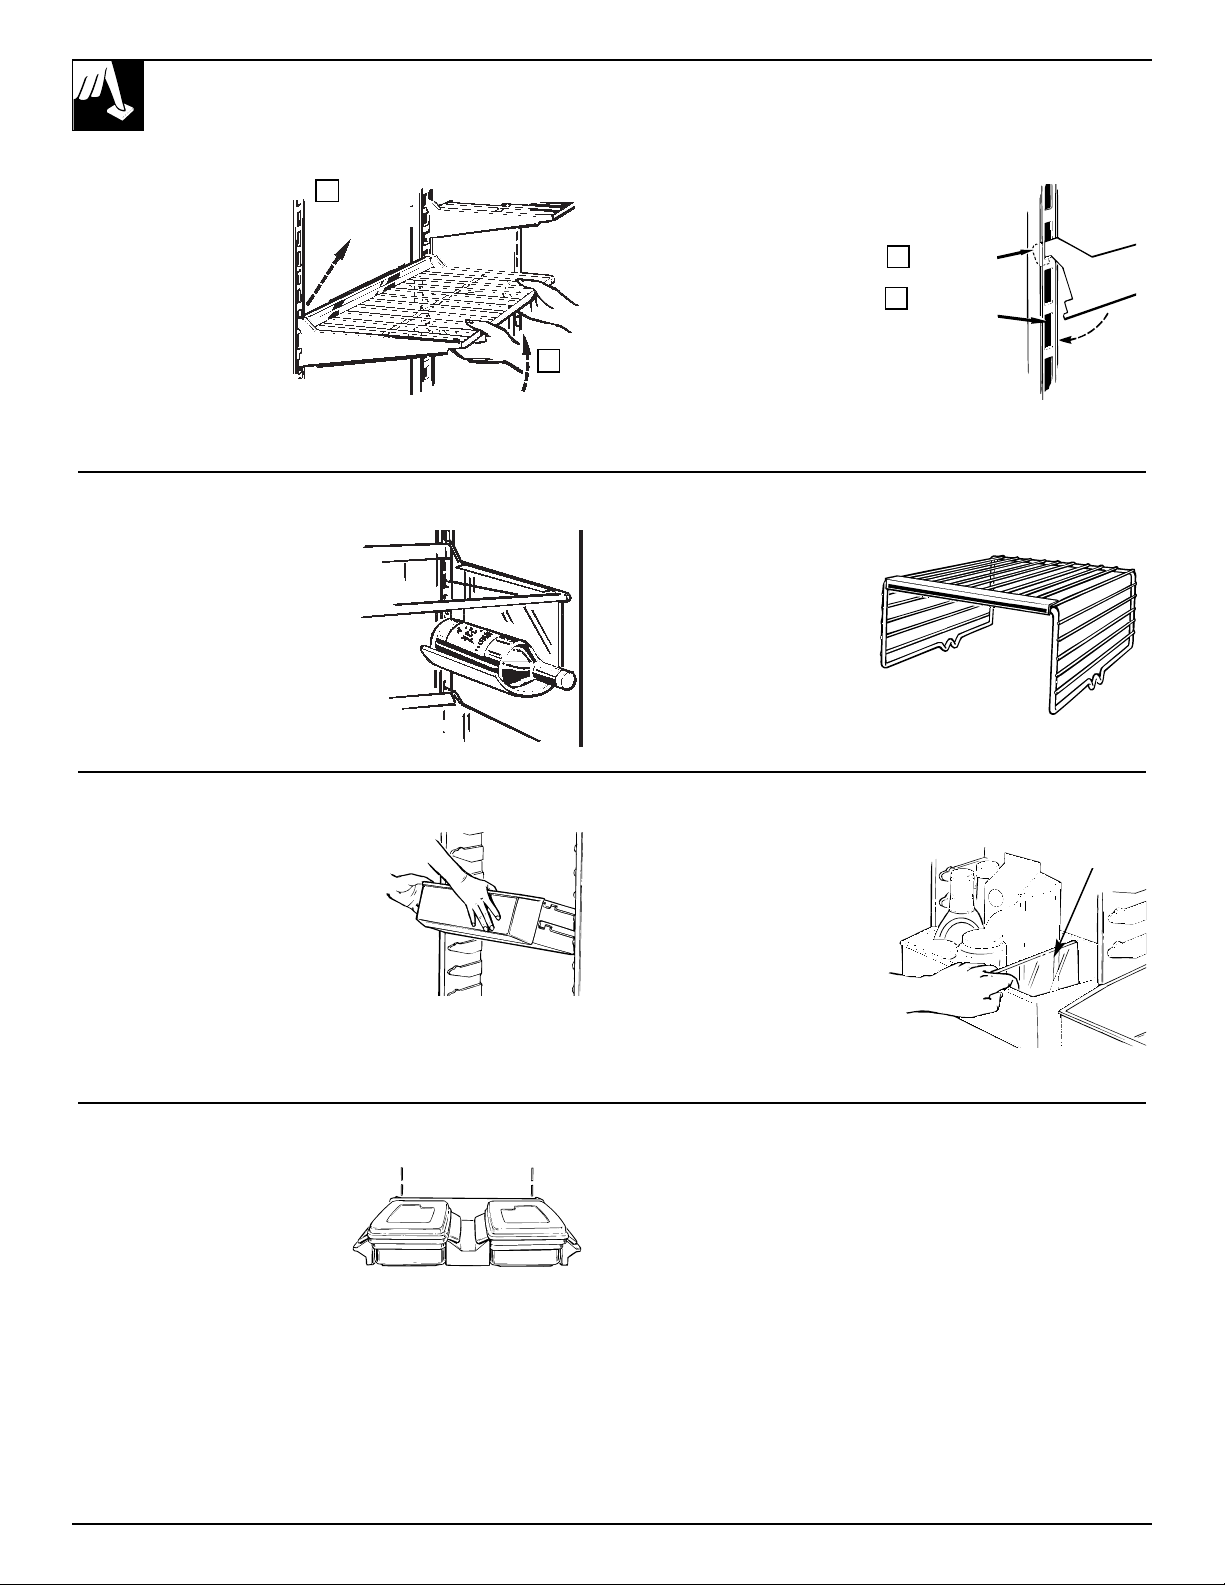
Removable Wine Rack (on some models)
The wine rack is designed to hold
a bottle on its side and will fit on
any shelf.
Extra Frozen Food Storage Compartment Shelf
(on some models)
Some models have an extra
frozen food storage
compartment shelf that allows
you to use the frozen food
storage compartment space
more efficiently.
SHELVES
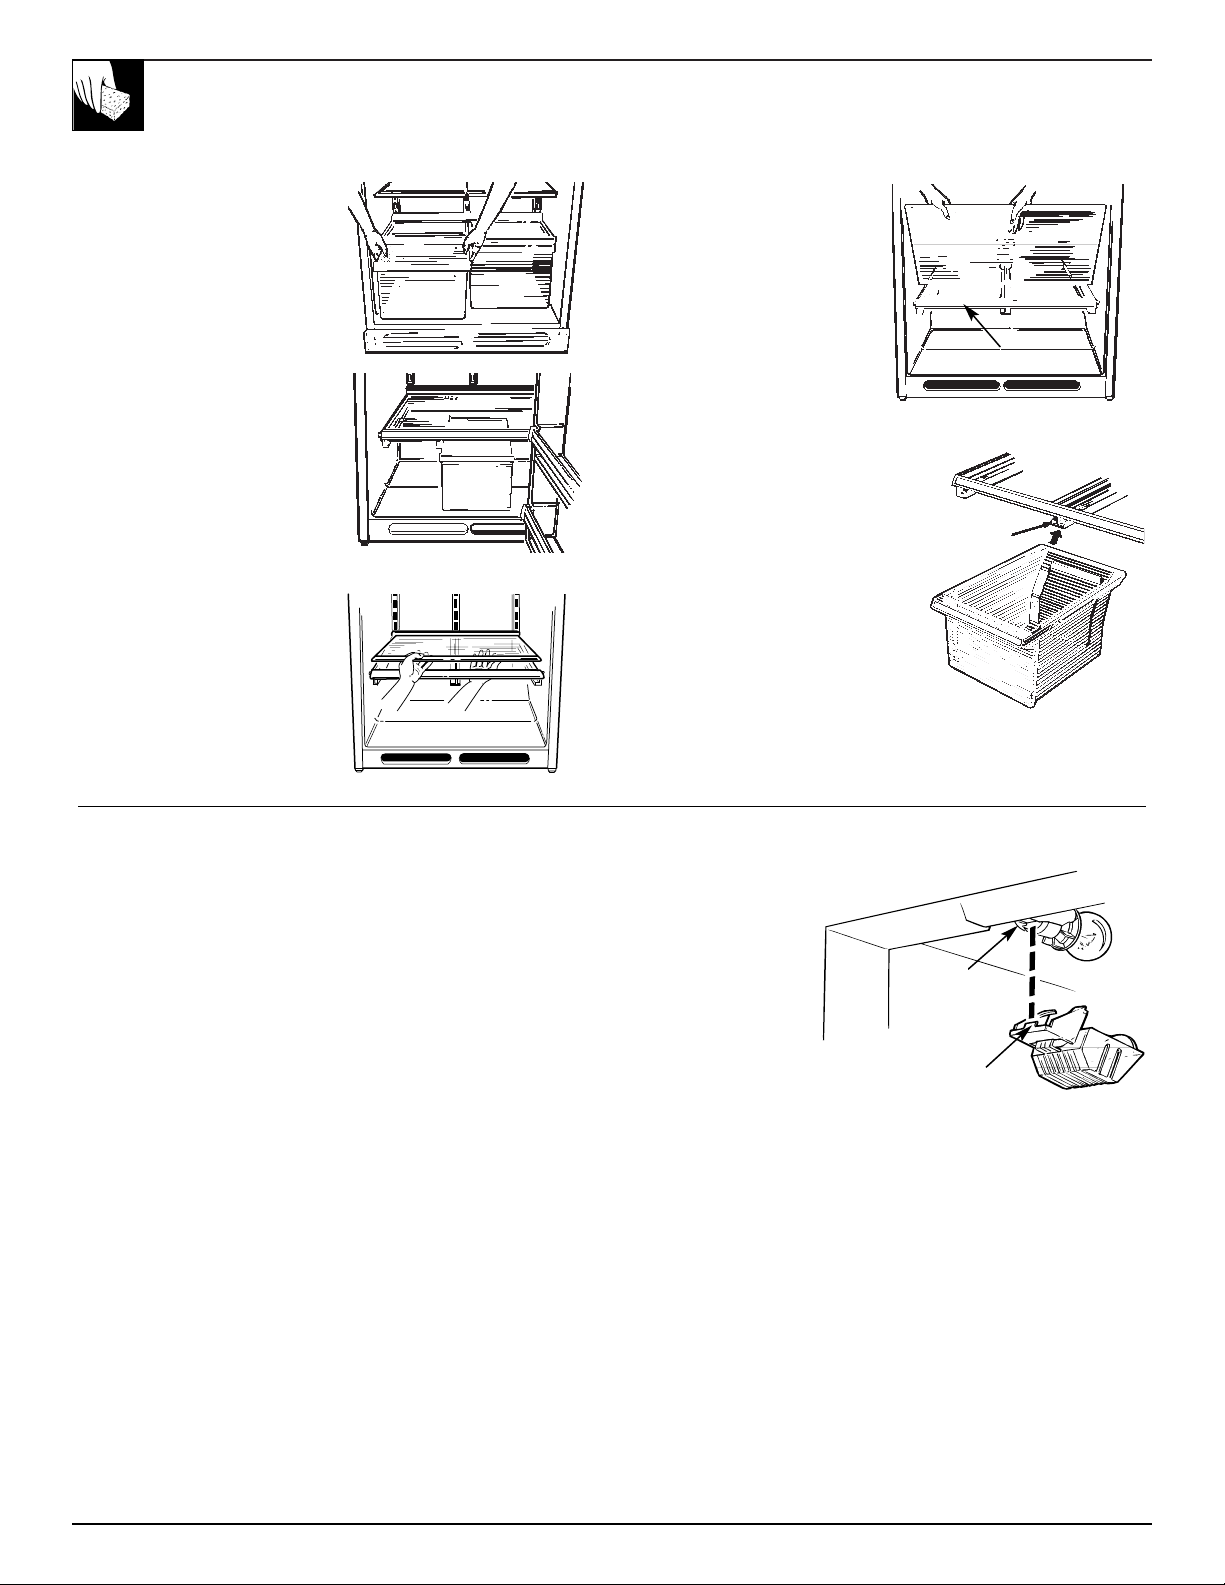
Adjustable Shelves (on some models)
Shelves in the fresh food and
frozen food storage
compartments are adjustable,
enabling you to make
efficient shelf arrangements
to fit your family’s food
storage needs. Steel shelves
in the frozen food storage
compartment in some
models are adjustable in the
same way.
To remove shelves: Tilt the
shelf up at front, then lift it up and out
of tracks on the rear wall of the refrigerator.
To replace shelves: Select the
desired shelf height. With shelf
front raised slightly, engage top
hooks in tracks at rear of cabinet.
Then lower front of shelf until it
locks into position.
Tempered glass shelves (on
some models) are adjustable in
the same manner.
2
Lift up and out
1
Tilt up
Engage
top hook
Lower to lock
into place
1
2
Porta-Bins on the Doors (on some models)
Adjustable Porta-Bins on fresh
food and frozen food storage compartment
doors can easily be carried from the
refrigerator to the work area.
To remove: Slide Porta-Bin forward on
molded supports until it comes completely
out of the door.
To relocate: Select desired shelf height,
engage Porta-Bins in the molded supports
of the door, and slide in. Porta-Bin will hook in place.
Snuggers are designed
to give you storage flexibility
in Porta-Bins and on your fresh
food door shelves. Items such
as salad dressings, steak sauces
and other condiments can now
be kept securely against the door
liner to help prevent tipping,
spilling or sliding.
Place index finger and middle
finger on either side of the snugger
near the front and simply move it
back and forth to fit your needs.
Snugger
Quick ServeTMSystem (on some models)
Cooking-serving-storage dishes with
durable see-through lids fit into a
rack that hangs on the fresh food or
freezer compartment door. Dishes
can be removed from and returned to
the rack as needed, and the rack can
be removed and relocated on either
door in the same manner as the door bins.
Dishes and lids are safe for use in microwave ovens, refrigerators,
freezers, and are dishwasher-safe.
The dishes should not be used for cooking high-fat foods such as
bacon and high-sugar foods such as candy and syrup. The high
temperatures of the fat and sugar can cause bubbles to form on the
inside of the dish.
CAUTION:
• Dishes and lids are not designed for use in the regular oven,
on the range-top or in the broiler. Such use can be hazardous.
4
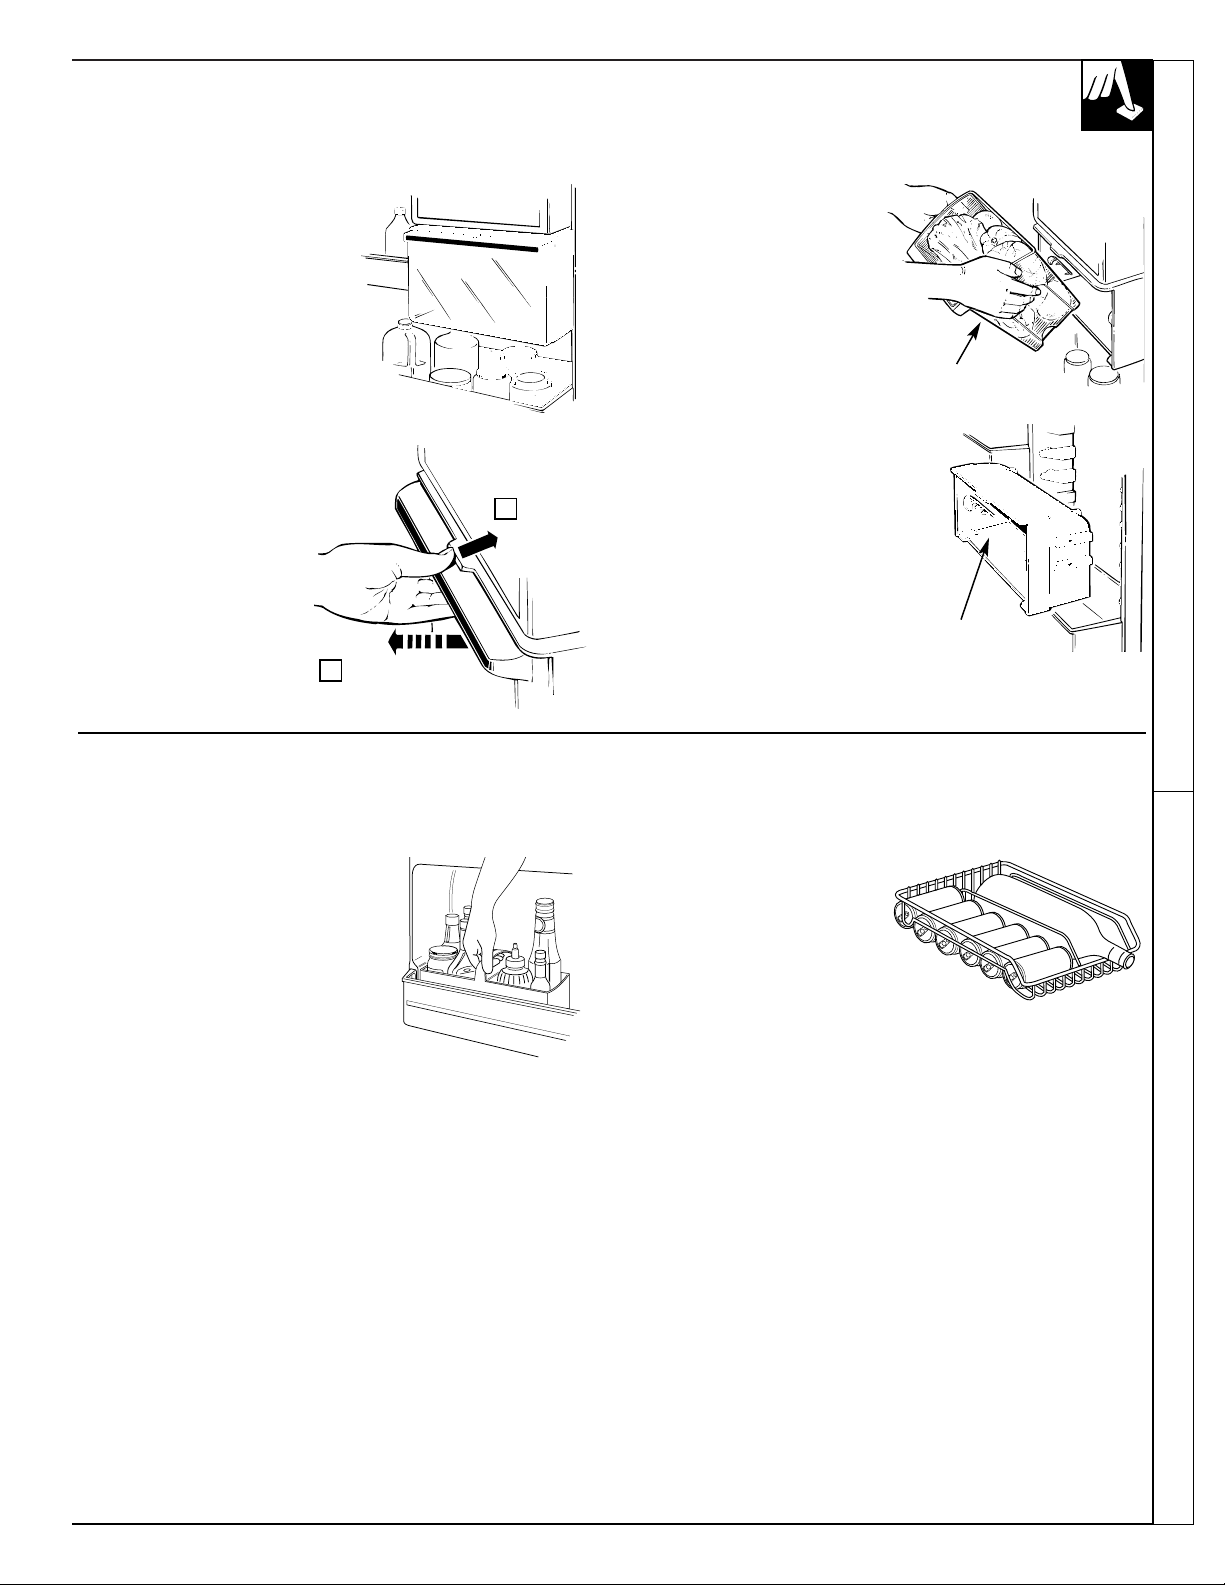
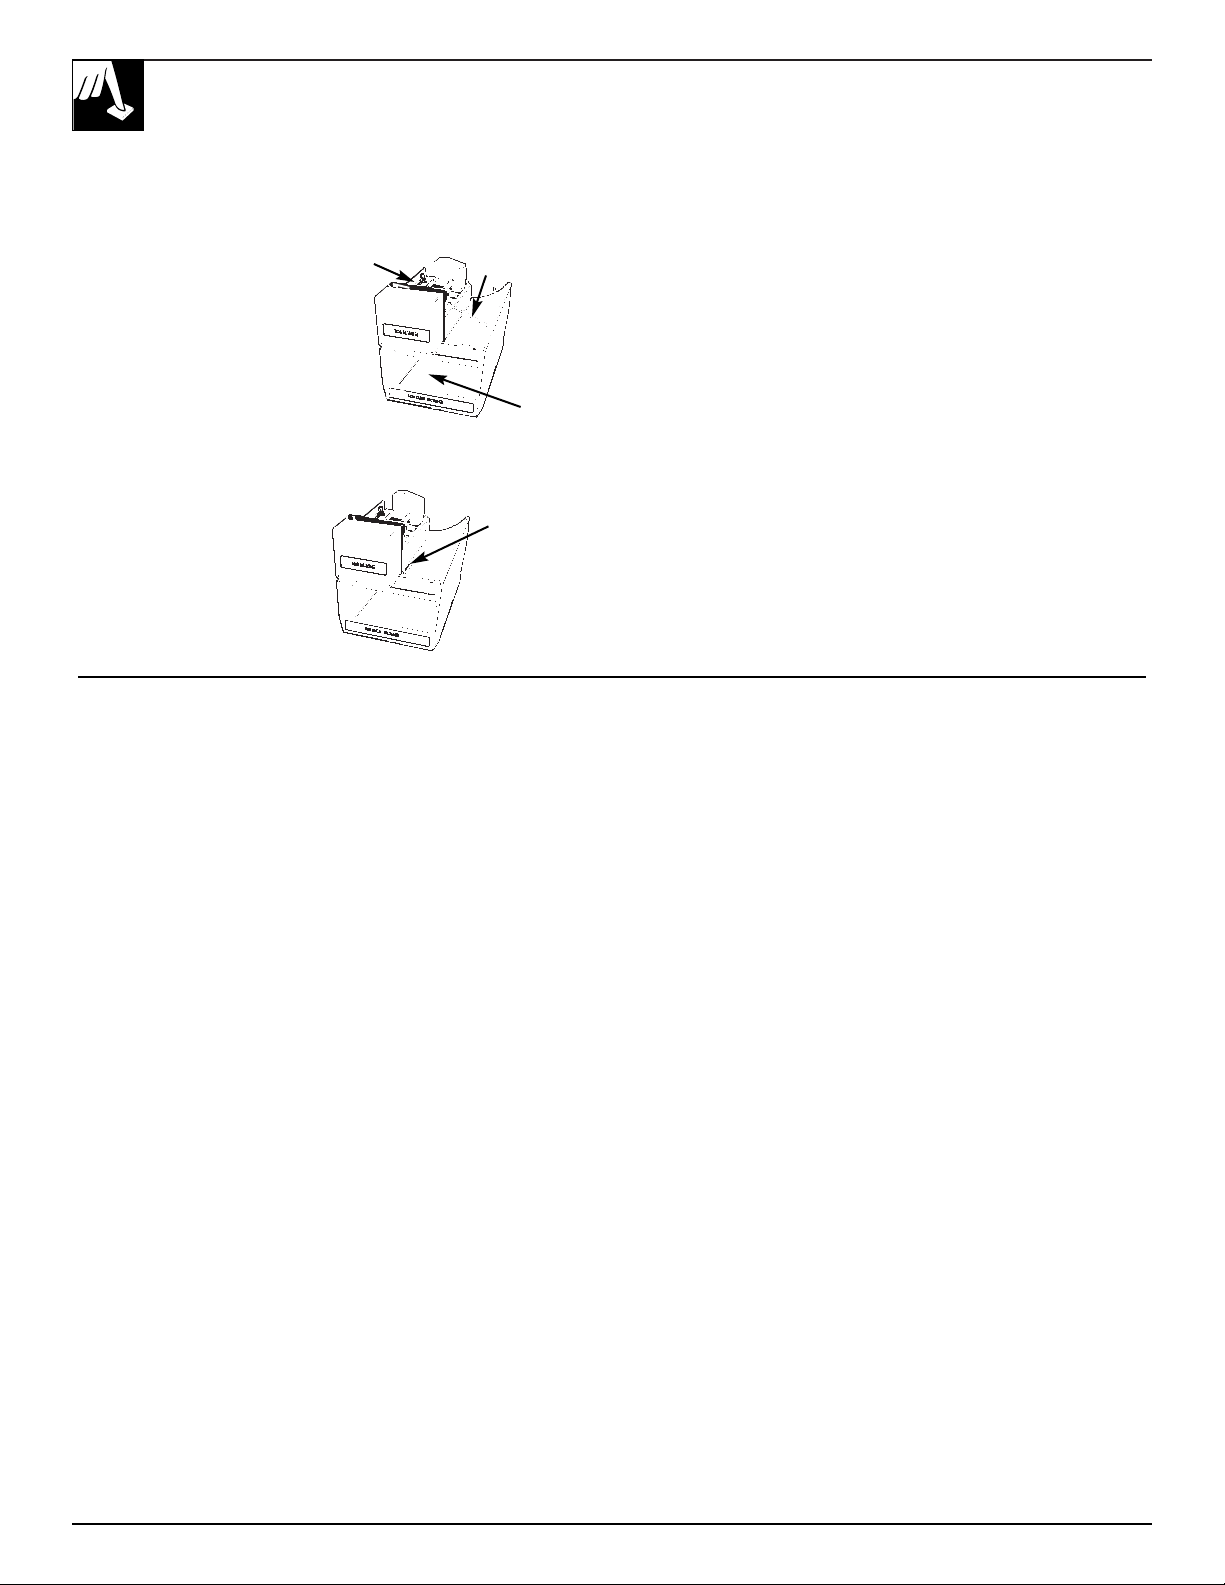
Quick Store Bin (on some models)
5
This removable tilt-out bin made of
Lexan polycarbonate resin can be
located on the fresh food or frozen
food storage compartment door. It has
been designed for convenient storage
of those frequently used items that do
not fit easily into a Porta-Bin or soonto-be-used items that require covered
storage to keep from drying out.
To open, push the latch up and
pull the bin handle forward.
To avoid damaging the
refrigerator, make sure the bin
is closed and latched before
closing the refrigerator door.
To remove the bin, lift it up and
out of the bin housing.
To relocate the Quick Store unit,
lift the bin housing up and out of the
molded supports on the door, move it
to the desired new location, and
lower it onto the molded supports on
the door. You do not have to remove
the bin from the housing when
relocating the Quick Store unit.
ACCESSORIES
Condiment Caddy Beverage Rack
The condiment caddy keeps frequently
used condiments together. It fits in your
refrigerator door shelf. A convenient
handle allows condiments to be easily
carried to the table.
Slide-out beverage rack holds
twelve cans of soda or two
wine/water bottles (lengthwise).
Can be removed for cleaning.
Quick Store Bin
Bin Housing
Shelves Accessories
2
Pull forward
QUICK S
1
Push up
STORAGE DRAWERS
6
Fruit & Vegetable Drawers Moist’n Fresh Drawer (on some models)
The storage drawers at the bottom of the fresh food compartment are
designed to provide high humidity levels required by most vegetables
and lower humidity levels required for most fruits.
When replacing the drawers, always push them all the way in.
Storage time will depend upon the type of food and its condition when
placed in the drawers.
Excess water that may accumulate in the bottom of the drawers should
be emptied and the drawers wiped dry.
Cool ’n Fresh Drawer (on some models)
This refrigerated drawer is designed to provide lower humidity storage
for items such as:
• Apples • Nectarines • Raspberries
• Apricots • Oranges • Squash, summer
• Grapes • Peaches • Strawberries
• Mushrooms • Pears • Tangerines
This refrigerated drawer is designed to keep unwrapped foods fresh
by retaining the natural moisture content of foods such as:
• Artichokes • Cherries • Peas, green
• Asparagus • Corn • Plums
• Beets, topped • Currants • Radishes
• Blueberries • Greens, leafy • Rhubarb
• Carrots • Lettuce • Spinach
• Celery • Parsley • Tomatoes, ripe
As in any refrigerated storage area, it is recommended that foods
with strong odors be stored wrapped—foods such as:
• Broccoli • Cauliflower • Parsnips
• Brussels sprouts • Green Onions • Turnips
• Cabbage
Adjustable Humidity Drawers (on some models) Snacks Drawer (on some models)
These drawers have individual,
adjustable humidity controls that let
you regulate the amount of cold air
entering the drawers.
Slide the control all the way to the setting and the drawer
provides high humidity recommended for most vegetables.
Slide the control all the way to the setting to provide
lower humidity levels recommended for most fruits.
The slide-out Snacks drawer can
be removed and taken to the sink
or food preparation area. You
may also relocate it and the shelf
to which it attaches within the
fresh food compartment to suit
your storage needs.
7
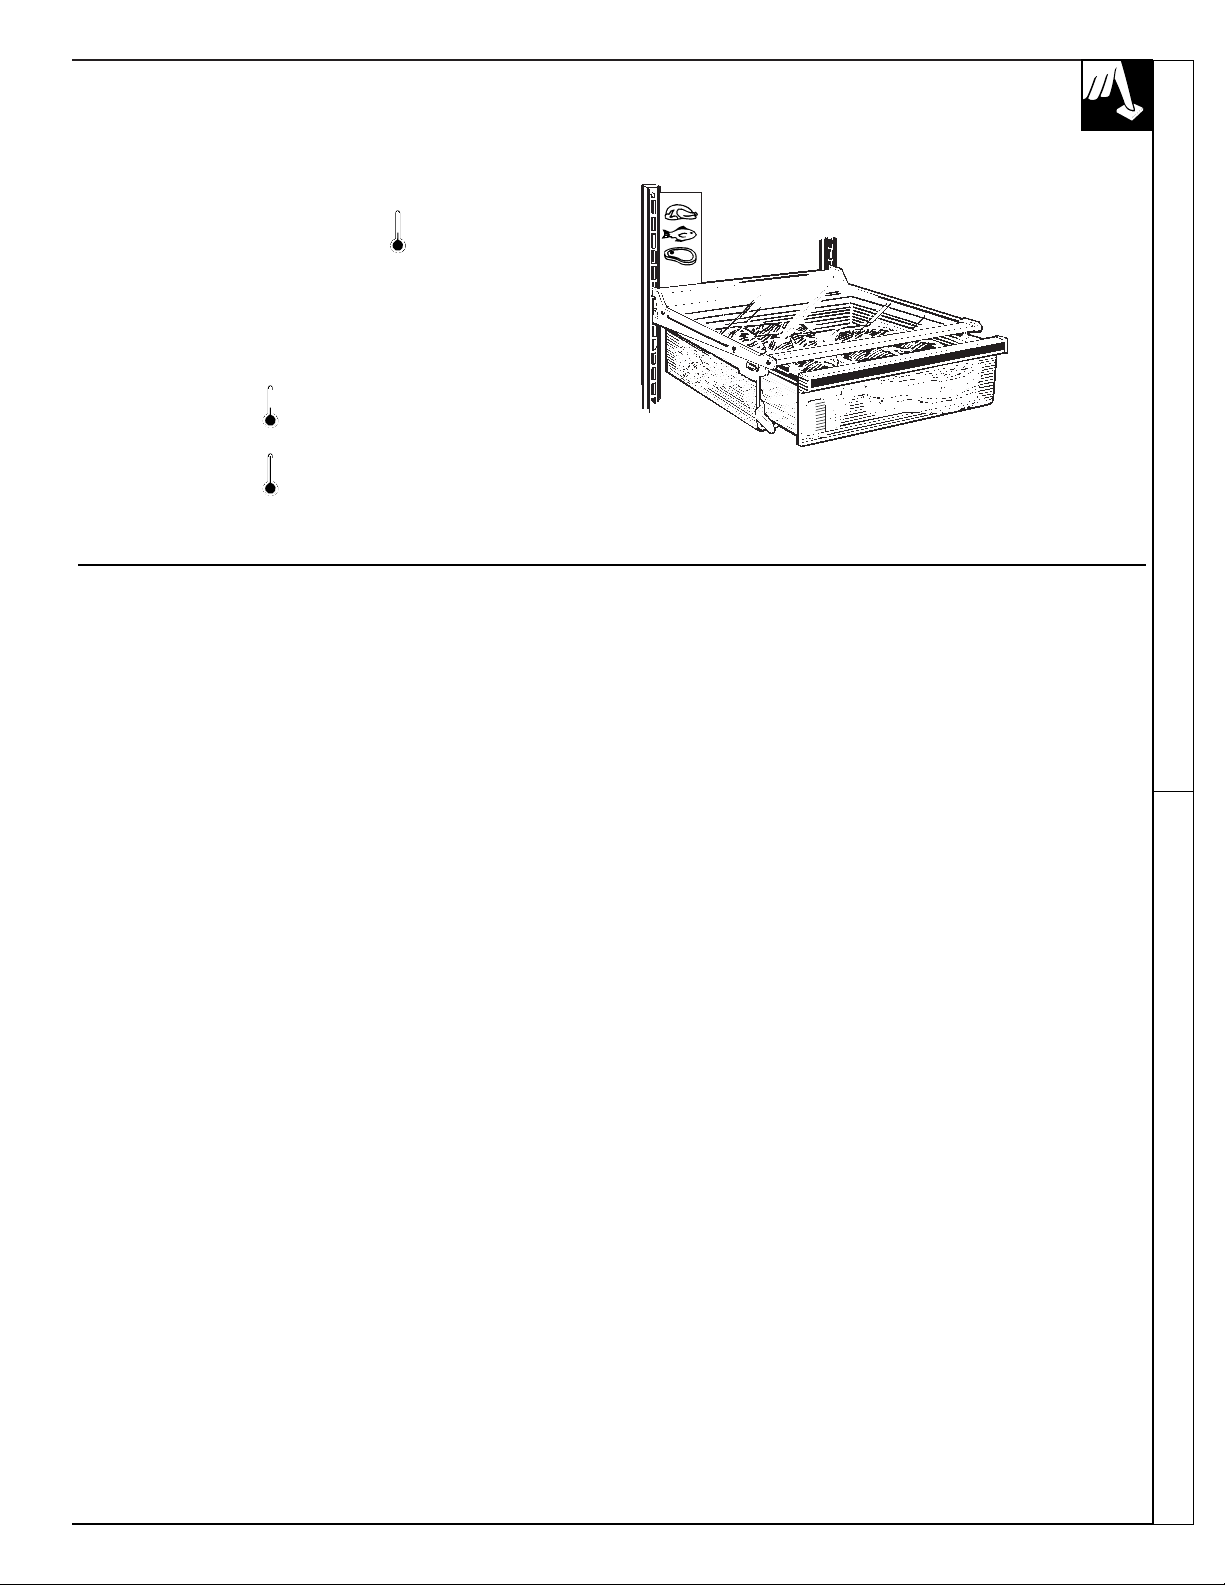
Adjustable Temperature Meat Drawer (on some models)
Fresh meats are stored best in the coldest part of the refrigerator.
When the drawer is placed in the top 6
slots on the left side and the lever is set at ,
air from the frozen food storage compartment is
forced around the drawer to keep it very cold.
You can move the drawer to any location for storage of items other
than fresh meats.
The variable temperature control lever lets you regulate the amount
of cold air surrounding the drawer.
When the lever is set at , the damper over the opening in
the drawer is fully open to provide the coldest storage area.
When the lever is set at , the damper is fully closed. Normal
refrigerator temperatures will be maintained.
Variable settings between these extremes may be selected.
FREEZER COMPAR TMENT
• Food to be frozen must not be placed in direct contact with food in storage.
• Do not store commercially quick-frozen food longer than the time recommended
by the food manufacturers.
• For fastest food freezing, set the frozen food control at position “7.” Since the
compressor will run 100% of the time at this setting, don’t forget to turn back
the setting after the food is frozen.
• If the power to the appliance is shut off for an extended time or if the refrigerating system
fails, do not open the doors unless absolutely necessary. When it is necessary, close them as
quickly as possible so the frozen food will stay frozen as long as possible.
Effervescent drinks should not be stored in the frozen food storage compartment.
Some products such as water ices should not be consumed too cold.
Storage Drawers Freezer Compartment
AUTOMATIC ICEMAKER
(on some models)
8
Your icemaker will produce eight cubes per cycle—approximately
100 cubes in a 24-hour period, depending on frozen food storage
compartment temperature, room temperature, number of door
openings and other use conditions.
If your refrigerator is
operated before the water
connection is made to the
icemaker, keep the feeler arm
in the STOP (up) position.
When the refrigerator is first
installed, allow about 24 hours
for the frozen food storage
compartment to cool down to
icemaking temperatures.
Throw away the first few batches of ice.
This flushes away impurities in the water line.
When the refrigerator has
been connected to the water
supply, move the feeler arm
to the ON (down) position.
Icemaking will continue until the feeler arm senses a sufficient
accumulation of ice cubes in the storage bin and halts the operation
temporarily. For maximum ice storage, level the stored cubes with
your hand occasionally. Be sure nothing interferes with the swing of
the feeler arm.
The icemaker ejects cubes in groups of eight and it is normal for
several cubes to be joined together.
Move the icemaker feeler arm to the STOP (up) position when:
• home water supply is to be off for several hours.
• ice storage bin is to be removed for a period of time.
• going away on vacation, at which time you should also turn off the
valve in the water supply line to your refrigerator.
• turning the fresh food control to “0.”
If ice is not used frequently, old ice cubes will become cloudy
and taste stale. Empty the ice storage bin periodically and wash
it in lukewarm water. Be sure to allow the storage bin to dry before
replacing it—otherwise ice cubes may stick to other parts of
the icemaker.
If this is your first icemaker, you’ll hear occasional sounds that may
be unfamiliar. They are normal icemaking sounds and are not a cause
for concern.
Icemaker
Ice
Storage Bin
Feeler arm in
STOP (up) position
Feeler arm in
ON (down)
position
Water Supply Kit Icemaker Accessory Kit
A kit containing copper tubing, shutoff valve, fittings and
instructions needed to connect the icemaker to your cold water
line is available at extra cost. Contact your local distributor and
order the appropriate kit depending on how much copper tubing
you need. See Preparation section.
If your refrigerator did not come already equipped with an automatic
icemaker, an Icemaker Accessory Kit is available at extra cost from
your local distributor. Check the back of the refrigerator for the
specific icemaker kit needed for your model.
CARE AND CLEANING
Cleaning—Outside
9
The door handles can be cleaned with a cloth dampened with a
solution of mild liquid dishwashing detergent and water. Dry with a
soft cloth. Don’t use wax on the door handles with metal trim.
Keep the finish clean. Wipe with a clean cloth lightly dampened with
kitchen appliance wax or mild liquid dishwashing detergent. Dry and
polish with a clean, soft cloth. Do not wipe the refrigerator with a
soiled dishwashing cloth or wet towel. These may leave a residue that
can erode the paint. Do not use scouring pads, powdered cleaners,
bleach or cleaners containing bleach because these products can
scratch and weaken the paint finish.
Protect the paint finish. The outside of the refrigerator has a high
quality, baked-on paint finish. With proper care, it will stay newlooking and rust-free for years. Apply kitchen/appliance wax when
the refrigerator is new and then at least twice a year.
Cleaning—Inside
Clean the inside of the fresh food and frozen food storage
compartments at least once a year. Unplug refrigerator before
cleaning. If this is not practical, wring excess moisture out of sponge
or cloth when cleaning around switches, lights or controls. Apply an
appliance wax/polish to the inside surface between the doors.
Use warm water and baking soda solution—about 15 ml of baking
soda to one liter of water. This both cleans and neutralizes odors.
Rinse thoroughly with water and wipe dry.
Avoid cleaning cold glass shelves (on some models) with hot water
because the extreme temperature difference may cause them to break.
Other parts of the refrigerator—including door gaskets, vegetable
drawers, ice trays and all plastic parts—can be cleaned the same way.
After cleaning the door gaskets, apply a thin layer of petroleum jelly
to the door gaskets at the hinge side. This helps keep the gaskets from
sticking and bending out of shape. Do not use cleansing powders or
other abrasive cleaners.
To help prevent odors, leave an open box of baking soda in the
rear of the refrigerator, on the top shelf. Change the box every three
months. An open box of baking soda in the frozen food storage
compartment will absorb stale frozen food storage compartment odors.
Quick Serve dishes and lids can be cleaned in an automatic
dishwasher or by hand with liquid dishwashing detergent and water.
You can remove stains by soaking them in a bleach and water
solution—1 part chlorine bleach to 3 parts water. (Stubborn stains
may require soaking.) Use a plastic scouring pad to remove burned-on
soil. Do not use cleansing powders or other abrasive cleaners.
Do not wash any of your refrigerator’s plastic parts in your
automatic dishwasher.
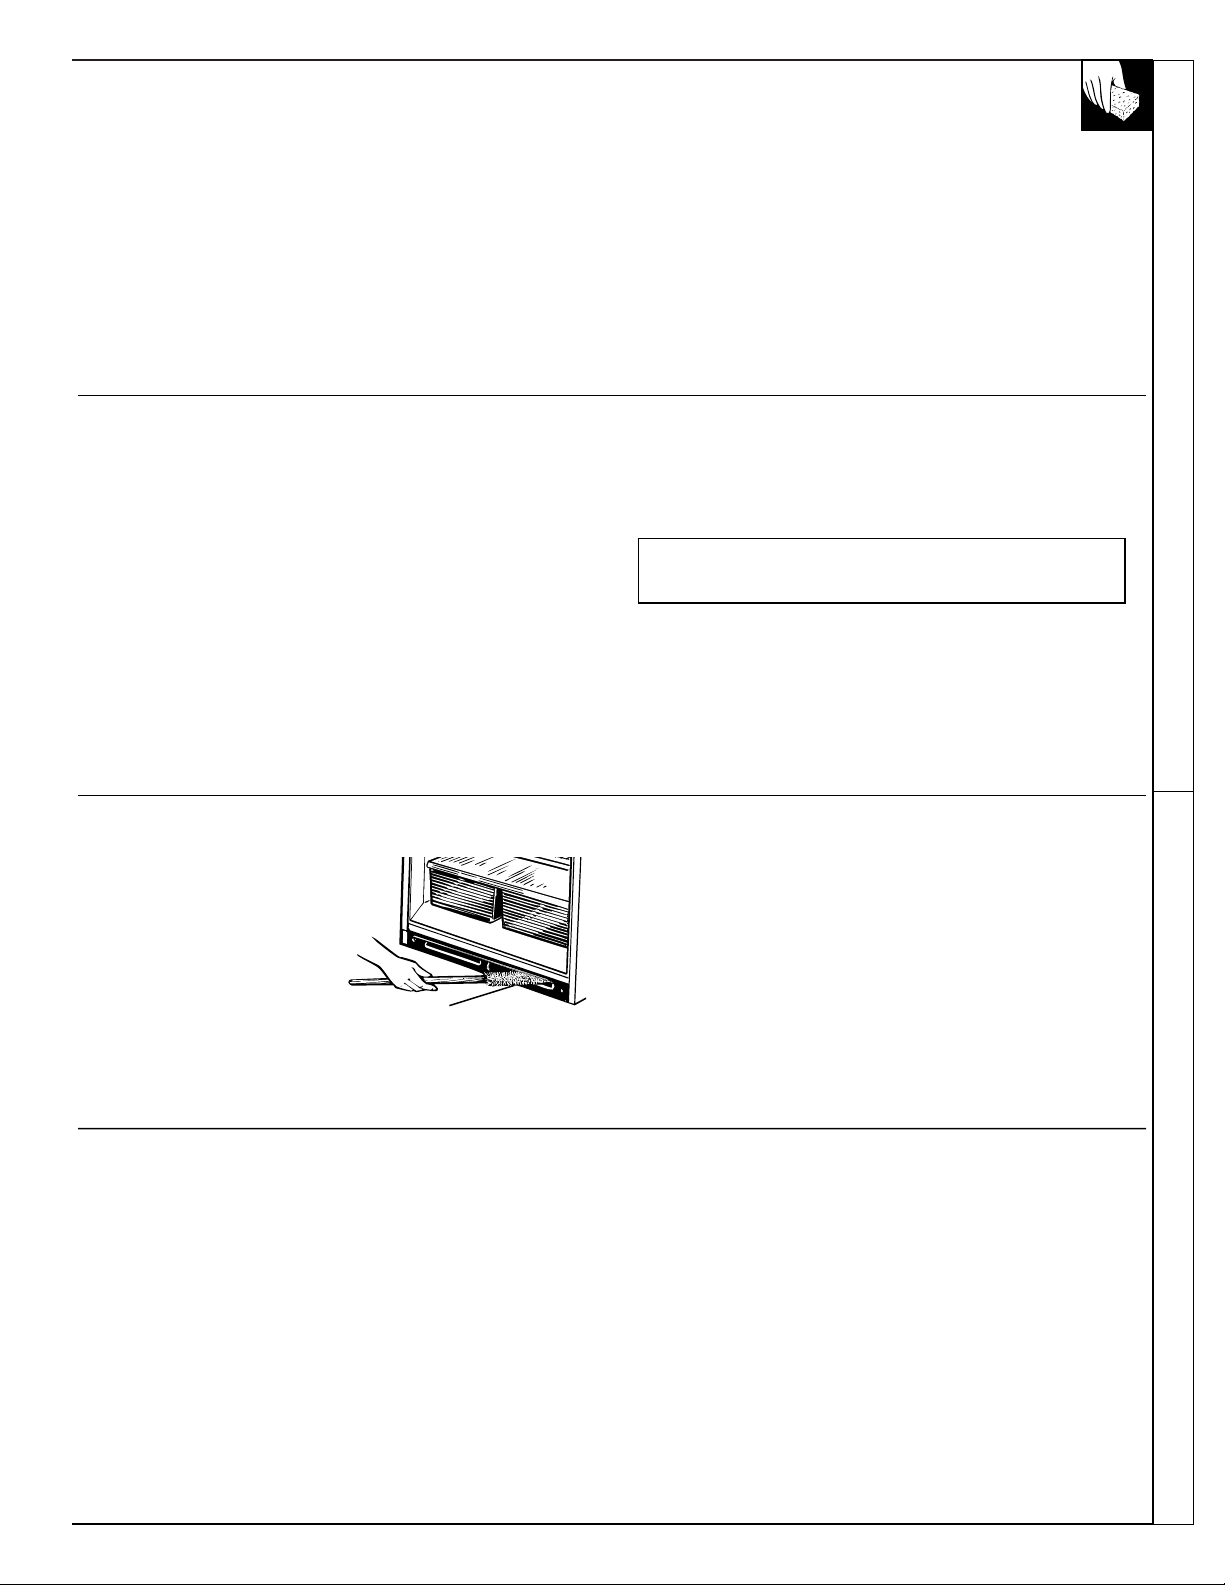
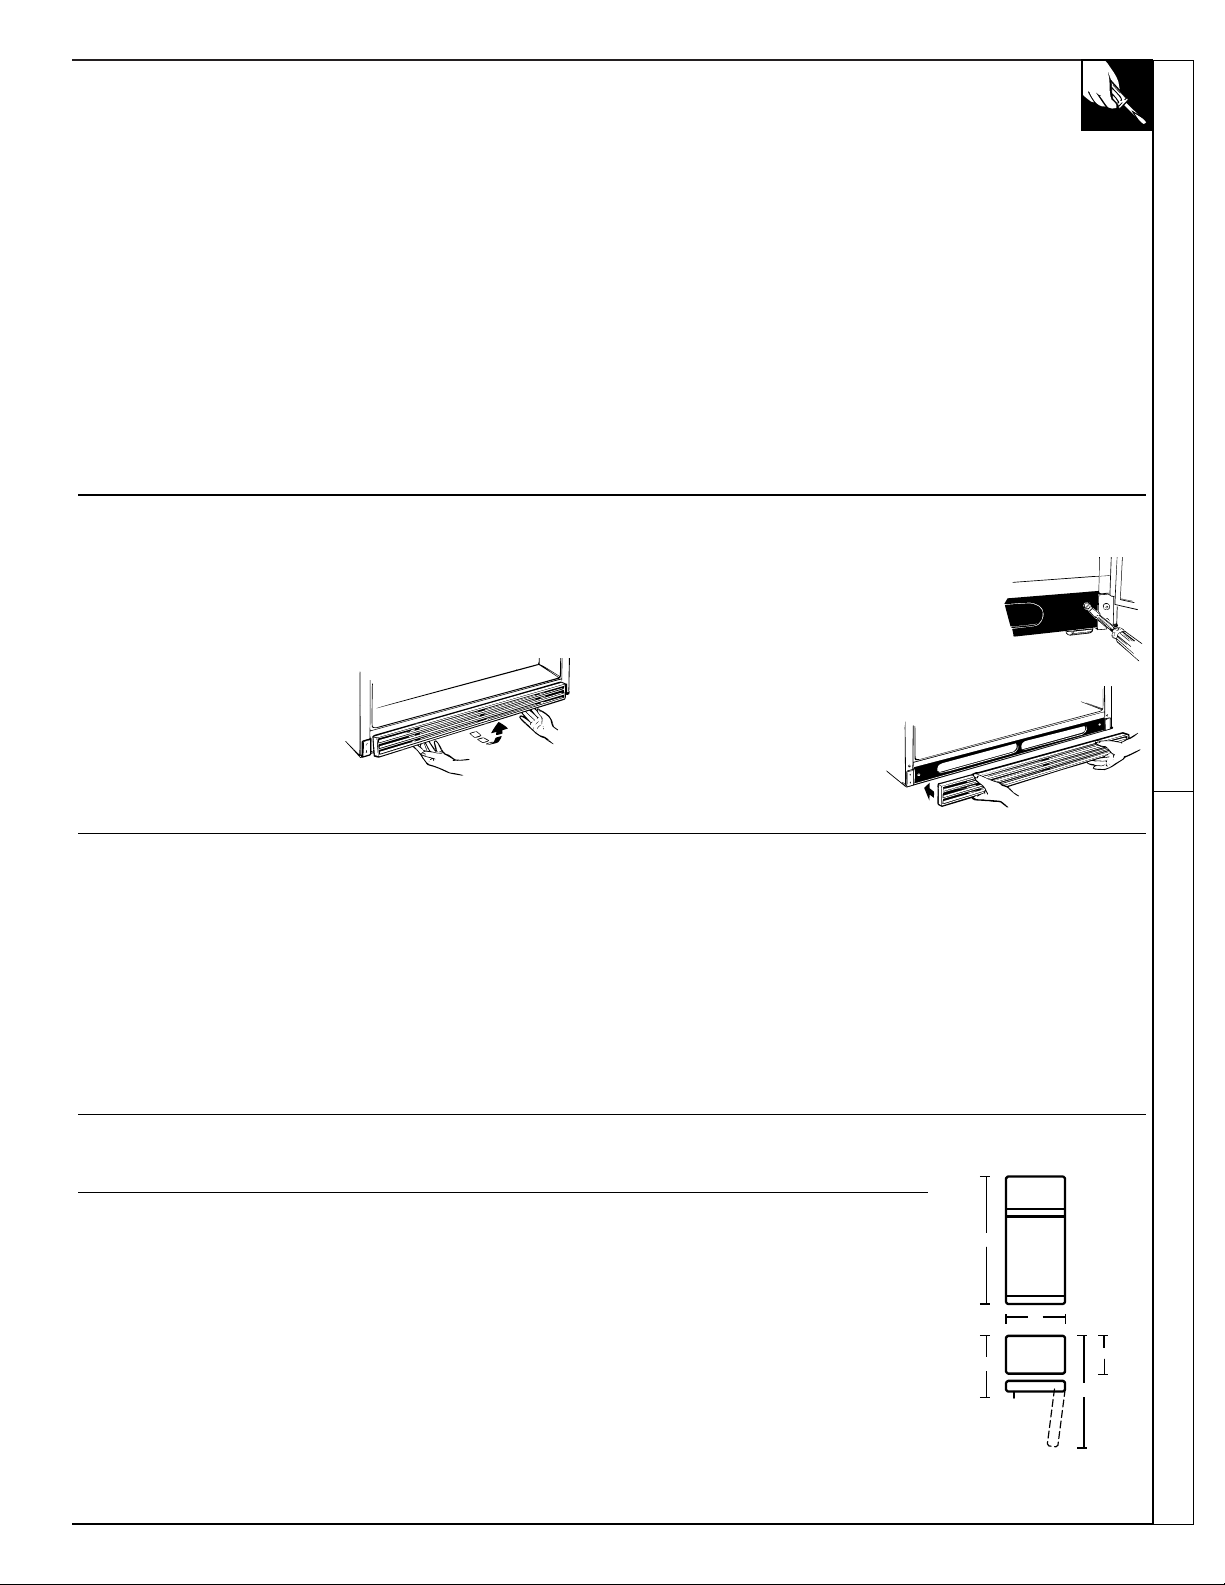
Under Refrigerator Behind Refrigerator
For most efficient operation, you
need to keep the area under the
refrigerator clean. Turn the
temperature control to “0.”
Remove the base grille. Sweep
away or vacuum dust that is readily
accessible on the condenser coils,
then turn the control back on.
For best results, use a brush
specially designed for this purpose,
available from your local distributor.
This easy cleaning operation should
be done at least once a year.
Care should be taken in moving your refrigerator away from the wall.
All types of floor coverings can be damaged, particularly cushioned
coverings and those with embossed surfaces.
Pull the refrigerator straight out and return it to position by pushing
it straight in. Moving your refrigerator in a side direction may
result in damage to your floor covering or refrigerator. Refer to
the Rollers section.
Clean the condenser coils at
least once a year.
Storage Drawer and Drawer Cover Removal
Drawers at the bottom of the fresh food compartment will stop
before coming all the way out of the refrigerator, to help prevent
contents from spilling onto the floor. These drawers can be removed
easily by lifting the sides up slightly while pulling the drawers past
the ‘‘stop’’ location.
To remove the drawers and their covers when the fresh food
compartment door cannot be opened fully, follow the procedure that
applies to your model.
(continued next page)
Automatic Icemaker Care and Cleaning
CARE AND CLEANING
(continued)
10
Two Drawers (on some models)
1. Remove the drawer farthest
from the door.
2. Remove the other drawer.
On models with a bottom
door shelf that blocks the
other drawer, slide the other
drawer toward the middle
and remove it.
3. Remove the glass cover. Reach
in, push the front of the glass
cover up and, at the same time,
pull it forward as far as it will
come. Tilt it and take it out.
4. Remove the drawer frame
(Always remove the glass
cover before you take out the
drawer frame.)
Lift the frame off the supports
at each side and back, pull it
forward, tilt it and take it out.
To replace:
1. Lower the frame until it rests
on the supports at each side
and back.
2. Replace the drawers.
If you removed the drawer slide,
replace it with the sloped end at
the front.
a. Slide one side of the drawer
onto the drawer slide.
b. Move the slide and drawer all
the way to the hinge side until
the other side of the drawer rests
on the frame.
c. Slide the other drawer into place.
3. Replace the glass cover, pushing its rear edge firmly into the rear
frame channel and gently lowering the front into place.
Frame
Drawer Slide
(sloped end)
Light Bulb Replacement
A light bulb and socket are located at the top of the fresh food
compartment opposite the temperature control panel.
Some models also have a bulb and socket in the upper left corner of
the frozen food storage compartment behind a removable light shield.
To replace either bulb, unplug the refrigerator from its electrical
outlet and remove the light shield by pulling down on the shield at
the bulb end. When the bulb cools, unscrew it and replace it with a
similar size bulb.
When replacing the light
shield make sure the tab
is placed in the groove
of the light shield holder.
Then rotate the shield
back and up until the
shield snaps into place.
Tab
Groove
PREPARATION
11
Clearances Water Supply to Icemaker (on some models)
Allow the following clearances for ease of installation, proper air
circulation and plumbing and electrical connections:
Sides..........................................................................19 mm
Top.............................................................................25 mm
Back...........................................................................25 mm
If Model 19, 22, or 25 is to be installed against a wall on the hinge side,
allow 38 mm for door clearance.
If your refrigerator has an icemaker, or if you plan to add an
icemaker later, the icemaker will have to be connected to a cold
drinking water line.
A water supply kit containing copper tubing, shutoff valve, fittings
and instructions is available at extra cost from your local distributor.
There should be sufficient tubing from the cold water supply to the
icemaker inlet to allow moving the refrigerator out from the wall
several feet (approximately 244 cm of 1/4″ copper tubing in three
25 cm diameter coils).
Do not use kits with plastic tubing since there is water pressure in the
supply line at all times.
Maximum permissible inlet water pressure—8.3 bars.
Minimum permissible inlet water pressure—1.4 bars.
Installation of icemaker must be made by a qualified service technician.
Rollers
Some models have adjustable rollers that allow you to move the
refrigerator away from the wall for cleaning. Rollers should be set so
the refrigerator is firmly positioned on the floor and the front is raised
just enough (about 19 mm from the floor) that the doors close easily
when opened about halfway.
Remove the base grille by
grasping the bottom of the grille
and pulling it out.
Turn the two front roller adjusting screws
clockwise to raise the refrigerator,
counterclockwise to lower it.
To replace the base grille, line
up the clips on the back of the
grille with the openings in the
base plate and push the grille
forward until it snaps into place.
When You Go on Vacation When You Move
For shorter vacations, remove perishable foods and leave controls at
regular settings. However, if room temperature is expected to drop
below 16°C, follow the same instructions as for extended vacations.
For extended vacations or absences, shut off the power to the
refrigerator, move the fresh food control to the “0” position, and
clean the interior with a baking soda solution of 15 ml of baking soda
to one liter of water. Wipe dry. To prevent odors, leave an open box of
baking soda in the refrigerator. Leave doors open.
Move icemaker feeler arm to STOP (up) position and be sure to shut
off water supply to the refrigerator.
Disconnect power cord from wall outlet, remove all food, and clean
and dry the interior.
Secure all loose items such as grille, shelves and storage pans by
taping them securely in place to prevent damage.
Be sure refrigerator stays in upright position during actual moving and
in van. Refrigerator must be secured in van to prevent movement.
Protect outside of refrigerator with blanket.
Dimensions
Model 18 19 21 22 24 25
A* 163 cm 163 cm 168 cm 168 cm 170 cm 170 cm
B 75 cm 75 cm 79 cm 79 cm 87 cm 87 cm
C** 80 cm 83 cm 80 cm 83 cm 80 cm 83 cm
D 147 cm 147 cm 152 cm 152 cm 160 cm 160 cm
E 70 cm 70 cm 70 cm 70 cm 70 cm 70 cm
* Height does not include hinge—Add 22 mm for hinge.
** Depth includes handle.
Care and Cleaning Preparation
A
B
C
E
D
12
INSTALLATION REQUIREMENTS
IMPORTANT…Please Read Carefully
Electrical Requirements
The refrigerator should always be plugged into its own individual
electrical outlet— Please refer to the rating plate on the refrigerator
for the correct voltage and frequency. This is recommended for best
performance and to prevent overloading house wiring circuits, which
could cause a fire hazard from overheated wires.
The refrigerator must be positioned so that the plug is accessible.
WARNING: HOW TO AVOID ACCIDENTS TO CHILDREN.
WHEN DISCARDING AN OLD REFRIGERATOR OR
FREEZER BE CERTAIN TO MAKE THE LOCK UNUSABLE.
IF POSSIBLE, REMOVE THE DOORS AND DISCARD
SEPARATELY. DO NOT ATTEMPT TO STAND ON TOP OF
YOUR APPLIANCE. IT IS NOT DESIGNED FOR SUCH USE
AND YOU COULD INJURE YOURSELF OR DAMAGE THE
APPLIANCE BY SUCH ABUSE. CHILDREN SHOULD NOT
BE ALLOWED TO PLAY WITH THE APPLIANCE OR
TAMPER WITH THE CONTROLS.
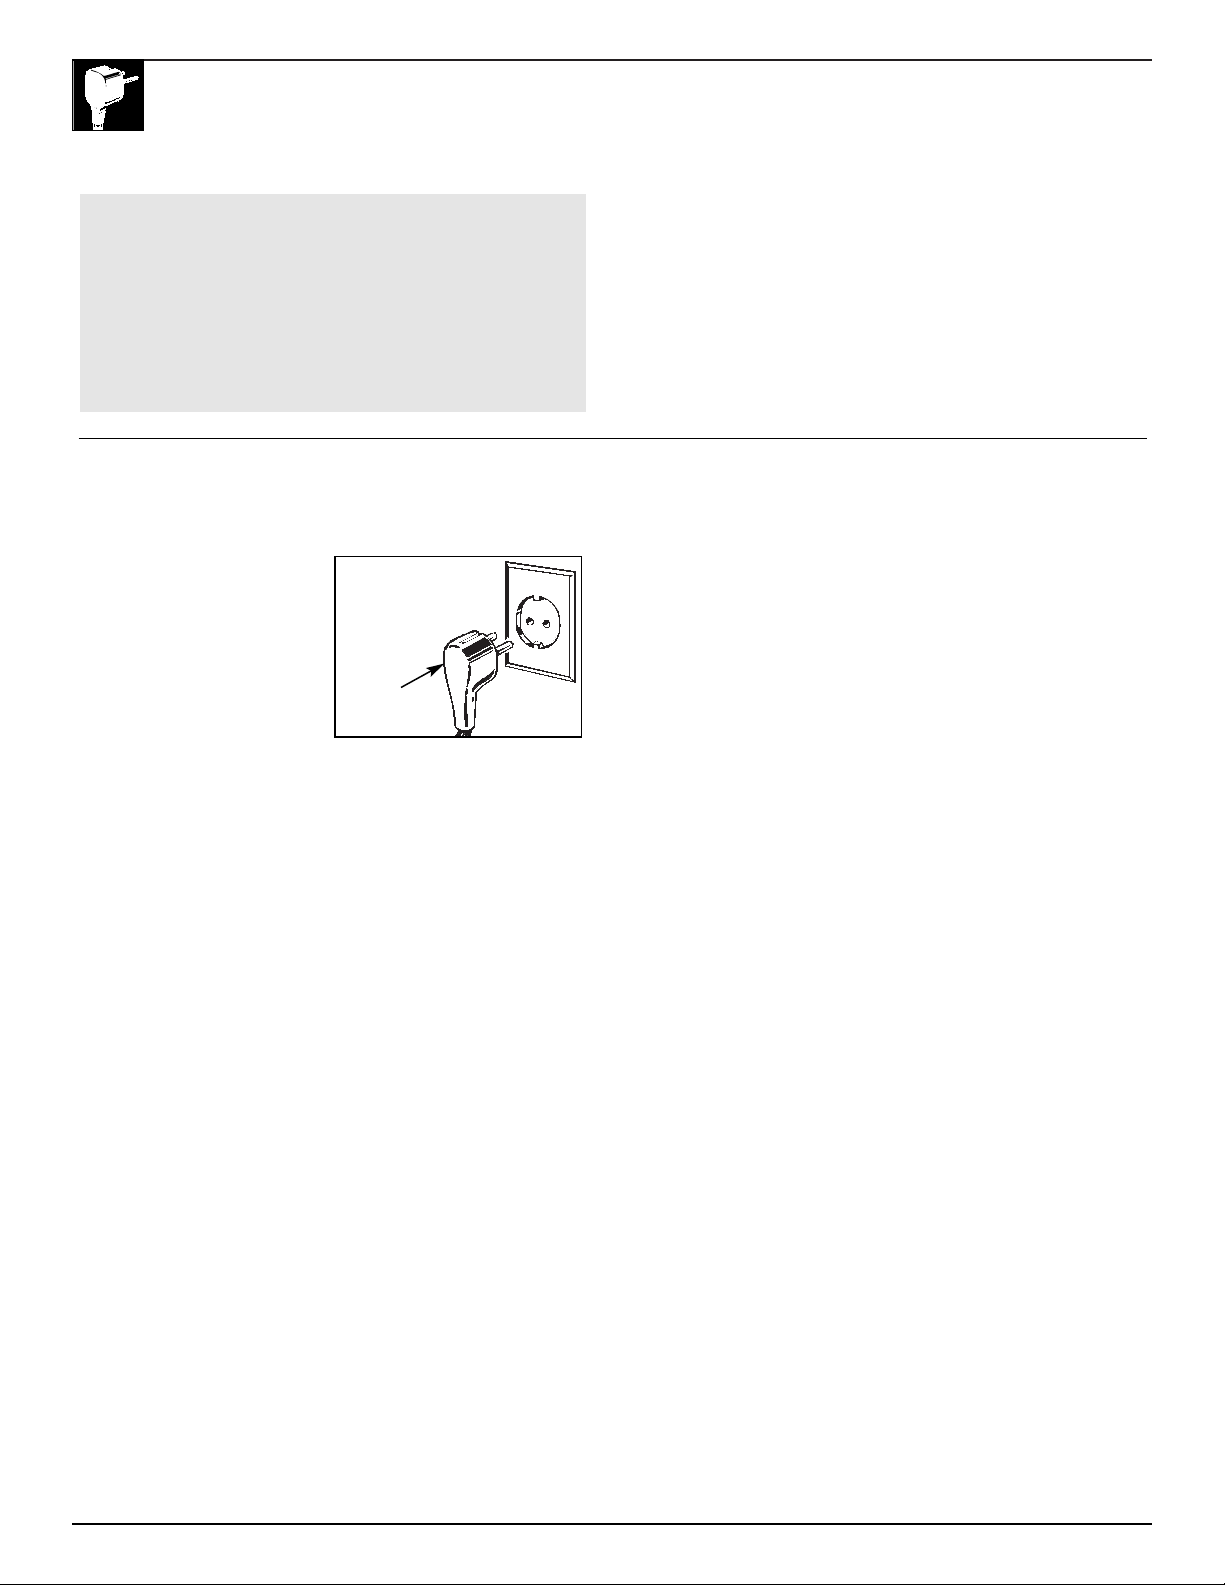
How to Connect Electricity
For personal safety, this appliance must be
properly earthed.
The power cord of this appliance
is equipped with an earthing plug
which mates with a standard
earthed wall outlet to minimize
the possibility of electric shock
hazard from this appliance.
Have the wall outlet checked
by a qualified electrician to make
sure the outlet is properly earthed.
Where an unearthed wall outlet is encountered, it is your personal
responsibility and obligation to have it replaced with a properly
earthed wall outlet.
If the plug does not fit your outlet a new plug can be fitted.
IMPORTANT: In some countries the refitting of electric plugs
and cables is only permitted when the work is completed by a
qualified technician.
If the power supply cord becomes damaged, it must be replaced by a
qualified service agent in order to avoid a safety hazard.
Insure proper
earthing exists
before using.
Earthing Plug
13
Installation
INSTALLATION INSTRUCTIONS
FOR GREAT BRITAIN AND IRELAND ONLY
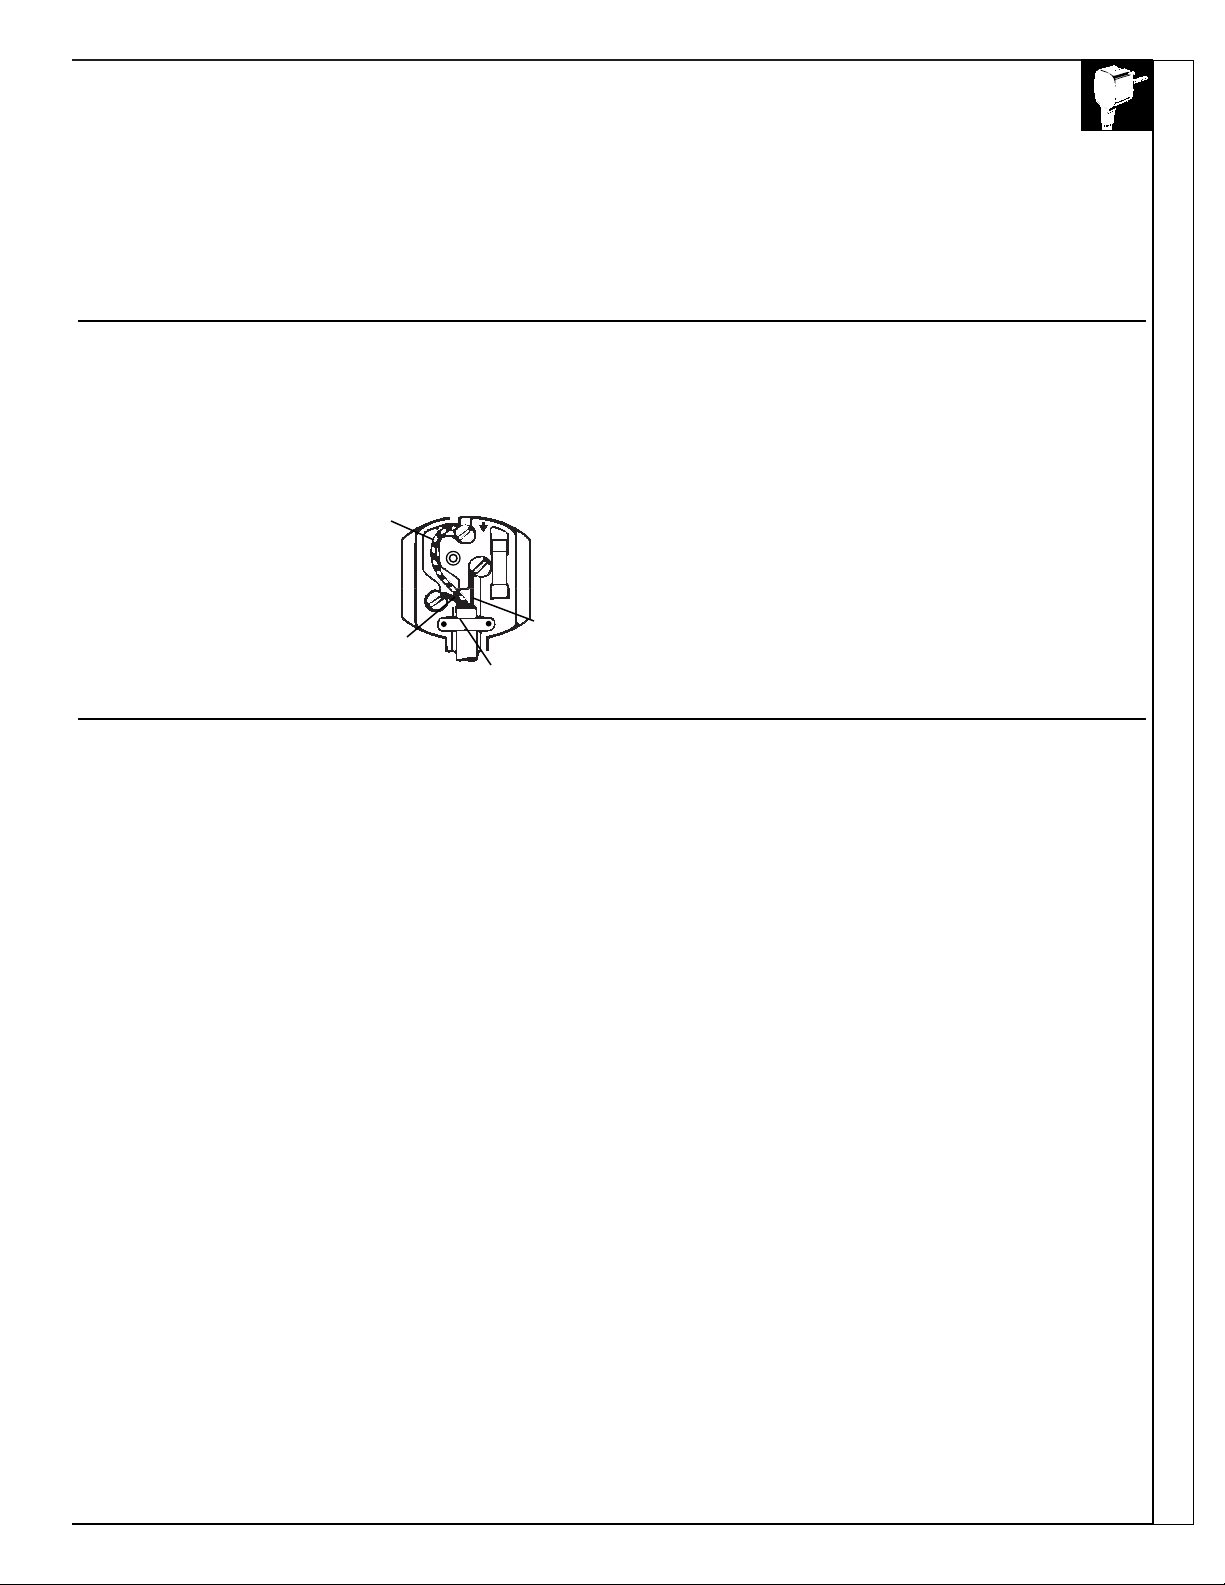
IMPORTANT: Fitting a Different Plug
The wires in the mains lead are coloured in accordance with the
following code: Green and Yellow—Earth; Blue—Neutral; Brown—
Live. If you fit your own plug the colours of these wires may not
correspond with the identifying marks on the plug terminals. This is
what you have to do:
1. Connect the green and yellow
(Earth) wire to the terminal
in the plug marked ‘E’ with
the symbol or coloured green
or green and yellow.
2. Connect the blue (Neutral) wire
to the terminal in the plug
marked ‘N’ or coloured black.
3. Connect the brown (Live) wire to
the terminal marked ‘L’ or
coloured red.
With alternative plug a 15A fuse must be fitted either in the plug or
adapter or in the main fuse box. In the event of replacing a fuse in the
plug supplied, a 13A ASTA approved fuse to BS1362 must be fitted.
If the plug is the moulded-on type the fuse cover must be refitted
when changing the fuse. In the event of losing the fuse cover the plug
must not be used until a replacement fuse cover has been obtained and
fitted. A new fuse cover can be obtained from your nearest Service
Centre or local Electricity Board. The colour of the correct
replacement fuse cover is that of the coloured marks or insert in the
base of the plug.
Mains Lead Replacement
If the mains lead on this appliance needs replacing at any time, it must be replaced by a
special lead which is obtainable from your nearest Service centre. A charge will be made for
the replacement of the mains lead if you have damaged the lead.
Green
Yellow
Blue
Brown
Cord Grip
Electrical Requirements
We recommend that this appliance is connected to the mains supply via a suitable switched
socket in a readily accessible position. All appliances come complete with a fitted plug.
The plug on your refrigerator has a 13A fuse. If the plug does not fit your sockets, a new
plug can be fitted. Cut off the old plug and throw it away, do not insert it into a socket
elsewhere in the house as this could cause a shock.
WARNING: THIS APPLIANCE MUST BE EARTHED.
E
L
13 AMP
N
14
WA TER LINE INSTALLATION
CAUTION:
• If you use your refrigerator before connecting
the water line, make sure the icemaker feeler arm
is kept in the STOP (up) position.
• Do not install the icemaker tubing in areas
where temperatures fall below 0°C.
•When using any electrical device (such as a
power drill) during installation, be sure the device
is insulated or wired in a manner to prevent the
hazard of electric shock.
• All installations must be in accordance with
local plumbing code requirements.
WARRANTY INFORMATION
This water line installation is not warranted by
the refrigerator or icemaker manufacturer.
Follow these instructions carefully to minimize
the risk of expensive water damage.
SHUT OFF THE MAIN WATER SUPPLY.
Turn on the nearest faucet long enough to clear
the line of water.
1
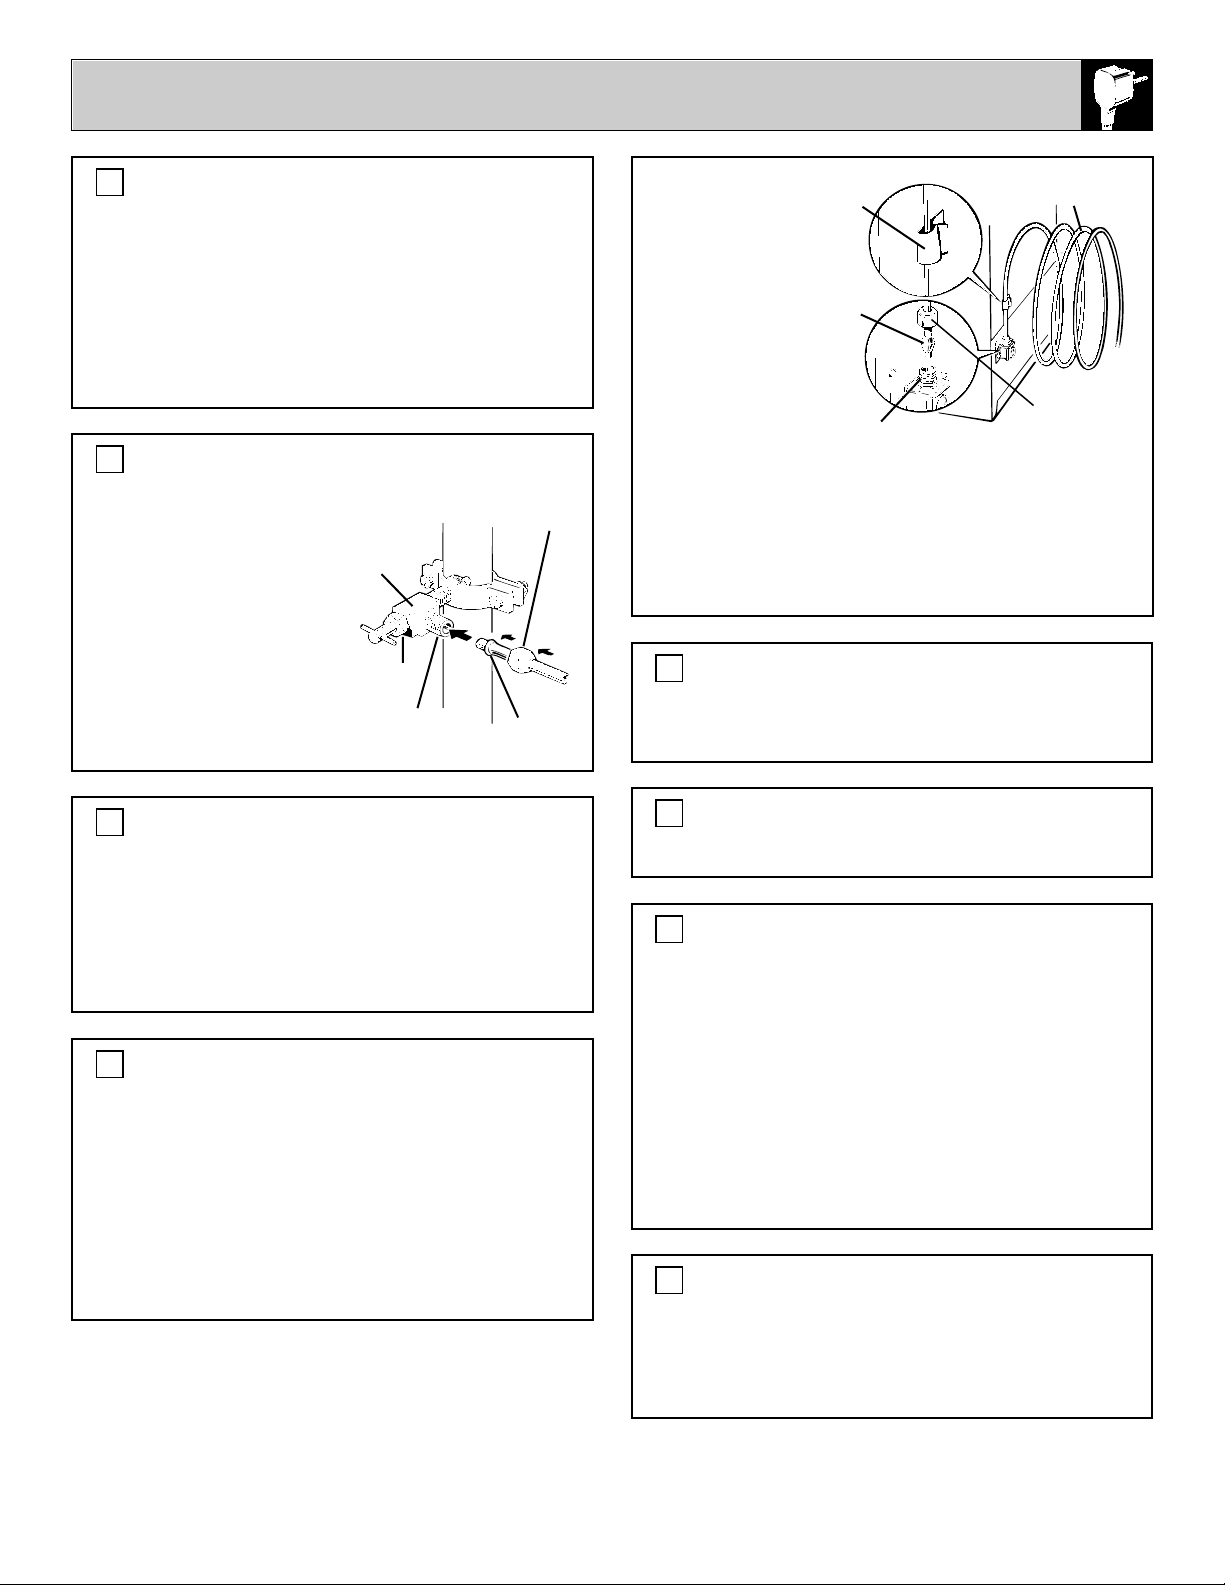
INSTALL THE SHUTOFF VALVE ON THE
NEAREST FREQUENTLY USED DRINKING
WATER LINE.
a. Choose a location for the valve that is easily
accessible. It is best to connect into the side of
a vertical water pipe. When it is necessary to
connect into a horizontal water pipe, make the
connection to the top or side, rather than at the
bottom, to avoid drawing off any sediment from
the water pipe.
b. Drill a 1/4″ hole in the water pipe, using a
sharp bit. Remove any burrs resulting from
drilling the hole in the pipe. (Do not drill
a hole if the valve is a self-piercing type.)
c. Fasten the shutoff valve to the cold water pipe
with the pipe clamp.
d. Tighten the
clamp screws until the
sealing washer
begins to swell. Do
not overtighten or
you may crush the
copper tubing.
2
WHAT YOU WILL NEED
• A cold water supply is required for automatic
icemaker operation. The water pressure must be
between 1.4 and 8.3 bars.
•
Power drill, unless you have a self-piercing valve.
• Copper tubing, 1/4″ outer diameter to connect
the refrigerator to the water supply. Be sure both
ends of the tubing are cut square.
To determine how much copper tubing you need:
measure the distance from the water valve on the
back of the refrigerator to the water supply pipe.
Then add 244 cm. Be sure there is sufficient extra
tubing (about 244 cm coiled into 3 turns of about
25 cm diameter) to allow the refrigerator to move
out from the wall after installation. Do not use
plastic tubing or plastic fittings because the water
supply line is under pressure at all times. Also,
certain types of plastic tubing may become brittle
with age and crack, resulting in water leakage.
• Shutoff valve to connect to the cold water line.
The shutoff valve should have a water inlet with a
minimum inside diameter of 5/32″ at the point of
connection to the COLD WATER LINE. Saddletype shutoff valves are included in many water
supply kits. Before purchasing, make sure a
saddle-type valve complies with your local
plumbing codes.
• Two 1/4″ outer diameter compression nuts
and 2 ferrules (sleeves)—to connect the copper
tubing to the shutoff valve and the refrigerator
water valve.
• If your existing water line has a flared fitting at
the end, you will need an adapter (available at
plumbing supply stores) to connect the water line
to the refrigerator OR—you can cut off the flared
fitting with a tube cutter and then use a
compression fitting.
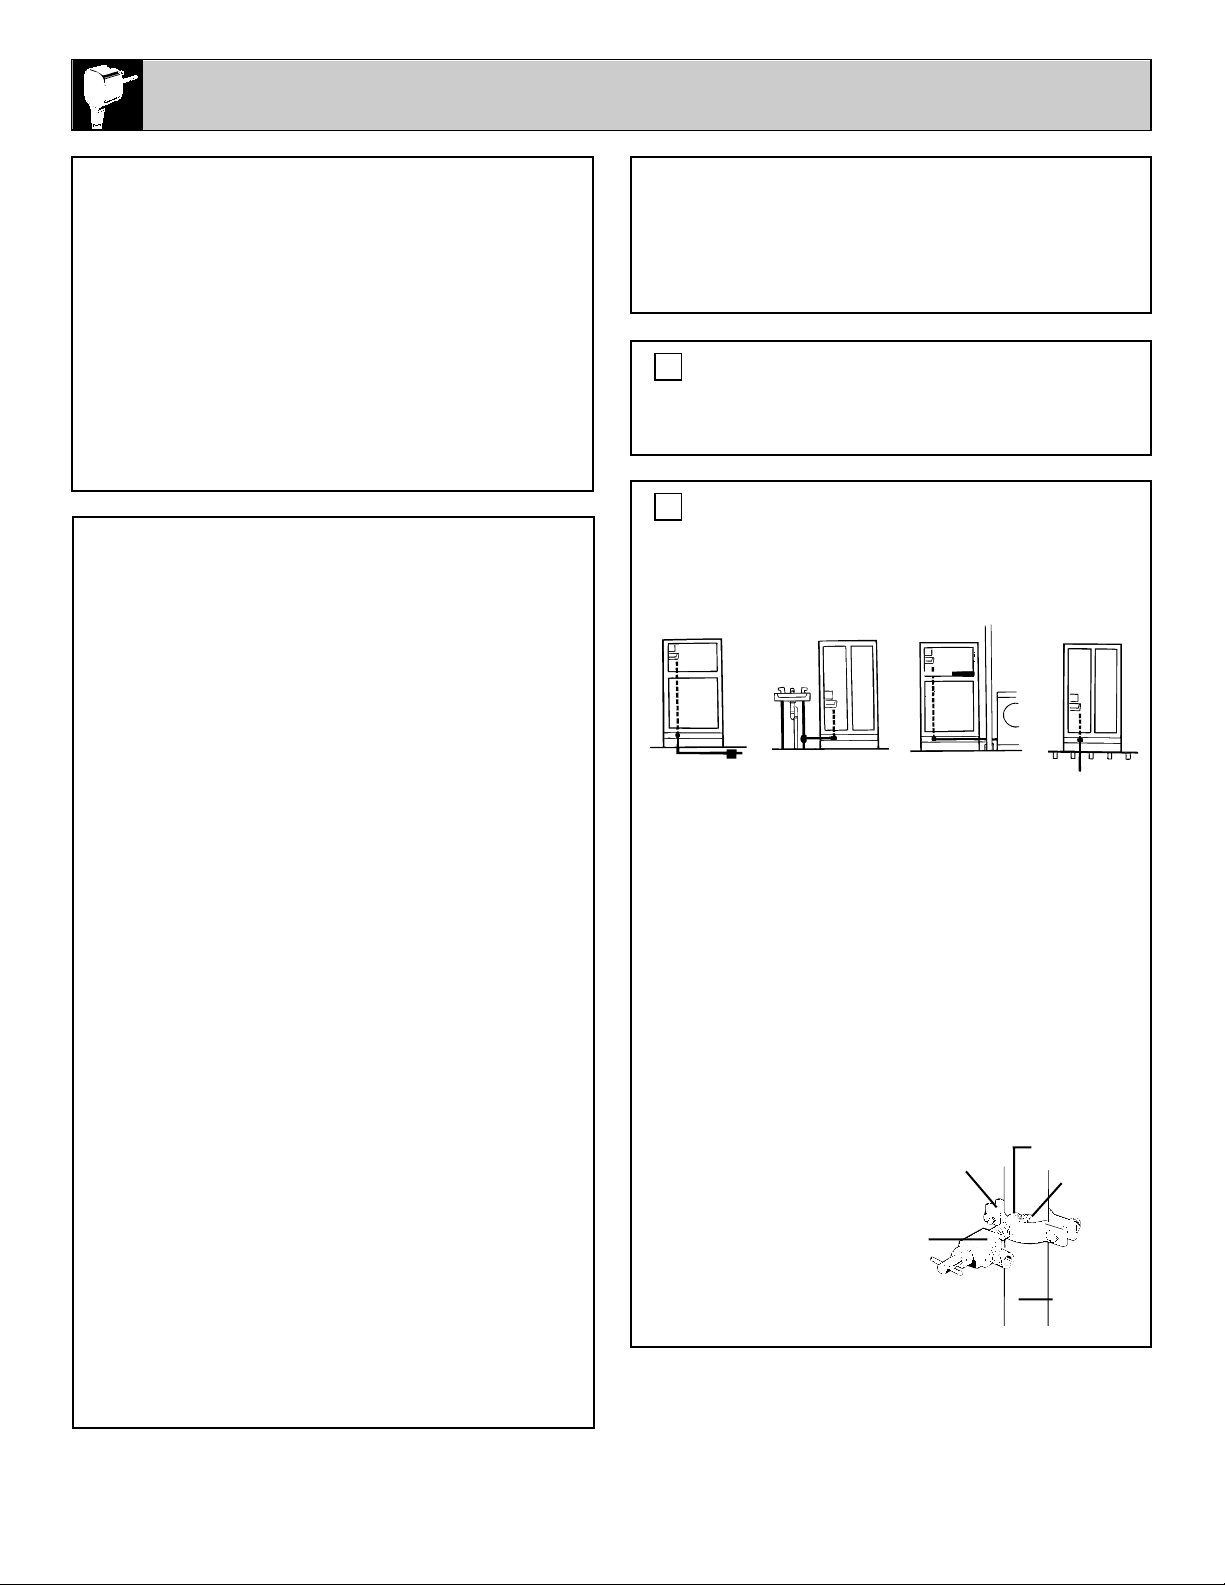
Typical ways to connect to water supply
Under sink
to cold
water pipe
Through wall to
utility room cold
water pipe
In crawl
space under
house
Through floor
to basement
cold water pipe
Pipe
Clamp
Saddle-Type
Shutoff
Valve
Washer
Inlet
End
Vertical
Cold Water
Pipe
15
ROUTE THE COPPER TUBING BETWEEN THE
COLD WATER LINE AND THE REFRIGERATOR.
Route the tubing through a hole drilled in the
floor or wall (behind the refrigerator or adjacent
base cabinet) as close to the wall as possible. Be
sure there is sufficient extra tubing (about 244 cm
coiled into 3 turns of about 25 cm diameter) to
allow the refrigerator to move out from the wall
after installation.
3
a. Remove the
plastic flexible
cap from the
water valve.
b. Place the
compression
nut and ferrule
(sleeve) onto the
end of the tubing
as shown.
c. Insert the end
of the copper
tubing into the water valve connection as far as
possible. While holding the tubing, tighten the
fitting.
d. Fasten the copper tubing into the clamp
provided to hold it in a vertical position. You may
need to pry open the clamp.
TURN THE WATER ON AT THE
SHUTOFF VALVE.
Tighten any connections that leak.
7
PLUG THE REFRIGERATOR POWER CORD
INTO AN EARTHED ELECTRICAL OUTLET.
8
MOVE THE REFRIGERATOR BACK TO
THE WALL.
Arrange the coil of copper tubing so that it does
not vibrate against the back of the refrigerator or
against the wall.
10
SET THE ICEMAKER FEELER ARM TO THE ON
(DOWN) POSITION.
The icemaker will not begin to operate until it
reaches its operating temperature of -9°C or
below. It will then begin operation automatically if
the icemaker is in the ON (down) position.
NOTE: The icemaker may double-cycle when it
first starts, causing some water spillage from the
icemaker into the ice bucket. This is normal and
should not happen again. The first few batches of
cubes should be thrown away, so that remaining
impurities in the water line will be flushed out.
9
CONNECT THE COPPER TUBING TO THE
SHUTOFF VALVE.
Place the compression
nut and ferrule
(sleeve) onto the
end of the tubing
and connect it to the
shutoff valve. Make
sure the tubing is fully
inserted into the valve.
Tighten the compression
nut securely.
4
TURN ON THE WATER AND FLUSH OUT
THE TUBING.
a. Turn the main water supply on and flush out
the tubing until the water is clear.
b. Shut the water off at the water valve after
about one liter of water has been flushed through
the tubing.
5
CONNECT THE COPPER TUBING TO
THE REFRIGERATOR.
Before making the connection to the
refrigerator, be sure the refrigerator power
cord is not plugged into the wall outlet.
We recommend installing a water filter (available
from your local distributor) if your water supply
has sand or particles that could clog the screen of
the refrigerator’s water valve. Install it in the
water line near the refrigerator.
6
Saddle-Type
Shutoff
Valve
Packing
Nut
Outlet
Valve
Compression Nut
Ferrule
(sleeve)
Ferrule
(sleeve)
1/4″ Copper Tubing
1/4″ Compression Nut
Tubing
Clamp
Refrigerator Connection
REVERSING THE DOOR SWING
16
NOTE: DOORS ON DISPENSER MODELS
DO NOT REVERSE.
When reversing the door swing:
• Read the instructions all the way through
before starting.
• Handle parts carefully to avoid scratching paint.
• Set screws down by their related parts to avoid
using them in the wrong places.
• Provide a non-scratching work surface for
the doors.
REMOVE FROZEN FOOD STORAGE
COMPARTMENT DOOR.
a. Tape the door shut with masking tape.
b. With a Phillips screwdriver,
remove the hinge cover (on
some models). With a Torx
Driver, remove 2 Torx
screws that hold the top hinge
to the cabinet.
c. Lift the hinge straight up
to free the hinge pin from the
socket in the top of the door.
d. Remove tape, tilt the door
away from the cabinet and lift it to free its
bottom socket from the hinge pin on the center
hinge bracket.
e. Set the door on a non-scratching surface
with the outside up.
2
IMPORTANT: Once you begin, do not move
cabinet until door-swing reversal is completed.
These instructions are for changing the
hinges from the right side to the left side.
If you ever want to change the hinges back to the
right side, follow these same instructions (merely
reverse all references to left and right).
REMOVE FRESH FOOD DOOR.
a. Tape the door shut
with masking tape.
b. Remove the hinge
pin with a 3/8″socket
and ratchet.
c. Remove tape and tilt
the door away from the
cabinet. Remove and
save the washer on the
hinge pin.
d. Lift the door
straight up to
free its bottom socket
from the pin in the
bottom hinge bracket.
3
TOOLS REQUIRED
• Phillips screwdriver
• Masking tape
• T20 or T25 Torx Driver, whichever
your model requires
• Putty knife or thin-blade screwdriver
• 3/8″ socket and ratchet
(a 6-point socket is recommended)
GENERAL
a. Unplug the refrigerator from its
electrical outlet.
b. Empty all door shelves, including the
dairy compartment.
CAUTION: Do not let either door drop to the
floor. To do so could damage the door stop.
1
REMOVE THE DOORS
Plastic
Washer
Hinge
Pin
Center
Hinge
Bracket
Fresh Food Door
17
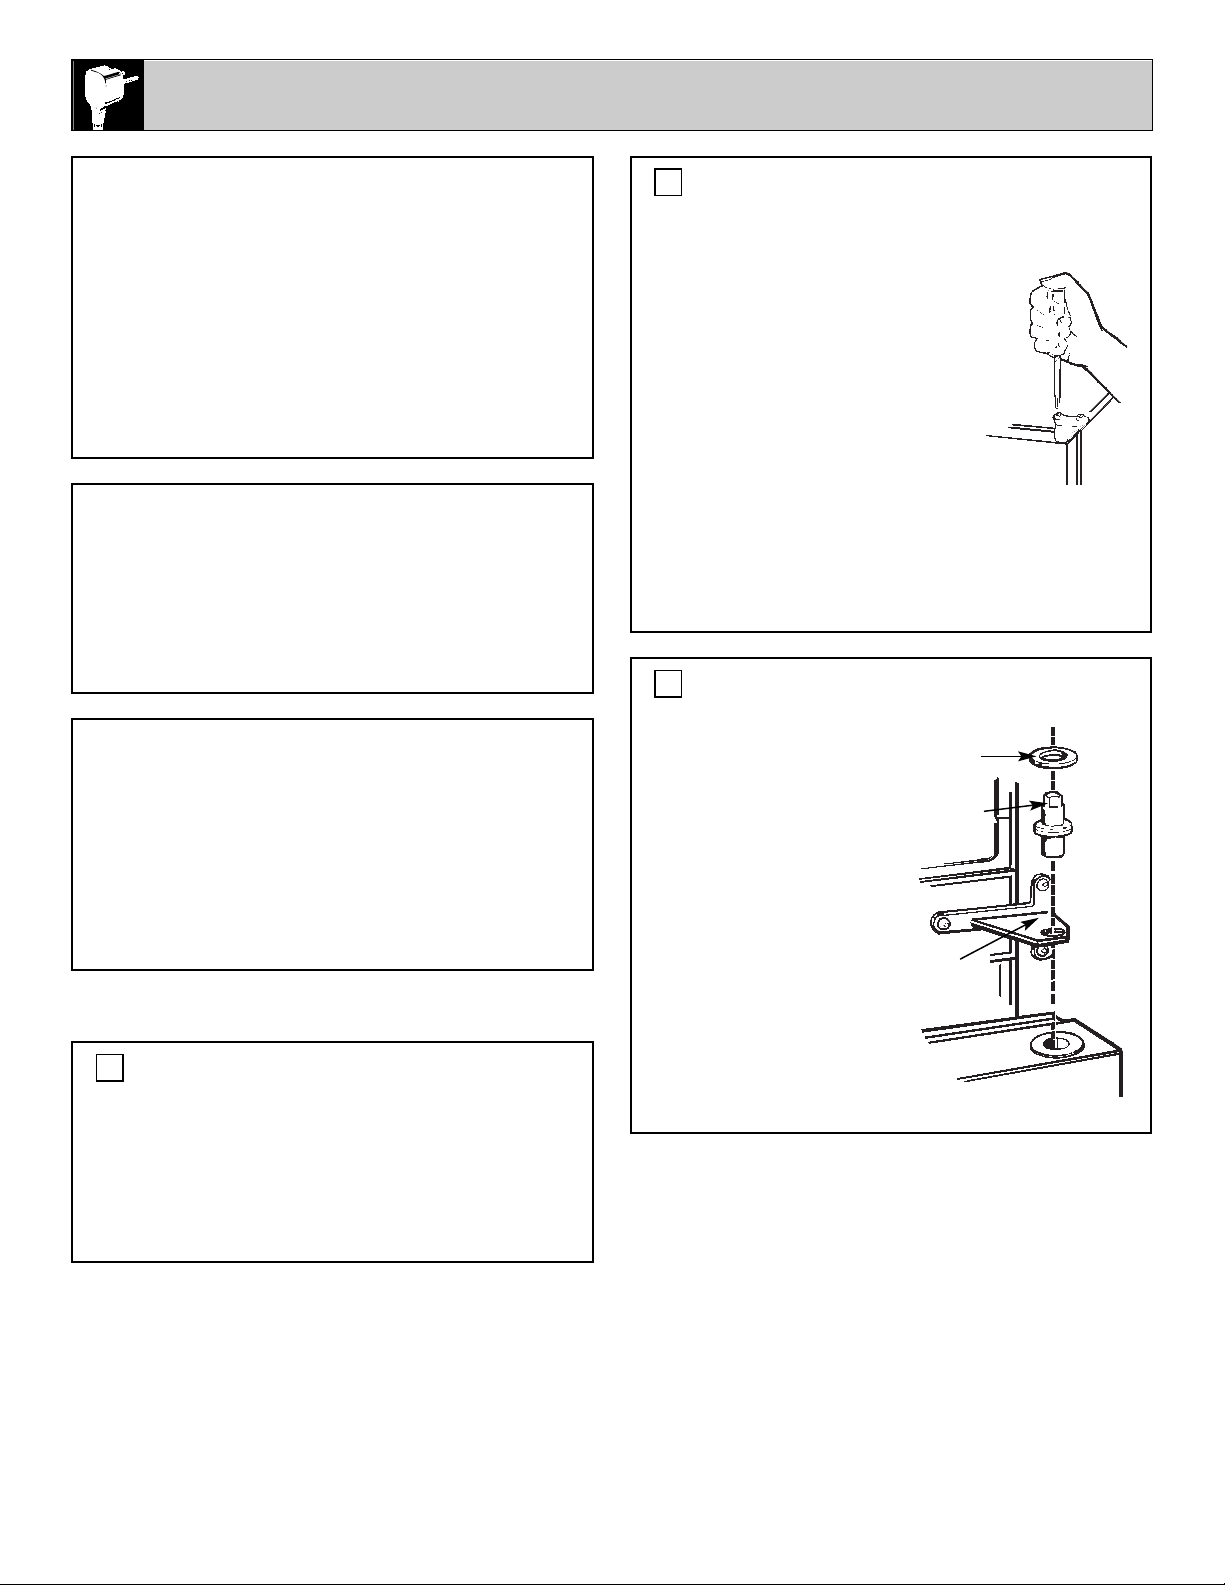
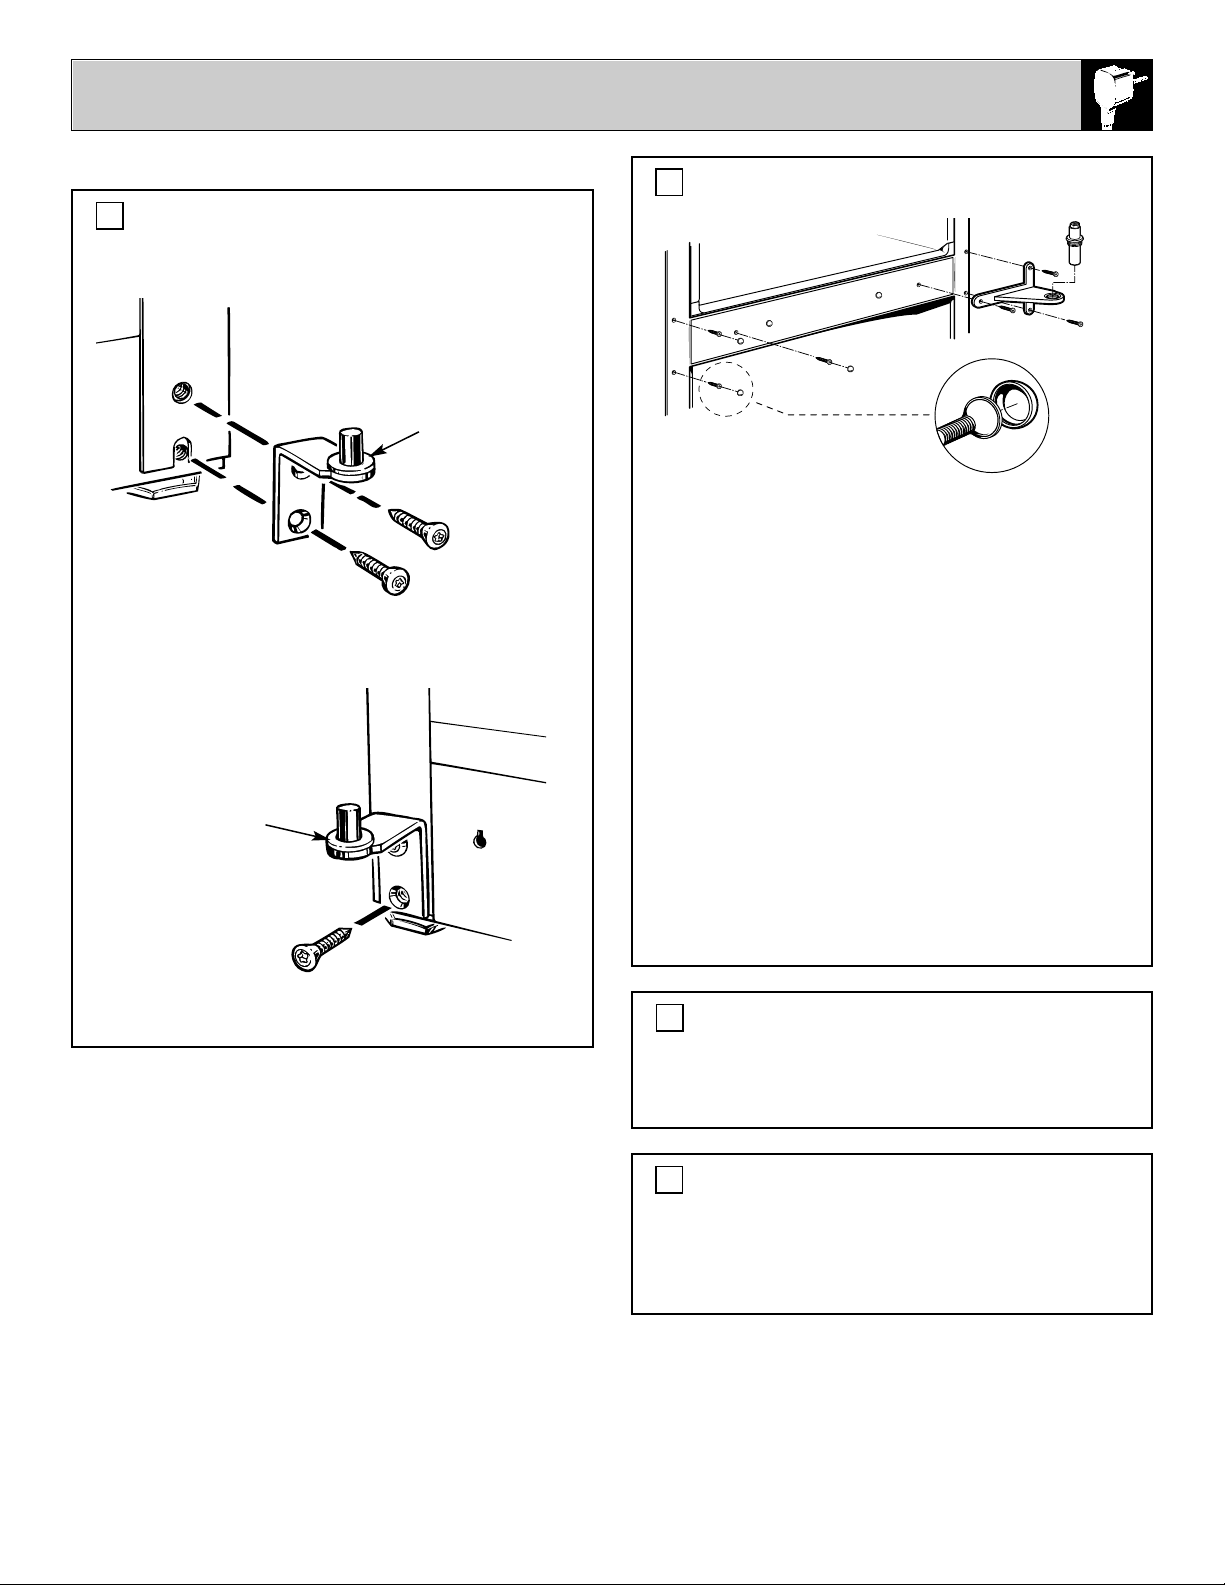
TRANSFER BOTTOM HINGE BRACKET TO THE LEFT.
a. Remove the base grille. Grasp it at the bottom
and pull it straight out.
b. Using a Torx Driver, remove the hinge bracket
and plastic washer from the bottom right side
of the cabinet.
c. Reinstall the hinge bracket and plastic
washer to the bottom left side of the cabinet.
1
TRANSFER CENTER HINGE BRACKET TO THE LEFT.
a. Remove the center hinge bracket by removing
the three Torx screws.
NOTE: Keep these screws with the hinge
bracket. They are long screws and will be used
when installing the hinge on the other side.
On some models, you will need to remove the
color-matched caps from the screw heads before
you can remove the screws. Use the edge of a thin
flat blade to gently pry the caps off the screw
heads. (A putty knife works well for this.) Cover
the blade with tape to prevent scratching the paint.
b. Remove the three Torx screws from the center
left side of the cabinet. Screw them into the holes
on the right side.
Place the center hinge bracket over the holes at
the center left side of the cabinet. Insert and
tighten the three long screws.
c. Replace the caps by snapping them over the
screws with your finger.
2
TRANSFER TOP HINGE TO THE LEFT.
Interchange hinge and screws at top right with
screws at top left of cabinet. Do not tighten
screws on hinge side at this time.
3
TRANSFER DOOR STOPS.
a. On each door, move the metal door stop from
the right end to the left end.
b. Move any screws from the left end to the
right end.
4
Plastic washer
Bottom left
Bottom right
Plastic washer
REVERSE HARDWARE ON CABINET
(continued next page)
REVERSING THE DOOR SWING
(continued)
18
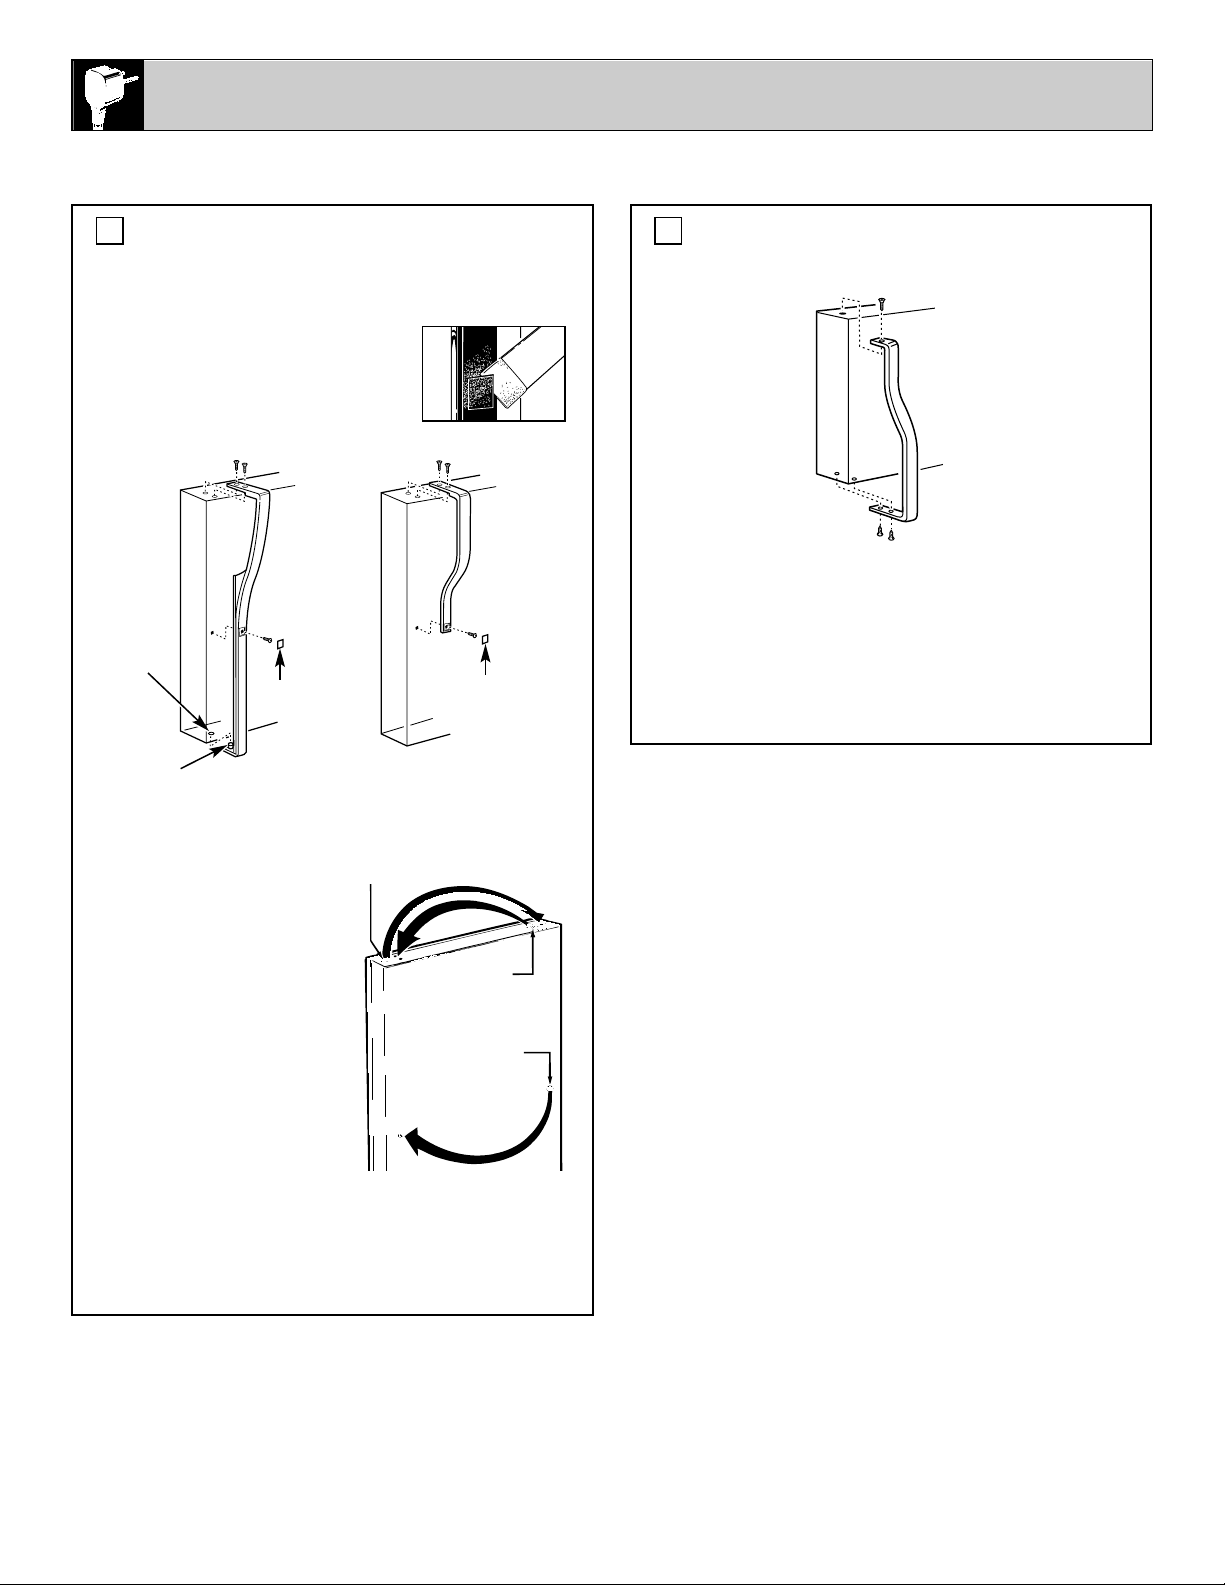
TRANSFER FRESH FOOD DOOR HANDLE
TO THE RIGHT.
To remove handle…
• Remove handle plug using
putty knife under edge, and
remove screw underneath.
• Remove two screws holding
handle to top of door.
After removing
handle…
• Remove small plug
buttons from right edge
of door top and insert
them into handle screw
holes on left side.
• Remove large plug
button from left edge of
door and insert it into
hole on opposite side.
• Transfer medallion on
door to opposite side.
When reinstalling handle…
• Attach handle to right side of door with screws
at top and under handle plug.
1
TRANSFER FROZEN FOOD STORAGE
COMPARTMENT DOOR HANDLE TO THE RIGHT.
• Remove one screw holding handle to top of door
and two screws holding handle to bottom of door.
• Remove handle.
• Remove plug button from right edge of door
and insert it into handle screw hole on left side.
• Attach handle on the opposite side using the
holes closest to the edge of door.
2
REVERSE DOOR HANDLES
Large Plug Button
Medallion
Small Plug
Buttons
Models with long handles have a pin that
fits into a hole at the bottom of the door.
Hole
Handle Plug
Pin
Handle Plug
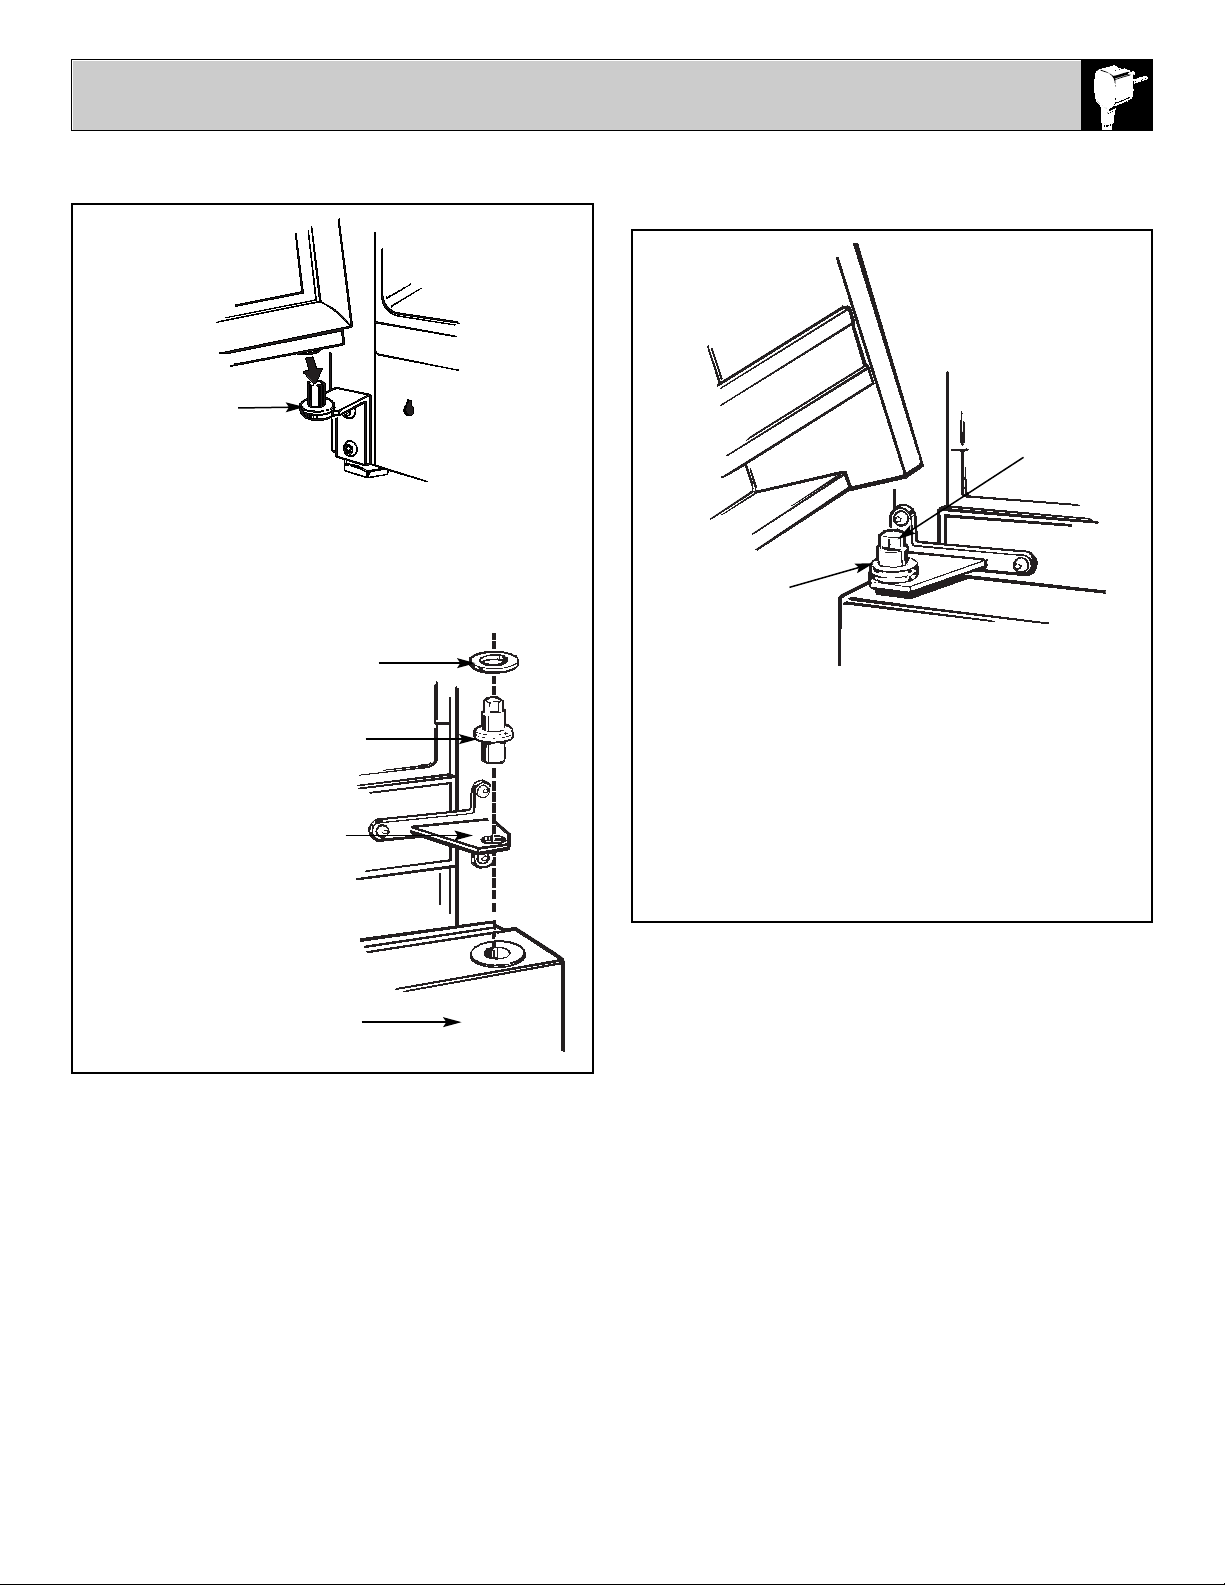
19
a. Lower bottom socket of fresh food door
onto pin on bottom hinge bracket. Be sure
washer is in place.
b. Tilt door toward cabinet and gently push
door under center hinge bracket and align
with the hole in the center hinge bracket.
c. Reinstall hinge
pin with a 3/8″
socket and ratchet
so it extends
through hole in
center hinge
bracket and into
socket on top of
fresh food door.
a. Lower bottom socket of frozen food
storage compartment door onto center hinge
pin. Be sure washer is in place.
b. Tilt door toward cabinet, lifting the top
hinge so the pin fits into the socket on top of
the door.
c. Tighten the top hinge screws after
supporting the door on the handle side and
aligning so the gap between the doors is even all
across the front.
REHANG FRESH FOOD DOOR REHANG FROZEN FOOD STORAGE
COMPARTMENT DOOR
Plastic
Washer
Plastic
Washer
Hinge Pin
Fresh Food Door
Center
Hinge
Bracket
Plastic Washer
Center Hinge Pin
PROBLEM POSSIBLE CAUSE
REFRIGERATOR DOES • May be in defrost cycle when motor does not operate for about 30 minutes.
NOT OPERATE
• Temperature control is in “0” position.
• If interior light is not on, refrigerator may not be plugged in at wall outlet.
• If plug is secure and the refrigerator still fails to operate, plug a lamp or a small
appliance into the same outlet to determine if there is a tripped circuit breaker or
burned-out fuse.
MOTOR OPERATES • Modern refrigerators with more storage space and a larger frozen food storage
FOR LONG PERIODS compartment require more operating time.
• Normal when refrigerator is first delivered to your home—usually requires
24 hours to completely cool down.
• Large amounts of food placed in refrigerator to be cooled or frozen.
• Hot weather—frequent door openings.
• Door left open.
• Temperature control is set too cold. Refer to Temperature Control section.
• Grille and condenser need cleaning. Refer to Care and Cleaning section.
MOTOR STARTS AND • Temperature control starts and stops motor to maintain even temperatures.
STOPS FREQUENTLY
VIBRATION OR RATTLING • If refrigerator vibrates, more than likely it is not resting solidly on the floor.
The front leveling legs need adjusting, or floor is weak or uneven. Refer to
Rollers in the Preparation section.
• If dishes vibrate on shelves, try moving them. Slight vibration is normal.
QUESTIONS?
USE THIS PROBLEM SOLVER
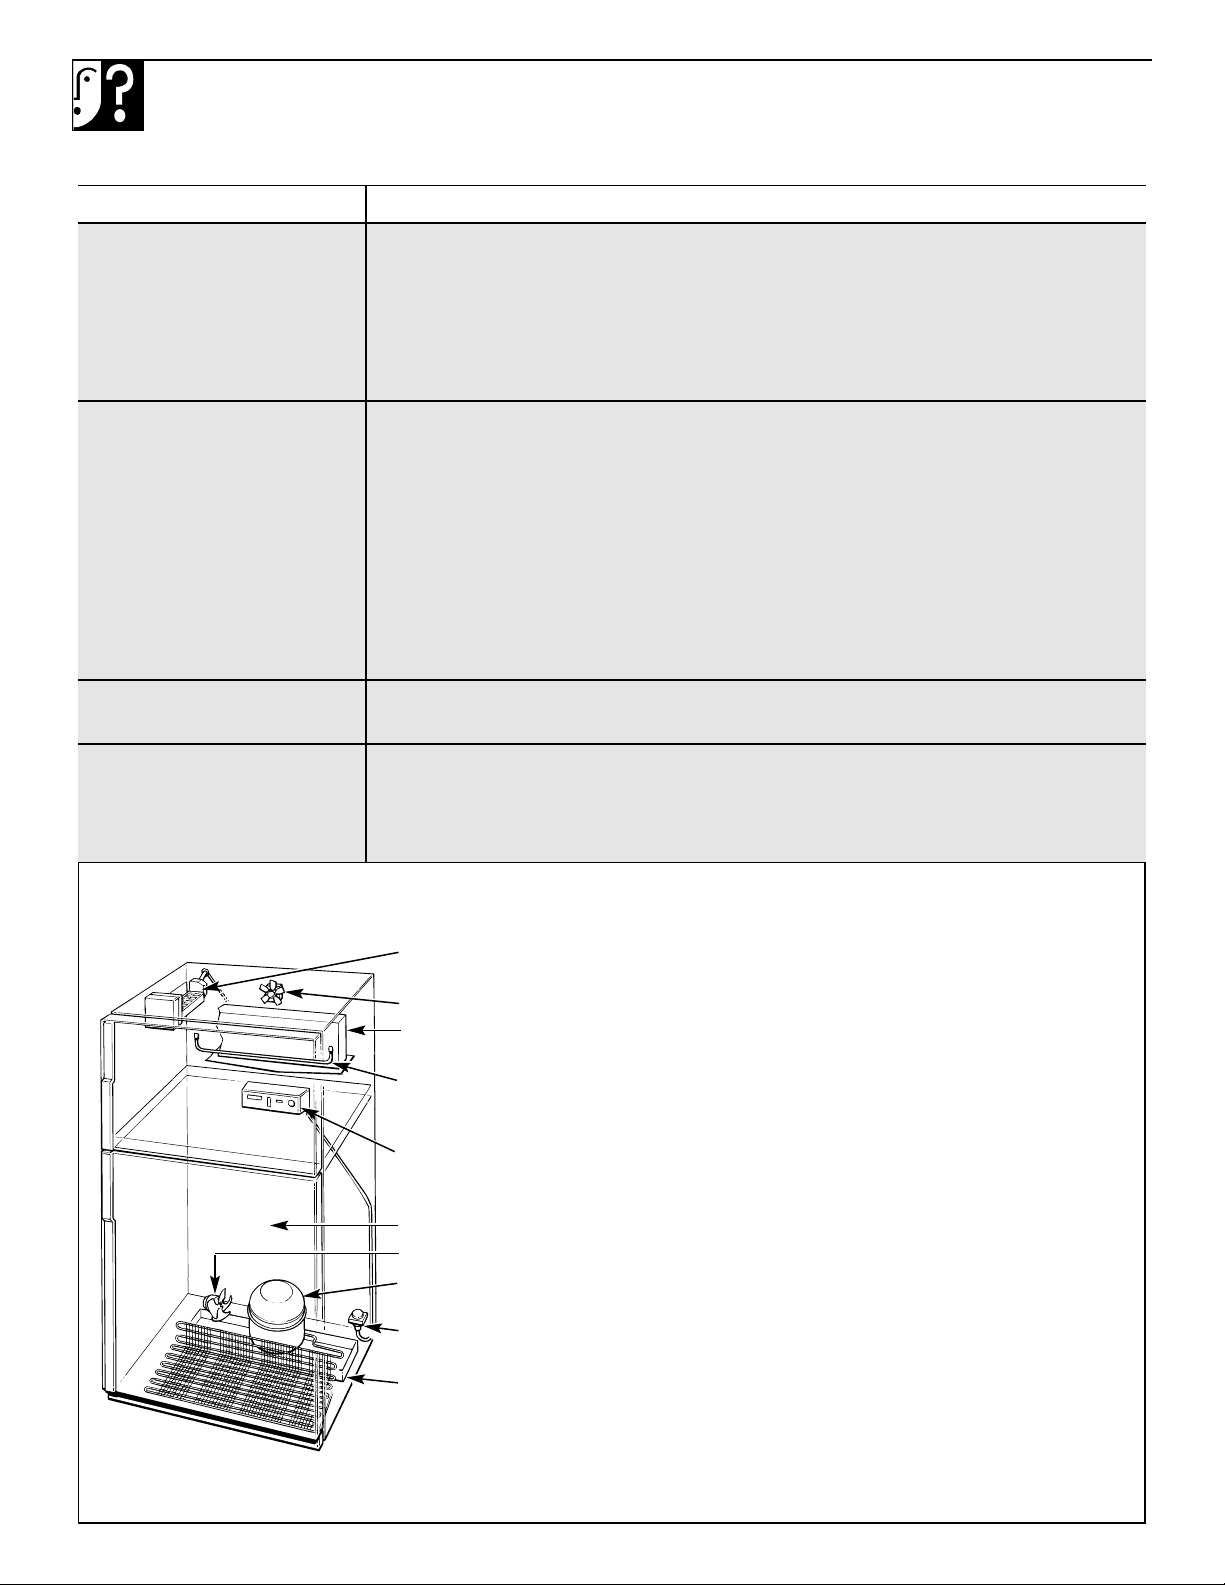
NORMAL OPERATING SOUNDS
These sounds are normal and are due mostly to highly efficient operation.
Icemaker (on some models). Occasionally you will hear ice cubes
dropping into the ice bin.
Evaporator Fan. You may hear air being forced through the cabinet by the fan.
Evaporator. The flow of refrigerant through the evaporator may create a
boiling or gurgling sound.
Defrost Heater. During defrost cycles, water dripping onto the heater may
cause a hissing or sizzling sound. After defrosting, a popping sound may occur
and the evaporator may create a boiling or gurgling sound.
Cold Control & Defrost Timer. These parts can produce a snapping sound
when turning the refrigerator on or of f. The timer also produces a sound similar
to an electric clock.
Plastic Liner. Cracking or popping sounds due to expansion of the plastic liner.
Condenser Fan. You may hear air being forced over the condenser by the fan.
Compressor. Modern, high efficiency compressors operate much faster than
older models. The compressor may have a high pitched hum or pulsating sound.
Water Valve (on models equipped with an automatic icemaker). When
the icemaker fills with water, a buzzing sound and running water will be heard.
Water Pan. Water may be heard running into the drain pan during the
defrost cycle.
Depending on the placement of the refrigerator in your kitchen, you may want to
place a piece of rubber-backed carpet under the refrigerator to reduce the noise.
20
PROBLEM POSSIBLE CAUSE
FOODS DRY OUT • Foods not covered, wrapped or sealed properly.
FRESH FOOD OR • Temperature control not set cold enough. Refer to Temperature Control section.
FROZEN FOOD STORAGE
• Warm weather—frequent door openings.
COMPARTMENT
• Door left open for too long a time.
TEMPERATURE TOO W ARM
• Package holding door open or blocking air duct in frozen food storage compartment.
FROST OR ICE CRYSTALS • Door may have been left ajar or package holding door open.
ON FROZEN FOOD
• Too frequent or too long door openings.
• Frost within package is normal.
AUTOMATIC ICEMAKER • Icemaker feeler arm is in STOP (up) position.
DOES NOT WORK
• Water supply turned off or not connected.
(on some models)
• Frozen food storage compartment too warm.
• Piled up cubes in the storage bin may cause icemaker to shut off prematurely.
Remove storage bin from frozen food storage compartment and level cubes by hand.
CUBES TOO SMALL • Water shutoff valve connecting refrigerator to home water line may be clogged.
SLOW ICE CUBE FREEZING • Door may have been left ajar.
• Turn temperature control to colder setting.
ICE CUBES HAVE • Ice storage bin needs to be emptied, washed and old cubes need to be discarded.
ODOR/TASTE
• Unsealed packages in refrigerator and/or frozen food storage compartments may be
transmitting odor/taste to ice cubes.
• Interior of refrigerator needs cleaning. Refer to Care and Cleaning section.
MOISTURE FORMS ON • Not unusual during periods of high humidity. To help prevent rust, wipe surface dry
CABINET SURFACE and make sure the anti-moisture switch is not set at the anti-moisture setting.
BETWEEN THE DOORS
• Move the anti-moisture switch to the moisture setting.
MOISTURE COLLECTS • Too frequent or too long door openings.
INSIDE
• In humid weather, air carries moisture into refrigerator when doors are opened.
• Move the anti-moisture switch to the moisture setting.
REFRIGERATOR HAS ODOR • Foods with strong odors should be tightly covered.
• Check for spoiled food.
• Interior needs cleaning. Refer to Care and Cleaning section.
• Defrost water drainage system needs cleaning.
• Keep open box of baking soda in refrigerator; replace every three months.
HOT AIR FROM BOTTOM • Normal air flow cooling motor. In the refrigerator process, it is normal that heat
OF REFRIGERATOR be expelled in the area under the refrigerator. Some floor coverings will discolor
at these normal and safe operating temperatures. Your floor covering supplier
should be consulted if you object to this discoloration.
FOOD FREEZING IN • Move the food away from the air vent (near the controls).
THE REFRIGERATOR
• Turn down the fresh food control.
ORANGE GLOW IN • An orange glow is sometimes seen in the frozen food storage compartment when the
THE FROZEN FOOD defrost heater is on. This is normal.
STORAGE COMPARTMENT
21
Problem Solver

22

Guide d’utilisation et d’entretien
GE Appliances
23
Consignes de sécurité...... 24, 25
Mode d’emploi et conseils
Accessoires ...................................................27
Bacs................................................................ 28
Clayettes ................................................ 26, 27
Commandes de température ........... 25, 26
Commutateur d’économie d’énergie..... 25
Compartiment congélateur...................... 29
Ensemble de fabrique de glace ............... 29
Fabrique de glace ....................................... 29
Entretien et nettoyage
Derrière le réfrigérateur............................. 30
Enlèvement des bacs et de
leur couvercle.................................... 30, 31
Nettoyage—extérieur et intérieur............ 30
Remplacement de l’ampoule électrique.. 31
Sous le réfrigérateur................................... 30
Guide de dépannage........ 41–43
Bruits de fonctionnement normaux ........ 41
Préparation
Alimentation en eau................................... 32
Dégagements .............................................. 32
Dimensions................................................... 32
Roulettes ....................................................... 32
Vacances et déménagement................... 32
Installation ................................. 33–40
Directives d’installation
de la conduite d’eau ........................ 35, 36
Exigences électriques......................... 33, 34
Grande-Bretagne et Irlande ...................... 34
Inversion de l’ouverture des portes .. 37–40
Mise à la terre.............................................. 33
Remplacement de la fiche........................ 34
Remplacement du fil conducteur.....25, 34
Numéros de modèle et de série .............. 24

AIDEZ-NOUS À VOUS AIDER…
Lisez attentivement ce guide. Inscrivez les numéros de modèle et de série.
Il est conçu pour vous aider à faire fonctionner et entretenir
correctement votre nouveau réfrigérateur. Gardez-le à portée de main
pour le consulter en cas de doute.
Si le réfrigérateur qui vous a été
livré est endommagé…
Communiquez immédiatement avec le marchand (ou le revendeur) qui
vous a vendu le réfrigérateur.
Économisez du temps et de l’argent.
Avant d’appeler le service de réparation…
Consultez le Guide de dépannage. Il contient une liste des problèmes
mineurs de fonctionnement auxquels vous pouvez vous-même
remédier.
Ils figurent sur l’étiquette qui se trouve sur la paroi de gauche près du
haut du compartiment réfrigérateur.
Numéro de modèle
Numéro de série
Mentionnez les numéros de modèle et de série dans toute
correspondance concernant votre réfrigérateur ou lorsque vous
appelez le service de réparation.
AVERTISSEMENT—Lorsque vous utilisez le
réfrigérateur, observez toujours certaines précautions de
base, notamment :
• N’utilisez le réfrigérateur que pour son usage prévu,
comme décrit dans le présent guide.
• Installez le réfrigérateur conformément aux directives
d’installation avant de l’utiliser. Voir les directives de mise
à la terre dans la section Installation.
AVERTISSEMENT—Raccordez uniquement à une
conduite d’eau potable.
• Ne débranchez jamais le réfrigérateur en tirant sur le
cordon d’alimentation. Saisissez fermement la fiche du
cordon et tirez droit pour la retirer de la prise.
• Réparez ou remplacez immédiatement tout cordon effiloché
ou endommagé. N’utilisez pas un cordon fendillé ou
présentant des signes d’usure sur la longueur ou aux extrémités.
• Lorsque vous déplacez votre réfrigérateur du mur, faites
attention de ne pas le faire rouler sur le cordon
d’alimentation afin de ne pas l’endommager.
• Ne laissez pas les enfants grimper, s’asseoir, se tenir debout
ni se pendre aux clayettes du réfrigérateur. Ils pourraient
endommager le réfrigérateur et se blesser gravement.
• Si vous avez gardé votre ancien réfrigérateur
dont vous ne vous servez plus, ayez soin de
démonter les portes. Ceci réduira le risque de
danger aux enfants.
• Une fois le réfrigérateur en marche, ne touchez pas les
surfaces froides du compartiment des aliments surgelés,
surtout si vous avez les mains humides ou mouillées : la
peau risque d’adhérer à ces surfaces très froides.
• Si votre réfrigérateur est équipé d’une fabrique de glace,
évitez de toucher aux pièces mobiles du mécanisme de celleci ainsi qu’à l’élément chauffant qui libère les glaçons. Ne
posez pas les doigts ou les mains sur le mécanisme de la
fabrique de glace pendant que le réfrigérateur est branché.
• Ne recongelez pas les aliments surgelés qui ont
complètement dégelé. Selon les experts en sûreté alimentaire :
“…Il n’y a pas de danger à recongeler les aliments partiellement
décongelés s’ils renferment encore des cristaux de glace ou si
leur température n’a pas encore dépassé 4 °C.
“…Les viandes hachées, la volaille ou le poisson dégelés dont
l’odeur ou la couleur sont suspectes ne doivent être ni recongelés
ni consommés. Les crèmes glacées décongelées doivent être
jetées. Si l’odeur ou l’aspect d’un aliment vous semble anormal,
jetez-le : sa consommation pourrait être dangereuse.
“…Même une décongélation partielle suivie d’une recongélation
peut altérer la qualité des aliments, surtout celle des fruits,
légumes et plats cuisinés. Les viandes rouges sont moins
susceptibles d’être altérées que la plupart des autres aliments.
Consommez les aliments recongelés dans les plus brefs délais
pour préserver au maximum leur qualité alimentaire.”
• Débranchez votre réfrigérateur avant de le nettoyer et de le
réparer. REMARQUE : Nous vous recommandons vivement
de confier toute réparation à un technicien qualifié.
• A vant de r emplacer une ampoule grillée, le réfrigérateur doit
être débranché pour éviter tout contact avec un fil sous tension.
(Une ampoule grillée peut se briser pendant l’opération.)
REMARQUE : Lorsque vous réglez la commande à
«0»
,
l’alimentation électrique de l’ampoule n’est pas coupée.
CONSIGNES DE SÉCURITÉ IMPORTANTES
Veuillez lire toutes les directives avant d’utiliser le réfrigérateur.
24

• N’entreposez et n’utilisez pas d’essence ou autres vapeurs et
liquides inflammables à proximité de cet appareil ou de tout
autre appareil électroménager.
Remplacement du fil conducteur
Si, à un moment quelconque, vous devez remplacer le fil
conducteur de votre réfrigérateur, remplacez-le par un fil spécial
en vente chez votre revendeur local. Si vous l’avez endommagé,
vous devrez payer les frais de remplacement.
CONSERVEZ CES
DIRECTIVES
Consignes de sécurité importantes Commandes de température
25
COMMANDES DE TEMPÉRATURE
Réfrigérateur Compartiment des aliments surgelés
Au départ, réglez les deux
commandes à «4».
La commande de température
du réfrigérateur déplace un
clapet pour changer la quantité
d’air froid qui circule entre le
compartiment des aliments
surgelés et le réfrigérateur.
La commande de température
du compartiment des
aliments surgelés maintient
les températures dans tout le
compartiment. Si vous réglez
la commande de température du
compartiment des aliments
surgelés à «0», le
refroidissement cesse dans les
deux compartiments—
réfrigérateur et compartiment des aliments surgelés—mais
l’alimentation électrique du réfrigérateur ne sera pas coupée.
Ne rangez pas de boissons gazeuses dans le compartiment des
aliments surgelés. Pour congeler les aliments le plus rapidement
possible, réglez la commande du compartiment des aliments surgelés à
«7». Puisque le compresseur fonctionnera 100 pour cent du temps à ce
réglage, n’oubliez pas de remettre la commande à sa position initiale
après la congélation des aliments.
Air froid du
compartiment
des aliments
surgelés
Vue de côté
Clapet
(réglage le plus froid)
(réglage le plus chaud)
Clapet
Limites de température ambiante Commutateur d’économie d’énergie
Ce réfrigérateur est conçu pour fonctionner aux températures
ambiantes spécifiées par le Type de température qui est marqué sur sa
plaque signalétique.
Type de Symbole Température ambiante
température Maximum Minimum
Tempéréprolongé SN 32 °C 10 °C
Tempéré N 32 °C 16 °C
Subtropical ST 38 °C 18 °C
Tropical T 43 °C 18 °C
REMARQUE : Des facteurs tels que l’emplacement du réfrigérateur,
la température ambiante et la fréquence d’ouverture de la porte
pourraient avoir un effet sur la température interne du réfrigérateur.
Réglez les commandes de température comme recommandé en tenant
compte de ces facteurs.
Le commutateur d’économie d’énergie est situé
sur le tableau de commande de température. Pour
réduire la quantité d’électricité consommée par
votre réfrigérateur, déplacez le commutateur vers
la gauche.
Ceci arrête le mécanisme de votre réfrigérateur
qui empêche la condensation de se former
sur les surfaces à l’extérieur ou à l’intérieur.
Lorsque ce mécanisme est coupé, la condensation peut se former sur
l’intérieur ou sur l’extérieur de votre réfrigérateur, particulièrement
par temps humide. L’humidité est généralement plus élevée en été, tôt
le matin et dans les maisons sans
climatisation. Pendant une période
prolongée, la condensation
sur la surface du réfrigérateur peut
provoquer la détérioration du fini de la peinture. Il est important de
protéger le fini en appliquant une cire pour appareils électroménagers
comme décrit à la section Entretien et nettoyage. Le coût de
fonctionnement de ce mécanisme basse tension est à peu près le
même que celui de deux veilleuses.
Lorsque vous déplacez le commutateur d’économie d’énergie vers la
droite, l’électricité basse tension circule dans l’appareil et réchauffe
l’extérieur et le haut du compartiment réfrigérateur. Dans la plupart des
cas, ceci empêche la formation de condensation ou de gouttelettes d’eau.
(suite à la page suivante)
7
4
1
7
0
6
5
4
3
2
1

COMMANDES DE TEMPÉRATURE
(suite)
Pas de dégivrage Vérification de la température
Il n’est pas nécessaire de dégivrer le compartiment des aliments
surgelés ou le réfrigérateur. Bien que votre réfrigérateur soit conçu et
équipé d’une commande de dégivrage automatique, la présence d’un
peu de givre sur les emballages est normale.
Pour le réfrigérateur, placez un récipient de lait sur la clayette
supérieure. Vérifiez-le le lendemain. Si le lait est trop chaud ou trop
froid, réglez la température en conséquence.
Pour le compartiment des aliments surgelés, placez un récipient
de crème glacée au centre du compartiment. Vérifiez-la le
lendemain. Si la crème glacée est trop dure ou trop molle, réglez la
température en conséquence.
Attendez toujours 24 heures pour laisser le réfrigérateur atteindre
la température que vous avez réglée.
Support à bouteille de vin (sur certains modèles)
Le support à bouteille de vin est
conçu pour tenir une bouteille
couchée et s’installe sur n’importe
quelle clayette.
Clayette supplémentaire du compartiment des
aliments surgelés (sur certains modèles)
Le compartiment des aliments
surgelés de certains modèles
est muni d’une clayette
supplémentaire qui vous permet
de ranger vos aliments surgelés
plus efficacement dans le
compartiment.
26
Clayettes réglables (sur certains modèles)
Les clayettes du réfrigérateur
et du compartiment des
aliments surgelés sont
réglables et vous permettent
de déplacer vos clayettes en
fonction des besoins de
rangement de votre famille.
Les clayettes en acier du
compartiment des aliments
surgelés de certains modèles
sont réglables de la même
manière.
Pour enlever une clayette :
Relevez l’avant de la clayette, puis soulevez-la en la tirant et dégagezla de la crémaillère de la paroi arrière du réfrigérateur.
Pour remettre une
clayette en place :
Choisissez la hauteur désirée. En
soulevant légèrement l’avant de
la clayette, engagez les ergots
supérieurs dans les crémaillères
au fond de l’appareil. Puis
abaissez l’avant de la clayette
jusqu’à ce qu’elle se bloque en
position.
Les clayettes en verre trempé
(sur certains modèles) sont
réglables de la même manière.
CLAYETTES
2
Soulevez et
tirez
1
Relevez
Engagez
l’ergot
supérieur
Abaissez pour
verrouiller
1
2
Balconnets amovibles (sur certains modèles)
Les balconnets amovibles et réglables
sur les portes du réfrigérateur et du
compartiment des aliments surgelés peuvent
facilement être transportés du réfrigérateur à
votre plan de travail.
Pour les retirer : Inclinez le balconnet vers
l’avant sur les supports moulés jusqu’à ce
qu’il sorte complètement de la porte.
Pour les repositionner ou les déplacer :
Choisissez la hauteur de clayette désirée, engagez le balconnet dans les
supports moulés de la porte et glissez-le. Le balconnet se bloquera en
place.
Des séparateurs sont conçus
pour rendre plus souple le
rangement de vos aliments dans
les balconnets amovibles et fixes
de la porte du réfrigérateur. Des
produits tels que les sauces salades,
les sauces à viande et autres
condiments peuvent désormais être
retenus fermement contre la porte
pour éviter qu’ils ne basculent, ne
se renversent ou ne glissent.
Saisissez l’avant du séparateur entre
l’index et le majeur puis déplacez-le
selon vos besoins.
Séparateur

Bac à rangement rapide («Quick Store») (sur certains modèles)
Ce bac inclinable et amovible en
résine de polycarbone Lexan peut être
positionné sur la porte du réfrigérateur
ou du compartiment des aliments
surgelés. Il a été conçu pour ranger
facilement les aliments fréquemment
utilisés qui tiennent difficilement dans
un balconnet ou des aliments qui
doivent être consommés rapidement et
risquent de dessécher s’ils ne sont pas
conservés couverts.
Pour l’ouvrir, soulevez le
loquet et tirez la poignée du
bac vers l’avant.
Pour éviter d’endommager le
réfrigérateur, assurez-vous
que le bac est fermé et
verrouillé avant de fermer
la porte du réfrigérateur.
Pour retirer le bac, soulevez-le
et sortez-le de son boîtier.
Pour remettre le bac à
rangement rapide en place, soulevez
le boîtier du bac, sortez-le des
supports moulés sur la porte,
apportez-le à l’endroit choisi et
abaissez-le dans les supports moulés
sur la porte. Vous n’avez pas à retirer
le bac de son boîtier lors de sa remise
en place.
1
Poussez vers
le haut
Tirez en avant
Système Quick Serve
TM
(sur certains modèles)
Ces récipients de cuisson-serviceconservation à couvercles durables et
transparents se rangent sur un
support qui peut être positionné sur
la porte du réfrigérateur ou du
compartiment des aliments surgelés.
On peut retirer les récipients du
support ou les remettre en place selon les besoins, et le support peut
être enlevé et remis en position sur l’une ou l’autre des portes de la
même manière qu’un balconnet amovible.
Les récipients et leurs couvercles peuvent être utilisés sans danger
dans le four à micro-ondes, le réfrigérateur, le congélateur et le lavevaisselle.
Ne les utilisez pas pour cuire des aliments à haute teneur en graisse,
comme le bacon, ni des aliments qui contiennent beaucoup de sucre,
comme les bonbons et les sirops. Les hautes températures des graisses
et des sucres risquent de provoquer la formation de bulles sur
l’intérieur du récipient.
ATTENTION :
• Ces récipients et leurs couvercles ne sont pas conçus pour être
utilisés dans un four standard, sur une cuisinière ou dans un
grilloir. Une telle utilisation peut être dangereuse.
Bac à rangement rapide
Boîtier du bac
2
27
ACCESSOIRES
Casier à condiments Porte-boissons
Le casier à condiments garde ensemble
les condiments dont vous vous servez
fréquemment. Il se range dans les
balconnets de la porte du réfrigérateur.
Une poignée commode vous permet
de transporter vos condiments jusqu’à
la table facilement.
Le porte-boissons coulissant
peut contenir jusqu’à douze
boîtes de boissons gazeuses ou
deux bouteilles de vin ou d’eau
(dans le sens de la longueur). Il
s’enlève pour le nettoyage.
Commandes de température Clayettes Accessoires
2
Pull forward
QUICK S
1
Push up

BACS
28
Bacs à fruits et à légumes Bac à légumes («Moist ’n Fresh») (sur certains modèles)
Les bacs au bas du réfrigérateur sont conçus pour maintenir un
degré d’humidité élevé pour la conservation de la plupart des légumes
ainsi qu’un degré d’humidité moins élevé pour la conservation des
fruits.
Lorsque vous remettez les bacs en place, poussez-les toujours
jusqu’au fond de l’appareil.
La durée de conservation dépend du type et de l’état de l’aliment
rangé dans les bacs.
Si une quantité d’eau excessive s’accumule dans le fond des bacs,
videz-les et essuyez-les.
Bac fraîcheur («Cool ’n Fresh») (sur certains modèles)
Ce bac est conçu pour maintenir un degré d’humidité moins élevé
pour la conservation de fruits et de légumes tels que :
• Abricots • Framboises • Pêches
• Champignons • Mandarines • Poires
• Courges d’été • Nectarines • Pommes
• Fraises • Oranges • Raisins
Ce bac est conçu pour conserver la fraîcheur des aliments non
emballés en retenant l’humidité naturelle des aliments tels que :
• Artichauts • Céleri • Légumes verts • Prunes
• Asperges • Cerises • Maïs • Radis
• Betteraves • Épinards • Myrtilles • Rhubarbe
équeutées • Groseilles • Persil • Tomates mûres
• Carottes • Laitue • Petits pois
Comme dans tout réfrigérateur, nous recommandons d’emballer les
aliments à odeur forte—tels que :
• Brocoli • Choux de Bruxelles • Oignons verts • Panais
• Choux • Choux-fleurs • Navets
Bacs à humidité réglable (sur certains modèles) Bac à casse-croûte (sur certains modèles)
Ces bacs sont dotés d’une
commande qui vous permet de
régler la quantité d’air froid qui entre
dans le bac.
Glissez la commande à fond sur le réglage pour que le bac
conserve un degré d’humidité élevé pour la conservation des légumes.
Glissez la commande à fond sur le réglage pour abaisser
le degré d’humidité dans le bac pour la conservation des fruits.
Le bac à casse-croûte coulissant
peut être retiré et transporté à
l’évier ou à votre plan de travail.
Vous pouvez aussi changer son
emplacement dans le réfrigérateur
ainsi que celui de la clayette à
laquelle il est fixé suivant vos
besoins de rangement.
Bac à viande à température réglable (sur certains modèles)
La viande fraîche se conserve le mieux dans la partie la plus froide du
réfrigérateur.
Lorsque le bac est placé dans l’une des 6 fentes
supérieures du côté gauche et la commande est réglée à ,
l’air du compartiment des aliments surgelés est envoyée autour du bac
afin de maintenir une température très froide à l’intérieur de celui-ci.
Si vous désirez vous servir du bac pour la conservation des aliments
autres que la viande fraîche, vous pouvez ranger celui-ci n’importe où
dans le réfrigérateur.
La commande de température réglable vous permet de régler le
débit d’air froid en provenance du congélateur.
Lorsque la commande est réglée à , le registre situé au-dessus de
l’ouverture du bac est complètement ouvert afin d’assurer une zone de
rangement aussi froide que possible.
Lorsque la commande est réglée à , le registre est complètement
fermé. Les températures normales du réfrigérateur seront maintenues.
D’autres réglages sont possibles entre ces extrêmes.
.

COMPARTIMENT CONGÉLATEUR
29
• Les aliments à congeler ne doivent pas rentrer en contact direct avec
les aliments déjà en conservation.
• Ne gardez pas les surgelés industriels qui ont été congelés
rapidement plus longtemps que recommandé par le fabricant.
• Pour congeler les aliments le plus rapidement possible, réglez la
commande du compartiment des aliments surgelés à «7». Puisque le
compresseur fonctionnera 100 pour cent du temps à ce réglage,
n’oubliez pas de remettre la commande à sa position initiale après la
congélation des aliments.
• Si l’alimentation électrique de l’appareil est interrompue pour une
période prolongée ou si le système frigorifique ne fonctionne pas,
n’ouvrez pas les portes à moins que ce soit absolument nécessaire.
Lorsque c’est nécessaire, fermez les portes le plus rapidement
possible pour que les aliments congelés restent congelés le plus
longtemps possible.
Les boissons gazeuses ne doivent pas être rangées dans le
compartiment des aliments surgelés.
Certains produits, tels que les sorbets, ne doivent pas être
consumés trop froids.
FABRIQUE DE GLACE AUTOMATIQUE
(sur certains modèles)
Votre fabrique de glace produit huit glaçons par cycle—environ
100 glaçons dans une période de 24 heures, selon la température du
compartiment des aliments surgelés, la température ambiante, la
fréquence d’ouverture de la porte et d’autres conditions d’utilisation.
Si votre réfrigérateur
est utilisé avant que l’eau ne
soit raccordée à la fabrique
de glace, gardez le bras
régulateur en position STOP
(ARRÊT—relevé).
Lorsque le réfrigérateur est
installé, attendez environ 24
heures pour que le
compartiment des aliments
surgelés atteigne une
température assez froide pour
la production de glaçons.
Jetez les premières séries de
glaçons. Cela permet d’éliminer
les impuretés dans la conduite d’eau.
Lorsque le réfrigérateur
a été raccordé à l’alimentation
en eau, amenez le bras
régulateur à la position ON
(MARCHE—abaissé).
La fabrication de glaçons continue jusqu’à ce que le bras régulateur
détecte une accumulation suffisante de glaçons dans le bac à glaçons
et arrête temporairement le fonctionnement. Pour un stockage
maximum de glaçons, égalisez à la main le niveau de glaçons de
temps en temps. Assurez-vous que rien n’empêche le bras régulateur
de bouger librement.
La fabrique de glace éjecte les glaçons en groupes de huit et il peut
arriver que plusieurs glaçons soient collés ensemble.
Amenez le bras régulateur de la fabrique de glace à la position
STOP (ARRÊT—relevé) lorsque :
• L’alimentation en eau de la maison doit être coupée pendant
plusieurs heures.
• Le bac à glaçons doit être retiré pendant un certain temps.
• Vous partez en vacances. Dans ce cas, fermez également le robinet
d’arrêt de la conduite d’eau de votre réfrigérateur.
• Vous réglez la commande de température du réfrigérateur à «0».
Si les glaçons ne sont pas utilisés souvent, les vieux glaçons
apparaîtront opaques et auront un goût fade. Videz régulièrement
le bac à glaçons et lavez-le à l’eau tiède. Laissez sécher le bac avant
de le remettre en place—sinon les glaçons risquent de coller aux
autres pièces de la fabrique de glace.
S’il s’agit de votre première fabrique de glace, vous entendrez
parfois des bruits qui vous sembleront inhabituels. Ce sont les bruits
normaux de fabrication des glaçons et il n’y a pas lieu de s’inquiéter.
Fabrique de glace
Bac à glaçons
Bras régulateur en
position STOP
(ARRÊT—relevé)
Bras régulateur en
position ON
(MARCHE—abaissé)
Ensemble pour raccordement à la conduite d’eau Ensemble de fabrique de glace
Un ensemble comprenant du tuyau de cuivre, un robinet d’arrêt, des
raccords et les directives nécessaires pour raccorder la fabrique de
glace à votre conduite d’eau froide est disponible moyennant un
supplément. Contactez votre distributeur local et commandez
l’ensemble approprié selon la longueur de tuyau de cuivre nécessaire.
Reportez-vous à la section Préparation.
Si votre réfrigérateur n’a pas été fourni avec une fabrique de glace
automatique, un ensemble de fabrique de glace est disponible,
moyennant des frais supplémentaires chez votre distributeur local.
Voyez derrière votre réfrigérateur pour l’ensemble de fabrique de
glace spécifique nécessaire pour votre modèle.
Bacs Compartiment congélateur Fabrique de glace automatique

ENTRETIEN ET NETTOYAGE
Nettoyage—extérieur
Les poignées de porte peuvent être nettoyées à l’aide d’un linge
humide et d’une solution d’eau et de détergent liquide doux pour la
vaisselle. Essuyez avec un linge doux. N’appliquez pas de cire sur les
poignées et les garnitures de porte.
Pour maintenir le fini propre, essuyez avec un linge propre
légèrement humecté de cire pour appareils électroménagers ou d’un
détergent liquide doux pour la vaisselle. Essuyez et polissez avec un
linge doux et propre. N’essuyez pas le réfrigérateur avec un linge à
vaisselle sale ou une serviette humide : ils pourraient laisser un résidu
qui peut endommager la peinture. N’utilisez pas de tampons à récurer,
de produits nettoyants en poudre, de javellisants ou de produits
nettoyants contenant un javellisant, car ces produits peuvent
égratigner la peinture et la rendre moins résistante.
Protégez le fini de l’appareil. La carrosserie du réfrigérateur est
recouverte d’une peinture de haute qualité cuite au four. Moyennant
certaines précautions, cette peinture gardera son éclat et résistera à la
rouille pendant de longues années. Appliquez une couche de cire pour
appareils électroménagers lorsque vous recevez votre réfrigérateur et,
par la suite, au moins deux fois par an.
Nettoyage—intérieur
Nettoyez l’intérieur du réfrigérateur et du compartiment des
aliments surgelés au moins une fois par an. Débranchez le
réfrigérateur avant de le nettoyer. S’il est trop difficile à faire, essorez
bien votre linge ou votre éponge pour enlever l’excès d’eau lorsque
vous nettoyez autour des interrupteurs, des lampes ou des commandes.
Appliquez une cire pour appareils électroménagers sur la surface
intérieure entre les portes.
Utilisez une solution d’eau tiède et de bicarbonate de soude–environ
15 ml de bicarbonate de soude par litre d’eau—afin de nettoyer tout en
neutralisant les odeurs. Rincez et essuyez bien.
Évitez de nettoyer les clayettes en verre (sur certains modèles) encore
froides dans de l’eau chaude car elles risquent de se casser à cause de
l’écart excessif de température.
Les autres pièces du réfrigérateur—y compris les joints de porte,
les bacs à viande et à légumes, le bac à glaçons et toutes les pièces
en plastique—peuvent être nettoyées de la même manière. Après avoir
nettoyé les joints de porte, appliquez une fine couche de vaseline sur
les joints du côté des charnières pour empêcher les joints de coller et
de se déformer. N’utilisez pas de poudre à récurer ou autres produits
nettoyants abrasifs.
Pour éviter les mauvaises odeurs, laissez une boîte ouverte de
bicarbonate de soude au fond du réfrigérateur, sur la clayette du haut.
Remplacez-la tous les trois mois. Une boîte ouverte de bicarbonate
de soude dans le compartiment des aliments surgelés absorbera les
odeurs de renfermé.
Les plats et les couvercles du système Quick-Serve peuvent être lavés
au lave-vaisselle ou à la main dans une solution d’eau et de détergent
liquide pour la vaisselle. Pour faire disparaître les taches, faite-les
tremper dans une solution d’eau et d’eau de Javel—une mesure d’eau
de Javel pour 3 mesures d’eau. (Il faudra peut-être laisser tremper les
taches tenaces.) Délogez la saleté brûlée à l’aide d’un tampon à
récurer en plastique. N’utilisez pas de poudre à récurer ou autre
produit nettoyant abrasif.
Ne lavez aucune pièce en plastique du réfrigérateur dans
votre lave-vaisselle.
Sous le réfrigérateur Derrière le réfrigérateur
Pour un fonctionnement plus
efficace, vous devez garder le
dessous du réfrigérateur propre.
Réglez la commande de température
à «0». Retirez la grille inférieure.
Balayez ou aspirez la poussière
immédiatement accessible sur
les serpentins du condenseur, puis
remettez en marche la commande.
Pour de meilleurs résultats, utilisez
une brosse conçue spécialement à cet
effet, disponible chez votre distributeur
local. Ce nettoyage simple doit être
effectué au moins une fois par an.
Prenez un soin particulier lorsque vous déplacez le réfrigérateur du
mur. Tous les types de revêtements de sol peuvent être endommagés,
surtout ceux qui sont coussinés ou dont la surface est gaufrée. Tirez le
réfrigérateur en ligne droite et, lorsque vous le remettez en place,
poussez-le vers le mur en ligne droite également. Si vous déplacez le
réfrigérateur latéralement, vous risquez de l'endommager ou d'abîmer
le revêtement de sol. Reportez-vous à la section Roulettes.
Nettoyez les serpentins
du condenseur au
moins une fois par an.
Enlèvement des bacs et de leur couvercle
Les bacs au bas du réfrigérateur se bloquent avant de sortir
complètement du réfrigérateur, afin d’empêcher que leur contenu ne se
renverse sur le sol. Ces bacs peuvent être retirés facilement en
soulevant légèrement les côtés tout en les tirant au-delà de leurs butées.
Pour enlever les bacs et leur couvercle lorsque la porte du
réfrigérateur ne peut pas s’ouvrir complètement, suivez la procédure
qui s’applique à votre modèle.
30

Entretien et nettoyage
Deux bacs (sur certains modèles)
1. Retirez le bac qui se trouve le
plus loin de la porte.
2. Retirez l’autre bac.
Pour les modèles dont le
balconnet de porte bloque
l’autre bac, glissez l’autre bac
vers le centre et retirez-le.
3. Retirez le couvercle en verre.
Soulevez l’avant du couvercle
en verre tout en le tirant vers
vous. Inclinez-le et sortez-le.
4. Enlevez le cadre du bac.
(Enlevez toujours le couvercle
en verre avant d’enlever le cadre
du bac.)
Soulevez le cadre pour le
dégager de ses supports latéraux
et arrière. Tirez-le vers vous,
inclinez-le puis sortez-le.
Pour les remettre en place :
1. Abaissez le cadre jusqu’à ce
qu’il repose sur les supports
latéraux et arrière.
2. Remettez les bacs en place.
Si vous avez retiré la glissière
du bac, remettez-la en place
avec l’extrémité en biseau à
l’avant.
a. Glissez un côté du bac sur la
glissière du bac.
b. Déplacez la glissière et le bac du
côté des charnières jusqu’à ce
que l’autre côté du bac repose
sur le cadre.
c. Glissez l’autre bac en place.
3. Remettez le couvercle en verre en place, en insérant la partie
arrière du couvercle dans le profilé arrière du cadre. Ensuite,
abaissez lentement le couvercle pour qu’il soit bien en place.
Cadre
Glissière du
bac (extrémité
en biseau)
Remplacement de l’ampoule
Une ampoule et une douille sont installées à la partie supérieure du
réfrigérateur en face du tableau de commande de température.
Sur certains modèles une ampoule et une douille sont également
situées dans le coin supérieur gauche du compartiment des aliments
surgelés derrière un écran protecteur flexible.
Pour remplacer l’une ou l’autre des ampoules, débranchez le
réfrigérateur de sa prise de courant et enlevez l’écran protecteur;
laissez refroidir l’ampoule puis dévissez-la et remplacez-la par une
ampoule de la même taille.
Lorsque vous remettez
l’écran protecteur en
place, assurez-vous que
la tige de l’écran
protecteur est insérée
dans la fente de son
support. Ensuite, faites
pivoter l’écran protecteur
vers l’arrière et vers le
haut jusqu’à ce qu’il soit
bien en place.
Fente
Tige
31

Dégagements
Prévoyez les dégagements suivants pour faciliter l’installation,
assurer une circulation d’air adéquate et permettre les
raccordements d’électricité et de plomberie :
Côtés ..............................................................................19 mm
Dessus ............................................................................25 mm
Arrière ............................................................................25 mm
Si le modèle 19, 22 ou 25 doit être installé contre un mur du côté des
charnières, prévoyez 38 mm de jeu pour le dégagement de la porte.
Alimentation en eau de la fabrique
de glace (sur certains modèles)
Si votre réfrigérateur est muni d’une fabrique de glace, ou si vous
prévoyez d’en ajouter une ultérieurement, vous devez la raccorder à
une conduite d’eau froide potable.
Moyennant un supplément, vous pouvez vous procurer un ensemble
comprenant un tuyau de cuivre, un robinet d’arrêt, des raccords et des
directives chez votre distributeur local. La longueur du tuyau reliant la
fabrique de glace à la conduite d’eau froide doit être suffisante pour
que vous puissiez éloigner le réfrigérateur du mur (environ 244 cm
de tuyau en cuivre de 1/4 de pouce enroulé pour former trois boucles
d’environ 25 cm de diamètre).
N’utilisez pas d’ensembles avec du tuyau en plastique comme il y a
toujours de la pression d’eau dans la conduite d’eau.
Limite maximum de pression d’arrivée d’eau : 8,3 bars.
Limite minimum de pression d’arrivée d’eau : 1,4 bars.
L’installation de la fabrique de glace doit être effectuée par un
technicien qualifié.
PRÉPARA TION
Roulettes
Certains modèles ont des roulettes réglables pour vous permettre
d’écarter le réfrigérateur du mur pour le nettoyage. Les roulettes doivent
être réglées de sorte que le réfrigérateur repose solidement sur le sol et
que l’avant de celui-ci soit soulevé suffisamment (environ 19 mm)
pour que les portes ferment facilement lorsqu’elles sont à demiouvertes.
Retirez la grille inférieure en
tenant le bas de la grille et en
la tirant.
Tournez les deux vis de réglage de la roulette avant
dans le sens des aiguilles d’une montre pour
soulever le réfrigérateur, dans le sens inverse
pour l’abaisser.
Pour remettre en place la grille inférieure,
alignez les agrafes à l’arrière de la grille avec les
ouvertures dans la base et poussez sur la grille
jusqu’à ce qu’elle soit bien en place.
Départ en vacances Déménagement
Lorsque vous partez pour peu de temps, retirez les aliments
périssables du réfrigérateur et laissez les commandes aux réglages
habituels. Toutefois, si la température de la pièce risque d’être inférieure
à 16 °C, suivez les mêmes directives que pour une absence prolongée.
Si vous vous absentez pour une longue période, débranchez le
réfrigérateur, réglez la commande de température du réfrigérateur à
«0» et nettoyez l’intérieur du réfrigérateur avec une solution d’eau et
de bicarbonate de soude à raison de 15 ml par litre d’eau. Essuyez.
Pour empêcher l’apparition d’odeurs, laissez une boîte ouverte de
bicarbonate de soude dans le réfrigérateur et laissez les portes
ouvertes.
Réglez le bras régulateur de la fabrique de glace à la position STOP
(ARRÊT—relevé) et prenez soin de fermer le robinet d’arrêt de la
conduite d’eau du réfrigérateur.
Débranchez le cordon d’alimentation, retirez tous les aliments du
réfrigérateur, nettoyez et séchez l’intérieur.
Immobilisez toutes les pièces amovibles, tels que la grille, les
clayettes et les bacs, avec du ruban adhésif pour éviter de les
endommager.
Assurez-vous que le réfrigérateur demeure debout pendant son
déménagement et dans le camion. Il doit être bien immobilisé dans le
camion afin d’éviter qu’il se déplace. Protégez la carrosserie du
réfrigérateur avec une couverture.
Dimensions
Modèle 18 19 21 22 24 25
A* 163 cm 163 cm 168 cm 168 cm 170 cm 170 cm
B 75 cm 75 cm 79 cm 79 cm 87 cm 87 cm
C** 80 cm 83 cm 80 cm 83 cm 80 cm 83 cm
D 147 cm 147 cm 152 cm 152 cm 160 cm 160 cm
E 70 cm 70 cm 70 cm 70 cm 70 cm 70 cm
**La charnière n’est pas comprise dans la hauteur—Ajoutez 22 mm de hauteur pour la charnière.
**La poignée est comprise dans la profondeur.
A
B
C
D
E
32

33
Préparation Installation
INSTALLA TION
IMPORTANT…Veuillez lire attentivement
Exigences électriques
Le réfrigérateur doit toujours être branché dans sa propre prise
de courant—Veuillez vérifier la tension nominale et la fréquence de
l’appareil sur la plaque signalétique du réfrigérateur. Cette précaution
est recommandée pour garantir un rendement optimum et éviter une
surcharge des circuits électriques de la résidence, ce qui pourrait créer
un risque d’incendie par surchauffe des fils.
Le réfrigérateur doit être placé de sorte que la fiche est accessible.
AVERTISSEMENT : POUR ÉVITER LES ACCIDENTS AVEC
LES ENFANTS. LORSQUE VOUS VOUS DÉBARRASSEZ DE
VOTRE ANCIEN RÉFRIGÉRATEUR OU CONGÉLATEUR,
PRENEZ SOIN DE RENDRE LE LOQUET INUTILISABLE. SI
POSSIBLE, DÉMONTEZ LES PORTES ET JETEZ-LES
SÉPARÉMENT. NE TENTEZ PAS DE VOUS METTRE DEBOUT
SUR L’APPAREIL. IL N’EST PAS CONÇU POUR UN TEL
USAGE ET VOUS POURRIEZ VOUS BLESSER GRAVEMENT
OU ENDOMMAGER L’APPAREIL. NE LAISSEZ PAS LES
ENFANTS JOUER AVEC LE RÉFRIGÉRATEUR OU
TRAFIQUER LES COMMANDES DE CELUI-CI.
Branchement électrique
Pour votre sécurité, cet appareil doit être
correctement mis à la terre.
Le cordon d’alimentation de cet
appareil est muni d’une fiche qui
se branche dans une prise murale
équipée d’une mise à la terre afin
de réduire les risques de chocs
électriques.
Faites examiner la prise murale
par un électricien qualifié pour
vous assurer qu’elle est
correctement mise à la terre.
Si la prise murale n’est pas munie d’une mise à la terre, il vous
incombe de la faire remplacer par une prise murale qui est
correctement mise à la terre.
Si la fiche ne convient pas à votre prise, vous pouvez en installer
une autre. IMPORTANT : Dans certains pays l’installation de
fiches électriques et de câbles est autorisée seulement lorsque le
travail est effectué par un électricien qualifié.
Si le cordon d’alimentation est endommagé, il faut que le
remplacement de celui-ci soit effectué par un réparateur autorisé
afin d’éviter tout risque pour votre sécurité.
Assurez-vous qu’il
y a une bonne mise
à la terre avant
l’utilisation.
Fiche pour
prise de terre

INSTALLA TION
POUR LA GRANDE-BRETAGNE ET L’IRLANDE SEULEMENT
Courant électrique
Nous recommandons que le réfrigérateur soit branché dans une prise
murale appropriée et facilement accessible. Tous les appareils sont
munis d’une fiche incorporée. Celle de votre réfrigérateur comporte
un fusible 13A.
Si la fiche ne convient pas à votre prise murale, vous pouvez en
installer une autre. Retirez l’ancienne et jetez-la, mais ne la branchez
pas dans une autre prise de la maison; ceci pourrait provoquer un choc
électrique.
AVERTISSEMENT : CET APPAREIL DOIT ÊTRE MIS À
LA TERRE.
IMPORTANT—Remplacement de la fiche
Les couleurs des fils de la fiche sont les suivantes : vert et jaune—
terre; bleu—neutre; marron—sous tension. Si vous installez vousmême une fiche sur l’appareil, il est possible que les couleurs de
celle-ci ne correspondent pas à celles des bornes de la fiche. Dans ce
cas, procédez comme suit :
1. Branchez le fil vert et jaune
(terre) à la borne de la fiche
marquée «E» avec un symbole
ou de couleur verte ou verte
et jaune.
2. Branchez le fil bleu (neutre) à la
borne de la fiche marquée «N»
ou de couleur noire.
3. Branchez le fil marron (sous
tension) à la borne de la fiche
marquée «L» ou de couleur rouge.
Si vous utilisez une fiche de remplacement, un fusible de 15A doit
être installé soit dans la fiche ou la fiche d’adaptation, soit dans le
boîtier d’alimentation électrique. Si vous installez un fusible dans la
fiche fournie avec l’appareil, il faut utiliser un fusible de 13A
approuvé par l’ASTA dans BS 1362.
S’il s’agit d’une fiche moulée, le couvercle du fusible doit être
remplacé lors du changement du fusible. En cas de perte du
couvercle du fusible, il faut éviter de vous servir de la fiche
jusqu’à ce que vous puissiez remplacer le couvercle de la fiche.
Vous pouvez vous procurer un nouveau couvercle de fusible chez
votre revendeur ou auprès de votre compagnie d’électricité. La
couleur appropriée pour le couvercle de fusible de remplacement
est la même que celle qui se trouve sur les bornes de la fiche ou sur
la pièce inséré à la base de la fiche.
Remplacement du fil conducteur
Si, à un moment quelconque, vous devez remplacer le fil conducteur de cet
appareil, remplacez-le par un fil spécial en vente chez votre revendeur local.
Les frais de remplacement du fil conducteur seront à votre charge si vous l’avez
endommagé.
Vert et
jaune
Bleu
Marron
Fixation
du cordon
34
E
L
13 AMP
N

DIRECTIVES D’INSTALLA TION DE LA CONDUITE D’EAU
35
(suite à la page suivante)
INSTALLEZ LE ROBINET D’ARRÊT SUR LA
CONDUITE D’EAU POTABLE FRÉQUEMMENT
UTILISÉE LA PLUS PROCHE.
Raccordements usuels à la conduite d’eau
principale
a. Choisissez pour le robinet un emplacement
facilement accessible. Il est préférable de
l’installer sur le côté d’une conduite d’eau froide
verticale. Si vous devez le raccorder à une
conduite d’eau horizontale, effectuez le
raccordement sur le dessus ou le côté de la
conduite pour éviter la chute de sédiments
provenant de la conduite d’eau.
b. Percez un trou de 1/4 de pouce dans la conduite
d’eau, à l’aide d’un foret affûté. Enlevez les bavures
produites lors du perçage de la conduite. (Ne
percez pas de trou si le robinet est autotaraudeur.)
c. Fixez le robinet d’arrêt
à la conduite d’eau froide
à l’aide d’une bride.
2
ATTENTION :
• Si vous utilisez votre réfrigérateur avant que la
conduite d’eau soit raccordée, assurez-vous que le
bras régulateur de la fabrique de glace est à la
position STOP (ARRÊT—relevé).
• N’installez pas le tuyau de la fabrique de glace
dans un endroit où la température descendra en
dessous de zéro.
• Lorsque vous utilisez un appareil électrique
(comme une perceuse) lors de l’installation,
assurez-vous qu’il est isolé ou câblé de façon à
éviter tout risque de chocs électriques.
• Toutes les installations doivent être conformes
aux exigences du code de plomberie local en vigueur.
RENSEIGNEMENTS SUR LA GARANTIE
L’installation de cette conduite d’eau n’est
pas garantie par le fabricant de la fabrique
de glace ou du réfrigérateur. Veuillez suivre
ces directives attentivement afin de réduire
au minimum les risques de dommages
coûteux causés par l’eau.
• Si votre conduite d’eau est dotée d’un raccord
évasé à une extrémité, vous aurez besoin d’un
adaptateur (vendu dans toutes les bonnes
quincailleries) pour raccorder la conduite d’eau
au réfrigérateur OU vous pouvez couper le
raccord évasé à l’aide d’un coupe-tubes et ensuite
utiliser un raccord à compression.
MATÉRIEL NÉCESSAIRE
• La fabrique de glace automatique nécessite une
conduite d’eau froide. La pression de l’eau doit
varier entre 1,4 et 8,3 bars.
• Perceuse électrique, à moins que vous ayez un
robinet autotaraudeur.
• Tuyau de cuivre de 1/4 de pouce de diamètre
extérieur pour raccorder le réfrigérateur à la
conduite d’eau. Assurez-vous que les extrémités du
tuyau et de la conduite sont coupées à angle droit.
Pour calculer la longueur de tuyau de cuivre
nécessaire, mesurez la distance entre l’électrovanne
à l’arrière du réfrigérateur et la conduite d’eau.
Ajoutez ensuite 244 cm. Assurez-vous que la
longueur de tuyau supplémentaire est suffisante
(environ 244 cm de tuyau enroulé pour former
trois boucles d’environ 25 cm de diamètre) pour
que vous puissiez éloigner le réfrigérateur du mur
après l’installation. N’utilisez pas de tuyau ou de
raccord en plastique car la conduite d’eau est
constamment sous pression. De plus, certains types
de tuyau de plastique peuvent casser et fendiller
avec le temps, provoquant des fuites d’eau.
• Robinet d’arrêt pour installation sur la conduite
d’eau froide. Le robinet d’arrêt doit être doté d’un
orifice d’entrée d’au moins 5/32 de pouce de
diamètre intérieur au point de raccordement avec
la CONDUITE D’EAU FROIDE. Bon nombre
d’ensembles de raccordement comprennent des
robinets d’arrêt à brides. Avant d’en faire l’achat,
assurez-vous que l’installation d’un robinet à
brides est conforme avec le code de plomberie en
vigueur dans votre région.
• Deux écrous à compression de 1/4 de pouce de
diamètre extérieur et deux douilles de
raccordement—pour raccorder le tuyau de cuivre au
robinet d’arrêt et à l’électrovanne du réfrigérateur.
FERMEZ LE ROBINET DE LA CONDUITE
D’EAU PRINCIPALE.
Ouvrez le robinet le plus près pour permettre à la
conduite d’eau de se vider.
1
À la conduite
d’eau froide
sous l’évier
À travers le mur, à
la conduite d’eau
froide de la salle
de lavage
Dans le vide
sanitaire sous
la maison
À travers le
plancher, à la
conduite d’eau
du sous-sol

DIRECTIVES D’INSTALLA TION DE LA CONDUITE D’EAU
(suite)
36
d. Serrez les vis de
la bride jusqu’à ce que
la rondelle d’étanchéité
commence à «gonfler».
Ne serrez pas de façon
excessive afin de ne
pas écraser le tuyau de
cuivre.
Nous recommandons d’installer un filtre à eau
(vendu dans les Centres de pièces et au Service
après-vente) si votre eau contient du sable ou des
particules qui pourraient obstruer la rondelle-filtre
de l’électrovanne du réfrigérateur.
Installez ce filtre
sur la conduite
d’eau, à proximité
du réfrigérateur.
a. Retirez le
capuchon en
plastique souple
du raccord du
réfrigérateur.
b. Installez l’écrou
à compression et la
douille de raccordement
à l’extrémité du tuyau, comme illustré.
c. Insérez l’extrémité du tuyau de cuivre le plus
loin possible dans le raccord du réfrigérateur.
Serrez le raccord tout en tenant le tuyau.
d. Insérez le tuyau de cuivre dans la fixation
fournie pour le maintenir en place. Il peut être
nécessaire d’ouvrir légèrement la fixation.
PLACEZ LE TUYAU DE CUIVRE ENTRE LA
CONDUITE D’EAU FROIDE ET LE RÉFRIGÉRATEUR.
Faites passer le tuyau par un trou percé dans le
plancher ou le mur (derrière le réfrigérateur ou à
proximité de l’armoire) le plus près possible du
mur. Assurez-vous que la longueur de tuyau
supplémentaire est suffisante (environ 244 cm
formant 3 boucles d’environ 25 cm de diamètre)
pour que vous puissiez éloigner le réfrigérateur du
mur après l’installation.
3
OUVREZ LE ROBINET D’ARRÊT DE LA
CONDUITE D’EAU PRINCIPALE.
Serrez tous les raccords qui fuient.
7
REPLACEZ LE RÉFRIGÉRATEUR PRÈS DU MUR.
Disposez les boucles de tuyau de cuivre de façon
qu’elles ne vibrent pas contre l’arrière du
réfrigérateur ou le mur.
10
PLACEZ LE BRAS RÉGULATEUR DE LA FABRIQUE
DE GLACE À LA POSITION ON (MARCHE—ABAISSÉ).
La fabrique de glace ne se met en marche que
lorsqu’elle atteint une température de
fonctionnement de -9 °C ou moins. Lorsque le
bras régulateur est à la position ON (MARCHE—
abaissé), la fabrique de glace se met
automatiquement en marche. REMARQUE :
Lorsqu’elle se met en marche pour la première
fois, la fabrique de glace peut effectuer un double
cycle, ce qui provoquera l’écoulement d’un peu
d’eau dans le bac à glaçons. Cette situation est
normale et ne devrait pas se reproduire. Jetez les
premiers lots de glaçons afin d’éliminer les
impuretés résiduelles de la conduite d’eau.
9
BRANCHEZ LE CORDON D’ALIMENTATION DU
RÉFRIGÉRATEUR DANS UNE PRISE DE COURANT
MISE À LA TERRE.
8
RACCORDEZ LE TUYAU DE CUIVRE AU
ROBINET D’ARRÊT.
Installez l’écrou à
compression et la douille
de raccordement à
l’extrémité du tuyau et
raccordez-le au robinet
d’arrêt. Assurez-vous
que le tuyau est bien
inséré à l’intérieur du
robinet. Serrez
solidement l’écrou à
compression.
4
OUVREZ LE ROBINET ET RINCEZ LE TUYAU.
a. Ouvrez le robinet de la conduite d’eau principale
et rincez le tuyau jusqu’à ce que l’eau soit propre.
b. Coupez l’eau au niveau de l’électrovanne après
avoir fait couler par le tuyau environ un litre (un
quart de gallon) d’eau.
5
RACCORDEZ LE TUYAU DE CUIVRE AU
RÉFRIGÉRATEUR.
Avant d’effectuer le raccordement au
réfrigérateur, assurez-vous que le cordon
d’alimentation de l’appareil n’est pas
branché dans la prise de courant.
6
Robinet
d’arrêt à
brides
Écrou
de serrage
Orifice de
sortie
Écrou à
compression
Douille de
raccordement
Bride
Robinet
d’arrêt à
brides
Rondelle
Orifice
d’entrée
Conduite
d’eau froide
verticale
Douille de
raccordement
Tuyau de cuivre de 1/4
de pouce
Écrou à
compression
de 1/4 de
pouce
Fixation
du tuyau
Raccord du réfrigérateur

INVERSION DE L’OUVERTURE DES POR TES
37
REMARQUE : LES PORTES SUR LES
MODÈLES DOTÉS D’UN DISTRIBUTEUR
DE GLAÇONS NE SONT PAS
RÉVERSIBLES
Lorsque vous inversez le sens d’ouverture des
portes :
• Veuillez lire toutes les directives avant de
commencer.
• Manipulez les pièces avec soin pour éviter
d’égratigner la peinture.
• Placez les vis à côté de leur pièce afin d’éviter
de les visser aux mauvais endroits.
• Prévoyez une surface de travail douce afin de ne
pas égratigner les portes.
ENLÈVEMENT DE LA PORTE DU
COMPARTIMENT DES ALIMENTS SURGELÉS
a. Maintenez la porte fermée à l’aide de
ruban-cache.
b. Avec un tournevis Phillips,
enlevez le protège-charnière
(sur certains modèles). À
l’aide du tournevis Torx,
retirez les 2 vis Torx qui
retiennent la charnière
supérieure à la carrosserie.
c. Soulevez la charnière vers
le haut pour dégager l’axe de
charnière de la douille située
sur le dessus de la porte.
d. Enlevez le ruban-cache. Éloignez la porte
de la carrosserie en l’inclinant, puis soulevez-
la pour dégager sa douille inférieure de l’axe de
charnière situé sur le support de charnière
centrale.
e. Couchez la porte sur sa contre-porte, sur
une surface douce pour ne pas l’égratigner.
2
IMPORTANT : Après avoir commencé, ne
déplacez pas l’appareil tant que l’opération
n’est pas terminée.
Ces directives s’appliquent au transfert des
charnières du côté droit au côté gauche.
Si jamais vous désirez retransférer les charnières
du côté gauche, suivez les mêmes directives—
en remplaçant seulement le mot «gauche» par le
mot «droit».
ENLÈVEMENT DE LA PORTE DU
RÉFRIGÉRATEUR
a. Maintenez la porte
fermée à l’aide de
ruban-cache.
b. Retirez l’axe de
charnière à l’aide d’une
clé à cliquet et d’une
douille de 3/8 de pouce.
c. Enlevez le rubancache. Éloignez la
porte de la
carrosserie en
l’inclinant. Retirez et
mettez de côté la
rondelle qui se trouve
sur l’axe de charnière.
d. Soulevez la porte et
tirez-la vers vous pour
dégager sa douille inférieure
de l’axe de charnière inférieure.
3
OUTILLAGE NÉCESSAIRE
• Tournevis Phillips
• Ruban-cache
• Tournevis Torx T20 ou T25, suivant votre
modèle de réfrigérateur
• Couteau à mastic ou tournevis à embout plat
• Clé à cliquet et douille hexagonale de 3/8 de
pouce
GÉNÉRALITÉS
a. Débranchez le réfrigérateur de sa prise de
courant.
b. Videz tous les balconnets de porte, y
compris le compartiment à produits laitiers.
ATTENTION : Ne laissez pas tomber les
portes sur le plancher. Cela pourrait
endommager les butées de porte.
1
POUR ENLEVER LES PORTES
Rondelle en
plastique
Axe de
charnière
Support de
charnière
centrale
Porte du réfrigérateur
(suite à la page suivante)

38
INVERSION DE L’OUVERTURE DES POR TES
(suite)
TRANSFERT DU SUPPORT DE CHARNIÈRE
INFÉRIEURE À GAUCHE.
a. Retirez la grille inférieure. Saisissez-la par le
bas et tirez-la vers vous.
b. À l’aide d’un tournevis Torx, enlevez le
support de charnière et la rondelle en plastique
du côté inférieur droit de l’appareil.
c. Réinstallez le support de charnière et la
rondelle en plastique sur le côté inférieur gauche
de l’appareil.
1
TRANSFERT DU SUPPORT DE CHARNIÈRE
CENTRALE À GAUCHE.
a. Retirez le support de charnière centrale en
enlevant les trois vis Torx.
REMARQUE : Gardez ces vis avec le support
de charnière. Elles sont plus longues et
seront utilisées pour installer la charnière
sur l’autre côté.
Sur certains modèles, pour pouvoir enlever les
vis, il faut d'abord retirer les capuchons de
couleur assortie installés sur les têtes de vis.
Enlevez les capuchons des têtes de vis à l'aide
d'une lame mince (par exemple la lame d'un
couteau à mastic). Pour ne pas égratigner la
peinture, recouvrez la lame de ruban gommé.
b. Retirez les trois vis Torx extérieures du milieu
du côté gauche de la carrosserie. Vissez-les
dans les trous percés du côté droit découverts
lors de l’étape (a) précédente.
Placez le support de charnière centrale vis-à-vis
des trous percés au milieu du côté gauche de la
carrosserie, insérez les trois vis que vous avez
retirées avec le support de charnière centrale
lors de l’étape (a) et serrez-les.
c. Réinstallez les capuchons en les plaçant sur
les têtes de vis et en appuyant fermement avec
votre doigt.
2
TRANSFERT DE LA CHARNIÈRE SUPÉRIEURE
À GAUCHE.
Intervertissez la charnière et les vis supérieures
droites avec les vis supérieures gauches de la
carrosserie. Ne serrez pas encore les vis qui
se trouvent du côté de la charnière.
3
TRANSFERT DES BUTÉES DES PORTES.
a. Transférez la butée métallique de chaque porte
du côté droit vers le côté gauche.
b. Transférez toutes les vis du côté gauche vers le
côté droit.
4
POUR TRANSFÉRER LES PIÈCES SUR
LA CARROSSERIE
Rondelle en plastique
Partie inférieure gauche
Partie inférieure droite
Rondelle en plastique

POUR TRANSFÉRER LES POIGNÉES DE PORTES
39
(suite à la page suivante)
TRANSFERT DE LA POIGNÉE DE PORTE
DU RÉFRIGÉRATEUR À DROITE.
Pour retirer la poignée…
• Enlevez l’embout en plaçant
sous le rebord la lame d’un
couteau à mastic. Enlevez
ensuite la vis.
• Retirez les deux vis qui
retiennent la poignée sur
le dessus de la porte.
Après avoir enlevé la
poignée…
• Retirez les petits
capuchons situées au
côté droit sur le dessus
de la porte et insérez-les
dans les trous des vis de
la poignée au côté
gauche.
• Enlevez le capuchon
grand installé dans le
trou du côté gauche de
la porte et insérez-le
dans le trou du côté
opposé.
• Transférez le bouton de la porte à l’autre côté.
Lorsque vous remettez la poignée en place…
• Fixez la poignée au côté droit de la porte en
insérant les vis sur le dessus de la poignée, et
sous l’embout de la
poignée
.
1
TRANSFERT DE LA POIGNÉE DE PORTE DU
COMPARTIMENT DES ALIMENTS SURGELÉS À
DROITE.
• Retirez la vis qui retient la poignée sur le dessus
de la porte ainsi que les deux vis qui la retiennent
sur le dessous.
• Enlevez la poignée.
• Retirez le capuchon situé au côté droit et insérezle dans le trou de vis de la poignée au côté gauche.
• Fixez la poignée sur le côté opposé en vous
servant des trous situés le plus près du bord de
la porte.
2
Capuchon grand
Bouton
Petits
capuchons
Les modèles à poignée longue possèdent
une goupille qui s’insère dans un trou à la
partie inférieure de la porte.
Trou
Embout de la
poignée
Goupille
Embout de
la poignée

INVERSION DE L’OUVERTURE DES POR TES
(suite)
40
a. Abaissez la douille de la porte du
réfrigérateur sur l’axe du support de charnière
inférieure. Assurez-vous que la rondelle est bien
en place.
b. Inclinez la porte vers la carrosserie et
poussez-la
doucement
sous le support
de charnière
centrale, puis
alignez-la avec le
trou percé dans
ce support.
c. Remettez l’axe
de charnière en
place à l’aide
d’une clé à cliquet
et d’une douille
de 3/8 de pouce,
de façon à ce qu’il
dépasse le trou
percé dans le
support de
charnière centrale
et pénètre dans la
douille qui se trouve sur le dessus
de la porte du réfrigérateur.
a. Abaissez la douille inférieure de la porte
du compartiment des aliments surgelés sur
l’axe de charnière centrale. Assurez-vous que la
rondelle est bien en place.
b. Inclinez la porte vers la carrosserie,
en soulevant l’axe de charnière supérieure de
façon à ce qu’il s’insère dans la douille
qui se trouve sur le dessus de la porte.
c. Serrez les vis de la charnière supérieure
en soutenant la porte du côté des poignées et en
vous assurant que les deux portes sont alignées
et que le jeu entre celles-ci est uniforme sur toute
la largeur.
POUR REMETTRE EN PLACE LA
PORTE DU RÉFRIGÉRATEUR
POUR REMETTRE EN PLACE LA PORTE DU
COMPARTIMENT DES ALIMENTS SURGELÉS
Rondelle en
plastique
Rondelle en
plastique
Axe de
charnière
Porte du réfrigérateur
Support de
charnière
centrale
Rondelle en
plastique
Axe de
charnière centrale

PROBLÈME CAUSE POSSIBLE
LE RÉFRIGÉRATEUR • Lorsque le moteur cesse de fonctionner pendant une trentaine de minutes, le cycle de
NE FONCTIONNE PAS dégivrage est peut-être en marche.
• La commande de température est réglée à «0».
• Si la lampe intérieure ne s’allume pas, le réfrigérateur n’est peut-être pas branché
dans la prise de courant.
• Si la fiche est bien branchée mais que le réfrigérateur ne fonctionne toujours pas,
branchez une lampe ou un petit appareil électroménager dans la prise de courant
pour vérifier s’il y a du courant (le disjoncteur ou le fusible peut avoir sauté).
LE MOTEUR FONCTIONNE • Les réfrigérateurs modernes étant plus grands, ainsi que leur compartiment des
PENDANT DE LONGUES aliments surgelés, leur moteur doit fonctionner plus longtemps.
PÉRIODES
• Si le réfrigérateur vient d’être installé, 24 heures sont habituellement nécessaires
pour qu’il refroidisse complètement.
• Une grande quantité d’aliments a été mise à refroidir ou à congeler.
• Temps chaud—ouverture fréquente des portes.
• Une porte est restée ouverte.
• Les commandes de température sont sur un réglage trop froid. Reportez-vous à la
section Commandes de température.
• La grille et le condenseur doivent être nettoyés. Reportez-vous à la section Entretien
et Nettoyage.
VOUS AVEZ DES QUESTIONS?
UTILISEZ CE GUIDE DE DÉPANNAGE
BRUITS DE FONCTIONNEMENT NORMAUX
Ces bruits sont normaux et imputables surtout au fonctionnement hautement efficace du réfrigérateur.
Fabrique de glace (sur certains modèles).
De temps en temps vous
entendrez des glaçons lorsqu’ils tombent dans le bac.
Ventilateur de l’évaporateur.
Vous entendrez peut-être de l’air envoyé dans
l’appareil par le ventilateur.
Évaporateur.
Le frigorigène qui circule dans l’évaporateur peut produire un
bruit de bouillonnement ou de gargouillement.
Élément de dégivrage.
Pendant les cycles de dégivrage, l’eau qui s’égoutte
sur l’élément de dégivrage peut produire un crépitement ou sifflement. Après
le dégivrage, un bruit de craquement peut se produire et l’évaporateur peut
produire un bruit de bouillonnement ou de gargouillement.
Commande
de température et minuterie de dégivrage. Ces pièces
peuvent produire un bruit lorsque le réfrigérateur se met en marche ou
s’arrête. La minuterie de dégivrage produit aussi un bruit similaire à celui
d’une pendule électrique.
Cuve en
plastique. Les bruits de craquement sont dûs à l’expansion de la
cuve en plastique.
Électrovanne
(sur les modèles dotés d’une fabrique de glace). La
fabrique de glace fera du bruit lorsqu’elle se remplit d’eau et lorsque l’eau
circule dans les tuyaux.
Plateau
de dégivrage. Vous entendrez peut-être de l’eau qui s’écoule dans le
plateau de dégivrage pendant le cycle de dégivrage.
Compresseur.
Les compresseurs modernes à rendement hautement efficace fonctionnent beaucoup plus
rapidement que les modèles anciens et peuvent produire un bourdonnement ou un bruit de pulsation.
Ventilateur
du condenseur. Vous entendrez peut-être de l’air envoyé au-dessus du condenseur par le ventilateur.
Suivant l’emplacement du réfrigérateur dans la cuisine, vous aurez peut-être
envie de mettre un tapis caoutchouté sous l’appareil pour réduire le bruit.
41
Inversion de l’ouverture des portes Guide de dépannage

GUIDE DE DÉPANNAGE
(suite)
42
PROBLÈME CAUSE POSSIBLE
VIBRATION OU • Le réfrigérateur n’est probablement pas posé solidement sur le sol et les vis des
BRUIT MÉTALLIQUE roulettes avant ou les pieds de nivellement doivent être réglés, ou le sol n’est pas
solide ou égal. Reportez-vous à la section Roulettes.
• Si les plats vibrent sur les clayettes, déplacez-les. Une légère vibration est normale.
LE MOTEUR DÉMARRE ET • La commande de température fait démarrer et arrêter le moteur pour maintenir
S'ARRÊTE FRÉQUEMMENT une température uniforme.
ALIMENTS DESSÉCHÉS • Les aliments ne sont pas couverts ou emballés de façon appropriée, ou leur
emballage n’est pas hermétique.
TEMPÉRATURE TROP • La commande de température n’a pas été réglée à une température assez froide.
ÉLEVÉE DANS LE Reportez-vous à la section Commandes de température.
COMPARTIMENT DES
• Temps chaud—ouverture fréquente des portes.
ALIMENTS SURGELÉS
• Porte laissée ouverte pendant trop longtemps.
OU LE RÉFRIGÉRATEUR
• Porte maintenue ouverte par un paquet, ou il y a un paquet qui bloque le conduit
d’air dans le compartiment des aliments surgelés.
GIVRE SUR LES ALIMENTS • La porte peut avoir été laissée entrouverte, ou un paquet l’empêche de fermer.
SURGELÉS
• Les portes sont ouvertes trop souvent ou pendant trop longtemps.
• Il est normal que du givre se forme à l’intérieur des paquets.
FABRIQUE DE GLACE • Le bras régulateur est à la position STOP (ARRÊT–relevé).
AUTOMATIQUE NE
• L’alimentation en eau est coupée ou non branchée.
FONCTIONNE PAS
• Le compartiment des aliments surgelés est trop chaud.
(sur certains modèles)
• Un amas de glaçons dans le bac à glaçons peut provoquer l’arrêt prématuré de la
fabrique de glace. Retirez le bac et nivelez les glaçons à la main.
GLAÇONS TROP PETITS • Le robinet d’arrêt reliant le réfrigérateur à la conduite d’eau peut être obstruée.
F ABRICATION LENTE • La porte peut avoir été laissée ouverte.
DES GLAÇONS
• Réglez la commande de température du compartiment des aliments surgelés à une
température plus froide.
ODEUR/SAVEUR • Le bac à glaçons doit être vidé et lavé. Jetez les vieux glaçons.
ANORMALE DES
• Des aliments non emballés hermétiquement dans le réfrigérateur et/ou le
GLAÇONS
compartiment des aliments surgelés peuvent avoir transmis leur odeur aux glaçons.
•
Nettoyez l’intérieur du réfrigérateur. Reportez-vous à la section Entretien et
Nettoyage.
CONDENSATION • Ceci n’est pas inhabituel pendant les périodes de forte humidité. Pour éviter la
SUR LA SURFACE DE rouille, essuyez la surface et assurez-vous que le commutateur d’économie d’énergie
L’APPAREIL ENTRE n’est pas réglé à gauche.
LES PORTES
• Réglez le commutateur d’économie d’énergie sur humidité.
DE LA CONDENSATION • Les portes sont ouvertes trop fréquemment ou pendant trop longtemps.
S’ACCUMULE À L’INTÉRIEUR
• Par temps humide, l’ouverture des portes apporte de l’humidité dans le réfrigérateur.
• Réglez le commutateur d’économie d’énergie sur humidité.

Guide de dépannage
43
PROBLÈME CAUSE POSSIBLE
ODEUR DANS LE • Les aliments à odeur forte doivent être emballés hermétiquement.
RÉFRIGÉRATEUR
• Vérifiez s’il n’y a pas d’aliments avariés.
• L’intérieur doit être nettoyé. Reportez-vous à la section Entretien et Nettoyage.
• Le système d’écoulement de l’eau de dégivrage doit être nettoyé.
• Gardez une boîte de bicarbonate de soude ouverte dans le réfrigérateur.
Remplacez-la tous les trois mois.
AIR CHAUD À LA BASE • Ce courant d’air est normal; il refroidit le moteur. Pendant le processus de réfrigération,
DU RÉFRIGÉRATEUR il est normal que de la chaleur soit expulsée à la base du réfrigérateur. Certains
revêtements de sol peuvent se décolorer sous l’effet de cette température de
fonctionnement normale qui ne présente aucun danger. Si vous voulez éviter cette
décoloration, consultez votre fournisseur de revêtements de sol.
CONGÉLATION D’ALIMENTS
• Éloignez les aliments du conduit d’air (près des commandes).
DANS LE RÉFRIGÉRATEUR
• Réglez la commande de température du réfrigérateur à une température
moins froide.
LUEUR ORANGE DANS • Une lueur orange brille parfois dans le compartiment des aliments surgelés pendant
LE COMPARTIMENT DES le dégivrage. C’est normal.
ALIMENTS SURGELÉS

44

Manual del usuario
GE Appliances
45
Medidas de seguridad...... 46, 47
Sugerencias e instrucciones
Accesorios .................................................... 50
Cajones .................................................. 50, 51
Compartimento del congelador.............. 51
Controles de temperatura ................. 47, 48
Equipo de accesorios para
la máquina de hacer hielo ..................... 52
Estanterías ............................................ 48, 49
Interruptor anti-humedad ......................... 47
Máquina de hacer hielo............................. 52
Cuidado y limpieza
Cambio de bombilla ................................... 54
Debajo del frigorífico ................................. 53
Detrás del frigorífico .................................. 53
Extracción de cajones y tapas.......... 53, 54
Limpieza—interior y exterior..................... 53
Solución de problemas.... 64–66
Ruidos normales de funcionamiento ..... 64
Preparación
Dimensiones ................................................ 55
Espacio libre ................................................. 55
Ruedas........................................................... 55
Suministro de agua .................................... 55
Vacaciones y mudanzas............................ 55
Instalación.................................. 56–63
Cambio del cable la red eléctrica .....47, 57
Características eléctricas .................. 56, 57
Gran Bretaña e Irlanda............................... 57
Instalación de una
clavija macho diferente ......................... 57
Instalación de la tubería del agua ... 58, 59
Cambiar el modo de
apertura de la puerta....................... 60–63
Puesta a tierra .............................................. 56
Números de modelo y de serie................ 46

AYUDENO AYUDARLE…
Lea este manual con detenimiento. Anote los números de modelo y de serie.
Queremos ayudarle a que el funcionamiento y cuidado de su nuevo
frigorífico sea el óptimo. Tenga este manual siempre a mano para su
consulta en caso de necesidad.
Si usted recibió el frigorífico con desperfectos…
Póngase inmediatamente en contacto con el concesionario
(o fabricante) donde haya adquirido el frigorífico.
Ahorre tiempo y dinero.
Antes de llamar al técnico…
Consulte la sección “Solución de problemas.” En ella se indican
problemas leves que usted mismo puede solucionar.
Los verá en una etiqueta situada en el lado izquierdo, hacia la parte
superior del compartimento de alimentos frescos.
Número de modelo
Número de serie
Haga constar los números de modelo y de serie en toda la
correspondencia concerniente a su frigorífico y también cuando
solicite asistencia técnica.
ADVERTENCIA—Cuando use este electrodoméstico
tenga siempre en cuenta las siguientes medidas básicas
de seguridad.
• Utilice este electrodoméstico con el único fin para el que se
ha fabricado, tal como se expliqua en el presente Manual
del usuario.
• Antes de usarlo, este frigorífico debe instalarse de acuerdo
con las Instrucciones de intalación. Ver las instrucciones
para ponerlo a tierra en la sección de Instalación.
ADVERTENCIA—Conectar sólo al suministro de
agua potable.
• No desenchufe nunca el frigorífico de un tirón. Al contrario,
sujete la clavija macho firmemente con los dedos y sáquela de
la toma de corriente con suavidad.
• Repare o renueve de inmediato todos los cables eléctricos que
se hayan deshilachado o que hayan sufrido algún desperfecto.
Absténgase de utilizar cables que presenten grietas o cortes, ya
sea en el cable o en el enchufe o clavija.
• Cuando mueva el frigorífico de la pared, tenga cuidado de
no pisar el cable eléctrico con las ruedas ni de causar
desperfectos.
• No permita que los niños se suban o se cuelguen de las
estanterías del frigorífico. Podrían causar serios desperfectos
al electrodoméstico y llegar a ocasionar daños personales.
• Si su frigorífico viejo sigue en su casa pero no lo
utiliza, asegúrese de desmontar las puertas. Esto
reducirá el riesgo de peligro para los niños.
• Una vez que el frigorífico esté en funcionamiento,
absténgase de tocar las superficies frías del compartimento
de alimentos congelados, sobre todo con las manos húmedas
o mojadas. La piel podría adherirse a estas superficies
extremadamente frías.
• Si su frigorífico tiene una máquina automática de hacer
hielo, evita el contacto con las piezas móviles del mecanismo
eyector o con el elemento calefactor que expulsa los cubitos.
No coloque los dedos o las manos en la máquina automática de
hacer hielo mientras el frigorífico esté enchufado.
• No vuelva a congelar alimentos congelados que hayan sido
totalmente descongelados. Los expertos en alimentación dicen:
“…Se pueden volver a congelar alimentos que hayan sido
previamente descongelados si aún contienen cristales de hielo o
si su temperatura es inferior a 4 °C.”
“…Las carnes picadas, aves de corral o pescado previamente
descongelados cuyo olor o color no sean óptimos, no deben
volver a congelarse ni tampoco consumirse. Los helados
descongelados deben tirarse a la basura. Si el olor o color de
algún alimento no fuera bueno, deshágase de él, pues su consumo
podría entrañar riesgos.”
“…Incluso la descongelación parcial y posterior recongelado
reducen la calidad nutritiva de los alimentos, en particular en
frutas, hortalizas y alimentos preparados. La calidad nutritiva
de las carnes rojas se ve menos afectada que la de muchos otros
alimentos. Consuma los alimentos recongelados lo más pronto
posible para preservar así, tanto como resulte posible, su
calidad nutritiva.”
• Desenchufe el frigorífico antes de proceder a su limpieza
o reparación. OBSERVACION: Recomendamos
encarecidamente que las reparaciones las realice un técnico
especializado.
• Desenchufe el frigorífico antes de cambiar una bombilla
fundida a fin de evitar tocar un filamento eléctrico cargado.
(La bombilla fundida podría romperse al cambiarla).
OBSERVACION: Al poner el control en la posición “0” no
se corta la electricidad del circuito de luces.
MEDIDAS IMPORTANTES DE SEGURIDAD
Lea todas las instrucciones antes de usar este electrodoméstico.
46

• No almacene ni utilice gasolina ni ningún otro vapor o
líquido inflamable en las proximidades de este u otro
electrodoméstico.
Cambio del cable de la red eléctrica
Si tuviera que cambiar el cable eléctrico del frigorífico por uno
nuevo, deberá emplear un cable especial que puede obtenerse en
el concesionario de su localidad. Si el usuario hubiera dañado el
cable o si se necesitara un cable más largo, este se cobrará.
CONSER VE ESTAS
INSTRUCCIONES
Medidas importantes de seguridad Controles de temperatura
CONTROLES DE TEMPERATURA
Alimentos frescos Alimentos congelados
Al principio ponga los dos
controles a “4.”
El control del compartimento
de alimentos frescos pone en
funcionamiento un regulador que
cambia la cantidad de aire frío
que va desde el compartimento
de alimentos congelados hacia
el compartimento de alimentos
frescos.
El control de los alimentos
congelados mantiene las
temperaturas de todo el
conservador. Si pone el control
de alimentos congelados a “0,”
el conservador para de enfriar en
ambas áreas—la de los alimentos
frescos y el compartimento de
alimentos congelados—pero la
corriente no se apaga.
Las bebidas efervescentes no se deben conservar en el compartimento
de alimentos congelados. Para congelar alimentos más rápido ponga el
control de los alimentos congelados en la posición “7.” Puesto que el
compresor funcionará a 100% del tiempo en esta posición, no se
olvide de poner de vuelta el control despues que los alimentos están
congelados.
Regulador
Aire frío del
compartimento
de alimentos
congelados
Vista de perfil
Regulador
(posición de máximo frío)
(posición de máximo calor)
Limites de temperatura ambiente Interruptor anti-humedad
Este frigorífico está diseñado para operar en temperaturas ambientes
especificadas por su Clase de temperatura la cual está marcada en la
chapita.
Clase de Símbolo Temperatura ambiente
temperatura
Máximo Mínimo
Templadoprolongado SN 32 °C 10 °C
Templado N 32 °C 16 °C
Subtropical ST 38 °C 18 °C
Tropical T 43 °C 18 °C
NOTA: La temperatura interna podría estar afectada por tales factores
como la ubicación del frigorífico, la temperatura ambiente y la
frecuencia de las aberturas de la puerta. Regule los mandos de
temperatura como requerido para compensar para estos factores.
El interruptor anti-humedad está localizado en el panel
de control de temperaturas. Para reducir la cantidad
de electricidad requerida para el funcionamiento del
frigorífico, ponga el interruptor a la izquierda.
Esto apaga la unidad que previene la formación
de humedad en el exterior del frigorífico o las
superficies al exterior y al interior.
Cuando esta unidad está apagada, se puede formar
humedad en el interior o el exterior del frigorífico, especialmente si el
tiempo es húmedo. Es más probable que la humedad sea alta en
verano, en las primeras horas de la mañana, y en casas donde no hay
aire acondicionado.
Después de un período largo de tiempo, la humedad que se forma en
la superficie del frigorífico puede causar el deterioro de la pintura. Es
importante que proteja el acabado de la pintura utilizando la cera
pulidora, tal como se describe en la sección de Cuidado y limpieza.
El costo de funcionamiento de la unidad de bajo voltaje es
aproximadamente el mismo que cuesta usar dos luces de noche.
Cuando usted ponga el interruptor anti-humedad a la derecha,
electricidad de bajo voltaje fluye por la unidad y calienta el exterior
del frigorífico y la parte superior del compartimento de alimentos
frescos. Bajo la mayoría de las condiciones, esto previene la
formación de humedad o de gotas de agua.
(continúa en la página siguiente)
47
7
4
1
7
0
6
5
4
3
2
1

CONTROLES DE TEMPERATURA
(continuación)
Botellero extraíble (en algunos modelos)
El botellero ha sido diseñado para
dar cabida a una botella y se adapta a
cualquier estantería.
Estantería extra para el compartimento de
alimentos congelados (en algunos modelos)
Algunos modelos tienen una
estantería extra para el
compartimento de alimentos
congelados que le permite usar
el espacio del congelador más
eficazmente.
48
Estanterías ajustables (en algunos modelos)
Las estanterías en los
compartimentos de alimentos
frescos y de alimentos
congelados son ajustables,
permitiéndole hacer el uso
más eficaz del espacio para
adaptarse a las necesidades
de almacenaje de comida de
su familia. Las estanterías de
acero en el compartimento
de alimentos congelados de
algunos modelos también
son ajustables.
Para sacar las estanterías: Incline la estantería hacia arriba por el
frente, luego levántela hacia arriba y hacia delante, sacándola de los
carriles en la pared trasera del conservador.
Para colocar las estanterías:
Elija la altura deseada de la
estantería. Levantando
ligeramente la parte de delante
de la estantería, enganche los
ganchos de arriba en los carriles
del fondo del gabinete. Luego
baje la parte de delante de la
estantería hasta que se coloque
en la posición correcta.
Las estanterías de vidrio
templado (en algunos modelos)
se ajustan de la misma forma.
ESTANTERIAS
2
Levante
hacia arriba
y hacia fuera
1
Incline hacia arriba
Enganche
el gancho
de arriba
Bájelo para
que encaje
en su lugar
1
2
Cómo comprobar la temperatura No necesita desongelarse
Para el compartimento de alimentos frescos haga la prueba de la
leche. Coloque un envase de leche en la estantería superior del
conservador de alimentos frescos. Examínelo al día siguiente. Si la
leche no está suficientemente fría o demasiado fría, reajuste los
controles de temperatura.
Para el compartimento de alimentos congelados haga la prueba
del helado. Coloque un envase de helado en el centro del
compartimento de alimentos congelados. Examínelo al día siguiente.
Si el helado está demasiado duro o demasiado blando, reajuste los
controles de temperatura.
Deje siempre que transcurran 24 horas para que el frigorífico
alcance la temperatura que usted haya fijado.
No tiene que descongelar ni el compartimento de alimentos
congelados ni el de los alimentos frescos. Aunque el diseño y
equipamiento del frigorífico hacen posible que se descongele
automáticamente, es normal que se forme algo de escarcha en los
paquetes.

Recipientes “Quick Store” (en algunos modelos)
49
Este recipiente removible hecho de
resina policarbonato Lexan, puede
colocarse en la puerta de los alimentos
frescos o en la del compartimento de
alimentos congelados. Ha sido
diseñado para que usted pueda
almacenar de manera conveniente
aquellos artículos que se usan
habitualmente pero que no encajan en
los recipientes portátiles, o para
aquellos artículos que va a utilizar en
seguida pero que requieren ser
cubiertos para evitar que se sequen.
Para abrir, empuje el picaporte
hacia arriba y tire la manilla del
recipiente hacia usted.
Para evitar dañar el
conservador, asegúrese que el
recipiente esté cerrado y
ajustado antes de cerrar la
puerta del conservador.
Para sacar el recipiente,
tire hacia arriba y sáquelo
de su lugar.
Para colocar la unidad “Quick Store”
en otro lugar, levante el contenedor del
recipiente hacia arriba y fuera de los
soportes de la puerta, póngalo en el
nuevo lugar deseado, situándolo en los
soportes de la puerta. No tiene que
sacar el recipiente del contenedor
cuando coloque la unidad “Quick Store”
en otro lugar.
Tire hacia
arriba
1
Tire hacia usted
Recipiente portátiles en las puertas (en algunos modelos)
Los recipientes portátiles ajustables
situados en las puertas de los alimentos
frescos y en las del compartimento de
alimentos congelados se pueden sacar
del conservador y llevar al lugar donde
vaya a preparar la comida.
Para sacar: Saque los recipientes
portátiles de los soportes tirando hacia
delante hasta que salgan completamente
de la puerta.
Para volver a poner: Elija la altura deseada de la estantería,
enganche los recipientes en los soportes de la puerta, y deslícelos
hacia dentro. Los recipientes portátiles encajarán en su lugar.
Los separadores ajustables
están diseñados para darle
flexibilidad de almacenaje en los
recipientes portátiles y en las
estanterías de la puerta de los
alimentos frescos. Artículos como
por ejemplo, salsas para aliñar
ensaladas, salsas para carne y
otros condimentos, pueden
mantenerse ahora seguros en la
puerta, previniendo que se
vuelquen, derramen o deslicen.
Coloque el dedo índice y el dedo medio en cualquier lado del
separador por el frente, y simplemente muévalo hacia delante y hacia
atrás para que se acomode a sus necesidades.
Separador
Sistema Quick Serve
TM
(en algunos modelos)
Se trata de las fuentes para cocinar,
servir y almacenar con tapaderas
durables transparentes que entran
en una rejilla de la puerta del
compartimento de alimentos frescos
o del compartimento del congelador.
Las fuentes se pueden sacar y volver a poner en la rejilla según
las necesidades y la rejilla se puede colocar en cualquier puerta
de la misma manera como los recipientes.
Los recipientes y sus tapas son idóneos para su uso en hornos
microondas, frigoríficos, congeladores y lavavajillas.
Los recipientes no deben usarse para preparar comidas de alto
contenido en grasa (panceta) o de alto contenido en azúcar (caramelos
y jarabes). Las elevadas temperaturas de la grasa y del azúcar pueden
hacer que se formen burbujas en el interior del recipiente.
PRECAUCION:
• Estos recipientes no deben usarse en hornos normales, cocinas
de guisar ni en parrillas, ya que dicho uso pudiera ser peligroso.
Recipiente “Quick Store”
Contenedor
del recipiente
“Quick Store”
Controles de temperatura Estanterías
2
QUICK S
1
Push up
2
Pull forward

ACCESORIOS
Cajita de condimentos Estante de bebidas
50
La cajita de condimentos guarda juntos
los contimentos frecuentemente usados.
Se encaje en el estante de puerta de su
frigorífico. Una asa práctica le permite
de llevar los condimentos fácilmente a
la mesa.
El estante de bebidas puede
contener doce latas de soda o dos
botellas de vino/agua (a lo largo).
Se puede quitar para limpiarlo.
CAJONES
Cajones para frutas y vegetales Cajón “Moist’n Fresh” (en algunos modelos)
Los cajones de almacenaje en el fondo del compartimento de los
alimentos frescos están diseñados para proveer los niveles altos de
humedad requeridos por la mayoría de los vegetales y los niveles
bajos de humedad requeridos por la mayoría de las frutas.
Cuando vuelva a colocar los cajones, empuje siempre completamente
hacia dentro.
El tiempo de almacenaje dependerá del tipo de alimento y de la
condición de éste cuando lo puso en los cajones.
El exceso de agua que puede acumularse en el fondo de los cajones
debería ser vaciado, y los cajones deberían ser secados.
Cajón “Cool ’n Fresh” (en algunos modelos)
Este cajón de refrigeración ha sido diseñado para proveer almacenaje
de baja humedad para alimentos tales como:
• Albaricoques • Fresas • Naranjas
• Calabaza • Mandarinas • Nectarinas
• Champiñones • Manzanas • Peras
• Frambuezas • Melocotones • Uvas
El cajón superior ha sido diseñado para mantener la frescura natural
de alimentos sin envolver tales como:
• Alcachofas • Espinacas • Rábanos
• Apio • Grosellas • Remolacha sin tallos
• Arándanos • Guisantes • Ruibarbo
• Cerezas • Lechuga • Tomate maduro
• Ciruelas • Maís • Verdura
• Espárragos • Perejil • Zanahorias
Como en todas las áreas de almacenamiento refrigeradas, se
rocomienda conservar en envoltorio aquellos alimentos que
despidan olor. Entre ellos:
• Brécol • Coles de bruselas • Chirivías
• Cebolletas • Coliflor • Nabos
• Col

51
Cajones ajustables a la humedad (en algunos modelos) Cajón para bocadillos (en algunos modelos)
Estos cajones tienen controles para
ajustar la humedad que le permiten
regular la cantidad de aire frío que
entra en los cajones.
Ponga el control completamente en la posición , y el
cajón proveerá la alta humedad recomendada para la mayoría de los
vegetales.
Ponga el control completamente en la posición para proveer
los niveles bajos de humedad recomendados para la mayoría de las frutas.
El cajón para bocadillos
removible puede sacarse y
llevarse al fregadero o al lugar de
preparación de la comida. Puede
volver a colocarlo, junto a la
estantería a la cual se adjunta, en
el departamento de alimentos
frescos según sea conveniente
para sus necesidades de almacenaje.
Cajón de carne con temperatura ajustable (en algunos modelos)
La carne fresca se conserva mejor en la parte más fría del conservador.
Cuando el cajón se coloca en los 6 primeros
espacios—empezando por arriba—del lado
izquierdo, y la palanca se pone en la posición ,
aire proveniente del compartimento de alimentos congelados es
forzado a moverse alrededor del cajón para mantenerlo muy frío.
Puede poner el cajón en cualquier otro lugar del conservador para
guardar artículos que no sean carnes frescas.
La palanca de control del regulador de temperatura variable le
permite regular la cantidad de aire frío alrededor del cajón.
Cuando la palanca está en la posición , el regulador que está
encima de la apertura del cajón está totalmente abierto para proveer el
máximo frío para guardar alimentos.
Cuando la palanca está en la posición , el regulador está totalmente
cerrado. Las temperaturas normales del conservador se mantendrán.
Puede seleccionar posiciones variables entre estos dos extremos.
COMPARTIMENTO DEL CONGELADOR
• Los alimentos para congelación no deberían de estar colocados en
contacto directo con los alimentos en almacenamiento.
• Para congelar alimentos más rápido ponga el control de los alimentos
congelados en la posición “7.” Puesto que el compresor funcionará a
100% del tiempo en esta posición, no se olvide de poner de vuelta el
control despues que los alimentos están congelados.
• No almacene los alimentos rápidamente congelados comercialmente
por más tiempo que el tiempo recomendado por los fabricantes de
alimentos.
• Si el suministro eléctrico del aparato está interrumpido por un largo
tiempo o si el sistema de refrigeración falla, no abra las puertas a
menos que sea absolutamente necesario. Cuando es necesario, cierre
las puertas tan rápido como posible para que los alimentos congelados
se quedan congelados por un tiempo tan largo como sea posible.
Las bebidas efervescentes no se deben conservar en
el compartimento de alimentos congelados.
Algunos productos tales como agua helada no deberían de ser
consumidos demasiado fríos.
Accesorios Cajones Compartimento del congelador

MAQUINA AUTOMATICA DE HACER HIELO
(en algunos modelos)
52
La máquina de hacer hielo producirá ocho cubitos por ciclo—
aproximadamente 100 cubitos en un período de 24 horas, dependiendo
de la temperatura del compartimento de alimentos congelados, de
la temperatura ambiente, del número de veces que abra la puerta y
otras condiciones.
Si su frigorífico se hace
funcionar antes que se
haya hecho la conexión del
agua a la máquina de hacer
hielo, mantenga la varilla de
contacto en la posición STOP
(PARADA—hacia arriba).
Después de instalar el
frigorífico, deje que el
compartimento de alimentos
congelados se enfríe durante
24 horas para alcanzar las
temperaturas necesarias
para hacer hielo.
Tire los primeros trozos de hielo.
Esto permitirá que se limpien las
impurezas en la corriente de agua.
Cuando el frigorífico haya
sido conectado al suministro de
agua, ponga la varilla de
contacto en la posición ON
(ACTIVADA—hacia abajo).
La fabricación de cubitos de hielo continuará hasta que la varilla de
contacto note que hay una acumulación suficiente de cubitos en el
recipiente de almacenaje, parando entonces la operación
temporalmente. Para utilizar al máximo el almacenaje de hielo, nivele
los cubitos almacenados con la mano ocasionalmente. Asegúrese de
que nada interfiera con el vaivén de la varilla de contacto.
La máquina de hacer hielo saca cubitos en grupos de ocho y es normal
que a veces varios cubitos se adhieran entre sí.
Ponga la varilla de contacto en la posición STOP
(PARADA—hacia arriba) cuando:
• el suministro de agua de su casa va a estar parado durante
unas horas.
• el recipiente de almacenaje de hielo va a ser sacado durante un
período de tiempo.
• se vaya de vacaciones—entonces también debe apagar la válvula de
suministro de agua del frigorífico.
• se sitúa el control de temperatura del compartimento de los
alimentos frescos en la posición “0.”
Si los cubitos de hielo no se usan frecuentemente, los cubitos viejos se
volverán obscuros y tendrán un gusto rancio. Vacíe el recipiente de
almacenaje de hielo periódicamente y límpielo en agua tibia. Asegúrese
que el recipiente de almacenaje se seque antes de volver a ponerlo—
sino los cubitos podrían pegarse a otras partes de la máquina de hielo.
Si ésta es su primera máquina de hacer hielo, oirá ruidos
ocasionales que le pueden resultar poco familiares. Son ruidos
normales de la máquina de hacer hielo y no le deberían preocupar.
Máquina de hacer hielo
Recipiente de
almacenaje
de hielo
Varilla de contacto en
posición STOP
(PARADA—hacia arriba)
Varilla de contacto en posición
ON (ACTIVADA—hacia abajo)
Equipo de suministro de agua Equipo de accesorios para hacer hielo
Un equipo que contiene tubos de cobre, válvulas de cierre, piezas de
unión y las instrucciones necesarias para conectar la máquina de hacer
hielo con el suministro de agua fría está a su disposición a costo extra.
Póngase en contacto con su distribuidor local y pida el equipo
apropiado dependiendo de cuantos tubos de cobre necesite. Consulte
el apartado Preparación.
Si su frigorífico no ha venido ya equipado con una máquina
automática de hacer hielo, usted puede obtener a costo extra un
equipo de accesorios para hacer hielo de su distribuidor local.
Controla la parte detrás de su frigorífico para el equipo de
accesorios para hacer hielo específico necesario para su modelo.

CUIDADO Y LIMPIEZA
Limpieza exterior
53
Los tiradores de la puerta pueden limpiarse con un paño
humedecido en una solución de agua y detergente suave para
lavavajillas. Séquelas con un paño suave. No use cera en los tiradores
de la puerta con acabado metálico.
Mantenga limpia la pintura exterior. Pase un paño limpio
humedecido en cera para electrodomésticos o en detergente líquido
para lavavajillas. Seque el frigorífico y sáquele brillo con un paño
suave limpio. No frote el frigorífico con un trapo sucio para trastes ni
con una toalla mojada. Pueden dejar un residuo que corroerá la
pintura. No use estropajos, limpiadores en polvo, lejía ni productos de
limpieza que contengan lejía ya que pueden dejar marcas y levantar la
pintura.
Proteja la pintura. El exterior del frigorífico tiene una capa
de pintura de alta calidad secada al fuego. Con el cuidado
adecuado, mantendrá su aspecto nuevo durante muchos años.
Aplique cera de cocina/electrodomésticos al estrenar el frigorífico
y con periodicidad semestral.
Limpieza interior
El interior de los compartimentos de alimentos frescos y del
compartimento de alimentos congelados debe limpiarse una vez al
año como mínimo. Desenchufe el frigorífico antes de proceder a su
limpieza. Si esto no fuera práctico, escurra bien la esponja o paño al
limpiar alrededor de interruptores, luces o mandos. Aplique cera de
electrodomésticos a la superficie interior entre las puertas.
Use una solución de agua caliente y bicarbonato sódico—15 ml de
bicarbonato sódico por cada litro de agua. Así limpiará y neutralizará
olores. Aclare bien con agua y seque con un paño. Evite limpiar los
entrepaños de vidrio fríos con agua caliente, ya que la extrema
diferencia de temperatura puede hacer que se quiebren.
Otras partes del frigorífico—incluyendo las juntas de las puertas, los
cajones para carnes y hortalizas, la cubitera y todas las piezas de
plástico—pueden limpiarse de la misma manera. Después de limpiar
las juntas de las puertas, aplique una capa de vaselina a las juntas por
el lado de las bisagras. Esto ayuda a evitar que las juntas se vuelvan
pegajosas y se deformen. Si las estanterías del compartimento de
alimentos congelados no corren bien después de limpiarlas,
lubríquelas con vaselina. No use productos de limpieza en polvo ni
otros limpiadores abrasivos.
Para prevenir malos olores, deje una caja abierta de bicarbonato
sódico al fondo de la estantería superior del conservador. Cambie la
caja cada tres meses. Se recomienda hacer lo mismo en el
compartimento de alimentos congelados.
Los platos y tapas del sistema “Quick Serve” pueden lavarse en un
lavavajillas automático o a mano con un detergente líquido y agua.
Puede sacar las manchas remojándolas en una solución de lejía y
agua—por cada parte de lejía con cloro, 3 partes de agua (las manchas
difíciles pueden requerir remojo). Utilice una esponja para restregar
para sacar manchas de quemaduras. No utilice polvos limpiadores u
otros productos de limpieza abrasivos.
No lave ninguna pieza de plástico del frigorífico en el
lavavajillas automático.
Debajo del frigorífico Detrás del frigorífico
Para un funcionamiento eficaz,
debe mantener la área de debajo del
frigorífico limpia. Gire el control de
temperatura a “0.”
Saque la rejilla de abajo. Barra o
aspire el polvo que sea accesible en
los espirales del condensador, luego
ponga el control en marcha de nuevo.
Para mejores resultados, utilice un
cepillo especialmente diseñado para
esto, el cual puede obtener en su
distribuidor local. Esta operación fácil
de limpieza debería hacerse
al menos una vez al año.
Es preciso tener cuidado al distanciar el frigorífico de la pared.
Podrían estropearse todo tipo de revestimientos de suelos, sobre todo
los que sean acolchados y los que tengan superficies con relieve.
El desplazamiento del frigorífico debe realizarse en línea recta tanto
para sacarle como para volver a meterle. Si le mueve de lado podría
estropear el revestimiento del suelo o el frigorífico.
Al volver a colocar el frigorífico en su posición original, asegúrese de
no pillar con las ruedas el cable de suministro eléctrico ni el tubo de
suministro de la máquina de hacer hielo. Consulte la sección Ruedas.
Limpie los espirales del
condensador al menos
una vez al año.
Extracción de cajones y tapas
Los cajones al fondo del compartimento de alimentos frescos se pararán
antes de que usted pueda sacarlos completamente; esto es para prevenir
que el contenido se derrame en el suelo. Estos cajones pueden sacarse
fácilmente, levantando los lados hacia arriba ligeramente, empujando a
su vez los cajones hasta pasada la parte donde está la “parada.”
Para sacar los cajones y sus cubiertas cuando el compartimento
de alimentos frescos no pueda ser abierto completamente, siga el
procedimiento que aplica a su modelo.
(continúa en la página siguiente)
Máquina automática de hacer hielo Cuidado y limpieza

CUIDADO Y LIMPIEZA
(continuación)
54
Dos cajones
(en algunos modelos)
1. Saque el cajón que está más
alejado de la puerta.
2. Saque el otro cajón.
En modelos con una estantería
de la puerta inferior que
bloquea el otro cajón, deslice
el otro cajón hacia el centro
y retírelo.
3. Saque la cubierta de cristal.
Ponga la mano por dentro,
empuje la parte de delante de la
cubierta de cristal hacia arriba y,
al mismo tiempo, estírela hacia
delante tanto como pueda.
Inclínela y sáquela.
4. Saque el marco del cajón.
(Siempre saque la cubierta de
cristal antes de sacar el marco
del cajón.)
Saque el marco de los soportes
levantándolo por cada lado y
por detrás, estire hacia delante,
inclínelo y sáquelo.
Para volver a colocar:
1. Baje el marco hasta que éste
descanse en los soportes a
cada lado y atrás.
2. Vuelva a colocar los cajones.
Si usted sacó el deslizador por
donde se pone el cajón, vuelva a
colocarlo con el extremo inclinado
en el frente.
a. Deslice un lado del cajón por el
deslizador.
b. Coloque el deslizador y el cajón
completamente hacia el lado de
la bisagra hasta que el otro lado
del cajón descanse sobre el marco.
c. Deslice el otro cajón hasta colocarlo en su lugar.
3. Vuelva a colocar la cubierta de cristal, empujando el extremo
trasero firmemente hacia la ranura del marco trasero y suavemente
bajando el frente hasta colocarlo en su lugar.
Marco
Deslizador del
cajón (extremo
inclinado)
Cambio de bombilla
En la parte de arriba del compartimento de alimentos frescos, que está
en la parte opuesta al panel de control de temperatura, encontrará una
bombilla y un enchufe.
Algunos modelos también tienen una bombilla y un enchufe en la
esquina izquierda de arriba del compartimento de alimentos
congelados, detrás de una pantalla removible de luz.
Para reemplazar cualiquiera bombilla, desenchufe el frigorífico, saque
la pantalla de luz tirando la pantalla hacia abajo al extremo donde se
encuentra la bombilla. Desenrosque la bombilla cuando esté fría, y
reemplácela con una bombilla de tamaño similar.
Al colocar de nuevo la
pantalla de luz, asegúrese
de que la oreja esté
situada en la guía del
soporte de la pantalla
de luz. A continuación,
haga girar la pantalla
hacia el fondo y hacia
arriba hasta que se
encaje en la posición
correcta.
Guía
Oreja

PREPARACION
Espacio libre
Se recomienda dejar suficiente espacio libre a fin de facilitar la
instalación, permitir la adecuada circulación de aire para las
conexiones eléctricas y de fontanería.
Laterales....................................................................19 mm
Parte superior.............................................................25 mm
Parte trasera...............................................................25 mm
Si el modelo 19, 22 ó 25 va a instalarse en contra de la pared, por el
lado de la bisagra, deje un espacio de 38 mm para que se pueda abrir
la puerta.
Suministro de agua para la máquina
de hacer hielo (en algunos modelos)
Si el frigorífico está equipado con una máquina de hacer hielo, o si
piensa incorporarla más adelante, tendrá que ir conectada a una
tubería de agua potable fría.
El distribuidor local tiene a la venta un juego de suministros que
incluye tubos de cobre, válvula de cierre, accesorios e instrucciones.
El tubo que llega a la máquina de hacer hielo proveniente del
suministro de agua fría debería ser lo suficientemente largo como para
permitir desplazar el frigorífico de la pared a varios cm de distancia:
aproximadamente un tubo de cobre de 1/4″ de unos 244 cm en tres
bobinas de un diámetro de 25 cm.
No utilice tubos de plástico, ya que la tubería de suministro lleva agua
a presión, constantemente.
Presión máxima de entrada de agua autorizada—8,3 barias.
Presión mínima de entrada de agua autorizada—1,4 barias.
La instalación de la máquina de hacer hielo debe realizarla un técnico
especializado.
Ruedas
Algunos modelos tienen ruedas ajustables que le permiten mover el
frigorífico de la pared para poder limpiar. Las ruedas deberían ser
puestas de tal forma que el frigorífico esté colocado firmemente en el
suelo y la parte de delante esté levantada lo suficiente
(aproximadamente 19 mm del suelo) para que las puertas puedan
cerrarse fácilmente cuando esté medio abierto.
Saque la rejilla de la base
cogiendo la parte del fondo de la
rejilla y estirándola hacia fuera.
Gire las dos ruedas de delante ajustando los
tornillos en dirección a las manillas del reloj
para levantar el frigorífico, y en dirección
contraria a las manillas del reloj para bajarlo.
Para reemplazar la rejilla de
la base, alinee los clips de la
parte trasera de la rejilla con las
aberturas en la placa de la base y
empuje la rejilla hacia delante
hasta que encaje en su lugar.
Preparándose para salir de vacaciones Cuando se cambie de casa
Para períodos cortos de vacaciones, retire los alimentos perecederos
y deje los mandos en sus posiciones normales. No obstante, si cree
que la temperatura ambiente va a descender por debajo de los 16 °C,
siga las mismas instrucciones que se ofrecen para períodos largos de
vacaciones.
Para períodos largos de vacaciones o ausencias prolongadas, corte el
suministro eléctrico que va al frigorífico, coloque el mando de alimentos
frescos en la posición “0” y limpie el interior con una solución de 15 ml
de bicarbonato sódico por cada litro de agua. Séquelo con un paño.
Para evitar olores, deje una caja abierta de bicarbonato sódico en el
frigorífico. Deje las puertas abiertas.
Desplace la varilla de contacto de la máquina de hacer hielo a la
posición STOP (PARADA—hacia arriba).
Desconecte el cable eléctrico de la toma de corriente de la pared,
saque todos los alimentos, limpie el interior y séquelo.
Sujete bien todas las piezas móviles—la rejilla, las estanterías y los
cajones—con cinta adhesiva. De ese modo no sufrirán desperfectos
con los movimientos.
Asegúrese de que el frigorífico permanezca siempre en posición
vertical durante la carga, desplazamiento y descarga. Sujete bien el
frigorífico en el camión de la mudanza para evitar que se mueva.
Proteja el exterior del frigorífico con una manta.
Dimensiones
Modelo 18 19 21 22 24 25
A* 163 cm 163 cm 168 cm 168 cm 170 cm 170 cm
B 75 cm 75 cm 79 cm 79 cm 87 cm 87 cm
C** 80 cm 83 cm 80 cm 83 cm 80 cm 83 cm
D 147 cm 147 cm 152 cm 152 cm 160 cm 160 cm
E 70 cm 70 cm 70 cm 70 cm 70 cm 70 cm
**La altura no incluye la bisagra—Añada 22 mm para la bisagra.
**La manija se incluye en la profundidad.
55
Cuidado y limpieza Preparación
A
B
C
E
D

INSTRUCCIONES PARA LA INST ALACION
IMPORTANTE…Leer detenidamente
56
Características eléctricas
El frigorífico siempre debe estar enchufado en su propia toma de
corriente individual. En la chapita del frigorífico se indican el voltaje
y frecuencia correctos. Son los recomendados para obtener un óptimo
rendimiento y para evitar sobrecargas en los circuitos eléctricos de la
casa, las cuales podrían provocar peligro de incendio si los cables se
calentaran en exceso.
El refrigerador se debe ubicar de forma que el enchufe
esté accesible.
ADVERTENCIA: COMO EVITAR ACCIDENTES
INFANTILES. AL DESHACERSE DE UN FRIGORIFICO O
CONGELADOR VIEJO, ASEGURESE DE QUE LA
CERRADURA QUEDE INSERVIBLE. DE SER POSIBLE,
DESMONTE LAS PUERTAS Y DESHAGASE DE ELLAS
POR SEPARADO. ABSTENGASE DE SUBIRSE ENCIMA
DEL ELECTRODOMESTICO, YA QUE NO HA SIDO
DISEÑADO PARA TAL USO Y PODRIA CAUSAR DAÑOS
PERSONALES O MATERIALES. NO PERMITA QUE LOS
NIÑOS JUEGUEN CON EL ELECTRODOMESTICO NI
CON LOS MANDOS DEL MISMO.
Cómo conectar el suministro eléctrico
Por razones de seguridad personal,
este electrodoméstico debe estar puesto
a tierra debidamente.
El cable eléctrico de este
electrodoméstico va equipado de
una clavija macho de puesta a
tierra que se corresponde con una
toma de corriente de pared normal,
también de puesta a tierra, para
minimizar la posibilidad de
descargas eléctricas.
Haga que un electricista verifique
la puesta a tierra de la toma de
corriente de la pared.
Si se descubre que la toma de corriente no está puesta a tierra, es
responsabilidad y obligación personales del usuario cambiar la
toma por otra que esté debidamente puesta a tierra.
Si la clavija no se adapta a la toma de corriente, puede acoplarse una
clavija distinta. IMPORTANTE: En algunos paises la reinstalación
de clavijas eléctricas y cables se permite sólo cuando el trabajo se
completa por un electricista.
Si el cable eléctrico sufriera algún desperfecto, llame al técnico para
que lo cambie, a fin de evitar riesgos.
Asegúrese de la
puesta a tierra
antes de usarlo.
Clavija de
puesta a tierra

INSTRUCCIONES PARA LA INST ALACION
PARA GRAN BRETAÑA E IRLANDA EXCLUSIVAMENTE
57
Instrucciones para la instalación
IMPORTANTE: Instalación de una clavija macho diferente
El color de los hilos del cable eléctrico corresponden al siguiente
esquema: Verde y amarillo: tierra, azul: neutro, marrón: cargado.
Si usted instala su propia clavija macho, los colores de estos alambres
puede que no correspondan con las marcas de identificación indicadas
en los bornes de la clavija. En tal caso, realice la siguiente operación:
1. Conecte el alambre verde y
amarillo (tierra) al borne de la
clavija que dice “E” con el
símbolo o color verde o verde y
amarillo.
2. Conecte el alambre azul (neutro)
al borne de la clavija que dice
“N” o de color negro.
3. Conecte el alambre marrón
(cargado) al borne que dice
“L” o de color rojo.
Con la clavija alternativa, un fusible 15A debe instalarse, ya sea en la
clavija o adaptador, o en la caja de fusibles principal. En caso de
cambiar un fusible en la clavija suministrada, debe instalarse un
fusible tipo 13A homologado por ASTA a BS1362.
Si la clavija está encapsulada, la tapa de fusibles debe reinstalarse
cuando se cambie el fusible. En caso de perder la tapa de fusibles, no
deberá usarse la clavija hasta haber obtenido e instalado otra tapa de
fusibles. Podrá obtener una nueva tapa de fusibles de su distribuidor
local. El color correcto de la nueva tapa de fusibles corresponde con
el de las marcas coloreadas o con el insertado en la base de la clavija.
Cambio del cable la red eléctrica
Si tuviera que cambiar el cable eléctrico del frigorífico por uno nuevo, deberá emplear
un cable especial que puede obtenerse del distribuidor local. Si el usuario hubiera dañado
el cable, se cobrará por el nuevo.
Características eléctricas
Recomendamos conectar este electrodoméstico a la red eléctrica por
medio de una caja combinada (un interruptor y una toma de corriente)
en una posición de fácil acceso. Todos los electrodomésticos tienen
una clavija macho. La clavija macho del frigorífico tiene un fusible
tipo 13A. Si las clavijas no se adaptan a las tomas de corriente, puede
acoplarse una clavija distinta. Corte la clavija que no sirve y tírela.
No la meta en ninguna toma de corriente de la casa ya que podría
producir una descarga eléctrica.
ADVERTENCIA: ESTE ELECTRODOMESTICO TIENE QUE
ESTAR PUESTO A TIERRA.
Verde
Amarillo
Azul
Marrón
Abrazadera
del cable
E
L
13 AMP
N

INSTALACION DE LA TUBERIA DEL AGUA
58
PRECAUCION:
• Si utiliza el frigorífico antes de conectar la
tubería del agua, asegúrese de que la varilla de
contacto de la máquina de hacer hielo permanezca
en la posición STOP (PARADA—hacia arriba).
• No instale el tubo de la máquina de hacer hielo
en sitios en que la temperatura podría bajar por
debajo de 0 °C.
• Cuando utilice un aparato eléctrico (como,
por ejemplo, un taladro eléctrico) durante la
instalación, asegúrese de que dicho aparato esté
eléctricamente aislado o que sus componentes
estén dispuestos de tal manera que no exista
peligro de producirse descargas eléctricas.
• Todas las instalaciones deben atenerse a la
normativa vigente en materia de obras de fontanería.
• Dos tuercas de compresión con diámetro
exterior de 1/4″ y dos férulas (mangas)—para
conectar el tubo de cobre a la llave de paso y la
válvula del agua del frigorífico.
• Si la tubería del agua existente tiene en el
extremo un empalme apestañado, para conectar
la tubería del agua al frigorífico se necesitará un
adaptador (que se compra en las tiendas de
abastecimientos de fontanería) O—podrá cortar
el empalme apestañado con un cortatubos, y
entonces usar un empalme de compresión.
INFORMACION SOBRE GARANTIA
Esta instalación de tubería del agua no está
garantizada ni por el fabricante del frigorífico
ni por el de la máquina de hacer hielo. Siga
estas instrucciones detenidamente para
minimizar el riesgo de producir daños
causados por acción del agua, los que
podrían resultar muy caros.
CORTE EL PASO DE AGUA DEL
ABASTECIMIENTO PRINCIPAL.
Abra el grifo más cercano durante el tiempo
suficiente para despejar la tubería del agua.
1
INSTALE LA LLAVE DE PASO EN LA
TUBERIA DE AGUA POTABLE DE USO FRECUENTE
MAS CERCANA.
a. Coloque la llave en un lugar que tenga fácil acceso
.
Lo mejor es colocarla en el lateral de un tubo
vertical. Si fuera necesario colocarla en un tubo
horizontal, haga la conexión en la parte superior o
lateral, en vez de en la inferior, para evitar la
extracción de sedimentos presentes en el tubo.
b. Haga un agujero de 1/4″ en el tubo con un
taladro, usando una broca bien afilada. Elimine las
asperezas que pudieran haberse producido al
hacer el agujero con el taladro. (No haga un
agujero si la llave es autopenetrante.)
2
QUE SE NECESITA
• Para el funcionamiento automático de la máquina
de hacer hielo es necesario abastecimiento de
agua fría. La presión del agua debe oscilar entre
1,4 y 8,3 barias.
• Perfore con taladro, a menos que usted tenga
una válvula autopenetrante.
• Para la conexión entre el frigorífico y el
abastecimiento de agua es necesario un tubo de
cobre de un diámetro exterior de 1/4″.
Asegúrese de que ambas puntas del tubo estén
cortadas a precisión.
Para determinar la cantidad de tubo de cobre que
necesita, mida la distancia desde la válvula del
agua detrás del frigorífico. Sume 244 cm.
Asegúrese de que la longitud del tubo sea
suficiente (unos 244 cm enroscado en 3 vueltas de
25 cm de diámetro) para permitir distanciar el
frigorífico de la pared después de la instalación.
No utilice tubos ni empalmes de plástico, ya que
la tubería del abastecimiento de agua se halla
siempre bajo presión. Además, ciertos tipos de
tubos de plástico podrían debilitarse con el tiempo
y agrietarse, ocasionando escapes de agua.
• Una llave de paso para conectarse a la tubería
del agua fría. La entrada de agua de dicha llave
habrá de tener un diámetro interior mínimo de
5/32″ en el punto de conexión a la TUBERIA DE
AGUA FRIA. En muchos de los juegos para el
abastecimiento de agua se incluyen llaves de paso
de tipo campana. Antes de comprarla, asegúrese
de que la llave de paso de tipo campana se ajusta a
las normas vigentes en materia de fontanería.
Formas típicas de conexión al
abastecimiento del agua
Debajo del
vertedero al tubo
de agua fría
Por la pared al
tubo de agua
fría de la sala
de servicio
En el sótano
de pequeña
altura debajo
de la casa
Por el piso al
tubo de agua
fría del sótano

59
c. Con la abrazadera de
tubo una la llave de paso
al tubo de agua fría.
d. Apriete los tornillos
de la abrazadera hasta
que la arandela obturadora
empiece a dilatarse. No sobreapriete
pues podría quebrar el tubo de cobre.
a. Retire el tapón de plástico de la válvula de agua.
b. Coloque la tuerca de
compresión y la férula
(manga)
en el
extremo del
tubo, tal como se
indica en la figura.
c. Introduzca el
extremo
del
tubo de cobre en
la entrada de la
válvula del agua
(lo máximo
posible). Apriete
el accesorio de
ajuste, al tiempo
que sujeta el tubo.
d. Sujete el tubo de cobre con la abrazadera que se
suministra, de modo que quede en posición vertical.
Es posible que tenga que abrir la abrazadera a palanca.
ABRA EL AGUA EN LA LLAVE DE PASO.
Apriete toda conexión en que haya escape de agua.
7
DESPLACE EL FRIGORIFICO NUEVAMENTE
CONTRA LA PARED.
Coloque las vueltas del tubo de cobre de modo
que éste no vibre contra la parte trasera del
frigorífico o contra la pared.
10
ENCHUFE EL CABLE ELECTRICO DEL
FRIGORIFICO EN UNA TOMA DE CORRIENTE
PUESTA A TIERRA.
8
COLOQUE LA VARILLA DE CONTACTO DE LA
MAQUINA DE HACER HIELO EN LA POSICION
“ON” (ACTIVADA—HACIA ABAJO).
La máquina de hacer hielo no entrará en funcionamiento
hasta que haya alcanzado su temperatura operativa
de -9 °C, o inferior. En dicho momento
entrará en
funcionamiento, siempre que se encuentre en la
posición ON (ACTIVADA—hacia abajo).
OBSERVACION: El frigorífico podría hacer un ciclo
doble al arrancar
por primera vez, ocasionando
cierto derrame de agua de la máquina para hacer
hielo a la cubitera. Las primeras tandas de hielo
deben tirarse a fin de eliminar las impurezas que
permanezcan en la tubería del agua.
9
HAGA PASAR EL TUBO DE COBRE ENTRE LA
TUBERIA DE AGUA FRIA Y EL FRIGORIFICO.
Haga pasar el tubo por un agujero hecho en el suelo
(detrás del frigorífico o del armario base adyacente)
lo más próximo posible a la pared. Asegúrese de
que la longitud del tubo sea suficiente (unos 244 cm
enroscado en 3 vueltas de 25 cm de diámetro) para
permitir distanciar el frigorífico de la pared después
de la instalación.
3
CONECTE EL TUBO DE COBRE A LA
LLAVE DE PASO.
Coloque la tuerca de
compresión y la férula
(manga) en el extremo
del tubo y
conéctelo a la
llave de paso.
Asegúrese
de que el tubo esté
totalmente
metido en la
llave. Apriete
bien la
tuerca de compresión.
4
ABRA EL AGUA Y ENJUAGUE EL TUBO.
a. Abra el abastecimiento principal del agua y deje
que corra por el interior del tubo hasta que el
agua salga clara.
b. Cierre el agua después de que haya pasado
por el tubo un litro (1 cuarto de galón),
aproximadamente.
5
CONECTE EL TUBO DE COBRE AL FRIGORIFICO.
Antes de efectuar la conexión al frigorífico,
asegúrese de que el cable eléctrico del
frigorífico no esté enchufado en la toma de
corriente de la pared.
Si su abastecimiento de agua contiene arena o
partículas que pudieran obstruir la criba de la
válvula del agua del frigorífico, recomendamos
que instale un filtro para agua (disponible a su
distribuidor local
).
Instálelo en el tubo de agua
cerca al frigorífico.
6
Abrazadera
del tubo
Llave de
paso
Arandela
Extremo
de entrada
Tubo de
agua fría
vertical
Llave
de paso
Tuerca de
presión
Válvula de salida
Tuerca de compresión
Férula
(manga)
Férula
(manga)
Tubería de
cobre de 1/4″
Tuerca de
compresión
de 1/4″
Abrazadera
del tubo
Conexión al frigorífico

CAMBIAR EL MODO DE APERTURA DE LA PUER TA
60
NOTA: Las puertas en modelos con
distribuidor no pueden cambiar su modo
de apertura.
Cuando cambie el modo de apertura de
la puerta:
• Lea las instrucciones por completo antes de
empezar.
• Maneje las partes con cuidado para evitar
rascar la pintura.
• Sitúe los tornillos cerca de las par tes
que correspondan para evitar utilizarlos en un
lugar incorrecto.
• Provea un lugar de trabajo apropiado para que
las puertas no se rasquen.
SAQUE LA PUERTA DEL COMPARTIMENTO DE
ALIMENTOS CONGELADOS.
a. Ponga cinta aislante alrededor de donde
se cierra la puerta.
b. Con un destornillador
Phillips, saque la cabeza de
la bisagra (en algunos
modelos). Con un
destornillador T20 o T25,
saque los tornillos que
aguantan la bisagra superior del
compartimento.
c. Levante la bisagra hacia
arriba para liberar la clavija de
la bisagra del encaje en la parte superior de
la puerta.
d. Saque la cinta aislante, incline la puerta
hacia usted y levántela para liberar el encaje
inferior de la clavija de la bisagra en el soporte
central de la bisagra.
e. Sitúe la puerta en una superficie
adecuada para que no se rasque, con la
parte exterior hacia arriba.
2
IMPORTANTE: Una vez haya empezado, no
mueva el cajón hasta que haya finalizado el
proceso de cambiar el modo de apertura de
la puerta.
Estas instrucciones son para cambiar las
bisagras del lado derecho al lado izquierdo.
Si usted quiere volver a poner las bisagras de
nuevo en el lado derecho, siga las mismas
instrucciones (simplemente cambie todas las
referencias a izquierda y derecha).
SAQUE LA PUERTA DE LOS ALIMENTOS FRESCOS.
a. Ponga cinta aislante
alrededor de donde se
cierra la puerta.
b. Saque la clavija de la
bisagra con un encaje de
3/8″ y trinquete.
c. Saque la cinta
aislante e incline la
puerta para sacarla del
compartimento. Saque la
arandela de la clavija de la
bisagra y guárdela.
d. Levante la puerta
hacia arriba para liberar el
encaje inferior de la clavija
de la bisagra en el soporte
inferior de la bisagra.
3
HERRAMIENTAS NECESARIAS
• Destornillador Phillips
• Cinta para cubrir (aislante)
• Destornillador T20 o T25, según el que necesite
su modelo
• Cuchillo de enmasillar o destornillador
de hoja delgada
• Encaje de 3/8″ y trinquete
(se recomienda un encaje de 6 salidas)
GENERAL
a. Desenchufe el frigorífico.
b. Vacíe las estanterías de las puertas,
incluyendo el compartimento de productos
lácteos.
PRECAUCION: No deje que ninguna de las
puertas se caiga al suelo. Si esto ocurriera el
freno de la puerta podría dañarse.
1
SAQUE LAS PUERTAS
Arandela
de plástico
Clavija
de la
bisagra
Soporte
central de
la bisagra
Puerta de los alimentos frescos

61
TRANSFIERA EL SOPORTE DE LA BISAGRA
INFERIOR A LA IZQUIERDA.
a. Saque la rejilla de la base. Cójala por el fondo y
tire hacia fuera.
b. Usando un destornillador T20 o T25, saque el
soporte de la bisagra y la arandela de plástico del
lado inferior derecho del compartimento.
c. Vuelva a instalar el soporte de la bisagra y la
arandela de plástico en el lado inferior izquierdo
del compartimento.
1
TRANSFIERA EL SOPORTE CENTRAL DE LA
BISAGRA A LA IZQUIERDA.
a. Saque el soporte de la bisagra de la parte
central derecha del compartimento sacando los
tres tornillos más exteriores.
NOTA: Guarde estos tornillos con el soporte
de la bisagra. Estos tornillos son más largos y
se usarán al instalar la bisagra del otro lado.
En algunos modelos, antes de quitar los
tornillos Ud. necesitará separar las tapas con
colores coordinantes de las cabezas de los
tornillos. Use el filo de una navaja plana para alzar
con suavidad las cabezas (una espátula también
pudiera desempeñar esta función). Cubra la navaja
con cinta adhesiva para no raspar la pintura.
b. Saque los tres tornillos más exteriores de la
parte central izquierda del compartimento.
Atorníllelos en los orificios del lado derecho
descubiertos en el Paso (a) arriba.
Ponga el soporte central de la bisagra en los orificios
en la parte central izquierda del compartimento,
inserte los tres tornillos que sacó con el soporte
central de la bisagra en el Paso (a) y apriételos.
c. Reemplace las tapas jalándolas sobre los
tornillos con sus dedos.
2
TRANSFIERA LA PARTE SUPERIOR DE LA
BISAGRA A LA IZQUIERDA.
Intercambie la bisagra y tornillos de la par te
superior derecha con los tornillos de la par te
superior izquierda del compartimento. No apriete
los tornillos a la bisagra en este momento.
3
TRANSFIERA LOS FRENOS DE LA PUERTA.
a. En cada puerta, saque los frenos de metal, y
cámbielos del extremo izquierdo al derecho.
b. Cambie los tornillos del extremo izquierdo
al derecho.
4
INVERTIR LA FERRETERIA
DEL COMPARTIMENTO
Arandela de plástico
Inferior izquierdo
Inferior derecho
Arandela de plástico
(continúa en la página siguiente)

CAMBIAR EL MODO DE APERTURA DE LA PUERT A
(continuación)
62
TRANSFIERA EL TIRADOR DE LA PUERTA DE
LOS ALIMENTOS FRESCOS A LA DERECHA.
Para sacar el tirador...
• Saque el taco del tirador
utilizando un cuchillo de
enmasillar por debajo del
extremo, y saque el tornillo
de debajo.
• Saque los dos tornillos
aguantando el tirador por la parte superior.
Después de haber
sacado el tirador...
• Saque los tacos
pequeños del extremo
derecho de la parte
superior de la puerta e
insértelos en los
orificios de los tornillos
del tirador en el lado
izquierdo.
• Saque el taco grande
del extremo izquierdo
de la puerta e insértelo
en el orificio de la parte
opuesta.
• Transfiera el medallón
de la puerta a la parte opuesta.
Cuando vuelva a instalar el tirador...
• Coloque el tirador en el lado derecho de la puerta
con los tornillos en la parte superior, debajo del
taco del tirador.
1
TRANSFIERA EL TIRADOR DE LA PUERTA DE
LOS ALIMENTOS CONGELADOS A LA DERECHA.
• Saque un tornillo aguantando la parte superior
de la puerta y los otros dos tornillos aguantando
el tirador en la parte inferior de la puerta.
• Saque el tirador.
• Saque el taco del extremo del lado derecho de
la puerta e insértelo en el orificio del tornillo del
tirador en el lado izquierdo.
• Ponga el tirador en el lado opuesto usando los
orificios más cercanos del borde de la puerta.
2
INVERTIR LOS TIRADORES DE LA PUERTA
Taco grande
Medallón
Tacos
pequeños
Los modelos con tiradores largos tienen
una clavija que se encaje en un orificio
en la parte inferior de la puerta.
Agujero
Taco del
tirador
Clavija
Taco del
tirador

63
a. Sitúe el encaje inferior de la puerta de los
alimentos frescos en la clavija del soporte
inferior de la bisagra. Asegúrese de que la
arandela esté en su lugar.
b. Incline la puerta hacia el compartimento y
empuje suavemente la puerta por debajo del
soporte central de la bisagra, y alinee con el
orificio en el soporte central de la bisagra.
c. Vuelva a
instalar la clavija
de la bisagra con
un encaje de 3/8″
y un trinquete para
que pase a través
del orificio de la
parte central del
soporte de la
bisagra y por el
encaje de la parte
superior de
la puerta de los
alimentos frescos.
a. Coloque el encaje de la puerta del
compartimento de alimentos congelados en
la clavija de la bisagra central. Asegúrese que la
arandela esté en su lugar.
b. Incline la puerta hacia el compartimento,
levantando la bisagra superior para que la
clavija cabe en el encaje de la parte superior
de la puerta.
c. Apriete los tornillos de la bisagra superior
después de haber aguantado la puerta por el
lado del tirador y haberla alineado, para que el
espacio entre las puertas sea el mismo en toda
la parte del frente.
Arandela de plástico
Arandela
de plástico
Clavija de
la bisagra
Puerta de los
alimentos frescos
Soporte
central de
la bisagra
Arandela de plástico
Clavija de la
bisagra central

PROBLEMA POSIBLE CAUSA
EL FRIGORIFICO NO ENTRA
• Quizás esté en el ciclo de descongelación, durante el cual el motor deja de
EN FUNCIONAMIENTO funcionar por espacio de unos 30 minutos.
• El mando de temperatura está en la posición “0.”
• Si la luz interior no está encendida, quizás el frigorífico no esté enchufado a la
toma de corriente.
• Si la clavija macho está bien metida y el frigorífico sigue sin funcionar, enchufe
una lámpara o un electrodoméstico pequeño en la misma toma de corriente para
comprobar si se ha disparado el interruptor automático o si se ha fundido un fusible.
EL MOTOR FUNCIONA
• Los frigoríficos modernos con mayor espacio de almacenamiento y compartimentos
DURANTE PERIODOS de alimentos congelados de mayor tamaño requieren más tiempo de funcionamiento.
PROLONGADOS
• Es normal después de recién instalado. Normalmente requiere 24 horas para
alcanzar la temperatura de enfriamiento.
• Gran cantidad de alimentos en el frigorífico para enfriar o congelar.
• El clima es caluroso; se abre la puerta con frecuencia.
• Se ha dejado la puerta abierta.
• Los mandos de temperatura se han fijado a un valor muy frío. Consulte las
instrucciones de uso de la selección de temperatura.
• Es necesario limpiar la rejilla y el condensador. Consulte la sección sobre
Cuidado y limpieza.
¿ALGUNA PREGUNTAS?
CONSULTE ESTAS SOLUCIONES
RUIDOS NORMALES DE FUNCIONAMIENTO
Estos ruidos son normales y causados por alta eficiencia.
Máquina de hacer hielo (en algunos modelos).
Oirá de vez en cuando los
cubos de hielo cayendo al recipiente.
Ventilador del evaporador.
Puede ser que oirá el aire forzado a través del
gabinete por el ventilador.
Evaporador.
El flujo de refrigerante a través del evaporador puede producir
un ruido her voroso o de burbujeo.
Calentador para descongelar.
Durante los ciclos de descongelamiento, el
goteo de agua que cae en el calentador para descongelar puede causar un
ruido silbante. Después del descongelamiento, un crujido se puede
producir y el evaporador puede producir un ruido hervoroso o de burbujeo.
Control de temperatura y control de tiempo de descongelamiento
. Estas
partes pueden producir un sonido al encenderse o apagarse el refrigerador.
El control de tiempo de descongelamiento produce también un sonido
similar al sonido de un reloj eléctrico.
Interior de plástico
. Crujidos o truenos causados por la expansión del
interior de plástico.
Válvula de agua
(en modelos equipados con máquina de hacer
hielo). Cuando la máquina de hacer hielo se llena de agua, se oirán un
zumbido y el flujo de agua.
Bandeja de desagüe
. Se puede oír agua que fluye a la bandeja de desagüe
en el ciclo de descongelamiento.
Compresor.
Los nuevos compresores de alta eficiencia funcionan mucho más rápido que los modelos
antiguos. El compresor puede producir un zumbido o ruido pulsante más alto.
Ventilador del condensador
. Puede ser que oirá el aire forzado sobre el condensador por el ventilador.
Dependiendo de la ubicación del refrigerador en la cocina, puede desear poner
un tapete con goma atrás debajo del refrigerador para reducir el ruido.
64

PROBLEMA POSIBLE CAUSA
EL MOTOR SE ENCIENDE Y • El control de temperatura enciende y apaga el motor para mantener
SE APAGA FRECUENTEMENTE
temperaturas uniformes.
VIBRACION O RUIDO • Si el frigorífico produce vibraciones, es más que probable que no descanse
firmemente en el suelo. Será necesario ajustar los tornillos de las ruedas delanteras
o las patas de nivelación delanteras. Quizás el suelo no sea resistente o uniforme.
Consulte el apartado Ruedas que figura en la página sobre Preparación.
• Si los platos o cazuelas vibran en las estanterías, intente moverlos. Es normal
una ligera vibración.
LOS ALIMENTOS SE RESECAN
• Los alimentos no están bien tapados, envueltos o en recipientes herméticos.
LA TEMPERATURA DEL • El mando de temperatura no está puesto a una temperatura suficientemente fría.
COMPARTIMENTO DE Consultar la sección Controles de la temperatura.
ALIMENTOS FRESCOS O DE
• El tiempo es caluroso; se abre la puerta con frecuencia.
ALIMENTOS CONGLELADOS
• Se ha dejado la puerta abierta largo rato.
ES DEMASIADO ELEVADA
• Quizás algún paquete impide que se cierre bien la puerta.
ESCARCHA DE HIELO EN • La puerta está entreabierta o algún paquete impide que se cierre bien la puerta.
LOS ALIMENTOS
• La puerta se abre con demasiada frecuencia o durante periodos demasiado largos.
CONGELADOS
• Es normal que haya escarcha en el interior del paquete.
LA MAQUINA AUTOMATICA
• La varilla de contacto está en la posición STOP (PARADA–hacia arriba).
DE HACER HIELO
• Se ha cortado o desconectado el suministro de agua.
NO FUNCIONA
• El compartimento de alimentos congelados está demasiado caliente.
(en algunos modelos)
• Los cubitos amontonados en la cubitera han hecho que la máquina de hielo se
detenga antes de tiempo. Ponga los cubitos a nivel.
LOS CUBITOS SON • La válvula de cierre del agua que conecta el frigorífico con el suministro de agua
DEMASIADO PEQUEÑOS de la casa puede estar atascada.
LOS CUBITOS SE HACEN • Quizás se haya dejado la puerta abierta.
MUY LENTAMENTE
• Baje la temperatura del congelador.
LOS CUBITOS SABEN • Necesita vaciar y limpiar la cubitera.
O HUELEN MAL
• Los paquetes no herméticos en el compartimento del conservador o del compartimento
de alimentos congelados pueden transmitir el mal sabor u olor a los cubitos.
• Limpie el interior del frigorífico. Consulte la sección Cuidado y limpieza.
FORMACION DE HUMEDAD • No es extraño en períodos de alta humedad. Para prevenir el moho, seque la
EN LA SUPERFICIE DE LOS superficie y asegúrese de que el interruptor anti-humidad no está
COMPARTIMENT OS ENTRE puesto en la posición anti-humedad.
LAS PUERTAS
• Ponga el control del interruptor anti-humidad en la posición humedad.
EL INTERIOR ESTA HUMEDO
• La puerta se abre con demasiada frecuencia o durante ratos demasiado largos.
• Cuando hay mucha humedad ambiental, el aire hace penetrar la humedad en el
frigorífico al abrirse la puerta.
• Ponga el control del interruptor anti-humidad en la posición humedad.
(continúa en la página siguiente)
65
Solución de problemas

PROBLEMA POSIBLE CAUSA
EL FRIGORIFICO HUELE • Los alimentos que despiden un fuerte olor deben estar bien tapados.
• Compruebe si algún alimento está en mal estado.
• Necesita limpiar el interior. Consulte la sección Cuidado y limpieza.
• Necesita limpiar el sistema de drenaje de agua de descongelación.
• Mantenga una caja abierta de bicarbonato sódico en el frigorífico. Cámbiela
cada tres meses.
SALE AIRE CALIENTE DE • La circulación de aire normal está enfriando el motor. En el proceso de
LA BASE DEL FRIGORIFICO refrigeración es normal que el calor sea expulsado por debajo del frigorífico.
Algunos suelos se decoloran a estas temperaturas normales y seguras. Consulte
con el vendedor de suelos si le preocupa la decoloración.
LA COMIDA SE CONGELA • Saque la comida de la zona donde está la rejilla de ventilación (cerca de
EN EL FRIGORIFICO los controles).
• Apague el control de los alimentos frescos.
UN BRILLO ANARANJADO • A veces aparece un brillo anaranjado en el compartimento de alimentos congelados
APARECE EN cuando el calefactor de descongelación está encendido. Eso es normal.
EL COMPARTIMENTO DE
ALIMENTOS CONGELADOS
SOLUCION DE PROBLEMAS
(continuación)
66

NOTAS
67
Solución de problemas

Part No. 162D7725P007
Pub No. 49-60034
This appliance conforms to the following EEC Directives:
Cet appareil ménager est conforme aux directives CEE suivantes :
Este electrodomestico se conforma con las siguientes instrucciones de la CEE:
Low Voltage Equipment
Appareils ménagers à bas voltage
Electrodomesticos de bajo voltaje
73/23/EEC
93/68/EEC
Electromagnetic Compatibility
Compatabilité électromagnétique
Compatibilidad electromagnética
89/336/EEC
92/31/EEC
93/68/EEC
Printed in the United States
Imprimé aux États-Unis
Impreso en los Estados Unidos
5-99 JR
 Loading...