

Page 1
How to M
the best from Mtf til
Dishwasher
Contents
»
Air friin
- —
Appliance Registration
C'are* anti r^lAantnr»
MA4V* V^AVUXAAAI^
China, Crystal, Sterling 10
Detergent, Detergent Guide 6, 7
dispenser L.ups
Door Latch
Jbnergy Saver
Energy-Saving Tips
Features
Loading
Model and Serial Numbers 2
Operating Guide 4, 5
Cycle Selection
Problem Solver
Repair Service
Rinse Agent
Safety Instructions
Warranty Back Cover
4,D
8,9
12-14
15
11
Use and Care of
2
built-in model
GSD400Y
2
4
5
6
Q,Si>
Q
Water Temperature
Winter Storage
® I ^FFbfhTe 4-22.-^^
6
11
ilillM
GsD #pi y
Ihiir Direct Line to General Eteciric
T-l
_____
iT'17' A
1 ne /^iswer 'L.eiaier
________________
ELECTilC
CPá Mft ¿T'^áT
P^S.
V?-53S’‘?
Page 2

Help US help you...
Energy-saviíig tips
Before using your dMiwusher? read this book carefully;
It is intended to help you operate
and maintain youir new dishwasher
properly.
Keep it handy for answers to your
questions,
If you don’t understand soinething
or need more help, write (inqlude
your phone numoer);
Consumer Affairs
GE Applianqes
Appliance Park
Louisville, KY 40225
Write down the model
and serial numbers.
You’ll find them on a label just
inside the dishwasher door,
These numbers are also on the
Consumer Product Ownership
Registration Card that came with
your dishwasher. Before sending in
this card, please write these
numbers here;
If received
a damaged dishwasher...
Immediately contact the dealer
(or builder) that sold you the
dishwasher,
8tm time und money,
Before yoa request
service... .
Check the Problem Solver (pages
12^14). It lists causes of minor
operating problems that you can
correct yourself.
To obtain Hispanic version of
this book, call
The GE Answer Center®
800426.2000
consumer information service.
Toll-free.
Para obtener la versión en
español de éste manual,
llame gratis a
The (GE Answer Center®
servicio de información
para el consumidor,
teléfono 800.626.2000.
The power consumption of your
dishwasher can be minimized if
you follow these suggestions:
• Operate dishwasher only when
full. Let dishes accumulate in
dishwasher. When you put in a
partial load, use RINSE ONLY
cycle to rinse off heavy soils. Be
sure to latch door when waiting for
full load. This helps keep soils
moist, easier to remove.
• If you don’t need your dishes
right away, use your ENERGY
SAVER no-heat feature that turns
the drying heater off automatically.
Dishes dry naturally over a longer
period such as overnight.
® Select cycle that uses least
amount of water to remove soil
from load. See pages 4 and 5.
Model Number
Serial Number
Use these numbers in any
correspondence or service calls
concerning your dishwasher.
Page 3

IMPOSTANT SAFETY INSTRUCTIONS
itead all instructions before using this appliance.
WARNING—When using this
appliance, always exercise basic
safety, precautions, including the
following:
о Use this appliance only for
its intended purpose, as you
wiU ñnd described in this Use
and Care Bock.
« This #shwasher must be
properly installed and located
In accordance with the
Installation Instructions before
it is used. If you did not receive
an Installation Instructions sheet
with your dishwasher, you can
obtain one by contacting the
service location nearest you.
—This appliance must be
connected to a grounded metal,
^^^rmanent wiring ¡^stem; or an
^^puipment-grounding conductor
must be run with the circuit
conductors and connected to the
equipment-grounding terminal
or lead of the appliance.
—Connect to a properly rated,
protected and sized power-supply
circuit to avoid electrical overload .
® Use only powder or liquid
detergents or wetting agents
recommended for use in a
dishwasher.
® Do not wash plastic items unless
marked “dishwasher safe” or the
equivalent. For plastic items not so
marked, check the manufacturer’s
recommendations.
® Load light plastic items so
they will not t^ome dislodged
and drop to the bottom of the
dishwasher—they might come
into contact with the heating
unit and be dainaged.
lb inmimlze the possibility of
Injury, .
• When loading items to be
washed:
A. Locate shaip items so that
they are not likely to damage
the door seal, and
B. Load sharp knives with the
handles up to reduce the risk
of cut-type injuries.
® Do not touch the heating
element during or immediately
after use.
® Do not operate your dishwasher
unless all enclosure panels are
properiy in place.
® Do not tamper with controls.
® Do not abuse, sit on, or stand
on the door or dish rack of the
dishwasher.
® Close supervision is necessary
if this appliance is used by or near
children. Do not allow children
to play inside, on or with this
appliance or any discarded
appliance. Dispose of discarded
appliances and shipping or
packing material properly.
Before discarding a dishwasher,
remove the door of the washing
compariment.
® Keep ail washing deteigeiits
and wetting ageius out of me
reach of children, pre^rably in
a locked cabinet. Observe all
warnings on container labels to
avoid personal injUiy.
«HYDROGjEi^GASis
produced fe' the chemical action
within yoiir wafor'heater, It can
accumulate in the water imter '
and/or water pipes if hot water
has not been used for a period of
two weeks or longer. HYDROGEN
GAS IS EXPLOSIVE. To prevent
the possibility of damage or
injury, if you have not used hot
water for two weefe or more, or
move into a residence in which
the hot water system may not
have been used for some time,
turn on all hot water feucets and
allow them to run for several
minutes before using any
electrical appliance which is
connected to the hot water
system. This will allow any
hydrogen gas to escape. Also,
since the gas is flammable, do
not smoke or use an open flame
or appliance during this process.
SAVE THESE
MSTOUCTIDNS
Шл
Page 4
Mow io ooorsiii^ '«/Olir rli«liw$ifihpr
--
---------------------------------
-----
y^
----------
----------
----------------
-------------
--
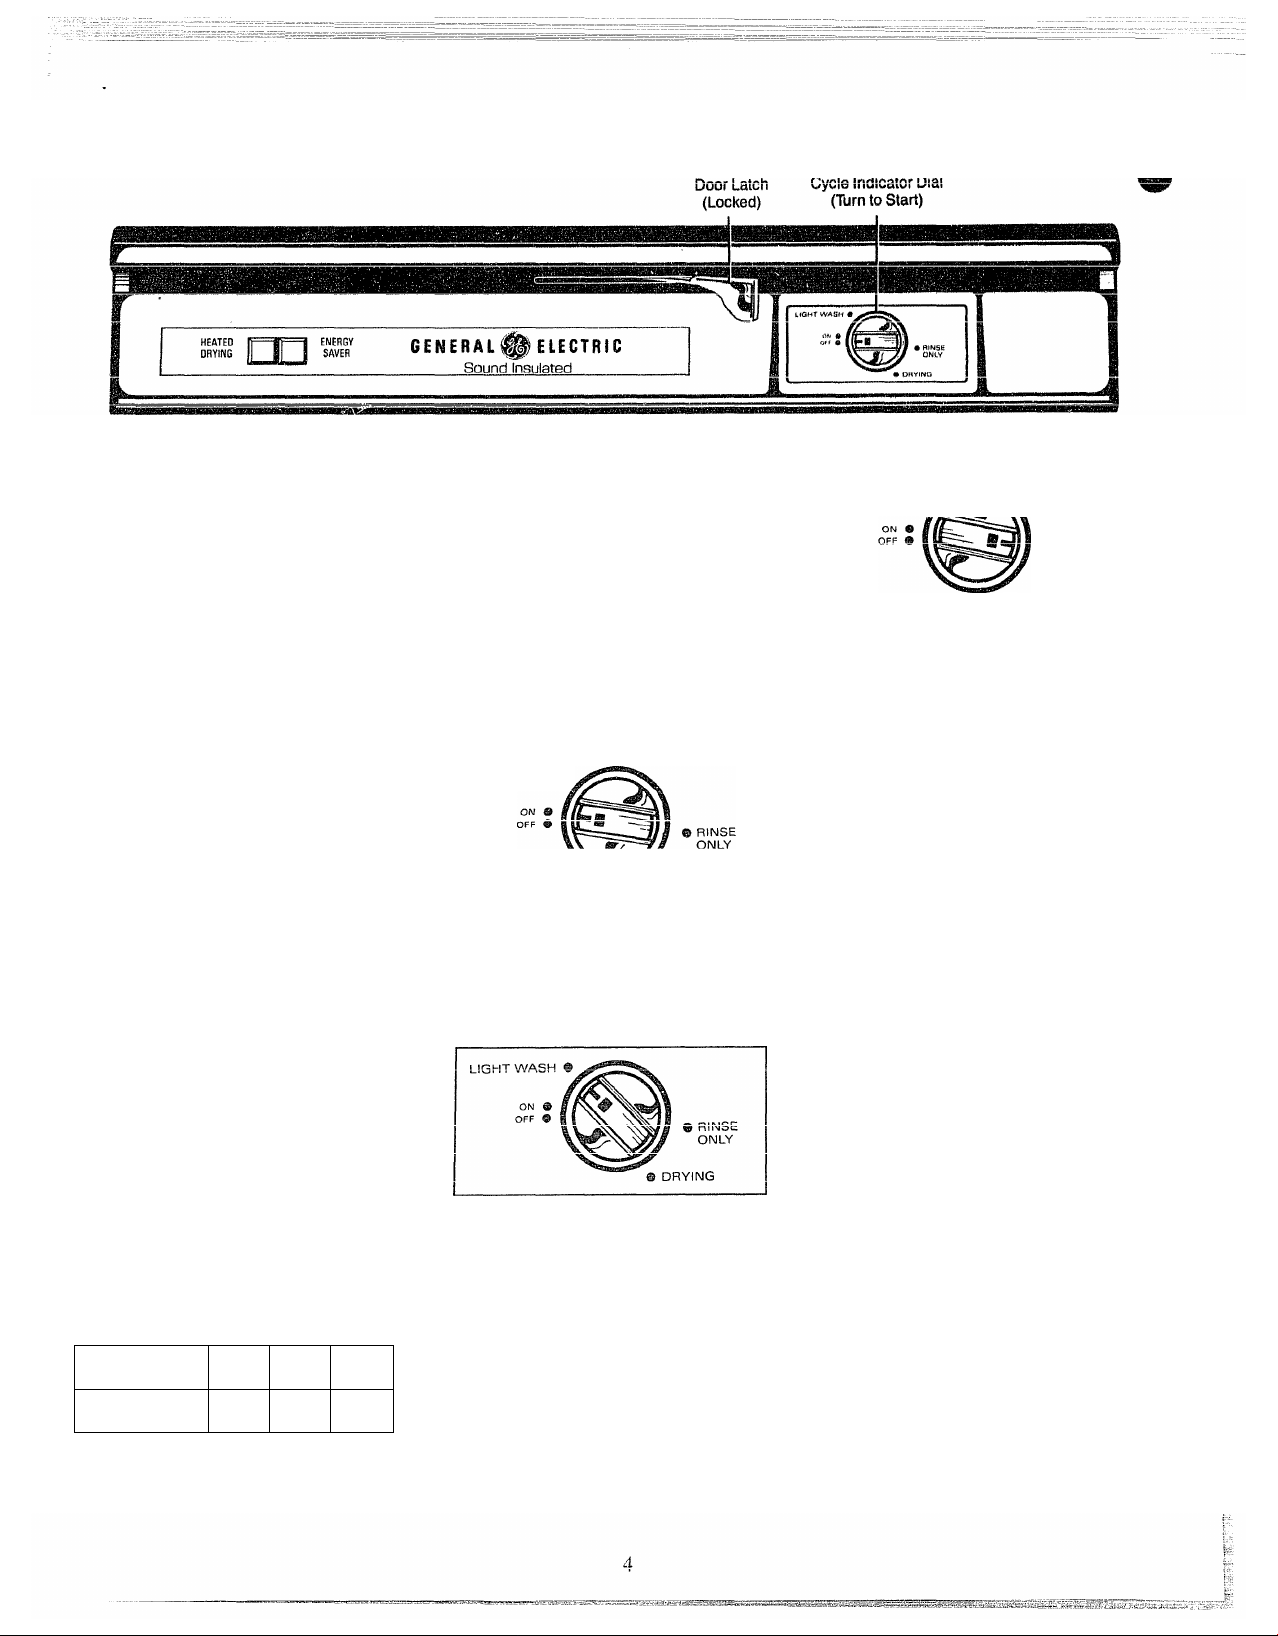
STEP 1. Load your dishwasher
with dishes, silverware, pots,
pans, bowls, etc. according to
instnictions on pages 8 and 9.
STEP 2, Add detergent to the
detergent dispenser. Make sure
Tnrlir'Cli'/Tr* Telili ic OT71h
UlVy XAlVXXVytlLWA J--^ACJ.A AkJ UV WA A
position before adding detergent.
(See pages 6 and 7.)
Use rinse aid agent to help prevent
spotting. (See page 6.)
STEP 3: Select Drvinn Ootion,
HEATED
DRYING
=1F
=i ENERGY
i SAVER
1
Amrinn r»n frtr filct Hrvina
VXXJTAJIA^ JIAWMVWA ASXA A«Ak/C> ^
ENERGY SAVER. Turns the
Ar\nr\cr hpatRT nfftn sflVi» finftrav
-
----------
----------------
--- ------
--------------------------cj.
Dishes dry naturally over a longer
period such as overnight.
If you need your dishes sooner,
open the dishwasher door after the
cycle is complete to reduce the
drying time.
Use of this option reduces the
electrical energy used by this
model approximately 9 % for
MrirmaJ /^vaIa
Estimated yearly savings, depending
on your local electrical rates, are:
STEP 4. Select the Cycle and start
dishwasher.
If your dishwasher drains into a
food waste disposer, operate the
disposer until It IS empty before
starting the dishwasher. (See Cycle
selection hints on next page.)
To obtain the benefits of a complete
cycle, be careful that you do not
turn the dial any further than
necessary to start the dishwasher.
® For NORMAL WASH cycle:
LIGHT WASH ®
DRYING
a= Latch the door.
K ClriMiHr fn-rn r^AfAlA TnHlAQtnr
C/. Aji LIAXAJt WAV' AAAVJ.AV'IAtV^JL
to ON position to start the cycle.
® For LIGHT WASH cycle:
a. Be sure door is unlatched.
b. Slowly turn Cycle Indicator Dial
to LIGHT WASH position.
c. Latch door to start the cycle.
For RINSE ONLY cycle;
LIG HT WA SH
RINSE
ONLY
nnviMri
a. Be sure door is unlatched.
b. Select ENERGY SAVER
drying option.
c. Slowly turn Cycle Indicator Dial
to RINSE ONLY position.
d. Latch the door to start the cycle.
1 Electric Rate
(per Kwh)
BStilTiatcd
Yearly Savings
$ .05
$6.25
$ .08
$10.00
$ .11
$13.75
Page 5
Cycle selection hints
X
f everyday dishes, glasses
m
and cookware.
LIGHT WASH~For dishes that
have been pre-rinsed before
loading. Also, for washing very
lightly soiled dishes with soils that
RINSE ONLY—For rinsing partial
loads which will be washed later.
Do not use detergent
What happens in each cycle
xr
___
?11 1- . .1 _1_!
® iou 11 near occasional cllciOng
sounds:
_
C/A-fi-
--
xvyv/vx VX10J^V/l>W1
action.
—Drain valve opening to pump
water out.
—Timer control as cycle
progresses.
—Detergent cup opening.
® The motor Stops during drying.
• Water vapor comes through the
vent by the door latch during
drying and when water is being
Dumoed out.
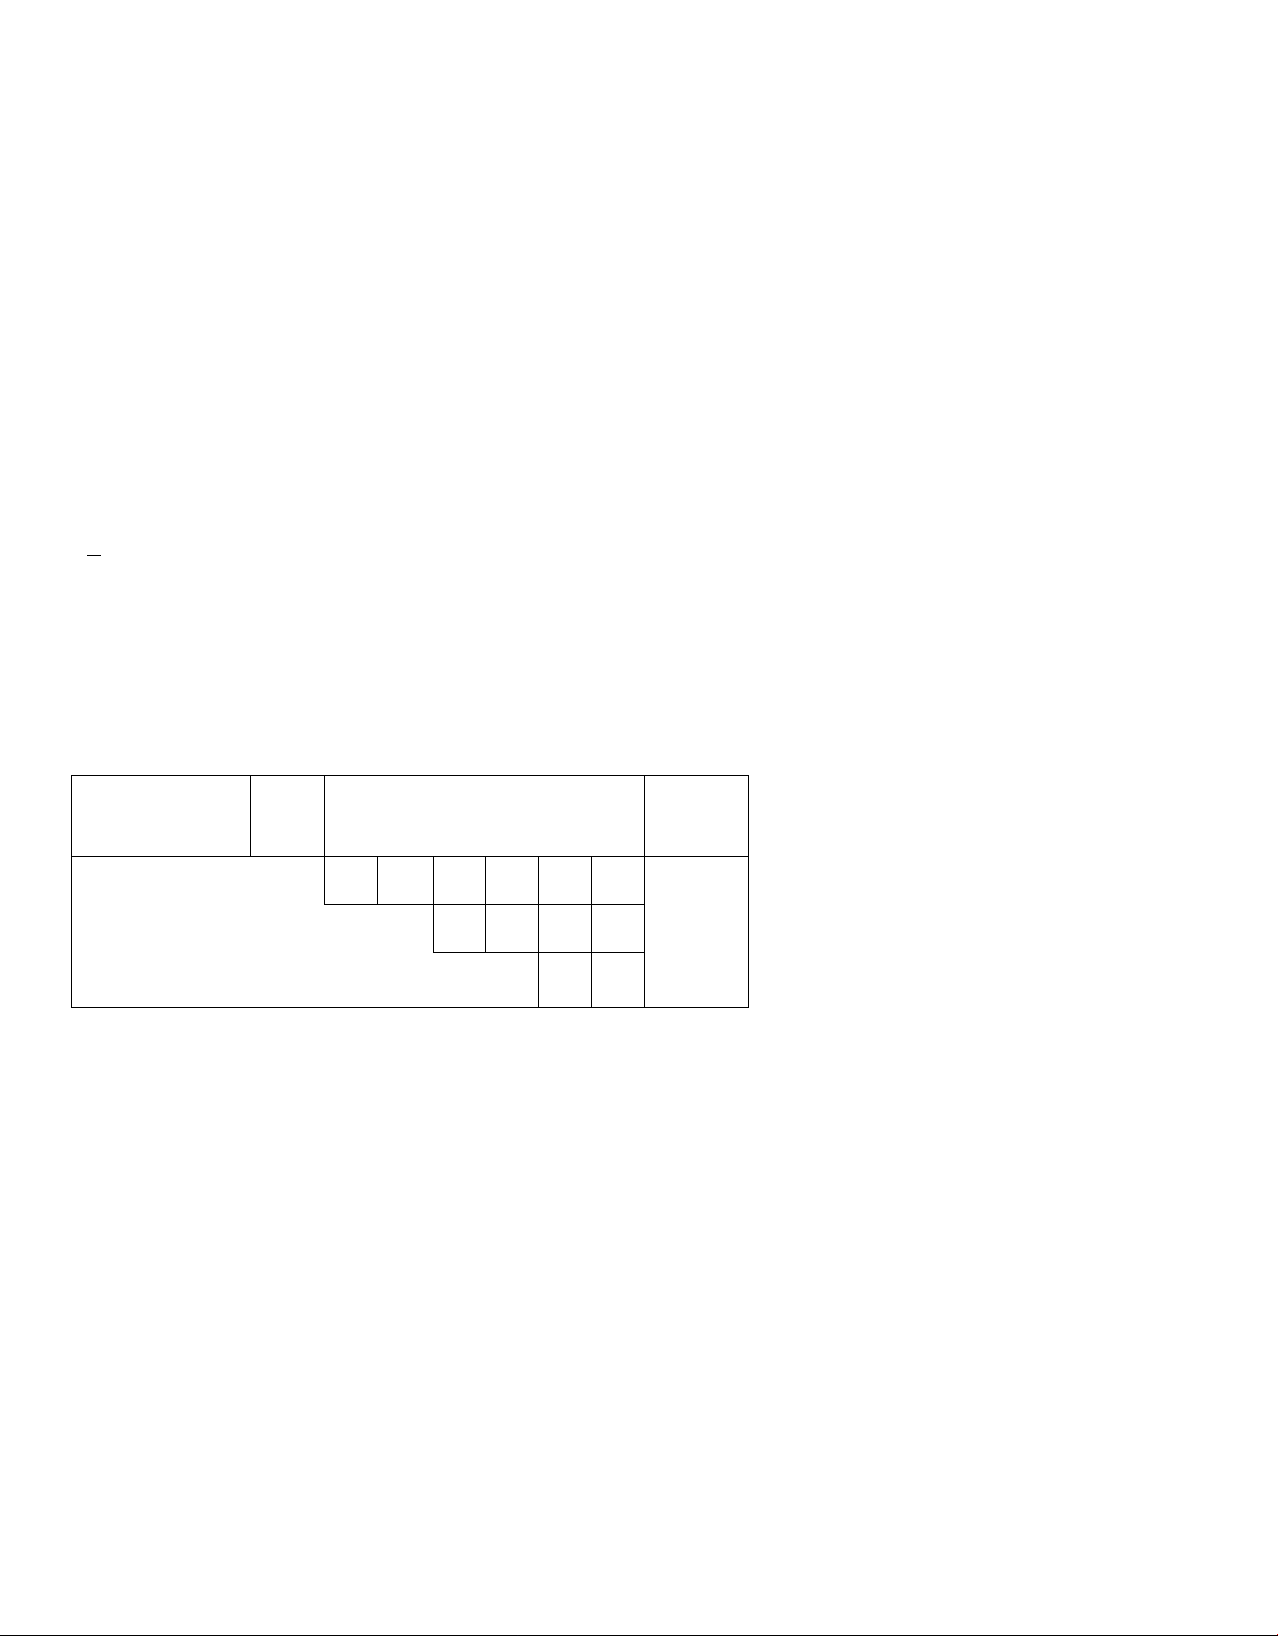
Water
Wash
Cycles
NORMAL WASH 11.4
LIGHT WASH 7.6
RINSE ONLY 3.8 Rinse Rinse
Use
Gallons
(approx.) Cycle Sequence
Wash/
ruil^c
Rinse 1
_____
Rinse I
1
Rinse
Main
watHi (
1
Main
Wash
Rinse 1
1
Rinse
, , 1
Rinse 55
Rinse
Approx.
Wash
Cycle Time
(in minutes)
47
12
Drying Options:
HEATED DRYING. Add 30 minutes to wash cycle time. Available on all wash cycles except
RINSE ONLY.
ENERGY SAVER. No Heat Drying to save energy.
Page 6

Good dishwashing starts with HOT water.
To get dishes clean and dry, you
need hot >^tef. lb help you get
of the proper temperature, your
dishwasher automatically heats the
water in the wash cycle. For good
washing arid drying, the entering
waici^i iiiudi at x^\j i\ ли
prevent dish damage, inlet water
should not exceed 150 °F.
How to test water temperature:
Check the water temperature
inside your dishwasher with a
candy or meat thermometer.
Let the dishwasher run through
one fill and pump out cycle, then
let the dishwasher fill with water
the second time. .
When you hear the water stop
filling, unlatch the door and slowly
open it.
Measure the temperature of the
water in the bottom of the tub this
way;
showers, give your water heater
time to recover'before operating the
dishwasher.
To improve washability if the water
is less than 120T and you cannot
adjust your water heater: Select a
longer O'cle and fill both deiergeni
cups at least half-full with detergent.
Help prevent spotting
with a rinse agent.
A rinse agent makes water flow off
dishes quicker than usual. This
lessens water spotting and makes
drying faster, too.
For best dishwashing
performance, use of a rinse
agciu duv;ii its uiaiiu is
recommended.
Rine#» aCTAntC r*r»iriA in AlttlAr limiiH
or solid form. Your dishwasher
uses the solid form.
If you can’t find any rinse agent,
write:
BENCKISER CONSUMER
PRODUCTS, INC.
/t<TT^rp
JJLjX jl^ixx j
1210 W County Road E.
Arden Hills, MN 55112
«« Tr?T^ T\TÈ\jr 1-^
WV/AJLAV/ JIAA WXVAAWX
How to choose and use the right detergent.
First, use only powder or liquid
deteiigeni specincaliy made for
use in dishwashers. Other types
will cause oversudsing.
Second, check the phosphate
content. Phosphate helps prevent
hard-water materials from forming
spots or film on your dishes. If
your water is hard (7 grains or
more), your detergent has to work
harder. Detergents with a higher
phosphate level will probably work
better. If the phosphate content is
luw to- / 70 ui less;, yuu 11 imvc lu
use extra detergent with hard water.
ibur water departmeni can ieil
you how hard your water is. So
can your county extension agent.
Or your area’s water softener
company. Just call and ask them
how many “grains” of hardness is
in your water.
How much detergent should you
use? That depends. Is your water
“hard” or “soft”? With hard water,
you need extra detergent to get
dishes clean. With soft water, you
need less detergent.
Remove the silverware basket and
place a candy or meat thermometer
in the water towards the middle of
the tub. If the temperature is less
than 120 °F, you will not get good
washing results. Higher water
temperature is needed to dissolve
grease and activate powder
detergents.
Helpful hints: If outside
temperatures are unusually low, or
il jv/ui VYC4WA IXUrVAO U VilOMXllVV/
O
from water heater to dishwasher,
you may need to set your water
heater’s thermostat up. If you have
not used hot water for some time,
the water in the pipes will be cold.
Turn on the hot water faucet at the
sink and allow it to run until the
water is hot. Then start the
dishwasher. If you’ve recently done
laundry or run hot water for
Too much detergent with soft water
not only wastes money, it can be
harmful. It can cause a permanent
giai>owaiv>, vaiiv-'Ci
“etching.” An outside layer of glass
is etched away! But why take a
chance when it’s easy to find out
the hardness of your water.
Keep your detergent fresh and
dry. Under the sink isn’t a good
place to store detergent. Too much
moisture. Don’t put powder
detergent into the dispenser until
you’re ready to wash dishes, either.
(It won’t be fresh OR dry.)
If your powder detergent gets old
or lumpy, throw it away. It won’t
wash well. Old detergent often won’t
dissolve.
If you use a liquid dishwasher
detergent, these precautions are not
necessary because liquid detergents
don’t “lump” as they age or come
in contact with water.
Page 7

How to pr ep ar e
the di sh es fo r was hi ng .
(libu^ll find two detergent
dispensers on the inside door of
your dishwasher. Two, because
some cycles use two washes.
See "Detergent Usage Guide”
below, (Be sure the Cycle Indicator
Dial is at OFF position before
adding detergent. Otherwise, the
detergent cup will not close and
latch properly.)
If this is your first dishwasher, or if
you’re replacing a much older
model, you may wonder how much
pre-preparation your dishes need.
Л AAVAAV*« A A W A AAAtAAAAg^ WA
normal food soils is not necessary.
With common sense and a little
practice you’ll soon know what
foods to remove. Here are some
guidelines;
1. Scrape off bones, seeds. Skins,
toothpicb and other hard solids. It
is also best to reniove hard shelled
vegetables, meat trimmings, leafy
vegetables and crusts. Remove
excessive quantities of Oil or
2. Remove large quantities of any
v<»rv Uttlis» PrA-rinciner rif
vaioiivraoiAwa iiao ca i./<uAA4.’'AAi
soft food disposer that pulverizes
soft food bits and flushes them away
It can handle 5ШЕ//aniounts of
soft foods, but large amounts will
3. Try to remove food scraps and
place dishes in dishwasher before
soil has a chance to dry and become
hard. Dishes with dried-on soil are
tYiri№ trl u/ach anA tvtot/
AAAWAW 1b»AAAAW%»A«r l^W VTMaAA MAAU AAAUjr
require additional preparation for
good results. Remember to use
your RINSE only cycle for small
‘^holding” loads.
Note: The foods mentioned above
are for examples only Other foods
not mentioned may also need to be
removed from your dishes. You
may also want to consider removing
foods such as mustard, mayonnaise,
vinegar, lemon juice and other
frtnitd fViiit r*an r>âns«!> Hîcr»Alnra<-inn
»AAlA«r WMAA AtAA*AlA^WAWA MAAWAA
of stainless steel if allowed to
remain on dishes for a long period
of time.
uiose tne main cup.
NOTE: Detergent cup may be
ooened manuallv with no harm.
Detergent Usage Guide (powder or liquid)
СЛЧС'Т* tl/A'rCn
%j\jr к ymi EIS.
(0-3 grains hardness)
CYCLES Main Cup
NORMAL WASH cycle 1 Tablespoon
iTiinîniuni
LIGHT WASH cycle
1 Tablespoon
Open Cup
. 1 Tablespoon
ШШхШйш
None Half Full
minimum
RINSE ONLY cycle
Use no detergent
*12 grains and up is extremely hard water. A water softener is recommended. Without it,
iime can build up in the water valve. The water valve may stick while open and cause flooding.
IFilled Main Cup holds 3 tablespoons; Filled Open Cup holds 2 tablespoons.
AiÎtîtSTTtltJÎ
тсь/лит wrtiJDis.
(3-7 grains)
Main Cup
.................................
Open Cup
Half Full . . Half Full
None
Use no detergent
HARD Water
(7-12 grains*)
Main CUpÿ
Completely .
ГШ1........................
Completely
Full
Use no detergent
Open Cupi
. Completely
Full
None
-
Page 8
How to load your dishwasher
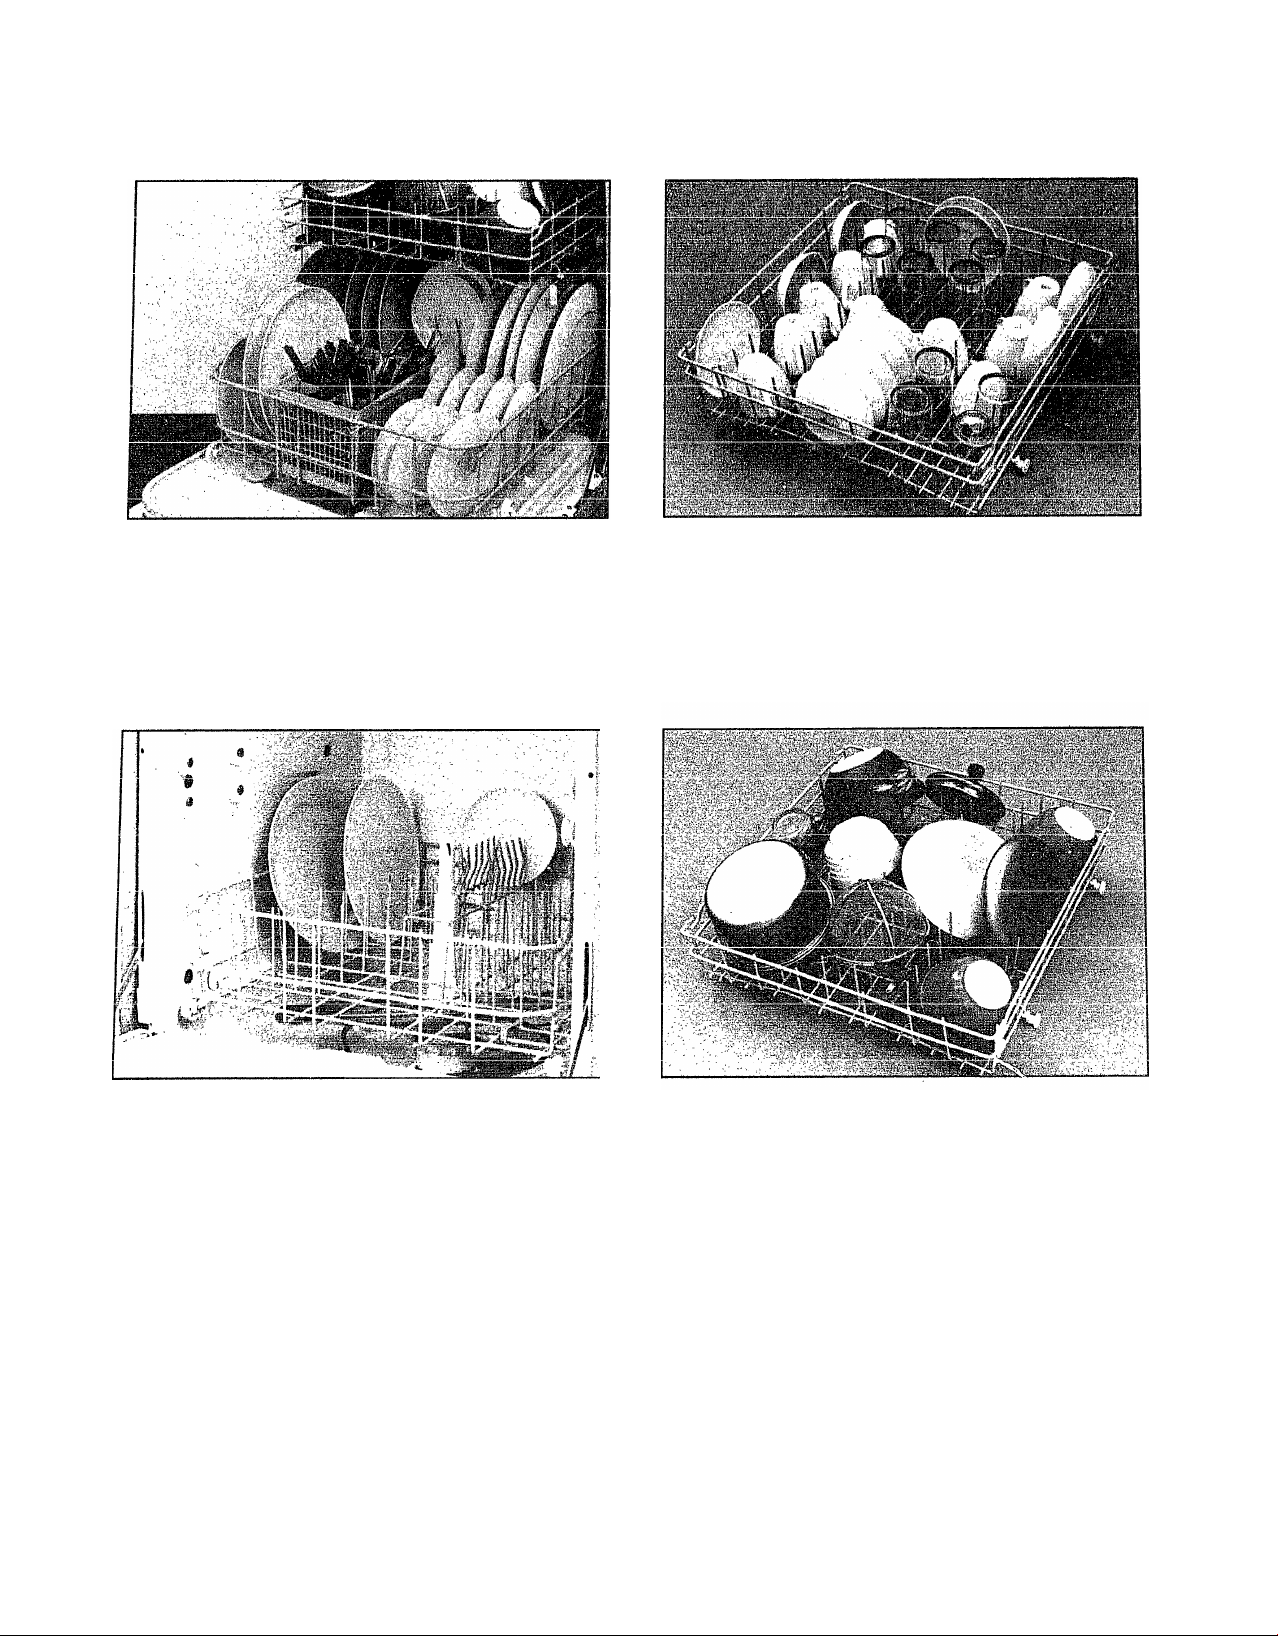
How to load the TOP RACK
This is a random mixed load, the most common type you
will have.
Make sure dishes are properly loaded to insure that
water can reach the soiled surfaces. The wash arm in the
bottom sprays water up. The tower that rises in the
VYmfAV
o^iAuo watvi
in the upper rack.
WATCH OUT FOR THIS.
The wash tower rises through the center of the bottom
----
-------
— .. —
---------
-------
^—
-------------
----------------------—----------------
----
--------------------
rack during the wash and rinse portions of the cycle.
Don’t block it or load tall things next to it. Also, be
careful not to let portions of items such as knives,
skewers or pot handles extend through the bottom rack
The top rack is best for glasses, cups and saucers. Cups
and glasses fit best along the sides. This is the place for
dishwasher-safe plastics, too. Make sure small plastic
__ j__1 «,,11
iicms arc luugcu ui uguuy su uicy cau t laii wiiiw uic
Calrod® heating unit.
Sauce pans, mixing bowls and other small items inay be
placed—face down—in the top rack. The top rack is
handy for all kinds of odd shapes. Be sure the force of
water and detergent can reach soiled surfaces.
Page 9
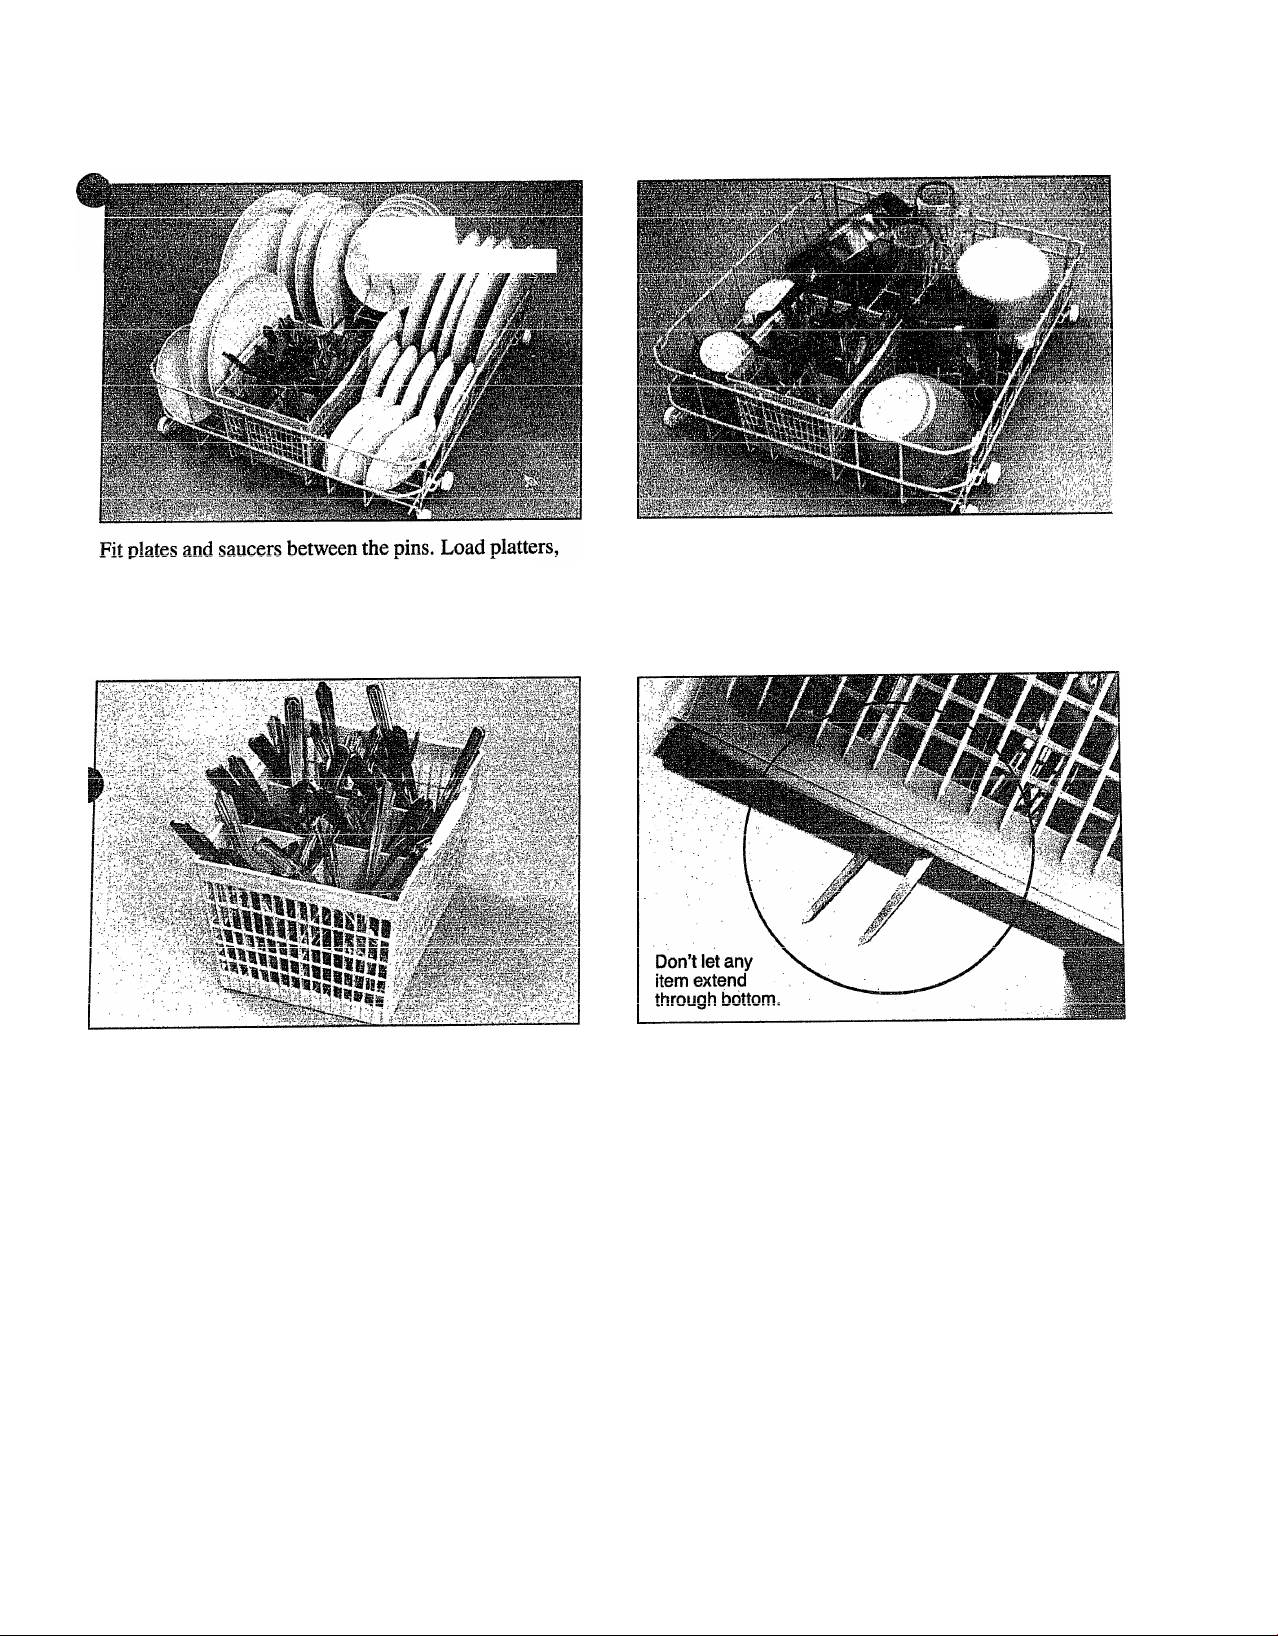
How to load the BOTTOM RACK
f J Ï
pots and bowls along the sides, in corners or in the
back.
Heavily soiled pots, pans and casseroles MUST be
loaded in the bottom rack, facing down. Prop the broiler
pan and rack along the edge. Shallow items may be
¿lllgiCU piUVlUCU lUC IVVVt^l ail-lW HAW
o4rli^ nr\i’ ftlA Cr^llArl
surface inside from the water.
Put flat warp in thp rpmovahlft silverware basket with
.A. vav AAMVTTMA«
handles up to protect your hands. Mix knives, forks and
spoons so they don’t nest together. Distribute evenly.
Small plastic items, such as measuring spoons and lids
from small containers, are not recommended for
automatic dishwashing. If placed in the dishwasher, they
should go in the bottom of the silverware basket with the
silverware on top.
Take out anything that might fall or extend through the
bottom of the silverware basket.
Page 10
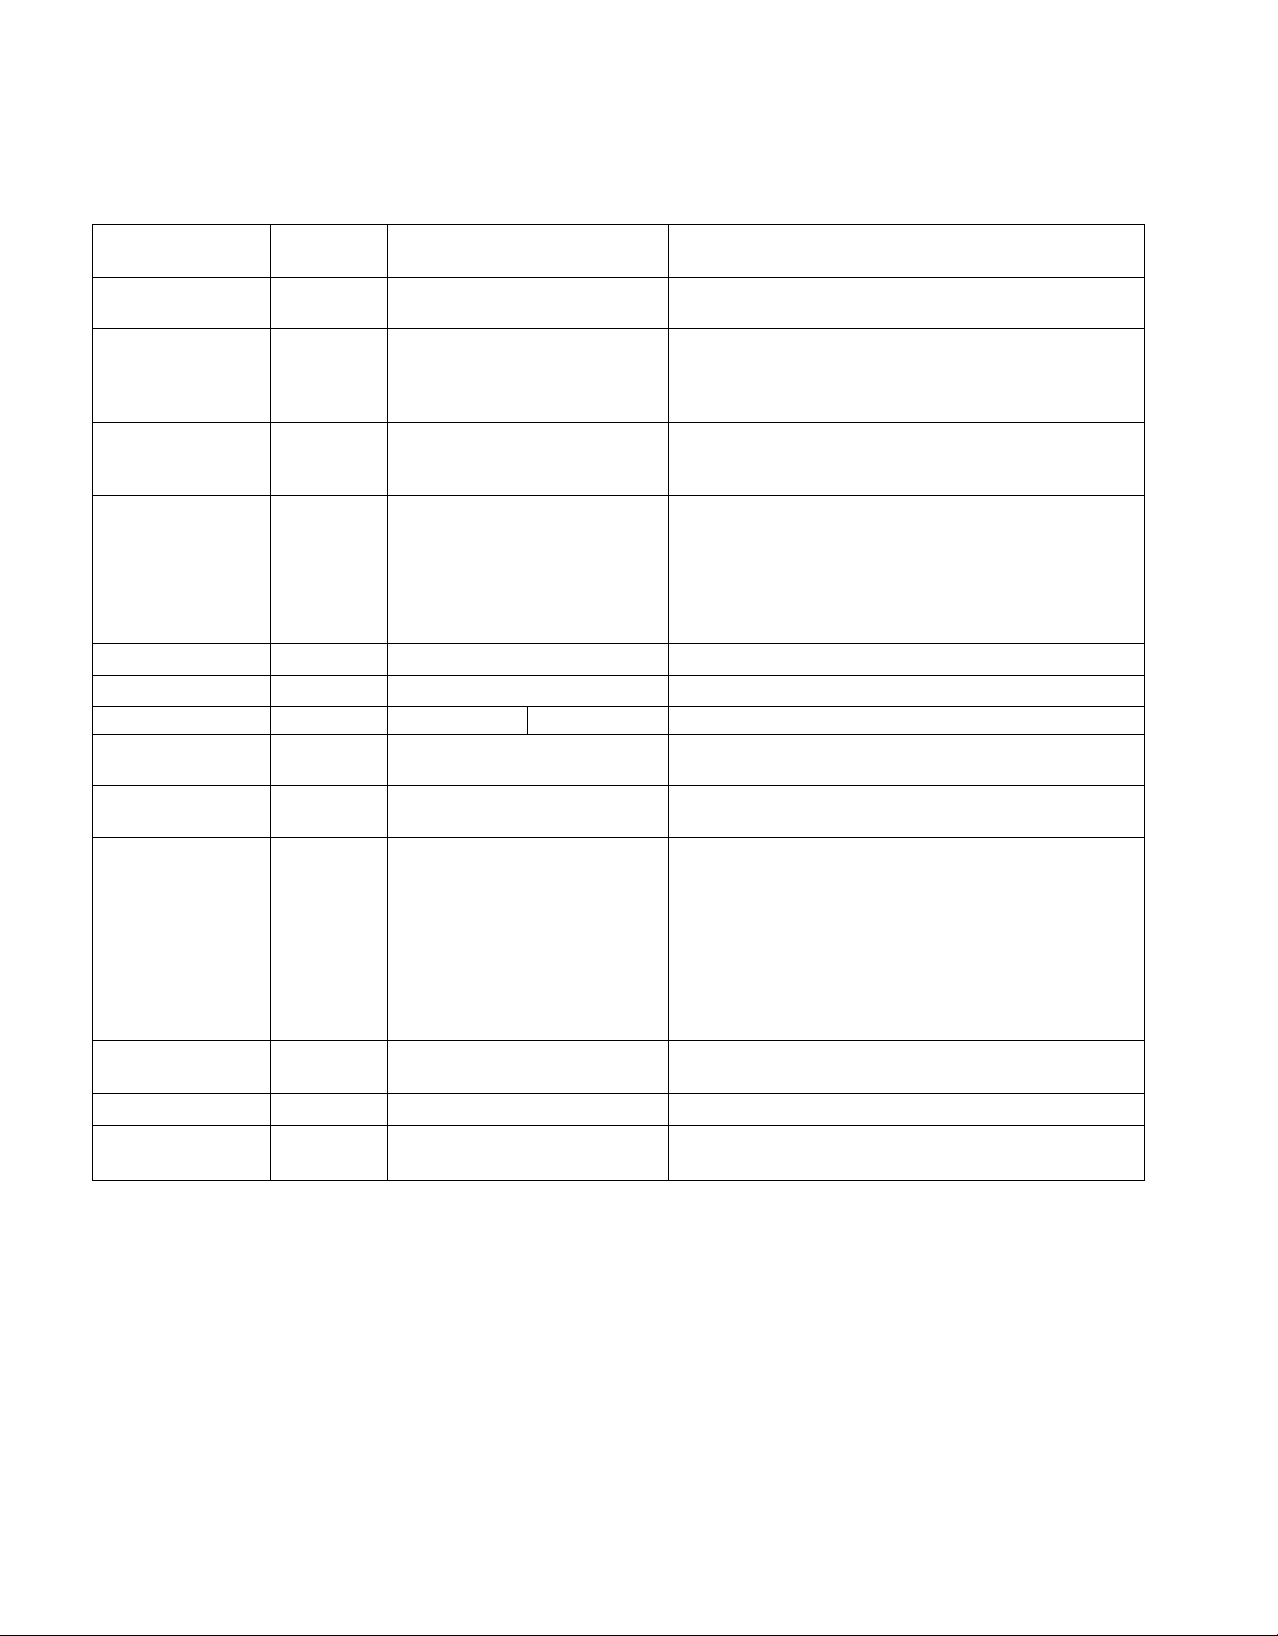
¥/liat you can usually wash safely in your dishwasher.
And what you can't.
Usually
Material
AlaKsliMsm
-
China/ '
Stoneware
Crystal
Noa-dlsMvare
!iems-“such
air cleaner ■
filters^ furnace
filters, paint
brnslies, etc.
Glass , YES
Iron
Pewter NO Pewter tarnishes
Plastics YES
Stainless steel YES
Sterling Silver
and Silver
plate
coatings
Tin NO
¥/ood
Sate Exceptions (not safe)
YES^ Some colored anodized
YES : Antique, meial-tiimi«ed,
, YES ■ , ■■■ Anhque, metahtrimiiisd or
■ NO ' '
-.NO. -■ Iron will rust. ^
YES
YES
l^\J
aluminum can fade.
hand-painted or over-the-glaze
■ - patterns'lade. ■ ■ ; ’
Gold leaf will discolor.
hand-painted patterns fade.
Gold leaf will discolor.
Milk Glass yellow.
Don’t put in same silverware
basket with stainless steel.
Contact between metals can
damage silver.
Don’t use copper utensils in
the same load. Silver may get a
brown film.
Adhesive used to attach some
hollow-handle knives can loosen.
Tin can rust. . ^ -.......................................... J
Y?uuu wall yvai^j kji i\js>^
its finish with any type washing.
.Special luslructioiis
Some darkening or spotting possible. Ssrnove by ,
scouring with soap-filled steel wool pads.
If in doubt, check with the manulhcturBr. Or test wash
one piece daily for at least a month. Compare with the
rest of the set, ' ‘ ■ . . ■ ,,
ùîadsseursly tops^vestmoyeihent,
Do not wash in dishwashen Damage to dishwasher
and discoloration or staining of dishwasher Xfxs^ result.
If it doesn’t say DïSHWAsMR'SÀFE, test oûê piece ' • '
, î:tefôredishWàsMhg.att;enlifê;s!ei,',’Washin.tOp;râ^ ■. ' : -
Rinse if not washing immediately. Salty or acid foods
Canstmn|flefiOn,i
Rinse if hot Washing immediâtêiÿ. S^iy or add foods can
stain if left on. Diy detesgent can cause difficuitAo-femové
black spots. Placé in back section of silverware bâskëi to
avoid exposure to detergent ffom the detergent cup,
After washing, wipe the non=stick coating area with
vegetable oil to keep it from losing its non-stick quality. j
: ' 1
Forget a dfeh? Here^s wlieii
you can add lío
Add dishes any time during the
RINSE ONLY cycle. With other
wash cycles, you can add dishes
at any time BEFORE the m_ain
detergent wash portion of the cycle.
However, opening the door during
any cy'cle lessens cleaning power.
So try to load everything at the
beginning.
Here’s how to add a forgotten dish:
1. Push the door latch to the left.
Washing will stop.
lu
2. Wait a few seconds until the
Wai<&A VmAAAD* U'p'&AA U’UVS.t
3. Add dishes you’ve forgotten.
4. Close the door and push the
latch to the far right. When the
door is locked, washing will
continue.
Page 11

Care and Cleaning
^;SER MAINTENANCE
INSTRUCTIONS
Clean the control panel with a
lightly dampened cloth. Dry
thoroughly. Do not use abrasives
or sharp objects on the panel.
They can damage it.
Clean the outside with a good
appliance polish wax. The outside
cabinet finish is durable, but it can
scratch. So use no scouring pads,
or harsh or gritty cleaners.
Appliance Polish & Cleaner
(Cat. No. WR97X216) is available
from GE and Hotpoint Appliance
Parts Marts.
The inside usually takes care of
itself. If it should ever need
cleaning, use a mild cleansing
powder. Scouring pads and harsh
cleaners can mar the finish.
Biiilt-in dishwashers often use an air gap. Keep it dean
An air gap is a plumbing device. It
protects your dishwasher against
water backing up into it if a drain
clogs. The air gap is not a part of
the dishwasher. And you may not
even have one. Not all plumbing
codes require air gaps.
If you have an air gap, check it at
least once a month. THE AIR
GAP IS NOT PART OF YOUR
DISHWASHER. IT IS NOT
COVERED IN YOUR WARRANTY.
The air gap is easy to dean. With
most types, first turn off the
dishwasher, then lift off the chrome
cover. Then unscrew the plastic cap
and check for any build-up of grit.
A toothpick makes cleaning easy.
Not using your dishwasher In winter? Protect against freezing.
If your dishwasher is left in an
unheated location during the winter
HAAV/AAMAO) «AMVV./ M OV/& V AWW VWV'AAXAAWJIMA«
take the following steps to prevent
the machine from freezing:
® Remove fuses or trip circuit
breakers to remove electric power
from the dishwasher.
® Tlirn off water to dishwasher.
Disconnect the water inlet line
from the water valve and drain.
* Remove water valve from the
dishwasher and blow on small
plastic outlet to remove water.
Replace water valve and water line.
® Remove plug in bottom of rubber
boot and drain completely. Replace
the plug.
fAr*hnir<iQn
Check the air gap any time your
dishwasher isn’t draining well.
How to change color panels
If you are redecorating, you can
uioijtwcioiiv/x o xxv/jm.
panels to change color.
The panel is held in place by the
door trim. You have a choice of
three colors; one on each side of
the removable panel and a third on
the permanent panel underneath.
Or you can paint the panel with the
nnlnr nf xrrwir mx/n AhnipA
VV/lVi. V/X VTTA*
How to change door panel Insert:
1. Take out the three trim screws on
either side of the dishwasher door.
Remove the side trim.
Slide out the panel.
3. Put the color you want in front;
or leave the removable panel off if
you want the Black panel showing.
(Handle the panel carefully. The
edges may be sharp.)
4. Replace side trim and screws.
If your dishwasher does not have
trim that accepts 1/4-inch thick
wood insert, an Accessorv Trim
- - j ^
Kit GPF18 can be purchased for
that purpose.
Dimensions for 1/4-inch wood
insert:
23%"wide X 17/i6"high
Note: Do not operate dishwaslier
while changing panel or when
lower access panel Is removed.
fiSissa—
mi
Change color in minutes. Just
remove trim and change.
11
liiics
>i'.' ,.-;5
Page 12
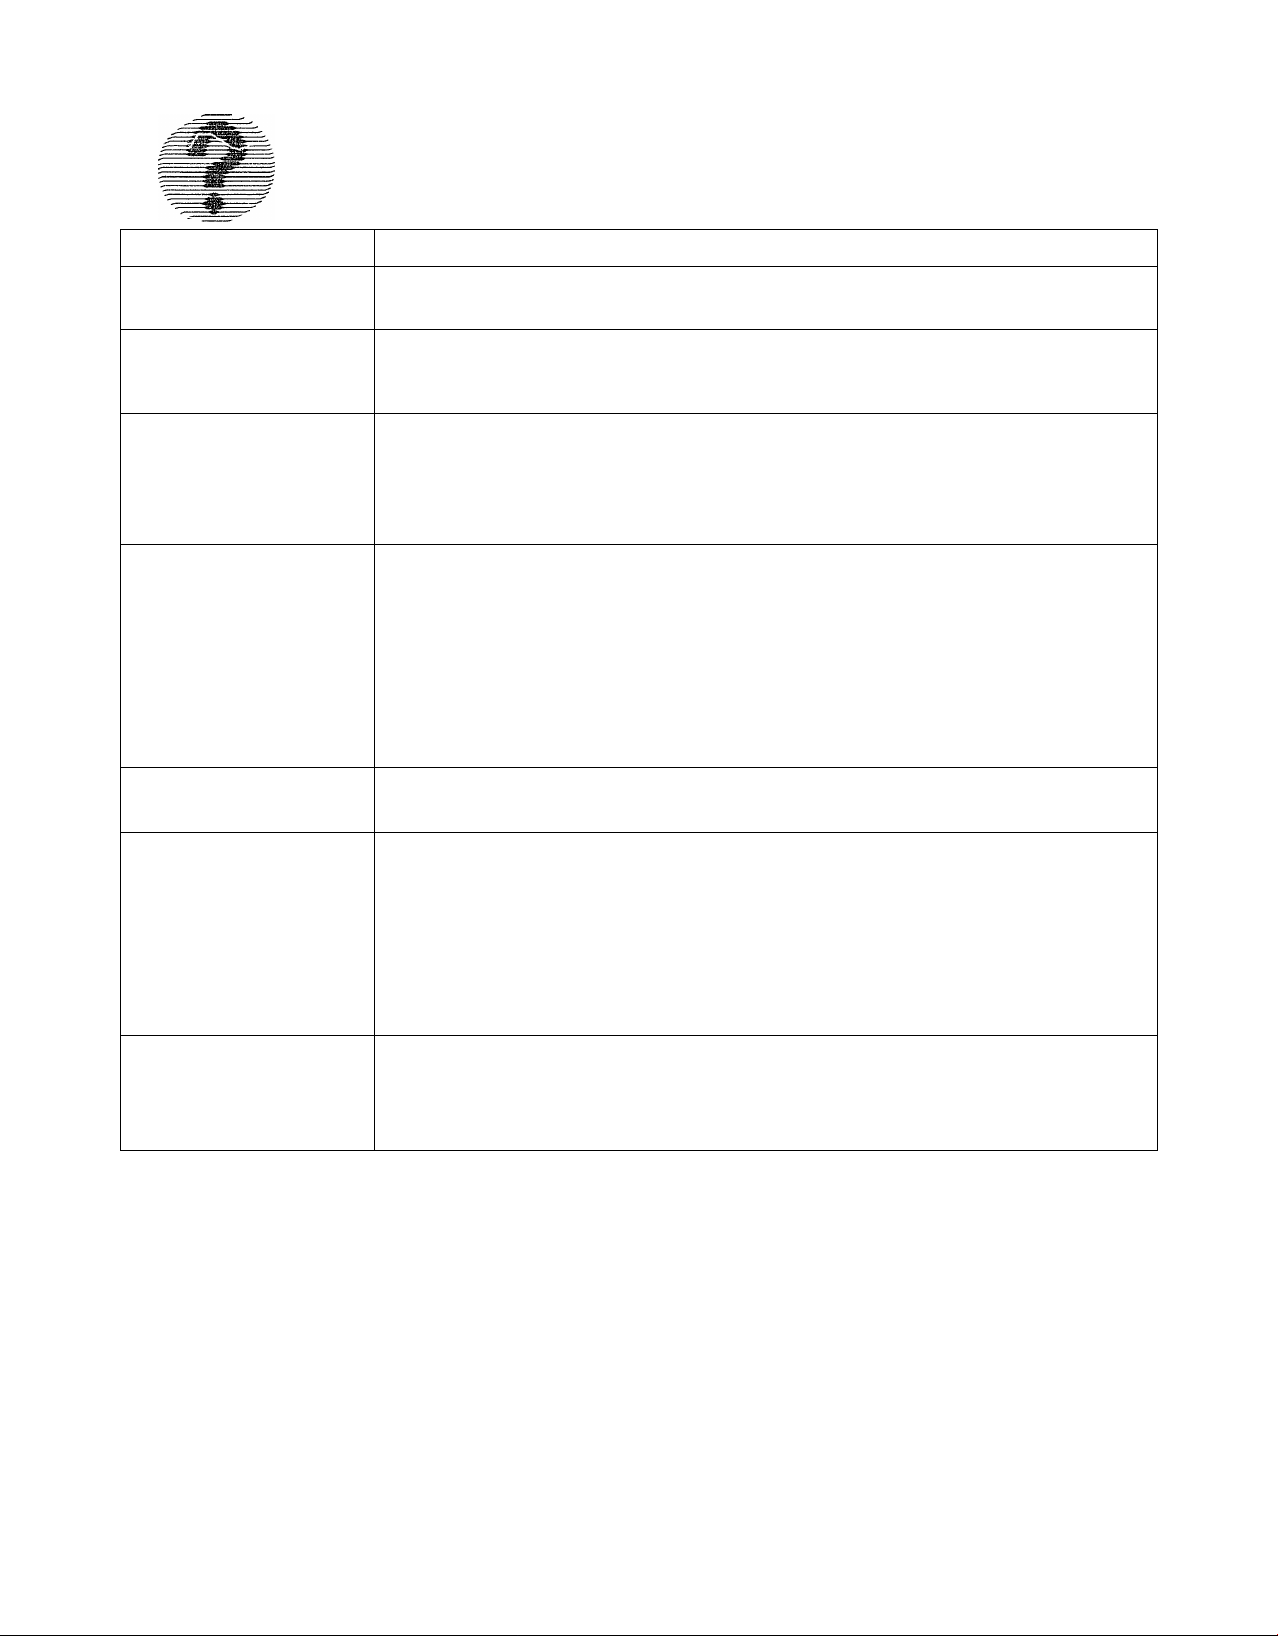
Questions?
Use This Problem Solver
PROBLEM
DISHWASHER
WONT RUN
UNUSUAL NOISE .
DISHES DON’T DRY
UNCLEAN DISHES
AND FLATWARE
BLACK OR GRAY
MARKS ON DISHES
POSSIBLE CAUSE AND REMEDY
A fuse in your home may be blown, or the circuit breaker tripped. Replace fuse or
reset circuit breaker. Remove any other appliances from the circuit.
Utensils may not be secure on rack pins, or something small may have dropped IVom
the rack. Water is causing utensils to rattle. Make sure everything is securely placed
in dishwasher.
Make sure inlet water temperature is correct. (See page 6.)
Unload the bottom rack first. Water from dishes in the top rack may be spilling into the
bottom rack.
Check for improper loading. Dishes shouldn’t nest together. Avoid overloading.
Check inlet water temperature. It should be at least 120°F. (To test, see page 6.)
To obtain the benefits of a complete cycle, be careful that you do not turn the dial any
further than necessary to start the dishwasher.
Water pressure may be temporarily low. Turn on a faucet. Is water coming out slower
than usual? If so, wait until pressure is normal before using your dishwasher.
Plugged air gap, (See page 11.)
Improper rack loading. (See pages 8 and 9.)
. J
Aluminum deposits often leave marks when they rub against other things. Remove 1
marks with a mild abrasive cleanser.
DETERGENT LEFT
IN DISPENSER CUPS
1 JL:IVVJU/1N 1
WONT LATCH
AFTER ADDING
DETERGENT
Water may not be reaching the detergent cups. Move dishes that may be blocking
detergent cup.
The dispenser cover may not be opening or may be blocked by improperly loaded
items. If you used a powder detergent, open the cup and remove any caked-on
detergent. If the cup still doesn’t open automatically, call for service.
Detergent may be old. If the powder detergent is hard or caked in the box, throw it away.
The detergent may not be working well. Try another brand.
XlilXiC'O.lWX Uiax iilUOX 1£1 vyx X XV/1 vup tW wxv^av/ C4li\X lutvil A
If you unlatch the door and open it to dry your dishes, the Cycle Indicator does not
advance to OFF by itself.
12
Page 13

PROBLEM
POSSIBLE CAUSE AND REMEDY
SPOTS AND FILMING
ON GLASSES AND
FLATWARE
Spotting can be caused by all these things:
® Extremely hard water. (See page 6.)
• Low inlet water temperature. (To test, see page 6.)
• Overloading the dishwasher.
« Improper loading. (See pages 8 and 9.)
® Old or damp powder detergent.
® Phosphate level in detergent too low. (See page 6.)
• Too little detergent. (See page 7.)
Due to varying local water conditions and personal preferences, try several brands
of detergents to find one that gives the best results for you. A liquid dishwashing
detergent may help reduce filming.
To remove stubborn spots and film from glassware:
1. Remove all metal utensils from the dishwasher.
2. Do not add detergent.
3. Select NORMAL WASH cycle.
4. Start the dishwasher and allow to run for 15 to 20 minutes. The dishwasher
will now be in tlie main wash.
5. Then open the door and pour 2 cups (500ml) of white vinegar into the bottom
of the dishwasher.
CLOUDINESS ON
GLASSWARE
YELLOW OR BROWN
FILM
'X.
6. Close the door and allow to complete the c^cle.
If vinegar rinse doesn’t work: Repeat as above, except use 1/4 cup (60ml) of citric
acid crystals instead of vinegar. (Most drugstores carry citric acid crystals. If yours
doesn’t, call GE Factory Service.)
Using a vinegar or citric acid crystal rinse more than twice a month? Consider a home
water softener.
If vinegar or citric acid crystal rinse doesn’t work, the cloudiness is “etching!’
The film cannot be removed.
It can be prevented: Use less detergent if you have soft Water. W^ash glassware in
shortest cycle that will get them clean.
waier lemperaiure entering uisnwasner exceeus lou r.
Tea or coffee can stain cups. Remove the stains by hand, using a solution of 1/2 cup
bleach and 3 cups warm water.
An overall 3/eIlow or brown film on dishes or glassware can be caused by iron deposits
in water. A special filter in the water supply line is the only way to correct this
orobiem. Your water softener company can tell you about the filter.
Yellow film on sterling silver results when you wash copper utensils in the same load.
Silver polish will usually remove this stain.
(continued next m2ei
■Ml
13
Page 14

The Problem Solver (continued)
PROBLEM
CHIPPING OF CHINA
SMALL AMOUNT OF
WATER STANDING
IN THE BOTTOM
OF THE TUB
water WON’T PUMP
OUT OF THE TUB
SUDS IN THE TUB
POSSIBLE CAUSE AND REMEDY
Rough handling can cause chipping. Load with care. Make sure glassware and china
are secure and сапЧ jar ioose. (See page 8 for correct way to load glassware.) Make
sure tall glasses and stemware will clear the top of the tub when you push the rack into
the dishwasher.
Always use the top rack for delicate items.
Water around the outlet on the tub bottom at the back of the tub is normal. It is clean
water. It’s there to keep the water seal lubricated.
If the entire bottom of die tub has water, you may have a drain problem. Clean the air
gap, if you have one. (See page 11.)
Check the kitchen sink. Is it draining well? %u may need a plumber.
If dishwasher drains into disposer, nm disposer to clear. Be sure disposer is not clogged.
Sudsing detergents are not meant for dishwashers. USE ONLY AUTOMATIC
DISHWASHER DETERGENTS TO AVOID SUDSING.
To remove suds from the tub: Open the dishwasher. Let suds evaporate. Add 1 gallon
of cold water to the tub. Close and latch the dishwasher. Pump out water by slowly
turning the control dial until a drain period is reached.
Repeat if necessary.
DISHWASHER LEAKS Suds can cause unit to overflow. That’s why it’s so important to use a detergent that’s
uesigiicd for iiUiuiiiatic dishwashers.
If you need more help,,, cal!, toll free:
The GE Answer Center®
800.626.2000
consumer Information service
14
Page 15

If ¥)u Need Service
To obtain service, see your warranty
on the back page of this book.
We’re proud of our service and
want you to be pleased. If for some
reason you are not happy with the
service you receive, here are three
steps to follow for further help.
FIRST, contact the people who
serviced your appliance. Explain
why you are not pleased. In most
cases, this will solve the problem.
NEXT, if you are still not pleased,
write all the details—including
your phone number—to:
Manager, Consumer Relations
GE Appliances
Appliance Park
Louisville, Kentucky 40225
FINALLY, if your problem, is still
not resolved, write;
Major Appliance
Consumer Action Panel
20 North Wacker Drive
Chicago, Illinois 60606
15
HI
Page 16

YOUR GENERAL ELECTRIC AUTOMATIC DISHWASHER
I 1
Save proof of original purchase date such as your sales slip or cancelled check to establish warranty period.
WHAT IS COVERED
BAS» 0 a BiH-VU!"
wriAi ID mui
FULL ONE-YEAR WARRANTY
For one year from date of original
purchase, we wiii provide, free of
chargS; parts and serviGS labor
In your home to repair or replace
any part of the dishwasher that
fails because of a manufacturing
defect.
® Service trips to your home to
teach you how to use the product.
Read your Use and Care materiaL
If you then have any questions
about operating the product,
please coniact your dealer or our
Consumer Affairs office at the
address below, or call, toll free:
The GE Answer Center®
800.626.2000
® Improper installation.
If you have an installation problem,
contact your dealer or installer.
You are responsible for providing
adequate electncal, plumbing and
other connecting facilities.
This warranty is extended to
the ofiginai pufchaSef and any
suGGoeding owner for products
purchased for ordinary home use
in the 48 mainland states, Hawaii
and Washington, D.C. In Alaska the
warranty is the same except that it is
LIMITED because you must pay to
ship the product to the service shop
or for the service isc-hnician's travel
costs to your home.
All warranty service will be provided
by our Factory Service Centers or
by our authorized Customer Care®
Rervicfirq Hiirina normal WOrklnO
hours.
Look in the White or Yellow Pages
of your telephone directory for
GENERAL ELECTRIC COMPANY,
GENERAL ELECTRIC FACTORY
SERVICE, GENERAL ELECTRICHOTPOINT FACTORY SERVICE or
GENERAL ELECTRIC CUSTOMER
CARE® SERVICE.
s Replacement of house fuses or
resetting of circuit breakers.
® Cieaning or servicing of air gap
device in drain line.
® Failure of the product if it is used
for other than its intended purpose
or used commercially.
® Damage to product caused
by accident, fire, floods or acts
of God.
WARRANTOR IS .A/07 RESPONSIBLE
FOR CONSEQUENTIAL DAMAGES.
Cnmn efatoo Hn nnf
WWi ■ IW Vl^ I IWL •
may not apply to you. This warranty gives you specific legal rights, and you may also have other rights which vary from state to state.
To know what your legal rights are in your state, consult your local or state consumer affairs office or your state’s Attorney General.
Part No. 165D3080P027
Pub. No. 49-5389
4-88
•.
Warrantor: General Electric Company
If further help is needed concerning this warranty, write:
Manager—"Cofisymer Affairs, GE Appliances, Louisville, KY 40225
©J
GSD400Y
 Loading...