

Page 1
GE Appliances
Refrigerators
Side by side
Part No. 162D3941P005 Pub. No. 49-6911
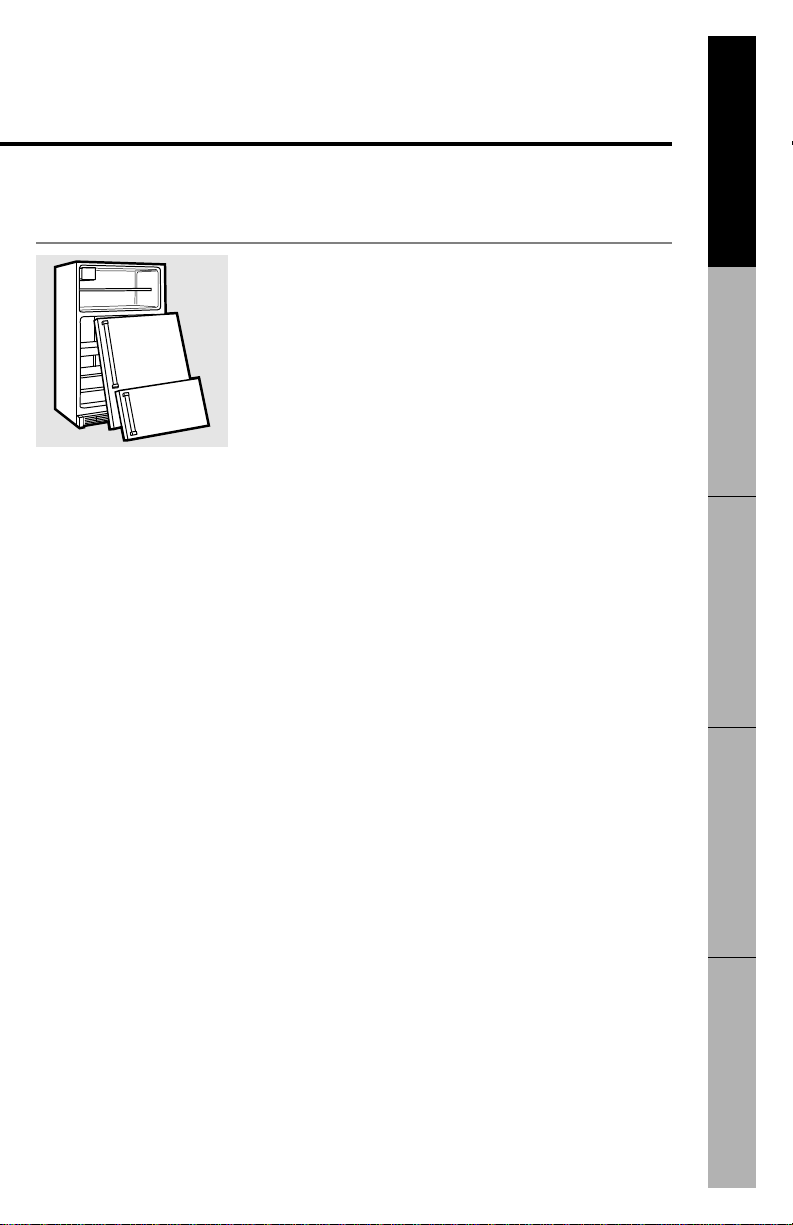
Profile Models
21 Built-In Style,
with Dispenser
Owner’s Manual
Page 2
Congratulations!
You Are Now Part of the GE Family.
Welcome to the GE family.
We’re proud of our quality
products and we are
committed to providing
dependable service. You’ll
see it in this easy-to-use
Owner’s Manual and you’ll
hear it in the friendly voices
of our customer service
department.
Best of all, you’ll experience
these values each time you
use your refrigerator.
That’s important, because
your new refrigerator will
be part of your family for
many years. And we hope
you will be part of ours for a
long time to come.
We thank you for buying
GE. We appreciate your
purchase, and hope you
will continue to rely on us
whenever you need quality
appliances for your home.
2
Important!
Staple sales slip or cancelled
check here.
Proof of the original purchase date
is needed to obtain service under
the warranty.
Write the model and serial
numbers here.
#
#
You can find them on a label on the
wall beside the top drawer or at the
bottom, just inside the fresh food
compartment door.
Page 3
GE&You,
AService Partnership.
Inside you will find many
helpful hints on how to use and
maintain your refrigerator
properly. Just a little preventive
care on your part can save you a
great deal of time and money
over the life of your refrigerator.
Read this Manual
Ask any GEappliance owner and they will
tell you we stand behind our products with
unmatched quality service. However, did
you know that most questions result from
simple problems that you can easily fix
yourself in just a few minutes? This
Owner’s Manual can tell you how.
You’ll find many answers to
common problems here.
If you review our chart of
Troubleshooting Tips first, you may
not need to call for service at all.
Review the Section on
Troubleshooting Tips
If you do need service, you can
relax knowing help is only a
phone call away. A list of toll-free
customer service numbers is
included in the back section. Or,
in
the U.S.,
you can always call the GE
Answer Center
® at 800.626.2000,
24 hours a day, 7 days a week.
In Canada,
call 800-361-3400.
If You Need Service
English . . . . . . . . . . . . . . . . . .4
Français . . . . . . . . . . . . . . . .37
Español . . . . . . . . . . . . . . . . .75
Languages
Safety Information
Safety Precautions . . . . . . . . . . .4
How to Connect Electricity . . . .6
Use of Adapter Plugs . . . . . . .6, 7
Use of Extension Cords . . . . . . .7
Operating Instructions
Controls . . . . . . . . . . . . . . . . . . .8
Features . . . . . . . . . . . . . . . .9–11
Automatic Icemaker . . . . . . . . .12
Ice and Water Dispenser . .13, 14
Care and Cleaning . . . . . . .15–17
Installation Instructions
Preparing to
Install the Refrigerator . . . .19, 20
Door Panels . . . . . . . . . . . .21–23
Water Line Installation . . .24–29
Troubleshooting Tips
Normal Operating Sounds . . . .30
Before You
Call For Service . . . . . . . . .31–34
Customer Service
Warranty
for Canadian Customers . . . . .35
Warranty
for U.S. Customers . . . . . . . . . .36
Service Telephone
Numbers . . . . . . . . . .Back Cover
3
Troubleshooting T ipsInstallation Instructions Customer ServiceOperating InstructionsSafety Information
Page 4
IMPORTANT SAFETY INFORMATION.
READ ALL INSTRUCTIONS BEFORE USING.
4
Use this appliance only for its intended purpose as
described in this Owner’s Manual.
■ This refrigerator must be
properly installed and
located in accordance with
the Installation Instructions
before it is used.
■ Do not allow children to
climb, stand or hang on the
shelves in the refrigerator.
They could damage the
refrigerator and seriously
injure themselves.
■ Do not touch the cold
surfaces in the freezer
compartment, particularly
when hands are damp or wet.
Skin may stick to these
extremely cold surfaces.
■ Do not store or use gasoline
or other flammable vapors
and liquids in the vicinity of
this or any other appliance.
■ In refrigerators with
automatic icemakers, avoid
contact with the moving parts
of the ejector mechanism, or
with the heating element that
releases the cubes. Do not
place fingers or hands on the
automatic icemaking
mechanism while the
refrigerator is plugged in.
■ Keep fingers out of the
“pinch point” areas;
clearances between the
doors and between the doors
and cabinet are necessarily
small. Be careful closing
doors when children are in
the area.
■ Unplug the refrigerator
before cleaning and making
repairs.
NOTE: We strongly recommend
that any servicing be performed
by a qualified individual.
■ Turning the control to the
OFF
position does not remove
power to the light circuit.
■ Do not refreeze frozen
foods which have thawed
completely.
SAFETY PRECAUTIONS
Operating Instructions
Installation Instructions
Safety InformationTroubleshooting TipsCustomer Service
When using electrical appliances, basic safety precautions
should be followed, including the following:
WARNING!
Page 5
IMPORTANT:
PROPER DISPOSAL OF THE REFRIGERATOR
5
Troubleshooting T ipsInstallation Instructions Customer ServiceOperating InstructionsSafety Information
Child entrapment and suffocation are not problems of
the past. Junked or abandoned refrigerators are still
dangerous…even if they will sit for “just a few days.”
If you are getting rid of your old refrigerator, please
follow the instructions below to help prevent accidents.
Before You Throw Away Your Old Refrigerator
or Freezer:
■ Take off the doors.
■ Leave the shelves in place so that children may not
easily climb inside.
CFC Disposal
Your old refrigerator has a cooling system that used
CFCs (chlorofluorocarbons). CFCs are believed to harm
stratospheric ozone.
If you are throwing away your old refrigerator, make
sure the CFC refrigerant is removed for proper disposal
by a qualified servicer. If you intentionally release this
CFC refrigerant you can be subject to fines and
imprisonment under provisions of the Federal Clean
Air Act.
Page 6
IMPORTANT SAFETY INFORMATION.
READ ALL INSTRUCTIONS BEFORE USING.
6
Operating Instructions
Installation Instructions
Safety InformationTroubleshooting TipsCustomer Service
HOW TO CONNECT ELECTRICITY
Do not, under any circumstances, cut or remove the third
(ground) prong from the power cord. For personal safety,
this appliance must be properly grounded.
The power cord of this appliance is equipped with a 3-prong
(grounding) plug which mates with a standard 3-prong
(grounding) wall outlet to minimize the possibility of electric
shock hazard from this appliance.
Have the wall outlet and circuit checked by a qualified electrician
to make sure the outlet is properly grounded.
Where a standard 2-prong wall outlet is encountered, it is your
personal responsibility and obligation to have it replaced with a
properly grounded 3-prong wall outlet.
The refrigerator should always be plugged into its own individual
electrical outlet which has a voltage rating that matches the rating
plate.
This provides the best performance and also prevents overloading
house wiring circuits which could cause a fire hazard from
overheated wires.
Never unplug your refrigerator by pulling on the power cord.
Always grip plug firmly and pull straight out from the outlet.
Repair or replace immediately all power cords that have become
frayed or otherwise damaged. Do not use a cord that shows cracks
or abrasion damage along its length or at either end.
When moving the refrigerator away from the wall, be careful not to
roll over or damage the power cord.
USE OF ADAPTER PLUGS
Because of potential safety hazards under certain conditions,
we strongly recommend against the use of an adapter plug.
However, if you must use an adapter, where local codes permit, a
temporary connection
may be made to a properly grounded 2-prong
wall outlet by use of a UL-listed adapter available at most local
hardware stores.
WARNING!
Page 7
7
The larger slot in the adapter must be aligned with the larger slot in
the wall outlet to provide proper polarity in the connection of the
power cord.
When disconnecting the power cord from the adapter, always hold
the adapter in place with one hand while pulling the power cord
plug with the other hand. If this is not done, the adapter ground
terminal is very likely to break with repeated use.
If the adapter ground terminal breaks,
DO NOT USE
the refrigerator
until a proper ground has been established.
Attaching the adapter ground terminal to a wall outlet cover screw does not
ground the appliance unless the cover screw is metal, and not insulated, and the
wall outlet is grounded through the house wiring. You should have the cir cuit
checked by a qualified electrician to make sure the outlet is properly grounded.
Troubleshooting T ipsInstallation Instructions Customer ServiceOperating InstructionsSafety Information
USE OF EXTENSION CORDS
Because of potential safety hazards under certain
conditions, we strongly recommend against the use of an
extension cord.
However, if you must use an extension cord, it is absolutely
necessary that it be a UL-listed, 3-wire grounding type appliance
extension cord having a grounding type plug and outlet and that
the electrical rating of the cord be 15 amperes (minimum) and
120 volts.
REMEMBER…
Your continued health and safety are important to us.
Please read and follow this Safety Information carefully.
We want you to remain a happy and healthy part of our
GE family.
SA VE THESE INSTRUCTIONS
Page 8
8
Operating Instructions
Installation Instructions
Safety InformationTroubleshooting TipsCustomer Service
Fresh Food Control
The fresh food control maintains the temperatures
throughout the fresh food compartment.
Freezer Control
The freezer control maintains the temperatures
throughout the freezer compartment.
Moving the freezer control to
OFF
stops cooling in
both areas—fresh food and freezer—but does not shut
off power to the refrigerator.
How To Test Temperatures
Use the milk test for the fresh food compartment. Place a container
of milk on the top shelf and check it a day later. If the milk is too
warm or too cold, adjust the temperature controls.
Use the ice cream test for the freezer compartment. Place a
container of ice cream in the center of the freezer and check it after
a day. If it’s too hard or too soft, adjust the temperature controls.
After changing the controls, allow 24 hours for the refrigerator to reach the
temperature you have set.
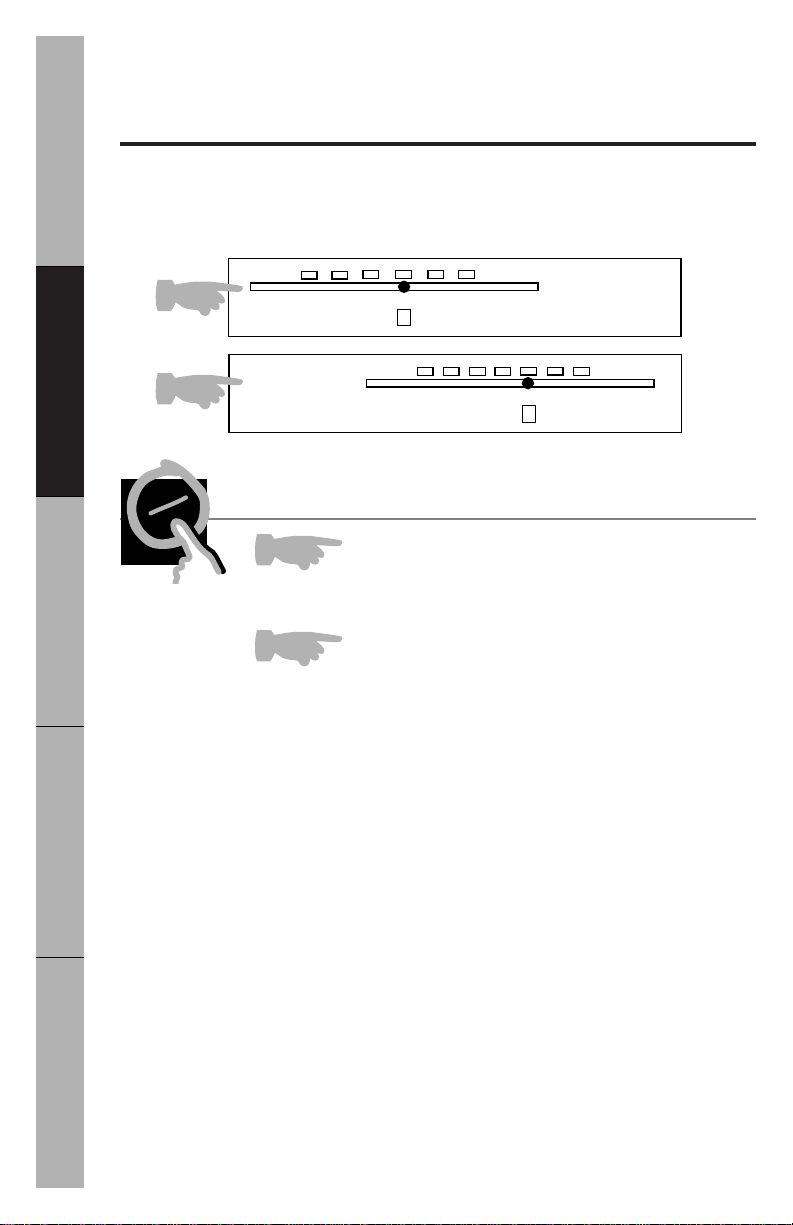
About the controls on the refrigerator.
Initially set the fresh food and freezer controls at 5. If you want colder or
warmer temperatures, adjust the fresh food temperature first. When
satisfied with that setting, adjust the freezer temperature.
1
3
7
9
5
COLD
FRESH FOOD
TEMPERATURE
COLDEST
1
3 5
7
9
FREEZER
TEMPERATURE
COLDEST
OFF
COLD
1
1
2
2
Control Settings
Page 9
9
Troubleshooting TipsInstallation Instructions Customer ServiceOperating InstructionsSafety Information
About the refrigerator shelves, racks and baskets.
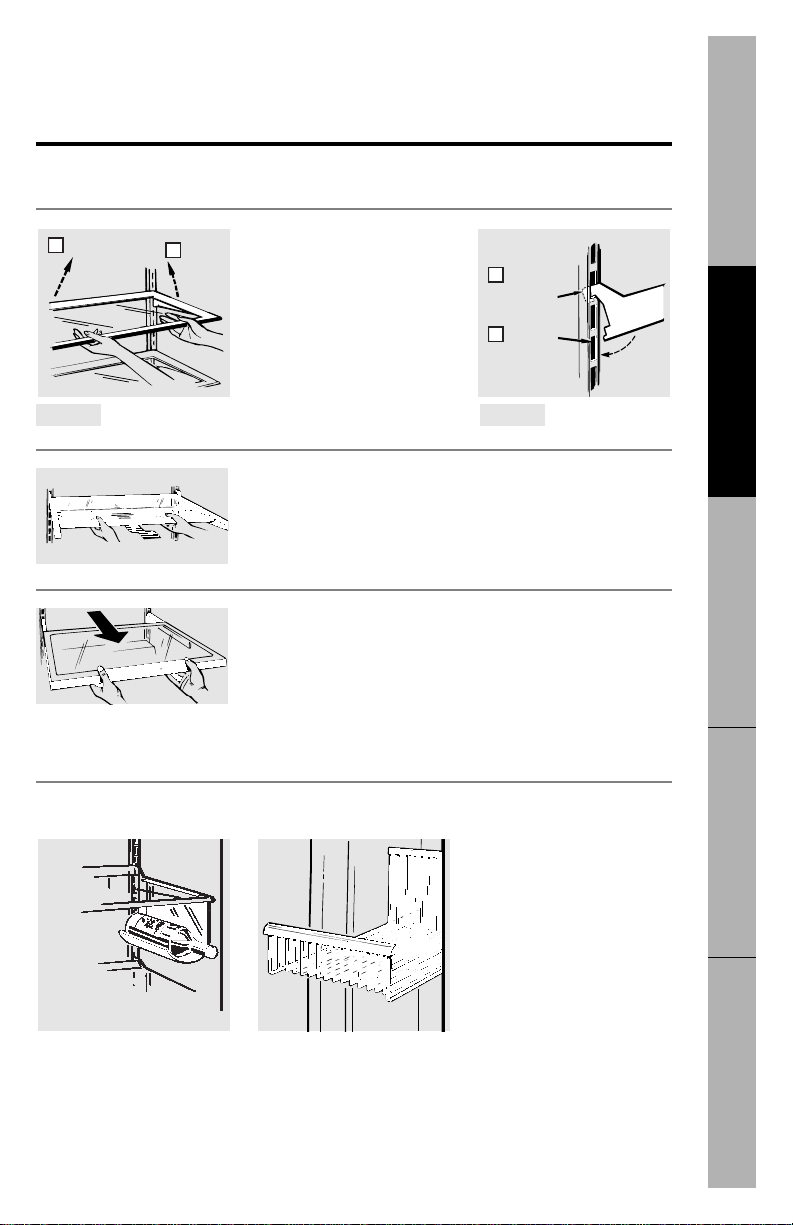
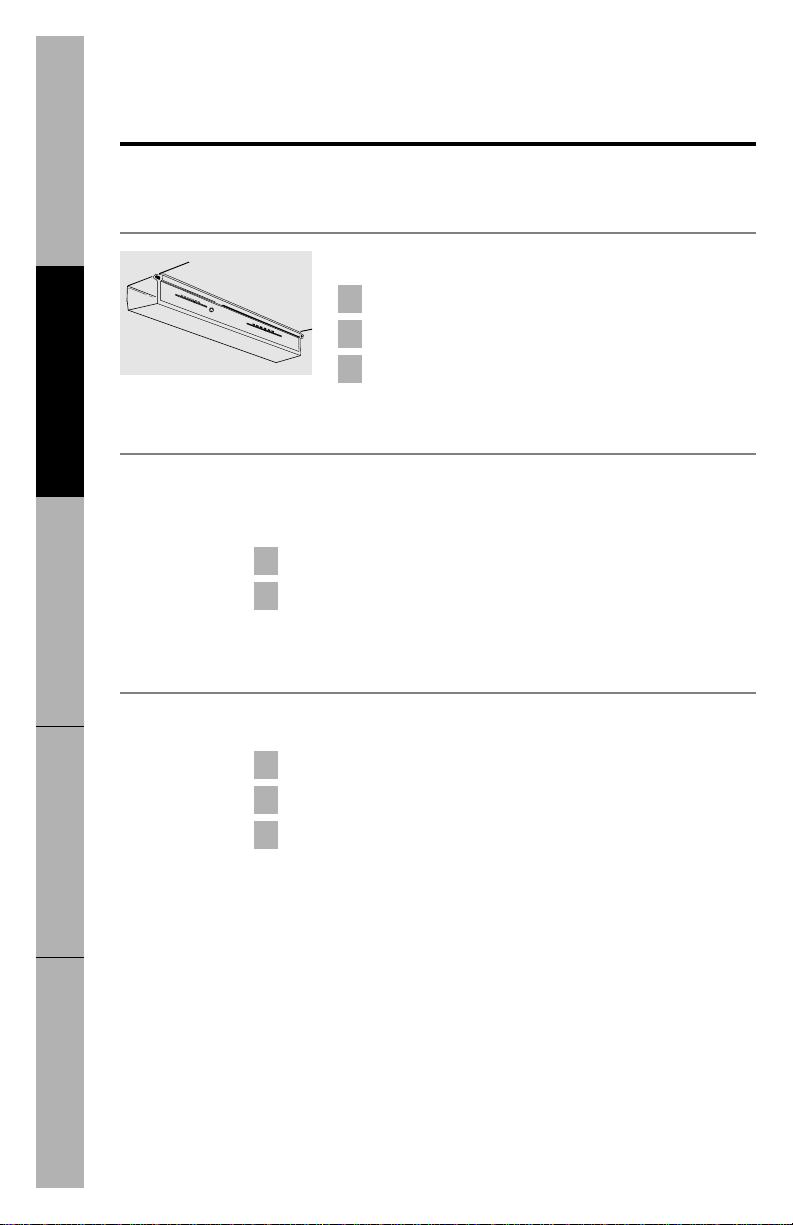
Rearranging the Shelves
Shelves in the fresh food
and freezer compartments
are adjustable.
Lift up and out
2
Tilt up
1
Insert
top hook
1
Lower to
lock in place
2
To Remove To Replace
Not all features are on all models.
Quick Space Shelf
This shelf splits in half and slides under itself for storage
of tall items on the shelf below.
Slide-Out Spillproof Shelf
(on some models)
The slide-out spillproof shelf allows you to reach items
stored behind others. The special edges are designed to
help prevent spills from dripping to lower shelves.
Make sure you push the shelves all the way back in before you
close the door .
Removable Wine Rack Freezer Baskets
Page 10
About the storage drawers and bins.
10
Operating Instructions
Installation Instructions
Safety InformationTroubleshooting TipsCustomer Service
Not all features are on all models.
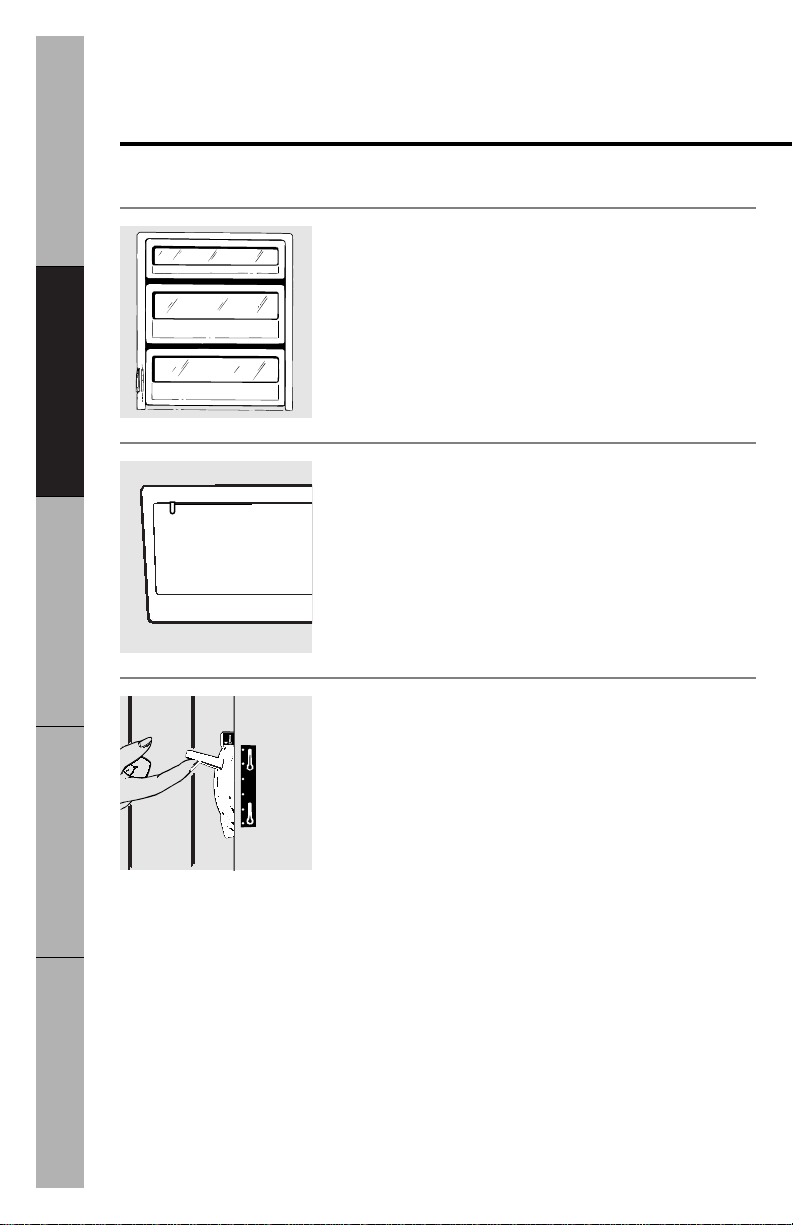
Fruit and Vegetable Drawers
Excess water that may accumulate in the bottom of the
drawers should be emptied and the drawers wiped dry.
Adjustable Humidity Drawers
Slide the control all the way to the
HIGH
setting
to provide high humidity recommended for most
vegetables.
Slide the control all the way to the
LOW
setting to
provide lower humidity levels recommended for
most fruits.
High Humidity Control Low
Convertible Meat Drawer
The convertible meat drawer has its own cold air duct to
allow a stream of cold air from the freezer compartment
to flow around the drawer.
The variable temperature control
regulates the air flow
from the freezer compartment.
Set control lever
down
to the coldest setting to store
fresh meats. If lever is left in meat position for a long
period of time, some frost may form on the inside of the
drawer.
Set control lever
up
to convert the drawer to normal
refrigerator temperature and provide extra vegetable
storage space. Cold air duct is turned off. Variable
settings between these extremes can be selected.
Normal
Coldest
Page 11
Not all features are on all models.
11
Troubleshooting T ipsInstallation Instructions Customer ServiceOperating InstructionsSafety Information
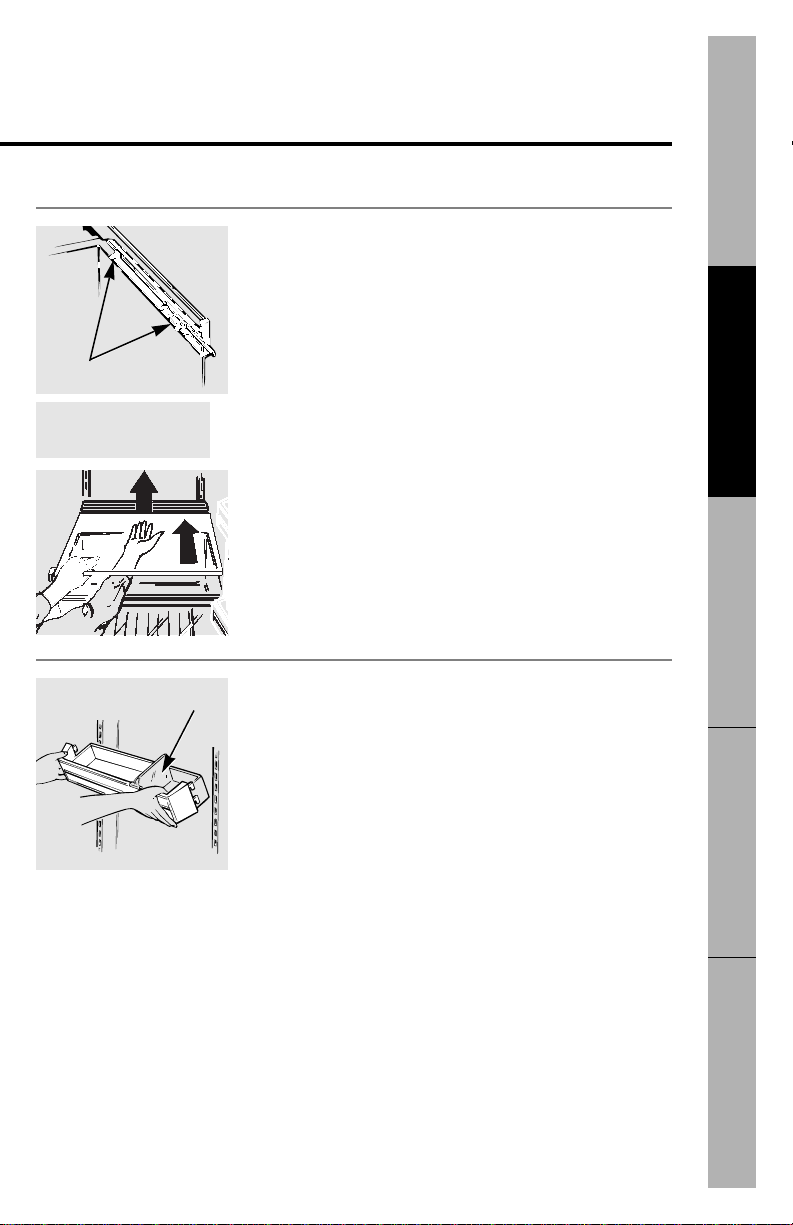
Drawer Removal
Drawers can easily be removed by tilting up slightly and
pulling past the
stop
location.
When the fresh food compartment door cannot be opened fully, you
must remove the lower door bins from the door before removing the
drawers.
To remove the glass shelf above the top drawer, first
remove the top drawer and any food on the shelf. Then
reach in, push the rear of the glass up until it touches
the bottom of the lower light shield. Then push the shelf
back (approx. 1/2
″—13mm) until it clears both the front
corner retainers.
To replace the shelf, reverse these steps.
Drawer Guides
When replacing the drawers, make
sure you slide them through both
drawer guides on the right side.
Bins on the Fresh Food Compartment Door
Adjustable bins can easily be carried from refrigerator to
work area.
T o remove:
Lift bin straight up until mounting hooks
disengage.
T o replace or relocate:
Select desired shelf height, engage
bin’s hook in slots on the tracks of the door, and push in.
Bin will lock in place.
The divider
(on some models) helps prevent tipping,
spilling or sliding of small items stored on the door
shelf. Place a finger on either side of the divider near the
front and move it back and forth to fit your needs.
Divider
Page 12
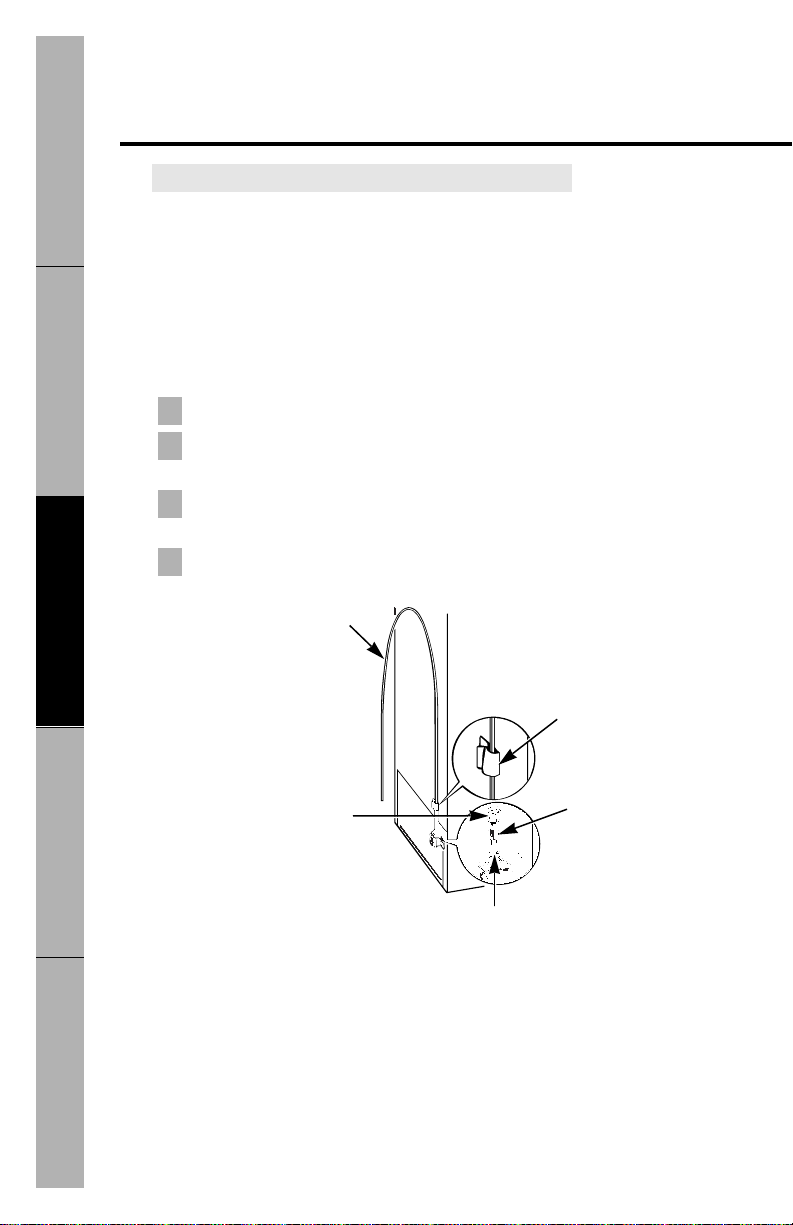
About the automatic icemaker.
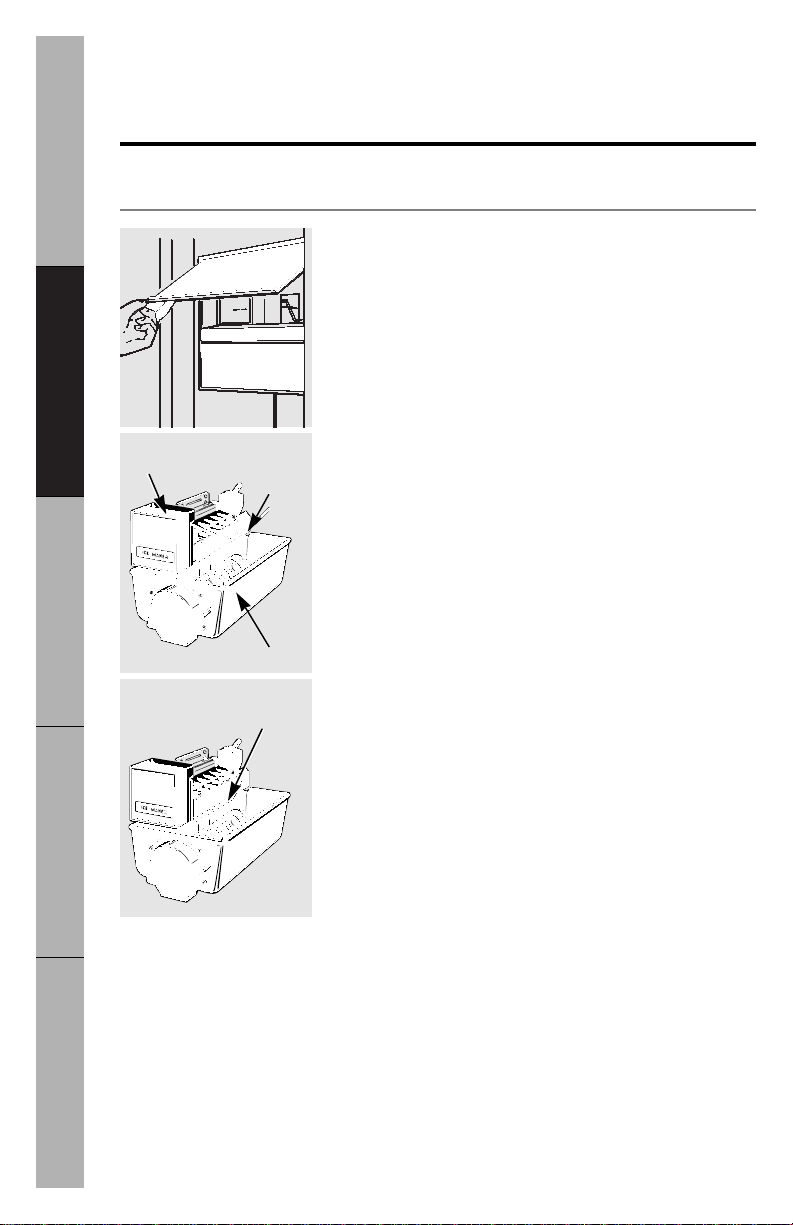
A newly-installed refrigerator may take 8 to 12 hours to begin making ice.
Automatic Icemaker
The icemaker will produce eight cubes per cycle—
approximately 120 cubes in a 24-hour period,
depending on freezer compartment temperature, room
temperature, number of door openings and other use
conditions.
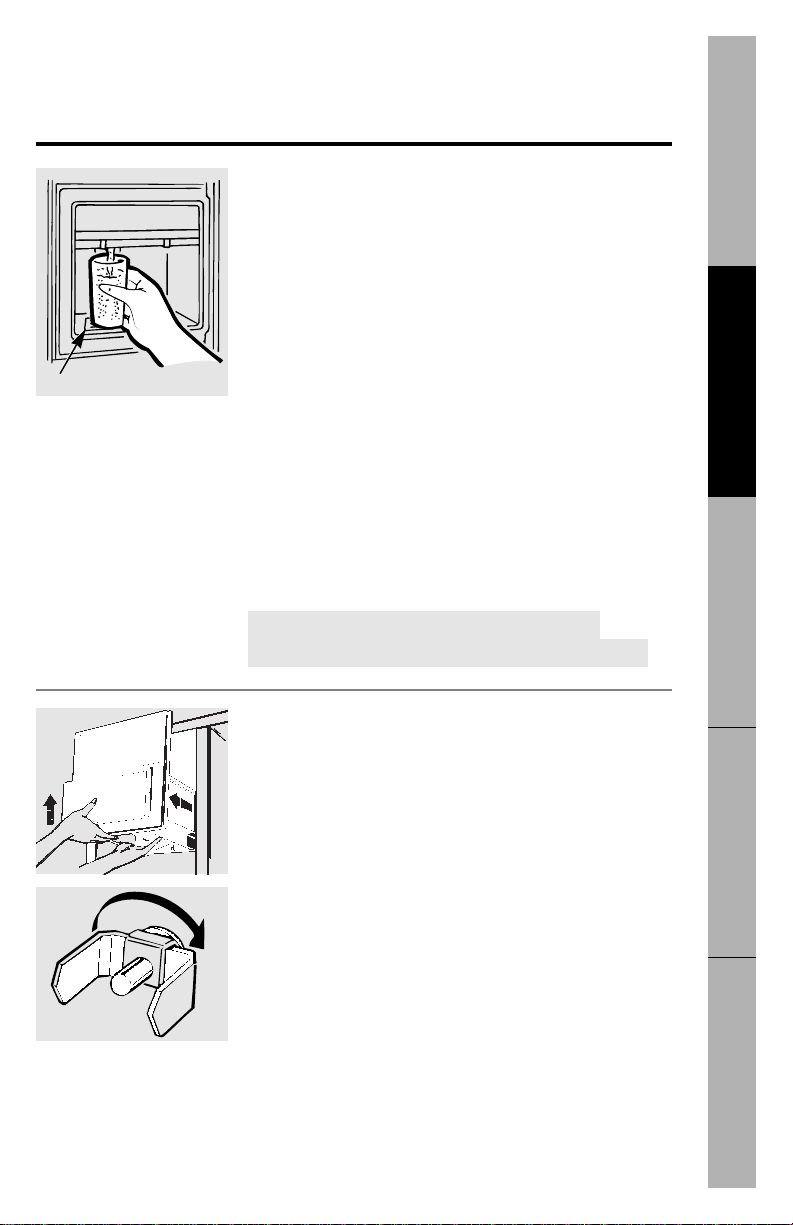
If the refrigerator is operated before the water
connection is made to the icemaker, raise the ice access
door and make sure the feeler arm is in the
STOP
(up)
position.
When the refrigerator has been connected to the water
supply, move the feeler arm to the
ON
(down) position.
The icemaker will fill with water when it cools to
freezing. A newly-installed refrigerator may take
8 to 12 hours to begin making ice cubes.
Throw away the first few batches of ice to allow the water
line to clear.
Be sure nothing interferes with the swing of the feeler arm.
It is normal for several cubes to be joined together.
If ice is not used frequently, old ice cubes will become
cloudy and taste stale.
12
Operating Instructions
Installation Instructions
Safety InformationTroubleshooting TipsCustomer Service
Icemaker
Ice Storage Bin
Feeler arm
in the
STOP
(up) position
Feeler arm in the
ON
(down) position
Page 13
About the ice and water dispenser.
Troubleshooting T ipsInstallation Instructions Customer ServiceOperating InstructionsSafety Information
Rotate
Drive
Mechanism
Ice Storage Bin
To remove:
Lift the left corner to free the bin from the shelf. Pull the
bin straight out while supporting it at front and back.
T o replace:
Slide the bin back until the tab on the bin locks into the
slot on the shelf. If the bin does not go all the way back,
remove it and turn the drive mechanism 1/4 turn. Then
push the bin back again until the tab on the bin locks
into the slot on the shelf.
13
To Use the Dispenser
Press the rim of the glass gently against the dispenser pad.
Set the selector switch to
CUBES,CRUSHED ICE
(on some
models) or
WA TER.
The spill shelf is not self-draining. To reduce water
spotting, the shelf and its grille should be cleaned
regularly.
If no water is dispensed when the refrigerator is first installed, there
may be air in the water line system. Press the dispenser pad for at
least two minutes to remove trapped air from the water line and to
fill the water system. To flush out impurities in the water line, throw
away the first six glassfuls of water.
A light switch (on some models) turns the
night light
in
the dispenser on or off. The light also comes on when
the dispenser pad is pressed. The light in the dispenser
should be replaced with a 7 watt maximum bulb when it
burns out.
CAUTION: Never put fingers or any other
objects into the ice crusher discharge opening.
Spill Shelf
Page 14

About the ice and water dispenser.
14
Operating Instructions
Installation Instructions
Safety InformationTroubleshooting TipsCustomer Service
■ Add ice before filling the glass with a beverage. This will
prevent splashing, which could cause the ice selector switch
to stick or bind.
■ Do not add ice from trays or bags to the storage bin. It may not
crush or dispense well.
■ Avoid overfilling glass with ice and use of narrow or extra-tall
glasses. Backed-up ice can jam the chute or cause the door in the
chute to freeze shut. If ice is blocking the chute, poke it through
with a wooden spoon.
■ Beverages and foods should not be quick-chilled in the ice
storage bin. Cans, bottles or food packages in the storage bin
may cause the icemaker or auger to jam.
■ Some crushed ice may be dispensed even though you selected
CUBES.
This happens occasionally when a few cubes accidentally
get directed to the crusher.
■ After crushed ice is dispensed, some water may drip from
the chute.
■ Sometimes a mound of snow will form on the door in the ice
chute. This condition is normal and usually occurs when you
have dispensed crushed ice repeatedly. The snow will eventually
evaporate.
■ Dispensed water is not ice cold. For colder water, add crushed ice
or cubes before dispensing water.
Important Facts About Your Dispenser
Page 15
15
T roubleshooting TipsInstallation Instructions Customer ServiceOperating InstructionsSafety Information
Care and cleaning of the refrigerator.
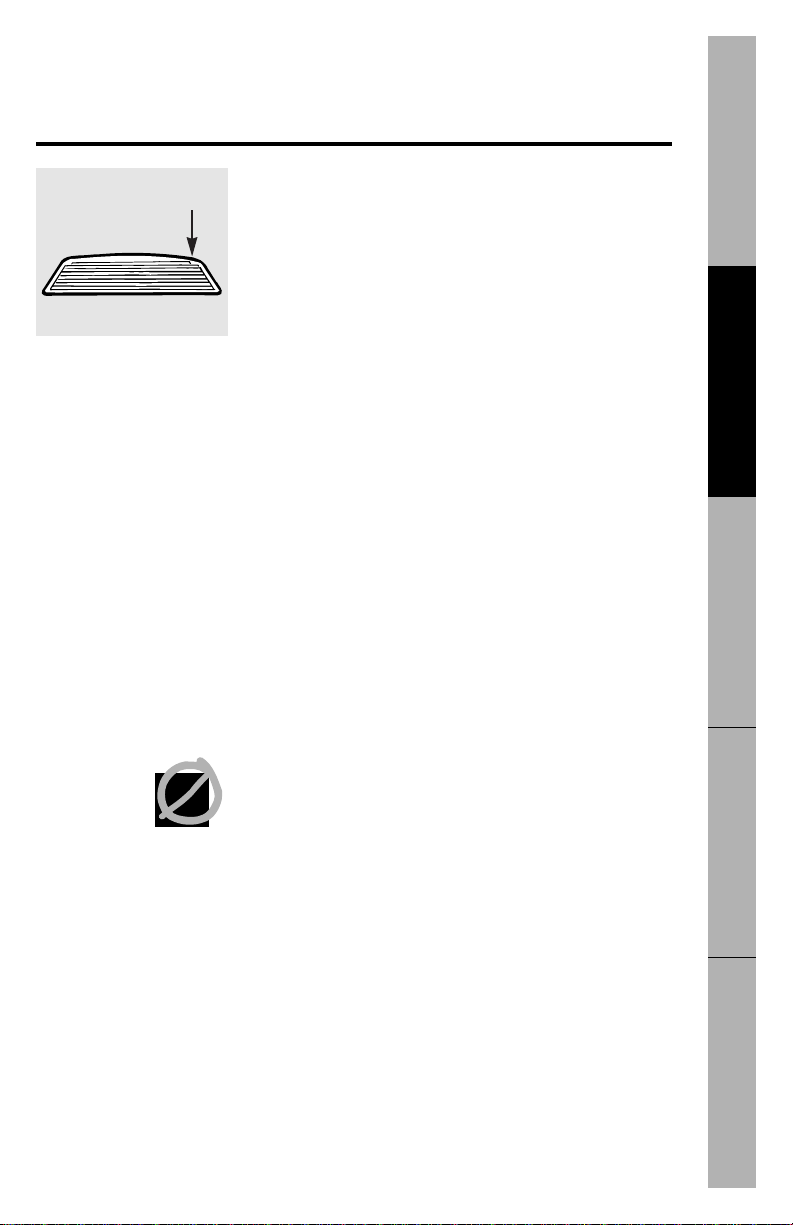
Cleaning the Outside
The dispenser well
, beneath the grille, should be wiped
dry. Water left in the well may leave deposits. Remove
the deposits by adding undiluted vinegar to the well.
Soak until the deposits disappear or become loose
enough to rinse away.
The dispenser pad
. Clean with warm water and baking
soda solution—about a tablespoon (15 ml) of baking
soda to a quart (1 L) of water. Rinse thoroughly and
wipe dry.
HINT : Open the freezer door par t way to prevent dispensing of ice
or water when cleaning.
The soft door handles
(on some models) are easy to keep
clean if they are waxed every few months. Use a
household wax such as Pledge brand or Jubilee brand to
coat the handles. Soil will then easily wash off with soapy
water or a non-abrasive all-purpose cleaner.
The long door handles and trim
(on models with a trim kit).
Clean with a cloth dampened with soapy water. Dry with
a soft cloth.
Keep the outside clean.
Wipe with a clean cloth lightly
dampened with kitchen appliance wax or mild liquid
dish detergent. Dry and polish with a clean, soft cloth.
Do not wipe the refrigerator with a soiled dish cloth or wet towel.
These may leave a residue that can erode the paint. Do not use
scouring pads, powdered cleaners, bleach or cleaners containing
bleach because these products can scratch and weaken the paint
finish.
Press here to
remove grille.
Page 16
Care and cleaning of the refrigerator.
16
Operating Instructions
Installation Instructions
Safety InformationTroubleshooting TipsCustomer Service
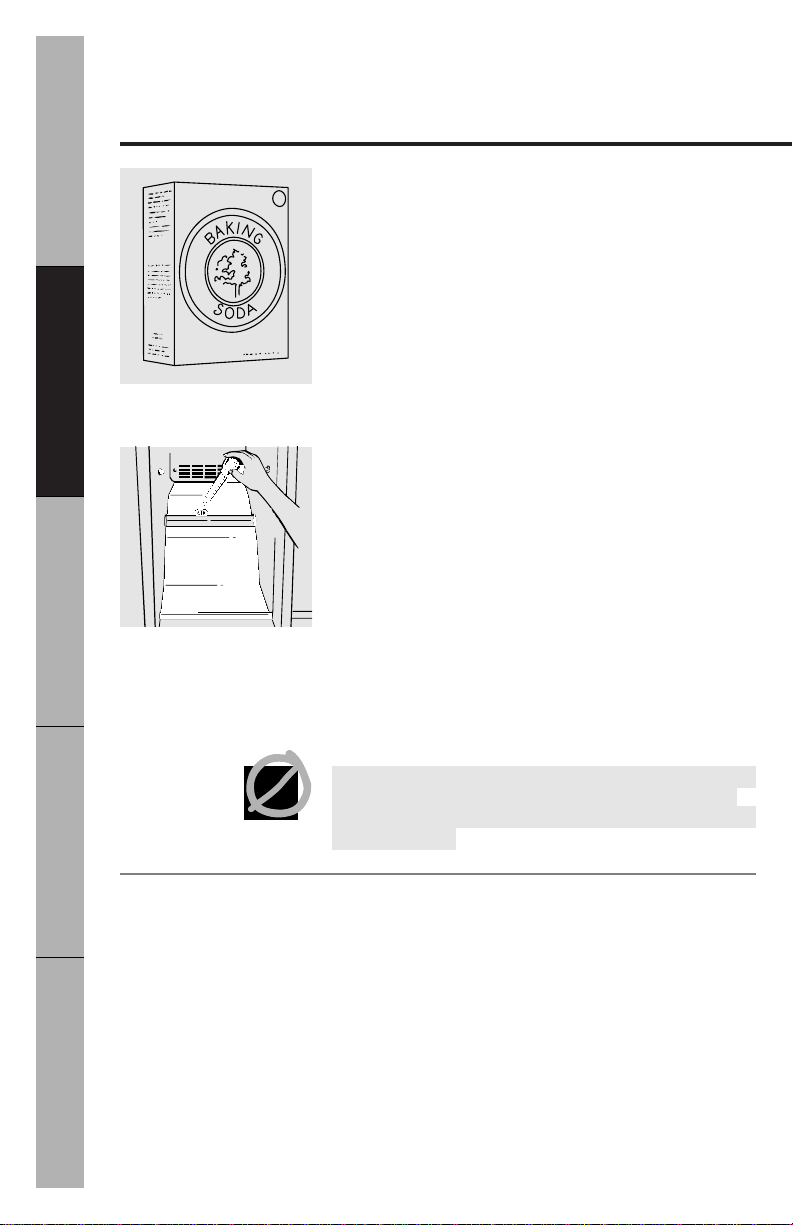
Cleaning the Inside
T o help pr event odors,
leave an open box of baking soda
in the fresh food and freezer compartments.
Unplug the refrigerator before cleaning.
If this is not
practical, wring excess moisture out of sponge or cloth
when cleaning around switches, lights or controls.
Use warm water and baking soda solution—about a
tablespoon (15 ml) of baking soda to a quart (1 L) of
water. This both cleans and neutralizes odors. Rinse
and wipe dry.
Drain opening in freezer compartment.
During yearly
cleaning, remove bottom freezer basket and flush a
solution of baking soda—1 teaspoon (5 ml) and 2 cups
(500 ml) of hot (not boiling) water—through the drain
line with the help of a meat baster. This will help
eliminate odor and reduce the likelihood of a clogged
drain line. If drain becomes clogged, use a meat baster
and baking soda solution to force the clog through the
drain line.
After cleaning the door gaskets, apply a thin layer of
petroleum jelly to the door gaskets at the hinge side.
This helps keep the gaskets from sticking and bending
out of shape.
Avoid cleaning cold glass shelves (on some models) with hot water
because the extreme temperature difference may cause them to
break. Handle glass shelves carefully. Bumping tempered glass can
cause it to shatter.
Secure all loose items such as grille, shelves and drawers by taping
them securely in place to prevent damage.
Be sure the refrigerator stays in an upright position during moving.
Preparing to Move
Page 17
17
T roubleshooting TipsInstallation Instructions Customer ServiceOperating InstructionsSafety Information
For long vacations or absences, remove food and unplug the
refrigerator. Move the freezer control to the
OFF
position, and clean
the interior with a baking soda solution of one tablespoon
(15 ml) of baking soda to one quart (1 L) of water. Leave the
doors open.
Move the icemaker feeler arm to
STOP
(up) position and shut
off the water supply to the refrigerator.
If the temperature can drop below freezing, have a qualified
servicer drain the water supply system to prevent serious property
damage due to flooding.
Preparing for Vacation
Behind the Refrigerator
Be careful when moving the refrigerator away from the wall. All
types of floor coverings can be damaged, particularly cushioned
coverings and those with embossed surfaces.
Pull the refrigerator straight out and return it to position by
pushing it straight in. Moving the refrigerator in a side direction
may result in damage to the floor covering or refrigerator.
When pushing the refrigerator back, make sure you don’t roll over the power cord
or icemaker supply line.
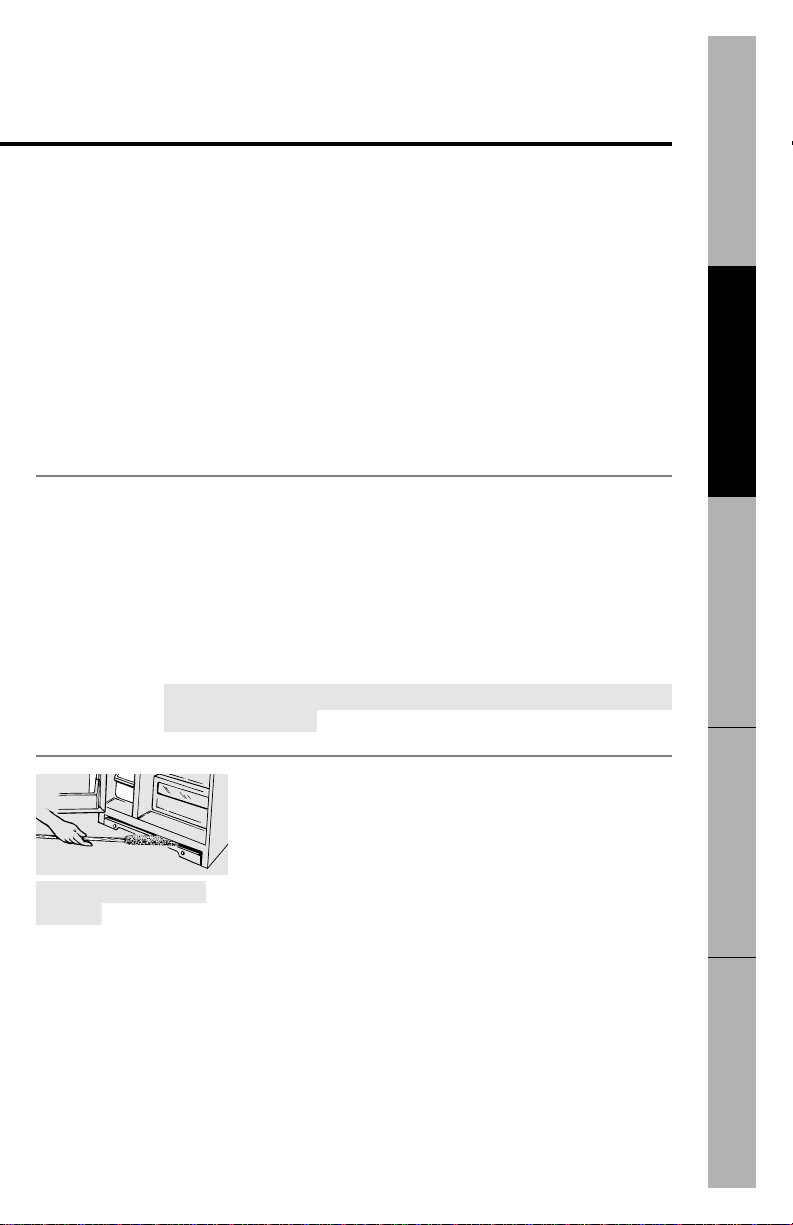
Under the Refrigerator
For most efficient operation, keep the area under the
refrigerator clean. Remove the base grille and sweep
away or vacuum up dust.
For best results, use a brush specially designed for this
purpose. It is available at most appliance parts stores.
Clean the condenser coils at least
once a year.
Page 18
Replacing the light bulbs.
Turning the control to the OFF position does not remove power to the
light circuit.
Fresh Food Compartment—Upper Light
Unplug refrigerator.
Pull off the temperature control knobs.
To remove the light shield, pull it straight out.
After replacing with an appliance bulb of the same or lower
wattage, reinstall the light shield and plug the refrigerator back in.
3
2
1
FREEZER
TEMPERATURE
COLD
OFF
COLDEST
1
3
5
*
7
9
FRESH FOOD
TEMPERATURE
COLD COLDEST
1
3
5
*
7
9
Profile
*INITIAL TEMPERATURE SETTINGS
ALLOW 24 HRS. FOR TEMP. TO STABILIZE
18
Unplug the refrigerator.
Remove the shelf just below light shield.
Pull the shield toward you to reach the bulb.
After replacing with an appliance bulb of the same or lower wattage, reinstall the
light shield and shelf, and plug the refrigerator back in.
3
2
1
Freezer Compartment
Operating Instructions
Installation Instructions
Safety InformationTroubleshooting TipsCustomer Service
This light is located behind a shield at the rear of the fresh food compartment.
Unplug the refrigerator.
Grasp the top edge of the light shield and lift it up and forward
to free its top edge.
After replacing with an appliance bulb of the same or lower wattage, hook the
top of the shield back in place and plug the refrigerator back in.
2
1
Fresh Food Compartment—Lower Light
(on some models)
Page 19
19
T roubleshooting TipsInstallation Instructions Customer ServiceOperating InstructionsSafety Information
Preparing to install the refrigerator.
Read these instructions completely and carefully.
Water Supply to the Icemaker
You will need to connect the icemaker to a cold water line.
A water supply kit (containing copper tubing, shutoff valve, fittings
and instructions) is available at extra cost from your dealer or from
Service and Parts, 800-626-2002.
Do not install the refrigerator where the temperature will go below
60°F. (16°C.) because it will not run often enough to maintain
proper temperatures.
Install it on a floor strong enough to support it fully loaded.
Refrigerator Location
Allow the following clearances for ease of installation, proper air
circulation and plumbing and electrical connections:
Sides . . . . . . . . . . . . . . . . . . . . . . . . . 5/8
″(15 mm)
Top . . . . . . . . . . . . . . . . . . . . . . . . . . 1″ (25 mm)
Back . . . . . . . . . . . . . . . . . . . . . . . . . . 1/2″ (13 mm)
If built-in, allow 7/8″(22 mm) for hinge covers.
If the refrigerator is against a wall on either side, allow 3/4″
(19 mm) for door clearance.
Clearances
Page 20
Preparing to install the refrigerator.
20
Operating Instructions
Installation Instructions
Safety Information
Troubleshooting TipsCustomer Service
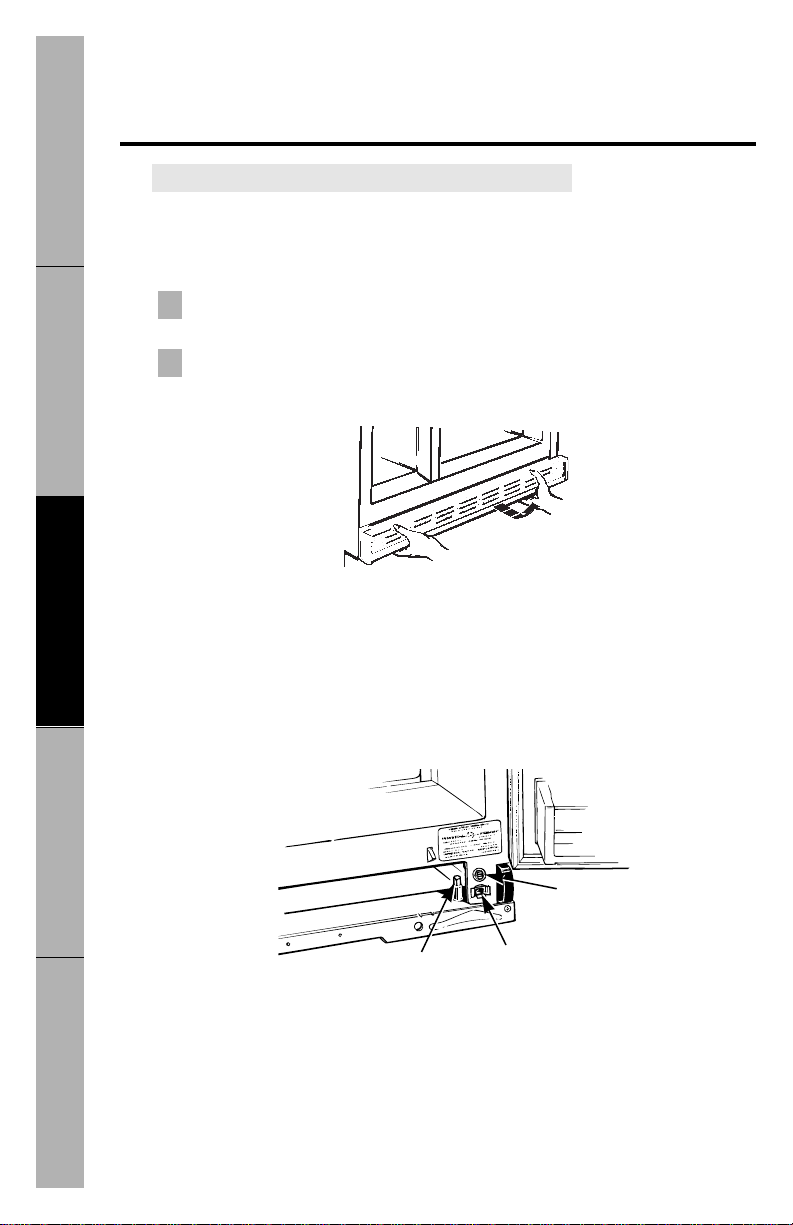
Leveling Rollers
The rollers have 2 purposes:
The rollers can be adjusted so the refrigerator is firmly positioned on the
floor and does not rock back and forth.
Rollers allow you to move the refrigerator away from the wall for cleaning.
T o adjust the r ollers,
remove the base grille by pulling it out at the bottom.
Turn the front roller adjusting screws
clockwise to raise
the refrigerator,
counterclockwise to lower
it. Use a 3/8″socket wrench, adjustable wrench
or pliers.
Turn the rear roller adjusting screws
clockwise to raise
the refrigerator,
counterclockwise to lower
it. Use a flat blade screwdriver.
NOTE: When leveling, you can improve door closure by raising the front as much as 5/8″(15 mm)
more than the rear of the refrigerator.
To replace the base grille,
align prongs on back of grille with clamps in cabinet
and push forward until grille snaps into place.
2
1
Read these instructions completely and carefully.
Front Roller
Adjusting Screw
Rear Roller
Adjusting Screw
Slot where prong of grille
snaps into place
Page 21
Troubleshooting TipsInstallation Instructions
Customer Service
Operating InstructionsSafety Information
Adding door panels.
Read these instructions completely and carefully.
Before You Begin
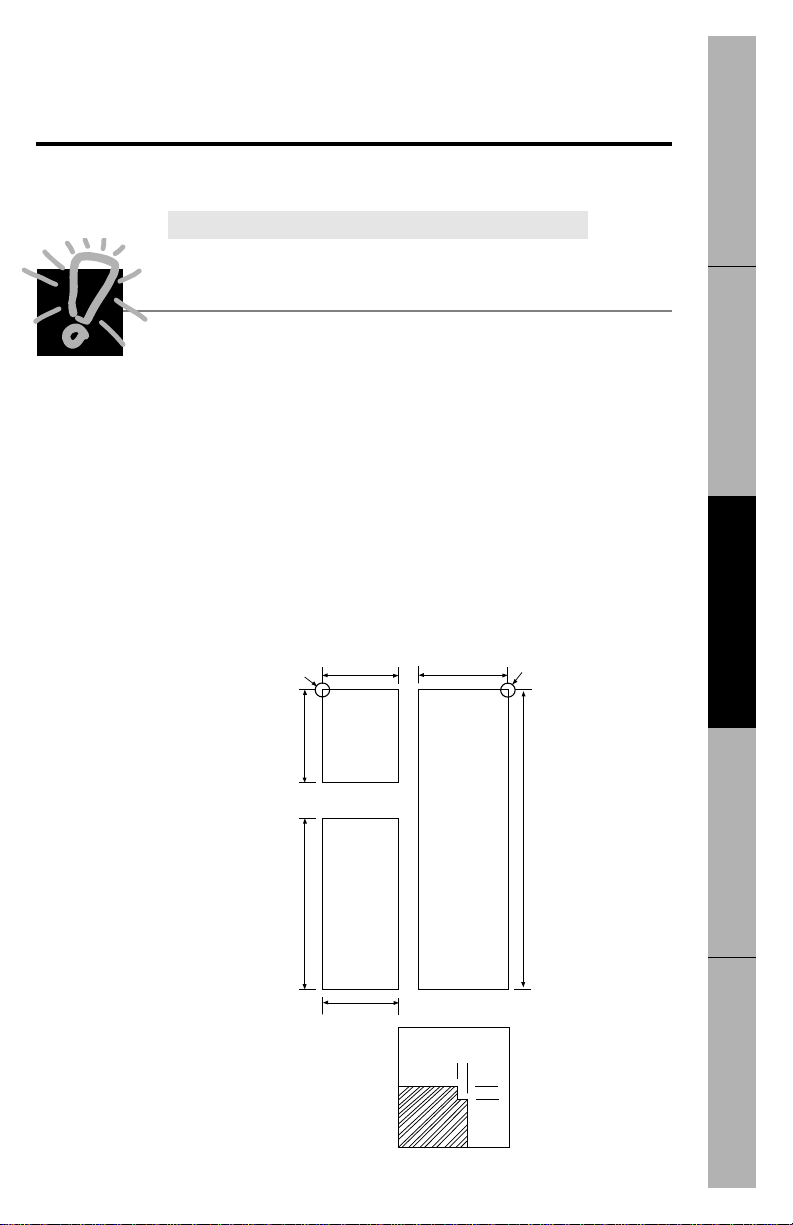
These instructions describe how to insert decorator panels
and what size the panels should be.
Panels Should Be Cut to the Following Dimensions:
Top freezer panel—145/16″ x 183/4″(36.4 cm x 47.6 cm)
Bottom freezer panel—14
5
/16″ x 323/8″(36.4 cm x 82.2 cm)
Fresh food panel—20
1
/16″ x 653/16″ (51.0 cm x 165.6 cm)
Panels that are 1/4″(6 mm) thick will fit the door frame trim with
no special preparation. If you have a material thinner than 1/4″
(6 mm), you will need to add a filler behind the panel for proper fit.
Pre-cut white and black panels are available from your dealer.
On models with a trim kit
21
Special cutout required,
see below.
Special cutout required,
see below.
14
5
/16″
36.4 cm
18
3
/4″
47.6 cm
32
3
/8″
82.2 cm
14
5
/16″
36.4 cm
1/8″
3 mm
5/16″
8 mm
20
1
/16″
51.0 cm
65
3
/16″
165.6 cm
A cut-out is required at these outer corners,
5/16″ (8 mm) long, 1/8″(3 mm) deep.
Page 22
Inserting the door panels.
22
Operating Instructions
Installation Instructions
Safety Information
Troubleshooting TipsCustomer Service
Read these instructions completely and carefully.
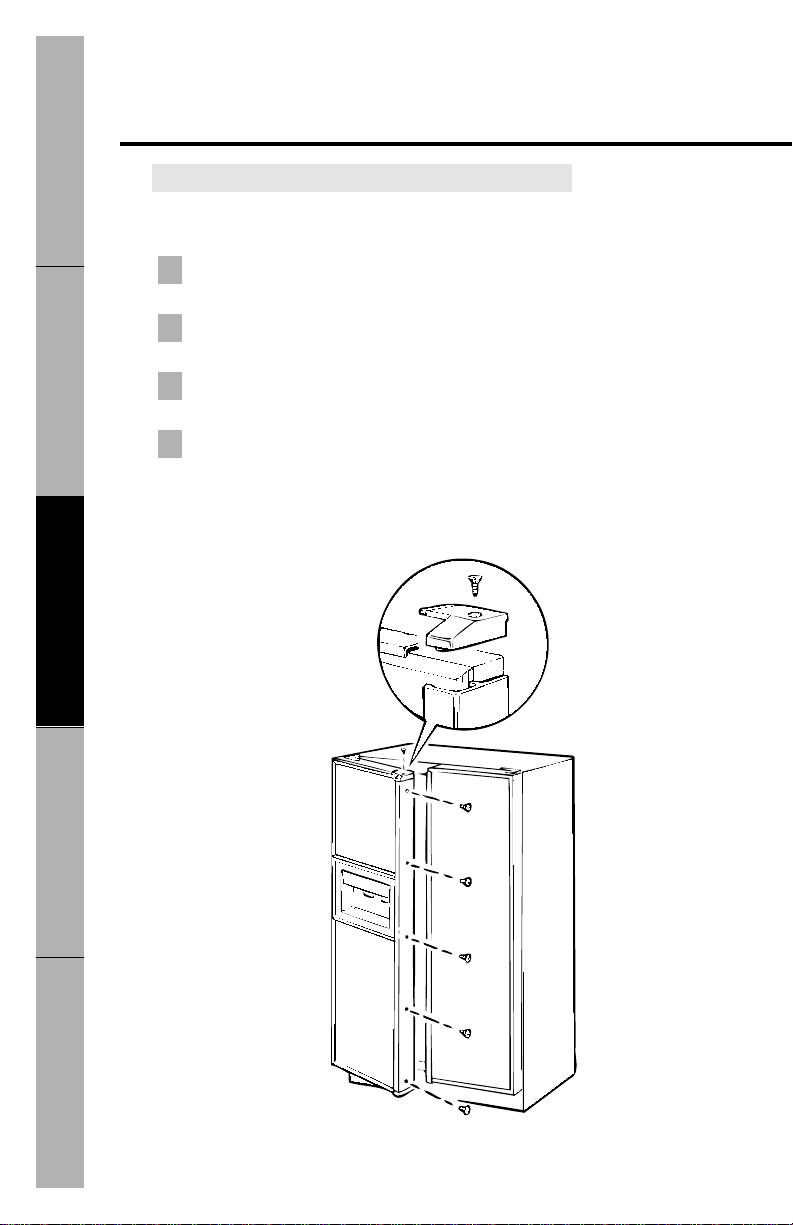
Remove the Door Handle Trim
Open the freezer door and remove the single screw from the top handle cap.
Do not try to remove the cap.
Loosen the screws across the top trim of the door approximately 1/4″(6
mm). This allows the top handle cap to slip out from under the top trim.
Remove the 5 screws from the full-length handle. Keep all screws.
Extra replacement screws for the door trim can be found in the storage drawers.
Carefully
remove the freezer door handle along with the top
handle cap.
NOTE:Be careful not to damage the bottom handle cap when removing the freezer door
handle. It is attached to the full-length handle with a screw and does not need to be
removed from the handle.
4
3
2
1
Page 23
Troubleshooting TipsInstallation Instructions
Customer Service
Operating InstructionsSafety Information
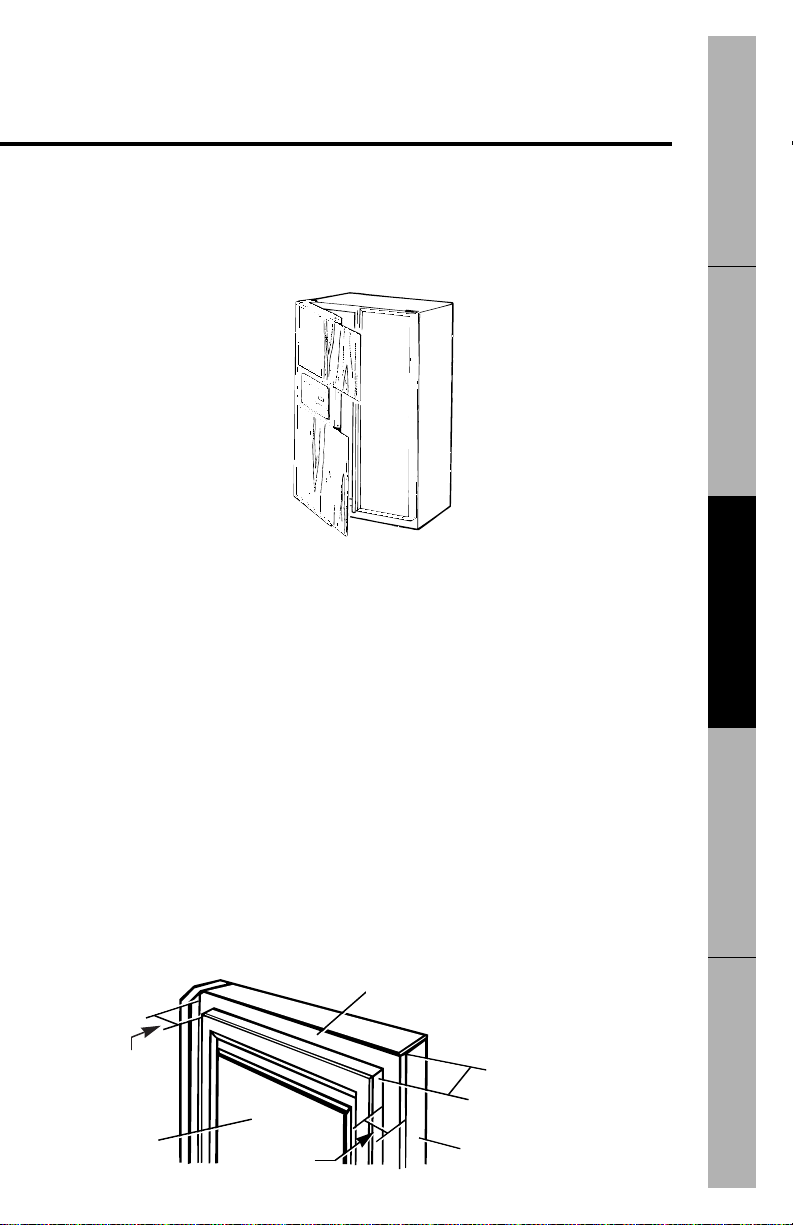
Insert the Panels
Carefully push the door panels into the slots. Make sure that the top freezer
panel is put in with the cut-out at the upper left hand corner. When inserting the
fresh food panel make sure the cut-out is at the upper right hand corner.
Replace the Door Handle and Trim
Reinstall the full length handle and top handle cap. Loosely screw the handle
onto the door. Place the cap on the top of the handle and loosely screw down the
cap. Lift the handle up and tighten the top screw on the handle. Then tighten
the handle cap screw so that the cap and handle fit flush. Tighten all the screws.
The fresh food panel is installed the same way.
3/4″ (19 mm) or Raised Panel
A raised panel design screwed or glued to a 1/4″(6 mm) thick backing, or a
3/4″(19 mm) routed board can be used. The raised portion of the panel must
be fabricated to permit clearances of at least 2″(51 mm) from the handle side
for fingertip clearance and 1
1
/4″(32 mm) from the hinge side to avoid striking
adjacent cabinetry.
Weight limitations for custom panels:
Fresh Food 38 lb. (17 kg) max.
Freezer Door 20 lb. (9 kg) max.
2″(51 mm)
Clearance
Handle Side
1
1
/4″ (32 mm)
Clearance
Hinge Side
Appearance
Panel
Refrigerator
Door
1/4″ (6 mm)
Thick Backing
3/4″
(19 mm)
23
Page 24

Installing the water line.
24
Operating Instructions
Installation Instructions
Safety Information
Troubleshooting TipsCustomer Service
Before You Begin
This water line installation is not warranted by the
refrigerator or icemaker manufacturer. Follow these
instructions carefully to minimize the risk of expensive
water damage.
Water hammer (water banging in the pipes) in house
plumbing can cause damage to refrigerator parts and lead
to water leakage or flooding. Call a qualified plumber to
correct water hammer before installing the water supply
line to the refrigerator.
To prevent burns and product damage, do not hook up the
water line to the hot water line.
If you use your refrigerator before connecting the water line,
make sure the icemaker feeler arm is kept in the STOP(up)
position.
Do not install the icemaker tubing in areas where
temperatures fall below freezing.
When using any electrical device (such as a power drill)
during installation, be sure the device is insulated or wired
in a manner to prevent the hazard of electric shock.
All installations must be in accordance with local plumbing
code requirements.
Read these instructions completely and carefully.
Page 25

25
T roubleshooting TipsInstallation Instructions
Customer Service
Operating InstructionsSafety Information
To determine how much copper tubing you need:
Measure the distance from the water valve on the back of the
refrigerator to the water supply pipe. Then add 8 feet (244 cm).
Be sure there is sufficient extra tubing [about 8 feet (244 cm)
coiled into 3 turns of about 10 inches (25 cm) diameter] to allow
the refrigerator to move out from the wall after installation.
■
A water supply kit
(containing copper tubing, shutoff valve and
fittings listed below) is available at extra cost from your dealer or
from Parts and Accessories, 800-626-2002.
■
Cold water supply.
The water pressure must be between
20 and 120 p.s.i.
■
Power drill.
■
Copper tubing,
1/4″outer diameter to connect the refrigerator to
the water supply. Be sure both ends of the tubing are cut square.
Do not use plastic tubing or plastic fittings because the water supply line is under
pressure at all times. Certain types of plastic tubing may become brittle with age
and crack, resulting in water leakage.
■
T wo 1/4 ″ outer diameter compression nuts and 2 fer rules (sleeves)—
to connect the copper tubing to the shutoff valve and the
refrigerator water valve.
■ If your existing water line has a flared fitting at the end, you will
need an
adapter
(available at plumbing supply stores) to connect
the water line to the refrigerator
OR
you can cut off the flared
fitting with a
tube cutter
and then use a compression fitting.
■
Shutoff valve
to connect to the cold water line. The shutoff valve
should have a water inlet with a minimum inside diameter of
5/32″at the point of connection to the
COLD WATER LINE.
Saddletype shutoff valves are included in many water supply kits. Before
purchasing, make sure a saddle-type valve complies with your
local plumbing codes.
What You Will Need
Page 26
Installing the water line.
26
Operating Instructions
Installation Instructions
Safety Information
Troubleshooting TipsCustomer Service
Read these instructions completely and carefully.
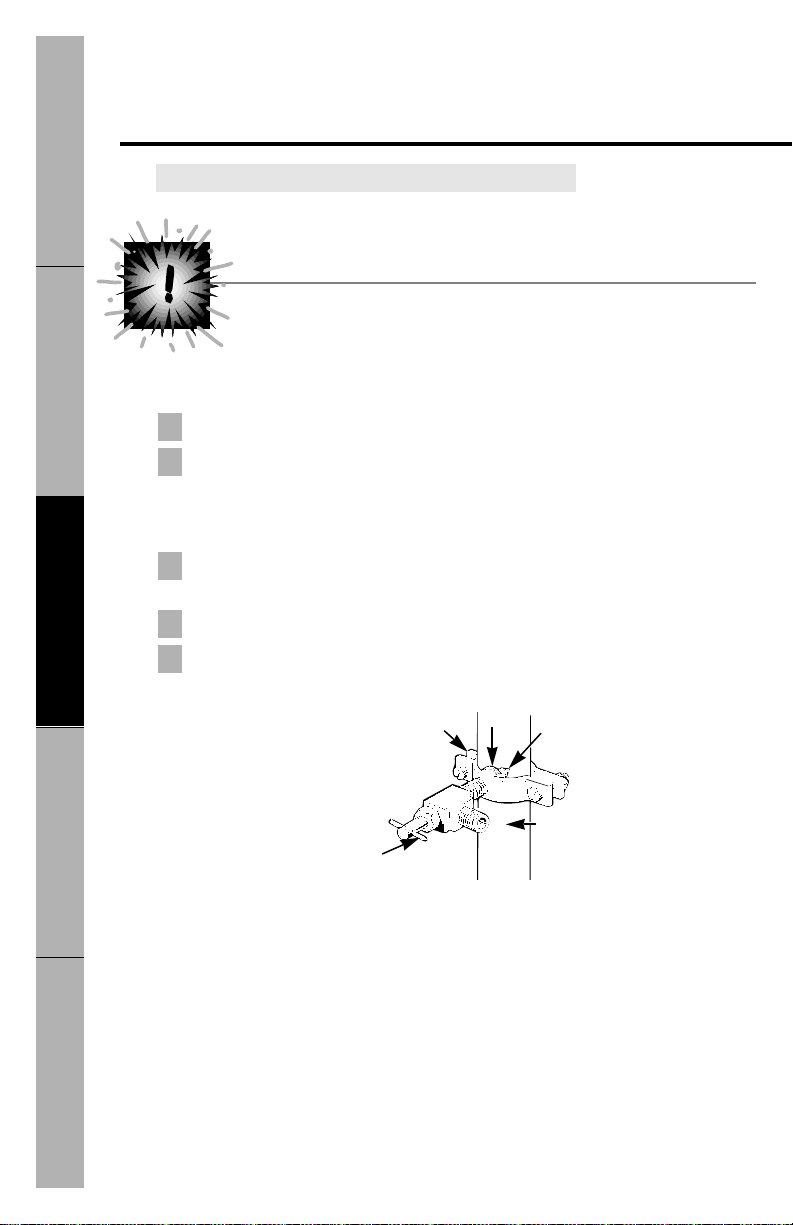
Install the Shutoff Valve
Install the shutoff valve on the nearest frequently used drinking water line.
Choose a location for the valve that is easily accessible. It is best to connect
into the side of a vertical water pipe. When it is necessary to connect into a
horizontal water pipe, make the connection to the top or side, rather than at
the bottom, to avoid drawing off any sediment from the water pipe.
Drill a 1/4
″hole in the water pipe, using a sharp bit. Remove any burrs
resulting from drilling the hole in the pipe.
Fasten the shutoff valve to the cold water pipe with the pipe clamp.
Tighten the clamp screws until the sealing washer begins to swell.
Do not overtighten or you may crush the copper tubing.
5
4
3
2
1
Washer
Inlet End
Pipe Clamp
Vertical Cold Water Pipe
Saddle-Type Shutoff Valve
Turn on the nearest faucet long enough to clear the line of water.
Shut Off the Main Water Supply
Page 27
27
T roubleshooting TipsInstallation Instructions
Customer Service
Operating InstructionsSafety Information
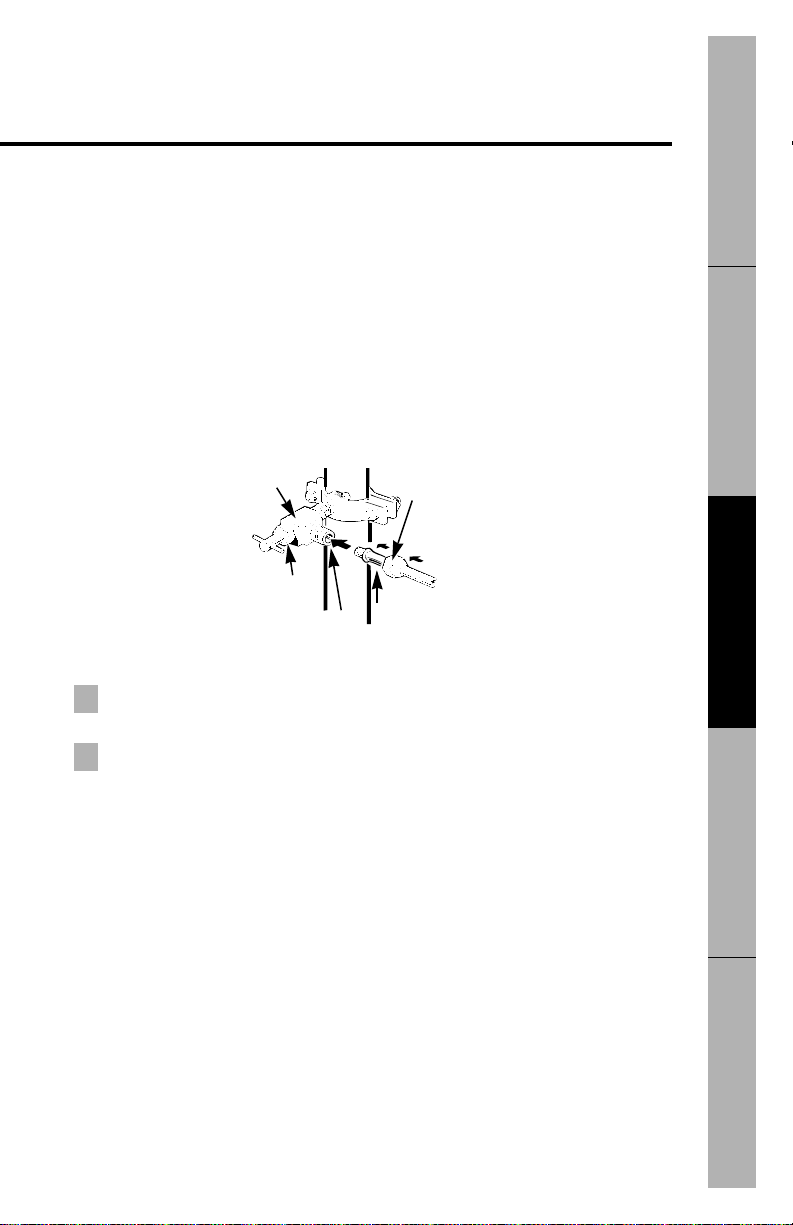
Route the Copper Tubing and Connect It to the Shutoff Valve
Route the copper tubing between the cold water line and the refrigerator.
Route the tubing through a hole drilled in the wall or floor (behind the
refrigerator or adjacent base cabinet) as close to the wall as possible.
Be sure there is sufficient extra tubing [about 8 feet (244 cm) coiled into 3 turns of about
10
″(25 cm) diameter] to allow the refrigerator to move out from the wall after installation.
Place the compression nut and ferrule (sleeve) onto the end of the tubing and
connect it to the shutoff valve.
Make sure the tubing is fully inserted into the valve. Tighten the compression
nut securely.
Saddle-Type Shutoff Valve
Compression Nut
Packing
Nut
Outlet Valve
Ferrule (sleeve)
Turn On the Water and Flush Out the Tubing
Turn the main water supply on and flush out the tubing until the water
is clear.
Shut the water off at the water valve after about one quart (1 L) of water has
been flushed through the tubing.
2
1
Page 28
Installing the water line.
28
Operating Instructions
Installation Instructions
Safety Information
Troubleshooting TipsCustomer Service
Read these instructions completely and carefully.
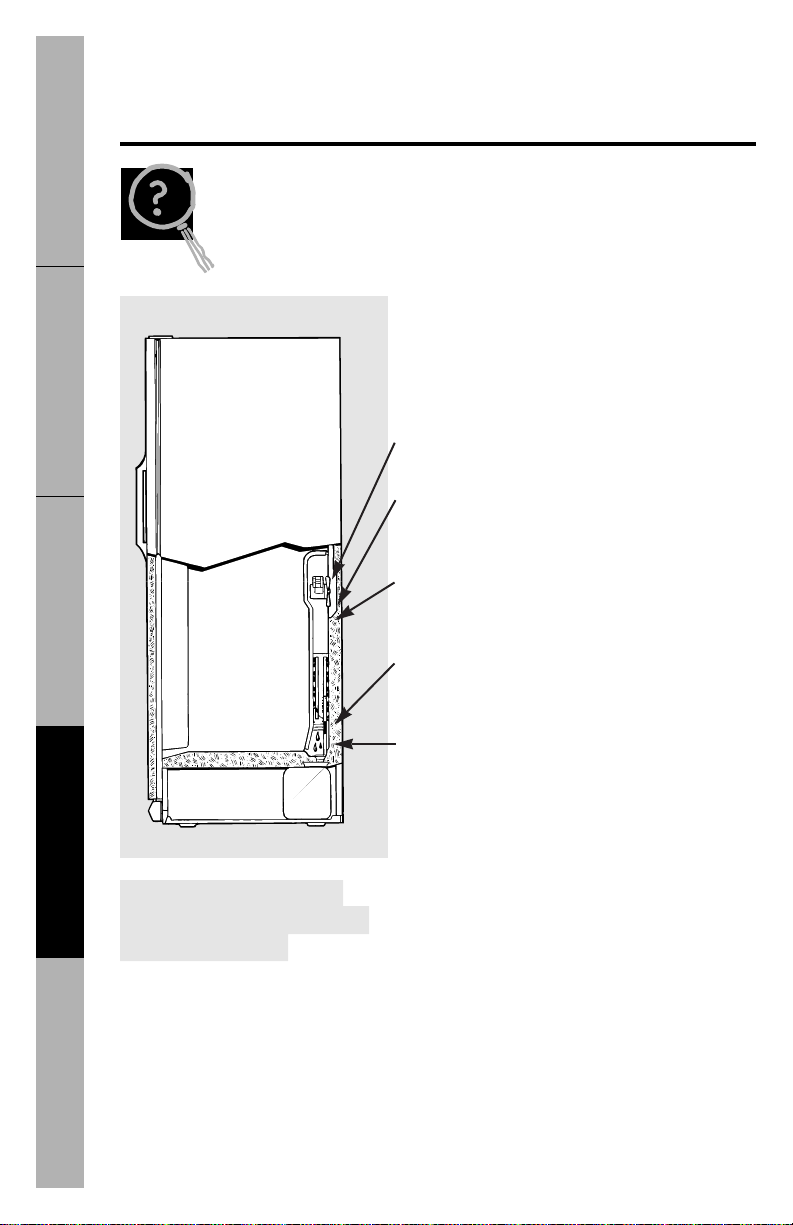
Connect the Tubing to the Refrigerator
Before making the connection to the refrigerator, be sure the
refrigerator power cord is not plugged into the wall outlet.
We recommend installing a water filter if your water supply has sand or particles
that could clog the screen of the refrigerator’s water valve. Install it in the water
line near the refrigerator.
Remove the plastic flexible cap from the water valve.
Place the compression nut and ferrule (sleeve) onto the end of the tubing as
shown.
Insert the end of the copper tubing into the water valve connection as far as
possible. While holding the tubing, tighten the fitting.
Fasten the copper tubing into the clamp provided to hold it in position.
You may need to pry open the clamp.
4
3
2
1
1/4″Compression Nut
1/4″ Copper Tubing
Ferrule (sleeve)
Tubing Clamp
Refrigerator Connection
Page 29

29
T roubleshooting TipsInstallation Instructions
Customer Service
Operating InstructionsSafety Information
Turn the Water On at the Shutoff Valve
Tighten any connections that leak.
Plug In the Refrigerator
Arrange the coil of copper tubing so that it does not vibrate against the back of
the refrigerator or against the wall.
Push the refrigerator back to the wall.
Start the Icemaker
Set the icemaker feeler arm to the
ON
(down) position. The icemaker will
not begin to operate until it reaches its operating temperature of 15°F. (-9°C.)
or below. It will then begin operation automatically if the icemaker feeler arm is
in the
ON
(down) position.
NOTE: The icemaker may double-cycle when it first starts, causing some water spillage from
the icemaker into the ice bucket. This is normal and should not happen again.
Page 30
30
Operating Instructions
Installation Instructions
Safety InformationTroubleshooting TipsCustomer Service
Normal operating sounds.
The new high efficiency compressor runs faster
and will have a higher pitch hum or pulsating
sound while operating.
Defrost timer and refrigerator control click on
and off.
The fan circulating air inside the freezer which
keeps the temperatures throughout.
Water dropping on the defrost heater causing a
sizzling, hissing or popping sound during the
defrost cycle.
The flow of refrigerant through the freezer
cooling coils sounds like boiling water or a
gurgling noise.
Cracking or popping of cooling coils caused by
expansion and contraction during defrost and
refrigeration following defrost.
Water dripping as it melts from the evaporator
and flows to the drain pan during the defrost
cycle.
Icemaker
The icemaker water valve will buzz when the
icemaker fills with water. If the feeler arm is in
the
ON
(down) position it will buzz even if it
has not yet been hooked up to water. Keeping
the feeler arm in the
ON
(down) position before
it is hooked up to water can damage the
icemaker. To prevent this, raise the feeler arm
to the
STOP
(up) position. This will stop the
buzzing.
The sound of cubes dropping into the bin and
water running in pipes as icemaker refills.
These sounds are normal
and are due mostly to highly
efficient operation.
Depending on the placement of the refrigerator in your kitchen,
you may want to place a piece of rubber backed carpet under the
refrigerator to reduce noise.
Page 31

Troubleshooting TipsInstallation Instructions Customer ServiceOperating InstructionsSafety Information
Before you call for service…
Troubleshooting Tips
Save time and money! Review the charts on the following pages
first and you may not need to call for service.
Problem Possible Causes What To Do
Refrigerator does not
Refrigerator in • Wait about 30 minutes for
operate
defrost cycle. defrost cycle to end.
Freezer control • Move the freezer control
in
OFF
position. to a temperature setting.
Refrigerator is • Push the plug completely
unplugged. into the outlet.
The fuse is blown/ • Replace fuse or reset
circuit breaker is the breaker.
tripped.
Motor operates for
Normal when • Wait 24 hours for the
long periods
refrigerator is first refrigerator to completely
(Modern refrigerators
plugged in. cool down.
with more storage
Often occurs when large • This is normal.
space and a larger
amounts of food are
freezer require more
placed in refrigerator.
operating time. They
Door left open. • Check to see if package is
start and stop often
holding door open.
to maintain even
Hot weather or frequent • This is normal.
temperatures.)
door openings.
Temperature controls • See
About the controls.
set at the coldest setting.
Grille and condenser • See
Care and cleaning
.
need cleaning.
Vibration or rattling
Roller screws or leveling • See
Leveling Rollers.
(Slight vibration
legs need adjusting.
is normal.)
Fresh food or freezer
Temperature control • See
About the controls.
compartment too warm
not set cold enough.
Warm weather or • Set the temperature
frequent door openings. control one step colder.
See
About the controls.
Door left open. • Check to see if package is
holding door open.
31
Page 32

Before you call for service…
32
Operating Instructions
Installation Instructions
Safety InformationTroubleshooting TipsCustomer Service
Problem Possible Causes What To Do
Frost or ice crystals on
Door left open. • Check to see if package is
frozen food
holding door open.
(Frost within package
Too frequent or too
is normal.)
long door openings.
Divider between fresh
Automatic energy saver • This helps prevent
food and freezer
system circulates warm condensation on the
compartment feels warm
liquid around front edge outside.
of freezer compartment.
Automatic icemaker
Icemaker feeler arm in • Move the feeler arm to the
does not work
the
STOP
(up) position.
ON
(down) position.
• Cubes may have fused to
the side of the mold.
Move the feeler arm to the
STOP
(up) position then
remove these cubes.
Water supply turned • See
Installing the water line.
off or not connected.
Freezer compartment • Wait 24 hours for the
too warm. refrigerator to completely
cool down.
Piled up cubes in the • Level cubes by hand.
storage bin cause the
icemaker to shut off.
Slow ice cube freezing
Door left open. • Check to see if package is
holding door open.
Temperature control • See
About the controls.
not set cold enough.
Ice cubes have
Ice storage bin needs • Empty and wash bin.
odor/taste
cleaning. Discard old cubes.
Food transmitting odor/ • Wrap foods well.
taste to ice cubes.
Interior of refrigerator • See
Care and cleaning.
needs cleaning.
Poor-tasting incoming water.
• Install a water filter.
Page 33

Troubleshooting TipsInstallation Instructions Customer ServiceOperating InstructionsSafety Information
Problem Possible Causes What To Do
Cube dispenser
Icemaker turned off or • Turn on icemaker or
does not work
water supply turned off. water supply.
Ice cubes are frozen to • Remove cubes and move
icemaker feeler arm. the feeler arm to the
ON
(down) position.
Irregular ice clumps in • Break up with fingertip
storage container.
pressure and discard
remaining clumps.
• Freezer may be too warm.
Adjust the freezer control
to a colder setting, one
position at a time, until
clumps do not form.
Water has poor taste/odor
Water dispenser has not • Dispense water until
been used for a long time. all water in system is
replenished.
Poor-tasting incoming water.
• Install a water filter.
Water dispenser
Water supply line turned • See the
Installing the water
does not work
off or not connected.
line
section.
Air may be trapped in the • Press the dispenser pad
water system. for at least two minutes.
Water is not dispensed
Water in reservoir • Call for service.
but icemaker is working
is frozen.
No water or ice
Supply line or shutoff • Call a plumber.
cube production
valve is clogged.
Refrigerator has odor
Foods transmitting • Foods with strong odors
odor to refrigerator. should be tightly wrapped.
• Keep an open box of baking
soda in the refrigerator;
replace every three months.
Interior needs cleaning. • See
Care and cleaning.
Moisture forms on
Not unusual during • Wipe surface dry.
outside of refrigerator
periods of high humidity.
33
Page 34

34
Operating Instructions
Installation Instructions
Safety InformationTroubleshooting TipsCustomer Service
Before you call for service…
Problem Possible Causes What To Do
Moisture collects inside
Too frequent or too
(In humid weather, air
long door openings.
carries moisture into
refrigerator when
doors are opened.)
Interior light does not work
No power at outlet. • Replace fuse or
reset the breaker.
Light bulb burned out. • See
Replacing the light bulbs
.
Door not closing properly
Door gasket on hinge side • Apply petroleum jelly on
or only partially closing
sticking or folding over. face of gasket.
Hot air from bottom
Normal air flow cooling • Your floor covering
of refrigerator
motor. In the refrigeration supplier should be
process, it is normal that consulted if you object to
heat be expelled in the this discoloration.
area under the refrigerator.
Some floor coverings will
discolor at these normal
and safe temperatures.
Water on kitchen floor or
Drain in the bottom of
on bottom of freezer
the freezer clogged.
Cubes jammed in chute. • Poke ice through the chute
with a wooden spoon.
Page 35

35
T roubleshooting TipsInstallation Instructions Customer ServiceOperating InstructionsSafety Information
Consumer Warranty
For customers in Canada
■This warranty applies only to single family domestic use in Canada when the
Refrigerator has been properly installed according to the instructions supplied by
Camco and is connected to an adequate and proper utility service. Damage due to
abuse, accident, commercial use, and alteration or the removal or defacing of the
serial plate, cancels all obligations of this warranty. Service during this warranty must
be performed by an Authorized Camco Service Agent.
■Neither Camco nor the Dealer is liable for any claims or damages resulting from any
failure of the Refrigerator or from service delays beyond their reasonable control.
■To obtain warranty service, purchaser must present the original bill of sale.
Components repaired or replaced are warranted through the remainder of the
original warranty period only.
■This warranty does not cover expense involved in making this appliance readily
accessible for servicing.
■This warranty gives you specific legal rights. Additional warranty rights may be
provided by law in some areas.
Camco Service is available coast-to-coast. See Customer Service section for service information.
If further help is needed concerning this Warranty, contact:
Manager, Consumer Relations, Camco Inc., Consumer Service,
5800 Keaton Crescent, Mississauga, Ontario, L5R 3K2
Terms and Conditions
Next Four Years
CAMCO
warrants the hermetically sealed refrigerator (namely: Evaporator,
Condenser, Motor Compressor, Interconnecting Tubing, Drier and Refrigerant
Charge) against defects in material or workmanship for an additional four years.
These parts will be repaired or replaced at the option of Camco without charge,
subject to the terms and conditions set out below.
The
DEALER
warrants for the next four years to provide the service labor necessary to
repair or replace the hermetically sealed refrigeration system to the terms and
conditions set out below.
First Year
CAMCO
warrants the replacement or repair of all parts of this Refrigerator which
prove to be defective in material or workmanship for one year from the date of
purchase. Such parts will be repaired or replaced at the option of Camco without
charge, subject to the terms and conditions set out below.
The
DEALER
warrants to provide the service labor for the repair or replacement of all
parts of this Refrigerator which prove to be defective in material or workmanship for
one year from the date of purchase.
Page 36

36
Operating Instructions
Installation Instructions
Safety InformationTroubleshooting TipsCustomer Service
Refrigerator Warranty
(For customers in the United States)
All warranty service provided by our Factory Service Centers,
or an authorized Customer Care
®
technician. For service,
call 800-GE-CARES.
This warranty is extended to the original purchaser and any succeeding owner for products purchased
for home use within the USA. In Alaska, the warranty excludes the cost of shipping or service calls to
your home.
Some states do not allow the exclusion or limitation of incidental or consequential damages. This
warranty gives you specific legal rights, and you may also have other rights which vary from state to
state. To know what your legal rights are, consult your local or state consumer affairs office or your
state’s Attorney General.
For The Period Of: GE Will Replace, At No Charge To You:
One Year Any part
of the refrigerator which fails due to a defect
From the date of the
in materials or workmanship. During this
full one-year
original purchase warranty,
GE will also provide,
free of charge,
all labor
and in-home service to replace the defective part.
Five Years Any part of the sealed refrigerating system
(the compressor,
From the date of the
condenser, evaporator and all connecting tubing)
original purchase
which fails due to a defect in materials or workmanship.
During this
five-year warranty,
GE will also provide,
free
of charge,
all labor and in-home service to replace the
defective part.
Lifetime Any see-through pan or drawer
furnished with the
From the date of the
refrigerator if the pan or drawer breaks during normal
original purchase
household use. Drawer covers are not included.
■ Service trips to your home to teach
you how to use the product.
■ Improper installation.
■ Failure of the product if it is
abused, misused, or used for other
than the intended purpose or used
commercially.
■ Loss of food due to spoilage.
■ Replacement of house fuses or
resetting of circuit breakers.
■ Damage to the product caused by
accident, fire, floods or acts of God.
■ Incidental or consequential damage to
personal property caused by possible
defects with this appliance.
What GE Will Not Cover:
Page 37

Électroménagers GE
Réfrigérateurs
Côte à côte
Pièce No162D3941P005 Pub. No49-6911
Modèle Profile
encastrable 21
avec distributeur
Manuel d’utilisation
37
Page 38

Félicitations!
Désormais vous faites partie de la famille GE.
Bienvenue dans la famille
GE. Nous sommes fiers de
la qualité de nos produits
et de la fiabilité de notre
service après-vente. Vous
le constaterez dans le
présent manuel, facile à
utiliser, et dans la voix
amicale de notre personnel
du service à la clientèle.
Mais, surtout, vous le
constaterez chaque fois
que vous vous servirez de
votre réfrigérateur. C’est
important, car votre
nouveau réfrigérateur fera
partie de votre famille
pendant des années. Et
nous espérons que vous
ferez partie de la nôtre
pendant longtemps aussi.
Nous vous remercions de
votre achat GE, et espérons
qu’à l’avenir vous penserez à
nous chaque fois que
vous aurez besoin d’un
électroménager de qualité.
38
Important!
Agrafez ici votre facture ou une copie
de votre chèque.
Pour bénéficier de réparations sous
garantie, il faut fournir une preuve de
la date d’achat d’origine.
Transcrivez les numéros de modèle et
de série ici.
N
o
N
o
Ils figurent sur l'étiquette qui se trouve
soit sur la paroi du réfrigérateur à côté
du bac supérieur, soit à la partie
inférieure de la contre-porte du
compartiment réfrigérateur.
Page 39

GEet vous,
un partenariat de service.
Vous y trouverez de nombreux
conseils pour l’utilisation et
l’entretien de votre réfrigérateur.
Ces quelques mesures
préventives vous permettront
d’économiser du temps et de
l’argent, et, ainsi, de prolonger
la vie de votre réfrigérateur.
Lisez votre manuel
Comme pourra le confirmer n’importe quel
propriétaire d’un électroménager GE, tous
nos appareils bénéficient d’un service aprèsvente incomparable. Mais saviez-vous que la
plupart des questions résultent de problèmes
simples que vous pouvez résoudre vousmême en quelques minutes? Le présent
manuel vous dira comment procéder.
Vous y trouverez des solutions
aux problèmes courants que
vous pourriez rencontrer. Et, en
consultant d’abord cette section,
vous pourrez peut-être éviter de
faire appel à un réparateur.
Consultez les Conseils
de dépannage
Si vous avez besoin de service,
vous savez que vous n’avez
qu’à nous téléphoner. Vous
trouverez à la fin du présent
manuel les numéros sans frais du
service à la clientèle.
Aux États-
Unis,
vous pouvez appeler 24
heures par jour, 7 jours par
semaine au GE Answer Center
®,
800.626.2000.
Au Canada,
appelez
le 800-361-3400.
Si vous avez
besoin de service
Mesures de sécurité
Mesures de sécurité . . . . . . . .40
Raccordement électrique . . . . .42
Fiche d’adaptation . . . . . . .42, 43
Cordons prolongateurs . . . . . .43
Fonctionnement
Commandes . . . . . . . . . . . . . .44
Caractéristiques . . . . . . . . .45–47
Machine à glaçons . . . . . . . . .48
Distributeur d’eau
et de glaçons . . . . . . . . . . .49, 50
Entretien et nettoyage . . . .51–54
Installation
Préparation . . . . . . . . . . . . .55, 56
Panneaux de porte . . . . . . .57–59
Installation de la
conduite d’eau . . . . . . . . . .60–65
Conseils de dépannage
Bruits de fonctionnement
normaux . . . . . . . . . . . . . . . . . .66
Avant d’appeler
un réparateur . . . . . . . . . . .67–71
Service à la clientèle
Garantie pour
la clientèle au Canada . . . . . . .72
Numéros de
service . . . . . . . . . . . . . . . . . . .73
39
Conseils de dépannageInstallation Service à la clientèleFonctionnementMesures de sécurité
Page 40

MESURES DE SÉCURITÉ IMPORTANTES.
LISEZ D’ABORD TOUTES LES DIRECTIVES.
40
N’utilisez cet électroménager que pour l’usage auquel il est
destiné, comme expliqué dans le présent manuel.
■ Installez le réfrigérateur
conformément aux
directives d’installation
avant de l’utiliser.
■ Ne laissez pas les enfants
grimper, s’asseoir, se tenir
debout ni se pendre aux
clayettes du réfrigérateur.
Ils pourraient endommager
le réfrigérateur et se blesser
gravement.
■ N’entreposez et n’utilisez pas
d’essence ou autres vapeurs
et liquides inflammables à
proximité de cet appareil ou
de tout autre appareil
électroménager.
■ Si votre réfrigérateur est doté
d’une machine à glaçons
automatique, évitez le
contact avec les pièces
mobiles du mécanisme
éjecteur, ou avec l’élément
chauffant qui libère les
glaçons. Ne posez pas les
doigts ou les mains sur le
mécanisme de la machine à
glaçons pendant que le
réfrigérateur est branché.
■ Éloignez les doigts des parties
du réfrigérateur où l’on peut
facilement se pincer : les
espaces entre les portes et
entre les portes et les placards
sont toujours étroits. Soyez
prudent lorsque vous fermez
les portes de l’appareil en
présence des enfants.
■ Ne touchez pas les surfaces
froides du congélateur,
surtout si vous avez les mains
humides ou mouillées : la
peau risque d’adhérer à ces
surfaces très froides.
■ Débranchez votre
réfrigérateur avant de le
nettoyer ou de le réparer.
REMARQUE : Nous vous
recommandons vivement de
confier toute réparation à un
technicien qualifié.
■ Lorsque vous réglez la
commande sur
OFF
(éteint),
l’alimentation électrique de
l’ampoule n’est pas coupée.
■ Ne recongelez pas les
aliments surgelés qui ont
complètement dégelé.
MESURES DE SÉCURITÉ
Fonctionnement
Installation
Mesures de sécuritéConseils de dépannageService à la clientèle
Lorsque vous utilisez un appareil électrique, observez
toujours les mesures de sécurité de base, y compris
les suivantes.
AVERTISSEMENT!
Page 41

41
Conseils de dépannageInstallation Service à la clientèleFonctionnementMesures de sécurité
Les enfants pris au piège ou morts d’asphyxie sont
toujours d’actualité. Les réfrigérateurs abandonnés sont
toujours aussi dangereux, même si on n’attend que
«quelques jours» pour s’en débarrasser. Si vous ne
gardez pas votre ancien réfrigérateur, veuillez suivre les
directives ci-dessous afin de prévenir les accidents.
Avant de vous débarrasser de votre ancien
réfrigérateur ou congélateur :
■ Démontez les portes.
■ Laissez les clayettes en place afin d’empêcher les
enfants de grimper à l’intérieur.
Se débarrasser du CFC
Votre ancien réfrigérateur a un système de
refroidissement qui a utilisé les CFC
(chlorofluorocarbones). Les CFC sont jugés nocifs pour
l’ozone stratosphérique.
Si vous vous débarrassez de votre ancien réfrigérateur,
assurez-vous que le frigorigène avec CFC soit enlevé
correctement par un technicien qualifié. Si vous libérez
intentionnellement ce frigorigène avec CFC vous
pouvez être soumis aux contraventions et à
l’emprisonnement sous provisions du Clean Air Act
fédéral.
IMPORTANT :
COMMENT VOUS DÉBARRASSER
CONVENABLEMENTDE VOTRE
ANCIEN RÉFRIGÉRATEUR
Page 42

MESURES DE SÉCURITÉ IMPORTANTES.
LISEZ D’ABORD TOUTES LES DIRECTIVES.
42
FICHE D’ADAPTATION
Nous vous recommandons fortement de ne pas utiliser une
fiche d’adaptation à cause des risques potentiels qu’elle
présente dans certaines circonstances.
RACCORDEMENT ÉLECTRIQUE
Ne coupez ni retirez en aucun cas la troisième broche (mise
à la terre) de la fiche du cordon d’alimentation. Pour votre
sécurité, cet appareil doit être correctement mis à la terre.
Le cordon d’alimentation de cet appareil est muni d’une fiche
à 3 broches (mise à la terre) qui se branche dans une prise murale
ordinaire à 3 alvéoles pour réduire au minimum les risques de
chocs électriques.
Faites examiner la prise de courant et le circuit par un électricien
qualifié pour vous assurer que la prise est correctement mise à la terre.
Si la prise murale est du type standard à 2 alvéoles, il vous incombe
de la faire remplacer par une prise à 3 alvéoles correctement mise à
la terre.
Le réfrigérateur doit toujours être branché dans sa propre prise de
courant, dont la tension nominale est identique à celle indiquée sur
la plaque signalétique.
Cette précaution est recommandée pour garantir un rendement
optimum et éviter une surcharge des circuits électriques de la
résidence, ce qui pourrait créer un risque d’incendie par
surchauffe des fils.
Ne débranchez jamais le réfrigérateur en tirant sur le cordon
d’alimentation. Saisissez fermement la fiche du cordon et tirez
droit pour la retirer de la prise.
Réparez ou remplacez immédiatement tout cordon effiloché ou
endommagé. N’utilisez pas un cordon fendillé ou présentant des
signes d’usure.
Lorsque vous déplacez votre réfrigérateur du mur, faites attention
de ne pas le faire rouler sur le cordon d’alimentation afin de ne pas
l’endommager.
Fonctionnement
Installation
Mesures de sécuritéConseils de dépannageService à la clientèle
AVERTISSEMENT!
Page 43

Toutefois, si vous décidez d’utiliser tout de même une fiche
d’adaptation, vous pouvez effectuer un
raccordement temporaire,
si les
codes locaux le permettent, dans une prise de courant à 2 alvéoles
adéquatement mise à la terre en utilisant une fiche d’adaptation
homologuée UL, en vente dans la plupart des quincailleries.
La
fente la plus longue de la fiche doit être alignée avec la fente la
plus longue de la prise murale afin d’assurer la polarité appropriée
pour le branchement du cordon d’alimentation.
Lorsque vous débranchez le cordon d’alimentation de la fiche
d’adaptation, saisissez toujours la fiche d’une main pendant que
vous tirez sur la fiche du cordon d’alimentation de l’autre. Sinon, la
borne de mise à la terre de la fiche d’adaptation risque de casser
avec le temps.
Si la borne de mise à la terre de la fiche casse,
N’UTILISEZPAS
l’appareil tant qu’une mise à la terre adéquate n’aura pas été rétablie.
Le fait de fixer la borne de mise à la terre de la fiche d’adaptation à la plaque de la
prise de courant n’assure pas automatiquement la mise à la terre de l’appareil. Il
faut que la vis soit en métal, non isolée, et que la prise de courant soit mise à la
terre par l’entremise du câblage de la résidence. Faites vérifier le circuit par un
électricien qualifié pour vous assurer que la prise est adéquatement mise à la terre.
Conseils de dépannageInstallation Service à la clientèleFonctionnementMesures de sécurité
CORDONS PROLONGATEURS
Nous vous recommandons fortement de ne pas utiliser de
cordons prolongateurs à cause des risques potentiels qu’ils
présentent dans certaines conditions.
Toutefois si vous décidez d’utiliser tout de même un cordon
prolongateur, il est absolument nécessaire qu’il s’agisse d’un
cordon à 3 fils avec mise à la terre pour appareils électroménagers
homologué UL, pourvu d’une fiche et d’une prise mises à la terre
de 15 ampères (minimum) et de 120 volts.
N’OUBLIEZ PAS…
Votre santé et votre sécurité sont importantes pour nous.
Veuillez lire et suivre attentivement ces mesures de sécurité.
Nous voudrions que tous les membres de la famille GE
soient heureux et en bonne santé.
CONSERVEZ CES DIRECTIVES
43
Page 44

Commande de température du réfrigérateur
La commande de température du réfrigérateur
maintient les températures dans tout le compartiment
réfrigérateur.
Commande de température du congélateur
La commande de température du congélateur
maintient les températures dans tout le compartiment
congélateur.
Si vous réglez la commande du congélateur sur
OFF
(éteint), la réfrigération cesse dans les deux
compartiments, mais le courant alimentant le
réfrigérateur n'est pas coupé.
Vérification de la température
Pour le réfrigérateur, placez un récipient de lait sur la clayette
supérieure. Vérifiez-le le lendemain. Si le lait est trop chaud ou trop
froid, réglez la température en conséquence.
Pour le congélateur, placez un récipient de crème glacée au centre
du congélateur. Vérifiez-la le lendemain. Si la crème glacée est trop
dure ou trop molle, réglez la température en conséquence.
Après avoir réglé les commandes, attendez 24 heures pour laisser le réfrigérateur
atteindre la température que vous avez réglée.
44
Les commandes du réfrigérateur.
Au départ, réglez les deux commandes à 5. Si vous désirez augmenter ou
abaisser la température, réglez d’abord celle du compartiment réfrigérateur.
Lorsque vous êtes satisfait du réglage du réfrigérateur, ajustez la
température du congélateur.
1
2
Réglage des commandes
Fonctionnement
Installation
Mesures de sécuritéConseils de dépannageService à la clientèle
1
3
7
9
5
COLD
FRESH FOOD
TEMPERATURE
COLDEST
1
3 5
7
9
FREEZER
TEMPERATURE
COLDEST
OFF
COLD
1
2
Page 45

Conseils de dépannageInstallation Service à la clientèleFonctionnementMesures de sécurité
45
Clayettes, supports et paniers du réfrigérateur.
Mise en place des
clayettes
Les clayettes du
réfrigérateur et du
congélateur sont
réglables.
Soulevez
et dégagez
2
Poussez
vers le
haut
1
Engagez
le
crochet
supérieur
1
Abaissez
pour
verrouiller
2
Pour retirer Pour remettre
Toutes les caractéristiques ne sont pas disponibles sur tous les modèles.
Clayette repliable
Cette clayette se divise en deux et sa partie avant se glisse
sous la partie arrière pour permettre le rangement de
produits de haute taille sur la clayette au-dessous.
Clayette anti-débordements
(sur certains modèles)
Cette clayette coulissante vous permet d'atteindre les
aliments rangés derrière d'autres. Ses rebords spéciaux
sont conçus pour empêcher les aliments renversés de
couler sur les clayettes inférieures.
Prenez soin de pousser les clayettes jusqu’au fond avant de
refermer la porte.
Support à bouteille
de vin amovible
Paniers du
congélateur
Page 46

Les bacs de rangement.
46
Toutes les caractéristiques ne sont pas disponibles sur tous les modèles.
Bacs à fruits et à légumes
Si une quantité d’eau excessive s’accumule dans le fond
des bacs, videz-les et essuyez-les.
Bacs à humidité réglable
Réglez la commande à
HIGH
(élevé) pour que le bac
conserve un degré d’humidité élevé pour la
conservation des légumes.
Réglez la commande à
LOW
(abaissé) pour abaisser le
degré d’humidité dans le bac pour la conservation des
fruits.
High Humidity Control Low
Bac à viande adaptable
Le bac à viande adaptable est muni d’une voie d’air
séparée qui permet à un courant d’air froid en
provenance du congélateur de circuler autour du bac.
La commande de température variable
règle le courant
d’air froid en provenance du congélateur.
Pour conserver la viande fraîche,
abaissez
le levier pour
ramener le bac à la température de réfrigération la plus
froide. Si vous le laissez à cette position pendant
longtemps, du givre peut se former à l’intérieur du bac.
Soulevez
le levier pour ramener le bac à la température
de réfrigération normale; vous aurez ainsi un bac à
légumes supplémentaire. L’accès de l’air froid est
fermé. Vous pouvez sélectionner différentes positions
entre ces deux extrêmes.
Normale
La plus
froide
Fonctionnement
Installation
Mesures de sécuritéConseils de dépannageService à la clientèle
Page 47

47
Toutes les caractéristiques ne sont pas disponibles sur tous les modèles.
Enlèvement des bacs de rangement.
Ces bacs peuvent être facilement enlevés en les inclinant
légèrement puis en les tirant au-delà de leurs
butées.
Si la porte du compartiment réfrigérateur ne peut pas être ouverte
complètement, il faudrait démonter les balconnets de porte
inférieurs avant d’enlever les bacs.
Pour enlever la clayette de verre au-dessus du bac
supérieur, enlevez d’abord le bac supérieur et tous les
aliments rangés sur la clayette. Ensuite, mettez votre
main à l’intérieur et soulevez l’arrière du verre jusqu’à
ce qu’il touche le dessous du protège-lumière inférieur.
Ensuite, poussez la clayette vers l’arrière (environ 1/2
po—13 mm) jusqu’à ce qu’elle se libère des supports de
coin de devant.
Pour remettre la clayette de verre en place, suivez les
mêmes étapes, mais dans l’ordre inverse.
Guides des bacs
Lorsque vous remettez les bacs en
place, assurez-vous de bien les faire
glisser sur les deux guides aménagés
du côté droit.
Conseils de dépannageInstallation Service à la clientèleFonctionnementMesures de sécurité
Balconnets sur la porte du réfrigérateur
Vous pouvez facilement transporter les balconnets
réglables du réfrigérateur à votre plan de travail.
Pour les retirer :
soulevez le balconnet tout droit jusqu’à
ce que les crochets se libèrent de la crémaillère.
Pour les remettre en place ou les déplacer :
choisissez la
hauteur de clayette désirée, engagez le crochet du
balconnet dans les fentes de la crémaillère de la porte et
glissez-le. Le balconnet s’accrochera en place.
Le
séparateur
(sur certains modèles) empêche les
produits de petite taille de basculer, de se renverser et de
glisser. Saisissez l’avant du séparateur entre deux doigts,
puis déplacez-le selon vos besoins.
Séparateur
Page 48

48
Fonctionnement
Installation
Mesures de sécuritéConseils de dépannageService à la clientèle
Machine à glaçons automatique
La machine à glaçons produira environ 8 glaçons
par cycle—soit environ 120 glaçons toutes les 24 heures—
selon la température du congélateur, la température
ambiante, la fréquence d’ouverture des portes et
d’autres conditions d’utilisation.
Si vous mettez votre réfrigérateur en marche avant
que la machine à glaçons ne soit alimentée en eau,
soulevez la porte d’accès et vérifiez que le bras
régulateur de la machine à glaçons est à la position
STOP
(ARRÊT—relevé).
Lorsque la conduite d’eau est raccordée au
réfrigérateur, abaissez le bras régulateur à la position
ON
(MARCHE—abaissé).
La machine à glaçons se remplit d’eau lorsqu’elle
atteint le point de congélation. Il faut prévoir entre 8 et
12 heures avant qu’un réfrigérateur nouvellement
installé commence à produire des glaçons.
Jetez les premiers lots de glaçons afin d’éliminer les
impuretés provenant de la conduite d’eau.
Assurez-vous que rien ne gêne le mouvement du bras
régulateur.
Il est normal que plusieurs glaçons soient collés entre
eux.
Lorsque vous n’utilisez pas souvent de glaçons, les vieux
glaçons perdent leur transparence et prennent un goût
désagréable.
Machine à glaçons automatique.
Il faut prévoir entre 8 et 12 heures avant qu’un réfrigérateur nouvellement
installé commence à produire des glaçons.
Machine à
glaçons
Bac à glaçons
Bras régulateur à
la position
STOP
(ARRÊT—relevé)
Bras régulateur à
la position
ON
(MARCHE—abaissé)
Page 49

Le distributeur d’eau et de glaçons.
Tournez
Mécanisme
d’entraînement
Bac à glaçons
Retrait du bac :
Soulevez le coin gauche pour dégager le bac de la
clayette. Tirez droit vers vous en soutenant le bac à
l’avant et à l’arrière.
Remise en place :
Glissez le bac vers l’arrière jusqu’à ce que la languette du
bac s’engage dans la fente de la clayette.
Si le bac ne va
pas jusqu’au
fond, retirez-le et donnez un quart de tour
au mécanisme
d’entraînement. Poussez-le vers l’arrière
de nouveau jusqu’à ce que la languette du bac s’engage
dans la fente de la clayette.
49
Conseils de dépannage
Installation
Service à la clientèleFonctionnementMesures de sécurité
Pour utiliser le distributeur
Appuyez le bord du verre doucement contre la
commande de distribution.
Réglez la manette sur
CUBES
(glaçons),
CRUSHED ICE
[glace concassée (sur certains modèles)] ou
WA TER
(eau).
Le bac de trop-plein n’est pas muni d’un système
d’écoulement. Afin de réduire les taches d’eau,
nettoyez le bac de trop-plein et sa grille régulièrement.
S’il n’y a pas d’eau distribuée lorsque le réfrigérateur est
initialement installé, il y a peut-être de l’air dans la conduite d’eau.
Appuyez sur la commande de distribution pendant deux minutes au
minimum pour expulser l’air de la conduite d’eau et remplir le
réservoir d’eau. Afin d’éliminer les éventuelles impuretés provenant
de la conduite d’eau, jetez les six premiers verres d’eau.
Un commutateur électrique (sur certains modèles)
allume ou éteint la
veilleuse
dans le distributeur. La
lumière s’allume également lorsqu’on appuie sur la
commande de distribution. Lorsque l’ampoule de la
veilleuse est grillée, remplacez-la par une ampoule de
7 watts maximum.
A TTENTION : Ne mettez jamais les doigts ou
d’autres objets dans l’ouverture du distributeur.
Bac de trop-plein
Page 50

50
Fonctionnement
Installation
Mesures de sécuritéConseils de dépannageService à la clientèle
Le distributeur d’eau et de glaçons.
■ Ajoutez les glaçons avant de remplir le verre de liquide. Ceci
évite les éclaboussures qui pourraient faire coller ou plier la
manette.
■ N’ajoutez pas dans le bac à glaçons des glaçons non fabriqués par
votre machine à glaçons. Ils risquent d’être difficiles à concasser
ou à distribuer.
■ Évitez de trop remplir les verres de glaçons et d’utiliser des verres
étroits ou très hauts. Le conduit peut se bloquer et le volet peut
geler et coincer. S’il y a des glaçons qui bloquent le conduit,
faites-les passer au moyen d’une cuillère en bois.
■ Ne placez pas de boissons ou d’aliments dans le bac à glaçons
pour les rafraîchir. Les boîtes, bouteilles et paquets alimentaires
peuvent coincer la machine à glaçons ou la vis sans fin.
■ Même si vous avez sélectionné
CUBES
(glaçons), il est possible
que de la glace concassée tombe dans votre verre. Cela se produit
de temps à autre lorsque plusieurs glaçons sont acheminés vers le
broyeur.
■ Après distribution de la glace concassée, de l’eau peut s’écouler
du conduit.
■ Un amas de givre se forme parfois sur le volet du conduit à
glaçons. Ceci est normal, et se produit généralement après des
distributions répétées de glace concassée. Le givre s’évaporera
après quelque temps.
■ L’eau venant du distributeur est fraîche, mais non glacée. Si vous
désirez de l’eau plus froide, ajoutez de la glace concassée ou des
glaçons dans votre verre avant de le remplir d’eau.
Renseignements importants concernant votre distributeur
Page 51

51
Conseils de dépannage
Installation
Service à la clientèleFonctionnementMesures de sécurité
Entretien et nettoyage du réfrigérateur.
Nettoyage de l’extérieur
Le bac de trop plein
, sous la grille, devrait être
soigneusement essuyé. L’eau qui reste dans le bac
peut laisser des dépôts. Vous pouvez éliminer ces dépôts
en versant du vinaigre non dilué dans le bac de trop
plein. Laissez tremper jusqu’à ce que les dépôts
disparaissent ou soient suffisamment ramollis pour
être éliminés par rinçage.
La commande de distribution
. Nettoyez-la au moyen d’une
solution d’eau et de bicarbonate de soude—environ une
cuillère à soupe (15 ml) de bicarbonate de soude par
pinte (1 L) d’eau. Rincez bien et essuyez.
SUGGESTION : Gardez la porte du congélateur à demi-ouverte afin
d’éviter que de la glace ou de l’eau soit dispensée au cours du
nettoyage.
Les poignées souples
(sur certains modèles) sont faciles à
nettoyer s’ils sont cirées plusieurs fois par an. Appliquez
une cire de ménage telle que Pledge ou Jubilee sur les
poignées. La saleté partira alors très facilement avec de
l’eau savonneuse ou un produit de nettoyage tout usage
non abrasif.
Les longues poignées de porte et leur garniture
(sur les
modèles avec ensemble de moulures). Nettoyez-les au
moyen d’un linge humecté d’eau savonneuse. Séchez
avec un linge doux.
Gardez l’extérieur du réfrigérateur propre.
Essuyez-le avec
un linge propre légèrement humecté de cire pour
appareils électroménagers ou d’un détergent liquide
doux pour la vaisselle. Séchez et polissez avec un linge
doux et propre.
N’essuyez pas le réfrigérateur avec un linge à vaisselle sale ou
une serviette humide : ils pourraient laisser un résidu qui pourra
endommager la peinture. N’utilisez pas de tampons à récurer,
de produits nettoyants en poudre, de javellisants ou de produits
nettoyants contenant un javellisant, car ces produits peuvent
égratigner la peinture et la rendre moins résistante.
Appuyez ici pour
enlever la grille.
Page 52

Entretien et nettoyage du réfrigérateur.
52
Nettoyage de l’intérieur
Pour éviter les mauvaises odeurs,
laissez une boîte ouverte
de bicarbonate de soude dans les compartiments
réfrigérateur et congélateur.
Débranchez le réfrigérateur avant de le nettoyer.
S’il est
trop difficile de le faire, essorez bien votre linge ou
votre éponge pour enlever l’excès d’eau lorsque vous
nettoyez autour des interrupteurs, des lampes ou des
commandes.
Utilisez une solution d’eau tiède et de bicarbonate de
soude–environ une cuillère à soupe (15 ml) de
bicarbonate de soude par pinte (1 L) d’eau—afin de
nettoyer tout en neutralisant les odeurs. Rincez et
essuyez bien.
Orifice d’écoulement du congélateur .
Au cours du
nettoyage annuel, retirez le panier du congélateur et,
à l’aide d’une poire à jus, versez une solution de
bicarbonate de soude—une cuillerée à thé (5 ml)—et un
demi-litre d’eau chaude (non bouillante) dans le tuyau
d’écoulement. Ceci contribue à neutraliser les odeurs
et à éviter que le tuyau ne se bouche. Si ce dernier se
bouche, versez, à l’aide d’une poire à jus, la solution
de bicarbonate de soude pour dégager le bouchon.
Après avoir nettoyé les joints de porte, appliquez une
fine couche de vaseline sur les joints du côté des
charnières pour empêcher les joints de coller et de se
déformer.
Évitez de nettoyer les clayettes en verre (sur certains modèles)
encore froides dans de l’eau chaude car elles risquent de se casser
à cause de l’écart excessif de température. Manipulez les clayettes
en verre avec prudence. Si vous cognez le verre trempé, il pourra se
briser.
Fonctionnement
Installation
Mesures de sécuritéConseils de dépannageService à la clientèle
Immobilisez tous les éléments amovibles, tels que la grille, les clayettes
et les bacs, à l’aide de ruban gommé pour éviter de les endommager.
Assurez-vous que le réfrigérateur demeure debout pendant son déménagement.
Déménagement
Page 53

53
Conseils de dépannage
Installation
Service à la clientèleFonctionnementMesures de sécurité
Lorsque vous vous absentez pendant une période prolongée,
videz et débranchez le réfrigérateur. Réglez la commande de
température du congélateur sur
OFF
(éteint) et nettoyez l’intérieur
avec une solution d’eau et de bicarbonate de soude, à raison d’une
cuillère à soupe (15 ml) de bicarbonate par pinte (1 L) d’eau.
Laissez les portes ouvertes.
Réglez le bras régulateur de la machine à glaçons à la position
STOP
(ARRÊT—relevé) et fermez le robinet d’arrêt de la conduite d’eau
du réfrigérateur.
Si la température risque de descendre sous le point de congélation,
demandez à un réparateur de vidanger la conduite d’eau afin
d’éviter les dégâts sérieux causés par les inondations.
Départ en vacances
Derrière le réfrigérateur
Prenez un soin particulier lorsque vous éloignez le réfrigérateur du
mur. Tous les types de revêtements de sol peuvent être
endommagés, particulièrement ceux qui sont coussinés ou dont la
surface est gaufrée.
Tirez le réfrigérateur en ligne droite et, lorsque vous le remettez en
place, poussez-le vers le mur en ligne droite. Les déplacements
latéraux du réfrigérateur pourraient endommager le revêtement
de sol ou le réfrigérateur.
Lorsque vous remettez le réfrigérateur en place en le poussant, veillez à ne pas le
faire rouler sur le cordon d’alimentation ou sur la conduite d’eau de la machine à
glaçons.
Sous le réfrigérateur
Pour un fonctionnement plus efficace, vous devez garder
la zone sous le réfrigérateur propre. Retirez la grille
inférieure et balayez ou aspirez la poussière.
Pour de meilleurs résultats, utilisez une brosse conçue
spécialement à cet effet que vous pouvez obtenir
dans la plupart des centres de pièces.
Nettoyez les bobines du condenseur
au moins une fois par an.
Page 54

Remplacement des ampoules.
Lorsque vous réglez la commande sur OFF (éteint), l’alimentation électrique
de l’ampoule n’est pas coupée.
Compartiment réfrigérateur—lampe supérieure
Débranchez le réfrigérateur.
Retirez les boutons de réglage de la température.
Pour enlever le protège-lumière, tirez-le droit vers
vous.
Après avoir remplacé l’ampoule par une autre de la même
puissance ou de puissance inférieure, remettez le protège-lumière
en place et rebranchez le réfrigérateur.
3
2
1
FREEZER
TEMPERATURE
COLD
OFF
COLDEST
1
3
5
*
7
9
FRESH FOOD
TEMPERATURE
COLD COLDEST
1
3
5
*
7
9
Profile
*INITIAL TEMPERATURE SETTINGS
ALLOW 24 HRS. FOR TEMP. TO STABILIZE
54
Débranchez le réfrigérateur.
Retirez la clayette située juste au-dessus du protège-lumière.
Tirez le protège-lumière vers vous afin d’accéder à l’ampoule.
Après avoir remplacé l’ampoule par une autre de la même puissance ou de
puissance inférieure, remettez en place le protège-lumière et la clayette
et rebranchez le réfrigérateur.
3
2
1
Compartiment congélateur
Cette lampe est située à l’arrière du compartiment réfrigérateur.
Débranchez le réfrigérateur.
Saisissez le bord supérieur du protège-lumière, soulevez-le et
tirez-le vers l’avant afin de dégager son rebord supérieur.
Après avoir remplacé l’ampoule par une autre de la même puissance ou de
puissance inférieure, raccrochez la partie supérieure du protège-lumière et
rebranchez le réfrigérateur.
2
1
Compartiment réfrigérateur—deux lampes inférieures
(sur certains modèles)
Fonctionnement
Installation
Mesures de sécuritéConseils de dépannageService à la clientèle
Page 55

55
Préparation.
Veuillez lire toutes les directives attentivement.
N’installez pas le réfrigérateur dans une pièce où la température
ambiante risque d’être inférieure à 60 °F (16 °C) parce qu’il ne se
mettra pas en marche suffisamment souvent pour maintenir les
températures convenables.
Installez le réfrigérateur sur un plancher suffisamment solide pour
le supporter lorsqu’il est plein.
Emplacement du réfrigérateur
Prévoyez les dégagements suivants pour faciliter l’installation,
assurer une circulation d’air adéquate, et permettre les
raccordements de plomberie et d’électricité :
Côtés . . . . . . . . . . . . . . . . . . . . . . . . . 5/8 po (15 mm)
Dessus . . . . . . . . . . . . . . . . . . . . . . . . 1 po (25 mm)
Arrière . . . . . . . . . . . . . . . . . . . . . . . 1/2 po (13 mm)
Si l’appareil est encastré, prévoyez 7/8 po (22 mm) pour les couvre-charnières.
Si l’un des deux côtés du réfrigérateur est contre un mur, prévoyez
3/4 po (19 mm) pour le dégagement de
la porte.
Dégagements
Conseils de dépannageInstallation Service à la clientèleFonctionnementMesures de sécurité
Alimentation en eau
de la machine à glaçons
La machine à glaçons doit être raccordée à une conduite d’eau froide.
Un nécessaire d’alimentation en eau (comprenant un tuyau de
cuivre, un robinet d’arrêt, des raccords et des directives) est
disponible moyennant supplément chez votre marchand ou auprès
du Service des pièces et accessoires, 800-626-2002.
Page 56

Préparation.
56
Roulettes de nivellement
Les roulettes de nivellement jouent deux rôles :
Elles peuvent être réglées de manière à permettre à l’appareil de reposer
solidement sur le sol et l’empêcher ainsi de branler.
Elles vous permettent d’éloigner le réfrigérateur du mur pour le nettoyage.
Pour régler les roulettes,
retirez la grille en la saisissant par dessous et en la tirant.
Tournez les vis de réglage des roulettes avant dans le
sens des aiguilles d’une
montre pour relever
le réfrigérateur et dans le
sens contraire pour l’abaisser.
Utilisez
une clé à pipe, une clé à molette de 3/8 po, ou une pince.
Tournez les vis de réglage des roulettes arrière dans le
sens des aiguilles d’une
montre pour relever
le réfrigérateur et dans le
sens contraire pour l’abaisser.
Utilisez
un tournevis à lame plate.
REMARQUE : Lorsque vous nivelez le réfrigérateur, vous pouvez faciliter la
fermeture des portes en relevant l’avant du réfrigérateur d’environ 5/8 po
(15 mm) par rapport à l’arrière du réfrigérateur.
Pour remettre la grille en place,
alignez les agrafes à l’arrière de la grille avec les
dispositifs de fixation du réfrigérateur et poussez sur la grille jusqu’à ce qu’elle
s’enclenche en place.
2
1
Veuillez lire toutes les directives attentivement.
Fonctionnement
Installation
Mesures de sécuritéConseils de dépannageService à la clientèle
Vis de réglage de la
roulette avant
Vis de réglage de la
roulette arrière
Fente où l’agrafe de la grille
s’enclenche en place
Page 57

Conseils de dépannageInstallation Service à la clientèleFonctionnementMesures de sécurité
Ajout des panneaux de porte.
Veuillez lire toutes les directives attentivement.
Avant de commencer
Les présentes directives expliquent l’installation des panneaux
décoratifs et précisent les dimensions des panneaux.
Les panneaux doivent être découpés aux dimensions
suivantes :
Panneau supérieur du congélateur—145/16po x 183/4po (36.4 cm x
47.6 cm)
Panneau inférieur du congélateur—14
5
/16po x 323/8po (36.4 cm x
82.2 cm)
Panneau du réfrigérateur—20
1
/16po x 653/16po (51.0 cm x 165.6 cm)
Les panneaux de 1/4 po (6 mm) d’épaisseur s’installent dans les
moulures de porte sans modification spéciale. Si l’épaisseur du
matériau utilisé est inférieure à 1/4 po (6 mm), il faudrait ajouter
un panneau de remplissage afin d’assurer une installation adéquate.
Vous pouvez procurer chez votre marchand des panneaux précoupés noirs et blancs.
57
Sur les modèles avec ensemble de moulures
Découpure spéciale
requise, voir
ci-dessous
Découpure spéciale
requise, voir
ci-dessous
14
5
/16po
36.4 cm
18
3
/4po
47.6 cm
32
3
/8po
82.2 cm
14
5
/16po
36.4 cm
1/8 po
3 mm
5/16 po
8 mm
201/16po
51.0 cm
65
3
/16po
165.6 cm
Une découpure spéciale est requise à ces coins arrière,
5/16 po (8 mm) de longueur 1/8 po (3 mm) de profondeur.
Page 58

Insertion des panneaux de porte.
58
Veuillez lire toutes les directives attentivement.
Fonctionnement
Installation
Mesures de sécuritéConseils de dépannageService à la clientèle
Enlevez l’enjoliveur de la poignée de porte
Ouvrez la porte du congélateur et enlevez la vis de l’embout supérieur de la
poignée.
N’essayez pas d’enlever l’embout.
Desserrez les vis de la moulure supérieure de la porte de 1/4 po (6 mm)
pour dégager l’embout supérieur de la poignée de la moulure supérieure.
Enlevez les 5 vis de la poignée longue. Conservez toutes les vis.
Les vis de
remplacement supplémentaires pour la moulure de porte se trouvent dans les
bacs de rangement.
Enlevez
délicatement
la poignée de la porte du congélateur ainsi que
l’embout supérieur de la poignée.
REMARQUE : Faites attention de ne pas endommager l’embout inférieur de la poignée
lorsque vous enlevez la poignée du congélateur. Il est fixé à la poignée longue au moyen
d’une vis. Il n’est pas nécessaire de l’enlever de la poignée.
4
3
2
1
Page 59

59
Conseils de dépannageInstallation Service à la clientèleFonctionnementMesures de sécurité
Insérez les panneaux
Insérez délicatement les panneaux de porte dans les fentes. Assurez-vous que la
découpure du panneau supérieur du congélateur se trouve dans le coin
supérieur gauche. Lorsque vous installez le panneau de porte du réfrigérateur,
assurez-vous que la découpure se trouve dans le coin supérieur droit.
Remettez l’enjoliveur de la poignée en place
Réinstallez la poignée longue et l’embout supérieur de la poignée. Vissez
légèrement la vis de la poignée à la porte. Placez l’embout sur le dessus de la
poignée et vissez légèrement la vis de l’embout. Relevez la poignée et serrez la vis
supérieure de la poignée. Ensuite, serrez la vis de l’embout de la poignée jusqu’à
ce que l'embout et la poignée soient bien alignés. Serrez toutes les vis.
Procédez de la même façon pour installer le panneau de porte du réfrigérateur.
Panneau surélevé ou de 3/4 po (19 mm)
Vous pouvez utiliser un panneau surélevé vissé ou collé sur un panneau de base de
1/4 po (6 mm) d’épaisseur, ou un panneau fraisé de 3/4 po (19 mm). La partie
surélevée du panneau doit être fabriquée de façon à offrir un dégagement pour les
doigts d’au moins 2 po (51 mm) du côté de la poignée et 1
1
/4po (32 mm) du côté de
la charnière pour éviter de frapper contre les placards adjacents.
Limites de poids pour les panneaux personnalisés :
Réfrigérateur : 38 livres (17 kg) max.
Congélateur : 20 livres (9 kg) max.
Dégagement de
2 po (51 mm) du
côté de la poignée
Dégagement du
côté de la charnière
de 1
1
/4po (32 mm)
Panneau
décoratif
Porte du
réfrigérateur
Panneau de base
de 1/4 po (6 mm)
3/4 po
(19 mm)
Page 60

60
Installation de la conduite d’eau.
Veuillez lire toutes les directives attentivement.
Avant de commencer
L’installation de cette conduite d’eau n’est pas garantie par
le fabricant de la machine à glaçons ou du réfrigérateur.
Veuillez suivre ces directives attentivement afin de réduire
au minimum les risques de dommages coûteux causés par
l’eau.
La présence d’un coup de bélier (de l’eau qui cogne dans
les tuyaux) dans la plomberie de votre résidence risque
d’endommager le réfrigérateur et provoquer des fuites et
des dégâts d’eau. Faites corriger le problème par un
plombier qualifié avant de raccorder la conduite d’eau au
réfrigérateur.
N’installez pas le robinet d’arrêt sur la conduite d’eau
chaude. Ceci pourrait provoquer des brûlures et
endommager l’appareil.
Si vous utilisez votre réfrigérateur avant que la conduite
d’eau soit raccordée, assurez-vous que le bras régulateur
de la machine à glaçons est à la position STOP (ARRÊT—
relevé).
N’installez pas le tuyau de la machine à glaçons dans un
endroit où la température descendra sous le point de
congélation.
Lorsque vous utilisez un appareil électrique (comme une
perceuse) lors de l’installation, assurez-vous qu’il est isolé
ou câblé de façon à éviter tout risque de chocs électriques.
Toutes les installations doivent être conformes aux
exigences du code de plomberie local en vigueur.
Fonctionnement
Installation
Mesures de sécuritéConseils de dépannageService à la clientèle
Page 61

Conseils de dépannageInstallation Service à la clientèleFonctionnementMesures de sécurité
Pour calculer la longueur de tuyau de cuivre nécessaire :
Mesurez la distance entre l’électrovanne à l’arrière du réfrigérateur
et la conduite d’eau. Ajoutez ensuite 8 pieds (244 cm). Assurezvous que la longueur de tuyau supplémentaire est suffisante
[environ 8 pieds (244 cm) de tuyau enroulé pour former trois
boucles d’environ 10 po (25 cm) de diamètre] pour que vous
puissiez éloigner le réfrigérateur du mur après l’installation.
■
Un nécessaire d’alimentation en eau
comprenant le tuyau de
cuivre, le robinet d’arrêt, et les raccords détaillés ci-dessous est
disponible, moyennant supplément, chez votre marchand ou
auprès du Service des pièces et accessoires au 800-626-2002.
■
Conduite d’eau froide.
La pression de l’eau doit varier entre
20 et 120 livres/po
2
.
■
Perceuse électrique.
■
Tuyau de cuivre
de 1/4 po de diamètre extérieur pour raccorder
le réfrigérateur à la conduite d’eau. Assurez-vous que les
extrémités du tuyau et de la conduite sont coupées à angle droit.
N’utilisez pas de tuyau ou de raccord en plastique car la conduite d’eau est
constamment sous pression. De plus, certains types de tuyau de plastique
peuvent casser et fendiller avec le temps, provoquant des fuites d’eau.
■
Deux écrous à compression de 1/4 po de diamètre extérieur et deux
douilles de raccordement
—pour raccorder le tuyau de cuivre au
robinet d’arrêt et à l’électrovanne du réfrigérateur.
■ Si votre conduite d’eau est dotée d’un raccord évasé à une
extrémité, vous aurez besoin d’un
adaptateur
(vendu dans toutes
les bonnes quincailleries) pour raccorder la conduite d’eau au
réfrigérateur
OU
vous pouvez couper le raccord évasé à l’aide
d’un
coupe-tubes
et ensuite utiliser un raccord à compression.
■
Robinet d’arrêt
pour installation sur la conduite d’eau froide.
Le robinet d’arrêt doit être doté d’un orifice d’entrée d’au moins
5/32 po de diamètre intérieur au point de raccordement avec la
CONDUITE D’EAU FROIDE.
Bon nombre d’ensembles de
raccordement comprennent des robinets d’arrêt à brides. Avant
d’en faire l’achat, assurez-vous que l’installation d’un robinet à
brides est conforme avec le code de plomberie en vigueur dans
votre région.
Matériel nécessaire
61
Page 62

Installation de la conduite d’eau.
62
Veuillez lire toutes les directives attentivement.
Fonctionnement
Installation
Mesures de sécuritéConseils de dépannageService à la clientèle
Installez le robinet d’arrêt
Installez le robinet d’arrêt sur la conduite d’eau potable fréquemment
utilisée la plus proche.
Choisissez pour le robinet un emplacement facilement accessible. Il est
préférable de l’installer sur le côté d’une conduite d’eau froide verticale.
Si vous devez le raccorder à une conduite d’eau horizontale, effectuez le
raccordement sur le dessus ou le côté plutôt qu’au fond de la conduite, afin
d’éviter la chute de sédiments provenant de la conduite d’eau.
Percez un trou de 1/4 po dans la conduite d’eau, à l’aide d’un foret affûté.
Enlevez les bavures produites lors du perçage de la conduite.
Fixez le robinet d’arrêt à la conduite d’eau froide à l’aide d’une bride.
Serrez les vis de la bride jusqu’à ce que la rondelle d’étanchéité commence à
gonfler.
Ne serrez pas de façon excessive afin de ne pas écraser le tuyau de cuivre.
5
4
3
2
1
Rondelle
Orifice
d’entrée
Bride
Conduite d’eau
froide verticale
Robinet d’arrêt
à brides
Ouvrez le robinet le plus près pour permettre à la conduite d’eau
de se vider.
Fermez le robinet de
la conduite d’eau principale
Page 63

Conseils de dépannage
Installation
Service à la clientèleFonctionnementMesures de sécurité
63
Faites passer le tuyau de cuivre et raccordez-le au robinet d’arrêt
Placez le tuyau de cuivre entre la conduite d’eau froide et le réfrigérateur.
Faites passer le tuyau par un trou percé dans le plancher ou le mur (derrière le
réfrigérateur ou à proximité de l’armoire) le plus près possible du mur.
Assurez-vous que la longueur de tuyau supplémentaire est suffisante [environ 8 pieds (244 cm)
formant 3 boucles d’environ 10 po (25cm) de diamètre] pour que vous puissiez éloigner le
réfrigérateur du mur après l’installation.
Installez l’écrou à compression et la douille de raccordement à l’extrémité du
tuyau et raccordez-le au robinet d’arrêt.
Assurez-vous que le tuyau est bien inséré à l’intérieur du robinet. Serrez
solidement l’écrou à compression.
Robinet d’arrêt à brides
Écrou à compression
Écrou de serrage
Orifice de sortie
Douille de raccordement
Ouvrez le robinet et rincez le tuyau
Ouvrez le robinet de la conduite d’eau principale et rincez le tuyau jusqu’à
ce que l’eau soit propre.
Coupez l’eau au niveau de l’électrovanne après avoir fait couler par le tuyau
environ une pinte (1 L) d’eau.
2
1
Page 64

Installation de la conduite d’eau.
64
Veuillez lire toutes les directives attentivement.
Raccordez le tuyau de cuivre au réfrigérateur
Avant d’effectuer le raccordement au réfrigérateur, assurez-vous que
le cordon d’alimentation de l’appareil n’est pas branché dans la prise
de courant.
Nous recommandons d’installer un filtre à eau si votre eau contient du sable ou
des particules qui pourraient obstruer la rondelle-filtre de l’électrovanne du
réfrigérateur. Installez ce filtre sur la conduite d’eau, à proximité du réfrigérateur.
Retirez le capuchon en plastique souple du raccord du réfrigérateur.
Installez l’écrou à compression et la douille de raccordement à l’extrémité
du tuyau, comme illustré.
Insérez l’extrémité du tuyau de cuivre le plus loin possible dans le raccord
du réfrigérateur. Serrez le raccord tout en tenant le tuyau.
Insérez le tuyau de cuivre dans la fixation fournie pour le maintenir en
place. Il peut être nécessaire d’ouvrir légèrement la fixation.
4
3
2
1
Fonctionnement
Installation
Mesures de sécuritéConseils de dépannageService à la clientèle
Écrou à compression de 1/4 po
Tuyau de cuivre de 1/4 po
Douille de raccordement
Fixation du tuyau
Raccord du réfrigérateur
Page 65

65
Ouvrez le robinet d’arrêt de la conduite d’eau principale
Serrez tous les raccords qui fuient.
Branchez le réfrigérateur
Disposez les boucles de tuyau de cuivre de façon qu’elles ne vibrent pas contre
l’arrière du réfrigérateur ou le mur.
Replacez le réfrigérateur près du mur.
Mettez la machine à glaçons en marche
Placez le bras régulateur de la machine à glaçons à la position
ON
(MARCHE—
abaissé). La machine à glaçons ne se met en marche que lorsqu’elle atteint une
température de fonctionnement de 15 °F (-9 °C) ou moins. Lorsque le bras
régulateur est à la position
ON
(MARCHE—abaissé), la machine à glaçons se met
automatiquement en marche.
REMARQUE : Lorsqu’elle se met en marche pour la première fois, la machine à glaçons peut
effectuer un double cycle, ce qui provoquera l’écoulement d’un peu d’eau dans le bac à glaçons.
Cette situation est normale et ne devrait pas se reproduire.
Conseils de dépannage
Installation
Service à la clientèleFonctionnementMesures de sécurité
Page 66

Ces bruits sont normaux et,
pour la plupart, imputables
au fonctionnement à haut
rendement de l’appareil.
66
Fonctionnement
Installation
Mesures de sécuritéConseils de dépannageService à la clientèle
Bruits de fonctionnement normaux.
Les compresseurs modernes à haut rendement
fonctionnent plus rapidement et produisent un
bourdonnement ou un bruit de pulsation plus
audible pendant le fonctionnement.
La minuterie de dégivrage et la commande du
réfrigérateur font entendre des déclics
lorsqu’elles se mettent en marche ou s’arrêtent.
Le ventilateur fait circuler de l’air dans le
congélateur afin de maintenir une température
uniforme.
Des gouttes d’eau tombent sur l’élément de
dégivrage, ce qui produit un crépitement ou
un sifflement pendant le cycle de dégivrage.
Le frigorigène qui circule dans les bobines de
refroidissement du congélateur fait un bruit qui
ressemble à de l’eau qui bout ou à un gargouillis.
L’expansion et la contraction des bobines de
refroidissement pendant le dégivrage et la
réfrigération qui suit le dégivrage produisent
des craquements.
De l’eau s’égoutte lorsqu’elle fond dans
l’évaporateur et s’écoule dans le plateau de
dégivrage pendant le cycle de dégivrage.
Machine à glaçons
L’électrovanne de la machine à glaçons fait du
bruit lorsque la machine à glaçons se remplit. Si le
bras régulateur est à la position
ON
(MARCHE—
abaissé), l’appareil fera du bruit même s’il n’a pas
encore été raccordé à la conduite d’eau.
Lorsque vous gardez le bras régulateur à la
position
ON
(MARCHE—abaissé) avant que
l’appareil soit raccordé à la conduite d’eau, ceci
peut endommager la machine à glaçons. Pour
l’éviter, relevez le bras régulateur à la position
STOP
(ARRÊT—relevé). Ceci arrêtera le bruit.
Les glaçons font du bruit lorsqu’ils tombent
dans le bac et lorsque l’eau circule dans les
tuyaux pour remplir la machine à glaçons.
Selon l’emplacement du réfrigérateur dans votre cuisine, vous
aurez peut-être envie d’installer celui-ci sur un tapis caoutchouté
afin de réduire le bruit de l’appareil.
Page 67

67
Conseils de dépannageInstallation Service à la clientèleFonctionnementMesures de sécurité
Avant d’appeler un réparateur…
Conseils de dépannage—Économisez du temps et de l’argent!
Consultez d’abord les tableaux qui suivent et vous pourrez peutêtre éviter de faire appel à un réparateur.
Problème Causes possibles Correctifs
Le réfrigérateur ne
Le cycle de dégivrage • Attendez environ 30 minutes
fonctionne pas
est peut-être en cours. afin que le cycle de dégivrage
puisse terminer.
La commande de • Réglez la commande de
température du température du compartiment
congélateur est congélateur sur une
réglée sur
OFF
(éteint). température.
Le réfrigérateur est • Enfoncez la fiche de l’appareil
débranché. dans la prise murale.
Le disjoncteur • Remplacez le fusible ou
ou le fusible peut réenclenchez le disjoncteur.
avoir sauté.
Le moteur fonctionne
Ceci est normal •Attendez 24 heures pour que
pendant de longues
lorsque le réfrigérateur le réfrigérateur refroidisse
périodes ou démarre
vient d’être branché. complètement.
et s’arrête
Une grande quantité
• C’est normal.
fréquemment
d’aliments a été mise
(Les réfrigérateurs
au réfrigérateur.
modernes et leurs
Porte laissée ouverte. • Vérifiez qu’il n’y a pas un paquet
congélateurs étant
qui empêche la porte de fermer.
plus grands, leur
Temps chaud ou • C’est normal.
moteur doit
ouverture fréquente
fonctionner plus
des portes.
longtemps. Ils
Les commandes de • Consultez
Les commandes.
démarrent et
température ont été
s’arrêtent
afin de
réglées à la température
maintenir des
la plus froide.
températures
Il faut nettoyer la grille • Consultez
Entretien et nettoyage.
uniformes.)
et le condenseur.
Vibration ou
Les vis de roulettes • Consultez
Roulettes de nivellement
.
bruit métallique
ou les pieds de
(une légère vibration
nivellement doivent
est normale)
être réglés.
Page 68

Fonctionnement
Installation
Mesures de sécuritéConseils de dépannageService à la clientèle
Avant d’appeler un réparateur…
68
Problème Causes possibles Correctifs
T empérature trop
La commande de • Consultez
Les commandes.
élevée dans le
température n’a pas été
congélateur ou
réglée à une température
le réfrigérateur
assez basse.
Temps chaud ou • Abaissez la commande de
ouverture fréquente température d’une position.
des portes. Consultez
Les commandes.
Porte laissée ouverte. • Vérifiez qu’il n’y a pas un
paquet qui empêche la
porte de fermer.
Givre sur les
Porte laissée ouverte. • Vérifiez qu’il n’y a pas un
aliments surgelés
paquet qui empêche la
(il est normal que
porte de fermer.
du givre se forme à
Les portes ont été
l’intérieur du paquet)
ouvertes trop souvent
ou pendant trop
longtemps.
La séparation entre
Le système automatique • Ceci empêche la formation de
le réfrigérateur
d’économie d’énergie condensation sur l’extérieur du
et le congélateur
fait circuler du liquide réfrigérateur.
est chaude
chaud autour du rebord
avant du congélateur.
La machine
Le bras régulateur est à • Abaissez le bras régulateur à
à glaçons
la position
STOP
la position
ON
(MARCHE—
automatique ne
(ARRÊT—relevé). abaissé).
fonctionne pas
• Il y a peut-être des glaçons collés
sur le côté du moule à glaçons.
Réglez le bras régulateur à la
position
STOP
(ARRÊT—relevé)
et retirez ces glaçons.
L’alimentation en eau • Consultez
Installation de la conduite
est coupée ou n’est pas
d’eau.
raccordée.
Le compartiment • Attendez 24 heures pour que la
congélateur est température du réfrigérateur se
trop chaud. stabilise.
Un amas de glaçons • Nivelez les glaçons à la main.
dans le bac provoque
l’arrêt de la machine à
glaçons.
Page 69

Conseils de dépannageInstallation Service à la clientèleFonctionnementMesures de sécurité
69
Problème Causes possibles Correctifs
Formation lente
Porte laissée ouverte. • Vérifiez qu’il n’y a pas un paquet
des glaçons
qui empêche la porte de fermer.
La commande de • Consultez
Les commandes.
température du
congélateur n’est pas
réglée à une température
assez froide.
Odeur/saveur
Il faut nettoyer le • Videz et lavez le bac à glaçons.
anormale des
bac à glaçons. Jetez les vieux glaçons.
glaçons
Des aliments ont • Emballez bien les aliments.
transmis leur odeur/
goût aux glaçons.
Il faut nettoyer • Consultez
Entretien et nettoyage.
l’intérieur du
réfrigérateur.
L’eau du robinet n’a • Installez un filtre à eau.
pas bon goût.
Mauvais goût/
Le distributeur d’eau • Faites couler l’eau jusqu’à ce
odeur de l’eau
n’a pas été utilisé que l’eau du système soit
pendant longtemps. remplacée par de l’eau fraîche.
L’eau du robinet n’a • Installez un filtre à eau.
pas bon goût.
La machine à
L’eau du réservoir est • Appelez un réparateur.
glaçons fonctionne,
gelée.
mais ne distribue
pas d’eau
La machine à
La conduite d’eau ou le • Appelez un plombier.
glaçons ne distribue
robinet d’arrêt est bouché.
ni eau ni glaçons
Page 70

Avant d’appeler un réparateur…
Fonctionnement
Installation
Mesures de sécuritéConseils de dépannageService à la clientèle
70
Problème Causes possibles Correctifs
Le distributeur
La machine à glaçons • Mettez en marche la machine
de glaçons ne
est éteinte ou à glaçons ou rétablissez
fonctionne pas
l’alimentation en eau l’alimentation en eau.
a été coupée.
Des glaçons sont • Retirez les glaçons et réglez le
collés au bras bras régulateur à la position
régulateur.
ON
(MARCHE—abaissé).
Blocs de glace • Brisez-en autant que possible
irréguliers dans le avec vos doigts et jetez ceux
bac à glaçons. qui restent.
• Le congélateur est peut-être trop
chaud. Réglez la commande du
congélateur sur une température
plus basse, en abaissant la
commande d’une position à
la fois jusqu’à ce que les blocs
de glace disparaissent.
Le distributeur
L’alimentation en eau • Consultez
Installation de la conduite
d’eau ne
est coupée ou n’est
d’eau.
fonctionne pas
pas raccordée.
Il y a de l’air dans la • Appuyez sur la commande de
conduite d’eau. distribution pendant au moins
deux minutes.
De la condensation
Cela n’est pas inhabituel • Essuyez bien la surface extérieure.
s’accumule à
pendant les périodes de
l’extérieur
forte humidité.
De la condensation
Les portes sont ouvertes
s’accumule à
trop fréquemment ou
l’intérieur (par temps
pendant trop longtemps.
humide, l’ouverture
des portes laisse
entrer de l’humidité
dans le réfrigérateur)
Odeur dans
Des aliments ont • Les aliments à odeur forte
le réfrigérateur
transmis leur odeur doivent être emballés
au réfrigérateur. hermétiquement.
• Gardez une boîte ouverte de
bicarbonate de soude dans le
réfrigérateur.
Il faut nettoyer • Consultez
Entretien et nettoyage.
l’intérieur.
Page 71

Conseils de dépannageInstallation Service à la clientèleFonctionnementMesures de sécurité
71
Problème Causes possibles Correctifs
L’éclairage
Il n’y a pas de courant • Remplacez le fusible ou
intérieur ne
au niveau de la prise. réenclenchez le disjoncteur.
fonctionne pas
L’ampoule est grillée. • Consultez
Remplacement des
ampoules.
La porte ne se
Le joint de la porte colle • Appliquez un peu de vaseline
referme pas
ou se replie du côté des sur la surface du joint.
entièrement
charnières.
Air chaud à
Courant d’air normal • Si vous voulez éviter cette
la base du
provenant du moteur. décoloration, consultez votre
réfrigérateur
Pendant le processus fournisseur de revêtements
de réfrigération, il est de sol.
normal que de la
chaleur soit expulsée à
la base du réfrigérateur.
Certains revêtements
de sol peuvent se
décolorer sous l’effet
de cette température de
fonctionnement normale
qui ne présente aucun
danger.
Eau sur le sol
L’orifice d’écoulement
ou au fond du
de l’eau au fond du
congélateur
congélateur est bouché.
Il y a des glaçons bloqués • Faites passer les glaçons à l’aide
dans le conduit. d’une cuillère en bois.
Page 72

Fonctionnement
Installation
Mesures de sécuritéConseils de dépannageService à la clientèle
72
Quatre années suivantes
CAMCO
garantit le système scellé de réfrigération (c’est à dire l’évaporateur, le
condenseur, le moteur du compresseur, la tuyauterie d’interconnexion, le
déshydrateur et la charge de frigorigène) contre tous défauts de matière ou de
fabrication pendant quatre années supplémentaires. Ces pièces seront réparées ou
remplacées gratuitement au choix de Camco aux termes et conditions ci-après.
Le
MARCHAND
garantit qu’il fournira la main-d’œuvre nécessaire à la réparation ou au
remplacement du système scellé de réfrigération aux termes et conditions indiqués ci- après.
Première année
CAMCO
garantit le remplacement ou la réparation de toutes les pièces de ce
réfrigérateur qui se révèlent défectueuses en termes de matière ou de fabrication
pendant un an à compter de la date de l’achat. Ces pièces seront réparées ou
remplacées au choix de Camco aux termes et conditions indiqués ci-après.
Le
MARCHAND
garantit qu’il fournira la main-d’œuvre nécessaire à la réparation ou
au remplacement de toutes les pièces de ce réfrigérateur qui se révèlent défectueuses
en termes de matière ou de fabrication pendant un an à compter de la date d’achat.
Garantie du client
Pour la clientèle au Canada
■La présente garantie ne s’applique qu’à l’utilisation domestique par une seule
famille au Canada, lorsque le réfrigérateur a été installé conformément aux
instructions fournies par Camco et est alimenté correctement en eau et en électricité.
Les dommages dûs à une utilisation abusive, un accident, une exploitation
commerciale, ainsi que la modification, l’enlèvement ou l’altération de la plaque
signalétique annulent la présente garantie. L’entretien effectué dans le cadre de la
présente garantie doit l’être par un réparateur agréé Camco.
■Camco et le Marchand ne peuvent être tenus pour responsables en cas de
réclamations ou dommages résultant de toute panne du réfrigérateur ou d’un
entretien retardé pour des raisons qui raisonnablement échappent à leur contrôle.
■Pour obtenir un service dans le cadre de la garantie, l’acheteur doit présenter la
facture originale. Les éléments réparés ou remplacés ne sont garantis que pendant le
restant de la période de garantie initiale.
■La présente garantie ne couvre pas les dépenses de préparation de cet appareil à
l’entretien.
■La présente garantie vous confère des droits précis. Il est possible que la législation
en vigueur dans certaines régions vous en confère d’autres.
Camco vous offre ses services dans tout le pays. Voir la page suivante pour des renseignements sur le
service après-vente. Pour de plus amples renseignements sur la présente garantie, veuillez contacter le :
Directeur, Relations avec les consommateurs, Camco Inc., Service après-vente
5800 Keaton Crescent, Mississauga, (Ontario) L5R 3K2
Termes et conditions
Page 73

73
Conseils de dépannageInstallation Service à la clientèleFonctionnementMesures de sécurité
Numéros de service.
Notre service d’information est ouvert 24 heures par jour, 7 jours par
semaine.
Au Canada,
écrivez au Directeur, Relations avec les consommateurs,
Camco Inc., 5800 Keaton Crescent, Mississauga (Ontario) Canada L5R 3K2.
GE Answer Center
®
Aux États-Unis : 800.626.2000
Pour faire réparer votre électroménager GE, il suffit de nous téléphoner.
Au Canada
, consultez l’annuaire téléphonique local pour connaître la
succursale du Service après-vente Camco la plus près de chez vous.
Réparations à domicile
Aux États-Unis : 800-432-2737
Sur demande, GE peut fournir une brochure sur l’aménagement d’une
cuisine pour les personnes à mobilité réduite.
Aux États-Unis,
appelez le
800-833-4322. Au Canada,
écrivez au Directeur, Relations avec les
consommateurs, Camco Inc., 5800 Keaton Crescent, Mississauga
(Ontario) Canada L5R 3K2.
Pour les besoins particuliers
Aux États-Unis : 800.626.2000
Achetez un contrat d’entretien GE avant que votre garantie n’expire et
bénéficiez d’un rabais substantiel. Ainsi le service après-vente GE sera
toujours là après expiration de la garantie.
Au Canada,
appelez le
800-461-3636.
Contrats d’entretien
Aux États-Unis : 800-626-2224
Ceux qui désirent réparer eux-mêmes leurs électroménagers peuvent
recevoir pièces et accessoires directement à la maison (cartes VISA,
MasterCard et Discover acceptées).
Les directives stipulées dans le présent
manuel peuvent être effectuées par n’importe quel utilisateur. Les autres
réparations doivent généralement être effectuées par un technicien qualifié.
Soyez prudent, car une réparation inadéquate peut affecter le fonctionnement
sécuritaire de l’appareil.
Et,
au Canada,
consultez l’annuaire téléphonique
local pour connaître la succursale du Service après-vente Camco la plus
près de chez vous.
Pièces et accessoires
Aux États-Unis : 800-626-2002
Si vous n’êtes pas satisfait du service après-vente dont vous avez bénéficié :
Premièrement,
communiquez avec les gens qui ont réparé votre appareil.
Ensuite,
si vous n’êtes toujours pas satisfait,
aux États-Unis,
envoyez tous les
détails—numéro de téléphone compris—au Manager, Consumer Relations,
GE Appliances, Appliance Park, Louisville, KY 40225; ou,
au Canada,
au
Directeur, Relations avec les consommateurs, Camco Inc., 5800 Keaton
Crescent, Mississauga (Ontario) Canada L5R 3K2.
Enfin,
si votre problème
n’est toujours pas résolu, écrivez au : Major Appliance Consumer Action
Program, 20 N. Wacker Dr., Chicago, IL 60606 (États-Unis uniquement).
Un service satisfaisant
Imprimé aux États-Unis
Page 74

74
Page 75

Electrodomésticos GE
Refrigeradores
Lado a lado
Part No. 162D3941P005 Pub. No. 49-6911
Modelos 21
empotrado,
Profile con
dispensador
Manual del propietario
75
Page 76

¡Congratulaciones!
Ahora usted es parte de la familia GE.
Bienvenido a la familia GE.
Somos orgullosos de la
calidad de nuestros
productos y creemos en el
servicio confiable. Lo verá
en este manual fácil de usar
y lo escuchará en las voces de
nuestro departamento de
servicio al consumidor.
Lo mejor será que usted
experimentará éstos valores
cada vez que use su
refrigerador. Eso es
importante porque su
refrigerador será parte de
su familia durante un largo
tiempo. Y esperemos que
usted será parte de nuestra
familia por mucho tiempo.
Los agradecemos de
comprar GE. Apreciamos su
compra y esperemos que
seguirá confiar en nosotros
cuando necesita un aparato
de calidad en su hogar.
76
¡Importante!
Engrape la factura de compra
o el cheque cancelado aquí.
Se requiere prueba de la fecha de
la compra original para obtener el
servicio cubierto bajo la garantía.
Anote aquí los números
de modelo y de serie.
No.
No.
Usted los verá en una etiqueta en la
pared junto al cajón superior o en el
fondo, precisamente en el interior de
la puerta del compartimiento de
alimentos frescos.
Page 77

GEy Usted,
UnaAsociación de Servicio.
Pregunte cualquier propietario de GE
aparatos y el le asegurará de que la
calidad de nuestro servicio es
incomparable. ¿Pero, sabía usted que
la mayoría de las preguntas son sobre
problemas que usted mismo puede resolver
en pocos minutos? Este manual del
propietario le ayudará en saber cómo.
Información de seguridad
Precauciones de seguridad . . .78
Conectar la electricidad . . . . . .80
Adaptadores . . . . . . . . . . .80, 81
Cables de extensión . . . . . . . .81
Instrucciones de operación
Controles del refrigerador
. . . . .82
Características . . . . . . . . . .83–85
Dispositivo para hacer hielo . . . .86
Dispensador de hielo
y de agua . . . . . . . . . . . . . .87, 88
Cuidado y limpieza . . . . . .89–92
Instrucciones de instalación
Preparación para
instalar el refrigerador . . . .93, 94
Paneles de puerta . . . . . . .95–97
Instalación de
la línea de agua . . . . . . . .98–103
Solucionar problemas
Sonidos normales
de la operación . . . . . . . . . . .104
Antes de
solicitar un servicio . . . .105–108
Servicio al consumidor
Garantía
para consumidores
en los Estados Unidos . . . . . .110
Números del servicio . . . . . . .111
77
Solucionar problemasInstalación Servicio al consumidorOperaciónSeguridad
Este contiene instrucciones que
le ayudará a usar y mantener de
manera correcta su refrigerador.
Un poco de cuidado preventivo
le ayudará a ahorrar tiempo y
dinero durante la vida de su
refrigerador.
Lea este manual
Si requiere un servicio, puede
sentirse relajado al saber que
la ayuda está sólo a una llamada
de distancia. Se incluye una
lista de números gratuitos de
servicio al consumidor en la
sección trasera. O
en los Estados
Unidos
llame al GE Answer
Center
® al 800.626.2000, las
24 horas del día, los 7 días de
la semana.
En Canadá
llame al
800-361-3400.
Si necesita servicio
Encontrará aquí soluciones a
los problemas más comunes.
En revisar nuestra sección de
Solucionar problemas primero,
tal vez no necesitará de solicitar
un servicio.
Revise la sección de
Solucionar problemas
Page 78

INFORMACIONES IMPORTANTES DE SEGURIDAD.
LEA PRIMERO TODAS LAS INSTRUCCIONES.
78
Use este aparato sólo para los fines que se describen en
este Manual del propietario.
■ Antes de usarse, este
refrigerador deberá
estar instalado y ubicado
de acuerdo con las
instrucciones de instalación.
■ No permita que los niños
se suban, se paren o se
cuelguen de las charolas
en el refrigerador. Podría
dañarse el refrigerador y
causarles serias lesiones.
■ No toque las superficies
frías del congelador, sobre
todo cuando tenga las
manos húmedas o mojadas.
La piel se podría adherir a
las superficies
extremadamente frías.
■ No guarde ni use gasolina
u otros vapores o líquidos
inflamables cerca de este o
cualquier otro aparato.
■ Aleje los dedos fuera de
las áreas donde se puede
pinchar los dedos; los
espacios entre las puertas y
entre las puertas y los
gabinetes son necesariamente
estrechos. Cierre las puertas
con cuidado en la presencia
de los niños.
■ Si su refrigerador tiene un
dispositivo automático para
hacer hielo, evite el contacto
con las partes móviles del
mecanismo de expulsión, o
con el elemento calefactor
que desprende los cubos. No
ponga los dedos ni las manos
en el mecanismo automático
para hacer hielo mientras el
refrigerador esté conectado.
■ Desconecte el refrigerador
antes de limpiarlo o efectuar
reparaciones.
NOTA: Recomendamos
enfáticamente encargar cualquier
servicio a un personal calificado.
■ El colocar el control en
posición
OFF
(apagado)
no quita la corriente del
circuito de la luz.
■ No vuelva a congelar los
alimentos congelados una
vez que se hayan
descongelados.
PRECAUCIONES DE SEGURIDAD
Operación
Instalación
SeguridadSolucionar problemasServicio al consumidor
Cuando use electrodomésticos, siga las precauciones
básicas de seguridad, incluyendo las siguientes:
¡ADVERTENCIA!
Page 79

IMPORTANTE:
DESHACERSE DEBIDAMENTE DE SU REFRIGERADOR
79
Solucionar problemasInstalación Servicio al consumidorOperaciónSeguridad
El atrampamiento y la sofocación de los niños no son un
problema del pasado. Los refrigeradores abandonados
son un peligro…aunque sea sólo por “pocos días.” Si se
deshace de su viejo refrigerador, por favor siga las
instrucciones abajo para ayudarnos a prevenir algún
accidente.
Antes de deshacerse de su viejo refrigerador o
congelador:
■ Quite las puertas.
■ Deje los entrepaños en su sitio para que los niños no
se suben adentro.
Deshacerse del CFC
Su antiguo refrigerador tiene un sistema de
refrigeración que usó CFC (clorofluorocarbonos).
Se cree que los CFC son nocivos para el ozono
estratosférico.
Si se desperdicia del antiguo refrigerador, asegúrese de
que se deshaga del refrigerante con CFC correctamente
por un técnico calificado. Si se libera a propósito el
refrigerante con CFC, usted puede estar sujeto a las
multas y al encarcelamiento bajo las estipulaciones del
Clean Air Act federal.
Page 80

INFORMACIONES IMPORTANTES DE SEGURIDAD.
LEA PRIMERO TODA LAS INSTRUCCIONES.
80
COMO CONECTAR LA ELECTRICIDAD
USO DE LOS ADAPTADORES
Debido a los accidentes potenciales relacionados con la
seguridad bajo determinadas circunstancias, recomendamos
estrictamente no utilizar un adaptador para clavija.
Bajo ninguna circunstancia debe cortar o quitar la tercera
punta (tierra) de la clavija. Para su seguridad personal, este
aparato deberá conectarse debidamente a tierra.
El cable eléctrico de este aparato está equipado con una clavija de
tres puntas (tierra) que enchufa en un contacto estándar de pared
de tres salidas (tierra) para reducir al mínimo la posibilidad de
daños por un choque eléctrico con este aparato.
Haga que un electricista calificado verifique el enchufe de la pared
y el circuito para asegurarse que la salida esté conectada
debidamente a tierra.
Donde se disponga sólo de un contacto de pared con salida para dos
puntas, es su responsabilidad personal y su obligación reemplazarlo
por un contacto adecuado para tres puntas con conexión a tierra.
El refrigerador deberá conectarse siempre en su propio contacto
eléctrico individual que tenga un voltaje que vaya de acuerdo con
la tabla de clasificación.
Esto garantiza la mejor ejecución y evita la sobrecarga del circuito
eléctrico de la casa y los daños a causa del sobrecalentamiento de
los cables.
Nunca desconecte el refrigerador jalando el cable. Tome siempre
firmemente la clavija y sáquela del contacto sin doblarla.
Repare o reemplace inmediatamente todos los cables eléctricos de
servicio que se hayan desgastado o dañado en alguna otra forma.
No utilice cables que muestren roturas o daños por abrasión a lo
largo de éste ni en la clavija o en alguno de sus extremos.
Al alejar su refrigerador de la pared, cuide que no pase sobre el
cable o lo dañe.
Operación
Instalación
SeguridadSolucionar problemasServicio al consumidor
¡ADVERTENCIA!
Page 81

81
USO DE CABLES DE EXTENSION
Debido a los accidentes potenciales que pudieran ocurrir
bajo determinadas condiciones, se recomienda
estrictamente no usar cables de extensión.
Sin embargo, si decidiera usarlos, es absolutamente necesario que
sea del tipo UL trifilar para aparatos y cuente con una clavija con
conexión a tierra y que el cable eléctrico sea de 15 amperios
(mínimo) y 120 voltios.
ACUERDESE DE . . .
Su salud y seguridad son importantes para nosotros.
Favor de leer y seguir cuidadosamente las precauciones de
seguridad.
Queremos que usted sea un feliz y sano miembro de nuestra
familia GE.
GUARDE ESTAS INSTRUCCIONES
Solucionar problemasInstalación Servicio al consumidorOperaciónSeguridad
Sin embargo, si se decidiera usar un adaptador donde los códigos
locales lo permitan, es necesario hacer una
conexión temporal
a un
contacto de pared para dos puntas debidamente conectado a tierra
utilizando un adaptador UL, mismo que puede adquirirse en
comercios locales especializados.
La punta más larga del adaptador se deberá alinear con la entrada
larga del contacto con el fin de tener la polaridad adecuada en la
conexión de la clavija.
Al desconectar el cable del adaptador, deténgalo siempre con una
mano tirando a la vez el cable eléctrico con la otra mano. De no
hacerlo puede causar que el adaptador se rompiera después de
mucho uso.
Si se rompiera la terminal a tierra del adaptador,
NO USE
el aparato
hasta que se haya reestablecido la conexión a tierra de manera
adecuada.
La conexión de la terminal de tierra del adaptador a la salida del contacto de
pared no conecta el aparato a tierra, a no ser que el tornillo de la tapa sea de
metal y no esté aislado y que el contacto de la pared esté conectado a tierra a
través del cableado de la casa. Un electricista calificado deberá revisar el circuito
para asegurarse de que el contacto esté debidamente conectado a tierra.
Page 82

Control del compartimiento de alimentos
frescos
El control para los alimentos frescos mantiene las
temperaturas en todas partes del compartimiento
de alimentos frescos.
Control del congelador
El control para el congelador mantiene las
temperaturas en todas partes del congelador.
La colocación del control del congelador en
OFF
(apagado) interrumpe el enfriamiento en ambos
compartimientos—el del alimentos frescos y el del
congelador—pero no apaga el refrigerador.
Cómo verificar las temperaturas
Haga la prueba de la leche para el compartimiento de alimentos
frescos. Coloque un recipiente con leche en el entrepaño superior
del compartimiento para alimentos frescos. Verifique el día
siguiente. Si la leche está demasiada tibia o demasiada fría, ajuste
los controles de la temperatura.
Haga la prueba del helado para el congelador. Coloque un
recipiente con helado en el centro del congelador. Verifique el día
siguiente. Si está demasiado duro o demasiado suave, ajuste los
controles de la temperatura.
Después de cambiar los controles, permita que transcurran 24 horas para que el
refrigerador alcance la temperatura deseada.
82
Los controles del refrigerador.
Coloque primero ambos controles en 5. Si quiera temperaturas más frías o
más cálidas, ajuste primero la temperatura del compartimiento de alimentos
frescos. Cuando esté satisfecho con ésta, ajuste la temperatura del
congelador.
1
2
El ajuste de los controles
Operación
Instalación
SeguridadSolucionar problemasServicio al consumidor
1
3
7
9
5
COLD
FRESH FOOD
TEMPERATURE
COLDEST
1
3 5
7
9
FREEZER
TEMPERATURE
COLDEST
OFF
COLD
1
2
Page 83

Solucionar problemasInstalación Servicio al consumidorOperaciónSeguridad
83
Los entrepaños, portavinos y canastas.
Arreglar los entrepaños
Los entrepaños de los
compartimientos de
alimentos frescos y del
congelador son
ajustables.
Levante y saque
2
Incline
1
Empotre
el gancho
superior
1
Suelte
para atorar
en la posición
correcta
2
Para sacar Para volver a colocar
No todos los modelos tienen todas las características.
Entrepaño ajustable
Este entrepaño se divide a la mitad y se desliza bajo sí
mismo para guardar artículos altos en el entrepaño
inferior.
Entrepaño deslizable a prueba de derramamientos
El entrepaño deslizable permite alcanzar artículos
guardados atrás de otros. Los bordes especiales están
diseñados para ayudar a prevenir derramamientos o
goteos a los entrepaños que se encuentran más abajo.
Asegúrese que se empujen hasta atrás antes de cerrar la puerta.
Portavinos
detachable
Canastas del
congelador
Page 84

Gavetas para guardar y recipientes.
84
No todos los modelos tienen todas las características.
Gavetas para frutas y vegetales
El exceso de agua que pueda acumularse en el fondo
de las gavetas deben ser vaciado y la gavetas deben ser
secadas.
Gavetas con humedad ajustable
Deslice el control hasta llegar a la posición
HIGH
(alto)
para proporcionar el alto nivel de humedad
recomendado para la mayoría de los vegetales.
Deslice el control hasta llegar a la posición
LOW
(bajo)para proporcionar el nivel de baja humedad
recomendado para la mayoría de las frutas.
High Humidity Control Low
Gaveta convertible para carnes
Esta gaveta convertible para carnes tiene su propio
conducto de refrigeración, el cual permite la circulación
en dicha gaveta de aire frío proveniente del congelador.
El control de temperatura variable
regula la circulación de
aire proveniente del compartimiento del congelador.
Coloque la palanca del control hacia
abajo
en la
posición más fría para conservar carne fresca. Si la
palanca se deja mucho tiempo en esta posición, se
podrá formar escarcha en el interior de la gaveta.
Coloque la palanca del control en la posición hacia
arriba
para poner la gaveta a la temperatura normal del
refrigerador y obtener así más espacio para guardar
hortalizas. El conducto de refrigeración queda apagado.
Se pueden seleccionar posiciones variables entre estos
extremos.
Normal
Más fría
Operación
Instalación
SeguridadSolucionar problemasServicio al consumidor
Page 85

85
Solucionar problemasInstalación Servicio al consumidorOperaciónSeguridad
No todos los modelos tienen todas las características.
Como sacar las gavetas
Pueden extraerse fácilmente levantándolas
ligeramente y tirando de ellas hasta pasar el punto
donde se
atrancan.
Cuando la puerta del compartimiento de alimentos frescos no se
puede abrir por completo, tendrá que sacar primero los recipientes
inferiores antes de sacar las gavetas.
Para retirar el entrepaño de vidrio que se encuentra
sobre la gaveta superior, quitar primero los alimentos
que se encuentren sobre el entrepaño. Introduzca la
mano, levante la parte posterior del entrepaño hasta
que toque la parte inferior del panel de la luz inferior.
Empuje el entrepaño hacia atrás (aprox. 1/2
″—13 mm)
hasta dejar libres los soportes de la esquina anterior.
Para volver a colocar el entrepaño de vidrio haga los
pasos en orden inverso.
Guías de la gaveta
Al volver a colocar las gavetas,
asegúrese de deslizarlas a través de
ambos guías de la gaveta del lado
derecho.
Recipientes en la puerta del compartimiento de
alimentos frescos
Los recipientes ajustables se pueden llevar fácilmente
del refrigerador al área de trabajo.
Para sacar:
Levante el recipiente hasta desenganchar.
Para volver a meter o colocar:
Seleccione la altura
deseada, engrane el recipiente en las guías de la puerta y
empuje hasta adentro. El recipiente se quedará en la
posición correcta.
El divisor
(en algunos modelos) ayuda a prevenir que se
caigan, se derramen o se deslicen artículos pequeños
guardados en el entrepaño de la puerta. Coloque un
dedo en ambos lados del divisor cerca del frente y mueva
hacia adelante y hacia atrás según se requiera.
El divisor
Page 86

86
El dispositivo automático para hacer hielo.
Un refrigerador recién instalado puede tardar hasta 8 a 12 horas antes de
empezar a hacer hielo.
Dispositivo automático para hacer hielo
El dispositivo para hacer hielo producirá ocho cubos
por ciclo—aproximadamente 120 cubos en un ciclo
de 24 horas, dependiendo de la temperatura del
congelador, de la temperatura ambiente, del número
de veces que se abra la puerta y de otras condiciones
del uso.
Si el refrigerador se usa antes de que se haga la
conexión de agua al dispositivo para hacer hielo, levante
la puerta de acceso al hielo y asegúrese de que el brazo
detector esté en la posición
STOP
(PARADA—hacia
arriba).
Cuando el refrigerador está conectado al suministro
de agua, mueva el brazo detector hasta la posición
ON
(ACTIVADA—hacia abajo).
El dispositivo para hacer hielo se llenará de agua
cuando la temperatura alcance el punto de
congelación. Un refrigerador recién instalado puede
necesitar entre 8 y 12 horas para empezar a hacer hielo.
Deshaga las primeras cargas de cubos de hielo para
permitir que la línea de agua se limpie.
Asegúrese de que nada impide el movimiento del brazo
detector.
Es normal que algunos cubos salgan pegados.
Si no se usa hielo con frecuencia, los cubos de hielo
viejos se opacan y adquieren un sabor rancio.
Dispositivo para
hacer hielo
Recipiente del hielo
Brazo detector
en la posición
STOP
(PARADA—
hacia arriba)
Brazo detector
en la posición
ON
(ACTIVADA—
hacia abajo)
Operación
Instalación
SeguridadSolucionar problemasServicio al consumidor
Page 87

El dispensador de hielo y de agua.
Solucionar problemasInstalación Servicio al consumidorOperaciónSeguridad
Gire
Mecanismo
de manejo
El recipiente de almacenamiento de hielo
Para sacar:
Levante la esquina izquierda para desprender el
recipiente del entrepaño. Jálelo hacia afuera
deteniendo atrás y adelante.
Para volver a colocar:
Deslice la parte de atrás del recipiente hasta que la
lengüeta entre en la perforación del entrepaño. Si el
recipiente no entrara hasta adentro, vuelva a sacar y gire
el mecanismo de manejo 1/4 de vuelta. Empuje de
nuevo hasta que la lengüeta se atore en la perforación
del entrepaño.
87
Para usar el dispensador
Presione el borde del vaso suavemente contra el botón
del dispensador.
Seleccione
CUBES
(cubos de hielo),
CRUSHED ICE
[hielo
triturado (en algunos modelos)] o
WA TER
(agua).
El recogedor no se vacía solo. Para reducir las manchas
de agua, el recogedor y la parrilla se deberán limpiar
regularmente.
Si no hay distribución de agua cuando el refrigerador está
primeramente instalado, hay posibilidad de aire en el sistema de la
línea de agua. Oprima el botón del dispensador durante al menos
dos minutos para eliminar el aire atrapado de la línea de agua y
llenar el sistema. Para eliminar las impurezas de la línea de agua,
deshaga los primeros seis vasos de agua.
Un interruptor de luz (en algunos modelos) enciende
o apaga
la luz de noche
en el dispensador. La luz se
enciende también cuando se presiona el botón del
dispensador. Cuando se funda la bombilla del
dispensador, deberá reemplazarse con una bombilla
de máximo 7 vatios.
PRECAUCION: No introduzca nunca los dedos ni
otros objetos en la apertura del dispensador de
hielo triturado.
Recogedor
Page 88

El dispensador de hielo y de agua.
88
■ Añade el hielo antes de llenar el vaso con bebida. Eso evitará
salpicaduras que pueden causar el botón de pegar o de se torcer.
■ No agregue hielo de charolas o de bolsas en el recipiente. Podría
provocar que no sale bien o que no se triturara adecuadamente.
■ Evite los vasos demasiado llenos de hielo y el uso de vasos
estrechos o demasiado altos. El hielo amontonado podría
obstruir el orificio o hacer que se congele la puerta del orifico
de manera que no se pueda abrir. Si hubiera hielo
bloqueándolo, desprenda con una cuchara de madera.
■ Las bebidas y los alimentos no se deberán enfriar rápidamente
en el recipiente del hielo. Las latas, botellas o paquetes de
comida en el recipiente de hielos podrían causar la obstrucción
del dispositivo para hacer hielo o del recipiente.
■ Un poco de hielo triturado puede surtir aunque había
seleccionado
CUBES
(cubos). Esto sucede en ocasiones cuando
algunos cubos se canalizan en el triturador.
■ Después de usar hielo triturado, un poco de agua puede gotear
del vertedero.
■ En ocasiones es posible que se forme escarcha sobre la puerta del
orificio del hielo. Esto es normal y sucede generalmente cuando
se ha surtido repetidamente hielo triturado. La escarcha se
evapora después de poco tiempo.
■ El agua surtida no está helada. Para agua más fría agregue
simplemente hielo triturado o cubos antes de extraer agua.
Datos importantes de su dispensador
Operación
Instalación
SeguridadSolucionar problemasServicio al consumidor
Page 89

89
Solucionar problemasInstalación Servicio al consumidorOperaciónSeguridad
Cuidado y limpieza del refrigerador.
Limpiar el exterior
El pozo del dispensador
, por debajo de la parrilla, se debe
mantener limpio y seco. El agua que se queda en el pozo
puede dejar depósitos. Quite los depósitos agregando
vinagre sin diluir al pozo. Remoje hasta que
desaparezcan los depósitos o hasta que se desprendan
lo suficiente para quitarlos.
El botón del dispensador
. Se limpia con una solución de
agua tibia y bicarbonato de sodio—aproximadamente
una cucharada (15 ml) de bicarbonato de sodio por
cada cuarto (1 litro) de agua. Enjuague completamente
con agua y seque.
CONSEJO: Abra la puerta del congelador un poco para evitar que
sale hielo o agua durante la limpieza.
Las manijas suaves forradas
(en algunos modelos) son
fáciles de mantener limpias si se enceran regularmente.
Use una cera doméstica (por ejemplo, Pledge o Jubilee)
para encerar las manijas. Limpie con agua y jabón o un
limpiador suave para todo uso.
Las manijas largas de la puerta y los ornamentos
(en
modelos con un juego de materiales ornamentales)
se pueden limpiar con un paño empapado con una
solución de detergente suave y agua. Seque con un
trapo limpio. No use cera en las manijas de la puerta ni
en los ornamentos.
Mantenga limpio el terminado.
Limpie con un paño
limpio ligeramente humedecido con cera para aparatos
de cocina o un detergente suave y agua. Seque y pula
con un paño limpio y suave.
No limpie el refrigerador con un paño sucio para trastes ni con un
paño húmedo. Estos podrían dejar residuos que afecten a la pintura.
No use estropajos, limpiadores en polvo, blanqueadores ni
limpiadores que contengan blanqueador, ya que estos productos
podrían rayar y desprender el terminado de pintura.
Presione aquí par
retirar la parrilla.
Page 90

Cuidado y limpieza del refrigerador.
90
Limpiar el interior
Para evitar olores,
deje una caja abierta de bicarbonato
de sodio en los compartimientos de alimentos frescos
y del congelador.
Desconecte el refrigerador antes de limpiarlo.
Si no fuera
posible, exprima el exceso de humedad de la esponja
o del paño cuando se limpie alrededor de botones,
bombillas o controles.
Use agua caliente y una solución de bicarbonato de
sodio—aproximadamente una cucharada (15 ml) de
bicarbonato de sodio por cada cuarto (1 litro) de agua.
Esta solución limpia y neutraliza olores. Enjuague y
seque.
Apertura del desagüe en el congelador.
En la limpieza
anual, retire la canasta inferior del congelador e
introduzca con ayuda de una jeringa para carne una
solución de bicarbonato de sodio—una cucharadita
(5 ml) y 2 tazas (500 ml) de agua caliente (no
hirviendo)—en la tubería de desagüe. Esto ayudará a
eliminar los olores y a reducir la probabilidad de que se
tape. Si se tapara el desagüe, use una jeringa para carne
y una solución de bicarbonato de sodio para destapar la
tubería.
Después de limpiar las juntas de las puertas, aplique una
capa delgada de vaselina del lado de la bisagra. Esto
ayuda a evitar que las juntas se doblen o se peguen.
Evite limpiar los entrepaños de vidrio (en algunos modelos) fríos con
agua caliente, ya que la extrema diferencia de temperatura puede
hacer que se quiebren. Maneje los entrepaños de vidrio con cuidado.
Chocar vidrio templado puede hacer que se rompe en pedazos.
Operación
Instalación
SeguridadSolucionar problemasServicio al consumidor
Asegure todos los elementos sueltos como parrillas, entrepaños, y
recipientes pegándolos con cinta adhesiva en su lugar para evitar
daños.
Asegúrese de que el refrigerador se coloque en posición vertical durante la
mudanza.
En caso de mudanza
Page 91

91
Solucionar problemasInstalación Servicio al consumidorOperaciónSeguridad
En el caso de vacaciones o ausencias prolongadas, quite los alimentos
y desenchufe el refrigerador. Mueva el control del congelador
a la posición
OFF
(apagado) y limpie el interior con solución de
bicarbonato de una cucharada (15 ml) de bicarbonato por un
cuarto (1 litro) de agua. Deje abiertas las puertas.
Mueva el brazo detector del dispositivo para hacer hielo a la
posición
STOP
(PARADA—hacia arriba) y desconecte el suministro
de agua al refrigerador.
Si la temperatura pueda llegar al punto de congelación, haya una
persona calificada para desaguar el sistema del suministro de agua
para evitar daños a la propiedad causados por inundación.
Preparación para vacaciones
Atrás del refrigerador
Se deberá tener cuidado al retirar el refrigerador de la pared. Todos
los tipos de recubrimiento de pisos se pueden dañar, sobre todo los
recubrimientos acojinados y los que tienen superficies repujadas.
Jale el refrigerador en forma recta y empuje nuevamente para
devolverlo a su posición. Mover el refrigerador en dirección lateral
puede causar daños al recubrimiento del piso o al refrigerador.
Al empujar el refrigerador a su lugar, asegúrese de no pasar sobre el cable
eléctrico ni sobre la línea de alimentación del dispositivo para hacer hielos.
Debajo del refrigerador
Para la operación más eficiente, usted necesita
mantener limpia la región debajo del refrigerador.
Quite la rejilla de la base y barra o pase el aspirador.
Para obtener los mejores resultados, use un cepillo para
este propósito. Puede adquirir uno en la mayoría de las
tiendas de refacciones para electrodomésticos.
Limpie las bobinas del condensador
al menos una vez al año.
Page 92

Reemplazar las bombillas.
El colocar el control en posición OFF (apagado) no quita la corriente del
circuito de la luz.
Compartimiento de alimentos frescos—
Luz superior
Desconecte el refrigerador.
Extraiga los botones de mando de temperatura.
Para quitar el panel de la luz, tire hacia usted.
Después de colocar una bombilla nueva del mismo o de menos
vatios, vuelve a instalar el panel y enchufe el refrigerador de nuevo.
3
2
1
FREEZER
TEMPERATURE
COLD
OFF
COLDEST
1
3
5
*
7
9
FRESH FOOD
TEMPERATURE
COLD COLDEST
1
3
5
*
7
9
Profile
*INITIAL TEMPERATURE SETTINGS
ALLOW 24 HRS. FOR TEMP. TO STABILIZE
92
Desconecte el refrigerador.
Retire el entrepaño que se encuentra justo debajo del
panel de luz.
Jale el panel hacia usted para tomar la bombilla.
Después de colocar una bombilla nueva del mismo o de menos vatios, vuelve a
instalar el panel y el entrepaño, y enchufe el refrigerador de nuevo.
3
2
1
Congelador
Esta luz se localiza detrás de un panel en la parte trasera del
compartimiento de alimentos frescos.
Desconecte el refrigerador.
Agarre el borde superior del panel de la luz y levántelo hacia
arriba y hacia afuera para liberar el borde superior.
Después de colocar una bombilla nueva del mismo o de menos vatios, enganche
de nuevo la parte superior del panel en su sitio, y enchufe el refrigerador de nuevo.
2
1
Compartimiento de alimentos frescos—Luz inferior
(en algunos modelos)
Operación
Instalación
SeguridadSolucionar problemasServicio al consumidor
Page 93

93
Preparación para instalar el refrigerador.
Lea las instrucciones completamente y debidamente.
Deje suficiente espacio para facilitar la instalación, la circulación
adecuada de aire y las conexiones de plomería y eléctricas.
Lados. . . . . . . . . . . . . . . . . . . . . . . . . 5/8
″(15 mm)
Parte superior . . . . . . . . . . . . . . . . . 1″ (25 mm)
Parte posterior . . . . . . . . . . . . . . . . 1/2″ (13 mm)
En caso de empotrados, deje 7/8″(22 mm) para las cubiertas de las bisagras.
Si el refrigerador estuviera colocado contra la pared en alguno de
sus lados, deje 3/4″(19 mm) para el movimiento de la puerta.
Espacios libres
Solucionar problemasInstalación Servicio al consumidorOperaciónSeguridad
Suministro de agua al
dispositivo para hacer hielo
El dispositivo para hacer hielo tendrá que ser conectado a una línea
de agua fría.
Por un costo adicional, es posible adquirir de su distribuidor o por
teléfono para partes y accesorios al 800-626-2002, un paquete para
el suministro de agua (contiene los tubos de cobre, la válvula de
cierre, los dispositivos de ajuste y las instrucciones).
No instale el refrigerador donde las temperaturas van debajo los
60 °F (16 °C), ya que no podrá funcionar bastante para mantener
las temperaturas adecuadas.
Instale sobre un piso suficientemente firme para soportar un
refrigerador completamente lleno.
Ubicación del refrigerador
Page 94

Preparación para instalar el refrigerador.
94
Rodillos niveladores
Los rodillos tienen dos propósitos:
Los rodillos se ajustan para que el refrigerador sea firmemente posicionado
en el piso y para no tambalearse.
Los rodillos permiten mover el refrigerador para retirarlo de la pared
para su limpieza.
Para ajustar los rodillos,
quite la parrilla de la base tirando hacia afuera en la
parte inferior.
Mueva los rodillos delanteros ajustando los tornillos
en sentido de las manecillas
del reloj para elevar
el refrigerador y
contra las manecillas del reloj para bajarlo.
Use una llave hexagonal de 3/8″ o una llave ajustable o pinzas.
Gire el rodillo trasero ajustando los tornillos
en sentido de las manecillas del reloj
para elevar
el refrigerador y
contra las manecillas del reloj para bajarlo.
Use un
destornillador de hoja plana.
NOTA: Para nivelar el refrigerador, se pueden cerrar las puertas con más facilidad levantando la
parte delantera 5/8
″(15 mm) más que la parte trasera del refrigerador.
Para volver a colocar la parrilla de la base
hay que alinear las puntas de la parte
trasera de la parrilla con pinzas en el gabinete y empujar hasta que la parrilla
atore en su lugar.
2
1
Lea las instrucciones completamente y debidamente.
Operación
Instalación
SeguridadSolucionar problemasServicio al consumidor
Tornillo de ajuste del
rodillo delantera
Tornillo de ajuste del
rodillo trasero
Orificio donde la punta de la parrilla
entra y queda en su lugar
Page 95

95
Solucionar problemasInstalación Servicio al consumidorOperaciónSeguridad
Cómo agregar paneles en las puertas.
Lea las instrucciones completamente y debidamente.
Antes de que empiece
Estas instrucciones describen cómo insertar paneles
decorativos y qué medidas deben tener éstos.
Los paneles deberán cortar a las siguientes medidas:
Panel superior del congelador—145/16″ x 183/4″(36.4 cm x 47.6 cm)
Panel inferior del congelador—14
5
/16″ x 323/8″(36.4 cm x 82.2 cm)
Panel del compartimiento para alimentos frescos—20
1
/16″ x 653/16″
(51.0 cm x 165.6 cm)
Los paneles con 1/4″(6 mm) de espesor entrarán en el marco de la
puerta sin necesidad de preparación especial. Si usted tiene un
material con un espesor menor de 1/4″(6mm), deberá agregar
algún relleno atrás del panel para que ajuste bien.
Su distribuidor tiene a la disposición paneles blancos y negros
precortados.
En modelos con juego de ornamentos
Es necesario un
corte especial;
vea abajo.
Es necesario un
corte especial;
vea abajo.
14
5
/16″
36.4 cm
18
3
/4″
47.6 cm
32
3
/8″
82.2 cm
14
5
/16″
36.4 cm
1/8″
3 mm
5/16″
8 mm
20
1
/16″
51.0 cm
65
3
/16″
165.6 cm
Un corte especial es necesario en las esquinas externas,
5/16″ (8 mm) de largo, 1/8″(3 mm) de profundidad.
Page 96

Cómo insertar los paneles de las puertas.
96
Quite el ornamento de la manija de la puerta
Abra la puerta del congelador y quite el único tornillo del casquete superior
de la manija.
No intente quitar el casquete.
Afloje los tornillos del ornamento superior de la puerta aproximadamente
1/4
″(6 mm). Esto permitirá al casquete de la manija deslizarse bajo el
ornamento superior.
Quite los 5 tornillos de la manija extra-larga. Guarde todos los tornillos.
Los
tornillos de repuesto adicionales para el ornamento de la puerta se encuentran dentro de las
gavetas para guardar.
Quite
cuidadosamente
la manija de la puerta del congelador con el casquete
superior de la manija.
NOTA: Tenga cuidado de no dañar el casquete inferior de la manija al quitar la manija de la
puerta del congelador . Está sujetado a la manija extra-larga de la puerta con un tornillo y no
necesita quitarlo de la manija.
4
3
2
1
Lea las instrucciones completamente y debidamente.
Operación
Instalación
SeguridadSolucionar problemasServicio al consumidor
Page 97

Inserte los paneles
Empuje cuidadosamente los paneles de la puerta en los orificios. Asegúrese de
que el panel superior del congelador se coloque con el corte en la esquina
superior izquierda. Al insertar el panel del compartimiento de alimentos
frescos, asegúrese de que el corte quede en la esquina superior derecha.
Vuelva a colocar la manija de la puerta y el ornamento
Reinstale la manija extra-larga y el casquete superior de la manija. Atornille
ligeramente la manija a la puerta. Coloque el casquete sobre la manija y atornille
ligeramente el casquete. Levante la manija y apriete el tornillo superior de la
manija. Entonces, apriete el tornillo del casquete de la manija para que el
casquete y la manija se empotren. Apriete todos los tornillos.
El panel del compartimiento para alimentos frescos se instala de la misma manera.
Panel de 3/4″(19 mm) o panel levantado
Puede utilizarse un diseño de panel levantado, atornillado o pegado a un soporte
posterior de 1/4″(6 mm) de espesor, o una tabla guía de 3/4″(19 mm). La
porción levantada del panel debe fabricarse de manera que permita un espacio
de por lo menos 2″(51 mm) desde el lado de la manija para permitir que entren
las puntas del dedo y 1
1
/4″(32 mm) del lado de la bisagra para evitar golpes contra
los gabinetes contiguos.
Limitaciones de peso para los paneles sobre medida:
Alimentos frescos 38 libras (17 kg) máximo
Puerta del congelador 20 libras (9 kg) máximo
Espacio de 2″
(51 mm) desde el
lado de la manija
Espacio libre del
lado de la bisagra
de 1
1
/4″ (32 mm)
Panel
aparente
Puerta del
refrigerador
Soporte posterior de
1/4″ (6 mm) de espesor
3/4″
(19 mm)
97
Solucionar problemasInstalación Servicio al consumidorOperaciónSeguridad
Page 98

98
Instalación de la línea de agua.
Antes de que empiece
Esta instalación de la línea de agua no está garantizada ni
por el fabricante del refrigerador ni por el del dispositivo
para hacer hielo. Siga estas instrucciones detenidamente
para minimizar el riesgo de producir daños causados por
acción del agua, los cuáles podrían resultar muy costosos.
El agua que estalla en la tubería de la casa con un ruido de
martillo, puede causar daños en partes del refrigerador y
también fugas o inundación. Llame a un plomero calificado
para rectificar el ruido de martillo en la tubería antes de
instalar la línea del suministro de agua al refrigerador.
Para prevenir quemaduras y daños al producto, no instale la
línea de agua a la tubería de agua caliente.
Si utiliza el refrigerador antes de conectar la tubería del
agua, asegúrese de que el brazo detector del dispositivo
para hacer hielo permanezca en la posición STOP
(PARADA—hacia arriba).
No instale el tubo del dispositivo para hacer hielo en sitios
en donde la temperatura pudiera descender por debajo del
punto de congelación.
Cuando utilice un aparato eléctrico (como, por ejemplo, un
taladro eléctrico) durante la instalación, asegúrese de que
dicho aparato esté eléctricamente aislado o conectado de
tal manera que no exista peligro de que se produzcan
descargas eléctricas.
Todas las instalaciones deben apegarse a las normas
vigentes en materia de obras de plomería.
Lea las instrucciones completamente y debidamente.
Operación
Instalación
SeguridadSolucionar problemasServicio al consumidor
Page 99

99
Solucionar problemasInstalación Servicio al consumidorOperaciónSeguridad
Para determinar la cantidad de tubo de cobre que necesita:
Mida la distancia desde la válvula del agua detrás del refrigerador
hasta el tubo de suministro de agua. Después añada 8 pies (244 cm).
Asegúrese de que haya suficiente tubo adicional 8 pies (244 cm)
doblado en forma de una gran espiral en 3 vueltas de 10
″
(24 cm) de diámetro para permitir distanciar el refrigerador de la
pared después de la instalación.
■
Un equipo de suministro de agua
(contiene los tubos de cobre,
la válvula de cierre y los dispositivos de ajuste que aparecen
en la lista abajo) se puede adquirir, por un costo adicional,
de su distribuidor o por teléfono para partes y accesorios al
800-626-2002.
■
Abastecimiento de agua fría.
La presión del agua debe oscilar entre
20 y 120 p.s.i. (libras por pulgada cuadrada).
■
T aladr o eléctrico.
■ Para la conexión entre el refrigerador y el abastecimiento de
agua es necesario un
tubo de cobre
de un diámetro exterior de
1/4″. Asegúrese de que ambos extremos del tubo estén cortados
a precisión.
No utilice tubos ni empalmes de plástico ya que la tubería de abastecimiento de
agua se halla siempre bajo presión. Además, ciertos tipos de tubos de plástico
podrían debilitarse con el tiempo y agrietarse, ocasionando fugas de agua.
■
Dostuercas de compresión con diámetro exterior de 1/4″y dos férulas
(mangas)—
para conectar el tubo de cobre a la llave de paso y la
válvula del agua del refrigerador.
■ Si la tubería del agua existente tiene en el extremo un empalme
apestañado, para conectar la tubería del agua al refrigerador se
necesitará de un
adaptador
(que se compra en las tiendas de
artículos de plomería)
O
, puede cortar el empalme apestañado
con un
cortatubos
y entonces usar un empalme de compresión.
■
Llave de paso
para conectarse a la tubería del agua fría. La
entrada de agua de dicha llave habrá de tener un diámetro
interior mínimo de 5/32″en el punto de conexión a la
TUBERIA
DE AGUA FRIA.
En muchos de los juegos de accesorios para el
abastecimiento de agua se incluyen llaves de paso tipo campana.
Antes de comprarla, asegúrese de que la llave de paso de tipo
campana se ajuste a las normas vigentes en materia de plomería.
Lo que se necesita
Page 100

Instalación de la línea de agua.
100
Lea las instrucciones completamente y debidamente.
Instale la llave de paso
Instale la llave de paso en la tubería de agua potable de uso frecuente más
cercana.
Coloque la llave en un lugar que tenga fácil acceso. Lo mejor es colocarla en
el lateral de un tubo vertical. Si fuera necesario colocarla en un tubo
horizontal, haga la conexión en la parte superior o lateral, en vez de en la
inferior, para evitar la extracción de sedimentos presentes en el tubo.
Haga un agujero de 1/4″en el tubo con un taladro, usando una broca bien
afilada. Elimine las asperezas que pudieran haberse producido al hacer el
agujero con el taladro.
Una la llave de paso al tubo de agua fría con la abrazadera de tubo.
Apriete los tornillos de la abrazadera hasta que la arandela obturadora
empiece a dilatarse.
No apriete demasiado pues podría quebrar el tubo de cobre.
5
4
3
2
1
Arandela
Extremo de entrada
Abrazadera del tubo
Tubo de agua fría ver tical
Llave de paso
Operación
Instalación
SeguridadSolucionar problemasServicio al consumidor
Abra la llave más cercana durante el tiempo suficiente para
despejar la tubería del agua.
Corte el paso de agua
del abastecimiento principal
 Loading...