

Page 1

Page 2
|mpo_an_ |_forma_on
Caution:TOreducethe riskof electricshock,do not removecover(orback).No
userserviceablepartsinside, Referservicingto qualified servicepersonnel.
Thissymbol indicatesimportant _ Thissymbolindicates"dangerousvoltage" insidethe product
instructions accompanyingthe product,_ that presentsa riskof electricshockor personalinjury.
WARNING
To reducethe riskof fire or electricshock,do not
exposethis productto rain or moisture. Noobjects
filled with liquids,suchasvases,shallbe placedon
the apparatus,
Notes:
ThisDVDplayerisdesignedandmanufacturedto
respondto the RegionManagementInformation.
If the Regionnumberof a DVDdiscdoes not
correspondto the Regionnumberof this DVD
player,this DVDplayer cannotplay the disc,The
Regionnumberfor this DVDplayerisRegionNo 1,
ThisdeviceisprotectedbyU.S,patentnumbers
4,631,603and 4,577,216and4,819,098andother
intellectual property rights. Theuseof
Macrovision'scopyprotectiontechnology in the
devicemustbeauthorized by Macrovisionandis
intended for homeand other limited pay-per-view
usesonly,unlessotherwiseauthorized in writing
by Macrovision.Reverseengineeringor
disassemblyisprohibited.
Product Registration
Pleasefill outtheproductregistrationcard(packed
separately)andreturnit immediately,Returningthe
cardallowsustocontactyouif needed.
Product Information
Keepyoursalesreceiptto obtain warranty partsand
serviceandfor proof of purchase.Attach it hereand
recordthe serialandmodel numbers,Thesenumbers
arelocatedoN theproduct,
Model No.
Serial No. PurchaseDate:
Dealer/Addres_Phone:
CAUTION
THiSPRODUCTUTILIZESALASER.USEOFCONTROLSOR
ADJUSTMENTSORPERFORMANCEOFPROCEDURES
OTHERTHANTHOSESPECIFIEDHEREINMAYRESULTIN
HAZARDOUSRADIATIONEXPOSURE.DONOTOPEN
COVERSANDDONOTREPAIRYOURSELEREFER
SERVICINGTOQUALIFIEDPERSONNEL.
Caution: TOpreventelectricshock,match
wide blade of plugto wideslot, fully insert.
Attention: Pour_viter leschocs_lectriques,
introduire la lamela pluslargede lafiche
danslabornecorrespondantedela priseet
pousserjusq6aufond.
Refertothe identification/rating label locatedonthe back panelof
your productfor itsproper operating voltage.
FCCRegulationsstatethat unauthorizedchangesor modifications
to this equipment mayvoid the user'sauthority to operate it.
Caution: Usingvideo gamesor any external accessorywith
fixed images for extended periods of time cancause them
to be permanently imprinted on the picture tube (or
projection TVpicture tubes). ALSO,some network/program
Iogos,phone numbers, etc. may causesimilardamage. This
damage isnot covered by your warranty.
G-LINK,VCRPlus+,PlusCode,andGUIDEPlus+aletrademalksof GemstarDevelopmentCorporation
TheGUIDEPlus+systemismanufacturedunderlicenseeomIndexSystemsInc
GEMSTAR IS NOT IN ANY WAY LIABLE FOR THE ACCURACY OF THE PROGRAM INFORMATION PROVIDED BY THE
GUIDE PLUS+ SYSTEM. IN NO EVENT SHALL GEMSTAR BE LIABLE FOR ANY AMOUNT REPRESENTING LOSS OF
PROFITS, LOSS OF BUSINESS, OR INDIRECT, SPECIAL, OR CONSEQUENTIAL DAMAGES IN CONNECTION WITH THE
PROVISION OR USE OF ANY INFORMATION, EQUIPMENT, OR SERVICES RELATING TO THE GUIDE PLUS+ SYSTEM.
Cable IV Installer: Thisreminderisprovidedto callyourattention
to Article 820-40of the National ElectricalCode(Section54of the
CanadianElectricalCode,PartI) which providesguidelines for
proper grounding and, in particular,specifiesthat thecableground
shall beconnectedto the grounding systemof the building asclose
to the point of cableentryaspractical,
I I
LASER
PRODUCT
THOMSONANDGEMSTARAREUNAFFILIATEDENTITLES.THEGUIDEPLUS+SYSTEMISOPERATEDBY GEMSTAR.
THOMSONSHALLNOTBELIABLEFORANY LOSSORDAMAGEINCLUDING,BUTNOTLIMITEDTO, DIRECT,INDIRECT,
SPECIALORCONSEQUENTIALDAMAGES,SUFFEREDBY THEUSEROFTHISPRODUCTDUETOMALFUNCTIONING,
UNAVAILABILITYORDISCONTINUANCEOFTHEGUIDEPLUS+SYSTEMORTHEACCURACYOFTHEPROGRAM
INFORMATIONPROVIDEDBY THEGUIDEPLUS+SYSTEM.
Page 3

"T'ab|e Qf Contents
Chapter I : Connections _ Setup
Things to Consider Before You Connect ......... 3
Protect Against Power Surges ................. 3
Protect Components from Overheating.. 3
Position Cables Properly to Avoid Audio
lnter|_rence ............................................. 3
Important Stand and Base Sa|_ty
lnfbrmation ............................................. 3
Use indirect Light ..................................... 3
Connection Pictures ................................. 3
Types of Discs Your TV/DVD will Play.... 3
Choose Your Connection .................................. 4
CaNes Needed to Connect Components
to Your TV/DVD ...................................... 4
W/BVD Only ..................................................... 5
IV/DVD + VCR ................................................... 6
TV/DVD + Receiver ............................................ 8
Why You Should Connect This G-LINK CaMe. 8
How to Find the Remote Sensor ............. 9
Placing the G-L1NK Wands ...................... 9
Put Batteries in the Remote .......................... 10
Plug in the 1V/DVD ......................................... 10
How to Use the Remote Control to Complete
the Interactive Setup ................................... 10
Turn on the IV ................................................ 10
Complete the Interactive Setup ..................... 10
Set the Menu Language ........................ 10
Complete Auto Channel Search ............ I1
The GUIDE Plus+ System Setup ............ I1
What to Expect .............................................. 15
Set the DVD Menu Language ....................... 15
Setting Other Options ................................... 15
The Buttons on the Remote Control ............ 16
The Front of Your IV/DVD ............................ 17
Chapter 2: Playing DVDs
Regionat Coding ............................................. 18
Using Different Menus .................................. 18
Loading and Playing Discs ............................ 18
To Load and Play a Disc ........................ 18
Using a Disc Menu ......................................... 19
Using the On-Screen Info Display ................ 19
Time Display ........................................... 19
Selecting a Title ...................................... 20
Selecting a Chapter ................................ 20
Selecting Subtitles .................................. 20
Changing the Audio Language ............. 21
Using the Repeat Feature ...................... 21
AoB Repeat ............................................. 21
Using Bookmarks .................................... 22
Changing the Camera Angle ................. 22
Disc PlaybackFeaturesUsingthe Remote ... 23
Chapter 3: Using the TV's Features
About the GUIDE Plus+ System .................... 24
Getting In 8 Out of the GU1DE Plus+
System ................................................... 24
The GU1DE Plus+ System Menus .......... 24
Grid Guide ............................................... 25
Sort .......................................................... 26
News ........................................................ 26
Schedule .................................................. 26
Messages ................................................. 27
Channels .................................................. 27
Setup ....................................................... 27
Promotions and Advertising .................. 27
Channel Banner .............................................. 28
Why You Should Use the Auto Tuning
Feature ......................................................... 28
How to Set Up the Auto Tuning
Feature ................................................... 28
Parental Controls and V-ehlp ....................... 29
How V-Chip Works ................................. 29
V-Chip TV Rating Limit ......................... 30
Blocking Specific Content Themes ....... 32
Viewing Specific Content Themes ........ 33
V-Chip Movie Rating Limit .................... 33
V-Chip Unrated Program Block ............. 34
Channel Block ......................................... 34
Front Panel Block ................................... 34
Lock/Unlock Parental Controls .............. 34
Manufactured under license from Dolby Laboratories "Dolby" and the double-D symbol are trademarks of Dolby
Laboratories Confidential unpublished works @1992-1997 Dolby Laboratories, Inc All rights reserved
DTSis a registered trademark of Digltal Home Theater Systems, Inc
Page 4
b|e Qf CQntents
Chapter 4: The DVD Menu
The DVD's Menu System ............................... 35
The Play/Resume Play Option ....................... 35
The Play Mode Menu ..................................... 35
Selecting a Play Mode ........................... 35
How to Create a Program ...................... 35
Editing a Program .................................. 36
AutoPlay .................................................. 37
Dub Assist ............................................... 37
lntroScan ................................................. 37
The Lock Menu ............................................... 37
Locking Your DVD .................................. 38
Unlocking Your DVD .............................. 38
Changing Your Password ....................... 38
Setting the Ratings Limits ..................... 38
Unrated Titles ......................................... 40
System Test ............................................. 40
The Display Menu .......................................... 40
TV Image ................................................. 40
On-Screen Displays ................................. 41
The Sound Menu ............................................. 41
Digital Output ........................................ 41
Sound Logic ............................................ 42
The Languages Menu ..................................... 42
Changing the Player Menus, Disc Menus,
Audio or Subtitles Language
Pre|?rences ............................................. 42
Glossary .......................................................... 43
Code List ......................................................... 44
Chapter 5: TV Menu
How to Use Your IV's Menu System ............ 45
Menus ...................................................... 45
Audio Menu ................................................... 45
Picture Quality Menu .................................... 46
Screen Menu .................................................. 46
Using Closed Captioning ............................... 47
Closed-Caption Modes ........................... 47
Channel Menu ................................................ 47
Time Menu ..................................................... 48
Chapter 6: Information Displays
Using the Info Display ................................... 49
Audio CD In|b Display ........................... 49
MP3 ln|b Display .................................... 49
Video CD lnfo Display ............................ 49
Using the Time Display .......................... 50
Selecting a Specific Track ...................... 50
Selecting a Specific Index
(Available only on Video CDs) ............. 50
Selecting a Play Mode
(Available only on Audio CDs and
MP3s) ...................................................... 50
Using the Program Play Feature ........... 50
Editing a Playlist .................................... 52
Using the Repeat Feature ...................... 52
A,,B Repeat (Available only on
Audio CDs) ............................................ 52
Changing the Audio Channel Output
(Available only on Video CDs) ............. 52
Using IntroScan (Available only on
Audio CDs and MP3s) .......................... 53
Using Bookmarks (Available only on
Audio CDs) ............................................ 53
Dub Assist (Available only on
Audio CDs) ............................................ 53
Chapter 7: Other Information
Troubleshooting ............................................. 54
Care and Cleaning .......................................... 58
Handling Cautions ................................. 58
Formation o1"Condensation .................. 59
Handling Discs ........................................ 59
Cleaning Discs ........................................ 59
Limited Warranty ........................................... 59
Accessories ...................................................... 61
Page 5

Connections & Setup Chapter 1
Things to Consider Before You Connect
Protect Against Power Surges
• Connect all components before you plug any of their power cords into the wall outlet.
• Turn off the 1V/DVD and/or component before you connect or disconnect any cables.
• Make sure all antennas and cables are properly grounded. Refer to the Important Safeguards sheet
packed with your TV[DVD.
Protect Components from Overheating
• Don't block ventilation holes on any of the components. Arrange the components so that air can
circulate freely.
• Don't stack components.
• If you place components in a stand, make sure you allow adequate ventilation.
• If you connect an audio receiver or amplifier, place it on the top shelf so the heated air from it won't
flow around other components.
Position Cables Properly to Avoid Audio Interference
• Insert each cable firmly into the designated jack.
• If you place components abovethe lV/DVD, route all cables down the sideof the back of the TV/DVD
insteadof straight down the middle of the back of the ]V/DVD.
• If your antenna uses3OO-ohmtwin lead cables,do not coil the cables.Also, keepthe twin lead
cablesaway from audio/video cables.
Important Stand and Base Safety Information
Choose the location for your TVIDVDcarefully.Place the IV/DVDon a stand or base that isof adequate
size and strength to prevent the TV[DVDfrom being accidentally tipped over, pushed off, or pulled off.
This could causepersonal injury andlor damage the WIDVD. Referto the Important Safeguardssheet
packedwith your lV/DVD.
Use Indirect Light
Don't placethe ]VIDVD wheresunlight or room lighting will be directed toward the screen.Usesoft or
indirect lighting.
Connection Pictures
Audiolvideo cables are usually bundled together. For better visibility, the connection pictures in this
book show each cable separately (audio left, audio right, and video).
Types of Discs Your TV/DVD will Play
• DVDdiscs - DVDdiscs contain high quality picture and sound content.
• Audio discs - Audio CDs contain musical or sound content only.
• Video CD discs - Like DVDvideo discs, Video CDscontain picture and sound content. The difference is
the amount of information that can be stored on the disc.
• MP3 discs - A disc that contains audio files (for example, a CD-R with downloaded MP3 files).
Chapter I Graphics contained within this publication are for representation onlg 3
Page 6
Chapter 1 Connections & Setup
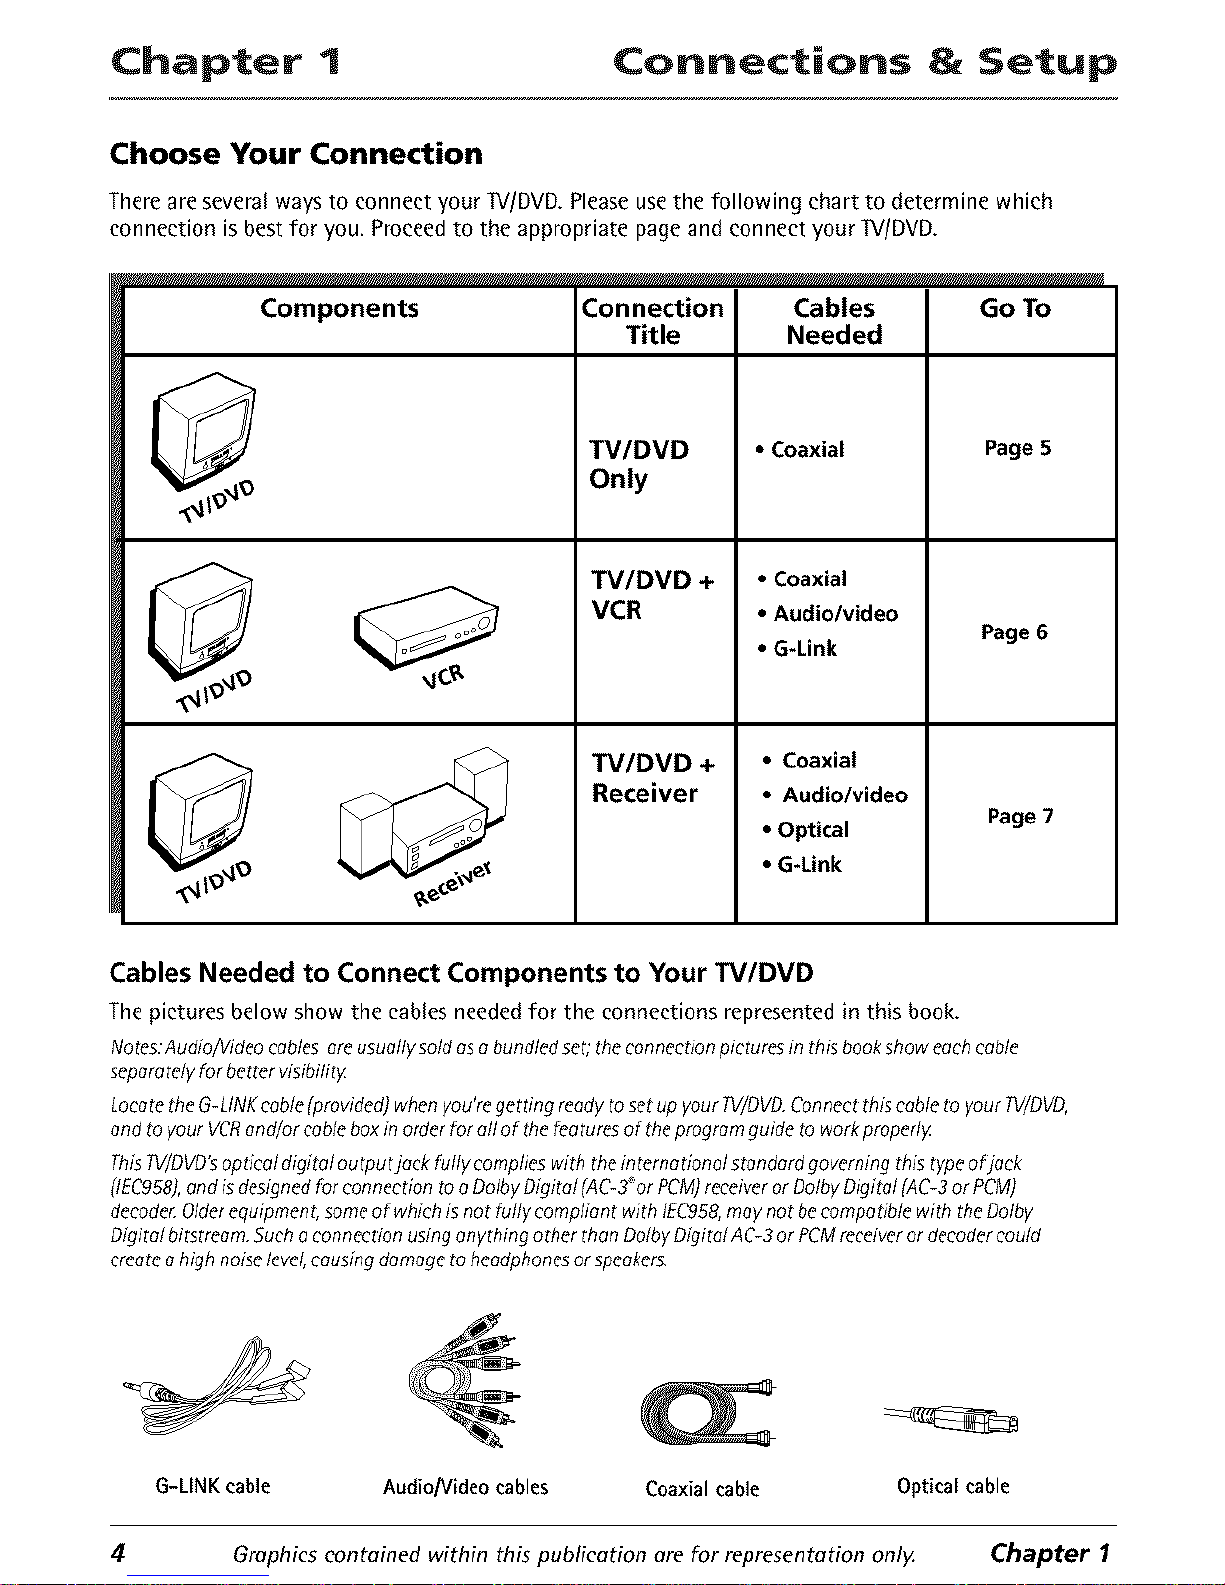
Choose Your Connection
There are several ways to connect your _//DVD. Please use the following chart to determine which
connection is best for you. Proceed to the appropriate page and connect your W/DVD.
Components
Connection
Title
TV/DVD
Only
TV/DVD +
VCR
TV/DVD +
Receiver
Cables Go To
Needed
• Coaxial Page 5
• Coaxial
• Audio/video
Page 6
• G-Link
• Coaxial
• Audio/video
• Optical Page 7
• G-Link
Cables Needed to Connect Components to Your TV/DVD
The pictures below show the cables needed for the connections represented in this book.
Notes:Audio/Videocables areusually so/dasa bundledset; theconnectionpictures in thisbookshow eachcab/e
separatelyfor bettervisibility
Locatetile G-LINKcob/e(prodded)whenyou're getting ready toset upyour PV/DVD.Connect thiscable to your PV/DVD,
end to your VCRand/or cobb boxin order for all of tile featuresof tile programguide to workproperly
ThisW/DVD'sopticaldigital output jack fully complieswith thein ternationol standard governing this typeofjack
[IEC958J,and isdesignedfor connectionto oDolby Digital [AC-3_orPCM)receiveror DolbyDigital (AC-3or PCM)
decodeLOlderequipment,someof whichis not fufly compliant with IEC958,may not becompatible with the Do/by
Digital bitstream.Sucha connection usingonything other thanDolbyDigital AC-3or PCMreceiveror decodercould
createa high noiselevel,causingdamage toheadphonesor speakers.
4
G-LINK cable Audio/Video cables Coaxial cable Optical cable
Graphics contained within this publication ore for representation only. Chapter I
Page 7
Connections & Setup Chapter 1
TV_)VD
CABLE
OR
OFF-AIR SIGNAL
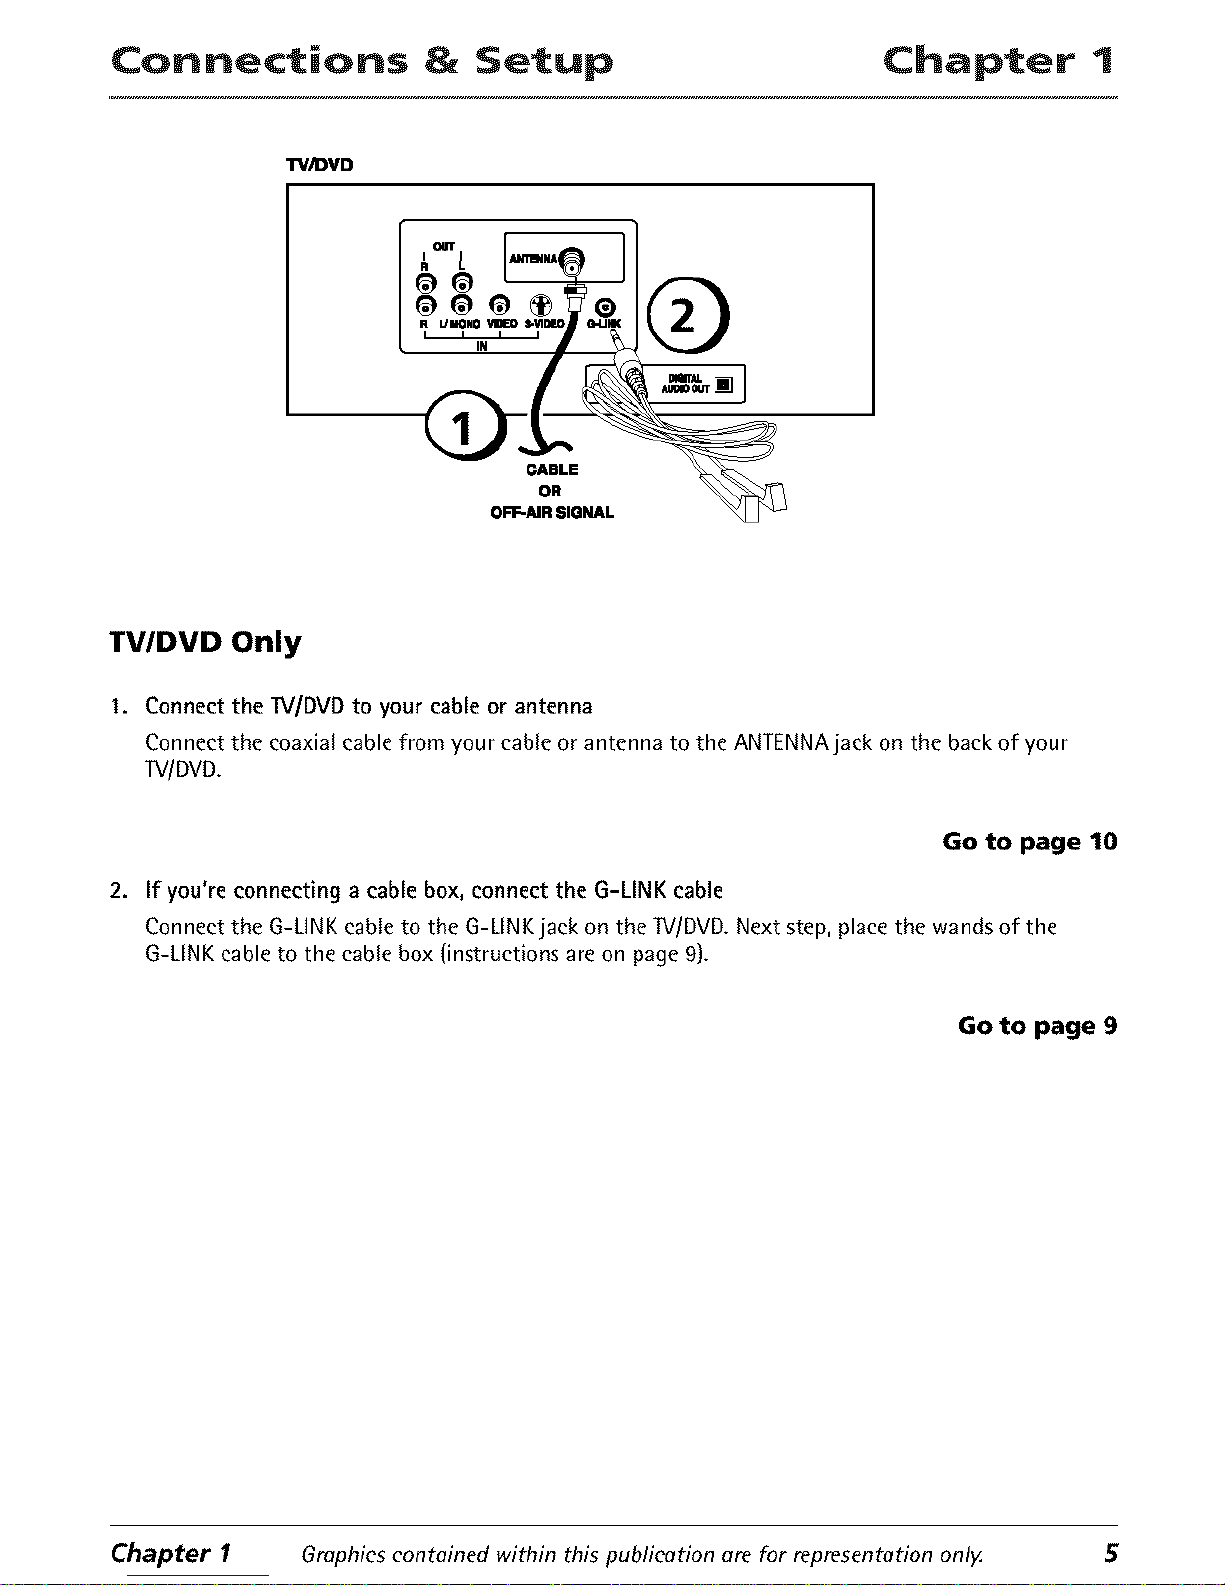
TV/DVD Only
1. Connect the 1N/DVD to your cable or antenna
Connect the coaxial cable from your cable or antenna to the ANTENNA jack on the back of your
TV/DVD.
Go to page 10
2. If you're connecting a cable box, connect the G-LINK cable
Connect the G-UNK cable to the G-LINK jack on the ]V/DVD. Next step, place the wands of the
G-LINK cable to the cable box (instructions are on page 9).
Go to page 9
Chapter I Graphics contained within this publication are for representation only 5
Page 8
Chapter 1 Connections & Setup
TV/DVD
®
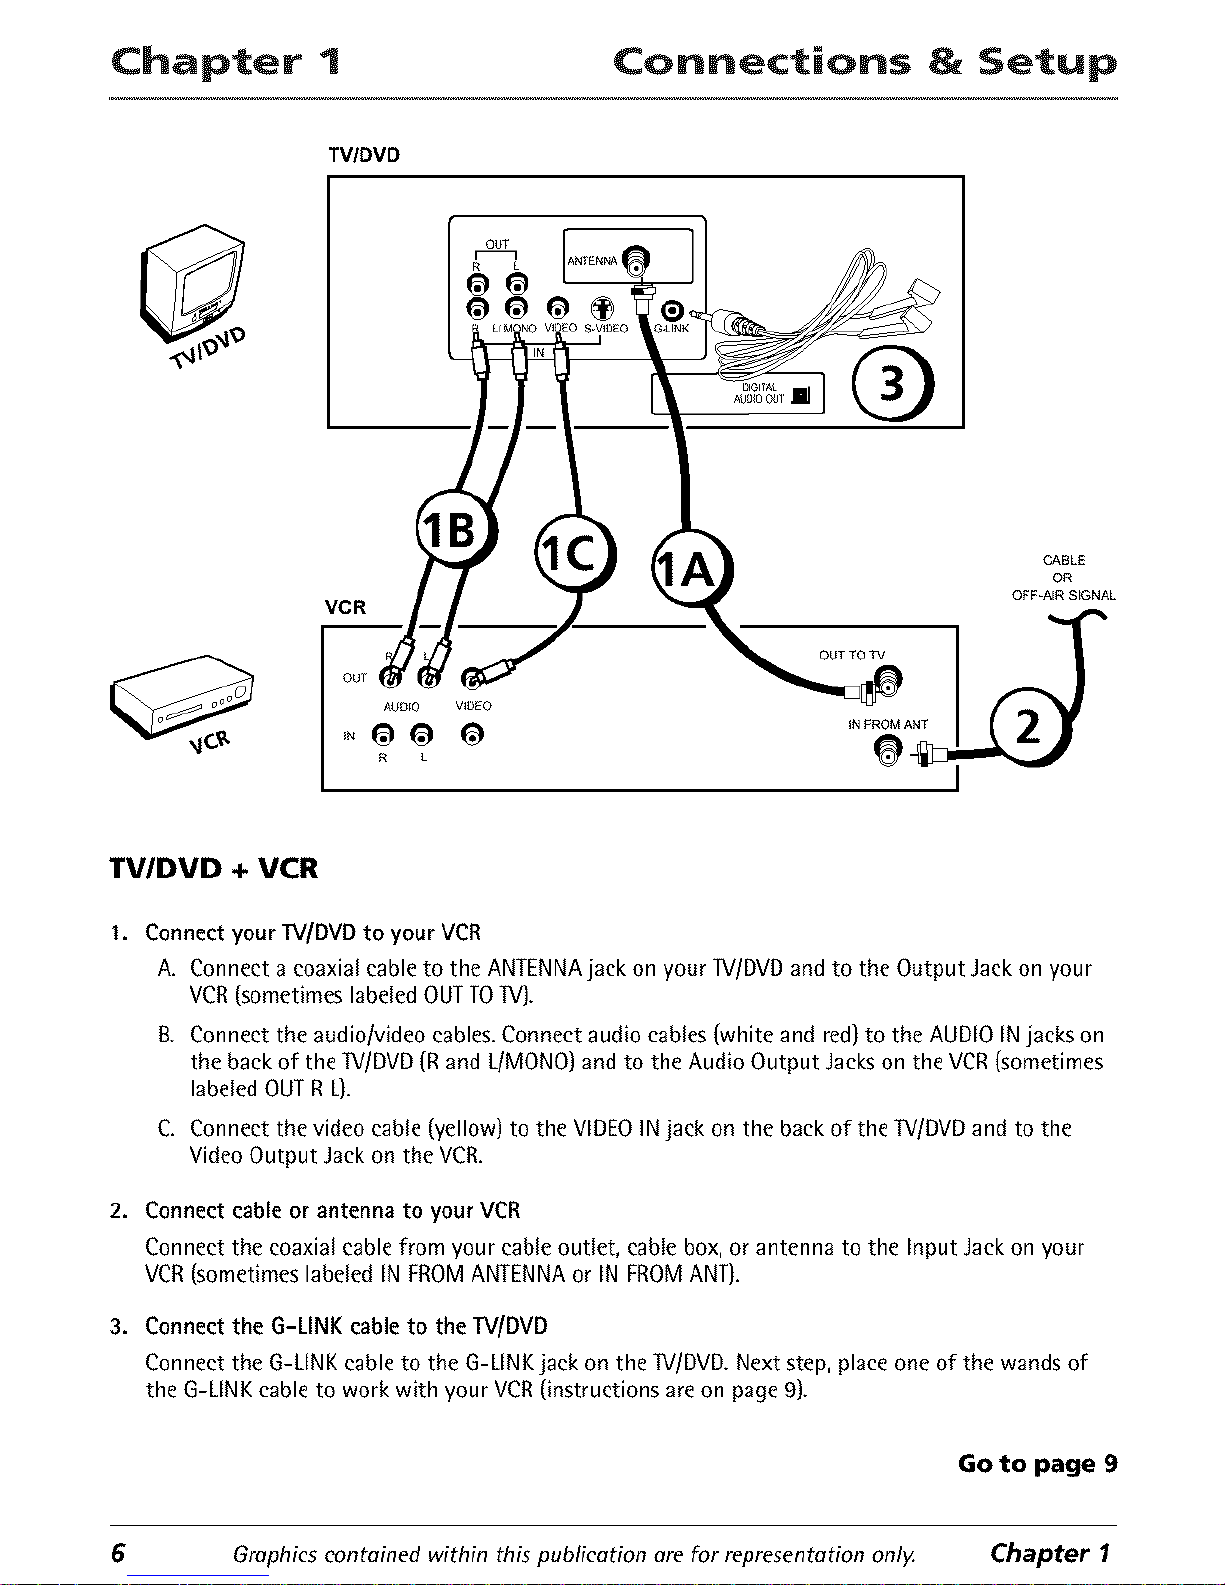
TV/DVD + VCR
1. Connect your lfV/DVD to your VCR
A. Connect a coaxial cable to the ANTENNA jack on your _//DVD and to the Output Jack on your
VCR (sometimes labeled OUT TO _rV).
g. Connect the audiolvideo cables. Connect audio cables (white and red) to the AUDIO IN jacks on
the back of the TV/DVD (R and L/MONO) and to the Audio Output Jacks on the VCR (sometimes
labeled OUT R L).
C, Connect the video cable (yellow) to the VIDEOINjack on the back of the TV/DVDand to the
Video Output Jackon the VCR.
2. Connect cable or antenna to your VCR
Connect the coaxial cable from your cable outlet, cable box, or antenna to the Input Jack on your
VCR (sometimes labeled IN FROM ANTENNA or IN FROM ANT).
3. Connect the G-LINK cableto the TV/DVD
Connect the G-LINKcable to the G-LINK jack on the "[V/DVD.Next step, placeone of the wands of
the G-LINKcable to work with your VCR(instructions are on page 9).
Go to page 9
6 Graphics contained within this publication ore for representation onl)_ Chapter I
Page 9
Connections & Setup Chapter 1
CABLE OR
TV/DVD
OUT
R L
u_
CZA]
i
0 VIDEO S-VIDEO
I I
j DOLBY DIGITAL
or DTS RECEIVER
*OR-
Note:Thebackof yourDdby Digital* or DTS++recdver might not look exactlyliketheone
shown here.
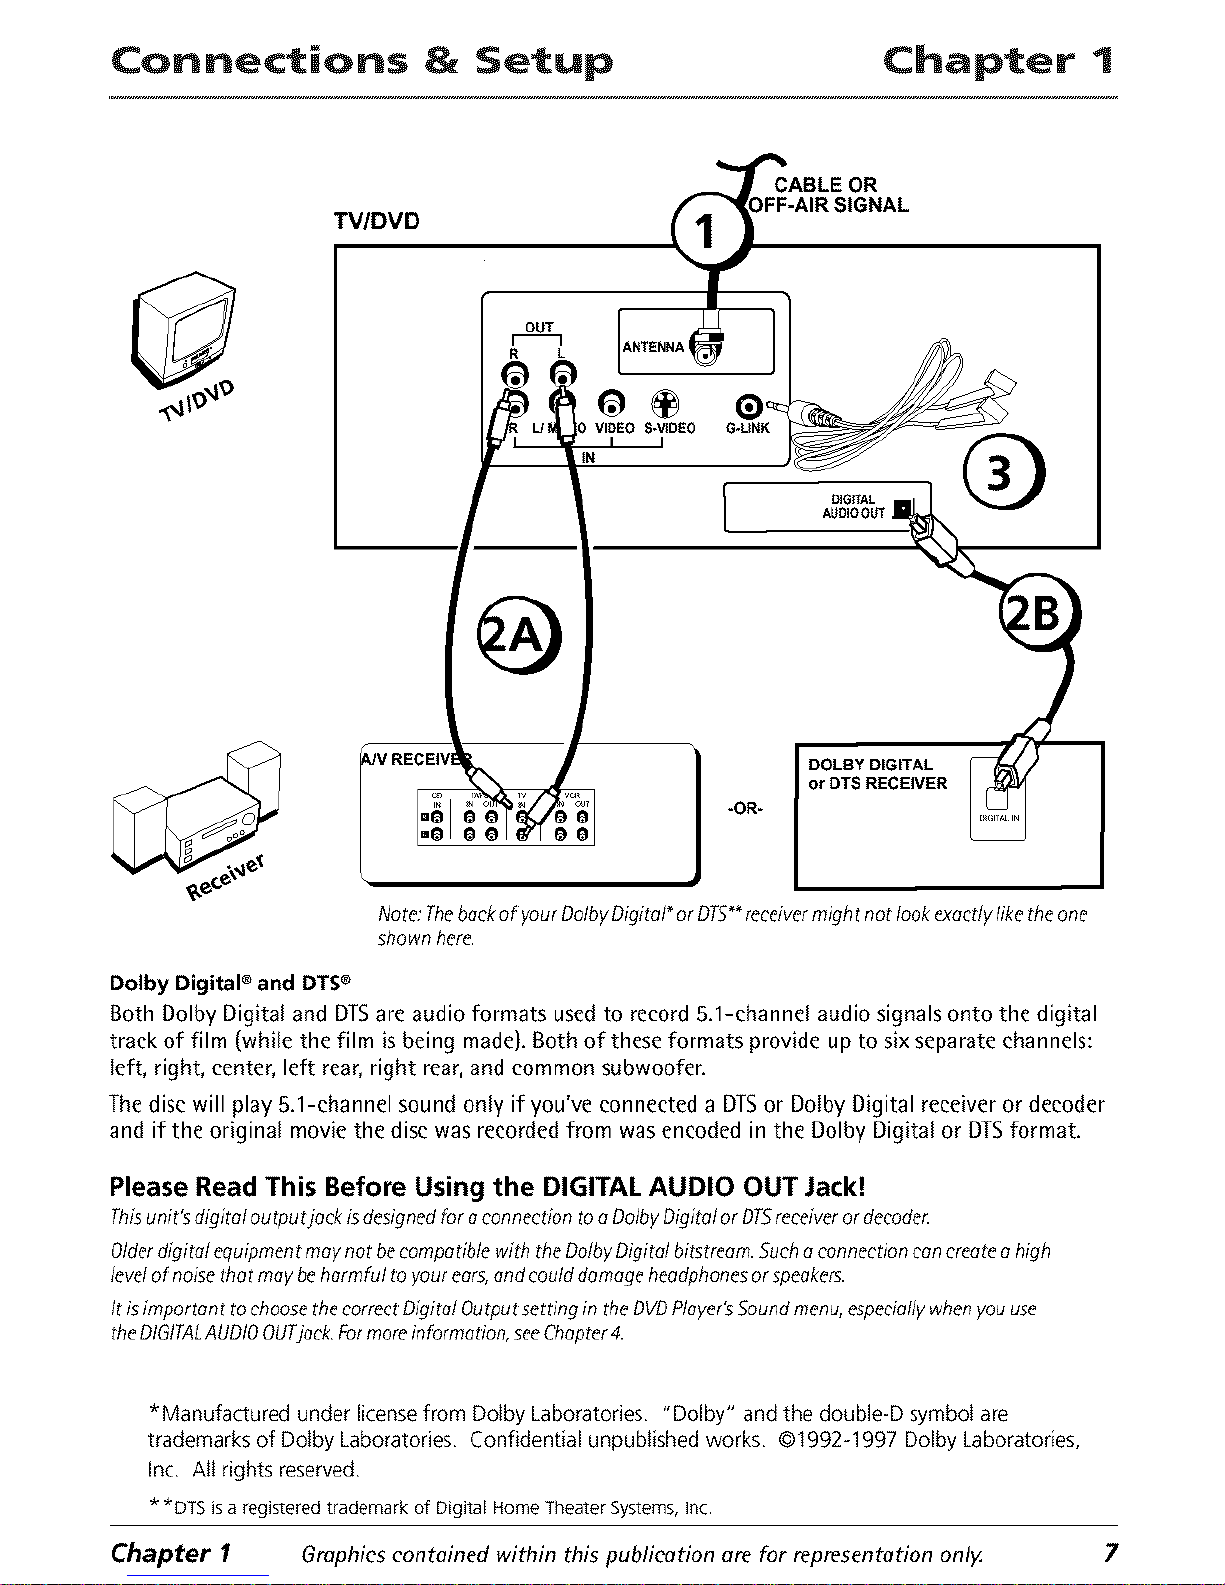
Dolby DigitaP and DTSe
Both Dolby Digita+ and DTSare audio formats used to record 5.1-ehanne{ audio signals onto the digital
track of film (white the film is being made). Both of these formats provide up to six separate channels:
taft, right, center, left rear, right rear, and common subwoofer.
The disc will play 5.1-channel sound only if you've connected a DIS or Dotby Digital receiver or decoder
and if the original movie the disc was recorded from was encoded in the Dolby Digital or DTSformat.
Please Read This Before Using the DIGITAL AUDIO OUT Jack!
Thisunit'sdigital outputjack isdesignedfor oconnection too Ddby Digital or DTSreceiverordeeode_
Olderdigital equipment maynot hetampa due with the DolbyDigital bitstreom.Sucho connection con createo high
levelof noise that may behormf+d toyour ears,andcould damage headphonesor speakers.
It isimportont tochoose theeorreczDigital Outputsetting in the OVDPlayer'sSoundmenu,especiallywhenyou use
tile DIGITALAUDIOOUTjack Formoreinformation,seeChapter4.
*Manufactured under license from Do+by Laboratories "Dolby" and the double-D symbol are
trademarks of Do+by Laboratories Confidential unpublished works ©1992-1997 Dolby Laboratories,
Inc All rights reserved
* *DTS is a registered trademark of Digital Home Theater Systems, Inc
Chapter I Graphics contained within this publication are for representation only. 7
Page 10

Chapter 1 Connections & Setup
TV/DVD + Receiver
1. Connect the I_//DVD to your cable or antenna
Connect the coaxial cable from your cable or antenna to the ANTENNAjack on the back of your
]V/DVD.
2A.Connect the AN receiver to your W/DVD
Connect the audio/video cables.Connect audio cables(white and red) to the AUDIOOUTjackson the
backof the ]V/DVD (R and L)and to the Audio Input Jackson the receiver(sometimeslabeled AUDIO
IN LR).
or
2B.Connect Dolby Digital or the DTSReceiverto your TVlDVD
If you have a DolbyDigital or DTSreceiver with a Digital Input jack, connect an optical cable (not
provided)to the DIGITALAUDIO OUTjack on the _V/DVDand to the Digital Input jack on the back of
the receiver.You must alsoset the Digital Output setting in the Sound menu (Chapter 4 hasdetails).
3. If you're connecting a cable box, connect the G-LINK cable
Connect the G-LINK cable to the G-LINK jack on the W/DVD. Next step, place the wands of the
G-LINK cable to the cable box (instructions are on page 9).
GO to page 9
Why You Should Connect This G-LINK Cable
The G-LINK cable enables the GUIDE Plus+ system (the on-screen interactive program guide) to work
with your VCR andlorcable box.
Cable Box - If your ]V/DVD is connected to a cable box you must connect the G-LINK cable to receive
TV program listings for your area, and to tune directly to a channel when the program guide is on your
TV screen.
VCR- If your 1V/DVDisconnected to a VCRand you don't connect the G-LINKcable, one-touch VCR
recording won't work. Theother features of the guide will work properly.
8 Graphics contained within this publication are for representation only. Chapter 1
Page 11
Connections & Setup Chapter 1
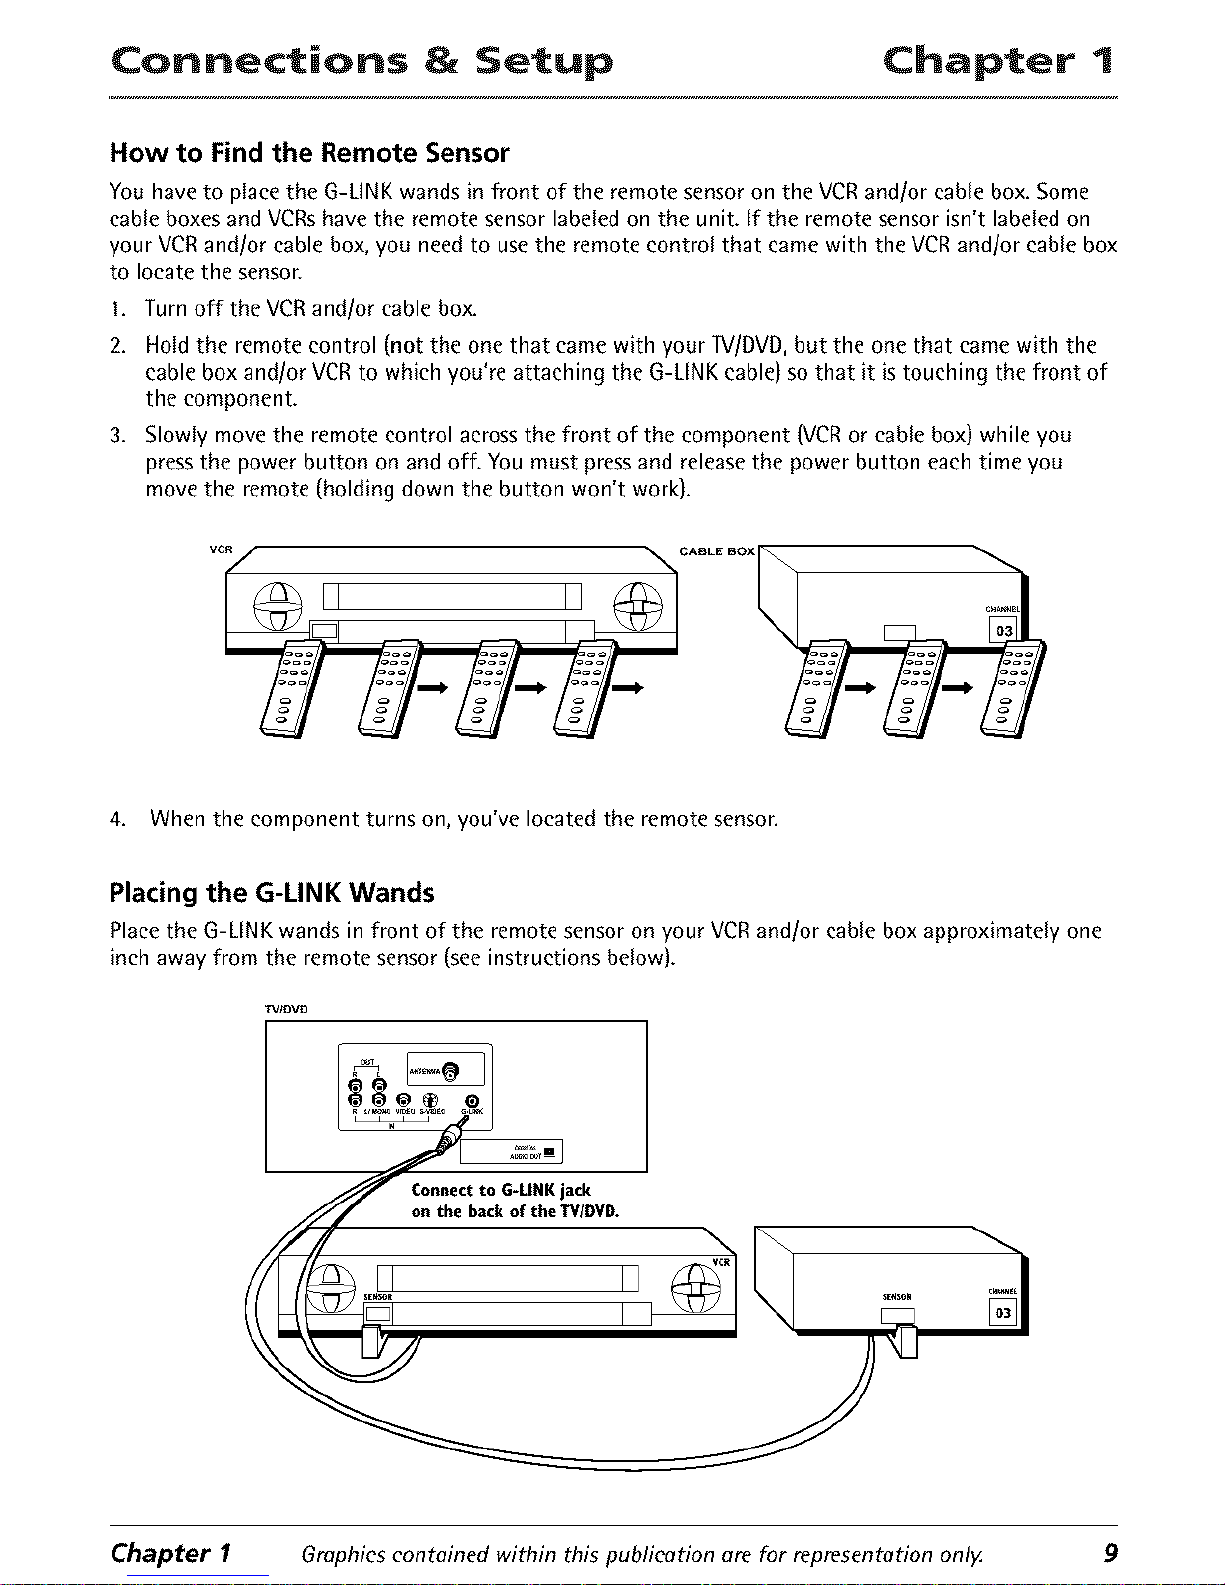
How to Find the Remote Sensor
You have to Naeethe G-UNK wands in front of the remote sensoron the VCRand/or cane box. Some
cane boxes andVCRshave the remote sensorlabeled on the unit. If the remote sensorisn't labeled on
your VCRand/or cable box, you needto usethe remote control that came with the VCRand/or cane box
to locate the sensor.
1. Turn off the VCRand!or cable box.
2. Hold the remote control (not the one that came with your lV/DVD, but the one that came with the
cable box and!or VCR to which you're attaching the G-LINK cable) so that it is touching the front of
the component.
3. Slowly move the remote control across the front of the component (VCR or cable box) while you
press the power button on and off. You must press and release the power button each time you
move the remote (holding down the button won't work).
II II
4. When the component turns on, you've located the remote sensor.
Placing the G-LINK Wands
Place the G-LINK wands in front of the remote sensor on your VCR and/or cable box approximately one
inch away from the remote sensor (see instructions below).
IV/aV9
oCn°ntheeC;_c°G;_1_11KJaT_kvD"
II k I ..... -I
Chapter I Graphics contoined within this publicotion are for representotion onlg 9
Page 12
Chapter 1 Connections & Setup
Put Batteries in the Remote
1. Remove the battery compartment cover on the remote.
2. Insert new batteries. Match the polarities (+ and -) on the batteries with the diagram on the remote.
3. Put the battery compartment cover back on the remote.
Plug in the TV/DVD
Plug the end of the power cord into the wall outlet. Match the wide blade of the plug with the wide slot
in the outlet. Insert the plug completely into the outlet.
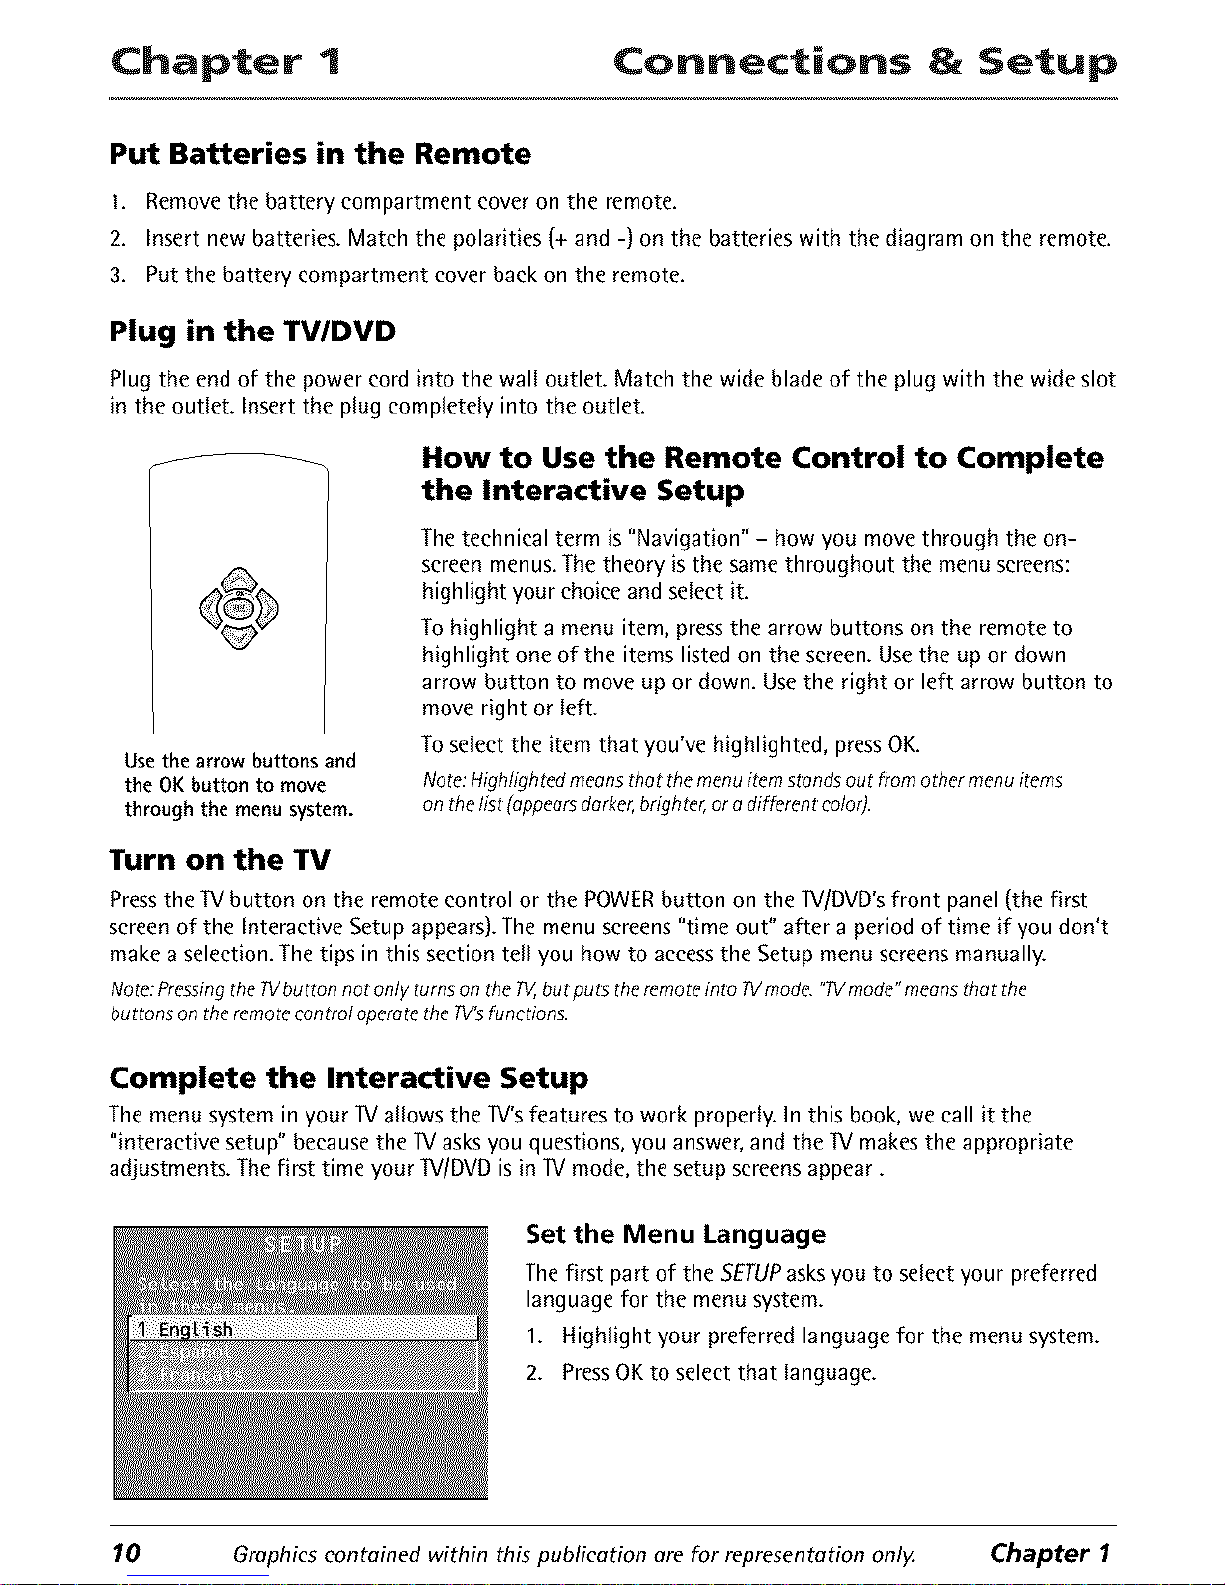
Use the arrow buttons and
the OK button to move
through the menu system.
How to Use the Remote Control to Complete
the Interactive Setup
The technical term is "Navigation" - how you move through the on-
screen menus. The theory is the same throughout the menu screens:
highlight your choice and select it.
To highlight a menu item, press the arrow buttons on the remote to
highlight one of the items listed on the screen. Use the up or down
arrow button to move up or down. Usethe right or left arrow button to
move right or left.
To select the item that you've highlighted, press OK.
Note:Highlightedmeansthor themenu item stondsout fromother menuitems
onthe list (appearsdarker,bNghter,or a different color).
Turn on the TV
Press the lV button on the remote control or the POWER button on the 1V/DVD's front panel (the first
screen of the Interactive Setup appears). The menu screens "time out" after a period of time if you don't
make a selection. The tips in this section tell you how to access the Setup menu screens manually.
Note:Pressingthe?Vbutton not only turns on the TV,butputs theremoteinto TVmode."TVmode"meansthat the
buttons on the remotecontrol operatetheTV'sfunctions.
Complete the Interactive Setup
The menu system in your lV allows the 1V's features to work properly. In this book, we call it the
"interactive setup" because the 1V asks you questions, you answer, and the 1M makes the appropriate
adjustments. The first time your 1M/DVD is in 1V mode, the setup screens appear.
Set the Menu Language
The first part of the SETUPasks you to select your preferred
language for the menu system.
1. Highlight your preferred language for the menu system.
2. Press OK to select that language.
10 Graphicscontained within this publication are for representation only. Chapter 1
Page 13
Connections & Setup Chapter 1
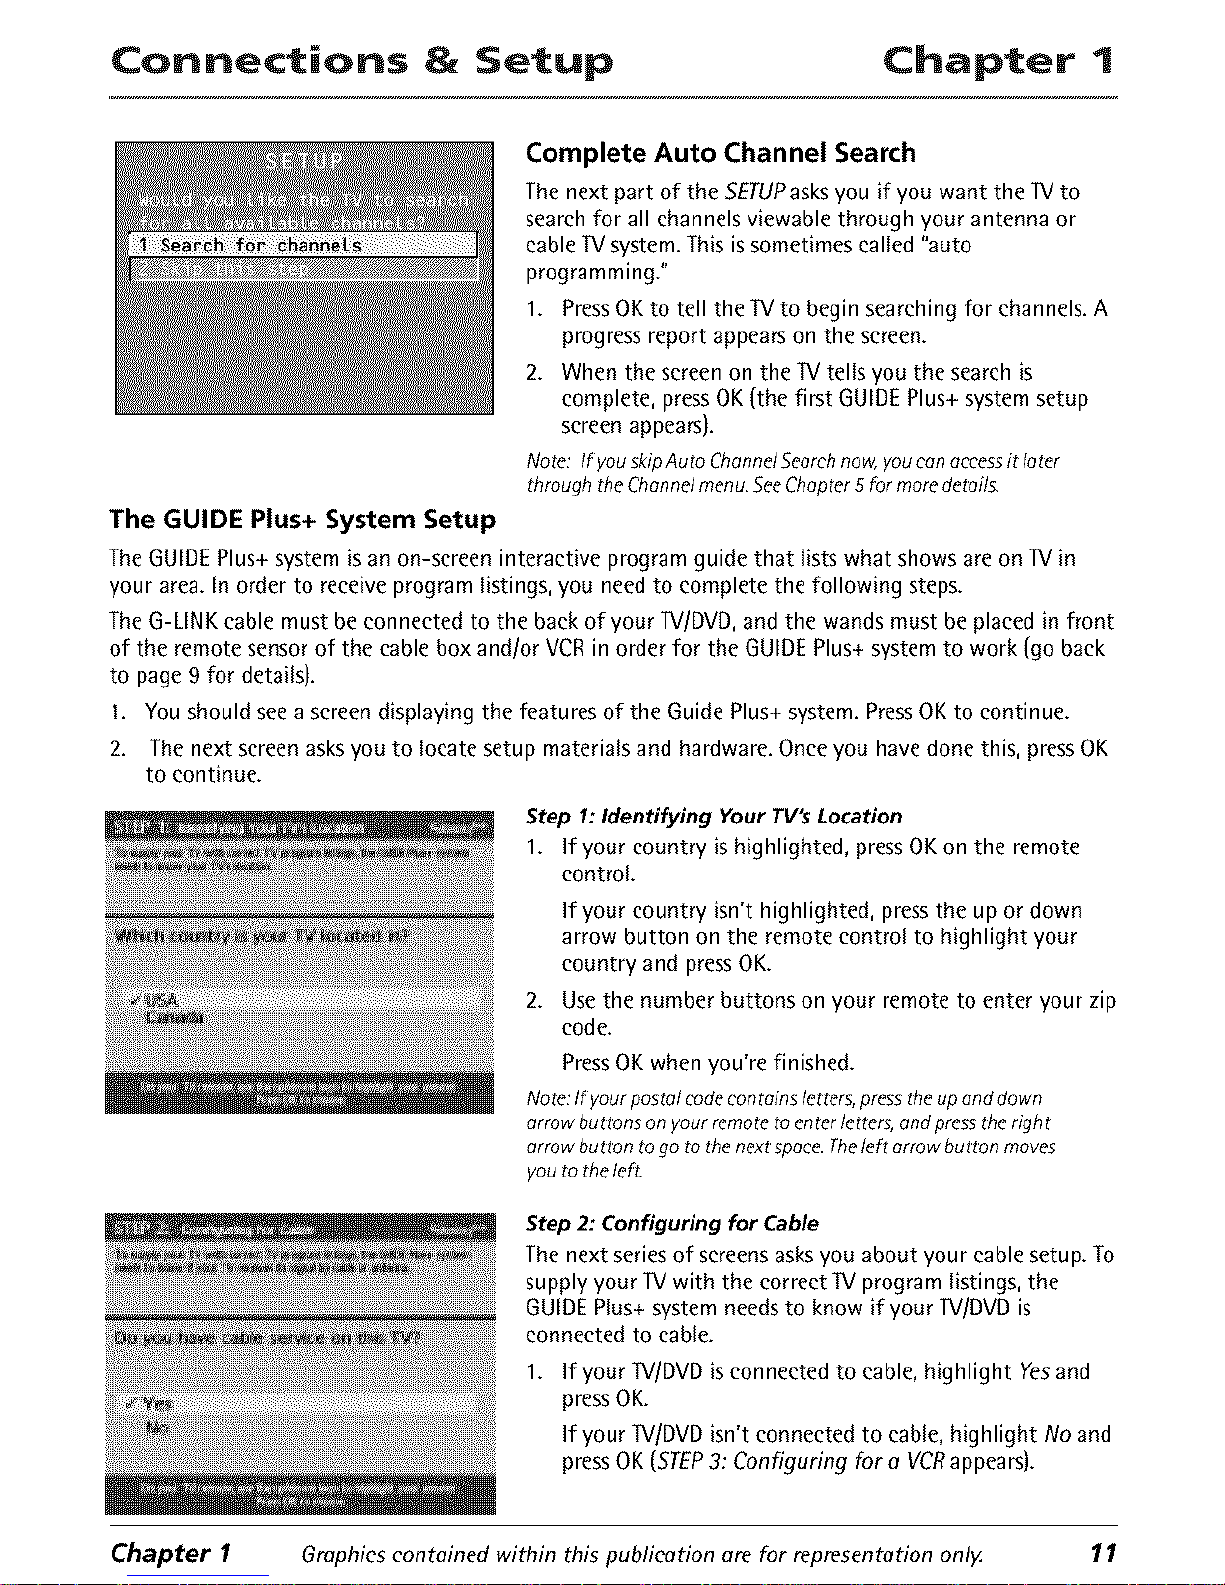
Complete Auto Channel Search
The next part of the 5ETUPasks you if you want the IV to
search for all channels viewable through your antenna or
cable W system. This is sometimes called "auto
programming."
1. Press OK to tell the IV to begin searching for channels. A
progress report appears on the screen.
2. When the screen on the IV tells you the search is
complete, press OK (the first GUIDE Plus+ system setup
screen appears).
Note: IfyouskipAutoChanndSeemhnow,youcanoccessit loter
throughtheChonnelmenuSeeChepter5formoredeteil¢.
The GUIDE Plus+ System Setup
The GUIDE Plus+ system is an on-screen interactive program guide that lists what shows are on IV in
your area. In order to receive program listings, you need to complete the following steps.
The G-LINK cable must be connected to the back of your IV/DVD, and the wands must be placed in front
of the remote sensor of the cable box and/or VCR in order for the GUIDE Plus+ system to work (go back
to page 9 for details).
1. You should see a screen displaying the features of the Guide Plus+ system. Press OK to continue.
2. The next screen asks you to locate setup materials and hardware. Once you have done this, press OK
to continue.
Step 1: Identifying Your TV's Location
1. If your country is highlighted, press OK on the remote
control.
If your country isn't highlighted, press the up or down
arrow button on the remote control to highlight your
country and press OK.
2. Use the number buttons on your remote to enter your zip
code.
Press OK when you're finished.
Note:If yourpostcflcodecontoinsletters,presstheup and down
errow buttons on your remotetoenterletters,and presstheright
affow button togo to thenext¸spoce.The/eftarrow burton moves
youto the left.
Step 2: Configuring for Cable
The next series of screens asks you about your cable setup. To
supply your IV with the correct IV program listings, the
GUIDE Plus+ system needs to know if your IV/DVD is
connected to cable.
1. If your IV/DVD is connected to cable, highlight Yes and
press OK.
If your IV/DVD isn't connected to cable, highlight No and
press OK (STEP3: Configuring fore VCRappears).
Chapter I Graphics contained within this publication are for representation only 11
Page 14
Chapter 1 Connections & Setup
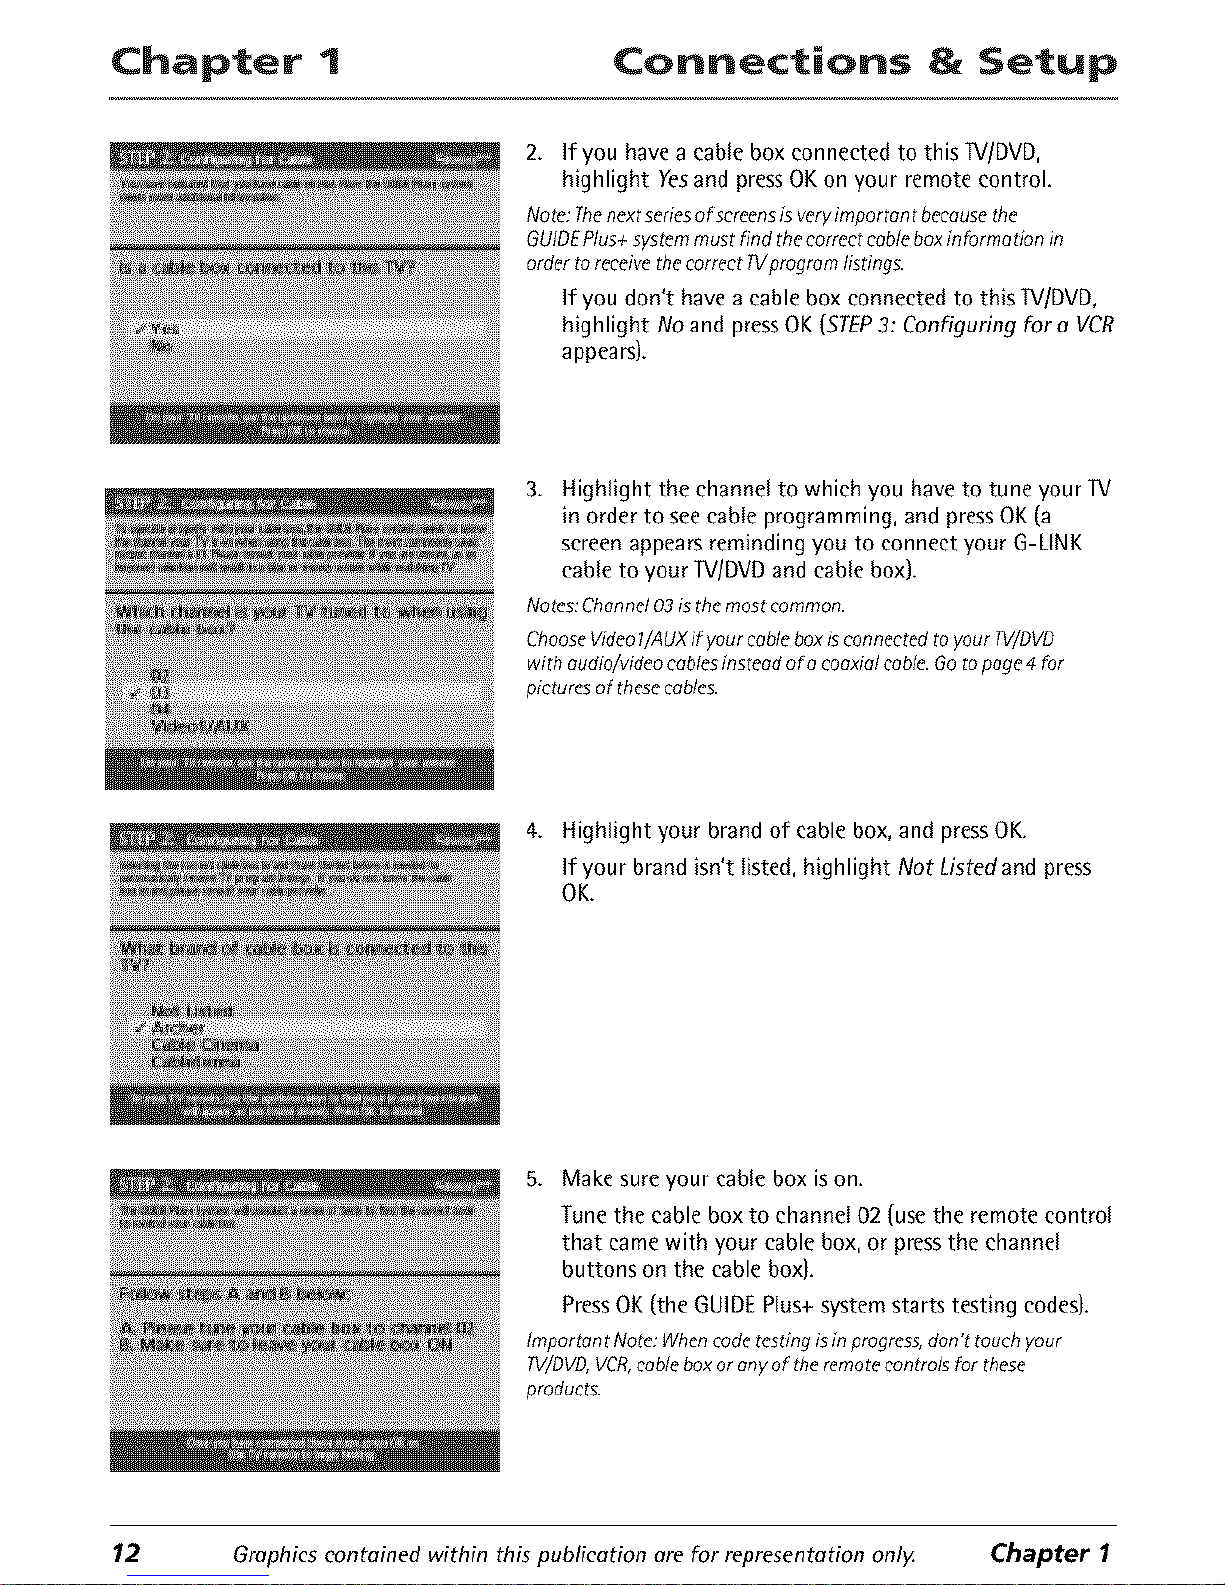
2. If you have a cable box connected to this IV/DVD,
highlight Yes and press OK on your remote control.
Note:Thenextseriesof screensisveryimportant becausethe
GUIDEPlus+systemmust find the correctcableboxinformation in
order to receivethecorrect PVprogramlisting£
If yOU don't have a cable box connected to this IV/DVD,
highlight No and press OK (STEP3: Configuring for a VCR
appears).
3. Highlight the channel to which you have to tune your IV
in order to see cable programming, and press OK (a
screen appears reminding you to connect your G-LINK
cable to your IV/DVD and cable box).
Notes: Channel 03 is the most common.
ChooseVideo1/AUXif your cableboxis connectedto your IV/DVD
with audio/videocablesinsteadof acoaxialcable.Go topage 4for
pictures of thesecables.
4. Highlight your brand of cable box, and press OK.
If your brand isn't listed, highlight Not Listed and press
OK.
5. Make sure your cable box is on.
Tune the cable box to channel 02 (use the remote control
that came with your cable box, or press the channel
buttons on the cable box).
Press OK (the GUIDE Plus+ system starts testing codes).
Important Note:Whencodetestingisin progress,don't touch your
TV/DVD,VCR,cableboxor any of theremote controls for these
products.
1.2 Graphics contained within this publication are for representation only. Chapter I
Page 15

Connections & Setup Chapter 1
6.
Lookat your cane box. If it isstill on and changed to
channel 09, the test was successful.Highlight Yes,and
pressOK (STEP3: Configuring for o VCRappears).
If your cane box didn't change to channel 09 or turned
itself off, you have two choices: No and Test this code
again.
Testthis code again: If you think the IV[DVD, the cane
box, or any of the remote controls might have been
touched or bumped during the test, highlight Testthis
codeagain and pressOK (the GUIDEPlus+system runs
the same set of codes).
No: If you don't think the test was interrupted, highlight
No and pressOK(GUIDEPlus+system tests the next
code).
Repeat the previous instructions until the IV finds the
correct cable box code. Follow the instructions on the
screen.
Note:If the W can't find your cableboxcode,atroubleshooting
checklistappears.C_refuflyrevieweachchecklistandratiow the
instructions on thescreen.
Step 3: Configuring for a VCR
1. If your IV/DVD isconnected to a VCR,pressOK(ascreen
appears reminding you to connect your G-LINKcable to
your IV/DVD and VCR).
If it is not, highlight No andpressOK (STEP4: Confirming
YourSettings appears).
2. Use the up and down arrow buttons to highlight the
brand of your VCRthat is connected to the IV/DVDand
pressOK.
If your brand isn't listed, highlight Not Listed and press
OK.
Chapter I Graphics contained within this publication are for representation onlg 13
Page 16

Chapter 1 Connections & Setup
3. Tune your VCR to channel 02. Next, turn OFF your VCR.
When you complete these steps, press OK to begin
testing.
Important Note:Whencodetestingisin progress,don't touch your
TV/DVD,VCR,or any of theremotecontroisfor theseproducts.
4.
Look at the front display of your VCR. If your VCR turned
on and changed to channel 09, the test was successful.
Highlight Yesand press OK.
If your VCR didn't change to channel 09, you can either
choose No or Test this code again.
If you think your 1V/DVD or remotes might have been
touched during the test, tune your VCR to channel 02,
turn off your VCR and highlight Test this code again.
If you don't think the test was interrupted, highlight No.
Tune your VCR to channel 02 and turn off your VCR. Press
OK (the GUIDE Plus+ system starts testing another set of
codes.)
Keep following the previous instructions until the VCR
finds the correct code.
Note:If theGUIDEPlus+systemcan'tlocate thecorrect codefor
theVCR,a list of troubleshooting instructions appearsto help you
beforeyou try ogain.
TryVCRconfiguretion again:repeat VCRsetup¸
Testalternate codes:testsselectedbrandsand if this
Fails,the testcontinues with all codesinthesystem.
5kip thisstep:the GUIDEPlus+systemwon't be able to
scheduleprograms to recordon yourVCR
Step 4: Confirming YourSettings
1. Makesure all settings are complete and correct. Highlight
Yes,endsetup and pressOK.If your cable box and/or VCR
code testing failed, you should seeINCOMPLETEwhere
the cable box andVCRcodesare listed. Oncesetup is
complete, additional screens appear.
If any settings are incomplete or incorrect, highlight No,
repeat setup process and press OK. Follow the
instructions on the screen.
14 Graphics contained within this publication are for representation only. Chapter 1
Page 17
Connections & Setup Chapter 1
2. Youcan view a demo of the GUIDEPlus+features, which
may take a few minutes to load. If you don't want to see
the demo,pressOKto watch W.
What to Expect
Thenext time you are in IV mode,the GUIDEPlus+ system
will appear on the screen.Thefollowing examplesexplain
what you might see:
* If all of the program information hasbeen sent to your
IV, the GUIDEPlus+systemappearswith all of your W
program listings.
* If the program information hasn't been sent to your IV
yet, an outline of the GUIDE(without lV program listings)
will appearon the screen.Program information isusually
sent to your IV at night.
, If the IV detected that you havemultiple cable
companies in your area, STEPS:Choosing YourChannel
Lineup appears.
Featuresof the GUIDEPlus+system areexplained in Chapter
3.
Toclear the guide from your screen,pressCLEARor GUIDEon
the remote control.
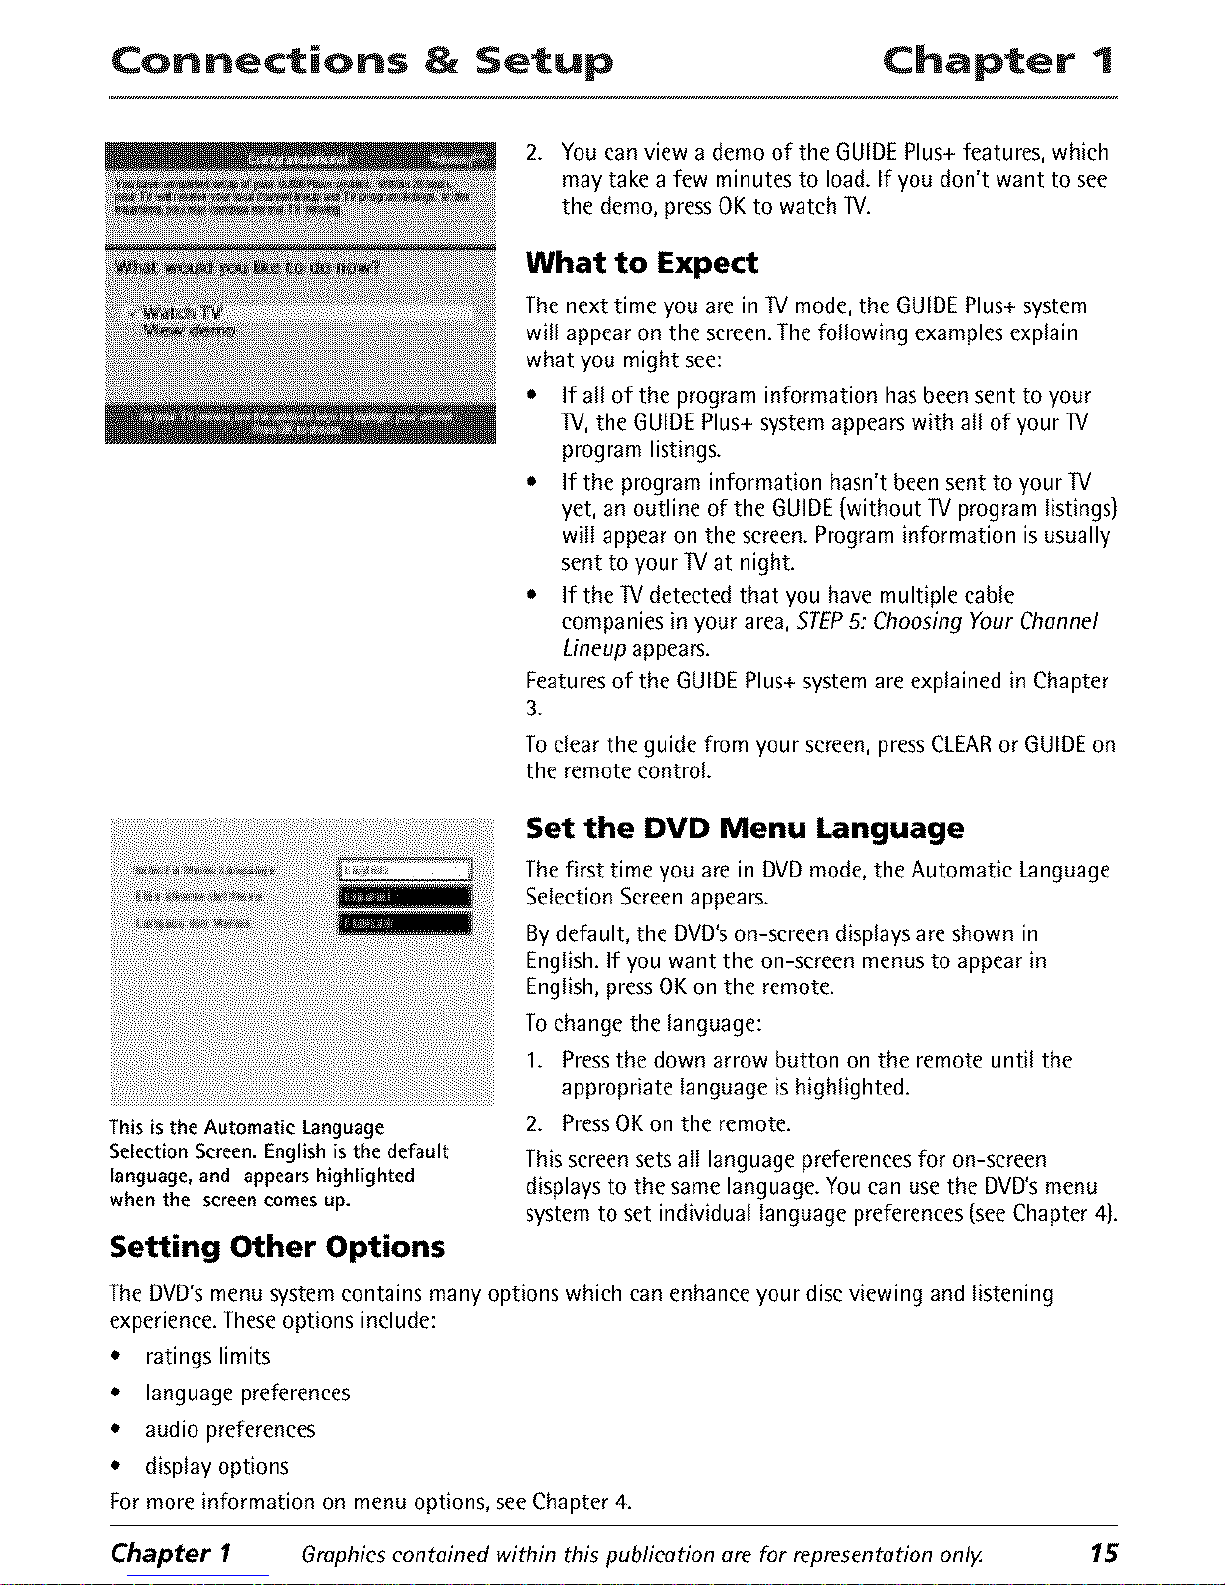
This is the Automatic Language
Selection Screen. Englishis the default
language, and appears highlighted
whenthe screencomes up.
Setting Other Options
Set the DVD Menu Language
Thefirst time you are in DVDmode, the Automatic Language
Selection Screenappears.
Bydefault, the DVD'son-screen displaysareshown in
English.If you want the on-screen menusto appear in
English,pressOKon the remote.
Tochange the language:
1. Pressthe down arrow button on the remote until the
appropriate language is highlighted.
2. PressOKon the remote.
Thisscreensetsall language preferencesfor on-screen
displaysto the same language. You can usethe DVD'smenu
systemto set individual language preferences(seeChapter 4).
The DVD'smenu system contains many options which can enhanceyour discviewing and listening
experience.Theseoptions include:
• ratings limits
• language preferences
• audio preferences
• display options
for more information on menu options, seeChapter4.
Chapter I Graphics contained within this publication ate for tepresentation only. 15
Page 18
Chapter 1 Connections & Setup
J
TV DVD ON,OFF
1 3
7 8 9 OPEN,CLOSE
@@@
INPUT
©
STOP
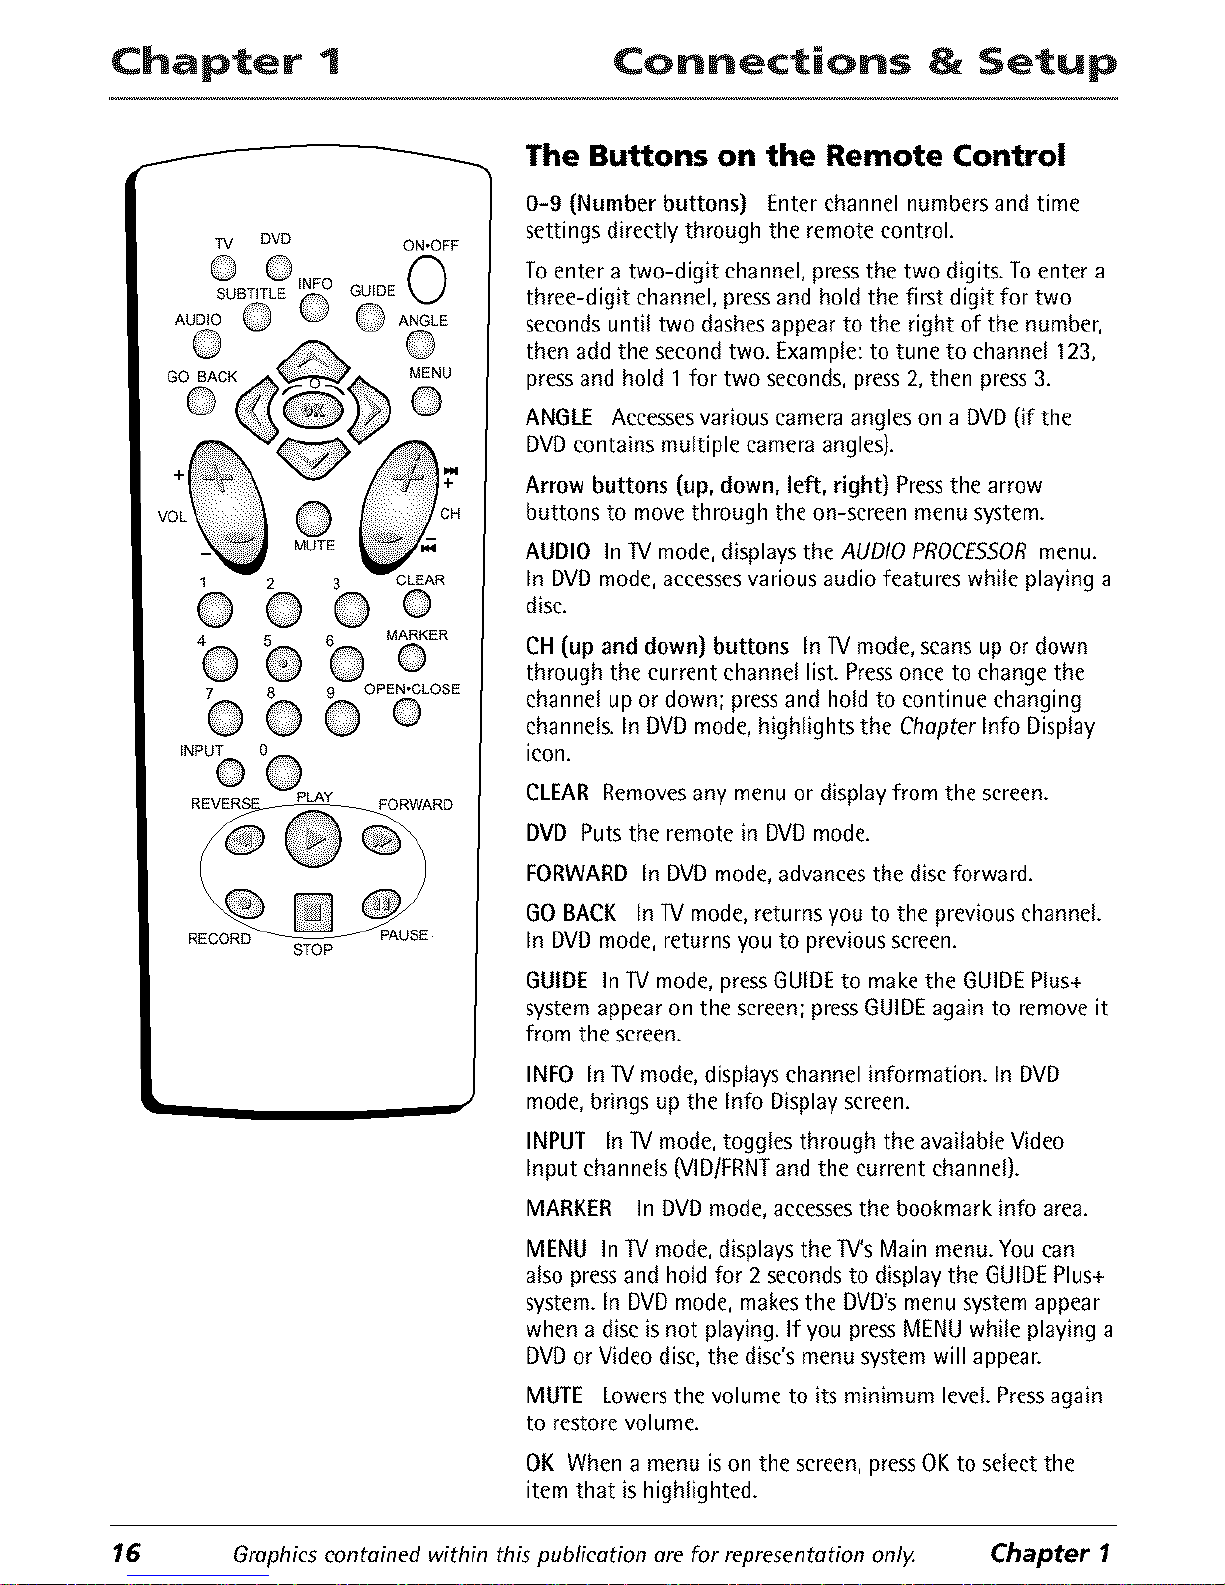
The Buttons on the Remote Control
0-9 (Number buttons) Enter channel numbers and time
settings directly through the remote control.
To enter a two-digit channel, press the two digits. To enter a
three-digit channel, press and hold the first digit for two
seconds until two dashes appear to the right of the number,
then add the second two. Example: to tune to channel 123,
press and hold 1 for two seconds, press 2, then press 3.
ANGLE Accessesvarious cameraangleson a DVD(if the
DVDcontains multiple camera angles).
Arrow buttons (up, down, left, right) Pressthe arrow
buttons to move through the on-screen menu system.
AUDIO In TVmode,displaysthe AUDIOPROCESSORmenu.
In DVDmode, accessesvarious audio features while playing a
disc.
CH (up and down) buttons In 1V mode, scans up or down
through the current channel list. Pressonce to change the
channel up or down; press and hold to continue changing
channels. In DVD mode, highlights the Chapter Info Display
icon.
CLEAR Removes any menu or display from the screen.
DVD Putsthe remote in DVDmode.
FORWARD In DVDmode,advancesthe disc forward.
GOBACK InIV mode,returns you to the previous channeL
In DVDmode, returns you to previous screen.
GUIDE In lV mode, press GUIDE to make the GUIDE Plus+
system appear on the screen; press GUIDE again to remove it
from the screen.
INFO In W mode, displayschannel information. In DVD
mode, brings up the Info Displayscreen.
INPUT In W mode, toggles through the available Video
Input channels (VlDIFRNTand the current channel).
MARKER In DVD mode, accesses the bookmark info area.
MENU In TVmode, displaysthe TV'sMain menu.Youcan
also pressand hold for 2 secondsto display the GUIDEPlus+
system.In DVDmode, makesthe DVD'smenu system appear
when a disc isnot playing. If you pressMENU while playing a
DVDor Video disc,the disc'smenu system will appear.
MUTE Lowers the volume to its minimum leveL Press again
to restore volume.
OK When a menu is on the screen, press OK to select the
item that is highlighted.
16 Graphics contained within this publication are for representation only. Chapter 1
Page 19
Connections & Setup Chapter 1
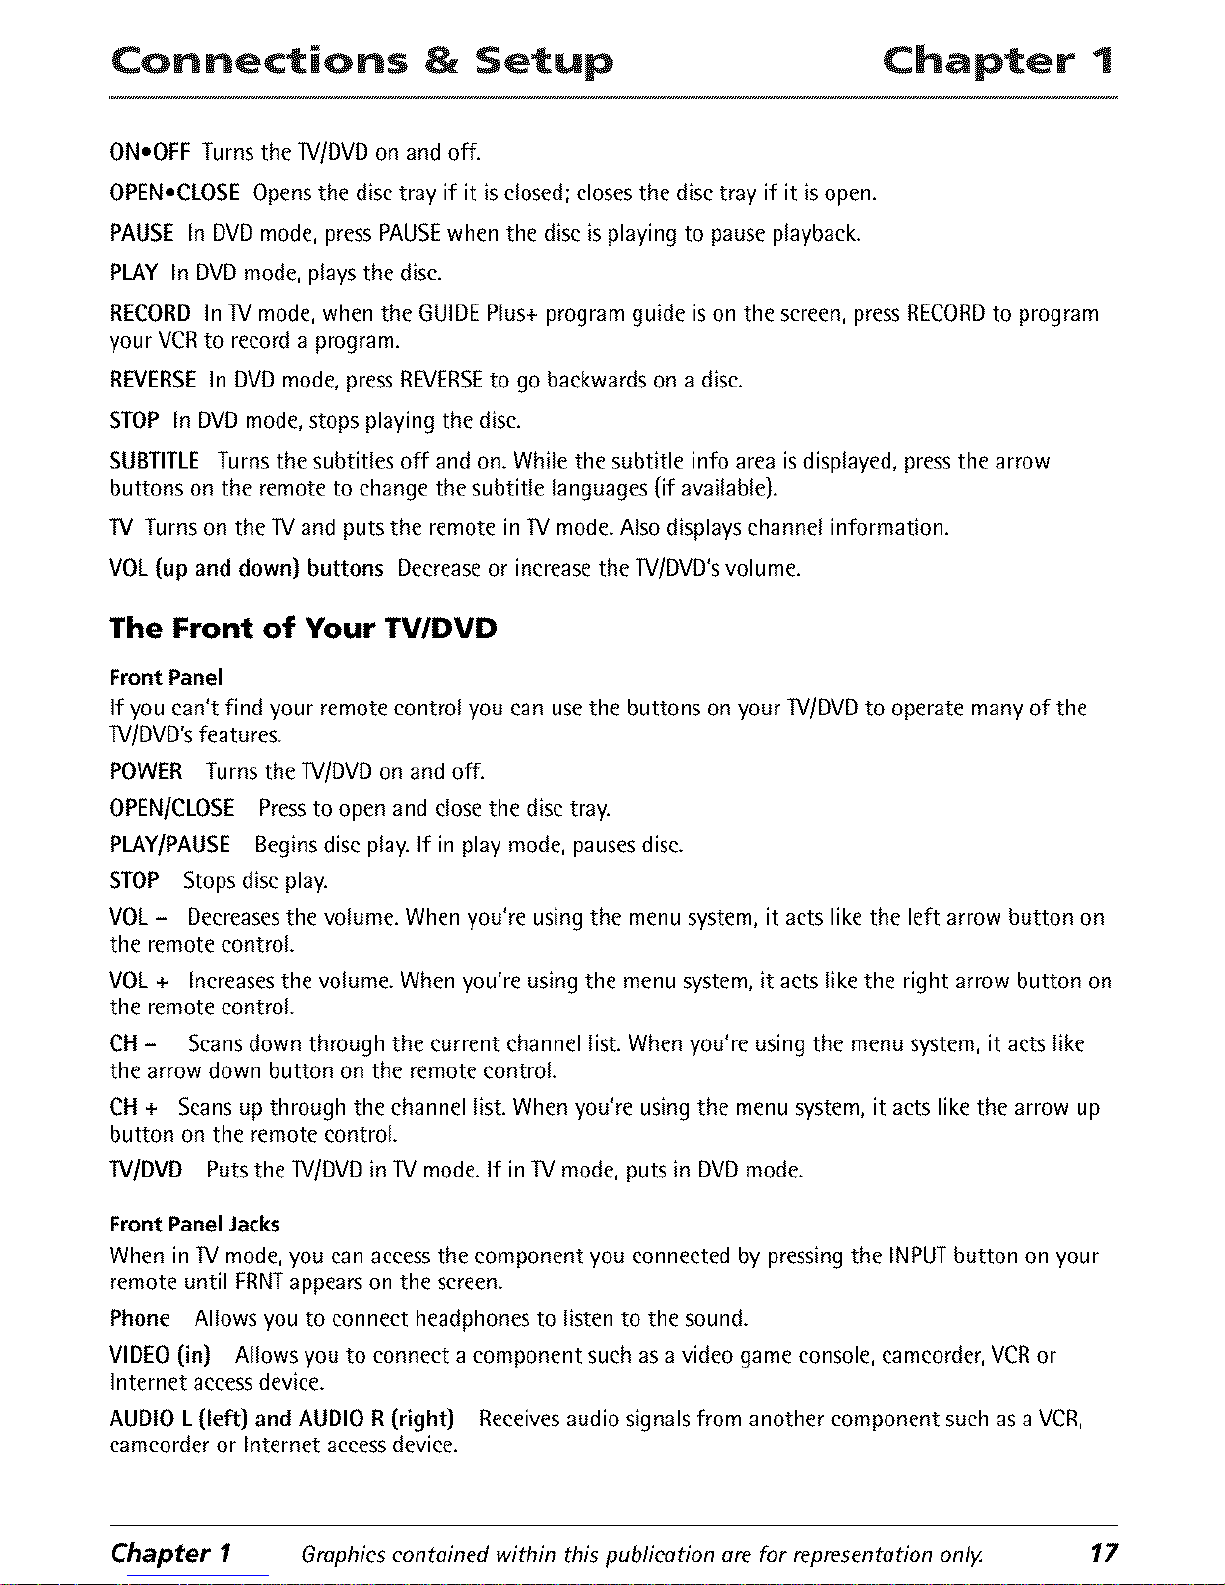
ON.OFF Turns the IV/DVD on and off.
OPEN.CLOSEOpensthe disc tray if it isclosed; closesthe disc tray if it isopen.
PAUSE In DVDmode, pressPAUSEwhen the disc is playing to pauseplayback.
PLAY In DVDmode, playsthe disc.
RECORDIn IV mode, when the GUIDEPlus+ program guide is on the screen, pressRECORDto program
your VCRto record a program.
REVERSEIn DVDmode, pressREVERSEto go backwards on a disc.
STOP In DVDmode,stops playing the disc.
SUBTITLE Turns the subtitles off and on. While the subtitle info area isdisplayed, pressthe arrow
buttons on the remoteto changethe subtitle languages(if available).
TV Turns on the IV and puts the remote in IV mode.Also displayschannel information.
VOL (up and down) buttons Decreaseor increasethe IV/DVD'svolume.
The Front of Your TV/DVD
Front Panel
If you can't find your remote control you can use the buttons on your 1V/DVD to operate many of the
]V/DVD's features.
POWER Turns the lV/DVD on and off.
OPEN/CLOSE Press to open and close the disc tray.
PLAY/PAUSE Begins disc play. If in play mode, pauses disc.
STOP Stops disc play.
VOL- Deereases the volume. When you're using the menu system, it acts like the left arrow button on
the remote control.
VOL+ Increases the volume. When you're using the menu system, it acts like the right arrow button on
the remote control.
CN - Scans down through the current channel list. When you're using the menu system, it acts like
the arrow down button on the remote control.
CN + Scans up through the channel list. When you're using the menu system, it acts like the arrow up
button on the remote control.
W/DVD Puts the ]V/DVD in lV mode. If in TV mode, puts in DVD mode.
Front Panel Jacks
When in W mode, you can access the component you connected by pressing the INPUT button on your
remote until ERNTappears on the screen.
Phone Allows you to connect headphones to listen to the sound.
VIDEO (in] Allows you to connect a component such as a video game console, eameorder, VCR or
Internet access device.
AUDIO L (left) and AUDIO R (right) Receives audio signals from another component such as a VCR,
camcorder or Interact access device.
Chapter I Graphics contained within this publication ate for representation onl)z 17
Page 20
Chapter 2 P|aying DVDs
Regional Coding
Boththe W/DVDunitandthediscsarecodedby region.Theseregionalcodesmustmatchinorderfor
thediscto play.If the codesdon'tmatch,the discwon't Nay.Thisunit'scodeisregion1.
Using Different Menus
Eachdisc isprogrammed with different features. Thereare three separate menu pathsthat you can use
to accessfeatures:
The Disc menu - The disc menu is part of each disc and is separate from the DVD's menu system. The
contents of each disc menu vary according to how the disc was authored and what features are
included. The disc menu is turned on and off (while the disc is playing) with the MENU button on the
remote.
• The DVD's Info Display - The Info Display appears as icons across the top of the screen when a disc
is playing. It can only be accessed while you are playing a disc. It's turned on and off with the INFO
button on the remote.
• The DVD's menu system - The DVD's menu system is accessed only when a disc isn't playing. It
appears automatically when the STOPbutton is pressed.
A feature will only work if the disc was programmed with that feature. If a menu item is "grayed out" it
means that item isn't available.
Loading and Playing Discs
Your W/DVD unit plays DVD discs, Video CD discs, Audio CD discs, MP3 discs and CD-R discs. Before you
load a disc, make sure that it is compatible with the player. The following discs CANNOT be used with
this player:
• Laserdiscs, CD-I, CD-ROM (computer-only discs], CD-RW, DVD-ROM, Discs recorded using other
broadcast standards (i.e. PAL or SECAM)
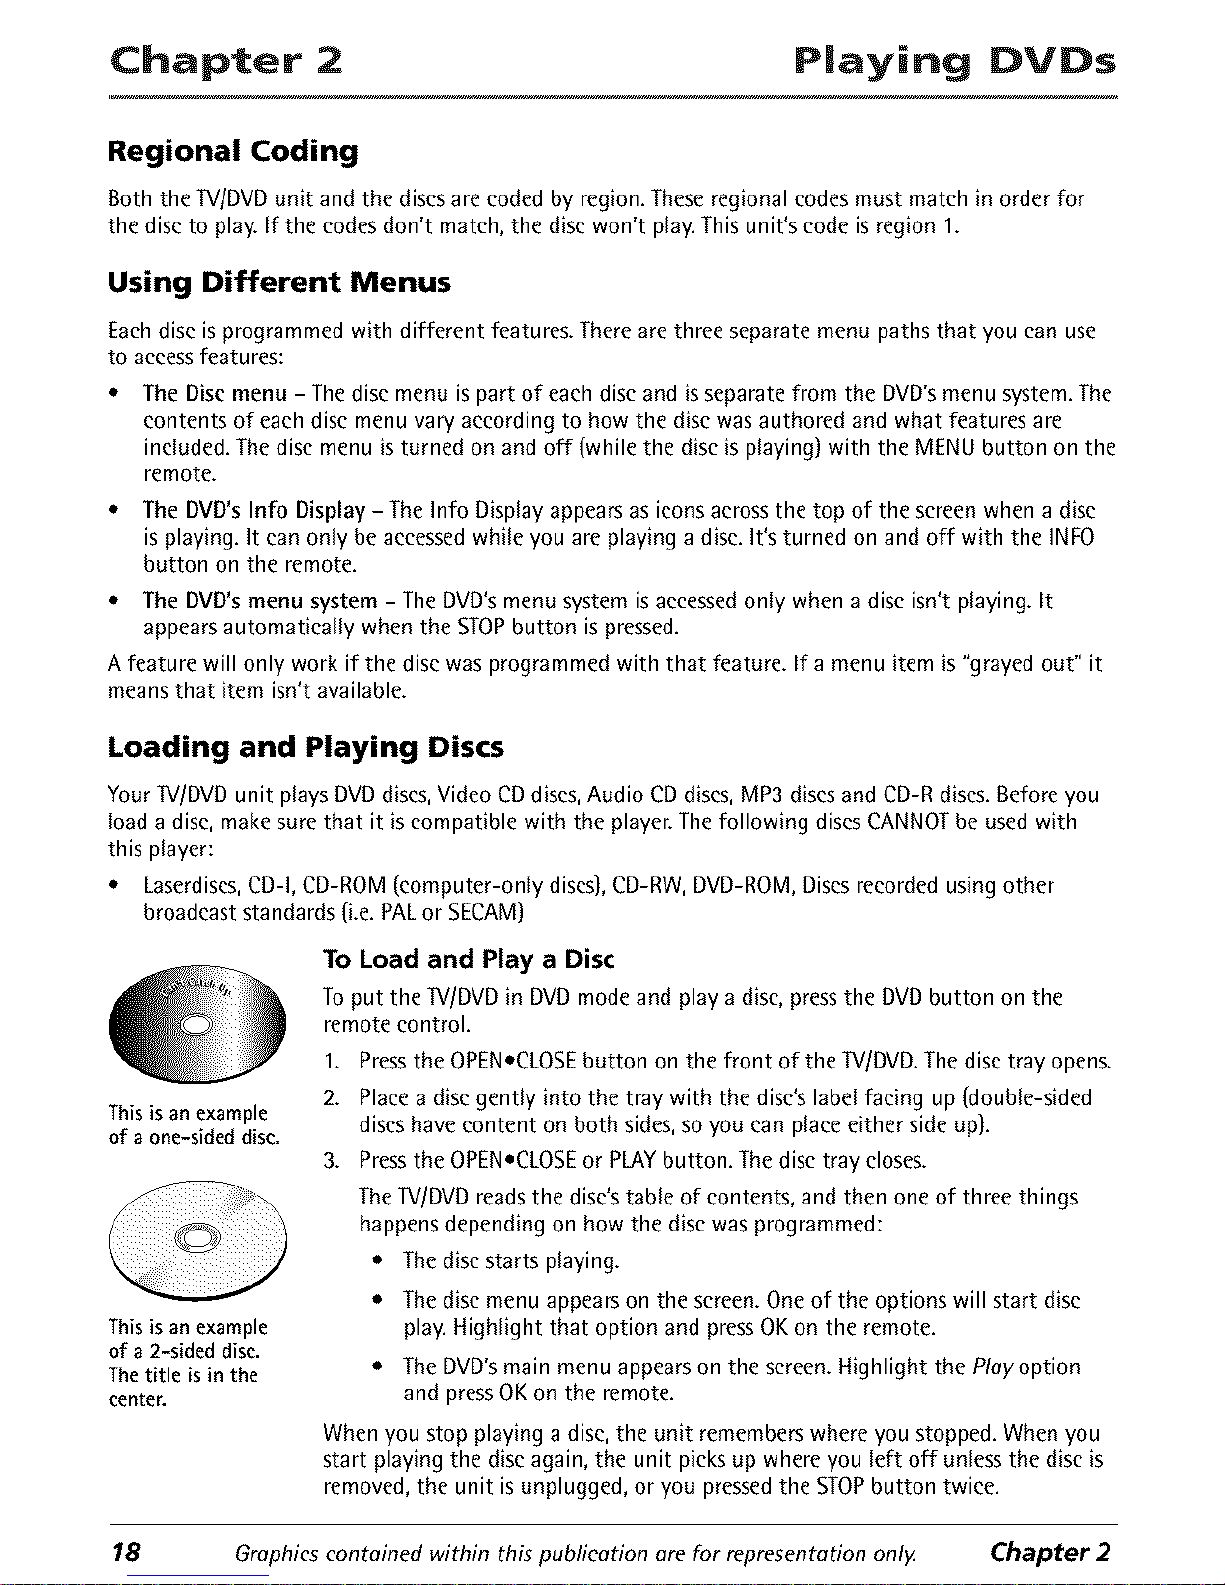
This is an example
of a one-sided disc.
This is an example
of a 2-sided disc.
The title is in the
cente_
To Load and Play a Disc
Toput the W/DVD in DVDmodeand play a disc,pressthe DVDbutton on the
remote control.
1. Press the OPEN•CLOSE button on the front of the W/DVD. The disc tray opens.
2. Place a disc gently into the tray with the disc's label facing up (double-sided
discs have content on both sides, so you can place either side up).
3. Press the OPEN•CLOSE or PLAY button. The disc tray closes.
The lV/DVD reads the disds table of contents, and then one of three things
happens depending on how the disc was programmed:
• The disc star ts playing.
• The disc menu appears on the screen. One of the options will start disc
play. Highlight that option and press OK on the remote.
• The DVD'smain menu appearson the screen.Highlight the Playoption
and pressOKon the remote.
When you stop playing a disc, the unit remembers where you stopped. When you
start playing the disc again, the unit picks up where you left off unless the disc is
removed, the unit is unplugged, or you pressed the STOP button twice.
18 Graphicscontained within this publication are for representation only Chapter 2
Page 21

Playing IDVDs Chapter 2
Using a Disc Menu
A disc is capable of having an on-screen menu that is separate from the DVD's menu system and on-
screen Info Display. The disc menu might only contain a list of the titles and chapters, or it may allow
you to change features such as language and playback settings.
The content and operation of disc menus vary from disc to disc.
Using the On-Screen Info Display
The on-screen Info Display contains many playback features. To see the Info Display, press the INFO
button on the remote while a disc is playing. The Info Display appears across the top of the screen. Each
feature is illustrated with an icon. Use the left/right arrow buttons on the remote to move through the
different icons in the Info Display.
When an icon is highlighted, use the up/down arrow buttons on the remote to scroll through the
choices displayed in the text box under the icons.
Remember, you can only access the Info Display when you're playing a disc. Also, the Info Display
features are only available if the disc was created with that particular feature (i.e., if you select the
Subtitle icon, you won't be able to change the subtitle language unless the author of the disc created
the disc with subtitles).
The invalid symbol _ appears on the screen when you press a button that doesn't have any function. If
one of the icons is "grayed out," that Info Display feature isn't available for the disc you're playing. To
make the Info Display disappear from the screen, press INEO on the remote.
Time Display
I
PLAY
Subtitles
Chapter
Title
I I
Repeat
Audio
I
Angle
Bookmarks
I
Transport mode Text about your Info Display
selection appears here
Time Display
This feature displaysthe audio!video time. For DVDdiscs, the time displayed refers to the eurrtnt title
time. ForAudio CDs,it refersto the current track time.
For DVD video discs, the Time Display also acts as a Time Search feature. This lets you go to a particular
scene in a movie by entering the time that scene is played. To use Time Search:
Press INEO on the remote to bring up the Info Display. Highlight the Time Display and enter the elapsed
time of the scene you wish to go to. For example, enter 01:12:00 to go to the scene that plays at I hour
and twelve minutes into the movie.
When you've entered the time, press OK on the remote.
Chapter 2 Graphics contained within this publication are for representation only 19
Page 22

Chapter 2 P|aying DVDs
Selecting a Title
Some discs contain more than one title. Each title is divided into chapters. To select a title:
1. While the disc is playing, press INFO on the remote to bring up the Info Display.
2. If the Title icon on the Info Display isn't highlighted, use the left/right arrow buttons to
highlight it.
3. Use the number button(s) on the remote to enter the title number or press the up/down arrow
buttons to go to the next/previous title.
4. Press OK on the remote when the title you want to play appears in the text window.
Note:Somediscsonly haveone title.
Selecting a Chapter
Because DVD discs use digital technology, a title can be divided into individual chapters (similar to tracks
on a CD). You can skip to a specific chapter by using the Chapter feature in the Info Display.
1. While a disc is playing, press INFO on the remote to bring up the Info Display.
2. PresstheleftlrightarrowbuttonstohighlighttheChopterieon.
3. Use the number buttons on the remote to enter the number of the chapter you want to play or press
the up/down arrow buttons to go to the next/previous title.
4. Press OK on the remote.
Notes:
TheChapterfeature won't work if thediscisn"tformatted with separatechapters.
BypressingCH+ or CH- onthe remote you canautomatically highlight theChoptericon. ThenpressCH+ to advance
to the next chapter or CH- to go to theprecedingchopte_
Selecting Subtitles
By default, subtitles are off. To turn subtitles on and change the Subtitle language
while you're watching a DVD disc:
1. While the disc is playing, press SUBTITLEon the remote.
2. If subtitles are off, press OK to turn them on.
3. Use the up/down arrow buttons to scroll through the subtitle languages that
are available on the disc. If subtitles aren't available, the text in the text box
will read Subtitles: NotAvailoble. If subtitles are available, the language
currently showing in the text box is the active selection. The subtitles will be
shown in that language.
4. To make the Info Display disappear, press the INFO button on the remote.
Notes:
Changingthesubtitle longuoge witfl the Info Displaywill only effect the disccurrendy being
played. Whenthediscisremovedor the unit is turned off, the subtitle language will revert to
thelanguagesetting spedfied through the DVD'smain menu
Thesubtftlelanguage can also hechanged through the DVD'smain menu
20 Graphicsconteined within this publieetion are for representation only Chapter 2
Page 23

Playing DVDs Chapter 2
Changing the Audio Language
If the disc was created with different language tracks (recorded in different
languages), you can use the Info Display to temporarily change the DVD's Audio
Language setting.
1. While a disc is playing, press AUDIO on the remote. The current audio language
appears in the text box below the row of icons.
2. Press the up/down arrow buttons to scroll through the audio languages that
are available on the disc until the audio language you want to use appears in
the text box. Audio will be played in that language.
3. To make the Info Display disappear, press the INFO button on the remote.
Notes:
Thelanguagefeatureonly worksif thedisc wascreated with multiple audio tracks
Whenyou choosean audio language from the Info Display,youonly override theaudio
languagesetting in theDVD'smain menu temporarily
Theaudio language canalsobechanged through the DVD'smain menu.
To Use Repeat:
Using the Repeat Feature
The default mode for the Repeat feature is Off. There are four Repeat options:
• Disc- repeats the disc that is playing
• Title - repeats the title that is playing
• Chapter - repeats the chapter that is playing
• Ao8 - Set the beginning (point A) and the end (point B) to make this part of
the movie play repeatedly.
1. While a disc is playing, press INFO on the remote to bring up the Info Display.
2. Highlight the Repeat icon. The text in the text box below the icons will read Repeat Mode: Off.
3. Press the up_d_wn arr_w butt_ns t_ s_r___thr_ugh the Repeat _pti_ns unti_ the Repeat _pti_n y_u
want is displayed in the text box.
4. Press OK. The selected repeat option will loop repeatedly until you turn Repeat off. Repeat is turned
off by completing steps 1 through 3 above, and selecting the Off option.
A.B Repeat
A•8 Repeat lets you define a specific segment on the disc that you want to repeat. For example, you
might like to watch the dogfight in the movie Top Gun. To watch this scene over and over:
1. Find the spot on the disc that is a few seconds before the beginning of the scene you want to repeat
(this gives you time to access the Info Display and the Repeat feature).
2. Press lNFO on the remote and select the Repeat ieon from the lnfo Display.
3. Press the up/down arrow buttons until the A•B Repeat option is shown in the text box underneath
the icons, The text box reads Repeat Mode: A-B Press OK to Set A Point,
4. At the beginning of the scene you want to repeat, press OK to set the A point.
5. When you get to the part of the disc that you want to be the end of the repeated segment (the B
point), press OK. The segment will repeat until you turn Repeat off.
6. To make the Info Display disappear from the screen, press the INFO button on the remote.
Chapter 2 Graphics contained within this publication are for representation onl)z 21
Page 24

Chapter 2 P|aying DVDs
How to Cancel Repeat
There are three ways to cancel Repeat:
• PressSTOP twice.
• Go to the Repeat icon in the Info Display and select Off.
• Eject the disc.
Using Bookmarks
The bookmark feature lets you mark a point on the disc that you can go to quickly.
You can store up to 6 bookmarks per disc. When you turn the IV/DVD off or
remove the disc, bookmarks are cleared.
Storing a Bookmark
1. While a disc is playing, press MARKER on the remote.
2. The Bookmark Menu appears. An available unmarked icon will be highlighted
(a disc with two arrows).
3. When you reach the scene you want to mark, press OK. The unmarked icon changes to two icons
(side-by-side):
• An arrow that is used to activate the bookmark.
• A trash can that is used to clear the bookmark.
Next to the icons, the bookmark start time and chapter are displayed.
4. Pressthe INFO button on the remote to make the Info Display disappear from the screen.
Using a Bookmark
1. While you're playing a disc, press MARKER on the remote. The Bookmork menu appears.
2. Highlight the arrow next to the bookmarked scene you want to activate.
3. PressOK to return to the place you bookmarked.
4. To make the Info Display disappear from the screen, press INEO on the remote.
Clearing a Bookmark
The bookmarks are cleared each time a disc is removed from the disc tray or when the power is turned
off. If you want to clear a bookmark while the disc is playing:
1. Press MARKER on the remote. The Bookmorkmenu appears.
2. Highlight the trash can icon next to the bookmark you want to clear. Press OK.
3. The bookmark is cleared and the trash can icon changes back to the unmarked disc icon.
If all 6 bookmarks are in use, you can only mark a new scene by clearing an existing bookmark.
Changing the Camera Angle
Some discs contain multiple angles of a particular scene or sequence. If the disc
only has one angle, this feature won't work. When multiple angles are available,
the Camera Angle icon appears in the upper right corner of the screen. To change
the camera angle:
22 Graphics contained within this publication are for representation onl)z Chapter 2
Page 25

Playing DVDs Chapter 2
I. While a disc is playing, press ANGLE on the remote. The Camera Angle icon will display the number
of angles available. For example, if there are 3 different angles, the icon will read I of 3. This means
angle 1 is currently being played.
2. The text box beneath the ieons displays Camero Angle: l. Usetheup/downarrowbuttonstoseroll
through the camera angle choices. The camera angle number displayed in the text window is
automatically shown.
3. To make the Info Display disappear, press the INFO button on the remote.
Disc Playback Features Using the Remote
You can use the remote control to activate disc playback features.
Playback features aren't usually available during the opening credits of a movie. If a playback feature
isn't available, the invalid symbol _ appears on the screen when you press that button.
Fast Motion Playback (Picture Scan)
To scan quickly through the disc when you're playing it, use the Picture Scan feature.
1. Press the REVERSEor FORWARD button on the remote when you're playing a disc.
2. Press the button again to scan at a faster speed. Each time you press the button, the scanning speed
increases.
3. Press the PLAYbutton at any time to resume normal playback.
Note:Youwon't hear the sound[eudio) on DVDdiscs whenyou'reusing thepicture soonfeoture.
Freeze Frame and Frame Advance
1. Press PAUSEwhen a disc is playing to freeze the picture.
2. Each time you press the PAUSEbutton, the picture advances one frame.
3. Press PLAYto resume normal playback.
Slow Motion Playback (in Freeze Frame Mode)
While the disc is in freeze frame mode, you can use slow motion playback.
I. While the disc is playing, press PAUSE on the remote.
2. Press the REVERSEor the FORWARD button.
3. Press the button again to increase the slow motion playback speed.
4. Press PLAYto resume normal playback.
Chapter Advance
While a disc is playing, you can highlight the Chapter icon by pressing CH + or CH - button. You can
then go forward or backward a chapter or track at a time by pressing CH + or CH - again.
Scene Again TM
When you're watching or listening to a DVD disc, press the GO BACK button on the remote to go back
approximately 10 seconds to see and hear missed content. Subtitles will automatically be displayed until
the end of the replayed scene (to select the subtitle options, see Chapter 4). This feature only works if
the disc is encoded with navigation control.
Chapter 2 Graphics contained within this publication are for representation only 23
Page 26

Chapter 3 Using the TV's Features
Action Video Program Menu
buttons window information options
Promotional Channel
information listings
About the GUIDE Plus+ System
The GUIDE Plus+ system is a no-fee, interactive on-
screen program guide that lists ]V schedules for your
area and allows your TV direct control of a cable box
and VCR.
There are six sections of the GUIDE Plus+ system:
• A row of Action buttons at the top of the screen
(I, 2 and 3)
• Video window
• Program information
• A row of menu options (Grid, Sort, News,
Schedule, Messages, Promotions, Channels, Setup]
• Channel listings
• Promotional information
Note: TheGUiDEplus+systemscreensiflustreted in this
bookorerepresentationsof what youerelikely tosee.Not
ell channels,programs,end GUIDEPlus+information
depictedwill be avaiinble in Fourare&
Newfeaturesandoptions can bedownloaded to the GUIDE
Plus+system,so thesetoo aresubject to chang_
Getting In & Out of the GUIDE Plus+ System
TOenter the GUIDE Plus+ system:
• Press GUIDE on the remote.
To exit the GUIDE Plus+ system:
• Highlight a program and press OK to exit the GUIDE Plus+ system and tune to the channel.
• Press GUIDE to exit the GUIDE Plus+ system and tune to the channel displayed in the video window.
• Press CLEAR to exit the GUIDE Plus+ system and return to the original channel
The GUIDE Plus+ System Menus
The GUIDE Plus+ system offers eight different options on the Menu bar: Grid, Sort, News, Schedule,
Messages, Promotions, Channels and Setup. To access the Menu bar:
1. Press GUIDE to access the GUIDE Plus+ system.
2. Press MENU or use the up and down arrow buttons to select the Menu bar (the Grid Guide appears
by default).
3. Use the left and right arrow buttons to access other menus.
4. Press OK, or MENU, or use the down arrow button to see the menu options.
Expanded Information
PressINFOon the remote to seeadditional program information.
Locking the Video Window
Highlight the network icon and press I to lock or unlock the video window.
24 Graphics contained within this publication ore for representation onl}4 Chapter 3
Page 27

Using the TV% Features Chapter 3
PressGUIDEon the remote control to
see the GUIDEPlus+ system. To remove
the program guide from the screen,
pressOK,GUIDE,or CLEAR.
Grid Guide
The Grid Guide appears each time you enter the GUIDE
Plus+ system. It displays the current programming for
eachchannel. Thecurrent program is displayed in the
video window.
• Pressthe up and down arrow buttons on the remote
to browse channel listings and the channel up and
down buttons to page through the listings. Use the
right and left arrow buttons to browse future
program listings.
• To tune to a channel, highlight the program you want
to view in the channel listing and press OK. Press
CLEARto exit the GUIDE Plus+ system and return to
the original channel. Press GUIDE to exit the GUIDE
Plus+ system and tune to the channel in the video
window.
Use the Grid Guide Action Buttons as described below.
Grid guide Grid guide
menu action buttons
selection
Grid Guide Action Buttons
Action buttons will change according to where you are in
the GUIDE Plus+ system. Be sure to look at the action bar
before pressing the command numbers.
When highlighting the program, the following Action
buttons appear:
• Watch Press 1 on the remote to place a timer in the
Schedule for the _[Vto turn on and tune to the
program highlighted in the ehanneI listing.
• Go To Press 2 on the remote to bring up the direct
dial box and enter the number of the channel you
want.
• Record Press 3 on the remote to place a timer in the
Schedule for the VCR to record the program
highlighted in the channel listing.
When highlighting the Channel names (the left column
on the channel listing), the following Action buttons
appear:
• Lock/Unlock Press 1 to lock or unlock the video
window to either stay at one channel as you browse
the GUIDE Plus+ system (lock) or change as you
browse through different channels (unlock).
Chapter 3 Graphicscontained within this publication arefor representation onl)_ 25
Page 28

Chapter 3 Using the TV's Features
Sort
Sort
The Sort menu lets you browse programs by category, such as
sports, movies or children's programs. Use the action buttons
to set up watch or record timers.
News menu
selection
News
The News menu lets you browse current news stories by
headline.
1. Use the up and down arrows to highlight a story.
• Use the up and down arrows to browse the list one
story at a time.
• Use the channel up and down to browse through the
list one page at a time.
2. Press the right arrow or INFO button to see full text.
Schedule menu
selection
Schedule
TheSchedule menu allowsyou to alter timers for either
viewing or recording programs.
Schedule Menu Action Buttons
When viewing the Schedule menu the following Action
buttons appear:
• Remove Highlight the Watch or Record timer you wish
to remove from the schedule and press 1 on the remote.
Change Highlight the Watch or Record timer you wish
to change and press 3 on the remote to toggle the
frequency between the following choices:
DALLY records the same program each day Monday
through Friday.
ONCE records only on that day.
WEEKLY records the program each week at the same
time.
26 Graphics contained within this publication ore for representation onl)_ Chapter 3
Page 29

Using the TV's Features Chapter 3
Messages
Occasionallyyou will receivemessagesregarding your GUIDEPlus+ system,asweII asspecial
programming information. You can accessthese messagesfrom the Messagesmenu on the Menu bar.
Channels
You can customize the channel listing by enabling or disabling the display of certain channels. For
instance, you may disable channels that you never watch. Useaction buttons to remove, replace or
change channels.
Setup
The Setup menu allows you to access the GUIDE Plus+ system setup information. You can do the
following in the Setup Menu:
• Chonge system settings Confirms the settings you completed in the GUIDE Plus+
system setup are correct.
• Review options Displays the GUIDE Plus+ auto display options.
On Automatically displays the GUIDE Plus+ system when you press the ON•OFF button on
the remote control
Off Disables the GUIDE Plus+ system from being displayed when you press the ON•OFF
button on the remote control.
• View demo Runs the GUIDE Plus+ system demonstration.
Promotional information
Promotions and Advertising
To find out more information about a program,
advertisement or special, use the left arrow button to
highlight the channel listing or promotional information box.
You can view a list of all available advertisements by
selecting promotions.
Chapter 3 Grophiescontained within this publication arefor representation onl)_ 27
Page 30

Chapter 3 Using the TV's Features
ChannelBanner
There are several indicators that might appear when you
press the 1V or INEO buttons on the remote. This display is
called the Channel Banner. The following list describes the
items on the Channel Banner screen (left to right and top to
bottom).
12:01
i
[]
ESPN
6O
SAP
Displays the current time.
The lock is displayed to indicate when Parental
Controls are locked or unlocked.
Displayed when Closed Captioning is available
on the current channel.
Displays the label assigned to the current
channel.
Displays the current channel or input channel
(ERNT).
Mute is displayed when you mute the audio.
Stereo is displayed when the current channel is
broadcasting in Stereo.
Displayed when the current channel is
broadcasting SAP (Second Audio Program)
information.
Displayed when the Sleep Timer has been set.
Why You Should Use the Auto Tuning Feature
Note:Youmust hoveeuniversolremote tousethis lecture. Topurchoseo universolremote,visit too.com.
The auto tuning feature automatically tunes the lV to the correct channel for different components you
have connected to your ]V/DVD (like a VCR,satellite receiver, etc.) When you set up auto tuning in the
menu system you don't have to remember to change your lV to channel 3, for example, when you want
to watch the tape in your VCR.
How to Set Up the Auto Tuning Feature
The way you set up the auto tuning feature in the ]V's menu corresponds to the component buttons on
the remote and the way you have each component connected to your lV/DVD. When you are in ]V mode
and set auto tuning, you're telling it what channel to tune to when you press the VCR1, VCR2, or
SAToCABLE button on the remote control.
1. PressMENU(the MAIN MENUappears).
2. Highlight Chonneland pressOKon your remote controk
3. Highlight Auto Tuning and pressOK.
28 Graphics contained within this publication ore for representation only. Chapter 3
Page 31

Using the TV's Features Chapter 3
4. Choose which channel you would like to set:
Set VCR I Channel Lets you set up the channel the W/DVD tunes to when you press the VCR1
button.
Set VCR2 Channel Lets you set up the channel the IV[DVD tunes to when you press the VCR2
button.
Set SAT/Coble Channel Lets you set up the channel the IV[DVD tunes to when you press the
SAT*CABLE button.
5. Pressthe right arrow button to select the choice that matches the way you have the component
connected to this W, and press OK.
The choices and a brief explanation follow:
Not connected Choose this if you don't have this particular
component connected to the IVIDVD, or if you don't want to
automatically tune to the correct channel when you're using
this component.
Channel 2 (SAT/CABLE only) Cam ponent (satellite or cable
box) is connected to the ANTENNA jack on the back of the
IV/DVD, and when in IV mode you want to tune to channel 2
when you press the SAT*CABLE button on the remote.
Reminder: make sure the component's Channel 2[314 switch
is set to channel 2. Usually this switch is on the back of the
component.
Channel 3 or 4 Component is connected to the ANTENNA
jack on the back of the IV/DVD, and when in IV mode you
want to tune to, for example, channel 3 when you press the
corresponding button on the remote. Reminder: make sure
the eomponent's Channel 314 switch is set to the appropriate
channel.
Videolnput Component isconnected to the VIDEOjack on
the back of the IVIDVD and when in IV mode you want to
tune to VlD (SVlDif you used an S-Videocable) Input
Channel when you pressthe corresponding button.
Parental Controls and V-Chip
The first three choices in the Parental Controls menu involve software inside your IV (referred to as V-
Chip[ which allows you to block IV programs and movies based on violence, sex, or other content you
may believe children should not view.
Once you block programs, you can unblock programs by entering a password.
By default, the software inside your IV is turned "off."
HOW V-Chip Works
V-Chip reads the program's age-based rating (IV-MA, IV-14, etc.) and content themes [(Violence (V),
Adult Language (L),etc.)]. If you have blocked the rating and/or content themes that the program
contains, you will receive the message, "This channel is not approved for viewing."
Broadcasters are not required to provide content themes, so programs received with no content themes
will only be blocked if you block their age-based rating. You can also block out programs that have been
given a rating of "Not Rated," and programs that are considered "unrated." The IV age-based ratings and
content themes you can block are listed on the following page.
Chapter 3 Graphicscontained within this publication arefor representation onl)_ 29
Page 32

Chapter 3 Using the TV's Features
W-MA - Mature Audience Only. Specifically designed to be viewed by adults and may be unsuitable
for children under 17. It contains one or more of the following content themes: crude indecent
language (L),explicit sexual activity (S),or graphic violence (V).
TV-14 - Parents Strongly Cautioned. Contains some material that many parents would find unsuitable
for children under 14. Parents are strongly urged to exercise greater care in monitoring this program
and are cautioned against letting children under the age of 14 watch unattended. This program
contains one or more of the following content themes: intensely suggestive dialogue (D), strong coarse
language (L), intense sexual situations (S), or intense violence (V).
TV-PG - Parental Guidance Suggested. Contains material that parents may find unsuitable for younger
children. Many parents may want to watch it with their younger children. The program contains one or
more of the following content themes: some suggestive dialogue (D), infrequent coarse language (L),
some sexual situations (S), or moderate violence (V).
W-G - General Audience. Most parents would find this program suitable for all ages. It contains
little or no sexual dialogue (D) or situations (S), no strong language (L), and little
or no violence (V).
TV-Y7 - Directed to Children 7 years and older. Designed for children ages 7 and above. It may be
more appropriate for children who have acquired the developmental skills needed to distinguish
between make-believe and reality. Themes and elements in this program may include mild fantasy
violence (FV)or comedie violence, or may frighten children under the age of 7.
W-Y - All Children. Themes and elements in this program are designed for a young audience, including
children from ages 2-6. It is not expected to frighten younger children.
V-Chip TV Rating Limit
The V-Chip WRoting Limit lets you decide which _V programs can and cannot be viewed. To set _V
programming limits:
I. Choose Parental Controls from the Main menu. If Parental Controls are locked, you must enter your
password. If they are not locked, you will get a message reminding you that your limits will not be
effective until you lock Parental Controls.
2. Press MENU to continue.
3. Highlight and select V-Chip WRating Limit.
4. Use the arrow buttons and the OK button on your remote to change the status of a lV program
rating or content theme from View to Block.
Changing the status of _V program limits is described in more detail later in the chapter.
30 Graphics contained within this publication are for representation onl)_ Chapter 3
Page 33

Using the TV's Features Chapter 3
The V-Chip Rating Limit Screen
The following is an example of where items are located within the Rating Limit screen.
Rating Field
Lets you select from a list
of age.based ratings you
can block or view.
\
Rating Status Field
Letsyou select whether the status of
the age-based rating limit to the left
isView or Block,
Content Themes
Liststhe content themes
you canblock or view.
T
Rating Settings Area
Lets you see the current block/view state of age-
based ratings and associated content. The View
(V) settings are coded in green, and the Block (B)
settings are coded in red.
Content Status Fields
Lets you select which
content themes to view
for the selected rating,
and whether the status of
the content theme is
currently View (V) or Block
(B).
Blocking Age-Based Ratings
You can automatically block all program ratings above a
specified age-based rating level.
To block programs with higher ratings:
I. Use the arrow buttons to highlight the Roting field.
2. Pressthe upldown arrow buttons on the remote to scroll
to the rating corresponding with the lowest rating you
do not want the child to watch.
3. Pressthe right arrow button to move the yellow
highlight to the Stotus field.
4. Pressthe up or down arrow button to toggle between
View and Block. The status for the rating listed to the left
and all higher ratings automatically changes to Block
(and B).
(Steps continued on next page)
Chapter 3 Grophicscontained within this publication arefor representation onl)_ 31
Page 34

Chapter 3 Using the TV's Features
Hierarchyof Age-BasedRatings
[V-MA MatureAudienceOnly
_/-14 ParentsStronglyCautioned
V-PG ParentalGuidanceSuggested
V-G GeneralAudience
V-Y7 Directedto Children7years
andolder
RI-y All Children
5. PressOK on the remote to return to the menu or exit the
screen when you are finished.
6. Select Lock Parental Controls from the Parental Controls
menu. Enter a password; if you have not set your
password, you will be prompted to enter it again.
Viewing Age-Rased Ratings
After you block age-based ratings, you can change some of
the ratings back to View.
1. Use the up/down arrow buttons to select the rating with
a status of Block.
2. Pressthe right arrow button to move the yellow
highlight to the rating status field.
3. Pressthe up button to select View.
Note: Thecontent status fieldscorrespondingto theunblocked
rating becomeViewaswell Theyand theage-basedrating status
are theonly fieldsthat automatically changeback to Viewwhen
you complete this proces&
Rememberto lock ParentalControlsfor rating limits to takeeffect.
Content Themes
D Sexually explicit dialogue
L Adult language
S Sexual situations
V Violence
FV FantasyViolence
Blocking Specific Content Themes
You can block programs based on their content. (Content is
represented by the D, L,S,V and FVon your screen.) When
you block a content theme for a particular rating, you
automatically block that content theme for higher rated
programs as well.
To block program content:
1. Determine the lowest level of content you don't want the
child to watch.
2. Pressthe up/down arrow buttons on the remote to scroll
to the rating corresponding with the lowest content you
do not want the child to watch.
3. Pressthe right arrow button to move the yellow
highlight to the content theme you want to block.
4. Pressthe up or down arrow button to toggle between
Viewand Block. The higher ratings' content theme
automatically change to Block (and B).
Notes: Broadcastersarenotrequired to providecontent themesor
age-basedmting_
Youmustremember tolock ParentalControlsfor rating limits to
take erred.
3.2 Graphics contained within this publication arefor representation onl}4 Chapter 3
Page 35

Using the TV% Features Chapter 3
Viewing Specific Content Themes
If you block specific content themes,you have the option of going back and changing someof the
content themes back to IV) View:
1. Determine the content themes you want to change to (V) View.
2. Use the up and down arrow buttons to scroll through the age-based ratings until the rating
whose content theme you want to change to View appears.
3. Press the right arrow button to move the yellow highlight to a particular content theme status,
such as the B under language (L) corresponding with IV-14.
4. Press the up or down arrow button to change its status back to V. Your child would then be able
to watch programs with IV-14 adult language content, but not programs with IV-PG or IV-MA
language content.
Note: Only thecontent themestat_s correspondingto 1V-14{L)languagechangesto{V)Viev_Nigherrated
content themes,such as that for ?V-MAlonguage,do not change.
V-Chip Movie Rating Limit
Set movie rating limits by blocking moviesrated above a
specified level.
Toaccessthe V-CHIPMOVIERATINGLIMITmenu:
1. PressMENUon the remote control (the IVMAIN MENU
appears).
2. Select Parental Controls.
3. Select V-Chip Movie Rating Limit.
Blocking Movie Ratings
Once you arc in the Movie Ratings menu, follow the same
steps described for blocking lV ratings.
Viewing Movie Ratings
After you block movie ratings, you have the option of
changing some of the rating status buttons back to View:
1. Highlight the Rotin 9 field and press the up and down
arrow buttons to find the rating you want to view.
2. Pressthe right arrow button to highlight the rating
Status field. Pressthe up and down arrows to change the
button from Block to View.
For example, if movies with a rating of PG-13 and higher are
blocked, you can change the rating status corresponding
with NC-17. Your child would then be able to watch all
movies with a G, PG, and NC-17 Rating.
3. PressOK to exit the screen, and be sure parental controls
arc locked.
Chapter 3 Graphicscontained within this publication are for representation onlF 33
Page 36

Chapter 3 Using the TV's Features
V-Chip Unrated Program Block
This option letsyou decide if programs that the V-Chip
recognizesas "unrated" can beviewed. "Unrated" ]V
programs may include news,sports, political, religious, local
andweather programs,emergency bulletins, public
announcements, and programs without ratings.
View All unrated programsare available.
Block All unrated programsare not available.
Note:YoumustremembertolockParentalControlsforrating
limitstot#keeffect.
Channel Block
Selecting this option lets you decide what channels can be
viewed.
View Makes the selected channel viewable.
Block The front panel and remote control CH(channel)
buttons will tune only to channels that you have
marked as View. The remote will still tune to the
blocked channel if you use the digits to access the
channel, but the channel will be blocked.
Don't forget to lock parental controls after you change the
status of Channel Block. If you don't, the channel block will
not take effect.
Note:If you hoveo digitol ceb/ebox chennels126-999 con be
blockedbut will not be removob/efrom yourscan/_
Front Panel Block
Selecting this option lets you block (disable) or unbloek
(enable) the TV'sfront panel. The remote still tunes to any
channel. When using this as a Parental Control method,
remove access to any remote that is capable of operating the
television while you have the front panel blocked.
Don't forget to lock parental controls after you change the
status. If you don't, the front panel block will not take
effect.
Lock/Unlock Parental Controls
Selecting this option lets you lock and unlock parental
controls settings using a password.
If you do not lock parental controls, none of the settings
for V-Chip, Channel Block, or Front Panel Block will take
effect.
If you forget your password,simultaneously pressand hold
VOL- on the television and VOL-on the remote for 3
seconds.Nothing appearson the screen;Parental Controls
simply unlock and you can re-enter a passwordvia Lock
Parental Controls.
34 Graphics contained within this publication are for representation only. Chapter 3
Page 37

The DVD rVlenu Chapter 4
The DVD's Menu System
The DVD's menu system is not the same as the disc menu or the Info Display. The DVD's main menu
comes up when there is no disc playing. If you are playing a disc, press STOP on the remote control to
stop playback and bring up the DVD's main menu.
The Play/Resume Play Option
Press OK to clear the screen and resume play.
To get to the DVb's main menu, press STOP on the remote
control. The first item in the main menu is the Play/Resume
Play option. If there isn't a disc in the IV/DVD, the option
reads Play with the prompt Insert Disc to the right. If there
is a disc in the IV/DVD and it was previously playing, the
option reads Resume Play and the name of the disc is
displayed on the right.
Any time you stop playback, you will be returned to the
DVD's main menu, and the Playoption will read Resume
Play. To resume play, highlight the option and press OK, or
press the PLAYbutton on the remote.
The Play Mode Menu
The DVD's Play Mode menu lets you choose different ways to play the disc. To see Play Mode menu
options, a disc must be in the IV/DVD.
1. If the disc is playing, press STOP (the DVD's main menu appears).
2. Highlight the Play Mode menu option.
3. PressOK. The Play Mode menu items appean
4. Highlight the desired option andpressOK.Program Playwill not work unlessyou havecreated a
program list.
iiii!!!i_!iiiiiiiii!_!i!!!!i!!i!_i!iiiiii!i!iii!ii!ili_iiii:iiii!ili!i_i!!i_!:!!i_!!!_!_ii_i_!i_ii_!i!!_iii_!l!_ii_i_!_!!_ii_i_i_!_ii_!i_:i!_iii¸i!iiiiiiii!iiiii_!i!iiii!ii_iii!
Selecting RandomPlay plays the disc's
tracks in random order.
Selecting a Play Mode
Thefirst three options in the Play Mode menu determine in
what order the titles or trackswill play on a disc.
Standard Play: plays the disc's titles and chapters in
their default order (i.e., chapter I of Title I plays first,
then chapter 2 of Title I, etc.]
Random Play: plays the chapters of each title in random
arden
Program Play: Plays the chapters on the disc in the
order you have programmed (you must select Edit
Program and set up the order in which you want the
tracks on the disc to play).
How to Create a Program
Tousethe Program Playoption, you must create a program list to set the order you want titles and
chapterson a DVDvideo discto play.Tocreate a program list for an Audio CDor MP3 go to Chapter 6.
Chapter 4 Graphicscontained within this publication are for representation onlF 35
Page 38

Chapter 4 The DVD rVlenu
When the Title box is highlighted,enter the
title number you want to place in the list.
Creating a Program List for a DVD Video Disc
I. If the disc is playing, press STOPto stop playback (the
DVD's main menu appears).
2. Highlight Play Mode and press OK (the Play Mode menu
appears).
3. Highlight Edit Program and press OK (the Edit Program
screen appears).
4. The Title box is highlighted. Use the up/down arrows or
the number buttons on the remote to enter the title you
want to play first. The title number you entered appears
in the Title box. The number of chapters available appears
under the Chapter box.
5. Use the up/down arrows or the number buttons on the
remote to enter the chapter you want to play first and
press OK. The highlight jumps to the Add button.
6. Press OK to add that chapter to the Program LisL The
highlight jumps back to the Title box so you can add
more titles and/or chapters. Make sure the Title box is
highlighted and enter your next title and/or chapter.
7. Continue adding titles/chapters as explained in steps 4-6
until your program is complete. You can play your
program by highlighting Pleyand pressing OK, or you can
save the program by highlighting Done and pressing OK.
The program will be erased when you remove the disc
from the ]V/DVD.
Editing a Program
To delete an entry from the playlist, highlight
it, then highlight Delete and pressOK.
Deleting Chapters
To delete chapters from the playlist:
I. If the disc is playing, press STOPto stop playback (the
DVD's main menu appears).
2. Highlight Play Mode and press OK (the Play Mode menu
appears).
3. Highlight Edit Program and press OK (the Edit Program
screen appears).
4. Highlight the item in the playlist you want to delete.
5. Highlight Delete, and press OK.
6. When you are finished rearranging the playlist, highlight
Done and press OK.
36 Graphics contained within this publication are for representation onl}4 Chapter 4
Page 39

The DVD rVlenu Chapter 4
InsertingChapters
Toinsert chapters into the playlist:
1. If the disc is playing, pressSTOPto stop playback (the DVD'smain menu appears).
2. Highlight PlayMode and pressOK(the Play Mode menu appears).
3. Highlight Edit Programand pressOK(the Edit Programscreenappears).
4. Usethe left/right arrow keysto movethe highlight to the program list. Usethe up/down arrow keys
to mark the spot in the playlist whereyou want to insert achapter (the inserted chapter will be
placedbefore the highlighted chapter).
5. Highlight the Chopterbox and usethe up/down arrows or the number buttons on the remote to
enter the chapter you want to playfirst.
6. Oneeyou enter the number, the lnsert box is highlighted. PressOKto insert the ehapter in the
playlist.
7. When you arefinished rearranging the playlist, highlight Doneand pressOK.
AutoPlay
You can set the AutoPlay option to play your disc automatically after you dose the disc tray.
1. From the DVD's main menu (in DVD mode, no disc playing) highlight the Play Mode option and press
OK.
2. The Play Mode selections appean Highlight the AutoPlay option and press OK to toggle the option
on!off.
3. Pressthe left arrow button to return to the previous menu or press GO BACK to return to the main
menu.
Dub Assist
Dub Assisthelpsyou recorda CDonto an audio cassettetape by determining the number of tracksthat
witl fit on one side of the tape soyou havetime to turn the tape over to record on the other side.For
stepson howto use DubAssist go to Chapter 6.
IntroScan
IntroSean plays the first 10 seconds of each track on an Audio CD or MP3 file. IntroSean will not repeat
automatically. Once it has completed, the system will stop the disc and return to the main menu.
To use IntroSean when playing a CD or MP3:
1. Highlight PlayModeand press OK.
2. Highlight IntroSeon and press OK to begin the function.
3. PressSTOP to stop the IntroSean function.
The Lock Menu
The padlock icon is displayed on the DVD's main menu which shows whether your DVD is locked or
unlocked.
Locked: A password is needed in order to play discs that aren't included in the rating limits
you have set. When the DVD is locked, no one can access the Lock Menu items without
entering the password.
Unlocked: A password isn't required to play discs.
Chapter 4 Graphics contained within this publication are for representation onl)_ 37
Page 40

Chapter 4 The DVD Wlenu
Locking Your DVD
I. If the disc isplaying, pressSTOP(the DVD'smain menu
appears).
2. Highlight Lockand pressOK (the Lockmenu items
appear).
3.
4.
Use the numbers on the remote to enter a
password.
5.
Highlight Lock Player and press OK. The Enter New
Password screen appears.
Pressthe number keys on the remote to enter the
password you want to use (similar to entering your PIN
when you use a bank machine).
After you've entered the last number in the password,
press OK. Confirm Password appears.
6. Enter the numbers you entered the first time and press
OK when you're finished.
7. Pressthe left arrow to return to the main menu.
Unlocking Your DVD
I. If the discis playing, pressSTOP(the DVD'smain menu appears).
2. Highlight Loekand pressOK.
3. TheEnterPasswordboxappears. Enteryourpassword(theLockmenuoptionsappear).
4. Highlight Unlock Playerand pressOK.The loekedicon ehanges to unloeked.
Changing Your Password
The DVD must be locked to change tile password.
1. If the disc is playing, press STOP (the DVD's main menu appears).
2. Highlight Lockand press OK. Enter Passwordappears on the sereen. Enter your password.
3. Highlight Change Password and press OK. Enter New Password appears.
4. Pressthe number buttons on the remote to enter the new password you want to use and press OK.
Confirm Password appears.
5. Pressthe number keys to enter the password again and press OK when you're finished.
Setting the Ratings Limits
The Ratings Limits feature is a rating limit system, sort of like movie ratings. It works with DVD discs that
have been assigned a rating. This helps you control the types of DVDs that your family watches.
Note:Whenin DVDmode,tile TV/DVDalerts you whenyou try toplayu moview_th uraring that exceedsthe limit
you'veset.Somediscsincludearating override feature Whenyouplay adisc with this teatufa,themessageOverride
Limit or CanceISelectionappearson the screen.If you chooseto overridetherating limit, you will needto enteryour
passwordtobeginplayback.
38 Graphics contained within this publication are for representation onlF Chapter 4
Page 41

The DVD rVlenu Chapter 4
Changingto a Different Country'sRating System
Somecountries usedifferent rating systems.Thedefault for this WIDVD is the United States.You can
change to a different country's rating systemthrough the Lockmenu.
I. If the disc is playing, pressSTOP(the DVD'smain menu isdisplayed).
2. Fromthe main menu, highlight the Lock option and pressOK(the Lockmenu appears).
3. Highlight Rotings Limits and pressOK (the Ratings Limits menu appears).
4. Highlight Country and pressOK(a list of countries appears).
5. Highlight the country you want to change to and pressOK(the country you selected appearsnext to
the Country path menu).
6. Pressthe left arrow keyto return to the main menu.
Rated Titles
TheRated Titlesoption lets you determine how your DVDwill react to discsthat contain moviesthat are
rated (in the U.S.A.,the Motion Pictures Association of America ratesmovies asG,PG,PG-13,etc.).
You decide which ratings require a password and which ones don't. This system ranks the ratings I
through 8 in order to accommodate different countries' ratings systems (I is considered a movie title
with the most offensive material).
In order for the Rating Level feature to work, the disc must be encoded with rating information. If the
author of the disc did not encode rating information, then this feature will not work for that disc.
When in DVD mode, the lV/DVD must be locked in order for it to enforce the settings in the Ratings
Limits part of the Lock menu.
The RatedTitles screen lets you set the
Rating Limit
1. Fromthe Loekmenu,highlight Ratings Limits and press
OK(the Ratings Limits menu isdisplayed).
2. Highlight Rated Titlesand pressOK(the 8-level rating
limits list appears).
3. Tochange the rating limit, pressthe up or down arrow
button.
4.
o The ratings that don't require a password (free
access) appear under the bar, in the green part of
the block.
o The ratings that require a password appear above
the bar, in the red part of the block.
When you have moved the bar to the desired setting,
press OK. You are returned to the Rated Titles screen and
the setting appears to the right of the Rated Titles
option. For example, if you set 3 as the highest rating for
Free Access (green), then the Rated Titles selection
appears as 3 (that's the DVD's number for PG in the 8-
level system) for the movie studio's rating. This means
when the DVD is locked, it will require you to enter the
password to play any discs that are rated higher than 3
(i.e., PG-13 or NC-17).
5. Pressthe left arrow button to return to the main screen.
Chapter 4 Graphics contained within this publication are for representation onl)_ 39
Page 42

Chapter 4 The DVD Menu
Unrated Titles
Some titles (movies) aren't rated, but may contain material that is unsuitable for children. You decide
how you want the Ratings Limits feature to handle these discs: free access or password required. To set
the Unrated Titles option:
1. Fromthe Lock Menu, highlight Ratings Limitsand press
OK.
ChooseUnrated Titles to set free accessor
requirea password for unrated titles.
2.
3.
Highlight Unrated Titles and press OK. The Unrated Titles
options appear.
Use the up/down arrow buttons to highlight your choice:
Free Access or Password Required. Press OK. Pressthe left
arrow button to return to the previous screen, and the
option you chose is displayed next to the Unrated Titles
option.
4. Press the left arrow key to return to the main menu.
System Test
There are several tests you can run from the System Test menu. If a problem is found, the text will
appear in light gray.
1. Highlight System Test within the Lock menu.
2. Press OK to display the System Test Results screen.
3. Press the left arrow key to return to the main menu.
The Display Menu
The Display menu contains the settings that affect how disc content looks on your g//DVD.
TV Image
The g/Image menu adjusts the way a movie appears on your g//DVD. Standard _Vs are 4 x 3 format.
1. From the DVD's main menu (in DVD mode, no disc playing), highlight Displayand press OK (the
Display options appear).
2. Highlight g/Image. Press OK. The g/Image options appear.
4x3 Letterbox
4x 3 Letterbox - Choosethis setting if you want to see
moviesin their original aspectratio (height-to-width
ratio).You'll seethe entire frame of the movie, but it will
take up a smaller portion of the screenvertically. The
moviemight appear with black barsat the top and
bottom of the screen.
40 Graphics contained within this publication are for representation onl)_ Chapter 4
Page 43

The DVD rVlenu Chapter 4
4x3 Standard
4x 3 Standard - Choosethis setting if you want the
movie to fill the entire screenof your W/DVD.This might
mean that parts of the picture (the left and right edges)
won't be seen.
Most dises produced in a widesereen format can't be
cropped in this fashion. This means the black bars will
appear at the top and the bottom of the screen.
On-Screen Displays
This feature lets you seleet whether you want eertain on-screen displaysto appear on the screen. It
contains three choices with cheek boxes next to them:
• Information Display - When turned on, displays time transport information when you are fast
forwarding or reversing playback.
• Angle Indicator - When turned on, displays eamera angle icon if more than one eamera angle is
available.
• Scene Again TM Text - When turned on, displays subtitles when you use the Scene Again TM feature.
The default is to show all on-screen displays. To turn one of the options on or off:
1. From the main menu, highlight the Displayoption and
press OK (the Display menu appears).
2. Highlight the On-Screen Displays option and press OK
(the three on-screen display options appear on the right).
3. Highlight an option and press OK. This toggles the option
on or off.
4. Press the left arrow key to return to the main menu.
The On-Screen Displaysoption lets you
choose which on-screen display items
appear on your TVIDVD.
The Sound Menu
The Sound menu lets you select different sound settings to mateh the equipment you have conneeted to
your unit.
Digital Output
Digital output lets you choosewhich type of digital audio isoutput from your unit. If you've usedan
optical cable to connect a Dolby Pro Logie,Dolby Digital, or DTSreeeiver,you must adjust this setting.
Thereare two options:
• Dolby Digital: Choosethis setting if you connected a DolbyDigital receiver.
• DTS: Choosethis setting if you connected a DTSreceiveror deeoderto your unit.
The default is Dolby Digital, To change the digital output:
Chapter 4 Graphics contained within this publication ate for representation onl)_ 41
Page 44

Chapter 4 The DVD rVlenu
1. From the main menu, highlight and select the Sound
option and press OK (the Sound menu is displayed).
2. Highlight the Digital Outputoption and press OK.
3. Highlight the desired output and press OK.
4. Press the left arrow key to return to the main menu.
Select the Digital Output option from the
Sound menu.
Notes:If you setDigitol Output to DTS,you musthove your unit
connectedtoo receiverordecoder with the DTSlecture end the
discyouploy must support the DTSaudio former. If youchooseDTS
endyour receiveror decoderdoesn't support DTS,you won't beer
onyeudio
If youdon't went tomekeony changes,pressCLEARtoreturn to
themoin menu or GOBACKtoreturn to the SpeakerSetupmenu
Sound Logic
The Sound Logic feature compresses the dynamic range {quietest sound to loudest sound) of a disc's
soundtraek. For example, action scenes might be very loud, while whispered dialog is quiet. The Sound
Logic feature evens out the range of the volume by making loud sounds quieter and soft sounds louder.
The Sound Logic option is a toggle, it can be turned on or off.
The default setting is off. To turn the Sound Logic feature on:
I. From the DVD's main menu, highlight Soundand press
OK (the Sound menu appears).
2. Highlight the Sound Logicoption and press OK.
3. Press the left arrow button to return to the main menu.
Note:Theperformance of the SoundLogicfeet_lrevariesdepending
on the type of equipmentyouhove connectedto yourTV/DVDend
theaudio formot of thediscyou'repleying
Select the Sound Logic option from the
Sound menu and press OKto toggle
Sound Logicon or off.
The Languages Menu
The Languages menu enables you to choose different language options for audio, subtitles, Disc Menu
items and DVD main menu items. The default for all Language menu items is English.
Select the language option you want to
change.
Changing the Player Menus, Disc Menus,
Audio or Subtitles Language Preferences
You can choose one of the languages For the text that
appears within the on-screen menu system.
1. From the main menu, highlight and select the Languages
option (the Languages menu is displayed).
2. Highlight the language option for the language you
want to change and press OK (the language choices are
displayed).
42 Graphics contained within this publication are for representation only. Chapter 4
Page 45

The DVD rVlenu Chapter 4
3. Highlight the language you want to use and press OK. The menu appears with your selection shown
next to the language option.
4. Press the left arrow button or press GO BACK to return to the previous menu.
No tes: If you change the Player Menu Language, the entire DVD's men u system will be displayed in the selected
language.
It yOUchange the Subtitle language, you still need to turn them on by pressing SUBTITLE,then OK
The option Original in the Audio Language menu is the long uage in which the audio was originally recorded.
How to Set Other in Disc Menus, Audio or Subtitles Language
If the language you want to useisn't listed,you can usethe Otheroption to selectthe language of your
choice.
1. Fr_m the main menu_ high_ight and se_ect the L_ngu_ges _pti_n (the L_ngu_ges menu is disp_ayed)_
2. Highlight the language option you want to change to Other and prtss OK (the language options are
displayed).
3. Highlight Otherand press OK.
4. Enter the code from the Language Codes list at the end of this chapter and press OK (the prtvious
menu appears with your selection shown next to the language option you changed].
5. Pressthe left arrow button or press GO BACK to return to the previous menu screen.
Note:Remem6er,your W/DVDcan't play the disc in the languageyouhovechosenif the discwasn't createdwith that
languageoption.
Glossary
The glossary contains definitions and information about the
features and controls when in the DVD mode.
The Glossary explains terms used
regarding the DVD mode of the
TWDVD and discs.
1. If the disc is playing, pressSTOP(the DVD'smain menu
appears).
2. Highlight GIossoryand pressOK(the GIossaryappears).
3. Usethe arrow buttons on your remote to highlight
different terms. The definitions appear on the right side
of the screen.
Some glossary definitions are more than one page. The
scroll icon appears in the definition box to let you know
when there's a second page.
To see the rest of the definition:
a. Press the right arrow button. The glossary
definition is highlighted.
b. Pressthe down arrow button. The second page
of the definition appears.
c. Press the up arrow button to return to the first
page of the definition or press GO BACK to
return to the main menu.
4, Press the left arrow button to return to the DVD's main
menu.
Chapter 4 Graphics contained within this publication art for representation only. 43
Page 46

Chapter 4 The DVD Menu
Code List Don't forget to press the OK button after * ou enter the code.
Language Code Language Code Language Code
Abkhazian 6566
Afbr 6565
Afrikaans 6570
Albanian 8381
Ameharic 6577
Arabic 6582
Armenian 7289
Assamese 6583
Aymara 6588
Azerbaijani 6590
Bashkir 6665
Basque 6985
Bengali; Bangla 6678
Bhutani 6890
Bihari 6672
Bislama 6673
Breton 6682
Bulgarian 6671
Burmese 7789
Byelorussian 6669
Cambodian 7577
Catalan 6765
Chinese 9072
Corsican 6779
Croatian 7282
Czech 6783
Danish 6865
Dutch 7876
English 6978
Esperanto 6979
Estonian 6984
Faroese 7079
Fiji 7074
Finnish 7073
French 7082
Frisian 7089
Galician 7176
Georgian 7565
German 6869
Greek 6976
Greenlandic 7576
Guarani 7178
Gujarati 7185
Hausa 7265
Hebrew 7387
Hindi 7273
Hungarian 7285
Icelandic 7383
Indonesian 7378
Interlingua 7365
Interlingue 7369
Inupiak 7375
Irish 7165
Italian 7384
Japanese 7465
Javanese 7487
Kannada 7578
Kashmiri 7583
Kazakh 7575
Kinyaiwanda 8287
Kirghiz 7589
Kirundi 8278
Korean 7579
Kurdish 7585
Laothian 7679
Latin 7665
Latvian, Lettish 7686
Lingala 7678
Lithuanian 7684
Macedonian 7775
Malagsy 7771
Malay 7783
Malayalam 7776
Maltese 7784
Maori 7773
Marathi 7782
Moldavian 7779
Mongolian 7778
Naru 7865
Nepali 7869
Norwegian 7879
Occitan 7967
Oriya 7982
Oromo (Afan) 7977
Panjabi 8065
Pashto, Pushto 8083
Persian 7065
Polish 8076
Porluguese 8084
Quechua 8185
Rhaero-Romance 8277
Romanian 8279
Russian 8285
Samoan 8377
Sangho 8371
Sanskrit 8365
Scots Gaelic 7168
Serbian 8382
Servo-Croatian 8372
Sesotho 8384
Setswana 8478
Shona 8378
Sindhi 8368
Singhalese 8373
Siswati 8383
Slovak 8375
Slovenian 8376
Somali 8379
Spanish 6983
Sundanese 8385
Swahili 8387
Swedish 8386
Tagalog 8476
Tajik 8471
Tamil 8465
Tatar 8484
Telugu 8469
Thai 8472
Tibetan 6679
Tigrinya 8473
"lk:mga 8479
"E,;onga 8483
Turkish 8482
Turkmen 8475
Twi 8487
Ukrainian 8575
Urdu 8582
Uzbek 8590
Vietnamese 8673
Volapgk 8679
Welsh 6789
Wolof 8779
Xhosa 8872
Yiddish 7473
Yoruba 8979
Zulu 9085
Chapter 4
44 Graphics contained within this publication are for representation only.
Page 47

Tv Menu Chapter 5
How to Use Your TV's Menu System
You use the buttons on the remote or the front of your W/DVD to access the menu system and make
changes to the settings.
The following pages explain how to use the different types of menus to adjust the features of your TV.
Menus
The first menu is called the Main menu. Press MENU on the remote or on the front panel to bring up
the Main menu. Note that holding MENU for 2 seconds displays the GUIDE Plus+ system.
Menus take you to another menu or a control panel. There are two ways to select a choice in a menu:
• Use your arrow buttons on your remote control to highlight your choice, and press OK.
• Press a number button on the remote. For example, in the Main menu press 3 to go straight to the
Screen menu.
Exiting a menu
There are three ways to exit a menu:
• Highlight Exitand press OK.
• Press 0 on the remote.
• Press CLEAR.The on-screen displays are created from the screen and you return to 1Vviewing.
Audio Menu
Tone Controls Displays the slider controls for adjusting the
lV's treble, bass and balance.
Audio Processor Displays a choice list of available audio
modes, which control the way the sound comes through your
speakers. You can also access the AUDIO PROCESSORmenu
by pressing the AUDIO button on the remote.
Mono Plays the sound in mono only. Use this setting
when receiving broadcasts with weak stereo signals.
Stereo Splits the incoming stereo audio signal into left
and right channels. Most lV programs and recorded
materials have stereo audio. The word STEREOappears on
the screen when you tune to a program that is broadcast
in stereo.
Sound Logic " Stereo Reducesthe annoying blasts in
volume during commercial breaks,and alsoamplifies
softer sounds in program material. Eliminatesthe needto
constantly adjust volume control.
SecondAudio Program (SAP] Playsthe program's
audio in a second language, if one is available.Theword
SAPappearson the screenwhen you tune to a program
that is broadcast with SAPinformation. SAPaudio is
broadcast in mono. SAPis alsoused to broadcast a
program'saudio with descriptions of the video for the
visually impaired.
Chapter 5 Graphics contained within this publication are for representation onl}4 45
Page 48

Chapter 5 Tv Menu
Speakers Displays a choice list that lets you turn the 1V/DVD's internal speakers on or off.
On This setting turns the 1V/DVD's speakers on.
Off This setting turns the lV/DVD's speakers off.
Picture Quality Menu
Basic Picture Controls Displays the five slider
controls for adjusting the way the picture looks.
Contrast Adjusts the difference between the light
and dark areas of the picture.
Color Adjusts the richness of the color.
Tint Adjusts the balance between the red and
green levels.
Black Level Adjusts the brightness of the picture.
Sharpness Adjusts the crispness of the edges in
the picture.
When exiting this menu, the Save Personal Picture Preset choice list will appear. You can choose either
Yesor No. If you save the settings as a Personal Picture Preset, the TV/DVD will store the settings so you
can re-select them quickly if someone changes the settings.
Picture Presets Displays a choice list that lets you select one of four preset picture settings: Bright
Lighting, Normal Lighting, Soft Lighting or Personal Picture Preset. Choose the setting that is best for
your viewing environment.
Color Warmth Displays a choice list that lets you set one of three automatic color adjustments: Cool
for a more blue palette of picture colors; Normal; and Warm for a more red palette of picture colors. The
warm setting corresponds to the NTSCstandard of 6500 K.
Screen Menu
Closed-Caption Display Displays a choice list that lets you choose the way closed captioning
information is shown on the screen.
Offalways No captioning information is displayed.
On always Captioning information is shown always, when available.
On when sound is muted Captioning information is shown, when available, whenever the 1VI
DVD's sound is muted. (To mute the sound, press the MUTE button.) The captioning information is
not displayed when the sound is not muted.
Closed-Caption Mode Displays a choice list that lets you choose which captioning mode is used for
displaying captioning information.
Menu Language Displays a choice list that lets you select your preferred language for the menus:
English, Spanish or French.
46 Graphics contained within this publication are for representation onl)_ Chapter 5
Page 49

Tv Menu Chapter 5
Using Closed Captioning
Many programs are encoded with dosed-captioning information, which lets you display the audio
portion of a program as text on the screen.
Closed captioning is not available on all channels at all times. Only specific programs encoded with
dosed-captioning information are applicable. When a program is closed captioned, the CC icon is
displayed in the channel banner. See Chapter 3 for more information about the channel banner.
Closed-Caption Modes
The IV offers eight closed-captioned modes, including four text modes.
TOset the Closed-Caption Mode:
1. Select Screen from the Main menu.
2. Highlight Closed-Caption Modeand press OK
(the Closed-Caption Mode appears).
3. Highlight your choice and press OK (the Screen
menu appears again).
Note:TheTextmodescovernearlyhaff of the pictureoil
thescreento displaythedosed-captioned text.Most
broadcastersusethe CCmode,which displaysa fewlines
of captionsat a time
Turning off Closed-Caption
1. Select Screen from the Main menu.
2. Press OK to select Closed-Caption Display.
3. Highlight Off AIways and press OK. The closed
captioning is turned off and you go back to the
Screen menu.
Channel Menu
Auto Channel Search When in 1V mode, searches
automatically for all the channels available through
the antenna input. When the IV finds an active
channel, it places it in the Normal channel list;
inactive channels (weak stations or channels with no
signal at all) will be removed from the channel list. If
you are using a cable box and have set up the GUIDE
Plus+ system, this option does not appear.
List and Labels Displays a control panel that lets
you edit your Normal channel list and choose a six-
character label for each channel. Follow the on-screen
directions to enter your channels and other
information.
Chapter 5 Graphics contained within this publication are for representation only. 47
Page 50

Chapter 5 Tv Menu
Channel # Usethe up and down arrows to scroll up and down through the channels available via your
antenna. You can enter the channel number directty using the number buttons.
Normal List Only the channels included in the Normal list areavailable when you scan up and
down using channel up and down. Usethe up and down arrow buttons to indicate whether the
channel number indicated isincluded (Yes)or is not included (No) in the Normal channel list.
Channel Label Use the up and down arrow buttons to enter a six-character label for each channel.
Hold the button down to scroll quickly through the characters. The 1V can store up to 27 labels in
memory.
AutoTuning Lets you set up the ]V to tune to the correct input channel when you press a component
button (VCR1, VCR2, or SATeCABLE] on the remote. Go to Chapter 3 for details about the Auto Tuning
feature.
Note:Youmusthave auniversalremote to usethe Auto Tuningleature. Topurchaseauniversalremore,go to page 61.
Video Input Source Lets you select whether or not you have used the S-Video jack to connect a
component. If you are using the S-Video jack in this way, select S-Video Input. If not, select Video Input.
Time Menu
Sleep Timer Displays a control panel that lets you
select the amount of time you want to give the lV/DVD
before it shuts itself off.
Schedule Displays a control panel that lets you set up
a schedule for turning the 1V/DVD on and off
automatically. Reminder: you must turn the schedule
On. The on-screen directions guide you through the
steps needed to set the schedule.
48 Graphics contained within this publication are for representation onl)_ Chapter 5
Page 51

information Disp|ays Chapter 6
Using the Info Display
Your IV/DVD gives you many options when playing different types of discs. You can access these
features through the on-screen Info Display.
To access the Info Display while a disc is playing, press INFO on the remote. The Info Display appears
across the top of the screen. Each of the playback features is represented by an icon. To access a feature,
use the arrow buttons on the remote to highlight the icon. Each feature that can be accessed from the
On-Screen Info Display is described on the following pages. To clear the Info Display from the screen,
press INFO on the remote control.
Audio CD Info Display
Repeat Bookmarks
Play Mode
I I IntroScanl I
MP3 InfoDisplay
Repeat
Play Mode IntroScan
I I =
Video CD Info Display
I_ PLAY
Index Repeat
Audio
I I
Chapter 6 Graphics contained within this publication are for representation only 49
Page 52

Chapter G lnfornlatien Displays
Using the Time Display
TheClock part of the Info Displayshowsthe current disc time. Toseethe current disc time:
1. PressINFOon the remote (the Info Display appears).
2. Highlight the Clockicon. PressOK.Theamount of time the track hasplayed appearsin the time
window.
3. PressINFOto clear the screen.
÷
÷
Selecting a Specific Track
1. Press]NFOonthe remote.
2. Highlight the Track icon.
3. Use the number buttons on the remote to enter the track number you want to
play, or use the up/down arrow buttons to scroll through the track numbers.
You may need to press the OK button on the remote after you enter a single
digit track numben
Selecting a Specific Index (Available only on Video CDs)
1. PressINFOon the remote.
2. Highlight the Index icon from the Info Display.
3. Use the number button(s) on the remote to enter the index number you want
to play, or use the upldown arrows to scroll through the index numbers. When
a new index number is entered, that index will begin playing.
Selecting a Play Mode (Available only on Audio CDs and MP3s)
The Play Mode feature lets you set up the order in which you want the tracks on
the disc to play. There are three options:
Standard: the tracks play in the order listed on the CD (starting with track 1). MP3
files are listed in the order they were recorded.
Random: the tracks on the disc play in random order.
Program: the tracks on the disc play in the order you've programmed.You must
first create a program list in the Play menu of the DVD'smain menu.
Switching between Standard and Random Play
Standard (the order listed on the disc) is the default setting for the DVD mode. To
change the default setting:
I. Press ]NFO on the remote while a disc is playing. The Info Display appears.
2. Highlight the Ploy Mode icon. The eurrent play mode appears in the text box
underneath the icons. Press the up/down arrow buttons to scroll through the
play mode choices until Random appears in the text box. The tracks on the disc
will now play in random order.
Note:TheW/DVDdefaultstoStandardplaybackwheneveryouput enew discintoyourW/DVD.
Using the Program Play Feature
Tousethe ProgramPlayfeature, you must enter the order in which you want the
tracks on the CD or MP3to play by creating a program. Thisis donefrom the
DVD'smain menu.
50 Graphics contained within this publication are for representation only Chapter 6
Page 53

Infor ation Disp|ays Chapter 6
Usethe Edit Program screen to create
your own playlist.
Toedit a CD:
I. If the disc isplaying, pressSTOPto stop playback (the
DVD'smain menu appears).
2. Highlight PlayMode and pressOK(the PlayMode menu
appears).
3. Highlight Edit Program and pressOK(the Edit Program
screen appears).
4. The Trackbox is highlighted. Use the number buttons on
the remote to enter the track you want to play first. The
track number you entered appears in the Track box and
the cursor highlights Add.
5. Press OKto add that track to the Program List.The cursor
jumps to the next spot in the Program List section. Make
sure the Trackbox is highlighted and enter your next
track.
6_
Continue adding tracks as explained in steps 4-5 until
your program is complete. You can play your program by
highlighting Ployand pressing OK, or you can save the
program by highlighting Done and pressing OK. If you
save the program, you can select it from the Info Display.
The program will be erased when you remove the disc
from the disc tray or the TV/DVD is turned off.
To edit a MP3:
1. If the disc is playing, press STOPto stop playback (the
DVD's main menu appears).
2. Highlight Play Mode and press OK (the Play Mode menu
appears).
3. Highlight Edit Program and press OK (the Edit Program
screen appears).
4. The Standard Playlist box is highlighted. Use the up/down
arrow buttons on the remote to enter the track you want
to play first and press OK.
Note:TheMP3might havebeensetupbyfolders.Youmigh tneedto
selecto folder first, pressOK,ond then choosea trock.
5. The cursor highlights Add. Press OK to add to the
Program List.
6. Continue adding tracks as explained in steps 4-5 until
your program is complete. You can play your program by
highlighting Ployand pressing OK, or you can save the
program by highlighting Done and pressing OK. If you
save the program, you can select it from the Info Display.
The program will be erased when you remove the disc
from the disc tray or the WIDVD is turned off.
Chapter 6 Graphicscontained within this publication are for representation only 51
Page 54

Chapter 6 information Disp|ays
Editing a Playlist
1. If the disc is playing, pressSTOPto stop playback. TheDVD'smain menu appears.
2. Highlight Play Mode and pressOK(the PIoy Mode menu appears).
3. Highlight Edit Programand pressOK(the Edit Programscreenappears).
4. Highlight the item in the playlist you want to delete.
5. Highlight Delete, and pressOK.
Using the Repeat Feature
Thedefault modefor the Repeatfeature is Off. Therearethree Repeatoptions for
Audio CDs:
* Disc - repeatsthe disc that is playing
* Track - repeatsthe track that is playing
* A*B - Set the beginning (point A) and the end (point B)to makethis part of
the CD play repeatedly.
TOUseRepeat:
1. While a disc isplaying, pressINFOon the remote to bring up the Info Display.
2. Highlight the Repeot icon.Thetext in the text box below the icons will read RepeatMode: Of_
3. Pressthe up_d_wnarr_w butt_ns t_ s_r___thr_ugh the Repeat_pti_ns unti_ the Repeat_pti_n y_u
want isdisplayed in the text box.
4. PressOK.Theselected repeatoption wilI loop repeatedlyuntil you turn Repeatoff. Repeatisturned
off by completing steps 1 through 3 above,and selecting the Off option.
A,B Repeat (Available only on Audio CDs)
AoB Repeat lets you define a specific segment on the disc that you want to repeat:
1. Find the spot on the disc that is a few seconds before the beginning of the part you want to repeat
(this gives you time to access the Info Display and the Repeat feature).
2. Press INFO on the remote and select the Repeaticon from the Info Display.
3. Press the upJdown arrow buttons until the AoB Repeat option is shown in the text box underneath
the icons. The text box reads Repeat Mode: A-B Press OK to Set A Point.
4. At the beginning of the part you want to repeat, press OK to set the A point.
5. When you get to the part of the disc that you want to be the end of the repeated segment (the B
point), press OK. The segment will repeat until you turn Repeat off.
6. To make the Info Display disappear from the screen, press the INFO button on the remote.
How to Cancel Repeat
There are three ways to cancel Repeat: Press STOP,go to the Repeat icon in the Info Display and select
Off, or eject the disc.
Changing the Audio Channel Output (Available only on Video CDs)
If you are playing a stereo Video CD, you can change the channel output.
I. Press INFO on the remote to bring up the Info Display.
2. Highlight the Audio Chonnelieon on the Info Display.
3. The audio channel choices appear in the text box. Use the upJdown arrow keys to scroll through the
choices: Stereo, Left, Rightor Mona. Whatever choice is displayed becomes the active choice.
52 Graphics contained within this publication are for representation onlg Chapter 6
Page 55

information Disp|ays Chapter 6
Using IntroScan (Available only on Audio CDs and MP3s)
IntroScan plays the first ten seconds of each track on the CD (similar to the scan feature that's on many
car radios]. To use IntroScan:
1. Press INFO on the remote (the Info Display appears).
2. Highlight the IntraScan icon. Press OK. The first ten seconds of each track will play.
• After IntroSean goes through all of the tracks, it stops.
• If you want to stop IntroSean while it's in progress, press PLAY on the remote. The current track
starts playing in its entirety.
• You can also access IntroScan from the Play Made menu in the DVD's main menu.
Using Bookmarks (Available only on Audio CDs)
Tostore, useand dear bookmarks,go to page22. Theinstructions arethe same.
Dub Assist (Available only on Audio CDs)
Dub Assist helps you record a CD onto an audio cassette tape by determining the number of tracks that
will fit on one side of the tape so you have time to turn the tape over to record on the other side. Dub
Assist does not have an icon on the Info Display bar. It is activated through the DVD's Play menu.
To use Dub Assist when you're recording a CD onto an audio cassette:
1. PressSTOP if a CD is playing (the DVD's main menu appears).
2. Highlight Play Mode and press OK (the Play Mode options appear).
3. Highlight Dub Assistand press OK (the Dub Assistsereen appears).
4. The highlight should be in the Play Order window. Choose Standard, Optimized, or Program.
Standard: This is the default mode. The tracks are recorded in
the order on the CD (track 1 is recorded first, track 2 second,
etc.)
Optimized: The tracks are recorded in the order that
optimizes the number of tracks that can fit on one side of
the audio cassette so you have the least amount of dead
space at the end of the tape.
Usethe Dub Assist screen to determine
how manyCD tracks can fit on a cassette.
Program: The tracks are recorded in the order you program.
You must create your program in the Edit Program menu
that's in the DVD's Playmenu.
5. Usethe arrow keysto highlight the Segment Lengthbox.
When the Segment Length box is highlighted, usethe
up/down arrow buttons to enter the length of one side
of the audio cassette.
6. The order the tracks will be recorded in appears in the
Segment Length box. Use the arrow keys to highlight the
Start box and press OK.
7. Follow the instructions on the screen to begin recording.
Chapter 6 Graphics contained within this publication are for representation onl)z 53
Page 56

Chapter ? Other information
Troubleshooting
If you are experiencing product operation problems, please review the troubleshooting section before
you call for service. Refer to the Limited Warranty for information on how to obtain repair service,
DVD Problems
Player won't work
• Resetthe W/DVD by unplugging the AC power cord and plugging it backin.
Disc won't play
• Insert a disc with the labelside facing up.
• Cheekthe type of disc you put into the disc tray. ThisTV/DVDonly playsDVDvideo discs,Video CDs,
audio CDsand MP3s.
• If the disc isa DTSmusic CD,it requiresa DTSdecoder.If you havea DTSreceiverhooked up to your
W/DVD and you are still not getting sound, make sure the sound isset correctly (seeChapter 4).
• Both the _/DVD and the disc are coded by region. If the regional codesdon't match, the disccan't
be played.ThisW/DVD is Region No. 1.
Play starts, but then stops immediately
• Thedisc isdirty. Clean it.
• Condensation hasformed. Allow player to dry out.
No sound or distorted sound
• Make sure your lV/DVD is connected properly. Make sure all cables are securely inserted into the
appropriate jacks.
• YoumayneedtoreadjusttheDigitalOutputsettingsfromtheSoundmenu(seeChapter4).
• Sound is muted during still, frame advance, or slow-motion play.
• If you connected an audio or audio/video receiver to your lV/DVD, make sure you chose the correct
input setting on the receiver.
Can't advance through a movie
• You can't advance through the opening creditsand warning information that appearat the
beginning of moviesbecausethe disc is programmedto prohibit that action.
The _ icon appears on screen
* The feature or action cannot be completed at this time because:
1. The disc's software restricts it.
2. The disc's software doesn't support that feature (e.g., angles).
3. The feature is not available at the moment.
4. You've requested a title or chapter number that is out of range.
The picture is distorted
" Thedisc might be damaged.Tryanother disc.
Picture is distorted during forward and reverse scan
* It is normal for somedistortion to appear whilescanning.
54 Graphics contained within this publication are for representation onl_ Chapter 7
Page 57

Other information Chapter ?
A screen saver appears on the screen
o Your 1V/DVD is equipped with a screen saver that appears on the screen after the DVD mode has
been idle for several minutes. Press STOPor GO RACK on the remote to make the screen saver
disappear from the screen and return to the DVD's main menu.
Subtitle and/or audio language is not the one selected from the initial setting
o If the subtitle and/or audio language does not exist on the disc, the initial settings will not be seen/
heard. The disc's priority language is selected instead. Set the subtitle and/or audio language
manually through the Info Display or the DVD's main menu.
The menu is displayed in a foreign language
o The Menu Language preferenceisset to that language. Fromthe DVD'smain menu, select the
Languagesoption (in Spanish,shown asIdiomas; in French,as Langues).Fromthe Languagesmenu,
selectthe Player Menusoption (In Spanish,shown asMen6s del Lector. in French,as Menus
Lecteur). Highlight the language you prefer and pressOK.
No forward or reverse scan
* Somediscshave sections that prohibit rapidscanning, or title and chapter skip.
. If you're trying to skip through the warning information and credits at the beginning of a movie,
you won't be able to. This part of the movie is often programmed to prohibit skipping through it.
Camera angle cannot be changed
. Somediscsdon't have the multi-camera angle system,and some discsonly have it in certain parts of
the movie.
Picture is too tall and thin
* Changethe aspect ratio using the TV/mage setting in the Display menu (seeChapter 4).
Picture is too short and wide
o Changethe aspect ratio using the TVlmage setting in the Display menu (seeChapter 4),
Cannot copy discs to video tape
o You can't record DVD discs onto videoeassettes because the discs are encoded with anti-copy
protection.
Full Version of Disc Does Not Play
o The DVDmight be locked. Tounlock seeChapter 4.
Disc won't eject
, When you put a disc into the disc tray, it may take up to 15 seconds to read the disc. You won't be
able to eject the disc during this time. Wait 15 seconds and try again.
TV Problems
TV won't turn on
, Press the ]V button.
,, Make sure the _V/DVD is plugged in.
. Cheek the wall receptacle (or extension cord) to make sure it is "live" by plugging in something else.
. Something might be wrong with your remote control. Press the POWER button on the front of the
]V/DVD. If the _V turns on, cheek the remote control solutions on pages 57-58.
Chapter 7 Graphics contained within this publication are for representation only. 55
Page 58

Chapter ? Other information
* Thefront panel buttons may be locked (disabled). Usethe remote control to unlock the front panel
controls by selecting the Front Panel Block inthe Porentol Controls menu and choosing Unblock.
Buttons don't work
* If you're using the remote control, press the IV button first to make sure the remote is in IV mode.
• The front panel buttons may be locked (disabled). Use the remote control to unlock the front panel
controls by selecting the Front Panel Block in the Parental Controls menu and choosing Unblock.
• Unplug the TV/DVD for two minutes and then plug it back in. Press the TV button and try again.
TV turns off while playing
• Scheduled Off function may have been activated. Go to page 26 for instructions.
• Electronic protection circuit may have been activated because of a power surge. Wait 30 seconds
and then turn the lV on again. If this happens frequently, the voltage in your house may be
abnormally high or low.
TV turns on unexpectedly
• Scheduled On or Watch from the GUIDE Plus+ system may have been activated. Go to page 48 or 26
for instructions.
Blank screen
• Make sure the component connected to the 1V/DVD is turned on.
• Try another channel.
No sound, picture okay
• Maybe sound is muted. Press the volume up button to restore sound.
• Maybe speakers are turned off. Cheek the Speakers control panel in the Audio menu. Go to page 46
for detailed instructions.
• If using S-VIDEO cables to connect a component, remember to also connect the component's left
and right Audio Output Jacks to the 1V/DVD's left and right INPUT Jacks.
Can't select certain channel
• Channel may be blocked or not approved in the Parental Controls menu.
• If using aVCR,make sure the W/VCRbutton on the VCRis in the correct mode (pressthe TV/VCR
button on your VCR).
Noisy stereo reception
• Thestation might be weak. Pressthe AUDIObutton on your remote control to display the AUDIO
PROCESSOR,allowing you to change the sound from stereoto mono.
No picture, no sound butTV is on
• The channel might be empty - change channels.
• If you're watching your VCR and it's connected with coaxial cable to the ANTENNA jack, tune the W
to channel 3 or 4 (whichever channel is selected on the 3!4 switch on the back of your VCR). Also
cheek to make sure the W/VCRbutton on the VCR is in the correct mode (press the TVNCR button
on your VCR).
Sound okay, picture poor
• Check antenna connections. Make sure all of the cables are firmly connected to the jacks.
• Try adjusting sharpness function to improve weak signals. Go to page 46 for more instructions.
56 Graphics contained within this publication are for representation onlF Chapter 7
Page 59

Other Inforrnation Chapter ?
Black box appears on the screen
* Closed-captioning might beon. Checkthe CIosed-Coption Disploycontrol panel in the Screenmenu.
Goto page47 for more instructions.
Every time I turn on the TV, the Guide is on the screen
* TheGUIDEPlus+systemautomatically appearson the screenwhen you usethe IV button on the
remote to turn on the W. You can turn off this feature by pressingGUIDEon your remote control
andthen select the Menu bar.Pressthe right arrow button to select Setup.Choose Reviewoptions
andselect OFF.
GUIDE Plus+ System Problems
GUIDE Plus+ setup won't switch to channel 9 for VCR and/or channel 02 cable box
* Checkto seeif the G-UNK wands are positioned correctly in front of components' remote sensors.
• GUIDEPlus+ systemcontrol of cable box isslower than direct control of the box itself. Keepthis in
mind when changing channels.
• You may have an incorrect GUIDEPlus+Channel Lineup.Theguide may get out of sync with the
cable provider. Usethe GUIDEPlus+ Setup in the GUIDEPlus+Menu to change the zip code to
99999.Turn the IV off for 10 minutes. UseSetup again to change the zip code backto the correct
value. If asked,besure to select the correct channel lineup from the on-screen list.
Program information doesn't download
• Review your setup information and make sure it's correct. Press MENUon the remote and select
GUIDEPlus+ Setup. Go to page 11for detailed instructions about the GUIDEPlus+ Setup menus.
• The IV/DVDmust be off to download information. Leave your IV/DVDoff overnight, for at least 10
hours, to receive the initial download for your area.
• If you're using a cable box, leave it on so you can receive program information.
Scheduled Watch or Record doesn't occur
• CheckSchedulefor timer conflicts. Goto page26 for instructions.
• Make sure the wands of the G-LINK cable are placed in front of the remote sensor(s) on the
eomponent(s).
• Make sure your VCRis turned off during the time you've scheduled to recorda program becausethe
systemturns the VCRon when it starts recording (if it's already on when recording starts,the system
will turn it off).
• Make sure there isa tape in the VCRand that the VCR is connected properlg
• Be sure that you set up the VCR in the GUIDE Plus+ Setup menus. If you don't complete the
Configuring for o VCRsteps successfully, the Record option won't be available. Go to page 13 for
detailed instructions.
• If a cable box is attached to your IV/DVD,make sure you set it up correctly in the GUIDEPlus+ Setup
menus. Go to page 12 for detailed instructions.
The Remote Control Doesn't Work
• Something might be between the remote and the remote sensoron the component. Makesure there
isa clear path.
Chapter 7 Graphics contained within this publication are for representation onl)_ 57
Page 60

Chapter ? Other information
The remote might be in the wrong mode.Tobe in DVDmode, pressDVDon the remote before you
pressany other buttons. If you're operating the IV, presstheIV button first.
Maybe batteries in remote are weak, deador installed incorrectly. Put new batteries in the remote.
(Note, if you remove the batteries,you may have to reprogram the remote to operate other
components.)
Problems with V-Chip/Parental Controls
The rating limits don't work
• You must lock the settings. Go to the TVMAIN MENU (pressMENUon your remote),select Parental
Controls (press6on your remote),select LockParental Controls (press6 on your remote).
I don't remember my password and I want to unlock the TV
,, If you forget your password, simultaneously press and hold VOL - on the front panel and VOL - on
the remote for 3 seconds. Nothing appears on the screen, Parental Controls simply unlock and you
can re-enter a password via Lock Parental Controls.
The V-Chip won't let me watch a program even though it's not rated as violent.
• Maybe the movie was given an NB (Not Bated) status. After you block movie ratings, you must set
NR to Viewseparately in order to view movies with an NR rating.
Care and Cleaning
CAUTION: Turn OFF your W/DVD before cleaning.
You can clean the IV/DVD as required, using a soft lint-free cloth. Be sure to occasionally dust the
ventilation slots in the cabinet to help assure adequate ventilation.
The lV/DVD's screen may be cleaned with a soft, lint-free cloth as well. Take care not to scratch or
mar the screen. If necessary, you may use a cloth dampened with warm water. Never use strong
cleaning agents, such as ammonia-based cleaners, or abrasive powder. These types of cleaners will
damage the IV/DVD.
While cleaning do not spray liquid directly on the screen, or allow liquid to run down the screen and
inside the IV/DVD. Also, avoid pIaeing drinks or vases with water on top of the IV/DVD. This could
increase the risk of fire or shock hazard or damage to the IV/DVD.
Caution: Using video games or any external accessory with fixed images for extended periods of time
can cause them to be permanently imprinted on the picture tube (or projection 1V picture tubes). ALSO,
some network/program Iogos, phone numbers, etc. may cause similar damage. This damage is not
covered by your warranty.
Handling Cautions
,, Before connecting other components to this IV/DVD, be sure to turn all components off.
,, Don't move the IV/DVD while a disc is being played. The disc may get scratched or broken, and the
IV/DVD's internal parts may be damaged.
,, Don't put any container filled with liquid or any small metal objects on the IV/DVD.
,, Be careful not to put your hand into the disc tray.
,, Don't place anything other than the disc in the disc tray.
,, Exterior influences such as lightning and static electricity can affect normal operation of this player.
If this occurs, turn the IV/DVD off and on again with the ON*OFF button, or disconnect and then
reconnect the AC power cord to the AC power outlet. The IV/DVD will operate normally.
,, Besure to remove the disc and turn off the IV/DVD after use.
58 Graphics contained within this publication are for representation onlF Chapter 7
Page 61

Other Information Chapter ?
Formation of Condensation
, Due to sharp changes in temperature and humidity, condensation may form if warm air comes in
contact with any cold parts inside the WIDVD.
• When condensation forms inside the _[VIDVD, it may not operate correctly. If this occurs, leave the
IVIDVD at room temperature until the inside of the disc tray becomes dry and operational.
• If condensation forms on a disc, wipe the disc with a soft, dry cloth by moving the cloth from the
center hole toward the outer edge.
Handling Discs
• Don't touch the disc's signal surfaces. Hold by the edges or by one edge and the hole in the center.
• Don't affix labels or adhesive tape to label surfaces. Don't scratch or damage the label.
• Do not use damaged (cracked or warped) discs.
Cleaning Discs
• Dirty discs can cause reduced video and audio performance. Always keep discs clean by wiping them
gently with a soft cloth from the inner edge toward the outer perimeter.
• If a disc becomes very dirty, wet a soft cloth in water, wring it out well. Wipe the dirt away gently,
and remove any water drops with a dry cloth.
• Do not use record-cleaning sprays or anti-static agents on discs. Also, never clean the discs with
benzene, thinner, or other volatile solvents which may cause damage to the disc surface.
Limited Warranty
What your warranty covers:
• Defects in material or workmanship.
For how long after your purchase:
• 90 days from date of purchase for labor charges.
• One year from date of purchase for parts.
• Two years from date of purchase for picture tube.
The warranty period for rental units begins with the first rental or 45 days from date of shipment to the
rental firm whichever comes first.
What we will do:
• Pay any Authorized GE Television Service Center the labor charges to repair your unit.
• Pay any Authorized GE Television Service Center for the new or, at our option, rebuilt replacement
parts and picture tube required to repair your unit.
How you get service:
• For screen sizes of 26" and smaller: Take your GE unit to any Authorized GE Television Service Center
and pick up when repairs are complete.
• For screen sizes larger than 26": Request home or pick up, repair and return service from any
Authorized GE Television Service Center, provided that your unit is located within the geographic
territory covered by an Authorized GETelevision Service Centen If not, you must take your TV/DVD
to the Service Center location at your own expense, or pay for the cost the Service Center may
charge to transport your unit to and from your home.
• To identify your nearest Authorized GEService Center, ask your dealer, look in the Yellow Pages, visit
www.home-electronics.net, or call 1-800-447-1700.
Chapter 7 Graphics contained within this publication are for representation onlF .$9
Page 62

Chapter 7 Other Information
• Proof of purchasein the form of abill of saleor receipted invoice which isevidencethat the
product is within the warranty period must be presentedto obtain warranty service. For rental
firms, proof of first rental isalso required.
What your warranty does not cover:
• Customer instruction. (YourOwner's Manual describeshow to install, adjust, and operate your
product. Any additional information should be obtained from your dealer.)
• Installation and relatedadjustments.
• Signal reception problems not causedby your TV/DVD.
• Damagefrom misuseor neglect.
• Batteries.
• A TV]DVDthat has been modified or incorporated into other products or is used for institutional or
other commercial purposes.
• Damage from images burnt onto the screen.
• Acts of nature, such as but not limited to lightning damage.
• A unit purchased or serviced outside the U.S.A.
Product Registration:
• Please complete and mail the Product Registration Card packed with your unit. It will make it easier
to contact you should it ever be necessary. The return of the card is not required for warranty
coverage.
Limitation of Warranty:
• THEWARRANTYSTATEDABOVEISTHEONLYWARRANTYAPPLICABLETOTHIS PRODUCF.ALL
OTHERWARRANTIES,EXPRESSOR IMPLIED(INCLUDINGALL IMPLIEDWARRANTIESOF
MERCHANTABILITYORFITNESSFORA PARTICULARPURPOSE)ARE HEREBYDISCLAIMED. NO
VERBALORWRITEENINFORMATIONGIVENBYTHOMSON INC.,ITSAGENTSOR EMPLOYEES
SHALLCREATEA GUARANTYORIN ANY WAY INCREASETHESCOPEOFTHIS WARRANTY.
• REPAIRORREPLACEMENTAS PROVIDEDUNDERTHISWARRANTYIS THEEXCLUSIVEREMEDYOF
THECONSUMER.THOMSONINC. SHALLNOTBE LIABLEFORINCIDENTALORCONSEQUENTIAL
DAMAGESRESULTINGFROMTHEUSEOFTHISPRODUCFORARISING OUTOFANY BREACHOF
ANYEXPRESSOR IMPLIEDWARRANTYONTHIS PRODUCF.THIS DISCLAIMEROFWARRANTIES
AND LIMITEDWARRANTYAREGOVERNEDBYTHELAWSOFTHESTATEOF INDIANA. EXCEPTTO
THEEXTENTPROHIBITEDBYAPPLICABLELAW,ANY IMPLIEDWARRANTYOFMERCHANTABILITY
ORFITNESSFORA PARTICULARPURPOSEON THIS PRODUCFIS LIMITEDTOTHEAPPLICABLE
WARRANTYPERIODSETFORTHABOVE.
How state law relates to this warmty:
• Some states do not allow the exclusion nor limitation of incidental or consequential damages, or
limitations on how long an implied warranty lasts, so the above limitations or exclusions may not
apply to you.
• This warranty givesyou specific legal rights, and you also may haveother rights that vary from state
to state.
If you purchased your product outside the United States:
• This warranty does not apply. Contact your dealer for warranty information.
Service calls which do not involve defective materials or workmanship are not covered by this
warranty. Costs of such service calls are the sole responsibility of the purchaser.
60 Graphics contained within this publication are for representation onlF Chapter
Page 63

Other Inforrnation Chapter 7
Screw-on antenna cable (3-ft)
Screw-on antenna cable (6-ft) VH82 $4.95 VH81 (3-ft)
Push-on antenna cable (6-ft) VH89 $5.95 VH82 (6-ft)
Monaural VCR Dubbing Cable (6-ft) VH83 $5.95
Stereo VCR Dubbing Cable (6-ft) VH84 $9.95
S-Video Cable (6-ft) VH976 $7.95
S-Video Cable (12-ft) VH913 $14.95
2-way Signal Splitter VH47 $3.95
Amplified Antenna ANT200 $49.95
Antenna Mixer (not shown) 193984 $11.15
Remote Control (RCG110TA1) 260889 $24.00
Audio,Video Adapter (not shown) 228449 $4.45
VH83 {6-ft)
Optical Cable (3-ft) DV3 $15.95
Optical Cable (6-ft) DV6 $19.95
*Prices subject to change
HOW TO ORDER
BY PHONE: Have your Visa, MasterCard or Discover
Card ready and call 1-800-338-0376. Use this number
only to place an order for accessory items listed on this
order form.
BY MAIL: mail money order or check in UScurrency
(made payable to Thomson Inc.) along with ordering
information (part numbers), phone number and
shipping address, to the following address:
Video Accessories
PO Box 8419
Ronks, PA 17573
RCG110TA1
Remote Control
7his is the remote control
that came packed wilb your
TV. Replacements or spare.s"
can be ordered as needed.
2-way Signal
Splitter
Helpsyou connect a
VH47 seco_d 7Y or VCR.
Screw-on Cable attaches
to the rou_d antenna
c0!_nectors (called 75-obm
F-type) on the back q/'3*mr
VCR or 7'IZ 7"he ends screw
o_to lhe connecto_ fi_r a
SeCZlre conllection.
VH89 (6-ft)
Push-on Cable attaches to
the rozo_d antenna
co!_nectot's (called 75-obm
t'=tppe) on the back O/')_mr
VCR or 7'IZ E_dspush o_
,fi_r a qzHck connection.
Monaural VCR Dubbing
lets you connect the video
and audio jack_ of two
VHS VCRs to duplicaW
tapes. Can also be used to
co!_necl a VCR to )'our T_
(]able is color-ccMed a_d
shielded Has RCAqype
phono pk_gs on each end.
Stereo VCR Dubbing
Cable 7Hplv cable that let,;
you connect the VZDJ_Oand
._1_o,iacA; of stereo
component.;
VH84 (6-ft)
S-Video Cable ha.;
multi-pi_ connectors on
VH976 (6-ft} each end fi;r con!_ecting
VH913 (12-ft) S-Video components to
your TK
_ Ampl_ed Antenna
Allows $,ou 1o q*_ickly
switch from the ante_na
s_qnal to the cable or
satellite signal without
disconnecting the
ANT200 antc_na.
Optical cable
DV3 {3-ft), Helps yoz_ connect to a
DV6(6-ft) component with al_ optical
D{gital Audio In /ack, such
as a Dolby Digital decoder
or FeCeil)eE
Chapter 7 Grophics eontoined within this publicotion ore for representotion onlF 61
Page 64

This equipment hasbeen tested and found to comply with the limits for a ClassBdigital device,
pursuant to Part 15of the FCCRules.Theselimits aredesignedto provide reasonable protection against
harmful interference in a residential installation. Thisequipment generates,uses,andcan radiate radio
frequency energy and, if not installed and used in accordance with the instructions, may cause harmful
interference to radio communications. However,there is no guarantee that interference will not occur in
aparticular installation. If this equipment doescauseharmful interference to radio or television
reception, which can bedetermined byturning the equipment off and on, the useris encouragedto try
to correct the interference by one or more of the following measures:
• Reorient or relocate the receiving antenna.
• Increase the separation between the equipment and receiver.
• Connect the equipment into an outlet on a circuit different from that to which the receiver is
connected.
• Consult the dealer or an experienced radio/IV technician for help.
This Class g digital apparatus complies with Canadian ICES-O03.
Visit the 6E web site at www.home-eleetronies.net
Please do not send any products to the Indianapolis address listed in this manual or on the
carton. This will only add delays in servicefor your product.
Thomson Inc.
10330 North Meridian Street
Indianapolis, IN 46290
@2003 Thomson Inc.
Trademark(s)® Registered
Marca(s) Registrada(s)
Printed in Thailand
TOCOM 16187540
O
THOMSON
THOMSON
 Loading...