

Page 1
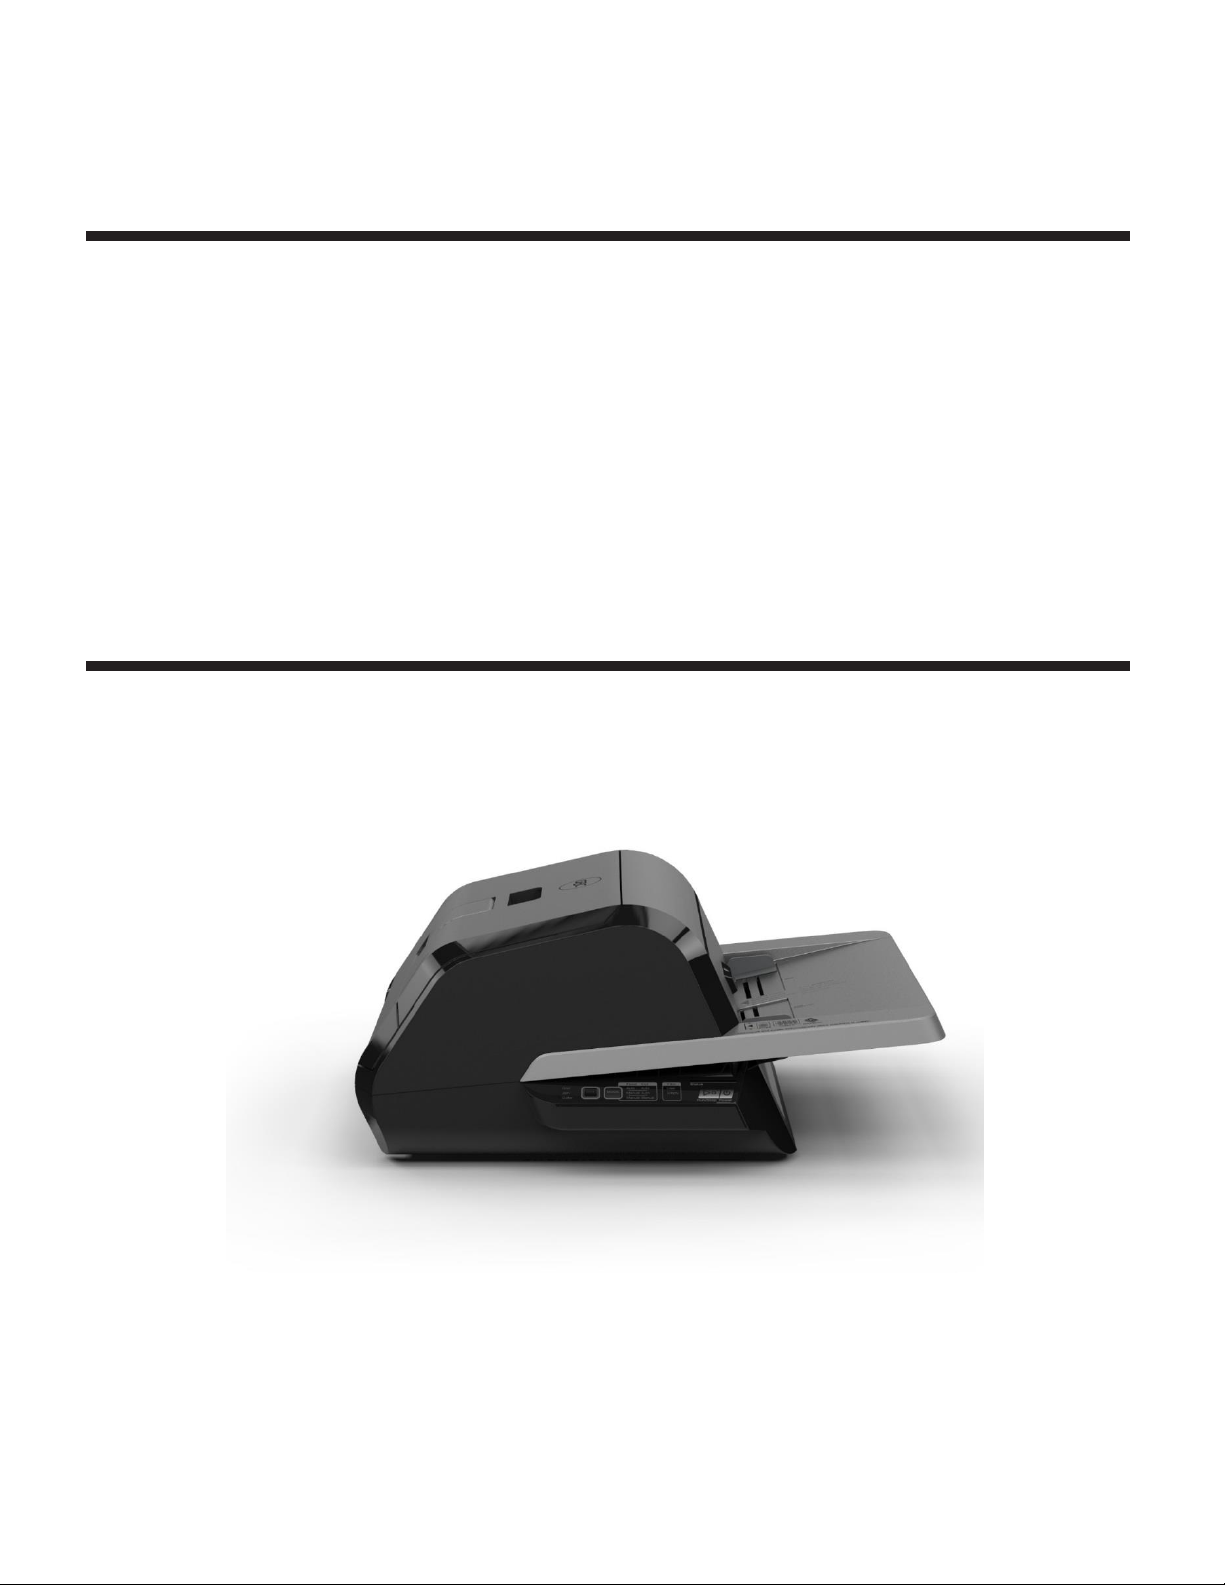
GBC FOTON 30
AUTOMATED LAMINATOR
INSTALLATION & OPERATION MANUAL
Document Number: CBT10000 Rev B
Do not duplicate without written
Brands
permission
from ACCO
Page 2

ACCO Brands reserves the right to make changes to this publication and to the products described in it without notice. All
specifications and information concerning products are subject to change without notice. Reference in this publication to
information or products protected by copyright or patent does not convey any license under the rights of ACCO Brands or
others. ACCO Brands assumes no liability arising from infringements of patents or any other rights of third parties.
This publication is copyrighted © 2018 by ACCO Brands. All rights reserved.
Page 3
1. Safety
YOUR SAFETY, AS WELL AS THE SAFETY OF OTHERS IS
IMPORTANT TO ACCO. IN THIS INSTRUCTION
MANUAL AND ON THE PRODUCT ARE IMPORTANT
SAFETY MESSAGES. BEFORE YOU INSTALL OR USE
THE MACHINE, READ AND FOLLOW ALL THE SAFETY
NOTICES CAREFULLY IN THIS CHAPTER.
Observe all the safety information provided.
Observe all safety warnings. Never remove safety
warnings or other information from the equipment.
Read all of the instructions and save these
instructions for further use.
The safety alert symbol precedes each safety
notice in this manual. The symbol indicates a
potential personal safety hazard to you or others, as
well as cause product damage or property damage.
This safety alert symbol indicates a potential
electrical shock. It warns you not to open the
laminator and expose yourself to hazardous voltage.
DO NOT OPEN. NO USER SERVICABLE PARTS INSIDES.
REFER SERVICING TO QUALITFIED SERVICE PERSONAL.
THE FOLLOWING WARNINGS ARE FOUND ON THE
FOTON 30 AUTOMATED LAMINATOR.
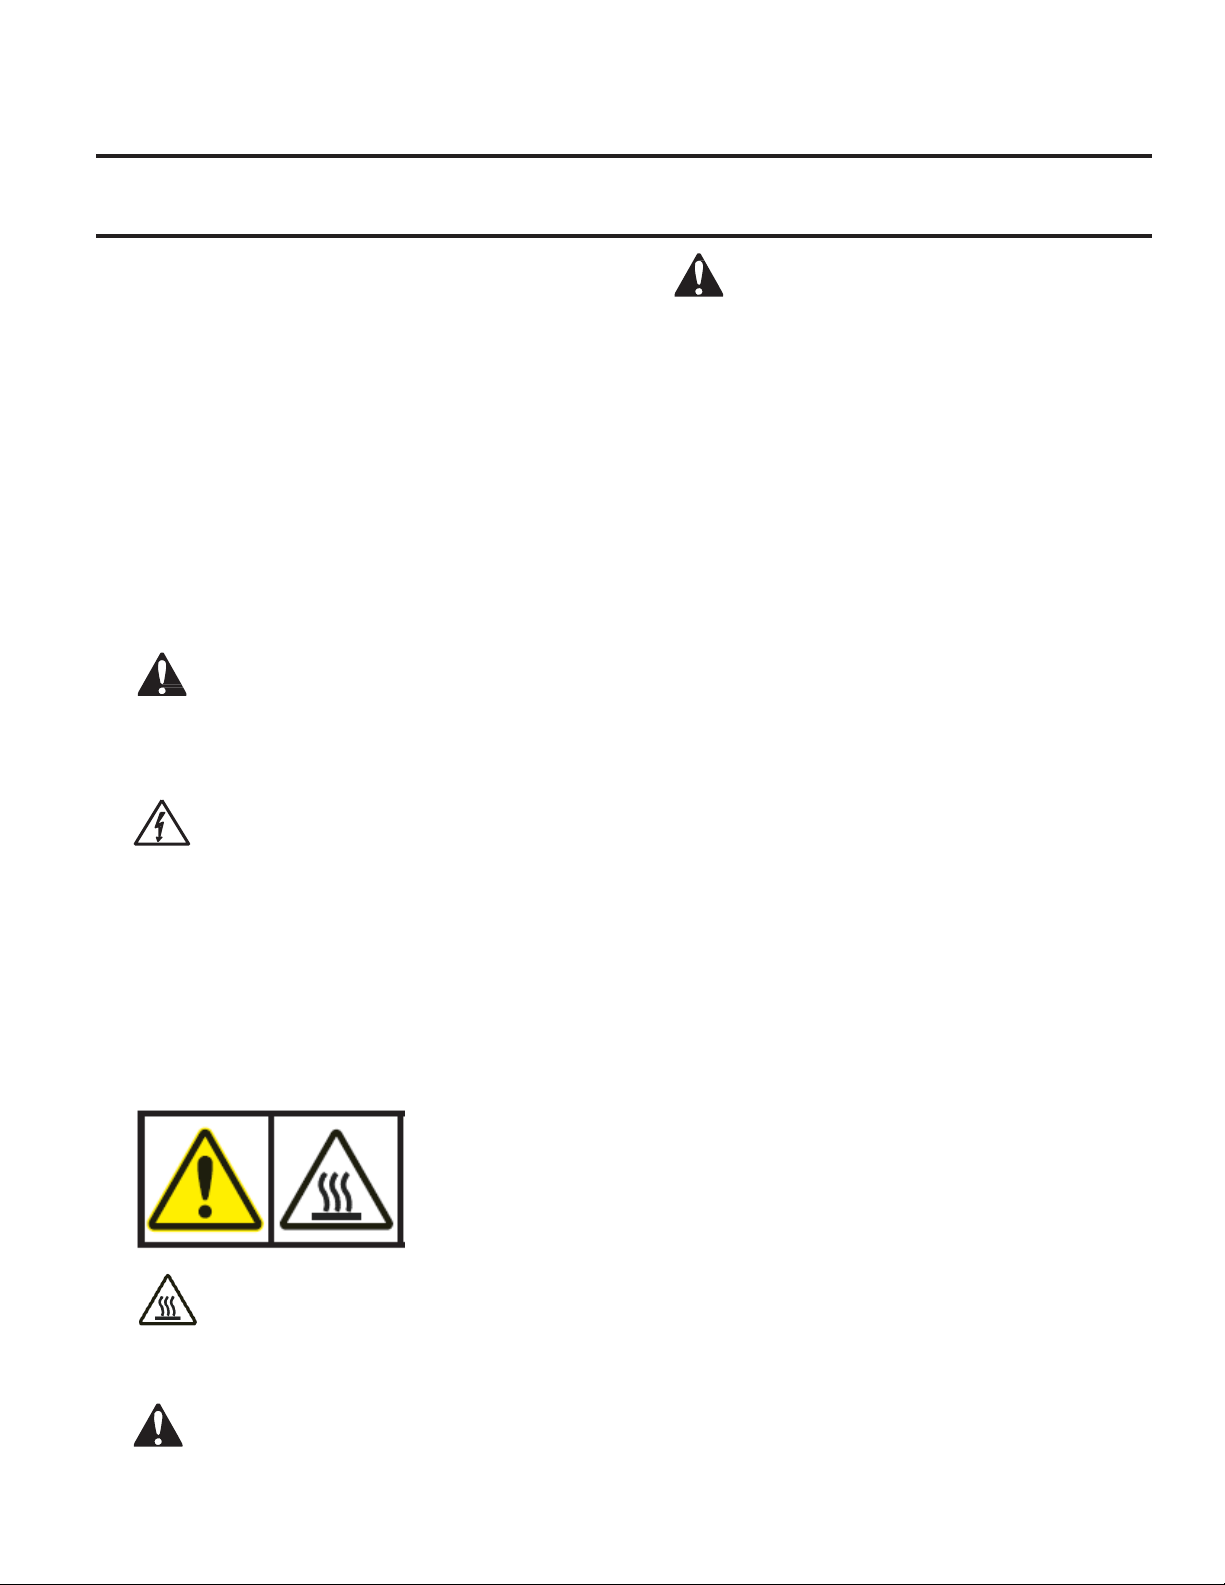
CAUTION Hot Surface: Laminator rollers can
be in excess of 260° F/ 126.7° C. Please use caution
and do not touch the rollers.
WARNING: Do not attempt to service or
repair the laminator.
WARNING: do not connect the
laminator to an electrical supply or attempt to
operate the laminator until you have completely
read these instructions. Maintain these
instructions in a convenient location for future
reference.
General safeguards
• Use this laminator only for its intended
purposes as according to the
specifications outlined in the operating
instructions.
• Keep hands, long hair, loose clothing and
articles such as necklaces or ties away
from the front of the feed rollers to
avoid entanglement and entrapment.
• When opening the top door of the
laminator, avoid contact with the
internal rollers when laminator is
powered on or shortly after the
laminator has been turned off. The
rollers can reach temperatures in excess
of 260º F / 126.7° C.
• Keep hands and fingers away from the
path of the sharp film cutter blade
located at the film exit.
Do not place the laminator on an
unstable cart, stand or table. An
unstable surface may cause the
laminator to fall resulting in serious
bodily injury. Avoid quick stops,
excessive force and uneven floor
surfaces when moving the laminator on
a cart or stand.
• Do not defeat or remove electrical and
mechanical safety equipment such as
interlocks, shields and guards.
• Do not insert objects unsuitable for
lamination.
• Do not expose laminator to liquids.
Page 4

Electrical Safeguards
• The equipment should be connected to an
easily accessible and grounded (3-pin)
receptacle (socket outlet) near the
equipment.
• This laminator must be connected to a supply
voltage corresponding to the electrical rating
as indicated on the serial plate located on the
rear of the machine.
• Unplug the laminator before moving it, or
when it is not in use for an extended period
of time.
• Do not operate the laminator with a damaged
power supply cord or plug.
• Do not overload electrical outlets as this can
result in fire or shock.
• Do not alter the attachment plug. This plug is
configured for the appropriate electrical
supply.
• The unit is intended for indoor use only.
• Disconnect the attachment plug from the
receptacle to which it is connected and keep
the power supply cord in your possession
while moving the laminator.
• Do not operate the laminator with a damaged
power supply cord or attachment plug, upon
occurrence of a malfunction, or after
laminator has been damaged. Contact an
authorized GBC service representative for
assistance.
CAUTION: The receptacle must be located
near the equipment and easily accessible. Do not
use an extension cord.
GBC Technical Service
To order replacement accessories, service, parts,
or an Equipment Maintenance Agreement, please
contact GBC Technical Service and Support at:
United States
ACCO Brands GBC Technical Service and Support
4 Corporate Drive Lake Zurich, IL 60047-8997
www.gbcconnect.com
1-800-723-4000
Canada
Ontario and Quebec – 1-800-268-3310
All other Provinces – 1-800-268-3447
Local 905-595-3100
Callcentre@GBCCanada.com
Mexico
(55) 1500 5778
Lada SIN costo: 01 800 759 6825
serviciotecnico@acco.com.mx
Page 5

2. Warranty
Limited 2 year/5000 Laminates Warranty; USA,
Mexico, and Canada
ACCO Brands USA LLC, ACCO Brands, 4 Corporate
Drive, Lake Zurich, IL 60047 (in Mexico, ACCO Brands
Mexicana, Neptuno 43, Fraccionamiento Nueva
Industrial Vallejo México 07700 D.F. México), (in
Canada, ACCO Brands Canada Inc., 7381 Bramalea
Road, Mississauga ON L5S1C4) (each, respectively,
“ACCO Brands”) warrants to the original purchaser
that this ACCO Brands product is free from defects in
workmanship and material under normal use and
service for a period of: two (2) years or 5000
laminates whichever comes first for parts.
ACCO Brands’ obligation under this warranty is limited
to replacement or repair, at ACCO Brands’ option, of
any warranted part found defective by ACCO Brands
without charge for material or labor. Any replacement,
at ACCO Brands’ option, may be the same product or a
substantially similar product that may contain
remanufactured or refurbished parts. This warranty
shall be void in the following circumstances:
(i) if the product has been improperly installed or
misused,
(ii) if the product has been damaged by negligence or
accident, or
(iii) if the product has been altered by anyone other
than ACCO Brands or ACCO Brands’ authorized agents.
Without limiting the generality of the previous
paragraph, ACCO Brands’ obligation under this limited
warranty does not include:
(iiii) damage caused to the rollers by knives, razors, or
other sharp tools; by any foreign objects falling into
the working area of the laminator; or by cleaning the
laminator with solutions or materials that harm its
surfaces;
For warranty execution, please contact ACCO Brands
at: 800-723-4000 or www.gbcconnect.com in the USA
800-263-1063 or www.gbccanada.com in Canada (55)
1500 5578 or www.accomexico.mx in Mexico
TO THE EXTENT ALLOWED BY APPLICABLE LAW,
THIS WARRANTY IS IN LIEU OF ALL OTHER
EXPRESSED WARRANTIES. REPRESENTATIONS OR
PROMISES INCONSISTENT WITH OR IN ADDITION
TO THIS WARRANTY ARE UNAUTHORIZED AND
SHALL NOT BE BINDING ON ACCO BRANDS. TO
THE EXTENT PERMITTED BY APPLICABLE LAWS,
ANY IMPLIED WARRANTIES (IF APPLICABLE) ARE
LIMITED IN DURATION TO THE DURATION OF
THIS WARRANTY. SOME STATES AND
JURISDICTIONS DO NOT ALLOW LIMITATIONS ON
HOW LONG AN IMPLIED WARRANTY LASTS, SO
THE ABOVE LIMITATION MAY NOT APPLY TO
YOU. TO THE EXTENT PERMITTED BY APPLICABLE
LAW, IN NO EVENT SHALL ACCO BRANDS BE
LIABLE FOR ANY SPECIAL, INCIDENTAL, PUNITIVE,
EXEMPLARY, CONSEQUENTIAL OR SIMILAR
DAMAGES, WHETHER OR NOT FORESEEABLE.
SOME STATES AND JURISDICTIONS DO NOT
ALLOW THE EXCLUSION OR LIMITATION OF
SPECIAL, INCIDENTAL, PUNITIVE, EXEMPLARY,
CONSEQUENTIAL, OR SIMILAR DAMAGES, SO THE
ABOVE EXCLUSION OR LIMITATION MAY NOT
APPLY TO YOU.
FOR CONSUMERS WHO HAVE THE BENEFIT OF
CONSUMER PROTECTION LAWS OR
REGULATIONS IN THEIR JURISDICTION OF
PURCHASE OR, IF DIFFERENT, IN THEIR
JURISDICTION OF RESIDENCE, THE BENEFITS
CONFERRED BY THIS WARRANTY ARE IN
ADDITION TO ALL RIGHTS AND REMEDIES
CONVEYED BY SUCH CONSUMER PROTECTION
LAWS AND REGULATIONS.
To the extent permitted by law, this warranty is
not transferable and will automatically terminate
if the original product purchaser sells or
otherwise disposes of the product.
This warranty gives you specific legal rights. Other
rights, which vary from jurisdiction to jurisdiction,
may exist. In addition some jurisdictions do not
allow (i) the exclusion of certain warranties, (ii)
limitations on how long an implied warranty lasts
and/or (iii) the exclusion or limitation of certain
types of costs and/ or damages, so the above
limitations may not apply.
Page 6
Model
FOTON 30 Automated Laminator
Operating Speed
3mil (75mic) 29.1"/min (700mm)
4mil (100mic) 25.6"/min (670mm)
5mil (125mic) 23.6"/min (650mm)
Operation Modes
Auto Feed / Auto Cut
Manual Feed / Auto Cut
Manual Feed / Manual Cut
Warm-up Time
3.5 min.
75mic/3mil
3.5 min. 100mic/4mil
4 min.
125mic/5mil
30 Sheets 75gsm paper
Maximum Film Width
12.01” (306mm) – Rest of World
11.5” (292mm) – North America
Maximum Document Thickness
250gsm Manually Fed
Document Lengths Supported
Document Widths Supported
Minimum 6” (152mm)
Maximum 17” (432mm)
Minimum 5” (127 mm)
Maximum 11.69” (297mm)
Auto Feeder Media Weight
Manual Feed Media Weight
High Reliability: 64 – 120 gsm
Variable Reliability: 121 – 220 gsm
64 – 250 gsm
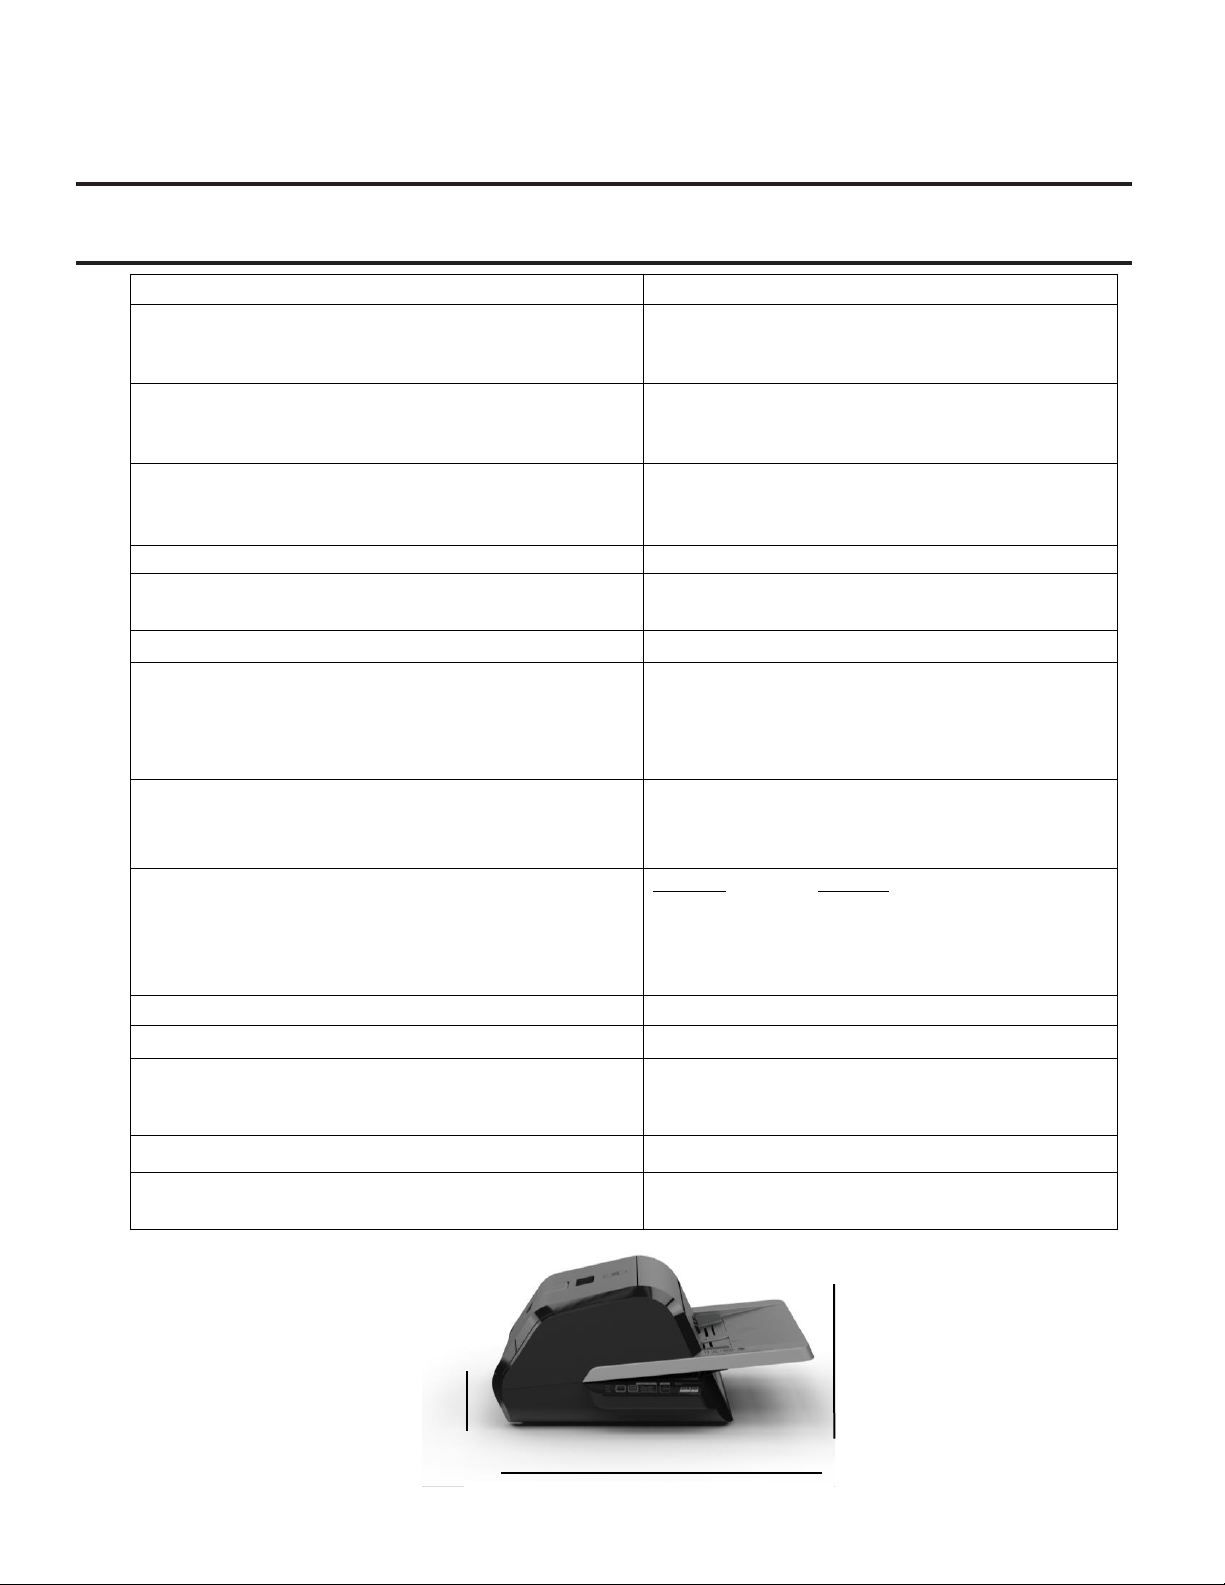
Dimensions:
Width
Height
Depth
Weight
Machine: Shipping:
22.7” (57.7 cm) 27” (68.6 cm)
9.6” (24.5 cm) 15” (38.1 cm)
18.8” (47.8 cm) 22.7” (57.8 cm)
21lbs (9.5kgs) 32.8lbs (14.9kg)
Auto Shut Off
15 minutes of inactivity
Duty Cycle
80 documents per week
Electrical Requirements
Voltage
Receptacle
120V, 60Hz
NEMA 5-15P
Fuse
Yes (internal & non-replaceable)
Operating Environment
41 – 95 (F) / 5 – 35 (C)
Maximum Altitude of 2,000m
Height
Width
Depth
Figure 1. Foton 30 Dimensions
3. Specifications
Page 7

FCC Class B Notice
This device complies with Part 15 of the FCC Rules.
Operation is subject to the following two conditions:
This device may not cause harmful
interference.
This device must accept any interference
received, including interference that may
cause undesired operation.
NOTE: This equipment has been tested and found
to comply with the limits for a Class B digital device,
pursuant to Part 15 of the FCC Rules. These limits
are designed to provide reasonable protection
against harmful interference in a residential
installation. This equipment generates, uses, and
can radiate radio frequency energy and, if not
installed and used in accordance with the
instructions, may cause harmful interference to
radio communications. However, there is no
guarantee that interference will not occur in a
particular installation. If this equipment does cause
harmful interference to radio or television reception,
which can be determined by turning the equipment
off and on, the user is encouraged to try to correct
the interference by one or more of the following
measures:
- Reorient or relocate the receiving antenna.
- Increase the separation between the
equipment and receiver.
- Connect the equipment into an outlet on a
circuit different from that to which the
receiver is connected.
- Consult the dealer or an experienced
radio/TV technician for help.
Canada Class B Notice - Avis
Canada, Class B
This Class B digital apparatus complies with
Canadian ICES-003.
Modifications
Any modifications made to this device that are
not approved by ACCO Brands may void the
authority granted to the user by the FCC and/or
by Industry Canada to operate this equipment.
Page 8
4. Installation
Service
WARNING:
the laminator.
result in
Disconnect the plug from the receptacle and contact
Customer Service when one or more of the following
has occurred.
severe
•
The
power supply cord or attachment plug is
damaged.
• Liquid has been spilled into the laminator.
• The laminator is m
mishandled.
• The laminator does not operate as described in
these instructio
Installation
• Shipping damage should be brought to the
immediate attention of the delivering carrier.
• Place the laminator on a stable flat surface
capable of supporting 50 lbs.
• The surface should be at least 30” high to
assure comfortable positioning during
operation. All four rubber feet should be on the
supporting surface.
• Connect power cord to an appropriate power
source. Avoid connecting other equipment to
the same branch circuit to which the laminator
is connected as this may cause nuisance
tripping of the circuit breaker or blown fuses.
• The laminator should be positioned to allow
exiting film to drop freely to a flat surface.
Accumulation of laminated documents as they
exit the laminator may cause a jam.
• Avoid placing laminator near sources of heat or
cold. Avoid locating the laminator in the direct
path of forced, heated or cooled air.
Caring for Foton 30
The only maintenance required by the operator is to
periodically clean the rollers. Keeping the rollers clean
ensures that your finished items will not be damaged by
dirt and adhesive build-ups.
Do not attempt to service or repair
Failure
to observe this warning could
personal injury or death.
alfunctioning after being
ns.
CAUTION: the following procedure is performed
while the laminator is hot. Use extreme caution.
WARNING: Do not apply cleaning fluids or
solvents to the rollers.
WARNING: Do not attempt to laminate
adhesives marked ‘Flammable’.
WARNING: Do not expose laminator to liquids.
1. Power the machine on, wait for it to completely
warm up.
2. Open the laminator door using the silver latch.
3. Clean the top rollers with a clean, damp lint-free
cloth. If there are any adhesive build-ups, you
may use isopropyl alcohol instead of water.
4. Lift leading film edge up to the handle of the
cartridge.
5. Clean the bottom rollers with a clean, damp lint-
free cloth. If there are any adhesive build-ups,
you may use isopropyl alcohol instead of water.
6. Place the leading film edge into proper position
and close the door.
7. Press and hold the RUN/STOP button for 5-7
seconds to manually advance the rollers.
8. Open the laminator door using the silver latch.
9. Repeat steps 4 – 6.
Note: Do not use metal scouring pads to clean the heat
rollers!
WARNING: Do not laminate glitter and/or
metallic items. Damage to the rollers may result.
The side covers and feed table can be cleaned with a
lint-free cloth and a mild detergent.
Page 9
Page 10
Page 11

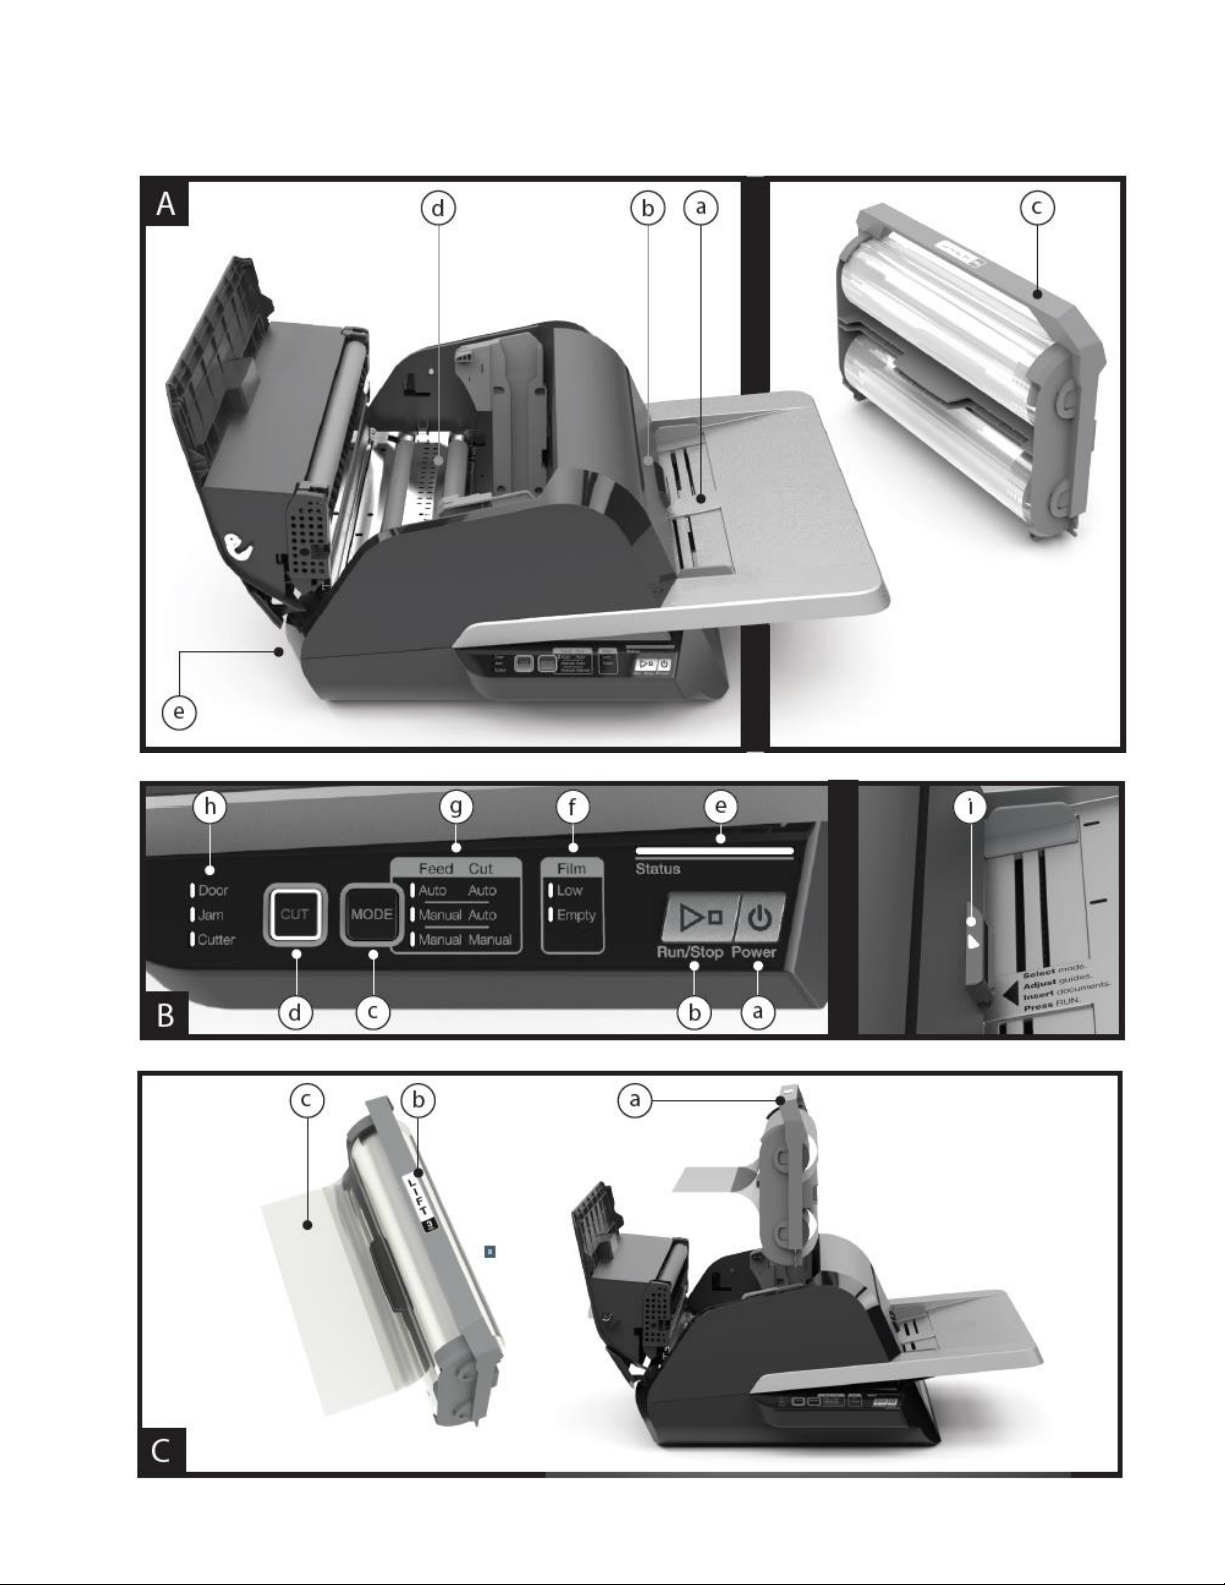
5. Feature Guide
A. GETTING TO KNOW YOUR LAMINATOR:
(Shown in image A above)
a. FEED TRAY & SIDE GUIDES:
i. Place document(s) to be
laminated and use the slide guides
to minimize skew. Flip out
extension for larger documents.
b. FEEDER/FEEDER DOOR:
i. Feeds document into laminator. A
red light on the door will indicate
that a mis-feed has occurred.
Open the door to clear any misfeeds.
c. LAMINATOR DOOR:
i. Door that gives access to the inner
parts of the laminator: rollers, film
cartridge, etc.
ii. To Open: pull on the silver latch,
and lift up
iii. To Close: gently lower using the
silver latch, and push latch closed.
DO NOT push down on the
laminator door to close.
d. FILM CARTRIDGE:
i. Replace the film cartridge when
empty or when a different
thickness is required. See
CARTRIDGE FILM LOADING for
details.
e. LAMINATORS ROLLERS:
i. Rollers heat-up to activate the
adhesive on the film and apply the
pressure to ensure the film sticks
to the document.
f. AUTO TRIMMER:
i. When in Auto Cut modes, the
trimmer finds the leading and
trailing edge of the document and
cuts the film. In Manual Cut
mode, it will cut the film when the
CUT button is pressed.
B. CONTROL PANEL: (Shown in image B above)
BUTTONS
a. POWER – turns the machine on/off. After
15 minutes of no use, the machine will
automatically turn off.
b. RUN/STOP – used to start and stop the
laminator.
i. Dual Function – Manual Advance:
Continuously hold the button to
manually advance the laminator
rollers. This can be used to clear
jams and debris for cleaning.
c. MODE – allows users to toggle through
three modes of operation.
i. Auto Feed / Auto Cut – best for
standard paper sizes printed on
20-32lb bond paper.
ii. Manual Feed / Auto Cut – best for
standard paper sizes on heavy
paper stocks that won’t Auto
Feed.
iii. Manual Feed / Manual Cut – best
for odd shaped and nonrectangular documents.
d. CUT – pressing this button will cycle the
trimmer to cut the film one time. This
button is primarily used in Manual Cut
mode.
INDICATORS
e. STATUS – communicates the status of the
machine:
i. Solid Green = ready to use
ii. Green Blinking Sequence =
running
iii. Solid Amber = warming up
iv. Amber Blinking Sequence =
warming up and RUN command
accepted. Will begin laminating
once ready.
v. Solid Red = error status
f. FILM – LED light will indicate when film is
low (approx. 30% remaining) or is empty.
i. Low = Amber LED light
ii. Empty = Red LED light
g. MODE – green LED light identifies what
mode of operation the machine is in.
h. ERROR MESSAGE – communicates error
messages that need to be resolved.
i. DOOR: one or both doors are
open
ii. JAM: the machine may encounter
two types of jams:
1. Laminator jam: push and
hold the RUN button to
manually advance the
rollers to clear itself.
2. Feeder jam: open the
feeder door and remove
the paper.
iii. CUTTER: trimmer cannot
complete full cut cycle
Page 12

i. MANUAL FEED INDICATOR – Located on
the Feeder Door, Illuminates GREEN when
the laminator is ready for a document to
be manually fed.
C. FILM CARTRIDGE: (Shown in image C above)
a. CARTRIDGE – inserts into the laminator.
b. CARTRIDGE LABEL – indicates film
thickness. Located on top of handle.
a. FILM LEADER – the first 3-4” (75-100mm)
of sealed laminating film provided on the
film cartridge. The film leader must be
placed facing the exit of the machine.
Page 13

6. Operation
OPERATION MODES:
AUTO FEED / AUTO CUT
Note: Best for standard paper sizes printed
on 20-32lb bond (75-120 gsm) paper.
1. Press the POWER button to turn the machine ON.
The machine will automatically start in Auto Feed
/ Auto Cut mode.
2. Place your document(s) in the FEED TRAY.
3. Slide the Side Guides to fit your document(s) to
minimize skew during lamination.
4. Press the RUN button:
Note: If RUN is pressed before the machine
has completely warmed up, the status bar
will be AMBER blinking in a sequence. The
laminator has accepted the command and
will start automatically when machine
reaches proper temperature.
5. Document(s) will be automatically laminated and
automatically trimmed as they exit the machine.
Note: If you hit stop while the document is
still feeding through the laminator, the
machine will finish laminating the document
before stopping.
MANUAL FEED / AUTO CUT
Note: Best for standard rectangular paper
sizes on heavy paper stocks that won’t Auto
Feed.
1. Press the POWER button to turn the machine ON.
2. Select the Manual Feed / Auto Cut mode by
pressing the Mode button.
3. Wait for the machine to reach proper
temperature: solid green STATUS light.
4. Place only the first document in the FEED TRAY.
The document must be placed in the center of the
Feed Tray and far enough into the feeder to grab
your document.
5. Press the RUN button. The document will begin to
feed into the laminator.
6. After your first document begins laminating, wait
for the MANUAL FEED indicator to illuminate
green. Once illuminated, the machine can be
manually fed the next document. Repeat this
process one sheet at a time until the job is
complete.
7. Documents will be manually laminated and
automatically trimmed as they exit the machine.
8. After the final document has been cut and exits
the machine will automatically stop.
MANUAL FEED / MANUAL CUT
Note: This mode is best used for odd-shaped
or non-rectangular documents that won’t
Auto Feed.
1. Press the POWER button to turn the machine
ON.
2. Select the Manual Feed / Manual Cut mode by
pressing the Mode button.
3. Wait for the machine to reach proper
temperature: solid green STATUS light.
4. Place only the first document in the FEED TRAY.
The document must be placed in the center of
the Feed Tray and far enough into the feeder to
grab your document.
5. Press the RUN button. The document will begin
to feed into the laminator.
6. After your first document begins laminating,
wait for the MANUAL FEED indicator to
illuminate green. Once illuminated, the
machine can be manually fed the next
document. Repeat this process one sheet at a
time until the job is complete.
7. Press the CUT button to cycle the trimmer
anytime you want to cut the film.
Note: It is recommended to press the CUT
button after you see the entire document
exit the machine to avoid cutting the
document.
8. After the final document has exited the
machine, press the STOP button to stop the
lamination process.
9. Once lamination has stopped, press CUT to cut
the remaining film that has exited the machine.
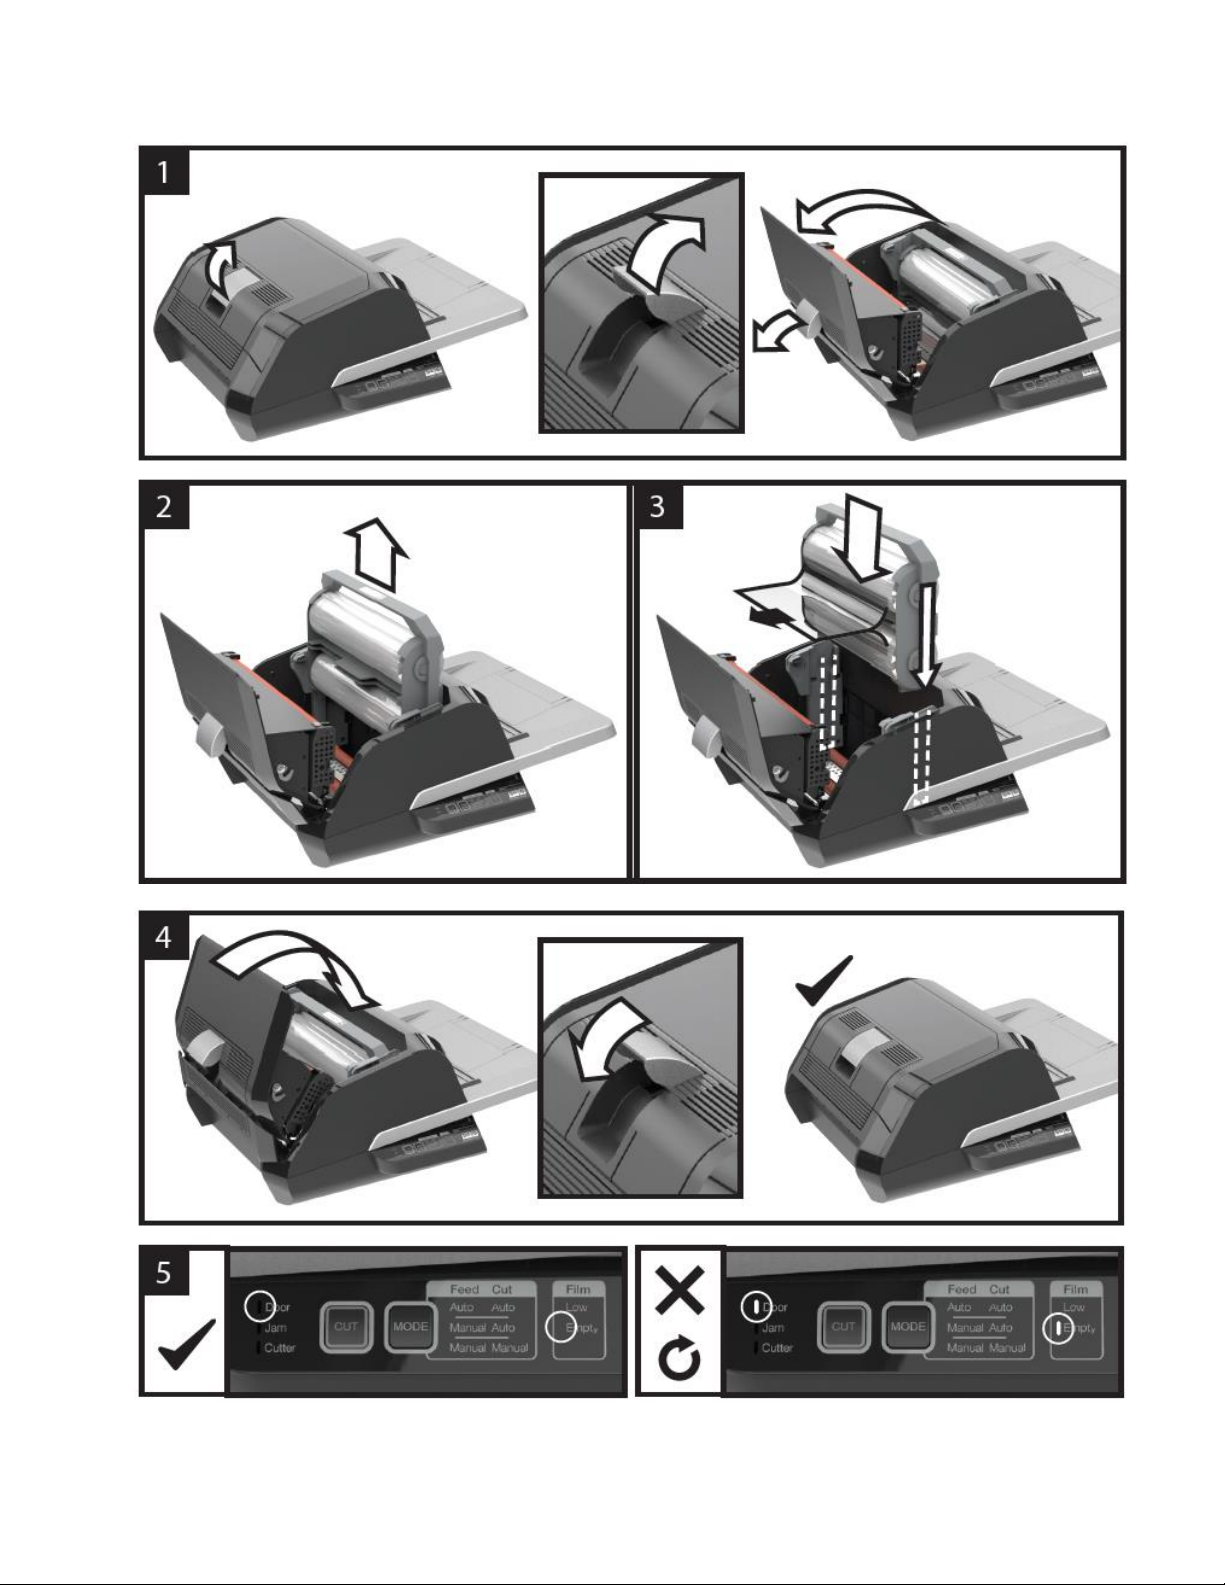
CARTRIDGE FILM LOADING
(Reference Images 1-4 to demonstrate process)
CAUTION: the following procedure might be
performed while the laminator is hot. Use extreme
caution.
Note: The film cartridges have an End of Roll sticker
which the laminator will automatically detect. Once
detected, the laminator will stop feeding any
remaining documents in the feed tray. The
laminator continue to laminate in the laminator.
The sticker may appear on the last document but
can be removed from the laminate.
1. Open Laminator Door: Open the laminator
door by fully raising the silver latch on the
top of the machine and pull up until door
fully opens.
Page 14

2. Remove Cartridge: Lift upward on the
cartridge handle to remove the installed
cartridge.
Caution: full cartridges tend to be
heavy
3. Insert Cartridge: Insert replacement
cartridge by aligning edges of cartridge over
grey channel guide in laminator and lowering.
Note: Film leader should be inserted
away from the feeder, facing
towards the exit of the machine.
4. Close Laminator Door: Close the laminator
door by gently lowering the door and fully
close the silver hatch on top. DO NOT push
down on the laminator door to close; use
the latch.
5. Ensure Cartridge is Fully Inserted: Film
6. Empty indicator will be illuminated when
no cartridge is installed or if the cartridge is
not fully seated on the bottom.
7. Automatically Thread: When the laminator
reaches proper temperature, the machine
will finish threading film and feed
approximately 9” (22.9 cm) of film to
eliminate potential wrinkles in the film.
Page 15

TROUBLE SHOOTING
SYMPTON
POSSIBLE CAUSE
CORRECTIVE ACTION
Pressing the Power
button does not
turn the machine
ON
The power cord may not
be inserted all the way
into outlet
Fully Insert plug into outlet
Make sure the outlet has power
Status Indicator
Red:
Door Error Indicator Red:
Paper Jam Error Indicator
Red:
Film Empty Indicator Red:
Cutter Error Indicator Red
Remove any paper from the feeder tray. Open and Close both the
laminator door and the feeder door. Ensure they are fully closed
Open the feeder door, and remove any paper from the feeder tray.
Close the feeder door.
If the above does not clear the error, press and hold the RUN button for
10 seconds to manually feed film. Film should begin to exit the machine
and Jam should clear.
If Jam error remains, open laminator door and look to see if film leader
is caught on an obstacle or the rollers. DO NOT CUT the film. Lift-up the
film leader and replace it in proper position. Shut Laminator door and
hold the run button for 10 Seconds.
Cartridge End of Roll label has been detected. Replace the film cartridge
with new cartridge and shut the laminator door.
The cutter could not initiate a cut, or did not finish a cut.
Press the manual cut button one time to try and activate the cutter. Not
resolved, try the following:
Observe the film at the exit of the laminator to see if the film is not cut
or partially cut.
Film is not cut:
Press and hold the RUN button for about 10-20 seconds to
manually advance the film. If there is laminated media in the
exit of the laminator, hold the RUN button until the media has
fully exited the laminator. Now press the manual cut button to
see if the cutter is activated.
Film is Partially Cut:
Open the laminator door and look to see if you can see the
trimmer blade. It will be near the back of the laminator
partway through the film. Using scissors cut the film hanging
out the exit of the laminator. Then using caution not to put
your fingers near the trimmer knife, carefully remove the
cartridge. Close the laminator door and try to manually cycle
the cutter. If the cutter works Re-insert your cartridge. Might
need to trim off the leading edge of film where the cutter
jammed. If you need to trim the film leave 4 inches (100mm)
of sealed film as the cartridge leader. Re-insert the cartridge.
The machine once warmed-up will automatically thread the
film and activate the trimmer.
If the cutter does not work after the above steps contact your service
provider.
Page 16

Film Wrinkles on
output
Film Misaligned
Press and hold the RUN button to manually advance the film. After 5 –
20 inches (125 – 500mm) of film has been advanced the wrinkle should
work themselves out. If wrinkle clear press the manual cut button and
you are ready to begin.
If wrinkles still present, open the laminator door. Grasp the film exiting
the laminator and hold it Taut while closing the laminator door. Repeat
above step and wrinkles should disappear.
Film Edges are not
evenly aligned.
Top and bottom rolls of
film are not matched
properly.
Press and hold the RUN button to manually advance the film. After 5
inches (125 mm). Grasp the film exiting the laminator and hold it Taut
while closing the laminator door.
Documents are
skewed in the film
when exiting
Documents fed in skewed
Before loading paper, try tapping the leading edge of the paper on a flat
surface and then repeat with the bottom or top edge to get your paper
properly squared.
Insert your media in the auto feeder and slide the edge guide up to edge
of your media.
Experiencing
frequent double
feeds
Paper has heavy static
Try fanning the media or placing in a paper jogger prior to feeding it. If
issues persist use the Manual Feed / Auto Cut mode.
Experiencing
frequent mis-feeds
Rollers are slipping on
media and do not feed
sheets
Try fanning the media or placing in a paper jogger prior to feeding it. If
issues persist use the Manual Feed / Auto Cut mode.
If mis-feeds continue use the Manual Feed / Auto Cut operation mode
and manual feed the media one sheet at a time
Page 17

Contre-colleuse sans pochette
GBC FOTON 30
MANUEL D’INSTALLATION ET D’UTILISATION
Numéro de document : CBT10000 Rév. B
Ne pas reproduire sans la permission écrite d'ACCO Brands.
Page 18

ACCO Brands se réserve le droit de modifier cette publication et les produits décrits dans les présentes sans préavis.
Toutes les spécifications et tous les renseignements concernant les produits peuvent être modifiés sans préavis. Dans cette
publication, toute référence à des renseignements ou des produits protégés par des droits d'auteur ou des brevets ne
confère aucune licence au titre des droits d'ACCO Brands ou des autres. ACCO Brands n’assume aucune responsabilité
découlant de toute violation aux brevets ou de tout autre droit de tiers.
Cette publication est protégée par des droits d’auteur © 2018 par ACCO Brands. Tous droits réservés.
Page 19

1. Sécurité
ACCO PREND TRÈS AU SÉRIEUX VOTRE SÉCURITÉ ET
CELLE DES AUTRES. D’IMPORTANTS MESSAGES DE
SÉCURITÉ SE TROUVENT DANS CE MANUEL
D’UTILISATION ET SUR LE PRODUIT. AVANT D’INSTALLER
OU D’UTILISER LA MACHINE, VEUILLEZ LIRE ET SUIVRE
ATTENTIVEMENT TOUTES LES CONSIGNES DE SÉCURITÉ
FIGURANT DANS CE CHAPITRE.
Respectez toutes les consignes de sécurité fournies.
Respectez tous les avertissements de sécurité. Ne
retirez pas les avertissements de sécurité ou les
autres renseignements de l’équipement.
Lisez toutes les directives et conservez-les
pour référence ultérieure.
Dans ce manuel le symbole d’alerte de
sécurité précède chaque consigne de sécurité.
Le symbole indique un risque éventuel pour votre
sécurité personnelle ou celle des autres, et la
possibilité de causer des dommages matériels.
Ce symbole d’alerte de sécurité indique le
risque d’un choc électrique. Il vous recommande de
ne pas ouvrir la contre-colleuse et de ne pas vous
exposer à des tensions dangereuses.
LES AVERTISSEMENTS SUIVANTS SE TROUVENT SUR LA
CONTRE-COLLEUSE SKYWARP.
NE L’OUVREZ PAS. IL NE CONTIENT AUCUNE PIÈCE QUI
PEUT ÊTRE RÉPARÉE PAR L’UTILISATEUR. TOUTE
RÉPARATION DOIT ÊTRE EFFECTUÉE PAR LE
PERSONNEL DE SERVICE QUALIFIÉ.
MISE EN GARDE surface chaude : La
température des rouleaux de la contre-colleuse peut
dépasser 126,7°C (260 °F). Soyez prudent et ne
touchez aux rouleaux.
AVERTISSEMENT : Ne tentez pas de
réparer la contre-colleuse.
AVERTISSEMENT : Ne reliez pas la
contre-colleuse à une alimentation électrique et
ne tentez pas d’utiliser la contre-colleuse avant
d’avoir complètement lu ces directives.
Conservez ces directives dans un endroit
pratique pour référence ultérieure.
Protections générales
• N'utilisez cette contre-colleuse que pour
son usage prévu et conformément aux
spécifications décrites dans les directives
d'utilisation.
• Gardez les mains, les cheveux longs, les
vêtements amples et les articles comme
les colliers ou les cravates loin des
rouleaux d’alimentation pour éviter tout
enchevêtrement et blocage.
• Lorsque vous ouvrez la porte de la
contre-colleuse, évitez tout contact avec
les rouleaux internes lorsque la contrecolleuse est sous tension ou peu après
qu'elle ait été mise hors tension. La
température des rouleaux peut
atteindre 126,7°C (260 °F).
• Gardez les mains et les doigts loin de la
lame tranchante du massicot de pellicule
située à la sortie de la pellicule.
Ne placez pas la contre-colleuse sur un
chariot, un support ou une table
instables. Une surface instable peut
provoquer la chute de la contre-colleuse
et causer des blessures graves. Évitez les
arrêts rapides, une force excessive et
des planchers à surface irrégulière
lorsque vous devez déplacer la contrecolleuse sur un chariot ou un support.
• Ne déjouez pas et ne retirez pas
l’équipement de sécurité électrique et
mécanique, comme les dispositifs de
verrouillage, les écrans et les éléments
de protection.
• N’insérez pas des objets qui ne doivent
pas être plastifiés.
• N’exposez pas la contre-colleuse à des
liquides.
Page 20

Protections électriques
• L’équipement doit être relié à une prise
facilement accessible et mise à la terre (trois
broches) près de celui-ci.
• Cette contre-colleuse doit être reliée à une
tension d’alimentation correspondant à la
puissance électrique indiquée sur la plaque
signalétique située à l’arrière de la machine.
• Débranchez la contre-colleuse avant de la
déplacer ou lorsqu’elle ne sera pas utilisée
pendant de longues périodes.
• N’utilisez pas contre-colleuse si le cordon
d’alimentation ou la fiche sont endommagés.
• Ne surchargez pas les prises électriques pour
éviter tout risque d'incendie ou de choc
électrique.
• Ne modifiez pas la fiche. Cette fiche est
configurée pour l’alimentation électrique
appropriée.
• L’unité est conçue pour être utilisée à
l’intérieur seulement.
• Débranchez la fiche de la prise dans laquelle
elle est insérée et gardez le cordon
d’alimentation en votre possession lorsque
vous déplacez la contre-colleuse.
• N’utilisez pas la contre-colleuse si le cordon
d’alimentation ou la fiche sont endommagés,
en cas de mauvais fonctionnement ou si elle a
été endommagée. Communiquez avec un
représentant de service GBC autorisé pour
obtenir de l’aide.
MISE EN GARDE : La prise doit être située
près de l’équipement et être facilement
accessible. N’utilisez pas de rallonge.
AVERTISSEMENT : Ne reliez pas la contrecolleuse à une alimentation électrique et ne tentez
pas d’utiliser la contre-colleuse avant d’avoir
complètement lu ces directives. Conservez ces
directives dans un endroit pratique pour référence
ultérieure.
AVERTISSEMENT: Cet appareil n'est pas
conçu pour être utilisé dans le champ de vision direct
des postes de travail à affichage visuel. Pour éviter
les réflexions gênantes sur les lieux de travail avec
écrans de visualisation, cet appareil ne doit pas être
placé dans le champ de vision directe.
Service technique GBC
Pour commander des accessoires de rechange,
des pièces, obtenir du service ou un contrat
d’entretien d’équipement, communiquez avec le
service technique et d’assistance GBC :
États-Unis
ACCO Brands GBC Technical Service and Support
4 Corporate Drive Lake Zurich, IL 60047-8997
www.gbcconnect.com
1-800-723-4000
Canada
Ontario et Québec – 1-800-268-3310
Toutes les autres provinces – 1-800-268-3447
Localement – 905-595-3100
Callcentre@GBCCanada.com
Mexique
(55) 1500 5778
Lada SIN costo: 01 800 759 6825
serviciotecnico@acco.com.mx
Page 21

2. Garantie
Garantie limitée de deux ans/ 5 000 laminages;
É.-U., Mexique et Canada
ACCO Brands USA LLC, ACCO Brands, 4 Corporate
Drive, Lake Zurich, IL 60047 É.-U. (au Mexique, ACCO
Brands Mexicana, Neptuno 43, Fraccionamiento
Nueva Industrial Vallejo México 07700 D.F. México),
(au Canada, ACCO Brands Canada Inc., 7381 Bramalea
Road, Mississauga ON L5S1C4) (chacune,
respectivement, « ACCO Brands ») garantit à
l’acheteur original que ce produit ACCO Brands sera
exempt de défauts de fabrication et de matériau s’il
est utilisé et entretenu normalement pendant une
période de deux (2) ans/5 000 laminages pour les
pièces de rechange.
L’obligation d'ACCO Brands en vertu de cette garantie
se limite au remplacement ou à la réparation, à la
discrétion d'ACCO Brands, de toute pièce garantie
jugée défectueuse par ACCO Brands, et ce, sans frais
pour les matériaux et la main d'œuvre. Tout
remplacement, à la discrétion d'ACCO Brands, sera
effectué au moyen du même produit ou d’un produit
substantiellement similaire qui peut contenir des
pièces reconstruites ou remises à neuf. Cette garantie
sera annulée dans les circonstances suivantes :
(i) le produit a été mal installé ou mal utilisé;
(ii) le produit a été endommagé par négligence ou par
accident; ou
(iii) le produit a été modifié par une personne autre
que ACCO Brands ou ses agents autorisés.
Sans limiter la généralité du paragraphe précédent,
l’obligation d'ACCO Brands au titre de cette garantie
ne comprend pas :
(iiii) les dommages causés aux rouleaux par des
couteaux, des rasoirs ou d’autres outils tranchants; par
tout corps étranger se trouvant dans la zone de travail
de la contre-colleuse; ou par le nettoyage de la contrecolleuse avec des solutions ou des matériaux
susceptibles d'endommager ses surfaces.
Pour l’exécution de la garantie, veuillez communiquer
avec ACCO Brands à : 800-723-4000 ou
www.gbcconnect.com aux É.-U;
800-263-1063 ou www.gbccanada.com au Canada;
(55) 1500 5578 ou www.accomexico.mx au Mexique
DANS LA MESURE PERMISE PAR LA LOI EN
VIGUEUR, CETTE GARANTIE REMPLACE TOUTES
LES AUTRES GARANTIES EXPRESSES.
LES REPRÉSENTATIONS OU PROMESSES
INCOMPATIBLES AVEC LA PRÉSENTE GARANTIE
S'Y AJOUTANT NE SONT PAS AUTORISÉES ET
N'ENGAGENT PAS ACCO BRANDS. DANS LA
MESURE PERMISE PAR LES LOIS EN VIGUEUR,
TOUTES LES GARANTIES IMPLICITES (LE CAS
ÉCHÉANT) SE LIMITENT EN DURÉE À LA DURÉE DE
CETTE GARANTIE. CERTAINES PROVINCES ET
JURIDICTIONS NE PERMETTENT PAS LES LIMITES
SUR LA DURÉE D’UNE GARANTIE IMPLICITE, PAR
CONSÉQUENT, LA LIMITE PRÉCÉDENTE PEUT NE
PAS S’APPLIQUER À VOTRE CAS. DANS LA
MESURE PERMISE PAR LA LOI EN VIGUEUR, ACCO
BRANDS NE SERA DANS AUCUN CAS TENUE
RESPONSABLE DES DOMMAGES SPÉCIAUX,
CONSÉCUTIFS, PUNITIFS, EXEMPLAIRES,
INDIRECTS OU SIMILAIRES, QU’ILS SOIENT
PRÉVISIBLES OU NON. CERTAINES PROVINCES ET
JURIDICTIONS NE PERMETTENT PAS L’EXCLUSION
OU LA LIMITE DES DOMMAGES SPÉCIAUX,
CONSÉCUTIFS, PUNITIFS, EXEMPLAIRES,
CONSÉCUTIFS OU SIMILAIRES, PAR CONSÉQUENT,
L’EXCLUSION OU LA LIMITE PRÉCÉDENTE PEUT NE
PAS S’APPLIQUER À VOTRE CAS.
POUR LES CONSOMMATEURS QUI BÉNÉFICIENT DE
LOIS OU DE RÈGLEMENTS SUR LA PROTECTION DU
CONSOMMATEUR DANS LEUR JURIDICTION
D’ACHAT, OU SI DIFFÉRENTE, DANS LEUR
JURIDICTION DE RÉSIDENCE, LES AVANTAGES
CONFÉRÉS PAR CETTE GARANTIE S’AJOUTENT À
TOUS LES DROITS OU RECOURS CONFÉRÉS PAR DE
TELLES LOIS ET DE TELS RÈGLEMENTS SUR LA
PROTECTION DU CONSOMMATEUR.
Dans la mesure permise par la loi, cette garantie
ne peut pas être transférée et prendra fin
automatiquement si l’acheteur initial du produit
vend ou dispose autrement du produit.
Cette garantie vous donne des droits juridiques
précis. Vous pouvez bénéficier d’autres droits,
qui varient d’une juridiction à l’autre. De plus,
certaines juridictions ne permettent pas (i)
l’exclusion de certaines garanties, (ii) les limites
sur la durée des garanties implicites; et/ou (iii)
l’exclusion ou la limite de certains types de coûts
et dommages; par conséquent, les limites ci-
dessus peuvent ne pas s’appliquer à votre cas.
Page 22

Modèle
Contre-colleuse sans pochette
FOTON 30
Vitesse de fonctionnement
3 mil (75 mic) 29,1 po/min (700 mm)
4 mil (100 mic) 25,6 po/min (670 mm)
5 mil (125 mic) 23,6 po/min (650 mm)
Modes de fonctionnement
Alimentation automatique/coupe automatique
Alimentation manuelle/coupe automatique
Alimentation manuelle/coupe manuelle
Durée du réchauffement
3 min 75 mic/3 mil
3,5 min 100 mic/4 mil
4 min 125 mic/3 mil
30 feuilles papier de 75 g/m²
Largeur maximale de la pellicule
12,01 po (306 mm) – reste du monde
11,5 po (292 mm) – Amérique du Nord
Épaisseur maximale du document
250 g/m² pour l’alimentation manuelle
Longueurs de document prises en charge
Largeurs de document prises en charge
Minimum 6 po (152 mm)
Maximum 17 po (432 mm)
Minimum 5 po (127 mm)
Maximum 11,69 po (297 mm)
Poids du support pour l’alimentation automatique
Poids du support pour l’alimentation manuelle
Fiabilité élevée : 64 – 120
g/m²
Fiabilité variable : 121 à 220 g/m²
64 à 250 g/m²
Dimensions :
Largeur
Hauteur
Profondeur
Poids
Machine : Expédition :
22,7 po (57,7 cm) 27,0 po (68,6 cm)
9,6 po (24,5 cm) 15,0 po (38,1 cm)
18,8 po (47,8 cm) 22,7 po (57,8 cm)
21 lb (9,5 kg) 32.8 lb (14,9 kg)
Arrêt automatique
15 minutes d’inactivité
Cycle de fonctionnement
80 documents par semaine
Exigences électriques
Tension
Prise
120 volts, 60 Hz
NEMA 5-15P
Fusible
Oui (interne et non remplaçable)
Environnement opérationnel
5 à 35 °C (41 à 95 °F)
Altitude maximale de 2 000 m
Hauteur
Largeur
Profondeur
Figure 1. Dimensions du Foton 30
3. Spécifications
Page 23

Avis de classe B de la FCC
Ce dispositif est conforme à la l'article 15 des
règlements de la FCC. Le fonctionnement est assujetti
aux deux conditions suivantes :
Ce dispositif ne doit pas causer d'interférences
nuisibles
Ce dispositif doit accepter toute interférence
reçue, y compris les interférences susceptibles
de provoquer un fonctionnement non désiré.
REMARQUE : Cet équipement a été testé et déclaré
conforme aux limites d'un appareil numérique de classe
B, conformément à l'article 15 des règlements de la
FCC. Ces limites sont conçues pour fournir une
protection raisonnable contre les interférences nuisibles
dans une installation résidentielle. Cet équipement
génère, utilise et peut émettre de l’énergie
radiofréquence et, s’il n’est pas installé et utilisé
conformément aux directives, peut causer de
l’interférence nuisible aux communications radio.
Cependant, il n'y a aucune garantie que des
interférences ne se produiront pas dans une installation
particulière. Si cet équipement cause des interférences
nuisibles à la réception radio ou télévisée, ce qui peut
être déterminé en allumant et en éteignant
l’équipement, l’utilisateur est encouragé à tenter de
corriger ces interférences en prenant une ou plusieurs
des mesures suivantes :
- Réorienter ou déplacer l’antenne de réception.
- Augmenter la distance entre l’équipement et le
récepteur.
- Brancher l'équipement à une prise de courant
sur un circuit différent de celui auquel le
récepteur est branché.
- Consulter le concessionnaire ou un technicien
radio/télé expérimenté pour obtenir de l’aide.
Avis de classe B du Canada
Classe B, Canada
Cet appareil numérique de classe B est conforme à la
norme canadienne ICES-003.
Modifications
Toute modification apportée à cet appareil qui n’est
pas approuvée par ACCO Brands peut annuler
l'autorité accordée à l'utilisateur par la FCC et/ou
Industrie Canada à utiliser cet équipement.
Page 24

4. Installation
Service
AVERTISSEMENT : Ne tentez pas de réparer la
contre-colleuse. Le non-respect de cet avertissement
pourrait entraîner des blessures graves ou la mort.
Débranchez la fiche de la prise et communiquez avec le
service à la clientèle dans l’un ou l’autre des cas suivants.
• Le cordon d’alimentation ou la fiche sont
endommagés.
• Du liquide a été renversé dans la contre-
colleuse.
• La contre-colleuse ne fonctionne pas
correctement après une mauvaise
manipulation.
• La contre-colleuse ne fonctionne pas comme il
est décrit dans ces directives.
Installation
• Tout dommage survenu durant l’expédition
doit être signalé immédiatement au
transporteur.
• Placez la contre-colleuse sur une surface plate
et stable pouvant soutenir une charge de 23 kg
(50 lb).
• La surface doit se trouver à une hauteur d’au
moins 76 cm (30 po) pour obtenir une position
confortable durant le fonctionnement. Les
quatre pieds en caoutchouc doivent se trouver
sur la surface portante.
• Reliez le cordon d’alimentation à une source
d’alimentation appropriée. Évitez de relier
d’autres équipements sur le circuit sur lequel la
contre-colleuse est branchée puisque cela peut
causer des déclenchements intempestifs du
disjoncteur ou le grillage des fusibles.
• La contre-colleuse doit être placée de manière
à permettre à la pellicule sortante de tomber
librement sur une surface plate. L’accumulation
de documents plastifiés à la sortie de la contrecolleuse peut provoquer un blocage.
• Évitez de placer la contre-colleuse près d’une
source de chaleur ou de froid. Évitez de placer
la contre-colleuse dans la voie directe de l’air
pulsé, chauffé ou refroidi.
Entretien du Foton 30
Le seul entretien devant être effectué par l’opérateur
consiste à nettoyer périodiquement les rouleaux. En
gardant les rouleaux propres, vous vous assurez que vos
produits finis ne seront pas endommagés par de la
saleté et l'accumulation d’adhésif.
MISE EN GARDE : Effectuez la procédure
suivante lorsque la contre-colleuse est chaude. Faites
preuve d'extrême prudence.
AVERTISSEMENT : N’appliquez pas des liquides
de nettoyage ou des solvants sur les rouleaux.
AVERTISSEMENT : Ne tentez pas de plastifier
des adhésifs portant la mention « Inflammable ».
AVERTISSEMENT : N’exposez pas la contre-
colleuse à des liquides.
1. Mettez la machine en marche et attendez qu’elle
se réchauffe.
2. Ouvrez la porte de la contre-colleuse au moyen
du loquet argenté.
3. Nettoyez les rouleaux supérieurs avec un chiffon
propre, humide et non pelucheux. En cas
d'accumulation d’adhésif, utilisez de l’alcool
isopropylique à la place de l’eau.
4. Soulevez le rebord avant de la pellicule jusqu’à la
poignée de la cartouche.
5. Nettoyez les rouleaux inférieurs à l'aide d'un
chiffon propre, humide et non pelucheux. En cas
d'accumulation d’adhésif, utilisez de l’alcool
isopropylique à la place de l’eau.
6. Placez le rebord avant de la pellicule dans la
position appropriée et fermez la porte.
7. Appuyez et maintenez le bouton RUN/STOP
(avancer/arrêter) enfoncé pendant cinq à sept
secondes pour faire avancer manuellement les
rouleaux.
8. Ouvrez la porte de la contre-colleuse au moyen
du loquet argenté.
9. Répétez les étapes 4 à 6.
Remarque : N’utilisez pas de tampons à récurer
métalliques pour nettoyer les rouleaux chauffants!
AVERTISSEMENT : Ne plastifiez pas des articles
métalliques et/ou à paillettes. Cela risque
d’endommager les rouleaux.
Les couvercles latéraux et la table d’alimentation
peuvent être nettoyés à l'aide d'un chiffon non
pelucheux et un détergent doux.
Page 25

Page 26

Page 27

5. Guide des caractéristiques
A. APPRENDRE À CONNAÎTRE VOTRE CONTRE-
COLLEUSE :
(illustrée dans la photo A ci-dessus)
a. BAC D’ALIMENTATION ET GUIDES
LATÉRAUX :
i. Placez le(s) document(s) à
plastifier et utilisez les guides
coulissants pour minimiser toute
déviation. Ouvrez l’extension pour
les documents plus longs.
b. ALIMENTATION/PORTE
D’ALIMENTATION :
i. Alimente le document dans la
contre-colleuse. Un voyant rouge
sur la porte indique que le
document n’a pas été inséré
correctement. Ouvrez la porte
pour éliminer tout problème
d'alimentation.
c. PORTE DE LA CONTRE-COLLEUSE :
i. Porte donnant accès aux pièces
internes de la contre-colleuse :
rouleaux, cartouche de pellicule, etc.
ii. Pour ouvrir : Tirez sur le loquet
argenté et soulevez.
iii. Pour fermer : Abaissez
doucement en utilisant le loquet
argenté et poussez-le pour le
fermer. NE poussez PAS sur la
porte de la contre-colleuse pour
la fermer.
d. CARTOUCHE DE PELLICULE :
i. Remplacez la cartouche de
pellicule lorsqu’elle est vide ou
lorsque vous avez besoin d’une
épaisseur différente. Reportezvous à CHARGEMENT DE LA
CARTOUCHE DE PELLICULE pour
de plus amples détails.
e. ROULEAUX DE LA CONTRE-COLLEUSE :
i. Les rouleaux se réchauffent pour
activer l’adhésif se trouvant sur la
pellicule tout en exerçant une
pression pour s’assurer que la
pellicule adhère au document.
f. MASSICOT AUTOMATIQUE :
i. En mode Auto Cut (coupe
automatique), le massicot trouve le
rebord avant et arrière du document
et coupe la pellicule. En mode
Manual Cut (coupe manuelle), il
coupe la pellicule lorsque le bouton
CUT (couper) est enfoncé.
B. PANNEAU DE COMMANDE : (illustré dans la photo
B ci-dessus)
BOUTONS
a. POWER – permet d’allumer ou d’éteindre
la machine. Après 15 minutes de non
utilisation, la machine s’éteint
automatiquement.
b. RUN/STOP – utilisé pour démarrer ou
arrêter la contre-colleuse.
i. Fonction double – avancée
manuelle : Gardez le bouton
enfoncé en continu pour faire
avancer manuellement les
rouleaux de la contre-colleuse.
Ce bouton peut être utilisé pour
éliminer les blocages et les débris
pour le nettoyage.
c. MODE – permet aux utilisateurs de
basculer entre les trois modes de
fonctionnement.
i. Auto Feed/Auto Cut (alimentation
et coupe automatiques) – idéal
pour les formats de papier bond
de 20 à 32 lb de taille standard.
ii. Manual Feed/Auto Cut
(alimentation manuelle/coupe
auto) – idéal pour les formats de
papier standard sur les papiers
épais qui ne s'alimentent pas
automatiquement.
iii. Manual Feed/Manual Cut
(alimentation et coupe manuelles)
– idéal pour les documents de
forme irrégulière et non
rectangulaires.
d. CUT (couper) – en appuyant sur ce bouton,
le massicot coupe une seule fois la
pellicule. Ce bouton est surtout utilisé en
mode de coupe manuelle.
INDICATEURS
e. STATUS (statut) – communique le statut de
la machine :
i. Vert fixe = prête à utiliser
ii. Vert clignotant =
en fonctionnement
iii. Orange fixe = réchauffement
iv. Orange clignotant =
réchauffement et commande RUN
(avancer) acceptée. Commencera
à plastifier dès qu’elle sera prête.
v. Rouge fixe = erreur
Page 28

f. FILM (pellicule) – le voyant à DEL indique
lorsque la cartouche est vide ou presque
vide (environ 30 % de la cartouche).
i. Low (presque vide) = voyant à
DEL orange
ii. Empty (vide) = voyant à DEL rouge
g. MODE – le voyant à DEL vert indique le
mode de fonctionnement de la machine.
h. ERROR MESSAGE (message d’erreur) –
communique les messages d’erreur qui
doivent être corrigés.
i. DOOR (porte) : une porte ou les
deux portes sont ouvertes
ii. JAM (blocage) : deux types de
blocage peuvent se produire :
1. Blocage de la contre-
colleuse : Enfoncez et
maintenez enfoncé le
bouton RUN (avancer)
pour faire avancer
manuellement les
rouleaux et éliminer le
blocage.
2. Blocage d’alimentation :
Ouvrez la porte
d’alimentation et retirez
le papier.
iii. CUTTER (massicot) : Le massicot
n'est pas en mesure d'effectuer
un cycle complet de coupe
i. MANUAL FEED INDICATOR (indicateur
d'alimentation manuelle) – Siuté sur la
Porte d'alimentation, indique que la
contre-colleuse est prête en s'allumant en
VERT pour charger le prochain document à
alimentation manuelle.
C. CARTOUCHE DE PELLICULE : (illustrée dans la photo
C ci-dessus)
a. CARTOUCHE – elle s’insère dans la contre-
colleuse.
b. ÉTIQUETTE DE CARTOUCHE – indique
l’épaisseur de la pellicule. Située sur le
dessus de la poignée.
a. AMORCE DE PELLICULE – les premiers 75 à
100 mm (3 à 4 pouces) de pellicule scellée
se trouvant sur la cartouche de pellicule.
Cette amorce doit être orientée vers la
sortie de la machine.
Page 29

6. Fonctionnement
MODES DE FONCTIONNEMENT :
AUTO FEED/AUTO CUT
(alimentation et coupe automatiques)
Remarque : Idéal pour les papiers bond
imprimés de 20 à 32 lb (75 à 120 g/m²) de
taille standard.
1. Enfoncez le bouton POWER (marche-arrêt) pour
mettre la machine en marche. La machine se met
en marche automatiquement en mode
d’alimentation et de coupe automatiques.
2. Placez votre (vos) document(s) dans le BAC
D’ALIMENTATION.
3. Glissez les guides latéraux pour qu'ils s'adaptent à
vos documents pour minimiser la déviation
durant le laminage.
4. Enfoncez le bouton RUN (avancer).
Remarque : Si le bouton RUN (avancer) est
enfoncé avant que la machine n’ait terminé son
réchauffement, la barre de statut clignotera en
ORANGE. La contre-colleuse a accepté la
commande et démarre automatiquement
lorsqu’elle a atteint la température appropriée.
5. Le document sera automatiquement plastifié et
découpé à sa sortie de la machine.
Remarque : Si vous enfoncez le bouton Stop
(arrêt) pendant que le document avance dans
la contre-colleuse, la machine terminera le
laminage avant de s’arrêter.
MANUAL FEED/AUTO CUT
(alimentation manuelle et coupe automatique)
Remarque : Idéal pour les papiers imprimés
épais de tailles rectangulaires standards qui
ne s’alimenteront pas automatiquement.
1. Enfoncez le bouton POWER (marche-arrêt) pour
mettre la machine en marche.
2. Sélectionnez le mode Manual Feed/Auto Cut
(alimentation manuelle et coupe automatique) en
enfonçant le bouton Mode.
3. Attendez que la machine ait atteint la
température appropriée, indiquée par le voyant
de statut en vert fixe.
4. Ne placez que le premier document dans le BAC
D’ALIMENTATION. Le document doit être placé au
centre du bac d’alimentation et suffisamment loin
dans le bac pour saisir votre document.
5. Enfoncez le bouton RUN (avancer). Le document
commencera à avancer dans la contre-colleuse.
6. Après avoir plastifié votre premier document,
attendez que l’indicateur MANUAL FEED
(alimentation manuelle) s’allume en vert. Une fois
allumé, la machine peut alors accepter le
prochain document à plastifier. Répétez cette
procédure une feuille à la fois jusqu’à ce que la
tâche soit terminée.
7. Les documents seront plastifiés manuellement
et taillés automatiquement à leur sortie de la
machine.
8. Lorsque le dernier document a été coupé et
expulsé de la machine, cette dernière s’arrête
automatiquement.
MANUAL FEED/MANUAL CUT
(alimentation et coupe manuelles)
Remarque : Ce mode est idéal pour les
documents de forme irrégulière ou non
rectangulaire qui ne peuvent pas être
alimentés automatiquement.
1. Enfoncez le bouton POWER (marche-arrêt)
pour mettre la machine en marche.
2. Appuyez sur le bouton Mode pour sélectionner
le mode Manual Feed/Manual Cut
(alimentation et coupe manuelles).
3. Attendez que la machine ait atteint la
température appropriée, indiquée par le
voyant de statut en vert fixe.
4. Ne placez que le premier document dans le
BAC D’ALIMENTATION. Le document doit être
placé au centre du bac d’alimentation et
suffisamment loin dans le bac pour saisir
votre document.
5. Enfoncez le bouton RUN (avancer). Le
document commencera à avancer dans la
contre-colleuse.
6. Après avoir plastifié votre premier document,
attendez que l’indicateur MANUAL FEED
(alimentation manuelle) s’allume en vert. Une
fois allumé, la machine peut alors accepter le
prochain document à plastifier. Répétez cette
procédure une feuille à la fois jusqu’à ce que la
tâche soit terminée.
7. Appuyez sur le bouton CUT (couper) pour
activer le massicot chaque fois que vous
souhaitez couper la pellicule.
Remarque : Il est recommandé d’enfoncer
le bouton CUT (couper) lorsque le
document complet est sorti de la machine
pour éviter de le couper.
8. Lorsque le dernier document est sorti de la
machine, enfoncez le bouton Stop (arrêter)
pour arrêter le processus de laminage.
9. Une fois le laminage arrêté, enfoncez le bouton
CUT (couper) pour couper le reste de la
pellicule qui est sorti de la machine.
Page 30

CHARGEMENT DE LA CARTOUCHE DE PELLICULE
(Reportez-vous aux photos 1 à 4 qui décrivent le
processus)
MISE EN GARDE : La procédure suivante peut être
effectuée lorsque la contre-colleuse est chaude. Faites
preuve d'extrême prudence.
Remarque : Les cartouches de pellicule sont munies
d’un autocollant portant la mention « fin de rouleau »
qui sera automatiquement détecté par la contrecolleuse. Une fois l'autocollant détecté, la contre-
colleuse cessera d’alimenter les autres documents
dans le bac d’alimentation. La contre-colleuse
continue à plastifier les documents. L’autocollant peut
apparaître sur le dernier document, mais il peut être
retiré du laminage.
1. Ouvrez la porte de la contre-colleuse :
Ouvrez la porte en relevant complètement le
loquet argenté situé sur le dessus de la
machine et soulevez jusqu’à ce que la porte
soit entièrement ouverte.
2. Retirez la cartouche : Soulevez la poignée de
la cartouche pour retirez la cartouche
installée.
Mise en garde : Les cartouches
pleines ont tendance à être lourdes.
3. Insérez la cartouche : Insérez une nouvelle
cartouche en alignant ses rebords sur le
profilé de guidage gris de la contre-colleuse
et en l’abaissant.
Remarque : L’amorce de la
pellicule doit être insérée du côté
opposé à l’alimentation, faisant
face à la sortie de la machine.
4. Fermez la porte de la contre-colleuse :
Fermez la porte de la contre-colleuse en
abaissant doucement la porte et en
fermant complètement le loquet argenté
qui se trouve sur le dessus. NE poussez PAS
la porte de la contre-colleuse vers le bas
pour la fermer; utilisez le loquet.
5. Vérifiez que la cartouche est bien insérée :
L’indicateur de pellicule vide s’allume
lorsqu’il n’y a pas de cartouche ou si cette
dernière n’est pas correctement enfoncée.
6. Enfilage automatique : Lorsque la contre-
colleuse atteint la température appropriée,
elle termine l'enfilage de la pellicule et
charge environ 23 cm (9 po) de pellicule
pour en éliminer les plis éventuels.
Page 31

DÉPANNAGE
SYMPTÔME
CAUSE POSSIBLE
ACTION CORRECTRICE
Le bouton Power
(marche-arrêt) est
enfoncé, mais la
machine ne se met
pas en marche
Le cordon d’alimentation
peut ne pas être
entièrement inséré dans
la prise
Insérez la fiche complètement dans la prise
Assurez-vous que la prise est sous tension
Indicateur de
statut rouge :
Indicateur d’erreur de
porte rouge :
Indicateur d’erreur de
blocage de papier rouge :
Indicateur de cartouche
de pellicule vide rouge :
Indicateur d’erreur de
coupe rouge :
Retirez tout papier se trouvant dans le bac d’alimentation. Ouvrez et
fermez la porte de la contre-colleuse et la porte d’alimentation. Vérifiez
qu’elles sont bien fermées.
Ouvrez la porte d’alimentation et retirez tout papier du bac
d’alimentation. Fermez la porte d’alimentation.
Si les mesures précédentes ne corrigent pas l’erreur, enfoncez et
maintenez enfoncé le bouton RUN (avancer) pendant 10 secondes pour
charger manuellement la pellicule. La pellicule devrait commencer à
sortir de la machine et le blocage devrait se dégager.
Si l’erreur de blocage persiste, ouvrez la porte de la contre-colleuse et
regardez si l’amorce de la pellicule est bloquée par un obstacle ou les
rouleaux. NE COUPEZ PAS la pellicule. Soulevez l’amorce de la pellicule
et replacez-la en bonne position. Fermez la porte de la contre-colleuse
et maintenez le bouton RUN (avancer) enfoncé pendant 10 secondes.
Une étiquette de fin de cartouche a été détectée. Remplacez la
cartouche de pellicule par une nouvelle cartouche et fermez la porte de
la contre-colleuse.
Le massicot n'a pas pu amorcer une coupe ou terminer la coupe.
Enfoncez le bouton Manual Cut (coupe manuelle) une fois pour tenter
d'activer le massicot. Si cela ne résout pas le problème, essayez les
mesures suivantes :
Observez la pellicule à sa sortie de la contre-colleuse pour voir si elle est
complètement ou partiellement coupée.
La pellicule n'est pas coupée :
Enfoncez et tenez le bouton RUN (avancer) pendant 10 à
20 secondes pour faire avancer manuellement la pellicule. S’il y a
un support plastifié à la sortie de la contre-colleuse, enfoncez le
bouton RUN (avancer) jusqu’à ce que le média soit complètement
sorti de la contre-colleuse. Enfoncez maintenant le bouton Manual
Cut (coupe manuelle) pour voir si le massicot s’active.
La pellicule est partiellement coupée :
Ouvrez la porte de la contre-colleuse et vérifiez que vous
pouvez voir la lame du massicot. Celle-ci devrait se trouver près
de l’arrière de la contre-colleuse, à mi-chemin de la pellicule.
Au moyen de ciseaux, coupez la pellicule qui se trouve à la
sortie de la contre-colleuse. Ensuite, en prenant soin de ne pas
mettre vos doigts près de la lame du massicot, retirez
soigneusement la cartouche. Fermez la porte de la contre-
Page 32

Indicateur de
statut rouge
(suite) :
Indicateur d’erreur de
coupe rouge (suite) :
colleuse et tentez d’activer manuellement le massicot. Si le
massicot fonctionne, réinsérez votre cartouche. Vous devrez
peut-être tailler le rebord avant de la pellicule à l’endroit où le
massicot s’est coincé. Si vous devez tailler la pellicule, laissez
une longueur de 100 mm (4 pouces) de pellicule scellée en
guise d'amorce de cartouche. Réinsérez la cartouche. Une fois
réchauffée, la machine enfilera automatiquement la pellicule et
activera le massicot.
Si, après avoir effectué les étapes précédentes, le massicot ne
fonctionne pas, communiquez avec votre fournisseur de service.
Plis sur la pellicule
à la sortie
La pellicule n'est pas
correctement alignée
Enfoncez et tenez le bouton RUN (avancer) pour faire avancer
manuellement la pellicule. Après avoir fait avancer 125 à 500 mm (5 à
20 pouces) de pellicule, les plis devraient disparaître. Si les plis sont
éliminés, enfoncez la bouton Manual Cut (coupe manuelle) pour
démarrer.
Si vous observez encore des plis, ouvrez la porte de la contre-colleuse.
saisissez la pellicule sortant de la contre-colleuse et tenez la bien tendue
tout en fermant la porte. Répétez l’étape ci-dessus et les plis devraient
disparaître.
Les rebords de la
pellicule ne sont
pas alignés
uniformément
Les rouleaux supérieur et
inférieur de pellicule ne
sont pas alignés
correctement
Enfoncez et tenez le bouton RUN (avancer) pour faire avancer
manuellement la pellicule. Après avoir avancé 125 mm (5 pouces) de
pellicule, saisissez la pellicule sortant de la contre-colleuse et tenez la
bien tendue tout en fermant la porte.
Les documents
sont décalés dans
la pellicule
lorsqu’ils sortent
Les documents ont été
mal insérés
Avant de charger le papier, tentez de tapoter son rebord avant sur une
surface plate, puis répétez avec le bas ou le rebord inférieur pour bien
centrer le papier.
Insérez votre support dans l’alimentation automatique et glissez le
guide latéral jusqu’à l’arête de votre support.
Deux documents
sont souvent
alimentés
ensemble
Le papier est chargé
d’électricité statique
Essayez de ventiler le support ou de placer une taqueuse avant de le
charger. Si les problèmes persistent, utilisez le mode Manual Feed/Auto
Cut (alimentation manuelle/coupe automatique).
Fréquentes
anomalies
d'alimentation
Les rouleaux glissent sur
le support et les feuilles
n’avancent pas
Page 33

GBC FOTON 30
Laminadora sin bolsa
MANUAL DE INSTALACIÓN Y OPERACIÓN
Número de documento: CBT10000 Rev B
No duplicar sin el permiso escrito de ACCO Brands.
Page 34

ACCO Brands se reserva el derecho de realizar cambios en esta publicación y en los productos descritos en ella sin previo
aviso. Todas las especificaciones e información sobre los productos están sujetas a cambios sin previo aviso. La referencia en
esta publicación a información o productos protegidos por derechos de autor o patentes no supone ninguna licencia bajo los
derechos de ACCO Brands u otros. Acco Brands no asume ninguna responsabilidad derivada de la infracción de patentes o
de cualquier otro derecho de terceros.
Esta publicación está protegida por los derechos de autor © 2018 de ACCO Brands. Todos los derechos reservados.
Page 35

1. Seguridad
PARA ACCO SU SEGURIDAD Y LA SEGURIDAD DE LOS
DEMÁS ES MUY IMPORTANTE. EN ESTE MANUAL DE
INSTRUCCIONES Y EN EL PRODUCTO, HAY MENSAJES
DE SEGURIDAD IMPORTANTES. ANTES DE INSTALAR
O UTILIZAR LA MÁQUINA, LEA Y SIGA ATENTAMENTE
TODAS LAS INDICACIONES DE SEGURIDAD DE ESTE
CAPÍTULO.
Respete toda la información de seguridad que se
brinda. Respete todas las advertencias de seguridad.
Nunca quite las advertencias de seguridad ni otro
tipo de información del equipo.
Lea todas las instrucciones y guárdelas para
uso posterior.
El símbolo de alerta de seguridad precede a
cada nota de seguridad de este manual. El símbolo
indica un riesgo potencial para su seguridad personal
o la de los demás, así como para el producto o la
propiedad.
Este símbolo de alerta de seguridad indica
una posible descarga eléctrica. Le advierte que no
abra la laminadora a fin de no exponerse a una
tensión peligrosa.
LAS SIGUIENTES ADVERTENCIAS SE ENCUENTRAN EN LA
LAMINADORA SKYWARP.
NO ABRIR NO HAY PARTES INTERNAS QUE PUEDA
REPARAR EL USUARIO. DERIVE EL SERVICIO A
PERSONAL CALIFICADO.
PRECAUCIÓN superficie caliente: Los rodillos
de la laminadora pueden tener más de 260 °F/126.7 °C
de temperatura. Tenga cuidado y no los toque.
ADVERTENCIA: No intente reparar ni
realizar mantenimiento a la laminadora.
ADVERTENCIA: No conecte la laminadora
a una fuente de alimentación eléctrica ni intente
utilizarla hasta que haya leído completamente
estas instrucciones. Mantenga estas instrucciones
en un lugar práctico para futuras consultas.
Garantías generales
• Utilice esta laminadora solo para los
fines previstos de acuerdo con las
especificaciones indicadas en el manual
de instrucciones.
• Mantenga las manos, el cabello largo, la
ropa holgada y artículos como collares o
corbatas lejos de la parte delantera de
los rodillos de alimentación para evitar
enredos y atrapamientos.
• Cuando abra la puerta superior de la
laminadora, evite el contacto con los
rodillos internos cuando esta esté
encendida o poco después de que se
haya apagado. Los rodillos pueden
alcanzar temperaturas superiores a los
260 °F/126.7 °C.
• Mantenga las manos y los dedos
alejados del trayecto de la hoja de corte
afilada situada en la salida del carrete
No coloque la laminadora sobre un carro,
soporte o mesa inestables. Una superficie
inestable puede causar que la laminadora
se caiga, lo cual puede provocar lesiones
graves. Evite paradas rápidas, fuerza
excesiva y superficies de piso irregulares
cuando mueva la laminadora sobre un
carro o soporte.
• No anule ni retire los equipos de
Protecciones eléctricas
seguridad eléctricos y mecánicos, como
enclavamientos, escudos y protecciones.
• No inserte objetos que no sean aptos
para la laminación.
• No exponga la laminadora a líquidos.
• El equipo debe estar conectado a un
receptáculo (tomacorriente) de fácil acceso y
con conexión a tierra (de 3 clavijas) cerca del
equipo.
Page 36

• Esta laminadora debe estar conectada a la
tensión de alimentación correspondiente a la
potencia eléctrica indicada en la placa de serie
situada en la parte posterior de la máquina.
• Desenchufe la laminadora antes de moverla o
cuando no esté en uso por un período
prolongado.
• No opere la laminadora con un cable de
alimentación o enchufe dañado.
• No sobrecargue los tomacorrientes, ya que
esto puede provocar incendios o descargas
eléctricas.
• No modifique el enchufe de conexión. Este
enchufe está configurado para la
alimentación eléctrica correspondiente.
• La unidad está diseñada para uso exclusivo en
interiores.
• Desconecte el enchufe del tomacorriente al
que está conectado y sostenga el cable de
alimentación mientras mueve la laminadora.
• No opere la laminadora con un cable de
alimentación o enchufe de conexión dañados
ante el mal funcionamiento ni después de
que la laminadora se haya dañado. Póngase
en contacto con un representante de servicio
autorizado de GBC para obtener ayuda.
PRECAUCIÓN: El receptáculo debe estar
situado cerca del equipo y debe ser de fácil
acceso. No utilice un cable prolongador.
ADVERTENCIA: No conecte la laminadora
a una fuente de alimentación eléctrica ni intente
utilizarla hasta que haya leído completamente
estas instrucciones. Mantenga estas instrucciones
en un lugar práctico para futuras consultas.
ADVERTENCIA: este dispositivo no está
diseñado para su uso en el campo de visión
directo en los lugares de trabajo de visualización.
Para evitar reflexiones incómodas en los lugares
de trabajo de pantallas visuales, este dispositivo
no debe colocarse en el campo de visión directa
Servicio técnico de GBC
Para solicitar accesorios de repuesto, servicio de
mantenimiento, piezas o un contrato de
mantenimiento de equipos, póngase en contacto
con el servicio de asistencia técnica y soporte
técnico de GBC en:
Estados Unidos
ACCO Brands GBC Technical Service and Support
4 Corporate Drive Lake Zurich, IL 60047-8997
www.gbcconnect.com
1-800-723-4000
Canadá
Ontario y Quebec: 1-800-268-3310
Todas las demás provincias: 1-800-268-3447
Local: 905-595-3100
Callcentre@GBCCanada.com
México
(55) 1500 5778
Lada SIN costo: 01 800 759 6825
serviciotecnico@acco.com.mx
Page 37

2. Garantía
Garantía limitada de 2 años/5000 laminados; EE. UU.,
México y Canadá.
ACCO Brands USA LLC, ACCO Brands, 4 Corporate Drive,
Lake Zurich, IL 60047 (en México, ACCO Brands
Mexicana, Neptuno 43, Fraccionamiento Nueva Industrial
Vallejo México 07700 D.F. México), (en Canadá, ACCO
Brands Canada Inc., 7381 Bramalea Road, Mississauga
ON L5S1C4) (cada uno, respectivamente, “ACCO Brands”)
garantiza al comprador original que este producto de
ACCO Brands no presenta defectos de mano de obra ni
materiales, en condiciones de uso habitual y
mantenimiento, por un período de: dos (2)
años/5000 laminados para piezas.
La obligación de ACCO Brands en virtud de esta
garantía se limita a la sustitución o reparación, a
elección de ACCO Brands, de cualquier pieza en
garantía que ACCO Brands encuentre defectuosa, sin
cargo por materiales ni mano de obra. El reemplazo, a
elección de ACCO Brands, puede ser el mismo
producto o un producto sustancialmente similar que
pueda contener piezas refabricadas o
reacondicionadas. Esta garantía quedará anulada en
las siguientes circunstancias:
(i) Si el producto se ha instalado o utilizado
incorrectamente.
(ii) Si el producto ha sido dañado por negligencia o
accidente.
(iii) Si el producto ha sido alterado por cualquier otra
persona que no sea ACCO Brands ni los agentes
autorizados de ACCO Brands
Sin limitar la generalidad del párrafo anterior, la
obligación de ACCO Brands bajo esta garantía limitada
no incluye:
(iiii) daños causados a los rodillos por cuchillos, navajas
de afeitar u otras herramientas filosas; por cualquier
objeto extraño que caiga en el área de trabajo de la
laminadora; o por la limpieza de la laminadora con
soluciones o materiales que dañen sus superficies.
Para la ejecución de la garantía, póngase en contacto
con ACCO Brands a: 800-723-4000 o
www.gbcconnect.com en los Estados Unidos;
800-263-1063 o www.gbccanada.com en Canadá;
(55) 1500 5578 o www.accomexico.mx en México.
EN LA MEDIDA EN QUE LO PERMITA LA LEY
APLICABLE, ESTA GARANTÍA SUSTITUYE A TODAS
LAS DEMÁS GARANTÍAS EXPRESAS. LAS
REPRESENTACIONES O PROMESAS
INCONSISTENTES CON ESTA GARANTÍA O APARTE
DE ESTA NO ESTÁN AUTORIZADAS Y NO SERÁN
VINCULANTES PARA ACCO BRANDS. EN LA
MEDIDA EN QUE LO PERMITAN LAS LEYES
APLICABLES, CUALQUIER GARANTÍA IMPLÍCITA (SI
CORRESPONDIERA) ESTÁ LIMITADA EN
DURACIÓN A LA DE ESTA GARANTÍA. ALGUNOS
ESTADOS Y JURISDICCIONES NO PERMITEN
LIMITACIONES EN CUANTO A LA DURACIÓN DE
UNA GARANTÍA IMPLÍCITA, POR LO QUE ES
POSIBLE QUE LA LIMITACIÓN ANTERIOR NO SE
APLIQUE EN SU CASO. EN LA MEDIDA EN QUE LO
PERMITA LA LEY APLICABLE, EN NINGÚN CASO
ACCO BRANDS SERÁ RESPONSABLE DE NINGÚN
DAÑO ESPECIAL, INCIDENTAL, PUNITIVO,
EJEMPLAR, CONSECUENTE O SIMILAR, SEA O NO
PREVISIBLE. ALGUNOS ESTADOS Y
JURISDICCIONES NO PERMITEN LA EXCLUSIÓN O
LIMITACIÓN DE DAÑOS ESPECIALES,
INCIDENTALES, PUNITIVOS, EJEMPLARES,
CONSECUENTES O SIMILARES, POR LO QUE ES
POSIBLE QUE LA EXCLUSIÓN O LIMITACIÓN
ANTERIOR NO SE APLIQUE EN SU CASO.
EN EL CASO DE LOS CONSUMIDORES QUE SE VEN
BENEFICIADOS POR LAS LEYES O REGLAMENTOS DE
PROTECCIÓN AL CONSUMIDOR EN SU JURISDICCIÓN
DE COMPRA O, SI SON DIFERENTES, EN SU
JURISDICCIÓN DE RESIDENCIA, LOS BENEFICIOS
CONFERIDOS POR ESTA GARANTÍA SE SUMAN A
TODOS LOS DERECHOS Y RECURSOS QUE SE
DERIVAN DE DICHAS LEYES Y REGLAMENTOS DE
PROTECCIÓN AL CONSUMIDOR.
En la medida en que lo permita la ley, esta
garantía no es transferible y terminará
automáticamente si el comprador original del
producto vende o se deshace del producto.
Esta garantía le otorga derechos legales
específicos. Pueden existir otros derechos que
varían de una jurisdicción a otra. Además,
algunas jurisdicciones no permiten (i) la exclusión
de ciertas garantías, (ii) limitaciones sobre la
duración de una garantía implícita o (iii) la
exclusión o limitación de ciertos tipos de costos o
daños, por lo que las limitaciones anteriores
pueden no ser aplicables.
Page 38

Modelo
FOTON 30 Laminadora sin bolsa
Velocidad de funcionamiento
3 mil (75 mic) 29.1 pulg./min. (700 mm)
4 mil (100 mic) 25.6 pulg./min. (670 mm)
5 mil (125 mic) 23.6 pulg./min. (650 mm)
Modos de operación
Alimentación automática/Corte automático
Alimentación manual/Corte automático
Alimentación manual/Corte manual
Tiempo de calentamiento
3 min. 75 mic/3 mil
3.5 min. 100 mic/4 mil
4 min. 125 mic/5 mil
30 hojas Papel de 75 g/m2
Ancho máximo del carrete
12.01 pulg. (306 mm) - Resto del mundo
11.5 pulg. (292 mm) - América del Norte
Grosor máximo del documento
250 g/m2 alimentado manualmente
Longitudes de documento admitidas
Anchos de documento admitidos
Mínimo 6 pulg. (152 mm)
Máximo 17 pulg. (432 mm)
Mínimo 5 pulg. (127 mm)
Máximo 11.69 pulg. (297 mm)
Peso del material del alimentador automático
Peso del material de alimentación manual
Alta fiabilidad: 64 – 120
g/m2
Fiabilidad variable: 121 - 220 g/m2
64 - 250 g/m2
Dimensiones:
Ancho
Altura
Profundidad
Peso
Máquina: Envío:
22.7 pulg. (57.7 cm) 27 pulg. (68.6 cm)
9.6 pulg. (24.5 cm) 15 pulg. (38.1 cm)
18.8 pulg. (47.8 cm) 22.7 pulg. (57.8 cm)
21 libras (9.5 kg) 32.8 libras (14.9kg)
Apagado automático
15 minutos de inactividad
Ciclo de trabajo
80 documentos por semana
Requisitos eléctricos
Voltaje
Receptáculo
120 V, 60 Hz
NEMA 5-15P
Fusible
Sí (interno y no reemplazable)
Entorno operativo
41 - 95 (°F)/5 - 35 (°C)
Altitud máxima de 2000 m
Altura
Ancho
Profundi
Figura 1. Dimensiones de Foton 30
3. Especificaciones
Page 39

Aviso de la FCC Clase B
Este dispositivo cumple con la Parte 15 de las normas
de la FCC. El funcionamiento está sujeto a las dos
condiciones siguientes:
Este dispositivo no puede causar interferencias
perjudiciales.
Este dispositivo debe aceptar cualquier
interferencia recibida, incluidas las interferencias
que puedan causar un funcionamiento no
deseado.
NOTA: Este equipo ha sido probado y se ha
determinado que cumple con los límites para un
dispositivo digital de Clase B, de acuerdo con la Parte 15
de las normas de la FCC. Estos límites están diseñados
para proporcionar una protección razonable contra
interferencias perjudiciales en una instalación residencial.
Este equipo genera, utiliza y puede irradiar energía de
radiofrecuencia y, si no se instala y utiliza de acuerdo con
las instrucciones, puede causar interferencias
perjudiciales en las comunicaciones de radio. Sin
embargo, no hay garantía de que no se produzcan
interferencias en una instalación en particular. Si este
equipo causa interferencias perjudiciales en la recepción
de radio o televisión, lo cual puede determinarse
apagando y encendiendo el equipo, se recomienda al
usuario que intente corregir la interferencia mediante una
o más de las siguientes medidas:
- Reoriente o reubique la antena receptora.
- Aumente la separación entre el equipo y el
receptor.
- Conecte el equipo a un tomacorriente de un
circuito diferente al que está conectado el
receptor.
- Consulte al distribuidor o a un técnico de
radio/TV experimentado para obtener ayuda.
Aviso de Clase B en Canadá
Canadá, Clase B
Este aparato digital de Clase B cumple con la norma
canadiense ICES-003.
Modificaciones
Cualquier modificación hecha a este dispositivo que
no esté aprobada por ACCO Brands puede anular la
autoridad otorgada al usuario por la FCC o por
Industry Canada para operar este equipo.
Page 40

4. Instalación
Servicio
ADVERTENCIA: No intente reparar ni realizar
mantenimiento a la laminadora. No respetar esta
advertencia puede causar lesiones personales graves o
la muerte.
Desconecte el enchufe del receptáculo y póngase en
contacto con el servicio de atención al cliente si se
producen una o más de las siguientes situaciones.
• El cable de alimentación o el enchufe de
conexión están dañados.
• Se ha derramado líquido en la laminadora.
• La laminadora no funciona correctamente
después de haber sido manipulada
incorrectamente.
• El laminador no funciona como se describe en
estas instrucciones.
Instalación
• Los daños durante el transporte deben
informados de inmediato a la empresa
transportista que realiza la entrega.
• Coloque la laminadora sobre una superficie
plana y estable capaz de soportar 50 lbs.
• La superficie debe tener al menos 30 pulg. de
altura para asegurar un posicionamiento
cómodo durante la operación. Los cuatro pies
de goma deben estar en la superficie de apoyo.
• Conecte el cable de alimentación a una fuente
de alimentación adecuada. Evite conectar otros
equipos al mismo circuito al que está
conectado la laminadora, ya que esto puede
hacer saltar el disyuntor o quemar los fusibles.
• El laminador debe colocarse de manera que la
película que sale pueda caer libremente sobre
una superficie plana. La acumulación de
documentos laminados al salir de la laminadora
puede causar un atasco.
• Evite colocar la laminadora cerca de fuentes de
calor o frío. Evite colocar la laminadora en el
camino directo del aire forzado, calentado o
enfriado.
Cuidados de la Foton 30
El único mantenimiento requerido por el operador es la
limpieza periódica de los rodillos. Mantener los rodillos
limpios asegura que sus productos terminados no se
dañen por la suciedad ni las acumulaciones de adhesivo.
PRECAUCIÓN: el siguiente procedimiento se
realiza mientras la laminadora está caliente. Tenga
mucho cuidado.
ADVERTENCIA: No aplique líquidos de limpieza ni
disolventes a los rodillos.
ADVERTENCIA: No intente laminar los adhesivos
marcados como “Inflamables”.
ADVERTENCIA: No exponga la laminadora a
líquidos.
1. Encienda la máquina, espere a que se caliente
completamente.
2. Abra la puerta de la laminadora con el pestillo
plateado.
3. Limpie los cilindros superiores con un paño
limpio, húmedo y sin pelusas. Si hay alguna
acumulación de adhesivo, puede usar alcohol
isopropílico en lugar de agua.
4. Levante el borde de la película hasta el mango del
cartucho.
5. Limpie los rodillos inferiores con un paño limpio y
húmedo sin pelusas. Si hay alguna acumulación
de adhesivo, puede usar alcohol isopropílico en
lugar de agua.
6. Coloque el borde delantero de la película en la
posición correcta y cierre la puerta.
7. Mantenga pulsado el botón RUN/STOP durante
5-7 segundos para hacer avanzar manualmente
los rodillos.
8. Abra la puerta de la laminadora con el pestillo
plateado.
9. Repita los pasos 4 a 6.
Nota: ¡No utilice esponjas metálicas para limpiar los
rodillos térmicos!
ADVERTENCIA: No lamine objetos con brillos ni
metálicos. Se pueden producir daños en los rodillos.
Las cubiertas laterales y la mesa de alimentación se
pueden limpiar con un paño sin pelusas y un detergente
suave.
Page 41

Page 42

Page 43

5. Guía de funciones
A. CONOZCA SU LAMINADORA:
(Se muestra en la imagen A de arriba)
a. BANDEJA DE ALIMENTACIÓN Y GUÍAS
LATERALES:
i. Coloque el documento o los
documentos que se laminarán y
utilice las guías de deslizamiento
para minimizar la inclinación. Use
la extensión para documentos
más grandes.
b. PUERTA DE ENTRADA/SALIDA:
i. Introduzca el documento en la
laminadora. Una luz roja en la
puerta indicará que se ha producido
un fallo de alimentación. Abra la
puerta para solucionar cualquier
problema de alimentación.
c. PUERTA LAMINADA:
i. Puerta que da acceso a las partes
internas de la laminadora:
rodillos, cartucho, etc.
ii. Para abrir: tire del pestillo
plateado y levántelo.
iii. Para cerrar: baje suavemente
usando el pestillo plateado y
empuje el pestillo para cerrarlo.
NO empuje hacia abajo la puerta
de la laminadora para cerrarla.
d. CARTUCHO DE PELÍCULA:
i. Reemplace el cartucho de película
cuando esté vacío o cuando
necesite un espesor diferente.
Consulte la sección CARGA DE
PELÍCULA DEL CARTUCHO para
obtener más detalles.
e. RODILLOS LAMINADORES:
i. Los rodillos se calientan para
activar el adhesivo en la película y
aplicar la presión necesaria para
que la película se adhiera al
documento.
f. CORTADORA AUTOMÁTICA:
i. En los modos de corte automático,
la cortadora encuentra el borde
anterior y posterior del
documento, y corta la película. En
el modo de corte manual, cortará
la película cuando se pulse el
botón CUT (Cortar).
B. PANEL DE CONTROL: (Se muestra en la imagen B
de arriba)
BOTONES
a. POWER (ENCENDER): enciende/apaga la
máquina. Después de 15 minutos de
inactividad, la máquina se apagará
automáticamente.
b. RUN/STOP (EJECUTAR/DETENER): se
utiliza para ejecutar y detener la
laminadora.
i. Función dual: Avance manual:
Mantenga presionado
continuamente el botón para
hacer avanzar manualmente los
rodillos laminadores. Esto se
puede utilizar para eliminar
atascos y resto de suciedad antes
de hacer la limpieza.
c. MODE (MODO): permite a los usuarios
alternar entre tres modos de operación.
i. Auto Feed/Auto Cut
(Alimentación automática/Corte
automático): ideal para tamaños
de papel estándar impresos en
papel de carta de 20-32 libras.
ii. Manual Feed/Auto Cut
(Alimentación manual/Corte
automático): ideal para tamaños
de papel estándar en papeles
pesados que no se alimentan
automáticamente.
iii. Manual Feed/Manual Cut
(Alimentación manual/Corte
manual): ideal para documentos
de formas irregulares y no
rectangulares.
d. CUT (CORTAR): al presionar este botón, se
establece un ciclo del cortador para cortar la
película una sola vez. Este botón se utiliza
principalmente en el modo de corte manual.
INDICADORES
e. ESTADO: comunica el estado de la máquina:
i. Verde fijo: listo para usar
ii. Secuencia de parpadeo en verde:
en marcha
iii. Ámbar fijo: calentamiento
iv. Secuencia de parpadeo en ámbar: se
aceptan los comandos de calentamiento y RUN (EJECUTAR). Comenzará
a laminar una vez que esté listo.
v. Rojo fijo: estado de error
Page 44

f. FILM (PELÍCULA): La luz LED indicará
cuando la película está por agotarse
(aproximadamente el 30 % restante) o
está vacía.
i. Bajo: luz LED ámbar
ii. Vacío: luz LED roja
g. MODE (MODO): la luz LED verde identifica
en qué modo de operación se encuentra la
máquina.
h. MENSAJE DE ERROR: comunica los
mensajes de error que deben ser resueltos.
i. PUERTA: una o ambas puertas
están abiertas
ii. ATASCO: la máquina puede
encontrarse con dos tipos de
atascos:
1. Atasco de la laminadora:
pulse y mantenga
pulsado el botón RUN
(EJECUTAR) para que los
rodillos avancen
manualmente y se
despejen por sí solos.
2. Atasco del alimentador:
abra la puerta del
alimentador y retire el
papel.
iii. CORTADORA: no puede
completar el ciclo de corte
completo
i. INDICADOR DE ALIMENTACIÓN MANUAL:
Ubicado en la puerta de alimentación, se
ilumina de color VERDE cuando la
laminadora está lista para que un
documento se alimente manualmente.
C. CARTUCHO DE PELÍCULA: (Se muestra en la imagen
C de arriba)
a. CARTUCHO: se inserta en la laminadora.
b. ETIQUETA DEL CARTUCHO: indica el
espesor de la película. Ubicado en la parte
superior del mango.
a. GUÍA DE LA PELÍCULA: Las primeras 3-
4 pulg. (75-100 mm) de película laminada
sellada que se encuentra en el cartucho de
la película. Esta guía debe colocarse en
dirección de la salida de la máquina.
Page 45

6. Operación
MODOS DE OPERACIÓN:
AUTO FEED/AUTO CUT
(ALIMENTACIÓN AUTOMÁTICA/CORTE AUTOMÁTICO)
Nota: Ideal para tamaños de papel estándar
impresos en papel de carta de 20-32 libras
(75-120 g/m2).
1. Pulse el botón POWER para encender la máquina.
La máquina se iniciará automáticamente en el
modo Alimentación automática/Corte automático
2. Coloque su(s) documento(s) en la BANDEJA DE
ALIMENTACIÓN.
3. Deslice las guías laterales para que se ajusten a
su(s) documento(s) y así minimizar la inclinación
durante la laminación.
4. Pulse el botón RUN (EJECUTAR):
Nota: Si se pulsa RUN (EJECUTAR) antes de que
la máquina se haya calentado completamente,
la barra de estado mostrará una luz ÁMBAR
que parpadea en una secuencia. El laminador
ha aceptado el comando y se iniciará
automáticamente cuando la máquina alcance
la temperatura adecuada.
5. Los documentos se laminarán automáticamente y se
recortarán automáticamente al salir de la máquina.
Nota: Si pulsa Stop (Detener) mientras el
documento sigue pasando por la laminadora,
la máquina terminará de laminar el
documento antes de detenerse.
MANUAL FEED/AUTO CUT
(ALIMENTACIÓN MANUAL/CORTE AUTOMÁTICO)
Nota: Ideal para tamaños de papel
rectangular estándar en papeles pesados que
no se alimentan automáticamente.
1. Pulse el botón POWER para encender la máquina.
2. Seleccione el modo Manual Feed/Auto Cut
(Alimentación manual/Corte automático)
pulsando el botón Mode (Modo).
3. Espere a que la máquina alcance la temperatura
adecuada: luz de ESTADO verde fija.
4. Coloque solo el primer documento en la BANDEJA
DE ALIMENTACIÓN. El documento debe colocarse
en el centro de la bandeja de alimentación y lo
suficientemente dentro del alimentador como
para que pueda tomar el documento.
5. Pulse el botón RUN (EJECUTAR). El documento
comenzará a alimentarse en la laminadora.
6. Después de que su primer documento
comience a laminarse, espere a que el
indicador de alimentación manual se ilumine en
verde. Una vez iluminada, la máquina puede ser
alimentada manualmente con el siguiente
documento. Repita este proceso hoja por hoja
hasta que el trabajo esté completo.
7. Los documentos se laminarán manualmente y
se recortarán automáticamente al salir de la
máquina.
8. Una vez que el documento final ha sido cortado y
sale, la máquina se detendrá automáticamente.
MANUAL FEED/MANUAL CUT
(ALIMENTACIÓN MANUAL/CORTE MANUAL)
Nota: Este modo se utiliza mejor para
documentos de forma extraña o no
rectangular que no se alimentan
automáticamente.
1. Pulse el botón POWER para encender la
máquina.
2. Seleccione el modo Manual Feed Manual Cut
(Alimentación manual/Corte manual) pulsando
el botón Mode (Modo).
3. Espere a que la máquina alcance la temperatura
adecuada: luz de ESTADO verde fija.
4. Coloque solo el primer documento en la BANDEJA
DE ALIMENTACIÓN. El documento debe colocarse
en el centro de la bandeja de alimentación y lo
suficientemente dentro del alimentador como
para que pueda tomar el documento.
5. Pulse el botón RUN (EJECUTAR). El documento
comenzará a alimentarse en la laminadora.
6. Después de que su primer documento
comience a laminarse, espere a que el
indicador de alimentación manual se ilumine
en verde. Una vez iluminada, la máquina puede
ser alimentada manualmente con el siguiente
documento. Repita este proceso hoja por hoja
hasta que el trabajo esté completo.
7. Pulse el botón CUT (CORTAR) para hacer girar la
cortadora en cualquier momento que desee
cortar la película.
Nota: Se recomienda presionar el botón
CUT (CORTAR) después de ver el
documento completo, para evitar cortar el
documento.
Page 46

8. Una vez que el documento final haya salido de la
máquina, pulse el botón STOP (DETENER) para
detener el proceso de laminación.
9. Una vez que la laminación se haya detenido, pulse
CUT (CORTAR) para cortar el resto de la película
que ha salido de la máquina.
CARGA DE LA PELÍCULA DE CARTUCHO
(Imágenes de referencia 1 a 4 para demostrar el
proceso)
PRECAUCIÓN: el siguiente procedimiento puede
realizarse mientras la laminadora está caliente. Tenga
mucho cuidado.
Nota: Los cartuchos de película tienen una etiqueta de
fin de rollo que la laminadora detectará
automáticamente. Una vez detectado, la laminadora
dejará de alimentar los documentos restantes en la
bandeja de alimentación. El laminador continúa
laminando en la laminadora. La pegatina puede
aparecer en el último documento, pero se puede
quitar del laminado.
1. Abra la puerta de la laminadora: Abra la
puerta de la laminadora levantando
completamente el pestillo plateado en la
parte superior de la máquina y tire hacia
arriba hasta que la puerta se abra
completamente.
2. Retire el cartucho: Levante el mango del
cartucho para extraer el cartucho instalado.
Precaución: los cartuchos llenos
tienden a ser pesados
3. Inserte el cartucho: Inserte el cartucho de
reemplazo alineando los bordes del
cartucho sobre la guía de canal gris en la
laminadora y bajando.
Nota: La guía de la película
se debe insertar lejos del
alimentador, en dirección
a la salida de la máquina.
4. Cierre la puerta de la laminadora:
Cierre la puerta de la laminadora
bajando suavemente la puerta y cierre
completamente la trampilla plateada en la
parte superior. NO empuje hacia abajo la
puerta de la laminadora para cerrarla;
utilice el pestillo.
5. Asegúrese de que el cartucho esté
completamente insertado: El indicador de
película vacía se iluminará cuando no haya
ningún cartucho instalado o cuando el
cartucho no esté completamente asentado
en la parte inferior.
6. Enhebrar automáticamente: Cuando la
laminadora alcanza la temperatura
adecuada, la máquina terminará de
enhebrar la película y alimentará
aproximadamente 9 pulg. (22.9 cm) de
película para eliminar posibles arrugas en
la película.
Page 47

RESOLUCIÓN DE PROBLEMAS
SÍNTOMA
CAUSA POSIBLE
MEDIDA CORRECTIVA
Presionar el botón
de encendido no
enciende la
máquina.
El cable de alimentación
no debe estar
completamente insertado
en el tomacorriente.
Inserte completamente el enchufe en el tomacorriente.
Asegúrese de que el tomacorriente esté encendido.
Indicador de
estado Rojo:
Indicador de error de
puerta Rojo:
Indicador de error de
atasco de papel Rojo:
Indicador de película
vacía Rojo:
Indicador de error del
cortador Rojo:
Retire el papel de la bandeja de alimentación. Abrir y cerrar tanto la
puerta de la laminadora como la puerta del alimentador. Asegúrese de
que estén completamente cerrados.
Abra la puerta del depósito y retire el papel de la bandeja de
alimentación. Cierre la puerta del alimentador.
Si lo anterior no elimina el error, presione y mantenga presionado el
botón RUN (EJECUTAR) durante 10 segundos para alimentar
manualmente la película. La película debe comenzar a salir de la
máquina y el atasco debe desaparecer.
Si el error de atasco persiste, abra la puerta de la laminadora y observe
si la guía de la película queda atrapada en un obstáculo o en los rodillos.
NO CORTE la película. Levante la guía de la película y vuelva a colocarla
en la posición correcta. Cierre la puerta de la laminadora y mantenga
presionado el botón de ejecutar durante 10 segundos.
Se ha detectado la etiqueta de fin de rollo del cartucho. Reemplace el
cartucho de película por uno nuevo y cierre la puerta de la laminadora.
El cortador no pudo iniciar un corte, o no terminó un corte.
Presione el botón de corte manual una vez para intentar activar la
cortadora. No resuelto, intente lo siguiente:
Observe la película a la salida de la laminadora para ver si la película no
está cortada o está parcialmente cortada.
La película no se corta:
Pulse y mantenga pulsado el botón RUN (EJECUTAR) durante unos
10 a 20 segundos para avanzar manualmente la película. Si hay
material laminado en la salida de la laminadora, mantenga
presionado el botón RUN (EJECUTAR) hasta que el material haya
salido completamente de la laminadora. Ahora pulse el botón de
corte manual para ver si la cortadora está activada.
La película se corta parcialmente:
Abra la puerta de la laminadora y fíjese si puede ver la hoja de la
recortadora. Estará cerca de la parte posterior de la laminadora a
través de la película. Con unas tijeras corte la lámina colgando hacia
fuera de la salida de la laminadora. Luego, con cuidado de no poner
los dedos cerca de la cuchilla, retire el cartucho con cuidado. Cierre
la puerta de la laminadora y trate de hacer un ciclo manual de la
cortadora. Si la cortadora funciona, vuelva a insertar el cartucho. Es
posible que tenga que recortar el borde delantero de la película
donde se atascó el cortador. Si necesita recortar la película, deje
4 pulgadas (100 mm) de película sellada como guía del cartucho.
Page 48

Indicador de
estado Rojo
continuo:
Indicador de error del
cortador Rojo continuo:
Vuelva a insertar el cartucho. La máquina, una vez calentada,
enhebrará automáticamente la película y activará el cortador.
Si la cortadora no funciona después de los pasos anteriores, póngase en
contacto con su proveedor de servicio.
Arrugas en la
película en la salida
Película desalineada
Pulse y mantenga pulsado el botón RUN (EJECUTAR) para avanzar
manualmente la película. Después de haber avanzado de 5 a
20 pulgadas (125 a 500 mm) de película la arruga debe resolverse por sí
misma. Si la arruga se elimina, presione el botón de corte manual y
estará listo para comenzar.
Si todavía hay arrugas, abra la puerta de la laminadora. Sujete la película
que sale de la laminadora y manténgala tensa mientras cierra la puerta
de la laminadora. Repita el paso anterior y las arrugas desaparecerán.
Los bordes de la
película no están
alineados
uniformemente.
Los rollos de película
superior e inferior no
están bien ajustados.
Pulse y mantenga pulsado el botón RUN (EJECUTAR) para avanzar
manualmente la película. Después de 5 pulgadas (125 mm). Sujete la
película que sale de la laminadora y manténgala tensa mientras cierra la
puerta de la laminadora.
Los documentos
están torcidos en
la película al salir.
Documentos introducidos
de forma irregular
Antes de cargar papel, intente golpeando el borde delantero del papel
en una superficie plana y luego repita con el borde inferior o superior
para que el papel quede en escuadra.
Inserte el material en el alimentador automático y deslice la guía de
bordes hasta el borde del material.
Instancias
frecuentes de
doble alimentación
El papel tiene estática
pesada.
Intente ventilar el material o colocarlo en un vibrador de papel antes de
alimentarlo. Si los problemas persisten, utilice el modo Manual
Feed/Auto Cut (Alimentación manual/Corte automático).
Instancias
frecuentes de
errores de
alimentación
Los rodillos se deslizan
sobre el material y no
alimentan las hojas
 Loading...