

Page 1

TS-82-914-90011
TS-82-914-90040
User Manual
PRODUCT CODE: DCV10001
Page 2
• Welcome:
Thanks for purchasing this product. Please read the instructions carefully before using this
product.
• FCC Compliance Statement (Class A):
This device complies with Part 15 of the FCC Rules. Operation is
subject to the following two conditions: (1) this device may not cause
harmful interference, and (2) this device must accept any interference
received; including interference that may cause undesired operation.
• Federal Communications Commission (FCC) Statement :
This Equipment has been tested and found to comply with the limits
for a Class A digital device, pursuant to Part 15 of the FCC rules. These
limits are designed to provide reasonable protection against harmful
interference when the equipment is operated in a commercial environment. This equipment
generates, uses and can radiate radio frequency energy and, if not installed and used in accordance with the instructions, may cause harmful interference to radio communications. Operation of this equipment in a residential area is likely to cause harmful interference in which case
the user will be required to correct the interference at his own expense.
• European Community Compliance Statement (Class A):
This is a class A product. In a domestic environment this product may
cause radio interference in which case the user may be required to take
adequate measures.
The symbol of the crossed out wheeled bin indicates this product should
not be placed in municipal waste. Instead, you need to dispose of the waste
equipment by handing it over to a designated collection point for the
recycling of waste electrical and electronic equipment.
Page 3
1
Warning
1. Do not look directly at the LED light source, which may cause retinal damage.
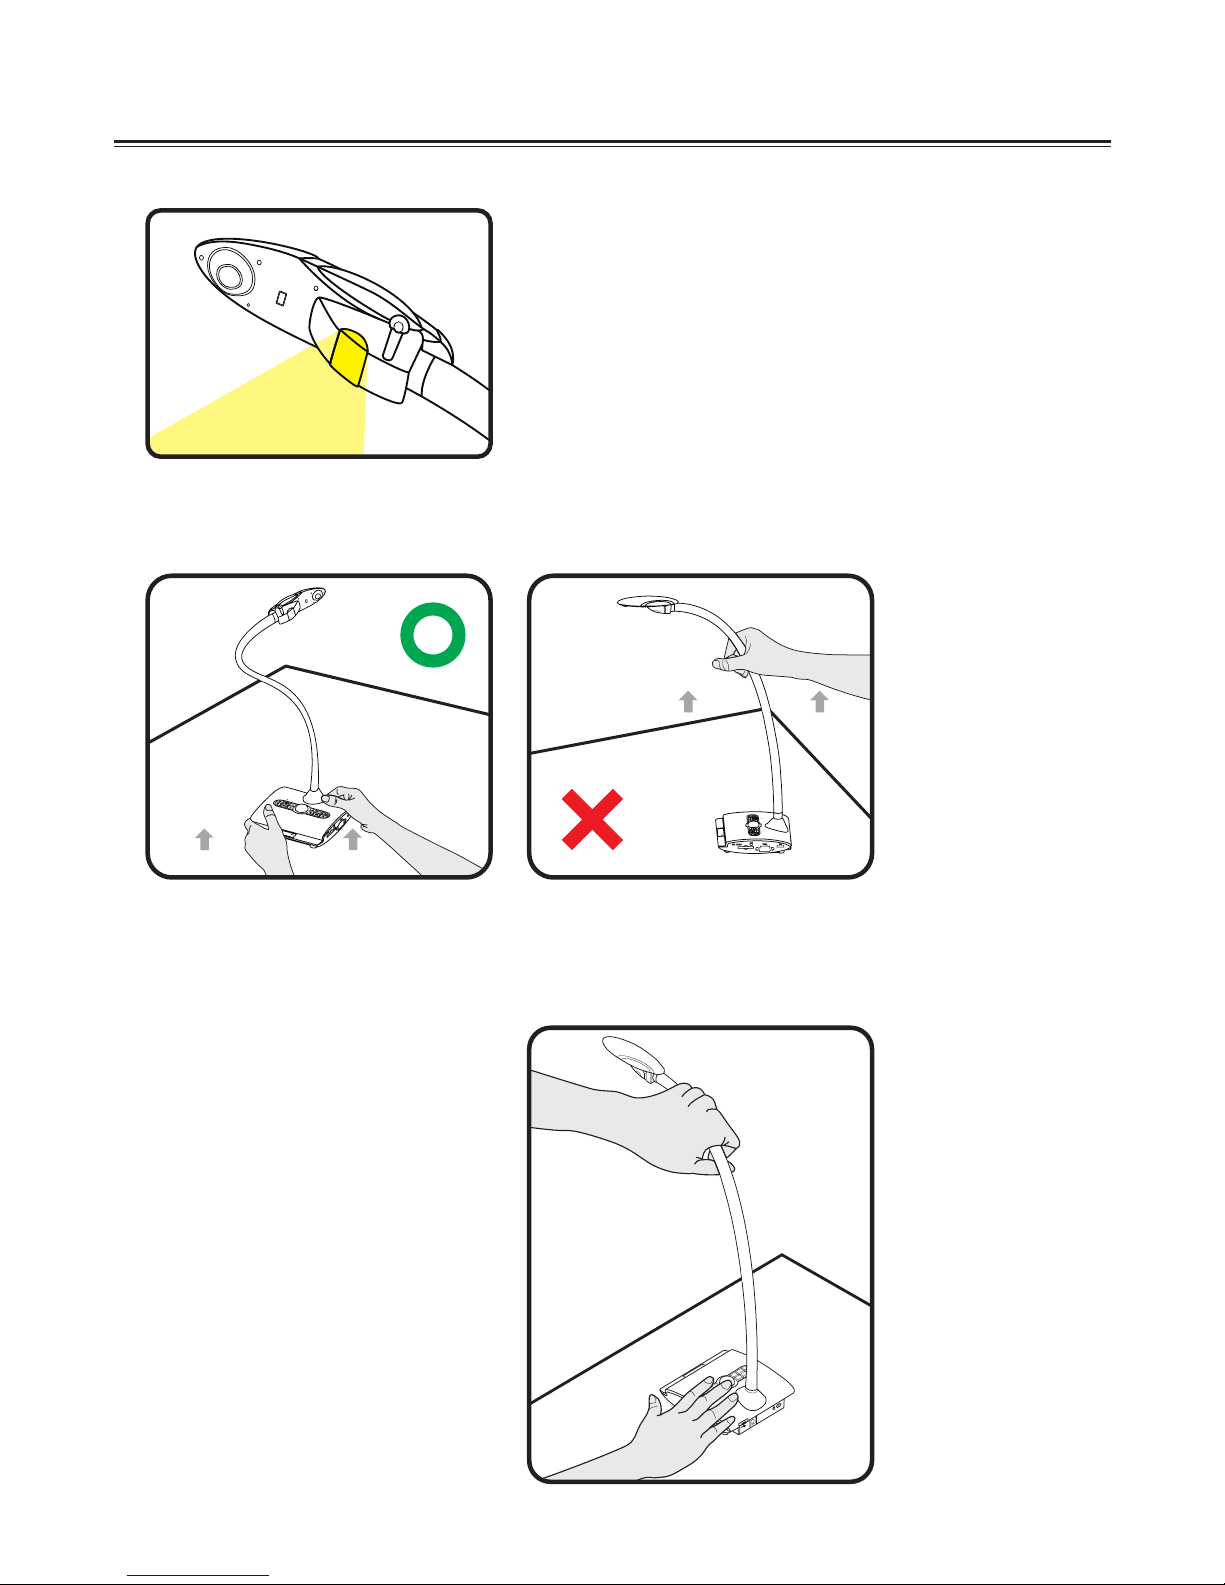
2. Carry the product by holding the base of the main unit in both hands. Never hold the
product by the arm or the camera head only.
3. The camera can be damaged if it hits a desk surface or any hard object.
4. Never turn the arm in the opposite direction.
5. Be sure to keep one hand on the
device base when adjusting the arm
and camera head.
Page 4
2
Preparing the Document Camera
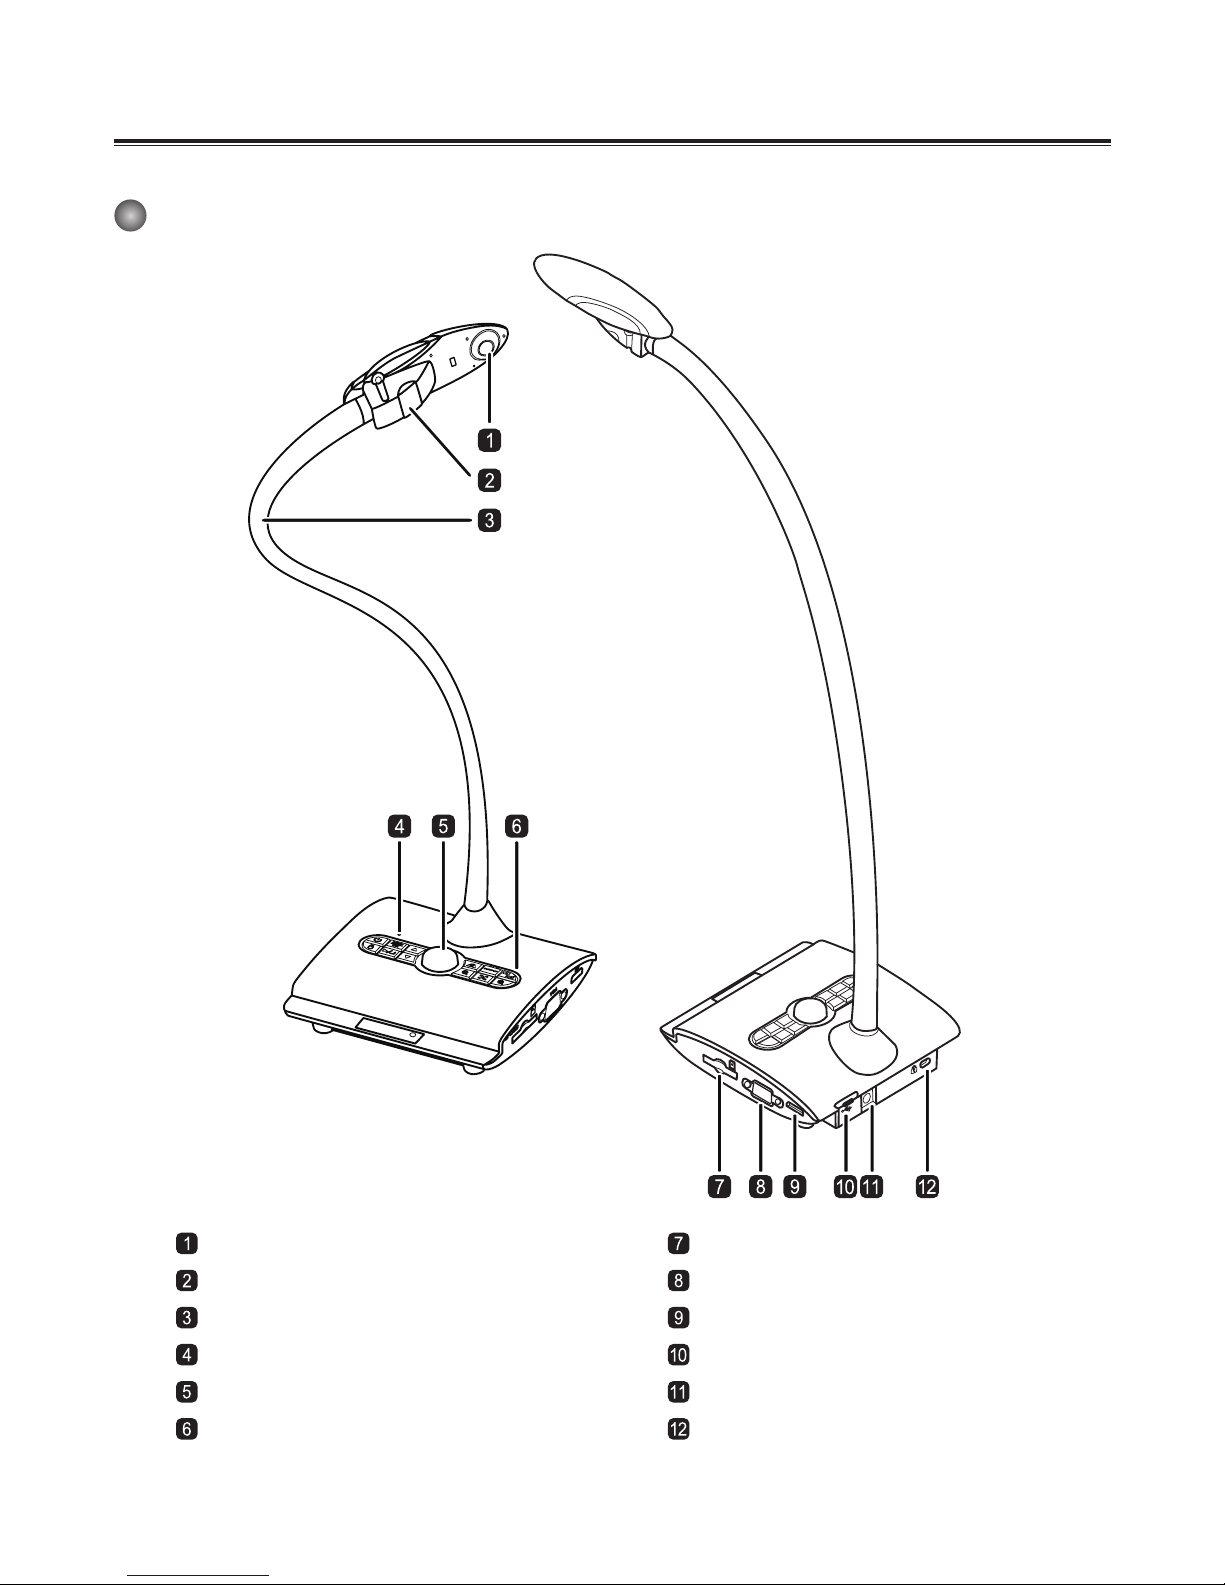
Knowing the Document Camera Parts
Camera Head
LED Lamp
Gooseneck Arm
Microphone
Remote Control Signal Receiver
Control Panel
SD Card Slot
VGA Output Port
HDMI Output Port
USB Port
DC 5V Power Socket
Anititheft Slot
Page 5
3
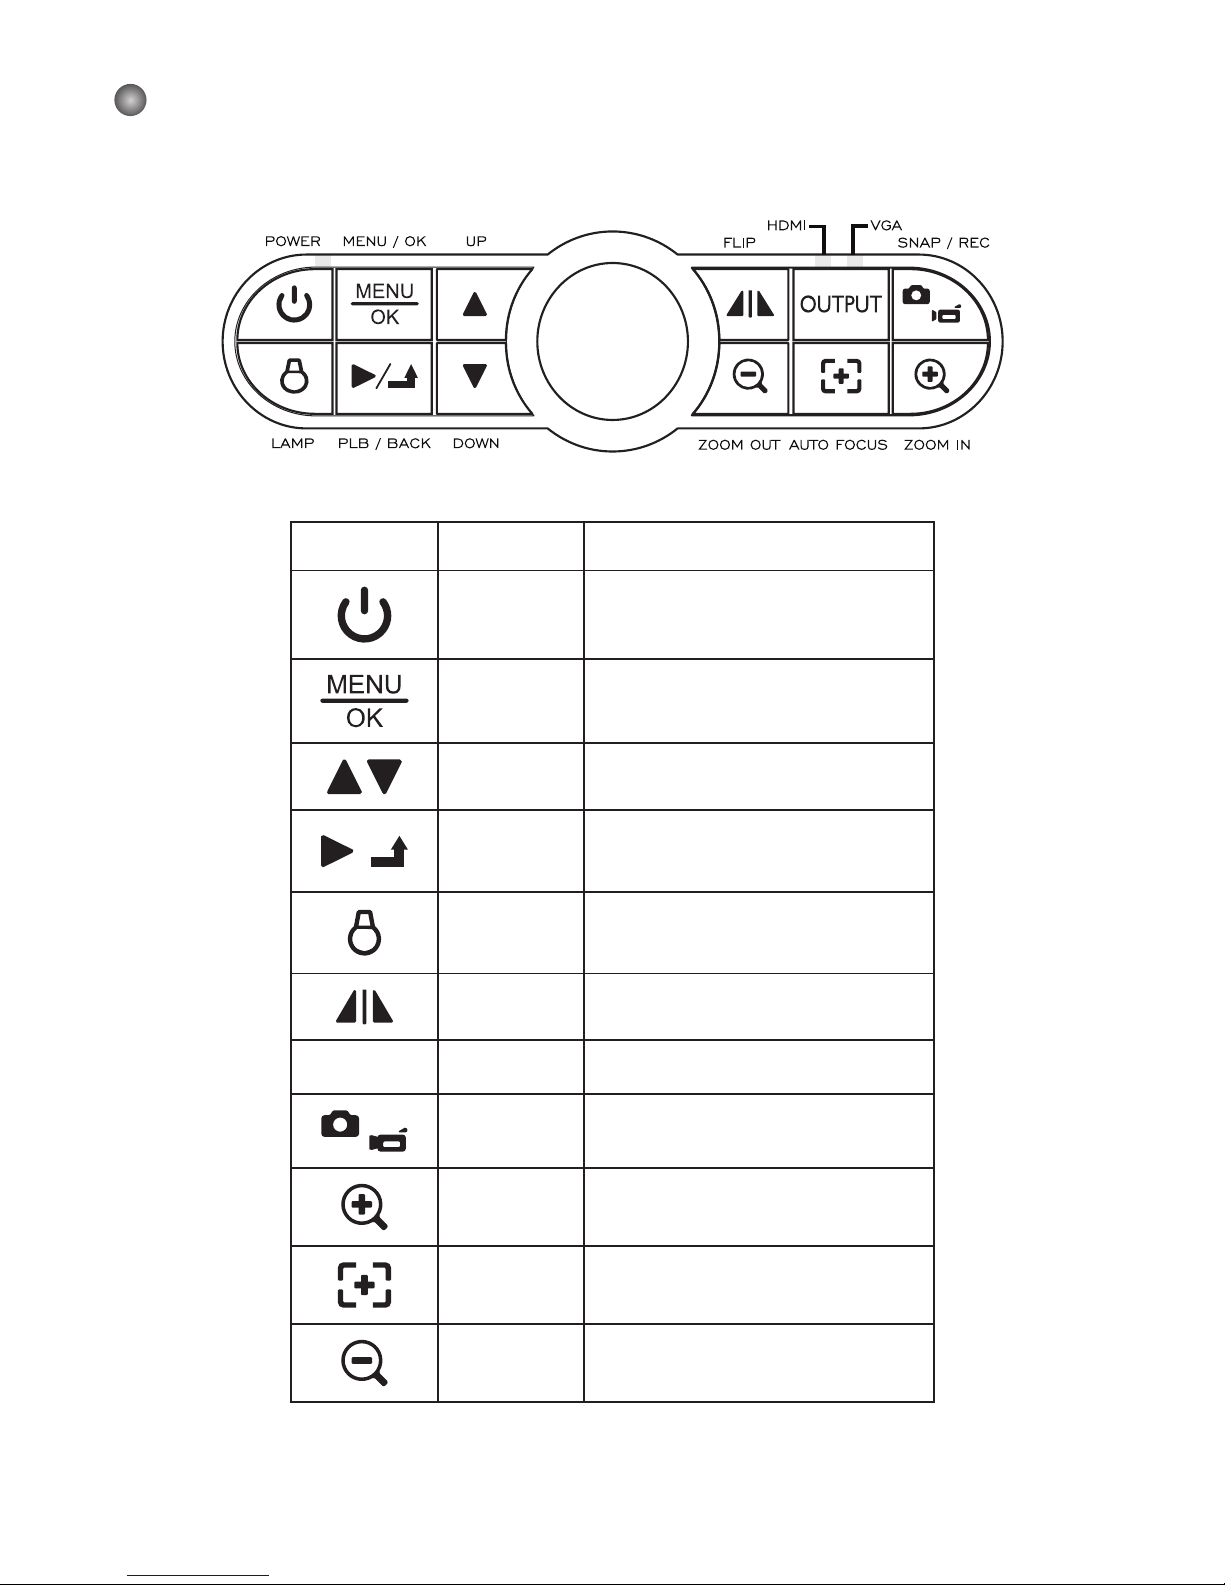
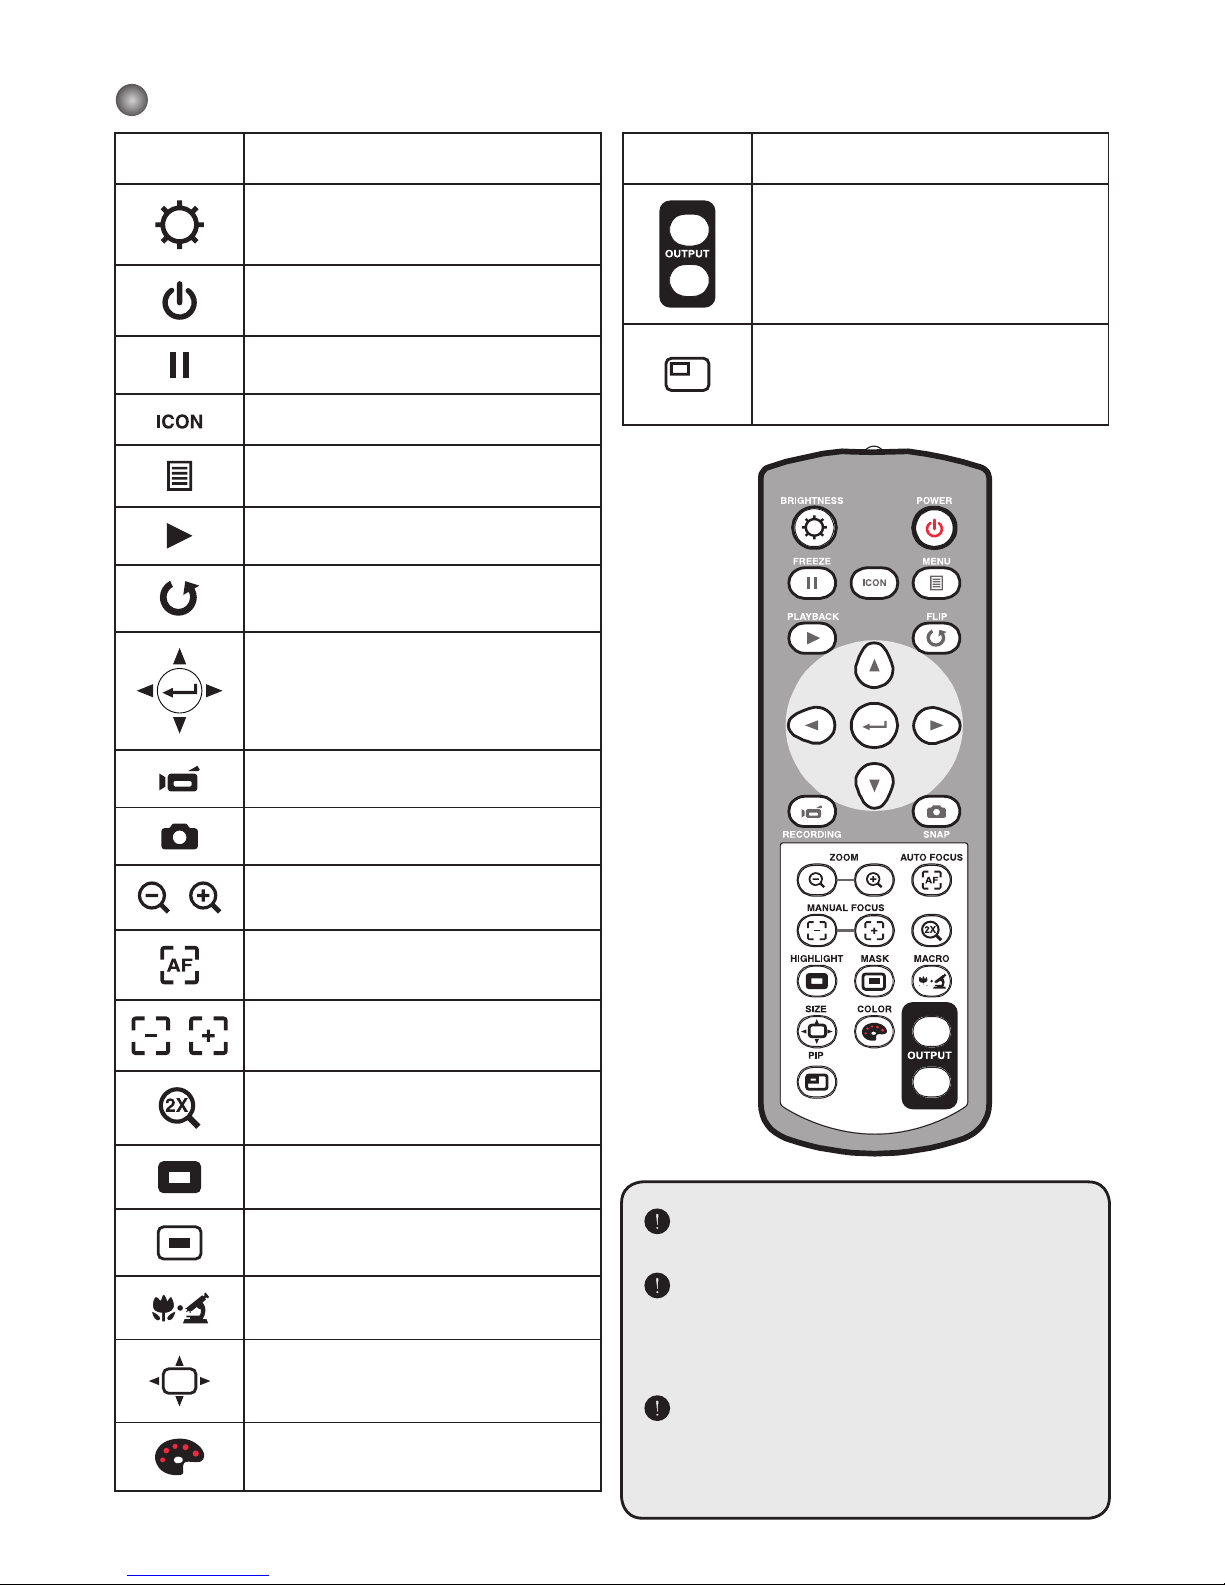
Control Panel
Icon Button Function
Power Power on/off
Menu/OK
Show menu and select.
Up/Down Up/Down button
/
PLB/BACK
Enter playback mode to display
recorded still images and video
clips/Leave current menu
LAMP
Turn on/off the LED lamp and
adjust the brightness of the LED
lamp
FLIP Flip image
OUTPUT
OUTPUT VGA/HDMI output switch
SNAP/REC.
Capture a still image/Record a
video clip
Zoom in Zoom in
Auto Focus One-time auto focus
Zoom out Zoom out
Page 6
4
Remote Control
Button Function
Brightness hotkey
Power on / off
Freeze current image.
* Pause the clip while playing videos
Show or hide on-screen icons
To show or hide OSD menu
Playback mode to display recorded
pictures and video clips
Invert image 180°
Select and adjust
Record a video clip
Capture a still image
/
Zoom out / Zoom in
One-shot auto focus
/
Use the level bar to adjust the focus
manually
2X or 4X digital zoom
Highlight function on / off
Mask function on / off
Macro / Normal switch
Adjust highlighted / masked area
size
Set color for highlighted / masked
area
Button Function
VGA
HDMI
VGA-HDMI output switch
Picture in Picture function on /
off *For displaying a still image as
an insert while displaying another
image.
Infrared remote control can only be
used in proximity to the unit.
Remove the battery cover and load
the batteries into the battery compartment correctly according to the
“+” and “-” symbols.
Be sure to use two AAA batteries. Do
not use new and old batteries or different battery types together.
VGA
HDMI
Page 7
5
Setting Up
This section provides useful tips on how to adjust the document camera smoothly for your
needs.
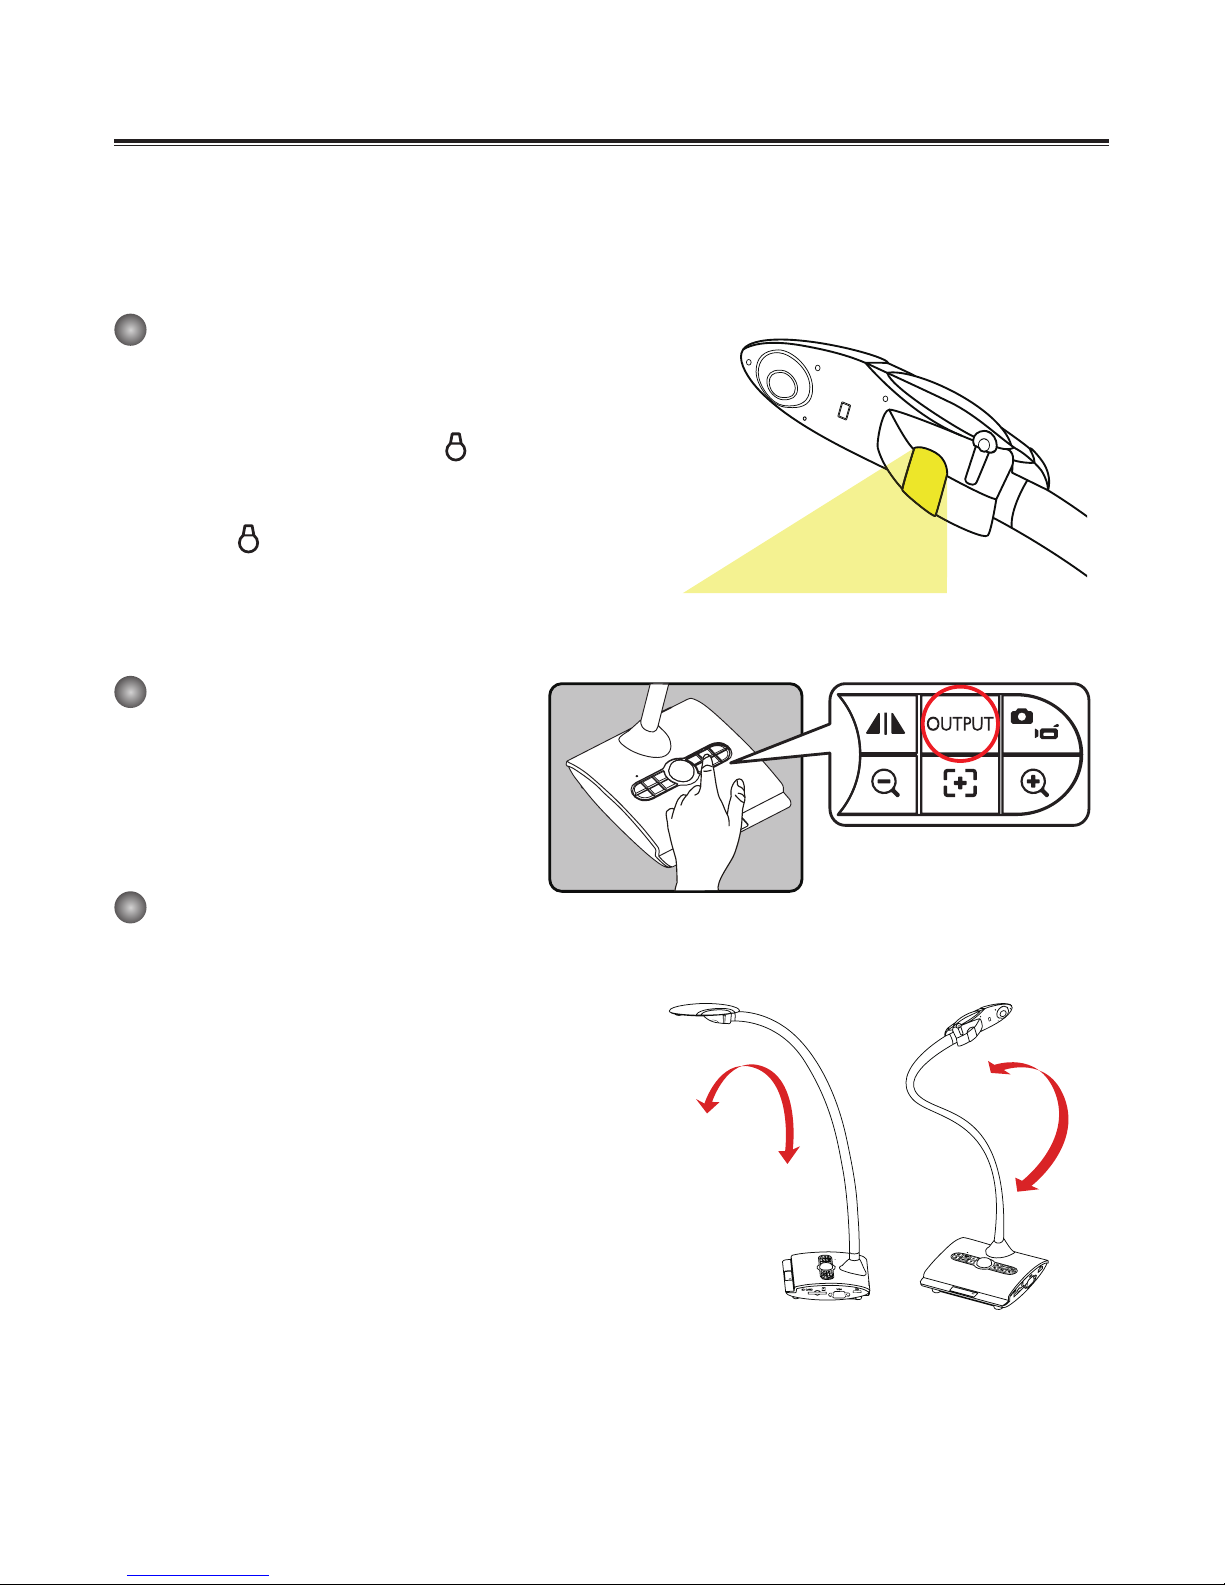
Illumination Lamp
If you are in a dark environment, please turn the
LED lamp on to make better exposure.
1. Press the LED lamp button (
) on the base to
turn on/off the LED lamp.
2. Adjusting the brightness by pressing the lamp
button (
)
Output Switch
Adjust the Output Switch on the control
panel according to your output port.
Gooseneck Arm
The gooseneck arm can be adjusted to support various working areas.
Page 8

6
If the document is not put in the
recommend working area, the image
should be rotated
by FLIP button (
) on control
panel or remote control.
16.54”
11.69”
Height 16.93”
for Max. working
(16.54”x 11.69”)
Minimum height 7.09”
Page 9
7
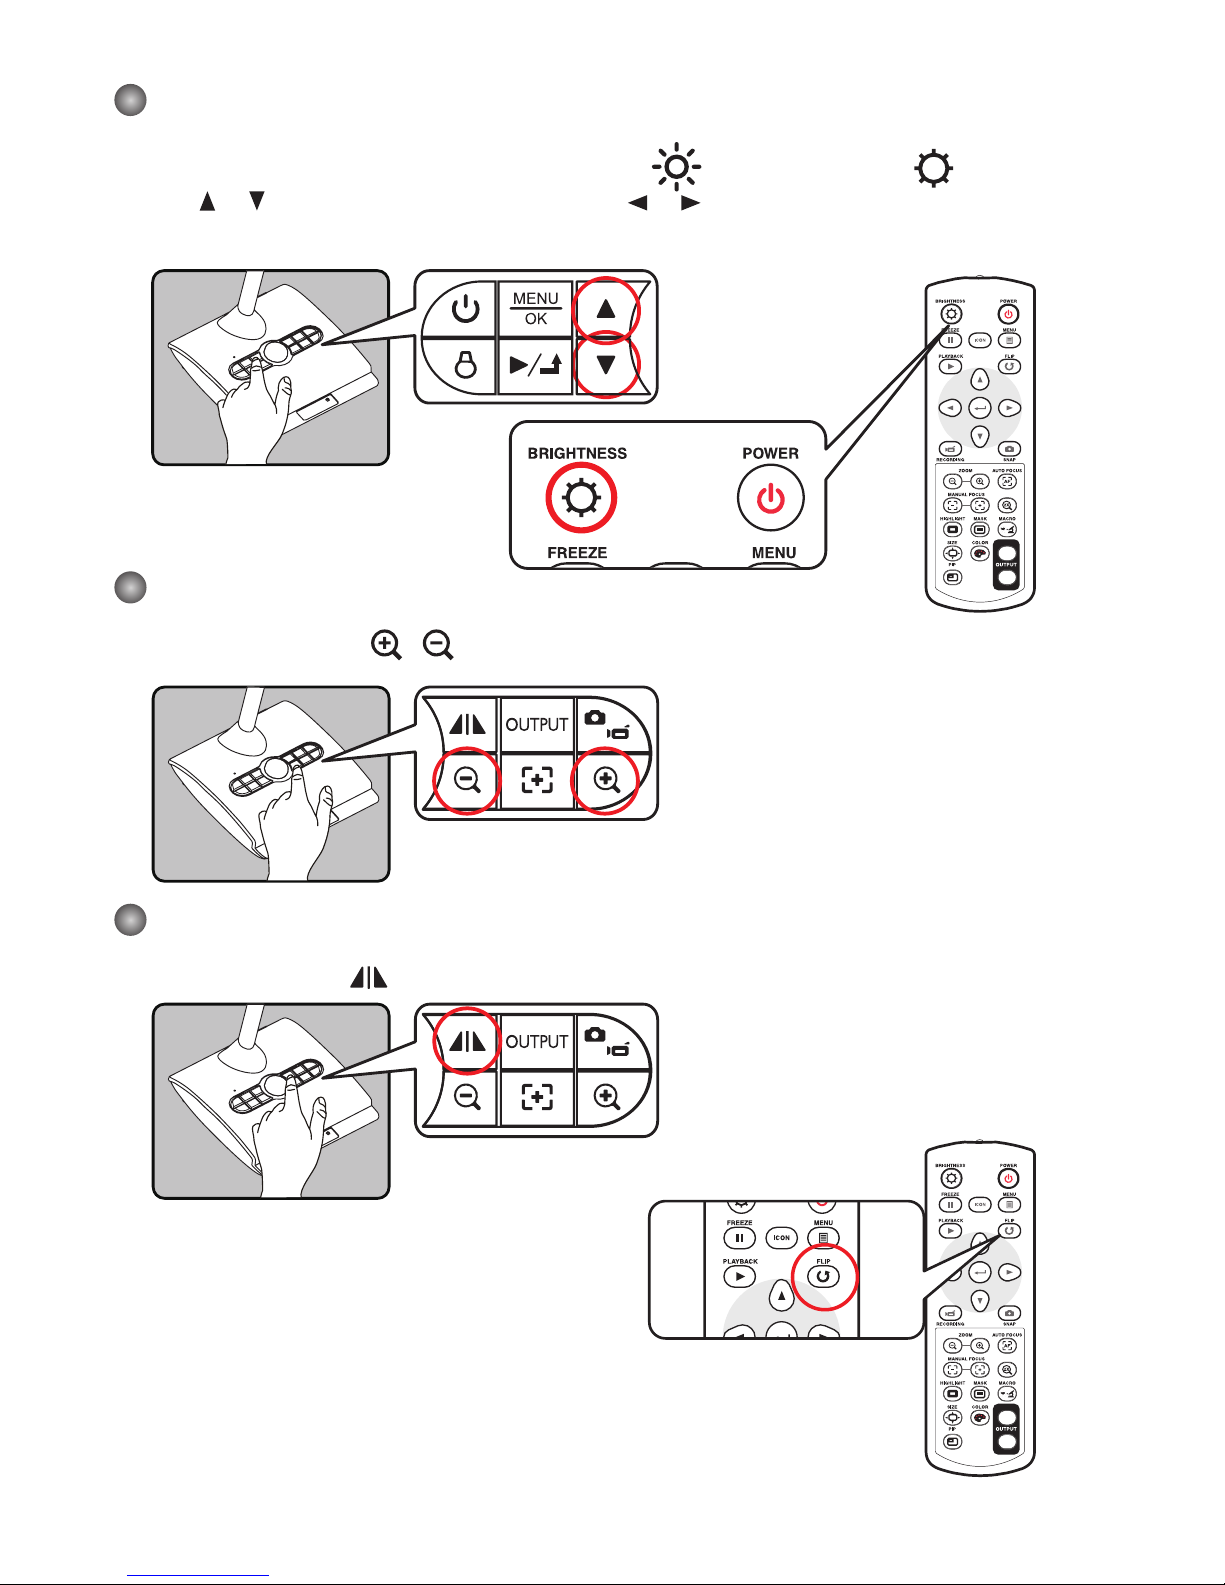
Adjusting the brightness
1. Press BRIGHTNESS button on the control panel ( ) or remote control ( ).
2. Use (
or ) buttons on the control panel or ( or ) buttons on the remote control to
increase or decrease the brightness level.
Zoom Function
Use the Zoom buttons ( / ) to zoom in or zoom out the screen.
Flip Function
Press the Flip Button ( ) to flip image
VGA
HDMI
VGA
HDMI
Page 10
8
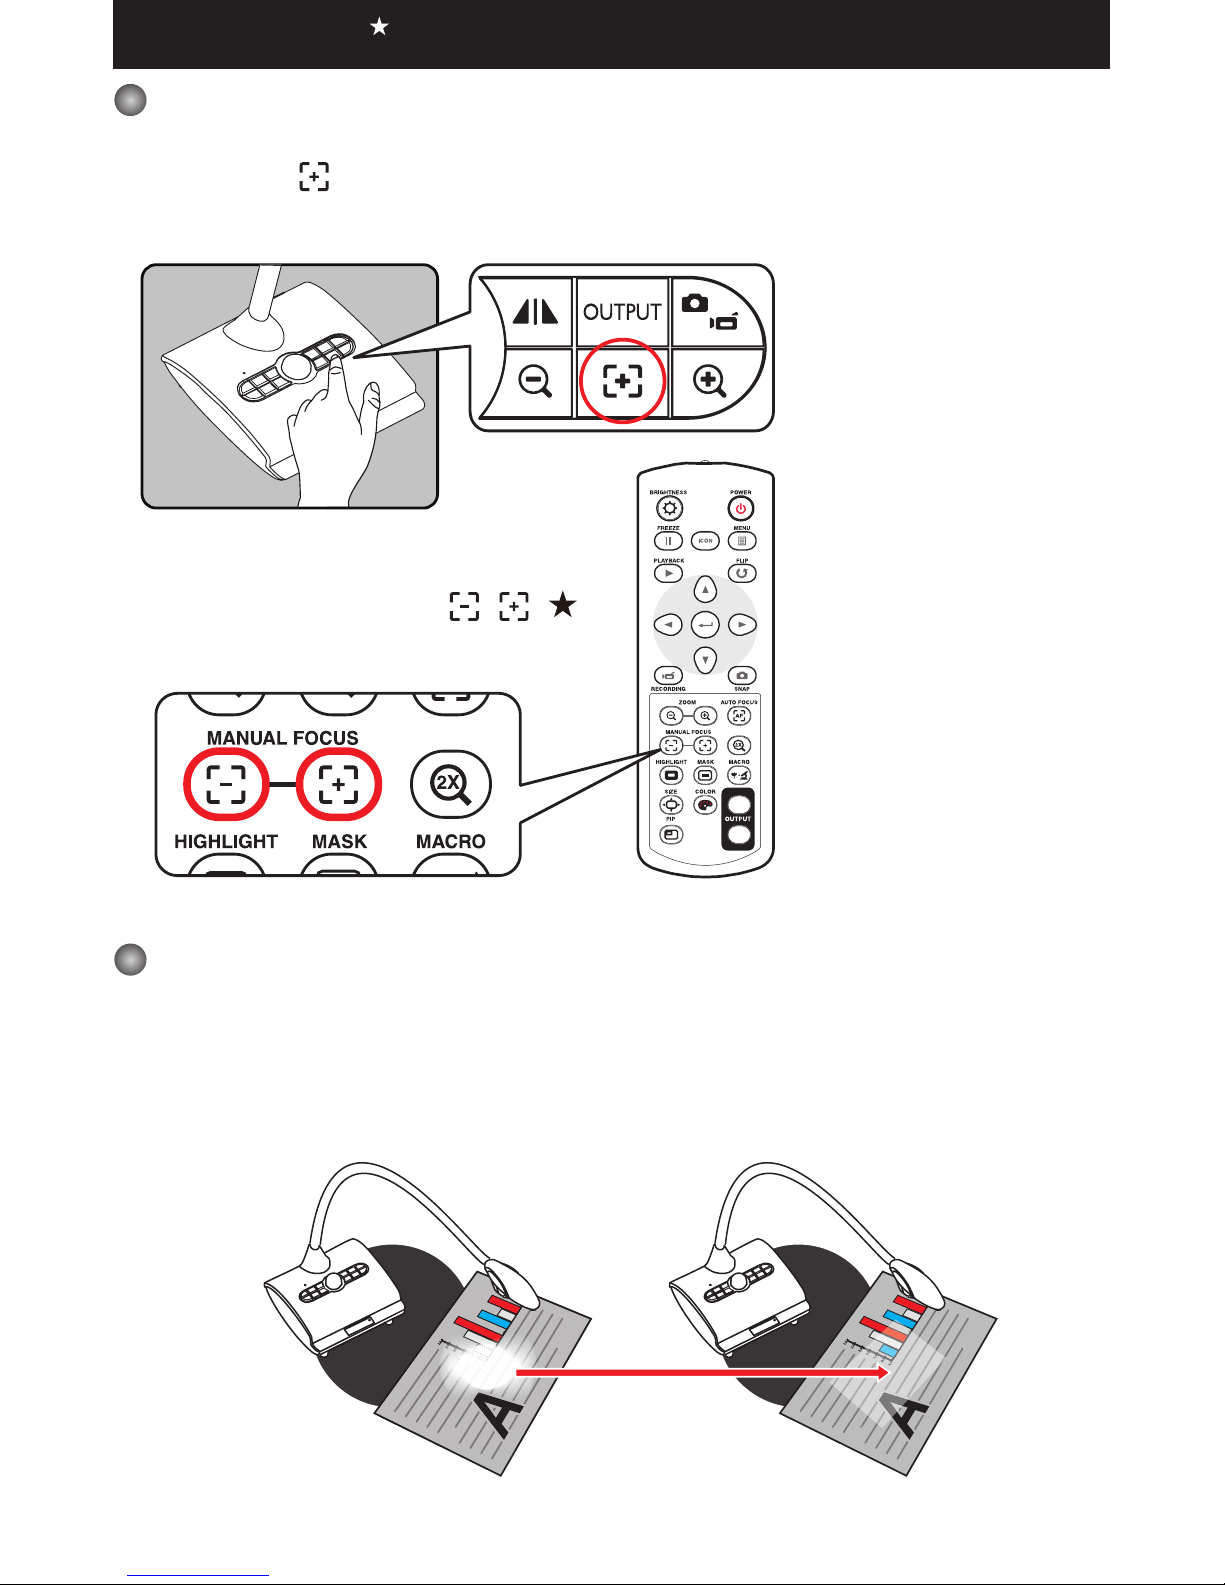
Adjusting the Focus
▶Automatic Focus
Press AF button ( ) to do an one-time auto focus. This function provides a one-time autofocus.
▶Manual Focus
Use the manual focus buttons ( / )( )
on remote control to finetune the focus.
Anti-glare
Anti-glare sheet is a transparent plastic that is overlaid on top of shiny object or glossy surface
to reduce the glare.
To use, simply place the anti-glare sheet on top of shiny object to glossy surface such as
magazine to reduce light reflectio
Functions indicated by can only be used by the remote control.
VGA
HDMI
+ Anti-glare
Page 11
9
Adjust the White Balance
1. Default white balance setting of the document camera is “Auto”.
2. There are various modes (Auto, Flurescent, Tungsten and Custom) for user to choose to fit
in different surroundings.
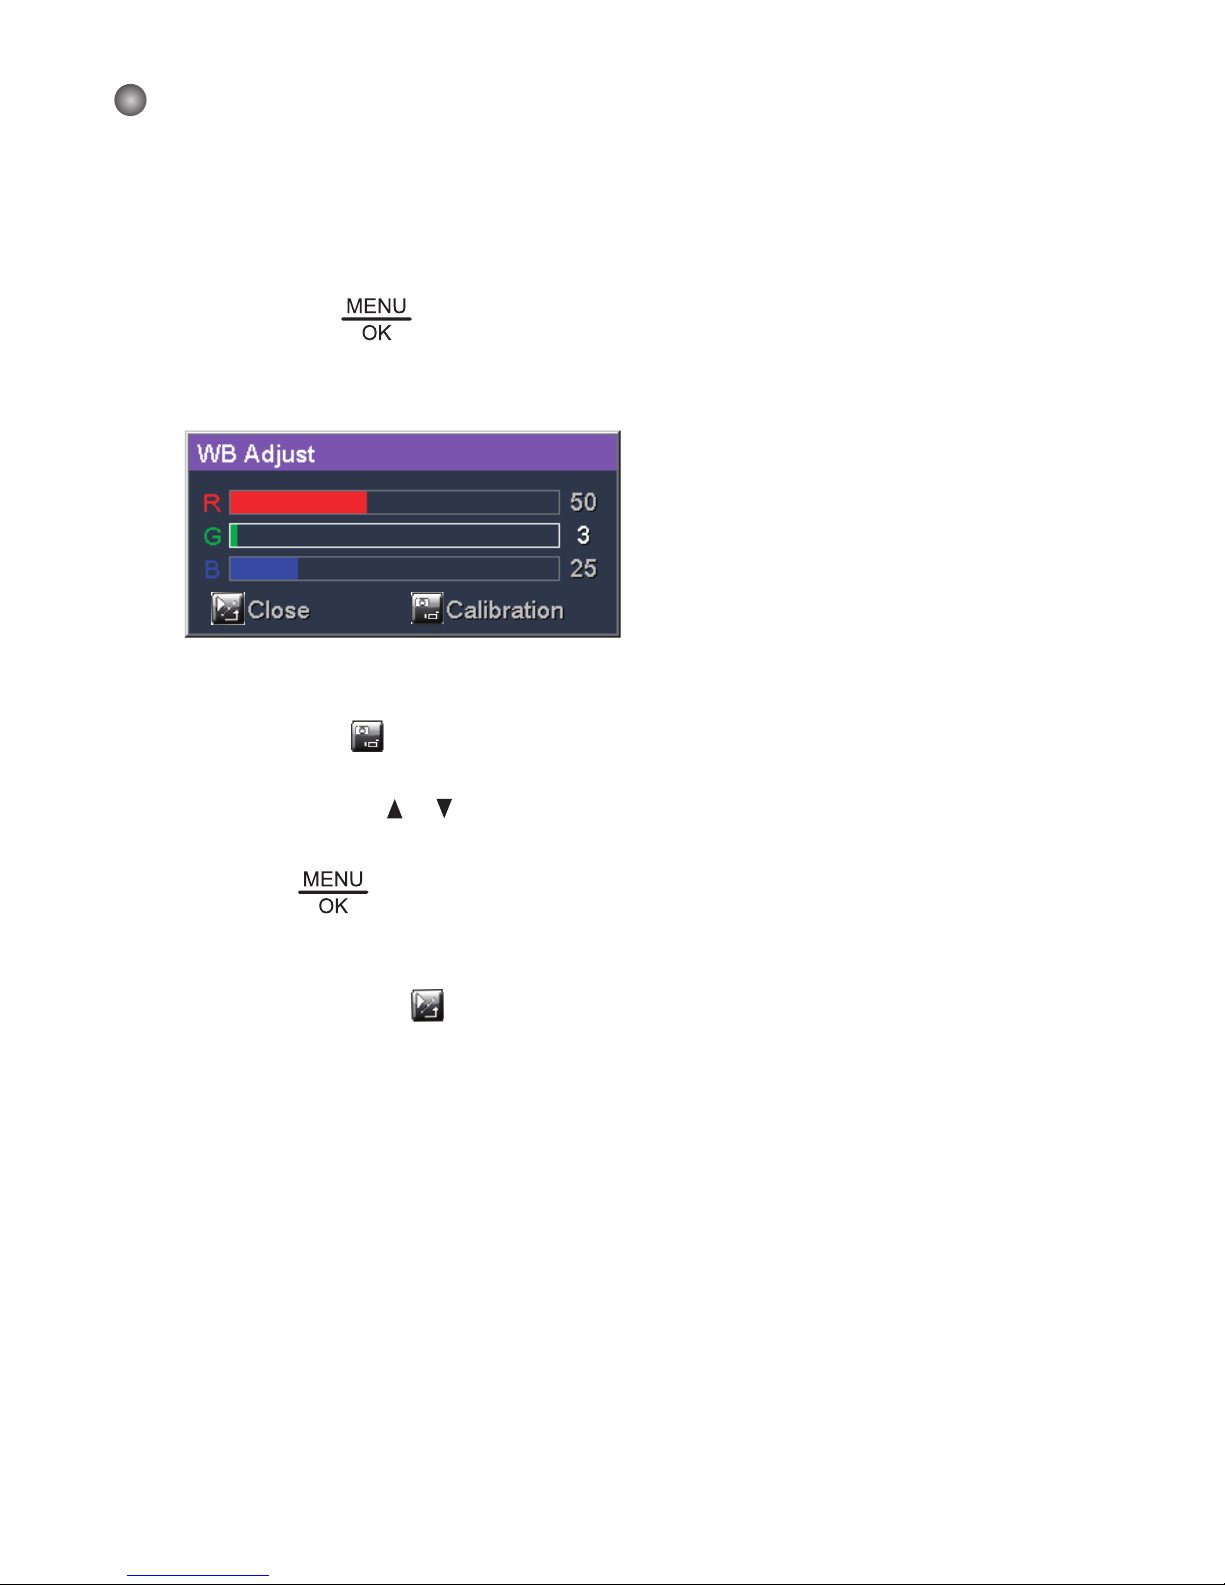
3. Custom white balance:
Press “MENU” ( ) button → White Balance → enter “Custom” mode.
There will be a pop out window as the picture below:
Press SNAP/REC. (
) button to get the data of the current image.
Use the Up or Down (
or ) key to adjust the number of R, G and B parameters.
Press”OK” (
) button to finish current parameter setting and jump to the next
parameter.
Press PLAYBACK/BACK (
) button to finish and leave WB adjust mode.
Page 12
10
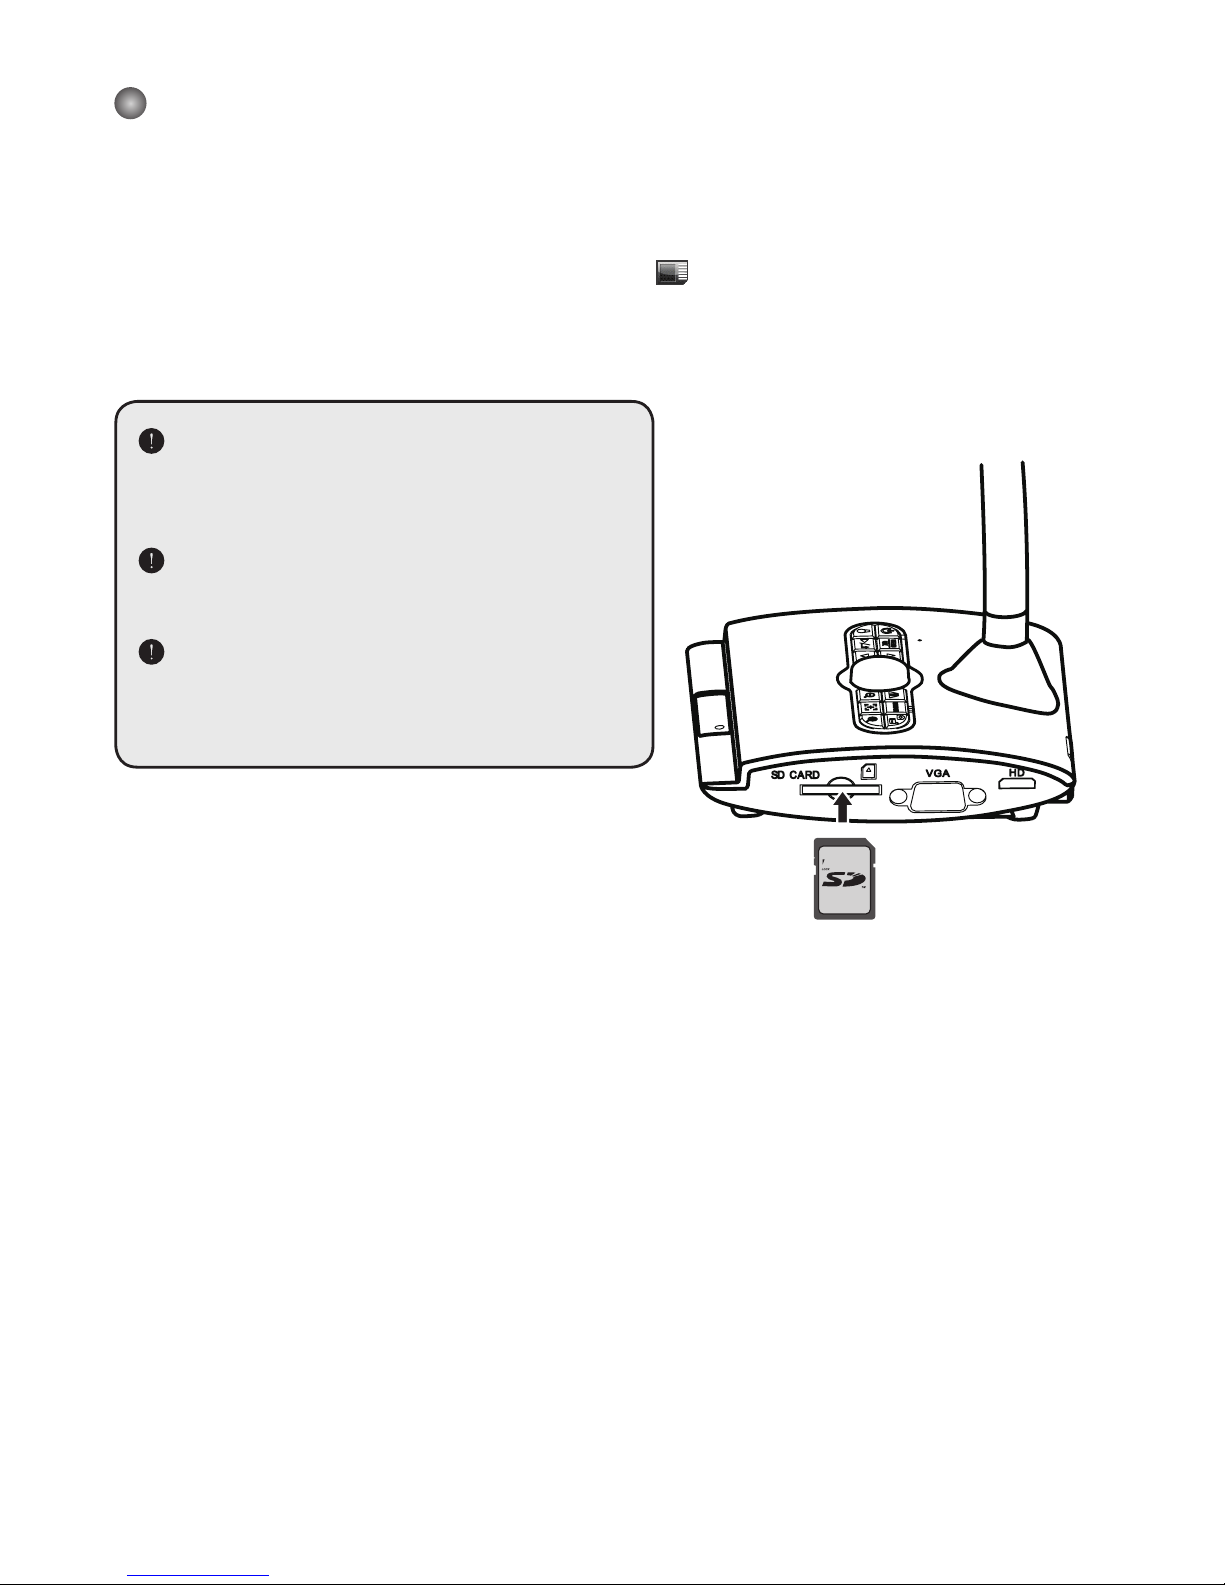
Inserting and Ejecting a SD / SDHC card (Not
supplied)
1. Insert a memory card (SD/SDHC/MMC/MMC 2.0) with the label facing up until it reaches
the end of the slot.
2. When the card is inserted successfully, the icon (
) will appear on screen and the internal
memory will become inaccessible.
3. To remove the card, push the card to release it and then pull it out gently.
When using a new memory card, you are
recommended to format the card with
the device. Do not turn off the device
while formatting the SD card.
Even if your card has been formatted on
other devices, you may have to reformat
the card with the device.
If no external storage devices are con-
nected, all files will be saved in the built-in
memory.
Page 13
11
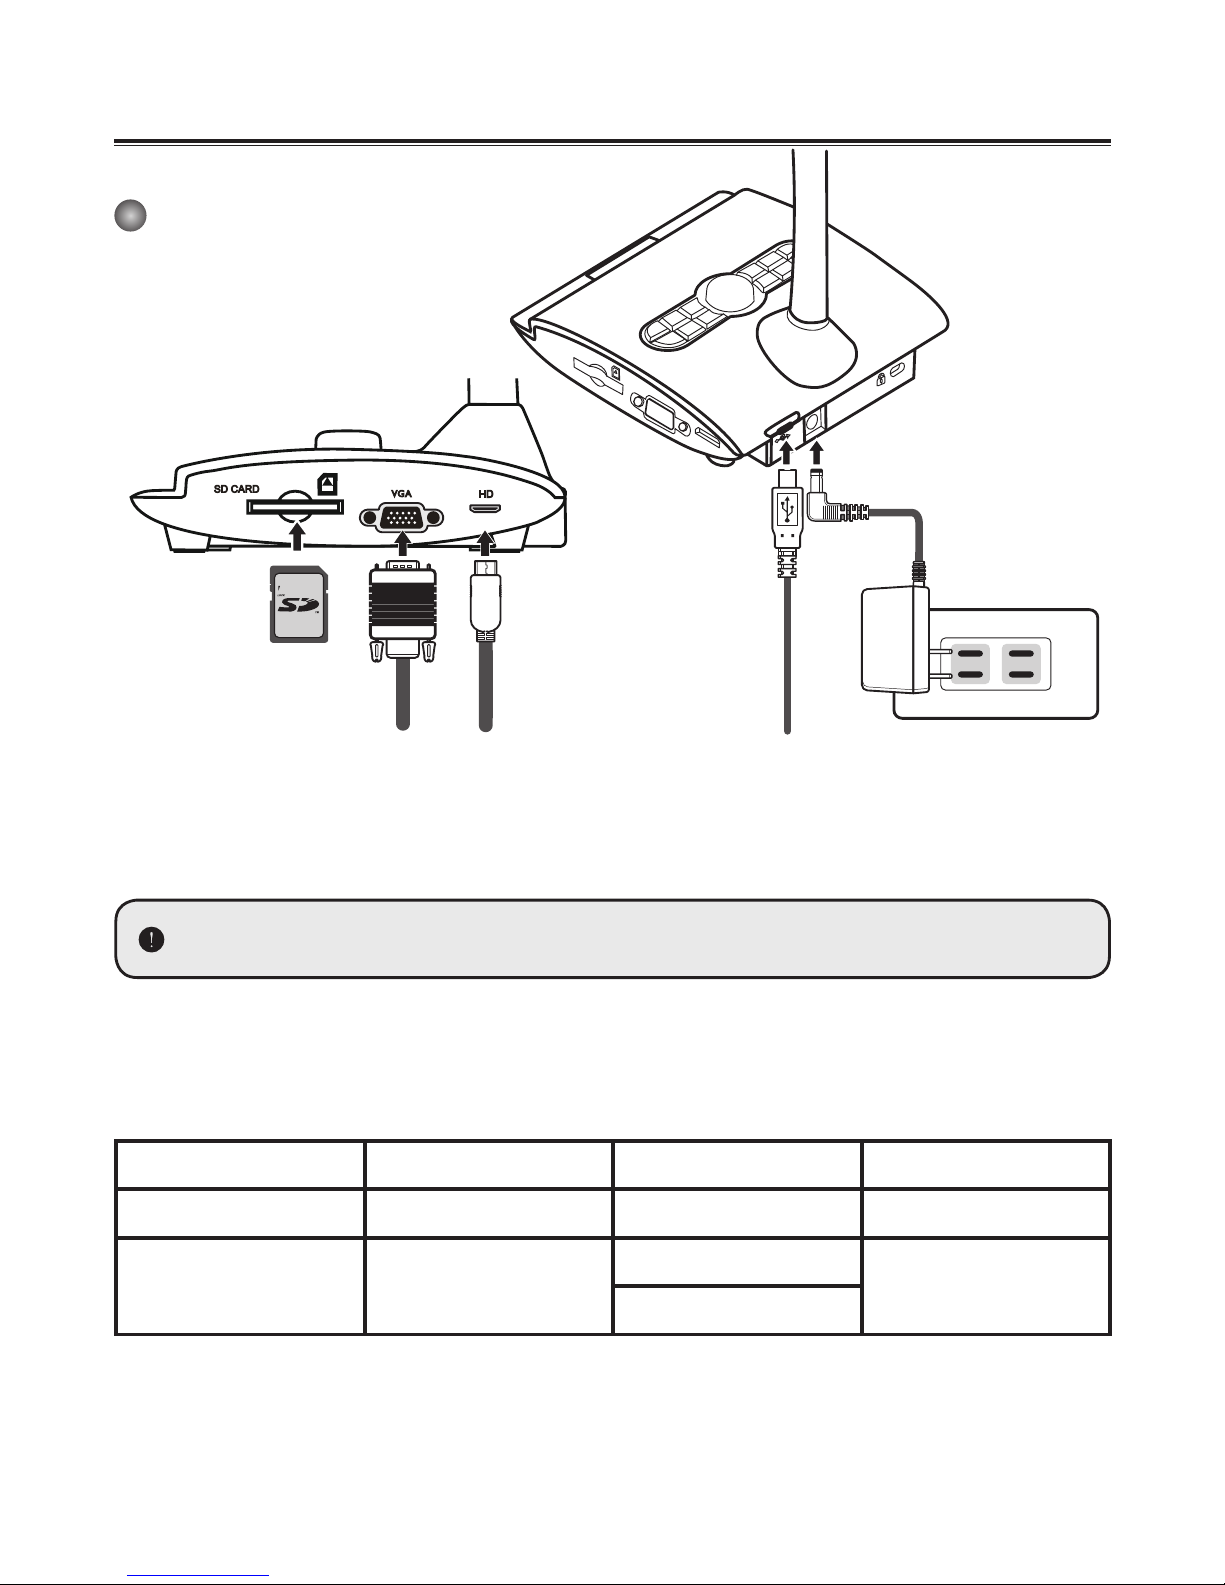
Making the Connections
System Diagram
Step 1 / Plugging in the Power Outlet
Use power adapter to connect DC IN connector on the product to a standard 100V~240V AC
power outlet.
The type of power adapter is depending on your countries / regions.
Step 2 / Output Resolution and Aspect Ratio.
Various output resolutions are available depending on the output and aspect ratio setting.
Please refer to the table listed below :
Out put Aspect-Ratio Resolution Vertical Frequency
VGA 4:3 1024 x 768 50 / 60 Hz
HDMI 16:9
1280 x 720
50 / 60 Hz
1920 x 1080
*Document camera will downgrade the output resolution automatically when the connected display
device doesn’t support the highest resolution.
SD CARD
Page 14
12
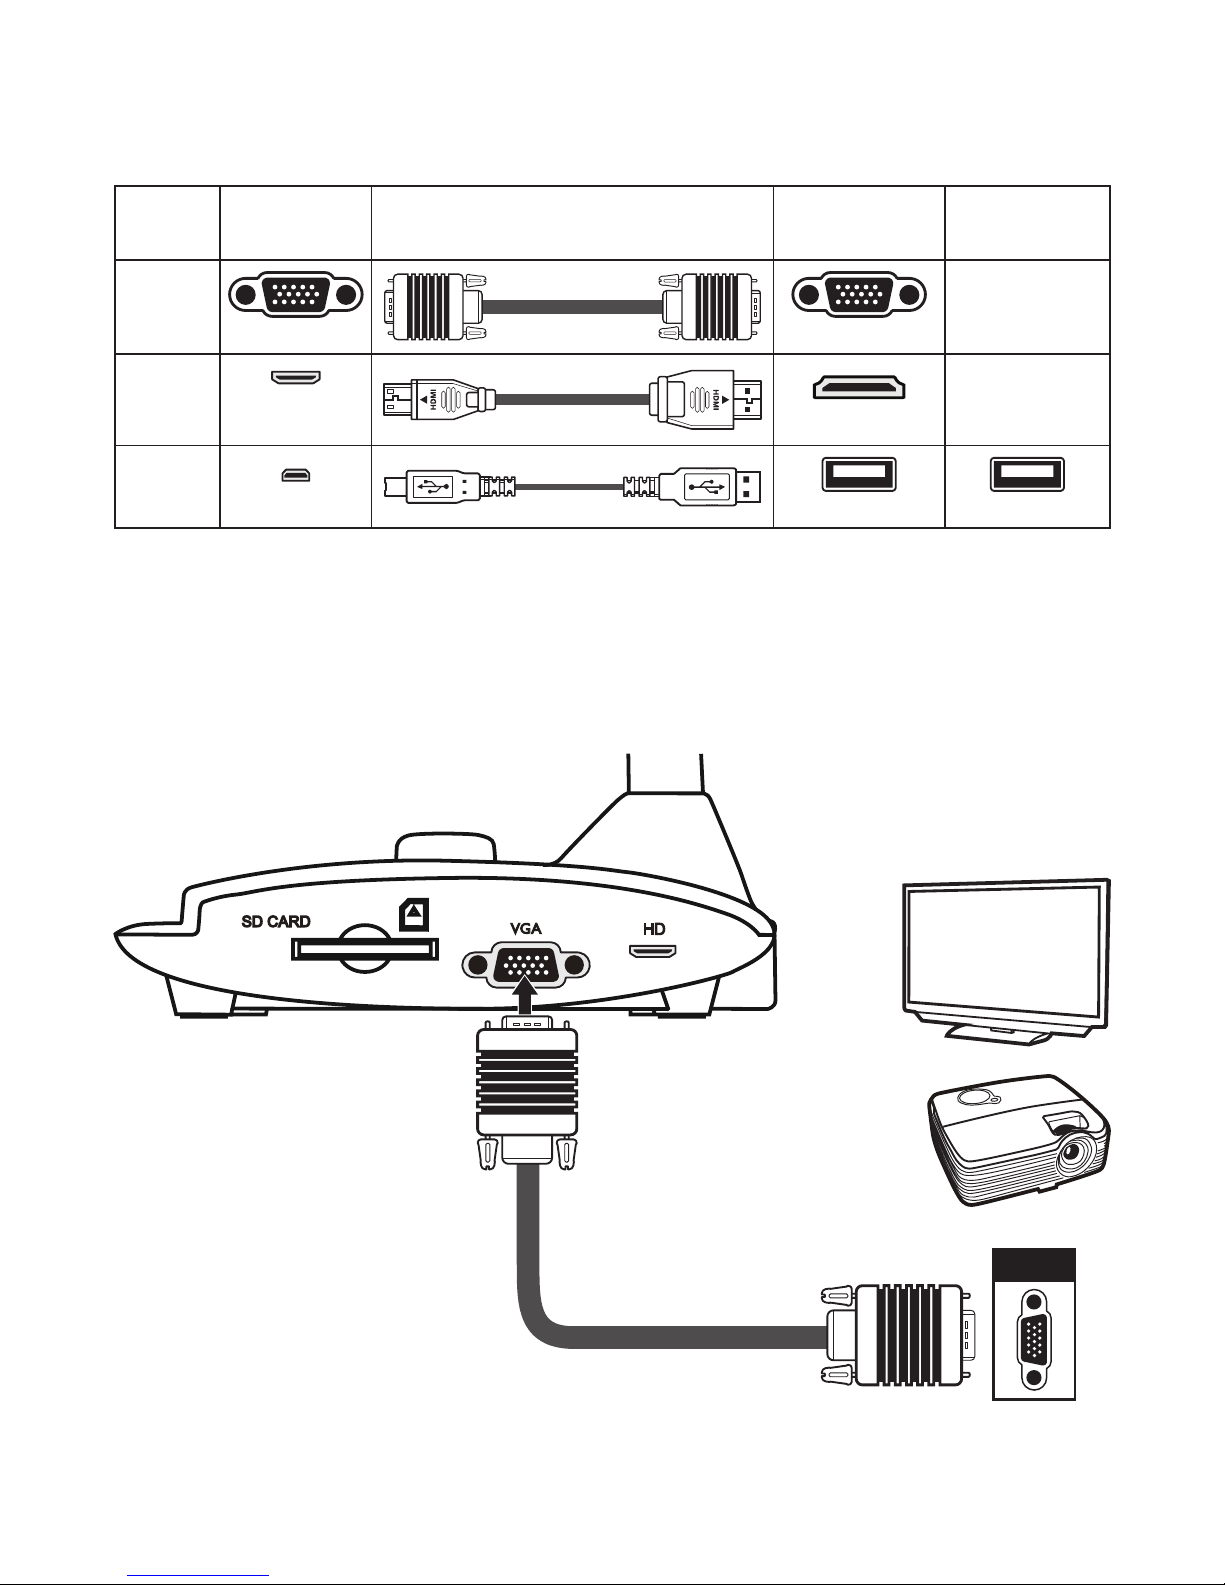
Step 2 / Connecting with Components
Product
Port
Cable
Display
Device Port
PC Port
VGA
RGB OUTPUT RGB INPUT
HDMI
Mini HD
OUT
HDMI-INPUT
USB
Micro USB
TYPE A Port TYPE A Port
▶Standard TV and Projector
• Connect via VGA OUTPUT
To display images, you can use VGA cable to connect to your TV/Projector’s RGB port via
the VGA OUT connector.
SD CARD
RGB
Page 15

13
Connect via HDMI OUTPUT
To display images, you can use HDMI cable to connect to TV/projector’s HDMI port via the
HDMI Out connector
▶Connect via USB
Press MENU ( ) button → select "USB Connect".
Choose "Disk" to connect mass storage.
Choose "PC Cam" to use as a PC-Cam.
SD CARD
HDM
Page 16

14
Basic Operation
1. Press MENU button on the remote control ( ) or control panel ( ).
2. Press (
or ) button to toggle between tabs.
3. Press OK button on the remote control(
) or control panel( ) to make a selection
and display the setting selections.
4. Use (
or ) to adjust the setting.
5. Press OK button on the remote control (
) or control panel ( ) to make the new
setting activate.
6. Press MENU button on the remote control or BACK (
) on the control panel to hide
the OSD menu.
Menu options in Preview Mode
Name icon Option Description
Brightness
-
Use the Right / Left buttons to make the
image brighter / darker
Effect
Graphic
To improve the tint of color-based subjects
such as pictures or figures.
Text
The function is designed especially for textbased documents to which can be enhanced
white and black subjects such as characters
and lines.
B&W
To output a black & white camera image.
To make the image easier to view,select this
when shooting black & white documents etc.
Negative To output a negative camera image.
Sketch To output a sketch camera image.
White Balance
Auto
There are various modes (Auto, Flurescent,
Tungsten and Custom) for user to choose and
fit in different surroundings.
Fluorescent
Tungsten
Custom
Quick Zoom
2X / 4X Set the quick zoom to 2X or 4X.
Focus
Normal Select standard mode for 25cm ~ ∞.
Macro /
Microscope
Select Macro/Microscope mode to
take close-ups or while connecting to a
microscope.
Page 17

15
Name icon Option Description
Image Size
0.8M / 2M
5M / 8M
Select the desired still image resolution.
Capture Mode
Capture
Capture a still image when push “SNAP/
REC.” button
Record
Record a video clip when push “SNAP/
REC.” button
SETTING
Beep
On / Off Enable beep sound on / off
Flicker
50Hz / 60Hz
Set flicker frequency to 50Hz or 60Hz
The flicker setting is based on the frequency
standard of your local power supply.
USB Mode
Off Disable USB function
Disk Select “Disk” to enter Mass storage Mode
PC cam Select “PC Cam“ to enter PC Cam Mode
HDMI
Out
720p
Adjust HD-OUTPUT resolution
1080i
VIDEO
MODE
High Quality
Select the desired video quality.
High Frame
Rate
Clock
- Set date and time
Language
- Allows you select the language used for OSD
Format
No / Yes
Format the storage medium. Note that all
files stored in the medium will be gone.
Reset
default
No / Yes
Restore factory defaults. Note that your
current settings will be overwritten.
Menu options in Playback Mode
Name icon Option Description
Delete one
Yes / No Delete current file.
Delete all
Yes / No
Delete all images of the same type stored in
the memory.
Slide show
On / off Start / Stop Slide Show
File Info
-
View the file’s title , saved date and time ,
size and the length of recording.
Volume
- Use the Right / Left buttons to adjust volume
Page 18

16
Recording a video clip / Taking a still picture
1. Set the caputre or record resolution.
according to the setting, please refer to the table below:
Output Switch Resolution Setting Recording resolution
VGA XGA 1024 x 768
HDMI
720P 1280 x 720
1080i 1920 x 1080
2. Use the Zoom button (
/ ) to zoom in or zoom out
the screen.
3. Automatic focus/Manual focus
Press AF button (
) to do one-time auto-focus.
Use manual focus button (
/ )( ) on the remote control to fine-tune focus.
Capture a still image:
(1) Press MENU button (
).
(2) Select Capture Mode → choose Capture (
) and press OK ( ) to confirm.
(3) Press the“SNAP/REC.”button (
) on the control panel to capture a still image.
Record a video clip:
(1) Press MENU button (
).
(2) Select Capture Mode → choose Record (
) and press OK ( ) to confirm.
(3) Press the Record button (
) to start recording and press it again to stop recording.
Playback
1. Press PLAYBACK button ( / ) .
2. The last recorded picture or video clip will show on the screen.
3. Use Up / Down button to choose files.
4. Press the Record button (
) to leave the
plackback mode.
Functions indicated by can only be used by the remote control.
Page 19

17
Copying Files to Computer
Please notice that the video clips are recorded in AVI format and are compiled as IMG_xxxx.avi
(xxxx are four serial numbers).
Before viewing these videos on your PC, you may need to install some media programs.
1. Turn on the document camera.
2. Connect the product to your computer with USB cable.
3. Press MENU (
) → select “USB Connect“ → choose “Disk“. The built-in memory
or external memory will be detected.
Then, You can view the image data on a SD card on the PC’s viewer software or simply cut/
copy and paste the file to your PC.
When the operating panel or the remote control is in operation, do not connect or
disconnect the USB cable, as this may cause malfunctions of the device to occur.
Using Document Camera as a PC cam
Starting the application
1. Make sure the USB connection setting is at “PC-Cam”.
2. Connect device and PC with accessory USB cable.
3. Start Discovery™ on your PC.
1. Connect the document camera to your computer
Turn on your computer then connect the accessory USB cable to the USB port of your
computer.
Make sure the connector and the port are aligned correctly.
Switch to PC Cam mode.
Connect the other end of the USB cable to the main unit.
Power on press MENU (
) → Setting → select USB Connect → select PC Cam ( ) and
press OK (
) button to conrm.
2. Launch PC Camera
After the document camera is correctly connected to and detected by your PC, you are
ready to use PC Camera function.
Working with Discovery™
Page 20

18
Advance Operation
Highlight function / Mask function( )
Highlight function
1. Use the Highlight function to draw attention to a particular section
of the output image.
2. Press the Highlight button (
) on the remote control, and use the
direction buttons to move the highlighted area.
Mask function
1. You can mask a section of the output image.
2. Press the Mask button (
) on the remote control, and use the
direction buttons to move the masked area.
Press the Size button ( ) on the remote control, and use the direction buttons
to adjust the highlighted / masked size.
Press the Color button ( ) on the remote control, and use the direction buttons
to adjust the color of highlighted / masked area.
PIP (Picture in Picture) function( )
1. Press the PIP button ( ) to display an around quarter-size still image on a live camera
display.
2. Use the up or down button to change the shift between still images.
Functions indicated by can only be used by the remote control.
Page 21

19
Connect to a microscope
Connect to a microscope enables you to examine microscopic objects on a big screen.
1. Adjust the microscope and focus objects.
2. Choose an appropriate micoscope adapter.
3. Microscope adapter accessaries are applicable to Ø28mm ,Ø31mm, Ø33mm, and Ø34mm
eyepieces.
For eyepieces of about Ø33mm, Ø34mm, only a microscope adaptor should be
installed.
For a Ø28mm eyepiece, insert the Ø28mm adapter into the microscope adapter.
For a Ø31mm eyepiece, insert the Ø31mm adapter into the microscope adapter.
4. Mount / take off the microscope adapter onto / off
the lens by doing the action shown in the picture.
Ø28mmØ31mm
Page 22

20
5. Switch the focus mode to Macro.
Press MENU (
)--> select Focus ( )
--> select Macro
or press Macro button (
)( ) on remote
controller.
6. Connect the lens with microscope adapter to
the microscope.
Functions indicated by can only be used by the remote control.
If the image is not clear. Please adjust the focus of microcope.
Press the AF button ( ) or use the manual focus button on remote control to
fine-tune the focus.
Page 23

21
Storing
1. Power off the product.
2. Unplug the AC adapter from the wall
outlet. Then , disconnected the AC
Adapter and all cables.
3. Fold the camera head and arms in the
direction shown in the figure.
Page 24

22
Troubleshooting
When using the document camera :
Problem Cause Solution
Cannot be powered on
normally.
The AC adapter is not
correctly connected to the
wall outlet or the document
camera.
Re-connect one end of the
AC adapter to the document camera and the other
end to a wall outlet.
Cannot take pictures and
video clips.
Out of memory.
Free some space from
the SD / MMC card or the
internal memory.
Using a “protected” SD
card.
Set the SD card to be written in.
No image output after
connecting.
The document camera is
not correctly connected to
the external device.
Re-connect all related
cables with the external
device correctly.
Incorrect input type of
display output device.
Set up correct input type of
display output device.
Incorrect supported
resolution of display output
device.
Set up correct supported
resolution of display output
device.
Incorrect output port
selected by output swtich
on document camera.
Set up correct output port
by output switch.
Page 25

23
When using the document camera :
Problem Cause Solution
The image is fuzzy.
Probably the distance of
object is too close to the
lens.
Press AF button to auto
focus or adjust by pressing
Manual Focus.
Select Macro mode if the
distance is less 25cm.
The image is reverse.
The document is not put in
the recommend working
area.
Press [
] button to adjust
the direction.
The image dose not move.
Camera image is set to
Freeze [
].
Press the [ ] button on
the control panel again to
unpause.
Remote control can not
work.
No power.
Replace the AAA batteries in
the remote control.
Object is blocking the
remote control signal
receiver of the document
camera.
Remove obstruction in front
of the product.
The distance of usage is
too far.
Stand closer to the product
to use the remote control.
The display device displays
“MEMORY ERROR” or
“CARD ERROR” message.
Or memory card cannot
be read.
The format of the memory
card is not compatible with
the product.
Use the "Format" function
of the document camera to
format the card.
The memory card is
corrupted.
Replace the memory card
with a new one.
Page 26

24
When using the document camera :
Problem Cause Solution
Cannot delete the pictures
and video clips, and also
cannot find them in the
memory card.
The lost recordings are
saved
in the internal memory.
It happens when you insert
a memory card after taking
a few pictures or video clips.
You can access those files
after removing the memory
card.
Cannot view the video clips
on my computer.
Software is not installed on
the computer.
Install Direct X 9.0c or above
and Windows Media 9.0 Codecs to solve this problem.
Go to the website “http://
www.microsoft.com” to
download the required files.
Please refer to “Copying
files to your computer”.
TV screen does not
display after connecting the
product to TV.
The product is not correctly
connected to the TV.
Reconnect the product to
TV correctly.
Noises occur when viewing
images on the computer.
The flicker setting does not
match the standard of the
country you are staying.
Adjust the flicker setting .
The contents in this manual are subject to change without prior notification.
Page 27

TS-82-914-90011
Manuel de l’utilisateur
Code de produit: DCV10001
Page 28

• Bienvenue:
Merci d’avoir acheté cet appareil. Veuillez lire attentivement ces instructions avant d’utiliser
cet appareil.
• Déclaration de conformité à la réglementation de la
FCC(Classe A):
Cet appareil est conforme à la section 15 de la règlementation de la
FCC. Son utilisation est soumise aux deux conditions suivantes : (1) cet
appareil ne doit pas provoquer d’interférences nuisibles et (2) cet
appareil doit tolérer les interférences reçues, y compris celles qui sont
susceptibles de perturber son fonctionnement.
• Déclaration de la Commission Fédérale des Télécommu-
nications (FCC):
Cet appareil produit, utilise et peut émettre une énergie haute fréquence et provoquer des
interférences nuisibles pour les communications radio s’il n’est pas installé et utilisé
conformément aux instructions. L’utilisation de cet appareil dans un environnement domestique peut provoquer des interférences nuisibles pour les communications radio et, le cas
échéant, l’utilisateur est responsable de prendre des mesures adéquates pour éliminer ces
interférences.
• Déclaration de conformité à la Communauté Européenne
(Classe A):
Cet appareil est un produit de Classe A. Dans un environnement domestique, cet appareil peut provoquer des interférences nuisibles pour les
communications radio et, le cas échéant, l’utilisateur est responsable de
prendre des mesures adéquates pour éliminer ces interférences.
Le symbole de la poubelle à roulettes barrée indique que cet appareil ne
doit pas être jeté avec les ordures municipales. Vous devez vous débar-asser de cet appareil, lorsque vous n’en avez plus besoin, en l’emmenant
dans un point de collection spéciallement conçu pour le recyclage des
appareils électriques et électroniques.
Page 29

1
1. Ne regardez jamais directement la source d’éclairage DEL, car elle peut faire mal à la
rétine.
2. Lorsque vous voulez transporter l’appareil, tenez directement la partie inférieure de
l’unité principale avec les deux mains. Ne transportez jamais l’appareil en utilisant le bras
ou la tête de la caméra.
3. Faites attention à ne pas cogner la tête de la caméra sur un bureau ou tout objet dur.
4. Ne tournez jamais le bras dans la direction opposée.
5. Assurez-vous de garder une main sur la base de
l’appareil lors de l’ajustement du bras et de la tête de
la caméra.
Page 30

2
Préparation du visualiseur
Présentation des parties
Tête de caméra
Lampe LED
Bras col de cygne
Microphone
Récepteur de signal de télécommande
Panneau de commande
Emplacement carte SD
Port de sortie VGA
Sortie HDMI
Port USB
Prise électrique 5V CC
Emplacement antivol
Page 31

3
Panneau de configuration
Bouton Fonction
Allumeer/éteindre l’alimentation
Affichage du menu et sélection
Up / Down
/
Accès au mode Lecture pour
visualiser les séquences vidéo et
les images enregistrées / Pour
quitter le menu
Allumer/éteindre et régler la
luminosité de la lampe LED
Tourner l’image par 180° chaque
fois
OUTPUT
Interrupteur de sortie HDMI-VGA
Prendre une photo /
Enregistrement d’une séquence
vidéo et audio
Zoom avant
Mise au point automatique
unique
Zoom arrière
Page 32

4
Télécommande
Bouton Fonction
Activer la touche de raccourci de la
luminosité
Allumer/éteindre l’alimentation
Geler l’image affichée
Afficher ou cacher les icônes de
l’écran
Pour ouvrir ou fermer le menu OSD
Ouvrir le mode Lecture pour afficher
les photos et les clips vidéos qui ont
été enregistrés
Tourner l’image par 180° chaque
fois
Utilisez ces boutons pour
sélectionner et ajuster
Enregistrer un clip vidéo
Prendre une photo
/
Zoom arrière / Zoom avant sur
l’image
Une photo avec mise au point
automatique
/
Utilisez la barre de niveau pour
ajuster manuellement la mise au
point
Aller rapidement au zoom
numérique 2X ou 4X
Activer/désactiver la fonction
Surbrillance
Activer/désactiver la fonction
Cacher
Interrupteur Macro/Normal
Ajustez la taille de la partie en
surbrillance/cachée avec les ouches
de navigation
Réglez la couleur de l’extérieur
de la partie en surbrillance/cachée
avec les touches de navigation
Button Function
VGA
HDMI
Interrupteur de sortie HDMI-VGA
Activer/désactiver la fonction Image
dans image *Pour afficher une
image fixe sous forme d’une petite
image tout en affichant l’image
La télécommande infrarouge ne peut
être utilisée que près de l’appareil.
Insérez les piles dans le bon sens en
respectant les signes “+” et “-”.
Enlevez les deux piles AAA en même
temps. N’utilisez pas une pile neuve
avec une pile usée ou des piles dif
férentes.
VGA
HDMI
Page 33

5
Installation
Cette section explique comment faire pour installer et ajuster le visualiseur en fonction de vos
besoins.
Lampe d’éclairage
Si vous êtes dans un environnement sombre, allumez
la lampe DEL pour une meilleure exposition.
1. Appuyez sur le bouton de la lampe DEL (
) à
la base pour allumer/éteindre la lampe DEL.
2. Ajustez la luminosité en appuyant sur le bouton
de la lampe (
).
Interrupteur de
sortie
Adaptez l’interrupteur de sortie en
fonction de la sortie branchée.
Bras col de cygne
Le bras col de cygne peut être ajusté pour s’adapter à
différents espaces de travail.
Page 34

6
ISi le document n’est pas mis dans
l’espace de travail recommandé,
l’image doit être tournée avec
le bouton RETOURNER (
) du
panneau de contrôle ou de la
télécommande.
16.54”
11.69”
Hauteur de
16.93”
pour la zone max.
(16.54”x 11.69”)
Hauteur minimale 7.09”
Espace de travail recommandé
Page 35

7
Adjusting the brightness
1. Appuyez sur le bouton LUMINOSITÉ de la télécommande ( ) ( ).
2. Utilisez les boutons ( ▲ or ▼ ) pour augmenter ou réduire le niveau de luminosité.
Fonction zoom
Utilisez le bouton Zoom ( / ) pour faire un zoom avant ou arrière à l’écran.
Fonction retourner
Appuyer sur le bouton pour retourner l’image ( ).
VGA
HDMI
VGA
HDMI
Page 36

8
Régler la taille focus
▶Automatique focus
Appuyez sur le bouton AF ( ) à automatique focus. Cette fonction fournit une auto oneshot- focus.
▶Manual Focus
Appuyez sur le bouton manual focus ( / )( )
sur la télécommande pour affiner la mise au point.
Anti-reflêt
La feuille anti-reflêt est une feuille transparente en plastique qui se pose au-dessus des objets
ou des surfaces brillantes pour réduire les reflêts. Pour l’utiliser, posez la feuille anti-reflêt
au-dessus d’un objet ou d’une surface brillante, comme un magazine, pour réduire les
reflêts de la lumière.
Fonctions indiquées par ne peuvent être utilisés par la télécommande.
VGA
HDMI
+ Anti-glare
Page 37

9
Ajuster la balance des blancs
1. Le paramètre de balance des blancs du document est sur «Auto» par défaut.
2. L’utilisateur peut choisir entre de nombreux modes (Auto, Fluorescent, Tungstène et
Personnalisé) pour s’adapter à différents environnements.
3. Balance des blancs personnalisée:
Appuyez sur le bouton «MENU» ( ) → Balances des blancs → esaisissez le mode
«Personnalisé».
Une fenêtre s’affichera comme sur l’illustration ci-dessous:
Appuyez sur le bouton SNAP/REC. (
) pour obtenir les données de l’image actuelle
Utilisez les «Up / Down» ( ▲ or ▼ ) pour ajuster les valeurs R, G et B.
Appuyez sur (
) pour confirmer un nouveau réglage.
Appuyez sur le bouton «PLAYBACK/BACK» (
) pour valider les réglages et fermer la
fenêtre.
Page 38

10
Insérer et retirer une carte SD/SDHC (pasfourni)
1. Insérez la carte mémoire dans la fente avec l’étiquette en haut et jusqu’au fond.
2. Si vous avez correctement inséré la carte, l’icône(
) apparaîtra sur l’écran et la
mémoireinterne ne sera plus disponible.
3. Pour retirer la carte, poussez-la pour la libérer, puis tirez-la doucement hors de la fente.
N’éteignez pas l’alimentation lorsque
vous formatez la carte SD.
Utilisez cet appareil pour formater la
carte SD. Si vous avez déjà formaté la
carte SD avec un ordinateur, formatez-la
à nouveau en utilisant l’appareil.
Si aucun périphérique de stockage n’est
connecté, les fichiers seront tous enregistrés dans la mémoire interne.
Page 39

11
Branchement des connexions
Diagramme du système
Etape 1 / Branchement sur une prise de courant
Utilisez l’adaptateur secteur pour brancher la prise ENTREE CC de l’appareil sur une prise
de courant 100—240V CA.
Le type d’adaptateur d’alimentation est en fonction de / vos régions du pays.
Etape 2/Résolution de sortie et rapport d’aspect
Plusieurs résolutions de sortie sont disponibles en fonction des réglages de la sortie et du rapport
d’aspect. Voir tableau ci-dessous:
Sortie Rapport d’aspect Résolution Fréquence verticale
VGA 4:3 1024 x 768 50 / 60 Hz
HDMI 16:9
1280 x 720
50 / 60 Hz
1920 x 1080
*Le visualiseur réduit automatiquement la résolution de sortie si l’appareil d’afchage ne supporte
pas la résolution maximale.
SD CARD
Page 40

12
Etape 2/Résolution d’affichage et rapport d’aspect
Port du
produit
Cable
port dispositif
d'affichage
PC Port
VGA
RGB OUTPUT RGB INPUT
HDMI
Mini HD
OUT
HDMI-INPUT
USB
Micro USB
TYPE A Port TYPE A Port
▶Télévision et projecteur standard
• Raccordement par la SORTIE VGA
Raccordez un câble VGA au port de sortie VGA.
SD CARD
RGB
Page 41

13
Raccordement par la SORTIE HDMI
Raccordez un câble HDMI au port de sortie HDMI.
▶Raccordement par USB
Appuyez sur le bouton MENU ( )→ Connexion USB.
Sélectionnez « Disque » pour raccorder un stockage
de masse.
Sélectionnez « PC Cam » pour l’utiliser comme une
webcam.
SD CARD
HDM
Page 42

14
Utilisation basique
1. Appuyez sur le bouton MENU ( )( )sur la télécommande ou le panneau de contrôle.
2. Appuyez sur les boutons (
or ) pour changer entre les onglets.
3. Appuyez sur(
)( ) tpour sélectionner et afficher les réglages disponibles.
4. Utilisez (
or ) pour ajuster un réglage.
5. Appuyez sur (
) ( ) pour confirmer un nouveau réglage.
6. Appuyez à nouveau sur le bouton MENU (
) pour fermer le menu OSD.
Options du menu dans le mode Prévisualisation
Elément icon Option Description
Luminosité
-
Utilisez les boutons Droite/Gauche pour
rendre l’image plus claire/foncée
Effet
Graphique
Choisir le graphic, vous pouvez avoir des
documents en couleur plus claires, plus
evidents, comme par exemple : Graphique 2
photos ou des schemats.
Texte
Ces fonctions étaient crées et fournies
seulement pour des document Sen textes
ou des documents en noir et blanc, par
exemple des caractères ou des traits en noir.
N & B
Pour prendre une image en noir & blanc
avec la caméra. Pour mieux voir l’image,
sélectionnez cela lorsque vous prenez des
photos de documents en noir & blanc, etc.
Négatif
Pour prendre une image négatif avec la
caméra.
Croquis
Pour prendre une image croquis avec la
caméra.
Balance des blancs
Auto
L’utilisateur peut choisir entre de
nombreux modes (Auto, Fluorescent,
Tungstène et ersonnalisé) pour s’adapter à
différents environnements.
Fluorescent
Tungstène
Personnalisé
Zoom rapide
2X / 4X Réglez le zoom rapide sur 2X ou 4X.
Macro
Normal
Sélectionnez le mode Standard pour 25cm ~
∞.
Macro /
Microscope
Sélectionnez le mode Macro/Microscope pour
prendre des photos en gros plan ou lorsque
connecté à un microscope.
Page 43

15
Elément icon Option Description
Résolution fixe
0.8M / 2M
5M / 8M
Sélectionnez la résolution fixe désirée.
Mode Capture
Capture Prendre une photo.
Record Enregistrer un clip vidéo.
RÉGLAGE
Bip
Marche/Arrêt Pour activer/désactiver le son bip
Fréquence
50Hz / 60Hz
Pour régler la fréquence de scintillement sur
50Hz ou 60Hz. Le réglage de fréquence est basé
sur le standard de fréquence de votre réseau
électrique local.
Connexion
USB
Non / Oui Débranchez la fonction USB
Disque
Sélectionnez « Disque » pour le mode Stockage
de masse »
Cam PC
Sélectionnez « Cam PC » pour ouvrir le mode
Cam PC
Sortie HDMI
720p
Ajuster la résolution de sortie HD
1080i
Mode vidéo
Haute qualité
Sélectionnez le mode vidéo désiré
rafraichissement
élevé
Horloge - Pour régler la date et l’heure
Langue
- Permet de choisir la langue utilisée par l’OSD
Formater
Non / Oui
Pour formater le support de stockage. Notez
que tous les fichiers stockés sur le support sont
supprimés.
Réinitialisation
défaut
Non / Oui
Pour restaurer les réglages d’usine par défaut.
Notez que vos réglages actuels sont effacés.
Menu options in Playback Mode
Elément icon Option Description
Eins löschen
Yes / No Pour supprimer le fichier sélectionné.
Alles löschen
Yes / No
Pour supprimer toutes les images du même
type enregistrées dans la mémoire.
Diaschau
On / off
Pour faire un diaporama avec l’intervalle
sélectionné
Dateiinfo
-
Pour afficher le titre du fichier, la date et
l’heure enregistré, la taille et la longueur de
l’enregistrement.
Volume
- Régler le volume de la lecture vidéo.
Page 44

16
Enregistrer un clip vidéo / Prendre une photo
1. Adapter la résolution de capture ou d’enregistrement aux réglages, voir tableau cidessous:
Interrupteur de sortie
Réglage de la
résolution
Résolution d’enregistrement
VGA XGA 1024 x 768
HDMI
720P 1280 x 720
1080i 1920 x 1080
2. Utilisez le bouton Zoom (
/ ) pour faire un zoom avant ou arrière à l’écran.
3. Automatique focus/Manual Focus
Appuyez sur le bouton AF (
) à automatique focus. Cette fonction fournit une auto
oneshot- focus.
Appuyez sur le bouton manual focus (
/ )( ) sur la télécommande pour affiner la
mise au point.
Prendre une photo.
(1) Appuyez sur le bouton MENU (
).
(2) Sélectionnez Mode Capture → sélectionnez Capture (
) et appuyez sur le bouton OK
(
) pour confi rmer.
(3) Appuyez sur le bouton pression (
) pour prendre une image fixe.
Enregistrer un clip vidéo.
(1) Appuyez sur le bouton MENU (
).
(2) Sélectionnez Mode Capture → sélectionnez Record (
) et appuyez sur le bouton OK
(
) pour confi rmer.
(3) Appuyez sur le bouton Enregistrer (
) pour
commencer un enregistrement et appuyez à nouveau
pour arrêter l’enregistrement.
Lecture
1. Appuyez sur le bouton LECTURE ( / ) .
2. La dernière image ou clip vidéo enregistré
commencera.
3. Use Up / Down button to choose files.
4. Appuyez sur le bouton Enregistrer (
) pour quitter le Mode plackback .
Fonctions indiquées par ne peuvent être utilisés par la télécommande.
Page 45

17
Copier des fichiers sur votre ordinateur
Veuillez noter que les clips vidéo sont enregistrés au format AVI et qu’ils sont compilés avec
CLIPxxxx.avi(xxxx sont des numéros en série).
Avant de pouvoir regarder ces clips vidéo sur votre PC, il est possible que vous ayez besoin
d’installer des programmes multimédia.
1. Allumez l’appareil.
2. Branchez l’appareil sur l’ordinateur en utilisant un câble USB.
3. Appuyez sur MENU (
) → sélectionnez « Connexion USB » → choisissez « Disque ».
Lamémoire interne ou la mémoire externe sera détectée.
Vous pouvez alors regarder les images d’une carte SD en utilisant un logiciel de lecture sur le
PC ou couper et coller simplement les fichiers sur votre PC.
Lorsque vous utilisez le panneau de contrôle ou la télécommande, ne branchez/
débranchez pas le câble USB, car cela peut causer un mal fonctionnement. Ceci peut
causer un mal fonctionnement.
Utilisation de l’appareil comme Cam PC
Démarrage de l’installation
1. Vérifiez que le paramètre de connexion USB est sur «PC-Cam».
2. Reliez l’appareil et le PC avec le câble USB.
3. Démarrez Discovery™ sur votre PC.
1. Branchez l’appareil sur votre ordinateur.
Allumez votre ordinateur, puis branchez le câble USB accessoire sur le port USB de votre
ordinateur. Assurez-vous que le connecteur et le port sont correctement alignés.
Choisissez le mode Cam PC.
Branchez l’autre extrémité du câble USB sur l’appareil.
Allumez, appuyez sur MENU (
) → sélectionnez Connexion USB → sélectionnez Cam
PC ( ) et appuyez sur le bouton OK pour conrmer.
2. Lancez la Caméra PC
Une fois l’appareil correctement connecté et détecté par votre PC, Vous pouvez lancer
votre logiciel préféré et utiliser la fonction de Caméra PC.et utiliser la fonction de Caméra
PC.
Travailler avec Discovery™
Page 46

18
Opérations avancées
Highlight function / Mask function( )
Fonction Surbrillance
1. Si vous voulez attirer l’attention sur une partie particulière d’une
image, vous pouvez utiliser la fonction Surbrillance.
2. Appuyez sur le bouton Surbrillance (
) sur la télécommande
etutilisez les boutons de direction pour déplacer la section en
surbrillance.
Fonction Cacher
1. Vous pouvez cacher une partie de l’image affichée.
2. Appuyez sur le bouton Cacher (
) sur la télécommande et
utilisez les boutons de direction pour déplacer la section à cacher.
Appuyez sur le bouton Taille ( ) sur la télécommande et utilisez les boutons de
direction pour ajuster la taille de la section en surbrillance/à cacher.
Appuyez sur le bouton Couleur( ) sur la télécommande et utilisez les boutons
de direction pour changer la couleur de la section en surbrillance/à cacher.
Fonction PIP (Image dans une Image)( )
1. Appuyez sur le bouton PIP ( ) pour afficher une image fixe d’environ un quart de la
taille sur l’affichage en direct de la caméra.
2. Appuyez sur les boutons HAUT / BAS pour modifier la position entre les images.
Fonctions indiquées par ne peuvent être utilisés par la télécommande.
Page 47

19
Branchement d’un microscope
Vous pouvez brancher un microscope pour vous permettre de regarder des objets microscopiques sur un grand écran.
1. Ajustez le microscope et faites la mise au point sur les objets.
2. Choisissez un adaptateur de microscope approprié.
3. Les accessoires d’adaptateur de microphone sont les lentilles suivantes : Ø28mm
,Ø31mm, Ø33mm, Ø34mm.
Pour la lentille de Ø33mm, Ø34mm, seulement un adaptateur de microscope avec
une étiquette Ø33 ou Ø34mm doit être installé.
Pour la lentille de Ø28mm, veuillez insérer l’adaptateur Ø28mm sur le Ø33 ou
Ø34mm.
Pour la lentille de Ø31mm, veuillez insérer l’adaptateur Ø31mm sur le Ø33 ou
Ø34mm.
4. Montez / enlevez l’adaptateur du
microscope sur / de l’objectif en suivant la manipulation indiquée sur l’image
Ø28mmØ31mm
Page 48

20
5. Appuyez sur MENU ( )--> sélectionnez
Mise au point ( ) --> sélectionnez Macro
ou appuyez sur le bouton (
)( ) de la
télécommande.
6. Branchement de la lentille avec l’adaptateur
de microscope sur le microscope.
Si l’image est floue. Ajustez la mise au point du microscope.
Appuyez sur le bouton AF ( ) ou utilisez le bouton de mise au point manuelle
de la télécommande pour ajuster manuellement la point.
Fonctions indiquées par ne peuvent être utilisés par la télécommande.
Page 49

21
Rangement
1. Eteignez l’appareil.
2.
Débranchez l’adaptateur secteur
de la prise de courant. Puis
débranchez l’adaptateur
secteur et tous les câbles.
3. Pliez la tête de la caméra et les bras dans
les directions indiquées sur la figure.
Page 50

22
Résolution de problèmes
Lorsque vous utilisez le visualiseur :
Problème Cause Solution
Elle ne s’allume pas normalement.
L’adaptateur secteur
n’est pas branché correctement sur la prise de
courant ou sur la caméra de
document.
Rebranchez une extrémité
de l’adaptateur secteur sur
la caméra de document et
l’autre extrémité sur une
prise de courant.
Impossible de prendre des
photos ou d’enregistrer
des clips vidéo.
Mémoire insuffisante
Libérez de l’espace sur la
carte SD/MMC ou dans la
mémoire interne.
La carte SD que vous utilisez
est “protégée”
Réglez la carte SD pour la
rendre inscriptible.
Aucune image après la
connexion.
La caméra de document
n’est pas correctement
connectée à l’appareil
externe.
Rebranchez tous les câbles
appropriés correctement
sur l’appareil externe.
Type de source d’appareil
d’affichage externe
incorrect.
Réglez le bon type de
source de l’appareil
d’affichage externe.
Résolution de l’appareil
d’affichage externe incorrecte.
Réglez la résolution
supportée de l’appareil
d’affichage externe.
Port de sortie du bouton
de sélection de la sortie
de la caméra de document
incorrect.
Réglez le port de sortie avec
le bouton de sélection de
la sortie.
Page 51

23
When using the document camera :
Problème Cause Solution
L’image est floue.
La distance entre l’objet et
l’objectif est trop petite.
Appuyez sur le bouton AF
pour faire automatiquement la mise au point ou
ajustez-la en appuyant sur
Mise au point manuelle.
Sélectionnez le mode
Macro si la distance est
moins de 25 cm.
L’image est à l’envers.
Le document n’est
pas posé correctement
dans l'espace de travail
recommandé.
Appuyez sur le bouton [
]
pour changer la direction.
L’image ne change pas.
L’image de la caméra est
réglé sur Geler Freeze [
].
Appuyez à nouveau sur le
bouton [ ] du panneau
de contrôle pour arrêter la
pause.
La télécommande ne
marche pas.
Pas d'alimentation
Remplacez les piles AAA de
la télécommande.
Un objet obstrue le
récepteur de signal de la
télécommande de la caméra
de document.
Enlevez les objects qui se
trouve devant la caméra de
document.
La distance d'utilisation est
trop grande.
Rapprochez-vous de la
caméra de document
lorsque vous utilisez la
télécommande.
L'écran LCD affiche un
message « ERREUR
MÉMOIRE » ou « ERREUR
CARTE ». Ou la carte
mémoire ne peut pas être
lue
Le format de la carte
mémoire n'est pas
compatible avec l'appareil.
Utilisez la fonction
« FORMATAGE » du
visualiseur de documents
pour formater la carte.
La carte mémoire est
altérée.
Remplacez la carte mémoire
avec une nouvelle carte.
Page 52

24
Lorsque vous utilisez le visualiseur :
Problème Cause Solution
Impossible de supprimer
les images et les séquences
vidéo et impossible également de les trouver dans la
carte mémoire.
Les enregistrements perdus
sont enregistrés dans la
mémoire interne.
Ceci se produit quand vous
insérez une carte mémoire
après avoir pris quelques
photos ou séquences vidéo.
Vous pourrez accéder à ces
fichiers après avoir retiré la
carte mémoire.
Impossible de visualiser les
séquences vidéo sur mon
ordinateur.
Le logiciel n’est pas installé
sur l’ordinateur
Installez un logiciel prenant
en charge les vidéos au
format AVI.
L’écran de la télévision
n’affiche rien après avoir
raccordé l’appareil à la
télévision.
L’appareil n’est pas raccordé correctement à la télévision.
Reconnectez correctement
l’appareil à la télévision.
Des bruits apparaissent
lors de la visualisation des
images sur l’écran LCD ou
sur l’ordinateur.
Le réglage du scintillement
ne correspond pas à la
norme du pays dans lequel
vous séjournez.
Ajustez le réglage du scintillement. Pour de plus amples
informations, veuillez consulter le tableau « Réglages
du scintillement » .
Le contenu de ce manuel est sujet à modification sans préavis.
 Loading...